Embed Size (px)
Citation preview
1 © United States Hunter Jumper Association, Inc.
Horsemanship Quiz Challenge Study Guide
2 © United States Hunter Jumper Association, Inc.
Dear Horsemanship Quiz Challenge Participant:
Welcome to the USHJA Horsemanship Study Guide, which was created to accompany the Horsemanship Quiz Challenge. The answer to every exam question (other than current events, rules and history of the sport) is located within the study guide.
For more information regarding current events and history of the sport, visit the EAP Current Events Study Guide. For more information regarding the rules of the sport, including current USEF rules, visit the USHJA Rules Resource.
The manual is broken into the following topics:
Anatomy and Physiology Nutrition Bandaging Pasture Management Conditioning Riding Theory First Aid Shipping Grooming and Blanketing Shoeing Horse Handling Stable Management Horse Health Tack
Horse Identification Welfare
Longeing This Study Guide is not intended to be an all-encompassing source of information. Since the study guide was built around the questions for the Horsemanship Quiz Challenge, some areas are covered in more depth than others. As the HQC grows and evolves, so will the study guide. Should you find any errors, please bring them to the attention of the USHJA staff at [email protected] so that they may be corrected.
Thank you for your interest in horsemanship and the Horsemanship Quiz Challenge. Good luck!
USHJA Horsemanship Quiz Challenge Program Committee
3 © United States Hunter Jumper Association, Inc.
Table of Contents
ANATOMY AND PHYSIOLOGY .......................................................... 7 Skeleton Bone diseases and problems Joints Ligaments Muscles Tendons General conformation Leg conformation Blemishes Athleticism Conformation types Locomotion Forequarters Hindquarters Systems of the horse
9 10 11 11 12 12 12 18 28 30 30 31 31 32 33
BANDAGING .......................................................................................... 39 Bandage bows Types of bandages Hoof bandaging Wound bandaging
40 40 44 44
CONDITIONING ..................................................................................... 46 General conditioning Aerobic Anaerobic Cooling
47 49 50 50
FIRST AID ................................................................................................ 52 Anaerobic bacteria Injections Bandaging Fever Hemorrhage Proud flesh Topical products
52 52 54 54 55 55 55
GROOMING AND BLANKETING ...................................................... 59 General grooming Skin problems Blanketing basics
59 63 65
HORSE HANDLING ............................................................................... 68 Behavior Blind spots Bridle tying Cool down
68 70 70 70
4 © United States Hunter Jumper Association, Inc.
Leading 72
Learning and ground manners Pastured and turning out horses Stall safety Pasture safety Restraining horses Safety Young horses
72 73 74 74 75 77 78
HORSE HEALTH .................................................................................... 79 General health Vital signs Vaccinations Inflammation Edema Dehydration Shock Medications Parasites Lameness Hooves Laminitis Scratches Tying up EPM Colic Choke Respiratory Young horses
79 81 82 82 83 83 83 84 84 87 87 88 88 89 89 90 92 92 93
HORSE IDENTIFICATION .................................................................. 95 Colors Face and leg markings Breeds
95 100 102
LONGEING. ............................................................................................ 104 Equipment Technique Long lining
104 107 111
NUTRITION ........................................................................................... 112 Feeding practices Carbohydrates Protein Fats Metabolism Energy needs Body condition Concentrates Roughage
112 114 115 115 116 116 116 116 118
5 © United States Hunter Jumper Association, Inc.
Pasture 120
Supplements Electrolytes
120 121
PASTURE MANAGEMENT ................................................................ 123 Fencing Drainage Shelter Water Grasses and forage Concentrates, hay and salt Trees and toxic plants Common sense pasture practices Herd behavior Pasture care
123 124 124 124 125 126 126 127 127 127
RIDING THEORY ................................................................................ 129 Safety Tacking Mounting Dismounting Untacking Position Seat Aids (natural and artificial) Natural aids Artificial aids Gaits Contact Half-halt Flatwork Jumping Releases
129 129 130 131 131 132 134 135 136 137 137 138 138 138 144 147
SHIPPING ............................................................................................. 148 Length of trip Paperwork Precautions
150 150 151
SHOEING ............................................................................................... 152 Shoeing basics Shoeing terms Mechanics Heels Metals and types of shoes Pads
154 156 158 158 159 160
STABLE MANAGEMENT ................................................................... 161 Arena Facilities
161 162

6 © United States Hunter Jumper Association, Inc.
Stable routine 162
Bedding Manure Pests
164 165 172
TACK ..................................................................................................... 173 Bits Boots Breastplates and martingales Cruppers and head bumpers Girths Halters Parts of the saddle Saddle fit Stirrup leathers and irons Parts of the bridle Tack cleaning Tanning
173 180 181 182 182 182 183 184 185 185 187 188
WELFARE............................................................................................. 189 GR803 HU126 GR839 HU102 JP102
189 189 189 189 190
7 © United States Hunter Jumper Association, Inc.
ANATOMY AND PHYSIOLOGY
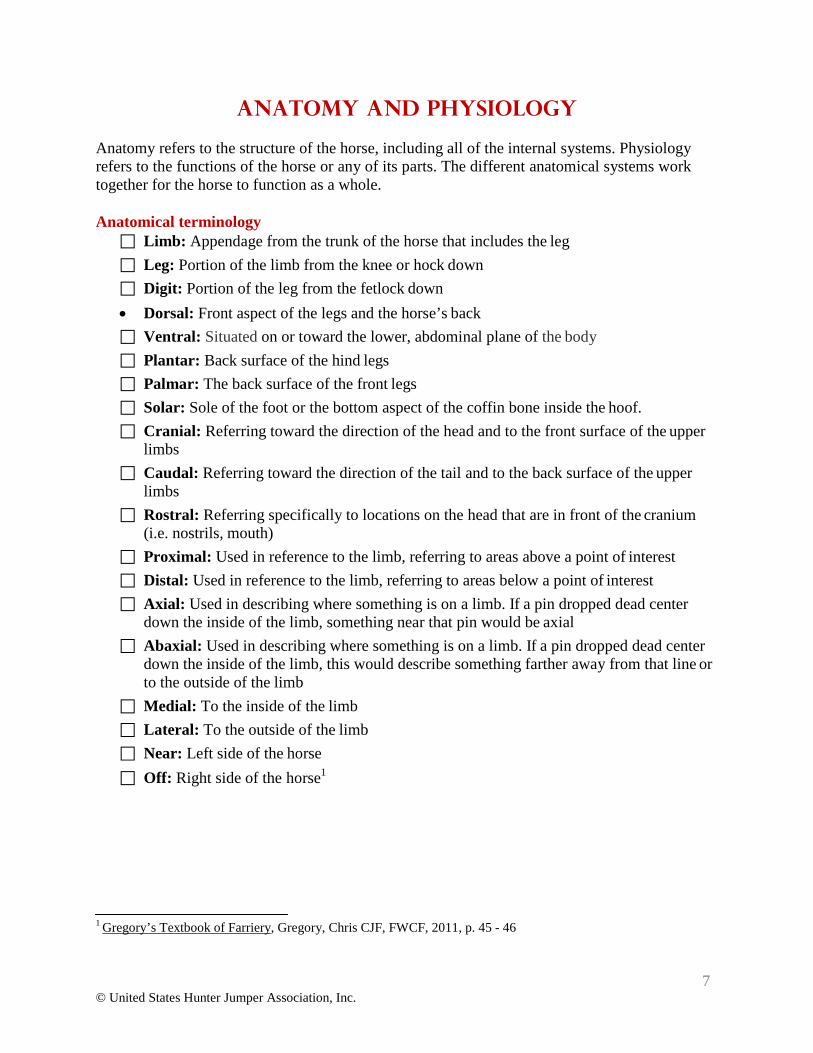
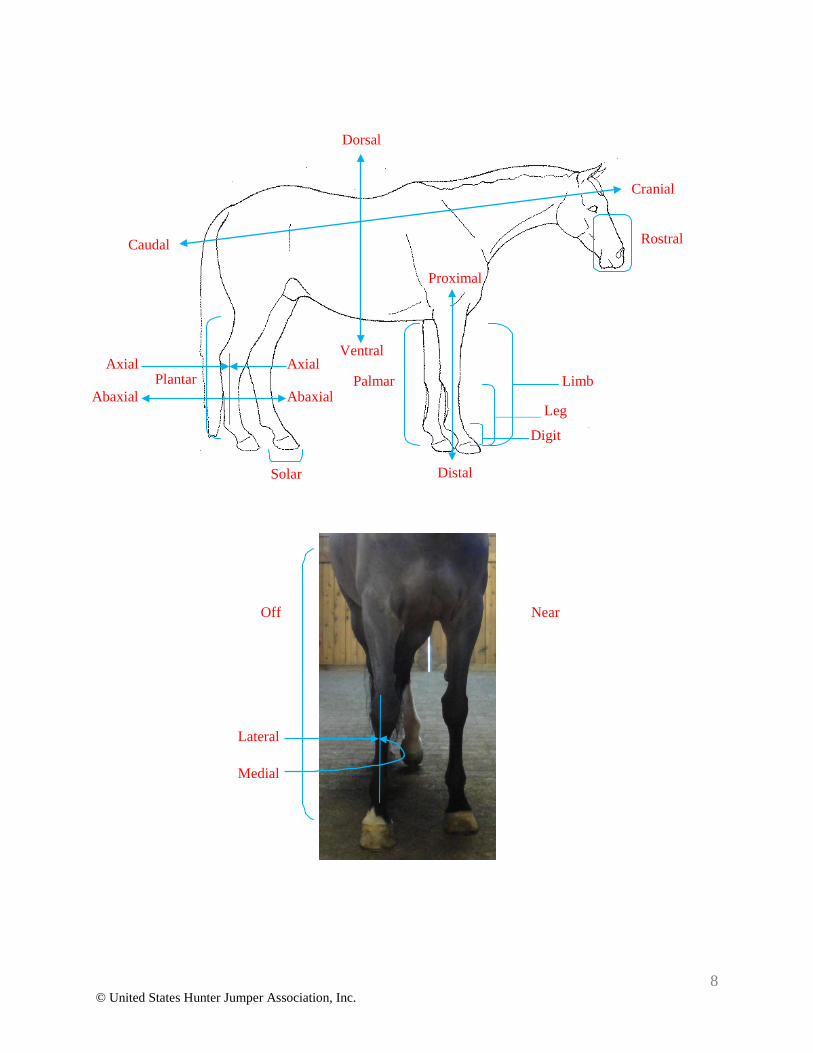
Anatomy refers to the structure of the horse, including all of the internal systems. Physiology refers to the functions of the horse or any of its parts. The different anatomical systems work together for the horse to function as a whole.
Anatomical terminology
Limb: Appendage from the trunk of the horse that includes the leg Leg: Portion of the limb from the knee or hock down Digit: Portion of the leg from the fetlock down
• Dorsal: Front aspect of the legs and the horse’s back Ventral: Situated on or toward the lower, abdominal plane of the body Plantar: Back surface of the hind legs Palmar: The back surface of the front legs Solar: Sole of the foot or the bottom aspect of the coffin bone inside the hoof. Cranial: Referring toward the direction of the head and to the front surface of the upper
limbs Caudal: Referring toward the direction of the tail and to the back surface of the upper
limbs Rostral: Referring specifically to locations on the head that are in front of the cranium
(i.e. nostrils, mouth) Proximal: Used in reference to the limb, referring to areas above a point of interest Distal: Used in reference to the limb, referring to areas below a point of interest Axial: Used in describing where something is on a limb. If a pin dropped dead center
down the inside of the limb, something near that pin would be axial Abaxial: Used in describing where something is on a limb. If a pin dropped dead center
down the inside of the limb, this would describe something farther away from that line or to the outside of the limb
Medial: To the inside of the limb Lateral: To the outside of the limb Near: Left side of the horse
Off: Right side of the horse1
1 Gregory’s Textbook of Farriery, Gregory, Chris CJF, FWCF, 2011, p. 45 - 46
8 © United States Hunter Jumper Association, Inc.
Dorsal
Cranial
Caudal Rostral
Proximal
Axial Axial Plantar
Ventral
Palmar
Limb Abaxial Abaxial
Leg
Digit
Solar Distal
Off Near
Lateral
Medial
9 © United States Hunter Jumper Association, Inc.
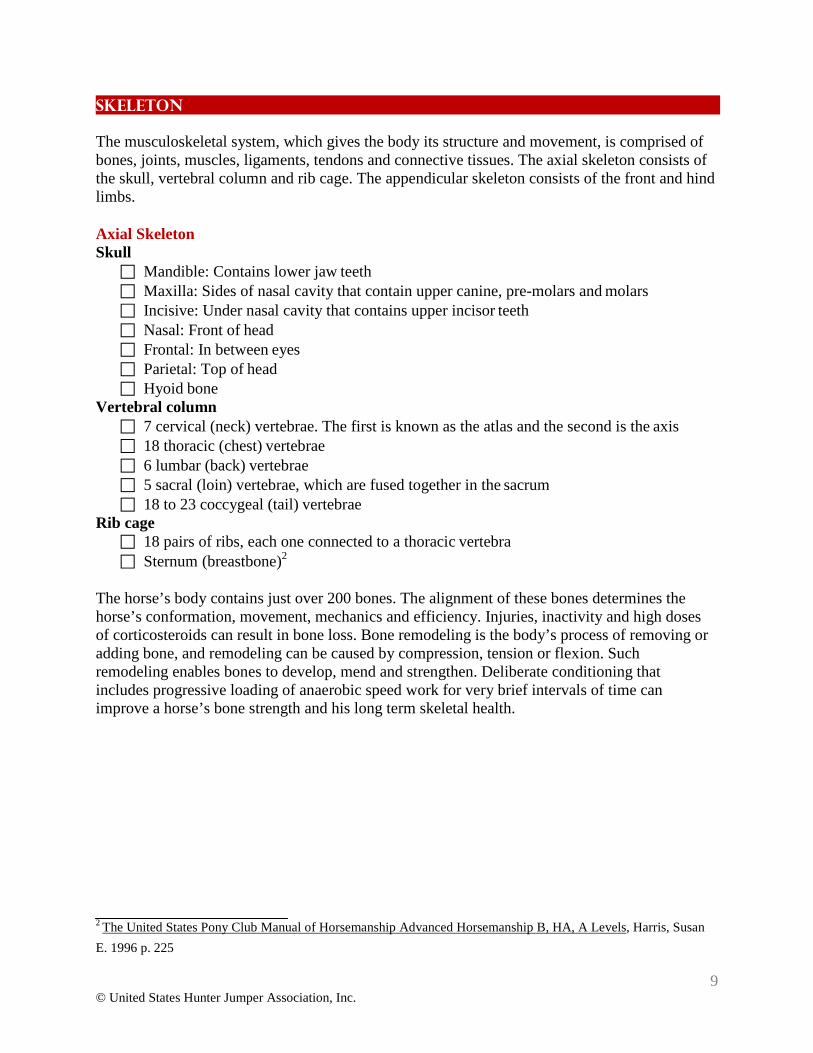
Skeleton The musculoskeletal system, which gives the body its structure and movement, is comprised of bones, joints, muscles, ligaments, tendons and connective tissues. The axial skeleton consists of the skull, vertebral column and rib cage. The appendicular skeleton consists of the front and hind limbs.
Axial Skeleton Skull
Mandible: Contains lower jaw teeth Maxilla: Sides of nasal cavity that contain upper canine, pre-molars and molars Incisive: Under nasal cavity that contains upper incisor teeth Nasal: Front of head Frontal: In between eyes Parietal: Top of head Hyoid bone
Vertebral column 7 cervical (neck) vertebrae. The first is known as the atlas and the second is the axis 18 thoracic (chest) vertebrae 6 lumbar (back) vertebrae 5 sacral (loin) vertebrae, which are fused together in the sacrum 18 to 23 coccygeal (tail) vertebrae
Rib cage 18 pairs of ribs, each one connected to a thoracic vertebra Sternum (breastbone)2
The horse’s body contains just over 200 bones. The alignment of these bones determines the horse’s conformation, movement, mechanics and efficiency. Injuries, inactivity and high doses of corticosteroids can result in bone loss. Bone remodeling is the body’s process of removing or adding bone, and remodeling can be caused by compression, tension or flexion. Such remodeling enables bones to develop, mend and strengthen. Deliberate conditioning that includes progressive loading of anaerobic speed work for very brief intervals of time can improve a horse’s bone strength and his long term skeletal health.
2 The United States Pony Club Manual of Horsemanship Advanced Horsemanship B, HA, A Levels, Harris, Susan E. 1996 p. 225
10 © United States Hunter Jumper Association, Inc.
Bone Diseases and Problems The horse’s leg structure makes it subject to many soundness issues, particularly those associated with the bone structures. Listed below are a few of the many problems that may develop.
Navicular syndrome is a degenerative condition that can affect the following structures:
• Navicular bone • Navicular bursa
• Deep digital flexor tendon • Supporting ligaments of the navicular bone
Navicular syndrome occurs when any of the above structures become inflamed and sore. The first symptom is often a mild lameness that comes and goes, sometimes even disappearing once the horse is warmed up. The horse develops a short, choppy stride landing toe first to stay off his painful heels. This causes the horse to stumble frequently. The lameness may become severe as the bone and tendon become inflamed and roughened. The heels may become more contracted as the syndrome progresses. Shoeing and medication may offer relief.
Some predispositions to navicular syndrome are:
Small feet Narrow heels Upright pasterns
11 © United States Hunter Jumper Association, Inc.
Long toes and low heels3 Ringbone is arthritis of the pastern joint and/or the coffin joint. New bone growth builds up around either of these two joints due to degenerative joint disease (DJD). Pigeon-toed horses or those with short, upright pasterns are pre-disposed to this condition, especially if they are used for jumping. High ringbone is characterized by a ring of bone around the pastern joint. In some cases it can be seen as a firm swelling approximately one inch above the coronet band. Low ringbone occurs between the pastern and the coffin bone and cannot be seen without an X-ray4.
Bone spavin is DJD in the hocks.
Joints A joint occurs every place two or more bones meet. Joints are composed of the following parts:
Ligaments Fibrous joint capsule Synovial membrane Synovial fluid (a slippery substance that lubricates the joint) Articular cartilage Subchondral bone
Joints provide the following functions:
Minimize frictional forces between bones Stabilize the skeletal structures during the loading phase as the horse bears weight on
each limb Act as a hinge during locomotion
Joints do not act the same way as bones during conditioning. Bones adapt and remodel to accept the progressive loading that results from conditioning. Joints do not have the ability to remodel as bones do. Joints benefit from moderate exercise but become stressed under excessively strenuous exercise. Torque and uneven loading are key factors in joint injuries. The more movement a joint makes, the more wear it experiences and the more susceptible it is to inflammation and injury. The bulk of joint problems for horses that jump occurs in the coffin and pastern joints in the form of DJD 5.
Ligaments Ligaments connect bones to each other across a joint. They are not as elastic as tendons and consequently they stretch or tear more easily. Ligaments stabilize the joint and prevent over- stretching, over-flexing or twisting. Injury to a ligament is known as desmitis.
3 All Horse Systems Go, Loving, Nancy S. DVM, 2006 p. 85 - 87 4 All Horse Systems Go, Loving, Nancy S. DVM, 2006 p. 121 - 122 5 All Horse Systems Go, Loving, Nancy S. DVM, 2006 p. 109 - 111
12 © United States Hunter Jumper Association, Inc.
Muscles
Muscles, which make up nearly half of a horse’s body weight, are attached to bone either by tendons or fascia. Muscles apply tension to their insertion points on bone when they contract, in turn creating locomotion. They pull against a fulcrum, which is generally located near a joint, and because they can only pull, they usually work in pairs. Flexor muscles bend joints and extensor muscles straighten them.
The three main types of muscles in the horse’s body are: Cardiac: Found only in the heart Smooth: Found in autonomic systems such as the digestive tract Skeletal: Responsible for moving the bones6
Tendons
Tendons connect muscles to bones, and tendons are more elastic than ligaments. They stretch and contract to help disperse the concussive forces that the skeletal system encounters. A tendon is protected by a tendon sheath where it crosses a joint and by a bursa sac where it travels over a bony structure. Tendon sheaths are filled with synovial fluid like a joint capsule. Elasticity is compromised in damaged tendons, which are prone to re-injury. Tendon injuries come in the following forms:
Tendonitis: Any clinical or pathological disorder that involves inflammation within the tendon and paratendon, but does not involve the tendon sheath.
Tendosynovitis: Inflammation within the tendon sheath. Tendon rupture or bowed tendon: The most severe of stress-induced inflammatory
reactions resulting in hemorrhage and edema.
General Conformation
Conformation refers to the way the horse’s body is put together and has an effect on the horse’s soundness, movement, rideability and athletic ability. A horse with excellent conformation is suited for a variety of tasks. Constituents of each sport or discipline have their own view on what constitutes ideal conformation.
When preparing to judge conformation, make sure to stand the horse square on a flat, level surface.
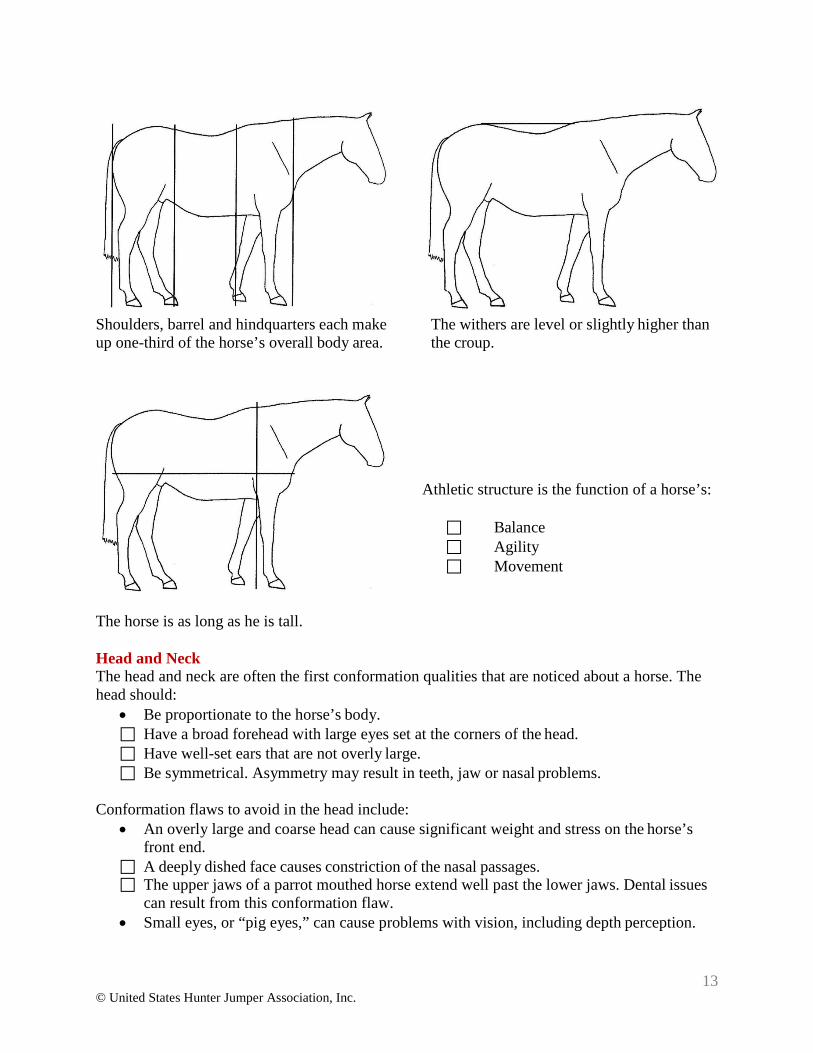
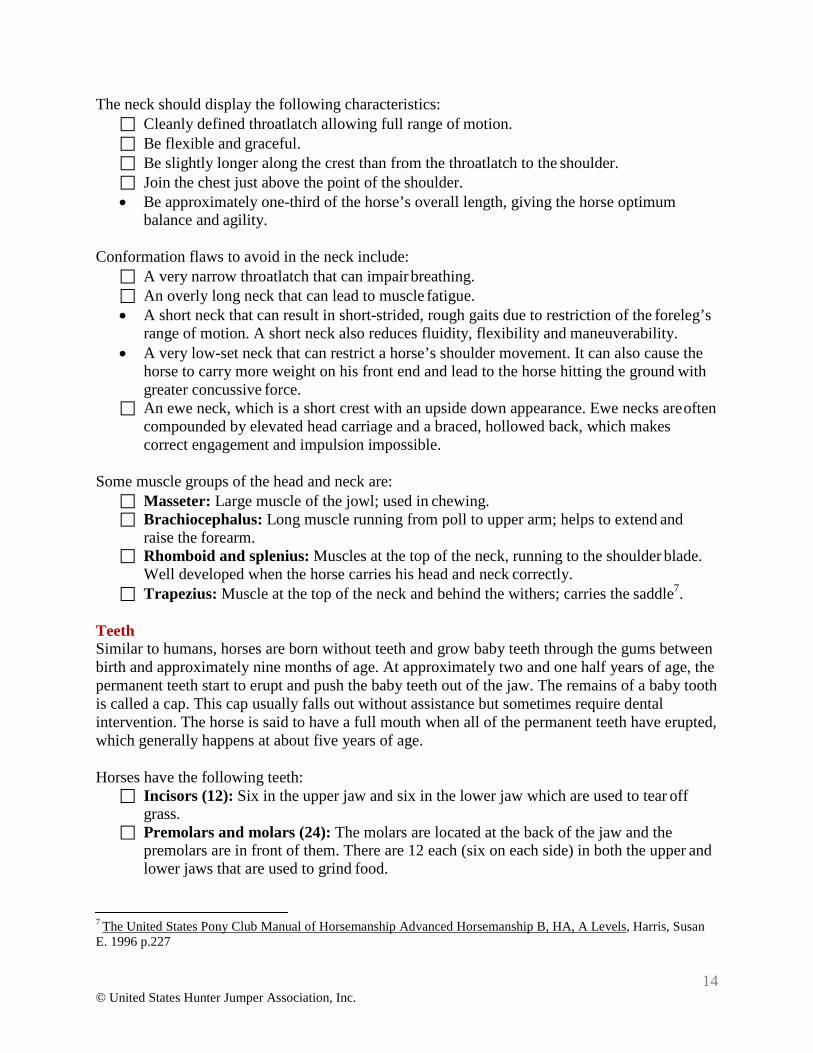
The ideal horse’s body can be described as follows: Three equal sections: Shoulders, barrel and hindquarters. Square: Excluding the head and neck, the horse is as long as he is tall. Equidistant: The distance from the point of shoulder to the point of the buttocks is equal
to the distance from the top of the withers to the ground. Even: The withers are level or slightly higher than the croup. Symmetrical: To judge symmetry, look at the horse from front and rear, both left and
right.
6 The United States Pony Club Manual of Horsemanship Intermediate Horsemanship C Level, Harris, Susan E. 1995 p. 226 - 227
13 © United States Hunter Jumper Association, Inc.
Shoulders, barrel and hindquarters each make The withers are level or slightly higher than up one-third of the horse’s overall body area. the croup.
Athletic structure is the function of a horse’s:
Balance Agility Movement
The horse is as long as he is tall. Head and Neck The head and neck are often the first conformation qualities that are noticed about a horse. The head should:
• Be proportionate to the horse’s body. Have a broad forehead with large eyes set at the corners of the head. Have well-set ears that are not overly large. Be symmetrical. Asymmetry may result in teeth, jaw or nasal problems.
Conformation flaws to avoid in the head include:
• An overly large and coarse head can cause significant weight and stress on the horse’s front end.
A deeply dished face causes constriction of the nasal passages. The upper jaws of a parrot mouthed horse extend well past the lower jaws. Dental issues
can result from this conformation flaw. • Small eyes, or “pig eyes,” can cause problems with vision, including depth perception.
14 © United States Hunter Jumper Association, Inc.
The neck should display the following characteristics: Cleanly defined throatlatch allowing full range of motion. Be flexible and graceful. Be slightly longer along the crest than from the throatlatch to the shoulder. Join the chest just above the point of the shoulder. • Be approximately one-third of the horse’s overall length, giving the horse optimum
balance and agility. Conformation flaws to avoid in the neck include:
A very narrow throatlatch that can impair breathing. An overly long neck that can lead to muscle fatigue. • A short neck that can result in short-strided, rough gaits due to restriction of the foreleg’s
range of motion. A short neck also reduces fluidity, flexibility and maneuverability. • A very low-set neck that can restrict a horse’s shoulder movement. It can also cause the
horse to carry more weight on his front end and lead to the horse hitting the ground with greater concussive force.
An ewe neck, which is a short crest with an upside down appearance. Ewe necks are often compounded by elevated head carriage and a braced, hollowed back, which makes correct engagement and impulsion impossible.
Some muscle groups of the head and neck are:
Masseter: Large muscle of the jowl; used in chewing. Brachiocephalus: Long muscle running from poll to upper arm; helps to extend and
raise the forearm. Rhomboid and splenius: Muscles at the top of the neck, running to the shoulder blade.
Well developed when the horse carries his head and neck correctly. Trapezius: Muscle at the top of the neck and behind the withers; carries the saddle7.
Teeth Similar to humans, horses are born without teeth and grow baby teeth through the gums between birth and approximately nine months of age. At approximately two and one half years of age, the permanent teeth start to erupt and push the baby teeth out of the jaw. The remains of a baby tooth is called a cap. This cap usually falls out without assistance but sometimes require dental intervention. The horse is said to have a full mouth when all of the permanent teeth have erupted, which generally happens at about five years of age.
Horses have the following teeth:
Incisors (12): Six in the upper jaw and six in the lower jaw which are used to tear off grass.
Premolars and molars (24): The molars are located at the back of the jaw and the premolars are in front of them. There are 12 each (six on each side) in both the upper and lower jaws that are used to grind food.
7 The United States Pony Club Manual of Horsemanship Advanced Horsemanship B, HA, A Levels, Harris, Susan E. 1996 p.227
15 © United States Hunter Jumper Association, Inc.
Canine teeth or tushes (4): Small pointed teeth found in both the upper and lower jaws just behind the incisors. Usually found only in male horses, although they can be present in mares.
Wolf teeth (1 to 4): Small extra premolars located right in front of the first premolars. These can cause bitting problems but are easily removed.
Incisors Age of eruption Central incisors Intermediate incisors Corner incisors Permanent central incisors Permanent intermediate incisors Permanent corner incisors Canine teeth
4 weeks 6 weeks 9 months 2 ½ years 3 ½ years 4 ½ years Between 4 and 5 years
Molars Age of eruption First premolars First molars Second molars Second premolars Third premolars Fourth premolars Third molars
5 to 6 months 9 to 12 months 2 years 2 ½ years 3 years Between 3 ½ and 4 ½ years 4 years
The eruption of the third molars completes the dental arcade (the rows of upper and lower back teeth).
Teeth continue to grow throughout the horse’s life. The grinding action of the teeth wears them down and changes their shape, especially on the grinding surface, called the table. This constant shape changing and the markings on the teeth allow us to age horses. The aging system works well through about eight years of age; after that it becomes more uncertain. Because the horse’s upper jaw is wider than his lower jaw, hooks or sharp edges form on the grinding teeth. Horses grind food in a sideways, one way action causing the teeth to wear unevenly. They require dental care every six months, in which the dentist or veterinarian floats (files) the teeth with a special rasp.
The horse’s mouth also contains:
Tongue Salivary glands Interdental space: The toothless space located between the front teeth and the pre-
molars. The bit rests here. Bars: The upper surface of the lower jawbones within the interdental space. The bit rests
on the bars, which are quite sensitive. The mouth is subject to the following problems:
Parrot mouth (overshot jaw): A jaw abnormality where the upper teeth protrude over the lower teeth, which makes grazing difficult.
16 © United States Hunter Jumper Association, Inc.
Undershot jaw: A jaw abnormality where the lower teeth protrude ahead of the upper teeth, which makes grazing difficult.
Step mouth: An abnormality of the dental arcade. One tooth is longer than the rest, creating a step. This may be caused by the loss of the opposing tooth. This makes chewing difficult and may require special dental treatment.
Wave mouth: A smooth but irregular mouth. This makes chewing difficult and may require special dental treatment.
Abscessed tooth: An infection at the root of a tooth. Signs of an abscess are bad breath and sometimes swelling in the jaw.
Bad breath: This is not normal for horses and may indicate an abscess or infection in the mouth, guttural pouch or nasal cavity.
Cribbing: This can result in inflamed gums and/or broken front teeth. (See Cribbing) Withers The withers are formed by the top part of the third through eighth thoracic vertebrae of the spine. The withers should be broad and slightly higher than the horse’s croup.
Conformation flaws to avoid in the withers include:
High withers: Can cause a horse to be unbalanced, run downhill and make saddle fitting difficult.
Low (mutton) withers: Can cause the saddle to slide forward, which increases the impact on the front legs.
Back Proper back conformation is:
• Well muscled • Short through the loins
• Blending smoothly into a wide, well-muscled loin • Medium height withers
Horses that have these attributes have a strong back that tolerates carrying weight well. Well- shaped withers keep the saddle in place.
Conformation flaws to avoid in the back include:
• Overly short: Limits the horse’s ability to move his legs and elbows vertically, which is referred to as scope.
• Long: Prone to fatigue and weakness. This flaw also limits a horse’s coordination and ability to collect.
Long loins: Reduce the ability to use the hindquarters for impulsion. The loins are not able to flex from side to side; therefore a long lumbar spine creates a weak back.
Sway back: This occurs when the spine rounds down toward the ground, giving the topline a concave appearance. It indicates weakened ligaments and muscular attachment. Long backs are prone to sway and chronic pain may result from this condition.
Roached back: Occurs when the spine rounds up in an arch, inhibiting flexibility. Riding a roached back horse for any amount of time may cause chronic soreness and soft tissue damage.
17 © United States Hunter Jumper Association, Inc.
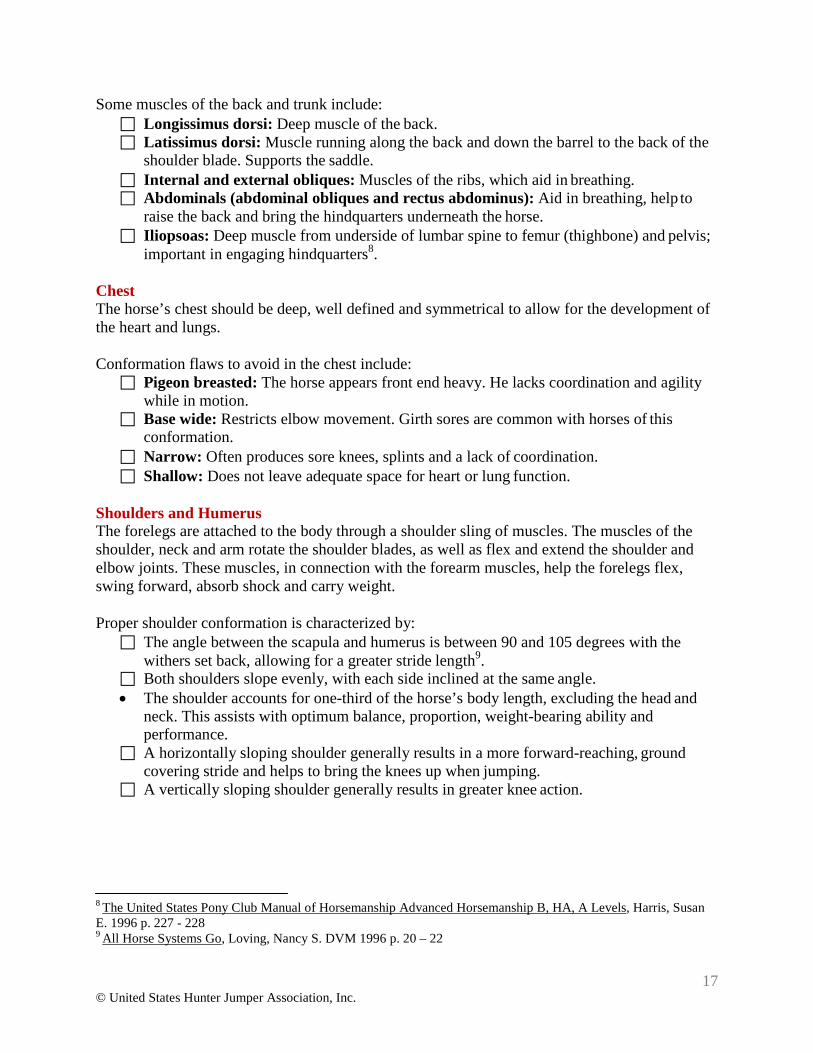
Some muscles of the back and trunk include: Longissimus dorsi: Deep muscle of the back. Latissimus dorsi: Muscle running along the back and down the barrel to the back of the
shoulder blade. Supports the saddle. Internal and external obliques: Muscles of the ribs, which aid in breathing. Abdominals (abdominal obliques and rectus abdominus): Aid in breathing, help to
raise the back and bring the hindquarters underneath the horse. Iliopsoas: Deep muscle from underside of lumbar spine to femur (thighbone) and pelvis;
important in engaging hindquarters8. Chest The horse’s chest should be deep, well defined and symmetrical to allow for the development of the heart and lungs.
Conformation flaws to avoid in the chest include:
Pigeon breasted: The horse appears front end heavy. He lacks coordination and agility while in motion.
Base wide: Restricts elbow movement. Girth sores are common with horses of this conformation.
Narrow: Often produces sore knees, splints and a lack of coordination. Shallow: Does not leave adequate space for heart or lung function.
Shoulders and Humerus The forelegs are attached to the body through a shoulder sling of muscles. The muscles of the shoulder, neck and arm rotate the shoulder blades, as well as flex and extend the shoulder and elbow joints. These muscles, in connection with the forearm muscles, help the forelegs flex, swing forward, absorb shock and carry weight.
Proper shoulder conformation is characterized by:
The angle between the scapula and humerus is between 90 and 105 degrees with the withers set back, allowing for a greater stride length9.
Both shoulders slope evenly, with each side inclined at the same angle. • The shoulder accounts for one-third of the horse’s body length, excluding the head and
neck. This assists with optimum balance, proportion, weight-bearing ability and performance.
A horizontally sloping shoulder generally results in a more forward-reaching, ground covering stride and helps to bring the knees up when jumping.
A vertically sloping shoulder generally results in greater knee action.
8 The United States Pony Club Manual of Horsemanship Advanced Horsemanship B, HA, A Levels, Harris, Susan E. 1996 p. 227 - 228 9 All Horse Systems Go, Loving, Nancy S. DVM 1996 p. 20 – 22
18 © United States Hunter Jumper Association, Inc.
Conformation flaws to avoid in the shoulder include: Excessively straight and upright shoulders with the wither set forward leads to
exaggerated knee action, limitation of ground covering ability and more concussion with each stride. This conformation makes it difficult for the horse to fold his legs when he jumps.
A short humerus results in short strides and limited ability.
Leg Conformation At rest, a horse bears approximately 55 percent of his body weight on his front legs and approximately 45 percent on his hind legs. His center of gravity is a balance point located close to the heart girth, and shifts as he puts more weight on his hindquarters or his forehand. His head and neck assist him in changing his balance back and forth.
Front Legs Proper front leg conformation is:
Vertically aligned with the point of shoulder when viewed from the front. Straight with flat knees and no rotation of the cannon bone. Upper forearm moving freely back and forth, with unrestricted elbow movement. Cannon bones of the front legs are shorter than the hind cannons. Angles of hooves, pasterns and shoulders should be the same. A moderately long, sloping pastern providing suspension and concussion absorption. • If you draw a plumb line down the center of the scapula, half of the horse’s leg should be
in front of the plumb line and half behind the plumb line. Conformation flaws to avoid in the front legs include:
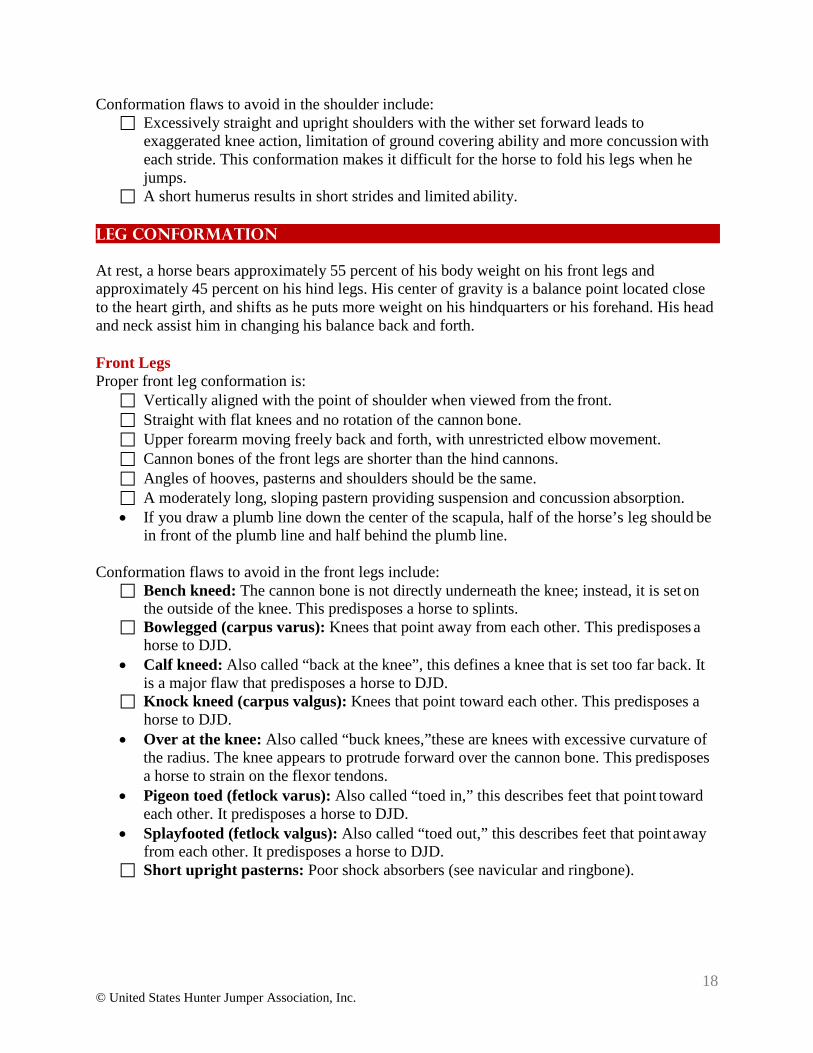
Bench kneed: The cannon bone is not directly underneath the knee; instead, it is set on the outside of the knee. This predisposes a horse to splints.
Bowlegged (carpus varus): Knees that point away from each other. This predisposes a horse to DJD.
• Calf kneed: Also called “back at the knee”, this defines a knee that is set too far back. It is a major flaw that predisposes a horse to DJD.
Knock kneed (carpus valgus): Knees that point toward each other. This predisposes a horse to DJD.
• Over at the knee: Also called “buck knees,”these are knees with excessive curvature of the radius. The knee appears to protrude forward over the cannon bone. This predisposes a horse to strain on the flexor tendons.
• Pigeon toed (fetlock varus): Also called “toed in,” this describes feet that point toward each other. It predisposes a horse to DJD.
• Splayfooted (fetlock valgus): Also called “toed out,” this describes feet that point away from each other. It predisposes a horse to DJD.
Short upright pasterns: Poor shock absorbers (see navicular and ringbone).
19 © United States Hunter Jumper Association, Inc.
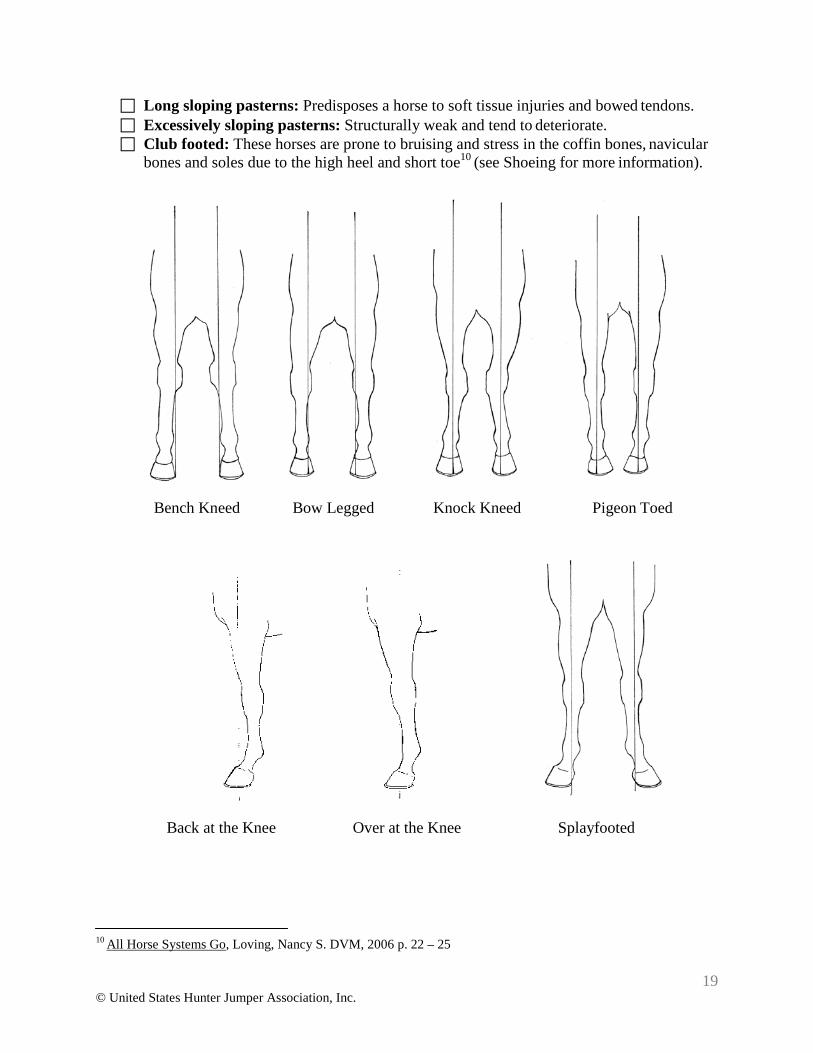
Long sloping pasterns: Predisposes a horse to soft tissue injuries and bowed tendons. Excessively sloping pasterns: Structurally weak and tend to deteriorate. Club footed: These horses are prone to bruising and stress in the coffin bones, navicular
bones and soles due to the high heel and short toe10 (see Shoeing for more information).
Bench Kneed Bow Legged Knock Kneed Pigeon Toed
Back at the Knee Over at the Knee Splayfooted
10 All Horse Systems Go, Loving, Nancy S. DVM, 2006 p. 22 – 25
20 © United States Hunter Jumper Association, Inc.
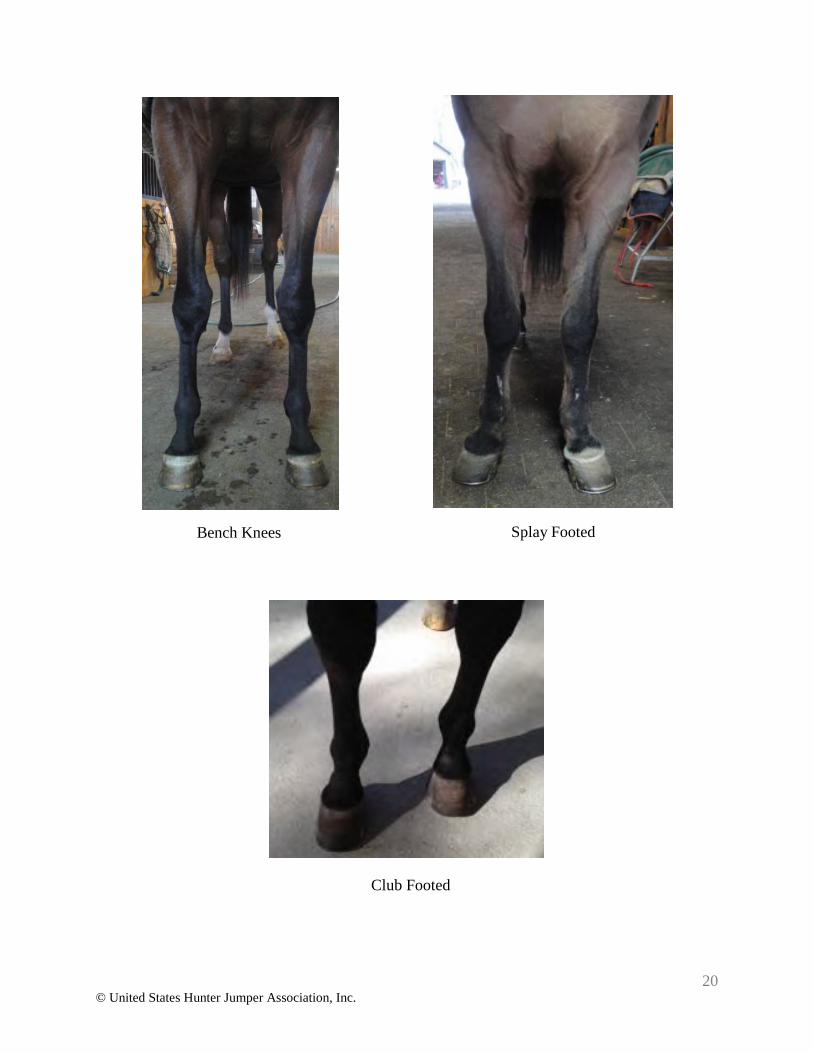
Bench Knees Splay Footed
Club Footed
21 © United States Hunter Jumper Association, Inc.
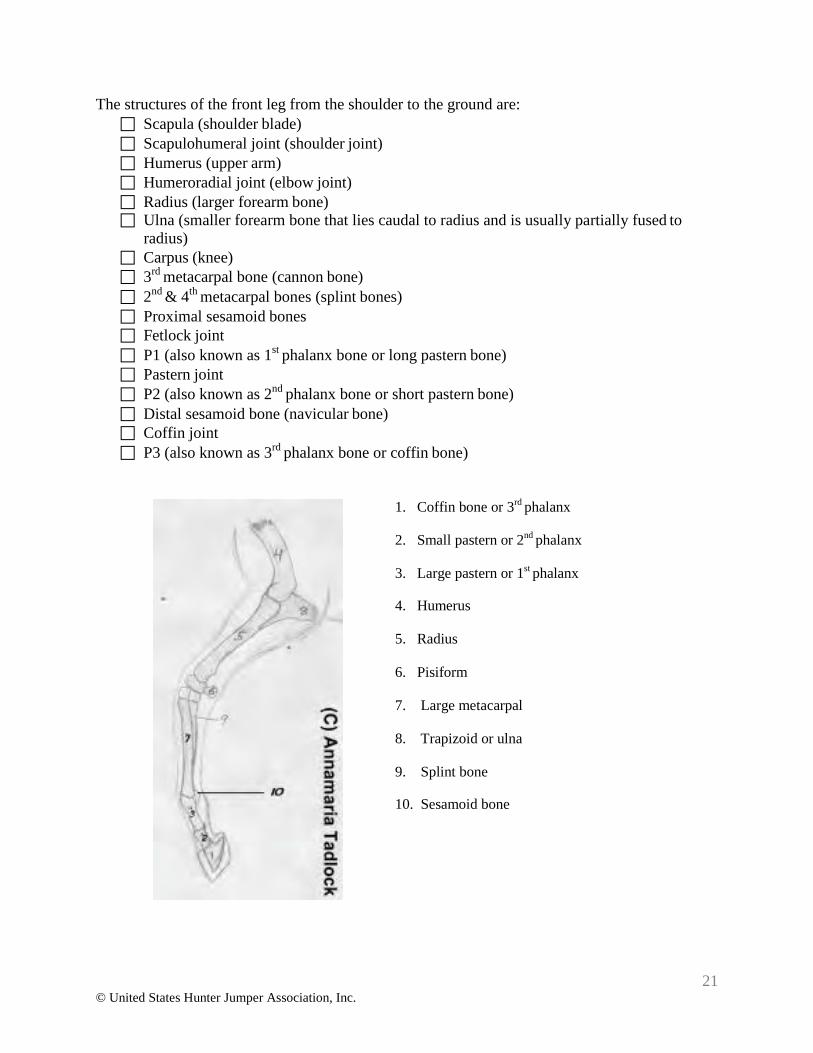
The structures of the front leg from the shoulder to the ground are: Scapula (shoulder blade) Scapulohumeral joint (shoulder joint) Humerus (upper arm) Humeroradial joint (elbow joint) Radius (larger forearm bone) Ulna (smaller forearm bone that lies caudal to radius and is usually partially fused to
radius) Carpus (knee) 3rd metacarpal bone (cannon bone) 2nd & 4th metacarpal bones (splint bones) Proximal sesamoid bones Fetlock joint P1 (also known as 1st phalanx bone or long pastern bone) Pastern joint P2 (also known as 2nd phalanx bone or short pastern bone) Distal sesamoid bone (navicular bone) Coffin joint P3 (also known as 3rd phalanx bone or coffin bone)
1. Coffin bone or 3rd phalanx
2. Small pastern or 2nd phalanx
3. Large pastern or 1st phalanx
4. Humerus
5. Radius
6. Pisiform
7. Large metacarpal
8. Trapizoid or ulna
9. Splint bone
10. Sesamoid bone
22 © United States Hunter Jumper Association, Inc.
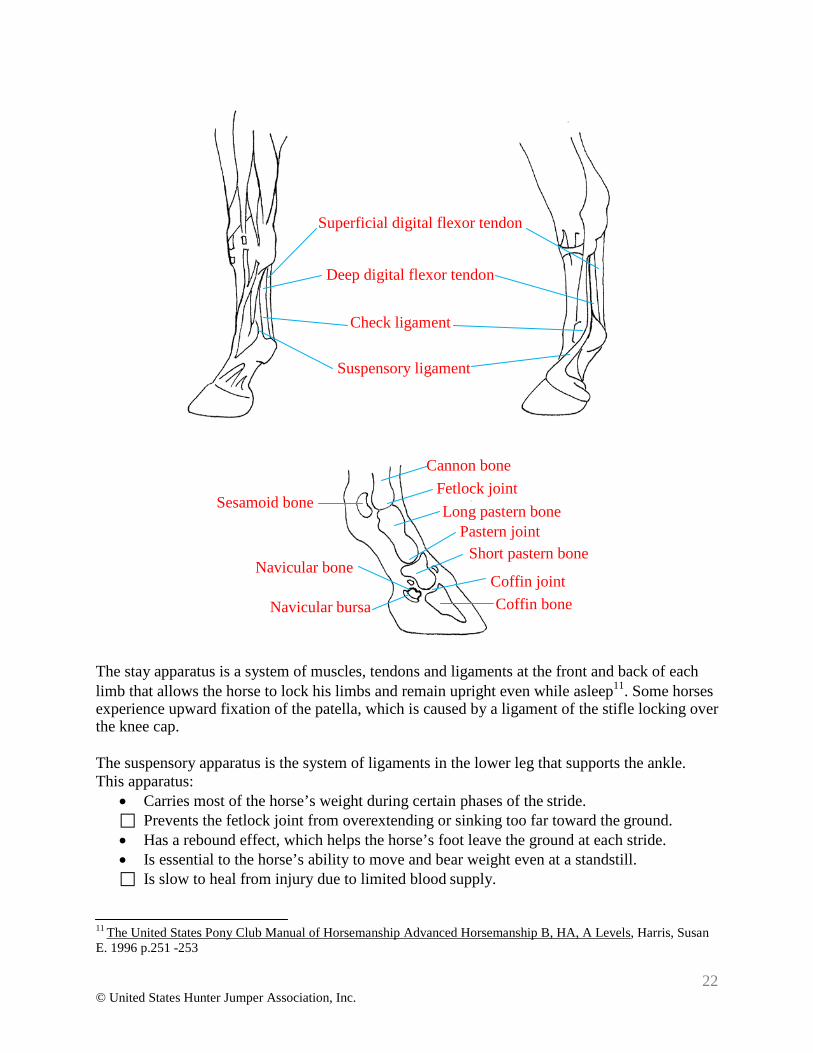
Superficial digital flexor tendon
Deep digital flexor tendon
Check ligament
Suspensory ligament
Sesamoid bone
Navicular bone
Navicular bursa
Cannon bone
Fetlock joint Long pastern bone
Pastern joint Short pastern bone
Coffin joint Coffin bone
The stay apparatus is a system of muscles, tendons and ligaments at the front and back of each limb that allows the horse to lock his limbs and remain upright even while asleep11. Some horses experience upward fixation of the patella, which is caused by a ligament of the stifle locking over the knee cap.
The suspensory apparatus is the system of ligaments in the lower leg that supports the ankle. This apparatus:
• Carries most of the horse’s weight during certain phases of the stride. Prevents the fetlock joint from overextending or sinking too far toward the ground. • Has a rebound effect, which helps the horse’s foot leave the ground at each stride. • Is essential to the horse’s ability to move and bear weight even at a standstill. Is slow to heal from injury due to limited blood supply.
11 The United States Pony Club Manual of Horsemanship Advanced Horsemanship B, HA, A Levels, Harris, Susan E. 1996 p.251 -253
23 © United States Hunter Jumper Association, Inc.
The suspensory apparatus contains the following structures: Suspensory ligament: Runs down the back of the leg from the carpal bones to the
proximal sesamoid bones where it forms two branches that run diagonally forward to the common digital extensor tendon.
Check ligament: Runs from the suspensory ligament to the deep flexor tendon. Deep digital flexor tendon: Runs behind the carpal bones, around the fetlock joint, and
across the navicular bone. The lower attachment point is the underside of the coffin bone. Superficial flexor tendon: Runs from behind the carpal bones and around the fetlock
joint where it forms two branches out to either side of the pastern. Common digital extensor tendon: Runs down the front of the leg to the top of the coffin
bone. Proximal sesamoid bones: These two bones form a pulley through which the flexor
tendons pass. Some muscles of the forelegs include:
Triceps: Large muscle from elbow to bottom of shoulder blade that straightens elbow and foreleg.
Extensor muscles of lower leg: Muscles of the forearm that extend the lower leg. Flexor muscles of lower leg: Muscles of the forearm that flex the joints of the lower
leg12. Hind Legs
Proper hind leg conformation is:
The hind cannon bones are slightly longer than the front cannon bones. When viewed from the side, a line connecting the stifle and elbow is horizontal. The gaskin is slightly shorter than the thigh. The hind leg is straight with a vertical line from the point of buttock down the back of the
hock, tendon and fetlock joint. The hock is wide from front to back. When viewed from behind, the hind legs are straight. A long distance from the hip to the hock indicates short, strong cannon bones and creates
a more powerful hind leg. Conformation flaws to avoid in the hind legs include:
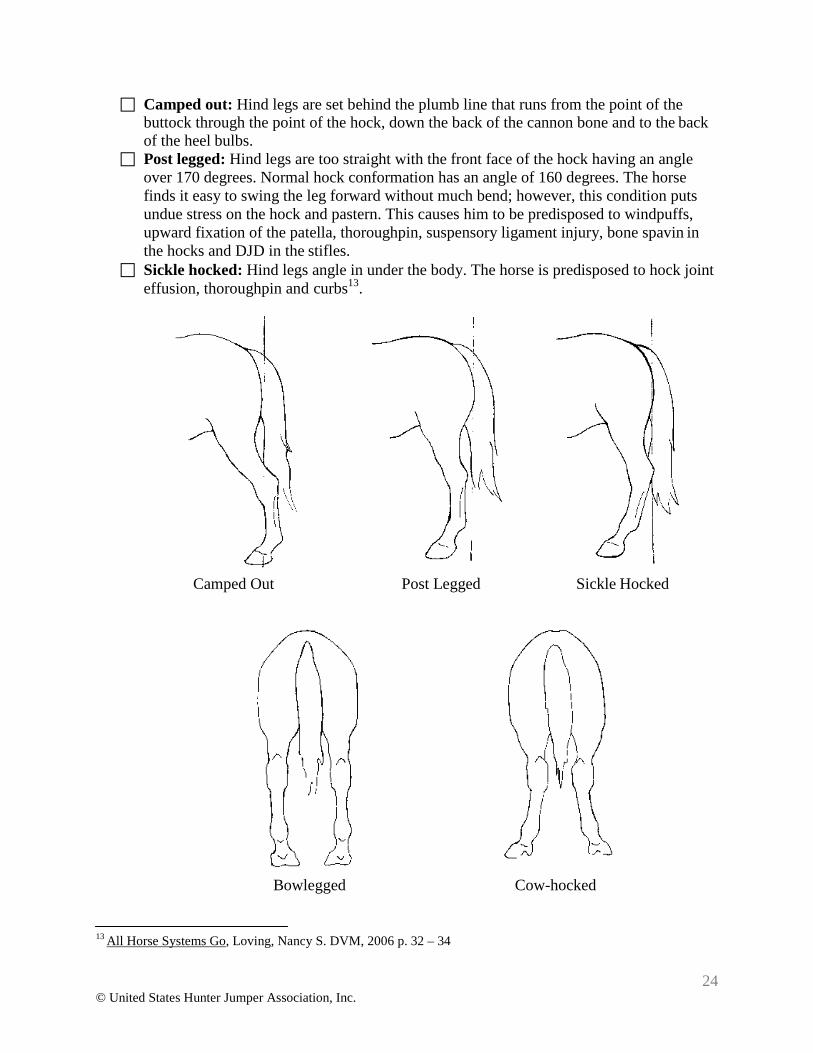
Bowlegged: Cannon bones rotate inward and hocks rotate outward. Cow hocked: Cannon bones rotate outward and hocks rotate inward. The horse stands
with his fetlocks farther apart than his hocks and is prone to DJD in the hocks and stifles due to the excessive strain on the inside of these joints.
Toed out: Fetlocks are directly under the hocks but the toes turn out under the fetlocks.
12 The United States Pony Club Manual of Horsemanship Advanced Horsemanship B, HA, A Levels, Harris, Susan E. 1996 p. 229
24 © United States Hunter Jumper Association, Inc.
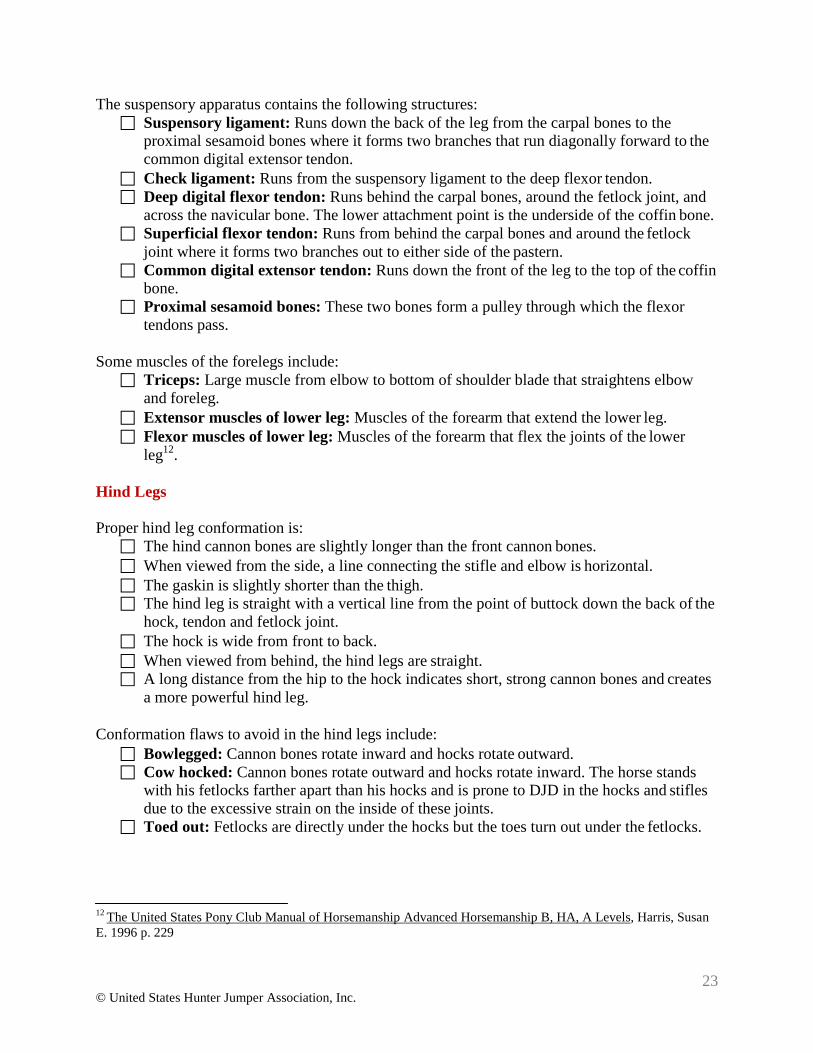
Camped out: Hind legs are set behind the plumb line that runs from the point of the buttock through the point of the hock, down the back of the cannon bone and to the back of the heel bulbs.
Post legged: Hind legs are too straight with the front face of the hock having an angle over 170 degrees. Normal hock conformation has an angle of 160 degrees. The horse finds it easy to swing the leg forward without much bend; however, this condition puts undue stress on the hock and pastern. This causes him to be predisposed to windpuffs, upward fixation of the patella, thoroughpin, suspensory ligament injury, bone spavin in the hocks and DJD in the stifles.
Sickle hocked: Hind legs angle in under the body. The horse is predisposed to hock joint effusion, thoroughpin and curbs13.
Camped Out Post Legged Sickle Hocked
Bowlegged Cow-hocked
13 All Horse Systems Go, Loving, Nancy S. DVM, 2006 p. 32 – 34
25 © United States Hunter Jumper Association, Inc.
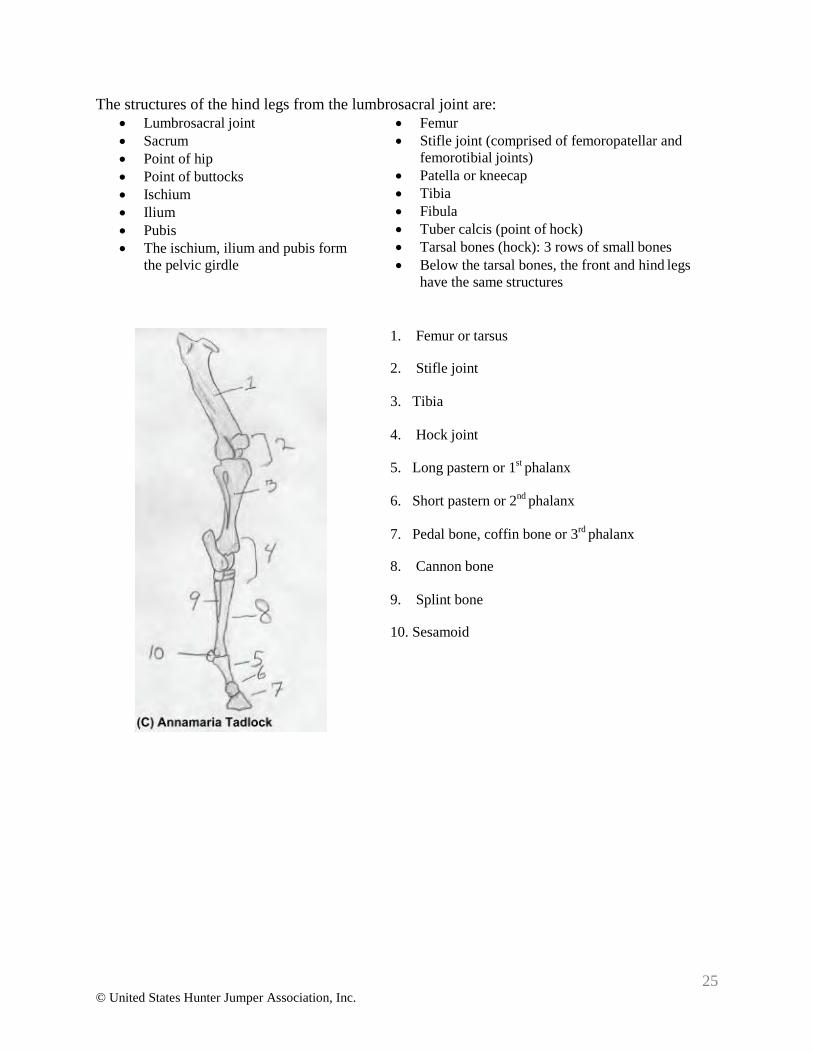
The structures of the hind legs from the lumbrosacral joint are: • Lumbrosacral joint • Sacrum • Point of hip • Point of buttocks • Ischium • Ilium • Pubis • The ischium, ilium and pubis form
the pelvic girdle
• Femur • Stifle joint (comprised of femoropatellar and
femorotibial joints) • Patella or kneecap • Tibia • Fibula • Tuber calcis (point of hock) • Tarsal bones (hock): 3 rows of small bones • Below the tarsal bones, the front and hind legs
have the same structures
1. Femur or tarsus
2. Stifle joint
3. Tibia
4. Hock joint
5. Long pastern or 1st phalanx
6. Short pastern or 2nd phalanx
7. Pedal bone, coffin bone or 3rd phalanx
8. Cannon bone
9. Splint bone
10. Sesamoid
26 © United States Hunter Jumper Association, Inc.
Problems of the hind end include: Bog spavin: Fluid buildup in the hock due to inflammation. Bone spavin: DJD in the hocks. Curb: Inflammation of the plantar ligament. Upward fixation of the patella: Caused by a ligament of the stifle locking over the knee
cap. Thoroughpin: A windpuff of the achilles tendon behind the hock. It is caused by chronic
inflammation in the tendon sheath around the deep flexor tendon where it attaches above the point of the hock14.
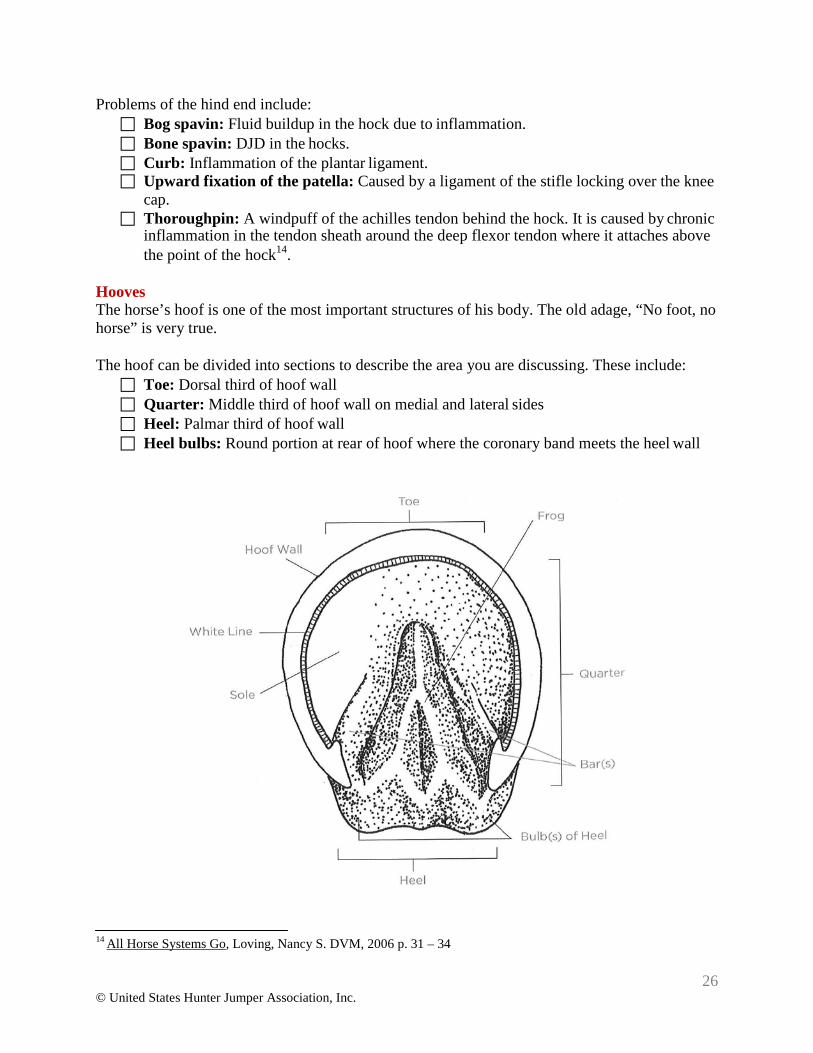
Hooves The horse’s hoof is one of the most important structures of his body. The old adage, “No foot, no horse” is very true.
The hoof can be divided into sections to describe the area you are discussing. These include:
Toe: Dorsal third of hoof wall Quarter: Middle third of hoof wall on medial and lateral sides Heel: Palmar third of hoof wall Heel bulbs: Round portion at rear of hoof where the coronary band meets the heel wall
14 All Horse Systems Go, Loving, Nancy S. DVM, 2006 p. 31 – 34
27 © United States Hunter Jumper Association, Inc.
The outer structures of the horse’s hoof are: Coronary band: Also called the coronet band, the outer band of tissue at the hairline
from which the hoof grows. Wall: Composed of keratin, the wall supports the weight of the horse while also
providing an impregnable barrier to external elements. Sole: Bottom layer of the hoof. • Bars: A weight bearing structure of the horse’s hoof. White line: Demarcation line where the sensitive and insensitive laminae meet. Frog: A dense tissue pad on the bottom of the foot that has a significant role in the
circulation of the foot. The inner structures of the hoof are:
• Corium: The tissue deep below the coronary band, which is also called the “quick.” The corium is filled with connective tissue, nerves and blood vessels and is responsible for the nourishment of the inner hoof structures. It is also responsible for the production of horn tissue and connects the basement membrane to the coffin bone.
Basement membrane: Suspends the coffin bone within the hoof capsule. Tubules: Reach from the coronary band to the ground. Horn tissue: Formed perpendicular to the tubules that provides stiffness and strength.
Also forms the insensitive laminae. Digital cushion: The spongy cushion above the frog that helps push blood back up
through the leg with each step. Sensitive laminae: Tiny hair-like tubules that grow from the surface of the coffin bone to
interlock with the insensitive laminae. The interlocking characteristics of the sensitive and insensitive laminae suspend the coffin bone in a flexible hard casing.
3rd phalanx bone (coffin bone): The largest bone in the foot. Distal sesamoid bone (navicular bone): Small wedge-shaped bone that lies under the
back of the coffin bone. Navicular bursa: A fluid-filled sac that serves to cushion the deep flexor tendon and the
navicular bone. Deep digital flexor tendon: Crosses the navicular bone and attaches to the underside of
the coffin bone. Proper hoof conformation is:
Large and strong hoof Wide, well-developed heels Prominent bars Large frog that touches the ground Concave or arched sole Walls absent of cracks or rings
Conformation flaws to avoid in the hooves include:
Too small: Due to the lack of surface area they are prone to concussion, especially in the navicular and coffin bone. They are predisposed to navicular syndrome.

28 © United States Hunter Jumper Association, Inc.
Contracted heels: Narrow heels with a small, pinched frog. This condition can be caused by navicular syndrome, poor conformation or poor trimming and shoeing.
Flat soles: The weight of the horse is carried on the sole instead of the wall, which makes the horse tender footed.
Shelly feet: These feet are brittle, causing them to crack and break easily. Brittle feet do not hold shoes well.
Blemishes
A blemish is defined as a visible imperfection generally caused by stress or injury. Some blemishes, such as a lump or scar, are unsightly but do not prevent the horse from working, while other blemishes may cause lameness. Some common blemishes include:
Bog spavin: Fluid buildup in the hock due to inflammation. It is generally an unsightly blemish and may be an indicator of osteochrondrosis (OCD).
Bowed tendon: Caused by an injury to the superficial digital flexor tendon. The tendon and its surrounding tissues stretch too far and rupture. Conformation flaws that contribute to this condition are long upright pasterns, a long toe and low heel. A bowed tendon is never as strong as it was before the injury occurred.
Capped hock: Caused by trauma to the hock and characterized by a cap-like protrusion covering the point of the hock. This blemish occurs from a localized injury at the point of the hock or damage to the achilles tendon. Two potential causes of this injury are kicking in the stall or trailer. Once healed, it is usually unsightly.
Capped elbow: Also called “shoe boil” or hygroma of the elbow, a cap-like protrusion over the horse’s elbow. This may result from the shoe repeatedly hitting the elbow when the horse lies down, and can result in an infection. Shoe boil boots can be worn by the horse while in his stall to help eliminate this problem. This is a blemish that does not generally cause unsoundness.
Cloudy eyes: May be caused by a corneal ulcer, which may negatively affect the horse’s vision. Common causes are abrasions from coarse hay, a tree branch, rope or chemical burns from treated fences. Another cause of cloudy eyes is equine recurrent uveitis (ERU), which is also known by the common term “moon blindness” or periodic opthalmia. Causes of ERU can be:
Leptospirosis infection Onchocerciasis Influenza virus Herpesvirus Septicemia (from bacterial infection) Streptococcal infection Lyme disease Physical trauma
29 © United States Hunter Jumper Association, Inc.
ERU can cause the development of cataracts from the recurring irritation and inflammation of the cornea. The lens will then turn opaque. ERU can lead to complete loss of vision in the eye. Although an estimated 8 to 25 percent of the horses in the United States have ERU, it is most common in Appaloosa horses15.
Contracted heels: Narrow heels that close in by the frog. A horse is often unwilling to support his weight on the affected foot. Contracted heels often occur in horses that are chronically lame (see navicular syndrome). A contracted heel indicates a lack of hoof flexibility.
Cracked hooves: Often show up in horses whose hooves are unbalanced due to either faulty conformation or poor trimming. Dry hoof walls can contribute to this problem. A crack that starts from the ground up is less severe than a crack that originates at the coronet band and works its way down. Cracks are commonly found in the quarter, toe and heel.
Curb: Inflammation or tearing of the plantar tarsal ligament at the back of the hock. Sickle hocked horses may develop curbs. They are also caused by sprinting or the rear limbs slipping as the horse pushes up a steep hill16.
Dished foot: A hoof wall that is concave, rather than straight, in front from the coronary band to the toe. This may develop in the horse with very long toes and is often related to subclinical (present but undetected) or chronic laminitis17.
Hoof flares: Occur as a result of an unbalanced foot. The hoof is steep on one side and flared on the other side, which bears the least amount of weight. Common causes of hoof flares are:
Poor trimming Ill-fitting shoes Unbalanced leg and foot conformation
Proper trimming and shoeing can address flares; however, flares caused by conformation flaws need to be addressed throughout the lifetime of the horse.
Splints: Hard, visible bumps that are generally located along the inside of the cannon bone. The splint bones are attached to the cannon bone by a small ligament and add structural strength to the cannon bones. Splints may be caused by injury, creating inflammation or tearing of the interoseous ligament joining the splint bone to the cannon bone. The injury causes a tear in the ligament resulting in the splint bone separating from the cannon bone. The injury may be severe enough to actually fracture the splint bone. As the injury to the ligament heals, scar tissue is formed by the body producing calcium deposits joining the splint bone to the cannon bone.
Splints may be caused by:
Poor leg conformation such as bench knees Acute injury from one leg striking the other A kick or other blow to the leg
15 All Horse Systems Go, Loving, Nancy S. DVM, 2006 p. 497 16 All Horse Systems Go, Loving, Nancy S. DVM, 2006 p. 187 17 All Horse Systems Go, Loving, Nancy S. DVM, 2006 p. 55
30 © United States Hunter Jumper Association, Inc.
Splints are hot and painful when they first occur. Once healed, they are a cosmetic blemish. Thoroughpin: A windpuff of the achilles tendon behind the hock. It causes chronic inflammation in the tendon sheath around the deep flexor tendon where it attaches above the point of the hock18.
Athleticism Athleticism defines the overall conformation that leads to athletic performance in a horse. If the body structures are well built and cohesive with each other, the horse has more athletic ability than one whose parts are out of agreement with each other.
When defining the athleticism of a horse, start with the topline. An athletic performance horse has the following attributes:
Long neck Good sloping shoulder Short back Well defined hind end Long, even strides with range and depth through the shoulder
Conformation Types
Different parts of the hunter/jumper discipline demand different conformation in our horses.
A jumper is defined by power and scope. When studying a jumper’s conformation, look for: Muscular hindquarters for strength and power An upright build in the topline A strong back that is normal to long Good substance and bone
An equitation horse needs to be extremely rideable. When studying an equitation horse’s conformation, look for:
Uphill balance A nicely defined, slender throatlatch attaching to a shorter, more upright neck Strong loin and compact back for ease in collection and lead changes Forward tipping femur for better impulsion
A hunter is defined by style and movement. When studying a hunter’s conformation, look for:
Level topline Long, laid-back shoulder for long, ground-covering strides Long forearm and short cannon for daisy-cutter movement, which defines a horse that
moves with a long, flat-kneed stride that could cut off a daisy
18 All Horse Systems Go, Loving, Nancy S. DVM, 2006 p. 33 - 34
31 © United States Hunter Jumper Association, Inc.
Beautiful head, nicely defined, slender throatlatch and long well tied-in neck. Well tied-in defines a neck that joins the chest just above the point of the shoulder19
A normal length of back A balanced hindquarter
Locomotion The horse’s power comes from his hindquarters. With each stride his hind legs propel him forward while the front legs reach out to carry his weight. The hind legs are drawn forward by the abdominal muscles and a set of deep inner muscles called the psoas group20. His hind legs act as levers and carry weight during transitions and collection. A horse that moves well is efficient, safer and an easier mount for the rider. Good movement means that a horse moves his legs:
Straight, without swinging them sideways or allowing them to strike each other With good engagement In such a fashion to absorb shock (especially the front legs)
Movement flaws to avoid include:
Interfering: Striking one leg against the other. This can be caused by toed-out conformation, which causes the legs to wing in, and by base narrow conformation.
Plaiting: Moving as if the horse is on a tightrope. This can be caused by base narrow conformation, which is caused by a narrow chest and can lead to interfering.
Forging: Hitting a front foot with the toe of the hind foot. This is common in a horse that moves on his forehand or with long toes. It can also be present in a horse that has a short back and long legs.
Over-reaching: The toe of the hind foot grabs the heel of the front foot causing injury. The same flaws that cause forging also cause over-reaching.
Paddling: The foot swings outward. This is a flaw of pigeon-toed horses. It predisposes horses to ringbone.
Winging in: The foot swings in toward the opposite leg. This is a flaw of splay-footed horses. It may lead to interfering and cause lameness. It predisposes horses to ringbone.
Forequarters At rest, a horse bears approximately 55 percent of his body weight on his front legs. This makes it extremely important that the horse have proper forequarter conformation. The main functions of the horse’s forequarters are to:
Absorb shock, especially in the front legs. • Support the horse’s weight. • Allow or limit the horse’s ability to cover the ground through the conformation of the
shoulder. A horizontally sloping shoulder generally results in a more forward-reaching, ground covering stride and helps to bring the knees up when jumping. A vertically sloping shoulder generally results in greater knee action.
19 All Horse Systems Go, Loving, Nancy S., DVM 2006 p 15 20 The United States Pony Club Manual of Horsemanship Advanced Horsemanship B, HA, A Levels, Harris, Susan E. 1996 p. 257
32 © United States Hunter Jumper Association, Inc.
Conformation flaws to avoid in the forequarters include: Excessively straight and upright shoulder with the wither set forward. This leads to
exaggerated knee action, limitation of ground covering ability and more concussion with each stride. This conformation makes it difficult for the horse to fold his legs when he jumps.
Excessively straight and upright pastern limits the shock absorption capacity of the column formed by the front leg, while an overly long pastern with more than a 45 degree angle may produce greater shock absorption and a smoother feeling ride but can produce excess strain on the tendons and ligaments of the lower leg.
A short humerus results in short strides and limited ability. • A narrow chest is likely to cause the horse’s front legs to interfere with each other while
in motion.
Hindquarters The horse’s hindquarters provide power through the propulsive muscles, which originate in the pelvis. Proper hindquarter conformation as it relates to a specific function or movement quality is:
A more horizontal croup and pelvis resulting in increased speed and a longer stride, especially in the trot. This configuration allows the hip joint to lengthen when the hip is extended, allowing for more forward push.
A steeper slope in the croup and greater length of the pelvis provides more strength and power in the hindquarters.
Long croup muscles are necessary for speed and impulsion. Hindquarters should be rounded, even and symmetrical when viewed from behind.
Conformation flaws to avoid in the hindquarters include:
• A short croup limiting the horse’s impulsion, leverage and power. • A hunter’s bump (junction of the sacrum and ileum at the top of the croup), which may
occur due to injuries or genetics and may indicate strained ligaments and damage to the sacroiliac joint.
One hip higher than the other may indicate uneven legs or chronic favoring of one side. Some muscles and tendons of the hindquarters are:
Vastus: Muscle from hip to stifle that flexes hind leg. Gluteal muscles: Large muscles of the hip that extend the femur. Quadriceps group: Muscles on the front of the femur (thighbone) that flex the hind leg
and bring it forward. Achilles tendon: Large tendon above the hock that extends the hock21.
21 The United States Pony Club Manual of Horsemanship Advanced Horsemanship B, HA, A Levels, Harris, Susan E. 1996 p.228
33 © United States Hunter Jumper Association, Inc.
Systems of the Horse Circulatory System The cardiovascular and hemolymphatic systems are responsible for effective transmission of oxygen and nutrients to all organs and tissues.
The primary function of the circulatory system is transportation of blood throughout the body. The circulatory system carries:
Oxygen from the lungs to the cells Carbon dioxide from the cells to the lungs Nutrients and water from the digestive tract to the cells Waste from the cells to the kidneys
Blood is composed of:
Plasma: The intravascular part of extracellular fluid (all fluid outside the cells). Plasma is mostly water with some proteins, glucose, clotting factors, ions and hormones.
Red blood cells: Produced in the bone marrow that contain hemoglobin. Hemoglobin carries oxygen and carbon dioxide.
White blood cells: Defense cells that fight against harmful germs in the case of disease or injury.
The heart is a blood pump that is covered by the pericardium (a protective cover). The upper chambers of the heart are the left and right atria, while the lower chambers of the heart are the left and right ventricles.
Blood is pumped from one chamber of the heart to another, and then outward through the arteries. Deoxygenated blood, which is depleted in oxygen and carries carbon dioxide, enters the heart through the vena cava. It is collected in the right atrium and pumped into the right ventricle through a one-way valve and then pumped into the pulmonary artery to the lungs. The carbon dioxide is exchanged for oxygen in the lungs. This oxygenated blood enters the left atrium through the pulmonary vein and is then pumped through a one-way valve to the left ventricle and then on to the aorta. The aorta is the main artery of the body and delivers blood to all parts of the body.
The heart contains three blood vessels: arteries, veins and capillaries. Arteries carry blood away from the heart and veins carry blood back to the heart. Capillaries are tiny blood vessels that absorb oxygen and nutrients and take carbon dioxide and wastes into the bloodstream.22
22 The United States Pony Club Manual of Horsemanship Advanced Horsemanship B, HA, A Levels, Harris, Susan E. 1996 p. 229 - 231
34 © United States Hunter Jumper Association, Inc.
Lymphatic System The lymphatic system consists of:
Lymph: A clear fluid containing white blood cells. Lymph vessels: Responsible for the transportation of lymph through the body. Lymph nodes: Bean-shaped structures of lymphatic tissue that filter blood and deal with
infection through the production of lymphocytes and antibodies. The following diseases affect both the circulatory and lymphatic systems:
Equine infectious anemia (EIA) Equine viral arteritis (EVA) Passive edema of the legs (stocking up) Lymphangitis23
Digestive System The digestive system is a network of organs designed to supply the body with the nutrition needed for growth, maintenance and repair, and also rid the body of waste.
The digestive tract of a full size horse is approximately 100 feet long. It consists of:
Mouth and teeth: Food is bitten off and chewed into small pieces. It is then mixed with saliva, which contains enzymes that change plant starch into animal starch that horses can absorb.
Tongue, pharynx and epiglottis: Aid in swallowing and directing food into the esophagus instead of the windpipe.
Esophagus: Moves food to the stomach. Horses are unable to vomit because the esophagus moves only one way.
Stomach: A small muscular sac capable of holding 2 to 4 gallons. Food is mixed with saliva and digestive juices and churned into a liquid form. Food is chemically broken down by the stomach’s secretions of hydrochloric acid, pepsin, rennin and lipase. The bloodstream then begins to absorb proteins and minerals. The stomach works best when it is approximately two- thirds full. Food passes through the pyloric valve into the small intestine in the order of water, carbohydrates, proteins and fats
Small intestine: A looping, folding tube approximately 70 feet long and covered with villi. These small, hair-like projections increase the surface area for the absorption of nutrients. The pancreas and liver provide digestive juices that break down nutrients including proteins, carbohydrates, fats and minerals and allow them to be absorbed by the bloodstream. The small intestine is broken down into three parts:
Duodenum: Receives the secretion of pancreatic juice from ducts in the pancreas and the liver, which changes the food from an acid concentration to a more basic form. The added
23 The United States Pony Club Manual of Horsemanship Advanced Horsemanship B, HA, A Levels, Harris, Susan E. 1996 p. 231 - 233
35 © United States Hunter Jumper Association, Inc.
enzymes aid in the breakdown of proteins, fats and starches. The pancreatic juice contains trypsin, amylase and bile.
Jejunum: This main part of the small intestine is where most proteins are absorbed into the bloodstream.
Ileum: A valve at the end of the ileum controls the flow of food into the cecum. Large intestine: A tube about 25 feet long where most grass, hay and bulky plant material (cellulose) are digested by bacteria and converted to fatty acids. The bacteria also manufacture some essential vitamins and amino acids. Solid wastes are collected here.
Cecum: A 4 foot long pouch where roughage is broken down by fermentation. Large colon: A 12 foot long tube where the last of the nutrients are broken down and
absorbed. These nutrients are mostly carbohydrates that have been derived from cellulose.
Small colon: A 10 foot long tube where manure balls are formed and water is absorbed. Rectum: A 1 foot long holding chamber located at the end of the digestive tract.
Pancreas: Produces pancreatic juice and insulin.
Liver: Converts amino acids into proteins, stores glycogen, produces bile and regulates the nutrients carried in the blood.
Food moves along the digestive tract through muscular contractions called peristalsis. It takes approximately 72 hours for food to pass all the way through the digestive tract24.
Integumentary System (Skin) The integumentary system is composed of the skin and hair of the horse and provides structural, photo-protective, immunologic and metabolic barrier protection.
The skin is the largest organ in a horse’s body. It serves several critical functions:
Provides an immune barrier to potentially dangerous foreign bodies and toxic substances. Regulates the internal temperature through the use of sweat glands. Along with the hair coat, it protects the body from ultraviolet radiation. Working together with hair coat and subcutaneous fat, it provides insulation in cold
temperatures. Excretes waste. Synthesizes vitamin D.
Skin is comprised of three layers:
Epidermis: The thin outer layer. Dermis: A thicker layer under the epidermis that contains sweat glands, sebaceous
glands, hair follicles, blood vessels and nerves. Subcutaneous fat: The layer that aids in insulating the body.
24 The United States Pony Club Manual of Horsemanship Advanced Horsemanship B, HA, A Levels, Harris, Susan E. 1996 p. 236 – 238
36 © United States Hunter Jumper Association, Inc.
The panniculus carnosus is a large, thin sheet of muscle that is evenly distributed over the body. It is responsible for the horse’s ability to twitch any area of his skin.
Skin is subject to the following problems:
Damage caused by wound trauma (such as saddle sores), sunburn, dermatitis, cuts and scrapes
Heat stress Fungal infections External parasites Edema Allergic reactions in the form of hives or edema
Nervous System The nervous system is a complex interaction between elements designed to originate or carry electrochemical charges to and from organs to initiate and regulate bodily functions and allow the horse to functionally relate to his environment.
The nervous system is a command and control center for the horse’s body. It is a complex interaction between elements designed to originate or carry electrochemical charges to and from organs. A horse is born with a full complement of nerves and does not produce any more during his lifetime.
The nervous system is made up of the central nervous system (CNS) and the peripheral nervous system (PNS).
Central nervous system: Lies within a series of protective bones and consists of:
Brain: Located within the skull Brainstem: Located within the vertebrae Spinal cord: Located within the vertebrae
Peripheral nervous system: Controls the activity of smooth muscle, cardiac muscle and glandular functions and consists of:
Sensory neurons Ganglia Nerves and nerve bundles
The PNS acts as the communication between the CNS and the body. It consists of nerve bundles extending out from the CNS to the body and limbs. These nerve bundles may be classified by function into afferent and efferent nerves. The afferent nerves carry signals from the body to the CNS, while the efferent nerves carry signals out from the CNS to the body.
The brain is divided into two halves (right and left) and three sections (cerebrum, cerebellum and brainstem). The cerebrum is the largest of the three parts and is responsible for memory, sensory awareness, learning and muscle movement. The cerebellum is located in back and beneath the cerebrum. The cerebellum coordinates muscle activity and movements and controls body posture.
37 © United States Hunter Jumper Association, Inc.
The brainstem acts as the intermediary between the brain and the spinal cord. All nerve fibers that relay signals pass through the brainstem. The brainstem also influences the heartbeat, breathing, vision and hearing. It contains the hypothalamus, which is the link between the nervous system and the endocrine system.
The spinal cord acts as a path of activity for transmission of nerve impulses between the brain and the rest of the body. It is held within the vertebral column, and acts as the coordinator for certain reflex activities involving muscles of limbs without first having to go through the brain. The large spinal nerves contain numerous smaller nerves that are classified into two types of nerve fibers: somatic nerve fibers and autonomic nerve fibers.
Somatic nerve fibers carry information to and from skeletal muscles, skin, joints and appendages. They act on voluntary control from the brain and their action leads to contraction of muscle.
Autonomic nerve fibers act mainly on reflex with little voluntary control from the brain. They control body functions such as blood pressure, breathing, temperature, et cetera. Autonomic nerves make connections to smooth muscles in blood vessels and glands throughout the body.
Diseases that affect the nervous system are:
Tetanus Equine encephalomyletis Rabies Botulism25
Respiratory System The respiratory system works with the circulatory system to provide oxygen to and remove carbon dioxide from the body tissues.
The main function of the respiratory system is to take in oxygen and deliver it to the blood. This system also removes carbon dioxide (a waste product from metabolism) from the blood. The system is broken into:
Upper respiratory system (head and throat)
Nostrils: Horses breathe only through their nostrils. Hairs inside the nostrils trap dust and foreign matter.
Nasal cavities: Air passages that remain separated from the mouth by the hard and soft palates.
Nasal turbinates: Located inside the nasal passages, these thin curling bones are covered with mucous membranes and help to warm incoming air as it proceeds to the lungs.
Sinuses: Air filled cavities in the bones of the skull that connect to the nasal cavities. They serve to reduce the weight of the skull and help to warm air as it passes toward the lungs.
Pharynx (throat): A common passage for food and air that is connected to the larynx.
25 The United States Pony Club Manual of Horsemanship Advanced Horsemanship B, HA, A Levels, Harris, Susan E. 1996 p. 242 - 243
38 © United States Hunter Jumper Association, Inc.
Larynx (voice box): Located between the branches of the lower jaw, the larynx contains the vocal cords, controls air flow and prevents food, water and foreign objects from entering the lungs.
Epiglottis: The flap covering the opening to the windpipe (glottis) when the horse swallows.
Trachea (windpipe): A long tube made out of cartilage rings that runs from the larynx to the lungs.
Lower respiratory tract
Lungs: Two organs filling the chest cavity. Bronchi: The trachea divides into two bronchi (one for each lung). These bronchi divide
into smaller bronchioles inside the lung. Alveoli: Air sacs at the end of the bronchioles responsible for the exchange of carbon
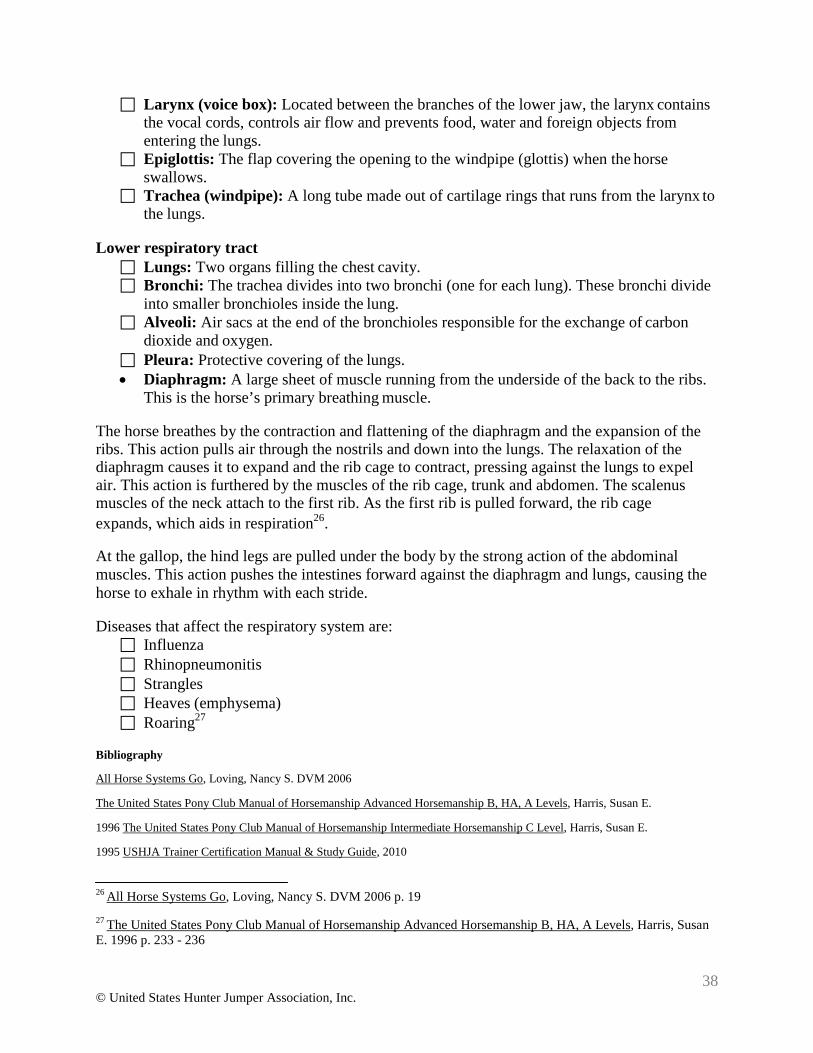
dioxide and oxygen. Pleura: Protective covering of the lungs. • Diaphragm: A large sheet of muscle running from the underside of the back to the ribs.
This is the horse’s primary breathing muscle. The horse breathes by the contraction and flattening of the diaphragm and the expansion of the ribs. This action pulls air through the nostrils and down into the lungs. The relaxation of the diaphragm causes it to expand and the rib cage to contract, pressing against the lungs to expel air. This action is furthered by the muscles of the rib cage, trunk and abdomen. The scalenus muscles of the neck attach to the first rib. As the first rib is pulled forward, the rib cage expands, which aids in respiration26.
At the gallop, the hind legs are pulled under the body by the strong action of the abdominal muscles. This action pushes the intestines forward against the diaphragm and lungs, causing the horse to exhale in rhythm with each stride.
Diseases that affect the respiratory system are: Influenza Rhinopneumonitis Strangles Heaves (emphysema) Roaring27
Bibliography
All Horse Systems Go, Loving, Nancy S. DVM 2006
The United States Pony Club Manual of Horsemanship Advanced Horsemanship B, HA, A Levels, Harris, Susan E.
1996 The United States Pony Club Manual of Horsemanship Intermediate Horsemanship C Level, Harris, Susan E.
1995 USHJA Trainer Certification Manual & Study Guide, 2010
26 All Horse Systems Go, Loving, Nancy S. DVM 2006 p. 19
27 The United States Pony Club Manual of Horsemanship Advanced Horsemanship B, HA, A Levels, Harris, Susan E. 1996 p. 233 - 236
39 © United States Hunter Jumper Association, Inc.
BANDAGING
Bandaging is a very important skill. Bandages must be applied correctly; otherwise, they can do more harm than good. The best way to learn to bandage is by observing an experienced horseman. Once you understand the basics of bandaging, practice under supervision until your bandages pass muster. Know what type of bandage you are applying and understand its purpose. If you are in doubt, no bandage at all is better than a poorly or improperly done bandage.
Bandages should be applied in pairs (either both front or both hind legs), and all the legs should be bandaged by the same person to make sure the same amount of tension is used.
Common bandages consist of two parts: the inner padding and the outer wrap. The inner padding is commonly known as the cottons. Depending on the job, cottons can be ready made cotton leg quilts, no-bow quilts, sheet cotton or Fybagees®. The outer wrap is commonly referred to as the flannel, but may be made out of flannel, knit or stockinette (track bandages). The flannel is between 4 to 6 inches wide and 9 to 16 feet long. Most commercially available flannels come in a 9 foot length.
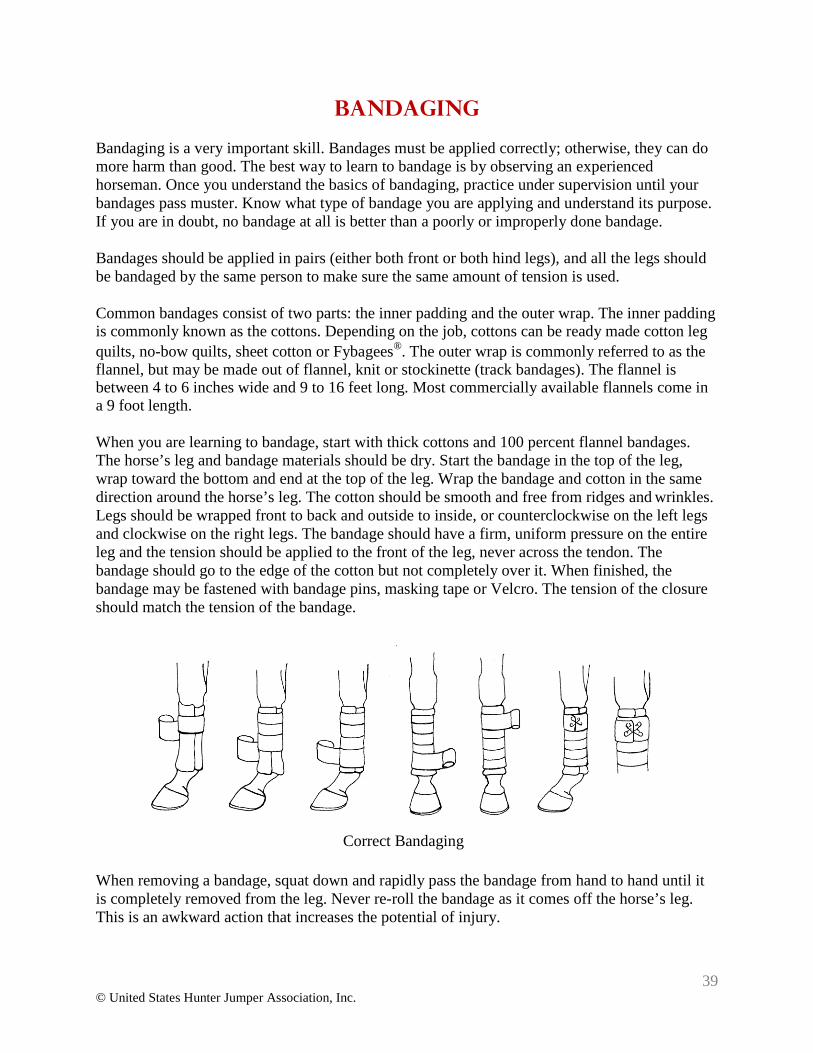
When you are learning to bandage, start with thick cottons and 100 percent flannel bandages. The horse’s leg and bandage materials should be dry. Start the bandage in the top of the leg, wrap toward the bottom and end at the top of the leg. Wrap the bandage and cotton in the same direction around the horse’s leg. The cotton should be smooth and free from ridges and wrinkles. Legs should be wrapped front to back and outside to inside, or counterclockwise on the left legs and clockwise on the right legs. The bandage should have a firm, uniform pressure on the entire leg and the tension should be applied to the front of the leg, never across the tendon. The bandage should go to the edge of the cotton but not completely over it. When finished, the bandage may be fastened with bandage pins, masking tape or Velcro. The tension of the closure should match the tension of the bandage.
Correct Bandaging
When removing a bandage, squat down and rapidly pass the bandage from hand to hand until it is completely removed from the leg. Never re-roll the bandage as it comes off the horse’s leg. This is an awkward action that increases the potential of injury.
40 © United States Hunter Jumper Association, Inc.
BANDAGING
Bandage Bows
Bandage bows are the result of bandaging a leg too tightly or with uneven pressure. The bandage puts excessive, acute pressure on the tendon, which results in giving the tendon a bowed appearance. Bandage bows may also result from the application of a fastening method, such as tape, that encircles the bandage and when done incorrectly, adds too much pressure.
Types of Bandages
Horses may wear bandages for a number of reasons. The most common bandages are: Stable Shipping Exercise Treatment
Stable Bandage A stable bandage can be used to provide warmth or support, prevent swelling, treat injuries or hold a dressing in place. It also acts as a base for a hock or knee bandage.
Stable bandages are always applied in pairs and must be reset at least every 12 hours. The bandages cover the area from the top of the cannon bone to the bottom of the fetlock. When applying the bandage, make sure to drop the wrap around the bottom of the fetlock joint and bring it up on an angle in front. This should create an upside-down “V” at the front of the joint, providing support to the joint and allowing the leg to bend28.
Shipping Bandage A shipping bandage is used to support and protect a horse’s legs when he is in transit. This bandage covers the area from the top of the cannon bone down past the coronet band and sometimes over the heels. It should be fastened securely to avoid the bandage slipping or coming undone in travel.
Exercise Bandage An exercise bandage is used to provide support and protection during exercise and is generally less bulky than other bandages. It is important to apply exercise bandages properly to avoid great harm to the horse’s legs. When applying the bandage, make sure to drop the wrap around the bottom of the fetlock joint and bring it up on an angle in front. This should create an upside- down “V” at the front of the joint, providing support to the joint and allowing the leg to bend. Again, the inner padding and the outer wrap should always be wrapped in the same direction and no pressure put on the tendon.
28 Bandaging Your Horse, Harris, Susan E. 1997 p. 30 – 32
41 © United States Hunter Jumper Association, Inc.
BANDAGING
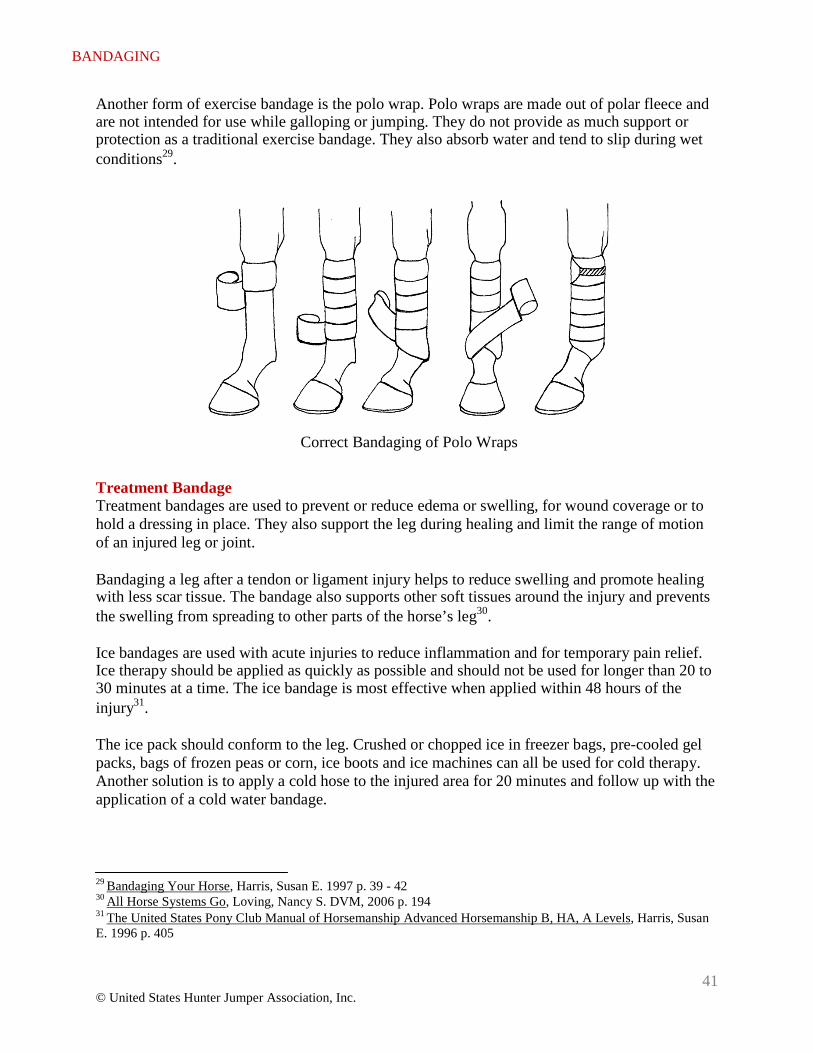
Another form of exercise bandage is the polo wrap. Polo wraps are made out of polar fleece and are not intended for use while galloping or jumping. They do not provide as much support or protection as a traditional exercise bandage. They also absorb water and tend to slip during wet conditions29.
Correct Bandaging of Polo Wraps
Treatment Bandage Treatment bandages are used to prevent or reduce edema or swelling, for wound coverage or to hold a dressing in place. They also support the leg during healing and limit the range of motion of an injured leg or joint.
Bandaging a leg after a tendon or ligament injury helps to reduce swelling and promote healing with less scar tissue. The bandage also supports other soft tissues around the injury and prevents the swelling from spreading to other parts of the horse’s leg30.
Ice bandages are used with acute injuries to reduce inflammation and for temporary pain relief. Ice therapy should be applied as quickly as possible and should not be used for longer than 20 to 30 minutes at a time. The ice bandage is most effective when applied within 48 hours of the injury31.
The ice pack should conform to the leg. Crushed or chopped ice in freezer bags, pre-cooled gel packs, bags of frozen peas or corn, ice boots and ice machines can all be used for cold therapy. Another solution is to apply a cold hose to the injured area for 20 minutes and follow up with the application of a cold water bandage.
29 Bandaging Your Horse, Harris, Susan E. 1997 p. 39 - 42 30 All Horse Systems Go, Loving, Nancy S. DVM, 2006 p. 194 31 The United States Pony Club Manual of Horsemanship Advanced Horsemanship B, HA, A Levels, Harris, Susan E. 1996 p. 405
42 © United States Hunter Jumper Association, Inc.
BANDAGING
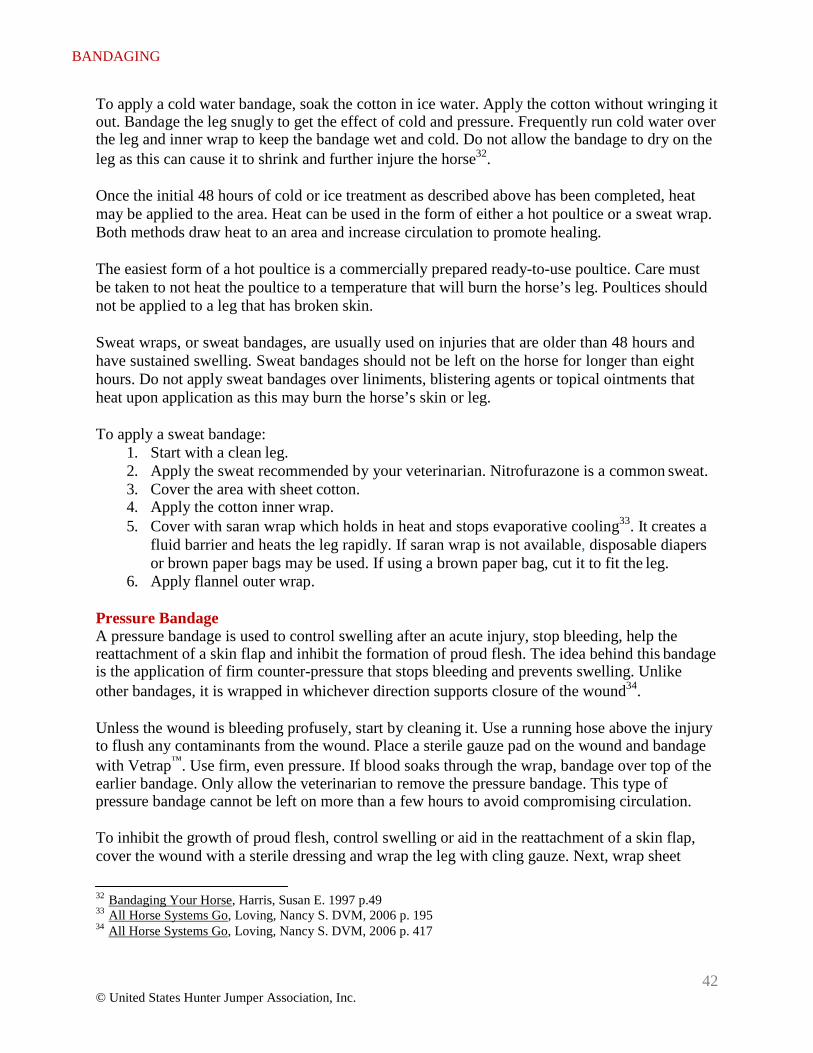
To apply a cold water bandage, soak the cotton in ice water. Apply the cotton without wringing it out. Bandage the leg snugly to get the effect of cold and pressure. Frequently run cold water over the leg and inner wrap to keep the bandage wet and cold. Do not allow the bandage to dry on the leg as this can cause it to shrink and further injure the horse32.
Once the initial 48 hours of cold or ice treatment as described above has been completed, heat may be applied to the area. Heat can be used in the form of either a hot poultice or a sweat wrap. Both methods draw heat to an area and increase circulation to promote healing.
The easiest form of a hot poultice is a commercially prepared ready-to-use poultice. Care must be taken to not heat the poultice to a temperature that will burn the horse’s leg. Poultices should not be applied to a leg that has broken skin.
Sweat wraps, or sweat bandages, are usually used on injuries that are older than 48 hours and have sustained swelling. Sweat bandages should not be left on the horse for longer than eight hours. Do not apply sweat bandages over liniments, blistering agents or topical ointments that heat upon application as this may burn the horse’s skin or leg.
To apply a sweat bandage:
1. Start with a clean leg. 2. Apply the sweat recommended by your veterinarian. Nitrofurazone is a common sweat. 3. Cover the area with sheet cotton. 4. Apply the cotton inner wrap. 5. Cover with saran wrap which holds in heat and stops evaporative cooling33. It creates a
fluid barrier and heats the leg rapidly. If saran wrap is not available, disposable diapers or brown paper bags may be used. If using a brown paper bag, cut it to fit the leg.
6. Apply flannel outer wrap.
Pressure Bandage A pressure bandage is used to control swelling after an acute injury, stop bleeding, help the reattachment of a skin flap and inhibit the formation of proud flesh. The idea behind this bandage is the application of firm counter-pressure that stops bleeding and prevents swelling. Unlike other bandages, it is wrapped in whichever direction supports closure of the wound34.
Unless the wound is bleeding profusely, start by cleaning it. Use a running hose above the injury to flush any contaminants from the wound. Place a sterile gauze pad on the wound and bandage with Vetrap™. Use firm, even pressure. If blood soaks through the wrap, bandage over top of the earlier bandage. Only allow the veterinarian to remove the pressure bandage. This type of pressure bandage cannot be left on more than a few hours to avoid compromising circulation.
To inhibit the growth of proud flesh, control swelling or aid in the reattachment of a skin flap, cover the wound with a sterile dressing and wrap the leg with cling gauze. Next, wrap sheet
32 Bandaging Your Horse, Harris, Susan E. 1997 p.49 33 All Horse Systems Go, Loving, Nancy S. DVM, 2006 p. 195 34 All Horse Systems Go, Loving, Nancy S. DVM, 2006 p. 417
43 © United States Hunter Jumper Association, Inc.
BANDAGING
cotton around the leg and then bandage over top with an elastic dressing such as Elastikon® or Vetrap™. If the wound needs air, it is better to use Elastikon® because it breathes better than Vetrap™.
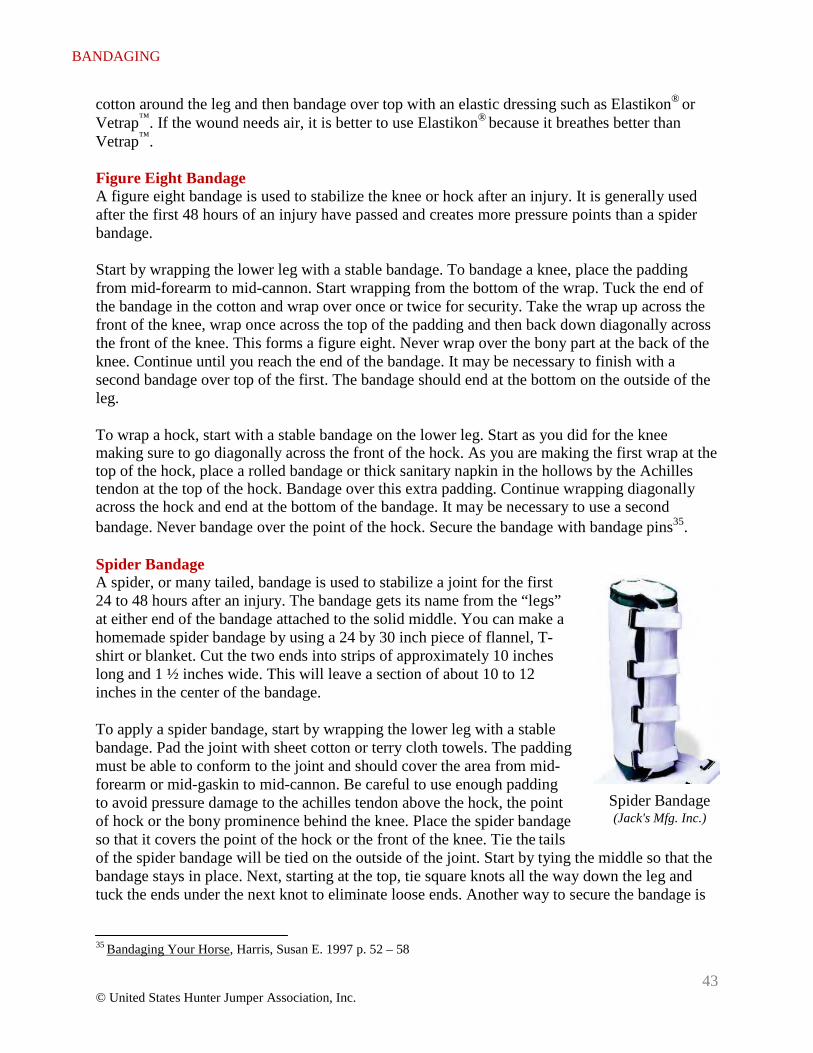
Figure Eight Bandage A figure eight bandage is used to stabilize the knee or hock after an injury. It is generally used after the first 48 hours of an injury have passed and creates more pressure points than a spider bandage.
Start by wrapping the lower leg with a stable bandage. To bandage a knee, place the padding from mid-forearm to mid-cannon. Start wrapping from the bottom of the wrap. Tuck the end of the bandage in the cotton and wrap over once or twice for security. Take the wrap up across the front of the knee, wrap once across the top of the padding and then back down diagonally across the front of the knee. This forms a figure eight. Never wrap over the bony part at the back of the knee. Continue until you reach the end of the bandage. It may be necessary to finish with a second bandage over top of the first. The bandage should end at the bottom on the outside of the leg.
To wrap a hock, start with a stable bandage on the lower leg. Start as you did for the knee making sure to go diagonally across the front of the hock. As you are making the first wrap at the top of the hock, place a rolled bandage or thick sanitary napkin in the hollows by the Achilles tendon at the top of the hock. Bandage over this extra padding. Continue wrapping diagonally across the hock and end at the bottom of the bandage. It may be necessary to use a second bandage. Never bandage over the point of the hock. Secure the bandage with bandage pins35.
Spider Bandage A spider, or many tailed, bandage is used to stabilize a joint for the first 24 to 48 hours after an injury. The bandage gets its name from the “legs” at either end of the bandage attached to the solid middle. You can make a homemade spider bandage by using a 24 by 30 inch piece of flannel, T- shirt or blanket. Cut the two ends into strips of approximately 10 inches long and 1 ½ inches wide. This will leave a section of about 10 to 12 inches in the center of the bandage.
To apply a spider bandage, start by wrapping the lower leg with a stable bandage. Pad the joint with sheet cotton or terry cloth towels. The padding must be able to conform to the joint and should cover the area from mid- forearm or mid-gaskin to mid-cannon. Be careful to use enough padding to avoid pressure damage to the achilles tendon above the hock, the point of hock or the bony prominence behind the knee. Place the spider bandage so that it covers the point of the hock or the front of the knee. Tie the tails
Spider Bandage (Jack's Mfg. Inc.)
of the spider bandage will be tied on the outside of the joint. Start by tying the middle so that the bandage stays in place. Next, starting at the top, tie square knots all the way down the leg and tuck the ends under the next knot to eliminate loose ends. Another way to secure the bandage is
35 Bandaging Your Horse, Harris, Susan E. 1997 p. 52 – 58
44 © United States Hunter Jumper Association, Inc.
BANDAGING
to French braid the tails down the leg. This method conforms well to the leg and produces fewer pressure points36.
Hoof Bandaging
Hoof bandages protect the horse’s feet, hold topical medications on the foot and treat a heel grab. To protect the foot after losing a shoe, use an elastic adhesive, such as Elastikon®, to protect the hoof from chipping and breaking up. For medication purposes, use a hoof pad to hold medication on the hoof. This is created by placing a disposable diaper with the plastic side out over the topical medication. Once the diaper is in place, the foot can be wrapped with a bandage such as Vetrap™. Do not bandage over the coronary band with duct tape as it can cause loss of circulation to the foot.
For heel grabs, clean the wound and apply a topical ointment. Cover the injury with a sterile gauze dressing and wrap the heel, coronary band and foot with elastic adhesive tape. Wrap tightly enough to hold the edges of the wound together and cover the bottom of the hoof with duct tape to make the wrap more durable.
Wound Bandaging
Most leg wounds benefit from being bandaged. Healthy granulation tissue forms more quickly in a bandaged wound, which leads to accelerated healing. A bandage provides support to the wound as the new skin cells migrate across its surface and the slight pressure reduces the growth of proud flesh. Most wounds should stay bandaged until a healthy granulation bed is present. Bandaging is no longer necessary when the injured area has contracted down to the size of a nickel.
Bandages help stop the environmental contamination of wounds. Manure, soil and clay, which cause irritation, are prevented from getting into the wound. The bandage keeps the wound warm, which promotes healing. Wrapping a wound also helps with evaporative fluid loss. A moist wound heals more quickly than a dry wound.
When a skin flap is present, the slight pressure of a bandage may help encourage reattachment. A light pressure bandage helps to relieve swelling which, if present, would restrict circulation and oxygen supply to the wound. Wounds that are bandaged with cotton pads and breathable elastic tape (such as Elastikon®) can still receive oxygen.
Bandaged wounds do not tend to form the same thick, hard scabs that unbandaged wounds produce. Bandaged wounds are less inflamed, dehydrated and contaminated than if they were left open. Although bandaged wounds can form more granulation tissue than their unbandaged counterparts, they are less susceptible to scar tissue37.
36 Bandaging Your Horse, Harris, Susan E. 1997 p. 52 - 58 37 All Horse Systems Go, Loving, Nancy S. DVM, 2006 p. 416 - 419

45 © United States Hunter Jumper Association, Inc.
BANDAGING
Bibliography
All Horse Systems Go, Loving, Nancy S. DVM, 2006
Bandaging Your Horse, Harris, Susan E. 1997
The United States Pony Club Manual of Horsemanship Advanced Horsemanship B, HA, A Levels, Harris, Susan E. 1996
USHJA Trainer Certification Manual & Study Guide, 2010
46 © United States Hunter Jumper Association, Inc.
CONDITIONING Conditioning is a system of bringing a horse to a level of fitness that is sufficient for him to do his job efficiently and correctly. Conditioning horses takes experience and judgment. The level of conditioning for intense physical activity takes an understanding of exercise physiology and modern conditioning methods38. A conditioning program should be individualized for each horse.
It takes approximately 4 to 6 weeks to bring an unfit horse to the point of regular work. The basic principles of conditioning are:
Training effect: This refers to physical development. All of the horse’s systems are involved but the cardiovascular system (heart and blood vessels) and the musculoskeletal system (soft tissues and bones) are the two systems that are the most affected.
Demand: Work creates a demand for more oxygen and fuel in the cells of the body. The body adapts by increasing the number of red blood cells and improving its efficiency in delivering oxygen and fuel to the cells, removing waste products and producing energy. The purpose of conditioning exercise is to increase demand enough to stimulate a training effect.
Progressive loading: Small, measured increases in exercise. Too little exercise does not create a demand and stimulate conditioning, while too much leads to overloading, injuries and breakdown. Interval training is based on progressive loading.
Overloading: This occurs when a body or some part of the body is subjected to work or stress beyond its limits. This may be caused by pushing the muscles too hard and too soon without allowing them the opportunity to strengthen and develop or working at a gait or speed past the horse’s current level of conditioning. Overloading may cause a setback or permanent damage. Overtraining predisposes horses to a compromised immune system, illness and injury. Signs of overtraining include:
Dull coat Poor appetite Weight loss Lack of energy Disinterest in work or sourness Heat and/or filling in the legs39
Rest: The horse requires periods of rest mixed in with the conditioning schedule. Rest allows the replenishment of depleted oxygen and aids in mental stability and attitude. Regular turn out and short training sessions help to keep a horse fresh.
38 The United States Pony Club Manual of Horsemanship Advanced Horsemanship B, HA, A Levels, Harris, Susan E. 1996 p 289 39 The United States Pony Club Manual of Horsemanship Advanced Horsemanship B, HA, A Levels, Harris, Susan E. 1996 p.296 - 297
47 © United States Hunter Jumper Association, Inc.
CONDITIONING
Nutrition: Proper nutrition gives a horse fuel for energy and enough liquids to be properly hydrated. A horse doing a larger amount of work requires more food and water.
Peaking: When a horse reaches peak condition he cannot improve his ability or performance. A horse cannot remain in peak condition indefinitely. After peaking, a horse’s performance will inevitably decline a bit.
General Conditioning
The horse’s body is designed for movement. Skeletal muscles produce locomotion through the process of contracting or shortening. They work in pairs, with one muscle flexing a joint and the other extending it. These contractions are caused by a chemical reaction between the actin filaments and the myosin filaments, which is triggered by a motor nerve impulse.
Muscles are made of fibers. Each fiber contains thousands of threadlike filaments called myofibrils. Muscle fibers are arranged in bundles, which in turn make up the muscle belly. Muscles store glycogen and triglycerides as sources of energy for contractions. Muscle contractions require energy, which is produced as either aerobic metabolism, anaerobic alactic metabolism or anaerobic lactic metabolism. Each type of metabolism produces energy suitable for a certain type of exercise. A horse uses all three metabolism types depending on the type of work he performs.
Aerobic metabolism: Produces energy at a fairly low rate, which is sustainable for a long period of time. A slow trot or canter over level ground is considered aerobic exercise because the oxygen inhaled by the horse can supply all the energy it needs. Muscles can utilize dietary fats for fuel at these speeds. Aerobic metabolism is fueled mostly by carbohydrates and fats and creates energy using oxygen and glycogen.
• Anaerobic alactic metabolism: Produces energy in short but intense bursts that last for only 10 to 20 seconds. This energy is used for brief, intensive efforts such as jumping or breaking into a run from a standstill. Anaerobic means “without air” and alactic means “without lactate.” This energy is produced using creatinine phosphokinase and glycogen. Anaerobic alactic energy ends when the muscle’s supply of creatinine phosphokinase is exhausted.
Anaerobic lactic metabolism: Produces energy for strenuous exertion that lasts more than 20 seconds, such as show jumping and racing. Anaerobic lactic metabolism produces energy using glycogen, such as carbohydrates, as fuel. No oxygen is used. It also produces lactate (lactic acid), which is a toxic waste product. The lactate is carried away by the circulatory system, but as more lactate is produced than can be carried away, it builds up in the muscle tissues and produces a burning sensation and fatigue40.
There are two types of muscle fibers: Slow-twitch fibers are best suited for aerobic metabolism, and fast-twitch fibers are suited for anaerobic metabolism. Horses with mostly slow twitch fibers are most suited for long distance work, which requires endurance. Horses with mostly fast twitch
40 The United States Pony Club Manual of Horsemanship Advanced Horsemanship B, HA, A Levels, Harris, Susan E. 1996 p. 290 -
48 © United States Hunter Jumper Association, Inc.
CONDITIONING
fibers are most suited for sports requiring brief, strenuous exercise such as jumping and sprinting.
Intentional systemic conditioning affects virtually all of the horse’s systems, allowing the muscles to gain both size and strength. The skeletal muscles are one of the most adaptable tissues in the body. All skeletal muscles are capable of responding to training over time.
Muscular conditioning results in improved reflexes, leading to improved muscle coordination and more efficient movement.
Because muscles develop more quickly than any other structure, beware of mistaking good muscular development as a sign for excellent overall body conditioning.
• Injuries are likely to occur when a horse’s body is overloaded.
Heart Strength and Efficiency Regular cardiovascular conditioning improves a horse’s aerobic capacity. Targeted conditioning strengthens the horse’s heart, allowing it to work efficiently at a higher rate. It also builds and strengthens capillaries, improving overall circulatory efficiency. The blood carries more oxygen and nutrients. The spleen serves as a reservoir for red blood cells, which are released to circulation when the spleen contracts during exercise. This increases the horse’s aerobic capacity and gives him endurance41.
Lung Capacity A horse’s consumption of oxygen during exercise is 30 times greater than when at rest. Conditioning improves a horse’s aerobic efficiency, both when exercising and when at rest. The horse’s ability to take in oxygen and expel carbon dioxide improves, allowing him to go longer distances at faster speeds without becoming winded. Gas exchange refers to the exchange of oxygen for carbon dioxide, which takes place in the alveoli and small blood vessels of the lungs. The mechanics of the canter and gallop cause the horse to breathe one time for each stride. This “locks” the respiration rate to the stride rate. The horse does not breathe in unison with each stride at other gaits, but he is more aerobically efficient when he moves at a regular stride rate, which allows him to breathe evenly in rhythm with his strides. At the trot, the horse often breathes once every two strides. At the canter and gallop, the movement of the hind legs, gut diaphragm, chest and neck are interconnected. During the first phase of the stride, the hind legs are under the horse, the ribs expand, the gut contents move backward in the abdomen and the diaphragm moves back. These actions create more space in the lungs and make the horse inhale. During the second phase of the stride, the neck is extended and lowered, the rib cage is compressed, the hind legs extend backward and the gut contents move forward pushing against the diaphragm, which causes the horse to exhale42.
Hoof, Bone, Tendon and Ligament Strength and Elasticity Bone tissue takes the longest to develop to maximum strength. Tendons and ligaments also require a lengthy conditioning time. It takes years to develop bones, tendons and ligaments to peak condition when conditioning a young horse or reconditioning a horse after a lengthy injury.
41 All Horse Systems Go, Loving, Nancy S. DVM, 2006 p. 219 - 220 42 The United States Pony Club Manual of Horsemanship Advanced Horsemanship B, HA, A Levels, Harris, Susan E. 1996 p. 294 - 295
49 © United States Hunter Jumper Association, Inc.
CONDITIONING
Some concussion is necessary in order to strengthen bone, but extreme concussive forces can cause overloading and damage. Progressive loading to gradually increase the stresses on bone, tendons and ligaments stimulates these tissues and, over time, strengthens them. Bone fatigue occurs when elasticity is lost due to overloading or uneven loading. Methodical, intentional warm-up and cool-down periods before and after exercise are critical to building and maintaining bone and soft tissue condition. When conditioning a horse, it is extremely important to examine the horse’s legs every day before and after the training session. In addition, the day after a hard work the horse should be brought out of his stall to be checked for heat, swelling, lameness or injury. These actions help prevent small problems from developing into large ones.
Conditioning contains a mixture of aerobic and anaerobic conditioning.
Aerobic
Aerobic exercise is characterized by long, slow to moderate, consistent activity that elevates the horse’s heart rate to a pre-determined target for a period of time while maintaining adequate oxygenation of muscle tissues. It increases the heart rate and, subsequently, increases the circulation of oxygen through the blood. Aerobic metabolism or production of energy uses oxygen and glycogen to create energy to move muscles43. Over time, aerobic exercise improves the horse’s cardiovascular system, increases the horse’s ability to oxygenate his tissues and builds endurance. During aerobic exercise, the horse relies on carbohydrates and fats as fuel to generate energy to meet the body’s increased demand for oxygen.
One type of aerobic conditioning is long, slow distance work (LSD). It usually consists of trotting and slow cantering with periods of walk. As the horse’s fitness grows, the length of the workout and distance traveled are increased instead of increasing the speed. This type of work lays the foundation for all other conditioning, providing a base of cardiovascular fitness and endurance44.
Once a horse has developed a solid LSD foundation, strength training exercise can be added. Not only is strength training a muscular response to cardiovascular conditioning, but a horse derives other benefits as well, including reduction in the risk of musculoskeletal injuries and overall improvements in performance. As muscular endurance improves, a horse should be able to perform repeated submaximal muscular contractions for longer periods. This is accomplished through repetition of low to moderate intensity work such as hill climbs, trotting gymnastic grids or cavaletti and cautious work in deeper than normal footing. Hill climbs should be started at the walk, gradually adding the trot and finally the canter as the horse’s strength improves over months of graduated demands45. Ideally, strength training should be incorporated three times per week and reduced to twice a week when workouts increase in intensity46.
43 The United States Pony Club Manual of Horsemanship Advanced Horsemanship B, HA, A Levels, Harris, Susan E. 1996 p. 291 44 The United States Pony Club Manual of Horsemanship Advanced Horsemanship B, HA, A Levels, Harris, Susan E. 1996 p. 297 45 All Horse Systems Go, Loving, Nancy S. DVM, 2006 p. 148 46 All Horse Systems Go, Loving, Nancy S. DVM, 2006 p. 227
CONDITIONING
50 © United States Hunter Jumper Association, Inc.
Strength training can be targeted to certain muscles. Hill climbs develop hind leg, forearm and shoulder muscles. Walking or trotting a hill develops independent muscles in each hind leg. As the horse accelerates into a canter or gallop, he propels himself forward by pushing off the ground with both hind legs at the same time. This exercises the hind legs in unison with considerable strain on the rump and back muscles. Downhill work strengthens pectoral, shoulder and forearm muscles, while braking strengthens the quadriceps muscles in the hind legs.
A horse gains as much training effect on the muscles and cardiovascular system doing a hill climb as he would covering three times the distance on flat ground. Bones and joints receive less impact stress with hill work than with flatwork, which attempts to reach the same heart rate by increasing speed47.
Anaerobic
Anaerobic means “without oxygen.” Anaerobic metabolism produces energy faster but less efficiently than aerobic metabolism48. Anaerobic exercise is brief and intense. It occurs above the aerobic threshold, which means that oxygen in the blood is used more quickly than it is replenished, resulting in the production of lactate or lactic acid. Lactic acid is a toxic waste product that causes a burning sensation and fatigue when it is present in sufficient quantities49. During anaerobic exercise, the horse relies on stored energy sources that do not need oxygen in order to be released. Anaerobic exercise involves relatively few repetitions at high levels of resistance for short periods of time (less than 30 seconds). Muscles trained under anaerobic conditions increase in mass, bulk, strength and power, leading to greater performance in short, highly intense activities. Areas most readily affected by anaerobic conditioning include the chest, forearm, hip and thigh muscles. Muscles must rest and recover after anaerobic exercise. The cycle of energy depletion and recovery results in an increase in the mass of fast-twitch muscle fibers. Resistance training can be added to anaerobic exercise in the form of faster gaits and hill work.
Anaerobic exercise should not be used until a horse has a base of fitness that has been obtained by aerobic conditioning. Anaerobic exercise is used to prepare muscles for certain functions such as jumping. Skill drills condition certain muscles anaerobically and improve strength, coordination and fluency in those skills50.
Cooling
The primary way that horses cool themselves is evaporative heat loss through sweating. Approximately 70 percent of the heat of locomotion is dispersed this way. A smaller percentage of heat is dissipated by rapid exhalations and panting. Cooling is made less efficient by the
47 All Horse Systems Go, Loving, Nancy S. DVM, 2006 p. 150 48 All Horse Systems Go, Loving, Nancy S. DVM, 2006 p. 141 49 The United States Pony Club Manual of Horsemanship Advanced Horsemanship B, HA, A Levels, Harris, Susan E. 1996 p. 292 50 The United States Pony Club Manual of Horsemanship Advanced Horsemanship B, HA, A Levels, Harris, Susan E. 1996 p. 298
CONDITIONING
51 © United States Hunter Jumper Association, Inc.
insulating effect of the hair coat and the subcutaneous fat layer. Efficient cooling is dependent on circulation and is adversely affected by dehydration.
Evaporative cooling starts when the horse sweats by pulling heat from the core of the body. The water vapor on the skin, which is produced by the sweat glands, is evaporated by the outside air. This process can be aided by heat transfer, which is achieved by the application of cool water onto the hot surface of the horse’s body. The horse’s chest, neck and legs should be repeatedly drenched with water. The water should be continuously applied and scraped off until the horse reaches a normal body temperature51. Leaving the water in the coat causes an insulating effect that makes the horse retain heat.
The horse also gets rid of heat by radiating it into cooler air. This does not work when the horse is covered by tack or a cooler, or when the air temperature is hotter than the horse. Horses also may be cooled by convective cooling by the use of fans or breezes52. A horse can suffer from heat stress once his body cannot dissipate heat quickly enough through sweating. Heat stress occurs when the body temperature climbs above 105 degrees, usually from overexertion rather than the heating effect of the sun’s rays.
Some horses do not sweat, especially in excessive heat and humidity. This condition is known as anhidrosis and can lead to dangerous heat exhaustion. Anhidrosis can be treated with products such as One AC. Clenbuterol may also be administered by the veterinarian to stimulate the sweat glands53.
The heat index should be considered when choosing a work level for a horse. Horses work comfortably when the heat index is around 125. At a heat index of 140 the horse relies mostly on sweating to dissipate body heat. At a heat index of greater than 150 (especially if humidity is more than half of this number) evaporative cooling is severely compromised. At 180 there is no natural way for the body to cool itself; internal temperatures will continue to rise, causing heat stress54.
Bibliography
All Horse Systems Go, Loving, Nancy S. DVM, 2006
The United States Pony Club Manual of Horsemanship Advanced Horsemanship B, HA, A Levels, Harris, Susan E. 1996
The United States Pony Club Manual of Horsemanship Intermediate Horsemanship C Level, Harris, Susan E.
1995 USHJA Trainer’s Certification Manual & Study Guide, 2010
51 All Horse Systems Go, Loving, Nancy S. DVM, 2006 p. 355 - 361 52 The United States Pony Club Manual of Horsemanship Intermediate Horsemanship C Level, Harris Susan E. 1995 p. 237 53 All Horse Systems Go, Loving, Nancy S. DVM, 2006 p. 355 - 361 54 All Horse Systems Go, Loving, Nancy S. DVM, 2006 p. 362
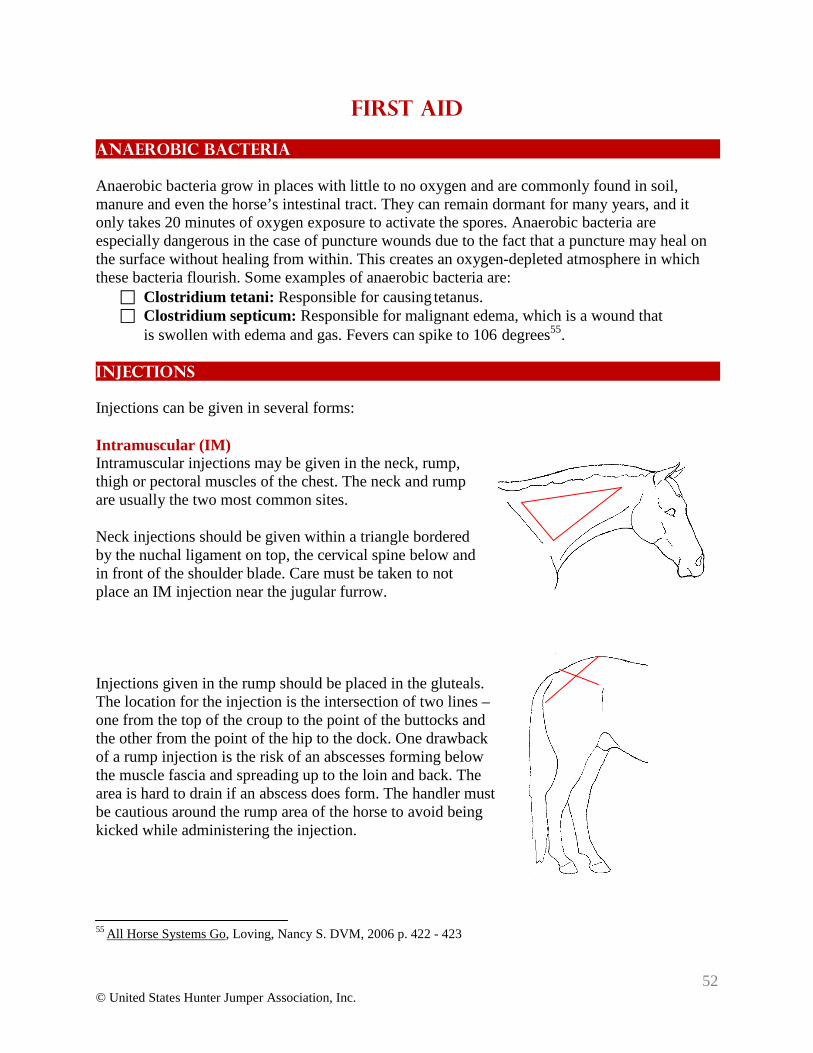
52 © United States Hunter Jumper Association, Inc.
FIRST AID
Anaerobic Bacteria Anaerobic bacteria grow in places with little to no oxygen and are commonly found in soil, manure and even the horse’s intestinal tract. They can remain dormant for many years, and it only takes 20 minutes of oxygen exposure to activate the spores. Anaerobic bacteria are especially dangerous in the case of puncture wounds due to the fact that a puncture may heal on the surface without healing from within. This creates an oxygen-depleted atmosphere in which these bacteria flourish. Some examples of anaerobic bacteria are:
Clostridium tetani: Responsible for causing tetanus. Clostridium septicum: Responsible for malignant edema, which is a wound that
is swollen with edema and gas. Fevers can spike to 106 degrees55.
Injections Injections can be given in several forms:
Intramuscular (IM) Intramuscular injections may be given in the neck, rump, thigh or pectoral muscles of the chest. The neck and rump are usually the two most common sites.
Neck injections should be given within a triangle bordered by the nuchal ligament on top, the cervical spine below and in front of the shoulder blade. Care must be taken to not place an IM injection near the jugular furrow.
Injections given in the rump should be placed in the gluteals. The location for the injection is the intersection of two lines – one from the top of the croup to the point of the buttocks and the other from the point of the hip to the dock. One drawback of a rump injection is the risk of an abscesses forming below the muscle fascia and spreading up to the loin and back. The area is hard to drain if an abscess does form. The handler must be cautious around the rump area of the horse to avoid being kicked while administering the injection.
55 All Horse Systems Go, Loving, Nancy S. DVM, 2006 p. 422 - 423
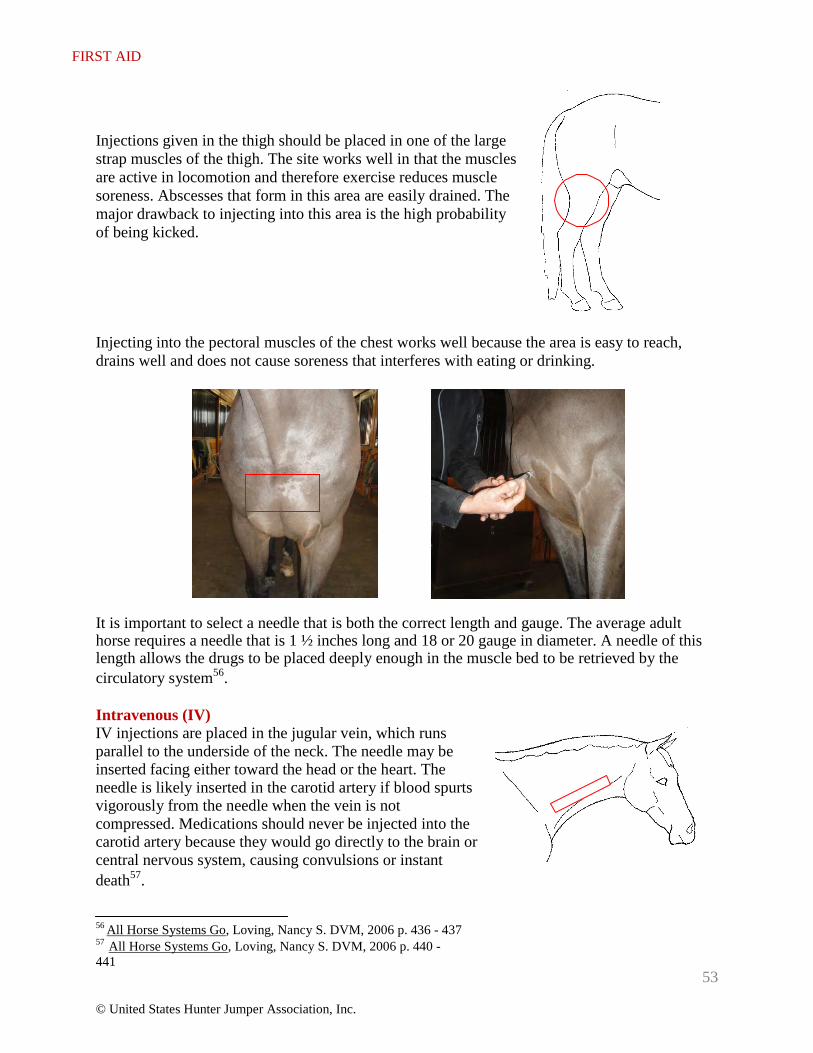
FIRST AID
Injections given in the thigh should be placed in one of the large strap muscles of the thigh. The site works well in that the muscles are active in locomotion and therefore exercise reduces muscle soreness. Abscesses that form in this area are easily drained. The major drawback to injecting into this area is the high probability of being kicked.
Injecting into the pectoral muscles of the chest works well because the area is easy to reach, drains well and does not cause soreness that interferes with eating or drinking.
It is important to select a needle that is both the correct length and gauge. The average adult horse requires a needle that is 1 ½ inches long and 18 or 20 gauge in diameter. A needle of this length allows the drugs to be placed deeply enough in the muscle bed to be retrieved by the circulatory system56.
Intravenous (IV) IV injections are placed in the jugular vein, which runs parallel to the underside of the neck. The needle may be inserted facing either toward the head or the heart. The needle is likely inserted in the carotid artery if blood spurts vigorously from the needle when the vein is not compressed. Medications should never be injected into the carotid artery because they would go directly to the brain or central nervous system, causing convulsions or instant death57.
56 All Horse Systems Go, Loving, Nancy S. DVM, 2006 p. 436 - 437 57 All Horse Systems Go, Loving, Nancy S. DVM, 2006 p. 440 - 441
53
© United States Hunter Jumper Association, Inc.
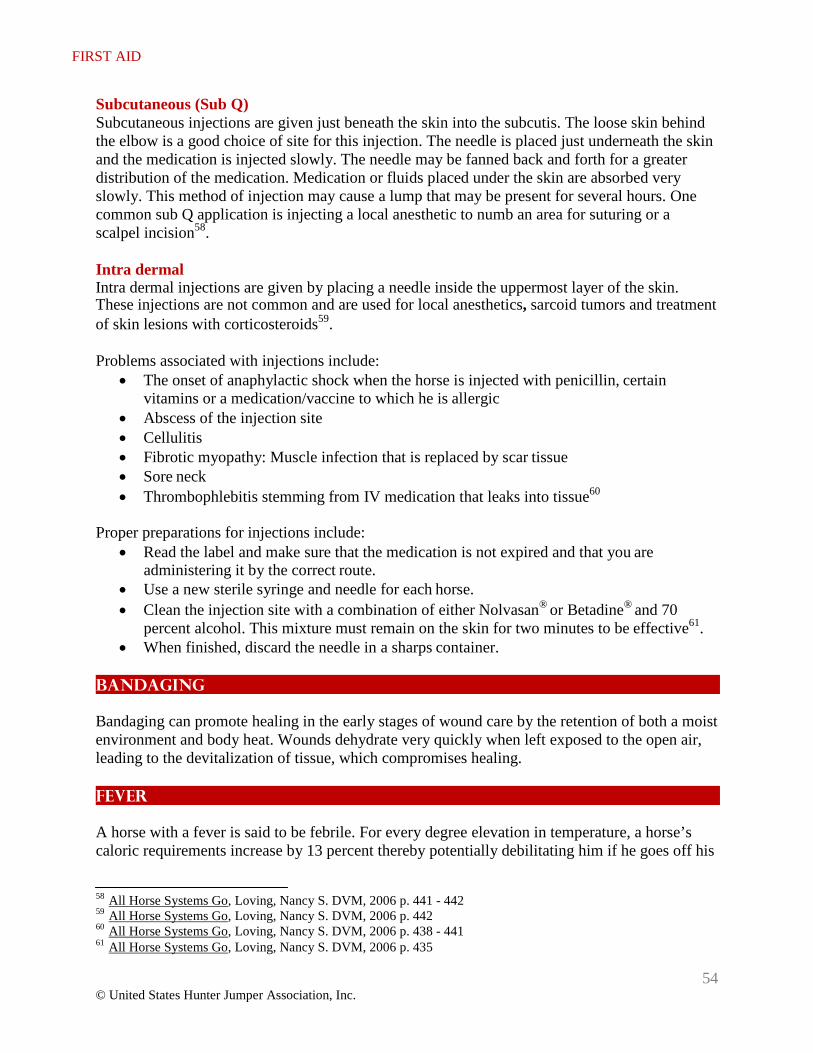
FIRST AID
Subcutaneous (Sub Q) Subcutaneous injections are given just beneath the skin into the subcutis. The loose skin behind the elbow is a good choice of site for this injection. The needle is placed just underneath the skin and the medication is injected slowly. The needle may be fanned back and forth for a greater distribution of the medication. Medication or fluids placed under the skin are absorbed very slowly. This method of injection may cause a lump that may be present for several hours. One common sub Q application is injecting a local anesthetic to numb an area for suturing or a scalpel incision58.
Intra dermal Intra dermal injections are given by placing a needle inside the uppermost layer of the skin. These injections are not common and are used for local anesthetics, sarcoid tumors and treatment of skin lesions with corticosteroids59.
Problems associated with injections include:
• The onset of anaphylactic shock when the horse is injected with penicillin, certain vitamins or a medication/vaccine to which he is allergic
• Abscess of the injection site • Cellulitis • Fibrotic myopathy: Muscle infection that is replaced by scar tissue • Sore neck • Thrombophlebitis stemming from IV medication that leaks into tissue60
Proper preparations for injections include: • Read the label and make sure that the medication is not expired and that you are
administering it by the correct route. • Use a new sterile syringe and needle for each horse. • Clean the injection site with a combination of either Nolvasan® or Betadine® and 70
percent alcohol. This mixture must remain on the skin for two minutes to be effective61. • When finished, discard the needle in a sharps container.
Bandaging
Bandaging can promote healing in the early stages of wound care by the retention of both a moist environment and body heat. Wounds dehydrate very quickly when left exposed to the open air, leading to the devitalization of tissue, which compromises healing.
Fever
A horse with a fever is said to be febrile. For every degree elevation in temperature, a horse’s caloric requirements increase by 13 percent thereby potentially debilitating him if he goes off his
58 All Horse Systems Go, Loving, Nancy S. DVM, 2006 p. 441 - 442 59 All Horse Systems Go, Loving, Nancy S. DVM, 2006 p. 442 60 All Horse Systems Go, Loving, Nancy S. DVM, 2006 p. 438 - 441 61 All Horse Systems Go, Loving, Nancy S. DVM, 2006 p. 435
54 © United States Hunter Jumper Association, Inc.
FIRST AID
feed or does not eat. A horse with a fever of 103.5 degrees or higher requires active assistance to cool down. Sponge his neck and chest with tepid water and move him out of the sun into the shade or a barn. Take off his blankets unless there is a wind or he is body clipped. Call your veterinarian. Prolonged fevers can cause a horse to stop eating and drinking, which may bring on dehydration and impaction colic.
The following are causes of fevers:
• Viral respiratory disease • Bacterial infection • Infection in the chest (pleuritis) or abdomen (peritonitis) • Wounds that have developed cellulitis • Heat stress or heat exhaustion • Medication reaction • Allergic reaction62
Hemorrhage
Bleeding injuries can be frightening to the handler, but a horse is able to lose 2 gallons of blood before the situation becomes life threatening. If a horse hemorrhages, offer him water to replace the fluids that have been lost from his body. It may be necessary to give him fluids IV. A bleeding wound takes approximately 12 minutes to clot if a small blood vessel is involved, while the clotting time for larger blood vessels and arteries is one hour. Keep a light and steady pressure on the wound to help it to clot and resist “peeking” to see if the bleeding has stopped. If the horse bleeds through the material being used to exert pressure on the wound, add a second or third layer instead of removing the bottom layer63.
Proud Flesh
Proud flesh is the common term for exuberant granulation. It is an angry looking tissue that bleeds very easily. Corticosteroids may be used to slow the growth of proud flesh but be aware that they can also slow healing. Pressure bandages may also help to control the formation of proud flesh. Proud flesh that cannot be controlled by corticosteroids or bandaging should be surgically removed. Occasionally, a keloid will form as a fragile, dry, skin-like covering over proud flesh. This scar protrudes above skin level and is subject to cracking and peeling. The keloid lacks elasticity because it does not have an underlying skin layer and may require a skin graft for reparation64.
Topical Products
When managing wounds, it is important to use the correct product for the task at hand. The initial treatment of a wound often affects the end result and the time of healing. The skin is the body’s defense against environmental and skin contaminants. When the skin is broken open, the
62 All Horse Systems Go, Loving, Nancy S. DVM, 2006 p. 429 - 430 63 All Horse Systems Go, Loving, Nancy S. DVM, 2006 p. 426 - 428 64 All Horse Systems Go, Loving, Nancy S. DVM, 2006 p. 416 – 417, 418, 420
55
© United States Hunter Jumper Association, Inc.
FIRST AID
56 © United States Hunter Jumper Association, Inc.
body is assaulted by dirt, gravel and other contaminants. Certain soils and clays inhibit the immune actions of white blood cells and antibodies, which lead to infection. A wound should be cleaned of all contamination and foreign matter as quickly as possible65.
Wound Types • Incision: A clean cut caused by a sharp object. This wound may bleed profusely and may
require stitches. • Laceration: A tear with jagged edges caused by a rough or irregular surface. This wound
may require stitches. • Abrasion: A scrape or sore that resembles road rash. This wound is generally full of dirt
and requires careful cleaning. • Puncture: A narrow, deep wound. This wound is predisposed to tetanus. • Contusion or bruise: Often caused by a kick or a blow. The skin may remain intact but
the underlying blood vessels and tissues are damaged. There can be bleeding under the skin causing a hematoma, which is a swelling filled with blood. Application of an ice pack for 20 minutes helps to control the swelling66.
Cleaning a Wound The first step to clean a wound is to gently hose away any dirt and other contaminants that are present on the skin surface. If possible, clip and shave any hair away from the margins of the wound. Hair makes it difficult to assess the nature of the wound, interferes with thorough cleaning, does not allow for proper drainage and acts as a foreign body to the wound67. Call your veterinarian if the wound smells bad or contains a foreign body. Ascertain that the wound is not a puncture wound that may be concealed by hair, mud or dirt. Punctures should be thoroughly investigated to see how deep they are and what structures are involved. They can seal over on top, creating an excellent chance for the growth of anaerobic bacteria. A puncture wound that has depth, heat, swelling or pain should be seen by a veterinarian. A tendon or joint puncture is a true emergency that requires immediate veterinary assistance. Cover the wound with sterile gauze pads to prevent hair from further contaminating it68.
The wound should be scrubbed with antiseptic soap and gauze sponges. Scrub for 10 minutes if the horse will allow you to do so. If not, gently hose for 5 to 10 minutes. Alternately scrub and rinse the wound until it is bleeding and shows healthy pink and glistening tissue. If the wound is deep, it may require lavage with saline solution. As a general principle, any product that is put into a wound should be so mild that if it were used in the horse’s eye it would not irritate the mucous membranes or the eye itself69.
When cleaning a wound, it is preferable to use saline solution rather than water because the salt content of saline solution approximates the salt content of the horse’s tissues. When water is used, the salt content of the body’s tissues tends to pull water into the wound causing edema. This interferes with circulation and slows healing. Saline solution can be made at home by
65 All Horse Systems Go, Loving, Nancy S. DVM, 2006 p. 403 66 The United States Pony Club Manual of Horsemanship Intermediate Riding C Level, Harris, Susan E. 1995 p. 230 67 All Horse Systems Go, Loving, Nancy S. DVM, 2006 p. 404 - 405 68 All Horse Systems Go, Loving, Nancy S. DVM, 2006 p. 403, 421 - 422 69 All Horse Systems Go, Loving, Nancy S. DVM, 2006 p.405 - 406
FIRST AID
© United States Hunter Jumper Association, Inc.
mixing ½ of a tablespoon of table salt into a quart of water. An antiseptic such as povidone iodine (Betadine®) or chlorhexidine (Nolvasan®) may be added to improve the antibacterial quality of the solution. Add enough povidone iodine to saline solution to make the solution the color of weak tea. Wear gloves when you are using povidone iodine to avoid absorbing toxic amounts of iodine. Chlorhexidine works on a broad spectrum of bacteria and its effects outlast those of povidone iodine.
Some topical preparations actually retard wound healing:
• Tincture of iodine: Destroys tissue and slows healing. It should only be used to toughen the hoof’s sole or control thrush.
• Soaps and detergents: Most are toxic to cells, causing them to swell and rupture. • Hydrogen peroxide: Toxic to equine cells. • Alcohol (rubbing or isopropyl): Destroys exposed tissue protein. It may be used to wipe
around the margins of wounds only70.
Healing begins with the production of collagen. Fibroblasts, which manufacture fibrin, appear on the third day after an injury. Blood vessels are the next to appear. Granulation tissue, which is made up of fibroblasts and capillaries, starts to fill in a wound. Skins cells grow across the granulation tissue in a process called epithelialization. Wound healing finishes by the action of contraction. Full thickness skin is pulled toward the center of the wound by myofibroblast cells. The rate of contraction is not affected by wound size but rather by skin tension, dehydration, edema and movement of the wound. Lower leg wounds heal slowly due to lack of blood supply and muscle.
Wounds heal much more quickly if they are kept warm and moist. This is especially true in the early stages of healing. The horse’s body is approximately 70 percent water, and wounds that are left open to the air dehydrate quickly. You may apply a water soluble dressing such as silver sulfadiazine or triple antibiotic ointment and a light bandage to a clean wound. Do not apply any topical ointments to a wound that may require sutures unless the ointment is water based. The decision to suture depends on:
• Location • Skin tension • Configuration • Degree of damage • Contamination
Topical ointments should be used with care. To avoid contamination, be sure to use tongue depressors or clean rubber gloves when scooping ointment from jars. Topical antibiotics are not likely to prevent infection with wounds that are deep or one to three hours old because they are already contaminated with bacteria. Antiseptic powders and sprays have a tendency to obstruct wound drainage, leading to the accumulation of exudates and drying the wound edges. Topical ointments cannot speed the healing process. Instead, they may actually delay healing if used improperly. Petroleum-based products interfere with drainage, attract manure and dirt, slow skin growth and retard healing. Nitrofurazone, which is petroleum based, can delay new skin growth 70 All Horse Systems Go, Loving, Nancy S. DVM, 2006 p. 405 - 407
57
FIRST AID
58 © United States Hunter Jumper Association, Inc.
by as much as 30 percent. The wound forms a thick scab that prevents it from healing from the inside out. Nitrofurazone is a carcinogen and therefore, gloves should be worn. Petroleum- based products may be used under weeping wounds to protect from skin scald.
Several antiseptic products have proven to be safe and effective on horses:
• Silver sulfadiazine: Water soluble cream • Nolvasan®
• Triple antibiotic ointment • Povidone iodine • Vitamin A&D® ointment • Aloe Vera • Unprocessed honey: Has antibacterial properties and promotes healing • Sugardine (sugar and povidone iodine in a 50:50 ratio): Has antibacterial properties71
A deep or traumatic wound that affects underlying bone may create a sequestrum, which is a bone that has broken off or become devitalized due to a lack of blood flow and acts as a foreign body to the wound. A sequestrum may require surgical removal if it forms a chronic draining wound.
Another type of wound is a rope burn. A horse tangled in a rope generally panics, thereby making his burn far more severe than if he remained quiet. Rope burns are classified as superficial, partial thickness or full thickness. A superficial burn is generally only reddened, thickened skin. A partial thickness burn has edema under the skin, intense inflammation and pain. This wound has a strong chance of becoming infected. A full thickness burn displays leathery and tanned tissue, extensive limb swelling and may be numb. A considerable amount of time is required for heat to dissipate from the burned tissue. A partial thickness burn can become a full thickness burn if treated with inappropriate topical medications or if bacteria invade the site. An eschar, or coagulated crust of skin debris, may form over top of the burn. It delays antibiotics reaching the wound and delays healing due to encouragement of harmful bacteria. An eschar that is brown-black in color is probably infected with bacteria. Even the mildest rope burn should be treated with immediate applications of ice to reduce heat72.
Bibliography
All Horse Systems Go, Loving, Nancy S. DVM, 2006
The United States Pony Club Manual of Horsemanship Intermediate Riding C Level, Harris, Susan E. 1995
USHJA Trainer Certification Manual & Study Guide, 2010
71 All Horse Systems Go, Loving, Nancy S. DVM, 2006 p. 407 - 415 72 All Horse Systems Go, Loving, Nancy S. DVM, 2006 p. 424 – 426
59 © United States Hunter Jumper Association, Inc.
GROOMING AND BLANKETING
General Grooming
Grooming is a job that should be performed daily on a horse. The best time to give your horse a thorough grooming is after exercise when his pores are open. This allows the oils to be spread through the horse’s coat and brings out a deep luster. Grooming:
Promotes circulation and health Checks for injuries and skin conditions Brings sheen to the coat through the distribution of oil Cleans the coat of sweat, dirt and dandruff • Removes bot eggs, which are small yellow specks on a horse’s legs and shoulders that are
deposited by bot flies in the summer time Allows additional time for training on ground manners Allows the groom to develop rapport with the horse
Common grooming tools include: Rubber curry comb: Used in large circles on the body to loosen dirt, dried sweat and
hair. Should not be used on the face, legs or other bony or sensitive areas of the body. • Dandy brush: A medium stiff brush that is used to knock mud and crusted dirt off the
horse’s body. Wet mud should not be brushed off. The best practice is to let it dry before brushing it off. If this is not practical, the mud may be hosed off. Many horses are too ticklish to have this brush used on clipped areas.
• Mud brush: A coarse brush with stiff bristles that knocks heavy mud out of the horse’s coat. This brush may also be used on a horse’s hooves. It is not suitable for ticklish, clipped or fine coated horses.
Body brush: A short bristled dense brush. It is often oval in shape and has a handle across the back. It is used to get deep into the coat to extract dandruff, oil and dirt that are against the skin.
Face brush: A soft brush that is often made of horsehair. Metal or plastic curry comb: Used to clean out brushes. Should not be used on the horse. • Rubber mitt: Used to curry the legs, face and bony areas of the horse’s body or as a curry
comb on ticklish horses. • Mane and tail brush: Used to detangle the mane and tail. Care should be taken to not
pull out or break off the horse’s tail hair. • Hoof pick: Used to clean out the horse’s feet. It has a hook and may have a brush
attached to the other side. When picking out the foot, care must be taken to work from the heel to the toe. Working from the toe to the heel increases the likelihood of injury.
• Rub rag: A rag that may be anything from a towel to a cactus cloth that is used to put a final polish on the horse’s coat.
• Sponges: One sponge is used to wipe out the eyes and nostrils and the other one to wipe the horse’s dock area.
Shedding blade: Used to remove winter coats during shedding season. • Bot egg knife: Used to scrape the bot eggs off the horse’s coat. Pulling comb: Used to shorten and thin the mane.

GROOMING AND BLANKETING
60 © United States Hunter Jumper Association, Inc.
Grooming Routine Grooming is a very important activity. Sadly, in these days of hurry, deep grooming is becoming a lost art and has been replaced by the convenience of bathing. Although bathing is a necessary activity, the overuse of soap strips the natural oils from your horse’s coat and makes it dull. Grooming promotes good circulation for the horse, which in turn stimulates a healthy hair coat. It also gives you a chance to get to know your horse and develop a relationship with him. Additionally, it is a time to check for any wounds, skin conditions, rubs or loose shoes before and after riding.
A thorough grooming takes approximately 45 minutes. The British Horse Society teaches that the horse should be “quartered” before a ride. Quartering means that you give the horse a 15- minute grooming that includes picking his feet, the removal of surface dirt from the horse’s coat, spot removal and the neatening of the mane and tail. After you ride, give your horse the remainder of his full 45 minutes of deep grooming. The best time to deeply groom your horse is after you have ridden him. When your horse has finished with his exercise but has cooled down, his pores are still open thereby allowing his natural coat oils to be distributed by good grooming. This is the time when a little elbow grease goes a long way.
To start your grooming, make sure that the horse is dry. A wet horse cannot be groomed properly. Assemble all of your tools and make sure that they are clean. It isn’t much use to clean a horse with a dirty brush. Brushes should be washed in a mild soap once a week. Rinse them thoroughly, shake out the water and leave them on a towel to dry.
If your horse is not showing, start out by spraying his tail with ShowSheen® so that it will have time to dry before your untangle his tail.
Tie or cross tie your horse and start out by picking out his feet. In some barns, the horse’s feet are picked out before the horse leaves the stall. Horses are creatures of routine and appreciate their feet being cleaned out in an order. Some people clean the horse’s feet out left front, left hind, right front, and right hind. Others use the race track method of cleaning out all four feet from the left side of the horse in the order of, left front, right front, left hind, and right hind. Check your horse for loose shoes, loose or missing nails and thrush. Feet should be picked out both before and after riding.
Pick up the curry comb and mentally divide your horse into sections. It is helpful to think of grooming your horse top to bottom and front to back. Grooming starts on the left side of the body behind the horse’s ear. Curry the horse in large circles, pushing as hard as the horse will allow you to. Thoroughly loosen the dirt on each area before moving to the next. Tap the dirt out of the curry comb on the floor or on your boot after each section. Do not tap the curry comb out on the stall walls. Be careful not to curry on any bony area of the horse’s body. Respect your horse’s ticklish areas and remember that horses can cow kick (kick out to the side).
Once you have curried the entire body, take the dandy brush and brush his body in sections. The best way to brush a horse is to have the brush in one hand and the metal curry comb in the other. If a metal curry comb is not available, a rubber one will suffice. Brush the horse by drawing the brush though the coat in the direction of the hair growth. Flick the brush up away from the horse
GROOMING AND BLANKETING
61 © United States Hunter Jumper Association, Inc.
at the end of each stroke to take the dirt out of the horse’s coat. At the end of every third stroke, run the brush across the curry comb to remove the dirt from the brush. Try to find a rhythm – brush, brush, brush, clean. Put some muscle into it and lean into the horse while grooming. Pay attention to the direction of the hair growth, especially by the horse’s hips. It is helpful to groom the left side of the horse with your left hand and the right side with your right hand. If you practice this skill, you will notice that your body becomes more symmetrical and your grooming will be of higher quality.
Next, go over the horse in the same fashion with the body brush. A good body brush should fit your hand well. Most of them have a strap across the back to help you get good leverage while you groom.
Some horses are very dirty in their stalls. Manure stains that cannot be brushed out require either spot washing or spraying with alcohol and rubbing out with a towel.
Continue on to the horse’s legs with a mud brush or dandy brush. A mud brush should be used on thick-coated horses or caked on mud or manure. Squat down while you brush. Keep one hand on the horse’s leg and brush with the other hand. Keeping one hand on the horse’s leg helps you feel if a horse is going to move his leg suddenly and helps you push away from him in an emergency. It is very painful to get a horse’s knee in your face. For safety reasons, never kneel down while grooming or put your hands on the floor where they could be stepped on. Clean your brush after each leg. Pay special attention to the horse’s heels and behind his fetlocks. Check for burrs, cuts and skin irritations.
Gently clean the horse’s face with the face brush. Some horses enjoy having their face gently scrubbed with a rubber grooming mitt. Each horse is an individual and a good groom learns to work with the horse. Make sure to unclip the throat latch of the halter and groom under the horse’s head. Check for ticks that like to embed themselves under the jaw.
Brush the mane flat. If the horse’s mane won’t stay on one side of the neck, it can be put in training braids. The best way to work with the tail is to untangle it by hand. Never rip out the tangles. If you must use a brush, gently brush the tail starting at the bottom and working toward the top. Make sure to remove any shavings, hay or straw from the tail. Look at the roots of the mane and tail as you brush. If the horse has scurf, which is the equivalent of human dandruff, his mane and tail needs to be washed. Check for ticks in the mane and the tail, indicated by a yellow, crusty serum. Wash the area thoroughly.
Finish your grooming by wiping out your horse’s eyes and nostrils with a clean, damp sponge. Wipe under his tail with a separate damp sponge. Then wipe your horse down with a clean rub rag. Put a small amount of baby oil on his muzzle to make him look extra fancy.
Several areas on the horse’s body do not get enough attention:
• Elbows • Legs • Belly • Dock
• Sheath • Udders • Inside of the ears • Between the hind legs
GROOMING AND BLANKETING
62 © United States Hunter Jumper Association, Inc.
After riding, allow your horse to go into his stall to urinate. If he is muddy or sweaty you can either allow him to dry and brush the mud and sweat from his coat or bathe him. Wet mud should not be brushed.
Quarter marks Quarter marks are decorative markings brushed into the horse’s coat at the hindquarters. These marks can enhance the conformation of a well-muscled hip and croup, and draw attention to the cleanliness and shine of a well-conditioned horse. Quarter marks can be done with a stencil or freehand. Some grooms produce the effect by spraying the area with fly spray and using a pulling comb while others use a damp sponge and a body brush.
Bathing In general, it is far better to groom a horse than to bathe him. Bathing strips the horse’s coat of oil and makes the coat dull. A horse that has the sweat groomed out, rather than washed out, will generally have a shinier coat. In addition, bathing can weaken a horse’s feet. A horse should be bathed:
To help with cool down Before a show To remove stains that cannot be brushed out
Products containing bluing can help remove stains. Bonami scouring powder may also be used on white markings. Mix the powder with water into a thick paste and rub it in to the stain. Once it dries it should be thoroughly brushed out. Do not use other scouring powders because they are too abrasive.
A horse may be hot toweled when it is too cold to bathe him. To hot towel, fill a large bucket with extremely hot water and one half teaspoon of shampoo. Put on dishwashing gloves and use a large light colored towel. Dip one end of the towel in the bucket and wring it out until it is nearly dry. Use the towel in a side-to-side motion, accumulating the dirt and scurf. Follow up by using the dry end of the towel to dry the area73.
A gelding or stallion’s sheath and a mare’s udder should be cleaned on a regular basis. The body secretes oils from the skin glands, which are known as smegma. They combine with urine and dirt to form a waxy build up that lines the sheath and coats the penis or folds of the udder. If the sheath is not kept clean the outer covering of the sheath or prepuce may develop a bacterial infection, which causes swelling and provides a feeding area for flies. Sheaths should be cleaned with a mild soap such as Ivory® or a sheath cleaning product such as Excalibur®.
The mane and tail need to be scrubbed to the roots during a bath. A dirty tail can irritate a horse, encouraging him to rub and break off the tail hair. Use a mild shampoo and work the lather deep into the mane or tail. Be sure to rinse away all of the soap to avoid irritation. This is an excellent time to check for ticks that burrow into the mane or tail. It is interesting to note that the horse’s body creates more dandruff or scurf during the winter months.
73 The United States Pony Club Manual of Horsemanship Intermediate Riding C Level, Harris, Susan E. 1995 p. 177 – 178
GROOMING AND BLANKETING
63 © United States Hunter Jumper Association, Inc.
Clipping and Trimming A horse should be clean, neat and well turned out. Part of this requires attention to the mane, tail, muzzle, ears and lower legs. Most show horses are clipped in the following areas:
Ears: Size 40 blades Muzzle: Size 40 blades Under the jaw: Size 10 blades Bridle path: Size 40 blades Lower legs: Size 10 blades Wounds: Size 40 blades
The eye whiskers should never be trimmed. They protect the horse’s eyes from injuries and foreign objects.
If body clipping is necessary, there are a variety of patterns to choose from:
Full body: The entire body is clipped. The saddle area may be left unclipped for protection.
Hunter: The legs and saddle area are left unclipped. Trace: The horse is clipped below the level of the traces, as if he were wearing a harness. Strip: The area under the throat, chest and belly is clipped.
Mane and Tail Care The mane should be kept neat by pulling or thinning, and should not be cut with scissors. To pull a mane, hold a small section of the mane and tease back the hair that you do not wish to pull. Wrap the remainder around a pulling comb and give a sharp yank to remove the hair. Most horses tolerate mane pulling without any problem, while some horses are sensitive and need to be restrained. The mane should be approximately 4 to 6 inches long so that it either lays flat or can be neatly braided. Horses with a very wide crest need their manes left slightly longer in order for the mane to lay flat.
The horse’s tail can be cut so that it does not drag on the ground. Care must be taken to not over shorten the tail. Tails can be banged (cut straight across) or switched (cut in a downwards “V”). A tail bandage may be used to smooth down the top of the tail or protect a braided tail from loosening or being rubbed. Tail bandages are made out of cotton, synthetics or stretchy material such as an ace bandage. Use caution when using a tail bandage to avoid cutting off the circulation to the tail.
Skin Problems
The horse’s skin is subject to many problems. In all cases, hygiene is of the utmost importance. Keep your barn clean, and if you suspect any fungal infections do not share equipment between horses. Common skin conditions include:
Hives: Also known as urticaria, hives are areas of edema that start small and grow into large, elevated, flat top bumps with steep sides. They generally develop on the neck, shoulders and
GROOMING AND BLANKETING
64 © United States Hunter Jumper Association, Inc.
sides of the thorax. They are caused by an allergic reaction to a plant, food, drug, pollen, mold, topical product or insect bite. They can also be the result of an autoimmune disease74.
Rain rot: This is the common name for infection caused by the dermatophilus congolensis organism. The spores, which are activated by moisture, are present in the soil and in the scabs of infected horses. Raised tufts of hair form along the back and rump of the infected horse. The lesions are generally painful. To help avoid rain rot, a horse that lives turned out in rainy conditions should have access to a run-in shed or stall. To treat rain rot, clip the hair away from the affected area and remove the scabs. Medicated shampoos such as povidone iodine should be lathered into the coat and allowed to stand for 10 minutes. Oral or injectable antibiotics may be necessary to eradicate the infection. Consult with your veterinarian75.
Ringworm: A fungal infection known as dermotophytosis. Fungi are present in dark, damp barns especially during the autumn and winter months. They are highly contagious and are spread by shared tack and other equipment. Humans can catch ringworm from an infected horse. A skin culture should be taken to diagnose ringworm. If ringworm is suspected, take action immediately:
Isolate the horse Remove all bedding and disinfect the stall Disinfect all equipment including brushes Do not share tack or equipment between horses76
Sarcoid: Benign tumor that is unique to equine skin. Sarcoids are localized and do not include the underlying structures. They are an external, cosmetic blemish that can be irritated and become ulcerated or infected. A horse can spread sarcoids on his body by biting, rubbing or through contaminated tack. Sarcoids generally appear on the limbs, head and neck, but can also appear on the chest, trunk, abdomen, flanks and prepuce. Sarcoids do not generally pose a health risk to horses. Unless they interfere with tack or grow and change, they should be left alone. They are either sessile (broad-based) or pedunculated (with a stalk) and exist in the following forms:
Verrucous: Wart-like, dry, horny masses resembling a cauliflower. They are difficult to distinguish from warts but generally do not have any hair around them. Verrucous sarcoids do not regress.
Fibroblastic: Develop from a wound or a verrucous sarcoid that has been traumatized. They have the appearance of normal granulation tissue. They may stay small for years and suddenly develop into a sore greater than 10 inches in diameter. A wound that does not heal may be a fibroblastic tumor.
Mixed: A mixture of verrucous and fibroblastic. Occult: Tumors with a flat or slightly raised and thickened aspect. If they are disturbed
they may convert to the fibroblastic form77.
74 All Horse Systems Go, Loving, Nancy S. DVM, 2006 p. 392 75 All Horse Systems Go, Loving, Nancy S. DVM, 2006 p. 375 76 All Horse Systems Go, Loving, Nancy S. DVM, 2006 p. 372 – 374
77 All Horse Systems Go, Loving, Nancy S. DVM, 2006 p. 394 – 395
GROOMING AND BLANKETING
65 © United States Hunter Jumper Association, Inc.
Scratches: The common name for dermatitis, it is characterized by the skin of the lower leg swelling and chapping, followed by weeping red skin at the back of the pasterns. (See Horse Health)
Sunburn: Horses are subject to sunburn. Sun block, Desitin™ or other zinc oxide creams may be applied to the muzzle. Some horses show sensitivity to PABA-containing products. The horse’s body can be shielded from the sun by the use of fly sheets and fly masks or bonnets.
Warts: Also known as papillomas, warts generally appear on horses under three years of age and those with compromised immune systems. The most common locations are on the muzzle, lips, prepuce, vulva, eyelids and ears. Warts may be transmitted by a virus and should be considered communicable. Do not share tack between horses when warts are present78. Most cases of warts are self-limiting and will gradually disappear.
Blanketing Basics
Horses that live in stalls need help to keep their bodies at a comfortable temperature. In the wild, horses huddle together when they are cold and roll in the mud or go into rivers when they are too hot. Stabled horses do not have that luxury and need help controlling their own thermostats with blankets, fans, heaters or whatever else may be necessary. A horse should wear a blanket that fits properly. Blanket measurements are taken from the center of the chest to the dock. Specific brands of blankets may fit certain conformation types (i.e., horses with narrow shoulders or high withers). Blankets should be kept in good repair and cleaned on a regular basis.
To put a blanket on a horse, place it high on the horse’s neck. Slide it back, in the direction of the hair growth, and fasten the chest buckles. Next, fasten the surcingles and leg straps (if any). To remove a blanket, undo the surcingles and leg straps first. Then undo the chest buckles and lift the blanket off of the horse’s body.
Blanketing a horse depends on several factors:
Coat: Horses that live in colder climates and are kept in work during the winter months may need to be body clipped in order to cool them out efficiently following work. A blanket or combination of blankets is necessary to retain their body warmth.
• Climate: Although the horse’s coat provides good natural insulation, he may need more blankets when wet or in windy, cold conditions.
Living conditions: In general, a horse living in a warm, draft-free barn requires fewer blankets.
Internal thermostat: Like people, some horses are warmer or colder than others. Each horse is an individual and should be treated as such. Some horses dislike blankets and will take them off regardless of the temperature.
78 All Horse Systems Go, Loving, Nancy S. DVM, 2006 p. 392
GROOMING AND BLANKETING
66 © United States Hunter Jumper Association, Inc.
Horse Clothing Blankets and horse clothing come in many types:
Stable sheet: The lightest blanket; may be worn alone or under a mid-weight or heavy
blanket as an insulating layer. It is usually 100 percent cotton and seldom has leg straps. It helps to keep the underside of the top blankets clean and is easier to launder than the bulkier heavy blankets.
Mid-weight stable or baker blanket: Heavier and more insulating than a sheet. Can be a
cotton blend or a synthetic and can be used in combination with other blankets. May have leg straps.
Heavy stable blanket: The most insulating blanket. Usually made out of a synthetic
material and may be lined with nylon, fleece or polar fleece. Can be used in combination with other blankets. May have leg straps.
• Under blankets: Not as common as they once were. These are heavy wool blankets
(generally a golden yellow or baby blue with contrasting color stripes) that are worn under a stable blanket. Due to their rectangular shape, they are placed high on the neck and the front corners are folded up toward the withers. This makes the front of the blanket into a triangle that is folded back over top of the horse’s blanket. Sometimes worn with a surcingle over top of the outer blanket. Very warm and insulating but tends to slip out from under the top layer.
• Rugs: Blankets used for turn out. The old-fashioned rug was the New Zealand, which was
made out of water resistant canvas with a wool lining. Today’s rugs are more high tech and include such features as water proofing and breathable fabrics. Rugs come in light, medium and heavy and generally have leg straps to keep them securely in place when the horse is moving around in turn out. Some rugs may have a built-in neck feature, belly band and/or a tail or storm flap for extra protection.
• Scrim: A light mesh-like blanket that is generally used at horse shows to shield the
horse’s coat from the sun and flies.
Ring sheet: Similar to a scrim but usually made of cotton or a cotton blend.
Fly sheet: Worn either in the barn or in turn out to shield a horse from flies and UV rays.
• Irish knit: A waffle weave sheet that is used to wick moisture away from a horse’s coat.
• Cooler: A large, non-fitted rectangular cover that is used to keep the horse warm while cooling out. It is made of wool, wool blend or polar fleece and is attached by ties under the horse’s neck.
GROOMING AND BLANKETING
67 © United States Hunter Jumper Association, Inc.
Dress sheet: A wool, wool blend or polar fleece sheet that is used to keep the horse warm while tacked up but not yet working or cooling out. A cooler may be used for the same purpose but due to its rectangular non-fitted design, it does not have as polished an appearance as a dress sheet.
• Quarter sheet: Worn underneath and extending behind the saddle, it keeps the horse’s
hindquarters warm in cold temperatures.
Rain sheet: Usually used at horse shows to shield a horse and its saddle from rain.
• Hood: Worn over the horse’s head and neck to keep him warm. Hoods can be made of canvas or synthetic. Some hoods are made of Lycra and are used to keep a horse clean and/or keep his braids neat overnight.
Nightwear: Lycra shoulder protectors, hoods or full body suits used to keep horses clean
and shiny. The shoulder protectors and full body suits help minimize blanket rubs.
Bibliography
All Horse Systems Go, Loving, Nancy S. DVM, 2006
The United States Pony Club Manual of Horsemanship Intermediate Riding C Level, Harris, Susan E. 1995
68 © United States Hunter Jumper Association, Inc.
HORSE HANDLING
Behavior Horses are prey animals and therefore are wary of predators sneaking up on them. They use their ears, nose and eyes to detect potential danger. Instinct makes flight the horse’s first option, but he will fight with his teeth and hooves if he is unable to flee.
To correctly approach a horse, speak to him in a low, soothing voice and place your hand on his body to give him the reassurance that you mean him no harm. Much is communicated by voice and touch. You should be as confident as you are gentle to help him understand that you are the dominant being, or “herd leader,” in the relationship. A nervous or timid approach makes him suspicious and therefore potentially more dangerous and unpredictable. Be sure to approach him from the shoulder rather than from directly in front of or behind him, as he has blind spots in these areas.
Be aware of your surroundings when you are handling horses. Inexperienced people, children and pets should be asked to step into a non-horse area when a horse is being handled. This is especially true when the horse is disobedient, injured, nervous or has been confined for a prolonged period of time. Horses can injure their handlers, bystanders, pets and objects around them without much effort. Take extra precautions, such as putting a chain across a horse’s nose for extra control.
Vices have been linked to boredom, nervousness, lack of exercise, neglect or inattention. Horses can learn stable vices from other horses. If left unchecked, a stable vice may become a permanent habit. Some stable vices are addictive and may border on compulsive behavior. The horse may choose to engage in the vice instead of eating or drinking. Stable vices may negatively influence the horse’s performance, soundness or ability to maintain weight.
It is not always possible to identify the causes of vices such as weaving, cribbing and stall walking. Many horses show these stereotypical behaviors due to boredom, stress, confinement and unhappiness with their neighbors or location. When possible, remove the horse from the situation that is bringing on the behavior. If that is not possible, you can try to modify the behavior by using a cribbing strap or muzzle to minimize cribbing, or by turning the horse out for a longer period of time to minimize stall walking. Try moving the horse to a different location, as he may enjoy either more or less privacy in his stall79. Some horses benefit from an object in their stall, such as a ball or a pacifier, while others enjoy the companionship of a goat or other small animal.
Stable vices include:
Cribbing (also known as crib biting) Cribbers grab onto the edge of a stall, fence or other hard object with their teeth, then arch or contract their neck, pull back and occasionally grunt. Some horses rock rhythmically while
79 All Horse Systems Go, Loving, Nancy S. DVM 2006 p. 474 – 478
69 © United States Hunter Jumper Association, Inc.
HORSE HANDLING
cribbing or crib biting. All aspects of cribbing are addictive behaviors that may cause significant damage or wear to the teeth. It is speculated that cribbing activates narcotic receptors within the central nervous system, causing an addiction80. In some cases, wood splinters may cause damage to the cribber’s mouth, throat or intestines. Both cribbers and windsuckers (see below) may be hard keepers. They also tend to be prone to gastric ulcers. Mineral imbalance, boredom, excessive stall confinement, ulcers and proximity to others with the vice have all been linked to cribbing and windsucking. Round-the-clock turnout with electric fencing limits a cribber’s opportunity to indulge his vice. Surgical intervention has a minimal (less than 60 percent) success rate. This surgery involves cutting the nerve supply to the muscles under the neck that enable a horse to crib81.
Windsucking This can occur without the horse grabbing onto anything with his teeth. He holds his neck and moves his mouth in a particular manner that allows him to suck air. Windsucking is often accompanied by an audible grunt.
Pawing This may stem from excitement, frustration, boredom, illness or pain. Horses can paw holes of significant size and depth in dirt-floored stalls. Stall mats or rigid flooring may eliminate pawing damage to a facility, but they do not stop a horse from the behavior. Pawing from nervous excitement or boredom can often be curtailed through consistent re-training. Longeing the horse every time he begins pawing, for instance, may teach him to associate pawing with going to work and be very effective in eliminating the habit. Consult your veterinarian for possible causes of pawing in case it stems from illness or pain.
Stall kicking Kicking the sides of a stall can inflict damage upon both the structure and the horse. A horse could catch a leg in the gap between stall bars, weaken and kick through wood walls, or punch through sheet metal siding. Stall kickers can sustain injuries, including lacerations, fractures, sprains, pulled or bowed tendons, capped hocks, hygromas, hoof damage and bruised muscles. Horses may become stall kickers for a variety of reasons including stress, claustrophobia, introduction of new stable mates, anticipation of feeding time and territorial “posturing.” Often changing the circumstances that instigated the behavior will eliminate it. Some advise hanging a rubber stall mat or otherwise padding the area where the horse routinely kicks in an effort to minimize noise, structure damage and injury. Kicking chains correctly affixed to the kicking legs are often effective in limiting or eliminating stall kicking behavior, but they do not address the underlying cause of the behavior. If the horse is forced to stop stall kicking, he may respond by developing another stable vice.
Weaving A weaving horse stands in one spot, but sways rhythmically and swings his head from side to side. Weaving is a boredom-related behavior.
80 All Horse Systems Go, Loving, Nancy S. DVM 2006 p. 475 81 All Horse Systems Go, Loving, Nancy S. DVM 2006 p.268
HORSE HANDLING
© United States Hunter Jumper Association, Inc.
Pacing A pacer or stall walker moves restlessly within the confines of the stall. He walks the stall perimeter or walks endlessly back and forth along a single stall wall. Pacing may stem from illness or pain. A horse that is confined for long periods of time may exhibit less weaving or pacing if the stall includes a U-shaped opening that allows him to put his head out of the stall, but restricts his motion from side to side. Similar to weaving, pacing is generally boredom- related and is seldom seen in horses that enjoy lengthy, daily turnout that includes the ability to graze.
Wood chewing This differs from cribbing because the horse does not suck in air when he indulges in the habit. A wood chewer can cause significant structural damage to stalls, sheds, barns and fences, as well as excessive wear to his teeth. Splinters from the wood can damage his mouth, throat and intestine. Wood chewing may stem from a salt, fiber or mineral deficiency, boredom and extensive confinement.82
Blind Spots
The horse has blind spots directly in front and behind him that are roughly the width of his body. He cannot see directly below his nose or distinguish an object that is less than four feet ahead of him. For that reason, he is less likely to spook when allowed to view objects from farther away. When working on the bit, the closer his face is to the vertical, the less vision he has directly in front of him. To resolve this, he is likely to raise his head high in order to see objects that are very close to him. This may not bother a horse in a ring situation, but it may impair his ability to handle uneven terrain outside the ring.
Bridle Tying
A horse should never be tied using his bridle, as he can easily injure his mouth if he pulls against the tie rope or rein. In addition, any time a horse feels that he cannot get free, he has a tendency to panic and in all probability the horse will destroy the bridle. If you need to tie or cross tie a bridled horse, take the time to put a halter on over the bridle, making sure that the noseband of the halter is large enough to fit over the cheeks of the bit. The reins can be looped through the throatlatch of the bridle or tied in a knot on the neck. It is important to note that a horse should not be able to get the reins under his feet when he is tied or cross tied. Additionally, a horse with or without a bridle should not be left unsupervised on the cross ties.
Cool Down
The purpose of a cool down period is to dissipate the heat generated by the working muscles. A cool down period allows the muscle and body temperature to decline slowly by the following actions of the horse’s body:
Redirecting the blood flow from the muscles to the internal organs. Replenishing the oxygen in muscles that reached an oxygen debt.
82 All Horse Systems Go, Loving, Nancy S. DVM 2006 p. 474 – 478
70

HORSE HANDLING
71 © United States Hunter Jumper Association, Inc.
• Flushing lactic acid from the horse’s system83.
Proper cool down also gives the ligaments, joints and tendons a chance to recover from the stress of work. Walking maintains flexibility in these structures and helps to minimize the potential for injury. Walk the horse until his body temperature and respirations return to normal. As a horseman, it is important to know your horse’s normal body temperature and respiratory rate.
Depending on the ambient temperature and the amount of work performed by the horse, the cool down period can take from 15 to 30 minutes.
Factors that affect cooling include:
Ambient temperature and humidity level Degree of body fat Length of the hair coat
The horse may require more help to bring his body temperature down in hot or humid conditions. First, sponge the large blood vessels of his neck, chest and legs with water to improve evaporative cooling. Then, bring him into the shade and direct a fan on his body.
Do not minimize the importance of a cool down period on cool days, as a horse’s skeletal muscles generate a large amount of heat even in cold weather. Improper cool down or exposure to cold rain can cause the muscles in the hindquarters to spasm and cramp. Horses that are prone to such cramps may benefit from a quarter sheet when cooling down.
A horse should wear a light cooler in cold or windy weather, especially if he is body clipped. Consider partially or fully body clipping a horse that is expected to work during the cold months because a long winter coat may take a significant amount of time to dry. A horse may be fully cooled down but still have a wet coat. Conversely, a dry horse is not necessarily cooled out properly. If the horse is wet, rubbing his coat briskly with a towel removes moisture from the coat and exposes more hair surface to the air to allow a quicker drying time.
Overweight horses or those with a heavy winter coat may “break out” into a sweat after they appear to be cool, caused by the insulation of the fat layer and/or the loft of the horse’s coat. This is a normal occurrence, but the horse must be monitored closely after working and be protected from drafts and chill when he is damp84. Do not blanket a wet horse unless the blanket is made out of a wicking fabric such as Gore-Tex™. A non-breathable fabric retains moisture and becomes soaked, causing the horse to remain chilled for a prolonged period of time. This “refrigerator effect” evaporates moisture from the skin faster than the body can warm the skin. In effect, the skin temperature and eventually the horse’s body temperature will drop85.
A horse should not be allowed to eat grain until at least 30 minutes after he is fully cool. This allows the normal blood flow to return to the intestines and reduces the risk of gas colic. The horse may have full access to hay and water once his body temperature returns to normal.
83 All Horse Systems Go, Loving, Nancy S. 2006 p. 156 84 All Horse Systems Go, Loving, Nancy S. 2006 p 158 - 159 85 All Horse Systems Go, Loving, Nancy S. 2006 p 160
HORSE HANDLING
72 © United States Hunter Jumper Association, Inc.
Leading
The horse is accustomed by his training to having the halter put on from the left side and is consequently more comfortable with the routine. Place the lead rope around the horse’s neck to prevent him from walking away as you put the halter on, especially when catching him in the pasture. Stand next to his left shoulder, facing forward, and slip the halter over his ears before buckling the crownpiece. You should practice leading the horse from either side, while always leading him with a lead rope or shank as it gives you leverage. Without a lead rope, you have little or no control if he pulls away from you. Never wrap the lead rope around your hand. If a horse panics and tries to run away, you can be dragged, or at the very least receive a painful rope burn. Cotton and leather are more appropriate lead rope materials than nylon. Nylon burns the handler’s hands if the horse pulls back sharply and can get into a knot that cannot easily be undone.
Learning and Ground Manners
Ground manners are an important piece of a horse’s training and set the tone between the horse and the handler. Good manners not only make a horse easier to handle, they are also the foundation of a good working relationship between the horse and the handler. This relationship carries over from ground work to mounted work.
Good ground manners include:
Turning to face you when you enter the stall Walking quietly through gates and stall doors Standing still even on a loose lead shank Staying next to you without crowding or bumping while being led Picking his feet up easily when asked Allowing his body to be lightly touched with a whip without fear or resentment
Correct and consistent handling teaches a horse to respect his handler. Inconsistent handling develops bad habits for which the horse receives discipline. This is the fault of the handler.
Horses learn differently than we do. They learn by association, meaning that they associate a signal with the action that immediately follows the signal. This is the basis for all training. To teach a horse a new skill or behavior, utilize reinforcement through rewards and corrections.
Rewards include: Food Patting Kind words
Release of pressure Cessation of work
Corrections include: • Words such as “quit” or “no” Sharp voice tones Making the horse repeat the correct behavior Making the horse stop and wait
HORSE HANDLING
73 © United States Hunter Jumper Association, Inc.
In order for the horse to learn, he must connect the reward or punishment with the action within one to three seconds. Whether you are rewarding or correcting, you must be consistent in the behaviors that you correct and the cues that you give to correct the behaviors. Following these procedures makes it easy for your horse to learn appropriate behaviors and new skills86.
Pastured Horses and Turning out Horses
Unless they are sick or injured, horses derive great benefit from daily turnout. The horse is a grazing animal by nature and if left to his natural conditions, he would graze 60 percent of the time. Grazing satisfies a physiological need for roughage and a psychological need to chew fiber. Horses are meant to graze and wander for long periods of time. Due to lack of land and human convenience, we have made them into animals that live in confinement.
It is extremely important to follow turn-out safety precautions because horses can act out in many ways when turned out. When turning a horse out, make sure to lead him all of the way through the gate and turn him to face you before removing the halter or unclipping the lead shank. He should stand quietly before you let him go. Never chase a horse away from the gate, as he may kick at you and it encourages bolting at the gate.
If you leave the halter on in the pasture, make sure that it is leather or at the very least has a leather crownpiece. This allows the halter to break if the horse gets caught on anything. Horses are able to catch their halters on fencing, protruding objects, other horses’ jaws and even on their own feet and shoes. When leaving the paddock, make sure that the gate is firmly closed and latched.
To catch a horse that has been turned out, enter the field and close and latch the gate behind you. Carry the halter (if your horse is not wearing it) and a lead rope over your shoulder but close to your body so that the horse does not see it easily. Some horses do not like to be caught and seeing the halter and/or lead rope is enough to send them galloping in the other direction. If your horse is hard to catch and is turned out alone, take a treat or small bucket of grain to entice him to come near enough for you to catch him. Move slowly and put the lead rope around his neck while he eats the treat. Do not chase him if he runs. If he does run, call him after he stops and try the feed again. Many horses connect being caught with working. If you practice catching your horse and rewarding him with a treat and not bringing him in, he may become more accustomed to being caught.
If there are multiple horses in a field, do not bring treats or grain to catch them as they may invade your personal space for the food or become dominantly aggressive toward other horses in your vicinity. To avoid injuries, do not walk between them in any circumstances. If the horses are unruly, it may be necessary for another person to hold one horse while you catch the other. If two horses in a field become anxious when separated, it may be necessary to bring them both in to avoid panic between one or both of them.
86 The United States Pony Club Manual of Horsemanship Intermediate Riding C Level, Harris, Susan E. 1995 p. 275 – 276
HORSE HANDLING
74 © United States Hunter Jumper Association, Inc.
When leading the horse through the paddock gate, make sure that the gate is open wide enough so that he does not bang his hips. Close and latch the gate when you leave to prevent it from sagging on its hinges.
Stall Safety
When entering a stall, make sure that the door is open to its fullest extent. Walk yourself and the horse into the stall and turn him to face the door. Turning him loose as he walks through the door is dangerous because he may do one or more of the following:
Kick you Bolt into the stall Hit his hips on the door frame Learn to drag people through the stall doorway
Once the horse is standing quietly, remove his halter and close and latch the door securely.
Occasionally a horse lies down in his stall and rolls into the wall, becoming cast. Cast is defined as being trapped against the wall or fence. Some horses lie quietly and wait for help while others are a danger to themselves and any person around them. The signs of a horse being cast overnight are very disturbed bedding in the stall and scratch marks on the wall. If you see these signs, monitor the horse for injuries. To help a cast horse, loop a soft rope or longe line around the fore and hind legs nearest the wall and pull the horse over onto his other side. This is generally a two-person task. If there is not a second person available, remove any ridges of bedding behind the horse’s back and shoulder and then take the horse by the tail and drag his quarters away from the wall. Great care should be taken that the horse does not kick or strike the handlers if he is in panic.
Piling the bedding up on the walls or banking can help prevent a horse from becoming cast. A horse who repeatedly casts himself may benefit from wearing an anti-cast roller or having anti- cast ridges or grooves in his stall. An anti-cast roller is usually made of leather and has a large leather-covered steel piece above the withers that stops the horse from rolling over. Anti-cast ridges are affixed to the wall to give the horse a foothold. His hooves catch on the ridges and help him right himself.
Pasture Safety
Pastures need to be inspected at least once a week for safety. When conducting a safety check, watch for:
Broken or loose fencing Protruding nails Proper function of an electric
fence, if present Holes
Animal burrows Trash Machinery Poisonous plants Erosion
HORSE HANDLING
75 © United States Hunter Jumper Association, Inc.
In addition to regular safety checks, make sure that the paddock does not have any place where one horse can trap another. Water troughs must not have any sharp edges. Any telephone guy wires should be fenced off.
Restraining Horses
Restraining a horse is often necessary for clipping, shoeing or veterinary care. The objectives of restraint are:
Avoid injury to the handler Prevent injury to the horse Allow a procedure to be handled effectively
Every horse responds differently to restraining procedures. An experienced handler can read the body language of a horse and be guided by the horse’s subtle cues. If possible, start off by working in a familiar area where the horse is comfortable. Speaking in a low, soothing and monotonous voice exerts a hypnotic effect on a horse’s psyche, while touching and stroking gains his confidence. Unless it is impractical, work from the horse’s left side as this is where he is used to seeing a handler. Do not tie or cross tie a horse for a procedure, as he may panic if he reacts to the procedure and finds himself confined. The possibility of injury to both horse and handler outweighs any possible benefit.
It is often the best practice to start with a minimal amount of restraint and move to the next level as necessary. Some horses become much harder to handle when certain types of restraint are used. Use common sense and caution when performing a procedure on a horse that is being difficult. Anticipate what the horse will do and try to stay one step ahead of him at all times. Remember that the horse should respect you as the leader of his herd.
Use cooperation rather than domination to get your point across to the horse. Do not allow yourself to display temper. A human will have trouble winning a physical battle with a large animal.
Make sure that your working environment is safe and that there is nothing that the horse can knock over or catch a leg on. The halter, lead shank and restraining devices should be in good repair. Ask anyone who is in the area to leave and confine any pets. Keep your fingers and hands safe from being trapped in the lead rope, chain or twitch. Above all, be ready to hang on and not let go if things get rough unless physical injury to the handler is imminent. As the handler, you are responsible to know which type of restraint works the best for each horse. Some veterinarians are very specific and will ask for a certain type of restraint for a procedure.
Restraint comes in two forms: physical and chemical.
Physical restraints include: Halter and lead rope Confinement in an enclosed area Distracting noises • Skin, rope, chain and “humane” twitches
Lip chain Stud chain Stocks
HORSE HANDLING
76 © United States Hunter Jumper Association, Inc.
The most basic level of restraint is a halter and lead rope in an enclosed area. Back the horse into a corner to give him an impression of control. Although standing on the left side of the horse is the most comforting position to the horse, standing on the same side as the person performing the procedure is much safer for both participants. If the horse attempts to kick, the handler can turn the horse’s head toward both people, which causes the horse’s hind end to spin the opposite direction. It is generally safer to stand close to the horse rather than far away to reduce the force of his kick or strike.
If a stronger restraining method is necessary, a rope halter is a step above a regular halter. The narrow rope of the halter is sharper than its leather or nylon counterparts, increasing the degree of contact on the horse’s head.
Some horses respond well to jiggling the halter or rapping on the horse’s head in a rhythm-less pattern. This can be used in connection with other restraint systems such as a lip or stud chain. It works well with a horse that needs distraction rather than restraint.
Skin pinching or “neck twitching” requires a fair amount of hand strength. Grab and hold a large fold of the horse’s skin on his neck just ahead of his shoulder while the procedure is being performed. The horse’s head should be turned toward you to loosen the skin so you can grasp it. Neck twitches serve as a distracting device87.
A twitch comes in two forms and is applied to the horse’s upper lip. The first is a long wooden handle with either a rope or chain loop at the end. The handler grasps the lip and pulls it through the loop, which is then twisted toward the holder. Care must be taken not to push the twitch in toward your abdomen due to the potential for injury. The second form of twitch is a nutcracker- like device called a “humane” twitch or one-man twitch. The horse’s lip is pinched in the end of the twitch and the device is closed with an attached rope and snap that connects to the horse’s halter. Although this twitch is very convenient, it can also become a dangerous weapon for the horse if he hits the handler in the face. Both types of twitches work on the principle of:
Pressure on the sensory nerves of the lip Acupressure over the calming points
The action of twitching a horse releases endorphins and enkephalins from the central nervous system, which help to sedate and relax the horse. At no point should a twitch be applied to an ear.
A lip chain can be applied across a horse’s upper gums. The lip chain is both self-punishing and self-rewarding in that it tightens or loosens based on the horse’s behavior. The handler should never yank on the chain.
It is important to assess the length of a stud chain, which is put over the horse’s nose. Some
chain lead shanks are long enough to go across the muzzle and up the cheek to the throatlatch ring of the halter. Care must be taken that the halter does not slip across into the horse’s eye.
87 All Horse Systems Go, Loving, Nancy S. DVM, 2006 p. 446 – 454
HORSE HANDLING
77 © United States Hunter Jumper Association, Inc.
Chemical restraints include tranquilizers and sedatives, which should be administered by your veterinarian. A tranquilizer, such as acepromazine, is a generalized central nervous system depressant. It relieves anxiety while having little effect on the horse’s motor skills. Xylazine and detomidine are central nervous system, musculoskeletal and cardiopulmonary depressants. Horses lose their coordination and stability due to the muscle relaxation caused by these drugs88.
Safety
Common sense, awareness of your surroundings, planning, responsibility and knowledge should be your watch words when it comes to barn safety. It is easy to become very casual when working around horses. Even the most experienced personnel should take sensible precautions, such as always wearing appropriate footwear, when working around horses.
Although most of us go to the barn to have a good time, we must be mindful of our equine companions. Loud music and playful yelling and running are all very disturbing to horses. A foolish or over confident person may mistakenly appear aggressively dominant to a horse, triggering the horse’s fight or flight instinct. On the other hand, a horse’s detection of fear in his handler can create an equally negative energy in the relationship. Your best tool is an air of quiet confidence when approaching and handling horses.
Use caution when performing even simple tasks. Before entering your horse’s stall, speak to him to alert him of your presence. Make sure that the horse turns to face you before you step into his stall. Never put yourself in a position that the horse is between you and the door. Even the kindest and most sensible horse can be frightened enough to hurt his handler.
Many horses are unwilling to be cross tied, especially if they are expected to stand in an aisle with no wall behind them. Cross tie the horse in a wash stall or other similar area that has a back wall. Horses that do not cross tie can be tied in their stalls using a slip knot and a safety string, which breaks when the horse resists to a certain amount of pressure. Safety string can be made out of baling twine or multiple loops of yarn. Some cross ties come with a “panic snap” or quick release device built in. This is generally a metal collar that releases when sufficient pressure is brought to bear on the tie. A panic snap can be used in place of a safety string.
A horse should be tied in the following manner:
At the level of his withers to avoid injury to his neck if he pulls back • With enough slack to turn his head but not enough that he can get his leg over the rope;
approximately 18” of slack is correct With a quick release knot To a secure object such as a fence post; never tie to a fence board89
88 All Horse Systems Go, Loving, Nancy S. DVM, 2006 p. 446 – 454 89 The United States Pony Club Manual of Horsemanship Basics for Beginners D Level, Harris, Susan E. 1994 p. 141 – 144
HORSE HANDLING
78 © United States Hunter Jumper Association, Inc.
Horses should never be tied with the following: Leather shanks because they break too easily • Chain shanks placed across the horse’s nose because they cause injury and may not be
able to be unknotted Nylon halters because they do not break Any knot other than a quick-release knot
Never leave a tied horse unsupervised.
Some horses have not been taught to tie. When tying them for the first time, make sure that they are in an enclosed space in case they break free.
It is not prudent to leave a horse loose when you are working with him. Horses can easily trap you in the back of their stall or step on you in panic.
Walking a horse, especially a saddled horse, under another horse’s cross ties is dangerous. The correct method of walking your horse past a cross tied horse is to undo the cross tie to avoid catching it on the saddle and panicking the two horses. A second person should stand beside the cross tied horse to prevent it from reaching out at the passing horse.
Young Horses
Training young horses is a process that should be accomplished by slowly building a solid foundation with each lesson building on previously learned skills. A good maxim is: The less experienced the horse, the more experienced the handler. A young or unskilled rider should not be asked to work with a young or green horse.
You should be your horse’s teacher and leader, not conqueror or tyrant. Be patient and prepared to explain a skill to a horse in different ways until he understands you. Take frequent breaks and never underestimate the value of praise to a young horse.
Have a system but not necessarily a schedule. Each horse is an individual and as such will learn at his own rate. Pre-determine your system and stay with it. Be willing to learn from the others who went before you, especially if you hit a roadblock that you can’t seem to get around. Even on the worst day, never lose your temper. Be fair and just with your horse.
Bibliography
All Horse Systems Go, Loving, Nancy S. DVM 2006
The United States Pony Club Manual of Horsemanship Intermediate Riding C Level, Harris, Susan E. 1995
The United States Pony Club Manual Basics for Beginners D Level, Harris, Susan E. 1994
USHJA Trainer Certification Manual & Study Guide, 2010
79 © United States Hunter Jumper Association, Inc.
HORSE HEALTH
General Health Keeping horses healthy can be a tough job. It is important to notice things about each individual horse, such as his eating and drinking habits, normal amounts of manure and whether or not he lies down on a regular basis. A good horseman can walk past a stall and immediately pick up that a horse is not himself. Some precautions to take are:
Isolate new horses for 2 weeks to help prevent an outbreak of communicable diseases Minimize nose-to-nose touching with strange horses Do not share equipment Keep vaccinations up to date
If horses need to be quarantined or isolated, the following bio-security protocols apply:
Isolation requires housing exposed or affected horses away from other horses. If affected horses must be near others, a solid barrier with no gaps must be erected between them.
Use different equipment to feed, clean and work with the affected horses. Buckets, feed tubs, lead shanks and halters should be clearly labeled as belonging to an individual horse. If equipment must be shared it should be disinfected by the following steps: Scrub thoroughly and clean with a detergent and water, rinse, apply disinfectant and follow by a final rinse. This should be done in an area with minimal foot and traffic flow that can be cleaned and disinfected after the procedure (preferably not in a grazing area but on a solid surface close to a drain). Cloth items should be laundered and thoroughly dried between each use. Disinfectant may be added to rinse water, but an additional rinse cycle must be used to remove disinfectant residue. Equipment that cannot be effectively disinfected, such as sponges and brushes, should not be shared between horses.
Assign specific individual(s) to care for affected horse(s). Ideally, a caretaker should not be responsible for both healthy and affected horses. If it is not practical to have a specific individual caring for a sick horse, the sick horse should be handled last.
Horse handlers must undergo rigorous hygiene procedures, such as wearing disposable gloves, thoroughly washing hands, washing and disinfecting footwear and wearing separate clothes when contacting the affected horses.
After handling a sick horse, gloves and booties should be disposed of in a lidded trash receptacle and gowns or barrier clothes should be put in a lidded hamper. Hands should be washed with pump soap for a minimum of 15 seconds. If water is not available, hands may be cleaned with a 62% ethyl alcohol hand gel or foam disinfectant and allowed to dry for 10 to 15 seconds.
Anything that touches an infected horse or carries secretions or manure from a sick horse has the potential to transfer pathogens to other horses. Do not share equipment or tack among infected and healthy horses on the facility.
80 © United States Hunter Jumper Association, Inc.
HORSE HEALTH
Post restricted access signs in the isolation area.
Footbaths and hand sanitizers should be placed at access points to the isolation stall. Ensure that footwear is cleaned when leaving the area.
Instruct caretakers not to submerge water hoses when filling buckets.
Disinfect wheelbarrow and tractor tires because manure on these tires is a potential source of the infection agent and can be tracked everywhere else on the facility.
Bedding from infected horses should be disposed of in separate dumpsters.
When cleaning the facility, note that non-porous stall surfaces (e.g. varnished wood, metal, painted concrete, asphalt, poured textured floors and stall mats) should be cleaned with a detergent, rinsed and either allowed to dry or squeegeed of excess water. Select a disinfectant that has a documented effectiveness in the presence of 10% organic matter, works in the local water type (i.e., hard or soft water) and is safe to use around horses and humans. It is necessary to thoroughly clean before using bleach because bleach is inactivated by organic matter. Bleach is the only practical commercially available disinfectant that kills clostridial spores. Viruses such as influenza, herpesvirus and equine viral arteritis are readily killed with detergents and disinfectants.
Vermin control is critical. Rodent, bird and insect control should be evaluated and upgraded as necessary. If adequate control cannot be achieved by traps, insecticides and rodenticides it may be necessary to screen the horse’s stall. Non-equines (e.g. cats, dogs and goats) should not be permitted in the isolation area.
Prior to repopulating a facility having housed affected animals, the facility should be thoroughly cleaned. Rubber boots, coveralls, goggles and gloves are to be worn by cleaning personnel. Completely strip stalls of all bedding material. Brush down all walls of cobwebs and other residual material.
Begin by wetting down all non-porous surfaces including walls, ceilings and ledges (top of walls) with detergent and water. Powdered laundry detergent can be used. Some veterinary disinfectants also have a detergent incorporated in the mix. Allow 5 to 10 minutes for the liquid to soften caked-on organic material, and then scrub surfaces with a stiff-bristled broom to loosen all of the material. Rinse the walls, beginning at the top toward the drain. Repeat this step until all of the surfaces are clean, including corners, ledges and drains. Do not use power washers set at greater than 120 psi which can aerosolize pathogens. A garden hose with a regular nozzle can be used. Squeegee excess water off surfaces or allow them to dry. Spray properly diluted disinfectant on surfaces, starting at the top of stall walls and working from the far end of the stall to the exit. Allow to dry and repeat. Completely clean and disinfect aisles, wash racks and common areas following similar procedures.
Porous surfaces, such as wood construction, dirt or clay flooring, are extremely difficult to clean and disinfect. It is critical to remove as much organic matter as possible. Thorough cleaning with large quantities of water can turn dirt or sand floors to a slurry and should be avoided. Remove all bedding and organic matter and thoroughly dry scrub all surfaces. Follow up with scrubbing
81 © United States Hunter Jumper Association, Inc.
HORSE HEALTH
stall walls with a detergent solution. Disinfectants can be sprayed on surfaces, but may have inadequate results if the surfaces are not also scrubbed. Remove all buckets, hay nets, feed tubs, stall webbings, metal grates, etc., and scrub with detergent solution, rinse, disinfect and then rinse thoroughly with potable water and allow to dry90.
Take a quarantined horse’s temperature two times per day to monitor his health.
Vital Signs
The true horseman recognizes the signs of health and sickness in his horses. A healthy horse has a bright, interested look with a shiny coat and loose, supple skin. His gums are a light pink. He may lie down periodically during the day but will get up easily. Some horses may rest a hind leg, but it is not normal for a horse to stand with one front leg out ahead of him. This behavior is called pointing and may indicate pain in the horse’s foot.
A normal horse enjoys eating and drinks about 12 gallons of water per day. He produces 35 to 50 pounds of manure per day and generally passes it about 8 times per day in the form of soft balls. His urine is slightly cloudy and light yellow or straw colored. This cloudy appearance is due to mucous and calcium oxalate crystals, which are normal components of urine91.
It is important to know what your horse’s normal vital signs are (temperature, pulse and respiration) in order to understand his health. A horse’s normal temperature is between 100 and 101 degrees. Temperature is taken by the use of a rectal thermometer. A digital thermometer is the easiest, but a glass veterinary thermometer can also be used. Make sure to shake the glass thermometer down below 97 degrees before inserting it into the rectum. His pulse or heart rate should be between 30 and 45 beats per minute. To take a horse’s pulse, put your finger on his facial artery (which crosses under his jawbone) for 10 seconds and multiply the result by 6. His resting respiration rate should be between 12 and 25 breaths. If it is necessary to obtain a base line for the horse’s vital signs, take his TPR (temperature, pulse and respiration) before you ride and after he is cooled out92.
A horse should be an appropriate weight. One that is too thin does not have enough fat between his muscles and skin. His ribs show and he has hollows in his flanks and hindquarters. He may appear depressed and dull. A fat horse has fat up over his back. His ribs are covered with fat and his belly is large. His hindquarters appear to be round instead of muscled. A horse that is too fat may be in danger of foundering.
A horse should have a health exam at least once every 12 months. It is important to keep records of your horse’s health including vaccinations, shoeing, de-worming and the date each procedure was performed. In addition, he should be tested annually for Equine Infectious Anemia (EIA) using a Coggins test, which detects the antibodies formed when a horse is infected with EIA.
90 AAEP Website, 2006 91 All Horse Systems Go, Loving, Nancy S. 2006 p. 167 92 The United States Pony Club Manual of Horsemanship Intermediate Riding C Level, Harris, Susan E. 1995 p. 234 – 237
82 © United States Hunter Jumper Association, Inc.
HORSE HEALTH
Signs that your horse does not feel well include: Colic (belly pain): He may paw, kick at his belly, stretch out as if to urinate, stop eating,
break out into a sweat, lie down, roll or sit on his hindquarters like a dog. Call your veterinarian immediately.
Coughing: He may have a wet cough with runny eyes and nose. Mucous should not be white, yellow or green.
Diarrhea or dry, hard manure balls Depression: He does not want to eat, drink or move and stands hunched up in his stall. • Fever: A fever of 102 degrees or higher is serious. Check the horse’s feet to make sure
they are not warm, especially if he is standing with his hind legs up under his body and his front feet out ahead of him. See Laminitis in this section for signs of founder. Call your veterinarian immediately93.
Vaccinations
Horses should be vaccinated on a regular schedule. Vaccines work by getting the horse’s body to produce antibodies for a particular disease. Vaccines do not give a horse 100 percent immunity, but a horse that is immunized will have a milder case of the disease. Make sure that he receives the appropriate vaccinations for his area of the country. The most common vaccines are:
Tetanus: Given once a year unless the horse gets a deep cut and requires a booster. Encephalomyletis (sleeping sickness): This disease is carried by birds and is transmitted
to the horse by a mosquito bite. In the north the vaccine is given annually in the spring. In the south the vaccine may be necessary every 3 or 6 months because the mosquitoes are active all year.
Influenza (flu): Protection lasts for 3 months. This is an important vaccination to give horses that travel and encounter strange horses.
Rhinopneumonitis: Intramuscular injection or intranasal inoculation that gives immunity for 3 to 6 months. Currently there is no vaccine to protect against rhinopneumonitis, also known as EHV-1 (see equine herpes virus in the Respiratory section).
Rabies: Given annually. Potomac horse fever: Ask your veterinarian if this is necessary in your area. Strangles: Two intranasal doses 3 weeks apart, followed by yearly intranasal doses. West Nile virus: Two intramuscular injections are given 3 to 5 weeks apart and then
annually.
Inflammation
The body responds to injury or infection with inflammation. The five signs of inflammation are: Heat Swelling Redness Pain on pressure Reduced use of affected area
93 The United States Pony Club Manual of Horsemanship Basics for Beginners D Level, Harris, Susan E. 1994 p. 211 - 212
83 © United States Hunter Jumper Association, Inc.
HORSE HEALTH
When inflammation is present, circulation is increased at the site as the body delivers leukocytes and antibodies or defense cells and takes away cellular debris. The cellular defense cells attempt to fight off the irritants and in the process exudates leak out of the capillaries into the surrounding tissue. Inflammation leads to healing, but sometimes inflammation needs to be controlled. Left unchecked, it can cause proud flesh, excessive scar tissue and loss of function. Treatments include cold therapy and antibiotics, but check with your veterinarian for the most appropriate treatment for your horse.94.
Edema
Edema, or swelling, refers to a localized build up of fluid. Heat may also be present. This condition is known as “stocking up” when it occurs in the legs. Edema may be caused by bug bites, strain, injury, trauma, illness, poor circulation, lack of exercise, feed changes or other environmental issues.
Dehydration
Dehydration occurs when the horse’s body tissues lose too much water. Horses can dehydrate through excessive sweating or by the under-consumption of water. Dehydration may lead to colic. A quick check for dehydration is to pinch the skin of the shoulder. If the skin stays up in a tented fashion or does not snap back into place quickly, the horse may be dehydrated. Encourage him to drink and contact your veterinarian immediately if the condition persists or is severe.
Shock
Shock is the collapse of the circulatory system due to traumatic injury. The body directs blood flow away from the outer extremities such as the legs and head as the body attempts to deal with a serious injury. This is an emergency that requires immediate veterinary attention. Signs of shock are:
Sweating, trembling, cool skin Apathetic attitude, depression Cold ears and legs and subnormal temperature Rapid, weak pulse and low or falling blood pressure Pale or bluish mucous membranes Weakness and collapse
Shock can be caused by: Severe trauma Burns Major infections Massive bleeding
Dehydration Intestinal obstructions Heart failure Anaphylactic shock95
94 The United States Pony Club Manual of Horsemanship Advanced Horsemanship, B, HA, A Levels, Harris, Susan E. 1996 p. 355 - 356 95 The United States Pony Club Manual of Horsemanship Advanced Horsemanship B, HA, A Levels, Harris, Susan E. 1996 p. 354
84 © United States Hunter Jumper Association, Inc.
HORSE HEALTH
Medications
All drugs should be given under the supervision of your veterinarian. Some of the common drugs are:
Antibiotics Used to kill bacteria and control bacterial infections. Medications may be prohibited by USEF rules. Make sure to do your due diligence to stay within the drug and medication rules. Common types of antibiotics are:
Trimethoprim Sulfas Penicillins Gentomycim
Corticosteroids Powerful anti-inflammatories. The horse’s body produces corticosteroids when adrenocorticotropic hormone (ACTH) stimulates the adrenal glands. A common corticosteroid is dexamethasone.
Non-steroidal anti-inflammatory drugs (NSAIDs) Used to reduce inflammation and to help pain associated with arthritis, sprains, strains and fevers. Common NSAIDs are:
Phenylbutazone • Flunixin maglumines (Banamine™) Ketoprophen
Side effects of NSAIDs are: Gastrointestinal ulcers Lesions of the mouth and tongue Kidney damage If injected improperly some NSAIDs (such as phenylbutazone) can cause serious
tissue damage
Tranquilizers and Sedatives Drugs that work through the central nervous system to circumvent a horse’s reaction to pain or other stimuli. Common drugs include xylazine (Rompun™) and acepromazine.
Parasites
Horses are exposed to a barrage of parasites all of the time. A de-worming program should be designed by your veterinarian. Different regions of the country have different de-worming needs, which can range from daily treatments to once every four months. Pasture rotation, manure clean-up and removal and avoiding overcrowded conditions help in minimizing parasite problems. Avoid haphazard de-worming and reliance on a single product. Long term warm and humid conditions are ideal for parasite growth. Climates with harsh cold winters kill larval stages and cause parasitic eggs to go dormant.
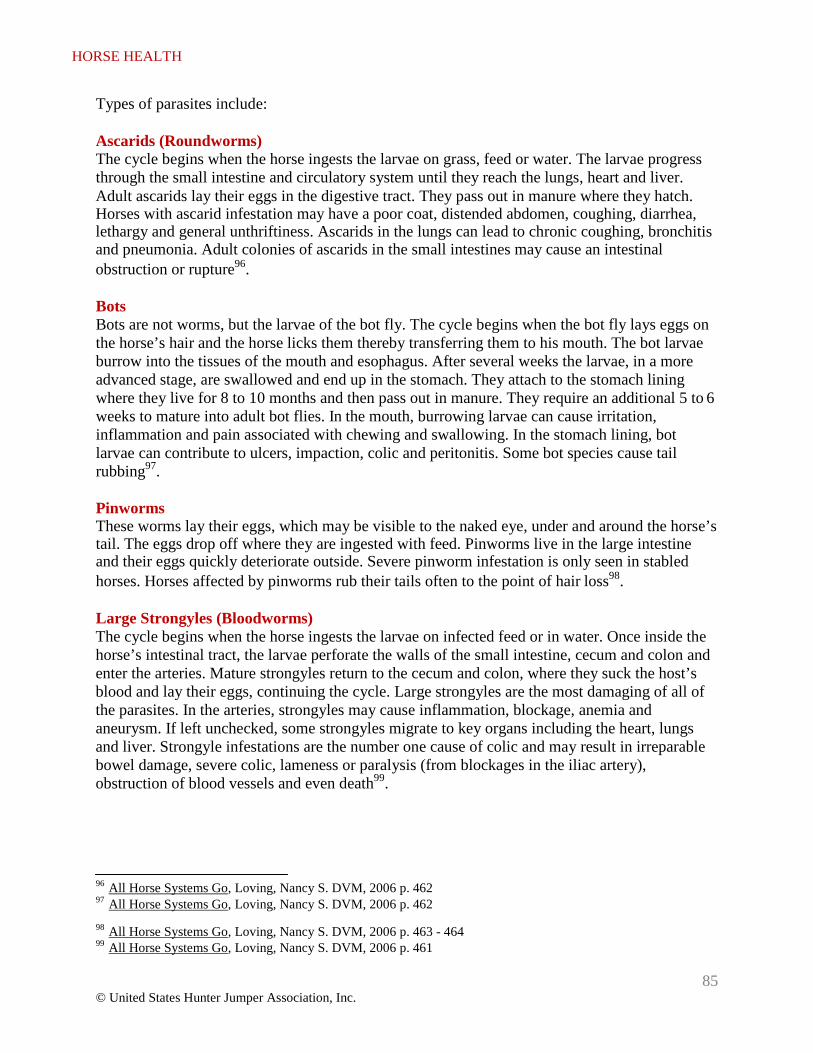
85 © United States Hunter Jumper Association, Inc.
HORSE HEALTH
Types of parasites include:
Ascarids (Roundworms) The cycle begins when the horse ingests the larvae on grass, feed or water. The larvae progress through the small intestine and circulatory system until they reach the lungs, heart and liver. Adult ascarids lay their eggs in the digestive tract. They pass out in manure where they hatch. Horses with ascarid infestation may have a poor coat, distended abdomen, coughing, diarrhea, lethargy and general unthriftiness. Ascarids in the lungs can lead to chronic coughing, bronchitis and pneumonia. Adult colonies of ascarids in the small intestines may cause an intestinal obstruction or rupture96.
Bots Bots are not worms, but the larvae of the bot fly. The cycle begins when the bot fly lays eggs on the horse’s hair and the horse licks them thereby transferring them to his mouth. The bot larvae burrow into the tissues of the mouth and esophagus. After several weeks the larvae, in a more advanced stage, are swallowed and end up in the stomach. They attach to the stomach lining where they live for 8 to 10 months and then pass out in manure. They require an additional 5 to 6 weeks to mature into adult bot flies. In the mouth, burrowing larvae can cause irritation, inflammation and pain associated with chewing and swallowing. In the stomach lining, bot larvae can contribute to ulcers, impaction, colic and peritonitis. Some bot species cause tail rubbing97.
Pinworms These worms lay their eggs, which may be visible to the naked eye, under and around the horse’s tail. The eggs drop off where they are ingested with feed. Pinworms live in the large intestine and their eggs quickly deteriorate outside. Severe pinworm infestation is only seen in stabled horses. Horses affected by pinworms rub their tails often to the point of hair loss98.
Large Strongyles (Bloodworms) The cycle begins when the horse ingests the larvae on infected feed or in water. Once inside the horse’s intestinal tract, the larvae perforate the walls of the small intestine, cecum and colon and enter the arteries. Mature strongyles return to the cecum and colon, where they suck the host’s blood and lay their eggs, continuing the cycle. Large strongyles are the most damaging of all of the parasites. In the arteries, strongyles may cause inflammation, blockage, anemia and aneurysm. If left unchecked, some strongyles migrate to key organs including the heart, lungs and liver. Strongyle infestations are the number one cause of colic and may result in irreparable bowel damage, severe colic, lameness or paralysis (from blockages in the iliac artery), obstruction of blood vessels and even death99.
96 All Horse Systems Go, Loving, Nancy S. DVM, 2006 p. 462 97 All Horse Systems Go, Loving, Nancy S. DVM, 2006 p. 462 98 All Horse Systems Go, Loving, Nancy S. DVM, 2006 p. 463 - 464 99 All Horse Systems Go, Loving, Nancy S. DVM, 2006 p. 461
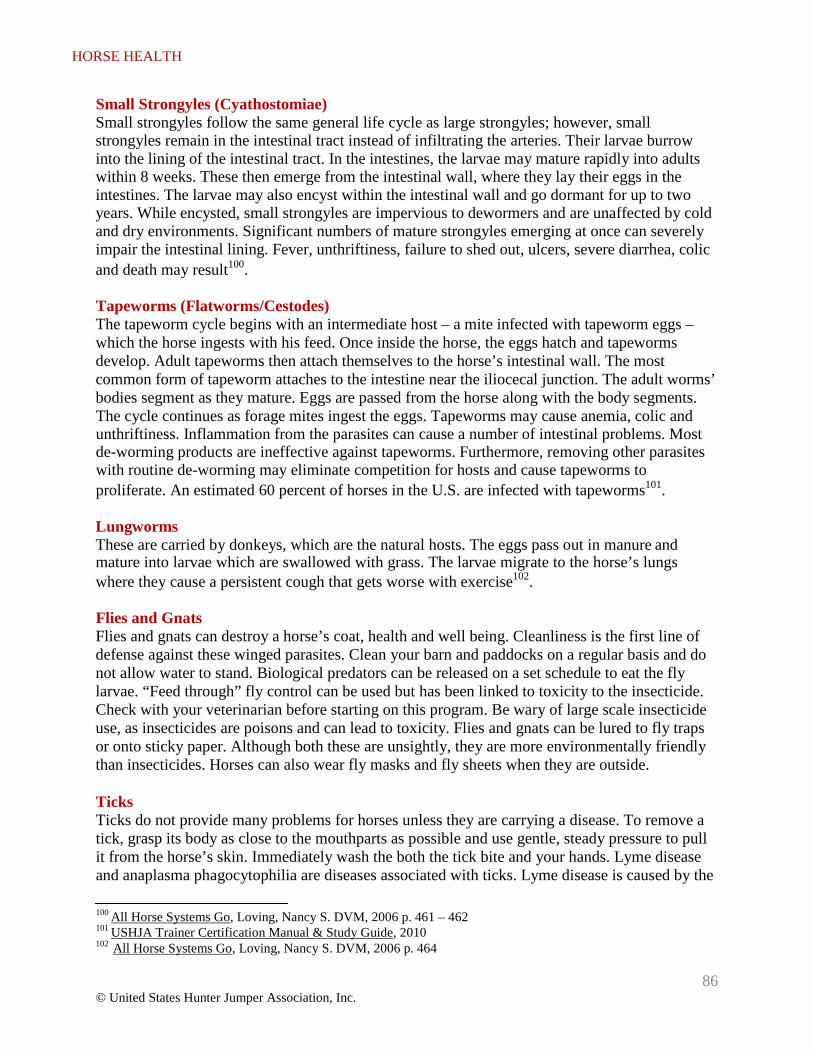
86 © United States Hunter Jumper Association, Inc.
HORSE HEALTH
Small Strongyles (Cyathostomiae) Small strongyles follow the same general life cycle as large strongyles; however, small strongyles remain in the intestinal tract instead of infiltrating the arteries. Their larvae burrow into the lining of the intestinal tract. In the intestines, the larvae may mature rapidly into adults within 8 weeks. These then emerge from the intestinal wall, where they lay their eggs in the intestines. The larvae may also encyst within the intestinal wall and go dormant for up to two years. While encysted, small strongyles are impervious to dewormers and are unaffected by cold and dry environments. Significant numbers of mature strongyles emerging at once can severely impair the intestinal lining. Fever, unthriftiness, failure to shed out, ulcers, severe diarrhea, colic and death may result100.
Tapeworms (Flatworms/Cestodes) The tapeworm cycle begins with an intermediate host – a mite infected with tapeworm eggs – which the horse ingests with his feed. Once inside the horse, the eggs hatch and tapeworms develop. Adult tapeworms then attach themselves to the horse’s intestinal wall. The most common form of tapeworm attaches to the intestine near the iliocecal junction. The adult worms’ bodies segment as they mature. Eggs are passed from the horse along with the body segments. The cycle continues as forage mites ingest the eggs. Tapeworms may cause anemia, colic and unthriftiness. Inflammation from the parasites can cause a number of intestinal problems. Most de-worming products are ineffective against tapeworms. Furthermore, removing other parasites with routine de-worming may eliminate competition for hosts and cause tapeworms to proliferate. An estimated 60 percent of horses in the U.S. are infected with tapeworms101.
Lungworms These are carried by donkeys, which are the natural hosts. The eggs pass out in manure and mature into larvae which are swallowed with grass. The larvae migrate to the horse’s lungs where they cause a persistent cough that gets worse with exercise102.
Flies and Gnats Flies and gnats can destroy a horse’s coat, health and well being. Cleanliness is the first line of defense against these winged parasites. Clean your barn and paddocks on a regular basis and do not allow water to stand. Biological predators can be released on a set schedule to eat the fly larvae. “Feed through” fly control can be used but has been linked to toxicity to the insecticide. Check with your veterinarian before starting on this program. Be wary of large scale insecticide use, as insecticides are poisons and can lead to toxicity. Flies and gnats can be lured to fly traps or onto sticky paper. Although both these are unsightly, they are more environmentally friendly than insecticides. Horses can also wear fly masks and fly sheets when they are outside.
Ticks Ticks do not provide many problems for horses unless they are carrying a disease. To remove a tick, grasp its body as close to the mouthparts as possible and use gentle, steady pressure to pull it from the horse’s skin. Immediately wash the both the tick bite and your hands. Lyme disease and anaplasma phagocytophilia are diseases associated with ticks. Lyme disease is caused by the
100 All Horse Systems Go, Loving, Nancy S. DVM, 2006 p. 461 – 462 101 USHJA Trainer Certification Manual & Study Guide, 2010 102 All Horse Systems Go, Loving, Nancy S. DVM, 2006 p. 464
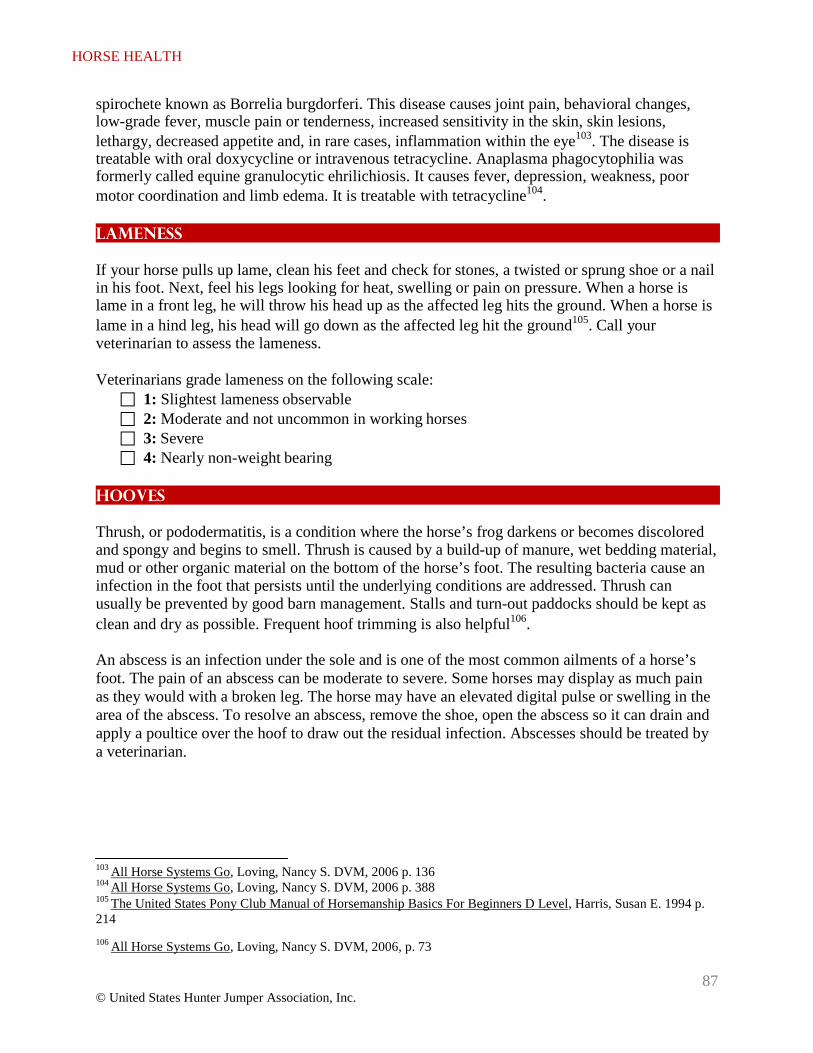
87 © United States Hunter Jumper Association, Inc.
HORSE HEALTH
spirochete known as Borrelia burgdorferi. This disease causes joint pain, behavioral changes, low-grade fever, muscle pain or tenderness, increased sensitivity in the skin, skin lesions, lethargy, decreased appetite and, in rare cases, inflammation within the eye103. The disease is treatable with oral doxycycline or intravenous tetracycline. Anaplasma phagocytophilia was formerly called equine granulocytic ehrilichiosis. It causes fever, depression, weakness, poor motor coordination and limb edema. It is treatable with tetracycline104.
Lameness
If your horse pulls up lame, clean his feet and check for stones, a twisted or sprung shoe or a nail in his foot. Next, feel his legs looking for heat, swelling or pain on pressure. When a horse is lame in a front leg, he will throw his head up as the affected leg hits the ground. When a horse is lame in a hind leg, his head will go down as the affected leg hit the ground105. Call your veterinarian to assess the lameness.
Veterinarians grade lameness on the following scale:
1: Slightest lameness observable 2: Moderate and not uncommon in working horses 3: Severe 4: Nearly non-weight bearing
Hooves
Thrush, or pododermatitis, is a condition where the horse’s frog darkens or becomes discolored and spongy and begins to smell. Thrush is caused by a build-up of manure, wet bedding material, mud or other organic material on the bottom of the horse’s foot. The resulting bacteria cause an infection in the foot that persists until the underlying conditions are addressed. Thrush can usually be prevented by good barn management. Stalls and turn-out paddocks should be kept as clean and dry as possible. Frequent hoof trimming is also helpful106.
An abscess is an infection under the sole and is one of the most common ailments of a horse’s foot. The pain of an abscess can be moderate to severe. Some horses may display as much pain as they would with a broken leg. The horse may have an elevated digital pulse or swelling in the area of the abscess. To resolve an abscess, remove the shoe, open the abscess so it can drain and apply a poultice over the hoof to draw out the residual infection. Abscesses should be treated by a veterinarian.
103 All Horse Systems Go, Loving, Nancy S. DVM, 2006 p. 136 104 All Horse Systems Go, Loving, Nancy S. DVM, 2006 p. 388 105 The United States Pony Club Manual of Horsemanship Basics For Beginners D Level, Harris, Susan E. 1994 p. 214 106 All Horse Systems Go, Loving, Nancy S. DVM, 2006, p. 73
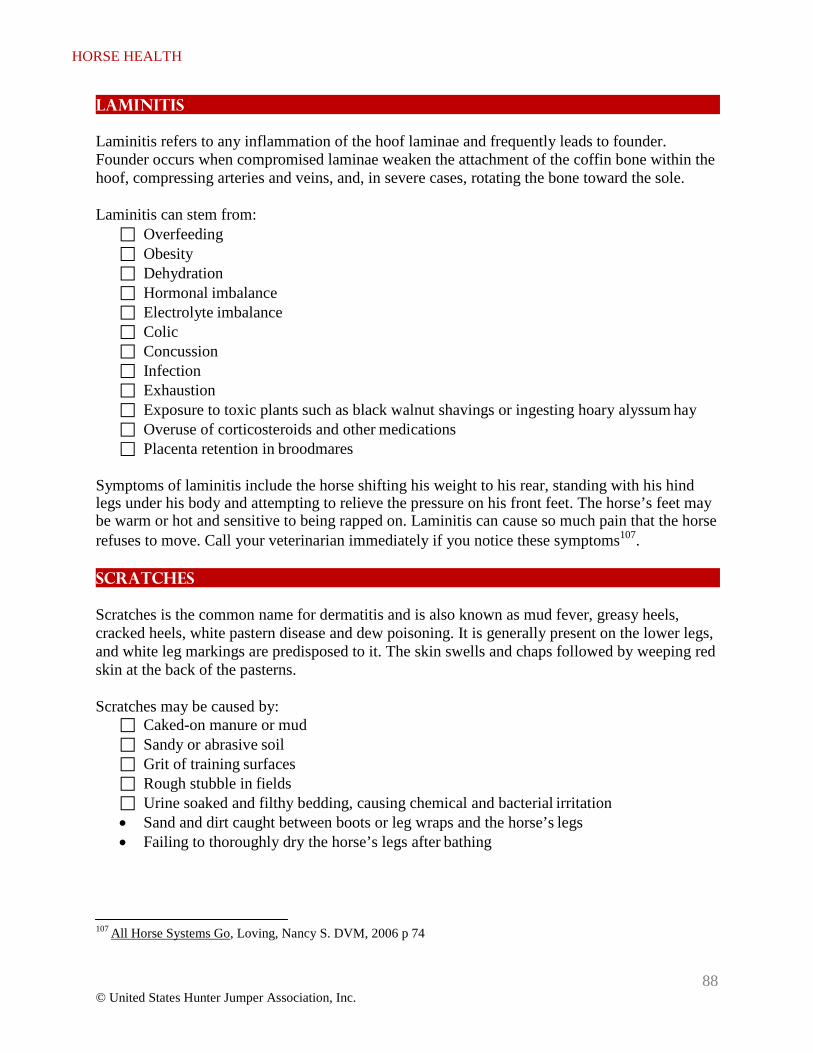
88 © United States Hunter Jumper Association, Inc.
HORSE HEALTH
Laminitis
Laminitis refers to any inflammation of the hoof laminae and frequently leads to founder. Founder occurs when compromised laminae weaken the attachment of the coffin bone within the hoof, compressing arteries and veins, and, in severe cases, rotating the bone toward the sole.
Laminitis can stem from:
Overfeeding Obesity Dehydration Hormonal imbalance Electrolyte imbalance Colic Concussion Infection Exhaustion Exposure to toxic plants such as black walnut shavings or ingesting hoary alyssum hay Overuse of corticosteroids and other medications Placenta retention in broodmares
Symptoms of laminitis include the horse shifting his weight to his rear, standing with his hind legs under his body and attempting to relieve the pressure on his front feet. The horse’s feet may be warm or hot and sensitive to being rapped on. Laminitis can cause so much pain that the horse refuses to move. Call your veterinarian immediately if you notice these symptoms107.
Scratches
Scratches is the common name for dermatitis and is also known as mud fever, greasy heels, cracked heels, white pastern disease and dew poisoning. It is generally present on the lower legs, and white leg markings are predisposed to it. The skin swells and chaps followed by weeping red skin at the back of the pasterns.
Scratches may be caused by:
Caked-on manure or mud Sandy or abrasive soil Grit of training surfaces Rough stubble in fields Urine soaked and filthy bedding, causing chemical and bacterial irritation • Sand and dirt caught between boots or leg wraps and the horse’s legs • Failing to thoroughly dry the horse’s legs after bathing
107 All Horse Systems Go, Loving, Nancy S. DVM, 2006 p 74
HORSE HEALTH
Another form of scratches known as photoactivated vasculitis can be brought on by photosensitivity. This form can be present on other areas of the body such as the muzzle108.
The best treatment for scratches is early identification of both the condition and the underlying cause. Horses may experience scratches due to:
Alfalfa or legume hay (causes photosensitivity) Clover or legume pasture (causes photosensitivity) Pasture that contains ragwort, buckwheat, vetch, St. Johnswort or horsebrush (causes
photosensitivity and potential liver damage) Wet, marshy land Alkaline soil Poor hygiene Long feathers on the pasterns • Failing to thoroughly dry the horse’s legs after bathing
After removing the horse from the causative agent, clip the hair away from the affected area. Scrub the affected area with an antiseptic soap and then towel dry. Treat the area with corticosteroid ointment, triple antibiotic ointment, aloe vera gel, Desitin® or Vitamin A&D®
ointment. Bandage the leg with a light pressure wrap109. Change the bandage in accordance with your veterinarian’s instructions.
Tying Up
Tying up is also known as exertional rhabdomyolysis (ER), myositis, azoturia or Monday morning syndrome. An inflammatory event in the muscle is known as myositis while a muscular cramp is known as tying up syndrome. Exertional rhabdomyolysis occurs when muscle tissues undergo damage, especially from exercise. Symptoms include a higher than normal heart rate during exercise and a poor heart rate recovery. Muscles may visibly cramp, spasm or swell. Sweating from pain or colic-like symptoms may also be present. In severe cases, myoglobin released from damaged muscle tissue turns the urine brown or red. Kidney failure may result.
The cause of ER is almost always over exercise. Other factors include dehydration, electrolyte depletion, alkaline blood PH and reduced oxygenation of muscles. Avoid overfeeding carbohydrates. If a horse shows signs of ER, immediately stop exercising him and cover his hindquarters with a cooler or saddle pad. If there is water available, sponge his neck and shoulders. Do not make him walk until he is able to. Call your veterinarian immediately.
EPM
Equine Protozoal Myelitis (EPM) is caused by a parasitic migration in the spinal cord that results in significant nerve damage. Horses become infected when they ingest food or water that is contaminated with animal droppings containing the sporocysts of EPM-causing parasites. The parasite migrates into the central nervous system and creates lesions in the spinal cord. The
108 All Horse Systems Go, Loving, Nancy S. DVM, 2006 p. 367 – 371 109 All Horse Systems Go, Loving, Nancy S. DVM, 2006 p. 367 – 371
89
© United States Hunter Jumper Association, Inc.
HORSE HEALTH
110 All Horse Systems Go, Loving, Nancy S. DVM, 2006 p. 297 – 298
90 © United States Hunter Jumper Association, Inc.
disease is diagnosed by blood tests and spinal taps. The horse is the “end host” of the protozoal parasite and therefore cannot infect other horses. Treatment requires aggressive veterinary attention. Prevention is better than cure: Keep the barn and its surrounding areas free of opossums, skunks and other possible intermediate hosts.
Symptoms include localized lack of coordination, gait abnormality, weakness and muscle atrophy. The horse may present symptoms in the rear legs, front legs or only on one side. Depending on the severity of the case, the horse may show any of these symptoms:
High head carriage Falling on the forehand Head tossing Refusals Run outs Noticeable reduction in stride length Falling Collapsing of the hindquarters Asymmetrical muscle atrophy
If the protozoal parasites affect the brain stem, behaviors may include:
Aggression Laziness Anxiety Hyper-sensitivity Unpredictability
Colic
Colic is defined as belly pain. Call your veterinarian immediately if you notice any of the following symptoms of colic:
Depression Lying down at unusual times Restlessness General discomfort Pawing Kicking or biting at the belly Flehmen (curling of the upper lip) Sweating Increased pulse and respiration Disinterest in eating Yawning and grinding of teeth110
HORSE HEALTH
114 All Horse Systems Go, Loving, Nancy S. DVM, 2006 p. 308 - 310
91 © United States Hunter Jumper Association, Inc.
Types of colic include:
Spasmodic This stems from spasms of the smooth muscles of the intestines. Spasmodic colic can be brought on by weather or barometric pressure changes, shipping, competition, toxic plants, blister beetles or organophosphate de-wormers. Spasmodic colic can cause an intussusception where the bowel telescopes into an adjacent section. This acts as an impaction colic and must be surgically addressed111.
Impaction This stems from dry intestinal contents when intestinal motility is slow or when there is insufficient intestinal water present. Impaction colic can be brought on by dehydration, electrolyte imbalances that affect gut motility or an obstruction. It generally starts off very mildly with intermittent pain. Manure may be non-existent, dry or covered in mucous. The predominant causes of impaction colic are limited exercise, decreased water intake, the consumption of coarse food, bedding or foreign materials, enteroliths or heavy parasite infestation112.
Gaseous This stems from gas build up in the intestine causing over-distention and pain. Gaseous colic is caused by any change to the normal movement patterns in the intestines. Bacterial overgrowth occurs in the stagnant gut, resulting in the death of the bacteria. The death of certain bacteria releases endotoxins, which may result in shock, laminitis or death113.
Intestinal Displacement or Torsion This stems from a loop of bowel that has moved into an inappropriate position in the body. The bowel may become trapped or twisted. In some cases, a strangulation obstruction may occur, which can be caused by:
Torsion (large intestinal twist) Volvulus (small intestine twist) Incarcerated (trapped) bowel Intestinal lipoma Nephrosplenic entrapment (pelvic flexure becomes entrapped behind the ligament
of the splenic) Intussusception (telescoped bowel)
Another type of displacement is intestinal torsion, which is caused by abnormal intestinal contracts aided by gravity. All of the above conditions require immediate veterinary attention114.
Sand Sand colic, which causes impaction, stems from the horse ingesting sand. The heavy and abrasive sand can erode through the intestinal lining at the location of the obstruction. Early diagnosis is of the utmost importance115.
111 All Horse Systems Go, Loving, Nancy S. DVM, 2006 p. 303 112 All Horse Systems Go, Loving, Nancy S. DVM, 2006 p. 303 – 308 113 All Horse Systems Go, Loving, Nancy S. DVM, 2006 p. 308

HORSE HEALTH
92 © United States Hunter Jumper Association, Inc.
Other factors involved in the onset of colic include: Colic caused by diet or management: Colic may be brought on by inappropriate
feeding. Causes include: o Overabundance of foods such as grain, alfalfa hay or rich pasture o Sudden feed changes o Moldy food o Cribbing o Feeding after exercise o Dehydration after exercise116
Gastric ulcer syndrome: This may cause intermittent colic.
Choke
This condition is also known as esophageal obstruction. Symptoms include inability to swallow, excessive drooling, copious amounts of nasal discharge, anxiety and general discomfort. Call your veterinarian immediately, as choking horses are at risk for aspiration pneumonia.
Respiratory
Diseases and problems that affect the respiratory system are:
Equine Herpes Virus (EHV) Also known as rhinopneumonitis or rhino, this disease is extremely contagious. It can be transmitted:
From horse to horse • Carried on a human’s clothing or footwear By a common water source
EHV may flare up from a latent virus. A horse can appear clinically normal and be responsible for shedding the virus, which may spread it to other horses. The virus has the following sub-types:
EHV-1: This most prevalent and virulent sub-type has been linked to viral abortions and neurological disorders.
EHV-4: Requires a longer incubation period and may present with flu-like symptoms. Initial symptoms are mild respiratory distress and nasal discharge that turns thick and yellowish and becomes crusty. The horse may have an elevated temperature, pinpoint hemorrhaging of the mucous membranes and edema of the limbs or abdomen. The dormant virus remains in the trigeminal facial nerve or within the lymphatic system.
Heaves This condition is also known as recurrent airway obstruction (RAO), equine chronic pulmonary obstructive disease (equine COPD) or broken wind. Symptoms include coughing, flared nostrils, depression, increased breathing rate, white nasal discharge, labored breathing and markedly
115 All Horse Systems Go, Loving, Nancy S. DVM, 2006 p. 310 – 312 116 All Horse Systems Go, Loving, Nancy S. DVM, 2006 p. 315 - 317
HORSE HEALTH
93 © United States Hunter Jumper Association, Inc.
decreased stamina. In extreme cases the horse may experience marked weight loss. The horse has a “heave line” of over-developed abdominal muscles and almost seems to breathe twice for each respiratory effort. Heaves can be caused by allergies to feed or environmental issues. The main contributors are moldy hay and dusty stable conditions. Legume hay has a high concentration of mold spores and is often linked to the development of heaves117.
Roaring Also known as laryngeal hemiplegia or recurrent laryngeal neuropathy, roaring is characterized by the paralysis of muscles of the vocal cords due to nerve damage. During exercise the paralyzed muscles partially obstruct the larynx, diminishing air intake and resulting in an audible roaring noise. Roaring is common in large breed horses. Horses with narrow jaws are predisposed to this complaint. Surgical repair known as a tie back may be successful in improving performance118.
Influenza Symptoms include lethargy, depression, lack of interest in food, body temperatures from 103 to 106 degrees, increased respiratory rate (up to 60 breaths per minute), watery nasal discharge and a dry hacking cough. The disease is spread by coughing, direct nose-to-nose contact, contaminated housing and substances capable of transferring disease such as food, water, human hands, buckets, rakes and clothing. A horse with influenza should be isolated for at least 2 to 3 weeks. Horses should be vaccinated for influenza. Those that travel and are exposed to large numbers of horses should be vaccinated more frequently. Ask your veterinarian for recommendations119.
Strangles The common name for an infection caused by Streptococcus equi is strangles. The bacteria invade the respiratory tract and cause swelling of the lymph nodes around the head and neck. Inflammation surrounding the pharynx may cause the horse to feel as if he is strangling. Symptoms include depression, body ache, nasal discharge, swollen lymph glands under the jaw and in the throatlatch area, edema of the face and slightly labored breathing. As the disease progresses, the lymph nodes break open to drain a thick, creamy pus. This condition is seen most often in very young and very old horses. Strangles is highly contagious and can remain in the soil for several years. Once a horse is suspected to have strangles he must be quarantined for approximately 6 weeks. Nursing care and quarantine protocols are very important. An intranasal vaccine is the most effective form of vaccination120.
Young Horses
Young horses are at risk for developmental orthopedic disease (DOD), which affects the joints and is linked to imbalances of the calcium and phosphorus ratio and/or deficiency in minerals such as copper, zinc and manganese. DOD is also linked to rich legume hay. It can manifest as:
117 All Horse Systems Go, Loving, Nancy S. DVM, 2006 p. 260 – 261 118 All Horse Systems Go, Loving, Nancy S. DVM, 2006 p. 258 – 259 119 All Horse Systems Go, Loving, Nancy S. DVM, 2006 p. 267 - 268
120 All Horse Systems Go, Loving, Nancy S. DVM, 2006 p. 273 - 279
HORSE HEALTH
94 © United States Hunter Jumper Association, Inc.
Epiphysitis This is a defect in the ossification (hardening into bone) of the end of the growth plate of the long bones. Its more correct name is physeal dysplasia because this condition affects the wide part of the long bone and the growth plate. Epiphysitis shows up as a fetlock problem in young horses between 4 and 6 months of age. Young horses from yearlings to 2-year-olds display problems in the knees. The affected horses have an hourglass shaped swelling above the affected joint and a knobby appearance of the joint area. The horses may or may not display lameness. Epihysitis may be caused by mineral imbalances or overfeeding. An overweight youngster may suffer this complaint due to the trauma caused by the overloading of his frame for his bones121.
Osteochondrosis (OCD) This is a defect in endochondral (cartilage) ossification at the joint surface, which causes abnormal cartilage in the form of a fragment, flap or cyst. Eventually this leads to lameness and arthritis. OCD generally shows up before the horse’s first birthday. Diet and poor conformation both play a role in the formation of OCD. Surgery to remove the defective cartilage can help alleviate the condition122.
Wobbler Syndrome or Cervical Vertebral Malformation (CVM) This neurological condition can be caused by OCD lesions on the spine, resulting in stenosis or narrowing of the spinal cord. A wobbler shows an un-coordinated and spastic gait, especially in the hind limbs. If diagnosed in the early stages, wobbler syndrome may be addressed with spinal surgery. The danger of riding a horse with neurological problems must be considered123.
Flexural Contractures This is defined as a joint that cannot be extended due to the tension in the tendon. It is usually a congenital problem caused by malposition of the foal in utero or the mare’s ingestion of teratogens. Teratogens are agents that are toxic to fetal growth such as locoweed or sudan grass. Overfeeding young foals can also result in acquired flexural contractures. Flexural contractures can cause the formation of club feet in foals. Corrective shoeing with toe extensions, physical therapy or surgery may correct this condition but some flexural contractures are severe enough to require euthanasia124.
Bibliography
All Horse Systems Go, Loving, Nancy S. DVM, 2006, p. 198 - 200
The United States Pony Club Manual of Horsemanship Advanced Horsemanship, B, HA, A Levels, Harris, Susan E. 1996
The United States Pony Club Manual of Horsemanship Basics For Beginners D Level, Harris, Susan E.
1994 The United States Pony Club Manual of Horsemanship Intermediate Riding C Level, Harris, Susan E.
1995 USHJA Trainer Certification Manual & Study Guide, 2010
121 All Horse Systems Go, Loving, Nancy S. DVM, 2006, p. 132 – 133 122 All Horse Systems Go, Loving, Nancy S. DVM, 2006, p. 133 - 134 123 All Horse Systems Go, Loving, Nancy S. DVM, 2006, p. 134, 517 124 All Horse Systems Go, Loving, Nancy S. DVM, 2006, p. 198 - 200
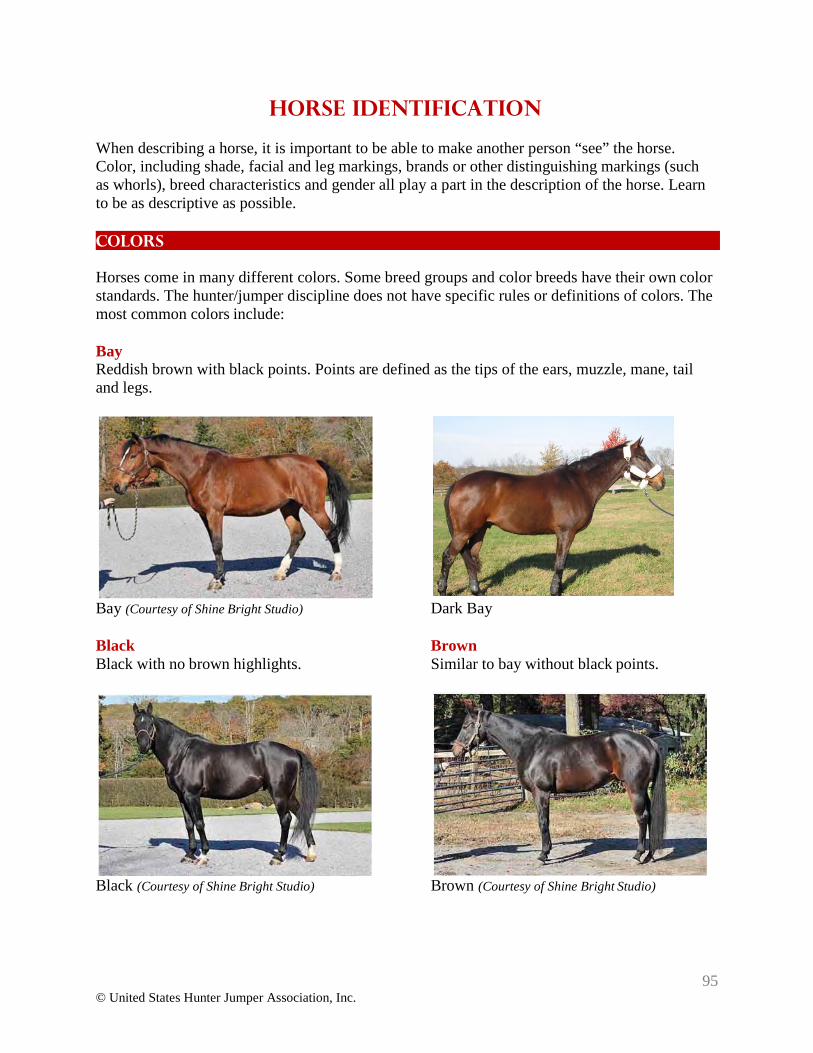
95 © United States Hunter Jumper Association, Inc.
HORSE IDENTIFICATION
When describing a horse, it is important to be able to make another person “see” the horse. Color, including shade, facial and leg markings, brands or other distinguishing markings (such as whorls), breed characteristics and gender all play a part in the description of the horse. Learn to be as descriptive as possible.
Colors Horses come in many different colors. Some breed groups and color breeds have their own color standards. The hunter/jumper discipline does not have specific rules or definitions of colors. The most common colors include:
Bay Reddish brown with black points. Points are defined as the tips of the ears, muzzle, mane, tail and legs.
Bay (Courtesy of Shine Bright Studio) Dark Bay Black Brown Black with no brown highlights. Similar to bay without black points.
Black (Courtesy of Shine Bright Studio) Brown (Courtesy of Shine Bright Studio)
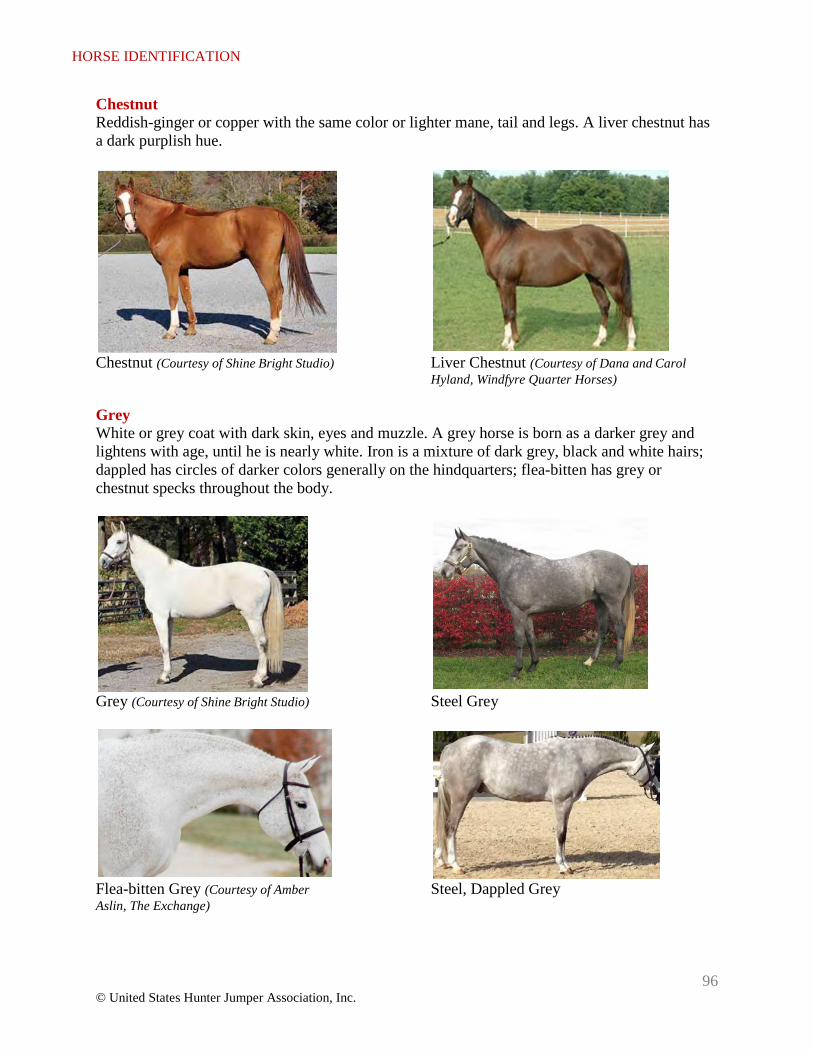
96 © United States Hunter Jumper Association, Inc.
HORSE IDENTIFICATION
Chestnut Reddish-ginger or copper with the same color or lighter mane, tail and legs. A liver chestnut has a dark purplish hue.
Chestnut (Courtesy of Shine Bright Studio) Liver Chestnut (Courtesy of Dana and Carol Hyland, Windfyre Quarter Horses)
Grey White or grey coat with dark skin, eyes and muzzle. A grey horse is born as a darker grey and lightens with age, until he is nearly white. Iron is a mixture of dark grey, black and white hairs; dappled has circles of darker colors generally on the hindquarters; flea-bitten has grey or chestnut specks throughout the body.
Grey (Courtesy of Shine Bright Studio) Steel Grey
Flea-bitten Grey (Courtesy of Amber Steel, Dappled Grey Aslin, The Exchange)
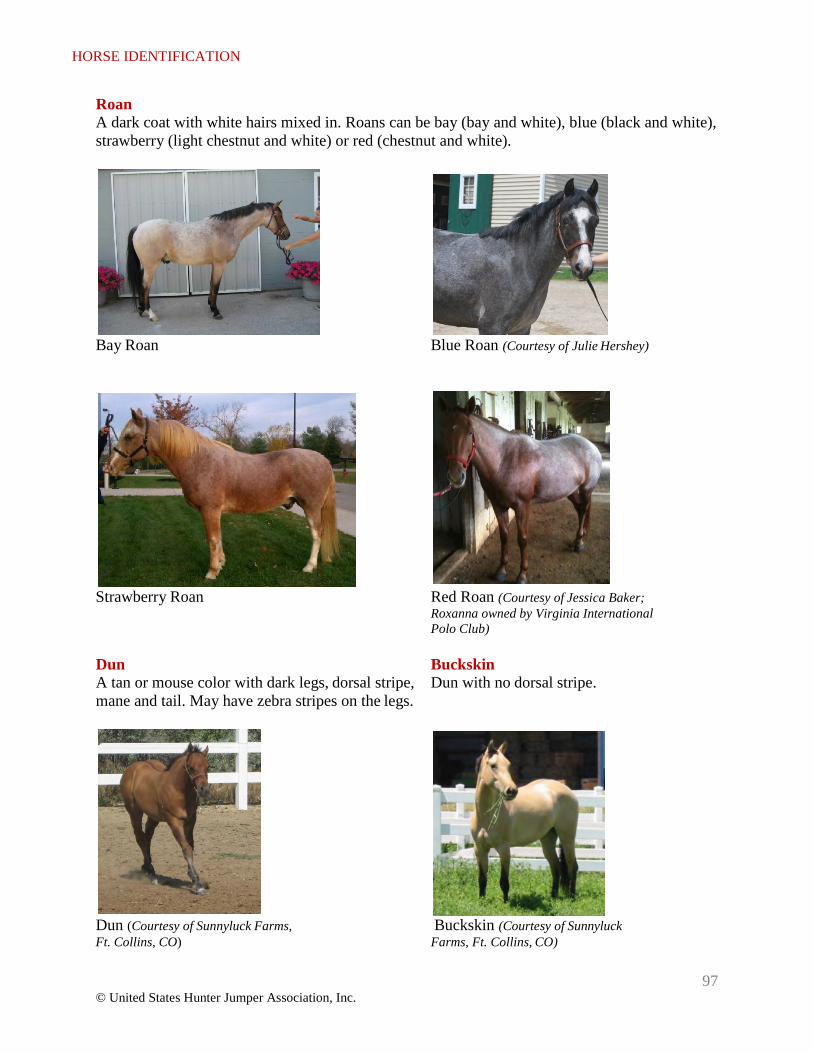
97 © United States Hunter Jumper Association, Inc.
HORSE IDENTIFICATION
Roan A dark coat with white hairs mixed in. Roans can be bay (bay and white), blue (black and white), strawberry (light chestnut and white) or red (chestnut and white).
Bay Roan Blue Roan (Courtesy of Julie Hershey)
Strawberry Roan Red Roan (Courtesy of Jessica Baker; Roxanna owned by Virginia International Polo Club)
Dun Buckskin A tan or mouse color with dark legs, dorsal stripe, Dun with no dorsal stripe. mane and tail. May have zebra stripes on the legs.
Dun (Courtesy of Sunnyluck Farms, Buckskin (Courtesy of Sunnyluck Ft. Collins, CO) Farms, Ft. Collins, CO)
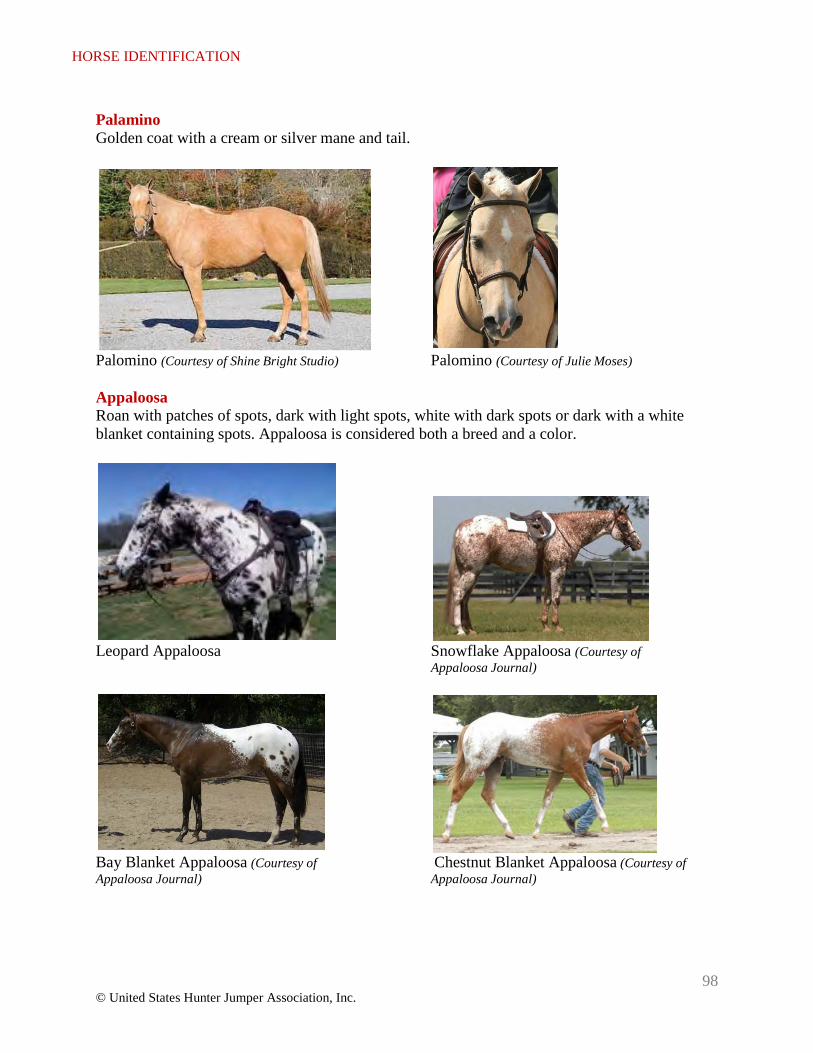
98 © United States Hunter Jumper Association, Inc.
HORSE IDENTIFICATION
Palamino Golden coat with a cream or silver mane and tail.
Palomino (Courtesy of Shine Bright Studio) Palomino (Courtesy of Julie Moses)
Appaloosa Roan with patches of spots, dark with light spots, white with dark spots or dark with a white blanket containing spots. Appaloosa is considered both a breed and a color.
Leopard Appaloosa Snowflake Appaloosa (Courtesy of Appaloosa Journal)
Bay Blanket Appaloosa (Courtesy of Chestnut Blanket Appaloosa (Courtesy of Appaloosa Journal) Appaloosa Journal)
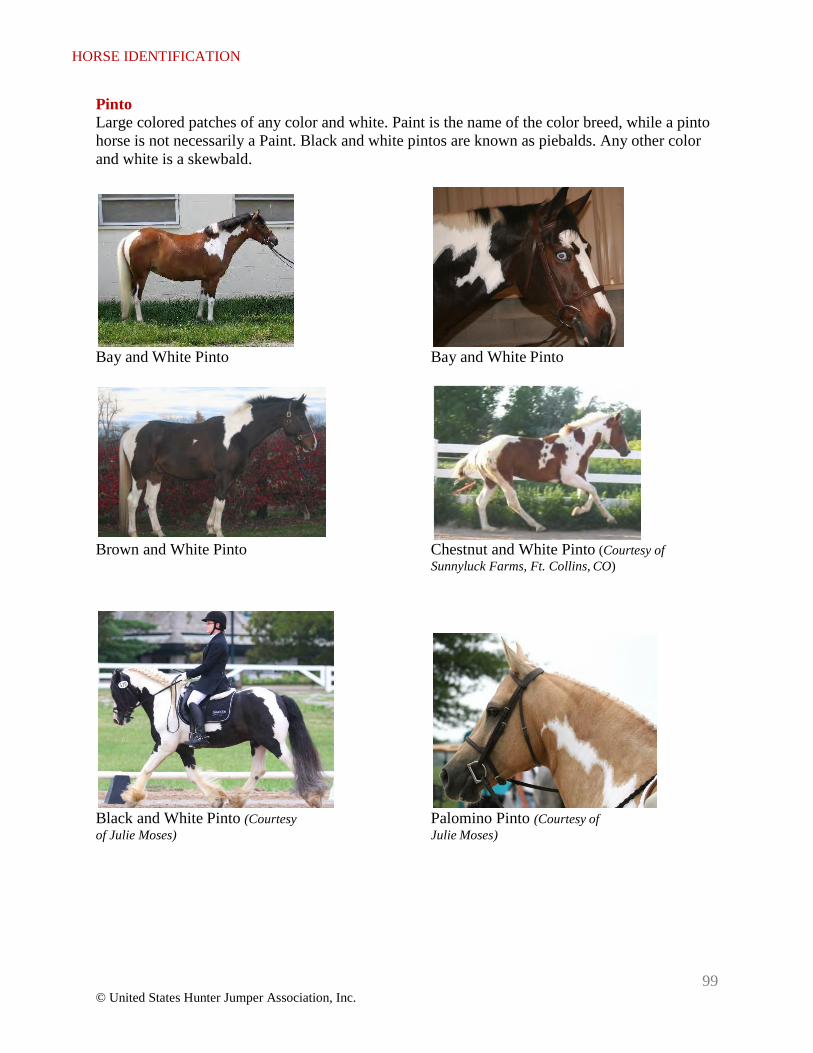
99 © United States Hunter Jumper Association, Inc.
HORSE IDENTIFICATION
Pinto Large colored patches of any color and white. Paint is the name of the color breed, while a pinto horse is not necessarily a Paint. Black and white pintos are known as piebalds. Any other color and white is a skewbald.
Bay and White Pinto Bay and White Pinto
Brown and White Pinto Chestnut and White Pinto (Courtesy of Sunnyluck Farms, Ft. Collins, CO)
Black and White Pinto (Courtesy Palomino Pinto (Courtesy of of Julie Moses) Julie Moses)
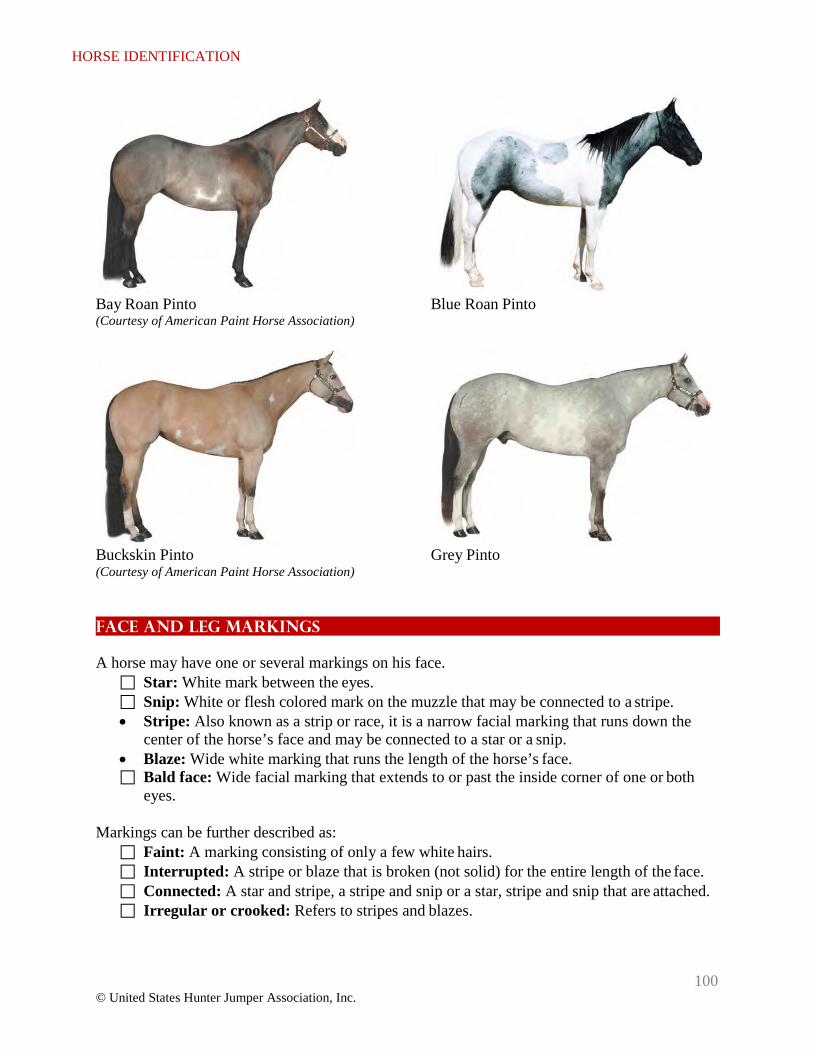
HORSE IDENTIFICATION
100 © United States Hunter Jumper Association, Inc.
Bay Roan Pinto Blue Roan Pinto (Courtesy of American Paint Horse Association)
Buckskin Pinto Grey Pinto (Courtesy of American Paint Horse Association)
Face and Leg Markings
A horse may have one or several markings on his face. Star: White mark between the eyes. Snip: White or flesh colored mark on the muzzle that may be connected to a stripe. • Stripe: Also known as a strip or race, it is a narrow facial marking that runs down the
center of the horse’s face and may be connected to a star or a snip. • Blaze: Wide white marking that runs the length of the horse’s face. Bald face: Wide facial marking that extends to or past the inside corner of one or both
eyes.
Markings can be further described as: Faint: A marking consisting of only a few white hairs. Interrupted: A stripe or blaze that is broken (not solid) for the entire length of the face. Connected: A star and stripe, a stripe and snip or a star, stripe and snip that are attached. Irregular or crooked: Refers to stripes and blazes.
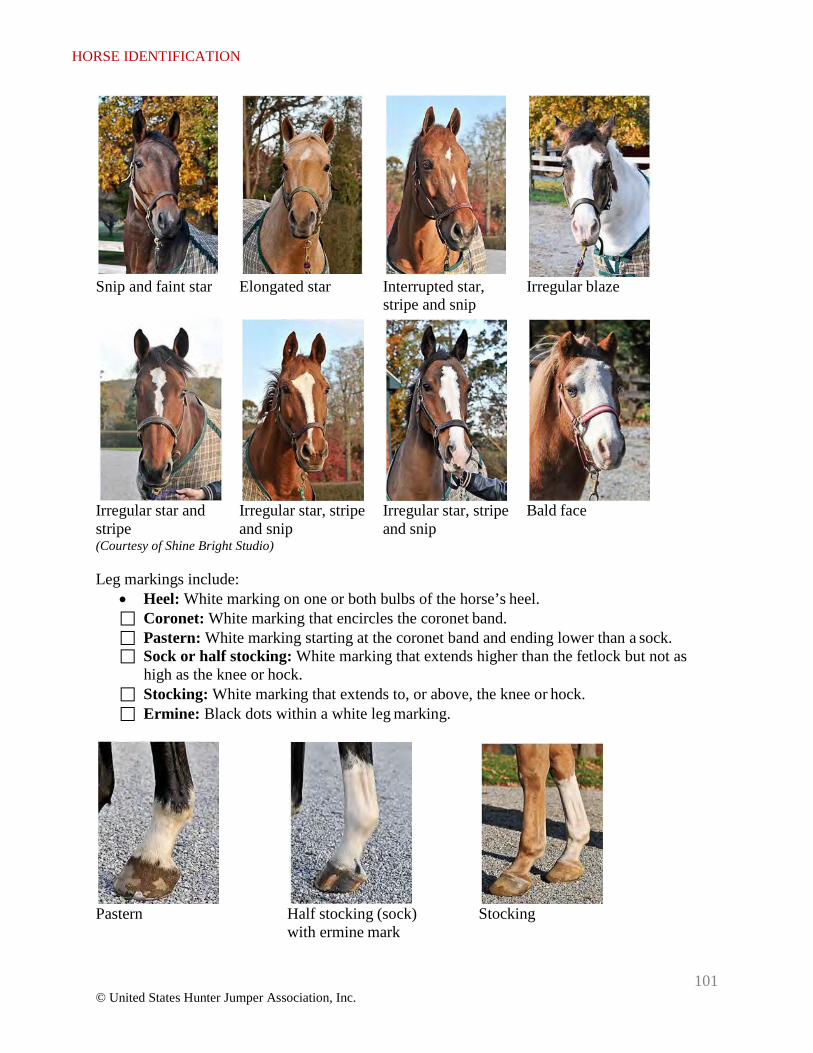
HORSE IDENTIFICATION
101 © United States Hunter Jumper Association, Inc.
Snip and faint star Elongated star Interrupted star, Irregular blaze
stripe and snip
Irregular star and Irregular star, stripe Irregular star, stripe Bald face stripe and snip and snip (Courtesy of Shine Bright Studio)
Leg markings include:
• Heel: White marking on one or both bulbs of the horse’s heel. Coronet: White marking that encircles the coronet band. Pastern: White marking starting at the coronet band and ending lower than a sock. Sock or half stocking: White marking that extends higher than the fetlock but not as
high as the knee or hock. Stocking: White marking that extends to, or above, the knee or hock. Ermine: Black dots within a white leg marking.
Pastern Half stocking (sock) Stocking with ermine mark
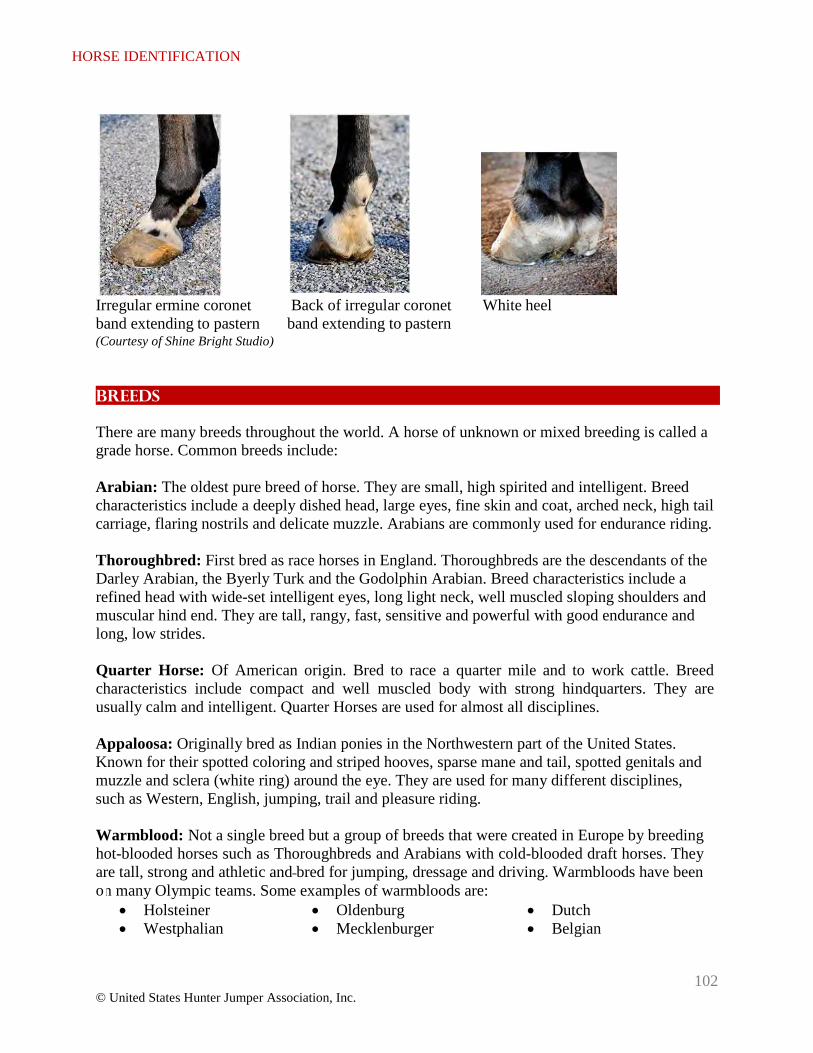
HORSE IDENTIFICATION
102 © United States Hunter Jumper Association, Inc.
Irregular ermine coronet Back of irregular coronet White heel band extending to pastern band extending to pastern (Courtesy of Shine Bright Studio)
Breeds
There are many breeds throughout the world. A horse of unknown or mixed breeding is called a grade horse. Common breeds include:
Arabian: The oldest pure breed of horse. They are small, high spirited and intelligent. Breed characteristics include a deeply dished head, large eyes, fine skin and coat, arched neck, high tail carriage, flaring nostrils and delicate muzzle. Arabians are commonly used for endurance riding.
Thoroughbred: First bred as race horses in England. Thoroughbreds are the descendants of the Darley Arabian, the Byerly Turk and the Godolphin Arabian. Breed characteristics include a refined head with wide-set intelligent eyes, long light neck, well muscled sloping shoulders and muscular hind end. They are tall, rangy, fast, sensitive and powerful with good endurance and long, low strides.
Quarter Horse: Of American origin. Bred to race a quarter mile and to work cattle. Breed characteristics include compact and well muscled body with strong hindquarters. They are usually calm and intelligent. Quarter Horses are used for almost all disciplines.
Appaloosa: Originally bred as Indian ponies in the Northwestern part of the United States. Known for their spotted coloring and striped hooves, sparse mane and tail, spotted genitals and muzzle and sclera (white ring) around the eye. They are used for many different disciplines, such as Western, English, jumping, trail and pleasure riding.
Warmblood: Not a single breed but a group of breeds that were created in Europe by breeding hot-blooded horses such as Thoroughbreds and Arabians with cold-blooded draft horses. They are tall, strong and athletic and bred for jumping, dressage and driving. Warmbloods have been o e e n many Olympic teams. Som
• Holsteiner • Westphalian
examples of warmbloods ar • Oldenburg • Mecklenburger
: • Dutch • Belgian
HORSE IDENTIFICATION
103 © United States Hunter Jumper Association, Inc.
Welsh pony: Originated in the mountains of Wales. Medium sized with beautiful heads, compact bodies and a floating trot, they are used for jumping and driving. Welsh ponies are divided into four sections by size and type. Section A and B Welsh ponies are the most common in the hunter/jumper segment of our sport.
• Section A: Welsh Mountain Pony (does not exceed 12.2 hands) • Section B: Welsh Mountain Pony (does not exceed 14.2 hands) • Section C: Welsh Pony of Cob Type (does not exceed 13.2 hands) • Section D: Welsh Cob (exceeds 13.2 hands)
Other pony breeds: Exmoor, Pony of the Americas, Connemara, Shetland, German Riding pony, New Forest and Dartmoor are all examples of pony breeds.
104 © United States Hunter Jumper Association, Inc.
LoNGeING
Longeing can be a wonderful training tool for horse and rider when it is handled in an appropriate manner. It is important to longe the horse using the correct equipment and in a safe and secure location. The longer should be well versed in proper longeing techniques, especially when longeing an untrained horse or teaching a rider on the longe line. Inexperienced longers should learn to longe by working with a very experienced horse.
Longeing can be used:
To train a horse to voice commands To teach stabilization To exercise a horse when he cannot be ridden To develop rhythm, balance and suppleness • To improve the rider’s position To diagnose lameness As advanced schooling for the horse
Longeing should not be used to work a horse down. Longeing is physically demanding on a horse and care should be exercised to not overwork the horse on the longe line. Longeing is harder than ordinary riding because working on a circle puts more stress on the horse’s legs, muscles, joints and tendons125. The humane treatment of the horse when longeing is the trainer’s responsibility, as is being sure the longer has enough experience to longe the horse appropriately.
Longeing a horse is very similar to riding him. The hand provides contact through the longe line in much the same fashion that the rein does. The whip simulates the rider’s leg. The longer’s body position and voice help the horse to understand the longeing aids. Equipment
The following equipment is necessary to longe a horse, either with or without a rider:
Longe line 30- feet minimum length with a swivel snap, cotton, cotton webbing 1 to 1 1/2 inches wide and 1/2 round spun nylon or Dacron. Stops may be sewn into the line for extra control in case the horse should pull against the longer. Narrow nylon lines and those with chain ends should be avoided. The end of the longe line should not be used as a whip.
Longe whip A long whip (approximately 5 feet) with a lash and a short popper on the end.
Longeing cavesson A leather and metal device that resembles a halter with an extra low-slung throatlatch called the jowl strap. The noseband is padded and has three longe line attachment rings. The longeing
125 The United States Pony Club Manual of Horsemanship Intermediate Horsemanship C Level, Harris, Susan E. 1995 p. 286
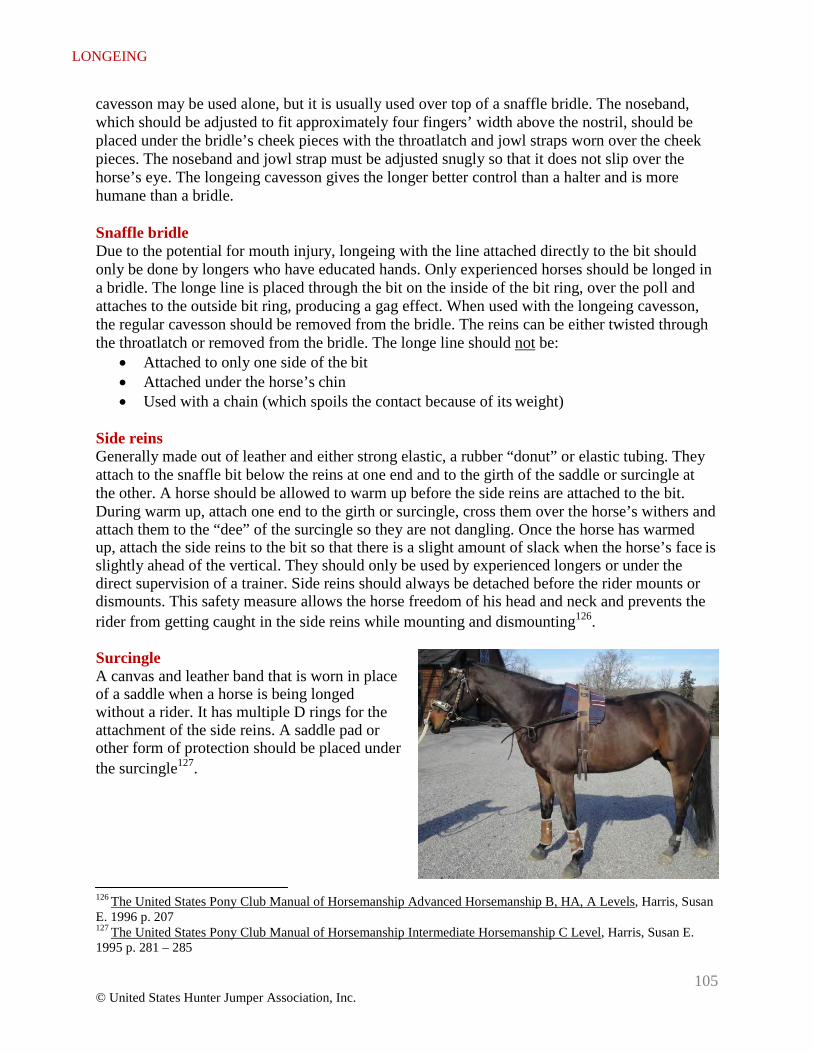
105 © United States Hunter Jumper Association, Inc.
LONGEING
cavesson may be used alone, but it is usually used over top of a snaffle bridle. The noseband, which should be adjusted to fit approximately four fingers’ width above the nostril, should be placed under the bridle’s cheek pieces with the throatlatch and jowl straps worn over the cheek pieces. The noseband and jowl strap must be adjusted snugly so that it does not slip over the horse’s eye. The longeing cavesson gives the longer better control than a halter and is more humane than a bridle.
Snaffle bridle Due to the potential for mouth injury, longeing with the line attached directly to the bit should only be done by longers who have educated hands. Only experienced horses should be longed in a bridle. The longe line is placed through the bit on the inside of the bit ring, over the poll and attaches to the outside bit ring, producing a gag effect. When used with the longeing cavesson, the regular cavesson should be removed from the bridle. The reins can be either twisted through the throatlatch or removed from the bridle. The longe line should not be:
• Attached to only one side of the bit • Attached under the horse’s chin • Used with a chain (which spoils the contact because of its weight)
Side reins Generally made out of leather and either strong elastic, a rubber “donut” or elastic tubing. They attach to the snaffle bit below the reins at one end and to the girth of the saddle or surcingle at the other. A horse should be allowed to warm up before the side reins are attached to the bit. During warm up, attach one end to the girth or surcingle, cross them over the horse’s withers and attach them to the “dee” of the surcingle so they are not dangling. Once the horse has warmed up, attach the side reins to the bit so that there is a slight amount of slack when the horse’s face is slightly ahead of the vertical. They should only be used by experienced longers or under the direct supervision of a trainer. Side reins should always be detached before the rider mounts or dismounts. This safety measure allows the horse freedom of his head and neck and prevents the rider from getting caught in the side reins while mounting and dismounting126.
Surcingle A canvas and leather band that is worn in place of a saddle when a horse is being longed without a rider. It has multiple D rings for the attachment of the side reins. A saddle pad or other form of protection should be placed under the surcingle127.
126 The United States Pony Club Manual of Horsemanship Advanced Horsemanship B, HA, A Levels, Harris, Susan E. 1996 p. 207 127 The United States Pony Club Manual of Horsemanship Intermediate Horsemanship C Level, Harris, Susan E. 1995 p. 281 – 285
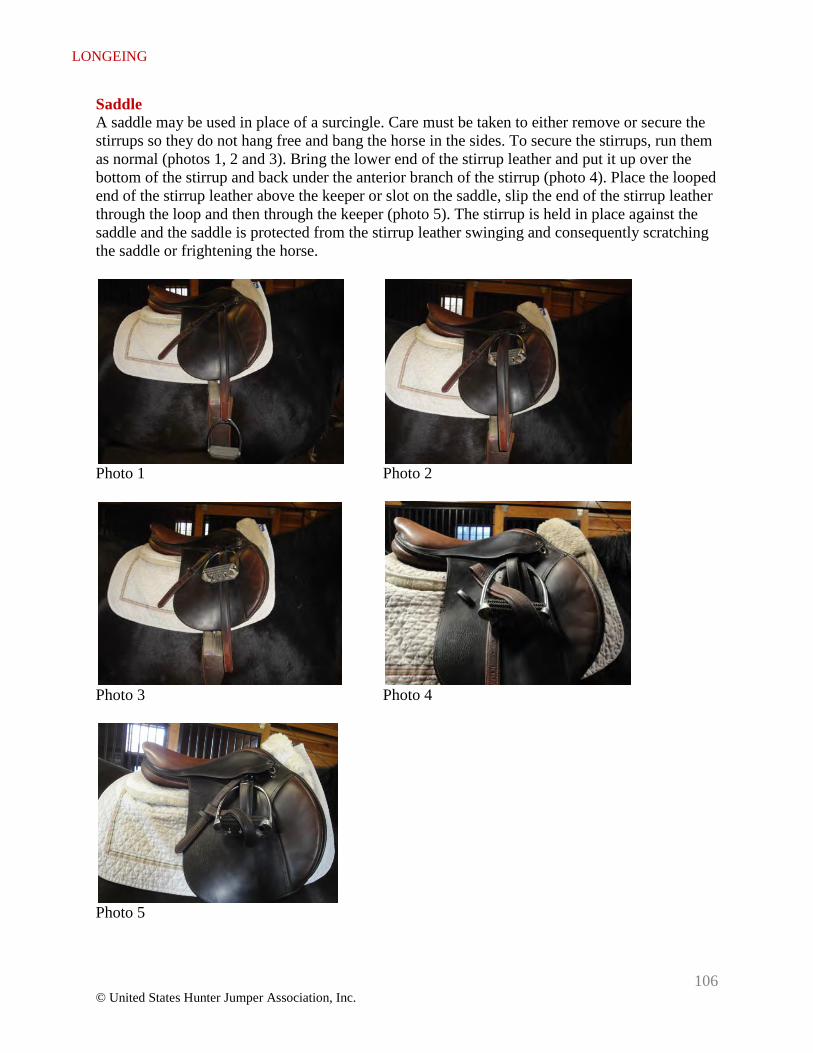
106 © United States Hunter Jumper Association, Inc.
LONGEING
Saddle A saddle may be used in place of a surcingle. Care must be taken to either remove or secure the stirrups so they do not hang free and bang the horse in the sides. To secure the stirrups, run them as normal (photos 1, 2 and 3). Bring the lower end of the stirrup leather and put it up over the bottom of the stirrup and back under the anterior branch of the stirrup (photo 4). Place the looped end of the stirrup leather above the keeper or slot on the saddle, slip the end of the stirrup leather through the loop and then through the keeper (photo 5). The stirrup is held in place against the saddle and the saddle is protected from the stirrup leather swinging and consequently scratching the saddle or frightening the horse.
Photo 1 Photo 2
Photo 3 Photo 4
Photo 5
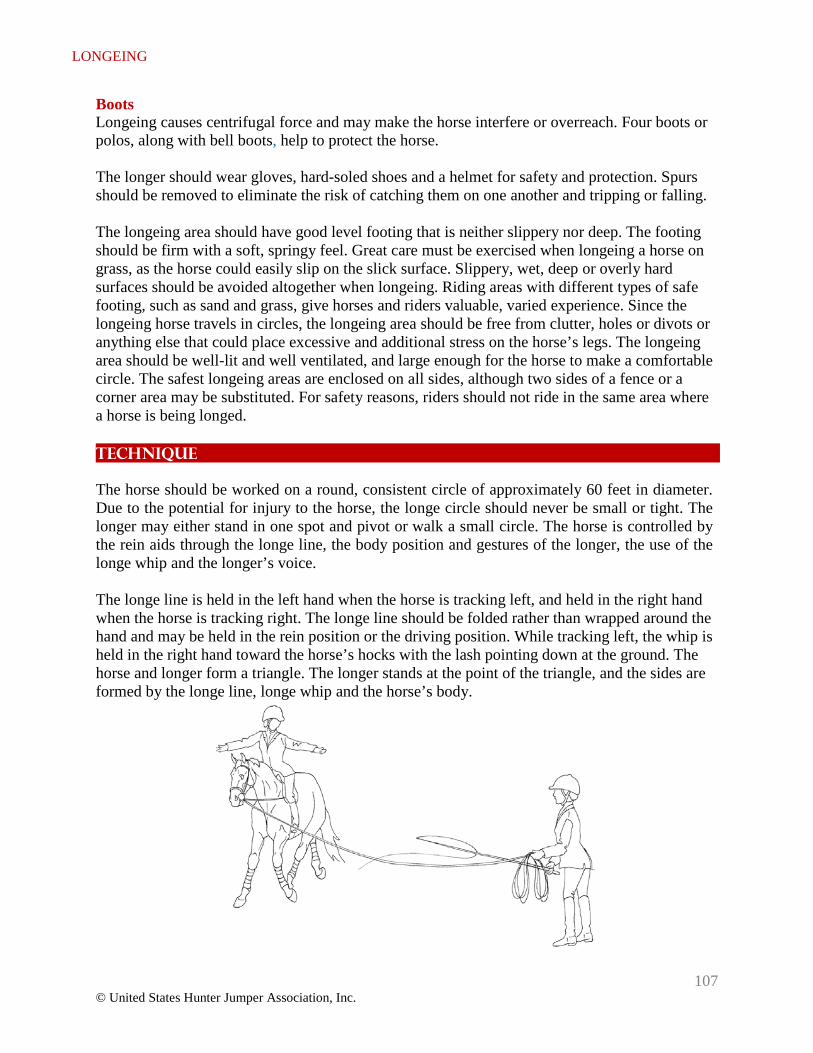
107 © United States Hunter Jumper Association, Inc.
LONGEING
Boots Longeing causes centrifugal force and may make the horse interfere or overreach. Four boots or polos, along with bell boots, help to protect the horse.
The longer should wear gloves, hard-soled shoes and a helmet for safety and protection. Spurs should be removed to eliminate the risk of catching them on one another and tripping or falling.
The longeing area should have good level footing that is neither slippery nor deep. The footing should be firm with a soft, springy feel. Great care must be exercised when longeing a horse on grass, as the horse could easily slip on the slick surface. Slippery, wet, deep or overly hard surfaces should be avoided altogether when longeing. Riding areas with different types of safe footing, such as sand and grass, give horses and riders valuable, varied experience. Since the longeing horse travels in circles, the longeing area should be free from clutter, holes or divots or anything else that could place excessive and additional stress on the horse’s legs. The longeing area should be well-lit and well ventilated, and large enough for the horse to make a comfortable circle. The safest longeing areas are enclosed on all sides, although two sides of a fence or a corner area may be substituted. For safety reasons, riders should not ride in the same area where a horse is being longed.
Technique
The horse should be worked on a round, consistent circle of approximately 60 feet in diameter. Due to the potential for injury to the horse, the longe circle should never be small or tight. The longer may either stand in one spot and pivot or walk a small circle. The horse is controlled by the rein aids through the longe line, the body position and gestures of the longer, the use of the longe whip and the longer’s voice.
The longe line is held in the left hand when the horse is tracking left, and held in the right hand when the horse is tracking right. The longe line should be folded rather than wrapped around the hand and may be held in the rein position or the driving position. While tracking left, the whip is held in the right hand toward the horse’s hocks with the lash pointing down at the ground. The horse and longer form a triangle. The longer stands at the point of the triangle, and the sides are formed by the longe line, longe whip and the horse’s body.
108 © United States Hunter Jumper Association, Inc.
LONGEING
A whip should be of good quality so that it is properly balanced. Handling the longe whip requires practice. The longer should learn to hold and use the longe whip in either hand. A horse should respect the longe whip but not fear it. He should learn to accept seeing and being touched with the whip. To teach him, start with a stiff dressage whip or driving whip. Allow him to sniff and touch it. When he is comfortable, touch him gently while speaking to him in a calm and kind voice. Move to the longe whip with the lash wrapped up when he is comfortable being touched with the shorter whip. End by touching the horse gently with the lash. Make sure to work on both sides of his body. This procedure may take some time and should not be rushed128.
The longe whip may be used in the following ways: • Close to the ground with a forward rotating motion to ask the horse to move forward. • Flicked at the hocks from back to front. This is a stronger way to ask for forward motion. • Flicked forward and upward toward the belly so that it lands where the rider’s leg rests.
This asks for forward and outward motion. • Pointing at the shoulder to ask the horse to move out to a larger circle or to stop cutting
in. • Under the longe line and toward the horse’s head asks the horse to slow down or stop.
This is an advanced aid that takes practice and tact. • Touching the horse is a strong driving aid in which the lash can be lightly tossed upward,
run out to lightly flick the horse or applied with a stinging snap. The latter should be used only for serious disobediences.
• The longe whip can be cracked, but this aid should only be used as a last resort when the horse is not listening. Cracking the whip on a regular basis makes the horse ignore the noise.
• Running out the lash may be done along the ground toward a specific part of the horse. • When the horse is too fresh, the longe whip may be held pointing at the ground behind the
longer’s body. • When approaching a horse, the longe whip should be held backwards with the lash in the
longer’s hand.
The longe whip should not be used: • In anger • To strike the horse (except for stinging snaps) • To make the horse buck and play • With a plastic bag or other device attached to the end
The horse can be started on the longe at approximately 5 years of age. This limitation is due to the lateral stress that longing puts on a horse’s legs. Young, immature horses are at risk to injuries from longing that is done incorrectly or for too long. Longing a young horse increases the risk of an accident caused by the horse’s immaturity129.
128 The United States Pony Club Manual of Horsemanship Intermediate Horsemanship C Level, Harris, Susan E. 1995 p. 277 129 The United States Pony Club Manual of Horsemanship Advanced Horsemanship B, HA, A Levels, Harris, Susan E. 1996 p. 150
109 © United States Hunter Jumper Association, Inc.
LONGEING
To teach a horse to longe, begin with the concepts of parallel leading and parallel longing. Parallel leading teaches a horse to move forward, stop and obey voice commands when he is several feet away from the longer. This develops into parallel longing with the horse located 6 to 10 feet away from the longer. To begin parallel leading, start by leading the horse as usual. Carry the longe whip in the hand opposite the longe line with the whip pointing backwards and down and the lash wrapped up. Gradually move away until you are 3 to 4 feet from the horse. Practice transitions, turning and voice commands on both sides of the horse. Make sure to use proper rein and whip aids. When the horse is obedient, gradually move farther away and progress to parallel longing. During both parallel leading and parallel longing you will walk with your horse. You may start to longe the horse on a 60-foot circle when the horse is obedient to voice commands, rein and whip aids 130.
The horse should be taught to stay on a consistent-sized, round circle. The initial job of the longer (and assistant if necessary) is to teach the horse voice commands131. Upward inflections are used for upward transitions and downward inflections for downward transitions. The longer’s vocabulary should be small and consistent so that the horse learns what he is being asked to do. It is better to only speak when necessary so as to not confuse the horse.
Good longing is generally a matter of communication between rider and horse, using body language, gestures, timing, tone of voice and a consistent vocabulary of commands132. Whether young or old, a horse must learn to have respect and manners while on the longe line. Kicking out, bucking or pulling away are all disrespectful behaviors that should be addressed immediately.
A horse should learn at the earliest opportunity to halt and stand on the longe line. A longer should never pull a horse in to the center of the circle. If it is necessary to adjust the horse’s tack or change direction, the longer should walk toward the horse, folding the excess longe line in his hand as he walks forward.
As the horse advances in his training, it is important to make sure that he goes around the round circle tracking correctly. This means that the horse’s hind legs follow in the tracks of his front legs. A horse should be studied carefully to see where his crookedness lies. Side reins may help him to look in to the center of the circle. Keep the circle large enough that he is comfortable and balanced. The longe whip can be used to encourage him to use his inside hind leg more strongly. Keep him at a slow speed and a steady rhythm and tempo until he is comfortable tracking correctly133.
If a horse cuts in to the center of the circle, he can be kept out by the movements of the longer’s body, limbs and whip (which are known as gestures). The horse responds well to body posture or
130 The United States Pony Club Manual of Horsemanship Intermediate Riding C Level, Harris, Susan E. 1995 p. 278 - 279 131 Schooling and Riding the Sport Horse, Cronin, Paul 2004 p. 119 132 The United States Pony Club Manual of Horsemanship Advanced Horsemanship B, HA, A, Harris, Susan E. 1996 p. 150 133 The United States Pony Club Manual of Horsemanship Advanced Horsemanship B, HA, A Levels, Harris, Susan E. 1996 p.156
110 © United States Hunter Jumper Association, Inc.
LONGEING
body language because it is similar to the way horses communicate with each other. The horse’s direction and impulsion are influenced by the body posture of the longer. The longer must give clear and consistent commands to the horse.
The rein aids that can be used while longeing are:
• Opening or leading rein: Used to lead the horse forward and ask him to stretch out his neck.
• Direct rein: Short squeezes on the rein used toward the longer’s elbow. This is used to make the circle smaller, increase bend or stop the horse from pulling away.
• Indirect rein: The longe line is moved inward and sideways toward the longer’s opposite hip. This asks the horse to slow down or stop.
• Giving the longe: The longe hand moves forward briefly, releasing the contact on the horse’s mouth. It is used as a reward and also to make the circle bigger. The longe line should not have enough slack to sag toward the ground.
• Vibrating the longe: Gentle vibrations to get the horse to listen to a light signal. • Half-halts: Used to prepare a horse for a transition. Raise the whip and ask the horse to
engage his hind end and follow with a short lift and squeeze on the longe line134.
Horses can be schooled on the longe line. This takes an educated, advanced-level horseman with experience in riding on active contact. The horse should be schooled to intermediate or advanced level. Advanced longing techniques can help the horse to understand steady contact. The correctly adjusted side reins coupled with impulsion ask the horse to reach forward into a plain snaffle bit. The full engagement of the horse’s hind legs moves the energy from the hind end to the neck and to the mouth.
A horse should not be asked to jump on the longe line because he tends to increase speed over the jump and wants to go straight afterward, as opposed to staying on the longing circle. It is not easy to keep him on the circle without pulling on the longe line and in effect hurting his mouth. Longing over rails or raised cavaletti are appropriate exercises135.
Students can benefit from riding on the longe line. Lessons may be conducted with or without side reins. For safety, the horse must be used to being ridden in side reins, be dependable, honest, responsive and consistent. Many exercises can be performed with and without reins and stirrups. Longe lessons can be used to allow a rider to concentrate on improving his riding without worrying about controlling his horse. Longing lessons:
• Build confidence • Improve suppleness, eliminate stiffness and help the rider follow the horse’s movements
more accurately • Improve a rider’s balance, security and correct position • Develop a secure, correct, supple and independent seat, from which the rider can apply
his aids correctly and easily136.
134 The United States Pony Club Manual of Horsemanship Intermediate Riding C Level, Harris, Susan E. 1995 p. 290 - 292 135 USHJA Trainer Certification Manual & Study Guide, Fargis, Joe, 2011 p 443 - 446 136 The United States Pony Club Manual of Horsemanship Advanced Riding, B, HA and A Levels, Harris, Susan E. 1996 p. 205
111 © United States Hunter Jumper Association, Inc.
LONGEING
Long Lining
Another advanced technique is long lining. The horse is worked with long lines, a bridle and a surcingle. The long liner drives the horse. The horse may be worked from the ground on straight lines, bending lines and circles. This should not be attempted without supervision from an experienced long lining instructor.
Bibliography
Schooling and Riding the Sport Horse, Cronin, Paul 2004
The United States Pony Club Manual of Horsemanship Advanced Horsemanship B, HA, A Levels, Harris, Susan E. 1996 p. 150
The United States Pony Club Manual of Horsemanship Intermediate Horsemanship C Level, Harris, Susan E. 1995
USHJA Trainer Certification Manual & Study Guide, Fargis, Joe, 2011
112 © United States Hunter Jumper Association, Inc.
NUTRITION
NUTRITION
Feeding Practices
One of the most important aspects of keeping a horse healthy is making sure that he receives free-choice water and appropriate feed on a regular schedule. Most horses are kept at boarding facilities, and the owner does not share in the responsibility of feeding the horse. As a horseman, it is important to know and understand what and when a horse eats. A horse requires a balanced diet of water, roughage and salt to survive.
A horse should be fed approximately 2 to 3 pounds of feed per day per 100 pounds of his body weight. At least 80 percent of that should come from good quality roughage. Unbalancing the concentrate/roughage balance can lead to increased gut acidity and stereotypical behaviors (with no apparent function), such as cribbing and wood chewing. Horses are trickle feeders and cannot cope digestively with large meals. Small portions and frequent feedings is the rule137. For this reason, a horse’s daily ration of concentrates and roughage should be broken down into 3 to 4 small meals per day. Feeding 3 to 4 times a day is better than the old-fashioned twice a day feeding to avoid overloading his digestive tract. Because different grains weigh different amounts for the same volume, horses should be fed by grain weight instead of feed volume. If a change in diet needs to be made it should be done gradually over the course of 10 to 14 days.
Water is the most important nutrient that you can give your horse. Clean, fresh water should be available to horses at all times. Water is an essential part of every cell and of all vital fluids (including blood), which carry nutrients to all parts of the body, pick up waste products and help to eliminate them. Water acts as a cooling agent in the summer and helps warm the body in the winter. Horses that do not drink an appropriate amount of water can suffer from dehydration, which can lead to impaction colic138.
Horses enjoy treats but should not be fed refined sugar. Better choices for treats are horse cookies, carrots or apples. To avoid choking, carrots and apples should be cut into pieces. Hand feeding can bring on mouthy behaviors so it is generally best to give treats in the horse’s feed tub.
Before dumping new grain into the horse’s feed bucket, check to make sure that the earlier grain was eaten. Never put new food on top of old food. It is important to find out why a horse did not eat his earlier ration. Sometimes the presence of supplements or medications causes horses to pick through or not eat their grain, but leaving food may also point toward illness or a dental problem.
A horse’s feed tub should be hung at about the height of his shoulder to keep him from pawing at the tub and potentially catching his legs on it.
137 The Horse Nutrition Handbook, Worth, Melyni PhD 2010 p. 14 138 The United States Pony Club Manual of Horsemanship Intermediate Horsemanship C Level, Harris, Susan E. 1995 p. 188

113 © United States Hunter Jumper Association, Inc.
NUTRITION
Some factors to take into account when determining how much to feed include: • Body type: Rangy vs. blocky. Rangy horses usually need more feed per 100 pounds of
body weight than blocky, chunky horses. • Current condition: This determines if the horse needs to gain, lose or maintain weight. • Temperament: A “hot” horse may need to be fed less grain and more carbohydrates in
the form of hay and grasses. • Appetite level and feeding behavior • Health • Work load • Type of work: A jumper may need to be fed a ration that results in high energy and a
hunter may need a high fat, high fiber, low concentrate diet to stay quiet but in good flesh.
• Age: Young horses have special nutritional needs for the growth and development of their bones. The calcium phosphorus ratio should be from 1.1:1 to 3:1 to avoid skeletal and joint problems. Older horses may not be able to adequately digest and utilize feed, often due to the deterioration of their teeth. They may profit from additional fat in their diet139.
• Lactating mares: These mares need the most food of any horse to adequately satisfy their body’s needs in addition to their foal’s nutritional requirements.
Horses need the following essential nutrients:
• Water: Most horses drink at least 12 gallons per day. Water needs may increase with work load.
• Carbohydrates: Starches and sugar create energy, while cellulose is necessary for digestion. These are found in grass, hay and grain.
• Proteins: The building blocks of cells, proteins are necessary for growth, repair and maintenance of the body. They are found in oilseed meals, oats, barley, corn and alfalfa.
• Fatty acids (lipids): Produce extra energy, especially when carbohydrates are insufficient. Small amounts are used in digestion, particularly of vitamins. These are found in corn oil and wheat-germ oil.
• Vitamins: Necessary for vital body functions. These are found in hay, grain, sunlight and vitamin supplements.
• Minerals: Build and maintain tissue, especially bones, and act as triggers for body functions. These are found in hay, grain, salt and mineral supplements140.
139 The United States Pony Club Manual of Horsemanship Advanced Horsemanship B, HA, A Levels, Harris, Susan E. 1996 p. 307 140 The Horse Nutrition Handbook, Worth, Melyni PhD 2010 p. 14
NUTRITION
143 All Horse Systems Go, Loving, Nancy S. DVM 2006 p. 139
114 © United States Hunter Jumper Association, Inc.
Carbohydrates
High-energy food is important for the equine athlete. Horses are fueled by carbohydrates, fats and proteins. Carbohydrates are chains of sugars joined together. The most important fuel for working muscles is derived from both carbohydrates and fat. Compared to carbohydrates and fats, protein is a less efficient fuel source because it costs more energy to metabolize while creating less energy.
A horse ingests carbohydrates and starches through grain and forage. The energy generated by the body metabolizing carbohydrates keeps a horse’s body temperature up to normal141. Carbohydrates also give the horse energy to perform his job.
Carbohydrates are used in the body as:
• Starches and sugars: Used for energy • Cellulose: Makes up the bulk of fiber in the horse’s diet
Carbohydrates are broken down into:
• Nonstructural carbohydrates: Short, simple chains of sugar that are soluble in water, such as starch and sugar. Nonstructural carbohydrates are broken down to simple sugars in the horse’s GI tract, such as fructose or glucose, and then absorbed. The sugars then pass to the liver, which sorts them and converts most of them to the simple sugar glucose. Glucose is released from the liver and travels to all cells of the body. The hormone insulin withdraws the glucose from the bloodstream and utilizes it for energy. If there is more glucose coming in from the bloodstream than the cell needs, it stores the extra glucose as the compound glycogen. If excess glucose continues to be supplied, then the adipocytes (special fat-producing cells) absorb it, convert it to fat and store it.
• Structural carbohydrates: Longer, complex chains of sugar. These make up the cell walls of plants and contribute to the rigidity of wood. Examples are cellulose, hemicellulose and lignin. Cellulose has strong cellular bonds and needs help from bacteria to be broken down. Lignin is indigestible, even to bacteria142.
The digestion of non-structural carbohydrates supplies the horse’s body with glucose. It is either used immediately by muscle tissue to produce energy or is stored in the muscle and liver as glycogen (a connected chain of glucose sugar molecules). When the body needs to use glycogen, it is must be broken back down to sugar molecules143.
Volatile fatty acids, or VFAs, are formed by the digestion of hay and other roughages. VFAs provide only a small part of the energy requirements of muscle. When more readily available energy is needed, it comes from glucose and fatty acids that are absorbed from the intestinal tract.
141 The United States Pony Club Manual of Horsemanship Intermediate Riding C Level, Harris, Susan E. 1995 p. 189 142 The Horse Nutrition Handbook, Worth, Melyni PhD 2010 p. 22 - 23
NUTRITION
146 USHJA Trainer Certification Manual & Study Guide, Gill, Amy M PhD
115 © United States Hunter Jumper Association, Inc.
Protein
Proteins are the building blocks of life. They are essential components of every cell in the body and are needed for growth, maintenance and repair of the body’s tissues. Proteins are composed of amino acids, which break down plant protein from feed into animal protein. The two most important amino acids are lysine and methionine144. Amino acids are very important; they must be present in the correct amount for the body to function properly.
Grain is high in digestible energy and, if managed correctly, should be incorporated in reasonable amounts in the performance horse diet. Energy is the term used to describe the caloric density of a ration. The digestible energy in grain produces glucose and aids with glycogen repletion and storage following maximal exertion145. Grain or concentrates contain between 45 to 65 percent soluble carbohydrates, making them more energy dense than forage, which is composed of structural carbohydrates or fiber. Grain, which is not a natural feedstuff for a horse, can lead to a starch overload in the hindgut. If a horse requires a higher digestible energy content and starch overload is a concern, beet pulp, soybean hulls and rice bran can be blended into the ration. These products do not contain a high level of starch.
There is a mistaken belief that the higher the protein percentage in feed, the more chance of the horse displaying bad behavior. The protein percentage noted on each bag of feed can be a misleading piece of information. The protein percentage measures crude protein level instead of energy or caloric density of the protein. Overfeeding calories can contribute to hyper activity and fractious behavior in horses. Also, sugar content of the feed may play an even bigger role in creating a misbehaving horse. Ingested sugars and starches cause changes in blood sugar concentrations and some individual horses appear to suffer sensitivity to the fluctuation while others are not bothered at all146.
Fats
Fats, also known as lipids, carry vitamins through the digestive system and are necessary in small amounts for metabolism. Fatty acids add to the health of the skin and coat and assist in the growth rate of young horses. Fats are calorie dense, efficiently digestible and metabolized to fuel aerobic activities. During aerobic exercise a horse’s body will burn fats and VFAs, saving glycogen reserves for anaerobic activities. When ingested, fat from dietary sources (such as vegetable oils or rice bran) is digested and formed into triglycerides, which are the major form of fat stored by the body. VFAs that are not needed as immediate muscle fuel are stored in fat reserves or adipose tissues as triglycerides. When the horse needs fuel, triglycerides are released from adipose tissue into the bloodstream. Upon their release they are known as free fatty acids. Fats and fibers do not cause an increase in blood glucose when consumed.
144 The United States Pony Club Manual of Horsemanship Intermediate Riding C Level, Harris, Susan E. 1995 p. 191 145 USHJA Trainer Certification Manual & Study Guide, Gill, Amy M PhD
NUTRITION
149 All Horse Systems Go, Loving, Nancy S. DVM 2006 p. 325
116 © United States Hunter Jumper Association, Inc.
The absence of carbohydrate content in fat minimizes the risk of colic or laminitis for the horse. In addition, a high-fat diet improves a horse’s tolerance to exercise in hot weather. Exercise improves the ability of muscles to use stored fat reserves147.
Metabolism
Metabolism is the process of energy production and consumption. There are two basic types of metabolism:
• Aerobic: The body’s most efficient way to produce energy because the food components are burned completely without generating toxic by-products. The muscle cells burn fuel using oxygen and enzymes to produce energy. The body produces energy slowly through this method.
• Anaerobic: Energy is produced in the absence of oxygen. The body produces energy much more quickly but less efficiently. Anaerobic metabolism produces the by-products of heat and lactic acid148.
Energy Needs
A horse’s energy needs for every two hours of work (as calculated by the National Research Council) increase by:
• Slow walk: 12 percent • Fast walk: 18 percent • Slow trot: 46 percent • Fast trot or slow canter: 97 percent • Medium canter: 138 percent149
Body Condition
A horse’s feed requirements vary due to many factors including his body condition. Horses are scored on a scale of 1 to 9, with 1 being emaciated and 9 being obese. The ideal body condition is 5, in which the horse has a level back with ribs that can be felt but not seen. There is a slight amount of fat at the tail head and the withers are rounded over the spinous processes with the neck and shoulder blending smoothly into the body. A horse with a body condition of 1 is terribly thin and appears to be starving. A horse with a body condition of 9 is in danger of foundering and urgently needs to lose weight before he can do even the smallest amount of work.
Concentrates
Oats Higher in fiber and lower in digestible energy due to the fibrous hull surrounding each kernel. Oats have 9 to 12 percent protein and 4 to 5 percent fat. They should be plump, have heavy kernels and weigh at least 32 pounds per bushel. Oats shouldn't have small black kernels which,
147 All Horse Systems Go, Loving, Nancy S. DVM 2006 p. 140 148 All Horse Systems Go, Loving, Nancy S. DVM 2006 p. 140 - 141
NUTRITION
117 © United States Hunter Jumper Association, Inc.
may indicate a toxic fungus known as ergot. They should be stored for 3 to 4 months after harvest to let their nitrogen level subside. Oats can be fed whole, crimped or rolled.
Corn Weighing approximately 56 pounds per bushel, corn has the most energy (calories) per pound of any grain. It is approximately 9 percent protein and 3 to 4 percent fat. To put this into perspective, one-half scoop of corn provides as much energy as one scoop of oats. It may be fed whole, cracked, rolled or on the cob. Whole ear corn includes the ground up cobs, which contain more fiber but reduce its energy per pound.
Improperly stored corn is subject to mycotoxins or the by-products of mold growth. Moldy corn can cause:
• Leukoencephalomalacia, which causes neurological signs, ataxia, depression and sudden death.
• Aflatoxicosis, which causes gastrointestinal disturbances, anorexia, diarrhea, hemorrhage, anemia and weight loss150.
Barley Similar to oats but has more energy and less fiber. Rolled barley weighs approximately 40 pounds per bushel. Barley can be fed rolled or flaked.
Beet pulp Sugar beet pulp or beet pulp is the dried, fibrous byproduct of the sugar beet151. It provides horses with a food that is high in fiber (18 percent), low in sugar and low in protein. Beet pulp comes in two forms, one that requires soaking before it is fed and one that does not. It contains more roughage than grain and more energy than hay. It is also more easily digestible than hay. Beet pulp is digested easily in the large intestine without concerns related to carbohydrate overload that arise from grain152. It can be fed as a substitute for roughage in horses with allergies.
Bran This is the ground up hulls of wheat. Bran is approximately 15 percent protein and 3 to 4 percent fat. It has more fiber than corn, about the same amount as oats and less than hay. Bran contains a high amount of phosphorous of which approximately 90 percent is in the form of phytate. Phytate interferes with calcium absorption and reduces the absorption of copper, zinc and manganese. This lack of phosphorus, coupled with a low amount of calcium may bring on bone problems. Bran should not contain dust, clumps or cobweb-like strands, which are evidence of weevils.
Rice Bran An energy dense food that is useful as a fat supplement, rice bran is 20 percent highly digestible fat. A horse can eat 1 cup, which weighs 1 pound, twice a day. Rice bran is high in phosphorus
150 The Horse Nutrition Handbook, Worth, Melyni PhD, 2010 p. 78, 202 - 203 151 The Horse Nutrition Handbook, Worth, Melyni PhD, 2010 p. 82 152 All Horse Systems Go, Loving, Nancy S. DVM, 2006 p 328 – 329
NUTRITION
118 © United States Hunter Jumper Association, Inc.
so care must be taken in balancing the calcium to phosphorus ratio. It contains an anabolic plant sterol called gamma oryzanol, which is thought to increase lean muscle mass.
Pellets or Extruded Some feeds are processed into pellets by being ground, mixed together and then heated and formed into small nuggets. Heating alters the starch molecule, making it more digestible and easier for the horse to absorb. Pelleted and extruded products contain little or no molasses and their shelf life is longer due to processing. Not all pelleted feeds are complete. Some must be combined with roughage in order for the horse to receive adequate fiber and nutrition. Due to the chance of dehydration with pelleted feeds, make sure water is readily accessible to the horse.
Oils Contain more than twice the calories of grains, contain no starch and are easily absorbed from the small intestine. When high-fat products are fed, less feed needs to be consumed by the horse to achieve the same caloric density of a feed containing high amounts of starch153.
Roughage
Hay and other roughage, such as grass, alfalfa cubes and beet pulp, should account for approximately 80 percent of a horse’s diet. High in fiber and low in energy, roughage is the most natural form of horse feed and takes a long time to consume and digest. The plant fiber that roughage provides is essential for equine intestinal health.
Varieties of hay include:
• Grass: Timothy, brome, orchard grass, ryegrass, prairie hay and coastal Bermuda. • Legume: Alfalfa, clover and Lucerne.
Make sure to use a good hay supplier who has a consistent source of high-quality hay. Hay should smell sweet and fresh like a fresh cut lawn and be both dust and mold free. It should be green in color and contain leafy, intact plants. The moisture content of hay should be between 12 and 18 percent. Hay that is damp (more than 20 percent moisture) will mold and spoil. Damp hay may also overheat and spontaneously combust. First-, second- or third-cutting may not make much of a difference to the hay quality.
Aspects to consider when looking at hay:
• Level of fertilization of the field: Hay grown in poor soil (lacks minerals or is infertile) is not of good value due to lack of nutrients
• Amount of water available during the growing season • Species of plant being grown • Region where the plant is being grown • Maturity level at harvest: Hay should be cut and baled before it matures, which holds its
nutritive value • Proper curing: Weather damage, improper handling or baling when wet can result in
moldy, dusty or less nutritious hay
153 USHJA Trainer Certification Manual & Study Guide, Gill, Amy M. PhD, 2010
NUTRITION
119 © United States Hunter Jumper Association, Inc.
• Proper storage: Hay exposed to weather during storage loses nutritional value (at least in the outer layers). Heat, overexposure to sunlight and long periods of storage diminish vitamin levels (especially carotene and vitamins A and D)154.
• Insect infestation • Weed control • Sunlight
Prior to feeding hay, check for:
• Mold: Can appear in white or grayish white patches. This can cause coughing and lead to more serious respiratory problems. When picking up a hay bale, note its weight. Extremely heavy bales tend to be wet and are most probably moldy. Moldy hay should not be fed to horses. If it cannot be returned to the hay dealer it may be sold or given to cattle farmers.
• Dead animals: Occasionally found in hay bales, especially large round bales. Ingesting hay that has had a dead animal in it may lead to botulism.
• Blister beetles: Found in alfalfa grown in the South, West and Southwest. Blister beetles are highly irritating and can cause death.
• Weeds: Some weeds present no problem to the horse, but other weeds when present in significant quantity can be very toxic or can reduce forage quality.
• Trash or other foreign objects
Hay may be fed to horses on the ground, in a net or from a manger or hay rack. Each method has its benefits and drawbacks. Feeding on the ground is the most natural position for a horse. When feeding hay outside, the horse may ingest sand and be at risk for a sand colic or parasite eggs and larvae. A hay rack is a better solution for outdoor hay feeding. A net helps to keep the horse’s hay neat and minimizes wastage. Nets must be secured with a quick-release knot and tied at a height so that a horse cannot get his legs caught (especially as the net empties). Mangers (if they are hung high) can cause dust and debris to get into and irritate a horse’s eyes.
Grass hay contains more fiber and lower levels of protein than legume hay, making it less likely that the hay will be overfed. Horses who are fed grass hay are more likely to require supplemental concentrates, especially if they are growing, lactating or in hard work155.
Legume hay is 20 percent higher in energy, twice as high in protein, three times as high in calcium and five times higher in vitamin A than good quality grass hay. Legume hay is best fed as a supplement to grass hay. Horses that eat a large amount of legume hay have a need to drink more water than normal to help their body excrete the high nitrogen level that comes from metabolizing the high protein content. In effect, legume hay can cause dehydration and the buildup of ammonia fumes in the horse’s stall, which are potentially dangerous to his airways and respiratory system.
154 The United States Pony Club Manual of Horsemanship Advanced Horsemanship B, HA, A Levels, Harris, Susan E. 1996 p. 309 - 311 155 The United States Pony Club Manual of Horsemanship Advanced Horsemanship B, HA, A Levels, Harris, Susan E. 1996 p. 309 - 311
NUTRITION
120 © United States Hunter Jumper Association, Inc.
Other problems that may develop from the overfeeding of legume hay are: • Development of gaseous colic • Laminitis • Myositis156
Horses are herbivores that are designed to graze on a continual basis. Their bodies are designed to efficiently process dietary fiber in the form of roughage, which includes pasture and hay. A horse should eat approximately 1 pound of roughage for every 100 pounds of body weight per day. When a horse receives an appropriate amount of hay it decreases aberrant behaviors such as licking the ground or eating dirt, which is also known as pica. If a horse has a fiber deficiency, he will eat fence boards, dirt or weeds. Fiber deficiencies limit normal stimulation of the large colon that may allow sand to precipitate out into the intestine. They also predispose a horse to gastric ulcers157.
Pasture
A horse’s nutritional needs can be met by good quality pasture with free access to salt and water. Horses in moderate to hard work require supplementation with concentrates. A horse that lives “at grass” or turned out requires prolonged grazing time so as to meet his nutritional needs. If he must be off the pasture for any significant amount of time, he requires supplementary feed to make up the difference.
Supplements
A supplement is defined as a substance the body needs that is not in the horse’s normal ration. A horse’s daily ration usually contains an adequate amount of vitamins, minerals and protein. Feeding supplements can drastically increase the price of feeding the horse, and if not properly used can actually create an imbalance in the horse’s diet. Certain vitamins and minerals can reach toxic levels in the body if they are overfed. Supplementation works well when feeding a low quality hay or pasture. There are numerous types of supplements. Always consult your veterinarian before starting a supplement regime.
Some common supplements include:
Ergogenic Performance-enhancing supplements that may or may not work. Much of the research has come from human studies and may not apply to equines. These supplements claim to increase speed, stamina and strength.
Joint Designed to promote joint health. They should contain glucosamine, chondroitin sulfate, silicon, methylsulfonylmethane (MSM) and hyaluronic acid (HA).
156 All Horse Systems Go, Loving, Nancy S. DVM 2006 p.327 157 All Horse Systems Go, Loving, Nancy S. DVM 2006 p.326 - 327
NUTRITION
© United States Hunter Jumper Association, Inc.
Vitamin Vitamin supplements typically have a short shelf life and may be negatively affected by exposure to air or light.
• A: Fat soluble and usually found in green hay and particularly in legume hay. Vitamin A deficiencies lead to eye, skin and reproductive problems and excesses lead to bone or tendon disease. Vitamin A is stored in the liver and can be toxic if overfed.
• D: Fat soluble and usually found in quality hay and produced by the horse’s body when exposed to the sun for a few hours of daylight each day. Vitamin D helps with calcium and phosphorus absorption and metabolism that is critical to bone, muscle and tendon health. Overfeeding vitamin D can lead to bone deposits in places such as the heart, blood vessels and kidneys. Bones and joints may develop calcium deposits.
• E: Fat soluble and usually found in good quality green roughage and summer pastures. Vitamin E is a useful antioxidant to stabilize cell membranes.
• B: Water soluble and usually found in good quality pasture and produced in the hindgut by the horse when fed adequate roughage. Helps with energy metabolism and contributes to performance.
• C: Water soluble and manufactured in the liver158.
Mineral Calcium, phosphorus and selenium are examples of minerals. Mineral imbalances and overdoses can cause serious problems.
Protein Examples include soybean meal, oilseed meal, legume meal and milk protein. Excess protein is converted to fat or excreted, and can cause kidney problems.
Fat Corn and wheatgerm oil are two examples of fats. Fat supplements help with weight gain, healthy skin and a shiny coat and are a source of concentrated energy. They tend to have a short shelf life and can quickly become rancid if exposed to heat, air or light.
Electrolytes
The horse’s body cannot function without the correct electrolyte balance. Electrolytes serve the body by:
• Mediating electrical impulses to stimulate muscle contraction and movement and efficient interaction of nerves and muscles
• Regulating the balance of body water within the various tissue compartments
Electrolytes assist the body by maintaining normal intestinal function, adequate blood circulation, normal heart rhythm and muscular strength and coordination.
158 All Horse Systems Go, Loving, Nancy S. 2006 p.338
121
NUTRITION
122 © United States Hunter Jumper Association, Inc.
Electrolytes are body salts that include: • Sodium and chloride: Horses obtain sodium and chloride from salt blocks. A horse fed
free-choice salt licks approximately 1 to 2 ounces per day. Horses should be allowed free-choice salt in the form of white salt bricks or blocks. Trace mineral (red) salt bricks have a high level of iron oxide. Iron overload may be a factor in the onset of insulin resistance in some horses.
• Potassium: Contained in hay and grass. • Calcium and magnesium: Contained in hay, with alfalfa being the richest source.
As horses sweat, losing body water, they lose approximately 1 teaspoon of salt for each cup of sweat they produce. Electrolyte imbalances and dehydration can cause:
• Myositis: Tying up syndrome • Thumps: Synchronous diaphragmatic flutter • Colic • Diarrhea
Electrolyte imbalances are more common in horses that are performing low to moderate intensity work, such as endurance riding. Most horses have enough electrolytes stored in their intestines to cover their needs for sports that have brief bursts of intense activities, such as show jumping. Electrolytes that are not needed by the body are not stored but are processed by the kidneys and excreted as urine.
During times of athletic effort, it is as important to allow the horse access to good quality hay, which gives the horse a reservoir of electrolytes, energy and water to draw from. Electrolytes may be supplemented at the same time and should be taste-tested by the handler to ensure they are salty, not sweet. If the electrolytes are sweet they are most likely composed of more sugar than salt. In this case, choose a different brand159.
Bibliography
All Horse Systems Go, Loving, Nancy S. DVM 2006
The Horse Nutrition Handbook, Worth, Melyni PhD 2010
The United States Pony Club Manual of Horsemanship Advanced Horsemanship B, HA, A Levels, Harris, Susan E. 1996
The United States Pony Club Manual of Horsemanship Basics For Beginners D Level, Harris, Susan E. 1994
The United States Pony Club Manual of Horsemanship Intermediate Horsemanship C Level, Harris, Susan E.
1995 USHJA Trainer Certification Manual & Study Guide, Gill, 2010
159 All Horse Systems Go, Loving, Nancy S. DVM 2006 p. 333 - 336
123 © United States Hunter Jumper Association, Inc.
PASTURE MANAGEMENT
A pasture or turn-out area is an important part of a horse’s life. Pastures can be small or large and may contain grass or be a dry lot. Dry lots are generally composed of stone dust and are used for horses that should not be on grass. Sand is not advantageous because of the risk of a horse developing sand colic from an impaction.
Factors to consider when planning a paddock area include:
• Fencing • Drainage • Shelter • Water • Grasses and forage • Concentrates, hay and salt • Trees and toxic plants
Regardless of their size, all pastures require ongoing management to keep them safe and useful for horses.
Fencing Fence should be a minimum of 3’6” high and should not have sharp corners or places where horses can be trapped during rough play. Fences should be checked for loose or fallen boards or protruding nails on a daily basis. Do not use metal or T posts due to the high chance of injury.
Fences can be composed of:
Wood Can be three or four boards high and consist of nailed-in boards or slip rails. Slip rails should be nailed in to prevent horses escaping. Boards should be nailed on the inside of the fence to prevent horses pushing the boards off. Pressure-treated posts and oak boards are extremely durable.
Wire Can be diamond mesh or box wire. Both types of wire are more secure with a top board to stop horses leaning on the fence and pushing it down. Some wire fences have a board on the bottom. Although wire fence may be less expensive initially, it can cause injuries that could have been avoided by using wood or a synthetic. Barbed wire is not appropriate for horse use due to the potential for injury.
Synthetics Synthetic fences such as PVC or rubber require much less maintenance than wood fences.
Metal Pipe Welded pipe can be expensive to install, but it is safe, durable and non-chewable.
124 © United States Hunter Jumper Association, Inc.
PASTURE MANAGEMENT
Electric A good choice when used as a top wire for other types of fencing. It is sometimes referred to as hot wire fence. An electric fence by itself is hard for horses to see. Electric tape fencing is easier to see and more durable than electric wire. Electric fence chargers require grounding and come in the form of solar and plug in.
Drainage
Horses do not benefit from pastures that are marshy or have standing water. Marshy pastures can pull a horse’s shoe off, cause soft tissue injuries from the deep footing and act as breeding grounds for disease-carrying insects. In addition, wet ground predisposes a horse to scratches, rain rot and thrush. If the horse lives turned out, wet ground does not give him a comfortable place to lie down.
Signs of a poorly drained pasture include160:
• Marshy grass • Standing water • Buttercups: Certain species of buttercups, which are pasture weeds, grow in wet
conditions. These may also be present in poorly managed pastures, which have been overgrazed or improperly mowed.
Shelter
Occasionally, due to health reasons, lack of stall space or the horse’s preference, a horse may live turned out in a pasture. This is the most natural place for a horse to be, although many horses do not tolerate this lifestyle. Horses that live outside must have shelter from the elements. A three- sided shed or run-in shed works well for this purpose. The shed should be large enough to comfortably fit all the horses in the pasture and should be faced with its back to the prevailing wind. The shed and pasture should be cleaned out on a regular basis to avoid parasite infestation. Hay should be provided if the grass is poor or sparse. It is safer and more economical to feed hay from a hayrack. The horse should be looked at daily and checked for injuries, rain rot or changes in weight. Trees may be used as a shelter or windbreak in mild weather.
Water
A clean, reliable, free-choice water source is of the utmost importance in a pasture. Water troughs should be sited in a well-drained area, away from fence corners and trees with leaves that may contaminate or poison the water. Some leaves produce tannic acid, which is toxic to horses. Troughs must be cleaned on a regular basis to keep the water fresh.
Ponds and streams are not generally safe sources of water. Ponds may be contaminated with certain species of blue-green algae that are toxic to horses. These types of algae are common in
160The BHS Complete Manual of Horse and Stable Management, The British Horse Society, 2008
125 © United States Hunter Jumper Association, Inc.
PASTURE MANAGEMENT
ponds that are contaminated by run-off from organic materials such as fertilizers. Pond water may also be stagnant. Ponds and streams may be polluted from upstream sources161. Horses living on full-time turnout need to be watched closely for their water consumption. In the winter, some horses do not drink sufficient water. Under-consumption of water brings on dehydration and predisposes the horse to impaction colic. These horses should be brought inside or, if feasible, warmed water should be added to their trough162. A horse cannot satisfy its water needs by eating snow163. If a stock-tank heater is used, care must be taken to make sure that the horse is not shocked by faulty wiring.
Grasses and Forage
Pastures usually contain grasses, legumes and a certain percentage of weeds. Each area of the country contains grasses that are compatible with the climate. Horses do the best on cool- season grasses, but these do not thrive in some parts of the country. Cool-season grasses are able to tolerate frost and grow well in locations where there is a cool spring and fall. They do not tolerate long periods of high temperatures or drought.
Cool-season grasses include164: • Timothy • Ryegrass • Orchard
• Fescue (subject to an endophyte fungus that can be toxic to horses) • Kentucky bluegrass • Brome
Warm-season grasses are able to withstand hot and humid weather. Many warm-season grasses are not palatable due to toxins in their leaves. A pasture may become overrun with these grasses as horses eat around them. Careful pasture management can avoid this situation. Additionally, horses that are not from the Southern regions may not be able to tolerate coastal Bermuda grass or coastal hay. This grass can bring on colic in horses that are not accustomed to eating it.
Warm-season grasses include165: • Coastal Bermuda • Switch
• Causcasian bluegrass • Tift 44
Legumes are high in protein, amino acids and nitrates. Legumes obtain nitrogen from the air, and this helps to fertilize the soil for other plants. Clovers can form a toxic fungus especially in hot and humid weather. This fungus leads to significant weight loss, drooling, oral lesions, colic, diarrhea and stomach edema166. For that reason, clovers are not a good choice for pasture.
Legumes include: • Alfalfa • Lespedeza
• Bird’s foot trefoil • Clover: Red, white or alsike
161 The Horse Nutrition Handbook, Worth, Melyni, PhD 2010 p. 19 162 The Horse Nutrition Handbook, Worth, Melyni, PhD 2010 p. 18 163 The United States Pony Club Manual of Horsemanship, Intermediate Horsemanship C Level, Harris, Susan E. 1995 p. 166 164 The Horse Nutrition Handbook, Worth, Melyni, PhD 2010 p 161 - 163 165 The Horse Nutrition Handbook, Worth, Melyni, PhD 2010 p 161 - 163
166 Horse Owner’s Field Guide to Toxic Plants, Burger, Sandra M. 1996 p. 116 - 123
126 © United States Hunter Jumper Association, Inc.
PASTURE MANAGEMENT
Concentrates, Hay and Salt
Horses do not require grain or salt in their paddock if they are turned out for a few hours a day. Special provisions must be made when feeding concentrates to horses that are permanently pastured together. Every herd has its pecking order, and feeding time can be a dangerous experience for the underdog. It is not ideal to feed concentrates to horses in a group situation, but if it is necessary, the feed tubs should be spread over a large area with at least 30 feet between horses. A better strategy is to bring horses into the barn when they are being fed.
Hay can be fed in mobile hay racks. This prevents hay from being wasted and trampled underfoot (which creates muddy conditions) and also minimizes the ingestion of sand, parasite eggs and larvae.
Make sure to have free-choice salt available for horses that live outside.
Trees and Toxic Plants
Pastures must be monitored closely for the natural hazard of toxic trees and plants. Most horses do not ingest toxic plants unless there is nothing else to eat. Toxic plants vary from region to region. Refer to field guides or call your county extension agent to determine the toxic plants in your area.
Common poisonous plants include167: • Arrowgrass • Bracken Fern • Buttercups • Clover (sweet, red, alsike) • Cocklebur • Fescue (tall and chewings) • Foxgloves • Goldenrod • Hydrangea • Lantana • Larkspur • Lupine • Milkweed • Pigweed • St. Johnswort (goatweed) • Trees (apple, black locust, black walnut, cherry, oak, peach, red maple) • Wild onions • Yew
167 Horse Owner’s Field Guide to Toxic Plants, Burger, Sandra M. 1996 p 18, 68, 72, 76, 86, 116 – 123, 164, 166, 172, 191, 195

127 © United States Hunter Jumper Association, Inc.
PASTURE MANAGEMENT
Common Sense Pasture Practices
Pastures should be checked on a daily basis for unsafe conditions, which include: • Broken fencing • Protruding nails • Trash • Horse shoes • Holes • Rocks • Dead animals • Grass clippings, which can be
toxic Herd Behavior
Many horses enjoy the companionship of other horses and develop good social skills, but care must be taken when introducing new horses to one another. If it is practical, allow the horses to meet in adjoining paddocks so that they can become accustomed to one another. The first time they are turned out together, make sure to leave their halters on so you can catch them quickly in case of an emergency, and watch them until they settle down. The turnout halter should be leather or at the very least it should have a leather crownpiece. Many horsemen do not believe in horses wearing halters in the paddock because the horses can play “halter tag” or catch their halters on nails, boards or any protruding objects. Some horses do not enjoy company and should be left in private turnout. Each horse is an individual and needs to be monitored closely for signs of unhappiness, which can manifest itself in behaviors as extreme as running and screaming.
Some horses become overly attached or needy. They do better in private turnout so that they cannot become dependent on their pasture mates. Some horses become so buddy sour that they do not wish to work unless their pasture mate is with them.
When turning horses out, consider the time of year and the amount of grass present. Spring grass contains high levels of proteins, minerals, vitamins and sugars or fructans168 that can cause horses and especially ponies to have digestive upsets, diarrhea or attacks of laminitis169. During this time any horse that is susceptible to these issues should have limited turn out time or wear an anti-grazing muzzle when turned out.
Pasture Care
Maintenance of a safe and productive pasture takes planning and work. The pasture should either be picked out or dragged with a chain harrow on a regular basis. Dragging the pasture on a hot, dry day breaks open manure balls and exposes any possible parasites to sunlight, which kills off the eggs and larvae170. Horses tend to make one area of the paddock the “bathroom” and once
168 All Horse Systems Go, Loving, Nancy S. DVM 2006 p. 328
169 The United States Pony Club Manual of Horsemanship, Intermediate Horsemanship C Level, Harris, Susan E. 1995 p. 329 170 The BHS Complete Manual of Horse and Stable Management, The British Horse Society, 2008 p 348
128 © United States Hunter Jumper Association, Inc.
PASTURE MANAGEMENT
they have dropped manure in an area they will not eat the grass in that location. The grass in these areas becomes rough and rank if the manure is not removed. Regular harrowing or picking of the pasture helps keep these areas small and confined.
Pastures need to be rested in order to let the grass grow. Over grazing and overcrowding can lead to poor or sick (lacking in nutrients) soil and a lack of edible grass. Parasites can also take over a pasture that has not been rested. One form of resting a pasture is rotation. Larger pastures can be divided into thirds, with one pasture resting, one pasture being fertilized or seeded and one pasture being used for grazing171. Pasture soil should be tested periodically, and the correct amount of fertilizer should be applied. Pastures should be mowed, as horses prefer to eat the shorter grass. When mowing, it important to cut to the correct height for the grass in the paddock. This helps strengthen the grass and helps to slow the production of weeds. Shorter grass species, such as bluegrass and rye grass, should be mowed at 2-3 inches; taller grass species should be mowed at 4-5 inches172.
Bibliography
Agricultural Management Practices for Commercial Equine Operations, Rutgers Cooperative Extention Bulletin E296, 2004
All Horse Systems Go, Loving, Nancy S. DVM 2006
The BHS Complete Manual of Horse and Stable Management, The British Horse Society,
2008 Field Management, Watson, Mary Gordon 1994
The Horse Nutrition Handbook, Worth, Melyni, PhD 2010
Horse Owner’s Field Guide to Toxic Plants, Burger, Sandra M. 1996
The United States Pony Club Manual of Horsemanship, Intermediate Horsemanship C Level, Harris, Susan E. 1995
171 Field Management, Watson, Mary Gordon 1994 p. 5 172 Agricultural Management Practices for Commercial Equine Operations, Rutgers Cooperative Extention Bulletin E296, 2004
129 © United States Hunter Jumper Association, Inc.
RIDING THEORY
Safety As with all moments spent with horses, safety is of paramount importance. While riding, it is important to remember a few common sense rules:
• Always wear a helmet with the chin strap securely fastened. • Boots or shoes should have a small heel to prevent the foot from slipping through the
stirrup. • Candy and gum should not be eaten or chewed while riding. This is a choking hazard. • When riding in company, keep at least one horse’s length between horses. • Dangling jewelry is unsafe. If earrings are worn, they should be small studs that will not
catch on anything. Bracelets and necklaces should not be worn while mounted. • Scarves should be short so that they cannot hook on anything to choke a rider. • Shorts and chaps are not a polished look. • Text messaging and cell phone calls should be handled in a non-horse part of the barn. • Never let your temper affect your working with your horse.
Tacking
When tacking up a horse it is a good idea to follow the same procedures each time. If using a martingale, put it over the horse’s head so that the neck strap buckle is on the left side of the horse’s neck. Place a clean saddle pad high on the horse’s withers. Gently set the saddle on top of the saddle pad and pull the saddle pad well up into the gullet. Doing this helps stop pressure sores on the horse’s withers. Slide the saddle back until it falls into the natural hollow of the horse’s back. If the saddle needs to be moved forward, pick it up and move it. Dragging the saddle against the direction of the hair has the potential to irritate a horse and cause saddle sores. Next, attach the tabs of the saddle pad. Make sure that they are above the buckle or billet guards. Attach the girth to the right side of the saddle making sure that the girth is even on the billets. Attach the girth on the left side again making sure that the buckles are even. Pull the billet guard down to cover the girth buckles. Doing this stops the girth buckles from abrading the saddle flaps. Make sure that the girth does not cause skin wrinkles that could potentially cause a girth sore or gall. Tighten the girth enough to keep the saddle in place but do not tighten it fully until you are ready to mount.
Before bridling your horse, make sure that the buckles of the noseband, throatlatch and curb chain (if any) are unfastened. Place the reins over the horse’s head so that he is restrained at all times. Unbuckle the halter behind the left ear or un-snap the throatlatch and remove the halter. Hang the halter over your arm and proceed to put the bridle on the horse. The bridle can be held either just above the bit with the handler’s hand across the front of the horse’s face or be held at the crownpiece. Place the fingers of your left hand on the mouthpiece of the bit and insert your left thumb into the horse’s mouth in the interdental space, or bars, and squeeze gently. When the horse opens his mouth, guide the bit in so that it is on top of the horse’s tongue. Bring the crownpiece to the ears and gently push the ears forward one at a time through the crownpiece. Make sure that all of the bridle parts are straight before buckling the throatlatch and noseband. If
130 © United States Hunter Jumper Association, Inc.
RIDING THEORY
using a standing martingale, attach the martingale to the noseband. The noseband should be tightened so that two fingers held perpendicular to the horse’s face can fit in between the horse’s jaw and the noseband. The throatlatch should be tightened so that four fingers or a fist can fit between the horse’s cheek and the throatlatch.
Mounting
When arriving in the ring, check and tighten the girth very gradually. The girth should be checked both before you mount and again after your horse has warmed up for a few minutes. A properly adjusted girth should be on the same holes of each billet. A girth that is too tight causes discomfort, pain or full blown panic for some horses. Horses that are “girthy” or cold backed may react to an overly tight girth by rearing, sitting down or flipping over. Be aware that a sensitive horse with an overly tight girth might buck when you mount him. To tighten your girth while mounted, keep both feet in the stirrups and put your left leg ahead of the saddle flap. Reach down with the left hand and pull upward on the billet leaving the buckle attached. Use the forefinger of the left hand to guide the tongue of the buckle into the next billet hole.
If using an unfamiliar saddle, estimate the length of the stirrup leathers by placing the fingers on the stirrup bar and stretching the stirrup to the armpit. Stand in front of the horse and make sure that the stirrups are even before mounting. The number stamped on the stirrup leathers holes is not necessarily an indication that the stirrups are even because leather can stretch unevenly or the horse may have an unlevel back. A capable rider should not remove the feet from the stirrups while adjusting the length. The rider should be able to adjust the stirrups at the halt and walk unassisted.
The three mounting methods are:
• From the ground • From a mounting block • With a leg up
When mounting from the ground, place the reins over the horse’s head, making sure that they are not twisted. Stand on the horse’s left side, or near side, facing the rear. Hold the reins and stick in your left hand, on the crest of the neck. The bight of the reins and the stick should be on the near side. Take up the slack from the reins so that the horse stands still. Place your left foot in the stirrup, with the toe toward, but not touching, the girth. Grasp the cantle with your right hand and push up off the ground with your right leg. As your body rises, push up with your arms to support your body and move your right hand to the pommel. Bend your right leg at the knee and swing it over the seat of the saddle and the horse’s croup, making sure you do not stab your horse with the toe of your boot. Place your right foot into the stirrup and sink down lightly into the saddle. Put one rein in each hand and move the bight of the reins to the right side, or off side, of the horse’s neck.
Mount the horse the same way from the mounting block. Stand the horse straight and square so that he does not bang his leg when moving away from the mounting block.
131 © United States Hunter Jumper Association, Inc.
RIDING THEORY
To take a leg up, place the reins over the horse’s head. Stand on the horse’s left side, facing the saddle. Hold the reins in the left hand, on the crest of the horse’s neck. The bight of the reins should be on the near side. Take up the slack from the reins so that horse stands still. Bend your left knee at 90 degrees by raising your foot off the ground. Have another person place their left hand on your left knee and their right hand on your left ankle. On an agreed count, the helper lifts upward while you push yourself up with your hands on the pommel and cantle. Move the right hand from the cantle to the pommel. Bend the right leg at the knee and swing it over the seat of the saddle and the horse’s croup. Place your right foot in the stirrup and sink down lightly into the saddle. Put one rein in each hand and move the bight of the reins to the off side of the horse’s neck.
Dismounting
Dismounting is the last action of riding the horse and is equally as important as any other component of the riding session. Your actions may have a positive or negative effect on the horse. Improper dismounting, such as swinging your leg over the pommel in front of you to slide down, can startle or scare him, putting both of you in danger. To dismount properly, come to a complete halt. Put the stick and the bight of the reins on the left or near side. Hold the reins in the left hand and place your hand on the crest of the horse’s neck, while taking up the slack so that the horse stands still. Place the right hand on the pommel of the saddle. Remove the right foot from the stirrup. Lift the right leg over the hindquarters without touching the horse. Bring your legs together while standing balanced in the left stirrup. Remove the left foot from the stirrup and slide off landing on both feet with a soft bend in your knees. Push your body away from the saddle as you dismount to avoid catching any clothing or equipment on the safety stirrups. Bring the reins forward over the head and immediately run up both stirrups and loosen the girth. It is important to run up the stirrups so that they do not catch on anything. A horse can actually catch his teeth on a stirrup left down if he bites at his side. Such an action will cause danger for both horse and rider.
Untacking
As with tacking up a horse, when untacking it is a good idea to follow the same procedures each time. Start by unfastening the throatlatch, noseband and curb chain if the horse is wearing one. Place the reins over the horse’s head as if he were to be ridden and gently slip the bridle off over the ears. Great care should be taken not to bang the bit into the horse’s teeth. Place the halter on the horse’s head and take the reins back over the head. Clip the horse on the cross ties or tie and hang the bridle neatly on a hook. Unbuckle the girth on the left side of the horse and let go of it gently so that it does not bang the horse in the ankles. Detach the girth from the right side and place it over top of the saddle. Use both hands to lift the saddle and pad off the horse’s back and hang it on a rack. If there is no rack available, place the saddle pommel down with the cantle leaning against a solid object. To avoid damaging the pommel or cantle, place the girth under the pommel and between the cantle and the object that the saddle is supported by. If using a martingale, take it off and hang it with the bridle.
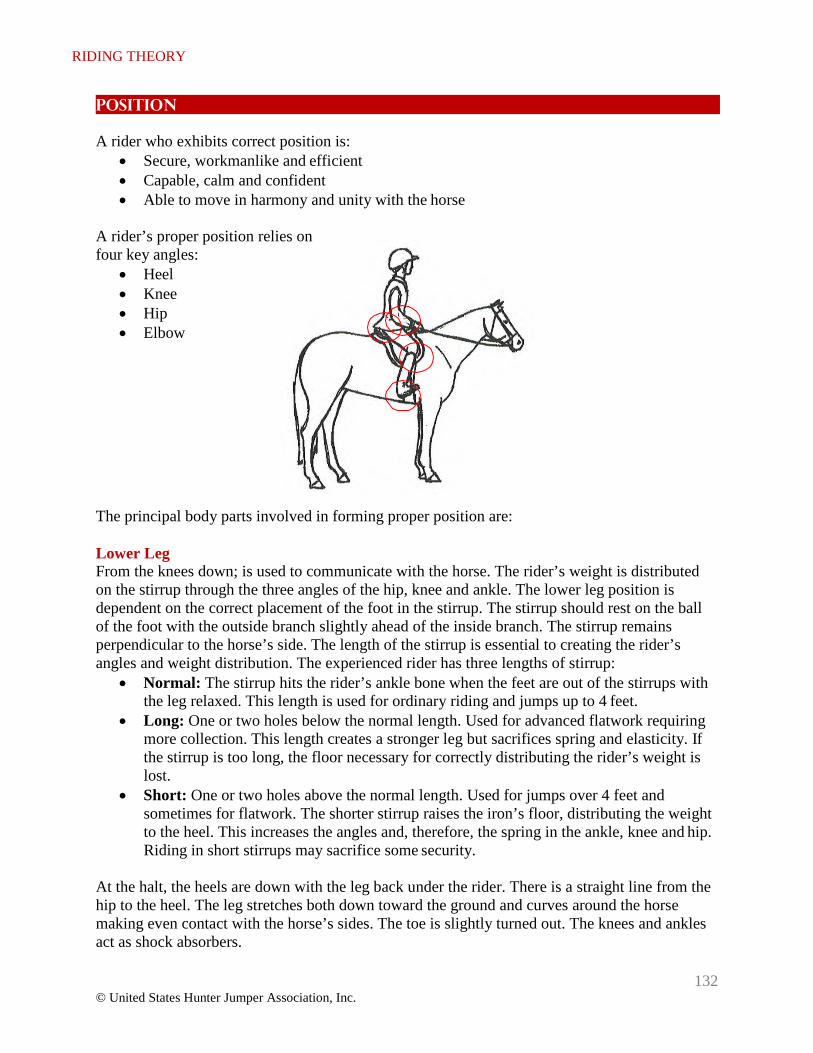
132 © United States Hunter Jumper Association, Inc.
RIDING THEORY
Position
A rider who exhibits correct position is: • Secure, workmanlike and efficient • Capable, calm and confident • Able to move in harmony and unity with the horse
A rider’s proper position relies on four key angles:
• Heel • Knee • Hip • Elbow
The principal body parts involved in forming proper position are:
Lower Leg From the knees down; is used to communicate with the horse. The rider’s weight is distributed on the stirrup through the three angles of the hip, knee and ankle. The lower leg position is dependent on the correct placement of the foot in the stirrup. The stirrup should rest on the ball of the foot with the outside branch slightly ahead of the inside branch. The stirrup remains perpendicular to the horse’s side. The length of the stirrup is essential to creating the rider’s angles and weight distribution. The experienced rider has three lengths of stirrup:
• Normal: The stirrup hits the rider’s ankle bone when the feet are out of the stirrups with the leg relaxed. This length is used for ordinary riding and jumps up to 4 feet.
• Long: One or two holes below the normal length. Used for advanced flatwork requiring more collection. This length creates a stronger leg but sacrifices spring and elasticity. If the stirrup is too long, the floor necessary for correctly distributing the rider’s weight is lost.
• Short: One or two holes above the normal length. Used for jumps over 4 feet and sometimes for flatwork. The shorter stirrup raises the iron’s floor, distributing the weight to the heel. This increases the angles and, therefore, the spring in the ankle, knee and hip. Riding in short stirrups may sacrifice some security.
At the halt, the heels are down with the leg back under the rider. There is a straight line from the hip to the heel. The leg stretches both down toward the ground and curves around the horse making even contact with the horse’s sides. The toe is slightly turned out. The knees and ankles act as shock absorbers.
133 © United States Hunter Jumper Association, Inc.
RIDING THEORY
Position faults include: • Heels up • Legs too far forward (chair seat) • Legs too far behind the rider • Pinching with the knee, heel or calf • Turning the toes toward the horse • Riding on the back of the calf • Rolling the ankles over to the outside • Extremely open or closed angles in the ankles and knees
Base of Support From the hips to the knees; is used for the rider’s security. The leg is wrapped around the horse and securely balances the rider in the middle of the saddle. The knee is relaxed allowing the leg to stretch down. The seat and position are independent of the rider’s hands. The seat bones are in contact with the saddle. The rider’s center of gravity drops down through the buttocks weighting the angles of the hip, knee and ankle. The hips act as shock absorbers.
Position faults include:
• Pelvis tilted forward, which throws the rider onto his crotch causing stiffness • Pelvis tilted backward, which puts the rider on his buttocks with a round back and leg
that sticks out ahead of him • Gripping at the knee • Loose thigh • Raising the thigh and squeezing the saddle in an effort to stay on • Unevenly distributed contact with tension points pinching at the saddle • Bringing the tailbone into contact with the saddle • Sitting crookedly or off-center in the saddle • Stiffness or tension in hips or knees
Upper Body From head to hips; is used to either follow or influence the horse’s balance. The position at the halt shows a slight arch in the back. Good posture includes the head up, shoulders back and chest lifted high. A rider’s head is heavy and controls balance. To help aim the horse, choose a target to steer for and look where you want to go, as opposed to looking down which affects the horse’s balance. The rider sits slightly in front of the vertical with softness and suppleness in the spine.
Position faults include:
• Collapsing in the small of the back • Collapsing at the waist • Slouching in the saddle • Dropping a shoulder • Looking down • Riding too far forward or sitting too far back • Roached or rounded back • Stiffness or tension in the rider’s body
134 © United States Hunter Jumper Association, Inc.
RIDING THEORY
Hands and Arms The (single) reins are held by passing through the little finger and the ring finger, going across the rider’s palms with the excess, or bight, coming out at the thumbs and hanging on the side of the horse’s neck. To shorten the reins, hold them in both hands. Take the extra portion of the right rein in the left hand and pull the rein through the right hand to the desired location. Do not jump or crawl the hands up the reins. The hands are beside each other without touching. The thumbs are on top of the reins, with straight, supple wrists. The thumb on top of the rein helps the rider to keep the rein at one length. There is a straight line from the elbow through the arm and rein to the horse’s bit. The elbows have a slight bend, are close to the torso and are carried slightly ahead of the body. The hands are independent and have a soft feel of the mouth.
Position faults include:
• Hands that are either too high or too low creating a broken line to the horse’s bit • Straight, locked or rigid elbows • Elbow wings flapping away from the body • Using the hands for balance • Open fingers on the reins • Wrists bent in or out
When in motion, the rider’s weight can influence the horse’s balance at the walk, sitting trot and canter or follow the horse’s motion at the posting trot and hand gallop. When a rider is influencing the horse’s balance, he sits just in front of the vertical with the seat bones making contact with the saddle and an open hip angle. When a rider is following the horse’s motion, his upper body is angled about 30 degrees inside the vertical. The crotch makes contact instead of the seat bones. The angles (except for the heels) are more closed.
Seat
The rider should strive to develop an independent seat that does not rely on his hands for balance. On the flat, he should sit on the vertical. When jumping, the angles should be more closed.
The seats used in the American Forward Riding System are:
• Full: The entire seat is in the saddle. This seat may be called three-point contact and refers to the seat and both legs being in contact with the horse. When riding in the full seat position the rider is generally collecting for control. This seat allows him to shift the balance more toward the horse’s rear. This position gives the rider more control and the horse less freedom. Practicing the full seat at different gaits, with and without irons, strengthens the seat.
• Half: The seat bones are out of the saddle. This seat is also called jumping seat or jumping position. The rider makes contact at only two points: each leg. The half-seat is primarily used at the gallop and for jumping. In general, when riding in the half-seat position, the rider is encouraging an extension of the horse’s action or motion. This position gives the horse more freedom and the rider less security. This is also the up phase of the rising trot. The half-seat can also be used as an exercise called the two-point, which promotes better leg position, upper body control and improved security on the
135 © United States Hunter Jumper Association, Inc.
RIDING THEORY
horse. Practicing the half-seat in schooling different movements strengthens the lower leg.
• Light: The position between the half-seat and full-seat. The horse has less freedom and the rider has more security than in the half-seat. Practicing the light seat at different gaits, with and without irons, strengthens the thighs.
• Driving: The rider deliberately rides behind the horse’s motion to more effectively influence the horse’s balance. The seat is used to drive a spooky or balky horse forward.
When jumping, a rider should ride with the motion. It is important to remember that the horse’s jump is the mechanism that closes a rider’s angles. A rider should not fling their body at a jump. It is occasionally necessary to ride behind the motion. Doing so strengthens the rider’s driving or holding aids. It is never correct to ride ahead of the motion.
Position faults include:
• Leaning too far forward: This pushes the rider’s leg back and out of position. • Jumping ahead: Generally a fault of a rider that is behind the motion and throws their
body forward to catch up. • Ducking: Dropping the head down below the crest while the horse is in the air. • Dropping back in the air: Weight shifts back at the top of the jumping arc. This fault
occurs in riders with a poorly placed and insecure lower leg. • Getting left behind: Rider caught behind as the horse leaves the ground. This is an
abusive habit. • Overweighting one stirrup: Uneven weight distribution. • Perching: The rider is above and ahead of the horse’s motion. This fault leads to
insecurity and a lack of control. • Eyes down: Looking at the jump or looking down at the horse. This fault interferes with
the rider’s balance and can inhibit the horse’s ability to jump well. • Bending at the waist: Not supporting the upper body with the abdominal muscles. This
fault causes the torso to collapse and makes it difficult to keep the body in balance with the horse and the eye forward.
• Looking too early: The rider’s eyes and head turn before the horse has landed. This fault twists the rider’s upper body and interferes with the horse’s balance and performance.
Aids
Aids are the signals that riders use to communicate with a horse. For instance, the rider uses aids to ask the horse to make a transition between gaits. The aids can be divided into natural and artificial and can generally be classified as either driving or restraining. They may be used laterally or diagonally. Aids must be coordinated – when applying one aid another must be relaxed for the horse to respond. For instance, a novice rider may relax both hands and add both legs to ask a horse to move forward.
When applying the aids, remember to use them in the following order of severity:
• Ask: Give a clear aid but use the most minimal form of the natural aid for the requested transition.
• Allow: Give the aid time to work.
136 © United States Hunter Jumper Association, Inc.
RIDING THEORY
• Tell: Use a more emphatic version of the initial natural aid. • Demand: Follow the natural aid with an artificial aid if needed for an upward transition
or a heavier hand for a downward transition.
For instance, when making a transition from walk to trot, use the aids in the following order: • Close both legs lightly at the girth (ask) • Wait for the horse to respond (allow) • Close both legs harder at the girth (tell) • Use a sharp aid such as a spur or a stick behind the leg (demand)
Natural Aids
Legs Used when the horse is being asked to move forward, to put the horse in front of the rider’s leg, to correct backwards mistakes of the horse, to give support and provide direction on lateral maneuvers and to soften the horse’s mouth. Leg aids can be used in the following manners:
• Urging: Applied at the girth to encourage impulsion. Both legs may be applied simultaneously, urging the horse into an upward transition or to lengthen a gait.
• Holding: Applied at the girth to keep a horse from falling in. May also be used to move a horse laterally. Applied with one leg at a time, generally on the inside of a turn. Helps keep a horse on a straight track and maintain a straight line.
• Displacing: Applied slightly behind the girth. Used to move or displace the horse’s haunch on turns and lateral maneuvers. May also be employed to hold the haunch in line, or prevent the haunches from falling out173.
Weight Involves either following the horse’s motion or influencing the horse’s balance.
Hands Manage or control forward movement of the horse, provide directional guidance and position the head and neck. Use the reins in a gentle give and take or as if squeezing water out of a sponge instead of yanking. Rein aids can be used in the following manners:
• Direct rein: The most basic use of hands on the reins. The rider’s hands move forward or backward but do not move laterally. For instance, to apply a left direct rein, the rider moves their left hand straight back toward their left hip. The line from the rider’s elbow to the bit is straight at all times.
• Opening or leading rein: Gives direction without taking away from the forward movement of the horse. The rider’s hand opens away from the horse’s body and leads the horse in the desired direction. This rein aid is used one hand at a time.
• Bearing or neck rein: Both hands move in the direction of the desired turn. The outside hand crosses over the horse’s withers and the outside rein presses against the horse’s neck, which pushes the horse to turn away from the rein. This is effective for advanced control of the horse’s shoulder especially on tight, timed turns.
173 Schooling and Riding the Sport Horse, Cronin, Paul D. 2004 p. 52
RIDING THEORY
174 Hunter Seat Equitation, Morris, George H. 1990 p. 31
137 © United States Hunter Jumper Association, Inc.
• Pulley rein: Firmly fixing the inside hand on the horse’s withers or neck and strongly pulling up and back with the outside hand. It is a tool for correcting runaways or for an emergency stop.
• Lifting rein: Used to correct horses that bear down heavily on the bit or overflex at the poll in avoidance. Both hands are raised higher than normal and the rider uses a series of bumps or nips that cease as soon as the horse corrects the behavior.
• Indirect rein: Controls lateral movements including bending and turning. The rider’s hand does not cross the mane line. There are two types of indirect rein aids:
o Indirect rein in front of the withers: Displaces the horse’s weight from one shoulder to the other. In a right indirect rein in front of the withers, the rider’s right hand moves toward the rider’s left hip.
o Indirect rein behind the withers: Displaces the horse’s weight from one shoulder to the opposite hind leg. In a right indirect rein behind the withers, the rider’s right hand moves toward the horse’s left hip174.
Voice Should be low and gentle.
Artificial Aids
Stick Also known as the bat, crop or whip. When using a stick, make sure to hold both reins in the hand without the stick. This is called bridging the reins. To bridge the reins, place both reins in one hand, and hold them with one rein on top of the other. A rider should be able to carry and use the stick with either hand. A dressage whip may be used without the rider taking his hands off the reins. A stick should only be used behind the leg.
Spur Used to reinforce the leg. The length of the shank depends on the need and skill of the rider. Only riders with a solid leg position should use spurs to avoid conflicting signals to the horse.
Gaits
Walk A four-beat gait that has no moment of suspension. The sequence of footfalls of the walk is: Left hind leg; left foreleg; right hind leg; right foreleg. The horse’s head and neck move in an oscillating motion. The speed of the walk:
• 3 mph: Shortened • 4 mph: Ordinary • 5 to 6 mph: Lengthened
Trot A two-beat gait with a moment of suspension. The legs move in diagonal pairs. The sequence of footfalls is: Left hind leg and right foreleg as a pair; right hind leg and left foreleg as a pair. The
RIDING THEORY
138 © United States Hunter Jumper Association, Inc.
trot can be ridden by posting, which is also known as rising, or sitting. When posting to the trot, the rider is in the up phase of the rise when the horse’s outside foreleg is forward. The horse’s head and neck remain still. The speed of the trot:
• 5 to 6 mph: Shortened • 8 mph: Ordinary • 10 mph: Lengthened
Canter A three-beat gait with a moment of suspension. The sequence of footfalls at the right lead canter is: Left hind leg; right hind leg and left foreleg as a pair; right foreleg. The horse is on the correct lead when the inside foreleg is leading. The horse’s head and neck move in an oscillating motion. Faults in the canter include the four-beat canter and the cross canter, when the horse is on one lead with his front legs and the other lead with his hind legs. The speed of the canter:
• 6 mph: Shortened • 10 to 12 mph: Ordinary • 14 mph: Lengthened
Gallop A four-beat gait with a moment of suspension. The sequence of footfalls at the right lead gallop is: Left hind leg; right hind leg; left foreleg; right foreleg. The horse’s head and neck move in a pronounced oscillating motion. The speed of the gallop is 14 to 18 mph175.
Contact
Contact is the feeling of the horse’s impulse to move forward to the rein. The rider closes the leg, which urges the horse forward until the horse’s forward motion meets the rider’s hands. The rider does not pull back. The rein impedes the horse’s forward motion creating the feeling of contact. Light contact is a steady feel of the horse’s mouth. The reins are not loose or sagging and there is a straight line from the rider’s hand to the mouth.
Half-Halt
A half-halt is a signal made by the coordinated action of the rider’s seat, legs and hands. Half- halts are used to increase his attention, decrease speed, renew impulse and regulate rhythm and balance. A half-halt is ridden by sitting in the full seat and closing the legs to engage the horse’s hindquarters. The hands and arms resist the mouth and then relax. As soon as the horse responds, the aids immediately release. The coordinated actions of driving forward, retarding the motion and then resuming the forward motion produce a half-halt. The half-halt never intends to bring the horse to a full halt.
Flatwork
Once mounted, make sure to take adequate time to warm up the horse. A horse benefits from a slow and consistent warm up. His heart rate accelerates rapidly in the first 2 to 3 minutes of
175 Hunter Seat Equitation, Morris, George H. 1990 p. 46 - 48
RIDING THEORY
139 © United States Hunter Jumper Association, Inc.
exertion. Several minutes of brisk walking or slow trotting gets the circulatory system ready to meet the oxygen needs of the muscles. Ten minutes of walking enhances the blood delivery to the muscles. In addition, walking improves condition by slowly activating ligaments, tendons and muscles to take on a small increase in load. Proper warm up minimizes the risk of musculoskeletal injuries and also prepares the horse and rider for focused work.
In the words of George Morris, “Forwardness is absolutely indispensable. One cannot go forward, backward, left or right without the horse thinking forward.” The purpose of flatwork is to make a horse rideable, forward, straight, supple and light. Flatwork is used to get the horse to move forward from the rider’s legs at a desired gait and speed, back from the rider’s hands with softness and left and right with ease. Flatwork teaches the rider the basics: position, balance, control of the horse, security in the saddle, confidence and independent seat, hands and legs.
As riders and horses advance through their schooling work, the concepts of impulsion, flexion, self-carriage and collection are introduced:
• Impulsion: Educated reserve energy or impulse, which is created by the rider’s leg. The horse is energetic and alert but remains calm and cooperative with the rider. Natural impulsion is generally uneducated energy176. Impulsion is taught in stages, which should include:
o Stabilization of gaits on passive contact o Consistent, soft or light contact with precise transitions and consistent reserve
energy o Active contact with increased impulse
• Flexion: Softening and relaxing of the jaw and poll, which allows for softer, more precise control. The muscles of the lower jaw must be relaxed so that, in response to rein tension of stronger than normal contact, there is a softening or flexion of the jaw177. Direct flexion is a retraction of the lower jaw in the vertical plane and is used in slowing down, halting, semi-collected and collected gaits and sometimes in backing. Flexion at the jaw should be taught before flexion at the poll. Lateral flexion is a retraction of the lower jaw combined with a soft turn of the head in the direction of travel. Lateral flexion teaches the horse to bend his neck slightly and yield promptly while turning and changing direction.
• Self-carriage: As the horse becomes better balanced and more connected, the head and neck are raised and are carried a little higher as the horse develops more strength. Flexion, collection and shortening movements are used to be able to ride a horse in a connected forward balance to achieve the ultimate goal of self-carriage. Working on progressive transitions from slow to fast is one of the basic tenets of the American Forward Riding System.
• Collection: The horse’s hindquarters are under him and his forehand is much freer than when he is in a connected forward balance. A collected horse can be extremely skillful at all sorts of turns, lateral movements and transitions at slow gaits. However, jumping requires a connected forward balance and thus, collection is used primarily for schooling gymnastics and flatwork. Collection requires both impulsion and flexion.
176 Schooling and Riding the Sport Horse, Cronin, Paul D. 2004 p. 11 177 Schooling and Riding the Sport Horse, Cronin, Paul D. 2004 p. 194
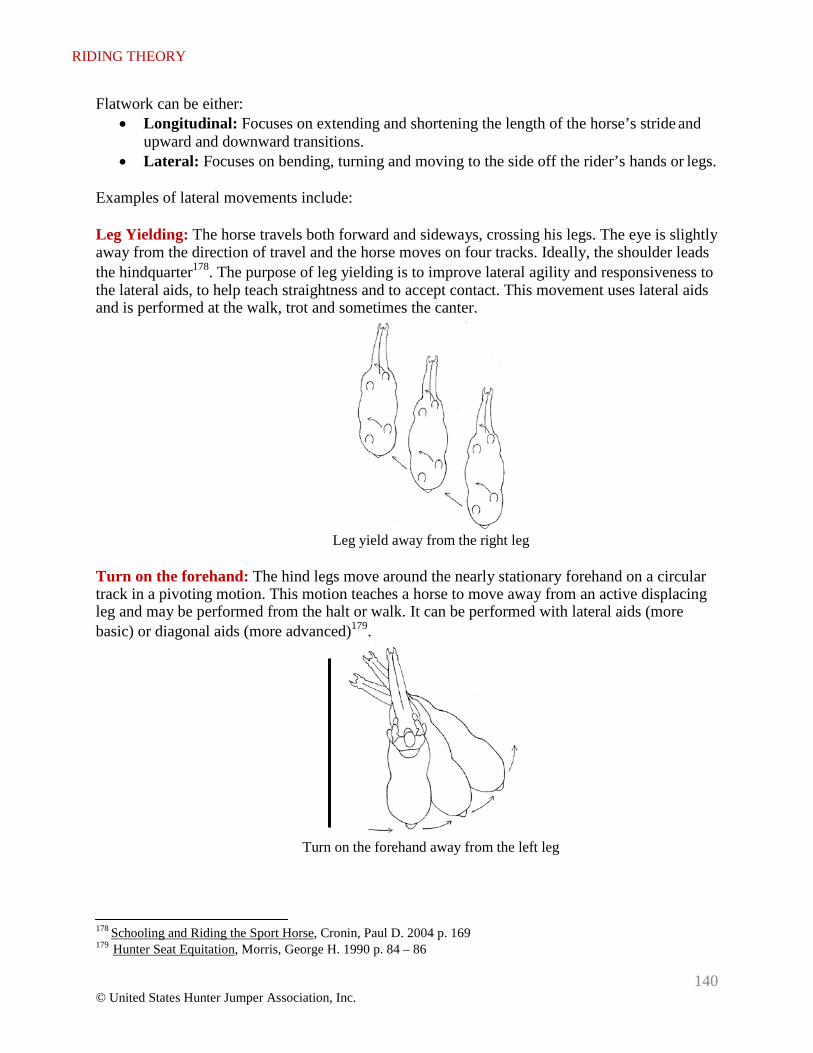
RIDING THEORY
140 © United States Hunter Jumper Association, Inc.
Flatwork can be either: • Longitudinal: Focuses on extending and shortening the length of the horse’s stride and
upward and downward transitions. • Lateral: Focuses on bending, turning and moving to the side off the rider’s hands or legs.
Examples of lateral movements include:
Leg Yielding: The horse travels both forward and sideways, crossing his legs. The eye is slightly away from the direction of travel and the horse moves on four tracks. Ideally, the shoulder leads the hindquarter178. The purpose of leg yielding is to improve lateral agility and responsiveness to the lateral aids, to help teach straightness and to accept contact. This movement uses lateral aids and is performed at the walk, trot and sometimes the canter.
Leg yield away from the right leg
Turn on the forehand: The hind legs move around the nearly stationary forehand on a circular track in a pivoting motion. This motion teaches a horse to move away from an active displacing leg and may be performed from the halt or walk. It can be performed with lateral aids (more basic) or diagonal aids (more advanced)179.
Turn on the forehand away from the left leg
178 Schooling and Riding the Sport Horse, Cronin, Paul D. 2004 p. 169 179 Hunter Seat Equitation, Morris, George H. 1990 p. 84 – 86
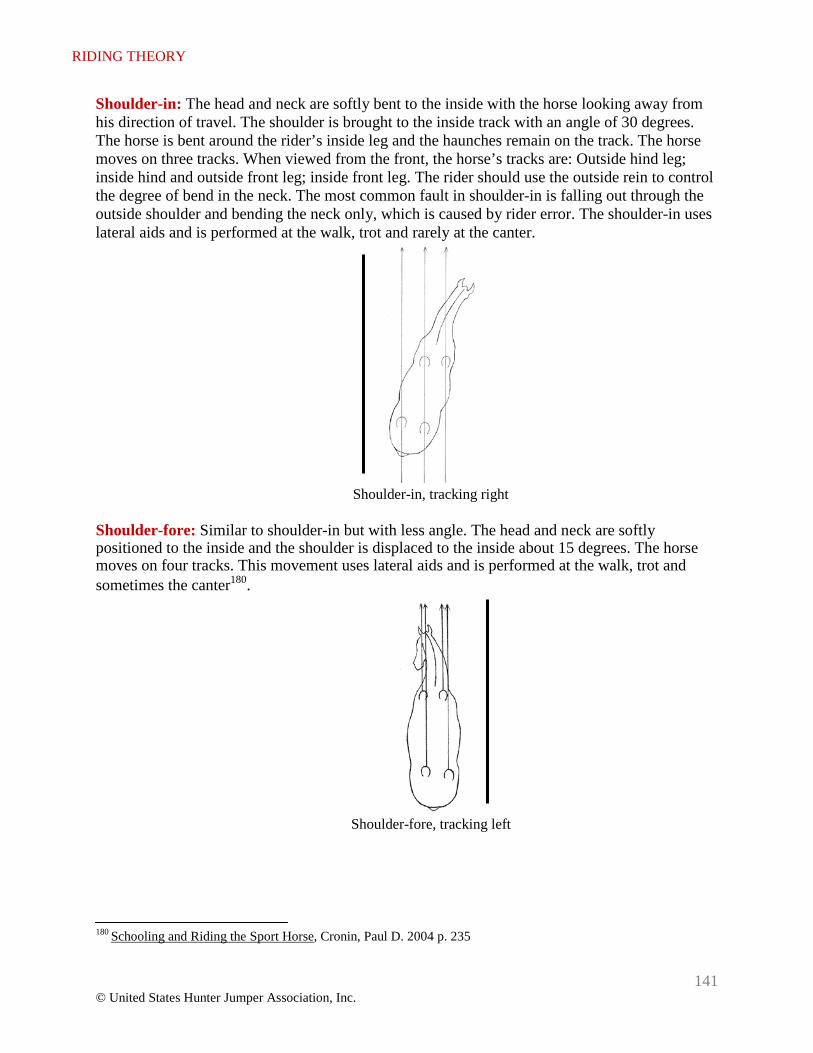
RIDING THEORY
141 © United States Hunter Jumper Association, Inc.
Shoulder-in: The head and neck are softly bent to the inside with the horse looking away from his direction of travel. The shoulder is brought to the inside track with an angle of 30 degrees. The horse is bent around the rider’s inside leg and the haunches remain on the track. The horse moves on three tracks. When viewed from the front, the horse’s tracks are: Outside hind leg; inside hind and outside front leg; inside front leg. The rider should use the outside rein to control the degree of bend in the neck. The most common fault in shoulder-in is falling out through the outside shoulder and bending the neck only, which is caused by rider error. The shoulder-in uses lateral aids and is performed at the walk, trot and rarely at the canter.
Shoulder-in, tracking right
Shoulder-fore: Similar to shoulder-in but with less angle. The head and neck are softly positioned to the inside and the shoulder is displaced to the inside about 15 degrees. The horse moves on four tracks. This movement uses lateral aids and is performed at the walk, trot and sometimes the canter180.
Shoulder-fore, tracking left
180 Schooling and Riding the Sport Horse, Cronin, Paul D. 2004 p. 235
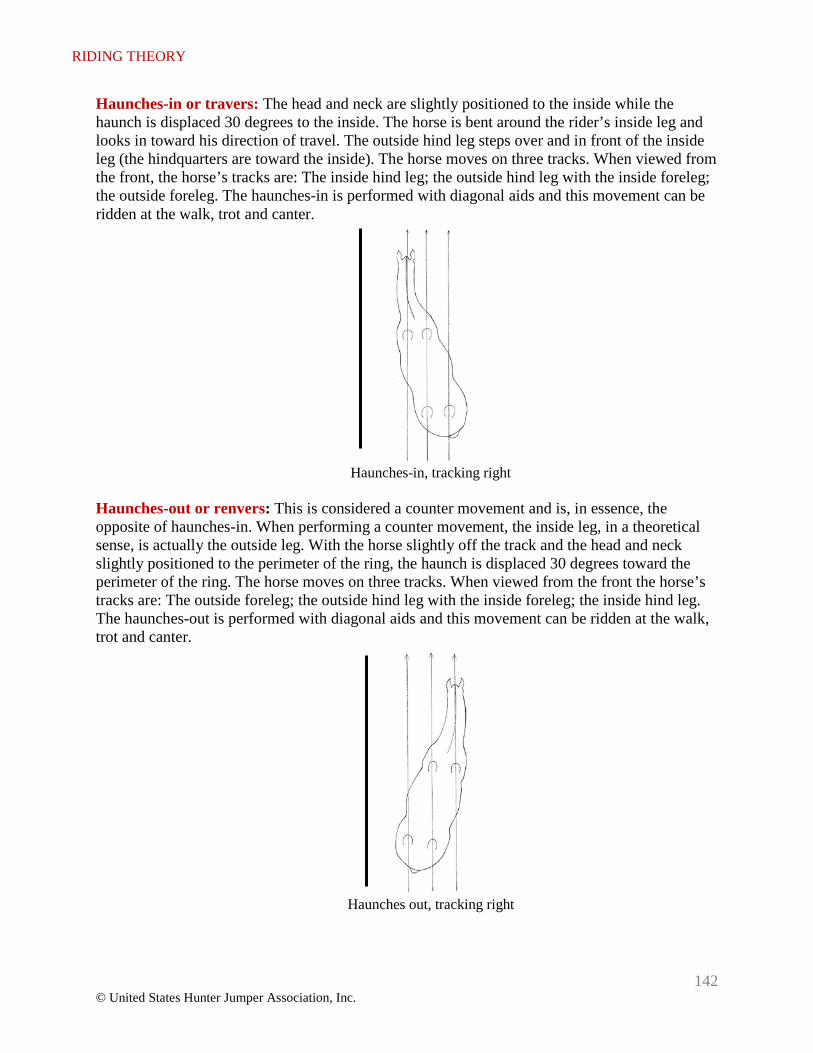
RIDING THEORY
142 © United States Hunter Jumper Association, Inc.
Haunches-in or travers: The head and neck are slightly positioned to the inside while the haunch is displaced 30 degrees to the inside. The horse is bent around the rider’s inside leg and looks in toward his direction of travel. The outside hind leg steps over and in front of the inside leg (the hindquarters are toward the inside). The horse moves on three tracks. When viewed from the front, the horse’s tracks are: The inside hind leg; the outside hind leg with the inside foreleg; the outside foreleg. The haunches-in is performed with diagonal aids and this movement can be ridden at the walk, trot and canter.
Haunches-in, tracking right
Haunches-out or renvers: This is considered a counter movement and is, in essence, the opposite of haunches-in. When performing a counter movement, the inside leg, in a theoretical sense, is actually the outside leg. With the horse slightly off the track and the head and neck slightly positioned to the perimeter of the ring, the haunch is displaced 30 degrees toward the perimeter of the ring. The horse moves on three tracks. When viewed from the front the horse’s tracks are: The outside foreleg; the outside hind leg with the inside foreleg; the inside hind leg. The haunches-out is performed with diagonal aids and this movement can be ridden at the walk, trot and canter.
Haunches out, tracking right
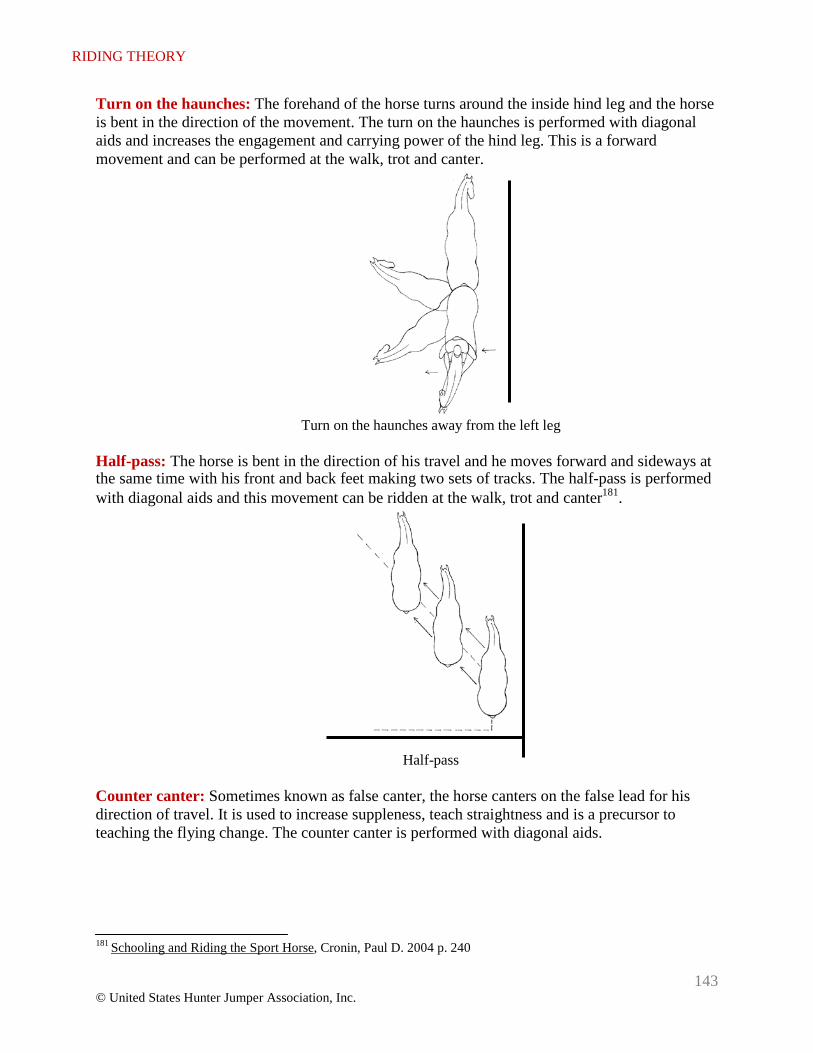
RIDING THEORY
143 © United States Hunter Jumper Association, Inc.
Turn on the haunches: The forehand of the horse turns around the inside hind leg and the horse is bent in the direction of the movement. The turn on the haunches is performed with diagonal aids and increases the engagement and carrying power of the hind leg. This is a forward movement and can be performed at the walk, trot and canter.
Turn on the haunches away from the left leg
Half-pass: The horse is bent in the direction of his travel and he moves forward and sideways at the same time with his front and back feet making two sets of tracks. The half-pass is performed with diagonal aids and this movement can be ridden at the walk, trot and canter181.
Half-pass
Counter canter: Sometimes known as false canter, the horse canters on the false lead for his direction of travel. It is used to increase suppleness, teach straightness and is a precursor to teaching the flying change. The counter canter is performed with diagonal aids.
181 Schooling and Riding the Sport Horse, Cronin, Paul D. 2004 p. 240
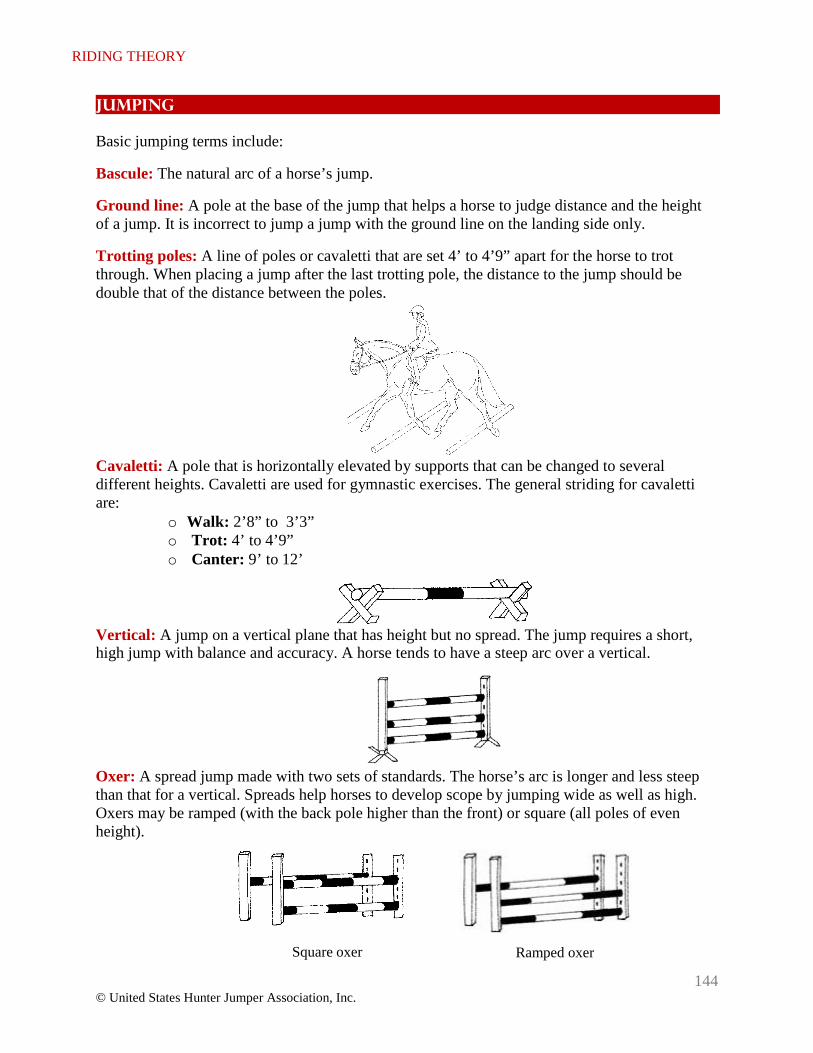
RIDING THEORY
144 © United States Hunter Jumper Association, Inc.
Jumping
Basic jumping terms include:
Bascule: The natural arc of a horse’s jump.
Ground line: A pole at the base of the jump that helps a horse to judge distance and the height of a jump. It is incorrect to jump a jump with the ground line on the landing side only.
Trotting poles: A line of poles or cavaletti that are set 4’ to 4’9” apart for the horse to trot through. When placing a jump after the last trotting pole, the distance to the jump should be double that of the distance between the poles.
Cavaletti: A pole that is horizontally elevated by supports that can be changed to several different heights. Cavaletti are used for gymnastic exercises. The general striding for cavaletti are:
o Walk: 2’8” to 3’3” o Trot: 4’ to 4’9” o Canter: 9’ to 12’
Vertical: A jump on a vertical plane that has height but no spread. The jump requires a short, high jump with balance and accuracy. A horse tends to have a steep arc over a vertical.
Oxer: A spread jump made with two sets of standards. The horse’s arc is longer and less steep than that for a vertical. Spreads help horses to develop scope by jumping wide as well as high. Oxers may be ramped (with the back pole higher than the front) or square (all poles of even height).
Square oxer Ramped oxer
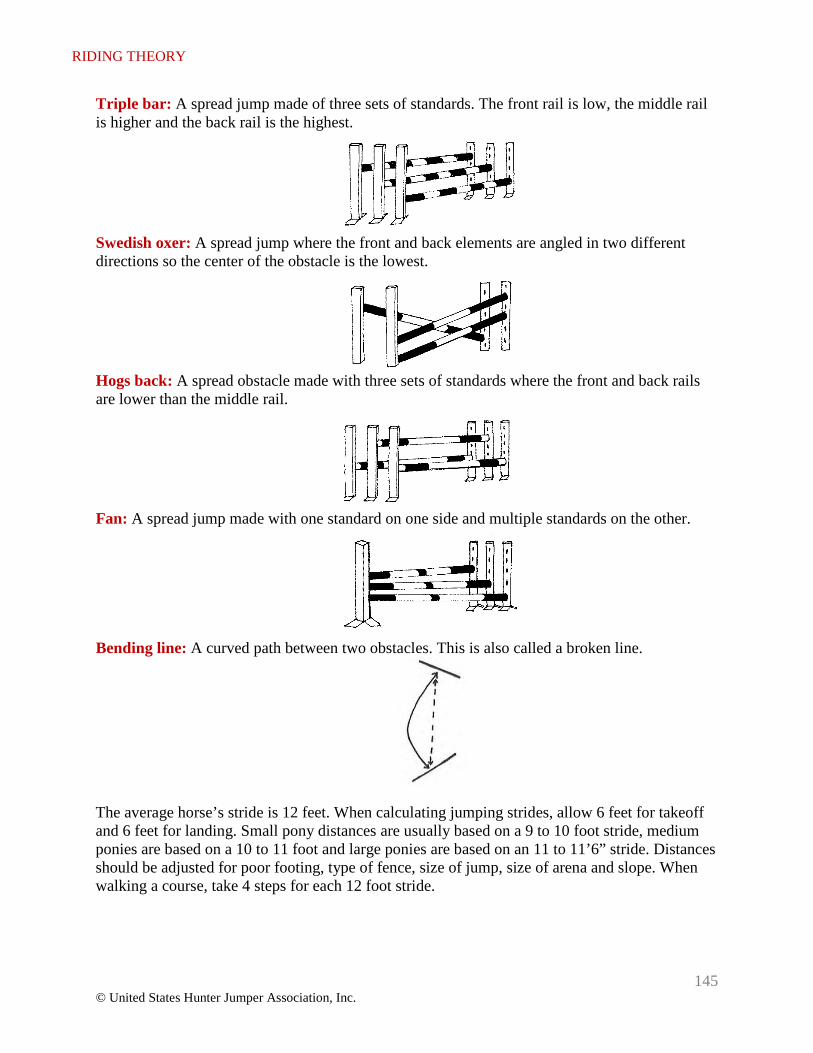
RIDING THEORY
145 © United States Hunter Jumper Association, Inc.
Triple bar: A spread jump made of three sets of standards. The front rail is low, the middle rail is higher and the back rail is the highest.
Swedish oxer: A spread jump where the front and back elements are angled in two different directions so the center of the obstacle is the lowest.
Hogs back: A spread obstacle made with three sets of standards where the front and back rails are lower than the middle rail.
Fan: A spread jump made with one standard on one side and multiple standards on the other.
Bending line: A curved path between two obstacles. This is also called a broken line.
The average horse’s stride is 12 feet. When calculating jumping strides, allow 6 feet for takeoff and 6 feet for landing. Small pony distances are usually based on a 9 to 10 foot stride, medium ponies are based on a 10 to 11 foot and large ponies are based on an 11 to 11’6” stride. Distances should be adjusted for poor footing, type of fence, size of jump, size of arena and slope. When walking a course, take 4 steps for each 12 foot stride.
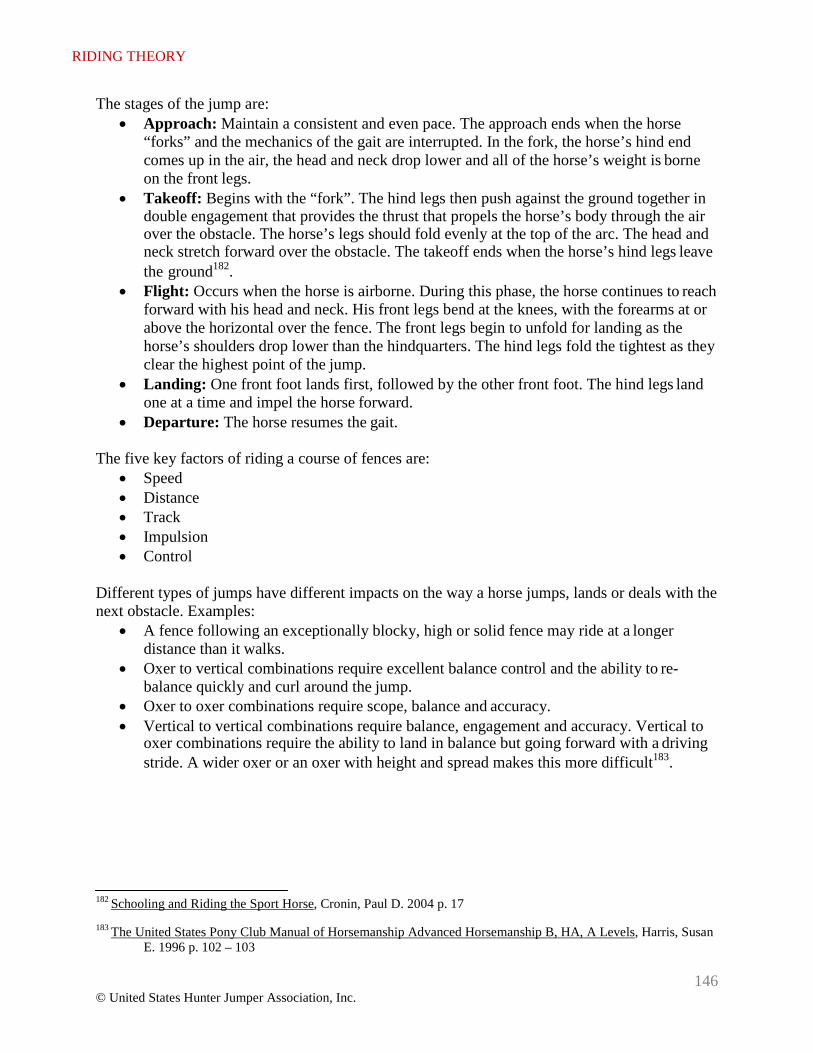
RIDING THEORY
146 © United States Hunter Jumper Association, Inc.
The stages of the jump are: • Approach: Maintain a consistent and even pace. The approach ends when the horse
“forks” and the mechanics of the gait are interrupted. In the fork, the horse’s hind end comes up in the air, the head and neck drop lower and all of the horse’s weight is borne on the front legs.
• Takeoff: Begins with the “fork”. The hind legs then push against the ground together in double engagement that provides the thrust that propels the horse’s body through the air over the obstacle. The horse’s legs should fold evenly at the top of the arc. The head and neck stretch forward over the obstacle. The takeoff ends when the horse’s hind legs leave the ground182.
• Flight: Occurs when the horse is airborne. During this phase, the horse continues to reach forward with his head and neck. His front legs bend at the knees, with the forearms at or above the horizontal over the fence. The front legs begin to unfold for landing as the horse’s shoulders drop lower than the hindquarters. The hind legs fold the tightest as they clear the highest point of the jump.
• Landing: One front foot lands first, followed by the other front foot. The hind legs land one at a time and impel the horse forward.
• Departure: The horse resumes the gait.
The five key factors of riding a course of fences are: • Speed • Distance • Track • Impulsion • Control
Different types of jumps have different impacts on the way a horse jumps, lands or deals with the next obstacle. Examples:
• A fence following an exceptionally blocky, high or solid fence may ride at a longer distance than it walks.
• Oxer to vertical combinations require excellent balance control and the ability to re- balance quickly and curl around the jump.
• Oxer to oxer combinations require scope, balance and accuracy. • Vertical to vertical combinations require balance, engagement and accuracy. Vertical to
oxer combinations require the ability to land in balance but going forward with a driving stride. A wider oxer or an oxer with height and spread makes this more difficult183.
182 Schooling and Riding the Sport Horse, Cronin, Paul D. 2004 p. 17
183 The United States Pony Club Manual of Horsemanship Advanced Horsemanship B, HA, A Levels, Harris, Susan E. 1996 p. 102 – 103
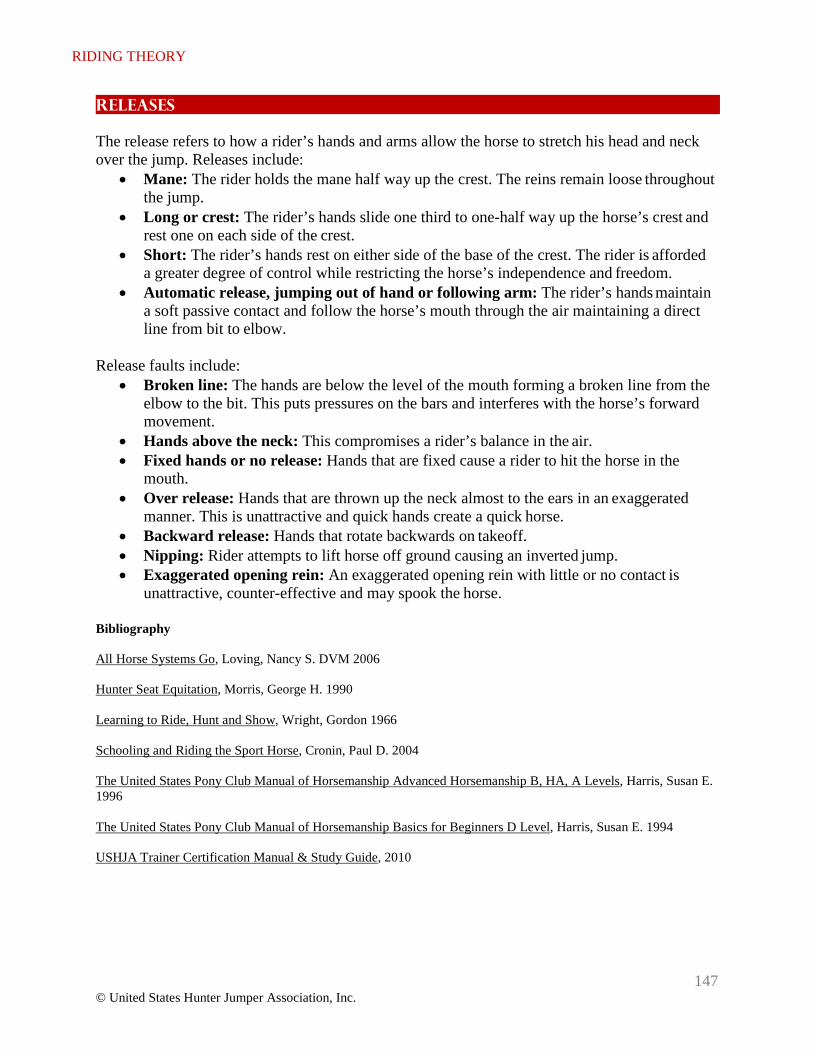
RIDING THEORY
147 © United States Hunter Jumper Association, Inc.
Releases
The release refers to how a rider’s hands and arms allow the horse to stretch his head and neck over the jump. Releases include:
• Mane: The rider holds the mane half way up the crest. The reins remain loose throughout the jump.
• Long or crest: The rider’s hands slide one third to one-half way up the horse’s crest and rest one on each side of the crest.
• Short: The rider’s hands rest on either side of the base of the crest. The rider is afforded a greater degree of control while restricting the horse’s independence and freedom.
• Automatic release, jumping out of hand or following arm: The rider’s hands maintain a soft passive contact and follow the horse’s mouth through the air maintaining a direct line from bit to elbow.
Release faults include:
• Broken line: The hands are below the level of the mouth forming a broken line from the elbow to the bit. This puts pressures on the bars and interferes with the horse’s forward movement.
• Hands above the neck: This compromises a rider’s balance in the air. • Fixed hands or no release: Hands that are fixed cause a rider to hit the horse in the
mouth. • Over release: Hands that are thrown up the neck almost to the ears in an exaggerated
manner. This is unattractive and quick hands create a quick horse. • Backward release: Hands that rotate backwards on takeoff. • Nipping: Rider attempts to lift horse off ground causing an inverted jump. • Exaggerated opening rein: An exaggerated opening rein with little or no contact is
unattractive, counter-effective and may spook the horse.
Bibliography
All Horse Systems Go, Loving, Nancy S. DVM 2006
Hunter Seat Equitation, Morris, George H. 1990
Learning to Ride, Hunt and Show, Wright, Gordon 1966
Schooling and Riding the Sport Horse, Cronin, Paul D. 2004
The United States Pony Club Manual of Horsemanship Advanced Horsemanship B, HA, A Levels, Harris, Susan E. 1996
The United States Pony Club Manual of Horsemanship Basics for Beginners D Level, Harris, Susan E. 1994
USHJA Trainer Certification Manual & Study Guide, 2010
148 © United States Hunter Jumper Association, Inc.
SHIPPING
Shipping is a necessary activity for most show horses. Shipping, if handled improperly, can be a stressful and potentially dangerous situation for horse and handler. A few key safety precautions should be observed:
The trailer and towing vehicle or van should be up-to-date on all maintenance including the electrical system and trailer brakes. The floorboards of the trailer should be regularly inspected for soft or rotted spots and the inside of the trailer should not have any protrusions or loose wires. The towing vehicle should have a full tank of fuel at the beginning of the trip. The connection between towing vehicle and trailer should be checked before loading the horses to make sure that everything is safe and secure. The underpinning of the towing vehicle where the hitch is attached as well as the underpinnings of the trailer spring system and the wheel bearings of the trailer tires should be checked on a regular basis. All lights, including running, brake and turn signals should be in working order.
A trailer should have regular maintenance including:
• Clean out the trailer after every trip. Leaving manure and urine in the trailer will rot the floor boards.
• Check air pressure in the tires and checking the tires for cuts, bulges or uneven wear once a week and before a trip.
• Pull out and clean the floor mats and clean and inspect the floor underneath. If you can push a penknife blade into the floorboards, there may be a rotten spot.
• Check and lubricate the trailer nose wheel, jack, hitch coupler and tailgate or trailer door. • Check and lubricate the hitch receiver and electrical receptacle on the tow vehicle and
keep them free from rust and corrosion. • Wash and wax the trailer and clean the interior with soap and water184.
Horse transportation comes in many forms. Horse compartments may be straight (one or two horses riding forward), head-to-head (pairs of horses riding facing each other) or slant (horses riding on the diagonal). Horses can be transported in:
• Bumper pull trailer: Attached by a ball and socket to a hitch that is welded to the frame underneath the towing vehicle. The towing vehicle should be a full size or ¾ ton vehicle with a Class III heavy duty hitch. A weight distributing hitch, equipped with torsion or sway bars, distributes the weight over all four vehicle wheels instead of mainly over the rear wheels185.
• Gooseneck trailer: Attached to either a ball or a fifth wheel in the bed of the truck • Horse van: Stand alone vehicle.
184 The United States Pony Club Manual of Horsemanship, Advanced Horsemanship B, HA, A Levels, Harris, Susan E. 1996 p. 411 - 412 185 The United States Pony Club Manual of Horsemanship, Advanced Horsemanship B, HA, A Levels, Harris, Susan E. 1996 p. 412
149 © United States Hunter Jumper Association, Inc.
SHIPPING
There are different types of partitions in trailers and vans: • Full partitions: These extend all of the way to the floor. Some horses may be
claustrophobic with full partitions. • Half partitions: These do not go all the way to the floor. They allow horses to spread
their legs for balance, however they may step on the adjacent horse. • No partitions: This is generally found in stock trailers and it may not be advisable for
show horses due to the high risk of horses kicking each other.
Horses that are being shipped generally require leg protection. This comes in three forms: • Shipping wraps: Extra long cottons are used so that the wrap can go down around the
bulb of the heel. Care must be taken that they are put on so that the horse cannot stand on them. They provide support and warmth for the horse.
• Stable bandages: These are used more frequently than shipping wraps. Their advantage is that the horse cannot tread on them as easily and because they are not near the floor, they do not absorb much urine. They can be used in connection with bell boots if extra protection is necessary.
• Shipping boots: Boots that cover the horse from the knee or hock to the ground. They are convenient to use but provide no support for the horse on long trips.
On long distance trips, especially when using a commercial carrier, it is often recommended to not bandage the horse for shipping. During a trip of 12 or more hours, it is easy for bandages or boots to slip or shift and the potential for accident or injury increases.
Horses should ship in a leather halter, which may be covered with fleece for comfort. The trailer ties should be on breakaway snaps or have safety strings. Horses should not be able to touch each other while they are in the trailer. If equipment is shipped, it should be out of reach of the horses’ mouth and be secured so that it cannot fall under the horse’s feet.
An experienced handler should load the horse. If a horse is traveling in a two-horse trailer, it is customary to load the larger horse in the left-hand stall to add stability to the trailer or van. This is because the road is crowned and is therefore higher toward the center.
It is safest to untie the horse before releasing the butt bar and unloading him. If the butt bar is released before the horse is untied, he may begin backing up out of the trailer and get spooked at still being connected to the trailer. This event may result in a broken halter or potentially severe injury.
Hay, dengie or alfalfa cubes should be provided to the horse while he is shipping. Hay can be put in a hay net or a hay bag. Hay nets must be tied high enough that the horse cannot get his legs caught, especially as the net empties. Dengie or alfalfa cubes can be put into a well secured bucket.
150 © United States Hunter Jumper Association, Inc.
SHIPPING
Length of Trip
Shipping can be both tiring and stressful on a horse. Factors to be considered when shipping are:
Size of stall The most common shipping problem in trailers and airplanes is claustrophobia. Ensuring that horses have enough space is usually enough to minimize this problem. Horses can be shipped in single, stall and a half, box stalls or stallion stalls. Only ponies, small horses or excellent shippers should be made to ship single (especially on long trips). Some horses will scramble or fall against the wall when shipped in a single stall. Partitions that do not go all the way to the floor allow horses to spread their legs and help to keep them standing up. Stallion stalls are box stalls with full doors. Some horses prefer to be shipped loose (or California style) in box or stallion stalls.
Horse location in the trailer Some horses have a definite preference for riding forward, backward or with the wall on their right or left side. Careful observation allows the shipper to understand a horse’s preferred location. Neighbor choice is also important: Horses should not be shipped next to a horse that they do not like.
Type of trailer Air ride trailers generally cushion the ride for horses.
Length of trip Long trips can be particularly stressful for horses. A horse should not travel for more than 12 hours at a time unless he is riding in a box stall. The shipper should stop every 4 hours to allow the horse to drink and to untie him so that he may stretch his neck down to clear his lungs. Allowing a horse to clear his lungs on long trips helps avoid the risk of respiratory problems that can turn into pneumonia.
Tying Aggressive horses should be tied so that they cannot molest their neighbor. Consider shipping aggressive horses in stallion stalls.
Weather Trips should be planned around the weather. Very hot, humid, stormy or icy weather may cause alteration of travel plans.
Paperwork
Horses should travel with a current (within 12 months) Coggins test. In addition, when crossing state lines, a health certificate is often necessary. The health certificate (which states that the horse is healthy and has a current Coggins test) must be signed by a licensed veterinarian. A passport is unnecessary for travel within the United States. The shipper should also carry the names and phone numbers of the contact person for each horse on the trailer.

151 © United States Hunter Jumper Association, Inc.
SHIPPING
Precautions
Shipping, especially over long distances, can bring on shipping fever. Shipping fever is a respiratory illness that is brought on by the stresses of shipping. Respiratory disease is linked to combining lengthy transport with immediate strenuous exercise. The horse’s immune system is compromised by factors such as:
Air quality in the trailer Ammonia fumes from urine and manure, exhaust fumes, dust particles, bacteria and mold spores can accumulate in the trailer during shipping.
Amount of irritants to the respiratory lining Hay, dust and mold spores can accumulate in the lungs. Because the horse is tied, he cannot lower his head to clear his lungs.
Stress of shipping Signs include dehydration, elevated heart rate and white cell count and weight loss. Cortisol, which has an adverse affect on the immune system, is released by the horse’s body in reaction to fear or stress. Short trips do not have much impact on cortisol levels but longer trips bring on immune system suppression. Horses that are stressed can lose body weight at the rate of 0.5 percent per hour of travel. This is a combination of food and water losses186.
Horses can be stressed by many factors including:
• Skill of the driver • Vibration of the trailer • Noise • Traffic conditions (repeated starting and stopping)
Horses should be monitored closely after long travel. Take the horse’s temperature shortly after arrival and again in one hour. Call your veterinarian if the horse spikes a fever.
Bibliography
All Horse Systems Go, Loving, Nancy S. 2006
USHJA Trainer Certification Manual & Study Guide, 2010
186 All Horse Systems Go, Loving, Nancy S. 2006 p. 478 - 485
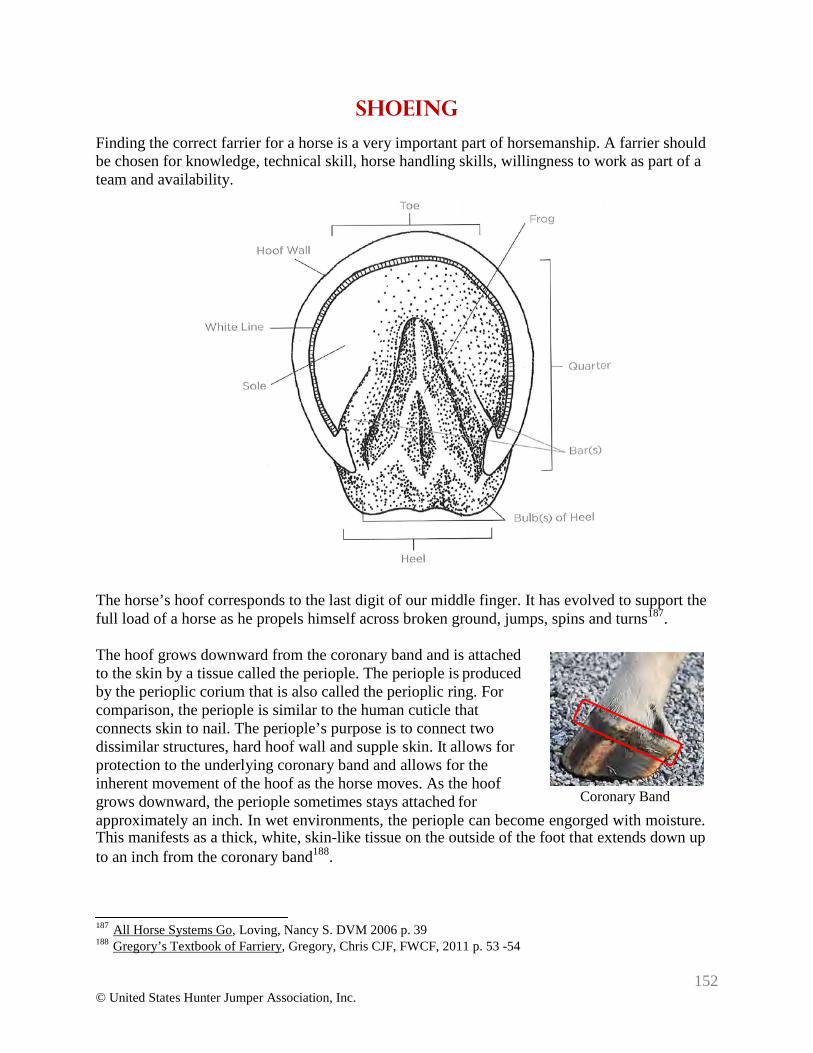
152 © United States Hunter Jumper Association, Inc.
SHOEING
Finding the correct farrier for a horse is a very important part of horsemanship. A farrier should be chosen for knowledge, technical skill, horse handling skills, willingness to work as part of a team and availability.
The horse’s hoof corresponds to the last digit of our middle finger. It has evolved to support the full load of a horse as he propels himself across broken ground, jumps, spins and turns187.
The hoof grows downward from the coronary band and is attached to the skin by a tissue called the periople. The periople is produced by the perioplic corium that is also called the perioplic ring. For comparison, the periople is similar to the human cuticle that connects skin to nail. The periople’s purpose is to connect two dissimilar structures, hard hoof wall and supple skin. It allows for protection to the underlying coronary band and allows for the inherent movement of the hoof as the horse moves. As the hoof grows downward, the periople sometimes stays attached for
Coronary Band approximately an inch. In wet environments, the periople can become engorged with moisture. This manifests as a thick, white, skin-like tissue on the outside of the foot that extends down up to an inch from the coronary band188.
187 All Horse Systems Go, Loving, Nancy S. DVM 2006 p. 39 188 Gregory’s Textbook of Farriery, Gregory, Chris CJF, FWCF, 2011 p. 53 -54
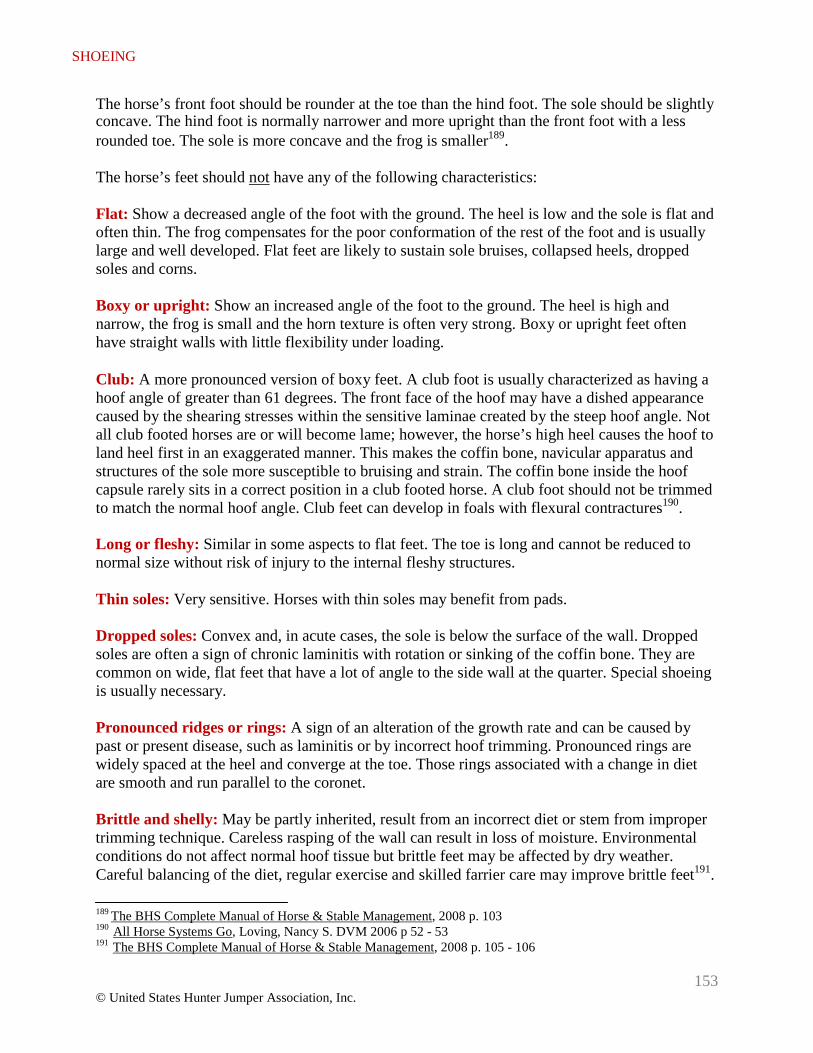
153 © United States Hunter Jumper Association, Inc.
SHOEING
The horse’s front foot should be rounder at the toe than the hind foot. The sole should be slightly concave. The hind foot is normally narrower and more upright than the front foot with a less rounded toe. The sole is more concave and the frog is smaller189.
The horse’s feet should not have any of the following characteristics:
Flat: Show a decreased angle of the foot with the ground. The heel is low and the sole is flat and often thin. The frog compensates for the poor conformation of the rest of the foot and is usually large and well developed. Flat feet are likely to sustain sole bruises, collapsed heels, dropped soles and corns.
Boxy or upright: Show an increased angle of the foot to the ground. The heel is high and narrow, the frog is small and the horn texture is often very strong. Boxy or upright feet often have straight walls with little flexibility under loading.
Club: A more pronounced version of boxy feet. A club foot is usually characterized as having a hoof angle of greater than 61 degrees. The front face of the hoof may have a dished appearance caused by the shearing stresses within the sensitive laminae created by the steep hoof angle. Not all club footed horses are or will become lame; however, the horse’s high heel causes the hoof to land heel first in an exaggerated manner. This makes the coffin bone, navicular apparatus and structures of the sole more susceptible to bruising and strain. The coffin bone inside the hoof capsule rarely sits in a correct position in a club footed horse. A club foot should not be trimmed to match the normal hoof angle. Club feet can develop in foals with flexural contractures190.
Long or fleshy: Similar in some aspects to flat feet. The toe is long and cannot be reduced to normal size without risk of injury to the internal fleshy structures.
Thin soles: Very sensitive. Horses with thin soles may benefit from pads.
Dropped soles: Convex and, in acute cases, the sole is below the surface of the wall. Dropped soles are often a sign of chronic laminitis with rotation or sinking of the coffin bone. They are common on wide, flat feet that have a lot of angle to the side wall at the quarter. Special shoeing is usually necessary.
Pronounced ridges or rings: A sign of an alteration of the growth rate and can be caused by past or present disease, such as laminitis or by incorrect hoof trimming. Pronounced rings are widely spaced at the heel and converge at the toe. Those rings associated with a change in diet are smooth and run parallel to the coronet.
Brittle and shelly: May be partly inherited, result from an incorrect diet or stem from improper trimming technique. Careless rasping of the wall can result in loss of moisture. Environmental conditions do not affect normal hoof tissue but brittle feet may be affected by dry weather. Careful balancing of the diet, regular exercise and skilled farrier care may improve brittle feet191.
189 The BHS Complete Manual of Horse & Stable Management, 2008 p. 103 190 All Horse Systems Go, Loving, Nancy S. DVM 2006 p 52 - 53 191 The BHS Complete Manual of Horse & Stable Management, 2008 p. 105 - 106
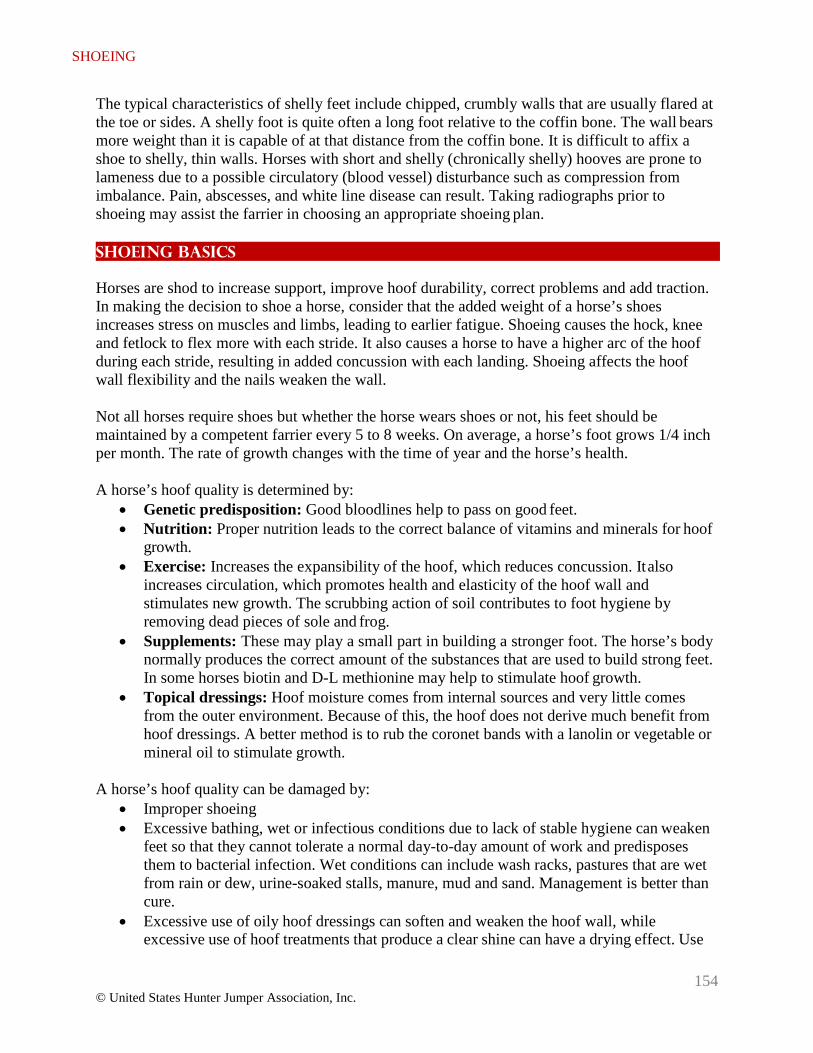
154 © United States Hunter Jumper Association, Inc.
SHOEING
The typical characteristics of shelly feet include chipped, crumbly walls that are usually flared at the toe or sides. A shelly foot is quite often a long foot relative to the coffin bone. The wall bears more weight than it is capable of at that distance from the coffin bone. It is difficult to affix a shoe to shelly, thin walls. Horses with short and shelly (chronically shelly) hooves are prone to lameness due to a possible circulatory (blood vessel) disturbance such as compression from imbalance. Pain, abscesses, and white line disease can result. Taking radiographs prior to shoeing may assist the farrier in choosing an appropriate shoeing plan.
Shoeing Basics
Horses are shod to increase support, improve hoof durability, correct problems and add traction. In making the decision to shoe a horse, consider that the added weight of a horse’s shoes increases stress on muscles and limbs, leading to earlier fatigue. Shoeing causes the hock, knee and fetlock to flex more with each stride. It also causes a horse to have a higher arc of the hoof during each stride, resulting in added concussion with each landing. Shoeing affects the hoof wall flexibility and the nails weaken the wall.
Not all horses require shoes but whether the horse wears shoes or not, his feet should be maintained by a competent farrier every 5 to 8 weeks. On average, a horse’s foot grows 1/4 inch per month. The rate of growth changes with the time of year and the horse’s health.
A horse’s hoof quality is determined by:
• Genetic predisposition: Good bloodlines help to pass on good feet. • Nutrition: Proper nutrition leads to the correct balance of vitamins and minerals for hoof
growth. • Exercise: Increases the expansibility of the hoof, which reduces concussion. It also
increases circulation, which promotes health and elasticity of the hoof wall and stimulates new growth. The scrubbing action of soil contributes to foot hygiene by removing dead pieces of sole and frog.
• Supplements: These may play a small part in building a stronger foot. The horse’s body normally produces the correct amount of the substances that are used to build strong feet. In some horses biotin and D-L methionine may help to stimulate hoof growth.
• Topical dressings: Hoof moisture comes from internal sources and very little comes from the outer environment. Because of this, the hoof does not derive much benefit from hoof dressings. A better method is to rub the coronet bands with a lanolin or vegetable or mineral oil to stimulate growth.
A horse’s hoof quality can be damaged by:
• Improper shoeing • Excessive bathing, wet or infectious conditions due to lack of stable hygiene can weaken
feet so that they cannot tolerate a normal day-to-day amount of work and predisposes them to bacterial infection. Wet conditions can include wash racks, pastures that are wet from rain or dew, urine-soaked stalls, manure, mud and sand. Management is better than cure.
• Excessive use of oily hoof dressings can soften and weaken the hoof wall, while excessive use of hoof treatments that produce a clear shine can have a drying effect. Use

155 © United States Hunter Jumper Association, Inc.
SHOEING
of either type of hoof dressing when applied to the entire hoof wall on a frequent basis can be harmful to the integrity of the foot.
• Medication: Some medications such as dexamethasone may cause founder if used in large quantities. Medication should only be given under the supervision of a veterinarian.
• Footing: Type, condition, depth and care can have a negative impact on hoof soundness. • Longeing: Inappropriate or incorrect longeing or circles will cause feet to fatigue and fail
due to the constant twisting of torque of the limb and foot. • Concussion: Continued concussion breaks down the strength of a foot and increases
inflammation, as well as loosens shoes. Jumping applies tremendous stress and force on the back section of the foot.
The two basic types of shoeing are hot and cold. In hot shoeing, the shoe is heated in a forge, shaped and then applied to the foot or burned on to check for proper fit and contact. The final adjustments are made and the shoe is then cooled in a bucket of water. The farrier is able to fine-tune the shoe to the horse’s foot. When a forge is not available or a horse will not tolerate hot shoeing, a farrier can cold shoe. Cold shoeing does not allow for as many adjustments to the shoe.
Pros for hot shoeing:
• Makes it easier to fit the shoe to the exact shape of the foot • Makes fitting clips easier and more precise • Seals the tubules • Kills bacteria • Toughens the hoof tissue that has been sealed • Perfect union between the shoe and the foot
Cons for hot shoeing:
• Cost • Time • Farrier must be skilled • Danger of farrier being burned and breathing in hoof smoke
Pros for cold shoeing:
• Faster than hot shoeing
Cons for cold shoeing: • Harder to make the ideal shape in the shoe • Modifications like clips and square toes are less likely to be used • Difficult to fit clips192
When observing a freshly shod hoof, the hoof angle and pastern angle should match. The clinches should be in line. A clinch or clench is where the nail comes through the hoof wall and is secured by being bent down and in toward the hoof. The wall should be lightly rasped up to
192 Gregory’s Textbook of Farriery, Gregory, Chris CJF, FWCF, 2011 p. 264 - 265
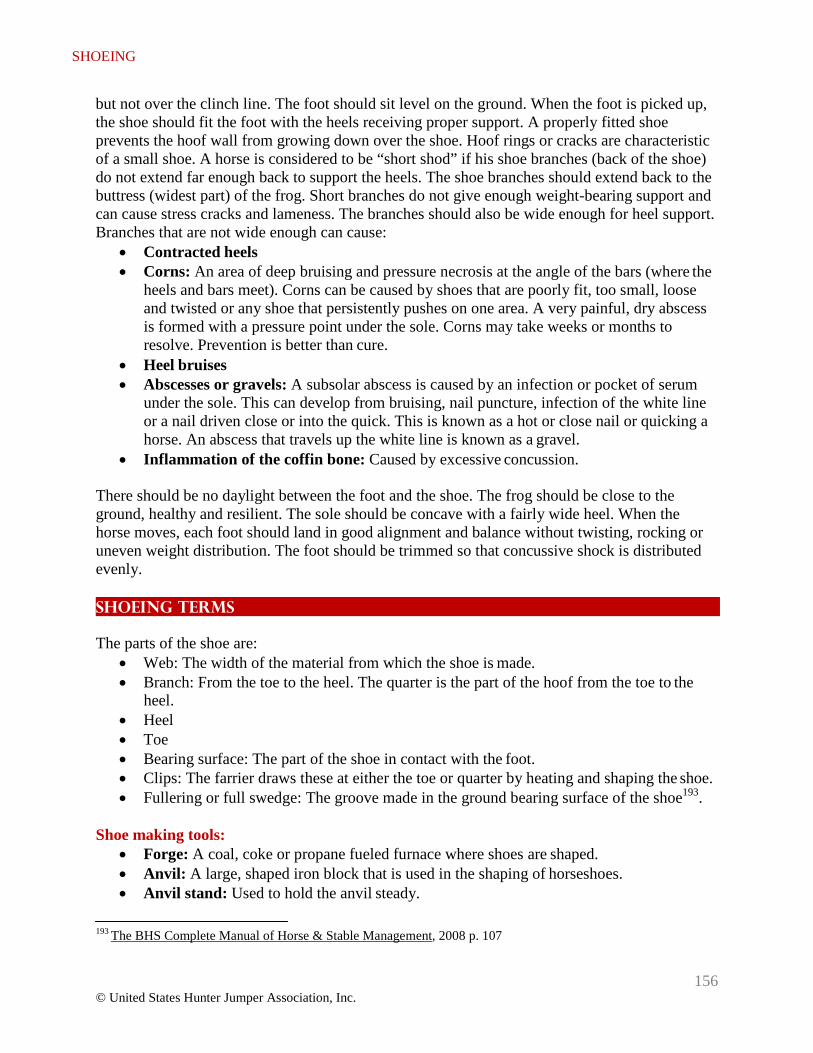
156 © United States Hunter Jumper Association, Inc.
SHOEING
but not over the clinch line. The foot should sit level on the ground. When the foot is picked up, the shoe should fit the foot with the heels receiving proper support. A properly fitted shoe prevents the hoof wall from growing down over the shoe. Hoof rings or cracks are characteristic of a small shoe. A horse is considered to be “short shod” if his shoe branches (back of the shoe) do not extend far enough back to support the heels. The shoe branches should extend back to the buttress (widest part) of the frog. Short branches do not give enough weight-bearing support and can cause stress cracks and lameness. The branches should also be wide enough for heel support. Branches that are not wide enough can cause:
• Contracted heels • Corns: An area of deep bruising and pressure necrosis at the angle of the bars (where the
heels and bars meet). Corns can be caused by shoes that are poorly fit, too small, loose and twisted or any shoe that persistently pushes on one area. A very painful, dry abscess is formed with a pressure point under the sole. Corns may take weeks or months to resolve. Prevention is better than cure.
• Heel bruises • Abscesses or gravels: A subsolar abscess is caused by an infection or pocket of serum
under the sole. This can develop from bruising, nail puncture, infection of the white line or a nail driven close or into the quick. This is known as a hot or close nail or quicking a horse. An abscess that travels up the white line is known as a gravel.
• Inflammation of the coffin bone: Caused by excessive concussion.
There should be no daylight between the foot and the shoe. The frog should be close to the ground, healthy and resilient. The sole should be concave with a fairly wide heel. When the horse moves, each foot should land in good alignment and balance without twisting, rocking or uneven weight distribution. The foot should be trimmed so that concussive shock is distributed evenly.
Shoeing Terms
The parts of the shoe are: • Web: The width of the material from which the shoe is made. • Branch: From the toe to the heel. The quarter is the part of the hoof from the toe to the
heel. • Heel • Toe • Bearing surface: The part of the shoe in contact with the foot. • Clips: The farrier draws these at either the toe or quarter by heating and shaping the shoe. • Fullering or full swedge: The groove made in the ground bearing surface of the shoe193.
Shoe making tools:
• Forge: A coal, coke or propane fueled furnace where shoes are shaped. • Anvil: A large, shaped iron block that is used in the shaping of horseshoes. • Anvil stand: Used to hold the anvil steady.
193 The BHS Complete Manual of Horse & Stable Management, 2008 p. 107
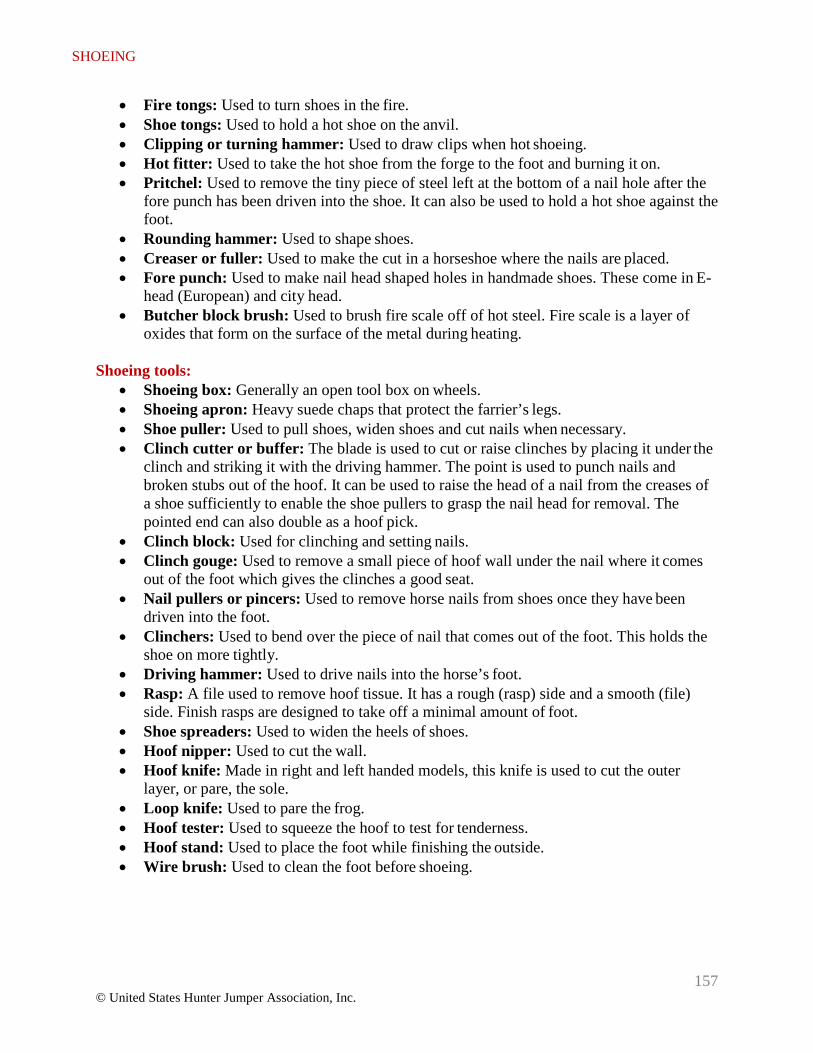
157 © United States Hunter Jumper Association, Inc.
SHOEING
• Fire tongs: Used to turn shoes in the fire. • Shoe tongs: Used to hold a hot shoe on the anvil. • Clipping or turning hammer: Used to draw clips when hot shoeing. • Hot fitter: Used to take the hot shoe from the forge to the foot and burning it on. • Pritchel: Used to remove the tiny piece of steel left at the bottom of a nail hole after the
fore punch has been driven into the shoe. It can also be used to hold a hot shoe against the foot.
• Rounding hammer: Used to shape shoes. • Creaser or fuller: Used to make the cut in a horseshoe where the nails are placed. • Fore punch: Used to make nail head shaped holes in handmade shoes. These come in E-
head (European) and city head. • Butcher block brush: Used to brush fire scale off of hot steel. Fire scale is a layer of
oxides that form on the surface of the metal during heating.
Shoeing tools: • Shoeing box: Generally an open tool box on wheels. • Shoeing apron: Heavy suede chaps that protect the farrier’s legs. • Shoe puller: Used to pull shoes, widen shoes and cut nails when necessary. • Clinch cutter or buffer: The blade is used to cut or raise clinches by placing it under the
clinch and striking it with the driving hammer. The point is used to punch nails and broken stubs out of the hoof. It can be used to raise the head of a nail from the creases of a shoe sufficiently to enable the shoe pullers to grasp the nail head for removal. The pointed end can also double as a hoof pick.
• Clinch block: Used for clinching and setting nails. • Clinch gouge: Used to remove a small piece of hoof wall under the nail where it comes
out of the foot which gives the clinches a good seat. • Nail pullers or pincers: Used to remove horse nails from shoes once they have been
driven into the foot. • Clinchers: Used to bend over the piece of nail that comes out of the foot. This holds the
shoe on more tightly. • Driving hammer: Used to drive nails into the horse’s foot. • Rasp: A file used to remove hoof tissue. It has a rough (rasp) side and a smooth (file)
side. Finish rasps are designed to take off a minimal amount of foot. • Shoe spreaders: Used to widen the heels of shoes. • Hoof nipper: Used to cut the wall. • Hoof knife: Made in right and left handed models, this knife is used to cut the outer
layer, or pare, the sole. • Loop knife: Used to pare the frog. • Hoof tester: Used to squeeze the hoof to test for tenderness. • Hoof stand: Used to place the foot while finishing the outside. • Wire brush: Used to clean the foot before shoeing.
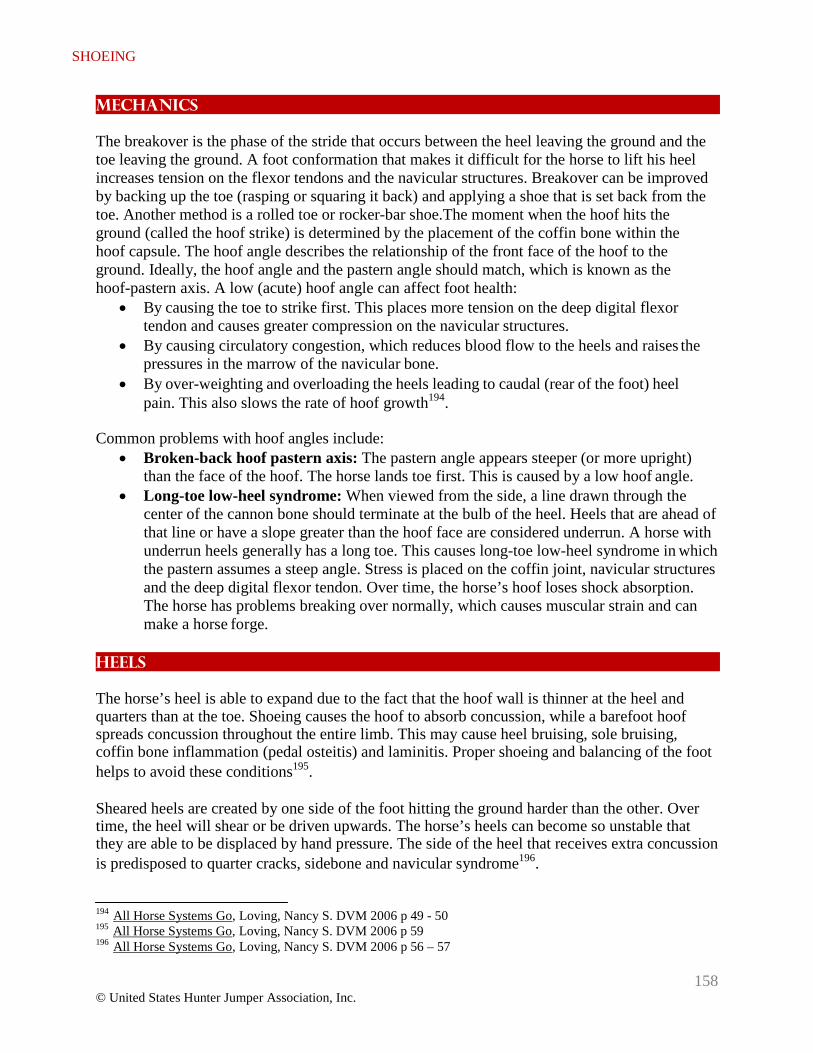
158 © United States Hunter Jumper Association, Inc.
SHOEING
Mechanics
The breakover is the phase of the stride that occurs between the heel leaving the ground and the toe leaving the ground. A foot conformation that makes it difficult for the horse to lift his heel increases tension on the flexor tendons and the navicular structures. Breakover can be improved by backing up the toe (rasping or squaring it back) and applying a shoe that is set back from the toe. Another method is a rolled toe or rocker-bar shoe.The moment when the hoof hits the ground (called the hoof strike) is determined by the placement of the coffin bone within the hoof capsule. The hoof angle describes the relationship of the front face of the hoof to the ground. Ideally, the hoof angle and the pastern angle should match, which is known as the hoof-pastern axis. A low (acute) hoof angle can affect foot health:
• By causing the toe to strike first. This places more tension on the deep digital flexor tendon and causes greater compression on the navicular structures.
• By causing circulatory congestion, which reduces blood flow to the heels and raises the pressures in the marrow of the navicular bone.
• By over-weighting and overloading the heels leading to caudal (rear of the foot) heel pain. This also slows the rate of hoof growth194.
Common problems with hoof angles include: • Broken-back hoof pastern axis: The pastern angle appears steeper (or more upright)
than the face of the hoof. The horse lands toe first. This is caused by a low hoof angle. • Long-toe low-heel syndrome: When viewed from the side, a line drawn through the
center of the cannon bone should terminate at the bulb of the heel. Heels that are ahead of that line or have a slope greater than the hoof face are considered underrun. A horse with underrun heels generally has a long toe. This causes long-toe low-heel syndrome in which the pastern assumes a steep angle. Stress is placed on the coffin joint, navicular structures and the deep digital flexor tendon. Over time, the horse’s hoof loses shock absorption. The horse has problems breaking over normally, which causes muscular strain and can make a horse forge.
Heels
The horse’s heel is able to expand due to the fact that the hoof wall is thinner at the heel and quarters than at the toe. Shoeing causes the hoof to absorb concussion, while a barefoot hoof spreads concussion throughout the entire limb. This may cause heel bruising, sole bruising, coffin bone inflammation (pedal osteitis) and laminitis. Proper shoeing and balancing of the foot helps to avoid these conditions195.
Sheared heels are created by one side of the foot hitting the ground harder than the other. Over time, the heel will shear or be driven upwards. The horse’s heels can become so unstable that they are able to be displaced by hand pressure. The side of the heel that receives extra concussion is predisposed to quarter cracks, sidebone and navicular syndrome196.
194 All Horse Systems Go, Loving, Nancy S. DVM 2006 p 49 - 50 195 All Horse Systems Go, Loving, Nancy S. DVM 2006 p 59 196 All Horse Systems Go, Loving, Nancy S. DVM 2006 p 56 – 57
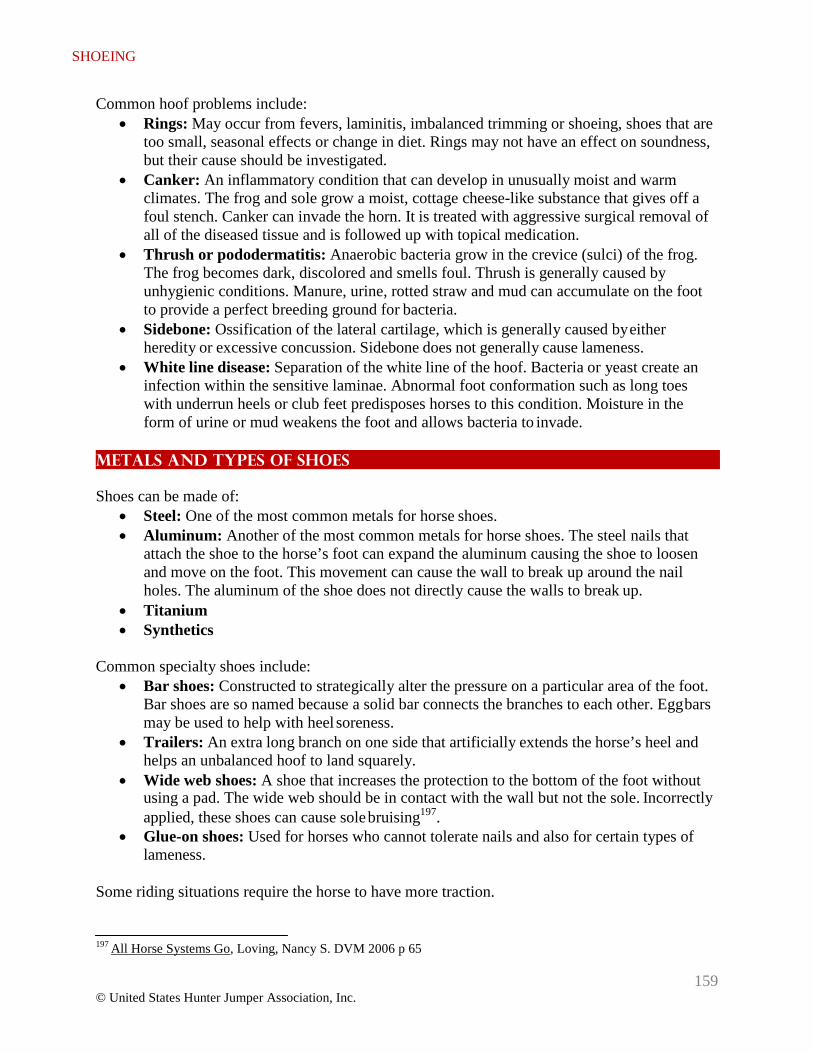
SHOEING
159 © United States Hunter Jumper Association, Inc.
Common hoof problems include: • Rings: May occur from fevers, laminitis, imbalanced trimming or shoeing, shoes that are
too small, seasonal effects or change in diet. Rings may not have an effect on soundness, but their cause should be investigated.
• Canker: An inflammatory condition that can develop in unusually moist and warm climates. The frog and sole grow a moist, cottage cheese-like substance that gives off a foul stench. Canker can invade the horn. It is treated with aggressive surgical removal of all of the diseased tissue and is followed up with topical medication.
• Thrush or pododermatitis: Anaerobic bacteria grow in the crevice (sulci) of the frog. The frog becomes dark, discolored and smells foul. Thrush is generally caused by unhygienic conditions. Manure, urine, rotted straw and mud can accumulate on the foot to provide a perfect breeding ground for bacteria.
• Sidebone: Ossification of the lateral cartilage, which is generally caused by either heredity or excessive concussion. Sidebone does not generally cause lameness.
• White line disease: Separation of the white line of the hoof. Bacteria or yeast create an infection within the sensitive laminae. Abnormal foot conformation such as long toes with underrun heels or club feet predisposes horses to this condition. Moisture in the form of urine or mud weakens the foot and allows bacteria to invade.
Metals and Types of Shoes
Shoes can be made of: • Steel: One of the most common metals for horse shoes. • Aluminum: Another of the most common metals for horse shoes. The steel nails that
attach the shoe to the horse’s foot can expand the aluminum causing the shoe to loosen and move on the foot. This movement can cause the wall to break up around the nail holes. The aluminum of the shoe does not directly cause the walls to break up.
• Titanium • Synthetics
Common specialty shoes include:
• Bar shoes: Constructed to strategically alter the pressure on a particular area of the foot. Bar shoes are so named because a solid bar connects the branches to each other. Egg bars may be used to help with heel soreness.
• Trailers: An extra long branch on one side that artificially extends the horse’s heel and helps an unbalanced hoof to land squarely.
• Wide web shoes: A shoe that increases the protection to the bottom of the foot without using a pad. The wide web should be in contact with the wall but not the sole. Incorrectly applied, these shoes can cause sole bruising197.
• Glue-on shoes: Used for horses who cannot tolerate nails and also for certain types of lameness.
Some riding situations require the horse to have more traction.
197 All Horse Systems Go, Loving, Nancy S. DVM 2006 p 65
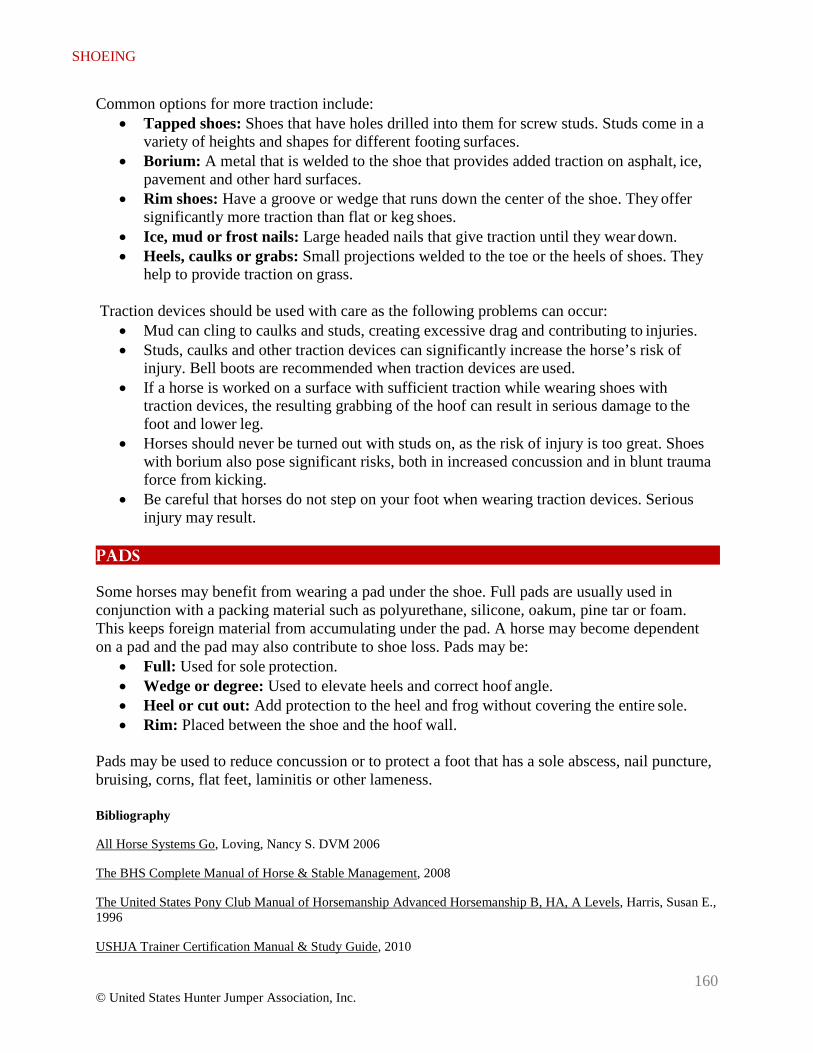
SHOEING
160 © United States Hunter Jumper Association, Inc.
Common options for more traction include: • Tapped shoes: Shoes that have holes drilled into them for screw studs. Studs come in a
variety of heights and shapes for different footing surfaces. • Borium: A metal that is welded to the shoe that provides added traction on asphalt, ice,
pavement and other hard surfaces. • Rim shoes: Have a groove or wedge that runs down the center of the shoe. They offer
significantly more traction than flat or keg shoes. • Ice, mud or frost nails: Large headed nails that give traction until they wear down. • Heels, caulks or grabs: Small projections welded to the toe or the heels of shoes. They
help to provide traction on grass.
Traction devices should be used with care as the following problems can occur: • Mud can cling to caulks and studs, creating excessive drag and contributing to injuries. • Studs, caulks and other traction devices can significantly increase the horse’s risk of
injury. Bell boots are recommended when traction devices are used. • If a horse is worked on a surface with sufficient traction while wearing shoes with
traction devices, the resulting grabbing of the hoof can result in serious damage to the foot and lower leg.
• Horses should never be turned out with studs on, as the risk of injury is too great. Shoes with borium also pose significant risks, both in increased concussion and in blunt trauma force from kicking.
• Be careful that horses do not step on your foot when wearing traction devices. Serious injury may result.
Pads
Some horses may benefit from wearing a pad under the shoe. Full pads are usually used in conjunction with a packing material such as polyurethane, silicone, oakum, pine tar or foam. This keeps foreign material from accumulating under the pad. A horse may become dependent on a pad and the pad may also contribute to shoe loss. Pads may be:
• Full: Used for sole protection. • Wedge or degree: Used to elevate heels and correct hoof angle. • Heel or cut out: Add protection to the heel and frog without covering the entire sole. • Rim: Placed between the shoe and the hoof wall.
Pads may be used to reduce concussion or to protect a foot that has a sole abscess, nail puncture, bruising, corns, flat feet, laminitis or other lameness.
Bibliography
All Horse Systems Go, Loving, Nancy S. DVM 2006
The BHS Complete Manual of Horse & Stable Management, 2008
The United States Pony Club Manual of Horsemanship Advanced Horsemanship B, HA, A Levels, Harris, Susan E., 1996
USHJA Trainer Certification Manual & Study Guide, 2010
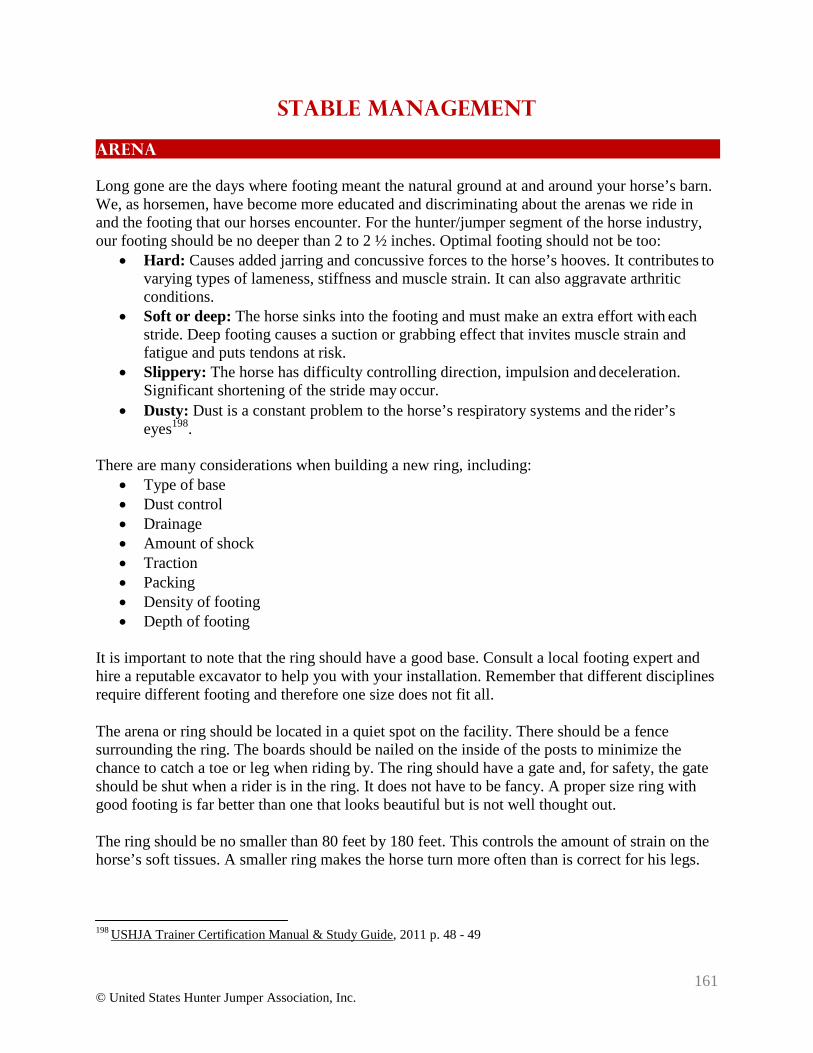
161 © United States Hunter Jumper Association, Inc.
STABLE MANAGEMENT
Arena Long gone are the days where footing meant the natural ground at and around your horse’s barn. We, as horsemen, have become more educated and discriminating about the arenas we ride in and the footing that our horses encounter. For the hunter/jumper segment of the horse industry, our footing should be no deeper than 2 to 2 ½ inches. Optimal footing should not be too:
• Hard: Causes added jarring and concussive forces to the horse’s hooves. It contributes to varying types of lameness, stiffness and muscle strain. It can also aggravate arthritic conditions.
• Soft or deep: The horse sinks into the footing and must make an extra effort with each stride. Deep footing causes a suction or grabbing effect that invites muscle strain and fatigue and puts tendons at risk.
• Slippery: The horse has difficulty controlling direction, impulsion and deceleration. Significant shortening of the stride may occur.
• Dusty: Dust is a constant problem to the horse’s respiratory systems and the rider’s eyes198.
There are many considerations when building a new ring, including:
• Type of base • Dust control • Drainage • Amount of shock • Traction • Packing • Density of footing • Depth of footing
It is important to note that the ring should have a good base. Consult a local footing expert and hire a reputable excavator to help you with your installation. Remember that different disciplines require different footing and therefore one size does not fit all.
The arena or ring should be located in a quiet spot on the facility. There should be a fence surrounding the ring. The boards should be nailed on the inside of the posts to minimize the chance to catch a toe or leg when riding by. The ring should have a gate and, for safety, the gate should be shut when a rider is in the ring. It does not have to be fancy. A proper size ring with good footing is far better than one that looks beautiful but is not well thought out.
The ring should be no smaller than 80 feet by 180 feet. This controls the amount of strain on the horse’s soft tissues. A smaller ring makes the horse turn more often than is correct for his legs.
198 USHJA Trainer Certification Manual & Study Guide, 2011 p. 48 - 49
162 © United States Hunter Jumper Association, Inc.
STABLE MANAGEMENT
Facilities
Horses do not require an elaborate facility. The most important quality of a facility is safety. When observing a facility, look for:
• Safe structures, grounds, horses and instruction • Clean, neat, uncluttered and well-tended structures and grounds • Professional, workmanlike personnel • USHJA Certified Trainers • Safe riding areas that are suited to the instruction • Necessary equipment such as cavaletti, ground poles and jump standards • Maintenance of good footing • Well-lighted, well-ventilated, dry and pleasant smelling stables and stalls that are the
correct size for the horse • Sturdy, well-constructed fencing, including perimeter fencing around the grounds • Adequate turnout199
• A source of clean, free-choice water • Feed and/or hay • Adequate bedding
Stable Routine
The day-to-day operation of a barn depends on an efficient and organized working staff that carries out a plan designed to give priority to the horse’s welfare (e.g., his exercise, feeding, grooming and detailed routine) for which he totally relies on man200. Most barns have a barn manager who should be experienced, calm and organized. A reputable barn manager is flexible, level headed and willing to take unexpected changes in stride. Some large facilities have a barn manager, facilities manager and a road manager while smaller barns may be a one-man operation.
Except in one-man operations, the barn manager is responsible for supervising and directing the grooms, who are in charge of the actual care of a horse. A barn manager should train grooms to understand their responsibilities. A good groom has an even temper, a confident manner with horses and takes pride in his horses and their surroundings. All horsemen should be observant because horses will communicate if they are being mistreated in any way.
Each barn develops its own stable routine to fit its situation. A routine helps the work to get done efficiently and economically. The general appearance of the barn reflects the hygiene and subsequently the general welfare of the horses201.
199 USHJA Trainer Certification Manual & Study Guide, 2011 p. 50 200 Practical Stable Management, Hughes, Christine and Oliver, Robert, 1987 p. 40 201 Practical Stable Management, Hughes, Christine and Oliver, Robert, 1987 p. 46
163 © United States Hunter Jumper Association, Inc.
STABLE MANAGEMENT
Sample routine: 1. Hay horses 2. Grain horses 3. Look at all horses for general signs of health; remove any bandages 4. First turnout 5. Start stall cleaning, dumping water buckets as the stalls are cleaned 6. Water horses 7. Prepare lunch feed and fill hay nets as necessary 8. Bring in first turnout; pick feet and change blankets as necessary 9. Second turnout (if necessary) 10. Sweep aisles 11. Bring in second turnout; pick feet and change blankets as necessary 12. Pick out stalls; feed lunch hay and grain as necessary 13. Employees go to lunch 14. Afternoon chores as necessary 15. Prepare afternoon feed and fill hay nets as necessary 16. Pick out stalls, feed afternoon hay and grain, top off water buckets 17. Prepare morning feed 18. Night check
Daily jobs:
• Manure pile maintenance • Sweep, rake and weed • Facility maintenance • Wrap legs and first aid • Water to outside paddocks • Rake riding arenas • Horse laundry • Fill out stable diary
Weekly jobs:
• Scrub water buckets • Scrub feed tubs and feed buckets • Scrub field water troughs • Check stalls for repairs and missing hardware (screw eyes, double end snaps, salt block
holders) • Check fences and paddocks • Clean tack and feed rooms • Wash brushes • Order feed and bedding • Update farrier and vet list • Trim muzzles and legs • Pull manes if necessary • Set jumping course(s)
164 © United States Hunter Jumper Association, Inc.
STABLE MANAGEMENT
Routine seasonal jobs (horses): • Dental care • De-worming • Vaccinations • Coggins tests • Unload hay and shavings trucks • Clean and repair blankets
Routine seasonal jobs (facility):
• Fencing maintenance (boards, nails, holes in fencing) • Pasture maintenance (mowing, drainage, holes, divots, nutrients) • Barn maintenance (stalls, gutters, roof, plumbing, painting) • Rodent control • Fire extinguisher check • Leaf clean up • Landscaping • Septic system maintenance • Manure removal • Drainage • Water systems and wells • Storm clean up • Driveway maintenance • Jump painting and repair
Routine jobs (vehicles):
• Maintenance of trucks, trailers, tractors, drags, etc. • Fueling • Administrative paperwork (registration and insurance)
Precautionary jobs:
• Fire plan • Emergency preparedness (storms and other natural disasters)
Bedding
When choosing a bedding type for your horse, the following factors should be taken into account:
• Cost • Disposal • Drainage or absorbent
The cost of bedding can vary not only from type-to-type but also by supplier. Make phone calls until a reliable, consistent source of the type of bedding preferred is found. The disposal of bedding can be expensive or inconvenient. Many farmers rent manure dumpsters. The location of the dumpster is important both for the ease of having it picked up by the farmer and the
165 © United States Hunter Jumper Association, Inc.
STABLE MANAGEMENT
accessibility by wheel barrow or tractor when cleaning stalls. If a dumpster is not utilized, a manure pit or pile may be used to stockpile manure before the next pickup. New and constantly changing environmental laws pertain to manure piles and their runoff. Be sure to understand and following the environmental laws that are in place in your area.
Bedding is put in stalls to provide a soft and comfortable bed, minimize slipping, control odor, for warmth and to prevent pressure sores. Regardless of the type, it is usually banked up around the sides of the stall to minimize drafts and to help prevent the horse from becoming cast. Bedding comes in two types: absorbent and drainage.
Absorbent bedding soaks up urine and minimizes odor to a certain extent. Examples of absorbent bedding are:
• Shavings: Pine shavings are preferred and shavings from treated lumber should be avoided. Horses should not ever be stabled on black walnut shavings (Juglans nigra) because laminitis develops within 10 to 24 hours202.
• Sawdust: Care must be taken that there are no foreign objects in each load if the sawdust is received from a mill.
• ABM: Pelletized bedding that expands as it becomes wet. • Shredded paper • Peat moss: Not much used in this country but excellent for horses with respiratory
complaints.
Straw is an example of drainage bedding. It requires some sort of drainage so that urine does not pool in the stall. French drains or drains that tie into the septic system both work well. Wheat straw is considered the best type of straw because it is the most durable and most horses do not like to eat it. Barley straw sometimes contains awns that irritate the horse’s mouth. Oat straw should be avoided for two reasons. Being the softest straw, it can tangle around a horse’s legs, making it difficult to muck out. It is also very sweet, enticing horses to eat it. Straw has an extra advantage in that it can be sold to mushroom farmers and therefore has no disposal cost. It also has natural oils that do not present the over-drying effect that kiln-dried shavings do203.
Manure
Manure management has become a very important topic. State environmental departments are beginning to scrutinize how barns dispose of their manure. The spreading of unprocessed manure has become regulated in some parts of the country. There are several methods for dealing with manure: spreading, dumpsters, composting and distribution to mushroom farmers. You should consider the expense of the manure disposal method when choosing the best one for your facility.
When thinking about manure it is important to note that the average 1,000 pound horse produces 9.1 tons of manure (feces and urine) per year. Gaining some basic knowledge about horses and how they digest and metabolize food and produce manure can help to more effectively control
202 All Horse Systems Go, Loving, Nancy S. DVM 2006 p. 80 203 USHJA Trainer Certification Manual & Study Guide 2011 p. 392
166 © United States Hunter Jumper Association, Inc.
STABLE MANAGEMENT
potential pollution. A horse digests about 60% of most feedstuffs. Feed that is 60% digestible indicates that if a horse is fed 25 pounds of dry feed, 15 pounds is digested and 10 pounds is excreted as manure. The feed’s digestibility depends on the following factors:
• Horse’s size, age and work level (sport, pleasure, breeding, pregnancy, lactation or retirement)
Amount of fiber. Feeds that are higher in fiber such as hays and grasses have a lower digestibility. Conversely, concentrate feeds that contain grains such as corn, oats, and/or barley usually have a higher efficiency of digestion and produce less manure
All nutrients that are digested are metabolized in the horse’s body. Some of these, especially nitrogen in proteins, are excreted in the urine. After being digested and metabolized in the body, waste nitrogen is converted to urea in the liver and excreted in the urine. Additional undigested nitrogen is excreted in the feces. Overfeeding protein increases the excretion of nitrogen. Nitrogen is a major component of protein. Horses need protein for maintenance, growth, reproduction, lactation and work. Phosphorus is a macromineral needed for maintenance, growth and other physiologic functions. Water is also essential for bodily functions. Water is lost from the body primarily in the excretion of feces and urine, sweat, evaporation from the lungs and skin, and in the case of lactation, from milk. It also affects the consistency of manure. Overfeeding phosphorus increases the excretion of phosphorous, most of which is excreted in the feces. Horses should be fed a diet that is digestible and formulated to meet nutritional requirements, while avoiding excesses. Overfeeding can result in higher levels of nitrogen and phosphorus in the manure. Horse farmers should feed horses according to their nutritional needs204.
Manure management begins with the transfer of manure and bedding from the horse’s stall to the manure pile. This can be accomplished by wheelbarrow, manure spreader, tractor and cart, conveyor belt or other mechanical device. One must consider the ease and efficiency of the person cleaning the stalls and the amount of dust produced by the cleaning and transportation method.
Wheelbarrow Transporting manure by wheelbarrow is the most common and labor intensive method. Wheelbarrows come in both one and two wheel versions and in different capacities. The choice of wheelbarrow depends on the strength of the handler. Wheelbarrows should be checked for the tightness of their bolts and tire inflation on a regular basis. It is much more economical to maintain a wheelbarrow than to buy a new one.
Manure spreader Manure spreaders and tractor pulled carts can be very useful. The first consideration is to make sure that your barn aisle is wide enough for a vehicle. The vehicle is pulled down the aisle and manure is thrown from the stall to the spreader or cart. This method requires less walking but
204 Agricultural Management Practices for Commercial Equine Operations E296, Rutgers Cooperative Research & Extension, (NJAES)2004
167 © United States Hunter Jumper Association, Inc.
STABLE MANAGEMENT
produces more dust and mess. The vehicle also produces exhaust, which may bother horses or their handlers.
Manure conveyer Some barns are equipped with a manure conveyer belt often made of metal and located underground in front of each stall. The belt is covered by heavy wooden planks that are removed for the stall cleaning process and lead to an upward sloping ramp that deposits manure into a truck or tractor pulled cart or dump truck. Some disadvantages of a conveyer belt are the expense of its installation, noise, its use as a tunnel for vermin, and its downtime for any repairs. The conveyer belt was originally built for cow manure, which is more liquid and contains less bedding material.
One must also examine the different disposal methods of manure.
Spreading Spreading manure is still acceptable in some parts of the country. Manure is transported by wheelbarrow and up a ramp to the spreader if it is not driven through the barn. For the safety of the stall cleaner, the ramp should be sturdy and made from a non-slip material. Many barns have a ramp made out of packed dirt. It is important to clean under and around the spreader on a regular basis so that the spillover of manure does not accumulate. The spreader works similar to a manure conveyer in that it has metal bars across the bottom of the machine that push manure toward the blades that throw the manure as the spreader moves forward. Spreaders can be either ground driven or PTO (power take off) driven. Some farms spread manure mixed with shavings or sawdust outside during the winter as an inexpensive all weather track.
Spreading manure has several potential problems:
The risk of infecting pastures with internal parasites. Imbalance of nutrients. Manure should be spread equal to or less than the amount that
plants can utilize in a year. When stockpiled manure is spread on crop fields, additional nutrients may be needed due to the fact that the application of manure may not meet the total needs of the crop. Each source of horse manure varies, especially when different bedding sources are used. Typically, a ton of horse manure contains 11 pounds of nitrogen, 2 pounds of phosphorous, and 8 pounds of potassium.
When not managed properly, horse manure can pollute the environment, mainly as ground or surface water pollution due to the nutrients nitrogen, phosphorus and carbon (organic matter). These nutrients can reach waterways as surface runoff or leachate from the manure pile.
Nitrogen excreted from horses is usually present as urea in urine, which is quickly converted to ammonia. Ammonia from horse manure can cause excessive algae growth and nutrient enrichment in a lake or slow-moving stream. This can result in waters rich in mineral and organic nutrients that promote a proliferation of plant life, especially algae, which reduces the dissolved oxygen content and often causes the extinction of other organisms. In the case of nitrogen, the excessive algae and conversion of ammonia to nitrate causes a reduction in dissolved oxygen in the water, which can contribute to fish kills through oxygen depletion.
168 © United States Hunter Jumper Association, Inc.
STABLE MANAGEMENT
Nitrogen present in organic matter in the feces is converted in the soil to ammonia and then nitrate, which can be taken up by plants. If plants do not take up nitrate it easily moves through the soil and can eventually leach into the groundwater where it can become a human health concern.
Spread only when the crops need nutrients. Avoid spreading on frozen ground because of the elevated chance of runoff.
Manure dumpster The next method is renting a manure dumpster. Many local farmers have made the service of composting manure available at a lower cost than renting from a sanitation company. The farmer composts the manure after removing it from a horse farm/facility. Manure that is intermingled with trash goes to a landfill. The farmer’s dumpster is better for the environment because the manure is re-purposed as compost. Dumpsters come in all sizes depending on the space allocated and the number of horses served. The dumpster must be located in an area that is accessible for the stall cleaner and the truck that picks it up. A ramp can be built so that the manure is dumped from above. If this is not feasible, the manure can be pushed back either by tractor or by hand. To save money, the dumpster should be packed as full as possible before pick up.
Distribution to mushroom farmers Mushroom farmers benefit from barns that use straw bedding and may actually pay a small amount for the discarded manure. Since mushroom farmers do not accept manure with any string, trash or shavings, the barn manager must carefully police the manure pile to ensure that only manure and straw are present. Mushroom farmers prefer a manure pit to a manure pile because it is easier to pick up manure that is contained in an enclosed location. The truck pulls up alongside the manure pit and a large mechanical claw is used to place the manure in the truck for transport. In most cases, the manure must be accessible by a tractor trailer.
Composting Composting takes manure and bedding and turns them into a dark, crumbly, earthy-smelling product similar to potting soil. This procedure is somewhat complicated and expensive to start up, and it is only a solution to manure disposal when done correctly. At a minimum, it requires a tractor with a front-end loader and the time to work the compost piles. If you do not have the time and interest to compost, you should probably choose a different manure disposal strategy.
The site of manure composting should have the following characteristics:
Adequate space for storage and composting The site must be in compliance with local ordinances Distance of 50 feet from the property line and 150 feet from residences and businesses,
according to general on-farm composting recommendations Not be located in a flood plain unless protected against the 100-year flood A concrete slab should be installed in the composting area or the lowest elevation of the
facility should be above the seasonal high water table Installation of a buffer zone between residences and water sources may be necessary The area around the composting site allows access to the composting site all year round
and is well drained. Wet weather can cause soils to become muddy, making it difficult to access and turn the piles.

169 © United States Hunter Jumper Association, Inc.
STABLE MANAGEMENT
The use of asphalt or concrete around the composting site is preferred when cleanliness and aesthetics are important objectives. However, this option is more expensive and adds a permanent structure to the farm. Gravel beds are another option. When gravel is used, it is difficult to keep the site clean.
Access to water in case the compost is too dry and water needs to be added A mechanism for turning the piles or moving the compost from bin to bin, such as a
pitchfork or a small front-end loader
The following factors are important in producing compost:
Pile composition Manure is often mixed with bedding from stalls, picked up from pastures, arenas and trails, old, moldy or unwanted hay, grass clippings, leaves and household vegetable wastes. When composting the manure, avoid baling wire or twine, syringes and needles, soda cans and other trash, shoes, nails and other metals, plastic or cedar wood (resistant to decay).
Availability of air Microorganisms need air (oxygen) to be able to decompose manure properly. To provide space for air to move in and out of the pile, manure should be combined with bulkier materials, such as wood shavings or straw bedding mucked from a stall, or even lawn clippings, leaves or hay. Infusing air into the pile is also accomplished by mixing and turning the pile frequently or by inserting perforated PVC pipes into the pile.
Moisture level Microorganisms grow best with the moisture level at around 50 percent. The average moisture content of horse manure is 70 percent, but the manure may be closer to the ideal moisture content when it is combined with soiled bedding.
Particle size Small particles decompose faster because they have more surface area for microbial activity. If you own a shredder or tub grinder, consider processing straw bedding, hay and other coarse materials before adding them to the compost pile.
Temperature As microorganisms decompose manure and bedding, their body heat causes the temperature in the pile to rise. A hot pile decays much faster than a cold pile, and greater heat is necessary to kill weed seeds and parasites. Effective composting takes place around temperatures of 130 to 150 degrees.
Pile size The size of the pile influences whether the pile will hold heat. Small piles are usually colder and dry out faster.
Nutrients Microbes use carbon, nitrogen and other nutrients from materials added to the pile to support their own growth. Nitrogen is the main nutrient found in manure, while carbon is the main
170 © United States Hunter Jumper Association, Inc.
STABLE MANAGEMENT
element found in bedding material. The challenge is to ensure the proper proportions of carbon and nitrogen needed for successful composting. The carbon to nitrogen ratio (C:N) of a material is an estimate of the relative amounts of these two elements. A ratio of about 30:1 is ideal for composting. A mixture of one part manure with two parts bedding (by volume) usually gives a reasonable mix for rapid composting. However, the amount and type of bedding can alter the C:N ratio and influence the management needed for successful composting205.
There are various methods of composting horse manure ranging from pile or windrow to undercover or in-vessel facilities. However, on small horse farms the choices are more limited because the purchase of dedicated equipment like a windrow turner is not efficient or affordable. The two methods that are the most feasible are shed or pile composting. The investment costs for shed composters may be as high as $5,000 per horse with half of the composting area under a roof. The investment costs for the pile composting are considerably less.
Shed composting Shed composting is often used because of the easier handling, aesthetics and the smaller chance of run-off and leaching. Shed composting keeps batches separate and helps to ensure pathogen reduction in the batch. Manure contains many bacteria and pathogens that can be harmful to horses and humans. Examples are parasitic roundworms, escherichia coli, listeria monocytogenes, salmonella and clostridium tetani. Protozoan pathogens such as giardia and cryptosporidium can be found in horse manure and are known to cause waterborne human disease. Careful composting helps to reduce these pathogens. A shed composter consists of several three-sided bins. Covering the compost bins with a permanent roof, plastic sheet or tarp is recommended. Protecting the pile from rainwater and snow helps regulate the proper moisture level by preventing piles from becoming too wet in the winter or too dry in the summer. Covering also prevents rain and snow melt from leaching contaminants from the pile and creating a pollution hazard. The shed should be wide enough to accommodate the bucket of a front end loader. The manure is collected in one bin at a time until the manure pile in the bin reaches 5 feet high. When the pile reaches 5 feet, the contents should be turned into the next bin and the first bin refilled. The pile height should not exceed 6 feet to ensure that the compost is aerated. Bins can be covered with a roof to reduce possible run-off. Because the bedding material is very absorbent, there is generally not leachate generated under the roof.
Pile composting Pile composting is generally chosen for economic reasons. Much care must be taken in choosing the site of the facility to reduce water pollution due to leaching and run-off and air pollution due to odors. The installation of a buffer zone between the composting facility and residences and water sources is recommended. In this method, the horse manure is piled in freestanding hay stack type piles. Waste is regularly added to the pile until it is four to six feet tall. The site should have room for two or three piles so that the first pile can mature while you are building your next piles. If there is enough room, windrows (large horizontal piles) of 6 to 10 feet wide by six feet
205 Manure and Pasture Management for Horse Owners: Managing Horse Manure by Composting Government of Alberta, Canada Agricultural and Rural Development
171 © United States Hunter Jumper Association, Inc.
STABLE MANAGEMENT
tall can be utilized. Regular mixing or turning is recommended to ensure the reduction of pathogens and to speed up the process. Some drawbacks to pile composting are the difficulty of working the site during inclement weather and the fact that turning the piles while ice is present shuts down the piles.
Turning compost The compost must be turned on a schedule. The purpose of turning is to move the outer portions of the pile into the hotter inner portions to reduce pathogen and weed seeds, homogenize the pile, and aerate the pile to some degree. If managed appropriately (sufficient aeration), odors released from composting horse manure on small farms are less of an issue. However, stronger odors are expected when the horse manure compost is turned. If wood shavings are used as bedding material, and if the composting is operated properly, after several turnings the compost releases an earthy smell during turning. The USDA requirement for the turning frequency to ensure pathogen reduction in windrows is five times in 15 days while keeping the pile’s temperatures above 131 degrees. Because this is not realistic for farmers on small farms, weekly turning is suggested. This reduces pathogens in the compost, but does not comply with the requirements for compost used in organic agriculture. After three to four months, compost turning can be reduced to once per month. At that time, the compost from two bins can be combined in one bin to compensate for volume reduction, which results as the material decomposes through the compost process. If necessary, water can be added during turning to adjust the moisture content to 55 to 60 percent. If the bins are full before nine months, the compost should be moved outside the bins to a dry, well-drained area. It is preferred that the compost is moved outside the roofed area after three to six months at the earliest. If stored outside, the compost should be covered loosely with a tarp or fleece until it is used.
Once the compost is ready for use, it can be applied to soil as a soil conditioner, mulch, or a supplemental nutrient source for plants. The compost can be used as mulch or on pastures after three months but it might still deplete the soil of nitrogen that is needed for crop growth. It needs to be composed for six to nine months to satisfy other uses. For example, it should be composed for more than nine months if its source material was high in wood chips. Generally, turned compost takes nine to 12 months to mature, while stacked takes up to two years. The specific end use of horse manure compost depends on the quantity and form of nutrients present in the compost, which varies depending on the initial horse manure characteristics, the composting operation and the compost maturity or readiness for use. Compost that is not matured or stabilized can harm plants and seedlings either by harmful break down products or by depletion of the soil of nitrogen (nitrogen immobilization) that is needed for the crops to grow. Compost adds organic matter to the soil and can benefit soil structure, aeration, moisture retention and permeability, but should be managed in a way to maximize plant utilization of nutrients and minimize runoff and leaching of nutrients. The major fertilizer nutrients of horse manure compost are nitrogen, phosphorus and potassium. However, horse manure compost also contains the secondary nutrients magnesium, calcium and sodium as well as micronutrients. The availability of these plant nutrients varies depending on the compost maturity, soil type and timing of the application. When applied at the optimum time, horse manure compost can be a supplemental nutrient source for pastures, field crops and horticultural crops.
172 © United States Hunter Jumper Association, Inc.
STABLE MANAGEMENT
Minimizing the amount of bedding used reduces the amount of total waste for disposal. Therefore, farms need to find the balance point in bedding amounts ensuring the horses’ health and minimizing waste. If straw is used as bedding, the manure is more easily composted than when wood shavings are used206.
Pests
Pests such as flies and gnats and vermin such as mice and rats should be eradicated in barns because flying pests and vermin can carry disease. The first step to getting rid of pests is to have a clean and neat barn. Feed should be kept in closed containers and inside a feed room. Any spilled feed should be swept up and discarded immediately. Customers and staff should not leave any food inside the barn. If the presence of rats or mice is suspected a barn cat or Jack Russell terrier can help thin out the population. Rats’ teeth are extremely hard and can grow at an alarming rate, and therefore placing feed inside metal cans or steel-lined feed storage bins may be necessary in extreme cases. Vermin can be poisoned but precautions must be taken to make sure that children and pets cannot access the poison. Manure piles should not be located too close to the barn, as they attract flies and are a potential fire hazard. Manure piles should be removed at regular intervals because vermin live there, especially in the winter. Rats and mice sometimes tunnel into stored hay or straw. For this reason, employ the principle of FIFO (first in, first out) when feeding hay or using straw.
Flies and other winged insects may bite horses hard enough to leave welts. Some horses are so sensitive to flies that they are unable to concentrate on doing their work. These flying pests may be somewhat controlled with fly sprays. Remember that most fly spray is made from chemicals, which may have a cumulative toxic effect. Fly traps and sticky fly paper may also be used. Picking out stalls on a regular basis and emptying muck tubs help to cut down the fly population. Fans help to keep the air moving inside the barn, which helps to minimize the flying insect population. Horses that are very sensitive may need to wear fly masks and fly sheets even inside the barn. Make sure that there is nowhere for standing water to accumulate to help get rid of mosquitoes.
“Feed through” fly control can be used, but it has been linked to toxicity. A better way of dealing with flies is to use fly predators. The larvae of tiny stingless wasps are put anywhere there is manure. They hatch and eat fly eggs causing fewer flies to hatch.
Bibliography
All Horse Systems Go, Loving, Nancy S. DVM
2006 USHJA Trainer Certification Manual & Study Guide,
2011
206 Best Management Practices for Horse Manure Composting on Small Farms E307, Rutgers Cooperative Research & Extension, (NJAES) 2006

173 © United States Hunter Jumper Association, Inc.
TACK
A horseman should understand any piece of training tack before using it on the horse. This includes bridles, saddles, martingales, longeing equipment and bits.
Bits Before thinking of the mechanics of bitting, a rider should understand that while the bit assists in positioning the horse’s head to give maximum control over the horse’s speed and direction, it is not the originator but the extension of the process. The origin of the head position lies in the early training of the horse, which should induce suppleness of poll, neck and spine thus enabling the loins and hocks to become engaged. The bit is the last item in this chain and to attempt to obtain any form of advanced head carriage by the bit alone results only in stiffness and a restricted action. The power of the horse comes from behind the saddle and is controlled by the application of the rider’s legs and seat, and the bit, through the rider’s hand, becomes an extension of the seat and leg207. There is no shortcut to success at anything to do with riding, no lasting good ever came out of the use of force, and there is no substitute for sympathy, patience or tact; so the simplest and most direct means of communication will probably be the best in the long run208.
Bits work on the principle of pressure, not pain. Even the mildest bit can cause pain if it is used in an incorrect manner or does not fit properly. Bits, including hackamores, work on pressure points on the horse’s head. Each pressure point has a specific effect on the horse. The pressure points and specific effects, are:
• Tongue: Flexion and yielding of jaw, chewing, activation of the salivary glands and production of foam. The tongue is a strong, elastic muscle with a noticeable bump halfway along it where the molars start. The edges of the tongue are more sensitive than the center. The horse can push the tongue against the bit, sending the bit forward in the mouth. The tongue acts as a cushion action of the bit on the bars. If a horse has an extremely thick or sensitive tongue or has suffered scarring of the tongue, he may not be able to tolerate excessive tongue pressure. Tongues vary in shape and size and a bit should not interfere with the tongue too much.
• Bars: Flexion and yielding of the jaw and flexion of the poll. The bars are the most sensitive structures of the mouth. Wide, flat bars are less sensitive than their sharp, thin counterparts and they become more sensitive closer to the incisors. Steady pressure on the bars generally makes the horse lower his head. Breeding determines a lot of their width and sensitivity. Finely bred animals, such as Thoroughbreds, have very narrow bars that are thinly covered with skin. Thicker set or less finely bred animals, such as drafts, have wider bars with a fleshy covering making them much less sensitive. The bar area is easily damaged and care must be taken since constant rough use can cause calluses or even splinter the bone. Any damage ultimately makes the mouth less sensitive209.
207 Saddlery, Edwards, E. Hartley, 1963 p. 36 208 Saddlery, Edwards, E. Hartley, 1963 p. 9 209 The Allen Illustrated Guide to Bits and Bitting (Allen Illustrated Guides), Vernon, Hilary 1998 p. 15 - 17
174 © United States Hunter Jumper Association, Inc.
TACK
• Corners of the mouth: Encourages extension of the head and neck and sometimes raises the head. The skin is flexible and less sensitive than the tongue. Pressure on lips comes mainly from the snaffle (particularly a gag snaffle). This type of bit causes the horse to open his mouth and point the nose out. Continual pressure on lip corners can cause soreness. Pay attention to the front molars of a horse wearing a gag because as the bit is drawn up into the mouth, the lip corners and insides of cheeks are pushed onto the first molar teeth and can cut if the teeth are too long or sharp.
• Palate (roof of the mouth): Encourages horse to open his mouth, tip his head or tuck his chin into his chest. This area is less sensitive than the bars. If the port of a curb bit touches the roof of the mouth, it produces a fulcrum effect and causes the cannons (sides of the mouthpiece) of the bit to push on the bars. Palate structures vary from horse to horse. A jointed bit may cause painful pressure in a horse with a low palate.
• Curb groove: The curb groove is located on the underside of the horse’s head where the lower lip meets the jaw. It is the location of the mandible nerve, which is a large and very sensitive nerve that runs down the edge of the under part of the jaw and goes into the bone just above the chin. A curb chain used in conjunction with a curb bit causes the bit to act as a fulcrum and press on the bars. If a curb chain on a bit stays low in the chin groove as the bit is used, the horse should respond by flexing and relaxing the jaw. If the curb chain flips up out of the groove as the cheek of the bit is rotated, pressure moves to the upper curb area, which ultimately puts pressure on the sensitive jaw directly above the mandible nerve itself. This is far more severe and likely to cause resistance. The heavier the curb chain and the lower it stays when in use, the better the result. It is quite possible to cause severe bruising to the curb area and in rare cases a split can form from constant painful pressure.
• Sides of jaw: Encourages the horse to turn away from lateral pressure. If the horse acts painful, check his teeth (especially in young horses).
• Bridge of nose: Encourages poll flexion. The bridge of the nose is a very complex, sensitive structure of bone and cartilage that is easily damaged. A noseband placed too low on the head is uncomfortable and, more importantly, interferes with breathing. Care must be taken to fit the noseband high enough above the nasal cartilage to ensure comfort.
• Poll: Encourages the lowering of the head210. The poll area needs to be handled with care as all mechanical control relies on some form of bridle fitting partially or fully to the poll region. Poll pressure by itself is not very significant. It is the poll pressure when combined with the bit and/or nose pressure that gives the best result. If you push down on top of a horse’s head, his automatic reaction is to raise the head, not lower it. The poll is an area that frequently and easily can be damaged often without a handler knowing it.
The severity of a particular bit depends on several factors: • Direct pressure: One pound of pressure on the reins equals one pound of pressure in the
mouth. • Leverage: This multiplies the pressure. Factors include length of shank, tightness of curb
chain and ratio of upper shank to lower shank. The greater the leverage, the more severe
210 The United States Pony Club Manual of Horsemanship Advanced Horsemanship B, HA, A Levels, Harris, Susan E. 1996 p. 424 – 425
175 © United States Hunter Jumper Association, Inc.
TACK
the pressure. Leverage bits should be used by riders with sensitive, independent hands and light contact.
• Mouthpiece: A thicker mouthpiece spreads pressure over a wide area while a thinner mouthpiece concentrates the pressure.
• Mouthpiece surface: Smooth mouthpieces are the gentlest while twisted, corkscrew, wire or sharp edge mouth pieces are more severe.
• Auxiliary equipment: Nosebands and martingales make bits more severe by limiting the horse’s options (i.e., stop horse from opening mouth, lift head, etc.).211
Mouthpieces may be made out of or covered with plastic, different metals, rubber or leather. A softer material is generally easier on a horse’s mouth. Horses can be fussy about the mouthpiece composition. Some metals such as sweet iron (which is rust on a steel mouthpiece), copper or aurigan silver may stimulate saliva production.
The bit sits in the mouth in the interdental space or bars. Dental issues, such as sharp teeth or the presence of wolf teeth, may cause discomfort for the horse and should be resolved by your veterinarian or dentist. Consider shape and size of the lips, bars and tongue when choosing a bit for the horse. A bit should be 1/4 inch wider than the horse’s mouth. An ill-fitting bit can make the horse fuss and toss his head from discomfort. When choosing a bit, remember that a horse with a bad mouth may benefit more from education than a stronger bit. Also, the stronger the bit that is used, the more the horse’s scope and shape to the jump can be adversely affected. Bits can be made more severe by:
• Improper fit • Improper use • Martingales • Nosebands • Draw reins
Bit selection depends on several factors such as:
• The horse’s age, sensitivity, natural balance, training, maturity and experience level • Any behavioral problems • The size, shape and conformation of the horse’s mouth and head, including thickness of
the tongue, length of the mouth, shallowness and width of the lower jaw, width of the face, height of the palate, shape of the lips and condition of the corners of the mouth
• The job the horse is being asked to perform • The horse’s tolerance or acceptance of the bit • The rider’s experience level212
• The taste of the bit. A bit that is satisfactory in taste to the horse is more readily accepted. A steel or sweet iron in combination with copper stimulates salivation, which in turn causes the horse to move his tongue and relax his lower jaw. A relaxed horse is more responsive and carries the bit in a more natural manner.
211 The United States Pony Club Manual of Horsemanship Advanced Horsemanship B, HA, A Levels, Harris, Susan E. 1996 p. 425 - 426 212 The United States Pony Club Manual of Horsemanship Advanced Horsemanship B, HA, A Levels, Harris, Susan E. 1996 p. 427 - 428
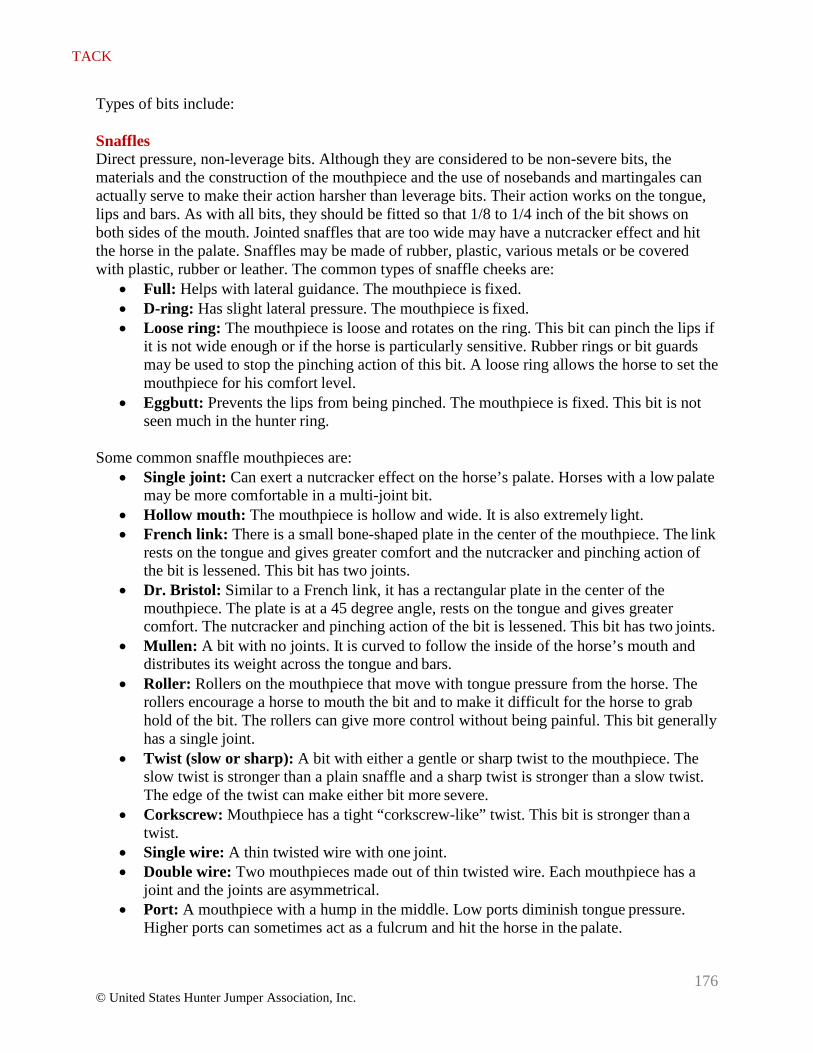
176 © United States Hunter Jumper Association, Inc.
TACK
Types of bits include:
Snaffles Direct pressure, non-leverage bits. Although they are considered to be non-severe bits, the materials and the construction of the mouthpiece and the use of nosebands and martingales can actually serve to make their action harsher than leverage bits. Their action works on the tongue, lips and bars. As with all bits, they should be fitted so that 1/8 to 1/4 inch of the bit shows on both sides of the mouth. Jointed snaffles that are too wide may have a nutcracker effect and hit the horse in the palate. Snaffles may be made of rubber, plastic, various metals or be covered with plastic, rubber or leather. The common types of snaffle cheeks are:
• Full: Helps with lateral guidance. The mouthpiece is fixed. • D-ring: Has slight lateral pressure. The mouthpiece is fixed. • Loose ring: The mouthpiece is loose and rotates on the ring. This bit can pinch the lips if
it is not wide enough or if the horse is particularly sensitive. Rubber rings or bit guards may be used to stop the pinching action of this bit. A loose ring allows the horse to set the mouthpiece for his comfort level.
• Eggbutt: Prevents the lips from being pinched. The mouthpiece is fixed. This bit is not seen much in the hunter ring.
Some common snaffle mouthpieces are:
• Single joint: Can exert a nutcracker effect on the horse’s palate. Horses with a low palate may be more comfortable in a multi-joint bit.
• Hollow mouth: The mouthpiece is hollow and wide. It is also extremely light. • French link: There is a small bone-shaped plate in the center of the mouthpiece. The link
rests on the tongue and gives greater comfort and the nutcracker and pinching action of the bit is lessened. This bit has two joints.
• Dr. Bristol: Similar to a French link, it has a rectangular plate in the center of the mouthpiece. The plate is at a 45 degree angle, rests on the tongue and gives greater comfort. The nutcracker and pinching action of the bit is lessened. This bit has two joints.
• Mullen: A bit with no joints. It is curved to follow the inside of the horse’s mouth and distributes its weight across the tongue and bars.
• Roller: Rollers on the mouthpiece that move with tongue pressure from the horse. The rollers encourage a horse to mouth the bit and to make it difficult for the horse to grab hold of the bit. The rollers can give more control without being painful. This bit generally has a single joint.
• Twist (slow or sharp): A bit with either a gentle or sharp twist to the mouthpiece. The slow twist is stronger than a plain snaffle and a sharp twist is stronger than a slow twist. The edge of the twist can make either bit more severe.
• Corkscrew: Mouthpiece has a tight “corkscrew-like” twist. This bit is stronger than a twist.
• Single wire: A thin twisted wire with one joint. • Double wire: Two mouthpieces made out of thin twisted wire. Each mouthpiece has a
joint and the joints are asymmetrical. • Port: A mouthpiece with a hump in the middle. Low ports diminish tongue pressure.
Higher ports can sometimes act as a fulcrum and hit the horse in the palate.
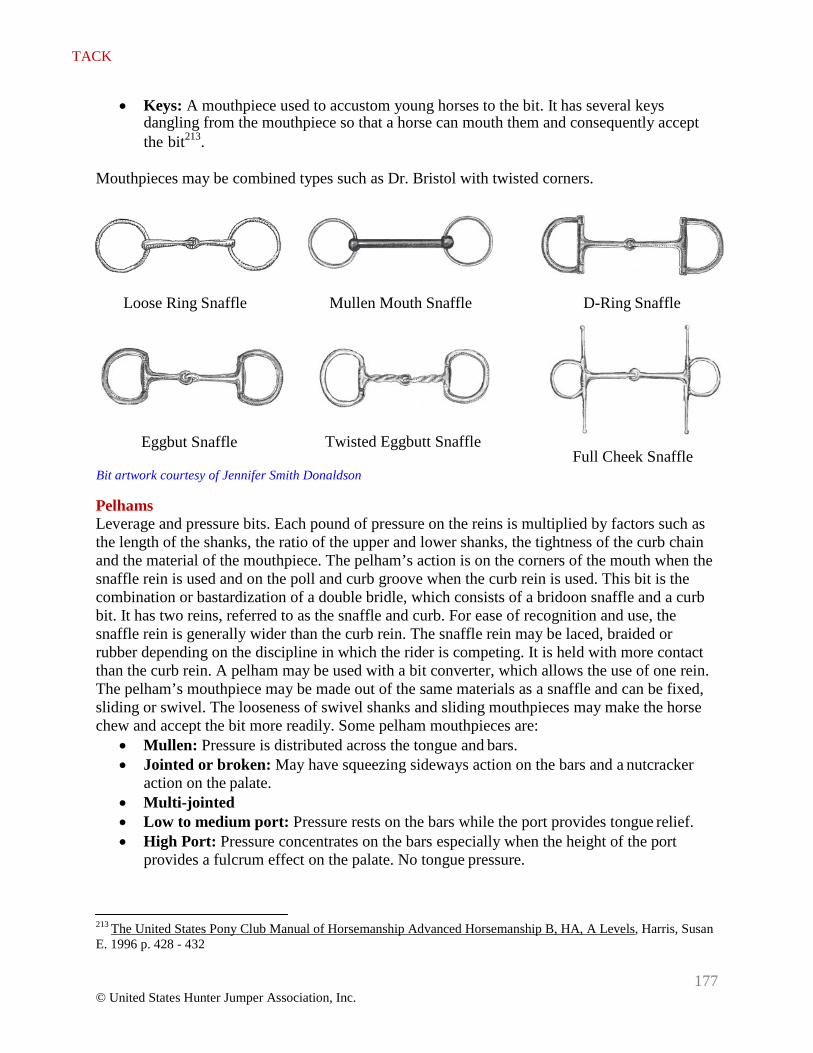
177 © United States Hunter Jumper Association, Inc.
TACK
• Keys: A mouthpiece used to accustom young horses to the bit. It has several keys dangling from the mouthpiece so that a horse can mouth them and consequently accept the bit213.
Mouthpieces may be combined types such as Dr. Bristol with twisted corners.
Loose Ring Snaffle Mullen Mouth Snaffle D-Ring Snaffle
Eggbut Snaffle Twisted Eggbutt Snaffle
Full Cheek Snaffle Bit artwork courtesy of Jennifer Smith Donaldson
Pelhams Leverage and pressure bits. Each pound of pressure on the reins is multiplied by factors such as the length of the shanks, the ratio of the upper and lower shanks, the tightness of the curb chain and the material of the mouthpiece. The pelham’s action is on the corners of the mouth when the snaffle rein is used and on the poll and curb groove when the curb rein is used. This bit is the combination or bastardization of a double bridle, which consists of a bridoon snaffle and a curb bit. It has two reins, referred to as the snaffle and curb. For ease of recognition and use, the snaffle rein is generally wider than the curb rein. The snaffle rein may be laced, braided or rubber depending on the discipline in which the rider is competing. It is held with more contact than the curb rein. A pelham may be used with a bit converter, which allows the use of one rein. The pelham’s mouthpiece may be made out of the same materials as a snaffle and can be fixed, sliding or swivel. The looseness of swivel shanks and sliding mouthpieces may make the horse chew and accept the bit more readily. Some pelham mouthpieces are:
• Mullen: Pressure is distributed across the tongue and bars. • Jointed or broken: May have squeezing sideways action on the bars and a nutcracker
action on the palate. • Multi-jointed • Low to medium port: Pressure rests on the bars while the port provides tongue relief. • High Port: Pressure concentrates on the bars especially when the height of the port
provides a fulcrum effect on the palate. No tongue pressure.
213 The United States Pony Club Manual of Horsemanship Advanced Horsemanship B, HA, A Levels, Harris, Susan E. 1996 p. 428 - 432
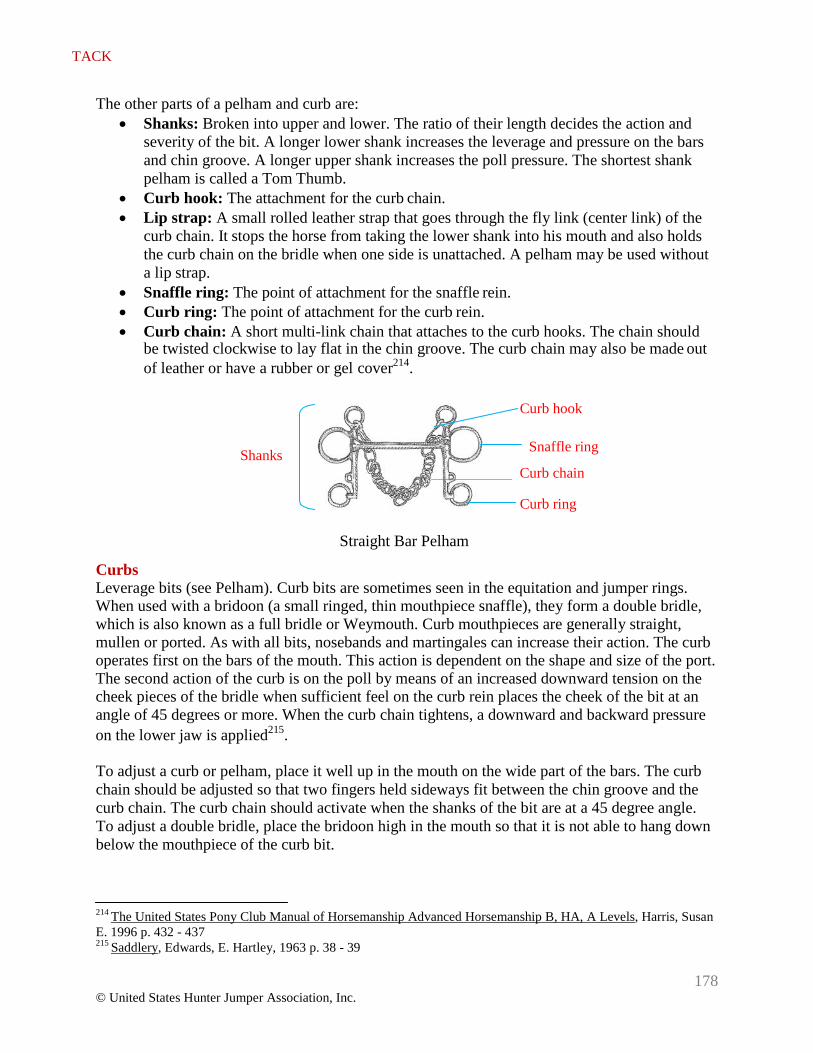
178 © United States Hunter Jumper Association, Inc.
TACK
The other parts of a pelham and curb are: • Shanks: Broken into upper and lower. The ratio of their length decides the action and
severity of the bit. A longer lower shank increases the leverage and pressure on the bars and chin groove. A longer upper shank increases the poll pressure. The shortest shank pelham is called a Tom Thumb.
• Curb hook: The attachment for the curb chain. • Lip strap: A small rolled leather strap that goes through the fly link (center link) of the
curb chain. It stops the horse from taking the lower shank into his mouth and also holds the curb chain on the bridle when one side is unattached. A pelham may be used without a lip strap.
• Snaffle ring: The point of attachment for the snaffle rein. • Curb ring: The point of attachment for the curb rein. • Curb chain: A short multi-link chain that attaches to the curb hooks. The chain should
be twisted clockwise to lay flat in the chin groove. The curb chain may also be made out of leather or have a rubber or gel cover214.
Shanks
Curb hook
Snaffle ring
Curb chain
Curb ring
Straight Bar Pelham
Curbs Leverage bits (see Pelham). Curb bits are sometimes seen in the equitation and jumper rings. When used with a bridoon (a small ringed, thin mouthpiece snaffle), they form a double bridle, which is also known as a full bridle or Weymouth. Curb mouthpieces are generally straight, mullen or ported. As with all bits, nosebands and martingales can increase their action. The curb operates first on the bars of the mouth. This action is dependent on the shape and size of the port. The second action of the curb is on the poll by means of an increased downward tension on the cheek pieces of the bridle when sufficient feel on the curb rein places the cheek of the bit at an angle of 45 degrees or more. When the curb chain tightens, a downward and backward pressure on the lower jaw is applied215.
To adjust a curb or pelham, place it well up in the mouth on the wide part of the bars. The curb chain should be adjusted so that two fingers held sideways fit between the chin groove and the curb chain. The curb chain should activate when the shanks of the bit are at a 45 degree angle. To adjust a double bridle, place the bridoon high in the mouth so that it is not able to hang down below the mouthpiece of the curb bit.
214 The United States Pony Club Manual of Horsemanship Advanced Horsemanship B, HA, A Levels, Harris, Susan E. 1996 p. 432 - 437 215 Saddlery, Edwards, E. Hartley, 1963 p. 38 - 39
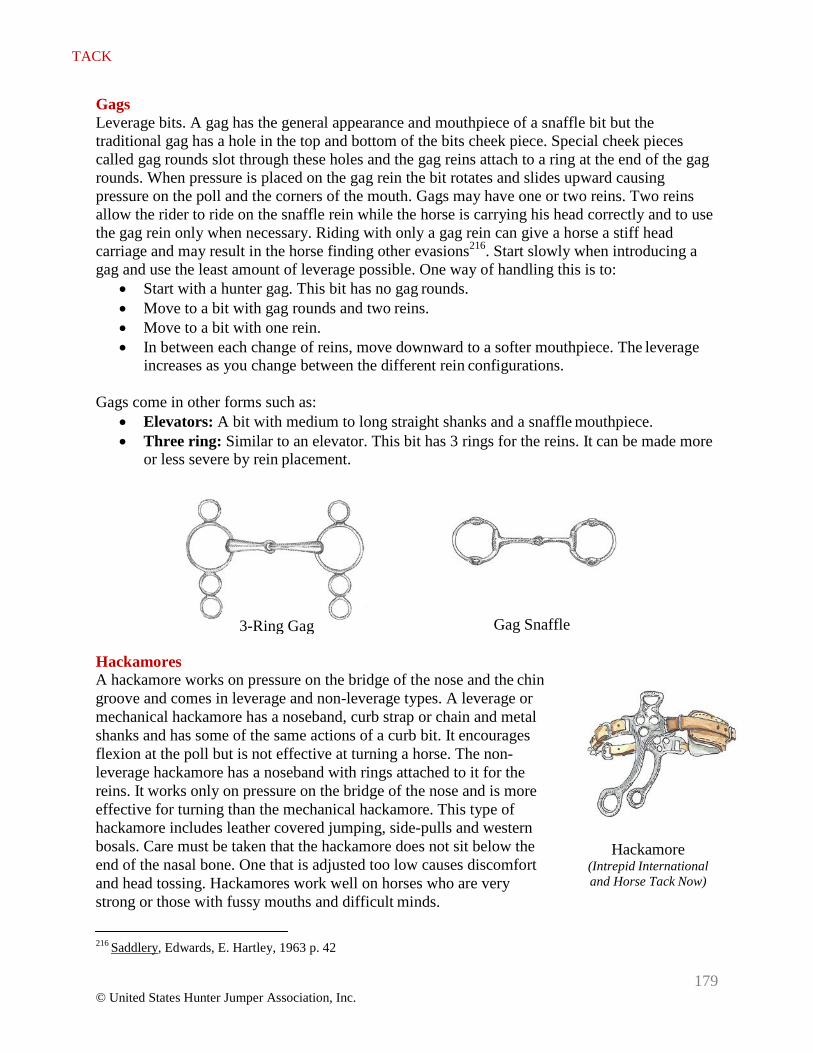
TACK
179 © United States Hunter Jumper Association, Inc.
Gags Leverage bits. A gag has the general appearance and mouthpiece of a snaffle bit but the traditional gag has a hole in the top and bottom of the bits cheek piece. Special cheek pieces called gag rounds slot through these holes and the gag reins attach to a ring at the end of the gag rounds. When pressure is placed on the gag rein the bit rotates and slides upward causing pressure on the poll and the corners of the mouth. Gags may have one or two reins. Two reins allow the rider to ride on the snaffle rein while the horse is carrying his head correctly and to use the gag rein only when necessary. Riding with only a gag rein can give a horse a stiff head carriage and may result in the horse finding other evasions216. Start slowly when introducing a gag and use the least amount of leverage possible. One way of handling this is to:
• Start with a hunter gag. This bit has no gag rounds. • Move to a bit with gag rounds and two reins. • Move to a bit with one rein. • In between each change of reins, move downward to a softer mouthpiece. The leverage
increases as you change between the different rein configurations.
Gags come in other forms such as: • Elevators: A bit with medium to long straight shanks and a snaffle mouthpiece. • Three ring: Similar to an elevator. This bit has 3 rings for the reins. It can be made more
or less severe by rein placement.
Gag Snaffle
Hackamores A hackamore works on pressure on the bridge of the nose and the chin groove and comes in leverage and non-leverage types. A leverage or mechanical hackamore has a noseband, curb strap or chain and metal shanks and has some of the same actions of a curb bit. It encourages flexion at the poll but is not effective at turning a horse. The non- leverage hackamore has a noseband with rings attached to it for the reins. It works only on pressure on the bridge of the nose and is more effective for turning than the mechanical hackamore. This type of hackamore includes leather covered jumping, side-pulls and western bosals. Care must be taken that the hackamore does not sit below the end of the nasal bone. One that is adjusted too low causes discomfort and head tossing. Hackamores work well on horses who are very strong or those with fussy mouths and difficult minds.
Hackamore (Intrepid International and Horse Tack Now)
216 Saddlery, Edwards, E. Hartley, 1963 p. 42
3-Ring Gag
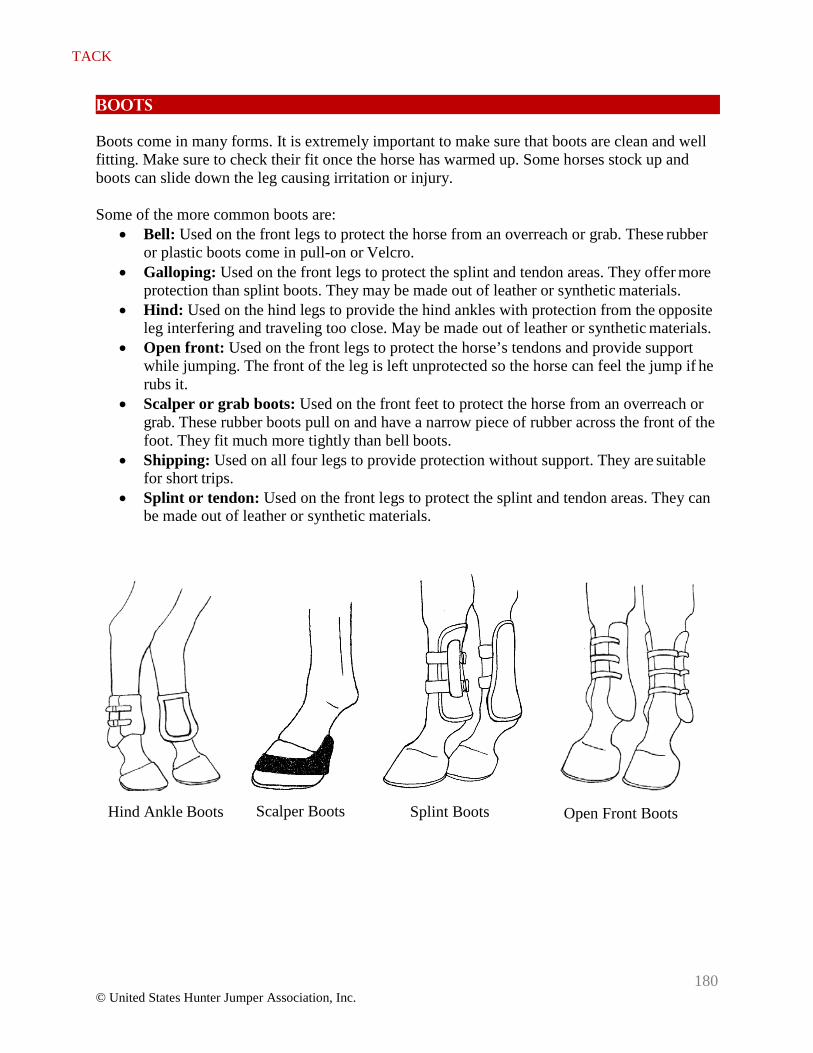
TACK
180 © United States Hunter Jumper Association, Inc.
Boots
Boots come in many forms. It is extremely important to make sure that boots are clean and well fitting. Make sure to check their fit once the horse has warmed up. Some horses stock up and boots can slide down the leg causing irritation or injury.
Some of the more common boots are:
• Bell: Used on the front legs to protect the horse from an overreach or grab. These rubber or plastic boots come in pull-on or Velcro.
• Galloping: Used on the front legs to protect the splint and tendon areas. They offer more protection than splint boots. They may be made out of leather or synthetic materials.
• Hind: Used on the hind legs to provide the hind ankles with protection from the opposite leg interfering and traveling too close. May be made out of leather or synthetic materials.
• Open front: Used on the front legs to protect the horse’s tendons and provide support while jumping. The front of the leg is left unprotected so the horse can feel the jump if he rubs it.
• Scalper or grab boots: Used on the front feet to protect the horse from an overreach or grab. These rubber boots pull on and have a narrow piece of rubber across the front of the foot. They fit much more tightly than bell boots.
• Shipping: Used on all four legs to provide protection without support. They are suitable for short trips.
• Splint or tendon: Used on the front legs to protect the splint and tendon areas. They can be made out of leather or synthetic materials.
Hind Ankle Boots Scalper Boots Splint Boots Open Front Boots
TACK
181 © United States Hunter Jumper Association, Inc.
Breastplates and Martingales
Breastplates are used on horses with high withers that run uphill and those with wide shoulders and narrow ribs. They keep the saddle forward on the horse’s back.
Types of breastplates are:
• Hunting: A yoke and girth strap, which attaches to the girth between the front legs. Straps attach from rings on either side of the withers to the saddle “dees” or to a nylon and leather strap around the stirrup bars. The shoulders may have adjustment buckles and can be made out of leather or elastic webbing. A martingale attachment may be attached at the chest ring.
• Breast collar or polo breastplate: A strap that runs from one side of the girth to the other across the horse’s chest. A strap across the withers stabilizes the breast collar and stops it from slipping down. Breast collars can be made out of webbing, leather or elastic.
• Elastic breast girth: Similar to a breast collar except it attaches to the saddle “dees” or stirrup bars by means of a nylon and leather strap. It should fit snugly but not tightly across the base of the horse’s neck. Breast girths are made out of elastic with leather ends.
Martingales are most commonly used to stop a horse from raising his head. Hunters may wear standing and running martingales used in a conventional manner for all over fences classes. Martingales of any type are prohibited in Under Saddle, hack and tie-breaking classes. Jumpers may wear standing or running martingales depending on the amount of prize money offered in the class. Consult the USEF Rule Book for specifics.
Some types of martingales are:
• Standing: A neck strap or yoke with a piece of leather that attaches to the girth at one end and the cavesson noseband on the other. There should be a rubber donut at the neck to stop the martingale from slipping in between the legs. The neck strap buckles on the left side of the horse. This martingale prevents a horse from throwing his head up.
• Running: Similar to a standing martingale, except this martingale forms two branches with a ring on each end. The reins pass through the rings and buckle as normal. There should be a rubber donut at the neck to stop the martingale from slipping in between the legs. The running martingale should be used with rubber or leather rein stops to prevent the rings from catching on the rein studs or the bit. When adjusted correctly, the rein will remain straight from the bit to the hand to the elbow. The branches can be made out of leather, elastic webbing or rubber tubing.
• Bib: Usually used in racing, it resembles a running martingale with a solid piece of leather between the branches. It keeps the horses from getting caught on the branches of the martingale.
• Irish: A short strap with a ring at either end. This martingale is worn under the neck. The reins are passed through the rings. The martingale prevents the reins from coming over the head. This martingale is usually seen only in racing.
TACK
182 © United States Hunter Jumper Association, Inc.
Cruppers and Head Bumpers
Some less used types of tack are cruppers and head bumpers. Cruppers are used on mutton withered horses and very fat ponies to keep the saddle from slipping forward over the withers. The strap passes around the dock and back to a “T” that fits into the saddle gullet or a fastening point on the cantle of the saddle. Head bumpers are a thick felt and leather hat that slots onto a horse’s halter crownpiece. The ears fit through two holes. Head bumpers are used to protect the poll on horses that throw their heads up while loading or unloading in a trailer.
Girths
Girths can be made out of leather or synthetic materials and may have elastic ends on either one or both sides. Girths should fit properly and, when tightened, have two spare holes above and at least one hole below the buckles. The girth should be even on both billets or girth straps. It should be attached on either the first and third or first and second and billet straps. This is due to the second and third billets being attached to the same place in the saddle. The girth attachment is much more secure if the straps are attached to the first and third or first and second billets. Girths must be kept in a clean and soft condition. Failure to perform these tasks often results in a girth sore or gall, which may take several days to heal.
Girth sores can result from skin pinches under the girth, ill-fitting or poorly constructed girths, base wide conformation, friction from vigorous work or a poor grooming job in the girth area. Dirt and sweat must be removed from the horse’s girth area both before and after the horse is ridden. A horse is generally unable to wear a girth while he has a girth sore, although a fleece or tube sock-like girth cover may help. Some horses benefit from the use of a shaped girth, which allows extra room by the horse’s elbows and helps to prevent girth sores. Girth sores will re- occur until the root cause is discovered and removed.
A belly guard is a special kind of girth used in the jumper ring to prevent a horse from abrading himself with his caulks or studs. Belly guards can be an integral part of the girth or slot onto a girth.
Halters
Halters, like bridles, should be fitted to each individual horse. The crownpiece rests behind the horse’s ears and should not fall down the horse’s neck or slip forward over the ears. The noseband should fall approximately 2 inches below the point of the cheekbone. Halters that rest too high on the face make control difficult. Halters that fall too low may risk damaging the nasal bones. Cheek pieces should fit comfortably on the face. Make sure to tuck in all loose ends of straps. Leather halters are preferred over nylon because they have a greater chance of breaking in an emergency if a horse is caught on an object.
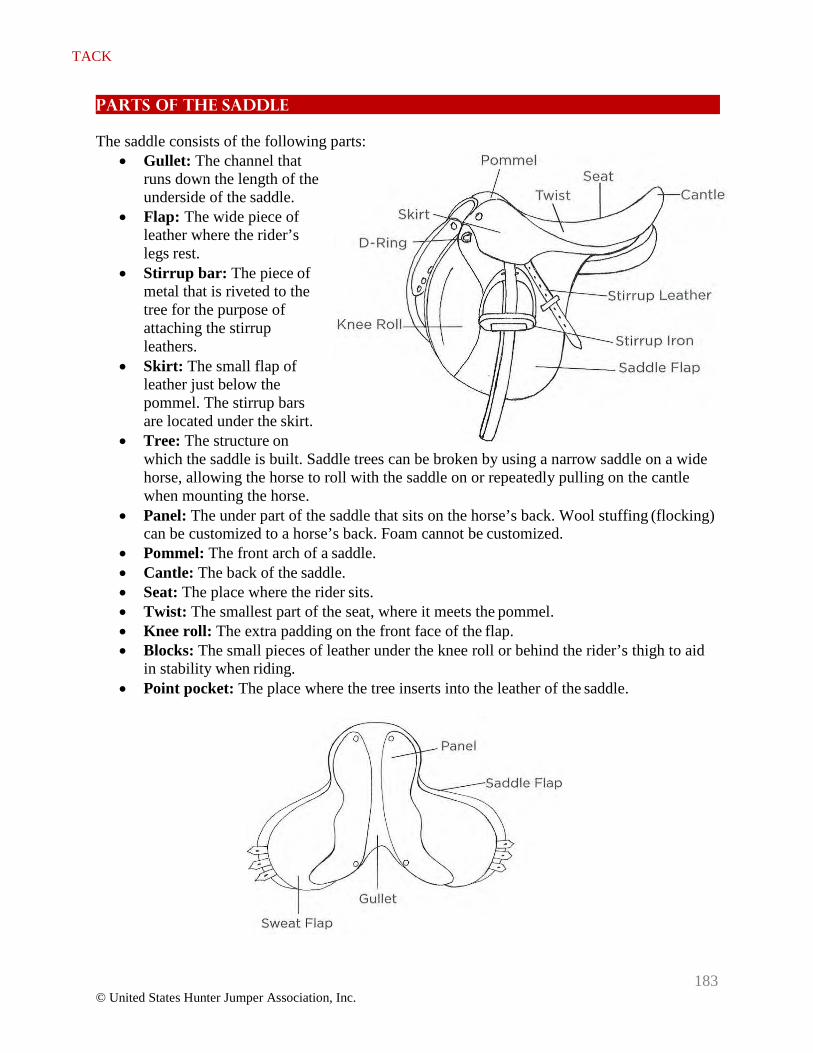
TACK
183 © United States Hunter Jumper Association, Inc.
Parts of the Saddle
The saddle consists of the following parts: • Gullet: The channel that
runs down the length of the underside of the saddle.
• Flap: The wide piece of leather where the rider’s legs rest.
• Stirrup bar: The piece of metal that is riveted to the tree for the purpose of attaching the stirrup leathers.
• Skirt: The small flap of leather just below the pommel. The stirrup bars are located under the skirt.
• Tree: The structure on which the saddle is built. Saddle trees can be broken by using a narrow saddle on a wide horse, allowing the horse to roll with the saddle on or repeatedly pulling on the cantle when mounting the horse.
• Panel: The under part of the saddle that sits on the horse’s back. Wool stuffing (flocking) can be customized to a horse’s back. Foam cannot be customized.
• Pommel: The front arch of a saddle. • Cantle: The back of the saddle. • Seat: The place where the rider sits. • Twist: The smallest part of the seat, where it meets the pommel. • Knee roll: The extra padding on the front face of the flap. • Blocks: The small pieces of leather under the knee roll or behind the rider’s thigh to aid
in stability when riding. • Point pocket: The place where the tree inserts into the leather of the saddle.
TACK
184 © United States Hunter Jumper Association, Inc.
Saddle Fit
It is very important that a horse’s saddle fits his back properly. The saddle should fit well enough that the horse has a uniform sweat mark with no dry patches after he has been worked. Dry patches indicate a place where the saddle is causing pressure points on the horse’s back. A saddle should fit level on the horse’s back with no spine pressure through the gullet. When standing behind the horse and looking through the gullet, you should be able to see daylight. A minimum of three fingers (held sideways) should fit between the withers and the underside of the pommel. A saddle should not pinch the withers or rock on his back. Although saddle pads can make adjustments to saddle fit, they cannot fix a saddle that does not fit a horse’s back. Improper fitting of tack can cause discomfort for the rider, discomfort for the horse and a potential loss of control.
Saddles can be:
• Too wide: The saddle sits down on the withers. • Too narrow: The saddle presses into the back muscles and pinches the shoulders. Many
saddles sit downhill on a horse because they are too narrow.
Some problems caused by poor saddle fit are: • Sore, pinched withers, which can be caused by abrasion and compression • Severe wither sores and fistulous withers, which can also come from poorly cleaned tack
or an unbalanced saddle, horse or rider • Pressure points • Back bruises • Saddle sores • Nerve damage • Inhibiting the horse’s balance or movement • Undesirable behavior, such as bucking, rearing, bolting, balking and head tossing
Saddle sores occur over the top or along the side of the withers. Saddle sores can be caused by:
• Ill-fitting, improperly positioned or dirty tack • An unbalanced rider or saddle • Concussion • Abrasion • Compression
Saddle sores that are not properly cared for can develop into a serious condition called fistulous withers. This condition starts with either a saddle sore or a blow to the withers. The soft tissue becomes inflamed and may lead to a chronic infection. This infection can eventually invade the thoracic vertebrae.
A properly fitted saddle should fit both the horse and rider. Make sure that the seat is the right size. Saddles are measured from the middle of the cantle to the button over the point pocket. Your saddle may be too large if your trainer tells you that you sit in a chair seat.
TACK
185 © United States Hunter Jumper Association, Inc.
Stirrup Leathers and Irons
Stirrup leathers should be checked on a daily basis for loose or rotted stitching. They also should be switched from left to right when cleaning the saddle. This ascertains that the stirrup leathers will stretch evenly. Pressure from mounting tends to stretch the left stirrup leather. Riders who
put more weight in one stirrup than the other can also create uneven stretching. It is important to note that stirrup leathers are not always made from the same piece of hide and therefore a great
amount of variation in stretching is possible. Stirrup irons should be 1 inch wider than the ball of your foot. Children generally use Peacock irons, which are safety stirrups with a strong rubber band on the outside that comes undone if the rider’s foot pushes against it. Safety stirrups are
necessary when the rider’s foot is small enough to get caught in the stirrup iron when falling off.
Parts of the Bridle
The bridle consists of the following parts: • Crownpiece: Fits over the top of the head and serves as the attachment point for the
cheek pieces and throatlatch. • Cheek pieces: Attachment to the crownpiece on one end and the bit on the other. The bit
is usually attached by a stud that slots through a hole on the underside of the cheek piece. Certain jumper and schooling bridles have buckles on the outside of the cheek piece to attach the bit. When properly adjusted, they should be level with the horse’s eye and have at least two holes above the buckle.
• Browband: The strap that fits across the front of the horse’s face directly below his ears. The crownpiece and upper strap of the noseband are threaded through the ends of the browband. The browband keeps the bridle in place directly behind the horse’s ears.
• Noseband: Consists of a top strap that fits under the crownpiece on top of the horse’s head and a band that goes around the horse’s head in the area at the end of the nasal bone but above the cartilage. Many types of nosebands exist, which are explained further in the next subsection.
• Throatlatch: A long thin strap on the crownpiece that buckles on the left side of the horse where the head and neck join. Four fingers or a fist should be able to fit between the jaw and the throatlatch.
• Reins: Attach to the bit and are held by the rider. Reins can be made out of leather, rubber and leather, or webbing. They are usually laced, braided or plain if they are made from leather.
• Converters: Not a bridle part but used as an accessory to convert two rein bits such as pelhams and gags to a one rein bit.
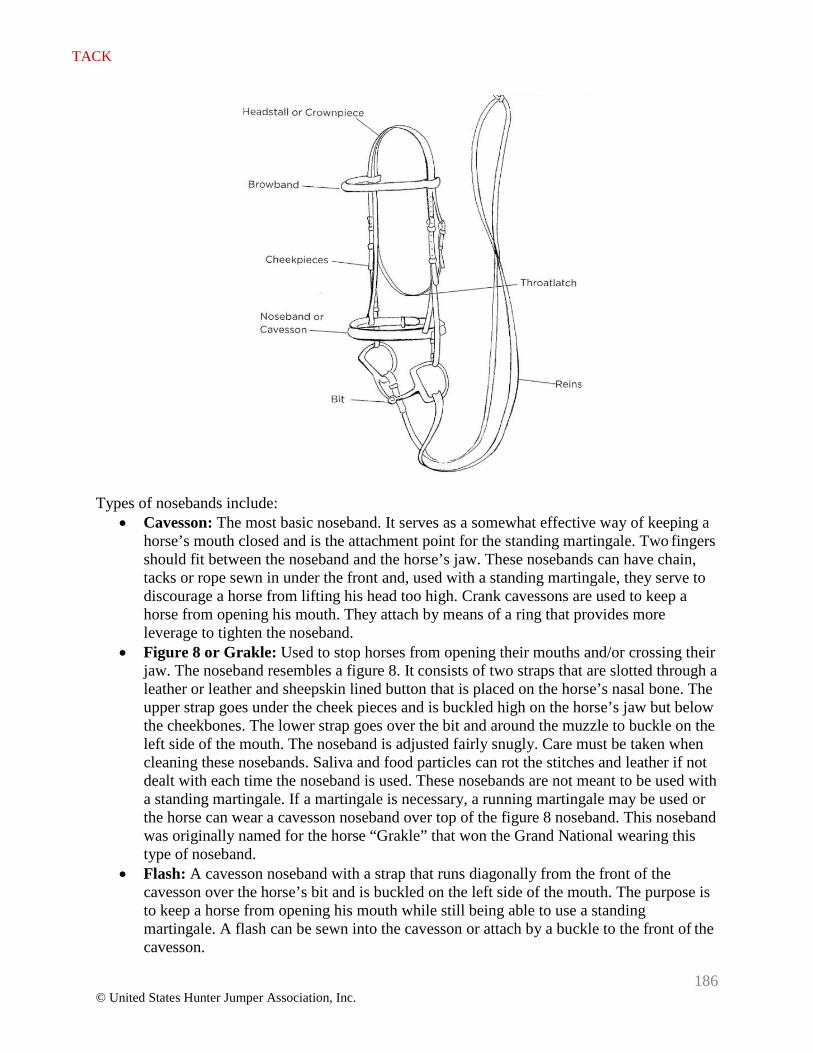
TACK
186 © United States Hunter Jumper Association, Inc.
Types of nosebands include: • Cavesson: The most basic noseband. It serves as a somewhat effective way of keeping a
horse’s mouth closed and is the attachment point for the standing martingale. Two fingers should fit between the noseband and the horse’s jaw. These nosebands can have chain, tacks or rope sewn in under the front and, used with a standing martingale, they serve to discourage a horse from lifting his head too high. Crank cavessons are used to keep a horse from opening his mouth. They attach by means of a ring that provides more leverage to tighten the noseband.
• Figure 8 or Grakle: Used to stop horses from opening their mouths and/or crossing their jaw. The noseband resembles a figure 8. It consists of two straps that are slotted through a leather or leather and sheepskin lined button that is placed on the horse’s nasal bone. The upper strap goes under the cheek pieces and is buckled high on the horse’s jaw but below the cheekbones. The lower strap goes over the bit and around the muzzle to buckle on the left side of the mouth. The noseband is adjusted fairly snugly. Care must be taken when cleaning these nosebands. Saliva and food particles can rot the stitches and leather if not dealt with each time the noseband is used. These nosebands are not meant to be used with a standing martingale. If a martingale is necessary, a running martingale may be used or the horse can wear a cavesson noseband over top of the figure 8 noseband. This noseband was originally named for the horse “Grakle” that won the Grand National wearing this type of noseband.
• Flash: A cavesson noseband with a strap that runs diagonally from the front of the cavesson over the horse’s bit and is buckled on the left side of the mouth. The purpose is to keep a horse from opening his mouth while still being able to use a standing martingale. A flash can be sewn into the cavesson or attach by a buckle to the front of the cavesson.
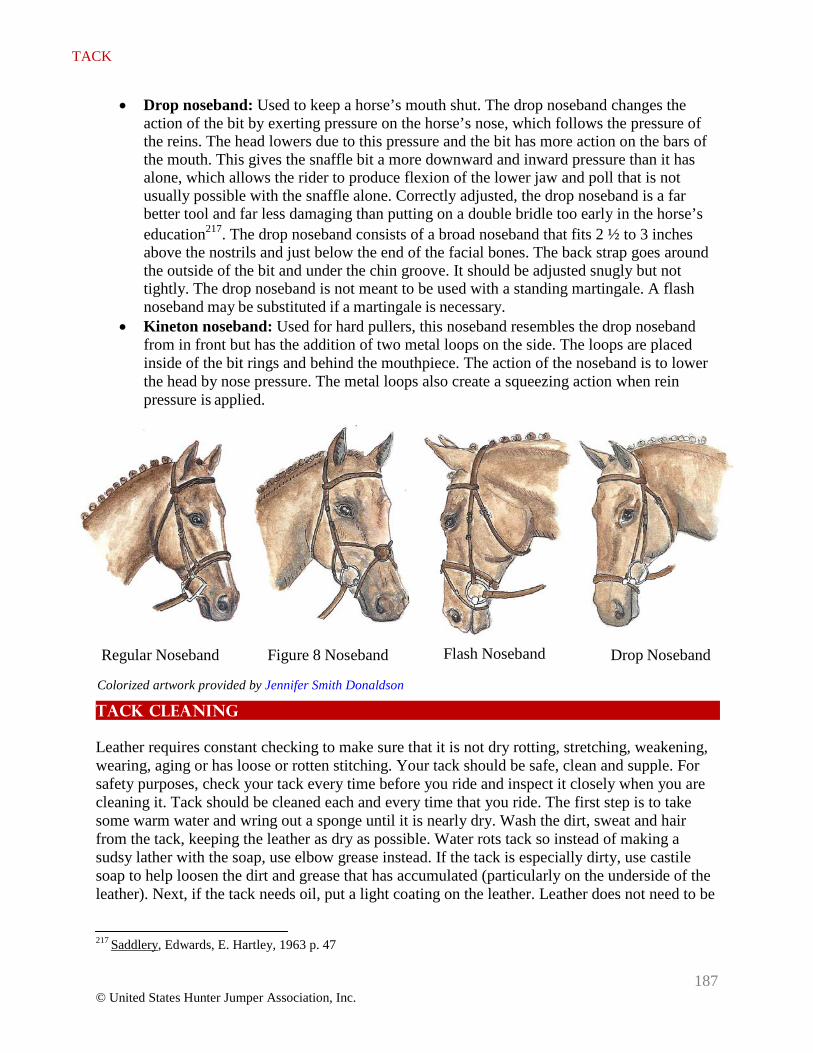
TACK
187 © United States Hunter Jumper Association, Inc.
• Drop noseband: Used to keep a horse’s mouth shut. The drop noseband changes the action of the bit by exerting pressure on the horse’s nose, which follows the pressure of the reins. The head lowers due to this pressure and the bit has more action on the bars of the mouth. This gives the snaffle bit a more downward and inward pressure than it has alone, which allows the rider to produce flexion of the lower jaw and poll that is not usually possible with the snaffle alone. Correctly adjusted, the drop noseband is a far better tool and far less damaging than putting on a double bridle too early in the horse’s education217. The drop noseband consists of a broad noseband that fits 2 ½ to 3 inches above the nostrils and just below the end of the facial bones. The back strap goes around the outside of the bit and under the chin groove. It should be adjusted snugly but not tightly. The drop noseband is not meant to be used with a standing martingale. A flash noseband may be substituted if a martingale is necessary.
• Kineton noseband: Used for hard pullers, this noseband resembles the drop noseband from in front but has the addition of two metal loops on the side. The loops are placed inside of the bit rings and behind the mouthpiece. The action of the noseband is to lower the head by nose pressure. The metal loops also create a squeezing action when rein pressure is applied.
Regular Noseband Figure 8 Noseband Flash Noseband Drop Noseband
Colorized artwork provided by Jennifer Smith Donaldson
Tack Cleaning
Leather requires constant checking to make sure that it is not dry rotting, stretching, weakening, wearing, aging or has loose or rotten stitching. Your tack should be safe, clean and supple. For safety purposes, check your tack every time before you ride and inspect it closely when you are cleaning it. Tack should be cleaned each and every time that you ride. The first step is to take some warm water and wring out a sponge until it is nearly dry. Wash the dirt, sweat and hair from the tack, keeping the leather as dry as possible. Water rots tack so instead of making a sudsy lather with the soap, use elbow grease instead. If the tack is especially dirty, use castile soap to help loosen the dirt and grease that has accumulated (particularly on the underside of the leather). Next, if the tack needs oil, put a light coating on the leather. Leather does not need to be
217 Saddlery, Edwards, E. Hartley, 1963 p. 47
TACK
188 © United States Hunter Jumper Association, Inc.
oiled often and over-oiling can be just as destructive as under oiling. Finish with a light application of glycerine soap, which serves to seal the leather. From time to time, jockeys or small accumulations of greasy dirt are found, especially on saddles. Jockeys are an indication that the tack has not received proper cleaning. The buckles on unused tack can be treated with petroleum jelly to prevent rust.
Tanning
Most tack is made out of leather. Leather is animal skin that has been tanned, which seals the top, or grain side, and leaves the underside, or flesh side, with its natural ability to absorb water, fat or oil. Leather loses its natural fat on a daily basis, and also when it is exposed to:
• Water • Heat • Sweat • Salt • Dirt • Neglect
Bibliography
Saddlery Modern Equipment for Horse and Stable, Edwards, E. Hartley 1977
The United States Pony Club Manual of Horsemanship Advanced Horsemanship B, HA, A Levels, Harris, Susan E. 1996
The United States Pony Club Manual of Horsemanship Basics for Beginners D Level, Harris, Susan E 1994
USHJA Trainer Certification Manual & Study Guide, 2010
189 © United States Hunter Jumper Association, Inc.
WELFARE
Horse Welfare Horse welfare should be the concern of every horseman. Whether you are a rider, trainer, owner, parent or groom, you should keep your eyes and ears open to make sure that horses are treated in a correct and humane manner. The rules of our sport are constantly changing so it is important to become acquainted with proper horse handling and to have a good working knowledge of the rules. If you witness abuse or cruelty you should take photographs or video and, if at a show, call the steward.
Here are some rules that explain inappropriate behaviors when dealing with horses.
GR803 Use of Whips No item may be used inside or outside the ring while showing a horse except one whip per handler. If whips are allowed, they must be no longer than 6 feet including the snapper or lash. No appendages of any kind are permitted. One longeing whip is permitted only when longeing.
HU126 Equipment (also found in JP111Tack and Attire) 4. Whips. Competitors are prohibited from carrying a whip that is longer than 30” (75cm) while jumping or schooling over fences. A rider may not carry more than one whip. Whips that are weighted at the end are prohibited.
GR839 Cruelty to and Abuse of a Horse 4. The following acts are included under the words Cruelty and Abuse but are not limited thereto:
h. Showing a horse with raw or bleeding sores around the coronets, pasterns or legs. i. Use of any explosive (e.g. fire crackers, torpedoes, fire extinguishers except in case of
fire, etc.) or laser beam devices anywhere on the competition grounds, except in an exhibition or if required in class specifications.
HU102 Horse Welfare 1. The following acts are prohibited:
a. Riding an exhausted horse. b. Excessive pressuring of a tired horse. c. Riding or longeing an obviously lame horse. d. Excessive use of a whip on any horse in a stall, aisle, schooling area, competition ring or
elsewhere on the competition grounds. The use of a whip must be for a good reason, done at the appropriate time, in the proper place and with appropriate restraint. Excessive whipping will not be tolerated.
e. Any striking of the horse’s head (on the poll or forward of the poll shall be deemed excessive).
f. Repeated jerking on the reins and sawing on the bit unless applied to an unruly horse that is jeopardizing his own safety or the safety of his rider.
g. Improper use of the bit resulting in bleeding, broken skin or broken mucous membrane. h. Excessive use of the spurs or spurring resulting in broken and bleeding skin.
190 © United States Hunter Jumper Association, Inc.
WELFARE
i. Rapping the legs of a horse with the butt end of a riding crop or other implement. j. Use of any substance to induce temporary heat causing hyper-sensitization. k. Poling l. Use of a wire or chain in conjunction with any schooling jumps. m. Use of electronic shock devices in schooling or showing. n. Use of shackles, hock hobbles and similar devices with the exception of kicking chains
while the horse is in the stall or in transport. This does not prohibit the use of rubber or plastic exercising devices.
o. Showing a horse with hypersensitive, raw or bleeding sores around the coronets, pasterns, legs or body.
p. Use of laser beam devices anywhere on the competition grounds, except in an exhibition or if required in class specifications (Exception: Lasers used in a therapeutic manner).
q. Withholding of feed or water for prolonged periods. r. Letting blood from a horse for other than diagnostic purposes. s. Inhumane treatment of a horse in a stall, aisle, schooling area, competition ring or
elsewhere on the competition grounds, by any person.
JP102 Horse Welfare 1. Conduct in the competition ring:
a. Any action against a horse by a competitor in the ring, deemed excessive by the judge, may be penalized by any one or combination of the following: Official warning, or elimination from the class.
b. Such action(s) could include, but are not limited to, excessive or improper use of the whip, spurs, reins, rider’s weight or rider’s hands.
c. In addition, after consultation with the Competition Manager and a Competition Steward, additional penalties, including one or more of the following: The issuance of an official warning card, disqualification from competing within the upcoming 24-hours period, disqualification from the balance of the competition.
2. Conduct outside of the competition ring: Any action(s) against a horse by an exhibitor deemed excessive by a Judge, Federation Steward, Certified Jumper Schooling Supervisor or Competition Veterinarian anywhere on the competition grounds may be punished by official warning or elimination from the class. Such action(s) could include, but are not limited to, excessive or improper use of the whip, spurs, reins, rider’s weight or rider’s hands.
Drugs and medications must be used within the Drug and Medications guidelines. Consult your veterinarian or call the Drug and Medications hotline.
Bibliography
2012 USEF Rule Book, January 5, 2012.