Embed Size (px)
Citation preview
HiTi Photo Printer P525L
User Manual
2
Contents
Regulatory compliance statements ........................................................................................... 3
Chapter 1. Important safety instruction .................................................................................... 5
◎ Safety Instruction ................................................................................................ 5
◎ Environments ...................................................................................................... 5
◎ Handling Instruction ........................................................................................... 6
◎ Handling Instruction for Consumable and Printed Outputs .............................. 8
Chapter 2. Accessory items ....................................................................................................... 9
◎ Accessory Item .................................................................................................... 9
Chapter 3. Basic functions introduction .................................................................................. 10
◎ Appearance ....................................................................................................... 10
◎ LCD Display ........................................................................................................ 10
Chapter 4. Installing and operation ......................................................................................... 11
◎ Installing ............................................................................................................ 11
◎ Operation Process ............................................................................................. 12
◎ Ribbon/Paper Installing .................................................................................... 13
◎ Printer transportation ....................................................................................... 15
Chapter 5. Operation panel and Printer Status ....................................................................... 17
◎ Operation Panel ................................................................................................ 17
◎ User Set Up Mode ............................................................................................. 18
Chapter 6. Routine Maintenance ............................................................................................ 19
◎ Cleaning of Thermal Printing Head and Roller ................................................. 19
◎ Cleaning of Outer Cabinet cleaning .................................................................. 20
◎ Cleaning of Filter ............................................................................................... 20
Chapter 7. Error Message Handling ........................................................................................ 21
◎ Error Message and Corrective Actions ............................................................. 21
◎ Failure Symptoms ............................................................................................. 22
◎ Paper Jam resolution ........................................................................................ 23
◎ Power Supply Interrupted During Printing ...................................................... 24
Chapter 8. Specification .......................................................................................................... 25
◎ Specification ...................................................................................................... 25
Regulatory compliance statements
American Users
FCC Part 15
For a Class A digital device or peripheral, the instructions furnished the user shall include the
following or similar statement, placed in a prominent location in the text of the manual.
This equipment has been tested and found to comply with the limits of a Class A digital
device, pursuant to Part 15 of the FCC Rules. These limits are designed to provide reasonable
protection against harmful interference when the equipment is operated in a commercial
environment. This equipment generates, uses, and can radiate radio frequency energy and,
if not installed and used in accordance with the instruction manual, may cause harmful
interference to radio communications. Operation of the equipment in a residential area is
likely to cause harmful interference in which case the user will be required to correct the
interference at his (or her own) expense.
FCC ID: W5388D2035001
Europe Users
Class A ITE is a category of all other ITE which satisfies the class A ITE limits but not the class
B ITE limits. Such equipment should not be restricted in its sale but the following warning
shall be included in the instructions for use.
European Union Regulatory Notice
The device bearing the CE marking is in compliance with the essential requirements and
other relevant provisions of Directive 1999/5/EC. This device complies with the following
harmonized European standards.
Health: EN 62311:2008
Safety: EN 60950-1:2006 + A1: 2010 + A11:2009 + A12:2011
EMC: EN301 489-1 v1.9.2:2011, EN301 489-3 v1.6.1:2013
Radio: EN302 291-1-2: V1.1.1:2005
Warning
This is a class A product. In a domestic environment this product may cause radio
interference in which case the user may be required to take adequate measurement.

4
Federal Communications Commission (FCC) Statement
You are cautioned that changes or modifications not expressly approved by the part
responsible for compliance could void the user’s authority to operate the equipment.
This device complies with Part 15 of the FCC Rules. Operation is subject to the following two
conditions:
1) this device may not cause harmful interference and
2) this device must accept any interference received, including interference that may cause
undesired operation of the device.
5
Chapter 1. Important safety instruction
◎ Safety Instruction
This manual provides detail instructions for the safety use of the printer.
Please read this manual carefully before operating the printer to ensure having proper use.
◆ In this manual, there are notes that require special attention. For your safety operation,
Safety Notices are separated as follows:
: Inappropriate handing can cause the death or serious wounds.
: Inappropriate handling can cause wounds and/or physical damage to the users.
* Attention: Explanation about the cause of the trouble and the environmental condition.
◆ It is difficult to forecast all the danger in setting and use of the printer.
Therefore, warnings in this Operation Manual, in the other documents on the printer
cannot cover all the cases. In case of performing the operation or maintenance which is
not described in this manual, all the concern for the safety have to be taken care at the
customer side.
◆ Operation and the notification for the maintenance described in this manual and other
documents are for the proper use of the printer.
In case of using the printer for the other purpose, all the concern for the safety has to be
taken care at the customer side.
◆ Do Not perform the operation which is prohibited in this manual and other
documents.
◎ Environments
To use the printer safety, please pay attention to followings:
: Do not let kids to touch the printer or the cables. It can cause accidents or
electric shock
6
: Do not place the printer under a humid or dusty place. It can cause a fire,
electric shock or printer problem. Do not place the printer with dust, sand and high humidity
such as bathing place, bathroom, hot spring or the street.
: Do not place the printer on rickety place and/or inclined place. Printer may fall
down or tumble and it can cause serious injury.
* Attention: Keep the printer out of direct sunlight
* Do not put metallic objects or case/cup with any liquid on top of the printer. Water spilt
on metallic items fall into the printer may cause the fire and electric shock. In case the
water spilt or metallic items fall into the printer, please turn off the printer power
immediately.
: Do not block the openings of the printer. In case, the opening blocked, the heat
will remain inside and it can cause the fire.
: Do not insert or fall the metallic or flammable items into the printer through
the openings of the printer, it can cause the fire or electric shock.
◎ Handling Instruction
When handling the printer, please pay attention to the followings:
: Lift the printer from its box and put it onto a flat and firm table or desk.
: The printer alone (without paper and ribbon installed) is weighted around
18Kgs. Please handle the printer carefully to prevent personal injury and damage of the
printer.
7
: When moving the printer, hold the bottom edge of the printer. It is strongly
recommended to handle the printer by one to two persons during the transportation.
: Please take caution when transporting the printer on the slippery floor.
: Please make sure the power is off and the power cord is removed from the
printer before transportation.
: In the cause of dropping the printer during transportation, contact HiTi dealers
or service center for inspection of the printer. Using the printer with possible damage
without proper inspection may cause fire or electric shock.
* Do not dismantle or remodel the printer. Some sections of the printer contain a high
voltage or become very hot. Ignoring this warning may cause electric shock, fire, or
burns.
: Secure the power cable firmly while using.
: The thermal head reached high temperature during operation but it is normal.
Do not touch the thermal head by any case. Touch the thermal head may cause person
injury or damage of the printer.
* Attention: Touching the surface of the thermal head directly may cause damage to the
thermal heat. Hard objects getting into the printer may cause the damage of printer or
result in malfunction. In such case, please do not use the printer while any obstacle
inside the printer.
: Do not attempt to service the printer beyond the instruction specified in this
document. In case of irrecoverable problem, please contact HiTi dealers or service center.
8
: This product must be grounded at all time during operation, and always used
with the specified power cable only or the power cable accompanying this product. If the
product is used without grounding, and current leakage occurs, fire or electrical shock may
occur, and may also cause interference to radio, TV, and other similar electric appliances
signal receiving. If the proper ground is not available, please contact HiTi dealers or service
center.
◎ Handling Instruction for Consumable and Printed Outputs
In handling the ink ribbon, paper and printed outputs, please pay attention to the
followings:
* Attention: Paper handling
Use only the paper specified by HiTi
Store the paper flat
Store the paper in a dry and dark place to avoid the direct sunlight(Temperatures
less than 30°c; Humidity less than 60%)
* Attention: Ink ribbon handling
Use only the ribbon specified by HiTi
Store the ink ribbon in cool place to avoid direct sunlight (Temperatures less than
30°C; Humidity less than 60%)
* Attention: Printed output handling
Store the printed outputs in a cool place to avoid direct sunlight
Store the printed outputs away from the organic solvent/fluid such as benzene,
thinner or alcohol which may change or deteriorate the colors
* Attention: Do not print 5 inch photo (5” x 7”) or 6 inch photo (4” x 6” or 6” x 8”) in one
printer.
9
Chapter 2. Accessory items
Before using the printer, please make sure the Chapter 1. Important Safety Instruction is
fully-acknowledged carefully.
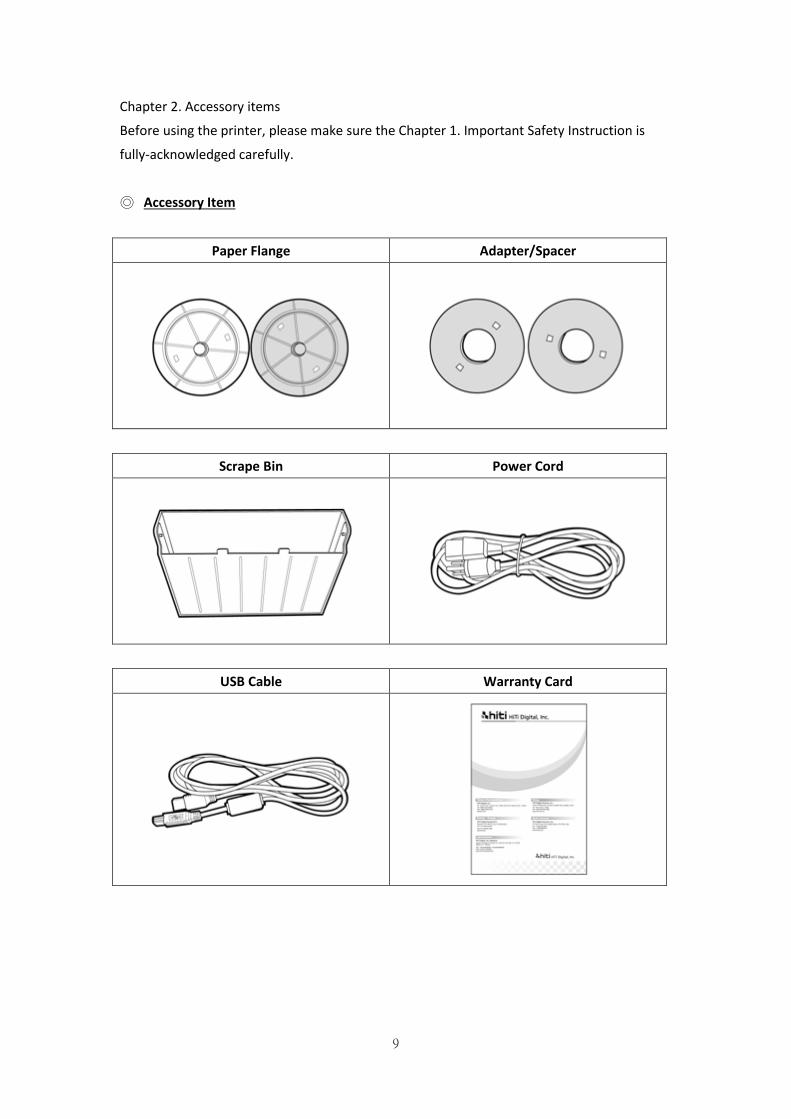
◎ Accessory Item
Paper Flange Adapter/Spacer
Scrape Bin Power Cord
USB Cable Warranty Card
10
Chapter 3. Basic functions introduction
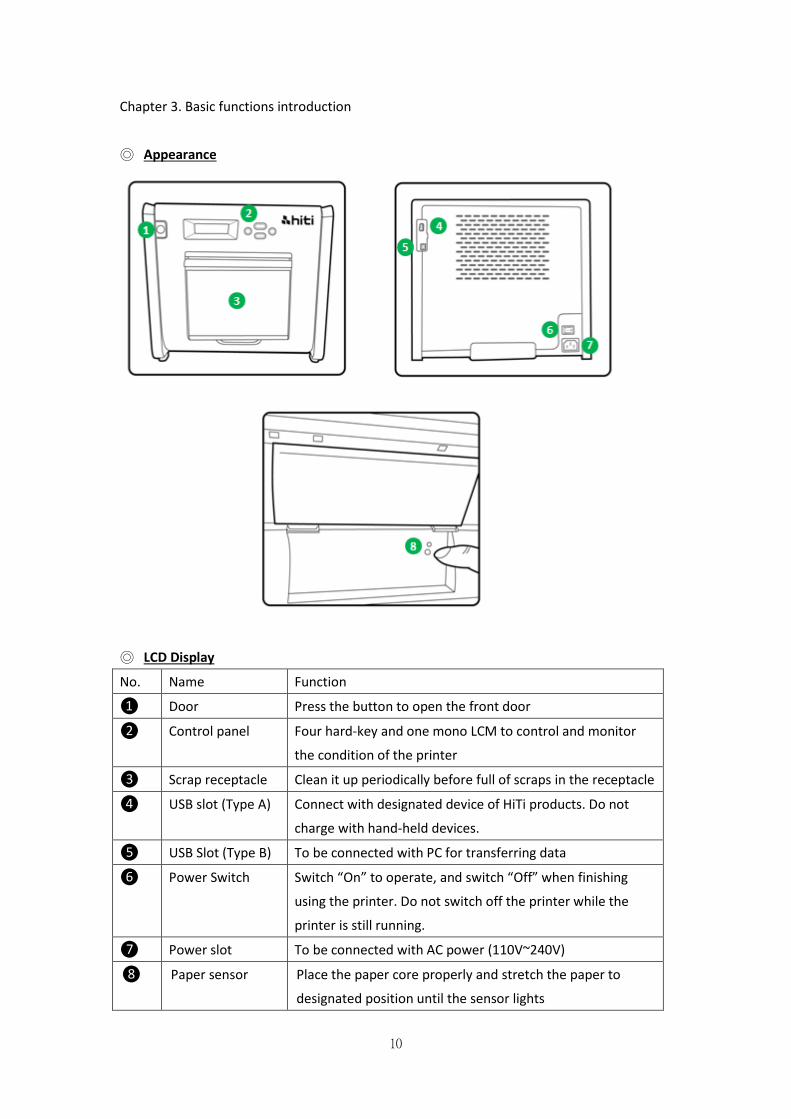
◎ Appearance
◎ LCD Display
No. Name Function
❶ Door Press the button to open the front door
❷ Control panel Four hard-key and one mono LCM to control and monitor
the condition of the printer
❸ Scrap receptacle Clean it up periodically before full of scraps in the receptacle
❹ USB slot (Type A) Connect with designated device of HiTi products. Do not
charge with hand-held devices.
❺ USB Slot (Type B) To be connected with PC for transferring data
❻ Power Switch Switch “On” to operate, and switch “Off” when finishing
using the printer. Do not switch off the printer while the
printer is still running.
❼ Power slot To be connected with AC power (110V~240V)
❽ Paper sensor Place the paper core properly and stretch the paper to
designated position until the sensor lights
11
Chapter 4. Installing and operation
Connect the power cord which is conformed to safety regulations below.
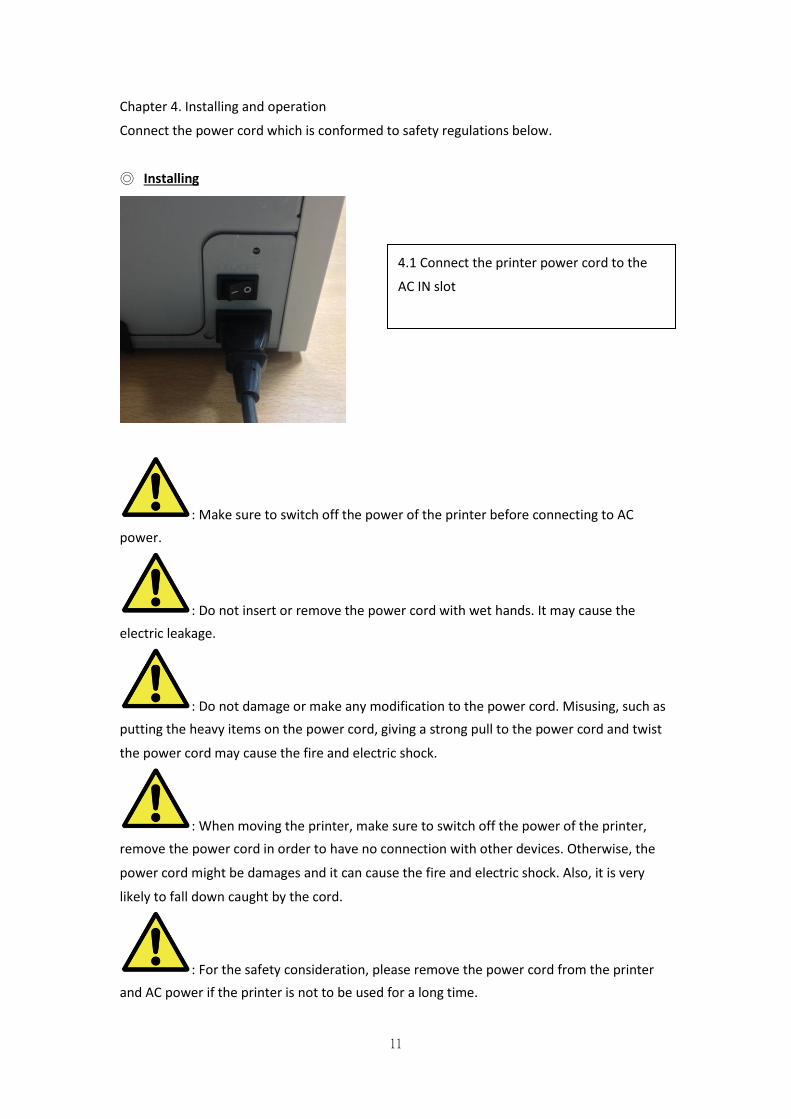
◎ Installing
: Make sure to switch off the power of the printer before connecting to AC
power.
: Do not insert or remove the power cord with wet hands. It may cause the
electric leakage.
: Do not damage or make any modification to the power cord. Misusing, such as
putting the heavy items on the power cord, giving a strong pull to the power cord and twist
the power cord may cause the fire and electric shock.
: When moving the printer, make sure to switch off the power of the printer,
remove the power cord in order to have no connection with other devices. Otherwise, the
power cord might be damages and it can cause the fire and electric shock. Also, it is very
likely to fall down caught by the cord.
: For the safety consideration, please remove the power cord from the printer
and AC power if the printer is not to be used for a long time.
4.1 Connect the printer power cord to the
AC IN slot
12
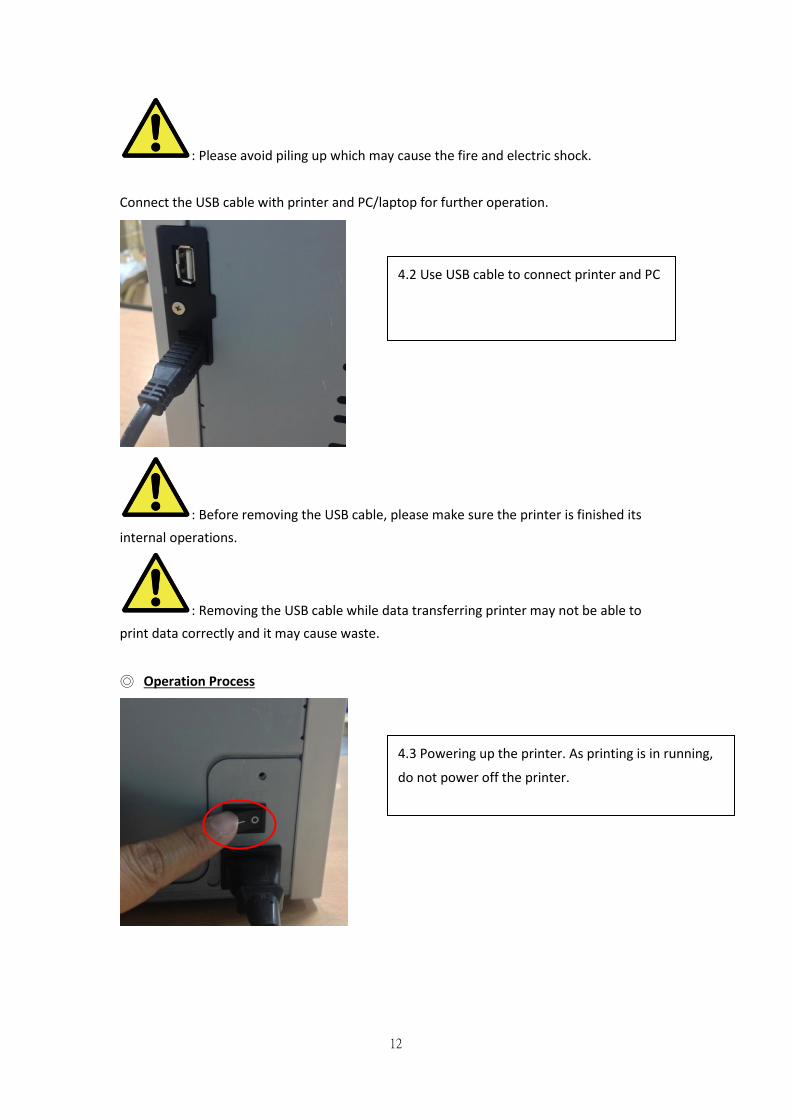
: Please avoid piling up which may cause the fire and electric shock.
Connect the USB cable with printer and PC/laptop for further operation.
: Before removing the USB cable, please make sure the printer is finished its
internal operations.
: Removing the USB cable while data transferring printer may not be able to
print data correctly and it may cause waste.
◎ Operation Process
4.2 Use USB cable to connect printer and PC
4.3 Powering up the printer. As printing is in running,
do not power off the printer.
13
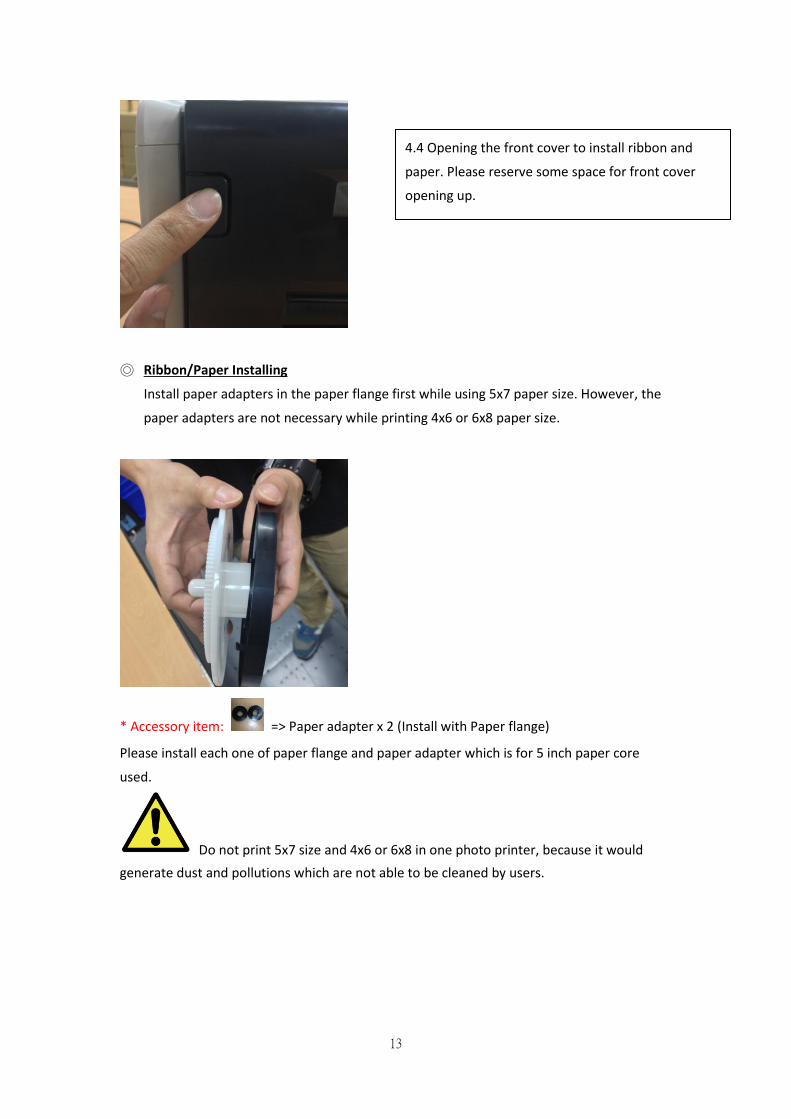
◎ Ribbon/Paper Installing
Install paper adapters in the paper flange first while using 5x7 paper size. However, the
paper adapters are not necessary while printing 4x6 or 6x8 paper size.
* Accessory item: => Paper adapter x 2 (Install with Paper flange)
Please install each one of paper flange and paper adapter which is for 5 inch paper core
used.
Do not print 5x7 size and 4x6 or 6x8 in one photo printer, because it would
generate dust and pollutions which are not able to be cleaned by users.
4.4 Opening the front cover to install ribbon and
paper. Please reserve some space for front cover
opening up.

14
4.5.1 Loading paper instructions
Place the paper flange in right positions.
* Attention: Installing the print kit to the printer can
be hassle-free. Please read the manual carefully
before working on the printing..
4.5.2 Pushing the paper to designated position
* Attention: To install the paper to position
specified correctly, please make sure the leading edge
of paper is inserted in at an oblique angle.
4.5.3 Paper sensor indicator
Make sure the sensor turns to blue to identify the
paper is placed in right position.
* Attention: Do not place paper with strong force
because it may cause damage to the paper.
15
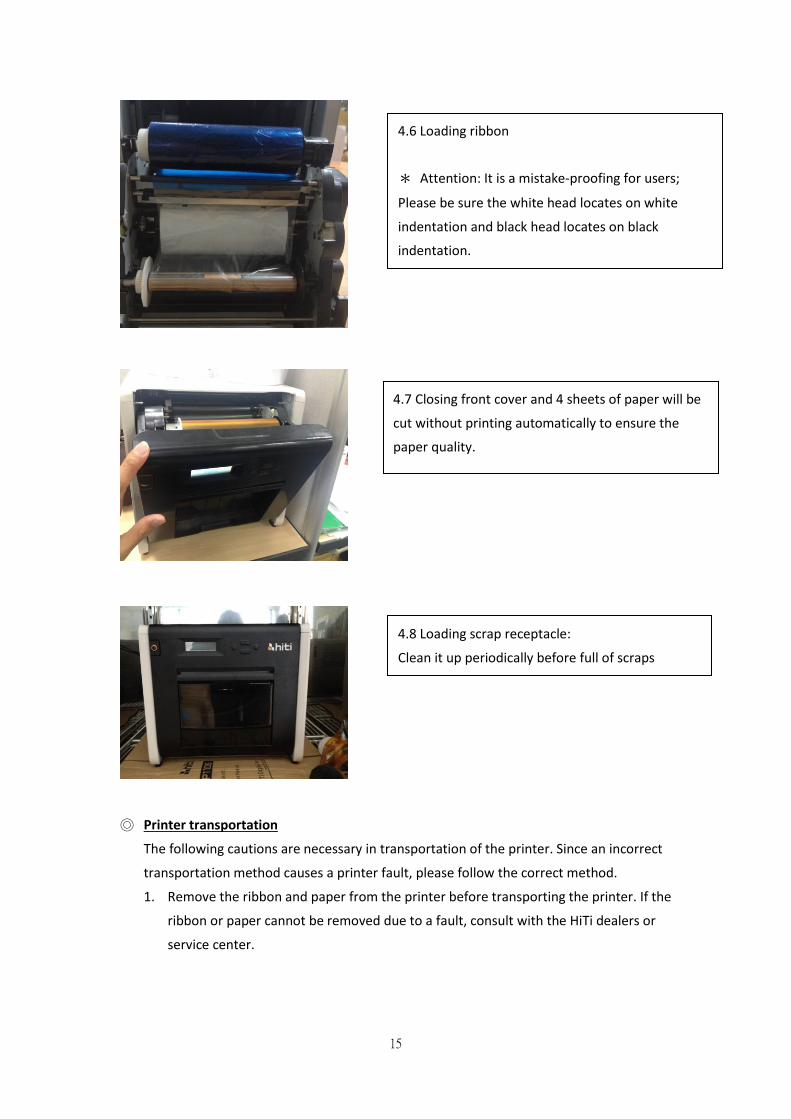
◎ Printer transportation
The following cautions are necessary in transportation of the printer. Since an incorrect
transportation method causes a printer fault, please follow the correct method.
1. Remove the ribbon and paper from the printer before transporting the printer. If the
ribbon or paper cannot be removed due to a fault, consult with the HiTi dealers or
service center.
4.6 Loading ribbon
* Attention: It is a mistake-proofing for users;
Please be sure the white head locates on white
indentation and black head locates on black
indentation.
4.7 Closing front cover and 4 sheets of paper will be
cut without printing automatically to ensure the
paper quality.
4.8 Loading scrap receptacle:
Clean it up periodically before full of scraps
8

16
2. Do not switch off the power while the front cover is open. Close the front cover
while the power is ON and switch off the power when “Ribbon Missing” is displayed
on the LCD of the operation panel.
17
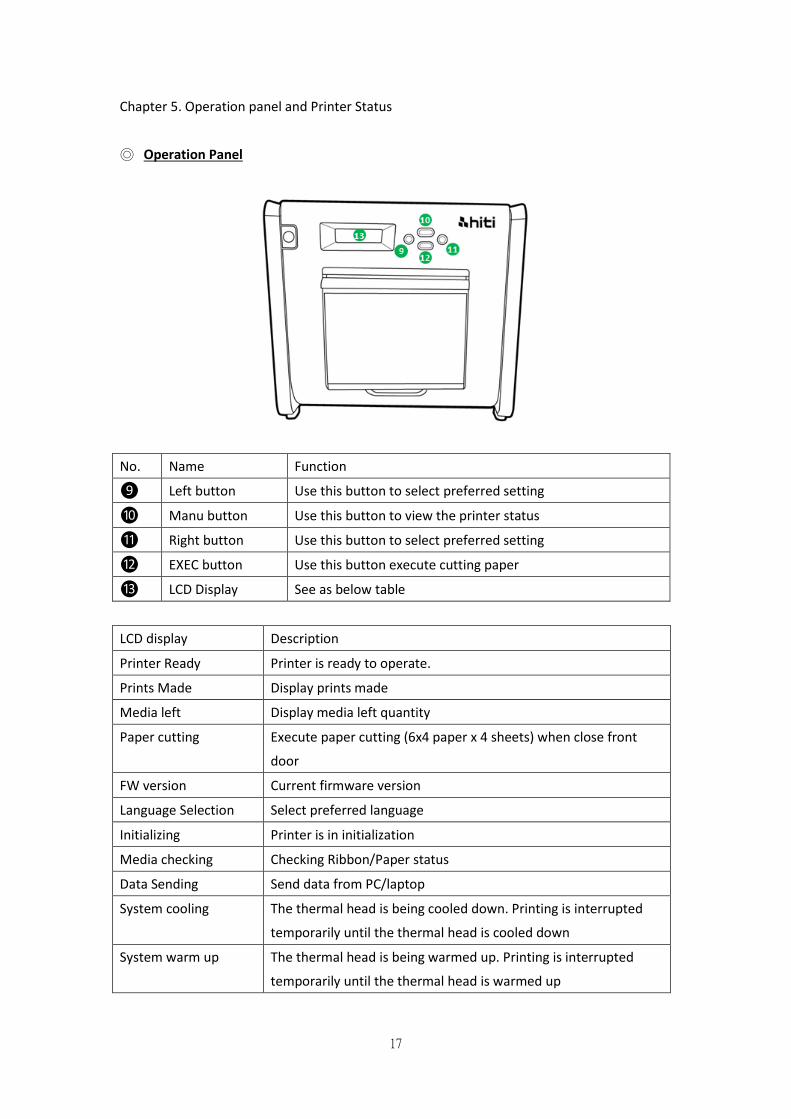
Chapter 5. Operation panel and Printer Status
◎ Operation Panel
No. Name Function
❾ Left button Use this button to select preferred setting
❿ Manu button Use this button to view the printer status
⓫ Right button Use this button to select preferred setting
⓬ EXEC button Use this button execute cutting paper
⓭ LCD Display See as below table
LCD display Description
Printer Ready Printer is ready to operate.
Prints Made Display prints made
Media left Display media left quantity
Paper cutting Execute paper cutting (6x4 paper x 4 sheets) when close front
door
FW version Current firmware version
Language Selection Select preferred language
Initializing Printer is in initialization
Media checking Checking Ribbon/Paper status
Data Sending Send data from PC/laptop
System cooling The thermal head is being cooled down. Printing is interrupted
temporarily until the thermal head is cooled down
System warm up The thermal head is being warmed up. Printing is interrupted
temporarily until the thermal head is warmed up
18
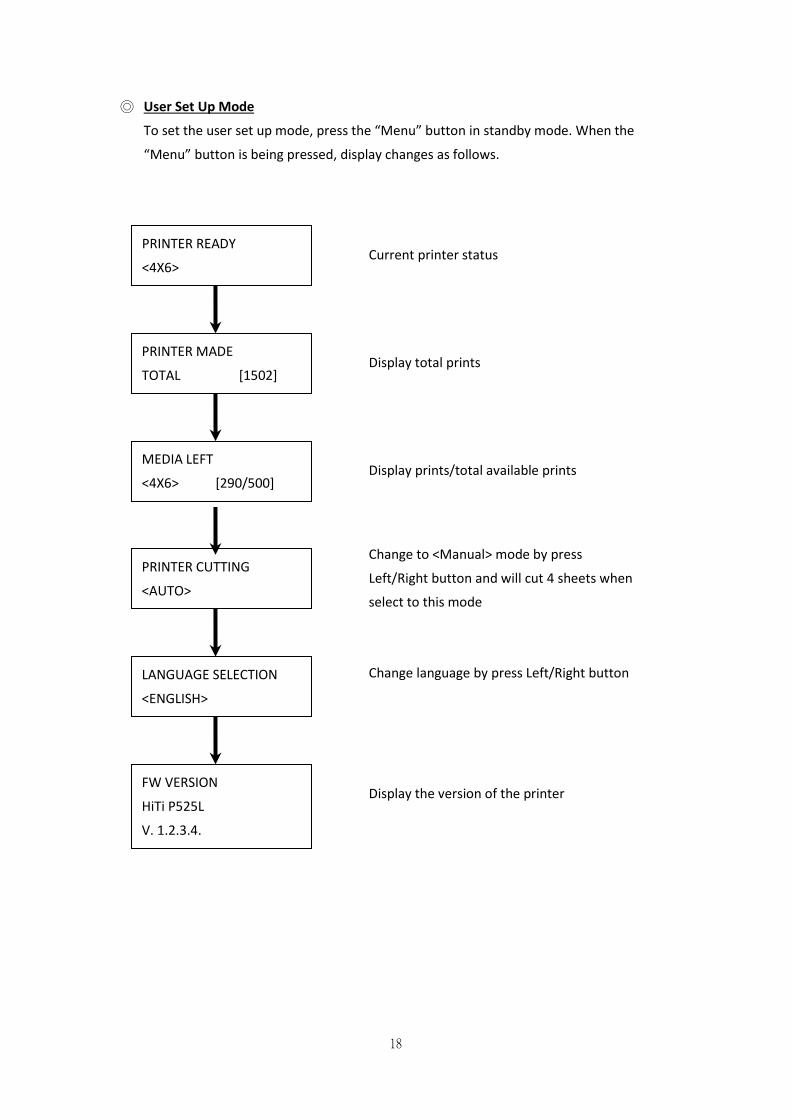
◎ User Set Up Mode
To set the user set up mode, press the “Menu” button in standby mode. When the
“Menu” button is being pressed, display changes as follows.
PRINTER READY
<4X6>
PRINTER MADE
TOTAL [1502]
MEDIA LEFT
<4X6> [290/500]
PRINTER CUTTING
<AUTO>
LANGUAGE SELECTION
<ENGLISH>
FW VERSION
HiTi P525L
V. 1.2.3.4.
Current printer status
Display the version of the printer
Display total prints
Change to <Manual> mode by press
Left/Right button and will cut 4 sheets when
select to this mode
Display prints/total available prints
Change language by press Left/Right button
19
Chapter 6. Routine Maintenance
◎ Cleaning of Thermal Printing Head and Roller
By using thermal transfer technology, daily maintenance is not necessary if the printer
has been using properly. However, in order to keep the best print quality, it is highly
recommended to clean Thermal Printing Head and Roller once a month.
: Make sure that the power is switched off before cleaning. Thermal Printing
Head reaches high temperature right after printing. Do not touch by hands directly. Make
sure the Thermal Printing Head has been sufficiently cooled down before start cleaning.
When fingerprint stick to the heating element, it can damage the Thermal Printing Head. Be
careful not to be hurt by the projections of the printer.
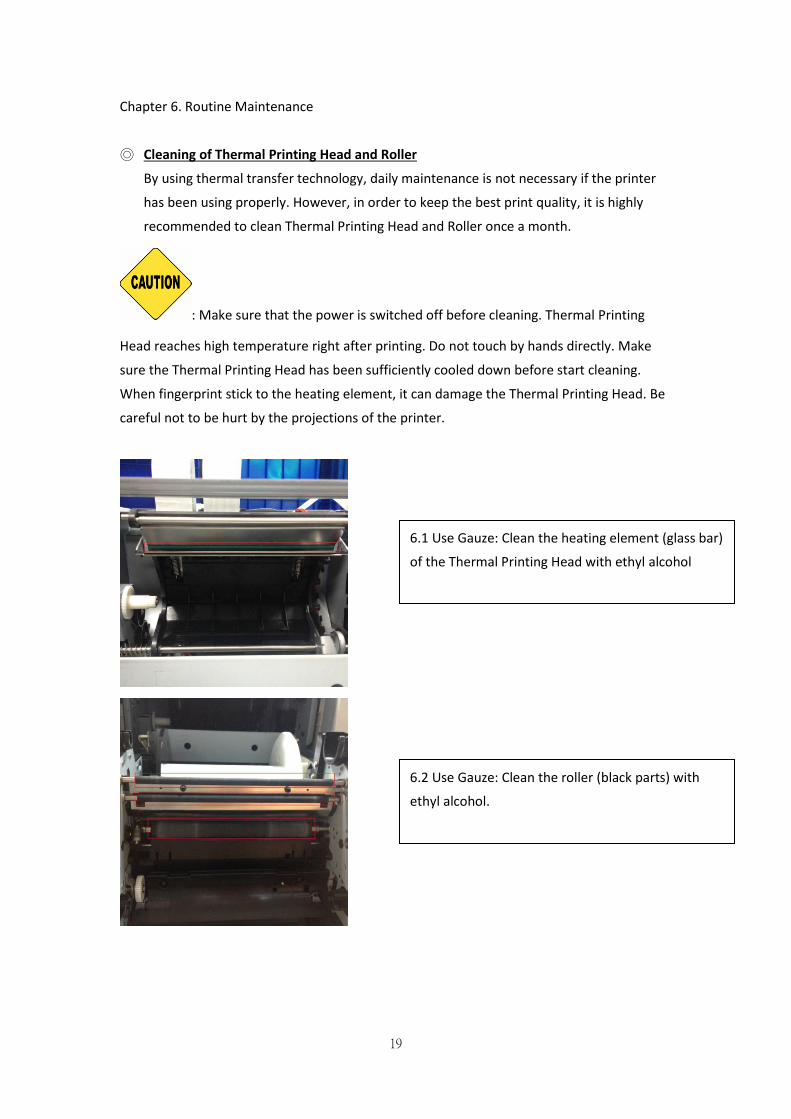
6.1 Use Gauze: Clean the heating element (glass bar)
of the Thermal Printing Head with ethyl alcohol
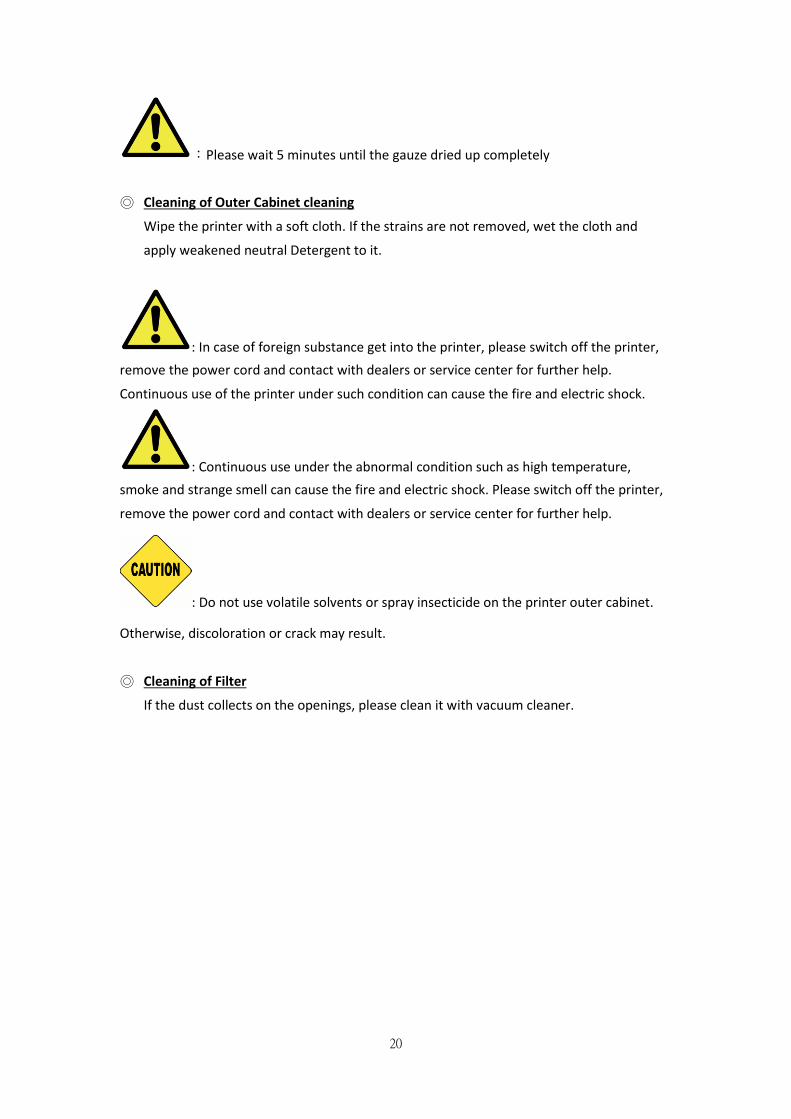
6.2 Use Gauze: Clean the roller (black parts) with
ethyl alcohol.
20
:Please wait 5 minutes until the gauze dried up completely
◎ Cleaning of Outer Cabinet cleaning
Wipe the printer with a soft cloth. If the strains are not removed, wet the cloth and
apply weakened neutral Detergent to it.
: In case of foreign substance get into the printer, please switch off the printer,
remove the power cord and contact with dealers or service center for further help.
Continuous use of the printer under such condition can cause the fire and electric shock.
: Continuous use under the abnormal condition such as high temperature,
smoke and strange smell can cause the fire and electric shock. Please switch off the printer,
remove the power cord and contact with dealers or service center for further help.
: Do not use volatile solvents or spray insecticide on the printer outer cabinet.
Otherwise, discoloration or crack may result.
◎ Cleaning of Filter
If the dust collects on the openings, please clean it with vacuum cleaner.
21
Chapter 7. Error Message Handling
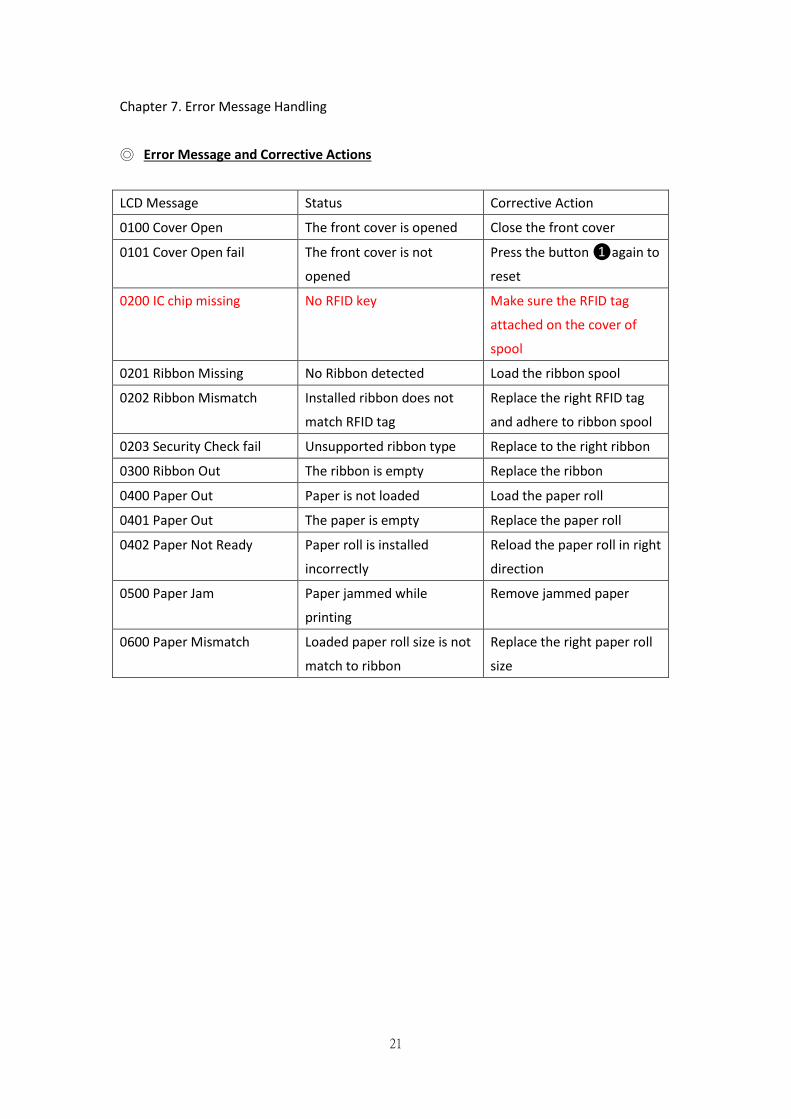
◎ Error Message and Corrective Actions
LCD Message Status Corrective Action
0100 Cover Open The front cover is opened Close the front cover
0101 Cover Open fail The front cover is not
opened
Press the button ❶again to
reset
0200 IC chip missing No RFID key Make sure the RFID tag
attached on the cover of
spool
0201 Ribbon Missing No Ribbon detected Load the ribbon spool
0202 Ribbon Mismatch Installed ribbon does not
match RFID tag
Replace the right RFID tag
and adhere to ribbon spool
0203 Security Check fail Unsupported ribbon type Replace to the right ribbon
0300 Ribbon Out The ribbon is empty Replace the ribbon
0400 Paper Out Paper is not loaded Load the paper roll
0401 Paper Out The paper is empty Replace the paper roll
0402 Paper Not Ready Paper roll is installed
incorrectly
Reload the paper roll in right
direction
0500 Paper Jam Paper jammed while
printing
Remove jammed paper
0600 Paper Mismatch Loaded paper roll size is not
match to ribbon
Replace the right paper roll
size

22
◎ Failure Symptoms
When detecting a failure symptom, check the printer regarding the following table.
Symptom Action
Power is not switch on ● Please check if the power cable is firmly
connected
The personal computer does not
recognize the printer
Check if the USB cable is connected to the personal
computer or printer
The printer does not ready ● Check if the front cover is properly closed
● Check if paper is jammed in the printer
● When the paper setting lamp goes off, insert the
edge of the paper until the paper setting lamp us lit
The front cover does not open ● Check if the printer is installed in a flat surface
● Please check if there is hindrance for opening the
front door
A straight stripe area is not printed ● The Thermal Printing Head may be dirty, clean it
up as Chapter 6. “Routine Maintenance” instructs
● If the blank area remains after cleaning Thermal
Printing Head, it may be caused by loosing of
Thermal Printing Head. Please consult HiTi dealers
or service center
Dotted areas are not printed ● The roller may be dirty. Clean the roller as
Chapter 6. “Routine Maintenance” instructs
23
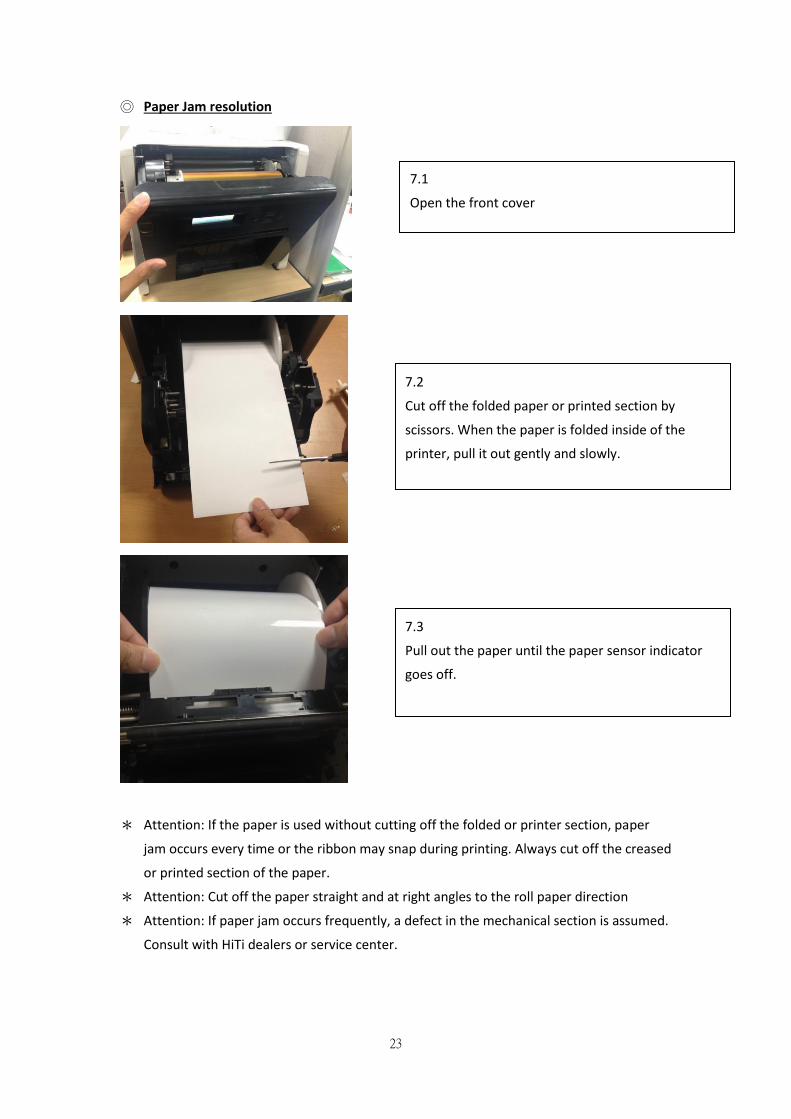
◎ Paper Jam resolution
* Attention: If the paper is used without cutting off the folded or printer section, paper
jam occurs every time or the ribbon may snap during printing. Always cut off the creased
or printed section of the paper.
* Attention: Cut off the paper straight and at right angles to the roll paper direction
* Attention: If paper jam occurs frequently, a defect in the mechanical section is assumed.
Consult with HiTi dealers or service center.
7.2
Cut off the folded paper or printed section by
scissors. When the paper is folded inside of the
printer, pull it out gently and slowly.
7.1
Open the front cover
7.3
Pull out the paper until the paper sensor indicator
goes off.
24
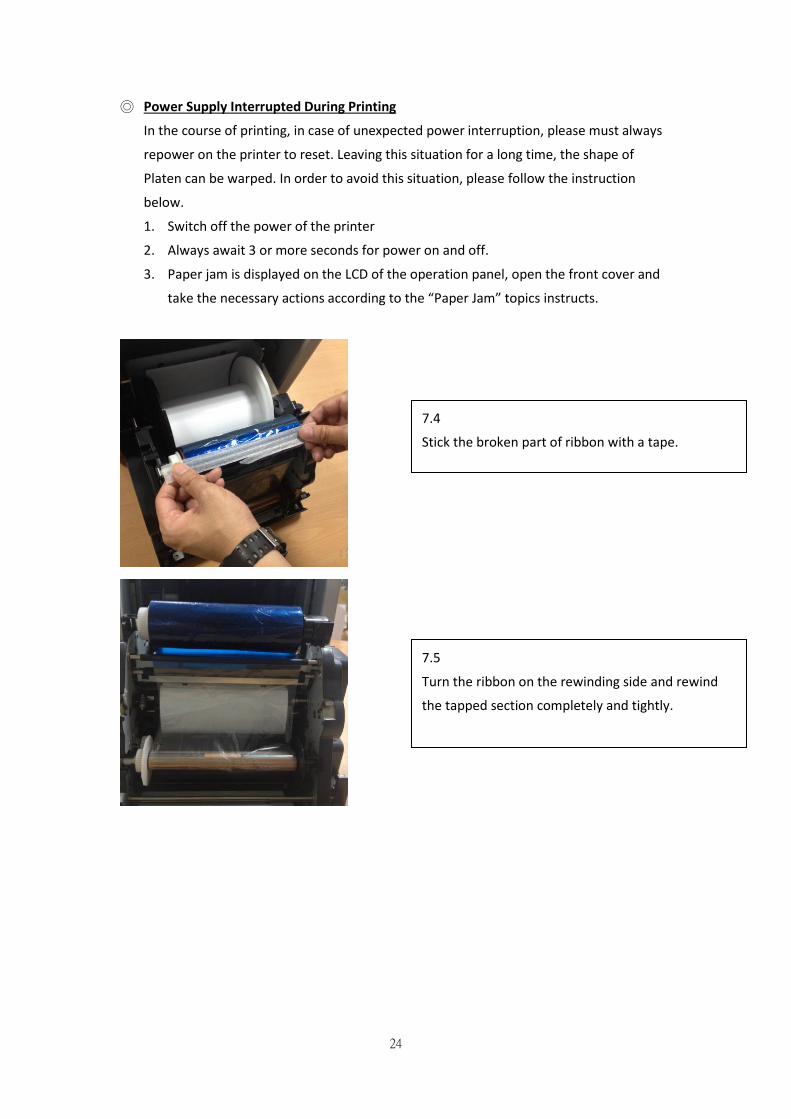
◎ Power Supply Interrupted During Printing
In the course of printing, in case of unexpected power interruption, please must always
repower on the printer to reset. Leaving this situation for a long time, the shape of
Platen can be warped. In order to avoid this situation, please follow the instruction
below.
1. Switch off the power of the printer
2. Always await 3 or more seconds for power on and off.
3. Paper jam is displayed on the LCD of the operation panel, open the front cover and
take the necessary actions according to the “Paper Jam” topics instructs.
7.4
Stick the broken part of ribbon with a tape.
7.5
Turn the ribbon on the rewinding side and rewind
the tapped section completely and tightly.
25
Chapter 8. Specification
◎ Specification
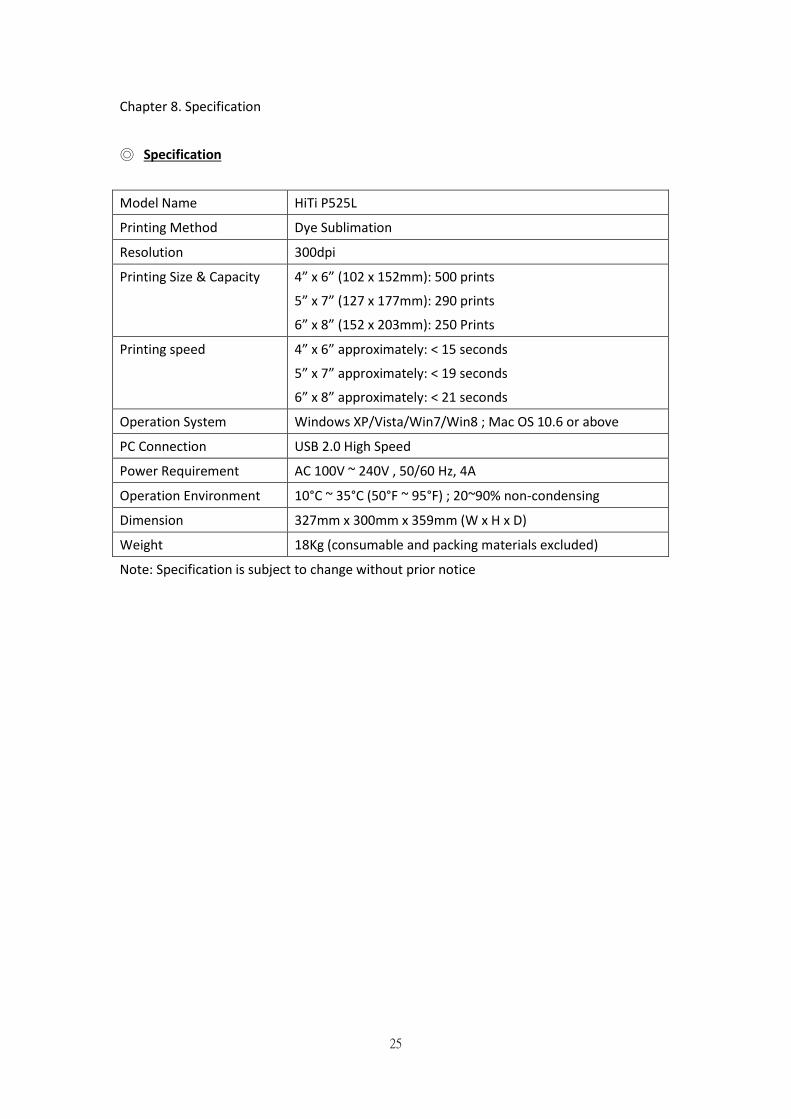
Model Name HiTi P525L
Printing Method Dye Sublimation
Resolution 300dpi
Printing Size & Capacity 4” x 6” (102 x 152mm): 500 prints
5” x 7” (127 x 177mm): 290 prints
6” x 8” (152 x 203mm): 250 Prints
Printing speed 4” x 6” approximately: < 15 seconds
5” x 7” approximately: < 19 seconds
6” x 8” approximately: < 21 seconds
Operation System Windows XP/Vista/Win7/Win8 ; Mac OS 10.6 or above
PC Connection USB 2.0 High Speed
Power Requirement AC 100V ~ 240V , 50/60 Hz, 4A
Operation Environment 10°C ~ 35°C (50°F ~ 95°F) ; 20~90% non-condensing
Dimension 327mm x 300mm x 359mm (W x H x D)
Weight 18Kg (consumable and packing materials excluded)
Note: Specification is subject to change without prior notice