Embed Size (px)
Citation preview

© 2012 HeartWare, Inc.
HeartWare® Ventricular Assist System System Overview Hands-on Practicum
GR00307 Rev01 11/12 Module 7/10 CAUTION: Federal Law (USA) restricts this device to sale by or on the order of a physician. Refer to the “Instructions For Use” for
complete Indications for Use, Contraindications, Warnings, Precautions, Adverse Events and Instructions prior to using this device.
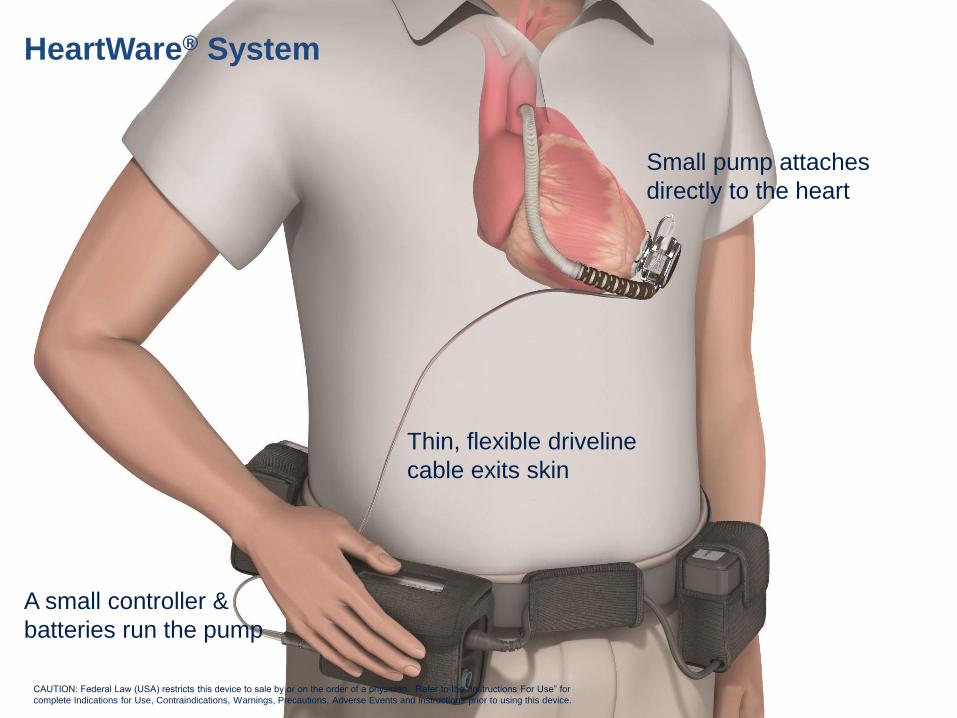
HeartWare® System
Small pump attaches
directly to the heart
Thin, flexible driveline
cable exits skin
A small controller &
batteries run the pump
CAUTION: Federal Law (USA) restricts this device to sale by or on the order of a physician. Refer to the “Instructions For Use” for
complete Indications for Use, Contraindications, Warnings, Precautions, Adverse Events and Instructions prior to using this device.
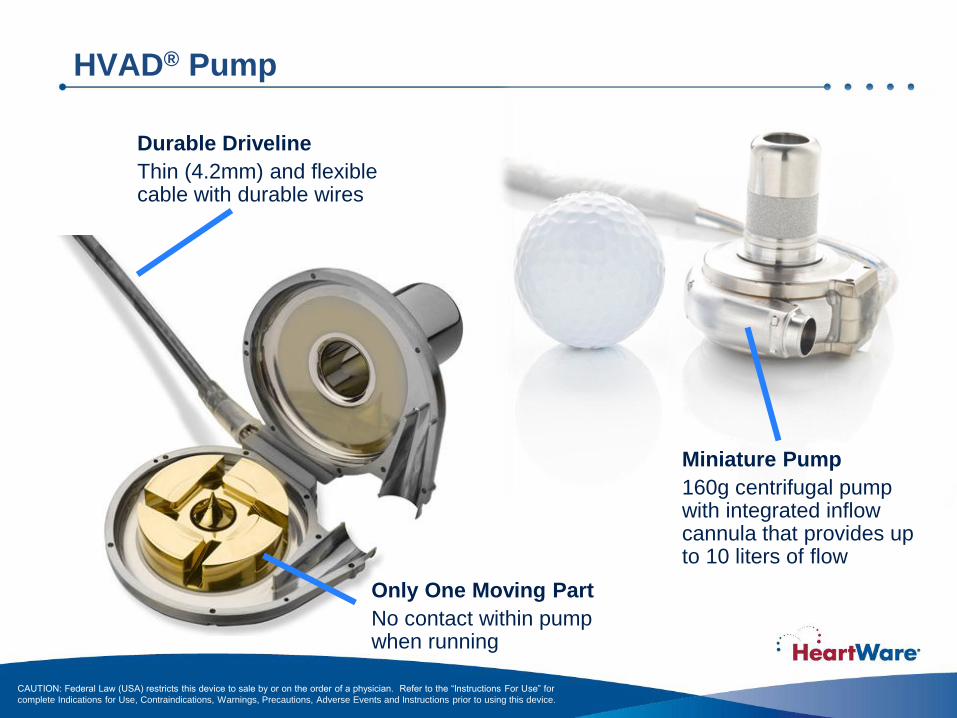
Only One Moving Part
No contact within pump when running
Durable Driveline
Thin (4.2mm) and flexible cable with durable wires
HVAD® Pump
Miniature Pump
160g centrifugal pump with integrated inflow cannula that provides up to 10 liters of flow
CAUTION: Federal Law (USA) restricts this device to sale by or on the order of a physician. Refer to the “Instructions For Use” for
complete Indications for Use, Contraindications, Warnings, Precautions, Adverse Events and Instructions prior to using this device.

Pericardial Placement
CAUTION: Federal Law (USA) restricts this device to sale by or on the order of a physician. Refer to the “Instructions For Use” for
complete Indications for Use, Contraindications, Warnings, Precautions, Adverse Events and Instructions prior to using this device.

HeartWare Patient Peripheral Components
HeartWare® Controller: Controls and manages
VAD operation
HeartWare® Power Sources: Power the
controller and pump
– Batteries
– AC adapter (plugs into wall outlet)
– DC adapter (plugs into car outlet)
Patient Pack: Holds a controller & 2 batteries;
may be worn around waist or over the shoulder
HeartWare® Shower Bag: Holds a controller &
2 batteries while showering
HeartWare® Battery Charger: Can
simultaneously charge up to 4 batteries
CAUTION: Federal Law (USA) restricts this device to sale by or on the order of a physician. Refer to the “Instructions For Use” for
complete Indications for Use, Contraindications, Warnings, Precautions, Adverse Events and Instructions prior to using this device.

HeartWare® Controller
Pump driveline is attached to
silver driveline connector and
must not be disconnected
Blue data connector is used by
clinicians to adjust pump parameters
and download pump information
Data Connection
Power
Connection
Power
Connection
Driveline Connection
The controller sends power and operating signals to the HVAD® Pump via a
percutaneous driveline. It also collects data on system operation.
Controller Display
2 identical power supply
connectors - controller requires
two power sources at all times Provides information on pump
parameters (flow, speed, power),
power sources and alarms
CAUTION: Federal Law (USA) restricts this device to sale by or on the order of a physician. Refer to the “Instructions For Use” for
complete Indications for Use, Contraindications, Warnings, Precautions, Adverse Events and Instructions prior to using this device.

HeartWare® Controller Display Overview
Scroll Button
Alarm Mute
Button
AC/DC Indicator
Battery Indicator 1
Alarm Indicator
Battery Indicator 2
Controller Display
Power Source 2 Power Source 1
CAUTION: Federal Law (USA) restricts this device to sale by or on the order of a physician. Refer to the “Instructions For Use” for
complete Indications for Use, Contraindications, Warnings, Precautions, Adverse Events and Instructions prior to using this device.
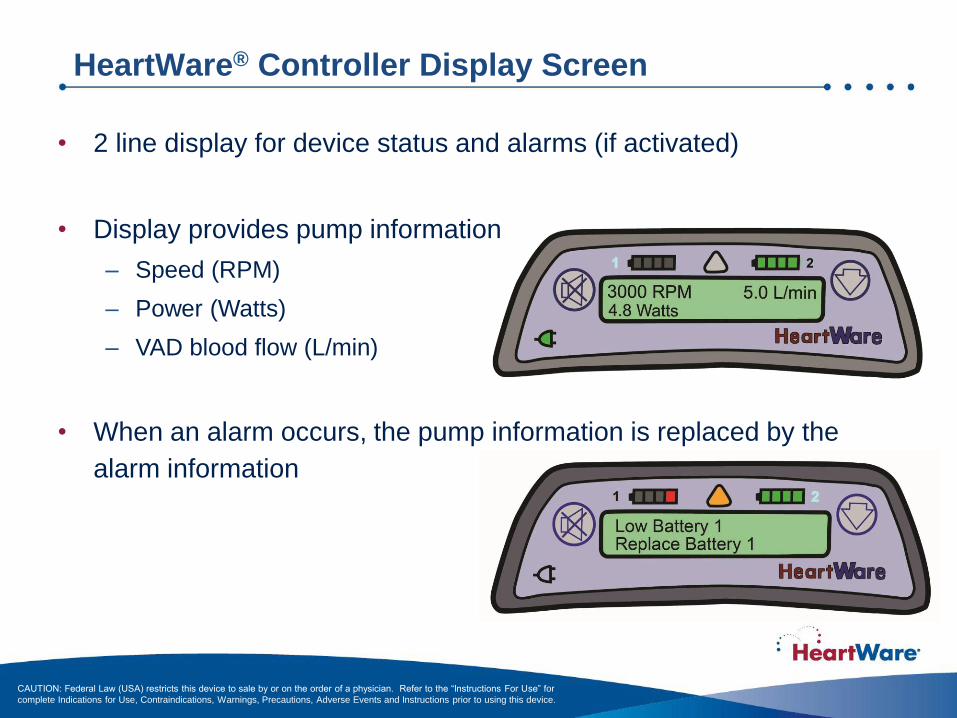
• 2 line display for device status and alarms (if activated)
• Display provides pump information
– Speed (RPM)
– Power (Watts)
– VAD blood flow (L/min)
• When an alarm occurs, the pump information is replaced by the
alarm information
HeartWare® Controller Display Screen
CAUTION: Federal Law (USA) restricts this device to sale by or on the order of a physician. Refer to the “Instructions For Use” for
complete Indications for Use, Contraindications, Warnings, Precautions, Adverse Events and Instructions prior to using this device.
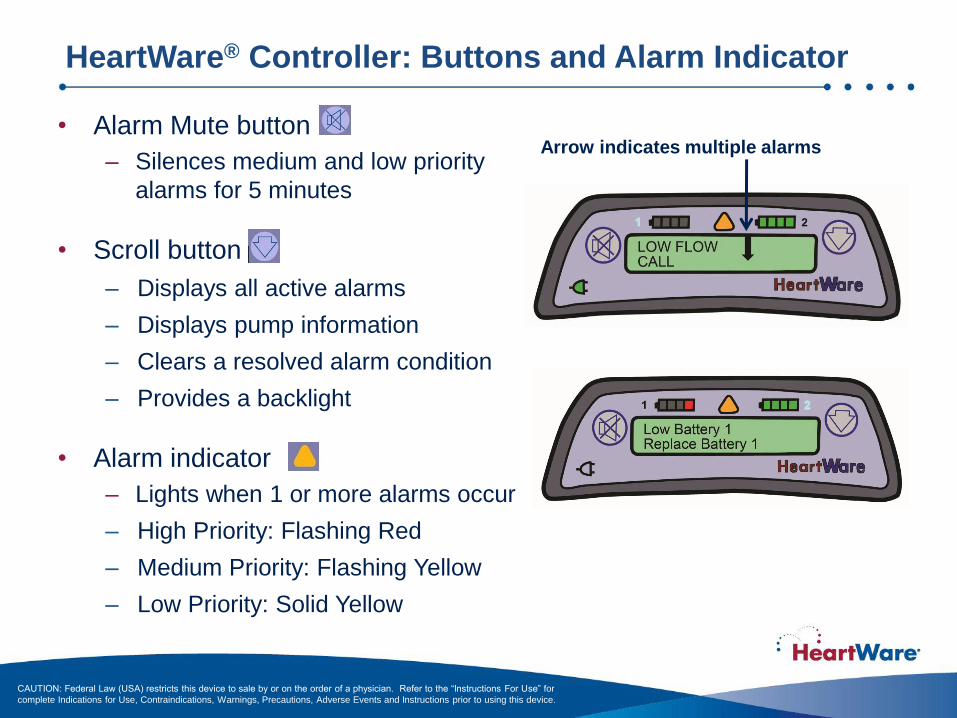
• Alarm Mute button
– Silences medium and low priority
alarms for 5 minutes
• Scroll button
– Displays all active alarms
– Displays pump information
– Clears a resolved alarm condition
– Provides a backlight
• Alarm indicator
– Lights when 1 or more alarms occur
– High Priority: Flashing Red
– Medium Priority: Flashing Yellow
– Low Priority: Solid Yellow
Arrow indicates multiple alarms
HeartWare® Controller: Buttons and Alarm Indicator
CAUTION: Federal Law (USA) restricts this device to sale by or on the order of a physician. Refer to the “Instructions For Use” for
complete Indications for Use, Contraindications, Warnings, Precautions, Adverse Events and Instructions prior to using this device.
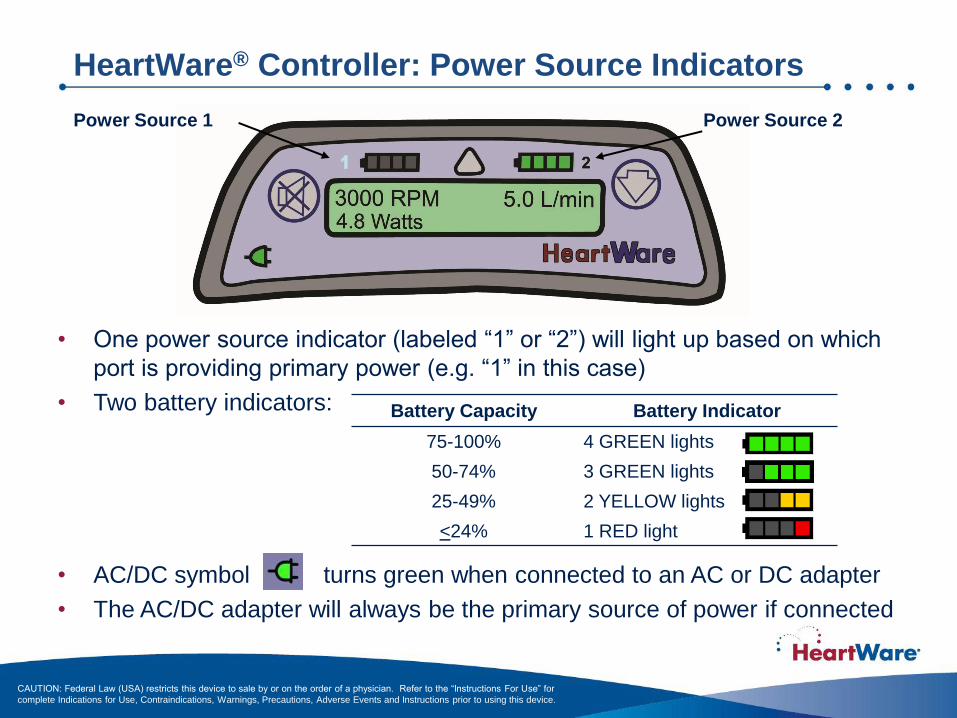
• One power source indicator (labeled “1” or “2”) will light up based on which
port is providing primary power (e.g. “1” in this case)
• Two battery indicators:
• AC/DC symbol turns green when connected to an AC or DC adapter
• The AC/DC adapter will always be the primary source of power if connected
Battery Capacity Battery Indicator
75-100% 4 GREEN lights
50-74% 3 GREEN lights
25-49% 2 YELLOW lights
<24% 1 RED light
Power Source 1 Power Source 2
HeartWare® Controller: Power Source Indicators
CAUTION: Federal Law (USA) restricts this device to sale by or on the order of a physician. Refer to the “Instructions For Use” for
complete Indications for Use, Contraindications, Warnings, Precautions, Adverse Events and Instructions prior to using this device.

Connecting the Driveline (Pump) to the HeartWare®
Controller
• Align the two red marks and push
together on the silver driveline connector
• An audible click will be heard confirming
proper connection
• Completely cover the controller’s silver
driveline connector with the driveline
cover
CAUTION: Federal Law (USA) restricts this device to sale by or on the order of a physician. Refer to the “Instructions For Use” for
complete Indications for Use, Contraindications, Warnings, Precautions, Adverse Events and Instructions prior to using this device.
To Connect Driveline (Pump) to Controller:

Disconnecting the Driveline (Pump) from the
Controller
• Grasp the driveline connector on the
ridged section
• Pull the driveline connector
straight out from the controller
• Do not disconnect by twisting or by
pulling the driveline, this can damage
the driveline
Grasp here
To Disconnect Driveline (Pump) From Controller:
CAUTION: Federal Law (USA) restricts this device to sale by or on the order of a physician. Refer to the “Instructions For Use” for
complete Indications for Use, Contraindications, Warnings, Precautions, Adverse Events and Instructions prior to using this device.

Connecting Power to the HeartWare® Controller
• Grasp the cable of the power source at the
back end of the connector (leaving front
end of connector free to rotate)
• Line up the solid white arrow on the
connector with the white dot on the controller
• Gently push (but DO NOT twist) the cable
into the controller until it naturally locks
into place; you should hear an audible click
• Confirm the cable is locked by gently pulling
the cable near the controller power connector
• DO NOT force the cable into the controller
connector without correct alignment as it may
result in damaged connectors
• Repeat above steps for second power source
All power sources (batteries, AC
adapter, DC adapter) use similar
connectors and plug into the same
controller power ports.
Grasp here
CAUTION: Federal Law (USA) restricts this device to sale by or on the order of a physician. Refer to the “Instructions For Use” for
complete Indications for Use, Contraindications, Warnings, Precautions, Adverse Events and Instructions prior to using this device.

Disconnecting Power from the HeartWare® Controller
• Turn the connector sleeve
ONLY counterclockwise until
it stops
• Then pull the connector
straight out from the controller
Connector sleeve
(turn in direction of
“release” arrow)
CAUTION: Federal Law (USA) restricts this device to sale by or on the order of a physician. Refer to the “Instructions For Use” for
complete Indications for Use, Contraindications, Warnings, Precautions, Adverse Events and Instructions prior to using this device.

HeartWare® Back-up Controller
• Keep a back-up controller and extra fully charged batteries
with the patient at all times in case of an emergency
• Verify that the back-up controller parameters match the
primary controller parameters (e.g., pump speed, viscosity,
alarm limit settings and suction detection)
• The back-up controller should be programmed:
– Before the implant procedure
– Upon any parameter change to the primary controller
– When the primary controller is replaced
CAUTION: Federal Law (USA) restricts this device to sale by or on the order of a physician. Refer to the “Instructions For Use” for
complete Indications for Use, Contraindications, Warnings, Precautions, Adverse Events and Instructions prior to using this device.

HeartWare® Controller Power Sources
HeartWare® Battery HeartWare® Controller AC Adapter
HeartWare® Controller DC Adapter
CAUTION: Federal Law (USA) restricts this device to sale by or on the order of a physician. Refer to the “Instructions For Use” for
complete Indications for Use, Contraindications, Warnings, Precautions, Adverse Events and Instructions prior to using this device.
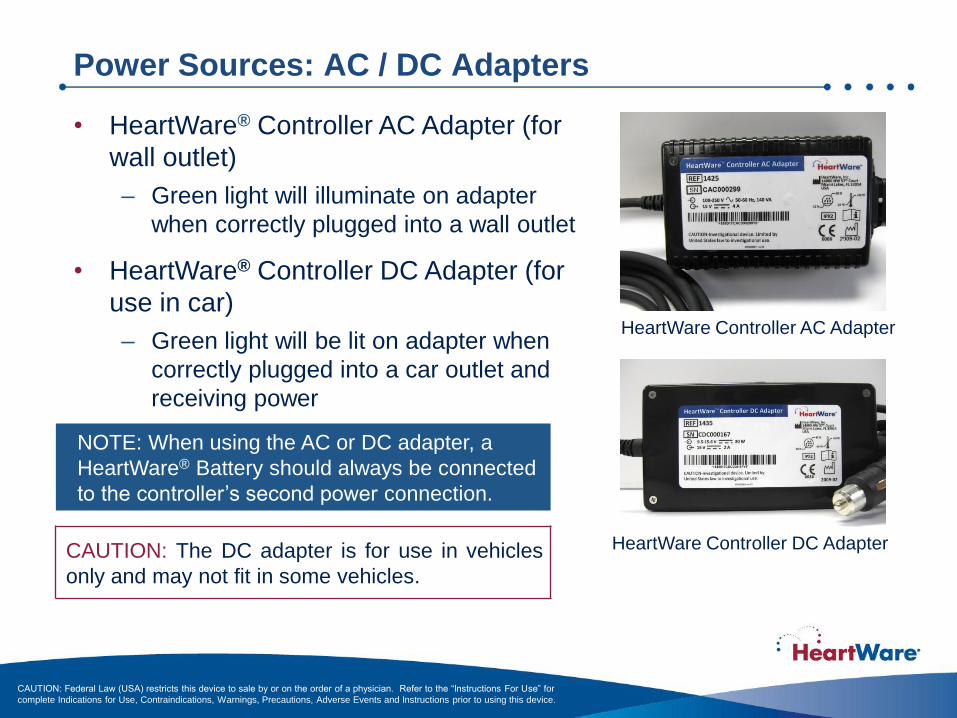
• HeartWare® Controller AC Adapter (for
wall outlet)
– Green light will illuminate on adapter
when correctly plugged into a wall outlet
• HeartWare® Controller DC Adapter (for
use in car)
– Green light will be lit on adapter when
correctly plugged into a car outlet and
receiving power
Power Sources: AC / DC Adapters
HeartWare Controller AC Adapter
HeartWare Controller DC Adapter
NOTE: When using the AC or DC adapter, a
HeartWare® Battery should always be connected
to the controller’s second power connection.
CAUTION: The DC adapter is for use in vehicles
only and may not fit in some vehicles.
CAUTION: Federal Law (USA) restricts this device to sale by or on the order of a physician. Refer to the “Instructions For Use” for
complete Indications for Use, Contraindications, Warnings, Precautions, Adverse Events and Instructions prior to using this device.

Power Sources: HeartWare® Batteries
The batteries are expected to have a useful
operating life of greater than 500 charge and
discharge cycles. If a battery provides only two
hours of support duration, it should be replaced.
• Contain lithium ion cells to
power the HVAD® Pump.
• Each battery provides 4 to 6
hours when fully charged.
• The capacity of each battery in
hours is based on:
• Controller and pump operating
power consumption
• Number of battery charge and
discharge cycles
CAUTION: Federal Law (USA) restricts this device to sale by or on the order of a physician. Refer to the “Instructions For Use” for
complete Indications for Use, Contraindications, Warnings, Precautions, Adverse Events and Instructions prior to using this device.
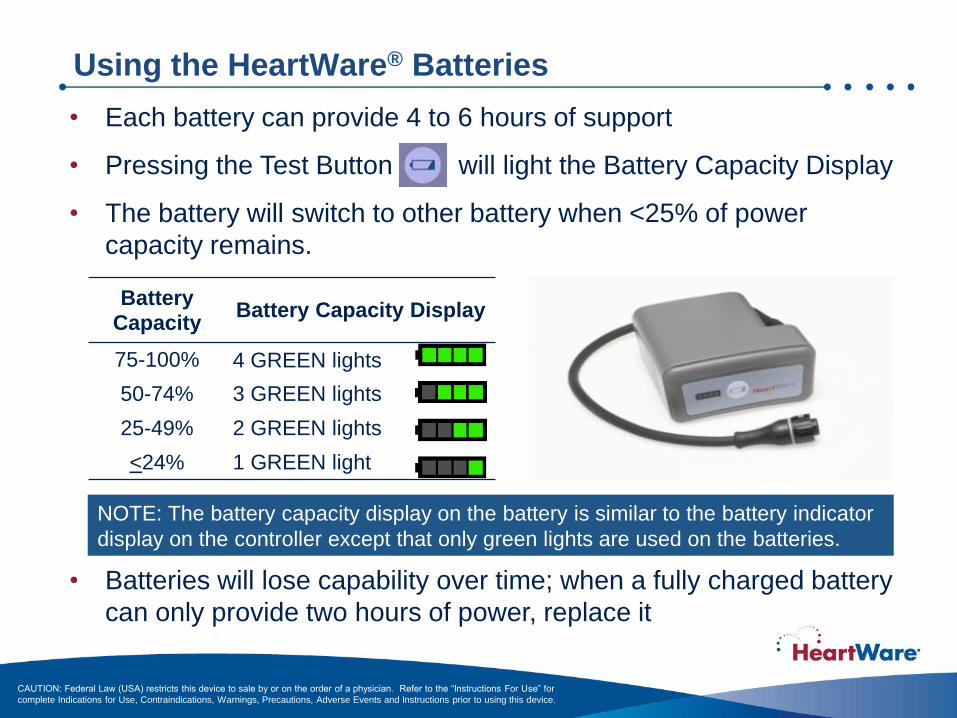
• Each battery can provide 4 to 6 hours of support
• Pressing the Test Button will light the Battery Capacity Display
• The battery will switch to other battery when <25% of power
capacity remains.
• Batteries will lose capability over time; when a fully charged battery
can only provide two hours of power, replace it
Using the HeartWare® Batteries
NOTE: The battery capacity display on the battery is similar to the battery indicator
display on the controller except that only green lights are used on the batteries.
Battery
Capacity Battery Capacity Display
75-100% 4 GREEN lights
50-74% 3 GREEN lights
25-49% 2 GREEN lights
<24% 1 GREEN light
CAUTION: Federal Law (USA) restricts this device to sale by or on the order of a physician. Refer to the “Instructions For Use” for
complete Indications for Use, Contraindications, Warnings, Precautions, Adverse Events and Instructions prior to using this device.
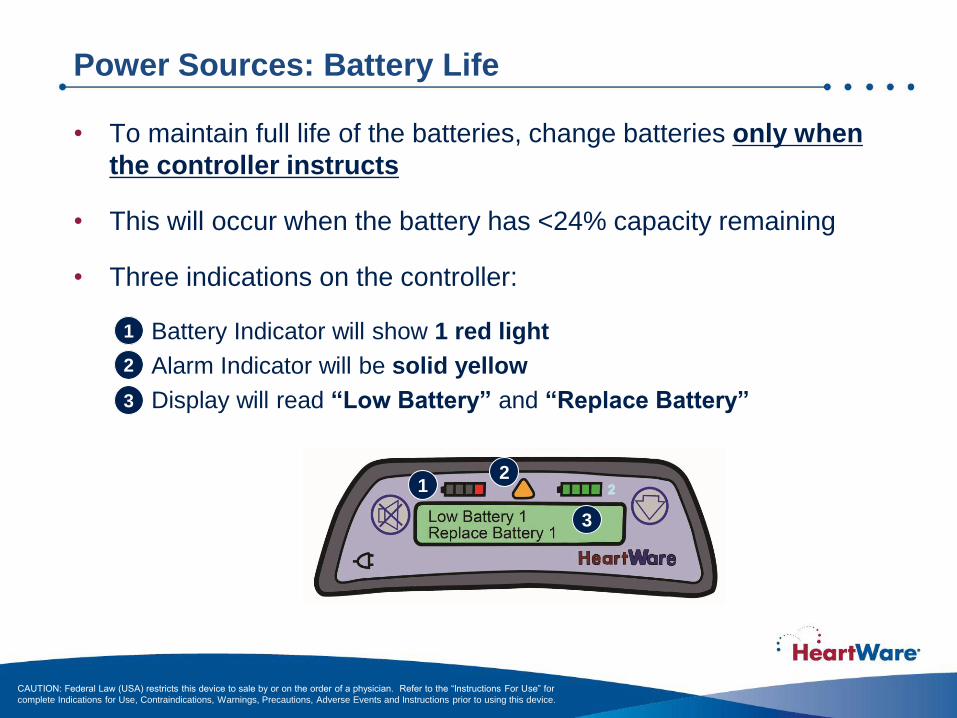
• To maintain full life of the batteries, change batteries only when
the controller instructs
• This will occur when the battery has <24% capacity remaining
• Three indications on the controller:
– Battery Indicator will show 1 red light
– Alarm Indicator will be solid yellow
– Display will read “Low Battery” and “Replace Battery”
Power Sources: Battery Life
CAUTION: Federal Law (USA) restricts this device to sale by or on the order of a physician. Refer to the “Instructions For Use” for
complete Indications for Use, Contraindications, Warnings, Precautions, Adverse Events and Instructions prior to using this device.
1
3
2
1
3
2

HeartWare® Battery Charger
• Charges up to 4 batteries at a time
• Takes up to 5 hours to fully charge
a depleted battery
• Connect and disconnect charger/
battery with same action as
controller/battery
• Powered by AC outlet (wall) only
• Charger should remain plugged in
• Batteries not in use should be
connected and stored in the
charger
CAUTION: Federal Law (USA) restricts this device to sale by or on the order of a physician. Refer to the “Instructions For Use” for
complete Indications for Use, Contraindications, Warnings, Precautions, Adverse Events and Instructions prior to using this device.

• Battery Charger Power Light: When Green, unit
is plugged into wall outlet and is ready for use
• “Ready” Light: When Green, battery is fully
charged and ready for use
• “Status” Light: Light means different things
depending upon color (see table below)
HeartWare® Battery Charger Indicators
STATUS Light
READY Light Battery Charger
Power Light
Color of Light Battery State
Yellow Battery being charged; NOT ready for use.
Flashing Yellow Battery not charging. Check battery connections. If connections intact, switch to another battery slot. If problem persists, return battery to HeartWare.
Red Battery too cold or too hot; waiting to charge.
Flashing Red Defective battery. DO NOT use. Mark battery and return to HeartWare.
CAUTION: Federal Law (USA) restricts this device to sale by or on the order of a physician. Refer to the “Instructions For Use” for
complete Indications for Use, Contraindications, Warnings, Precautions, Adverse Events and Instructions prior to using this device.

Patient Pack (Carry Bag)
• Patient Pack holds the HeartWare® Controller and 2 HeartWare®
Batteries
• Instructions on proper packing, use, and care can be found in the
Patient Manual
CAUTION: Federal Law (USA) restricts this device to sale by or on the order of a physician. Refer to the “Instructions For Use” for
complete Indications for Use, Contraindications, Warnings, Precautions, Adverse Events and Instructions prior to using this device.

Additional Patient Pack Options
HeartWare® Shoulder Pack HeartWare® Waist Pack
Instructions on proper packing, use and care can be found in the Patient Manual
NOTE: These additional options are for clinical trial patients only
CAUTION: Federal Law (USA) restricts this device to sale by or on the order of a physician. Refer to the “Instructions For Use” for
complete Indications for Use, Contraindications, Warnings, Precautions, Adverse Events and Instructions prior to using this device.
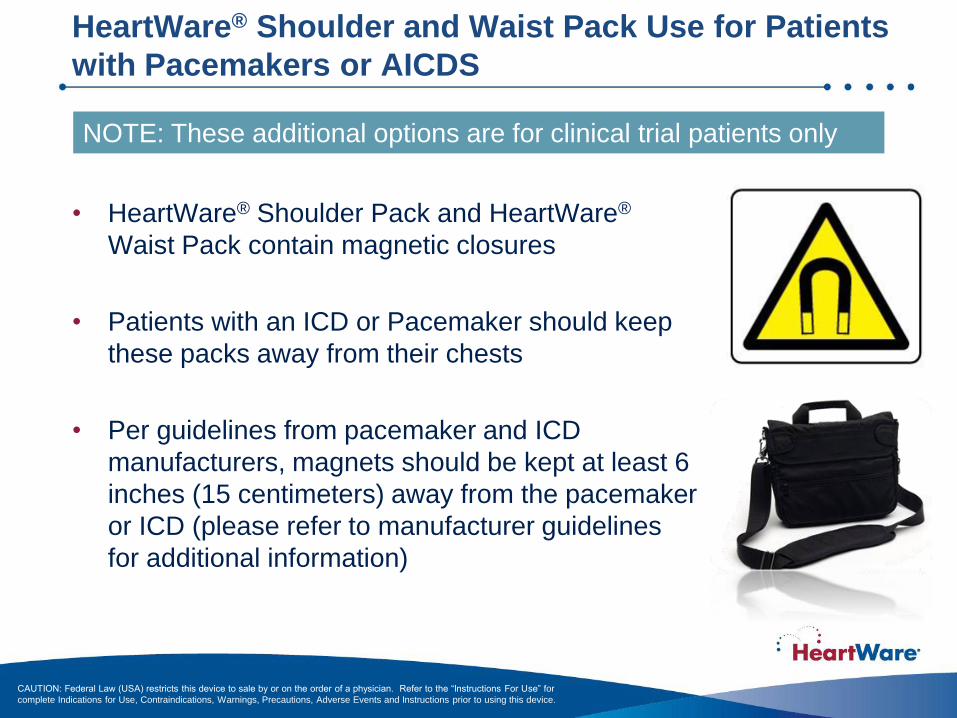
HeartWare® Shoulder and Waist Pack Use for Patients
with Pacemakers or AICDS
• HeartWare® Shoulder Pack and HeartWare®
Waist Pack contain magnetic closures
• Patients with an ICD or Pacemaker should keep
these packs away from their chests
• Per guidelines from pacemaker and ICD
manufacturers, magnets should be kept at least 6
inches (15 centimeters) away from the pacemaker
or ICD (please refer to manufacturer guidelines
for additional information)
NOTE: These additional options are for clinical trial patients only
CAUTION: Federal Law (USA) restricts this device to sale by or on the order of a physician. Refer to the “Instructions For Use” for
complete Indications for Use, Contraindications, Warnings, Precautions, Adverse Events and Instructions prior to using this device.

HeartWare® Shower Bag
• Allows patients to shower with the HeartWare® Ventricular Assist System
• Water resistant (not water proof) - protects the controller and batteries from
direct water spray and moisture
• Instructions on proper packing, use and care can be found in the Patient
Manual
CAUTION: Federal Law (USA) restricts this device to sale by or on the order of a physician. Refer to the “Instructions For Use” for
complete Indications for Use, Contraindications, Warnings, Precautions, Adverse Events and Instructions prior to using this device.
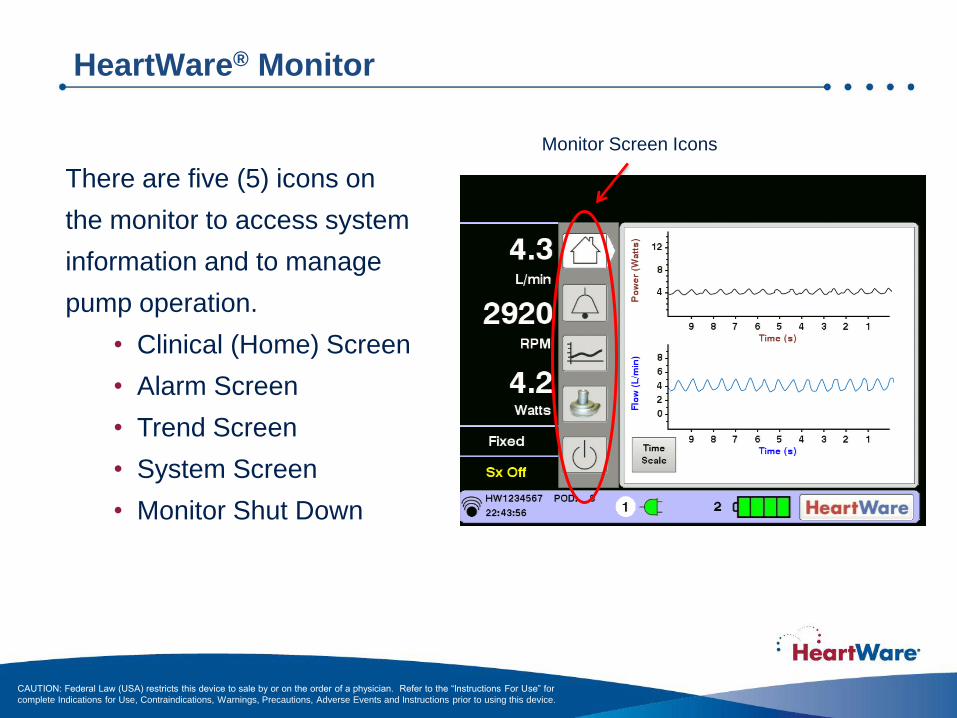
HeartWare® Monitor
There are five (5) icons on
the monitor to access system
information and to manage
pump operation.
• Clinical (Home) Screen
• Alarm Screen
• Trend Screen
• System Screen
• Monitor Shut Down
Monitor Screen Icons
CAUTION: Federal Law (USA) restricts this device to sale by or on the order of a physician. Refer to the “Instructions For Use” for
complete Indications for Use, Contraindications, Warnings, Precautions, Adverse Events and Instructions prior to using this device.
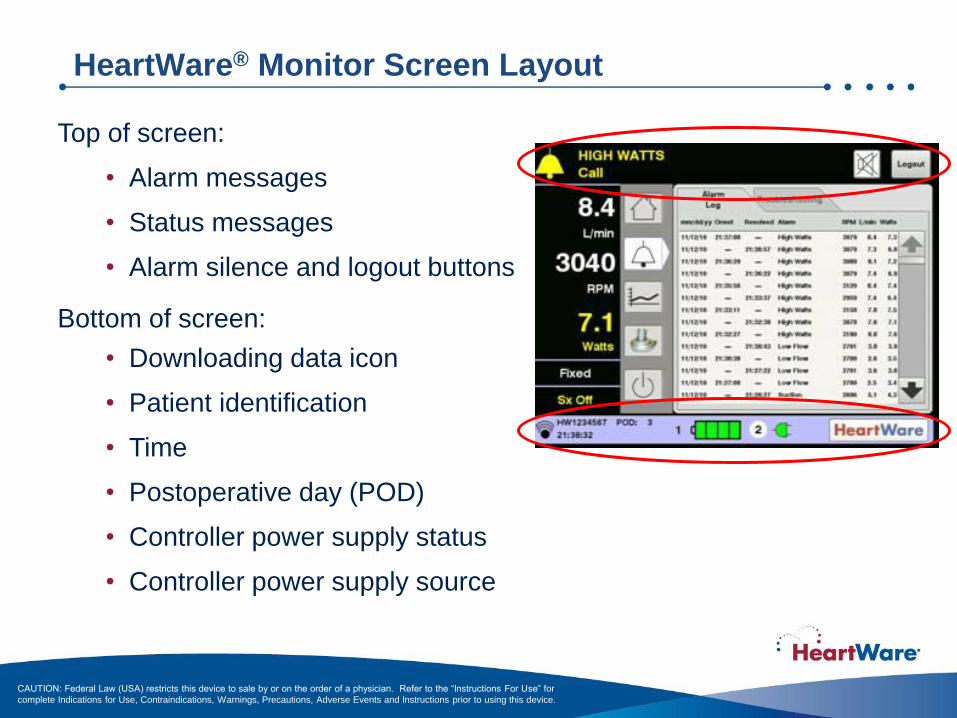
Bottom of screen:
• Downloading data icon
• Patient identification
• Time
• Postoperative day (POD)
• Controller power supply status
• Controller power supply source
Top of screen:
• Alarm messages
• Status messages
• Alarm silence and logout buttons
HeartWare® Monitor Screen Layout
CAUTION: Federal Law (USA) restricts this device to sale by or on the order of a physician. Refer to the “Instructions For Use” for
complete Indications for Use, Contraindications, Warnings, Precautions, Adverse Events and Instructions prior to using this device.

Clinical (Home) Screen
• Provides ongoing monitoring
information when pump
adjustment or access to other
screens is not required
• Displays:
Real-time power (Watts)
waveform
Real-time estimated
HVAD® Pump blood flow
(L/min) waveform
CAUTION: Federal Law (USA) restricts this device to sale by or on the order of a physician. Refer to the “Instructions For Use” for
complete Indications for Use, Contraindications, Warnings, Precautions, Adverse Events and Instructions prior to using this device.

The Alarm Screen has two tabs: [Alarm Log] and [Troubleshooting]
Alarm Log Troubleshooting
Alarm Screen
CAUTION: Federal Law (USA) restricts this device to sale by or on the order of a physician. Refer to the “Instructions For Use” for
complete Indications for Use, Contraindications, Warnings, Precautions, Adverse Events and Instructions prior to using this device.
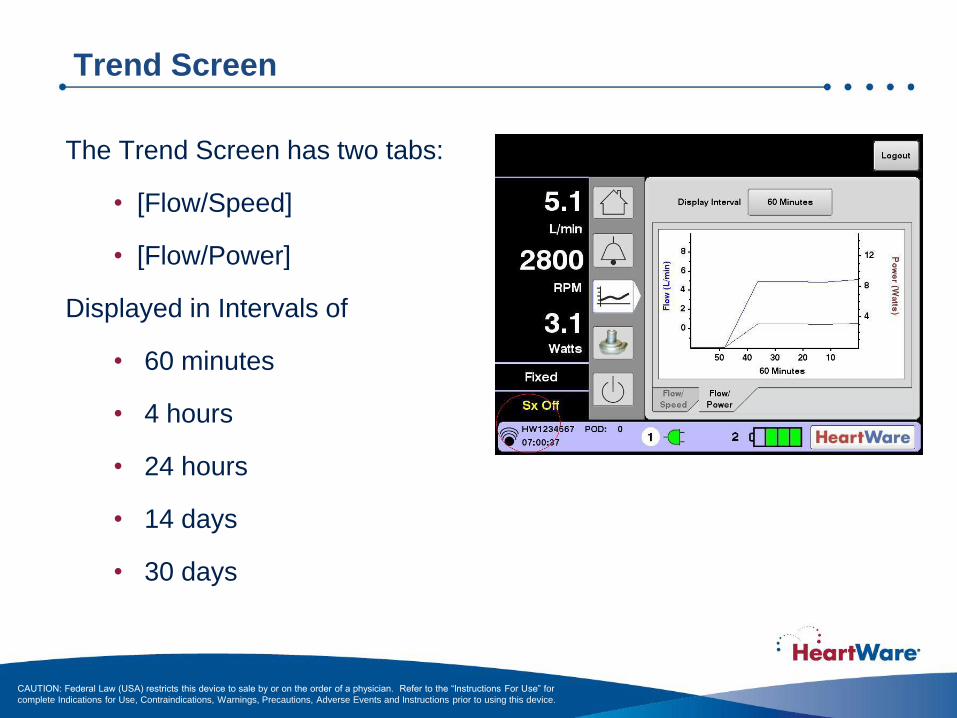
Trend Screen
The Trend Screen has two tabs:
• [Flow/Speed]
• [Flow/Power]
Displayed in Intervals of
• 60 minutes
• 4 hours
• 24 hours
• 14 days
• 30 days
CAUTION: Federal Law (USA) restricts this device to sale by or on the order of a physician. Refer to the “Instructions For Use” for
complete Indications for Use, Contraindications, Warnings, Precautions, Adverse Events and Instructions prior to using this device.
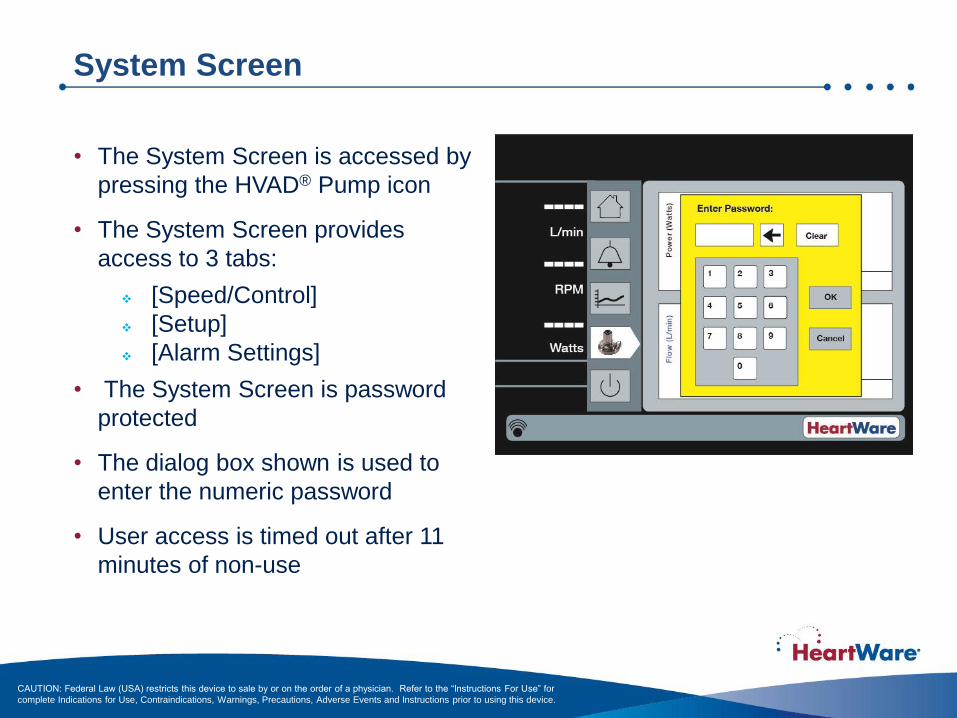
• The System Screen is accessed by
pressing the HVAD® Pump icon
• The System Screen provides
access to 3 tabs:
[Speed/Control]
[Setup]
[Alarm Settings]
• The System Screen is password
protected
• The dialog box shown is used to
enter the numeric password
• User access is timed out after 11
minutes of non-use
System Screen
CAUTION: Federal Law (USA) restricts this device to sale by or on the order of a physician. Refer to the “Instructions For Use” for
complete Indications for Use, Contraindications, Warnings, Precautions, Adverse Events and Instructions prior to using this device.
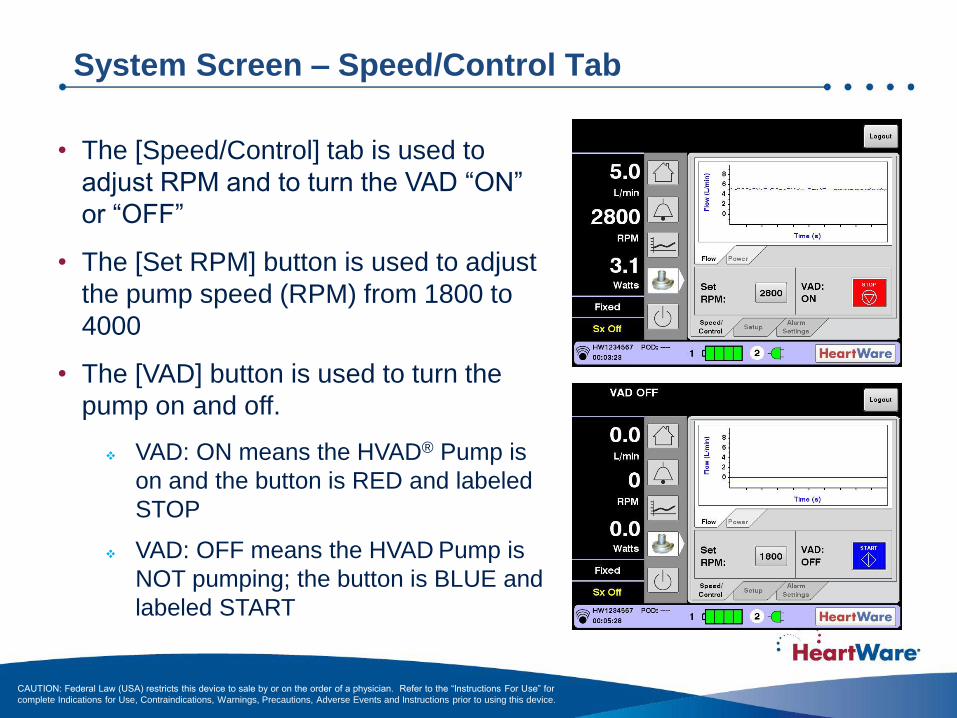
• The [Speed/Control] tab is used to
adjust RPM and to turn the VAD “ON”
or “OFF”
• The [Set RPM] button is used to adjust
the pump speed (RPM) from 1800 to
4000
• The [VAD] button is used to turn the
pump on and off.
VAD: ON means the HVAD® Pump is
on and the button is RED and labeled
STOP
VAD: OFF means the HVAD Pump is
NOT pumping; the button is BLUE and
labeled START
System Screen – Speed/Control Tab
CAUTION: Federal Law (USA) restricts this device to sale by or on the order of a physician. Refer to the “Instructions For Use” for
complete Indications for Use, Contraindications, Warnings, Precautions, Adverse Events and Instructions prior to using this device.

System Screen – Setup Tab
When the [Setup] tab is
pressed, four tabs are
displayed at the top:
• [Patient]
• [VAD]
• [Controller]
• [Monitor]
CAUTION: Federal Law (USA) restricts this device to sale by or on the order of a physician. Refer to the “Instructions For Use” for
complete Indications for Use, Contraindications, Warnings, Precautions, Adverse Events and Instructions prior to using this device.
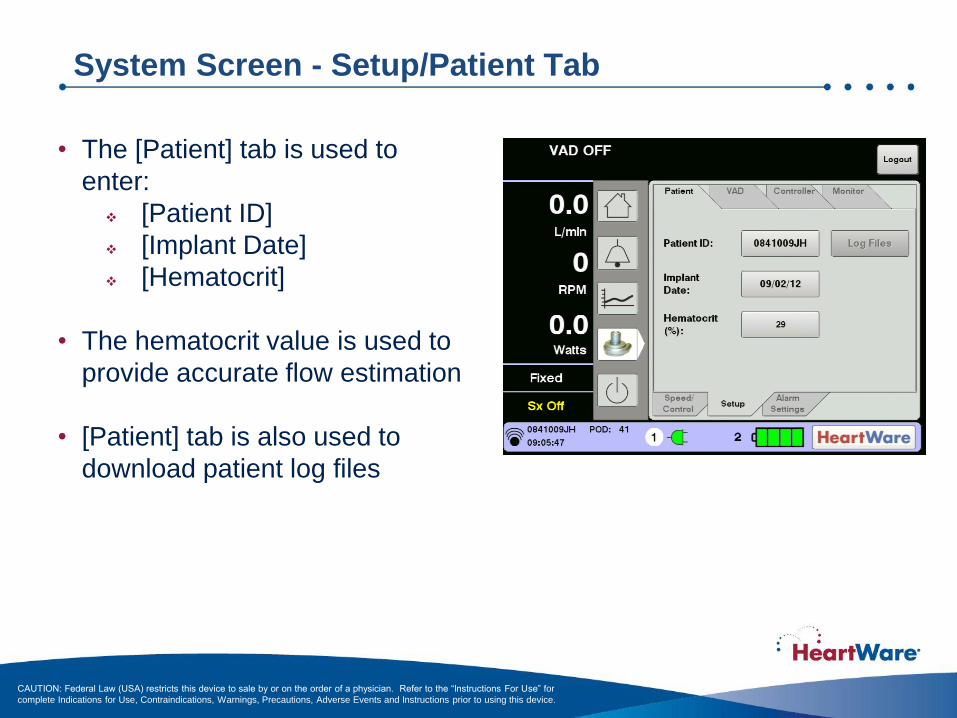
System Screen - Setup/Patient Tab
• The [Patient] tab is used to
enter:
[Patient ID]
[Implant Date]
[Hematocrit]
• The hematocrit value is used to
provide accurate flow estimation
• [Patient] tab is also used to
download patient log files
CAUTION: Federal Law (USA) restricts this device to sale by or on the order of a physician. Refer to the “Instructions For Use” for
complete Indications for Use, Contraindications, Warnings, Precautions, Adverse Events and Instructions prior to using this device.
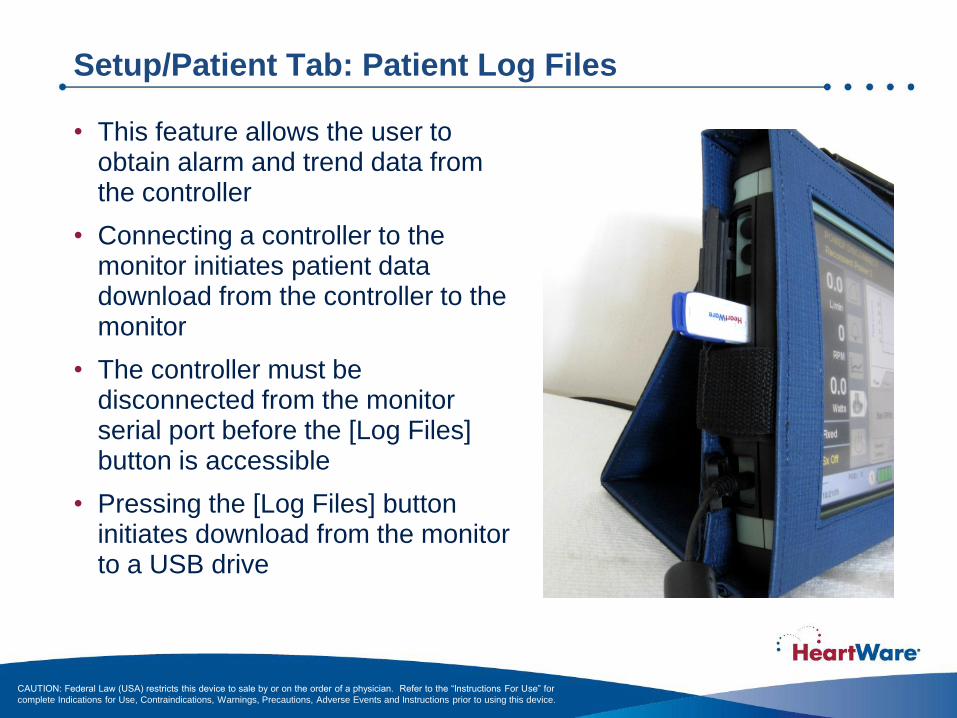
Setup/Patient Tab: Patient Log Files
• This feature allows the user to obtain alarm and trend data from the controller
• Connecting a controller to the monitor initiates patient data download from the controller to the monitor
• The controller must be disconnected from the monitor serial port before the [Log Files] button is accessible
• Pressing the [Log Files] button initiates download from the monitor to a USB drive
CAUTION: Federal Law (USA) restricts this device to sale by or on the order of a physician. Refer to the “Instructions For Use” for
complete Indications for Use, Contraindications, Warnings, Precautions, Adverse Events and Instructions prior to using this device.
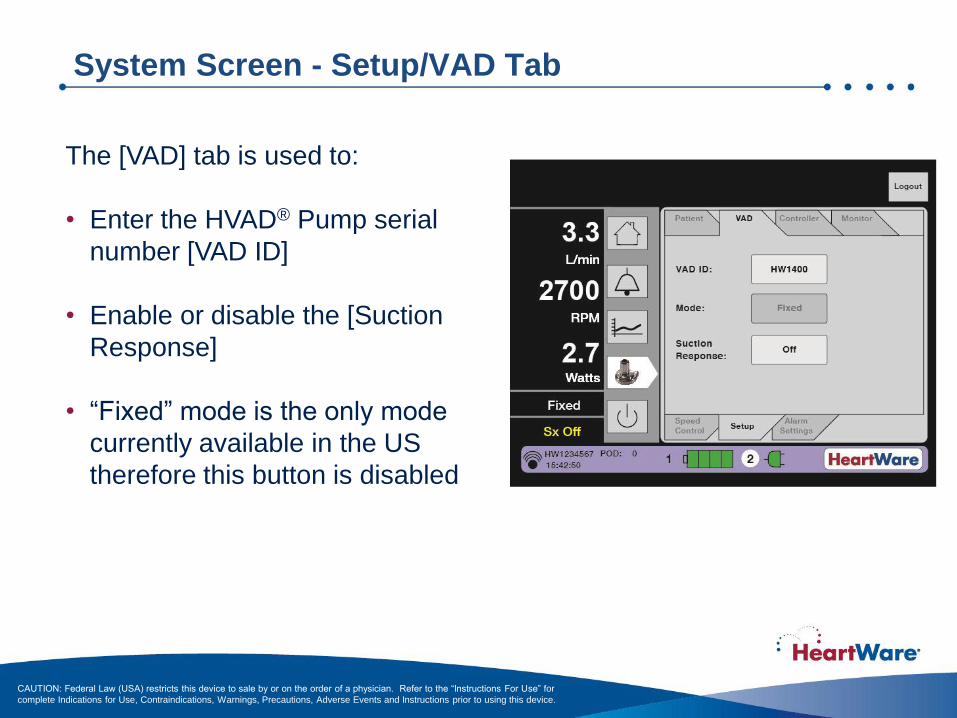
System Screen - Setup/VAD Tab
The [VAD] tab is used to:
• Enter the HVAD® Pump serial
number [VAD ID]
• Enable or disable the [Suction
Response]
• “Fixed” mode is the only mode
currently available in the US
therefore this button is disabled
CAUTION: Federal Law (USA) restricts this device to sale by or on the order of a physician. Refer to the “Instructions For Use” for
complete Indications for Use, Contraindications, Warnings, Precautions, Adverse Events and Instructions prior to using this device.
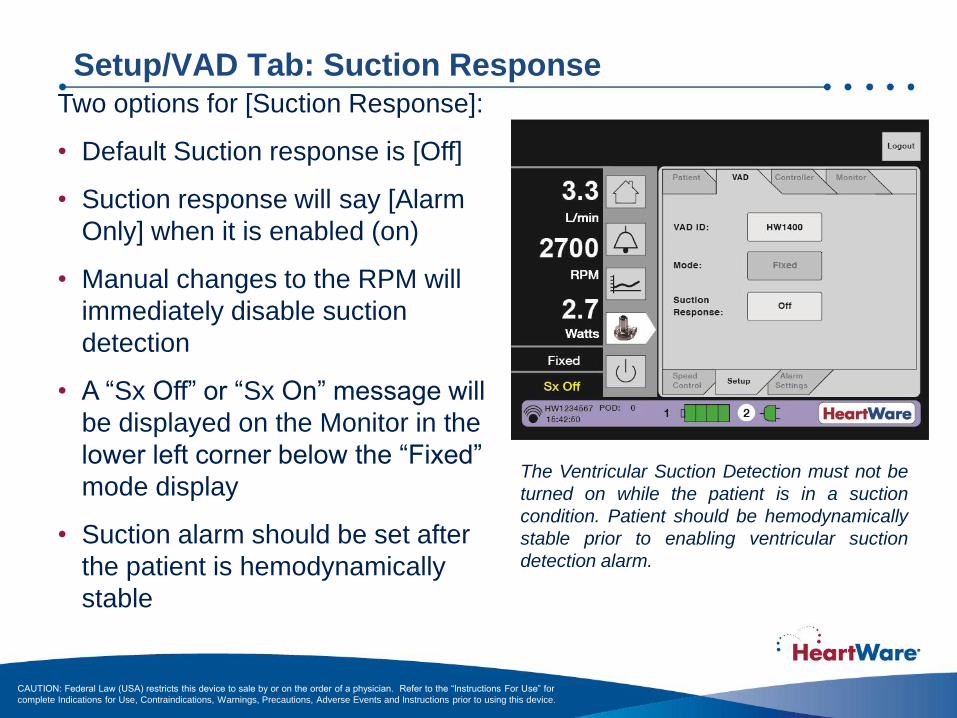
Setup/VAD Tab: Suction Response Two options for [Suction Response]:
• Default Suction response is [Off]
• Suction response will say [Alarm
Only] when it is enabled (on)
• Manual changes to the RPM will
immediately disable suction
detection
• A “Sx Off” or “Sx On” message will
be displayed on the Monitor in the
lower left corner below the “Fixed”
mode display
• Suction alarm should be set after
the patient is hemodynamically
stable
The Ventricular Suction Detection must not be
turned on while the patient is in a suction
condition. Patient should be hemodynamically
stable prior to enabling ventricular suction
detection alarm.
CAUTION: Federal Law (USA) restricts this device to sale by or on the order of a physician. Refer to the “Instructions For Use” for
complete Indications for Use, Contraindications, Warnings, Precautions, Adverse Events and Instructions prior to using this device.

System Screen - Setup/Controller Tab
• The [Controller] tab is pressed to
access [Controller Date], [Controller
Time], and [Set Defaults] parameters
• [Disable “VAD Stop” Alarm] is used to
silence the “VAD Stop” alarm while
programming a controller not
connected to a VAD
• The [Set Defaults] button sets the
controller parameters to the original
manufacturer settings
Default settings
• Set Speed is 2500 RPM
• Low Flow Alarm threshold is 1.0 L/min
• High Power Alarm threshold is 16 Watts
• Suction Detection is “Off”
• Data Log Interval:15 minutes
• Hematocrit: 30%
CAUTION: Do not use the “set defaults”
button on the monitor when a controller is
connected to a patient. Pressing it will erase
all patient VAD parameter information from
the controller.
CAUTION: Federal Law (USA) restricts this device to sale by or on the order of a physician. Refer to the “Instructions For Use” for
complete Indications for Use, Contraindications, Warnings, Precautions, Adverse Events and Instructions prior to using this device.

System Screen - Setup/Monitor Tab
• [Monitor Date] & [Monitor Time]
buttons set the date and time on
the monitor.
• [Touchscreen] button is used to
initiate touch screen calibration for
the monitor. The monitor will only
initiate the calibration sequence if
the controller is NOT connected to
the monitor.
CAUTION: Federal Law (USA) restricts this device to sale by or on the order of a physician. Refer to the “Instructions For Use” for
complete Indications for Use, Contraindications, Warnings, Precautions, Adverse Events and Instructions prior to using this device.

System Screen – Alarm Settings Tab
Default settings
• Low Flow Alarm Limit is 1.0 L/min
• High Power Alarm Limit is 16 Watts
• The [Alarm Settings] tab is used to
set the [Low Flow Alarm Limit] and
[High Power Alarm Limit]
thresholds
• Both flow and power are “time
averaged” values
• The [Low Flow Alarm] should be
set 2 L/min below the average flow
but no less than 2 L/min
• The [High Power Alarm] should be
set 2 above the displayed Watts
CAUTION: Federal Law (USA) restricts this device to sale by or on the order of a physician. Refer to the “Instructions For Use” for
complete Indications for Use, Contraindications, Warnings, Precautions, Adverse Events and Instructions prior to using this device.
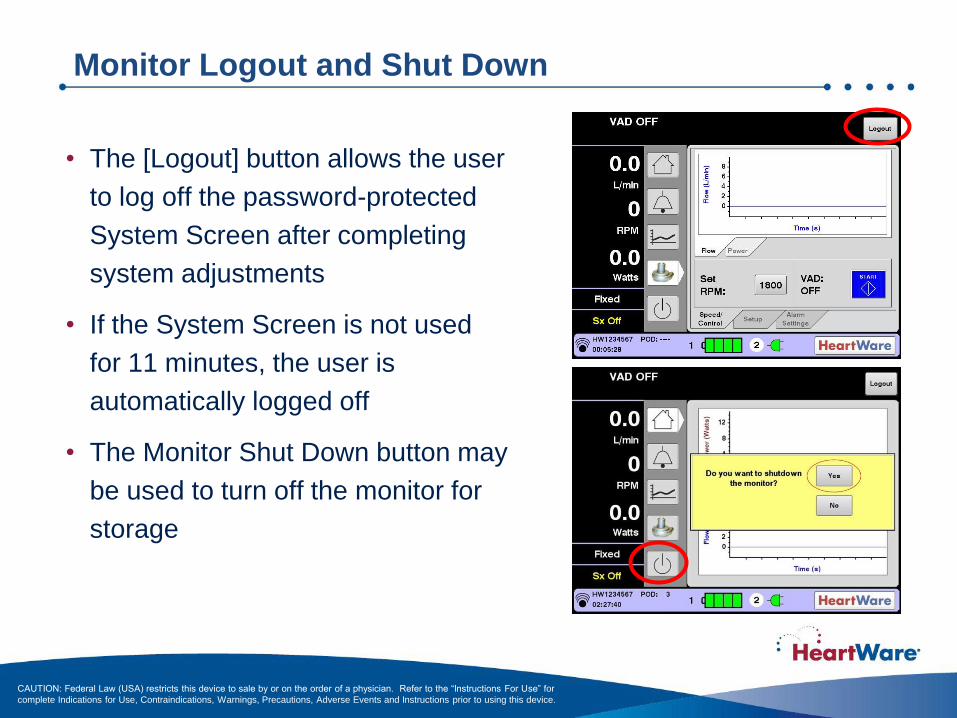
Monitor Logout and Shut Down
• The [Logout] button allows the user
to log off the password-protected
System Screen after completing
system adjustments
• If the System Screen is not used
for 11 minutes, the user is
automatically logged off
• The Monitor Shut Down button may
be used to turn off the monitor for
storage
CAUTION: Federal Law (USA) restricts this device to sale by or on the order of a physician. Refer to the “Instructions For Use” for
complete Indications for Use, Contraindications, Warnings, Precautions, Adverse Events and Instructions prior to using this device.
Waveform Definitions:
1. Flow Pulsatility: The
difference between the
minimum and maximum of
the flow waveform. Pulsatility
should be >2 L/min.
2. Waveform Trough: the
minimum value of the VAD
flow waveform. Trough
should be >2 L/min.
Flow waveforms provide
additional information about the
patient condition and VAD
performance.
HVAD® Pump Flow Waveform Characteristics
Flow Pulsatility
Waveform Trough
CAUTION: Federal Law (USA) restricts this device to sale by or on the order of a physician. Refer to the “Instructions For Use” for
complete Indications for Use, Contraindications, Warnings, Precautions, Adverse Events and Instructions prior to using this device.
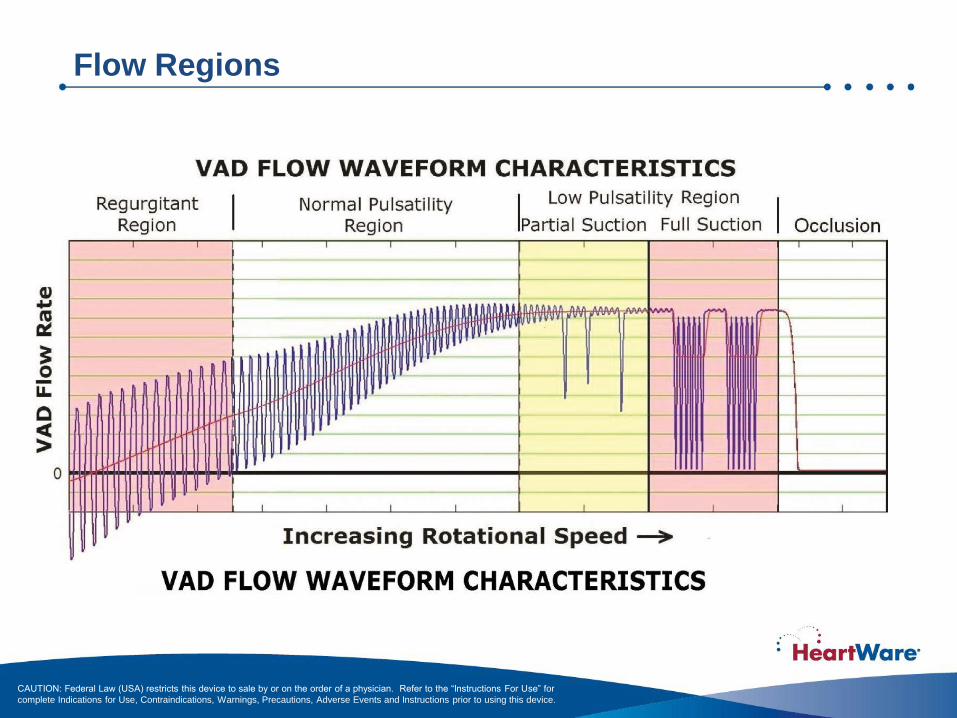
Flow Regions
CAUTION: Federal Law (USA) restricts this device to sale by or on the order of a physician. Refer to the “Instructions For Use” for
complete Indications for Use, Contraindications, Warnings, Precautions, Adverse Events and Instructions prior to using this device.

Suction Detection
CAUTION: Federal Law (USA) restricts this device to sale by or on the order of a physician. Refer to the “Instructions For Use” for
complete Indications for Use, Contraindications, Warnings, Precautions, Adverse Events and Instructions prior to using this device.
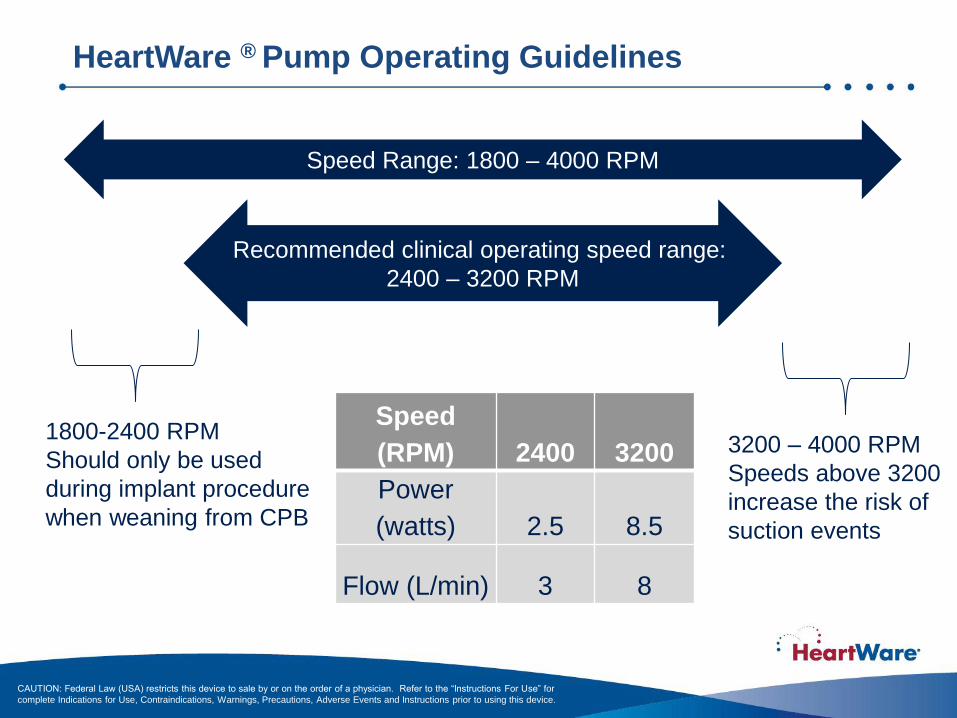
Speed Range: 1800 – 4000 RPM
Recommended clinical operating speed range:
2400 – 3200 RPM
1800-2400 RPM
Should only be used
during implant procedure
when weaning from CPB
3200 – 4000 RPM
Speeds above 3200
increase the risk of
suction events
Speed
(RPM) 2400 3200
Power
(watts) 2.5 8.5
Flow (L/min) 3 8
HeartWare ® Pump Operating Guidelines
CAUTION: Federal Law (USA) restricts this device to sale by or on the order of a physician. Refer to the “Instructions For Use” for
complete Indications for Use, Contraindications, Warnings, Precautions, Adverse Events and Instructions prior to using this device.
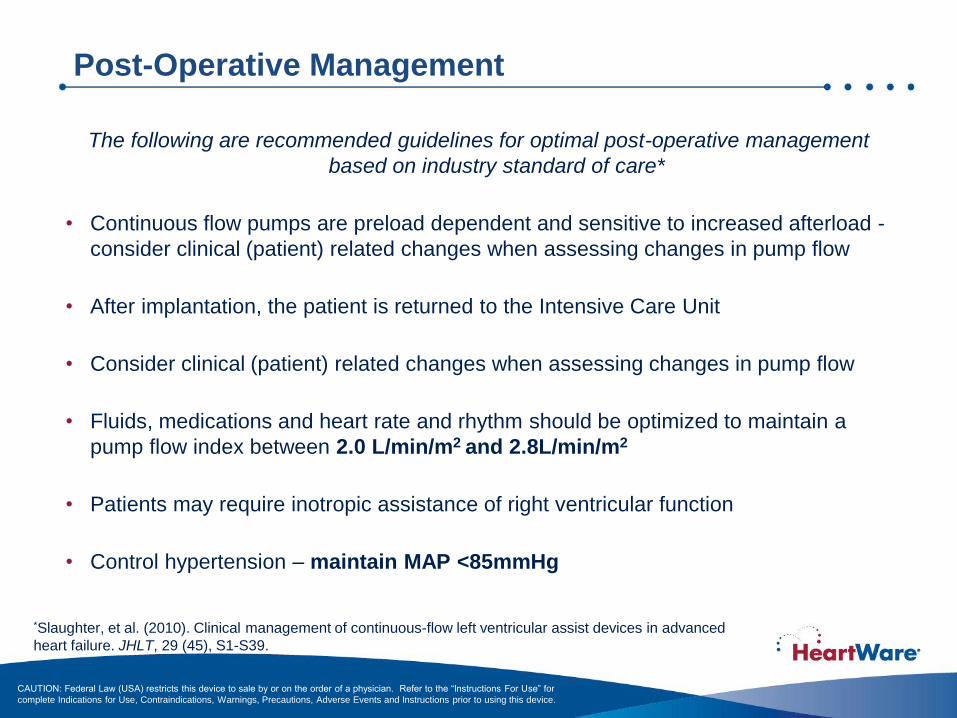
Post-Operative Management
The following are recommended guidelines for optimal post-operative management
based on industry standard of care*
• Continuous flow pumps are preload dependent and sensitive to increased afterload -
consider clinical (patient) related changes when assessing changes in pump flow
• After implantation, the patient is returned to the Intensive Care Unit
• Consider clinical (patient) related changes when assessing changes in pump flow
• Fluids, medications and heart rate and rhythm should be optimized to maintain a
pump flow index between 2.0 L/min/m2 and 2.8L/min/m2
• Patients may require inotropic assistance of right ventricular function
• Control hypertension – maintain MAP <85mmHg
*Slaughter, et al. (2010). Clinical management of continuous-flow left ventricular assist devices in advanced
heart failure. JHLT, 29 (45), S1-S39.
CAUTION: Federal Law (USA) restricts this device to sale by or on the order of a physician. Refer to the “Instructions For Use” for
complete Indications for Use, Contraindications, Warnings, Precautions, Adverse Events and Instructions prior to using this device.

Arrhythmias/Emergency Procedures
• Arrhythmias may occur in the post-operative period
• OK to defibrillate HeartWare® System patients
• Anti-arrhythmic drugs, pacemakers, and ICDs are compatible with
the HeartWare® System
• Institute appropriate ACLS protocols as needed
• If chest compressions have been administered, confirm function and
positioning of HVAD® Pump
CAUTION: Federal Law (USA) restricts this device to sale by or on the order of a physician. Refer to the “Instructions For Use” for
complete Indications for Use, Contraindications, Warnings, Precautions, Adverse Events and Instructions prior to using this device.

Postoperative Management - Anticoagulation
• Anticoagulation should be individualized for each patient
• In general, begin low-dose heparin at 10 units/kg/hr on postoperative
day one to a target PTT of 40-50 seconds
• Prior to initiation of anticoagulation, chest tube drainage should be
less than 40 ml/hr for approximately three hours, the HCT should be
stable without the need for transfusion of blood products, and
coagulation factors approaching normal
• Gradually increase the heparin dosage to maintain the PTT in a
range of 50-60 seconds
CAUTION: Federal Law (USA) restricts this device to sale by or on the order of a physician. Refer to the “Instructions For Use” for
complete Indications for Use, Contraindications, Warnings, Precautions, Adverse Events and Instructions prior to using this device.
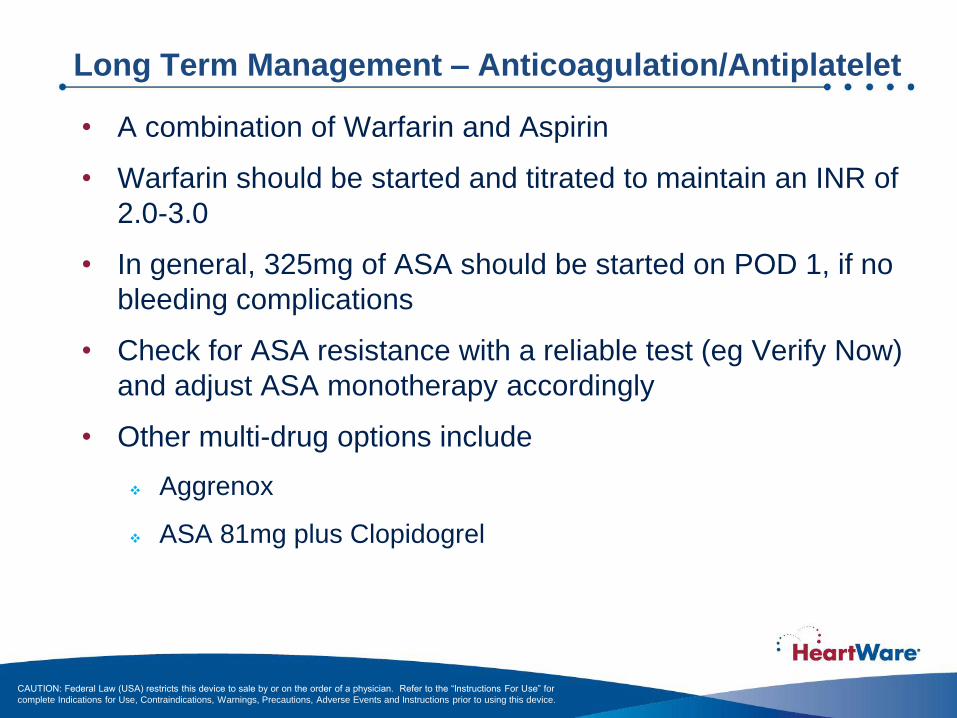
Long Term Management – Anticoagulation/Antiplatelet
• A combination of Warfarin and Aspirin
• Warfarin should be started and titrated to maintain an INR of
2.0-3.0
• In general, 325mg of ASA should be started on POD 1, if no
bleeding complications
• Check for ASA resistance with a reliable test (eg Verify Now)
and adjust ASA monotherapy accordingly
• Other multi-drug options include
Aggrenox
ASA 81mg plus Clopidogrel
CAUTION: Federal Law (USA) restricts this device to sale by or on the order of a physician. Refer to the “Instructions For Use” for
complete Indications for Use, Contraindications, Warnings, Precautions, Adverse Events and Instructions prior to using this device.

Driveline Care
• Good hand-washing technique
• Always use aseptic technique
• Dressing change protocol as per institutional guidelines
• Prevention of trauma is critical for prevention of infection, so
driveline should be immobilized
• Education of the patient and caregiver in the care and
maintenance of the driveline is critical in the effort to prevent
infection1
1Slaughter, et al. (2010). Clinical management of continuous-flow left ventricular assist devices in advanced
heart failure. JHLT, 29 (45), S1-S39.
CAUTION: Prophylactic topical antibiotic ointments such as silver
sulfadiazine, betadine or polymixin-neomycin-bacitracin should not
be used as these ointments can injure the tissue adjacent to the
exit site
CAUTION: Federal Law (USA) restricts this device to sale by or on the order of a physician. Refer to the “Instructions For Use” for
complete Indications for Use, Contraindications, Warnings, Precautions, Adverse Events and Instructions prior to using this device.

Driveline Care
• Wear a cap, mask, and sterile gloves when performing exit
site care
• Aseptic technique should be followed whenever the dressing
is removed and the exit site exposed
• Visually inspect the driveline for tears, kinks, or any traumatic
damage
• Clean exit site with antiseptic cleansing agent daily; then rinse
and dry the exit site to avoid tissue injury
• Cover exit site with an occlusive dressing
• Immobilize the driveline and keep the extra length under a
binder or clothing to minimize potential trauma to the exit site
CAUTION: Federal Law (USA) restricts this device to sale by or on the order of a physician. Refer to the “Instructions For Use” for
complete Indications for Use, Contraindications, Warnings, Precautions, Adverse Events and Instructions prior to using this device.

Nutrition / Activity / Hygiene
• Advance diet as tolerated
• Have patient ambulate as tolerated
• Contact sports are contraindicated
• No swimming
• Patients may travel via fixed wing aircraft or helicopter
• Showering is possible with the use of a HeartWare® Shower Bag and
clinician approval. Until clinician approval, sponge baths only.
CAUTION: Federal Law (USA) restricts this device to sale by or on the order of a physician. Refer to the “Instructions For Use” for
complete Indications for Use, Contraindications, Warnings, Precautions, Adverse Events and Instructions prior to using this device.
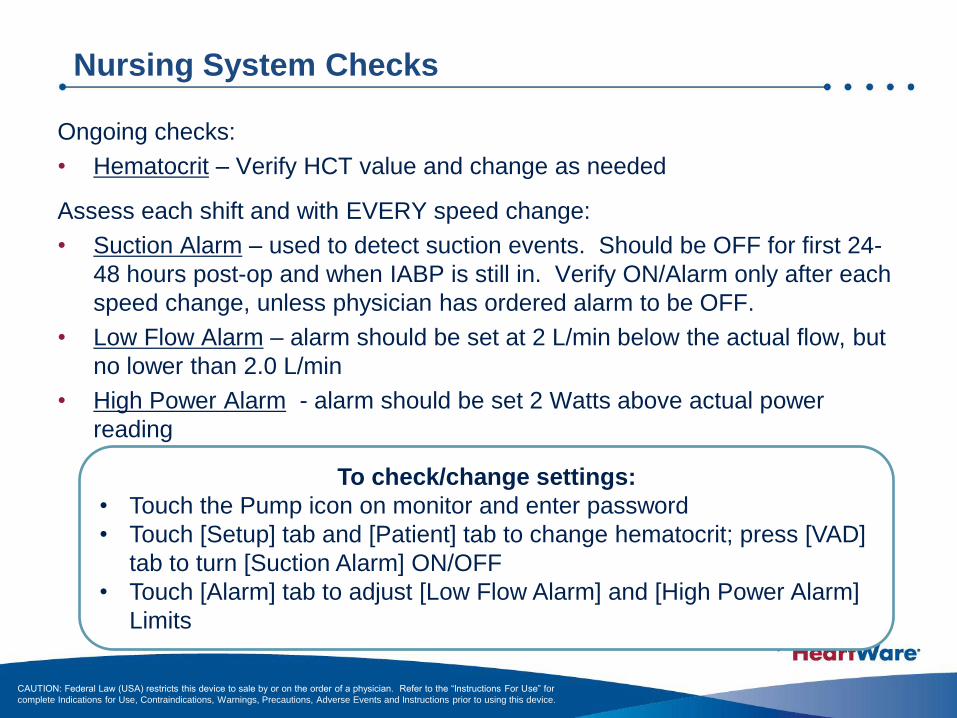
Nursing System Checks
Ongoing checks:
• Hematocrit – Verify HCT value and change as needed
Assess each shift and with EVERY speed change:
• Suction Alarm – used to detect suction events. Should be OFF for first 24-
48 hours post-op and when IABP is still in. Verify ON/Alarm only after each
speed change, unless physician has ordered alarm to be OFF.
• Low Flow Alarm – alarm should be set at 2 L/min below the actual flow, but
no lower than 2.0 L/min
• High Power Alarm - alarm should be set 2 Watts above actual power
reading
To check/change settings:
• Touch the Pump icon on monitor and enter password
• Touch [Setup] tab and [Patient] tab to change hematocrit; press [VAD]
tab to turn [Suction Alarm] ON/OFF
• Touch [Alarm] tab to adjust [Low Flow Alarm] and [High Power Alarm]
Limits
CAUTION: Federal Law (USA) restricts this device to sale by or on the order of a physician. Refer to the “Instructions For Use” for
complete Indications for Use, Contraindications, Warnings, Precautions, Adverse Events and Instructions prior to using this device.

High Medium Low
Controller Display
Flashing Red Triangle
Flashing Yellow Triangle
Solid Yellow Triangle
Controller Audio
Loudest intermittent beep
Cannot be silenced by the Mute Button
Intermittent beep that becomes louder in 1 and 5 min
Intermittent beep that becomes louder in 5 and 10 min
Controller Silencing
Cannot be silenced by the Mute Button
The alarm will clear once the problem is resolved
May be silenced for 5 min or 1 hour
Controller and Electrical Faults may be permanently silenced
May be silenced for 5 min
Monitor Display
Red bell Yellow bell Yellow bell
Summary of Alarm Display and Audio by Alarm Type
CAUTION: Federal Law (USA) restricts this device to sale by or on the order of a physician. Refer to the “Instructions For Use” for
complete Indications for Use, Contraindications, Warnings, Precautions, Adverse Events and Instructions prior to using this device.

High Priority Alarms Summary (Blank or Flashing Red)
Alarm Type Alarm Display
(line 1)
Action
(line 2)
High – Critical
(Blank Display)
No Message No Message
High - Critical
(Flashing Red)
VAD Stopped Connect Driveline
VAD Stopped Change Controller
Critical Battery 1 Replace Battery 1
Critical Battery 2 Replace Battery 2
Controller Failed Change Controller
CAUTION: Federal Law (USA) restricts this device to sale by or on the order of a physician. Refer to the “Instructions For Use” for
complete Indications for Use, Contraindications, Warnings, Precautions, Adverse Events and Instructions prior to using this device.

High Priority Alarms: Blank Display
Alarm
Display
(line 1)
Action
(line2) Potential Causes Potential Actions
No Message No Message • No power to pump
• Pump has stopped
1. Connect two new
power sources
2. Replace controller
3. Contact clinical
specialist
No Power (no message): If both power sources are disconnected
from the controller, a loud continuous alarm will sound and there will
be NO message on the controller display. The HVAD® Pump is NOT
pumping and power sources should be connected immediately. If this
action does not resolve the alarm condition, replace the controller.
CAUTION: Federal Law (USA) restricts this device to sale by or on the order of a physician. Refer to the “Instructions For Use” for
complete Indications for Use, Contraindications, Warnings, Precautions, Adverse Events and Instructions prior to using this device.
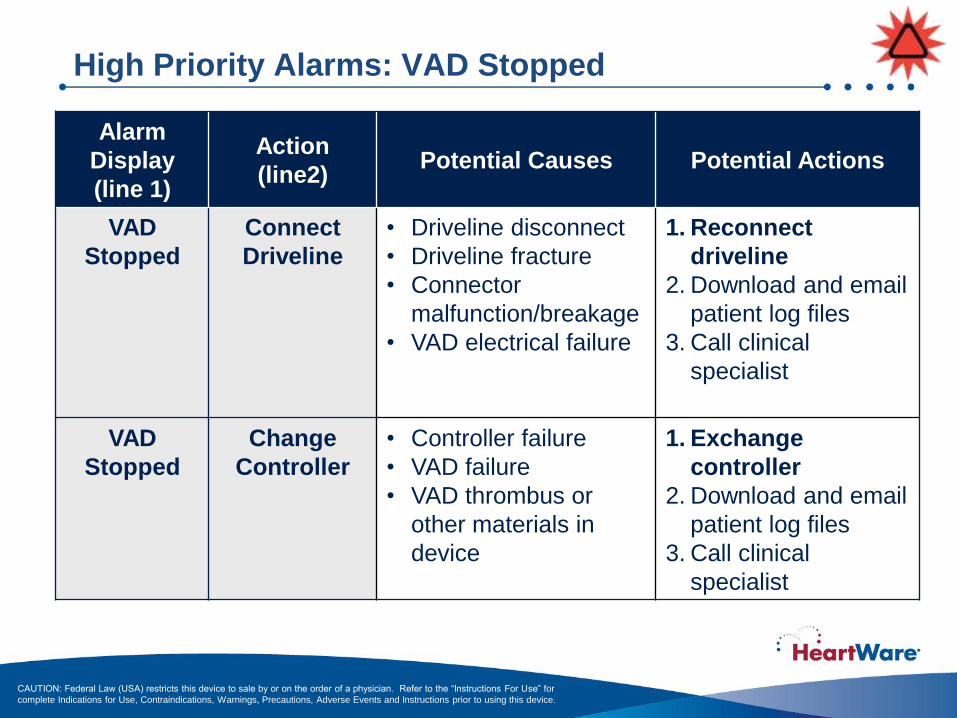
High Priority Alarms: VAD Stopped
Alarm
Display
(line 1)
Action
(line2) Potential Causes Potential Actions
VAD
Stopped
Connect
Driveline
• Driveline disconnect
• Driveline fracture
• Connector
malfunction/breakage
• VAD electrical failure
1. Reconnect
driveline
2. Download and email
patient log files
3. Call clinical
specialist
VAD
Stopped
Change
Controller
• Controller failure
• VAD failure
• VAD thrombus or
other materials in
device
1. Exchange
controller
2. Download and email
patient log files
3. Call clinical
specialist
CAUTION: Federal Law (USA) restricts this device to sale by or on the order of a physician. Refer to the “Instructions For Use” for
complete Indications for Use, Contraindications, Warnings, Precautions, Adverse Events and Instructions prior to using this device.

High Priority Alarms: Controller Failed, Critical Battery
Alarm
Display
(line 1)
Action
(line2) Potential Causes Potential Actions
Controller
Failed
Change
Controller
• Controller component
failed
1. Exchange controller
Critical
Battery 1
Replace
Battery 1
• Limited battery 1 or
battery 2 time
remaining
• Critical battery
malfunction without
adequate secondary
power source
1. Replace critical
battery with fully
charged battery or
AC/DC adapter
2. Change controller if
new power sources
do not correct alarm
Critical
Battery 2
Replace
Battery 2
CAUTION: Federal Law (USA) restricts this device to sale by or on the order of a physician. Refer to the “Instructions For Use” for
complete Indications for Use, Contraindications, Warnings, Precautions, Adverse Events and Instructions prior to using this device.
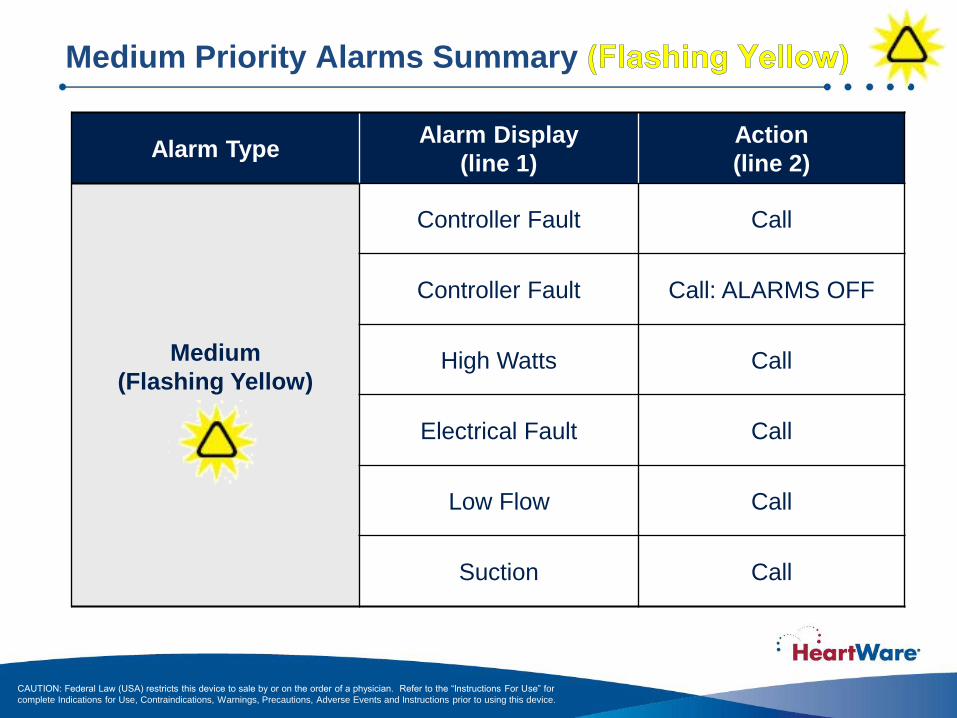
Medium Priority Alarms Summary
Alarm Type Alarm Display
(line 1)
Action
(line 2)
Medium
(Flashing Yellow)
Controller Fault Call
Controller Fault Call: ALARMS OFF
High Watts Call
Electrical Fault Call
Low Flow Call
Suction Call
CAUTION: Federal Law (USA) restricts this device to sale by or on the order of a physician. Refer to the “Instructions For Use” for
complete Indications for Use, Contraindications, Warnings, Precautions, Adverse Events and Instructions prior to using this device.
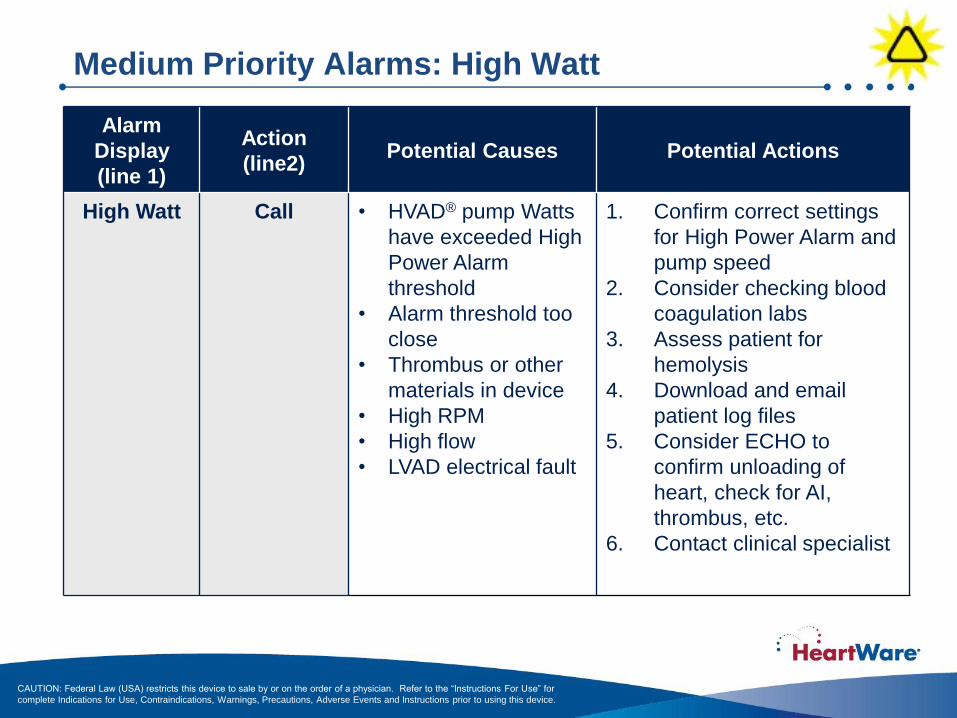
Medium Priority Alarms: High Watt
Alarm
Display
(line 1)
Action
(line2) Potential Causes Potential Actions
High Watt Call • HVAD® pump Watts
have exceeded High
Power Alarm
threshold
• Alarm threshold too
close
• Thrombus or other
materials in device
• High RPM
• High flow
• LVAD electrical fault
1. Confirm correct settings
for High Power Alarm and
pump speed
2. Consider checking blood
coagulation labs
3. Assess patient for
hemolysis
4. Download and email
patient log files
5. Consider ECHO to
confirm unloading of
heart, check for AI,
thrombus, etc.
6. Contact clinical specialist
CAUTION: Federal Law (USA) restricts this device to sale by or on the order of a physician. Refer to the “Instructions For Use” for
complete Indications for Use, Contraindications, Warnings, Precautions, Adverse Events and Instructions prior to using this device.

Medium Priority Alarms: Electrical Fault
Alarm
Display
(line 1)
Action
(line2) Potential Causes Potential Actions
Electrical
Fault
Call • Fault in continuity of
pump-to-controller
electrical connections
(e.g. contaminated
driveline connector)
• Partial driveline fracture
• Connector malfunction
• Controller component
failure
• VAD malfunction
• Controller dropped
1. Ensure driveline
connector is
engaged
2. Patient should be
seen in
clinic/hospital
3. Inspect driveline for
defects or the ability
to reproduce the
alarm
4. Download and email
patient log files
5. Contact clinical
specialist
CAUTION: Federal Law (USA) restricts this device to sale by or on the order of a physician. Refer to the “Instructions For Use” for
complete Indications for Use, Contraindications, Warnings, Precautions, Adverse Events and Instructions prior to using this device.
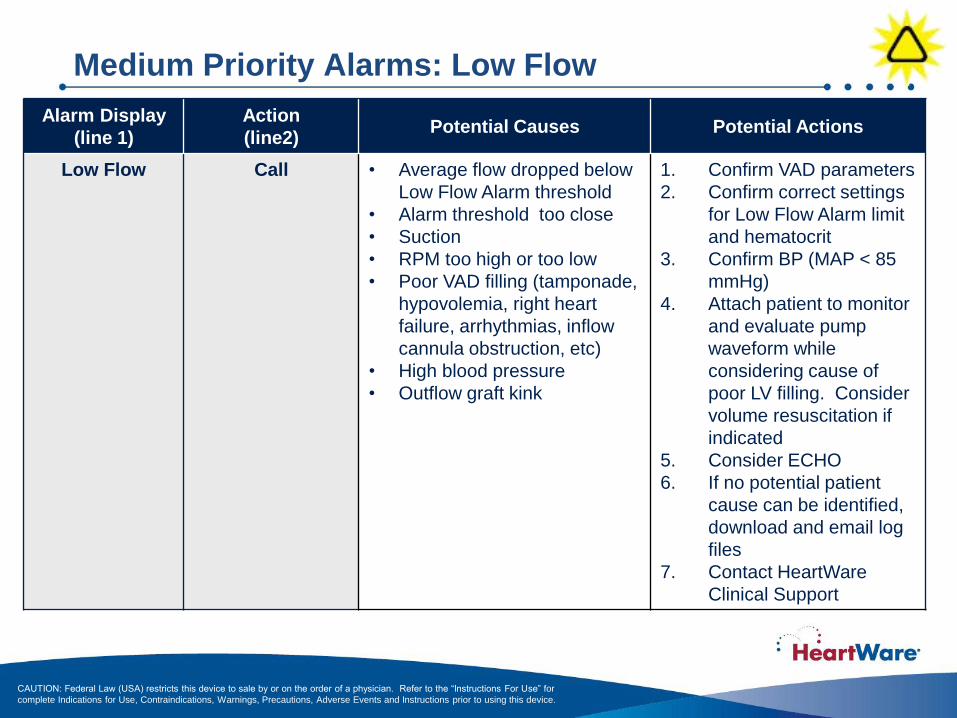
Medium Priority Alarms: Low Flow
Alarm Display
(line 1)
Action
(line2) Potential Causes Potential Actions
Low Flow Call • Average flow dropped below
Low Flow Alarm threshold
• Alarm threshold too close
• Suction
• RPM too high or too low
• Poor VAD filling (tamponade,
hypovolemia, right heart
failure, arrhythmias, inflow
cannula obstruction, etc)
• High blood pressure
• Outflow graft kink
1. Confirm VAD parameters
2. Confirm correct settings
for Low Flow Alarm limit
and hematocrit
3. Confirm BP (MAP < 85
mmHg)
4. Attach patient to monitor
and evaluate pump
waveform while
considering cause of
poor LV filling. Consider
volume resuscitation if
indicated
5. Consider ECHO
6. If no potential patient
cause can be identified,
download and email log
files
7. Contact HeartWare
Clinical Support
CAUTION: Federal Law (USA) restricts this device to sale by or on the order of a physician. Refer to the “Instructions For Use” for
complete Indications for Use, Contraindications, Warnings, Precautions, Adverse Events and Instructions prior to using this device.
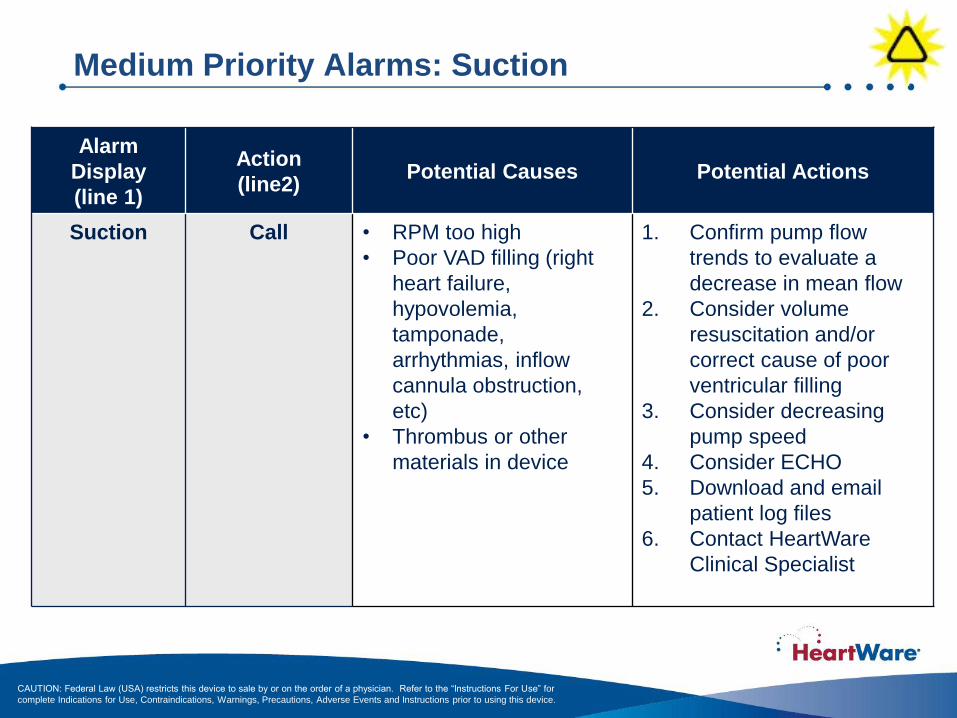
Medium Priority Alarms: Suction
Alarm
Display
(line 1)
Action
(line2) Potential Causes Potential Actions
Suction Call • RPM too high
• Poor VAD filling (right
heart failure,
hypovolemia,
tamponade,
arrhythmias, inflow
cannula obstruction,
etc)
• Thrombus or other
materials in device
1. Confirm pump flow
trends to evaluate a
decrease in mean flow
2. Consider volume
resuscitation and/or
correct cause of poor
ventricular filling
3. Consider decreasing
pump speed
4. Consider ECHO
5. Download and email
patient log files
6. Contact HeartWare
Clinical Specialist
CAUTION: Federal Law (USA) restricts this device to sale by or on the order of a physician. Refer to the “Instructions For Use” for
complete Indications for Use, Contraindications, Warnings, Precautions, Adverse Events and Instructions prior to using this device.
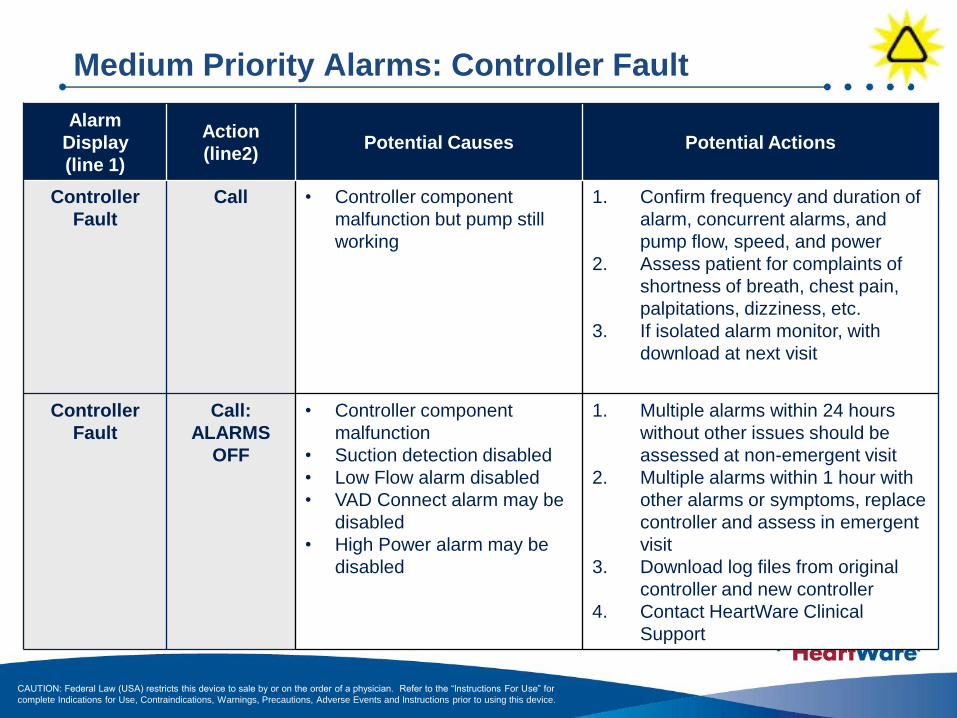
Medium Priority Alarms: Controller Fault
Alarm
Display
(line 1)
Action
(line2) Potential Causes Potential Actions
Controller
Fault
Call • Controller component
malfunction but pump still
working
1. Confirm frequency and duration of
alarm, concurrent alarms, and
pump flow, speed, and power
2. Assess patient for complaints of
shortness of breath, chest pain,
palpitations, dizziness, etc.
3. If isolated alarm monitor, with
download at next visit
Controller
Fault
Call:
ALARMS
OFF
• Controller component
malfunction
• Suction detection disabled
• Low Flow alarm disabled
• VAD Connect alarm may be
disabled
• High Power alarm may be
disabled
1. Multiple alarms within 24 hours
without other issues should be
assessed at non-emergent visit
2. Multiple alarms within 1 hour with
other alarms or symptoms, replace
controller and assess in emergent
visit
3. Download log files from original
controller and new controller
4. Contact HeartWare Clinical
Support
CAUTION: Federal Law (USA) restricts this device to sale by or on the order of a physician. Refer to the “Instructions For Use” for
complete Indications for Use, Contraindications, Warnings, Precautions, Adverse Events and Instructions prior to using this device.

Handling an Emergency: Changing the Controller
1. Have the patient sit or lie down.
2. Place the new controller within easy reach.
3. Connect back-up power sources to the new controller.
• Confirm that the power cables are properly locked on the
controller by gently pulling on the cable near the connector
• A “Power Disconnect” alarm will activate if a second power
source is not connected to the new controller within 20 seconds
of controller power up
• A “VAD Stopped” alarm will activate if the pump driveline is not
connected to the new controller within 10 seconds - this alarm
will resolve once the pump driveline is connected
CAUTION: Federal Law (USA) restricts this device to sale by or on the order of a physician. Refer to the “Instructions For Use” for
complete Indications for Use, Contraindications, Warnings, Precautions, Adverse Events and Instructions prior to using this device.

Handling an Emergency: Changing the Controller
4. Pull back the white driveline cover from the
original controller’s silver connector.
5. Disconnect the driveline from the original
controller by pulling the silver connector away
from the controller. Do not disconnect by pulling
on the driveline cable. A “VAD Stopped” alarm
may activate. Don’t panic. You can silence the
alarm after restarting the pump with the new
controller, which is the priority.
CAUTION: Federal Law (USA) restricts this device to sale by or on the order of a physician. Refer to the “Instructions For Use” for
complete Indications for Use, Contraindications, Warnings, Precautions, Adverse Events and Instructions prior to using this device.

Handling an Emergency: Changing the Controller
6. Connect the driveline to the new controller
(align the two red marks and push together).
If the “VAD Stopped” alarm was active on the
new controller, it will now resolve. The pump
should restart.
Verify the pump is working (RPM, L/min, Watts). If the pump does not
restart, call for medical assistance immediately.
CAUTION: Federal Law (USA) restricts this device to sale by or on the order of a physician. Refer to the “Instructions For Use” for
complete Indications for Use, Contraindications, Warnings, Precautions, Adverse Events and Instructions prior to using this device.

Handling an Emergency: Changing the Controller
7. To prevent the controller alarm from
sounding after the power is removed:
• If the red alarm adapter is available:
before you remove power, insert it into
the blue connector on the original
controller.
• If no alarm adapter is available:
o Before you remove power, press
and hold the alarm mute and
scroll buttons simultaneously on
the original controller until it
beeps, or for at least 5 seconds.
o Release the alarm mute and
scroll buttons.
Original controller
CAUTION: Federal Law (USA) restricts this device to sale by or on the order of a physician. Refer to the “Instructions For Use” for
complete Indications for Use, Contraindications, Warnings, Precautions, Adverse Events and Instructions prior to using this device.
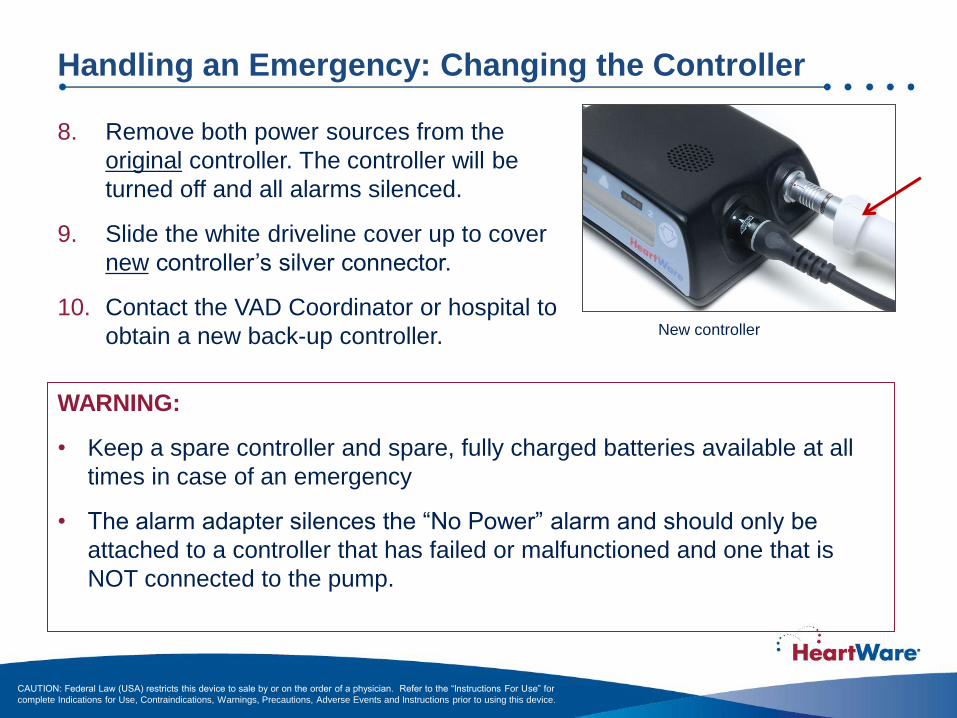
Handling an Emergency: Changing the Controller
8. Remove both power sources from the
original controller. The controller will be
turned off and all alarms silenced.
9. Slide the white driveline cover up to cover
new controller’s silver connector.
10. Contact the VAD Coordinator or hospital to
obtain a new back-up controller. New controller
WARNING:
• Keep a spare controller and spare, fully charged batteries available at all
times in case of an emergency
• The alarm adapter silences the “No Power” alarm and should only be
attached to a controller that has failed or malfunctioned and one that is
NOT connected to the pump.
CAUTION: Federal Law (USA) restricts this device to sale by or on the order of a physician. Refer to the “Instructions For Use” for
complete Indications for Use, Contraindications, Warnings, Precautions, Adverse Events and Instructions prior to using this device.