Embed Size (px)
Citation preview

HANDBOOK
7 6 5 4 3 2 1
www.TheDeterminator.com

THE DETERMINATOR
Handbook
The information in this handbook will help you originate keys for vehicles in a
quick and timely manner. The Determinator decoding tool is very simple to use and
by following the instructions and these tips you will find your success rate much
higher.
As a Locksmith you must have an understanding on how automotive locks work.
Understanding how bi-directional locks work is a must. You should have some
impressioning skills as well. Do not expect a great deal of success if you try to use
the Determinator for the first time on a job without going over the instructions or
getting a feel for the tool. You should allow yourself some practice time before
using on a job. Make sure you read and understand the instructions.
ALWAYS FOLLOW THESE RULES
1. Make sure you read and understand the instructions.
2. Take your time .
3. Record your findings while you are at the vehicle.
4. Clean the lock out with a good degreaser that dries fast.
5. Cut your EVEN spaces on one side of the key and the odd spaces on the
other side.
6. WIDEN the cuts.
7. Use a code machine that allows you to do rules 5 and 6. A Framon or HPC
Code machine will leave a nice clean and clear cut.
These rules are very important. If you follow each of them you will do just
fine. The most important key is the first key when originating keys. By
following these rules you will find that you will be able to pick up impression
marks quite easily.

Below are two keys for the same lock. It’s a GM 10 cut key on the B86 keyway.
Key One has both sides cut with all the spaces 3 through 9.
Key Two is cut with the EVEN spaces on one side and ODD on the other.
Can you find the impression marks as easily on Key One as compared to Key Two?
Can you pick up the marks? Are you sure of the marks? Can you tell what
spaces they are on ?
Can you see the marks on Key Two? You can examine each space quickly and see
the marks much better on Key Two as compared to Key One.
With the nice WIDE CUTS and the EVEN SPACES on one side of the key and the
ODD SPACES on the other the impression marks are much easier to see. Spaces 3 and 4 have the impression marks.
Follow these rules on ALL the keys you make with the
Determinator. Making a key for a GM, Ford, Nissan, Toyota or ANY type is the same.

FOR 2 Determinator
The FOR2 Determinator works on the strattec locks with spaces 1 through 6 in the
door lock. It is a fairly simple lock system that is easy to make keys for. There is
a lot of play in the locks so half cuts are NOT recommended. There are 2
Decoding tools in the FOR2 Determinator set.
“3” Key traps tumblers with a 3 4 or 5 depth.
“B” key traps tumblers with a 4 or 5 depth.
Any space that does not trap with either tool is an “A”
Make sure you READ AND UNDERSTAND the instructions that
come with the Determinator.
Clean the door lock with a good degreaser. Ford locks tend to have a lot of
grease in them. This grease needs to be cleaned out for the tool to decode
the locks properly.
Insert the “3” tool with the trap Space 6 trapped with the “3” tool.
facing up. Here it trapped right You know now that the EVEN
away. You can see space 6. Spaces are on top. Put a “3” in
space 6. Anything that traps with
the “3” key put a “3” in that space.

Use the release tool on the milled Here you can see space 2 is
side of the key to release the is trapped. You will put a
trapped tumbler. Finish decoding “3” in space 2 on your chart
the lock with the “3” key. pad.
Space 3 trapped with the “3” key Space 1 trapped with the “3” key.
Put a “3” in every space that trapped Now use the “B” key. Here you can
with the “3” key. Spaces that did not see that space 2 is trapped.
will be an “A”

Space 2 was the only space that Here is your first key. Put the EVEN
trapped using the “B” key. Change spaces on one side and the ODD spaces
the “3’ that was in space 2 to a “B”. on the other. Take note on how the
Cut your “A” ‘s to a 1 depth. WIDE the cuts are.
Cut your “3”’s to a 3 depth.
Cut your “B” to a “4” depth.
Make sure you read and understand the instructions with your DETERMINATOR.
There are “RULES” to follow. One of the Rules for FOR 2 is that on your chart,
If you have an “A” cut right next to a “B” cut, the “A” will always be a 2 depth
and the “B” will always be a “4” depth. In our story case here we did not have the
combo, but it is common so look out for it.
Use your vise grips and try the key You can clearly see an impression mark
in the lock. It may turn hard. Use in space 2. Space 2 was “4” depth. You
Locksmith knowledge on how much know now that it is a “5” depth.
torque to use. Make sure to make your cuts WIDE.

You can see a real good mark in space Space 2 was a 4 depth. It had a mark
5. It was a 1 depth. You will cut it so you will cut it down to a 5 depth.
down to a 2 depth. Widening the Space 5 was a 1 depth. It had a mark
cuts makes it easier to see the You will cut it down to a 2 depth.
impression marks. Your final cuts in the door are 353123.
Try your key in the door locks to make sure it is working properly. Now you
can put all 6 cuts on BOTH sides of the key. Test it in the door locks again.
Now look up your door cuts, 353123 on the Determinator FORD Charts. You will
find that there is only one combination with the door cuts that we have. Space
7and 8 will be a 2 and a 4.
SUMMARY ON THE FOR 2 DETERMINATOR 1. Always put your even spaces on one side of the key and the odd spaces on the other side.
2. DO NOT use half cuts. “A” cut to 1 depth, “3”’s cut to a 3 depth, “B” cut to a 4 depth.
3. WIDEN your cuts so it will be much easier to see the impression marks.

GM WAVE KEYS
The GM WAVES are a special set of keys that come with the GM1
Determinator set. By following the instructions you will be able to pick
over the ignition using these keys. These keys work on the B86 keyway
and they will also work on the new B106 keyway.
There are three different types of ignition face caps.
Round Cap Plastic Cap Big Ears Small Rubber Ears
There ae five keys in the WAVE KEY SET.
Each key is cut different on each side .
First you must pry off the Insert an old pick at the 7
face cap. Gently and using o’clock postion where the side
common sense. Most pop off bar is. You need to put pressure
quite easily. on the sidebar.
Insert a Wave key and while As soon as it picks, you can
you pull the key in and out remove the pick and turn to
turn it left and right. Again the ON position.
use some common sense.
You must keep pressure on the sidebar as you work the key in and
out, and while turning left and right. You can ease up on the
pressure on the sidebar and reapply during this process.
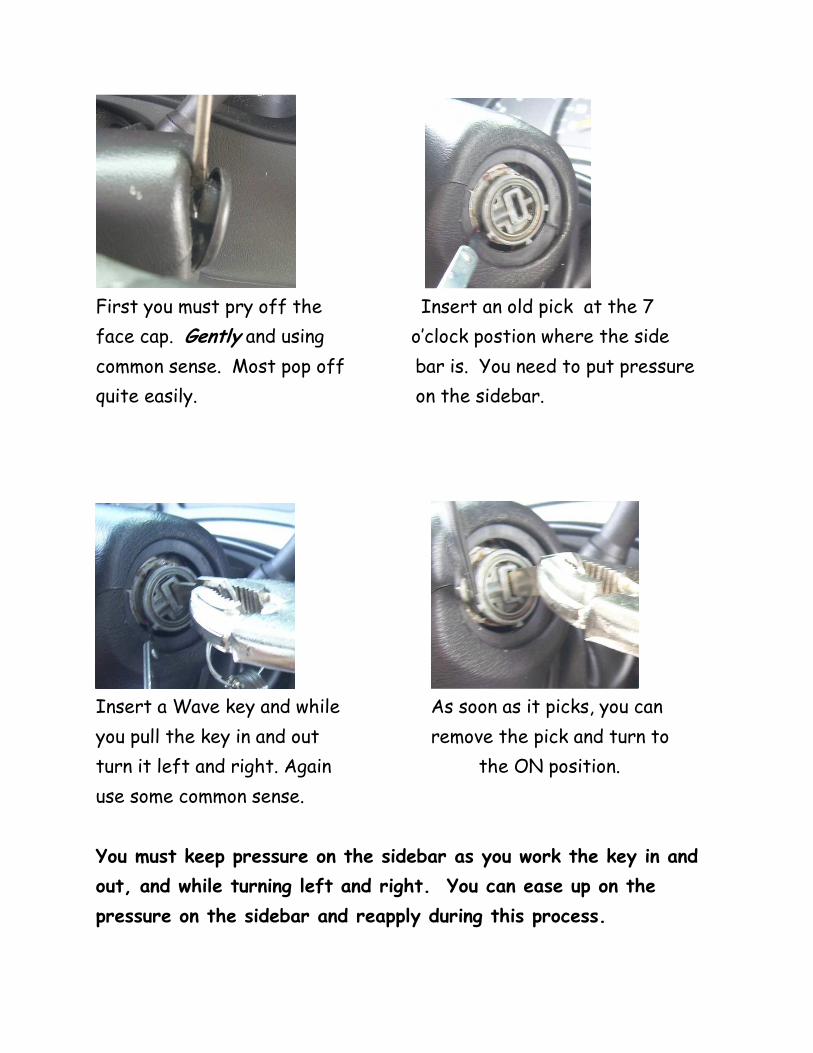
You must gain access to the You can drill a small access hole.
retainer. On top of the Gently take your time and drill
shroud use an ignition as a the small hole.
guide to the retainer.
OTHER ways of doing this is by pulling the shroud apart or using an “L” shape tool
from the front of the lock to hit the retainer. DO what your situaion calls for.
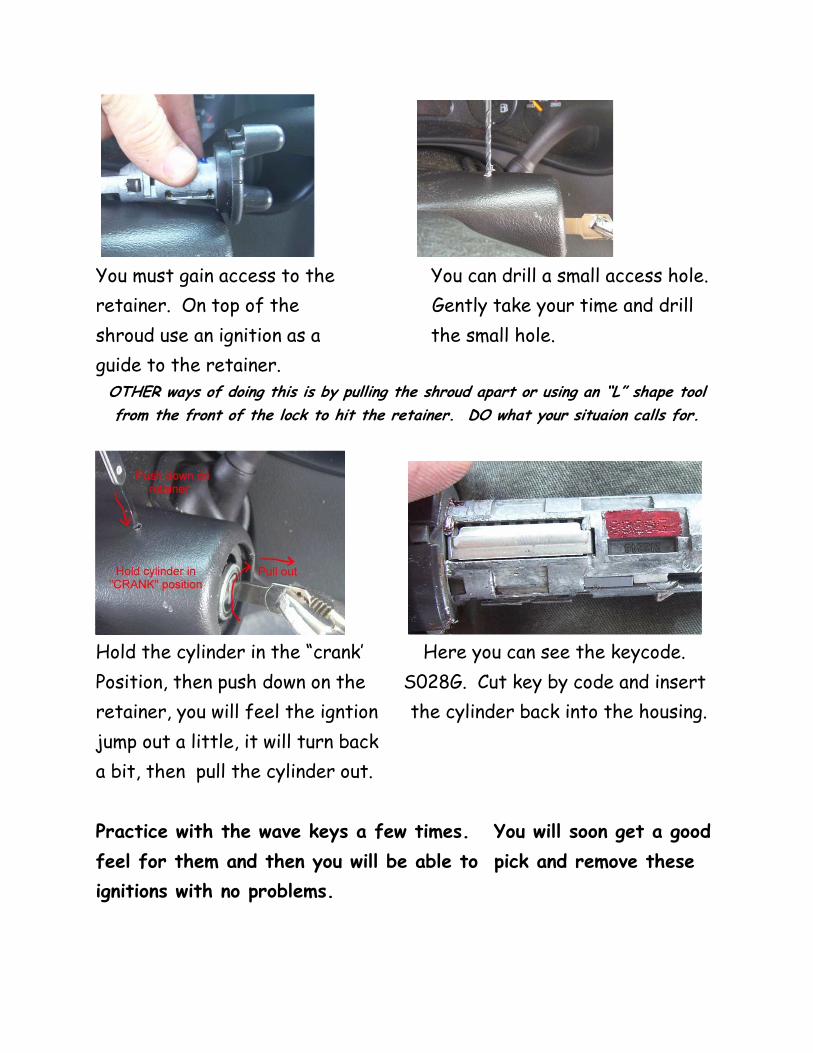
Hold the cylinder in the “crank’ Here you can see the keycode.
Position, then push down on the S028G. Cut key by code and insert
retainer, you will feel the igntion the cylinder back into the housing.
jump out a little, it will turn back
a bit, then pull the cylinder out.
Practice with the wave keys a few times. You will soon get a good
feel for them and then you will be able to pick and remove these
ignitions with no problems.

Some ignitions with the ROUND face cap and with the BIG plastic
ears, have a metal ring that goes around the cap to help hold it on. You
must break or cut this ring to get the face cap off. I took an old flat
blade screwdriver and used my dremel tool to sharpen the end of it.
Work the screwdriver tool back and forth while you push the sharp end
of it into the metal ring. Soon you will feel and see it cut through.
The metal ring broke. Now you can pry the face cap off. It will hold
and stay on without this metal ring. Do not cut yourself with either
the tool or the metal ring.

MIT1 Determinator
The MIT 1 Determinator works on the Mitsubishi X263 key way.
It is a very simple system to make keys for. There are 4 depths and
8 spaces in this system and half cuts work well in it.
When the MIT 1 Determinator traps a tumbler, you will know that it is
either a 3 or 4 depth tumbler. Spaces that passed will be 1 or 2 depth
tumblers. I like to make my first key about 5 to 9 thousandths deeper
than a 1 or 3 depth. Not a half cut. Doing it this why I find it easier
to see the impression marks. Remember to put your odd spaces on one
side and the even spaces on the other. WIDEN your cuts.
REMEMBER TO READ AND UNDERSTAND THE INSTRUCTIONS
THAT COME WITH YOUR DETERMINATOR.
Clean the lock out with a good cleaner. Then proceed.
With the trap facing up insert Put a 3 in space 4. You also know now that
the Determinator. Slowly pull the even spaces are on top. Put a “T” above
it out. Take note of any space above the even spaces.
that traps. Here space 4 traps.

Use the release tool to release the On the bottom side you can see that
trapped tumbler. Finish decoding the space 7 is trapped. You will put a “3”
top. Nothing else trapped on the top. in space 7.
Space 5 Traps. Space 1 traps.
Make your chart. Put a “3’ in every Put your EVEN spaces on one side and
space that trapped. And a “1” in every ODD spaces on the other side. Make
space that passed. your cuts WIDE.

Use your vise grips and your Here you can clearly see impression marks
impressioning skills as you turn on spaces 2 and 6. With the WIDE cuts
the key. you can pick up the marks.
You can see space 3 has a mark. Make your changes to your chart.
Wide cuts are very important!
Cut your key and try it in the locks. Here is the final key.
Check for any more marks and make
any necessary adjustments.

Toy 2 Determinator
TR47 with split wafers. 8 spaces and 4 depths. Spaces 4 and 7 will have the split
wafers. You will have to use TWO release tools to release a tumbler that is
trapped on those spaces.
Make sure you READ AND UNDERSTAND the instructions that
come with the Determinator.
1 . With the trap facing up, insert the tool and slowly pull out. Here you can see
that it stops on space 4. That means space 4 has to be either a 3 or 4 depth
tumbler.
2. Use two release tools to release the trapped tumbler.
3. On your chart put a “3” in space 4. You now know that the EVEN spaces are
on top of the lock.

4. Space 2 trapped, you know that 5. Finish taking your readings.
it is a 3 or 4 depth tumbler. Put a Here you see that space 5
3 on your chart. is trapped on the bottom.
6. Here is what we came up 7. Cut your first key with EVEN
with for our readings. See Spaces on one side and ODD spaces
how we separated the even on the other side. Widen your cuts.
spaces from the odd. Top This is VERY IMPORTANT!
and bottom.
I don’t use half cuts in the doors. I will cut my key just about 5
to 9 thousandths shallower than a full depth of 1’s and 3’s.

8. Use your vise grips and go 9. You can clearly check each space for marks.
back and forth a few times. Space 2 has a very good mark. Since it was a
Use common sense on how 3 depth we will cut it down to a 4 depth.
much torque to apply.
10. There is also a small mark on 11. Make your changes on your chart pad.
space 3. It was a 1 depth now you will
make it a 2 depth.
12. Try to turn the key again. 13. Check each space for marks. You
As soon as you feel it starting can see space 8 has a clear mark.
to turn STOP! Don’t force it.
You are only trying to get marks.

14. You can see marks on space 7. 15. Make your changes to your chart and
you can cut a new key with the exact depths.
16. Test your new key in the doors 17. Here are the final cuts of the key.
and then you can progress space Space 1 progressed to a 3 depth.
one from the ignition.
SUMMARY ON THE TOY 2 DETERMINATOR
1. Always put even spaces on one side of key and odd space on other side.
2. WIDEN YOUR CUTS
3. Space 4 and 7 have split wafers, if they trap you will use 2 release tools.
4. Don’t use half cuts in door, cut your first key about 5 to 9 thousands
shallower than a full cut.
5. As soon as you feel the key starting to turn, STOP. Pick up your marks.
6. If you are having trouble releasing a tumbler, sometimes it is easier to push
the Determinator all the way into the lock, insert the release tool then pull
the tools out.