Embed Size (px)
Citation preview
LH340 EDGE3 Series Quick Setup Guide - English - R1
Skill Level
Intermediateeasy advanced
Time
under 30 minutesunder 15 minutes under 60 minutes
Hand Tools Hardware
Router
Hi Speed
over 60 minutes
Skill Level
Intermediateeasy advanced
Time
under 30 minutesunder 15 minutes under 60 minutes
Hand Tools Hardware
Router
Hi Speed
over 60 minutes
Time: 20 Minutes Time: 20 Minutes Time: 20 MinutesHand Tools Hand ToolsSkills - Easy Skills - Easy Skills - Easy
BASIC INSTALLATION GUIDE BASIC INSTALLATION GUIDE BASIC INSTALLATION GUIDE BASIC INSTALLATION GUIDE
Skill Level
Intermediateeasy advanced
Time
under 30 minutesunder 15 minutes under 60 minutes
Hand Tools Hardware
Router
Hi Speed
over 60 minutes
Skill Level
Intermediateeasy advanced
Time
under 30 minutesunder 15 minutes under 60 minutes
Hand Tools Hardware
Router
Hi Speed
over 60 minutes
Skill Level
Intermediateeasy advanced
Time
under 30 minutesunder 15 minutes under 60 minutes
Hand Tools Hardware
Router
Hi Speed
over 60 minutes
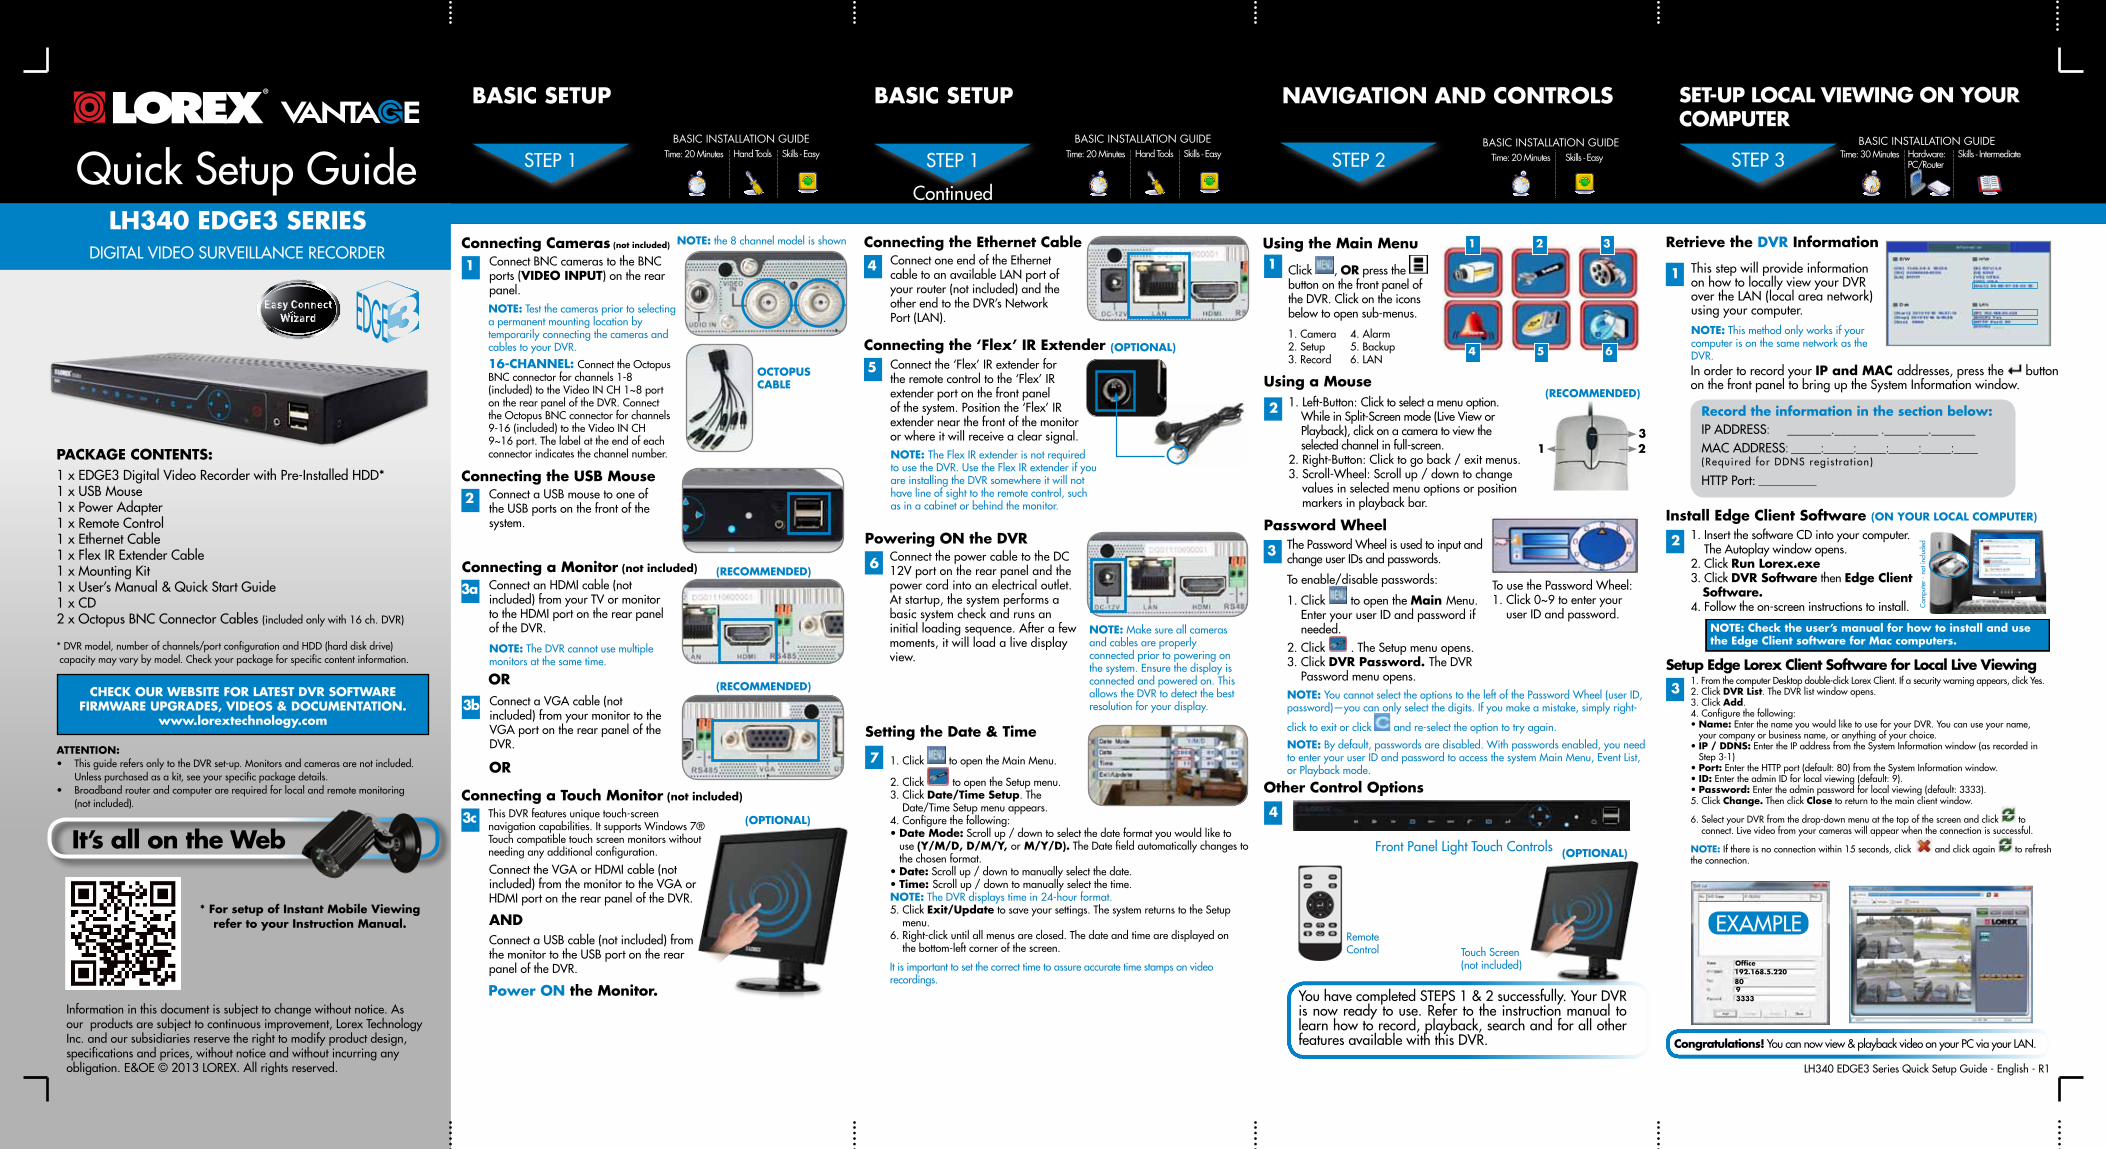
Digital ViDeo SurVeillance recorDer
LH340 EDGE3 SERIES
Quick Setup guide
ATTENTION: • ThisguiderefersonlytotheDVRset-up.Monitorsandcamerasarenotincluded.
Unlesspurchasedasakit,seeyourspecificpackagedetails.• Broadbandrouterandcomputerarerequiredforlocalandremotemonitoring
(notincluded).
Informationinthisdocumentissubjecttochangewithoutnotice.Asourproductsaresubjecttocontinuousimprovement,LorexTechnologyInc.andoursubsidiariesreservetherighttomodifyproductdesign,specificationsandprices,withoutnoticeandwithoutincurringanyobligation.E&OE©2013LOREX.Allrightsreserved.
* For setup of Instant Mobile Viewing refer to your Instruction Manual.
It’s all on the Web
Time: 30 Minutes Skills - IntermediateHardware: PC/Router
Skill Level
Intermediateeasy advanced
Time
under 30 minutesunder 15 minutes under 60 minutes
Hand Tools Hardware
Router
Hi Speed
over 60 minutes
Skill Level
Intermediateeasy advanced
Time
under 30 minutesunder 15 minutes under 60 minutes
Hand Tools Hardware
Router
Hi Speed
over 60 minutes
Congratulations!Youcannowview&playbackvideoonyourPCviayourLAN.
1xEDGE3DigitalVideoRecorderwithPre-InstalledHDD*1xUSBMouse1xPowerAdapter1xRemoteControl1xEthernetCable1xFlexIRExtenderCable1xMountingKit1xUser’sManual&QuickStartGuide1xCD2xOctopusBNCConnectorCables(includedonlywith16ch.DVR)
*DVRmodel,numberofchannels/portconfigurationandHDD(harddiskdrive)capacitymayvarybymodel.Checkyourpackageforspecificcontentinformation.
PACKAGE CONTENTS:
4
Connecting the Ethernet CableConnectoneendoftheEthernetcabletoanavailableLANportofyourrouter(notincluded)andtheotherendtotheDVR’sNetworkPort(LAN).
2
Using a Mouse1.Left-Button:Clicktoselectamenuoption.WhileinSplit-Screenmode(LiveVieworPlayback),clickonacameratoviewtheselectedchannelinfull-screen.2.Right-Button:Clicktogoback/exitmenus.3.Scroll-Wheel:Scrollup/downtochangevaluesinselectedmenuoptionsorpositionmarkersinplaybackbar.
1 23
YouhavecompletedSTEPS1&2successfully.YourDVRisnowreadytouse.Refer to the instructionmanual tolearnhowtorecord,playback,searchandforallotherfeaturesavailablewiththisDVR.
Using the Main Menu
Click ,ORpressthe buttononthefrontpaneloftheDVR.Clickontheiconsbelowtoopensub-menus.
1
Other Control Options
4
Retrieve the DVR Information
InordertorecordyourIP and MAC addresses,pressthe buttononthefrontpaneltobringuptheSystemInformationwindow.
1 ThisstepwillprovideinformationonhowtolocallyviewyourDVRovertheLAN(localareanetwork)usingyourcomputer.NOTE:ThismethodonlyworksifyourcomputerisonthesamenetworkastheDVR.
BASIC SETUPBASIC SETUP NAVIGATION AND CONTROLS SET-UP LOCAL VIEWING ON YOUR COMPUTER
Continued
STEP1 STEP2 STEP3STEP1
6
Powering ON the DVRConnectthepowercabletotheDC12Vportontherearpanelandthepowercordintoanelectricaloutlet.Atstartup,thesystemperformsabasicsystemcheckandrunsaninitialloadingsequence.Afterafewmoments,itwillloadalivedisplayview.
NOTE:Makesureallcamerasandcablesareproperlyconnectedpriortopoweringonthesystem.Ensurethedisplayisconnectedandpoweredon.ThisallowstheDVRtodetectthebestresolutionforyourdisplay.
5
Connecting the ‘Flex’ IR ExtenderConnectthe‘Flex’IRextenderfortheremotecontroltothe‘Flex’IRextenderportonthefrontpanelofthesystem.Positionthe‘Flex’IRextendernearthefrontofthemonitororwhereitwillreceiveaclearsignal.NOTE: TheFlexIRextenderisnotrequiredtousetheDVR.UsetheFlexIRextenderifyouareinstallingtheDVRsomewhereitwillnothavelineofsighttotheremotecontrol,suchasinacabinetorbehindthemonitor.
1.Camera2.Setup3.Record
1 2 3
4 5 6
NOTE:Bydefault,passwordsaredisabled.Withpasswordsenabled,youneedtoenteryouruserIDandpasswordtoaccessthesystemMainMenu,EventList,orPlaybackmode.
Itisimportanttosetthecorrecttimetoassureaccuratetimestampsonvideorecordings.
Setting the Date & Time
1.Click toopentheMainMenu.
2.Click toopentheSetupmenu.3.ClickDate/Time Setup.TheDate/TimeSetupmenuappears.4.Configurethefollowing:•Date Mode:Scrollup/downtoselectthedateformatyouwouldliketouse(Y/M/D, D/M/Y, or M/Y/D).TheDatefieldautomaticallychangestothechosenformat.•Date:Scrollup/downtomanuallyselectthedate.•Time: Scrollup/downtomanuallyselectthetime.NOTE:TheDVRdisplaystimein24-hourformat.5.ClickExit/Updatetosaveyoursettings.ThesystemreturnstotheSetupmenu.6.Right-clickuntilallmenusareclosed.Thedateandtimearedisplayedonthebottom-leftcornerofthescreen.
7
4.Alarm5.Backup6.LAN
Password WheelThePasswordWheelisusedtoinputandchangeuserIDsandpasswords.
TousethePasswordWheel:1.Click0~9toenteryouruserIDandpassword.
3
(RECOMMENDED)
(OPTIONAL)
IPADDRESS: _______._______ ._______._______
MACADDRESS: _____:_____:_____:_____:_____:____
Record the information in the section below:
(Required forDDNSregis t rat ion)
HTTPPort:
Setup Edge Lorex Client Software for Local Live Viewing
31.FromthecomputerDesktopdouble-clickLorexClient.Ifasecuritywarningappears,clickYes.2.ClickDVR List.TheDVRlistwindowopens.3.ClickAdd.4.Configurethefollowing:•Name:EnterthenameyouwouldliketouseforyourDVR.Youcanuseyourname,yourcompanyorbusinessname,oranythingofyourchoice.•IP / DDNS:EntertheIPaddressfromtheSystemInformationwindow(asrecordedinStep3-1)•Port:EntertheHTTPport(default:80)fromtheSystemInformationwindow.•ID:EntertheadminIDforlocalviewing(default:9).•Password:Entertheadminpasswordforlocalviewing(default:3333).5.ClickChange.ThenclickClosetoreturntothemainclientwindow.
6.SelectyourDVRfromthedrop-downmenuatthetopofthescreenandclick toconnect.Livevideofromyourcameraswillappearwhentheconnectionissuccessful.
NOTE:Ifthereisnoconnectionwithin15seconds,click andclickagain torefreshtheconnection.
NOTE:YoucannotselecttheoptionstotheleftofthePasswordWheel(userID,password)—youcanonlyselectthedigits.Ifyoumakeamistake,simplyright-
clicktoexitorclick andre-selecttheoptiontotryagain.
Connecting the USB Mouse2 ConnectaUSBmousetooneof
theUSBportsonthefrontofthesystem.
Connecting Cameras (not included)
1 ConnectBNCcamerastotheBNCports(VIDEO INPUT)ontherearpanel.NOTE:TestthecameraspriortoselectingapermanentmountinglocationbytemporarilyconnectingthecamerasandcablestoyourDVR.
NOTE:the8channelmodelisshown
16-CHANNEL: ConnecttheOctopusBNCconnectorforchannels1-8(included)totheVideoINCH1~8portontherearpaneloftheDVR.ConnecttheOctopusBNCconnectorforchannels9-16(included)totheVideoINCH9~16port.Thelabelattheendofeachconnectorindicatesthechannelnumber.
Connecting a Monitor (not included)
OR
3c
ConnecttheVGAorHDMIcable(notincluded)fromthemonitortotheVGAorHDMIportontherearpaneloftheDVR.
OR
3b ConnectaVGAcable(notincluded)fromyourmonitortotheVGAportontherearpaneloftheDVR.
3a ConnectanHDMIcable(notincluded)fromyourTVormonitortotheHDMIportontherearpaneloftheDVR.
NOTE:TheDVRcannotusemultiplemonitorsatthesametime.
Connecting a Touch Monitor (not included)
OCTOPUSCABLE
Power ON the Monitor.
(RECOMMENDED)
(RECOMMENDED)
(OPTIONAL)
ConnectaUSBcable(notincluded)fromthemonitortotheUSBportontherearpaneloftheDVR.
AND
ThisDVRfeaturesuniquetouch-screennavigationcapabilities.ItsupportsWindows7®Touchcompatibletouchscreenmonitorswithoutneedinganyadditionalconfiguration.
RemoteControl
FrontPanelLightTouchControls
TouchScreen(notincluded)
(OPTIONAL)
2
Install Edge Client Software (ON YOUR LOCAL COMPUTER)
1.InsertthesoftwareCDintoyourcomputer.TheAutoplaywindowopens.2.ClickRun Lorex.exe3.ClickDVR SoftwarethenEdge Client Software.4.Followtheon-screeninstructionstoinstall. C
ompu
ter
-not
incl
uded
NOTE: Check the user’s manual for how to install and use the Edge Client software for Mac computers.
CHECK OUR WEBSITE FOR LATEST DVR SOFTWARE FIRMWARE UPGRADES, VIDEOS & DOCUMENTATION.
www.lorextechnology.com
Toenable/disablepasswords:
1.Click toopentheMain Menu.EnteryouruserIDandpasswordifneeded.2.Click .TheSetupmenuopens.3.ClickDVR Password. TheDVRPasswordmenuopens.
80
Office
3333
192.168.5.220
9
EXAMPLE
LH340 EDGE3 Series Quick Setup Guide - English - R1
INTERNET REMOTE MONITORINGINTERNET REMOTE MONITORING INTERNET REMOTE MONITORING INTERNET REMOTE MONITORING INTERNET REMOTE MONITORING
Congratulations!YouhavecompletedStep4successfully.Youcannowconnectovertheinternettoview,setup&backupvideofromyourDVR.
ContinuedContinuedContinued Continued
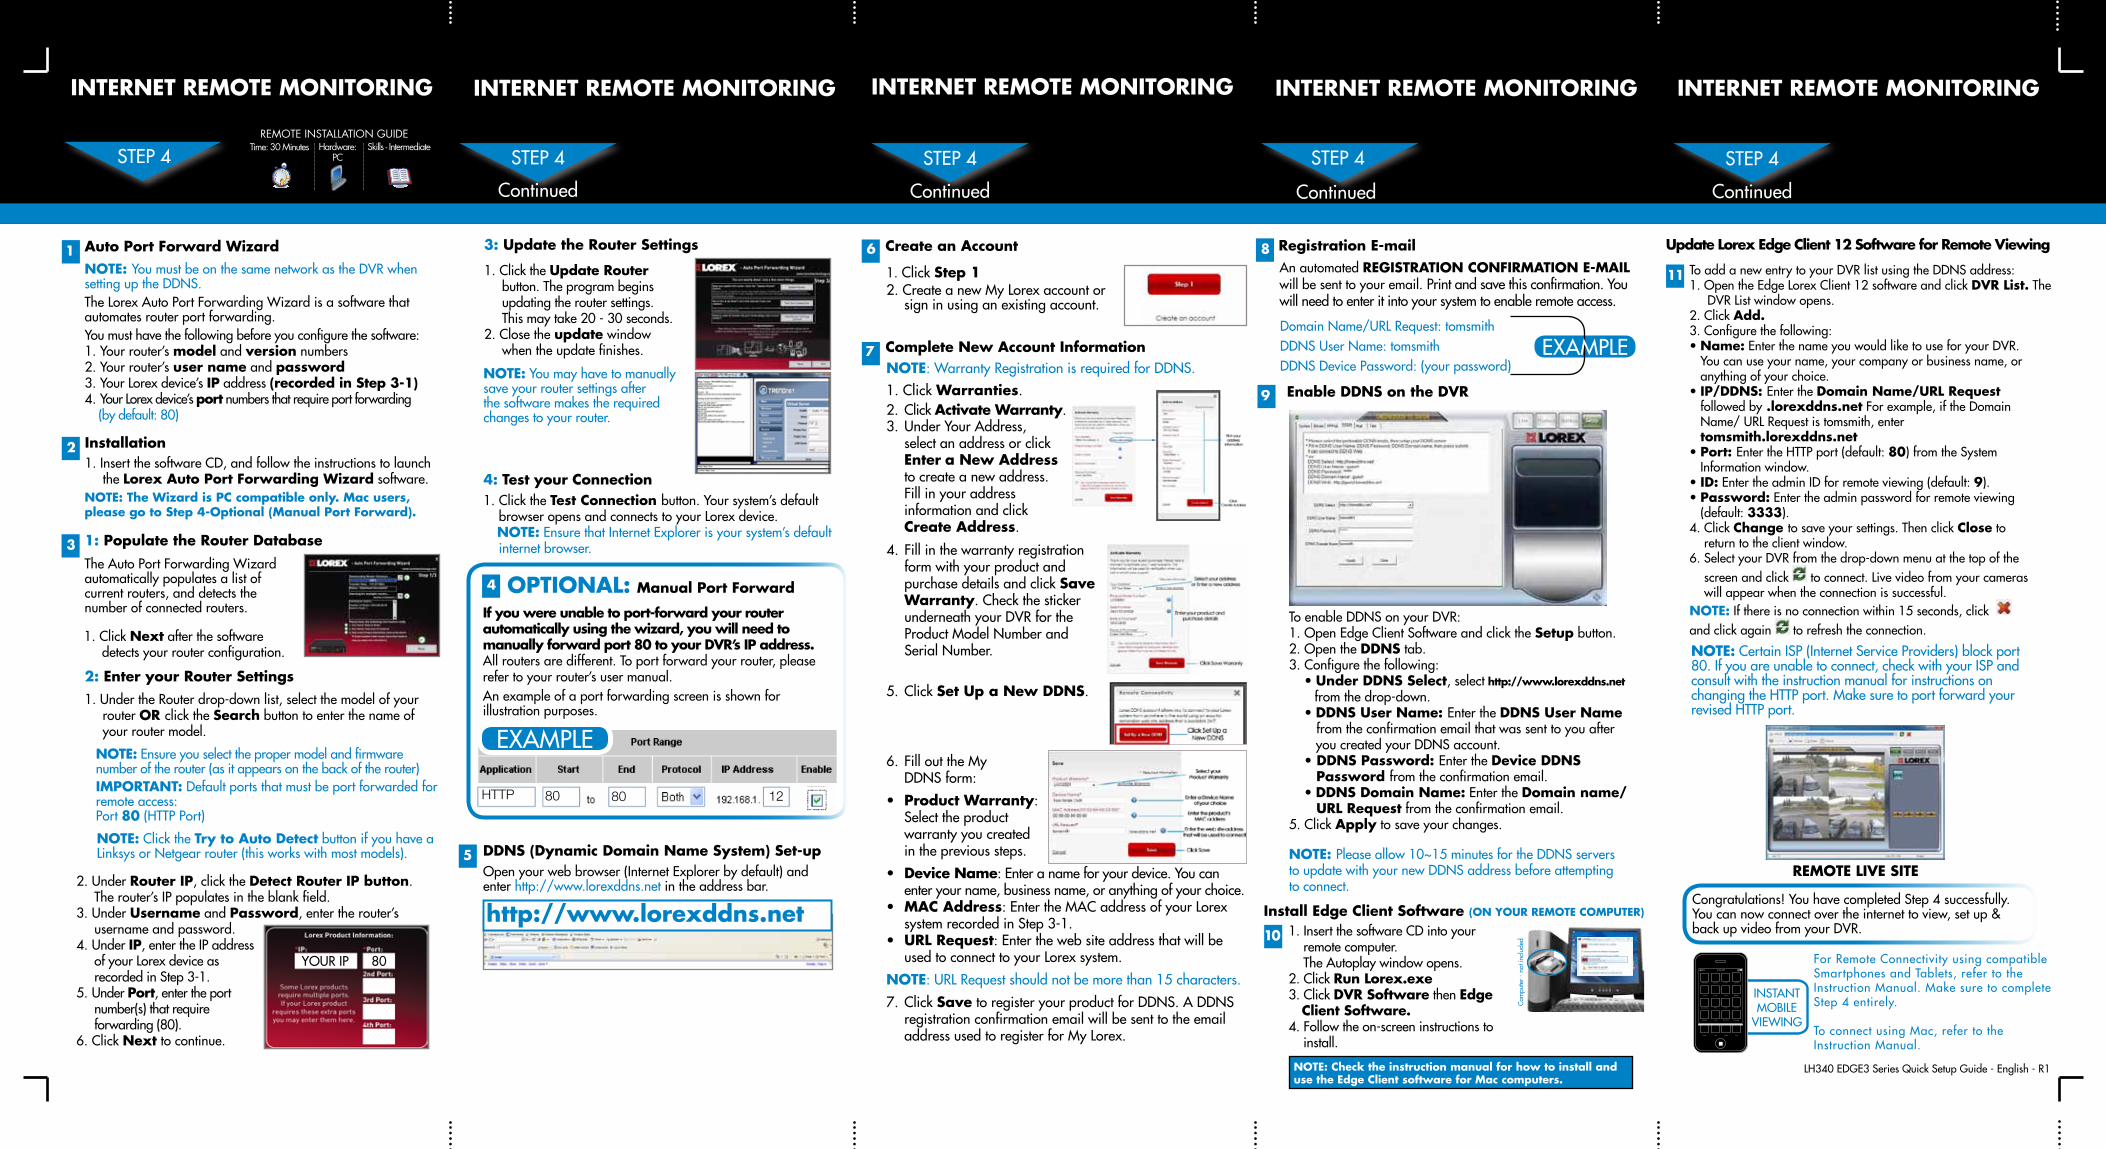
5Openyourwebbrowser(InternetExplorerbydefault)andenterhttp://www.lorexddns.netintheaddressbar.
DDNS (Dynamic Domain Name System) Set-up
http://www.lorexddns.net
1.InsertthesoftwareCD,andfollowtheinstructionstolaunchtheLorex Auto Port Forwarding Wizardsoftware.
Installation2
1: Populate the Router Database3TheAutoPortForwardingWizardautomaticallypopulatesalistofcurrentrouters,anddetectsthenumberofconnectedrouters.
1.ClickNextafterthesoftwaredetectsyourrouterconfiguration.
2.UnderRouter IP,clicktheDetect Router IP button.Therouter’sIPpopulatesintheblankfield.
3.UnderUsernameandPassword,entertherouter’susernameandpassword.
4.UnderIP,entertheIPaddressofyourLorexdeviceasrecordedinStep3-1.
5.UnderPort,entertheportnumber(s)thatrequireforwarding(80).
6.ClickNexttocontinue.
NOTE:ClicktheTry to Auto DetectbuttonifyouhaveaLinksysorNetgearrouter(thisworkswithmostmodels).
2: Enter your Router Settings
80
1.UndertheRouterdrop-downlist,selectthemodelofyourrouterOR clicktheSearchbuttontoenterthenameofyourroutermodel.
NOTE:Ensureyouselectthepropermodelandfirmwarenumberoftherouter(asitappearsonthebackoftherouter)IMPORTANT:Defaultportsthatmustbeportforwardedforremoteaccess:Port80(HTTPPort)
4: Test your Connection1.ClicktheTest Connection button.Yoursystem’sdefaultbrowseropensandconnectstoyourLorexdevice. NOTE:EnsurethatInternetExplorerisyoursystem’sdefaultinternetbrowser.
3: Update the Router Settings
1.ClicktheUpdate Router button.Theprogrambeginsupdatingtheroutersettings. Thismaytake20-30seconds.
2.Closetheupdatewindowwhentheupdatefinishes.
NOTE:Youmayhavetomanuallysaveyourroutersettingsafterthesoftwaremakestherequiredchangestoyourrouter.
ForRemoteConnectivityusingcompatibleSmartphonesandTablets,refertotheInstructionManual.MakesuretocompleteStep4entirely.
ToconnectusingMac,refertotheInstructionManual.
Complete New Account Information7
6 Create an Account
ToaddanewentrytoyourDVRlistusingtheDDNSaddress:1.OpentheEdgeLorexClient12softwareandclickDVR List.The
DVRListwindowopens.2.ClickAdd.3.Configurethefollowing:•Name:EnterthenameyouwouldliketouseforyourDVR.Youcanuseyourname,yourcompanyorbusinessname,oranythingofyourchoice.•IP/DDNS: EntertheDomain Name/URL Request followedby .lorexddns.netForexample,iftheDomainName/URLRequestistomsmith,enter tomsmith.lorexddns.net•Port: EntertheHTTPport(default:80)fromtheSystemInformationwindow.•ID:EntertheadminIDforremoteviewing(default:9).•Password:Entertheadminpasswordforremoteviewing(default:3333).4.ClickChange tosaveyoursettings.ThenclickClosetoreturntotheclientwindow.6.SelectyourDVRfromthedrop-downmenuatthetopofthescreenandclick toconnect.Livevideofromyourcameraswillappearwhentheconnectionissuccessful.NOTE:Ifthereisnoconnectionwithin15seconds,click andclickagain torefreshtheconnection.
Auto Port Forward Wizard1
TheLorexAutoPortForwardingWizardisasoftwarethatautomatesrouterportforwarding.
NOTE: YoumustbeonthesamenetworkastheDVRwhensettinguptheDDNS.
Youmusthavethefollowingbeforeyouconfigurethesoftware:1.Yourrouter’smodelandversionnumbers2.Yourrouter’suser nameandpassword3.YourLorexdevice’sIPaddress(recorded in Step 3-1)4.YourLorexdevice’sportnumbersthatrequireportforwarding(bydefault:80)
OPTIONAL: Manual Port Forward4
If you were unable to port-forward your router automatically using the wizard, you will need to manually forward port 80 to your DVR’s IP address. Allroutersaredifferent.Toportforwardyourrouter,pleaserefertoyourrouter’susermanual.Anexampleofaportforwardingscreenisshownforillustrationpurposes.
8AnautomatedREGISTRATION CONFIRMATION E-MAIL willbesenttoyouremail.Printandsavethisconfirmation.Youwillneedtoenteritintoyoursystemtoenableremoteaccess.
Registration E-mail
DomainName/URLRequest:tomsmithDDNSUserName:tomsmithDDNSDevicePassword:(yourpassword)
EXAMPLE
80 80HTTP
EXAMPLE
12
STEP4 STEP4 STEP4 STEP4 STEP4REMOTE INSTALLATION GUIDE
Time: 30 Minutes Skills - IntermediateHardware: PC
Skill Level
Intermediateeasy advanced
Time
under 30 minutesunder 15 minutes under 60 minutes
Hand Tools Hardware
Router
Hi Speed
over 60 minutes
Update Lorex Edge Client 12 Software for Remote Viewing
11
10
REMOTE LIVE SITE
YOURIP
ToenableDDNSonyourDVR:1.OpenEdgeClientSoftwareandclicktheSetupbutton.2.OpentheDDNStab.3.Configurethefollowing:•Under DDNS Select,selecthttp://www.lorexddns.net fromthedrop-down.•DDNS User Name: EntertheDDNS User Name fromtheconfirmationemailthatwassenttoyouafteryoucreatedyourDDNSaccount.• DDNS Password: EntertheDevice DDNS Password fromtheconfirmationemail.•DDNS Domain Name:EntertheDomain name/ URL Requestfromtheconfirmationemail.5.ClickApplytosaveyourchanges.
Enable DDNS on the DVR
NOTE: Pleaseallow10~15minutesfortheDDNSserverstoupdatewithyournewDDNSaddressbeforeattemptingtoconnect.
Install Edge Client Software (ON YOUR REMOTE COMPUTER)
1.InsertthesoftwareCDintoyourremotecomputer.TheAutoplaywindowopens.2.ClickRun Lorex.exe3.ClickDVR SoftwarethenEdge Client Software.4.Followtheon-screeninstructionstoinstall.
Com
pute
r-n
otin
clud
ed
NOTE: Check the instruction manual for how to install and use the Edge Client software for Mac computers.
9
NOTE: The Wizard is PC compatible only. Mac users, please go to Step 4-Optional (Manual Port Forward).
1.ClickStep 12.CreateanewMyLorexaccountor
signinusinganexistingaccount.
3.UnderYourAddress,selectanaddressorclickEnter a New Address tocreateanewaddress.FillinyouraddressinformationandclickCreate Address.
1.ClickWarranties.2.ClickActivate Warranty.
NOTE:WarrantyRegistrationisrequiredforDDNS.
4. FillinthewarrantyregistrationformwithyourproductandpurchasedetailsandclickSave Warranty.CheckthestickerunderneathyourDVRfortheProductModelNumberandSerialNumber.
5.ClickSet Up a New DDNS.
7.ClickSavetoregisteryourproductforDDNS.ADDNSregistrationconfirmationemailwillbesenttotheemailaddressusedtoregisterforMyLorex.
NOTE:URLRequestshouldnotbemorethan15characters.
6. FillouttheMyDDNSform:
• Product Warranty:Selecttheproductwarrantyyoucreatedintheprevioussteps.
• Device Name:Enteranameforyourdevice.Youcanenteryourname,businessname,oranythingofyourchoice.
• MAC Address:EntertheMACaddressofyourLorexsystemrecordedinStep3-1.
• URL Request:EnterthewebsiteaddressthatwillbeusedtoconnecttoyourLorexsystem.
NOTE:CertainISP(InternetServiceProviders)blockport80.Ifyouareunabletoconnect,checkwithyourISPandconsultwiththeinstructionmanualforinstructionsonchangingtheHTTPport.MakesuretoportforwardyourrevisedHTTPport.
inStantMOBILE
VieWing