Embed Size (px)
Citation preview

Guidelines and Considerations forPerformance and Scaling your Red HatEnterprise Linux OpenStack Platform 6
CloudJoe Talerico, Roger Lopez
Version 1.1, 2015-09-09

Table of ContentsComments and Feedback . . . . . . . . . . . . . . . . . . . . . . . . . . . . . . . . . . . . . . . . . . . . . . . . . . . . . . . . . . . . . . . . . . . . . . . 2
Staying In Touch . . . . . . . . . . . . . . . . . . . . . . . . . . . . . . . . . . . . . . . . . . . . . . . . . . . . . . . . . . . . . . . . . . . . . . . . . . . . . 2
Like us on Facebook . . . . . . . . . . . . . . . . . . . . . . . . . . . . . . . . . . . . . . . . . . . . . . . . . . . . . . . . . . . . . . . . . . . . . . . 2
Follow us on Twitter . . . . . . . . . . . . . . . . . . . . . . . . . . . . . . . . . . . . . . . . . . . . . . . . . . . . . . . . . . . . . . . . . . . . . . . 2
Plus us on Google+ . . . . . . . . . . . . . . . . . . . . . . . . . . . . . . . . . . . . . . . . . . . . . . . . . . . . . . . . . . . . . . . . . . . . . . . . . 2
1. Executive Summary. . . . . . . . . . . . . . . . . . . . . . . . . . . . . . . . . . . . . . . . . . . . . . . . . . . . . . . . . . . . . . . . . . . . . . . . . . 3
2. Reference Architecture Environment . . . . . . . . . . . . . . . . . . . . . . . . . . . . . . . . . . . . . . . . . . . . . . . . . . . . . . . . . . 4
2.1. Reference Architecture Overview . . . . . . . . . . . . . . . . . . . . . . . . . . . . . . . . . . . . . . . . . . . . . . . . . . . . . . . . . . . 4
2.2. Network Topology . . . . . . . . . . . . . . . . . . . . . . . . . . . . . . . . . . . . . . . . . . . . . . . . . . . . . . . . . . . . . . . . . . . . . . . . 5
2.3. Network Traffic Types . . . . . . . . . . . . . . . . . . . . . . . . . . . . . . . . . . . . . . . . . . . . . . . . . . . . . . . . . . . . . . . . . . . . 7
2.4. Hardware Details . . . . . . . . . . . . . . . . . . . . . . . . . . . . . . . . . . . . . . . . . . . . . . . . . . . . . . . . . . . . . . . . . . . . . . . . 8
2.5. Software Version Details . . . . . . . . . . . . . . . . . . . . . . . . . . . . . . . . . . . . . . . . . . . . . . . . . . . . . . . . . . . . . . . . . . 9
3. Reference Architecture Configuration Details . . . . . . . . . . . . . . . . . . . . . . . . . . . . . . . . . . . . . . . . . . . . . . . . . 12
3.1. /etc/resolv.conf . . . . . . . . . . . . . . . . . . . . . . . . . . . . . . . . . . . . . . . . . . . . . . . . . . . . . . . . . . . . . . . . . . . . . . . . . . 12
3.2. Network Configuration . . . . . . . . . . . . . . . . . . . . . . . . . . . . . . . . . . . . . . . . . . . . . . . . . . . . . . . . . . . . . . . . . . 13
3.2.1. External Network . . . . . . . . . . . . . . . . . . . . . . . . . . . . . . . . . . . . . . . . . . . . . . . . . . . . . . . . . . . . . . . . . . . 13
3.2.2. Tenant Network . . . . . . . . . . . . . . . . . . . . . . . . . . . . . . . . . . . . . . . . . . . . . . . . . . . . . . . . . . . . . . . . . . . . . 14
3.2.3. Storage Network . . . . . . . . . . . . . . . . . . . . . . . . . . . . . . . . . . . . . . . . . . . . . . . . . . . . . . . . . . . . . . . . . . . . 14
3.2.4. Provisioning Network . . . . . . . . . . . . . . . . . . . . . . . . . . . . . . . . . . . . . . . . . . . . . . . . . . . . . . . . . . . . . . . . 15
3.3. OS Configuration . . . . . . . . . . . . . . . . . . . . . . . . . . . . . . . . . . . . . . . . . . . . . . . . . . . . . . . . . . . . . . . . . . . . . . . . 15
3.3.1. Using the Red Hat Subscription Manager . . . . . . . . . . . . . . . . . . . . . . . . . . . . . . . . . . . . . . . . . . . . . . 15
3.3.2. Required Channels . . . . . . . . . . . . . . . . . . . . . . . . . . . . . . . . . . . . . . . . . . . . . . . . . . . . . . . . . . . . . . . . . . . 17
3.3.3. Setting up Extra Packages for Enterprise Linux (EPEL) . . . . . . . . . . . . . . . . . . . . . . . . . . . . . . . . . . 21
3.3.4. NTP Configuration . . . . . . . . . . . . . . . . . . . . . . . . . . . . . . . . . . . . . . . . . . . . . . . . . . . . . . . . . . . . . . . . . . 22
3.3.5. Configuring Security-Enhanced Linux (SELinux) . . . . . . . . . . . . . . . . . . . . . . . . . . . . . . . . . . . . . . . 24
3.3.6. Configuring Firewall Settings . . . . . . . . . . . . . . . . . . . . . . . . . . . . . . . . . . . . . . . . . . . . . . . . . . . . . . . . . 25
3.3.7. Optimizing Red Hat Enterprise Linux OpenStack Platform 6 Environment using Tuned . . . . . 25
4. Red Hat Enterprise Linux OpenStack Platform 6 Configuration . . . . . . . . . . . . . . . . . . . . . . . . . . . . . . . . . 28
4.1. Installing the Red Hat Enterprise Linux OpenStack Platform Installer . . . . . . . . . . . . . . . . . . . . . . . 28
4.2. Local Repository of Installation Media Prerequisite . . . . . . . . . . . . . . . . . . . . . . . . . . . . . . . . . . . . . . . . 28
4.3. Running the Red Hat Enterprise Linux OpenStack Platform Installer . . . . . . . . . . . . . . . . . . . . . . . . 29
4.4. Create the Local Repository . . . . . . . . . . . . . . . . . . . . . . . . . . . . . . . . . . . . . . . . . . . . . . . . . . . . . . . . . . . . . . 35
5. Overview of eDeploy’s Automatic Health Check (AHC) . . . . . . . . . . . . . . . . . . . . . . . . . . . . . . . . . . . . . . . . . 37
5.1. Creating the eDeploy’s Automatic Health Check (AHC) Custom OS Image . . . . . . . . . . . . . . . . . . . . . . 38
5.2. Analyzing the eDeploy’s Automatic Health Check (AHC) Results . . . . . . . . . . . . . . . . . . . . . . . . . . . . . . 43
5.2.1. Analyzing Results using Summary View . . . . . . . . . . . . . . . . . . . . . . . . . . . . . . . . . . . . . . . . . . . . . . . 45

5.2.2. Analyzing Results using Detail View . . . . . . . . . . . . . . . . . . . . . . . . . . . . . . . . . . . . . . . . . . . . . . . . . . . 46
6. Creating a Red Hat Enterprise Linux OpenStack Platform 6 Deployment . . . . . . . . . . . . . . . . . . . . . . . . . 47
7. Storage Configuration of Ceph Nodes . . . . . . . . . . . . . . . . . . . . . . . . . . . . . . . . . . . . . . . . . . . . . . . . . . . . . . . . . 55
7.1. Install and Configure Ceph Admin Server . . . . . . . . . . . . . . . . . . . . . . . . . . . . . . . . . . . . . . . . . . . . . . . . . . 55
7.2. RHEL-OSP and Red Hat Ceph Storage Integration . . . . . . . . . . . . . . . . . . . . . . . . . . . . . . . . . . . . . . . . . . . 57
8. Validating and Benchmarking Red Hat Enterprise Linux OpenStack Platform using Tempest, Rally,
and CBTOOL
69
8.1. Tempest . . . . . . . . . . . . . . . . . . . . . . . . . . . . . . . . . . . . . . . . . . . . . . . . . . . . . . . . . . . . . . . . . . . . . . . . . . . . . . . . 69
8.1.1. Before you Begin . . . . . . . . . . . . . . . . . . . . . . . . . . . . . . . . . . . . . . . . . . . . . . . . . . . . . . . . . . . . . . . . . . . . 69
8.1.2. Validating using Tempest . . . . . . . . . . . . . . . . . . . . . . . . . . . . . . . . . . . . . . . . . . . . . . . . . . . . . . . . . . . . 71
8.1.3. Getting Started with Tempest . . . . . . . . . . . . . . . . . . . . . . . . . . . . . . . . . . . . . . . . . . . . . . . . . . . . . . . . . 71
8.1.4. Tempest Package Requirements . . . . . . . . . . . . . . . . . . . . . . . . . . . . . . . . . . . . . . . . . . . . . . . . . . . . . . . 71
8.1.5. Tempest Configuration . . . . . . . . . . . . . . . . . . . . . . . . . . . . . . . . . . . . . . . . . . . . . . . . . . . . . . . . . . . . . . . 72
8.2. Rally . . . . . . . . . . . . . . . . . . . . . . . . . . . . . . . . . . . . . . . . . . . . . . . . . . . . . . . . . . . . . . . . . . . . . . . . . . . . . . . . . . . 74
8.2.1. Before you Begin . . . . . . . . . . . . . . . . . . . . . . . . . . . . . . . . . . . . . . . . . . . . . . . . . . . . . . . . . . . . . . . . . . . . 74
8.2.2. Rally Installation . . . . . . . . . . . . . . . . . . . . . . . . . . . . . . . . . . . . . . . . . . . . . . . . . . . . . . . . . . . . . . . . . . . . 74
8.2.3. Rally Configuration . . . . . . . . . . . . . . . . . . . . . . . . . . . . . . . . . . . . . . . . . . . . . . . . . . . . . . . . . . . . . . . . . . 75
8.2.4. Rally Verification . . . . . . . . . . . . . . . . . . . . . . . . . . . . . . . . . . . . . . . . . . . . . . . . . . . . . . . . . . . . . . . . . . . . 80
8.2.5. Benchmarking with Rally . . . . . . . . . . . . . . . . . . . . . . . . . . . . . . . . . . . . . . . . . . . . . . . . . . . . . . . . . . . . 81
8.3. Cloud Rapid Experimentation and Analysis Toolkit (CBTOOL) . . . . . . . . . . . . . . . . . . . . . . . . . . . . . . . . 84
8.3.1. Before you Begin . . . . . . . . . . . . . . . . . . . . . . . . . . . . . . . . . . . . . . . . . . . . . . . . . . . . . . . . . . . . . . . . . . . . 84
8.3.2. CBTOOL Virtual Machine . . . . . . . . . . . . . . . . . . . . . . . . . . . . . . . . . . . . . . . . . . . . . . . . . . . . . . . . . . . . 84
8.3.3. CBTOOL Extending Tenant network . . . . . . . . . . . . . . . . . . . . . . . . . . . . . . . . . . . . . . . . . . . . . . . . . . . 85
8.3.4. Installation of CBTOOL Orchestrator role within a VM . . . . . . . . . . . . . . . . . . . . . . . . . . . . . . . . . . 88
8.3.5. Configuring the CBTOOL Orchestrator VM . . . . . . . . . . . . . . . . . . . . . . . . . . . . . . . . . . . . . . . . . . . . . 90
8.3.6. Preparing a CBTOOL Workload VM . . . . . . . . . . . . . . . . . . . . . . . . . . . . . . . . . . . . . . . . . . . . . . . . . . . 94
8.3.7. Benchmarking with the CBTOOL . . . . . . . . . . . . . . . . . . . . . . . . . . . . . . . . . . . . . . . . . . . . . . . . . . . . . . 96
9. Analyzing Red Hat Enterprise Linux OpenStack Platform 6 Benchmark Results with Rally . . . . . . . 100
9.1. Initial boot-storm Rally Results . . . . . . . . . . . . . . . . . . . . . . . . . . . . . . . . . . . . . . . . . . . . . . . . . . . . . . . . . . 103
9.2. Rally boot-storm Results with HAProxy Modification . . . . . . . . . . . . . . . . . . . . . . . . . . . . . . . . . . . . . . 104
9.3. Rally Max Guest Launch . . . . . . . . . . . . . . . . . . . . . . . . . . . . . . . . . . . . . . . . . . . . . . . . . . . . . . . . . . . . . . . . 107
10. Analyzing Red Hat Enterprise Linux OpenStack Platform 6 Benchmark Results with CBTOOL . . . 111
10.1. Analyzing Linpack Results . . . . . . . . . . . . . . . . . . . . . . . . . . . . . . . . . . . . . . . . . . . . . . . . . . . . . . . . . . . . . 111
10.2. Analyzing the FIO Results . . . . . . . . . . . . . . . . . . . . . . . . . . . . . . . . . . . . . . . . . . . . . . . . . . . . . . . . . . . . . . 112
10.3. Analyzing Netperf Results . . . . . . . . . . . . . . . . . . . . . . . . . . . . . . . . . . . . . . . . . . . . . . . . . . . . . . . . . . . . . . 118
11. Conclusion . . . . . . . . . . . . . . . . . . . . . . . . . . . . . . . . . . . . . . . . . . . . . . . . . . . . . . . . . . . . . . . . . . . . . . . . . . . . . . . 120
12. Troubleshoot . . . . . . . . . . . . . . . . . . . . . . . . . . . . . . . . . . . . . . . . . . . . . . . . . . . . . . . . . . . . . . . . . . . . . . . . . . . . . 122
12.1. Red Hat Enterprise Linux OpenStack Platform 6 Installation . . . . . . . . . . . . . . . . . . . . . . . . . . . . . 122

Appendix A: Revision History . . . . . . . . . . . . . . . . . . . . . . . . . . . . . . . . . . . . . . . . . . . . . . . . . . . . . . . . . . . . . . . . . 123
Appendix B: Contributors . . . . . . . . . . . . . . . . . . . . . . . . . . . . . . . . . . . . . . . . . . . . . . . . . . . . . . . . . . . . . . . . . . . . 124
Appendix C: Ceph Configuration File . . . . . . . . . . . . . . . . . . . . . . . . . . . . . . . . . . . . . . . . . . . . . . . . . . . . . . . . . . 125
Appendix D: Open vSwitch Configuration . . . . . . . . . . . . . . . . . . . . . . . . . . . . . . . . . . . . . . . . . . . . . . . . . . . . . . 126
Appendix E: Tempest Package Requirements Text File . . . . . . . . . . . . . . . . . . . . . . . . . . . . . . . . . . . . . . . . . . 128
Appendix F: Tempest Skip File (ra-skip-file) . . . . . . . . . . . . . . . . . . . . . . . . . . . . . . . . . . . . . . . . . . . . . . . . . . . . 129
Appendix G: Rally JSON file . . . . . . . . . . . . . . . . . . . . . . . . . . . . . . . . . . . . . . . . . . . . . . . . . . . . . . . . . . . . . . . . . . . 130
Appendix H: Ceph Admin Virtual Machine XML . . . . . . . . . . . . . . . . . . . . . . . . . . . . . . . . . . . . . . . . . . . . . . . . 131
Appendix I: LinPack CBTOOL Client Script (ProvisionVMs.py) . . . . . . . . . . . . . . . . . . . . . . . . . . . . . . . . . . . 135
Appendix J: Fio Provisioning VMs Python Script (FioProvisionVMs.py) . . . . . . . . . . . . . . . . . . . . . . . . . . . 140
Appendix K: Netperf CBTOOL Client Script (NetProvisionVMs.py) . . . . . . . . . . . . . . . . . . . . . . . . . . . . . . . . 145
Appendix L: Configuration Scripts. . . . . . . . . . . . . . . . . . . . . . . . . . . . . . . . . . . . . . . . . . . . . . . . . . . . . . . . . . . . . 150
Appendix M: References. . . . . . . . . . . . . . . . . . . . . . . . . . . . . . . . . . . . . . . . . . . . . . . . . . . . . . . . . . . . . . . . . . . . . . 151

100 East Davie StreetRaleigh NC 27601 USAPhone: +1 919 754 3700Phone: 888 733 4281Fax: +1 919 754 3701PO Box 13588Research Triangle Park NC 27709 USA
Linux is a registered trademark of Linus Torvalds. Red Hat, Red Hat EnterpriseLinux and the Red Hat "Shadowman" logo are registered trademarks of Red Hat,Inc. in the United States and other countries.
Ceph is a registered trademark of Red Hat, Inc.
UNIX is a registered trademark of The Open Group.
Intel, the Intel logo and Xeon are registered trademarks of Intel Corporation or itssubsidiaries in the United States and other countries. All other trademarksreferenced herein are the property of their respective owners.
© 2015 by Red Hat, Inc. This material may be distributed only subject to the termsand conditions set forth in the Open Publication License, V1.0 or later (the latestversion is presently available at http://www.opencontent.org/openpub/).
The information contained herein is subject to change without notice. Red Hat, Inc.shall not be liable for technical or editorial errors or omissions contained herein.
Distribution of modified versions of this document is prohibited without theexplicit permission of Red Hat Inc.
Distribution of this work or derivative of this work in any standard (paper) bookform for commercial purposes is prohibited unless prior permission is obtainedfrom Red Hat Inc.
The GPG fingerprint of the [email protected] key is: CA 20 86 86 2B D6 9D FC 65F6 EC C4 21 91 80 CD DB 42 A6 0E
Send feedback to [email protected]
www.redhat.com 1 [email protected]

Comments and FeedbackIn the spirit of open source, we invite anyone to provide feedback and comments on any referencearchitecture. Although we review our papers internally, sometimes issues or typographical errors areencountered. Feedback allows us to not only improve the quality of the papers we produce, but allowsthe reader to provide their thoughts on potential improvements and topic expansion to the papers.Feedback on the papers can be provided by emailing [email protected]. Please refer to thetitle within the email.
Staying In TouchJoin us on some of the popular social media sites where we keep our audience informed on newreference architectures as well as offer related information on things we find interesting.
Like us on Facebook
https://www.facebook.com/rhrefarch
Follow us on Twitter
https://twitter.com/RedHatRefArch
Plus us on Google+
https://plus.google.com/u/0/b/114152126783830728030/
[email protected] 2 www.redhat.com
1. Executive SummaryAs the adoption of OpenStack increases, the industry seeks to learn about OpenStack’s reliability andscalability for production environments. Common questions that typically arise are “How muchhardware do I need?”, “Is my hardware working as intended?”, “What are the best practices for scalingout?” among others. The purpose of this reference architecture is to answer these questions byutilizing common benchmark workloads to simulate load upon a scaling OpenStack environment todetermine bottlenecks that may arise and how to overcome them. Specifically, this referencearchitecture shares sample results from Rally used to create boot-storms and validate max-guest perhost of the compute servers, tuning around issues found during boot-storm testing, tuning networkingMTU sizes, using the CBTOOL to synchronize benchmark results for CPU linpack, filesystem I/O usingfio, client/server networking using netperf, and performance differences when moving fromephemeral storage to cinder utilizing external Ceph servers.
It is best suited for system, storage, and OpenStack administrators deploying Red Hat Enterprise LinuxOpenStack Platform 6 (RHEL-OSP 6) with the intent of scaling their private cloud environment. Toachieve the goal of answering these questions, the following tasks are covered within this referencearchitecture:
• Validating the level of performance provided by the physical hardware prior to deploying theOpenStack environment using eDeploy’s Automatic Health Check (AHC)
• Deploying Red Hat Enterprise Linux OpenStack Platform 6 using the RHEL-OSP Installer usingephermal storage
• Deploying Red Hat Enterprise Linux OpenStack Platform 6 using the RHEL-OSP Installer using RedHat Ceph Storage [1: Ceph Storage - http://www.inktank.com/openstack-storage-solutions/]
• Validating the OpenStack deployment to ensure proper OpenStack functionality using Tempest [2:Tempest- http://docs.openstack.org/developer/tempest/overview.html]
• Capture, present, and analyze benchmark results using Linpack [3: Linpack - http://www.netlib.org]
• Capture, present, and analyze different benchmark workload scenario results using Rally [4: Rally -https://wiki.openstack.org/wiki/Rally]
• Capture, present, and analyze different benchmark workload scenario results using the CloudRapid Experimentation and Analysis Toolkit (CBTOOL) [5: CBTOOL -https://pypi.python.org/pypi/cloudbench/0.14.1]
• Detail the best practices to optimize a Red Hat Enterprise Linux OpenStack Platform 6 environment
www.redhat.com 3 [email protected]

2. Reference Architecture EnvironmentThis section focuses on the components for the deployment and scaling of Red Hat Enterprise LinuxOpenStack Platform 6 on Red Hat Enterprise Linux 7 AMD64.
2.1. Reference Architecture OverviewA pictorial representation of the environment in this reference environment is shown below.
Figure 2.1: Reference Environment Overview
[email protected] 4 www.redhat.com

2.2. Network TopologyThe network topology in this reference environment consists of a Cisco Nexus 7010 switch that is VLANsegmented for the different network traffic types.
Within the RHEL-OSP Provisioning node (Installer node), the following Ethernet devices connect to aspecified network.
• em1 External network
• em2 master bridge labeled brmgt
• em3 Management network
• p1p1 Tenant network
• brmgt Default network
• br-int Open vSwitch bridge for local guests
• br-tun OVS bridge for tunnel traffic
• macvtap0@em1 External network access to ceph-admin VM
• macvtap1@em1 External network access to tempest VM
• macvtap2@em1 External network access to rally VM
• macvtap3@em1 External network access to cbtool VM
www.redhat.com 5 [email protected]

The bridge labeled brmgt provides Default network access to the virtual machines that reside within theProvisioning node. MacVTap, a simplified networking bridge, provides External network access to thevirtual machines that reside within the Provisioning node. The virtual machines located within theProvisioning node are labeled: ceph-admin, tempest, rally, cbtool. These virtual machines allow for thebenchmarking and scaling of the RHEL-OSP cloud environment. A pictorial representation of thenetworking bridges is shown below.
Figure 2.2: Networking Bridges within Provisioning Node
Within the Controller nodes and the Compute nodes, the following Ethernet devices connect to aspecified network.
• eno1 attached to bridge br-ex
• eno2 Default network
• eno3 Cluster Management network
• eno4 Management network
• enp4s0f0 Tenant network
• enp4s0f1 Storage network
• br-ex External network
[email protected] 6 www.redhat.com

Within the Ceph OSD nodes, the following Ethernet devices connect to a specified network.
• eno2 Default network
• enp66s0f0 Storage network
A pictorial representation of this reference environment is shown in Reference Architecture Overview.
2.3. Network Traffic TypesThis section describes the different network traffic types when installing RHEL-OSP 6. By default,RHEL-OSP 6 installation places all network traffic types under the Default traffic type with thefollowing exceptions:
• Tenant network
• External network
The network traffic types include:
• Provisioning - The provisioning network deploys the different hosts that interact with the RHEL-OSP Installer.
• External - The external network sets connectivity outside the internal network.
• Tenant - The tenant network routes internal traffic and provides access among the virtualinstances.
• Management - The management network routes internal communication between RHEL-OSPcomponents.
• Cluster Management - The cluster management network routes internal cluster communicationbetween Pacemaker and Galera.
• Storage Clustering - The storage clustering network routes internal cluster communication betweenCeph nodes.
• Storage - The storage network routes storage traffic connectivity between controller, compute, andCeph nodes.
• Public API - The public API network provides access to all of RHEL-OSP’s APIs to tenants. It includessetting up access to the RESTFUL API and the Horizon Graphical User Interface.
• Admin API - The admin API network provides administrative access to various RHEL-OSP services.
www.redhat.com 7 [email protected]

2.4. Hardware DetailsTable 1. Hardware Details
Hardware Specifications
Provisioning node (RHEL-OSP Installer) [1 x DellPowerEdge R610 ]
Red Hat Enterprise Linux 7.1 x86_64 kernel 3.10.0-229.el7.x86_64
4 x Broadcom Gigabit Ethernet 5709C
2 Socket, 12 Core (24 cores) Intel® Xeon® CPUX5650 @ 2.67 Ghz
48 GB of memory, DDR3 8GB @ 1333 MHz
2 x 500 GB SAS internal disk drives
Controller node [3 x Dell PowerEdge R610] Red Hat Enterprise Linux 7.1 x86_64 kernel 3.10.0-229.el7.x86_64
4 x Broadcom Gigabit Ethernet 5709C
2 Socket, 12 Core (24 cores) Intel® Xeon® CPUX5650 @ 2.67 Ghz
48 GB of memory, DDR3 8GB @ 1333 MHz
2 x 500 GB SAS internal disk drives
Compute nodes [8 x Dell PowerEdge R610] Red Hat Enterprise Linux 7.1 x86_64 kernel 3.10.0-229.el7.x86_64
4 x Broadcom Gigabit Ethernet 5709C
2 Socket, 12 Core (24 cores) Intel® Xeon® CPUX5650 @ 2.67 Ghz
48 GB of memory, DDR3 8GB @ 1333 MHz
2 x 500 GB SAS internal disk drives
Ceph Storage nodes [4 x Dell PowerEdge R720xd] Red Hat Enterprise Linux 7.0 x86_64 kernel 3.10.0-123.el7.x86_64
4 x Broadcom Gigabit Ethernet 5709C 2 x IntelCorporation Ethernet 10G 2P X520 Adapter
2 Socket, 12 Core (24 cores) Intel® Xeon® CPUX5650 @ 2.67 Ghz
48 GB of memory, DDR3 8GB @ 1333 MHz
2 x 500 GB SAS internal disk drives; 12 x 1 TB SASinternal disk drives
[email protected] 8 www.redhat.com

Hardware Specifications
Switch Cisco Nexus 7010
2.5. Software Version DetailsThe following tables provide the installed software versions for the different servers that make up theRHEL-OSP 6 reference environment.
Table 2. RHEL-OSP Installer Software Versions
Software Version
rhel-osp-installer 0.5.7-3.el7ost
rhel-osp-installer-client 0.5.7-3.el7ost
puppet 3.6.2-2.el7
foreman 1.6.0.49-6.el7ost
dnsmasq 2.66-12.el7
dhcp 4.2.5-36.el7
foreman-discovery-image 7.0-20150227.0.el7ost
foreman-installer 1.6.0-0.3.RC1.el7ost
foreman-postgresql 1.6.0.49-6.el7ost
foreman-proxy 1.6.0.30-6.el7ost
foreman-selinux 1.6.0.14-1.el7sat
www.redhat.com 9 [email protected]
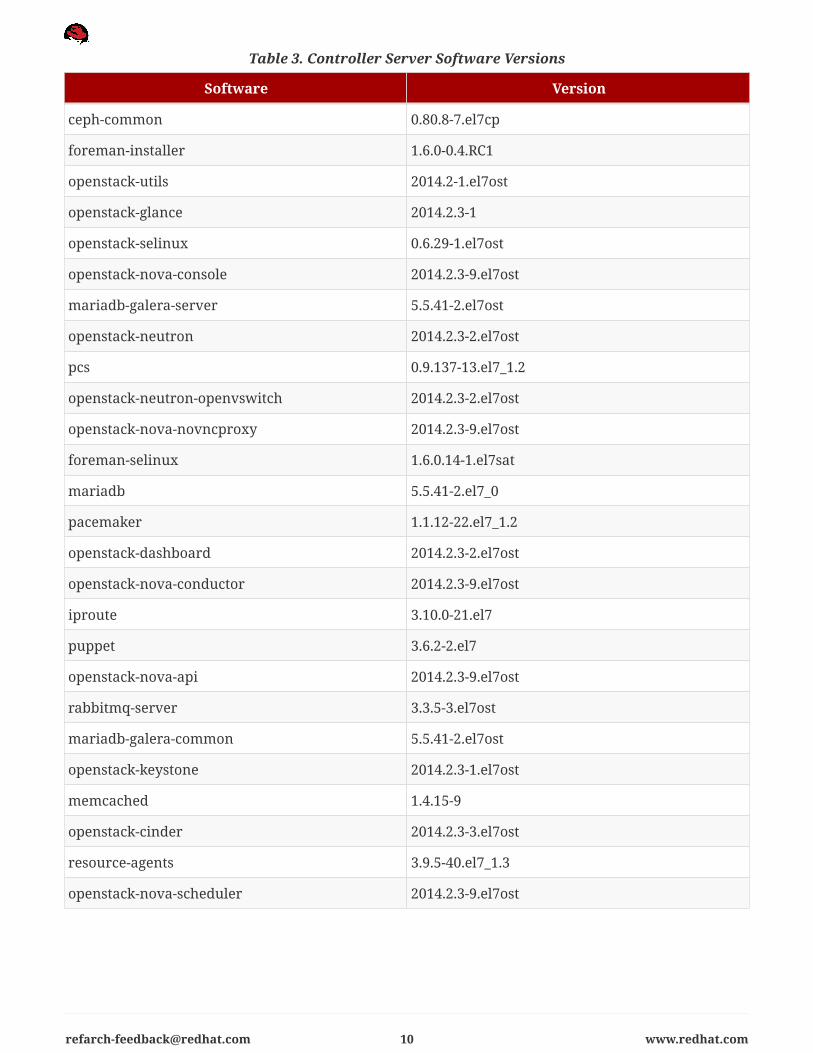
Table 3. Controller Server Software Versions
Software Version
ceph-common 0.80.8-7.el7cp
foreman-installer 1.6.0-0.4.RC1
openstack-utils 2014.2-1.el7ost
openstack-glance 2014.2.3-1
openstack-selinux 0.6.29-1.el7ost
openstack-nova-console 2014.2.3-9.el7ost
mariadb-galera-server 5.5.41-2.el7ost
openstack-neutron 2014.2.3-2.el7ost
pcs 0.9.137-13.el7_1.2
openstack-neutron-openvswitch 2014.2.3-2.el7ost
openstack-nova-novncproxy 2014.2.3-9.el7ost
foreman-selinux 1.6.0.14-1.el7sat
mariadb 5.5.41-2.el7_0
pacemaker 1.1.12-22.el7_1.2
openstack-dashboard 2014.2.3-2.el7ost
openstack-nova-conductor 2014.2.3-9.el7ost
iproute 3.10.0-21.el7
puppet 3.6.2-2.el7
openstack-nova-api 2014.2.3-9.el7ost
rabbitmq-server 3.3.5-3.el7ost
mariadb-galera-common 5.5.41-2.el7ost
openstack-keystone 2014.2.3-1.el7ost
memcached 1.4.15-9
openstack-cinder 2014.2.3-3.el7ost
resource-agents 3.9.5-40.el7_1.3
openstack-nova-scheduler 2014.2.3-9.el7ost
[email protected] 10 www.redhat.com

Table 4. Compute Node Software Versions
Software Version
openstack-nova-compute 2014.2.3-9.el7ost
openstack-utils 2014.2-1.el7ost
python-cinderclient 1.1.1-1.el7ost
openstack-neutron-openvswitch 2014.2.3-2.el7ost
ceph-common 0.80.8-7.el7cp
iproute 3.10.0-21.el7
openstack-neutron 2014.2.3-2.el7ost
openstack-selinux 0.6.29-1.el7ost
foreman-selinux 1.6.0.14-1.el7sat
foreman-installer 1.6.0-0.4.RC1.el7ost
puppet 3.6.2-2.el7
Table 5. Ceph Admin Server Software Versions
Software Version
calamari-server 1.2.3-13.el7cp
calamari-clients 1.2.3-3.el7cp
ceph-deploy 1.5.22-0.2.rc1.el7cp
httpd 2.4.6-31.el7
Table 6. Ceph OSD Node Software Versions
Software Version
ceph 0.80.8-5.el7cp
ceph-common 0.80.8-7.el7cp
dnsqmasq 2.66-13.el7_1
iproute 3.10.0-21.el7
puppet 3.6.2-2.el7
www.redhat.com 11 [email protected]

3. Reference Architecture ConfigurationDetailsThis reference architecture focuses on the deployment and scaling of Red Hat Enterprise LinuxOpenStack Platform 6. The configuration is intended to provide a comprehensive Red Hat OpenStacksolution that not only involves deploying, but caters to understanding the fundamentals of properlyscaling a RHEL-OSP 6 environment. The key components covered consists of:
• Validating physical hardware performance using eDeploy’s Automatic Health Check (AHC)
• Deploying Red Hat Enterprise Linux OpenStack Platform 6 using ephermal storage
• Deploying Red Hat Enterprise Linux OpenStack Platform 6 using Ceph OSD storage
• Validating the Red Hat Enterprise Linux OpenStack Platform 6 deployment using Tempest
• Capturing, measuring, and presenting different benchmark workload scenario results using Rallyand CBTOOL
3.1. /etc/resolv.confThe resolver is a set of routines in the C library that provides access to the Internet Domain NameSystem (DNS). The resolver configuration file contains information that is read by the resolver routinesthe first time they are invoked by a process. The file is designed to be human readable and contains alist of keywords with values that provide various types of resolver information. [6: man resolv.conf]The /etc/resolv.conf file for this reference environment consists of two configuration options:nameserver and search. The search option is used to search for a host name that is part of a particulardomain. The nameserver option is the IP address of the name server the systems must query. If morethan one nameserver is listed, the resolver library queries them in order. An example of the/etc/resolv.conf file is shown below.
Example 1. /etc/resolv.conf
# Generated by NetworkManagersearch sbu.lab.eng.bos.redhat.comnameserver 10.16.36.29nameserver 10.11.5.19nameserver 10.5.30.160
[email protected] 12 www.redhat.com

3.2. Network ConfigurationThe process of setting up different network interfaces for the multiple networks required for a RHEL-OSP 6 installation is shown in the subsequent steps. All other networks not specified above, fall underthe default network.
This reference environment isolates the following Network Traffic Types as follows:
• Tenant network
• External network
• Storage network
• Default network
• Cluster Management network
• Management network
It is recommended to isolate and bond all the RHEL-OSP environment networks.However, due to hardware limitations, this reference environment does not bondany of the network interfaces, nor does it isolate all networks. The sections belowdescribe the details.
3.2.1. External Network
The external network configuration focuses on the proper creation of a public network interface.Within each node of the cluster, as the root user, modify the ifcfg-em1 network configuration file withthe appropriate IP address, netmask, and gateway if not using DHCP.
An example of the provisioning node that uses DHCP is shown.
Example 2. Provisioning Node - /etc/sysconfig/network-scripts/ifcfg-em1
# Generated by dracut initrdDEVICE="em1"ONBOOT=yesNETBOOT=yesUUID="c8e174a1-a6cf-4c48-ae9a-ea69be3df5d6"IPV6INIT=yesBOOTPROTO=dhcpHWADDR="d4:be:d9:b3:8e:0f"TYPE=EthernetNAME="em1"
Snippet of the ip -a command showing the network details.
www.redhat.com 13 [email protected]

# ip -a[ ... Output Abbreviated ... ]2: em1: <BROADCAST,MULTICAST,UP,LOWER_UP> mtu 1500 qdisc mq state UP qlen 1000 link/ether d4:be:d9:b3:8e:0f brd ff:ff:ff:ff:ff:ff inet 10.16.154.0/21 brd 10.16.159.255 scope global dynamic em1 valid_lft 73367sec preferred_lft 73367sec inet6 fe80::d6be:d9ff:feb3:8e0f/64 scope link valid_lft forever preferred_lft forever[ ... Output Abbreviated ... ]
3.2.2. Tenant Network
The tenant network routes internal traffic and provides access among the virtual instances. The tenantnetwork is isolated on a 10Gb Ethernet device labeled enp4s0f0 within the Controller nodes andCompute nodes. No manual action is required, as the setup process is done via the RHEL-OSP Installer.
3.2.3. Storage Network
The storage network routes storage traffic between Controller, Compute, and Ceph nodes. Within eachnode of the cluster, as the root user, modify the 10Gb Ethernet device. This reference environment’s10Gb Ethernet device for the storage network is labeled ifcfg-enp4s0f1 within the Controller andCompute nodes. Within the Ceph nodes it is labeled ifcfg-enp4s0f0. It is recommended that once theRHEL-OSP Installer has completed setup, to manually enable jumbo frames within the Ethernet device.
Example 3. Controller Node - /etc/sysconfig/network-scripts/ifcfg-enp4s0f1
BOOTPROTO="none"IPADDR="192.168.0.112"NETMASK="255.255.0.0"GATEWAY=""DEVICE="enp4s0f1"HWADDR="90:e2:ba:05:93:49"ONBOOT=yesPEERROUTES=noNM_CONTROLLED=noDEFROUTE=noPEERDNS=noMTU=9000
It is recommended to use a 10Gb Ethernet device for storage network traffic.
[email protected] 14 www.redhat.com

3.2.4. Provisioning Network
The provisioning network deploys the RHEL-OSP 6 environment by interacting with the RHEL OSPInstaller. It manages the installation of the different nodes by the use of PXE to discover and deploy theRHEL-OSP 6 environment. The deployment process assigns an IP address associated with theprovisioning network for each node within the RHEL-OSP environment.
As the root user on the Provisioning node, modify the ifcfg-em2 network configuration file with theappropriate IP address and netmask. An example of setting up the network interface can be seenbelow.
DEVICE=em2BOOTPROTO=noneHWADDR=d4:be:d9:b3:8e:11ONBOOT=yesHOTPLUG=yesTYPE=EthernetIPADDR=20.0.0.1NETMASK=255.255.255.0PEERDNS=yesDNS1=20.0.0.1DNS2=10.5.30.160NM_CONTROLLED=no
3.3. OS ConfigurationThis section describes the operating system configuration details that are common across all nodes thatare part of RHEL-OSP 6 deployment unless otherwise specified.
3.3.1. Using the Red Hat Subscription Manager
The subscription-manager command is used to register systems to the Red Hat Network (RHN) and tomanage the subscription entitlements for the systems. The --help option can be specified on thecommand line to query the command for the available options. If the --help option is issued alongwith a command directive, then options available for the specific command directive are listed. To useRed Hat Subscription Management for providing packages to a system, the system must first registerwith the service. To register a system, use the subscription-manager command and pass the registercommand directive. If the --username and --password options are specified, then the command will notprompt for the RHN authentication credentials.
An example of registering a system using subscription-manager is shown below.
www.redhat.com 15 [email protected]

# subscription-manager register --username [User] --password '[Password]'The system has been registered with id: abcd1234-ab12-ab12-ab12-481ba8187f60
After a system is registered, it must be attached to an entitlement pool. For the purposes of thisreference environment, the Red Hat Enterprise Linux Server and Red Hat Cloud Infrastructure poolsare shown. To identify and subscribe to the Red Hat Enterprise Linux Server and the Red Hat CloudInfrastructure entitlement pools, the following command directives are required.
# subscription-manager list --available | grep -A8 "Red Hat Enterprise Linux Server,Standard"Subscription Name: Red Hat Enterprise Linux Server, Standard (Physical or VirtualNodes)Provides: Red Hat Container Images Beta Red Hat Beta Red Hat Software Collections (for RHEL Server) Oracle Java (for RHEL Server) Red Hat Enterprise Linux Atomic Host Beta Red Hat Container Images Red Hat Enterprise Linux Server Red Hat Software Collections Beta (for RHEL Server) Red Hat Enterprise Linux Atomic Host Red Hat Developer Toolset (for RHEL Server)SKU: RH00004Contract: 10663493Pool ID: 8a85f9814bfa3a50014c47eda1311388Provides Management: NoAvailable: 527
# subscription-manager attach --pool 8a85f9814bfa3a50014c47eda1311388Successfully attached a subscription for: Red Hat Enterprise Linux Server, Standard(Physical or Virtual Nodes)
[email protected] 16 www.redhat.com

# subscription-manager list --available | grep -A8 "OpenStack"Subscription Name: Red Hat Cloud Infrastructure, Standard (8-sockets)Provides: Red Hat OpenStack Beta Red Hat Software Collections (for RHEL Server) Red Hat Enterprise Virtualization Red Hat Ceph Storage Calamari Red Hat Enterprise MRG Messaging Red Hat Beta JBoss Enterprise Application Platform Red Hat Ceph Storage MON Red Hat Ceph Storage-- Red Hat OpenStack Red Hat Enterprise Linux High Availability (for RHEL Server) Red Hat Enterprise Linux Server Red Hat Software Collections Beta (for RHEL Server) Red Hat Enterprise Linux Load Balancer (for RHEL Server) Red Hat CloudFormsSKU: MCT2861Contract: 10658757Pool ID: 8a85f9814bfa3a50014c234c0eca3812
# subscription-manager attach --pool 8a85f9814bfa3a50014c234c0eca3812Successfully attached a subscription for: Red Hat Cloud Infrastructure, Standard (8-sockets)
3.3.2. Required Channels
When a system is registered Using the Red Hat Subscription Manager, the specified entitlement poolsthat correspond with that system depends on whether the system is one of the following:
• Red Hat Enterprise Linux OpenStack Platform Installer Server (Provisioning node)
• Deployed Server, i.e. controller nodes, compute nodes, Ceph nodes
• Virtual Machine, i.e. tempest, rally, cbtool
www.redhat.com 17 [email protected]
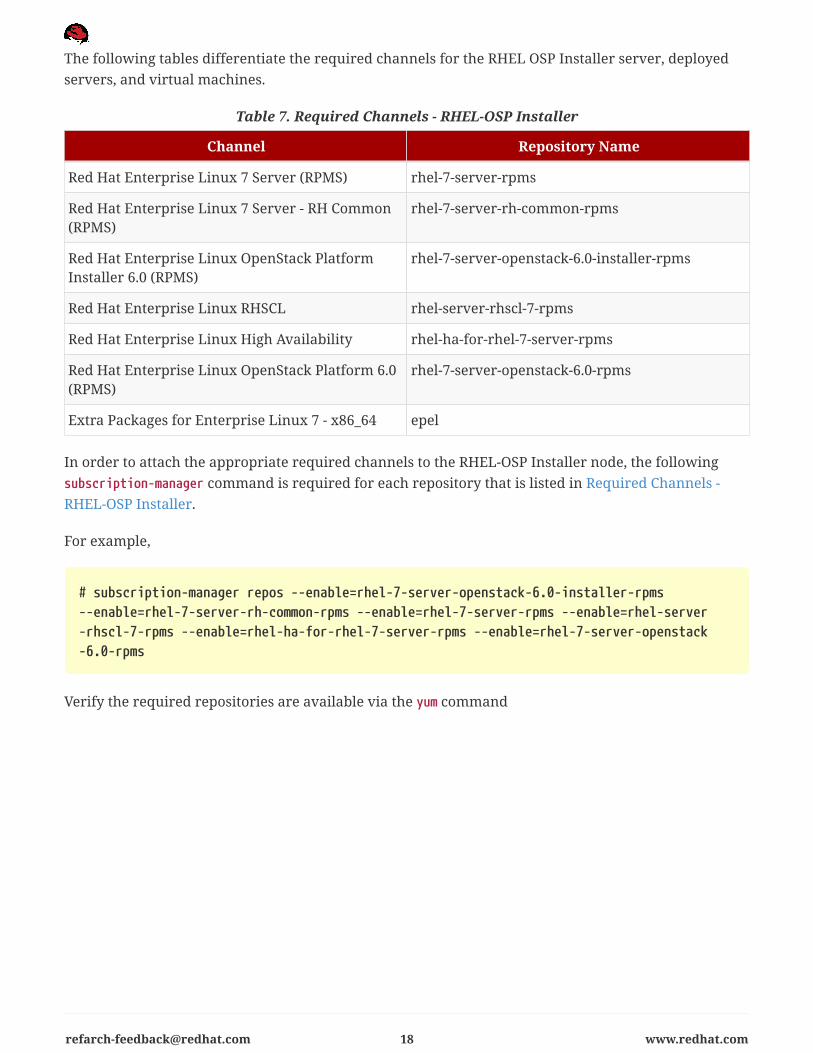
The following tables differentiate the required channels for the RHEL OSP Installer server, deployedservers, and virtual machines.
Table 7. Required Channels - RHEL-OSP Installer
Channel Repository Name
Red Hat Enterprise Linux 7 Server (RPMS) rhel-7-server-rpms
Red Hat Enterprise Linux 7 Server - RH Common(RPMS)
rhel-7-server-rh-common-rpms
Red Hat Enterprise Linux OpenStack PlatformInstaller 6.0 (RPMS)
rhel-7-server-openstack-6.0-installer-rpms
Red Hat Enterprise Linux RHSCL rhel-server-rhscl-7-rpms
Red Hat Enterprise Linux High Availability rhel-ha-for-rhel-7-server-rpms
Red Hat Enterprise Linux OpenStack Platform 6.0(RPMS)
rhel-7-server-openstack-6.0-rpms
Extra Packages for Enterprise Linux 7 - x86_64 epel
In order to attach the appropriate required channels to the RHEL-OSP Installer node, the followingsubscription-manager command is required for each repository that is listed in Required Channels -RHEL-OSP Installer.
For example,
# subscription-manager repos --enable=rhel-7-server-openstack-6.0-installer-rpms--enable=rhel-7-server-rh-common-rpms --enable=rhel-7-server-rpms --enable=rhel-server-rhscl-7-rpms --enable=rhel-ha-for-rhel-7-server-rpms --enable=rhel-7-server-openstack-6.0-rpms
Verify the required repositories are available via the yum command
[email protected] 18 www.redhat.com
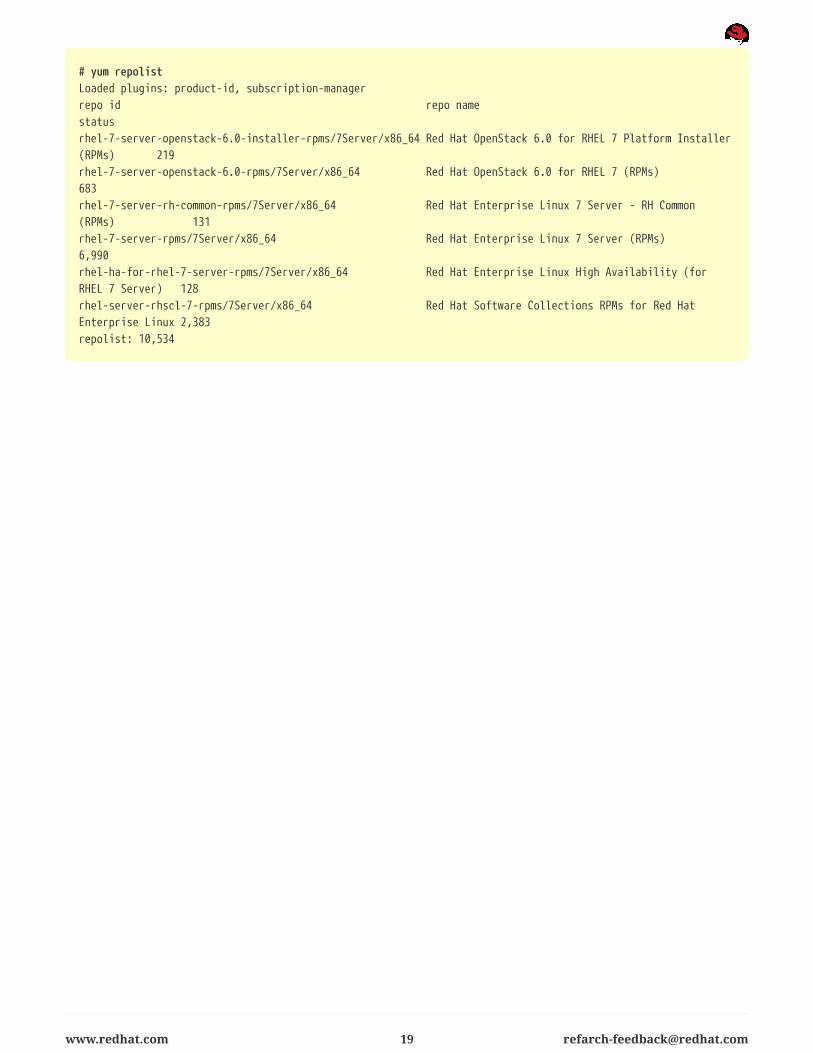
# yum repolist
Loaded plugins: product-id, subscription-manager
repo id repo name
status
rhel-7-server-openstack-6.0-installer-rpms/7Server/x86_64 Red Hat OpenStack 6.0 for RHEL 7 Platform Installer
(RPMs) 219
rhel-7-server-openstack-6.0-rpms/7Server/x86_64 Red Hat OpenStack 6.0 for RHEL 7 (RPMs)
683
rhel-7-server-rh-common-rpms/7Server/x86_64 Red Hat Enterprise Linux 7 Server - RH Common
(RPMs) 131
rhel-7-server-rpms/7Server/x86_64 Red Hat Enterprise Linux 7 Server (RPMs)
6,990
rhel-ha-for-rhel-7-server-rpms/7Server/x86_64 Red Hat Enterprise Linux High Availability (for
RHEL 7 Server) 128
rhel-server-rhscl-7-rpms/7Server/x86_64 Red Hat Software Collections RPMs for Red Hat
Enterprise Linux 2,383
repolist: 10,534
www.redhat.com 19 [email protected]

Table 8. Required Channels - Deployed Servers
Channel Repository Name
Red Hat Enterprise Linux 7 Server - RH Common(RPMS)
rhel-7-server-rh-common-rpms
Red Hat Enterprise Linux OpenStack PlatformInstaller 6.0 (RPMS)
rhel-7-server-openstack-6.0-installer-rpms
Red Hat Enterprise Linux OpenStack Platform 6.0(RPMS)
rhel-7-server-openstack-6.0-rpms
Red Hat Enterprise Linux High Availability rhel-ha-for-rhel-7-server-rpms
Red Hat Enterprise Linux 7 Server (RPMs) rhel-7-server-rpms
In order to attach the appropriate required channels to the Deployed Server nodes, the followingsubscription-manager command is required for each repository that is listed in Required Channels -Deployed Servers.
For example,
# subscription-manager repos --enable=rhel-7-server-openstack-6.0-installer-rpms--enable=rhel-7-server-rh-common-rpms --enable=rhel-7-server-openstack-6.0-rpms--enable=rhel-ha-for-rhel-7-server-rpms --enable=rhel-7-server-rpms
Similar subscription-manager commands are used to associate the required channels for the virtualmachines. The tables below list the required channels for the different virtual machines.
Table 9. Required Channels - Ceph-Admin VM
Channel Repository Name
calamari packages for x86_64 calamari
ceph_deploy packages for x86_64 ceph_deploy
Red Hat Enterprise Linux 7 Server (RPMS) rhel-7-server-rpms
Red Hat Enterprise Linux High Availability (forRHEL 7 Server) (RPMs)
rhel-ha-for-rhel-7-server-rpms
[email protected] 20 www.redhat.com
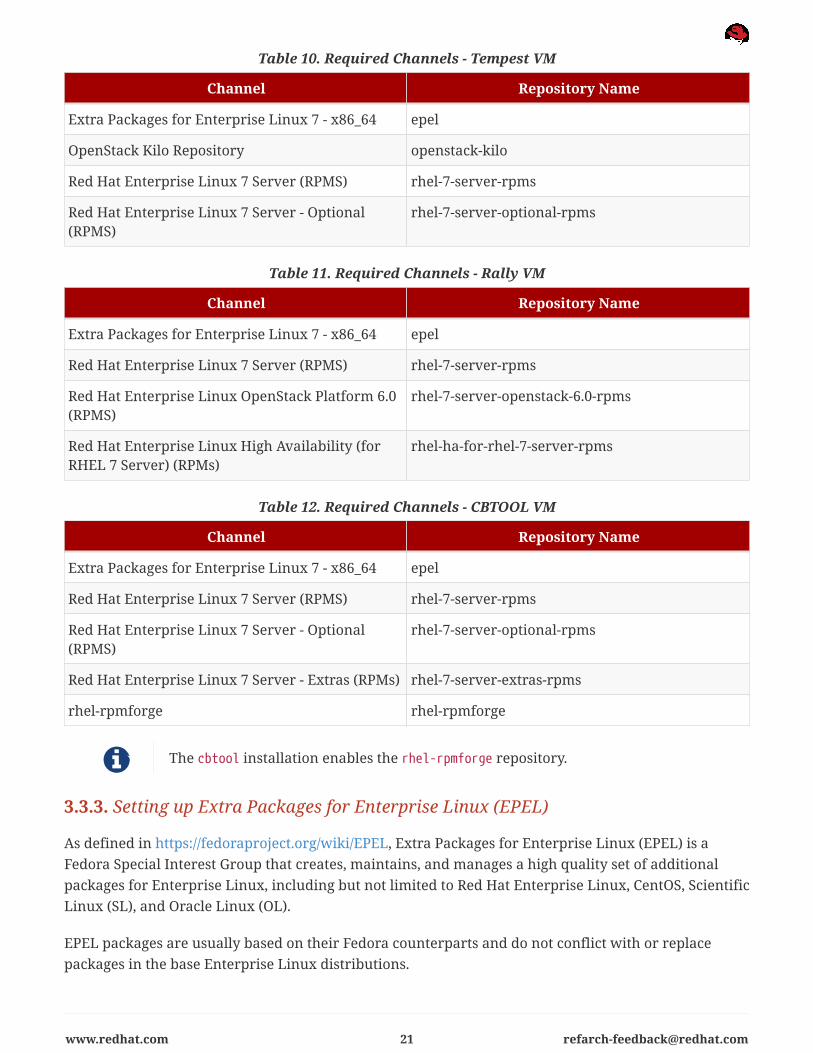
Table 10. Required Channels - Tempest VM
Channel Repository Name
Extra Packages for Enterprise Linux 7 - x86_64 epel
OpenStack Kilo Repository openstack-kilo
Red Hat Enterprise Linux 7 Server (RPMS) rhel-7-server-rpms
Red Hat Enterprise Linux 7 Server - Optional(RPMS)
rhel-7-server-optional-rpms
Table 11. Required Channels - Rally VM
Channel Repository Name
Extra Packages for Enterprise Linux 7 - x86_64 epel
Red Hat Enterprise Linux 7 Server (RPMS) rhel-7-server-rpms
Red Hat Enterprise Linux OpenStack Platform 6.0(RPMS)
rhel-7-server-openstack-6.0-rpms
Red Hat Enterprise Linux High Availability (forRHEL 7 Server) (RPMs)
rhel-ha-for-rhel-7-server-rpms
Table 12. Required Channels - CBTOOL VM
Channel Repository Name
Extra Packages for Enterprise Linux 7 - x86_64 epel
Red Hat Enterprise Linux 7 Server (RPMS) rhel-7-server-rpms
Red Hat Enterprise Linux 7 Server - Optional(RPMS)
rhel-7-server-optional-rpms
Red Hat Enterprise Linux 7 Server - Extras (RPMs) rhel-7-server-extras-rpms
rhel-rpmforge rhel-rpmforge
The cbtool installation enables the rhel-rpmforge repository.
3.3.3. Setting up Extra Packages for Enterprise Linux (EPEL)
As defined in https://fedoraproject.org/wiki/EPEL, Extra Packages for Enterprise Linux (EPEL) is aFedora Special Interest Group that creates, maintains, and manages a high quality set of additionalpackages for Enterprise Linux, including but not limited to Red Hat Enterprise Linux, CentOS, ScientificLinux (SL), and Oracle Linux (OL).
EPEL packages are usually based on their Fedora counterparts and do not conflict with or replacepackages in the base Enterprise Linux distributions.
www.redhat.com 21 [email protected]

The EPEL repository within this reference environment enables building the custom eDeployAutomatic Health Check (AHC) operating system, installing Tempest, Rally, and CBTOOL tools in theirrespective VMs.
EPEL is required only within the RHEL OSP Provisioning node, tempest VM, rallyVM, and cbtool VM. The current use of eDeploy’s Automatic Health Check (AHC),Tempest, Rally, and CBTOOL is not supported with RHEL-OSP 6, however, they areused to validate the underlying hardware and benchmark the RHEL-OSP 6environment.
To configure the EPEL repository on the RHEL-OSP Provisioning node,
1. Install the EPEL RPM using yum
# yum install https://dl.fedoraproject.org/pub/epel/7/x86_64/e/epel-release-7-5.noarch.rpm
2. Verify the EPEL repository is available via the yum command
# yum repolist
3.3.4. NTP Configuration
The ntpd [7: ntpd - Network Time Protocol (NTP) daemon man page - man ntpd (8)] program is anoperating system daemon which sets and maintains the system time, synchronizing with Internetstandard time servers. The ntpd program operates by exchanging messages with one or moreconfigured servers at designated poll intervals.
To configure the ntpd daemon within the Provisioning node,
1. If not installed, install ntpd via yum as follows:
# yum install ntp
2. Edit the /etc/ntp.conf file with a text editor such as vi
# vi /etc/ntp.conf
3. Locate the following public server pool section, and modify to include the appropriate NTP servers.For the purposes of this reference environment, four NTP servers are used, but only one isrequired. The iburst option is added to speed up the time in which it takes to properly sync with
[email protected] 22 www.redhat.com

the NTP server(s).
# Use public servers from the pool.ntp.org project.# Please consider joining the pool (http://www.pool.ntp.org/join.html).server clock.corp.redhat.com iburst
clock.corp.redhat.com points to an array of four different NTP servers.
4. Save all the changes within the /etc/ntp.conf file
5. Start the ntpd daemon via the command:
# systemctl start ntpd.service
6. Ensure that the ntpd daemon is started when the system is booted.
# systemctl enable ntpd.serviceln -s /usr/lib/systemd/system/ntpd.service' '/etc/systemd/system/multi-user.target.wants/ntpd.service'
7. Verify that the status of the ntpd daemon is up and is enabled.
# systemctl status ntpd.servicentpd.service - Network Time Service Loaded: loaded (/usr/lib/systemd/system/ntpd.service; enabled) Active: active (running) since Wed 2015-04-29 11:38:23 EDT; 1min 28s ago Main PID: 20562 (ntpd) CGroup: /system.slice/ntpd.service \u2514\u250020562 /usr/sbin/ntpd -u ntp:ntp -g
www.redhat.com 23 [email protected]

3.3.5. Configuring Security-Enhanced Linux (SELinux)
SELinux is an implementation of a mandatory access control (MAC) mechanism developed by theNational Security Agency (NSA). The purpose of SELinux is to apply rules on files and processes basedon defined policies. When policies are appropriately defined, a system running SELinux enhancesapplication security by determining if an action from a particular process should be granted thusprotecting against vulnerabilities within a system. The implementation of Red Hat Enterprise Linux 7enables SELiunux by default and appropriately sets it to the default setting of enforcing. It is highlyrecommended that SELinux be kept in enforcing mode when running RHEL-OSP 6.
Verify that SELinux is running and set to enforcing:
As the root user,
# sestatusSELinux status: enabledSELinuxfs mount: /sys/fs/selinuxSELinux root directory: /etc/selinuxLoaded policy name: targetedCurrent mode: enforcingMode from config file: enforcingPolicy MLS status: enabledPolicy deny_unknown status: allowedMax kernel policy version: 28
If the system is running in permissive mode or disabled mode, modify the /etc/selinux/config file and setSELinux to enforcing as shown below.
SELINUX=enforcing
The modification of the /etc/selinux/config file takes effect after a reboot. To change the setting ofSELinux immediately without a reboot (only if SELinux is set to permissive mode), run the followingcommand:
# setenforce 1
[email protected] 24 www.redhat.com

3.3.6. Configuring Firewall Settings
The following ports are enabled and opened within the RHEL-OSP Provisioning node. The firewalldservice is disabled and the iptables service is enabled for setting firewall rules.
Table 13. Firewall Setting for the Provisioning Node
Service Port Type
ssh 22 tcp
apache 443 tcp
apache 80 tcp
apache 8080 tcp
dns 53 tcp
dns 53 udp
dhcp 67 udp
bootp 68 udp
tftp 69 udp
puppetmaster 8140 tcp
3.3.7. Optimizing Red Hat Enterprise Linux OpenStack Platform 6 Environment usingTuned
The tuned package in Red Hat Enterprise Linux 7 is recommended for automatically tuning the systemfor common workloads via the use of profiles. Each profile is tailored for different workload scenarios.The default profile selected is the throughput-performance profile.
It is recommended to use different tuned profiles depending on the systems role within the RHEL-OSP 6environment. The following table is a breakdown of the particular tuned profiles that should be usedfor the Controller nodes, Provisioning node, Compute nodes, and Ceph OSD nodes.
Table 14. Tuned Profile for RHEL-OSP 6 Environment
Tuned Profile System Role
throughput-performance Controller nodes
throughput-performance Provisioning node
throughput-performance Ceph nodes
virtual-host Compute nodes
The following table provides a description of the differences between the throughput-performance
www.redhat.com 25 [email protected]

profile and the virtual-host profile.
Table 15. Throughput Performance vs Virtual Host
Tuned Parameter throughput-performance virtual-host
CPU governor performance performance
energy_perf_bias performance performance
min_perf_pct (intel_pstate_only) 100% 100%
kernel.sched_min_granularity_ns
10ms 10ms
kernel.sched_wake_granularity_ns
15ms 15ms
Disk read-ahead 4096 4096
vm.dirty_ratio 40% 40%
File-system barrier off off
Transparent Hugepages always always
vm.swappiness 10 10
vm.dirty_background_ratio - 5%
kernel.sched_migration_cost_ns - 5ms
The following procedures provide the steps that are required to select the appropriate profile for thespecified type of system.
By default on Red Hat Enterprise Linux 7, the tuned package is installed and enabled.
On each node within the RHEL-OSP 6 environment, as the root user,
1. Activate the appropriate tuned profile for the corresponding nodes. Information on what tunedprofile to set can be found within the Tuned Profile for RHEL-OSP 6 Environment table. Anexample of setting the tuned profile for compute nodes is shown below.
# tuned-adm profile virtual-host
[email protected] 26 www.redhat.com

2. Verify that the virtual-host profile is active
# tuned-adm activeCurrent active profile: virtual-host
If at any point in time a revert to the original settings is required with persistenceacross reboots, the following commands can be run on each node within theRHEL-OSP 6 environment.
# systemctl stop tuned.service# systemctl disable tuned.service
www.redhat.com 27 [email protected]

4. Red Hat Enterprise Linux OpenStackPlatform 6 Configuration
4.1. Installing the Red Hat Enterprise Linux OpenStackPlatform InstallerPrior to the installation of the RHEL-OSP 6 Installer, ensure the following prerequisities from thefollowing sections have been meet:
• Reference Architecture Environment
• Reference Architecture Configuration Details
As the root user within the Provisioning node,
# yum install rhel-osp-installer
Once the installation is complete, modify the /etc/resolv.conf file and move the Provisioning nodenamserver below the public nameserver. The reasoning for moving the public nameserver above theProvisioning node nameserver is to ensure that subscription-manager can resolve cdn.redhat.com whenattempting to attach to the appropriate subscription pools. The example below shows are existing/etc/resolv.conf where IP 10.5.30.160 is our public nameserver, while the Provisioning node nameserver IPis 20.0.0.1.
# cat /etc/resolv.conf# Generated by NetworkManagersearch sbu.lab.eng.bos.redhat.comnameserver 10.5.30.160nameserver 20.0.0.1
4.2. Local Repository of Installation Media PrerequisiteDuring the installation process of the rhel-osp-installer package, one of the sections requires theRHEL repository path. For the purposes of this reference environment, a local RHEL repository iscreated and hosted within the apache webserver from the Provisioning node. The setup of thisrepository is done after the setup of rhel-osp-installer is complete. When asked for the Repositorypath, this reference environment uses: http://gprfc001.sbu.lab.eng.bos.redhat.com:8080/rhel7/
[email protected] 28 www.redhat.com

4.3. Running the Red Hat Enterprise Linux OpenStackPlatform InstallerOnce the installation of the rhel-osp-installer package is complete, run the rhel-osp-installer to startthe setup process of the RHEL-OSP 6 environment.
Key points to mention prior to installation:
• Obtain the Local Repository Installation Media Repository Path URL
• When using subscription-manager the recommended subscription manager pool to enter is the RedHat Cloud Infrastructure, Standard (8-sockets) that contains the required Red Hat OpenStackrepositories.
As the root user,
# rhel-osp-installer
Please select NIC on which you want provisioning enabled:1. em12. em23. em34. em45. p1p16. p1p2? 2Networking setup: Network interface: 'em2' IP address: '20.0.0.1' Network mask: '255.255.255.0' Network address: '20.0.0.0' Host Gateway: '10.16.159.254' DHCP range start: '20.0.0.2' DHCP range end: '20.0.0.254' DHCP Gateway: '20.0.0.1' DNS forwarder: '10.5.30.160' Domain: 'sbu.lab.eng.bos.redhat.com' NTP sync host: '0.rhel.pool.ntp.org' Timezone: 'America/New_York'Configure networking on this machine: \u2713Configure firewall on this machine: \u2713
The installer can configure the networking and firewall rules on this machine with theabove configuration. Default values are populated from the this machine's existingnetworking configuration.
www.redhat.com 29 [email protected]

If you DO NOT want to configure networking please set 'Configure networking on thismachine' to No before proceeding. Do this by selecting option 'Do not configurenetworking' from the list below.
How would you like to proceed?:1. Proceed with the above values2. Change Network interface3. Change IP address4. Change Network mask5. Change Network address6. Change Host Gateway7. Change DHCP range start8. Change DHCP range end9. Change DHCP Gateway10. Change DNS forwarder11. Change Domain12. Change NTP sync host13. Change Timezone14. Do not configure networking15. Do not configure firewall16. Cancel Installation12Enter a list of NTP hosts, separated by commas. First in the list will be the default.clock.corp.redhat.comNetworking setup: Network interface: 'em2' IP address: '20.0.0.1' Network mask: '255.255.255.0' Network address: '20.0.0.0' Host Gateway: '10.16.159.254' DHCP range start: '20.0.0.2' DHCP range end: '20.0.0.254' DHCP Gateway: '20.0.0.1' DNS forwarder: '10.5.30.160' Domain: 'sbu.lab.eng.bos.redhat.com' NTP sync host: 'clock.corp.redhat.com' Timezone: 'America/New_York'Configure networking on this machine: \u2713Configure firewall on this machine: \u2713
The installer can configure the networking and firewall rules on this machine with theabove configuration. Default values are populated from the this machine's existingnetworking configuration.
If you DO NOT want to configure networking please set 'Configure networking on thismachine' to No before proceeding. Do this by selecting option 'Do not configurenetworking' from the list below.
[email protected] 30 www.redhat.com

How would you like to proceed?:1. Proceed with the above values2. Change Network interface3. Change IP address4. Change Network mask5. Change Network address6. Change Host Gateway7. Change DHCP range start8. Change DHCP range end9. Change DHCP Gateway10. Change DNS forwarder11. Change Domain12. Change NTP sync host13. Change Timezone14. Do not configure networking15. Do not configure firewall16. Cancel Installation1Configure client authentication SSH public key: '' Root password: '*******************************************'
Please set a default root password for newly provisioned machines. If you choose not toset a password, it will be generated randomly. The password must be a minimum of 8characters. You can also set a public ssh key which will be deployed to newly provisionedmachines.
How would you like to proceed?:1. Proceed with the above values2. Change SSH public key3. Change Root password4. Toggle Root password visibility2You may either use a path to your public key file or enter the whole key (including typeand comment)file or keyssh-rsaAAAAB3NzaC1yc2EAAAADAQABAAABAQDLp0tqdJTMn9nWw4m4b5ovPhJ73LGzO81A37k2MzKFzw/3wre/DWUMwNjDBlRWgpl/9WuowuEBkK41Wz7PirBGnjxreSBR0lLumeRQql43OwYig1Iu6Y7FacAIDsJusKti76y2JkUa5B6M+PCJvDBeixtHCFgmf6rSqz54AvnXzGBb7lR2cywkvAM+vMyKKFw9SkxKAKy+TnFCq+P2HWAbsuGKrjcZw9YeBSBwPH2k9S7KHcGCt/Kjv7P6/cHKrD68i3i1luiHwFyqipzdFtgqfUBnwzoQa9sl7Jh4ioBBFIOLy6lIOIMFDmr3TCVFit8lGWyv7TuhAwVhYCq3s043 [email protected] client authentication SSH public key: 'ssh-rsaAAAAB3NzaC1yc2EAAAADAQABAAABAQDLp0tqdJTMn9nWw4m4b5ovPhJ73LGzO81A37k2MzKFzw/3wre/DWUMwNjDBlRWgpl/9WuowuEBkK41Wz7PirBGnjxreSBR0lLumeRQql43OwYig1Iu6Y7FacAIDsJusKti76y2JkUa5B6M+PCJvDBeixtHCFgmf6rSqz54AvnXzGBb7lR2cywkvAM+vMyKKFw9SkxKAKy+TnFCq+P2HWAbsuGKrjcZw9YeBSBwPH2k9S7
www.redhat.com 31 [email protected]

KHcGCt/Kjv7P6/cHKrD68i3i1luiHwFyqipzdFtgqfUBnwzoQa9sl7Jh4ioBBFIOLy6lIOIMFDmr3TCVFit8lGWyv7TuhAwVhYCq3s043 [email protected]' Root password: '*******************************************'
Please set a default root password for newly provisioned machines. If you choose not toset a password, it will be generated randomly. The password must be a minimum of 8characters. You can also set a public ssh key which will be deployed to newly provisionedmachines.
How would you like to proceed?:1. Proceed with the above values2. Change SSH public key3. Change Root password4. Toggle Root password visibility3new value for root password********enter new root password again to confirm********Configure client authentication SSH public key: 'ssh-rsaAAAAB3NzaC1yc2EAAAADAQABAAABAQDLp0tqdJTMn9nWw4m4b5ovPhJ73LGzO81A37k2MzKFzw/3wre/DWUMwNjDBlRWgpl/9WuowuEBkK41Wz7PirBGnjxreSBR0lLumeRQql43OwYig1Iu6Y7FacAIDsJusKti76y2JkUa5B6M+PCJvDBeixtHCFgmf6rSqz54AvnXzGBb7lR2cywkvAM+vMyKKFw9SkxKAKy+TnFCq+P2HWAbsuGKrjcZw9YeBSBwPH2k9S7KHcGCt/Kjv7P6/cHKrD68i3i1luiHwFyqipzdFtgqfUBnwzoQa9sl7Jh4ioBBFIOLy6lIOIMFDmr3TCVFit8lGWyv7TuhAwVhYCq3s043 [email protected]' Root password: '********'
Please set a default root password for newly provisioned machines. If you choose not toset a password, it will be generated randomly. The password must be a minimum of 8characters. You can also set a public ssh key which will be deployed to newly provisionedmachines.
How would you like to proceed?:1. Proceed with the above values2. Change SSH public key3. Change Root password4. Toggle Root password visibility1Starting networking setupNetworking setup has finishedInstalling +hoste: /allge[mapostgresgresql::0.0.0.0/0onfig/Preject][77%] [.........................]Installing Done [100%][...........................................]Starting configuration...Redirecting to /bin/systemctl stop puppet.serviceRedirecting to /bin/systemctl start puppet.service
[email protected] 32 www.redhat.com

Now you should configure installation media which will be used for provisioning.Note that if you don't configure it properly, host provisioning won't work until youconfigure installation media manually.
Enter RHEL repo path:1. Set RHEL repo path (http or https URL): http://2. Proceed with configuration3. Skip this step (provisioning won't work)1Path: http://gprfc001.sbu.lab.eng.bos.redhat.com:8080/rhel7/
Enter RHEL repo path:1. Set RHEL repo path (http or https URL):http://gprfc001.sbu.lab.eng.bos.redhat.com:8080/rhel7/2. Proceed with configuration3. Skip this step (provisioning won't work)2
Enter your subscription manager credentials:1. Subscription manager username:2. Subscription manager password:3. Comma or Space separated repositories: rhel-7-server-rpms rhel-7-server-openstack-6.0-rpms rhel-7-server-openstack-6.0-installer-rpms rhel-ha-for-rhel-7-server-rpms rhel-7-server-rh-common-rpms4. Subscription manager pool (recommended):5. Subscription manager proxy hostname:6. Subscription manager proxy port:7. Subscription manager proxy username:8. Subscription manager proxy password:9. Proceed with configuration10. Skip this step (provisioning won't subscribe your machines)1Username: <username>
Enter your subscription manager credentials:1. Subscription manager username: <username>2. Subscription manager password:3. Comma or Space separated repositories: rhel-7-server-rpms rhel-7-server-openstack-6.0-rpms rhel-7-server-openstack-6.0-installer-rpms rhel-ha-for-rhel-7-server-rpms rhel-7-server-rh-common-rpms4. Subscription manager pool (recommended):5. Subscription manager proxy hostname:6. Subscription manager proxy port:7. Subscription manager proxy username:8. Subscription manager proxy password:9. Proceed with configuration10. Skip this step (provisioning won't subscribe your machines)
www.redhat.com 33 [email protected]

2Password: *******
Enter your subscription manager credentials:1. Subscription manager username: <username>2. Subscription manager password: *******3. Comma or Space separated repositories: rhel-7-server-rpms rhel-7-server-openstack-6.0-rpms rhel-7-server-openstack-6.0-installer-rpms rhel-ha-for-rhel-7-server-rpms rhel-7-server-rh-common-rpms4. Subscription manager pool (recommended):5. Subscription manager proxy hostname:6. Subscription manager proxy port:7. Subscription manager proxy username:8. Subscription manager proxy password:9. Proceed with configuration10. Skip this step (provisioning won't subscribe your machines)4Pool: 8a85f9814bfa3a50014c234c0eca3812
Enter your subscription manager credentials:1. Subscription manager username: <username>2. Subscription manager password: *******3. Comma or Space separated repositories: rhel-7-server-rpms rhel-7-server-openstack-6.0-rpms rhel-7-server-openstack-6.0-installer-rpms rhel-ha-for-rhel-7-server-rpms rhel-7-server-rh-common-rpms4. Subscription manager pool (recommended): 8a85f9814bfa3a50014c234c0eca38125. Subscription manager proxy hostname:6. Subscription manager proxy port:7. Subscription manager proxy username:8. Subscription manager proxy password:9. Proceed with configuration10. Skip this step (provisioning won't subscribe your machines)9Starting to seed provisioning dataUse 'base_RedHat_7' hostgroup for provisioning Success! * Foreman is running at https://gprfc001.sbu.lab.eng.bos.redhat.com Initial credentials are admin / YXikgFQmfG79K6SD * Foreman Proxy is running at https://gprfc001.sbu.lab.eng.bos.redhat.com:8443 * Puppetmaster is running at port 8140 The full log is at /var/log/rhel-osp-installer/rhel-osp-installer.log
[email protected] 34 www.redhat.com

4.4. Create the Local RepositoryAfter the successful installation using the rhel-osp-installer, add a local repository for the installationmedia. Ensure to set the URL for the installation media to point to the Repository Path URL providedwhen running the rhel-osp-installer.
Within the Provisioning node, as the root user,
1. Download a copy of Red Hat Enterprise Linux 7.1. An evaluation copy can be found at Red HatEnterprise Linux 7 Evaluation
2. Create a directory to store the Red Hat Enterprise Linux 7 ISO.
# mkdir -p /path/to/rhel7iso
3. Mount the Red Hat Enterprise Linux 7 ISO to /path/to/rhel7iso
# mount -o loop rhel-server-7.1-x86_64-dvd.iso /path/to/rhel7iso
4. Create a file labeled repos.conf located within the /etc/httpd/conf.d/ directory using an editor such asvi, and include the following.
# cat /etc/httpd/conf.d/repos.conf<VirtualHost *:8080>DocumentRoot /path/to/rhel7iso<Directory /path/to/rhel7iso>Options +IndexesAllow from all</Directory></VirtualHost>
www.redhat.com 35 [email protected]

5. Modify the file labeled ports.conf located within the /etc/httpd/conf/ directory using an editor suchas vi, and include to listen to port 8080. An example of the ports.conf file.
# cat /etc/httpd/conf/ports.conf# # Listen & NameVirtualHost resources in module puppetlabs-apache# Managed by Puppet#
Listen 443Listen 80Listen 8140Listen 8080
6. Restart the httpd service
# systemctl restart httpd.service
7. Modify the /etc/sysconfig/iptables file and accept traffic on port 8080. A snippet of the/etc/sysconfig/iptables file is shown below.
[ … Output Abbreviated … ]-A INPUT -p udp -m multiport --ports 69 -m comment --comment "69 accept - tftp" -j ACCEPT-A INPUT -p tcp -m multiport --ports 80 -m comment --comment "80 accept - apache" -j ACCEPT-A INPUT -p tcp -m multiport --ports 8080 -m comment --comment "8080 accept - apache" -jACCEPT[ … Output Abbreviated … ]
While firewalld is the default firewall system within RHEL 7, it is disabled andreplaced with the iptables firewall service. The firewall.rb file located withinlib/puppet/util/ requires the iptables-services package due to its dependency on/usr/libexec/iptables/iptables.init
[email protected] 36 www.redhat.com

5. Overview of eDeploy’s Automatic HealthCheck (AHC)eDeploy’s Automatic Health Check (AHC) is a framework developed by eNovance to capture, measure,and report a system’s overall performance by stress testing its CPU, memory, storage, and network. It isa publicly available open source project on GitHub via https://github.com/enovance/edeploy. AHC’smain objective is to report a level of performance that provides an estimation of a server’s capabilitiesand ensures its basic features are running as intended.
Why is this important?
When dealing with large complex environments to run particular workloads, it can be very difficult topinpoint why a particular server might not be running as expected. As layers of complexity are added,i.e. filesystems, software configurations, changes in the operating system, performance can be effected.eDeploy’s AHC solves this by creating a static custom OS image that embeds the least amount ofsoftware based on the Linux distribution chosen to run a consistent series of benchmark test. The mainbenefit of this approach is by creating a custom OS image, end users can boot a server with the AHC OSthat runs a series of benchmark tests that validates whether the BIOS and firmware versions are thesame for identical servers, gather the servers performance metrics, and upload those results to acentral location while always providing consistent results as all the benchmark tests are automated.The flexibility of AHC also allows for re-running the AHC OS image using non-destructive tests whentroubleshooting a specific server and comparing those results with the initial results captured prior todeployment.
What benchmarks does AHC run?
The benchmark AHC components used within this reference environment are the following:
• Sysbench [8: Sysbench - http://sourceforge.net/projects/sysbench/] – used for CPU and Memorybenchmarking as it offers a single interface to compute both CPU computing power and memorybandwidth. With regards to CPU, Sysbench reports a number that represents a global level ofperformance, while the memory module of Sysbench performs I/Os of a given block size resultingin a report of memory bandwidth in MB/sec during a constant time.
• Fio [9: Fio - http://freecode.com/projects/fio] – is an I/O open source tool developed by Jens Axboe(Linux Kernel Maintainer of the Block Layer) used to stress test the performance of the underlyinghardware prior to adding complexities such as the filesystems layer. Fio’s ability to perform I/Os atthe block level allows the end user to perform specific I/O patterns while keeping under control thetime spent on running and ensuring it runs without any cache Layer from the Linux kernel(O_DIRECT).
www.redhat.com 37 [email protected]

How is AHC used in this reference architecture?
AHC is used in this reference architecture to answer two key questions:
• How much hardware do I need?
• Is the hardware I am deploying on RHEL-OSP 6 working as expected?
With the use of AHC, an end user can review the performance results to understand their servers'capabilities to properly size their hardware infrastructure. The section labeled Creating the eDeploy’sAutomatic Health Check (AHC) Custom OS Image provides the details in setting up AHC.
Is eDeploy’s Automatic Health Check (AHC) supported?
At the time of this writing, the eDeploy’s AHC tool is not supported with RHEL-OSP 6, however, it is akey component to validate and benchmark the underlying hardware within this referenceenvironment.
5.1. Creating the eDeploy’s Automatic Health Check (AHC)Custom OS ImageThe Automatic Health Check (AHC) custom operating system creates an image using a base Linuxdistribution such as Red Hat Enterprise Linux and adds all the different benchmark componentsdescribed within the Overview of eDeploy’s Automatic Health Check (AHC).
In order to create the AHC image, follow the steps below.
Within the Provisioning node as the root user,
1. Install the following packages that reside within the Red Hat Enterprise Linux 7.1 repository andthe EPEL repository using the yum command.
# yum install make git httpd dnsmasq rsync unzip debootstrap pigz compat-glibc python-pip gcc python-devel python-mock python-netaddr qemu-kvm compat-glibc python-pip gcc-c++ glibc
Ensure that the EPEL repository is set as certain packages are only found withinthe EPEL repository. Refer to section Setting up Extra Packages for EnterpriseLinux (EPEL) for more information on enabling the EPEL repository.
2. Save an ISO copy of the Red Hat Enterprise Linux 7.1 x86_64 ISO locally on the provisioning node.An evaluation of Red Hat Enterprise Linux can be downloaded at: Red Hat Enterprise Linux 7Evaluation
[email protected] 38 www.redhat.com

3. Install the following python software package using pip
# pip install hardware
The installation of hardware can take sometime to complete.
4. Create a directory to store and clone the eDeploy GitHub repository.
# mkdir -p /path/to/myedeploy# cd /path/to/myedeploy/# git clone https://github.com/enovance/edeploy.git
At the time of this writing, the eDeploy repository consisted of the final commit idof d2960bc974a4a331809ed9ba93c20ced74a484ce.
5. Create a symbolic link of the libc.a file within /usr/lib64/ directory. The libc.a library file enablesthe use of the memory stress tests.
# ln -s /usr/lib/x86_64-redhat-linux6E/lib64/libc.a /usr/lib64/libc.a
6. Build the eDeploy environment using the make command.
# cd /path/to/myedeploy/# make install-www
An error stating that the www-data user does not exist can be safely ignored as theRHEL-OSP Provisioning node handles the web traffic.
7. Within the eDeploy build environment located within /path/to/myedeploy/edeploy/build, create theAutomatic Health Check (AHC) custom OS using eDeploy health-check profile as follows:
# cd /path/to/myedeploy/edeploy/build# make DIST=redhat DVER=RH7.0 VERSION='1.0' ISO_PATH=path/to/rhel-server-7.1-dvd.isoRHN_USERNAME=<user> RHN_PASSWORD='<password>' health-check
To understand the command above it reads as follows: Create a distribution (DIST) labeled 'redhat'with the distribution version (DVER) of 7.0. A custom version (VERSION) of 1.0 is specified by theuser, along with the ISO path (ISO_PATH) to the Red Hat Enterprise Linux 7.1 AMD64 ISO, the RHNcredentials, and the health-check profile that creates the AHC custom OS.
www.redhat.com 39 [email protected]

At the time of this writing when creating Red Hat Enterprise Linux 7.xdistributions, the DVER needs to be RH7.0
8. Once the health-check is complete, check for an exit 0 status similar to the following:
basename /var/lib/debootstrap/install/RH7.0-1.0/health.pxe + cut -d . -f 1+ CLEAN_CURRENT_TARGET=health+ '[' health-check = health ']'+ '[' -z 1 ']'+ prevent_ctrl_c off+ case "$1" in+ trap 2+ exit 0
9. Copy the health.pxe binary from the /var/lib/deboostrap/install/RH7.0-1.0/ into the/var/lib/tftpboot/boot directory.
# cp /var/lib/deboostrap/install/RH7.0-1.0/health.pxe /var/lib/tftpboot/boot/
10. Copy the vmlinuz binary from the /var/lib/debootstrap/install/RH7.0-1.0/base/boot into the/var/lib/tftpboot/boot directory.
# cp /var/lib/debootstrap/install/RH7.0-1.0/base/boot/vmlinuz-3.10.0-229.el7.x86_64/var/lib/tftpboot/boot/
11. Within the /etc/deploy.conf file, modify the PXE Management URL by using the IP address of theprovisioning node.
[SERVER]
HEALTHDIR=/var/lib/edeploy/health/CONFIGDIR=/var/lib/edeploy/configLOGDIR=/var/lib/edeploy/config/logsHWDIR=/var/lib/edeploy/config/hwLOCKFILE=/var/run/httpd/edeploy.lockUSEPXEMNGR=FalsePXEMNGRURL=http://<IP-ADDR-OF-PROVISIONING-NODE>:8000
If modifying location of HEALTHDIR, CONFIGDIR, LOGDIR, HWDIR from/var/lib/edeploy, ensure the directory is owned by the user apache.
[email protected] 40 www.redhat.com

12. Modify /etc/httpd/conf.d/05-foreman.conf to enable the AHC upload scripts.
<VirtualHost *:80>
[ … Output Appreviated … ]
<Directory "/usr/share/foreman/public/cgi-bin">Options SymLinksIfOwnerMatchAllowOverride NoneRequire all grantedOptions +ExecCGIAddHandler cgi-script .py</Directory>
[ … Output Abbreviated … ]
</VirtualHost>
13. Restart httpd service for the changes to take effect.
# systemctl restart httpd.service
14. Create a cgi-bin subdirectory within /var/lib/foreman/public.
# mkdir -p /var/lib/foreman/public/cgi-bin
15. Copy upload-health.py and upload.py scripts to /var/lib/foreman/public/cgi-bin/ directory.
# cp /root/edeploy/server/upload-health.py /var/lib/foreman/public/cgi-bin/# cp /root/edeploy/server/upload.py /var/lib/foreman/public/cgi-bin/
16. Apply the foreman user and group ownership to the /var/lib/foreman/public/cgi-bin and the apachegroup to /var/lib/edeploy/ directories respectively.
# chown -R foreman:foreman /var/lib/foreman/public/cgi-bin/# chown -R apache:apache /var/lib/edeploy/
www.redhat.com 41 [email protected]

17. Configure RHEL-OSP Provisioning node PXE to use the AHC image.
# cat /var/lib/tftpboot/pxelinux.cfg/defaultDEFAULT menuPROMPT 0MENU TITLE PXE MenuTIMEOUT 200TOTALTIMEOUT 6000ONTIMEOUT Health
LABEL HealthMENU LABEL AHC Health CheckKERNEL boot/vmlinuz-3.10.0-229.el7.x86_64APPEND initrd=boot/health.pxe SERV=<IP-ADDR-OF-PROV-NODE> SESSION=installONSUCCESS=halt ONFAILURE=console IP=all:dhcp pci=bfsort
LABEL discoveryMENU LABEL Foreman DiscoveryKERNEL boot/foreman-discovery-image-latest-vmlinuzAPPEND rootflags=loop initrd=boot/foreman-discovery-image-latest-imgroot=live:/foreman.iso rootfstype=auto ro rd.live.image rd.live.check rd.lvm=0rootflags=ro crashkernel=128M elevator=deadline max_loop=256 rd.luks=0 rd.md=0 rd.dm=0foreman.url=https://<IP-ADDR-OF-PROV-NODE> nomodeset selinux=0 stateless biosdevname=0IPAPPEND 2
Besides the addition of the Health details, notice the ONTIMEOUT value is modifiedfrom discovery to Health to ensure auto booting into the heatlth-check image.
18. Load the SELinux policy module labeled ahc-selinux-policy.pp, otherwise SELinux blocks theHealth Check results from being uploaded to the Provisioning node. The ahc-selinux-policy.ppSELinux policy module is a separate file download available with this reference architecture.Please see Appendix M: Configuration Scripts. To activate the semodule, use the following command.
# semodule -i /path/to/ahc-selinux-policy.pp
19. (Optional Step) If downloading the ahc-selinux-policy.pp is not an option, temporarily set SELinuxto permissive mode within the Provisioning node in order for the results from the RHEL-OSPenvironment nodes to be uploaded.
# setenforce 0
[email protected] 42 www.redhat.com

20. PXE Boot the RHEL-OSP 6 environment nodes (controller nodes, compute nodes, Ceph OSD nodes)and select the Health option (defaults into the Health option after 60 seconds). Once the nodes bootinto the AHC OS image, the benchmark stress tests are automatically started. The results areuploaded to the Provisioning node specified within the /etc/edeploy.conf file under the PXEMNGRURLand reside within the /var/lib/edeploy/health/install/ directory (default).
If the user modifies the /etc/deploy.conf file to point the results and logs to adifferent directory, then the user and group permissions need to be owned byapache.
21. If temporarily set SELinux to permissive mode to capture the Health Check results, set SELinux backto enforcing mode once all the results of the RHEL OSP environment nodes has been uploaded tothe provisioning node.
# setenforce 1
5.2. Analyzing the eDeploy’s Automatic Health Check (AHC)ResultsThe AHC health check results are captured and stored by default within the/var/lib/edeploy/health/install/<date-time> directory. This location may vary depending on the values setwithin the /etc/edeploy.conf file. The typical naming convention of the file is: <Model>-<Manufacturer>-<ID>-.hw. An example of one of the corresponding servers in our RHEL-OSP 6 environment isPowerEdgeR610-DellInc-FGVXXR1-.hw
The results are analyzed by using the cardiff tool located under /root/edeploy/tools/cardiff. cardiff usespattern matching to select the appropriate files that will be analyzed. In order to compare the differentserver results, create a directory labeled results within the /var/lib/edeploy/health/install/resultsdirectory and copy all the .hw files from their corresponding directories as follows:
# mkdir -p /var/lib/edeploy/health/install/results# cd /var/lib/edeploy/health/install/# cp <date-time>/*.hw results/
When running the cardiff command, the -p option is used to specify the exact pattern and must beenclosed in single quotes ('). An example of running the command is shown below.
# cd /root/edeploy/tools/cardiff# ./cardiff.py -p '/var/lib/edeploy/health/install/results/PowerEdge*.hw'
www.redhat.com 43 [email protected]

The example above looks for all the files prefixed by the keyword "PowerEdge" within the/var/lib/edeploy/health/install/results directory. In order to ensure that the results are not skewed orinconsistent, cardiff groups identical servers when doing a comparison analysis.
What if the servers are similar but not identical?
Similar servers are separated and put into different groups. For example, if two servers are the same,but have different firmware versions, they are separated into different groups. If the end users wishesnot to differentiate similar servers by the firmware version, the -I option can be used to ignore specificdifferences.
For example, if the end user wishes to ignore different firmware versions, the command would be asfollows:
# ./cardiff.py -p '/var/lib/edeploy/health/install/results/PowerEdge*.hw' -I firmware
This example will group all PowerEdge servers together assuming the only difference is the firmwareversions. Multiple components can be ignored using a comma to separate the list. Availablecomponents that can be ignored are: "cpu, hpa, disk, firmware, memory, network, system"
An example of ignoring multiple components:
# ./cardiff.py -p '/var/lib/edeploy/health/install/results/PowerEdge*.hw' -Ifirmware,disk
When trying to analyze the differences between groups, the -o option followed by a directory createsthe specified directory and stores the differences between the hw files in that specified location. In theexample below, the test directory is created and stores the differences of all the PowerEdge-*.hwhardware files.
# ./cardiff.py -p '/var/lib/edeploy/health/install/results/PowerEdge*.hw' -o test/
Within the test directory, a file named System.diff shows the differences between the .hw files specified.
[email protected] 44 www.redhat.com

5.2.1. Analyzing Results using Summary View
When running the cardiff tool, the default view is known as the summary view. The summary reportprovides the following information for each test:
• Test name
• Tested device name
• View name
• Subgroup status (consistent|curious|unstable)
• Average performance
• Standard deviation
Snippet of typical summary output:
[ ... Output Appreviated ...]
Group 0 : Checking logical disks perfstandalone_randread_4k_IOps sda: SUMMARY : 2 consistent hosts with 134.50 IOps asaverage value and 3.50 standard deviationstandalone_read_1M_KBps sda: SUMMARY : 2 consistent hosts with 111669.50 IOps asaverage value and 2019.50 standard deviationstandalone_randread_4k_KBps sda: SUMMARY : 2 consistent hosts with 550.50 IOps asaverage value and 14.50 standard deviationstandalone_read_1M_IOps sda: SUMMARY : 2 consistent hosts with 106.00 IOps asaverage value and 2.00 standard deviation
The values consistent, unstable, curious for each component is based upon the value of the standarddeviation.
• Standard deviation lower than expected value for the group - consistent
• Standard deviation higher than expected value for the group - unstable
• X number of hosts are too far from mean while the group is having acceptable standard deviationvalue - unstable
www.redhat.com 45 [email protected]

5.2.2. Analyzing Results using Detail View
When running the cardiff tool, if the values of specific hosts need to be analyzed, the detailed viewprovides a report in a row/column format where every column is a host and every row is a test. In theexample below, the option -l specifies the log-level, -g option specifies the group, -c option specifies thecategory, and the -i option specifies the item.
# ./cardiff.py -p '/var/lib/edeploy/health/install/results/PowerEdge*.hw' -l DETAIL -g'0' -c 'standalone_rand._4k_IOps' -i 'sd.'
Group 0 : Checking logical disks perf
standalone_randread_4k_IOps : DETAIL : sd.*FGVQXR1 FGVXXR1sda 138 131
The example above shows that Dell PowerEdge Server R610 with Service tag FGVQXR1 provided 138random read 4k IOPs, while Dell PowerEdge R610 with Service tag FGVXXR1 provided 131 randomread 4k IOPs during the capturing of performance results. While the results from this example are notthat interesting, the key is to ensure the different servers being tested provide results that are withinan acceptable range in order to validate the physical hardware. If one or more of the Dell PowerEdgeservers produces a low number of random read 4k IOPs compared to its identical counterpart(s), theadded benefit of troubleshooting the issue prior to any installation of RHEL-OSP 6 can be done thussimplifying the troubleshooting process.
For more information about the Automatic Health Check tool and analyzing the results, please visit:Automatic Health Check Documentation
[email protected] 46 www.redhat.com

6. Creating a Red Hat Enterprise LinuxOpenStack Platform 6 DeploymentThe previous sections describe how to prepare the RHEL-OSP 6 environment and validate theunderlying hardware’s baseline performance. With the prerequisites in place, the focus turns todeploying the RHEL-OSP 6 environment.
1. Within the Provisioning node, modify the /var/lib/tftpboot/pxelinux.cfg/default file and change theONTIMEOUT value to discovery from the initial value of Health
2. Reboot all the nodes that are to be part of the RHEL-OSP 6 environment in order to initiate beingdiscovered by the RHEL-OSP Provisioning node
3. Within a browser, visit the respective Dashboard URL provided at the end of the rhel-osp-installer. This particular reference environment’s URL is:https://gprfc001.sbu.lab.eng.bos.redhat.com
4. Log into the OpenStack Dashboard using the initial crendentials given by the rhel-osp-installer.
5. Within the Hosts tab, select Discovered hosts.
6. Ensure all the nodes that are to be part of the RHEL-OSP 6 environment are discovered andaccounted for. This reference environment discovers three controller nodes, eight compute nodesand four Ceph OSD nodes.
7. Within the OpenStack Installer tab select New deployment.
Figure 6.1: Discovered Hosts
www.redhat.com 47 [email protected]

8. Within the Deployment Settings tab, enter Name, Networking, Messaging Provider, Platform, ServicePassword and click Next. This reference environment entered the following:
• Name - OSP6RA
• Networking - Neutron Networking
• Messaging Provider - Rabbit MQ
• Platform - Red Hat Enterprise Linux OpenStack Platform 6 on RHEL 7
• Service Password - This reference environment uses 'Use single password for all services'
9. Within the Network Configuration tab, select the button labeled New Subnet and create the Externalsubnet. This reference environment uses the following entries:
• Name - External
• DHCP server - External DHCP
• Network Address - 10.16.152.0/21
10. Within the same Network Configuration tab, reselect the button labeled New Subnet and create theTenant subnet. This reference environment uses the following entries:
• Name - Tenant
• DHCP server - No existing DHCP
• Network Address - 192.168.3/24
• IP Range Start - 192.168.3.100
• IP Range End - 192.168.3.254
11. Within the same Network Configuration tab, reselect the button labeled New Subnet and create theStorage subnet. This reference environment uses the following entries:
• Name - Storage
• Network Address - 192.168.0.0
• Network Mask - 255.255.0.0
• IPAM - Internal DB
• IP Range Start - 192.168.0.100
• IP Range End - 192.168.0.254
• Boot Mode - Static
[email protected] 48 www.redhat.com
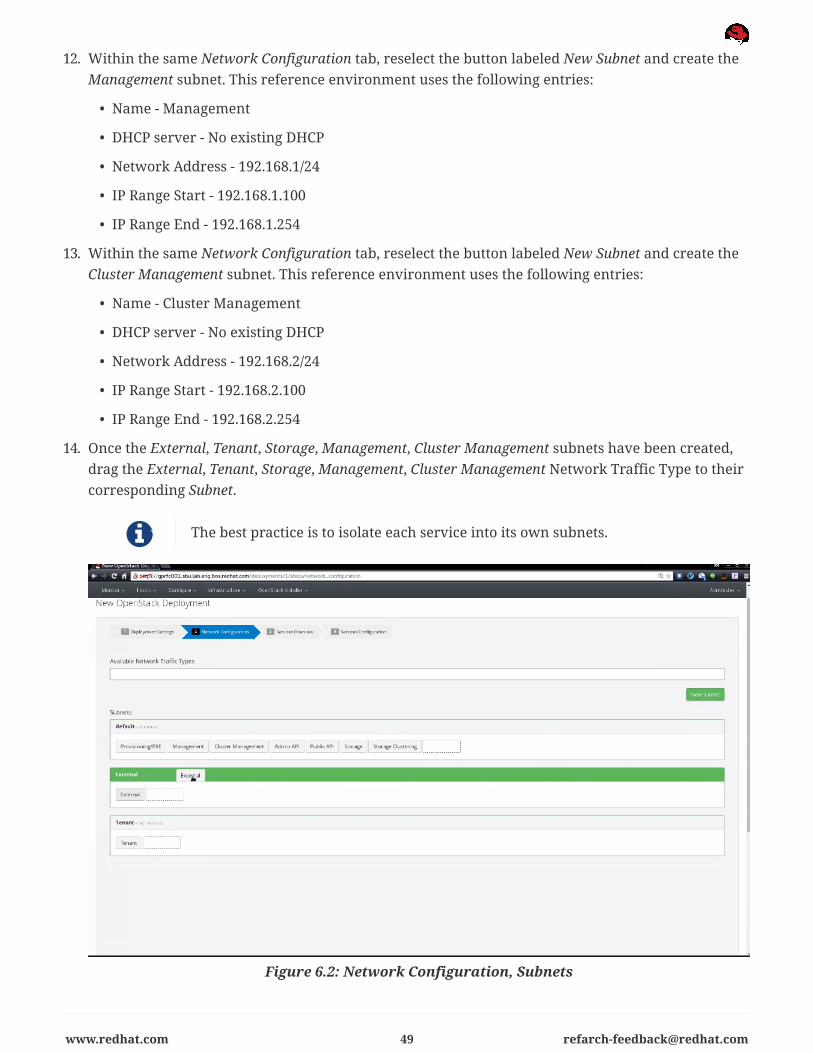
12. Within the same Network Configuration tab, reselect the button labeled New Subnet and create theManagement subnet. This reference environment uses the following entries:
• Name - Management
• DHCP server - No existing DHCP
• Network Address - 192.168.1/24
• IP Range Start - 192.168.1.100
• IP Range End - 192.168.1.254
13. Within the same Network Configuration tab, reselect the button labeled New Subnet and create theCluster Management subnet. This reference environment uses the following entries:
• Name - Cluster Management
• DHCP server - No existing DHCP
• Network Address - 192.168.2/24
• IP Range Start - 192.168.2.100
• IP Range End - 192.168.2.254
14. Once the External, Tenant, Storage, Management, Cluster Management subnets have been created,drag the External, Tenant, Storage, Management, Cluster Management Network Traffic Type to theircorresponding Subnet.
The best practice is to isolate each service into its own subnets.
Figure 6.2: Network Configuration, Subnets
www.redhat.com 49 [email protected]

15. Within the Services Overview tab, review the Deployment Roles & Available servers for theController and Compute nodes and click Next.
16. Within the Services Configuration tab, select the Glance service and Choose Driver Backend Ceph.
Figure 6.3: Services Configuration, Glance
[email protected] 50 www.redhat.com

17. Within the same Services Configuration tab, select the Cinder service and Choose Driver Backendcheckbox Ceph.
Figure 6.4: Services Configuration, Cinder
18. Click Submit at the bottom right hand corner to start the deployment process.
19. Within the OpenStack Installer tab, select Deployments.
• Within the Overview page, click on the Controller icon.
• Select the appropriate host(s) to be assigned to the Controller Deployment Role via the andclick Assign Hosts.
• Within the same Overview page, assign the appropriate host(s) to the different DeploymentRoles (Compute and Ceph Storage Node) as done in the previous step.
• Within the Hosts tab, click the Assigned link and select all *Compute* nodes and click ConfigureNetworks. The configured networks for the compute nodes are the Tenant, Management, ClusterManagement and Storage networks. To configure the network, drag and move the appropriatenetwork to the NIC chosen for the specified network traffic. An example image is shown below.For this reference environment, the following NICs are associated with the following networks.
◦ eno2 Default Network
◦ eno3 Cluster Management Network
◦ eno4 Management Network
◦ enp4s0f0 Tenant Network
◦ enp4s0f1 Storage Network
www.redhat.com 51 [email protected]
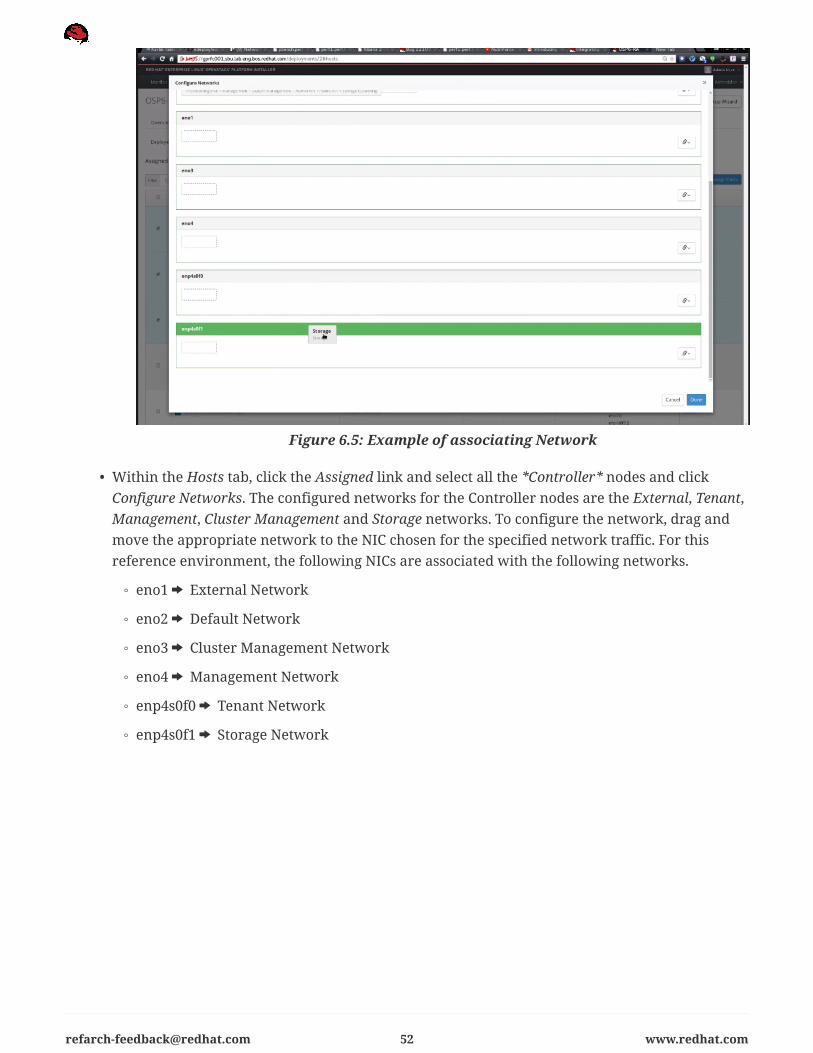
Figure 6.5: Example of associating Network
• Within the Hosts tab, click the Assigned link and select all the *Controller* nodes and clickConfigure Networks. The configured networks for the Controller nodes are the External, Tenant,Management, Cluster Management and Storage networks. To configure the network, drag andmove the appropriate network to the NIC chosen for the specified network traffic. For thisreference environment, the following NICs are associated with the following networks.
◦ eno1 External Network
◦ eno2 Default Network
◦ eno3 Cluster Management Network
◦ eno4 Management Network
◦ enp4s0f0 Tenant Network
◦ enp4s0f1 Storage Network
[email protected] 52 www.redhat.com

• Within the Hosts tab, click the Assigned link and select all the *Ceph* nodes and click ConfigureNetworks. The configured networks for the Ceph nodes are the Management, Cluster Management,and Storage network. To configure the network, drag and move the appropriate network to the NICchosen for the specified network traffic. For this reference environment, the following NICs areassociated with the following networks.
◦ eno2 Default Network
◦ enp66s0f1 Storage Network
• Once the all the hosts are assigned, within the Hosts tab, select Deploy button on the top rightcorner.
• Check the that confirms The networks have been configured for these hosts and click Deploy.
• The deployment procedure will start deploying the Controller nodes first, followed by the computeand Ceph nodes. If the deployment has been successful, the status bar displays Successfulcompletion.
Figure 6.6: Deployment Status
In the event of an unsuccessful deployment, please visit the following referencearchitecture Deploying Highly Available Red Hat Enterprise Linux OpenStackPlatform 6 with Ceph Storage, Troubleshooting Section for more information ontroubleshooting.
www.redhat.com 53 [email protected]

• After successful deployment, the Dashboard URL is displayed on the deployment screen.
Figure 6.7: Deployment Success
[email protected] 54 www.redhat.com

7. Storage Configuration of Ceph NodesCeph [10: Ceph - http://www.ceph.com] is an open source distributed object store and file systemdesigned to provide excellent performance, reliability, and scalability. This reference environmenttakes advantage of Ceph technology as the backend storage for the RHEL-OSP 6 environment. For moreinformation about Ceph, visit:
• http://ceph.com
• Integrating Staypuft-installed OSP5 with Ceph
• Deploying HA RHEL-OSP 6 with Ceph Storage
7.1. Install and Configure Ceph Admin ServerThe Ceph Admin Server administers and monitors the Ceph storage cluster. The Ceph Admin Servercan be integrated with the RHEL-OSP Installer node. However, it is possible run this server as a virtualmachine as it is not resource intensive. Due to the hardware limitations within this referenceenvironment, the Red Hat Ceph Storage Admin Server is created as a virtual machine.
1. Within the RHEL-OSP Provisioning node, create a virtual machine using virt-manager that installsRed Hat Enterprise Linux 7.0 operating system
Please refer to Creating Guests with Virt-Manager for more information.
2. Within virtual machine labeled ceph-admin, subscribe to the Required Channels - Ceph-Admin VMusing subscription-manager. Visit section Using the Red Hat Subscription Manager for moreinformation on attaching to the Red Hat Server entitlement pool
3. Within ceph-admin VM, configure NTP as shown in section NTP Configuration.
www.redhat.com 55 [email protected]

4. Assuming no DNS access, modify the /etc/hosts file within the ceph-admin VM, to enablecommunication between the Installer for Red Hat Ceph Storage and RHEL-OSP nodes.
This reference architecture uses the Provisioning network IP addresses in the20.0.0.x subnet.
# cat /etc/hosts127.0.0.1 localhost localhost.localdomain localhost4 localhost4.localdomain4::1 localhost localhost.localdomain localhost6 localhost6.localdomain620.0.0.2 mac90b11c0947f1.sbu.lab.eng.bos.redhat.com osd1 mac90b11c0947f120.0.0.3 mac90b11c064959.sbu.lab.eng.bos.redhat.com osd2 mac90b11c06495920.0.0.4 mac90b11c094103.sbu.lab.eng.bos.redhat.com osd3 mac90b11c09410320.0.0.5 mac90b11c094248.sbu.lab.eng.bos.redhat.com osd4 mac90b11c09424820.0.0.6 macd4bed9b38f0d.sbu.lab.eng.bos.redhat.com ctrl1 macd4bed9b38f0d20.0.0.7 macd4bed9b38dc9.sbu.lab.eng.bos.redhat.com ctrl2 macd4bed9b38dc920.0.0.8 macd4bed9b395f1.sbu.lab.eng.bos.redhat.com ctrl3 macd4bed9b395f120.0.0.130 ceph-admin.sbu.lab.eng.bos.redhat.com ceph-admin
5. Generate SSH keys on the Red Hat Ceph Storage Admin Server using ssh-keygen and copy thegenerated ssh keys to the managed hosts
# ssh-keygen# for HOST in ctrl{1,2,3} osd{1,2,3,4}; do ssh-copy-id $HOST; done
6. Update all managed hosts within the /etc/hosts provisioning network entries.
# for i in ctrl{1,2,3} osd{1,2,3,4}; do cat /etc/hosts | grep -i 20.0.0 | ssh $i "cat >> /etc/hosts";
done
For more information with regards to Red Hat Ceph Storage, please visit the reference architectureSection 4.7 Red Hat Ceph Storage and integration, Deploying HA RHEL-OSP 6 with Red Hat CephStorage
[email protected] 56 www.redhat.com

7.2. RHEL-OSP and Red Hat Ceph Storage IntegrationThe following section provides the basic steps in order to integrate RHEL-OSP 6 with Ceph. For moredetailed information with regards to Red Hat Ceph Storage integration with RHEL-OSP, please visitreference architecture Deploying HA RHEL-OSP 6 with Ceph Storage
Within the ceph-admin VM,
1. Allow TCP traffic on ports 4505, 4506, 2003 and services ssh and http for the Red Hat Ceph StorageAdmin server (ceph-admin)
# firewall-cmd --permanent --zone=public --add-service=ssh
# firewall-cmd --permanent --zone=public --add-service=http
# firewall-cmd --permanent --zone=public --add-rich-rule="rule family="ipv4" port protocol="tcp"
port="2003" accept"
# firewall-cmd --permanent --zone=public --add-rich-rule="rule family="ipv4" port protocol="tcp"
port="4505" accept"
# firewall-cmd --permanent --zone=public --add-rich-rule="rule family="ipv4" port protocol="tcp"
port="4506" accept"
2. Restart the firewalld service
# systemctl restart firewalld.service
3. Verify the public zone has all the services and rich rules in place
# firewall-cmd --zone=public --list-allpublic (default, active) interfaces: eth1 sources: services: dhcpv6-client http ssh ports: masquerade: no forward-ports: icmp-blocks: rich rules: rule family="ipv4" port port="2003" protocol="tcp" accept rule family="ipv4" port port="4505" protocol="tcp" accept rule family="ipv4" port port="4506" protocol="tcp" accept
4. Download the rhceph-1.2.3-rhel-7-x86_64.iso
5. Create a directory labeled /mnt/iso and mount the rhceph-1.2.3-rhel-7-x86_64.iso as follows:
www.redhat.com 57 [email protected]

# mkdir -p /mnt/iso# mount -o loop rhceph-1.2.3-rhel-7-x86_64.iso /mnt/iso
6. Copy the pem files located within the /mnt/iso directory to the /etc/pki/product/ directory as follows:
# cp /mnt/iso/RHCeph-Calamari-1.2-x86_64-c1e8ca3b6c57-285.pem /etc/pki/product/285.pem# cp /mnt/iso/RHCeph-Installer-1.2-x86_64-8ad6befe003d-281.pem /etc/pki/product/281.pem# cp /mnt/iso/RHCeph-MON-1.2-x86_64-d8afd76a547b-286.pem /etc/pki/product/286.pem# cp /mnt/iso/RHCeph-OSD-1.2-x86_64-25019bf09fe9-288.pem /etc/pki/product/288.pem
7. Install Ceph Enterprise (ICE) package via yum:
# yum localinstall /mnt/iso/ice_setup-0.2.2-1.el7cp.noarch.rpm
8. Create a configuration directory to configure ICE
# mkdir -p /root/config-cluster# cd /root/config-cluster
9. Within the config-cluster directory, configure ICE via the ice_setup command pointing to thelocation of the mounted iso files
# ice_setup -d /mnt/iso
Ensure to run the ice_setup within the configuration directory created. Thisscript creates cephdeploy.conf used via the command ceph-deploy to point to thelocal repository. All the defaults are used during the ice_setup.
10. Initiate the Calamari setup via the following command and enter the proper credentials:
# calamari-ctl initialize
The defaults were used during the initalization of Calamari
[email protected] 58 www.redhat.com

11. Install Red Hat Ceph Storage to the Red Hat Ceph Storage OSD nodes and the Red Hat Ceph Storagemonitor nodes via the following command:
# for HOST in ctrl{1,2,3} osd{1,2,3,4}; do ceph-deploy install $HOST; done
[ ... Output Abbreviated ... ]
[mac90b11c0947f1][DEBUG ] Complete![mac90b11c0947f1][INFO ] Running command: ceph --version[mac90b11c0947f1][DEBUG ] ceph version 0.80.8(69eaad7f8308f21573c604f121956e64679a52a7)
[ ... Output Abbreviated ... ]
12. Copy the generated ceph.conf file from one of the Red Hat Ceph Storage OSD nodes due to Red HatBugzilla 1184256. Ensure to be within the /root/config-cluster directory.
# ceph-deploy config pull osd1
[ceph_deploy.conf][DEBUG ] found configuration file at: /root/config-cluster/cephdeploy.conf[ceph_deploy.cli][INFO ] Invoked (1.5.22-rc1): /usr/bin/ceph-deploy config pullmac90b11c064959[ceph_deploy.config][DEBUG ] Checking mac90b11c064959 for /etc/ceph/ceph.conf[mac90b11c064959][DEBUG ] connected to host: mac90b11c064959[mac90b11c064959][DEBUG ] detect platform information from remote host[mac90b11c064959][DEBUG ] detect machine type[mac90b11c064959][DEBUG ] fetch remote file[ceph_deploy.config][DEBUG ] Got /etc/ceph/ceph.conf from mac90b11c064959
13. Create the initial Red Hat Ceph Storage cluster via the following command
# ceph-deploy --overwrite-conf mon create-initial
[ ... Output Appreviated ... ]
[ceph_deploy.gatherkeys][DEBUG ] Checking macd4bed9b395f1 for /var/lib/ceph/bootstrap-mds/ceph.keyring[macd4bed9b395f1][DEBUG ] connected to host: macd4bed9b395f1[macd4bed9b395f1][DEBUG ] detect platform information from remote host[macd4bed9b395f1][DEBUG ] detect machine type[macd4bed9b395f1][DEBUG ] fetch remote file[ceph_deploy.gatherkeys][DEBUG ] Got ceph.bootstrap-mds.keyring key frommacd4bed9b395f1.
www.redhat.com 59 [email protected]

14. The Red Hat Ceph Storage monitoring status can be viewed from any of the Controller nodes via thecommand
# ceph mon_status
{"name":"macd4bed9b395f1","rank":0,"state":"leader","election_epoch":4,"quorum":[0,1,2],"outside_quorum":[],"extra_probe_peers":["172.17.10.113:6789\/0","172.17.10.114:6789\/0"],"sync_provider":[],"monmap":{"epoch":1,"fsid":"5c0de4d2-1ba1-4211-bc44-43d1397e073a","modified":"0.000000","created":"0.000000","mons":[{"rank":0,"name":"macd4bed9b395f1","addr":"172.17.10.112:6789\/0"},{"rank":1,"name":"macd4bed9b38dc9","addr":"172.17.10.113:6789\/0"},{"rank":2,"name":"macd4bed9b38f0d","addr":"172.17.10.114:6789\/0"}]}}
[email protected] 60 www.redhat.com

15. List the disks within each Red Hat Ceph Storage OSD server. This allows to identify which disks areto be initialized. The example below shows the output of the Red Hat Ceph Storage OSD node osd1.Repeat the process for all Red Hat Ceph Storage OSD nodes.
# ceph-deploy disk list osd1
[ceph_deploy.conf][DEBUG ] found configuration file at: /root/config-cluster/cephdeploy.conf[ceph_deploy.cli][INFO ] Invoked (1.5.22-rc1): /usr/bin/ceph-deploy disk list osd1[osd1][DEBUG ] connected to host: osd1[osd1][DEBUG ] detect platform information from remote host[osd1][DEBUG ] detect machine type[ceph_deploy.osd][INFO ] Distro info: Red Hat Enterprise Linux Server 7.1 Maipo[ceph_deploy.osd][DEBUG ] Listing disks on osd1...[osd1][DEBUG ] find the location of an executable[osd1][INFO ] Running command: /usr/sbin/ceph-disk list[osd1][DEBUG ] /dev/sda :[osd1][DEBUG ] /dev/sda1 other[osd1][DEBUG ] /dev/sda2 other, ext3, mounted on /boot[osd1][DEBUG ] /dev/sda3 swap, swap[osd1][DEBUG ] /dev/sda4 other, 0x5[osd1][DEBUG ] /dev/sda5 other, LVM2_member[osd1][DEBUG ] /dev/sdb other, unknown[osd1][DEBUG ] /dev/sdc other, unknown[osd1][DEBUG ] /dev/sdd other, unknown[osd1][DEBUG ] /dev/sde other, unknown[osd1][DEBUG ] /dev/sdf other, unknown[osd1][DEBUG ] /dev/sdg other, unknown[osd1][DEBUG ] /dev/sdh other, unknown[osd1][DEBUG ] /dev/sdi other, unknown[osd1][DEBUG ] /dev/sdj other, unknown[osd1][DEBUG ] /dev/sdk other, unknown[osd1][DEBUG ] /dev/sdl other, unknown[osd1][DEBUG ] /dev/sdm other, unknown
16. With the output listed above, disks sd{b,c,d,e,f,g,h,i,j,k,l,m} are to be initialized. Within thisreference environment, each Red Hat Ceph Storage OSD node has the same number of disks witheach disk having the same amount of corresponding diskspace.
The command below removes any preexisting partitions and data on the disks.
# for HOST in osd{1,2,3,4}; do for DISK in sd{b,c,d,e,f,g,h,i,j,k,l,m}; do ceph-deploy disk zap
$HOST:/dev/$DISK; done; done
www.redhat.com 61 [email protected]
17. Once the disks have been initialized, prior to activating the disks to the cluster, the followingworkarounds to the RHEL-OSP 6 are required.
The two workarounds include:
• Red Hat Bugzilla 1212580 which states that the RHEL-OSP parameter osd_mount_options_xfsshould not have a -o prefix
Failure to remove the -o prefix from the Red Hat Enterprise Linux Installercauses the activation of disks to fail.
• The default amount of ports enabled for Red Hat Ceph Storage is only ten. For the Red Hat CephStorage OSD nodes, at least 3 TCP ports for every OSD disk per OSD server are required.
To remove the -o prefix, follow the steps below.
• Login to the RHEL-OSP Installer Dashboard.
• Hover over the Hosts tab and select All hosts.
• Click on the Ceph Host group, i.e. Ceph Storage Node (OSD)
• Click on the Parameters tab
• Scroll to the osd_mount_options_xfs option and click the override button
• Scroll to the ports option and click the override button.
• Scroll all the way to the bottom and remove the -o prefix from the line -oinode64,noatime,logbsize=256k
• Modify the ports ["6800-6950"] and specify the appropriate amount of ports. This referenceenvironment opens ports ["6800-6950"], however, every environment varies depending on theamount of OSD disks per OSD server.
• Click the Submit button.
• Hover over the Hosts tab and select All hosts.
• Click on the Controller Host group, i.e. Controller
• Repeat steps 4,5,7,8 for the Controller group.
Step 6 is omitted for Controller group steps.
• Hover over the Hosts tab and select All hosts.
• Select the for each Controller node and Ceph OSD node
• On the right hand side, click on the Select Action button, click on Run Puppet, click Submit on theverification window.
[email protected] 62 www.redhat.com

1. Verify the ceph.conf osd_mount_options_xfs has removed the -o prefix and provides the outputshown below.
# cat ceph.conf | grep osd_mount_options_xfsosd_mount_options_xfs = inode64,noatime,logbsize=256k
2. Once the disks have been initialized and the -o prefix value has been removed from the ceph.conf,add the disks to the cluster via the osd create command as follows:
# ceph-deploy --overwrite-conf osd create osd{1,2,3,4}:sd{b,c,d,e,f,g,h,i,j,k,l,m}
3. Start the ceph service on all the Red Hat Ceph Storage OSD nodes
# for i in 1 2 3 4; do ssh root@osd${i} systemctl start ceph; done
4. Within a Red Hat Ceph Storage monitor node (controller node), verify the status of the Red HatCeph Storage OSD disks as follows:
# ceph osd tree
[ ... Output Appreviated ... ]
-5 10.8 host mac90b11c09424884 0.9 osd.84 up 185 0.9 osd.85 up 186 0.9 osd.86 up 187 0.9 osd.87 up 188 0.9 osd.88 up 189 0.9 osd.89 up 190 0.9 osd.90 up 191 0.9 osd.91 up 192 0.9 osd.92 up 193 0.9 osd.93 up 194 0.9 osd.94 up 195 0.9 osd.95 up 1
www.redhat.com 63 [email protected]

5. Once the status of all the Red Hat Ceph Storage OSD disks is set to up, the next step is to create thestorage pools. However, in order to create the storage pool, the number of Placement Groups (PG)needs to be calculated. To calculate the proper number of PGs, use the following calculation:
• (Total number of Red Hat Ceph Storage OSD Disks in the cluster * 100) / number of replicas =number of PGs
The value needs to be rounded up to the nearest power of two. For this reference environment,there are a total of 48 OSD disks (12 per each OSD node). The formula calculation is as follows:(48 * 100) / 3 = 1600. The nearest power of two value to 1600 is the value 2048.
6. On a controller node, such as ctrl1, create the storage pools. Storage pool volumes is used whencreating cinder volumes. Storage pool images is used when creating glance images.
# ceph osd pool create volumes 2048pool 'volumes' created
# ceph osd pool create images 2048pool 'images' created
7. Once the storage pools have been created, within a controller node such as ctrl1, import the RHEL-OSP Installer volume and images key rings as follows:
# ceph auth import -i /etc/ceph/ceph.client.volumes.keyringimported keyring
# ceph auth import -i /etc/ceph/ceph.client.images.keyringimported keyring
8. Upon completing the Red Hat Ceph Storage cluster configuration, glance is to be installed. Theinclude_glance value must be set to true and a puppet update must be sent to the controller nodes.
The following steps install glance using the Horizon Dashboard.
• Login to the RHEL OSP Installer Dashboard.
• Hover over the Hosts tab and select All hosts.
• Click on the Controller group, i.e. Controller
• Click on the Parameters tab
• Scroll to the include_glance option and click the override button
• Scroll all the way to the bottom and change the value of include_glance parameter to true.
[email protected] 64 www.redhat.com

• Click the Submit button.
• Hover over the Hosts tab and select All hosts.
• Select the for each Controller node
• On the right hand side, click on the Select Action button, click on Run Puppet, click Submit on theverification window.
9. On one controller node, restart the cinder service as follows:
# systemctl restart openstack-cinder-api# systemctl restart openstack-cinder-scheduler# systemctl restart openstack-cinder-volume
10. Ensure to source the keystonerc_admin file
# source ~/keystonerc_admin
11. With all the above steps completed, validate the created cinder volume as follows:
# cinder create 1
+---------------------+--------------------------------------+| Property | Value |+---------------------+--------------------------------------+| attachments | [] || snapshot_id | None || source_volid | None || status | creating || volume_type | None |+---------------------+--------------------------------------+
# cinder list
+--------------------------------------+-----------+--------------+------+-------------+----------
+-------------+
| ID | Status | Display Name | Size | Volume Type | Bootable |
Attached to |
+--------------------------------------+-----------+--------------+------+-------------+----------
+-------------+
| dddf7da7-c746-416f-b872-f9540470f866 | available | None | 1 | None | false |
|
+--------------------------------------+-----------+--------------+------+-------------+----------
+-------------+
The status is available.
www.redhat.com 65 [email protected]

[email protected] 66 www.redhat.com

12. Verify that the volume resides within the Red Hat Ceph Storage pool labeled volumes
# rbd ls volumesvolume-dddf7da7-c746-416f-b872-f9540470f866
13. Verify glance is working by attempting to create a glance image
# glance image-create --name='cirros' --is-public=true --container-format=bare --disk-format=qcow2 <
cirros-0.3.1-x86_64-disk.img
+------------------+--------------------------------------+
| Property | Value |
+------------------+--------------------------------------+
| checksum | d972013792949d0d3ba628fbe8685bce |
| container_format | bare |
| created_at | 2015-05-07T19:00:57 |
| deleted | False |
| deleted_at | None |
| disk_format | qcow2 |
| id | 34f8a0b6-a638-4503-899a-5cdfea9cfd66 |
| is_public | True |
| min_disk | 0 |
| min_ram | 0 |
| name | cirros |
| owner | 6f98906137a2421da579d4e70714cac6 |
| protected | False |
| size | 13147648 |
| status | active |
| updated_at | 2015-05-07T19:00:58 |
| virtual_size | None |
+------------------+--------------------------------------+
A cirros image can be located at: https://download.cirros-cloud.net/
14. Verify that the glance image is active
# glance image-list
+--------------------------------------+--------+-------------+------------------+----------+--------+
| ID | Name | Disk Format | Container Format | Size | Status |
+--------------------------------------+--------+-------------+------------------+----------+--------+
| 34f8a0b6-a638-4503-899a-5cdfea9cfd66 | cirros | qcow2 | bare | 13147648 | active |
+--------------------------------------+--------+-------------+------------------+----------+--------+
15. Verify that the images reside within the Red Hat Ceph Storage pool labled images
# rbd ls images34f8a0b6-a638-4503-899a-5cdfea9cfd66
www.redhat.com 67 [email protected]

16. Within a monitor node (Controller node), enable the storage pool volumes to read from the storagepool images
# ceph auth caps client.volumes mon 'allow r' osd 'allow class-read object_prefixrbd_children, allow rwx pool=volumes, allow rwx pool=vms, allow rx pool=images'
[email protected] 68 www.redhat.com

8. Validating and Benchmarking Red HatEnterprise Linux OpenStack Platform usingTempest, Rally, and CBTOOLWith the installation of RHEL-OSP 6 complete, the main focus turns towards validating andbenchmarking the existing RHEL-OSP 6 deployment using open source tools that include Tempest,Rally, and CBTOOL.
At the time of this writing, the open source tools Tempest, Rally, CBTOOL are notsupported with RHEL-OSP 6, however, they are key components in benchmarkingthe RHEL-OSP 6 cloud within this reference environment.
8.1. TempestTempest validates the deployment by running a set of tests against the OpenStack Cloud environment.The tests include validation against the OpenStack API and other specific tests.
8.1.1. Before you Begin
Ensure the following prerequisites are met:
• Reference Architecture Configuration Details
• Red Hat Enterprise Linux OpenStack Platform 6 Configuration
Within the Provisioning node, as the root user:
Create a virtual machine labeled tempest using virt-manager that installs Red Hat Enterprise Linux 7.1operating system
Please refer to Creating Guests with Virt Manager for more information.
Prior to installing Tempest, create the following networks within the RHEL-OSP 6 environment.Tempest requires one of the networks to be considered external.
www.redhat.com 69 [email protected]

# neutron net-create private --shared# neutron subnet-create private <private_network_address>/<mask># neutron router-create router# neutron router-interface-add <id_of_router> <private_subnet_id># neutron net-create public --router:external --provider:network_type flat# neutron subnet-create public --allocation-pool start=<start_ip>,end=<end_ip>--gateway=<default_gateway> --enable_dhcp=False <public_network_address>/<mask># neutron router-gateway-set <id_of_router> <public_network_id>
[email protected] 70 www.redhat.com

8.1.2. Validating using Tempest
As mentioned within Tempest’s GitHub Repository [11: https://github.com/redhat-openstack/tempest],Tempest contains a list of Design Principles for validating the OpenStack Cloud. The main objective ofTempest is to validate any OpenStack installation by explicitly testing OpenStack scenarios using publicinterfaces to determine whether the OpenStack cloud is running as intended. The following sectionsprovide detailed steps in installing Tempest and showing how to run different OpenStack scenarios.
8.1.3. Getting Started with Tempest
The following section describes the steps to install and configure Tempest within the tempest VM.
Due to enhancements with the latest Tempest version, the openstack-tempest kiloRPM is used for validating the RHEL-OSP 6 environment.
8.1.4. Tempest Package Requirements
A specific set of packages is required to properly deploy Tempest on a Red Hat Enteprise Linux 7.xsystem. The number of installed packages required varies depending on Red Hat Enterprise Linux 7installation performed. For the purposes of this reference architecture, the following packages arerequired.
Table 16. Required Packages for Tempest Installation
Required Packages
gcc
libxml2-devel
libxslt-devel
python-devel
openssl-devel
python-testtools
libffi-devel
libffi
rdo-testing-kilo
wget
In order for these packages to successfully install, ensure the following channels areenabled within the RHEL Tempest VM located within the Required Channels -Tempest VM
www.redhat.com 71 [email protected]
For simplicity, a file labeled req-rpms.txt contains the name of each RPM package listed above on aseparate line. It is included in Appendix E: Tempest Package Requirements Text File.
If not using the req-rpms.txt file, the rdo-testing-kilo package resides in thefollowing location: rdo-release-kilo-1.noarch.rpm
Within the tempest virtual machine,
1. Use the yum package manager to install the packages and any of their dependencies with thefollowing command:
# yum install `awk '{print $1}' ./req-rpms.txt`
2. Once the dependencies have been installed, install the openstack-tempest RPM
# yum install openstack-tempest
8.1.5. Tempest Configuration
Within the tempest virtual machine,
1. Create a working directory to run the tempest tools, i.e. mytempest
# mkdir -p /path/to/mytempest
2. Within the mytempest directory, run the configure-tempest-directory command to setup tempestwithin the mytempest directory.
# cd /path/to/mytempest# /usr/share/openstack-tempest-kilo/tools/configure-tempest-directory
3. Export the RHEL-OSP 6 environment variables with the proper credentials. The credentials for thisreference environment are as follows:
# export OS_USERNAME=admin# export OS_TENANT_NAME=admin# export OS_PASSWORD=# export OS_AUTH_URL=http://20.0.0.29:35357/v2.0/
The OS_PASSWORD is omitted.
[email protected] 72 www.redhat.com
4. With a saved resource state, run the config_tempest.py script with the following credentials toproperly create the tempest.conf file that resides within the /etc/ directory.
# tools/config_tempest.py --debug --create identity.uri $OS_AUTH_URLidentity.admin_username $OS_USERNAME identity.admin_password $OS_PASSWORDidentity.admin_tenant_name $OS_TENANT_NAME object-storage.operator_role Member
5. Prior to running any tempest tests, it is critical to preserve a clean resource state of the existingRHEL OpenStack cloud.
# python -m tempest.cmd.cleanup --init-saved-state
Current cleanup with Tempest does not cleanup the entire environment. It ispossible that manual intervention is required to clean up the existing RHELOpenStack cloud. Information regarding issues with tempest can be seen here:https://review.openstack.org/#/c/191978
6. Review the etc/tempest.conf located within the mytempest directory to ensure it meets all yourRHEL-OSP 6 environment needs.
7. Verify the run-test.sh script properly runs, by using one of the tempest tests labeledtempest.api.compute.flavors
# tools/run-tests.sh --concurrency 4 tempest.api.compute.flavors
The option concurrency 4 prevents Tempest from creating race conditions and/orunexpected errors.
8. After successful verification, run the run-tests.sh script as follows:
# tools/run-tests.sh --concurrency 4 --skip-file tools/ra-skip-file | tee ra-out.txt
The ra-skip-file contains specific tempest tests excluded when running the run-tests.sh script. The reason specific tests are excluded is due to our environmentnot running certain scenarios, e.g. floating IP tests and third party tests. The ra-skip-file for this reference environment is included in the Appendix F: TempestSkip File (ra-skip-file). Each RHEL-OSP 6 environment varies and thus the testscenario cases to omit may vary for each environment.
www.redhat.com 73 [email protected]
9. Once the tempest tests that verify RHEL-OSP 6 deployment are complete, cleanup the environmentto return it to its original resource state.
# python -m tempest.cmd.cleanup
8.2. RallyRally [12: https://wiki.openstack.org/wiki/Rally] is a benchmarking tool created to answer theunderlying question of "How does OpenStack work at scale?". Rally is able to achieve the answer to thisquestion by automating the processes that entail OpenStack deployment, cloud verification,benchmarking, and profiling. While Rally has the capabilities to offer an assortment of Rally actions totest and validate the OpenStack cloud, this reference environment focuses specifically on using thebenchmarking tool to test specific scenarios using an existing RHEL-OSP cloud and generate HTMLreports based upon the captured results.
8.2.1. Before you Begin
Ensure the following prerequisites are met:
• Reference Architecture Configuration Details
• Red Hat Enterprise Linux OpenStack Platform 6 Configuration
• Tempest
• Enable the required repository channels - Required Channels - Rally VM
8.2.2. Rally Installation
Within the Provisioning node, as the root user:
Create a virtual machine labeled rally using virt-manager that installs Red Hat Enterprise Linux 7.1operating system
Please refer to Creating Guests with Virt Manager for more information.
Within the rally virtual machine,
1. Create a working directory to clone the rally git repository.
# mkdir /path/to/myrally
[email protected] 74 www.redhat.com

2. If not already installed, install git using the yum command.
# yum install git
3. Clone the repository using git.
# git clone https://github.com/openstack/rally.git
4. Access the working directory.
# cd /path/to/myrally/rally
5. As the root user, run the install_rally script and follow the prompts to install the requireddependencies.
# /path/to/myrally/rally/install_rally.sh[ ... Output Abbreviated ...]Installing rally-manage script to /usr/binInstalling rally script to /usr/bin======================================================================Information about your Rally installation: * Method: system * Database at: /var/lib/rally/database * Configuration file at: /etc/rally======================================================================
8.2.3. Rally Configuration
1. Export the RHEL-OSP 6 environment variables with the proper credentials. The credentials for thisreference environment are as follows:
# export OS_USERNAME=admin# export OS_TENANT_NAME=admin# export OS_PASSWORD=# export OS_AUTH_URL=http://20.0.0.29:35357/v2.0/
The OS_PASSWORD is omitted.
www.redhat.com 75 [email protected]

2. Add the existing RHEL-OSP 6 deployment to the Rally database. Create a Rally deployment json filelabeled osp-deployment.json.
{ "type": "ExistingCloud", "auth_url": "http://<DEPLOYMENT_IP>:35357/v2.0/", "region_name": "RegionOne", "endpoint_type": "public", "admin": { "username": "admin", "password": "********", "tenant_name": "admin" }, "users": [ { "username": "admin", "password": "*****", "tenant_name": "admin" } ]}
3. (Optional) If creating additional users outside of Rally and adding them to the json file labeled osp-deployment.json, please ensure to look over Bugzilla 1175432 that highlights a known racecondition.
4. Add the existing RHEL OpenStack Platform 6 deployment to the Rally database. The followingnames the entry RA-Rally and captures all the appropriate credentials required within the osp-deployment.json.
# rally deployment create --name RA-Rally --file osp-deployment.json
+--------------------------------------+----------------------------+----------+------------------
+--------+
| uuid | created_at | name | status |
active |
+--------------------------------------+----------------------------+----------+------------------
+--------+
| 496e3be9-6020-4543-82f6-e7eb90517153 | 2015-05-12 15:18:13.817669 | RA-Rally | deploy->finished |
|
+--------------------------------------+----------------------------+----------+------------------
+--------+
Using deployment: 496e3be9-6020-4543-82f6-e7eb90517153
~/.rally/openrc was updated
[ ... Output Abbreviated ... ]
[email protected] 76 www.redhat.com

Rally Extending Tenant network (Optional)
The following steps are optional and only required if the Rally benchmark scenario being run requiresdirect access to the guest. Direct access refers to ssh capability. When running theNovaServers.boot_server scenario, extending the tenant network is not required as this specificscenario does not ssh into the guests but simply launches the guests.
In order to enable direct access to the launched guests, please follow the instructions below. Thefollowing steps all reside within the Provisioning node unless otherwise specified.
1. If the current RHEL-OSP 6 deployment does not have any floating IPs available, extend the Tenantnetwork to the rally host. Run the following to install the Neutron Open vSwitch agent package.
# yum install openstack-neutron-openvswitch
2. Copy the Neutron configuration files from a RHEL-OSP 6 compute node that has been deployed bythe RHEL-OSP Provisioning node to the RHEL-OSP Provisioning node.
# scp <Compute_Node_IP>:/etc/neutron/* /etc/neutron/
3. Set an IP address to the interface that would have been associated with the Tenant network had itbeen part of the RHEL-OSP 6 cluster.
4. Edit ovs_neutron_plugin.ini and change local_ip to IP address that resides on the Tenant network.
[OVS]vxlan_udp_port=4789network_vlan_ranges=tunnel_type=vxlantunnel_id_ranges=1:1000tenant_network_type=vxlanlocal_ip=<IP_WITHIN_TENANT_NETWORK>enable_tunneling=Trueintegration_bridge=br-inttunnel_bridge=br-tun
www.redhat.com 77 [email protected]

5. Edit /etc/neutron/plugin.ini and change local_ip to IP address that resides on the Tenant network.
[OVS]vxlan_udp_port=4789network_vlan_ranges=tunnel_type=vxlantunnel_id_ranges=1:1000tenant_network_type=vxlanlocal_ip=<IP_WITHIN_TENANT_NETWORK>enable_tunneling=Trueintegration_bridge=br-inttunnel_bridge=br-tun
6. Restart neutron-openvswitch-agent
# systemctl restart openvswitch# systemctl restart neutron-openvswitch-agent
7. On a Controller node, verify the agent is properly setup by checking the neutron agent-list.
# neutron agent-list
[ ... Output Abbreviated ... ]
| 8578499b-0873-47a9-9cae-9884d4abf768 | Open vSwitch agent | <Provisioning_Host> | :-) | True | neutron-
openvswitch-agent |
8. On Controller node, create variables netid and hostid with the information below.
# netid=<ID_OF_PRIVATE_NETWORK># echo $netid# hostid=<PROVISIONING_NODE_HOSTNAME># echo $hostid
[email protected] 78 www.redhat.com

9. On Controller node, create a neutron port labeled rally-port that binds to the host_id and createsthe port within the network of the associated netid
# neutron port-create --name rally-port --binding:host_id=$hostid $netid
Created a new port:
+-----------------------
+---------------------------------------------------------------------------------+
| Field | Value
|
+-----------------------
+---------------------------------------------------------------------------------+
| admin_state_up | True
|
| allowed_address_pairs |
|
| binding:host_id | <Provisioning_HOST> |
| binding:profile | {}
|
| binding:vif_details | {"port_filter": true, "ovs_hybrid_plug": true}
|
| binding:vif_type | ovs
|
| binding:vnic_type | normal
|
| device_id |
|
| device_owner |
|
| extra_dhcp_opts |
|
| fixed_ips | {"subnet_id": "5279a66d-a5f5-4639-b664-163c39f26838", "ip_address": "10.1.0.2"}
|
| id | 0a9e54da-6588-42ce-9011-d637c3387670
|
| mac_address | fa:16:3e:44:c3:d9
|
| name | rally-port |
| network_id | 1cd7ae4f-d057-41bd-8c56-557771bf9f73
|
| security_groups | 76fe37c7-debb-46b4-a57a-d7dbb9dfd0ed
|
| status | DOWN
|
| tenant_id | 6f98906137a2421da579d4e70714cac6
|
+-----------------------
+---------------------------------------------------------------------------------+
10. Within the Provisioning node, modify the Rally VM XML with the following:
www.redhat.com 79 [email protected]

# virsh edit rally... <interface type='bridge'> <mac address='fa:16:3e:1a:3b:f1'/> <source bridge='br-int'/> <virtualport type='openvswitch'> <parameters interfaceid='neutron-port-id'/> </virtualport> <target dev='vnet4'/> <model type='virtio'/> <alias name='net1'/> <address type='pci' domain='0x0000' bus='0x00' slot='0x0f' function='0x0'/> </interface>...
Ensure to update the neutron-port-id with the id located in the previous stepwhen creating the rally-port.
11. Once the XML file changes have been applied to the rally guest, reboot the rally guest.
8.2.4. Rally Verification
Within the rally VM,
1. List the current status of the RHEL-OSP 6 deployment.
# rally deployment list
+--------------------------------------+----------------------------+----------+------------------
+--------+
| uuid | created_at | name | status |
active |
+--------------------------------------+----------------------------+----------+------------------
+--------+
| 496e3be9-6020-4543-82f6-e7eb90517153 | 2015-05-12 15:18:13.817669 | RA-Rally | deploy->finished | *
|
+--------------------------------------+----------------------------+----------+------------------
+--------+
2. Using the built-in sample keystone scenario labeled create-user.json, test the rally environment toconfirm proper functionality of rally. The following create-user.json scenario creates 10 names at atime up to 100 times and shows the duration of creating a user in subsets of 10 until reaching themax total users to generate (up to 100). This sample test verifies that our rally service can accessour RHEL-OSP 6 environment.
[email protected] 80 www.redhat.com
# rally task start /path/to/myrally/rally/samples/tasks/scenarios/keystone/create-user.json
8.2.5. Benchmarking with Rally
The following section describes the different test case scenarios to benchmark our existing RHEL-OSP 6environment. The results captured by these tests are analyzed in section Analyzing Red Hat EnterpriseLinux OpenStack Platform 6 Benchmark Results with Rally
Rally runs different types of scenarios based on the information provided by a user defined .json file.While Rally consists of many scenarios, this reference environment consists of showing two keyscenarios that focus on end user usability of the RHEL-OSP cloud.
• Keystone.create-user (setup validation)
• NovaServers.boot_server
The user defined .json files associated with these Rally scenarios are provided within the Appendix G:Rally JSON File
In order to properly create the user defined .json files, understanding how to assign parameter valuesis critical. The following example breaks down an existing .json file that runs theNovaServers.boot_server scenario.
www.redhat.com 81 [email protected]

{ "NovaServers.boot_server": [ { "args": { "auto_assign_nic": true, "detailed": true, "flavor": { "name": "m1.tiny" }, "image": { "name": "cirros" } }, "context": { "quotas": { "nova": { "cores": -1, "instances": -1, "ram": -1 }, "neutron": { "port": -1 } }, }, "runner": { "type": "constant", "times": 1, "concurrency": 1 } } ]}
A .json file consists of the following:
• A curly bracket {, followed by the name of the Rally scenario, e.g. "NovaServers.boot_server",followed by a colon : and bracket [. The syntax is critical when creating a .json file otherwise theRally task fails. Each value assigned requires a comma , unless it is the final argument in a section.
• The next piece of the syntax are the arguments, args
◦ args consists of parameters that are assigned user defined values. The most notable parametersinclude:
▪ auto_assign_nic - The value can be set to true in which a random network is chosen.Otherwise, a network ID can be specified.
[email protected] 82 www.redhat.com

▪ flavor - The size of the guest instances to be created, e.g. "m1.small".
▪ image - The name of the image file used for creating guest instances.
▪ quotas - Specification of quotas for the CPU cores, instances, and memory (ram). Setting avalue of -1 for cores, instances, and ram allows for use of all the resources available withinthe RHEL-OSP 6 cloud.
▪ tenants - amount of total tenants to be created.
▪ users_per_tenant - amount of users to be created within each tenant.
▪ concurrency - amount of guest instances to run on each iteration.
▪ times - amount of iterations to perform.
• The closing syntax of a json file are the ending bracket ] and curly bracket bracket }.
Once defining a json file is complete, the next step into properly benchmarking with Rally is to run ascenario. Using the provided json file, a user can ensure that their RHEL-OSP 6 environment canproperly create guest instances.
# rally task start simple-boot-server.json[ ... Output Abbreviated ... ]+------------------------------------------------------------------------------------------+| Response Times (sec) |+------------------+--------+--------+--------+--------+--------+--------+---------+-------+| action | min | median | 90%ile | 95%ile | max | avg | success | count |+------------------+--------+--------+--------+--------+--------+--------+---------+-------+| nova.boot_server | 30.197 | 30.197 | 30.197 | 30.197 | 30.197 | 30.197 | 100.0% | 1 || total | 30.198 | 30.198 | 30.198 | 30.198 | 30.198 | 30.198 | 100.0% | 1 |+------------------+--------+--------+--------+--------+--------+--------+---------+-------+Load duration: 30.2116880417Full duration: 54.2107958794
HINTS:* To plot HTML graphics with this data, run: rally task report 34a1760b-7aa6-4c9a-bbcf-87efc3b8a6d5 --out output.html
* To get raw JSON output of task results, run: rally task results 34a1760b-7aa6-4c9a-bbcf-87efc3b8a6d5
In Analyzing Red Hat Enterprise Linux OpenStack Platform 6 Benchmark Results with Rally, the focalpoint is on running different Rally scenarios and analyzing those results.
For more information regarding Rally, please visit http://rally.readthedocs.org/en/latest/overview.html
www.redhat.com 83 [email protected]

8.3. Cloud Rapid Experimentation and Analysis Toolkit(CBTOOL)As mentioned in the CBTOOL documentation [13: https://github.com/ibmcb/cbtool], the CBTOOL is aframework that automates IaaS cloud benchmarking through the running of controlled experiments.An experiment is executed by the deployment and running of a set of Virtual Applications (VApps).Each VApp represents a group of VMs with different roles logically connected to execute differentapplication types. For this reference environment, our workload VApp consists of two critical roles forbenchmarking, the orchestrator role and workload role. In the following sections, the steps on how toinstall the workload VApp using different VMs with their specified roles is shown.
For more information on the CBTOOL visit: https://github.com/ibmcb/cbtool
8.3.1. Before you Begin
Ensure the following prerequisites are met:
• Reference Architecture Configuration Details
• Red Hat Enterprise Linux OpenStack Platform 6 Configuration
• Tempest
• Rally
• Enable the required repository channels - Required Channels - CBTOOL VM
8.3.2. CBTOOL Virtual Machine
Within the Provisioning node, as the root user:
Create a virtual machine labeled cbtool using virt-manager that installs Red Hat Enterprise Linux 7.1operating system
Please refer to Creating Guests with Virt Manager for more information.
[email protected] 84 www.redhat.com

8.3.3. CBTOOL Extending Tenant network
Within the Provisioning node, as the root user,
1. If the current RHEL-OSP 6 deployment does not have any floating IPs available, extend the Tenantnetwork to the CBTOOL host. The steps below are mentioned within section Rally Extending Tenantnetwork (Optional), however, the steps are required for benchmarking with the CBTOOL.
# yum install openstack-neutron-openvswitch
2. Copy the Neutron configuration files from a RHEL-OSP 6 compute node that has been deployed bythe RHEL-OSP Provisioning node.
# scp <COMPUTE_NODE_IP>:/etc/neutron/* /etc/neutron/
3. Set an IP address to the interface that would have been associated with the Tenant network had itbeen part of the RHEL-OSP 6 cluster.
4. Edit ovs_neutron_plugin.ini and change local_ip to the IP address on the Tenant network.
[OVS]vxlan_udp_port=4789network_vlan_ranges=tunnel_type=vxlantunnel_id_ranges=1:1000tenant_network_type=vxlanlocal_ip=<TENANT_NETWORK_IP>enable_tunneling=Trueintegration_bridge=br-inttunnel_bridge=br-tun
www.redhat.com 85 [email protected]

5. Edit /etc/neutron/plugin.ini and change local_ip to the IP address on the Tenant network.
[OVS]vxlan_udp_port=4789network_vlan_ranges=tunnel_type=vxlantunnel_id_ranges=1:1000tenant_network_type=vxlanlocal_ip=<TENANT_NETWORK_IP>enable_tunneling=Trueintegration_bridge=br-inttunnel_bridge=br-tun
6. Restart neutron-openvswitch-agent
# systemctl restart openvswitch# systemctl restart neutron-openvswitch-agent
7. . On a Controller node, verify the agent is properly setup by checking the neutron agent list.
# neutron agent-list
[ ... Output Abbreviated ... ]
| 8578499b-0873-47a9-9cae-9884d4abf768 | Open vSwitch agent | <Provisioning_Host> | :-) | True | neutron-
openvswitch-agent |
8. On a Controller node, create variables netid and hostid that store the private network id and theProvisioning node’s hostname respectively.
# netid=<ID_OF_PRIVATE_NETWORK># echo $netid# hostid=<PROVISIONING_NODE_HOSTNAME># echo $hostid
[email protected] 86 www.redhat.com

9. On a Controller node, create a neutron port labeled cbtool-port that binds to the host_id andcreates a port with the netid
# neutron port-create --name cbtool-port --binding:host_id=$hostid $netid
Created a new port:
+-----------------------
+---------------------------------------------------------------------------------+
| Field | Value
|
+-----------------------
+---------------------------------------------------------------------------------+
| admin_state_up | True
|
| allowed_address_pairs |
|
| binding:host_id | <Provisioning_HOST> |
| binding:profile | {}
|
| binding:vif_details | {"port_filter": true, "ovs_hybrid_plug": true}
|
| binding:vif_type | ovs
|
| binding:vnic_type | normal
|
| device_id |
|
| device_owner |
|
| extra_dhcp_opts |
|
| fixed_ips | {"subnet_id": "5279a66d-a5f5-4639-b664-163c39f26838", "ip_address": "10.1.0.2"}
|
| id | 0a9e54da-6588-42ce-9011-d637c3387670
|
| mac_address | fa:16:3e:44:c3:d9
|
| name | cbtool-port |
| network_id | 1cd7ae4f-d057-41bd-8c56-557771bf9f73
|
| security_groups | 76fe37c7-debb-46b4-a57a-d7dbb9dfd0ed
|
| status | DOWN
|
| tenant_id | 6f98906137a2421da579d4e70714cac6
|
+-----------------------
+---------------------------------------------------------------------------------+
10. Within the Provisioning node, modify the CBTOOL VM XML with the following:
www.redhat.com 87 [email protected]

# virsh edit cbtool... <interface type='bridge'> <mac address='fa:16:3e:1a:3b:f1'/> <source bridge='br-int'/> <virtualport type='openvswitch'> <parameters interfaceid='neutron-port-id'/> </virtualport> <target dev='vnet4'/> <model type='virtio'/> <alias name='net1'/> <address type='pci' domain='0x0000' bus='0x00' slot='0x0f' function='0x0'/> </interface>...
Ensure to update the neutron-port-id with the id located in the previous stepwhen creating the cbtool-port.
11. Once the XML file changes have been applied to the cbtool guest, reboot the cbtool guest.
Once the cbtool virtual machine is up and running, create a service file for the new interface on thecbtool host, and enable dhcp. An example of the ifcfg-eth0 file found within the cbtool guest.
# cat /etc/sysconfig/network-scripts/ifcfg-eth0TYPE=EthernetBOOTPROTO=dhcpDEVICE=eth0ONBOOT=yes
8.3.4. Installation of CBTOOL Orchestrator role within a VM
The CBTOOL Orchestrator virtual machine controls the launching and setup of the workload virtualmachines that are created within the RHEL-OSP 6 environment. The steps below show how to setup thecbtool virtual machine with the orchestrator role.
1. Create a working directory to clone the cbtool git repository.
# mkdir /path/to/mycbtool
2. If not already installed, install the following packages using the yum command.
# yum install git net-tools mongodb-server python-twisted-web python-webob R psmisc
[email protected] 88 www.redhat.com

3. Access the working cbtool directory.
# cd /path/to/mycbtool
4. Clone the cbtool repository using git.
# git clone https://github.com/ibmcb/cbtool.git
www.redhat.com 89 [email protected]

5. Within the install directory of cbtool, install the orchestrator role.
# /path/to/mycbtool/cbtool/install -r orchestrator[ ... Output Abbreviated ... ]All dependencies are in placeChecking for a "private" configuration file for user "root" in/opt/cbtool//configs/root_cloud_definitions.txt)File already exists, tool is ready to be used.
If any dependencies are listed, install the missing packages via the yum command.
8.3.5. Configuring the CBTOOL Orchestrator VM
Once the installation is complete, the following configuration changes are required for successful useof cbtool.
1. Modify the MongoDB configuration file /etc/mongod.conf with an editor such as vi. Set the bind_ipto the Manager IP. The Manager IP resides from the interface added to the cbtool VM. Initiating anifup command on the interface assigns an IP address.
# cat /etc/mongod.conf
[ ... Output Abbreviated ... ]bind_ip = <MANAGER_IP>
2. Restart the MongoDB service as follows
# /bin/mongod -f /etc/mongod.conf --pidfilepath /var/run/mongod.pid > mongo.out 2>&1 &
3. Modify the file labeled root_cloud_definitions.txt within the /path/to/mycbtool/configs directoryusing an editor such as vi
# vi /path/to/mycbtool/cbtool/configs/root_cloud_definitions.txt
4. Within the root_cloud_definitions.txt, set the MANAGER_IP to the IP address of interface labeledcbtool-port from the cbtool VM.
MANAGER_IP = <MANAGER IP>
[email protected] 90 www.redhat.com

5. Within the root_cloud_definitions.txt, modify the value of STARTUP_CLOUD from SIMCLOUD toMYOPENSTACK
STARTUP_CLOUD = MYOPENSTACK
6. Locate the OSK section within the root_cloud_definitions.txt, and set the following parameters. Anexample of our OSK environment settings.
#-------------------------------------------------------------------------------# OpenStack (OSK) requires the following parameters (replace everything between <>,including the signs!)[USER-DEFINED : MYOPENSTACK]OSK_ACCESS = http://20.0.0.29:35357/v2.0/ # Address of controlled node (where nova-api runs)OSK_CREDENTIALS = admin-*-adminOSK_SECURITY_GROUPS = default # Make sure that this group exists firstOSK_INITIAL_VMCS = RegionOne:sut # Change "RegionOne" accordinglyOSK_LOGIN = fedora # The username that logins on the VMs#-------------------------------------------------------------------------------
The OSK_CREDENTIALS password portion is omitted with an asterisk *.
7. Add a line under OSK_LOGIN labeled OSK_NETNAME for the Tenant network. This referenceenvironment’s Tenant network name is private.
OSK_NETNAME = private
8. Within the openstack.txt file located within /path/to/mycbtool/cbtool/configs/templates, modify theCLOUD_MAC variable and set to $FALSE.
# cat /opt/mycbtool/cbtool/configs/templates/_openstack.txt
[ ... Output Abbreviated ... ]
CLOUD_MAC = $False
[ ... Output Abbreviated ... ]
www.redhat.com 91 [email protected]

9. When running the cbtool workload experiments, cbtool does not make any changes to the quotas.Due to this, the changes must be done manually. Within a Controller node, run the following novacommand to capture the initial default quota values:
]# nova quota-show+-----------------------------+--------+| Quota | Limit |+-----------------------------+--------+| instances | 1000 || cores | 200 || ram | 512000 || floating_ips | 10 || fixed_ips | -1 || metadata_items | 128 || injected_files | 5 || injected_file_content_bytes | 10240 || injected_file_path_bytes | 255 || key_pairs | 100 || security_groups | 10 || security_group_rules | 20 || server_groups | 10 || server_group_members | 10 |+-----------------------------+--------+
10. Update the quota values for instances, cores, and ram as follows:
# nova quota-class-update --instances 1000 default# nova quota-class-update --cores 200 default# nova quota-class-update --ram 512000 default
[email protected] 92 www.redhat.com

11. Verify the updated limit value changes using the nova command.
# nova quota-show+-----------------------------+--------+| Quota | Limit |+-----------------------------+--------+| instances | 1000 || cores | 200 || ram | 512000 || floating_ips | 10 || fixed_ips | -1 || metadata_items | 128 || injected_files | 5 || injected_file_content_bytes | 10240 || injected_file_path_bytes | 255 || key_pairs | 100 || security_groups | 10 || security_group_rules | 20 || server_groups | 10 || server_group_members | 10 |+-----------------------------+--------+
12. Update cinder quota to allow more volumes be created.
# cinder quota-update <tenant-id> --gigabytes 10000# cinder quota-show <tenant-id>+-----------+--------+| Property | Value |+-----------+--------+| gigabytes | 100000 || snapshots | 1000 || volumes | 1000 |+-----------+--------+
www.redhat.com 93 [email protected]

13. Update the neutron ports to allow additional ports.
# neutron quota-update --port 100
# neutron quota-show+---------------------+-------+| Field | Value |+---------------------+-------+| floatingip | 50 || network | 10 || port | 100 || router | 10 || security_group | 10 || security_group_rule | 100 || subnet | 10 |+---------------------+-------+
14. Once the cbtool workload experiments are complete, return the quotas to their default values.
# nova quota-class-update --instances <ORIGINAL_VALUES> default# nova quota-class-update --cores <ORIGINAL_VALUES> default# nova quota-class-update --ram <ORIGINAL_VALUES> default# neutron quota-update --port <ORGIONAL_VALUES># cinder quota-update <tenant-id> --gigabytes <ORGIONAL_VALUES>
8.3.6. Preparing a CBTOOL Workload VM
With the proper setup of the CBTOOL Orchestrator VM complete, the next step involves the creation ofthe CBTOOL Workload VM. The purpose of the CBTOOL Workload VM is to initiate the workload tobenchmark the RHEL-OSP 6 environment.
1. Within the OpenStack Cloud, launch a VM. This reference environment creates a Fedora 21 virtualmachine with a flavor size of small.
2. Once the VM is launched, execute the steps 1-4 noted within the Installation of CBTOOLOrchestrator role within a VM to prepare the cbtool workload environment.
3. Install the which package within the CBTOOL Workload VM using the yum command
# yum install which
[email protected] 94 www.redhat.com

4. Within the cbtool, install the workload role with a null workload thus creating a baseline VM for theworkloads that are to be run within the OpenStack Cloud environment.
# path/to/mycbtool/cbtool/install -r workload -wks null[ ... Output Abbreviated ... ]All dependencies are in placeChecking for a "private" configuration file for user "root" in/opt/cbtool//configs/root_cloud_definitions.txt)File already exists, tool is ready to be used.
5. The CBTOOL Workload VM consists of using the following workloads:
• Linpack [14: Linpack - https://software.intel.com/en-us/articles/intel-math-kernel-library-documentation/]
• Fio [15: Fio - http://freecode.com/projects/fio]
• NetPerf [16: Netperf - http://www.netperf.org/netperf/].
6. Install linpack within the CBTOOL Workload VM as follows:
# cd ~ ; wget http://registrationcenter.intel.com/irc_nas/7615/l_lpk_p_11.3.0.004.tgz# tar -xzf l_lpk_p_11.3.0.004.tgz# mkdir -p ~/linpack/benchmarks/linpack# ln -s~/compilers_and_libraries_2016.0.038/linux/mkl/benchmarks/linpack/xlinpack_xeon64~/linpack/benchmarks/linpack/xlinpack_xeon64
7. Install fio within the CBTOOL Workload VM as follows:
# yum install git python-setuptools gcc# /usr/bin/easy_install pip# cd /var/tmp/# git clone git://git.kernel.dk/fio.git# cd fio# ./configure && make && make install
8. Install netperf within the CBTOOL Workload VM as follows:
# yum install http://ftp.momo-i.org/pub/rpms/fedora/21/x86_64/netperf-2.6.0-2.fc21.x86_64.rpm
www.redhat.com 95 [email protected]

9. Once the above steps are complete, within a Controller node host, save the CBTOOL Workload VMas an image within glance via the nova command:
# nova image-create <instance-name or uuid> cb_nullworkload
8.3.7. Benchmarking with the CBTOOL
With the CBTOOL Orchestrator and Workload VMs created, this section shows how to run workloadsusing the cbtool.
1. Run the cbtool command using the cb binary with the --hard_reset option.
# cd /opt/mycbtool/cbtool# ./cb --hard_reset
The use of hard_reset kills all running cbtool daemons, cleans the Object Store,removes any log files from the Log Store, and any performance data that resideswithin the Metric Store. Cleanup of the Metric Store can cause loss of datapermanently if not extracted prior. For more information visit:https://github.com/ibmcb/cbtool/wiki/FAQ#q6
2. Once the cbtool is running, Application Instances (AI) can be launched. To launch a specifiedworkload, use the aiattach command. The following command launches the linpack workload.
# aiattach linpack
3. The linpack workload is configured to be a single guest instance running the application workloadIntel Linpack. The virtual_application.txt file determines the particular workload that is to belaunched.
# cat /opt/mycbtool/cbtool/scripts/linpack/virtual_application.txt
[ ... Output Abbreviated ... ]
[AI_TEMPLATES : LINPACK]SUT = linpack
[ ... Output Abbreviated ... ]
[email protected] 96 www.redhat.com

The System Under Test (SUT) line defines the number of guests and theirspecified role. In the case of linpack, one guest with the linpack role is launched.A similar example is shown below using the netperf workload, however, thisworkload launches one guest with the netclient role and one with the netserverrole.
# cat /opt/mycbtool/cbtool/scripts/netperf/virtual_application.txt
[ ... Output Abbreviated ... ]
[AI_TEMPLATES : NETPERF]# Attributes MANDATORY for all Virtual ApplicationsSUT = netclient->netserver
[ ... Output Abbreviated ... ]
4. To enable cbtool to boot from a cinder volume within Ceph the cbtool configuration file must bemodified. Create the fio line under [VM_TEMPLATES : OSK_CLOUDCONFIG] in the/path/to/mycbtool/cbtool/configs/root_cloud_definitions.txt.
[ ... Output Abbreviated ... ]
[VM_TEMPLATES : OSK_CLOUDCONFIG]FIO = boot_volume:true, boot_volume_size:20, size:m1.small,imageid1:cb_nullworkload_rawLINPACK = size:m1.small, imageid1:cb_nullworkload
5. The cb_nullworkload image must be updated to be in the raw format, since it resides within Red HatCeph Storage. Within a RHEL-OSP Controller, run the following commands.
# glance image-download cb_nullworkload > cb_nullworkload.qcow2# qemu-img convert cb_nullworkload.qcow2 cb_nullworkload.raw# glance image-create --name cb_nullworkload_raw --is-public true --disk-format raw--container-format bare --file cb_nullworkload.raw
With the configuration updated, the fio workload launched by cbtool, first creates a cinder bootvolume on Ceph and then launches the workload. This is important as it shows key differences ofrunning workloads on ephemeral disk vs a cinder boot volume backed by Ceph.
www.redhat.com 97 [email protected]

6. cbtool provides an API that can be utilized to create customizable workloads. The cbtoolincorporates client scripts that are associated with the API. This reference environment utilizesthree specific client scripts labeled:
• ProvisionVMs.py - launch linpack workloads and gathers workload results
• FioProvisionVMs.py - launch fio workloads and gathers workload results
• NetProvisionVMs.py - launch netperf workloads and gathers workload results
The following client scripts can be found in the following Appendices:Appendix I: LinPack CBTOOL Client Script (ProvisionVMs.py), Appendix J: FioProvisioning VMs Python Script (FioProvisionVMs.py), Appendix K: NetperfCBTOOL Client Script (NetProvisionVMs.py)
7. In order to run one of the specified client scripts, reset the cbtool, change to the appropriate clientsdirectory and run a particular workload. An example of running the ProvisionVMs.py,FioProvisionVMs.py, and NetperfProvisionVMs.py is shown.
# cd /opt/mycbtool/cbtool# ./cb --hard_reset cldlist# cd /opt/mycbtool/cbtool/clients# python ProvisionVMs.py <number of linpack AIs to run># python FioProvisionVMs.py <number of fio AIs to run># python NetProvisionVMs.py <number of netperf AIs to run>
The number of guest instances launched is determined by the AIs specificationswithin the virtual_application.txt file. For example, for each AI specified with thenetperf workload, two guests are launched.
[email protected] 98 www.redhat.com

8. The client scripts create two CSV files: <datetime>-launch-data and <datetime>-workload-data. Thelaunch data CSV file contains the time taken for a guest to boot and become available. Theworkload data CSV file returns specific metrics (e.g. iops, latency) about the specified workload.
# cat <datetime>-launch-data
[ ... Output Abbreviated ... ]
guest,guest_active,guest_sshable,last_known_statecb-root-MYOPENSTACK-vm49-fio ,42, 10, ACTIVE with ip assigned
[ ... Output Abbreviated ... ]
# cat <datetime>-workload-data
[ ... Output Abbreviated ... ]
instance,time,write_latency,write_iops,read_latency,read_iops0767786F-22F6-523C-9ADE-7340FAA5E278, 1433614654, 92.672, 42, 63.232, 55
[ ... Output Abbreviated ... ]
Once the CSV files are generated, the focal point turns to analyzing those results as shown in AnalyzingRed Hat Enterprise Linux OpenStack Platform 6 Benchmark Results with CBTOOL
For more information regarding CBTOOL, please visit https://github.com/ibmcb/cbtool
www.redhat.com 99 [email protected]

9. Analyzing Red Hat Enterprise LinuxOpenStack Platform 6 Benchmark Resultswith RallyWith the basic fundamentals in creating a .json file as seen in the section Benchmarking with Rally,this section changes its focuses to the following:
• Manually calculating expected max number of guests
• Creating a JSON file that captures max number of guests for the RHEL-OSP 6 environment
• Using Rally’s HTML Reporting to analyze the captured results
With Rally, the scenario chosen launches a m1.tiny guest with 1 vCPU, 512MB of RAM, and 1GB ofstorage disk. In order to determine the maximum amount of deployable guest instances within theOpenStack cloud, the smallest default flavor within the OpenStack environment is chosen. Within thereference environment, the theoretical limit of 600GB of Total RAM to deploy guest instancesconstitutes to 1152 guest instances available for deployment with the m1.tiny flavor. The theoreticalvalue to determine maximum number of deployable guest instances is determined by calculating TotalRAM across Compute Nodes * 1.5. The value 1.5 represents the default memory overcommit ratio(1.5:1) within the RHEL-OSP 6 environment. The overcommit ratio, found within the/etc/nova/nova.conf file, plays an important role in scalability and performance. As the value ofovercommit is increased, scalability increases while performance decreases. Performance suffers dueto more demand added to the OpenStack cloud for additional guests using a fixed amount of resources.However, as the value of overcommit is decreased, performance increases as less resources are sharedacross the different guests but scalability suffers due to the ratio getting closer to the 1:1 mapping ofphysical hardware.
Once the theoretical maximum amount of deployable guest instances within an existing RHEL-OSP 6environment is identified, the next step is to create a .json file that attempts to reach the theoreticalupper boundaries calculated. The .json file to capture the maximum number of guests that can belaunched by a RHEL-OSP 6 environment is as follows.
[email protected] 100 www.redhat.com

{ "NovaServers.boot_server": [ { "args": { "auto_assign_nic": true, "detailed": true, "flavor": { "name": "m1.tiny" }, "image": { "name": "cirros" } }, "context": { "quotas": { "nova": { "cores": -1, "instances": -1, "ram": -1 }, "neutron": { "port": -1 } }, }, "runner": { "type": "constant", "times": 10, "concurrency": 10 } } ]}
The initial objective is to use small times and concurrency values in order to diagnose any errors asquickly as possible.
When creating a .json file, the value of concurrency and times are static values that dictate themaximum number of guests to launch for the specified scenario. To overcome this limitation, a createa script labeled rally-wrapper.sh that increments the maximum number of guests to launch until thesuccess rate is no longer satisfied. The rally-wrapper.sh script increments the values of concurrency andtimes by a value of 10 as long as the success rate is met.
www.redhat.com 101 [email protected]

The contents of the rally-wrapper.sh script:
# cat rally-wrapper.sh## This code will increment by 10# @author Joe Talerico <[email protected]>#RALLY_JSON="ra-scaleboot-nonetworking.json"EXPECTED_SUCCESS="100"REPEAT=1INCREMENT=10TIMESTAMP=$(date +%s)mkdir -p run-${REPEAT}
while [[ $REPEAT -gt 0 ]] ; do RUN=true while $RUN ; do CONCURRENCY=`cat ${RALLY_JSON} | grep concurrency | awk '{print $2}'` echo "Current number of guests launching : ${CONCURRENCY}" RALLY_RESULT=$(rally task start ${RALLY_JSON}) TASK=$(echo "${RALLY_RESULT}" | grep Task | grep finished | awk '{printsubstr($2,0,length($2)-1)}') RUN_RESULT=$(echo "${RALLY_RESULT}" | grep total | awk '{print $16}') echo " Task : ${TASK}" echo " Result : ${RUN_RESULT}" rally task report ${TASK} --out run-${REPEAT}/${TASK}.html rally task results ${TASK} > run-${REPEAT}/${TASK}.json
SUCCESS_RATE=$(echo "${RUN_RESULT}" | awk -F. '{ print $1 }')
if [ "${SUCCESS_RATE}" -ge "${EXPECTED_SUCCESS}" ] ; then NEW_CON=$(echo "`cat ${RALLY_JSON} | grep concurrency | awk '{print$2}'`+${INCREMENT}" | bc) sed -i "s/\"times\"\:.*$/\"times\"\: ${NEW_CON},/g" ${RALLY_JSON} sed -i "s/\"concurrency\"\:.*$/\"concurrency\"\: ${NEW_CON}/g" ${RALLY_JSON} else RUN=false sed -i "s/\"times\"\:.*$/\"times\"\: 10,/g" ${RALLY_JSON} sed -i "s/\"concurrency\"\:.*$/\"concurrency\"\: 10/g" ${RALLY_JSON} fi sleep 60 done let REPEAT-=1done
[email protected] 102 www.redhat.com

9.1. Initial boot-storm Rally ResultsThe boot-storm tests in rally attempt to launch as many guests as the RHEL-OSP environment canhandle simultaneously. The initial results gathered by the rally-wrapper.sh achieved 50 guests bootingconcurrently with a success rate of merely 66%.
A snippet of the initial results is shown below.
+------------------------------------------------------------------------------------------+| Response Times (sec) |+------------------+--------+--------+--------+--------+--------+--------+---------+-------+| action | min | median | 90%ile | 95%ile | max | avg | success | count |+------------------+--------+--------+--------+--------+--------+--------+---------+-------+| nova.boot_server | 25.659 | 43.729 | 57.849 | 59.921 | 65.646 | 43.937 | 66.0% | 50 || total | 25.66 | 43.729 | 57.849 | 59.921 | 65.646 | 43.937 | 66.0% | 50 |+------------------+--------+--------+--------+--------+--------+--------+---------+-------+Load duration: 65.679931879Full duration: 95.9438509941
HINTS:* To plot HTML graphics with this data, run: rally task report 4fb55900-9eac-456b-9a82-092d3fc27952 --out output.html
* To get raw JSON output of task results, run: rally task results 4fb55900-9eac-456b-9a82-092d3fc27952
With the unexpected results, further investigation into the rally boot-storm results is required. Theerror in question shows:
raise ConnectionError(err, request=request)\nConnectionError: ('Connection aborted.',BadStatusLine(\"''\",))\n
The Connection aborted. BadStatusLine error does not provide any definitive reasons to the bad resultscaptured. However, due to HAProxy being the top layer of the stack with regards to incoming clientconnections, the HAProxy timeout value within the RHEL-OSP 6 reference environment is increasedfrom 30 seconds to 180 seconds. It was determined that the timeout value of incoming connections isnot sufficient to handle incoming Rally client connection requests due to Rally reusing clientconnections instead of creating new client connections. A Red Hat Bugzilla 1199568 has been filedagainst the low timeout value of HAProxy that produces a ConnectionError.
On the Provisoning node, modify the common.pp script located within the/etc/puppet/environments/production/modules/quickstack/manifests/load_balancer/ directory with aneditor such as vi and change the value of "'client 30s'" to "'client 180s'" as shown.
www.redhat.com 103 [email protected]

# vim/etc/puppet/environments/production/modules/quickstack/manifests/load_balancer/common.pp 'timeout' => [ 'connect 5s', 'client 180s', 'server 30s' ]
Once the above changes have been made to each Controller node, run the following puppet commandon each Controller node for the changes to take effect.
# puppet agent -t
9.2. Rally boot-storm Results with HAProxy ModificationWith the use of the rally-wrapper.sh script and the latest HAProxy configuration changes, the numberof guests booting concurrently increased from 50 to 170.
+-----------------------------------------------------------------------------------------------+| Response Times (sec) |+------------------+--------+---------+---------+---------+---------+---------+---------+-------+| action | min | median | 90%ile | 95%ile | max | avg | success | count |+------------------+--------+---------+---------+---------+---------+---------+---------+-------+| nova.boot_server | 36.069 | 103.301 | 155.696 | 160.621 | 168.563 | 102.651 | 100.0% | 170 || total | 36.069 | 103.301 | 155.697 | 160.621 | 168.563 | 102.651 | 100.0% | 170 |+------------------+--------+---------+---------+---------+---------+---------+---------+-------+Load duration: 169.118088007Full duration: 242.402312994
To further investigate the results, Rally provides the ability to generate a detailed HTML report basedon the captured results. The HTML page includes an overview of a specified scenario, along with theInput file providing the details of the scenario. To recap from section Benchmarking with Rally, when ascenario is completed, the following output is observed.
[email protected] 104 www.redhat.com

[ ... Output Abbreviated ... ]
+-----------------------------------------------------------------------------------------------+| Response Times (sec) |+------------------+--------+---------+---------+---------+---------+---------+---------+-------+| action | min | median | 90%ile | 95%ile | max | avg | success | count |+------------------+--------+---------+---------+---------+---------+---------+---------+-------+| nova.boot_server | 36.069 | 103.301 | 155.696 | 160.621 | 168.563 | 102.651 | 100.0% | 170 || total | 36.069 | 103.301 | 155.697 | 160.621 | 168.563 | 102.651 | 100.0% | 170 |+------------------+--------+---------+---------+---------+---------+---------+---------+-------+Load duration: 169.118088007Full duration: 242.402312994
HINTS:* To plot HTML graphics with this data, run: rally task report 34a1760b-7aa6-4c9a-bbcf-87efc3b8a6d5 --out output.html
* To get raw JSON output of task results, run: rally task results 34a1760b-7aa6-4c9a-bbcf-87efc3b8a6d5
While the response time results display on the terminal, one can create a detailed HTML report of thespecific scenario with the provided command found within the HINTS section. The following commandcreates a report of the scenario with id: 34a1760b-7aa6-4c9a-bbcf-87efc3b8a6d5 and generates an HTMLfile labeled output.html
rally task report 34a1760b-7aa6-4c9a-bbcf-87efc3b8a6d5 --out output.html
When opening the HTML page labeled output.html, the HTML page lands on the Benchmark overviewsection located on the left panel detailing the following:
• Scenario - name of the scenario
• Load duration(s) - time taken to run specified scenario
• Full duration - total time taken to run the overall benchmark task
• Iterations - the number of times to run the specified scenario
• Runner - the type of test that is running, e.g. the consistant # of guests will be launched.
• Errors - number of iterations that failed during the benchmark scenario
• Success (SLA) - percentage specified within the input file on the acceptable success rate
While the Benchmark overview section gives an overview of the benchmark, a detailed view of thespecified scenario can be seen in the left panel labeled NovaServers.boot_server.
When clicking on the task labeled NovaServers.boot_server, there are 4 main tabs: Overview, Details,Failures, Input task.
www.redhat.com 105 [email protected]

The Overview tab provides a quick snapshot of the Load duration, Full duration, Iterations, andFailures as seen in the Benchmark overview section but breaks down the Total durations into thespecified actions that consist within a scenario. Within the rally scenario, there is only one actionlabeled boot_server. This table consists of providing detailed information with regards to time takento boot an RHEL-OSP 6 instance. The graph labeled Charts for the Total durations (Iterations on the Xaxis and Duration on the Y axis) shows how the scenario’s duration is effected by the increase initerations.
Within the HTML report, hovering over the graph provides detailed informationabout a specific single point.
Figure 9.1: Interactive Duration Chart
The Failures tab details the information about why a particular Iteration failed. It consists of a tabledetailing the following:
• Iteration - the iteration point at which the failure occured
• Exception Type - the type of error that occured
• Exception message - the error message associated with the Exception Type
This information is useful when trying to troubleshoot errors.
When looking closer at the Rally scenario attempting to achieve 180 guests booting concurrently, thefollowing errors occurred.
ClientException: The server has either erred or is incapable of performing the requestedoperation. (HTTP 500) (Request-ID: req-56f1793d-5583-46b1-b889-7db397cfd45a)
Based on the ClientException above, the Controller nodes were unable to service the incoming request.By taking the req-id above, one can further investigate the error by looking at the logs for possiblereasons for the HTTP 500 error. It is recommended to enable DEBUG logging within nova and neutron to
[email protected] 106 www.redhat.com

gather further details in determining why the error took place.
9.3. Rally Max Guest LaunchWhile the boot-storm tests attempt to launch as many guests as the RHEL-OSP environment can handlesimultaneously, the max guest test tries to see whether the reference environment can achieve thetheoretical max of 1152 m1.tiny guests based upon the initial calculations seen in Analyzing Red HatEnterprise Linux OpenStack Platform 6 Benchmark Results with Rally. The rally-wrapper.sh scriptdoes the max guest launch test by concurrently launching 20 guest instances until reaching themaximum amount of times of 1152. However, with an acceptable success rate of 90%, the maximumguest instances achieved by the reference environment is only 1100. The final .json file version isshown below.
www.redhat.com 107 [email protected]

{ "NovaServers.boot_server": [ { "runner": { "type": "constant", "concurrency": 20, "times": 1100 }, "args": { "detailed": true, "flavor": { "name": "m1.tiny" }, "auto_assign_nic": true, "image": { "name": "cirros" } }, "context": { "quotas": { "nova": { "cores": -1, "ram": -1, "instances": -1 }, "neutron": { "port": -1 } } } } ]}
With the above scenario, the reference environment is able to achieve a 99.9% success rate with only asingle guest entering an ERROR state.
[email protected] 108 www.redhat.com

+-------------------------------------------------------------------------------------------+| Response Times (sec) |+------------------+--------+--------+--------+--------+---------+--------+---------+-------+| action | min | median | 90%ile | 95%ile | max | avg | success | count |+------------------+--------+--------+--------+--------+---------+--------+---------+-------+| nova.boot_server | 12.975 | 23.242 | 35.699 | 47.56 | 296.991 | 31.851 | 99.9% | 1100 || total | 12.975 | 23.242 | 35.7 | 47.561 | 296.991 | 31.851 | 99.9% | 1100 |+------------------+--------+--------+--------+--------+---------+--------+---------+-------+Load duration: 1801.66033602Full duration: 2309.60547209
HINTS:* To plot HTML graphics with this data, run: rally task report f9f79150-df68-4a45-944c-d757e8835ce4 --out output.html
* To get raw JSON output of task results, run: rally task results f9f79150-df68-4a45-944c-d757e8835ce4
With a closer review of the results, the max time allotted for a guest to boot is reaching the 300 secondmark. Typically, services timeout on scheduling when over 300 seconds. Increasing the scenario test tolaunching 1200 guest introduces more errors and failures.
+-------------------------------------------------------------------------------------------+| Response Times (sec) |+------------------+--------+--------+--------+--------+---------+--------+---------+-------+| action | min | median | 90%ile | 95%ile | max | avg | success | count |+------------------+--------+--------+--------+--------+---------+--------+---------+-------+| nova.boot_server | 14.397 | 24.24 | 37.607 | 59.747 | 251.389 | 30.734 | 83.5% | 1200 || total | 14.397 | 24.24 | 37.608 | 59.747 | 251.389 | 30.734 | 83.5% | 1200 |+------------------+--------+--------+--------+--------+---------+--------+---------+-------+Load duration: 1651.86261511Full duration: 2064.80595303
HINTS:* To plot HTML graphics with this data, run: rally task report 92c30c8d-d212-41f4-8836-64eabe6a5e88 --out output.html
* To get raw JSON output of task results, run: rally task results 92c30c8d-d212-41f4-8836-64eabe6a5e88
www.redhat.com 109 [email protected]

When investigating the guests that entered into an ERROR state, it shows that the reference environmentreached its resource threshold.
GetResourceErrorStatus: Resource <Server: rally_novaserver_HvhmayLIcN18AZLM> has ERRORstatus:
This concludes that while the theoretical maximum number of guests is 1152, the referenceenvironment could only achieve up to 1100 guests due to:
• Resource depletion
• Specified Success Rate value of 90%
[email protected] 110 www.redhat.com

10. Analyzing Red Hat Enterprise LinuxOpenStack Platform 6 Benchmark Resultswith CBTOOLWith the use of the cbtool framework to benchmark the OpenStack Cloud as seen in the sectionBenchmarking with the CBTOOL, this section focuses on analyzing the different results captured by thebenchmarking tools linpack, fio, netperf.
10.1. Analyzing Linpack ResultsAs described by NetLib [17: http://www.netlib.org/linpack], " linpack is a collection of Fortransubroutines that analyze and solve linear equations and linear least-squares problems. The packagesolves linear systems whose matrices are general, banded, symmetric indefinite, symmetric positivedefinite, triangular, and tridiagonal square. In addition, the package computes the QR and singularvalue decompositions of rectangular matrices and applies them to least-squares problems. linpack usescolumn-oriented algorithms to increase efficiency by preserving locality of reference. "
The performance of linpack is measured via one of the following:
• Mflop/s - millions of floating point operations per second
• Gflop/s - billions of floating point operations per second
• Tflop/s - trillions of floating point operations per second
Prior to reviewing our linpack results, understanding "What is the theoretical peak performance?" ofthe RHEL-OSP 6 environment is reviewed. NetLib describes theoretical peak performance as: "Thetheoretical peak is based not on an actual performance from a benchmark run, but on a papercomputation to determine the theoretical peak rate of execution of floating point operations for themachine. This is the number manufacturers often cite; it represents an upper bound on performance.That is, the manufacturer guarantees that programs will not exceed this rate-sort of a "speed of light"for a given computer. The theoretical peak performance is determined by counting the number offloating-point additions and multiplications (in full precision) that can be completed during a period oftime, usually the cycle time of the machine." [18: http://www.netlib.org/utk/people/JackDongarra/faq-linpack.html#_What_is_the_theoretical%20peak%20perfor] A simple formula to calculate thetheoretical maximum Gflop/s is (Number of cores) * (Number of floating-point instructions per clockcycle in double precision) * (Clock frequency).
The servers within this reference environment all use Intel® Xeon® CPU X5650 @ 2.67 Ghz. However,each virtual machine consists of only 1 vCPU. Due to this, the calculation of the theoretical peakperformance per virtual machine is as follows: 1 * 4 * 2.67 = 10.68 Gflop/s.
The linpack table results obtained within the RHEL-OSP 6 reference environment reach very close to
www.redhat.com 111 [email protected]

the theoretical limits.
Table 17. RHEL-OSP 6 Environment Linpack Results (per Guest)
Guests Max Throughput (Gflop/s) Average Throughput (Gflop/s)
16 10.61 10.58
32 10.36 10.30
64 9.67 9.43
A graph representation of the RHEL-OSP 6 Environment Linpack Results (per Guest) is shown below.
Figure 10.1: Linpack Throughput
The results from Figure 10.1 represents the scaling of m1.small flavored guests being created within theRHEL-OSP 6 reference environment. It shows that as the number of guest instances are created, thereference environment is able to achieve CPU throughput similar to the theoretical max throughput.However, due to the RAM limitations within our reference environment’s compute hosts, the limitationis on the amount of bootable guest instances not CPU throughput.
10.2. Analyzing the FIO ResultsOne of the main reasons to use fio for random I/O testing is that it does not require having toread/write an entire file. fio provides the ability to specify the duration of a test, thus allowing testswith very small I/O sizes (e.g. 4K) to spread randomly across an entire disk. This is beneficial because itallows fio tests to produce real-world results in relation to disk seek time.
[email protected] 112 www.redhat.com

Below is a representation of the two fio workloads used within the reference environment. The joblabeled randread.fiojob focuses on random reads across the disk spindles with a block size of 64k, filesize of 4GB, and an IOPS rate limit of 100. The job labeled randwrite.fiojob focuses on random writesacross the disk spindles with a block size of 64k, file size of 4GB, and an IOPS rate limit of 100.
# cd /opt/mycbtool/cbtool/scripts/fio# cat randread.fiojob[global]ioengine=syncbs=64kdirect=1rw=randreadsize=4grate_iops=100
[randreads]name=fiofilenumjobs=1
# cat randwrite.fiojob[global]ioengine=syncbs=64kdirect=1fsync_on_close=1rw=randwritesize=4grate_iops=100
[randwrites]name=fiofilenumjobs=1
The fio jobs packaged with CBTOOL limits the guest instance’s IOPS rate to 100 toeliminate I/O contention between guests. This ensures every guest is doing similaramount of I/O.
www.redhat.com 113 [email protected]

The fio job results obtained within the RHEL-OSP 6 reference environment are shown in the followingtable. The RHEL-OSP 6 Environment Fio Ceph disks vs Ephemeral Disks (per Guest) table shows theaverage read IOPS, read latency, write IOPS and write latency between using Ceph disks versusephemeral disks. When using Ceph disks, it is clear that at 16 guests and 32 guests the referenceenvironment can clearly obtain results at or near the IOPS rate limit set by the fio jobs for each guestlaunched within the environment. However, a significant drop is seen when launching 64 guests usingCeph due to saturation of the 10Gb Storage network NIC. Due to hardware limitations within thereference environment, the Storage and Storage Clustering network are setup on one 10Gb NIC. Due tothis, when launching additional guests and effectively causing more I/O traffic on the network, the10Gb NIC used for Storage and Storage Clustering reaches network saturation causing the overallperformance penalty. To remedy this issue, an additional 10Gb NIC should be added to isolate theStorage and Storage Clustering thus removing the NIC bottleneck.
Table 18. RHEL-OSP 6 Environment Fio Ceph disks vs Ephemeral Disks (per Guest)
Guests Avg Read IOPs Avg Read Latency(microseconds)
Avg Write IOPS Avg Write Latency(microseconds)
16 with Ceph 100 2.01 99.93 10.44
16 w/o Ceph 49.31 78.94 96.75 24.64
32 with Ceph 99.90 16.63 81.25 52.68
32 w/o Ceph 30.21 127.45 77.87 47.98
64 with Ceph 63.70 56.34 43.98 90.52
64 w/o Ceph 15.18 188.96 19.92 636.68
[email protected] 114 www.redhat.com

The following image shows the 10Gb NIC reaching its network saturation point when running 64guests.
Figure 10.2: 10Gb NIC Saturation
The following table represents the fio % Difference Results between running on Ceph disks versusEphemeral disks from the results shown in the RHEL-OSP 6 Environment Fio Ceph disks vs EphemeralDisks (per Guest) table.
Table 19. RHEL-OSP 6 Environment Fio % Difference Results between Ceph disks vs EphemeralDisks
Guests % Diff Read IOPs % Diff ReadLatency
(microseconds)
% Diff Write IOPs % Diff WriteLatency
(microseconds)
16 67.89% -190.05% 3.24% -80.90%
32 107.10% -153.83% 4.24% 9.33%
64 122.99% -108.11% 75.30% -150.20%
www.redhat.com 115 [email protected]

When viewing the table results, for example with 16 guests, it reads as follows:
At 16 guests,
• Ceph disks performed 67.89% better than ephemeral disks
• Ceph disks reduced read latency by 190.05%
• Ceph disks performed 3.24% better writing I/O
• Ceph disks reduced write latency by 80.90%
A bar graph representation of the RHEL-OSP 6 Environment Fio Ceph disks vs Ephemeral Disks (perGuest) table is shown below.
Figure 10.3: Fio IOPS Results
Within this reference environment, we can conclude that moving I/O bound workloads from ephermalstorage to cinder volumes backed by Red Hat Ceph Storage increases performance 50-120x anddecreases latency, even when scaling the workloads across multiple virtual machines. When migratingto a cinder boot volume backed by Red Hat Ceph Storage, an average 15% decrease in CPU utilizationon the RHEL-OSP Compute nodes is observed.
[email protected] 116 www.redhat.com

The below image shows the CPU utilization of one OpenStack Compute node, with the fio workloadusing ephemeral storage.
Figure 10.4: Compute Node CPU Utilization No Red Hat Ceph Storage Backend
www.redhat.com 117 [email protected]

When migrating to a cinder boot volume backed by Red Hat Ceph Storage, our CPU utilization is downan average of 15%.
Figure 10.5: Compute Node CPU Utilization with Red Hat Ceph Storage Backend
10.3. Analyzing Netperf ResultsAs described on Netperf’s site [19: http://www.netperf.org/svn/netperf2/tags/netperf-2.6.0/doc/netperf.html#Introduction], " netperf is a benchmark that can be use to measure variousaspect of networking performance. The primary foci are bulk (aka unidirectional) data transfer andrequest/response performance using either TCP or UDP and the Berkeley Sockets interface. As of thiswriting, the tests available either unconditionally or conditionally include:
• TCP and UDP unidirectional transfer and request/response over IPv4 and IPv6 using the Socketsinterface.
• TCP and UDP unidirectional transfer and request/response over IPv4 using the XTI interface.
• Link-level unidirectional transfer and request/response using the DLPI interface.
• Unix domain sockets
[email protected] 118 www.redhat.com

• SCTP unidirectional transfer and request/response over IPv4 and IPv6 using the sockets interface.
With CBTOOL netperf, a comprehensive list of different network test case scenarios are available. Thisreference architecture focuses on the tcp_stream test against two guests using the default values.
The netperf table results shows that with an increased MTU size, there is greater utilization of the 10Gbnetwork when using VXLAN Tunnels. It is highly recommended to use Jumbo Frames to achieve thegreater utilization.
Table 20. Comparing default MTU vs Jumbo Frame MTU using Netperf
Test Across VXLAN Tunnel Mbps
Default MTU 1500 2254.06
MTU 8950 6289.21
%Diff 94.46%
www.redhat.com 119 [email protected]

11. ConclusionRed Hat solutions involving Red Hat Enterprise Linux OpenStack Platform are created to deliver aproduction-ready foundation that simplifies the deployment process, shares the latest best practices,and gets the utmost performance and scale for a public or private OpenStack cloud. The steps andprocedures covered within this reference architecture provide system, storage, and cloudadministrators the blueprint required to create their own customized Red Hat Enterprise LinuxOpenStack cloud solution.
A successful deployment consists of the following:
• Isolating and bonding the different network traffic types to be used within a RHEL-OSPenvironment
• Setting the OS configuration for the provisioning node and each node within the RHEL-OSPenvironment.
• Validating the underlying hardware using the Automatic Health Check for each node that resides inthe RHEL-OSP environment.
• Using the RHEL-OSP Installer to successfully deploy a RHEL-OSP cloud environment
• Installing and configuring Ceph nodes
With a successful deployment, key open source tools can be used to validate the environment, measureperformance, and scalability. The key open source tools include:
• Tempest
• Rally
• CBTOOL
The Rally test results for the reference environment demonstrated that HAProxy timeout values play acritical role in performance and scalability. When the timeout value is increased, the RHEL-OSPenvironment does not cause a timeout to happen with existing client connections. This is importantdue to Rally reusing client connections instead of creating new connections for each incoming request.Due to hardware limitations, the amount of RAM is a limiting factor to performance and scalability asthe default overcommit ratio for RAM is (1.5:1). Increasing the overcommit ratio allows for additionalscalability, but at the cost of performance. On the other hand, decreasing the overcommit ratio boostsperformance, but at the cost of scalability.
The cbtool framework allows for benchmarking the RHEL-OSP environment using differentbenchmarking tools, specifically linpack, fio, and netperf.
When using linpack, the test results demonstrated that the CPU throughput within each RHEL-OSPguest could achieve close to its theoretical peak performance as shown in RHEL-OSP 6 EnvironmentLinpack Results (per Guest).
[email protected] 120 www.redhat.com

When using fio, the test results demonstrate the key differences in IOPs vs Latency when using Cephdisks vs Ephemeral disks. The test results show that at a guest levels at or below 32, the referenceenvironment can clearly obtain results at or near the IOPS rate limit set by the fio jobs for each guestlaunched. However, a significant drop is seen when launching 64 guests using Ceph due to saturationof the 10GB Storage network NIC. This is due to the reference environment’s hardware limitations andhaving to setup the Storage network and Storage Clustering network on the same 10Gb NIC. The fioresults comparison is shown in RHEL-OSP 6 Environment Fio Ceph disks vs Ephemeral Disks (perGuest).
When using netperf, the test results demonstrate the increased performance, measured in MBps, whenincreasing MTU size on a 10Gb network that utilizes VXLAN tunnels. A performance difference of94.46% is observed. Results can be seen within Comparing default MTU vs Jumbo Frame MTU usingNetperf.
RHEL-OSP clouds are meant to allow for scaling resources when they become saturated. The toolsdescribed within this reference architecture help the administrator know the physical limits of theconfiguration under test. Monitoring these resources when in production should allow for theadministrator to add "compute" nodes to extend VM capacity, "storage" nodes to improve IO/sec and/orpeak Gbps. Controller nodes as more difficult to alter other than to free up more cpu on the HA nodesif needed or additional network expansion is required.
For any questions or concerns, please email [email protected] and ensure to visit the RedHat Reference Architecture page to find about all of our Red Hat solution offerings.
www.redhat.com 121 [email protected]

12. Troubleshoot
12.1. Red Hat Enterprise Linux OpenStack Platform 6InstallationIf a specific host on the Provisioning node’s User Interface reports an error, log into that host via sshand review the /root/install.post.log for more information.
# cat /root/install.post.log
This indicates where the RHEL-OSP Installer ran into issues during the installation. Common issuesinclude networking (DNS, Routing, etc), missing packages and issues with subscription manager (pool-id, user, password, etc).
Add the following lines to fix a DNS issue, edit /etc/dhcp/dhcpd.conf to add an external DNS server :
# option domain-name-servers 20.0.0.1, <dns-to-add>;
If the above does not fix the issue, the setup possibly needs NAT enabled on the RHEL-OSP 6 host. Toenable NAT, run the following commands:
# echo 1 > /proc/sys/net/ipv4/ip_forward# /sbin/iptables -t nat -A POSTROUTING -o <external-interface> -j MASQUERADE# /sbin/iptables -A FORWARD -i <external-interface> -o <rhel_osp_installer-mgt-interface>-m state --state RELATED,ESTABLISHED -j ACCEPT# /sbin/iptables -A FORWARD -i <rhel_osp_installer-mgt-interface -o <external-interface>-j ACCEPT
[email protected] 122 www.redhat.com

Appendix A: Revision HistoryRevision Release Date Author(s) Notes
1.1 Wednesday Sept 9, 2015 Joe Talerico, RogerLopez
Grammatical error andacronym fixes
1.0 Friday July 17, 2015 Joe Talerico, RogerLopez
Initial Release
PDF generated by Asciidoctor PDF
www.redhat.com 123 [email protected]

Appendix B: Contributors1. Jacob Liberman, content reviewer
2. Keith Schincke, content reviewer
3. Kambiz Aghaiepour, content reviewer
4. Ben England, content reviewer
5. Tim Wilkinson, content reviewer
6. David Kranz, content reviewer
7. Douglas Shakshober, content reviewer
8. Andy Bond, content reviewer
9. Sai Sindhur, content reviewer
10. Dan Allen, Asciidoctor PDF
[email protected] 124 www.redhat.com

Appendix C: Ceph Configuration File
[global]fsid = 90cdd6e2-3b7f-4f3e-ae81-bcd94a8fd3dfmon_initial_members = macd4bed9b395f1, macd4bed9b38dc9, macd4bed9b38f0dmon_host = 192.168.0.113, 192.168.0.112, 192.168.0.114auth_cluster_required = cephxauth_service_required = cephxauth_client_required = cephxfilestore_xattr_use_omap = true
public_network = 192.168.0.0/24cluster_network = 192.168.0.0/24
[osd]osd_mkfs_options_xfs = -f -i size=2048 -n size=64kosd_mount_options_xfs = inode64,noatime,logbsize=256k
[client.images]keyring = /etc/ceph/ceph.client.images.keyring
[client.volumes]keyring = /etc/ceph/ceph.client.volumes.keyring
www.redhat.com 125 [email protected]

Appendix D: Open vSwitch Configuration
577270e3-21ea-40b6-8201-9893f2a47cb9 Bridge br-int fail_mode: secure Port "vnet4" tag: 4095 Interface "vnet4" Port "vnet5" tag: 1 Interface "vnet5" Port br-int Interface br-int type: internal Port patch-tun Interface patch-tun type: patch options: {peer=patch-int} Bridge br-tun fail_mode: secure Port "vxlan-c0a80369" Interface "vxlan-c0a80369" type: vxlan options: {df_default="true", in_key=flow, local_ip="192.168.3.254",out_key=flow, remote_ip="192.168.3.105"} Port "vxlan-c0a80365" Interface "vxlan-c0a80365" type: vxlan options: {df_default="true", in_key=flow, local_ip="192.168.3.254",out_key=flow, remote_ip="192.168.3.101"} Port "vxlan-c0a8036a" Interface "vxlan-c0a8036a" type: vxlan options: {df_default="true", in_key=flow, local_ip="192.168.3.254", out_key=flow,remote_ip="192.168.3.106"} Port patch-int Interface patch-int type: patch options: {peer=patch-tun} Port "vxlan-c0a80364" Interface "vxlan-c0a80364" type: vxlan options: {df_default="true", in_key=flow, local_ip="192.168.3.254",out_key=flow, remote_ip="192.168.3.100"} Port "vxlan-c0a8036e" Interface "vxlan-c0a8036e"
[email protected] 126 www.redhat.com

type: vxlan options: {df_default="true", in_key=flow, local_ip="192.168.3.254",out_key=flow, remote_ip="192.168.3.110"} Port "vxlan-c0a80368" Interface "vxlan-c0a80368" type: vxlan options: {df_default="true", in_key=flow, local_ip="192.168.3.254",out_key=flow, remote_ip="192.168.3.104"} Port "vxlan-c0a8036c" Interface "vxlan-c0a8036c" type: vxlan options: {df_default="true", in_key=flow, local_ip="192.168.3.254",out_key=flow, remote_ip="192.168.3.108"} Port "vxlan-c0a8036d" Interface "vxlan-c0a8036d" type: vxlan options: {df_default="true", in_key=flow, local_ip="192.168.3.254",out_key=flow, remote_ip="192.168.3.109"} Port "vxlan-c0a80367" Interface "vxlan-c0a80367" type: vxlan options: {df_default="true", in_key=flow, local_ip="192.168.3.254", out_key=flow,remote_ip="192.168.3.103"} Port "vxlan-c0a8036b" Interface "vxlan-c0a8036b" type: vxlan options: {df_default="true", in_key=flow, local_ip="192.168.3.254",out_key=flow, remote_ip="192.168.3.107"} Port br-tun Interface br-tun type: internal Port "vxlan-c0a80366" Interface "vxlan-c0a80366" type: vxlan options: {df_default="true", in_key=flow, local_ip="192.168.3.254",out_key=flow, remote_ip="192.168.3.102"} ovs_version: "2.1.3"
www.redhat.com 127 [email protected]

Appendix E: Tempest Package RequirementsText File
gcclibxml2-devellibxslt-develpython-developenssl-develpython-testtoolslibffi-devellibffihttps://repos.fedorapeople.org/repos/openstack/openstack-kilo/rdo-release-kilo-1.noarch.rpmwget
[email protected] 128 www.redhat.com

Appendix F: Tempest Skip File (ra-skip-file)
-tempest\.api\.compute\.floating_ips.* -tempest\.thirdparty\.boto.*-tempest\.api\.compute\.floating_ips.* -tempest\.api\.network\.test_floating_ips.*-tempest\.api\.network\.admin\.test_floating_ips_admin_actions.*
www.redhat.com 129 [email protected]

Appendix G: Rally JSON file
{ "NovaServers.boot_server": [ { "args": { "auto_assign_nic": true, "detailed": true, "flavor": { "name": "m1.tiny" }, "image": { "name": "cirros" } }, "context": { "quotas": { "nova": { "cores": -1, "instances": -1, "ram": -1 }, "neutron": { "port": -1 } }, }, "runner": { "type": "constant", "times": 1, "concurrency": 1 } } ]}
[email protected] 130 www.redhat.com

Appendix H: Ceph Admin Virtual MachineXML
<domain type='kvm' id='8'> <name>cephadmin</name> <uuid>83cbba2b-e2b0-4941-a90e-60d6a010a00d</uuid> <memory unit='KiB'>2097152</memory> <currentMemory unit='KiB'>2097152</currentMemory> <vcpu placement='static'>2</vcpu> <resource> <partition>/machine</partition> </resource> <os> <type arch='x86_64' machine='pc-i440fx-rhel7.1.0'>hvm</type> <boot dev='hd'/> </os> <features> <acpi/> <apic/> <pae/> </features> <cpu mode='custom' match='exact'> <model fallback='allow'>Westmere</model> </cpu> <clock offset='utc'> <timer name='rtc' tickpolicy='catchup'/> <timer name='pit' tickpolicy='delay'/> <timer name='hpet' present='no'/> </clock> <on_poweroff>destroy</on_poweroff> <on_reboot>restart</on_reboot> <on_crash>restart</on_crash> <pm> <suspend-to-mem enabled='no'/> <suspend-to-disk enabled='no'/> </pm> <devices> <emulator>/usr/libexec/qemu-kvm</emulator> <disk type='file' device='disk'> <driver name='qemu' type='qcow2'/> <source file='/home/cephadmin.qcow2'/> <backingStore/> <target dev='hda' bus='ide'/> <alias name='ide0-0-0'/> <address type='drive' controller='0' bus='0' target='0' unit='0'/>
www.redhat.com 131 [email protected]

</disk> <disk type='block' device='cdrom'> <driver name='qemu' type='raw'/> <backingStore/> <target dev='hdb' bus='ide'/> <readonly/> <alias name='ide0-0-1'/> <address type='drive' controller='0' bus='0' target='0' unit='1'/> </disk> <controller type='usb' index='0' model='ich9-ehci1'> <alias name='usb0'/> <address type='pci' domain='0x0000' bus='0x00' slot='0x05' function='0x7'/> </controller> <controller type='usb' index='0' model='ich9-uhci1'> <alias name='usb0'/> <master startport='0'/> <address type='pci' domain='0x0000' bus='0x00' slot='0x05' function='0x0'multifunction='on'/> </controller> <controller type='usb' index='0' model='ich9-uhci2'> <alias name='usb0'/> <master startport='2'/> <address type='pci' domain='0x0000' bus='0x00' slot='0x05' function='0x1'/> </controller> <controller type='usb' index='0' model='ich9-uhci3'> <alias name='usb0'/> <master startport='4'/> <address type='pci' domain='0x0000' bus='0x00' slot='0x05' function='0x2'/> </controller> <controller type='pci' index='0' model='pci-root'> <alias name='pci.0'/> </controller> <controller type='ide' index='0'> <alias name='ide0'/> <address type='pci' domain='0x0000' bus='0x00' slot='0x01' function='0x1'/> </controller> <controller type='virtio-serial' index='0'> <alias name='virtio-serial0'/> <address type='pci' domain='0x0000' bus='0x00' slot='0x06' function='0x0'/> </controller> <interface type='bridge'> <mac address='52:54:00:73:8d:fa'/> <source bridge='brmgt'/> <target dev='vnet0'/> <model type='rtl8139'/> <alias name='net0'/> <address type='pci' domain='0x0000' bus='0x00' slot='0x03' function='0x0'/> </interface>
[email protected] 132 www.redhat.com
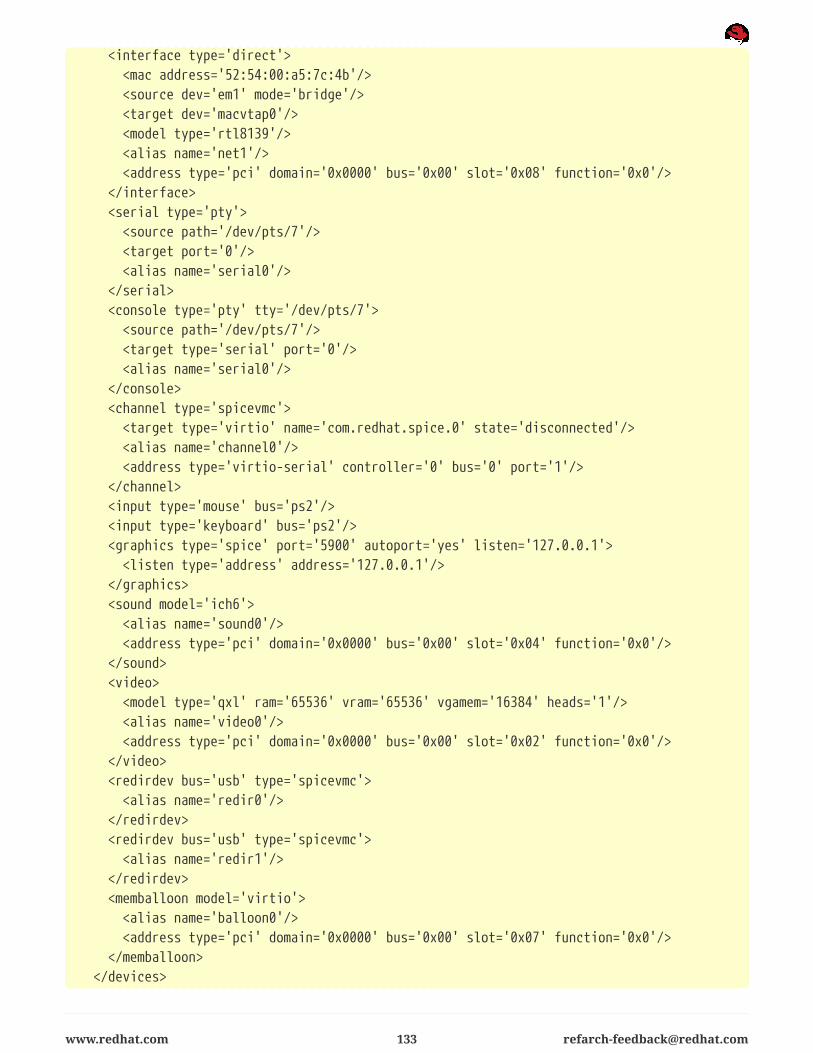
<interface type='direct'> <mac address='52:54:00:a5:7c:4b'/> <source dev='em1' mode='bridge'/> <target dev='macvtap0'/> <model type='rtl8139'/> <alias name='net1'/> <address type='pci' domain='0x0000' bus='0x00' slot='0x08' function='0x0'/> </interface> <serial type='pty'> <source path='/dev/pts/7'/> <target port='0'/> <alias name='serial0'/> </serial> <console type='pty' tty='/dev/pts/7'> <source path='/dev/pts/7'/> <target type='serial' port='0'/> <alias name='serial0'/> </console> <channel type='spicevmc'> <target type='virtio' name='com.redhat.spice.0' state='disconnected'/> <alias name='channel0'/> <address type='virtio-serial' controller='0' bus='0' port='1'/> </channel> <input type='mouse' bus='ps2'/> <input type='keyboard' bus='ps2'/> <graphics type='spice' port='5900' autoport='yes' listen='127.0.0.1'> <listen type='address' address='127.0.0.1'/> </graphics> <sound model='ich6'> <alias name='sound0'/> <address type='pci' domain='0x0000' bus='0x00' slot='0x04' function='0x0'/> </sound> <video> <model type='qxl' ram='65536' vram='65536' vgamem='16384' heads='1'/> <alias name='video0'/> <address type='pci' domain='0x0000' bus='0x00' slot='0x02' function='0x0'/> </video> <redirdev bus='usb' type='spicevmc'> <alias name='redir0'/> </redirdev> <redirdev bus='usb' type='spicevmc'> <alias name='redir1'/> </redirdev> <memballoon model='virtio'> <alias name='balloon0'/> <address type='pci' domain='0x0000' bus='0x00' slot='0x07' function='0x0'/> </memballoon> </devices>
www.redhat.com 133 [email protected]

<seclabel type='dynamic' model='selinux' relabel='yes'> <label>system_u:system_r:svirt_t:s0:c619,c632</label> <imagelabel>system_u:object_r:svirt_image_t:s0:c619,c632</imagelabel> </seclabel></domain>
[email protected] 134 www.redhat.com

Appendix I: LinPack CBTOOL Client Script(ProvisionVMs.py)
#!/usr/bin/env python#/*******************************************************************************# Copyright (c) 2012 Red Hat.# Licensed under the Apache License, Version 2.0 (the "License");# you may not use this file except in compliance with the License.# You may obtain a copy of the License at# http://www.apache.org/licenses/LICENSE-2.0# Unless required by applicable law or agreed to in writing, software# distributed under the License is distributed on an "AS IS" BASIS,# WITHOUT WARRANTIES OR CONDITIONS OF ANY KIND, either express or implied.# See the License for the specific language governing permissions and# limitations under the License.#/*******************************************************************************'''This script will launch X guests at Y rate, once all guests are launchedthis script will change a field, to start load on all the guests.
Please review the cbtool/scripts/linpack/cb_linpack.sh for an example@author Joe Talerico'''from time import sleepfrom sys import pathfrom time import strftimeimport osimport loggingimport fnmatchimport yamlimport threadingimport sys
_home = "/opt/cbtool"
for _path, _dirs, _files in os.walk(os.path.abspath(_home)): for _filename in fnmatch.filter(_files, "code_instrumentation.py") : path.append(_path.replace("/lib/auxiliary",'')) break
from lib.api.api_service_client import *
_api_endpoint = "172.18.0.5"_cloud_name = "MYOPENSTACK"_workload = "linpack"
www.redhat.com 135 [email protected]

_launch_rate = 5_write_file = "%s" % strftime("%m%d%Y-%H:%M:%S")_launch_until = int(sys.argv[1])_retrun_msg = ""logging.basicConfig(level=logging.INFO)logger = logging.getLogger(__name__)
#----------------------- theThread ---------------------------------------------####-------------------------------------------------------------------------------class theThread (threading.Thread): def __init__(self, api, ai): threading.Thread.__init__(self) self.api = api self.ai = ai def run(self): _sampling(self.api,self.ai)#----------------------- end theThread -----------------------------------------
#----------------------- _sampling ---------------------------------------------####-------------------------------------------------------------------------------def _sampling(_api, _ai) : check_time = None
# # Chagne to bool, switch to false when outside of QoS # _samples = 5 file = open("%s-workload-data"%(_write_file), "a") while _samples > 0 : _data = _api.get_latest_app_data(_cloud_name,_ai) if _data != None : if _data['time'] != check_time : check_time = _data['time'] file.write("%s, %s, %s, %s\n" % (_ai, _data['time'], _data['app_throughput_average']['val'], _data['app_throughput_max']['val'])) _samples-=1 else: continue
file.close() return True
[email protected] 136 www.redhat.com

#----------------------- End _sampling -----------------------------------------
#----------------------- CloudBench API ----------------------------------------api = APIClient("http://" + _api_endpoint + ":7070")_launched_ais = []app = Nonetry : error = False vm = None _cloud_attached = False for _cloud in api.cldlist() : if _cloud["name"] == _cloud_name : _cloud_attached = True _cloud_model = _cloud["model"] break if not _cloud_attached : print "Cloud " + _cloud_name + " not attached" exit(1) ai_return_state=True print "Launching AI %s" % _workload vms=[] _launch = None _ignore_ai = [] _prev_failed = []#----------------------- AIs to ignore... since this is a new run. ------------- for ai in api.applist(_cloud_name) : _ignore_ai.append([val.split("|")[0] for val in ai["vms"].split(",")][0])#----------------------- AIs failed before our run ----------------------------- for ai in api.applist(_cloud_name,state="failed") : _prev_failed.append([val.split("|")[0] for val in ai["vms"].split(",")][0])
## Determine Baseline For YCSB And Kmeans.#
_ai_list = [] _current_ai = [] _file = open("%s-launch-data"%(_write_file), "w") while ai_return_state :
# Rand function to determine when to launch the next AI set.
_current_ai = [] for ai in api.applist(_cloud_name) : if not [val.split("|")[0] for val in ai["vms"].split(",")][0] in _ignore_ai : _current_ai.append([val.split("|")[0] for val in ai["vms"].split(",")][0])#----------------------- Create Apps over time ----------------------------------
www.redhat.com 137 [email protected]

if _launch_rate > _launch_until : _launch = _launch_until else : _launch = _launch_rate logger.info("Launching : %s guests" % _launch) api.appattach(_cloud_name,_workload,async=_launch)#----------------------- Wait for the AIs to be launched ----------------------- while True : _ai_list = [] for ai in api.applist(_cloud_name) : if not [val.split("|")[0] for val in ai["vms"].split(",")][0] in_ignore_ai : if not [val.split("|")[0] for val in ai["vms"].split(",")][0] in_current_ai : _ai_list.append([val.split("|")[0] for val inai["vms"].split(",")][0]) if len(_ai_list) != _launch : for ai in api.applist(_cloud_name,state="failed") : if not [val.split("|")[0] for val in ai["vms"].split(",")][0] in_prev_failed :#----------------------- Failed AI --------------------------------------------- logger.info("Failed to launch a AI") sleep(20) else : break#----------------------- Waiting for AIs to have management data. -------------- for vm in _ai_list : while True : _guest_data = api.get_latest_management_data(_cloud_name,vm) if _guest_data == None : sleep(5) continue else: break#----------------------- Build a list of Guest UUIDs --------------------------- for vm in _ai_list : _guest_data = api.get_latest_management_data(_cloud_name,vm) if _guest_data["cloud_hostname"].find(_workload) != -1 : _data_uuid = _guest_data["uuid"] _file.write("%s ,%s, %s, %s" % (_guest_data["cloud_hostname"], _guest_data["mgt_003_provisioning_request_completed"], _guest_data["mgt_004_network_acessible"], _guest_data["last_known_state"]))
_launch_until = _launch_until - _launch_rate if _launch_until > 0 : sleep(20) ai_return_state = True
[email protected] 138 www.redhat.com

else : _ai_list = _current_ai + _ai_list ai_return_state = False
for app in api.applist(_cloud_name): if not [val.split("|")[0] for val in ai["vms"].split(",")][0] in _ignore_ai : api.appalter(_cloud_name, app['uuid'], 'wait_for', 1)
#----------------------- Sampling will being the workload, and begin sampling th threads = [] _file.close() for ai in _ai_list : threads.append( theThread(api,ai) ) [x.start() for x in threads] [x.join() for x in threads]#----------------------- Remove existing VMs. ---------------------------------- print "Removing all AIs" for apps in api.applist(_cloud_name) : api.appdetach(_cloud_name,apps['uuid'])
except APIException, obj : error = True print "API Problem (" + str(obj.status) + "): " + obj.msg
except APINoSuchMetricException, obj : error = True print "API Problem (" + str(obj.status) + "): " + obj.msg
except KeyboardInterrupt : print "Aborting this VM."
#except Exception, msg :# error = True# print "Problem during experiment: " + str(msg)
finally : if app is not None : try : if error : print "Destroying VM..." api.appdetach(_cloud_name, app["uuid"]) except APIException, obj : print "Error finishing up: (" + str(obj.status) + "): " + obj.msg
www.redhat.com 139 [email protected]

Appendix J: Fio Provisioning VMs PythonScript (FioProvisionVMs.py)
#!/usr/bin/env python#/*******************************************************************************# Copyright (c) 2012 Red Hat.# Licensed under the Apache License, Version 2.0 (the "License");# you may not use this file except in compliance with the License.# You may obtain a copy of the License at# http://www.apache.org/licenses/LICENSE-2.0# Unless required by applicable law or agreed to in writing, software# distributed under the License is distributed on an "AS IS" BASIS,# WITHOUT WARRANTIES OR CONDITIONS OF ANY KIND, either express or implied.# See the License for the specific language governing permissions and# limitations under the License.#/*******************************************************************************'''This script will launch X guests at Y rate, once all guests are launchedthis script will change a field, to start load on all the guests.
Please review the cbtool/scripts/fio/cb_start_fio.sh for an example@author Joe Talerico'''from time import sleepfrom sys import pathfrom time import strftimeimport osimport loggingimport fnmatchimport threadingimport sys
_home = "/opt/cbtool"
for _path, _dirs, _files in os.walk(os.path.abspath(_home)): for _filename in fnmatch.filter(_files, "code_instrumentation.py") : path.append(_path.replace("/lib/auxiliary",'')) break
from lib.api.api_service_client import *
_api_endpoint = "10.0.74.86"_cloud_name = "MYOPENSTACK"_workload = "fio"_launch_rate = 24
[email protected] 140 www.redhat.com
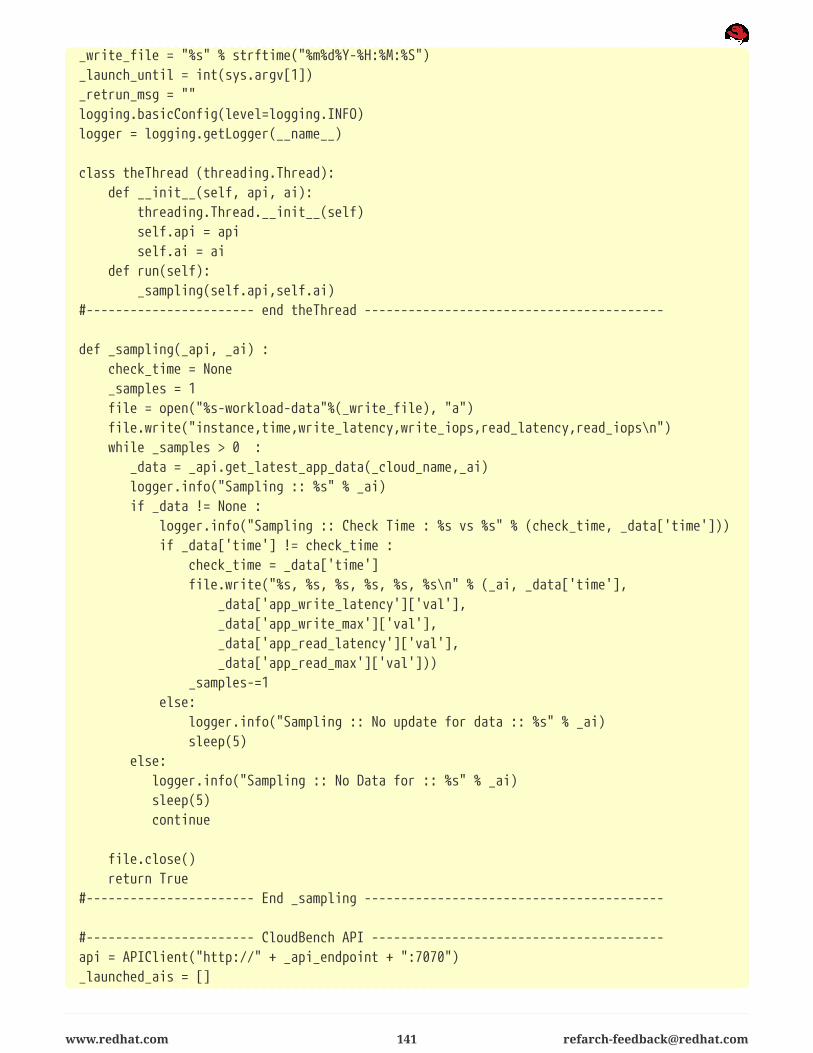
_write_file = "%s" % strftime("%m%d%Y-%H:%M:%S")_launch_until = int(sys.argv[1])_retrun_msg = ""logging.basicConfig(level=logging.INFO)logger = logging.getLogger(__name__)
class theThread (threading.Thread): def __init__(self, api, ai): threading.Thread.__init__(self) self.api = api self.ai = ai def run(self): _sampling(self.api,self.ai)#----------------------- end theThread -----------------------------------------
def _sampling(_api, _ai) : check_time = None _samples = 1 file = open("%s-workload-data"%(_write_file), "a") file.write("instance,time,write_latency,write_iops,read_latency,read_iops\n") while _samples > 0 : _data = _api.get_latest_app_data(_cloud_name,_ai) logger.info("Sampling :: %s" % _ai) if _data != None : logger.info("Sampling :: Check Time : %s vs %s" % (check_time, _data['time'])) if _data['time'] != check_time : check_time = _data['time'] file.write("%s, %s, %s, %s, %s, %s\n" % (_ai, _data['time'], _data['app_write_latency']['val'], _data['app_write_max']['val'], _data['app_read_latency']['val'], _data['app_read_max']['val'])) _samples-=1 else: logger.info("Sampling :: No update for data :: %s" % _ai) sleep(5) else: logger.info("Sampling :: No Data for :: %s" % _ai) sleep(5) continue
file.close() return True#----------------------- End _sampling -----------------------------------------
#----------------------- CloudBench API ----------------------------------------api = APIClient("http://" + _api_endpoint + ":7070")_launched_ais = []
www.redhat.com 141 [email protected]

app = Nonetry : error = False vm = None _cloud_attached = False for _cloud in api.cldlist() : if _cloud["name"] == _cloud_name : _cloud_attached = True _cloud_model = _cloud["model"] break if not _cloud_attached : print "Cloud " + _cloud_name + " not attached" exit(1) ai_return_state=True print "Launching AI %s" % _workload vms=[] _launch = None _ignore_ai = [] _prev_failed = []#----------------------- AIs to ignore... since this is a new run. ------------- for ai in api.applist(_cloud_name) : _ignore_ai.append([val.split("|")[0] for val in ai["vms"].split(",")][0])#----------------------- AIs failed before our run ----------------------------- for ai in api.applist(_cloud_name,state="failed") : _prev_failed.append([val.split("|")[0] for val in ai["vms"].split(",")][0]) _ai_list = [] _current_ai = [] _file = open("%s-launch-data"%(_write_file), "w") while ai_return_state : _current_ai = [] for ai in api.applist(_cloud_name) : if not [val.split("|")[0] for val in ai["vms"].split(",")][0] in _ignore_ai : _current_ai.append([val.split("|")[0] for val in ai["vms"].split(",")][0])#----------------------- Create Apps over time ---------------------------------- if _launch_rate > _launch_until : _launch = _launch_until else : _launch = _launch_rate logger.info("Launching : %s guests" % _launch) api.appattach(_cloud_name,_workload,async=_launch)#----------------------- Wait for the AIs to be launched ----------------------- while True : _ai_list = [] for ai in api.applist(_cloud_name) : if not [val.split("|")[0] for val in ai["vms"].split(",")][0] in_ignore_ai : if not [val.split("|")[0] for val in ai["vms"].split(",")][0] in_current_ai :
[email protected] 142 www.redhat.com

_ai_list.append([val.split("|")[0] for val inai["vms"].split(",")][0])
if len(_ai_list) != _launch : for ai in api.applist(_cloud_name,state="failed") : if not [val.split("|")[0] for val in ai["vms"].split(",")][0] in_prev_failed :#----------------------- Failed AI --------------------------------------------- logger.info("Failed to launch a AI") exit(1) sleep(20) else : break#----------------------- Waiting for AIs to have management data. -------------- for vm in _ai_list : while True : _guest_data = api.get_latest_management_data(_cloud_name,vm) if _guest_data == None : sleep(5) continue else: break#----------------------- Build a list of Guest UUIDs --------------------------- _file.write("guest,guest_active,guest_sshable,last_known_state\n") for vm in _ai_list : for _guest_data in api.get_latest_management_data(_cloud_name,vm) : if _guest_data["cloud_hostname"].find(_workload) != -1 : _data_uuid = _guest_data["uuid"] _file.write("%s ,%s, %s, %s\n" % (_guest_data["cloud_hostname"], _guest_data["mgt_003_provisioning_request_completed"], _guest_data["mgt_004_network_acessible"], _guest_data["last_known_state"]))
_launch_until = _launch_until - _launch_rate if _launch_until > 0 : sleep(20) ai_return_state = True else : _ai_list = _current_ai + _ai_list ai_return_state = False
for app in api.applist(_cloud_name): if not [val.split("|")[0] for val in ai["vms"].split(",")][0] in _ignore_ai : api.appalter(_cloud_name, app['uuid'], 'wait_for', 1)
#----------------------- Sampling will being the workload, and begin sampling th threads = [] _file.close()
www.redhat.com 143 [email protected]

for ai in _ai_list : threads.append( theThread(api,ai) ) [x.start() for x in threads] [x.join() for x in threads]#----------------------- Remove existing VMs. ---------------------------------- print "Removing all AIs" for apps in api.applist(_cloud_name) : api.appdetach(_cloud_name,apps['uuid'])
except APIException, obj : error = True print "API Problem (" + str(obj.status) + "): " + obj.msg
except APINoSuchMetricException, obj : error = True print "API Problem (" + str(obj.status) + "): " + obj.msg
except KeyboardInterrupt : print "Aborting this VM."
finally : if app is not None : try : if error : print "Destroying VM..." api.appdetach(_cloud_name, app["uuid"]) except APIException, obj : print "Error finishing up: (" + str(obj.status) + "): " + obj.msg
[email protected] 144 www.redhat.com

Appendix K: Netperf CBTOOL Client Script(NetProvisionVMs.py)
#!/usr/bin/env python#/*******************************************************************************# Copyright (c) 2012 Red Hat.# Licensed under the Apache License, Version 2.0 (the "License");# you may not use this file except in compliance with the License.# You may obtain a copy of the License at# http://www.apache.org/licenses/LICENSE-2.0# Unless required by applicable law or agreed to in writing, software# distributed under the License is distributed on an "AS IS" BASIS,# WITHOUT WARRANTIES OR CONDITIONS OF ANY KIND, either express or implied.# See the License for the specific language governing permissions and# limitations under the License.#/*******************************************************************************'''This script will launch X guests at Y rate, once all guests are launchedthis script will change a field, to start load on all the guests.
Please review the cbtool/scripts/netperf/.sh for an example@author Joe Talerico'''from time import sleepfrom sys import pathfrom time import strftimeimport osimport loggingimport fnmatchimport threadingimport sys
_home = "/opt/cbtool"
for _path, _dirs, _files in os.walk(os.path.abspath(_home)): for _filename in fnmatch.filter(_files, "code_instrumentation.py") : path.append(_path.replace("/lib/auxiliary",'')) break
from lib.api.api_service_client import *
_api_endpoint = "10.0.74.86"_cloud_name = "MYOPENSTACK"_workload = "netperf"_launch_rate = 24
www.redhat.com 145 [email protected]
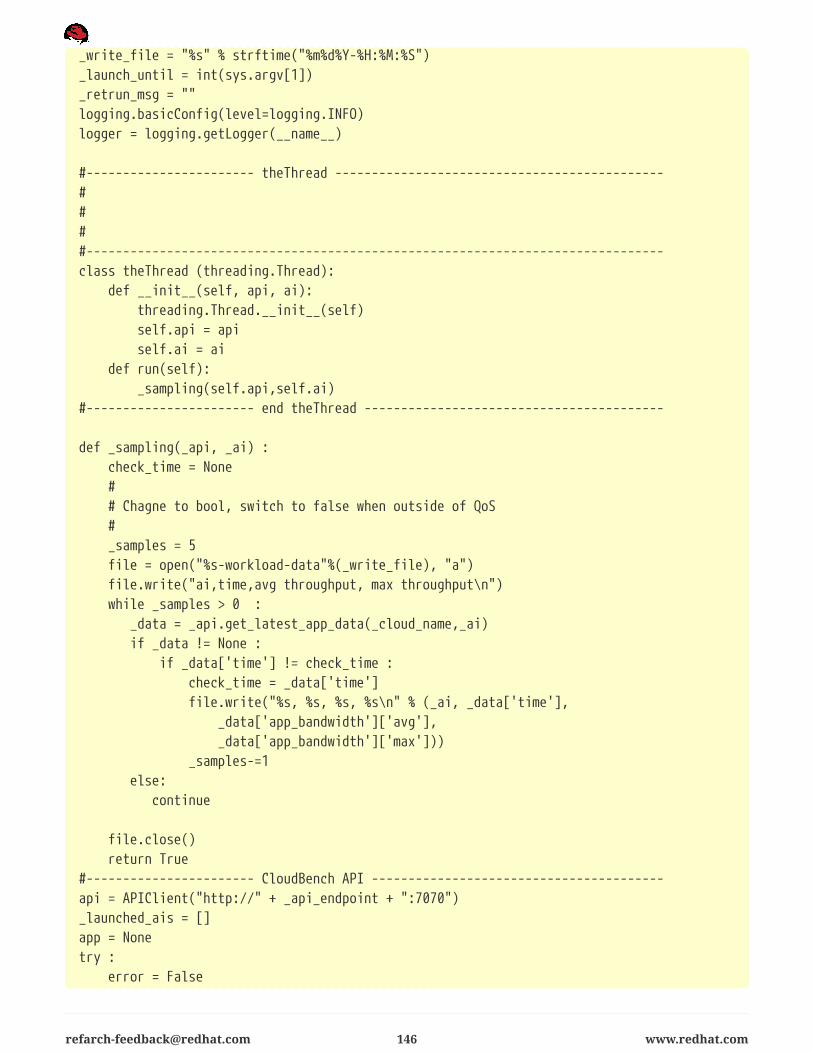
_write_file = "%s" % strftime("%m%d%Y-%H:%M:%S")_launch_until = int(sys.argv[1])_retrun_msg = ""logging.basicConfig(level=logging.INFO)logger = logging.getLogger(__name__)
#----------------------- theThread ---------------------------------------------####-------------------------------------------------------------------------------class theThread (threading.Thread): def __init__(self, api, ai): threading.Thread.__init__(self) self.api = api self.ai = ai def run(self): _sampling(self.api,self.ai)#----------------------- end theThread -----------------------------------------
def _sampling(_api, _ai) : check_time = None # # Chagne to bool, switch to false when outside of QoS # _samples = 5 file = open("%s-workload-data"%(_write_file), "a") file.write("ai,time,avg throughput, max throughput\n") while _samples > 0 : _data = _api.get_latest_app_data(_cloud_name,_ai) if _data != None : if _data['time'] != check_time : check_time = _data['time'] file.write("%s, %s, %s, %s\n" % (_ai, _data['time'], _data['app_bandwidth']['avg'], _data['app_bandwidth']['max'])) _samples-=1 else: continue
file.close() return True#----------------------- CloudBench API ----------------------------------------api = APIClient("http://" + _api_endpoint + ":7070")_launched_ais = []app = Nonetry : error = False
[email protected] 146 www.redhat.com

vm = None _cloud_attached = False for _cloud in api.cldlist() : if _cloud["name"] == _cloud_name : _cloud_attached = True _cloud_model = _cloud["model"] break if not _cloud_attached : print "Cloud " + _cloud_name + " not attached" exit(1) ai_return_state=True print "Launching AI %s" % _workload vms=[] _launch = None _ignore_ai = [] _prev_failed = []#----------------------- AIs to ignore... since this is a new run. ------------- for ai in api.applist(_cloud_name) : _ignore_ai.append([val.split("|")[0] for val in ai["vms"].split(",")][0])#----------------------- AIs failed before our run ----------------------------- for ai in api.applist(_cloud_name,state="failed") : _prev_failed.append([val.split("|")[0] for val in ai["vms"].split(",")][0])
_ai_list = [] _current_ai = [] _file = open("%s-launch-data"%(_write_file), "w") while ai_return_state : # Rand function to determine when to launch the next AI set. _current_ai = [] for ai in api.applist(_cloud_name) : if not [val.split("|")[0] for val in ai["vms"].split(",")][0] in _ignore_ai : _current_ai.append([val.split("|")[0] for val in ai["vms"].split(",")][0])#----------------------- Create Apps over time ---------------------------------- if _launch_rate > _launch_until : _launch = _launch_until else : _launch = _launch_rate logger.info("Launching : %s guests" % _launch) api.appattach(_cloud_name,_workload,async=_launch)#----------------------- Wait for the AIs to be launched ----------------------- while True : _ai_list = [] for ai in api.applist(_cloud_name) : if not [val.split("|")[0] for val in ai["vms"].split(",")][0] in_ignore_ai : if not [val.split("|")[0] for val in ai["vms"].split(",")][0] in_current_ai : _ai_list.append([val.split("|")[0] for val in
www.redhat.com 147 [email protected]

ai["vms"].split(",")][0]) if len(_ai_list) != _launch : for ai in api.applist(_cloud_name,state="failed") : if not [val.split("|")[0] for val in ai["vms"].split(",")][0] in_prev_failed :#----------------------- Failed AI --------------------------------------------- logger.info("Failed to launch a AI") exit(1) sleep(20) else : break#----------------------- Waiting for AIs to have management data. -------------- for vm in _ai_list : while True : _guest_data = api.get_latest_management_data(_cloud_name,vm) if _guest_data == None : sleep(5) continue else: break#----------------------- Build a list of Guest UUIDs --------------------------- for vm in _ai_list : _guest_data = api.get_latest_management_data(_cloud_name,vm) if _guest_data["cloud_hostname"].find(_workload) != -1 : _data_uuid = _guest_data["uuid"] _file.write("%s ,%s, %s, %s" % (_guest_data["cloud_hostname"], _guest_data["mgt_003_provisioning_request_completed"], _guest_data["mgt_004_network_acessible"], _guest_data["last_known_state"]))
_launch_until = _launch_until - _launch_rate if _launch_until > 0 : sleep(20) ai_return_state = True else : _ai_list = _current_ai + _ai_list ai_return_state = False
for app in api.applist(_cloud_name): if not [val.split("|")[0] for val in ai["vms"].split(",")][0] in _ignore_ai : api.appalter(_cloud_name, app['uuid'], 'wait_for', 1)
#----------------------- Sampling will being the workload, and begin sampling th threads = [] _file.close() for ai in _ai_list : threads.append( theThread(api,ai) ) [x.start() for x in threads]
[email protected] 148 www.redhat.com

[x.join() for x in threads]#----------------------- Remove existing VMs. ---------------------------------- print "Removing all AIs" for apps in api.applist(_cloud_name) : api.appdetach(_cloud_name,apps['uuid'])
except APIException, obj : error = True print "API Problem (" + str(obj.status) + "): " + obj.msg
except APINoSuchMetricException, obj : error = True print "API Problem (" + str(obj.status) + "): " + obj.msg
except KeyboardInterrupt : print "Aborting this VM."
#except Exception, msg :# error = True# print "Problem during experiment: " + str(msg)
finally : if app is not None : try : if error : print "Destroying VM..." api.appdetach(_cloud_name, app["uuid"]) except APIException, obj : print "Error finishing up: (" + str(obj.status) + "): " + obj.msg
www.redhat.com 149 [email protected]

Appendix L: Configuration ScriptsAll the configuration scripts can be downloaded from the Red Hat customer portal. A listing of all thefiles and a brief description can be seen in the following table.
Files Description
ra-skip-file The skipped tests when running Tempest.
req-rpms.txt The Tempest package requirement txt file.
ProvisionVMs.py Launchs linpack workloads.
FioProvisionVMs.py Launchs fio workloads.
NetProvisionVMs.py Launchs netperf workloads.
rally-wrapper.sh Script to increment values of conucrrency andtimes.
ahc-selinux-policy.pp Enable SELinux for uploading Health Checkresults.
[email protected] 150 www.redhat.com

Appendix M: ReferencesAutomatic Health Check (AHC) - User Guide
https://github.com/enovance/edeploy/blob/master/docs/AHC.rst
Sysbench
http://sourceforge.net/projects/sysbench/
FIO
http://freecode.com/projects/fio
Netperf
http://www.netperf.org/netperf/
Linpack
https://software.intel.com/en-us/articles/intel-math-kernel-library-documentation/
CBTOOL
https://github.com/ibmcb/cbtool
Ceph
http://ceph.com/
Rally
http://rally.readthedocs.org/en/latest/overview.html
Reference Architecture - Deploying HA RHEL OSP 6 with Ceph Storage
http://www.redhat.com/en/files/resources/en-rhel-openstack-6-ceph-storage.pdf
Integrating Staypuft-installed OSP5 with Ceph
https://access.redhat.com/articles/1428763
www.redhat.com 151 [email protected]