Embed Size (px)
Citation preview

Cost Transfer Training Guide Page 1 of 25
Guide for Cost Transfer Requests
Table of Contents
Introduction ................................................................................................................................................................ 1
Add a new Cost Transfer (CT) ..................................................................................................................................... 3
Complete a new Cost Transfer (CT) ........................................................................................................................... 7
Approving / Denying a Cost Transfer (CT) ............................................................................................................... 14
Appendix A – Workflow Diagrams……………………………………………………………………………………………………………………… 21
Appendix B – Cost Transfer Rules………………………………………………………………………………………………………………………. 25
Appendix C – Cost Transfer Exclusions…………………………………………………………………………………………………………………27
Introduction Cost Transfers (also known by CT)
In EIS, a user may request a new Cost Transfer, review an already created Cost Transfer and approve or deny the Cost Transfer. This document outlines the functionalities available to campus users.
When to use a Cost Transfer
1. A Cost Transfer is used to correct an expense, in whole or in part, that was erroneously charged to a Sponsored Project or Department Account. When using a cost transfer, a sponsored project must be used on at least one side of the transaction (“Move To” or “Move From”). A sponsored project may be used on both sides of the transaction. For example, a Pcard was used to purchase lab supplies, and the expense was incorrectly charged to the department instead of to a sponsored project. A cost transfer is used to move the expense from the department to the sponsored project. Corrections to Payroll transactions cannot be requested through this process. Please consult with your Sponsored Projects Office for guidance on Payroll corrections.
2. To correct the GL expense account that was assigned to a transaction. For example, an expense was classified as Lab Supplies (GL account 53071), but should have been classified as a Participant Cost (GL Account 51621).

Cost Transfer Training Guide Page 2 of 25
Cost Transfer Rules 1. Transactions involve departments within the same institution. A sponsored project must be involved.
Move From Move To
Sponsored Project (-GRCT)
Sponsored Project (-GRCT)
Discretionary Project (-DISC)
Department (DEPT)
Discretionary Project (-DISC) Sponsored Project (-GRCT)
Department (DEPT) Sponsored Project (-GRCT)
2. All cost transfers will involve either 5 or 8 expense accounts, excluding: B5010 (Salaries and Wages),
B5050 (Payroll Related Costs), B5400 (Depreciation & Amortization), B5440 (Interest Expense), B5811 (Asset Retirement Obligation Expense), B5485 (Claims & Judgements), B5600 (F&A Expense), B5780 (Interest Expense and Fiscal Charges), B5800 (Adjustments), B5810 (Lapsed Appropriations), B5820 (Other Nonoperating Expenses), B7000 (Transfers).
3. Cost transfers can interchange with the same 5 general ledger expense account, or a different 5 general
ledger expense account. When moving an expense from an “8” general ledger expense account, the same “8” general ledger expense account must be used on the “Move To” side of the transaction. These are primarily services provided within the institution and are considered interdepartmental charges.
5 to the same 5
5 to a different 5
8 to the same 8 only
4. Cost transfers for AP Journals involving state appropriated funds (fund cats 105 and 106 for all institutions, in addition to funding combination 306-200054 and 200-890002 at HSC) cannot be requested through this process. Please consult with your Sponsored Projects Office for guidance.
Account Types 1 – Assets 5 – Expenses 2 – Liabilities 6 – Internal Income 3 – Fund Balance 7 – Transfers 4 – Revenue 8 – Internal Expenses

Cost Transfer Training Guide Page 3 of 25
Add a new Cost Transfer (CT)
NAVIGATION:
Main Menu > Campus Self-Service > Transfers (Budget, IDT & CT) > ABA IDT CT Entry
1. Login to FSPD: https://myfs.unt.edu
2. Go to Main Menu and select Campus Self-Service.
3. Select Transfers (Budget, IDT & CT)
4. Next select ABA IDT CT Entry to access Electronic ABA/IDT/CT Entry details page (The Landing
page)

Cost Transfer Training Guide Page 4 of 25
5. From the ABA/IDT/CT Entry Landing Page, click on the CT Form button to access Cost Transfer
Entry Form
Your access to the Cost Transfer form is granted upon
successful completion of training.

Cost Transfer Training Guide Page 5 of 25
6. Select the desired “Business Unit” campus code and click the Add a New Value…

Cost Transfer Training Guide Page 6 of 25
7. A blank Cost Transfer Form will display.

Cost Transfer Training Guide Page 7 of 25
Complete a new Cost Transfer (CT)
Enter all necessary information to complete the IDT form.
1. Phone number
• A contact number is required. Input your phone number.
2. Description
• Enter the description of the CT. This description is for all lines of the CT and allows only
30 characters. Description is a required field. It will be displayed on the Approver box
and on the search results page. Example, Conference Expenses.
3. Select Dept/Proj
This is the Dept or Proj where the expense resides today - where the expense is being
“moved from.” Depending on the selection, the fields on the form change.
• If “Department” is selected:
A look up field will appear so that you can search for the department number,
or you may key-in the Department number.
• If “Project” is selected :
Two look up fields will appear. Select the PC Business Unit (-DISC for a
discretionary project, -GRCT for a sponsored project) and the Project number.

Cost Transfer Training Guide Page 8 of 25
4. Select Jrnl Info
Click the look up to see a list of transactions. Select the appropriate line.
5. Enter the Amount for the cost transfer – up to the amount of the selected journal line

Cost Transfer Training Guide Page 9 of 25
6. Enter the Cost Transfer Line Justification
This is a required field. The first 25 characters keyed in this field will appear on
the cost transfer journal entry, which will be displayed in COGNOS & the Grants
WorkCenter.
7. Enter the “Move To” values
The “Move From” section is filled in with the appropriate values for the
selected transaction and is not editable. Required fields in “Move To” are
denoted with an asterisk. If the “Move To” source is a sponsored project, key
it in the “SpeedType Key” field, and the appropriate data will populate. For
other funding sources, enter the necessary values manually. The “Account”
field is a required field and must always be entered manually.

Cost Transfer Training Guide Page 10 of 25
8. Answer the pop-up questions asking you to explain changes made.
- Question 1 – Why was the transferring expense charged to the original
Project/DeptID?
Use the look up to view/select standard responses. If selecting “Other,” an answer
should be keyed in the text box.
- Question 2 – How does this charge benefit the receiving project?
• Presented only if there is a SpeedType in the “Move To” section. Required when presented. Key answer is free open-text field.
- Question 3 – Why is the cost transfer being requested more than 90 days after the journal /
occurrence date of the original transaction?
• Presented only if the transaction is 90 days old or more. Required when
presented. Key answer in free text field.
- Question 4 – What corrective action has been taken to eliminate the need for a late
cost transfer of this type in the future?
• Presented only if the transaction is 90 days old or more. Required when
presented. Key answer in free text field.
Cost Transfer Training Guide Page 11 of 25
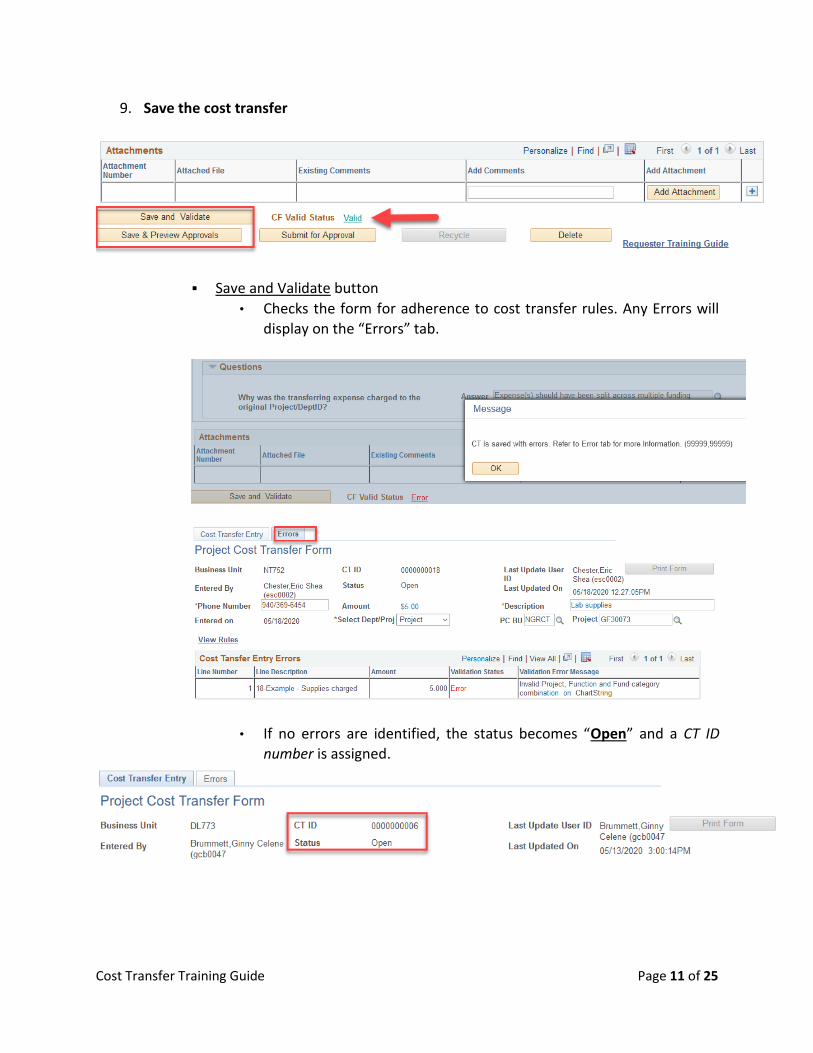
9. Save the cost transfer
Save and Validate button
• Checks the form for adherence to cost transfer rules. Any Errors will
display on the “Errors” tab.
• If no errors are identified, the status becomes “Open” and a CT ID
number is assigned.

Cost Transfer Training Guide Page 12 of 25
Save & Preview Approvals button
• Can be selected after “Save and Validate” is processed without errors.
Allows user to see the approval workflow. If an error indicates that the
approver does not have the cost transfer approval role, contact your
Sponsored Projects Office or FSS for assistance.
After the workflow is reviewed, the requester can click the Return to Entry Page link to return to
Cost Transfer Entry main page. Additional lines can be added, or proceed with adding supporting
attachments and submitting for approval.

Cost Transfer Training Guide Page 13 of 25
Adding additional lines:
10. Add supporting attachments (required documentation)
• Attach supporting documentation for the cost transfer. Click “Add Attachment” to
browse for files. Add additional lines as needed. Comments about the attachment may
also be added for clarification. Additional attachments may be added by approver(s)
or preparer after the cost transfer has been submitted, but attachments cannot be
deleted.
11. Submit for Approval
• The transaction enters into workflow. Status changes to “Pending Approval.”

Cost Transfer Training Guide Page 14 of 25
*NOTE: Preparer can “Recycle” the cost transfer while it is in “Pending Approval” status, as long
as one line has not been fully approved. Recycling takes the cost transfer out of the approval
workflow and allows the preparer to edit and resubmit.
Approving / Denying a Cost Transfer (CT)
Upon submission of a cost transfer, the first approver in the workflow will receive a notification
of submission by email:
1. Click the link in the email, or log in to myfs.unt.edu and access the Worklist:
Cost Transfer Training Guide Page 15 of 25
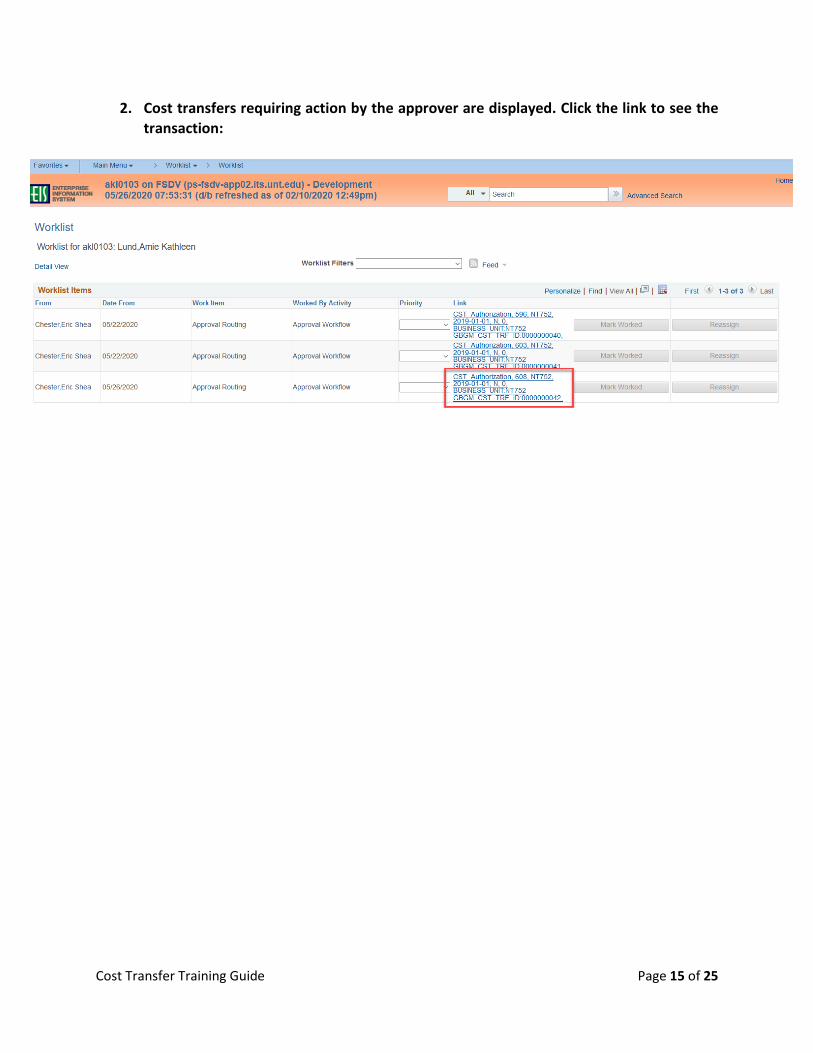
2. Cost transfers requiring action by the approver are displayed. Click the link to see the
transaction:
Cost Transfer Training Guide Page 16 of 25
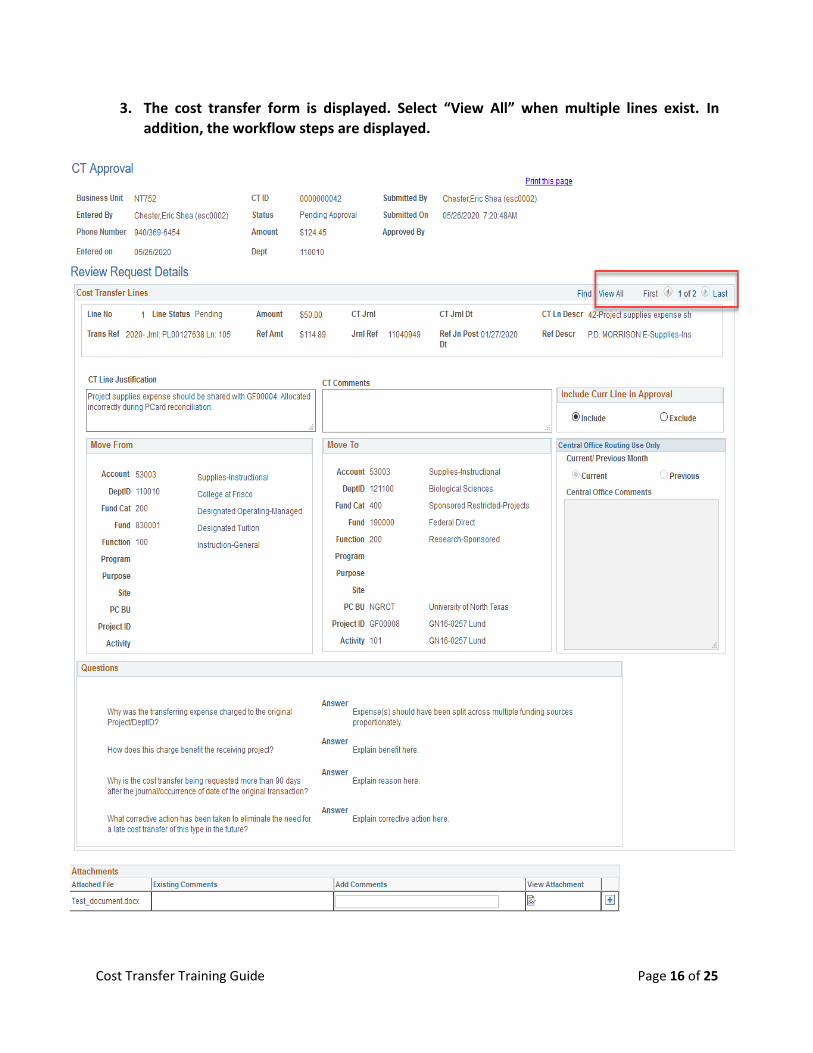
3. The cost transfer form is displayed. Select “View All” when multiple lines exist. In
addition, the workflow steps are displayed.

Cost Transfer Training Guide Page 17 of 25
4. An approver can choose to add additional approvers or reviewers to the workflow:
- Click the Green “+” sign and add the User ID and select Approver or Reviewer
- Click “Insert” and the individual now appears in the workflow:
*Preparers can also add Ad Hoc approvers/reviewers from the View Cost Transfers page
or when Previewing Approvals from the Cost Transfer Entry page, once a cost transfer
has been submitted.
5. For multi-line cost transfers, approver can choose to include/exclude each line. Please
note, all lines default to “Include”
Line 1 “include”
Cost Transfer Training Guide Page 18 of 25
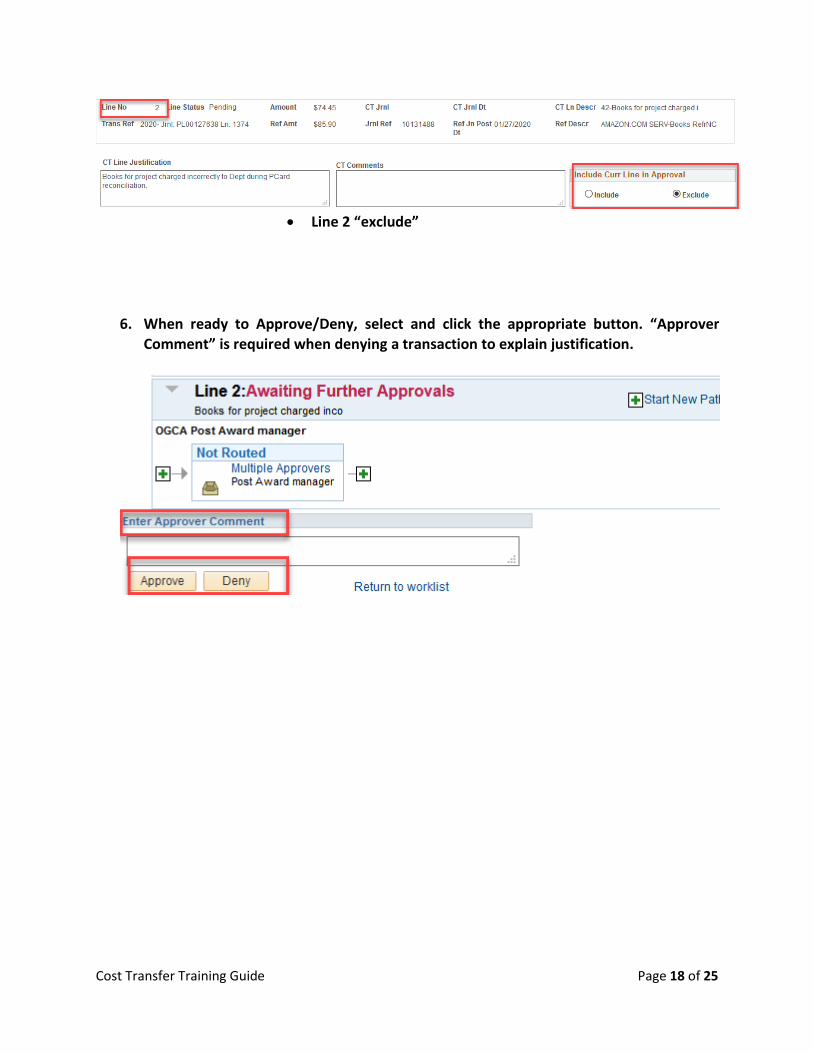
Line 2 “exclude”
6. When ready to Approve/Deny, select and click the appropriate button. “Approver
Comment” is required when denying a transaction to explain justification.

Cost Transfer Training Guide Page 19 of 25
7. If all lines have been approved or denied, the cost transfer no longer appears on the
approver’s worklist. Click triangle pull-down to display comments from the approver.

Cost Transfer Training Guide Page 20 of 25
8. The preparer will receive an automated e-mail notice when the cost transfer has been fully
approved, or if it has been denied:
If approved, expect to see the transaction in COGNOS and Grants WorkCenter the
following day. The journal will begin with “CTR.”
If denied, a notification email will be sent.
The preparer can choose to “Recycle” the denied cost transfer to make edits and
resubmit for approval
After clicking “Recycle” the cost transfer status becomes “Open” and available for editing. It can then
be resubmitted for approval with changes.

Cost Transfer Training Guide Page 21 of 25
Appendix A
Cost Transfer Approval Workflow Diagrams (Campus Specific)
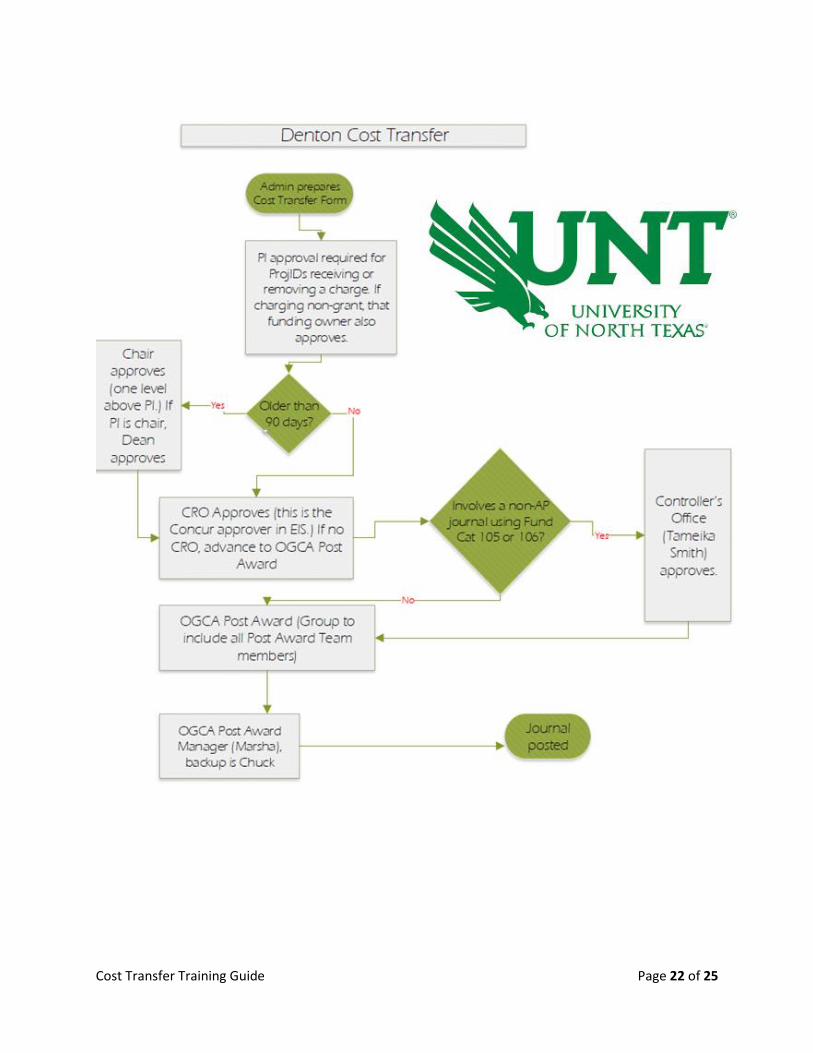
Cost Transfer Training Guide Page 22 of 25

Cost Transfer Training Guide Page 23 of 25
Cost Transfer Training Guide Page 24 of 25
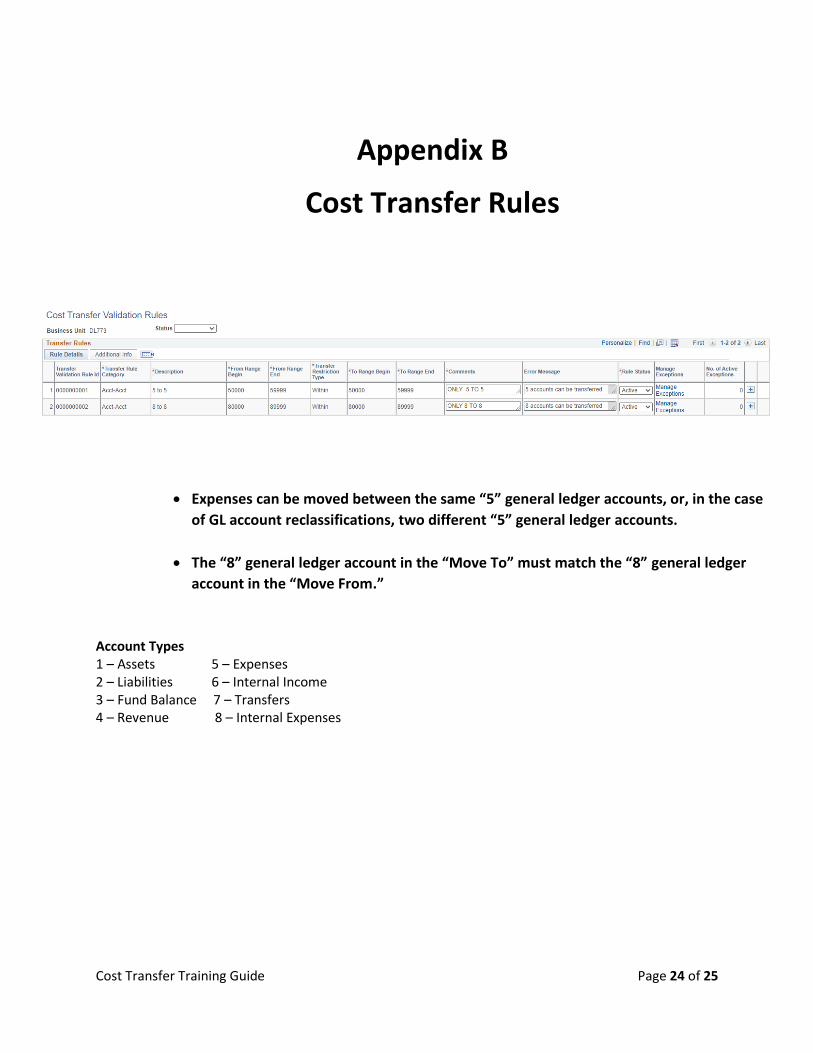
Appendix B
Cost Transfer Rules
Expenses can be moved between the same “5” general ledger accounts, or, in the case
of GL account reclassifications, two different “5” general ledger accounts.
The “8” general ledger account in the “Move To” must match the “8” general ledger
account in the “Move From.”
Account Types 1 – Assets 5 – Expenses 2 – Liabilities 6 – Internal Income 3 – Fund Balance 7 – Transfers 4 – Revenue 8 – Internal Expenses

Cost Transfer Training Guide Page 25 of 25
Appendix C
Cost Transfer Exclusions
B-Level accounts
AP Journal Fund Cat / Fund
Other journal types
Other journal types excluded from cost transfers are HR journals, closing (CLS) journals, and year-end
(YE) journals.