Embed Size (px)
Citation preview

GXV3275 Wi-Fi User Guide
Grandstream Networks, Inc.
GXV3275 IP Multimedia Phone for AndroidTM
Wi-Fi User Guide

GXV3275 Wi-Fi User Guide Page 1 of 20
GXV3275 Wi-Fi User Guide
Index
INTRODUCTION ........................................................................................ 3
CONNECT TO WI-FI .................................................................................. 4
TURN ON/OFF WI-FI ............................................................................................................................. 4
ADD WI-FI NETWORKS ........................................................................................................................ 6
CONFIGURING WI-FI FROM PROVISIONING .................................................................................... 9
WI-FI SETTINGS ...................................................................................... 10
ACCESS WI-FI SETTINGS ................................................................................................................. 10
SCAN ................................................................................................................................................... 11
ADD WI-FI NETWORK MANUALLY .................................................................................................... 11
WPS PUSH BUTTON .......................................................................................................................... 12
WPS PIN ENTRY ................................................................................................................................. 14
WI-FI DIRECT ...................................................................................................................................... 16
ADVANCED SETTINGS ...................................................................................................................... 17
PORTABLE HOTSPOT ............................................................................ 20
GXV3275 Wi-Fi User Guide Page 2 of 20
Table of Figures
GXV3275 Wi-Fi User Guide
Figure 1: Turn On/Off Wi-Fi from Status Bar ................................................................................................. 4
Figure 2: Turn On/Off Wi-Fi from Settings .................................................................................................... 5
Figure 3: Turn On/Off Wi-Fi from Web UI ...................................................................................................... 6
Figure 4: GXV3275 Wi-Fi Settings ................................................................................................................ 7
Figure 5: GXV3275 Connect to Wi-Fi ........................................................................................................... 7
Figure 6: GXV3275 Connect to Wi-Fi via Web UI ......................................................................................... 8
Figure 7: GXV3275 Available Wi-Fi Network List ........................................................................................ 10
Figure 8: GXV3275 Wi-Fi Settings: Scan .................................................................................................... 11
Figure 9: GXV3275 Add Wi-Fi Network Manually ....................................................................................... 12
Figure 10: GXV3275 WPS available network ............................................................................................. 13
Figure 11: GXV3275 Wi-Fi WPS Push Button ............................................................................................ 13
Figure 12: GXV3275 Connect to a WPS Network ...................................................................................... 14
Figure 13: GXV3275 Wi-Fi WPS Pin Entry ................................................................................................. 15
Figure 14: GXV3275 Connected to a Wi-Fi WPS Pin Entry Network ......................................................... 15
Figure 15: GXV3275 Wi-Fi Direct: Search Available Device ...................................................................... 16
Figure 16: GXV3275 Wi-Fi Direct: Connected ............................................................................................ 17
Figure 17: GXV3275 Wi-Fi Settings: Advanced .......................................................................................... 18
Figure 18: GXV3275 Wi-Fi Advanced Settings ........................................................................................... 19
Figure 19: GXV3275 Wi-Fi Hotspot ............................................................................................................ 20

GXV3275 Wi-Fi User Guide Page 3 of 20
INTRODUCTION
The GXV3275 has integrated Wi-Fi that supports 802.11b/g/n for network flexibility. This User Guide
describes how to use the Wi-Fi function to connect the GXV3275 into your local network. To learn more
about GXV3275's basic and advanced features, please visit link http://www.grandstream.com/support to
download the latest "GXV3275 User Guide" and "GXV3275 Administration Guide".
GXV3275 Wi-Fi User Guide Page 4 of 20
CONNECT TO WI-FI
Wi-Fi is supported and built-in on the GXV3275. GXV3275 can be connected to network if Wi-Fi is
available within the area. By default, Wi-Fi is turned off on the GXV3275. Users can turn on Wi-Fi from
web UI, LCD settings->system settings or provisioning.
TURN ON/OFF WI-FI
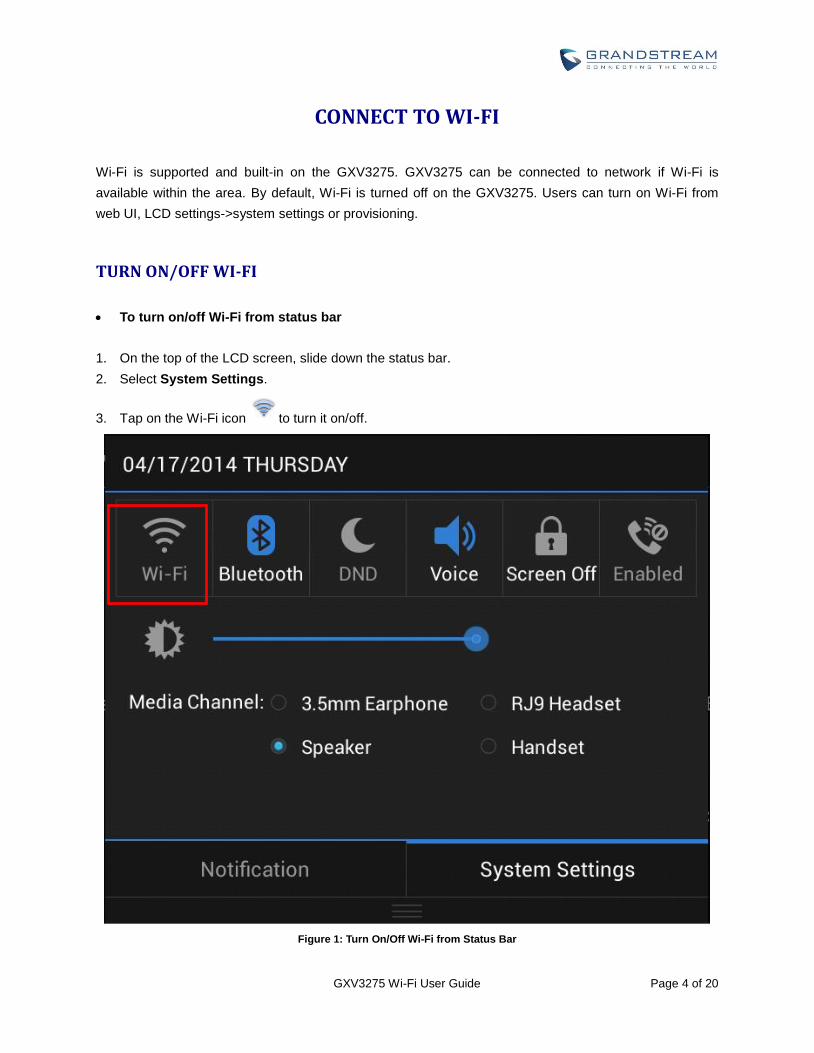
To turn on/off Wi-Fi from status bar
1. On the top of the LCD screen, slide down the status bar.
2. Select System Settings.
3. Tap on the Wi-Fi icon to turn it on/off.
Figure 1: Turn On/Off Wi-Fi from Status Bar
GXV3275 Wi-Fi User Guide Page 5 of 20
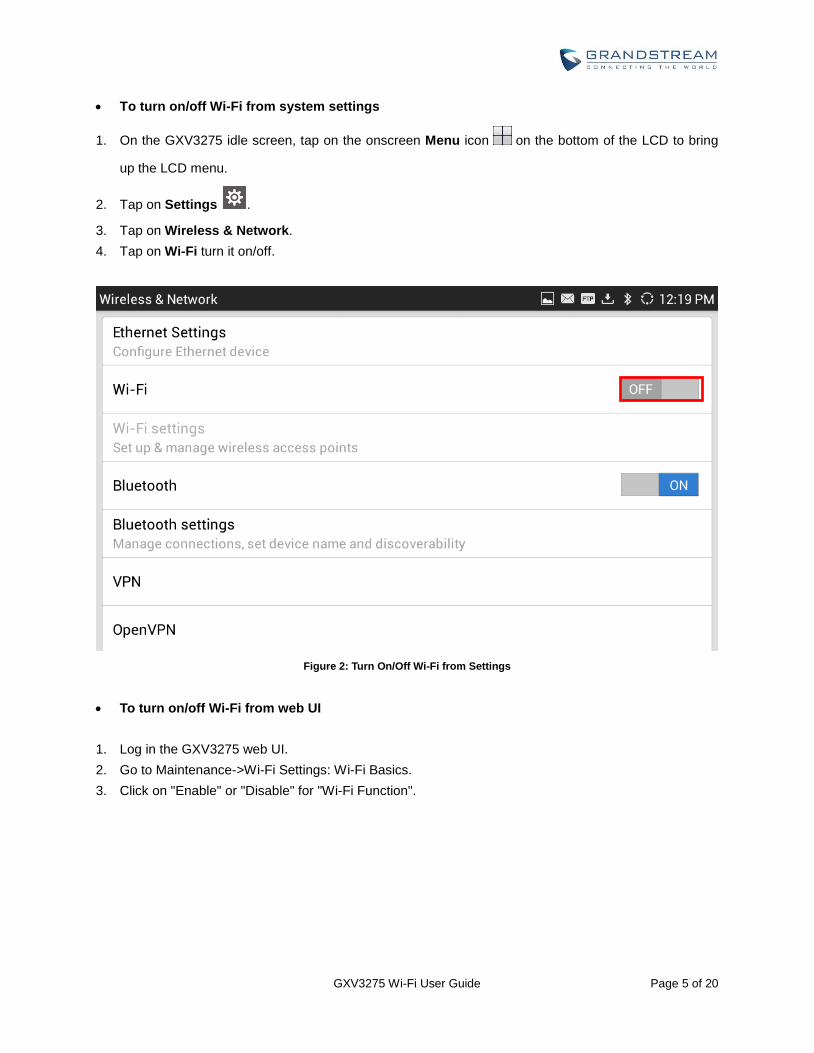
To turn on/off Wi-Fi from system settings
1. On the GXV3275 idle screen, tap on the onscreen Menu icon on the bottom of the LCD to bring
up the LCD menu.
2. Tap on Settings .
3. Tap on Wireless & Network.
4. Tap on Wi-Fi turn it on/off.
Figure 2: Turn On/Off Wi-Fi from Settings
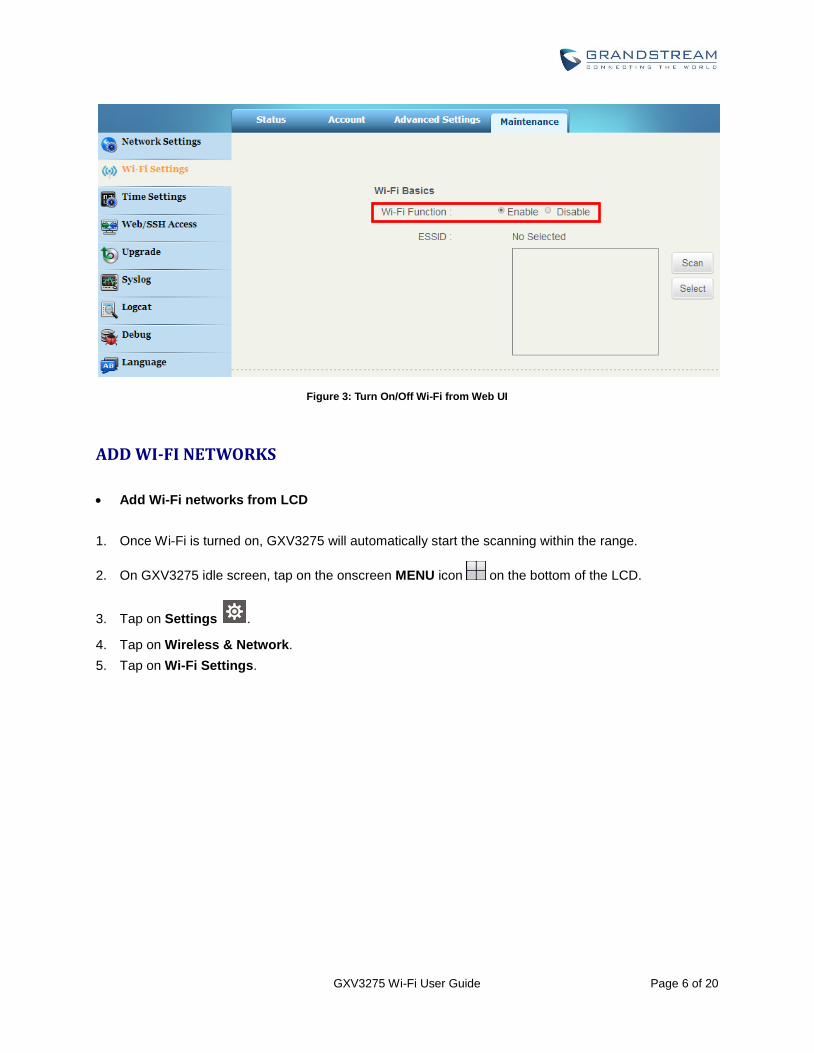
To turn on/off Wi-Fi from web UI
1. Log in the GXV3275 web UI.
2. Go to Maintenance->Wi-Fi Settings: Wi-Fi Basics.
3. Click on "Enable" or "Disable" for "Wi-Fi Function".
GXV3275 Wi-Fi User Guide Page 6 of 20
Figure 3: Turn On/Off Wi-Fi from Web UI
ADD WI-FI NETWORKS
Add Wi-Fi networks from LCD
1. Once Wi-Fi is turned on, GXV3275 will automatically start the scanning within the range.
2. On GXV3275 idle screen, tap on the onscreen MENU icon on the bottom of the LCD.
3. Tap on Settings .
4. Tap on Wireless & Network.
5. Tap on Wi-Fi Settings.
GXV3275 Wi-Fi User Guide Page 7 of 20
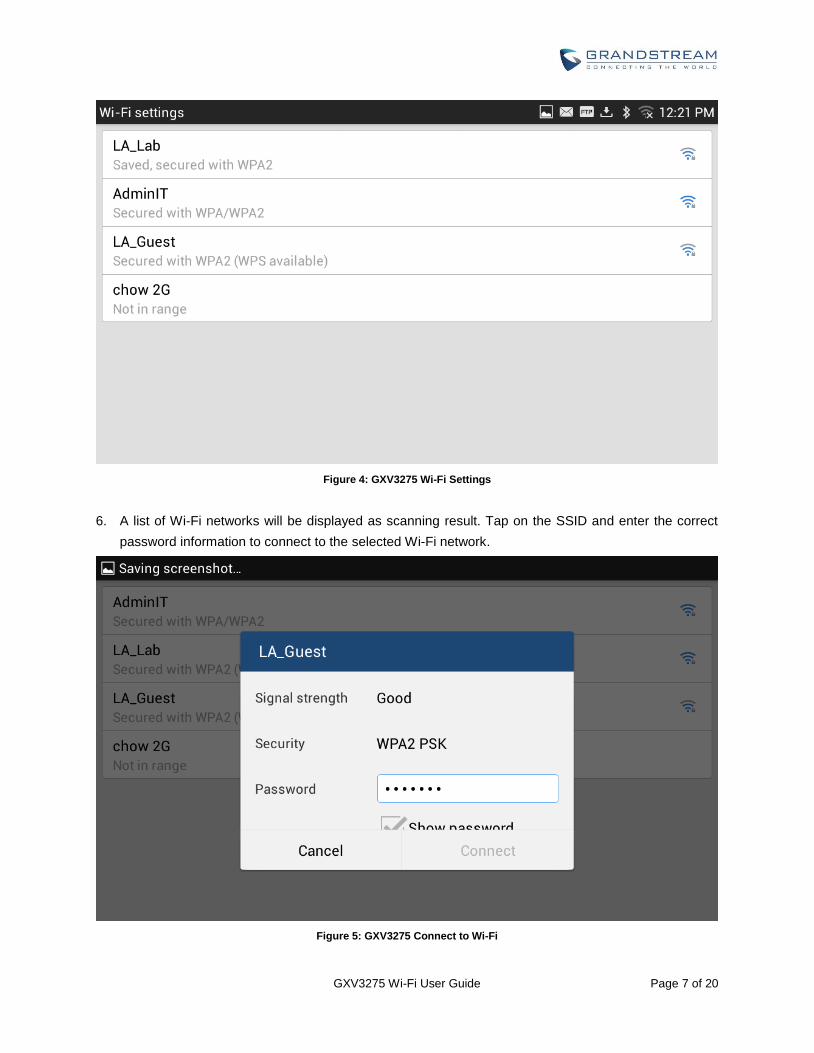
Figure 4: GXV3275 Wi-Fi Settings
6. A list of Wi-Fi networks will be displayed as scanning result. Tap on the SSID and enter the correct
password information to connect to the selected Wi-Fi network.
Figure 5: GXV3275 Connect to Wi-Fi
GXV3275 Wi-Fi User Guide Page 8 of 20
7. The phone will start connecting to the Wi-Fi. The status bar will show Wi-Fi signal strength.
8. Once authenticated, the phone will obtain IP address via DHCP and connect to the Wi-Fi network.
9. After successfully connected, the password will be remembered. When the GXV3275 has Wi-Fi
turned on in the future, it will connect to this network automatically if the SSID is within the range.
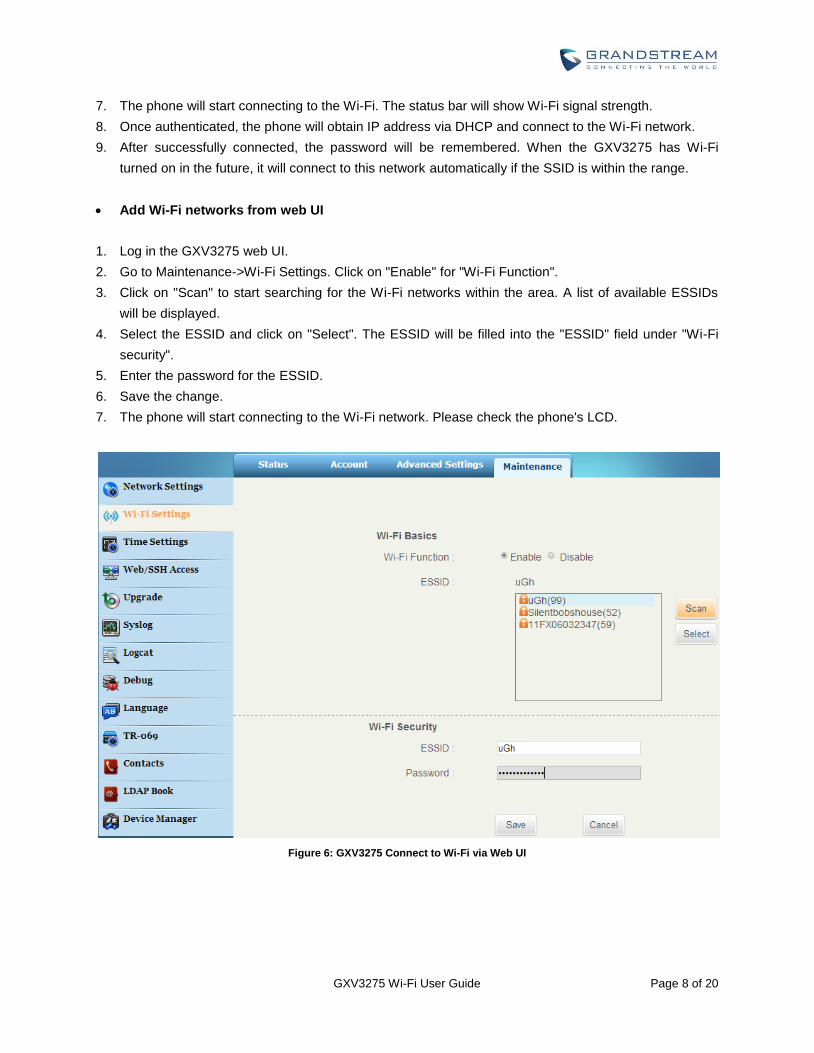
Add Wi-Fi networks from web UI
1. Log in the GXV3275 web UI.
2. Go to Maintenance->Wi-Fi Settings. Click on "Enable" for "Wi-Fi Function".
3. Click on "Scan" to start searching for the Wi-Fi networks within the area. A list of available ESSIDs
will be displayed.
4. Select the ESSID and click on "Select". The ESSID will be filled into the "ESSID" field under "Wi-Fi
security".
5. Enter the password for the ESSID.
6. Save the change.
7. The phone will start connecting to the Wi-Fi network. Please check the phone's LCD.
Figure 6: GXV3275 Connect to Wi-Fi via Web UI
GXV3275 Wi-Fi User Guide Page 9 of 20
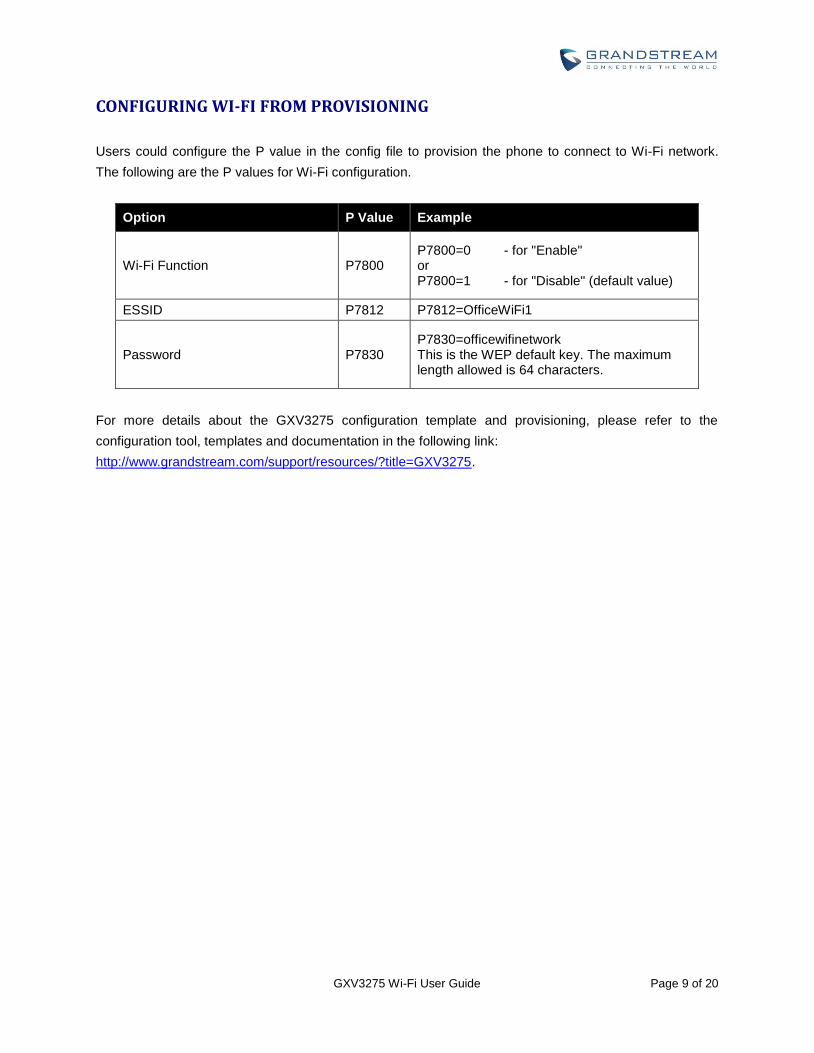
CONFIGURING WI-FI FROM PROVISIONING
Users could configure the P value in the config file to provision the phone to connect to Wi-Fi network.
The following are the P values for Wi-Fi configuration.
Option P Value Example
Wi-Fi Function P7800 P7800=0 - for "Enable" or P7800=1 - for "Disable" (default value)
ESSID P7812 P7812=OfficeWiFi1
Password P7830 P7830=officewifinetwork This is the WEP default key. The maximum length allowed is 64 characters.
For more details about the GXV3275 configuration template and provisioning, please refer to the
configuration tool, templates and documentation in the following link:
http://www.grandstream.com/support/resources/?title=GXV3275.
GXV3275 Wi-Fi User Guide Page 10 of 20
WI-FI SETTINGS
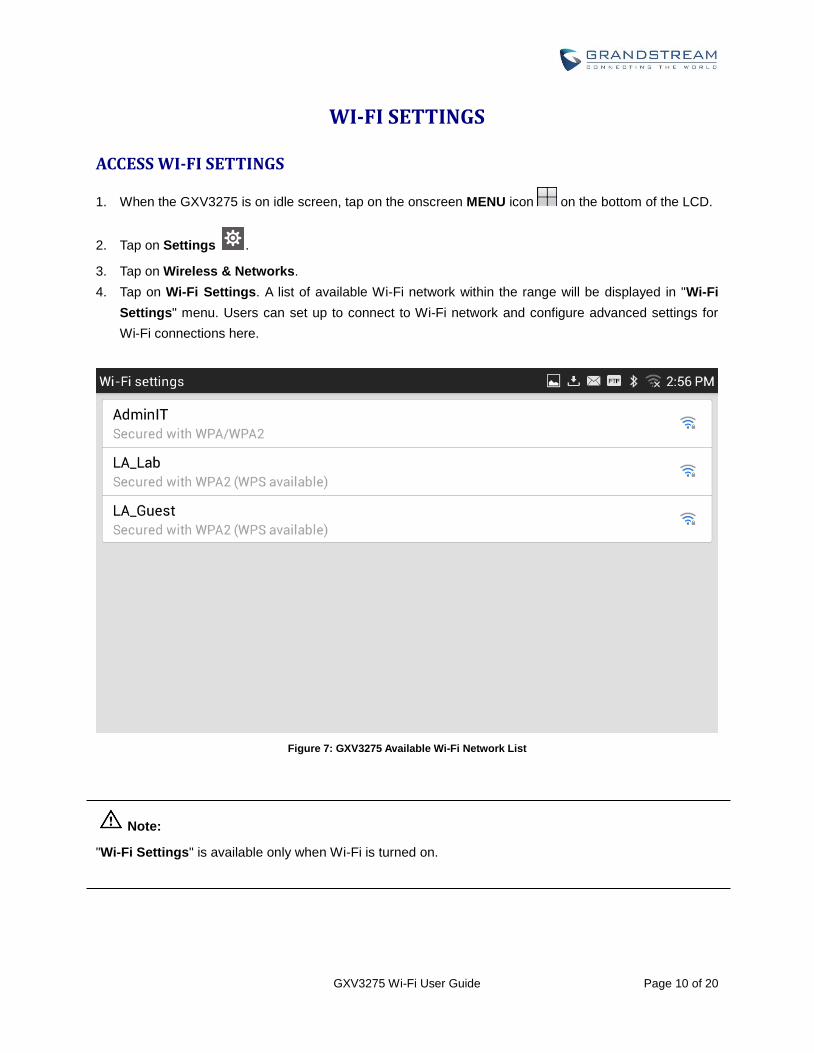
ACCESS WI-FI SETTINGS
1. When the GXV3275 is on idle screen, tap on the onscreen MENU icon on the bottom of the LCD.
2. Tap on Settings .
3. Tap on Wireless & Networks.
4. Tap on Wi-Fi Settings. A list of available Wi-Fi network within the range will be displayed in "Wi-Fi
Settings" menu. Users can set up to connect to Wi-Fi network and configure advanced settings for
Wi-Fi connections here.
Figure 7: GXV3275 Available Wi-Fi Network List
Note:
"Wi-Fi Settings" is available only when Wi-Fi is turned on.
GXV3275 Wi-Fi User Guide Page 11 of 20
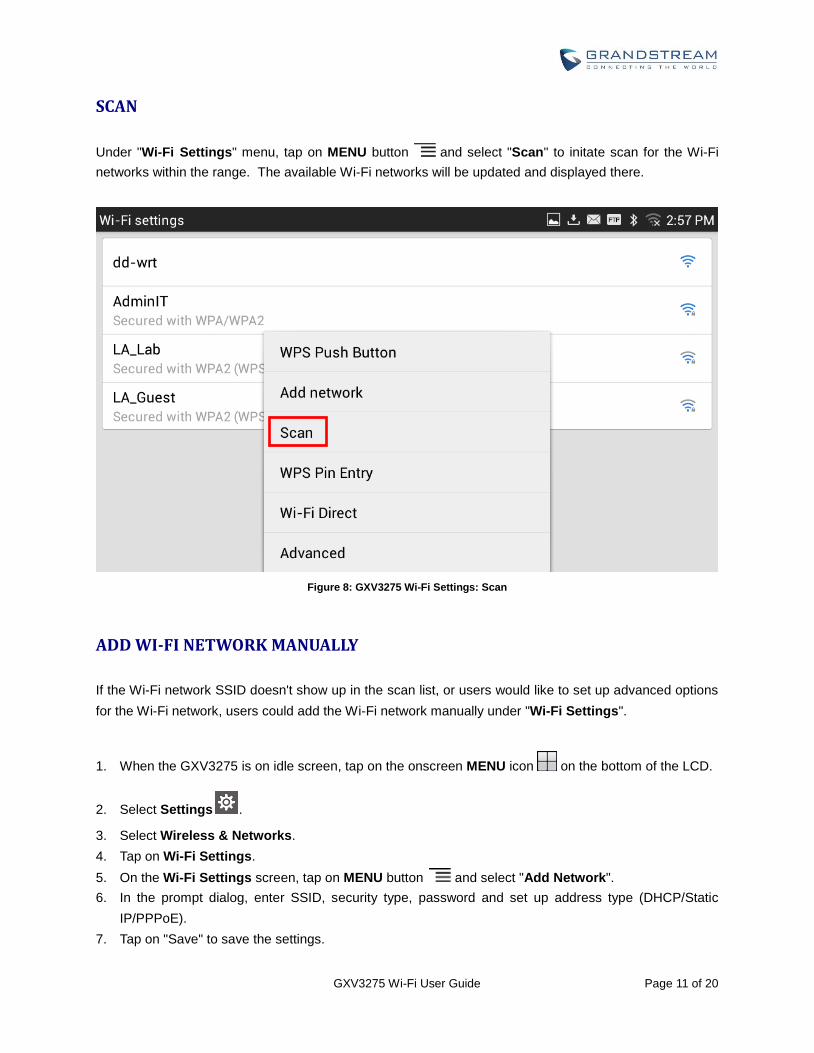
SCAN
Under "Wi-Fi Settings" menu, tap on MENU button and select "Scan" to initate scan for the Wi-Fi
networks within the range. The available Wi-Fi networks will be updated and displayed there.
Figure 8: GXV3275 Wi-Fi Settings: Scan
ADD WI-FI NETWORK MANUALLY
If the Wi-Fi network SSID doesn't show up in the scan list, or users would like to set up advanced options
for the Wi-Fi network, users could add the Wi-Fi network manually under "Wi-Fi Settings".
1. When the GXV3275 is on idle screen, tap on the onscreen MENU icon on the bottom of the LCD.
2. Select Settings .
3. Select Wireless & Networks.
4. Tap on Wi-Fi Settings.
5. On the Wi-Fi Settings screen, tap on MENU button and select "Add Network".
6. In the prompt dialog, enter SSID, security type, password and set up address type (DHCP/Static
IP/PPPoE).
7. Tap on "Save" to save the settings.
GXV3275 Wi-Fi User Guide Page 12 of 20
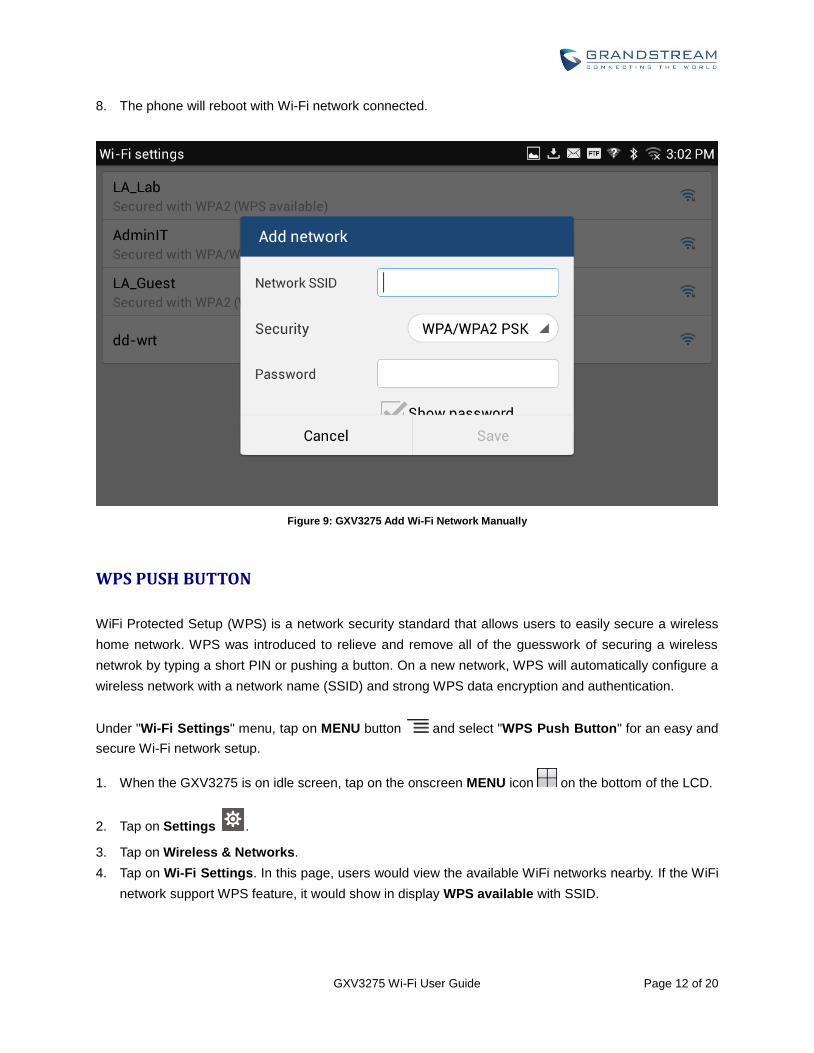
8. The phone will reboot with Wi-Fi network connected.
Figure 9: GXV3275 Add Wi-Fi Network Manually
WPS PUSH BUTTON
WiFi Protected Setup (WPS) is a network security standard that allows users to easily secure a wireless
home network. WPS was introduced to relieve and remove all of the guesswork of securing a wireless
netwrok by typing a short PIN or pushing a button. On a new network, WPS will automatically configure a
wireless network with a network name (SSID) and strong WPS data encryption and authentication.
Under "Wi-Fi Settings" menu, tap on MENU button and select "WPS Push Button" for an easy and
secure Wi-Fi network setup.
1. When the GXV3275 is on idle screen, tap on the onscreen MENU icon on the bottom of the LCD.
2. Tap on Settings .
3. Tap on Wireless & Networks.
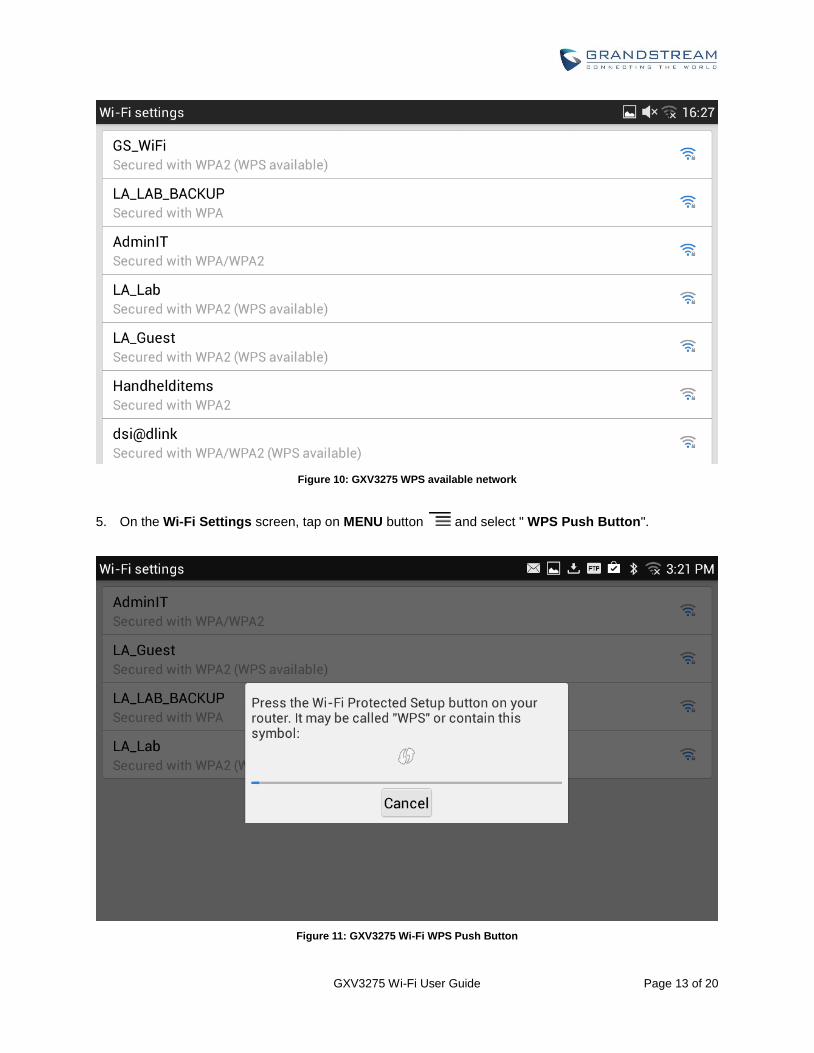
4. Tap on Wi-Fi Settings. In this page, users would view the available WiFi networks nearby. If the WiFi
network support WPS feature, it would show in display WPS available with SSID.
GXV3275 Wi-Fi User Guide Page 13 of 20
Figure 10: GXV3275 WPS available network
5. On the Wi-Fi Settings screen, tap on MENU button and select " WPS Push Button".
Figure 11: GXV3275 Wi-Fi WPS Push Button
GXV3275 Wi-Fi User Guide Page 14 of 20
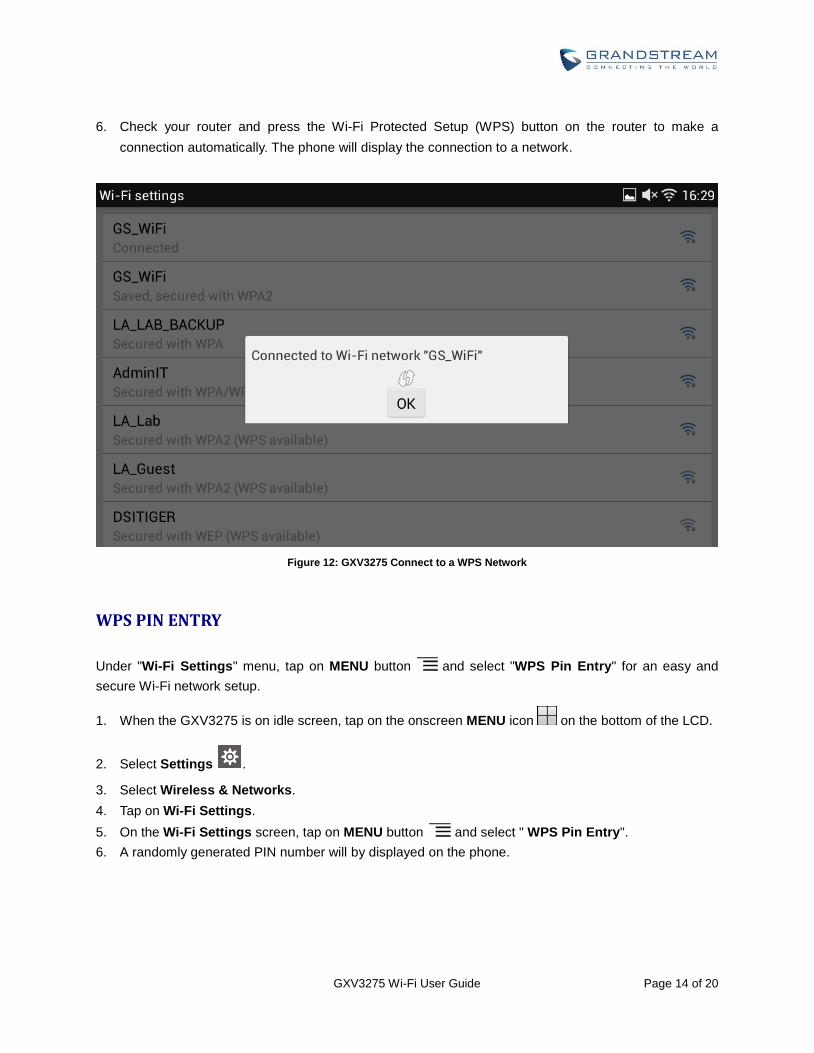
6. Check your router and press the Wi-Fi Protected Setup (WPS) button on the router to make a
connection automatically. The phone will display the connection to a network.
Figure 12: GXV3275 Connect to a WPS Network
WPS PIN ENTRY
Under "Wi-Fi Settings" menu, tap on MENU button and select "WPS Pin Entry" for an easy and
secure Wi-Fi network setup.
1. When the GXV3275 is on idle screen, tap on the onscreen MENU icon on the bottom of the LCD.
2. Select Settings .
3. Select Wireless & Networks.
4. Tap on Wi-Fi Settings.
5. On the Wi-Fi Settings screen, tap on MENU button and select " WPS Pin Entry".
6. A randomly generated PIN number will by displayed on the phone.
GXV3275 Wi-Fi User Guide Page 15 of 20
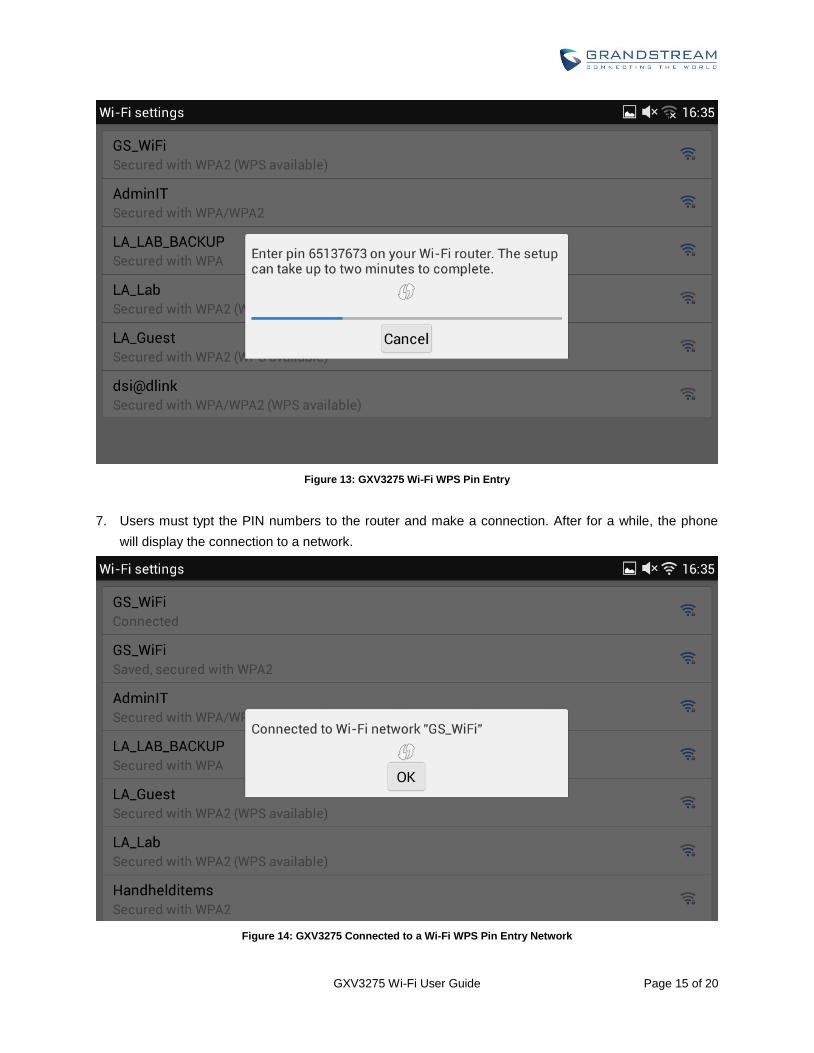
Figure 13: GXV3275 Wi-Fi WPS Pin Entry
7. Users must typt the PIN numbers to the router and make a connection. After for a while, the phone
will display the connection to a network.
Figure 14: GXV3275 Connected to a Wi-Fi WPS Pin Entry Network
GXV3275 Wi-Fi User Guide Page 16 of 20
WI-FI DIRECT
Wi-Fi Direct, initially called Wi-Fi P2P, is a Wi-Fi standard that enables devices to connect easily with
each other without requiring a wireless access point and to communicate at typical Wi-Fi speeds for
everything from file transfer to Internet connectivity. It can reach up to 250 Mbps of data transferring rate.
Under "Wi-Fi Settings" menu, tap on MENU button and select "Wi-Fi Direct". This can be used to
set up peer-to-peer connection between two Wi-Fi Direct devices. To share data and sync files using Wi-
Fi Direct, users must download and install sharing applications (3rd party application) to send/receive files.
To use Wi-Fi Direct:
1. When the GXV3275 is on idle screen, tap on the onscreen MENU icon on the bottom of the LCD.
2. Select Settings .
3. Select Wireless & Networks.
4. Tap on Wi-Fi Settings.
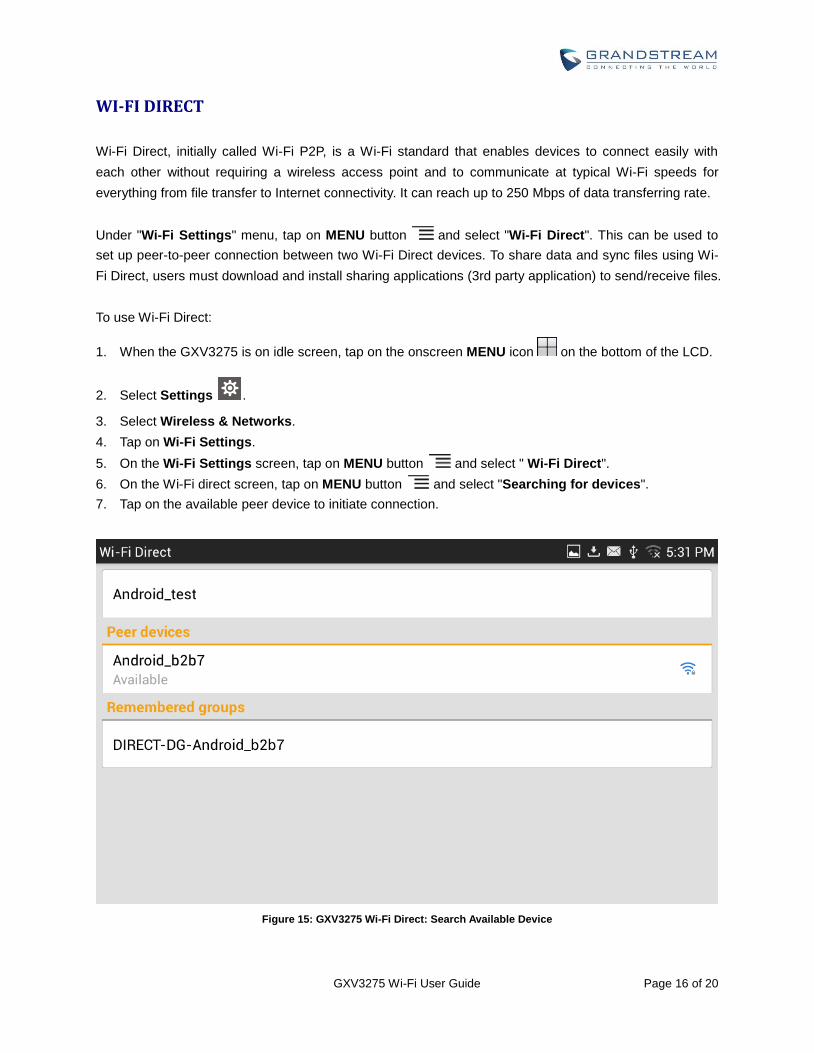
5. On the Wi-Fi Settings screen, tap on MENU button and select " Wi-Fi Direct".
6. On the Wi-Fi direct screen, tap on MENU button and select "Searching for devices".
7. Tap on the available peer device to initiate connection.
Figure 15: GXV3275 Wi-Fi Direct: Search Available Device
GXV3275 Wi-Fi User Guide Page 17 of 20
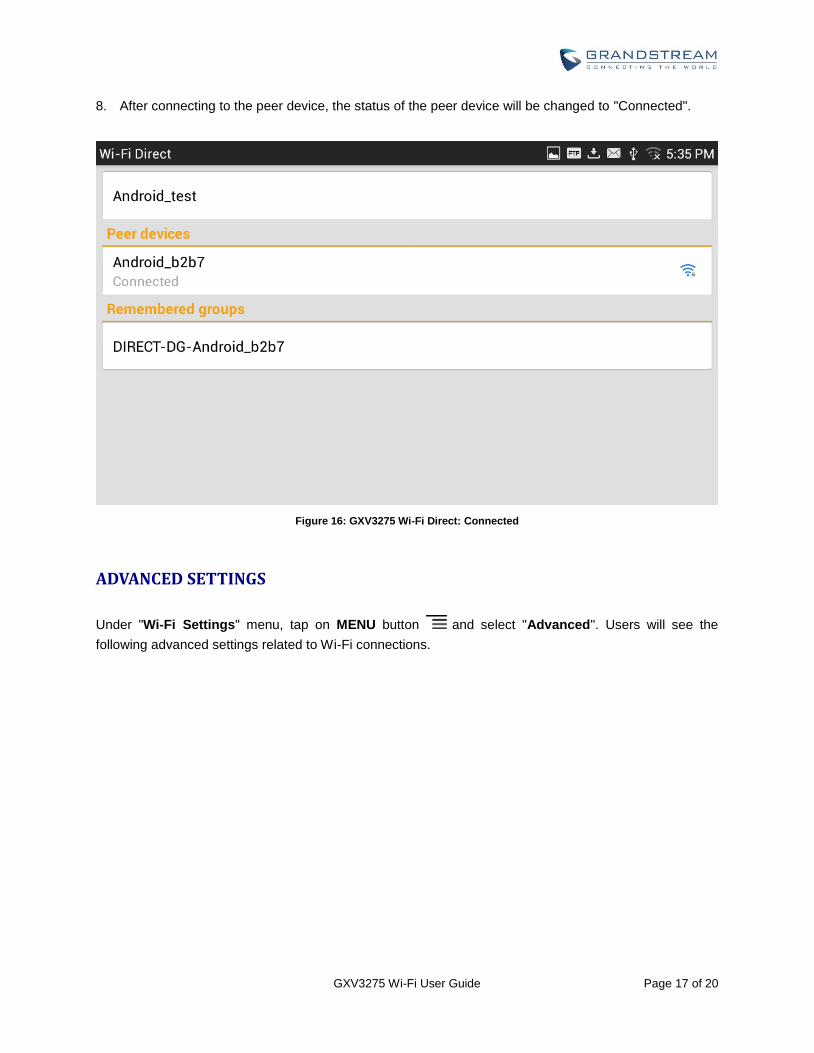
8. After connecting to the peer device, the status of the peer device will be changed to "Connected".
Figure 16: GXV3275 Wi-Fi Direct: Connected
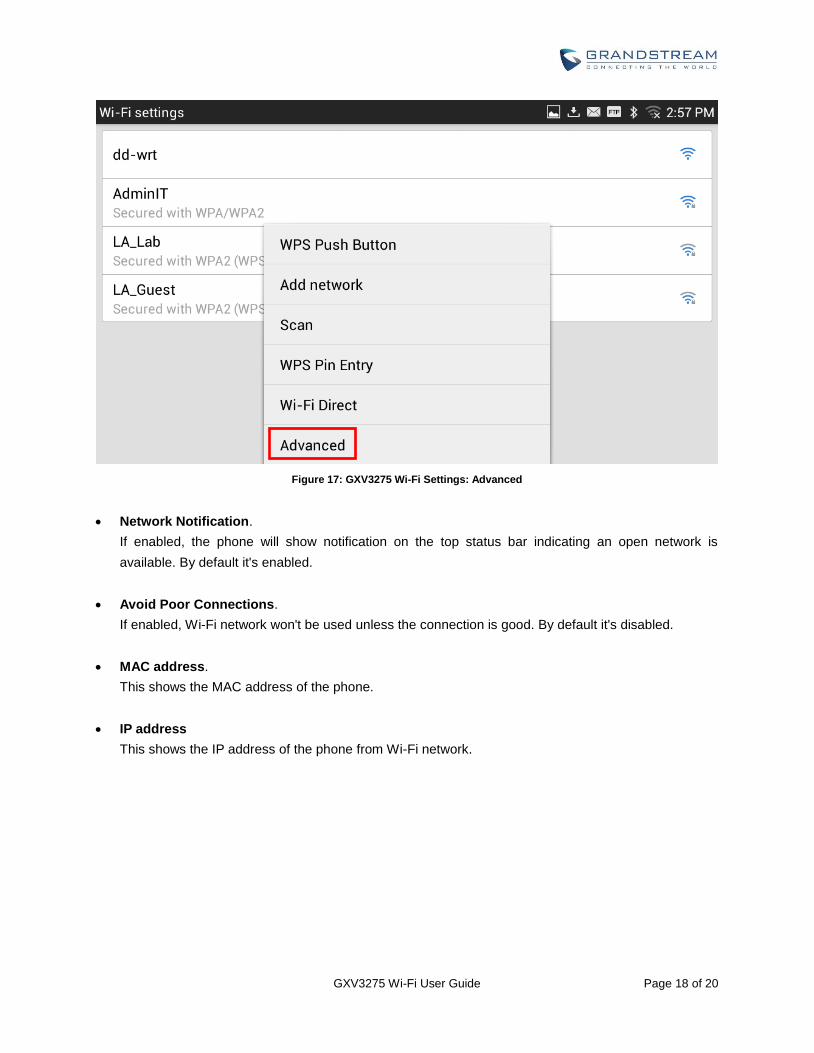
ADVANCED SETTINGS
Under "Wi-Fi Settings" menu, tap on MENU button and select "Advanced". Users will see the
following advanced settings related to Wi-Fi connections.
GXV3275 Wi-Fi User Guide Page 18 of 20
Figure 17: GXV3275 Wi-Fi Settings: Advanced
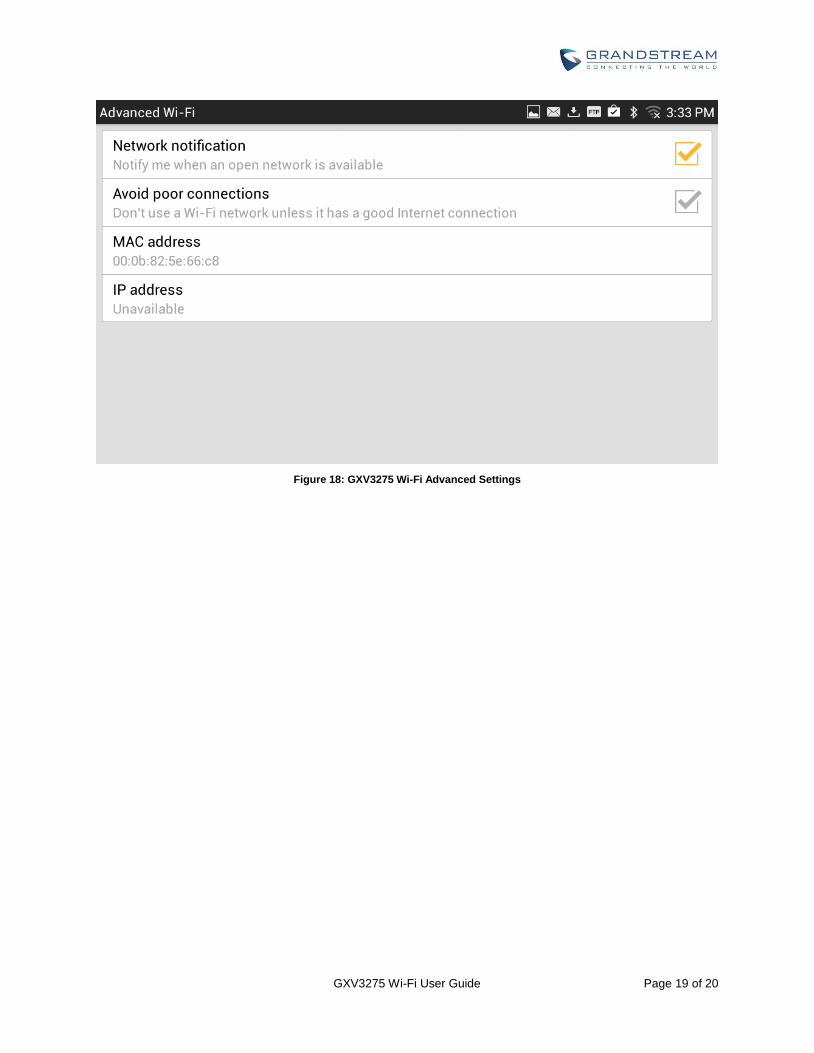
Network Notification.
If enabled, the phone will show notification on the top status bar indicating an open network is
available. By default it's enabled.
Avoid Poor Connections.
If enabled, Wi-Fi network won't be used unless the connection is good. By default it's disabled.
MAC address.
This shows the MAC address of the phone.
IP address
This shows the IP address of the phone from Wi-Fi network.
GXV3275 Wi-Fi User Guide Page 19 of 20
Figure 18: GXV3275 Wi-Fi Advanced Settings
GXV3275 Wi-Fi User Guide Page 20 of 20
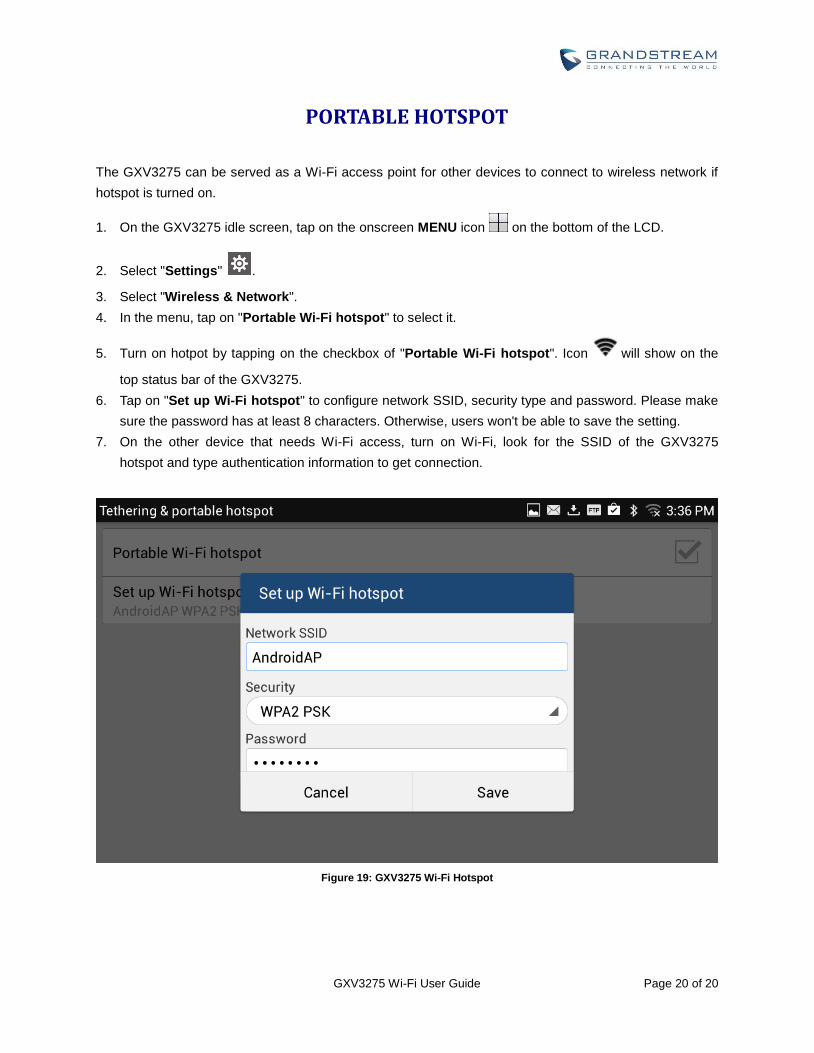
PORTABLE HOTSPOT
The GXV3275 can be served as a Wi-Fi access point for other devices to connect to wireless network if
hotspot is turned on.
1. On the GXV3275 idle screen, tap on the onscreen MENU icon on the bottom of the LCD.
2. Select "Settings" .
3. Select "Wireless & Network".
4. In the menu, tap on "Portable Wi-Fi hotspot" to select it.
5. Turn on hotpot by tapping on the checkbox of "Portable Wi-Fi hotspot". Icon will show on the
top status bar of the GXV3275.
6. Tap on "Set up Wi-Fi hotspot" to configure network SSID, security type and password. Please make
sure the password has at least 8 characters. Otherwise, users won't be able to save the setting.
7. On the other device that needs Wi-Fi access, turn on Wi-Fi, look for the SSID of the GXV3275
hotspot and type authentication information to get connection.
Figure 19: GXV3275 Wi-Fi Hotspot


![Adobe Photoshop PDF...Access Point LLIJtJ Dual Band Wi-Fi Access Point Wi-Fi Access Point tin] Wi-Fi 97 Wi-Fi AUDIOPHILE VIDEOPHILE nnsW01wa0QnnIWãlluunnunnvvao ñ00f-h01sQIfiðŠ](https://img.pdfslide.us/doc/110x75/5f13acbb3777f75a635fee7f/adobe-photoshop-pdf-access-point-llijtj-dual-band-wi-fi-access-point-wi-fi-access.jpg)