Embed Size (px)
Citation preview

GP2X User Guide Version 1.2
Authored by: Guyfawkes Last Updated: December 26, 2005 Homepage: http://www.emuholic.com/
2
Contents
Basic Usage
Page 3 – GP2X Information Page 6 – Setting up your GP2X Page 8 – Using the GP2X for the first time Page 11 – Managing files on the GP2X Page 12 – Installing and loading software Page 15 – Viewing Images Page 17 – Playing Music Page 19 – Viewing Movies Page 21 – Reading E-Books Page 23 – Using Explorer Page 25 – Using the Settings menu Page 28 – Troubleshooting Page 29 – Useful information
Advanced Usage
Page 30 – Installing software updates and firmware flashing Page 32 – Customising the menu graphics Page 33 – Developing for the GP2X introduction
Page 34 – Credits, Thanks and other stuff

3
GP2X Information
Product Name:
* GP2X-F100
General
* Main Processor: MagicEyes MP2520F * CPU: ARM920T - 200 MHz * CoProcessor: ARM940T - 200 MHz * Dimension 143.6mm* 82.9mm*34mm * Mass (w/o batteries): 161g/5.68oz (GP32 NLU: 163g/5.74oz) * RAM: 64Mb * Internal Storage: 64Mb NAND Flash Memory * External Storage: SD Card * Connections: EXTension port, USB 2.0, DC in (3v), Headphone jack. * O/S: Linux * Batteries: 2 x AA * Display: 3.5" TFT LCD * Resolution: 320*240 (QVGA) * TV Output: up to 720*480 with separate S-Video cable.
Video
* Video Codec support: MPEG 1, 2, 3, 4, DivX 3.11, 4.x, 5.x and higher, XviD, WMV (7, 8, 9 Series by 'After Support') * Extension support: AVI, MPG, MPEG * Audio Formats: MP3, OGG, WMA (by 'After Support') * Resolution: MAX 720*480 * Frame Rate: Max 30 fps * Bit Rate: Video Max: 2500Kbps, Audio Max: 384Kbps * Caption: SMI
Audio
* 2 Channel Stereo (L+R) * Frequency Response 20Hz~20KHz * Sampling Rate 16bit/8~48KHz * Supported Formats WMA, OGG, MP3 * 11 Equalizer settings
4
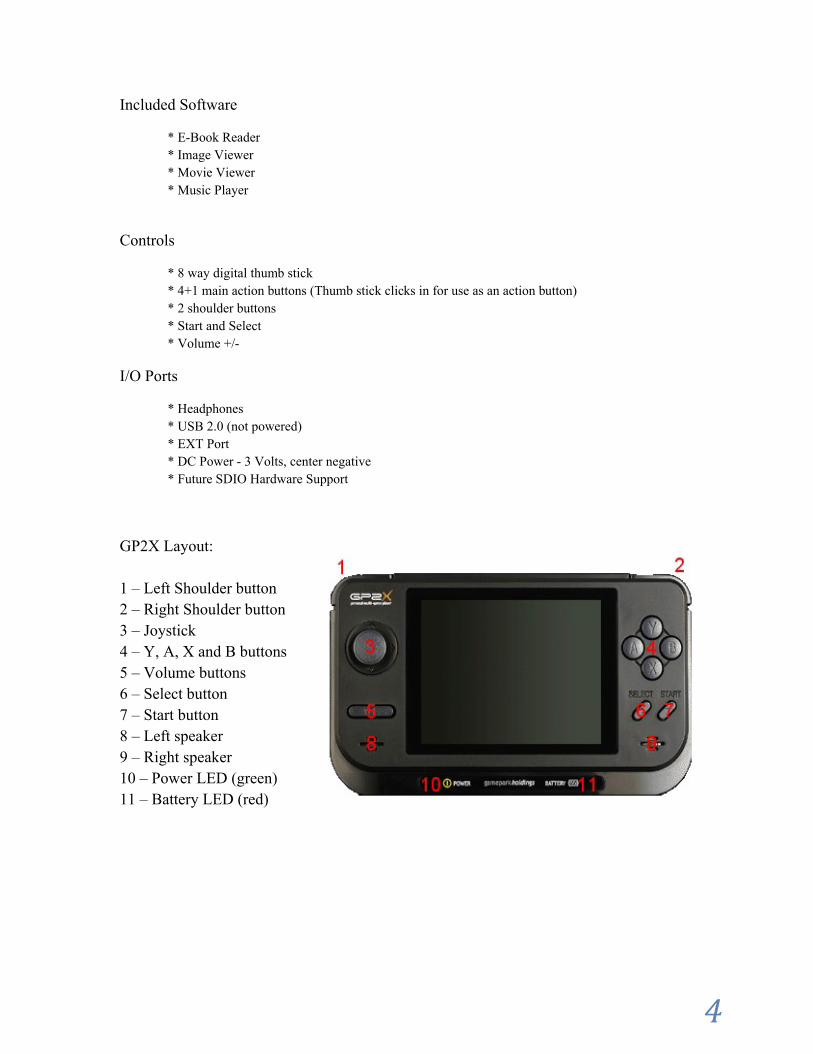
Included Software
* E-Book Reader * Image Viewer * Movie Viewer * Music Player
Controls
* 8 way digital thumb stick * 4+1 main action buttons (Thumb stick clicks in for use as an action button) * 2 shoulder buttons * Start and Select * Volume +/-
I/O Ports
* Headphones * USB 2.0 (not powered) * EXT Port * DC Power - 3 Volts, center negative * Future SDIO Hardware Support
GP2X Layout: 1 – Left Shoulder button 2 – Right Shoulder button 3 – Joystick 4 – Y, A, X and B buttons 5 – Volume buttons 6 – Select button 7 – Start button 8 – Left speaker 9 – Right speaker 10 – Power LED (green) 11 – Battery LED (red)

5
12 – Secure Digital Card slot 13 – Headphone Jack 14 – Battery Cover 15 – DC Power (3 Volts, center negative) 16 – Mini USB socket

6
Setting Up Your GP2X
You should have the following inside your GP2X box:
1x GP2X unit 1x USB cable 1x Screen Protector 1x Pack of 2 AA batteries 1x Korean/English Manual
Fitting the Screen Protector
After unpacking the GP2X you should install the screen protector immediately. Carefully remove the shipping film from the GP2X screen by pulling the Red tag on the top right. Now remove the film from the Screen Protector and ensuring there is no dust on the underside of the Screen Protector and on the GP2X screen carefully place it on the GP2X. The Screen Protector also has a film to protect the screen, using a fingernail or knife, gently unpeel it from a corner of the screen.
Fitting the batteries
The GP2X uses two AA batteries to power the device. To fit these, gently push and slide the marked area on the battery cover found on the back of the GP2X towards you. Insert the batteries the correct way as shown in the battery compartment and then replace the battery cover.

7
Fitting the Secure Digital Card
The GP2X uses a Secure Digital Card (not supplied as standard) as its storage. To install this insert the Secure Digital Card with the back facing you into the Secure Digital Slot found on the top of the GP2X. The notch should be on the bottom right hand side and when inserted you should hear a click to confirm it is correctly inserted. Do not try to force the Secure Digital Card into the slot or you may damage the Card or the GP2X!
Wrong
Correct
Installing the USB Cable
The GP2X can connect to your PC via a USB cable to transfer your games, utilities, movies, music and E-Books. To do this you will require a free USB port on your PC, it is recommended you have a USB 2 port for faster transferring of files but a USB 1 port will work. Locate an unused USB port on your PC and carefully insert the USB connector into it. To connect the USB cable to your GP2X, remove the rubber protection cover and insert the USB cable into the GP2X.
You are now ready to switch on and enjoy the GP2X!
8
Using the GP2X for the first time
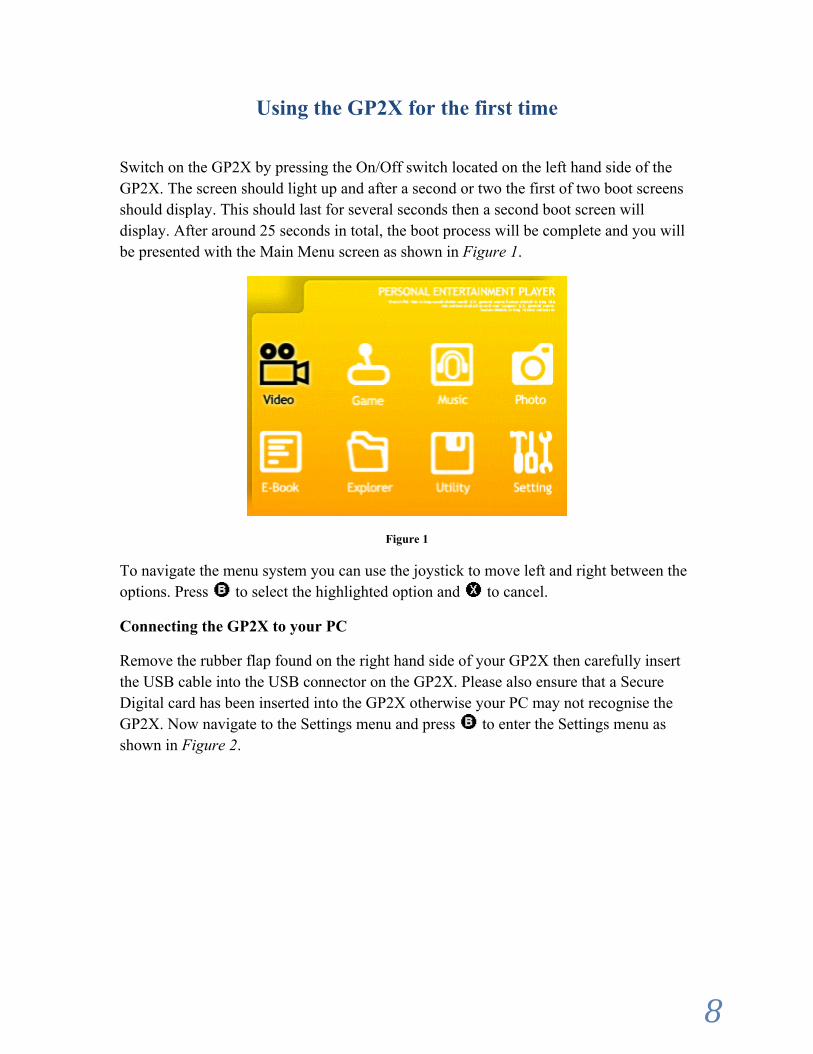
Switch on the GP2X by pressing the On/Off switch located on the left hand side of the GP2X. The screen should light up and after a second or two the first of two boot screens should display. This should last for several seconds then a second boot screen will display. After around 25 seconds in total, the boot process will be complete and you will be presented with the Main Menu screen as shown in Figure 1.
Figure 1
To navigate the menu system you can use the joystick to move left and right between the options. Press to select the highlighted option and to cancel.
Connecting the GP2X to your PC
Remove the rubber flap found on the right hand side of your GP2X then carefully insert the USB cable into the USB connector on the GP2X. Please also ensure that a Secure Digital card has been inserted into the GP2X otherwise your PC may not recognise the GP2X. Now navigate to the Settings menu and press to enter the Settings menu as shown in Figure 2.

9
Figure 2
Now navigate to the USB option and press to select it. The USB Connection screen will appear as in Figure 3.
Figure 3
After a few seconds Windows should report that it has found a new USB device and will start to automatically configure the GP2X as a drive device. Once you are notified that the device is ready to use, open My Computer and locate the new Drive that has been created as shown in Figure 4.

10
Figure 4
In this example the Secure Digital Card is already formatted but if you have a new card you may need to format it for it to be used on the GP2X. To do this right click on the Secure Digital drive (in this example Drive G) and choose Format from the options.
A new window will appear and prompt you for some information. The Capacity will vary between different sizes of Cards; in this example a 256 MB Card is shown. The File System should be set to FAT32 and the Allocation unit size set to Default allocation size. The Volume label is the name of your drive; you may rename this to an easily identifiable name such as GP2X Card. Once you are happy with the settings click on the Start button and the Secure Digital Card will proceed to be formatted.
Once the process is completed you can now begin to transfer files to your GP2X.

11
Managing files on the GP2X
Copying files to your GP2X
Copying files to the GP2X is much like everyday file copying on your hard drive. In the following example we will copy a MP3 to the GP2X.
Connect your GP2X to your PC as shown here. Now select which file you wish to copy to the GP2X by clicking on it once, if you wish to select more files then hold the CTRL button while clicking on a new file to select/deselect it. Once you have chosen your file(s) right click on one of them and choose Copy from the options, next click on the GP2X drive (in our case drive G) and choose Paste from the options. Your files will now be copied to the GP2X, the time it takes depends on the size and number of files you copied.
Deleting files on your GP2X
Again this is the same as performing a deletion of files on your PC. Connect your GP2X to your PC as shown here. Now select which file you wish to delete from the GP2X by clicking on it once, if you wish to select more files then hold the CTRL button while clicking on a new file to select/deselect it. Now press the Delete key on your PC or right click and choose Delete from the options. Your file(s) will now be deleted from the GP2X. You can also perform this task from within the GP2X Explorer, more information here.
Useful Tips
1 - You can create new folders on your Secure Digital Card for the various file types supported on the GP2X. For example: a Games folder to store your games, a Music folder to store your MP3’s or a Video folder to store your videos. This way it is easier to keep track of what is installed on your GP2X and you can manage your files more efficiently.
2 – Never remove your Secure Digital Card or switch off your GP2X while files are being accessed. This can result in the loss or damage of files on your Secure Digital Card.

12
Installing and loading software
Installing the SDL files
The GP2X supports SDL which is a development library for multiple devices and operating systems. Games using SDL may require library files to be installed to the GP2X in order for them to run, you will only need to install these once. You can download the SDL files from the GP2X Archive at http://archive.gp2x.de/
The SDL files are in a Zip archive format so you can simply extract the two files (install_libs.gpu and install_libs.tar.gz) straight to the GP2X drive as you normally would on your PC. Open the file in your preferred .zip extraction program and point it to extract the files to the GP2X drive (in this case the G drive).
Now quit the USB connection screen and return to the main menu. Navigate to the Utility option and press . You will be presented with the Utility Launcher screen as shown in Figure 5.
Figure 5
The two options are described:
NAND Memory – This is the internal memory of the GP2X and only important files such as drivers like the SDL files should be installed to here. The reason is that only 20MB is available for storage so space is more limited than you would get with a Secure Digital Card. SD Memory Card – This is your Secure Digital Card where all data such as games, music and videos are stored.
Please note that you cannot copy files to the NAND Memory via the USB cable. In order to run any software initially you will need a Secure Digital card.
13
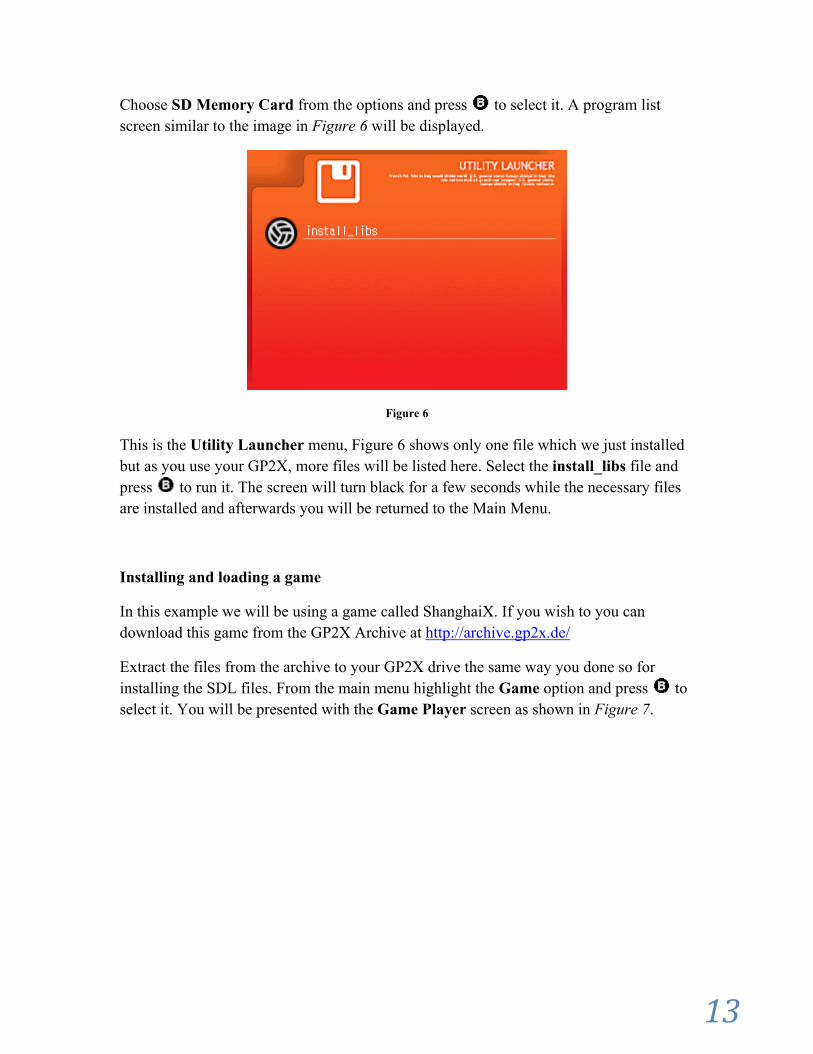
Choose SD Memory Card from the options and press to select it. A program list screen similar to the image in Figure 6 will be displayed.
Figure 6
This is the Utility Launcher menu, Figure 6 shows only one file which we just installed but as you use your GP2X, more files will be listed here. Select the install_libs file and press to run it. The screen will turn black for a few seconds while the necessary files are installed and afterwards you will be returned to the Main Menu.
Installing and loading a game
In this example we will be using a game called ShanghaiX. If you wish to you can download this game from the GP2X Archive at http://archive.gp2x.de/
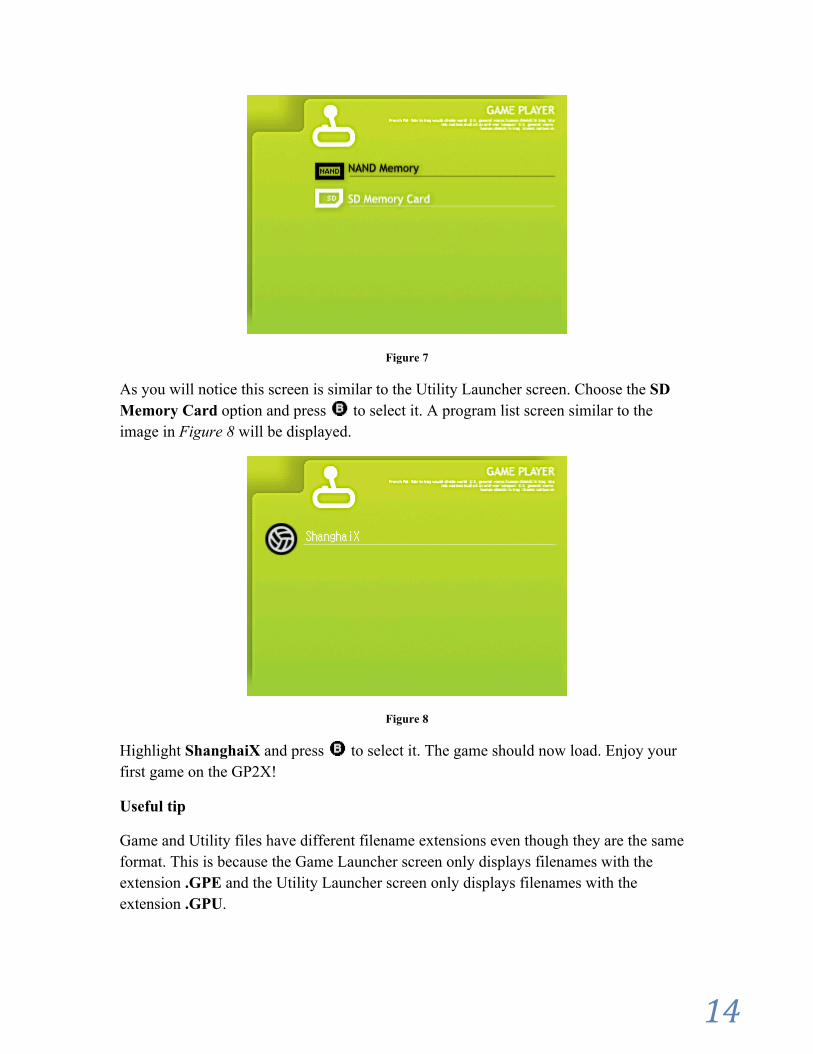
Extract the files from the archive to your GP2X drive the same way you done so for installing the SDL files. From the main menu highlight the Game option and press to select it. You will be presented with the Game Player screen as shown in Figure 7.
14
Figure 7
As you will notice this screen is similar to the Utility Launcher screen. Choose the SD Memory Card option and press to select it. A program list screen similar to the image in Figure 8 will be displayed.
Figure 8
Highlight ShanghaiX and press to select it. The game should now load. Enjoy your first game on the GP2X!
Useful tip
Game and Utility files have different filename extensions even though they are the same format. This is because the Game Launcher screen only displays filenames with the extension .GPE and the Utility Launcher screen only displays filenames with the extension .GPU.

15
Viewing Images
The GP2X can view images that are stored on your Secure Digital Card. The following image formats are supported
JPEG - .jpg extension Bitmap - .bmp extension Graphics Interchange - .gif extension Portable Network Graphics - .png extension
From the Main Menu, choose the Photo option and press to select. You will be presented with the Photo Viewer screen as shown in Figure 9.
Figure 9
Choose the SD Memory Card option and press to select it. An image list screen similar to the image in Figure 10 will be displayed.

16
Figure 10
Highlight the image you wish to view and press to select. After a second or two, depending on the size of the file, your image will be displayed. Pressing the or shoulder buttons on your GP2X will automatically load and display the previous or following image on your Secure Digital Card.
To return to the list of images press the button, and to return to the Main Menu press the button.
Useful tip
The GP2X cannot currently display images larger than 2048x1024 pixels; if the image is larger it may not be displayed. Use a photo editing application to reduce the resolution to 2048x1024 pixels or lower.
17
Playing Music The GP2X can support the following audio formats:
MP3 - .mp3 filename extension OGG - .ogg filename extension
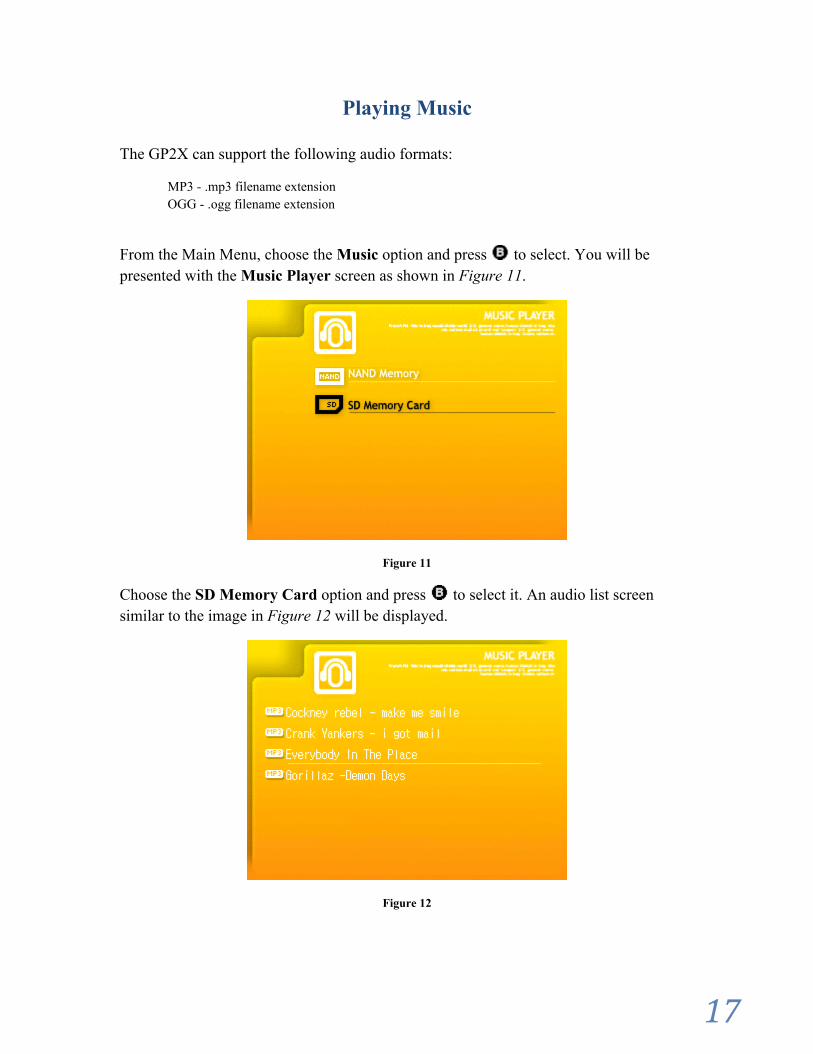
From the Main Menu, choose the Music option and press to select. You will be presented with the Music Player screen as shown in Figure 11.
Figure 11
Choose the SD Memory Card option and press to select it. An audio list screen similar to the image in Figure 12 will be displayed.
Figure 12

18
Choose the song you wish to listen to and press to select. The audio player will then appear and start to play your chosen song as shown in Figure 13.
Figure 13
Pressing will show or hide a series of options for the player. These are:
Previous Track Next Track Skip Backwards Skip Forwards Play Pause Stop Open a new file Equalizer
Use the joystick to change between the options and press to select.
The Equalizer has eleven presets to suit the style of music. These are Normal, Rock, Pop, Jazz, Classic, Dance, Heavy Metal, Disco, Soft, Live 3D and Hall. To change between these highlight the Equalizer option and press to cycle through the presets.
The Volume buttons found on the GP2X can be pressed to increase or decrease the volume in 10 settings. You can also lock the buttons and turn the screen off and on by pressing to save battery life and also avoid unnecessary button pressing.
To exit the Music Player press twice to return to the file list screen or press to return to the Main Menu.
19
Viewing Movies
The GP2X can support the following file formats:
AVI – XVid
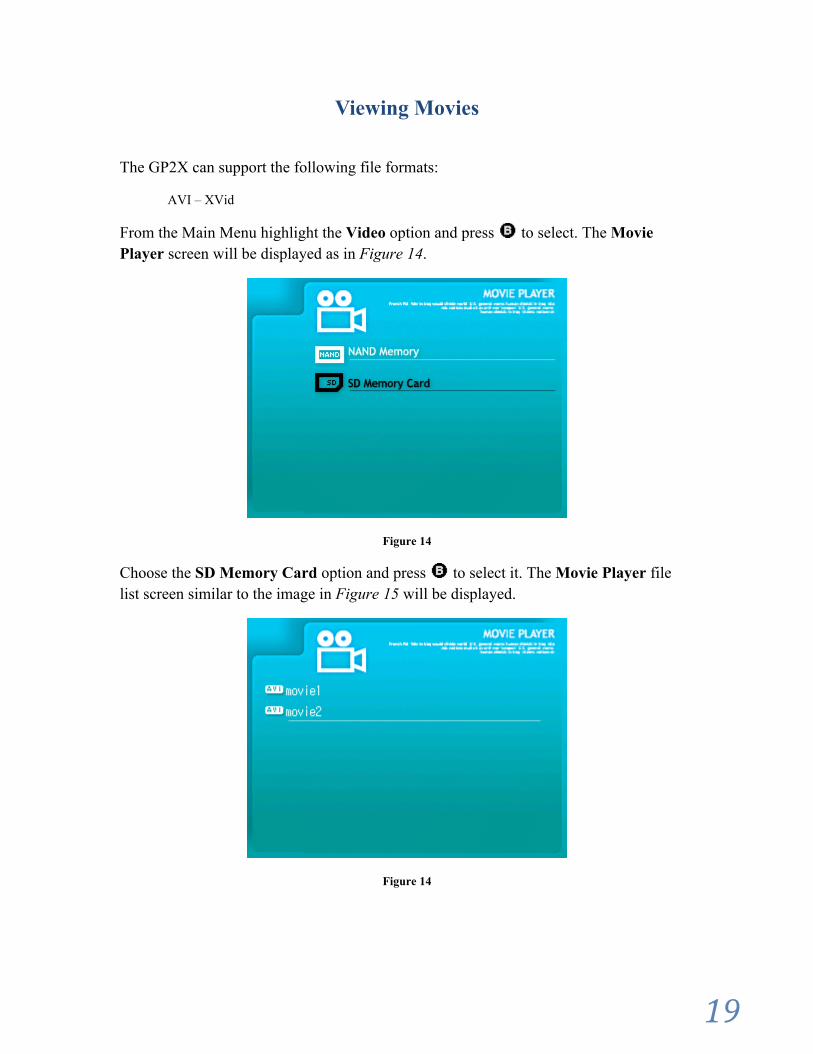
From the Main Menu highlight the Video option and press to select. The Movie Player screen will be displayed as in Figure 14.
Figure 14
Choose the SD Memory Card option and press to select it. The Movie Player file list screen similar to the image in Figure 15 will be displayed.
Figure 14

20
Highlight the video you wish to view and press to select. A message will display that your video is being loaded and then after a second or two your chosen video will start to play.
Pressing will show or hide a series of options for the player.
These are:
Previous Video Next Video Skip Backwards Skip Forwards Play Pause Stop Open a new file
Use the joystick to change between the options and press to select. The Volume buttons found on the GP2X can be pressed to increase or decrease the volume in 10 settings. To exit the Video Player press to return to the file list screen or press to return to the Main Menu.

21
Reading E-Books
The GP2X can read E-Books in the .TXT format. Word wrapping should be disabled to ensure the best format to view the E-Book as currently the GP2X E-Book viewer can only display 54 characters per line instead of the usual 80 characters per line.
From the Main Menu highlight the E-Book options and press to select. The E-Book Viewer screen will be displayed as in Figure 16.
Figure 16
Choose the SD Memory Card option and press to select it. An E-Book file list screen similar to the image in Figure 17 will be displayed.
Figure 17

22
Highlight the E-Book you wish to view and press to select. Your chosen E-Book will be loaded and displayed similar to what is shown in Figure 18.
Figure 18
The following controls are available to use when reading an E-Book:
– Scroll the page one line up – Scroll the page one line down – Scroll the page one page up – Scroll the page one page down
– Return to the E-Book file list screen – Return to Main Menu
The E-Book viewer has an automatic bookmark feature that will save the current page number if you exit the E-Book viewer or switch off your GP2X.

23
Using Explorer
The GP2X has a built in File Explorer that allows you to view folders and files on your Secure Digital Card.
From the Main Menu highlight the E-Book options and press to select. The Explorer screen will be displayed as in Figure 19.
Figure 19
Choose the SD Memory Card option and press to select it. An Explorer file list screen similar to the image in Figure 20 will be displayed.
Figure 20
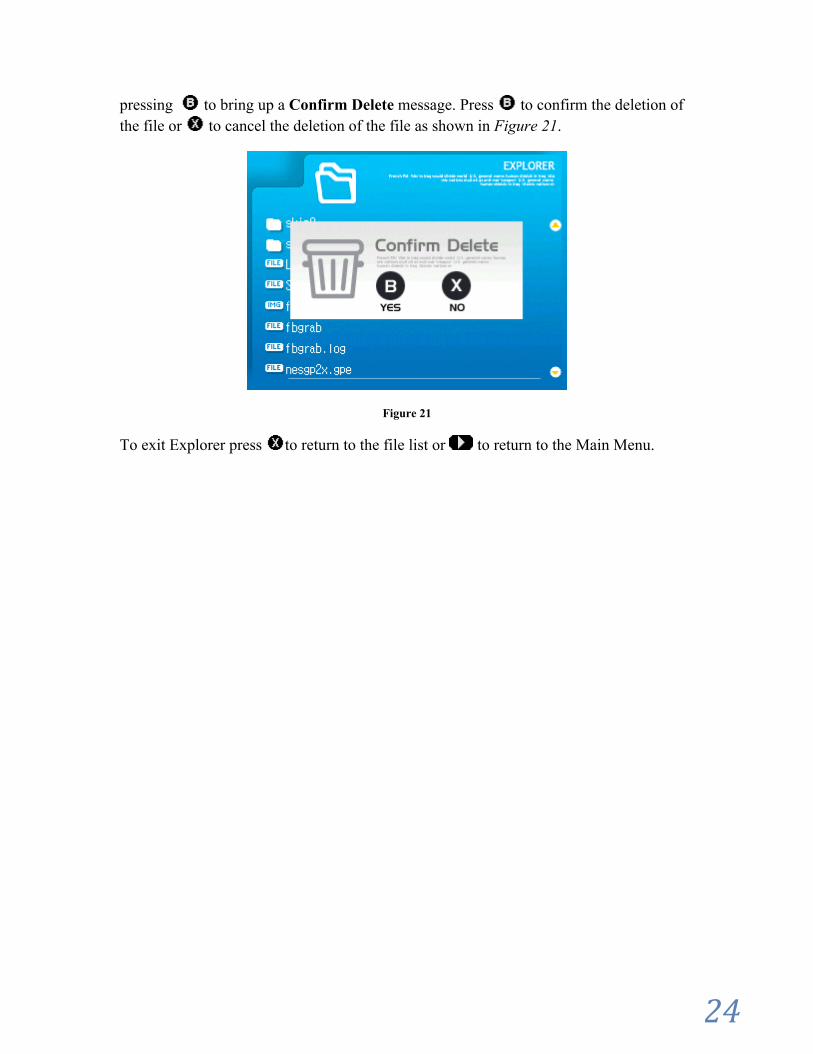
Use the joystick to navigate through the folders and files. To view a folder press and to exit the folder press . You can also delete files one at a time by choosing a file and
24
pressing to bring up a Confirm Delete message. Press to confirm the deletion of the file or to cancel the deletion of the file as shown in Figure 21.
Figure 21
To exit Explorer press to return to the file list or to return to the Main Menu.

25
Using the Settings menu
From the Main Menu highlight the Setting option and press to select. The Settings screen will be displayed as in Figure 22.
Figure 22
Five options are available to choose from, these are:
T-Mode – A diagnostic tool for your GP2X Battery – Shows the battery level USB – Connects the GP2X to your PC TV-Out – Activate the TV-Out feature Info – Provides some information on your GP2X.
T-Mode
This allows you to make some basic tests on your GP2X. There are seven screens in total, to change screen press and at the same time.
Screen 1 – Shows the manufacturer date, firmware revision and your GP2X serial number. Screen 2 – Shows a joystick and button test. You can press any of the joystick directions and buttons to check they are working.
26
Screens 3 to 7 – Displays black, white, red, green and blue backgrounds to check the colour display on the screen and any possible dead pixels.
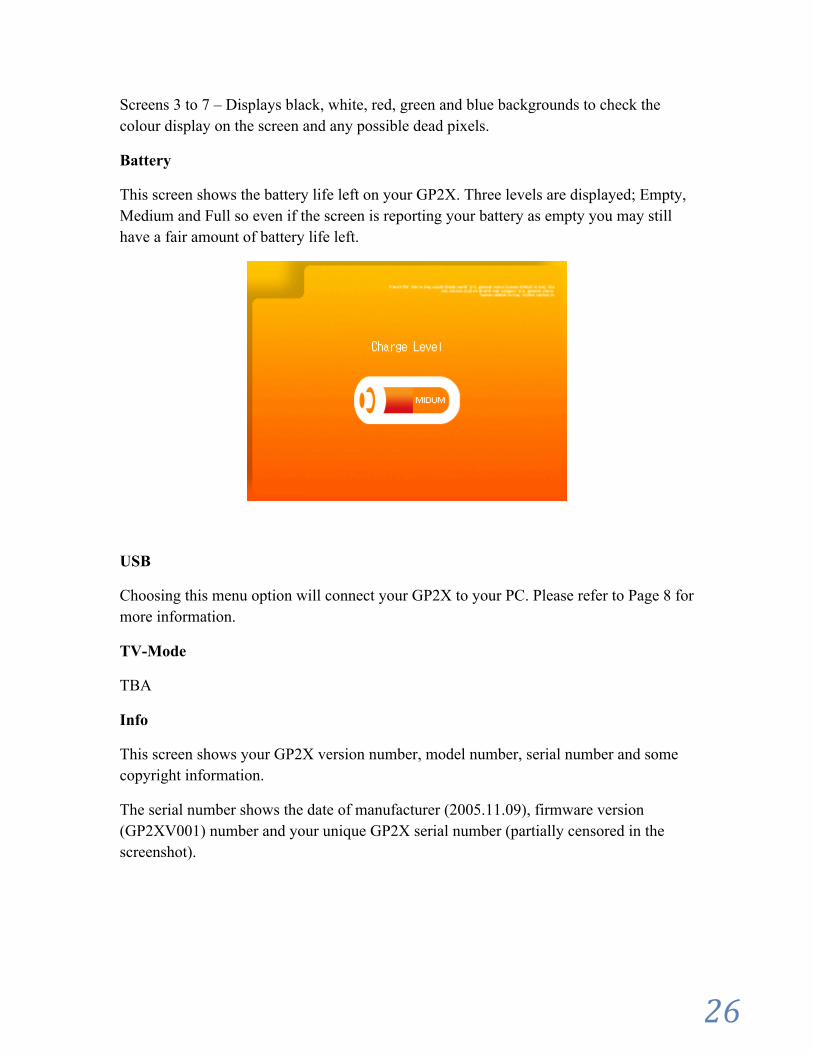
Battery
This screen shows the battery life left on your GP2X. Three levels are displayed; Empty, Medium and Full so even if the screen is reporting your battery as empty you may still have a fair amount of battery life left.
USB
Choosing this menu option will connect your GP2X to your PC. Please refer to Page 8 for more information.
TV-Mode
TBA
Info
This screen shows your GP2X version number, model number, serial number and some copyright information.
The serial number shows the date of manufacturer (2005.11.09), firmware version (GP2XV001) number and your unique GP2X serial number (partially censored in the screenshot).

27
28
Troubleshooting
GP2X does not switch on Check that you have correctly inserted the batteries and that they have not run out of power.
GP2X displays random coloured lines when switched on or during use Check that your batteries have not run out of power. Use a fresh pair of batteries and try again.
USB is not found or does not connect - Ensure that the cable is fully inserted into both your PC USB port and your GP2X - Check that the Secure Digital card is correctly inserted into the GP2X as described here. A Secure Digital card is required for the PC to recognise the GP2X. - If your PC does not find your GP2X when connected to the USB, try removing all other USB devices and then rebooting your PC. Now connect your GP2X to your PC as shown here. If your GP2X is found by your PC you can now reconnect your other USB devices.
Secure Digital card cannot be accessed on the GP2X - Check that the Secure Digital card is correctly inserted into the GP2X as described here. - Ensure that you have the correct files on your Secure Digital card, for example if trying to watch a Video that there is at least one .avi file present on your card. Use the Explorer menu to check properly. - Check that your Secure Digital card is properly formatted as described here.
Firmware update does not show the message box - This is a known problem and will be fixed in a future update. This happening means that your GP2X firmware cannot currently be updated. You can download a Firmware Updater (currently v1.1.0) at http://archive.gp2x.de/ which will update your GP2X a second way.

29
Useful Information
GP2X News Sites (English)
Emuholic - http://emuholic.emuboards.com/ – Official homepage for the GP2X User Guide and we also post the latest handheld news for GP2X, GP32, GBA, DS, PSP and the Zodiac. GP32X - http://www.gp32x.com/ – Latest news for the GP32 and GP2X. GP2X Emulation - http://gp2x-emulation.dcemu.co.uk/ – News for the GP2X. My GP2X - http://www.mygp2x.com/ - Blog style news for the GP2X. GP2X User - http://www.gp2xuser.com/ - News for the GP2X
GP2X News Sites (Non English)
GP32Spain - http://www.gp32spain.com/ - Spanish GP2X and GP32 news. GP2X.de - http://www.gp2x.de/ - German GP2X news. GP2Xfr - http://www.gp2xfr.info/ - French GP2X news. GPain - http://www.gpain.com/ - Korean GP2X news. GP2Mania - http://gp2mania.com/ - Korean GP2X news.
GP2X Resources
GP2X Archive - http://archive.gp2x.de/ - The one stop site for all GP2X releases. PD Roms - http://pdroms.de/ - Archive for GP2X releases. GP2X Wiki - http://wiki.gp2x.org/ - Wiki for the GP2X GP2X.Letter - http://news.gp2x.info/ - Newsletter for the GP2X.
GP2X Stores
GBAX – http://www.gbax.com/ GP32Z – http://www.gp32z.com/ GP2X.de - http://shop.gp2x.de/
GP2X Developer Homepages
TBA
IRC Channels
#GP2X on EFNet - irc://irc.efnet.org/gp2x – General chat for GP2X #GP2XDEV on EFNet - irc://irc.efnet.org/gp2xdev – Development chat for GP2X

30
Installing software updates and firmware flashing
Important Note: Before proceeding you should be aware that flashing your GP2X firmware can go wrong so please be careful when doing so. You will need either a fresh pair of batteries or a trusted power adaptor, this is vital as batteries running out during the flashing process can leave you with an incomplete flashed firmware which may leave your GP2X unusable. We take no responsibility for any damage caused when performing a firmware update and you do so at your own risk.
Firmware flashing
Download the latest firmware update from http://archive.gp2x.de/ in the Firmware section. In this example we are using the Firmware v1.1.0 released on 23rd December 2005. Using your preferred archive extraction tool, open the file gp2x-4th_update-051222.zip and extract all the files to your Secure Digital card.
There should be eight files on your Secure Digital card:
charset.tar.gz EBookViewer gp2xkernel.img mplayer MusicPlayer patch20051216.gpu profile version
If these files are not present on your Secure Digital card check that the gp2x-4th_update-051222.zip file has the above files and extract them again to the Secure Digital card.
Double check that your batteries are fully charged or your power adaptor is connected and that all files are present on the Secure Digital card. When you have done so, switch on the GP2X and wait for a message to appear that your firmware has been updated. Do NOT switch off your GP2X or remove the Secure Digital card at this time as it may result in an incomplete firmware flash and break your GP2X.
After the firmware updated message has appeared you can now continue and the GP2X should now be using the new firmware. You can check by viewing the Info screen and reading the version number.
Installing the software patches
The GP2X uses applications much like a PC would. These applications occasionally need to be updated to fix any bugs or to provide new features.

31
If you already performed the above firmware flash, the necessary files to perform the software update will already be installed on your GP2X. From the Main Menu, highlight the Utility menu and press to select. Choose SD Memory Card from the options and press to select it, a program list screen will be shown. In the case of the v1.1.0 update the file you need to run is patch200511216.gpu, locate this on your card and press to load it.
The screen will display a black colour for a few seconds while the software update is being performed. Do NOT switch off your GP2X or remove the Secure Digital card at this time as it may result in an incomplete software update.
When the update has completed you will be returned to the Main Menu, it is now safe to delete the firmware and software update files from your Secure Digital card.
Useful tip - Never download or install a firmware update from an untrusted source. The update may be fake and damage your GP2X. If you are unsure, ask on one of the forums before installing. The GP2X Archive at http://archive.gp2x.de/ is a trusted site but you should always check beforehand. - If you are unable to upgrade your firmware due to the SD Card bug which prevents the firmware being updated. You can download a Firmware Updater (currently v1.1.0) from http://archive.gp2x.de/ in the Firmware section which will update your GP2X a second way.
32
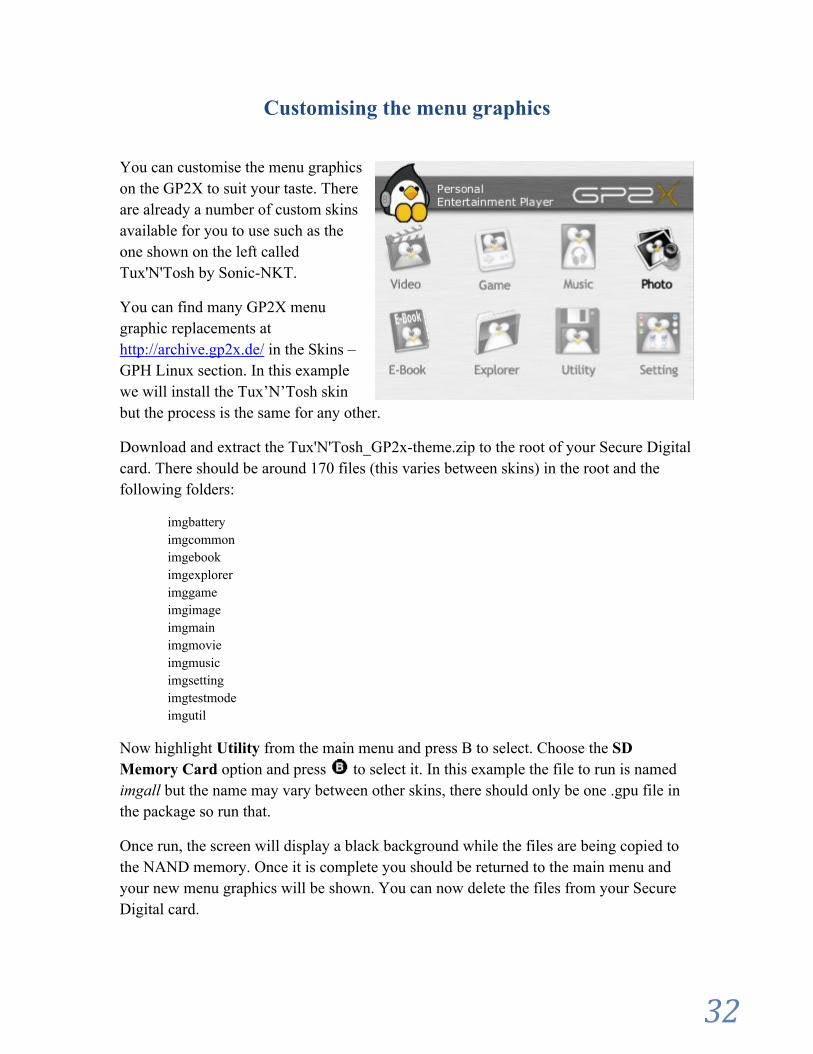
Customising the menu graphics
You can customise the menu graphics on the GP2X to suit your taste. There are already a number of custom skins available for you to use such as the one shown on the left called Tux'N'Tosh by Sonic-NKT.
You can find many GP2X menu graphic replacements at http://archive.gp2x.de/ in the Skins – GPH Linux section. In this example we will install the Tux’N’Tosh skin but the process is the same for any other.
Download and extract the Tux'N'Tosh_GP2x-theme.zip to the root of your Secure Digital card. There should be around 170 files (this varies between skins) in the root and the following folders:
imgbattery imgcommon imgebook imgexplorer imggame imgimage imgmain imgmovie imgmusic imgsetting imgtestmode imgutil
Now highlight Utility from the main menu and press B to select. Choose the SD Memory Card option and press to select it. In this example the file to run is named imgall but the name may vary between other skins, there should only be one .gpu file in the package so run that.
Once run, the screen will display a black background while the files are being copied to the NAND memory. Once it is complete you should be returned to the main menu and your new menu graphics will be shown. You can now delete the files from your Secure Digital card.

33
Developing for the GP2X introduction
Note: Things are always changing in the development scene so this guide may not be fully accurate or even useful.
First download DevkitGP2X from http://archive.gp2x.de/ in the Development Utilities section. Run the file that was downloaded and install it to c:\devkitgp2x\. You will also need MinSys installed which you can download from http://www.devkitpro.org/. Don’t forget to include the PATHs for your devkitgp2x/bin/, devkitgp2x/include and MinSys folders.
Next download theoddbot’s GP2X SDL libraries from http://www.emuholic.com/theoddbot-libs-open2x-soft-float-beta2.tar.gz. Extract this file to a temporary location on your PC. Now locate the extracted folder and follow the folders until you get to the \theoddbot-libs-open2x-soft-float\usr\ folder. Now select and copy all the folders as follows:
bin etc include info lib main share
Now go to your c:\devkitgp2x\ folder and paste the above folders. You will be asked if it is OK to overwrite some folders, choose Yes for all of these prompts.
Now download http://www.emuholic.com/arm-linux-sdl-config.rar and extract this file to the c:\devkitgp2x\bin\ folder.
I have provided a SDL Test Program project for you to test your development setup; you can download it at http://archive.gp2x.de/cgi-bin/cfiles.cgi?0,0,0,0,46,1047. Extract this file to a folder on your PC and from the command prompt type ‘make’ and press return.
The demo project should now start to compile and after a few seconds will finish. You should now have a new file named sdltest.gpe, copy this file and the /sdltest/ folder the root folder of your GP2X and from the Game menu select ‘sdltest’. After a few seconds while the program loads a menu containing the tests should appear.
If you have problems relating to executables not being found you may need to update your PATHS list. You will need paths to c:\devkitGP2x\bin\ and c:\msys\bin\. You can find information on how to do this at http://www.devkitpro.org/setup.shtml.

34
Credits, Thanks and other stuff
Credits
Guyfawkes – GP2X User Guide. All content not credited below. GP2X Wiki – GP2X Specifications
Thanks to
Efegea – for his very useful screen grab tool. Soyburg and Overjupiter – Corrections to the user guide. Igboo, David Flores, Tony Cardine – Additions to the user guide. rhk – his makefile for the demo project. Sonic-NKT – Screenshot from his Tux'N'Tosh_GP2x-theme
Other Stuff
If you notice any mistakes in the guide or have a suggestion on a new section to add please contact me by email at [email protected] (remove NOSPAM) or on IRC - EFNet #gp2xdev.
This guide may be freely distributed provided it is not edited in any way and it is not sold for a profit. Stores selling the GP2X may include this PDF on their own demo CD/DVD or include a printed version.
If you are going to mirror this guide on your own website please ensure that the latest version is always used as the latest guide may contain important changes not found in an earlier version. The latest version can always be found here.
Translated versions of this guide will be available shortly. We currently have German, Spanish, French and Dutch versions planned. If you would like to translate to another language please contact me at [email protected] (remove NOSPAM).


![Smi cop8[1]](https://img.pdfslide.us/doc/110x75/54959009b47959146b8b4599/smi-cop81.jpg)