Embed Size (px)
Citation preview
Glitch2
User GuideVersion 2.1
Glitch v2.1 User Guide Page 1 of 32 http://illformed.com
G
Table of ContentsSystem Requirements.....................................................................................................4
Windows...............................................................................................................................................4Mac.......................................................................................................................................................4Linux.....................................................................................................................................................4
How To Install...................................................................................................................5Preparation..........................................................................................................................................5Important Steps Before Upgrading..................................................................................................5
Windows..........................................................................................................................................5Mac..................................................................................................................................................5
Windows Installation..........................................................................................................................6Mac Installation...................................................................................................................................7Linux Installation................................................................................................................................8Final Steps............................................................................................................................................8
User Interface..................................................................................................................9Overview..............................................................................................................................................9Common Control Types...................................................................................................................10Top Section........................................................................................................................................11
Logo...............................................................................................................................................11About Box & Plug-in Preferences..............................................................................................11Program Controls........................................................................................................................11Master Output Controls..............................................................................................................12
Middle Section..................................................................................................................................13Scene Controls.............................................................................................................................13Effect Controls..............................................................................................................................14Sequence Controls......................................................................................................................14Sequencer.....................................................................................................................................16
Bottom Section.................................................................................................................................17Workflow........................................................................................................................17
Banks, Programs & Scenes..............................................................................................................17What is a bank?............................................................................................................................17What is a program?......................................................................................................................17What is a scene?...........................................................................................................................17
How to automate Program changes..............................................................................................18How to automate Scene changes...................................................................................................18How to configure audio and MIDI routing....................................................................................18Guides & Tutorials............................................................................................................................18
Effect Modules...............................................................................................................19Common Functions..........................................................................................................................19Common Filter Controls..................................................................................................................19Common Mixer Controls.................................................................................................................20Common Timing Controls...............................................................................................................20Randomizer.......................................................................................................................................21Modulator..........................................................................................................................................22Tape Stop...........................................................................................................................................23
Glitch v2.1 User Guide Page 2 of 32 http://illformed.com

Retrigger............................................................................................................................................24Reverser.............................................................................................................................................25Stretcher............................................................................................................................................26Lofi......................................................................................................................................................27Distortion...........................................................................................................................................28Gater...................................................................................................................................................29Delay...................................................................................................................................................30Shuffler...............................................................................................................................................31
Additional Credits..........................................................................................................32
Glitch v2.1 User Guide Page 3 of 32 http://illformed.com
System RequirementsGlitch is a stereo audio effect plug-in that must be loaded into a suitable host with support forVST 2.4 or Audio Unit 2 effect plug-ins.
To take full advantage of Glitch's features, the host should also support the ability to routeMIDI note data into effect plug-ins.
Any modern “DAW” (Digital Audio Workstation) with a sequencer time line and transportcontrols should be fine, but please thoroughly test the demo version of Glitch first to ensureproper compatibility with your preferred host.
Windows• Any sequencer host with support for VST 2.4 effect plug-ins.
• Windows XP SP2, Vista, 7, or higher.
• 1024 x 768 or higher resolution.
• Any CPU with SSE2.
Mac• Any sequencer host with support for VST 2.4 or Audio Unit 2 effect plug-ins.
• Mac OS X 10.6 or higher.
• 1024 x 768 or higher resolution.
• Intel CPU.
Linux• Any sequencer host with support for VST 2.4 effect plug-ins.
• Linux with GCC 4.X libs (ex: Ubuntu 12.04 or newer), X.org 7.1+.
• A real-time kernel is recommended.
• 1024 x 768 or higher resolution.
• Any CPU with SSE2.
Glitch v2.1 User Guide Page 4 of 32 http://illformed.com
How To InstallPreparationVisit http://illformed.com/glitch/ to download Glitch for your chosen operating system.
You should now have a standard ZIP file located in your downloads folder. The file name willvary based on your chosen version and operating system. For example:
• Glitch_2_1_0_Windows_Demo.zip
• Glitch_2_1_0_Mac_Registered.zip
Important Steps Before UpgradingIf you are upgrading to a newer version of Glitch, or upgrading the demo version to the fullregistered version, it is strongly recommended that you completely delete the previousversion from your system before installing the new version.
i Note: There is no way to unlock or activate the demo version. You must simply delete the demo and install the full version instead.
Windows• Using Windows Explorer, navigate to your VST plug-ins folder.
• Delete the files Glitch2.dll and Glitch2.res
• Repeat for both the 32-bit and 64-bit versions, if both are installed.
• Empty the Recycle Bin to permanently delete the files.
• Load your DAW and perform a plug-in rescan to confirm that Glitch is gone.
• Proceed to install the new version of Glitch as usual.
Mac• Using Finder, navigate to: Macintosh HD > Library > Audio > Plug-Ins
• Enter the VST folder and delete the file Glitch2.vst
• Enter the Components folder and delete the file Glitch2.component
• Empty the Trash Can to permanently delete the files.
• Load your DAW and perform a plug-in rescan to confirm that Glitch is gone.
• Proceed to install the new version of Glitch as usual.
Glitch v2.1 User Guide Page 5 of 32 http://illformed.com
Windows Installation
Open the ZIP file
Using Windows Explorer, double-click the ZIP file to open it. You should see the followingitems inside:
• Glitch2_32bit
• Glitch2_64bit
• Glitch2_Presets
Copy the plug-in files to your VST plug-ins folder
Copy the entire Glitch2_32bit folder into your 32-bit VST plug-ins folder.
Copy the entire Glitch2_64bit folder into your 64-bit VST plug-ins folder.
If you don't know the exact location of your VST plug-ins folder, please refer to your DAW'suser guide or options screen for more information.
Some common locations include:
• C:\Program Files\Steinberg\VstPlugins\
• C:\Program Files\Common Files\Steinberg\VST2\
Optional: Copy the preset files to your Documents folder
Copy the entire Glitch2_Presets folder to a common location that can be easily accessed,such as your Documents folder.
Glitch v2.1 User Guide Page 6 of 32 http://illformed.com
Mac Installation
Open the ZIP file
Using Finder, double-click the ZIP file to open it. A new folder with the same name should beautomatically created for you, containing the following items:
• Glitch2.component
• Glitch2.vst
• Glitch2_Presets
Copy the plug-in files to your plug-in Library
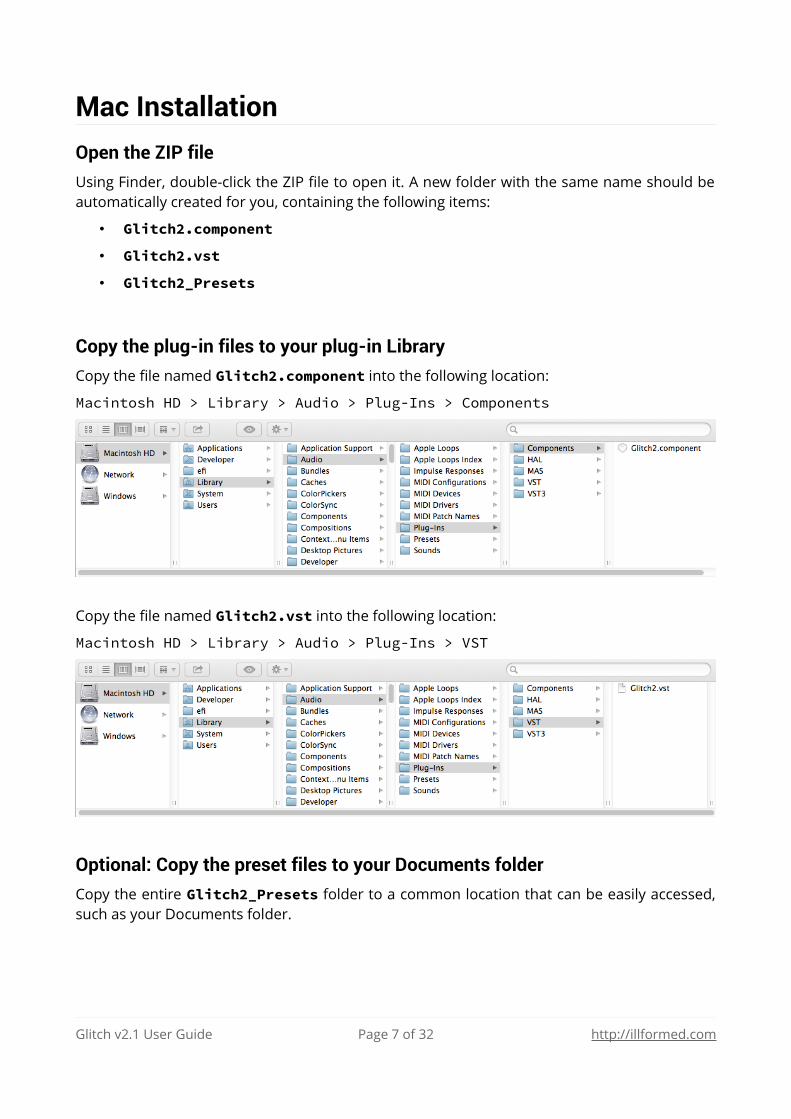
Copy the file named Glitch2.component into the following location:
Macintosh HD > Library > Audio > Plug-Ins > Components
Copy the file named Glitch2.vst into the following location:
Macintosh HD > Library > Audio > Plug-Ins > VST
Optional: Copy the preset files to your Documents folder
Copy the entire Glitch2_Presets folder to a common location that can be easily accessed,such as your Documents folder.
Glitch v2.1 User Guide Page 7 of 32 http://illformed.com
Linux Installation
Open the ZIP file
Using the unzip command or your preferred ZIP tool, extract the contents of the ZIP file to asuitable temporary location. Inside, you should see the following items:
• Glitch2_32bit
• Glitch2_64bit
• Glitch2_Presets
Copy the plug-in files to your VST plug-ins folder
Copy the entire Glitch2_32bit folder into your 32-bit VST plug-ins folder.
Copy the entire Glitch2_64bit folder into your 64-bit VST plug-ins folder.
If you don't know the exact location of your VST plug-ins folder, check your VST_PATHenvironment variable, or refer to your DAW's user guide or options screen for moreinformation.
Some common locations include:
• /usr/lib/lxvst
• /usr/local/lib/lxvst
• /usr/lib/vst
• /usr/local/lib/vst
• ~/.vst
Optional: Copy the preset files to your Home folder
Copy the entire Glitch2_Presets folder to a common location that can be easily accessed,such as your Home folder.
Final Steps
Restart your DAW and re-scan your plug-ins
To complete the installation, you should restart your DAW and perform a plug-in rescan.
It may also be necessary to completely clear the plug-in cache, or to reboot your computer.
Please refer to your DAW's user guide for more detailed information on working with plug-ins.
Glitch v2.1 User Guide Page 8 of 32 http://illformed.com
User InterfaceOverview
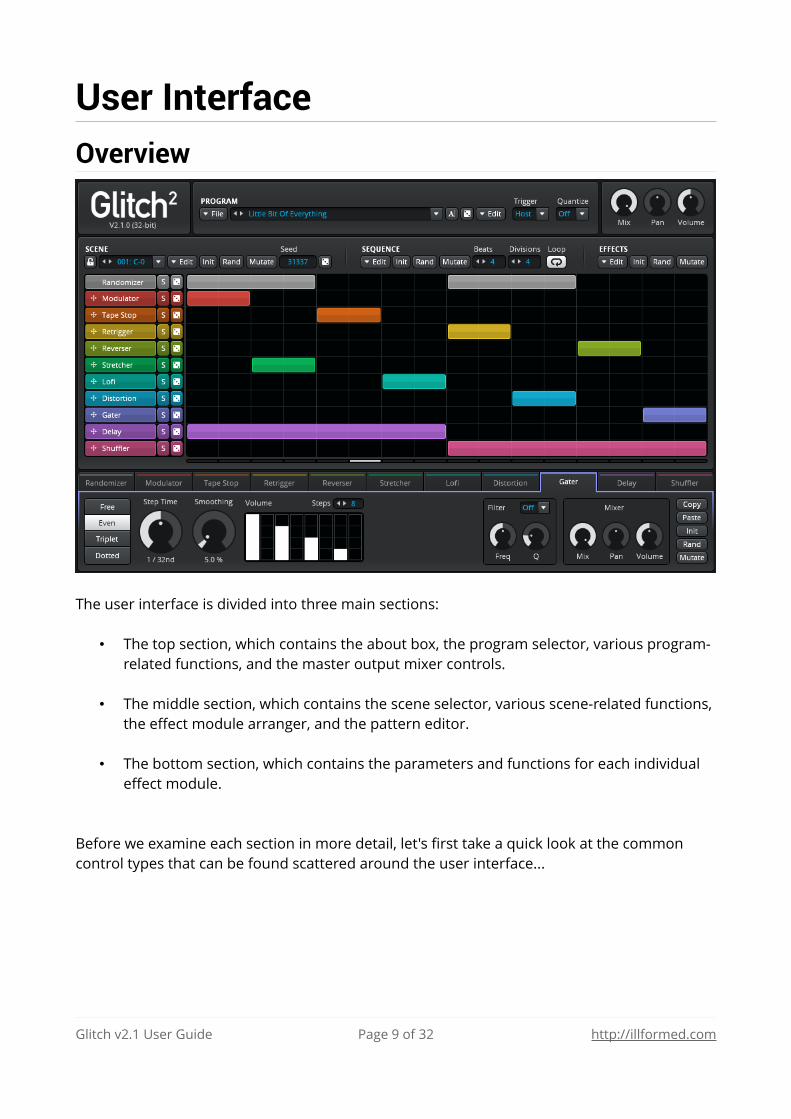
The user interface is divided into three main sections:
• The top section, which contains the about box, the program selector, various program-related functions, and the master output mixer controls.
• The middle section, which contains the scene selector, various scene-related functions, the effect module arranger, and the pattern editor.
• The bottom section, which contains the parameters and functions for each individual effect module.
Before we examine each section in more detail, let's first take a quick look at the common control types that can be found scattered around the user interface...
Glitch v2.1 User Guide Page 9 of 32 http://illformed.com
Common Control Types
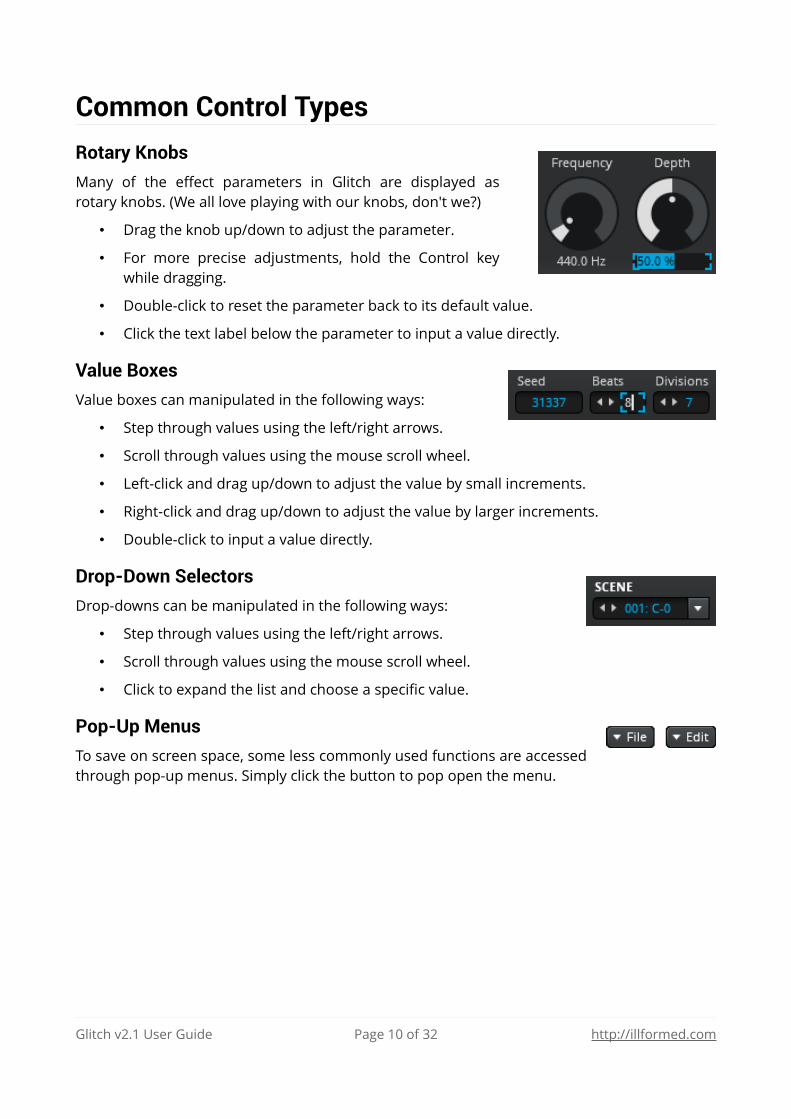
Rotary Knobs
Many of the effect parameters in Glitch are displayed asrotary knobs. (We all love playing with our knobs, don't we?)
• Drag the knob up/down to adjust the parameter.
• For more precise adjustments, hold the Control keywhile dragging.
• Double-click to reset the parameter back to its default value.
• Click the text label below the parameter to input a value directly.
Value Boxes
Value boxes can manipulated in the following ways:
• Step through values using the left/right arrows.
• Scroll through values using the mouse scroll wheel.
• Left-click and drag up/down to adjust the value by small increments.
• Right-click and drag up/down to adjust the value by larger increments.
• Double-click to input a value directly.
Drop-Down Selectors
Drop-downs can be manipulated in the following ways:
• Step through values using the left/right arrows.
• Scroll through values using the mouse scroll wheel.
• Click to expand the list and choose a specific value.
Pop-Up Menus
To save on screen space, some less commonly used functions are accessedthrough pop-up menus. Simply click the button to pop open the menu.
Glitch v2.1 User Guide Page 10 of 32 http://illformed.com
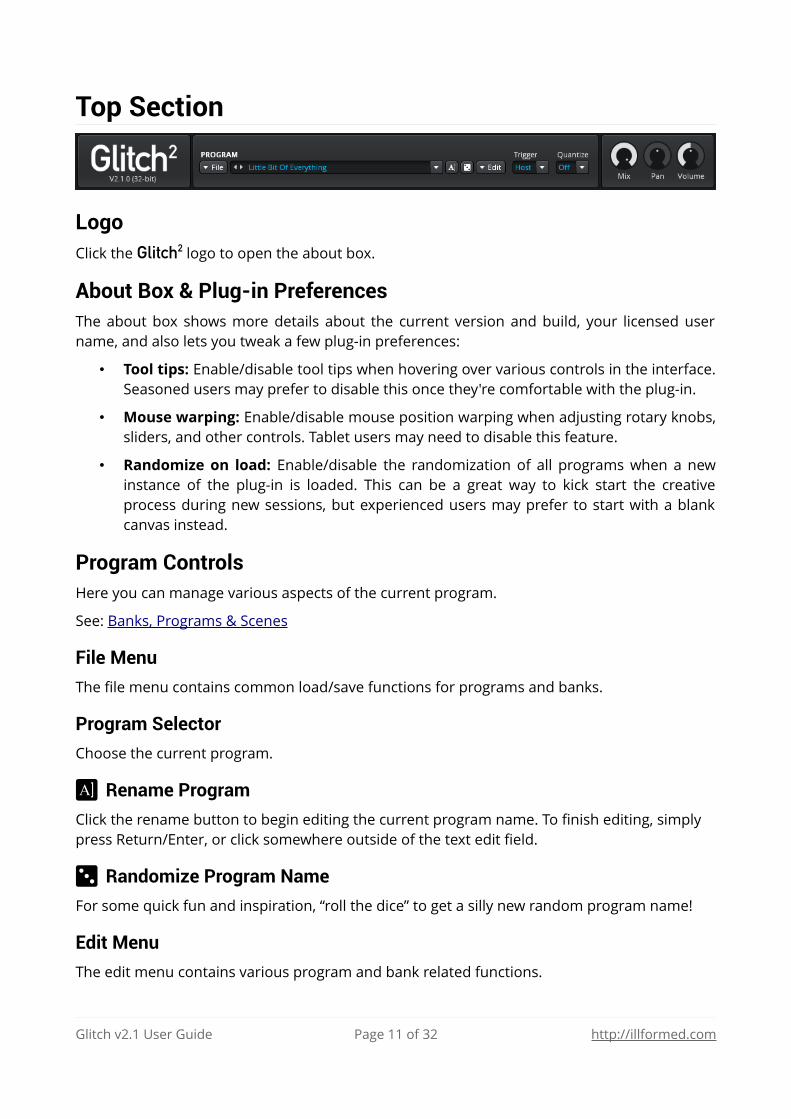
Top Section
LogoClick the Glitch2 logo to open the about box.
About Box & Plug-in PreferencesThe about box shows more details about the current version and build, your licensed username, and also lets you tweak a few plug-in preferences:
• Tool tips: Enable/disable tool tips when hovering over various controls in the interface.Seasoned users may prefer to disable this once they're comfortable with the plug-in.
• Mouse warping: Enable/disable mouse position warping when adjusting rotary knobs,sliders, and other controls. Tablet users may need to disable this feature.
• Randomize on load: Enable/disable the randomization of all programs when a newinstance of the plug-in is loaded. This can be a great way to kick start the creativeprocess during new sessions, but experienced users may prefer to start with a blankcanvas instead.
Program ControlsHere you can manage various aspects of the current program.
See: Banks, Programs & Scenes
File Menu
The file menu contains common load/save functions for programs and banks.
Program Selector
Choose the current program.
Rename Program
Click the rename button to begin editing the current program name. To finish editing, simply press Return/Enter, or click somewhere outside of the text edit field.
Randomize Program Name
For some quick fun and inspiration, “roll the dice” to get a silly new random program name!
Edit Menu
The edit menu contains various program and bank related functions.
Glitch v2.1 User Guide Page 11 of 32 http://illformed.com
Trigger Mode
• Host: Glitch will start when the host transport begins to play. It will stop when the hoststops, or when the end of the sequencer is reached and looping is disabled.
• Gate: Glitch will start when a MIDI note is triggered. It will stop when the note isreleased, or when the host stops, or when the end of the sequencer is reached andlooping is disabled.
• Latch: Glitch will start when a MIDI note is triggered. It will continue playing until thehost stops, or when the end of the sequencer is reached and looping is disabled.
i Note: The Trigger mode applies to all scenes within the current program.
Quantize
When triggering MIDI notes live from an external controller, you may wish to enable Quantizein order to help you synchronize scene changes to the beat. The incoming MIDI notes will bequantized to the time interval you choose, and any “late” notes will be delayed until the nextinterval occurs.
i Note: When sequencing MIDI notes directly in your host, leave Quantize disabled.
i Note: The Quantize setting applies to all scenes within the current program.
Master Output ControlsUse the Mix, Pan and Volume parameters to adjust Glitch's final output.
i Note: The master output levels apply to all scenes within the current program.
Mix
Set the mix level from 0% (fully dry) to 100% (fully wet).
Pan (Panning)
Adjust the stereo panning from left to right.
Volume
Set the output level from 0% (-INF dB) to 200% (+6 dB).
i Tip: For more subtle usage, try moving Glitch into the background by lowering the master mix level, allowing only a small amount of glitchy texture to creep through instead of being 100% in your face. Sometimes less is more!
Glitch v2.1 User Guide Page 12 of 32 http://illformed.com
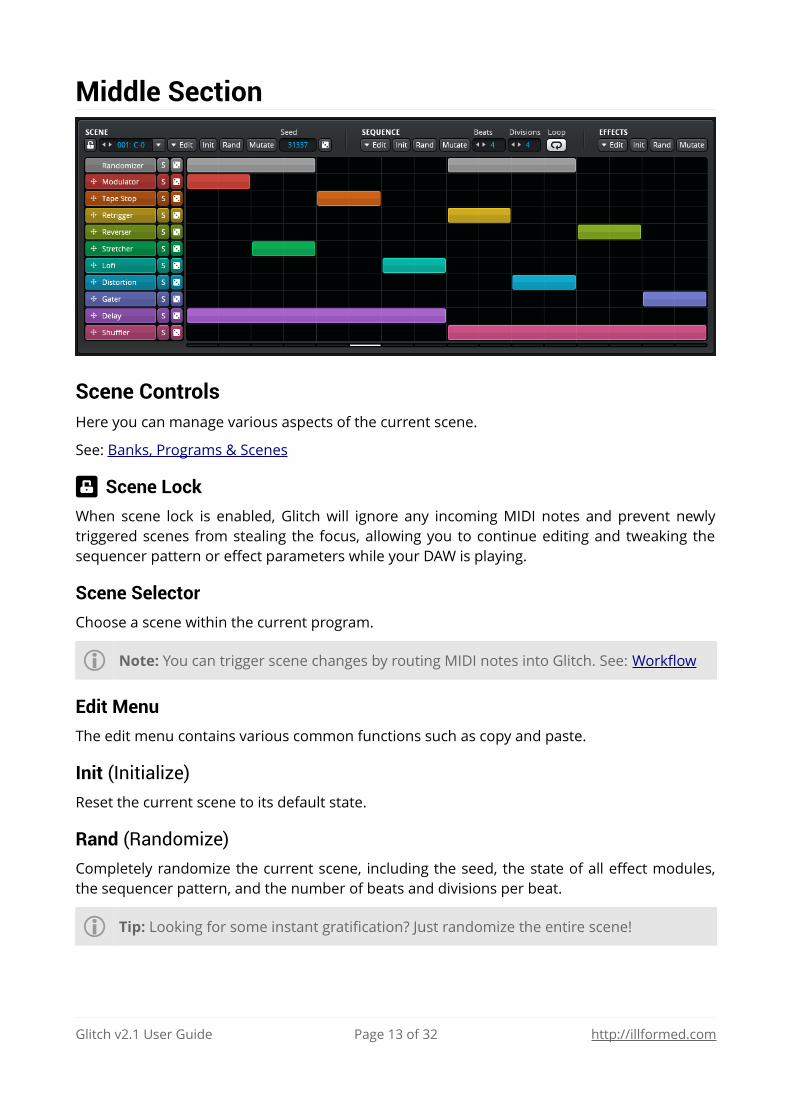
Middle Section
Scene ControlsHere you can manage various aspects of the current scene.
See: Banks, Programs & Scenes
Scene Lock
When scene lock is enabled, Glitch will ignore any incoming MIDI notes and prevent newlytriggered scenes from stealing the focus, allowing you to continue editing and tweaking thesequencer pattern or effect parameters while your DAW is playing.
Scene Selector
Choose a scene within the current program.
i Note: You can trigger scene changes by routing MIDI notes into Glitch. See: Workflow
Edit Menu
The edit menu contains various common functions such as copy and paste.
Init (Initialize)
Reset the current scene to its default state.
Rand (Randomize)
Completely randomize the current scene, including the seed, the state of all effect modules,the sequencer pattern, and the number of beats and divisions per beat.
i Tip: Looking for some instant gratification? Just randomize the entire scene!
Glitch v2.1 User Guide Page 13 of 32 http://illformed.com
Mutate
Mutate operates similarly to the Randomize function, but only changes the sequencer patternand effect parameters by a small amount. This is handy if you like what you currently have,and just want to give things a gentle nudge in a slightly different direction.
Seed
While various aspects of Glitch are based on random numbers, a core concept is that theoverall outcome should still be repeatable and predictable on some basic level. The plug-inwould not be very useful after all, if it could not reliably output the same basic results eachtime you render your project.
To that end, the seed sets the state of the main random number generators in Glitch eachtime a scene is (re)triggered, which in turns affects the outcome of various random functionsas the scene continues to play out — most notably the sequence of effects chosen by theRandomizer module, and the sequence of random slices chosen by the Shuffler module.
Randomize Seed
“Roll the dice” to quickly get a new random seed.
Effect ControlsHere you can quickly manage the state of all effect modules simultaneously.
Edit Menu
The edit menu contains various common functions such as copy and paste.
Init (Initialize)
Reset all effect modules back to their default state.
Rand (Randomize)
Completely randomize the state of all effect modules.
Mutate
Randomize the state of all effect modules by a small amount.
Sequence ControlsHere you can manage various aspects of the sequencer pattern, timing, and other properties.
Edit Menu
The edit menu contains various common functions such as copy and paste.
Glitch v2.1 User Guide Page 14 of 32 http://illformed.com
Init (Initialize)
Reset the current sequencer pattern and beat settings to their default state.
Rand (Randomize)
The randomize function offers two different modes:
1. Left-click to generate a random pattern which only has a single effect playing at anygiven moment in time.
2. Right-click to keep the existing pattern, then add another layer of randomized blockson top, gradually increasing the pattern density each time.
i Note: The selection of effects chosen by the randomize function is determined by the weights set in the Randomizer module. If you wish to exclude a certain effect from the randomly generated pattern, you should set its Randomizer weight to 0%.
Mutate
Randomize the position and duration of all sequencer blocks by a small amount.
Beats
Set the numbers of beats in the current sequencer pattern, ranging from 1 to 8 beats.
i Tip: If you need to program a sequence longer than 8 beats, you can break it down intomultiple smaller scenes, and then perform a series of scene changes in your host by sending MIDI notes into Glitch, just as you might do with a drum machine.
Divisions (Divisions Per Beat)
Set the resolution of the sequencer in divisions per beat, ranging from 2 to 8 divisions.
i Tip: Experiment with different timings and explore interesting new rhythms!At 4 divisions per beat, each sequencer step is equal to 1/16th note.At 3 divisions per beat, each sequencer step is equal to 1/8th triplet note.
Loop
Toggle looping for the current scene.
i Tip: To easily trigger scenes in a one-shot fashion from your MIDI controller's drum pads or keys, try using the “Latch” trigger mode with looping disabled.
Glitch v2.1 User Guide Page 15 of 32 http://illformed.com
SequencerBelow the various Scene, Sequence and Effect controls, the main sequencer area is dividedvertically, with the effect module controls to the left, and the pattern editor to the right.
Effect Module Arranger
Click an effect module's name to bring its controls into view in the bottom section of theinterface.
To the right of each module's name is a solo button to quickly preview that effect alone whiletweaking its parameters, and a randomize button to quickly generate a new random patternsequence for that effect.
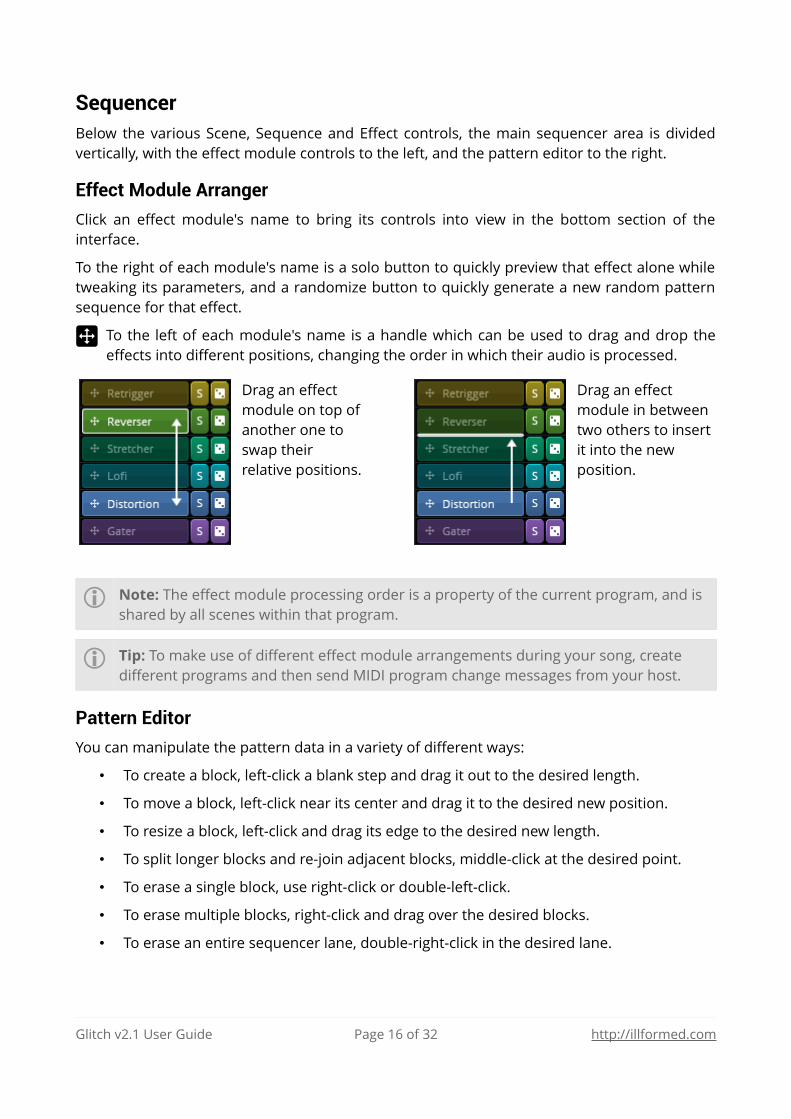
To the left of each module's name is a handle which can be used to drag and drop theeffects into different positions, changing the order in which their audio is processed.
Drag an effect module on top ofanother one to swap their relative positions.
Drag an effect module in between two others to insertit into the new position.
i Note: The effect module processing order is a property of the current program, and is shared by all scenes within that program.
i Tip: To make use of different effect module arrangements during your song, create different programs and then send MIDI program change messages from your host.
Pattern Editor
You can manipulate the pattern data in a variety of different ways:
• To create a block, left-click a blank step and drag it out to the desired length.
• To move a block, left-click near its center and drag it to the desired new position.
• To resize a block, left-click and drag its edge to the desired new length.
• To split longer blocks and re-join adjacent blocks, middle-click at the desired point.
• To erase a single block, use right-click or double-left-click.
• To erase multiple blocks, right-click and drag over the desired blocks.
• To erase an entire sequencer lane, double-right-click in the desired lane.
Glitch v2.1 User Guide Page 16 of 32 http://illformed.com
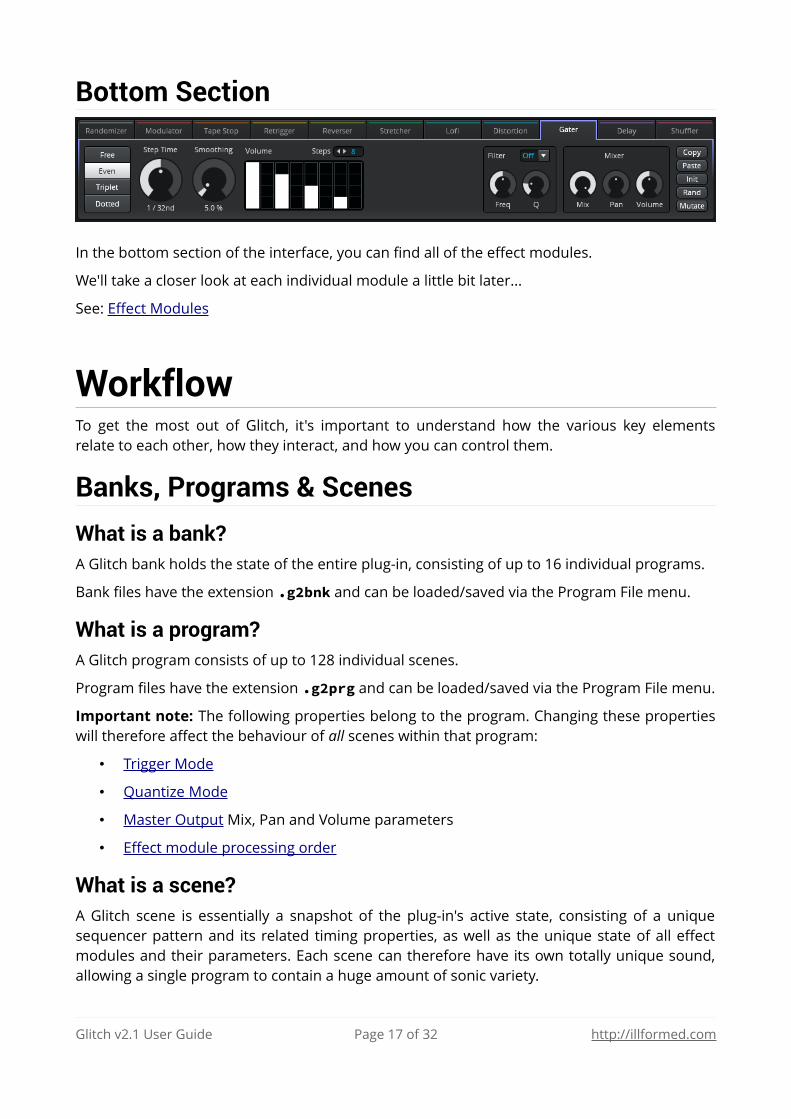
Bottom Section
In the bottom section of the interface, you can find all of the effect modules.
We'll take a closer look at each individual module a little bit later...
See: Effect Modules
WorkflowTo get the most out of Glitch, it's important to understand how the various key elementsrelate to each other, how they interact, and how you can control them.
Banks, Programs & Scenes
What is a bank?A Glitch bank holds the state of the entire plug-in, consisting of up to 16 individual programs.
Bank files have the extension .g2bnk and can be loaded/saved via the Program File menu.
What is a program?A Glitch program consists of up to 128 individual scenes.
Program files have the extension .g2prg and can be loaded/saved via the Program File menu.
Important note: The following properties belong to the program. Changing these propertieswill therefore affect the behaviour of all scenes within that program:
• Trigger Mode
• Quantize Mode
• Master Output Mix, Pan and Volume parameters
• Effect module processing order
What is a scene?A Glitch scene is essentially a snapshot of the plug-in's active state, consisting of a uniquesequencer pattern and its related timing properties, as well as the unique state of all effectmodules and their parameters. Each scene can therefore have its own totally unique sound,allowing a single program to contain a huge amount of sonic variety.
Glitch v2.1 User Guide Page 17 of 32 http://illformed.com
How to automate Program changesGlitch will change programs in response to standard MIDI program change messages.
Please refer to your DAW's user guide for more detailed instructions on how to send MIDIprogram change messages into effect plug-ins.
How to automate Scene changesWhile it's fun and easy enough to fill the sequencer with Randomizer blocks and let it play in anever-ending chaotic loop, that will probably start to get pretty boring after a while. Tobecome a true Glitch ninja, you must master the art of scene control and bend the plug-in toyour will!
Within each program there are 128 unique scenes — each corresponding to one of the 128standard MIDI notes. By sending MIDI notes into Glitch from your DAW or external controller,you can trigger scene changes at key moments in your song or project, and build up morecomplex pattern arrangements over time.
Please refer to your DAW's user guide for more detailed instructions on how to send MIDInotes into effect plug-ins.
How to configure audio and MIDI routingAlthough the exact set up varies slightly from DAW to DAW, you will usually need to configureGlitch in one of the following ways:
1) Glitch inserted on an audio track:
• Add Glitch directly to an audio track.
• Create a MIDI track to contain your scene control notes.
• Route the MIDI track's output to the instance of Glitch.
2) Glitch inserted on a MIDI track:
• Add Glitch directly to a MIDI track containing your scene control notes.
• Route some other track's audio into Glitch via the plug-in aux or sidechain bus.
Please refer to your DAW's user guide for more detailed instructions on how to route audioand MIDI between tracks and plug-ins.
Guides & TutorialsStay tuned to http://illformed.com for guides and tutorials that may be released in the future.
Glitch v2.1 User Guide Page 18 of 32 http://illformed.com
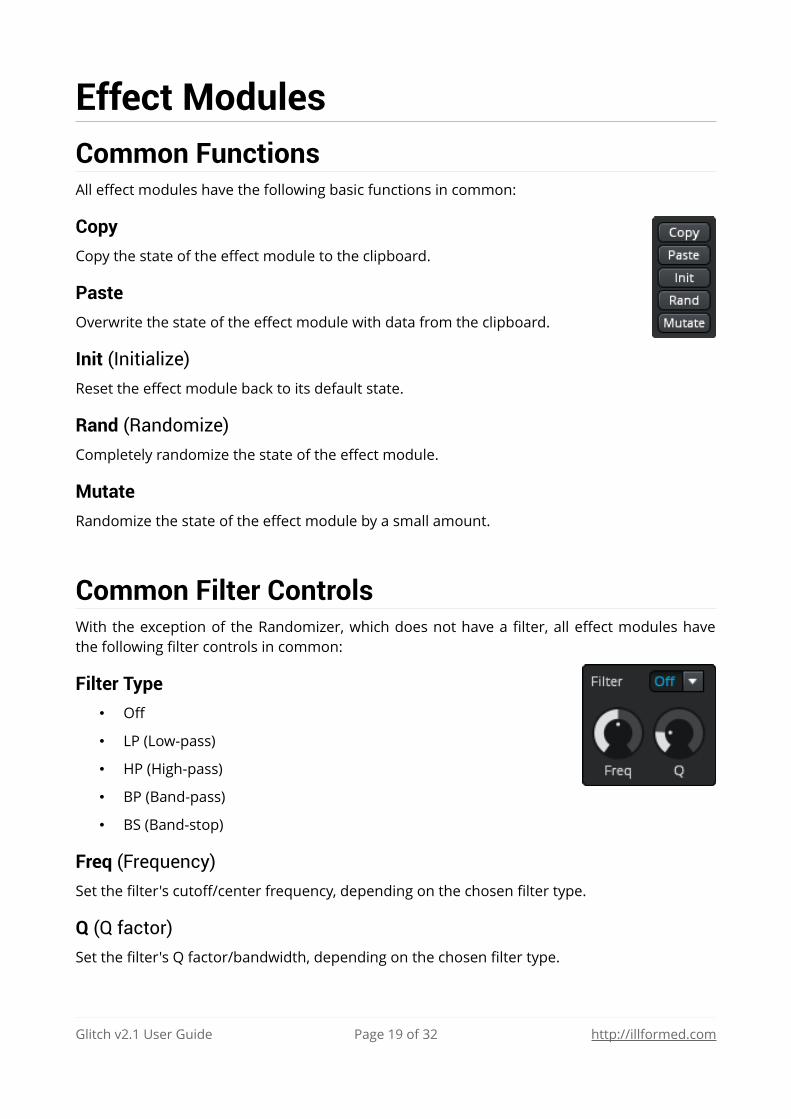
Effect ModulesCommon FunctionsAll effect modules have the following basic functions in common:
Copy
Copy the state of the effect module to the clipboard.
Paste
Overwrite the state of the effect module with data from the clipboard.
Init (Initialize)
Reset the effect module back to its default state.
Rand (Randomize)
Completely randomize the state of the effect module.
Mutate
Randomize the state of the effect module by a small amount.
Common Filter ControlsWith the exception of the Randomizer, which does not have a filter, all effect modules havethe following filter controls in common:
Filter Type
• Off
• LP (Low-pass)
• HP (High-pass)
• BP (Band-pass)
• BS (Band-stop)
Freq (Frequency)
Set the filter's cutoff/center frequency, depending on the chosen filter type.
Q (Q factor)
Set the filter's Q factor/bandwidth, depending on the chosen filter type.
Glitch v2.1 User Guide Page 19 of 32 http://illformed.com
Common Mixer ControlsWith the exception of the Randomizer, which does not have a mixer, all effect modules havethe following mixer controls in common:
Mix
Set the mix level from 0% (fully dry) to 100% (fully wet).
Pan (Panning)
Adjust the stereo panning from left to right.
Volume
Set the output level from 0% (-INF dB) to 200% (+6 dB).
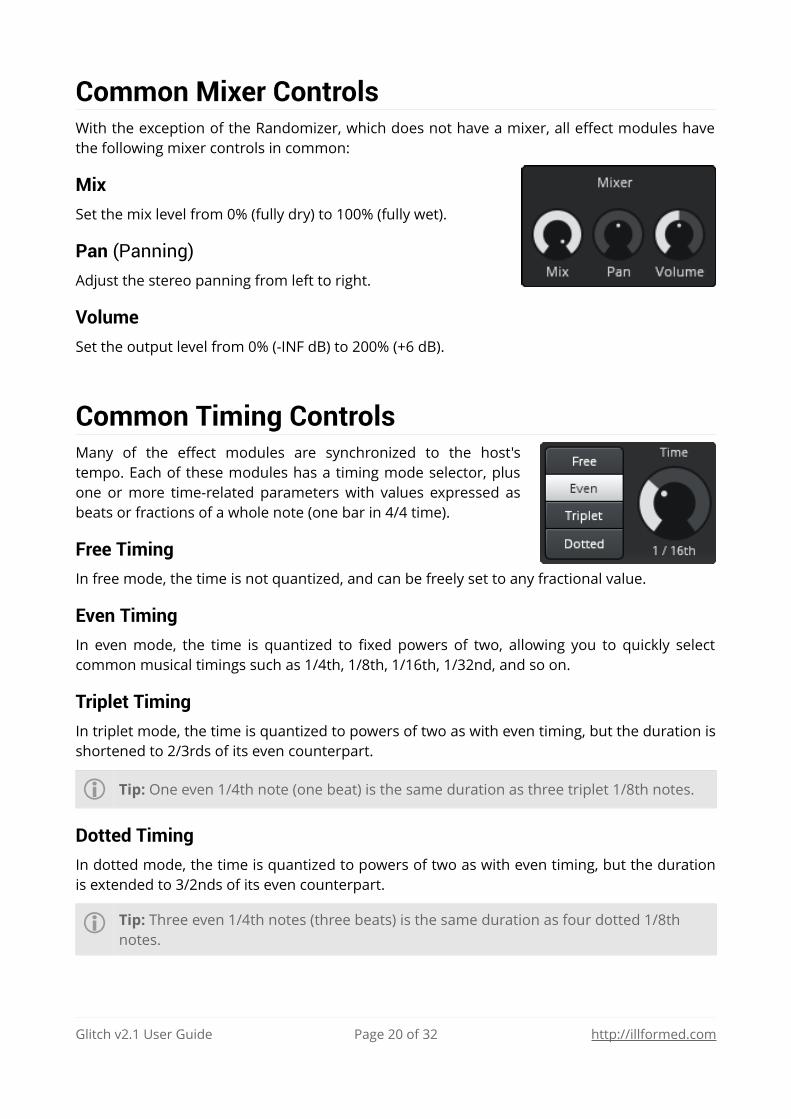
Common Timing ControlsMany of the effect modules are synchronized to the host'stempo. Each of these modules has a timing mode selector, plusone or more time-related parameters with values expressed asbeats or fractions of a whole note (one bar in 4/4 time).
Free Timing
In free mode, the time is not quantized, and can be freely set to any fractional value.
Even Timing
In even mode, the time is quantized to fixed powers of two, allowing you to quickly selectcommon musical timings such as 1/4th, 1/8th, 1/16th, 1/32nd, and so on.
Triplet Timing
In triplet mode, the time is quantized to powers of two as with even timing, but the duration isshortened to 2/3rds of its even counterpart.
i Tip: One even 1/4th note (one beat) is the same duration as three triplet 1/8th notes.
Dotted Timing
In dotted mode, the time is quantized to powers of two as with even timing, but the durationis extended to 3/2nds of its even counterpart.
i Tip: Three even 1/4th notes (three beats) is the same duration as four dotted 1/8th notes.
Glitch v2.1 User Guide Page 20 of 32 http://illformed.com
RandomizerThe Randomizer is a special module that does not produce any sound of its own, hence itslack of a filter and mixer controls. Instead, the Randomizer affects the behaviour of varioussequencer-related functions.
Each of the “weight” parameters sets the likelihood for that particular effect module to betriggered when a Randomizer step is programmed into the sequencer.
i Tip: If effect “A” has a weight of 20% and effect “B” has a weight of 10%, then effect “A” is twice as likely to be triggered.
These weights also affect the outcome of the functions used to generate new randomsequencer patterns.
If you wish to generate random patterns that are more biased towards certain effect modules(or to remove certain effects from the random pattern generation entirely), you can adjusttheir respective weights in the Randomizer before using the randomize sequence functions.
i Tip: Don't want to hear a particular effect module? Set its Randomizer weight to 0% and it won't be chosen by any further random functions.
Glitch v2.1 User Guide Page 21 of 32 http://illformed.com
ModulatorThe Modulator performs amplitude modulation — often called “ring” modulation — on theaudio input. An internal sine wave oscillator provides the carrier signal.
An envelope follower also monitors the amplitude of the audio input, allowing the oscillator'sfrequency to be easily automated for some simple FM-like results.
Frequency
The frequency of the internal oscillator.
Depth
How deeply the audio input's amplitude will be modulated by the oscillator.
Osc Vol (Oscillator Volume)
Raising the oscillator volume above 0% will make its signal audible, essentially causing it tofunction as a crude type of synthesizer — quite fun for producing sci-fi bleeps and bloops!
Spread
The internal oscillator generates a stereo signal. By adjusting the spread parameter, you canoffset the phase of the left and right channels to create interesting stereo effects.
i Tip: Try using very low frequencies and a spread of +/-90° for a simple auto-panner.
FM Depth (Frequency Modulation Depth)
How deeply the oscillator frequency will be modulated by the envelope follower.
i Tip: For a fun warbly sound that automatically reacts to your audio input, try setting Frequency to minimum, FM Depth to maximum, and then turn up the Osc Volume.
FM Attack (Frequency Modulation Attack)
How rapidly the envelope follower responds to peaks in the audio input.
FM Release (Frequency Modulation Release)
How rapidly the envelope follower falls after a peak in the audio input.
Glitch v2.1 User Guide Page 22 of 32 http://illformed.com
Tape StopThe Tape Stop module pitch bends the audio input to approximate the sound of a cassettetape deck or vinyl turntable slowing to a stop after being powered off.
Timing Mode
See: Common Timing Controls
Slow Down
How rapidly the audio input will be slowed to a stop.
Speed Up
How rapidly the audio input will return to normal speed after being stopped.
Play Mode
Change the stopping and starting behaviour.
• Stop / Start: The audio will begin playing normally, and then continually repeat theprocess of slowing down and speeding up again.
• Stop: The audio will begin playing normally, and then slow down to a complete stop.
• Start / Stop: The audio will begin in the stopped state, and then continually repeat theprocess of speeding up and slowing down again.
• Start: The audio will begin in the stopped state, and then speed back up to normal.
Glitch v2.1 User Guide Page 23 of 32 http://illformed.com
RetriggerThe Retrigger module captures a portion of the audio input, then repeats it at regular intervalsto produce beat repeats, snare rolls, “bouncing balls”, and other types of stutter effects.
Timing Mode
See: Common Timing Controls
Initial Speed, Final Speed, Transition Time
These three parameters control how the retriggering effect will change speed over time.
The effect begins retriggering at the Initial Speed, then gradually slides towards the FinalSpeed, arriving at the final speed after the duration set by the Transition Time.
i Tip: For a “bouncing ball” effect, set the Initial Speed to a low value, Final Speed to a high value, Transition Time to a long duration, and then draw a long Retrigger block into the sequencer pattern.
Decay
Increasing the Decay causes each repeat to gradually fade to silence.
i Tip: When using high Retrigger speeds, some added Decay can help to make the effect sound more refined and interesting.
Glitch v2.1 User Guide Page 24 of 32 http://illformed.com

ReverserThe Reverser module captures a portion of the audio input, plays it forwards through Point Auntil Point B is reached, then backwards to Point A, then forwards to Point B, then backwards,forwards, and so on, in an endless ping-pong loop.
Timing Mode
See: Common Timing Controls
Time
The Time parameter sets the maximum amount of audio that will be captured, and thereforedictates the maximum possible loop size.
Point A, Point B
These parameters allow you to adjust the loop boundaries within the captured audio buffer,effectively shortening the total duration set by the Time parameter, and shifting the loop todifferent sections within the audio buffer.
i Tip: For some interesting drum processing, draw individual Reverser blocks into the sequencer pattern in line with the major drum hits in your loop, then set Point A to around 50% and Point B to around 100% so that only the tail end of each drum hit is affected, while the attack portion remains unaffected.
Glitch v2.1 User Guide Page 25 of 32 http://illformed.com
StretcherThe Stretcher module captures the incoming audio and effectively slows it down using asimple granular time-stretching technique, sounding vaguely similar to some hardwaresamplers of the late 80s and early 90s.
An envelope follower monitors the amplitude of the audio input, allowing the grain size to beeasily modulated for a more interesting sound.
Speed
The effective speed at which to play back the stretched audio.
Grain Size
The duration of each grain.
i Tip: Shorter grains tend to produce a more artificial or metallic sound that can work well for special FX, while longer durations may be better suited for vocals, pads, and other more organic or flowing sounds.
Jitter
Increase Jitter to randomly alter the size of each new grain.
i Tip: A small amount of Jitter can help to give the overall sound more texture, and can also help to mask some of the harsh metallic tones produced by shorter grain sizes. Higher amounts can produce some kick-ass stuttering audio destruction!
Smoothing
The amount of cross-fading applied to each overlapping grain.
GM Depth (Grain Modulation Depth)
How deeply the grain size will be modulated by the envelope follower.
GM Attack (Grain Modulation Attack)
How rapidly the envelope follower responds to peaks in the audio input.
GM Release (Grain Modulation Release)
How rapidly the envelope follower falls after a peak in the audio input.
Glitch v2.1 User Guide Page 26 of 32 http://illformed.com
LofiThe Lofi module is a “bit crusher” effect which reduces the effective sampling frequency andbit depth of the audio input, to approximate the sound of cheap samplers, classic video gameeffects, distorted radio signals, and so on.
An envelope follower also monitors the amplitude of the audio input, allowing the samplingfrequency to be easily automated.
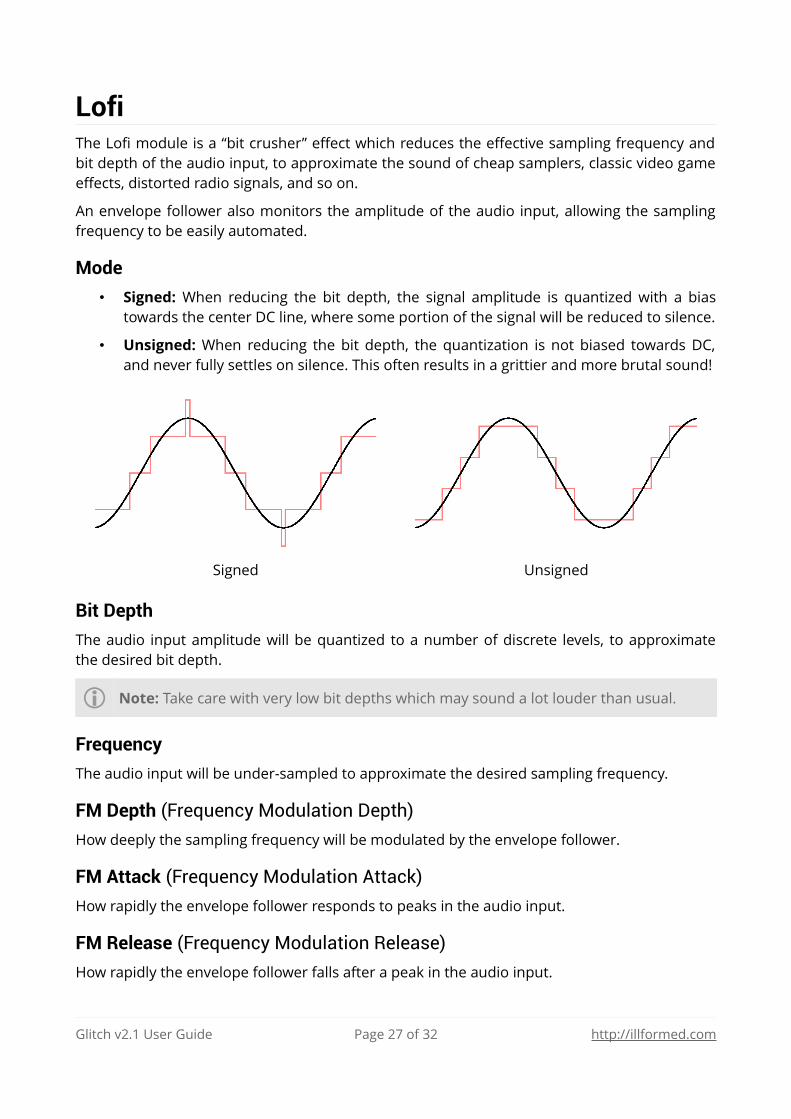
Mode
• Signed: When reducing the bit depth, the signal amplitude is quantized with a biastowards the center DC line, where some portion of the signal will be reduced to silence.
• Unsigned: When reducing the bit depth, the quantization is not biased towards DC,and never fully settles on silence. This often results in a grittier and more brutal sound!
Signed Unsigned
Bit Depth
The audio input amplitude will be quantized to a number of discrete levels, to approximatethe desired bit depth.
i Note: Take care with very low bit depths which may sound a lot louder than usual.
Frequency
The audio input will be under-sampled to approximate the desired sampling frequency.
FM Depth (Frequency Modulation Depth)
How deeply the sampling frequency will be modulated by the envelope follower.
FM Attack (Frequency Modulation Attack)
How rapidly the envelope follower responds to peaks in the audio input.
FM Release (Frequency Modulation Release)
How rapidly the envelope follower falls after a peak in the audio input.
Glitch v2.1 User Guide Page 27 of 32 http://illformed.com
DistortionA multi-mode distortion effect that can produce a wide range of gritty timbres and tones.
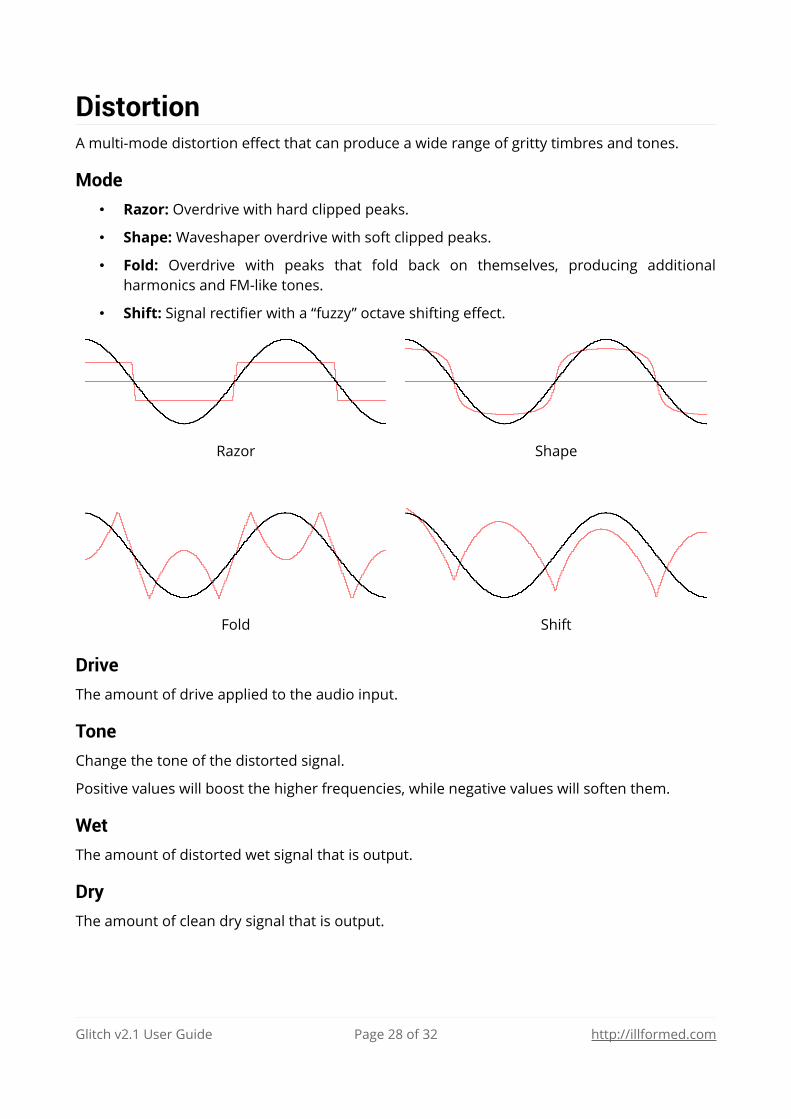
Mode
• Razor: Overdrive with hard clipped peaks.
• Shape: Waveshaper overdrive with soft clipped peaks.
• Fold: Overdrive with peaks that fold back on themselves, producing additionalharmonics and FM-like tones.
• Shift: Signal rectifier with a “fuzzy” octave shifting effect.
Razor Shape
Fold Shift
Drive
The amount of drive applied to the audio input.
Tone
Change the tone of the distorted signal.
Positive values will boost the higher frequencies, while negative values will soften them.
Wet
The amount of distorted wet signal that is output.
Dry
The amount of clean dry signal that is output.
Glitch v2.1 User Guide Page 28 of 32 http://illformed.com
GaterThe Gater module is a tempo-synced “trance gate” volume effect with a built-in programmablestep sequencer, useful for adding rhythmic detail and texture to sounds.
Timing Mode
See: Common Timing Controls
Step Time
The duration of each step in the sequencer.
Smoothing
Smoothing defines how quickly (or slowly) the step sequencer transitions from one volumelevel to the next.
At lower values, the volume changes will be more rapid, resulting in a sharper sound.
At higher values, the volume changes will be more gradual, resulting in a smoother sound.
Sequencer
A programmable step sequencer with up to 16 steps.
Glitch v2.1 User Guide Page 29 of 32 http://illformed.com
DelayA tempo-synced delay effect with variable slew rate and stereo separation.
Timing Mode
See: Common Timing Controls
Time
Set the delay time.
Slew
Slew defines how quickly the effect responds to changes in delay time.
At lower settings, the delay line will morph very gradually towards the new time, resulting in aheavily warped “dub delay” type of sound.
At higher settings, the delay line will “zip” more rapidly towards the new time.
Spread
Spread separates the left and right channel delay times, to create interesting stereo effects.
Spreading to the left (negative values) will increase the left channel delay size, while spreadingto the right (positive values) will increase the right channel delay size.
i Tip: A small amount of spread is great for widening the sound and giving it presence.
Send
How much of the dry input signal is sent through the delay line.
Feedback
The amount of feedback in the delay line.
Increasing the feedback will result in more echoes being heard.
Return
How much of the wet delayed signal and feedback is returned from the delay line.
i Tip: For a classic “slap back” echo effect, set Send to at least 50%, Feedback to 0%, and Return to 100%.
Glitch v2.1 User Guide Page 30 of 32 http://illformed.com
ShufflerThe Shuffler effect records the incoming audio to a buffer, then picks random slices from thebuffer and plays them back in a different order, with additional chances to repeat the slice orplay it in reverse.
Timing Mode
See: Common Timing Controls
Min Time, Max Time
Set the minimum and maximum size of each slice that will be shuffled.
Longer times are useful for tempo-synced beat repeat effects, while shorter times are goodfor more heavily chopped up sounds.
i Tip: The min and max times should be shorter than the duration of any Shuffler blocks programmed into the Sequencer, otherwise the effect will not always have enough timeto activate. In general, the effect works best when you program a long Shuffler block into the Sequencer that spans several beats, or even the entire duration.
Range
How far back into the audio buffer slices will be picked from.
Shuffle
The likelihood for a slice to be randomly shuffled.
Repeat
The likelihood for a shuffled slice to be randomly repeated.
Reverse
The likelihood for a shuffled slice to be randomly reversed.
Glitch v2.1 User Guide Page 31 of 32 http://illformed.com
Additional CreditsApplication framework and plug-in framework by Eduard Müller.
This software uses the FreeImage open source image library.
See http://freeimage.sourceforge.net for details.
FreeImage is used under the FIPL, version 1.0.
Portions of this software are copyright © 2002 The FreeType Project.
See http://www.freetype.org for details.
All rights reserved.
VST Plug-in Technology by Steinberg Media Technologies.
Audio Units SDK by Apple.
Glitch v2.1 User Guide Page 32 of 32 http://illformed.com


![[MS-HTML5]: Microsoft Edge / Internet Explorer …...Microsoft Edge / Internet Explorer HTML5 Standards Support Document Intellectual Property Rights Notice for Open Specifications](https://img.pdfslide.us/doc/110x75/5e9a9185566493310c7ff612/ms-html5-microsoft-edge-internet-explorer-microsoft-edge-internet-explorer.jpg)


![[MS-DOM1]: Internet Explorer Document Object Model … Explorer Document Object Model (DOM) Level 1 Standards Support Document Intellectual Property Rights Notice for Open Specifications](https://img.pdfslide.us/doc/110x75/5afb54857f8b9a44659029d9/ms-dom1-internet-explorer-document-object-model-explorer-document-object.jpg)