Embed Size (px)
Citation preview
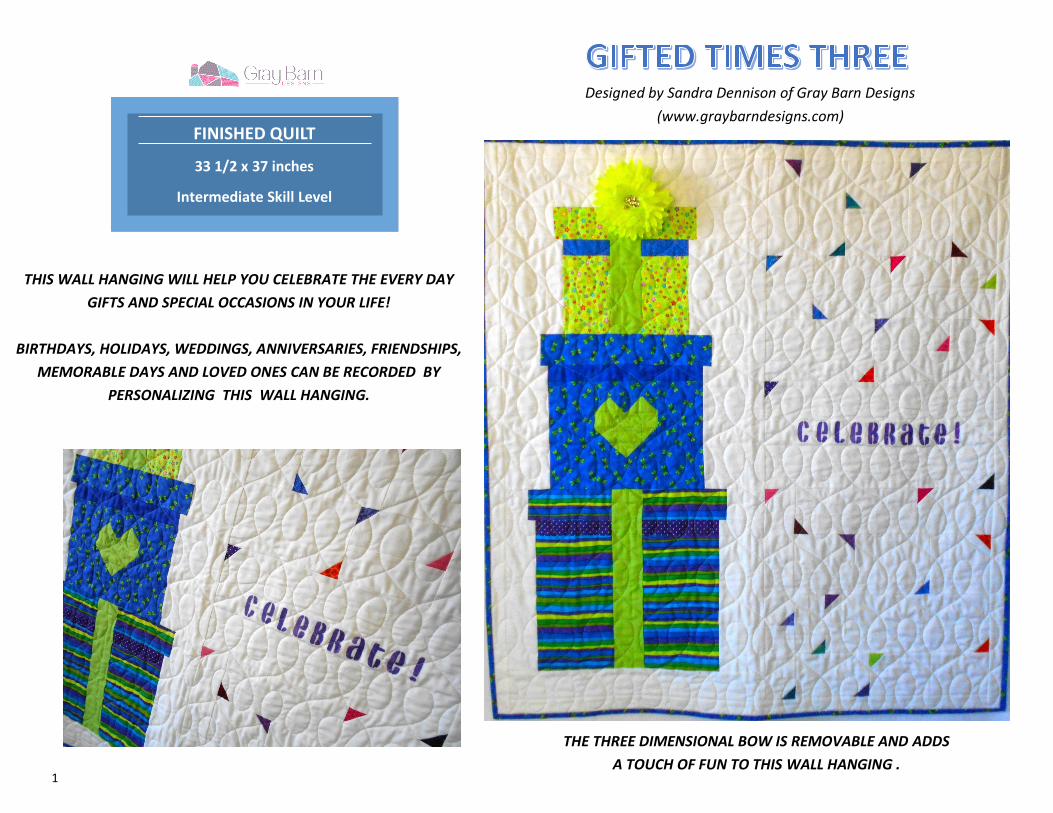
1
THIS WALL HANGING WILL HELP YOU CELEBRATE THE EVERY DAY
GIFTS AND SPECIAL OCCASIONS IN YOUR LIFE!
BIRTHDAYS, HOLIDAYS, WEDDINGS, ANNIVERSARIES, FRIENDSHIPS,
MEMORABLE DAYS AND LOVED ONES CAN BE RECORDED BY
PERSONALIZING THIS WALL HANGING.
Designed by Sandra Dennison of Gray Barn Designs
(www.graybarndesigns.com)
THE THREE DIMENSIONAL BOW IS REMOVABLE AND ADDS
A TOUCH OF FUN TO THIS WALL HANGING .
33 1/2 x 37 inches
Intermediate Skill Level
FINISHED QUILT

2
General Notes and Instructions
All seam allowances = ¼ inch
All fabrics are sewn with right sides together
Assume width of Fabric = 42 inches
Press all seams toward dark fabric unless otherwise noted
.25 inch = 1/4 inch
.50 inch = 1/2 inch
.75 inch = 3/4 inch
“ is a symbol for inch
QUILTING MATH
Materials
1 Fat Quarter Stripe Print (Large Box)
1 Fat Eighth Purple/White Polka Dot Print (Large Box)
1 Fat Quarter Lime Green Solid (Large Box, Medium Box, Small Box)
1 Fat Quarter Blue/Lime Green Print (Medium Box)
1 Fat Eighth Solid Blue (Medium Box, Small Box)
1 Fat Quarter Lime Green Print (Small Box)
Bright Fabric Scraps for Confetti
½ yard Binding Fabric (we used the Dark Blue/Lime Green Print as shown in the Medium Box)
1 ½ yard white background fabric
45” x 42” Quilt Batting
1 ¼ yard Backing Fabric
1 Bow of Your Choice
1 Medium Size Safety Pin
Tip
For the bow at the top of the gift,
check the hair section of discount
stores. There are lots of choices and
colors. Hair bows have a clip that
easily attaches to the safety pin so the
bow can be easily removed or
changed.

3
General Notes and Instructions
Trust us when we say, this pattern
goes together easily if you cut your
fabrics and sew in small sections at
a time!
Cut out and label the pieces for the
large gift box first. Sew the large gift
box section together and then move on to
cut out and sew the medium gift box. Last
but not least, cut out and sew the small gift
box.
Likewise, the confetti sections will go to-
gether smoothly if you work in stages. To
help you stay organized while mak-
ing the confetti sections, each piece
has both a size and a letter.
To get started, cut out and label
your pieces for Confetti Section 1
first. Sew Confetti Section 1 together and once this section is complete, move
on to complete Confetti Section 2 .
Complete Confetti Section 3 last.
Confetti Making Instructions for Confetti Sections 1, 2 and 3:
Step 1: Draw a diagonal line along the wrong side of each 1.5” square.
Step 2: Sew the confetti square right side down on a white square or rectangle.
Step 3: Trim 1/4” inch seam and press toward the dark fabric.

4
From White Background Fabric cut: 2 rectangles - 2 x 2.5 inches 2 rectangles – 2.5 10.5 inches 1 rectangle - 16.5 x 2.5 inches 4 strips—1.5 inches x width of fabric (NOTE: These 4 strips are not part of the large gift box but will be used at the very end of the project so label them and set them aside for later.
From Stripe Print (box bottom and lid) cut: 2 rectangles – 5.5 x 9.5 inches 2 rectangles – 6.0 x 2.5 inches
From Purple/White Polka Dot Print (box band) cut: 2 rectangles - 5.5 x 1.5 inches
From Lime Green Solid (ribbon) cut: 1 rectangle - 2.5 x 12.5 inches
Large Gift Box - Cutting and Layout Instructions
Use a design board to lay out all rectangles according to the diagram above.
Step 1: Sew the box top rectangles together as shown in Diagram 1. Step 2: Sew the box bands and box bottoms together as shown in Diagram 2.
Large Gift Box - Sewing Instructions

5
Step 3: Sew one 2.5 x 10.5 rectangle to the left side of one Step 2 block as shown in Diagram 3. Step 4: Sew one 2.5 x 10.5 rectangle to the right side of one Step 2 block as shown in Diagram 3. Step 5: Sew the blocks created in Step 1 to the top of the blocks created in Steps 3 and 4 as shown in Diagram 4. Step 6: Refer to Diagram 5 and sew the 2.5 x 12.5 inch ribbon to the box units created in Step 5. Step 7: Sew the 16.5 x 2.5 rectangle to the bottom of the box as shown in Diagram 6.
Large Gift Box - Sewing Instructions (continued)

6
Sewing Instructions for the Pieced Heart Step 1: Take one 1.5 inch blue print square and place it right side up on your work surface. Step 2: Take one 1.5 inch green square and using a thin pencil, draw a diagonal line from corner to corner on the wrong side of the fabric. Place it right side down on the blue print square. Step 3: Sew along the diagonal line (Diagram 1). Step 4: Trim the block ¼ inch from the line you just sewed and press the seam toward the green fabric (Diagram 2). Step 5: Repeat steps 1 through 5 above so you have a total of 8 half square triangles. Step 6: Referring to Diagram 3, lay out all your heart pieces in rows. Sew pieces together by row and then sew all rows together to make your pieced heart block. This block should measure 4.5 x 4.5 inches.
Medium Gift Box - Cutting and Layout Instructions
From White Background Fabric cut: 2 rectangles – 3.0 x 2.5 inches 2 rectangles – 3.5 x 8.5 inches
From Blue/Green Print (box bottom, lid and pieced heart) cut: 2 rectangles – 7.5 x 3.5 inches 1 rectangle – 4.5 x 2.5 inches 1 rectangle – 4.5 x 1.5 inches 1 rectangle – 11.5 x 2.5 inches 8 squares – 1.5 x 1.5 inches
From Solid Blue (box band) cut: 1 rectangle - 10.5 x 1.5 inches
From Lime Green Solid (Pieced Heart) cut: 14 squares - 1.5 x 1.5 inches
Use a design board to lay out all rectangles according to the diagram above.

7
Step 1: Sew the box top rectangles together as shown in Diagram 1. Step 2: Sew the pieced heart to the rectangles as shown in Diagram 2. Step 3: Sew one 7.5 x 3.5 rectangle to the left side of the Step 2 block as shown in Diagram 3. Step 4: Sew one 7.5 x 3.5 rectangle to the right side of the Step 2 block as shown in Diagram 3. Step 5: Sew the 10.5 x 1.5 rectangle to the top of the block created in Steps 3 and 4 as shown in Diagram 4. Step 6: Sew one 3.5 x 8.5 rectangle to the left side of the block created in Step 5 as shown in Diagram 5. Step 7: Sew one 3.5 x 8.5 rectangle to the right side of the block created in Step 5 as shown in Diagram 5. Step 8: Sew the box top rectangles created in Step 1 to the top of the block created in Steps 6 and 7 as shown in Diagram 5.
Medium Gift Box - Sewing Instructions

8
From White Background Fabric cut: 2 rectangles – 4.0 x 2.5 inches 2 rectangles – 4.5 x 6.5 inches 1 rectangle—17.5 x 3.5 inches
From Lime Green Print (box bottom and lid) cut: 2 rectangles – 5.5 x 3.5 inches
From Blue Solid (box band) cut: 2 rectangles - 3.5 x 1.5 inches
From Lime Green Solid (box ribbon) cut: 1 rectangle - 2.5 x 8.5 inches
Small Gift Box - Cutting and Layout Instructions
Use a design board to lay out all rectangles according to the diagram above.
Small Gift Box - Sewing Instructions
Step 1: Sew the box top rectangles together as shown in Diagram 1. Step 2: Sew the box bands and box bottoms together as shown in Diagram 2.

9
Step 3: Sew one 4.5 x 6.5 rectangle to the left side of one Step 2 block as shown in Diagram 3. Step 4: Sew together one 4.5 x 6.5 rectangle to the right side of one Step 2 block as shown in Diagram 3. Step 4: Sew the blocks from Step 1 to the blocks from Step 3 as shown in Diagram 4. Step 5: Refer to Diagram 5 and sew the 2.5 x 12.5 inch ribbon to the blocks created in Step 4. Step 6: Sew the 17.5 x 3.5 inch rectangle to the top of the box as shown in Diagram 5.
Small Gift Box - Sewing Instructions
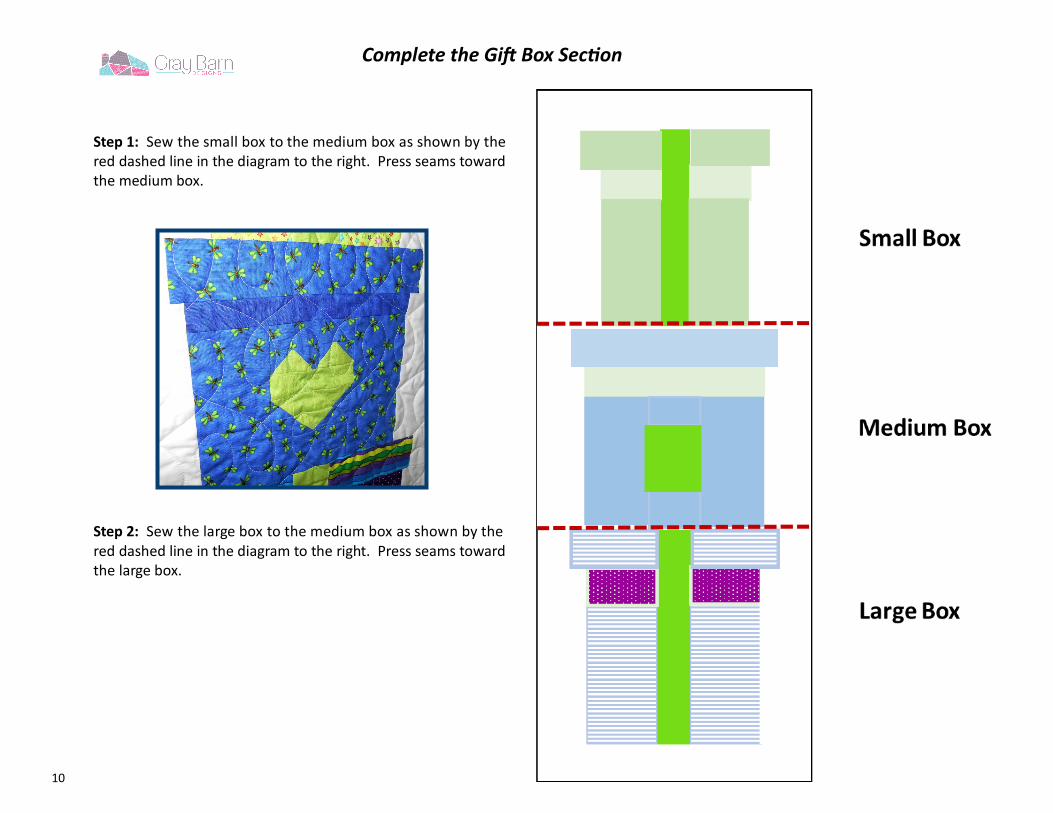
10
Complete the Gift Box Section
Step 1: Sew the small box to the medium box as shown by the red dashed line in the diagram to the right. Press seams toward the medium box. Step 2: Sew the large box to the medium box as shown by the red dashed line in the diagram to the right. Press seams toward the large box.

11
Confetti Section 1 - Cutting and Sewing Instructions
Build the blocks for Confetti Section 1
Step 1: Using the diagram on the right, cut out (16) white background rectangles and label each rectangle with the corresponding letter. Step 2: Dive into your stash and cut out (13) 1.5” colorful squares. Step 3: Add confetti to your white background rectangles according to the instructions on Page 3.
Row 1 Step 4: Sew blocks C1 and C2 together as noted in the diagram. Step 5: Sew blocks A, B, joined C1/C2, D and E together to form Row 1.
Row 2 Step 6: Sew blocks H1 and H2 together as noted in the diagram. Step 7: Sew joined H1 and H2 block to block I. Step 8: Sew blocks F, G and combined H1/H2/I blocks together to form Row 2.
Row 3 Step 9: Sew blocks K1 and K2 together as noted in the diagram. Step 10: Sew blocks J, joined blocks K1 and K2, and block L together to form Row 3.
Row 4 Step 11: Stencil your message in the rectangle, using your favorite method. Complete Confetti Section 1
Step 12: Sew rows 1, 2, 3 and 4 together as noted in the diagram.
Tip: We used sticky notes to label our squares and rectangles. Be-fore adding confetti, use a straight pin to secure your sticky note so it
doesn’t fall off while you are sewing!
Tip: We used a Cricut® machine to make the stencil and embroidery paint to make our message. Have an embroidery machine? Use it to
create your message!

12
Build the blocks for Confetti Section 2 Step 1: Using the diagram on the right, cut out (2) white background rectangles. La-bel them. Step 2: Dive into your stash and cut out (3) 1.5” colorful squares. Step 3: Add confetti to white background rectangles according to instructions on Page 3. Step 4: Sew block N and O together to form Confetti section 2.
Confetti Section 2 - Cutting and Sewing Instructions

13
Build the blocks Confetti section 3 Step 1: Using the diagram on the right, cut out (9) white background squares and rectangles. Label them. Step 2: Dive into your stash and cut out (10) 1.5” colorful squares. Step 3: Add confetti to the white background squares and rectangles according to instructions on Page 3.
Row 1 Step 4: Sew blocks P and Q together as noted in the diagram to form row 1.
Row 2 Step 5: Sew blocks R, S and T together as noted in the diagram to form row 2.
Row 3 Step 6: Sew blocks U and V together as noted in the diagram to form row 3.
Row 4 Step 7: Sew blocks W and X together as noted in the diagram to form row 4. Complete Confetti Section 3
Step 8: Sew rows 1, 2, 3 and 4 together as noted in the diagram.
Confetti Section 3 - Cutting and Sewing Instructions

14
Step 1: Sew Confetti Section 2 to Confetti Section 3 as shown at right. Press seams toward Confetti Section 3.
Step 2: Sew Confetti Section 1 to Confetti Sections 2 and 3 as shown at right. Press seam toward Confetti Section 2 and 3.
Complete the Confetti Section

15
Complete the Wall Hanging
Step 1: Sew the gift box section to the confetti Section. Press seams toward the confetti section. Step 2: Sew a white 1.5 inch x width of fabric strip to the left side and to the right side of your wall hanging as shown in the diagram on the right. Trim the excess fabric and press seams toward 1.5 inch fabric strip. Step 3: Sew a white 1.5 inch x width of fabric strip to the top and to the bottom of your wall hanging as shown in the diagram on the right. Trim the excess fabric and press seams toward the 1.5 inch fabric strip. Step 4: Quilt your wall hanging using your favorite quilting method. Step 5: Create a hanging sleeve using your favorite method and attach it to the top of your wall hanging. Step 6: Piece your binding strips together and attach to your wall hanging using your favorite binding method. Step 7: Attach a medium size safety pin to the top of the small gift box. Step 8: Clip a decorative bow to the safety pin. The bow can easily be removed so you can change the bow or wash your wall hanging as needed.
Copyright Gray Barn Designs 2016. Unauthorized use and/or duplication of this material without express and written permission from Gray Barn Designs is strictly prohibited.
Excerpts and links may be used provided that clear credit is given to Gray Barn Designs with appropriate and specific direction to the original content.