Embed Size (px)
Citation preview
20178
Get Connected, Together towards
the best solutions
for your patients.
2 GC get connected
Dear reader,
Welcome to another new edition of GC Get Connected, the first in 2017. As you can already guess, our main
focus for the first part of this year is the International Dental Show (IDS). Can you believe it’s been two years
already? In this Get Connected, we already highlight some of the new products and innovations you’ll be able
to discover at the IDS and several local events later this year.
First of all, the award winning design of the D-Light® Pro, a dual wavelength LED curing light which also helps
you to see further. Then there’s Essentia® Universal Shade: 1 shade, 3 viscosities for all posterior indications &
cavity classes.
GRADIA PLUS is our new Modular composite system for indirect restorations. Its unique modular concept has
fewer standard shades, but uses a more individual mixing and layering approach making it more compact
and cost-effective. We’re also delighted to celebrate the 10th anniversary of our GIC restorative EQUIA. 10 years
of outstanding clinical success and several millions of restorations, an ideal occasion to look back (to its past
merits) and ahead, as this product will show its value for years to come.
Of course there are many more new products (the improved Reline 2 and the LRF Blocks on the laboratory
side, to name just a few) and our digital product portfolio (IOS, ALS and GC’s CAD-CAM Production Centre)
that will catch your attention. From 21-27 March 2017 you can join us on our booth (N010-O029) in the
Kölnmesse in Cologne (Germany) to meet our team of product specialists, they’ll be glad to tell you all about it.
Education remains one of the focal points of our way of working. Also in 2017 we have an exciting line-up of
trainings at our GC Europe campus. We also continuously invest yearly in new training facilities
spread across Europe. At the moment we have five beautiful training facilities in Europe: Spain, Italy
Turkey and France.
Enjoy the read,
Michele Puttini
President, GC Europe
Dear readersWelcome to the 8th edition of GC’s Get Connected newsletter.
GC get connected 3
1. Welcome word M. Puttini 2
2. The future of restorative dentistry is … digital 5 Clinical case by Dr. Filip Keulemans
3. 10 years of GC EQUIA: Experts take stock - Significant progress in GIC 11 By Professor Dr. Sevil Gurgan (Turkey), Professor Elmar Reich (Germany), PD Dr. Falk Schwendicke (Germany)
and Professor Hervé Tassery (France)
4. Seeing is believing! Near-UV light detection mode with GC D-Light Pro® 19 By Dr. Javier Tapia Guadix, DDS, CG Artist
5. Clinical application of the Proximal Box Elevation Technique in combination with Cerasmart Inlays. 25 By Dr. Dayana da Silva Gonçalves and Prof. Laura Ceballos, Spain
6. Essentia Universal shade - A universal solution for posterior restorations? 31 By Dr Bojidar Kafelov, Bulgaria
7. Winners Essentia Facebook contest 36
8. How to maintain comfort and function after implant placement in denture wearers? 41 The use of silicone soft relining material as a solution By Dr David Garcia-Baeza and Dr Olga González, Madrid, Spain
9. Effectively combining - CAD/CAM applications 47 By Garlef Roth, Germany
1. GRADIA® PLUS A new concept for indirect lab composite techniques 57 Diederik Hellingh, Mr Simone Maffei and Mr Michael Brüsch
11. Press for success! GC Initial LiSi Press - An extraordinary combination of strength and aesthetics 63 Carsten Fischer, sirius ceramics, Frankfurt am Main
Bonding &Conditioning
Contents
Endo Bonding &Conditioning
Restoratives
Impression Taking& Model Creation
Finishing & polishing
Identify
Prevent
ModellationResin / Wax
Pressing
Intra Oral Scanning
Lab Scanning& CAD
Chairside CAM
Staining
Cementation
Casting FullContour
Build-Up
Follow-up &maintenance
CAM Frameworks
Implant &Preparation
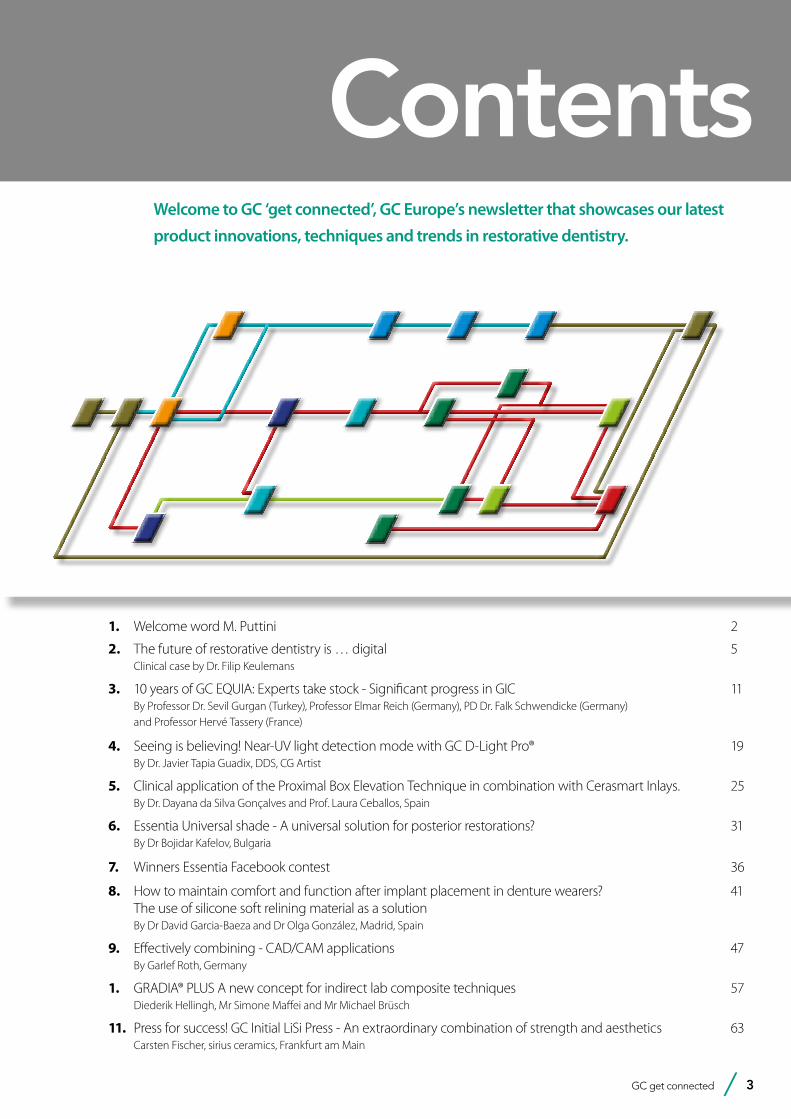
Welcome to GC ‘get connected’, GC Europe’s newsletter that showcases our latest
product innovations, techniques and trends in restorative dentistry.
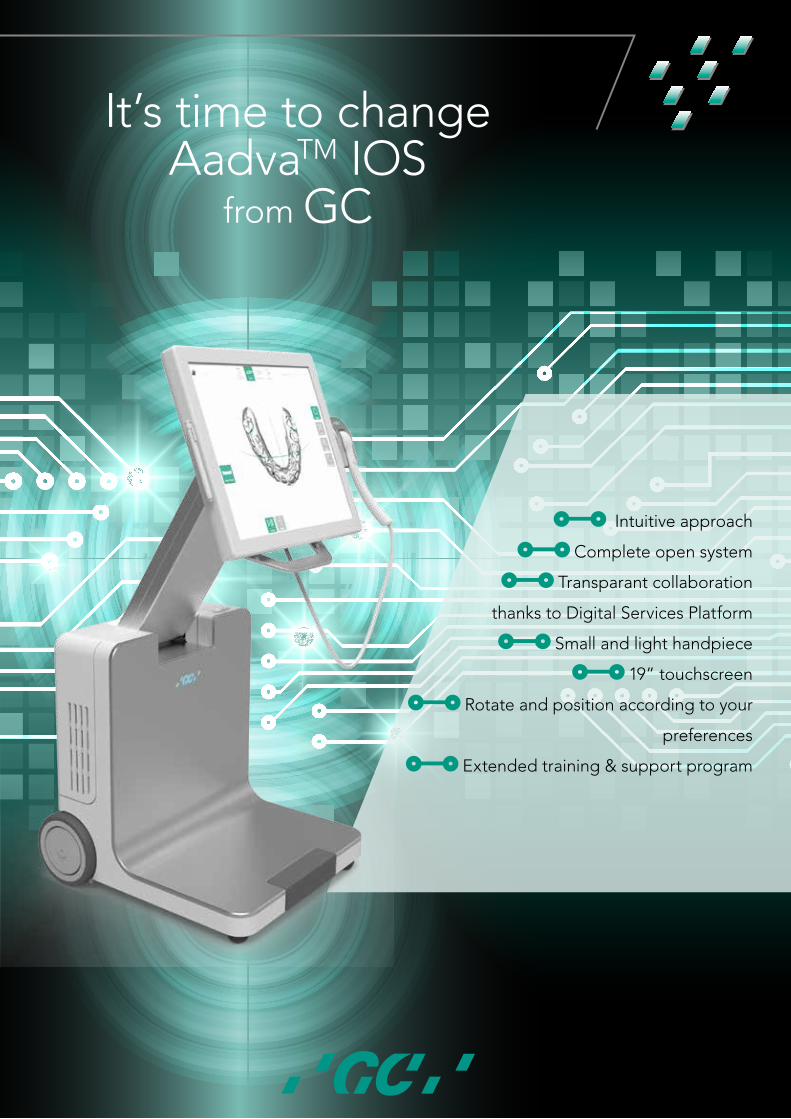
It’s time to changeAadvaTM IOS
from GC
Intuitive approach
Complete open system
Transparant collaboration
thanks to Digital Services Platform
Small and light handpiece
19” touchscreen
Rotate and position according to your
preferences
Extended training & support program
4 GC get connected
It’s time to changeAadvaTM IOS
from GC
Intuitive approach
Complete open system
Transparant collaboration
thanks to Digital Services Platform
Small and light handpiece
19” touchscreen
Rotate and position according to your
preferences
Extended training & support program
GC get connected 5
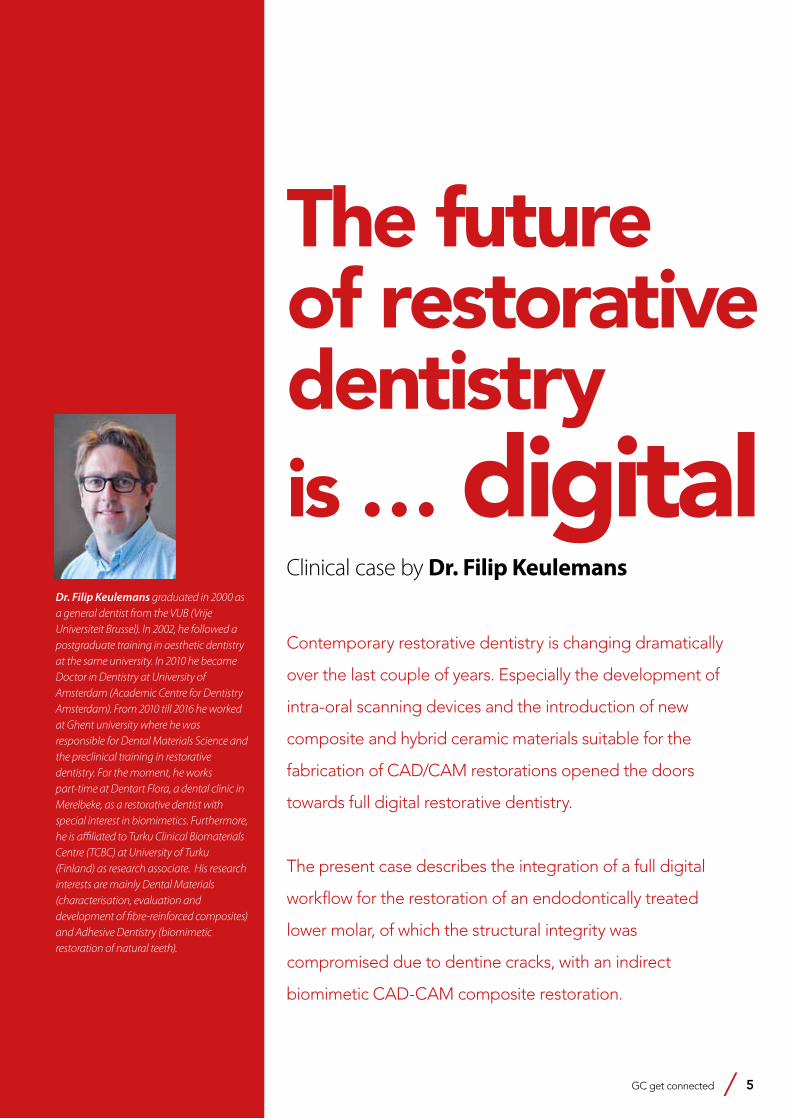
The future of restorative dentistry is … digitalClinical case by Dr. Filip Keulemans
Contemporary restorative dentistry is changing dramatically
over the last couple of years. Especially the development of
intra-oral scanning devices and the introduction of new
composite and hybrid ceramic materials suitable for the
fabrication of CAD/CAM restorations opened the doors
towards full digital restorative dentistry.
The present case describes the integration of a full digital
workflow for the restoration of an endodontically treated
lower molar, of which the structural integrity was
compromised due to dentine cracks, with an indirect
biomimetic CAD-CAM composite restoration.
Dr. Filip Keulemans graduated in 2000 as a general dentist from the VUB (Vrije Universiteit Brussel). In 2002, he followed a postgraduate training in aesthetic dentistry at the same university. In 2010 he became Doctor in Dentistry at University of Amsterdam (Academic Centre for Dentistry Amsterdam). From 2010 till 2016 he worked at Ghent university where he was responsible for Dental Materials Science and the preclinical training in restorative dentistry. For the moment, he works part-time at Dentart Flora, a dental clinic in Merelbeke, as a restorative dentist with special interest in biomimetics. Furthermore, he is affiliated to Turku Clinical Biomaterials Centre (TCBC) at University of Turku (Finland) as research associate. His research interests are mainly Dental Materials (characterisation, evaluation and development of fibre-reinforced composites) and Adhesive Dentistry (biomimetic restoration of natural teeth).
It’s time to changeAadvaTM IOS
from GC
Intuitive approach
Complete open system
Transparant collaboration
thanks to Digital Services Platform
Small and light handpiece
19” touchscreen
Rotate and position according to your
preferences
Extended training & support program
6 GC get connected
Clinical case report
Initial situation and treatment
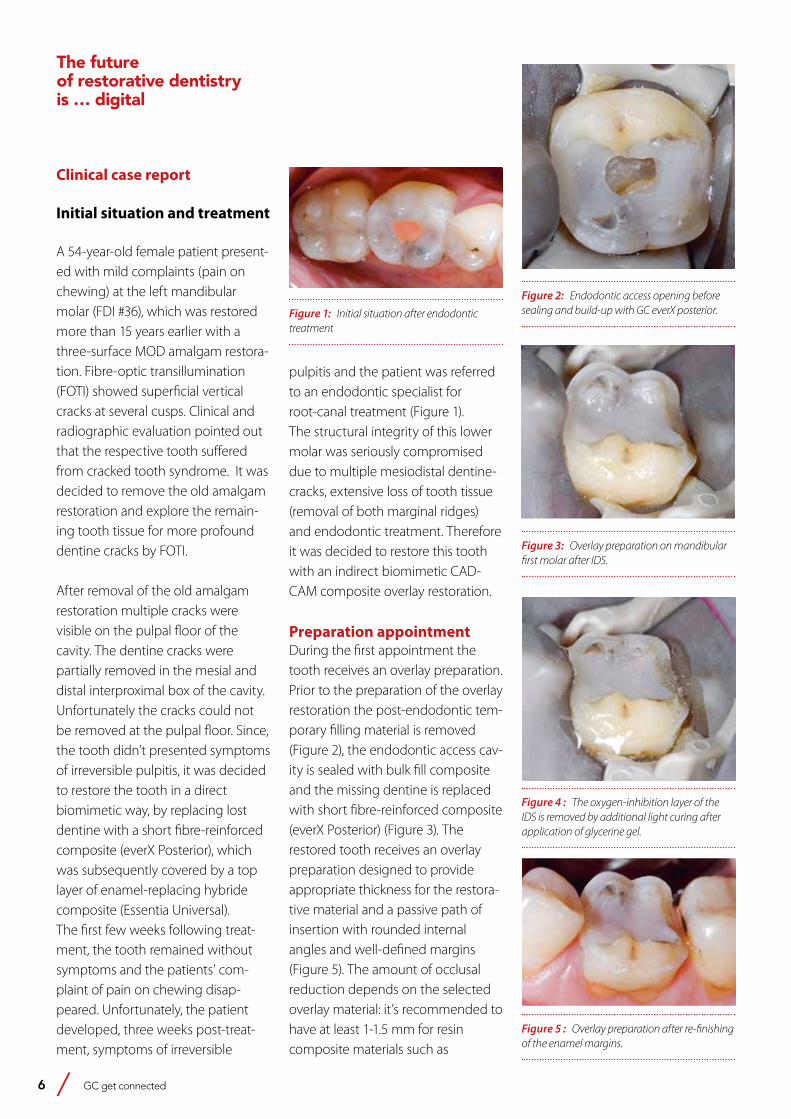
A 54-year-old female patient present-ed with mild complaints (pain on chewing) at the left mandibular molar (FDI #36), which was restored more than 15 years earlier with a three-surface MOD amalgam restora-tion. Fibre-optic transillumination (FOTI) showed superficial vertical cracks at several cusps. Clinical and radiographic evaluation pointed out that the respective tooth suffered from cracked tooth syndrome. It was decided to remove the old amalgam restoration and explore the remain-ing tooth tissue for more profound dentine cracks by FOTI.
After removal of the old amalgam restoration multiple cracks were visible on the pulpal floor of the cavity. The dentine cracks were partially removed in the mesial and distal interproximal box of the cavity. Unfortunately the cracks could not be removed at the pulpal floor. Since, the tooth didn’t presented symptoms of irreversible pulpitis, it was decided to restore the tooth in a direct biomimetic way, by replacing lost dentine with a short fibre-reinforced composite (everX Posterior), which was subsequently covered by a top layer of enamel-replacing hybride composite (Essentia Universal). The first few weeks following treat-ment, the tooth remained without symptoms and the patients’ com-plaint of pain on chewing disap-peared. Unfortunately, the patient developed, three weeks post-treat-ment, symptoms of irreversible
pulpitis and the patient was referred to an endodontic specialist for root-canal treatment (Figure 1). The structural integrity of this lower molar was seriously compromised due to multiple mesiodistal dentine-cracks, extensive loss of tooth tissue (removal of both marginal ridges) and endodontic treatment. Therefore it was decided to restore this tooth with an indirect biomimetic CAD-CAM composite overlay restoration.
Preparation appointmentDuring the first appointment the tooth receives an overlay preparation. Prior to the preparation of the overlay restoration the post-endodontic tem-porary filling material is removed (Figure 2), the endodontic access cav-ity is sealed with bulk fill composite and the missing dentine is replaced with short fibre-reinforced composite (everX Posterior) (Figure 3). The restored tooth receives an overlay preparation designed to provide appropriate thickness for the restora-tive material and a passive path of insertion with rounded internal angles and well-defined margins (Figure 5). The amount of occlusal reduction depends on the selected overlay material: it’s recommended to have at least 1-1.5 mm for resin composite materials such as
Figure 1: Initial situation after endodontic treatment
Figure 2: Endodontic access opening before sealing and build-up with GC everX posterior.
Figure 3: Overlay preparation on mandibular first molar after IDS.
Figure 4 : The oxygen-inhibition layer of the IDS is removed by additional light curing after application of glycerine gel.
Figure 5 : Overlay preparation after re-finishing of the enamel margins.
The futureof restorative dentistryis … digital
GC get connected 7
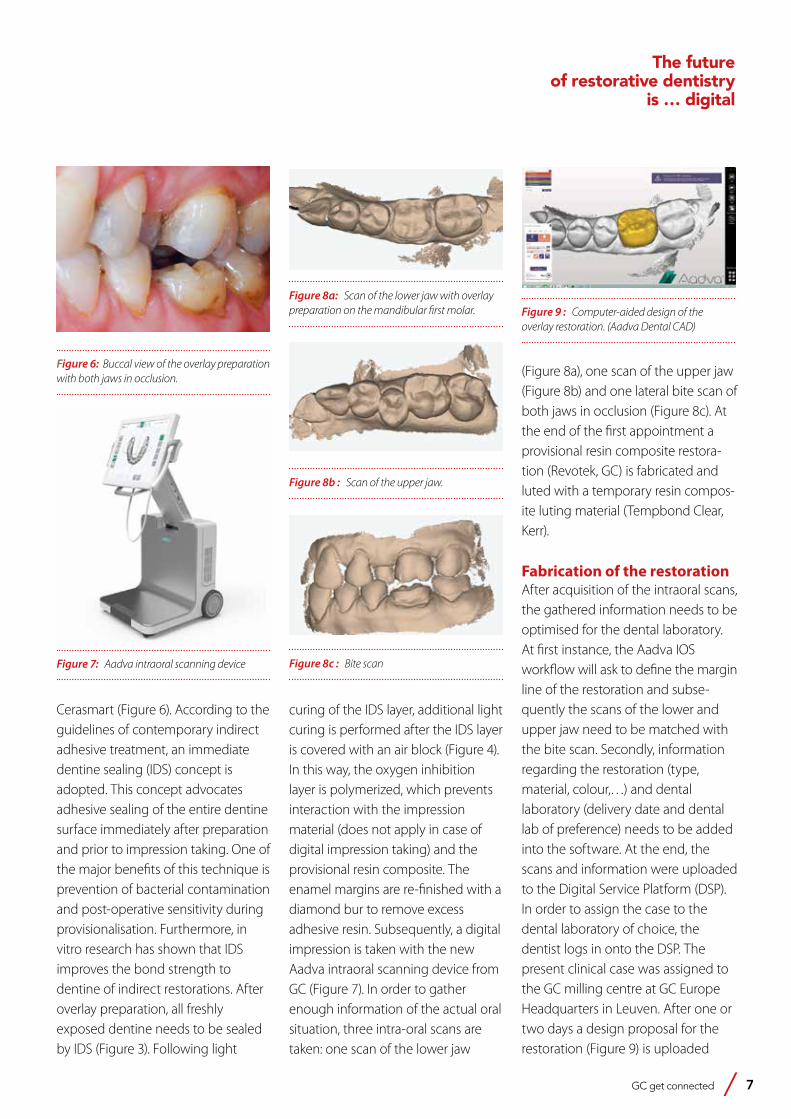
(Figure 8a), one scan of the upper jaw (Figure 8b) and one lateral bite scan of both jaws in occlusion (Figure 8c). At the end of the first appointment a provisional resin composite restora-tion (Revotek, GC) is fabricated and luted with a temporary resin compos-ite luting material (Tempbond Clear, Kerr).
Fabrication of the restorationAfter acquisition of the intraoral scans, the gathered information needs to be optimised for the dental laboratory. At first instance, the Aadva IOS workflow will ask to define the margin line of the restoration and subse-quently the scans of the lower and upper jaw need to be matched with the bite scan. Secondly, information regarding the restoration (type, material, colour,…) and dental laboratory (delivery date and dental lab of preference) needs to be added into the software. At the end, the scans and information were uploaded to the Digital Service Platform (DSP). In order to assign the case to the dental laboratory of choice, the dentist logs in onto the DSP. The present clinical case was assigned to the GC milling centre at GC Europe Headquarters in Leuven. After one or two days a design proposal for the restoration (Figure 9) is uploaded
Figure 6: Buccal view of the overlay preparation with both jaws in occlusion.
Figure 7: Aadva intraoral scanning device
Figure 8a: Scan of the lower jaw with overlay preparation on the mandibular first molar.
Figure 8b : Scan of the upper jaw.
Figure 8c : Bite scan
Figure 9 : Computer-aided design of the overlay restoration. (Aadva Dental CAD)
Cerasmart (Figure 6). According to the guidelines of contemporary indirect adhesive treatment, an immediate dentine sealing (IDS) concept is adopted. This concept advocates adhesive sealing of the entire dentine surface immediately after preparation and prior to impression taking. One of the major benefits of this technique is prevention of bacterial contamination and post-operative sensitivity during provisionalisation. Furthermore, in vitro research has shown that IDS improves the bond strength to dentine of indirect restorations. After overlay preparation, all freshly exposed dentine needs to be sealed by IDS (Figure 3). Following light
curing of the IDS layer, additional light curing is performed after the IDS layer is covered with an air block (Figure 4). In this way, the oxygen inhibition layer is polymerized, which prevents interaction with the impression material (does not apply in case of digital impression taking) and the provisional resin composite. The enamel margins are re-finished with a diamond bur to remove excess adhesive resin. Subsequently, a digital impression is taken with the new Aadva intraoral scanning device from GC (Figure 7). In order to gather enough information of the actual oral situation, three intra-oral scans are taken: one scan of the lower jaw
The futureof restorative dentistry
is … digital
8 GC get connected
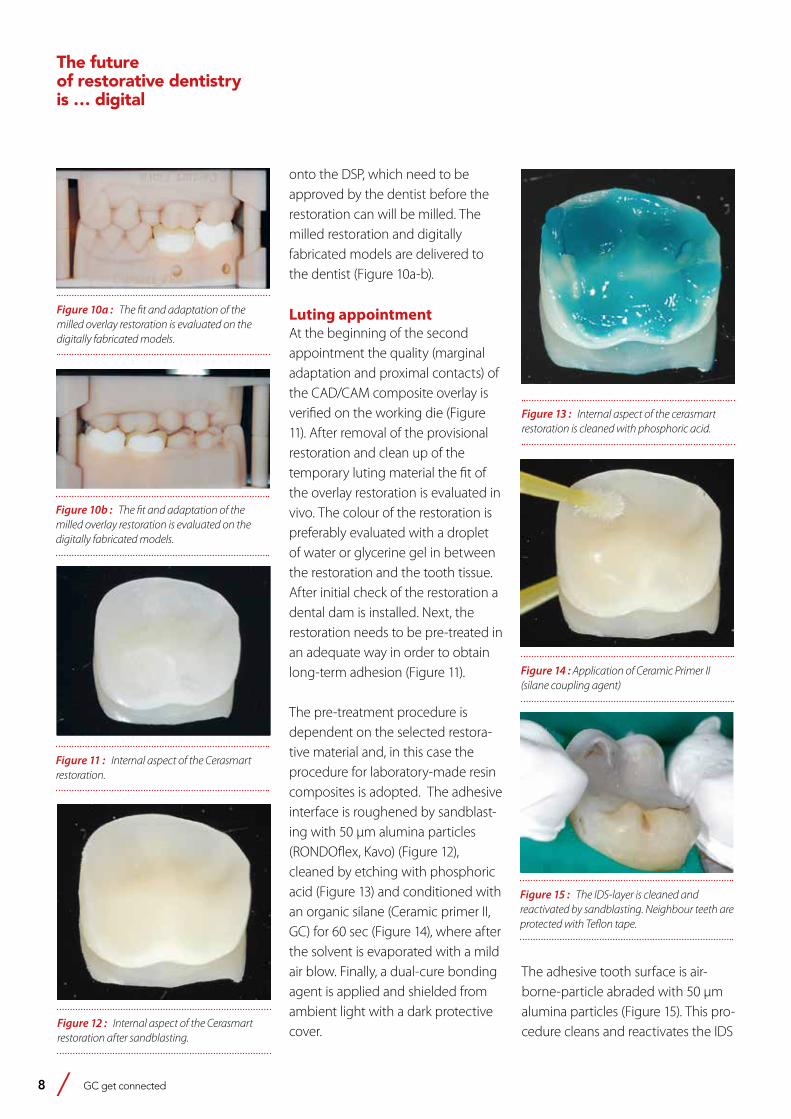
onto the DSP, which need to be approved by the dentist before the restoration can will be milled. The milled restoration and digitally fabricated models are delivered to the dentist (Figure 10a-b).
Luting appointmentAt the beginning of the second appointment the quality (marginal adaptation and proximal contacts) of the CAD/CAM composite overlay is verified on the working die (Figure 11). After removal of the provisional restoration and clean up of the temporary luting material the fit of the overlay restoration is evaluated in vivo. The colour of the restoration is preferably evaluated with a droplet of water or glycerine gel in between the restoration and the tooth tissue. After initial check of the restoration a dental dam is installed. Next, the restoration needs to be pre-treated in an adequate way in order to obtain long-term adhesion (Figure 11).
The pre-treatment procedure is dependent on the selected restora-tive material and, in this case the procedure for laboratory-made resin composites is adopted. The adhesive interface is roughened by sandblast-ing with 50 μm alumina particles (RONDOflex, Kavo) (Figure 12), cleaned by etching with phosphoric acid (Figure 13) and conditioned with an organic silane (Ceramic primer II, GC) for 60 sec (Figure 14), where after the solvent is evaporated with a mild air blow. Finally, a dual-cure bonding agent is applied and shielded from ambient light with a dark protective cover.
Figure 10a : The fit and adaptation of the milled overlay restoration is evaluated on the digitally fabricated models.
Figure 10b : The fit and adaptation of the milled overlay restoration is evaluated on the digitally fabricated models.
Figure 11 : Internal aspect of the Cerasmart restoration.
Figure 12 : Internal aspect of the Cerasmart restoration after sandblasting.
Figure 13 : Internal aspect of the cerasmart restoration is cleaned with phosphoric acid.
Figure 14 : Application of Ceramic Primer II (silane coupling agent)
Figure 15 : The IDS-layer is cleaned and reactivated by sandblasting. Neighbour teeth are protected with Teflon tape.
The adhesive tooth surface is air-borne-particle abraded with 50 μm alumina particles (Figure 15). This pro-cedure cleans and reactivates the IDS
The futureof restorative dentistryis … digital
GC get connected 9
The presented case shows that intra-oral scanning devices and new CAD/CAM composite materials made it possible to integrate a full digital workflow for the fabrication of indirect restorations.
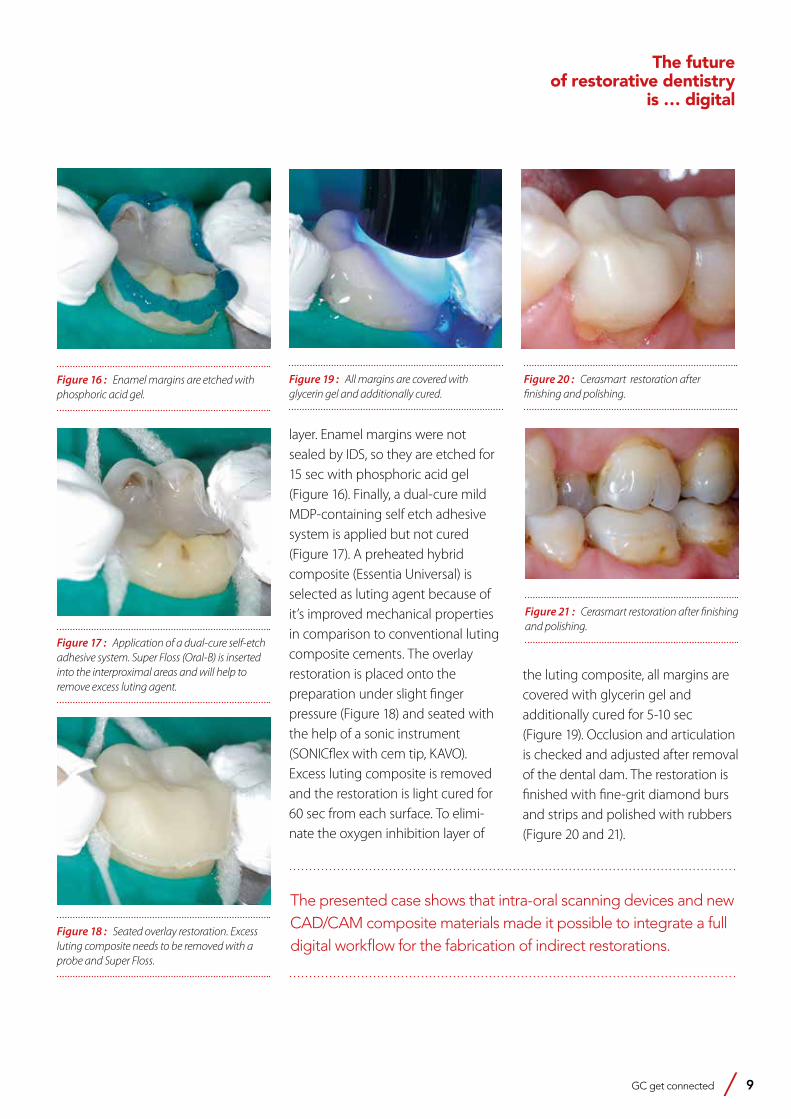
layer. Enamel margins were not sealed by IDS, so they are etched for 15 sec with phosphoric acid gel (Figure 16). Finally, a dual-cure mild MDP-containing self etch adhesive system is applied but not cured (Figure 17). A preheated hybrid composite (Essentia Universal) is selected as luting agent because of it’s improved mechanical properties in comparison to conventional luting composite cements. The overlay restoration is placed onto the preparation under slight finger pressure (Figure 18) and seated with the help of a sonic instrument (SONICflex with cem tip, KAVO). Excess luting composite is removed and the restoration is light cured for 60 sec from each surface. To elimi-nate the oxygen inhibition layer of
the luting composite, all margins are covered with glycerin gel and additionally cured for 5-10 sec (Figure 19). Occlusion and articulation is checked and adjusted after removal of the dental dam. The restoration is finished with fine-grit diamond burs and strips and polished with rubbers (Figure 20 and 21).
Figure 16 : Enamel margins are etched with phosphoric acid gel.
Figure 17 : Application of a dual-cure self-etch adhesive system. Super Floss (Oral-B) is inserted into the interproximal areas and will help to remove excess luting agent.
Figure 18 : Seated overlay restoration. Excess luting composite needs to be removed with a probe and Super Floss.
Figure 20 : Cerasmart restoration after finishing and polishing.
Figure 21 : Cerasmart restoration after finishing and polishing.
Figure 19 : All margins are covered with glycerin gel and additionally cured.
The futureof restorative dentistry
is … digital
EQUIA Forte from GC
EQUIA Forte takes the proven EQUIA approach to the next level.
No need for conditioning or bonding with its built-in universal adhesive technology and
outstanding wettability. EQUIA Forte is extremely tolerant
and bonds equally well to all surfaces even in the deepest of lesions. With EQUIA Forte Coat acting like
a lustre coating, you save on polishing time and achieve excellent aesthetics in no time.
The glass hybrid revolution
GC get connected 11
10 years of GC EQUIA: Experts take stockSignificant progress in GI TechnologyProfessor Dr. Sevil Gurgan (Turkey), Professor Elmar Reich (Germany), PD Dr. Falk Schwendicke (Germany) and Professor Hervé Tassery (France)
At the beginning of 2017, the question of the future of
dental amalgam still remains the focus of widespread public
attention: the EU Parliament, Commission and Member
States had just reached a compromise on the continued
use of the controversial material, which is likely to include,
among other things, ceasing to use it on children under the
age of 15 and on pregnant and breastfeeding women from
July 2018. In this discussion leading dental experts outline
how they see the future of amalgam and the role that
modern glass ionomer-based filling solutions like EQUIA
and EQUIA Forte (both GC) play in the search for alternative
materials. The 10th anniversary of the EQUIA concept in
2017 offered an occasion for the discussion.
12 GC get connected
1. Where do you see the future trends in dentistry?
Dr Falk Schwendicke: We can expect many trends: for one thing, digital procedures will play a greater role, not just with regard to CAD/CAM processes, but also in imaging, treatment supervision or in the form of apps for patient communication and health management. E-health is getting more and more important and patients welcome this development too, because for them, digital processes offer a great motivation to think about health issues on an ongoing basis at home.Furthermore, I can see a trend towards to even more prevention. Health management is very important here, too. These trends mainly become relevant in the context of epidemiology: more and more older people are keeping their natural teeth for longer. We need ideas in this area!
Professor Hervé Tassery: Actually, it’s mainly in the area of CAD/CAM processes that we can expect to see interesting developments. With regard to patients, too, social aspects will become increasingly significant. I would also expect, therefore, that going forward, health policy around dentistry will be increasingly focused on prevention.Professor Dr Elmar Reich: I think that tailored dentistry based on diagnoses of cariological and parodontological risk factors will become more important. I am also, like my colleagues, anticipating major developments in digitalisation. Digital dentistry brings challenges, but also a lot of opportunities for practitioners. In this area, I’m finding it particularly exciting to see how developments in the field of digital intraoral impression-taking will progress. A whole new topic is the fact that society’s ageing, and therefore patients are too. In this area, dentistry has an
obligation to offer treatment concepts for the increasing number of older patients - whether it’s in the practice, at home or in care facilities. Professor Sevil Gurgan: We’re already witnessing enormous changes and the 21st century will go even further than the recent past in producing developments of note for human existence. The decades ahead of us promise a multitude of scientific and technological discoveries and economic, social and political changes on a scale as yet unseen in the history of humanity. The biological and digital revolutions are converging more quickly in clinical dentistry than, for example, in general medicine and pharmacy. Fundamental improvements in health research, risk assessment and disease prevention, as well as in diagnosis, therapy, biomaterials and successful treatments in the healthcare sector will change healthcare worldwide. If you look back, you can clearly see
10 years of GC EQUIA: Experts take stockSignificant progress in GIC
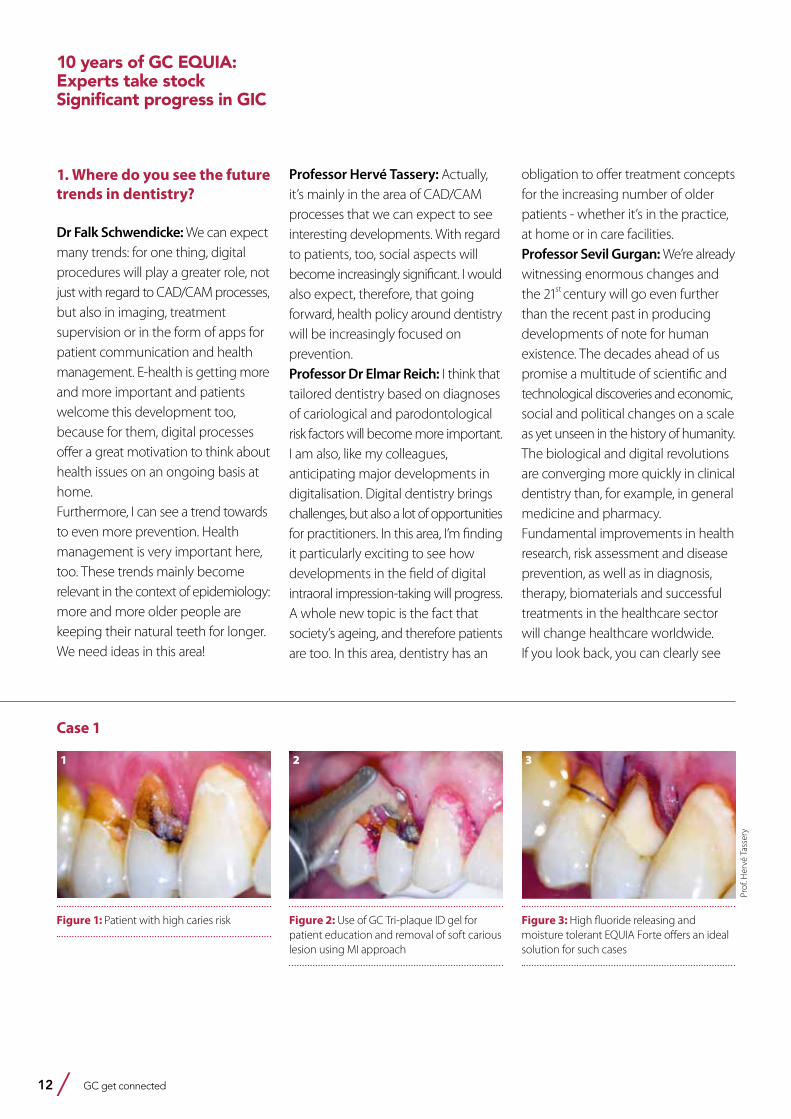
Case 1
Figure 1: Patient with high caries risk Figure 2: Use of GC Tri-plaque ID gel for patient education and removal of soft carious lesion using MI approach
Figure 3: High fluoride releasing and moisture tolerant EQUIA Forte offers an ideal solution for such cases
1 2 3
Prof
. Her
vé T
asse
ry

GC get connected 13
from the progress in dentistry and in society that the dental profession has experienced impressive technological growth. The following is a list of areas in which digital dentistry has already arrived: CAD/CAM and intraoral imaging (both laboratory and practice-controlled), caries diagnosis, computer-assisted implantology including designing and manufacturing surgical guides, digital intra- and extraoral radiography including dental volume imaging, electronic and surgical hand-pieces, lasers, occlusion and jaw joint analyses and diagnostics, intra- and extraoral photography, practice and patient data management including digital patient communication and colour identification.
2. Where could the developments in restorative dentistry lead?
Schwendicke: Prevention will play an even greater role in the care of elderly patients, especially those with a need for long-term care. A new mix of individual and group prophylactic approaches could appear. Traditional restorations work only in a limited way in such patients and precisely for the treatment of root caries; also here we will need alternative concepts.I also think that the number of sealants will increase, as will the use of bioactive materials. There will be a greater focus on biocompatibility and general health matters, too. Aesthetic aspects will remain extremely important here.Tassery: Today people are already trying to keep their teeth for longer. I don’t think we’ve reached the end of that process. Efforts to get patients actively involved in the treatment
process will also continue to increase.Reich: A major topic is actually the longevity of restorations: patients request these and modern materials in this area already perform very well. However, there is sure to be further progress. The number of preventative sealants will also increase. Chairside treatments are a major trend across the board, of course, as well as “green” dentistry. If you look at the risk of developing allergies, glass ionomer cements beat composites. That’s why I think that GICs will become even more significant.Gurgan: This brings to mind a few exciting questions: Will your dentist be able to “grow” you a real tooth one day, to replace one that you’ve lost? Will a medicine be tailored not just to your illness, but to your genetic code as well? And will you be able to protect babies against tooth decay before they even have teeth? This may not be as far off as we might think. The dental profession is entering a phase of astonishing new discoveries. If the right technologies are available, there will also be the challenge of getting people from all walks of life to profit from this extraordinary thrust of knowledge.
3. What restorative options does modern dentistry have to offer?
Schwendicke: Holistic approaches offer new opportunities: Biologically-controlled cavity management will also impact on restorative dentistry. There will be a focus on materials which are biomimetic, remineralising, antibacterial or which affect biofilms. In addition, materials which allow a sealant procedure without grinding
the natural tooth will increase in importance, as well as materials which fits into modified restoration substrates: In the past, all carious dentin has traditionally been removed from a cavity. Modern excavation concepts for deep caries doesn’t foreseen that anymore. According to this, new materials will also have an improved adhesion to and bioactivity with remaining carious dentin.With that in mind we will probably see more materials which connect with the tooth, like glass ionomer cements (GICs) and composites, but which can also do even more. Especially, for the mechanical characteristic GIC’s still have more potential for development in this area. Tassery: The thinking in dentistry has really changed - with regard to treatment concepts, too: among other things, with the minimal invasion approach, we now have improved opportunities to provide adequate treatment while still preserving the substance of the tooth.Gurgan: A new type of dentistry has emerged - a new “restorative approach” called Modern Restorative Dentistry (MRD). MRD follows a minimal-invasion approach but, strictly speaking, has maximum coverage. The approach describes the concept that all healthy tooth structures are preserved during the procedure and that form and function are restored using modern adhesive materials.Reich: I also think that the direction of travel is towards tooth-preserving procedures and the corresponding restoration materials. Patients also want these materials to look as much like real teeth as possible. On the practitioner side I see a trend, in cases
10 years of GC EQUIA: Experts take stock
Significant progress in GIC
14 GC get connected
where there’s any doubt, towards removing less caries in order to protect the pulp.
4. In your opinion, what effect will the Minamata Convention have on the use of amalgam in dentistry?
Schwendicke: Whether it’s in the short or long term Amalgam will disappear and become unimportant. With regard to alternatives, there are currently two options: Composites, possibly bulk-fill materials, can be used, as can cement-type fillings like GICs, for example. Because politics has had a strong impact on this development, it’s difficult to predict the result. Nonetheless, GICs offer a good approach here, although, as already mentioned, the mechanical features still need improvement in comparison to amalgam.Tassery: I am also working on the assumption that we need to think more about restorative alternatives. I think, therefore, that it’s high time we made more effort to develop high-viscosity GICs.Gurgan: As we know, the Minamata Convention aimed to minimise the use of amalgam and to promote the use of cost-effective, clinically effective quicksilver-free alternatives for restorations. With regard to the environment, it’s desirable from a dental perspective that the use of dental amalgam is reduced. This can be achieved effectively by increasing cavity prevention and by promoting the use of high-quality alternatives to dental amalgam. The use of amalgam is prohibited in many countries. Glass ionomers and composites can be used as alternatives - however, the
choice of material ultimately depends on the tooth, its position and the size of the cavities. The type of healthcare, patients’ wishes, technological and financial aspects and environmental factors should also be considered. It is also important to ensure the “longevity” of the restoration and to preserve it and the natural structure of the tooth as well as possible. Our healthcare institutions must concentrate more on disease prevention and minimise potential interventions. Cost aspects should also not be underestimated, because cost effectiveness in countries with high incomes and with a low instance of dental diseases is not representative and cannot be extended to all countries worldwide. The challenges facing countries with medium and low incomes are considerable. Unfortunately the populations of many countries still have high demand for restorative procedures to treat cavities. In this regard, glass ionomers and composites have great potential for use as alternatives to dental amalgam.Reich: In many developing countries, amalgam is still a proven and reliable material for fillings. As an alternative, development aid is currently only providing GICs used in ART technology.
5. What alternatives are there to amalgam?
Reich: Self-hardening adhesive restoration materials can offer an alternative. Schwendicke: As we’ve mentioned, GICs offer a good foundation. Their aesthetics and application are already convincing; the mechanical characteristics just need some
improvement. If we can achieve that, GICs could well become the new amalgam.Tassery: One important approach is certainly in prevention. In this area we still need a better understanding of how biofilm can be controlled and managed so that no cavities occur in the first place.Gurgan: In the past, glass ionomers looked like a relevant alternative in children’s dental care only. However, thanks to the continued developments they can now be used on adults in general and on older patients. The longevity and failure rate of restorations are important factors. Our clinical studies showed that restorations in small Class II cavities and in occlusal surfaces now have high longevity rates. That’s why it’s important to keep studying the long-term use of these materials in the permanent posterior region.
6. You have already discussed the progressive evolution in GICs. Could you elaborate?
Schwendicke: EQUIA and EQUIA Forte represent significant progress in GICs. However, until now the indications were still limited. GICs are well-suited to restorations on occlusal cavities, but for larger occluso-proximal cavities I’m still not quite convinced. Restrictions in cavity size - key word: bucco-oral distance - are unfavourable in everyday dentistry: Here once again, we can see the need to develop the mechanical characteristics. Other than that, however, GICs work well in all areas - they are relatively aesthetically pleasing, easy to handle and bioactive.Reich: For me, GICs are an extremely
10 years of GC EQUIA: Experts take stockSignificant progress in GIC
GC get connected 15
10 years of GC EQUIA: Experts take stock
Significant progress in GIC
important material which still have interesting potential for development. Gurgan: Since the introduction of GICs, these materials have undergone many modifications over the years. Their physical characteristics - especially resistance to wear, reduced sensitivity with early water absorption, so that restorations could be positioned and polished in the same visit, and their translucency - were improved by increasing the viscosity and reducing the amount of filling material to achieve a certain texture. To improve the mechanical characteristics of GICs and enable their clinical use in the posterior region, studies have been carried out to strengthen their matrix by adding different types of filling material. A further development in strengthening GICs is the use of a surface protector. The “coating” should offer protection in the early setting phase and close any surface tears and porosity, which increases the GIC filling’s resistance to wear and fracture toughness.
7. What news is there on the performance of glass ionomer materials in in-vitro studies?
Gurgan: There are a few in-vitro studies demonstrating the progress in glass ionomer technology. However, laboratory studies don’t always reflect the behaviour of materials in clinical practice due to the differences between laboratory and practice conditions. On the other hand, controlled clinical studies can provide the ultimate proof of clinical effectiveness.Reich: Clinical studies are an important way to ensure the effectiveness and safety of a material, although the test
conditions in in-vitro studies rarely correspond to the real-life clinical situation. Tassery: In reality we need lots of studies to be able to confirm the clinical effectiveness of a material. However, by their nature these take a long time and, to obtain meaningful results, need a lot of funding.
8. Could you speak in more detail on the long-term clinical results of the glass ionomer-based restoration system EQUIA (GC)?
Schwendicke: As we mentioned, EQUIA offers excellent results on smaller, mainly occlusal, cavities. This actually applies to GICs in general. Clinical studies also show an improvement and acceptable longevity on limited extended occluso-proximal cavities. However, dentists would like to be able to use GICs for any indication, e.g. on larger MOD cavities in molars as well. We still need better results in this area.Reich: A study by a research group at Greifswald University, headed by Professor Dr Reiner Biffar1 and a research done Prof. Dr. Gurgan2 showed that EQUIA performs so well clinically that the material could be used to place posterior fillings that would last for several years. Gurgan: In the context of our study2 a total of 140 posterior lesions (80 Class I and 60 Class II cavities) were restored in 59 patients, according to the manufacturer’s instructions, using EQUIA (EQUIA Fil and EQUIA Coat, GC) or a posterior composite (Gradia Direct Posterior in combination with G-Bond, both GC). The restorations were qualitatively assessed according to
the modified USPHS (US Public Health Service) criteria under the scanning electron microscope (REM) at the beginning of the study and then annually over a period of six years. After six years, a total of 115 restorations (70 Class I and 45 Class II cavities) had been evaluated in 47 patients, equal to a recall rate of 79.6%. Only two Class II fillings using EQUIA had to be changed after three and four years respectively due to a marginal fracture, while after five and six years there were no further problems with the fillings. After six years, both materials still showed similar and mainly clinically successful performance levels, while the REM evaluations matched the clinical findings. This shows that the glass ionomer-based EQUIA system performs to the same standard as a composite after a period of six years.
9. What notable developments are there in glass ionomer technology?
Reich: There are certainly a lot of developments in glass ionomer technology at present. The EQUIA concept is already performing well and, depending on the indications, is a good option for posterior treatments. However, naturally I hope that the further potential for optimisation will be thoroughly exploited. Tassery: Compared to the older products, current GICs have become far more aesthetically pleasing. However, in larger cavities they reach their limits. Here, onlays are generally the better option. With regard to speed of setting and flexural strength, light-curing GICs are also an interesting development.
16 GC get connected
EQUIA Forte GC:ltä
EQUIA Forte vie todistetun EQUIA konseptin uudelle tasolle.
Ei esikäsittelyä tai sidostusta johtuen materiaalin universaalista sidostusteknologiasta ja erinomaisesta kostuttavuudesta.
EQUI Forte on erittäin toleranttija se sitoutuu hyvin kaikille pinnoille myös
syvissä leesioissa. EQUIA Forte Coat toimii kiillotuspinnoitteena,
kiillotukseen ei kulu aikaa ja erinomainen esteettisyys saavutetaan nopeasti.
Lasihybridi-vallankumous
189720-GC-EQUIA Forte-ADV-210x297-FI.indd 1 21/05/15 13:06
10 years of GC EQUIA: Experts take stockSignificant progress in GIC
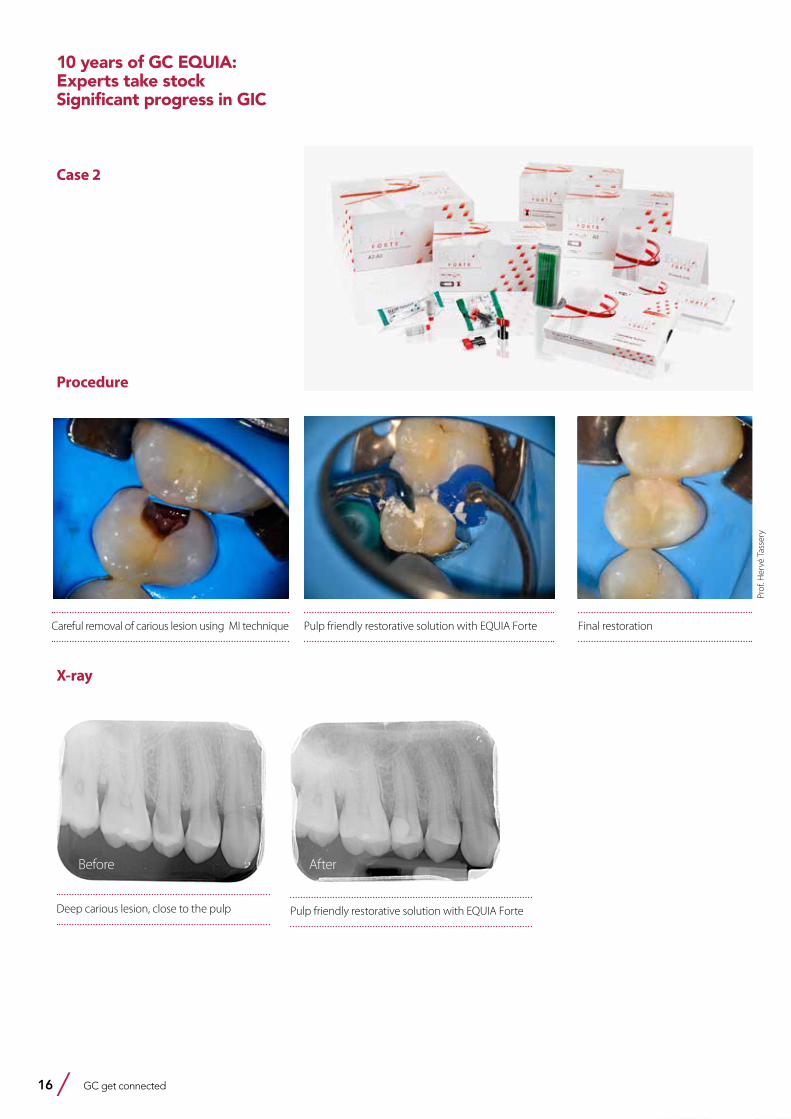
Case 2
Careful removal of carious lesion using MI technique Pulp friendly restorative solution with EQUIA Forte Final restoration
Deep carious lesion, close to the pulp Pulp friendly restorative solution with EQUIA Forte
X-ray
Procedure
Before After
Prof
. Her
vé T
asse
ry
GC get connected 17
EQUIA Forte GC:ltä
EQUIA Forte vie todistetun EQUIA konseptin uudelle tasolle.
Ei esikäsittelyä tai sidostusta johtuen materiaalin universaalista sidostusteknologiasta ja erinomaisesta kostuttavuudesta.
EQUI Forte on erittäin toleranttija se sitoutuu hyvin kaikille pinnoille myös
syvissä leesioissa. EQUIA Forte Coat toimii kiillotuspinnoitteena,
kiillotukseen ei kulu aikaa ja erinomainen esteettisyys saavutetaan nopeasti.
Lasihybridi-vallankumous
189720-GC-EQUIA Forte-ADV-210x297-FI.indd 1 21/05/15 13:06
Gurgan: In March 2015, EQUIA Forte was launched, containing a new generation of glass fillers - called glass hybrids. In this system, the glass filler matrix combines fluor-alumino-silicates (FAS) of different sizes. Smaller, highly reactive fillers (ca. 4 μm) were added to the larger glass fillers from EQUIA Forte Fil (ca. 25 μm), strengthening the matrix. A highly molecular polyacrylic acid was added to EQUIA Forte Fil, making the cement matrix stronger and more stable. In addition to the physical characteristics, handling was optimised to make the material less sticky and more packable. In contrast, the coating is based on the same technology as EQUIA Coat, equipped with evenly distributed nanofillers and a new, multi-functional monomer which increases the coating’s surface hardness and resistance to wear. The new EQUIA Forte is, according to the use instructions and in comparison to EQUIA, recommended for expanded use in Class II cavities, so long as the cupids are not affected, and also for restorations in Class I, unloaded Class II restorations, interdental restorations, core build-ups, Class V restorations and root caries treatments. Studies are currently underway on the use of EQUIA Forte on larger Class II cavities and to restore non-carious, cervical lesions in bruxism patients - also in comparison here to a composite. We
will report on the results of the use of EQUIA Forte in larger Class II cavities at the 6-month point at the IADR 2017 in San Francisco.
10. In your opinion, what are the main reasons why materials like EQUIA and EQUIA Forte make ideal alternatives (to amalgam) for restorations?
Schwendicke: GICs are impressively easy to work with. With their self-adhesive qualities, they are quick and uncomplicated to use in day-to-day clinical life. In my opinion we shouldn’t overstate the fluoride release and remineralising qualities, but with GICs patients benefit from an attractive aesthetic and the fact that hyper-sensitivity only occur extremely rarely.Reich: The physical values, such as the thermal expansion and the modulus of elasticity of GIC-based materials, make them appear better than those of composites. If the strength and setting on the tooth can be optimised further - e.g. by continuing to develop the materials and improve clinical techniques - I foresee excellent prospects for GICs.Tassery: Depending on the indications, EQUIA and EQUIA Forte are promising options for the posterior region. Benefits include their “tooth-like” qualities and their good edge sealing.
Using GICs also means there is barely any post-operative sensitivity. Additional benefits are their remineralising qualities and, above all, the opportunity to offer GICs in the context of a minimally-invasive approach.Gurgan: Amalgam has been used for decades and is viewed by many as the best restoration material for the posterior area. However, in response to UNEP’s (United Nations Environmental Programme) Minamata Convention, many countries have now banned amalgam and both the World Dental Association (FDI) and the World Health Organisation (WHO) are promoting alternatives to amalgam. In comparison to other permanent filling materials, like composites for example, GICs have many benefits - such as their ability to adhere to wet enamel and dentin and their anti-cariogenic qualities, thanks to long-term fluoride release. Additional clinical benefits like biocompatible features and a low thermal expansion coefficient reinforce their great significance in everyday practice. The glass ionomer-based EQUIA system has excellent biocompatibility and it is further distinguished by its bulk fill technology, the lack of any need for etching and bonding procedures, easy handling and quick setting.
10 years of GC EQUIA: Experts take stock
Significant progress in GIC
18 GC get connected
Prof. Dr. Sevil Gürgan (Turkey) graduated from the Hacettepe University School of Dentistry, Ankara, Turkey and got her PhD degree at the Department of Restorative Dentistry of the same school. She became Associate Professor in 1988 and Professor in 1995. She had been as a visiting Professor at the New York University School of Dentistry in New York in 1995 and at the Tufts University School of Dentistry in Boston in 2005. She is an active member of International Association for Dental Research, past board Member of International Association for Dental Research Continental European Division (2009-2012), board member of the European Academy of Operative Dentistry, and the World Federation for Laser Dentistry.
She acted as the vice President of Hacettepe University between 2008-2012 and was head of the Department of Restorative Dentistry of the Dental Faculty between 2005-2011. Currently she is professor at the same department. She has published several articles on dental materials and dental bleaching and has been giving lectures and courses at national and international congresses and meetings for more than 20 years.
Professor Elmar Reich (Germany) graduated from the University of Tübingen/Germany in 1979. Graduate program at the University of Ann Arbor/ Michigan 1980/81 in Restorative Dentistry and Periodontology. 1994-2000: Chairman of the Department for Periodontology and Conservative Dentistry at the University of Saarland, Homburg, GermanyFDI: Chairman of the FDI Science Commission (1997 – 2003).1997-2000: Head of the WHO-Centre for Standardisation in Dentistry, University of Saarland.October 2000-December 2003: Head of New Technologies, business unit of KaVo Co. Since January 2004 Pr. Reich is working in a private dental practice in Biberach/Germany and is professor at the Department of Conservative Dentistry and Periodontology, University of Cologne.Since 2008: member of FDI Education Committee 2010-2013: Chairman of FDI Education Committee
PD Dr. Falk Schwendicke (Germany)
2016 Deputy head of department2015 Editorial Board, Journal of Dental Research2013 Associate Professor for Caries Research and Preventive Dentistry, Department of Operative and Preventive Dentistry, Charité – Universitätsmedizin Berlin, Germany2012-2013 Assistant Professor, Clinic for Conservative Dentistry and Periodontology, Christian-Albrechts-Universität Kiel, Germany2009-2012 Associate Dentist, Banbury, Oxfordshire, United Kingdom2009 Dental licence, German Dental Licence Board, Berlin, Germany2009 Doctorate thesis, Institute for Biochemistry, Charité – Universitätsmedizin Berlin, Germany: “Peptidic Inhibitors of a filarial chitinase – exploration and characterisation” (magna cum laude) 2008 Dental exam, Charité – Universitätsmedizin Berlin (grade: excellent -1.0)
Professor Hervé Tassery (France) team leader of LBN Laboratory Montpellier universitySpecialist in Preventive and minimally invasive dentistry Professor in conservative dentistry and endodontics at University of MarseilleLecturer and author on preventive dentistry and Minimum Intervention
Literature
1. Biffar R, Klinke T, Daboul A, Frankenberger R, Hickel R (2015): 48 months clinical performance of two current glass-ionomer systems in a field study. Abstract Nr. 0039, ConsEuro 2015
2. Gurgan S (2015): 6 year clinical success of GI restorative comparing with composite resin in posterior teeth. J Dent Res 2015;94(Spec Iss B):[Abstract # 0220; CED-IADR; p 100]
10 years of GC EQUIA: Experts take stockSignificant progress in GIC
GC get connected 19
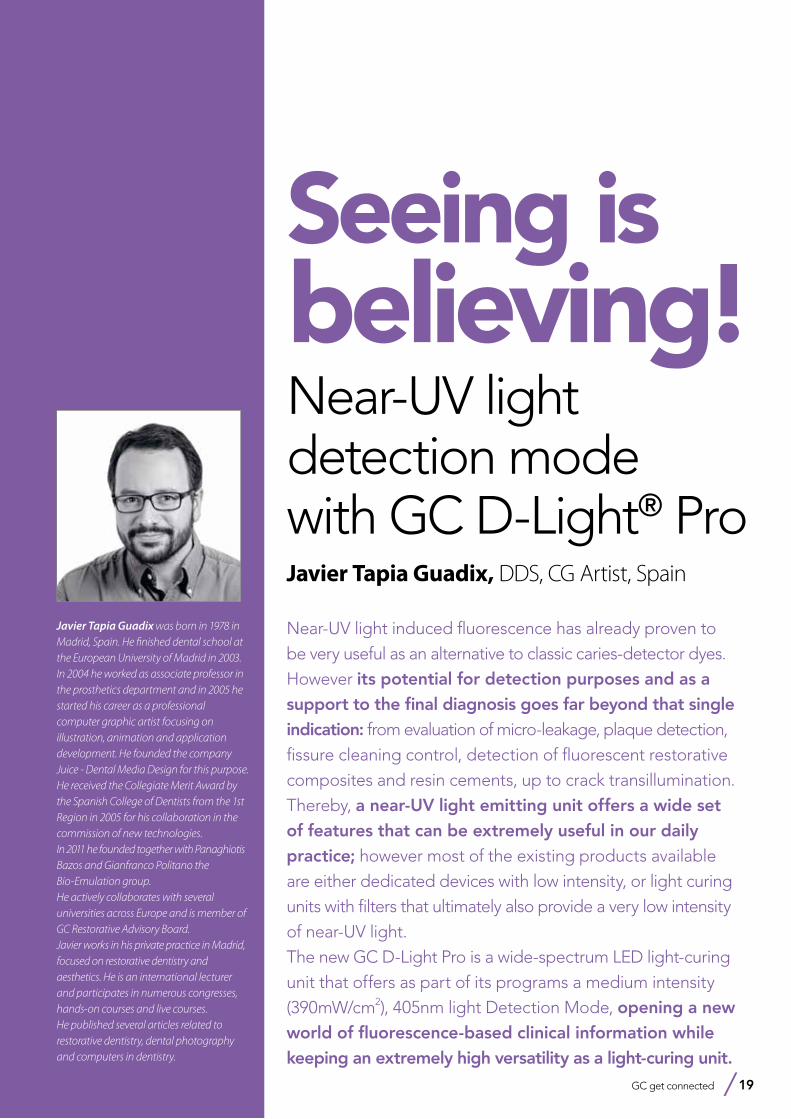
Seeing is believing!Near-UV light detection mode with GC D-Light® ProJavier Tapia Guadix, DDS, CG Artist, Spain
Near-UV light induced fluorescence has already proven to be very useful as an alternative to classic caries-detector dyes. However its potential for detection purposes and as a support to the final diagnosis goes far beyond that single indication: from evaluation of micro-leakage, plaque detection, fissure cleaning control, detection of fluorescent restorative composites and resin cements, up to crack transillumination. Thereby, a near-UV light emitting unit offers a wide set of features that can be extremely useful in our daily practice; however most of the existing products available are either dedicated devices with low intensity, or light curing units with filters that ultimately also provide a very low intensity of near-UV light.The new GC D-Light Pro is a wide-spectrum LED light-curing unit that offers as part of its programs a medium intensity (390mW/cm2), 405nm light Detection Mode, opening a new world of fluorescence-based clinical information while keeping an extremely high versatility as a light-curing unit.
Javier Tapia Guadix was born in 1978 in Madrid, Spain. He finished dental school at the European University of Madrid in 2003. In 2004 he worked as associate professor in the prosthetics department and in 2005 he started his career as a professional computer graphic artist focusing on illustration, animation and application development. He founded the company Juice - Dental Media Design for this purpose.He received the Collegiate Merit Award by the Spanish College of Dentists from the 1st Region in 2005 for his collaboration in the commission of new technologies.In 2011 he founded together with Panaghiotis Bazos and Gianfranco Politano the Bio-Emulation group.He actively collaborates with several universities across Europe and is member of GC Restorative Advisory Board.Javier works in his private practice in Madrid, focused on restorative dentistry and aesthetics. He is an international lecturer and participates in numerous congresses, hands-on courses and live courses.He published several articles related to restorative dentistry, dental photography and computers in dentistry.
20 GC get connected
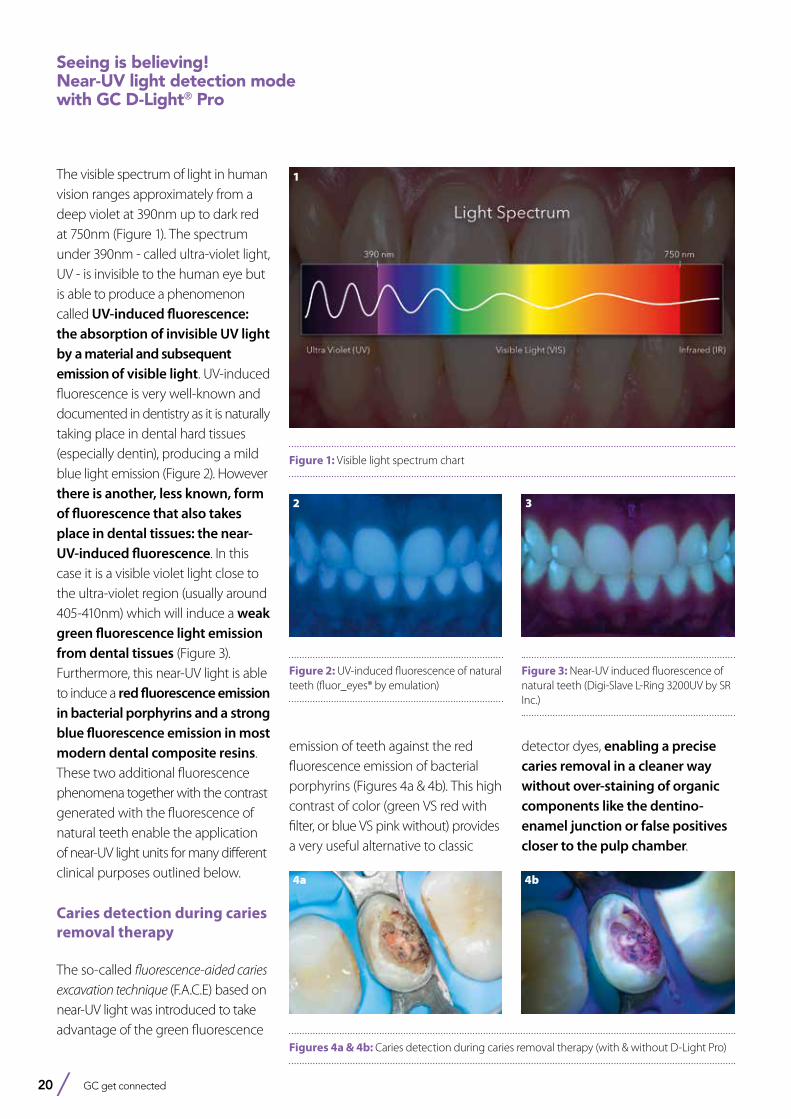
The visible spectrum of light in human vision ranges approximately from a deep violet at 390nm up to dark red at 750nm (Figure 1). The spectrum under 390nm - called ultra-violet light, UV - is invisible to the human eye but is able to produce a phenomenon called UV-induced fluorescence: the absorption of invisible UV light by a material and subsequent emission of visible light. UV-induced fluorescence is very well-known and documented in dentistry as it is naturally taking place in dental hard tissues (especially dentin), producing a mild blue light emission (Figure 2). However there is another, less known, form of fluorescence that also takes place in dental tissues: the near-UV-induced fluorescence. In this case it is a visible violet light close to the ultra-violet region (usually around 405-410nm) which will induce a weak green fluorescence light emission from dental tissues (Figure 3). Furthermore, this near-UV light is able to induce a red fluorescence emission in bacterial porphyrins and a strong blue fluorescence emission in most modern dental composite resins. These two additional fluorescence phenomena together with the contrast generated with the fluorescence of natural teeth enable the application of near-UV light units for many different clinical purposes outlined below.
Caries detection during caries removal therapy
The so-called fluorescence-aided caries excavation technique (F.A.C.E) based on near-UV light was introduced to take advantage of the green fluorescence
emission of teeth against the red fluorescence emission of bacterial porphyrins (Figures 4a & 4b). This high contrast of color (green VS red with filter, or blue VS pink without) provides a very useful alternative to classic
detector dyes, enabling a precise caries removal in a cleaner way without over-staining of organic components like the dentino-enamel junction or false positives closer to the pulp chamber.
Figure 1: Visible light spectrum chart
1
Figure 2: UV-induced fluorescence of natural teeth (fluor_eyes® by emulation)
2
Figure 3: Near-UV induced fluorescence of natural teeth (Digi-Slave L-Ring 3200UV by SR Inc.)
3
Figures 4a & 4b: Caries detection during caries removal therapy (with & without D-Light Pro)
4a 4b
Seeing is believing!Near-UV light detection mode with GC D-Light® Pro
GC get connected 21
Seeing is believing!Near-UV light detection mode
with GC D-Light® Pro
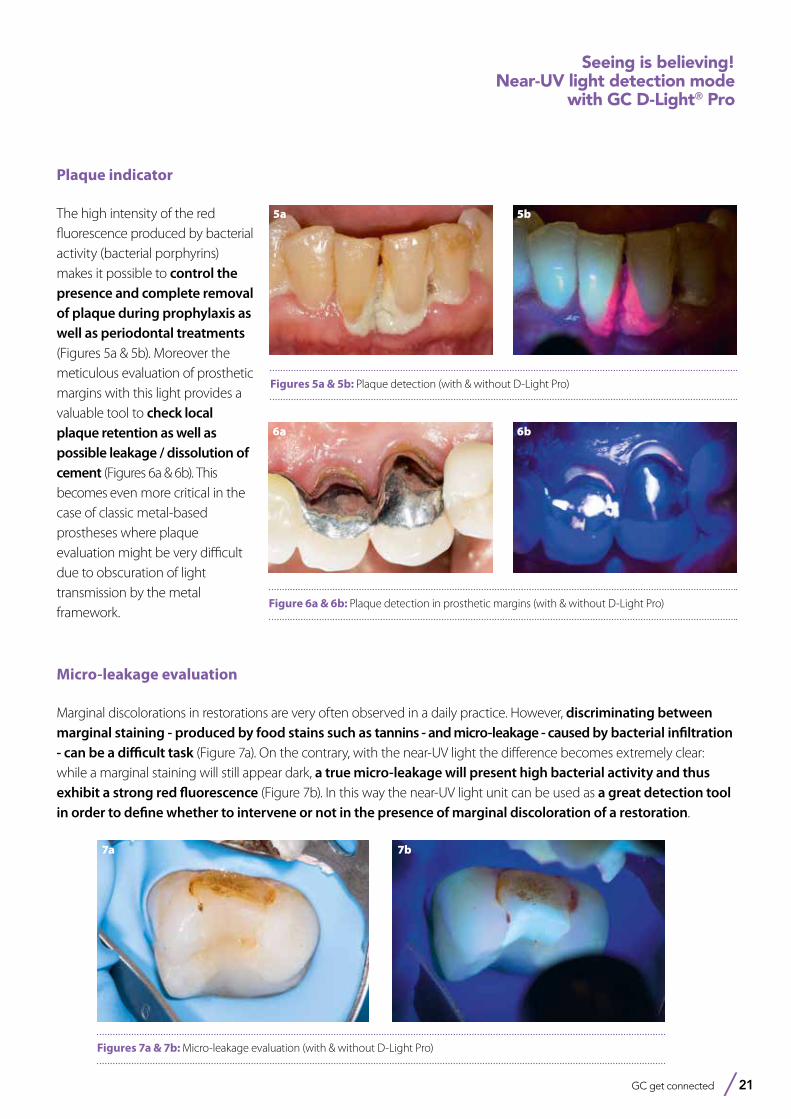
Plaque indicator
The high intensity of the red fluorescence produced by bacterial activity (bacterial porphyrins) makes it possible to control the presence and complete removal of plaque during prophylaxis as well as periodontal treatments (Figures 5a & 5b). Moreover the meticulous evaluation of prosthetic margins with this light provides a valuable tool to check local plaque retention as well as possible leakage / dissolution of cement (Figures 6a & 6b). This becomes even more critical in the case of classic metal-based prostheses where plaque evaluation might be very difficult due to obscuration of light transmission by the metal framework.
Figures 5a & 5b: Plaque detection (with & without D-Light Pro)
5a 5b
Figure 6a & 6b: Plaque detection in prosthetic margins (with & without D-Light Pro)
6a 6b
Figures 7a & 7b: Micro-leakage evaluation (with & without D-Light Pro)
7a 7b
Micro-leakage evaluation
Marginal discolorations in restorations are very often observed in a daily practice. However, discriminating between marginal staining - produced by food stains such as tannins - and micro-leakage - caused by bacterial infiltration - can be a difficult task (Figure 7a). On the contrary, with the near-UV light the difference becomes extremely clear: while a marginal staining will still appear dark, a true micro-leakage will present high bacterial activity and thus exhibit a strong red fluorescence (Figure 7b). In this way the near-UV light unit can be used as a great detection tool in order to define whether to intervene or not in the presence of marginal discoloration of a restoration.
22 GC get connected
9a
Figures 9a & 9b: Fissure cleaning control before and after prophylaxis (both with D-Light Pro)
9b
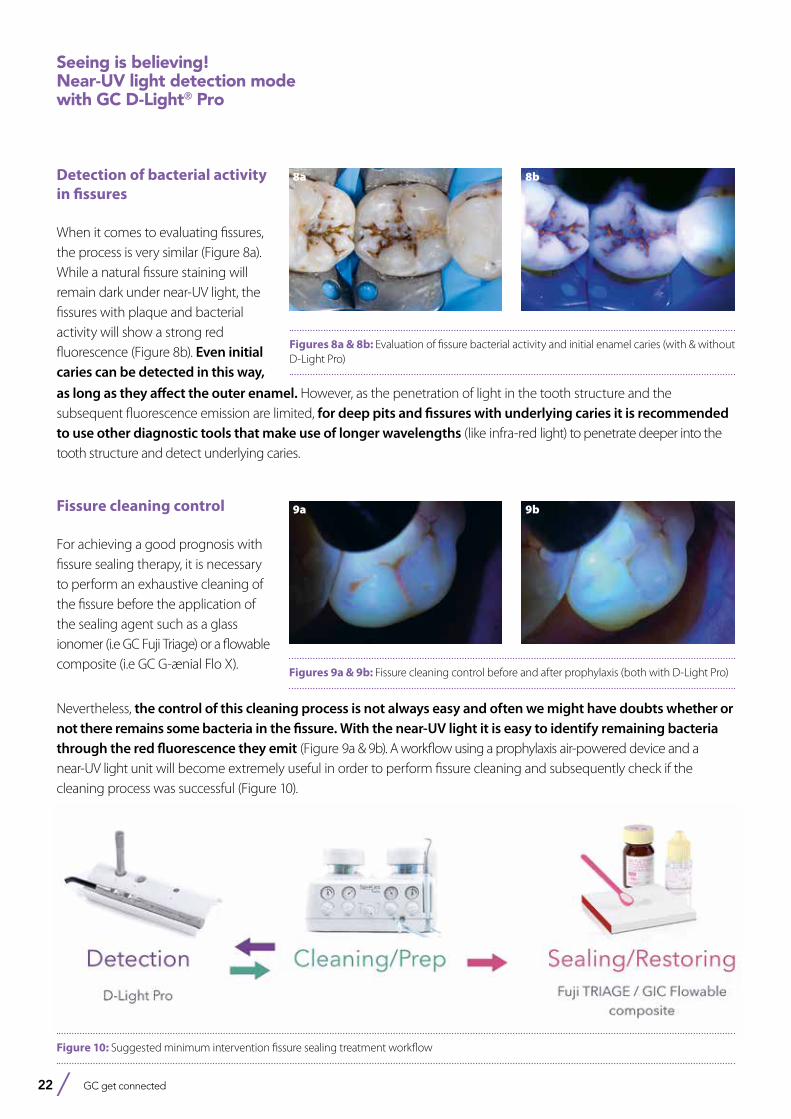
Figure 10: Suggested minimum intervention fissure sealing treatment workflow
Detection of bacterial activity in fissures
When it comes to evaluating fissures, the process is very similar (Figure 8a). While a natural fissure staining will remain dark under near-UV light, the fissures with plaque and bacterial activity will show a strong red fluorescence (Figure 8b). Even initial caries can be detected in this way,
Figures 8a & 8b: Evaluation of fissure bacterial activity and initial enamel caries (with & without D-Light Pro)
8a 8b
Seeing is believing!Near-UV light detection mode with GC D-Light® Pro
as long as they affect the outer enamel. However, as the penetration of light in the tooth structure and the subsequent fluorescence emission are limited, for deep pits and fissures with underlying caries it is recommended to use other diagnostic tools that make use of longer wavelengths (like infra-red light) to penetrate deeper into the tooth structure and detect underlying caries.
Fissure cleaning control
For achieving a good prognosis with fissure sealing therapy, it is necessary to perform an exhaustive cleaning of the fissure before the application of the sealing agent such as a glass ionomer (i.e GC Fuji Triage) or a flowable composite (i.e GC G-ænial Flo X).
Nevertheless, the control of this cleaning process is not always easy and often we might have doubts whether or not there remains some bacteria in the fissure. With the near-UV light it is easy to identify remaining bacteria through the red fluorescence they emit (Figure 9a & 9b). A workflow using a prophylaxis air-powered device and a near-UV light unit will become extremely useful in order to perform fissure cleaning and subsequently check if the cleaning process was successful (Figure 10).
GC get connected 23
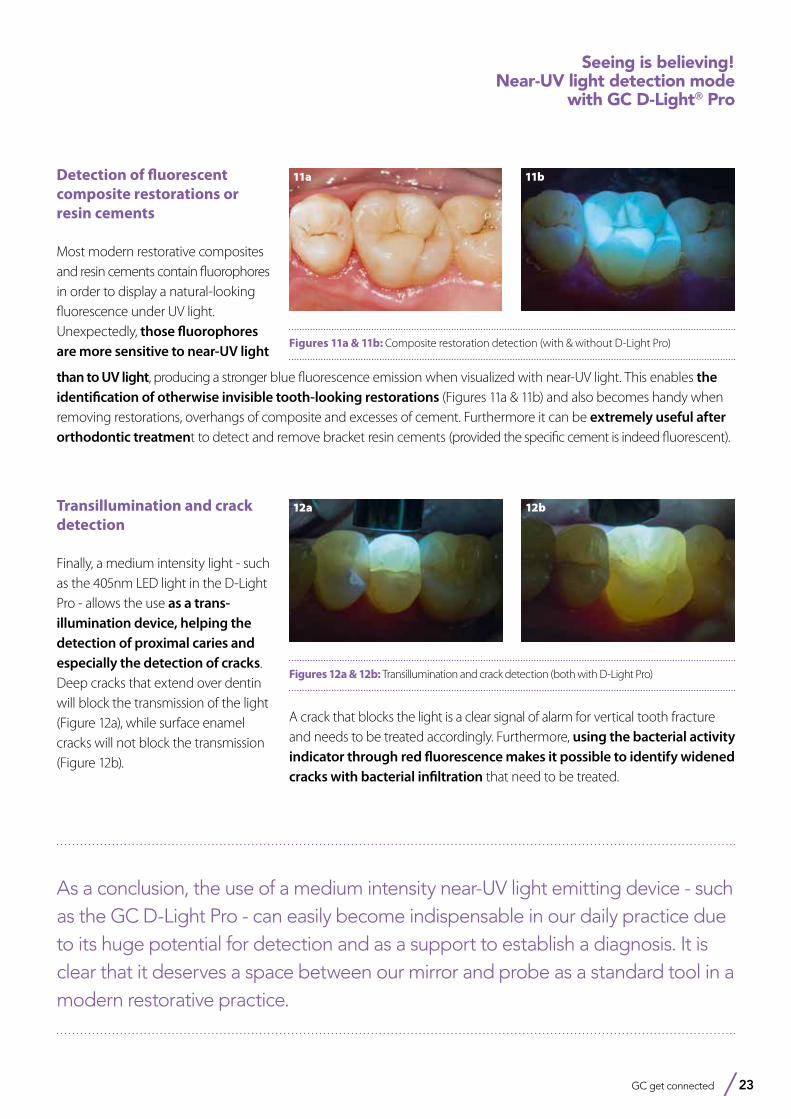
Figures 11a & 11b: Composite restoration detection (with & without D-Light Pro)
11a 11b
Figures 12a & 12b: Transillumination and crack detection (both with D-Light Pro)
12a 12b
As a conclusion, the use of a medium intensity near-UV light emitting device - such as the GC D-Light Pro - can easily become indispensable in our daily practice due to its huge potential for detection and as a support to establish a diagnosis. It is clear that it deserves a space between our mirror and probe as a standard tool in a modern restorative practice.
Detection of fluorescent composite restorations or resin cements
Most modern restorative composites and resin cements contain fluorophores in order to display a natural-looking fluorescence under UV light. Unexpectedly, those fluorophores are more sensitive to near-UV light
Seeing is believing!Near-UV light detection mode
with GC D-Light® Pro
than to UV light, producing a stronger blue fluorescence emission when visualized with near-UV light. This enables the identification of otherwise invisible tooth-looking restorations (Figures 11a & 11b) and also becomes handy when removing restorations, overhangs of composite and excesses of cement. Furthermore it can be extremely useful after orthodontic treatment to detect and remove bracket resin cements (provided the specific cement is indeed fluorescent).
Transillumination and crack detection
Finally, a medium intensity light - such as the 405nm LED light in the D-Light Pro - allows the use as a trans-illumination device, helping the detection of proximal caries and especially the detection of cracks. Deep cracks that extend over dentin will block the transmission of the light (Figure 12a), while surface enamel cracks will not block the transmission (Figure 12b).
A crack that blocks the light is a clear signal of alarm for vertical tooth fracture and needs to be treated accordingly. Furthermore, using the bacterial activity indicator through red fluorescence makes it possible to identify widened cracks with bacterial infiltration that need to be treated.
24 GC get connected
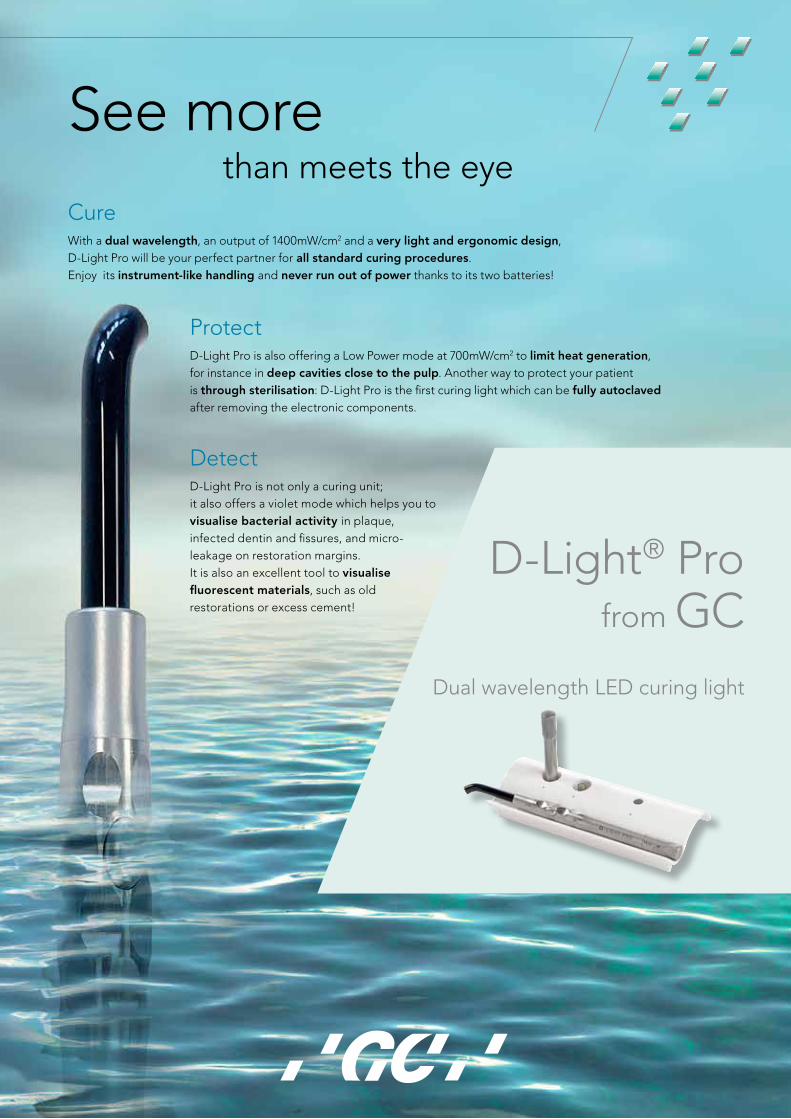
D-Light® Pro from GC
Dual wavelength LED curing light
See more than meets the eye
DetectD-Light Pro is not only a curing unit; it also offers a violet mode which helps you to visualise bacterial activity in plaque, infected dentin and fissures, and micro-leakage on restoration margins.It is also an excellent tool to visualise fluorescent materials, such as old restorations or excess cement!
ProtectD-Light Pro is also offering a Low Power mode at 700mW/cm2 to limit heat generation, for instance in deep cavities close to the pulp. Another way to protect your patient is through sterilisation: D-Light Pro is the first curing light which can be fully autoclaved after removing the electronic components.
CureWith a dual wavelength, an output of 1400mW/cm2 and a very light and ergonomic design, D-Light Pro will be your perfect partner for all standard curing procedures. Enjoy its instrument-like handling and never run out of power thanks to its two batteries!
GC get connected 25
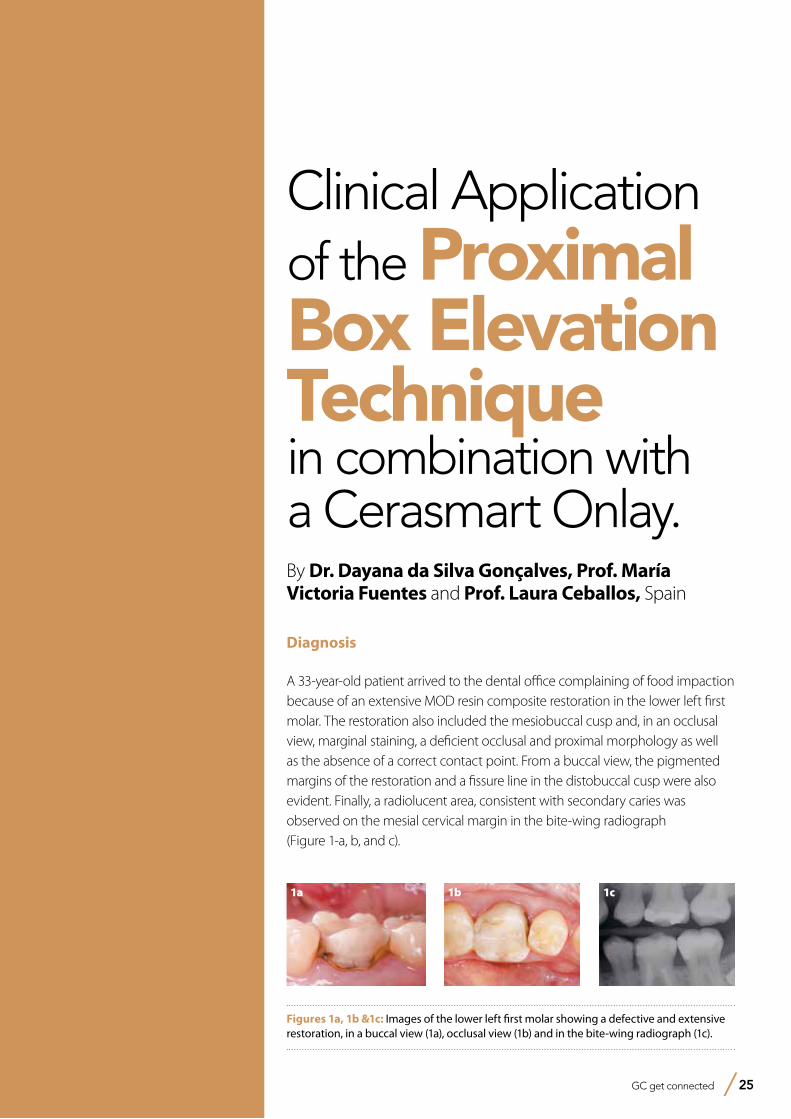
Clinical Application of the Proximal Box Elevation Technique in combination with a Cerasmart Onlay.By Dr. Dayana da Silva Gonçalves, Prof. María Victoria Fuentes and Prof. Laura Ceballos, Spain
Diagnosis
A 33-year-old patient arrived to the dental office complaining of food impaction because of an extensive MOD resin composite restoration in the lower left first molar. The restoration also included the mesiobuccal cusp and, in an occlusal view, marginal staining, a deficient occlusal and proximal morphology as well as the absence of a correct contact point. From a buccal view, the pigmented margins of the restoration and a fissure line in the distobuccal cusp were also evident. Finally, a radiolucent area, consistent with secondary caries was observed on the mesial cervical margin in the bite-wing radiograph (Figure 1-a, b, and c).
Figures 1a, 1b &1c: Images of the lower left first molar showing a defective and extensive restoration, in a buccal view (1a), occlusal view (1b) and in the bite-wing radiograph (1c).
1a 1c1b
26 GC get connected
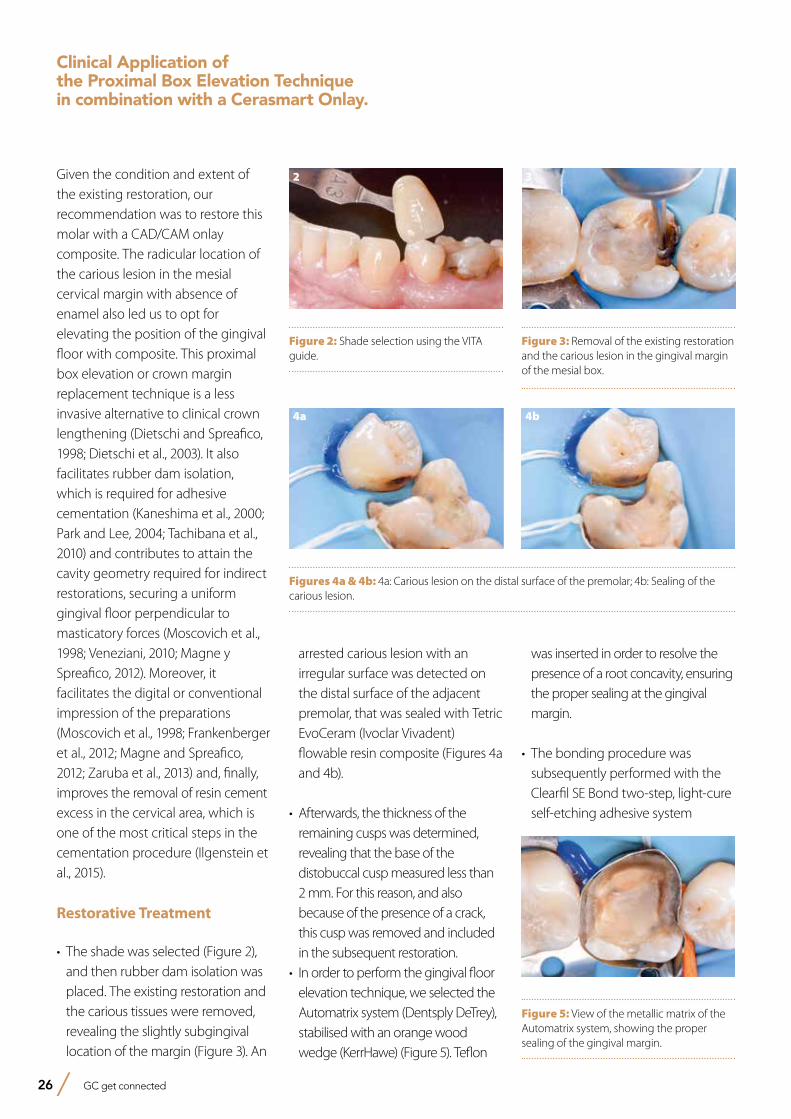
Given the condition and extent of the existing restoration, our recommendation was to restore this molar with a CAD/CAM onlay composite. The radicular location of the carious lesion in the mesial cervical margin with absence of enamel also led us to opt for elevating the position of the gingival floor with composite. This proximal box elevation or crown margin replacement technique is a less invasive alternative to clinical crown lengthening (Dietschi and Spreafico, 1998; Dietschi et al., 2003). It also facilitates rubber dam isolation, which is required for adhesive cementation (Kaneshima et al., 2000; Park and Lee, 2004; Tachibana et al., 2010) and contributes to attain the cavity geometry required for indirect restorations, securing a uniform gingival floor perpendicular to masticatory forces (Moscovich et al., 1998; Veneziani, 2010; Magne y Spreafico, 2012). Moreover, it facilitates the digital or conventional impression of the preparations (Moscovich et al., 1998; Frankenberger et al., 2012; Magne and Spreafico, 2012; Zaruba et al., 2013) and, finally, improves the removal of resin cement excess in the cervical area, which is one of the most critical steps in the cementation procedure (Ilgenstein et al., 2015).
Restorative Treatment
• The shade was selected (Figure 2), and then rubber dam isolation was placed. The existing restoration and the carious tissues were removed, revealing the slightly subgingival location of the margin (Figure 3). An
arrested carious lesion with an irregular surface was detected on the distal surface of the adjacent premolar, that was sealed with Tetric EvoCeram (Ivoclar Vivadent) flowable resin composite (Figures 4a and 4b).
• Afterwards, the thickness of the remaining cusps was determined, revealing that the base of the distobuccal cusp measured less than 2 mm. For this reason, and also because of the presence of a crack, this cusp was removed and included in the subsequent restoration.
• In order to perform the gingival floor elevation technique, we selected the Automatrix system (Dentsply DeTrey), stabilised with an orange wood wedge (KerrHawe) (Figure 5). Teflon
was inserted in order to resolve the presence of a root concavity, ensuring the proper sealing at the gingival margin.
• The bonding procedure was subsequently performed with the Clearfil SE Bond two-step, light-cure self-etching adhesive system
Figure 2: Shade selection using the VITA guide.
Figure 3: Removal of the existing restoration and the carious lesion in the gingival margin of the mesial box.
Figures 4a & 4b: 4a: Carious lesion on the distal surface of the premolar; 4b: Sealing of the carious lesion.
2 3
4a 4b
Figure 5: View of the metallic matrix of the Automatrix system, showing the proper sealing of the gingival margin.
5
Clinical Application of the Proximal Box Elevation Technique in combination with a Cerasmart Onlay.
GC get connected 27
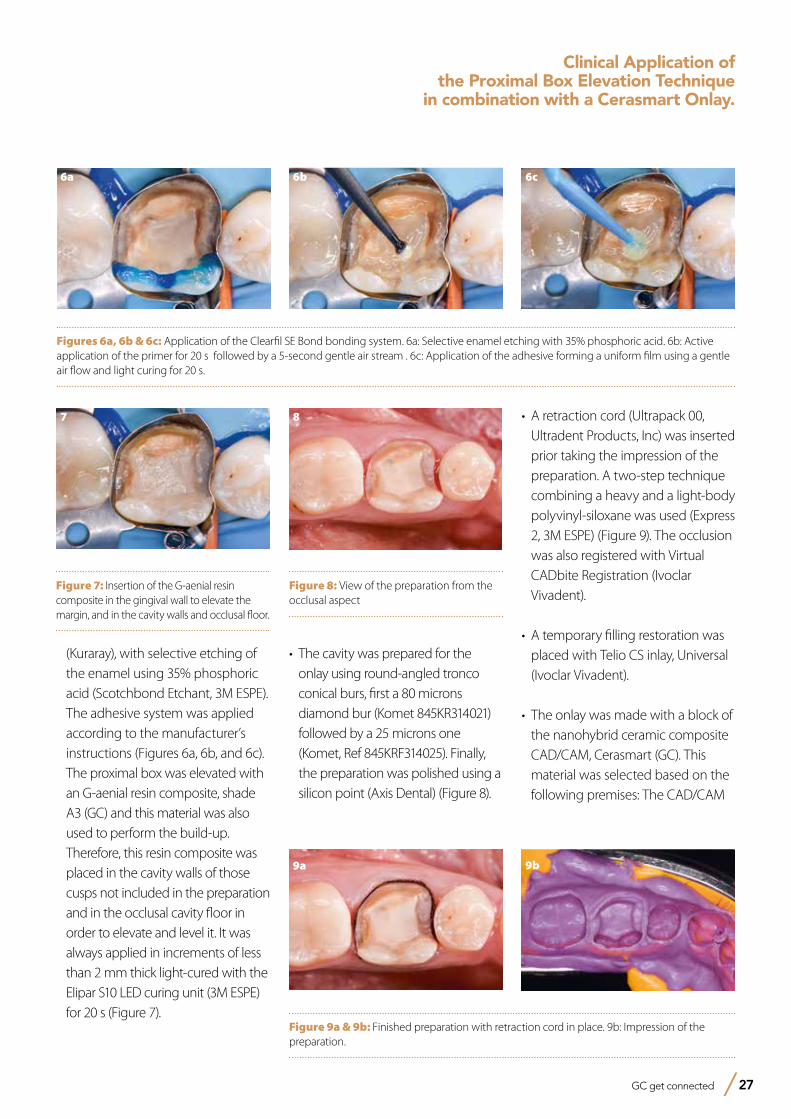
(Kuraray), with selective etching of the enamel using 35% phosphoric acid (Scotchbond Etchant, 3M ESPE). The adhesive system was applied according to the manufacturer’s instructions (Figures 6a, 6b, and 6c).
The proximal box was elevated with an G-aenial resin composite, shade A3 (GC) and this material was also used to perform the build-up. Therefore, this resin composite was placed in the cavity walls of those cusps not included in the preparation and in the occlusal cavity floor in order to elevate and level it. It was always applied in increments of less than 2 mm thick light-cured with the Elipar S10 LED curing unit (3M ESPE) for 20 s (Figure 7).
• The cavity was prepared for the onlay using round-angled tronco conical burs, first a 80 microns diamond bur (Komet 845KR314021) followed by a 25 microns one (Komet, Ref 845KRF314025). Finally, the preparation was polished using a silicon point (Axis Dental) (Figure 8).
• A retraction cord (Ultrapack 00, Ultradent Products, Inc) was inserted prior taking the impression of the preparation. A two-step technique combining a heavy and a light-body polyvinyl-siloxane was used (Express 2, 3M ESPE) (Figure 9). The occlusion was also registered with Virtual CADbite Registration (Ivoclar Vivadent).
• A temporary filling restoration was placed with Telio CS inlay, Universal (Ivoclar Vivadent).
• The onlay was made with a block of the nanohybrid ceramic composite CAD/CAM, Cerasmart (GC). This material was selected based on the following premises: The CAD/CAM
Figures 6a, 6b & 6c: Application of the Clearfil SE Bond bonding system. 6a: Selective enamel etching with 35% phosphoric acid. 6b: Active application of the primer for 20 s followed by a 5-second gentle air stream . 6c: Application of the adhesive forming a uniform film using a gentle air flow and light curing for 20 s.
Figure 7: Insertion of the G-aenial resin composite in the gingival wall to elevate the margin, and in the cavity walls and occlusal floor.
7
Figure 8: View of the preparation from the occlusal aspect
8
9b
Figure 9a & 9b: Finished preparation with retraction cord in place. 9b: Impression of the preparation.
9a
6a 6b 6c
Clinical Application of the Proximal Box Elevation Technique
in combination with a Cerasmart Onlay.
28 GC get connected
therefore, the physical and colour stability is greater than that of conventional composites made in the laboratory (Stawarczyk et al., 2012). On the other hand, restorations made of composite resin-based CAD/CAM blocks are easier to repair intra-orally than ceramic restorations (Rocca et al., 2010; Miyazaki and Hotta, 2011; Nguyen, 2012; Zaghloul et al., 2014; Park et al., 2016).
composite resin-based blocks are manufactured under controlled conditions to offer the highest properties, increase the homogeneity of the material, reduce the presence of fissures, and increase reliability compared to the composite materials used for the stratification technique (Giordano 2006; Mainjot et al., 2016). They are also polymerised under standard parameters at high temperatures and pressures (Nguyen et al., 2012),
Luting procedure:
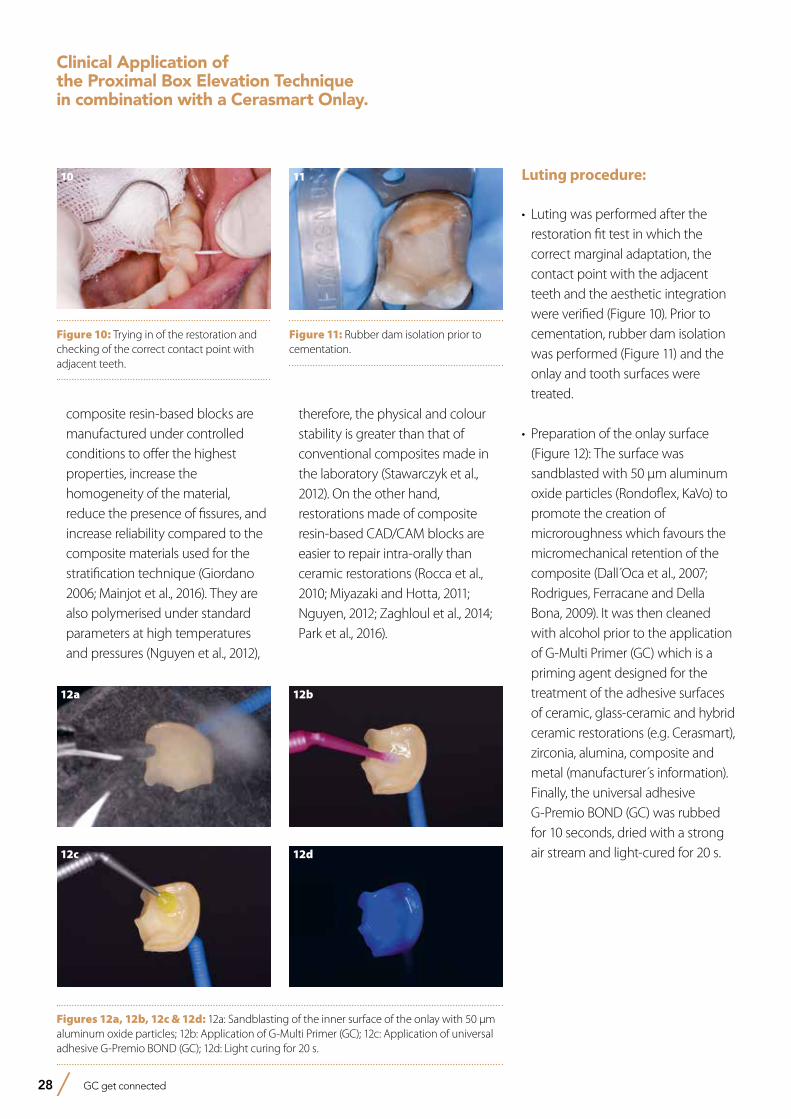
• Luting was performed after the restoration fit test in which the correct marginal adaptation, the contact point with the adjacent teeth and the aesthetic integration were verified (Figure 10). Prior to cementation, rubber dam isolation was performed (Figure 11) and the onlay and tooth surfaces were treated.
• Preparation of the onlay surface (Figure 12): The surface was sandblasted with 50 µm aluminum oxide particles (Rondoflex, KaVo) to promote the creation of microroughness which favours the micromechanical retention of the composite (Dall Oca et al., 2007; Rodrigues, Ferracane and Della Bona, 2009). It was then cleaned with alcohol prior to the application of G-Multi Primer (GC) which is a priming agent designed for the treatment of the adhesive surfaces of ceramic, glass-ceramic and hybrid ceramic restorations (e.g. Cerasmart), zirconia, alumina, composite and metal (manufacturer s information). Finally, the universal adhesive G-Premio BOND (GC) was rubbed for 10 seconds, dried with a strong air stream and light-cured for 20 s.
Figures 12a, 12b, 12c & 12d: 12a: Sandblasting of the inner surface of the onlay with 50 µm aluminum oxide particles; 12b: Application of G-Multi Primer (GC); 12c: Application of universal adhesive G-Premio BOND (GC); 12d: Light curing for 20 s.
12a 12b
12c 12d
Figure 10: Trying in of the restoration and checking of the correct contact point with adjacent teeth.
10
Figure 11: Rubber dam isolation prior to cementation.
11
Clinical Application of the Proximal Box Elevation Technique in combination with a Cerasmart Onlay.
GC get connected 29
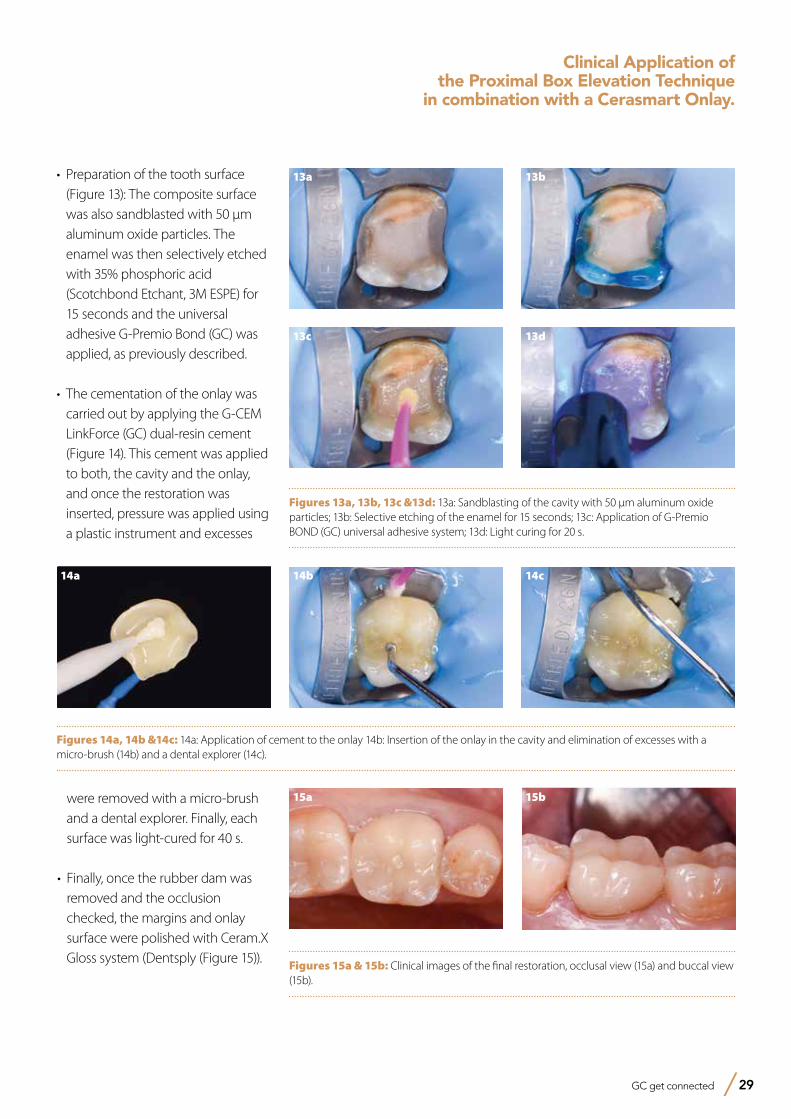
• Preparation of the tooth surface (Figure 13): The composite surface was also sandblasted with 50 μm aluminum oxide particles. The enamel was then selectively etched with 35% phosphoric acid (Scotchbond Etchant, 3M ESPE) for 15 seconds and the universal adhesive G-Premio Bond (GC) was applied, as previously described.
• The cementation of the onlay was carried out by applying the G-CEM LinkForce (GC) dual-resin cement (Figure 14). This cement was applied to both, the cavity and the onlay, and once the restoration was inserted, pressure was applied using a plastic instrument and excesses
Figures 13a, 13b, 13c &13d: 13a: Sandblasting of the cavity with 50 μm aluminum oxide particles; 13b: Selective etching of the enamel for 15 seconds; 13c: Application of G-Premio BOND (GC) universal adhesive system; 13d: Light curing for 20 s.
13a 13b
13c 13d
Figures 14a, 14b &14c: 14a: Application of cement to the onlay 14b: Insertion of the onlay in the cavity and elimination of excesses with a micro-brush (14b) and a dental explorer (14c).
14a 14b 14c
Figures 15a & 15b: Clinical images of the final restoration, occlusal view (15a) and buccal view (15b).
15b15a
Clinical Application of the Proximal Box Elevation Technique
in combination with a Cerasmart Onlay.
were removed with a micro-brush and a dental explorer. Finally, each surface was light-cured for 40 s.
• Finally, once the rubber dam was removed and the occlusion checked, the margins and onlay surface were polished with Ceram.X Gloss system (Dentsply (Figure 15)).
References- Dall Oca S, Papacchini F, Goracci C, Cury A, Suh B.I, Tay F.R, Polimeni A, Ferrari M. (2007) Effect of oxygen inhibition on composite repair strength over time.
J Biomed Mater Res B Appl Biomater 10:493-8.- Dietschi D, Olsburgh S, Krejci I, Davidson C. (2003) In vitro evaluation of marginal and internal adaptation after occlusal stressing of indirect class II composite restorations
with different resinous bases. Eur J Oral Sci 111:73-80.- Dietschi D, Spreafico R. (1998) Current clinical concepts for adhesive cementation of tooth-colored posterior restorations. Pract Periodontics Aesthet Dent 10:47-54.- Frankenberger R, Hehn J, Hajtó J, Krämer N, Naumann M, Koch A, Roggendorf MJ. (2012) Effect of proximal box elevation with resin composite on marginal quality of
ceramic inlays in vitro. Clin Oral Investig 17:177-83.- Giordano R. (2006) Materials for chairside CAD/CAM produced restorations. JADA 137:14S–21S.- Ilgenstein I, Zitzmann NU, Bühler J, Wegehaupt FJ, Attin T, Weiger R, Krastl G. (2015) Influence of proximal box elevation on the marginal quality and fracture behavior of
root-filled molars restored with CAD/CAM ceramic or composite onlays. Clin Oral Investig 19:1021-8. - Kaneshima T, Yatani H, Kasai T, Watanabe EK, Yamashita A. (2000) The influence of blood contamination on bond strengths between dentin and an adhesive resin
cement. Oper Dent 25:195-201. - Magne P, Spreafico R. (2012) Deep margin elevation: a possible adjunct procedure to inmediate sealing. Am J Esthet Dent 2:86-96. - Mainjot AK, Dupont NM, Oudkerk JC, Dewael TY, Sadoun MJ. (2016) From Artisanal to CAD-CAM Blocks: State of the Art of Indirect Composites. J Dent Res 95:487-95.- Miyazaki T, Hotta Y. (2011) CAD/CAM systems available for the fabrication of crown and bridge restorations. Aust Dent J 56:97-106.- Moscovich H, Roeters FJ, Verdonschot N, de Kanter RJ, Creugers NH. (1998) Effect of composite basing on the resistance to bulk fracture of industrial porcelain inlays.
J Dent 26:183-89- Nguyen JF, Migonney V, Ruse ND, Sadoun M. (2012) Resin composite blocks via high-pressure high-temperature polymerization. Dent Mater 28:529-534.- Park JW, Lee KC. (2004) The influence of salivary contamination on shear bond strength of dentin adhesive systems. Oper Dent 29:437-42. - Park SH, Yoo YJ, Shin YJ, Cho BH, Baek SH. (2016) Marginal and internal fit of nano-composite CAD/CAM restorations. Restor Dent Endod 41:37-43. - Rocca GT, Bonnafous F, Rizcalla N, Krejci I. (2010) A technique to improve the esthetic aspects of CAD/CAM composite resin restorations. J Prosthet Dent 104:273-275.- Rodrigues SA Jr, Ferracane JL, Della Bona A. (2009) Influence of surface treatments on the bond strength of repaired resin composite restorative materials.
Dent Mater 25:442-51.- Stawarczyk B, Sener B, Trottmann A, Roos M, Ozcan M, Hämmerle CH. (2012) Discoloration of manually fabricated resins and industrially fabricated CAD/CAM blocks
versus glass-ceramic: effect of storage media, duration, and subsequent polishing. Dent Mater J 31:377-383.- Tachibana A, Castanho GM, Vieira SN, Matos AB. (2010) Influence of blood contamination on bond strength of a self-etching adhesive to dental tissues. J Adhes Dent
13:349-58.- Tekçe N; Pala K; Demirci M; Tuncer S. (2016) Influence of different materials and cavity preparation designs on the fracture resistance of mesio-occluso-distal inlay
restoration. Dent Mater 35:523-531.- Veneziani M. (2010) Adhesive restorations in the posterior area with subgingival cervical margins: New classification and differentiated treatment approach. Eur J Esthet
Dent 5:50-76. - Zaghloul H, Elkassas DW, Haridy MF. (2014) Effect of incorporation of silane in the bonding agent on the repair potential of machinable esthetic blocks. Eur J Dent 8:44–52.- Zaruba M, Göhring TN, Wegehaupt FJ, Attin T. (2013) Influence of a proximal margin elevation technique on marginal adaptation of ceramic inlays. Acta Odontol Scand
71:317-24.
Clinical Application of the Proximal Box Elevation Technique in combination with a Cerasmart Onlay.
Prof. Laura Ceballos• Degree in Dentistry with Distinction from the
University of Granada (1997).• Doctorate in Dentistry with Distinction from the
University of Granada (2001).• Professor of Pathology and Dental Therapeutics
at the Rey Juan Carlos University since 2007.• President of the Spanish Society of Conservative
Dentistry (2012-2015).• Member of the Executive Committee of the
European Federation of Conservative Dentistry (EFCD).
• Author of publications on adhesion, cementation, the effect of bleaching agents, properties of composite resins, etc. in relevant international journals.
Dr. Dayana da Silva Gonçalves• General Dentist, Univ. Santa María - Caracas,
Venezuela (2004)• Official recognition of the title of Dentist to the
corresponding Spanish Degree in Dentistry, University of Barcelona, Spain (2009)
• Specialist in Endodontics and Conservative Dentistry, Rey Juan Carlos University, Madrid (2010-2011)
• Master Degree in Integrated Dentistry, Rey Juan Carlos University, Madrid (2011-2012)
• Professor of the Master Degree Programme in Endodontics and Restorative Dentistry, Rey Juan Carlos University, Madrid (since 2012)
• Associate Professor of the Specialization course in Aesthetic Dentistry, Rey Juan Carlos University, Madrid (2012-2016).
• Doctorate in Dentistry, Rey Juan Carlos University, Madrid (2016)
30 GC get connected
Prof. Maria Victoria Fuentes• Degree in Dentistry, University of Granada
(1998).• Fellow researcher FPI of the Ministery of
Education and Sciences in the University of Granada (1999-2002).
• Doctorate in Dentistry, University of Granada (2003).
• Formation in Scientific Methodology in Healthcare Sciences, Autonomous University of Barcelona.
• Professor in Dentistry at the Rey Juan Carlos University.
• Professor of postgraduate course “Master in Endodontics and Restorative Dentistry”, at the Rey Juan Carlos University, Madrid.
• Author of articles published in relevant international journals.
A universal solution for posterior restorations?Clinical case reports using Essentia® Universal ShadeDr Bojidar Kafelov, Bulgaria
Dr Bojidar Kafelov graduated from the Medical University of Sofia Dental School in 2009. Since then he completed many continuing education courses in the field of endodontics and composite restorations. He published his first case report in 2011 in Roots Magazine (Roots 1/2011), and in 2012 another article related to pre-endodontic build-up in Oral Health Journal, Canada. He is working as a full-time endodontist at the Svedent Dental Clinic (Sofia, Bulgaria) since 2009, and is lecturing and giving hands-on courses in Bulgaria and abroad. Additionally he is an active member of the Bulgarian Society of Aesthetic Dentistry and an opinion leader for GC and Dentsply Maillefer.
Since the introduction of adhesive dentistry, dentists around the world are searching for an easy and efficient way to reproduce nature and to achieve the right occlusal anatomy in the posterior area. Numerous methods were developed which combine different shades in order to achieve perfect integration of the restoration with the natural tooth structure; however these layering approaches are complicated and imply a steep learning curve for the dentist. When I finished dental school and started to do posterior restorations on a daily basis, I found that one of my main struggles was to build nice-looking Class I or Class II restorations which integrated well, both in terms of color and anatomy. I started working with Gradia Direct and after that with G-ænial (GC, Japan) but both composite systems suggest two-shade recipes for the posterior region, with an opaque dentin shade and a translucent enamel shade. Post-endodontic restorations were also a challenge in terms of shade integration, and if I had to place a fiber post the final result was not always satisfying.
GC get connected 31
32 GC get connected
The Essentia composite system (GC, Japan) was introduced at the IDS in 2015. At first glance it seemed to be a nice system, but still recommended combining two shades in the posterior area: a hyperchromatic dentin shade called Dark Dentin (DD) and a translucent enamel shade named Light Enamel (LE). The one shade I was really puzzled by was the Universal shade, as it was recommended for mono-shade build-ups in posterior. I doubted the efficiency of this Universal shade and I did not try it out
for the first couple of months after I started using Essentia. However when I first used it for a small Class II restoration, I immediately fell in love with this material. It has now been a year since I first tried the Universal shade and it has become my go-to product for every posterior restoration, as well as for post-endodontic build-ups. And the best thing is yet to come – GC is now introducing two new viscosities with the same Universal shade as the paste version – Essentia
HiFlo and Essentia LoFlo, which feature respectively a very fluid and a thixotropic viscosity. I had the opportunity to try out these new composites during the test phase, and I liked very much the result I was able to achieve combining the three viscosities of the Universal shade. Here are a few clinical cases which were all performed using Essentia Universal (paste), Essentia LoFlo Universal (thixotropic), at times combined with everX Posterior fibre-reinforced composite (GC, Japan).
Case 1
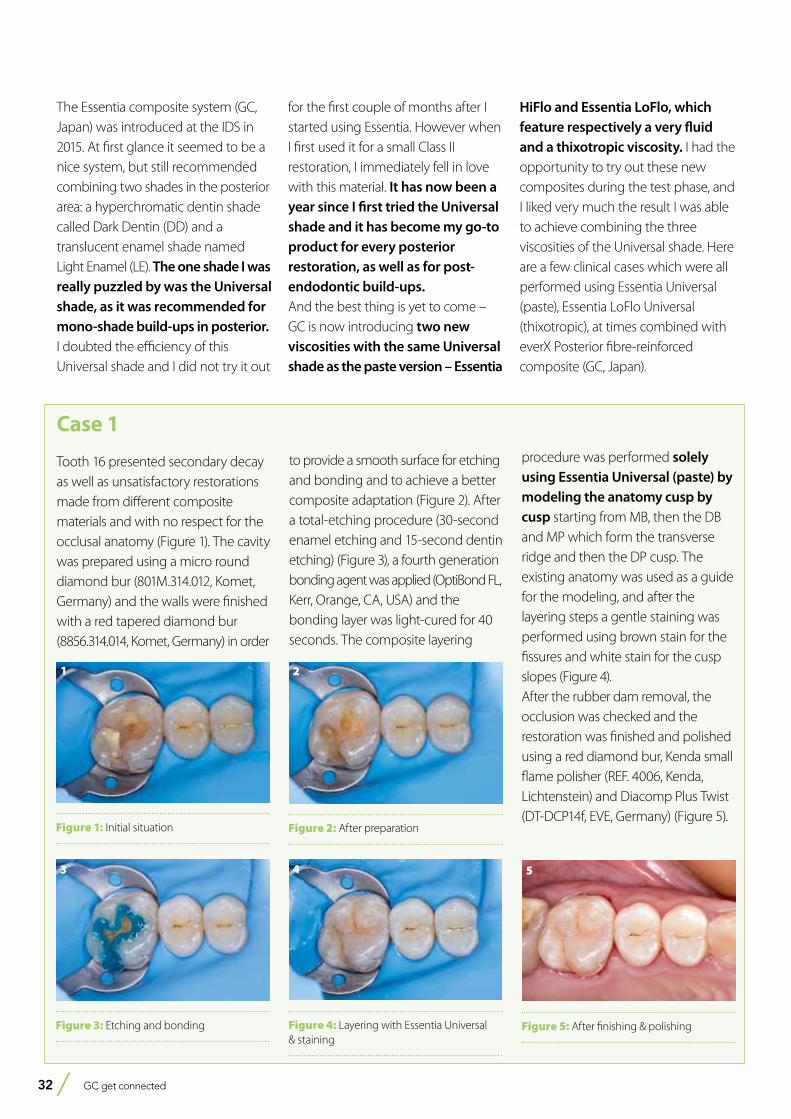
Tooth 16 presented secondary decay as well as unsatisfactory restorations made from different composite materials and with no respect for the occlusal anatomy (Figure 1). The cavity was prepared using a micro round diamond bur (801M.314.012, Komet, Germany) and the walls were finished with a red tapered diamond bur (8856.314.014, Komet, Germany) in order
to provide a smooth surface for etching and bonding and to achieve a better composite adaptation (Figure 2). After a total-etching procedure (30-second enamel etching and 15-second dentin etching) (Figure 3), a fourth generation bonding agent was applied (OptiBond FL, Kerr, Orange, CA, USA) and the bonding layer was light-cured for 40 seconds. The composite layering
procedure was performed solely using Essentia Universal (paste) by modeling the anatomy cusp by cusp starting from MB, then the DB and MP which form the transverse ridge and then the DP cusp. The existing anatomy was used as a guide for the modeling, and after the layering steps a gentle staining was performed using brown stain for the fissures and white stain for the cusp slopes (Figure 4). After the rubber dam removal, the occ lusion was checked and the restoration was finished and polished using a red diamond bur, Kenda small flame polisher (REF. 4006, Kenda, Lichtenstein) and Diacomp Plus Twist (DT-DCP14f, EVE, Germany) (Figure 5).
Figure 1: Initial situation
1
Figure 2: After preparation
2
Figure 3: Etching and bonding
3
Figure 4: Layering with Essentia Universal & staining
4
Figure 5: After finishing & polishing
5
GC get connected 33
A universal solution for posterior restorations?Clinical case reports using Essentia Universal Shade
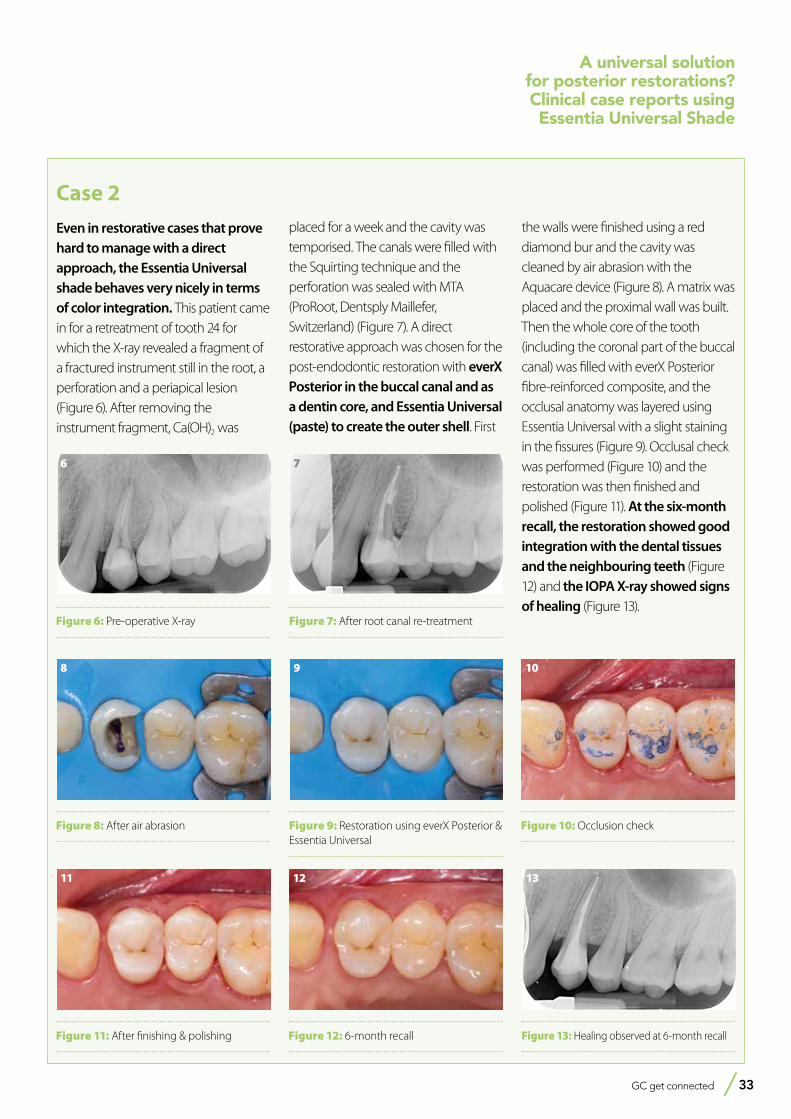
Case 2
Even in restorative cases that prove hard to manage with a direct approach, the Essentia Universal shade behaves very nicely in terms of color integration. This patient came in for a retreatment of tooth 24 for which the X-ray revealed a fragment of a fractured instrument still in the root, a perforation and a periapical lesion (Figure 6). After removing the instrument fragment, Ca(OH)2 was
placed for a week and the cavity was temporised. The canals were filled with the Squirting technique and the perforation was sealed with MTA (ProRoot, Dentsply Maillefer, Switzerland) (Figure 7). A direct restorative approach was chosen for the post-endodontic restoration with everX Posterior in the buccal canal and as a dentin core, and Essentia Universal (paste) to create the outer shell. First
the walls were finished using a red diamond bur and the cavity was cleaned by air abrasion with the Aquacare device (Figure 8). A matrix was placed and the proximal wall was built. Then the whole core of the tooth (including the coronal part of the buccal canal) was filled with everX Posterior fibre-reinforced composite, and the occlusal anatomy was layered using Essentia Universal with a slight staining in the fissures (Figure 9). Occlusal check was performed (Figure 10) and the restoration was then finished and polished (Figure 11). At the six-month recall, the restoration showed good integration with the dental tissues and the neighbouring teeth (Figure 12) and the IOPA X-ray showed signs of healing (Figure 13).
Figure 6: Pre-operative X-ray
6
Figure 7: After root canal re-treatment
7
Figure 9: Restoration using everX Posterior & Essentia Universal
9
Figure 8: After air abrasion
8
Figure 10: Occlusion check
10
Figure 11: After finishing & polishing
11
Figure 12: 6-month recall
12
Figure 13: Healing observed at 6-month recall
13
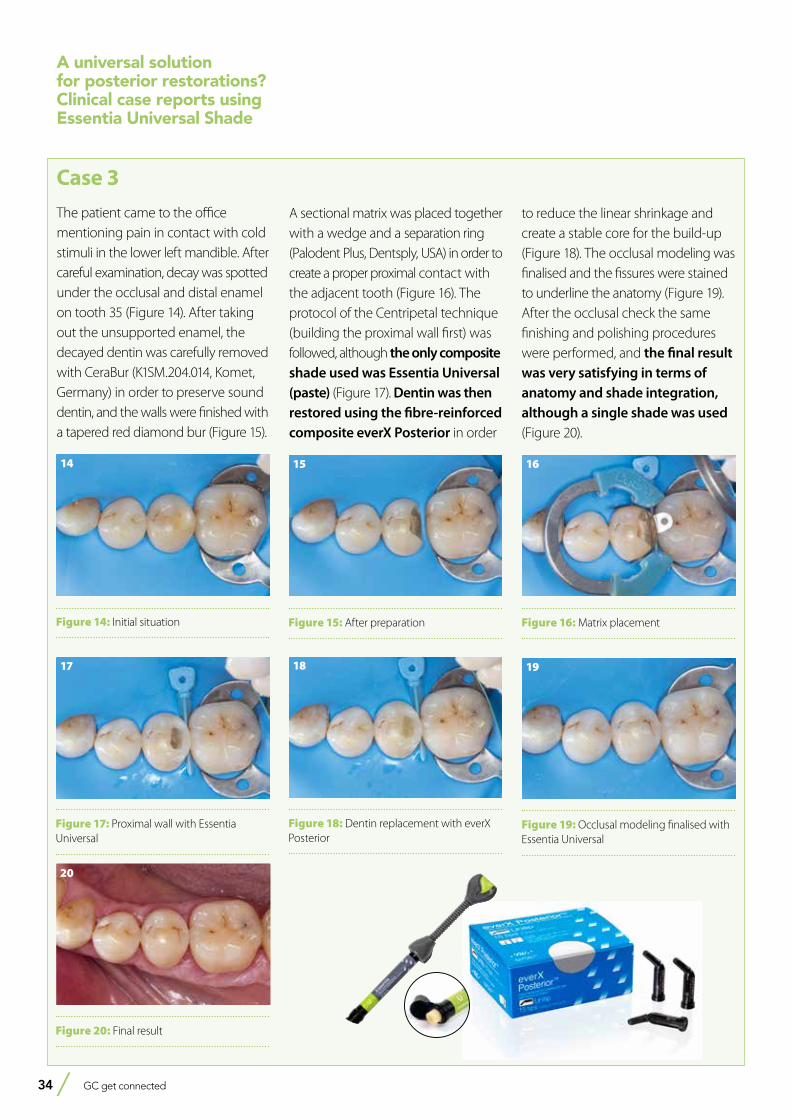
34 GC get connected
Case 3
The patient came to the office mentioning pain in contact with cold stimuli in the lower left mandible. After careful examination, decay was spotted under the occlusal and distal enamel on tooth 35 (Figure 14). After taking out the unsupported enamel, the decayed dentin was carefully removed with CeraBur (K1SM.204.014, Komet, Germany) in order to preserve sound dentin, and the walls were finished with a tapered red diamond bur (Figure 15).
A sectional matrix was placed together with a wedge and a separation ring (Palodent Plus, Dentsply, USA) in order to create a proper proximal contact with the adjacent tooth (Figure 16). The protocol of the Centripetal technique (building the proximal wall first) was followed, although the only composite shade used was Essentia Universal (paste) (Figure 17). Dentin was then restored using the fibre-reinforced composite everX Posterior in order
to reduce the linear shrinkage and create a stable core for the build-up (Figure 18). The occlusal modeling was finalised and the fissures were stained to underline the anatomy (Figure 19). After the occlusal check the same finishing and polishing procedures were performed, and the final result was very satisfying in terms of anatomy and shade integration, although a single shade was used (Figure 20).
Figure 14: Initial situation
14
Figure 15: After preparation
15
Figure 17: Proximal wall with Essentia Universal
17
Figure 18: Dentin replacement with everX Posterior
18
Figure 19: Occlusal modeling finalised with Essentia Universal
19
Figure 16: Matrix placement
16
Figure 20: Final result
20
A universal solution for posterior restorations?Clinical case reports using Essentia Universal Shade
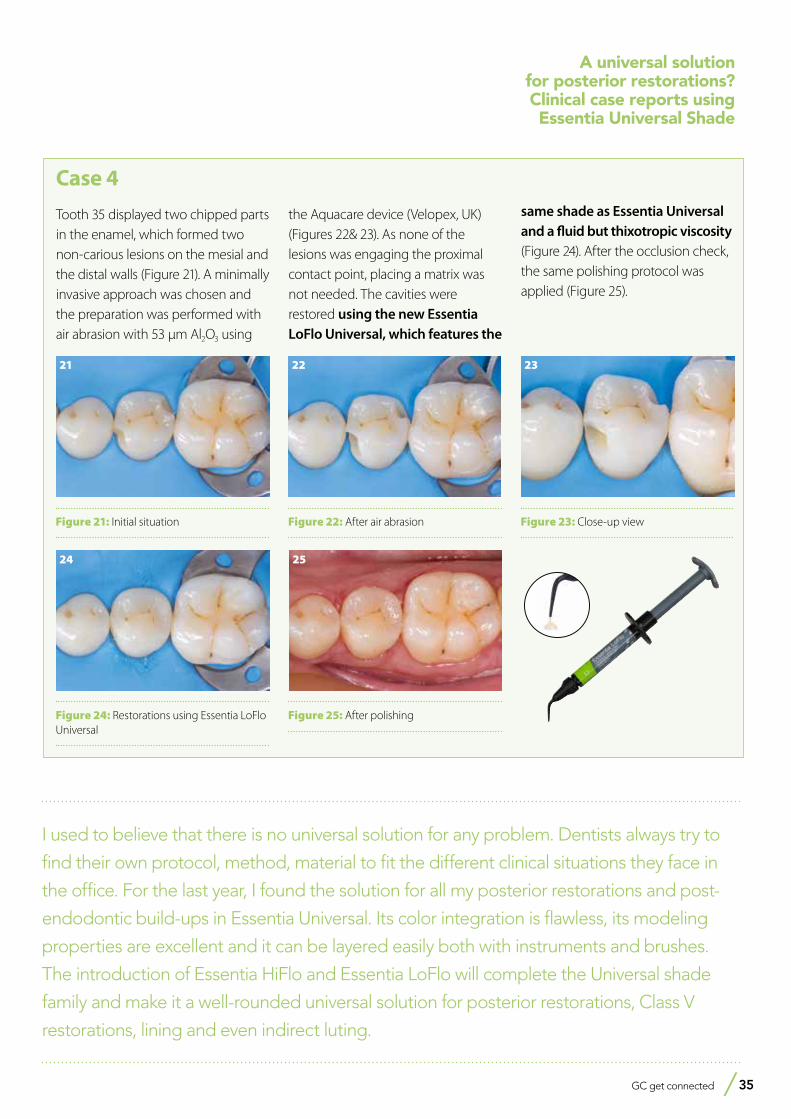
GC get connected 35
A universal solution for posterior restorations?Clinical case reports using Essentia Universal Shade
Figure 25: After polishing
25
Figure 23: Close-up view
23
Figure 24: Restorations using Essentia LoFlo Universal
24
Figure 21: Initial situation
21
Figure 22: After air abrasion
22
Case 4
Tooth 35 displayed two chipped parts in the enamel, which formed two non-carious lesions on the mesial and the distal walls (Figure 21). A minimally invasive approach was chosen and the preparation was performed with air abrasion with 53 µm Al2O3 using
the Aquacare device (Velopex, UK) (Figures 22& 23). As none of the lesions was engaging the proximal contact point, placing a matrix was not needed. The cavities were restored using the new Essentia LoFlo Universal, which features the
same shade as Essentia Universal and a fluid but thixotropic viscosity (Figure 24). After the occlusion check, the same polishing protocol was applied (Figure 25).
I used to believe that there is no universal solution for any problem. Dentists always try to
find their own protocol, method, material to fit the different clinical situations they face in
the office. For the last year, I found the solution for all my posterior restorations and post-
endodontic build-ups in Essentia Universal. Its color integration is flawless, its modeling
properties are excellent and it can be layered easily both with instruments and brushes.
The introduction of Essentia HiFlo and Essentia LoFlo will complete the Universal shade
family and make it a well-rounded universal solution for posterior restorations, Class V
restorations, lining and even indirect luting.
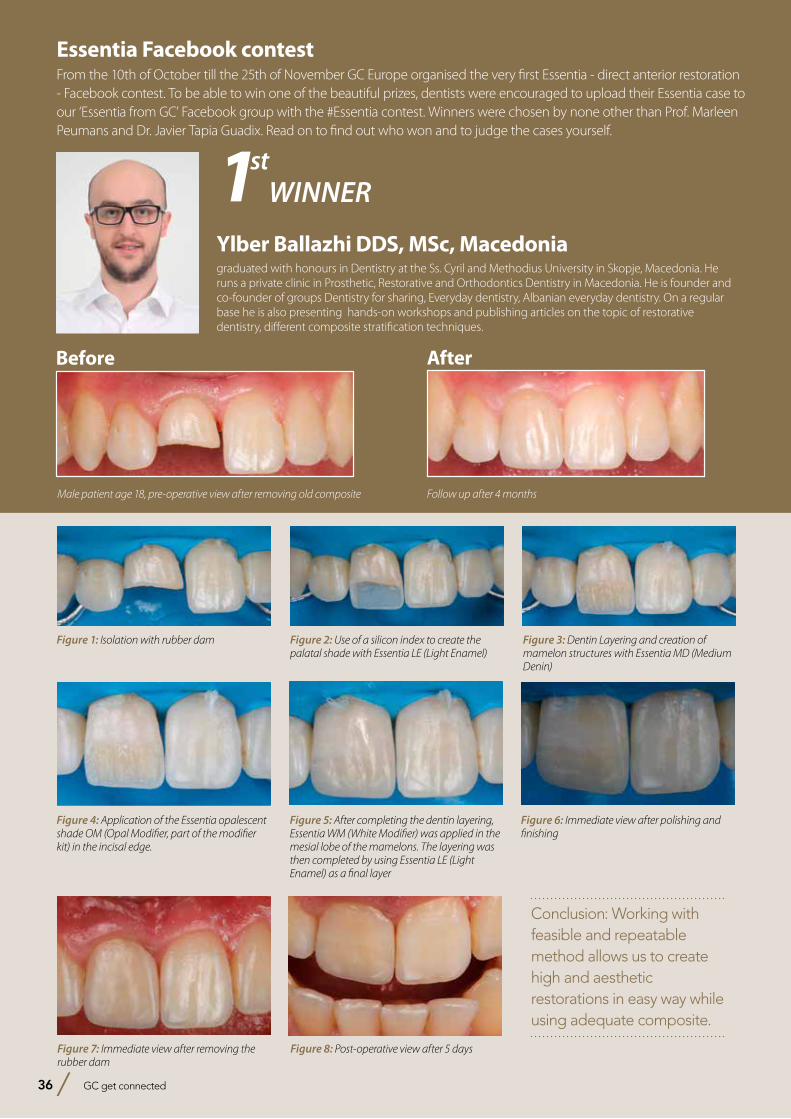
Ylber Ballazhi DDS, MSc, Macedonia graduated with honours in Dentistry at the Ss. Cyril and Methodius University in Skopje, Macedonia. He runs a private clinic in Prosthetic, Restorative and Orthodontics Dentistry in Macedonia. He is founder and co-founder of groups Dentistry for sharing, Everyday dentistry, Albanian everyday dentistry. On a regular base he is also presenting hands-on workshops and publishing articles on the topic of restorative dentistry, different composite stratification techniques.
36 GC get connected
1stWINNER
Before After
Figure 1: Isolation with rubber dam Figure 2: Use of a silicon index to create the palatal shade with Essentia LE (Light Enamel)
Figure 3: Dentin Layering and creation of mamelon structures with Essentia MD (Medium Denin)
Figure 4: Application of the Essentia opalescent shade OM (Opal Modifier, part of the modifier kit) in the incisal edge.
Figure 5: After completing the dentin layering, Essentia WM (White Modifier) was applied in the mesial lobe of the mamelons. The layering was then completed by using Essentia LE (Light Enamel) as a final layer
Figure 6: Immediate view after polishing and finishing
Figure 7: Immediate view after removing the rubber dam
Figure 8: Post-operative view after 5 days
Male patient age 18, pre-operative view after removing old composite Follow up after 4 months
Essentia Facebook contest From the 10th of October till the 25th of November GC Europe organised the very first Essentia - direct anterior restoration - Facebook contest. To be able to win one of the beautiful prizes, dentists were encouraged to upload their Essentia case to our ‘Essentia from GC’ Facebook group with the #Essentia contest. Winners were chosen by none other than Prof. Marleen Peumans and Dr. Javier Tapia Guadix. Read on to find out who won and to judge the cases yourself.
Conclusion: Working with feasible and repeatable method allows us to create high and aesthetic restorations in easy way while using adequate composite.
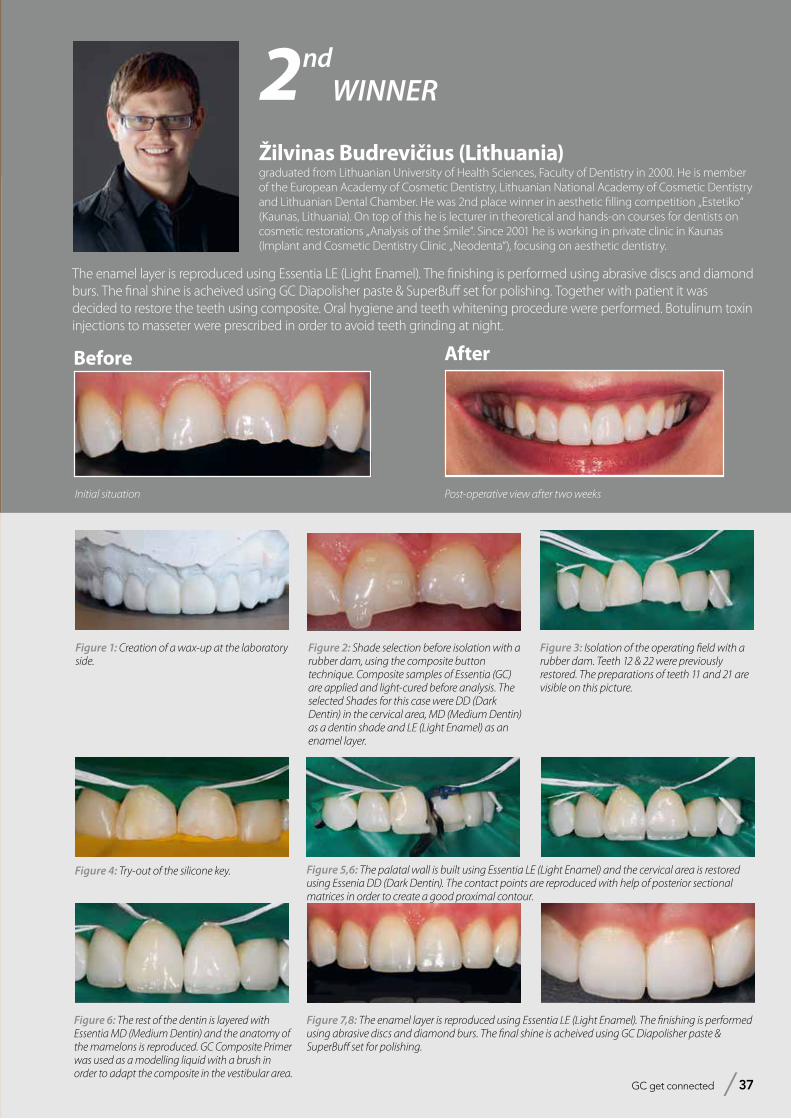
GC get connected 37
Before After
Initial situation Post-operative view after two weeks
Žilvinas Budrevičius (Lithuania)graduated from Lithuanian University of Health Sciences, Faculty of Dentistry in 2000. He is member of the European Academy of Cosmetic Dentistry, Lithuanian National Academy of Cosmetic Dentistry and Lithuanian Dental Chamber. He was 2nd place winner in aesthetic filling competition „Estetiko“ (Kaunas, Lithuania). On top of this he is lecturer in theoretical and hands-on courses for dentists on cosmetic restorations „Analysis of the Smile“. Since 2001 he is working in private clinic in Kaunas (Implant and Cosmetic Dentistry Clinic „Neodenta“), focusing on aesthetic dentistry.
2ndWINNER
Figure 2: Shade selection before isolation with a rubber dam, using the composite button technique. Composite samples of Essentia (GC) are applied and light-cured before analysis. The selected Shades for this case were DD (Dark Dentin) in the cervical area, MD (Medium Dentin) as a dentin shade and LE (Light Enamel) as an enamel layer.
Figure 1: Creation of a wax-up at the laboratory side.
Figure 5,6: The palatal wall is built using Essentia LE (Light Enamel) and the cervical area is restored using Essenia DD (Dark Dentin). The contact points are reproduced with help of posterior sectional matrices in order to create a good proximal contour.
Figure 3: Isolation of the operating field with a rubber dam. Teeth 12 & 22 were previously restored. The preparations of teeth 11 and 21 are visible on this picture.
Figure 6: The rest of the dentin is layered with Essentia MD (Medium Dentin) and the anatomy of the mamelons is reproduced. GC Composite Primer was used as a modelling liquid with a brush in order to adapt the composite in the vestibular area.
Figure 7,8: The enamel layer is reproduced using Essentia LE (Light Enamel). The finishing is performed using abrasive discs and diamond burs. The final shine is acheived using GC Diapolisher paste & SuperBuff set for polishing.
Figure 4: Try-out of the silicone key.
The enamel layer is reproduced using Essentia LE (Light Enamel). The finishing is performed using abrasive discs and diamond burs. The final shine is acheived using GC Diapolisher paste & SuperBuff set for polishing. Together with patient it was decided to restore the teeth using composite. Oral hygiene and teeth whitening procedure were performed. Botulinum toxin injections to masseter were prescribed in order to avoid teeth grinding at night.
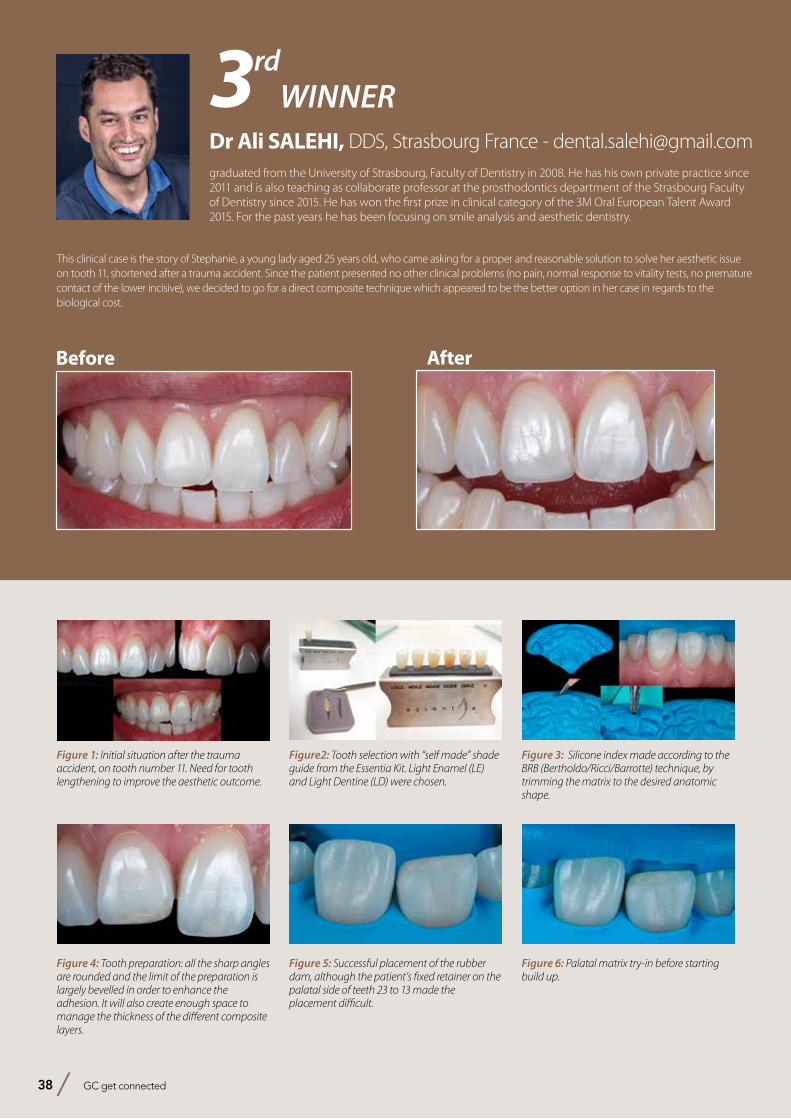
Dr Ali SALEHI, DDS, Strasbourg France - [email protected] from the University of Strasbourg, Faculty of Dentistry in 2008. He has his own private practice since 2011 and is also teaching as collaborate professor at the prosthodontics department of the Strasbourg Faculty of Dentistry since 2015. He has won the first prize in clinical category of the 3M Oral European Talent Award 2015. For the past years he has been focusing on smile analysis and aesthetic dentistry.
3rdWINNER
This clinical case is the story of Stephanie, a young lady aged 25 years old, who came asking for a proper and reasonable solution to solve her aesthetic issue on tooth 11, shortened after a trauma accident. Since the patient presented no other clinical problems (no pain, normal response to vitality tests, no premature contact of the lower incisive), we decided to go for a direct composite technique which appeared to be the better option in her case in regards to the biological cost.
Figure 1: Initial situation after the trauma accident, on tooth number 11. Need for tooth lengthening to improve the aesthetic outcome.
Figure2: Tooth selection with “self made” shade guide from the Essentia Kit. Light Enamel (LE) and Light Dentine (LD) were chosen.
Figure 3: Silicone index made according to the BRB (Bertholdo/Ricci/Barrotte) technique, by trimming the matrix to the desired anatomic shape.
Figure 4: Tooth preparation: all the sharp angles are rounded and the limit of the preparation is largely bevelled in order to enhance the adhesion. It will also create enough space to manage the thickness of the different composite layers.
Figure 5: Successful placement of the rubber dam, although the patient’s fixed retainer on the palatal side of teeth 23 to 13 made the placement difficult.
Figure 6: Palatal matrix try-in before starting build up.
38 GC get connected
Before After
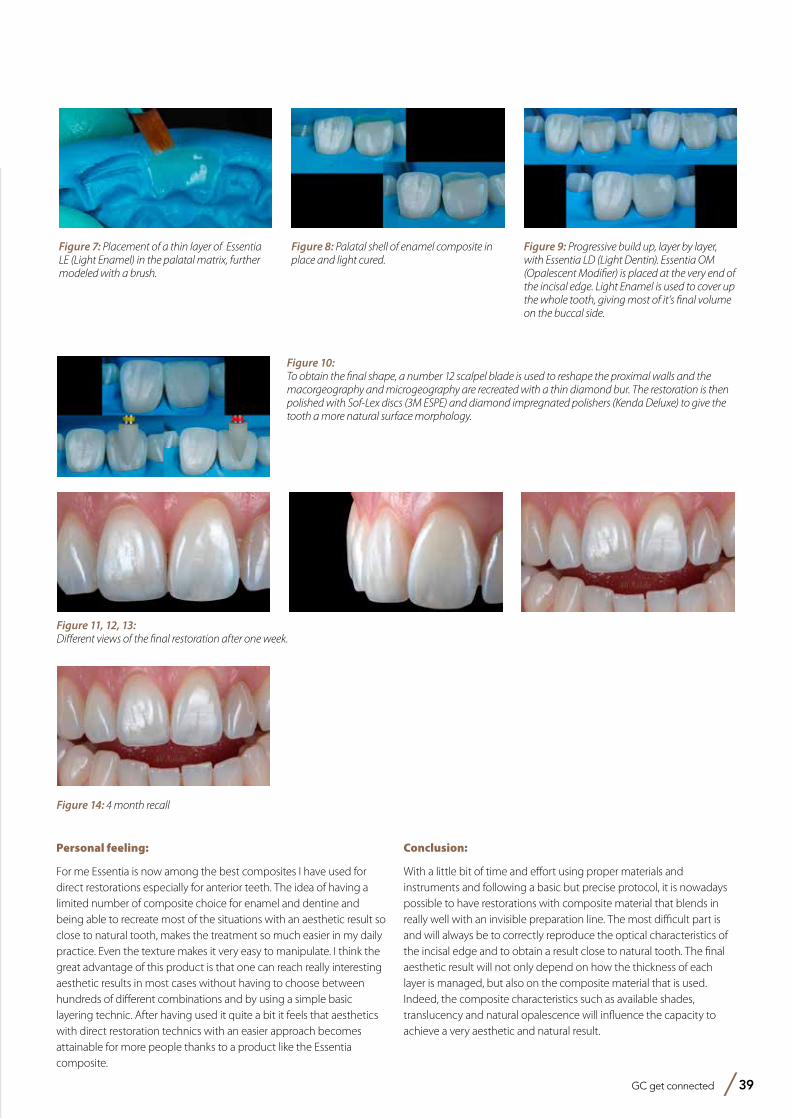
GC get connected 39
Personal feeling:
For me Essentia is now among the best composites I have used for direct restorations especially for anterior teeth. The idea of having a limited number of composite choice for enamel and dentine and being able to recreate most of the situations with an aesthetic result so close to natural tooth, makes the treatment so much easier in my daily practice. Even the texture makes it very easy to manipulate. I think the great advantage of this product is that one can reach really interesting aesthetic results in most cases without having to choose between hundreds of different combinations and by using a simple basic layering technic. After having used it quite a bit it feels that aesthetics with direct restoration technics with an easier approach becomes attainable for more people thanks to a product like the Essentia composite.
Conclusion:
With a little bit of time and effort using proper materials and instruments and following a basic but precise protocol, it is nowadays possible to have restorations with composite material that blends in really well with an invisible preparation line. The most difficult part is and will always be to correctly reproduce the optical characteristics of the incisal edge and to obtain a result close to natural tooth. The final aesthetic result will not only depend on how the thickness of each layer is managed, but also on the composite material that is used. Indeed, the composite characteristics such as available shades, translucency and natural opalescence will influence the capacity to achieve a very aesthetic and natural result.
Figure 7: Placement of a thin layer of Essentia LE (Light Enamel) in the palatal matrix, further modeled with a brush.
Figure 8: Palatal shell of enamel composite in place and light cured.
Figure 9: Progressive build up, layer by layer, with Essentia LD (Light Dentin). Essentia OM (Opalescent Modifier) is placed at the very end of the incisal edge. Light Enamel is used to cover up the whole tooth, giving most of it’s final volume on the buccal side.
Figure 11, 12, 13:Different views of the final restoration after one week.
Figure 10:To obtain the final shape, a number 12 scalpel blade is used to reshape the proximal walls and the macorgeography and microgeography are recreated with a thin diamond bur. The restoration is then polished with Sof-Lex discs (3M ESPE) and diamond impregnated polishers (Kenda Deluxe) to give the tooth a more natural surface morphology.
Figure 14: 4 month recall
Fit and comfort for an active life
RELINETM II Soft & RELINETM II Extra Soft
from GC
Soft silicone relining materials
in cartridge delivery
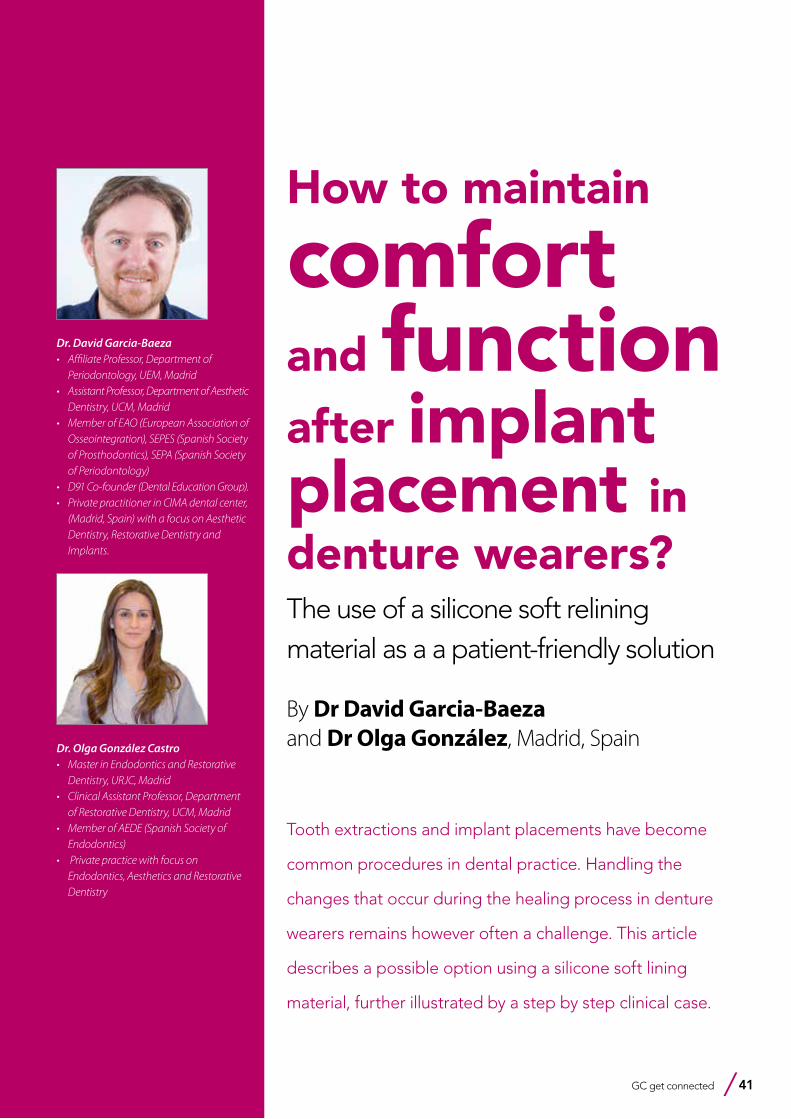
GC get connected 41
Dr. Olga González Castro• Master in Endodontics and Restorative
Dentistry, URJC, Madrid• Clinical Assistant Professor, Department
of Restorative Dentistry, UCM, Madrid• Member of AEDE (Spanish Society of
Endodontics)• Private practice with focus on
Endodontics, Aesthetics and Restorative Dentistry
Dr. David Garcia-Baeza• Affiliate Professor, Department of
Periodontology, UEM, Madrid • Assistant Professor, Department of Aesthetic
Dentistry, UCM, Madrid• Member of EAO (European Association of
Osseointegration), SEPES (Spanish Society of Prosthodontics), SEPA (Spanish Society of Periodontology)
• D91 Co-founder (Dental Education Group).• Private practitioner in CIMA dental center,
(Madrid, Spain) with a focus on Aesthetic Dentistry, Restorative Dentistry and Implants.
Tooth extractions and implant placements have become
common procedures in dental practice. Handling the
changes that occur during the healing process in denture
wearers remains however often a challenge. This article
describes a possible option using a silicone soft lining
material, further illustrated by a step by step clinical case.
How to maintain
comfort
and function
after implant placement in denture wearers?The use of a silicone soft relining material as a a patient-friendly solution
By Dr David Garcia-Baeza and Dr Olga González, Madrid, Spain
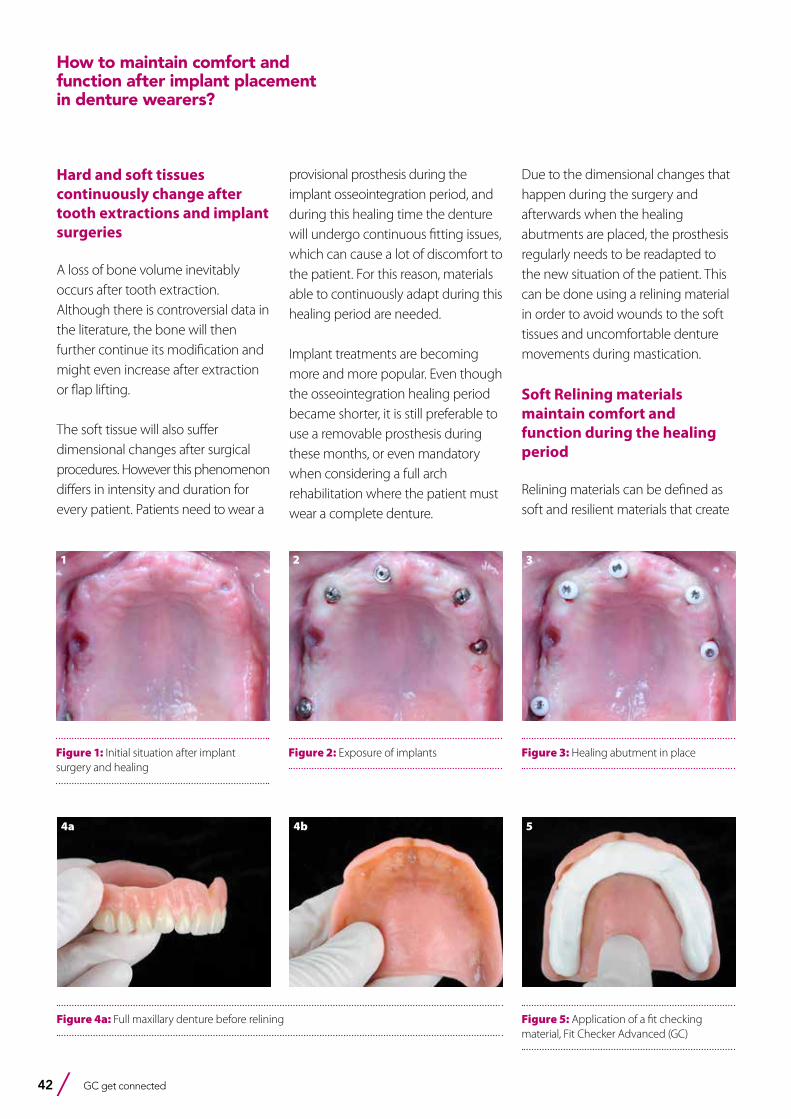
42 GC get connected
Hard and soft tissues continuously change after tooth extractions and implant surgeries
A loss of bone volume inevitably occurs after tooth extraction. Although there is controversial data in the literature, the bone will then further continue its modification and might even increase after extraction or flap lifting.
The soft tissue will also suffer dimensional changes after surgical procedures. However this phenomenon differs in intensity and duration for every patient. Patients need to wear a
provisional prosthesis during the implant osseointegration period, and during this healing time the denture will undergo continuous fitting issues, which can cause a lot of discomfort to the patient. For this reason, materials able to continuously adapt during this healing period are needed.
Implant treatments are becoming more and more popular. Even though the osseointegration healing period became shorter, it is still preferable to use a removable prosthesis during these months, or even mandatory when considering a full arch rehabilitation where the patient must wear a complete denture.
Due to the dimensional changes that happen during the surgery and afterwards when the healing abutments are placed, the prosthesis regularly needs to be readapted to the new situation of the patient. This can be done using a relining material in order to avoid wounds to the soft tissues and uncomfortable denture movements during mastication.
Soft Relining materials maintain comfort and function during the healing period
Relining materials can be defined as soft and resilient materials that create
Figure 2: Exposure of implants
2
Figure 3: Healing abutment in place
3
Figure 4a: Full maxillary denture before relining
4a 4b
Figure 5: Application of a fit checking material, Fit Checker Advanced (GC)
5
Figure 1: Initial situation after implant surgery and healing
1
How to maintain comfort and function after implant placement in denture wearers?
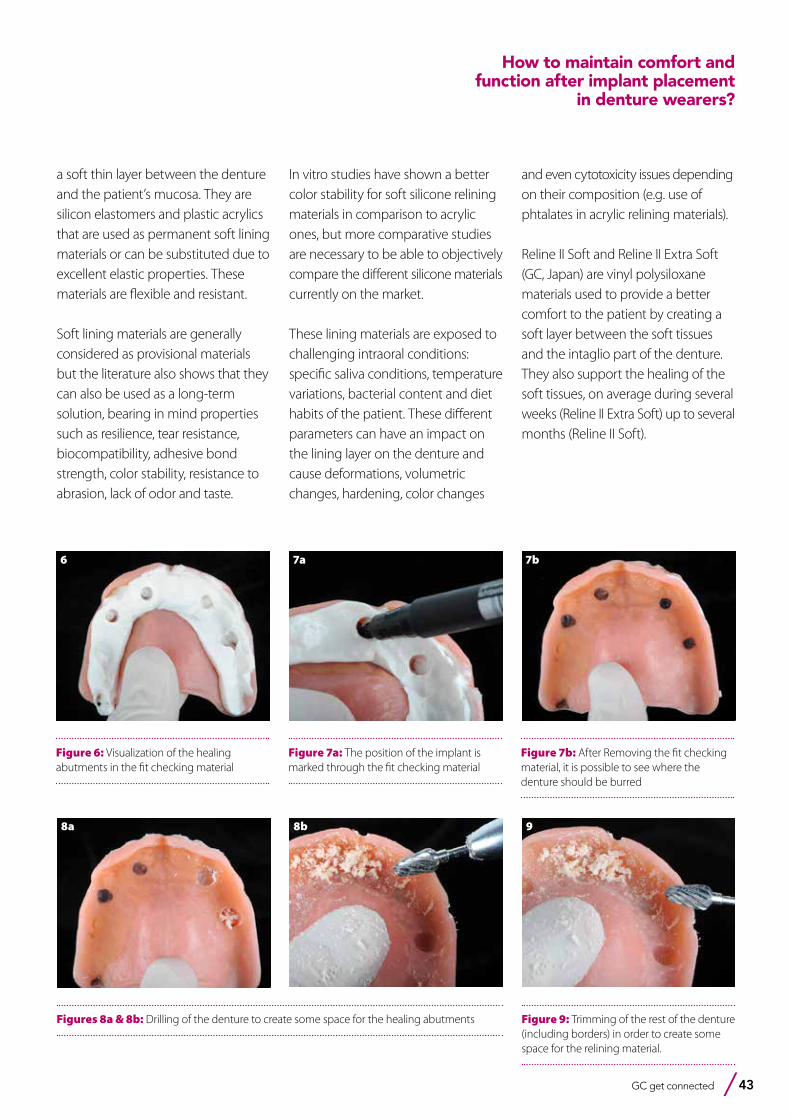
GC get connected 43
Figure 6: Visualization of the healing abutments in the fit checking material
6
Figure 7a: The position of the implant is marked through the fit checking material
7a
Figure 7b: After Removing the fit checking material, it is possible to see where the denture should be burred
7b
Figures 8a & 8b: Drilling of the denture to create some space for the healing abutments
8a 8b
Figure 9: Trimming of the rest of the denture (including borders) in order to create some space for the relining material.
9
a soft thin layer between the denture and the patient’s mucosa. They are silicon elastomers and plastic acrylics that are used as permanent soft lining materials or can be substituted due to excellent elastic properties. These materials are flexible and resistant.
Soft lining materials are generally considered as provisional materials but the literature also shows that they can also be used as a long-term solution, bearing in mind properties such as resilience, tear resistance, biocompatibility, adhesive bond strength, color stability, resistance to abrasion, lack of odor and taste.
In vitro studies have shown a better color stability for soft silicone relining materials in comparison to acrylic ones, but more comparative studies are necessary to be able to objectively compare the different silicone materials currently on the market.
These lining materials are exposed to challenging intraoral conditions: specific saliva conditions, temperature variations, bacterial content and diet habits of the patient. These different parameters can have an impact on the lining layer on the denture and cause deformations, volumetric changes, hardening, color changes
and even cytotoxicity issues depending on their composition (e.g. use of phtalates in acrylic relining materials).
Reline II Soft and Reline II Extra Soft (GC, Japan) are vinyl polysiloxane materials used to provide a better comfort to the patient by creating a soft layer between the soft tissues and the intaglio part of the denture. They also support the healing of the soft tissues, on average during several weeks (Reline II Extra Soft) up to several months (Reline II Soft).
How to maintain comfort and function after implant placement
in denture wearers?
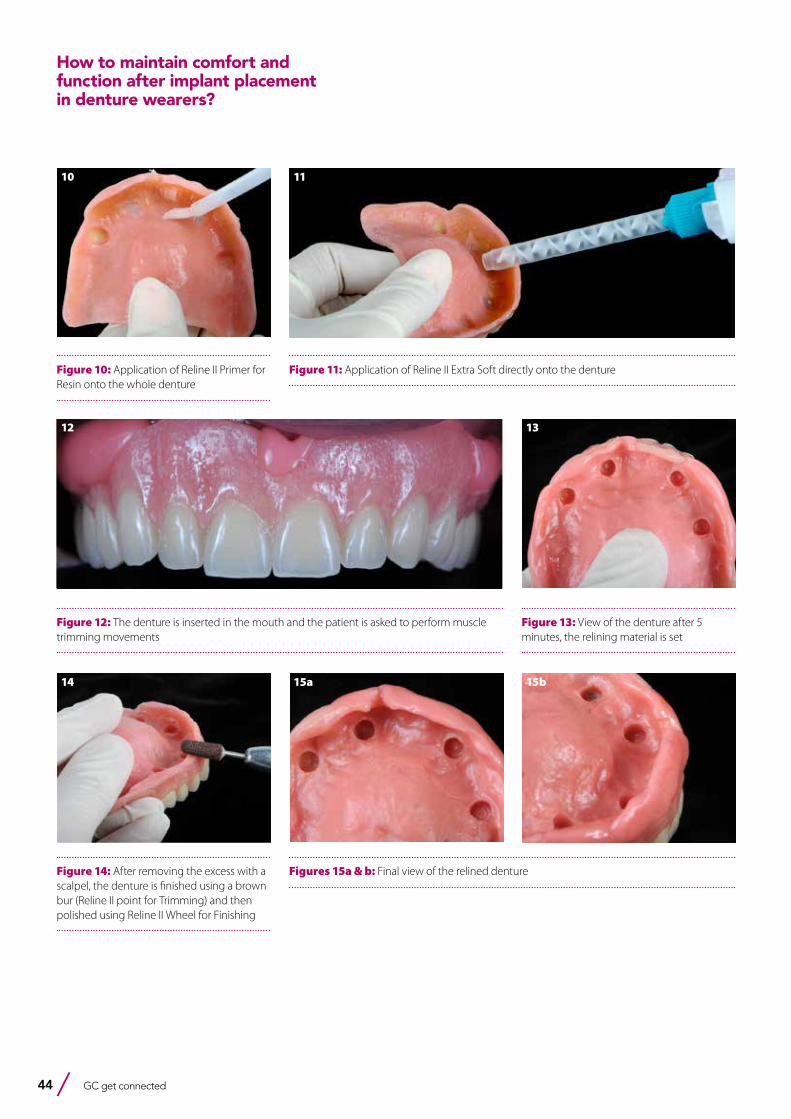
44 GC get connected
Figure 10: Application of Reline II Primer for Resin onto the whole denture
10
Figures 15a & b: Final view of the relined denture
15a 15b
Figure 11: Application of Reline II Extra Soft directly onto the denture
11
Figure 12: The denture is inserted in the mouth and the patient is asked to perform muscle trimming movements
12
Figure 13: View of the denture after 5 minutes, the relining material is set
13
Figure 14: After removing the excess with a scalpel, the denture is finished using a brown bur (Reline II point for Trimming) and then polished using Reline II Wheel for Finishing
14
How to maintain comfort and function after implant placement in denture wearers?
GC get connected 45
Bibliography
1. Atay A, Bozok Cetintas V, Cal E, Kosova B, Kesercioglu A, Guneri P. Cytotoxicity of hard and soft denture lining material. Dental Materials Journal 2012;31(6):1082-1086
2. Dimiou AM, Michalakis K, Pissiotis A. Influence of thickness increase of intraoral autopolymerizing hard denture base liners on the temperature rise during the polymerization process .J Prosthet Dent 2014 Jun;111(6):512-20
3. Silva C , Machado A, Chaves C, Pavarina A, Vergani C. Effect of thermal cycling on denture base and autolymerizing reline resins. J Appl Oral Sci 2013;21(3):219-24
4. Ogawa A, Kimoto S, Saeki H, Ono M, Furuse N, Kawai Y. The influence of patient characteristics on acrylic based resilient denture liners embedded in maxillary complete dentures. J Prosthdont Res 2016Jul;60(3):199-205
5. Nowakowska-Toporowska A. Color change of soft silicone relining materials after storage in artificial saliva. J Prosthet Dent 2016;115 (3):377-380
6. Takase K. Evaluation of glass transition temerature and dynamic mechanical propierties of autopolymerized hard direct denture reline resins. Dent Materials J 2015;34(2):211-8
7. Tewary. Evaluation of linear dimensional accurary of hard chairside and laboratory heat cure reline resins at different tine intervals after processing. Indian J Dent Rest 2014Nov-Dec;25(6):686-91
8. Bail M. Histopathological changes by the use of soft reline materials a rat model study. Plos One 2014 Jun 25;9(6):e100293.doi9. Song YH, Song HJ, Han MK, Yan HS, Park YJ. Citotoxicity of soft denture lining material depending on theis component types. Int J
Prosthodont 2014 May-Jun;27(3):229-3510. Kim BJ. Shore hardness and tensile bond strength of long-term soft denture lining materials. J Prosthet Dent 2014;112(5):1289-9711. Lau M. Tensile and shear bond strength of hard and soft denture relining materials to the conventional heat cured acrylic denture based
resin: An in vitro study. J Int Oral Health 2014Apri;6(2):55-6112. Osathananda R, Wiwatwarrapan C. Surface treatment with methyl formate- methyl acetate increased the shear bond strength between
reline resins and denture base resin. Gerodontology 2016 Jun;33(2):147-5413. Kim JH. Evaluation of adhesión of reline resins to the thermoplastic denture based resin for non-metal clasp denture. Dent Mater J.
2014;33(1):32-814. Surapaneni H, Ariga P, Haribabu R, Ravi Shankar, Kumar VHC, Attili S. Comparative evaluation of tensile bond strenght betwwen silicon soft
liners and processed denture based resin conditioned by three modes of surface treatment: An in vitro study. J Indian Prosthodont Soc 2013 Sept;13(3):274-80
15. Tanimoto Y, Saeki H, Kimoto S, Kimoto S, Nishiwaki T, Nishiyama N. Evaluation of adhesive propierties of threee resilient denture liners by the modified peel test method. Acta Biomaterialia 5(2009)764-769
16. Lin NY, Lee HR, Lee H, Pae A. Wettability of denture relining materials under wáter storage over time. J Adv Prosthodont 2009;1:1-517. Huh JB, Lim Y, Youn HI, Myung B, Lee JY, Shin SW. Effect of denture cleansers on Candida Albicans biofilm formation over resilient liners.
J Adv Prosthodont 2014;6:109-11418. Mutluay M, Oguz S, Floystrand F, Saxegaard E, Dogan A, Bek B, Ruyter E. A prospective study on the clinical performance of polysiloxane
soft liners: One-year results. Dental Materials Journal 2008;27(3):440-44719. Santawisuk W, Kanchanavasita W, Sirisinha C, Harnirattisan C. Dynamic viscoelastic properties of experimental silicone soft lining materials.
Dental Materials Journal 2010;29(4):454-46020. Saravi ME, Vodjani M, Bahrani F. Evaluation of Cellular toxicity of three denture base acrylic resins. Journal of Dentistry, Thran University of
Medical Sciences2012;9(4):180-18821. Palla ES, Karaoglani E, Naka O, Anastassiadou V. Soft denture liners effect on the masticatory function in patients wearing complete
dentures: A systematic review. J Dent 2015 Dec; 43(12):1403-10
Conclusion: Nowadays, many patients undergo implant treatments on which a partial or complete denture will be placed. During the whole treatment while the tissue is healing, the denture will need to be adjusted in order to obtain a better quality of life for the patient. Soft lining materials have been shown to be clinically safe, to have a good biocompatibility, and play an important role in improving comfort and function during this healing period. Reline II Extra Soft from GC is a durable material which can be recommended as a long-term lining material in many clinical situations. As shown in this clinical report, this product can be used to re-adapt a full denture after placement of the implant abutments.
How to maintain comfort and function after implant placement
in denture wearers?
GCAadva
Open Lab Scanner
with a patented implant
recognition system
The greatest precision at the speed of light
GCAadva
Open Lab Scanner
with a patented implant
recognition system
The greatest precision at the speed of light
Effectively combining CAD/CAM applicationsComputer-aided production processes are firmly established in the manufacture of prosthetic dental restorations.
By Garlef Roth, Frankfurt am Main
They optimise working processes and reduce the need for additional materials; but above all, they lead to higher-quality results.This user case study shows how this is possible through combining laboratory-specific and industrial production techniques.
A 67-year-old patient paid a visit to her dentist because of a defective prosthesis which had lost firm grip, causing areas of pressure. She had heard through acquaintances that complete sets of dentures can be fixed firmly in the mouth. “I want something like that”, was what she told her dentist. After the assessment, the bones were evaluated using digital volume tomography (DTV). Based on the findings, the clinician recommended that the patient have five implants inserted. The top set of dentures would then be manufactured and fixed in place with a bar. After various possible solutions were presented to the patient, she chose to have a top set of dentures fixed with a bar. After various possible solutions were presented to the patient, she opted for the first suggestion. The recommendation of a bar was based on various arguments: Primary blocking of the five implants, even support for the top set of dentures, highest possible friction across a small area, fixed denture implant in the mouth – i.e. a secure hold for the prosthesis. On top of this was also a manufacturing-related aspect: The implant abutments (structural components) and the bar can be designed in a dental laboratory and manufactured stress-free and at the same time by an external milling centre (GC Manufacturing . Europe N.V., Belgium) from a piece of cobalt-chrome. The implants are inserted using the usual treatment protocols at positions 13, 16, 21, 23 and 26 using submerged healing. The current prosthesis was thoroughly removed basally at the points of the inserted implants. This allowed it to be used for the interim period without interfering with healing of the gingiva. After complete osseointegration of the five implants, they were
Dr Garlef Roth1984 - 1988: Dental Technology Instructor1988 - 1992: employment in various dentallaboratories. 1992 - 1997: employment in various practical labs. 1997 - 2000: employed in the clinical studio of Dr. H. Mayer / ZÄ K. Stryczek (focus on implant restorations) and management of the daily organization.2000 - Foundation of Innovative DentalDesign in Bad Homburg , where I wasemployed since 2002 as laboratorymanager. 2006 - Foundation and opening of Mainhattan Dental (focus on DigitalDental Technology , Ceramic aestheticrestorations and implant restorationsWorking as a consultant for compositeand ceramic coatings. 2013 speaker and support of the CAD project for GC.
GC get connected 47
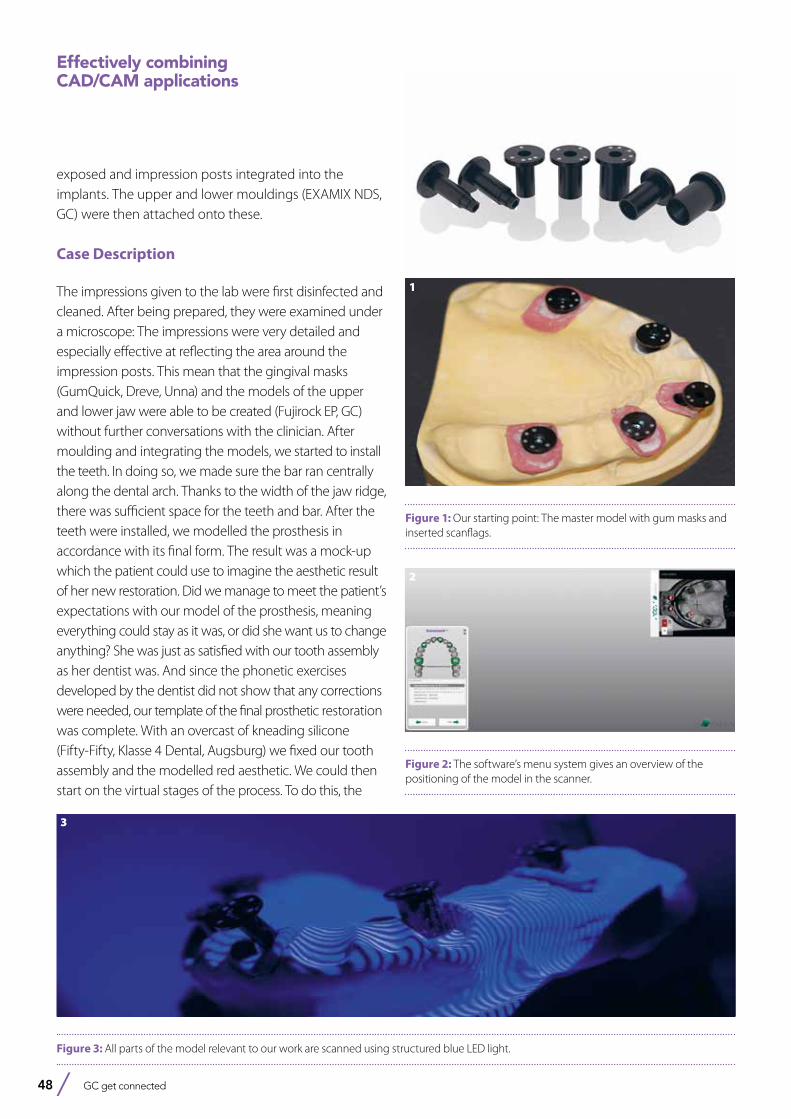
48 GC get connected
exposed and impression posts integrated into the implants. The upper and lower mouldings (EXAMIX NDS, GC) were then attached onto these.
Case Description
The impressions given to the lab were first disinfected and cleaned. After being prepared, they were examined under a microscope: The impressions were very detailed and especially effective at reflecting the area around the impression posts. This mean that the gingival masks (GumQuick, Dreve, Unna) and the models of the upper and lower jaw were able to be created (Fujirock EP, GC) without further conversations with the clinician. After moulding and integrating the models, we started to install the teeth. In doing so, we made sure the bar ran centrally along the dental arch. Thanks to the width of the jaw ridge, there was sufficient space for the teeth and bar. After the teeth were installed, we modelled the prosthesis in accordance with its final form. The result was a mock-up which the patient could use to imagine the aesthetic result of her new restoration. Did we manage to meet the patient’s expectations with our model of the prosthesis, meaning everything could stay as it was, or did she want us to change anything? She was just as satisfied with our tooth assembly as her dentist was. And since the phonetic exercises developed by the dentist did not show that any corrections were needed, our template of the final prosthetic restoration was complete. With an overcast of kneading silicone (Fifty-Fifty, Klasse 4 Dental, Augsburg) we fixed our tooth assembly and the modelled red aesthetic. We could then start on the virtual stages of the process. To do this, the
Effectively combining CAD/CAM applications
Figure 1: Our starting point: The master model with gum masks and inserted scanflags.
Figure 3: All parts of the model relevant to our work are scanned using structured blue LED light.
Figure 2: The software’s menu system gives an overview of the positioning of the model in the scanner.
1
2
3
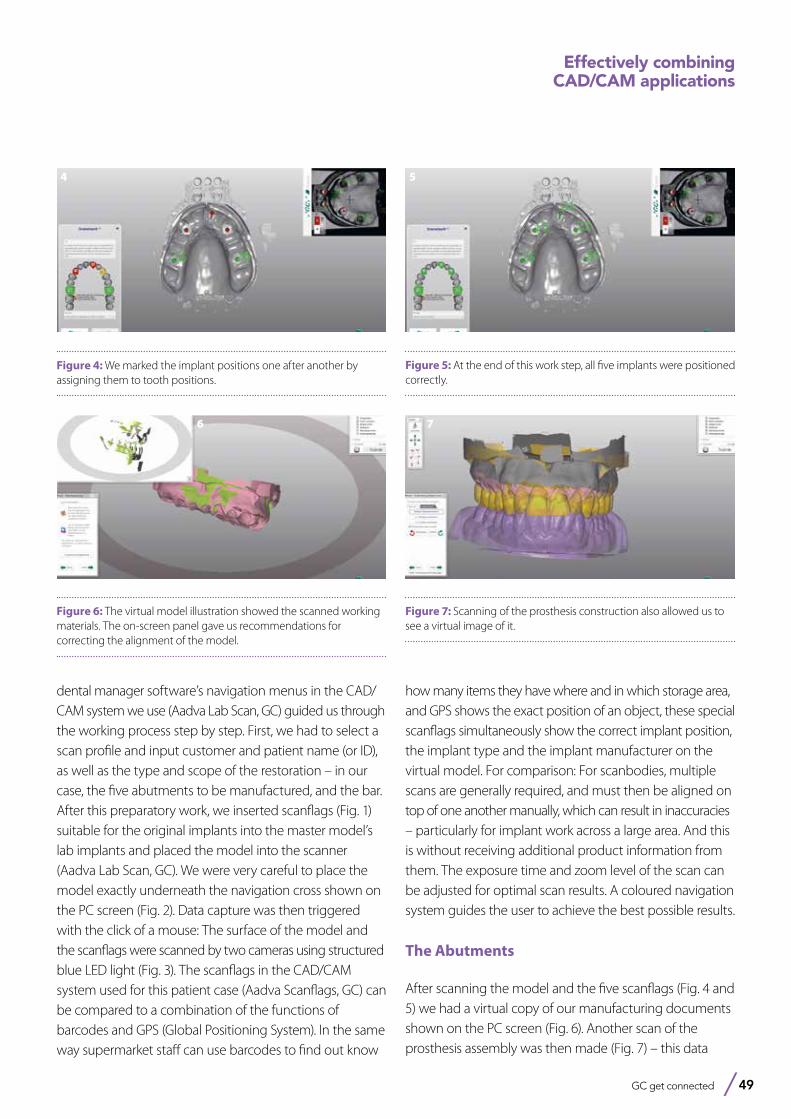
GC get connected 49
Effectively combining CAD/CAM applications
dental manager software’s navigation menus in the CAD/CAM system we use (Aadva Lab Scan, GC) guided us through the working process step by step. First, we had to select a scan profile and input customer and patient name (or ID), as well as the type and scope of the restoration – in our case, the five abutments to be manufactured, and the bar. After this preparatory work, we inserted scanflags (Fig. 1) suitable for the original implants into the master model’s lab implants and placed the model into the scanner (Aadva Lab Scan, GC). We were very careful to place the model exactly underneath the navigation cross shown on the PC screen (Fig. 2). Data capture was then triggered with the click of a mouse: The surface of the model and the scanflags were scanned by two cameras using structured blue LED light (Fig. 3). The scanflags in the CAD/CAM system used for this patient case (Aadva Scanflags, GC) can be compared to a combination of the functions of barcodes and GPS (Global Positioning System). In the same way supermarket staff can use barcodes to find out know
Figure 4: We marked the implant positions one after another by assigning them to tooth positions.
Figure 5: At the end of this work step, all five implants were positioned correctly.
Figure 6: The virtual model illustration showed the scanned working materials. The on-screen panel gave us recommendations for correcting the alignment of the model.
how many items they have where and in which storage area, and GPS shows the exact position of an object, these special scanflags simultaneously show the correct implant position, the implant type and the implant manufacturer on the virtual model. For comparison: For scanbodies, multiple scans are generally required, and must then be aligned on top of one another manually, which can result in inaccuracies – particularly for implant work across a large area. And this is without receiving additional product information from them. The exposure time and zoom level of the scan can be adjusted for optimal scan results. A coloured navigation system guides the user to achieve the best possible results.
The Abutments
After scanning the model and the five scanflags (Fig. 4 and 5) we had a virtual copy of our manufacturing documents shown on the PC screen (Fig. 6). Another scan of the prosthesis assembly was then made (Fig. 7) – this data
Figure 7: Scanning of the prosthesis construction also allowed us to see a virtual image of it.
4 5
6 7
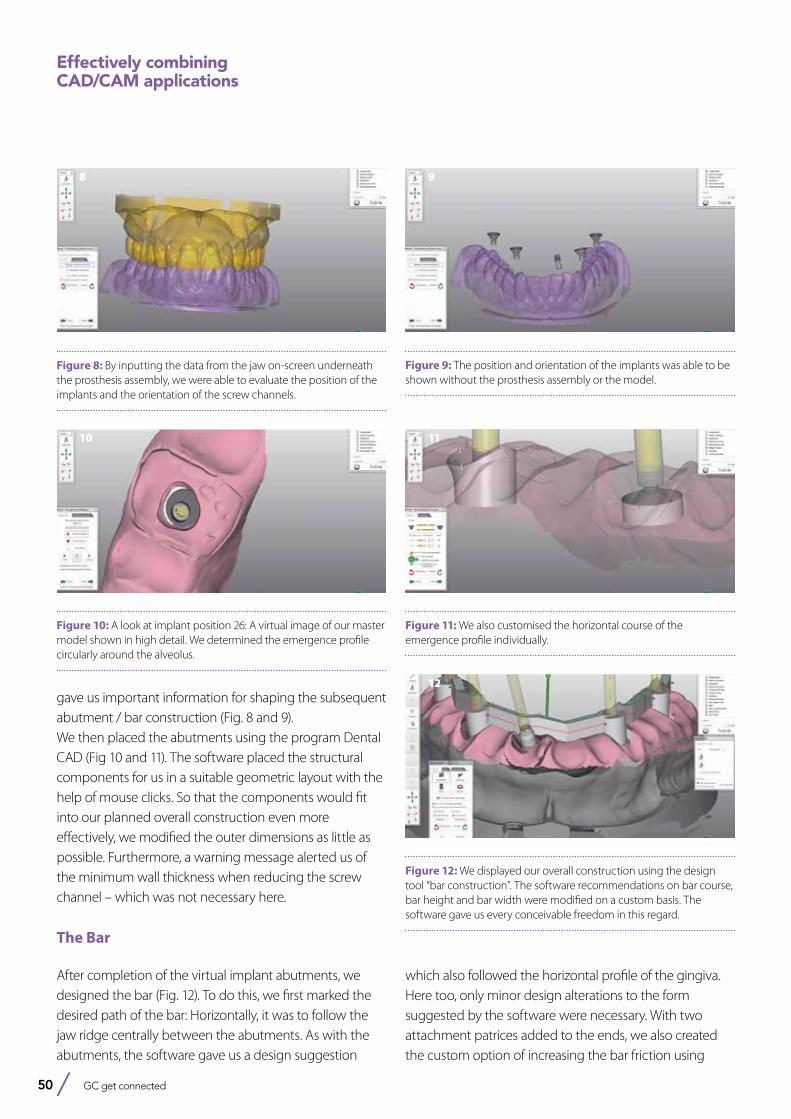
50 GC get connected
gave us important information for shaping the subsequent abutment / bar construction (Fig. 8 and 9). We then placed the abutments using the program Dental CAD (Fig 10 and 11). The software placed the structural components for us in a suitable geometric layout with the help of mouse clicks. So that the components would fit into our planned overall construction even more effectively, we modified the outer dimensions as little as possible. Furthermore, a warning message alerted us of the minimum wall thickness when reducing the screw channel – which was not necessary here.
The Bar
After completion of the virtual implant abutments, we designed the bar (Fig. 12). To do this, we first marked the desired path of the bar: Horizontally, it was to follow the jaw ridge centrally between the abutments. As with the abutments, the software gave us a design suggestion
Figure 8: By inputting the data from the jaw on-screen underneath the prosthesis assembly, we were able to evaluate the position of the implants and the orientation of the screw channels.
Figure 9: The position and orientation of the implants was able to be shown without the prosthesis assembly or the model.
Figure 10: A look at implant position 26: A virtual image of our master model shown in high detail. We determined the emergence profile circularly around the alveolus.
Figure 11: We also customised the horizontal course of the emergence profile individually.
Figure 12: We displayed our overall construction using the design tool “bar construction”. The software recommendations on bar course, bar height and bar width were modified on a custom basis. The software gave us every conceivable freedom in this regard.
Effectively combining CAD/CAM applications
which also followed the horizontal profile of the gingiva. Here too, only minor design alterations to the form suggested by the software were necessary. With two attachment patrices added to the ends, we also created the custom option of increasing the bar friction using
8 9
10 11
12
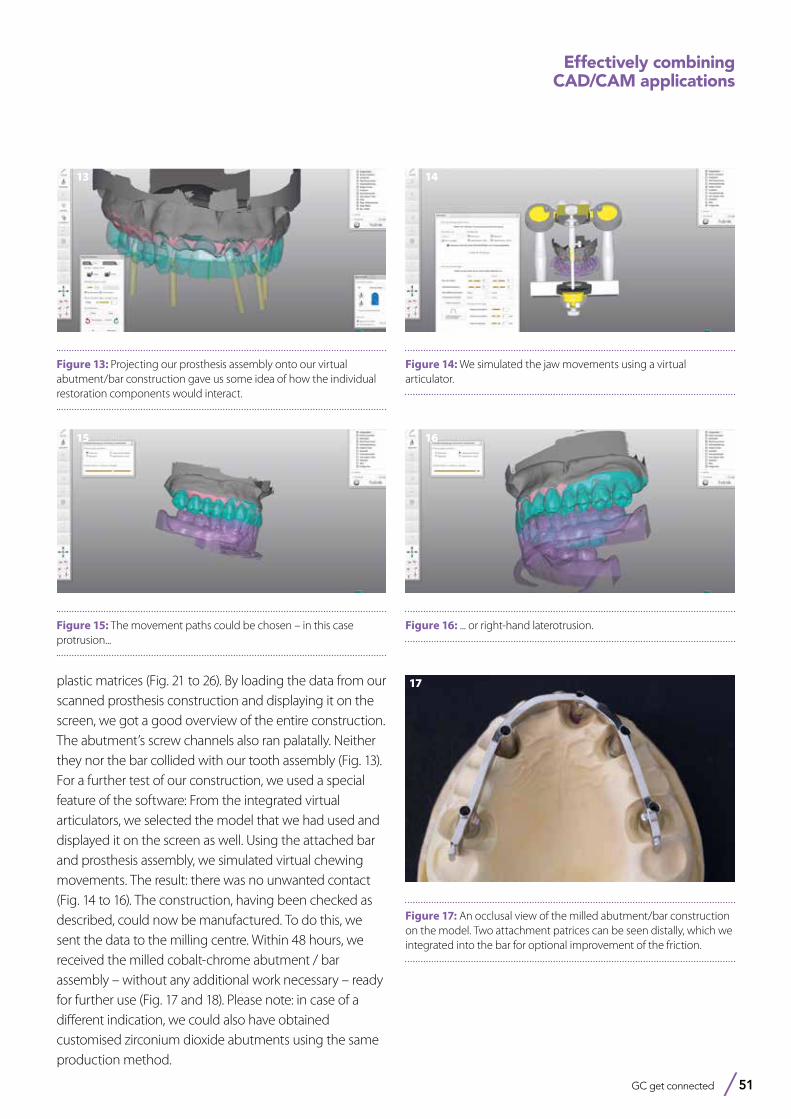
GC get connected 51
Figure 13: Projecting our prosthesis assembly onto our virtual abutment/bar construction gave us some idea of how the individual restoration components would interact.
Figure 14: We simulated the jaw movements using a virtual articulator.
Figure 15: The movement paths could be chosen – in this case protrusion...
Figure 16: ... or right-hand laterotrusion.
plastic matrices (Fig. 21 to 26). By loading the data from our scanned prosthesis construction and displaying it on the screen, we got a good overview of the entire construction. The abutment’s screw channels also ran palatally. Neither they nor the bar collided with our tooth assembly (Fig. 13). For a further test of our construction, we used a special feature of the software: From the integrated virtual articulators, we selected the model that we had used and displayed it on the screen as well. Using the attached bar and prosthesis assembly, we simulated virtual chewing movements. The result: there was no unwanted contact (Fig. 14 to 16). The construction, having been checked as described, could now be manufactured. To do this, we sent the data to the milling centre. Within 48 hours, we received the milled cobalt-chrome abutment / bar assembly – without any additional work necessary – ready for further use (Fig. 17 and 18). Please note: in case of a different indication, we could also have obtained customised zirconium dioxide abutments using the same production method.
Effectively combining CAD/CAM applications
Figure 17: An occlusal view of the milled abutment/bar construction on the model. Two attachment patrices can be seen distally, which we integrated into the bar for optional improvement of the friction.
13
15
17
16
14

52 GC get connected
Figure 19: The secondary structure was now created virtually – here with offset caps, since only one coating was required on the bar.
Figure 20: Choosing a negative cement gap cancelled out the scanspray task. This reflected the primary construction.
Figure 21: The scanned bar – top view... Figure 22: ... and side view.
Effectively combining CAD/CAM applications
Figure 18: From the vestibular direction, the perfect positioning of the bar on the abutment could be seen as well as the horizontal course of the bar along the gingiva.
The Bar Bracket
Based on the bar data, we also designed the bar bracket (secondary bar construction, bar matrix) (Fig. 19 to 28). So that it was fixed securely in the prosthesis plastic later on, retentions were integrated. After this work was carried out, we transferred the data to our own 5-axis milling machine CAM 5 (VHF, Ammerbuch). Using this, we produced the bar bracket from polyether ether ketone (PEEK), a highly biocompatible plastic which is increasingly being used for prosthetic dental restorations. With the PEEK BIO-P used here (Degos Dental, Regenstauf) we repeatedly achieved very good results.
18
19 20
21 22
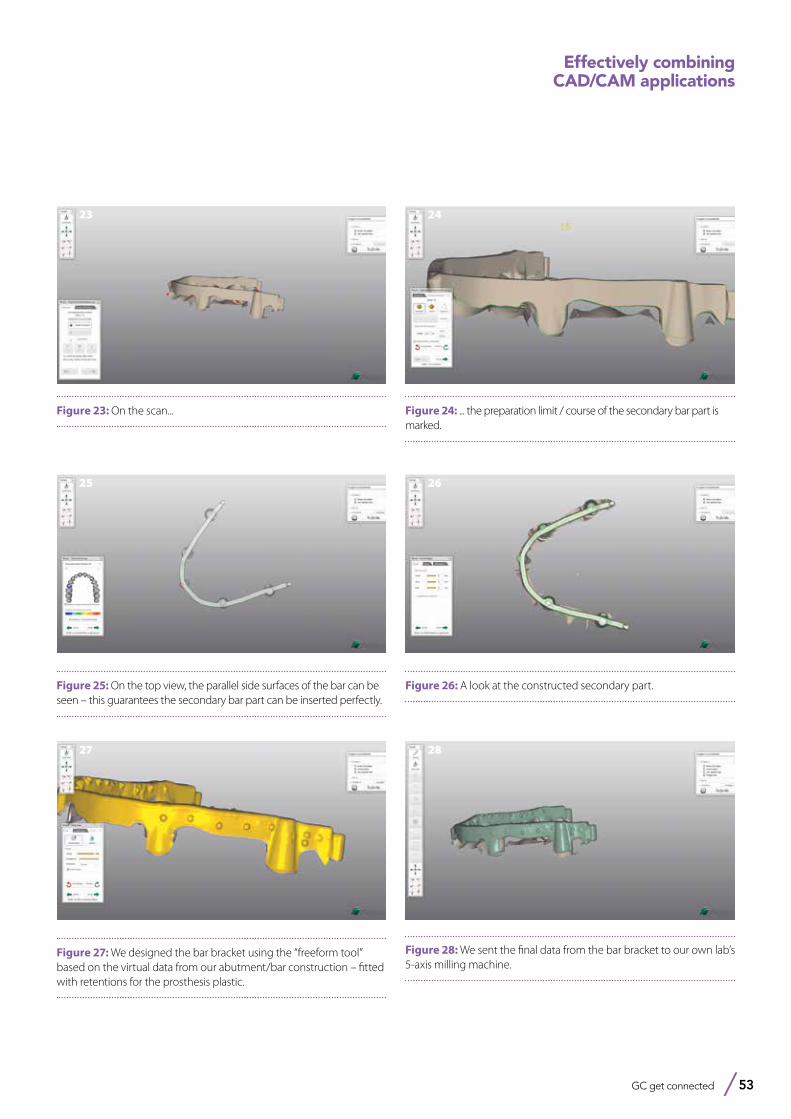
GC get connected 53
Effectively combining CAD/CAM applications
Figure 27: We designed the bar bracket using the “freeform tool” based on the virtual data from our abutment/bar construction – fitted with retentions for the prosthesis plastic.
27
Figure 28: We sent the final data from the bar bracket to our own lab’s 5-axis milling machine.
28
Figure 25: On the top view, the parallel side surfaces of the bar can be seen – this guarantees the secondary bar part can be inserted perfectly.
25
Figure 26: A look at the constructed secondary part.
26
Figure 23: On the scan...
23
Figure 24: ... the preparation limit / course of the secondary bar part is marked.
24

54 GC get connected
After one last surface treatment with visio.link (bredent, Senden) we combined the bar and the bar bracket together (Fig. 29 and 30).
The Prosthesis
After the bar bracket was produced, we milled the prosthesis assembly starting basally and palatally. We now had space to place the tooth assembly onto the bar and to set the bar bracket into the prosthetic base with wax. We finished modelling the prosthesis by contouring the palatal prosthesis components and subsequently contouring the vestibular red aesthetics (Fig. 31 to 34). Our last working steps concerned the production of the prosthesis in plastic (PlastoPress LT, S&S Scheftner, Mainz).
Effectively combining CAD/CAM applications
Figure 29: The bar bracket was conditioned with an adhesion agent – shown here in vestibular view ...
29
Figure 30: ... and in occlusal view.
30
Figure 31: The assembly of the top set of dentures was incorporated above this and waxed into place with the bar bracket.
31
Figure 32: Shown in labial view: our contouring on the model.
32
The Incorporation
The abutment/bar construction was screwed into the patient’s mouth – a Sheffield test using articulating film confirmed the perfect passive fit of the construction. The top set of dentures could then be effortlessly incorporated by the dentist. The prosthesis glided perfectly into position and had a firm grip. With just a few minor adjustments to the occlusal contacts, ideal functionality of the prosthesis was guaranteed. The patient then removed the prosthesis herself and noticed immediately how firmly the set of dentures was fixed in place – this is how she wanted it to be. The patient was very pleased with the dentures, particularly because of how firmly they were fixed in place, but thanks to the functionality and aesthetics.
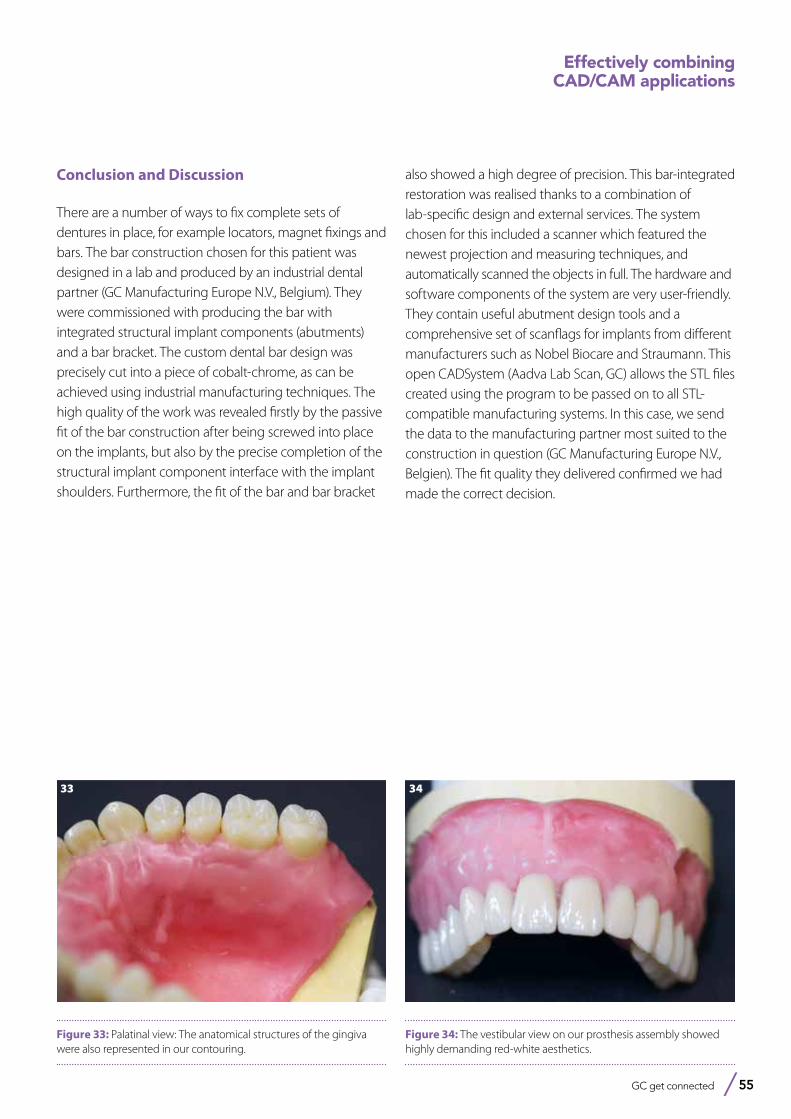
GC get connected 55
Effectively combining CAD/CAM applications
Figure 33: Palatinal view: The anatomical structures of the gingiva were also represented in our contouring.
33
Figure 34: The vestibular view on our prosthesis assembly showed highly demanding red-white aesthetics.
34
Conclusion and Discussion
There are a number of ways to fix complete sets of dentures in place, for example locators, magnet fixings and bars. The bar construction chosen for this patient was designed in a lab and produced by an industrial dental partner (GC Manufacturing Europe N.V., Belgium). They were commissioned with producing the bar with integrated structural implant components (abutments) and a bar bracket. The custom dental bar design was precisely cut into a piece of cobalt-chrome, as can be achieved using industrial manufacturing techniques. The high quality of the work was revealed firstly by the passive fit of the bar construction after being screwed into place on the implants, but also by the precise completion of the structural implant component interface with the implant shoulders. Furthermore, the fit of the bar and bar bracket
also showed a high degree of precision. This bar-integrated restoration was realised thanks to a combination of lab-specific design and external services. The system chosen for this included a scanner which featured the newest projection and measuring techniques, and automatically scanned the objects in full. The hardware and software components of the system are very user-friendly. They contain useful abutment design tools and a comprehensive set of scanflags for implants from different manufacturers such as Nobel Biocare and Straumann. This open CADSystem (Aadva Lab Scan, GC) allows the STL files created using the program to be passed on to all STL-compatible manufacturing systems. In this case, we send the data to the manufacturing partner most suited to the construction in question (GC Manufacturing Europe N.V., Belgien). The fit quality they delivered confirmed we had made the correct decision.
56 GC get connected
GRADIA PLUS from GC
when innovation meets indication...
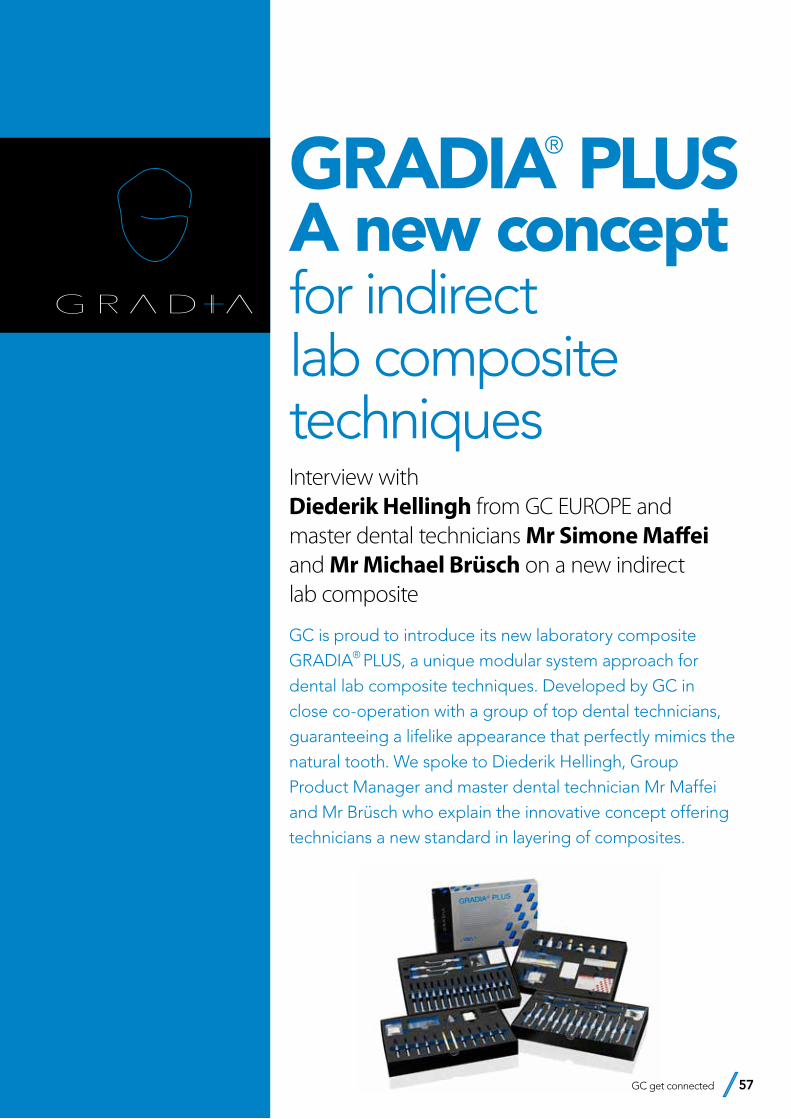
GRADIA® PLUS A new concept for indirect lab composite techniquesInterview with Diederik Hellingh from GC EUROPE and master dental technicians Mr Simone Maffei and Mr Michael Brüsch on a new indirect lab composite
GC is proud to introduce its new laboratory composite GRADIA® PLUS, a unique modular system approach for dental lab composite techniques. Developed by GC in close co-operation with a group of top dental technicians, guaranteeing a lifelike appearance that perfectly mimics the natural tooth. We spoke to Diederik Hellingh, Group Product Manager and master dental technician Mr Maffei and Mr Brüsch who explain the innovative concept offering technicians a new standard in layering of composites.
GC get connected 57
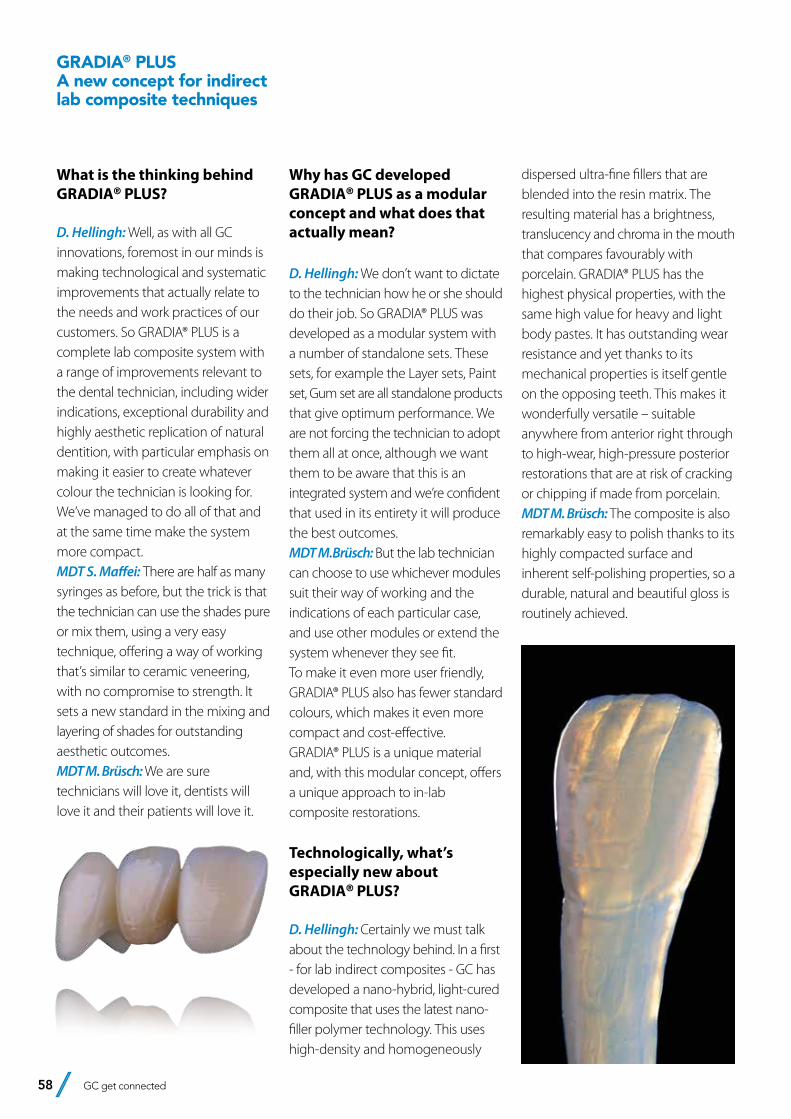
58 GC get connected
GRADIA® PLUS A new concept for indirect lab composite techniques
Why has GC developed GRADIA® PLUS as a modular concept and what does that actually mean?
D. Hellingh: We don’t want to dictate to the technician how he or she should do their job. So GRADIA® PLUS was developed as a modular system with a number of standalone sets. These sets, for example the Layer sets, Paint set, Gum set are all standalone products that give optimum performance. We are not forcing the technician to adopt them all at once, although we want them to be aware that this is an integrated system and we’re confident that used in its entirety it will produce the best outcomes. MDT M.Brüsch: But the lab technician can choose to use whichever modules suit their way of working and the indications of each particular case, and use other modules or extend the system whenever they see fit. To make it even more user friendly, GRADIA® PLUS also has fewer standard colours, which makes it even more compact and cost-effective. GRADIA® PLUS is a unique material and, with this modular concept, offers a unique approach to in-lab composite restorations.
Technologically, what’s especially new about GRADIA® PLUS?
D. Hellingh: Certainly we must talk about the technology behind. In a first - for lab indirect composites - GC has developed a nano-hybrid, light-cured composite that uses the latest nano-filler polymer technology. This uses high-density and homogeneously
dispersed ultra-fine fillers that are blended into the resin matrix. The resulting material has a brightness, translucency and chroma in the mouth that compares favourably with porcelain. GRADIA® PLUS has the highest physical properties, with the same high value for heavy and light body pastes. It has outstanding wear resistance and yet thanks to its mechanical properties is itself gentle on the opposing teeth. This makes it wonderfully versatile – suitable anywhere from anterior right through to high-wear, high-pressure posterior restorations that are at risk of cracking or chipping if made from porcelain. MDT M. Brüsch: The composite is also remarkably easy to polish thanks to its highly compacted surface and inherent self-polishing properties, so a durable, natural and beautiful gloss is routinely achieved.
What is the thinking behind GRADIA® PLUS?
D. Hellingh: Well, as with all GC innovations, foremost in our minds is making technological and systematic improvements that actually relate to the needs and work practices of our customers. So GRADIA® PLUS is a complete lab composite system with a range of improvements relevant to the dental technician, including wider indications, exceptional durability and highly aesthetic replication of natural dentition, with particular emphasis on making it easier to create whatever colour the technician is looking for. We’ve managed to do all of that and at the same time make the system more compact. MDT S. Maffei: There are half as many syringes as before, but the trick is that the technician can use the shades pure or mix them, using a very easy technique, offering a way of working that’s similar to ceramic veneering, with no compromise to strength. It sets a new standard in the mixing and layering of shades for outstanding aesthetic outcomes. MDT M. Brüsch: We are sure technicians will love it, dentists will love it and their patients will love it.
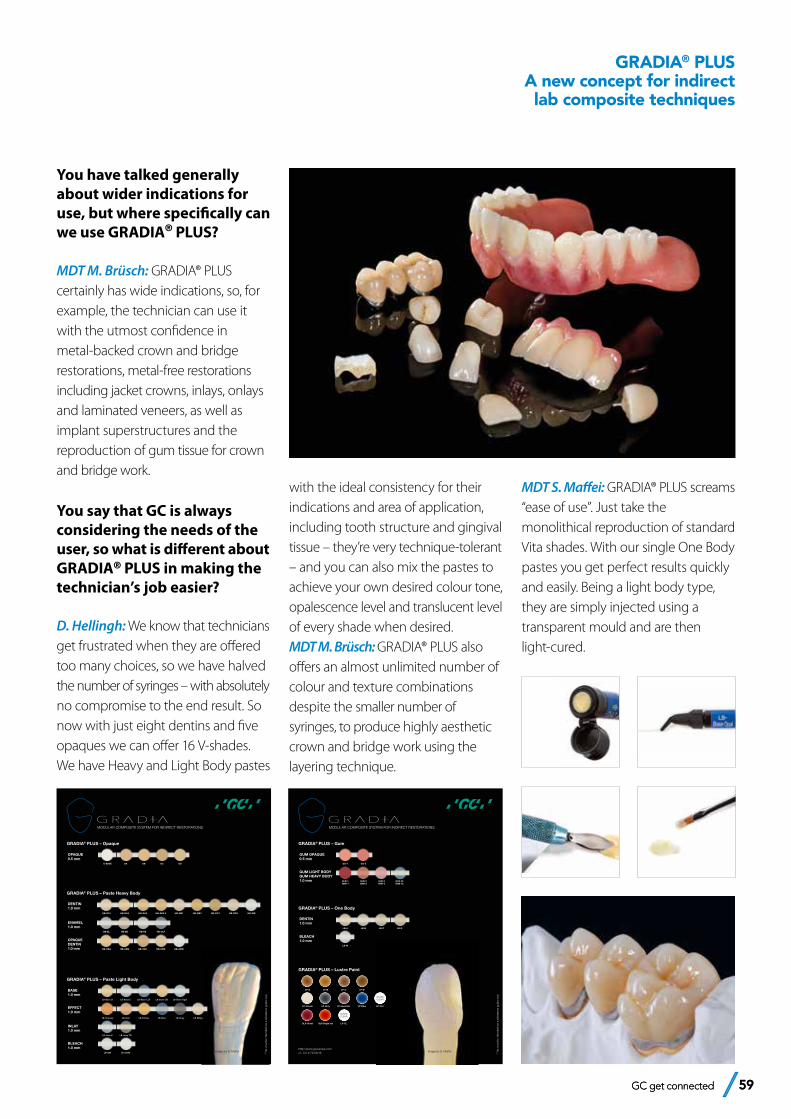
GC get connected 59 GC get connected 59
GRADIA® PLUS A new concept for indirect lab composite techniques
MODULAR COMPOSITE SYSTEM FOR INDIRECT RESTORATIONS
GRADIA® PLUS – Opaque
OPAQUE0.5 mm
O-BASE OA OB OC OD
GRADIA® PLUS – Paste Heavy Body
DENTIN1.0 mm
HB-DA1 HB-DA2 HB-DA3 HB-DA3.5 HB-DB1 HB-DB3 HB-DC3 HB-DD2 HB-DW
ENAMEL1.0 mm
HB-EL HB-ED HB-PE HB-CLF
OPAQUE DENTIN1.0 mm HB-ODA HB-ODB HB-ODC HB-ODD HB-ODW
GRADIA® PLUS – Paste Light Body
BASE1.0 mm
LB-Base D LB-Base E LB-Base CLF LB-Base OD LB-Base Opal
EFFECT1.0 mm
LB-Orange LB-Red LB-Yellow LB-Blue LB-Grey LB-Milky
INLAY1.0 mm
LB-Inlay E LB-Inlay TD
BLEACH1.0 mm
LB-DW LB-ODW Image by S. Maffei This
cha
rt is
inte
nded
as
a re
fere
nce
guid
e on
ly
MODULAR COMPOSITE SYSTEM FOR INDIRECT RESTORATIONS
GRADIA® PLUS – One Body
DENTIN1.0 mm
LB-A LB-B LB-C LB-D
BLEACH1.0 mm
LB-W
GRADIA® PLUS – Gum
GUM OPAQUE0.5 mm
GO-1 GO-2
GUM LIGHT BODYGUM HEAVY BODY1.0 mm GLB-1
GHB-1 GLB-2GHB-2
GLB-3GHB-3
GLB-CLGHB-CL
http://www.gceurope.comz L CC 8 79 06/16 Image by S. Maffei
GRADIA® PLUS – Lustre Paint
LP-A LP-B LP-C LP-D
LP-Cream LP-Grey LP-Lavender LP-Blue LP-CLF
GLP-Violet GLP-Bright red LP-CL
GLASSCLEAR
GLASSCLEAR
This
cha
rt is
inte
nded
as
a re
fere
nce
guid
e on
ly
You have talked generally about wider indications for use, but where specifically can we use GRADIA® PLUS?
MDT M. Brüsch: GRADIA® PLUS certainly has wide indications, so, for example, the technician can use it with the utmost confidence in metal-backed crown and bridge restorations, metal-free restorations including jacket crowns, inlays, onlays and laminated veneers, as well as implant super structures and the reproduction of gum tissue for crown and bridge work.
You say that GC is always considering the needs of the user, so what is different about GRADIA® PLUS in making the technician’s job easier?
D. Hellingh: We know that technicians get frustrated when they are offered too many choices, so we have halved the number of syringes – with absolutely no compromise to the end result. So now with just eight dentins and five opaques we can offer 16 V-shades. We have Heavy and Light Body pastes
with the ideal consistency for their indications and area of application, including tooth structure and gingival tissue – they’re very technique-tolerant – and you can also mix the pastes to achieve your own desired colour tone, opalescence level and translucent level of every shade when desired. MDT M. Brüsch: GRADIA® PLUS also offers an almost unlimited number of colour and texture combinations despite the smaller number of syringes, to produce highly aesthetic crown and bridge work using the layering technique.
MDT S. Maffei: GRADIA® PLUS screams “ease of use”. Just take the monolithical reproduction of standard Vita shades. With our single One Body pastes you get perfect results quickly and easily. Being a light body type, they are simply injected using a transparent mould and are then light-cured.

60 GC get connected
GRADIA® PLUS A new concept for indirect lab composite techniques
Moreover, with its combination of durability and aesthetics, GRADIA® PLUS is equally at home in posterior and anterior restorations and is up to the most aesthetically demanding case.
Added colour, internally and externally, is crucial to the aesthetics of a restoration. What does GRADIA® PLUS have to offer that improves the options for the technician?
D. Hellingh: We’ve used the “less is more” philosophy with Lustre Paint; our paint-on set that includes a wide range of colours for both internal and external characterisation and adds a key dimension to the GRADIA® PLUS system. MDT M. Brüsch: Lustre Paint has a simple technique for achieving durable colour and superb surface gloss with great wear resistance, and using this
light-cured characterisation on your surfaces reduces the polishing stage, saving valuable time. The results are just beautiful. MDT S. Maffei: Oh, and you can easily mix the colours to produce subtle changes, and alter the consistency if necessary by using the diluting liquid provided.
Tell us more about GRADIA® PLUS’s approach to complex “red” aesthetic cases. What is the GC solution?
MDT M. Brüsch: We know that matching the countless variations in gingival tissue is challenging. But with the GRADIA® PLUS Gum set, which includes a wide variety of red shades, we believe close matches in colour and texture are made much easier, regardless of age or ethnicity. MDT S. Maffei: The gum set is for implant superstructures and other fixed or removable prostheses like crowns, bridges and partial dentures. GRADIA® PLUS gum shades have the same strength, durability and handling properties as GRADIA® PLUS tooth shades.
The GRADIA® PLUS modular concept includes a new light-curing unit. Just what is “new” about it that will appeal to the technician?
D. Hellingh: We call it the LABOLIGHT DUO. It’s an all-in-one device for step-by-step intermediate curing and final curing. Thanks to GC, no more need for two separate devices – imagine that! This dual purpose is achieved with two curing modes – pre-curing, which is the step
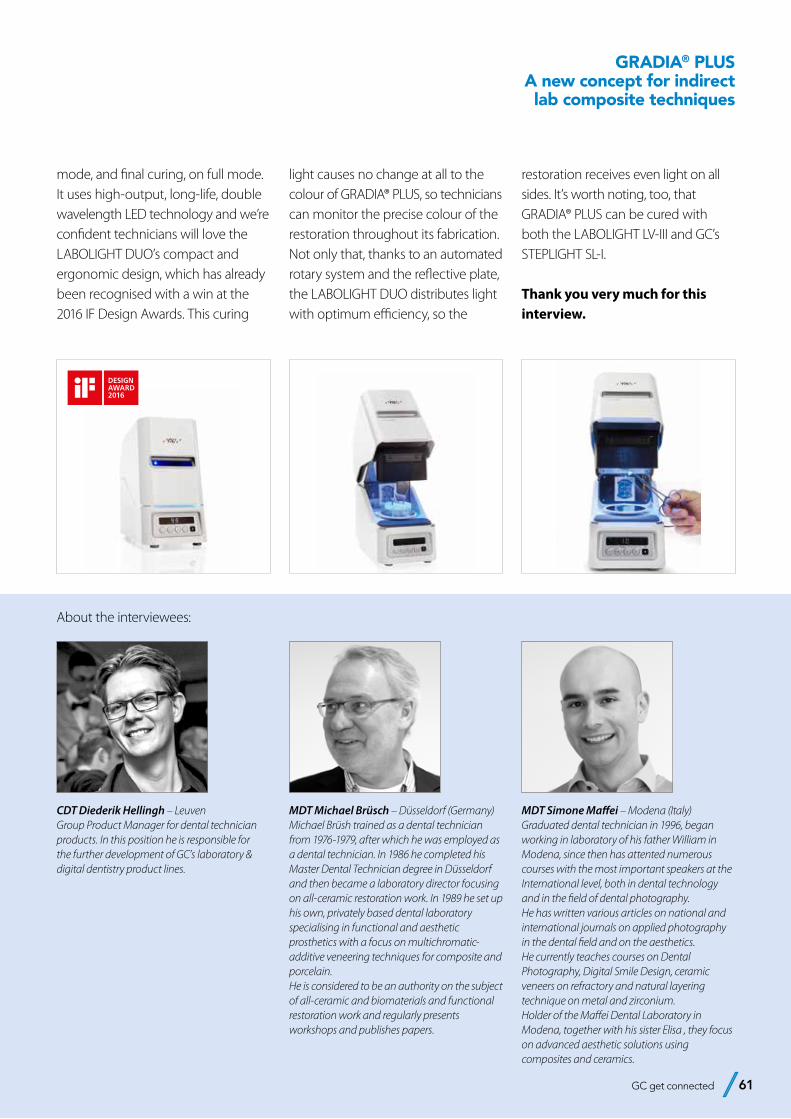
GC get connected 61
CDT Diederik Hellingh – Leuven Group Product Manager for dental technician products. In this position he is responsible for the further development of GC’s laboratory & digital dentistry product lines.
MDT Michael Brüsch – Düsseldorf (Germany)Michael Brüsh trained as a dental technician from 1976-1979, after which he was employed as a dental technician. In 1986 he completed his Master Dental Technician degree in Düsseldorf and then became a laboratory director focusing on all-ceramic restoration work. In 1989 he set up his own, privately based dental laboratory specialising in functional and aesthetic prosthetics with a focus on multichromatic-additive veneering techniques for composite and porcelain.He is considered to be an authority on the subject of all-ceramic and biomaterials and functional restoration work and regularly presents workshops and publishes papers.
MDT Simone Maffei – Modena (Italy)Graduated dental technician in 1996, began working in laboratory of his father William in Modena, since then has attented numerous courses with the most important speakers at the International level, both in dental technology and in the field of dental photography.He has written various articles on national and international journals on applied photography in the dental field and on the aesthetics.He currently teaches courses on Dental Photography, Digital Smile Design, ceramic veneers on refractory and natural layering technique on metal and zirconium.Holder of the Maffei Dental Laboratory in Modena, together with his sister Elisa , they focus on advanced aesthetic solutions using composites and ceramics.
About the interviewees:
GRADIA® PLUS A new concept for indirect lab composite techniques
mode, and final curing, on full mode. It uses high-output, long-life, double wavelength LED technology and we’re confident technicians will love the LABOLIGHT DUO’s compact and ergonomic design, which has already been recognised with a win at the 2016 IF Design Awards. This curing
light causes no change at all to the colour of GRADIA® PLUS, so technicians can monitor the precise colour of the restoration throughout its fabrication. Not only that, thanks to an automated rotary system and the reflective plate, the LABOLIGHT DUO distributes light with optimum efficiency, so the
restoration receives even light on all sides. It’s worth noting, too, that GRADIA® PLUS can be cured with both the LABOLIGHT LV-III and GC’s STEPLIGHT SL-I.
Thank you very much for this interview.
GC get connected 61
LiSi from GC Master your
lithium disilicate challenges
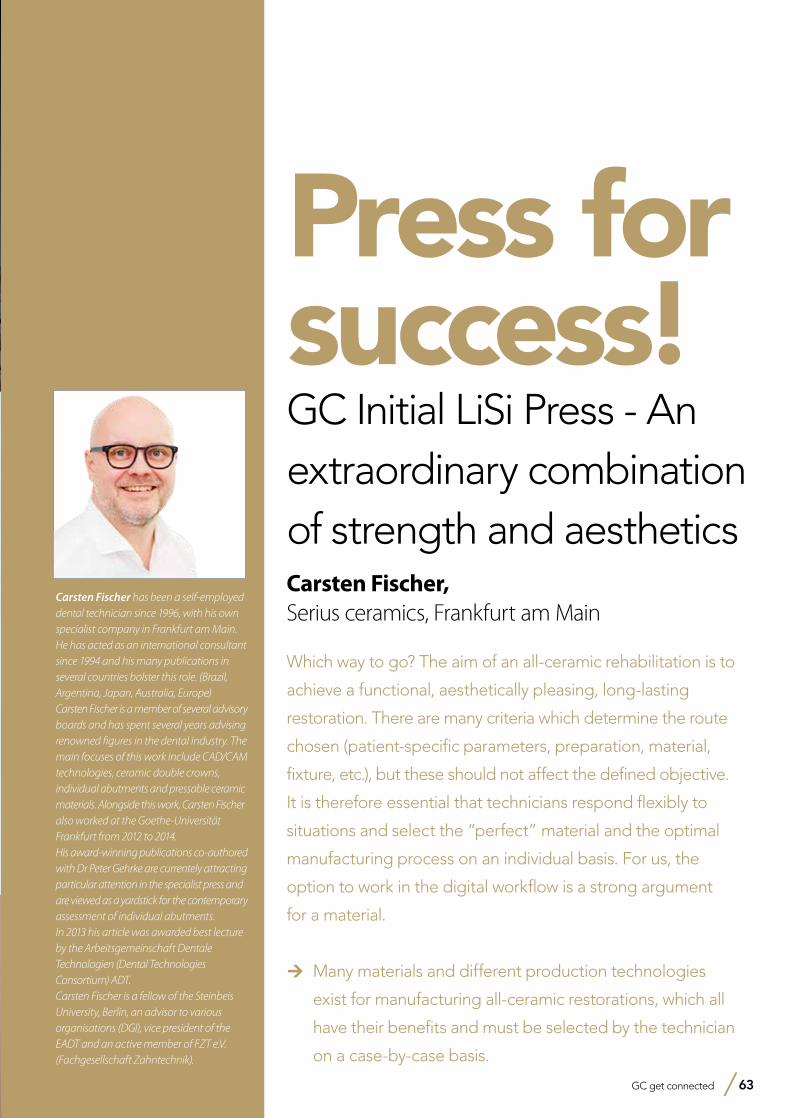
GC get connected 63
Press for success!GC Initial LiSi Press - An extraordinary combination of strength and aestheticsCarsten Fischer, Serius ceramics, Frankfurt am Main
Which way to go? The aim of an all-ceramic rehabilitation is to
achieve a functional, aesthetically pleasing, long-lasting
restoration. There are many criteria which determine the route
chosen (patient-specific parameters, preparation, material,
fixture, etc.), but these should not affect the defined objective.
It is therefore essential that technicians respond flexibly to
situations and select the “perfect” material and the optimal
manufacturing process on an individual basis. For us, the
option to work in the digital workflow is a strong argument
for a material.
ÚMany materials and different production technologies
exist for manufacturing all-ceramic restorations, which all
have their benefits and must be selected by the technician
on a case-by-case basis.
Carsten Fischer has been a self-employed dental technician since 1996, with his own specialist company in Frankfurt am Main. He has acted as an international consultant since 1994 and his many publications in several countries bolster this role. (Brazil, Argentina, Japan, Australia, Europe)Carsten Fischer is a member of several advisory boards and has spent several years advising renowned figures in the dental industry. The main focuses of this work include CAD/CAM technologies, ceramic double crowns, individual abutments and pressable ceramic materials. Alongside this work, Carsten Fischer also worked at the Goethe-Universität Frankfurt from 2012 to 2014.His award-winning publications co-authored with Dr Peter Gehrke are currentely attracting particular attention in the specialist press and are viewed as a yardstick for the contemporary assessment of individual abutments.In 2013 his article was awarded best lecture by the Arbeitsgemeinschaft Dentale Technologien (Dental Technologies Consortium) ADT.Carsten Fischer is a fellow of the Steinbeis University, Berlin, an advisor to various organisations (DGI), vice president of the EADT and an active member of FZT e.V. (Fachgesellschaft Zahntechnik).

64 GC get connected
Press for success!GC Initial LiSi Press - An extraordinary combination of strength and aesthetics
1. A “keyboard” of pressable ceramics
But which ceramic is best suited to which indication? At this point, it’s worth taking a look at the wider ceramics family. A statement by the DGZMK divides pressable ceramics into:1. Material composition: oxide
ceramics, silicate ceramics2. Manufacturing process: integral
shape, casting, hot pressing, copy grinding, CAD/CAM
3. Clinical application: conventional cementation, fixed using adhesive
1.1 Differentiation by material compositionSilicate ceramics (e.g. feldspar and glass ceramics) are ideal for restorations on individual teeth (veneers, inlays, onlays) because they behave similarly to enamel. With values of between 50 to 200 MPa, it has low bending strength. In the jaw area, which is under a lot of functional strain, or in multi-faceted restorations, oxide ceramics are preferable (e.g. zirconium oxide). They have a low proportion of glass, resulting in high resistance (bending strength of conventional zirconium oxide of 1000 to 1200 MPa). The limited light-optical properties are balanced out to some degree using a veneer or translucent zirconium oxide (3rd generation).(ÒCave: There is a correlation between translucency and strength. The higher the translucency of zirconium oxide, the lower its bending strength). Lithium disilicate has also been established as an equivalent. The strong glass ceramic has a high crystalline proportion of lithium disilicate and lithium orthophosphate. Thanks to improved light-optical
properties, the material is also well-suited to, and safe for, monolithic treatments. Conventional lithium disilicate (IPS e.max) has an average final strength of around 360 MPa. We are now hearing discussions that this is just the “lower” measured bending strength and that the actual value is higher. However, in this area we practicians are initially guided by the comprehensive studies from the past few years, in which the researchers always assumed 360 MPa.ÒA new lithium disilicate has been
available for a short while now. GC Initial LiSi Press offers us some advantages in comparison to the conventional material (cf. point 3 of this article).
1.2 Differentiation by manufacturing processCAD/CAM (grinding, milling) and pressing should be mentioned as manufacturing technologies for pressable ceramic restorations. The choice of manufacturing method generally depends on the material. For example, oxide ceramics are now used using CAD/CAM technology. Press technology (lost wax technique) is a popular process for glass ceramics and lithium disilicate. A hybrid technology is also often used, in which wax objects are milled by machine and then pressed in the classic fashion. We prefer this method in our day-to-day work when lithium disilicate is used. With the hybrid technology, we can make maximum use of the benefits of the digital workflow and minimise faulty steps in the manual technology.Examples from everyday life in our laboratory - material and manufacturing technology
• Hybrid ceramic (e.g. Cerasmart): grinding
• Lithium disilicate (e.g. IPS e.max, GC Initial LiSi Press): pressing, grinding (e.max)
• Oxide ceramic (e.g. Zirlux zirconium oxide): milling
• Veneering ceramic (e.g. GC Initial): manually
ÒThe press technology is highly relevant when manufacturing pressable ceramic restorations and is an essential component of day-to-day life in our laboratory.
1.3 Differentiation by clinical applicationThe decision on the type of clinical fixture for a pressable ceramic restoration is based on the material’s bending strength. Ceramics with a bending strength of under 350 MPa are fixed using adhesive. For ceramics with a bending strength of more than 350 MPa, there is a choice between conventional, self-adhesive or adhesive fixture.
The criteria mentioned demon strate the wealth of ceramic materials that a dental laboratory has to work with. To be able to cover everything, it is hardly enough to have only one pressable ceramic system. This is why a carefully thought-through ‘keyboard’ of pressable ceramics is used in our laboratory. The transitions are often fluid and sometimes “blurry”, but we need different pressable ceramic materials nonetheless. With a graded range, we make individual aesthetically pleasing and clinically long-lasting
GC get connected 65
Press for success!GC Initial LiSi Press - An extraordinary
combination of strength and aesthetics
restorations for each patient, without losing sight of the need for efficiency in everyday life in the laboratory.
2. Press technology as a building block for success
One “key” on our pressable ceramic keyboard is press technology and we gratefully profit from its advantages. These include the 1:1 transposition of wax modelling into ceramic, the efficient process, the high quality of the material and the good aesthetic results. Because there is often no need for conventional stratification, this reduces the amount of work required, the sources of errors and the factors which can affect the material’s structure. For us, the indication “monolithic” is a decisive argument for a material. In our laboratory, monolithic restoration in the posterior region has been established as a firm standard.
An overview of the benefits of press technology:• Loss-free transfer of wax modelling
to ceramic,• Aesthetic benefits,• Precise moulding of edge regions,• Microscopically exact ceramic
layers,• No sinter shrinkage.
2.1 GC Initial LiSi Press and the high standard set by IPS e.maxThe success of press technology can be traced back to the innovative material lithium disilicate - high-strength glass ceramic. When deciding on a new lithium disilicate, we set the bar high and take our lead from the classic IPS
e.max. The newcomer GC Initial LiSi Press is generating a beneficial impetus for this standard. With IPS e.max Press, the company Ivoclar Vivadent (Schaan) set a bar that is still viewed as the standard across the board today. This relates to both the aesthetic qualities and the physical properties. We have also come to recognise the benefits of lithium disilicate and won’t accept limitations in a new product where it is concerned. We’ve been spoilt by the good light-optical properties, the wide range of colours and translucency, and the high strength for a glass ceramic. Today, we are no longer able to do without these features. Based on the existing standards (IPS e.max), there has been an impressive process of development over the past few years in which other manufacturers were also involved, e.g. GC (GC Europe, Leuven). Now, with GC Initial LiSi Press, there is another lithium disilicate available for pressing which combines the aforementioned advantages and develops them further.
3. The newcomer: GC Initial LiSi Press
The delightful-sounding material LiSi Press has succeeded in optimising the physical properties and material qualities. Furthermore, the colour saturation has been amended. On the one hand, the fluorescent effect is well-balanced and natural. On the other, the levels of value and chroma are ideal and this can be seen in the higher colour density. The opportunities that GC Lustre Pastes
and GC Initial LiSi veneering ceramic offer are also impressive. We can work within a rounded product portfolio which opens up excellent opportunities.
• Optimised material qualities,• Improved light-optical properties
(colour density),• Simplified manufacturing process,• Ideal equivalent: LiSi veneering
ceramic, Lustre Pastes.
3.1 Optimised material qualitiesEssentially, the physical properties of a ceramic are influenced by the composition of the raw materials and the added materials, as well as the manufacturing process. Among other things, the grain size determines the quality of the material. GC Initial LiSi Press has a refined grain. The High Density Micronization (HDM) technology was developed specially for the manufacture of this lithium disilicate. This results in evenly dispersed lithium disilicate microcrystals which fill the entire glass matrix. (ÒCave: if the crystals are larger, the matrix structure cannot be fully exploited.) The small grains are the basis for LiSi Press’s good material properties. From our perspective as practicians, it makes complete sense to continue developing the basic substance. The smaller the grain, the less the glass matrix is open to attack, through etching, for example, and the greater the apparent resistance to ageing. For single tooth crowns on implants, for example, this increases our confidence in the long-term stability. The individual small grain also helps to ensure effective polishing. The residual roughness is considerably reduced. The surfaces are extremely smooth and homogeneous. It should
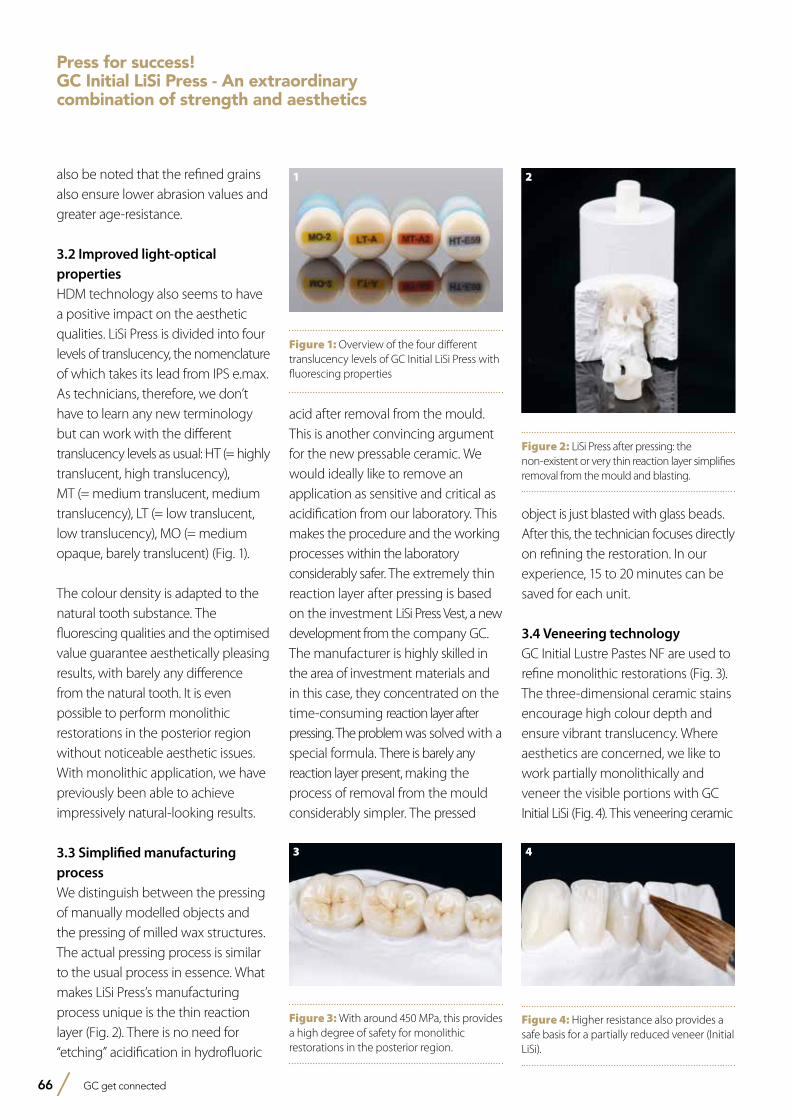
66 GC get connected
Press for success!GC Initial LiSi Press - An extraordinary combination of strength and aesthetics
also be noted that the refined grains also ensure lower abrasion values and greater age-resistance.
3.2 Improved light-optical propertiesHDM technology also seems to have a positive impact on the aesthetic qualities. LiSi Press is divided into four levels of translucency, the nomenclature of which takes its lead from IPS e.max. As technicians, therefore, we don’t have to learn any new terminology but can work with the different translucency levels as usual: HT (= highly translucent, high translucency), MT (= medium translucent, medium translucency), LT (= low translucent, low translucency), MO (= medium opaque, barely translucent) (Fig. 1).
The colour density is adapted to the natural tooth substance. The fluorescing qualities and the optimised value guarantee aesthetically pleasing results, with barely any difference from the natural tooth. It is even possible to perform monolithic restorations in the posterior region without noticeable aesthetic issues. With monolithic application, we have previously been able to achieve impressively natural-looking results.
3.3 Simplified manufacturing processWe distinguish between the pressing of manually modelled objects and the pressing of milled wax structures. The actual pressing process is similar to the usual process in essence. What makes LiSi Press’s manufacturing process unique is the thin reaction layer (Fig. 2). There is no need for “etching” acidification in hydrofluoric
acid after removal from the mould. This is another convincing argument for the new pressable ceramic. We would ideally like to remove an application as sensitive and critical as acidification from our laboratory. This makes the procedure and the working processes within the laboratory considerably safer. The extremely thin reaction layer after pressing is based on the investment LiSi Press Vest, a new development from the company GC. The manufacturer is highly skilled in the area of investment materials and in this case, they concentrated on the time-consuming reaction layer after pressing. The problem was solved with a special formula. There is barely any reaction layer present, making the process of removal from the mould considerably simpler. The pressed
object is just blasted with glass beads. After this, the technician focuses directly on refining the restoration. In our experience, 15 to 20 minutes can be saved for each unit.
3.4 Veneering technologyGC Initial Lustre Pastes NF are used to refine monolithic restorations (Fig. 3). The three-dimensional ceramic stains encourage high colour depth and ensure vibrant translucency. Where aesthetics are concerned, we like to work partially monolithically and veneer the visible portions with GC Initial LiSi (Fig. 4). This veneering ceramic
1
Figure 1: Overview of the four different translucency levels of GC Initial LiSi Press with fluorescing properties
2
Figure 2: LiSi Press after pressing: the non-existent or very thin reaction layer simplifies removal from the mould and blasting.
Figure 3: With around 450 MPa, this provides a high degree of safety for monolithic restorations in the posterior region.
3
Figure 4: Higher resistance also provides a safe basis for a partially reduced veneer (Initial LiSi).
4
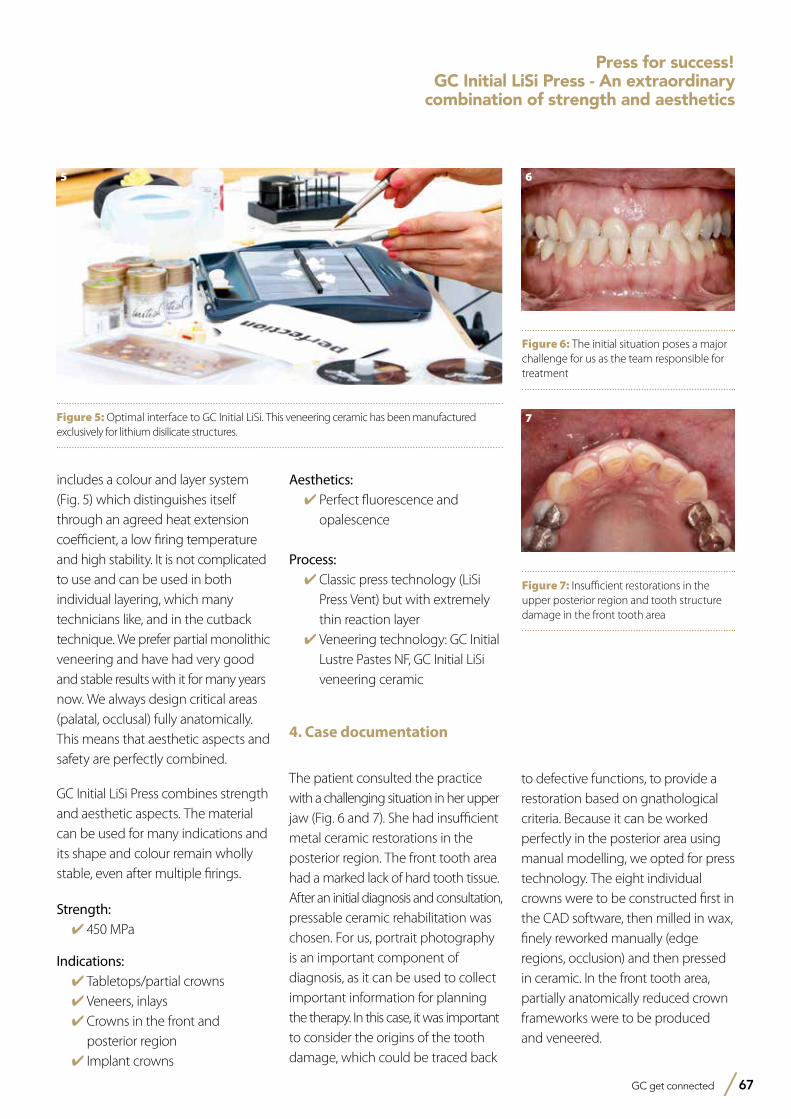
GC get connected 67
Press for success!GC Initial LiSi Press - An extraordinary
combination of strength and aesthetics
includes a colour and layer system (Fig. 5) which distinguishes itself through an agreed heat extension coefficient, a low firing temperature and high stability. It is not complicated to use and can be used in both individual layering, which many technicians like, and in the cutback technique. We prefer partial monolithic veneering and have had very good and stable results with it for many years now. We always design critical areas (palatal, occlusal) fully anatomically. This means that aesthetic aspects and safety are perfectly combined.
GC Initial LiSi Press combines strength and aesthetic aspects. The material can be used for many indications and its shape and colour remain wholly stable, even after multiple firings.
Strength:✔450 MPa
Indications:✔Tabletops/partial crowns✔Veneers, inlays✔Crowns in the front and
posterior region✔Implant crowns
Aesthetics:✔Perfect fluorescence and
opalescence
Process:✔Classic press technology (LiSi
Press Vent) but with extremely thin reaction layer
✔Veneering technology: GC Initial Lustre Pastes NF, GC Initial LiSi veneering ceramic
4. Case documentation
The patient consulted the practice with a challenging situation in her upper jaw (Fig. 6 and 7). She had insufficient metal ceramic restorations in the posterior region. The front tooth area had a marked lack of hard tooth tissue. After an initial diagnosis and consultation, pressable ceramic rehabilitation was chosen. For us, portrait photography is an important component of diagnosis, as it can be used to collect important information for planning the therapy. In this case, it was important to consider the origins of the tooth damage, which could be traced back
to defective functions, to provide a restoration based on gnathological criteria. Because it can be worked perfectly in the posterior area using manual modelling, we opted for press technology. The eight individual crowns were to be constructed first in the CAD software, then milled in wax, finely reworked manually (edge regions, occlusion) and then pressed in ceramic. In the front tooth area, partially anatomically reduced crown frameworks were to be produced and veneered.
Figure 5: Optimal interface to GC Initial LiSi. This veneering ceramic has been manufactured exclusively for lithium disilicate structures.
5
Figure 6: The initial situation poses a major challenge for us as the team responsible for treatment
6
Figure 7: Insufficient restorations in the upper posterior region and tooth structure damage in the front tooth area
7
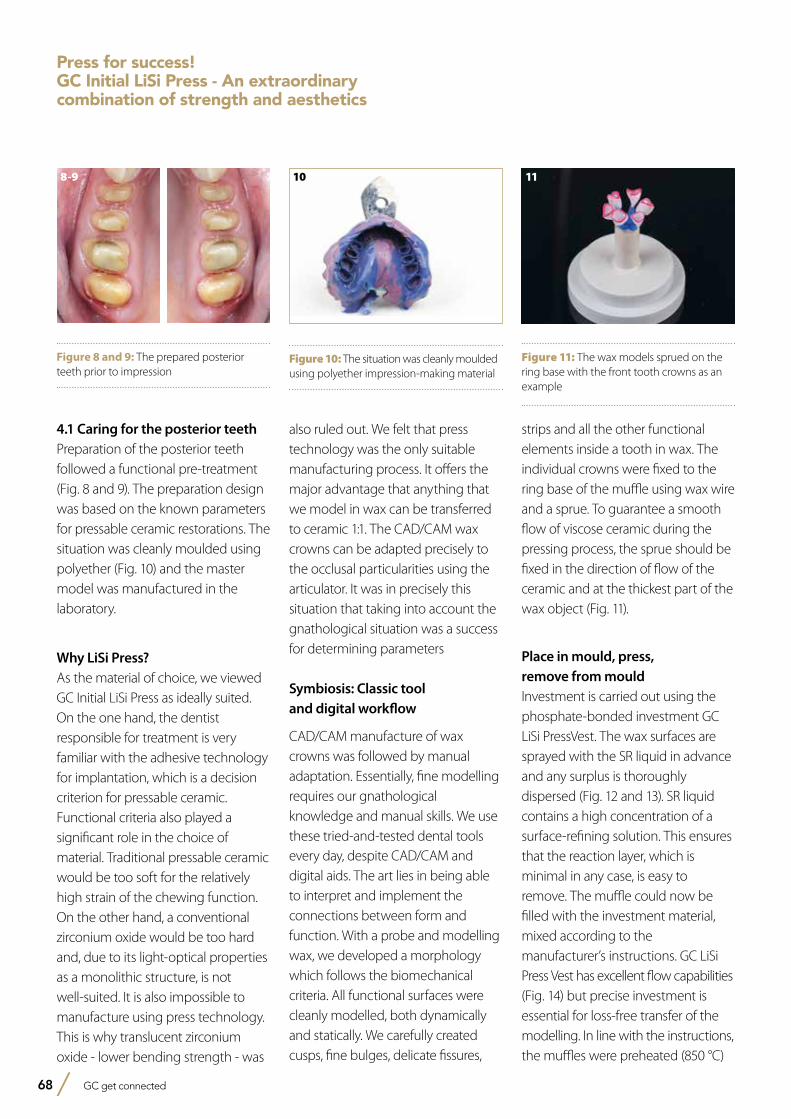
68 GC get connected
Press for success!GC Initial LiSi Press - An extraordinary combination of strength and aesthetics
4.1 Caring for the posterior teethPreparation of the posterior teeth followed a functional pre-treatment (Fig. 8 and 9). The preparation design was based on the known parameters for pressable ceramic restorations. The situation was cleanly moulded using polyether (Fig. 10) and the master model was manufactured in the laboratory.
Why LiSi Press?As the material of choice, we viewed GC Initial LiSi Press as ideally suited. On the one hand, the dentist responsible for treatment is very familiar with the adhesive technology for implantation, which is a decision criterion for pressable ceramic. Functional criteria also played a significant role in the choice of material. Traditional pressable ceramic would be too soft for the relatively high strain of the chewing function. On the other hand, a conventional zirconium oxide would be too hard and, due to its light-optical properties as a monolithic structure, is not well-suited. It is also impossible to manufacture using press technology. This is why translucent zirconium oxide - lower bending strength - was
also ruled out. We felt that press technology was the only suitable manufacturing process. It offers the major advantage that anything that we model in wax can be transferred to ceramic 1:1. The CAD/CAM wax crowns can be adapted precisely to the occlusal particularities using the articulator. It was in precisely this situation that taking into account the gnathological situation was a success for determining parameters
Symbiosis: Classic tool and digital workflow
CAD/CAM manufacture of wax crowns was followed by manual adaptation. Essentially, fine modelling requires our gnathological knowledge and manual skills. We use these tried-and-tested dental tools every day, despite CAD/CAM and digital aids. The art lies in being able to interpret and implement the connections between form and function. With a probe and modelling wax, we developed a morphology which follows the biomechanical criteria. All functional surfaces were cleanly modelled, both dynamically and statically. We carefully created cusps, fine bulges, delicate fissures,
strips and all the other functional elements inside a tooth in wax. The individual crowns were fixed to the ring base of the muffle using wax wire and a sprue. To guarantee a smooth flow of viscose ceramic during the pressing process, the sprue should be fixed in the direction of flow of the ceramic and at the thickest part of the wax object (Fig. 11).
Place in mould, press, remove from mouldInvestment is carried out using the phosphate-bonded investment GC LiSi PressVest. The wax surfaces are sprayed with the SR liquid in advance and any surplus is thoroughly dispersed (Fig. 12 and 13). SR liquid contains a high concentration of a surface-refining solution. This ensures that the reaction layer, which is minimal in any case, is easy to remove. The muffle could now be filled with the investment material, mixed according to the manufacturer’s instructions. GC LiSi Press Vest has excellent flow capabilities (Fig. 14) but precise investment is essential for loss-free transfer of the modelling. In line with the instructions, the muffles were preheated (850 °C)
8-9
Figure 8 and 9: The prepared posterior teeth prior to impression
10
Figure 10: The situation was cleanly moulded using polyether impression-making material
11
Figure 11: The wax models sprued on the ring base with the front tooth crowns as an example
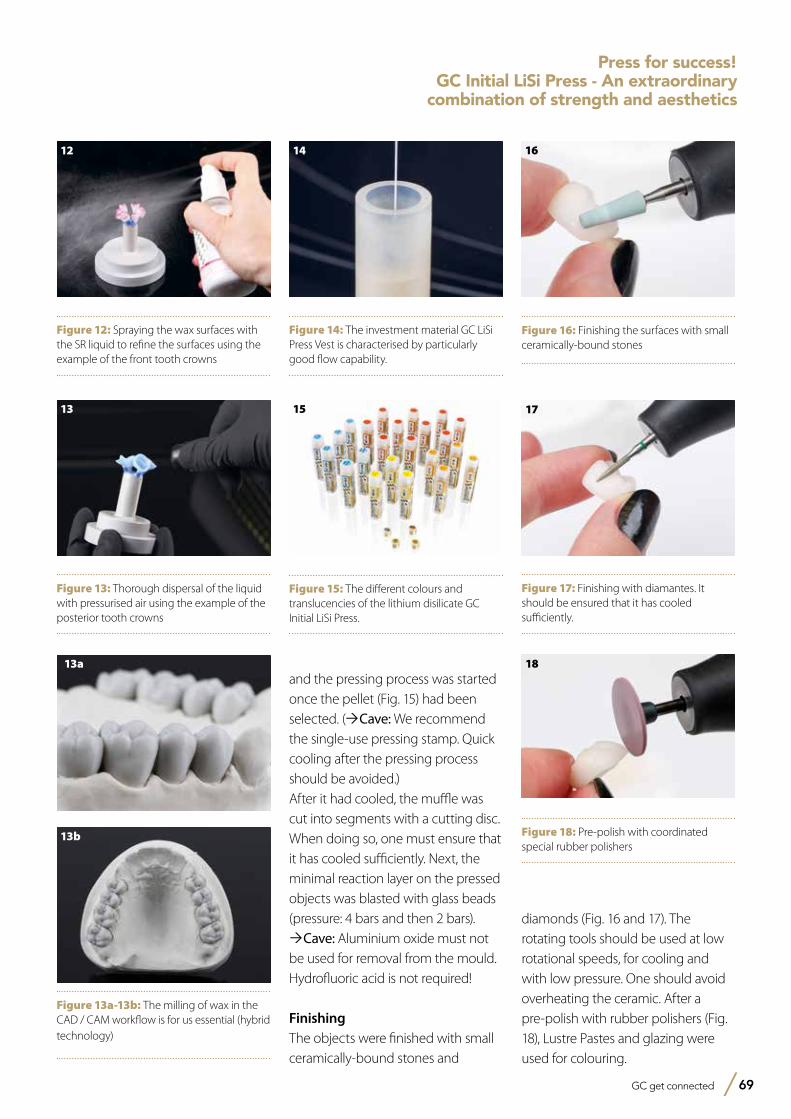
GC get connected 69
Press for success!GC Initial LiSi Press - An extraordinary
combination of strength and aesthetics
and the pressing process was started once the pellet (Fig. 15) had been selected. (ÒCave: We recommend the single-use pressing stamp. Quick cooling after the pressing process should be avoided.)After it had cooled, the muffle was cut into segments with a cutting disc. When doing so, one must ensure that it has cooled sufficiently. Next, the minimal reaction layer on the pressed objects was blasted with glass beads (pressure: 4 bars and then 2 bars). ÒCave: Aluminium oxide must not be used for removal from the mould.Hydrofluoric acid is not required!
FinishingThe objects were finished with small ceramically-bound stones and
Figure 12: Spraying the wax surfaces with the SR liquid to refine the surfaces using the example of the front tooth crowns
12
Figure 13: Thorough dispersal of the liquid with pressurised air using the example of the posterior tooth crowns
13
Figure 14: The investment material GC LiSi Press Vest is characterised by particularly good flow capability.
14
Figure 15: The different colours and translucencies of the lithium disilicate GC Initial LiSi Press.
15
Figure 16: Finishing the surfaces with small ceramically-bound stones
16
Figure 17: Finishing with diamantes. It should be ensured that it has cooled sufficiently.
17
Figure 18: Pre-polish with coordinated special rubber polishers
1813a
Figure 13a-13b: The milling of wax in the CAD / CAM workflow is for us essential (hybrid technology)
13b
diamonds (Fig. 16 and 17). The rotating tools should be used at low rotational speeds, for cooling and with low pressure. One should avoid overheating the ceramic. After a pre-polish with rubber polishers (Fig. 18), Lustre Pastes and glazing were used for colouring.
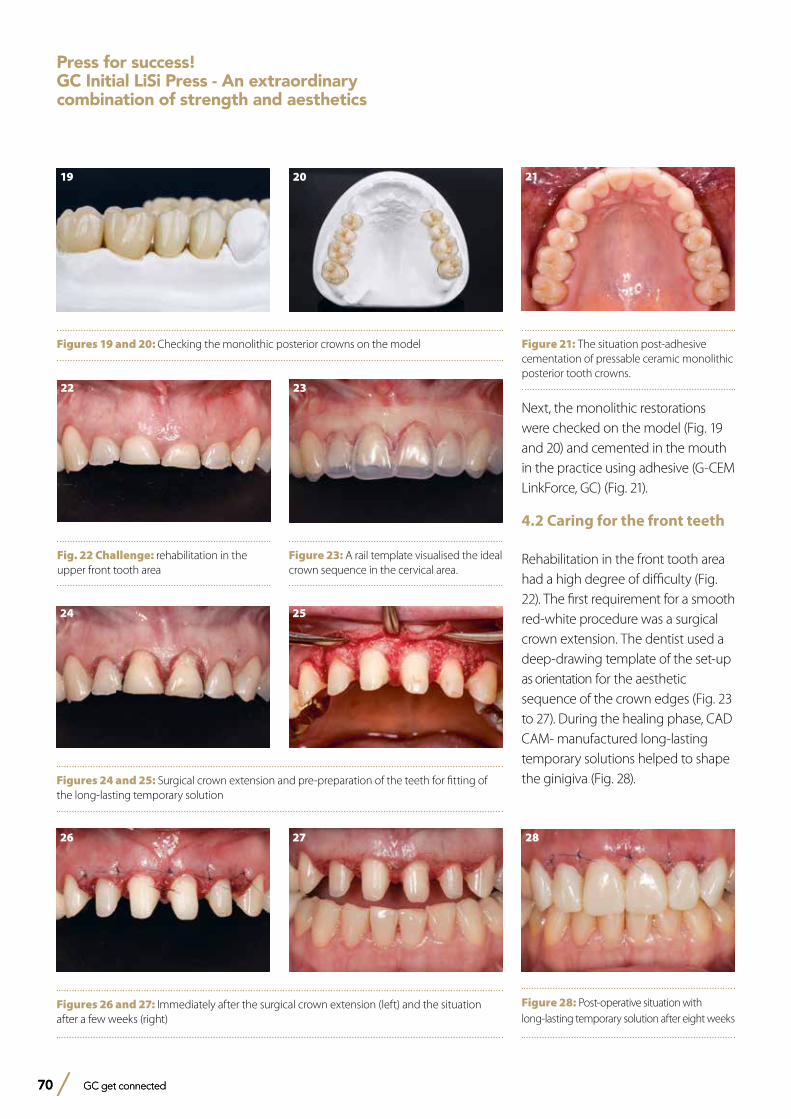
70 GC get connected70 GC get connected
Next, the monolithic restorations were checked on the model (Fig. 19 and 20) and cemented in the mouth in the practice using adhesive (G-CEM LinkForce, GC) (Fig. 21).
4.2 Caring for the front teeth
Rehabilitation in the front tooth area had a high degree of difficulty (Fig. 22). The first requirement for a smooth red-white procedure was a surgical crown extension. The dentist used a deep-drawing template of the set-up as orientation for the aesthetic sequence of the crown edges (Fig. 23 to 27). During the healing phase, CAD CAM- manufactured long-lasting temporary solutions helped to shape the ginigiva (Fig. 28).
Figures 19 and 20: Checking the monolithic posterior crowns on the model
19 20
Fig. 22 Challenge: rehabilitation in the upper front tooth area
22
Figure 23: A rail template visualised the ideal crown sequence in the cervical area.
23
Figures 24 and 25: Surgical crown extension and pre-preparation of the teeth for fitting of the long-lasting temporary solution
24 25
Figures 26 and 27: Immediately after the surgical crown extension (left) and the situation after a few weeks (right)
26 27
Figure 21: The situation post-adhesive cementation of pressable ceramic monolithic posterior tooth crowns.
21
Figure 28: Post-operative situation with long-lasting temporary solution after eight weeks
28
Press for success!GC Initial LiSi Press - An extraordinary combination of strength and aesthetics
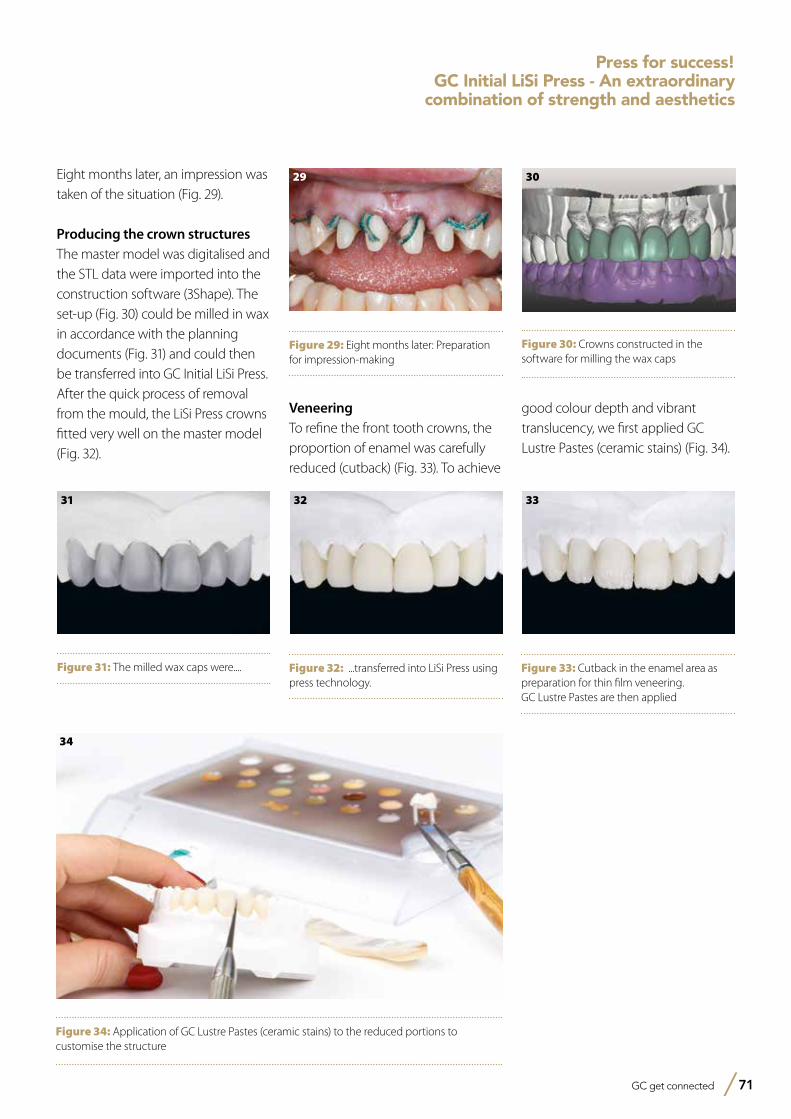
GC get connected 71
Eight months later, an impression was taken of the situation (Fig. 29).
Producing the crown structuresThe master model was digitalised and the STL data were imported into the construction software (3Shape). The set-up (Fig. 30) could be milled in wax in accordance with the planning documents (Fig. 31) and could then be transferred into GC Initial LiSi Press. After the quick process of removal from the mould, the LiSi Press crowns fitted very well on the master model (Fig. 32).
Figure 29: Eight months later: Preparation for impression-making
29
Figure 30: Crowns constructed in the software for milling the wax caps
30
Figure 31: The milled wax caps were....
31
Figure 32: ...transferred into LiSi Press using press technology.
32
Figure 33: Cutback in the enamel area as preparation for thin film veneering. GC Lustre Pastes are then applied
33
Figure 34: Application of GC Lustre Pastes (ceramic stains) to the reduced portions to customise the structure
34
Press for success!GC Initial LiSi Press - An extraordinary
combination of strength and aesthetics
VeneeringTo refine the front tooth crowns, the proportion of enamel was carefully reduced (cutback) (Fig. 33). To achieve
good colour depth and vibrant translucency, we first applied GC Lustre Pastes (ceramic stains) (Fig. 34).
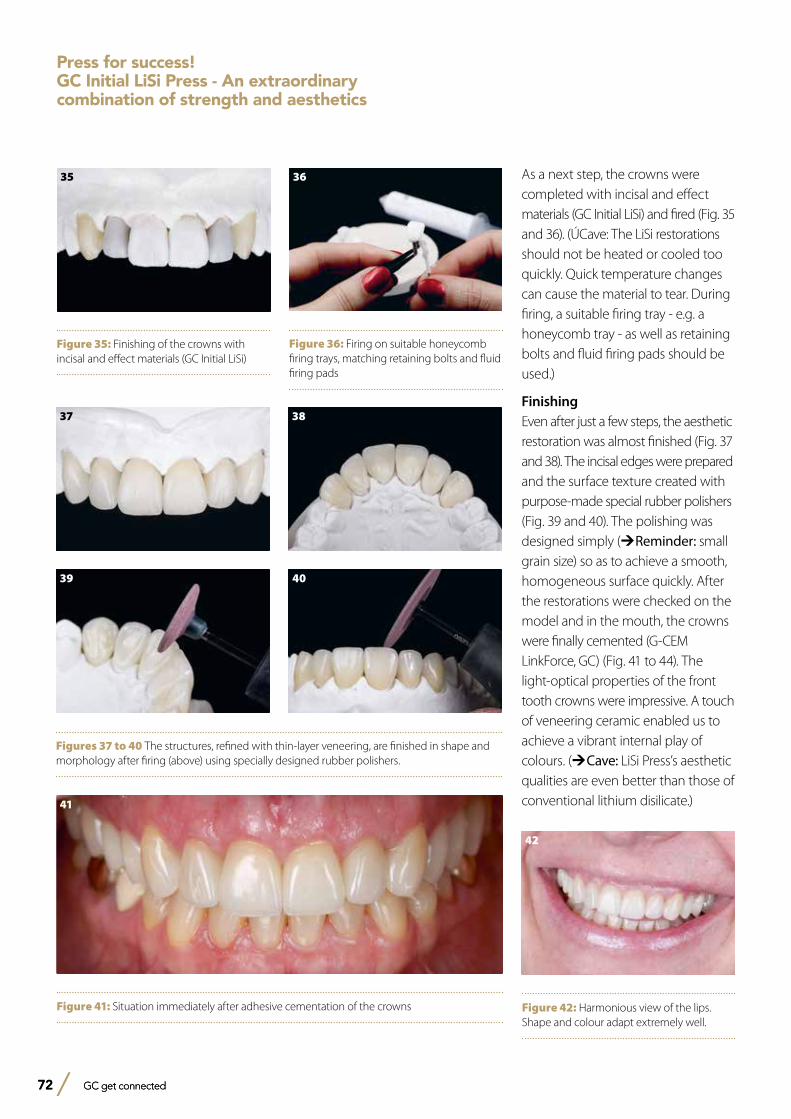
72 GC get connected72 GC get connected
As a next step, the crowns were completed with incisal and effect materials (GC Initial LiSi) and fired (Fig. 35 and 36). (ÚCave: The LiSi restorations should not be heated or cooled too quickly. Quick temperature changes can cause the material to tear. During firing, a suitable firing tray - e.g. a honeycomb tray - as well as retaining bolts and fluid firing pads should be used.)
FinishingEven after just a few steps, the aesthetic restoration was almost finished (Fig. 37 and 38). The incisal edges were prepared and the surface texture created with purpose-made special rubber polishers (Fig. 39 and 40). The polishing was designed simply (ÚReminder: small grain size) so as to achieve a smooth, homogeneous surface quickly. After the restorations were checked on the model and in the mouth, the crowns were finally cemented (G-CEM LinkForce, GC) (Fig. 41 to 44). The light-optical properties of the front tooth crowns were impressive. A touch of veneering ceramic enabled us to achieve a vibrant internal play of colours. (ÚCave: LiSi Press’s aesthetic qualities are even better than those of conventional lithium disilicate.)
37 38
39 40
Figures 37 to 40 The structures, refined with thin-layer veneering, are finished in shape and morphology after firing (above) using specially designed rubber polishers.
41
Figure 41: Situation immediately after adhesive cementation of the crowns
42
Figure 42: Harmonious view of the lips. Shape and colour adapt extremely well.
Figure 35: Finishing of the crowns with incisal and effect materials (GC Initial LiSi)
35
Figure 36: Firing on suitable honeycomb firing trays, matching retaining bolts and fluid firing pads
36
Press for success!GC Initial LiSi Press - An extraordinary combination of strength and aesthetics
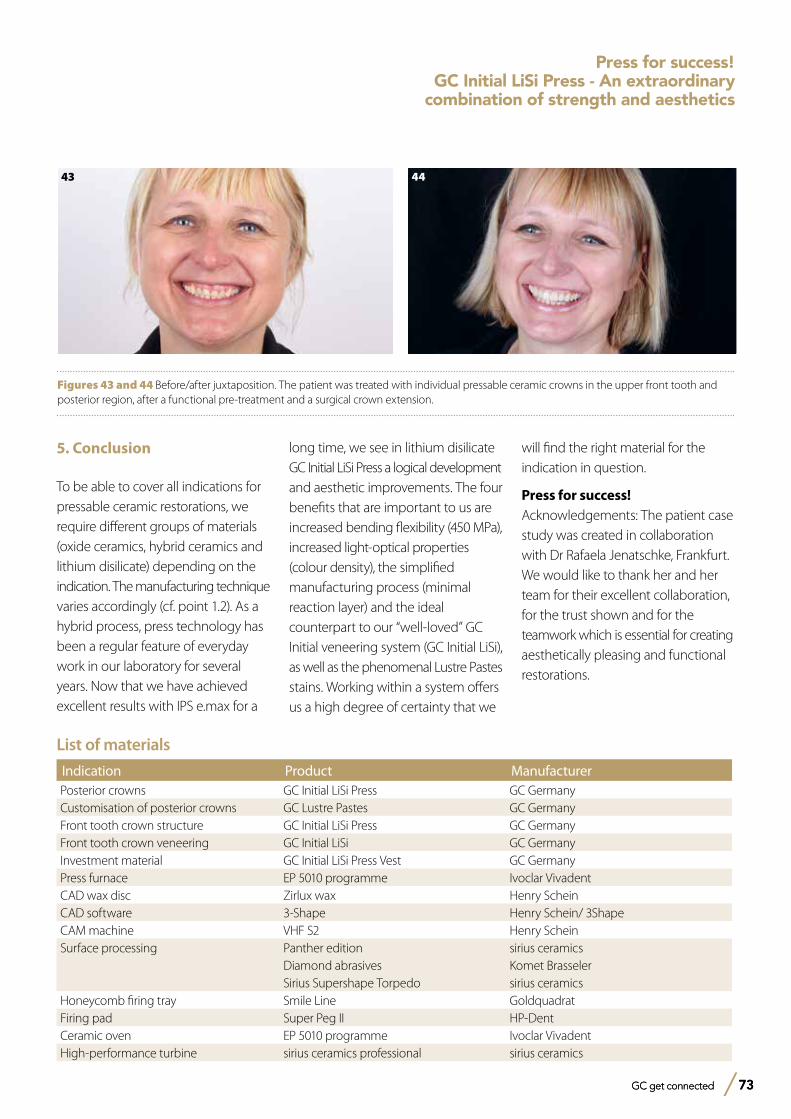
GC get connected 73 GC get connected 73
List of materials
Indication Product ManufacturerPosterior crowns GC Initial LiSi Press GC GermanyCustomisation of posterior crowns GC Lustre Pastes GC GermanyFront tooth crown structure GC Initial LiSi Press GC GermanyFront tooth crown veneering GC Initial LiSi GC GermanyInvestment material GC Initial LiSi Press Vest GC GermanyPress furnace EP 5010 programme Ivoclar VivadentCAD wax disc Zirlux wax Henry ScheinCAD software 3-Shape Henry Schein/ 3ShapeCAM machine VHF S2 Henry ScheinSurface processing Panther edition sirius ceramics
Diamond abrasives Komet BrasselerSirius Supershape Torpedo sirius ceramics
Honeycomb firing tray Smile Line GoldquadratFiring pad Super Peg II HP-DentCeramic oven EP 5010 programme Ivoclar VivadentHigh-performance turbine sirius ceramics professional sirius ceramics
5. Conclusion
To be able to cover all indications for pressable ceramic restorations, we require different groups of materials (oxide ceramics, hybrid ceramics and lithium disilicate) depending on the indication. The manufacturing technique varies accordingly (cf. point 1.2). As a hybrid process, press technology has been a regular feature of everyday work in our laboratory for several years. Now that we have achieved excellent results with IPS e.max for a
43
Figures 43 and 44 Before/after juxtaposition. The patient was treated with individual pressable ceramic crowns in the upper front tooth and posterior region, after a functional pre-treatment and a surgical crown extension.
44
long time, we see in lithium disilicate GC Initial LiSi Press a logical development and aesthetic improvements. The four benefits that are important to us are increased bending flexibility (450 MPa), increased light-optical properties (colour density), the simplified manufacturing process (minimal reaction layer) and the ideal counterpart to our “well-loved” GC Initial veneering system (GC Initial LiSi), as well as the phenomenal Lustre Pastes stains. Working within a system offers us a high degree of certainty that we
will find the right material for the indication in question.
Press for success!Acknowledgements: The patient case study was created in collaboration with Dr Rafaela Jenatschke, Frankfurt. We would like to thank her and her team for their excellent collaboration, for the trust shown and for the teamwork which is essential for creating aesthetically pleasing and functional restorations.
Press for success!GC Initial LiSi Press - An extraordinary
combination of strength and aesthetics
74 GC get connected
Notes
GC get connected 75
Notes

GC EUROPE N.V.East European OfficeSiget 19BHR-10020 ZagrebTel. +385.1.46.78.474Fax. [email protected]://eeo.gceurope.com
GC IBÉRICADental Products, S.L.Edificio Codesa 2Playa de las Americas, 2, 1°, Of. 4ES-28290 Las Rozas, MadridTel. +34.916.364.340Fax. [email protected]://spain.gceurope.com
GC AUSTRIA GmbHSwiss OfficeBergstrasse 31cCH-8890 FlumsTel. +41.81.734.02.70Fax. [email protected]://switzerland.gceurope.com
GC AUSTRIA GmbHTallak 124A-8103 Gratwein-StrassengelTel. +43.3124.54020Fax. [email protected]://austria.gceurope.com
GC NORDIC ABDanish Branch Harbour House Sundkrogsgade 21 DK-2100 København Tel. +45 23 26 03 [email protected] http://denmark.gceurope.com
GC NORDIC ABFinnish BranchVanha Hommaksentie 11BFIN-02430 MasalaTel. & Fax. [email protected]://finland.gceurope.com
GC BENELUX B.V.Edisonbaan 12NL-3439 MN NieuwegeinTel. +31.30.630.85.00Fax. [email protected]://benelux.gceurope.com
GC GERMANY GmbHSeifgrundstraße 2D-61348 Bad HomburgTel. +49.61.72.99.59.60Fax. [email protected]://germany.gceurope.com
GC UNITED KINGDOM Ltd.16-23, Coopers CourtNewport PagnellUK-Bucks. MK16 8JSTel. +44.1908.218.999Fax. [email protected]://uk.gceurope.com
GC FRANCE s.a.s.8, rue Benjamin FranklinF-94370 Sucy en Brie CedexTel. +33.1.49.80.37.91Fax. [email protected]://france.gceurope.com
GC NORDIC ABBox 703 96SE-107 24 StockholmSwedenTel: +46 8 506 361 [email protected]://nordic.gceurope.com
GC ITALIA S.r.l.Via Calabria 1I-20098 San Giuliano MilaneseTel. +39.02.98.28.20.68Fax. [email protected]://italy.gceurope.com
GC EUROPE N.V. • Head Office • Researchpark Haasrode-Leuven 1240 • Interleuvenlaan 33 • B-3001 LeuvenTel. +32.16.74.10.00 • Fax. +32.16.40.48.32 • [email protected] • http://www.gceurope.com