Embed Size (px)
Citation preview

GE InfrastructureSensing
Moisture Monitor™ Series 3Panametrics Hygrometer
Service Manual

GE InfrastructureSensing
Moisture Monitor™ Series 3Panametrics Hygrometer
Service Manual910-110SBFebruary 2005
Moisture Monitor™ is a GE Panametrics product. GE Panametrics has joined other GE high-technology sensing businesses under a new name—GE Infrastructure Sensing.

February 2005
Warranty Each instrument manufactured by GE Infrastructure Sensing, Inc. is warranted to be free from defects in material and workmanship. Liability under this warranty is limited to restoring the instrument to normal operation or replacing the instrument, at the sole discretion of GE Infrastructure Sensing, Inc. Fuses and batteries are specifically excluded from any liability. This warranty is effective from the date of delivery to the original purchaser. If GE Infrastructure Sensing, Inc. determines that the equipment was defective, the warranty period is:
• one year for general electronic failures of the instrument
• one year for mechanical failures of the sensor
If GE Infrastructure Sensing, Inc. determines that the equipment was damaged by misuse, improper installation, the use of unauthorized replacement parts, or operating conditions outside the guidelines specified by GE Infrastructure Sensing, Inc., the repairs are not covered under this warranty.
The warranties set forth herein are exclusive and are in lieu ofall other warranties whether statutory, express or implied(including warranties of merchantability and fitness for aparticular purpose, and warranties arising from course ofdealing or usage or trade).
Return Policy If a GE Infrastructure Sensing, Inc. instrument malfunctions within the warranty period, the following procedure must be completed:
1. Notify GE Infrastructure Sensing, Inc., giving full details of the problem, and provide the model number and serial number of the instrument. If the nature of the problem indicates the need for factory service, GE Infrastructure Sensing, Inc. will issue a RETURN AUTHORIZATION number (RA), and shipping instructions for the return of the instrument to a service center will be provided.
2. If GE Infrastructure Sensing, Inc. instructs you to send your instrument to a service center, it must be shipped prepaid to the authorized repair station indicated in the shipping instructions.
3. Upon receipt, GE Infrastructure Sensing, Inc. will evaluate the instrument to determine the cause of the malfunction.
Then, one of the following courses of action will then be taken:
• If the damage is covered under the terms of the warranty, the instrument will be repaired at no cost to the owner and returned.
• If GE Infrastructure Sensing, Inc. determines that the damage is not covered under the terms of the warranty, or if the warranty has expired, an estimate for the cost of the repairs at standard rates will be provided. Upon receipt of the owner’s approval to proceed, the instrument will be repaired and returned.
iii

February 2005
Table of Contents
Chapter 1: Installing Optional Features
Making Electrical Connections . . . . . . . . . . . . . . . . . . . . . . . . . . . . . . . . . . . . . . . . . . . . . . . . . . . . . . . . . . 1-1Making Channel Connections . . . . . . . . . . . . . . . . . . . . . . . . . . . . . . . . . . . . . . . . . . . . . . . . . . . . . . . 1-1Connecting the Power . . . . . . . . . . . . . . . . . . . . . . . . . . . . . . . . . . . . . . . . . . . . . . . . . . . . . . . . . . . . . . 1-2
Precautions for Modified or Non-GE Panametrics Cables . . . . . . . . . . . . . . . . . . . . . . . . . . . . . . . . . 1-3Connecting the Recorder Outputs . . . . . . . . . . . . . . . . . . . . . . . . . . . . . . . . . . . . . . . . . . . . . . . . . . . . . . . 1-4
Accessing the Channel Cards . . . . . . . . . . . . . . . . . . . . . . . . . . . . . . . . . . . . . . . . . . . . . . . . . . . . . . . 1-4Setting the Switch Blocks . . . . . . . . . . . . . . . . . . . . . . . . . . . . . . . . . . . . . . . . . . . . . . . . . . . . . . . . . . . 1-5Replacing the Channel Card. . . . . . . . . . . . . . . . . . . . . . . . . . . . . . . . . . . . . . . . . . . . . . . . . . . . . . . . . 1-5Connecting Recorders . . . . . . . . . . . . . . . . . . . . . . . . . . . . . . . . . . . . . . . . . . . . . . . . . . . . . . . . . . . . . . 1-6
Connecting Alarms . . . . . . . . . . . . . . . . . . . . . . . . . . . . . . . . . . . . . . . . . . . . . . . . . . . . . . . . . . . . . . . . . . . . . 1-7Connecting Pressure Sensor Inputs. . . . . . . . . . . . . . . . . . . . . . . . . . . . . . . . . . . . . . . . . . . . . . . . . . . . . . 1-9
Connecting a Pressure Transducer . . . . . . . . . . . . . . . . . . . . . . . . . . . . . . . . . . . . . . . . . . . . . . . . . 1-10Connecting Pressure Transmitters . . . . . . . . . . . . . . . . . . . . . . . . . . . . . . . . . . . . . . . . . . . . . . . . . . 1-12
Connecting Auxiliary Inputs . . . . . . . . . . . . . . . . . . . . . . . . . . . . . . . . . . . . . . . . . . . . . . . . . . . . . . . . . . . . 1-17Accessing Channel Cards . . . . . . . . . . . . . . . . . . . . . . . . . . . . . . . . . . . . . . . . . . . . . . . . . . . . . . . . . . 1-18Replacing the Channel Card. . . . . . . . . . . . . . . . . . . . . . . . . . . . . . . . . . . . . . . . . . . . . . . . . . . . . . . . 1-19
Connecting a Personal Computer or Printer. . . . . . . . . . . . . . . . . . . . . . . . . . . . . . . . . . . . . . . . . . . . . 1-20Performing an MH Calibration Test/ Adjustment . . . . . . . . . . . . . . . . . . . . . . . . . . . . . . . . . . . . . . . . 1-22
Preliminary Steps. . . . . . . . . . . . . . . . . . . . . . . . . . . . . . . . . . . . . . . . . . . . . . . . . . . . . . . . . . . . . . . . . . 1-22Calibration Procedure. . . . . . . . . . . . . . . . . . . . . . . . . . . . . . . . . . . . . . . . . . . . . . . . . . . . . . . . . . . . . . 1-22
v

February 2005
Table of Contents (cont.)
Chapter 2: Troubleshooting and Maintenance
Introduction . . . . . . . . . . . . . . . . . . . . . . . . . . . . . . . . . . . . . . . . . . . . . . . . . . . . . . . . . . . . . . . . . . . . . . . . . . . 2-1Testing Alarm Relays . . . . . . . . . . . . . . . . . . . . . . . . . . . . . . . . . . . . . . . . . . . . . . . . . . . . . . . . . . . . . . . . . . . 2-2Testing Recorder Outputs . . . . . . . . . . . . . . . . . . . . . . . . . . . . . . . . . . . . . . . . . . . . . . . . . . . . . . . . . . . . . . . 2-3Trimming Recorder Outputs . . . . . . . . . . . . . . . . . . . . . . . . . . . . . . . . . . . . . . . . . . . . . . . . . . . . . . . . . . . . 2-5Screen Messages . . . . . . . . . . . . . . . . . . . . . . . . . . . . . . . . . . . . . . . . . . . . . . . . . . . . . . . . . . . . . . . . . . . . . . 2-8Common Problems . . . . . . . . . . . . . . . . . . . . . . . . . . . . . . . . . . . . . . . . . . . . . . . . . . . . . . . . . . . . . . . . . . . . 2-11Delta F Oxygen Cell Electrolyte. . . . . . . . . . . . . . . . . . . . . . . . . . . . . . . . . . . . . . . . . . . . . . . . . . . . . . . . . 2-13
Checking the Electrolyte Level . . . . . . . . . . . . . . . . . . . . . . . . . . . . . . . . . . . . . . . . . . . . . . . . . . . . . 2-13Replenishing the Electrolyte . . . . . . . . . . . . . . . . . . . . . . . . . . . . . . . . . . . . . . . . . . . . . . . . . . . . . . . 2-13
Adding/Removing a PCMCIA Card. . . . . . . . . . . . . . . . . . . . . . . . . . . . . . . . . . . . . . . . . . . . . . . . . . . . . . 2-14Recharging the Battery Pack . . . . . . . . . . . . . . . . . . . . . . . . . . . . . . . . . . . . . . . . . . . . . . . . . . . . . . . . . . 2-17Installing a Channel Card . . . . . . . . . . . . . . . . . . . . . . . . . . . . . . . . . . . . . . . . . . . . . . . . . . . . . . . . . . . . . . 2-19Entering Channel Card Reference Values . . . . . . . . . . . . . . . . . . . . . . . . . . . . . . . . . . . . . . . . . . . . . . . 2-21
Entering Moisture Reference Data. . . . . . . . . . . . . . . . . . . . . . . . . . . . . . . . . . . . . . . . . . . . . . . . . . 2-22Entering Oxygen Reference Data. . . . . . . . . . . . . . . . . . . . . . . . . . . . . . . . . . . . . . . . . . . . . . . . . . . 2-23Entering Pressure Reference Data. . . . . . . . . . . . . . . . . . . . . . . . . . . . . . . . . . . . . . . . . . . . . . . . . . 2-24
Replacing and Recalibrating Moisture Probes. . . . . . . . . . . . . . . . . . . . . . . . . . . . . . . . . . . . . . . . . . . 2-25Recalibrating the Pressure Sensors. . . . . . . . . . . . . . . . . . . . . . . . . . . . . . . . . . . . . . . . . . . . . . . . . . . . . 2-25Calibrating the Delta F Oxygen Cell . . . . . . . . . . . . . . . . . . . . . . . . . . . . . . . . . . . . . . . . . . . . . . . . . . . . 2-26
Checking the Oxygen Cell Calibration . . . . . . . . . . . . . . . . . . . . . . . . . . . . . . . . . . . . . . . . . . . . . . 2-26Entering the New Span Value . . . . . . . . . . . . . . . . . . . . . . . . . . . . . . . . . . . . . . . . . . . . . . . . . . . . . . 2-28
Delta F Oxygen Cell Background Gas Correction Factors . . . . . . . . . . . . . . . . . . . . . . . . . . . . . . . . 2-29Correcting for Different Background Gases . . . . . . . . . . . . . . . . . . . . . . . . . . . . . . . . . . . . . . . . . 2-29Entering the Current Multiplier . . . . . . . . . . . . . . . . . . . . . . . . . . . . . . . . . . . . . . . . . . . . . . . . . . . . . 2-30
Error Descriptions . . . . . . . . . . . . . . . . . . . . . . . . . . . . . . . . . . . . . . . . . . . . . . . . . . . . . . . . . . . . . . . . . . . . . 2-32Range Errors . . . . . . . . . . . . . . . . . . . . . . . . . . . . . . . . . . . . . . . . . . . . . . . . . . . . . . . . . . . . . . . . . . . . . . 2-32Signal Errors . . . . . . . . . . . . . . . . . . . . . . . . . . . . . . . . . . . . . . . . . . . . . . . . . . . . . . . . . . . . . . . . . . . . . . 2-32Calibration Errors. . . . . . . . . . . . . . . . . . . . . . . . . . . . . . . . . . . . . . . . . . . . . . . . . . . . . . . . . . . . . . . . . . 2-32
Loading New Software . . . . . . . . . . . . . . . . . . . . . . . . . . . . . . . . . . . . . . . . . . . . . . . . . . . . . . . . . . . . . . . . 2-33
vi

February 2005
Table of Contents (cont.)
Appendix A: Application of the Hygrometer (900-901D1)
Introduction. . . . . . . . . . . . . . . . . . . . . . . . . . . . . . . . . . . . . . . . . . . . . . . . . . . . . . . . . . . . . . . . . . . . . . . . . . . . A-1Moisture Monitor Hints . . . . . . . . . . . . . . . . . . . . . . . . . . . . . . . . . . . . . . . . . . . . . . . . . . . . . . . . . . . . . . . . . A-2
Pressure . . . . . . . . . . . . . . . . . . . . . . . . . . . . . . . . . . . . . . . . . . . . . . . . . . . . . . . . . . . . . . . . . . . . . . . . . . . A-3Response Time . . . . . . . . . . . . . . . . . . . . . . . . . . . . . . . . . . . . . . . . . . . . . . . . . . . . . . . . . . . . . . . . . . . . . A-3Temperature . . . . . . . . . . . . . . . . . . . . . . . . . . . . . . . . . . . . . . . . . . . . . . . . . . . . . . . . . . . . . . . . . . . . . . . A-4Flow Rate . . . . . . . . . . . . . . . . . . . . . . . . . . . . . . . . . . . . . . . . . . . . . . . . . . . . . . . . . . . . . . . . . . . . . . . . . . A-4
Contaminants . . . . . . . . . . . . . . . . . . . . . . . . . . . . . . . . . . . . . . . . . . . . . . . . . . . . . . . . . . . . . . . . . . . . . . . . . . A-5Non-Conductive Particulates . . . . . . . . . . . . . . . . . . . . . . . . . . . . . . . . . . . . . . . . . . . . . . . . . . . . . . . . A-5Conductive Particulates. . . . . . . . . . . . . . . . . . . . . . . . . . . . . . . . . . . . . . . . . . . . . . . . . . . . . . . . . . . . . A-6Corrosive Particulates . . . . . . . . . . . . . . . . . . . . . . . . . . . . . . . . . . . . . . . . . . . . . . . . . . . . . . . . . . . . . . A-6
Aluminum Oxide Probe Maintenance . . . . . . . . . . . . . . . . . . . . . . . . . . . . . . . . . . . . . . . . . . . . . . . . . . . . A-7Corrosive Gases And Liquids . . . . . . . . . . . . . . . . . . . . . . . . . . . . . . . . . . . . . . . . . . . . . . . . . . . . . . . . . . . . A-9Materials of Construction . . . . . . . . . . . . . . . . . . . . . . . . . . . . . . . . . . . . . . . . . . . . . . . . . . . . . . . . . . . . . .A-10Calculations and Useful Formulas in Gas Applications . . . . . . . . . . . . . . . . . . . . . . . . . . . . . . . . . . .A-11
Nomenclature . . . . . . . . . . . . . . . . . . . . . . . . . . . . . . . . . . . . . . . . . . . . . . . . . . . . . . . . . . . . . . . . . . . . .A-11Parts per Million by Volume . . . . . . . . . . . . . . . . . . . . . . . . . . . . . . . . . . . . . . . . . . . . . . . . . . . . . . . .A-12Parts per Million by Weight. . . . . . . . . . . . . . . . . . . . . . . . . . . . . . . . . . . . . . . . . . . . . . . . . . . . . . . . .A-13Relative Humidity. . . . . . . . . . . . . . . . . . . . . . . . . . . . . . . . . . . . . . . . . . . . . . . . . . . . . . . . . . . . . . . . . .A-13Weight of Water per Unit Volume of Carrier Gas . . . . . . . . . . . . . . . . . . . . . . . . . . . . . . . . . . . .A-13Weight of Water per Unit Weight of Carrier Gas . . . . . . . . . . . . . . . . . . . . . . . . . . . . . . . . . . . . .A-14Comparison of PPMV Calculations . . . . . . . . . . . . . . . . . . . . . . . . . . . . . . . . . . . . . . . . . . . . . . . . . .A-21
Liquid Applications . . . . . . . . . . . . . . . . . . . . . . . . . . . . . . . . . . . . . . . . . . . . . . . . . . . . . . . . . . . . . . . . . . . .A-22Theory of Operation . . . . . . . . . . . . . . . . . . . . . . . . . . . . . . . . . . . . . . . . . . . . . . . . . . . . . . . . . . . . . . .A-22Moisture Content Measurement in Organic Liquids . . . . . . . . . . . . . . . . . . . . . . . . . . . . . . . . . .A-22
Empirical Calibrations . . . . . . . . . . . . . . . . . . . . . . . . . . . . . . . . . . . . . . . . . . . . . . . . . . . . . . . . . . . . . . . . .A-28Solids Applications . . . . . . . . . . . . . . . . . . . . . . . . . . . . . . . . . . . . . . . . . . . . . . . . . . . . . . . . . . . . . . . . . . . .A-34
vii

Chapter 1

Installing Optional Features
Making Electrical Connections . . . . . . . . . . . . . . . . . . . . . . . . . . . . . . . . . . . 1-1
Precautions for Modified or Non-GE Panametrics Cables . . . . . . . . . . . 1-3
Connecting the Recorder Outputs . . . . . . . . . . . . . . . . . . . . . . . . . . . . . . . . 1-4
Connecting Pressure Sensor Inputs . . . . . . . . . . . . . . . . . . . . . . . . . . . . . . . 1-9
Connecting Auxiliary Inputs . . . . . . . . . . . . . . . . . . . . . . . . . . . . . . . . . . . . 1-17
Connecting a Personal Computer or Printer . . . . . . . . . . . . . . . . . . . . . . 1-20
Performing an MH Calibration Test/ Adjustment . . . . . . . . . . . . . . . . . . 1-22
February 2005
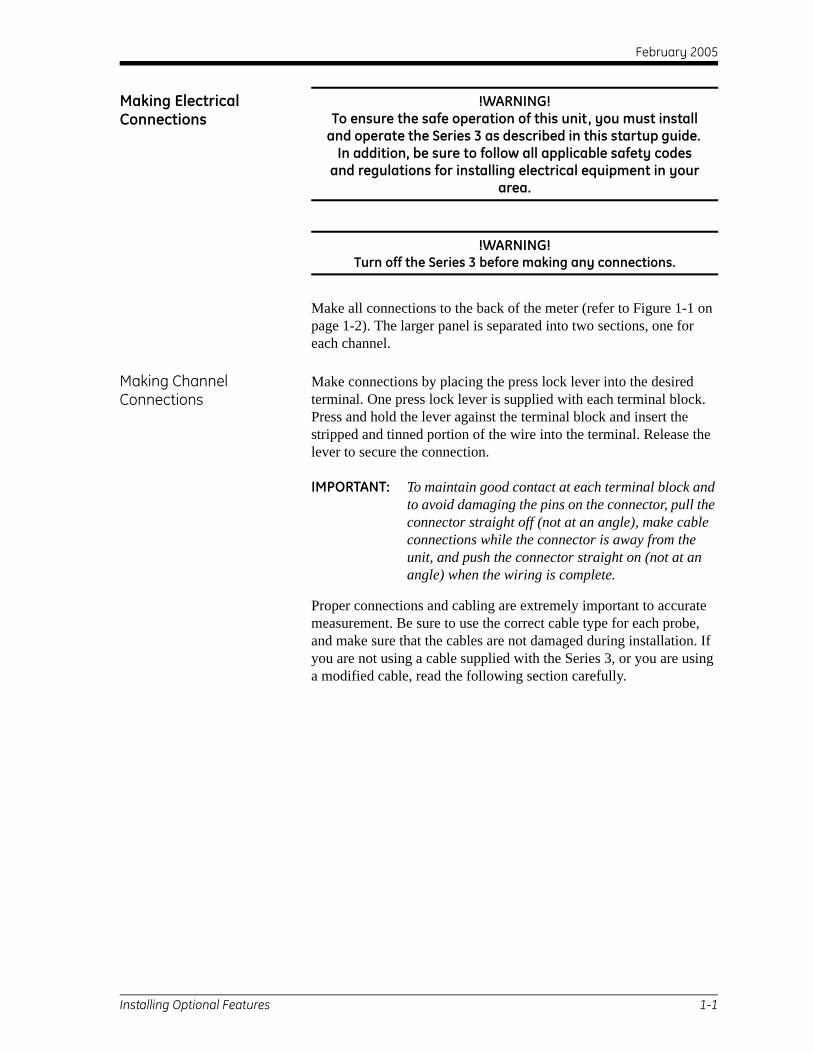
Making Electrical Connections
!WARNING!To ensure the safe operation of this unit, you must install
and operate the Series 3 as described in this startup guide. In addition, be sure to follow all applicable safety codes
and regulations for installing electrical equipment in your area.
!WARNING!Turn off the Series 3 before making any connections.
Make all connections to the back of the meter (refer to Figure 1-1 on page 1-2). The larger panel is separated into two sections, one for each channel.
Making Channel Connections
Make connections by placing the press lock lever into the desired terminal. One press lock lever is supplied with each terminal block. Press and hold the lever against the terminal block and insert the stripped and tinned portion of the wire into the terminal. Release the lever to secure the connection.
IMPORTANT: To maintain good contact at each terminal block and to avoid damaging the pins on the connector, pull the connector straight off (not at an angle), make cable connections while the connector is away from the unit, and push the connector straight on (not at an angle) when the wiring is complete.
Proper connections and cabling are extremely important to accurate measurement. Be sure to use the correct cable type for each probe, and make sure that the cables are not damaged during installation. If you are not using a cable supplied with the Series 3, or you are using a modified cable, read the following section carefully.
Installing Optional Features 1-1

February 2005
Connecting the Power !WARNING!Division 2 applications may require special installation.
Consult the National Electric Code for proper installation requirements. The analyzer must be configured in a
suitable enclosure and installed according to the applicable sections of the National Electric Code, Article 500, that pertain to the hazardous environment in which
the electronics will be used.
Note: The power line is the main disconnect device. However, GE Infrastructure Sensing does not provide power supply cords with CSA Div. 2 hygrometers
IMPORTANT: For compliance with the EU’s Low Voltage Directive (IEC 1010), this unit requires an external power disconnect device such as a switch or circuit breaker. The disconnect device must be marked as such, clearly visible, directly accessible, and located within 1.8 m (6 ft) of the Series 3.
Figure 1-1: Series 3 Back Panel
ALM BALM AC
RECA
NO
RTNB
RTNNC
+24V1 2
NO C
AUX
NCALM BALM A
RTN
BA REC
CNO NC
1 2RTN
NO C
AUX+24V
NC
OXYGEN
7
98
6543
3
54
12
7
98
6543
OXYGEN
3
54
12
STD/TFPROBE
12
12
STD/TFPROBE
SLO-BLO3AG
ine
eut
GN
Lnd
1/2 AMP250V
CHANNEL 1 CHANNEL 2
HA
ZAR
DO
US
AR
EAC
ON
NEC
TIO
NS
1-2 Installing Optional Features

February 2005
Precautions for Modified or Non-GE Panametrics Cables
Many customers must use pre-existing cables, or in some cases, modify the standard moisture cable supplied with the Series 3 to meet special needs. If you prefer to use your own cables or to modify our cables, observe the precautions listed below. In addition, after connecting the moisture probe, you must perform a calibration adjustment as described in Performing a Calibration Test/Adjustment on page 1-22 to compensate for any electrical offsets.
Caution!GE Infrastructure Sensing cannot guarantee operation to
the specified accuracy of the Series 3 unless you use hygrometer cables supplied with the Series 3.
• Use cable that matches the electrical characteristics of GE Panametrics cable (contact the factory for specific information on cable characteristics). The cable must have individually shielded wire sets. A single overall shield is incorrect.
• If possible, avoid all splices. Splices will impair the performance. When possible, instead of splicing, coil the excess cable.
• If you must splice cables, be sure the splice introduces minimum resistive leakage or capacitive coupling between conductors.
• Carry the shield through any splice. A common mistake is to not connect the shields over the splice. If you are modifying a supplied cable, the shield will not be accessible without cutting back the cable insulation. Also, do not ground the shield at both ends. You should only ground the shield at the hygrometer electronics.
Installing Optional Features 1-3

February 2005
Connecting the Recorder Outputs
The Series 3 has two optically isolated recorder outputs. These outputs provide either a current or voltage signal, which you set using switch blocks on the channel card. Although the Series 3 is configured at the factory, you should check the switch block positions before making connections. Use the following steps to check or reset these switch settings:
Accessing the Channel Cards
1. Remove the screws on the front panel and slide the electronics unit out of its enclosure.
2. Remove the retainer bar by removing the two screws on the outside of the chassis (see Figure 1-2 below).
3. Remove the desired channel card (see Figure 1-2 below) by sliding it straight up.
Figure 1-2: Channel Cards Location
Retainer Bar
Screw
ChannelCards
Screw
Top View
1-4 Installing Optional Features

February 2005
Setting the Switch Blocks 1. Locate switch blocks S2 and S3 (see Figure 1-3 below). Switch block S2 controls the output signal for Recorder A and switch block S3 controls the output signal for Recorder B.
2. Set the switches in the appropriate positions: I for current or V for voltage.
Replacing the Channel Card
1. Once the switches are set, replace the channel card.
Note: If you intend to connect pressure inputs or other input devices to the Series 3, do not replace the retainer bar and cover, because you will need to set switches on the channel card for those inputs as well.
2. Replace the retainer bar. Make sure the slots on the retainer bar are seated correctly against the printed circuit boards. Secure the bar with two screws.
3. Slide the electronics units into its enclosure and replace the screws. Tighten the screws until they are snug. Do not over tighten. You may now connect the recorder(s).
Figure 1-3: Channel Card - S2 and S3 Locations
S3S2
Installing Optional Features 1-5

February 2005
Connecting Recorders Connect the recorders to the terminal block on the back panel labeled REC. See Figure 1-4 below for terminal block location. Make connections for recorder outputs using Table 1-1 below.
IMPORTANT: To maintain good contact at each terminal block and to avoid damaging the pins on the connector, pull the connector straight off (not at an angle), make cable connections while the connector is away from the unit, and push the connector straight on (not at an angle) when the wiring is complete.
Figure 1-4: REC Terminal Block Locations
Table 1-1: Recorder Connections
Connect Recorder A: To REC Terminal Block:out (+) pin A+
return (–) pin A–Connect Recorder B: To REC Terminal Block:
out (+) pin B+return (–) pin B–
ALM BALM AC
RECA
NO
RTNB
RTNNC
+24V1 2
NO C
AUX
NCALM BALM A
RTN
BA REC
CNO NC
1 2RTN
NO C
AUX+24V
NC
OXYGEN
7
98
6543
3
54
12
7
98
6543
OXYGEN
3
54
12
STD/TFPROBE
12
12
STD/TFPROBE
SLO-BLO3AG
ine
eut
GN
Lnd
1/2 AMP250V
CHANNEL 1 CHANNEL 2
REC Terminal Blocks
HA
ZAR
DO
US
AR
EAC
ON
NEC
TIO
NS
1-6 Installing Optional Features

February 2005
Connecting Alarms You can order the Series 3 with optional high and low alarm relays. Hermetically sealed alarm relays are also available. Each alarm relay is a single-pole double throw relay that contains the following contacts (see Figure 1-5 on the next page):
• normally closed (NC)
• armature contacts (C)
• normally open (NO)
Make connections for the high and low alarm relays on the desired channel(s) terminal blocks labeled ALM A and ALM B on the back panel of the electronics unit. Use Table 1-2 below to make high and low alarm connections. See Figure 1-6 on page 1-8 for the terminal block locations.
IMPORTANT: To maintain good contact at each terminal block and to avoid damaging the pins on the connector, pull the connector straight off (not at an angle), make cable connections while the connector is away from the unit, and push the connector straight on (not at an angle) when the wiring is complete.
Note: The alarm terminal block has an additional Return connection that you can use to ground the alarms if desired.
Table 1-2: Alarm Connections
Connect Low Alarm: To ALM A Terminal BlockNC contact pin NCC contact pin C
NO contact pin NOConnect High Alarm: To ALM B Terminal Block
NC contact pin NCC contact pin C
NO contact pin NO
Installing Optional Features 1-7

February 2005
Connecting Alarms (cont.)
Figure 1-5: Alarm Relay Contact Points
Figure 1-6: ALM A and ALM B Terminal Block Locations
NC
C
NO
ALM BALM AC
RECA
NO
RTNB
RTNNC
+24V1 2
NO C
AUX
NCALM BALM A
RTN
BA REC
CNO NC
1 2RTN
NO C
AUX+24V
NC
OXYGEN
7
98
6543
3
54
12
7
98
6543
OXYGEN
3
54
12
STD/TFPROBE
12
12
STD/TFPROBE
SLO-BLO3AG
ine
eut
GN
Lnd
1/2 AMP250V
CHANNEL 1 CHANNEL 2
HA
ZAR
DO
US
AR
EAC
ON
NEC
TIO
NS
ALM A and ALM BTerminal Blocks
1-8 Installing Optional Features

February 2005
Connecting Pressure Sensor Inputs
The Series 3 accepts either pressure transducers or pressure transmitters with 0/4 to 20-mA or 0 to 2-V output. Each type of sensor is connected to the Series 3 differently; therefore it is important to know which type of pressure sensor you are using.
IMPORTANT: The transducer must be supplied by GE Infrastructure Sensing or approved by GE Infrastructure Sensing for use in this circuit.
A pressure transducer is an electrically passive device that requires a well-regulated excitation voltage or current. The transducer produces a low level signal output (typically in the millivolt or microamp range) when pressure is applied to it.
A pressure transmitter is an electrically active device containing electronic circuits. A pressure transmitter requires some sort of power source, such as a 24 VDC or 120 VAC. It produces a larger output signal than a pressure transducer in either current or voltage. The more common pressure transmitters produce a 4-20 mA current output.
IMPORTANT: The following connection information does not pertain to the TF Series Probe.
To properly connect your pressure sensor, use the appropriate section that follows.
Installing Optional Features 1-9

February 2005
Connecting a Pressure Transducer
Using a two-pair shielded cable, connect the pressure transducer to the terminal block labeled STD/TF PROBE on the back of the electronics unit (see Figure 1-7 on page 1-11). Refer to Table 1-3 below for the proper pin connections for the pressure transducer. If you are not using a GE Panametrics-supplied cable, see Figure 1-8 on page 1-11 to make the proper pin connections to the pressure transducer connector.
IMPORTANT: The transducer must be supplied by or approved by GE Infrastructure Sensing for use in this circuit.
IMPORTANT: To maintain good contact at each terminal block and to avoid damaging the pins on the connector, pull the connector straight off (not at an angle), make cable connections while the connector is away from the unit, and push the connector straight on (not at an angle) when the wiring is complete.
Note: If you connect a pressure transducer to the STD/TF Probe terminal block, you must activate the TF Probe in the pressure column for that channel as described in Chapter 3 of the Programming Manual.
Table 1-3: Pressure Transducer Connections
Connect Pressure Transducer:To STD/TF PROBE Terminal Block:
Positive Excitation Lead - red (P1+) pin 5Negative Excitation Lead - white (P1-) pin 6
Positive Output Lead - black (P2+) pin 7Negative Output Lead - green (P2-) pin 8
Shield pin 9
1-10 Installing Optional Features

February 2005
Connecting a Pressure Transducer (cont.)
Figure 1-7: STD/TF Probe Terminal Block Locations
Figure 1-8: Pressure Transducer Cable Assembly
ALM BALM AC
RECA
NO
RTNB
RTNNC
+24V1 2
NO C
AUX
NCALM BALM A
RTN
BA REC
CNO NC
1 2RTN
NO C
AUX+24V
NC
OXYGEN
7
98
6543
3
54
12
7
98
6543
OXYGEN
3
54
12
STD/TFPROBE
12
12
STD/TFPROBE
SLO-BLO3AG
ine
eut
GN
Lnd
1/2 AMP250V
CHANNEL 1 CHANNEL 2
HA
ZAR
DO
US
AR
EAC
ON
NEC
TIO
NS
STD/TF ProbeTerminal Blocks
Installing Optional Features 1-11

February 2005
Connecting Pressure Transmitters
The Series 3 accepts two types of pressure transmitters:
Note: Optional auxiliary inputs are required.
• Two-wire or loop-powered transmitter (this is always a 4 to 20-mA system).
• Four-wire or self-powered transmitter (this can be either a current or voltage output system).
Connect the pressure transmitter to the designated pins on the AUX terminal block. Pin connections include at least one of the auxiliary inputs (pin 1 or 2, see Figure 1-9 below).
Note: Because you are connecting the sensor to one of the auxiliary inputs, you must set the corresponding auxiliary switch to either current or voltage (refer to Setting Input Switches, on page 1-15).
Use the appropriate section that follows to connect a pressure transmitter to the Series 3.
Figure 1-9: AUX Terminal Block - Pin Designations
Loop
Pow
ered
Self
Pow
ered
+ – + – RTN 1 2 +24V
+24VRTN 1 2Source
AuxiliaryInputs
1-12 Installing Optional Features

February 2005
Connecting the Two-Wire or Loop-Powered Transmitter
Use a two-wire non-shielded cable to make connections to the terminal block labeled AUX on the back of the electronics unit (refer to Figure 1-10 below). Use Table 1-4 below to make the proper pin connections.
Note: Twisted-pair cables work well with this circuit.
IMPORTANT: To maintain good contact at each terminal block and to avoid damaging the pins on the connector, pull the connector straight off (not at an angle), make cable connections while the connector is away from the unit, and push the connector straight on (not at an angle) when the wiring is complete.
Once you complete the pressure connections, you must set switch block S1 on the Series 3 channel card for either current or voltage, depending on the type of pressure sensor you are using (refer to Setting Input Switches, on page 1-15).
Figure 1-10: AUX Terminal Block Locations
Table 1-4: Two-Wire or Loop-Powered Trans. Connections
Connect: To AUX Terminal BlockPositive Lead (Output) pin +24VNegative Lead (Input) pin 2 (aux. input 2) or
pin 1 (aux. input 1)
ALM BALM AC
RECA
NO
RTNB
RTNNC
+24V1 2
NO C
AUX
NCALM BALM A
RTN
BA REC
CNO NC
1 2RTN
NO C
AUX+24V
NC
OXYGEN
7
98
6543
3
54
12
7
98
6543
OXYGEN
3
54
12
STD/TFPROBE
12
12
STD/TFPROBE
SLO-BLO3AG
ine
eut
GN
Lnd
1/2 AMP250V
CHANNEL 1 CHANNEL 2
AUX Terminal Blocks
Installing Optional Features 1-13

February 2005
Connecting the Four-Wire or Self-Powered Transmitter
Use a four-wire non-shielded cable to make connections to the terminal block labeled AUX on the back of the electronics unit (refer to Figure 1-10 on page 1-13). Use Table 1-5 below to make the proper pin connections.
Note: Twisted-pair cables work well with this circuit.
IMPORTANT: To maintain good contact at each terminal block and to avoid damaging the pins on the connector, pull the connector straight off (not at an angle), make cable connections while the connector is away from the unit, and push the connector straight on (not at an angle) when the wiring is complete.
IMPORTANT: Connect the remaining leads to an external power source.
Once you complete the pressure connections, you must set switch block S1 on the Series 3 channel card for either current or voltage input, depending on the type of pressure sensor you are using (refer to Setting Input Switches on page 1-15).
Table 1-5: Four-Wire or Self-Powered Trans. Connections
Connect: To AUX Terminal Block:Negative Lead (Input) pin RTNPositive Lead (Output) pin 2 (aux. input 2) or
pin 1 (aux. input 1)
1-14 Installing Optional Features
February 2005
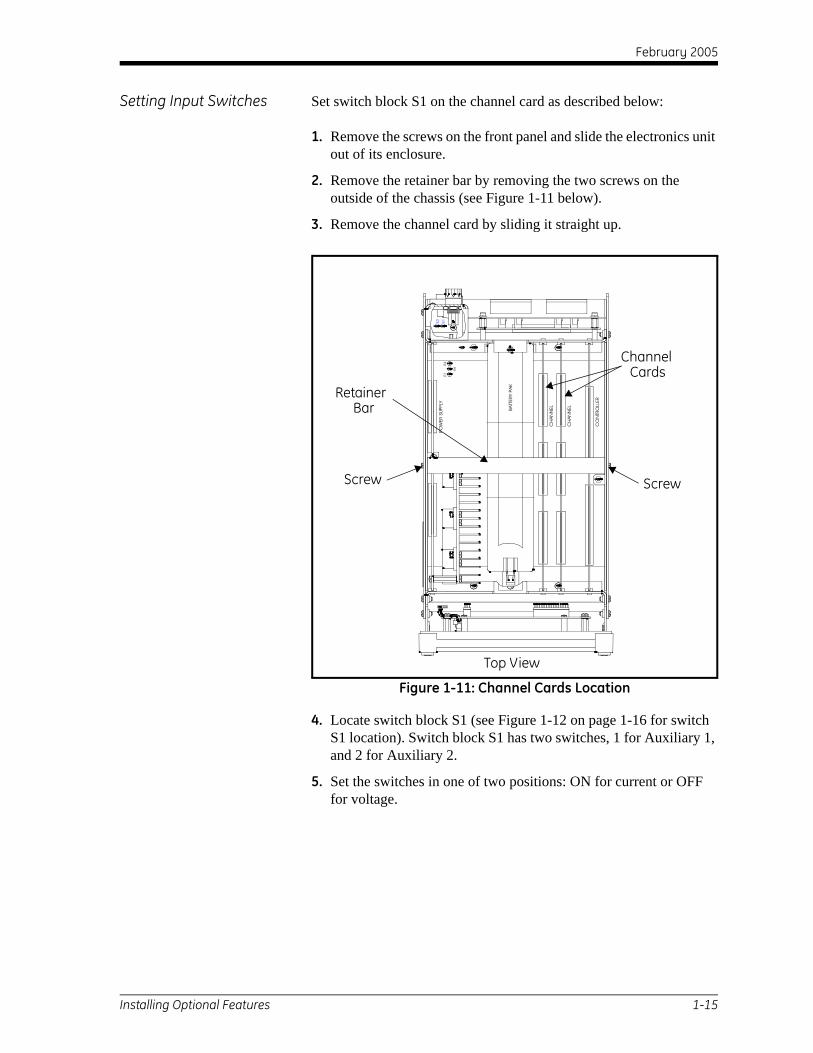
Setting Input Switches Set switch block S1 on the channel card as described below:
1. Remove the screws on the front panel and slide the electronics unit out of its enclosure.
2. Remove the retainer bar by removing the two screws on the outside of the chassis (see Figure 1-11 below).
3. Remove the channel card by sliding it straight up.
Figure 1-11: Channel Cards Location
4. Locate switch block S1 (see Figure 1-12 on page 1-16 for switch S1 location). Switch block S1 has two switches, 1 for Auxiliary 1, and 2 for Auxiliary 2.
5. Set the switches in one of two positions: ON for current or OFF for voltage.
E2 E1PO
WER
SUPP
LY
E6
E7E4
CH
AN
NELBA
TTER
Y PA
K
CH
AN
NEL
CO
NTR
OLL
ER
Retainer
Screw
Channel Cards
Top View
Screw
Bar
Installing Optional Features 1-15

February 2005
Setting Input Switches (cont.)
Figure 1-12: Channel Card - Switch S1 Location
6. Once the switches are set, replace the channel card.
7. Replace the retainer bar. Make sure the slots on the retainer bar are seated correctly against the printed circuit boards. Secure the bar with two screws.
8. Slide the electronics unit into its enclosure and replace the screws. Tighten the screws until they are snug. Do not over-tighten.
You have completed connecting the pressure transmitter.
S1
1-16 Installing Optional Features
February 2005
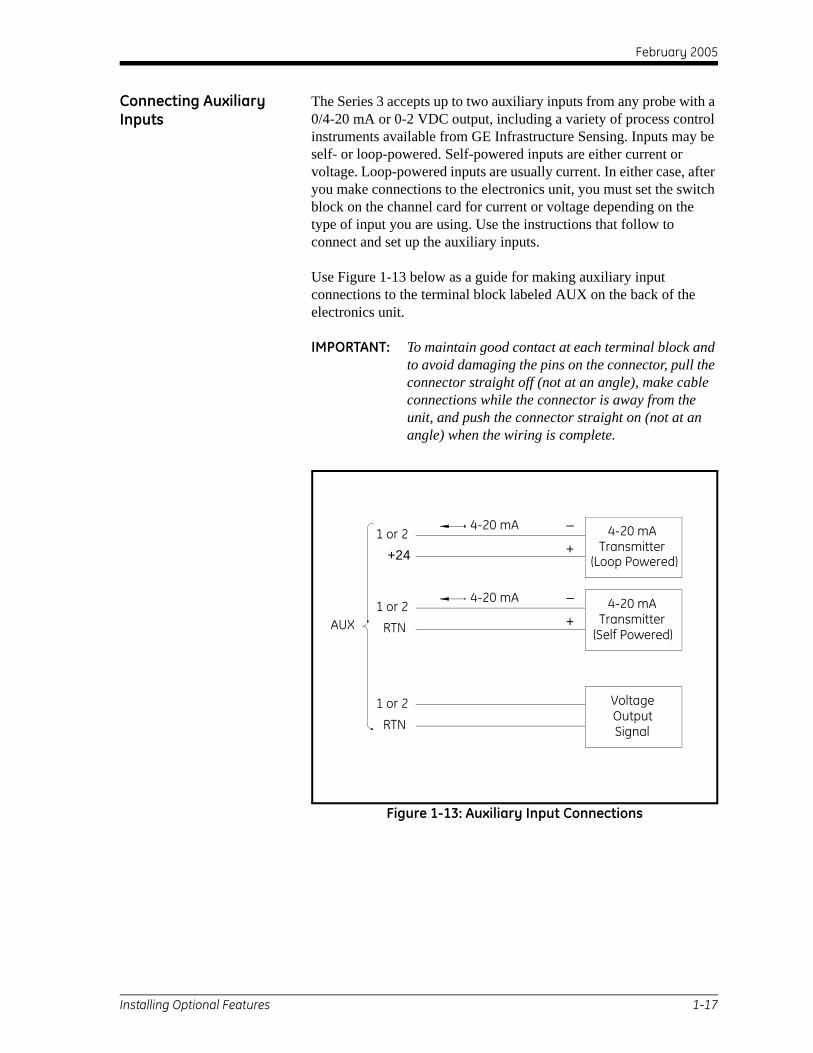
Connecting Auxiliary Inputs
The Series 3 accepts up to two auxiliary inputs from any probe with a 0/4-20 mA or 0-2 VDC output, including a variety of process control instruments available from GE Infrastructure Sensing. Inputs may be self- or loop-powered. Self-powered inputs are either current or voltage. Loop-powered inputs are usually current. In either case, after you make connections to the electronics unit, you must set the switch block on the channel card for current or voltage depending on the type of input you are using. Use the instructions that follow to connect and set up the auxiliary inputs.
Use Figure 1-13 below as a guide for making auxiliary input connections to the terminal block labeled AUX on the back of the electronics unit.
IMPORTANT: To maintain good contact at each terminal block and to avoid damaging the pins on the connector, pull the connector straight off (not at an angle), make cable connections while the connector is away from the unit, and push the connector straight on (not at an angle) when the wiring is complete.
Figure 1-13: Auxiliary Input Connections
RTN
1 or 2
4-20 mATransmitter
(Self Powered)
(Loop Powered)Transmitter
4-20 mA
SignalOutputVoltage
RTN
1 or 2
+241 or 2
–
+
–
+
4-20 mA
4-20 mA
AUX
Installing Optional Features 1-17

February 2005
Accessing Channel Cards After making auxiliary input connections, you must set switch block S1 on the Series 3 channel card for current or voltage input as described in the following sections:
1. Remove the screws on the front panel and slide the electronics unit out of its enclosure.
2. Remove the retainer bar by removing the two screws on the outside of the chassis (see Figure 1-14 below).
3. Remove the channel card by sliding it straight up.
Figure 1-14: Location of Channel Cards
4. Locate switch block S1 (see Figure 1-12 on page 1-16 for switch S1 location). Switch block S1 has two switches, 1 for Auxiliary 1, and 2 for Auxiliary 2.
5. Set the switches in one of two positions: ON for current or OFF for voltage.
E2 E1PO
WER
SUP
PLY
E6
E7E4
CH
ANN
ELBATT
ERY
PAK
CH
ANN
EL
CO
NTR
OLL
ER
Retainer
Screw
Channel
Top View
Cards
Bar
Screw
1-18 Installing Optional Features

February 2005
Replacing the Channel Card
1. Once switches are set, replace the channel card.
Note: If you intend to connect another type of input device to the Series 3, do not replace the cover because you will need to set switches on the channel card for those inputs as well.
2. Replace the retainer bar. Make sure the slots on the retainer bar are seated correctly against the printed circuit boards. Secure the bar with two screws.
3. Slide the electronics unit back into its enclosure and replace the screws. Tighten the screws until they are snug. Do not over tighten.
You have completed connecting the output device. Refer to Reconfiguring a Channel for a New Sensor and Entering Calibration Data for New Probes/Sensors in Chapter 3 of the Programming Manual to properly set up the auxiliary input.
Installing Optional Features 1-19

February 2005
Connecting a Personal Computer or Printer
You can connect the Series 3 to a personal computer or serial printer using the RS232 communications port. Refer to the instructions below to set up and connect your PC or printer.
The Series 3 has a special switch that you can use to set the Series 3 up as Data Terminal Equipment (DTE) or Data Communications Equipment (DCE). This switch changes the transmit and receive pin functions on the RS232 connector on the back of the Series 3. Use the steps below to properly set the switch.
1. Remove the screws on the front panel and slide the electronics unit out of its enclosure.
2. Locate the RS232 switch on the display board. Use Figure 1-15 below to locate the switch.
3. Set the RS232 switch to the desired position. Set the switch to DTE if the Series 3 will be transmitting data and DCE if the unit will be receiving data.
Note: If communications do not work properly, try changing the RS232 switch position.
Figure 1-15: RS232 Switch Location
E2 E1PO
WER
SUP
PLY
E6
E7E4
CH
ANN
ELBATT
ERY
PAK
CH
ANN
EL
CO
NTR
OLL
ER
RS232Switch
Top View
1-20 Installing Optional Features

February 2005
Connecting a Personal Computer or Printer (cont.)
You can connect a PC or printer using a serial cable with a 9-pin or 25-pin female connector. Refer to Table 1-6 for the pin connections for the cable connectors.
Note: See EIA-RS Serial Communications (document #916-054) for more details.
Connect one end of cable to the 9-pin connector on the rear of the electronics unit (see Figure 1-16 below). Connect the other end of the cable to your output device and set up the communications port as described in Setting Up the Communication Port in Chapter 3 of the Programming Manual.
Figure 1-16: RS232 Communications Port
Table 1-6: RS232 Cable Pin Connections
Pin Number on Connector
Wire9-Pin to Series 3
25-Pin to Output Device
9-Pin toOutput Device
Red Lead (Transmit)* 2 3 2
Green Lead (Receive)* 3 2 3
Black Lead (Return) 5 7 5
*The RS232 switch setting (DTE or DCE) determines the functions of pins 2 and 3.
ALM BALM AC
RECA
NO
RTNB
RTNNC
+24V1 2
NO C
AUX
NCALM BALM A
RTN
BA REC
CNO NC
1 2RTN
NO C
AUX+24V
NC
OXYGEN
7
98
6543
3
54
12
7
98
6543
OXYGEN
3
54
12
STD/TFPROBE
12
12
STD/TFPROBE
SLO-BLO3AG
ine
eut
GN
Lnd
1/2 AMP250V
CHANNEL 1 CHANNEL 2
HA
ZAR
DO
US
AR
EAC
ON
NEC
TIO
NS
RS232 Communications Port
Installing Optional Features 1-21

February 2005
Performing an MH Calibration Test/ Adjustment
If you modify the supplied cables or do not use standard GE Panametrics-supplied cables, you must perform a calibration test/adjustment to test the cable and, if necessary, compensate for any error or offset introduced by splicing or long cable lengths. This procedure is also recommended for testing the installation of GE Panametrics cables.
Use the following steps to perform a calibration adjustment:
Preliminary Steps 1. Power up the Series 3.
2. Set up the matrix format on the screen to display MH for each channel where you are checking an M or TF Series cable. Refer to Displaying Measurements in Chapter 2 of the Programming Manual.
3. Make sure the high, low and zero reference values are recorded on the sticker located on the outside chassis of the Series 3.
Calibration Procedure 1. Disconnect the moisture probe from the cable (leave the probe cable connected to the Series 3) and verify that the displayed MH value equals the zero reference value within ±0.0003 MH.
• If the reading is within specification, no further testing is necessary.
• If the reading is less than the specified reading (previous recorded zero reference value on the sticker ±0.0003), add this difference to the low reference value.
• If the reading is greater than the specified reading (previous recorded zero reference value on sticker ±0.0003), subtract this difference from the low reference value.
2. Note the final corrected low reference value and record it.
1-22 Installing Optional Features

February 2005
Calibration Procedure (cont.)
3. Reprogram the Series 3 with the new (corrected) low reference value (if required) as described in Entering Channel Card Reference Values in Chapter 2.
4. Verify that the probe cable is not connected to the probe.
5. Note the zero reference reading and verify that the reading is now within ±0.0003 MH.
6. Fill out a new high and low reference sticker with the final low reference value. Make sure you record the information below:
HIGH REF = ORIGINAL VALUELOW REF = NEW CORRECTED VALUEZERO REF = ORIGINAL RECORDED VALUE
7. Reconnect the probe to the cable.
Note: If cables are changed in any way, repeat this procedure for maximum accuracy.
The Series 3 is now ready for operation.
Installing Optional Features 1-23

Chapter 2

Troubleshooting and Maintenance
Introduction. . . . . . . . . . . . . . . . . . . . . . . . . . . . . . . . . . . . . . . . . . . . . . . . . . . . 2-1
Testing Alarm Relays. . . . . . . . . . . . . . . . . . . . . . . . . . . . . . . . . . . . . . . . . . . . 2-2
Testing Recorder Outputs. . . . . . . . . . . . . . . . . . . . . . . . . . . . . . . . . . . . . . . . 2-3
Trimming Recorder Outputs . . . . . . . . . . . . . . . . . . . . . . . . . . . . . . . . . . . . . 2-5
Screen Messages . . . . . . . . . . . . . . . . . . . . . . . . . . . . . . . . . . . . . . . . . . . . . . . 2-8
Common Problems. . . . . . . . . . . . . . . . . . . . . . . . . . . . . . . . . . . . . . . . . . . . . 2-10
Delta F Oxygen Cell Electrolyte. . . . . . . . . . . . . . . . . . . . . . . . . . . . . . . . . . 2-12
Adding/Removing a PCMCIA Card . . . . . . . . . . . . . . . . . . . . . . . . . . . . . . . 2-13
Recharging the Battery Pack. . . . . . . . . . . . . . . . . . . . . . . . . . . . . . . . . . . . 2-16
Installing a Channel Card . . . . . . . . . . . . . . . . . . . . . . . . . . . . . . . . . . . . . . . 2-18
Entering Channel Card Reference Values . . . . . . . . . . . . . . . . . . . . . . . . . 2-20
Replacing and Recalibrating Moisture Probes. . . . . . . . . . . . . . . . . . . . . 2-24
Recalibrating the Pressure Sensors . . . . . . . . . . . . . . . . . . . . . . . . . . . . . . 2-24
Calibrating the Delta F Oxygen Cell . . . . . . . . . . . . . . . . . . . . . . . . . . . . . . 2-25
Delta F Oxygen Cell Background Gas Correction Factors . . . . . . . . . . . 2-28
Error Descriptions . . . . . . . . . . . . . . . . . . . . . . . . . . . . . . . . . . . . . . . . . . . . . 2-31

February 2005
Introduction The Moisture Image Series 3 is designed to be maintenance and trouble free; however, because of process conditions and other factors, minor problems may occur. Some of the most common problems and procedures are discussed in this section. If you cannot find the information you need in this section, please consult GE Infrastructure Sensing.
Caution!Do not attempt to troubleshoot the Series 3 beyond the
instructions in this section. If you do, you may damage the unit and void the warranty.
This section includes the following information:
• Testing the Alarm Relays
• Testing the Recorder Outputs
• Trimming the Recorder Outputs
• Screen Messages
• Common Problems
• Checking and Replenishing Electrolyte in the Delta F Oxygen Cell
• Adding or Removing a PCMCIA Card
• Recharging the Battery Pack
• Installing a Channel Card
• Entering Reference Values for a Channel Card
• Replacing and Recalibrating the Moisture Probes
• Recalibrating the Pressure Sensors
• Calibrating the Delta F Oxygen Cell
• Delta F Oxygen Cell Background Gas Correction Factors
• Range Error Descriptions
• Signal Error Descriptions
• Calibration Error Descriptions
Troubleshooting and Maintenance 2-1

February 2005
Testing Alarm Relays The Test Menu enables you to either trip or reset the alarm relays. While in this menu, the Series 3 stops making measurements.
Press the [PROG] key to enter the user program.
Note: If you have already entered the user program, refer to the menu maps in Chapter 3 of the Programming Manual to navigate in the Programming Menu.
Be sure the number displayed in the upper right-hand corner of the screen is the channel you want to program. If not, press the [CHAN] key to select the desired channel.
.
You can now do one of the following:
• To test the other alarm, press [NO] and repeat the final two steps.
• To exit, select [DONE] followed by [RUN].
Enter Passcode: XXXX Enter the passcode.
Programming Menu 1 Use the arrow keys to move the brackets to TEST and press [TEST] CONTRAST
[YES].
Test Menu 1 Use the arrow keys to move to ALARM and press [YES]. [ALARM] RECORDER
Select Alarm 1 Use the arrow keys to move the brackets to the alarm you want to test and press [YES].
[A] B
Alarm Relay 1 Use the arrow keys to select TRIP, to trip the relay, or RESET, to reset the relay.
TRIP [RESET]
2-2 Troubleshooting and Maintenance

February 2005
Testing Recorder Outputs
The Recorder Output Test Menu enables you to test outputs to make sure they are operating properly. When you enter this menu, the Series 3 stops making measurements.
Press the [PROG] key to enter the user program.
Note: If you have already entered the user program, refer to the menu maps in Chapter 3 of the Programming Manual to navigate to the Programming Menu.
Be sure the number displayed in the upper right-hand corner of the screen is the channel you want to program. If not, press the [CHAN] key to select the desired channel.
The recorder pen should swing to the appropriate value. Press [YES].
Note: The recorder output depends on the recorder range (0-20 mA, 4-20 mA, 0-2 V).
Enter Passcode: XXXX Enter the passcode.
Programming Menu 1 Use the arrow keys to move the brackets to TEST and press [TEST] CONTRAST
[YES].
Test Menu 1 Use the arrow keys to move to RECORDER and press [YES]. ALARM [RECORDER]
Select Recorder 1 Use the arrow keys to move the brackets to the recorder you want [A] B
to test and press [YES].
Select RCD Range 1 Use the arrow keys to move the brackets to the output range and press [YES].
[0-20mA] 4-20mA
RCD Test Option 1 Use the arrow keys to move the brackets to SCALE and press [SCALE] TRIM
[YES].
Percent of Scale 1 Enter the percentage between 0 and 100 and press [YES]. 50
Troubleshooting and Maintenance 2-3

February 2005
Testing Recorder Outputs (cont.)
You can now do one of the following:
• To test another percentage, repeat the “Percent of scale” step.
• To test the other recorder, press [NO] twice and repeat the last four steps.
• To exit, press [RUN].
2-4 Troubleshooting and Maintenance

February 2005
Trimming Recorder Outputs
The measured value of the recorder outputs can vary from the programmed value due to load resistance tolerance (e.g., chart recorder, display, computer interface, etc.). The Series 3 provides a trimming feature you can use to compensate for any variation in the recorder outputs.
To accurately trim the recorder outputs, you will need a digital multimeter capable of measuring 0-2 V with a resolution of ±0.0001 VDC (0.1 mV) or 0-20 mA with a resolution of ±0.01 mA. (The range you use depends on your recorder output.) Most good quality 3 1/2-digit meters are adequate for recorder output trimming. Use the following steps to trim recorder outputs.
1. Make sure the recorder switches on the corresponding channel card(s) are set for the correct output - current (I) or voltage (V). Refer to page 1-5 to check switch settings.
2. Disconnect the load (e.g., chart recorder, indicator) from the end of the recorder output signal wires.
3. Attach the digital multimeter to the signal wires.
Note: If the recorder location is very distant from the Series 3, you may want to have one person taking readings at the recorder location and one person taking readings at the Series 3 location.
Press the [PROG] key to enter the user program.
Note: If you have already entered the user program, refer to the menu maps in Chapter 3 of the Programming Manual to navigate to the Programming Menu.
Be sure the number displayed in the upper right-hand corner of the screen is the channel you want to program. If not, press the [CHAN] key to select the desired channel.
Enter Passcode: XXXX Enter the passcode.
Programming Menu 1 Use the arrow keys to move the brackets to TEST and press [TEST] CONTRAST
[YES].
Troubleshooting and Maintenance 2-5

February 2005
Trimming Recorder Outputs (cont.)
Observe the multimeter reading. Wait at least 5 seconds for the recorder output to settle. The multimeter should display one of the readings listed in Table 2-1 below:
Note: The recorders cannot be trimmed to output a value of 0.00 mA/0.00 V due to the limits imposed by electronic noise. The recorders will typically output 0.01 mA at zero output; therefore, you should use 5% for the test value for 0 to 20-mA and 0 to 2-V ranges.
Test Menu 1 Use the arrow keys to move to RECORDER and press [YES]. ALARM [RECORDER]
Select Recorder 1 Use the arrow keys to move the brackets to the recorder you want to test and press [YES].
[A] B
Select RCD Range 1 Use the arrow keys to move the brackets to the output range and press [YES].
[0-20mA] 4-20mA
RCD Test Option 1 Use the arrow keys to move the brackets to TRIM and press [YES].
SCALE [TRIM]
Sel RCD-A OUTPUT 1 Use the arrow keys to select ZERO and press [YES]. [ZERO] SPAN
Table 2-1: Voltmeter Readings
Recorder Output Range Desired Voltmeter Reading0 to 20 mA 1 mA
4 to 20 mA 4 mA
0 to 2 V 0.1 V
2-6 Troubleshooting and Maintenance

February 2005
Trimming Recorder Outputs (cont.)
The Series 3 displays the zero and span readings for 2 seconds. Use the arrow keys to select TRIM-UP or TRIM-DOWN to correct the difference between the desired multimeter reading and the actual voltmeter reading. The Series 3 displays the new zero and span value.
Note: The trim resolution is limited to ±0.05 mA or ±0.5 mV. Choose the trim value that produces an output closest to the value desired.
Continue trimming until you reach the desired value. Then press [NO] and repeat the last four steps for the SPAN value.
Note: The zero trim is an offset adjustment, while the span trim is a slope adjustment. As a result, the zero and span trim affect each other. Therefore, after you adjust one, you may have to adjust the other.
You can now do one of the following:
• To trim the other recorder, press the [NO] key to return to the Select Recorder step and repeat the procedure.
• To exit, press [RUN].
RCD-A Zero TRIM 1 Use the arrow keys to select VIEW and press [YES]. [VIEW] TRIM-UP
Troubleshooting and Maintenance 2-7

February 2005
Screen Messages The Series 3 has several screen messages that may display during operation. Refer to Table 2-2 below for a list of these errors and the possible solutions.
Table 2-2: Screen Messages and the Possible Causes
Screen Message Possible Cause System Response Action
The Series 3 is running on battery power.
None None
Battery Low! Series 3 is running on battery power and the battery is low. When this message appears, you have about 1 hour before the unit automatically shuts off.
None Recharge battery as described on page 2-18.
Battery Pack Installed
Your unit is equipped with a battery pack.
None None
The Series 3 is charging the battery pack
None None
Cal Err!
(See Calibration Error Description on page 2-31.)
During Auto-Cal, an internal reference is found to be outside its acceptable range.
Signal Error has occurred.
Alarms and recorders respond asprogrammed.Refer to page 2-31.
Make sure the analyzer is grounded properly.Reseat the channel card. Follow the first four steps in Installing a Channel Card on page 2-18.Remove source of Signal Error and attempt another Auto-Cal.Contact GE Infrastructure Sensing.
CHANNEL NOT AVAILABLE
No channel card is installed at the position selected.
None Select a different channel.
EH (measurement mode)
Computer Enhanced Response is activated.
None None
Fluid Low! Fluid level in the Delta F Oxygen Cell is low.
None Add fluid to the cell as described on page 2-12.
KD or KH (measurement mode)
A constant dew point is being used.
None None
KT (measurement mode)
A constant temperature is being used.
None None
KP (measurement mode)
A constant pressure is being used.
None None
Log is Full The Series 3 memory is full.
The Series 3 continues to log, but does not store the data in the memory. If you have an external display device con-nected to the unit, the log data will display.
The next time you set up a log, the Series 3 will ask you to overwrite the log. Respond YES.
No option board installed
There is no option board installed in your unit.
None None
C
B
2-8 Troubleshooting and Maintenance

February 2005
NO PROBE Unit has not been configured for the probe activated. For example, you will not be able to display pressure when an M Series probe is con-nected.
N/A Make sure the correct probe is activated as described in Chapter 3 of the Programming Manual.Connect the required probe.
NOT AVAIL The mode and/or units selected require more data or need a different probe. For example, you will not be able to read %RH with a moisture probe that does not have the temperature option.
None Check configuration as described in Chapter 3 of the Programming Manual. Choose a different mode and/or units as described in Chap-ter 1 of the Programming Manual.Connect the required probe.
Over Rng(See Range Error Description on page 2-31.)
The input signal is above the calibrated range of the probe.
Alarms and recorders respond as programmed. Refer to page 2-31.
Contact GE Infrastructure Sensing for a higher calibrated probe.Change the measurement units so that the measurement is within range. For example, change ppb to ppm. Refer to Displaying Measure-ments in the Programming Manual to change the measurement units.
Printing The Series 3 is printing a report.
None None
RAM failed RAM is changed or cor-rupted.
Battery may need to be replaced.
RAM is reset. Program info will be lost.Screen is reset to display signal ground.
Same as above.
Press [YES] to continue with power up. Check reference and calibra-tion values against reference stick-ers and calibration data sheets; then do one of the following:• Re-enter data that is lost or does not match. See Reconf iguring a Channel for a New Sensor, Entering Calibration Data for New Probes/Sensors, and Entering Reference Values for a Channel Card, (all in Chapter 3 of the Programming Manual).• If data is OK, turn power off and then on. If RAM error occurs again, replace battery.
Sig Err!
(See Signal Error Description on page 2-31.)
The input signal from the probe exceeds the capacity of the analyzer electronics.
Alarms and recorders respond as programmed. Refer to page 2-31.
Check for a short in the probe. Contact GE Infrastructure Sensing.
Check wiring for shorts.
Under Rng(See Range Error Description on page 2-31.)
The input signal is below the calibrated range of the probe.
Alarms and recorders respond as programmed. Refer to page 2-31.
Contact GE Infrastructure Sensing.
Table 2-2: Screen Messages and the Possible Causes (cont.)
Screen Message Possible Cause System Response Action
Troubleshooting and Maintenance 2-9

February 2005
Common Problems If the Series 3 measurement readings seem strange or do not make sense, there may be a problem with the probe or a component of the process system. Table 2-3 below contains some of the most common problems that affect measurements.
Table 2-3: Troubleshooting Guide for Common Problems
Symptom Possible Cause System
Response Action
Accuracy of the moisturesensor is ques-tioned.
Insufficient time for the system to equilibrate.
Probe reads too wet during dry down conditions or too dry in wet up conditions.
Change the flow rate. A change in dew point indicates the sample system is not at equi-librium, or there is a leak. Allow sufficient time for the sample system to equilibrate and for the moisture reading to become steady. Check for leaks.
Dew point at sampling point is different than the dew point of the main stream.
Probe reads too wet or too dry.
Readings may be correct if the sampling point and main stream do not run under the same process conditions. Different process conditions cause readings to vary. Refer to Appendix A for more information. If sam-pling point and main stream conditions are the same, check the sample system pipes, and any pipe between the sample system and the main stream, for leaks. Also check the sample system for water adsorbing sur-faces such as rubber or plastic tubing, paper-type filters, or condensed water traps. Remove or replace contaminating parts with stainless steel parts.
The sensor or sensor shield is affected by process con-taminants (refer to Appen-dix A).
Probe reads too wet or too dry.
Clean the sensor and the sensor shield as described in Appendix A. Then reinstall the sensor.
Sensor is contaminated with conductive particles (refer to Appendix A).
Probe reads high dew point.
Clean the sensor and the sensor shield as described in Appendix A. Then reinstall the sensor. Also, install a proper filter (i.e., sin-tered or coalescing element).
Sensor is corroded (refer to Appendix A).
Probe reads too wet or too dry.
Return the probe to GE Infrastructure Sens-ing for evaluation.
Sensor temp. is greater than 70°C (158°F).
Probe reads too dry.
Return the probe to GE Infrastructure Sens-ing for evaluation.
Stream particles causing abrasion.
Probe reads too wet or too dry.
Return the probe to GE Infrastructure Sens-ing for evaluation.
Screen always reads thewettest(highest)programmed moisturecalibration value while dis-playing the dew/frost point.
Probe is saturated. Liquid water present on sensor surface and/or across elec-trical connections.
N/A Clean sensor and sensor shield as described in Appendix A. Then reinstall sensor.
Shorted circuit on sensor. N/A Run “dry gas” over the sensor surface. If the high reading persists, the probe is probably shorted and should be returned to GE Infra-structure Sensing for evaluation.
Sensor is contaminated with conductive particles (refer to Appendix A).
N/A Clean sensor and sensor shield as described in Appendix A. Then reinstall sensor.
Improper cable connection.
N/A Check cable connections to both the probe and the Series 3.
2-10 Troubleshooting and Maintenance

February 2005
Symptom Possible Cause System
Response ActionScreen always reads thedriest (lowest) programmed moisturecalibration value while dis-playing the dew/frost point.
Open circuit on sensor. N/A Return probe to GE Infrastructure Sensing for evaluation.
Non-conductive material is trapped under contact arm of sensor.
N/A Clean sensor and sensor shield as described in Appendix A. Then reinstall sensor. If low reading persists, return the probe to GE Infrastructure Sensing for evaluation.
Improper cable connection.
N/A Check cable connections to both the probe and the Series 3.
Slow response.
Slow outgassing of system.
N/A Replace the system components with stain-less steel or electro-polished stainless steel.
Sensor is contaminated with non-conductive particles (refer to Appendix A).
N/A Clean the sensor and sensor shield as described in Appendix A. Then reinstall the sensor.
Table 2-3: Troubleshooting Guide for Common Problems (cont.)
Troubleshooting and Maintenance 2-11

February 2005
Delta F Oxygen Cell Electrolyte
As a result of operating the Series 3, particularly when monitoring dry gases, there may be a gradual loss of water from the electrolyte in the Delta F oxygen cell. The electrolyte level should be checked at regular intervals to ensure your cell is always operating properly. This section describes how to check and replenish the electrolyte in your oxygen cell.
Note: Some applications require that the electrolyte be changed periodically. Consult GE Infrastructure Sensing.
Checking the Electrolyte Level
Using the min/max window on the oxygen cell, check to be sure the electrolyte level covers about 60% of the window (see Figure 2-1 below).
Figure 2-1: Delta F Oxygen Cell Electrolyte Level
Replenishing the Electrolyte
Once the oxygen cell receives the initial charge of electrolyte, you should monitor the level regularly. DO NOT let the fluid level drop below the “MIN” level mark on the window.
!WARNING!Electrolyte contains a strong caustic ingredient and can be
harmful if it comes in contact with skin or eyes. Follow proper procedures for handling the caustic (Potassium
Hydroxide) solution. Consult your company safety personnel.
To raise the fluid level in the reservoir, add DISTILLED WATER slowly in small amounts. Check the level as you add the distilled water, making sure you do not overfill the reservoir. The electrolyte mixture should cover approximately 60% of the min/max window.
MaxMax
Min
Level Indicator
2-12 Troubleshooting and Maintenance

February 2005
Adding/Removing a PCMCIA Card
To expand the memory or replace software, the Series 3 controller board has brackets for a linear (not flash or ATA) SRAM PCMCIA expansion card that can hold up to 1 MB of data. (Please contact GE Infrastructure Sensing for a list of compatible devices and formatting.) To install or remove the card, open the enclosure and handle the card as described below.
Caution!Make sure you have a record of the data listed below
before you reinitialize the system.
1. Make sure you have a record of the following data, as described in Chapter 3 of the Programming Manual:
Note: This information should have been recorded on a separate sheet of paper.
• Probe configuration
• Probe calibration data (See the Calibration Data Sheets.)
• Recorder Outputs
• Alarm Outputs
• Data Logger
• Reference values (See page 2-20 of this chapter.)
!WARNING!Remove power by disconnecting the main AC power cord
before proceeding with this procedure.
2. Turn the power off and unplug the unit.
3. Discharge static from your body.
4. Open the Series 3 enclosure by removing the screws on the front panel and sliding the electronics unit out.
5. Use Figure 2-2 on page 2-14 to locate the controller board inside the electronics unit, and remove the card by pulling it out of the brackets. The controller board will appear similar to Figure 2-3 on page 2-15.
Troubleshooting and Maintenance 2-13

February 2005
Adding/Removing a PCMCIA Card (cont.)
Figure 2-2: Controller Board Location
6. Insert the PCMCIA card into the brackets along the side of the cutout area. Orient the card so that Pin 1 of the PCMCIA card lines up with Pin 1 of the connector on the controller card.
Note: When you are inserting the PCMCIA card, the face of the card with the arrows must be on the side next the controller board.
7. Check the switch settings to make sure they match the ones shown in Figure 2-3 on page 2-15 (all switches down). The switch settings shown in the insert are preset at the factory, and must remain at this setting for normal operation.
8. Replace the controller card.
9. Slide the electronics unit back into place on the Series 3 and reinsert the screws on the front panel.
10.Plug in the meter.
E2 E1PO
WER
SUP
PLY
E6
E7E4
CH
ANN
ELBATT
ERY
PAK
CH
ANN
EL
CO
NTR
OLL
ERRetainer
Controller
Top View
Bar
Board
2-14 Troubleshooting and Maintenance

February 2005
Adding/Removing a PCMCIA Card (cont.)
Figure 2-3: Controller Board - PCMCIA Card Insertion
PCMCIA Card
Troubleshooting and Maintenance 2-15

February 2005
Recharging the Battery Pack
When the battery pack is fully charged, it provides 8 hours of continuous operation.
Note: Continuous use of the backlight and/or alarms will shorten the battery life 1-2 hours.
When the battery pack needs recharging, a “Battery Low!” message appears on the display. You can recharge the battery pack using either an auto-charge or a full charge.
The Series 3 begins an auto-charge when you plug it into AC line power and turn it on. An auto-charge recharges the battery pack for twice as long as the unit ran off battery power. For example, if the unit ran off the battery for 5 hours, the auto-charge will charge the unit for 10 hours. Use of the auto-charge does not ensure your battery is fully charged. To make sure your battery will hold enough power for 6 to 8 hours of operation, perform a full charge, which takes 16 hours (960 minutes).
Use the following section to recharge the battery pack using the full charge option.
!WARNING!Do not attempt to recharge the battery pack when the
temperature is 0°C (32°F) or below.
Plug the Series 3 into an AC power source and turn the unit on.
Press the [PROG] key to enter the user program.
Note: If you are already in the Battery Test Menu, skip to the “Battery Test” step.
.
Enter Passcode: XXXX Enter the passcode.
Programming Menu 1 Use the arrow keys to move the brackets to TEST and press [TEST] CONTRAST
[YES].
Test Menu 1 Use the arrow keys to move to BATTERY and press [YES]. [BATTERY]
2-16 Troubleshooting and Maintenance

February 2005
Recharging the Battery Pack (cont.)
.
The Series 3 displays the charge time. The charge time indicates the rate of the auto-charge, which is typically twice as long as the run time (read the introductory paragraph on page 2-16). If you charge the battery for the indicated charge time, this does not guarantee your unit will be fully charged. To fully charge the unit, press [YES] and skip to the next step. If the charge time is acceptable, press [YES] followed by [RUN].
To exit, press [RUN]. The Series 3 will charge for 16 hours (960 minutes). When the Series 3 is charging, it displays a reverse video C in the right-hand corner of the display.
Battery Test 1 Use the arrow keys to move to RDCHGTIME and press [YES]. STATUS [RDCHGTIME]
Battery Test 1 Use the arrow keys to move to CHANGE-CHGTIME and press [YES].
[Change-ChgTime]
Time to Charge Bat 1 Enter the desired value and press [YES]. XX:XX (HH:MM)
Troubleshooting and Maintenance 2-17

February 2005
Installing a Channel Card The Series 3 can have up to two channel cards. If you need to replace one, GE Infrastructure Sensing will send you a channel card that you can insert into the electronics unit. Use the following steps to install a channel card.
1. Turn the Series 3 off and unplug the main AC power cord.
!WARNING!Remove power by disconnecting the main AC power cord
before proceeding with this procedure.
2. To access the channel cards, remove the screws on the front panel and slide the electronics unit out of its enclosure.
Caution!Channel cards can be damaged by static electricity.
Observe ESD handling precautions.
3. Remove the retainer bar by removing the two screws on the outside of the chassis (see Figure 2-4 below).
Figure 2-4: Channel Cards Location
E2 E1PO
WER
SUP
PLY
E6
E7E4
CH
ANN
ELBATT
ERY
PAK
CH
ANN
EL
CO
NTR
OLL
ER
Retainer
ChannelCards
Bar
ScrewScrew
2-18 Troubleshooting and Maintenance

February 2005
Installing a Channel Card (cont.)
4. Remove the old channel card by pulling the board straight up (see Figure 2-4 on page 2-18).
5. Insert the new channel card into the vacant slot.
6. Push down on the board and make sure it makes contact with the connectors on the bottom of the unit.
7. Replace the retainer bar. Make sure the slots on the retainer bar are seated correctly against the printed circuit boards. Secure the bar with two screws.
8. Replace the cover on the electronics unit. Make sure when you are sliding the electronics into the enclosure, the electronics line up with the sliding guides on the inside of the enclosure. Replace the screws in the front panel. Do not over tighten the screws.
You have completed installing the channel card. Enter the calibration data as described in Entering Calibration Data for New Probes/Sensors in Chapter 3 of the Programming Manual, and reference the data as described in the next section.
Troubleshooting and Maintenance 2-19

February 2005
Entering Channel Card Reference Values
The high and low reference values are entered at the factory. However, if you replace the channel card, you will have to re-enter the reference values for moisture, oxygen, and pressure. The references are unit-specific factory calibration values. (Reference values are located on a label placed on the left side of the Series 3 chassis.)
Compare the data on the Series 3 screen to the reference data printed on the label placed on the side of the unit, or supplied with the replacement channel card. If the replacement channel card is the old version (for models with serial numbers below 2001), the label is on the back of the card. If the replacement card is the new version, the values are on a tag attached to the card.
Press the [PROG] key to enter the user program.
Note: If you have already entered the user program, refer to the menu maps in the Programming Manual to navigate in the Programming Menu.
Be sure the number displayed in the upper right-hand corner of the screen is the channel you want to program. If not, press the [CHAN] key to select the desired channel.
.
Enter Passcode: XXXX Enter the passcode.
Programming Menu 1 Use the arrow keys to move the brackets to SYSTEM and press [YES].
[SYSTEM] AUTOCAL
Measurement Mode 1 You only need to enter reference data for moisture, oxygen and/or pressure. Use the arrow keys to move to the desired measurement mode and press [YES]. Refer to Table 2-4 on page 2-21 for a list of available measurement modes.
O [H] T P AUX1
2-20 Troubleshooting and Maintenance

February 2005
Entering Channel Card Reference Values (cont.)
IMPORTANT: Make sure you have selected the correct channel before you proceed. Press the [CHAN] key to select the desired channel.
The remaining prompts depend on the measurement mode you selected. Refer to one of the following sections to properly program your unit:
• Entering Moisture Reference Data below
• Entering Oxygen Reference Data on page 2-22
• Entering Pressure Reference Data on page 2-23
Note: You do not have to enter reference data for temperature, auxiliary 1, auxiliary 2, or constant ppmv.
Entering Moisture Reference Data
Note: The reference values shown above are for example only. You should verify the actual values as listed on the label placed on the left hand side of the Series 3 chassis or supplied with the new channel card.
Press the [NO] key and proceed to the next page.
Table 2-4: Measurement Modes
Display Abbreviation Measurement ModeO Oxygen
H Hygrometry
T Temperature
P Pressure
AUX1 Auxiliary 1
AUX2 Auxiliary 2
CONSTANT-PPMV PPMv Multiplication Factor
System Menu 1 Use the arrow keys to move the brackets to REF and press [YES]. CONFIG [REF]
MH Hi Ref Lo Ref 1 Enter the low reference value. Press [YES] and press the left 0.1660 0.0000
arrow key.
MH Hi Ref Lo Ref 1 Enter the high reference value and press [YES]. 0.1660 2.9335
Troubleshooting and Maintenance 2-21

February 2005
Entering Moisture Reference Data (cont.)
You may now do one of the following:
• Enter data for oxygen or pressure reference data by pressing the [NO] key until you return to Measurement Mode, then select the desired mode and press [YES]. Refer to Entering Oxygen Reference Data below or Entering Pressure Reference Data on page 2-23.
• Refer to another section and perform a different procedure. Refer to the menu maps in Chapter 3 of the Programming Manual to navigate through the user program.
• Exit by pressing [NO] followed by the [RUN] key.
Entering Oxygen Reference Data
Note: The reference values shown above are for example only. You should verify the actual values as listed on the label placed on the left hand side of the Series 3 chassis or supplied with the new channel card.
Repeat the zero and span value steps to enter high reference values.
You may now do one of the following:
• Enter data moisture or pressure reference data by pressing the [NO] key until you return to Measurement Mode, then select the desired mode and press [YES]. Refer to Entering Moisture Reference Data on page 2-21 or Entering Pressure Reference Data on page 2-23.
• Refer to another section and perform a different procedure. Refer to the menu maps in Chapter 3 of the Programming Manual to navigate through the user program.
• Exit by pressing [NO] followed by the [RUN] key.
Oxygen Ref Menu 1 Use the arrow keys to move the brackets to LOW and press [LOW] HIGH
[YES].
Lo O2 Zero Span 1 Enter the low oxygen zero value. Press [YES] and then press the +0.0499 +0.0000
right arrow key.
Lo O2 Zero Span 1 Enter the low oxygen span value Press [YES]. Then press the +0.0499 +1.9923
[NO] key.
Oxygen Ref Menu 1 Press the right arrow key to [LOW] HIGH move to HIGH, and then press
[YES].
2-22 Troubleshooting and Maintenance

February 2005
Entering Pressure Reference Data
Press the [NO] key.
You may now do one of the following:
• Enter data moisture or oxygen reference data by pressing the [NO] key until you return to Measurement Mode, then select the desired mode and press [YES]. See Entering Moisture Reference Data on page 2-21 or Entering Oxygen Reference Data on page 2-22.
• Refer to another section and perform a different procedure. Refer to the menu maps in Chapter 3 of the Programming Manual to navigate through the user program.
• Exit by pressing [NO] followed by the [RUN] key.
P Hi Ref Lo Ref 1 Enter the low pressure value. Press [YES] and press the left arrow key.
0.05 0.00
P Hi Ref LoRef 1 Enter the low reference value and press [YES]. 0.05 99.89
Troubleshooting and Maintenance 2-23

February 2005
Replacing and Recalibrating Moisture Probes
For maximum accuracy, you should send the probes back to the factory for recalibration every six months to one year, depending on the application. Under severe conditions you should send the probes back more frequently; in milder applications you do not need to recalibrate probes as often. Contact a GE Infrastructure Sensing applications engineer for the recommended calibration frequency for your application.
When you receive new or recalibrated probes, be sure to install and connect them as described in Chapter 1, Installation, of the Startup Guide. Once you have installed and connected the probes, enter the calibration data supplied with each probe as described in Entering Calibration Data for New Probes/Sensors in Chapter 3 of the Programming Manual, then configure the channel as described in Reconfiguring a Channel for a New Sensor in Chapter 3 of the Programming Manual.
Recalibrating the Pressure Sensors
Since the pressure sensor on a TF Series Probe is a strain gage type, the pressure calibration is linear and is calibrated at two data points. Each point consists of a pressure value and a corresponding voltage value. Check or change the two calibration points using the steps below.
1. Set one of the lines on the screen to display pressure in mV. Refer to Displaying Measurements in Chapter 2 of the Programming Manual to set up the screen. Select pressure as the measurement mode and pmv to display millivolts.
2. Expose the pressure sensor to the air and record the mV reading. This reading is the mV reading for the zero pressure.
3. Expose the pressure sensor to a known full scale pressure source (at least 50% of the full scale capability) and record the mV reading. This reading is the mV reading for the span pressure.
4. Enter the above readings as described in Entering Calibration Data for New Probes/Sensors in Chapter 3 of the Programming Manual.
2-24 Troubleshooting and Maintenance

February 2005
Calibrating the Delta F Oxygen Cell
You should calibrate the Delta F Oxygen Cell when you initially receive it. After that, calibrate the oxygen cell once a month for the first three months, and then as needed. You should also calibrate the oxygen cell if you change the electrolyte.
Calibrating the oxygen cell involves two parts:
• checking the oxygen cell calibration
• entering the new span value
Note: The oxygen cell is calibrated using nitrogen as the background gas.
Checking the Oxygen Cell Calibration
1. Determine which channel is connected to the Delta F Oxygen Cell.
2. Set up the display to read the oxygen content in PPMv and µA. Refer to Displaying Measurements in Chapter 2 of the Programming Manual for details.
Note: If your operational range of measurement is significantly below the span gas you are using, you may elect to input the PPM O2 content of the span gas and the measured µA value as an alternative to the following procedure.
To perform this part of calibration you must have a calibration gas with a known PPMv value and a calibration gas inlet valve.
Note: GE Infrastructure Sensing recommends a span calibration gas be 80-100% of the span of the sensor’s overall range in a background of nitrogen (e.g., 80-100 PPM O2 in N2 for a 0-100 PPM O2 sensor).
3. Run the calibration gas through the oxygen cell.
Troubleshooting and Maintenance 2-25

February 2005
Checking the Oxygen Cell Calibration (cont.)
4. Read the PPMv value. If it is correct, your oxygen cell does not need calibration. If the reading is incorrect, you must calculate the new span reading (x). Solve the following equation for x:
where OXc = Correct PPMv for calibration gas OX0 = Zero value in PPMv* OX1 = Span value in PPMv* IOc = Actual reading for calibration gas in µA IO0 = Zero value in µA* x = New span reading in µA
*See the Calibration Data Sheet for the oxygen cell to obtain the necessary zero and span values.
Example:If the calibration data for your cell is as follows: OXc = 75 PPMv = Correct PPMv for cal gas OX0 = 0.050 PPMv = Zero value in PPMv OX1 = 100 PPMv = Span value in PPMv IOc = 290 µA = Actual reading for calibration gas IO0 = 0.4238 µA = Zero value
Therefore,
The new span value (x) is 100 PPMv ≅ 387 µA. Enter the new value as described in the next section.
x IOcOX1 OXc–( ) IOc IO0–( )
OXc OX0–( )---------------------------------------------------------------+=
x 290 100 75–( ) 290 0.4238–(75 0.05–( )
----------------------------------------------------------+=
2-26 Troubleshooting and Maintenance

February 2005
Entering the New Span Value
Press the [PROG] key to enter the user program..
Be sure the number displayed in the upper right-hand corner of the screen is the channel you want to program. If not, press the [CHAN] key to select the desired channel.
.
To exit, press [RUN].
Enter Passcode: XXXX Enter the passcode.
Programming Menu 1 Use the arrow keys to move the brackets to SYSTEM and press [YES].
[SYSTEM] AUTOCAL
Measurement Mode 1 Use the arrow keys to move the brackets to O and press [YES]. [O] H T P Aux1
System Menu 1 Use the arrow keys to move the brackets to CURVES and press [YES].
[CURVES] CONSTANT
O2 Curve Menu 1 Use the arrow keys to move the brackets to CURVE and press [YES].
S/N [CURVE] BkGd
Sel. O2 Curve Pts# 1 Use the arrow keys to move the brackets to SPAN and press [YES].
ZERO [SPAN]
#1 O(ua) O(%) 1 Enter the new span percentage value. Press [YES] and press the left arrow key.
0.721 0.0000
#1 O(ua) O(ppm) 1 Enter the new span microamp value and press [YES]. Zero [SPAN]
Troubleshooting and Maintenance 2-27

February 2005
Delta F Oxygen Cell Background Gas Correction Factors
The factory calibration procedure for Delta F oxygen cells uses nitrogen as the reference background gas. The Series 3 will measure oxygen incorrectly if the transport rate of oxygen through the cell diffusion barrier is different than the cell is calibrated for. Therefore, if you want to use a background gas other than nitrogen, you must recalibrate the Series 3 for the desired gas.
The Series 3 can easily be recalibrated for a number of different background gases. Correct your system for the appropriate background gas by referring to Table 2-6 on page 2-30 and entering the correct current multiplier into the “Oxygen Probe Calibration” section of the System Calibration Menu. A detailed explanation and description of this process follows.
Note: In order to use the current multipliers in this appendix, your calibration data sheet should contain calibration data for nitrogen. If your calibration data sheet contains data for a background gas other than nitrogen, contact the factory for the nitrogen calibration sheet.
Correcting for Different Background Gases
A single “Background Gas Correction Factor” based on the reference nitrogen measurement can be derived for each background gas because, in practice, the diffusion rate for a typical background gas is stable and predictable and because the cell’s response is linear. The current multiplier that is entered into the “Oxygen Probe Calibration” section is the inverse of this “Background Gas Correction Factor.”
For example, Table 2-5 below represents the calibration values (two points) for a specific oxygen cell calibrated in nitrogen. This data is supplied with the cell and is stored in the Series 3 user program.
When the oxygen cell is used in a background gas other than nitrogen, users must enter the gas’s current multiplier, listed in Table 2-6 on page 2-30. The Series 3 will apply the appropriate correction to the oxygen signal. The original calibration values for nitrogen are programmed into the “Oxygen Probe Calibration” section. However, the Series 3 uses the current multiplier to determine the correct oxygen concentration.
Table 2-5: Oxygen Cell Calibration Data (ref. to nitrogen)
Zero Calibration Point Zero PPMV Value =.0500 PPMV
Zero µA Value =.9867 µA
Span Calibration Point Span PPMV Value = 100.0 PPMV
2-28 Troubleshooting and Maintenance

February 2005
Entering the Current Multiplier
Note: The default setting for the Current Multiplier is 1.00.
To change the Current Multiplier, first select a Current Multiplier from Table 2-6 on page 2-30. Then press the [PROG] key to enter the user program.
Be sure the number displayed in the upper right-hand corner of the screen is the channel you want to program. If not, press the [CHAN] key to select the desired channel.
.
.
To exit, press the [RUN] key.
Enter Passcode: XXXX Enter the passcode.
Programming Menu 1 Use the arrow keys to move the brackets to SYSTEM and press [YES].
[SYSTEM] AUTOCAL
Measurement Mode 1 Use the arrow keys to move the brackets to O and press [YES]. [O] H T P AUX1
System Menu 1 Use the arrow keys to move the brackets to CURVES and press [YES].
[CURVES] CONSTANT
O2 Curve Menu 1 Use the arrow keys to move the brackets to BkGd and press [YES]. S/N CURVE [BkGd]
O2 uA Multiplier 1 Use the numeric keys to enter the Current Multiplier. Press [YES] to confirm your entry.
1.00
Troubleshooting and Maintenance 2-29

February 2005
Table 2-6: Background Gas Current MultipliersBackground Gas Current Multipliers
Up to 1000 PPM 5000-10,000 PPM 2.5% to 10% 25%Argon (Ar) 0.97 0.96 0.95 0.98
Hydrogen (H2) 1.64 1.96 2.38 1.35
Helium (He) 1.72 2.13 2.70 1.39
Methane (CH4) 1.08 1.09 1.11 1.05
Ethane (C2H6) 0.87 0.84 0.81 0.91
Propylene (C3H6) 0.91 0.88 0.87 0.93
Propane (C3H8) 0.79 0.76 0.72 0.58
Butene (C4H8) 0.69 0.65 0.60 0.77
Butane (C4H10) 0.68 0.63 0.58 0.76
Butadiene (C6H6) 0.71 0.66 0.62 0.79
Acetylene (C2H2) 0.95 0.94 0.93 0.97
Hexane (C6H14) 0.57 0.52 0.89 0.67
Cyclohexane (C6H12) 0.64 0.58 0.54 0.72
Vinyl Chloride (CH2CHCl) 0.74 0.69 0.65 0.81
Vinylidene Chloride (C2H2F2) 0.77 0.73 0.69 0.83
Neon (Ne) 1.18 1.23 1.28 1.11
Xenon (Xe) 0.70 0.65 0.61 0.78
Krypton (Kr) 0.83 0.79 0.76 0.88
Sulfur Hexaflouride (SF6) 0.54 0.49 0.44 0.64
Freon 318 (C4F8) 0.39 0.34 0.30 0.49
Tetrafluoromethane (CF4) 0.62 0.57 0.52 0.71
Carbon Monoxide (CO) 0.99 0.99 0.98 0.99
2-30 Troubleshooting and Maintenance

February 2005
Error Descriptions
Range Errors Range Errors occur when an input signal that is within the capacity of the analyzer exceeds the calibration range of the probe. The Series 3 displays Range Errors with an “Over Rng” or “Under Rng” message. The error condition extends to all displayed measurements of that mode. For example, if dew point displays “Over Rng,” then moisture in PPMv will also display “Over Rng.”
In addition, since several moisture modes (such as % RH, ppmv, PPMw, and MMSCF) are dependent on more than one input to calculate their results, some modes can generate an error opposite to the initial error. For example, %RH is dependent on moisture and temperature. The nature of the %RH calculation is such that low temperatures result in a high %RH. Therefore, it is possible for temperature to read “Under Rng” while %RH reads “Over Rng.”
If multiple Range Errors occur simultaneously, the Series 3 responds to them in the following order:
1. Oxygen Errors
2. Moisture Errors
3. Temperature Errors
4. Pressure Errors
Signal Errors Signal Errors occur when an electrical fault causes a measurement signal to exceed the capacity of the analyzer electronics. The Series 3 displays Signal Errors with a “Sig Err!” message.
Calibration Errors A Calibration Error indicates a failure of the internal reference during Auto-Cal. During Auto-Cal, internal reference components are measured and compared to factory calibration values. Each reference is read repeatedly and the value measured is compared to a table of acceptable values. Any deviation from the factory values is calculated and corrected. Should a reference fall outside the acceptable range, a “Cal Err!” message appears.
It is possible for one mode to fail Auto-Cal while the others continue to operate. Only the failed mode will display a “Cal Err!” Usually, Auto-Cal errors are indicative of a channel card fault.
Troubleshooting and Maintenance 2-31

February 2005
Loading New Software At some point, a new version of the MMS 3 operating software may be released. To update your system, use the following guidelines:
1. Record all of the setup, configuration, calibration and reference information from the MMS 3, and transfer required logs to a PC.
IMPORTANT: All of the settings will be lost when the code is updated. Any logs will also be erased.
2. Obtain the new software file (with a *.cod extension) and save the file to your PC hard drive.
3. Set up the MMS 3 with an RS232 cable connected to a COM port (most likely COM1) on a PC having a communications program like Hyperterminal. (See Connecting a Personal Computer or Printer in Chapter 1.)
4. Start the communications program on the PC and select the COM port with the connection to the MMS-3.
5. Set the following information:Baud Rate = 19200Data Bits = 8Parity = noneStop Bits = 1Flow Control = none.
6. Turn on the power to the MMS 3.
7. Press the 0 (zero) key on the MMS 3.
Note: The display will indicate a message similar to Reload Flash via RS232 (Y/N)?
8. Press the [YES] key on the MMS 3.
9. Using the PC communications program, choose the Transfer file menu and select Send File.
10. Select the XMODEM transfer protocol.
11. Select the file to send: the file that was saved to the PC hard drive.
The File transfer will commence. Once the file is successfully transferred, the meter will reboot and load the new software.
Note: Once the software is loaded into the MMS 3, it will be necessary to reprogram the configuration data, references, recorders, alarms, logs, etc. (see the previous sections in this manual).
After reprogramming is complete, the MMS 3 is ready for operation.
2-32 Troubleshooting and Maintenance

Appendix A
Application of the Hygrometer (900-901E)
Introduction. . . . . . . . . . . . . . . . . . . . . . . . . . . . . . . . . . . . . . . . . . . . . . . . . . . . A-1
Moisture Monitor Hints . . . . . . . . . . . . . . . . . . . . . . . . . . . . . . . . . . . . . . . . . . A-2
Contaminants . . . . . . . . . . . . . . . . . . . . . . . . . . . . . . . . . . . . . . . . . . . . . . . . . . A-5
Aluminum Oxide Probe Maintenance . . . . . . . . . . . . . . . . . . . . . . . . . . . . . A-7
Corrosive Gases And Liquids . . . . . . . . . . . . . . . . . . . . . . . . . . . . . . . . . . . . . A-9
Materials of Construction. . . . . . . . . . . . . . . . . . . . . . . . . . . . . . . . . . . . . . .A-10
Calculations and Useful Formulas in Gas Applications . . . . . . . . . . . . .A-11
Liquid Applications. . . . . . . . . . . . . . . . . . . . . . . . . . . . . . . . . . . . . . . . . . . . .A-22
Empirical Calibrations. . . . . . . . . . . . . . . . . . . . . . . . . . . . . . . . . . . . . . . . . .A-28
Solids Applications. . . . . . . . . . . . . . . . . . . . . . . . . . . . . . . . . . . . . . . . . . . . .A-34

February 2005
Introduction This appendix contains general information about moisture monitoring techniques. System contaminants, moisture probe maintenance, process applications and other considerations for ensuring accurate moisture measurements are discussed.
The following specific topics are covered:
• Moisture Monitor Hints
• Contaminants
• Aluminum Oxide Probe Maintenance
• Corrosive Gases and Liquids
• Materials of Construction
• Calculations and Useful Formulas in Gas Applications
• Liquid Applications
• Empirical Calibrations
• Solids Applications
Application of the Hygrometer (900-901E) A-1

February 2005
Moisture Monitor Hints Hygrometers using aluminum oxide moisture probes have been designed to reliably measure the moisture content of both gases and liquids. The measured dew point will be the real dew point of the system at the measurement location and at the time of measurement. However, no moisture sensor can determine the origin of the measured moisture content. In addition to the moisture content of the fluid to be analyzed, the water vapor pressure at the measurement location may include components from sources such as: moisture from the inner walls of the piping; external moisture through leaks in the piping system; and trapped moisture from fittings, valves, filters, etc. Although these sources may cause the measured dew point to be higher than expected, it is the actual dew point of the system at the time of measurement.
One of the major advantages of the aluminum oxide hygrometer is that it can be used for in situ measurements (i.e., the sensor element is designed for installation directly within the region to be measured). As a result, the need for complex sample systems that include extensive piping, manifolds, gas flow regulators and pressure regulators is eliminated or greatly reduced. Instead, a simple sample system to reduce the fluid temperature, filter contaminants and facilitate sensor removal is all that is needed.
Whether the sensor is installed in situ or in a remote sampling system, the accuracy and speed of measurement depend on the piping system and the dynamics of the fluid flow. Response times and measurement values will be affected by the degree of equilibrium reached within system. Factors such as gas pressure, flow rate, materials of construction, length and diameter of piping, etc. will greatly influence the measured moisture levels and the response times.
Assuming that all secondary sources of moisture have been eliminated and the sample system has been allowed to come to equilibrium, then the measured dew point will equal the actual dew point of the process fluid.
Some of the most frequently encountered problems associated with moisture monitoring sample systems include:
• the moisture content value changes as the total gas pressure changes
• the measurement response time is very slow
• the dew point changes as the fluid temperature changes
• the dew point changes as the fluid flow rate changes.
A-2 Application of the Hygrometer (900-901E)

February 2005
Moisture Monitor Hints (cont.)
Aluminum oxide hygrometers measure only water vapor pressure. In addition, the instrument has a very rapid response time and it is not affected by changes in fluid temperature or fluid flow rate. If any of the above situations occur, then they are almost always caused by a defect in the sample system. The moisture sensor itself can not lead to such problems.
Pressure Aluminum oxide hygrometers can accurately measure dew points under pressure conditions ranging from vacuums as low as a few microns of mercury up to pressures of 5000 psig. The calibration data supplied with the moisture probe is directly applicable over this entire pressure range, without correction.
Note: Although the moisture probe calibration data is supplied as meter reading vs. dew point, it is important to remember that the moisture probe responds only to water vapor pressure.
When a gas is compressed, the partial pressures of all the gaseous components are proportionally increased. Conversely, when a gas expands, the partial pressures of the gaseous components are proportionally decreased. Therefore, increasing the pressure on a closed aqueous system will increase the vapor pressure of the water, and hence, increase the dew point. This is not just a mathematical artifact. The dew point of a gas with 1000 PPMv of water at 200 psig will be considerably higher than the dew point of a gas with 1000 PPMv of water at 1 atm. Gaseous water vapor will actually condense to form liquid water at a higher temperature at the 200 psig pressure than at the 1 atm pressure. Thus, if the moisture probe is exposed to pressure changes, the measured dew point will be altered by the changed vapor pressure of the water.
It is generally advantageous to operate the hygrometer at the highest possible pressure, especially at very low moisture concentrations. This minimizes wall effects and results in higher dew point readings, which increases the sensitivity of the instrument.
Response Time The response time of the standard M Series GE Panametrics Aluminum Oxide Moisture Sensor is very rapid - a step change of 63% in moisture concentration will be observed in approximately 5 seconds. Thus, the observed response time to moisture changes is, in general, limited by the response time of the sample system as a whole. Water vapor is absorbed tenaciously by many materials, and a large, complex processing system can take several days to “dry down” from atmospheric moisture levels to dew points of less than -60°C. Even simple systems consisting of a few feet of stainless steel tubing and a small chamber can take an hour or more to dry down from dew points of +5°C to -70°C. The rate at which the system reaches equilibrium will depend on flow rate, temperature, materials of construction and system pressure. Generally speaking, an increase in flow rate and/or temperature will decrease the response time of the sample system.
Application of the Hygrometer (900-901E) A-3

February 2005
Response Time (cont.) To minimize any adverse affects on response time, the preferred materials of construction for moisture monitoring sample systems are stainless steel, PTFE and glass. Materials to be avoided include rubber elastomers and related compounds.
Temperature The aluminum oxide hygrometer is largely unaffected by ambient temperature. However, for best results, it is recommended that the ambient temperature be at least 10°C higher than the measured dew point, up to a maximum of 70°C. Because an ambient temperature increase may cause water vapor to be desorbed from the walls of the sample system, it is possible to observe a diurnal change in moisture concentration for a system exposed to varying ambient conditions. In the heat of the day, the sample system walls will be warmed by the ambient air and an off-gassing of moisture into the process fluid, with a corresponding increase in measured moisture content, will occur. The converse will happen during the cooler evening hours. This effect should not be mistakenly interpreted as indicating that the moisture probe has a temperature coefficient.
Flow Rate Aluminum oxide hygrometers are unaffected by the fluid flow rate. The moisture probe is not a mass sensor but responds only to water vapor pressure. The moisture probe will operate accurately under both static and dynamic fluid flow conditions. In fact, the specified maximum fluid linear velocity of 10,000 cm/sec for the M Series Aluminum Oxide Moisture Sensor indicates a mechanical stability limitation rather than a sensitivity to the fluid flow rate.
If the measured dew point of a system changes with the fluid flow rate, then it can be assumed that off-gassing or a leak in the sample system is causing the variation. If secondary moisture is entering the process fluid (either from an ambient air leak or the release of previously absorbed moisture from the sample system walls), an increase in the flow rate of the process fluid will dilute the secondary moisture source. As a result, the vapor pressure will be lowered and a lower dew point will be measured.
Note: Refer to the Specifications chapter in the Startup Guide for the maximum allowable flow rate for the instrument.
A-4 Application of the Hygrometer (900-901E)
February 2005
Contaminants Industrial gases and liquids often contain fine particulate matter. Particulates of the following types are commonly found in such process fluids:
• carbon particles
• salts
• rust particles
• polymerized substances
• organic liquid droplets
• dust particles
• molecular sieve particles
• alumina dust
For convenience, the above particulates have been divided into three broad categories. Refer to the appropriate section for a discussion of their affect on the aluminum oxide moisture probe.
Non-Conductive Particulates
Note: Molecular sieve particles, organic liquid droplets and oil droplets are typical of this category.
In general, the performance of the moisture probe will not be seriously hindered by the condensation of non-conductive, non-corrosive liquids. However, a slower response to moisture changes will probably be observed, because the contaminating liquid barrier will decrease the rate of transport of the water vapor to the sensor and reduce its response time.
Particulate matter with a high density and/or a high flow rate may cause abrasion or pitting of the sensor surface. This can drastically alter the calibration of the moisture probe and, in extreme cases, cause moisture probe failure. A stainless steel shield is supplied with the moisture probe to minimize this effect, but in severe cases, it is advisable to install a PTFE or stainless steel filter in the fluid stream.
On rare occasions, non-conductive particulate material may become lodged under the contact arm of the sensor, creating an open circuit. If this condition is suspected, refer to the Probe Cleaning Procedure section of this appendix for the recommended cleaning procedure.
Application of the Hygrometer (900-901E) A-5

February 2005
Conductive Particulates Note: Metallic particles, carbon particles and conductive liquid droplets are typical of this category.
Since the hygrometer reading is inversely proportional to the impedance of the sensor, a decrease in sensor impedance will cause an increase in the meter reading. Thus, trapped conductive particles across the sensor leads or on the sensor surface, which will decrease the sensor impedance, will cause an erroneously high dew point reading. The most common particulates of this type are carbon (from furnaces), iron scale (from pipe walls) and glycol droplets (from glycol-based dehydrators).
If the system contains conductive particulates, it is advisable to install a PTFE or stainless steel filter in the fluid stream.
Corrosive Particulates Note: Sodium chloride and sodium hydroxide particulates are typical of this category.
Since the active sensor element is constructed of aluminum, any material that corrodes aluminum will deleteriously affect the operation of the moisture probe. Furthermore, a combination of this type of particulate with water will cause pitting or severe corrosion of the sensor element. In such instances, the sensor cannot be cleaned or repaired and the probe must be replaced.
Obviously, the standard moisture probe can not be used in such applications unless the complete removal of such part by adequate filtration is assured.
A-6 Application of the Hygrometer (900-901E)

February 2005
Aluminum Oxide Probe Maintenance
Other than periodic calibration checks, little or no routine moisture probe maintenance is required. However, as discussed in the previous section, any electrically conductive contaminant trapped on the aluminum oxide sensor will cause inaccurate moisture measurements. If such a situation develops, return of the moisture probe to the factory for analysis and recalibration is recommended. However, in an emergency, cleaning of the moisture probe in accordance with the following procedure may be attempted by a qualified technician or chemist.
IMPORTANT: Moisture probes must be handled carefully and cannot be cleaned in any fluid which will attack its components. The probe’s materials of construction are Al, Al2O3, nichrome, gold, stainless steel, glass
and Viton® A. Also, the sensor’s aluminum sheet is very fragile and can be easily bent or distorted. Do not permit anything to touch it!
The following items will be needed to properly complete the moisture probe cleaning procedure:
• approximately 300 ml of reagent grade hexane or toluene
• approximately 300 ml of distilled (not deionized) water
• two glass containers to hold above liquids (metal containers should not be used).
To clean the moisture probe, complete the following steps:
1. Record the dew point of the ambient air.
2. Making sure not to touch the sensor, carefully remove the protective shield from the sensor.
3. Soak the sensor in the distilled water for ten (10) minutes. Be sure to avoid contact with the bottom and the walls of the container!
4. Remove the sensor from the distilled water and soak it in the clean container of hexane or toluene for ten (10) minutes. Again, avoid all contact with the bottom and the walls of the container!
5. Remove the sensor from the hexane or toluene, and place it face up in a low temperature oven set at 50°C ±2°C (122°F ±4°F) for 24 hours.
Application of the Hygrometer (900-901E) A-7

February 2005
Aluminum Oxide Probe Maintenance (cont.)
6. Repeat steps 3-5 for the protective shield. During this process, swirl the shield in the solvents to ensure the removal of any contaminants that may have become embedded in the porous walls of the shield.
7. Carefully replace probe’s protective shield, making sure not to touch the sensor.
8. Connect the probe cable to the probe, and record the dew point of the ambient air, as in step 1. Compare the two recorded dew point readings to determine if the reading after cleaning is a more accurate value for the dew point of the ambient atmosphere.
9. If the sensor is in proper calibration (±2°C accuracy), reinstall the probe in the sample cell and proceed with normal operation of the hygrometer.
10.If the sensor is not in proper calibration, repeat steps 1-9, using time intervals 5 times those used in the previous cleaning cycle. Repeat this procedure until the sensor is in proper calibration.
A trained laboratory technician should determine if all electrically conductive compounds have been removed from the aluminum oxide sensor and that the probe is properly calibrated. Probes which are not in proper calibration must be recalibrated. It is recommended that all moisture probes be recalibrated by GE Infrastructure Sensing approximately once a year, regardless of the probe’s condition.
A-8 Application of the Hygrometer (900-901E)

February 2005
Corrosive Gases And Liquids
GE Panametrics M Series Aluminum Oxide Moisture Sensors have been designed to minimize the affect of corrosive gases and liquids. As indicated in the Materials of Construction section of this appendix, no copper, solder or epoxy is used in the construction of these sensors. The moisture content of corrosive gases such as H2S, SO2, cyanide containing gases, acetic acid vapors, etc. can be measured directly.
Note: Since the active sensor is aluminum, any fluid which corrodes aluminum will affect the sensor’s performance.
By observing the following precautions, the moisture probe may be used successfully and economically:
1. The moisture content of the corrosive fluid must be 10 PPMv or less at 1 atmosphere, or the concentration of the corrosive fluid must be 10 PPMv or less at 1 atmosphere.
2. The sample system must be pre-dried with a dry inert gas, such as nitrogen or argon, prior to introduction of the fluid stream. Any adsorbed atmospheric moisture on the sensor will react with the corrosive fluid to cause pitting or corrosion of the sensor.
3. The sample system must be purged with a dry inert gas, such as nitrogen or argon, prior to removal of the moisture probe. Any adsorbed corrosive fluid on the sensor will react with ambient moisture to cause pitting or corrosion of the sensor.
4. Operate the sample system at the lowest possible gas pressure.
Using the precautions listed above, the hygrometer has been used to successfully measure the moisture content in such fluids as hydrochloric acid, sulfur dioxide, chlorine and bromine.
Application of the Hygrometer (900-901E) A-9

February 2005
Materials of Construction
M1 and M2 Sensors:
Electrical Connector:
Sensor Element: 99.99% aluminum, aluminum oxide, gold, Nichrome, A6
Back Wire: 316 stainless steel
Contact Wire: gold, 304 stainless steel
Front Wire: 316 stainless steel
Support: Glass (Corning 9010)
Pins: Al 152 Alloy (52% Ni)
Glass: Corning 9010
Shell: 304L stainless steel
O-Ring: silicone rubber
Threaded Fitting: 304 stainless steel
O-Ring: Viton® A
Cage: 308 stainless steel
Shield: 304 stainless steel
A-10 Application of the Hygrometer (900-901E)

February 2005
Calculations and Useful Formulas in Gas Applications
A knowledge of the dew point of a system enables one to calculate all other moisture measurement parameters. The most important fact to recognize is that for a particular dew point there is one and only one equivalent vapor pressure.
Note: The calibration of moisture probes is based on the vapor pressure of liquid water above 0°C and frost below 0°C. Moisture probes are never calibrated with supercooled water.
Caution is advised when comparing dew points measured with an aluminum oxide hygrometer to those measured with a mirror type hygrometer, since such instruments may provide the dew points of supercooled water.
As stated above, the dew/frost point of a system defines a unique partial pressure of water vapor in the gas. Table A-1 on page A-15, which lists water vapor pressure as a function of dew point, can be used to find either the saturation water vapor pressure at a known temperature or the water vapor pressure at a specified dew point. In addition, all definitions involving humidity can then be expressed in terms of the water vapor pressure.
Nomenclature The following symbols and units are used in the equations that are presented in the next few sections:
• RH = relative humidity
• TK = temperature (°K = °C + 273)
• TR = temperature (°R = °F + 460)
• PPMv = parts per million by volume
• PPMw = parts per million by weight
• Mw = molecular weight of water (18)
• MT = molecular weight of carrier gas
• PS = saturation vapor pressure of water at the prevailing temperature (mm of Hg)
• PW = water vapor pressure at the measured dew point(mm of Hg)
• PT = total system pressure (mm of Hg)
Application of the Hygrometer (900-901E) A-11

February 2005
Parts per Million by Volume
The water concentration in a system, in parts per million by volume, is proportional to the ratio of the water vapor partial pressure to the total system pressure:
(A-1)
In a closed system, increasing the total pressure of the gas will proportionally increase the partial pressures of the various components. The relationship between dew point, total pressure and PPMV is provided in nomographic form in Figure A-1 on page A-20.
Note: The nomograph shown in Figure A-1 on page A-20 is applicable only to gases. Do not apply it to liquids.
To compute the moisture content for any ideal gas at a given pressure, refer to Figure A-1 on page A-20. Using a straightedge, connect the dew point (as measured with the aluminum oxide hygrometer) with the known system pressure. Read the moisture content in PPMV where the straightedge crosses the moisture content scale.
Typical Problems 1. Find the water content in a nitrogen gas stream, if a dew point of -20°C is measured and the pressure is 60 psig.
Solution: In Figure A-1 on page A-20, connect 60 psig on the Pressure scale with -20°C on the Dew/Frost Point scale. Read 200 PPMV, on the Moisture Content scale.
2. Find the expected dew/frost point for a helium gas stream having a measured moisture content of 1000 PPMV and a system pressure of 0.52 atm.
Solution: In Figure A-1 on page A-20, connect 1000 PPMV on the Moisture Content scale with 0.52 atm on the Pressure scale. Read the expected frost point of –27°C on the Dew/Frost Point scale.
PPMVPWPT------- 106×=
A-12 Application of the Hygrometer (900-901E)

February 2005
Parts per Million by Weight
The water concentration in the gas phase of a system, in parts per million by weight, can be calculated directly from the PPMV and the ratio of the molecular weight of water to that of the carrier gas as follows:
(A-2)
Relative Humidity Relative humidity is defined as the ratio of the actual water vapor pressure to the saturation water vapor pressure at the prevailing ambient temperature, expressed as a percentage.
(A-3)
1. Find the relative humidity in a system, if the measured dew point is 0°C and the ambient temperature is +20°C.
Solution: From Table A-1 on page A-20, the water vapor pressure at a dew point of 0°C is 4.579 mm of Hg and the saturation water vapor pressure at an ambient temperature of +20°C is 17.535 mm of Hg. Therefore, the relative humidity of the system is100 x 4.579/17.535 = 26.1%.
Weight of Water per Unit Volume of Carrier Gas
Three units of measure are commonly used in the gas industry to express the weight of water per unit volume of carrier gas. They all represent a vapor density and are derivable from the vapor pressure of water and the Perfect Gas Laws. Referenced to a temperature of 60°F and a pressure of 14.7 psia, the following equations may be used to calculate these units:
(A-4)
(A-5)
(A-6)
Note: MMSCF is an abbreviation for a “million standard cubic feet” of carrier gas.
PPMW PPMVMWMT---------×=
RHPWPS------- 100×=
mg of waterliter of gas
----------------------------- 289PWTK-------×=
lb of waterft3 of gas
-------------------------- 0.0324PWTR-------×=
lb of waterMMSCF of gas-------------------------------------
PPMV21.1
----------------106 PW×21.1 PT×-----------------------= =
Application of the Hygrometer (900-901E) A-13

February 2005
Weight of Water per Unit Weight of Carrier Gas
Occasionally, the moisture content of a gas is expressed in terms of the weight of water per unit weight of carrier gas. In such a case, the unit of measure defined by the following equation is the most commonly used:
(A-7)
For ambient air at 1 atm of pressure, the above equation reduces to the following:
(A-8)
grains of waterlb of gas
------------------------------------ 7000MW PW×MT PT×
------------------------×=
grains of waterlb of gas
------------------------------------ 5.72 PW×=
A-14 Application of the Hygrometer (900-901E)
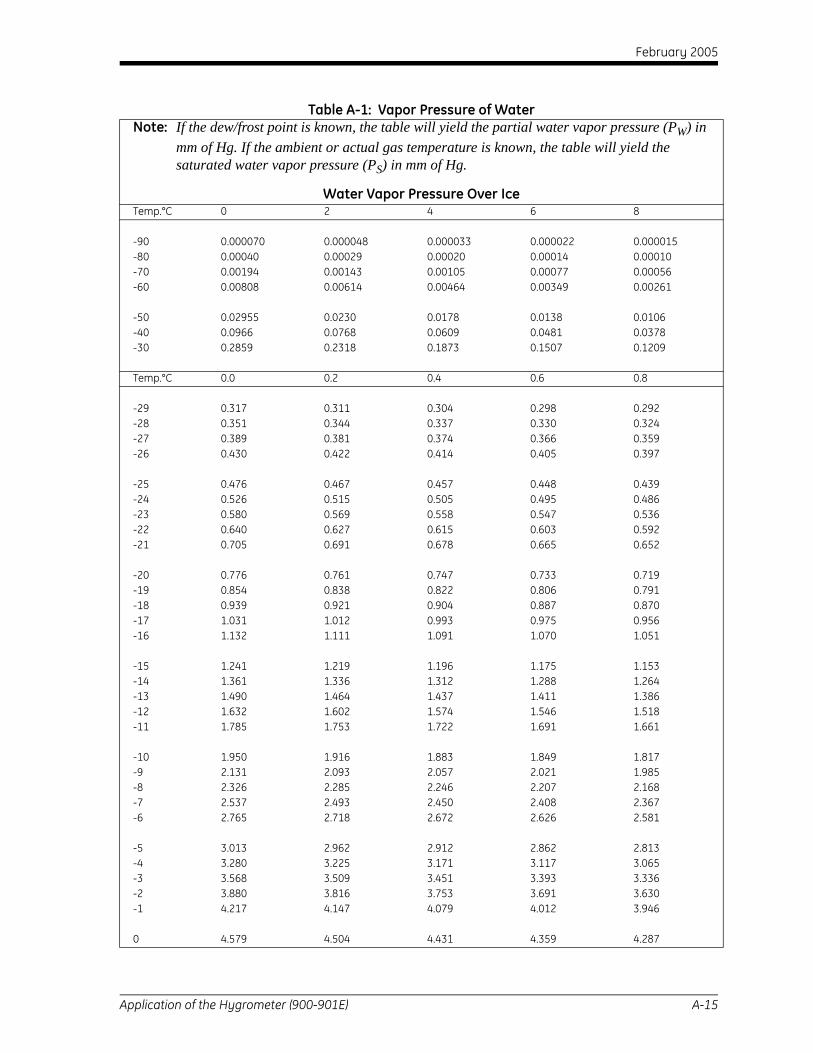
February 2005
Table A-1: Vapor Pressure of WaterNote: If the dew/frost point is known, the table will yield the partial water vapor pressure (PW) in
mm of Hg. If the ambient or actual gas temperature is known, the table will yield the saturated water vapor pressure (PS) in mm of Hg.
Water Vapor Pressure Over IceTemp.°C 0 2 4 6 8
-90 0.000070 0.000048 0.000033 0.000022 0.000015-80 0.00040 0.00029 0.00020 0.00014 0.00010-70 0.00194 0.00143 0.00105 0.00077 0.00056-60 0.00808 0.00614 0.00464 0.00349 0.00261
-50 0.02955 0.0230 0.0178 0.0138 0.0106-40 0.0966 0.0768 0.0609 0.0481 0.0378-30 0.2859 0.2318 0.1873 0.1507 0.1209
Temp.°C 0.0 0.2 0.4 0.6 0.8
-29 0.317 0.311 0.304 0.298 0.292-28 0.351 0.344 0.337 0.330 0.324-27 0.389 0.381 0.374 0.366 0.359-26 0.430 0.422 0.414 0.405 0.397
-25 0.476 0.467 0.457 0.448 0.439-24 0.526 0.515 0.505 0.495 0.486-23 0.580 0.569 0.558 0.547 0.536-22 0.640 0.627 0.615 0.603 0.592-21 0.705 0.691 0.678 0.665 0.652
-20 0.776 0.761 0.747 0.733 0.719-19 0.854 0.838 0.822 0.806 0.791-18 0.939 0.921 0.904 0.887 0.870-17 1.031 1.012 0.993 0.975 0.956-16 1.132 1.111 1.091 1.070 1.051
-15 1.241 1.219 1.196 1.175 1.153-14 1.361 1.336 1.312 1.288 1.264-13 1.490 1.464 1.437 1.411 1.386-12 1.632 1.602 1.574 1.546 1.518-11 1.785 1.753 1.722 1.691 1.661
-10 1.950 1.916 1.883 1.849 1.817-9 2.131 2.093 2.057 2.021 1.985-8 2.326 2.285 2.246 2.207 2.168-7 2.537 2.493 2.450 2.408 2.367-6 2.765 2.718 2.672 2.626 2.581
-5 3.013 2.962 2.912 2.862 2.813-4 3.280 3.225 3.171 3.117 3.065-3 3.568 3.509 3.451 3.393 3.336-2 3.880 3.816 3.753 3.691 3.630-1 4.217 4.147 4.079 4.012 3.946
0 4.579 4.504 4.431 4.359 4.287
Application of the Hygrometer (900-901E) A-15

February 2005
Aqueous Vapor Pressure Over Water
Temp.°C 0.0 0.2 0.4 0.6 0.8
0 4.579 4.647 4.715 4.785 4.8551 4.926 4.998 5.070 5.144 5.2192 5.294 5.370 5.447 5.525 5.6053 5.685 5.766 5.848 5.931 6.0154 6.101 6.187 6.274 6.363 6.453
5 6.543 6.635 6.728 6.822 6.9176 7.013 7.111 7.209 7.309 7.4117 7.513 7.617 7.722 7.828 7.9368 8.045 8.155 8.267 8.380 8.4949 8.609 8.727 8.845 8.965 9.086
10 9.209 9.333 9.458 9.585 9.71411 9.844 9.976 10.109 10.244 10.38012 10.518 10.658 10.799 10.941 11.08513 11.231 11.379 11.528 11.680 11.83314 11.987 12.144 12.302 12.462 12.624
15 12.788 12.953 13.121 13.290 13.46116 13.634 13.809 13.987 14.166 14.34717 14.530 14.715 14.903 15.092 15.28418 15.477 15.673 15.871 16.071 16.27219 16.477 16.685 16.894 17.105 17.319
20 17.535 17.753 17.974 18.197 18.42221 18.650 18.880 19.113 19.349 19.58722 19.827 20.070 20.316 20.565 20.81523 21.068 21.324 21.583 21.845 22.11024 22.377 22.648 22.922 23.198 23.476
25 23.756 24.039 24.326 24.617 24.91226 25.209 25.509 25.812 26.117 26.42627 26.739 27.055 27.374 27.696 28.02128 28.349 28.680 29.015 29.354 29.69729 30.043 30.392 30.745 31.102 31.461
30 31.824 32.191 32.561 32.934 33.31231 33.695 34.082 34.471 34.864 35.26132 35.663 36.068 36.477 36.891 37.30833 37.729 38.155 38.584 39.018 39.45734 39.898 40.344 40.796 41.251 41.710
35 42.175 42.644 43.117 43.595 44.07836 44.563 45.054 45.549 46.050 46.55637 47.067 47.582 48.102 48.627 49.15738 49.692 50.231 50.774 51.323 51.87939 52.442 53.009 53.580 54.156 54.737
40 55.324 55.910 56.510 57.110 57.72041 58.340 58.960 59.580 60.220 60.860
Table A-1: Vapor Pressure of Water (cont.)
A-16 Application of the Hygrometer (900-901E)

February 2005
Aqueous Vapor Pressure Over Water (cont.)
Temp.°C 0.0 0.2 0.4 0.6 0.8
42 61.500 62.140 62.800 63.460 64.12043 64.800 65.480 66.160 66.860 67.56044 68.260 68.970 69.690 70.410 71.140
45 71.880 72.620 73.360 74.120 74.88046 75.650 76.430 77.210 78.000 78.80047 79.600 80.410 81.230 82.050 82.87048 83.710 84.560 85.420 86.280 87.14049 88.020 88.900 89.790 90.690 91.590
50 92.51 93.50 94.40 95.30 96.3051 97.20 98.20 99.10 100.10 101.1052 102.09 103.10 104.10 105.10 106.2053 107.20 108.20 109.30 110.40 111.4054 112.51 113.60 114.70 115.80 116.90
55 118.04 119.10 120.30 121.50 122.6056 123.80 125.00 126.20 127.40 128.6057 129.82 131.00 132.30 133.50 134.7058 136.08 137.30 138.50 139.90 141.2059 142.60 143.90 145.20 146.60 148.00
60 149.38 150.70 152.10 153.50 155.0061 156.43 157.80 159.30 160.80 162.3062 163.77 165.20 166.80 168.30 169.8063 171.38 172.90 174.50 176.10 177.7064 179.31 180.90 182.50 184.20 185.80
65 187.54 189.20 190.90 192.60 194.3066 196.09 197.80 199.50 201.30 203.1067 204.96 206.80 208.60 210.50 212.3068 214.17 216.00 218.00 219.90 221.8069 223.73 225.70 227.70 229.70 231.70
70 233.70 235.70 237.70 239.70 241.8071 243.90 246.00 248.20 250.30 252.4072 254.60 256.80 259.00 261.20 263.4073 265.70 268.00 270.20 272.60 274.8074 277.20 279.40 281.80 284.20 286.60
75 289.10 291.50 294.00 296.40 298.8076 301.40 303.80 306.40 308.90 311.4077 314.10 316.60 319.20 322.00 324.6078 327.30 330.00 332.80 335.60 338.2079 341.00 343.80 346.60 349.40 352.20
80 355.10 358.00 361.00 363.80 366.8081 369.70 372.60 375.60 378.80 381.8082 384.90 388.00 391.20 394.40 397.4083 400.60 403.80 407.00 410.20 413.60
Table A-1: Vapor Pressure of Water (cont.)
Application of the Hygrometer (900-901E) A-17
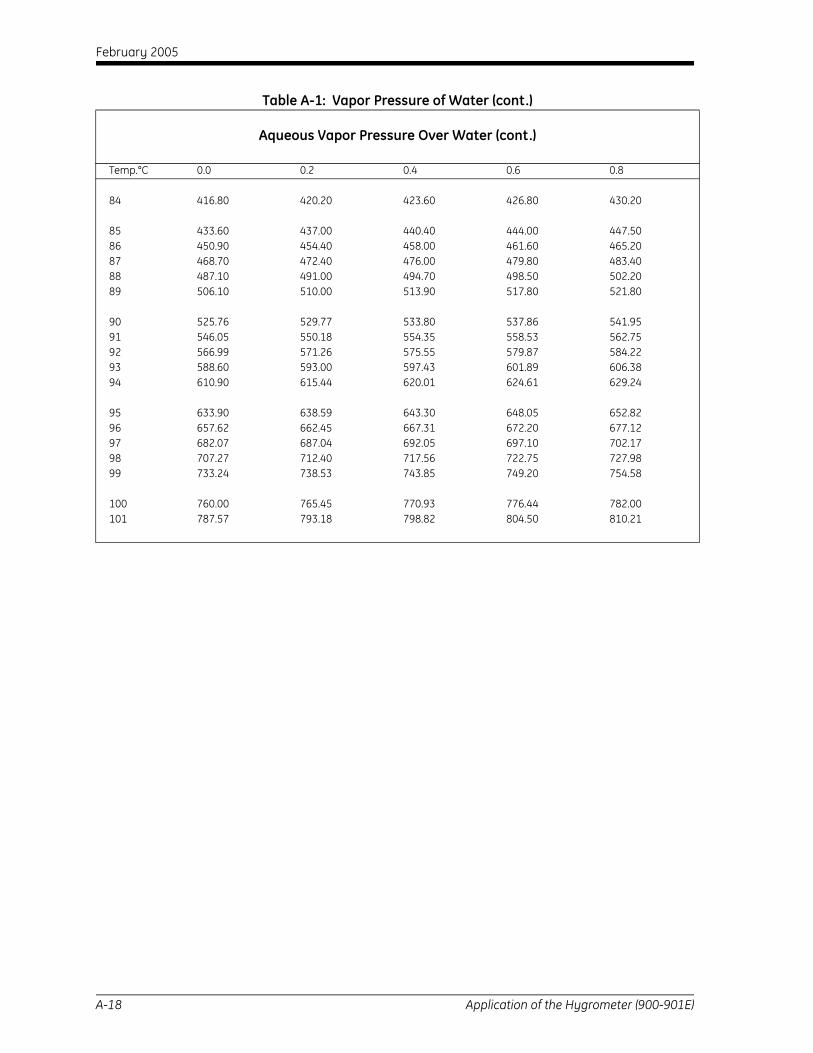
February 2005
Aqueous Vapor Pressure Over Water (cont.)
Temp.°C 0.0 0.2 0.4 0.6 0.8
84 416.80 420.20 423.60 426.80 430.20
85 433.60 437.00 440.40 444.00 447.5086 450.90 454.40 458.00 461.60 465.2087 468.70 472.40 476.00 479.80 483.4088 487.10 491.00 494.70 498.50 502.2089 506.10 510.00 513.90 517.80 521.80
90 525.76 529.77 533.80 537.86 541.9591 546.05 550.18 554.35 558.53 562.7592 566.99 571.26 575.55 579.87 584.2293 588.60 593.00 597.43 601.89 606.3894 610.90 615.44 620.01 624.61 629.24
95 633.90 638.59 643.30 648.05 652.8296 657.62 662.45 667.31 672.20 677.1297 682.07 687.04 692.05 697.10 702.1798 707.27 712.40 717.56 722.75 727.9899 733.24 738.53 743.85 749.20 754.58
100 760.00 765.45 770.93 776.44 782.00101 787.57 793.18 798.82 804.50 810.21
Table A-1: Vapor Pressure of Water (cont.)
A-18 Application of the Hygrometer (900-901E)

February 2005
Table A-2: Maximum Gas Flow RatesBased on the physical characteristics of air at a temperature of 77°F and a pressure of 1 atm, the following flow rates will produce the maximum allowable gas stream linear velocity of 10,000 cm/sec in the corresponding pipe sizes.
Inside Pipe Diameter (in.) Gas Flow Rate (cfm)0.25 7
0.50 27
0.75 60
1.0 107
2.0 429
3.0 966
4.0 1,718
5.0 2,684
6.0 3,865
7.0 5,261
8.0 6,871
9.0 8,697
10.0 10,737
11.0 12,991
12.0 15,461
Table A-3: Maximum Liquid Flow RatesBased on the physical characteristics of benzene at a temperature of 77°F, the following flow rates will produce the maximum allowable fluid linear velocity of 10 cm/sec in the corresponding pipe sizes.
Inside Pipe Diameter (in.) Flow Rate (gal/hr) Flow Rate (l/hr)0.25 3 110.50 12 460.75 27 1031.0 48 1822.0 193 7303.0 434 1,6424.0 771 2,9195.0 1,205 4,5616.0 1,735 6,5677.0 2,361 8,9398.0 3,084 11,6759.0 3,903 14,77610.0 4,819 18,24311.0 5,831 22,07412.0 6,939 26,269
Application of the Hygrometer (900-901E) A-19

February 2005
Figure A-1: Moisture Content Nomograph for Gases
1.00.8
0.60.50.4
0.3
0.2
0.1
3.0
2.0
4.05.06.0
10.08.0
20
30
5040
60
10080
800
200
300
500400
600
1,000
4,000
2,000
3,000
10,000
6,0005,000
8,000
.01
.02
.03
.04
.05
.06
.08
.10
.3
.2
.4
.6
.5
1.0.8
2.0
3.0
5.04.0
6.0
108.0
80
20
30
5040
60
100
400
200
300
1,000
600500
800
0
5
10
20
30405060
80100
150
200
300
400500600
8001,000
1,500
2,000
3,000
4,0005,0006,000
8,00010,000
MO
ISTU
RE
CO
NTE
NT,
PP M
by
volu
me
PRES
S UR
E, A
TMO
S PH
ERE S
PRES
SUR
E, P
SIG
+20
+10
0
-10
-20
-30
-40
-50
-60
-70
-80
-90
DEW
/FR
OST
PO
INT,
° C
60504030
20
10
0
-10
-20
-30
-40
-50
-60
-70
-80
-90
-100
-110
-120
-130
DEW
/FR
OST
PO
INT,
°F
A-20 Application of the Hygrometer (900-901E)

February 2005
Comparison of PPMV Calculations
There are three basic methods for determining the moisture content of a gas in PPMV:
• the calculations described in this appendix
• calculations performed with the slide rule device that is provided with each hygrometer
• values determined from tabulated vapor pressures
For comparison purposes, examples of all three procedures are listed in Table A-4 below.
Table A-4: Comparative PPMV Values
Dew Point (°C)
Pressure (psig)
Calculation Method
Slide RuleAppendix
AVapor
Pressure-80 0 0.5 0.55 0.526
100 0.065 N.A. 0.0675800 0.009 N.A. 0.0095
1500 0.005 N.A. 0.0051-50 0 37 40 38.88
100 4.8 5.2 4.98800 0.65 0.8 0.7016
1500 0.36 0.35 0.3773+20 0 N.A. 20,000 23,072.36
100 3000 3000 2956.9800 420 400 416.3105
1500 220 200 223.9
Application of the Hygrometer (900-901E) A-21

February 2005
Liquid Applications
Theory of Operation The direct measurement of water vapor pressure in organic liquids is accomplished easily and effectively with GE Panametrics’ Aluminum Oxide Moisture Sensors. Since the moisture probe pore openings are small in relation to the size of most organic molecules, admission into the sensor cavity is limited to much smaller molecules, such as water. Thus, the surface of the aluminum oxide sensor, which acts as a semi-permeable membrane, permits the measurement of water vapor pressure in organic liquids just as easily as it does in gaseous media.
In fact, an accurate sensor electrical output will be registered whether the sensor is directly immersed in the organic liquid or it is placed in the gas space above the liquid surface. As with gases, the electrical output of the aluminum oxide sensor is a function of the measured water vapor pressure.
Moisture Content Measurement in Organic Liquids
Henry’s Law Type Analysis
When using the aluminum oxide sensor in non-polar liquids having water concentrations ≤1% by weight, Henry’s Law is generally applicable. Henry’s Law states that, at constant temperature, the mass of a gas dissolved in a given volume of liquid is proportional to the partial pressure of the gas in the system. Stated in terms pertinent to this discussion, it can be said that the PPMW of water in hydrocarbon liquids is equal to the partial pressure of water vapor in the system times a constant.
As discussed above, an aluminum oxide sensor can be directly immersed in a hydrocarbon liquid to measure the equivalent dew point. Since the dew point is functionally related to the vapor pressure of the water, a determination of the dew point will allow one to calculate the PPMW of water in the liquid by a Henry’s Law type analysis. A specific example of such an analysis is shown below.
For liquids in which a Henry’s Law type analysis is applicable, the parts per million by weight of water in the organic liquid is equal to the partial pressure of water vapor times a constant:
(a)
where, K is the Henry’s Law constant in the appropriate units, and the other variables are as defined on page A-11.
PPMW K PW×=
A-22 Application of the Hygrometer (900-901E)

February 2005
Henry’s Law Type Analysis (cont.)
Also, the value of K is determined from the known water saturation concentration of the organic liquid at the measurement temperature:
(b)
For a mixture of organic liquids, an average saturation value can be calculated from the weight fractions and saturation values of the pure components as follows:
(c)
where, Xi is the weight fraction of the ith component, (CS)i is the
saturation concentration (PPMW) of the ith component, and n is the total number of components.
In conclusion, the Henry’s Law constant (K) is a constant of proportionality between the saturation concentration (CS) and the saturation vapor pressure (PS) of water, at the measurement temperature. In the General Case, the Henry’s Law constant varies with the measurement temperature, but there is a Special Case in which the Henry’s Law constant does not vary appreciably with the measurement temperature. This special case applies to saturated, straight-chain hydrocarbons such as pentane, hexane, heptane, etc.
A: General Case Determination of Moisture Content if CS is Known:
The nomograph for liquids in Figure A-2 on page A-32 can be used to determine the moisture content in an organic liquid, if the following values are known:
• the temperature of the liquid at the time of measurement
• the saturation water concentration at the measurement temperature
• the dew point, as measured with the aluminum oxide hygrometer
KSaturation PPMW
PS-------------------------------------------=
Ave. CS Xi CS( )ii 1=
n
∑=
Application of the Hygrometer (900-901E) A-23

February 2005
A: General Case (cont.) Complete the following steps to determine the moisture content from the nomograph:
1. Using a straightedge on the two scales on the right of the figure, connect the known saturation concentration (PPMW) with the measurement temperature (°C).
2. Read the Henry’s Law constant (K) on the center scale.
3. Using a straightedge, connect above K value with the dew/frost point, as measured with the GE Panametrics’ hygrometer.
4. Read the moisture content (PPMW) where the straight edge crosses the moisture content scale.
Empirical Determination of K and CS
If the values of K and CS are not known, the hygrometer can be used to determine these values. In fact, only one of the values is required to determine PPMW from the nomograph in Figure A-2 on page A-32. To perform such an analysis, proceed as follows:
1. Obtain a sample of the test solution with a known water content; or perform a Karl Fischer titration on a sample of the test stream to determine the PPMW of water.
Note: The Karl Fischer analysis involves titrating the test sample against a special Karl Fischer reagent until an endpoint is reached.
2. Measure the dew point of the known sample with the hygrometer.
3. Measure the temperature (°C) of the test solution.
4. Using a straightedge, connect the moisture content (PPMW) with the measured dew point, and read the K value on the center scale.
5. Using a straightedge, connect the above K value with the measured temperature (°C) of the test solution, and read the saturation concentration (PPMW).
Note: Since the values of K and CS vary with temperature, the hygrometer measurement and the test sample analysis must be done at the same temperature. If the moisture probe temperature is expected to vary, the test should be performed at more than one temperature.
A-24 Application of the Hygrometer (900-901E)

February 2005
B: Special Case As mentioned earlier, saturated straight-chain hydrocarbons represent a special case, where the Henry’s Law constant does not vary appreciably with temperature. In such cases, use the nomograph for liquids in Figure A-2 on page A-32 to complete the analysis.
Determination of moisture content if the Henry’s Law constant (K) is known.
1. Using a straightedge, connect the known K value on the center scale with the dew/frost point, as measured with the hygrometer.
2. Read moisture content (PPMW) where the straightedge crosses the scale on the left.
Typical Problems
1. Find the moisture content in benzene, at an ambient temperature of 30°C, if a dew point of 0°C is measured with the hygrometer.
a. From the literature, it is found that CS for benzene at a temperature of 30°C is 870 PPMW.
b. Using a straightedge on Figure A-2 on page A-32, connect the 870 PPMW saturation concentration with the 30°C ambient temperature and read the Henry’s Law Constant of 27.4 on the center scale.
c. Using the straightedge, connect the above K value of 27.4 with the measured dew point of 0°C, and read the correct moisture content of 125 PPMW where the straightedge crosses the moisture content scale.
2. Find the moisture content in heptane, at an ambient temperature of 50°C, if a dew point of 3°C is measured with the hygrometer.
a. From the literature, it is found that CS for heptane at a temperature of 50°C is 480 PPMW.
b. Using a straightedge on Figure A-2 on page A-32, connect the 480 PPMW saturation concentration with the 50°C ambient temperature and read the Henry’s Law Constant of 5.2 on the center scale.
c. Using the straightedge, connect the above K value of 5.2 with the measured dew point of 3°C, and read the correct moisture content of 29 PPMW where the straightedge crosses the moisture content scale.
Application of the Hygrometer (900-901E) A-25

February 2005
B: Special Case (cont.) Note: If the saturation concentration at the desired ambient temperature can not be found for any of these special case hydrocarbons, the value at any other temperature may be used, because K is constant over a large temperature range.
3. Find the moisture content in hexane, at an ambient temperature of 10°C, if a dew point of 0°C is measured with the GE Panametrics hygrometer.
a. From the literature, it is found that CS for hexane at a temperature of 20°C is 101 PPMW.
b. Using a straightedge on Figure A-2 on page A-32, connect the 101 PPMW saturation concentration with the 20°C ambient temperature and read the Henry’s Law Constant of 5.75 on the center scale.
c. Using the straightedge, connect the above K value of 5.75 with the measured dew point of 0°C, and read the correct moisture content of 26 PPMW where the straightedge crosses the moisture content scale.
4. Find the moisture content in an unknown organic liquid, at an ambient temperature of 50°C, if a dew point of 10°C is measured with the GE Panametrics hygrometer.
a. Either perform a Karl Fischer analysis on a sample of the liquid or obtain a dry sample of the liquid.
b. Either use the PPMW determined by the Karl Fischer analysis or add a known amount of water (i.e. 10 PPMW) to the dry sample.
c. Measure the dew point of the known test sample with the GE Panametrics hygrometer. For purposes of this example, assume the measured dew point to be -10°C.
d. Using a straightedge on the nomograph in Figure A-2 on page A-32, connect the known 10 PPMW moisture content with the measured dew point of -10°C, and read a K value of 5.1 on the center scale.
e. Using the straightedge, connect the above K value of 5.1 with the measured 10°C dew point of the original liquid, and read the actual moisture content of 47 PPMW on the left scale.
A-26 Application of the Hygrometer (900-901E)

February 2005
B: Special Case (cont.) Note: The saturation value at 50°C for this liquid could also have been determined by connecting the K value of 5.1 with the ambient temperature of 50°C and reading a value of 475 PPMW on the right scale.
For many applications, a knowledge of the absolute moisture content of the liquid is not required. Either the dew point of the liquid or its percent saturation is the only value needed. For such applications, the saturation value for the liquid need not be known. The hygrometer can be used directly to determine the dew point, and then the percent saturation can be calculated from the vapor pressures of water at the measured dew point and at the ambient temperature of the liquid:
% Saturation CCS------ 100×
PWPS------- 100×= =
Application of the Hygrometer (900-901E) A-27

February 2005
Empirical Calibrations For those liquids in which a Henry’s Law type analysis is not applicable, the absolute moisture content is best determined by empirical calibration. A Henry’s Law type analysis is generally not applicable for the following classes of liquids:
• liquids with a high saturation value (2% by weight of water or greater)
• liquids, such as dioxane, that are completely miscible with water
• liquids, such as isopropyl alcohol, that are conductive
For such liquids, measurements of the hygrometer dew point readings for solutions of various known water concentrations must be performed. Such a calibration can be conducted in either of two ways:
• perform a Karl Fischer analysis on several unknown test samples of different water content
• prepare a series of known test samples via the addition of water to a quantity of dry liquid
In the latter case, it is important to be sure that the solutions have reached equilibrium before proceeding with the dew point measurements.
Note: Karl Fischer analysis is a method for measuring trace quantities of water by titrating the test sample against a special Karl Fischer reagent until a color change from yellow to brown (or a change in potential) indicates that the end point has been reached.
Either of the empirical calibration techniques described above can be conducted using an apparatus equivalent to that shown in Figure A-3 on page A-33. The apparatus pictured can be used for both the Karl Fischer titrations of unknown test samples and the preparation of test samples with known moisture content. Procedures for both of these techniques are presented below.
A-28 Application of the Hygrometer (900-901E)

February 2005
A. Instructions for Karl Fischer Analysis
To perform a Karl Fischer analysis, use the apparatus in Figure A-3 on page A-33 and complete the following steps:
1. Fill the glass bottle completely with the sample liquid.
2. Close both valves and turn on the magnetic stirrer.
3. Permit sufficient time for the entire test apparatus and the sample liquid to reach equilibrium with the ambient temperature.
4. Turn on the hygrometer and monitor the dew point reading. When a stable dew point reading indicates that equilibrium has been reached, record the reading.
5. Insert a syringe through the rubber septum and withdraw a fluid sample for Karl Fischer analysis. Record the actual moisture content of the sample.
6. Open the exhaust valve.
7. Open the inlet valve and increase the moisture content of the sample by bubbling wet N2 through the liquid (or decrease the moisture content by bubbling dry N2 through the liquid).
8. When the hygrometer reading indicates the approximate moisture content expected, close both valves.
9. Repeat steps 3-8 until samples with several different moisture contents have been analyzed.
Application of the Hygrometer (900-901E) A-29

February 2005
B. Instructions for Preparing Known Samples
Note: This procedure is only for liquids that are highly miscible with water. Excessive equilibrium times would be required with less miscible liquids.
To prepare samples of known moisture content, use the apparatus in Figure A-3 on page A-33 and complete the following steps:
1. Weigh the dry, empty apparatus.
2. Fill the glass bottle with the sample liquid.
3. Open both valves and turn on the magnetic stirrer.
4. While monitoring the dew point reading with the hygrometer, bubble dry N2 through the liquid until the dew point stabilizes at some minimum value.
5. Turn off the N2 supply and close both valves.
6. Weigh the apparatus, including the liquid, and calculate the sample weight by subtracting the step 1 weight from this weight.
7. Insert a syringe through the rubber septum and add a known weight of H2O to the sample. Continue stirring until the water is completely dissolved in the liquid.
8. Record the dew point indicated by the hygrometer and calculate the moisture content as follows:
9. Repeat steps 6-8 until samples with several different moisture contents have been analyzed.
Note: The accuracy of this technique can be checked at any point by withdrawing a sample and performing a Karl Fischer titration. Be aware that this will change the total liquid weight in calculating the next point.
PPMWweight of water
total weight of liquid-------------------------------------------------- 106×=
A-30 Application of the Hygrometer (900-901E)

February 2005
C. Additional Notes for Liquid Applications
In addition to the topics already discussed, the following general application notes pertain to the use of moisture probes in liquid applications:
1. All M Series Aluminum Oxide Moisture Sensors can be used in either the gas phase or the liquid phase. However, for the detection of trace amounts of water in conductive liquids (for which an empirical calibration is required), the M2 Sensor is recommended. Since a background signal is caused by the conductivity of the liquid between the sensor lead wires, use of the M2 Sensor (which has the shortest lead wires) will result in the best sensitivity.
2. The calibration data supplied with GE Panametrics Moisture Probes is applicable to both liquid phase (for those liquids in which a Henry’s Law analysis is applicable) and gas phase applications.
3. As indicated in Table A-3 on page A-19, the flow rate of the liquid is limited to a maximum of 10 cm/sec.
4. Possible probe malfunctions and their remedies are discussed in the Troubleshooting chapter of this manual.
Application of the Hygrometer (900-901E) A-31
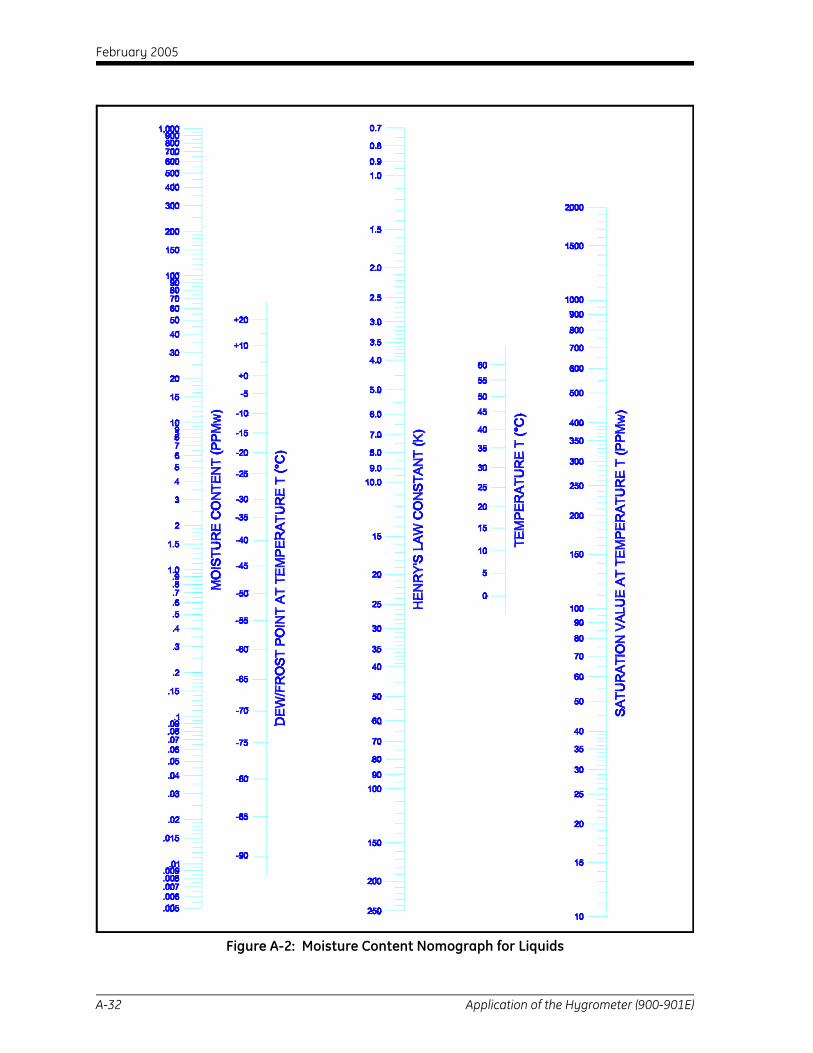
February 2005
Figure A-2: Moisture Content Nomograph for Liquids
A-32 Application of the Hygrometer (900-901E)

February 2005
Figure A-3: Moisture Content Test Apparatus
Stainless Steel Tubing
Soft Solder
(soft soldered to cover)
3/4-26 THD Female(soft soldered to cover)
Metal Cover with
M2 Probe
Rubber Septum
Exhaust
Glass Bottle
Magnetic Stirrer Bar
Teflon Washer
Liquid
Magnetic Stirrer
Application of the Hygrometer (900-901E) A-33

February 2005
Solids Applications
A. In-Line Measurements Moisture probes may be installed in-line to continuously monitor the drying process of a solid. Install one sensor at the process system inlet to monitor the moisture content of the drying gas and install a second sensor at the process system outlet to monitor the moisture content of the discharged gas. When the two sensors read the same (or close to the same) dew point, the drying process is complete. For example, a system of this type has been used successfully to monitor the drying of photographic film.
If one wishes to measure the absolute moisture content of the solid at any time during such a process, then an empirical calibration is required:
1. At a particular set of operating conditions (i.e. flow rate, temperature and pressure), the hygrometer dew point reading can be calibrated against solids samples with known moisture contents.
2. Assuming the operating conditions are relatively constant, the hygrometer dew point reading can be noted and a solids sample withdrawn for laboratory analysis.
3. Repeat this procedure until a calibration curve over the desired moisture content range has been developed.
Once such a curve has been developed, the hygrometer can then be used to continuously monitor the moisture content of the solid (as long as operating conditions are relatively constant).
A-34 Application of the Hygrometer (900-901E)

February 2005
B. Laboratory Procedures If in-line measurements are not practical, then there are two possible laboratory procedures:
1. The unique ability of the sensor to determine the moisture content of a liquid can be used as follows:
a. Using the apparatus shown in Figure A-3 on page A-33, dissolve a known amount of the solids sample in a suitable hydrocarbon liquid.
b. The measured increase in the moisture content of the hydrocarbon liquid can then be used to calculate the moisture content of the sample.
c. For best results, the hydrocarbon liquid used above should be pre-dried to a moisture content that is insignificant compared to the moisture content of the sample.
Note: Since the addition of the solid may significantly change the saturation value for the solvent, published values should not be used. Instead, an empirical calibration, as discussed in the previous section, should be used.
d. A dew point of -110°C, which can correspond to a moisture content of 10-6 PPMW or less, represents the lower limit of sensor sensitivity. The maximum measurable moisture content depends to a great extent on the liquid itself. Generally, the sensor becomes insensitive to moisture contents in excess of 1% by weight.
2. An alternative technique involves driving the moisture from the solids sample by heating:
a. The evaporated moisture is directed into a chamber of known volume, which contains a calibrated moisture sensor.
b. Convert the measured dew point of the chamber into a water vapor pressure, as discussed earlier in this appendix. From the known volume of the chamber and the measured vapor pressure (dew point) of the water, the number of moles of water in the chamber can be calculated and related to the percent by weight of water in the test sample.
c. Although this technique is somewhat tedious, it can be used successfully. An empirical calibration of the procedure may be performed by using hydrated solids of known moisture content for test samples.
Application of the Hygrometer (900-901E) A-35

February 2005
Index
AAlarmsConnecting . . . . . . . . . . . . . . . . . . . . . . . . . 1-7Resetting. . . . . . . . . . . . . . . . . . . . . . . . . . . 2-2Testing . . . . . . . . . . . . . . . . . . . . . . . . . . . . 2-2
ApplicationsGases . . . . . . . . . . . . . . . . . . . . . . . . . . . .A-11Liquids . . . . . . . . . . . . . . . . . . . . . . . . . . .A-22Solids . . . . . . . . . . . . . . . . . . . . . . . . . . . .A-34
Auxiliary InputsConnecting . . . . . . . . . . . . . . . . . . . . . . . . 1-17Switch Settings. . . . . . . . . . . . . . . . . . . . . 1-17
BBackground Gas Correction Factors . . . . . . 2-29
CCable Precautions. . . . . . . . . . . . . . . . . . . . . . 1-3Cables
Calibration Adjustment . . . . . . . . . . . . . . 1-22Calculations . . . . . . . . . . . . . . . . . . . . . . . . .A-11Calibration
Empirical . . . . . . . . . . . . . . . . . . . . . . . . .A-28Making Adjustments for Cables. . . . . . . . 1-22Replacing Probes . . . . . . . . . . . . . . . . . . . 2-25
Calibration Errors. . . . . . . . . . . . . . . . . . . . . 2-32Channel Card
Installing. . . . . . . . . . . . . . . . . . . . . . . . . . 2-19Common Problems. . . . . . . . . . . . . . . . . . . . 2-11Communications Port
Connecting . . . . . . . . . . . . . . . . . . . . . . . . 1-20Contaminants . . . . . . . . . . . . . . . . . . . . . . . . .A-5Corrosive Substances . . . . . . . . . . . . . . . . . . .A-6
EElectrical Connections . . . . . . . . . . . . . . . . . .1-1
Alarms. . . . . . . . . . . . . . . . . . . . . . . . . . . . .1-7Auxiliary Inputs . . . . . . . . . . . . . . . . . . . .1-17Communications Port . . . . . . . . . . . . . . . .1-20Pressure Sensors . . . . . . . . . . . . . . . . . . . . .1-9Recorders . . . . . . . . . . . . . . . . . . . . . . . . . .1-4
Empirical Calibrations . . . . . . . . . . . . . . . . A-28Error Message
Screen Messages . . . . . . . . . . . . . . . . . . . . .2-8Error Messages
Calibration Error Description . . . . . . . . . .2-32Signal Error Description . . . . . . . . . . . . . .2-32
FFlow Rates
Gases . . . . . . . . . . . . . . . . . . . . . . . . . . . . A-19Liquids . . . . . . . . . . . . . . . . . . . . . . . . . . A-19Monitoring Hints. . . . . . . . . . . . . . . . . . . . A-4
GGases
Corrosive. . . . . . . . . . . . . . . . . . . . . . . . . . A-6Flow Rates . . . . . . . . . . . . . . . . . . . . . . . A-19
HHigh and Low Reference Values
Reference Values. . . . . . . . . . . . . . . . . . . .2-21
IInputs
Connecting . . . . . . . . . . . . . . . . . . . . . . . .1-17Moisture Probes . . . . . . . . . . . . . . . . . . . . .1-9Oxygen Cells. . . . . . . . . . . . . . . . . . . . . . . .1-9Pressure Sensors . . . . . . . . . . . . . . . . . . . . .1-9
InstallationChannel Card . . . . . . . . . . . . . . . . . . . . . .2-19Electrical Connections . . . . . . . . . . . . . . .1-17
Instrument ProgramReplacing . . . . . . . . . . . . . . . . . . . . . . . . .2-14
Index 1

February 2005
Index (cont.)L
Linear Memory Card . . . . . . . . . . . . . . . . . . 2-14Liquids
Applications . . . . . . . . . . . . . . . . . . . . . . A-22Corrosive. . . . . . . . . . . . . . . . . . . . . . . . . . A-6Flow Rates . . . . . . . . . . . . . . . . . . . . . . . A-19
Loading New Software . . . . . . . . . . . . . . . . . 2-33
MMaintenance
Channel Card, Installing . . . . . . . . . . . . . . 2-19Instrument Program, Replacing . . . . . . . . 2-14Oxygen Cell . . . . . . . . . . . . . . . . . . . . . . . 2-13Replacing and Recalibrating Probes . . . . . 2-25
Menu OptionsEntering Reference Values . . . . . . . . . . . . 2-21
MessagesScreen Messages . . . . . . . . . . . . . . . . . . . . . 2-8
Modifying Cables . . . . . . . . . . . . . . . . . . . . . . 1-3Calibration Adjustment. . . . . . . . . . . . . . . 1-22
Moisture ProbeCleaning Procedure. . . . . . . . . . . . . . . . . . A-7Contaminants . . . . . . . . . . . . . . . . . . . . . . A-5Corrosive Substances . . . . . . . . . . . . . . . . A-6Gas Flow Rates . . . . . . . . . . . . . . . . . . . . A-19Liquid Flow Rates. . . . . . . . . . . . . . . . . . A-19Materials of Construction . . . . . . . . . . . . A-10Monitoring Hints . . . . . . . . . . . . . . . . . . . A-1
Moisture Probes . . . . . . . . . . . . . . . . . . . . . . 2-25Common Problems . . . . . . . . . . . . . . . . . . 2-11
Monitoring HintsFlow Rate . . . . . . . . . . . . . . . . . . . . . . . . . A-4Moisture . . . . . . . . . . . . . . . . . . . . . . . . . . A-1Pressure. . . . . . . . . . . . . . . . . . . . . . . . . . . A-3Response Time . . . . . . . . . . . . . . . . . . . . . A-4Temperature . . . . . . . . . . . . . . . . . . . . . . . A-4
OOutputs
Connecting Alarms . . . . . . . . . . . . . . . . . . . 1-7Connecting Recorders. . . . . . . . . . . . . . . . . 1-4Testing Alarm Relays . . . . . . . . . . . . . . . . . 2-2
Oxygen CellBackground Gas Correction Factors. . . . . 2-29Checking and Replenishing Electrolyte . . 2-13
PPCMCIA Card
Replacing . . . . . . . . . . . . . . . . . . . . . . . . . 2-14Personal Computer
Communications Port . . . . . . . . . . . . . . . 1-20PPMv, Calculating. . . . . . . . . . . . . . . . . . . . A-12PPMw, Calculating . . . . . . . . . . . . . . . . . . . A-13Pressure Monitoring Hints. . . . . . . . . . . . . . . A-3Pressure Sensors
Setting Switches . . . . . . . . . . . . . . .1-15, 1-16Pressure Transducers
Connecting. . . . . . . . . . . . . . . . . . . . 1-10, 1-11Pressure Transmitter
Connecting. . . . . . . . . . . . . . . . . . . . . . . . 1-13Printer
Communications Port . . . . . . . . . . . . . . . 1-20Probes
Replacing and Recalibrating . . . . . . . . . . 2-25
RRecorders
Connecting. . . . . . . . . . . . . . . . . . . . . . . . . 1-4Setting Switches . . . . . . . . . . . . . . . . . . . . 1-4
Reference MenuSetting High & Low Values. . . . . . . . . . . 2-21
Relative Humidity, Calculating . . . . . . . . . . A-13Relays
Alarms . . . . . . . . . . . . . . . . . . . . . . . . . . . . 2-2Response Time, Moisture Probe . . . . . . . . . . A-4Return Policy . . . . . . . . . . . . . . . . . . . . . . . . . . iiiRS232
Communications Port . . . . . . . . . . . . . . . 1-20
2 Index

February 2005
Index (cont.)S
Screen Messages . . . . . . . . . . . . . . . . . . . . . . 2-8Common Problems. . . . . . . . . . . . . . . . . . 2-11
Setting UpEntering Reference Values . . . . . . . . . . . . 2-21
Signal Errors. . . . . . . . . . . . . . . . . . . . . . . . . 2-32Software, Loading . . . . . . . . . . . . . . . . . . . . 2-33Solids Applications . . . . . . . . . . . . . . . . . . .A-34Specifications
Moisture Probe . . . . . . . . . . . . . . . . . . . . .A-10Switch Blocks
Switch Settings. . . . . . . . . . . . . . . . . . . . . 1-17Switch Settings
Auxiliary Inputs . . . . . . . . . . . . . . . . . . . . 1-17Pressure Sensors. . . . . . . . . . . . . . . 1-15, 1-16Recorders . . . . . . . . . . . . . . . . . . . . . . . . . . 1-4
TTemperature, Monitoring . . . . . . . . . . . . . . . .A-4Testing
Alarm Relays . . . . . . . . . . . . . . . . . . . . . . . 2-2Calibration Adjustment . . . . . . . . . . . . . . 1-22
TroubleshootingCommon Problems. . . . . . . . . . . . . . . . . . 2-11Screen Messages . . . . . . . . . . . . . . . . . . . . 2-8
Troubleshooting and MaintenanceContaminants . . . . . . . . . . . . . . . . . . . . . . .A-5
UUser Program . . . . . . . . . . . . . . . . . . . . . . . . 2-14
WWarranty . . . . . . . . . . . . . . . . . . . . . . . . . . . . . . iii
Index 3

CERT-ATEX-D (Rev. August 2004)
GE InfrastructureSensing ATEX COMPLIANCE
We, GE Infrastructure Sensing, Inc. 1100 Technology Park Drive
Billerica, MA 01821-4111 U.S.A.
as the manufacturer, declare under our sole responsibility that the product
Moisture Monitor Series 3 Analyzer
to which this document relates, in accordance with the provisions of ATEX Directive 94/9/EC Annex II, meets the following specifications:
Furthermore, the following additional requirements and specifications apply to the product:
• Having been designed in accordance with EN 50014 and EN 50020, the product meets the fault tolerance requirements of electrical apparatus for category “ia”.
• The product is an electrical apparatus and must be installed in the hazardous area in accordance with the requirements of the EC Type Examination Certificate. The installation must be carried out in accordance with all appropriate international, national and local standard codes and practices and site regulations for flameproof apparatus and in accordance with the instructions contained in the manual. Access to the circuitry must not be made during operation.
• Only trained, competent personnel may install, operate and maintain the equipment.
• The product has been designed so that the protection afforded will not be reduced due to the effects of corrosion of materials, electrical conductivity, impact strength, aging resistance or the effects of temperature variations.
• The product cannot be repaired by the user; it must be replaced by an equivalent certified product. Repairs should only be carried out by the manufacturer or by an approved repairer.
• The product must not be subjected to mechanical or thermal stresses in excess of those permitted in the certification documentation and the instruction manual.
• The product contains no exposed parts which produce surface temperature infrared, electromagnetic ionizing, or non-electrical dangers.
1180
II 1 G EEx ia IIC (-20°C to +50°C)BAS01ATEX7097

GE InfrastructureSensing
DECLARATIONOF
CONFORMITY
CERT-DOC-H2 August 2004
TÜV ESSENISO 9001
U.S.
TÜV
We, Panametrics Limited Shannon Industrial Estate
Shannon, County Clare Ireland
declare under our sole responsibility that the
Moisture Image Series 1 AnalyzerMoisture Image Series 2 Analyzer
Moisture Monitor Series 3 Analyzer
to which this declaration relates, are in conformity with the following standards:
• EN 50014:1997+A1+A2:1999
• EN 50020:1994
• II (1) G [EEx ia] IICBAS01ATEX7097Baseefa (2001) Ltd/EECS, Buxton SK17 9JN, UK
• EN 61326:1998, Class A, Annex A, Continuous Unmonitored Operation
• EN 61010-1:1993+A2:1995, Overvoltage Category II, Pollution Degree 2
following the provisions of the 89/336/EEC EMC Directive, the 73/23/EEC Low Voltage Directive and the 94/9/EC ATEX Directive.
The units listed above and any sensors and ancillary sample handling systems supplied with them do not bear CE marking for the Pressure Equipment Directive, as they are supplied in accordance with Article 3, Section 3 (sound engineering practices and codes of good workmanship) of the Pressure Equipment Directive 97/23/EC for DN<25.
Shannon - July 1, 2003Mr. James Gibson
GENERAL MANAGER

GE InfrastructureSensing
DECLARATIONDE
CONFORMITE
CERT-DOC-H2 August 2004
TÜV ESSENISO 9001
U.S.
TÜV
Nous, Panametrics Limited Shannon Industrial Estate
Shannon, County Clare Ireland
déclarons sous notre propre responsabilité que les
Moisture Image Series 1 AnalyzerMoisture Image Series 2 Analyzer
Moisture Monitor Series 3 Analyzer
rélatif á cette déclaration, sont en conformité avec les documents suivants:
• EN 50014:1997+A1+A2:1999
• EN 50020:1994
• II (1) G [EEx ia] IICBAS01ATEX7097Baseefa (2001) Ltd/EECS, Buxton SK17 9JN, UK
• EN 61326:1998, Class A, Annex A, Continuous Unmonitored Operation
• EN 61010-1:1993+A2:1995, Overvoltage Category II, Pollution Degree 2
suivant les régles de la Directive de Compatibilité Electromagnétique 89/336/EEC, de la Directive Basse Tension73/23/EEC et d’ATEX 94/9/EC.
Les matériels listés ci-dessus, ainsi que les capteurs et les systèmes d'échantillonnages pouvant être livrés avec ne portent pas le marquage CE de la directive des équipements sous pression, car ils sont fournis en accord avec la directive 97/23/EC des équipements sous pression pour les DN<25, Article 3, section 3 qui concerne les pratiques et les codes de bonne fabrication pour l'ingénierie du son.
Shannon - July 1, 2003Mr. James Gibson
DIRECTEUR GÉNÉRAL

GE InfrastructureSensing KONFORMITÄTS-
ERKLÄRUNG
CERT-DOC-H2 August 2004
TÜV ESSENISO 9001
U.S.
TÜV
Wir, Panametrics Limited Shannon Industrial Estate
Shannon, County Clare Ireland
erklären, in alleiniger Verantwortung, daß die Produkte
Moisture Image Series 1 AnalyzerMoisture Image Series 2 Analyzer
Moisture Monitor Series 3 Analyzer
folgende Normen erfüllen:
• EN 50014:1997+A1+A2:1999
• EN 50020:1994
• II (1) G [EEx ia] IICBAS01ATEX7097Baseefa (2001) Ltd/EECS, Buxton SK17 9JN, UK
• EN 61326:1998, Class A, Annex A, Continuous Unmonitored Operation
• EN 61010-1:1993+A2:1995, Overvoltage Category II, Pollution Degree 2
gemäß den Europäischen Richtlinien, Niederspannungsrichtlinie Nr.: 73/23/EG, EMV-Richtlinie Nr.: 89/336/EG und ATEX Richtlinie Nr. 94/9/EG.
Die oben aufgeführten Geräte und zugehörige, mitgelieferte Sensoren und Handhabungssysteme tragen keineCE-Kennzeichnung gemäß der Druckgeräte-Richtlinie, da sie in Übereinstimmung mit Artikel 3, Absatz 3 (gute Ingenieurpraxis) der Druckgeräte-Richtlinie 97/23/EG für DN<25 geliefert werden.
Shannon - July 1, 2003Mr. James Gibson
GENERALDIREKTOR

USA
1100 Technology Park DriveBillerica, MA 01821-4111Web: www.gesensing.com
Ireland
Shannon Industrial EstateShannon, County ClareIreland


![Ge Jri Infrastructure Investor 09272012[1]](https://img.pdfslide.us/doc/110x75/544f60c8b1af9f2f638b57e9/ge-jri-infrastructure-investor-092720121.jpg)