Embed Size (px)
Citation preview

GAS-POWERED CHAIN SAW
OWNER’S MANUAL
WARNING:Read carefully and understand all INSTRUCTIONS before operating. Failureto follow the safety rules and other basic safety precautions may result inserious personal injury. Allow only persons who have read and understandthis manual to operate the chain saw.
Item # 190555
M190555C

2
Thank you very much for choosing a NORTHERN TOOL + EQUIPMENT CO., INC. Product! For future
reference, please complete the owner’s record below:
Model: _______________ Purchase Date: _______________
Save the receipt, warranty and these instructions. It is important that you read the entire manual to
become familiar with this product before you begin using it.
This machine is designed for certain applications only. Northern Tool + Equipment cannot be responsiblefor issues arising from modification. We strongly recommend this machine is not modified and/or used forany application other than that for which it was designed. If you have any questions relative to aparticular application, DO NOT use the machine until you have first contacted Northern Tool + Equipmentto determine if the application should be performed using product.
For technical questions please call 1-866-443-2576.
INTENDED USE
This chain saw is designed for cutting wood and wood-related products only. Do not cut solid metal,
sheet metal, plastic or any other non-wood material.
Any Questions, Comments, Problems, or Parts Orders
Call Powerhorse Product Support at 1-866-443-2576

3
GENERAL SAFETY RULES
WARNING:
Some instructions contained within this manual are marked with this symbol. These instructions are
critical points that must be taken seriously. Read and understand all instructions. Failure to follow all
instructions listed below may result in serious bodily injury.
IMPORTANT:
This indicates instructions, which must be followed. Failure to do so could lead to mechanical failure,
breakdown or damage.
NOTE:
This indicates hints or specific direction useful to the assembly and/or use of the product
WARNING: Do not lend or rent your chainsaw without the owner’s manual. Be sure
anyone using your saw reads and understands the information contained in this manual.
WARNING: Because a chain saw is a high-speed woodcutting tool, some special safety
precautions must be observed as with any other power saw to reduce the risk of personal injury.
Careless or improper use may cause serious or fatal injury.
WARNING: Carbon Monoxide produced by the engine during use can kill. Saw MUST be
used outdoors. Do not use indoors, near windows or in other sheltered areas.
WARNING: The warnings, cautions, and instructions discussed in this instruction manual
cannot cover all possible conditions or situations that could occur. It must be understood by the
operator that common sense and caution are factors, which cannot be built into this product, but must be
supplied by the operator.
SAVE THESE INSTRUCTIONS

4
WORK AREA
Keep work area clean, free of clutter and well lit. Cluttered and dark work areas can cause
accidents.
Do not use the chain saw where there is a risk of causing a fire or an explosion; e.g. in the
presence of flammable liquids, gasses, or dust. Chain saw use creates sparks, which may ignite the
dust or fumes.
Minors should never be allowed to use a chain saw. Bystanders, especially children and animals,
should not be allowed in the area where a chain saw is in use.
Be aware of all power lines, electrical circuits, water pipes and other mechanical hazards in your
work area, particularly those hazards below the work surface hidden from the operator’s view that
may be unintentionally contacted and may cause personal harm or property damage.
Be aware of your surroundings. Never use the chain saw when the ground is slippery or when
other conditions exist which might make it difficult to maintain a steady posture. Using the chain saw
in confined work areas may also put you in a dangerous situation.
Do not use the chain saw at night or at times of heavy fog, or at any other times when your field of
vision might be limited, making it difficult to gain a clear view of the area.
Never use the chain saw during a rain or lightning storm, or at times of strong or gale-force
winds, or at other times when weather conditions make it unsafe to use the chain saw.
PERSONAL SAFETY
Stay alert, watch what you are doing and use common sense when operating a chain saw. Do not
use a chain saw while you are tired or under the influence of drugs, alcohol or medication. A moment
of inattention while operating a chain saw may result in serious personal injury.
Dress properly. Clothing must be sturdy and snug fitting, but allow complete freedom of movement.
Avoid loose-fitting jackets, scarfs, neckties, jewelry, flared or cuffed pants,
unconfined long hair or anything that could become entangled with the saw or
brush. Wear overalls or jeans with a reinforced cut-retardant insert or
cut-retardant chaps.
Use safety apparel and equipment. Use safety goggles or safety glasses with side shields which
comply with current national standards, or when needed, a face shield. Wear an
approved safety hard hat to protect your head. Chain saw noise may damage
your hearing. Always wear sound barriers (ear plugs or ear mufflers) to protect
your hearing. Continual and regular users should have their hearing checked
regularly. Protect your hands with heavy-duty, nonslip gloves. Wear sturdy boots
with nonslip soles. Steel-toed safety boots are recommended.
Do not overreach. Good footing is most important in chain saw work. Keep proper footing and
balance at all times.

5
WARNING: Avoid “kickback” by knowing what conditions can create it. Kickback may occur
when the nose or tip of the guide bar touches an object, or when the wood closes in and pinches the saw
chain in the cut. Tip contact in some cases may cause a lightning fast reverse reaction, kicking the guide
bar up and back towards the operator. Pinching the saw chain along the top of the guide bar may push
the guide bar rapidly back towards the operator. Either of these reactions my cause you to lose control of
the saw which could result in serious personal injury.
Remove adjusting keys or wrenches before starting the chain saw. A wrench or key that is left
attached to a rotating part of the chain saw may result in personal injury.
INTERNAL COMBUSTION ENGINE SAFETY
WARNING: Internal combustion engines present special hazards during operation and fueling.
Read and follow the warning instructions in the engine Owner’s Manual and the safety guidelines below.
Failure to follow the warnings and safety standards could result in severe injury or death.
DO NOT run the chain saw indoors or in an enclosed area such as a deep trench unless
adequate ventilation, through such items as exhaust fans or hoses, is provided. Exhaust gas
from the engine contains poisonous carbon monoxide gas; exposure to carbon monoxide can
cause loss of consciousness and may lead to death.
DO NOT smoke while operating the chain saw.
DO NOT smoke when refueling the chain saw.
DO NOT refuel a hot or running chain saw.
DO NOT refuel the chain saw near an open flame.
DO NOT spill fuel when refueling the chain saw.
DO NOT run the chain saw near open flames.
ALWAYS refill the fuel tank in a well-ventilated area.
ALWAYS replace the fuel tank cap after refueling.
ALWAYS check the fuel lines and the fuel tank for leaks and cracks before starting the chain
saw. Do not run the chain saw if fuel leaks are present or the fuel lines are loose.
ALWAYS avoid contact with hot fuel, oil, exhaust fumes and solid surfaces.
Never touch the engine or muffler while the engine is on or immediately after it has been turned
off. These areas get hot and may cause burns.
Move the chain saw at least 10 feet from fueling point before starting the engine.
NOTE: All Federal and State laws and any regulation having jurisdiction covering the safety
requirements for use of the chain saw take precedence over the statements in this manual. Users of
this chain saw must adhere to such regulations.

6
EXPLANATION OF SYMBOLS ON THE MACHINE
For safe operation and maintenance, symbols are carved on the machine.
The port to refuel “MIX GASOLINE”
Location: Fuel cap
The port to add chain oil
Location: Oil cap
Setting the switch to the “O” position, the engine stops immediately.
Location: Rear left of the unit.
Starting the engine. If you pull the choke knob (at back-right of rear handle)
to the point of the arrow, you can set the starting mode as follows:
First position starting mode: when engine is warm
Second position starting mode: when engine is cold
Location: Upper right of the air cleaner cover
The screw under the “H” stamp is the High-speed adjustment screw
The screw under the “L” stamp is the Slow-speed adjustment screw
The screw at the left of the “T” stamp is the Idle adjustment screw.
Location: Left side of rear handle
Shows the directions that the chain brake is released (white arrow) and activated
(Black arrow).
Location: Front of the chain cover

7
TECHNICAL SPECIFICATIONS & PACKING LIST
Model 190555mm 370x235x270External dimension: L x W x Hinch 14.6x9.32x10.6
Mass: Saw without guide bar and chain, emptytanks
lb/kg 9.3/4.2
Volume:Fuel Tank gallon/mL 0.08/310Tank for chain lubrication oil gallon/mL 0.06/210Fuel (Mixture ratio) Gas (50:1)Oil 2-cycle engine oilUsable cutting length of guide bar inch/mm 14”/355.6Chain:Specified pitch inch/mm 0.375/9.53Specified gauge (thickness of drive links) inch/mm 0.05/1.27Replacement chain (Oregon brand) 91VG/91PReplacement bar (Oregon brand) 140SDEA041Type of guide bar Sprocket noseLubrication Automatic oil pumpSprocket: Specified number of teeth 6
m/s 21Maximum chain speedft/s 68.898
Engine:Type Air cooled 2-cycle single cylinderCarburetor WalbroSpark Plug Type / Gap NHSP LD LDRTF L8
0.0236” - 0.0265”Magneto CDIStarter Recoil starterMaximum speed with cutting attachment RPM 125000r/min 10%Speed at idling RPM 3000r/min ± 10%Engine Displacement: cc 37.2Fuel consumption: At maximum engine power g/kw.h 560Sound pressure level: (ISO7182) LpAav db(A) 104Guaranteed sound power level: (ISO9207)LwAav
dB(A) 114
Chain brake: (ISO6535) Mean braking time atracing speed
s 0.12
Vibration: (ISO7505) ms/s2 5.35/4.67
NOTE: Specifications, descriptions and illustrative material in this literature are as accurate as
known at the time of publication, but are subject to change without notice.
Illustrations may include optional equipment and accessories, and may not include all standard
equipment.

8
CHAIN SAW USE AND CARE
Do not rely exclusively upon the safety devices built into your chain saw. As a chain saw user,
you should take several steps to keep your cutting free from accident or injury.
With a basic understanding of kickback, you can reduce or eliminate the element of surprise.
Sudden surprise contributes to accidents.
Keep a good firm grip on the saw with both hands, the right hand on the rear handle, and the
left hand on the front handle, when the engine is running. Use a firm grip with thumbs and finger
encircling the chainsaw handles. A firm grip will help you reduce kickback and maintain control
of the saw. Do not let go!
Make sure the area in which you are cutting is free from obstructions. Do not let the nose of the
guide bar contact a log, branch, or any other obstruction that could be hit while you are
operating the saw.
Cut with the chain saw running at full speed.
Do not overreach or cut above shoulder height.
Keep the chain sharp and the saw properly maintained.
Do not operate a chain saw in a tree unless you have been specifically trained to do so.
Do not force the chain saw. Chain saws do a better and safer job when used in the manner for
which they are designed. Plan your work, and use the correct accessories for the job.
Never use a chain saw with a malfunctioning switch. Any chain saw that cannot be controlled with
the switch is dangerous and must be repaired by an authorized service representative before using.
Be sure the saw chain stops moving when the throttle trigger is released.
Always operate chain saw with all safety devices and guards in place and in working order. DO NOT
modify or defeat safety devices. DO NOT operate chain saw if any safety devices or guards are
missing or inoperative.
Keep guards in place and in working order.
Before starting the engine make sure the chain saw is not in contact with anything.
Keep all parts of your body away from the saw chain when the engine is running.
Do not operate chain saw with one hand! Serious injury to operator, helpers, bystanders or any
combination thereof may result from one-handed operation.
Keep the handles dry, clean, and free of oil or fuel mixture.
Never leave chain saw running unattended, and shut off the engine before setting down the saw.
Carry the chain saw with the engine stopped, the chain guard (scabbard) over the chain and guide
bar, the scabbard covered guide bar facing the rear, and the muffler away from you body.
When transporting the chain saw in a vehicle, keep the chain and bar covered with the chain
guard and properly secure the saw to prevent turnover and fuel spillage.
Store chain saw properly. When the chain saw is not in use, store it in a dry, secure place out of the
reach of children. Inspect the chain saw for good working condition prior to storage and before
re-use.
Use only accessories that are recommended by the manufacturer for your model. Accessories
that may be suitable for one chain saw may create a risk of injury when used on another tool.
IMPORTANT: Read carefully and understand all SAFETY ANDOPERATING instructions before using this chain saw. Failure to follow the safetyrules and other basic safety precautions may result in serious personal injury.Allow only persons who have read and understand this manual to operate thechain saw.

9
INSTALLING GUIDE BAR AND SAW CHAIN
Open the box and install the guide bar and the saw chain on the power unit as follows:
WARNING: The saw chain has very sharp edges. Use thick protective gloves for safety.
1. Pull the guard toward the front handle to
check that the chain brake is not engaged.
2. Loosen the nuts and remove the chain
cover.
3. Remove and discard the plastic spacer bar
that is positioned over the tensioner area.
4. Gear the chain to the sprocket and, while
fitting the saw chain around the guide bar,
mount the guide bar to the power unit.
Adjust the position of chain tensioner
5. Fit the chain cover to the power unit and
fasten the nuts to finger tightness.
Note: Chain must be in the groove. Pay attention to
the correct direction of the saw chain.
Moving direction
HandleGuard
Chain Guard
(Scabbard)
Spacer bar
Nuts
Spacer Bar
Before Removal
After Removal

10
6. While holding up the tip of the guide bar,
adjusting the chain tension by turning
the tensioner screw until the tie straps
just touch the bottom side of the bar
rail.
7. Tighten the nuts securely with the bar tip
held up (12-15N.m). Then check the
chain for smooth rotation and proper
tension while moving it by hand. If
necessary, readjust with chain cover
loose.
8. Tighten the tensioner screw.
NOTE: A new chain will expand its length in
the beginning of use. Check and readjust the
tension frequently as a loose chain can
easily derail or cause rapid wear of itself and
the guide bar.
FUEL AND CHAIN OIL
WARNING: Gasoline is very flammable. Avoid smoking, open flames and/or sparks near
fuel. Stop the engine and allow to cool before refueling. Move at least 3m (10 ft) away from the
fueling point before restarting the engine
Mix a quality grade of unleaded gasoline with quality oil specifically for air-cooled 2 cycle engines.
The recommended mixture ratio is 50:1, which you can achieve by mixing 2.56 oz. of 2-cycle
oil with one gallon of gasoline.
NOTE: Most engine troubles are caused, directly or indirectly, by the fuel used on the machine.
Take special care not to mix motor oil for 4 cycle engines.
FUELING
1. Untwist and remove fuel cap.
2. Pour fuel into fuel tank to 80% of full capacity.
3. Fasten fuel cap securely and wipe any fuel spillage around the unit.
CHAIN OIL
Use special chain and bar oil formulated specifically for use with chain saws.
NOTE: Do not use used oil that can cause damage to the oil pump. Always use fresh oil.
OPERATION
WARNING: Do not drop start your chainsaw. This method is very dangerous because
you may lose control of the saw. Proper starting methods reduce the risk of injury.
WARNING: Be sure that the guide bar and the chain are clear of you and all other
obstructions, including the ground. Never attempt to start the chainsaw when the guide bar is in a
cut or kerf.

11
STARTING THE ENGINE
1. Fill fuel and oil tanks, tighten the caps
securely.
2. Set the switch to “I” position.
3. Press primer bulb 6 to 7 times or until
filled with gasoline.
4. Pull out the choke knob out to the
second-stage position. The choke will
close and the throttle lever will then be set
in the starting position.
5. While holding the chainsaw securely on
the ground, pull the starter rope
vigorously.
6. When the engine has ignited, push in the
choke knob to the first-stage position.
7. Allow engine to warm up with the throttle
lever pulled slightly
8. To stop the engine, turn the engine switch
to “STOP” position.
NOTE: If the choke is left CLOSED
(pulled out) after the first firing sound, and
the starter handle is still being pulled, the
result will be an intake of too much fuel
and the engine will fail to start.
WARNING: Do not wrap the
starting rope around your hands when
pulling the starter grip. Do not allow
the grip to snap back.
Primer bulb

CHECKING THE CHAIN OIL SUPPLY
After starting the engine, run the chain
at medium speed and see if chain oil
scatters from the chain.
Chain oil flow can be changed by
inserting a screwdriver in the hole on the
bottom of the clutch side. Adjust
according to your work conditions.
Note: Never adjust oil flow with engine
running.
The oil reservoir should be nearly
empty by the time fuel is used up. Be
sure to refill the oil tank each time you
refuel your chain saw.
CHAIN BRAKE
This machined is equipped with an
automatic brake system to stop saw chain
rotation upon occurrence of kickback
during saw cutting. The brake is
automatically operated by inertial force,
which acts on the weight fitted inside the
front guard.
This brake can be operated manually by
pushing the front guard towards the guide
bar. To release the brake, pull front guard
back towards the front handle until a “click”
sound is heard.
The chain should stop immediately with
the engine at full speed. If the chain is
slow to stop or does not stop, replace
the brake band and clutch drum before
use.
CAUTION: Confirm brake operation
each time you use the chain saw. In case
the brake is not effective, ask an authorized
dealer to inspect and possibly repair the unit.
If the engine is allowed to run at a high speed
with the brake engaged, the clutch will
overheat and create problems for the engine.
If the chain saw is operated while the brake is
engaged, immediately release the throttle
lever and keep the engine idling.

13
CARBURETOR ANTI-FREEZE MECHANISM
Operating the chain saw in temperatures of
0–41°F at times of high humidity may result
in ice forming within the carburetor; this may
cause the output power of the engine to be
reduced or for the engine to fail to operate
smoothly.
This product has accordingly been designed
with a ventilation hatch the back of the air
cleaner cover to allow warm air to thereby
prevent icing from occurring.
Under normal circumstances the product
should be used in normal operating mode,
i.e., in the mode to which it is set at the time
of shipment. However, when the possibility
exists that icing may occur. The unit should
be set to operate in anti-freeze mode before
use.
SWITCHING OPERATING MODES
1. Turn off engine.
2. Remove cover of air filter, remove air filter,
and remove the choke knob from the
cylinder cover.
3. Loosen the screws holding the cylinder
cover in place (3 screws on the inside and
1 screw on the outside of the cover),
remove the cylinder cover.
4. Press with your finger down on the icing
cap located on the right-hand side of the
cylinder cover to remove the icing cap.
5. Adjust the icing cap so the “snow” mark
faces upwards. Position it back into the
cylinder cover.
6. Reattach cylinder cover, choke knob, air
filter and air filter cover.

14
SAWING
Always follow the safety regulations. The chain saw must only be used for cutting wood. It is
forbidden to cut other types of material vibrations and kickback vary with different materials and the
requirements of the safety regulations would not be respected. Do not use the chain saw as a lever for
lifting, moving or splitting objects.
It is not necessary to force the saw into the cut. Apply only light pressure while running the engine
at full throttle.
When the saw chain is caught in the cut, do not attempt to pull it out by force, but use a wedge or
a lever to open the way.
FELLING A TREE
1. Decide the felling direction. Consider the
wind, lean of the tree, location of heavy
branches, and ease of completing the task
after felling and other factors.
2. While clearing the area around the tree,
arrange a good foothold and retreat path.
3. Make a notch cut one-third of the way into
the tree on the felling side.
4. Make a felling cut from the opposite side of
the notch and at a level slightly higher than
the bottom of the notch.
BUCKING AND LIMBING
Always ensure your foothold. Do not stand on the log.
Be alert to the rolling over of a cut log. When working on a slope, stand on the uphill side of the
log.
Follow the instructions in “Operation” to avoid kickback of the saw.
Before starting work, check the direction of bending force inside the log to be cut. Always finish cutting
from the opposite side of the bending direction to prevent the guide bar from being caught in the cut.
A log laying on the ground A log hanging off the ground
In area A, saw up from the bottom one- third
and finish by sawing down from the top. In
area B, saw down from the top one-third and
finish by sawing up from the bottom.
Before you fell a tree, warn allbystanders of the danger.
Saw down halfway, then roll the log over
and cut from the opposite side.

15
Cutting the limbs off a fallen tree Pruning of standing tree
First check to which side the limb is bent.
Then make the initial cut from the bent side
and finish by sawing from the opposite side.
Be alert of the springing back of a limb.
Start cutting up from the bottom, and finish down
from the top.
Do not use an unstable foothold or ladder.
Do not overreach.
Do not cut above shoulder height
Always use both hands to hold the saw.

16
MAINTENANCE
WARNING: Make sure this chain saw is turned off before attempting any maintenance,
cleaning, or inspection. Disconnect the spark plug to prevent accidental starting.
Maintain your chain saw. It is recommended that the general condition of any chain saw be
examined before it is used. Keep your chain saw in good repair by adopting a program of
conscientious repair and maintenance in accordance with the recommended procedures found
in this manual. If any abnormal vibrations or noise occurs, turn the tool off immediately and have
the problem corrected before further use. Have necessary repairs made by qualified service
personnel.
Keep cutting tools sharp and clean. Properly maintained cutting tools with sharp cutting
edges are less likely to bind and are easier to control. Keep handles dry, clean, and free from oil
and grease.
Cleaning. Use only soap and a damp cloth to clean your tools. Many household cleaners are
harmful to plastics and insulation. Never allow liquids inside the chain saw.
MAINTENANCE AFTER EACH USE
Air Filter
Dust on the air filter can be removed by
tapping the corner of the filter against a hard
surface. To clean dirt in the mesh, split the
filter into halves and brush in gasoline.
When using compressed air, blow from the
inside.
To assemble the cleaner halves, press the
rim until it clicks.
NOTE: When installing the main filter, make
sure that the grooves on the filter edge fit
correctly with the projections on the cylinder
cover.
Oiling Port
Detach the guide bar and check the oiling
port for clogging.
Guide Bar
With the guide bar off, remove any sawdust
in the bar groove and oiling port.
Grease the nose sprocket from the feeding
port on the tip of the bar.
Other Maintenance
Check for fuel leakage and loose fasteners
and damage to major parts, especially
handle joints and guide bar mounting. If any
defects are found, have them repaired before
operating again.
17
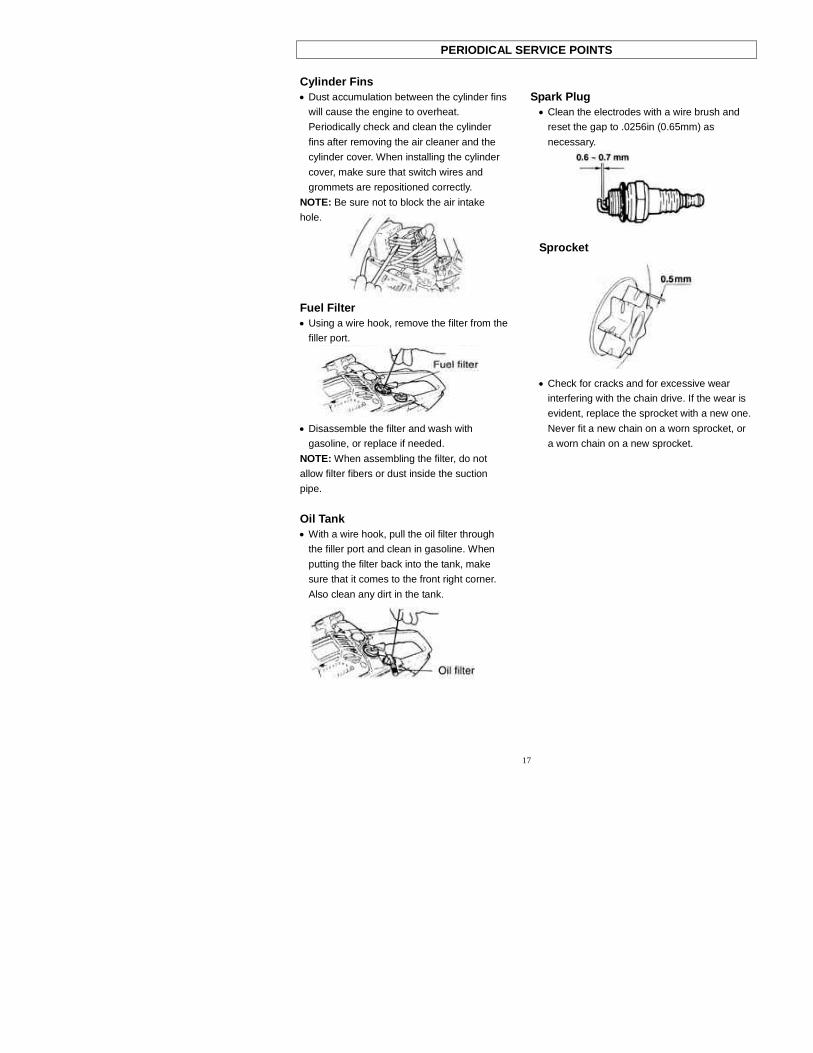
PERIODICAL SERVICE POINTS
Cylinder Fins
Dust accumulation between the cylinder fins
will cause the engine to overheat.
Periodically check and clean the cylinder
fins after removing the air cleaner and the
cylinder cover. When installing the cylinder
cover, make sure that switch wires and
grommets are repositioned correctly.
NOTE: Be sure not to block the air intake
hole.
Fuel Filter
Using a wire hook, remove the filter from the
filler port.
Disassemble the filter and wash with
gasoline, or replace if needed.
NOTE: When assembling the filter, do not
allow filter fibers or dust inside the suction
pipe.
Oil Tank
With a wire hook, pull the oil filter through
the filler port and clean in gasoline. When
putting the filter back into the tank, make
sure that it comes to the front right corner.
Also clean any dirt in the tank.
Spark Plug
Clean the electrodes with a wire brush and
reset the gap to .0256in (0.65mm) as
necessary.
Sprocket
Check for cracks and for excessive wear
interfering with the chain drive. If the wear is
evident, replace the sprocket with a new one.
Never fit a new chain on a worn sprocket, or
a worn chain on a new sprocket.

18
TROUBLESHOOTING GUIDE
1. Starting Failure
2. Lack of Power/Poor Acceleration/Rough Idling
3. Chain oil does not come out
Any Questions, Comments, Problems, or Parts OrdersCall Powerhorse Product Support at 1-866-443-2576

19
CHAINSAW EXPLODED VIEW

20
CHAINSAW EXPLODED VIEW – (CONTINUED)
Item # Part # Description Qty Item # Part # Description Qty1 YD38-3.04.00-00 Right cover assembly 1 51 GB/T845 Tapping screw ST4.8X16 22 YD38-3.04.00-16 Screw M5X40 1 52 YD38-3.06.04-00 Cushion socket 1 13 YD38-3.04.00-13 Pin gland 5×6.3×30 1 53 GB/T818 Screw M5X14 5
4 YD38-3.04.00-12Heavy brock gland6.3×9×15
1 54 YD38-3.06.03-00 Cushion socket 2 1
5 YD38-3.04.00-2 Front damper 1 55 YD38-3.00.00-8 Dust cover 2 16 YD38-3.04.02-00 Heavy brock 1 56 YD38-3.00.00-4 Front handle spring 17 YD38-3.04.00-7 Heavy brock spring 1 57 YD38-3.00.00-1 Front handle 1
8 YD38-3.04.00-9 Brake torsion rod spring 1 58 YD38-3.00.00-13Torsion rod spring coverplate
1
9 YD38-3.04.00-14 Washer 5.2X23X1.2 1 59 YD38-3.03.00-15 Balancer cover 110 GB/T6185.1 Lock- nut M5 1 60 YD38-3.03.00-14 Balancer rubber 111 YD38-3.04.00-6 Spring base 1 61 YD38-3.03.00-13 Balancer body 112 YD38-3.04.00-5 Front guard spring 1 62 YD38-3.03.00-3 Balancer root 113 YD38-3.04.00-15 Tensioner cover plate 1 63 YD38-3.03.00-1 Fuel tube 114 GB/T119.2 Pin 3X14 1 63A YD38-3.03.00-1A Scavenge tube 115 YD38-3.04.00-4 Main level 1 64 YD38-3.03.00-2 Tube root 116 YD38-3.04.00-3 Secondary pull-rod 1 64A YD38-3.03.00-2A Tube root 117 GB/T119.2 Pin 3X9 3 65 YD38-3.03.00-12 Clump weight 118 YD38-3.04.00-11 Break control rod 1 66 YD38-3.03.04-00 Fuel filter assembly 119 YD38-3.04.00-8 Brake spring 1 67 YD38-3.03.01-00-02 Base- Green 120 YD45-3.04.00-10 Break strap 1 68 YD38-3.00.00-5 Base spring 121 GB/T845 Tapping screw ST4.2X12 2 69 YD38-3.03.03-2 Anti-drop plate 1
22 YD38-3.04.00-1 Break spring cover plate 1 70 YD38-3.03.02-3Packing washer24X34X1.5
1
23 YD38-3.04.01-00 Right cover 1 71 YD38-3.03.02-1 Petrol cover 124 GB/T846 Tapping screw ST4.2X9.5 2 72 YD38-3.03.03-3 Packing washer 24X30X2 125 GB/T6177.1 Nut M8 2 73 YD38-3.03.03-1 Oil cover 126 YD38 -3.05.00-2-02 Air filter cover- Green 1 74 GB/T119.2 Pin 5X24 127 YD38-3.05.01-00 Air filter lock nut 1 75 YD38-3.01.11.04-00 Extinction switch 1
28 YD38-3.05.00-6Lock nut washer15X26X1
1 76 YD38-3.03.00-4 Primer Assy 1
29 YD38.01.08.00-00 Air filter 1 76A YD38-3.03.00-4A Fuel pumping bulb 130 YD38-3.05.00-7 Air intake socket gasket 1 77 YD38-3.03.00-9 Trigger control rack 1
31A YD38-3.05.00-00Upper cover plateassembly
1 78 YD38-3.03.00-8 Trigger torsion rod spring 1
31 YD38-3.05.00-1-02 Upper cover plate -Green 1 79 YD38-3.03.00-7 Trigger 132 YD38-3.05.00-5 Anti-freeze block 1 80 YD38-3.00.00-6 Throttle rod 133 YD38-3.05.00-4 Shock block 1 81 YD38-3.03.00-10 Handle cover 134 GB/T845 Tapping screw ST4.8X19 10 82 YD38-3.01.06.00-00 Carburetor 135 YD38-3.05.00-3 Idle adjusting guide set 1 83 YD38-3.01.00.02-00 Air intake socket 136 YD38-3.00.00-7 Dust shield 1 84 YD38-3.01.00-17 Carburetor screw 2
37 YD38-3.00.00-11Throttle lever retainingbracket
1 85 YD38-3.01.00.02-1 Air intake socket screw 1
38 YD38-3.00.00-10 Throttle rod 1 86 YD38-3.01.11.03-00 Earth cable 139 YD38-3.02.00-1 Bossing 1 87 YD38-3.06.01-00 Case 1
40 YD38-3.02.00-00 Start assembly 1 88 YD38-3.03.05-00Fuel filter assembly withtube
1
41 GB/T845 Tapping screw ST4.8X13 1 89 YD38-3.03.06-00 Breather valve Assy 142 GB/T96 Washer 5 1 90 YD38-3.03.02-00 Fuel Tank-cap Assy 1
43 YD38-3.02.00-6Start stretching wire3X920
1 91 YD38-3.03.03-00 Cap Oil Tank 1
44 YD38-3.02.00-2 Start plate 1 92 YD38-3.08.00-00 Accessory Assy 145 YD38-3.02.00-3 Coil-spring gland 1 93 YD38-3.07.00-00 Chain cover 146 YD38-3.02.00-5 Start coil-spring 1 94 YD38-3.07.02-01 Chain 14" 147 YD38-3.02.00-4 Start handle 1 95 YD38-3.07.01-01 Guide Bar 14" 148 YD38-3.02.01-00 Start cover 1 96 YD38-3.08.01-00 Spark Sleeve 149 GB/T845 Tapping screw ST4.8X25 6 97 YD38-3.08.04-00 File 150 YD38-3.00.00-9 dust cover1 1 98 YD38-3.08.02-00 Screwdriver 1
99 YD38-3.08.03-00 Manual 1

21
ENGINE EXPLODED VIEW

22
ENGINE EXPLODED VIEW – (CONTINUED)
Item # Part # Description Qty Item # Part # Description Qty
1 YD38-3.01.00-1 Cylinder body 1 33 YD38-3.01.00-15 Chain catcher 1
2 GB/T6185.1 Nut M5 2 34 YD38-3.01.00-16 Chain catcher screw 53 GB/T818 Screw M5X14 2 35 YD38-3.01.00-4 Damper 1
4 YD38-3.01.09.00-1 Silencer cover plate 1 36 GB/T818 Screw M4X10 1
5 YD38-3.01.09.00-00 Silencer body 1 37 YD38-3.01.01.02-00 Oil seal 12X22X7 1
6 YD38-3.01.00-6 Silencer sealing plate 1 38 YD38-3.01.11.01-00 Igniter 1
7 YD38-3.01.00-10 Muffler connecting screw 1 39 GB/T818 Screw M4X14 6
8 GB/T70.1 Screw M5X20 4 40 YD38-3.01.11.02-00 Extinction conductor 1
9 YD38-3.01.11.05-00Spark plug NHSP LDL8RTF
1 41 GB/T6177.2 Nut M8X1 1
10 YD38-3.01.00-7Air intake tube sealingplate
1 42 YD38-3.01.10.00-00 Flywheel assembly 1
11 YD38-3.01.00-3 Air intake tube 1 43 YD38-3.01.10.00-3 Pusher dog screw 212 YD38-3.01.00-8 Carburetor sealing plate 1 44 YD38-3.01.10.00-1 Pusher dog 2
13 YD38-3.01.00-5 Cylinder sealing plate 1 45 YD38-3.01.10.00-2 Torsion rod spring 2
14 YD38-3.01.03.00-2 Piston ring 1 46 YD38-3.01.10.01-00 Flywheel 115 YD38-3.01.03.00-3 Piston pin 1 47 YD38-3.01.13.00-00 Clutch assembly 1
16 YD38-3.01.03.00-4 Piston pin circlip 2 48 YD38-3.01.13.01-1 Retainer 1
17 YD38-3.01.03.04-00 Piston 1 49 YD38-3.01.13.01-3 Clutch extension spring 118 YD38-3.01.03.00-5 Needle bearing ring 2 50 YD38-3.01.13.01-2 Shoe block 1
19 YD38-3.01.03.02-00Needle bearing10X14X11 1 51 YD38-3.01.13.00-2 Clutch adjusting washer 1
20 YD38-3.01.03.01-00 Crank shaft components 1 52 YD38-3.01.13.00-1 Clutch shell 1
21 GB/T1099Semicircular key3X3.5X10 1 53 YD38-3.01.00.01-6 Needle bearing 10X13X13 1
22 YD38-3.01.01.00-1 Left crank case 1 54 YD38-3.01.00-11 Worm 1
23 GB/T276Bearing 6202 grade D15X35X11
2 55 YD38-3.00.00-12 Cover plate 1
24 YD38-3.01.01.00-3 Case body sealing plate 1 56 YD38-3.01.15.00-00 Oil pump 1
25 YD38-3.01.01.00-2 Right crank case 1 57 YD38-3.01.00-13 Oil outgoing tube 3X6.5X80 126 GB/T893.1 Shield ring 32 1 58 YD38-3.01.00-12 Worm washer 10X18X1 1
27 YD38-3.01.01.01-00 Oil seal 12X32X5.5 1 59 YD38-3.00.00-2Oil ingoing tube3.3X6.5X68
1
28 GB/T70.1 Screw M5X30 4 60 YD38-3.00.00-17 Oil tube clip 2
29 GB/T900Double-screw boltAYM8-M8X26-8.8
2 61 YD38-3.00.00-3 Oil tube tie-in 1
30 YD38-3.01.00-9 Tension block 1 62 YD38-3.00.00-16 Oil filter screen assy 1
31 GB/T9074.1 Adjust screw M5X48 1 63 YD38-3.01.00-11 Nozzle 132 YD38-3.01.00-1 Spiked bumper 1 64 YD38-3.01.00-12 Oil filter screen 1

23
WARRANTYMANUFACTURER’S LIMITED WARRANTY
The limited warranty set forth below is given by Northern Tool + Equipment Co. with respect to new merchandise
purchased and used in the United States, its possessions and territories.
Northern Tool + Equipment Co. warrants this product against defects in material and workmanship for a period of
two (2) year commencing on the date of original purchase and will, at its option, repair or replace, free of charge, any
part found to be defective in material or workmanship. This limited warranty shall only apply if this product has been
operated and maintained in accordance with the Operator’s Manual furnished with the product, and has not been
subject to misuse, abuse, commercial use, neglect, accident, improper maintenance, alteration, vandalism, theft, fire,
water or damage because of other peril or natural disaster. Damage resulting from the installation or use of any
accessory or attachment not approved by Northern Tool + Equipment Co. for use with the products(s) covered by this
manual will void your warranty as to any resulting damage. This warranty is limited to ninety (90) days from the date
of original retail purchase for any Northern Tool + Equipment Co. product that is used for rental or commercial
purposes, or any other income-producing purposes.
This limited warranty does not provide coverage in the following cases:
1. Tune-ups – Spark Plugs, Carburetor Adjustments, Filters
2. Wear items – Starter Pulley and Starter Rope
3. Northern Tool + Equipment Co. does not extend any warranty for products sold or exported outside of the
United States of America, its possessions and territories, except those sold through Northern Tool +
Equipment Co. authorized channels of export distribution.
Northern Tool + Equipment Co. reserves the right to change or improve the design of any Northern Tool + Equipment
Co. product without assuming any obligation to modify any product previously manufactured.
No implied warranty, including any implied warranty of merchantability or fitness for a particular purpose,
applies after the applicable period of express written warranty above as to the parts as identified. No other
express warranty or guaranty, whether written or oral, except as mentioned above, given by any person or
entity, including a dealer or retailer, with respect to any product shall bind Northern Tool + Equipment Co.
During the period of the Warranty, the exclusive remedy is repair or replacement of the product as set forth
above. (Some states do not allow limitations on how long an implied warranty lasts, so the above limitation may not
apply to you.)
The provisions as set forth in this warranty provide the sole and exclusive remedy arising from the sales.
Northern Tool + Equipment Co. shall not be liable for incidental or consequential loss or damages including,
without limitation, expenses incurred for substitute or related expenses, or for rental expenses to
temporarily replace a warranted product. (Some states do not allow limitations on how long an implied warranty
lasts, so the above limitation may not apply to you.)
In no event shall recovery of any kind be greater than the amount of the purchase price of the product sold.
Alteration of the safety features of the product shall void this warranty. You assume the risk and liability for loss,
damage, or injury to you and your property and/or to others and their property arising out of the use or misuse or
inability to use the product.
This limited warranty shall not extend to anyone other than the original purchaser, original lessee or the person for
whom it was purchased as a gift.
How State Law Relates to this Warranty: This warranty gives you specific legal rights, and you may also have
other rights which vary from state to state.
For questions about your warranty, please call 1-866-443-2576.

24
WARNINGSome dust created by power sanding, sawing, grinding, drilling, and other construction activities contains
chemicals known to the State of California to cause cancer, birth defects or other reproductive harm. Some
examples of these chemicals are:
• Lead from lead-based paints,
• Crystalline silica from bricks and cement and other masonry products, and
• Arsenic and chromium from chemically treated lumber.
Your risk from these exposures varies, depending on how often you do this type of work. To reduce your
exposure to these chemicals: work in a well ventilated area, and work with approved safety equipment, such as
those dust masks that are specially designed to filter out microscopic particles.
Distributed by
Northern Tool + Equipment Co.,
2800 Southcross Drive West
P.O. Box 1499 Burnsville, MN 55337-0499
Made in China