Embed Size (px)
Citation preview

3D GameStudio
Tutorial
Learn the basics of 3D GameStudio
For A6By Robert-Jan Drenth June 2004
RJD Productions
For more information about 3D GameStudio visit www.3dgamestudio.com
Mail to me: [email protected]
3D GameStudio
file:///C|/tutorial%20basics%20by%20RJD.htm (1 of 54)14-9-2004 19:58:52

3D GameStudio
Index
Foreword 3What are WED, MED and SED used for 3The basics of WED 3The interface 4The seven menu’s 8- The file menu 8- The edit menu 10- The mode menu 11- The object menu 12- The texture menu 19- The view menu 25- The help menu 30Create your first level using the templates 31Adding rooms and doors 40Some tips for you 53The end 53
file:///C|/tutorial%20basics%20by%20RJD.htm (2 of 54)14-9-2004 19:58:52

3D GameStudio
Foreword Hello readers, Welcome to the world of creating games with 3D GameStudio! My name is Robert-Jan Drenth and I’m thirteen years old. I made this tutorial to help new users of 3D GameStudio who don’t have any experience with creating (3D) games before. This tutorial will teach you the basics you need to know about 3D GameStudio. After that I will teach you how to make a simple shooter, using the things you have learned. Good luck and I hope you will enjoy this tutorial. Robert-Jan Drenth
What are WED, MED and SED used for This is very easy to explain: WED stands for World EDitor, MED stands for Model EDitor and SED stands for Script EDitor. In WED you create the levels for your game. For example the Techdemo in your Work directory that comes with 3D GS. In MED you make the models for your game like the gun you shoot with (if you make a shooter) and with SED you create the scripts you are going to need for your game (to make the gun actually shoot).
The basics of WEDAs I mentioned before, WED is for creating your level, which is one of the most important things.
file:///C|/tutorial%20basics%20by%20RJD.htm (3 of 54)14-9-2004 19:58:52
3D GameStudio
Without good levels your game won’t be a success.
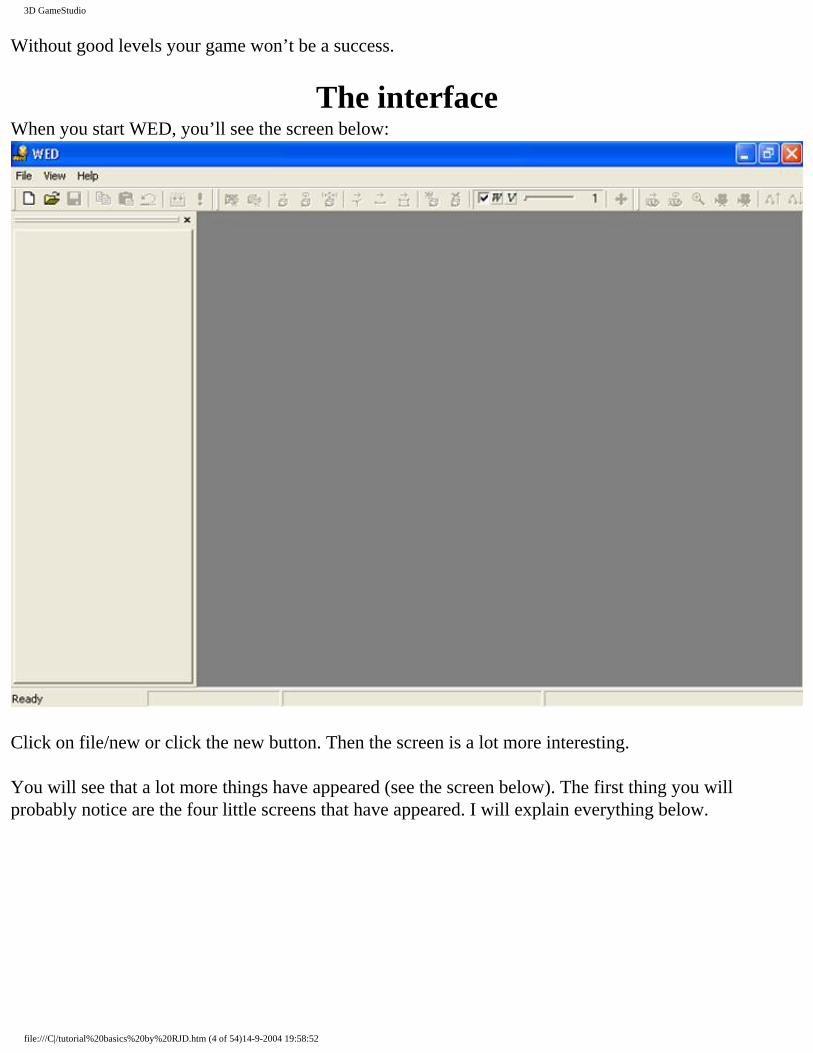
The interfaceWhen you start WED, you’ll see the screen below:
Click on file/new or click the new button. Then the screen is a lot more interesting. You will see that a lot more things have appeared (see the screen below). The first thing you will probably notice are the four little screens that have appeared. I will explain everything below.
file:///C|/tutorial%20basics%20by%20RJD.htm (4 of 54)14-9-2004 19:58:52
3D GameStudio
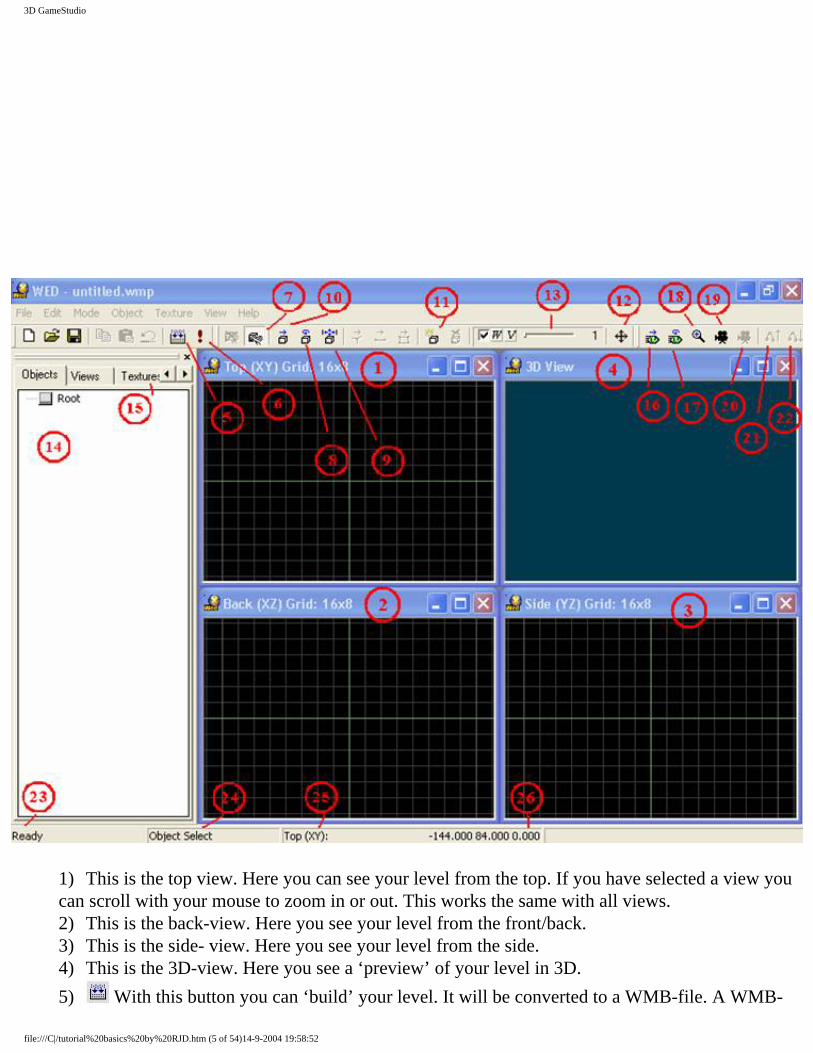
1) This is the top view. Here you can see your level from the top. If you have selected a view you can scroll with your mouse to zoom in or out. This works the same with all views. 2) This is the back-view. Here you see your level from the front/back.3) This is the side- view. Here you see your level from the side.4) This is the 3D-view. Here you see a ‘preview’ of your level in 3D.
5) With this button you can ‘build’ your level. It will be converted to a WMB-file. A WMB-
file:///C|/tutorial%20basics%20by%20RJD.htm (5 of 54)14-9-2004 19:58:52
3D GameStudio
file is your level in 3D. Don’t forget: after every little change you have to rebuild your level! You can select this function too by clicking on file/Build WMB…
6) With this button you can test your level. You can select this option too by clicking file/Run Level…
7) With this option you can select objects in your level in every view by clicking one object or by drawing a frame around the objects you want to select.
8) With this option you can rotate an object by having it selected and moving the mouse from left to right (rotating counter-clockwise) or from right to left (rotating clockwise). This works in every view. You can do this too with the arrow keys.
9) With this option you can scale an object in your level. This works in every view. See 12) for more information about scaling. You can also do this with the arrow keys.
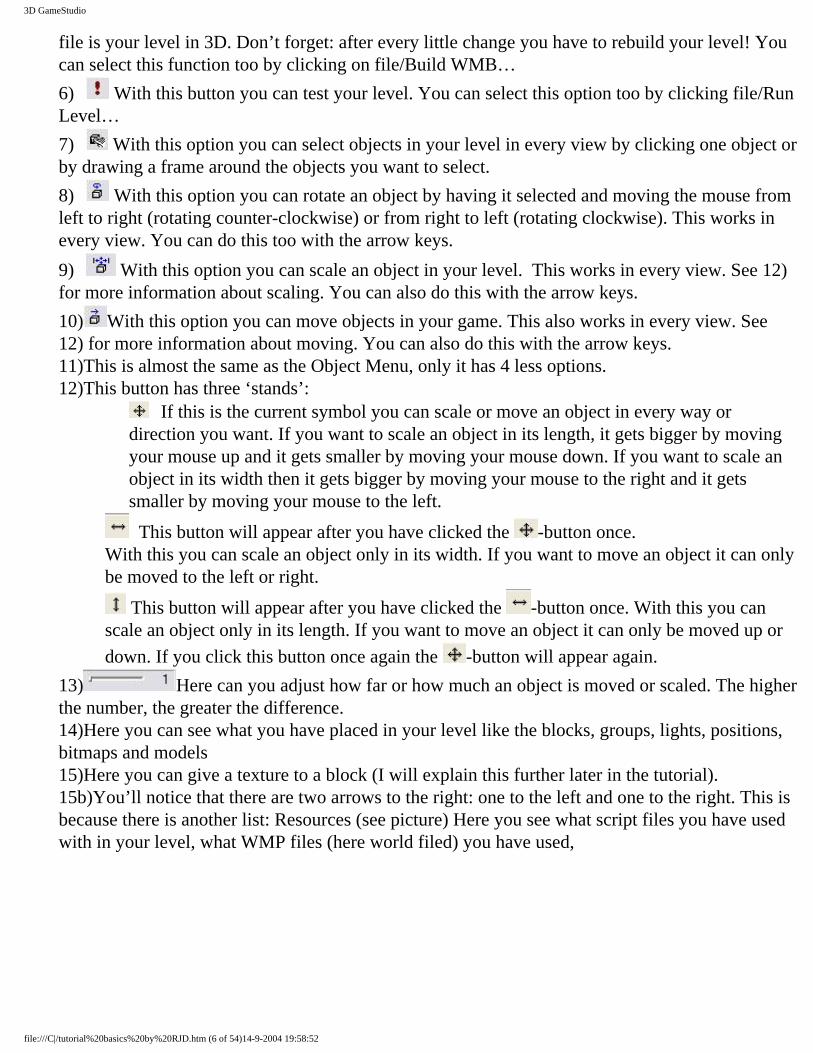
10) With this option you can move objects in your game. This also works in every view. See 12) for more information about moving. You can also do this with the arrow keys.11)This is almost the same as the Object Menu, only it has 4 less options.12)This button has three ‘stands’:
If this is the current symbol you can scale or move an object in every way or direction you want. If you want to scale an object in its length, it gets bigger by moving your mouse up and it gets smaller by moving your mouse down. If you want to scale an object in its width then it gets bigger by moving your mouse to the right and it gets smaller by moving your mouse to the left.
This button will appear after you have clicked the -button once.With this you can scale an object only in its width. If you want to move an object it can only be moved to the left or right.
This button will appear after you have clicked the -button once. With this you can scale an object only in its length. If you want to move an object it can only be moved up or
down. If you click this button once again the -button will appear again.
13) Here can you adjust how far or how much an object is moved or scaled. The higher the number, the greater the difference.14)Here you can see what you have placed in your level like the blocks, groups, lights, positions, bitmaps and models15)Here you can give a texture to a block (I will explain this further later in the tutorial).15b)You’ll notice that there are two arrows to the right: one to the left and one to the right. This is because there is another list: Resources (see picture) Here you see what script files you have used with in your level, what WMP files (here world filed) you have used,
file:///C|/tutorial%20basics%20by%20RJD.htm (6 of 54)14-9-2004 19:58:52

3D GameStudio
what map files you have used, what picture files you have used (one is standard: palette.pcx) etc. Every tiny little thing you have used in your level is listed here. This is almost the same as Objects list (number 14), only here just stand everything once, and this is more ordered.
16) With this button selected you can float through your level in the 3D view.With the left mouse button you can go up or down, or ‘strafe’ left or right. With the right mouse button you can go forward or backward and you can ‘strafe’ left or right.17)With this button you can rotate the camera. If you use the left mouse button you will circle around one point and when you use the right mouse button you will stay where you are and you can look around.
18) If you have selected this button you can zoom in or out by holding the left mouse button and move the mouse. If you move the mouse up, you will zoom in, if you move the mouse down you will zoom out.
19) If you click this mouse button two dots will appear in top, back and side views depending on your position in 3D view. If you move the green/yellow dot with your mouse you will look in a different direction and when you move the red dot your position will change, depending on where you have placed the red dot. You can do this best in the Top View.
20)This button is normally green. If you click this button you are in Walk-Thru mode. It works the same when you test out your level. That means that you will go forward with the right mouse button and the up arrow key. You will go backwards by pressing the left mouse button and the down arrow key. You can use the mouse to look around just like the left and right arrow keys. If
file:///C|/tutorial%20basics%20by%20RJD.htm (7 of 54)14-9-2004 19:58:52
3D GameStudio
you press ‘.’ or ‘,’ you will strafe to the right or left. With ‘Home’ and ‘End’ you will move up and down and with Page Up and Page Down you will look up and down.
21) With this button you can scope up. I will explain this later just like the scope down button, the next button.
22) With this you can scope down.
23) Here is the ‘status’ of the program displayed. For example when you load a level there are the name of the scripts, models and everything else you have used displayed, when it is being loaded.24) Here stands the function you have selected. So the moment you click the move button for instance there will appear Object Move, but it will disappear the moment you release the left mouse button.25) Here stands the name of the view where your mouse is located or was located if it isn’t ‘on’ a view anymore.26) This shows the position of the mouse in the level. The first coordinate displayed is the X-coordinate, and then comes the Y-coordinate and then the Z-coordinate. To the right where the coordinates are displayed is an empty space at the moment, but if you have selected something in your level, there is displayed what it is. For example.
The seven menu’s Now that I have explained the interface I will explain the menu’s.There are 7 menu’s (after you have loaded a level or created a new one):
I will explain them in the order they stand in the picture.
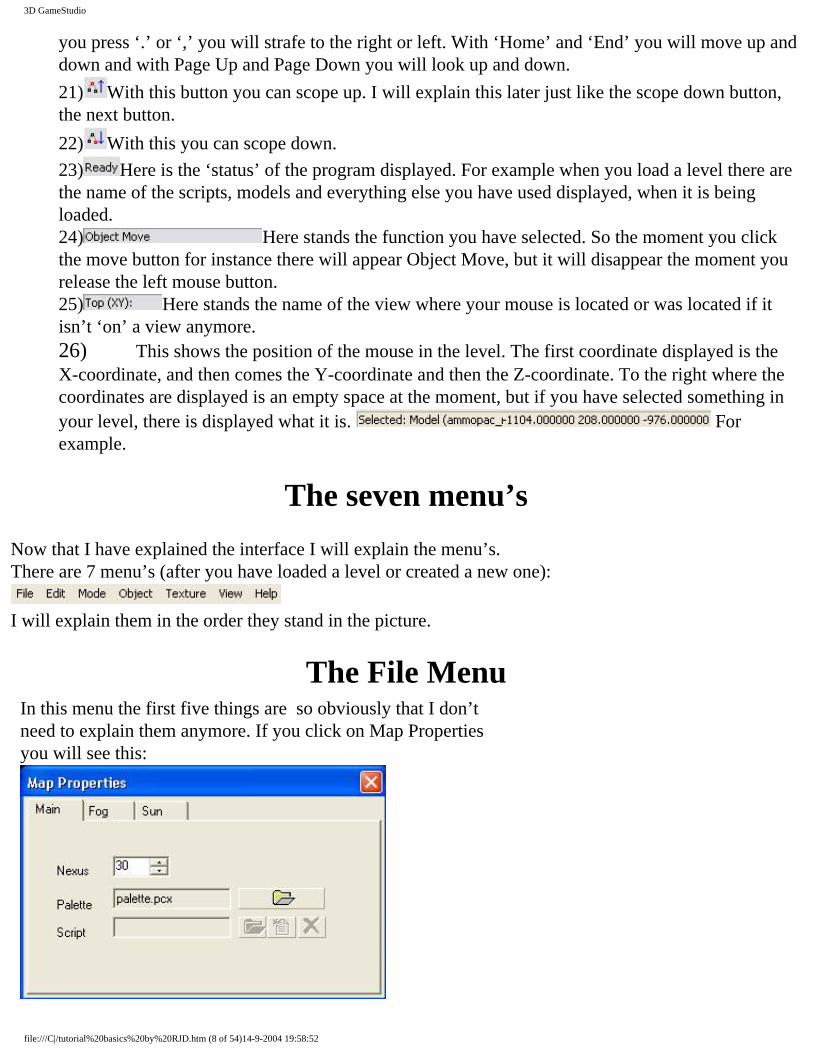
The File MenuIn this menu the first five things are so obviously that I don’t need to explain them anymore. If you click on Map Properties you will see this:
file:///C|/tutorial%20basics%20by%20RJD.htm (8 of 54)14-9-2004 19:58:52

3D GameStudio
Every model and picture is an entity. There is a maximum number of entities you can have in your level. This is ten times the Nexus. So now the maximum number of entities would be 300. For every level you need a Palette. You can use the default one. After script comes the name of the
starting script. If you don’t have one, you can click the new button. The new script will have the extension .wdl and the name of your level, so you have to save it first. Note: Never use a space in a name! Otherwise you would get the error message: Invalid Script! if you make a new script. You can do that with the middle of the three buttons. With the left one you can open an existing script and with the right button you delete the current script (it won’t be deleted from your hard disk). The tabs Fog and Sun is for advanced users. With Add Script you can add a script so you don’t have to script everything you have scripted before again. You even don’t have to script that you are using another script in your level. By using this, the script will automatically be copied to your work folder. Remember that if the script uses pictures, you have to copy them to your of the template folder by hand. If you click Build WMB you will see that the following window will appear:
file:///C|/tutorial%20basics%20by%20RJD.htm (9 of 54)14-9-2004 19:58:52

3D GameStudio
With build level selected the level will be build completely. If you build your level as a map entity, it too will be build, but you can use it as an entity in other levels. Thus if you build an door you can build it as a map entity and give it the ‘door’ action in another level (I will explain later how you can do that). You can set different building properties like Visibility and Light calculations, which are now visible, but you don’t need to worry about that. If you change this sometime, but if you want to build your level with the default settings later, you just have to click default build button. The Starter and Resource functions are only for the Pro edition and I don’t think you’ve got that, if you have to use this tutorialJ. Then you’ve got Publish. This will create a new directory in the directory you have saved your level. Named like your level, but it has .CD added after the name. In the newly created directory there are all files copied that your level uses when you run it. But the most important thing is, that there is an EXE-file created. If you have A6 Trial, the EXE-file won’t be created. Below Publish are the last four opened projects listed. By clicking on them they will be opened.If you click Properties you can set advanced settings, but too key combinations to use a certain function. I don’t expect this will be also difficult so I won’t explain it further.And with exit you, of course, close the programJ.
The Edit Menu
In the Edit menu, you can do several things, like undo, Cut, Copy and Paste, which I don’t need to explain. With Select None everything you have selected will be unselected. With Delete you delete the current object. With Duplicate you make an exact copy of the selected model(s) and/or block(s). If you hollow a block with a block selected, the selected block becomes a room. This are just some blocks together. If you want to create an opening in a block, you have to create a new block, give it the size you want the hole to have, place the new block where you want the opening and click on CSG Subtract. In object mode you can select what kind of objects you want to select. So if you check models, you can’t select a block by mistake.
file:///C|/tutorial%20basics%20by%20RJD.htm (10 of 54)14-9-2004 19:58:52

3D GameStudio
If you get an error, while building the level, which says that it’s the ‘fault’ of a block, you can search for the block, because blocks all have a number and the number of the block that caused the error is displayed in the error. If the block is in a group you can scope down the group and then you have to repeat Find Object. This is an example of an error like that:
The Mode Menu
The mode menu isn’t too hard to understand. The first four commands have been explained before. Now we come to something that is totally new. Vertex Move, Edge Move and Face Move. The concepts Vertex and Face will come back in MED. A model exists out vertexes. A face connects three vertexes so you get a triangle. A block has the same structure, but it doesn’t exist out of triangles, but squares. If you move a vertex the form of the block will change. Most of the time you get an error, but you can always hope you won’tJ. An edge can also be moved like a vertex, the only difference is that two vertexes are being moved and you will get less errors. Isn’t that nice? With Face Move you will move a whole square at once and I never got an error while doing that.
file:///C|/tutorial%20basics%20by%20RJD.htm (11 of 54)14-9-2004 19:58:52

3D GameStudio
Eye Move and Eye Rotate are explained before (the numbers 16 and 17 of the interface).With Eye Zoom you can zoom in or out in the 2D views if you have no scroll on your mouse.You can only select Walk-Thru if you have selected the 3D view.
The Object Menu
Now we come to the next menu: the Object Menu. This is probably the most important menu, because you can here add everything you need in your game (except the scripts). Click on Add Cube/Medium. Now has a medium block appeared. You can choose two other sizes for a block you want to add: Small and Large. If the block hasn’t precisely the size you want it to have, just scale the block. You can too add a Hollow Cube and again you can choose three sizes, the same as you can choose when you add a ‘normal’ block. I advice you not to add hollow blocks, because if you scale it, the thickness of the walls will change too and this way the walls in your game will never have the same size. If you move your mouse to Add Primitive you will see that more options will appear:
file:///C|/tutorial%20basics%20by%20RJD.htm (12 of 54)14-9-2004 19:58:52

3D GameStudio
The names of the options you can select explain themselves, so I don’t have to do that anymore.
If you move your mouse down from Add Primitive to Add Prefab a great list appears:
If you change the three numbers that are standing next to each other, the colour the light gives, changes. The maximum is 256. The range is in quants displayed.
Well, this is very simple too, because the names are explaining themselves another time. If you move the mouse to letters for example, you will see a whole list of lett*.wmp and on the place of that tiny little star are the letters of the alphabet standing from A to Z. If you click for instance letta.wmp the letter A will appear in three or four of your screens. In every view one, but not always in the 3D view. You can select every ‘option’ in the prefab list to see things revealed you can use. You can thank Conitec for creating all those things. This will save you a lot of work if you are going to use them.
file:///C|/tutorial%20basics%20by%20RJD.htm (13 of 54)14-9-2004 19:58:52
3D GameStudio
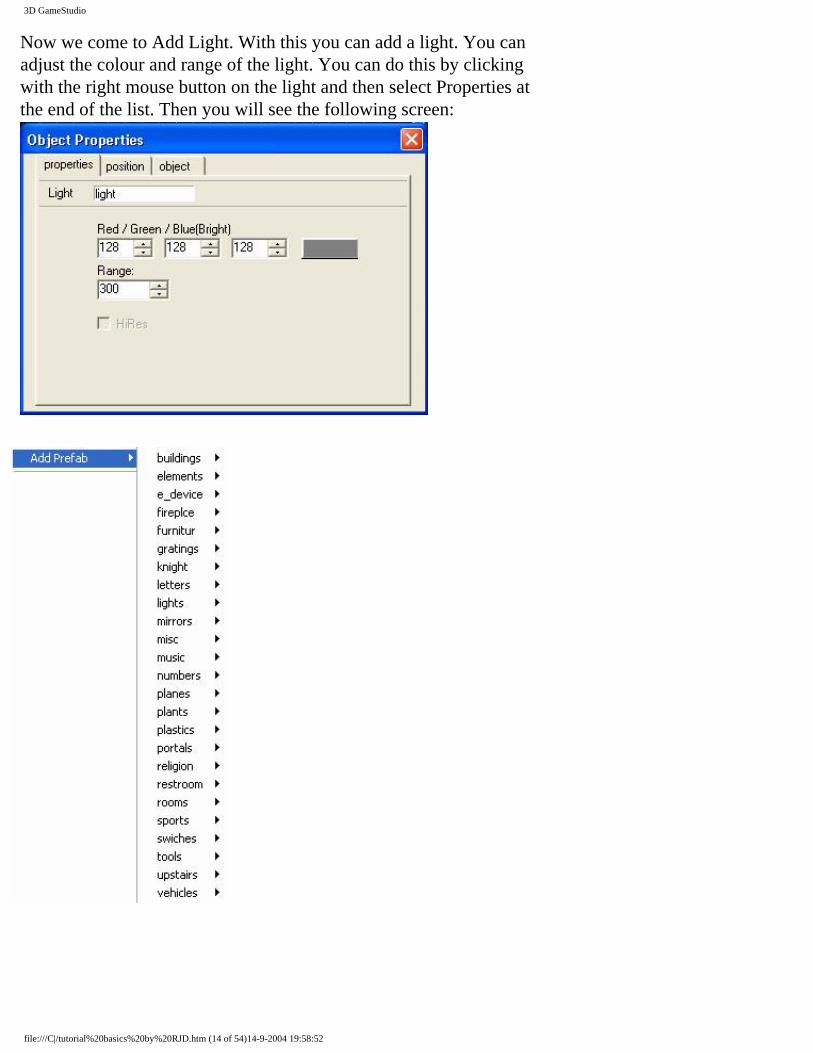
Now we come to Add Light. With this you can add a light. You can adjust the colour and range of the light. You can do this by clicking with the right mouse button on the light and then select Properties at the end of the list. Then you will see the following screen:
file:///C|/tutorial%20basics%20by%20RJD.htm (14 of 54)14-9-2004 19:58:52

3D GameStudio
If you want to make the light emit a certain colour, like brown or green or something like that, you will have to guess a bit what has to be the combination of the amount of red, green and blue light. There is an
easier way. Open paint, click on colours: and then on ‘edit colours’. Now you see screen 1:
file:///C|/tutorial%20basics%20by%20RJD.htm (15 of 54)14-9-2004 19:58:52

3D GameStudio
screen 1 screen 2Now click on ‘Define Custom Colours >>’ and then you will see screen 2. Here you can move the cross in the newly appeared area to the colour you would like your light(s) to have. Now you have picked out your colour which you would like to know what it’s red, green and blue values are. They are at the right side. Replace the values of your light in WED with these values and now your light has got the desired colour!But if you are going to use lights in your game, you will have to put in whole your level lights. If you would use for instance one light, the rest of the level would be dark, so keep that in mind.
With this screen you can easily set properties for the model without a bit of scripting. The names of the checkboxes will explain themselves very good, and if some don’t do that, you probably don’t need to use tem. Now click on behaviour. Now it’s getting interesting. Here you can give a model a certain action. Now there stands the default action ‘ndef’ which is no action. You can give a model an action by clicking on the map icon that is placed next to the textbox where you can see what action the model has. If you click this icon a new window will appear. Here you see a list of actions you can give to an entity. If you have not yet created a new script you will see this:
file:///C|/tutorial%20basics%20by%20RJD.htm (16 of 54)14-9-2004 19:58:52
3D GameStudio
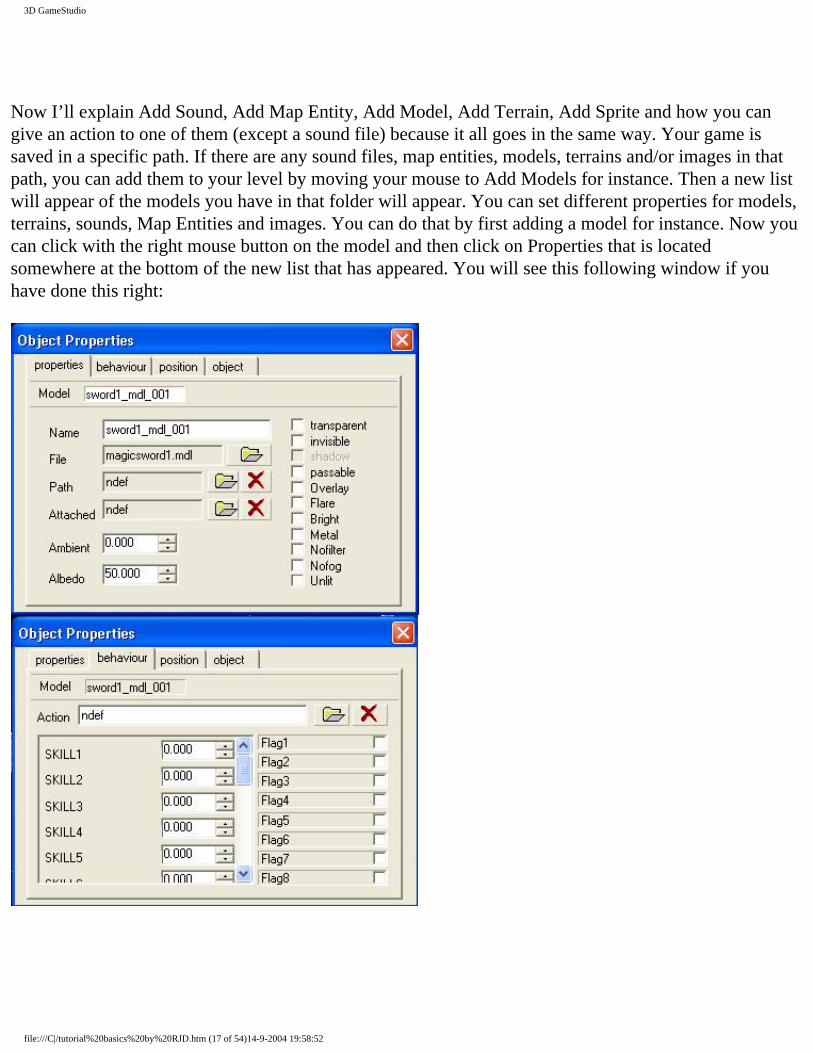
Now I’ll explain Add Sound, Add Map Entity, Add Model, Add Terrain, Add Sprite and how you can give an action to one of them (except a sound file) because it all goes in the same way. Your game is saved in a specific path. If there are any sound files, map entities, models, terrains and/or images in that path, you can add them to your level by moving your mouse to Add Models for instance. Then a new list will appear of the models you have in that folder will appear. You can set different properties for models, terrains, sounds, Map Entities and images. You can do that by first adding a model for instance. Now you can click with the right mouse button on the model and then click on Properties that is located somewhere at the bottom of the new list that has appeared. You will see this following window if you have done this right:
file:///C|/tutorial%20basics%20by%20RJD.htm (17 of 54)14-9-2004 19:58:52

3D GameStudio
If you haven’t saved your level yet do that now. Create a new script by clicking File/Map Properties and click on the New Script button.If you now repeat the actions to give a model an action you will see that there is now a full list of actions you can give to the model. These are already made by Conitec and you can use them freely. Thanks for that, Conitec!Double click on one of the actions and the model will have that action assigned to itself. If you want the model to be the player, give it the player_walk_fight action. If it has to be an enemy, give it the actor_walk_fight action or the actor_ai_one. If you give a model this action, the enemy will be harder to defeat.The full list of actions:
Some of the actions that I have in my list aren’t in yours, because I created them myself; the armor action for example (don’t worry, I will give you the script of the ‘armor’ and ‘armor_full’ action). If you now test your game, you won’t float through the air anymore, in fact, you won’t be able to do anything! You can fix this by deleting the script.You can give Map Entities, Sprites and Terrains also an action, but you will do that less. If you add a sound, you can adjust its volume and range. The defaults are displayed.Now let’s talk about positions. You probably won’t use positions, but you never now. Positions are used to take a look at places in a game. For instance if you want to let the player look at a screen of a security camera. You set the position where you want the player to look at. A position can be moved
file:///C|/tutorial%20basics%20by%20RJD.htm (18 of 54)14-9-2004 19:58:52

3D GameStudio
and rotated just like a block or model. Now only paths are left to explain. Paths are used to let
an actor walk a route, made by you. The patrol_path action makes an actor do that. But if you don’t know how to create a path that action will be worthless. So click Add Path. Now a little square has appeared in your 2D views and maybe your 3D view too. It will look like this:
Select the path and it will turn red. Now select Vertex Move with the path selected. Move your mouse to the dot and hold Ctrl+Alt and move the mouse to another spot. Now you have two dots. If you do that again you have a triangle. If you go on that way you can create more complex paths your actor has to follow. Now we come to the end Object Menu. I only need to explain Load Model, Load Sound, Load Prefab and Save Prefab. With the first three you can load a model, sound or prefab outside the directory you saved your level. Save Prefab can only be selected if you have selected one or more blocks. Then will it be saved as a WMP-file and you can use it in other levels. That was the end of the object menu. Let’s get to the next menu.
The Texture Menu
file:///C|/tutorial%20basics%20by%20RJD.htm (19 of 54)14-9-2004 19:58:52

3D GameStudio
I will explain this menu in the order you are probably going to use this menu.First a little introduction before we start with the menu. Every block has a texture attached to it. Try to vary much with textures, otherwise your level will be boring. If you don’t give a block a texture yourself, it will automatically get the standard texture (see the picture under the menu). A texture is saved in a WAD-file. A WAD-file contains a collection of pictures and/or bitmaps or other picture-files. With 3D GS comes a WAD-file you can use: standard.wad. You can find this file in the directory called ‘wads’ in your 3D GS folder. But now you think: ‘That’s nice you can give a texture to a block, but how do you actually do that?’
Now we come to the texture menu. The menu looks like this:
This isn’t too hard. First you must add a WAD-file to your level before you can give a texture to a block. You do that by clicking on Texture Manager… Now the following screen comes up:
You can add a WAD-file by clicking Add WAD. Now you will get a dialogue where you can select the WAD-file you want to add. In this case is that standard.wad. After you have selected the WAD-file it will appear in the WAD Manager. You can remove it again by selecting it and clicking the remove button. You can create your own WAD-file by clicking New WAD. Just give it a name and location and your new, empty WAD-file will be saved. If you added some pictures in your WAD-file (I will explain later how) you have to save it by selecting the WAD-file in the WAD Manager and then you have to click Save WAD. That isn’t too hard, is it? Build WAD is a very handy
file:///C|/tutorial%20basics%20by%20RJD.htm (20 of 54)14-9-2004 19:58:52

3D GameStudio
With this command the program will make a new WAD-file with only the pictures you have used. You can say where the file can be saved and what name you want it to have. This option will save disk space for the persons who are going to play your game(not for yourself, because you surely will use the textures you didn’t use this time another time), because you otherwise would have to include all the WAD-files. Now that you have added a WAD-file, you can give a block the desired texture. You can do that in two ways. The first one is the complex one. You will first have to select a block. Then you will have to click on the Texture statement (number 15 in the picture with the numbers, somewhere at the beginning). Now you’ll see the following screen:
First click only once at the texture you want to give the block. There are more pictures in this WAD-file you can choose of (notice the small slider to the right of the pictures). Now you must click Apply To Object in the Texture menu. The block has now the texture you wanted it to have if you have done everything all right. My block will now have the *water3 texture. The second way to give a block a texture is to select a block and instead of clicking the desired texture once, you have to click it twice. That’s all! The second way is much easier. Now your block has the texture you want it to have. You can see what texture the selected block has, by clicking on ‘Texture’ (see picture on the left). It is located under Object. Now you’ve can see what texture your block has. But if you have a complex level and you would want to know what texture all the blocks have, you would have to check it one by one. That would take a very long time. If you press F7 once, you will be able to see all blocks with their textures in the 3D View. When you click at standard.wad (see the picture left, you must click the ‘button’ which says standard.wad) the list will be shorted in. If you click it again the full list will appear again. This way you can take a look at other
file:///C|/tutorial%20basics%20by%20RJD.htm (21 of 54)14-9-2004 19:58:52
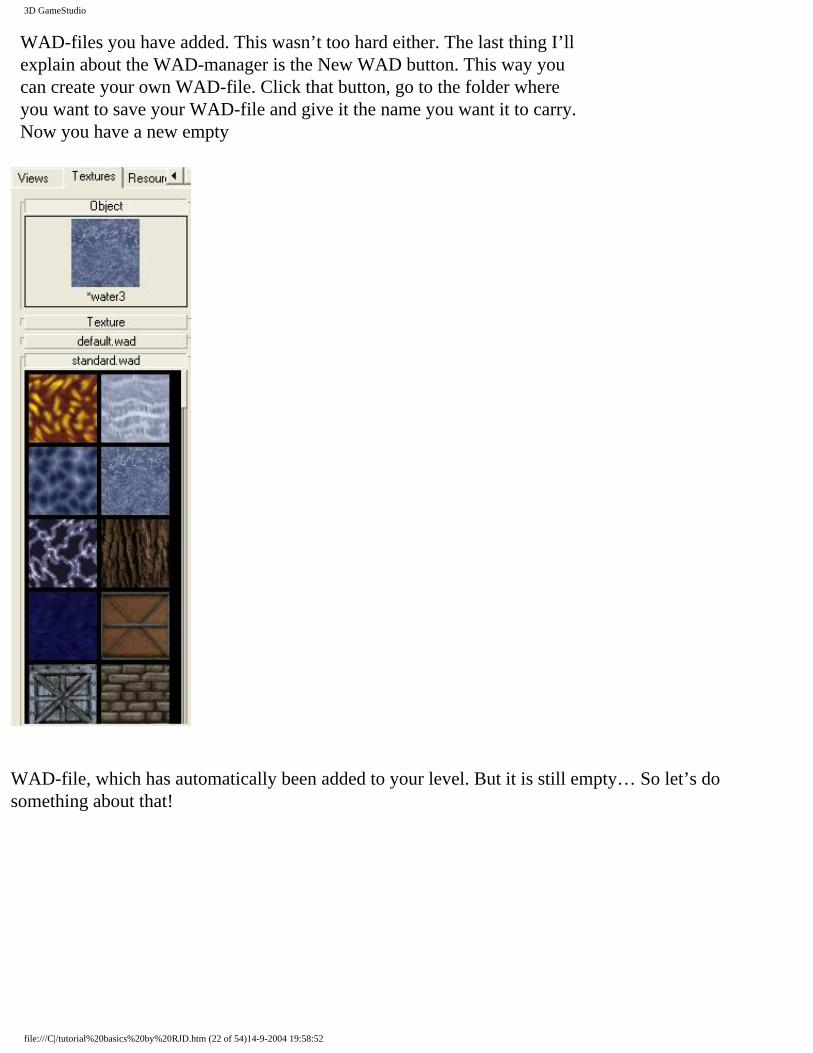
3D GameStudio
WAD-files you have added. This wasn’t too hard either. The last thing I’ll explain about the WAD-manager is the New WAD button. This way you can create your own WAD-file. Click that button, go to the folder where you want to save your WAD-file and give it the name you want it to carry. Now you have a new empty
WAD-file, which has automatically been added to your level. But it is still empty… So let’s do something about that!
file:///C|/tutorial%20basics%20by%20RJD.htm (22 of 54)14-9-2004 19:58:52

3D GameStudio
Click the right mouse button in the black area. Now the following pop-up menu will appear (see the picture under the picture to the left). The only thing you have to do is to click Add Texture. Now you have to select a picture you want to have in your WAD-file and you are done! That’s all! Do this as many times you want. After that, you, of course, will have to save your WAD-file by clicking Save WAD in the same menu where you can add your pictures. You can also delete and rename your pictures. But there is one thing to remember about the textures you add: they must have the good size in pixels. The pictures can only have sizes like this: 8x8, 16x16, 32x32, 64x64, 128x128, 256x256, 512x512, 1024x1024 etc, otherwise you would get an error message. And some old or ‘weak’ 3D cards can’t display some textures, depending on its size. Keep this always in mind when you create a new picture for your WAD-files. The only thing left to explain is the Texture Bookmarks. Here you can add the pictures from WAD-files you frequently use, so you don’t have to add WAD-files just for one picture. Click on Texture Bookmarks in the Texture menu. Mine is empty ‘cause I never use this function, but maybe you will.
file:///C|/tutorial%20basics%20by%20RJD.htm (23 of 54)14-9-2004 19:58:52

3D GameStudio
You can easily add textures to the Texture Bookmarks by clicking right on a texture and after that you must click Add To Bookmarks and the texture you just clicked will appear in the Texture Bookmarks. That was another menu. Just two to go…
file:///C|/tutorial%20basics%20by%20RJD.htm (24 of 54)14-9-2004 19:58:52
3D GameStudio
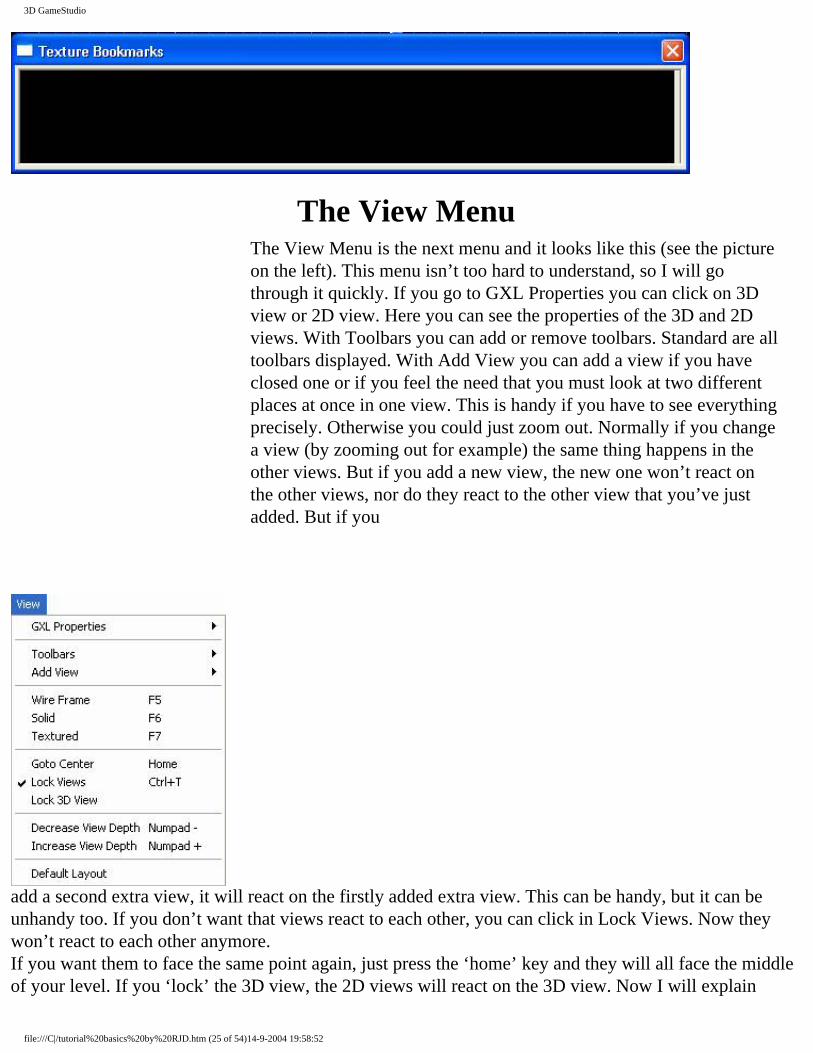
The View MenuThe View Menu is the next menu and it looks like this (see the picture on the left). This menu isn’t too hard to understand, so I will go through it quickly. If you go to GXL Properties you can click on 3D view or 2D view. Here you can see the properties of the 3D and 2D views. With Toolbars you can add or remove toolbars. Standard are all toolbars displayed. With Add View you can add a view if you have closed one or if you feel the need that you must look at two different places at once in one view. This is handy if you have to see everything precisely. Otherwise you could just zoom out. Normally if you change a view (by zooming out for example) the same thing happens in the other views. But if you add a new view, the new one won’t react on the other views, nor do they react to the other view that you’ve just added. But if you
add a second extra view, it will react on the firstly added extra view. This can be handy, but it can be unhandy too. If you don’t want that views react to each other, you can click in Lock Views. Now they won’t react to each other anymore. If you want them to face the same point again, just press the ‘home’ key and they will all face the middle of your level. If you ‘lock’ the 3D view, the 2D views will react on the 3D view. Now I will explain
file:///C|/tutorial%20basics%20by%20RJD.htm (25 of 54)14-9-2004 19:58:52

3D GameStudio
three more or less important functions: Wire Frame, Solid and Textured. These three functions affect the 3D view. You will understand it better when I show the difference between them rather then explain it to you. As an example I used a normal block with the standard texture attached to it. Here it comes:
This is the 3D view with Wire Frame set. Now you can only see the contours of the block.
file:///C|/tutorial%20basics%20by%20RJD.htm (26 of 54)14-9-2004 19:58:52

3D GameStudio
This is the 3D view with Textured set. Now you can see what texture you have attached to a block so you know at once when you made a mistake. Yeah, the hot-key for this function is F7.
This is the 3D view with Solid set. Now you see every block as a solid block. They can have different colours, depending on the texture they have attached.
file:///C|/tutorial%20basics%20by%20RJD.htm (27 of 54)14-9-2004 19:58:52

3D GameStudio
That were those three functions. The next few things are a piece of cake. Ok, this whole menu is a piece of cake, but we are talking about the last three things. We start with Increase and Decrease View Depth become handy if you have a big level in which you can’t see the furthest part of you level. for example this:
But this is a bit of a problem. We want to see the corner of the level. Just hold ‘Numpad +’ for a while and…
file:///C|/tutorial%20basics%20by%20RJD.htm (28 of 54)14-9-2004 19:58:52

3D GameStudio
your problem is solved.
This way you can decrease the depth of the view by pressing’ the ‘Numpad –’ key. This way you can get something like the previous picture. Btw, in the 3D View are the texture sometimes a bit strange displayed as you can see in the picture. However, if you run the level you will see the textures normal. Don’t worry about that.Now we come to the last thing of this menu, Default Layout. If you have added some views or changed the size of a view, the standard four views with the standard size appear and, if added, the other view(s)
file:///C|/tutorial%20basics%20by%20RJD.htm (29 of 54)14-9-2004 19:58:52

3D GameStudio
will disappear.
The Help Menu Now we have come to the final and shortest menu, the Help Menu and it looks like this:
If you click on Contents or if you press ‘F1’ the Manual will appear. The Manual is a good source of information about 3D GS so you should really read it. It helped me a lot when I was a beginner. (of course you don’t have to read the whole manual. Only the things that are interesting to you ;) )
If you click Updates or Community there must be a internet connection open. If you click Updates the download page of 3D GS is opened and if you click Community the 3D GS Forum is loaded. This is a good source of information. If you click About WED you see what edition of 3D GS have, what version and what version WED is. The next line shows that Conitec made this program and the third line shows by whom this version is registered. Now we’ve had all the menus and buttons and those kind of things! I know it was a very long part, but now you are familiar with most functions. But not all functions. I haven’t yet explained some important things and they will come up in the next part of the tutorial:
file:///C|/tutorial%20basics%20by%20RJD.htm (30 of 54)14-9-2004 19:58:52

3D GameStudio
Create your first level using the templates OK people, now you are going to use what you have learned. First of all create a new level, save it under the desired name in your work directory, add standard.wad to your level, add a large block and scale it till you get something like this and then hollow the block in the Edit Menu:
file:///C|/tutorial%20basics%20by%20RJD.htm (31 of 54)14-9-2004 19:58:52

3D GameStudio
Now Scope Down (button 22) having the block selected and give every side of the block a nice texture. I used the ‘stonewall2’ texture for the ground, the sides that must be the walls the ‘stonewall1’ texture and the side that must become the air the ‘skywhite’ texture. But you are of course free to give them other textures. In my 3D view it looks like this with Textured selected in the view menu and after I have moved the camera a bit:
file:///C|/tutorial%20basics%20by%20RJD.htm (32 of 54)14-9-2004 19:58:52

3D GameStudio
But this isn’t saying much because it’s just a kind of preview of your level. It looks much better if you see it in real 3D. Now build your level (button 5 or use the File Menu) in the normal way and then run the level (button 6 or use the File Menu). Now you get this dialogue:
This is the standard way, but I prefer the Window checkbox unchecked. Notice if you check or uncheck the same checkboxes, the caption of the textbox changes. Here you can type different commands to let your game behave the way you want. For instance you can make your own commands, but you would have to script that, and that isn’t what this tutorial is about. Test out everything, ‘cause then you will understand the things much faster then when I explain them. If you just run the level without checking or un-checking some of the checkboxes it will look like this:
file:///C|/tutorial%20basics%20by%20RJD.htm (33 of 54)14-9-2004 19:58:52

3D GameStudio
Now you can look around using the mouse and cursor keys, the home and end key and the page up and the page down key. Try this now with the Window checkbox unchecked. Then you will probably find out why I find this easier. Having looked around you will notice that the level is a bit empty. Let’s do something about that right away!We do that by first adding the player model. Add the guard.mdl model to your level. Now we actually want to make the model the player. So create a new script. The A5_template_script or the normal template script, they’re the same, so that doesn’t matter. Now click right on the guard model, click on properties and give it the player_walk_fight action. Now when have selected this action you see that this:
file:///C|/tutorial%20basics%20by%20RJD.htm (34 of 54)14-9-2004 19:58:52

3D GameStudio
has changed into this:
If you move the slider a bit down, you will see that there are many more skills (values if you like) you can set, like the health and armor of the player. If you don’t change anything, the standard values are used, which are fine, unless you want to make the player a bit more advanced. Next to the list of skills, there are checkboxes which are explaining themselves good enough, so I don’t need to do that any more. Now we have the player entity, but we haven’t got an opponent. So let’s make one. Add the warlock.mdl model and give that the actor_walk_fight or the actor_ai_one action (the only difference is that the actor_ai_one actor is a bit harder to fight). You can do this the same way as you made the player. You will notice that after you have set the action for this entity that you can set different skills for opponents too. It works the same way as with the player. The only difference is that you can set the alertness, accuracy and cowardice. With alertness you can set the range in which the enemy will notice the player (default 1000 quants). The enemy won’t notice the player through blocks and he won’t notice the player either while he has his back on the player. If you want the enemy to be ‘blind’, enter a negative number.The default value for accuracy is 5. The five stands for 5 degrees abnormality. As well as horizontal as well as vertical. If you enter a negative number the enemy has a perfect aim. With cowardice you can make the enemy run away when his health drops below a certain number. If you want the enemy fight to death, enter a negative number. The default is to let the enemy run away when its health drops below 30. You can set for many other entities different skills too. You’ll probably have to move the model a bit, because it has the same position as the player if you used the Object Menu. My level now looks like this:
file:///C|/tutorial%20basics%20by%20RJD.htm (35 of 54)14-9-2004 19:58:52

3D GameStudio
file:///C|/tutorial%20basics%20by%20RJD.htm (36 of 54)14-9-2004 19:58:52

3D GameStudio
OK, now we have our opponent we can start shooting around. Build the level, but not the whole level, but only update the entities. This builds much faster if you have a big level. With a small level like this it doesn’t matter. The larger the level, the longer it takes to build the level. Remember that every time you change something in your level, it must be rebuild. I forgot that many times when I started with 3D GS and when I changed something I just couldn’t figure out why nothing had changed when I tested my levelJ. Anyway, good luck fighting the enemy.
file:///C|/tutorial%20basics%20by%20RJD.htm (37 of 54)14-9-2004 19:58:52

3D GameStudio
And you needed your luck, but it didn’t help you, because you didn’t even have a gun! You ended up the way showed in the picture. This way you will never win. That’s not fair, isn’t it? So the next thing we are going to do is add a gun. In your work folder aren’t models of guns. You could make them, but there are some included in the models directory in the ‘template_6’ folder. Click on Load Entity in the Object Menu, go up one folder and open the ‘template_6’ folder and then open the ‘models’ folder.
I’m using laser_1st.md, but you are free to choose your own gun. The gun has the same position as the player. This way the player immediately picks up the gun when the level starts so he can start shooting straight awayJ after you gave the gun an action to make it shoot.There are different gun actions:
- flashgun- gun- lasergun- logangun- shotgun- sparkgun- weap_m16- weap_mg_animated- weap_rocketlauncher
You can set for every gun its weapon number (the number that must be pressed on the keyboardto use the desired weapon). But the ‘gun’ action is a bit more complicated. Here you can set many more properties for the weapon you’re about to create. This is everything of importance you can change: Skill 4, Ammotype
file:///C|/tutorial%20basics%20by%20RJD.htm (38 of 54)14-9-2004 19:58:52

3D GameStudio
With skill 4, Ammotype you can set which type of ammo is needed for the gun (the digit before the comma) and how many clips are already in the gun when picked up (the digit after the comma). Skill 5, BulletspeedWith Skill5, Bulletspeed, can you set the range of the weapon in quants (the digit before the comma), and the recoil (the digit behind the comma). You can let the gun have two types of recoil: If the digit behind the comma is positive, the gun will move backwards. IF the digit would be negative, the gun will be tilted upwards a bit. You can make two guns, just to try out the difference between these two settings. Skill 6, Weapon numberWith this skill, Skill6, you can set the weapon number of the gun. This can vary from 1 to 9. You can’t use 0, because if you would do that, the standard value would be used, which is different per gun. If you have two different types of guns with the same weapon number, the first one which is being picked up will be ‘thrown away’ after you have picked up the second, so watch out with this. Skill 7, FiretimeHere you can set how many shots per second can be fired. You must set this in ticks. A second is divided in 16 ticks. So if want your gun to shoot 2 bullets a second, you would have to set the value of Skill7 to 8, because 16/2 = 8. If you would want your gun to shoot 4 bullets per second, you would have give Skill 7 the value 4, because 16/4 = 4. Etc. Skill 8, FiremodeWith this skill, you can set the effect that the gun will have. The different effects you can set are: DAMAGE_SHOOT (value 1) – If you use this the damage isn’t done by a bullet, but a function checks where the hit point of the bullet, if it would exist, would be. DAMAGE_IMPACT (value 2) – If you use this, a bullet will be fired that does the damage.DAMAGE_EXPLODE (value 3) – This effect makes the gun cause damage to more enemies, if they are standing close to the hit point.FIRE_PARTICLE (value 4) – This creates a smoke trail on the route of the bullet.FIRE_BALL (value 12) – The gun shoots orange fireballs which emit light.FIRE_ROCKET (value 16) – The gun will shoot a rocket, like a rocket launcher.FIRE_LASER (value 20) – The gun will shoot a laser beam.BULLET_SMOKETRAIL (value 32) – This only works if your gun shoots the orange fireballs. This will emit a trail of sparks behind the fireballHIT_FLASH (value 128) – At the hit point of the bullet will be a light flashHIT_EXPLO (value 256) – An explosion will be created at hit pointHIT_SMOKE (value 512) – At hit point some smoke will be emitted. HIT_SCATTER (value 1024) – The gun will behave like a shotgun, which accuracy is less.GUNFX_BRASS (value 2048) – The gun will emit empty cartridge cases.HIT_SPARKS (value 8192) – At hit point sparks will be created.HIT_HOLE (value 16384) – A bullet hole is being created at hit point (only if the bullet hits a block or wall, just how you name it).
file:///C|/tutorial%20basics%20by%20RJD.htm (39 of 54)14-9-2004 19:58:52

3D GameStudio
As you can see you can choose from many effects. To combine them, you must add the numbers of the effects to each other. So if you want to let the bullet do the damage itself, and you want the bullet to be a fireball, you must add 2+12 with a total of 14. If you want more effects, you must add more numbers. In our case we must give skill 8 the value 14. All we have to do is define the damage that the gun does. This is easy. The number after the decimal in skill 8 indicates the damage that the gun does. So if you want to take 10 hit points for each shot you would have to add ‘.10’ after the 14. The value of our skill 8 is now 14.10 That’s all! Now you can create your own guns, and even better, you can now kill your killer! You call a crosshair by pressing ‘k’ in the game. You can of course use predefined gun actions and they are good and I use them rather then that I make my own custom gun. For this level I used ‘logangun’ action. Ok, now you can create an opponent and a gun, you’ve learned the very basics of making a shooter, but have you ever see a shooter with just one opponent, room and gun? Well, I haven’t, so let’s do something about it!
Adding rooms and doors
It you want to add a new room, you must first add a new block, enlarge it and then hollow it. Next thing you must do is place it exactly next to your first room/hollowed block.
Only the width and height matter. I made something like this: (see the first picture below on the left). The space between point 1 and point 2 doesn’t matter as long the block doesn’t collide with other blocks. Now click CSG Subtract in the Edit Menu having the newly added block selected. Before you CSG Subtract, check in at least two views if the block is in the position you want it to be! If you don’t do that, it is bound to go wrong sometime.
You can always zoom in if you aren’t sure if it is in the right position. Give the second room some nice textures matching each other. If you want to have the second room the same size as the first, you can Duplicate the first block by pressing Ctrl+D for your door like I did. Next thing you have to do is add a new block and give it the desired shape of the ‘would be’ door.
file:///C|/tutorial%20basics%20by%20RJD.htm (40 of 54)14-9-2004 19:58:52

3D GameStudio
After you have CSG Subtracted, delete the block with which you have used CSG Subtract. Now take a look in your 3D view and you will see something like this.
Note that the newly with CSG Subtract created surfaces have no texture. You can correct this by selecting one of the two blocks,
file:///C|/tutorial%20basics%20by%20RJD.htm (41 of 54)14-9-2004 19:58:52

3D GameStudio
scope it down, select the side with the hole and double click on the texture you have attached to that side. Do this with the other block too. But now you’ve got different textures on the ground and we don’t want that.
This is easy to correct. Select one of the blocks, scope it down, select the side with the hole and scope that one down too. Now you can select four different blocks. Select the block at the bottom and give it the same texture as the ground.
file:///C|/tutorial%20basics%20by%20RJD.htm (42 of 54)14-9-2004 19:58:52

3D GameStudio
This looks better, doesn’t it? If you want that there is a real door in it, and not just a hole, create a new block that fits exactly in the hole. Now click in the Edit Menu on Cut with the block you just created selected. Save the level, create a new one and click on Paste in the Edit Menu. Now the block has appeared. This is exactly what we want, because we don’t know the size of the block and now we have the perfect block.
I hope you remembered the texture, otherwise you must check which one it is. Do the same thing for the other room. If you’ve done it right, it looks like this:
file:///C|/tutorial%20basics%20by%20RJD.htm (43 of 54)14-9-2004 19:58:52

3D GameStudio
Now add standard.wad to the level and give the block the texture you would give a door. Save it under a name, door.wmp for example, and save it in the folder you’re working. Click on the build button, but now build it as a Map Entity. Go back now to your level and add your door as a Map Entity and move your door in place. But it isn’t a door yet. You can give Map Entities, just like models, an action. In our case, we want it to have the door action. Now build your level, and don’t only update the entities, but build the whole level. You can open the door by walking to it and press space when you come close to it.
Now build your level, and don’t only update the entities, but build the whole level. You can open the door by walking to it and press space when you come close to it.
file:///C|/tutorial%20basics%20by%20RJD.htm (44 of 54)14-9-2004 19:58:52
3D GameStudio
Let the door exactly fit.
file:///C|/tutorial%20basics%20by%20RJD.htm (45 of 54)14-9-2004 19:58:52

3D GameStudio
We have killed our killer… and we have opened the door. Hmm, the door isn’t what we expected it to be. It doesn’t behave like a normal door. Yes, it opens, but that’s all. Now we can go left or right. But when you open a door, isn’t there one large doorway and not two little ones? Let’s fix that first before we go on.
This is the top view of door.wmp. Notice the green lines. They indicate the origin of the level. Most of the time this isn’t very important, but now it is important. The ‘door’ action makes a model or map entity rotate around its vertical axis, which is precisely located at the origin of the model or map entity. So it isn’t a big surprise (once you know this) that the door behaves like this while it is rotating:
file:///C|/tutorial%20basics%20by%20RJD.htm (46 of 54)14-9-2004 19:58:52

3D GameStudio
Open door.wmp again.
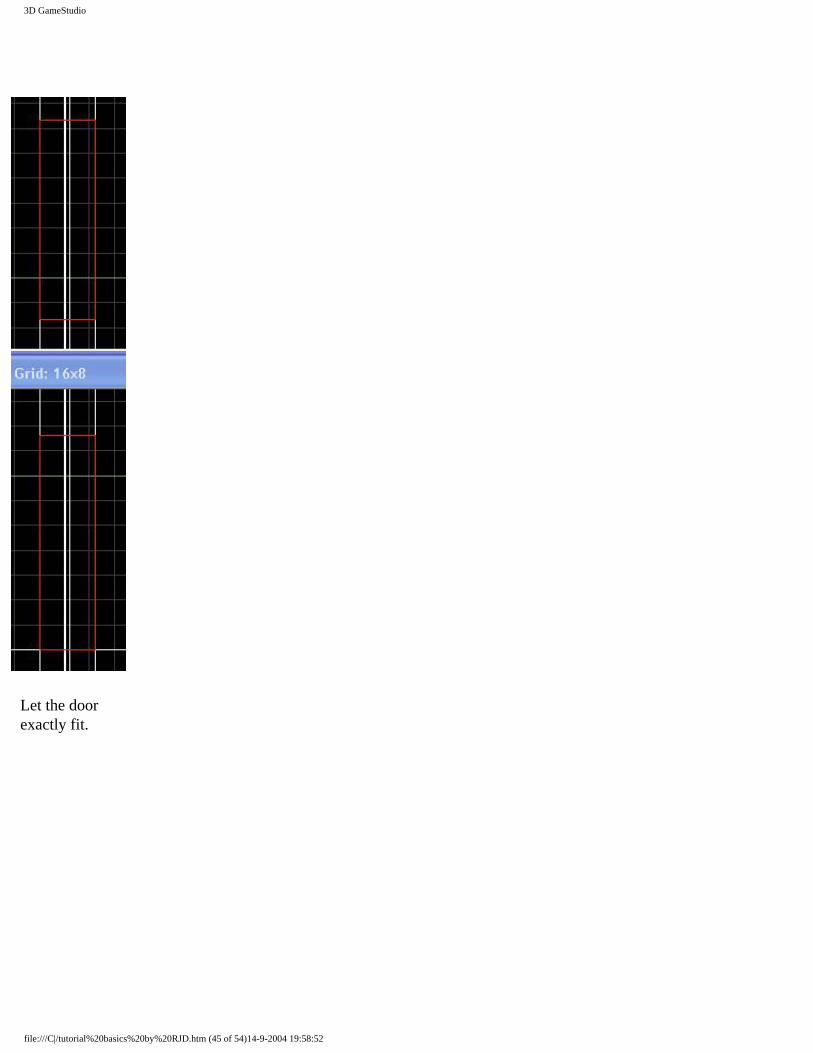
To correct this, you must move the redlined side four squares upwards and one to the left. Now the door will look and behave like this:
You see that everything is all right now. Save the door, and build it again as a map entity. Now go back to your level, delete the old door, and load the new one. Set it in place and give it the ‘door’ action. Build your level again and run it.
file:///C|/tutorial%20basics%20by%20RJD.htm (47 of 54)14-9-2004 19:58:52
3D GameStudio
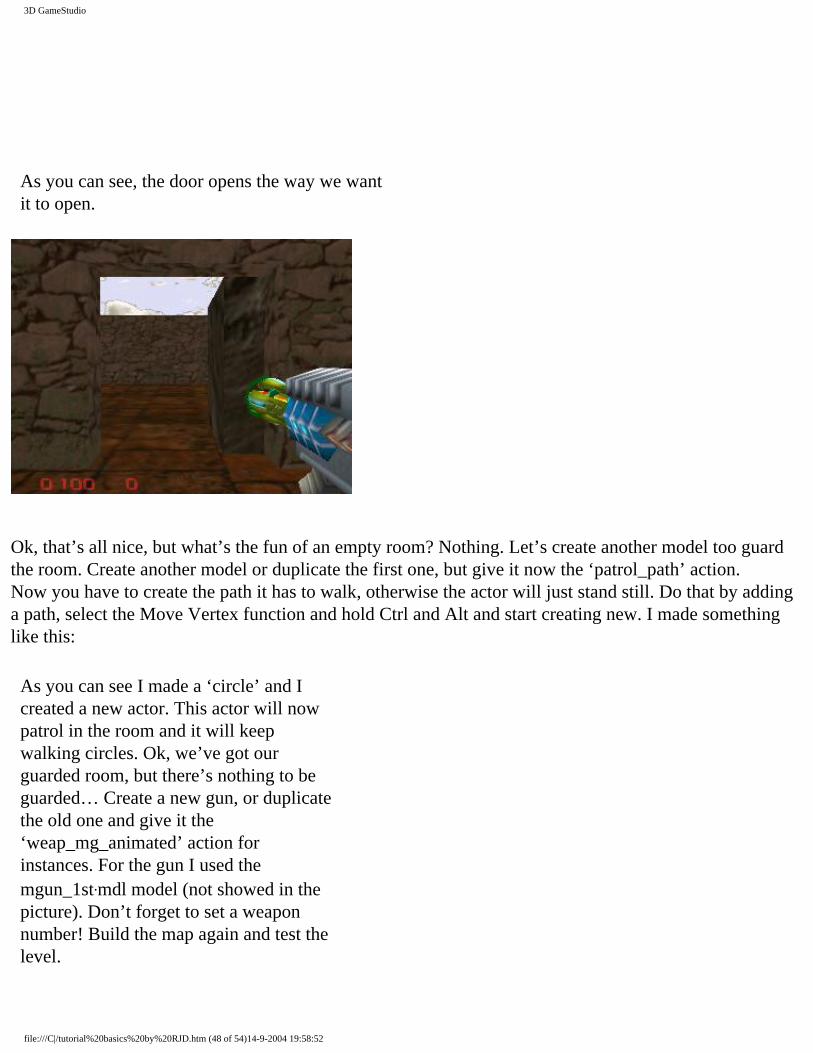
As you can see, the door opens the way we want it to open.
Ok, that’s all nice, but what’s the fun of an empty room? Nothing. Let’s create another model too guard the room. Create another model or duplicate the first one, but give it now the ‘patrol_path’ action.Now you have to create the path it has to walk, otherwise the actor will just stand still. Do that by adding a path, select the Move Vertex function and hold Ctrl and Alt and start creating new. I made something like this:
As you can see I made a ‘circle’ and I created a new actor. This actor will now patrol in the room and it will keep walking circles. Ok, we’ve got our guarded room, but there’s nothing to be guarded… Create a new gun, or duplicate the old one and give it the ‘weap_mg_animated’ action for instances. For the gun I used the mgun_1st.mdl model (not showed in the picture). Don’t forget to set a weapon number! Build the map again and test the level.
file:///C|/tutorial%20basics%20by%20RJD.htm (48 of 54)14-9-2004 19:58:52

3D GameStudio
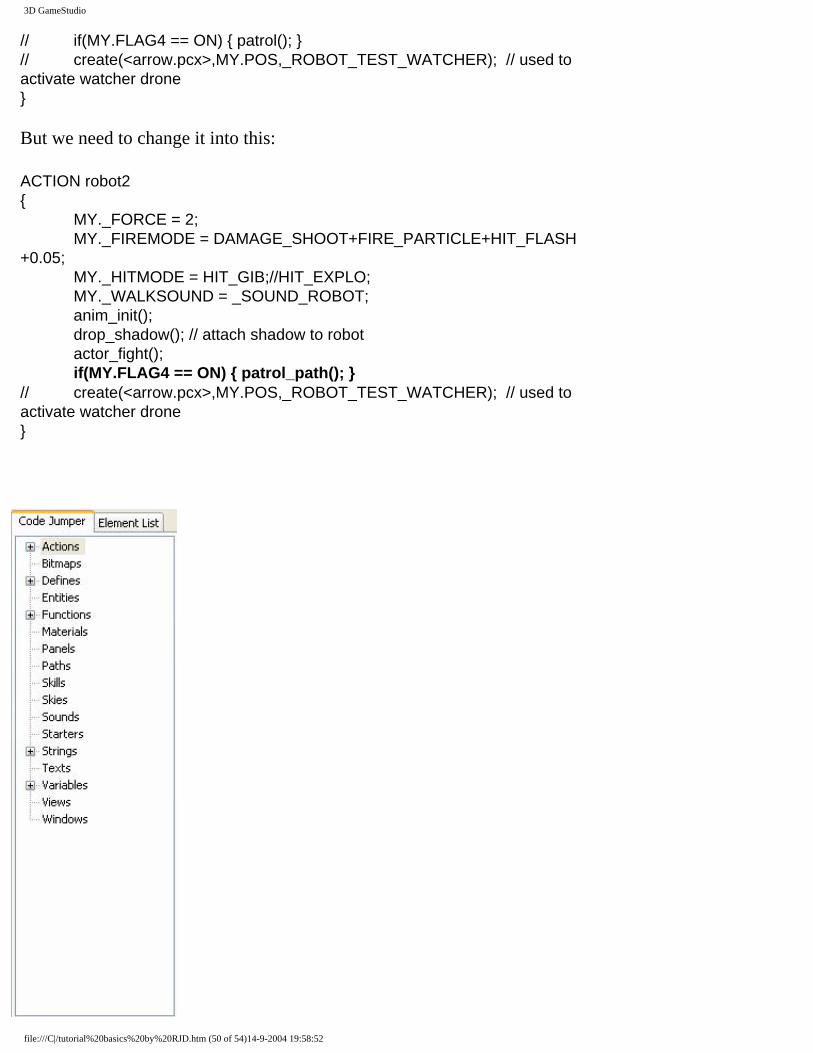
Ok, the newly created actor patrols the route we have set for him, but it doesn’t do anything when it sees the player. In fact, he won’t do anything at all except walking, he even won’t die when we shoot him! This is easy to fix, but it requires some scripting. Don’t worry if you don’t know how to script, this bit is very simple. Open war.wdl in the template folder and go to the robot2 action. You can go there by clicking on the ‘+’ next to ‘actions’ in the right column of the screen. It’s called ‘Code Jumper’:
If you click the plus sign, a list of actions appears. Click on the ‘robot2’ action. Now the visible lines of code have changed and now there stands the ‘robot2’ action plus some other things. This is the original ‘robot2’ action:ACTION robot2{ MY._FORCE = 2; MY._FIREMODE = DAMAGE_SHOOT+FIRE_PARTICLE+HIT_FLASH+0.05; MY._HITMODE = HIT_GIB;//HIT_EXPLO; MY._WALKSOUND = _SOUND_ROBOT; anim_init(); drop_shadow(); // attach shadow to robot actor_fight();
file:///C|/tutorial%20basics%20by%20RJD.htm (49 of 54)14-9-2004 19:58:52
3D GameStudio
// if(MY.FLAG4 == ON) { patrol(); }// create(<arrow.pcx>,MY.POS,_ROBOT_TEST_WATCHER); // used to activate watcher drone} But we need to change it into this: ACTION robot2{ MY._FORCE = 2; MY._FIREMODE = DAMAGE_SHOOT+FIRE_PARTICLE+HIT_FLASH+0.05; MY._HITMODE = HIT_GIB;//HIT_EXPLO; MY._WALKSOUND = _SOUND_ROBOT; anim_init(); drop_shadow(); // attach shadow to robot actor_fight(); if(MY.FLAG4 == ON) { patrol_path(); }// create(<arrow.pcx>,MY.POS,_ROBOT_TEST_WATCHER); // used to activate watcher drone}
file:///C|/tutorial%20basics%20by%20RJD.htm (50 of 54)14-9-2004 19:58:52

3D GameStudio
You can copy and past the code or change that one line, that’s up to you. But before you do something like that, back-up war.wdl first. You never know what might go wrong…
Now save the file in the template folder and go back to WED, change the action of the patrolling model from ‘patrol_path’ to ‘robot2’ and select flag 4. Now it just behaves like the normal ‘actor_walk_fight’ action, but now he’s walking along the path and he shoots the player when he sees him:
Pity for him he didn’t make it. Now your simple game is finished, so let’s make an EXE-file from it.
file:///C|/tutorial%20basics%20by%20RJD.htm (51 of 54)14-9-2004 19:58:52
3D GameStudio
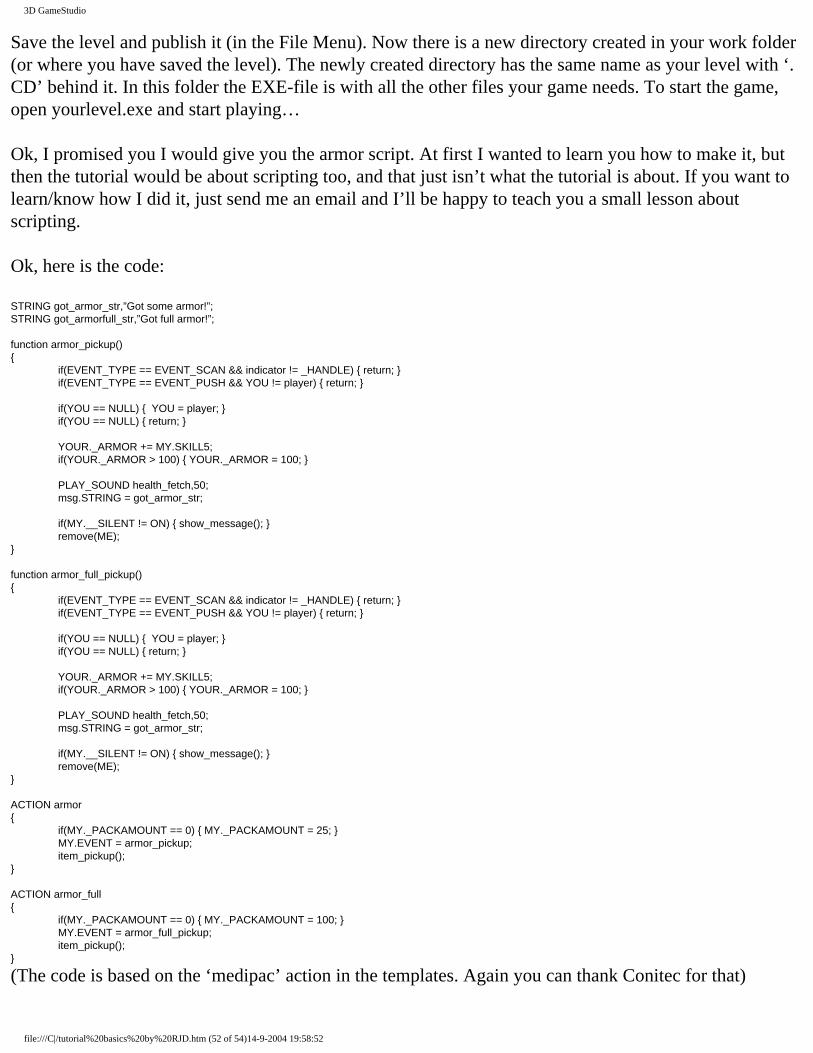
Save the level and publish it (in the File Menu). Now there is a new directory created in your work folder (or where you have saved the level). The newly created directory has the same name as your level with ‘.CD’ behind it. In this folder the EXE-file is with all the other files your game needs. To start the game, open yourlevel.exe and start playing… Ok, I promised you I would give you the armor script. At first I wanted to learn you how to make it, but then the tutorial would be about scripting too, and that just isn’t what the tutorial is about. If you want to learn/know how I did it, just send me an email and I’ll be happy to teach you a small lesson about scripting. Ok, here is the code: STRING got_armor_str,”Got some armor!”;STRING got_armorfull_str,”Got full armor!”; function armor_pickup(){ if(EVENT_TYPE == EVENT_SCAN && indicator != _HANDLE) { return; } if(EVENT_TYPE == EVENT_PUSH && YOU != player) { return; } if(YOU == NULL) { YOU = player; } if(YOU == NULL) { return; } YOUR._ARMOR += MY.SKILL5; if(YOUR._ARMOR > 100) { YOUR._ARMOR = 100; } PLAY_SOUND health_fetch,50; msg.STRING = got_armor_str; if(MY.__SILENT != ON) { show_message(); } remove(ME);} function armor_full_pickup(){ if(EVENT_TYPE == EVENT_SCAN && indicator != _HANDLE) { return; } if(EVENT_TYPE == EVENT_PUSH && YOU != player) { return; } if(YOU == NULL) { YOU = player; } if(YOU == NULL) { return; } YOUR._ARMOR += MY.SKILL5; if(YOUR._ARMOR > 100) { YOUR._ARMOR = 100; } PLAY_SOUND health_fetch,50; msg.STRING = got_armor_str; if(MY.__SILENT != ON) { show_message(); } remove(ME);} ACTION armor{ if(MY._PACKAMOUNT == 0) { MY._PACKAMOUNT = 25; } MY.EVENT = armor_pickup; item_pickup();} ACTION armor_full{ if(MY._PACKAMOUNT == 0) { MY._PACKAMOUNT = 100; } MY.EVENT = armor_full_pickup; item_pickup();}
(The code is based on the ‘medipac’ action in the templates. Again you can thank Conitec for that)
file:///C|/tutorial%20basics%20by%20RJD.htm (52 of 54)14-9-2004 19:58:52

3D GameStudio
The ‘armor’ action gives the player 25 more armorpoints, and the ‘armor_full’ action gives the player 100 points of armor or restores it to 100 points. To add this code to your game, open weapons.wdl, scroll down to the end of the script, and copy and paste the code there. Save the script and from now on you can let player pick up some armor.
Some tips for you Of course, with a game like this you would never have much success, but it isn’t bad for a beginner. Later you would have to add a story or something. Some tips for you:-In the beginning tryout a bit what kind of games you like best to make. And if you know that, try to find out what you like better: scripting, making levels or models. You can like and be good at more then one thing.-Don’t expect too much of your first few games/levels, because they will be no good. Later they will become better and better.-Add much DIFFERENT effects to your game (if you come to that stage, which you will surely will come to). If you’re using explosions or something, try to vary as much as possible, because looking every time to the same effects is a kind of boring.-Make sure the player know what to do next. If the payer doesn’t know what he has to do, or get something in a secret room that he can’t find anywhere, he will start disliking the game more and more in a very fast tempo. -Don’t make your games too hard. Because you are making the game, you find everything very easy to understand and find. Because you made the game, you know what to do next and how you can recognise things. This is an often made mistake (or I’m very bad at gamingJ). The game must be ‘player friendly’. -In the beginning you can use other people’s stuff (ONLY if you have their permission!!!), for the things you want, but can’t make yourself. For example, if you want a script for something, search for it (not on googleor an other search page, but on forums and sites about 3D GS) and take a good look at the scripts, so you can make your own scripts in the future and/or follow the C-script tutorial that comes with 3D GS. There are enough forums or webpage’s that have the script you are looking for. There are lots of links on the 3d GameStudio links page which you can use.-If you want to make games, just make them!
The end Ok, now you know the basics of 3D GS and how to make a simple shooter we’ve come to the end of this tutorial. I hope you have learned from it and found it useful. With your newly gained skills you can’t yet make a game that will land in the shops (if that’s your final goal). For that you will really need to learn a script language with which you can program in 3D GS (C, C++ or Delphi). Because there is much more room for improvement for everything. Have fun in creating 3D games with 3D GS, and all of you, good luck! You can always e-mail me if you got a question or something (maybe you want to know a good
file:///C|/tutorial%20basics%20by%20RJD.htm (53 of 54)14-9-2004 19:58:52

3D GameStudio
link for resources or (a) good forum(s). I didn’t mention links here, because I’m not sure if I’m allowed or not. With all that laws around, you never know… ;) ) Robert-Jan Drenth
file:///C|/tutorial%20basics%20by%20RJD.htm (54 of 54)14-9-2004 19:58:52