Embed Size (px)
Citation preview

G HUB Early Access Manual
Windows Installation 1
Mac Installation 1
Getting Started 2
1: Setting Up A Game Profile 3
2: G HUB Settings 5
3: Your Gear 7
LIGHTSYNC 8
LIGHTSYNC (Keyboards) 10
Assignments 13
How to create an assignment on your Gear 14
How to assign a G SHIFT command 16
Sensitivity (DPI) 17
Game Mode 20
Acoustics 21
Equalizer 23
Webcam 25
Camera 25
+ ADD NEW CAMERA 25
Video 26
+ ADD NEW FILTER 27
4. Advanced settings 28
Assignments: Create new macro 28
Assignments: Program a macro 29
Simple Macro 29
Advanced Macro 30
Assignments: Command Lighting 33
Assignments: Profile Cycle and Onboard Profile Cycle Commands 36
LIGHTSYNC: Animations 37
LIGHTSYNC: Create an animation 38
LIGHTSYNC: Audio Visualizer 40
Audio Visualizer features for Keyboards 41
LIGHTSYNC: Screen Sampler 42
LIGHTSYNC: Screen Sampler Edit 44
Screen Sampler for light and sound devices 45
Screen Sampler for Mice 46
1
Windows Installation 1. Download the G HUB Early Access executable and double click the file to start the installation. You may be
prompted to install .NET 3.5 first, if not previously enabled through Windows Features. You will need this
Windows feature to install G HUB.
Note: If User Account Control asks you ‘Do you want to allow this app to make changed to your device?’ click Yes
2. When the Logitech G HUB windows appears click INSTALL to continue.
3. You will see a progress bar, once the download is complete click INSTALL AND LAUNCH
4. Whilst G HUB is being setup, you may see the logo animation for a short time. Once setup is complete you will
see the patch notes. Click the X at the top to take you to the home screen
5. Congratulations on installing G HUB!
To uninstall G HUB: For Windows 10, go to Windows Settings > Apps > Apps and Features > highlight G HUB and
Uninstall. For Windows 7/8/8.1 go to Control Panel > Programs > Programs and Features > highlight G HUB and
Uninstall
Mac Installation 1. Download the G HUB Early Access executable and run the application from your downloads
2. When the Logitech G HUB windows appears click INSTALL to continue.
3. You will see a progress bar, once the download is complete click INSTALL AND LAUNCH
To uninstall G HUB: Go to Application and run the Logitech G HUB Uninstaller. Or drag the Logitech G HUB application
onto the Trash
2
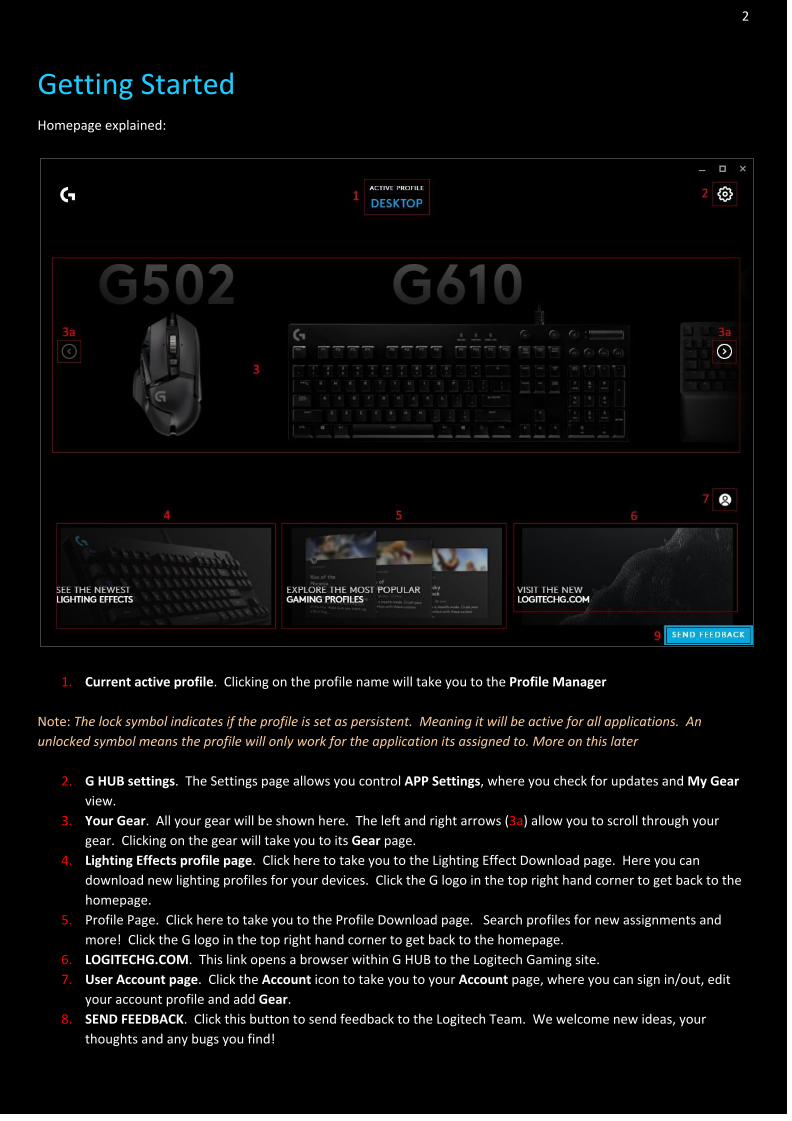
Getting Started Homepage explained:
1. Current active profile. Clicking on the profile name will take you to the Profile Manager
Note: The lock symbol indicates if the profile is set as persistent. Meaning it will be active for all applications. An
unlocked symbol means the profile will only work for the application its assigned to. More on this later
2. G HUB settings. The Settings page allows you control APP Settings, where you check for updates and My Gear
view.
3. Your Gear. All your gear will be shown here. The left and right arrows (3a) allow you to scroll through your
gear. Clicking on the gear will take you to its Gear page.
4. Lighting Effects profile page. Click here to take you to the Lighting Effect Download page. Here you can
download new lighting profiles for your devices. Click the G logo in the top right hand corner to get back to the
homepage.
5. Profile Page. Click here to take you to the Profile Download page. Search profiles for new assignments and
more! Click the G logo in the top right hand corner to get back to the homepage.
6. LOGITECHG.COM. This link opens a browser within G HUB to the Logitech Gaming site.
7. User Account page. Click the Account icon to take you to your Account page, where you can sign in/out, edit
your account profile and add Gear. 8. SEND FEEDBACK. Click this button to send feedback to the Logitech Team. We welcome new ideas, your
thoughts and any bugs you find!
3
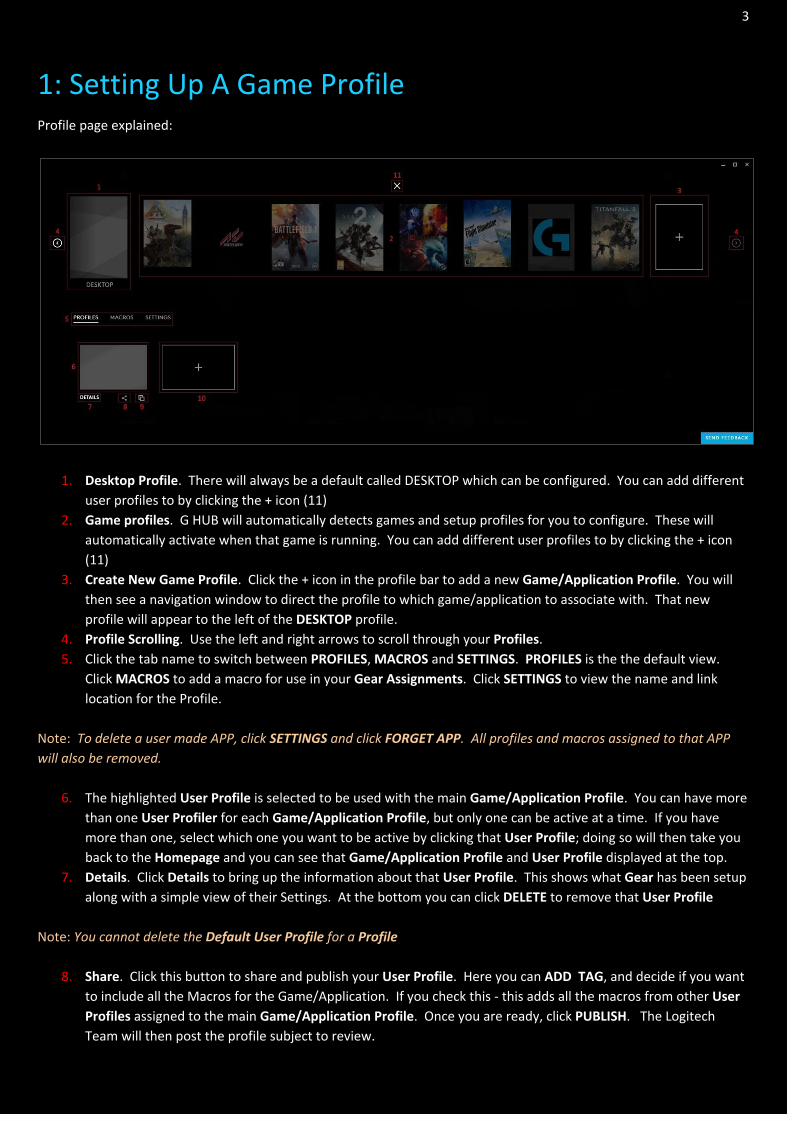
1: Setting Up A Game Profile Profile page explained:
1. Desktop Profile. There will always be a default called DESKTOP which can be configured. You can add different
user profiles to by clicking the + icon (11)
2. Game profiles. G HUB will automatically detects games and setup profiles for you to configure. These will
automatically activate when that game is running. You can add different user profiles to by clicking the + icon
(11)
3. Create New Game Profile. Click the + icon in the profile bar to add a new Game/Application Profile. You will
then see a navigation window to direct the profile to which game/application to associate with. That new
profile will appear to the left of the DESKTOP profile.
4. Profile Scrolling. Use the left and right arrows to scroll through your Profiles. 5. Click the tab name to switch between PROFILES, MACROS and SETTINGS. PROFILES is the the default view.
Click MACROS to add a macro for use in your Gear Assignments. Click SETTINGS to view the name and link
location for the Profile.
Note: To delete a user made APP, click SETTINGS and click FORGET APP. All profiles and macros assigned to that APP
will also be removed.
6. The highlighted User Profile is selected to be used with the main Game/Application Profile. You can have more
than one User Profiler for each Game/Application Profile, but only one can be active at a time. If you have
more than one, select which one you want to be active by clicking that User Profile; doing so will then take you
back to the Homepage and you can see that Game/Application Profile and User Profile displayed at the top.
7. Details. Click Details to bring up the information about that User Profile. This shows what Gear has been setup
along with a simple view of their Settings. At the bottom you can click DELETE to remove that User Profile
Note: You cannot delete the Default User Profile for a Profile
8. Share. Click this button to share and publish your User Profile. Here you can ADD TAG, and decide if you want
to include all the Macros for the Game/Application. If you check this - this adds all the macros from other User
Profiles assigned to the main Game/Application Profile. Once you are ready, click PUBLISH. The Logitech
Team will then post the profile subject to review.

4
9. Duplicate User Profile. Click this to create a copy of the User Profile, which you can then configure for another
user or possibly for a different class of character for example.
10. Create a new User Profile. This creates a blank User Profile for you to configure for the Game/Application
Profile. The User Profile will automatically populate with the Gear plugged in at that time, but you can add
Gear to the User Profile at any time.
11. Click the X to go back to the Homepage
5
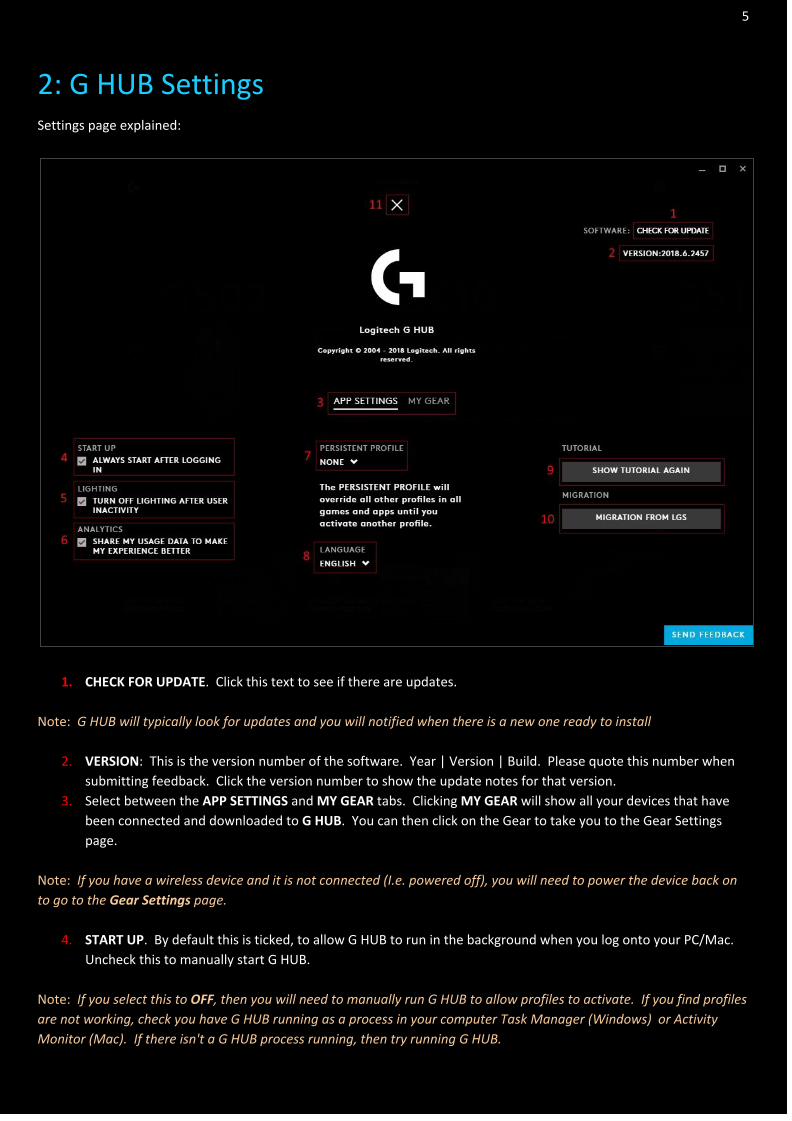
2: G HUB Settings Settings page explained:
1. CHECK FOR UPDATE. Click this text to see if there are updates.
Note: G HUB will typically look for updates and you will notified when there is a new one ready to install
2. VERSION: This is the version number of the software. Year | Version | Build. Please quote this number when
submitting feedback. Click the version number to show the update notes for that version.
3. Select between the APP SETTINGS and MY GEAR tabs. Clicking MY GEAR will show all your devices that have
been connected and downloaded to G HUB. You can then click on the Gear to take you to the Gear Settings
page.
Note: If you have a wireless device and it is not connected (I.e. powered off), you will need to power the device back on
to go to the Gear Settings page.
4. START UP. By default this is ticked, to allow G HUB to run in the background when you log onto your PC/Mac.
Uncheck this to manually start G HUB.
Note: If you select this to OFF, then you will need to manually run G HUB to allow profiles to activate. If you find profiles
are not working, check you have G HUB running as a process in your computer Task Manager (Windows) or Activity
Monitor (Mac). If there isn't a G HUB process running, then try running G HUB.
6
5. LIGHTING. By default this is checked to ON. This setting is to help with power saving on Wireless devices.
Uncheck this if you want your Gear to always be using Lighting profiles even after a period of inactivity.
6. ANALYTICS. By default this set to OFF. Check this to enable anonymous usage data and help Logitech improve
G HUB!
7. PERSISTENT PROFILE. As mentioned in the Settings page, this will override all other User Profiles. Click the
drag down icon to show the list of your Profiles and their User Profiles. Select one by clicking the name. If you
then decide to not want a persistent User Profile, simply go to the Profile Manager page and select a different
profile as normal.
8. LANGUAGE. This shows which language is currently selected. Use the drag down icon to change the language.
9. SHOW TUTORIAL AGAIN. Click this to re-enable all the tool tips.
10. MIGRATION FROM LGS. Click this to cross check from LGS and import profiles compatible with your Gear list.
11. Click the X to go back to the Homepage
7
3: Your Gear Clicking on the picture of your device will take you to its Gear page. Depending on what device it is, you will see slightly
different options on the left hand side.
MICE
● LIGHTSYNC
○ PRIMARY | LOGO
● Assignments
○ AUDIO | MACROS | SYSTEM
● Sensitivity (DPI)
KEYBOARDS
● LIGHTSYNC
○ PRESETS | FREESTYLE | ANIMATIONS
● Assignments
○ AUDIO | MACROS | SYSTEM
● Game Mode
AUDIO (Headsets and Speakers)
● LIGHTSYNC
○ PRIMARY | LOGO
● Assignments
○ AUDIO | MACROS | SYSTEM
● Acoustics
● Equalizer
WEBCAMS
● Webcam
○ CAMERA | VIDEO
8
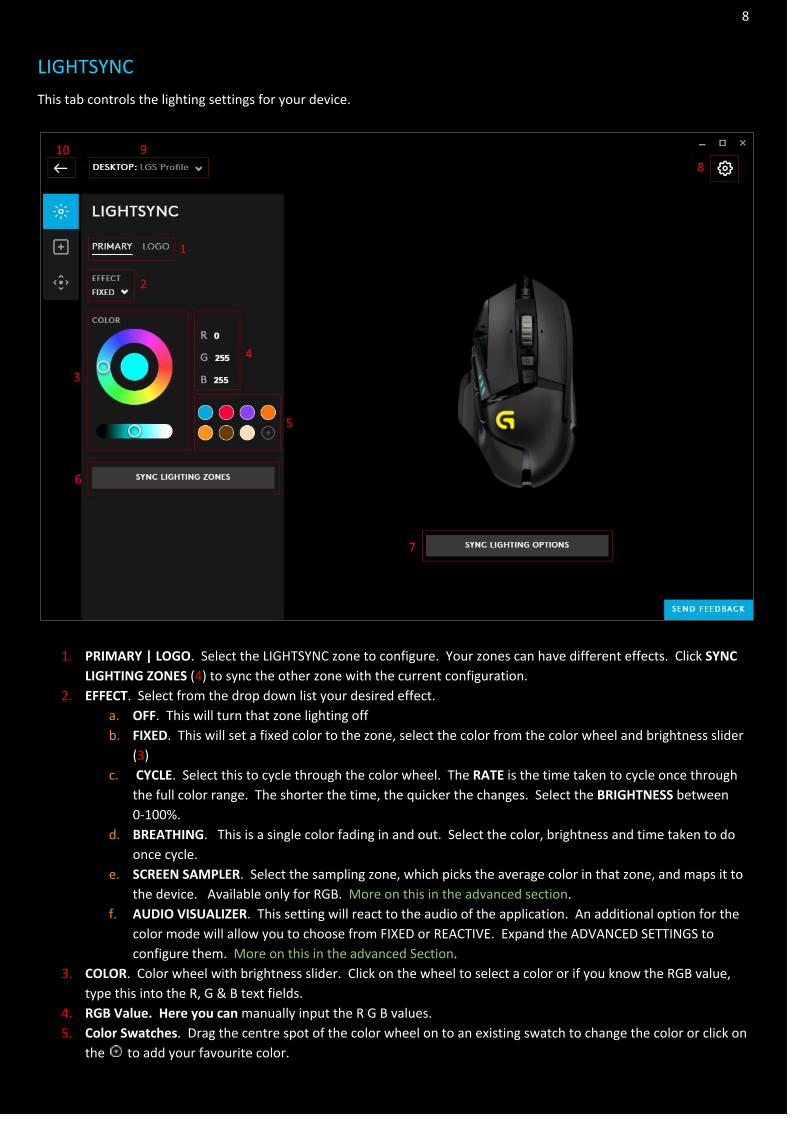
LIGHTSYNC
This tab controls the lighting settings for your device.
1. PRIMARY | LOGO. Select the LIGHTSYNC zone to configure. Your zones can have different effects. Click SYNC
LIGHTING ZONES (4) to sync the other zone with the current configuration.
2. EFFECT. Select from the drop down list your desired effect.
a. OFF. This will turn that zone lighting off
b. FIXED. This will set a fixed color to the zone, select the color from the color wheel and brightness slider
(3) c. CYCLE. Select this to cycle through the color wheel. The RATE is the time taken to cycle once through
the full color range. The shorter the time, the quicker the changes. Select the BRIGHTNESS between
0-100%.
d. BREATHING. This is a single color fading in and out. Select the color, brightness and time taken to do
once cycle.
e. SCREEN SAMPLER. Select the sampling zone, which picks the average color in that zone, and maps it to
the device. Available only for RGB. More on this in the advanced section. f. AUDIO VISUALIZER. This setting will react to the audio of the application. An additional option for the
color mode will allow you to choose from FIXED or REACTIVE. Expand the ADVANCED SETTINGS to
configure them. More on this in the advanced Section. 3. COLOR. Color wheel with brightness slider. Click on the wheel to select a color or if you know the RGB value,
type this into the R, G & B text fields.
4. RGB Value. Here you can manually input the R G B values.
5. Color Swatches. Drag the centre spot of the color wheel on to an existing swatch to change the color or click on
the to add your favourite color.
9
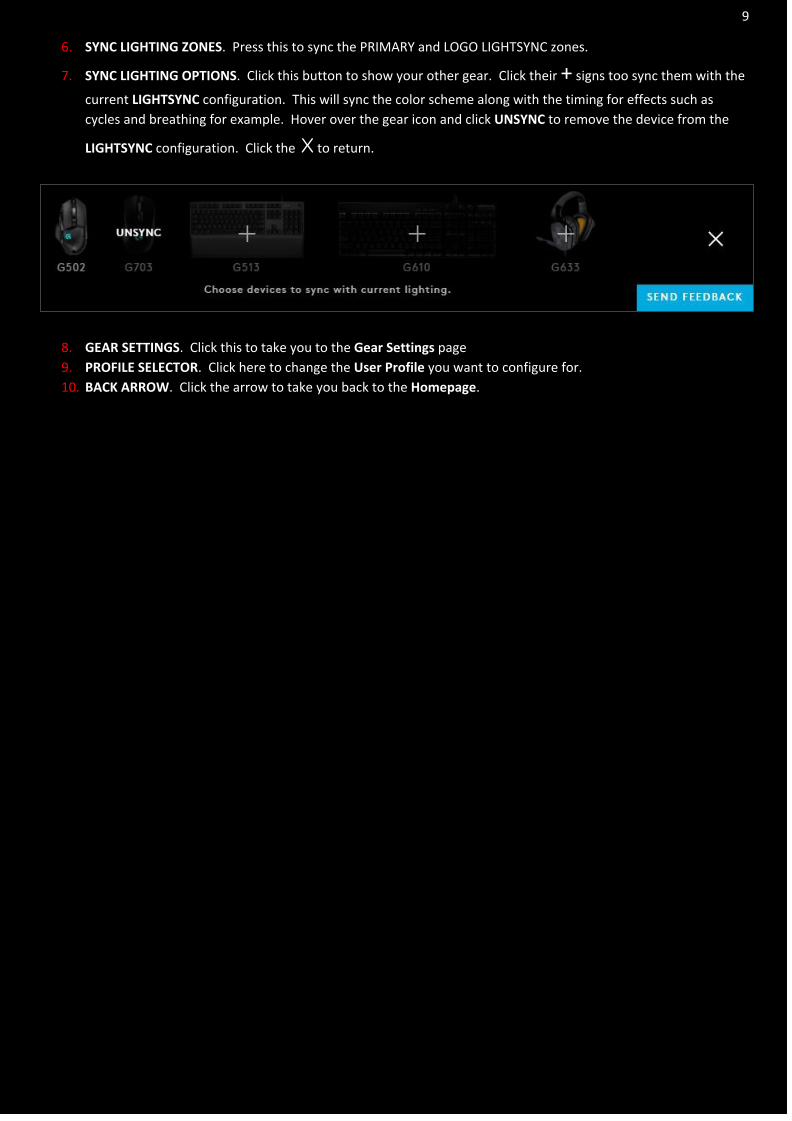
6. SYNC LIGHTING ZONES. Press this to sync the PRIMARY and LOGO LIGHTSYNC zones.
7. SYNC LIGHTING OPTIONS. Click this button to show your other gear. Click their + signs too sync them with the
current LIGHTSYNC configuration. This will sync the color scheme along with the timing for effects such as
cycles and breathing for example. Hover over the gear icon and click UNSYNC to remove the device from the
LIGHTSYNC configuration. Click the X to return.
8. GEAR SETTINGS. Click this to take you to the Gear Settings page
9. PROFILE SELECTOR. Click here to change the User Profile you want to configure for.
10. BACK ARROW. Click the arrow to take you back to the Homepage.
10
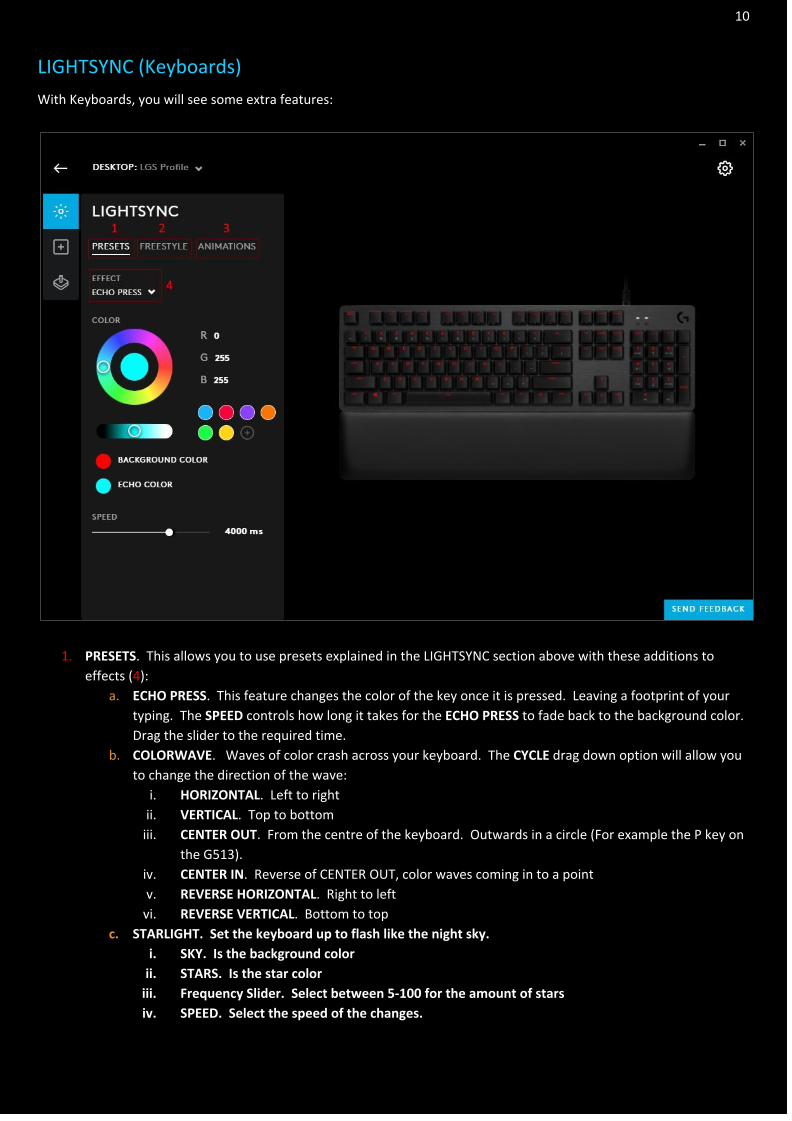
LIGHTSYNC (Keyboards)
With Keyboards, you will see some extra features:
1. PRESETS. This allows you to use presets explained in the LIGHTSYNC section above with these additions to
effects (4): a. ECHO PRESS. This feature changes the color of the key once it is pressed. Leaving a footprint of your
typing. The SPEED controls how long it takes for the ECHO PRESS to fade back to the background color.
Drag the slider to the required time.
b. COLORWAVE. Waves of color crash across your keyboard. The CYCLE drag down option will allow you
to change the direction of the wave:
i. HORIZONTAL. Left to right
ii. VERTICAL. Top to bottom
iii. CENTER OUT. From the centre of the keyboard. Outwards in a circle (For example the P key on
the G513).
iv. CENTER IN. Reverse of CENTER OUT, color waves coming in to a point
v. REVERSE HORIZONTAL. Right to left
vi. REVERSE VERTICAL. Bottom to top
c. STARLIGHT. Set the keyboard up to flash like the night sky.
i. SKY. Is the background color
ii. STARS. Is the star color
iii. Frequency Slider. Select between 5-100 for the amount of stars
iv. SPEED. Select the speed of the changes.
11
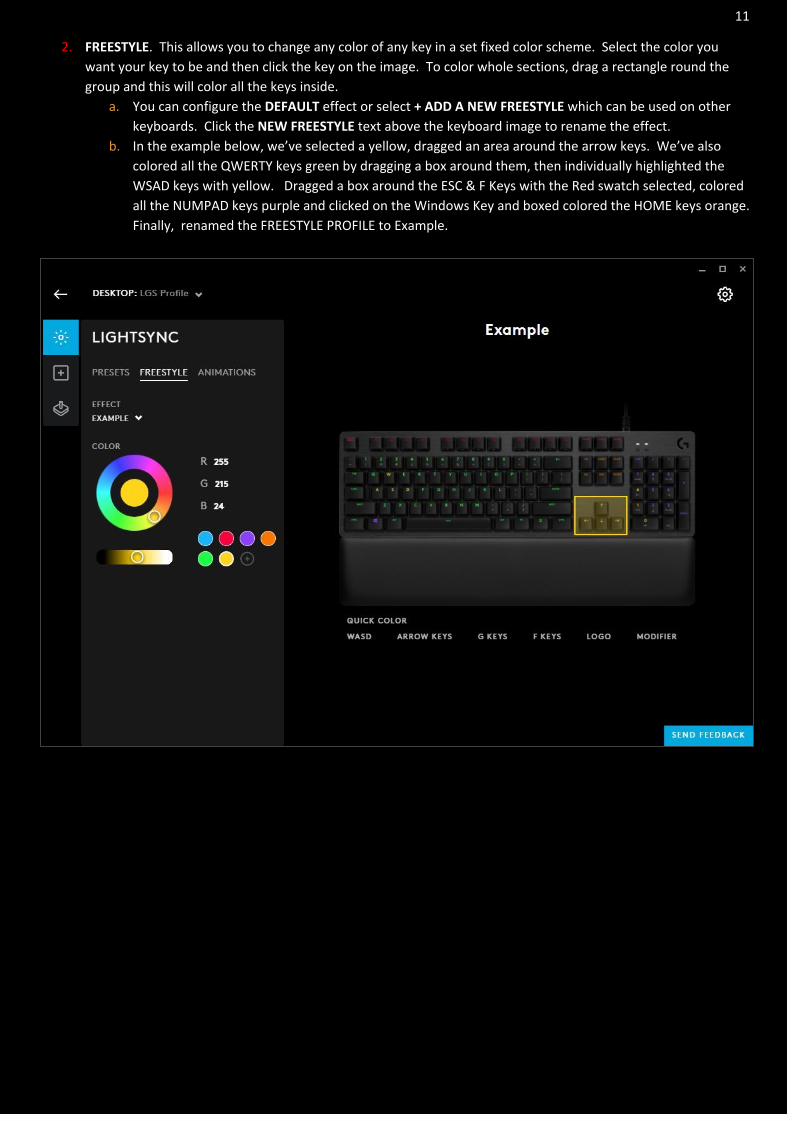
2. FREESTYLE. This allows you to change any color of any key in a set fixed color scheme. Select the color you
want your key to be and then click the key on the image. To color whole sections, drag a rectangle round the
group and this will color all the keys inside.
a. You can configure the DEFAULT effect or select + ADD A NEW FREESTYLE which can be used on other
keyboards. Click the NEW FREESTYLE text above the keyboard image to rename the effect.
b. In the example below, we’ve selected a yellow, dragged an area around the arrow keys. We’ve also
colored all the QWERTY keys green by dragging a box around them, then individually highlighted the
WSAD keys with yellow. Dragged a box around the ESC & F Keys with the Red swatch selected, colored
all the NUMPAD keys purple and clicked on the Windows Key and boxed colored the HOME keys orange.
Finally, renamed the FREESTYLE PROFILE to Example.
12
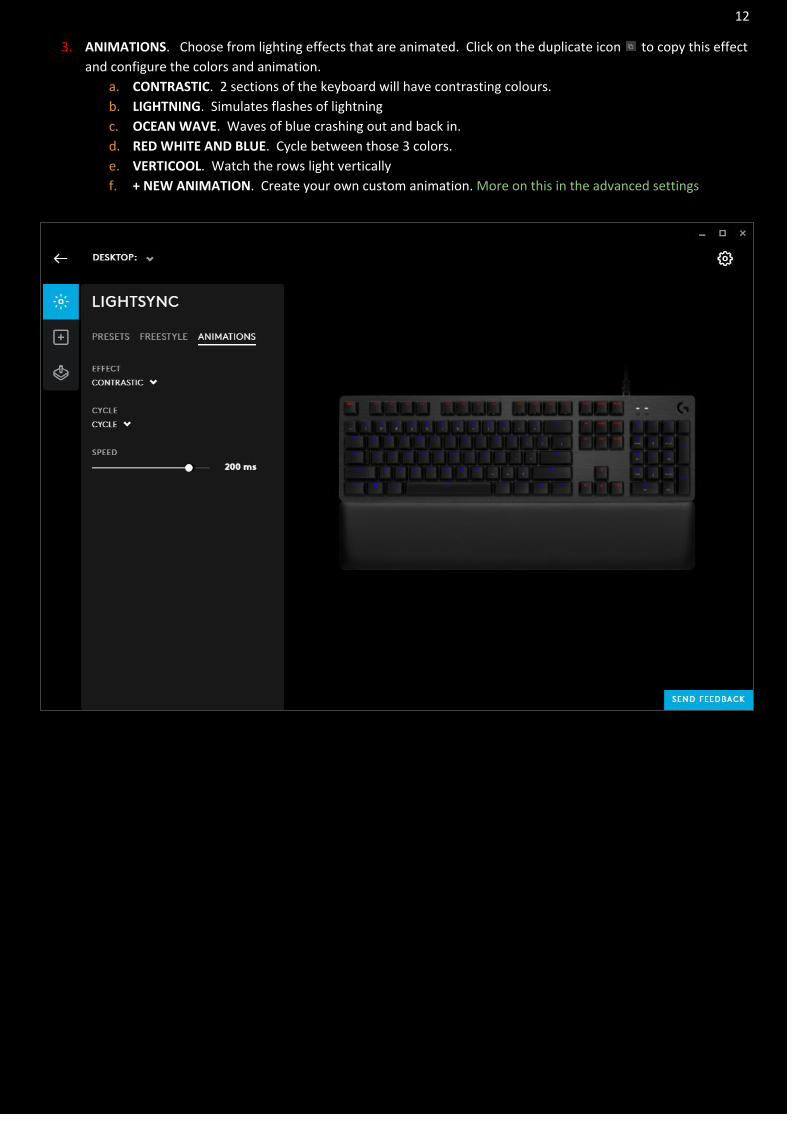
3. ANIMATIONS. Choose from lighting effects that are animated. Click on the duplicate icon to copy this effect
and configure the colors and animation.
a. CONTRASTIC. 2 sections of the keyboard will have contrasting colours.
b. LIGHTNING. Simulates flashes of lightning
c. OCEAN WAVE. Waves of blue crashing out and back in.
d. RED WHITE AND BLUE. Cycle between those 3 colors.
e. VERTICOOL. Watch the rows light vertically
f. + NEW ANIMATION. Create your own custom animation. More on this in the advanced settings
13
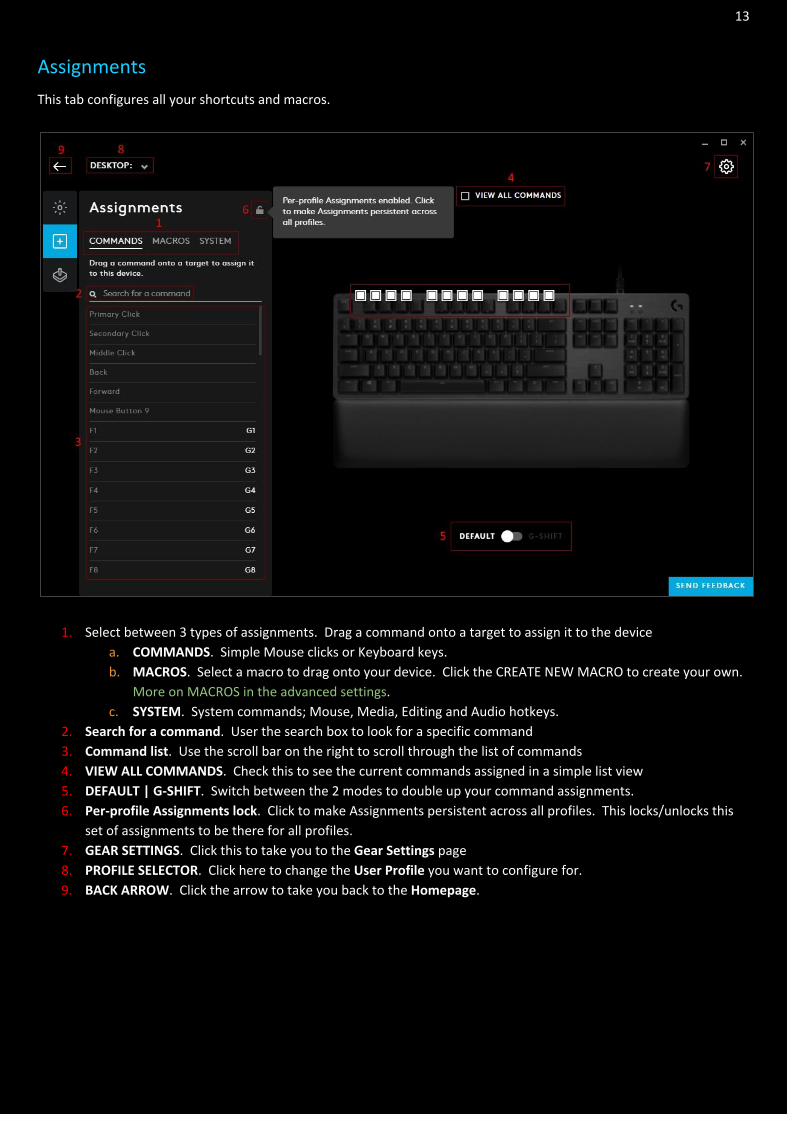
Assignments
This tab configures all your shortcuts and macros.
1. Select between 3 types of assignments. Drag a command onto a target to assign it to the device
a. COMMANDS. Simple Mouse clicks or Keyboard keys.
b. MACROS. Select a macro to drag onto your device. Click the CREATE NEW MACRO to create your own.
More on MACROS in the advanced settings. c. SYSTEM. System commands; Mouse, Media, Editing and Audio hotkeys.
2. Search for a command. User the search box to look for a specific command
3. Command list. Use the scroll bar on the right to scroll through the list of commands
4. VIEW ALL COMMANDS. Check this to see the current commands assigned in a simple list view
5. DEFAULT | G-SHIFT. Switch between the 2 modes to double up your command assignments.
6. Per-profile Assignments lock. Click to make Assignments persistent across all profiles. This locks/unlocks this
set of assignments to be there for all profiles.
7. GEAR SETTINGS. Click this to take you to the Gear Settings page
8. PROFILE SELECTOR. Click here to change the User Profile you want to configure for.
9. BACK ARROW. Click the arrow to take you back to the Homepage.
14
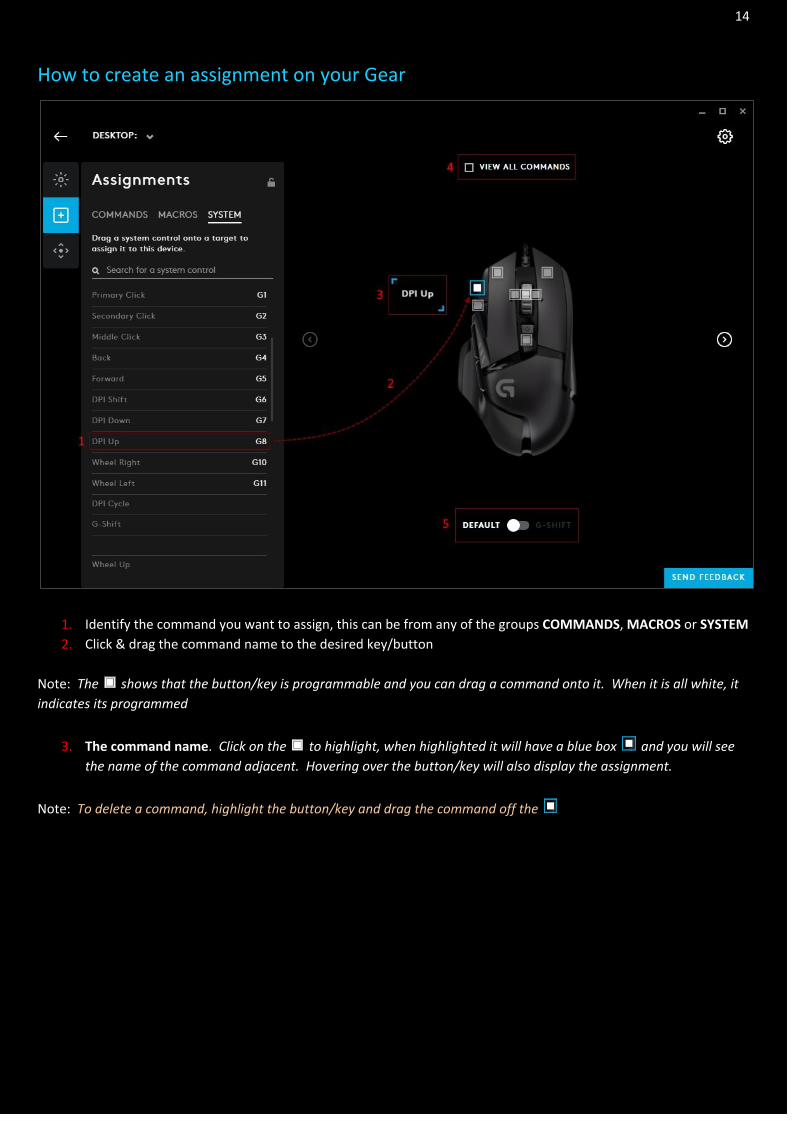
How to create an assignment on your Gear
1. Identify the command you want to assign, this can be from any of the groups COMMANDS, MACROS or SYSTEM
2. Click & drag the command name to the desired key/button
Note: The shows that the button/key is programmable and you can drag a command onto it. When it is all white, it
indicates its programmed
3. The command name. Click on the to highlight, when highlighted it will have a blue box and you will see
the name of the command adjacent. Hovering over the button/key will also display the assignment.
Note: To delete a command, highlight the button/key and drag the command off the
15
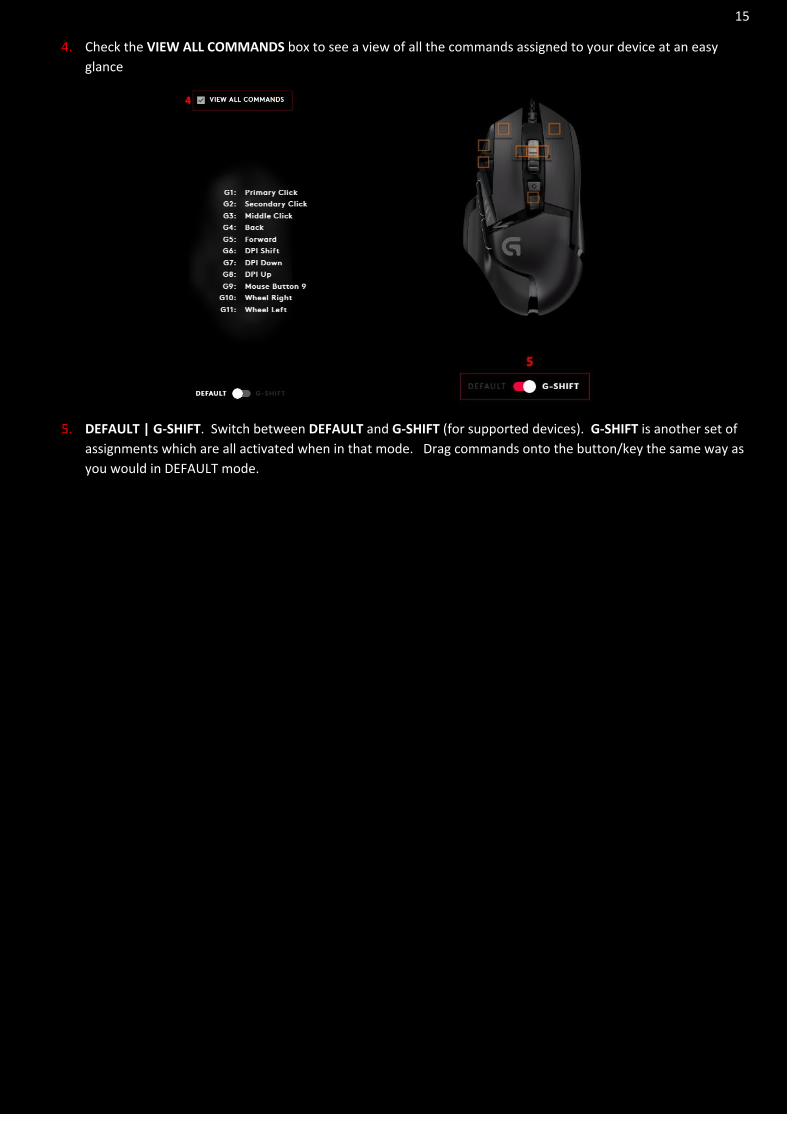
4. Check the VIEW ALL COMMANDS box to see a view of all the commands assigned to your device at an easy
glance
5. DEFAULT | G-SHIFT. Switch between DEFAULT and G-SHIFT (for supported devices). G-SHIFT is another set of
assignments which are all activated when in that mode. Drag commands onto the button/key the same way as
you would in DEFAULT mode.
16
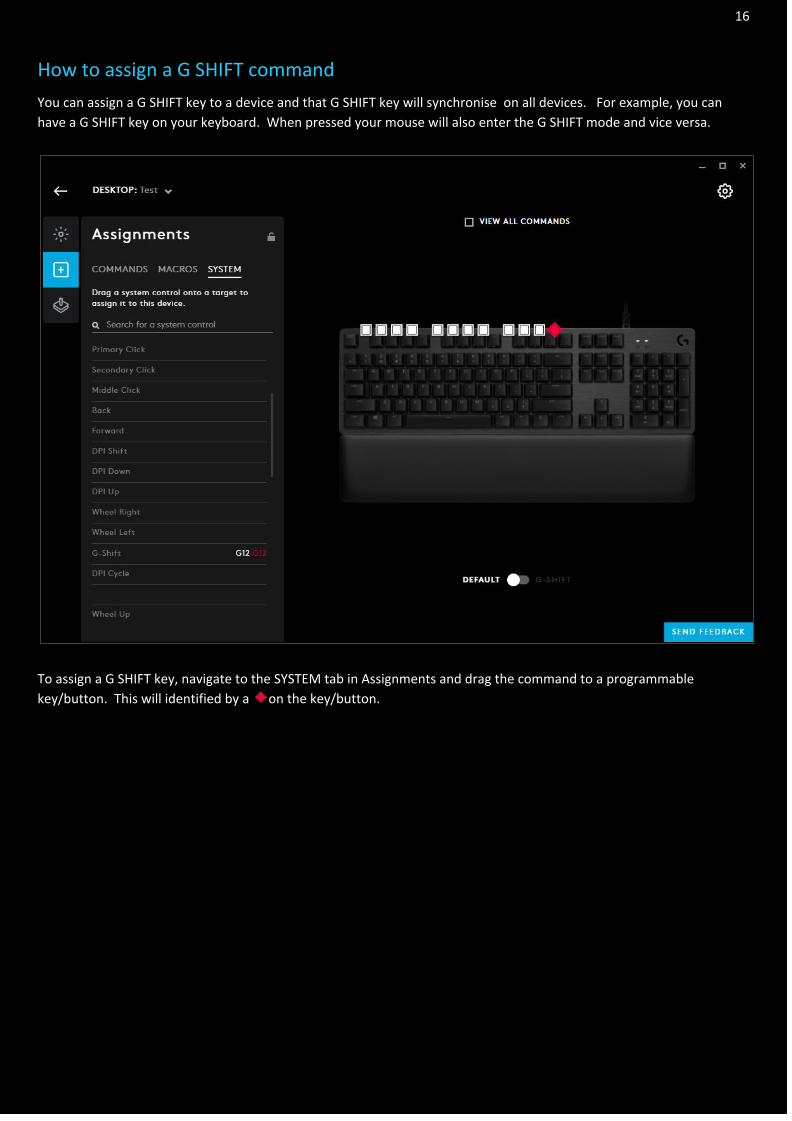
How to assign a G SHIFT command
You can assign a G SHIFT key to a device and that G SHIFT key will synchronise on all devices. For example, you can
have a G SHIFT key on your keyboard. When pressed your mouse will also enter the G SHIFT mode and vice versa.
To assign a G SHIFT key, navigate to the SYSTEM tab in Assignments and drag the command to a programmable
key/button. This will identified by a on the key/button.
17
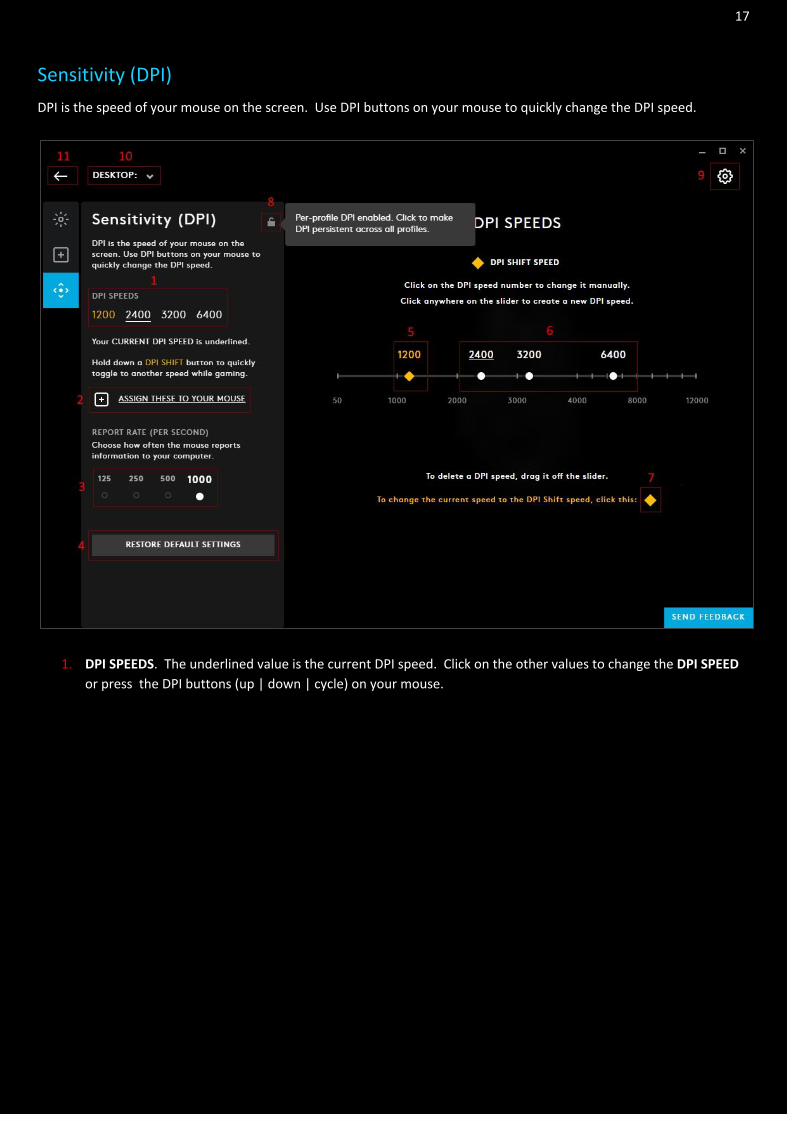
Sensitivity (DPI)
DPI is the speed of your mouse on the screen. Use DPI buttons on your mouse to quickly change the DPI speed.
1. DPI SPEEDS. The underlined value is the current DPI speed. Click on the other values to change the DPI SPEED
or press the DPI buttons (up | down | cycle) on your mouse.

18
2. ASSIGN DPI CONTROLS. Clicking this will take you to the Assignments page. There is an automatic search in the
SYSTEM tab with DPI performed to show you just the DPI commands. Not all mice have a DPI SHIFT command
assigned to a button by default so check if you have this command assigned before using it.
Note: You might have to click the Left/Right arrows either side of the device to see the other button/key view
3. REPORT RATE. This is the speed at which the mouse reports to the computer. By default this should be 1000
and you shouldn't need to change it. If you see skipping with the mouse pointer, reducing this might help.
4. RESTORE DEFAULT SETTINGS. Click this to reset the mouse DPI settings back to factory settings.
5. DPI SHIFt SPEED. One of the DPI modes will be selected as the DPI SHIFT SPEED, this is indicated by being yellow
6. SPI SLIDERS
a. Drag the sliders to the desired DPI values.
b. The DPI SHIFT speed in yellow is the assigned DPI value for your DPI SHIFT button
c. Click on the slider bar to create a new DPI speed
d. Drag a DPI Speed off by dragging the slider downwards; off the the slider bar.
e. All changes are saved automatically
Note: There are a maximum set of DPI speeds a mouse can have. For example the G502 can support up to 5 individual
DPI values.
7. Change to be DPI SHIFT Speed. Click the yellow diamond to Select the DPI mode you want to be the new DPI
SHIFT speed
8. PER-PROFILE DPI LOCK. Lock this to set the DPI configuration for all your profiles.
9. GEAR SETTINGS. Click this to take you to the Gear Settings page
10. PROFILE SELECTOR. Click here to change the User Profile you want to configure for.
11. BACK ARROW. Click the arrow to take you back to the Homepage.
19
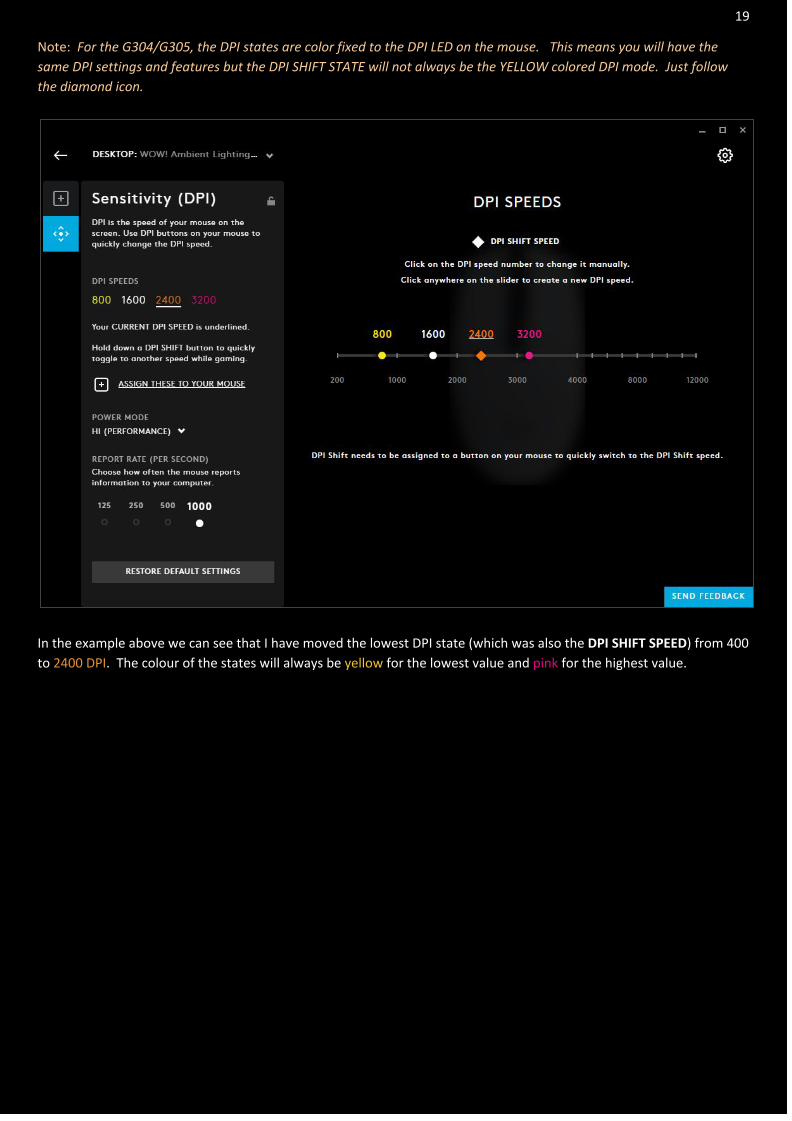
Note: For the G304/G305, the DPI states are color fixed to the DPI LED on the mouse. This means you will have the
same DPI settings and features but the DPI SHIFT STATE will not always be the YELLOW colored DPI mode. Just follow
the diamond icon.
In the example above we can see that I have moved the lowest DPI state (which was also the DPI SHIFT SPEED) from 400
to 2400 DPI. The colour of the states will always be yellow for the lowest value and pink for the highest value.
20
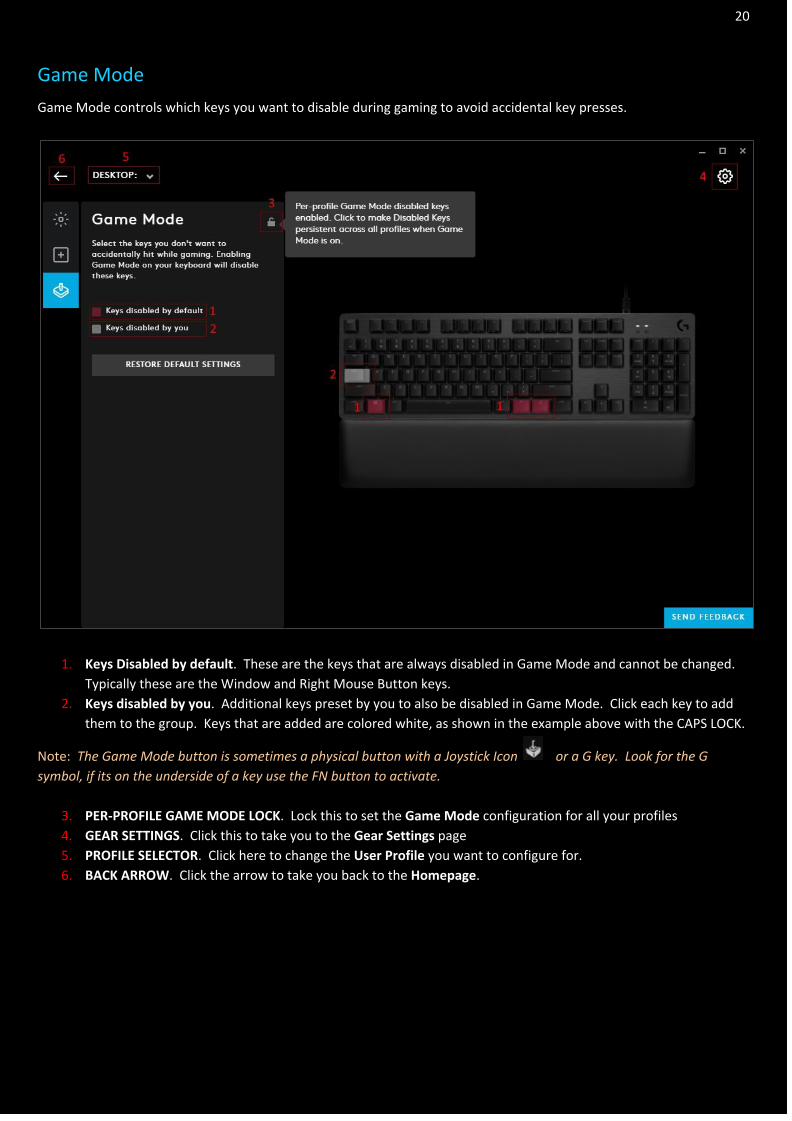
Game Mode
Game Mode controls which keys you want to disable during gaming to avoid accidental key presses.
1. Keys Disabled by default. These are the keys that are always disabled in Game Mode and cannot be changed.
Typically these are the Window and Right Mouse Button keys.
2. Keys disabled by you. Additional keys preset by you to also be disabled in Game Mode. Click each key to add
them to the group. Keys that are added are colored white, as shown in the example above with the CAPS LOCK.
Note: The Game Mode button is sometimes a physical button with a Joystick Icon or a G key. Look for the G
symbol, if its on the underside of a key use the FN button to activate.
3. PER-PROFILE GAME MODE LOCK. Lock this to set the Game Mode configuration for all your profiles
4. GEAR SETTINGS. Click this to take you to the Gear Settings page
5. PROFILE SELECTOR. Click here to change the User Profile you want to configure for.
6. BACK ARROW. Click the arrow to take you back to the Homepage.
21
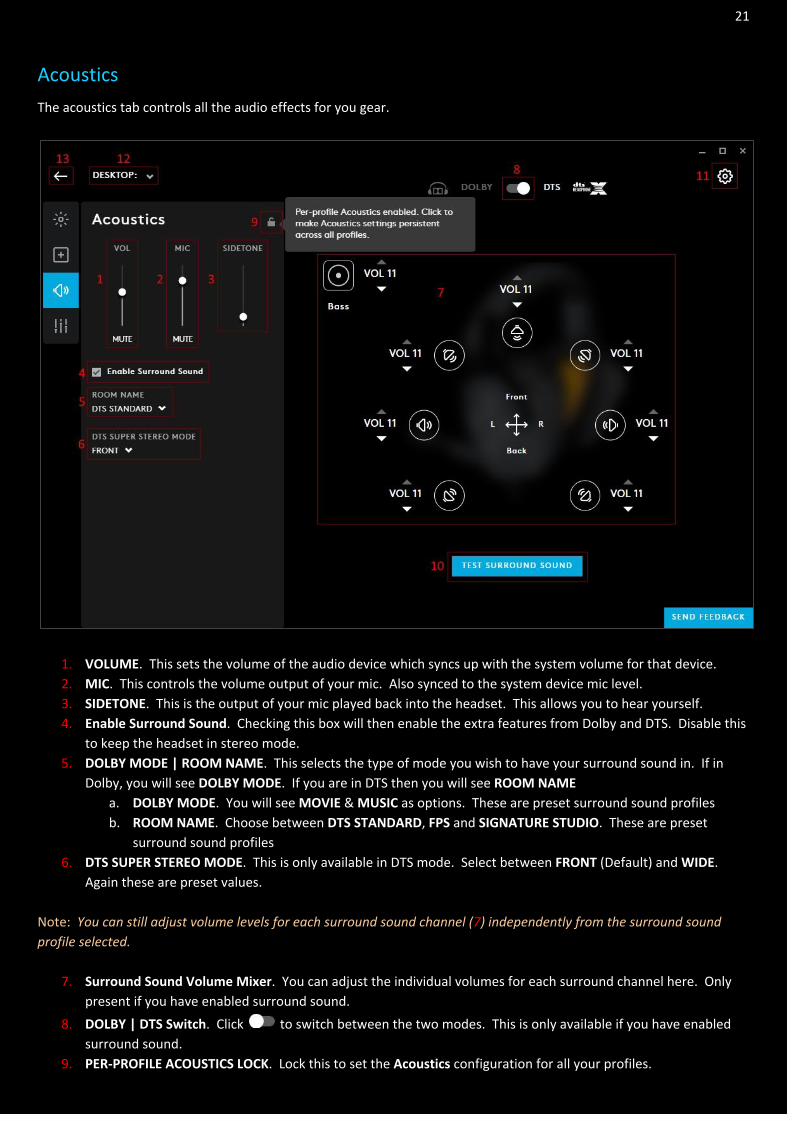
Acoustics
The acoustics tab controls all the audio effects for you gear.
1. VOLUME. This sets the volume of the audio device which syncs up with the system volume for that device.
2. MIC. This controls the volume output of your mic. Also synced to the system device mic level.
3. SIDETONE. This is the output of your mic played back into the headset. This allows you to hear yourself.
4. Enable Surround Sound. Checking this box will then enable the extra features from Dolby and DTS. Disable this
to keep the headset in stereo mode.
5. DOLBY MODE | ROOM NAME. This selects the type of mode you wish to have your surround sound in. If in
Dolby, you will see DOLBY MODE. If you are in DTS then you will see ROOM NAME
a. DOLBY MODE. You will see MOVIE & MUSIC as options. These are preset surround sound profiles
b. ROOM NAME. Choose between DTS STANDARD, FPS and SIGNATURE STUDIO. These are preset
surround sound profiles
6. DTS SUPER STEREO MODE. This is only available in DTS mode. Select between FRONT (Default) and WIDE. Again these are preset values.
Note: You can still adjust volume levels for each surround sound channel (7) independently from the surround sound
profile selected.
7. Surround Sound Volume Mixer. You can adjust the individual volumes for each surround channel here. Only
present if you have enabled surround sound.
8. DOLBY | DTS Switch. Click to switch between the two modes. This is only available if you have enabled
surround sound.
9. PER-PROFILE ACOUSTICS LOCK. Lock this to set the Acoustics configuration for all your profiles.
22
10. TEST SURROUND SOUND. Click this button to play the surround sound test audio. This will go through each
channel and includes samples of film and gaming audio. This is available if you have surround sound enabled.
11. GEAR SETTINGS. Click this to take you to the Gear Settings page
12. PROFILE SELECTOR. Click here to change the User Profile you want to configure for.
13. BACK ARROW. Click the arrow to take you back to the Homepage.
23
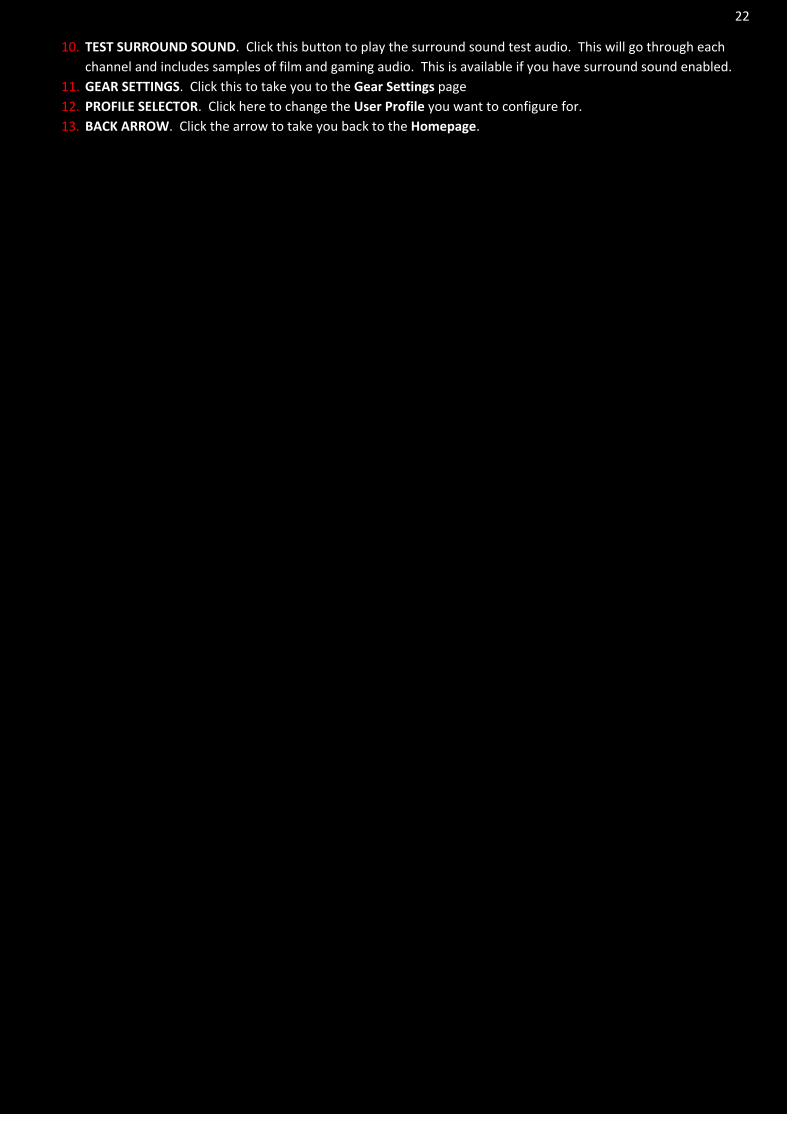
Equalizer
To further enhance your audio, select a MOOD for your gear. In the example below, we have created a new equalizer
and called it Test
1. MOODS. Select your MOOD from :
a. DEFAULT
b. FLAT
c. BASS BOOST
d. MOBA
e. FPS
f. CINEMATIC
g. COMMUNICATIONS
h. + ADD NEW EQUALIZER

24
2. Enable Advanced EQ. Available when you select + ADD NEW EQUALIZER. Checking this box will switch to the
full EQ view:
3. Simple Equalizer View. Drag the BASS and TREBLE sliders to your prefered settings.
4. Equalizer Profile Name. If you have selected + ADD NEW EQUALIZER, click here to rename your Equalizer.
5. PER-PROFILE EQUALIZER LOCK. Lock this to set the Equalizer configuration for all your profiles.
6. GEAR SETTINGS. Click this to take you to the Gear Settings page
7. PROFILE SELECTOR. Click here to change the User Profile you want to configure for.
8. BACK ARROW. Click the arrow to take you back to the Homepage.
25
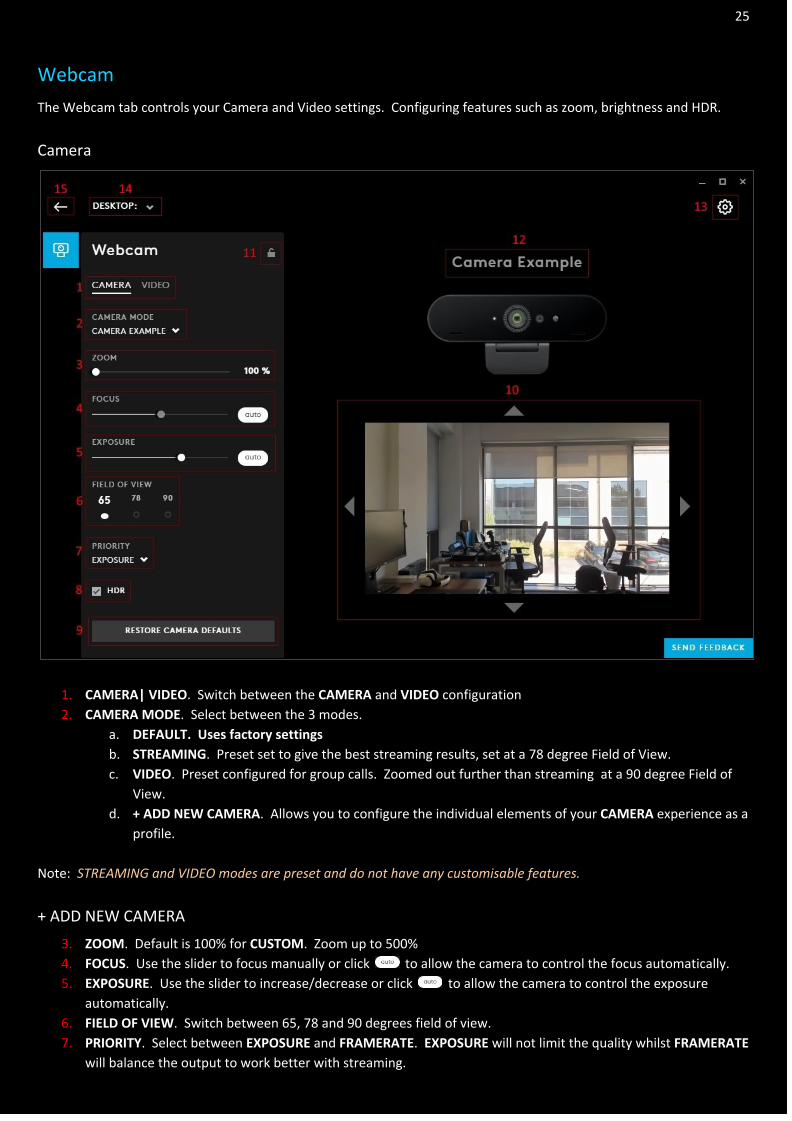
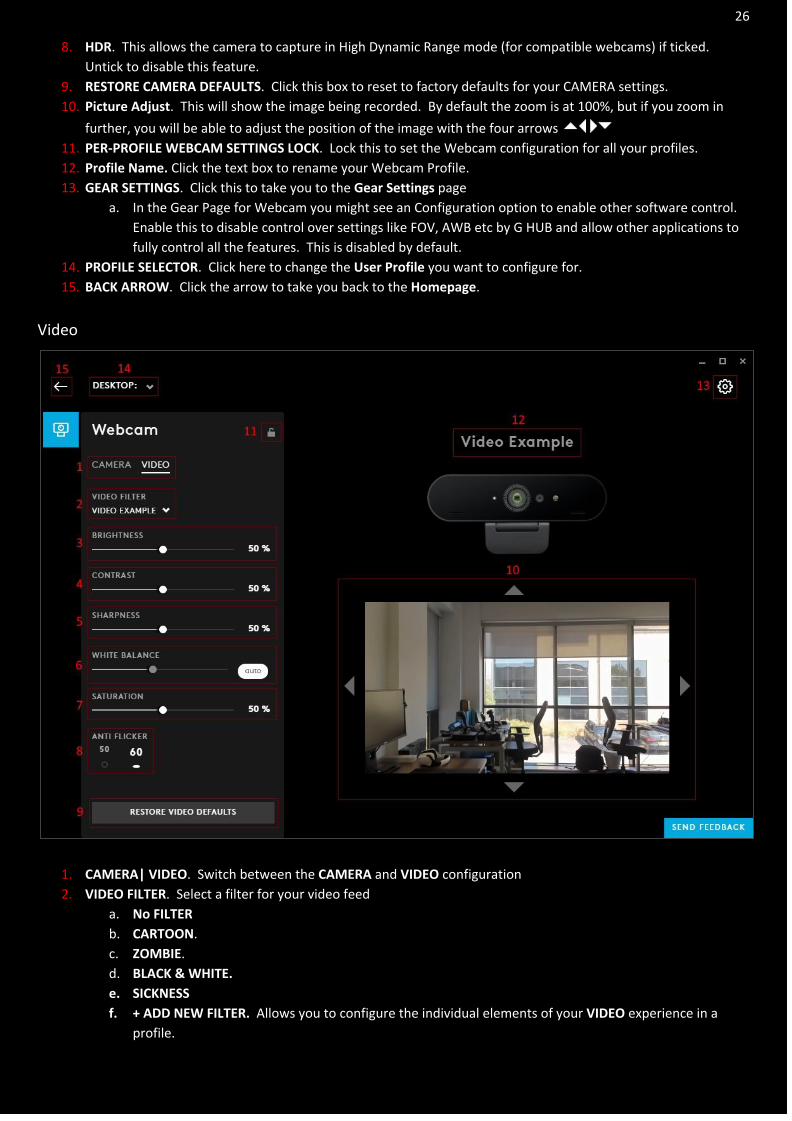
Webcam
The Webcam tab controls your Camera and Video settings. Configuring features such as zoom, brightness and HDR.
Camera
1. CAMERA| VIDEO. Switch between the CAMERA and VIDEO configuration
2. CAMERA MODE. Select between the 3 modes.
a. DEFAULT. Uses factory settings
b. STREAMING. Preset set to give the best streaming results, set at a 78 degree Field of View.
c. VIDEO. Preset configured for group calls. Zoomed out further than streaming at a 90 degree Field of
View.
d. + ADD NEW CAMERA. Allows you to configure the individual elements of your CAMERA experience as a
profile.
Note: STREAMING and VIDEO modes are preset and do not have any customisable features.
+ ADD NEW CAMERA
3. ZOOM. Default is 100% for CUSTOM. Zoom up to 500%
4. FOCUS. Use the slider to focus manually or click to allow the camera to control the focus automatically.
5. EXPOSURE. Use the slider to increase/decrease or click to allow the camera to control the exposure
automatically.
6. FIELD OF VIEW. Switch between 65, 78 and 90 degrees field of view.
7. PRIORITY. Select between EXPOSURE and FRAMERATE. EXPOSURE will not limit the quality whilst FRAMERATE
will balance the output to work better with streaming.
26
8. HDR. This allows the camera to capture in High Dynamic Range mode (for compatible webcams) if ticked.
Untick to disable this feature.
9. RESTORE CAMERA DEFAULTS. Click this box to reset to factory defaults for your CAMERA settings.
10. Picture Adjust. This will show the image being recorded. By default the zoom is at 100%, but if you zoom in
further, you will be able to adjust the position of the image with the four arrows
11. PER-PROFILE WEBCAM SETTINGS LOCK. Lock this to set the Webcam configuration for all your profiles.
12. Profile Name. Click the text box to rename your Webcam Profile.
13. GEAR SETTINGS. Click this to take you to the Gear Settings page
a. In the Gear Page for Webcam you might see an Configuration option to enable other software control.
Enable this to disable control over settings like FOV, AWB etc by G HUB and allow other applications to
fully control all the features. This is disabled by default.
14. PROFILE SELECTOR. Click here to change the User Profile you want to configure for.
15. BACK ARROW. Click the arrow to take you back to the Homepage.
Video
1. CAMERA| VIDEO. Switch between the CAMERA and VIDEO configuration
2. VIDEO FILTER. Select a filter for your video feed
a. No FILTER
b. CARTOON.
c. ZOMBIE.
d. BLACK & WHITE.
e. SICKNESS
f. + ADD NEW FILTER. Allows you to configure the individual elements of your VIDEO experience in a
profile.
27
Note: CARTOON, ZOMBIE, BLACK & WHITE and SICKNESS filters are preset and do not have any customisable features.
+ ADD NEW FILTER
3. BRIGHTNESS. Use the slider to adjust the brightness. Default is 50%
4. CONTRAST. User to slider to adjust the contrast. Default is 50%
5. SHARPNESS. User to slider to adjust the sharpness. Default is 50%
6. WHITE BALANCE. Use the slider to adjust manually or click to activate Automatic White Balance
7. SATURATION. User to slider to adjust the saturation. Default is 50%
8. ANTI FLICKER. Switch between 50Hz and 60Hz output frequencies.
9. RESTORE CAMERA DEFAULTS. Click this box to reset to factory defaults for your VIDEO settings.
10. Picture Adjust. This will show the image being recorded. By default the zoom (Camera setting) is at 100%, but if
you zoom in further, you will be able to adjust the position of the image with the four arrows
11. PER-PROFILE WEBCAM SETTINGS LOCK. Lock this to set the Webcam configuration for all your profiles.
12. Profile Name. Click the text box to rename your Webcam Profile.
13. GEAR SETTINGS. Click this to take you to the Gear Settings page
14. PROFILE SELECTOR. Click here to change the User Profile you want to configure for.
15. BACK ARROW. Click the arrow to take you back to the Homepage.
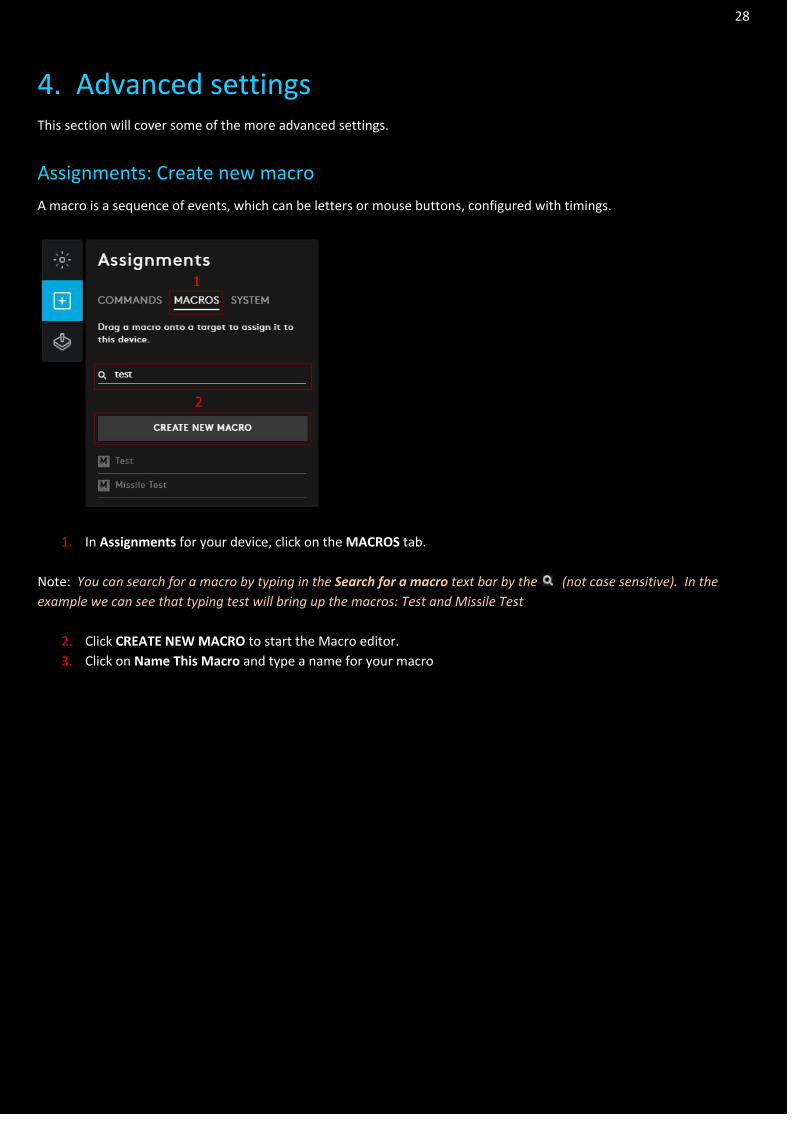
28
4. Advanced settings This section will cover some of the more advanced settings.
Assignments: Create new macro
A macro is a sequence of events, which can be letters or mouse buttons, configured with timings.
1. In Assignments for your device, click on the MACROS tab.
Note: You can search for a macro by typing in the Search for a macro text bar by the (not case sensitive). In the
example we can see that typing test will bring up the macros: Test and Missile Test
2. Click CREATE NEW MACRO to start the Macro editor.
3. Click on Name This Macro and type a name for your macro
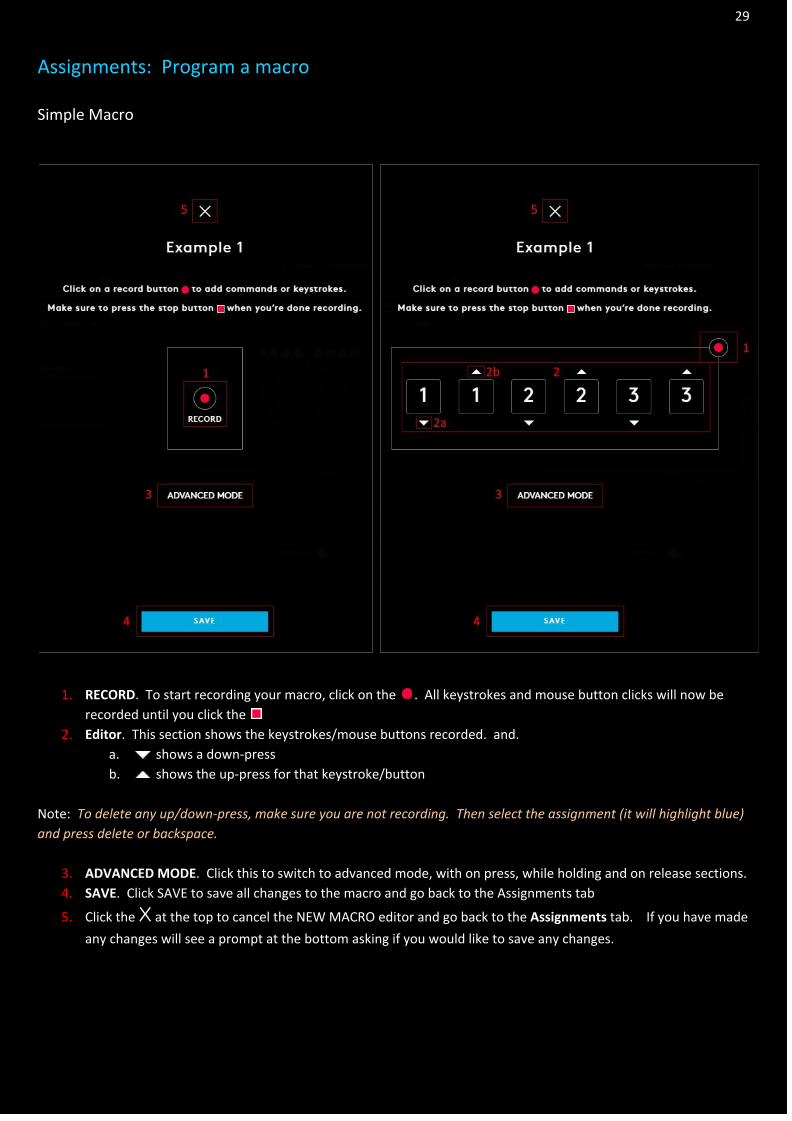
29
Assignments: Program a macro
Simple Macro
1. RECORD. To start recording your macro, click on the . All keystrokes and mouse button clicks will now be
recorded until you click the
2. Editor. This section shows the keystrokes/mouse buttons recorded. and.
a. shows a down-press
b. shows the up-press for that keystroke/button
Note: To delete any up/down-press, make sure you are not recording. Then select the assignment (it will highlight blue)
and press delete or backspace.
3. ADVANCED MODE. Click this to switch to advanced mode, with on press, while holding and on release sections.
4. SAVE. Click SAVE to save all changes to the macro and go back to the Assignments tab
5. Click the X at the top to cancel the NEW MACRO editor and go back to the Assignments tab. If you have made
any changes will see a prompt at the bottom asking if you would like to save any changes.
30
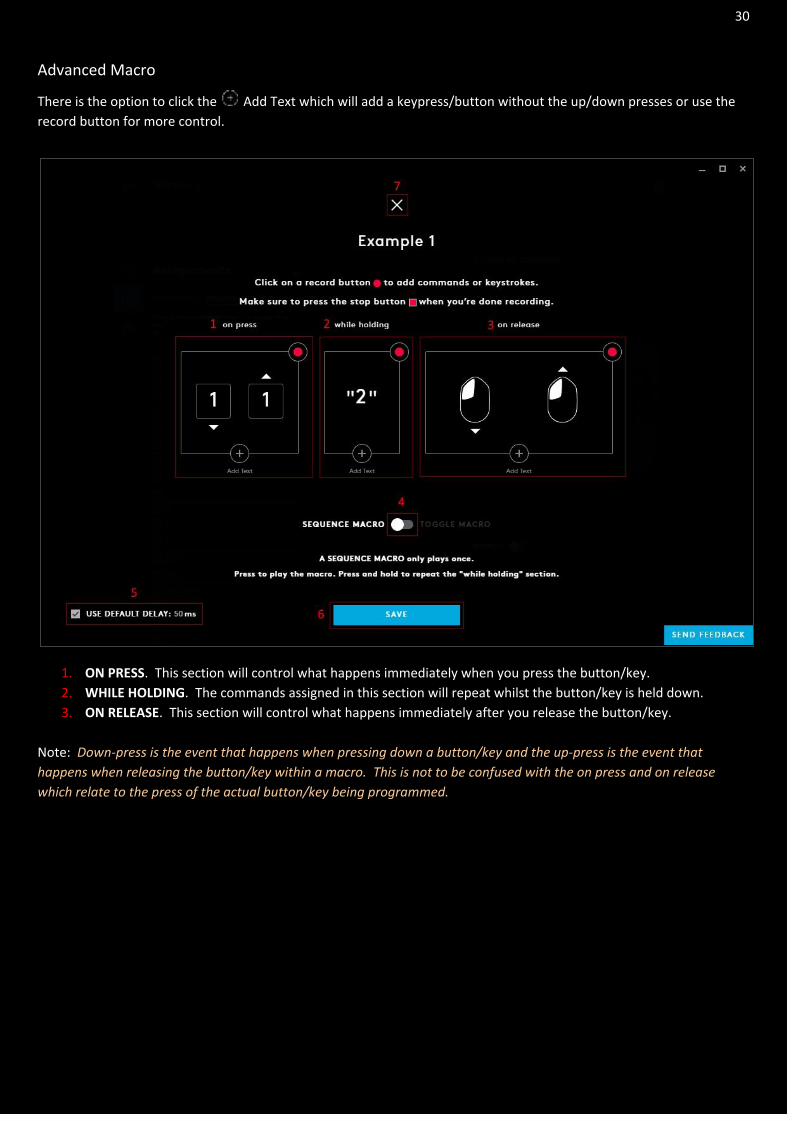
Advanced Macro
There is the option to click the Add Text which will add a keypress/button without the up/down presses or use the
record button for more control.
1. ON PRESS. This section will control what happens immediately when you press the button/key.
2. WHILE HOLDING. The commands assigned in this section will repeat whilst the button/key is held down.
3. ON RELEASE. This section will control what happens immediately after you release the button/key.
Note: Down-press is the event that happens when pressing down a button/key and the up-press is the event that
happens when releasing the button/key within a macro. This is not to be confused with the on press and on release
which relate to the press of the actual button/key being programmed.
31
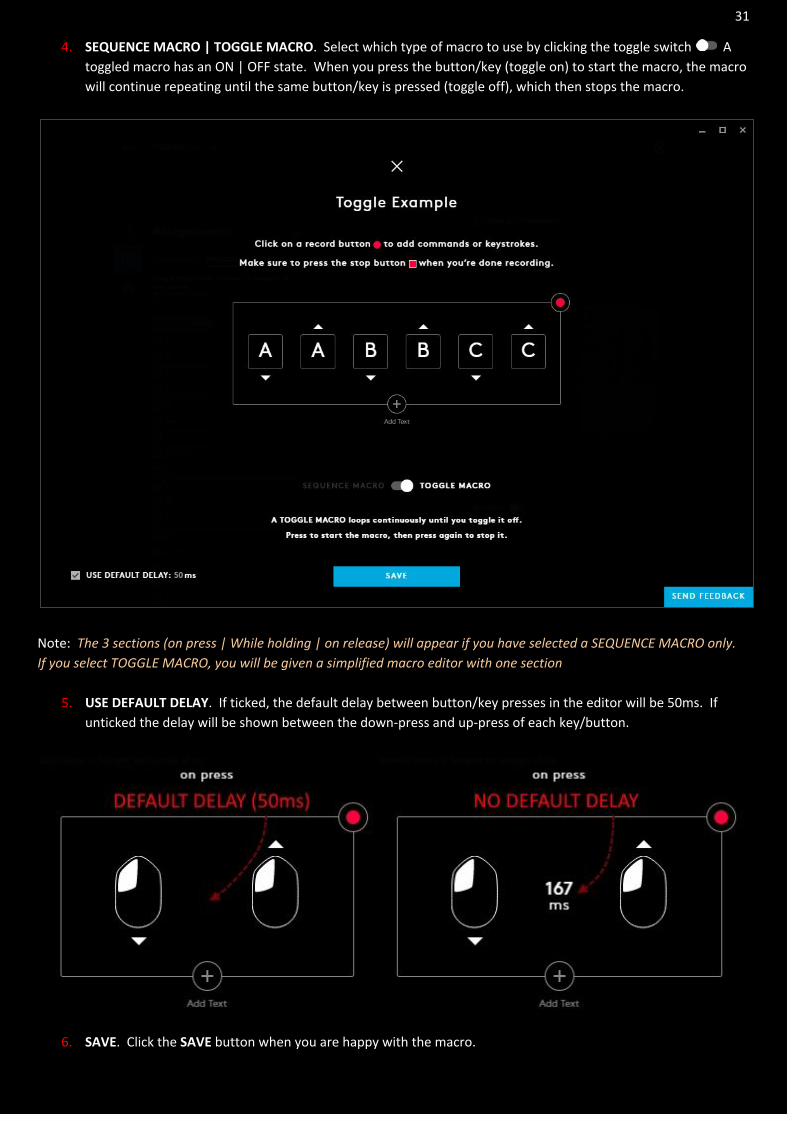
4. SEQUENCE MACRO | TOGGLE MACRO. Select which type of macro to use by clicking the toggle switch A
toggled macro has an ON | OFF state. When you press the button/key (toggle on) to start the macro, the macro
will continue repeating until the same button/key is pressed (toggle off), which then stops the macro.
Note: The 3 sections (on press | While holding | on release) will appear if you have selected a SEQUENCE MACRO only.
If you select TOGGLE MACRO, you will be given a simplified macro editor with one section
5. USE DEFAULT DELAY. If ticked, the default delay between button/key presses in the editor will be 50ms. If
unticked the delay will be shown between the down-press and up-press of each key/button.
6. SAVE. Click the SAVE button when you are happy with the macro.
32
Note: You can some back to a macro at anytime to edit, by clicking on to the MACROS tab in Assignments and the
clicking on the macro name in the list.
7. Click the X at the top to cancel the NEW MACRO editor and go back to the Assignments tab. If you have made
any changes will see a prompt at the bottom asking if you would like to save any changes.
33
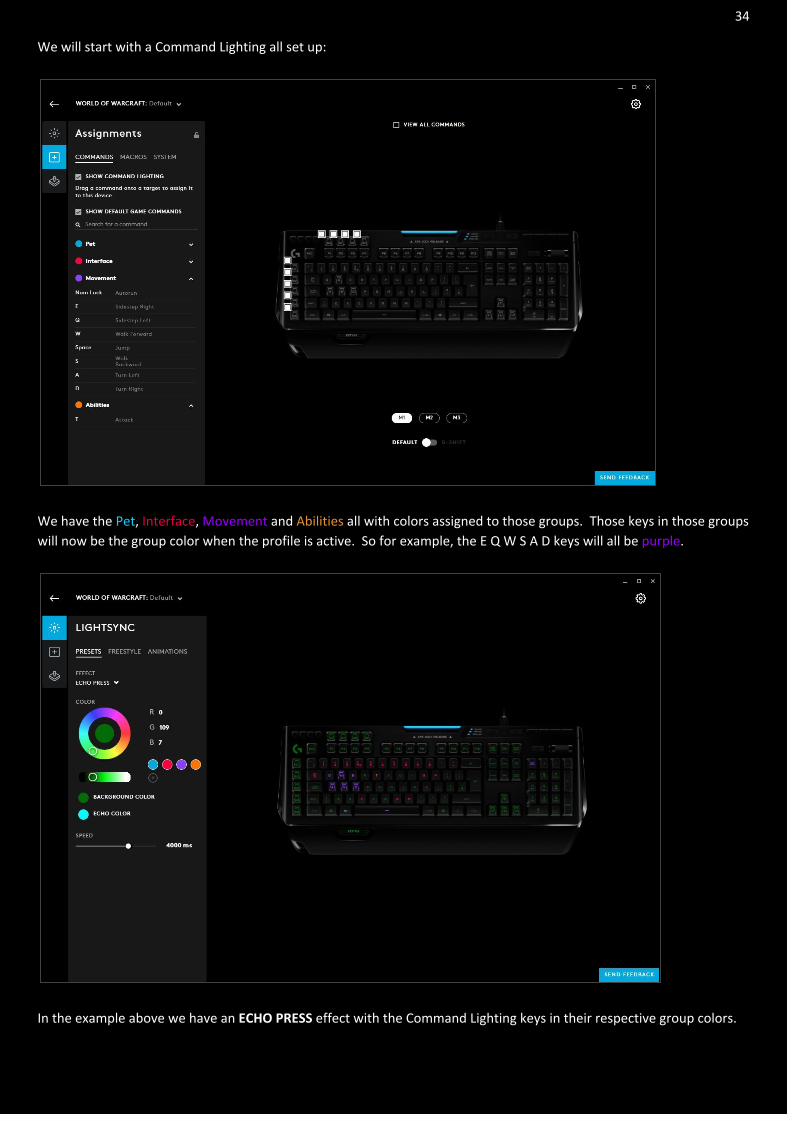
Assignments: Command Lighting
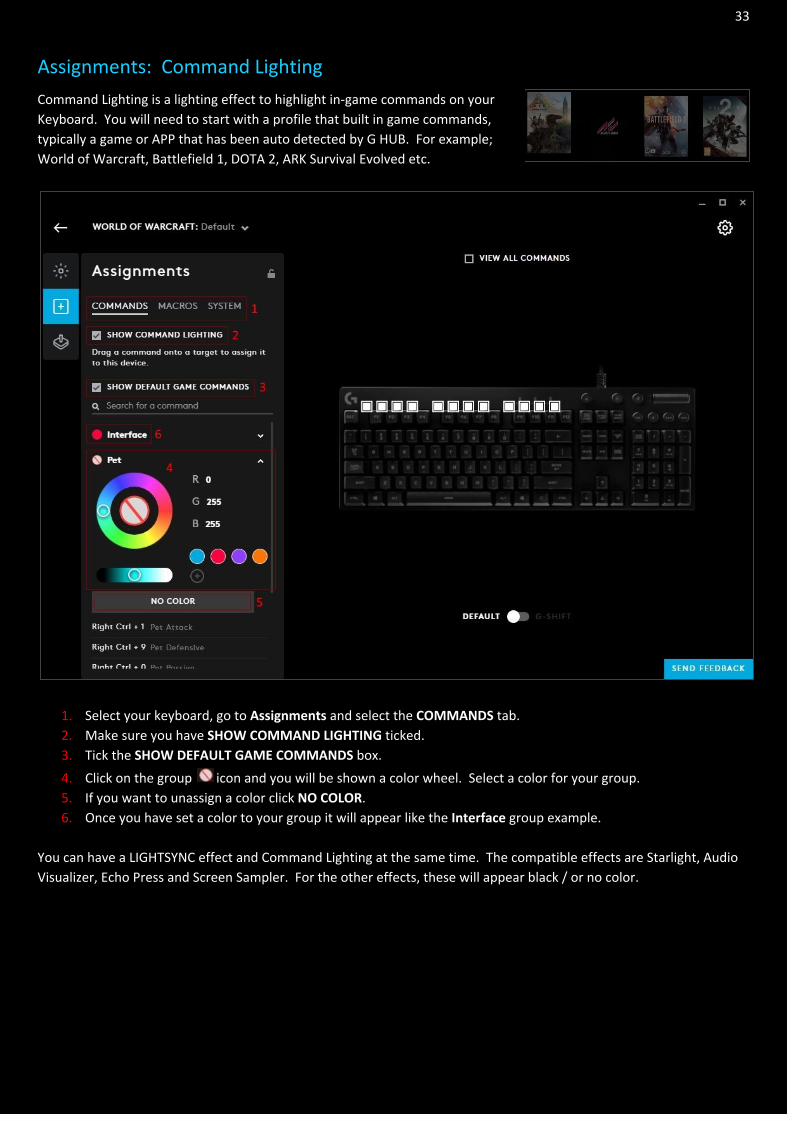
Command Lighting is a lighting effect to highlight in-game commands on your
Keyboard. You will need to start with a profile that built in game commands,
typically a game or APP that has been auto detected by G HUB. For example;
World of Warcraft, Battlefield 1, DOTA 2, ARK Survival Evolved etc.
1. Select your keyboard, go to Assignments and select the COMMANDS tab.
2. Make sure you have SHOW COMMAND LIGHTING ticked.
3. Tick the SHOW DEFAULT GAME COMMANDS box.
4. Click on the group icon and you will be shown a color wheel. Select a color for your group.
5. If you want to unassign a color click NO COLOR. 6. Once you have set a color to your group it will appear like the Interface group example.
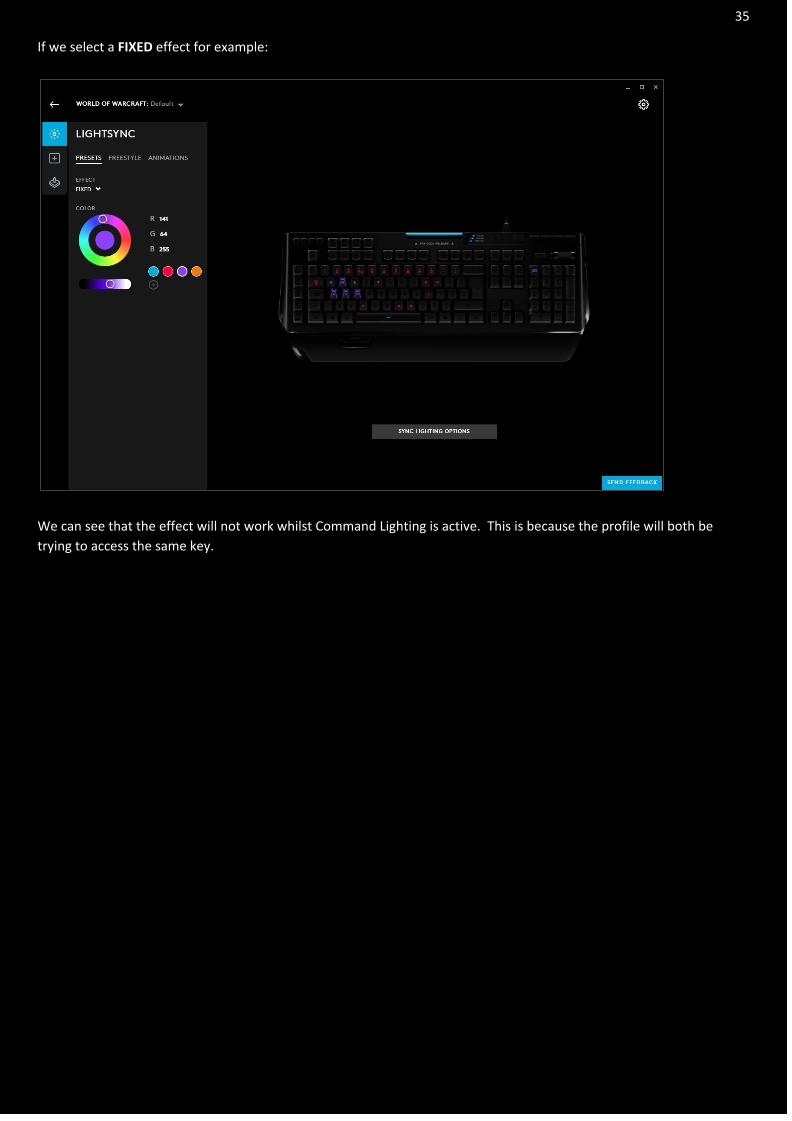
You can have a LIGHTSYNC effect and Command Lighting at the same time. The compatible effects are Starlight, Audio
Visualizer, Echo Press and Screen Sampler. For the other effects, these will appear black / or no color.
34
We will start with a Command Lighting all set up:
We have the Pet, Interface, Movement and Abilities all with colors assigned to those groups. Those keys in those groups
will now be the group color when the profile is active. So for example, the E Q W S A D keys will all be purple.
In the example above we have an ECHO PRESS effect with the Command Lighting keys in their respective group colors.
35
If we select a FIXED effect for example:
We can see that the effect will not work whilst Command Lighting is active. This is because the profile will both be
trying to access the same key.
36
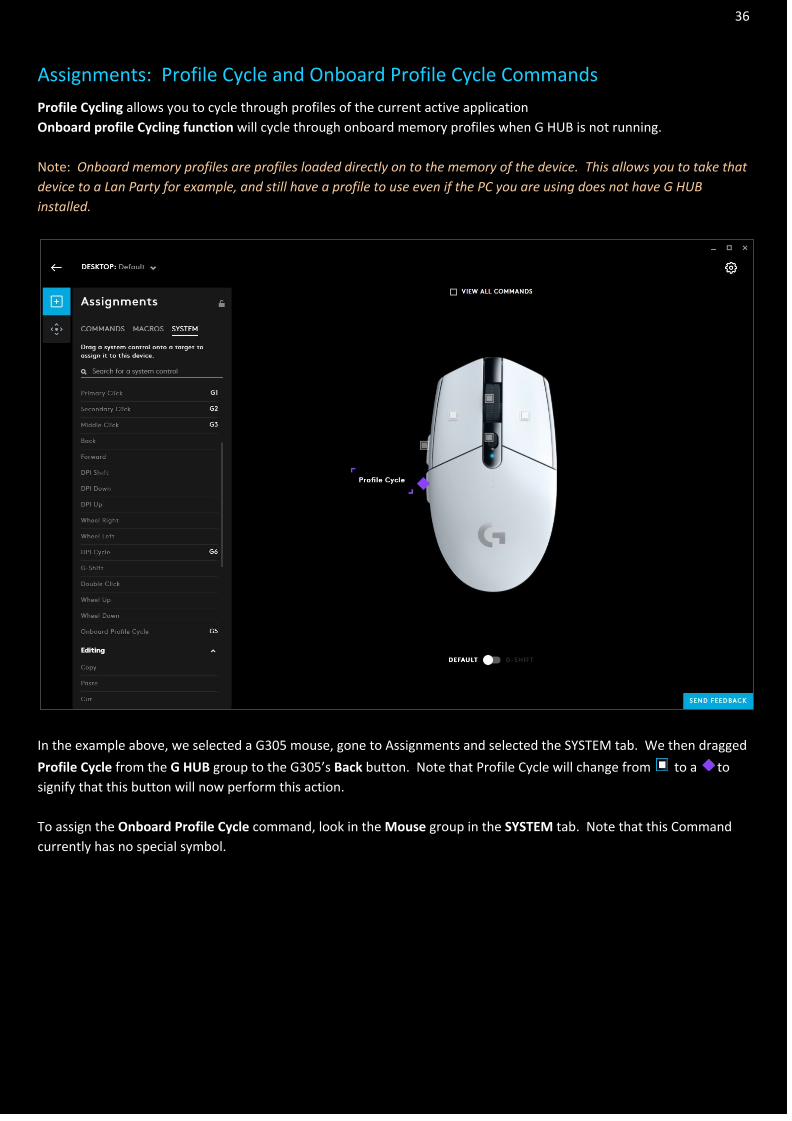
Assignments: Profile Cycle and Onboard Profile Cycle Commands
Profile Cycling allows you to cycle through profiles of the current active application
Onboard profile Cycling function will cycle through onboard memory profiles when G HUB is not running.
Note: Onboard memory profiles are profiles loaded directly on to the memory of the device. This allows you to take that
device to a Lan Party for example, and still have a profile to use even if the PC you are using does not have G HUB
installed.
In the example above, we selected a G305 mouse, gone to Assignments and selected the SYSTEM tab. We then dragged
Profile Cycle from the G HUB group to the G305’s Back button. Note that Profile Cycle will change from to a to
signify that this button will now perform this action.
To assign the Onboard Profile Cycle command, look in the Mouse group in the SYSTEM tab. Note that this Command
currently has no special symbol.
37
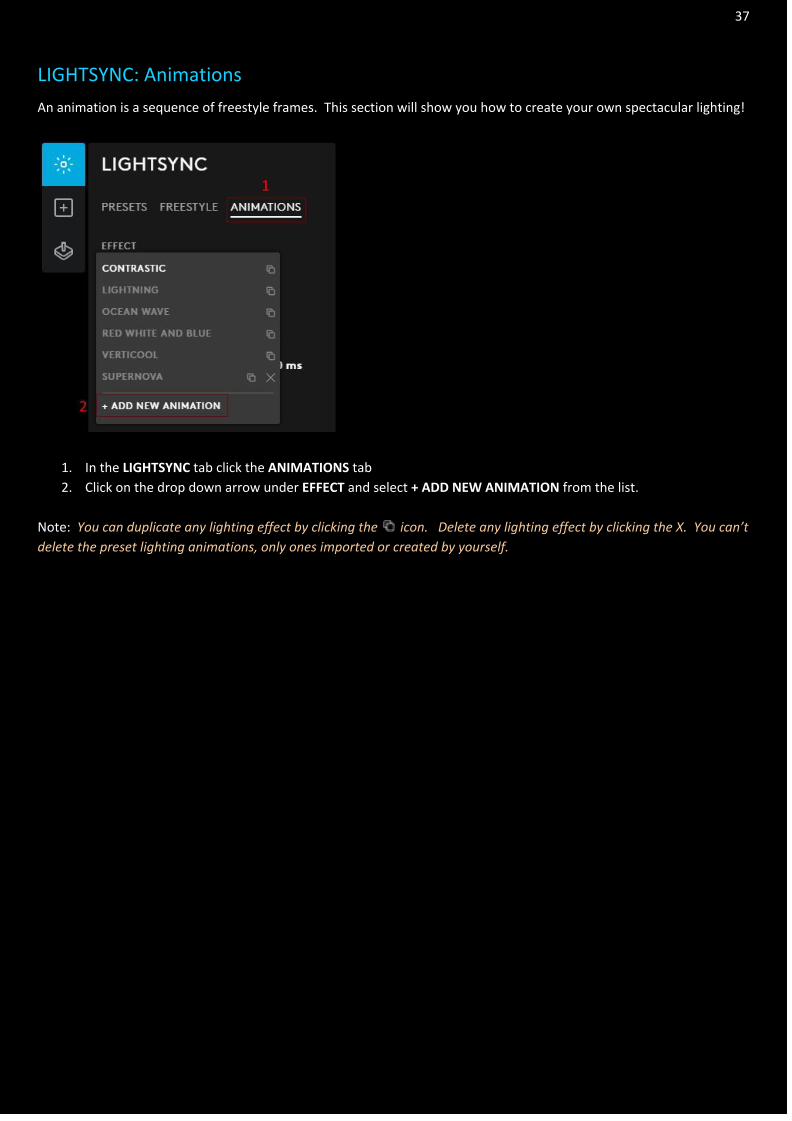
LIGHTSYNC: Animations
An animation is a sequence of freestyle frames. This section will show you how to create your own spectacular lighting!
1. In the LIGHTSYNC tab click the ANIMATIONS tab
2. Click on the drop down arrow under EFFECT and select + ADD NEW ANIMATION from the list.
Note: You can duplicate any lighting effect by clicking the icon. Delete any lighting effect by clicking the X. You can’t
delete the preset lighting animations, only ones imported or created by yourself.
38
LIGHTSYNC: Create an animation
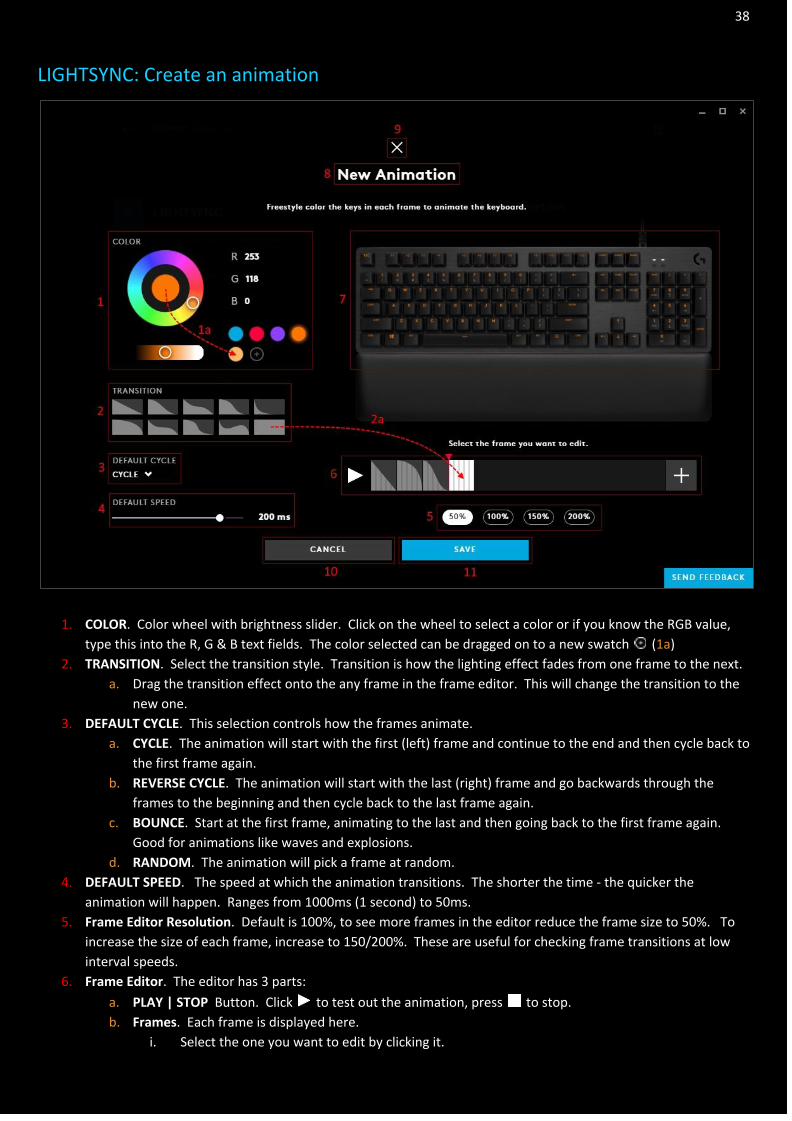
1. COLOR. Color wheel with brightness slider. Click on the wheel to select a color or if you know the RGB value,
type this into the R, G & B text fields. The color selected can be dragged on to a new swatch (1a) 2. TRANSITION. Select the transition style. Transition is how the lighting effect fades from one frame to the next.
a. Drag the transition effect onto the any frame in the frame editor. This will change the transition to the
new one.
3. DEFAULT CYCLE. This selection controls how the frames animate.
a. CYCLE. The animation will start with the first (left) frame and continue to the end and then cycle back to
the first frame again.
b. REVERSE CYCLE. The animation will start with the last (right) frame and go backwards through the
frames to the beginning and then cycle back to the last frame again.
c. BOUNCE. Start at the first frame, animating to the last and then going back to the first frame again.
Good for animations like waves and explosions.
d. RANDOM. The animation will pick a frame at random.
4. DEFAULT SPEED. The speed at which the animation transitions. The shorter the time - the quicker the
animation will happen. Ranges from 1000ms (1 second) to 50ms.
5. Frame Editor Resolution. Default is 100%, to see more frames in the editor reduce the frame size to 50%. To
increase the size of each frame, increase to 150/200%. These are useful for checking frame transitions at low
interval speeds.
6. Frame Editor. The editor has 3 parts:
a. PLAY | STOP Button. Click to test out the animation, press to stop.
b. Frames. Each frame is displayed here.
i. Select the one you want to edit by clicking it.
39
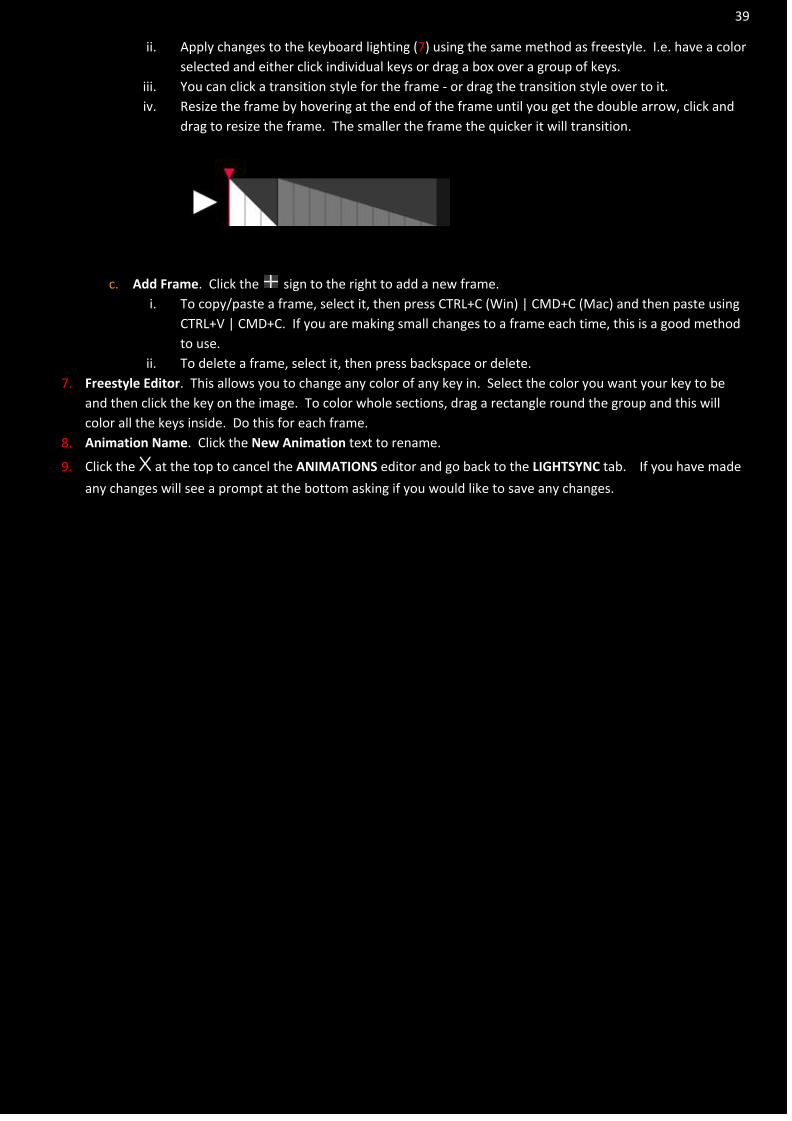
ii. Apply changes to the keyboard lighting (7) using the same method as freestyle. I.e. have a color
selected and either click individual keys or drag a box over a group of keys.
iii. You can click a transition style for the frame - or drag the transition style over to it.
iv. Resize the frame by hovering at the end of the frame until you get the double arrow, click and
drag to resize the frame. The smaller the frame the quicker it will transition.
c. Add Frame. Click the sign to the right to add a new frame.
i. To copy/paste a frame, select it, then press CTRL+C (Win) | CMD+C (Mac) and then paste using
CTRL+V | CMD+C. If you are making small changes to a frame each time, this is a good method
to use.
ii. To delete a frame, select it, then press backspace or delete.
7. Freestyle Editor. This allows you to change any color of any key in. Select the color you want your key to be
and then click the key on the image. To color whole sections, drag a rectangle round the group and this will
color all the keys inside. Do this for each frame.
8. Animation Name. Click the New Animation text to rename.
9. Click the X at the top to cancel the ANIMATIONS editor and go back to the LIGHTSYNC tab. If you have made
any changes will see a prompt at the bottom asking if you would like to save any changes.
40
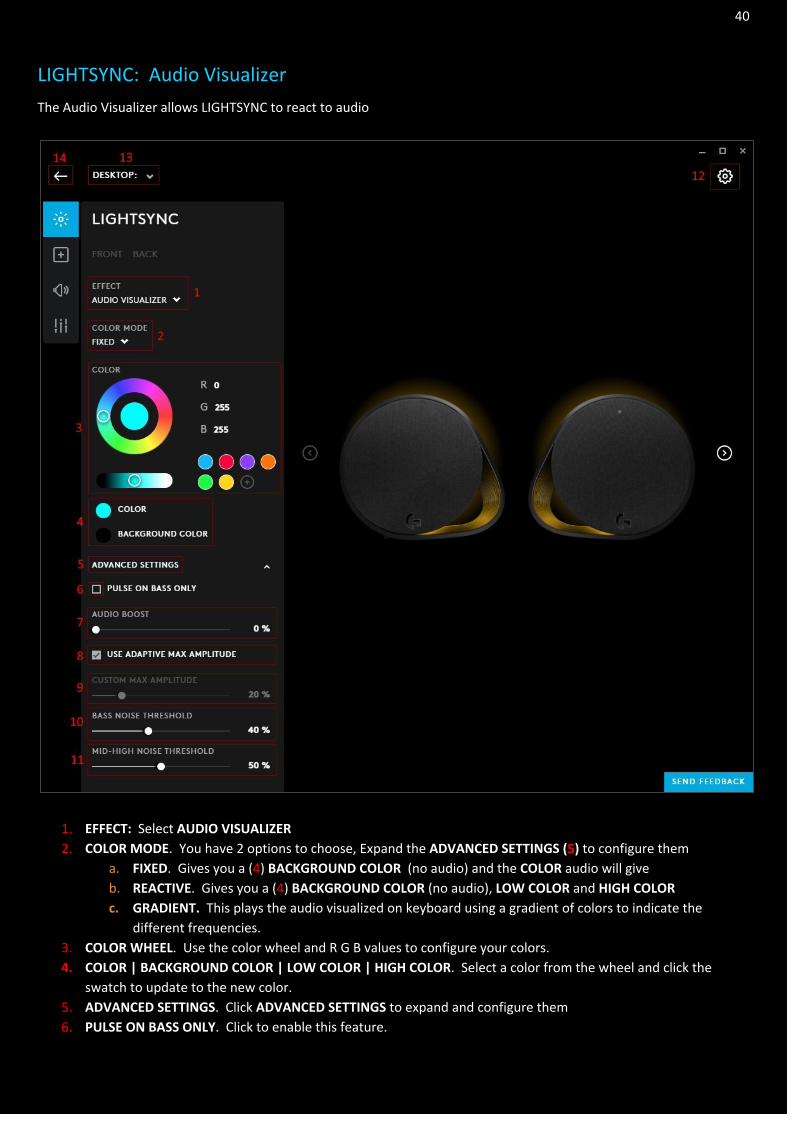
LIGHTSYNC: Audio Visualizer
The Audio Visualizer allows LIGHTSYNC to react to audio
1. EFFECT: Select AUDIO VISUALIZER
2. COLOR MODE. You have 2 options to choose, Expand the ADVANCED SETTINGS (5) to configure them
a. FIXED. Gives you a (4) BACKGROUND COLOR (no audio) and the COLOR audio will give
b. REACTIVE. Gives you a (4) BACKGROUND COLOR (no audio), LOW COLOR and HIGH COLOR
c. GRADIENT. This plays the audio visualized on keyboard using a gradient of colors to indicate the
different frequencies.
3. COLOR WHEEL. Use the color wheel and R G B values to configure your colors.
4. COLOR | BACKGROUND COLOR | LOW COLOR | HIGH COLOR. Select a color from the wheel and click the
swatch to update to the new color.
5. ADVANCED SETTINGS. Click ADVANCED SETTINGS to expand and configure them
6. PULSE ON BASS ONLY. Click to enable this feature.
41
7. AUDIO BOOST. AUDIO BOOST will enhance the reaction to low sounds. So if a track or game is naturally quiet,
try boosting the audio. 0% is OFF and at 100% any sound will maximise the visualizer. For quiet audio, 30% is a
good value to try first.
8. USE ADAPTIVE MAX AMPLITUDE. When ticked, each frequency bar will dynamically raise the max sound limit
based on a curve and loudness of the frequency.
9. CUSTOM MAX AMPLITUDE. This option is available if ADAPTIVE MAX AMPLITUDE is set to off.
10. BASS NOISE THRESHOLD. The lower limit for each bass frequency that will be deemed as silence. For example,
if the value is set at 10 and incoming bass frequency signal is 9, it will be perceived as 0.
11. MID-HIGH NOISE THRESHOLD. The lower limit for each mid-high frequency that will be deemed as silence. For
example, if the value is set to 10 and incoming frequency signal is 9, it will be perceived as 0.
12. GEAR SETTINGS. Click this to take you to the Gear Settings page
13. PROFILE SELECTOR. Click here to change the User Profile you want to configure for.
14. BACK ARROW. Click the arrow to take you back to the Homepage.
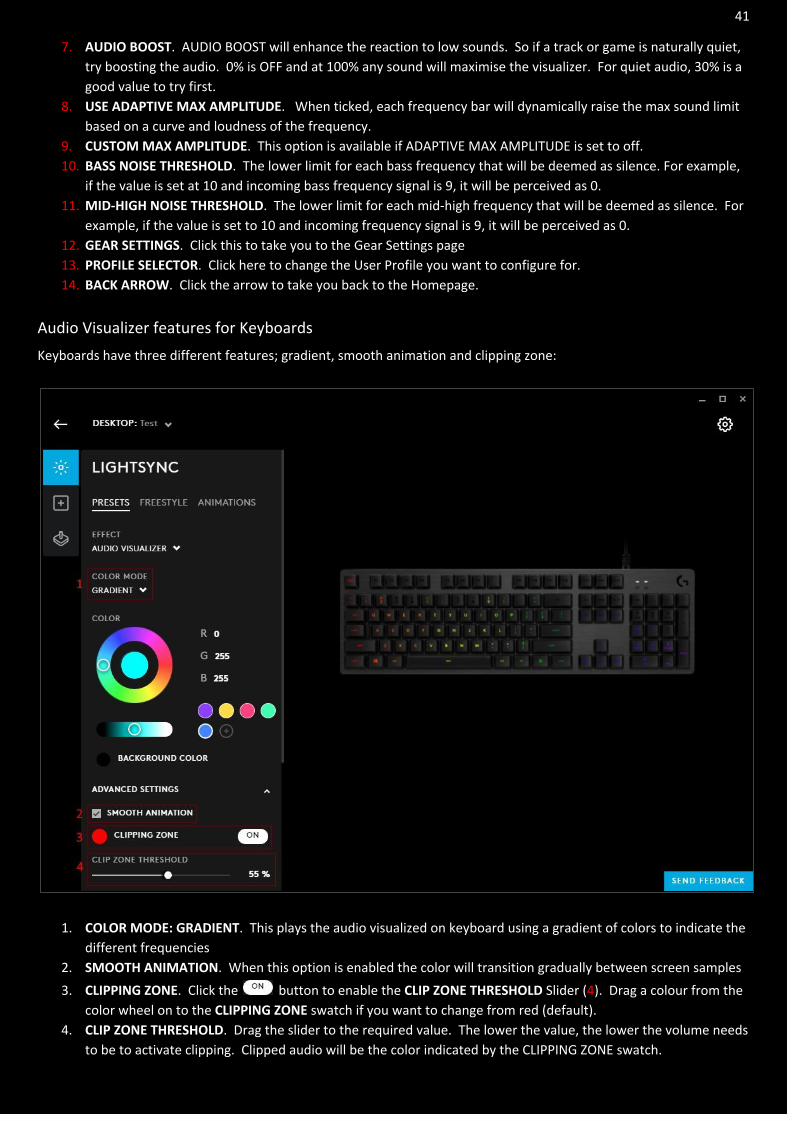
Audio Visualizer features for Keyboards
Keyboards have three different features; gradient, smooth animation and clipping zone:
1. COLOR MODE: GRADIENT. This plays the audio visualized on keyboard using a gradient of colors to indicate the
different frequencies
2. SMOOTH ANIMATION. When this option is enabled the color will transition gradually between screen samples
3. CLIPPING ZONE. Click the button to enable the CLIP ZONE THRESHOLD Slider (4). Drag a colour from the
color wheel on to the CLIPPING ZONE swatch if you want to change from red (default).
4. CLIP ZONE THRESHOLD. Drag the slider to the required value. The lower the value, the lower the volume needs
to be to activate clipping. Clipped audio will be the color indicated by the CLIPPING ZONE swatch.
42
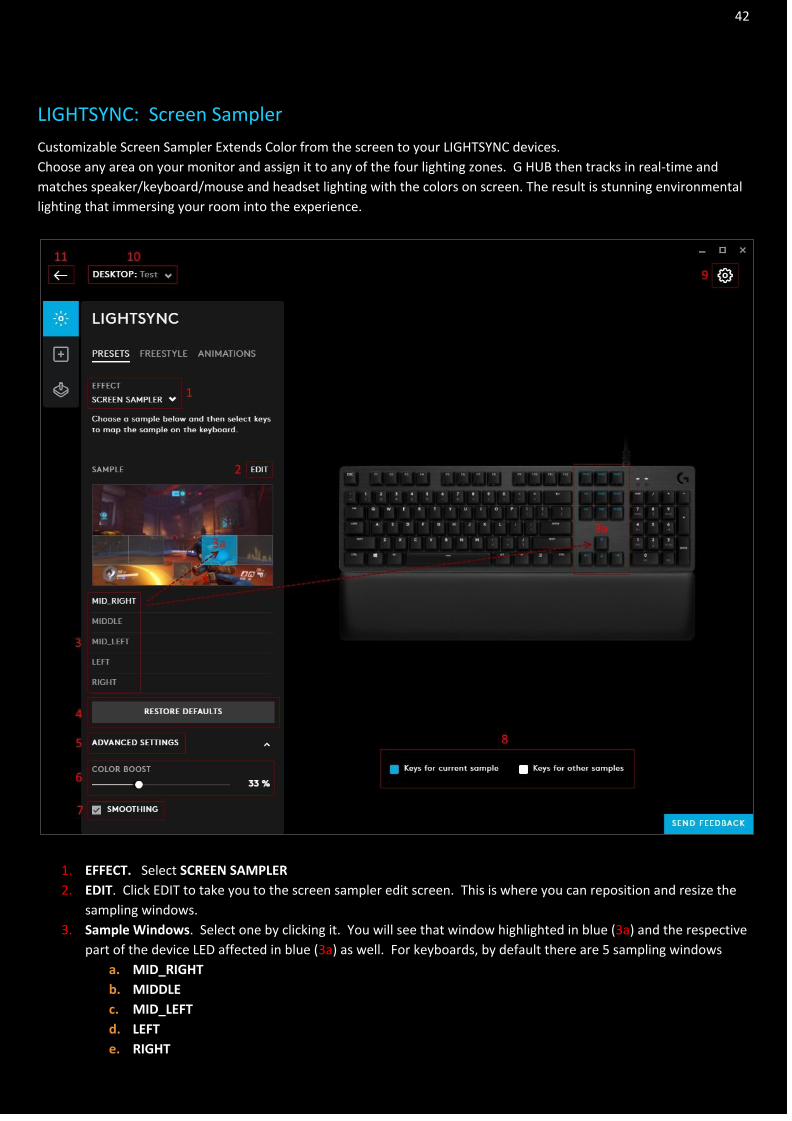
LIGHTSYNC: Screen Sampler
Customizable Screen Sampler Extends Color from the screen to your LIGHTSYNC devices.
Choose any area on your monitor and assign it to any of the four lighting zones. G HUB then tracks in real-time and
matches speaker/keyboard/mouse and headset lighting with the colors on screen. The result is stunning environmental
lighting that immersing your room into the experience.
1. EFFECT. Select SCREEN SAMPLER
2. EDIT. Click EDIT to take you to the screen sampler edit screen. This is where you can reposition and resize the
sampling windows.
3. Sample Windows. Select one by clicking it. You will see that window highlighted in blue (3a) and the respective
part of the device LED affected in blue (3a) as well. For keyboards, by default there are 5 sampling windows
a. MID_RIGHT
b. MIDDLE
c. MID_LEFT
d. LEFT
e. RIGHT

43
4. RESTORE DEFAULTS. Click this to reset the sampling windows back to default. This will also remove any extra
sampling windows you may have created.
5. ADVANCED SETTINGS. Click ADVANCED SETTINGS to expand and configure them
6. COLOR BOOST. This boosts the color of the sampling. Increasing the % will increase the vibrance of that color.
Default is 33%
7. SMOOTHING. When this option is enabled the color will transition gradually between screen samples
8. Keys for current sample | Keys for other samples. This shows which area/set of keys are currently active. In
the example above for the MID_RIGHT, you can see that the arrow keys and home sections are highlighted blue,
showing that these keys are assigned to the MID_RIGHT sampling window.
9. GEAR SETTINGS. Click this to take you to the Gear Settings page
10. PROFILE SELECTOR. Click here to change the User Profile you want to configure for.
11. BACK ARROW. Click the arrow to take you back to the Homepage.
44
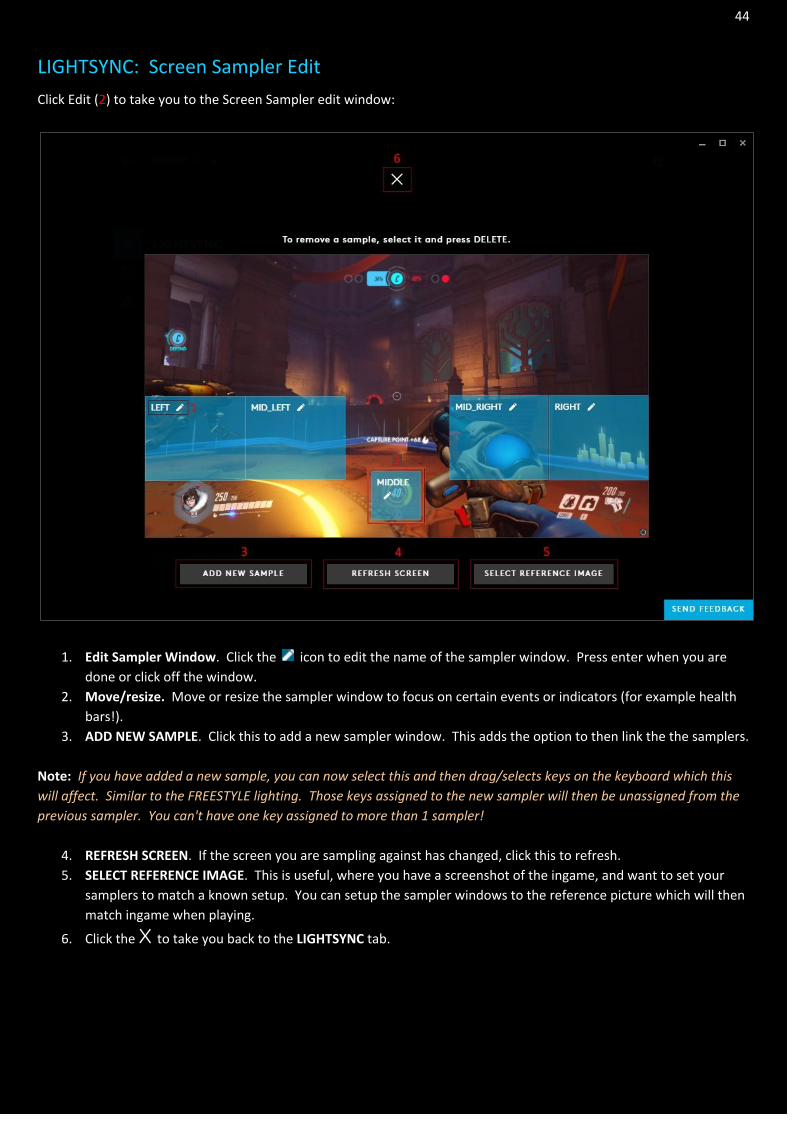
LIGHTSYNC: Screen Sampler Edit
Click Edit (2) to take you to the Screen Sampler edit window:
1. Edit Sampler Window. Click the icon to edit the name of the sampler window. Press enter when you are
done or click off the window.
2. Move/resize. Move or resize the sampler window to focus on certain events or indicators (for example health
bars!).
3. ADD NEW SAMPLE. Click this to add a new sampler window. This adds the option to then link the the samplers.
Note: If you have added a new sample, you can now select this and then drag/selects keys on the keyboard which this
will affect. Similar to the FREESTYLE lighting. Those keys assigned to the new sampler will then be unassigned from the
previous sampler. You can't have one key assigned to more than 1 sampler!
4. REFRESH SCREEN. If the screen you are sampling against has changed, click this to refresh.
5. SELECT REFERENCE IMAGE. This is useful, where you have a screenshot of the ingame, and want to set your
samplers to match a known setup. You can setup the sampler windows to the reference picture which will then
match ingame when playing.
6. Click the X to take you back to the LIGHTSYNC tab.
45
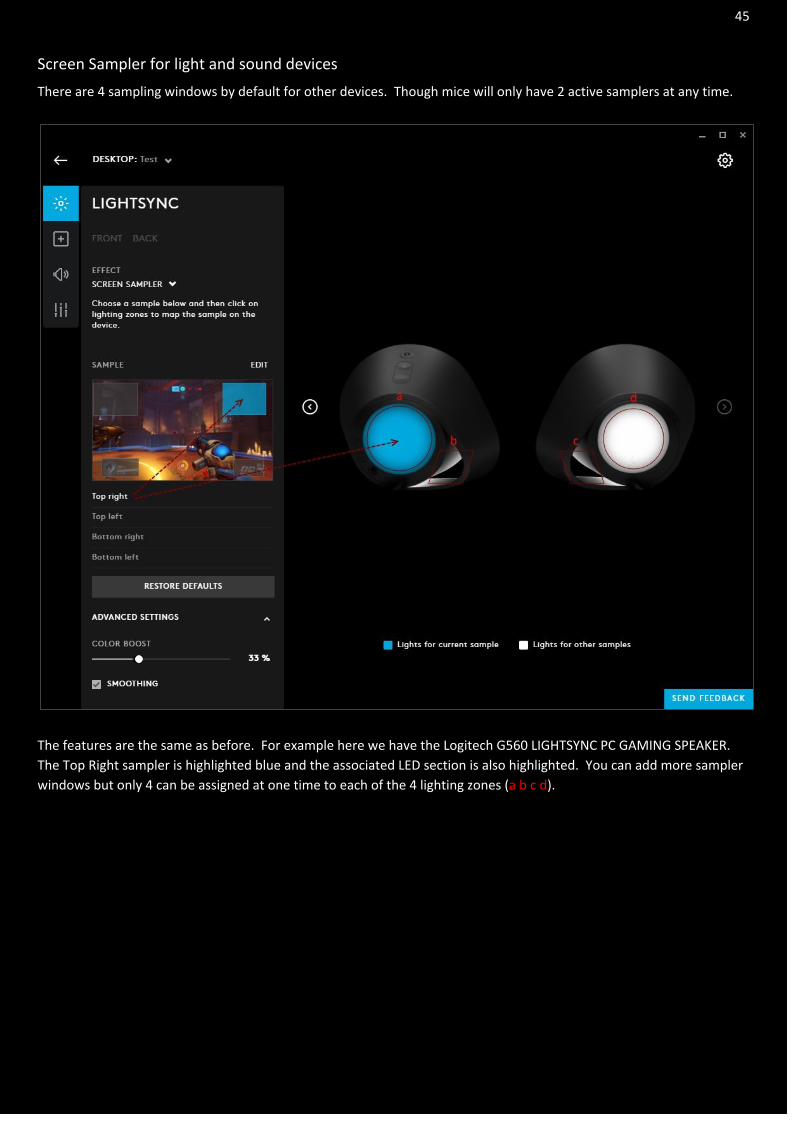
Screen Sampler for light and sound devices
There are 4 sampling windows by default for other devices. Though mice will only have 2 active samplers at any time.
The features are the same as before. For example here we have the Logitech G560 LIGHTSYNC PC GAMING SPEAKER.
The Top Right sampler is highlighted blue and the associated LED section is also highlighted. You can add more sampler
windows but only 4 can be assigned at one time to each of the 4 lighting zones (a b c d).
46
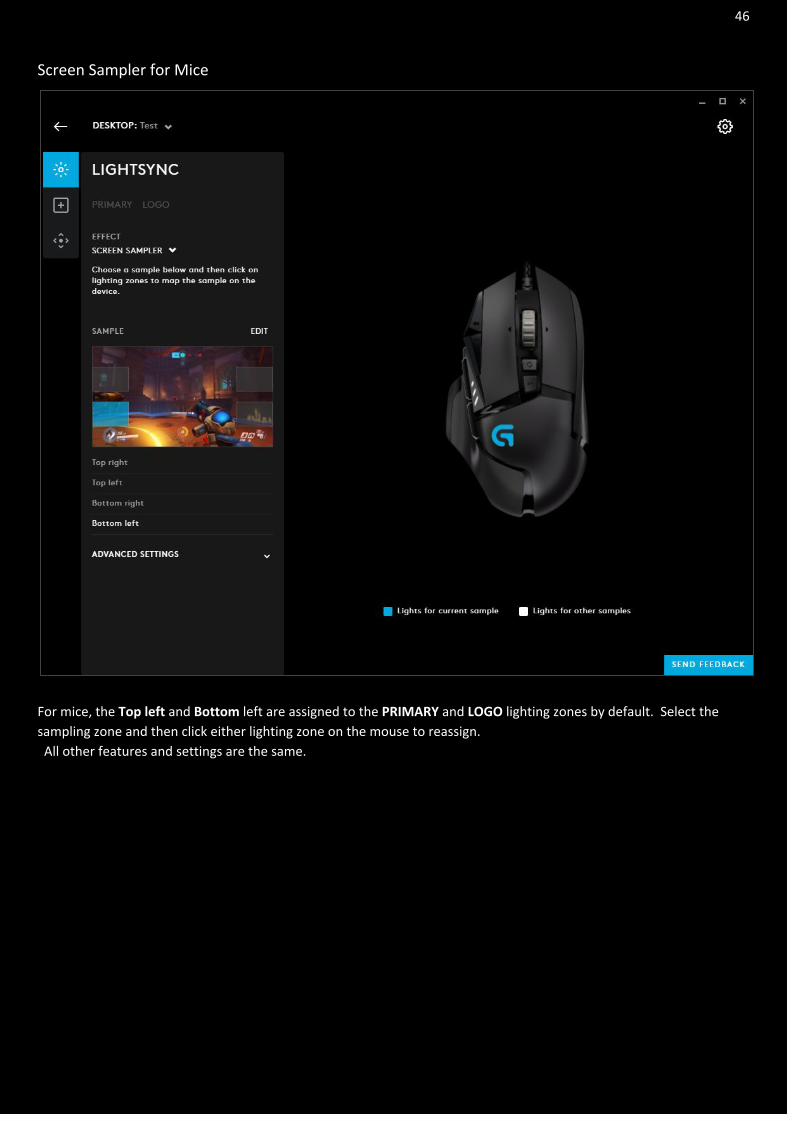
Screen Sampler for Mice
For mice, the Top left and Bottom left are assigned to the PRIMARY and LOGO lighting zones by default. Select the
sampling zone and then click either lighting zone on the mouse to reassign.
All other features and settings are the same.