Embed Size (px)
DESCRIPTION
Â
Citation preview
C&T PUBLISH
ING
ISBN 978-1-60705-572-3
9 7 8 1 6 0 7 0 5 5 7 2 3
5 2 9 9 5
US $29.95
CRAFTS/Needlework/Embroidery
10877
Also available as an eBook
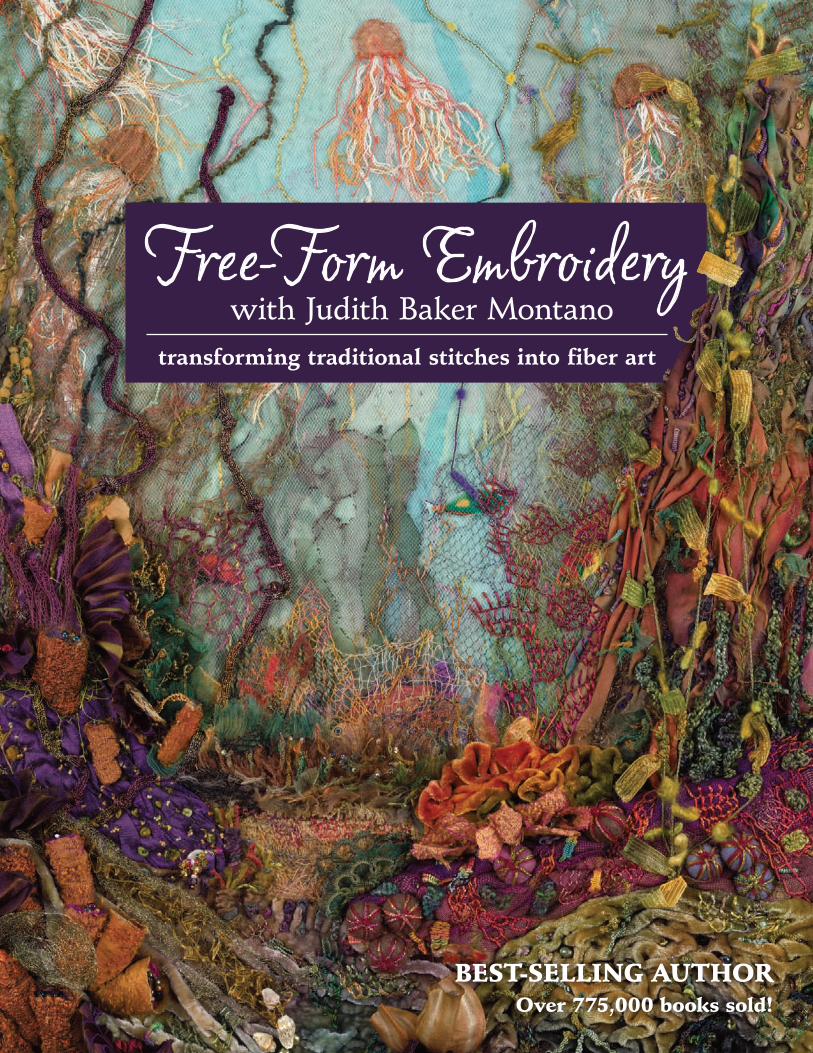
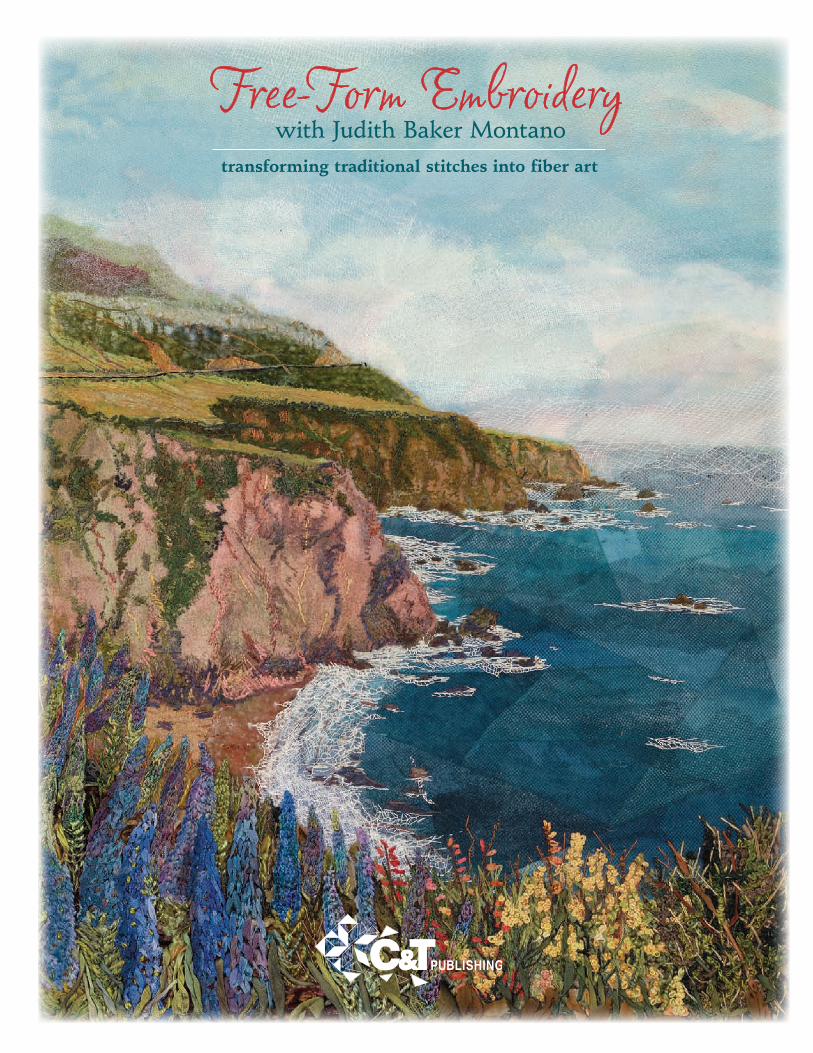
Free-Form Embroiderywith Judith Baker Montano
transforming traditional stitches into fiber art
BEST-SELLING AUTHOROver 775,000 books sold!
Free-Form E
mbroidery
with
Judith
Baker M
ontanoJud
ith B
aker Montano
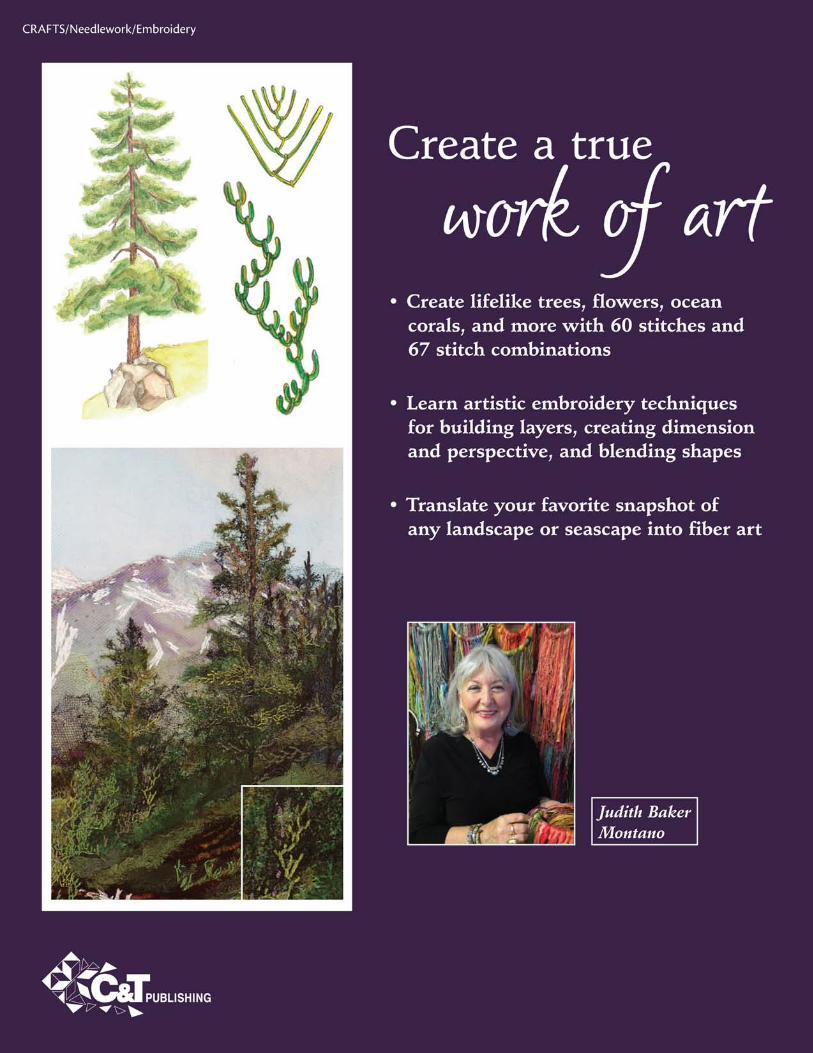
Create a true
work of art • Create lifelike trees, flowers, ocean
corals, and more with 60 stitches and 67 stitch combinations
• Learn artistic embroidery techniques for building layers, creating dimension and perspective, and blending shapes
• Translate your favorite snapshot of any landscape or seascape into fiber art
Judith Baker Montano
Free-Form Embroiderywith Judith Baker Montano
transforming traditional stitches into fiber art
Text, Artwork, and Photography copyright © 2012 by Judith Baker Montano
Photography and Artwork copyright © 2012 by C&T Publishing, Inc.
PUBLISHER: Amy Marson
CREATIVE DIRECTOR: Gailen Runge
ART DIRECTOR: Kristy Zacharias
EDITOR: Lynn Koolish
COVER DESIGNER: April Mostek
BOOK DESIGNER: Rose Sheifer
PRODUCTION COORDINATOR: Jenny Davis
PRODUCTION EDITOR: Alice Mace Nakanishi
WATERCOLOR ILLUSTRATIONS: Judith Baker Montano
NUMBERED STITCH DIAGRAMS: Kirstie L. Pettersen and Richard Sheppard
Flat Embroidery Photography by C&T Publishing, Inc.; How-to Photography by Judith Baker Montano;
Finished Fiber Artwork Photography by Robert Valentine, Giclee Print Net, Inc., unless otherwise noted
Published by C&T Publishing, Inc., P.O. Box 1456, Lafayette, CA 94549
All rights reserved. No part of this work covered by the copyright hereon may be used in any form or reproduced by any means—graphic, electronic, or mechanical, including photocopying, recording, taping, or information storage and retrieval systems—without
written permission from the publisher. The copyrights on individual artworks are retained by the artist as noted in Free-Form Embroidery with Judith Baker Montano. These designs
may be used to make items only for personal use or donation to nonprofit groups for sale or for display only at events, provided the following credit is included on a conspicuous label: Designs copyright © 2012 by Judith Baker Montano from the book Free-Form Embroidery
with Judith Baker Montano from C&T Publishing, Inc. Permission for all other purposes must be requested in writing from C&T Publishing, Inc.
Attention Teachers: C&T Publishing, Inc., encourages you to use this book as a text for teaching. Contact us at 800-284-1114 or www.ctpub.com for lesson plans
and information about the C&T Creative Troupe.
We take great care to ensure that the information included in our products is accurate and presented in good faith, but no warranty is provided nor are results guaranteed.
Having no control over the choices of materials or procedures used, neither the author nor C&T Publishing, Inc., shall have any liability to any person or entity with respect to any loss or damage caused directly or indirectly by the information contained in this book. For your convenience, we post an up-to-date listing of corrections on our website (www.ctpub.com).
If a correction is not already noted, please contact our customer service department at [email protected] or at P.O. Box 1456, Lafayette, CA 94549.
Trademark (™) and registered trademark (®) names are used throughout this book. Rather than use the symbols with every occurrence of a trademark or registered trademark name, we are using the names only in the editorial fashion and to the
benefit of the owner, with no intention of infringement.
Library of Congress Cataloging-in-Publication Data
Montano, Judith Baker.
Free-form embroidery with Judith Baker Montano : transforming traditional stitches into fiber art / Judith Baker Montano.
pages cm
ISBN 978-1-60705-572-3 (soft cover)
1. Embroidery. I. Title.
TT770.M635 2012
746.44--dc23
2012004062
Printed in China
10 9 8 7 6 5 4 3 2 1
DedicationDedicated to Paloma Boucher Montano
My little dove Paloma
Sweet baby love Paloma
Fly free and high
Throughout the sky
My little dove Paloma
AcknowledgmentsThank you to my beloved husband, Ernest Shealy, and my family,
who make all the hours in the studio worthwhile. They are my
beloved band of troubadours who make the journey easier.
Thank you to my editor, Lynn Koolish, and designer, Rose Sheifer,
for your friendship and creative input. Along with the C&T team,
you were a joy to work with.
Thank you to my wonderful friends and mentors:
Jan Beaney, Valerie Bothel, Jack Brockette, Kaffe Fassett,
Mary Fisher, Kathleen Glynn, Joan Hanley, Kathy Koch,
Dulany Lingo, Jean Littlejohn, Brandon Mabley, Penny Morgan,
Di Pettigrew, Robin Richards, Ann Riseborough, Alys Romer,
Justin Schultze, Ricky Tims, and Faye Walker.
Introduction .................... 6
Supplies and Tools ........ 8
Threads • Ribbons • Yarns • Fabrics • Hoops, Frames, Clamps, and Stands • Tools • Needles • Metric Conversions • Crochet Hooks and Knitting Needles
Techniques ......................18
Choosing Background Fabrics • Presenting Finished Pieces
Stitch Guide ...................23
1. Arrowhead Stitch 24
2. Arrowhead Stitch: Stacked 24
3. Backstitch: Star 25
4. Backstitch: Threaded 25
5. Braid Stitch 26
6. Bullion Stitch 26
7. Buttonhole Stitch 28
8. Buttonhole Stitch: Circle 28
9. Buttonhole Stitch: Knotted 29
10. Buttonhole Stitch: Triangles, Half-Circles 29
11. Chain Stitch and Chain Stitch Zigzag 30
12. Chain Stitch: Crochet 31
13. Chain Stitch: Open 31
14. Chain Stitch: Twisted 32
15. Colonial Knot 32
16. Coral Stitch 33
17. Couching Stitch 33
18. Cretan Stitch 34
19. Double Knot Stitch 35
20. Eyelet Stitch 36
21. Featherstitch: Single / Double / Triple 36
22. Featherstitch: Leaf 37
23. Fern Leaf Stitch 38
24. Fishbone Stitch 39
25. Flat Stitch 39
26. Fly Stitch 40
27. Fly Stitch: Leaf 40
28. Fly Stitch: Seedpod 40
29. French Knot 40
30. French Knot: Couched 41
31. Head of the Bull Stitch 42
32. Herringbone Stitch 43
33. Judith’s Knotted Flower Stitch 43
34. Lazy Daisy Stitch 44
35. Leaf Ribbon Stitch 44
36. Long and Short Stitch 45
37. Loop Stitch 46
38. Maidenhair Stitch 46
39. Montano Knot 47
40. Needle Weaving Bar Stitch 47
41. Net Stitch 48
42. Overcast Stitch 49
43. Pistil Stitch 49
44. Plume Stitch 50
45. Raised Straight Stitch 50
46. Ribbon Split Stitch 51
47. Romanian Couching 52
48. Running Stitch 52
49. Satin Stitch 53
50. Scroll Stitch 54
51. Seed Stitch 54
52. Snail Trail Stitch 55
53. Spider Web Backstitch 55
54. Split Stitch 56
55. Stem Stitch 57
56. Straight Stitch 57
57. String of Pearls Stitch 58
Twisted Chain Stitch: see 14. Chain Stitch: Twisted
58. Van Dyke Stitch 59
59. Wheat Ear Stitch and Wheat Ear Stitch: Detached 60
60. Whipstitch: Thread and Ribbon 61
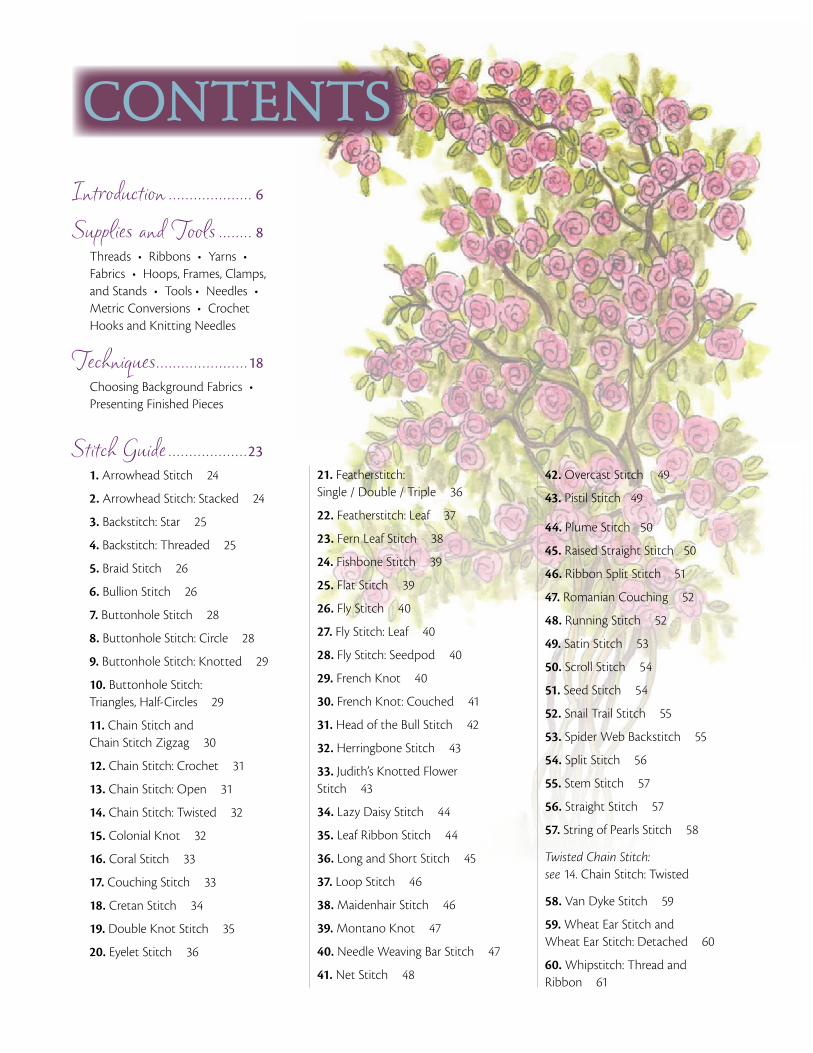
CONTENTS
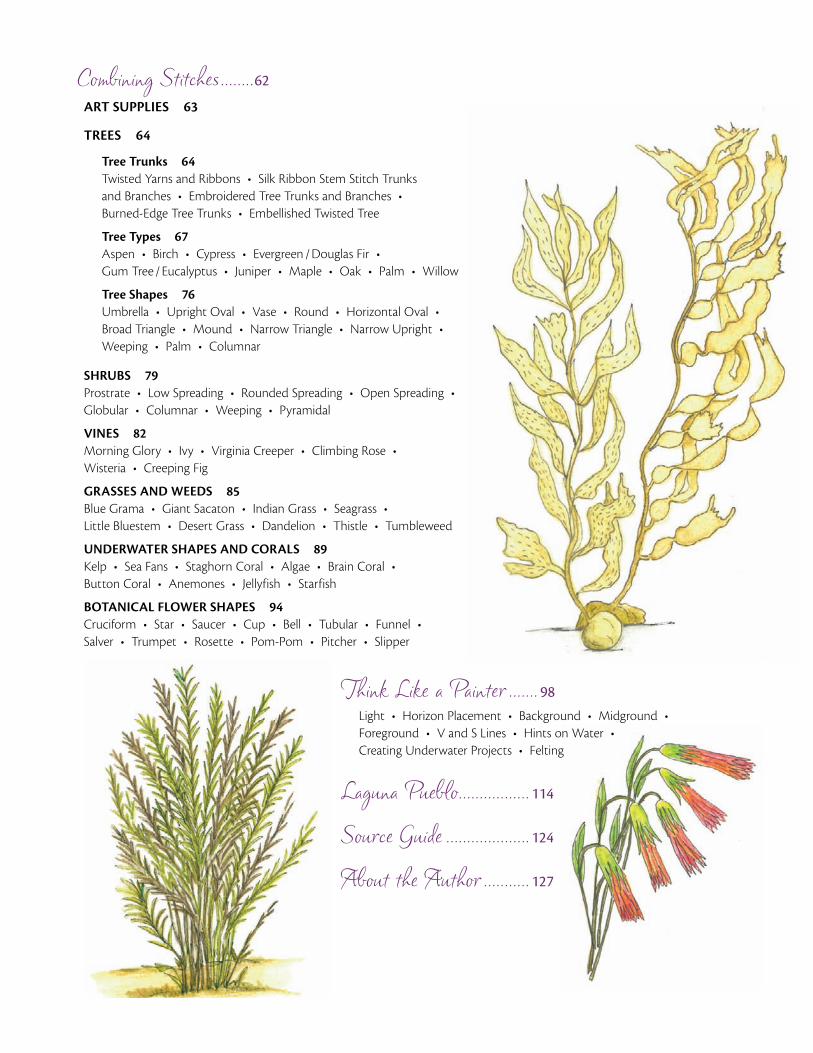
Combining Stitches ........62
ART SUPPLIES 63
TREES 64
Tree Trunks 64 Twisted Yarns and Ribbons • Silk Ribbon Stem Stitch Trunks and Branches • Embroidered Tree Trunks and Branches • Burned-Edge Tree Trunks • Embellished Twisted Tree
Tree Types 67 Aspen • Birch • Cypress • Evergreen / Douglas Fir • Gum Tree / Eucalyptus • Juniper • Maple • Oak • Palm • Willow
Tree Shapes 76 Umbrella • Upright Oval • Vase • Round • Horizontal Oval • Broad Triangle • Mound • Narrow Triangle • Narrow Upright • Weeping • Palm • Columnar
SHRUBS 79 Prostrate • Low Spreading • Rounded Spreading • Open Spreading • Globular • Columnar • Weeping • Pyramidal
VINES 82 Morning Glory • Ivy • Virginia Creeper • Climbing Rose • Wisteria • Creeping Fig
GRASSES AND WEEDS 85 Blue Grama • Giant Sacaton • Indian Grass • Seagrass • Little Bluestem • Desert Grass • Dandelion • Thistle • Tumbleweed
UNDERWATER SHAPES AND CORALS 89 Kelp • Sea Fans • Staghorn Coral • Algae • Brain Coral • Button Coral • Anemones • Jellyfish • Starfish
BOTANICAL FLOWER SHAPES 94 Cruciform • Star • Saucer • Cup • Bell • Tubular • Funnel • Salver • Trumpet • Rosette • Pom-Pom • Pitcher • Slipper
Think Like a Painter ....... 98
Light • Horizon Placement • Background • Midground • Foreground • V and S Lines • Hints on Water • Creating Underwater Projects • Felting
Laguna Pueblo .................114
Source Guide ....................124
About the Author ...........127
INTRODUCTION
Embroidery, like painting and music, is an art form steeped in
traditional rules and techniques requiring years of practice. As
a dyslexic I had difficulty learning from the written word, so
I used pictures and diagrams. Coats and Clark’s 100 Stitches
was my best friend. After years of practice the featherstitch
became second nature to me. I could eye the width and
height of most stitches and I even invented some of my
own stitches.
I went on to write stitch dictionaries for needleworkers using
the written word, diagrams, and photographs for each stitch.
They are the books I wish I had when I was learning.
With a background in traditional fine arts, I began to mix
fabrics with embroidery to create landscapes and seascapes.
I soon discovered that using threads, yarns, and ribbons is
no different from using paint, brushes, and paper! All the
traditional rules of art still apply!
I experimented with the thickness of threads and yarns,
distorting the traditional stitches to create organic shapes.
At first everything took on a flat folk-art look, but after
rereading my basic art books things started to improve.
Many artists—such as Picasso, who studied classical art at
the School of Fine Arts in Barcelona and then broke the rules
with cubism, or Billy Joel, who began with a classical piano
background and went on to be one of our most popular
contemporary musicians—have used their classical training to
produce new and innovative material. Those lessons in using
gradations, and those countless hours of musical scales, paid
off. They provided a good firm base from which to expand.
It is no different with the art of embroidery. Many textile
artists started out with classic training as taught by the
British Royal School of Embroidery, City and Guilds, or the
Embroiderers’ Guild, and then went on to create new avenues
that forever changed and enhanced the world of needle art.
When I look back on my journey from traditional to free-
form embroidery, I realize that I have many champions and
influences.
Constance Howard (1920–2000), a graduate of the Royal
School of Embroidery, is remembered as one of our most
endearing personalities. Constance single-handedly brought
embroidery into the world of art and fashion. She started the
Department of Embroidery in the Art School at Goldsmiths
College in London. Her vibrant personality, wild hair colors,
and contagious enthusiasm made her a beloved international
teacher and mentor.
Erica Wilson, an international needlework artist, was famous
for her kits and patterns. As a child I waited patiently for
my mother’s monthly copy of McCall’s Needlework & Crafts
magazine to search out Erica’s patterns and designs. Erica was
born in Scotland and graduated from the Royal School of
Needlework in London. She ran a successful needlework shop in New York City for 33 years, hosted two PBS embroidery
shows, and has written sixteen needlework books!
One man on my list of needlework champions is Roosevelt
“Rosey” Grier, a professional football player. He loved needle-
point and macramé and designed several patterns for
publication. I admired him because he was such a big man
(6́ 5˝ and 300 pounds) and I could visualize him, head down
over his needlepoint, in the locker room, ignoring all the
taunts of his fellow players. He wrote Rosey Grier’s Needlepoint
for Men in 1973 and was a popular contributor to the needle-
work magazines of the time.
Annemieke Mein of Sale, Australia, is a textile artist and hero
of mine. She was born in Haarlem, the Netherlands, in 1944.
She immigrated with her parents to Australia in 1951. Her love
of wildlife is depicted in her wide, sweeping textiles worked in
minute detail on a grand scale. Annemieke was the first textile
artist to be a member of the Wildlife Art Society of Australia
and the Australian Guild of Realist Artists. In 1988 she received
the Order of Australia medal for services to the arts. She
encouraged and inspired me to attempt some of my early
landscape pieces.
Pat Langford (1927–2003) of Melbourne, Australia, was a
student of Constance Howard’s and a wonderful artist in her
6 Free-Form Embroidery with Judith Baker Montano
7Introduction
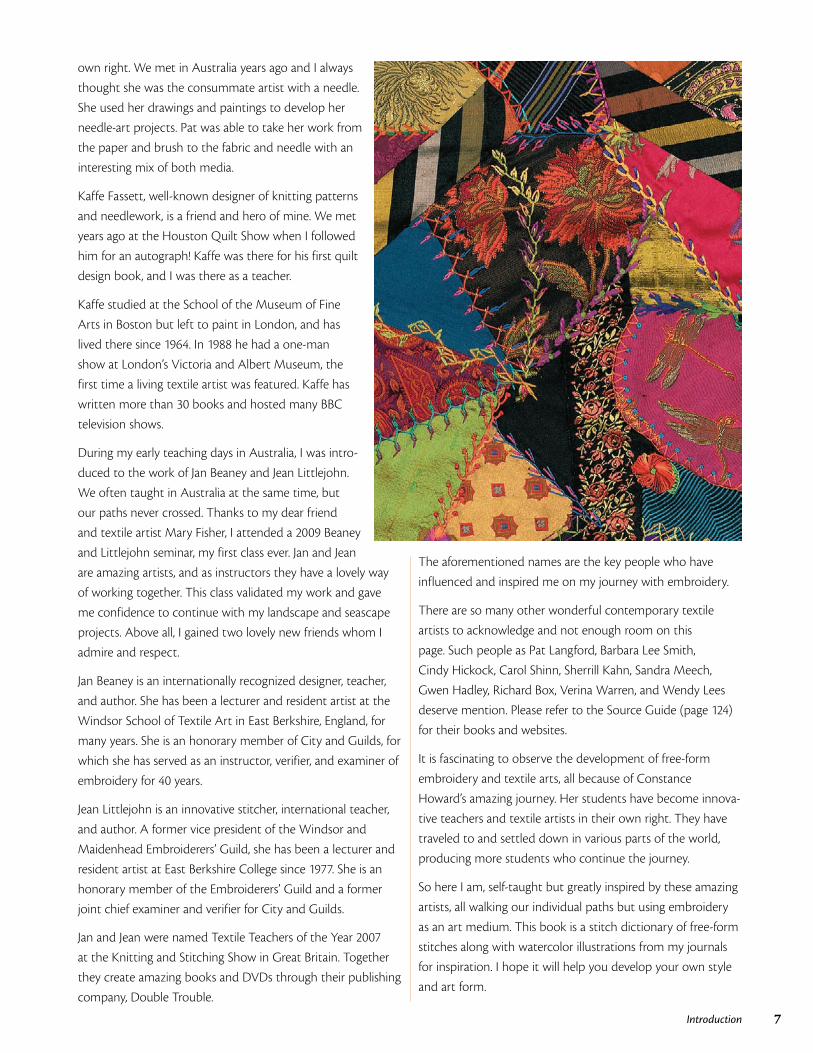
own right. We met in Australia years ago and I always
thought she was the consummate artist with a needle.
She used her drawings and paintings to develop her
needle-art projects. Pat was able to take her work from
the paper and brush to the fabric and needle with an
interesting mix of both media.
Kaffe Fassett, well-known designer of knitting patterns
and needlework, is a friend and hero of mine. We met
years ago at the Houston Quilt Show when I followed
him for an autograph! Kaffe was there for his first quilt
design book, and I was there as a teacher.
Kaffe studied at the School of the Museum of Fine
Arts in Boston but left to paint in London, and has
lived there since 1964. In 1988 he had a one-man
show at London’s Victoria and Albert Museum, the
first time a living textile artist was featured. Kaffe has
written more than 30 books and hosted many BBC
television shows.
During my early teaching days in Australia, I was intro-
duced to the work of Jan Beaney and Jean Littlejohn.
We often taught in Australia at the same time, but
our paths never crossed. Thanks to my dear friend
and textile artist Mary Fisher, I attended a 2009 Beaney
and Littlejohn seminar, my first class ever. Jan and Jean
are amazing artists, and as instructors they have a lovely way
of working together. This class validated my work and gave
me confidence to continue with my landscape and seascape
projects. Above all, I gained two lovely new friends whom I
admire and respect.
Jan Beaney is an internationally recognized designer, teacher,
and author. She has been a lecturer and resident artist at the
Windsor School of Textile Art in East Berkshire, England, for
many years. She is an honorary member of City and Guilds, for
which she has served as an instructor, verifier, and examiner of
embroidery for 40 years.
Jean Littlejohn is an innovative stitcher, international teacher,
and author. A former vice president of the Windsor and
Maidenhead Embroiderers’ Guild, she has been a lecturer and
resident artist at East Berkshire College since 1977. She is an
honorary member of the Embroiderers’ Guild and a former
joint chief examiner and verifier for City and Guilds.
Jan and Jean were named Textile Teachers of the Year 2007
at the Knitting and Stitching Show in Great Britain. Together
they create amazing books and DVDs through their publishing
company, Double Trouble.
The aforementioned names are the key people who have
influenced and inspired me on my journey with embroidery.
There are so many other wonderful contemporary textile
artists to acknowledge and not enough room on this
page. Such people as Pat Langford, Barbara Lee Smith,
Cindy Hickock, Carol Shinn, Sherrill Kahn, Sandra Meech,
Gwen Hadley, Richard Box, Verina Warren, and Wendy Lees
deserve mention. Please refer to the Source Guide (page 124)
for their books and websites.
It is fascinating to observe the development of free-form
embroidery and textile arts, all because of Constance
Howard’s amazing journey. Her students have become innova-
tive teachers and textile artists in their own right. They have
traveled to and settled down in various parts of the world,
producing more students who continue the journey.
So here I am, self-taught but greatly inspired by these amazing
artists, all walking our individual paths but using embroidery
as an art medium. This book is a stitch dictionary of free-form
stitches along with watercolor illustrations from my journals
for inspiration. I hope it will help you develop your own style
and art form.
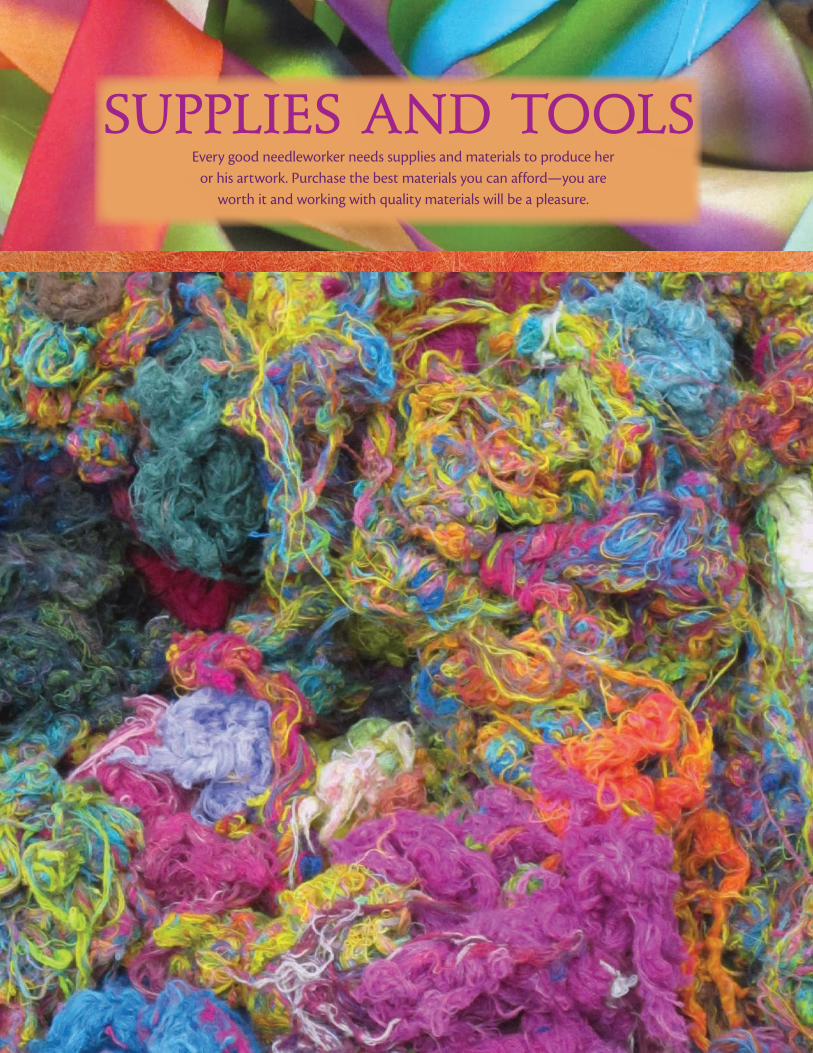
Every good needleworker needs supplies and materials to produce her or his artwork. Purchase the best materials you can afford—you are
worth it and working with quality materials will be a pleasure.
SUPPLIES AND TOOLS
9Supplies and Tools
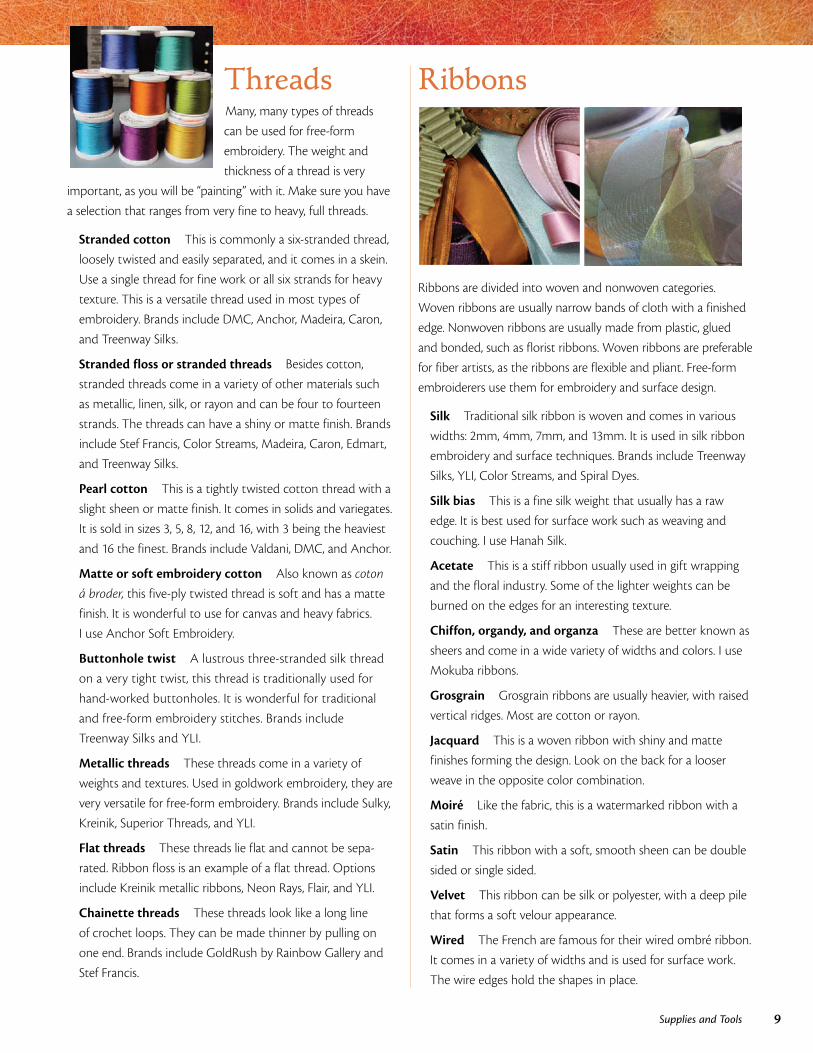
ThreadsMany, many types of threads
can be used for free-form
embroidery. The weight and
thickness of a thread is very
important, as you will be “painting” with it. Make sure you have
a selection that ranges from very fine to heavy, full threads.
Stranded cotton This is commonly a six-stranded thread,
loosely twisted and easily separated, and it comes in a skein.
Use a single thread for fine work or all six strands for heavy
texture. This is a versatile thread used in most types of
embroidery. Brands include DMC, Anchor, Madeira, Caron,
and Treenway Silks.
Stranded floss or stranded threads Besides cotton,
stranded threads come in a variety of other materials such
as metallic, linen, silk, or rayon and can be four to fourteen
strands. The threads can have a shiny or matte finish. Brands
include Stef Francis, Color Streams, Madeira, Caron, Edmart,
and Treenway Silks.
Pearl cotton This is a tightly twisted cotton thread with a
slight sheen or matte finish. It comes in solids and variegates.
It is sold in sizes 3, 5, 8, 12, and 16, with 3 being the heaviest
and 16 the finest. Brands include Valdani, DMC, and Anchor.
Matte or soft embroidery cotton Also known as coton
á broder, this five-ply twisted thread is soft and has a matte
finish. It is wonderful to use for canvas and heavy fabrics.
I use Anchor Soft Embroidery.
Buttonhole twist A lustrous three-stranded silk thread
on a very tight twist, this thread is traditionally used for
hand-worked buttonholes. It is wonderful for traditional
and free-form embroidery stitches. Brands include
Treenway Silks and YLI.
Metallic threads These threads come in a variety of
weights and textures. Used in goldwork embroidery, they are
very versatile for free-form embroidery. Brands include Sulky,
Kreinik, Superior Threads, and YLI.
Flat threads These threads lie flat and cannot be sepa-
rated. Ribbon floss is an example of a flat thread. Options
include Kreinik metallic ribbons, Neon Rays, Flair, and YLI.
Chainette threads These threads look like a long line
of crochet loops. They can be made thinner by pulling on
one end. Brands include GoldRush by Rainbow Gallery and
Stef Francis.
Ribbons
Ribbons are divided into woven and nonwoven categories.
Woven ribbons are usually narrow bands of cloth with a finished
edge. Nonwoven ribbons are usually made from plastic, glued
and bonded, such as florist ribbons. Woven ribbons are preferable
for fiber artists, as the ribbons are flexible and pliant. Free-form
embroiderers use them for embroidery and surface design.
Silk Traditional silk ribbon is woven and comes in various
widths: 2mm, 4mm, 7mm, and 13mm. It is used in silk ribbon
embroidery and surface techniques. Brands include Treenway
Silks, YLI, Color Streams, and Spiral Dyes.
Silk bias This is a fine silk weight that usually has a raw
edge. It is best used for surface work such as weaving and
couching. I use Hanah Silk.
Acetate This is a stiff ribbon usually used in gift wrapping
and the floral industry. Some of the lighter weights can be
burned on the edges for an interesting texture.
Chiffon, organdy, and organza These are better known as
sheers and come in a wide variety of widths and colors. I use
Mokuba ribbons.
Grosgrain Grosgrain ribbons are usually heavier, with raised
vertical ridges. Most are cotton or rayon.
Jacquard This is a woven ribbon with shiny and matte
finishes forming the design. Look on the back for a looser
weave in the opposite color combination.
Moiré Like the fabric, this is a watermarked ribbon with a
satin finish.
Satin This ribbon with a soft, smooth sheen can be double
sided or single sided.
Velvet This ribbon can be silk or polyester, with a deep pile
that forms a soft velour appearance.
Wired The French are famous for their wired ombré ribbon.
It comes in a variety of widths and is used for surface work.
The wire edges hold the shapes in place.
10 Free-Form Embroidery with Judith Baker Montano
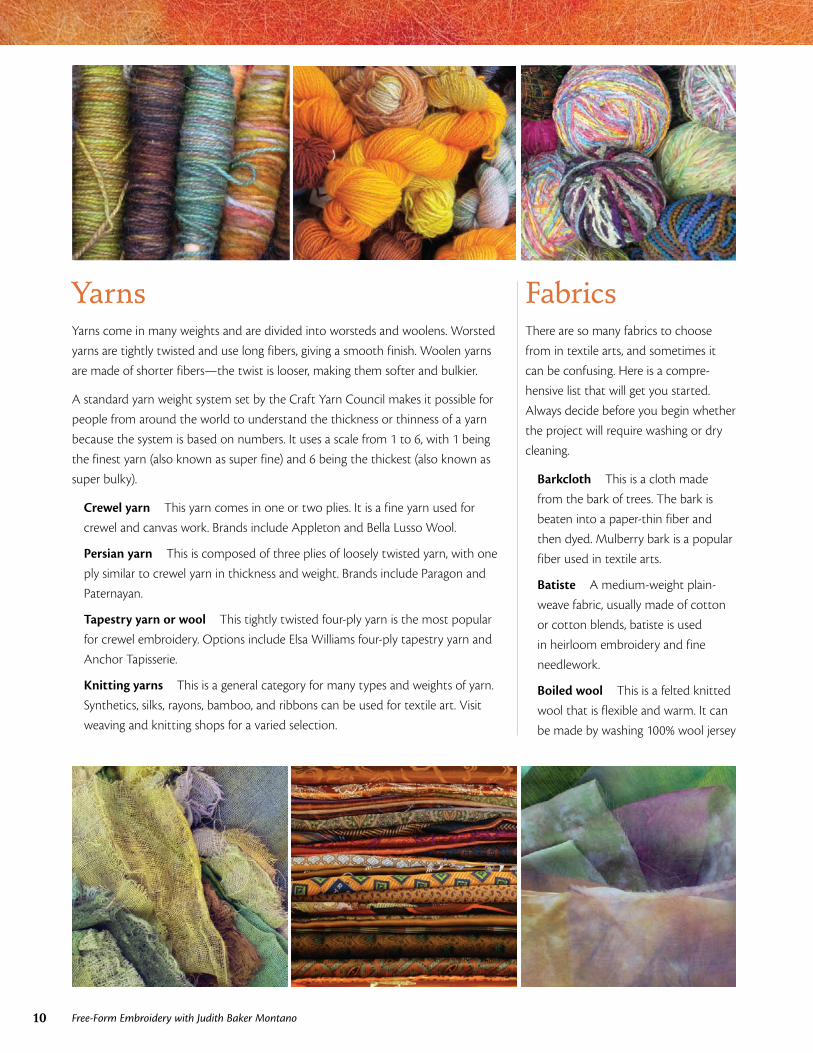
YarnsYarns come in many weights and are divided into worsteds and woolens. Worsted
yarns are tightly twisted and use long fibers, giving a smooth finish. Woolen yarns
are made of shorter fibers—the twist is looser, making them softer and bulkier.
A standard yarn weight system set by the Craft Yarn Council makes it possible for
people from around the world to understand the thickness or thinness of a yarn
because the system is based on numbers. It uses a scale from 1 to 6, with 1 being
the finest yarn (also known as super fine) and 6 being the thickest (also known as
super bulky).
Crewel yarn This yarn comes in one or two plies. It is a fine yarn used for
crewel and canvas work. Brands include Appleton and Bella Lusso Wool.
Persian yarn This is composed of three plies of loosely twisted yarn, with one
ply similar to crewel yarn in thickness and weight. Brands include Paragon and
Paternayan.
Tapestry yarn or wool This tightly twisted four-ply yarn is the most popular
for crewel embroidery. Options include Elsa Williams four-ply tapestry yarn and
Anchor Tapisserie.
Knitting yarns This is a general category for many types and weights of yarn.
Synthetics, silks, rayons, bamboo, and ribbons can be used for textile art. Visit
weaving and knitting shops for a varied selection.
FabricsThere are so many fabrics to choose
from in textile arts, and sometimes it
can be confusing. Here is a compre-
hensive list that will get you started.
Always decide before you begin whether
the project will require washing or dry
cleaning.
Barkcloth This is a cloth made
from the bark of trees. The bark is
beaten into a paper-thin fiber and
then dyed. Mulberry bark is a popular
fiber used in textile arts.
Batiste A medium-weight plain-
weave fabric, usually made of cotton
or cotton blends, batiste is used
in heirloom embroidery and fine
needlework.
Boiled wool This is a felted knitted
wool that is flexible and warm. It can
be made by washing 100% wool jersey
11Supplies and Tools
in hot water and drying in a hot dryer. There will be about
50% shrinkage.
Broadcloth A tightly woven plain-weave fabric, with a
slight ridge effect in one direction, broadcloth is usually
made from cotton or cotton/polyester blends.
Calico A tightly woven cotton fabric with an allover
print, usually a small floral pattern on a contrasting
background color.
Canvas This woven cotton, linen, or synthetic fabric is
made with a basic plain weave in heavy- and firm-weight
yarns. It is also referred to as duck.
Challis A lightweight, soft plain-weave fabric with a
slightly brushed surface, the fabric is often printed, usually
in a floral pattern. It is generally made of cotton, wool,
or rayon.
Cheesecloth This is a lightweight, sheer, loosely woven
cotton fabric with a very soft texture. It may be natural
colored, bleached, or dyed. It is used for canning and
jam making.
Chiffon A plain-woven lightweight, extremely sheer, airy,
and soft silk, rayon, or synthetic fabric, containing highly
twisted filament yarns.
Chintz A glazed plain-weave cotton fabric, chintz is often
printed with brightly colored flowers or stripes. Its name
comes from the Hindu word meaning “spotted.” Unglazed
chintz is called cretonne.
Corduroy A cotton fabric with rows of ridges, or wales,
parallel to the selvage. The ridges are built so that lines can
be seen when the pile is cut. Corduroy is classified by the
number of wales, or cords, to the inch.
Crepe This is a lightweight fabric of silk, rayon, cotton,
wool, man-made, or blended fibers, characterized by a
crinkled surface.
Damask A glossy jacquard fabric (see Jacquard, at right),
usually made from linen, cotton, rayon, silk, or blends. The
patterns are flat and reversible. It is often used for napkins
and tablecloths.
Drill A heavy, strong, durable twilled fabric of cotton or
synthetic fibers, similar to denim.
Duchess satin One of the heaviest and richest-looking
satins. It is usually made of silk and is also known as
peau de soie.
Duck A tightly woven, heavy plain-weave bottom-weight
fabric with a hard, durable finish, duck is usually made
of cotton.
Dupioni The silk for dupioni comes from fiber formed by
two silkworms spinning their cocoons together in an inter-
locking manner (or from single cocoons that are spun side
by side and interlocked). The yarn is uneven, irregular, and
larger than regular filaments. It is used to make shantung
and dupioni.
Eyelet This fabric contains patterned cut-outs, around
which stitching or embroidery is applied in order to prevent
the fabric from unraveling.
Faille A glossy, soft, finely ribbed silklike woven fabric
made from cotton, silk, or synthetics.
Felt This is a nonwoven fabric made from wool, hair,
fur, or synthetic fibers. The fibers are locked together
in a process using heat, water, and pressure to form a
compact material.
Flannel A medium-weight plain-weave or twilled fabric
usually made from cotton, cotton blends, or wool. Flannel
has a very soft hand; it is brushed on both sides to create a
soft, fuzzy surface.
Gabardine A tightly woven, twilled, worsted fabric with
a slight diagonal line on the right side. Gabardine is made of
wool, polyester, cotton, rayon, and various blends.
Gauze This is a thin, sheer plain-weave fabric made from
cotton, wool, silk, rayon, or synthetic fibers. Gauze is used
for curtains, apparel, trimmings, and surgical dressings.
Habutai A soft, lightweight silk dress fabric originally
woven in the gum on hand looms in Japan.
Jacquard A woven fabric with a shiny or matte finish
forming the woven design. Brocade and damask are types
of jacquard woven fabrics.
Mousseline This is the name for a wide category of
fabrics that are fairly sheer and lightweight and made
in a variety of fibers. Mousseline has a crisp hand and is
often used today for a fabric resembling peau de soie (see
Duchess satin, at left).
Noil A silk fabric that has the look of hopsack but is
much softer. Silk noil, sometimes called raw silk, has a nubby
feel and a low sheen.
Organdy A stiffened, sheer, lightweight plain-weave
fabric, organdy has a medium to high yarn count.
12 Free-Form Embroidery with Judith Baker Montano
Organza A crisp, sheer, lightweight plain-weave fabric,
with a medium to high yarn count, made of silk, rayon,
nylon, or polyester. It is used primarily in evening and
wedding apparel.
Satin This is a fabric with a basic weave, characterized
by long floats of yarn on the face of the fabric, creating a
smooth and shiny surface. Examples of satin weave fabrics
include slipper satin, crépe-back satin, faille satin, bridal satin,
moleskin, and antique satin.
Tulle Tulle is a lightweight, extremely fine machine-made
netting, usually with a hexagon-shaped mesh effect. It is
used for veils and dance costumes.
Tussah This fabric is woven from silk fibers made by
wild, uncultivated silkworms. Tussah is naturally tan in
color, cannot be bleached, and has a rougher texture than
cultivated silk.
Tweed A medium- to heavyweight woolen twill-weave
fabric containing colored slubbed yarns.
Velour Velour is a medium-weight closely woven fabric
with a thick pile. It resembles velvet but has a lower-cut pile.
Velvet Velvet is a type of tufted fabric in which the cut
threads are very evenly distributed, with a short, dense pile,
giving it a distinct feel. Velvet can be made from any fiber.
Variations include the following:
Crushed velvet is any velvet with an irregular pattern of
nap going in different directions. The pattern gives the
fabric a crushed or rumpled appearance.
Panné is a type of lustrous, lightweight velvet fabric in
which the pile has been flattened in one direction. It
has a longer or higher pile than regular velvet and is
often made as a knit fabric.
Velveteen A cotton cut-pile weave fabric, velveteen is
woven with two sets of filling yarns; the extra set creates
the pile. It has a much lower nap than velvet (above).
Voile This is a crisp, lightweight, plain-weave cottonlike
fabric, made with high-twist yarns in a high-yarn-count
construction. Similar in appearance to organdy (page 11)
and organza (above), it is used in heirloom embroidery.
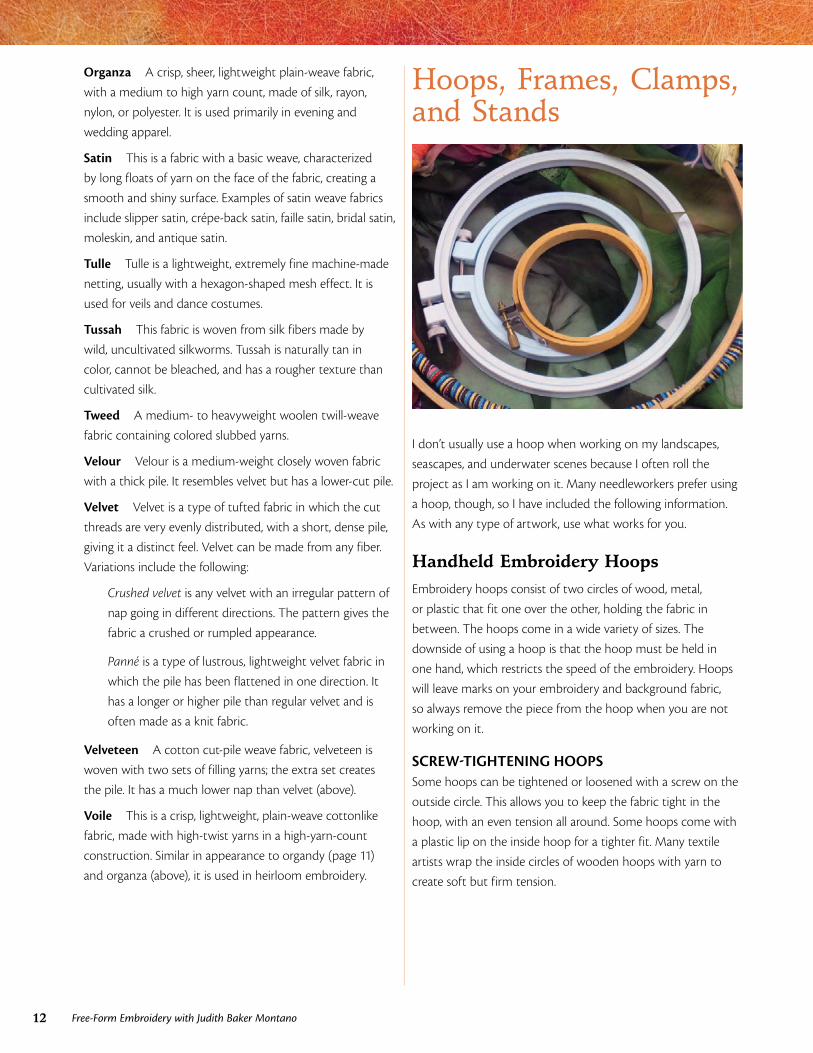
Hoops, Frames, Clamps, and Stands
I don’t usually use a hoop when working on my landscapes,
seascapes, and underwater scenes because I often roll the
project as I am working on it. Many needleworkers prefer using
a hoop, though, so I have included the following information.
As with any type of artwork, use what works for you.
Handheld Embroidery HoopsEmbroidery hoops consist of two circles of wood, metal,
or plastic that fit one over the other, holding the fabric in
between. The hoops come in a wide variety of sizes. The
downside of using a hoop is that the hoop must be held in
one hand, which restricts the speed of the embroidery. Hoops
will leave marks on your embroidery and background fabric,
so always remove the piece from the hoop when you are not
working on it.
SCREW-TIGHTENING HOOPSSome hoops can be tightened or loosened with a screw on the
outside circle. This allows you to keep the fabric tight in the
hoop, with an even tension all around. Some hoops come with
a plastic lip on the inside hoop for a tighter fit. Many textile
artists wrap the inside circles of wooden hoops with yarn to
create soft but firm tension.
13Supplies and Tools
PINCH-STYLE HOOPSThis style has circular metal handles that, when squeezed,
allow the inside circle to fit into the outside circle. The fabric
lies on the inside circle and is then tightened when the
handles are released. The tension is looser with this style of
hoop and needs to be adjusted frequently.
SNAP PLASTIC FRAMESThis setup comes in rectangles or squares. Plastic tubes form
the frame. The fabric lies over this frame, and the holders
(larger tubes cut in half and cut to a shorter length) snap
over the fabric and the tubes underneath. This is a looser
hold but works well on larger projects.
Embroidery StandsAn embroidery stand is simply a hoop on a stand, allowing
the embroiderer to have both hands free! It usually comes in
two pieces, the hoop and the stand. The hoop fits into the
stand, and the height and tilt can be adjusted for ease and
comfort.
The hoop can be a circle, square, or rectangle.
The hoops and stands come in wood, plastic, and metal,
with wood being the most common. Some are pinch styles,
in which the ends of the project are caught between two
end dowels that are tightened to hold the fabric. The other
style has canvas webbing attached to the end dowels. The
ends of the project are basted to these canvas strips and
then rolled to tighten. Some of these have a variety of dowel
lengths, and the dowels can be purchased separately.
How to Choose a Hoop or StandChoosing a hoop or stand is really a matter of personal
preference. The small handheld hoops do not require a lot
of time for preparing the fabric and are good for fast and
small projects. These hoops are portable and easily set up.
Embroidery stands require more preparation time but are
sturdier and allow the embroiderer to carry on with a long-
term project and to have the luxury of using both hands
and being able to tilt the project to the back when needed.
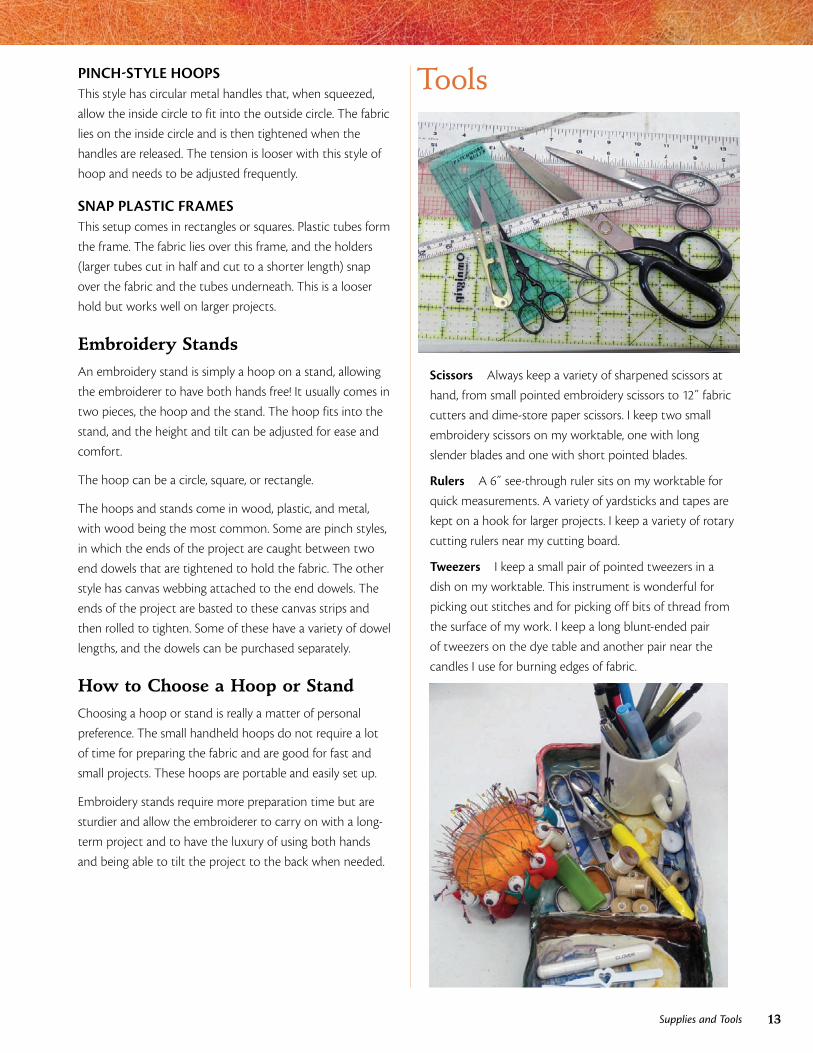
Tools
Scissors Always keep a variety of sharpened scissors at
hand, from small pointed embroidery scissors to 12˝ fabric
cutters and dime-store paper scissors. I keep two small
embroidery scissors on my worktable, one with long
slender blades and one with short pointed blades.
Rulers A 6˝ see-through ruler sits on my worktable for
quick measurements. A variety of yardsticks and tapes are
kept on a hook for larger projects. I keep a variety of rotary
cutting rulers near my cutting board.
Tweezers I keep a small pair of pointed tweezers in a
dish on my worktable. This instrument is wonderful for
picking out stitches and for picking off bits of thread from
the surface of my work. I keep a long blunt-ended pair
of tweezers on the dye table and another pair near the
candles I use for burning edges of fabric.
14 Free-Form Embroidery with Judith Baker Montano
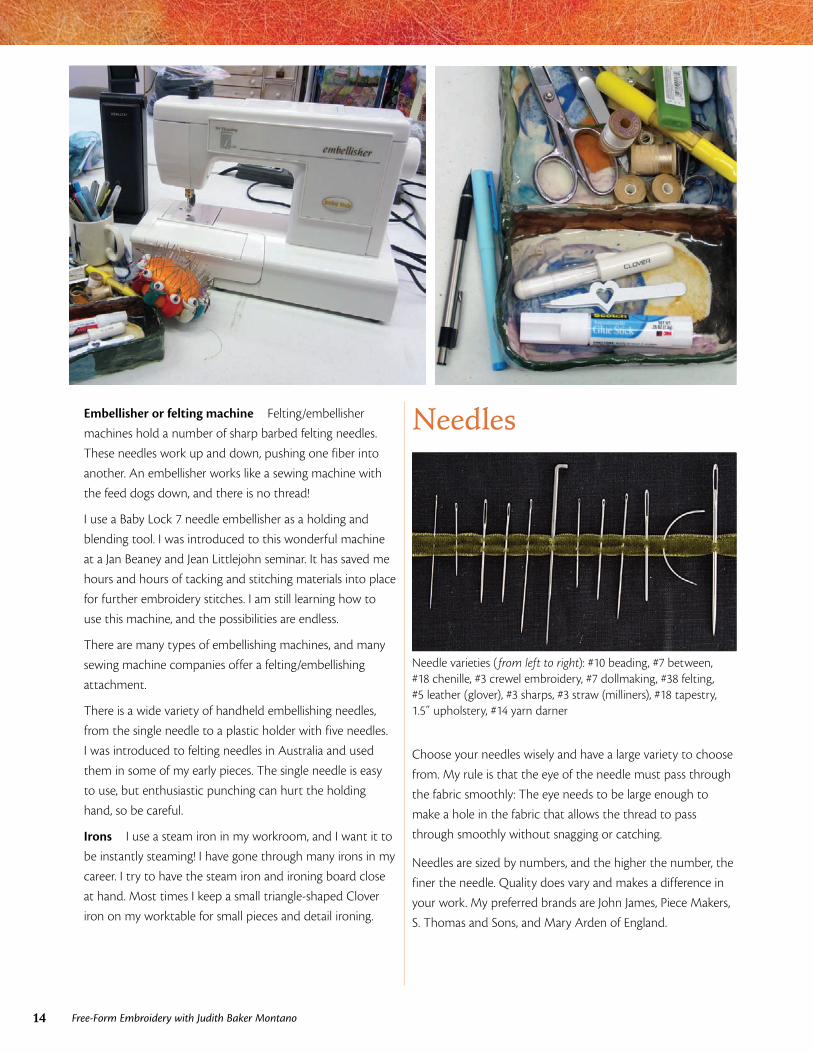
Embellisher or felting machine Felting/embellisher
machines hold a number of sharp barbed felting needles.
These needles work up and down, pushing one fiber into
another. An embellisher works like a sewing machine with
the feed dogs down, and there is no thread!
I use a Baby Lock 7 needle embellisher as a holding and
blending tool. I was introduced to this wonderful machine
at a Jan Beaney and Jean Littlejohn seminar. It has saved me
hours and hours of tacking and stitching materials into place
for further embroidery stitches. I am still learning how to
use this machine, and the possibilities are endless.
There are many types of embellishing machines, and many
sewing machine companies offer a felting/embellishing
attachment.
There is a wide variety of handheld embellishing needles,
from the single needle to a plastic holder with five needles.
I was introduced to felting needles in Australia and used
them in some of my early pieces. The single needle is easy
to use, but enthusiastic punching can hurt the holding
hand, so be careful.
Irons I use a steam iron in my workroom, and I want it to
be instantly steaming! I have gone through many irons in my
career. I try to have the steam iron and ironing board close
at hand. Most times I keep a small triangle-shaped Clover
iron on my worktable for small pieces and detail ironing.
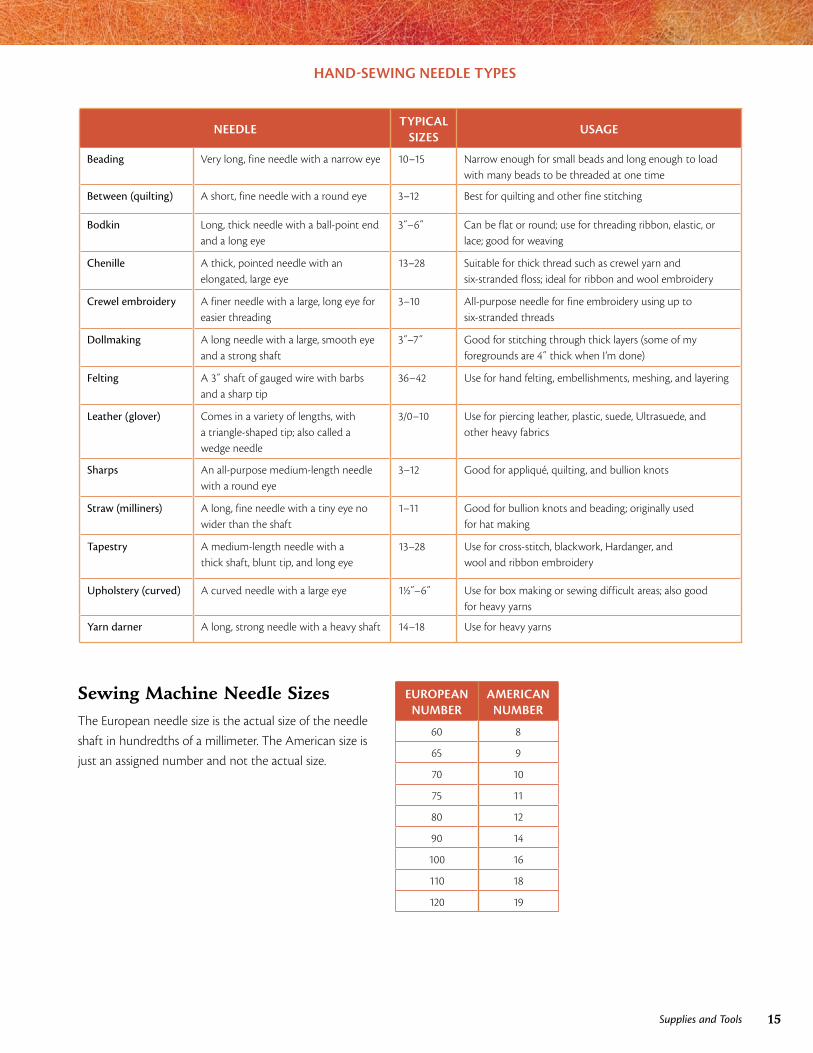
Needles
Needle varieties ( from left to right): #10 beading, #7 between, #18 chenille, #3 crewel embroidery, #7 dollmaking, #38 felting, #5 leather (glover), #3 sharps, #3 straw (milliners), #18 tapestry, 1.5˝ upholstery, #14 yarn darner
Choose your needles wisely and have a large variety to choose
from. My rule is that the eye of the needle must pass through
the fabric smoothly: The eye needs to be large enough to
make a hole in the fabric that allows the thread to pass
through smoothly without snagging or catching.
Needles are sized by numbers, and the higher the number, the
finer the needle. Quality does vary and makes a difference in
your work. My preferred brands are John James, Piece Makers,
S. Thomas and Sons, and Mary Arden of England.
15Supplies and Tools
HAND-SEWING NEEDLE TYPES
NEEDLETYPICAL
SIZESUSAGE
Beading Very long, fine needle with a narrow eye 10–15 Narrow enough for small beads and long enough to load with many beads to be threaded at one time
Between (quilting) A short, fine needle with a round eye 3–12 Best for quilting and other fine stitching
Bodkin Long, thick needle with a ball-point end and a long eye
3˝–6˝ Can be flat or round; use for threading ribbon, elastic, or lace; good for weaving
Chenille A thick, pointed needle with an elongated, large eye
13–28 Suitable for thick thread such as crewel yarn and six-stranded floss; ideal for ribbon and wool embroidery
Crewel embroidery A finer needle with a large, long eye for easier threading
3–10 All-purpose needle for fine embroidery using up to six-stranded threads
Dollmaking A long needle with a large, smooth eye and a strong shaft
3˝–7˝ Good for stitching through thick layers (some of my foregrounds are 4˝ thick when I’m done)
Felting A 3˝ shaft of gauged wire with barbs and a sharp tip
36–42 Use for hand felting, embellishments, meshing, and layering
Leather (glover) Comes in a variety of lengths, with a triangle-shaped tip; also called a wedge needle
3/0–10 Use for piercing leather, plastic, suede, Ultrasuede, and other heavy fabrics
Sharps An all-purpose medium-length needle with a round eye
3–12 Good for appliqué, quilting, and bullion knots
Straw (milliners) A long, fine needle with a tiny eye no wider than the shaft
1–11 Good for bullion knots and beading; originally used for hat making
Tapestry A medium-length needle with a thick shaft, blunt tip, and long eye
13–28 Use for cross-stitch, blackwork, Hardanger, and wool and ribbon embroidery
Upholstery (curved) A curved needle with a large eye 11/2˝–6˝ Use for box making or sewing difficult areas; also good for heavy yarns
Yarn darner A long, strong needle with a heavy shaft 14–18 Use for heavy yarns
Sewing Machine Needle SizesThe European needle size is the actual size of the needle
shaft in hundredths of a millimeter. The American size is
just an assigned number and not the actual size.
EUROPEAN NUMBER
AMERICAN NUMBER
60 8
65 9
70 10
75 11
80 12
90 14
100 16
110 18
120 19
16 Free-Form Embroidery with Judith Baker Montano
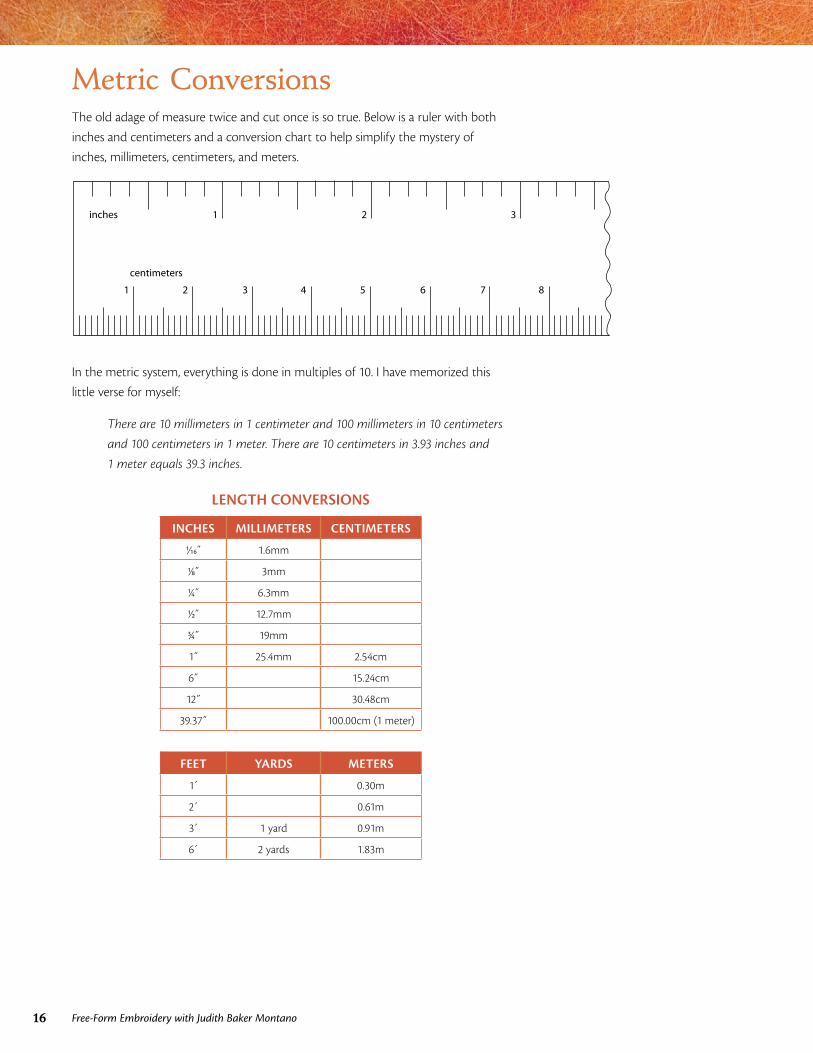
Metric ConversionsThe old adage of measure twice and cut once is so true. Below is a ruler with both
inches and centimeters and a conversion chart to help simplify the mystery of
inches, millimeters, centimeters, and meters.
inches
centimeters
1
1 2 3 4 5 6 7 8
2 3
In the metric system, everything is done in multiples of 10. I have memorized this
little verse for myself:
There are 10 millimeters in 1 centimeter and 100 millimeters in 10 centimeters
and 100 centimeters in 1 meter. There are 10 centimeters in 3.93 inches and
1 meter equals 39.3 inches.
LENGTH CONVERSIONS
INCHES MILLIMETERS CENTIMETERS
1/16̋ 1.6mm
1/8˝ 3mm
1/4˝ 6.3mm
1/2˝ 12.7mm
3/4˝ 19mm
1˝ 25.4mm 2.54cm
6˝ 15.24cm
12˝ 30.48cm
39.37˝ 100.00cm (1 meter)
FEET YARDS METERS
1́ 0.30m
2´ 0.61m
3´ 1 yard 0.91m
6´ 2 yards 1.83m
17Supplies and Tools
CROCHET HOOK SIZES
METRIC (MM)
OLD UK SIZE
U.S. SIZE
0.60 6 14
— 51/2 13
0.75 5 12
— 41/2 11
1.00 4 10
— 31/2 9
1.25 3 8
1.50 21/2 7
1.75 2 6
— 11/2 5
2.00 1 4
2.25 13 B/1
2.50 12 —
2.75 — C/2
3.00 11 —
3.25 10 D/3
3.50 9 E/4
3.75 — F/5
4.00 8 G/6
4.50 7 7
5.00 6 H/8
5.50 5 I/9
6.00 4 J/10
KNITTING NEEDLE SIZES
METRIC (MM)
OLD UK SIZE
U.S. SIZE
2 14 0
2.25 13 1
2.75 12 2
3 11 3
3.25 10 4
3.75 9 5
4 8 6
4.5 7 7
5 6 8
5.5 5 9
6 4 10
6.5 3 —
7 2 101/2
7.5 1 —
8 0 11
9 00 13
10 000 15
12 — 171/2
15 — 19
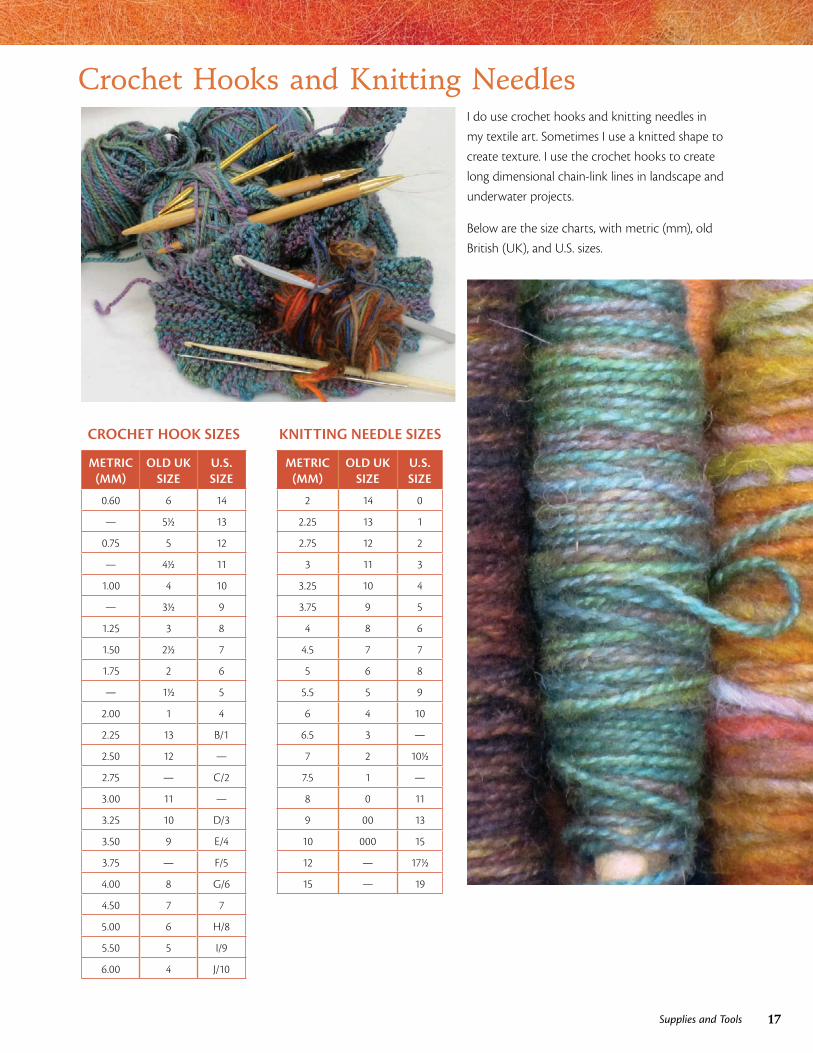
Crochet Hooks and Knitting NeedlesI do use crochet hooks and knitting needles in
my textile art. Sometimes I use a knitted shape to
create texture. I use the crochet hooks to create
long dimensional chain-link lines in landscape and
underwater projects.
Below are the size charts, with metric (mm), old
British (UK), and U.S. sizes.
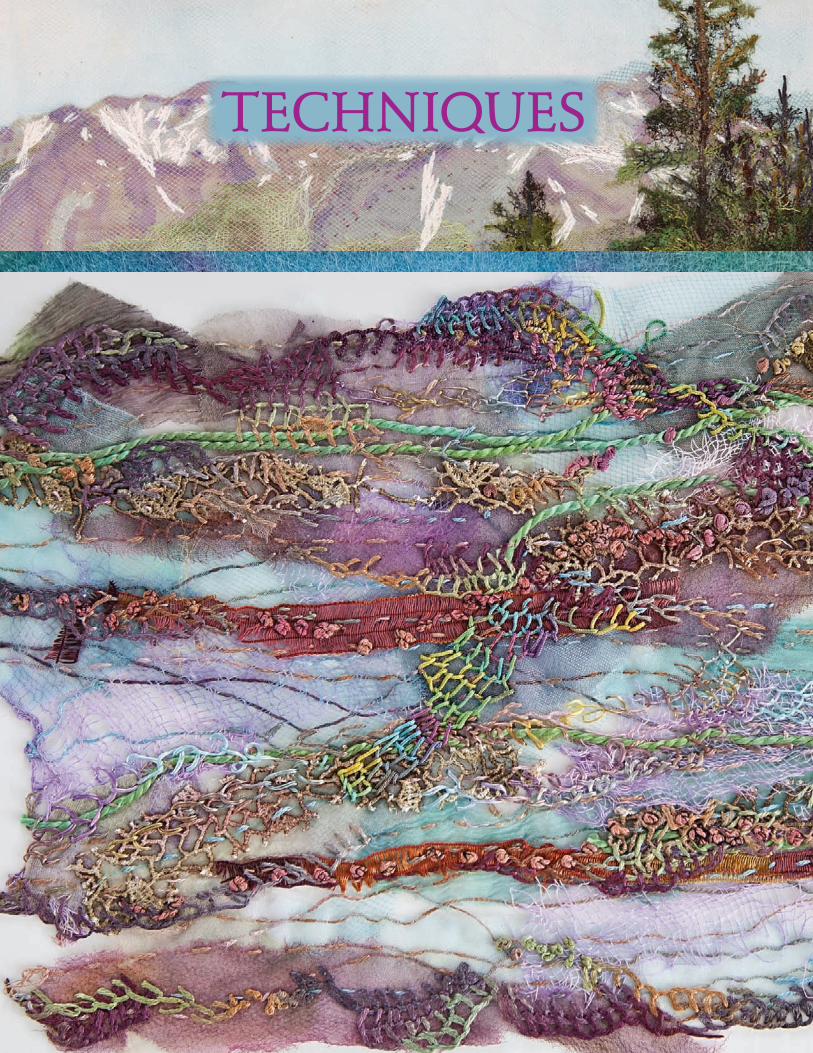
TECHNIQUES
19Techniques
Choosing Background FabricsRefer to Fabrics (pages 10–12) as needed.
I choose my background fabrics very carefully for
embroidery projects. The background fabric acts as a
foundation, providing texture and color to complement
the chosen threads and yarns.
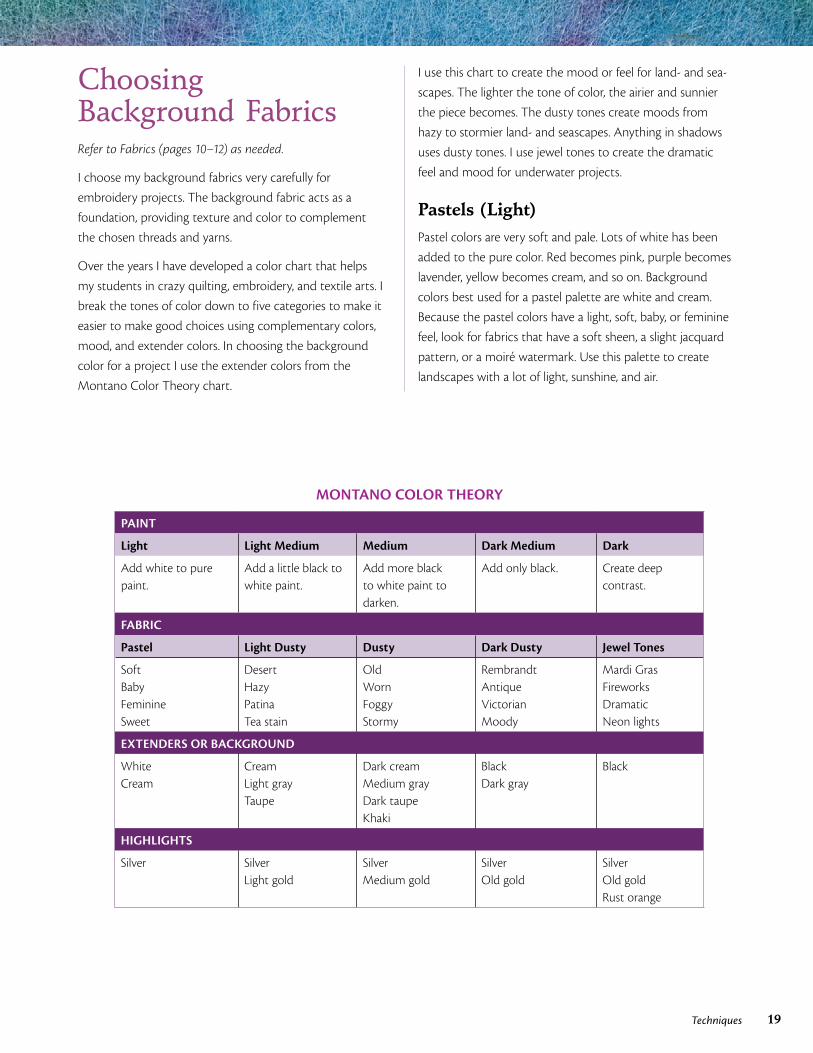
Over the years I have developed a color chart that helps
my students in crazy quilting, embroidery, and textile arts. I
break the tones of color down to five categories to make it
easier to make good choices using complementary colors,
mood, and extender colors. In choosing the background
color for a project I use the extender colors from the
Montano Color Theory chart.
I use this chart to create the mood or feel for land- and sea-
scapes. The lighter the tone of color, the airier and sunnier
the piece becomes. The dusty tones create moods from
hazy to stormier land- and seascapes. Anything in shadows
uses dusty tones. I use jewel tones to create the dramatic
feel and mood for underwater projects.
Pastels (Light)Pastel colors are very soft and pale. Lots of white has been
added to the pure color. Red becomes pink, purple becomes
lavender, yellow becomes cream, and so on. Background
colors best used for a pastel palette are white and cream.
Because the pastel colors have a light, soft, baby, or feminine
feel, look for fabrics that have a soft sheen, a slight jacquard
pattern, or a moiré watermark. Use this palette to create
landscapes with a lot of light, sunshine, and air.
MONTANO COLOR THEORY
PAINT
Light Light Medium Medium Dark Medium Dark
Add white to pure paint.
Add a little black to white paint.
Add more black to white paint to darken.
Add only black. Create deep contrast.
FABRIC
Pastel Light Dusty Dusty Dark Dusty Jewel Tones
SoftBabyFeminineSweet
DesertHazyPatinaTea stain
OldWornFoggyStormy
RembrandtAntiqueVictorianMoody
Mardi GrasFireworksDramaticNeon lights
EXTENDERS OR BACKGROUND
WhiteCream
CreamLight grayTaupe
Dark creamMedium grayDark taupeKhaki
BlackDark gray
Black
HIGHLIGHTS
Silver SilverLight gold
SilverMedium gold
SilverOld gold
SilverOld goldRust orange
20 Free-Form Embroidery with Judith Baker Montano
Light Dusty (Light Medium)Light dusties are pastel colors that have a bit of black added
to them to create a soft grayed and muted effect. Words
such as hazy, muted, desert, and patina best describe this
group. The best background colors for a light dusty project
are cream, light gray, and taupe. Make sure the texture of the
fabric is not too rough, as it will compete with the needle-
work. Use this palette to create desert scenes or rainy days
and hazy seascapes.
Dusty (Medium)At this point more black is added than white to the pure
colors. It creates a moodier feeling using grayed tonal shades.
Words to describe this are old, worn, foggy, and stormy. Good
background colors are medium gray, dark taupe, dark cream,
and khaki. Look for matte finishes when choosing the fabrics.
Create stormy and foggy scenes using this palette.
Dark Dusty (Dark Medium)For these colors, the painter adds only black to the pure
colors. This creates a deeply moody, Victorian feel to the
project. Words that best describe this are antique, Rembrandt,
Victorian, and moody. Black and darkest gray are the best
background colors. Depending on the needlework subject,
choose a fabric texture that will not compete. Create dark,
moody landscapes with this palette.
Jewel Tones (Dark)If the painter continues to add black, the color will become
muddied and dull, but think of jungle flowers, neon lights,
Mardi Gras, and fireworks! These are the jewel tone colors
that create drama and excitement. The only background
for jewel tone colors is black, as it will always make the
colors appear more vibrant. These colors are wonderful for
underwater scenes.
Presenting Finished PiecesThere are many ways to present finished textile projects.
I always try to answer a few basic questions before I make
this decision.
■ Will this project be washable?
■ How much wear and tear will this project endure?
■ How will I clean this project if it gets dusty?
■ How much am I willing to spend on the presentation
of this project?
WallhangingMany textile art projects can be backed with fabric and a
presentation sleeve so the finished project can hang from a
rod on the wall. This is a relatively inexpensive way to present
your work. Just make sure it hangs out of direct light and in a
place where it won’t be touched.
Stitched to CanvasSome textile art projects can be presented on prepared oil
painting canvases, or you can buy wooden stretcher bars to
create your own sizes of canvas. I use a background fabric that
complements the project and is easy to sew through. The
fabric is then stapled to the wooden form and a hanging wire
is added to the back. Make sure the finished project has been
properly sized—I do this by drawing the outline of the final
size of the piece on foamcore board and pulling and stretching
as needed until the piece is the correct size. If it’s okay to get
the piece damp, I spritz it with water before sizing. Either way,
pin the piece and leave it for several days.
21 21Techniques
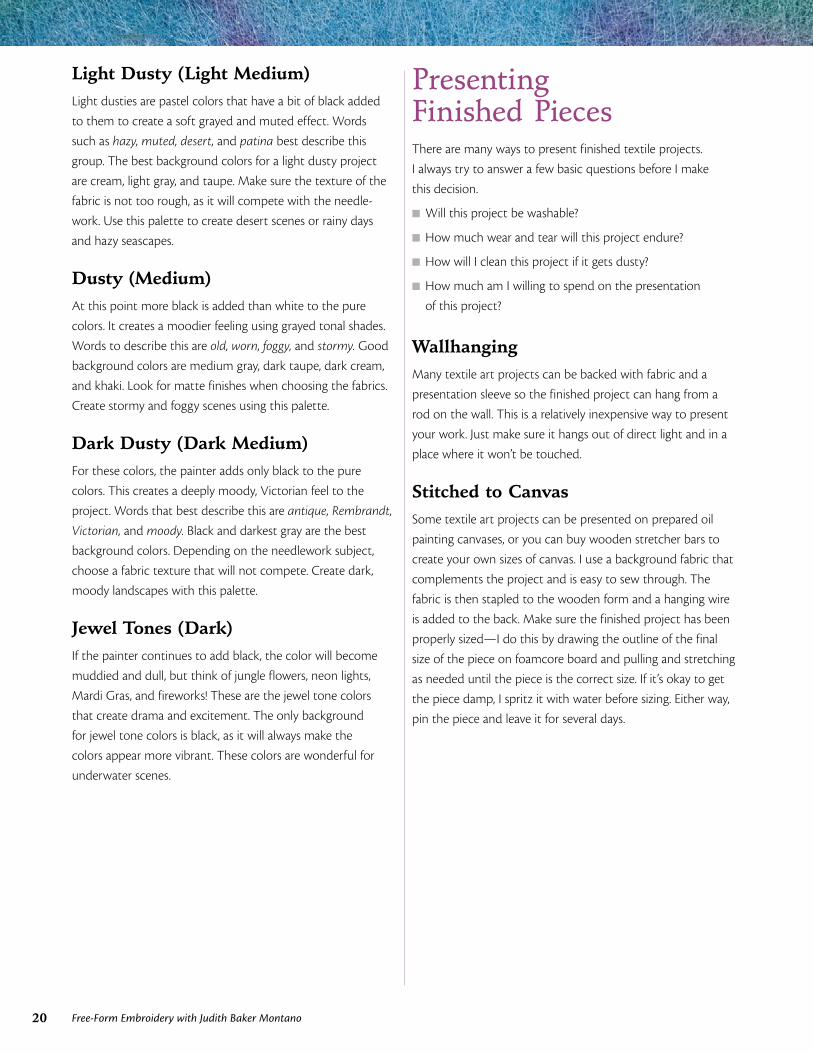
Framed
I prefer to present my work like a textile painting and frame
the finished piece in a mat and frame using museum-quality
nonglare glass. I try to buy the best I can afford, as I feel the
finishing and presentation of an art piece makes or breaks
a project. I always choose a double mat because I can add
spacers between the two mats to get the desired depth so
the glass does not touch the fabrics. Sometimes the depth
of a textile art piece can be as great as four inches!
Framing is the most expensive but the safest way to present
your artwork. The textile project is stretched and wedged into
a double mat and behind glass. It will not get dusty and it will
never need cleaning.
MATS AND FRAMES IN THE STUDIOI keep a big selection of working mats and frames in my
studio. I use these in the development of my projects.
I decide on a finished size and then choose a mat with that
inside measurement. The mat may be two long L shapes
taped to the proper size. I then use the mat for measuring
and marking the outside lines on the background fabric of
my project (using a water-erasable pen). I also use the mat as
a frame to block out the outside bits that distract from the
project. This way I can concentrate on the project. The mat
lets me know right away if the horizon placement is working.
It also allows me to see if the background is setting back into
the picture or if the shading is correct.
I also use a frame around the mat when tacking my project
up on the corkboard. I leave it overnight so that it is the first
thing I see in the morning. Any mistakes will show right away.
Matting Your Finished Projects
1. Choose the finished size. Standard sizes of the openings
are 4˝ × 6 ,̋ 5˝ × 7 ,̋ 8˝ × 10 ,̋ 9˝ × 12 ,̋ 11˝ × 14 ,̋ 16˝ × 20 ,̋
18˝ × 24 ,̋ and up. Make sure the finished project is 1/2˝ bigger
than the opening all around so it can be glued onto the
first mat.
2. Purchase the double mat and a piece of foamcore board to
be cut into strips to act as spacers between the 2 mats. Cover
the outside mat and put it aside to keep it clean.
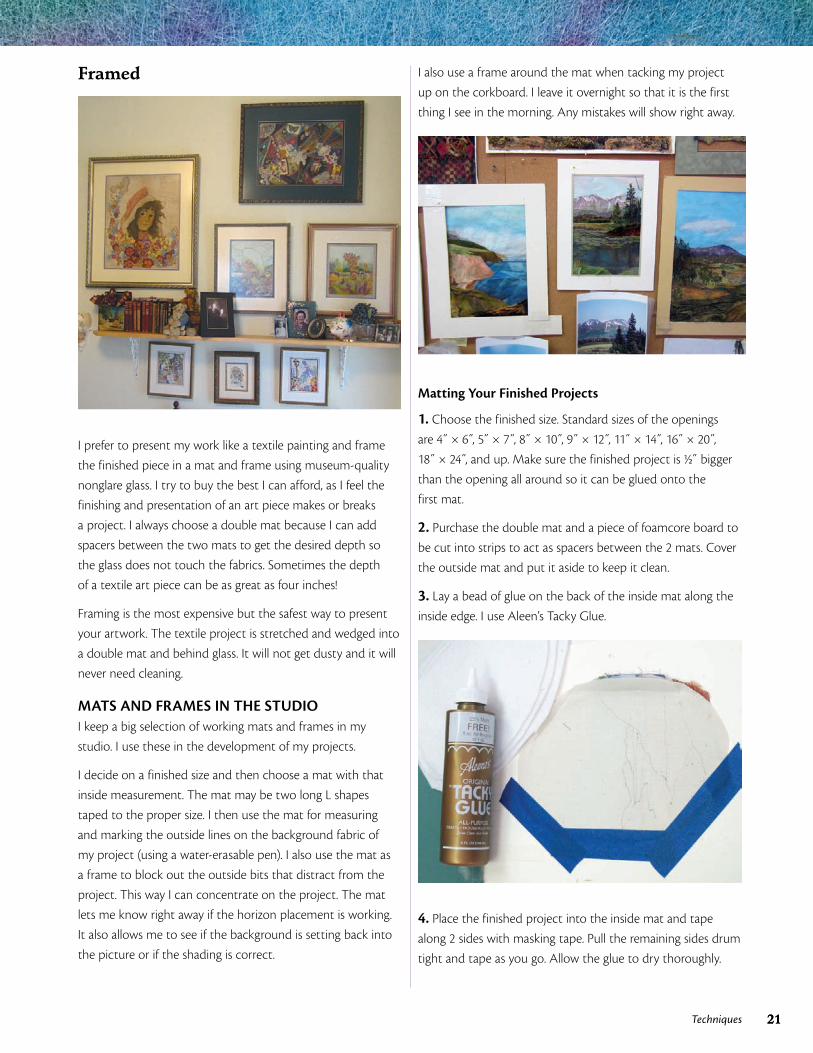
3. Lay a bead of glue on the back of the inside mat along the
inside edge. I use Aleen’s Tacky Glue.
4. Place the finished project into the inside mat and tape
along 2 sides with masking tape. Pull the remaining sides drum
tight and tape as you go. Allow the glue to dry thoroughly.
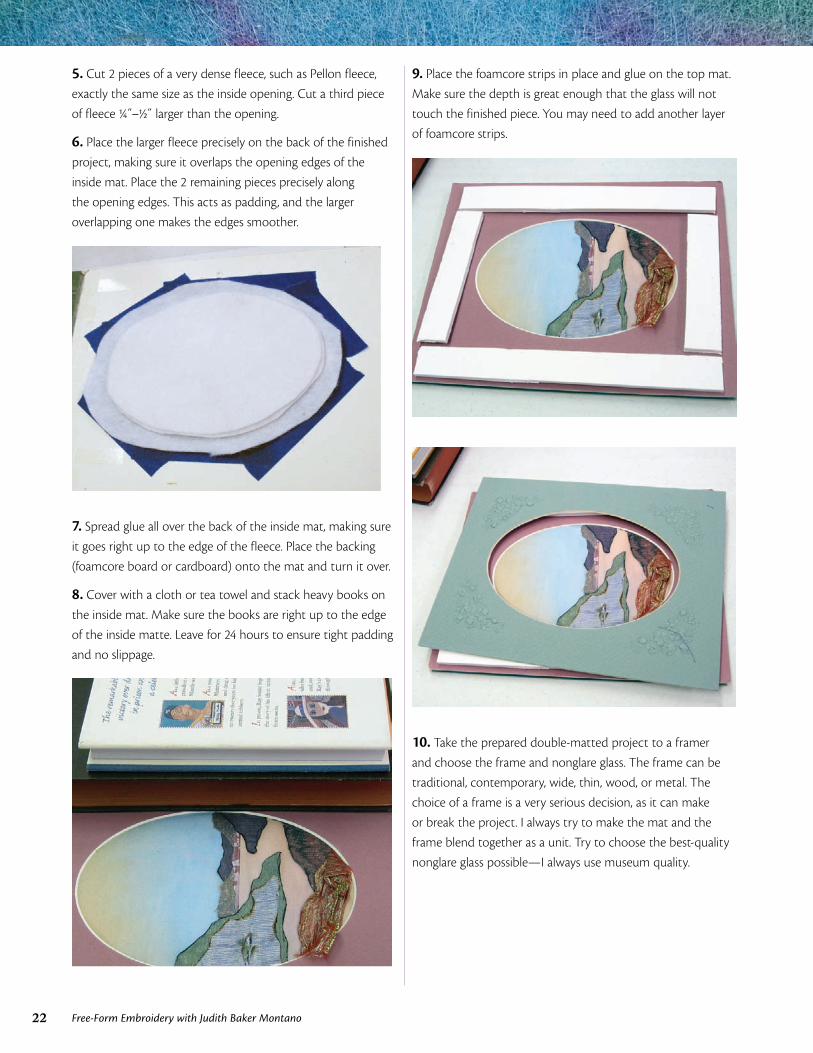
5. Cut 2 pieces of a very dense fleece, such as Pellon fleece,
exactly the same size as the inside opening. Cut a third piece
of fleece 1/4˝–1/2˝ larger than the opening.
6. Place the larger fleece precisely on the back of the finished
project, making sure it overlaps the opening edges of the
inside mat. Place the 2 remaining pieces precisely along
the opening edges. This acts as padding, and the larger
overlapping one makes the edges smoother.
7. Spread glue all over the back of the inside mat, making sure
it goes right up to the edge of the fleece. Place the backing
(foamcore board or cardboard) onto the mat and turn it over.
8. Cover with a cloth or tea towel and stack heavy books on
the inside mat. Make sure the books are right up to the edge
of the inside matte. Leave for 24 hours to ensure tight padding
and no slippage.
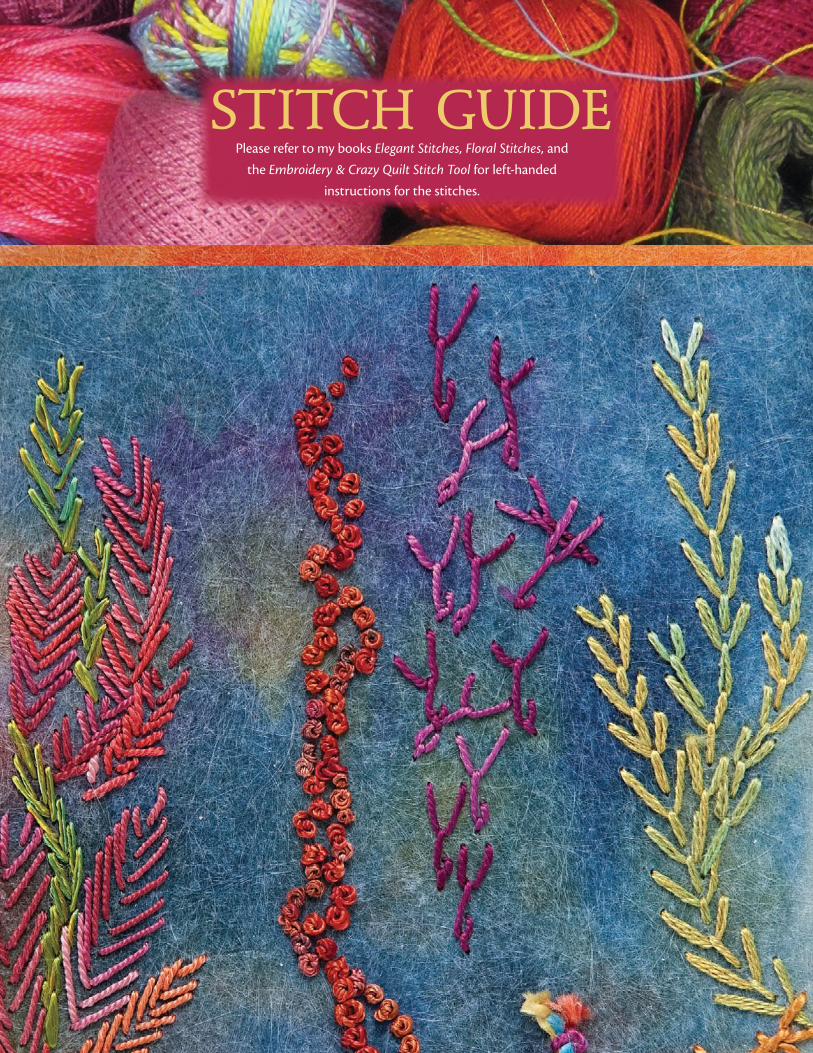
9. Place the foamcore strips in place and glue on the top mat.
Make sure the depth is great enough that the glass will not
touch the finished piece. You may need to add another layer
of foamcore strips.
10. Take the prepared double-matted project to a framer
and choose the frame and nonglare glass. The frame can be
traditional, contemporary, wide, thin, wood, or metal. The
choice of a frame is a very serious decision, as it can make
or break the project. I always try to make the mat and the
frame blend together as a unit. Try to choose the best-quality
nonglare glass possible—I always use museum quality.
22 Free-Form Embroidery with Judith Baker Montano
Please refer to my books Elegant Stitches, Floral Stitches, and
the Embroidery & Crazy Quilt Stitch Tool for left-handed
instructions for the stitches.
STITCH GUIDE
24 Free-Form Embroidery with Judith Baker Montano
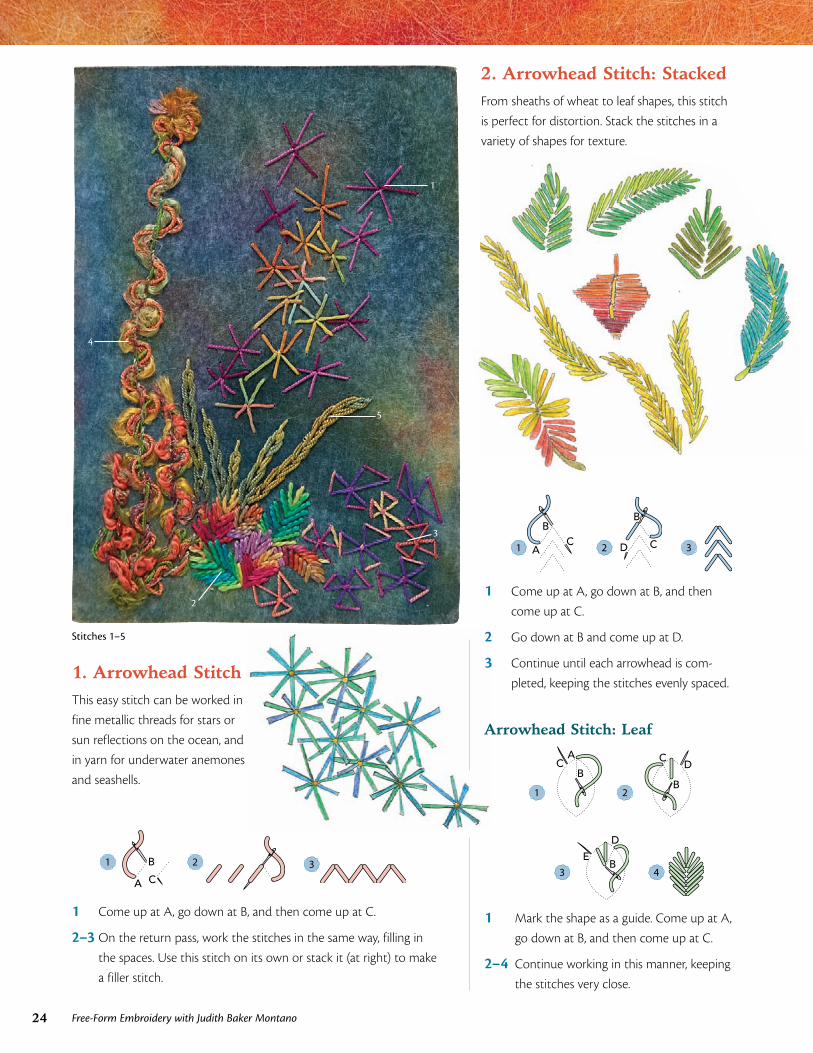
2. Arrowhead Stitch: StackedFrom sheaths of wheat to leaf shapes, this stitch
is perfect for distortion. Stack the stitches in a
variety of shapes for texture.
1
5
2
4
3
Stitches 1–5
1. Arrowhead StitchThis easy stitch can be worked in
fine metallic threads for stars or
sun reflections on the ocean, and
in yarn for underwater anemones
and seashells.
1
B
CA
2
3
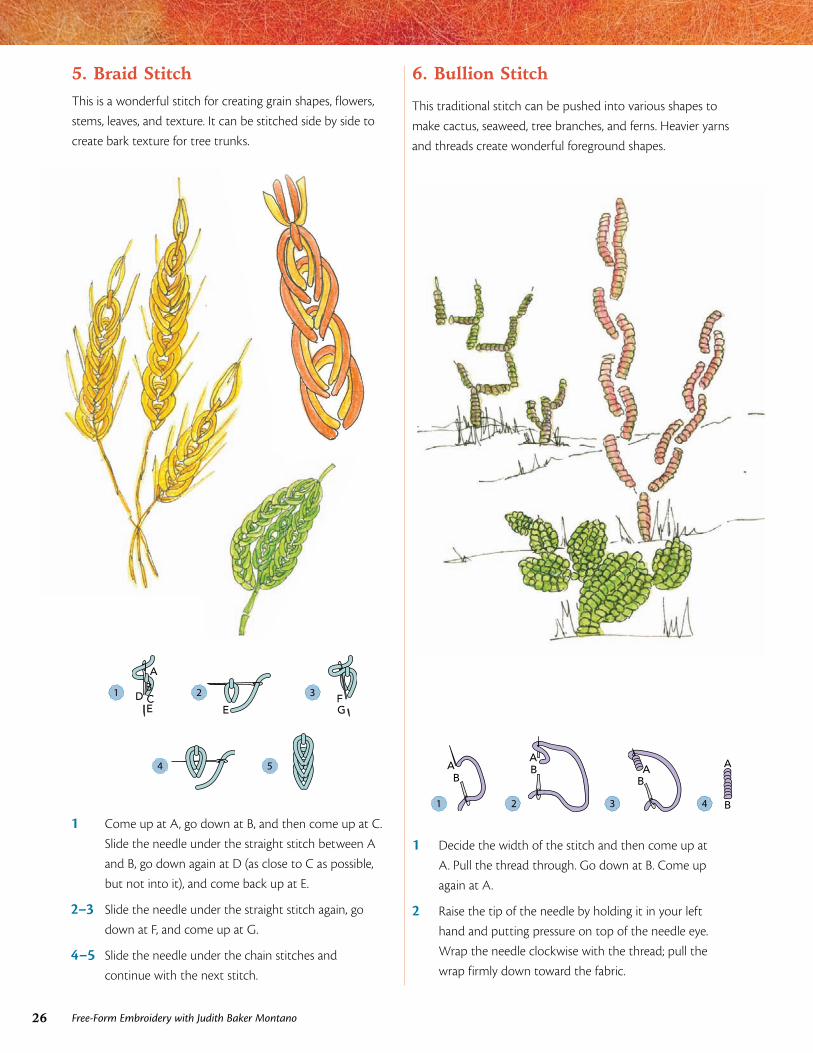
1 Come up at A, go down at B, and then come up at C.
2–3 On the return pass, work the stitches in the same way, filling in
the spaces. Use this stitch on its own or stack it (at right) to make
a filler stitch.
1 A
BC
2
B
CD
3
1 Come up at A, go down at B, and then
come up at C.
2 Go down at B and come up at D.
3 Continue until each arrowhead is com-
pleted, keeping the stitches evenly spaced.
Arrowhead Stitch: Leaf
1
AC
B
2
CD
B
3
EB
D
4
1 Mark the shape as a guide. Come up at A,
go down at B, and then come up at C.
2–4 Continue working in this manner, keeping
the stitches very close.
25Stitch Guide
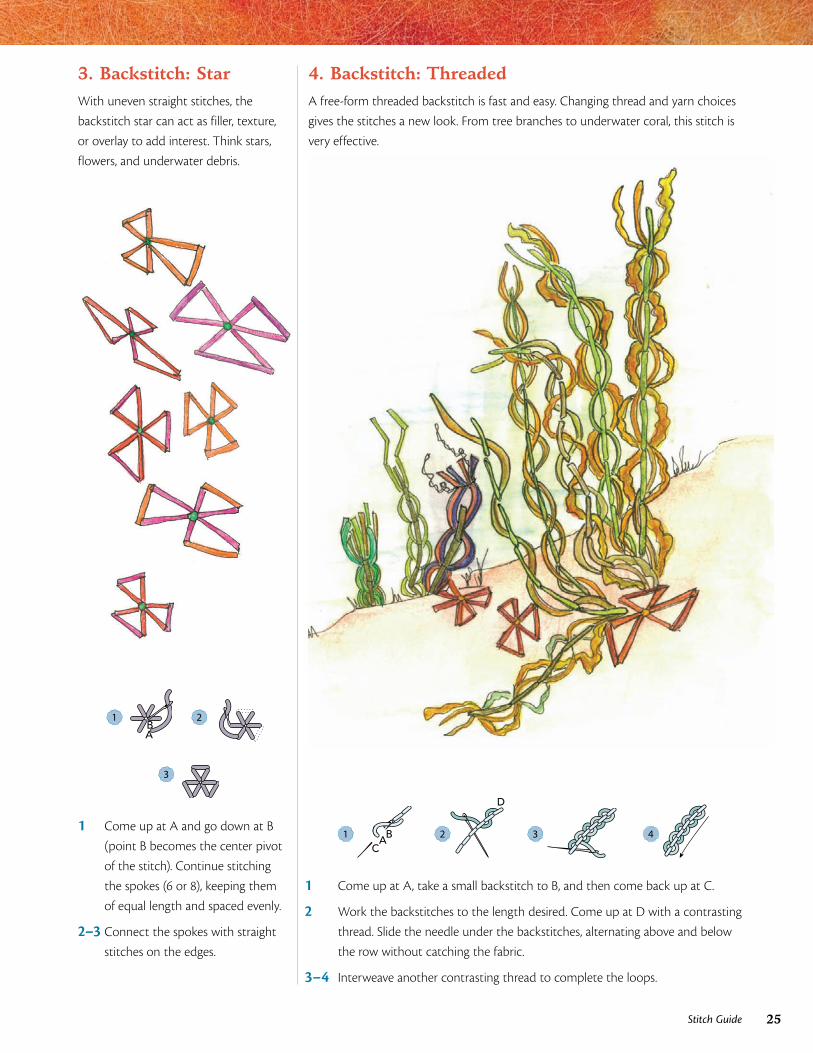
3. Backstitch: StarWith uneven straight stitches, the
backstitch star can act as filler, texture,
or overlay to add interest. Think stars,
flowers, and underwater debris.
1
BA
2
3
1 Come up at A and go down at B
(point B becomes the center pivot
of the stitch). Continue stitching
the spokes (6 or 8), keeping them
of equal length and spaced evenly.
2–3 Connect the spokes with straight
stitches on the edges.
4. Backstitch: ThreadedA free-form threaded backstitch is fast and easy. Changing thread and yarn choices
gives the stitches a new look. From tree branches to underwater coral, this stitch is
very effective.
1
CBA
2
D
3
4
1 Come up at A, take a small backstitch to B, and then come back up at C.
2 Work the backstitches to the length desired. Come up at D with a contrasting
thread. Slide the needle under the backstitches, alternating above and below
the row without catching the fabric.
3–4 Interweave another contrasting thread to complete the loops.
26 Free-Form Embroidery with Judith Baker Montano
6. Bullion Stitch
This traditional stitch can be pushed into various shapes to
make cactus, seaweed, tree branches, and ferns. Heavier yarns
and threads create wonderful foreground shapes.
1
AB
D CE
2
E 3
FG
4
5
1 Come up at A, go down at B, and then come up at C.
Slide the needle under the straight stitch between A
and B, go down again at D (as close to C as possible,
but not into it), and come back up at E.
2–3 Slide the needle under the straight stitch again, go
down at F, and come up at G.
4–5 Slide the needle under the chain stitches and
continue with the next stitch.
1
AB
2
AB
3
AB
4 B
A
1 Decide the width of the stitch and then come up at
A. Pull the thread through. Go down at B. Come up
again at A.
2 Raise the tip of the needle by holding it in your left
hand and putting pressure on top of the needle eye.
Wrap the needle clockwise with the thread; pull the
wrap firmly down toward the fabric.
5. Braid StitchThis is a wonderful stitch for creating grain shapes, flowers,
stems, leaves, and texture. It can be stitched side by side to
create bark texture for tree trunks.
27Stitch Guide
10
7
8
6
9
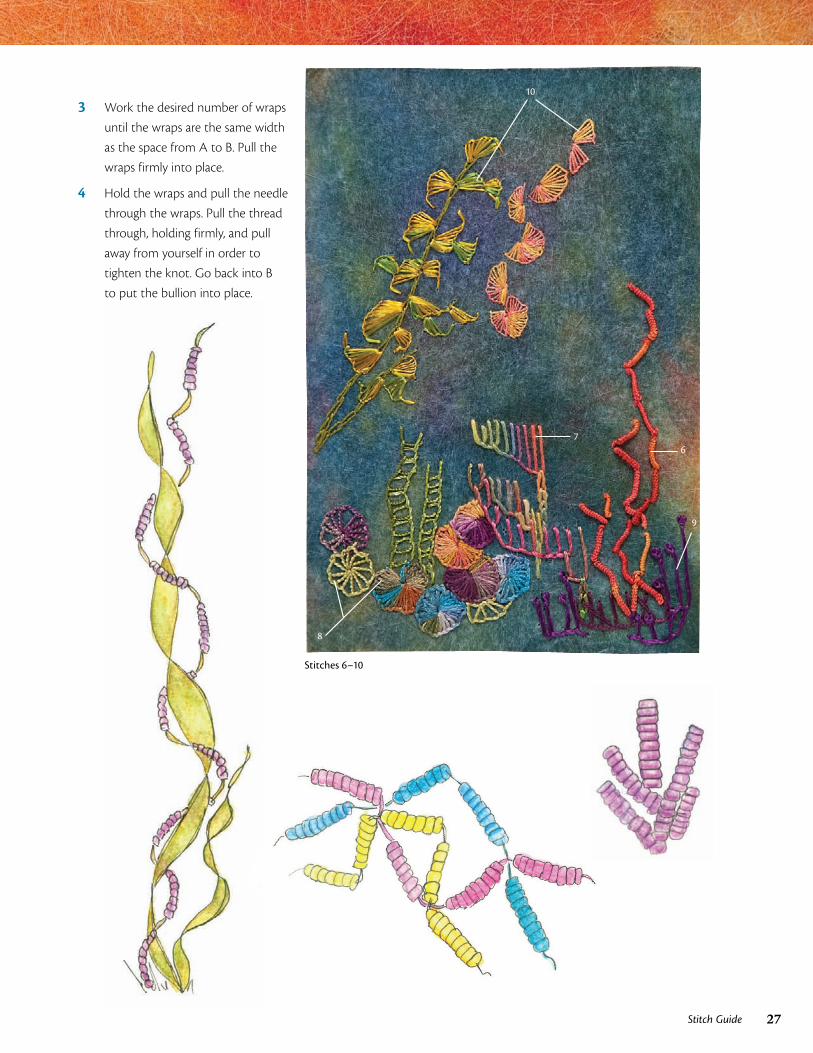
Stitches 6–10
3 Work the desired number of wraps
until the wraps are the same width
as the space from A to B. Pull the
wraps firmly into place.
4 Hold the wraps and pull the needle
through the wraps. Pull the thread
through, holding firmly, and pull
away from yourself in order to
tighten the knot. Go back into B
to put the bullion into place.
28 Free-Form Embroidery with Judith Baker Montano
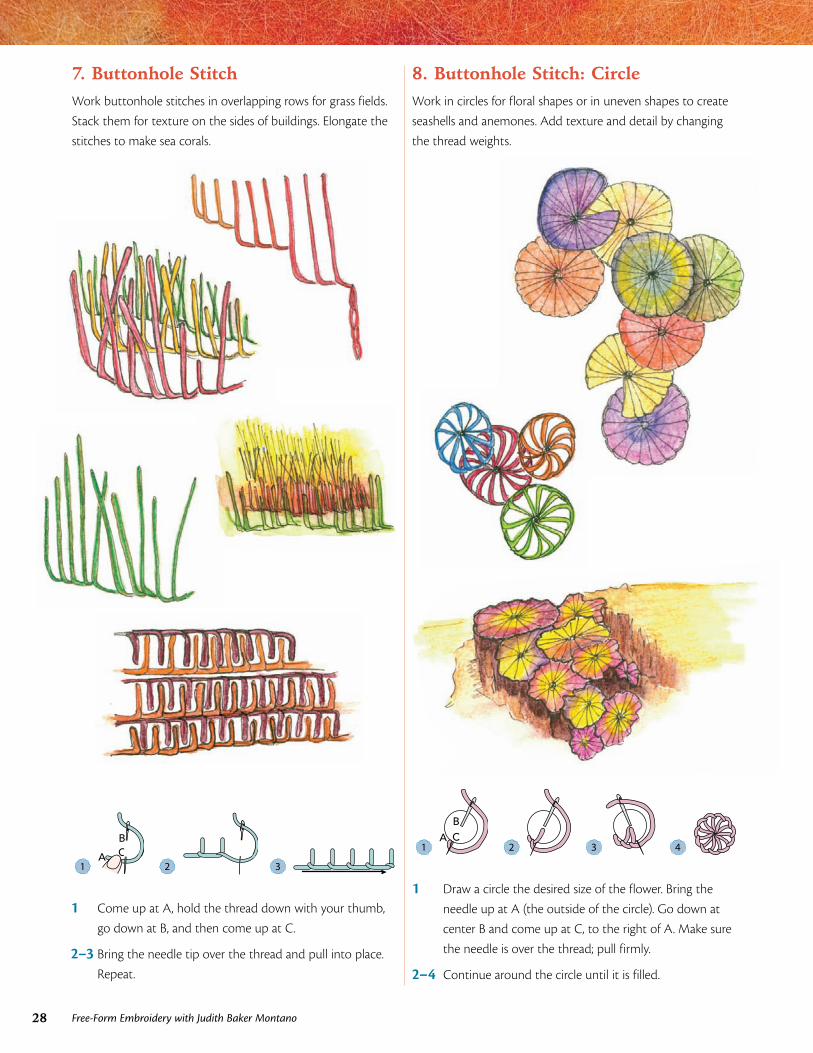
7. Buttonhole StitchWork buttonhole stitches in overlapping rows for grass fields.
Stack them for texture on the sides of buildings. Elongate the
stitches to make sea corals.
8. Buttonhole Stitch: CircleWork in circles for floral shapes or in uneven shapes to create
seashells and anemones. Add texture and detail by changing
the thread weights.
1 CB
A 2 3
1 Come up at A, hold the thread down with your thumb,
go down at B, and then come up at C.
2–3 Bring the needle tip over the thread and pull into place.
Repeat.
1 A C
B
2 3 4
1 Draw a circle the desired size of the flower. Bring the
needle up at A (the outside of the circle). Go down at
center B and come up at C, to the right of A. Make sure
the needle is over the thread; pull firmly.
2–4 Continue around the circle until it is filled.
29Stitch Guide
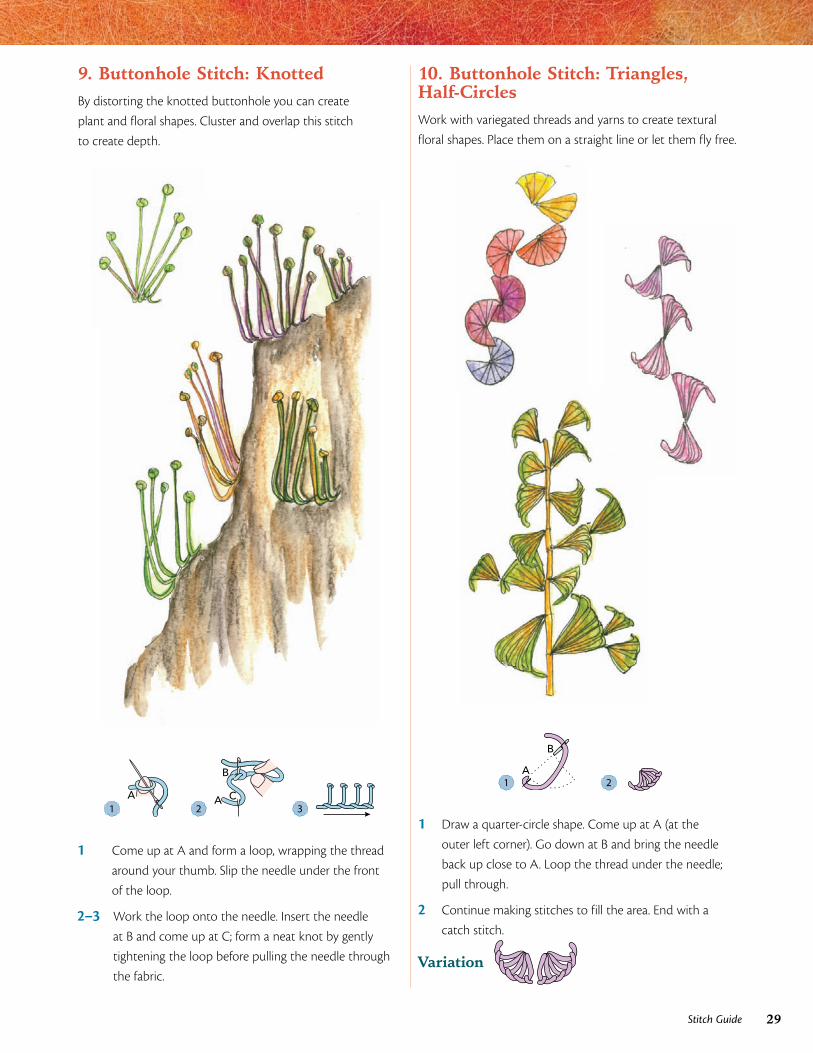
9. Buttonhole Stitch: KnottedBy distorting the knotted buttonhole you can create
plant and floral shapes. Cluster and overlap this stitch
to create depth.
10. Buttonhole Stitch: Triangles, Half-CirclesWork with variegated threads and yarns to create textural
floral shapes. Place them on a straight line or let them fly free.
1 A
2 A C
B
3
1 Come up at A and form a loop, wrapping the thread
around your thumb. Slip the needle under the front
of the loop.
2–3 Work the loop onto the needle. Insert the needle
at B and come up at C; form a neat knot by gently
tightening the loop before pulling the needle through
the fabric.
1
B
A
2
1 Draw a quarter-circle shape. Come up at A (at the
outer left corner). Go down at B and bring the needle
back up close to A. Loop the thread under the needle;
pull through.
2 Continue making stitches to fill the area. End with a
catch stitch.
Variation
ES07.01
30 Free-Form Embroidery with Judith Baker Montano
11
12
12
13
11
Stitches 11–13
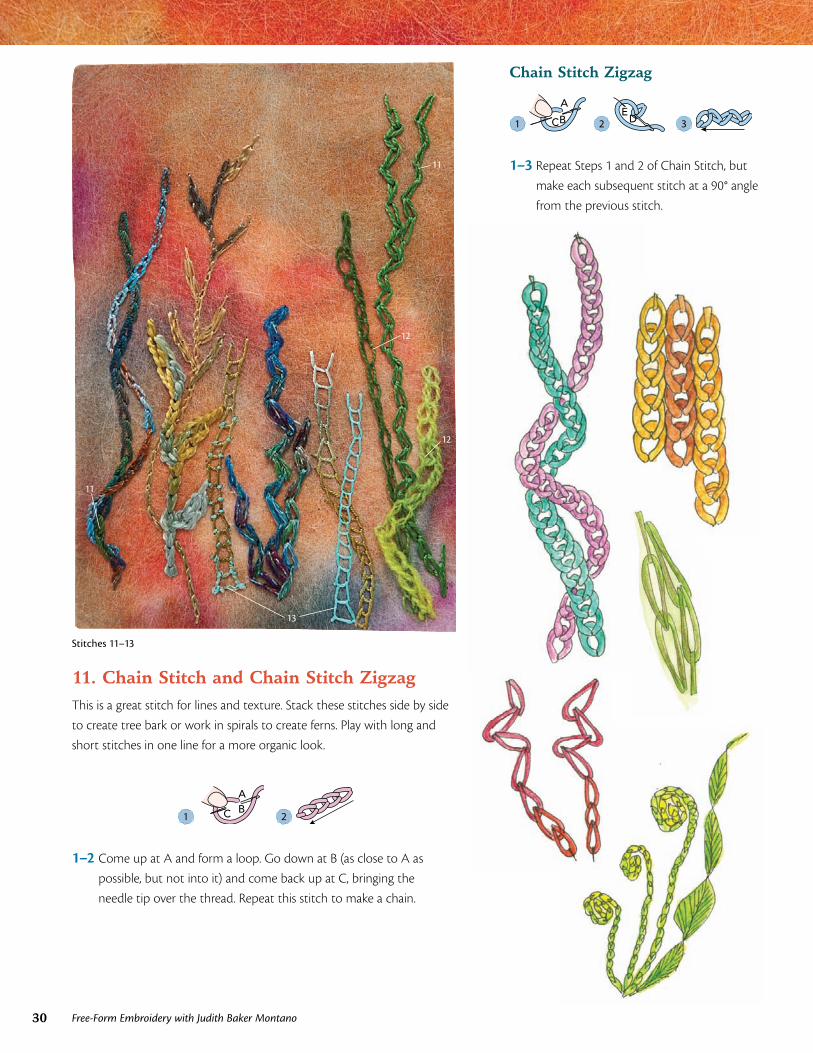
11. Chain Stitch and Chain Stitch ZigzagThis is a great stitch for lines and texture. Stack these stitches side by side
to create tree bark or work in spirals to create ferns. Play with long and
short stitches in one line for a more organic look.
1 C
AB
2
1–2 Come up at A and form a loop. Go down at B (as close to A as
possible, but not into it) and come back up at C, bringing the
needle tip over the thread. Repeat this stitch to make a chain.
Chain Stitch Zigzag
1 CB
A
2 E
D 3
1–3 Repeat Steps 1 and 2 of Chain Stitch, but
make each subsequent stitch at a 90° angle
from the previous stitch.
31Stitch Guide
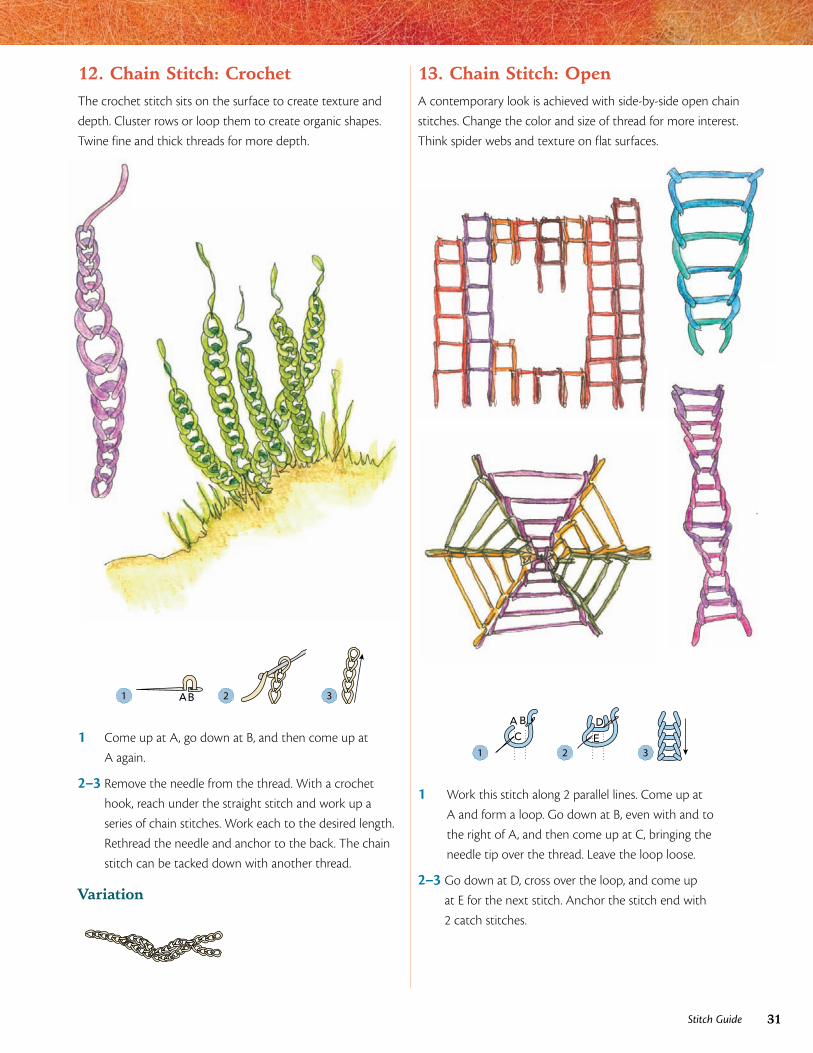
12. Chain Stitch: CrochetThe crochet stitch sits on the surface to create texture and
depth. Cluster rows or loop them to create organic shapes.
Twine fine and thick threads for more depth.
13. Chain Stitch: OpenA contemporary look is achieved with side-by-side open chain
stitches. Change the color and size of thread for more interest.
Think spider webs and texture on flat surfaces.
1 AB 2 3
1 Come up at A, go down at B, and then come up at
A again.
2–3 Remove the needle from the thread. With a crochet
hook, reach under the straight stitch and work up a
series of chain stitches. Work each to the desired length.
Rethread the needle and anchor to the back. The chain
stitch can be tacked down with another thread.
Variation
ES13.03
1
A BC
2 E
D
3
1 Work this stitch along 2 parallel lines. Come up at
A and form a loop. Go down at B, even with and to
the right of A, and then come up at C, bringing the
needle tip over the thread. Leave the loop loose.
2–3 Go down at D, cross over the loop, and come up
at E for the next stitch. Anchor the stitch end with
2 catch stitches.
32 Free-Form Embroidery with Judith Baker Montano
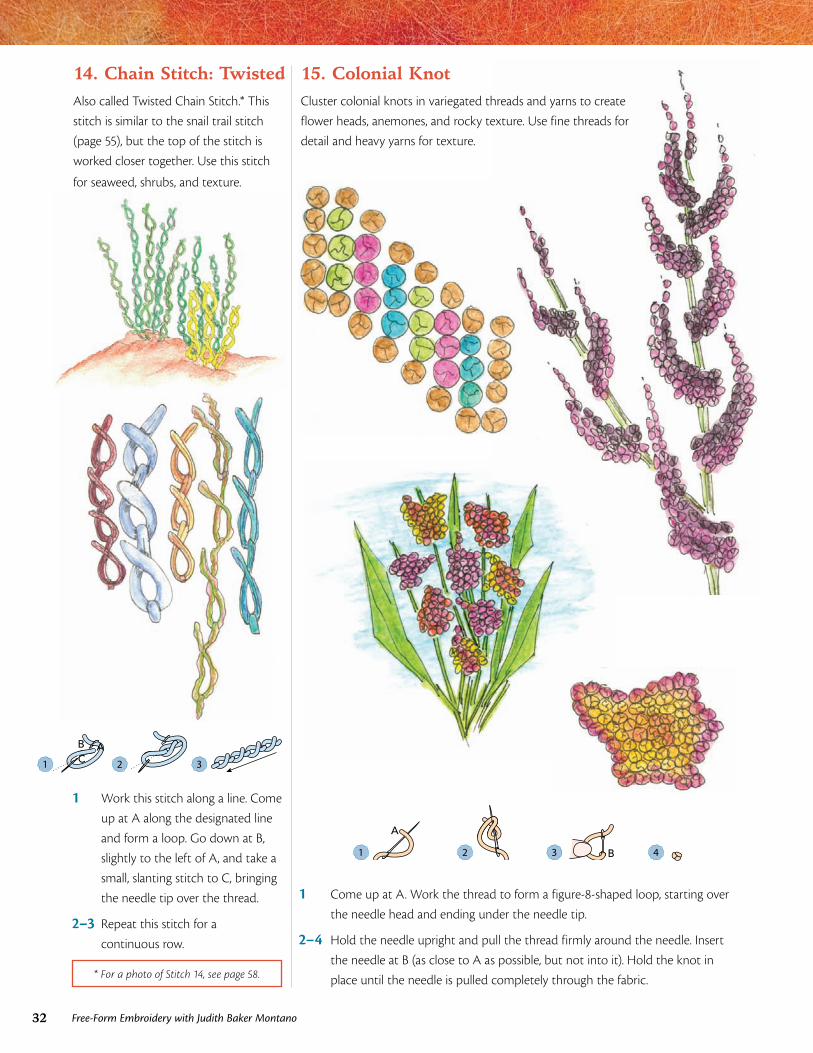
14. Chain Stitch: TwistedAlso called Twisted Chain Stitch.* This
stitch is similar to the snail trail stitch
(page 55), but the top of the stitch is
worked closer together. Use this stitch
for seaweed, shrubs, and texture.
15. Colonial KnotCluster colonial knots in variegated threads and yarns to create
flower heads, anemones, and rocky texture. Use fine threads for
detail and heavy yarns for texture.
1
ABC
2 3
1 Work this stitch along a line. Come
up at A along the designated line
and form a loop. Go down at B,
slightly to the left of A, and take a
small, slanting stitch to C, bringing
the needle tip over the thread.
2–3 Repeat this stitch for a
continuous row.
1
A
2 3 B 4
1 Come up at A. Work the thread to form a figure-8-shaped loop, starting over
the needle head and ending under the needle tip.
2–4 Hold the needle upright and pull the thread firmly around the needle. Insert
the needle at B (as close to A as possible, but not into it). Hold the knot in
place until the needle is pulled completely through the fabric.* For a photo of Stitch 14, see page 58.
33Stitch Guide
17
17
18
16
15
Stitches 15–18
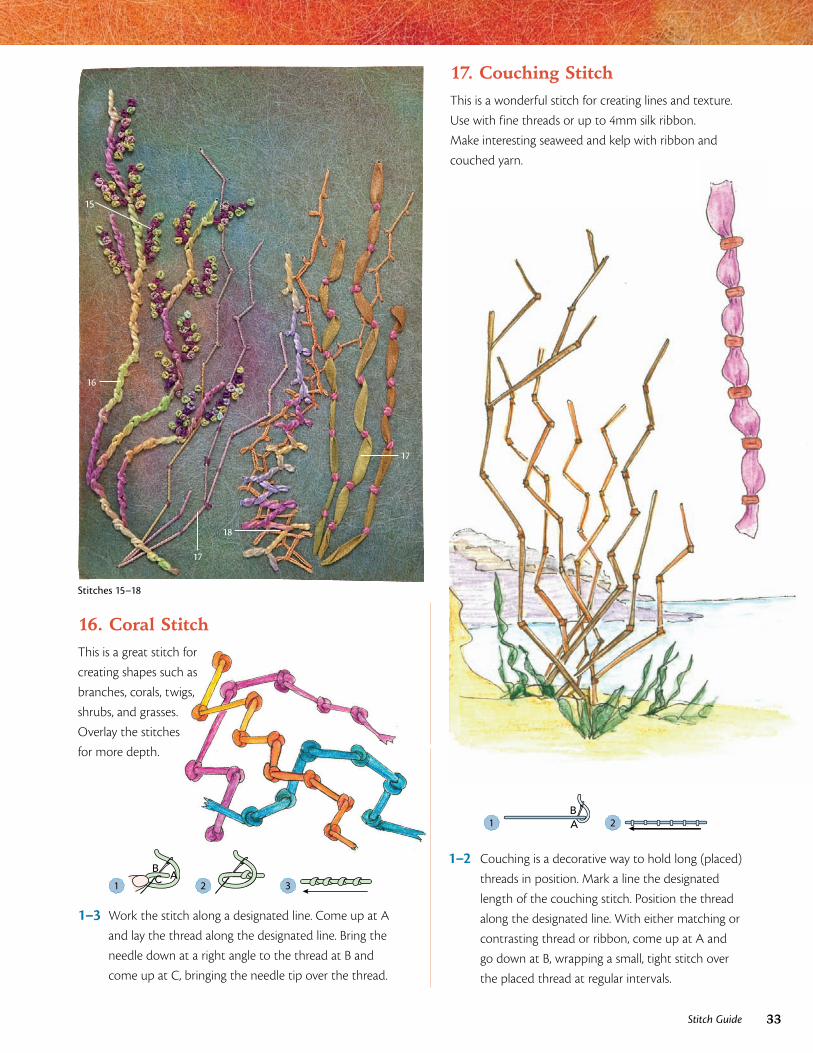
16. Coral StitchThis is a great stitch for
creating shapes such as
branches, corals, twigs,
shrubs, and grasses.
Overlay the stitches
for more depth.
17. Couching StitchThis is a wonderful stitch for creating lines and texture.
Use with fine threads or up to 4mm silk ribbon.
Make interesting seaweed and kelp with ribbon and
couched yarn.
1 B
AC 2 3
1–3 Work the stitch along a designated line. Come up at A
and lay the thread along the designated line. Bring the
needle down at a right angle to the thread at B and
come up at C, bringing the needle tip over the thread.
1 AB
2
1–2 Couching is a decorative way to hold long (placed)
threads in position. Mark a line the designated
length of the couching stitch. Position the thread
along the designated line. With either matching or
contrasting thread or ribbon, come up at A and
go down at B, wrapping a small, tight stitch over
the placed thread at regular intervals.
34 Free-Form Embroidery with Judith Baker Montano
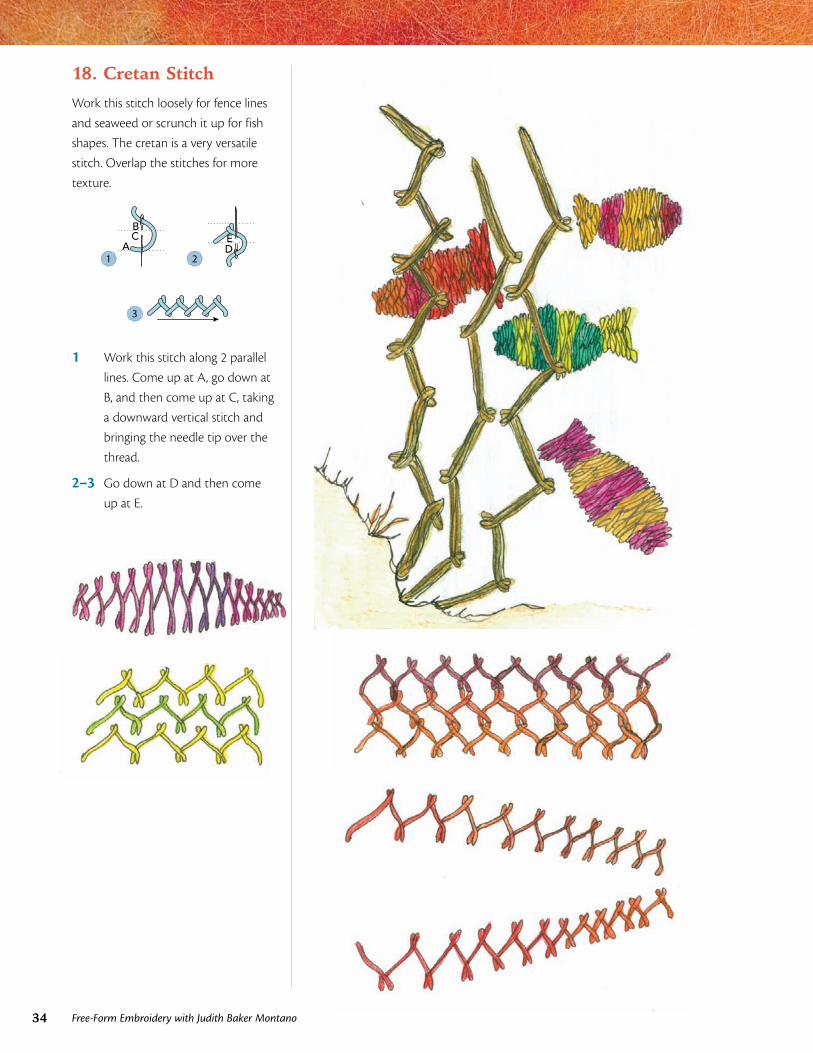
18. Cretan Stitch
Work this stitch loosely for fence lines
and seaweed or scrunch it up for fish
shapes. The cretan is a very versatile
stitch. Overlap the stitches for more
texture.
1
BC
A
2
ED
3
1 Work this stitch along 2 parallel
lines. Come up at A, go down at
B, and then come up at C, taking
a downward vertical stitch and
bringing the needle tip over the
thread.
2–3 Go down at D and then come
up at E.
35Stitch Guide
23
19
22
20
21 Single
21 Double & triple
Stitches 19–23
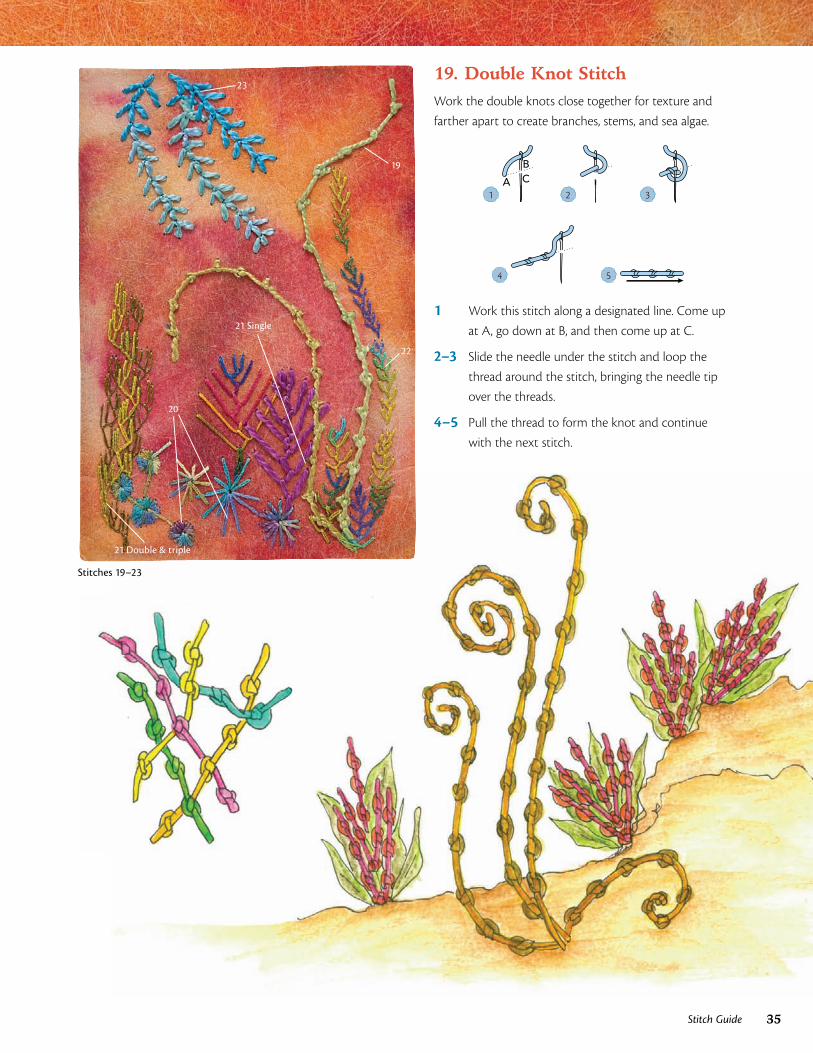
19. Double Knot StitchWork the double knots close together for texture and
farther apart to create branches, stems, and sea algae.
1 A
BC
2 3
4 5
1 Work this stitch along a designated line. Come up
at A, go down at B, and then come up at C.
2–3 Slide the needle under the stitch and loop the
thread around the stitch, bringing the needle tip
over the threads.
4–5 Pull the thread to form the knot and continue
with the next stitch.
36 Free-Form Embroidery with Judith Baker Montano
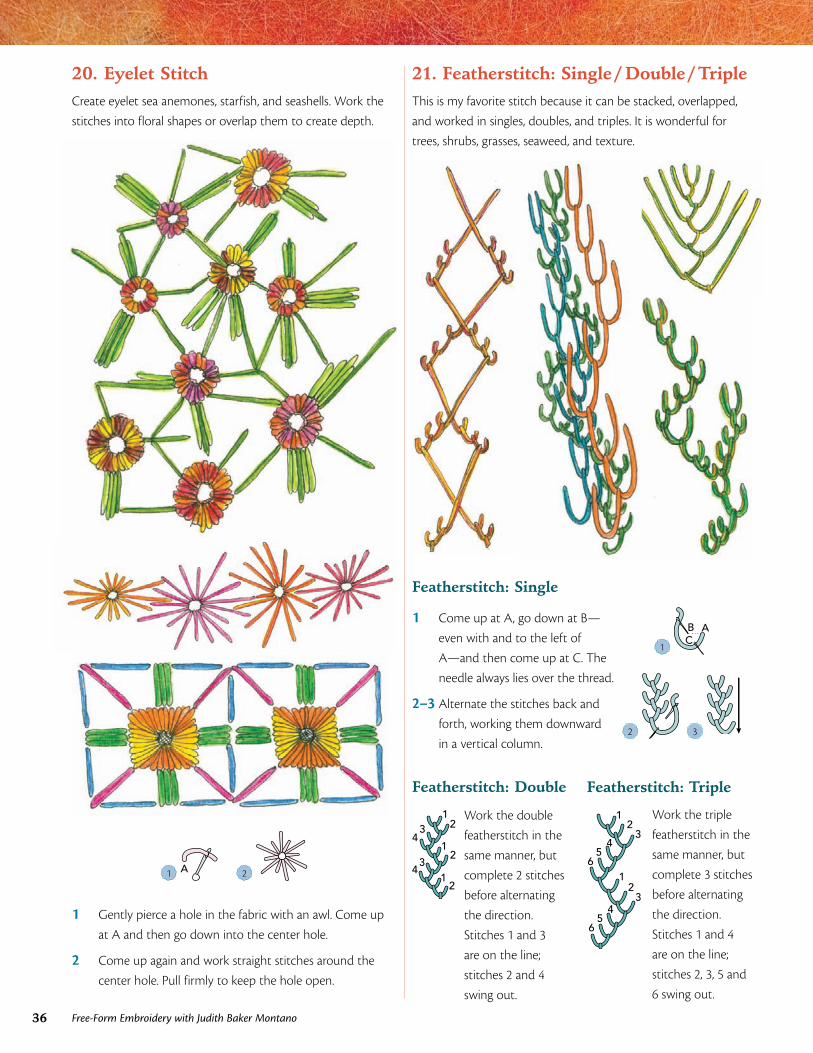
21. Featherstitch: Single / Double / TripleThis is my favorite stitch because it can be stacked, overlapped,
and worked in singles, doubles, and triples. It is wonderful for
trees, shrubs, grasses, seaweed, and texture.
20. Eyelet StitchCreate eyelet sea anemones, starfish, and seashells. Work the
stitches into floral shapes or overlap them to create depth.
1 A 2
1 Gently pierce a hole in the fabric with an awl. Come up
at A and then go down into the center hole.
2 Come up again and work straight stitches around the
center hole. Pull firmly to keep the hole open.
Featherstitch: Single
1 Come up at A, go down at B—
even with and to the left of
A—and then come up at C. The
needle always lies over the thread.
2–3 Alternate the stitches back and
forth, working them downward
in a vertical column.
Featherstitch: Double
Work the double
featherstitch in the
same manner, but
complete 2 stitches
before alternating
the direction.
Stitches 1 and 3
are on the line;
stitches 2 and 4
swing out.
123
41
23
41
2
Featherstitch: Triple
1
B AC
2 3
Work the triple
featherstitch in the
same manner, but
complete 3 stitches
before alternating
the direction.
Stitches 1 and 4
are on the line;
stitches 2, 3, 5 and
6 swing out.
12
34
1
56
23
45
6
37Stitch Guide
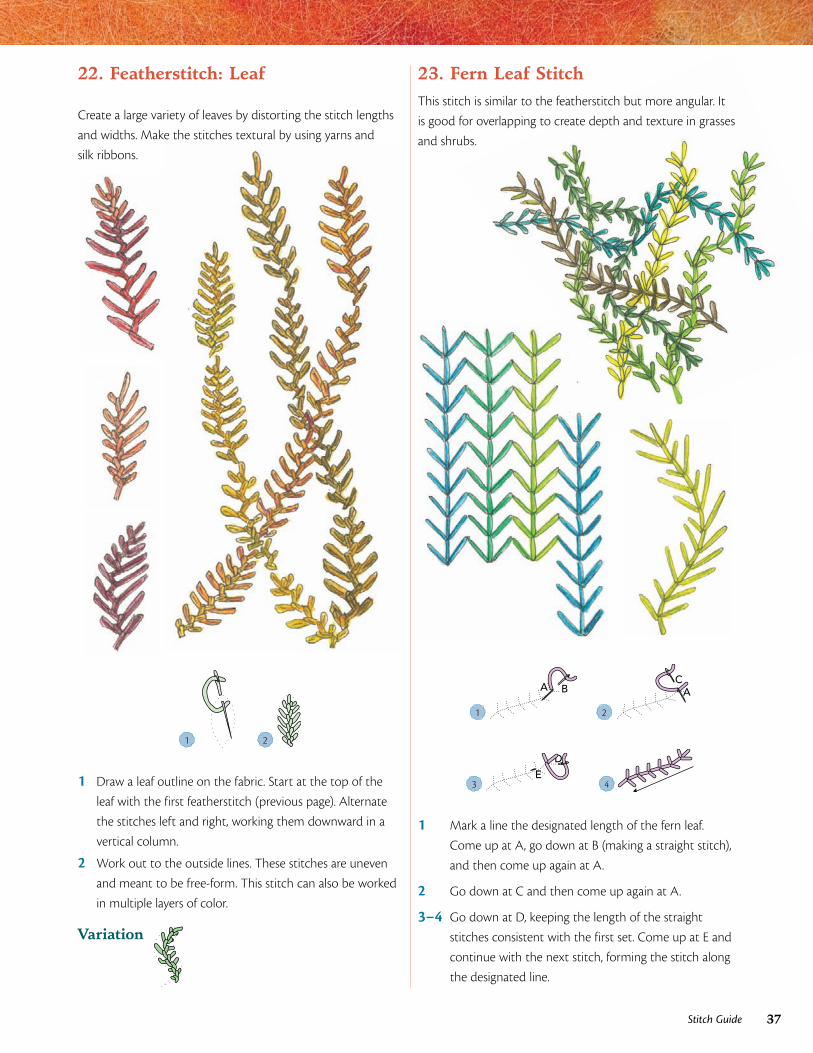
22. Featherstitch: Leaf
Create a large variety of leaves by distorting the stitch lengths
and widths. Make the stitches textural by using yarns and
silk ribbons.
23. Fern Leaf StitchThis stitch is similar to the featherstitch but more angular. It
is good for overlapping to create depth and texture in grasses
and shrubs.
1 2
1 Draw a leaf outline on the fabric. Start at the top of the
leaf with the first featherstitch (previous page). Alternate
the stitches left and right, working them downward in a
vertical column.
2 Work out to the outside lines. These stitches are uneven
and meant to be free-form. This stitch can also be worked
in multiple layers of color.
Variation
1
A B
2
AC
3
DE
4
1 Mark a line the designated length of the fern leaf.
Come up at A, go down at B (making a straight stitch),
and then come up again at A.
2 Go down at C and then come up again at A.
3–4 Go down at D, keeping the length of the straight
stitches consistent with the first set. Come up at E and
continue with the next stitch, forming the stitch along
the designated line.
38 Free-Form Embroidery with Judith Baker Montano
29
30
28
27
26
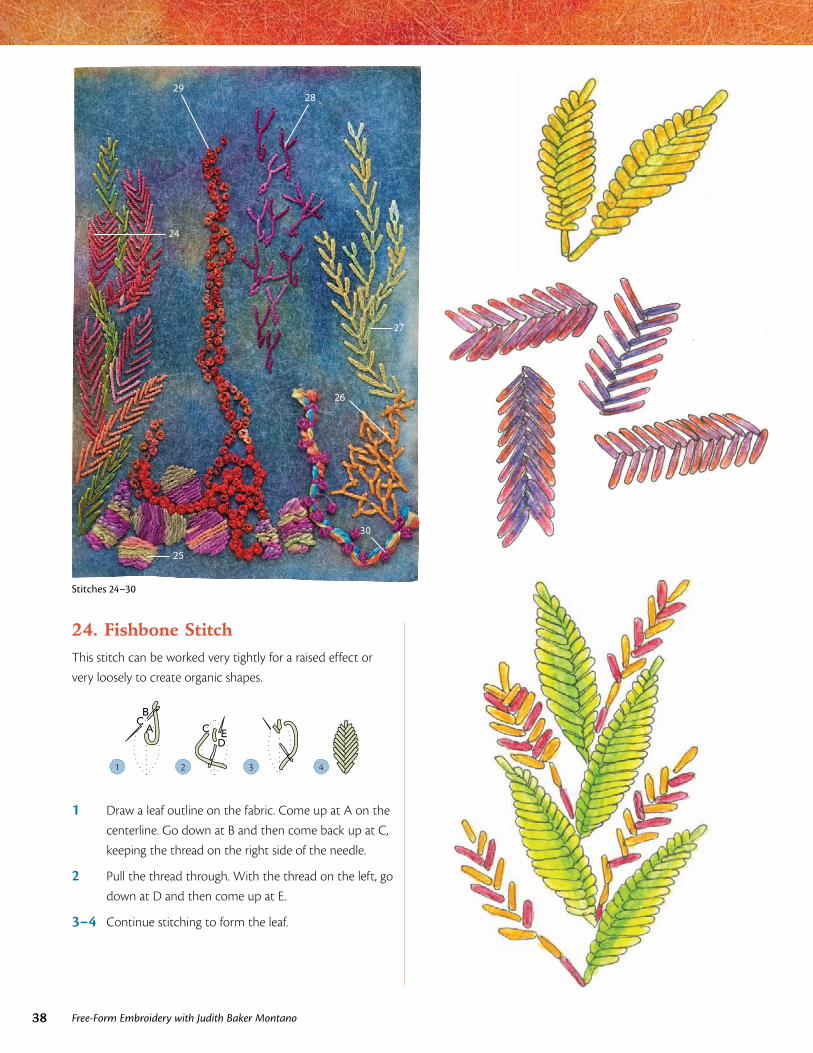
25
24
Stitches 24–30
24. Fishbone StitchThis stitch can be worked very tightly for a raised effect or
very loosely to create organic shapes.
1
BC
A
2
ECD
3 4
1 Draw a leaf outline on the fabric. Come up at A on the
centerline. Go down at B and then come back up at C,
keeping the thread on the right side of the needle.
2 Pull the thread through. With the thread on the left, go
down at D and then come up at E.
3–4 Continue stitching to form the leaf.
39Stitch Guide
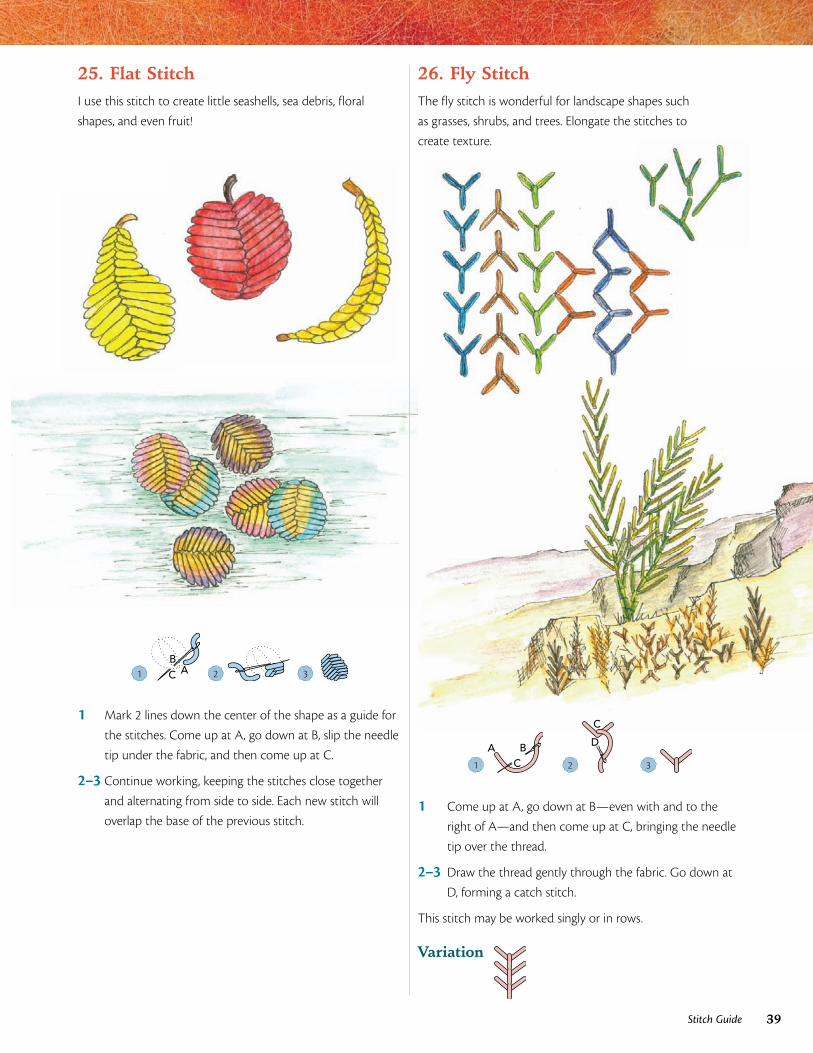
25. Flat StitchI use this stitch to create little seashells, sea debris, floral
shapes, and even fruit!
26. Fly StitchThe fly stitch is wonderful for landscape shapes such
as grasses, shrubs, and trees. Elongate the stitches to
create texture.
1 ABC 2 3
1 Mark 2 lines down the center of the shape as a guide for
the stitches. Come up at A, go down at B, slip the needle
tip under the fabric, and then come up at C.
2–3 Continue working, keeping the stitches close together
and alternating from side to side. Each new stitch will
overlap the base of the previous stitch.
1 BA
C 2
C
D
3
1 Come up at A, go down at B—even with and to the
right of A—and then come up at C, bringing the needle
tip over the thread.
2–3 Draw the thread gently through the fabric. Go down at
D, forming a catch stitch.
This stitch may be worked singly or in rows.
Variation
40 Free-Form Embroidery with Judith Baker Montano
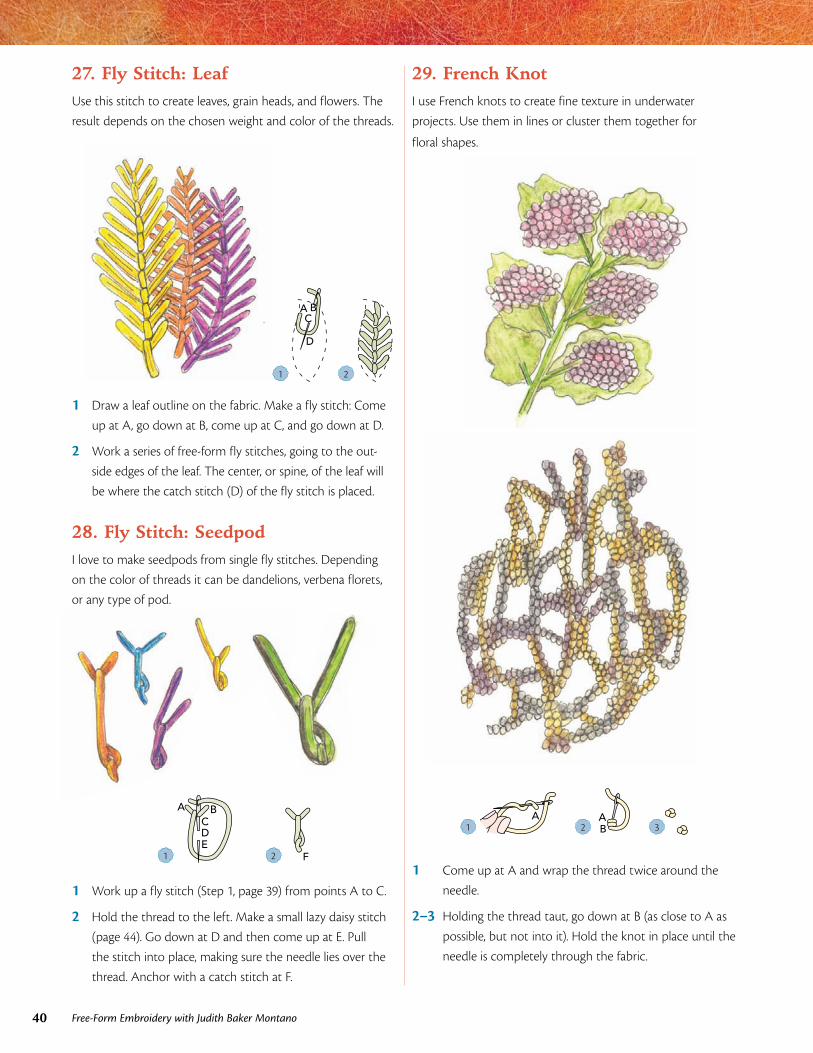
27. Fly Stitch: LeafUse this stitch to create leaves, grain heads, and flowers. The
result depends on the chosen weight and color of the threads.
1
A BC
D
2
1 Draw a leaf outline on the fabric. Make a fly stitch: Come
up at A, go down at B, come up at C, and go down at D.
2 Work a series of free-form fly stitches, going to the out-
side edges of the leaf. The center, or spine, of the leaf will
be where the catch stitch (D) of the fly stitch is placed.
28. Fly Stitch: SeedpodI love to make seedpods from single fly stitches. Depending
on the color of threads it can be dandelions, verbena florets,
or any type of pod.
29. French KnotI use French knots to create fine texture in underwater
projects. Use them in lines or cluster them together for
floral shapes.
1
A BCDE
2 F
1 Work up a fly stitch (Step 1, page 39) from points A to C.
2 Hold the thread to the left. Make a small lazy daisy stitch
(page 44). Go down at D and then come up at E. Pull
the stitch into place, making sure the needle lies over the
thread. Anchor with a catch stitch at F.
1 A
2 BA
3
1 Come up at A and wrap the thread twice around the
needle.
2–3 Holding the thread taut, go down at B (as close to A as
possible, but not into it). Hold the knot in place until the
needle is completely through the fabric.
41Stitch Guide
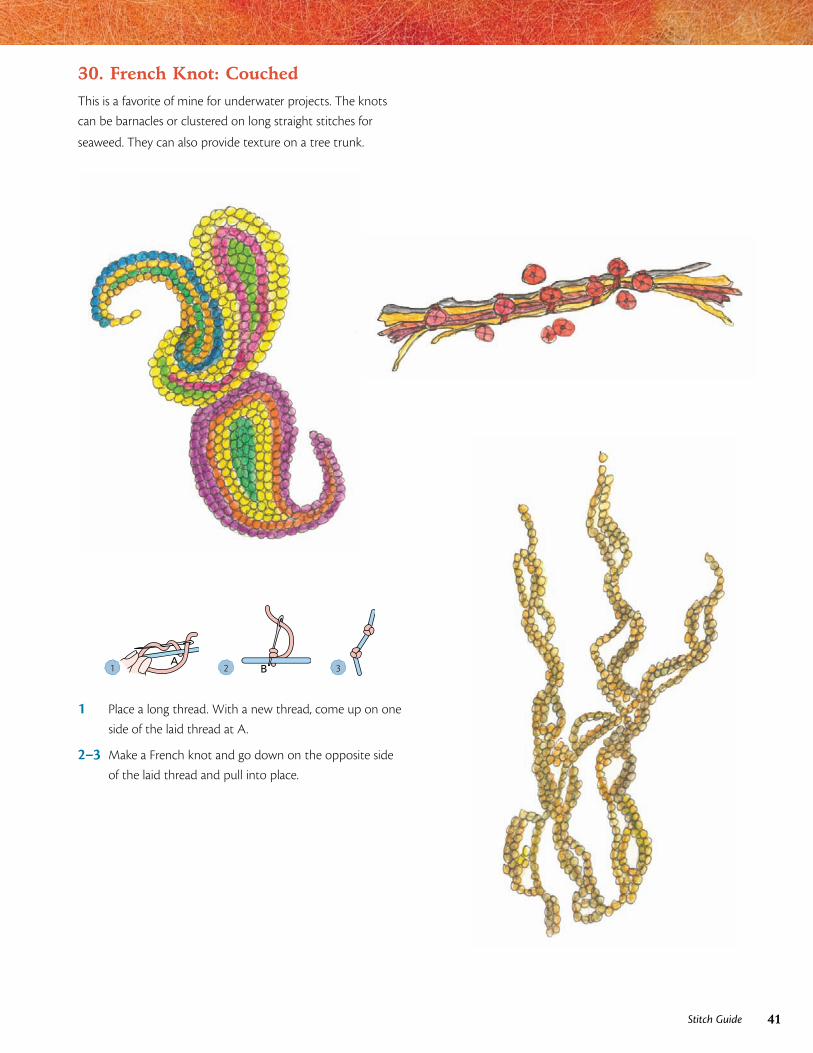
30. French Knot: CouchedThis is a favorite of mine for underwater projects. The knots
can be barnacles or clustered on long straight stitches for
seaweed. They can also provide texture on a tree trunk.
1A
2 B 3
1 Place a long thread. With a new thread, come up on one
side of the laid thread at A.
2–3 Make a French knot and go down on the opposite side
of the laid thread and pull into place.
42 Free-Form Embroidery with Judith Baker Montano
33
32
35
34
31
Stitches 31–35
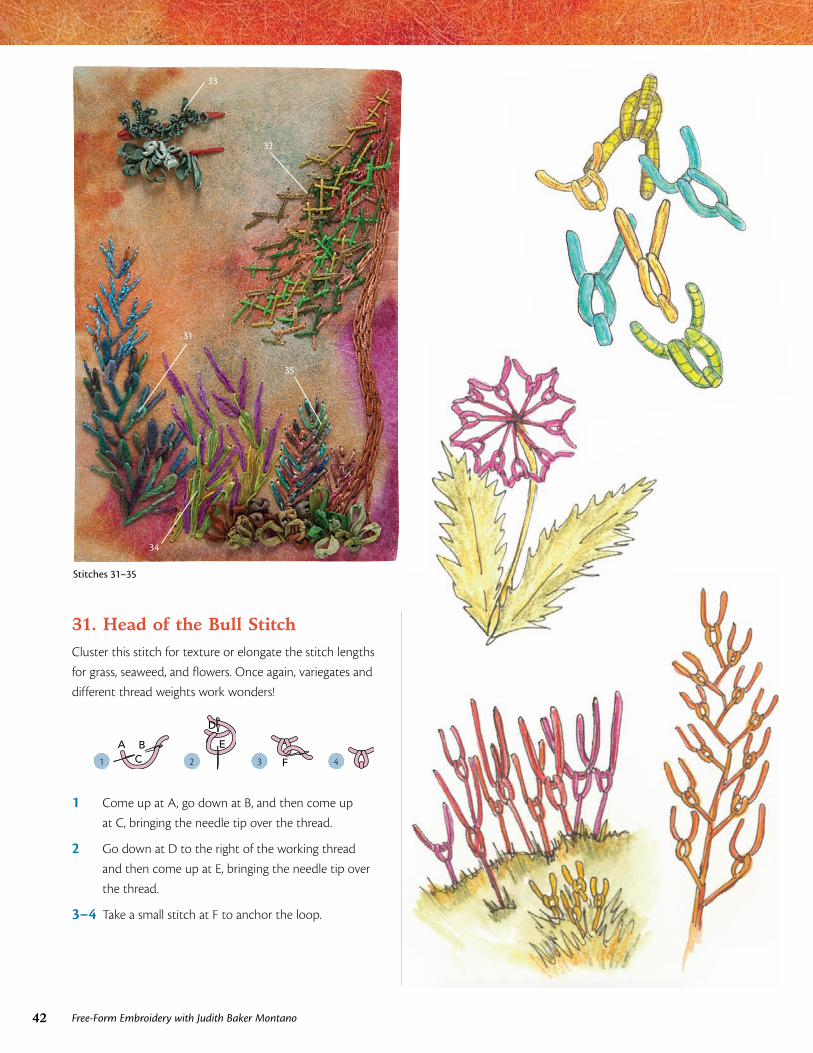
31. Head of the Bull StitchCluster this stitch for texture or elongate the stitch lengths
for grass, seaweed, and flowers. Once again, variegates and
different thread weights work wonders!
1 CBA
2 E
D
3 F 4
1 Come up at A, go down at B, and then come up
at C, bringing the needle tip over the thread.
2 Go down at D to the right of the working thread
and then come up at E, bringing the needle tip over
the thread.
3–4 Take a small stitch at F to anchor the loop.
43Stitch Guide
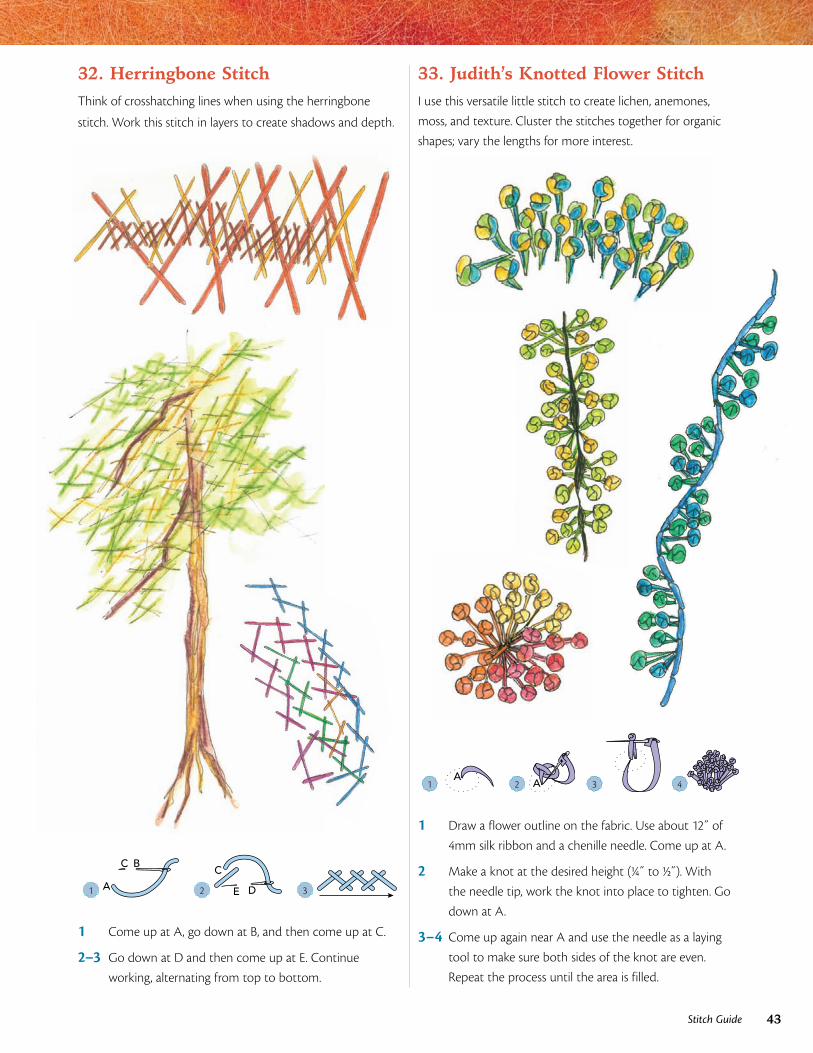
32. Herringbone StitchThink of crosshatching lines when using the herringbone
stitch. Work this stitch in layers to create shadows and depth.
33. Judith’s Knotted Flower StitchI use this versatile little stitch to create lichen, anemones,
moss, and texture. Cluster the stitches together for organic
shapes; vary the lengths for more interest.
1
C B
A 2
C
E D 3
1 Come up at A, go down at B, and then come up at C.
2–3 Go down at D and then come up at E. Continue
working, alternating from top to bottom.
1 A
2 A 3 4
1 Draw a flower outline on the fabric. Use about 12˝ of
4mm silk ribbon and a chenille needle. Come up at A.
2 Make a knot at the desired height (1/4˝ to 1/2˝). With
the needle tip, work the knot into place to tighten. Go
down at A.
3–4 Come up again near A and use the needle as a laying
tool to make sure both sides of the knot are even.
Repeat the process until the area is filled.
44 Free-Form Embroidery with Judith Baker Montano
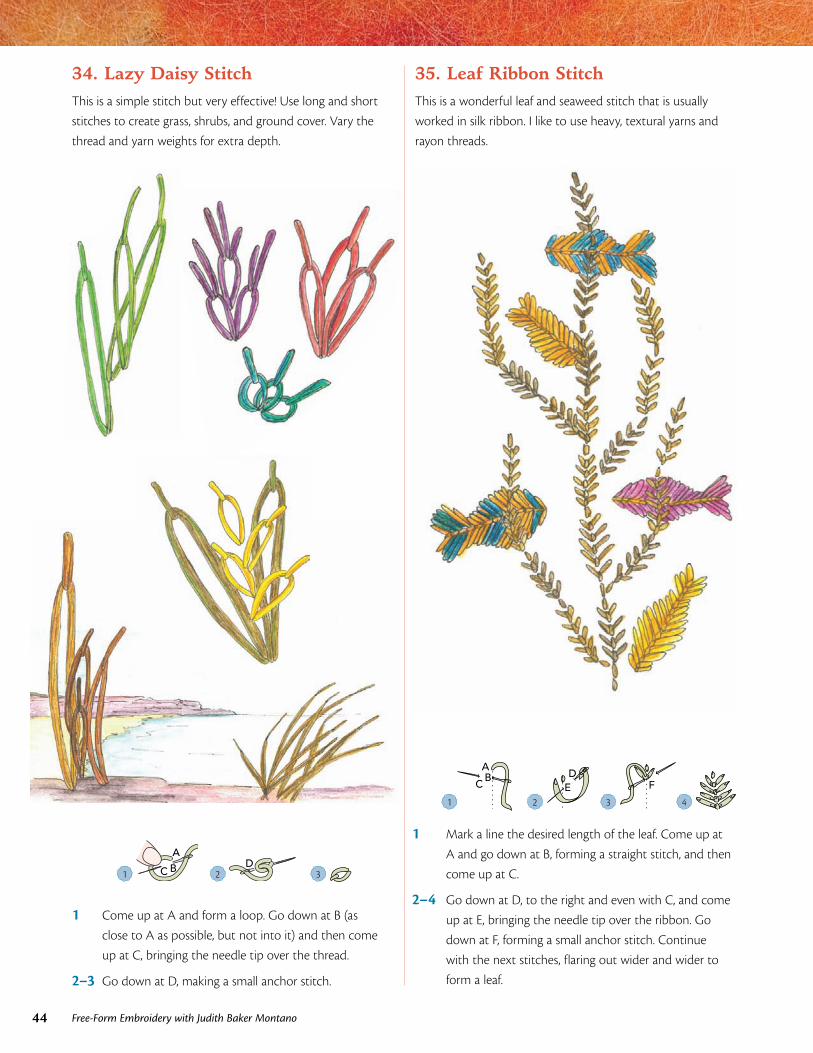
34. Lazy Daisy StitchThis is a simple stitch but very effective! Use long and short
stitches to create grass, shrubs, and ground cover. Vary the
thread and yarn weights for extra depth.
35. Leaf Ribbon StitchThis is a wonderful leaf and seaweed stitch that is usually
worked in silk ribbon. I like to use heavy, textural yarns and
rayon threads.
1 C BA
2 D
3
1 Come up at A and form a loop. Go down at B (as
close to A as possible, but not into it) and then come
up at C, bringing the needle tip over the thread.
2–3 Go down at D, making a small anchor stitch.
1
AB
C
2
DE
3 F
4
1 Mark a line the desired length of the leaf. Come up at
A and go down at B, forming a straight stitch, and then
come up at C.
2–4 Go down at D, to the right and even with C, and come
up at E, bringing the needle tip over the ribbon. Go
down at F, forming a small anchor stitch. Continue
with the next stitches, flaring out wider and wider to
form a leaf.
45Stitch Guide
37
38
36
39
Stitches 36–39
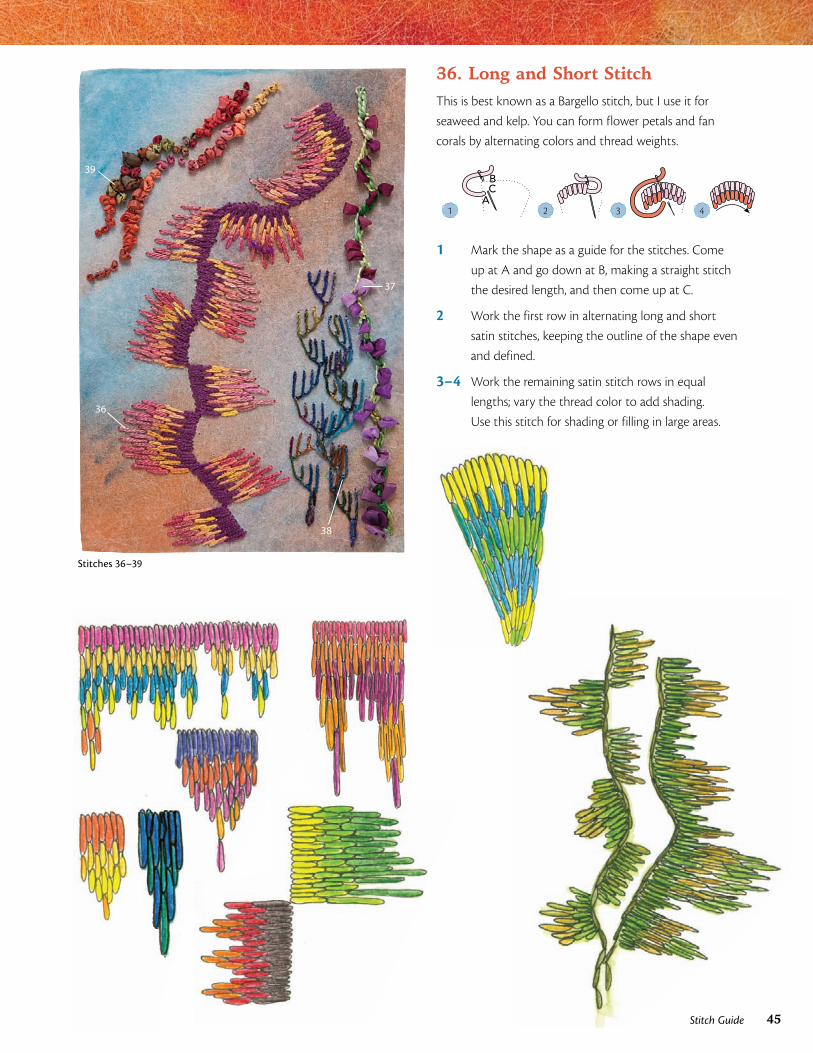
36. Long and Short StitchThis is best known as a Bargello stitch, but I use it for
seaweed and kelp. You can form flower petals and fan
corals by alternating colors and thread weights.
1
BC
A 2 3 4
1 Mark the shape as a guide for the stitches. Come
up at A and go down at B, making a straight stitch
the desired length, and then come up at C.
2 Work the first row in alternating long and short
satin stitches, keeping the outline of the shape even
and defined.
3–4 Work the remaining satin stitch rows in equal
lengths; vary the thread color to add shading.
Use this stitch for shading or filling in large areas.
46 Free-Form Embroidery with Judith Baker Montano
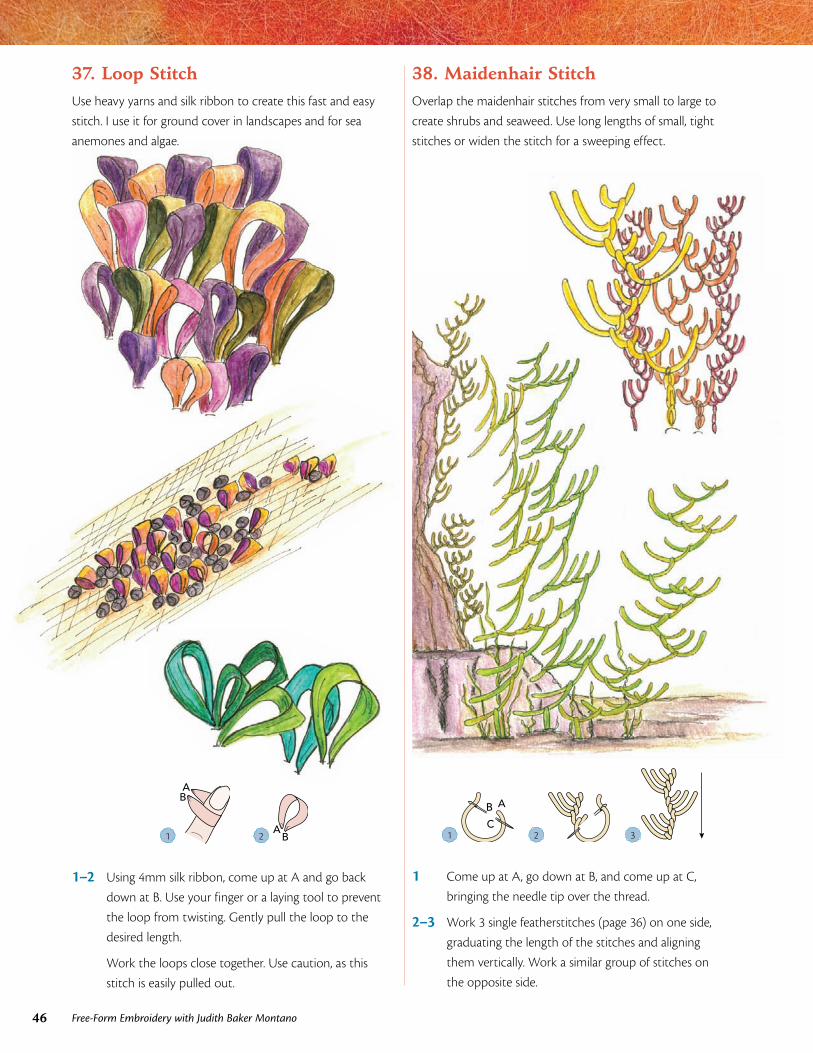
38. Maidenhair StitchOverlap the maidenhair stitches from very small to large to
create shrubs and seaweed. Use long lengths of small, tight
stitches or widen the stitch for a sweeping effect.
1
AB
2 A
B
1–2 Using 4mm silk ribbon, come up at A and go back
down at B. Use your finger or a laying tool to prevent
the loop from twisting. Gently pull the loop to the
desired length.
Work the loops close together. Use caution, as this
stitch is easily pulled out.
1
A
C
B
2 3
1 Come up at A, go down at B, and come up at C,
bringing the needle tip over the thread.
2–3 Work 3 single featherstitches (page 36) on one side,
graduating the length of the stitches and aligning
them vertically. Work a similar group of stitches on
the opposite side.
37. Loop StitchUse heavy yarns and silk ribbon to create this fast and easy
stitch. I use it for ground cover in landscapes and for sea
anemones and algae.
47Stitch Guide
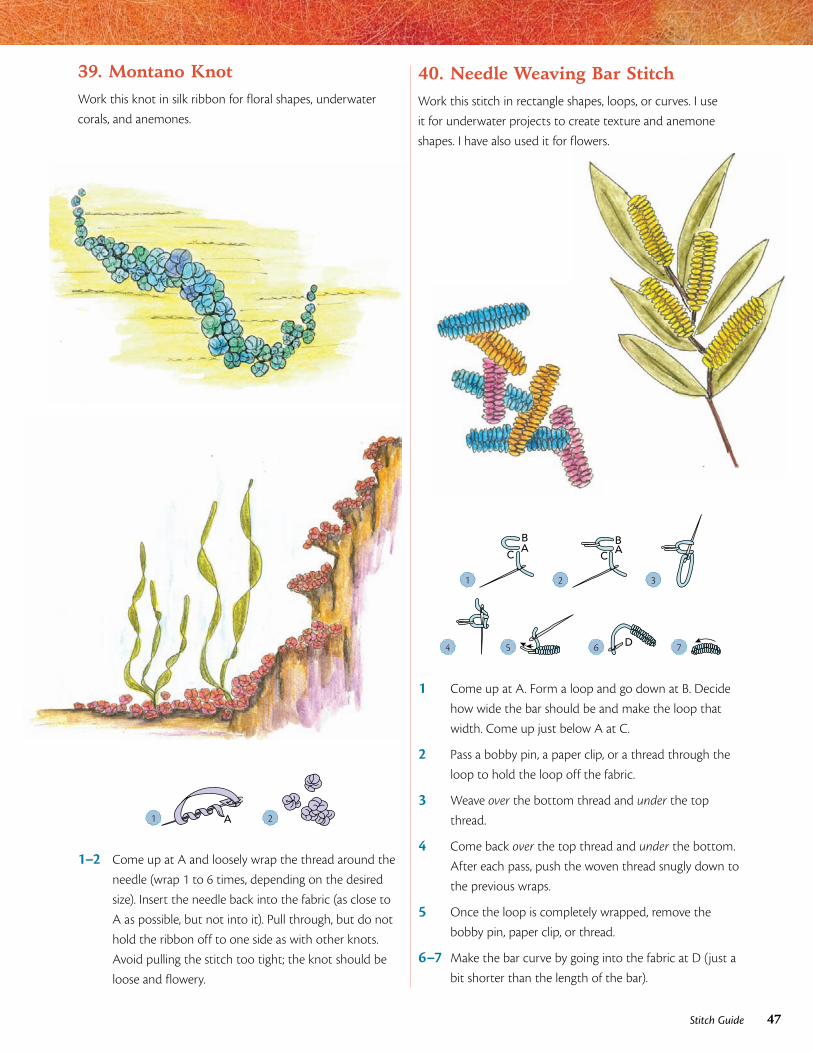
39. Montano KnotWork this knot in silk ribbon for floral shapes, underwater
corals, and anemones.
40. Needle Weaving Bar StitchWork this stitch in rectangle shapes, loops, or curves. I use
it for underwater projects to create texture and anemone
shapes. I have also used it for flowers.
1 A 2
1–2 Come up at A and loosely wrap the thread around the
needle (wrap 1 to 6 times, depending on the desired
size). Insert the needle back into the fabric (as close to
A as possible, but not into it). Pull through, but do not
hold the ribbon off to one side as with other knots.
Avoid pulling the stitch too tight; the knot should be
loose and flowery.
1
AB
C
2
AB
C
3
4 5 6 D 7
1 Come up at A. Form a loop and go down at B. Decide
how wide the bar should be and make the loop that
width. Come up just below A at C.
2 Pass a bobby pin, a paper clip, or a thread through the
loop to hold the loop off the fabric.
3 Weave over the bottom thread and under the top
thread.
4 Come back over the top thread and under the bottom.
After each pass, push the woven thread snugly down to
the previous wraps.
5 Once the loop is completely wrapped, remove the
bobby pin, paper clip, or thread.
6–7 Make the bar curve by going into the fabric at D (just a
bit shorter than the length of the bar).
48 Free-Form Embroidery with Judith Baker Montano
4043
42
44
41
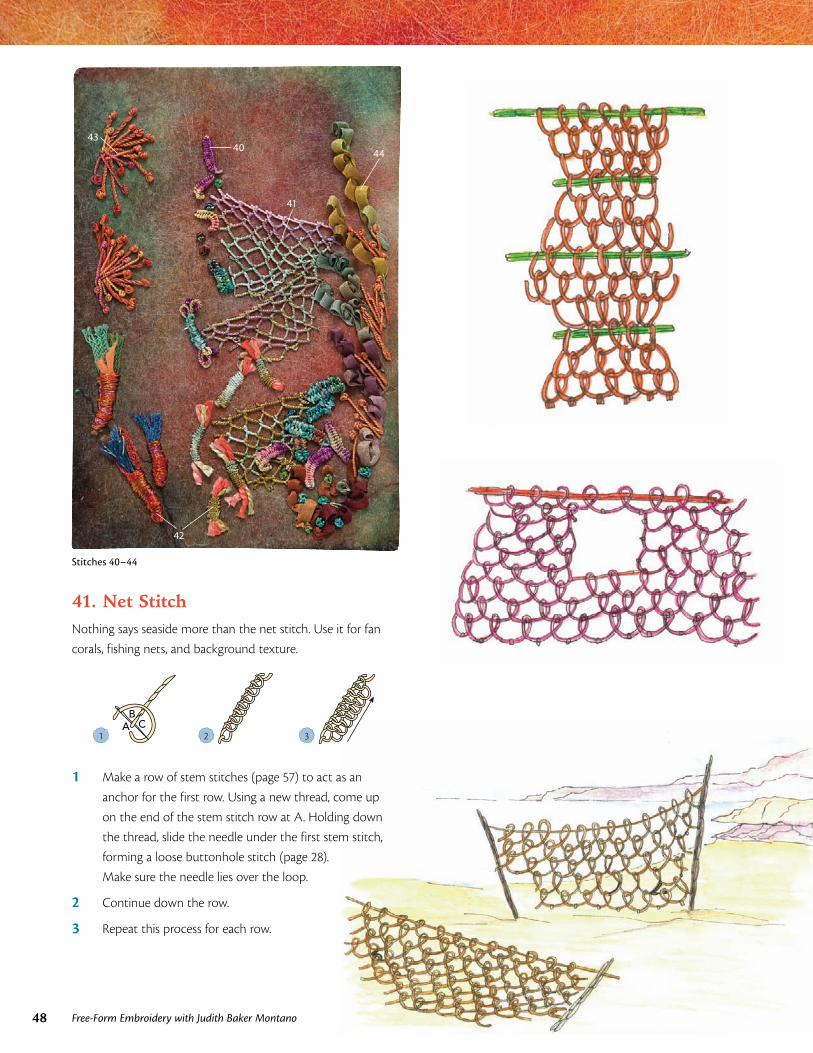
Stitches 40–44
41. Net StitchNothing says seaside more than the net stitch. Use it for fan
corals, fishing nets, and background texture.
1 A
BC
2 3
1 Make a row of stem stitches (page 57) to act as an
anchor for the first row. Using a new thread, come up
on the end of the stem stitch row at A. Holding down
the thread, slide the needle under the first stem stitch,
forming a loose buttonhole stitch (page 28).
Make sure the needle lies over the loop.
2 Continue down the row.
3 Repeat this process for each row.
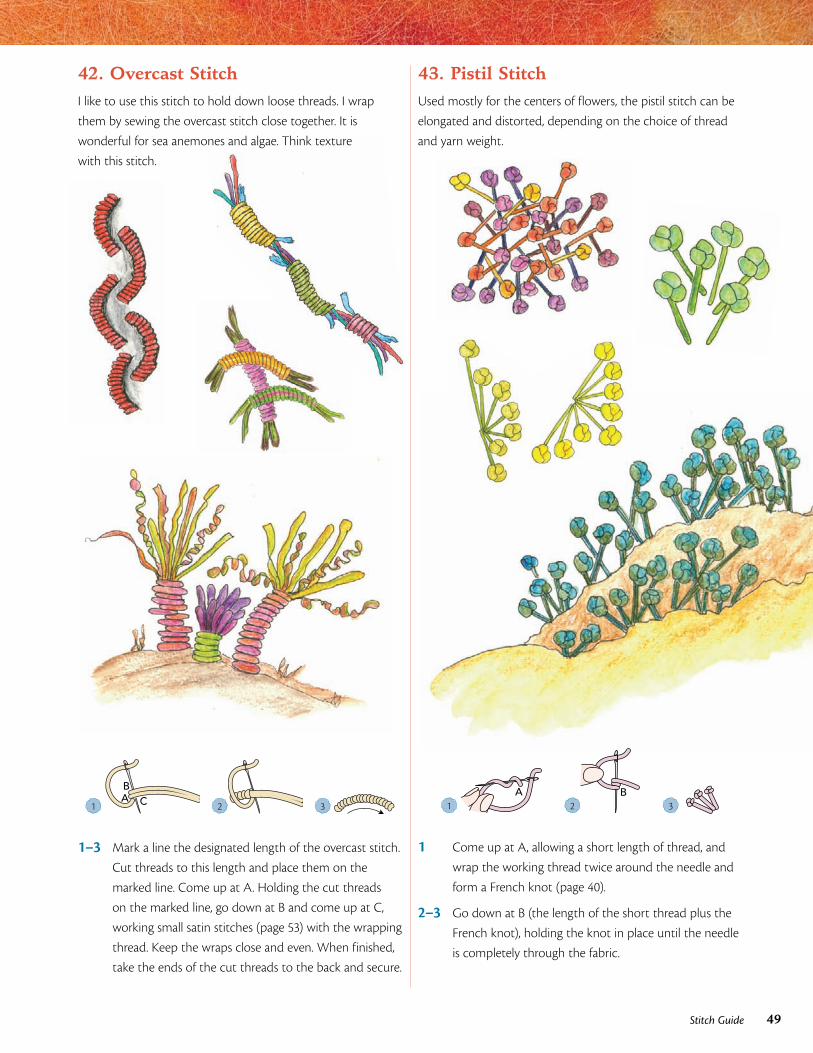
49Stitch Guide
1
BCA
2 3
1–3 Mark a line the designated length of the overcast stitch.
Cut threads to this length and place them on the
marked line. Come up at A. Holding the cut threads
on the marked line, go down at B and come up at C,
working small satin stitches (page 53) with the wrapping
thread. Keep the wraps close and even. When finished,
take the ends of the cut threads to the back and secure.
1 A
2B
3
1 Come up at A, allowing a short length of thread, and
wrap the working thread twice around the needle and
form a French knot (page 40).
2–3 Go down at B (the length of the short thread plus the
French knot), holding the knot in place until the needle
is completely through the fabric.
42. Overcast StitchI like to use this stitch to hold down loose threads. I wrap
them by sewing the overcast stitch close together. It is
wonderful for sea anemones and algae. Think texture
with this stitch.
43. Pistil StitchUsed mostly for the centers of flowers, the pistil stitch can be
elongated and distorted, depending on the choice of thread
and yarn weight.
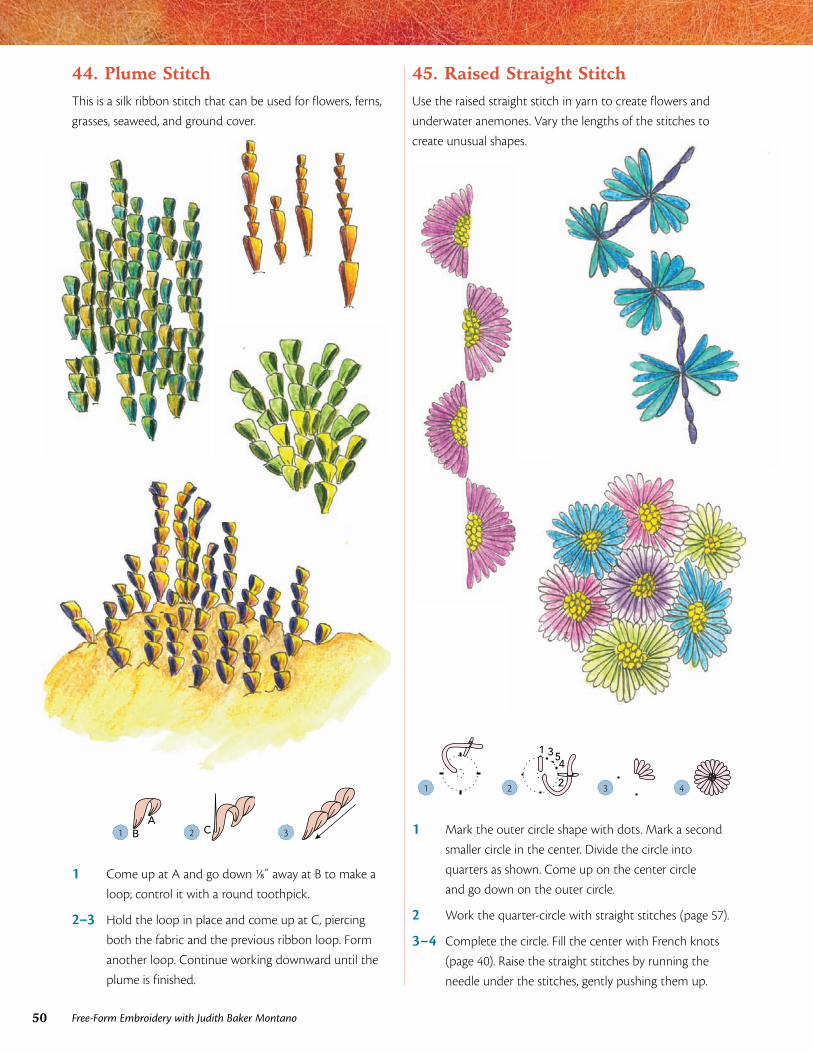
50 Free-Form Embroidery with Judith Baker Montano
1 2
1 354
2 3 4
1 Mark the outer circle shape with dots. Mark a second
smaller circle in the center. Divide the circle into
quarters as shown. Come up on the center circle
and go down on the outer circle.
2 Work the quarter-circle with straight stitches (page 57).
3–4 Complete the circle. Fill the center with French knots
(page 40). Raise the straight stitches by running the
needle under the stitches, gently pushing them up.
44. Plume StitchThis is a silk ribbon stitch that can be used for flowers, ferns,
grasses, seaweed, and ground cover.
45. Raised Straight StitchUse the raised straight stitch in yarn to create flowers and
underwater anemones. Vary the lengths of the stitches to
create unusual shapes.
1 BA
2 C 3
1 Come up at A and go down 1/8˝ away at B to make a
loop; control it with a round toothpick.
2–3 Hold the loop in place and come up at C, piercing
both the fabric and the previous ribbon loop. Form
another loop. Continue working downward until the
plume is finished.
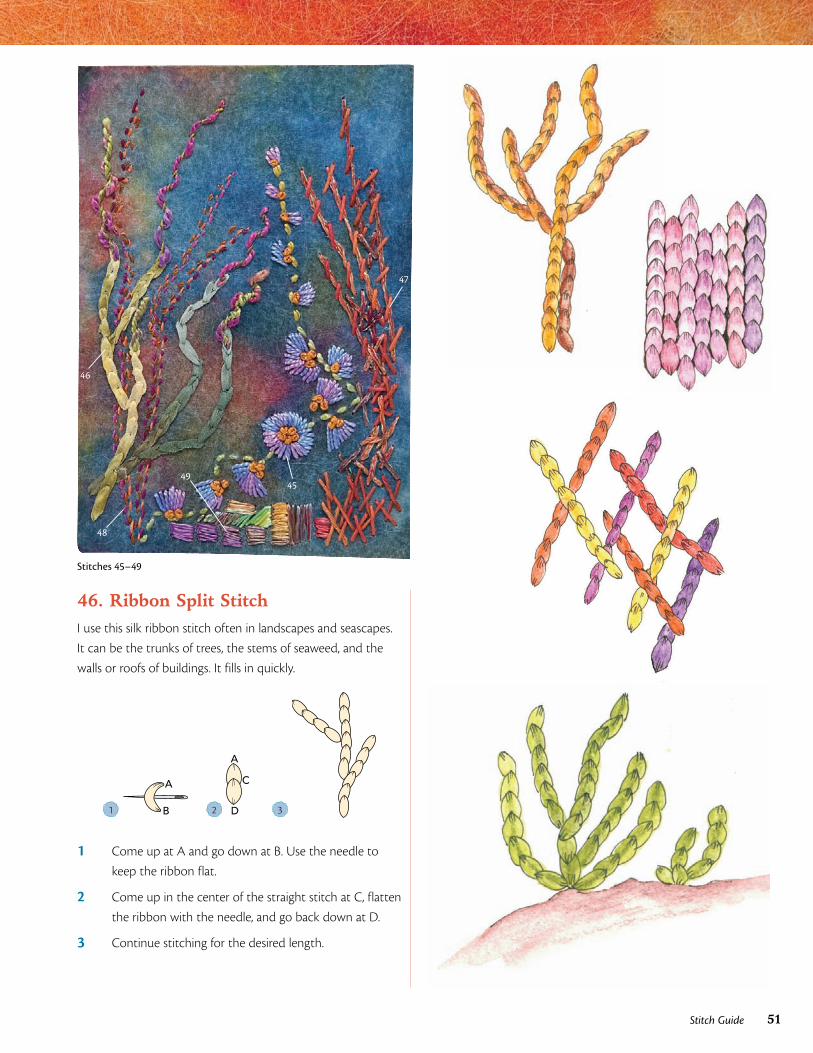
51Stitch Guide
45
47
46
49
48
Stitches 45–49
46. Ribbon Split StitchI use this silk ribbon stitch often in landscapes and seascapes.
It can be the trunks of trees, the stems of seaweed, and the
walls or roofs of buildings. It fills in quickly.
1
A
B 2
C
A
D 3
1 Come up at A and go down at B. Use the needle to
keep the ribbon flat.
2 Come up in the center of the straight stitch at C, flatten
the ribbon with the needle, and go back down at D.
3 Continue stitching for the desired length.
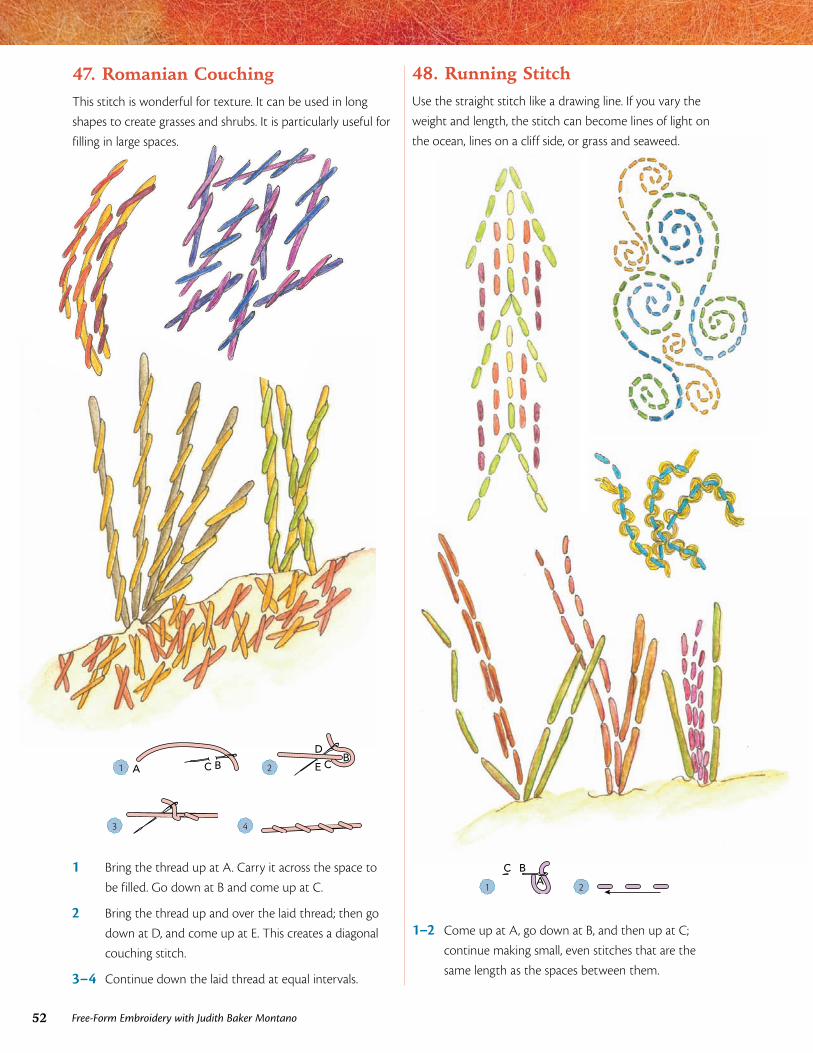
52 Free-Form Embroidery with Judith Baker Montano
48. Running StitchUse the straight stitch like a drawing line. If you vary the
weight and length, the stitch can become lines of light on
the ocean, lines on a cliff side, or grass and seaweed.
1 CA B 2B
CE
D
3 4
1 Bring the thread up at A. Carry it across the space to
be filled. Go down at B and come up at C.
2 Bring the thread up and over the laid thread; then go
down at D, and come up at E. This creates a diagonal
couching stitch.
3–4 Continue down the laid thread at equal intervals.
1 C B
A 2
1–2 Come up at A, go down at B, and then up at C;
continue making small, even stitches that are the
same length as the spaces between them.
47. Romanian CouchingThis stitch is wonderful for texture. It can be used in long
shapes to create grasses and shrubs. It is particularly useful for
filling in large spaces.
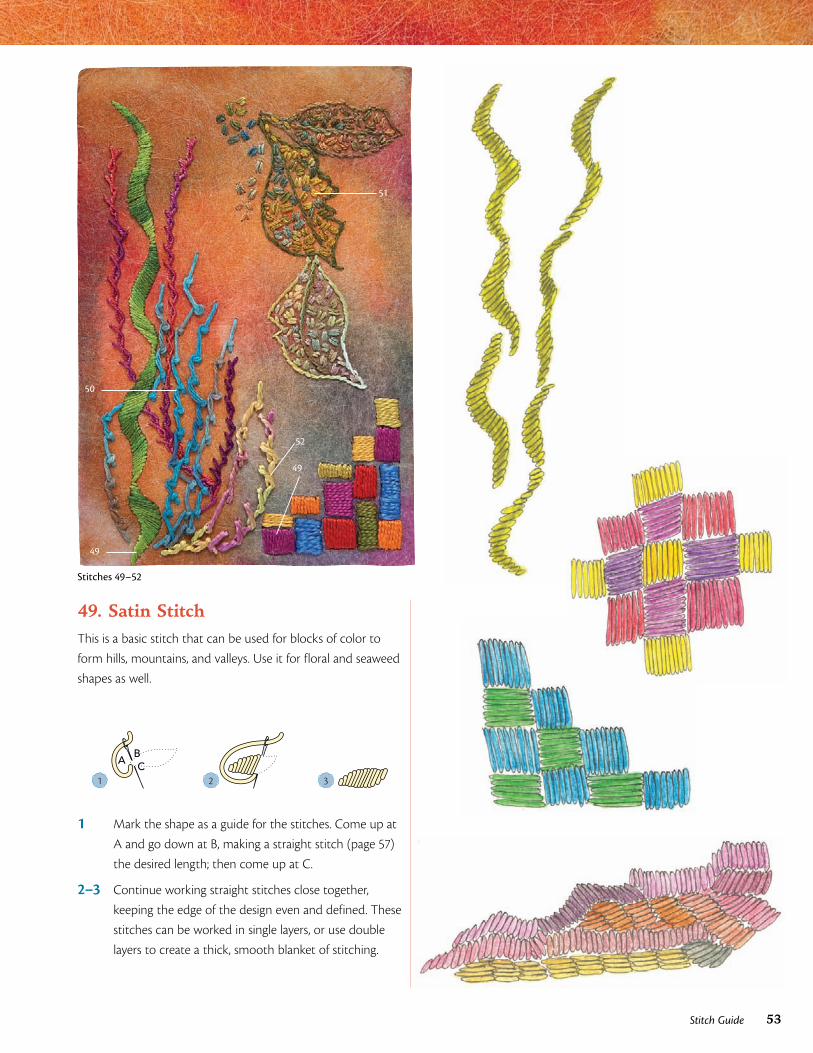
53Stitch Guide
51
52
49
49
50
Stitches 49–52
49. Satin StitchThis is a basic stitch that can be used for blocks of color to
form hills, mountains, and valleys. Use it for floral and seaweed
shapes as well.
1
ABC
2 3
1 Mark the shape as a guide for the stitches. Come up at
A and go down at B, making a straight stitch (page 57)
the desired length; then come up at C.
2–3 Continue working straight stitches close together,
keeping the edge of the design even and defined. These
stitches can be worked in single layers, or use double
layers to create a thick, smooth blanket of stitching.
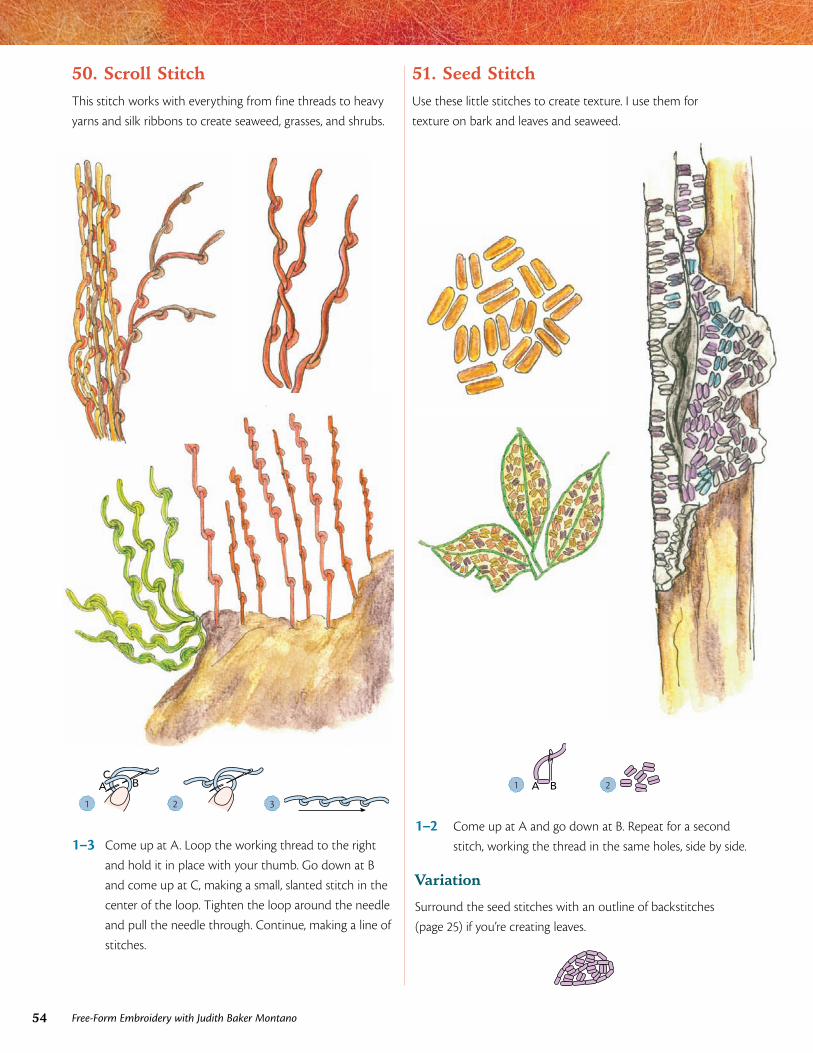
54 Free-Form Embroidery with Judith Baker Montano
51. Seed StitchUse these little stitches to create texture. I use them for
texture on bark and leaves and seaweed.
1
BAC
2 3
1–3 Come up at A. Loop the working thread to the right
and hold it in place with your thumb. Go down at B
and come up at C, making a small, slanted stitch in the
center of the loop. Tighten the loop around the needle
and pull the needle through. Continue, making a line of
stitches.
1 A B 2
1–2 Come up at A and go down at B. Repeat for a second
stitch, working the thread in the same holes, side by side.
Variation
Surround the seed stitches with an outline of backstitches
(page 25) if you’re creating leaves.
50. Scroll StitchThis stitch works with everything from fine threads to heavy
yarns and silk ribbons to create seaweed, grasses, and shrubs.
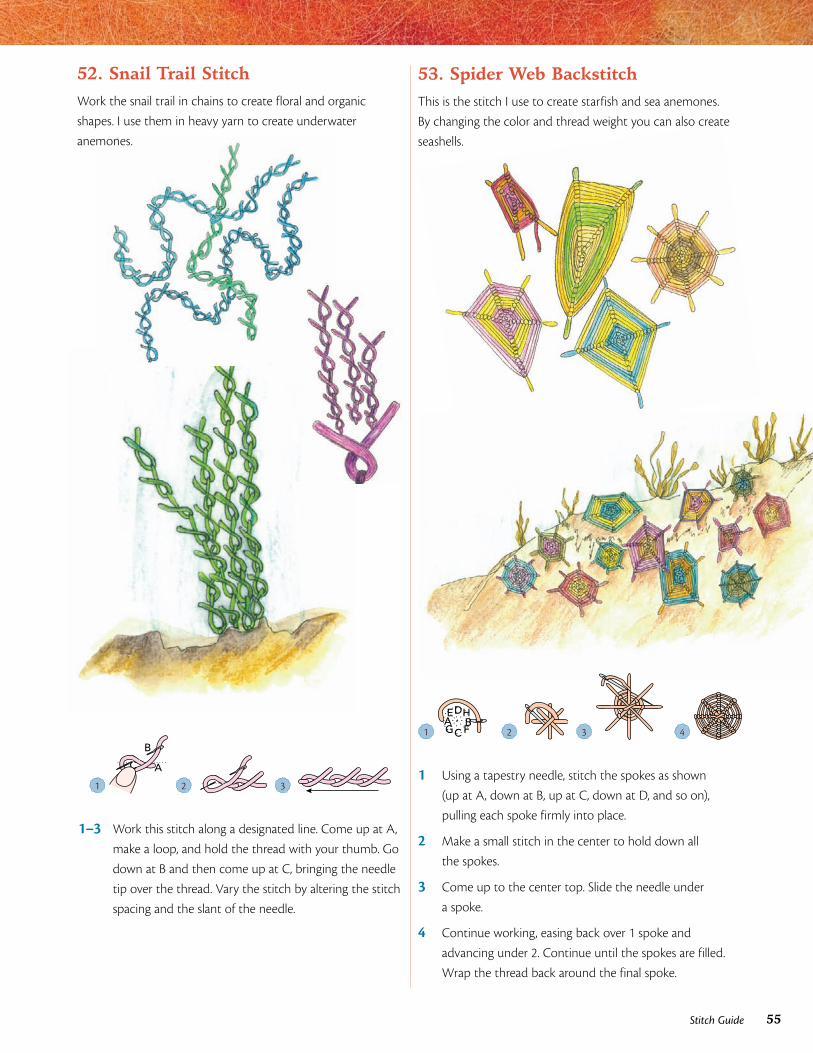
55Stitch Guide
1
C
B
A
2 3
1–3 Work this stitch along a designated line. Come up at A,
make a loop, and hold the thread with your thumb. Go
down at B and then come up at C, bringing the needle
tip over the thread. Vary the stitch by altering the stitch
spacing and the slant of the needle.
1 A
C
DE H
FGB
2 3 4
1 Using a tapestry needle, stitch the spokes as shown
(up at A, down at B, up at C, down at D, and so on),
pulling each spoke firmly into place.
2 Make a small stitch in the center to hold down all
the spokes.
3 Come up to the center top. Slide the needle under
a spoke.
4 Continue working, easing back over 1 spoke and
advancing under 2. Continue until the spokes are filled.
Wrap the thread back around the final spoke.
53. Spider Web BackstitchThis is the stitch I use to create starfish and sea anemones.
By changing the color and thread weight you can also create
seashells.
52. Snail Trail StitchWork the snail trail in chains to create floral and organic
shapes. I use them in heavy yarn to create underwater
anemones.
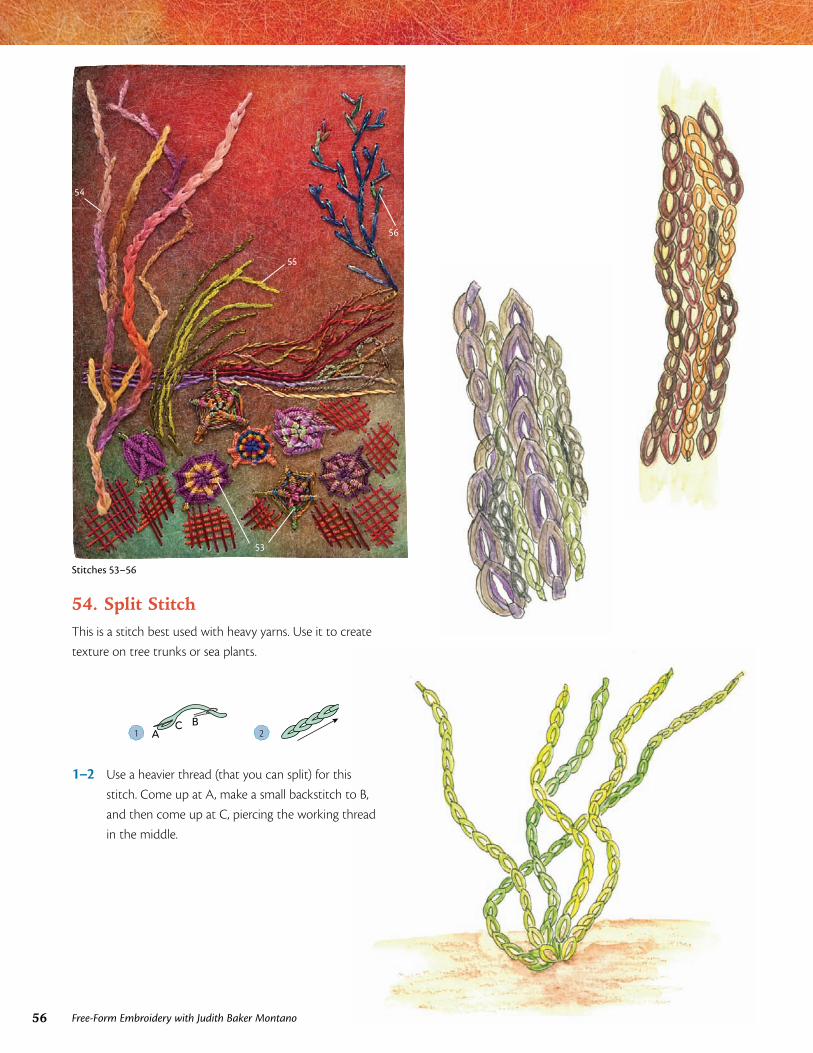
56 Free-Form Embroidery with Judith Baker Montano
54
55
56
53
Stitches 53–56
54. Split StitchThis is a stitch best used with heavy yarns. Use it to create
texture on tree trunks or sea plants.
1 C B
A 2
1–2 Use a heavier thread (that you can split) for this
stitch. Come up at A, make a small backstitch to B,
and then come up at C, piercing the working thread
in the middle.
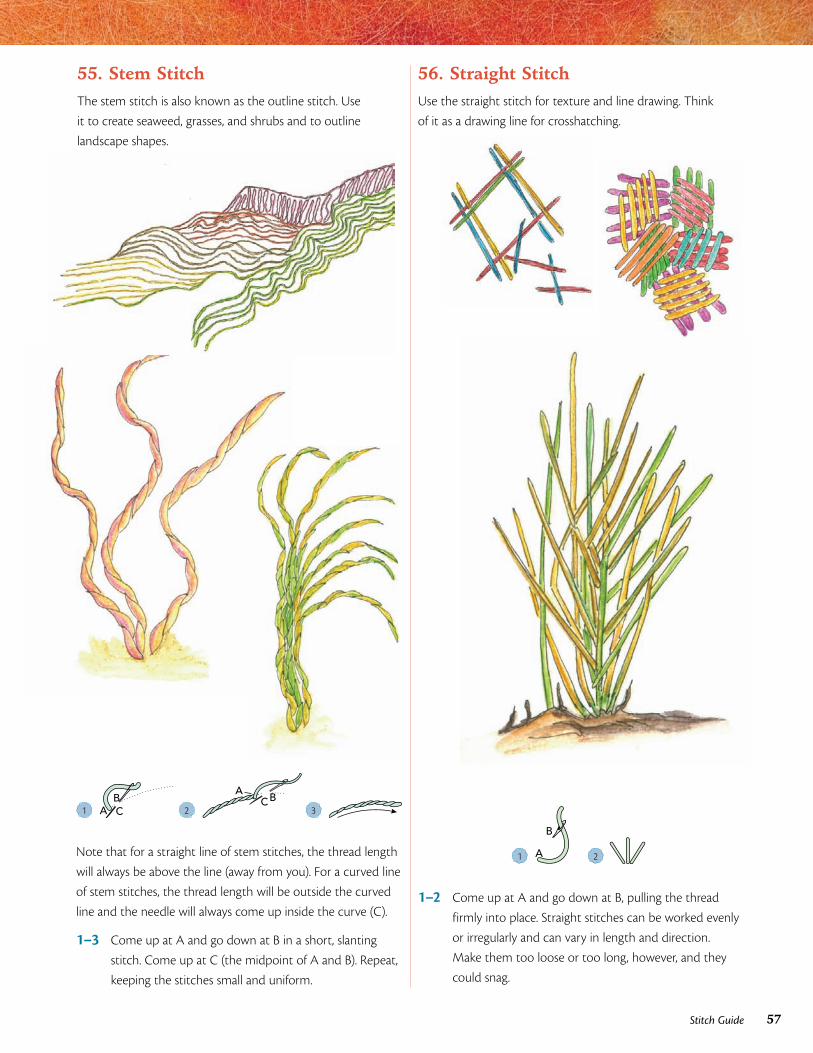
57Stitch Guide
55. Stem StitchThe stem stitch is also known as the outline stitch. Use
it to create seaweed, grasses, and shrubs and to outline
landscape shapes.
56. Straight StitchUse the straight stitch for texture and line drawing. Think
of it as a drawing line for crosshatching.
1 ABC 2
BA
C 3
Note that for a straight line of stem stitches, the thread length
will always be above the line (away from you). For a curved line
of stem stitches, the thread length will be outside the curved
line and the needle will always come up inside the curve (C).
1–3 Come up at A and go down at B in a short, slanting
stitch. Come up at C (the midpoint of A and B). Repeat,
keeping the stitches small and uniform.
1 AB
2 S020b.eps
1–2 Come up at A and go down at B, pulling the thread
firmly into place. Straight stitches can be worked evenly
or irregularly and can vary in length and direction.
Make them too loose or too long, however, and they
could snag.
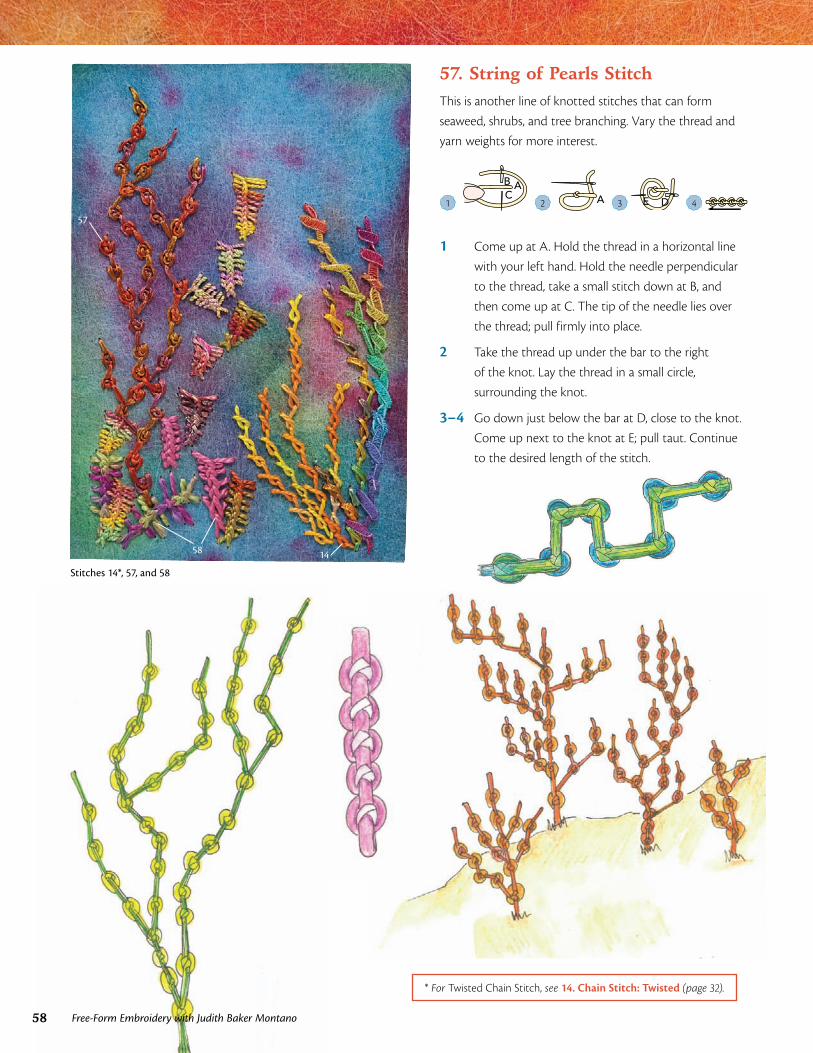
58 Free-Form Embroidery with Judith Baker Montano
57
58
Stitches 14*, 57, and 58
57. String of Pearls StitchThis is another line of knotted stitches that can form
seaweed, shrubs, and tree branching. Vary the thread and
yarn weights for more interest.
1 AB
C 2 A 3 E D 4
1 Come up at A. Hold the thread in a horizontal line
with your left hand. Hold the needle perpendicular
to the thread, take a small stitch down at B, and
then come up at C. The tip of the needle lies over
the thread; pull firmly into place.
2 Take the thread up under the bar to the right
of the knot. Lay the thread in a small circle,
surrounding the knot.
3–4 Go down just below the bar at D, close to the knot.
Come up next to the knot at E; pull taut. Continue
to the desired length of the stitch.
* For Twisted Chain Stitch, see 14. Chain Stitch: Twisted (page 32).
14
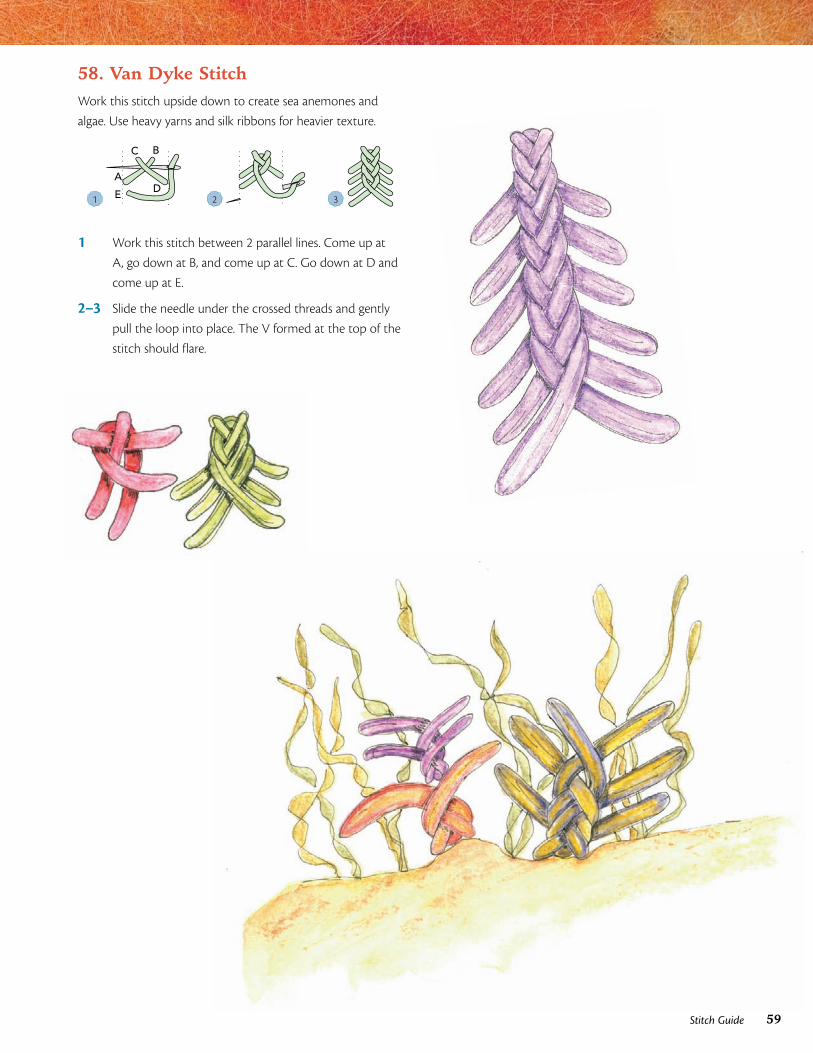
59Stitch Guide
58. Van Dyke StitchWork this stitch upside down to create sea anemones and
algae. Use heavy yarns and silk ribbons for heavier texture.
1
A
C B
DE 2 3
1 Work this stitch between 2 parallel lines. Come up at
A, go down at B, and come up at C. Go down at D and
come up at E.
2–3 Slide the needle under the crossed threads and gently
pull the loop into place. The V formed at the top of the
stitch should flare.
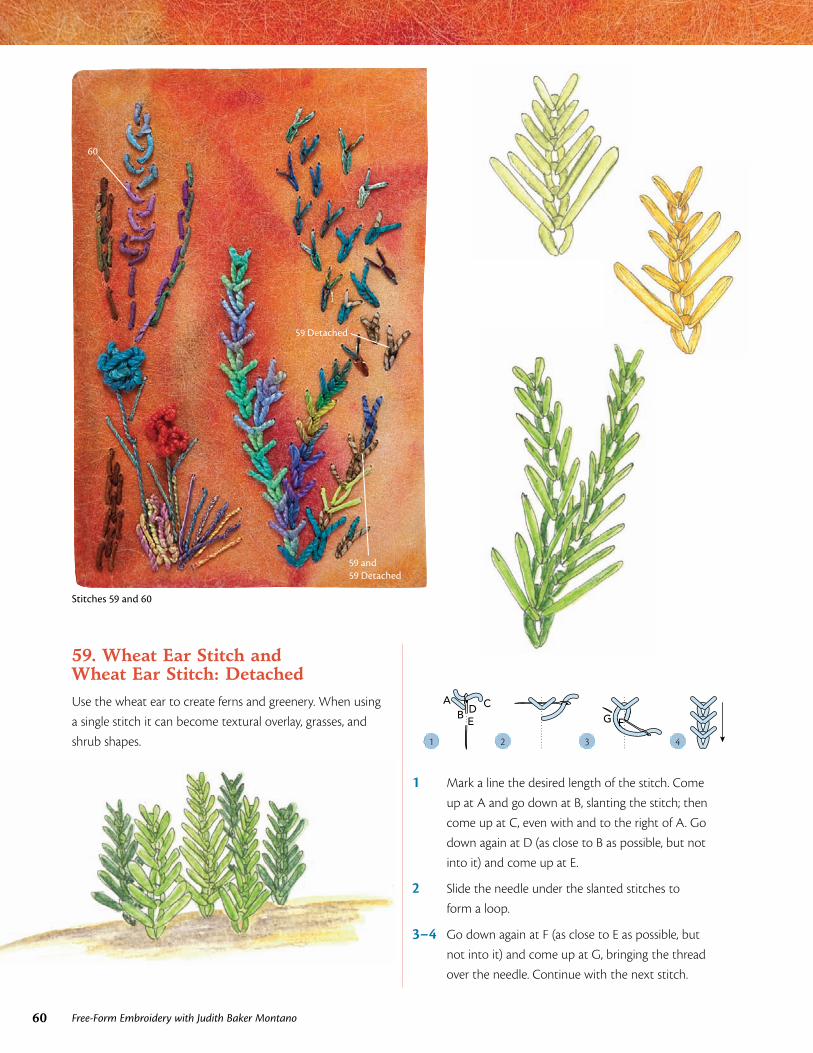
60 Free-Form Embroidery with Judith Baker Montano
60
59 Detached
59 and 59 Detached
Stitches 59 and 60
59. Wheat Ear Stitch and Wheat Ear Stitch: DetachedUse the wheat ear to create ferns and greenery. When using
a single stitch it can become textural overlay, grasses, and
shrub shapes. 1
CDBE
A
2 3
G F
4
1 Mark a line the desired length of the stitch. Come
up at A and go down at B, slanting the stitch; then
come up at C, even with and to the right of A. Go
down again at D (as close to B as possible, but not
into it) and come up at E.
2 Slide the needle under the slanted stitches to
form a loop.
3–4 Go down again at F (as close to E as possible, but
not into it) and come up at G, bringing the thread
over the needle. Continue with the next stitch.
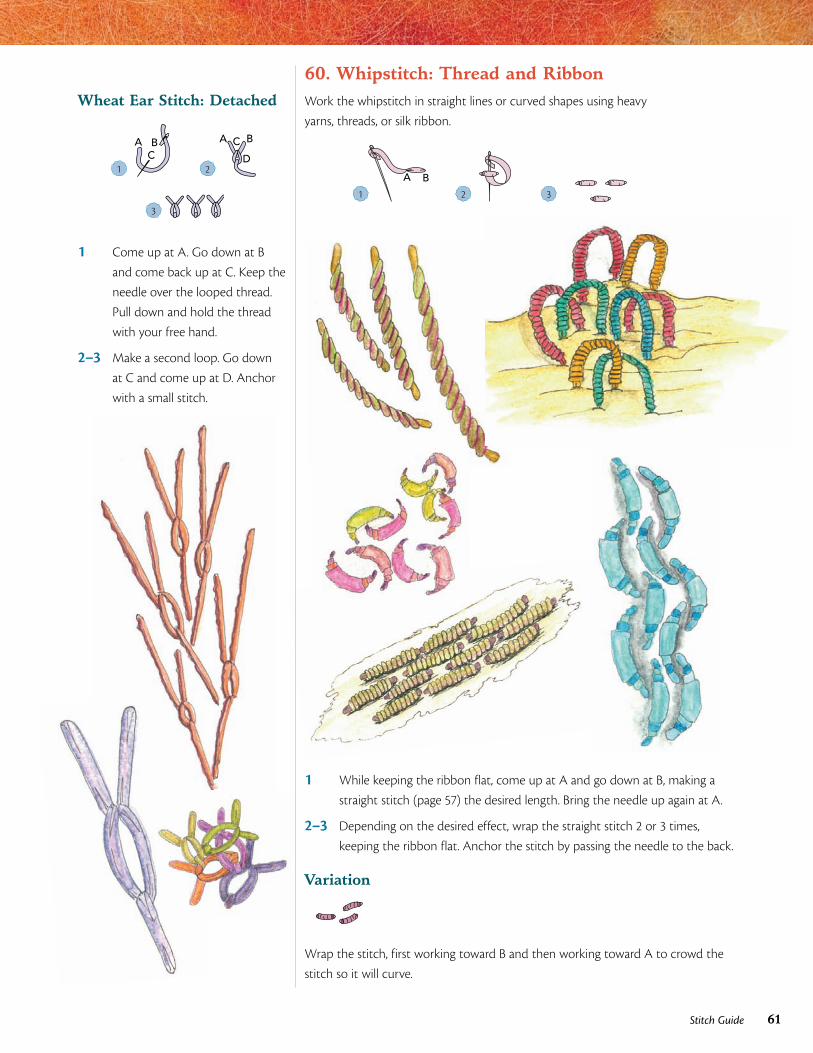
61Stitch Guide
Wheat Ear Stitch: Detached
1
A BC
2
A BC
D
3
1 Come up at A. Go down at B
and come back up at C. Keep the
needle over the looped thread.
Pull down and hold the thread
with your free hand.
2–3 Make a second loop. Go down
at C and come up at D. Anchor
with a small stitch.
60. Whipstitch: Thread and RibbonWork the whipstitch in straight lines or curved shapes using heavy
yarns, threads, or silk ribbon.
1
A B
2 3
1 While keeping the ribbon flat, come up at A and go down at B, making a
straight stitch (page 57) the desired length. Bring the needle up again at A.
2–3 Depending on the desired effect, wrap the straight stitch 2 or 3 times,
keeping the ribbon flat. Anchor the stitch by passing the needle to the back.
Variation
S079c.eps
Wrap the stitch, first working toward B and then working toward A to crowd the
stitch so it will curve.
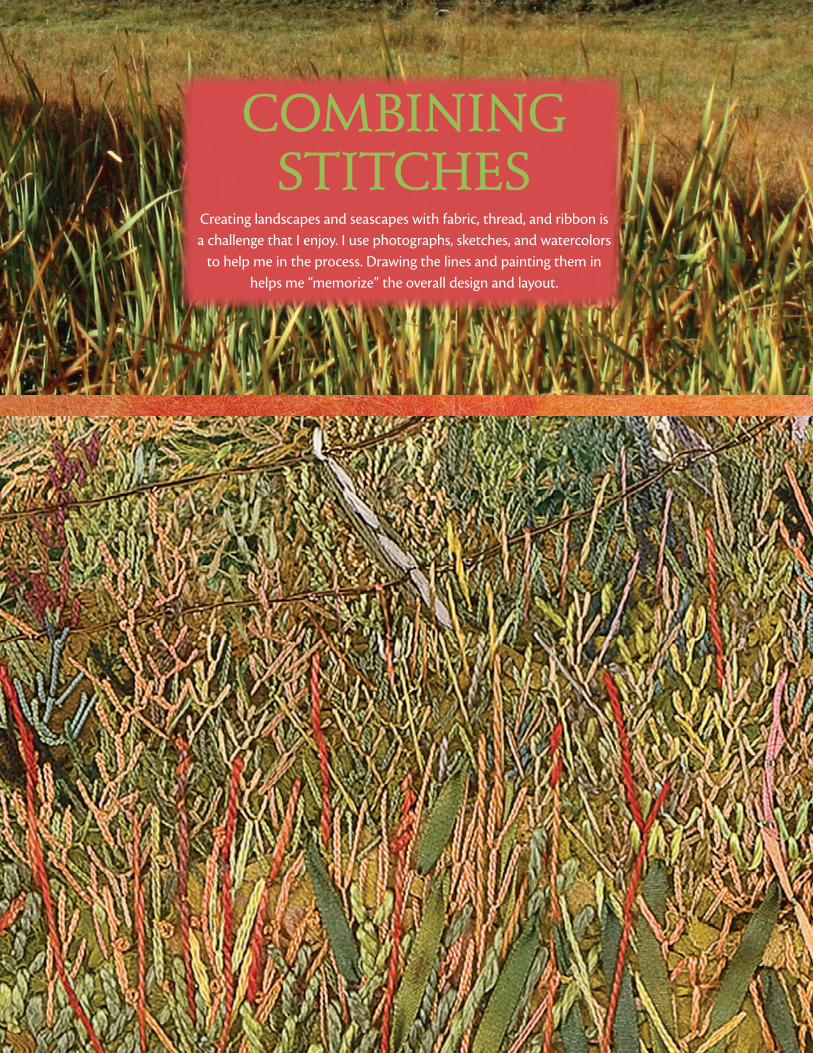
Creating landscapes and seascapes with fabric, thread, and ribbon is a challenge that I enjoy. I use photographs, sketches, and watercolors
to help me in the process. Drawing the lines and painting them in helps me “memorize” the overall design and layout.
COMBINING STITCHES
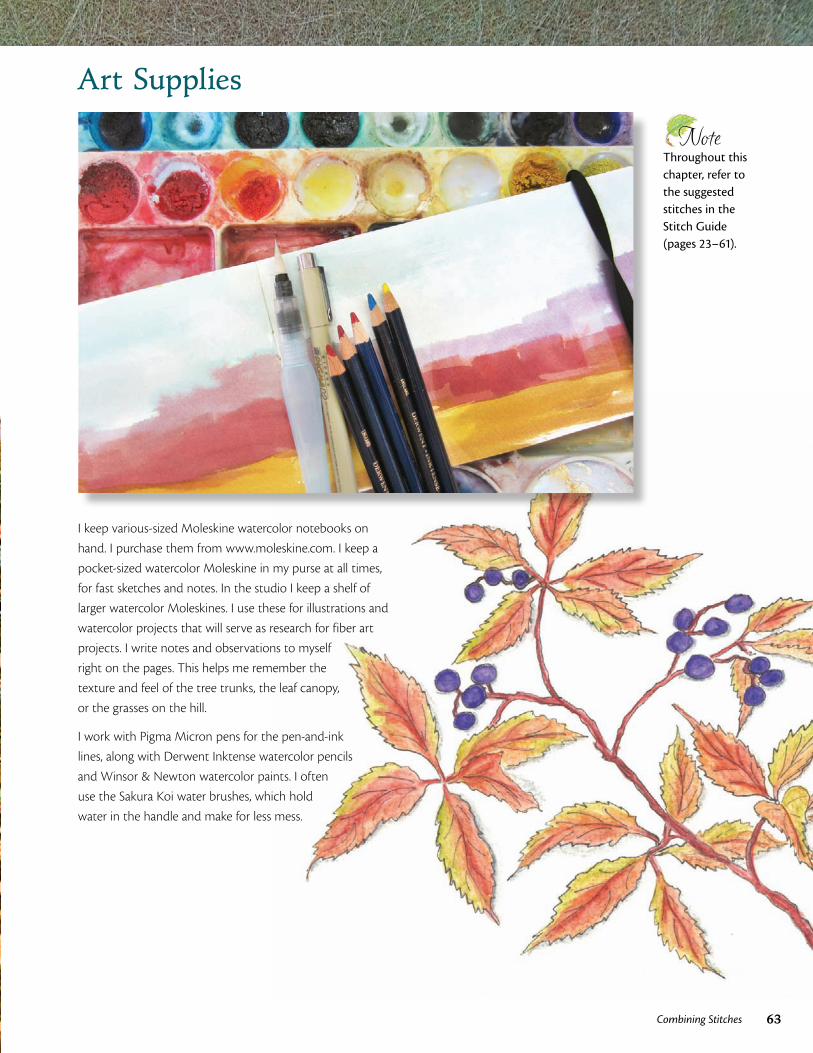
63Combining Stitches
Art Supplies
I keep various-sized Moleskine watercolor notebooks on
hand. I purchase them from www.moleskine.com. I keep a
pocket-sized watercolor Moleskine in my purse at all times,
for fast sketches and notes. In the studio I keep a shelf of
larger watercolor Moleskines. I use these for illustrations and
watercolor projects that will serve as research for fiber art
projects. I write notes and observations to myself
right on the pages. This helps me remember the
texture and feel of the tree trunks, the leaf canopy,
or the grasses on the hill.
I work with Pigma Micron pens for the pen-and-ink
lines, along with Derwent Inktense watercolor pencils
and Winsor & Newton watercolor paints. I often
use the Sakura Koi water brushes, which hold
water in the handle and make for less mess.
Throughout this chapter, refer to the suggested stitches in the Stitch Guide (pages 23–61).
Note
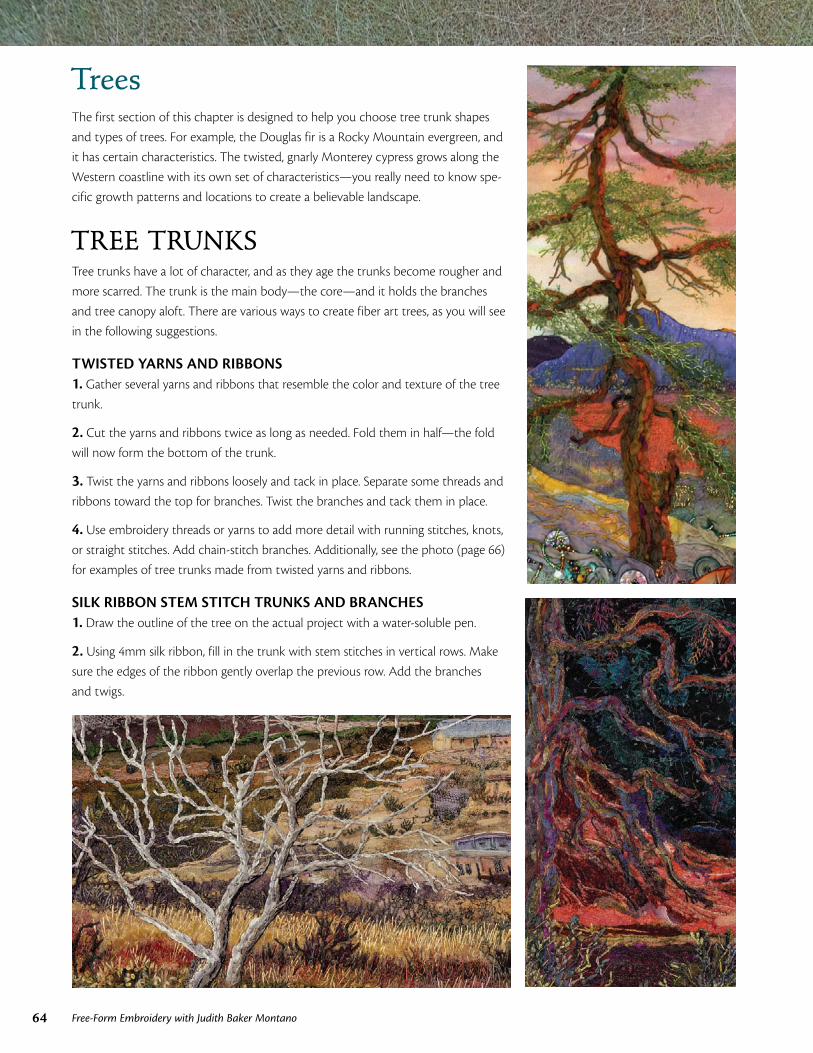
64 Free-Form Embroidery with Judith Baker Montano
TreesThe first section of this chapter is designed to help you choose tree trunk shapes
and types of trees. For example, the Douglas fir is a Rocky Mountain evergreen, and
it has certain characteristics. The twisted, gnarly Monterey cypress grows along the
Western coastline with its own set of characteristics—you really need to know spe-
cific growth patterns and locations to create a believable landscape.
TREE TRUNKSTree trunks have a lot of character, and as they age the trunks become rougher and
more scarred. The trunk is the main body—the core—and it holds the branches
and tree canopy aloft. There are various ways to create fiber art trees, as you will see
in the following suggestions.
TWISTED YARNS AND RIBBONS1. Gather several yarns and ribbons that resemble the color and texture of the tree
trunk.
2. Cut the yarns and ribbons twice as long as needed. Fold them in half—the fold
will now form the bottom of the trunk.
3. Twist the yarns and ribbons loosely and tack in place. Separate some threads and
ribbons toward the top for branches. Twist the branches and tack them in place.
4. Use embroidery threads or yarns to add more detail with running stitches, knots,
or straight stitches. Add chain-stitch branches. Additionally, see the photo (page 66)
for examples of tree trunks made from twisted yarns and ribbons.
SILK RIBBON STEM STITCH TRUNKS AND BRANCHES1. Draw the outline of the tree on the actual project with a water-soluble pen.
2. Using 4mm silk ribbon, fill in the trunk with stem stitches in vertical rows. Make
sure the edges of the ribbon gently overlap the previous row. Add the branches
and twigs.
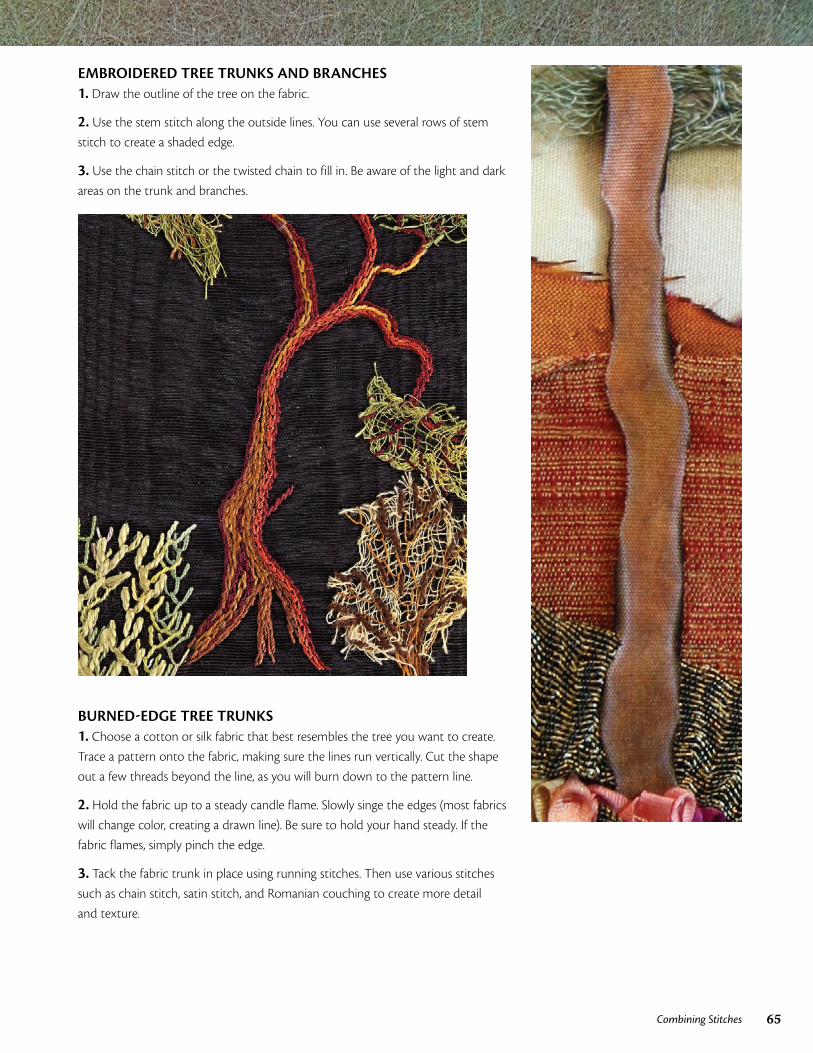
65Combining Stitches
EMBROIDERED TREE TRUNKS AND BRANCHES1. Draw the outline of the tree on the fabric.
2. Use the stem stitch along the outside lines. You can use several rows of stem
stitch to create a shaded edge.
3. Use the chain stitch or the twisted chain to fill in. Be aware of the light and dark
areas on the trunk and branches.
BURNED-EDGE TREE TRUNKS1. Choose a cotton or silk fabric that best resembles the tree you want to create.
Trace a pattern onto the fabric, making sure the lines run vertically. Cut the shape
out a few threads beyond the line, as you will burn down to the pattern line.
2. Hold the fabric up to a steady candle flame. Slowly singe the edges (most fabrics
will change color, creating a drawn line). Be sure to hold your hand steady. If the
fabric flames, simply pinch the edge.
3. Tack the fabric trunk in place using running stitches. Then use various stitches
such as chain stitch, satin stitch, and Romanian couching to create more detail
and texture.
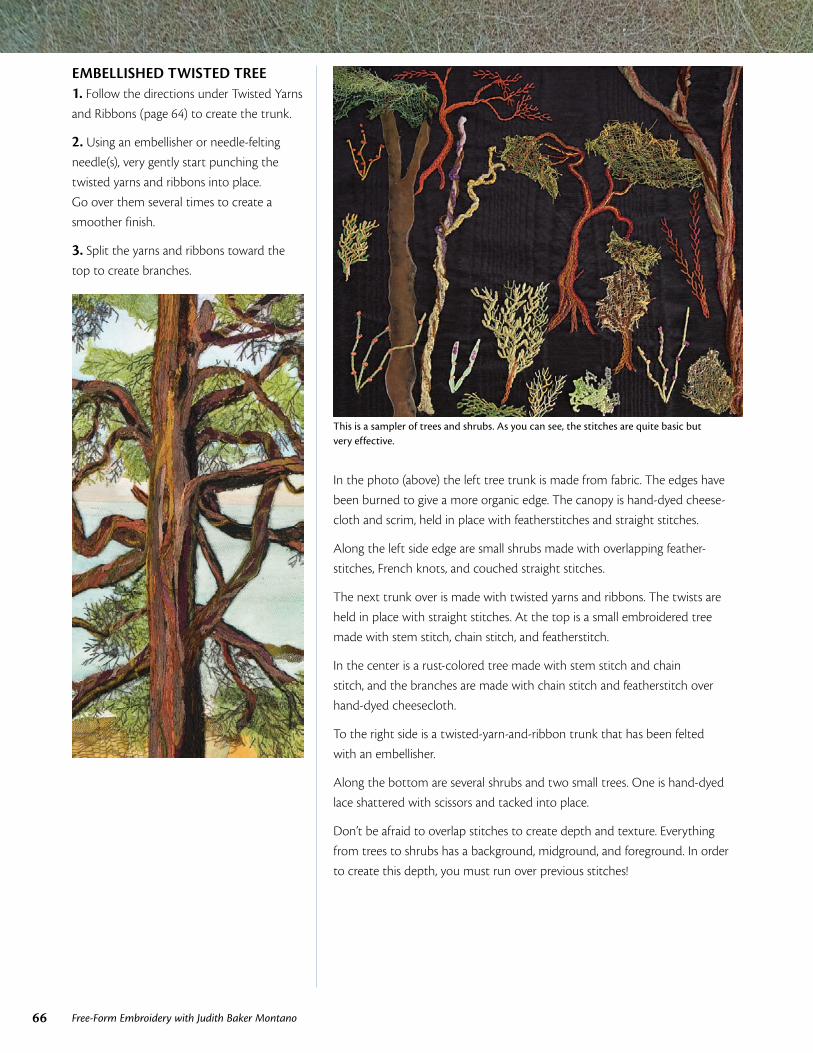
66 Free-Form Embroidery with Judith Baker Montano
EMBELLISHED TWISTED TREE1. Follow the directions under Twisted Yarns and Ribbons (page 64) to create the trunk.
2. Using an embellisher or needle-felting
needle(s), very gently start punching the
twisted yarns and ribbons into place.
Go over them several times to create a
smoother finish.
3. Split the yarns and ribbons toward the
top to create branches.
This is a sampler of trees and shrubs. As you can see, the stitches are quite basic but very effective.
In the photo (above) the left tree trunk is made from fabric. The edges have
been burned to give a more organic edge. The canopy is hand-dyed cheese-
cloth and scrim, held in place with featherstitches and straight stitches.
Along the left side edge are small shrubs made with overlapping feather-
stitches, French knots, and couched straight stitches.
The next trunk over is made with twisted yarns and ribbons. The twists are
held in place with straight stitches. At the top is a small embroidered tree
made with stem stitch, chain stitch, and featherstitch.
In the center is a rust-colored tree made with stem stitch and chain
stitch, and the branches are made with chain stitch and featherstitch over
hand-dyed cheesecloth.
To the right side is a twisted-yarn-and-ribbon trunk that has been felted
with an embellisher.
Along the bottom are several shrubs and two small trees. One is hand-dyed
lace shattered with scissors and tacked into place.
Don’t be afraid to overlap stitches to create depth and texture. Everything
from trees to shrubs has a background, midground, and foreground. In order
to create this depth, you must run over previous stitches!
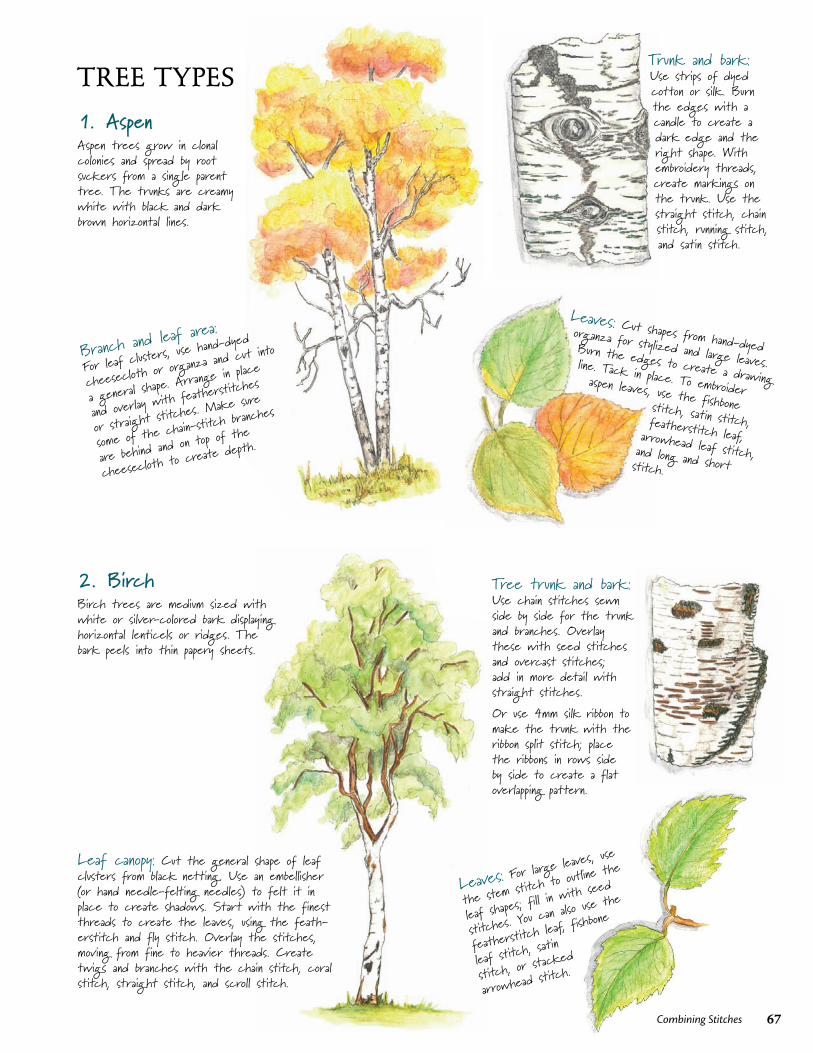
67Combining Stitches
TREE TYPESTrunk and bark: Use strips of dyed cotton or silk. Burn the edges with a candle to create a dark edge and the right shape. With embroidery threads, create markings on the trunk. Use the straight stitch, chain stitch, running stitch, and satin stitch.
1. AspenAspen trees grow in clonal colonies and spread by root suckers from a sing le parent tree. The trunks are creamy white with black and dark brown horizontal lines.
Branch and leaf are
a:
For leaf clusters, us
e hand-dyed
cheesecloth or org
anza and cut into
a general shape. Ar
range in place
and overlay with fe
atherstitches
or straight stitche
s. Make sure
some of the chain-
stitch branches
are behind and on t
op of the
cheesecloth to cre
ate depth.
2. BirchBirch trees are medium sized with white or silver-colored bark displaying horizontal lenticels or ridges. The bark peels into thin papery sheets.
Leaves: For larg
e leaves, use
the stem stitch
to outline the
leaf shapes; fill i
n with seed
stitches. You ca
n also use the
featherstitch le
af, fishbone
leaf stitch, satin
stitch, or stack
ed
arrowhead stitc
h.
Tree trunk and bark: Use chain stitches sewn side by side for the trunk and branches. Overlay these with seed stitches and overcast stitches; add in more detail with straight stitches.
Or use 4mm silk ribbon to make the trunk with the ribbon split stitch; place the ribbons in rows side by side to create a flat overlapping pattern.
Leaf canopy: Cut the general shape of leaf clusters from black netting. Use an embellisher (or hand needle-felting needles) to felt it in place to create shadows. Start with the finest threads to create the leaves, using the feath-erstitch and fly stitch. Overlay the stitches, moving from fine to heavier threads. Create twigs and branches with the chain stitch, coral stitch, straight stitch, and scroll stitch.
Leaves: Cut shapes from hand-dyed organza for stylized and large leaves. Burn the edges to create a drawing line. Tack in place. To embroider aspen leaves, use the fishbone stitch, satin stitch, featherstitch leaf, arrowhead leaf stitch, and long and short stitch.
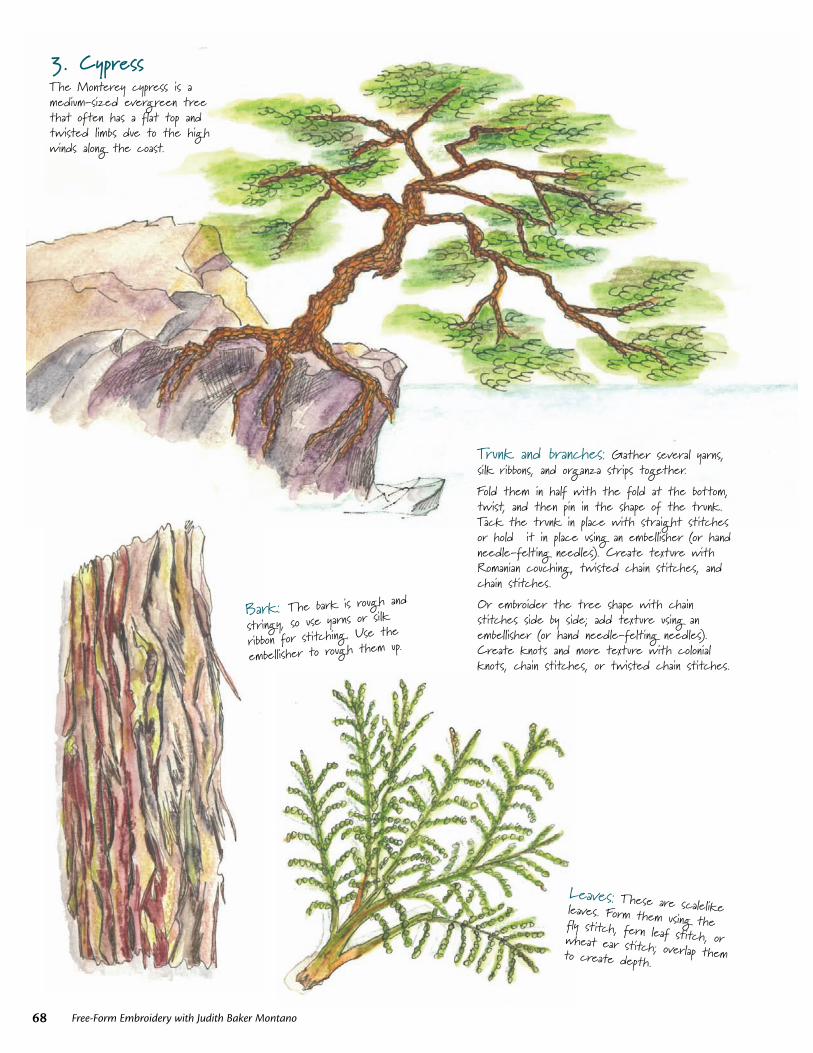
68 Free-Form Embroidery with Judith Baker Montano
3. CypressThe Monterey cypress is a medium-sized evergreen tree that often has a flat top and twisted limbs due to the high winds along the coast.
Trunk and branches: Gather several yarns, silk ribbons, and organza strips together.
Fold them in half with the fold at the bottom, twist, and then pin in the shape of the trunk. Tack the trunk in place with straight stitches or hold it in place using an embellisher (or hand needle-felting needles). Create texture with Romanian couching , twisted chain stitches, and chain stitches.
Or embroider the tree shape with chain stitches side by side; add texture using an embellisher (or hand needle-felting needles). Create knots and more texture with colonial knots, chain stitches, or twisted chain stitches.
Bark: The bark is rough and
stringy, so use yarns or silk
ribbon for stitching. Use the
embellisher to rough them up.
Leaves: These are scalelike leaves. Form them using the fly stitch, fern leaf stitch, or wheat ear stitch; overlap them to create depth.
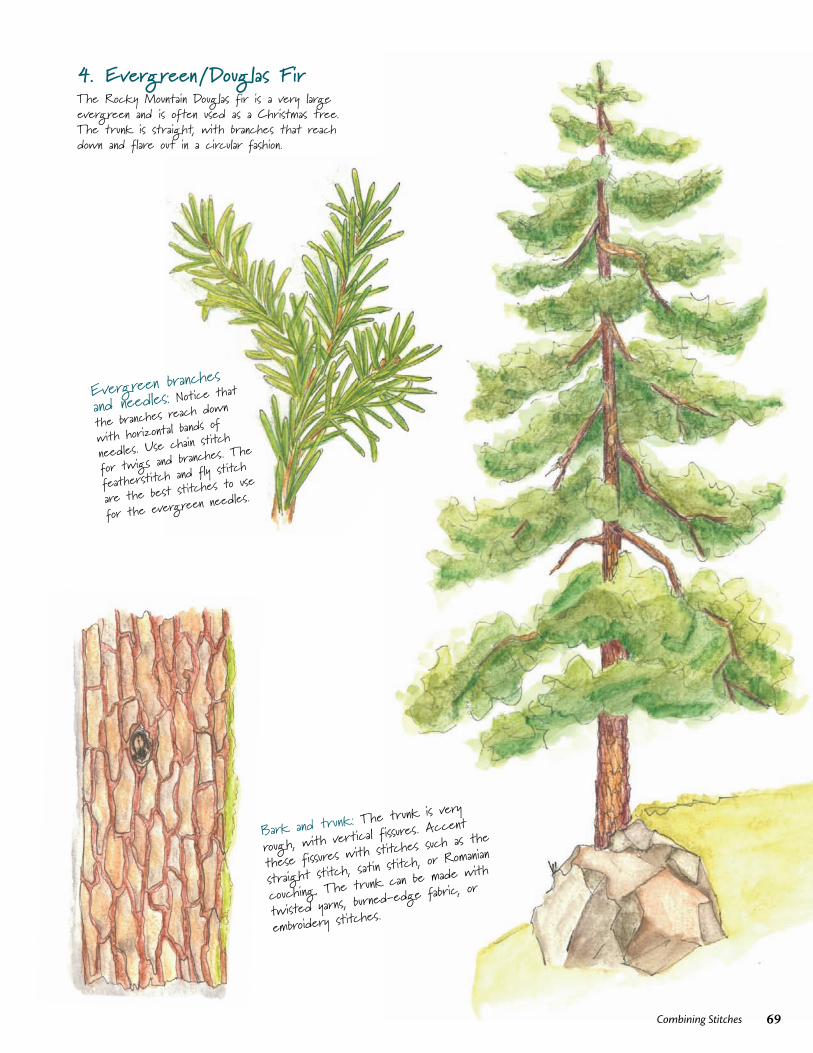
Bark and trunk: The trunk
is very
rough, with vertical fissures
. Accent
these fissures with stitches
such as the
straight stitch, satin stitch
, or Romanian
couching. The trunk can be
made with
twisted yarns, burned-edge
fabric, or
embroidery stitches.
Evergreen branches
and needles: Notice that
the branches reach down
with horizontal bands of
needles. Use chain stitch
for twigs and branches. Th
e
featherstitch and fly stitc
h
are the best stitches to us
e
for the evergreen needle
s.
4. Evergreen / Douglas FirThe Rocky Mountain Douglas fir is a very large evergreen and is often used as a Christmas tree. The trunk is straight, with branches that reach down and flare out in a circular fashion.
69Combining Stitches
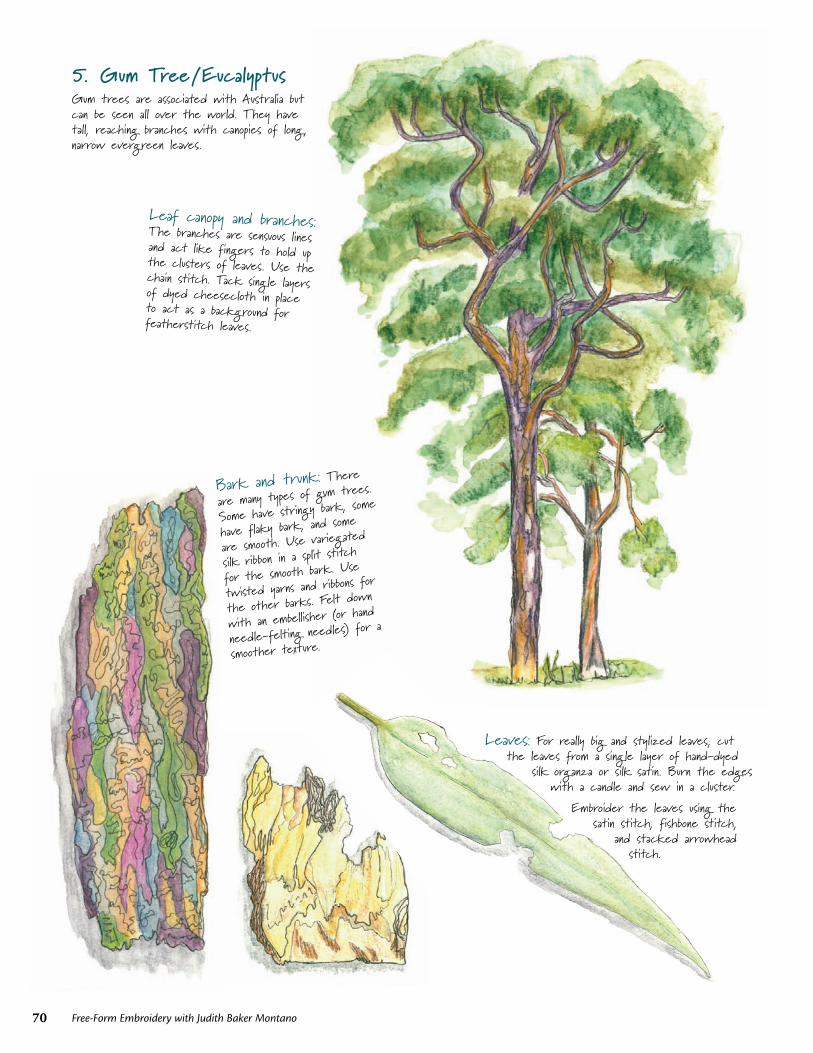
70 Free-Form Embroidery with Judith Baker Montano
5. Gum Tree / EucalyptusGum trees are associated with Australia but can be seen all over the world. They have tall, reaching branches with canopies of long , narrow evergreen leaves.
Leaf canopy and branches: The branches are sensuous lines and act like fingers to hold up the clusters of leaves. Use the chain stitch. Tack sing le layers of dyed cheesecloth in place to act as a background for featherstitch leaves.
Leaves: For really big and stylized leaves, cut the leaves from a sing le layer of hand-dyed
silk organza or silk satin. Burn the edges with a candle and sew in a cluster.
Embroider the leaves using the satin stitch, fishbone stitch,
and stacked arrowhead stitch.
Bark and trunk: There
are many types of gum trees.
Some have stringy bark, some
have flaky bark, and some
are smooth. Use variegated
silk ribbon in a split stitch
for the smooth bark. Use
twisted yarns and ribbons for
the other barks. Felt down
with an embellisher (or hand
needle-felting needles) for a
smoother texture.
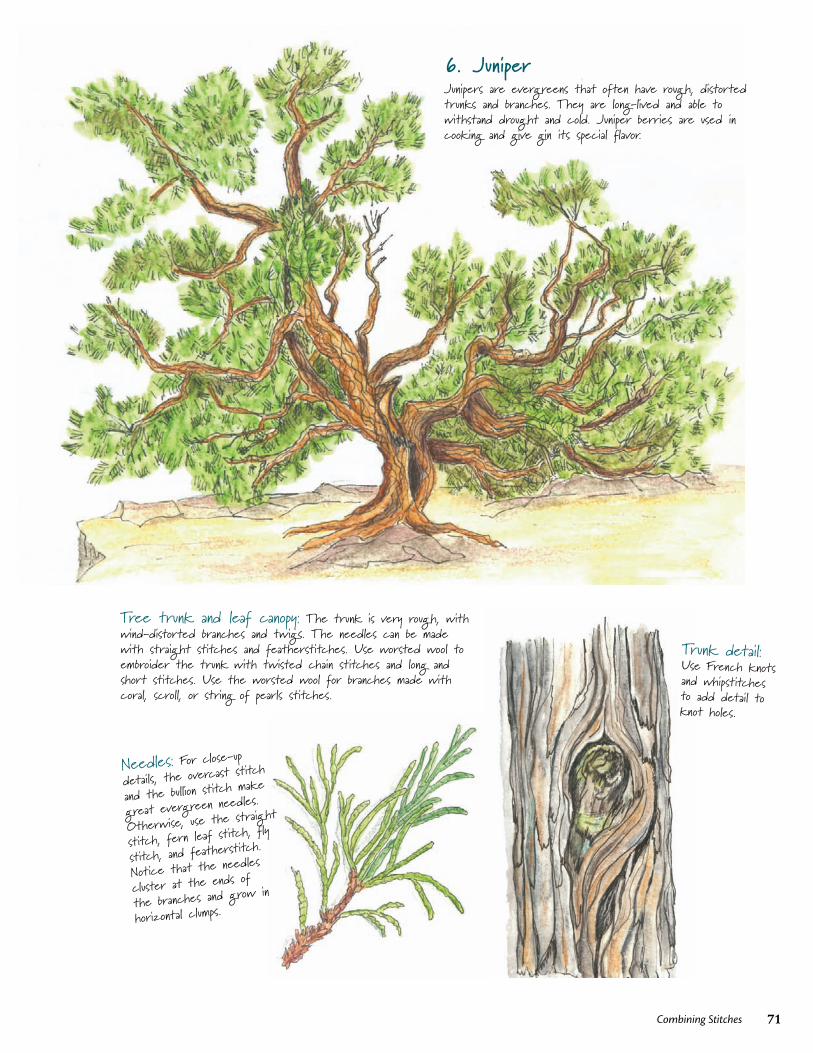
71Combining Stitches
6. JuniperJunipers are evergreens that often have rough, distorted trunks and branches. They are long-lived and able to withstand drought and cold. Juniper berries are used in cooking and give gin its special flavor.
Trunk detail: Use French knots and whipstitches to add detail to knot holes.
Needles: For close-up
details, the overcast stitch
and the bullion stitch make
great evergreen needles.
Otherwise, use the straight
stitch, fern leaf stitch, fly
stitch, and featherstitch.
Notice that the needles
cluster at the ends of
the branches and grow in
horizontal clumps.
Tree trunk and leaf canopy: The trunk is very rough, with wind-distorted branches and twigs. The needles can be made with straight stitches and featherstitches. Use worsted wool to embroider the trunk with twisted chain stitches and long and short stitches. Use the worsted wool for branches made with coral, scroll, or string of pearls stitches.
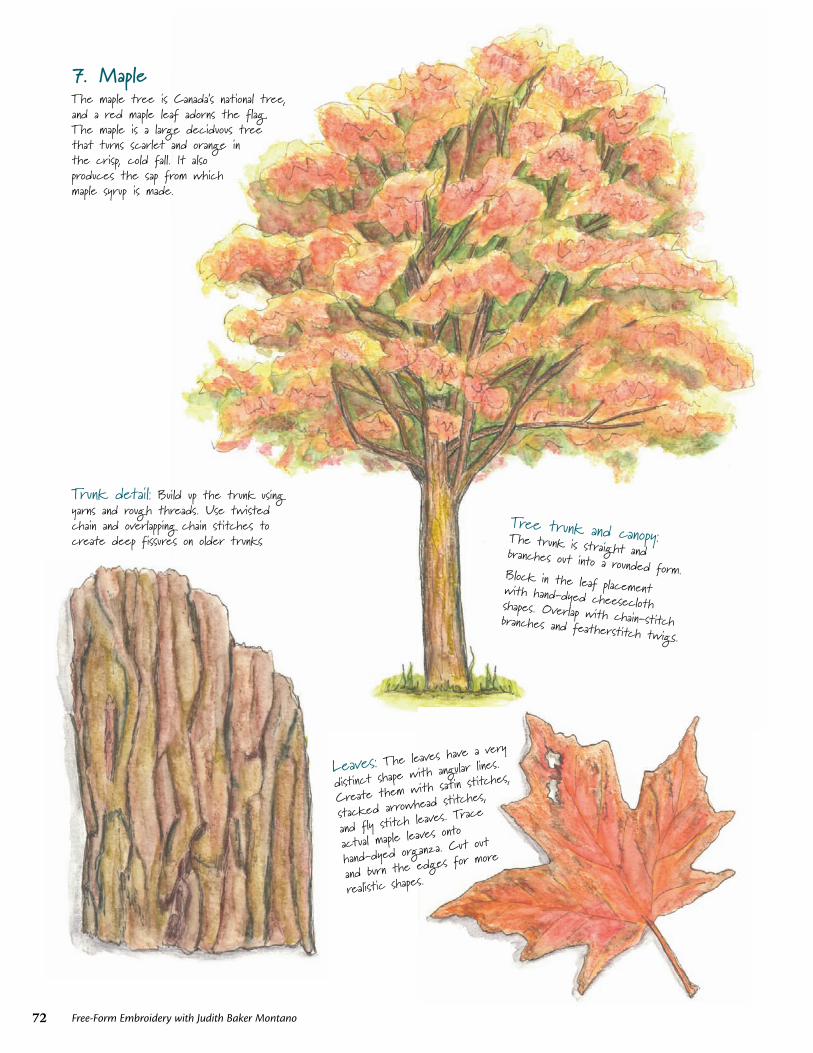
72 Free-Form Embroidery with Judith Baker Montano
7. MapleThe maple tree is Canada’s national tree, and a red maple leaf adorns the flag. The maple is a large deciduous tree that turns scarlet and orange in the crisp, cold fall. It also produces the sap from which maple syrup is made.
Tree trunk and canopy: The trunk is straight and branches out into a rounded form.Block in the leaf placement with hand-dyed cheesecloth shapes. Overlap with chain-stitch branches and featherstitch twigs.
Leaves: The leaves have a ve
ry
distinct shape with angular li
nes.
Create them with satin stitc
hes,
stacked arrowhead stitches,
and fly stitch leaves. Trace
actual maple leaves onto
hand-dyed organza. Cut out
and burn the edges for mo
re
realistic shapes.
Trunk detail: Build up the trunk using yarns and rough threads. Use twisted chain and overlapping chain stitches to create deep fissures on older trunks
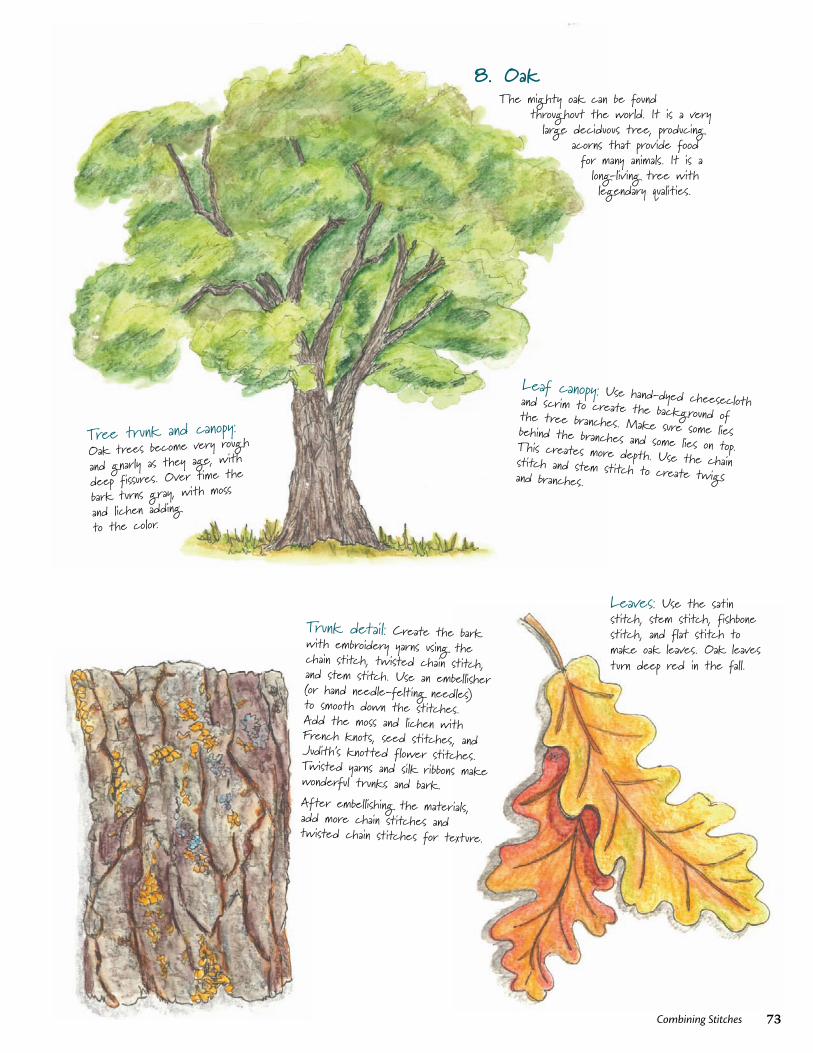
8. OakThe mighty oak can be found
throughout the world. It is a very large deciduous tree, producing
acorns that provide food for many animals. It is a long-living tree with legendary qualities.
Tree trunk and canopy: Oak trees become very rough
and gnarly as they age, with
deep fissures. Over time the
bark turns gray, with moss
and lichen adding to the color.
Trunk detail: Create the bark with embroidery yarns using the chain stitch, twisted chain stitch, and stem stitch. Use an embellisher (or hand needle-felting needles) to smooth down the stitches. Add the moss and lichen with French knots, seed stitches, and Judith’s knotted flower stitches. Twisted yarns and silk ribbons make wonderful trunks and bark.After embellishing the materials, add more chain stitches and twisted chain stitches for texture.
Leaf canopy: Use hand-dyed cheesecloth and scrim to create the background of the tree branches. Make sure some lies behind the branches and some lies on top. This creates more depth. Use the chain stitch and stem stitch to create twigs and branches.
Leaves: Use the satin stitch, stem stitch, fishbone stitch, and flat stitch to make oak leaves. Oak leaves turn deep red in the fall.
73Combining Stitches
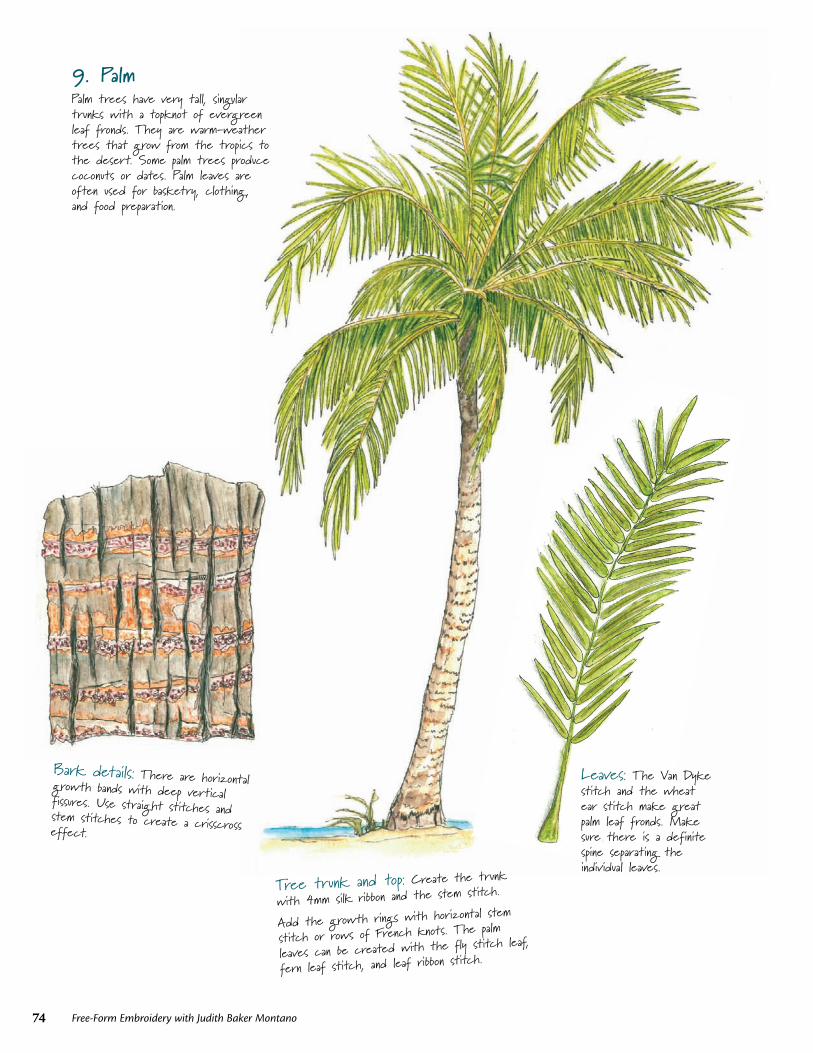
74 Free-Form Embroidery with Judith Baker Montano
9. PalmPalm trees have very tall, singular trunks with a topknot of evergreen leaf fronds. They are warm-weather trees that grow from the tropics to the desert. Some palm trees produce coconuts or dates. Palm leaves are often used for basketry, clothing , and food preparation.
Tree trunk and top: Create the trunk
with 4mm silk ribbon and the stem stitch.
Add the growth rings with horizontal stem
stitch or rows of French knots. The palm
leaves can be created with the fly stitch leaf,
fern leaf stitch, and leaf ribbon stitch.
Bark details: There are horizontal growth bands with deep vertical fissures. Use straight stitches and stem stitches to create a crisscross effect.
Leaves: The Van Dyke stitch and the wheat ear stitch make great palm leaf fronds. Make sure there is a definite spine separating the individual leaves.
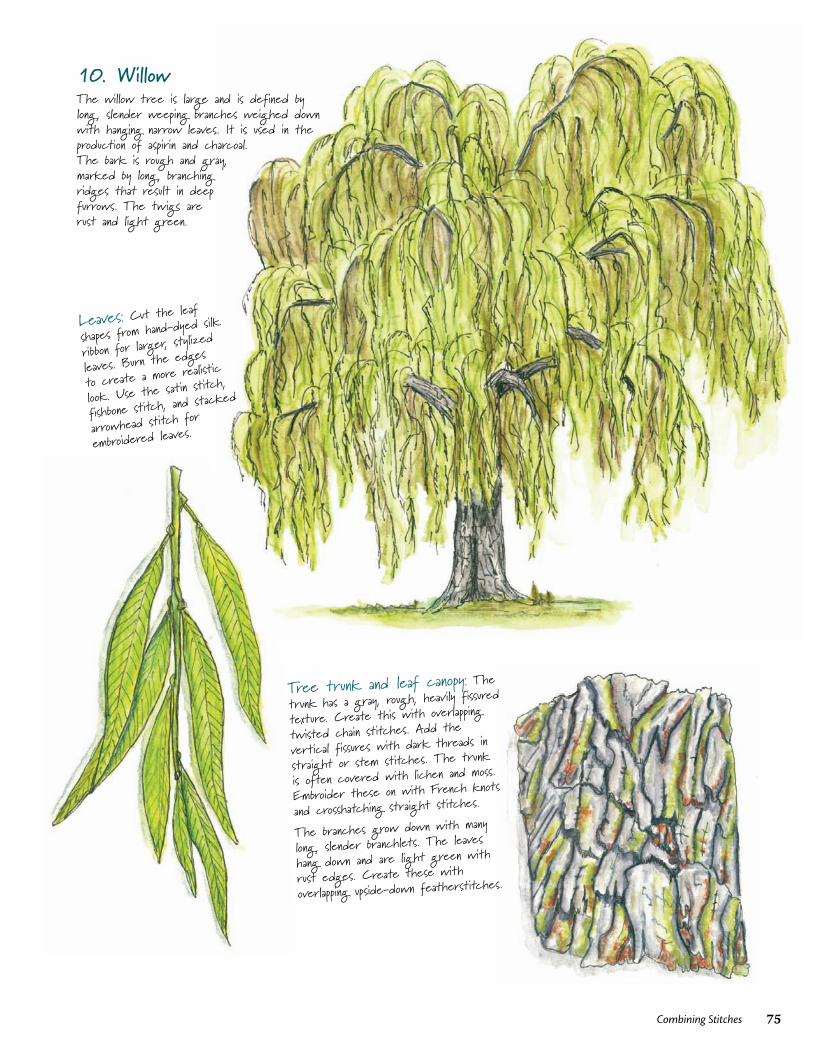
75Combining Stitches
10. WillowThe willow tree is large and is defined by long , slender weeping branches weighed down with hanging narrow leaves. It is used in the production of aspirin and charcoal. The bark is rough and gray, marked by long , branching ridges that result in deep furrows. The twigs are rust and light green.
Tree trunk and leaf canopy: The trunk has a gray, rough, heavily
fissured
texture. Create this with overlapping
twisted chain stitches. Add the
vertical fissures with dark threads in
straight or stem stitches. The trunk
is often covered with lichen and moss.
Embroider these on with French knots
and crosshatching straight stitches.
The branches grow down with many
long , slender branchlets. The leaves
hang down and are light green with
rust edges. Create these with
overlapping upside-down featherstitches.
Leaves: Cut the leaf
shapes from hand-dyed silk
ribbon for larger, stylized
leaves. Burn the edges
to create a more realistic
look. Use the satin stitch,
fishbone stitch, and stacked
arrowhead stitch for
embroidered leaves.
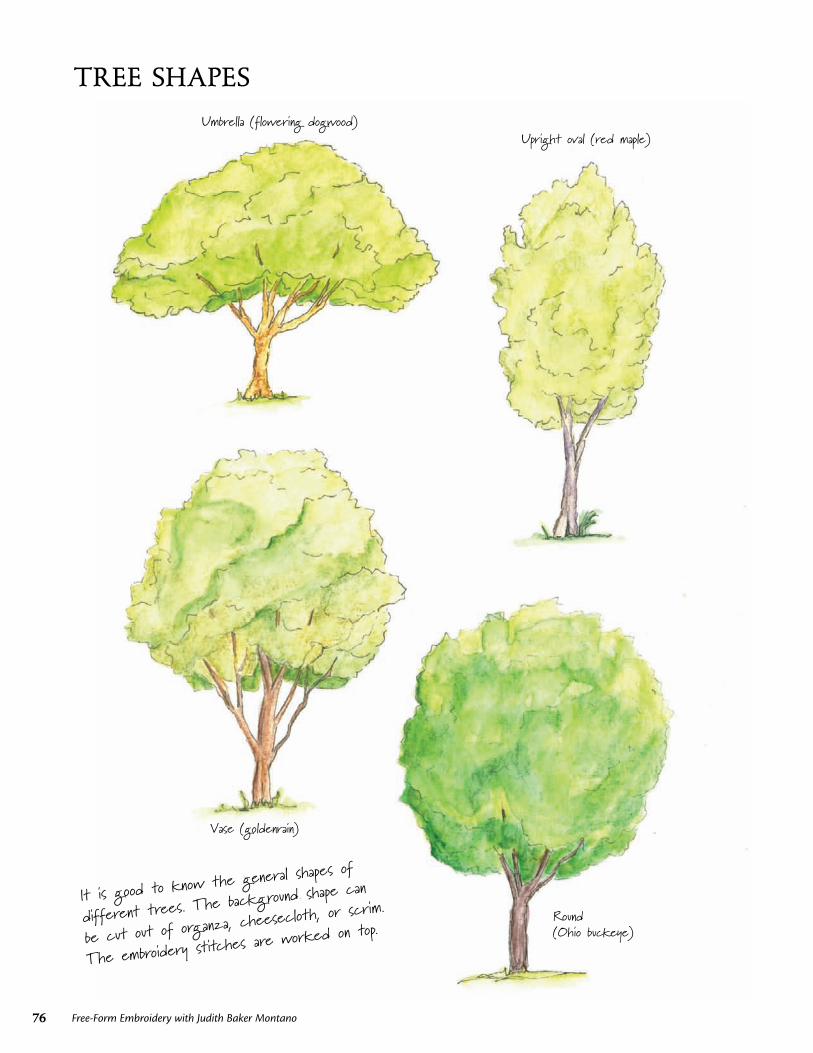
76 Free-Form Embroidery with Judith Baker Montano
Umbrella (flowering dogwood)Upright oval (red maple)
Vase (goldenrain)
Round (Ohio buckeye)
It is good to know the genera
l shapes of
different trees. The backgroun
d shape can
be cut out of organza, cheesec
loth, or scrim.
The embroidery stitches are w
orked on top.
TREE SHAPES

77Combining Stitches
Horizontal oval (hawthorn) Broad triangle (pine oak)
Mound (Tamukeyama)
Narrow triangle (Austrian pine)
Pay special attention to the way tree branches grow. Are they upright, horizontal, or growing downward? Use stem stitch, chain stitch, coral stitch, and straight stitch for the branches. Make sure the branches show through the leaf canopy.
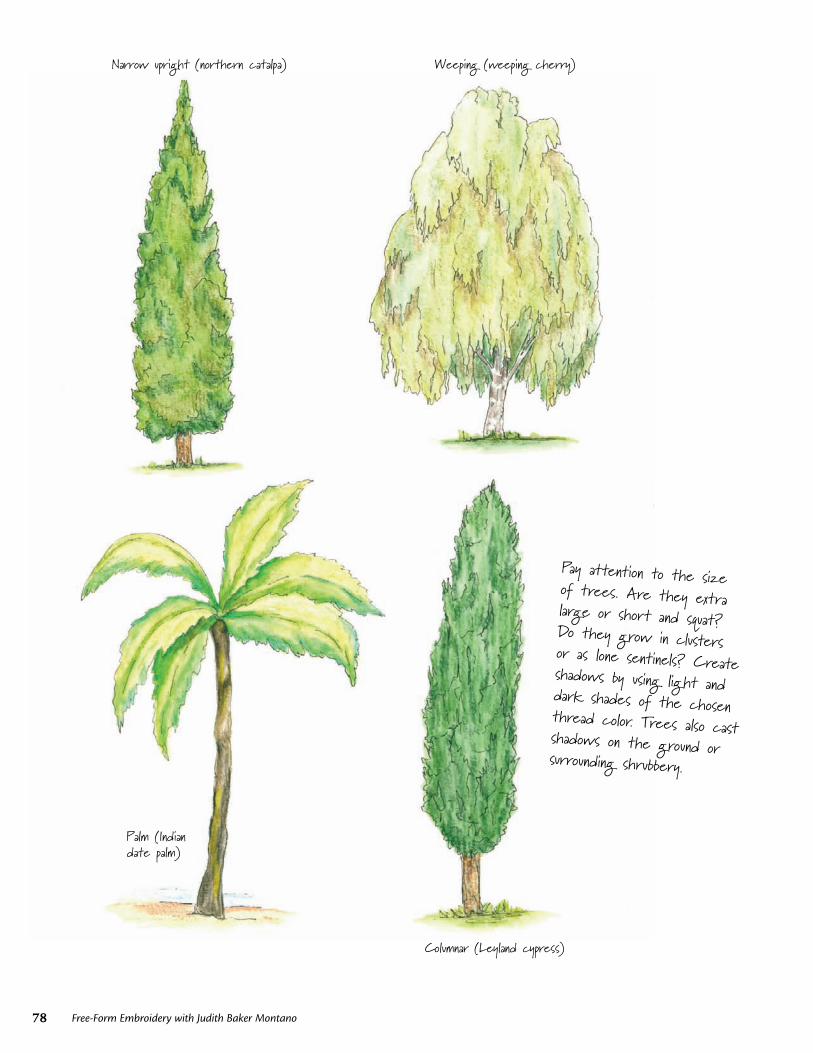
78 Free-Form Embroidery with Judith Baker Montano
Narrow upright (northern catalpa) Weeping (weeping cherry)
Palm (Indian date palm)
Columnar (Leyland cypress)
Pay attention to the size of trees. Are they extra large or short and squat? Do they grow in clusters or as lone sentinels? Create shadows by using light and dark shades of the chosen thread color. Trees also cast shadows on the ground or surrounding shrubbery.
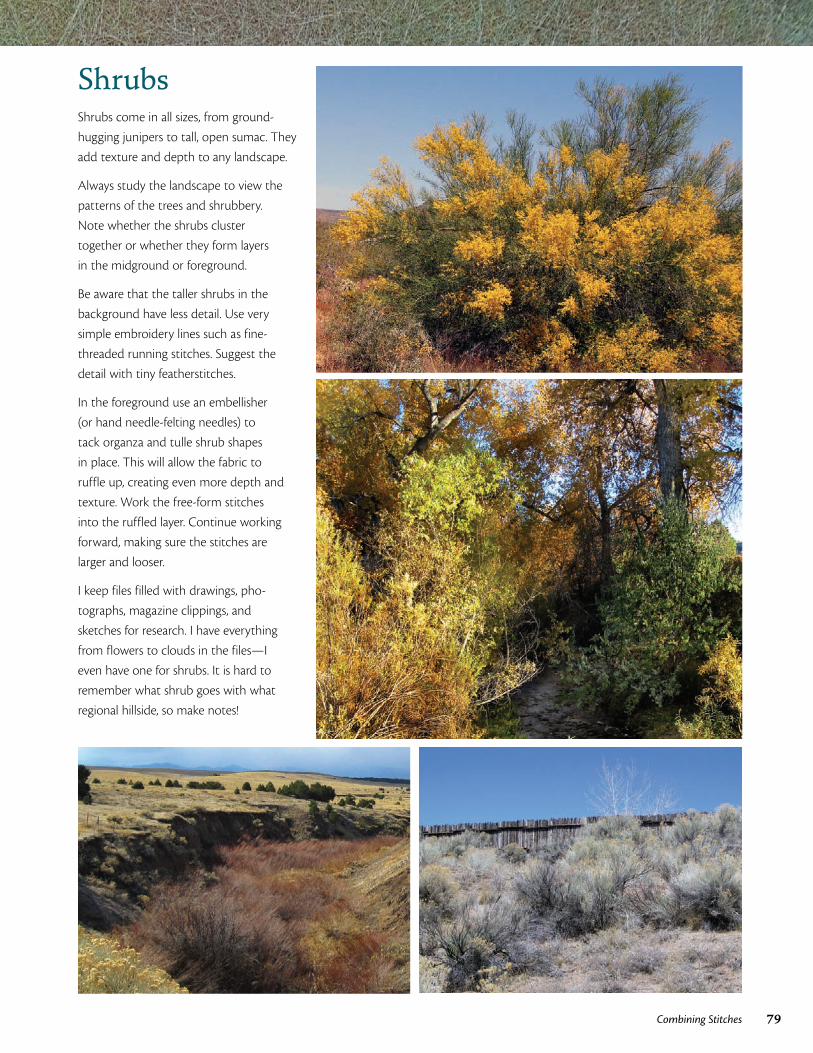
79Combining Stitches
ShrubsShrubs come in all sizes, from ground-
hugging junipers to tall, open sumac. They
add texture and depth to any landscape.
Always study the landscape to view the
patterns of the trees and shrubbery.
Note whether the shrubs cluster
together or whether they form layers
in the midground or foreground.
Be aware that the taller shrubs in the
background have less detail. Use very
simple embroidery lines such as fine-
threaded running stitches. Suggest the
detail with tiny featherstitches.
In the foreground use an embellisher
(or hand needle-felting needles) to
tack organza and tulle shrub shapes
in place. This will allow the fabric to
ruffle up, creating even more depth and
texture. Work the free-form stitches
into the ruffled layer. Continue working
forward, making sure the stitches are
larger and looser.
I keep files filled with drawings, pho-
tographs, magazine clippings, and
sketches for research. I have everything
from flowers to clouds in the files—I
even have one for shrubs. It is hard to
remember what shrub goes with what
regional hillside, so make notes!
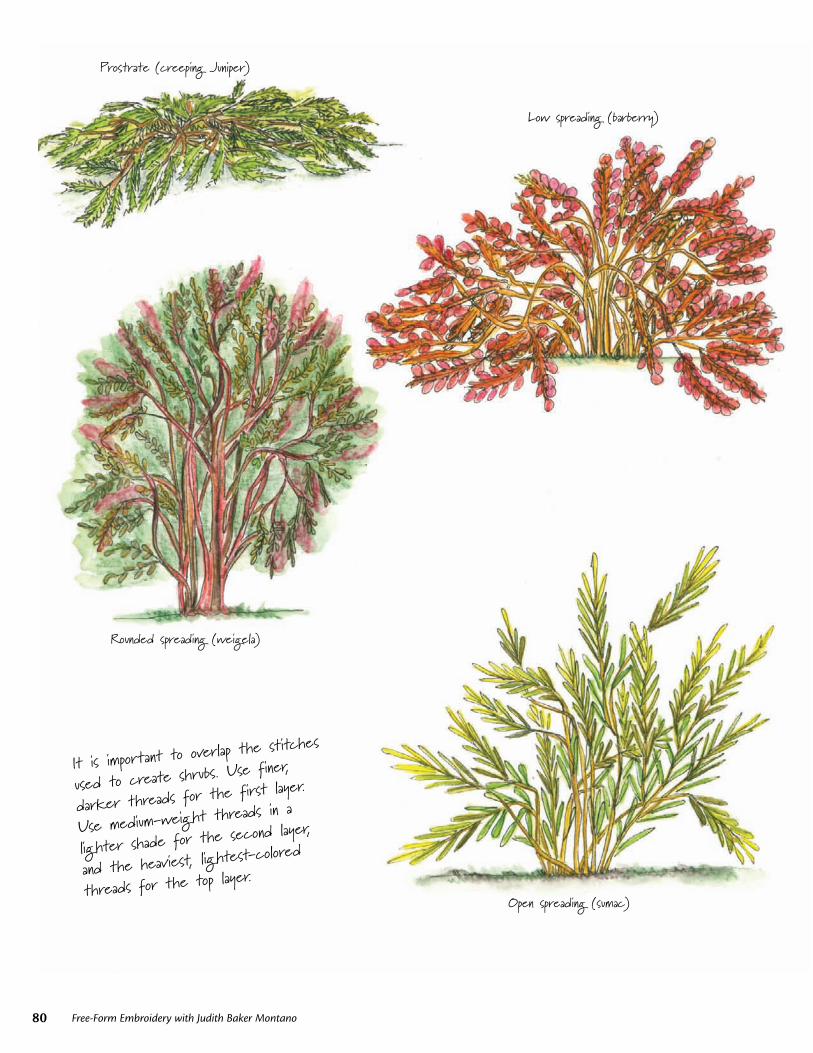
80 Free-Form Embroidery with Judith Baker Montano
Prostrate (creeping Juniper)
Low spreading (barberry)
Rounded spreading (weigela)
Open spreading (sumac)
It is important to overlap the stitche
s
used to create shrubs. Use finer,
darker threads for the first layer.
Use medium-weight threads in a
lighter shade for the second layer,
and the heaviest, lightest-colored
threads for the top layer.
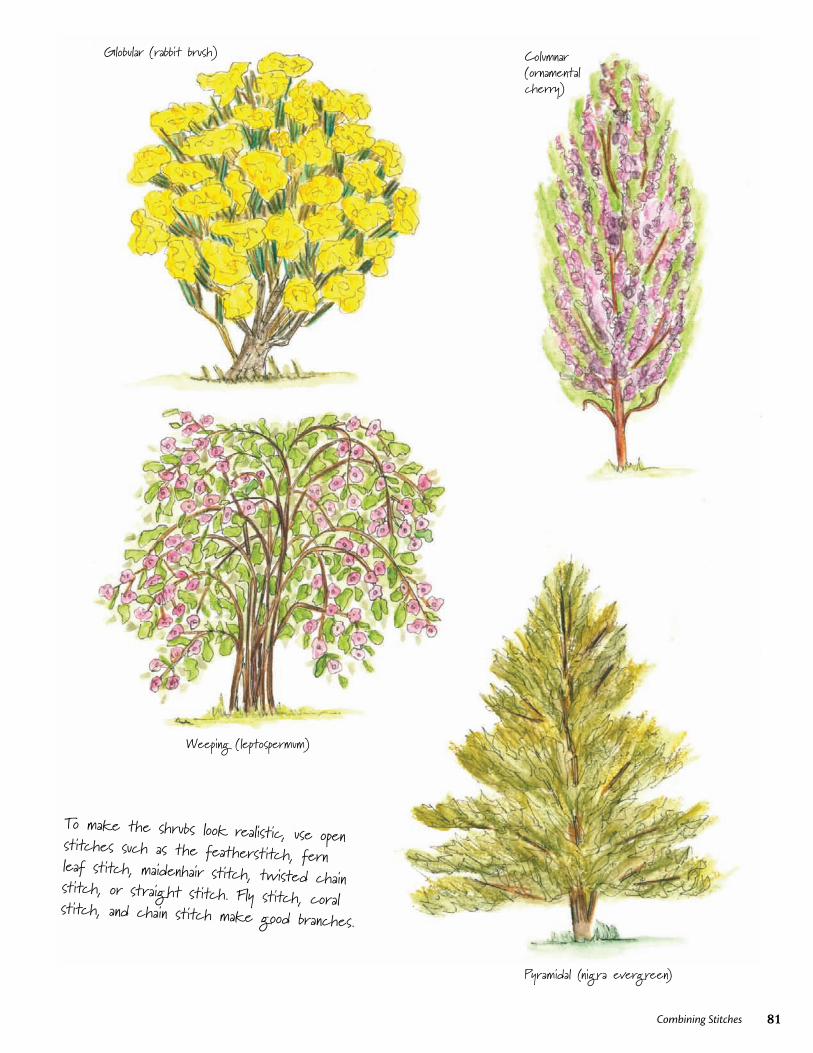
81Combining Stitches
Prostrate (creeping Juniper)
Low spreading (barberry)
Rounded spreading (weigela)
Open spreading (sumac)
Globular (rabbit brush) Columnar (ornamental cherry)
Weeping (leptospermum)
Pyramidal (nigra evergreen)
To make the shrubs look realistic, use open stitches such as the featherstitch, fern leaf stitch, maidenhair stitch, twisted chain stitch, or straight stitch. Fly stitch, coral stitch, and chain stitch make good branches.
Pyramidal (nigra evergreen)
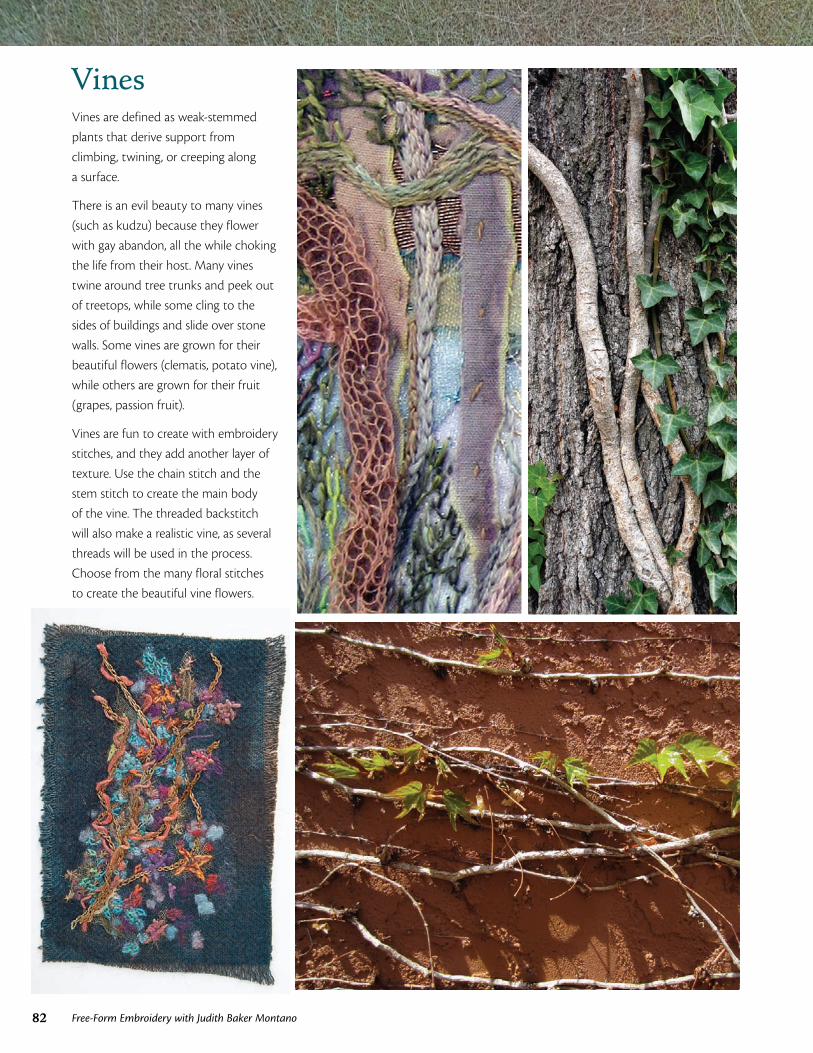
82 Free-Form Embroidery with Judith Baker Montano
VinesVines are defined as weak-stemmed
plants that derive support from
climbing, twining, or creeping along
a surface.
There is an evil beauty to many vines
(such as kudzu) because they flower
with gay abandon, all the while choking
the life from their host. Many vines
twine around tree trunks and peek out
of treetops, while some cling to the
sides of buildings and slide over stone
walls. Some vines are grown for their
beautiful flowers (clematis, potato vine),
while others are grown for their fruit
(grapes, passion fruit).
Vines are fun to create with embroidery
stitches, and they add another layer of
texture. Use the chain stitch and the
stem stitch to create the main body
of the vine. The threaded backstitch
will also make a realistic vine, as several
threads will be used in the process.
Choose from the many floral stitches
to create the beautiful vine flowers.
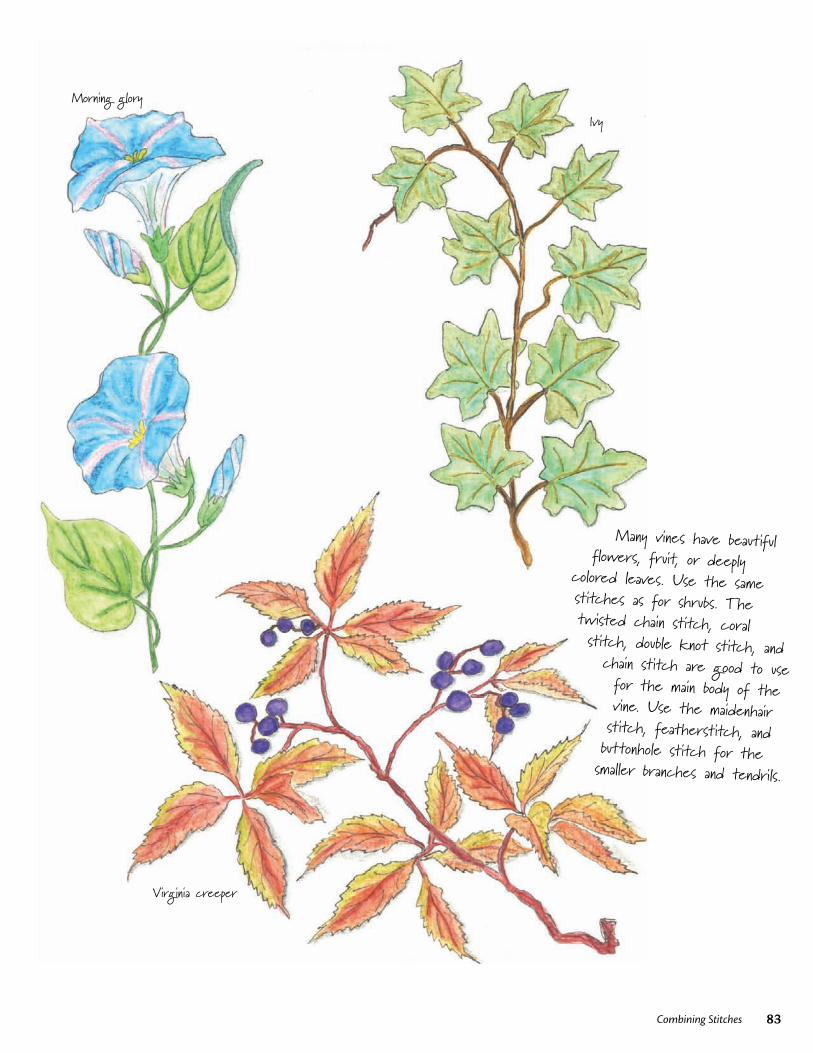
83Combining Stitches
Morning glory
Ivy
Virginia creeper
Many vines have beautiful flowers, fruit, or deeply
colored leaves. Use the same stitches as for shrubs. The twisted chain stitch, coral stitch, double knot stitch, and
chain stitch are good to use for the main body of the vine. Use the maidenhair stitch, featherstitch, and buttonhole stitch for the smaller branches and tendrils.
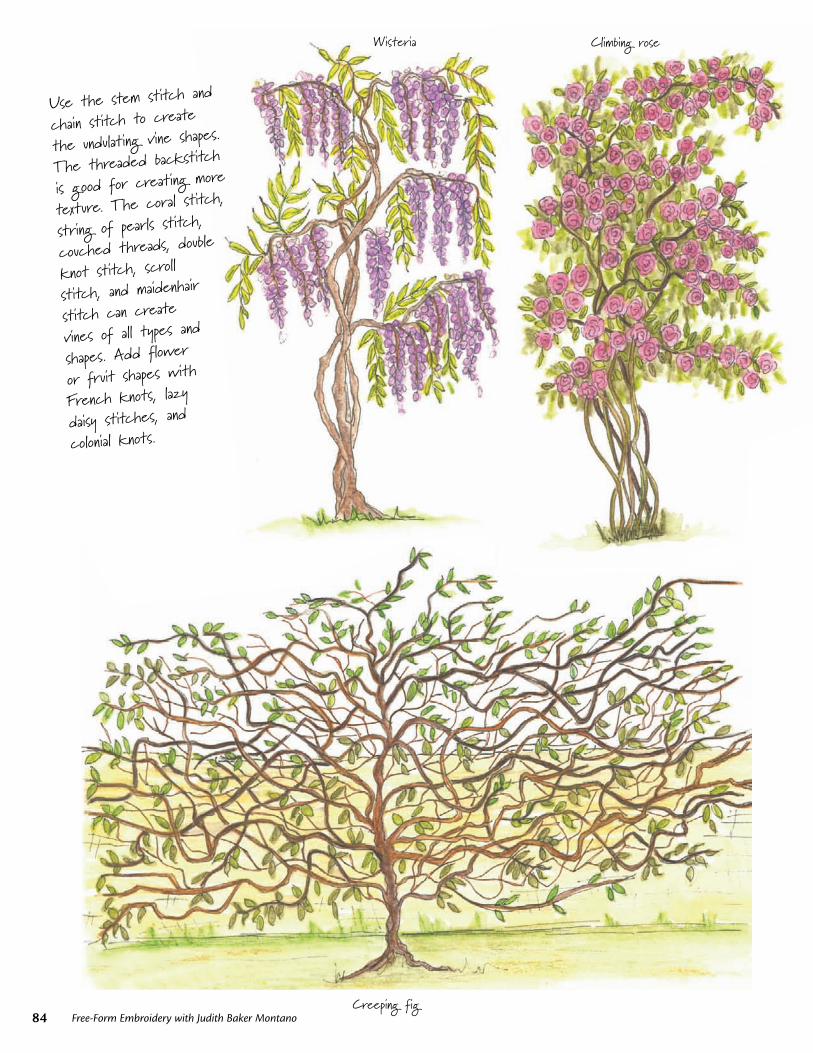
84 Free-Form Embroidery with Judith Baker Montano
Climbing roseWisteria
Creeping fig
Climbing roseWisteria
Creeping fig
Climbing roseWisteria
Creeping fig
Use the stem stitch and
chain stitch to create
the undulating vine shapes.
The threaded backstitch
is good for creating more
texture. The coral stitch,
string of pearls stitch,
couched threads, double
knot stitch, scroll
stitch, and maidenhair
stitch can create
vines of all types and
shapes. Add flower
or fruit shapes with
French knots, lazy
daisy stitches, and
colonial knots.
Climbing roseWisteria
Creeping fig
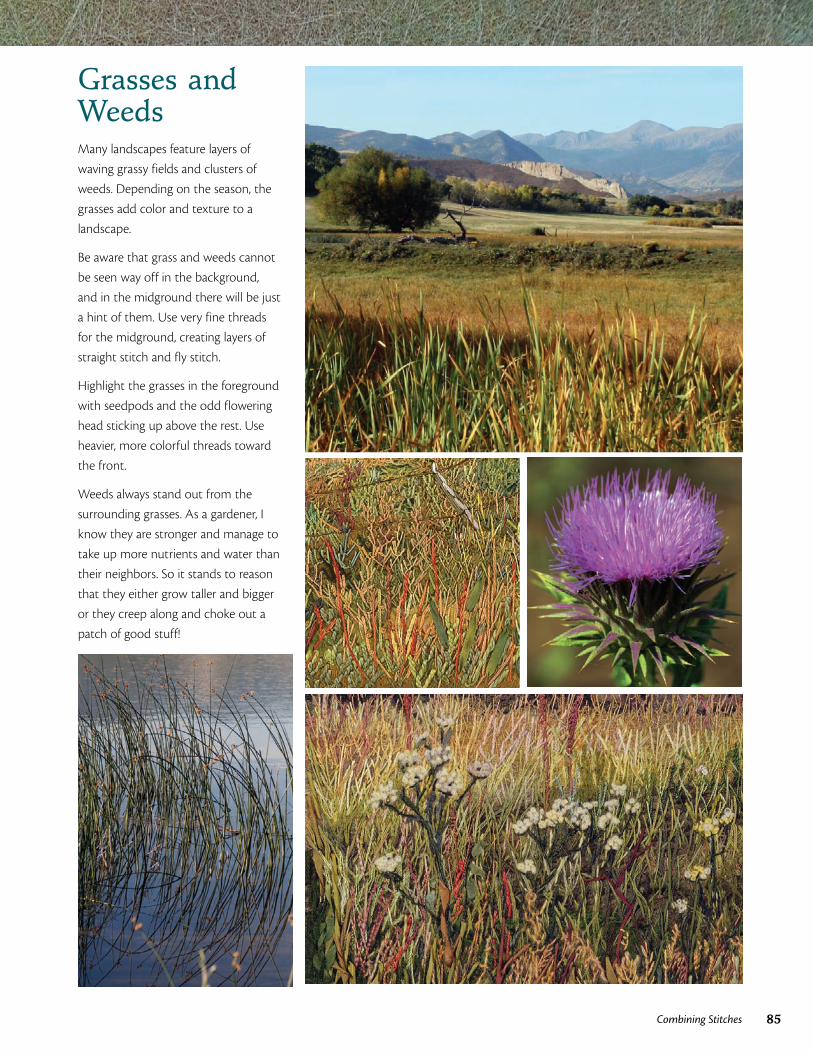
85Combining Stitches
Grasses and WeedsMany landscapes feature layers of
waving grassy fields and clusters of
weeds. Depending on the season, the
grasses add color and texture to a
landscape.
Be aware that grass and weeds cannot
be seen way off in the background,
and in the midground there will be just
a hint of them. Use very fine threads
for the midground, creating layers of
straight stitch and fly stitch.
Highlight the grasses in the foreground
with seedpods and the odd flowering
head sticking up above the rest. Use
heavier, more colorful threads toward
the front.
Weeds always stand out from the
surrounding grasses. As a gardener, I
know they are stronger and manage to
take up more nutrients and water than
their neighbors. So it stands to reason
that they either grow taller and bigger
or they creep along and choke out a
patch of good stuff!
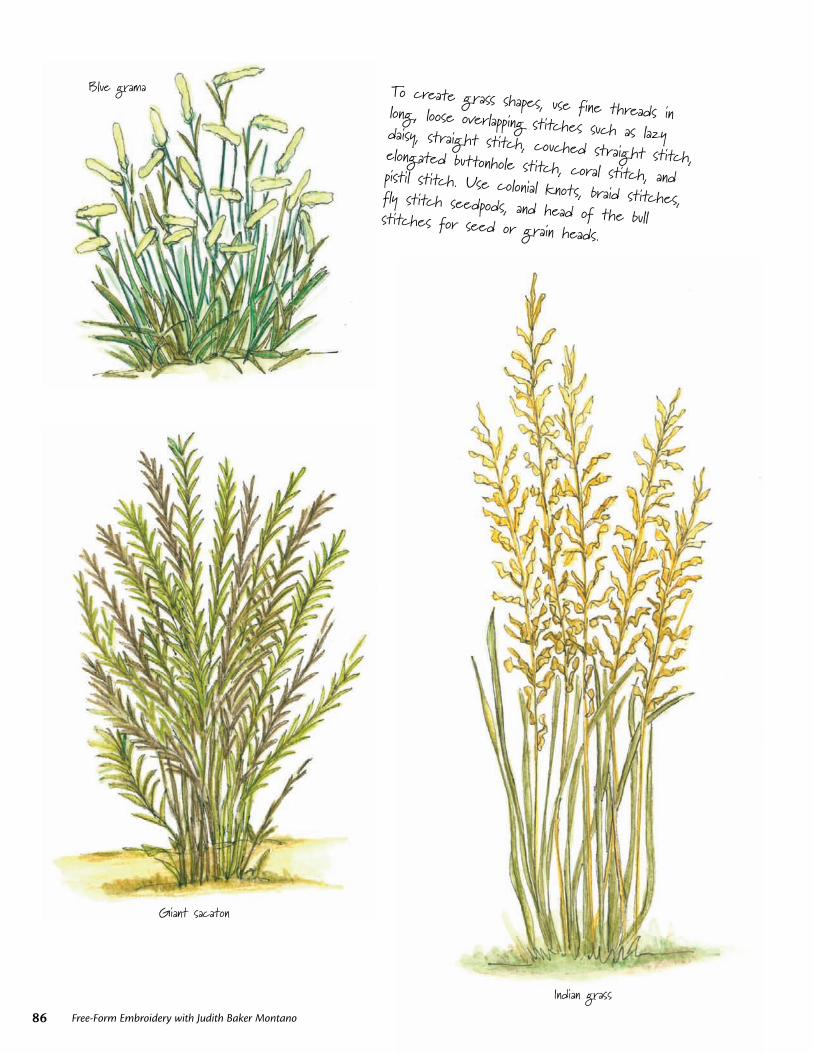
86 Free-Form Embroidery with Judith Baker Montano
Blue grama
Giant sacaton
Indian grass
Blue grama
Giant sacaton
Indian grass
To create grass shapes, use fine threads in long, loose overlapping stitches such as lazy daisy, straight stitch, couched straight stitch, elongated buttonhole stitch, coral stitch, and pistil stitch. Use colonial knots, braid stitches, fly stitch seedpods, and head of the bull stitches for seed or grain heads.
Blue grama
Giant sacaton
Indian grass
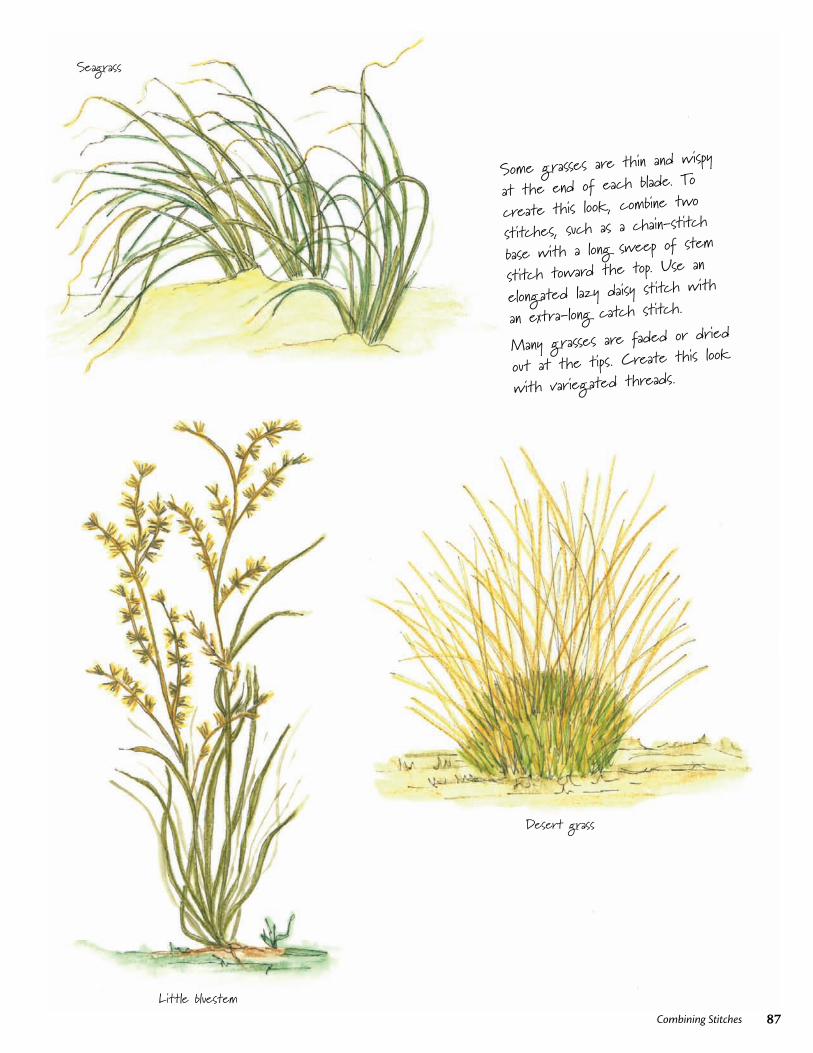
87Combining Stitches
Seagrass
Desert grass
Little bluestem
Some grasses are thin and wispy
at the end of each blade. To
create this look, combine two
stitches, such as a chain-stitch
base with a long sweep of stem
stitch toward the top. Use an
elongated lazy daisy stitch with
an extra-long catch stitch.
Many grasses are faded or dried
out at the tips. Create this look
with variegated threads.
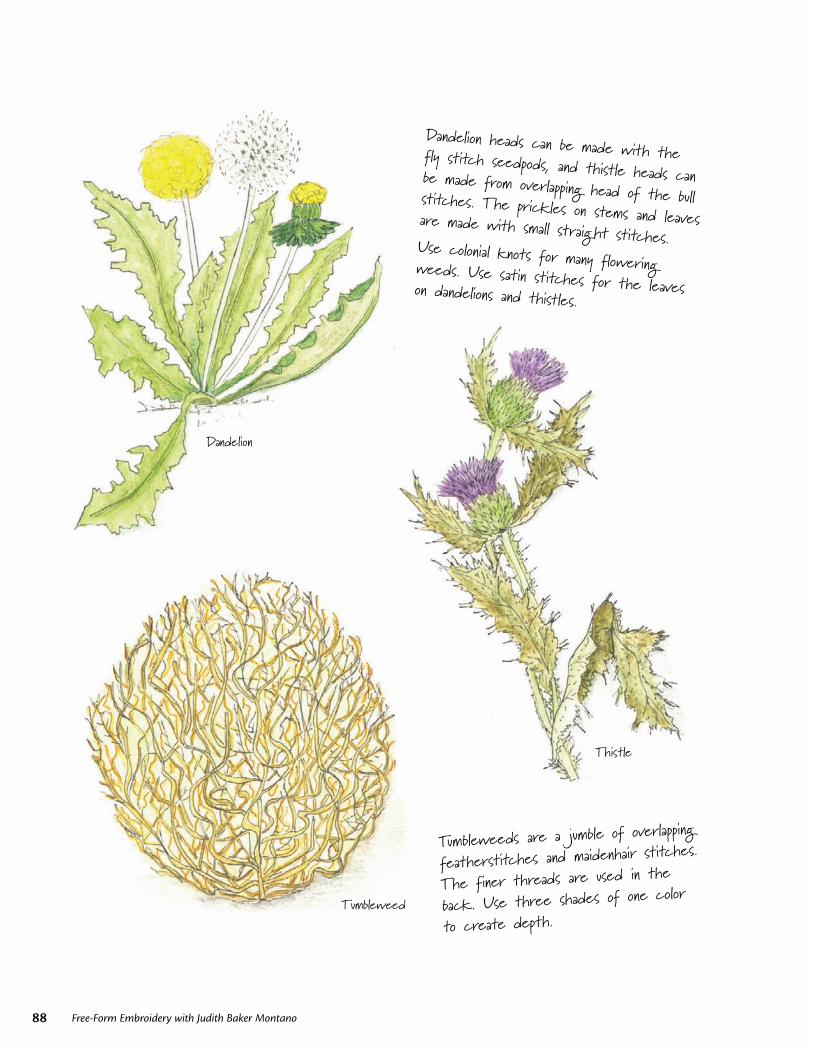
88 Free-Form Embroidery with Judith Baker Montano
Dandelion
Thistle
Tumbleweed
Dandelion heads can be made with the fly stitch seedpods, and thistle heads can be made from overlapping head of the bull stitches. The prickles on stems and leaves are made with small straight stitches.Use colonial knots for many flowering weeds. Use satin stitches for the leaves on dandelions and thistles.
Tumbleweeds are a jumble of overlapping
featherstitches and maidenhair stitches.
The finer threads are used in the
back. Use three shades of one color
to create depth.
Dandelion
Thistle
Tumbleweed
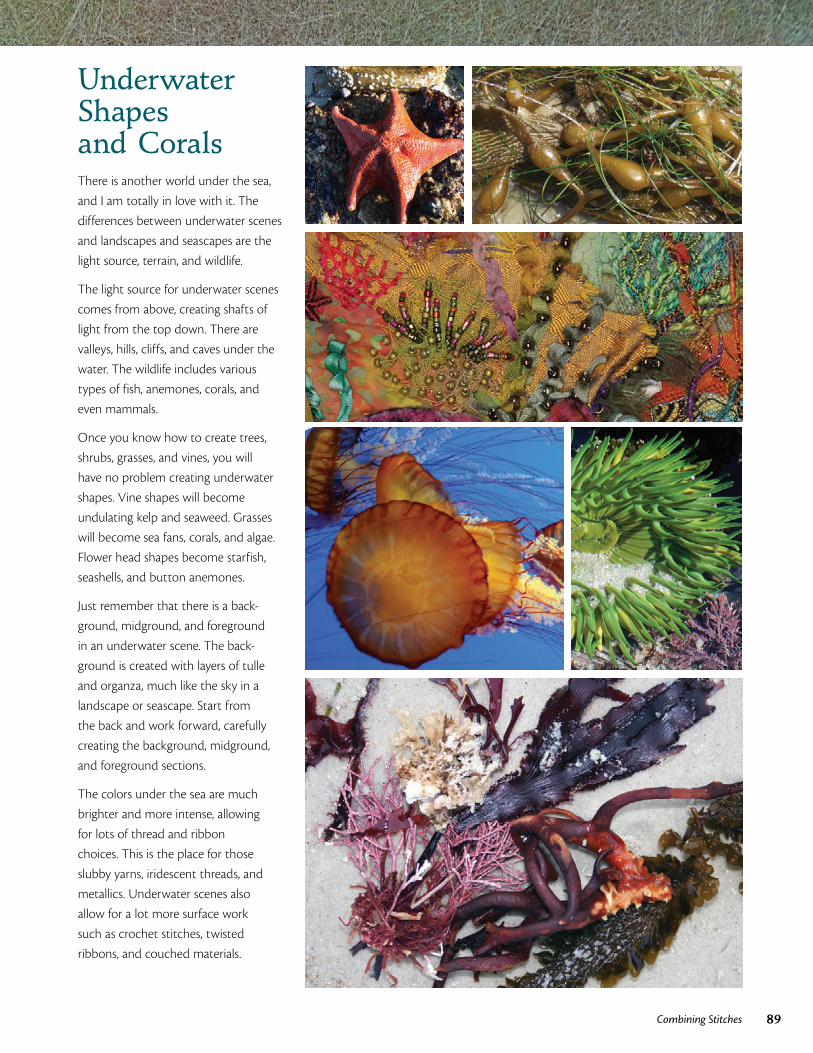
89Combining Stitches
Underwater Shapes and CoralsThere is another world under the sea,
and I am totally in love with it. The
differences between underwater scenes
and landscapes and seascapes are the
light source, terrain, and wildlife.
The light source for underwater scenes
comes from above, creating shafts of
light from the top down. There are
valleys, hills, cliffs, and caves under the
water. The wildlife includes various
types of fish, anemones, corals, and
even mammals.
Once you know how to create trees,
shrubs, grasses, and vines, you will
have no problem creating underwater
shapes. Vine shapes will become
undulating kelp and seaweed. Grasses
will become sea fans, corals, and algae.
Flower head shapes become starfish,
seashells, and button anemones.
Just remember that there is a back-
ground, midground, and foreground
in an underwater scene. The back-
ground is created with layers of tulle
and organza, much like the sky in a
landscape or seascape. Start from
the back and work forward, carefully
creating the background, midground,
and foreground sections.
The colors under the sea are much
brighter and more intense, allowing
for lots of thread and ribbon
choices. This is the place for those
slubby yarns, iridescent threads, and
metallics. Underwater scenes also
allow for a lot more surface work
such as crochet stitches, twisted
ribbons, and couched materials.
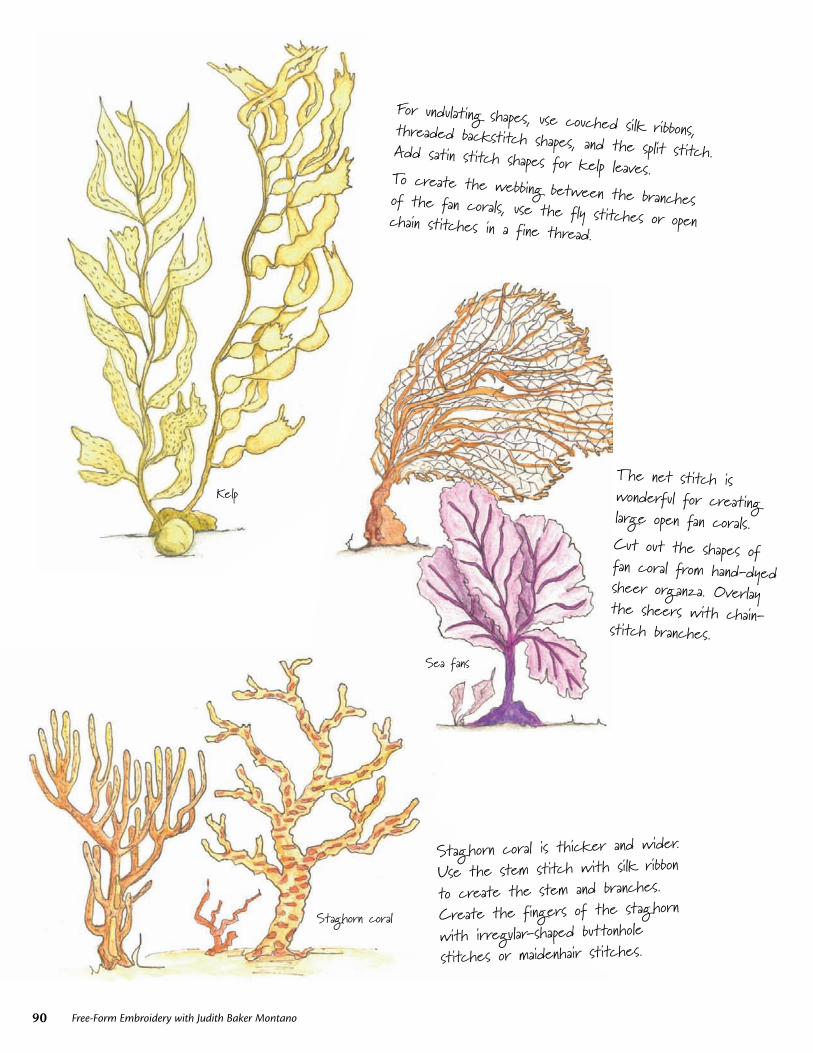
90 Free-Form Embroidery with Judith Baker Montano
For undulating shapes, use couched silk ribbons, threaded backstitch shapes, and the split stitch. Add satin stitch shapes for kelp leaves.To create the webbing between the branches of the fan corals, use the fly stitches or open chain stitches in a fine thread.
Kelp
Sea fans
Staghorn coral
Kelp
Sea fans
Staghorn coral
Kelp
Sea fans
Staghorn coral
Staghorn coral is thicker and wider.
Use the stem stitch with silk ribbon
to create the stem and branches.
Create the fingers of the staghorn
with irregular-shaped buttonhole
stitches or maidenhair stitches.
The net stitch is wonderful for creating large open fan corals.Cut out the shapes of fan coral from hand-dyed sheer organza. Overlay the sheers with chain-stitch branches.
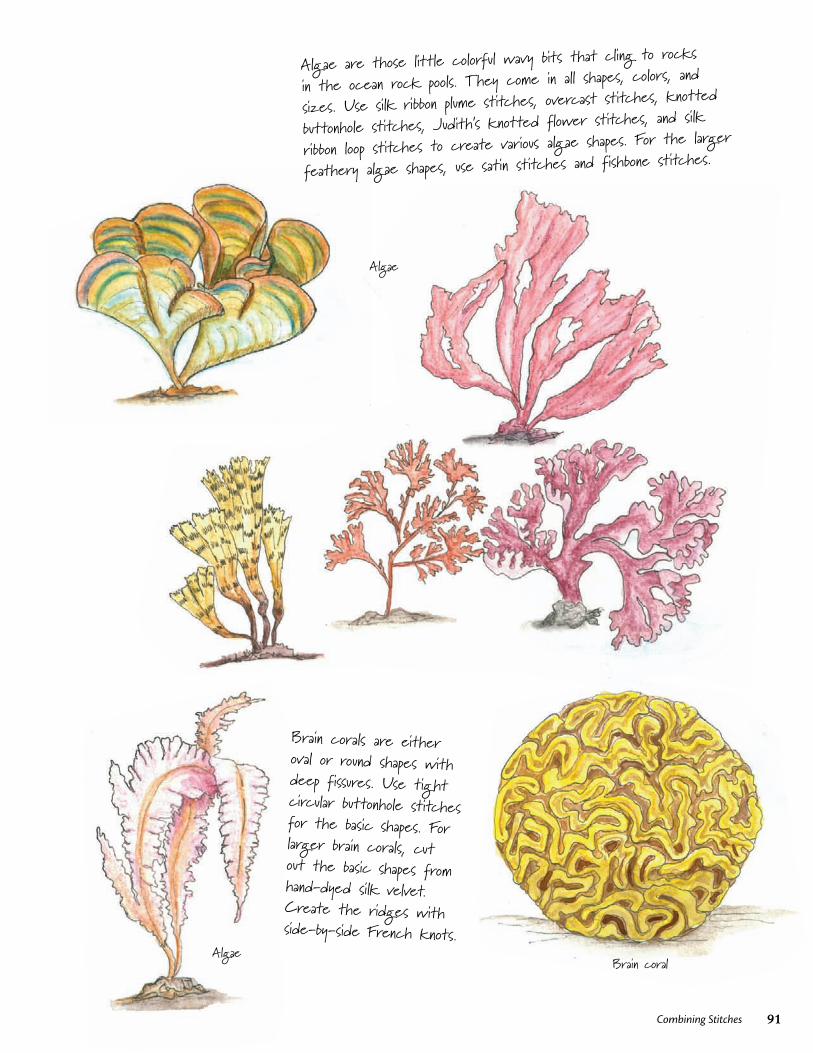
91Combining Stitches
Algae
Brain coral
Algae
Algae
Brain coral
Algae
Algae
Brain coral
Algae
Algae
Brain coral
Algae
Algae are those little colorful wavy bits that cling to rocks
in the ocean rock pools. They come in all shapes, colors, and
sizes. Use silk ribbon plume stitches, overcast stitches, knotted
buttonhole stitches, Judith’s knotted flower stitches, and silk
ribbon loop stitches to create various algae shapes. For the larger
feathery algae shapes, use satin stitches and fishbone stitches.
Brain corals are either oval or round shapes with deep fissures. Use tight circular buttonhole stitches for the basic shapes. For larger brain corals, cut out the basic shapes from hand-dyed silk velvet. Create the ridges with side-by-side French knots.
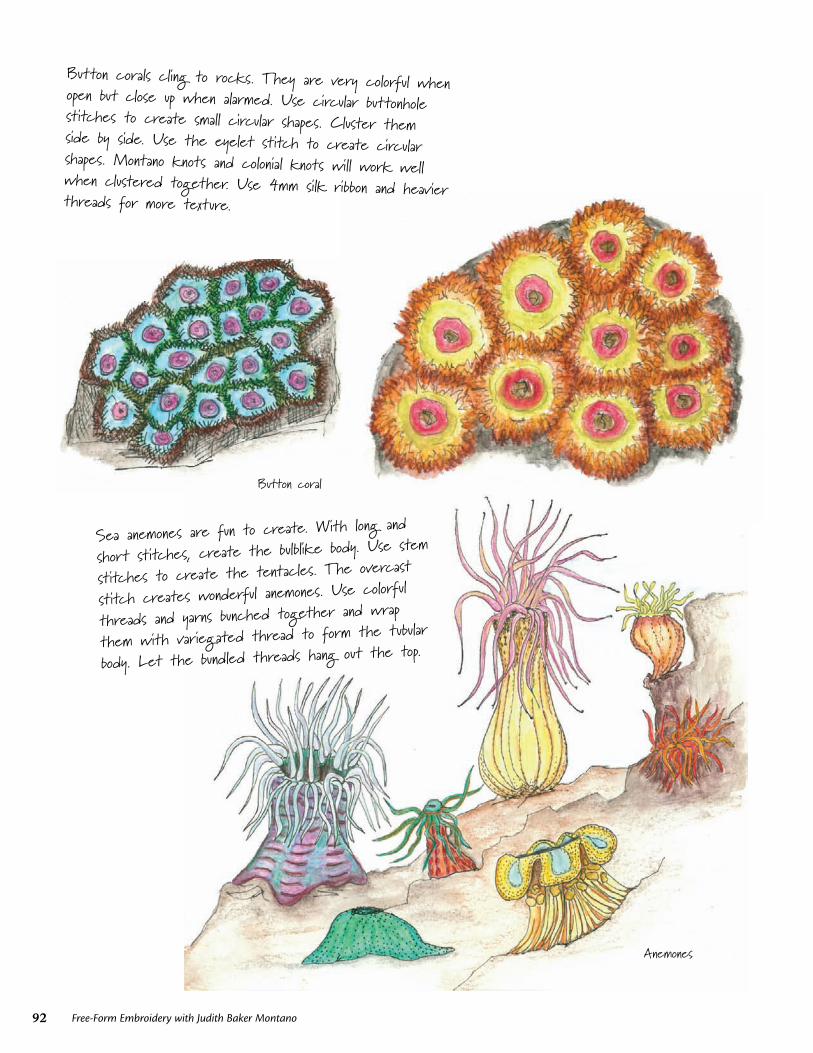
92 Free-Form Embroidery with Judith Baker Montano
Button coral
Anemones
Button coral
Anemones
Button coral
Anemones
Button corals cling to rocks. They are very colorful when open but close up when alarmed. Use circular buttonhole stitches to create small circular shapes. Cluster them side by side. Use the eyelet stitch to create circular shapes. Montano knots and colonial knots will work well when clustered together. Use 4mm silk ribbon and heavier threads for more texture.
Sea anemones are fun to create. With long and
short stitches, create the bulblike body. Use stem
stitches to create the tentacles. The overcast
stitch creates wonderful anemones. Use colorful
threads and yarns bunched together and wrap
them with variegated thread to form the tubular
body. Let the bundled threads hang out the top.
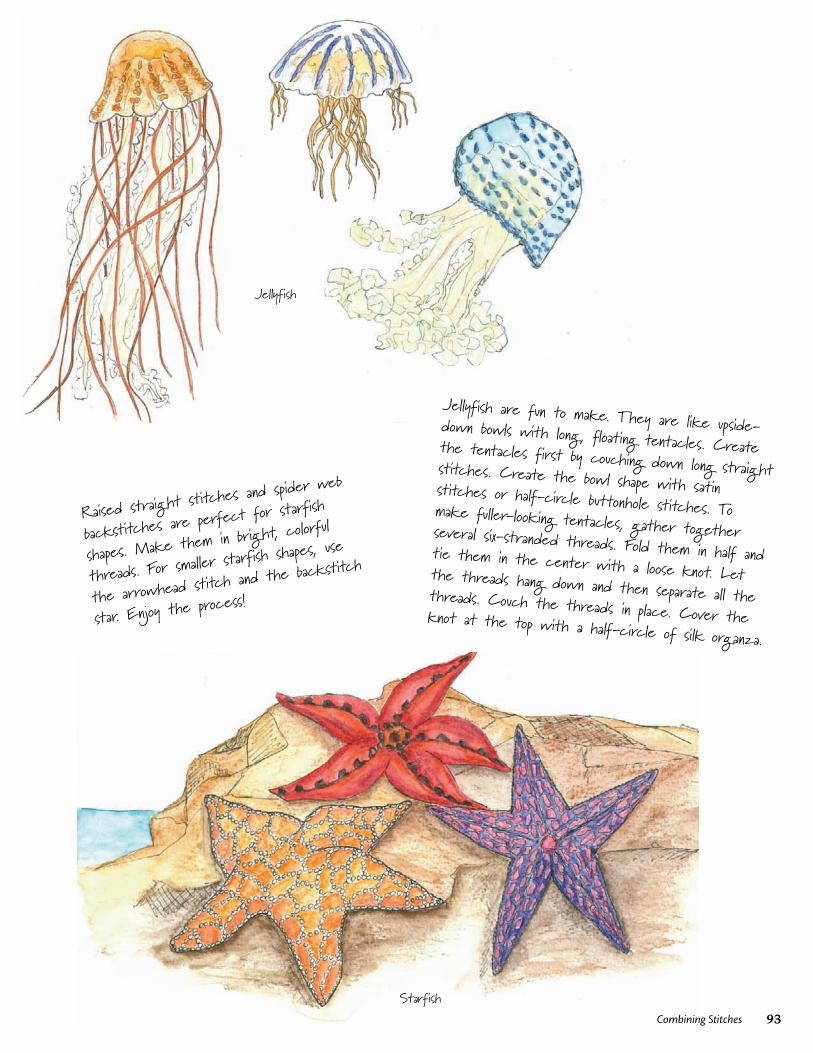
Jellyfish
Starfish
Jellyfish
Starfish
Jellyfish are fun to make. They are like upside-down bowls with long, floating tentacles. Create the tentacles first by couching down long straight stitches. Create the bowl shape with satin stitches or half-circle buttonhole stitches. To make fuller-looking tentacles, gather together several six-stranded threads. Fold them in half and tie them in the center with a loose knot. Let the threads hang down and then separate all the threads. Couch the threads in place. Cover the knot at the top with a half-circle of silk organza.
Raised straight stitches a
nd spider web
backstitches are perfect f
or starfish
shapes. Make them in bright, colorfu
l
threads. For smaller starfish
shapes, use
the arrowhead stitch and
the backstitch
star. Enjoy the process!
93Combining Stitches
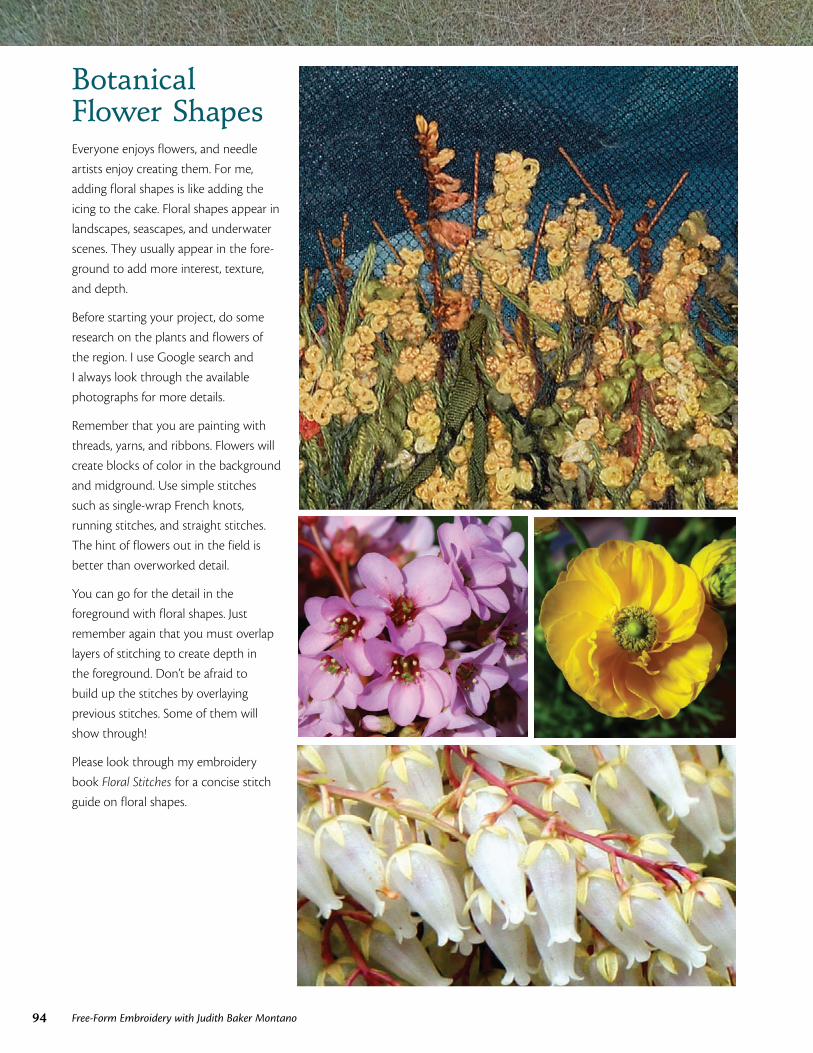
94 Free-Form Embroidery with Judith Baker Montano
Botanical Flower ShapesEveryone enjoys flowers, and needle
artists enjoy creating them. For me,
adding floral shapes is like adding the
icing to the cake. Floral shapes appear in
landscapes, seascapes, and underwater
scenes. They usually appear in the fore-
ground to add more interest, texture,
and depth.
Before starting your project, do some
research on the plants and flowers of
the region. I use Google search and
I always look through the available
photographs for more details.
Remember that you are painting with
threads, yarns, and ribbons. Flowers will
create blocks of color in the background
and midground. Use simple stitches
such as single-wrap French knots,
running stitches, and straight stitches.
The hint of flowers out in the field is
better than overworked detail.
You can go for the detail in the
foreground with floral shapes. Just
remember again that you must overlap
layers of stitching to create depth in
the foreground. Don’t be afraid to
build up the stitches by overlaying
previous stitches. Some of them will
show through!
Please look through my embroidery
book Floral Stitches for a concise stitch
guide on floral shapes.
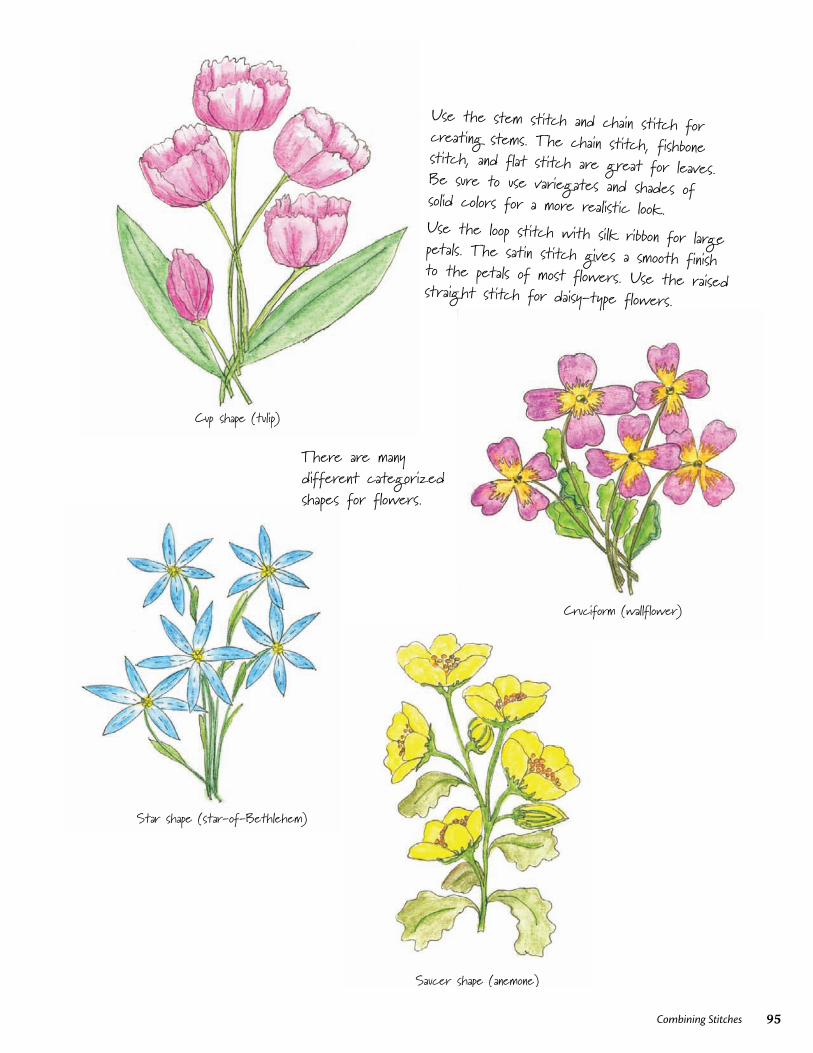
95Combining Stitches
Cruciform (wallflower)Star shape (star-of-Bethlehem)
Saucer shape (anemone)
Cup shape (tulip)
Cruciform (wallflower)Star shape (star-of-Bethlehem)
Saucer shape (anemone)
Cup shape (tulip)
Cruciform (wallflower)Star shape (star-of-Bethlehem)
Saucer shape (anemone)
Cup shape (tulip)
Cruciform (wallflower)Star shape (star-of-Bethlehem)
Saucer shape (anemone)
Cup shape (tulip)
Use the stem stitch and chain stitch for creating stems. The chain stitch, fishbone stitch, and flat stitch are great for leaves. Be sure to use variegates and shades of solid colors for a more realistic look.Use the loop stitch with silk ribbon for large petals. The satin stitch gives a smooth finish to the petals of most flowers. Use the raised straight stitch for daisy-type flowers.
There are many different categorized shapes for flowers.
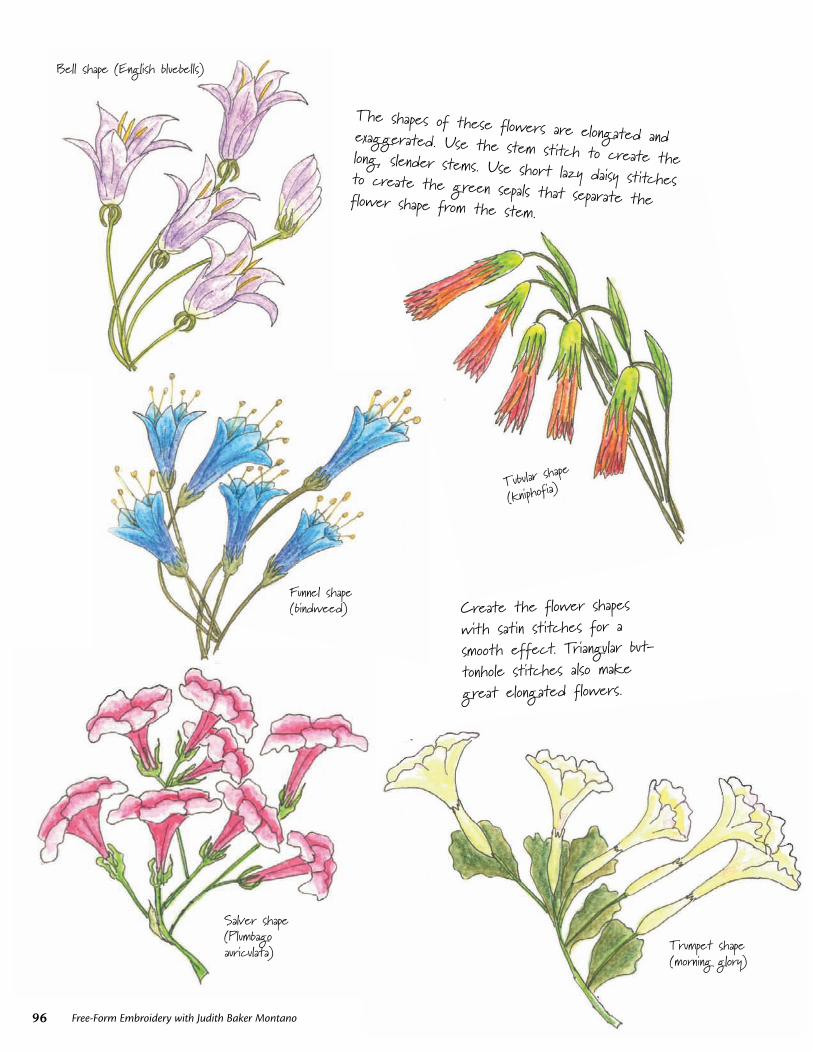
96 Free-Form Embroidery with Judith Baker Montano
Bell shape (Englis
h bluebells)
Tubular shape
(kniphofia)
Funnel shape
(bindweed)
Salver shape
(Plumbago
auriculata)
Trumpet shape
(morning glory)
Bell shape (English bluebells)
Tubular shape (kniphofia)
Funnel shape (bindweed) Salver shape
(Plumbago auriculata)
Trumpet shape (morning glory)
Bell shape (English bluebells)
Tubular shape (kniphofia)
Funnel shape (bindweed) Salver shape
(Plumbago auriculata)
Trumpet shape (morning glory)
Bell shape (English bluebells)
Tubular shape (kniphofia)
Funnel shape (bindweed) Salver shape
(Plumbago auriculata)
Trumpet shape (morning glory)
The shapes of these flowers are elongated and exaggerated. Use the stem stitch to create the long, slender stems. Use short lazy daisy stitches to create the green sepals that separate the flower shape from the stem.
Create the flower shapes with satin stitches for a smooth effect. Triangular but-tonhole stitches also make great elongated flowers.
Bell shape (English bluebells)
Tubular shape (kniphofia)
Funnel shape (bindweed) Salver shape
(Plumbago auriculata)
Trumpet shape (morning glory)
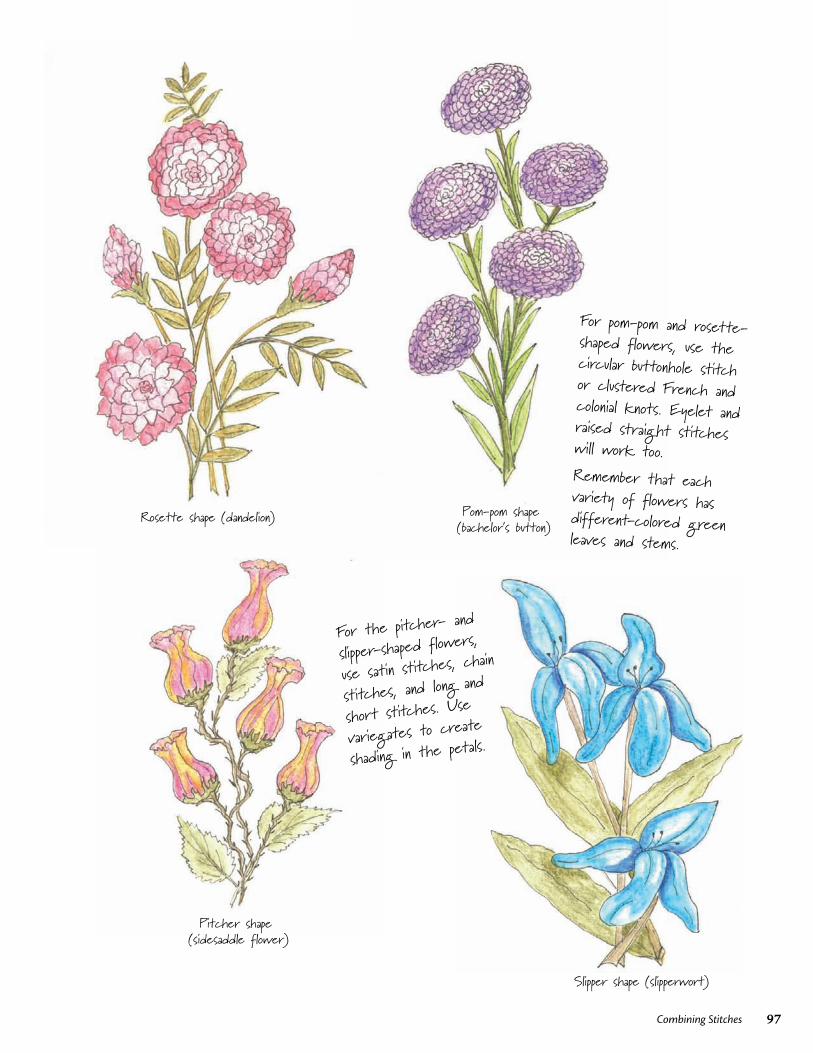
97Combining Stitches
Rosette shape (dandelion) Pom-pom shape (bachelor’s button)
Pitcher shape (sidesaddle flower) Slipper shape (slipperwort)
Rosette shape (dandelion)Pom-pom shape (bachelor’s button)
Pitcher shape (sidesaddle flower) Slipper shape (slipperwort)
For pom-pom and rosette-shaped flowers, use the circular buttonhole stitch or clustered French and colonial knots. Eyelet and raised straight stitches will work too.Remember that each variety of flowers has different-colored green leaves and stems.
Rosette shape (dandelion) Pom-pom shape (bachelor’s button)
Pitcher shape (sidesaddle flower) Slipper shape (slipperwort)
For the pitcher- and
slipper-shaped flowers,
use satin stitches, chain
stitches, and long and
short stitches. Use
variegates to create
shading in the petals.
Rosette shape (dandelion) Pom-pom shape (bachelor’s button)
Pitcher shape (sidesaddle flower) Slipper shape (slipperwort)
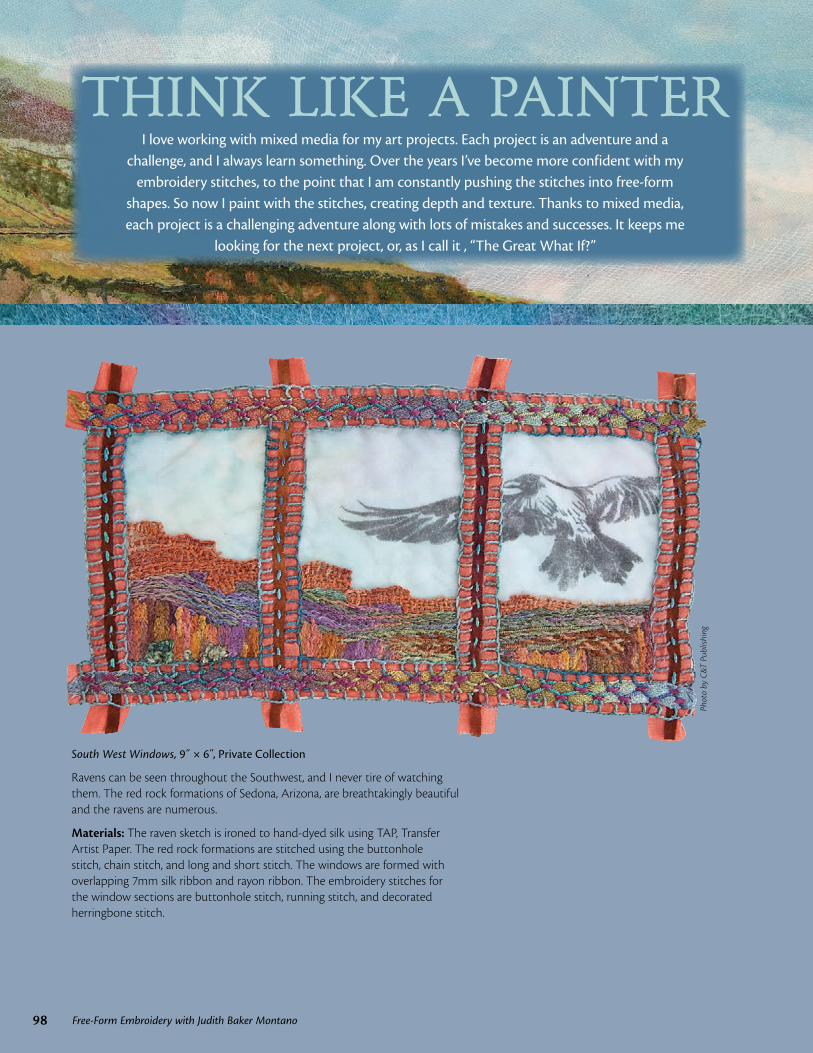
THINK LIKE A PAINTER
South West Windows, 9˝ × 6 ,̋ Private Collection
Ravens can be seen throughout the Southwest, and I never tire of watching them. The red rock formations of Sedona, Arizona, are breathtakingly beautiful and the ravens are numerous.
Materials: The raven sketch is ironed to hand-dyed silk using TAP, Transfer Artist Paper. The red rock formations are stitched using the buttonhole stitch, chain stitch, and long and short stitch. The windows are formed with overlapping 7mm silk ribbon and rayon ribbon. The embroidery stitches for the window sections are buttonhole stitch, running stitch, and decorated herringbone stitch.
Phot
o by
C&T
Pub
lishi
ng
I love working with mixed media for my art projects. Each project is an adventure and a challenge, and I always learn something. Over the years I’ve become more confident with my
embroidery stitches, to the point that I am constantly pushing the stitches into free-form shapes. So now I paint with the stitches, creating depth and texture. Thanks to mixed media, each project is a challenging adventure along with lots of mistakes and successes. It keeps me
looking for the next project, or, as I call it , “The Great What If?”
98 Free-Form Embroidery with Judith Baker Montano
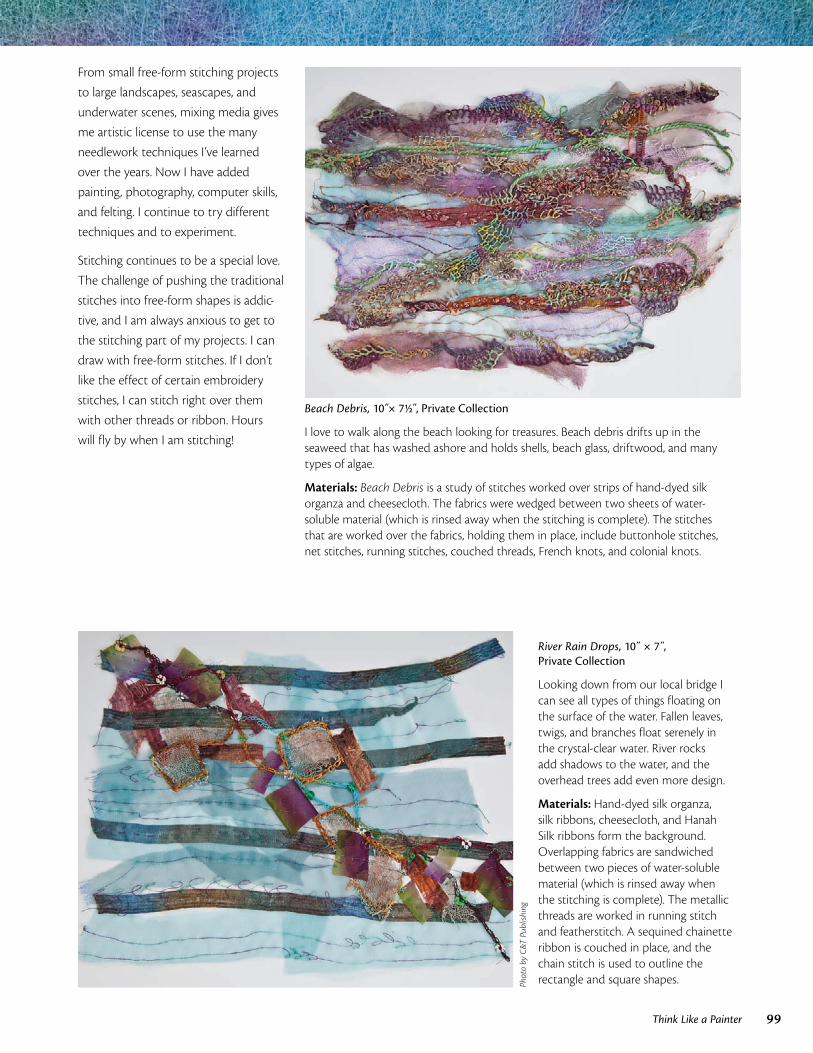
99Think Like a Painter
From small free-form stitching projects
to large landscapes, seascapes, and
underwater scenes, mixing media gives
me artistic license to use the many
needlework techniques I’ve learned
over the years. Now I have added
painting, photography, computer skills,
and felting. I continue to try different
techniques and to experiment.
Stitching continues to be a special love.
The challenge of pushing the traditional
stitches into free-form shapes is addic-
tive, and I am always anxious to get to
the stitching part of my projects. I can
draw with free-form stitches. If I don’t
like the effect of certain embroidery
stitches, I can stitch right over them
with other threads or ribbon. Hours
will fly by when I am stitching!
Beach Debris, 10˝× 71/2 ,̋ Private Collection
I love to walk along the beach looking for treasures. Beach debris drifts up in the seaweed that has washed ashore and holds shells, beach glass, driftwood, and many types of algae.
Materials: Beach Debris is a study of stitches worked over strips of hand-dyed silk organza and cheesecloth. The fabrics were wedged between two sheets of water-soluble material (which is rinsed away when the stitching is complete). The stitches that are worked over the fabrics, holding them in place, include buttonhole stitches, net stitches, running stitches, couched threads, French knots, and colonial knots.
River Rain Drops, 10˝ × 7 ,̋ Private Collection
Looking down from our local bridge I can see all types of things floating on the surface of the water. Fallen leaves, twigs, and branches float serenely in the crystal-clear water. River rocks add shadows to the water, and the overhead trees add even more design.
Materials: Hand-dyed silk organza, silk ribbons, cheesecloth, and Hanah Silk ribbons form the background. Overlapping fabrics are sandwiched between two pieces of water-soluble material (which is rinsed away when the stitching is complete). The metallic threads are worked in running stitch and featherstitch. A sequined chainette ribbon is couched in place, and the chain stitch is used to outline the rectangle and square shapes.Ph
oto
by C
&T P
ublis
hing
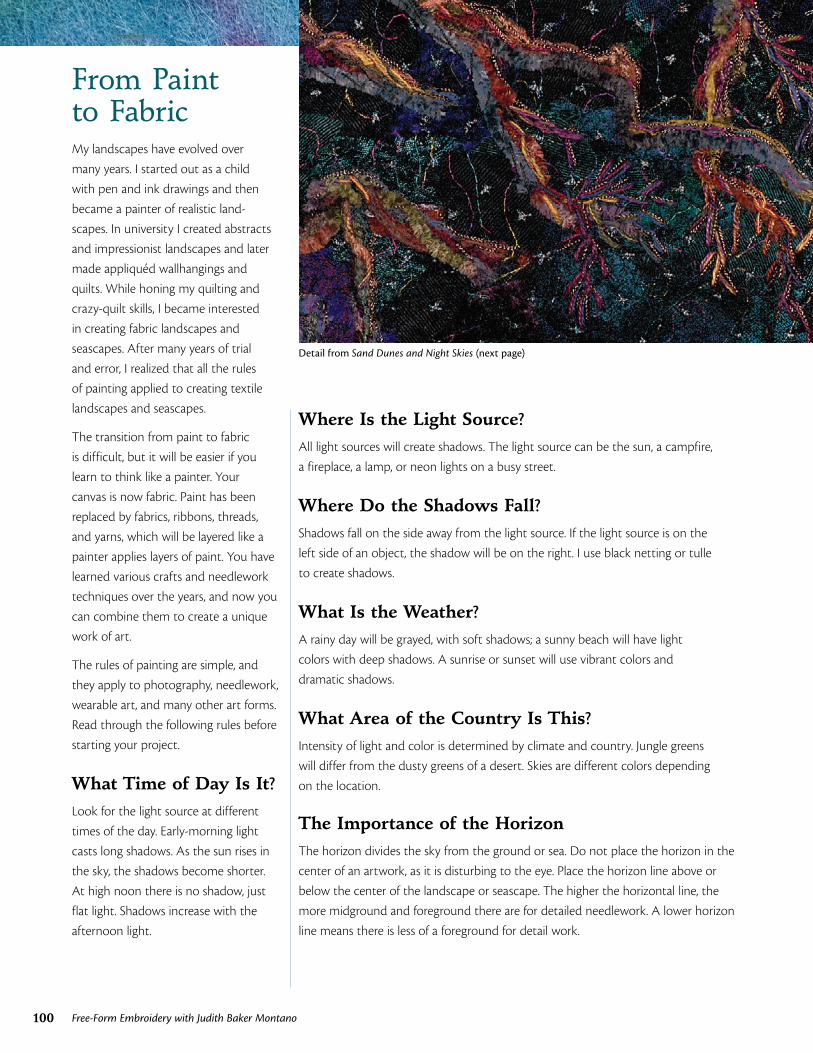
100 Free-Form Embroidery with Judith Baker Montano
From Paint to FabricMy landscapes have evolved over
many years. I started out as a child
with pen and ink drawings and then
became a painter of realistic land-
scapes. In university I created abstracts
and impressionist landscapes and later
made appliquéd wallhangings and
quilts. While honing my quilting and
crazy-quilt skills, I became interested
in creating fabric landscapes and
seascapes. After many years of trial
and error, I realized that all the rules
of painting applied to creating textile
landscapes and seascapes.
The transition from paint to fabric
is difficult, but it will be easier if you learn to think like a painter. Your
canvas is now fabric. Paint has been
replaced by fabrics, ribbons, threads,
and yarns, which will be layered like a
painter applies layers of paint. You have
learned various crafts and needlework
techniques over the years, and now you
can combine them to create a unique
work of art.
The rules of painting are simple, and
they apply to photography, needlework,
wearable art, and many other art forms.
Read through the following rules before
starting your project.
What Time of Day Is It?Look for the light source at different
times of the day. Early-morning light
casts long shadows. As the sun rises in
the sky, the shadows become shorter.
At high noon there is no shadow, just
flat light. Shadows increase with the
afternoon light.
Where Is the Light Source?All light sources will create shadows. The light source can be the sun, a campfire,
a fireplace, a lamp, or neon lights on a busy street.
Where Do the Shadows Fall?Shadows fall on the side away from the light source. If the light source is on the
left side of an object, the shadow will be on the right. I use black netting or tulle
to create shadows.
What Is the Weather?A rainy day will be grayed, with soft shadows; a sunny beach will have light
colors with deep shadows. A sunrise or sunset will use vibrant colors and
dramatic shadows.
What Area of the Country Is This?Intensity of light and color is determined by climate and country. Jungle greens
will differ from the dusty greens of a desert. Skies are different colors depending
on the location.
The Importance of the HorizonThe horizon divides the sky from the ground or sea. Do not place the horizon in the
center of an artwork, as it is disturbing to the eye. Place the horizon line above or
below the center of the landscape or seascape. The higher the horizontal line, the
more midground and foreground there are for detailed needlework. A lower horizon
line means there is less of a foreground for detail work.
Detail from Sand Dunes and Night Skies (next page)
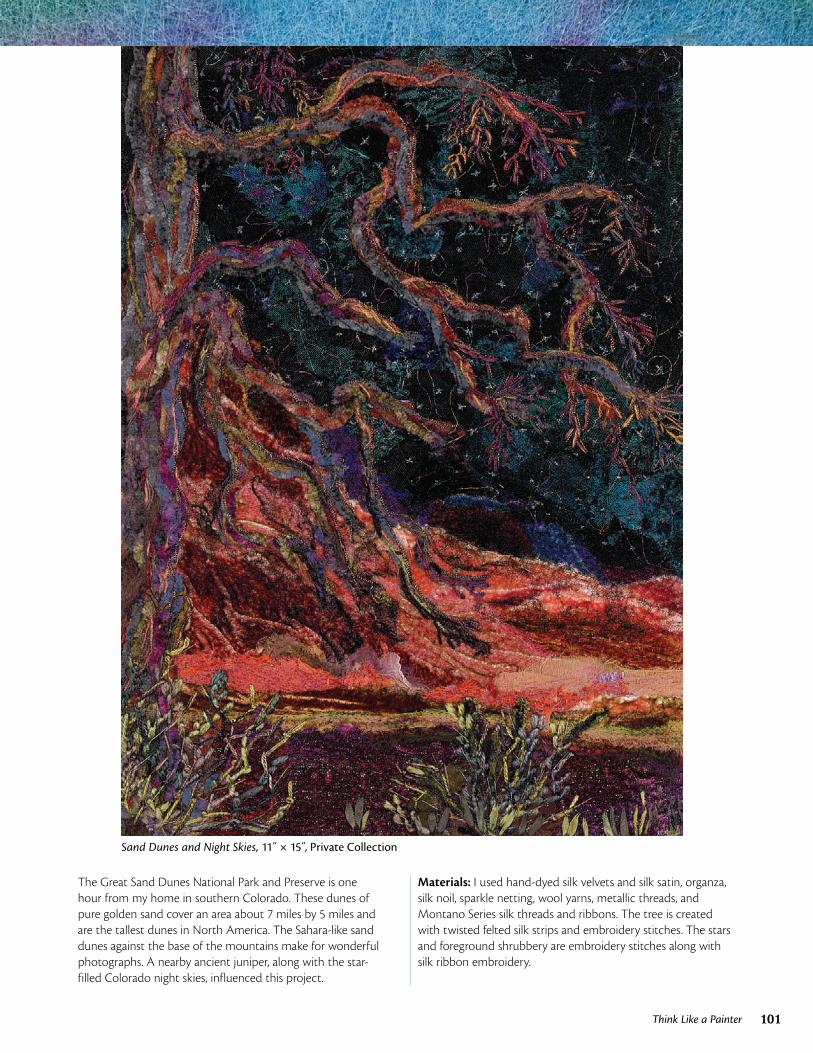
101Think Like a Painter
Sand Dunes and Night Skies, 11˝ × 15 ,̋ Private Collection
The Great Sand Dunes National Park and Preserve is one hour from my home in southern Colorado. These dunes of pure golden sand cover an area about 7 miles by 5 miles and are the tallest dunes in North America. The Sahara-like sand dunes against the base of the mountains make for wonderful photographs. A nearby ancient juniper, along with the star-filled Colorado night skies, influenced this project.
Materials: I used hand-dyed silk velvets and silk satin, organza, silk noil, sparkle netting, wool yarns, metallic threads, and Montano Series silk threads and ribbons. The tree is created with twisted felted silk strips and embroidery stitches. The stars and foreground shrubbery are embroidery stitches along with silk ribbon embroidery.
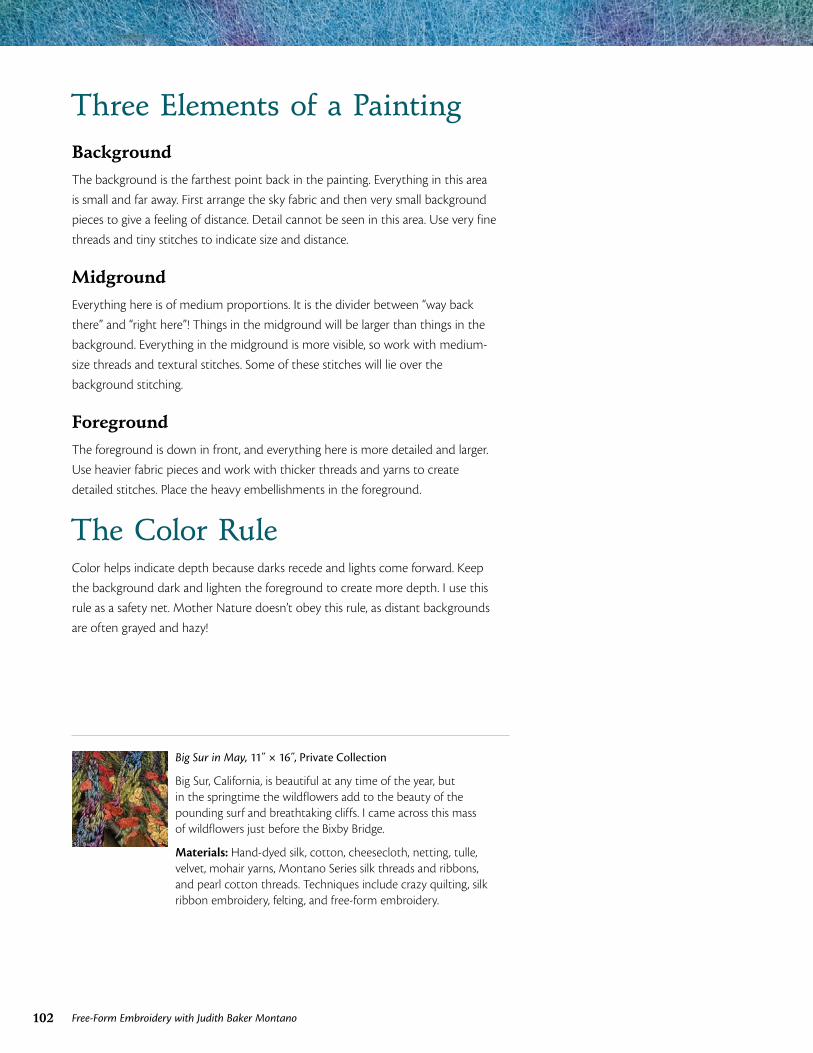
102 Free-Form Embroidery with Judith Baker Montano
Three Elements of a PaintingBackgroundThe background is the farthest point back in the painting. Everything in this area
is small and far away. First arrange the sky fabric and then very small background
pieces to give a feeling of distance. Detail cannot be seen in this area. Use very fine
threads and tiny stitches to indicate size and distance.
MidgroundEverything here is of medium proportions. It is the divider between “way back
there” and “right here”! Things in the midground will be larger than things in the
background. Everything in the midground is more visible, so work with medium-
size threads and textural stitches. Some of these stitches will lie over the
background stitching.
ForegroundThe foreground is down in front, and everything here is more detailed and larger.
Use heavier fabric pieces and work with thicker threads and yarns to create
detailed stitches. Place the heavy embellishments in the foreground.
The Color RuleColor helps indicate depth because darks recede and lights come forward. Keep
the background dark and lighten the foreground to create more depth. I use this
rule as a safety net. Mother Nature doesn’t obey this rule, as distant backgrounds
are often grayed and hazy!
Big Sur in May, 11˝ × 16 ,̋ Private Collection
Big Sur, California, is beautiful at any time of the year, but in the springtime the wildflowers add to the beauty of the pounding surf and breathtaking cliffs. I came across this mass of wildflowers just before the Bixby Bridge.
Materials: Hand-dyed silk, cotton, cheesecloth, netting, tulle, velvet, mohair yarns, Montano Series silk threads and ribbons, and pearl cotton threads. Techniques include crazy quilting, silk ribbon embroidery, felting, and free-form embroidery.
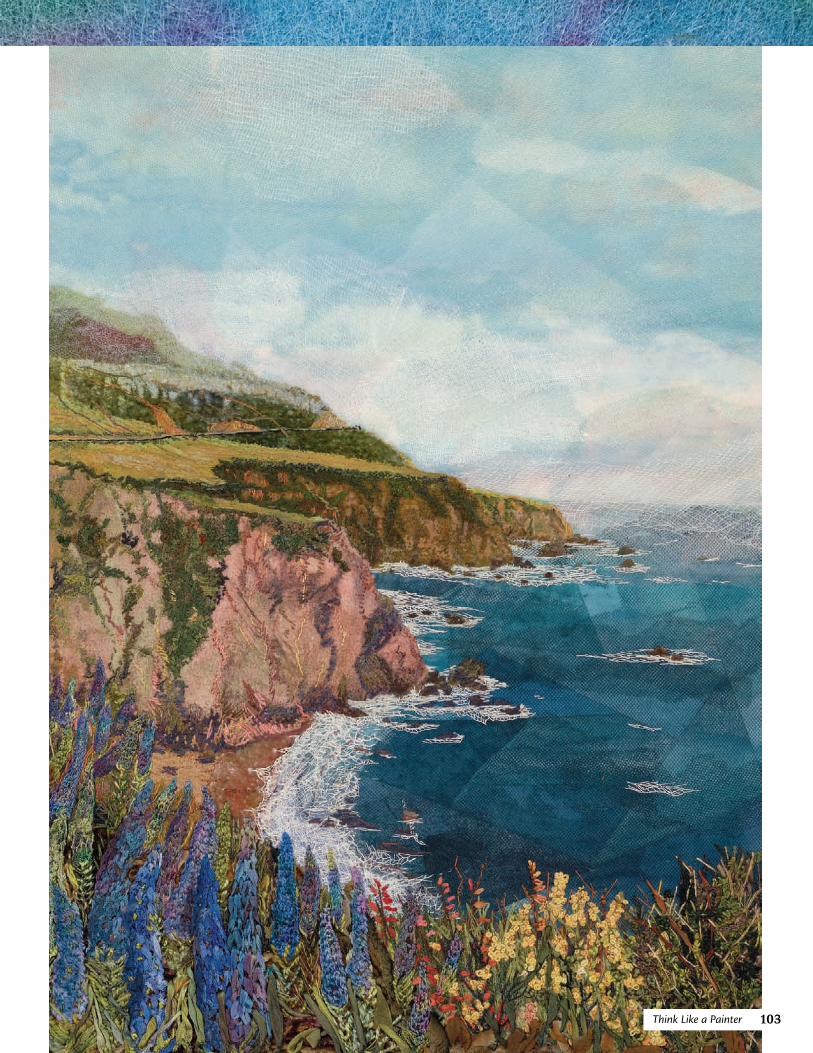
103Think Like a Painter
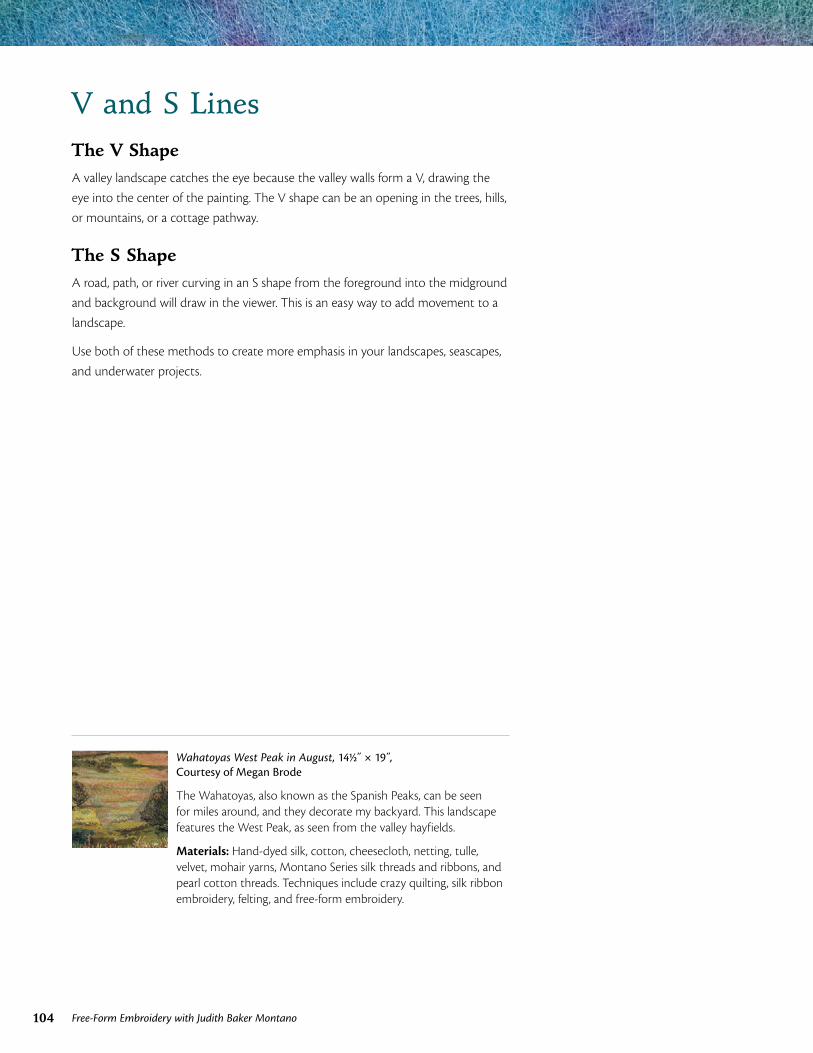
104 Free-Form Embroidery with Judith Baker Montano
V and S LinesThe V ShapeA valley landscape catches the eye because the valley walls form a V, drawing the
eye into the center of the painting. The V shape can be an opening in the trees, hills,
or mountains, or a cottage pathway.
The S ShapeA road, path, or river curving in an S shape from the foreground into the midground
and background will draw in the viewer. This is an easy way to add movement to a
landscape.
Use both of these methods to create more emphasis in your landscapes, seascapes,
and underwater projects.
Wahatoyas West Peak in August, 141/2˝ × 19 ,̋ Courtesy of Megan Brode
The Wahatoyas, also known as the Spanish Peaks, can be seen for miles around, and they decorate my backyard. This landscape features the West Peak, as seen from the valley hayfields.
Materials: Hand-dyed silk, cotton, cheesecloth, netting, tulle, velvet, mohair yarns, Montano Series silk threads and ribbons, and pearl cotton threads. Techniques include crazy quilting, silk ribbon embroidery, felting, and free-form embroidery.
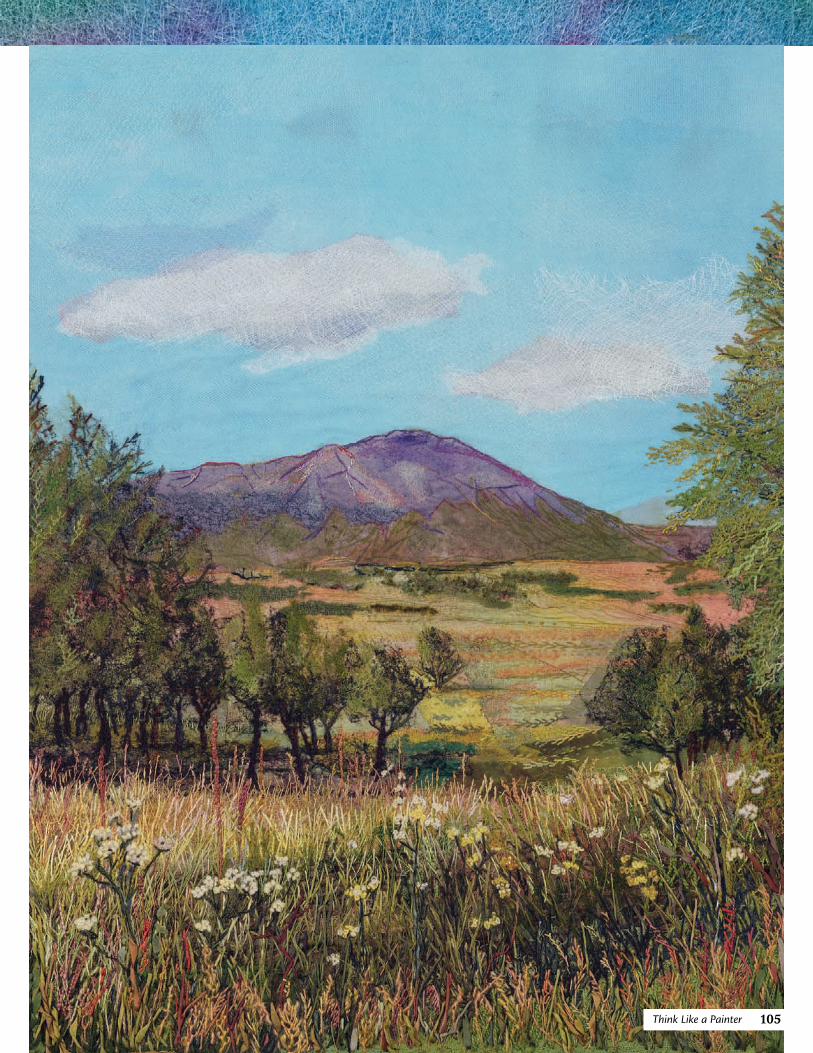
105Think Like a Painter
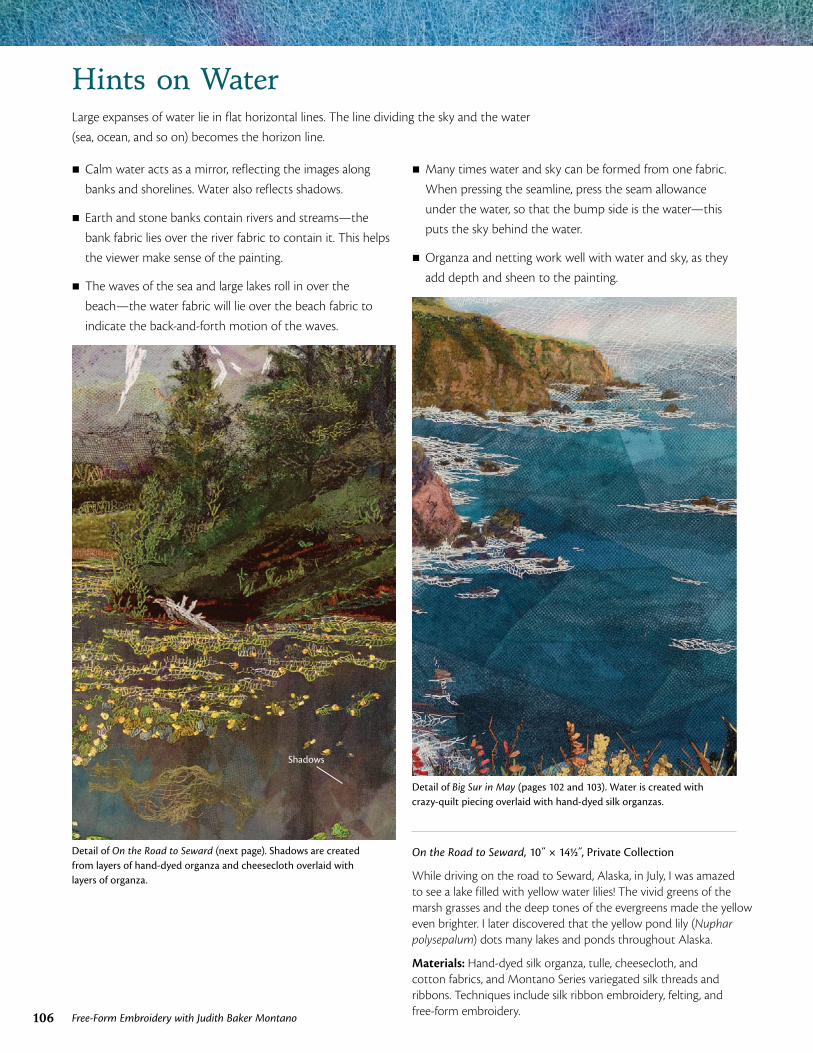
106 Free-Form Embroidery with Judith Baker Montano
Hints on WaterLarge expanses of water lie in flat horizontal lines. The line dividing the sky and the water
(sea, ocean, and so on) becomes the horizon line.
On the Road to Seward, 10˝ × 141/2 ,̋ Private Collection
While driving on the road to Seward, Alaska, in July, I was amazed to see a lake filled with yellow water lilies! The vivid greens of the marsh grasses and the deep tones of the evergreens made the yellow even brighter. I later discovered that the yellow pond lily (Nuphar polysepalum) dots many lakes and ponds throughout Alaska.
Materials: Hand-dyed silk organza, tulle, cheesecloth, and cotton fabrics, and Montano Series variegated silk threads and ribbons. Techniques include silk ribbon embroidery, felting, and free-form embroidery.
� Many times water and sky can be formed from one fabric.
When pressing the seamline, press the seam allowance
under the water, so that the bump side is the water—this
puts the sky behind the water.
� Organza and netting work well with water and sky, as they
add depth and sheen to the painting.
Detail of Big Sur in May (pages 102 and 103). Water is created with crazy-quilt piecing overlaid with hand-dyed silk organzas.
� Calm water acts as a mirror, reflecting the images along
banks and shorelines. Water also reflects shadows.
� Earth and stone banks contain rivers and streams—the
bank fabric lies over the river fabric to contain it. This helps
the viewer make sense of the painting.
� The waves of the sea and large lakes roll in over the
beach—the water fabric will lie over the beach fabric to
indicate the back-and-forth motion of the waves.
Shadows
Detail of On the Road to Seward (next page). Shadows are created from layers of hand-dyed organza and cheesecloth overlaid with layers of organza.

107Think Like a Painter

108 Free-Form Embroidery with Judith Baker Montano
Creating Underwater ProjectsThe rules of painting apply to underwater projects as well. The light source is
overhead, and air is replaced with water. There are hills, valleys, cliffs, and plains
along with a foreground, midground, and background, all under the sea. Seaweed
and kelp, anchored to rocks and corals, wave and swirl in the water currents,
reaching up to the light. Fish and unanchored organisms float throughout the
water. It is a busy place with lots of movement.
There is a horizon line under the sea, and it is just as important as in a landscape
or seascape. Important points to remember include the following:
� If the horizon line is above the center, there will be more midground and
foreground and less background. This allows more room for free-form
stitching and embellishing, giving the stitcher more leeway in adding
texture and detail.
� If the horizon line lies below the center of a project, there will be less
midground and foreground and more background, creating less space for
detail stitches and embellishments. The sky or background will be much
larger and important!
� Organisms under the sea attach themselves to rocky and coral berms on
the bottom and tend to float upward. So make the horizon line lower to
allow for all the upward-floating shapes.
Under the Sea, 12˝ × 18 ,̋ Private Collection
The sea anemones and starfish that live among the rugged rocks of the Monterey coastline are beautiful and fascinating to me. I love creating underwater projects because I can use so many different needlework techniques and materials.
Materials: Hand-dyed silk, cotton, velvet, cheesecloth, organza, netting, and scrim, along with silk and organza ribbons, fancy yarns, variegated threads, silk tubing, mulberry bark, Montano Series silk threads and ribbons, beads, shells, buttons, metallic threads, and beach findings.
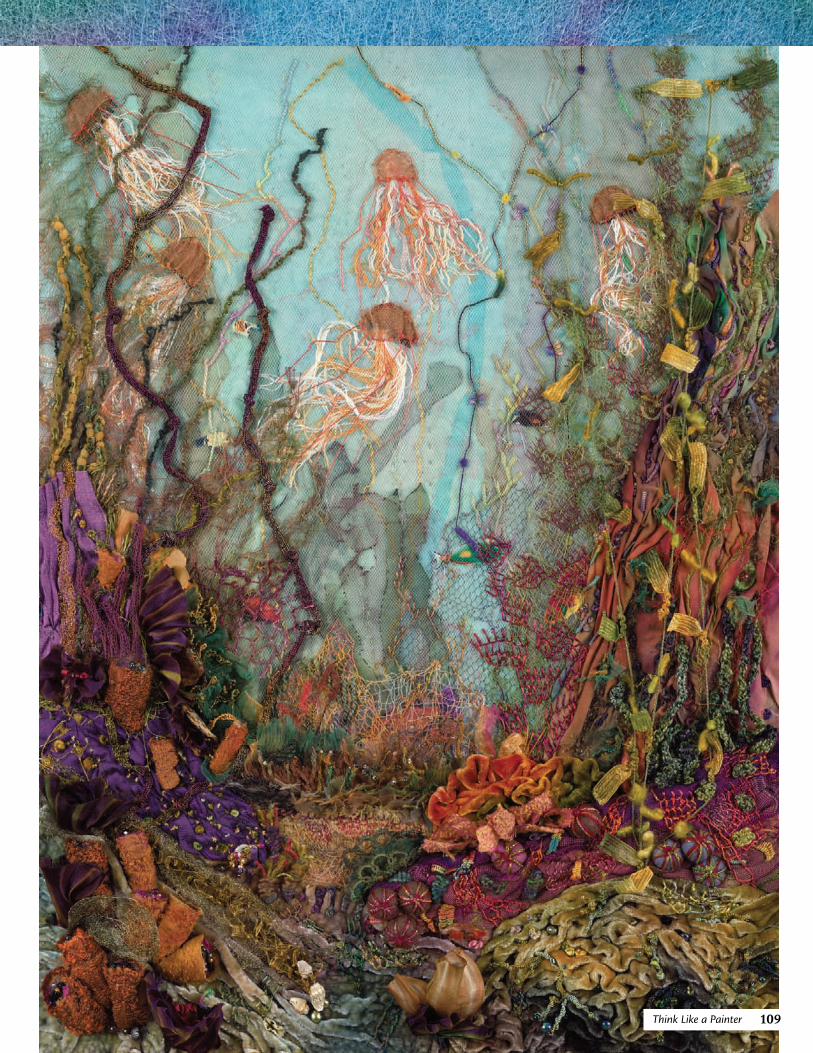
109Think Like a Painter
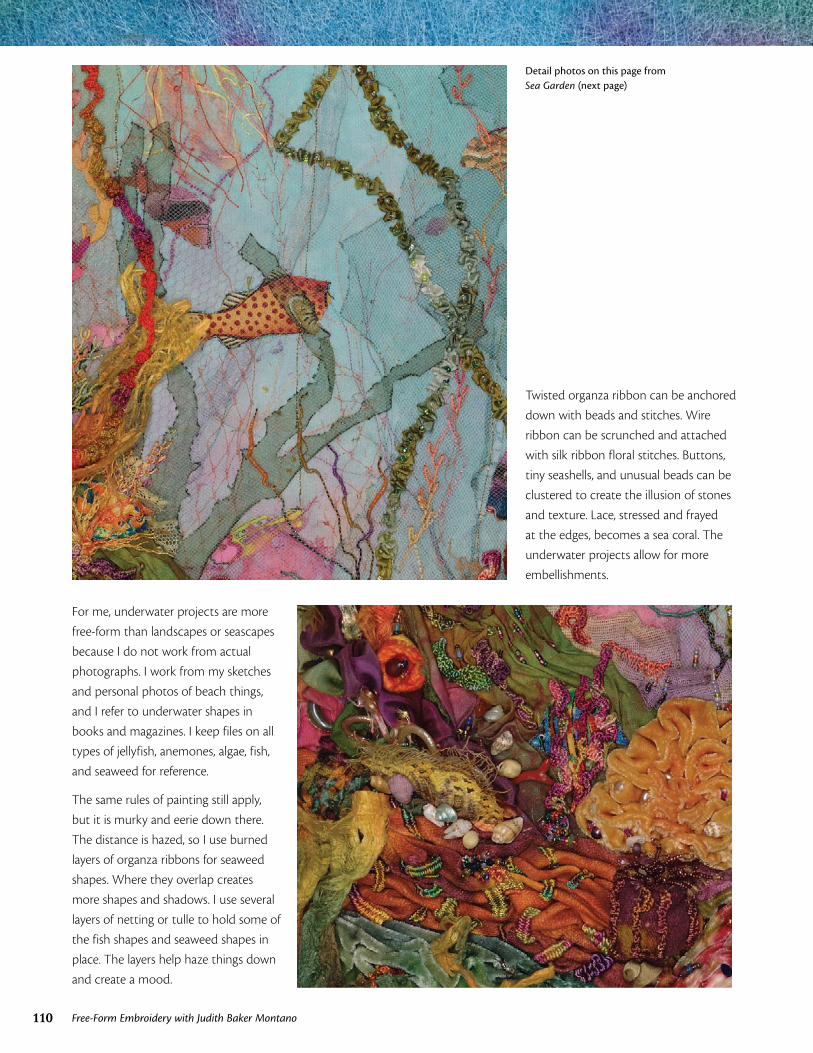
110 Free-Form Embroidery with Judith Baker Montano
For me, underwater projects are more
free-form than landscapes or seascapes
because I do not work from actual
photographs. I work from my sketches
and personal photos of beach things,
and I refer to underwater shapes in
books and magazines. I keep files on all
types of jellyfish, anemones, algae, fish,
and seaweed for reference.
The same rules of painting still apply,
but it is murky and eerie down there.
The distance is hazed, so I use burned
layers of organza ribbons for seaweed
shapes. Where they overlap creates
more shapes and shadows. I use several
layers of netting or tulle to hold some of
the fish shapes and seaweed shapes in
place. The layers help haze things down
and create a mood.
Twisted organza ribbon can be anchored
down with beads and stitches. Wire
ribbon can be scrunched and attached
with silk ribbon floral stitches. Buttons,
tiny seashells, and unusual beads can be
clustered to create the illusion of stones
and texture. Lace, stressed and frayed
at the edges, becomes a sea coral. The
underwater projects allow for more
embellishments.
Detail photos on this page from Sea Garden (next page)
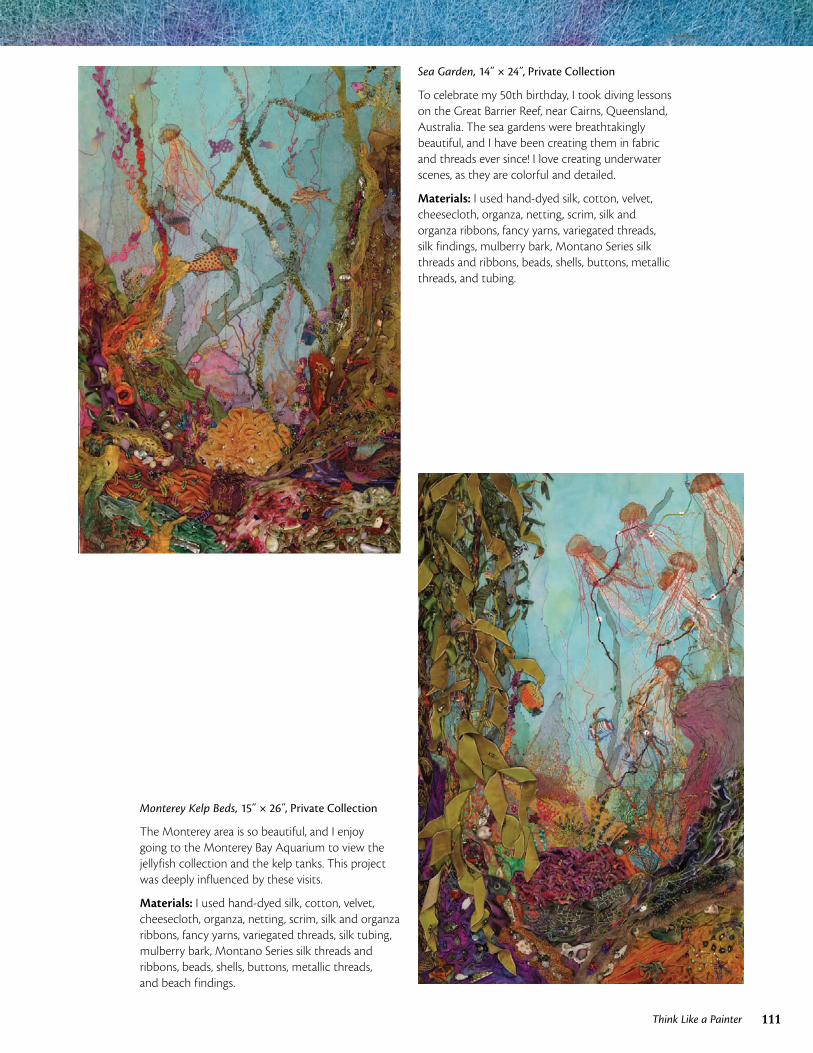
111Think Like a Painter
Sea Garden, 14˝ × 24 ,̋ Private Collection
To celebrate my 50th birthday, I took diving lessons on the Great Barrier Reef, near Cairns, Queensland, Australia. The sea gardens were breathtakingly beautiful, and I have been creating them in fabric and threads ever since! I love creating underwater scenes, as they are colorful and detailed.
Materials: I used hand-dyed silk, cotton, velvet, cheesecloth, organza, netting, scrim, silk and organza ribbons, fancy yarns, variegated threads, silk findings, mulberry bark, Montano Series silk threads and ribbons, beads, shells, buttons, metallic threads, and tubing.
Monterey Kelp Beds, 15˝ × 26 ,̋ Private Collection
The Monterey area is so beautiful, and I enjoy going to the Monterey Bay Aquarium to view the jellyfish collection and the kelp tanks. This project was deeply influenced by these visits.
Materials: I used hand-dyed silk, cotton, velvet, cheesecloth, organza, netting, scrim, silk and organza ribbons, fancy yarns, variegated threads, silk tubing, mulberry bark, Montano Series silk threads and ribbons, beads, shells, buttons, metallic threads, and beach findings.
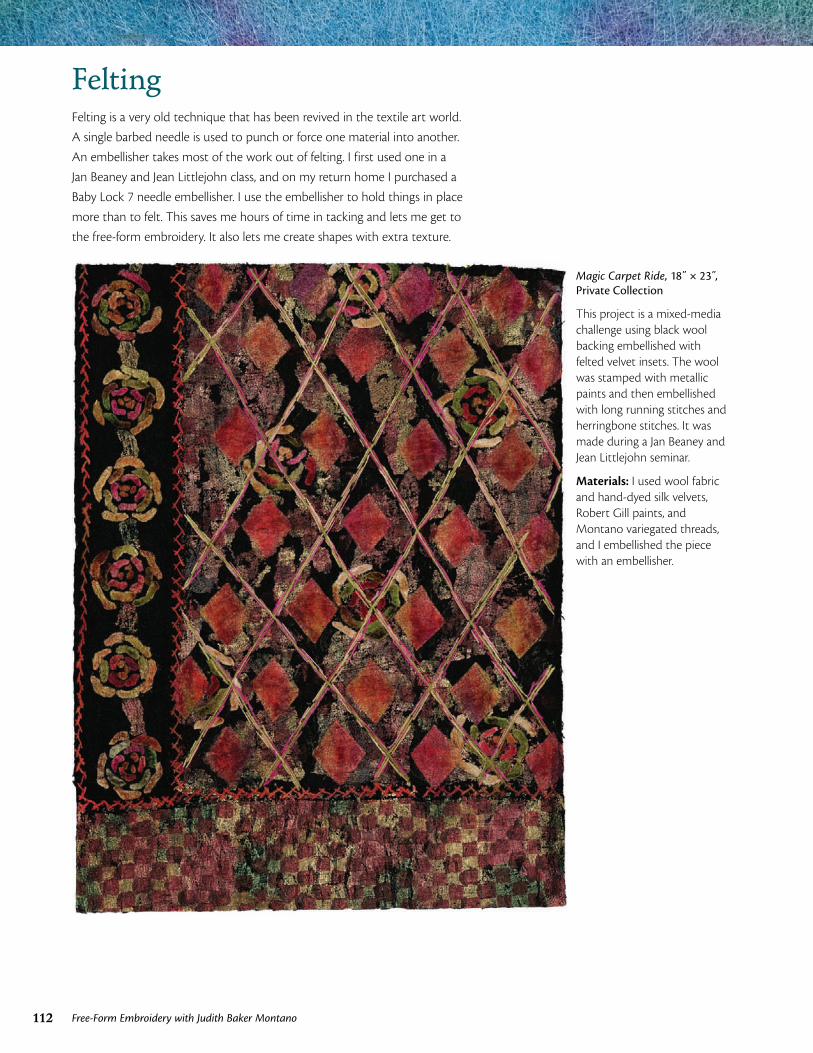
112 Free-Form Embroidery with Judith Baker Montano
FeltingFelting is a very old technique that has been revived in the textile art world.
A single barbed needle is used to punch or force one material into another.
An embellisher takes most of the work out of felting. I first used one in a
Jan Beaney and Jean Littlejohn class, and on my return home I purchased a
Baby Lock 7 needle embellisher. I use the embellisher to hold things in place
more than to felt. This saves me hours of time in tacking and lets me get to
the free-form embroidery. It also lets me create shapes with extra texture.
Magic Carpet Ride, 18˝ × 23 ,̋ Private Collection
This project is a mixed-media challenge using black wool backing embellished with felted velvet insets. The wool was stamped with metallic paints and then embellished with long running stitches and herringbone stitches. It was made during a Jan Beaney and Jean Littlejohn seminar.
Materials: I used wool fabric and hand-dyed silk velvets, Robert Gill paints, and Montano variegated threads, and I embellished the piece with an embellisher.
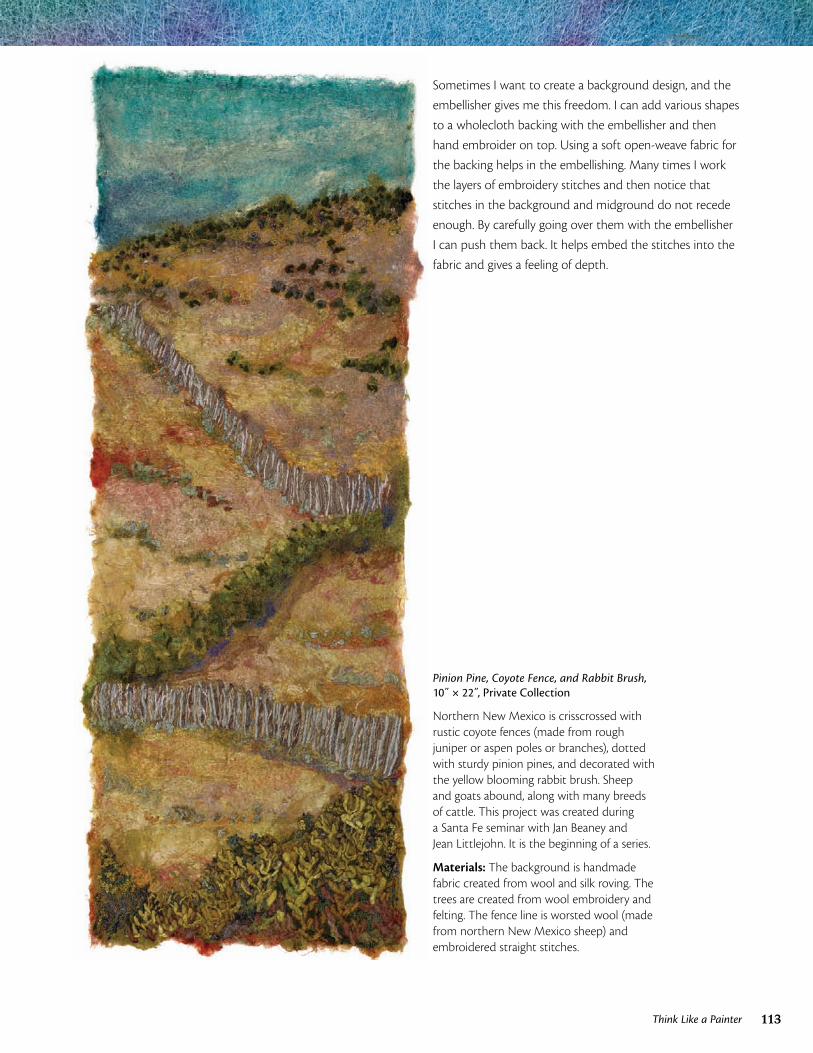
113Think Like a Painter
Sometimes I want to create a background design, and the
embellisher gives me this freedom. I can add various shapes
to a wholecloth backing with the embellisher and then
hand embroider on top. Using a soft open-weave fabric for
the backing helps in the embellishing. Many times I work
the layers of embroidery stitches and then notice that
stitches in the background and midground do not recede
enough. By carefully going over them with the embellisher
I can push them back. It helps embed the stitches into the
fabric and gives a feeling of depth.
Pinion Pine, Coyote Fence, and Rabbit Brush, 10˝ × 22 ,̋ Private Collection
Northern New Mexico is crisscrossed with rustic coyote fences (made from rough juniper or aspen poles or branches), dotted with sturdy pinion pines, and decorated with the yellow blooming rabbit brush. Sheep and goats abound, along with many breeds of cattle. This project was created during a Santa Fe seminar with Jan Beaney and Jean Littlejohn. It is the beginning of a series.
Materials: The background is handmade fabric created from wool and silk roving. The trees are created from wool embroidery and felting. The fence line is worsted wool (made from northern New Mexico sheep) and embroidered straight stitches.
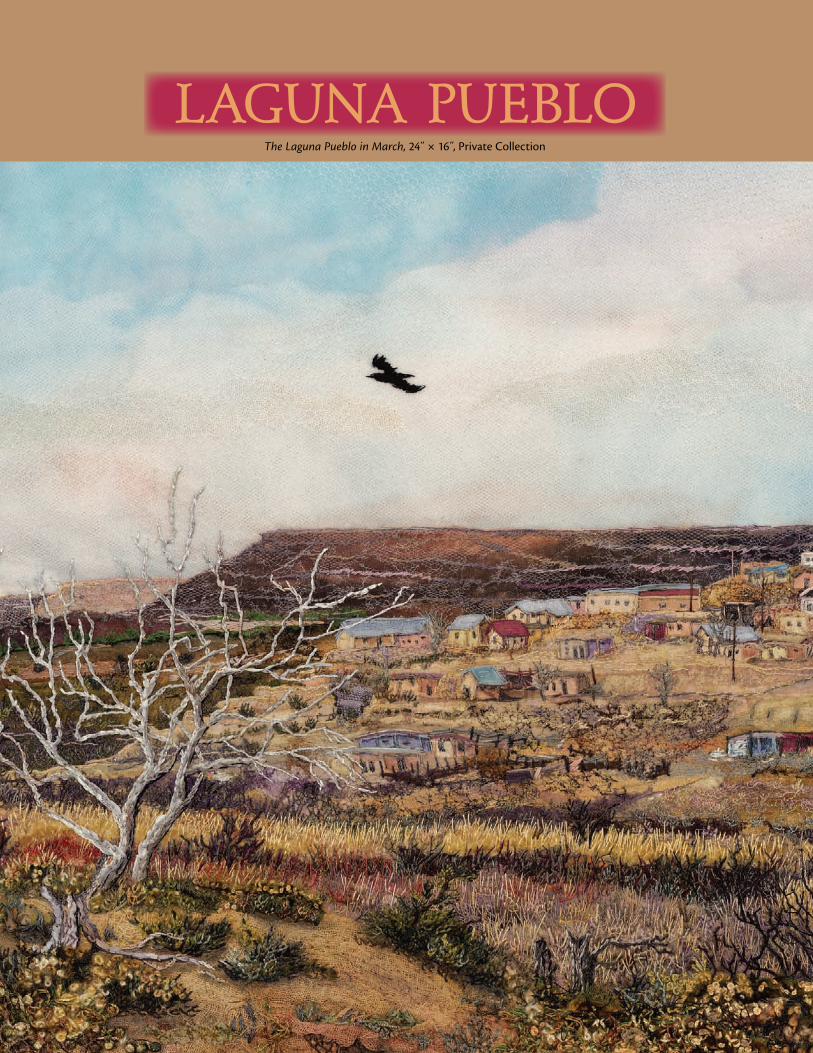
LAGUNA PUEBLOThe Laguna Pueblo in March, 24˝ × 16 ,̋ Private Collection
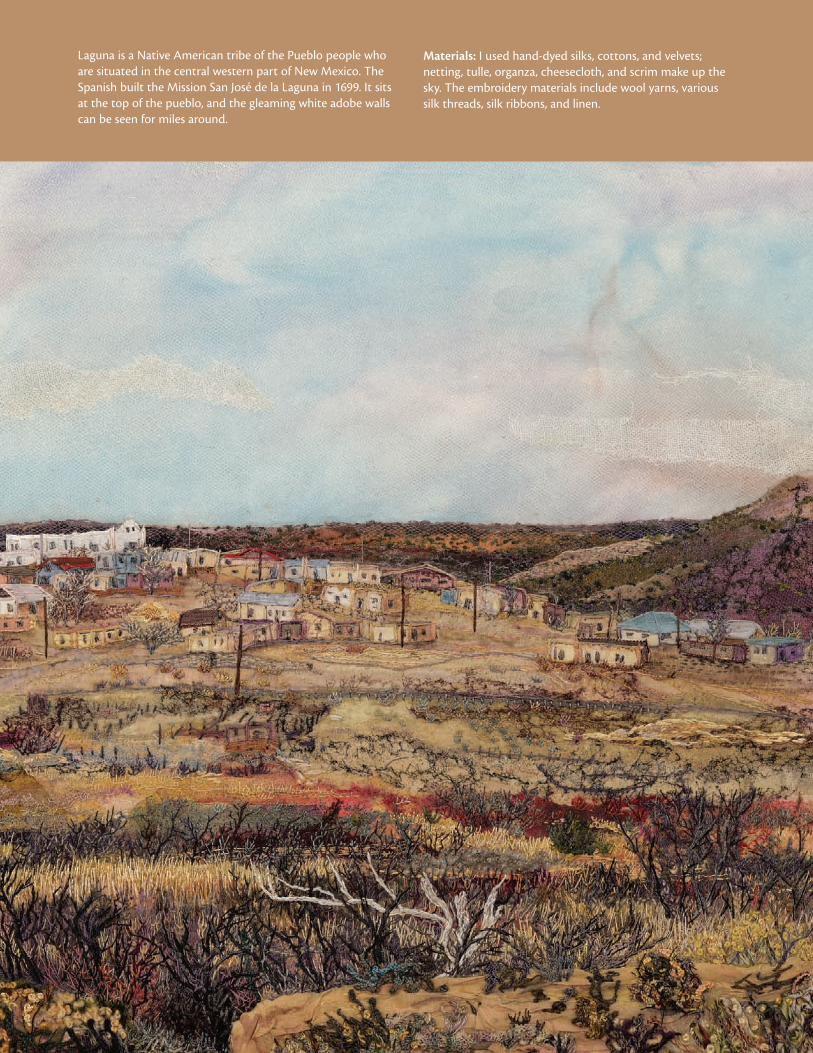
Laguna is a Native American tribe of the Pueblo people who are situated in the central western part of New Mexico. The Spanish built the Mission San José de la Laguna in 1699. It sits at the top of the pueblo, and the gleaming white adobe walls can be seen for miles around.
Materials: I used hand-dyed silks, cottons, and velvets; netting, tulle, organza, cheesecloth, and scrim make up the sky. The embroidery materials include wool yarns, various silk threads, silk ribbons, and linen.
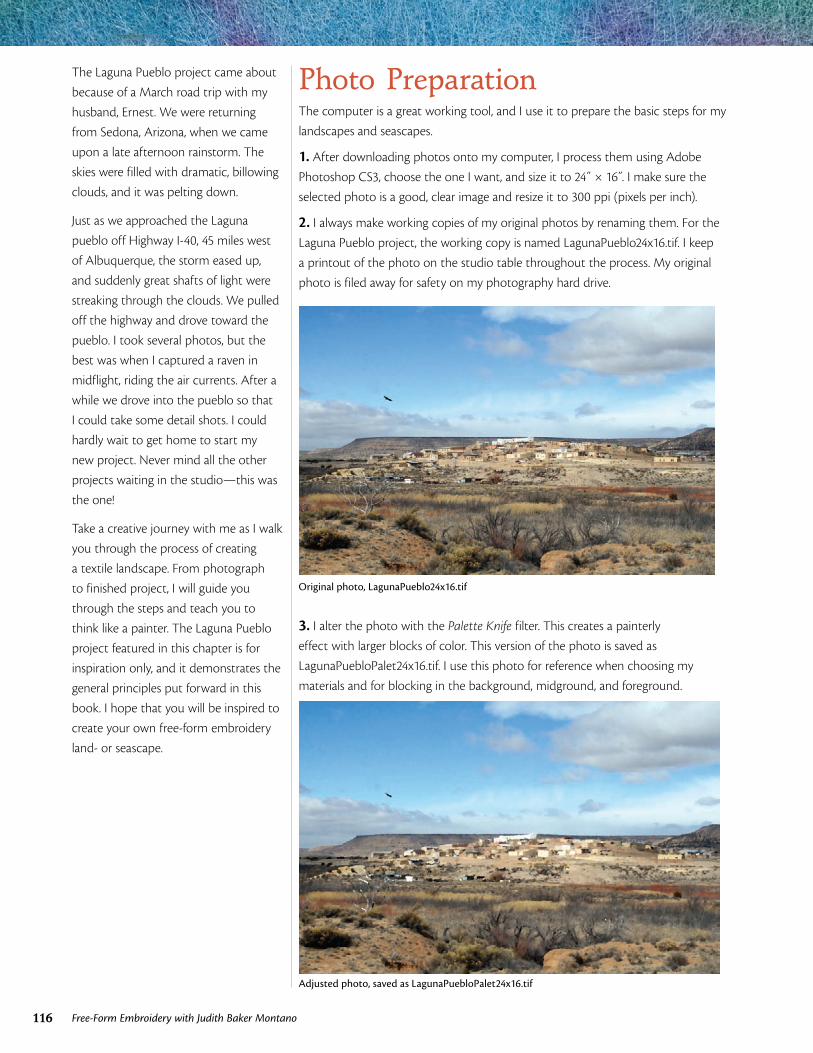
116 Free-Form Embroidery with Judith Baker Montano
The Laguna Pueblo project came about
because of a March road trip with my
husband, Ernest. We were returning
from Sedona, Arizona, when we came
upon a late afternoon rainstorm. The
skies were filled with dramatic, billowing
clouds, and it was pelting down.
Just as we approached the Laguna
pueblo off Highway I-40, 45 miles west
of Albuquerque, the storm eased up,
and suddenly great shafts of light were
streaking through the clouds. We pulled
off the highway and drove toward the
pueblo. I took several photos, but the
best was when I captured a raven in
midflight, riding the air currents. After a
while we drove into the pueblo so that
I could take some detail shots. I could
hardly wait to get home to start my
new project. Never mind all the other
projects waiting in the studio—this was
the one!
Take a creative journey with me as I walk
you through the process of creating
a textile landscape. From photograph
to finished project, I will guide you
through the steps and teach you to
think like a painter. The Laguna Pueblo
project featured in this chapter is for
inspiration only, and it demonstrates the
general principles put forward in this
book. I hope that you will be inspired to
create your own free-form embroidery
land- or seascape.
Photo PreparationThe computer is a great working tool, and I use it to prepare the basic steps for my
landscapes and seascapes.
1. After downloading photos onto my computer, I process them using Adobe
Photoshop CS3, choose the one I want, and size it to 24˝ × 16 .̋ I make sure the
selected photo is a good, clear image and resize it to 300 ppi (pixels per inch).
2. I always make working copies of my original photos by renaming them. For the
Laguna Pueblo project, the working copy is named LagunaPueblo24x16.tif. I keep
a printout of the photo on the studio table throughout the process. My original
photo is filed away for safety on my photography hard drive.
Original photo, LagunaPueblo24x16.tif
3. I alter the photo with the Palette Knife filter. This creates a painterly
effect with larger blocks of color. This version of the photo is saved as
LagunaPuebloPalet24x16.tif. I use this photo for reference when choosing my
materials and for blocking in the background, midground, and foreground.
Adjusted photo, saved as LagunaPuebloPalet24x16.tif
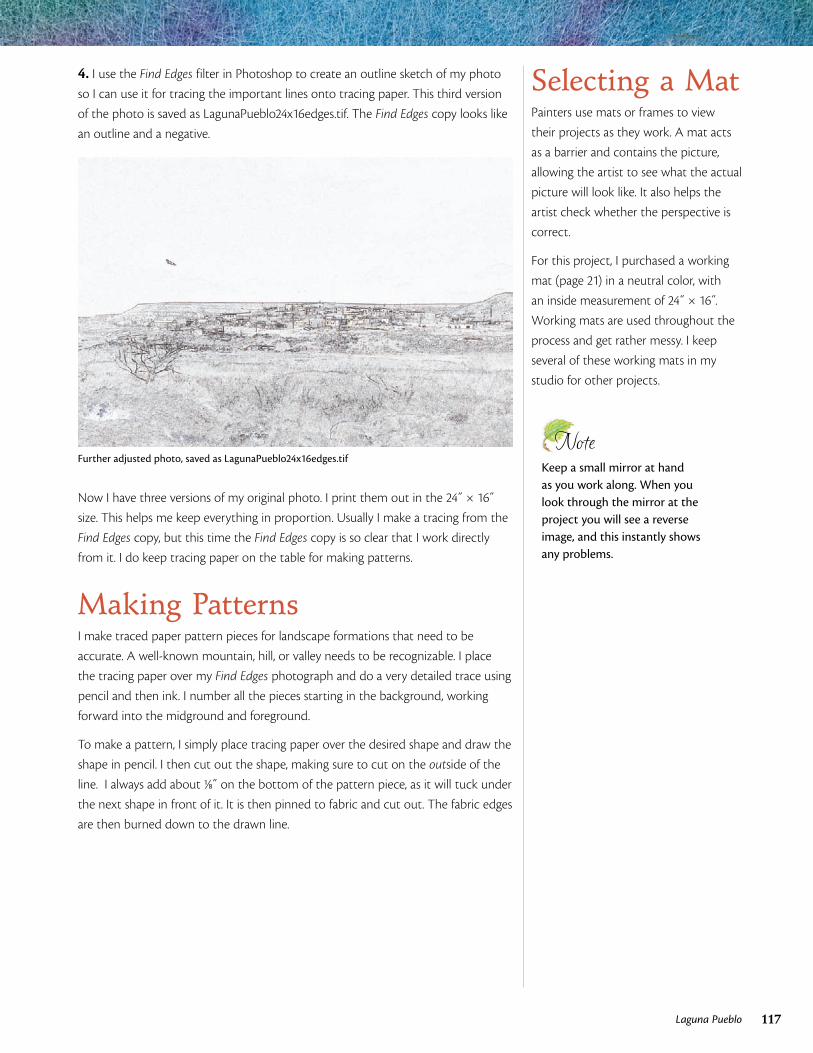
117Laguna Pueblo
4. I use the Find Edges filter in Photoshop to create an outline sketch of my photo
so I can use it for tracing the important lines onto tracing paper. This third version
of the photo is saved as LagunaPueblo24x16edges.tif. The Find Edges copy looks like
an outline and a negative.
Further adjusted photo, saved as LagunaPueblo24x16edges.tif
Now I have three versions of my original photo. I print them out in the 24˝ × 16˝
size. This helps me keep everything in proportion. Usually I make a tracing from the
Find Edges copy, but this time the Find Edges copy is so clear that I work directly
from it. I do keep tracing paper on the table for making patterns.
Making PatternsI make traced paper pattern pieces for landscape formations that need to be
accurate. A well-known mountain, hill, or valley needs to be recognizable. I place
the tracing paper over my Find Edges photograph and do a very detailed trace using
pencil and then ink. I number all the pieces starting in the background, working
forward into the midground and foreground.
To make a pattern, I simply place tracing paper over the desired shape and draw the
shape in pencil. I then cut out the shape, making sure to cut on the outside of the
line. I always add about 1/8˝ on the bottom of the pattern piece, as it will tuck under
the next shape in front of it. It is then pinned to fabric and cut out. The fabric edges
are then burned down to the drawn line.
Selecting a MatPainters use mats or frames to view
their projects as they work. A mat acts
as a barrier and contains the picture,
allowing the artist to see what the actual
picture will look like. It also helps the
artist check whether the perspective is
correct.
For this project, I purchased a working
mat (page 21) in a neutral color, with
an inside measurement of 24˝ × 16 .̋
Working mats are used throughout the
process and get rather messy. I keep
several of these working mats in my
studio for other projects.
NoteKeep a small mirror at hand as you work along. When you look through the mirror at the project you will see a reverse image, and this instantly shows any problems.
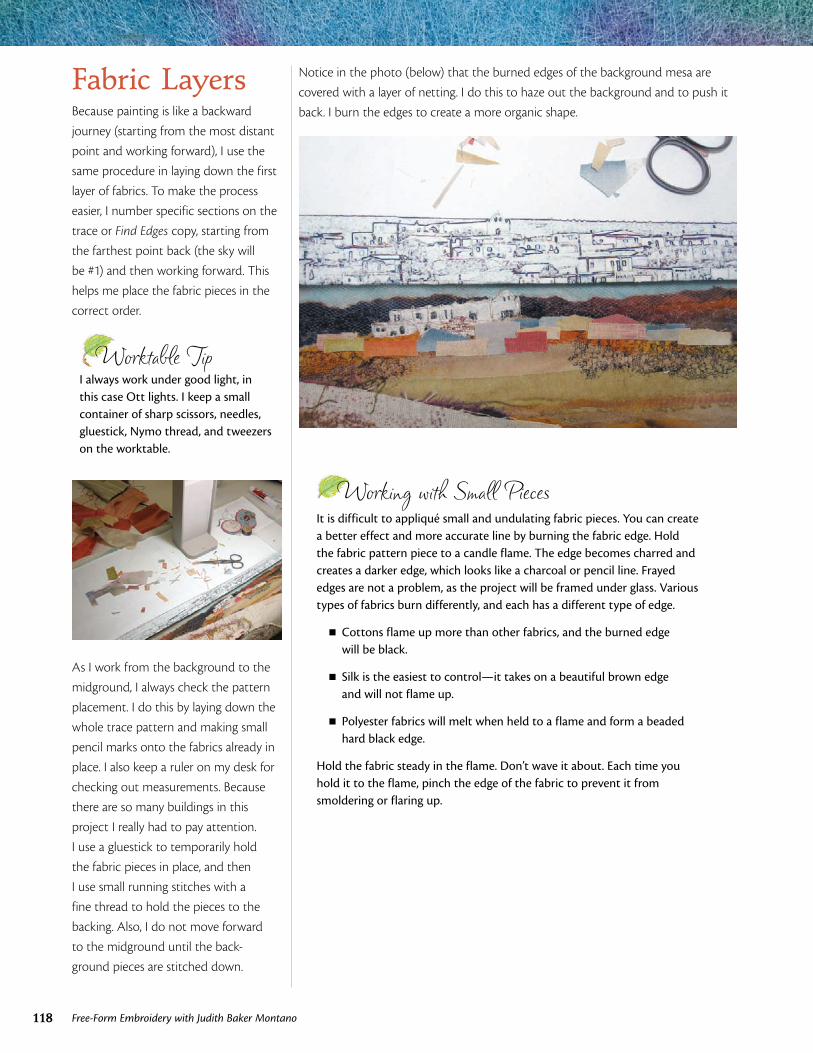
118 Free-Form Embroidery with Judith Baker Montano
Fabric LayersBecause painting is like a backward
journey (starting from the most distant
point and working forward), I use the
same procedure in laying down the first
layer of fabrics. To make the process
easier, I number specific sections on the
trace or Find Edges copy, starting from
the farthest point back (the sky will
be #1) and then working forward. This
helps me place the fabric pieces in the
correct order.
I always work under good light, in this case Ott lights. I keep a small container of sharp scissors, needles, gluestick, Nymo thread, and tweezers on the worktable.
Worktable Tip
As I work from the background to the
midground, I always check the pattern
placement. I do this by laying down the
whole trace pattern and making small
pencil marks onto the fabrics already in
place. I also keep a ruler on my desk for
checking out measurements. Because
there are so many buildings in this
project I really had to pay attention.
I use a gluestick to temporarily hold
the fabric pieces in place, and then
I use small running stitches with a
fine thread to hold the pieces to the
backing. Also, I do not move forward
to the midground until the back-
ground pieces are stitched down.
Notice in the photo (below) that the burned edges of the background mesa are
covered with a layer of netting. I do this to haze out the background and to push it
back. I burn the edges to create a more organic shape.
Working with Small PiecesIt is difficult to appliqué small and undulating fabric pieces. You can create a better effect and more accurate line by burning the fabric edge. Hold the fabric pattern piece to a candle flame. The edge becomes charred and creates a darker edge, which looks like a charcoal or pencil line. Frayed edges are not a problem, as the project will be framed under glass. Various types of fabrics burn differently, and each has a different type of edge.
� Cottons flame up more than other fabrics, and the burned edge will be black.
� Silk is the easiest to control—it takes on a beautiful brown edge and will not flame up.
� Polyester fabrics will melt when held to a flame and form a beaded hard black edge.
Hold the fabric steady in the flame. Don’t wave it about. Each time you hold it to the flame, pinch the edge of the fabric to prevent it from smoldering or flaring up.
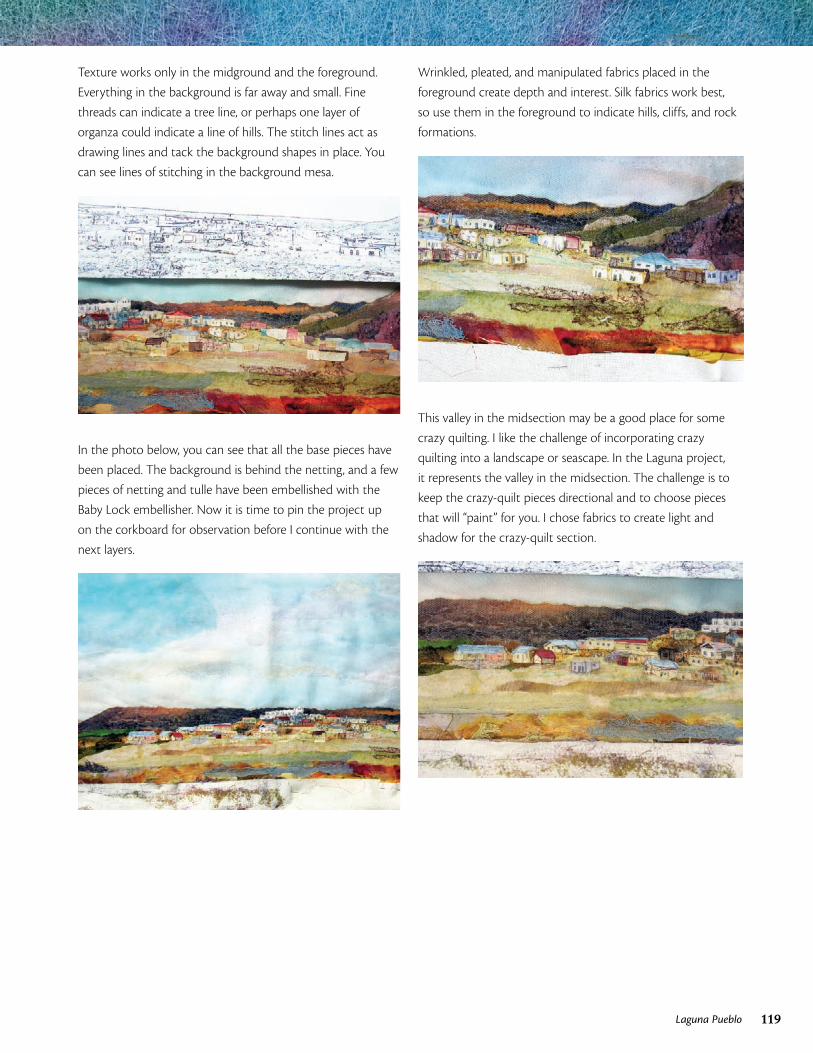
119Laguna Pueblo
Texture works only in the midground and the foreground.
Everything in the background is far away and small. Fine
threads can indicate a tree line, or perhaps one layer of
organza could indicate a line of hills. The stitch lines act as
drawing lines and tack the background shapes in place. You
can see lines of stitching in the background mesa.
In the photo below, you can see that all the base pieces have
been placed. The background is behind the netting, and a few
pieces of netting and tulle have been embellished with the
Baby Lock embellisher. Now it is time to pin the project up
on the corkboard for observation before I continue with the
next layers.
Wrinkled, pleated, and manipulated fabrics placed in the
foreground create depth and interest. Silk fabrics work best,
so use them in the foreground to indicate hills, cliffs, and rock
formations.
This valley in the midsection may be a good place for some
crazy quilting. I like the challenge of incorporating crazy
quilting into a landscape or seascape. In the Laguna project,
it represents the valley in the midsection. The challenge is to
keep the crazy-quilt pieces directional and to choose pieces
that will “paint” for you. I chose fabrics to create light and
shadow for the crazy-quilt section.
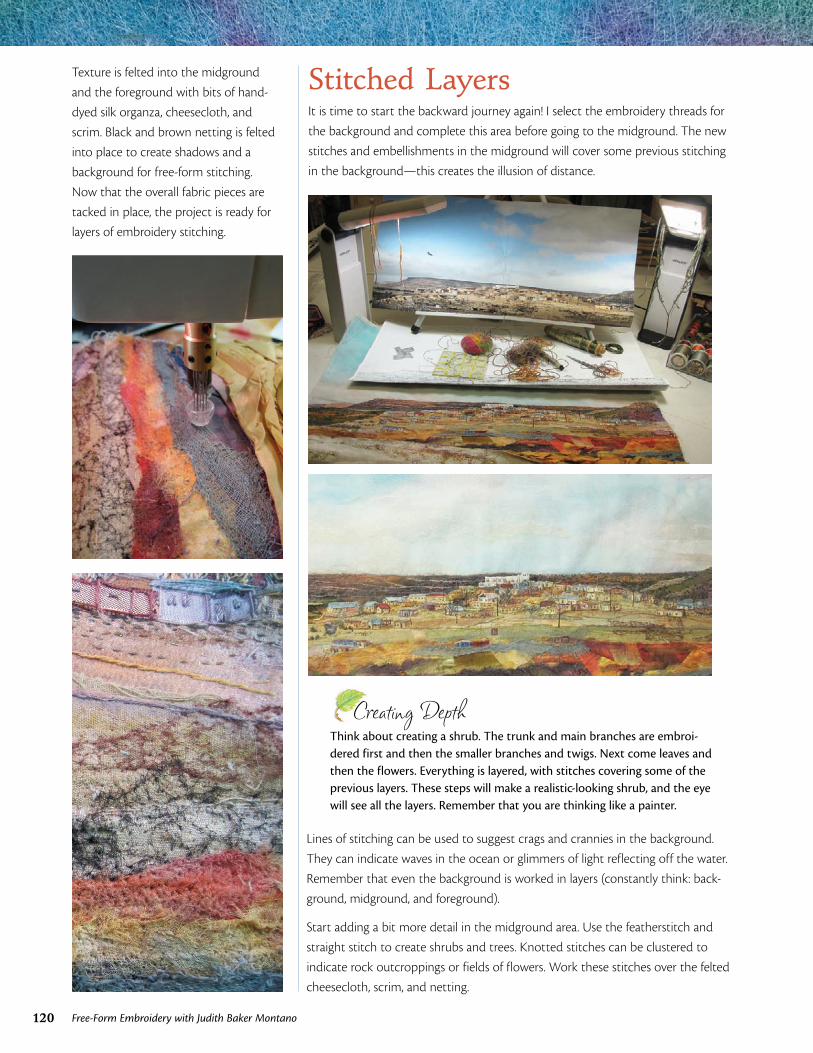
120 Free-Form Embroidery with Judith Baker Montano
Texture is felted into the midground
and the foreground with bits of hand-
dyed silk organza, cheesecloth, and
scrim. Black and brown netting is felted
into place to create shadows and a
background for free-form stitching.
Now that the overall fabric pieces are
tacked in place, the project is ready for
layers of embroidery stitching.
Stitched LayersIt is time to start the backward journey again! I select the embroidery threads for
the background and complete this area before going to the midground. The new
stitches and embellishments in the midground will cover some previous stitching
in the background—this creates the illusion of distance.
Lines of stitching can be used to suggest crags and crannies in the background.
They can indicate waves in the ocean or glimmers of light reflecting off the water.
Remember that even the background is worked in layers (constantly think: back-
ground, midground, and foreground).
Start adding a bit more detail in the midground area. Use the featherstitch and
straight stitch to create shrubs and trees. Knotted stitches can be clustered to
indicate rock outcroppings or fields of flowers. Work these stitches over the felted
cheesecloth, scrim, and netting.
Creating DepthThink about creating a shrub. The trunk and main branches are embroi-dered first and then the smaller branches and twigs. Next come leaves and then the flowers. Everything is layered, with stitches covering some of the previous layers. These steps will make a realistic-looking shrub, and the eye will see all the layers. Remember that you are thinking like a painter.
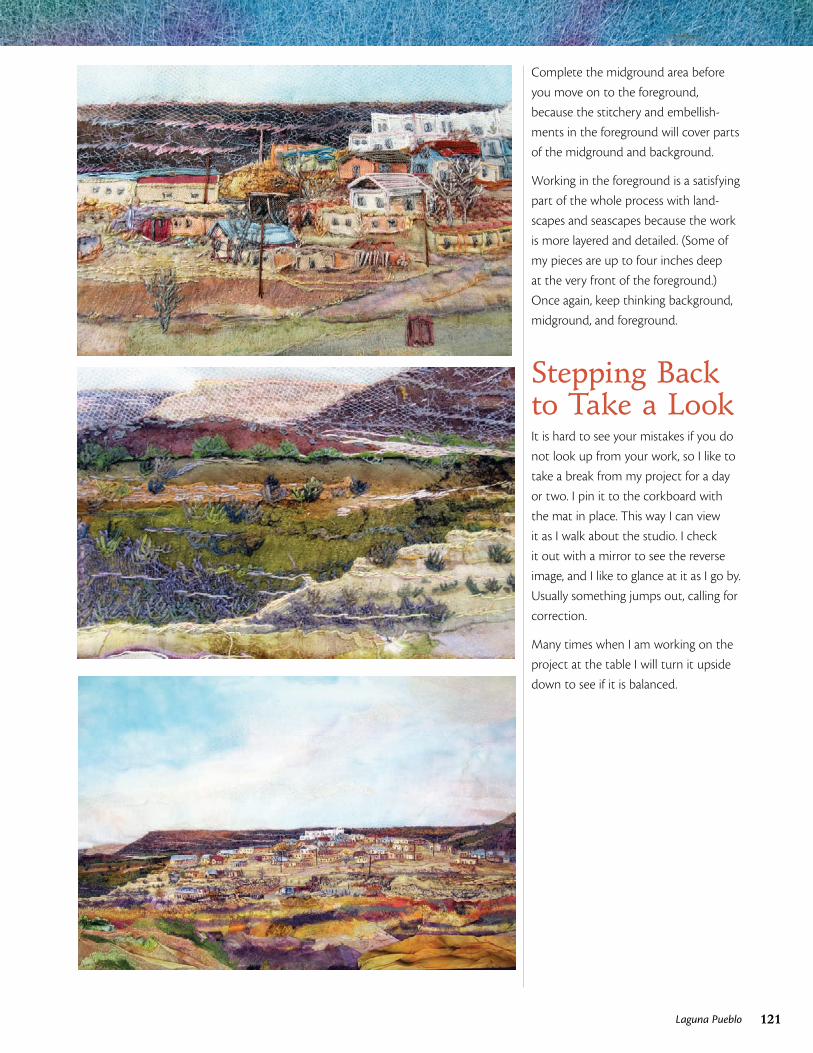
121Laguna Pueblo
Stepping Back to Take a LookIt is hard to see your mistakes if you do
not look up from your work, so I like to
take a break from my project for a day
or two. I pin it to the corkboard with
the mat in place. This way I can view
it as I walk about the studio. I check
it out with a mirror to see the reverse
image, and I like to glance at it as I go by.
Usually something jumps out, calling for
correction.
Many times when I am working on the
project at the table I will turn it upside
down to see if it is balanced.
Complete the midground area before
you move on to the foreground,
because the stitchery and embellish-
ments in the foreground will cover parts
of the midground and background.
Working in the foreground is a satisfying
part of the whole process with land-
scapes and seascapes because the work
is more layered and detailed. (Some of
my pieces are up to four inches deep
at the very front of the foreground.)
Once again, keep thinking background,
midground, and foreground.
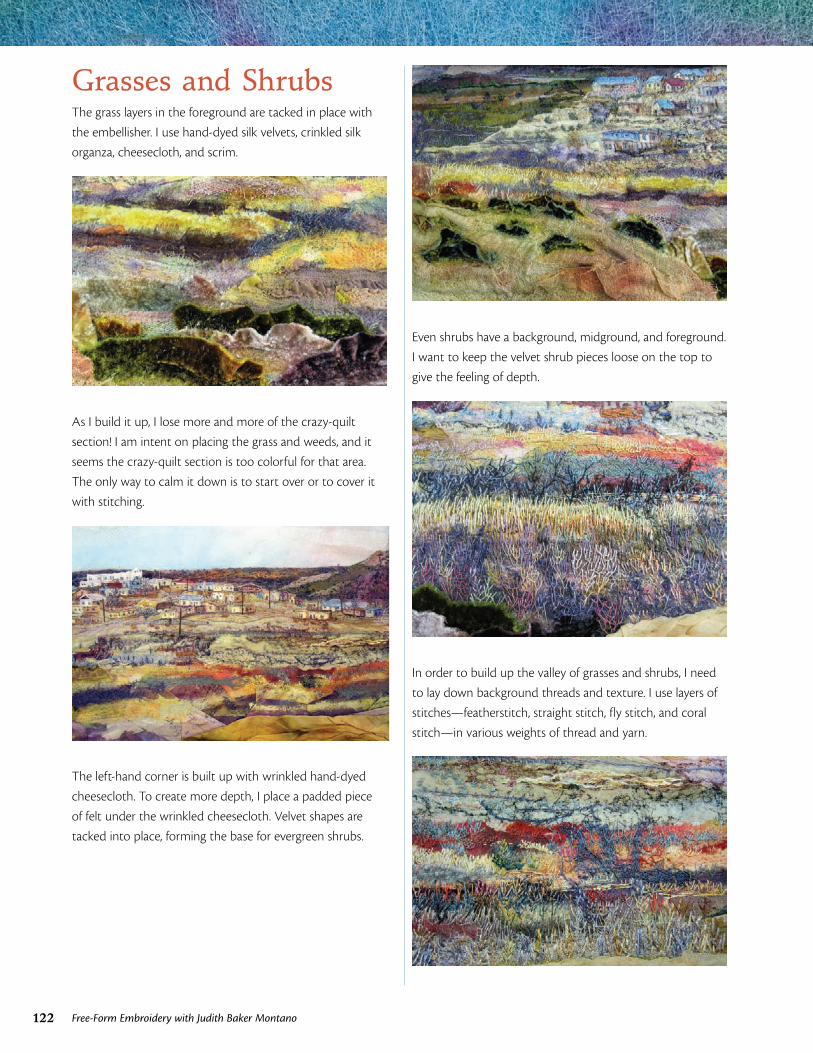
122 Free-Form Embroidery with Judith Baker Montano
Grasses and ShrubsThe grass layers in the foreground are tacked in place with
the embellisher. I use hand-dyed silk velvets, crinkled silk
organza, cheesecloth, and scrim.
As I build it up, I lose more and more of the crazy-quilt
section! I am intent on placing the grass and weeds, and it
seems the crazy-quilt section is too colorful for that area.
The only way to calm it down is to start over or to cover it
with stitching.
The left-hand corner is built up with wrinkled hand-dyed
cheesecloth. To create more depth, I place a padded piece
of felt under the wrinkled cheesecloth. Velvet shapes are
tacked into place, forming the base for evergreen shrubs.
Even shrubs have a background, midground, and foreground.
I want to keep the velvet shrub pieces loose on the top to
give the feeling of depth.
In order to build up the valley of grasses and shrubs, I need
to lay down background threads and texture. I use layers of
stitches—featherstitch, straight stitch, fly stitch, and coral
stitch—in various weights of thread and yarn.
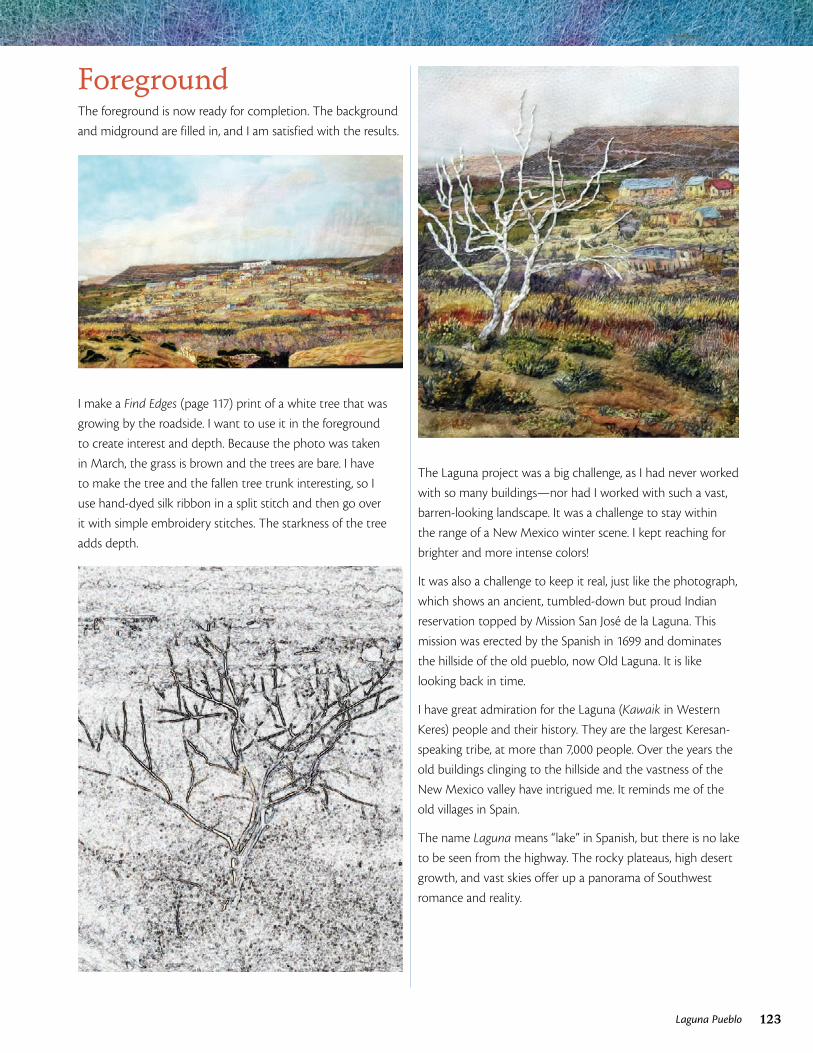
123Laguna Pueblo
ForegroundThe foreground is now ready for completion. The background
and midground are filled in, and I am satisfied with the results.
I make a Find Edges (page 117) print of a white tree that was
growing by the roadside. I want to use it in the foreground
to create interest and depth. Because the photo was taken
in March, the grass is brown and the trees are bare. I have
to make the tree and the fallen tree trunk interesting, so I
use hand-dyed silk ribbon in a split stitch and then go over
it with simple embroidery stitches. The starkness of the tree
adds depth.
The Laguna project was a big challenge, as I had never worked
with so many buildings—nor had I worked with such a vast,
barren-looking landscape. It was a challenge to stay within
the range of a New Mexico winter scene. I kept reaching for
brighter and more intense colors!
It was also a challenge to keep it real, just like the photograph,
which shows an ancient, tumbled-down but proud Indian
reservation topped by Mission San José de la Laguna. This
mission was erected by the Spanish in 1699 and dominates
the hillside of the old pueblo, now Old Laguna. It is like
looking back in time.
I have great admiration for the Laguna (Kawaik in Western
Keres) people and their history. They are the largest Keresan-
speaking tribe, at more than 7,000 people. Over the years the
old buildings clinging to the hillside and the vastness of the
New Mexico valley have intrigued me. It reminds me of the
old villages in Spain.
The name Laguna means “lake” in Spanish, but there is no lake
to be seen from the highway. The rocky plateaus, high desert
growth, and vast skies offer up a panorama of Southwest
romance and reality.
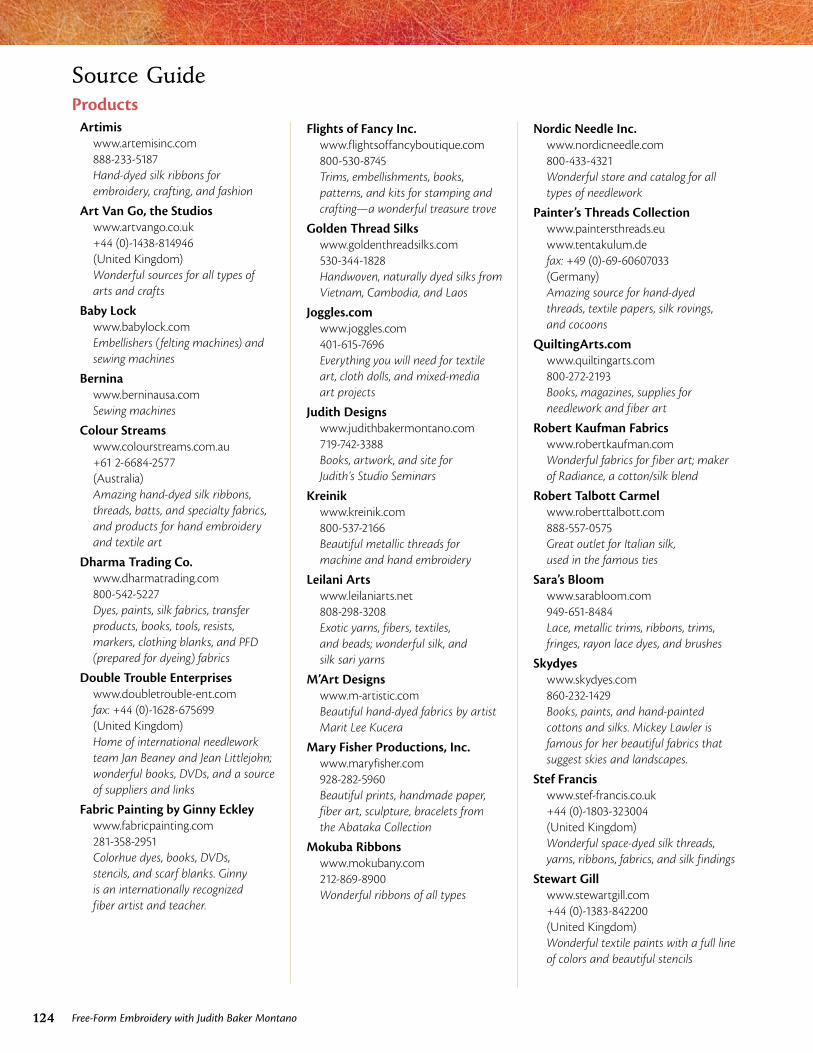
124 Free-Form Embroidery with Judith Baker Montano
Source GuideProducts
Artimiswww.artemisinc.com888-233-5187Hand-dyed silk ribbons for embroidery, crafting, and fashion
Art Van Go, the Studioswww.artvango.co.uk+44 (0)-1438-814946(United Kingdom)Wonderful sources for all types of arts and crafts
Baby Lockwww.babylock.comEmbellishers ( felting machines) and sewing machines
Berninawww.berninausa.comSewing machines
Colour Streamswww.colourstreams.com.au+61 2-6684-2577(Australia)Amazing hand-dyed silk ribbons, threads, batts, and specialty fabrics, and products for hand embroidery and textile art
Dharma Trading Co.www.dharmatrading.com800-542-5227Dyes, paints, silk fabrics, transfer products, books, tools, resists, markers, clothing blanks, and PFD (prepared for dyeing) fabrics
Double Trouble Enterpriseswww.doubletrouble-ent.comfax: +44 (0)-1628-675699 (United Kingdom)Home of international needlework team Jan Beaney and Jean Littlejohn; wonderful books, DVDs, and a source of suppliers and links
Fabric Painting by Ginny Eckleywww.fabricpainting.com281-358-2951Colorhue dyes, books, DVDs, stencils, and scarf blanks. Ginny is an internationally recognized fiber artist and teacher.
Flights of Fancy Inc.www.flightsoffancyboutique.com800-530-8745Trims, embellishments, books, patterns, and kits for stamping and crafting—a wonderful treasure trove
Golden Thread Silkswww.goldenthreadsilks.com530-344-1828Handwoven, naturally dyed silks from Vietnam, Cambodia, and Laos
Joggles.comwww.joggles.com401-615-7696Everything you will need for textile art, cloth dolls, and mixed-media art projects
Judith Designswww.judithbakermontano.com719-742-3388Books, artwork, and site for Judith’s Studio Seminars
Kreinikwww.kreinik.com800-537-2166Beautiful metallic threads for machine and hand embroidery
Leilani Artswww.leilaniarts.net808-298-3208Exotic yarns, fibers, textiles, and beads; wonderful silk, and silk sari yarns
M’Art Designswww.m-artistic.comBeautiful hand-dyed fabrics by artist Marit Lee Kucera
Mary Fisher Productions, Inc.www.maryfisher.com928-282-5960Beautiful prints, handmade paper, fiber art, sculpture, bracelets from the Abataka Collection
Mokuba Ribbonswww.mokubany.com212-869-8900Wonderful ribbons of all types
Nordic Needle Inc.www.nordicneedle.com800-433-4321Wonderful store and catalog for all types of needlework
Painter’s Threads Collectionwww.paintersthreads.euwww.tentakulum.defax: +49 (0)-69-60607033(Germany)Amazing source for hand-dyed threads, textile papers, silk rovings, and cocoons
QuiltingArts.comwww.quiltingarts.com800-272-2193Books, magazines, supplies for needlework and fiber art
Robert Kaufman Fabricswww.robertkaufman.comWonderful fabrics for fiber art; maker of Radiance, a cotton/silk blend
Robert Talbott Carmelwww.roberttalbott.com888-557-0575Great outlet for Italian silk, used in the famous ties
Sara’s Bloomwww.sarabloom.com949-651-8484Lace, metallic trims, ribbons, trims, fringes, rayon lace dyes, and brushes
Skydyeswww.skydyes.com860-232-1429Books, paints, and hand-painted cottons and silks. Mickey Lawler is famous for her beautiful fabrics that suggest skies and landscapes.
Stef Franciswww.stef-francis.co.uk+44 (0)-1803-323004(United Kingdom)Wonderful space-dyed silk threads, yarns, ribbons, fabrics, and silk findings
Stewart Gillwww.stewartgill.com+44 (0)-1383-842200(United Kingdom)Wonderful textile paints with a full line of colors and beautiful stencils

125Source Guide
St. Theresa Textile Trovewww.sttheresatextile.com859-380-2833African artifacts, beads, fabrics, trims, and jewelry findings
Superior Threadswww.superiorthreads.com800-499-1777Supplier of fine threads in cotton and silk, in variegated colors, and silk ribbons
Susan Clarke Originalswww.susanclarkeoriginals.com530-246 8880Buttons, charms, glass, and enamel
Thai Silkswww.thaisilks.com800-722-7455More than 1,400 silk fabrics of every kind; blank scarves and artist items
The Thread Studiowww.thethreadstudio.com+61 8-9227-1561(Australia)Amazing and unusual threads; everything for textile art, online workshops, and books (orders by phone or email only)
Treenway Silkswww.treenwaysilks.com888-383-7455Silk ribbon, threads, many unusual silk products; Montano Series of variegated silk threads and ribbons
YLI Corporationwww.ylicorp.com803-985-3100A wonderful variety of threads in silk, rayon, nylon, metallic, and cotton for embroidery, quilting, sewing, serging, and embellishing
Schools and AssociationsCity and Guilds
www.cityandguilds.com/uk(United Kingdom)
Constance Howard Resource and Research Centre in Textiles
www.gold.ac.uk/constance-howard+44 (0)-2077-172210 (United Kingdom)
Embroiderers’ Guildwww.embroiderersguild.com+44 (0)-1932-260738 (United Kingdom)
Gail Harker Creative Studies Centerwww.gailcreativestudies.com360-279-2105
Royal School of Needleworkwww.royal-needlework.org.uk+44 (0)-2031-666932(United Kingdom)
School of Stitched Textileswww.sofst.org+44 (0)-1257-463163(United Kingdom)
Surface Design Associationwww.surfacedesign.org707-829-3110
Windsor School of Textile Arts (East Berkshire College)
www.eastberks.ac.uk+44 (0)-1753-793000(United Kingdom)
Artists, Teachers, and More Inspiration
The 62 Groupwww.62group.org.uk
Barbara Lee Smithwww.barbaraleesmith.com
Carol Shinnwww.carolshinn.com
Erica Wilson and Vladimir Kaganwww.ericawilson.com
www.nantuckettodayonline.com (under Archives, click “Revisit past issues” > “Nov./Dec. 2008” > “Creatively Kagan”)
www.theselby.com (under Manhattan, click “erica wilson & vladimir kagan”)Wonderful photos of Erica Wilson’s New York apartment
Jan Beaney and Jean Littlejohnwww.doubletrouble-ent.com
Kaffe Fassettwww.kaffefassett.com
Mary Corbet’s Needle ’n Threadwww.needlenthread.comWonderful, informative website
Selvedge Magazinewww.selvedge.org
Textile Artswww.textilearts.net
Verina Warrenwww.verinawarren.co.uk
126 Free-Form Embroidery with Judith Baker Montano
BooksBeaney, Jan. The Art of the Needle: Designing in Fabric and Threads. London: Century Hutchinson, 1988.
Beaney, Jan. Stitches: New Approaches. London: Batsford, 2004.
Beaney, Jan, and Jean Littlejohn. A Complete Guide to Creative Embroidery: Designs • Textures • Stitches. London: Batsford, 2003.
Beaney, Jan, and Jean Littlejohn. Stitch Magic: Ideas and Interpretation. London: Batsford, 2005.
Box, Richard. Color and Design for Embroidery. Dulles, VA: Brassey’s Inc., 2000.
Box, Richard. The Embroidered Countryside. London: Batsford, 1995.
Box, Richard. Flowers for Embroidery: A Step-by-Step Approach. London: Batsford, 1993.
Brickell, Christopher, and H. Marc Cathey, eds. The American Horticultural A–Z Encyclopedia of Garden Plants. New York: DK Publishing, Inc. 1996.
Brown, Pauline. Decoration on Fabric: A Sourcebook of Ideas. London: Guild of Master Craftsman Publications, 2002.
Embroiderers’ Guild, The. Embroidery Studio—The Ultimate Workshop: Design, Technique and Inspiration. Newton Abbot, UK: David and Charles, 1996.
Fassett, Kaffe. Kaffe Fassett’s Glorious Color for Needlepoint and Knitting. New York: Sterling Publishing Company, Inc., 2000.
Fassett, Kaffe. Glorious Inspirations: Sources from Art and Nature for Innovative Needlework Designs. New York: Clarkson Potter Publishers, 1991.
Fassett, Kaffe. Glorious Needlepoint. New York: Three Rivers Press, 1992.
Fassett, Kaffe, and Candace Bahouth. Mosaics: Inspiration and 24 Original Projects for Interiors and Exteriors. Newtown, CT: The Taunton Press, Inc., 2001.
Fassett, Kaffe, with Liza Prior Lucy. Glorious Patchwork: More Than 25 Glorious Quilt Designs. New York: Clarkson Potter Publishers, 1997.
Grey, Maggie. From Image to Stitch. London: Batsford, 2008.
Grier, Rosey, and Dennis Baker. Rosey, an Autobiography: The Gentle Giant. Tulsa, OK: Honor Books, 1986.
Hall, Jane. The Art and Embroidery of Jane Hall: Reflections of Nature. Turnbridge Wells, UK: Search Press Ltd., 2010.
Hedley, Gwen. Drawn to Stitch: Line, Drawing, and Mark-Making in Textile Art. Loveland, CO: Interweave Press, 2010.
Howard, Constance. The Constance Howard Book of Stitches. London: Batsford, 2005.
Howard, Constance. Embroidery and Colour. London: Batsford, 1976.
Kahn, Sherrill. Creative Embellishments for Paper, Jewelry, Fabric, and More. Woodinville, WA: Martingale & Company, 2007.
Langford, Pat. Embroidery from Sketch to Stitch. Cammeray, Australia: Simon & Schuster Australia, 2001.
Lees, Wendy. Inspired to Stitch: The Creative Embroidery Course. Newton Abbot, UK: David and Charles, 1994.
Macoboy, Stirling. Stirling Macoboy’s What Flower Is That? Edison, NJ: Chartwell Books, 2000.
Meech, Sandra. Connecting Art to Stitch. London: Batsford, 2009.
Meech, Sandra. Contemporary Quilts: Design, Surface and Stitch. London: Batsford, 2007.
Mein, Annemieke. The Art of Annemieke Mein: Wildlife Artist in Textiles. Turnbridge Wells, UK: Search Press Ltd., 2008.
Shinn, Carol. Freestyle Machine Embroidery: Techniques and Inspiration for Fiber Art. Loveland, CO: Interweave Press, 2009.
Smith, Barbara Lee. Celebrating the Stitch: Contemporary Embroidery of North America. Newtown, CT: The Taunton Press, Inc., 1991.
Snyderman, Marty, and M. Tundi Agardy. Life in the Sea. Lincolnwood, IL: Publications International, 1997.
Springall, Diana. Inspired to Stitch: 21 Textile Artists. London: A&C Black, 2005.
Taylor’s Guide to Shrubs (Kathleen Fisher, ed., 2000), Taylor’s Guide to Trees (Susan A. Roth, ed., 2001), Taylor’s Guide to Natural Gardening (Roger Holmes, ed., 1993). Based on Taylor’s Encyclopedia of Gardening. Boston: Houghton Mifflin Company.
Warren, Verina. Landscape in Embroidery. London: Batsford, 1990.
Watts, Pamela. Embroidered Flowers. London: Batsford, 2003.
Wilson, Erica. Erica Wilson’s Embroidery Book. New York: Charles Scribner’s Sons, 1973.
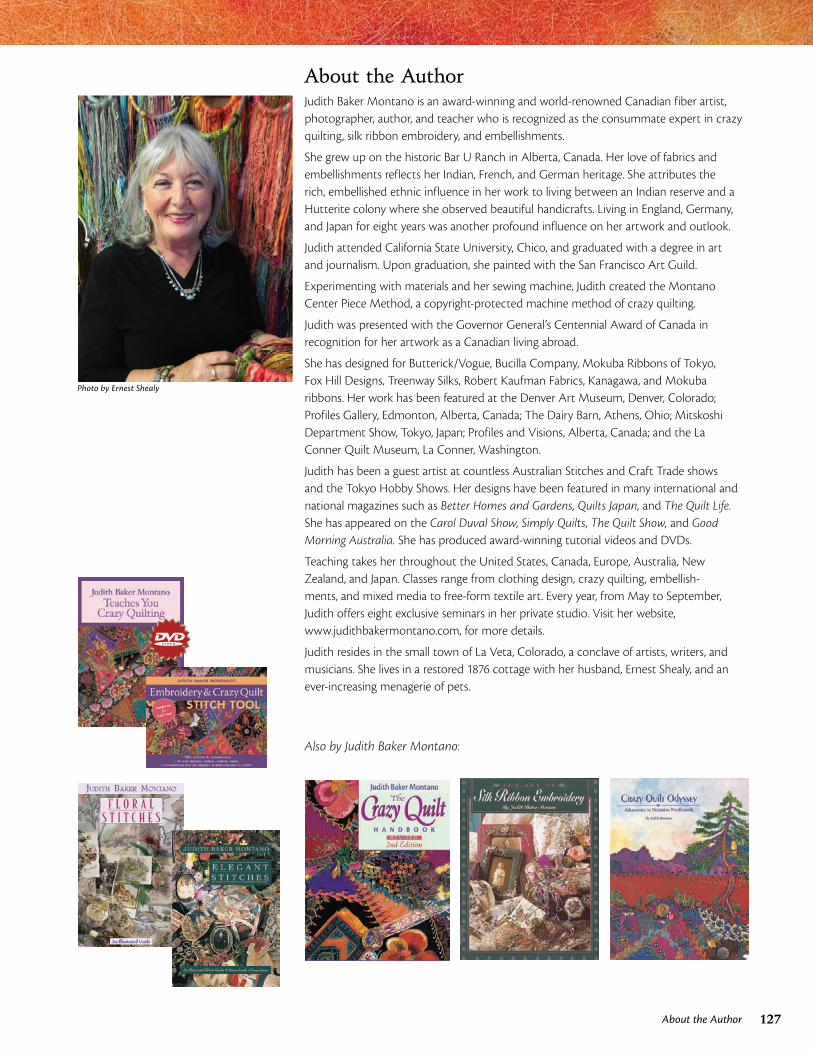
127About the Author
About the AuthorJudith Baker Montano is an award-winning and world-renowned Canadian fiber artist, photographer, author, and teacher who is recognized as the consummate expert in crazy quilting, silk ribbon embroidery, and embellishments.
She grew up on the historic Bar U Ranch in Alberta, Canada. Her love of fabrics and embellishments reflects her Indian, French, and German heritage. She attributes the rich, embellished ethnic influence in her work to living between an Indian reserve and a Hutterite colony where she observed beautiful handicrafts. Living in England, Germany, and Japan for eight years was another profound influence on her artwork and outlook.
Judith attended California State University, Chico, and graduated with a degree in art and journalism. Upon graduation, she painted with the San Francisco Art Guild.
Experimenting with materials and her sewing machine, Judith created the Montano Center Piece Method, a copyright-protected machine method of crazy quilting.
Judith was presented with the Governor General’s Centennial Award of Canada in recognition for her artwork as a Canadian living abroad.
She has designed for Butterick/Vogue, Bucilla Company, Mokuba Ribbons of Tokyo, Fox Hill Designs, Treenway Silks, Robert Kaufman Fabrics, Kanagawa, and Mokuba ribbons. Her work has been featured at the Denver Art Museum, Denver, Colorado; Profiles Gallery, Edmonton, Alberta, Canada; The Dairy Barn, Athens, Ohio; Mitskoshi Department Show, Tokyo, Japan; Profiles and Visions, Alberta, Canada; and the La Conner Quilt Museum, La Conner, Washington.
Judith has been a guest artist at countless Australian Stitches and Craft Trade shows and the Tokyo Hobby Shows. Her designs have been featured in many international and national magazines such as Better Homes and Gardens, Quilts Japan, and The Quilt Life. She has appeared on the Carol Duval Show, Simply Quilts, The Quilt Show, and Good Morning Australia. She has produced award-winning tutorial videos and DVDs.
Teaching takes her throughout the United States, Canada, Europe, Australia, New Zealand, and Japan. Classes range from clothing design, crazy quilting, embellish-ments, and mixed media to free-form textile art. Every year, from May to September, Judith offers eight exclusive seminars in her private studio. Visit her website, www.judithbakermontano.com, for more details.
Judith resides in the small town of La Veta, Colorado, a conclave of artists, writers, and musicians. She lives in a restored 1876 cottage with her husband, Ernest Shealy, and an ever-increasing menagerie of pets.
Also by Judith Baker Montano:
Photo by Ernest Shealy
Great Products from C&T PUBLISHING
Available at your local retailer or www.ctpub.com or 800-284-1114
For a list of other fine books from C&T Publishing, visit our website to view our catalog online.P.O. Box 1456 Lafayette, CA 94549 800-284-1114
C&T Publishing’s professional photography services are now available to the public. Visit us at www.ctmediaservices.com.
Tips and Techniques can be found at www.ctpub.com > Consumer Resources > Quiltmaking Basics: Tips & Techniques for Quiltmaking & More
Email: [email protected] Website: www.ctpub.com
For quilting supplies:
COTTON PATCH1025 Brown Ave. Lafayette, CA 94549 Store: 925-284-1177 Mail order: 925-283-7883
Note: Fabrics shown may not be currently available, as fabric manufacturers keep most fabrics in print for only a short time.
Email: [email protected] Website: www.quiltusa.com

Free-Form Embroidery with Judith Baker Montano Download
Copyright © 2011 by C&T Publishing, Inc.
ISBN 978-1-60705-573-0
Published by C&T Publishing, Inc., PO Box 1456, Lafayette, CA 94549. www.ctpub.com
All rights reserved. No part of this work covered by the copyright hereon may be used in any form or reproduced by any means—graphic, electronic, or mechanical, including photocopying, recording, taping, or information storage and retrieval systems—without written permission from the Publisher.
Acceptable uses of this ELECTRONIC PRODUCT:
1. Purchaser is entitled to print out as many copies of this ELECTRONIC PRODUCT as they wish for personal use. Photocopying, digitizing, and all other forms of copying to “share” or “distribute” the ELECTRONIC PRODUCT, whether for profit or not, is strictly prohibited.
2. Purchaser may not transfer the ELECTRONIC PRODUCT to any other person, via the Internet, email, on disk, in electronic or printed form or any other form without the written permission of C&T Publishing. Purchaser may not make the ELECTRONIC PRODUCT available over a network where it could be used by multiple computers at the same time.
3. Purchaser may not rent, lease, transfer, lend, or share the ELECTRONIC PRODUCT.
Limited Warranty: Limited Warranty on this ELECTRONIC PRODUCT. C&T Publishing, Inc. warrants the ELECTRONIC PRODUCT will be delivered by C&T Publishing, Inc. free from defects in materials and workmanship under normal use for a period of ninety (90) days from the date of original purchase. C&T Publishing, Inc. will not replace the ELECTRONIC PRODUCT due to Purchaser changing computers or accidentally deleting ELECTRONIC PRODUCT or for any other loss of the file that is considered out of the control of C&T Publishing, Inc. Your exclusive remedy under this Section shall be, at C&T Publishing, Inc.’s option, a refund of the purchase price of the ELECTRONIC PRODUCT.
Contact us at 800-284-1114 or www.ctpub.com for more information about the C&T Teachers Program.
We take great care to ensure that the information included in our products is accurate and presented in good faith, but no warranty is provided nor are results guaranteed. Having no control over the choices of materials or procedures used, neither the author nor C&T Publishing, Inc., shall have any liability to any person or entity with respect to any loss or damage caused directly or indirectly by the information contained in this book. For your convenience, we post an up-to-date listing of corrections on our website (www.ctpub.com). If a correction is not already noted, please contact our customer service department at [email protected] or at P.O. Box 1456, Lafayette, CA 94549.
Trademark (™) and registered trademark (®) names are used throughout this ELECTRONIC PRODUCT. Rather than use the symbols with every occurrence of a trademark or registered trademark name, we are using the names only in the editorial fashion and to the benefit of the owner, with no intention of infringement.
Pattern Note: This digital file contains patterns that may not print true to size and may require sizing adjustments (inchmarks are included on patterns for reference). Depending on your viewing application or device, printing desired page may result in multiple printed pages.

Quiltmaking
Sewing
Fiber Arts & Mixed Media
Needle Arts
Papercrafts Create & Treasure
Notions & Interfacing
DVD’s
Gifts
Online Products
web www.ctpub.com n 1651 Challenge Drive, Concord, CA 94520 u.s. toll free 800.284.1114 n int’l 925.677.0377 n fax 925.677.0373from C&T Publishing
C&T Publishing is proud to offer you innovative books and products to inspire your creativity. look for our products at local quilt shops, craft and art supply stores, or fine book-sellers.
going green We have been working hard for the last several years to make our operations friendlier to the environment. We were certified as a California bay Area green business in 2007. since then, we have taken other major steps to green our operations, most notably by printing our catalogs and other sales materials on recycled paper. our catalogs and many of our most popular books are now available as downloads that you can view online. This is an important part of our efforts to save natural resources and reduce our carbon footprint.
inTeresTed in Publishing A book?
Have an idea for a new product?
We are always looking for original ideas for books, dVds, and related products. Visit our website and click on “submissions” to submit your proposal.
for purchasing an eProduct from C&T Publishing!
We appreciate your business!
Thank you
1022
93
Quiltmaking
Sewing
Fiber Arts & Mixed Media
Needle Arts
Papercrafts Create & Treasure
Tools, Notions & Interfacing
DVD’s
Gifts
Digital Products
Quiltmaking
Sewing
Fiber Arts & Mixed Media
Needle Arts
Papercrafts Create & Treasure
Notions & Interfacing
DVD’s
Gifts
Online Products
web www.ctpub.com n 1651 Challenge Drive, Concord, CA 94520 u.s. toll free 800.284.1114 n int’l 925.677.0377 n fax 925.677.0373from C&T Publishing
C&T Publishing is proud to offer you innovative books and products to inspire your creativity. look for our products at local quilt shops, craft and art supply stores, or fine book-sellers.
going green We have been working hard for the last several years to make our operations friendlier to the environment. We were certified as a California bay Area green business in 2007. since then, we have taken other major steps to green our operations, most notably by printing our catalogs and other sales materials on recycled paper. our catalogs and many of our most popular books are now available as downloads that you can view online. This is an important part of our efforts to save natural resources and reduce our carbon footprint.
inTeresTed in Publishing A book?
Have an idea for a new product?
We are always looking for original ideas for books, dVds, and related products. Visit our website and click on “submissions” to submit your proposal.
for purchasing an eProduct from C&T Publishing!
We appreciate your business!
Thank you
1022
93