Embed Size (px)
Citation preview

Use _ Care GuideConvection Microwave Oven
Mode d'emploi et d'entretienFour de Micro-onde/_ convection
Guia de Uso y CuidadoMicroondas de convecddn

2 Finding Information
Please read and save this guide
Thankyou for choosing Electrolux, the new premiumbrand in home appliances, This Use & Care Guideis part of our commitment to customer satisfactionand product quality throughout the service life of yournew appliance,
We view your purchase as the beginning of arelationship. To ensure our ability to continue servingyou, please use this page to record important productinformation,
Keep a record for quickreference
Purchase date
Electrolux model number
Electrolux serial number (see page 10 for location)
NOTE
Registering your product with Electrolux enhanc-es our ability to serve you. You can register onlineat www, electroluxusa.com or by dropping yourProduct Registration Card in the mail.
Table of Contents
FindingInformation............................................. 2
Safety............................................................ 3-5
InformationYouNeedToKnow.............................. 6-9
Part Names...................................................... 10
ControlPanelandMenu....................................... 11
BeforeOperating................................................ 12
Manual Operation............................................... 13
SensorModes............................................... 14-16
AutoCook.................................................... 17-19
ConvectionAulomaticOperation......................... 20-22
Manual ConvectionandAutomaticMix Cooking....... 23-26
QuickSettings................................................... 27
OtherSpecialFeatures......................................... 28
ConvenientFeatures....................................... 29-31
Cleaningand Care.............................................. 32
ServiceCall Check.............................................. 33
Speci|icatiens ................................................... 34
WarrantyInformation .......................................... 35
For toll-free telephone support in the U.S. and Canada:1-877-4ELECTROLUX (1-877-435-3287)For online support and Internet production informationvisit http :iiwww.electroluxusa.com
@2008Electrolux Home Products, lnc. All rights reserved.

Safety 3
i PORTA SAFETY I CTIONS
WARNING
When using electrical appliances, basic safetyprecautions should be followed to reduce the risk ofburns, electric shock, fire, injury to persons or exposureto excessive microwave energy:
• READ ALL instructions before using the appliance.
,, READ AND FOLLOW the specific "PRECAUTIONSTO AVOID POSSIBLE EXPOSURE TO EXCESSIVE
MICROWAVE ENERGY" on page 4.
• This appliance must be grounded. Connect onlyto properly grounded outlet. See "GROUNDINGINSTRUCTIONS" found on page 5.
• Install or locate this appliance only in accordance withthe provided installation instructions.
• Some products such as whole eggs and sealedcontainers - for example, closed jars - are able toexplode and SHOULD NOT be HEATED in thisoven.
• Use this appliance ONLY for its intended use asdescribed in this manual. DO NOT use corrosive
chemicals or vapors in this appliance. This type ofoven is specifically designed to heat, cook or dry food.It is not designed for industrial or laboratory use.
• As with any appliance, CLOSE SUPERVISION isnecessary when used by CHILDREN or INFIRMPERSONS.
,' DO NOT operate this appliance if it has a damagedcord or plug, if it is not working properly or if it hasbeen damaged or dropped.
• This appliance, including power cord, must beserviced ONLY by qualified service personnel.Contact nearest Electrolux Authorized Servicer for
examination, repair or adjustment.
,, DO NOT cover or block any vents or openings onthe oven.
• DO NOT store or use this appliance outdoors. DONOT use this product near water--for example, neara kitchen sink, in a wet basement, near a swimmingpool, or similar locations.
- DO NOT immerse cord or plug in water.
• Keep cord AWAY from HEATED surfaces.
,, DO NOT let cord hang over edge of table orcounter.
• Review the door cleaning instructions on page 32.,, DO NOT mount over a sink.
,, DO NOT store anything directly on top of the appliancesurface when the appliance is in operation.
]To reduce the risk of fire in the oven cavity:
,, DO NOT overcook food. Carefully attend toappliancewhen paper, plastic or other combustiblematerials are placed inside the oven to facilitatecooking.
• Remove wire twist-ties from paper or plastic bagsbefore placing bag in oven.
• If materials inside the oven ignite, keep ovendoor closed, turn oven off and disconnect thepower cord or shut off power at the fuse or circuitbreaker panel.
,, DO NOT use the cavity for storage purposes. DONOT leave paper products, cooking utensils or foodin the cavity when not in use.
Liquids, such as water, coffee or tea are able to beoverheated beyond the boiling point without appearingto be boiling. Visible bubbling or boiling when thecontainer is removed from the Convection Microwave
Oven is not always present. THIS COULD RESULTIN VERY HOT LIQUIDS SUDDENLY BOILING OVERWHEN A SPOON OR OTHER UTENSIL IS INSERTEDINTO THE LIQUID.
To reduce the risk of injury to persons:
,, DO NOT overheat the liquid.
• Stir the liquid both before and halfway throughheating it.
• DO NOT use straight-sided containers with narrownecks. Use a wide-mouthed container.
• After heating, allow the container to stand in theConvection Microwave Oven at least for 20 seconds
before removing the container.
• Use extreme care when inserting a spoon or otherutensil into the container.
If the oven light fails, consult a Electrolux AuthorizedServicer.
SAVE THESE INSTRUCTIONS

4 Safety
What you need to know about safety instructions
Warning and Important Instructions appearing in this guide are not meant to cover all possible conditions andsituations that may occur. Common sense, caution and care must be exercised when installing, maintainingor operating a microwave.
ALWAYS contact your dealer, distributor, service agent or manufacturer about problems or conditions youdo not understand.
Recognize Safety Symbols, Words, Labels
WARNINGWARNING -- Hazards or unsafe practiceswhich COULD result in severe personal injuryor death.
CAUTION
CAUTION -- Hazards or unsafe practices whichCOULD result in minor personal injury.
PRECAUTIONS TO AVOID POSSIBLEEXPOSURE TO
ENERGY
Adhere to the following precautions:
o DO NOT attempt to operate this oven with the door open since open-door operation can resultin harmful exposure to microwave energy. It is important not to defeat or tamper with the safetyinterlocks.
* DO NOT place any object between the oven front face and the door or allow soil or cleaner residueto accumulate on sealing surfaces,
o DO NOT operate the oven if it is damaged. It is particularly important that the oven door close properlyand that there is no damage to the: (1) door (bent), (2) hinges and latches (broken or loosened),(3) door seals and sealing surfaces.
o The oven should not be adjusted or repaired by anyone except properly qualified servicepersonnel.
H

Safety 5
GRO Di i CTIOThis appliance must be grounded. This oven is equipped with a cord having a grounding wire with a ground-ing plug. tt must be plugged into a wall receptacle that is properly installed and grounded in accordancewith the National Electrical Code and local codes and ordinances. In the event of an electrical short circuit,grounding reduces risk of electric shock by providing an escape wire for the electric current.
WARNINGImproper use of the grounding plug can result in a risk of electric shock,
Electrical Requirements
The electrical requirements are a 120 volt 60 Hz, AC only, 15 amp. or more protected electrical supply. It isrecommended that a separate circuit serving only this appliance be provided.
The oven is equipped with a 3-prong grounding plug. It must be plugged into a wall receptacle that is properlyinstalled and grounded.
A short power-supply cord is provided to reduce risk of becoming entangled in or tripping over a longer cord.DO NOT USE AN EXTENSION CORD. tf the power supply cord is too short, have a qualified electrician orserviceperson install an outlet near the appliance.
NOTES:
1. If you have any questions about the grounding or electrical instructions, consult a qualified electrician orserviceperson.
2. Neither Electrolux nor the dealer can accept any liability for damage to the oven or personal injury resultingfrom failure to observe the correct electrical connection procedures.
Federa Communications Commission Radio FrequencyInterference Statement (U.S.A. Onmy)
This equipment generates and uses ISM frequency energy and if not installed and used properly, that isin strict accordance with the manufacturer's instructions, may cause interference to radio and televisionreception. It has been type tested and found to comply with limits for tSM Equipment pursuant to part 18 ofFCC Rules, which are designed to provide reasonable protection against such interference in a residentialinstallation.
However, there is no guarantee that interference will not occur in a particular installation. If this equipmentdoes cause interference to radio or television reception, which can be determined by turning the equipmentoff and on, the user is encouraged to try to correct the interference by one or more of the following:
,, Reorient the receiving antenna of the radio or television.
,, Relocate the microwave oven with respect to the receiver.
• Move the microwave oven away from the receiver.
,, Plug the microwave oven into a different outlet so that the microwave oven and the receiver are ondifferent branch circuits.
The manufacturer is not responsible for any radio or television interference caused by unauthorizedmodification to this convection microwave oven. It is the responsibility of the user to correct such interfer-ence.

6 Information You Need To Know
About your oven
This Use and Care Guide is valuable: read it carefullyand always save it for reference.
NEVER use the Convection Microwave Oven withoutthe turntable and support nor turn the turntableover so that a large dish could be placed in theoven. The turntable will turn both clockwise andcounterclockwise.
ALWAYS have food in the Convection MicrowaveOven when it is on to absorb the microwave
energy.
When using the Convection Microwave Oven atpower levels below 100%, you may hear the mag-netron cycling on and off. it is normal for the exteriorof the oven to be warm to the touch when cookingor reheating.
Condensation is a normal part of microwave cook-ing. Room humidity and the moisture in food willinfluence the amount of moisture that condenses in
the oven. Generally, covered foods will not cause asmuch condensation as uncovered ones. Ventilation
openings must not be blocked.
The Convection Microwave Oven is for food prepa-ration only. It should not be used to dry clothes ornewspapers.Your Convection Microwave Oven is rated 900 watts
by using the IEC Test Procedure. In using recipesor package directions, check food a minute or twobefore the minimum time and add time accordingly.
About safety
Check foods to see that they are cooked to theUnited States Department of Agriculture's recom-mended temperatures.
160°F
165°F
170F
180°F
For fresh pork, ground meat, bone-less white poultry, fish, seafood, eggdishes and frozen prepared food.
For leftover, ready-to-reheat refriger-ated. and dell and carry-out "fresh"food.
White meat of poultry.
Dark meat of poultry.
To test for doneness, insert a meat thermometer _na thick or dense area away from fat or bone. NEVERleave the thermometer in the food during cooking,unless it is approved for microwave use.
,, ALWAYS use potholders to prevent burns whenhandling utensils that are in contact with hot food.Enough heat from the food can transfer throughutensils to cause skin burns.
Avoid steam burns by directing steam away fromthe face and hands. Slowly lift the farthest edgeof a dish's covering and carefully open popcornand oven cooking bags away from the face.
* Stay near the oven while it's in use and checkcooking progress frequently so that there is nochance of overcooking food.
,, NEVER use the cavity for storing cookbooks orother items.
Select, store and handle food carefully to pre-serve its high quality and minimize the spread offoodborne bacteria.
,, Keep waveguide cover clean. Food residue cancause arcing and/or fires.
,, Use care when removing items from the oven sothat the utensil, your clothes or accessories donot touch the safety door latches.
,, Keep aluminum foil used for shielding at least1 inch away from walls, ceiling and door.

Information You Need To Know 7
About microwave cooking
Arrange food carefully. Place thickest areastowards outside of dish.
,, Watch cooking time. Cook for the shortest amountof time indicated and add more as needed. Foodseverely overcooked can smoke or ignite.
,, Cover foods while cooking. Check recipe or cook-book for suggestions: paper towels, wax paper,microwave plastic wrap or a lid. Covers preventspattering and help foods to cook evenly.
Shield with small flat pieces of aluminum foilany thin areas of meat or poultry to preventovercooking before dense, thick areas are cookedthoroughly.
Stir foods from outside to center of dish once ortwice during cooking, if possible.
,, Turn foods over once during microwaving to speedcooking of such foods as chicken and hamburg-ers. Large items like roasts must be turned overat least once.
,, Rearrange foods such as meatballs halfwaythrough cooking both from top to bottom and fromthe center of the dish to the outside.
Add standing time. Remove food from ovenand stir, if possible. Cover for standing timewhich allows the food to finish cooking withoutovercooki rig.
,, Check for doneness. Look for signs indicating thatcooking temperatures have been reached.
,, Doneness signs include:Food steams throughout, not just at edge.
Center bottom of dish is very hot to thetouch.
Poultry thigh joints move easily.Meat and poultry show no pinkness.
Fish is opaque and flakes easily with a fork.
About food
Eggs,sausages,
nuts, seeds,fruits &vegetables
* Puncture egg yolks before cooking toprevent "explosion".
o Pierce skins of potatoes, apples, squash,hot dogs and sausages so that steamescapes.
,, Cookeggs in shells.
o Reheat whole eggs.
,, Dry nuts or seeds in shells.
Baby food ,, Transfer baby food to small dish and heatcarefully, stirring often. Check temperaturebefore serving.
,, Put nipples on bottles after heating andshake thoroughly. "Wrist" test beforefeeding.
,, Heat disposable bottles,
,, Heat bottles with nipples on.
,, Heat baby food in original jars.
General ,, Cut baked goods with filling after heating ,, Heat or cook in closed glass jars or airto release steam and avoid burns, tight containers.
• Stir liquids briskly before and after heating ,, Can in the microwave as harmfulto avoid "eruption"_ bacteria may not be destroyed.
• Use deep bowl. when cooking liquids or ,, Deep fat fry.
cereals, to prevent boilovers. • Dry wood, gourds, herbs or wet papers.

Information You Need To Know
About utensils and coverings
It is not necessary to buy all new cookware. Many pieces already in your kitchen can be used successfullyin your Convection Microwave Oven. The chart below will help you decide what utensils and coveringsshould be used in each mode.
Aluminum foil YES - Small flat pieces ofaluminum foil placed smoothly onfood can be used to shield areasfrom cooking or defrosting tooquickly. Keep foil at least 1 inchfrom walls of oven.
YES - For shielding YES - For shielding
Browning dish YES - Do not exceed NO NOrecommended preheating time.Follow manufacturer's directions.
Glass,heat-resistant
YES - Excellent. YES - Excellent YES - Excellent
non-heat_esistant
Lids, glass YES YES - Broil. No YEScover.
Metal cookware NO YES YES - Do not use
metal covering.
Oven cooking bags YES - Good for large meats orfoods that need tenderizing. DONOT use metal twist ties.
YES - Broil. Nocover.
YES - Do not usemetal twist ties.

Information You Need To Know 9
Paper towels YES - To cover for reheating and NO NOcooking. Do not use recycledpaper towels which may containmetal fillings.
Microwave-safeplastic containers
YES - Use for reheating anddefrosting. Some m_crowave-safe plastics are not suitable forcooking foods with high fat andsugar content.Follow manufacturer's directions.
NO NO
Plastic wrap YES - Use brands specially NO NOmarked for microwave use. DO
NOT allow plastic wrap to touchfood. Vent so steam can escape.
Styrofoam YES - For reheating NO NO
and reheating, ..... .......................
Wicker, wood, YES - May be used for short NO NOstraw periods of time. Do not use with
high fat or high sugar contentfoods. Could char.
DISH CHECK Ifyou wish to check if a dish is safe for microwaving, place the empty dish in the oven andmicrowave on HIGH for 30 seconds. If the dish becomes very hot, DO NOT use it for microwaving.
ACCESSORIES There are many microwave accessories available for purchase. Evaluate carefullybefore you purchase so that they meet your needs. A microwave-safe thermometer wilt assist you indetermining correct doneness and assure you that foods have been cooked to safe temperatures whenusing microwave-only cooking.
Electrolux is not responsible for any damage to the oven when accessories are used.

1 Part Names
19 13 12._J j,
S f m
JS
10
9
8
"6 _-7
14 17
16
1 Control panel
2 Ventilation openings
3 Model/Serial label
4 Door seals and sealing surfaces
5 Safety door latches -- The oven will notoperate unless the door is securely closed.
6 Oven door with see-through window
7 Door handle
8 Door hinges
9 Turntable motor shaft
10 Menu label
tl Oven light -- tt will light when oven is operatingor door is open.
12 Waveguide cover: DO NOT REMOVE.
13 Time display: 99 minutes, 99 seconds
14 Popcorn/Bacon Tray
15 Removable turntable -- Place the turntable on
the turntable support securely. The turntablewill rotate clockwise or counterclockwise. Onlyremove for cleaning.
16 Removable turntable support -- Carefully placethe turntable support in the center of the ovenfloor.
17 High Rack
18 Low Rack
19 Convection Fan
Accessories
The following accessories are designed especiallyfor use in this oven only for convection, mix or broilcooking. DO NOT USE FOR MICROWAVE ONLYCOOKING. Do not substitute similar types of racksfor these specially designed ones.
Hig h rack (Baking rack)-forconvection and low mix.
,, This rack is placedon the turntable fortwo-level cooking,such as layer cakes,muffins, etc.
Low rack (Broiling rack)-for convection, broiling orhigh mix.
Place on the turntableand use for roasting orbroiling to allow juicesto drain away from food.

Control panel and menu
Words in the lower portion of the display wilt light to indicate what function is in progress.
20 21 22 23 15 30 17 27
24 25 16 15 31 12 29 12 18 19 28
Number next to the control panel illustration
indicates pages on which there are feature descriptions and usage information.
Refer to the menu label for quick references.
1 Ground Meat
2 Rice3 Fish/Seafood
4 Frozen Entrees
5 Chicken Breast
1 Ice Cream
2 Cream Cheese
3 Butter
4 Chocolate
1 Hamburgers2 Chicken Pi_es.! Steaks
4 Fish Steaks
1 Frozen Microwave Pizza
2 Hand-Held Snacks 3-4 oz3 Hand-Held Snacks 5-6 oz
4 Chicken Nuggets
5 Hot Dogs6 Frozen K4d'sMeaJ
1 Ground Meat
2 Steaks/Chops/Fish3 Chicken Pieces
4 Roast
5 Caseerole
6 Soup
1 Chicken
2 TuNey3 qiJrkey Breast4 Pork
1 Fresh Rolls/Muffins
2 Frozen RoJis!Mu#ins
3 Pasta
1 1 minute
2 2 minutes
3 3 minutes4 4 minutes
5 5 minutes6 6 minutes
1 Bundt Cake
2 CookJee3 Muffins
4 French Fries
TLAB-B071 MRRO

12 Before Operating
,
3,
Before operating your new Convection MicrowaveOven make sure you read and understand thisUse and Care Guide completely.
Before the Convection Microwave Oven can be
used, follow these procedures:
Plug in the oven. Close the door. The oven displaywill show ENJOY YOUR OVEN TOUCH CLEARAND TOUCH CLOCK.
Touch the STOP/CLEAR pad, • will appear.
Set clock, See below.
To set the clock
• Suppose you want to enter the correct time of day12:30 (AM. or P,M),
1 Touch set clock.
2, Enter the correct time of
day by touching thenumbers in sequence,
3. Touch set clock again.
This is a 12 hour clock, If you attempt to enter anincorrect clock time, ERROR will appear in thedisplay, Touch the STOP/CLEAR pad and re-enterthe time,
If the electrical power supply to your ConvectionMicrowave Oven should be interrupted, the dis-play will intermittently show ENJOY YOUR OVENTOUCH CLEAR AND TOUCH CLOCK after thepower is reinstated, If this occurs during cooking,the program will be erased, The time of day wiltalso be erased, Simply touch STOP/CLEAR padand reset the clock for the correct time of day,
NOTE
Your Convection Microwave Oven can be pro-grammed with the door open except for START,popcorn, fresh veggies, frozen veggies,baked potato and sensor reheat.
Stop/CmearTouch the STOP/CLEAR to:
1. Erase if you make a mistake duringprogramming.
2. Cancel timer.
3. Stop the oven temporarily during cooking.
4. Return the time of day to the display.
5. Cancel a program during cooking, touch twice.

Manual Operation 3
Time cooking
Your Convection Microwave Oven can be pro-grammed for 99 minutes 99 seconds (99.99). Alwaysenter the seconds after the minutes, even if they areboth zeros.
,, Suppose you want to cook for 5 minutes at100%.
1. Enter cooking time. _-5_
2, Touch START.
To set power level
There are eleven preset power levels.
Using lower power levels increases the cooking timewhich is recommended for foods such as cheese,milk and long slow cooking of meats.
Power level 100% High
8 8O%
6 60%
4 40%
2 2O%
t 10% Low
0 0%
• Suppose you want to defrost for 5 minutes at30%.
1. Enter defrosting time. _-_( 0__
2. ToUChnumberPOWer3.level and O
3. Touch START.
You can program up to 4 automatic cookingsequences. Follow directions on page 30.
Manual defrost
If the food that you wish to defrost is not listed on theDefrost chart or is above or below the limits in the
"Amount" column on the Defrost chart, you need todefrost manually.
You can defrost any frozen food, either raw or previ-ously cooked, by using Power level 3. Follow theexact 3-step procedure found under Time cooking.Estimate defrosting time and touch 3 for 30% whenyou select the power level.
For either raw or previously cooked frozen food therule of thumb is approximately 5 minutes per pound.For example, defrost 5 minutes for 1 pound of frozenspaghetti sauce.
Always stop the oven periodically to remove orseparate the portions that are defrosted. If food isnot defrosted at the end of the estimated defrostingtime, program the oven in 1 minute increments onpower level 3 until totally defrosted.
When using plastic containers from the freezer,defrost only long enough to remove from the plasticin order to place in a microwave-safe dish.

14 Sensor Modes
The sensor is a semi-conductor device that detectsthe vapor (moisture and humidity) emitted from thefood as it heats, The sensor adjusts the cooking timesand power level for various foods and quantities.
Using Sensor Modes:,
,
,
,
6.
6_
After oven is plugged in, wait 2 minutes beforeusing Sensor Modes.
Be sure the exterior of the cooking containerand the interior of the oven are dry. Wipe off anymoisture with a dry cloth or paper towel.
The oven works with foods at normal storagetemperature. For example, popcorn would be atroom temperature.
Any Sensor Modes selection can be programmedwith More or less time adjustment. See page 30.
More or less food than the quantity listed in thechart should be cooked following the guidelinesin any microwave cookbook.
During the first part of any sensor cooking orreheating, food name will appear on the display,Do not open the oven door or touch STOP/CLEARduring this part of the cycle. The measurement ofvapor will be interrupted. If this occurs, an errormessage will appear. To continue cooking, touchthe STOP/CLEAR pad and cook manually.
When the sensor detects the vapor emitted fromthe food, remainder of cooking time will appear.Door may be opened when remaining cookingtime appears on the display At this time, you maystir or season food, as desired.
7. Except for popcorn, if the sensor does not detectvapor properly when cooking other foods, ERRORwill be displayed.
8. Check food for temperature after cooking. Ifadditional time is needed, continue to cookmanually.
9. Each food has a cooking hint. Touch user prefpad when the HELP indicator is lighted in thedisplay.
Covering Foods:Some foods cook better when covered. Use the coverrecommended in the food charts.
1. Casserole lid.
, Plastic wrap: Use plastic wrap recommended formicrowave cooking, Cover dish loosely; allowapproximately 1/2 inch to remain uncovered toallow steam to escape. Plastic wrap should nottouch food.
3_ Wax paper: Cover dish completely; fold excesswrap under dish to secure. If dish is wider thanpaper, overlap two pieces at least one inchto cover.
Be careful when removing any covering to allowsteam to escape away from you.
Quick Sensor
You can cook or reheat many foods by touching aQuick Sensor pad (fresh veggies, frozen veggies,popcorn, baked potato and sensor reheat). Youdon't need to calculate cooking time or power level.
, Suppose you want to pop a 3.5 oz. bag ofpopcorn.
Use the popcorn/bacon trayprovided with your unit to cookpopcorn quickly and efficiently.
Touch popcorn pad once forregular. Touch popcorn padtwice for snack size.
WARNMNGDo not place microwave popcorn directly on themetal turntable as metal on metal may producesparking, Always use the popcorn/bacon trayprovided with the unit to cook popcorn.
NOTES
1. Quick Sensor can be programmed with Moreor tess time adjustment, See page 30.
2. The final result wilt vary according to the foodcondition (e.g. initial temperature, shape,quality). Check food for temperature afterheating. If additional time is needed, continueto heat manually.

Sensor Modes 15
Quick Sensor chart
Fresh Veggies:Soft
Broccoli 0.25 - 2.0 lb
Brussels sprouts 0.25 - 2.0 lbCabbage 0.25 - 2.0 lbCauliflower (fiowerets) 0.25 - 2.0 lbCauliflower (whole) 1 mediumSpinach 0.25 - 1.0 lbZucchini 0.25 - 2.0 IbBaked apples 2 - 4 medium
HardCarrots, sliced 0.25 - 2.0 IbCorn on cob 2 - 4 pcs.Green beans 0.25 - 2.0 tbWinter squash
- diced 0.25 - 2.0 Ib- halves 1 - 2
Wash and place in casserole. Add no water if vegetableshave just been washed. Cover with lid for tender vegetables.Use plastic wrap for tender-crisp vegetables. Touch freshveggies pad once. After cooking, stir, if possible. Let stand,covered, for 2 to 5 minutes.
Place in casserole. Add 1-4 tbsp. water. Cover with lid fortender vegetables. Use plastic wrap cover for tender-crispvegetables. Touch fresh veggies pad twice. After cooking,stir, if possible. Let stand, covered, for 2 to 5 minutes.
Popcorn Regular3.0 - 3.5 oz bag
Snack
1.5 - 1.75 oz bag
Use only popcorn packaged for the microwave. Try severalbrands to decide which you like. Do not try to pop unpoppedkernels. Use the popcorn/bacon tray provided with your unitto cook popcorn quickly and efficiently. Touch popcornpad once for regular. Touch popcorn pad twice for snacksize. This sensor works well with most brands of microwave
popcorn. You may wish to try several and choose yourfavorite. Pop only one bag at a time. Unfold the bag andplace in oven according to directions.
Sensor Reheat 4 - 36 oz Place in dish or casserole slightly larger than amount to bereheated. Flatten, if possible. Cover with lid, plastic wrapor ,wax paper. Use covers such as plastic wrap or lids withlarger quantities of more dense foods such as stews. Afterreheating, stir well, if possible. Re-cover and allow to stand2 to 3 minutes. Foods should be very hot. tf not, continueto heat with variable power and time.

16 Sensor Modes
Sensor Cook
You can cook many foods by touching the sensorcook pad and the food number. You don't need tocalculate cooking time or power level.
,, Suppose you want to cook ground meat.
Step Touch
1. Touch sensor cook pad,number 1 for ground meat.
2. Touch START pad.
Sensor Cook chart
NOTES
1. Sensor Cook can be programmed with Moreor less time adjustment. See page 30.
2. The final result will vary according to the foodcondition (e.g. initial temperature, shape,quality). Check food for temperature afterheating. If additional time is needed, continueto heat manually.
3. Stay near the oven while it's in use and checkcooking progress frequently so that there isno chance of overcooking food.
1. Ground Meat 0.25 - 2.0 Ib
2. Rice
3. Fish/Seafood
Use this setting to cook ground beef or turkey as patties or in acasserole to be added to other ingredients. Place patties on amicrowave-safe rack and cover with wax paper. Place ground meatin a casserole and cover with wax paper or plastic wrap. When ovenstops, turn patties over or stir meat in casserole to break up largepieces. Re-cover and touch START. After cooking, let stand, covered,for 2 to 3 minutes.
0.5 - 2.0 cups Place rice into a deep casserole dish and add double quantity ofwater. Cover with lid or plastic wrap. After cooking, stir, cover and letstand 3 to 5 minutes or until all liquid has been absorbed.
Rice Water Size of casserole dish
,5 cu_ 1 cuL 1.5 quart1 cup 2 cups 2 quart
1.5 cups 3 cups 2.5 or 3 quart2 cups 4 cups 3 quart or larger
0.25 - 2.0 Ib Arrange in ring around shallow glass dish (roll fillet with edgesunderneath). Cover with plastic wrap. After cooking, let stand,covered, 3 minutes.
5. Chicken 0.5 - 2.0 IbBreast
Cover with vented plastic wrap. When oven stops, turn over. Shieldwith small, flat pieces of aluminum foil any areas that are cooking toorapidly. Re-cover and touch START. After cooking, let stand, covered3 to 5 minutes. Chicken should be 160°F.

Auto Cook 7
"Your oven has convenient pads to assist with mealpreparation. The Auto Cook settings will automaticallycompute the correct cooking time and microwavepower level for foods shown in the following charts.
,, Suppose you want to heat 1 cup of water.
Step Touch
1. Touch beverage pad.
2. Enter cups by touchingthe number pads 1 and 0.
3, Touch START.
! NOTES
1. All Auto Cook settings can be programmedwith More or less time adjustment. Touchthe power level pad once or twice beforetouching START pad. See page 30 - Moreor less adjustment.
2. Each food has a cooking hint. Touch userpref pad when the HELP indicator is lightedin the display.
3. Should you attempt to enter more or lessthan the allowed amount, an error messagewill appear in the display.
More or less than the quantity listed inthe chart should be cooked following theguidelines in any microwave cookbook.
4. The final cooking result will vary accordingto the food condition (e.g. initial temperature,shape, quality). Check food for temperatureafter cooking. If additional time is needed,continue to cook rnanually.
Auto Cook chart
Pizza 1 - 6 slices Use this setting to reheat refrigerated leftover pizza, 1 slice is approxi-(6 - 8 oz) mately 1i8th of a 12-inch pizza or 1/12th of a 16-inch pizza. If possible,
place on paper towel on a microwave-safe rack. Touch pizza pad, enternumber of slices, and touch START.
Beverage _210 This seiting is good a be_eiage to a better d_!nking................................................. temperatu re, stir liqu d briskly beforeand after heating to avoid !eru pti0n!!,
The beverage setting must be ente[ed in 0 5

1 Auto Cook
Auto Cook chart (cont.)
Snacks1 Microwave
Pizza1 (6 - 8 oz) Use for frozen microwave pizza. Remove from package and unwrap.
Follow package directions for use of package and/or silver crisping disc.Touch snacks pad and the number 1. Touch START.
3. Hand-held 5- 6 ozSnacks
Use for frozen French fries, cheese sticks, appetizers etc. Remove fromouter package. Follow package directions for how to wrap or cover. Becareful when removing from the oven as snack may be very hoL Touchsnacks pad and the number 3, Touch START,
5. Hot Dogs 1 - 6 Place hot dog in bun. Wrap each with paper towel or napkin. Touchsnacks pad and the number 5. Enter the quantity of hot dogs and touchSTART,
Kzd s Meal for most brands, You may wish to try several and ch00se your favo ireRem0_e #ackage from Wrapping and follow package directions
ce0king, !et staUd, co_ered 1 te 3 minutes,

Auto Cook 19
Reheat Pasta / Reheat Breads
The reheat settings automatically computes the cor-rect warming and heating time and microwave powerlevel for foods shown in the chart below.
• Suppose you want to heat 2 fresh rolls or muffins.
1. Touch auto reheat.
NOTES
1. To reheat different foods or foods aboveor below the quantity allowed, use manualoperation.
2. Reheat settings can be programmed withMore or tess time adjustment. See page 30.
2. Touch number 1 forfresh rolls or muffins.
3. Touch desired number
to select quantity.
4. Touch START pad.
Auto Reheat chart
1. Fresh Rolls/ 1 - 10Muffins
Use this pad to warm rolls, muffins, biscuits, bagels etc. Large itemsshould be considered as 2 or 3 regular size. Arrange on plate; coverwith paper towel. For refrigerated rolls or muffins, it may be necessaryto double the entered amount to ensure the proper serving temperature.For example, enter quantity of 2 for 1 refrigerated muffin. Touch desirednumber to select quantity and touch START.
_S should be c0nsidered as 2er3 _egular size AFrange on pla!e,cover With paPer towel: TouCh desired number select quantity and:toUch:START
3. Pasta 1 - 6 cups Use this pad to reheat refrigerated canned or homemade pasta with sauce.For room temperature pastas, use Less option. Pasta without saucedouble the quantity per setting. For example, measure 2 cups of cookednoodles and program for 1cup. Cover with lid or plastic wrap. Touch autoreheat pad and touch number 3. Enter the desired number of cups andtouch START. After cooking, let stand, covered, 2 to 3 minutes.

2 Convection Automatic Operation
This section of the operation manual offers instruc-tions for preparing 12 popular foods using Auto Broil,Auto Roast and Auto Bake,
After selecting the desired feature follow the direc-tions indicated in the display.
For helpful hints, simply touch HELP anytime HELPis lighted in the display.
Auto Broil
CAUTION
The oven cabinet, cavity, door, turntable, turntablesupport, racks and dishes will become hot. ToPREVENT BURNS, use thick oven gloves whenremoving the food or turntable from the oven.
auto broil automatically broils hamburgers, chickenpieces, steaks and fish steaks.
• Suppose you want to broil 2 hamburgers.
Step Touch
1. Touch auto broil.
2. Select desired setting.Ex: for hamburgers,touch number 1.
3. Touch number pad toenter quantity.
Follow information in display for cooking information.For well done or rare burgers, touch POWER LEVELpad to select More for well done or Less for rare. SeeMore/Less Time Adjustment on page 30.
After broil preheat cycle ends, the oven will stop anddirections will be displayed. Follow the indicatedmessage. Open the door and place hamburgersinto oven. Close the door.
5. Touch START.
NOTES
1. Auto Broil can be programmed with More/Less Time Adjustment. See page 30.
2. tf you attempt to enter more or less than theallowed amount as indicated in chart below,an error message will appear in the display.
4. Touch START.
Auto Broil Chart
1. Hamburgers 1 - 8 pieces Low0.25 Ib each
Use this setting to broil hamburger patties. Place on lowrack.
be 170_Ei
3. Steaks 0.5 - 2 lb Low Use this setting to broil steaks from 3/4" to 1" thick. Individualboneless steaks broil evenly. Place steak on low rack. For welldone, touch POWER LEVEL once; for rare, touch POWERLEVEL twice.
Place on low rack,

Convection Automatic Operation 2
Auto Roast
auto roast automatically roasts chicken, turkey,turkey breast or pork.,, Suppose you want to roast a 2.5 pound chicken.
NOTES
1, Auto Roast can be programmed with More/Less Time Adjustment. See page 30.
2. If you attempt to enter more or less than theallowed weight as indicated in chart below,an error message will appear in the display.
1. Touch auto roast.
2. Select desired setting. /----_,Ex: for chicken,touch number 1.
3. Touch number pad toenter weight.
4. Touch START.
After Auto Roast cycle ends, a tong tone wilt sound.Follow the indicated message.
Auto Roast Chart
1. Chicken 2.5 - 7.5 Ib After the cycle ends, cover with foil and let stand for 5-10Low minutes.
2, TUrkeY &5 _! 6 !b .........Lew c_ver "with f0i! and !et stand 10 minuteS, Internal temperatureof White meat should be 170_F and of dark meat, 180°FI
Season, as desired. Place on low rack. After the cycle ends,3. Turkey breast 3 - 6 lb Low cover with foil and let stand 10 minutes. Internal temperature
of white meat should be 170°F.
Shouid be 160_R
22 Convection Automatic Operation
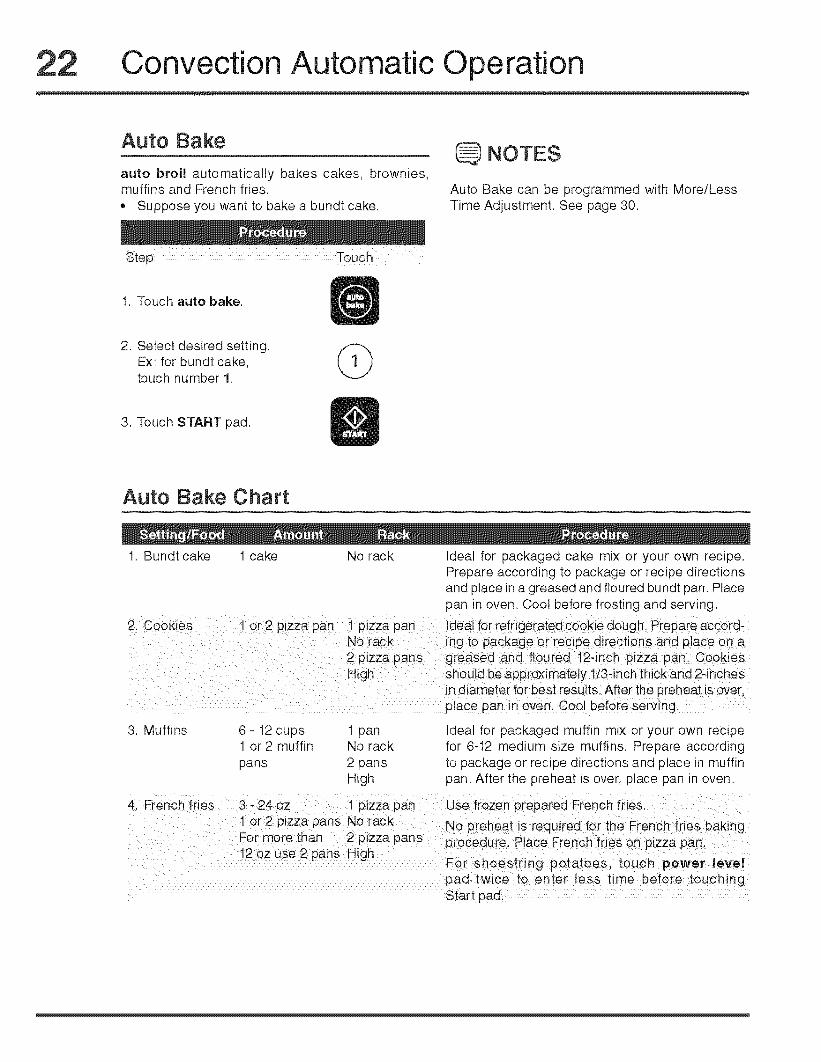
Auto Bake
auto broil automatically bakes cakes, brownies,muffins and French fries.,, Suppose you want to bake a bundt cake.
NOTES
Auto Bake can be programmed with More/LessTime Adjustment, See page 30.
1. Touch auto bake.
2. Select desired setting.Ex: for bundt cake,touch number 1.
©3. Touch START pad.
Auto Bake Chart
1. Bundt cake 1 cake No rack Ideal for packaged cake mix or your own recipe.Prepare according to package or recipe directionsand place in a greased and floured bundt pan. Placepan in oven. Coot before frosting and serving.
3. Muffins 6- 12 cups 1 pan1 or 2 muffin No rackpans 2 pans
High
4. French fries 3 - 24 oz 1 pizza pan1 or 2 pizza pans No rac kFor more than 2 pizza pans12 oz use2 pans High
Ideal for packaged muffin mix or your own recipefor 6-12 medium size muffins. Prepare accordingto package or recipe directions and place in muffinpan. After the preheat is over, place pan in oven.
Use frozen prepared French fries.
No preheat is required for the French fries bakingprooedure. Place French fries on pizza pan.
For shoestring potatoes, toJch power levelpad twice to enter less time before touchingStart pad.

Manual Convection and Automatic Mix Cooking 23
This section gives you specific cooking instructionsand procedures.
The oven should not be used without the turntable
in place, and it should never be restricted so that itcannot rotate. You may remove the turntable whenpreheating the oven and when preparing food to becooked directly on the turntable.
CAUTION
The oven cabinet, cavity, door, turntable, turntablesupport, racks and dishes will become hot. ToPREVENT BURNS, use thick oven gloves whenremoving the food or turntable from the oven.
CONVECTION COOKING
To Preheat and Cook withConvection
Your oven can be programmed to combine preheatingand convection cooking operations. You can preheat tothe same temperature as the convection temperatureor change to a higher or lower temperature.
,, Suppose you want to preheat to 350°F, andthen cook 25 minutes at 375°F convection.
1. Touch preheat.
During convection heating, hot air is circulatedthroughout the oven cavity to brown and crisp foodsquickly and evenly. This oven can be programmedfor ten different convection cooking temperatures forup to 99 minutes, 99 seconds.
To Cook with Convection
2. Select temperature bytouching number pad.
3. Touch convec bake.
. Suppose you want to cook at 350°F for 20 minutes. 4. Select temperature bytouching number pad.
1. Touch convec bake.
5. Enter cooking time bytouching the number pads.
375 ° F
2. Select temperature bytouching number pad.
3. Enter cooking time bytouching the number pads.
4. Touch START.
350 _ F
6. Touch START.
when the oven reaches the programmedtemperature, a signal will sound 1 time. The ovenwill stop, and directions will be displayed. Followthe indicated message.
7. Open the door, Place foodin the oven, Close the door.Touch START,
@ NOTES
if you wish to know the programmed oventemperature, simply touch the convec bake pad.As long as your finger is touching the convecbake pad, the programmed oven temperaturewill be displayed.
If the oven door is not opened, the oven wiltautomatically hold at the preheat temperaturefor 30 minutes. After this time has elapsed,an audible signal will sound, and the oven willturn off.
Manual Convection and Automatic Mix Cooking
NOTES
1. To program only preheat, touch the STARTpad after step 2. Preheating will start. Whenthe oven reaches the programmed tempera-ture, follow the indicated message.
2. To preheat and cook with the same tem-perature, enter same temperature in steps2 and 4.
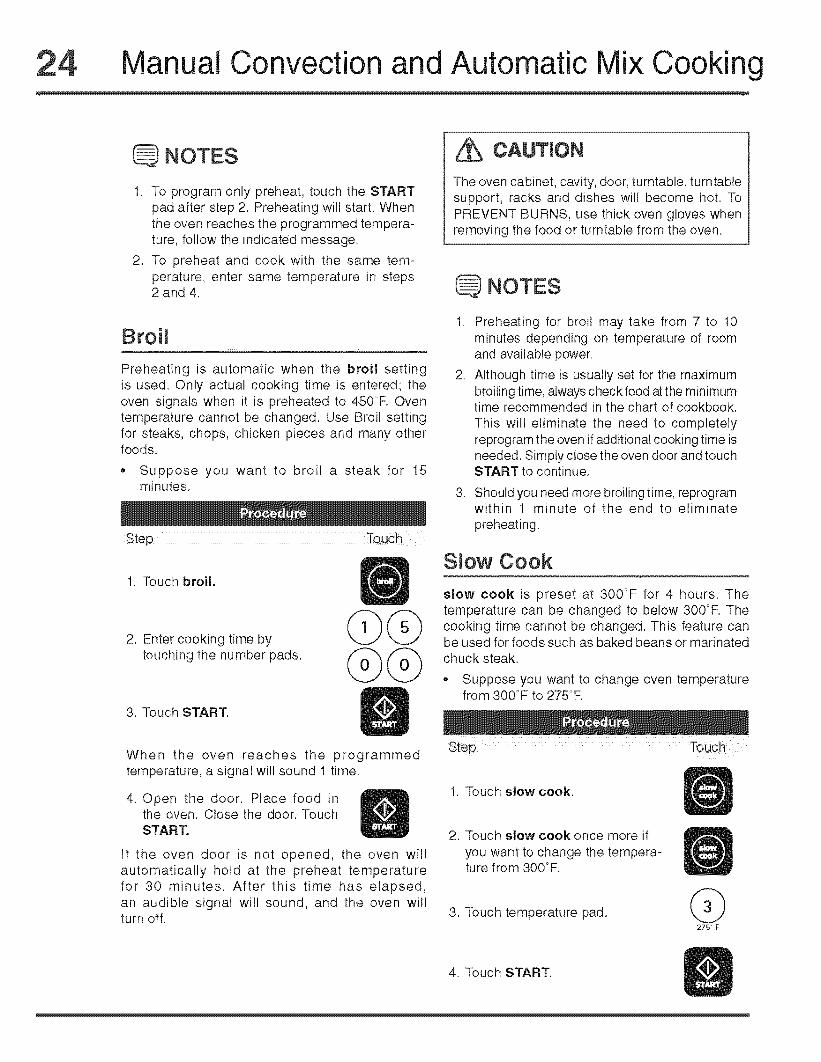
Broil
Preheating is automatic when the broil settingis used. Only actual cooking time is entered; theoven signals when it is preheated to 450'_R Oventemperature cannot be changed. Use Broil settingfor steaks, chops, chicken pieces and many otherfood&
,, Suppose you want to broil a steak for 15minutes.
1. Touch broil.
2. Enter cooking time bytouching the number pads.
3. Touch START.
When the oven reaches the programmedtemperature, a signal will sound 1 time.
4. Open the door. Place food inthe oven. Close the door. TouchSTART.
If the oven door is not opened, the oven willautomatically hold at the preheat temperaturefor 30 minutes. After this time has elapsed,an audible signal will sound, and the oven willturn off.
CAUTION
The oven cabinet, cavity, door, turntable, turntablesupport, racks and dishes will become hot. ToPREVENT BURNS, use thick oven gloves whenremoving the food or turntable from the oven.
NOTES
.
.
Preheating for broil may take from 7 to 10minutes depending on temperature of roomand available power.
Although time is usually set for the maximumbroiling time, always check food at the minimumtime recommended in the chart of cookbook.
This wilt eliminate the need to completelyreprogram the oven if additional cooking time isneeded. Simply close the oven door and touchSTART to continue.
Should you need more broiling time, reprogramwithin 1 minute of the end to eliminatepreheating.
SmowCook
slow cook is preset at 300°F for 4 hours. Thetemperature can be changed to below 300°F. Thecooking time cannot be changed. This feature canbe used for foods such as baked beans or marinatedchuck steak.
,, Suppose you want to change oven temperaturefrom 300°F to 275°F.
1. Touch slow cook.
2. Touch slow cook once more if
you want to change the tempera-ture from 300'_F.
3. Touch temperature pad.
4. Touch START.
275 ° F

Manual Convection and Automatic Mix Cooking 25
NOTES
If you do not change the temperature, omit steps2 and 3.
Automatic Mix Cooking
This oven has two pre-programmed settings thatmake it easy to cook with both convection heat andmicrowave automatically.
High Mix Roast 300°F 30%
3. Touch START.
To Preheat and Cook withAutomatic Mix
'tour oven can be programmed to combine preheat-ing and automatic mix cooking operations. Youcan preheat at the same temperature as the presetcombination temperature or change it to a differenttemperature.
• Suppose you want to preheat to 350°F and thencook 25 minutes on 325°F Low Mix Bake.
With the exception of those foods that cook best byconvection heating alone, most foods are well suitedto mix cooking using either Low Mix Bake or HighMix Roast.
The marriage of these two cooking methods pro-duces juicy meats, moist and tender cakes and finetextured breads, all with just the right amount ofbrowning and crispness.
The temperatures can be changed; however, themicrowave power cannot.
The oven temperature can be changed from 100°Fto 450°F. To change the temperature, first touchHigh mix or Low mix then touch the same padagain. When the display says SELECT TEMP, touchdesired temperature pad. Ex: High Mix, High Mixpad, 7. The mix temperature will change to 375°Fautomatically.
To Cook with Automatic Mix
o Suppose you want to bake a cake for 25 minuteson low mix bake.
Step TouCh
1. Touch low mix bake.
2. Enter cooking time bytouching the number pads.
Step Touch
1. Touch preheat.
2. Touch temperature pad.
3. Touch low mix bake. Touchlow mix bake once more to
change the cooking tem-perature,
4. Touch temperature pad.
5. Enter cooking time bytouching the number pads.
6, Touch START,
3£,0 _ F
When the oven reaches the programmed tem-perature, signal will sound 1 time. The oven willstop and directions will be displayed. Follow theindicated message.
7. Open the door. Place foodin the oven. Close the door.Touch START.
If the oven door is not opened, the oven will automati-cally hold at the preheat temperature for 30 minutes.After this time has elapsed, an audible signal willsound and the oven will turn off.

Manual Convection and Automatic Mix Cooking
NOTES
To program only preheat, touch the START padafter step 2. Preheating will start. When the ovenreaches the programmed temperature, follow theindicated message.
Helpful Hints for Convection and Automatic Mi× Cooking
Your Convection Microwave Oven can cook anyfood perfectly because of the number of ways it cancook: microwave only, automatic mix, convectiononly or broil. This Use & Care Guide tells you howtoprogram the oven.
The oven cannot be used without the turntable in
place. Never restrict the movement of the turntable.
CONVECTION COOKING:
.
,
.
,
When preheating, the turntable can be left in orremoved. When using the high rack for 2 shelfbaking in a preheated oven, it is easier to removethe turntable for preheat.
Place high rack on turntable along with foods.When preheat is over, open oven door and quicklyplace turntable, high rack and foods to be bakedinside.
Do not cover turntable, low rack or high rack withaluminum foil. It interferes with air flow that cooksfood.
Round pizza pans are excellent cooking utensilsfor many convection-only items. Choose pans thatdo not have extended handles.
Using a preheated low rack can give a grilledappearance to steaks, hot dogs etc.
AUTOMATIC MIX COOKING:
1. Meats are best when roasted directly on the lowrack. A dish can be placed below the meat if gravyis to be made from the drippings.
2. Less tender cuts of meat can be roasted and
tenderized using oven cooking bags.
3. When baking, check for doneness after time haselapsed. If not completely done, let stand in ovena few minutes to complete cooking.
NOTES
,
,
During mix baking some metal baking utensilsmay cause arcing when they come in contactwith the turntable, oven walls or accessoryracks. Arcing is a discharge of electricity thatoccurs when microwaves come in contactwith metal.
If arcing occurs, place a heat resistant dish(Pyrex ® pie plate, glass pizza dish or dinnerplate) between the pan and the turntableor rack. If arcing occurs with other metalbaking utensils, discontinue their use for mixcooking.

Quick Settings 27
Quick Settings (melt, soften) automatically computethe correct heating time and microwave power levelfor softening and melting foods shown in the chart.
o Suppose you want to melt 1 square of chocolate.
step Touch
1. Touch melt, soften pad.
2. Select desired food bytouching number pad.Ex: Touch number 4 forchocolate.
3. Touch number 2 pad toselect 1 square.
NOTES
1. To soften or melt other food or foods exceptthe quantity listed in the Quick settings Chart,use manual operation.
2. Quick Settings can be programmed with Moreor tess time adjustment. See page 30.
4. Touch START pad.
Quick settings chart
Melt, Soften1. Ice Cream 1 pint
1/2 gallon
DO NOT COVER.
After touching melt, soften, touch number 1 for 1 pint.After touching melt, soften, touch number 2 for 1/2 gallon.
3. Butter Use a Pyrex measuring cup. Cover with plastic wrap.2 tbsp After touching melt, soften, touch number 1 for 2 tbsp.1/2 cup After touching melt, soften, touch number 2 for 1/2 cup.
4, ChQco!ate ! chips Afte_ touching melt_ SQften, !ouch number ! f0r'! oupof chips,

Other Special Features
Auto Defrost
auto defrost automatically defrosts all the foodsfound in the Auto Defrost chart below.
• Suppose you want to defrost a 2.0 pound steak. NOTES
1. Touch auto defrost padand number 2 for steak.
2. Enter weight by touchingthe number pads 2 and 0.Ex: 2.0 Ib steak.
3. Touch START pad. Theoven will stop so the foodcan be checked.
,
,
After the 1st stage, openthe door. Turn steak overand shield any warmportions. Close the door.Touch START pad.
After the 2nd stage, openthe door. Shield any warmportions. Close the door.Touch START pad.
1. To defrost other food or foods above or belowthe weights allowed on the Defrost chart, usetime and 30% power. See Manual defrost onpage 13.
2. Auto Defrost can be programmed with Moreor less time adjustment. Touch the powerlevel pad once or twice before touchingSTART pad.
3. Touch user pref pad when the HELP indicatoris lighted in the display for a helpful hint.
4. If you attempt to enter more or tess than theamount as indicated in the chart below, anerror message will appear in the display.
5. Check foods when oven signals. After finalstage, small sections may still be icy. Letstand to continue thawing. Do not defrost untilall ice crystals are thawed.
6. Shielding prevents cooking from occurringbefore the center of the food is defrosted. Use
small smooth strips of aluminum foil to coveredges and thinner sections of the food.
After defrost cycle ends, let stand, covered.
Auto Defrost chart
1. Ground Meat 0.5 - 3.0 Ib Remove any thawed pieces after each stage. Let stand, covered, for5 to 10 minutes.
3. Chicken Pieces 0.5- 3.0 Ib After each stage, rearrange pieces or remove portions should theybecome warm or thawed. Let stand, covered, for 10 to 20 minutes.
5. Casserole 2 - 6 cups After audible signal, stir if possible. At end, stir well and let stand,covered for 5 to 10 minutes.
covered for 5 to lO minute&

Convenient Features 29
User pref
user pref provides 4 features that make using youroven easy because specific instructions are providedin the interactive display.
1. CHILD LOCK
The Child Lock prevents unwanted oven operationsuch as by small children. The oven can be set sothat the control panel is deactivated or locked. To set,touch user pref, the number 1 and then touch theSTART pad. Should a pad be touched, LOCK ONwill appear in the display.
To cancel, touch user pref and START pad.
2. AUDIBLE SIGNAL ELIMINATION
If you wish to have the oven operate with noaudible signals, touch user pref, the number 2 andSTOPICLEAR.
To cancel and restore the audible signal, touchuser pref, the number 2 and START.
3. AUTO START
If you wish to program your oven to begin cookingautomatically at a designated time of day, follow thisprocedure:
,, Suppose you want to start cooking a stew for20 minutes on 50% at 4:30. Before setting, checkto make sure the clock is showing the correct timeof day.
1. Touch user pref pad.
Step Touch
6. Touch power level pad.
7. Touch number 5 for 50%
power.
8. Touch START pad.
| NOTES
,
2,
,
Auto Start can be used for manual cookingif clock is set.
If the oven door is opened after programmingAuto Start, it is necessary to touch the STARTpad for Auto Start time to appear in thereadout so that the oven will automaticallybegin programmed cooking at the chosenAuto Start time.
Be sure to choose foods that can be left in theoven safely until the Auto Start time. Acorn orbutternut squash are often a good choice.
4. LANGUAGE SELECTION
The oven comes set for English and U.S. CustomaryUnit-pounds. To change, touch user pref and thenumber 4. Continue to touch the number 4 until yourchoice is selected from the table below. Then, touchSTART pad.
2. Touch number 3.
3. Enter the start time.
4. Touch set clock pad,
Once English LB
_ times Spanish KG
5 times French LB
5. Enter cooking time.

3 Convenient Features
Multiple sequence cooking
Your oven can be programmed for up to 4 automaticcooking sequences, switching from one power levelsetting to another automatically.
Sometimes cooking directions tell you to start on onepower level and then change to a different powerlevel. Your oven can do this automatically.
,, Suppose you want to cook a roast 10 minutes at30% and then continue to cook for 25 minutes at375 ° and 20 minutes at Io mix bake.
1. Touch power level padand number pad 3 for30% power.
2. Enter cooking time bytouching the numberpads.
gq}q}@@@
3. Touch conv bake.
@NOTE
1. tf power level is touched once, high will bedisplayed.
2. If you wish to know power level, simplytouch power level. As long as your fingeris touching power level, the power will bedisplayed.
More or less time adjustment
Should you discover that you like any of the SensorModes, Auto Cook, Quick Settings, Auto Reheat orAuto Defrost slightly more done, touch the powerlevel pad once after touching your choice of pads orbefore touching START pad. The display will showMORE.
Should you discover that you like any of the SensorModes, Auto Cooks, Quick Settings, Auto Reheator Auto Defrost slightly less done, touch the powerlevel pad twice after touching your choice of pads orbefore touching START pad. The display will showLESS.
4. Select temperature bytouching number pad.
5. Entercookingtime bytouchingthe numberpads.
6. Touch !o mix bake.
Enter cooking time.
Z Touch START pad,
Quick Startquick start is a short-cut method to set time for 1-6minutes at power level 100.
,, Suppose you want to heat a cup of soup fortwo minutes.
Touch number2.
The oven will start immediately and will signal thenturn off automatically when finished.
Add 30 Seconds
add 30 seconds provides a convenient way toextend cooking time by 30 seconds while the oventimer is counting down. It will add 30 seconds to thetime shown each time the pad is touched.
This pad may also be used as a quick start for30 seconds of cooking. No need to touch START,the oven will start immediately.

Convenient Features 3
Timer on-off
,, Suppose you want to time a 3-minute long dis-tance phone call.
1. Touch timer on-off.
2. Enter time.
3. Touch timer on-off. Thetimer will count down. Tocancel the timer, touchthe STOP/CLEAR padonce.
Demonstration mode
To demonstrate, touch set clock, the number 0 andthen touch the START pad and hold for three sec-onds. DEMO ONwill appear in the display. Cookingoperations and specific special features can nowbe demonstrated with no power in the oven. Forexample, touch add 30 seconds pad and the displaywill show :30and count down quickly to END.
To cancel, touch set clock, the number 0 and STOP/CLEAR pads. tf easier, unplug the oven from theelectrical outlet and replug.
Help
Each setting has a cooking hint, If you wish tocheck, touch user pref whenever HELP is lighted inthe Interactive Display for these and other manualoperation hints.
NOTE
timer on-off operates as a kitchen timer andcannot be used when the oven is operating.

32 Cleaning and Care
Disconnect the power cord before cleaning or leave the door open to inactivate theoven during cleaning.
Exterior
Clean the outside with mild soap and water; rinse anddry with a soft cloth. Do not use any type of householdor abrasive cleaner.
Door
Wipe the window on both sides with a damp clothto remove any spills or spatters. Metal parts will beeasier to maintain if wiped frequently with a dampcloth. Avoid the use of spray and other harsh cleanersas they may stain, streak or dull the door surface.
Touch Control Panel
Care should be taken in cleaning the touch controlpanel. If the control panel becomes soiled, open theConvection Microwave Oven door before cleaning.Wipe the panel with a cloth dampened slightly withwater only. Dry with a soft cloth. Do not scrub or useany sort of chemical cleaners. Close door and touchSTOP/CLEAR,
Interior -- After Microwave Cooking
Cleaning is easy because no heat is generated to theinterior surfaces; therefore, there is no baking andsetting of spills or spattering. To clean the interiorsurfaces, wipe with a soft cloth and warm water. DONOT USE ABRASIVE OR HARSH CLEANERS OR
SCOURING PADS. For heavier soil, use baking sodaor a mild soap; rinse thoroughly with hot water.
Interior -- After Convection, Mix or Broil Cooking
Spatters may occur because of moisture and grease.Wash immediately after use with hot, soapy water.Rinse and polish dry. Harder to remove spatters mayoccur if oven is not thoroughly cleaned or if there islong time/high temperature cooking. If so, you maywish to purchase an oven cleaner pad with liquidcleaner within it i not a soap filled steel pad for useon stainless steel or porcelain surfaces.
Follow manufacturer's directions carefully and beespecially cautious not to get any of the liquid cleanerin the perforations on the walt or ceiling or any doorsurfaces.
Rinse thoroughly and polish dry.
After cleaning the interior thoroughly, residual greasemay be removed from the interior ducts and heaterby simply operating the oven on 450°F for 20 minuteswithout food. Ventilate the room if necessary.
Waveguide Cover
The waveguide cover is made from mica so requiresspecial care. Keep the waveguide cover clean toassure good oven performance. Carefully wipe with adamp cloth any food spatters from the surface of thecover immediately after they occur. Built-up splashesmay overheat and cause smoke or possibly catch fire.Do not remove the waveguide cover.
Odor Removal
Occasionally, a cooking odor may remain in the oven.To remove, combine 1 cup water, grated peel andjuice of 1 lemon and several whole cloves in a 2-cupglass measuring cup. Boil for several minutes using100% power. Allow to set in oven until cool. Wipeinterior with a soft cloth.
Turntable/Turntable Support/Racks
The turntable, turntable support and racks can beremoved for easy cleaning. Wash them in mild,sudsy water; for stubborn stains use a mild cleanserand a non-abrasive scouring sponge. They are alsodishwasher-proof. Use top rack of dishwasher forturntable support.
Foods with high acidity, such as tomatoes or lemons,will cause the porcelain enamel turntable to discolor.Do not cook highly acidic foods directly on the turn-table; if spills occur, wipe up immediately.
The turntable motor shaft is not sealed, so excesswater or spills should not be allowed to stand in thisarea.
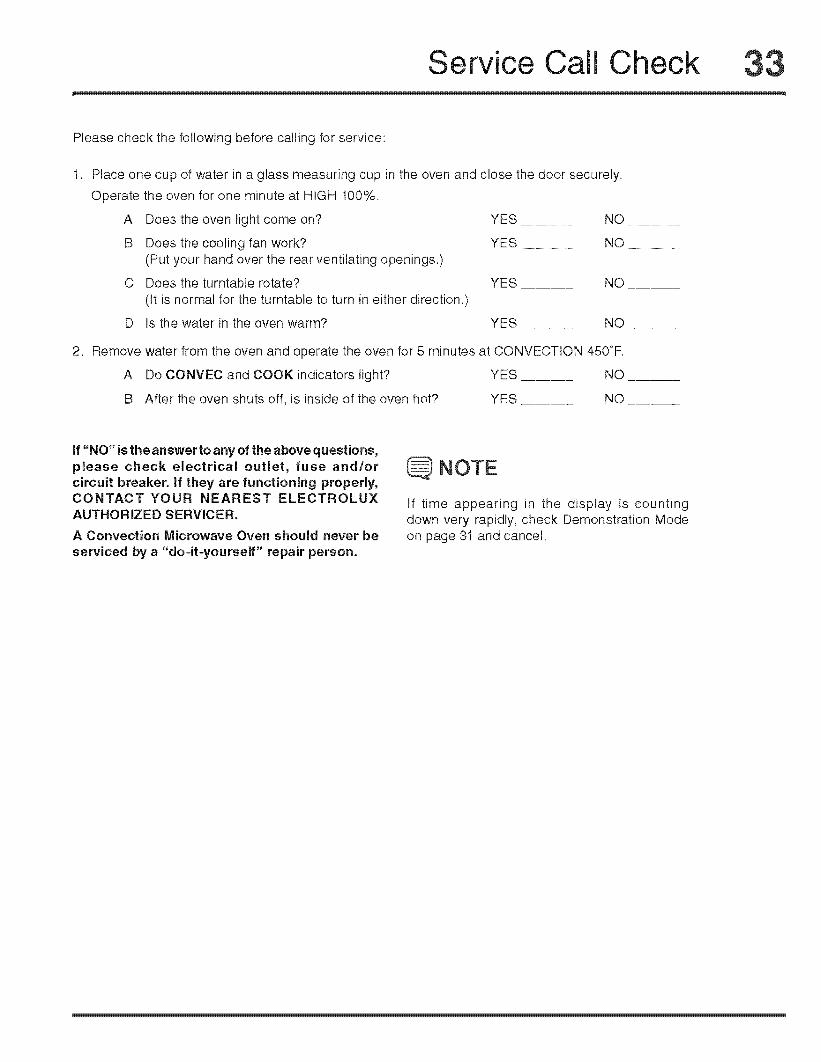
Service Ca Check ,33
Please check the following before calling for service:
,
Place one cup of water in a glass measuring cup in the oven and close the door securely.
Operate the oven for one minute at HIGH 100%.
A Does the oven light come on? YES NO
B Does the cooling fan work? YES NO(Put your hand over the rear ventilating openings.)
C Does the turntable rotate? YES NO
(It is normal for the turntable to turn in either direction.)
D Is the water in the oven warm? YES NO
Remove water from the oven and operate the oven for 5 minutes at CONVECTION 450°R
A Do CONVEC and COOK indicators light? YES NO
B After the oven shuts off, is inside of the oven hot? YES NO
If "NO" isthe answer to any of the above questions,please check electrical outlet, fuse and/orcircuit breaker, if they are functioning properly,CONTACT YOUR NEAREST ELECTROLUXAUTHORIZED SERVICER.
A Convection Microwave Oven should never be
serviced by a "do-it-yourself" repair person.
NOTE
If time appearing in the display is countingdown very rapidly, check Demonstration Modeon page 31 and cancel.

34 Specifications
E30MO75HSS / E30MO75HPS
AC Line Voltage:UL Rating:CSA Rating:
Single phase 120V, 60Hz, Ac onlySingle phase 117V, 60Hz, Ac only
Output Power:*Microwave 900 wattsConvection 1450 watts
Outside Dimensions: E30M075HSS / E30M075HPS: 30" (W) x 20-7/8" (H) x 24-15/32" (D)
Oven Capacity: 1.5 Cu. Ft.
* The international Electrotechnical Commission's standardized method for measuring output wattage.This test method is widely recognized.
** internal capacity is calculated by measuring maximum width, depth and height. Actual capacity for holdingfood is less.
in compliance with standards set by:
FCC Federal Communications Commission Authorized.
DHHS
C_US
Complies with Department of Health and Human Services (DHHS) rule, CFR, Title 21,Chapter l, Subchapter J.
This symbol on the nameplate means the product is listed by Underwriters Laboratories,Inc. for use in USA or Canada.

Warranty information 35
Major Appliance Warranty information
Your appliance is covered by a one year limited warranty. For one year from your original date of purchase, Electrolux will repair orreplace any parts of this appliance that prove to be defective in materials or workmanship when such appliance is installed, used,and maintained in accordance with the provided instructions. In addition, the magnetron tube of your appliance is covered by a twothrough five year limited warranty. During the 2nd through 5th years from your original date of purchase, Etectrolux will provide areplacement magnetron tube for your appliance which has proven to be defective in materials or workmanship when your applianceis installed, used, and maintained in accordance with the provided instructions.
Exclusions
This warranty does not cover the following:
1. Products with original serial numbers that have been removed, altered or cannot be readily deterrnined.2. Product that has been transferred from its original owner to another party or removed outside the USA or Canada.3. Rust on the interior or exterior of the unit.
4. Products purchased "as-is" are not covered by this warranty.5. Food loss due to any refrigerator or freezer failures.6. Products used in a commercial setting.7. Service calls which do not involve malfunction or defects in materials or workmanship, or for appliances not in ordinary household
use or used other than in accordance with the provided instructions.8. Service calls to correct the installation of your appliance or to instruct you how to use your appliance.9. Expenses for making the appliance accessible for servicing, such as removal of trim, cupboards, shelves, etc., which are not
a part of the appliance when it is shipped from the factory.10. Service calls to repair or replace appliance light bulbs, air filters, water filters, other consumables, or knobs, handles, or other
cosmetic parts.11. Labor or in-home service costs during the additional limited warranty periods beyond the first year from your original date of
purchase.12. Pickup and delivery costs; your appliance is designed to be repaired in the home.13. Surcharges including, but not limited to, any after hour, weekend, or holiday service calls, tolls, ferry trip charges, or mileage
expense for service calls to remote areas, including the state of Alaska.14. Damages to the finish of appliance or home incurred during transportation or installation, including but not limited to floors,
cabinets, walls, etc.15. Damages caused by: services performed by unauthorized service companies; use of parts otherthan genuine Electrolux parts
or parts obtained from persons other than authorized service companies; or external causes such as abuse, misuse, inadequatepower supply, accidents, fires, or acts of God.
DISCLAIMER OF IMPLIED WARRANTIES; LIMITATION OF REMEDIES
CUSTO M ER'S SO LE AN D EXCLUSIVE REMEDY UNDER TH IS LI M ITED WARRANTY SHALL BE REPAIR OR REPLACEM ENT AS
PROVIDED HEREIN. CLAIMS BASED ON IMPLIED WARRANTIES, INCLUDING WARRANTIES OF MERCHANTABILITY ORFITNESS FOR A PARTICULAR PURPOSE, ARE LIMITED TO ONE YEAR OR THE SHORTEST PERIOD ALLOWED BY LAW,BUT NOT LESS THAN ONE YEAR. ELECTROLUX SHALL NOT BE LIABLE FOR CONSEQU ENTIAL OR iNCIDENTAL DAMAGESSUCH AS PROPERTY DAMAGE AND INCIDENTAL EXPENSES RESU LTING FROM ANY BREACH OF THIS WRITTEN LIMITEDWARRANTY OR ANY IMPLIED WARRANTY. SOME STATES AND PROVINCES DO NOT ALLOW THE EXCLUSION OR LIMITATIONOF INCIDENTAL OR CONSEQUENTIAL DAMAGES, OR LIMITATIONS ON THE DURATION OF iMPLIED WARRANTIES, SOTHESE LIMITATIONS OR EXCLUSIONS MAY NOT APPLY TO YOU. THIS WRITTEN WARRANTY GIVES YOU SPECIFIC LEGALRIGHTS. YOU MAY ALSO HAVE OTHER RIGHTS THAT VARY FROM STATE TO STATE.
If You Need Service
Keep your receipt, delivery slip, or some other appropriate payment record to establish the warranty period should se rvi ce be required.If service is performed, it is in your best interest to obtain and keep all receipts. Service under this warranty must be obtained bycontacting Electrolux at the addresses or phone numbers below.
This warranty only applies in the USA, Puerto Rico and Canada. In the USA and Puerto Rico, you rappliance is warranted by EtectrotuxMajor Appliances North America, a division of Electrolux Home Products, Inc. In Canada, your appliance is warranted by ElectroluxCanada Corp. Electrolux authorizes no person to change or add to any obligations under this warranty. Obligations for service andparts under this warranty must be performed by Electrolux or an authorized service company. Product features or specifications asdescribed or illustrated are subject to change without notice.
USA1-877-435-3287
Electrolux Major Appliances North AmericaP.O, Box 212378
Augusta, GA 30907
Canada1-800-265-8352
Electrolux Canada Corp.5855 Terry Fox WayMississauga, Ontario, Canada L5V 3E4
m ............
10-08

NOTE