Embed Size (px)
Citation preview
Foundation Flash CS5 for Designers
Tom Green and Tiago Dias

Foundation Flash CS5 for Designers Copyright © 2010 by Tom Green and Tiago Dias
All rights reserved. No part of this work may be reproduced or transmitted in any form or by any means, electronic or mechanical, including photocopying, recording, or by any information storage or retrieval system,
without the prior written permission of the copyright owner and the publisher.
ISBN-13 (pbk): 978-1-4302-2994-0
ISBN-13 (electronic): 978-1-4302-2995-7
Printed and bound in the United States of America 9 8 7 6 5 4 3 2 1
Trademarked names, logos, and images may appear in this book. Rather than use a trademark symbol with every occurrence of a trademarked name, logos, or image we use the names, logos, or images only in an
editorial fashion and to the benefit of the trademark owner, with no intention of infringement of the trademark.
The use in this publication of trade names, service marks, and similar terms, even if they are not identified as such, is not to be taken as an expression of opinion as to whether or not they are subject to proprietary rights.
Distributed to the book trade worldwide by Springer Science+Business Media LLC., 233 Spring Street, 6th
Floor, New York, NY 10013. Phone 1-800-SPRINGER, fax (201) 348-4505, e-mail [email protected], or visit www.springeronline.com.
For information on translations, please e-mail [email protected] or visit www.apress.com.
Apress and friends of ED books may be purchased in bulk for academic, corporate, or promotional use. eBook
versions and licenses are also available for most titles. For more information, reference our Special Bulk Sales–
eBook Licensing web page at www.apress.com/info/bulksales.
The information in this book is distributed on an “as is” basis, without warranty. Although every precaution has been taken in the preparation of this work, neither the author(s) nor Apress shall have any liability to any person
or entity with respect to any loss or damage caused or alleged to be caused directly or indirectly by the information contained in this work.
The source code for this book is freely available to readers at www.friendsofed.com in the Downloads section.
Credits
President and Publisher: Paul Manning
Lead Editor: Ben Renow-Clarke
Technical Reviewers:
Cheridan Kerr, Kristian Besley
Editorial Board: Clay Andres, Steve Anglin, Mark Beckner,
Ewan Buckingham, Gary Cornell, Jonathan Gennick,
Jonathan Hassell, Michelle Lowman, Matthew Moodie,
Duncan Parkes, Jeffrey Pepper, Frank Pohlmann,
Douglas Pundick, Ben Renow-Clarke, Dominic Shakeshaft, Matt Wade, Tom Welsh
Coordinating Editor: Mary Tobin
Copy Editor: Kim Wimpsett
Compositor:
Lynn LHeureux
Indexer: Kevin Broccoli
Artist: April Milne
Cover Designer:
Anna Ishchenko
1
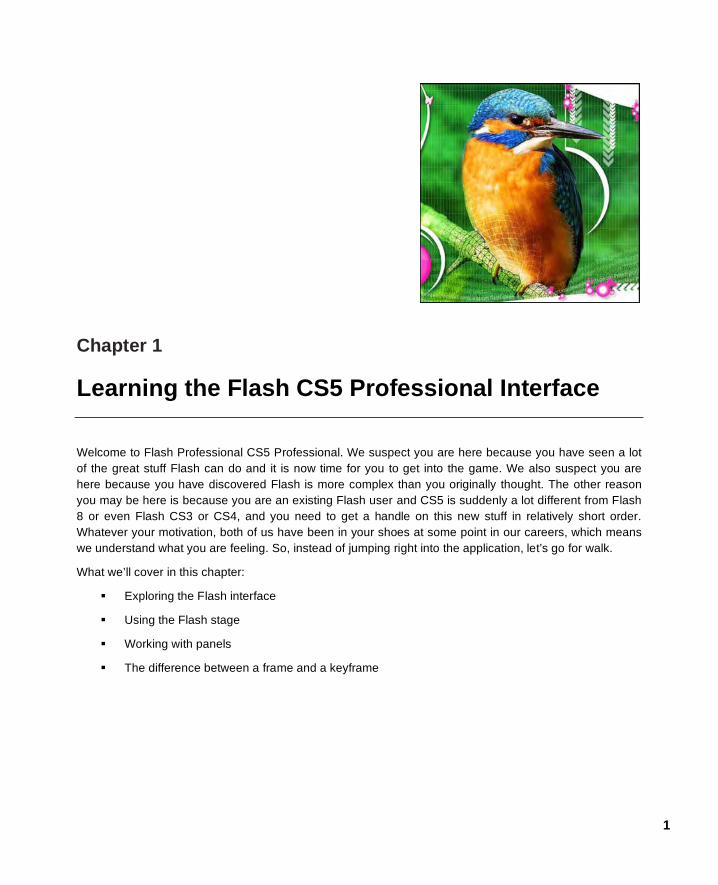
Chapter 1
Learning the Flash CS5 Professional Interface
Welcome to Flash Professional CS5 Professional. We suspect you are here because you have seen a lot
of the great stuff Flash can do and it is now time for you to get into the game. We also suspect you are
here because you have discovered Flash is more complex than you originally thought. The other reason
you may be here is because you are an existing Flash user and CS5 is suddenly a lot different from Flash
8 or even Flash CS3 or CS4, and you need to get a handle on this new stuff in relatively short order.
Whatever your motivation, both of us have been in your shoes at some point in our careers, which means
we understand what you are feeling. So, instead of jumping right into the application, let’s go for walk.
What we’ll cover in this chapter:
Exploring the Flash interface
Using the Flash stage
Working with panels
The difference between a frame and a keyframe

CHAPTER 1
2
Using frames to arrange the content on the stage
Using layers to manage content on the stage
Adding objects to the Library
Testing your movie
If you haven’t already, download the chapter files. You can find them www.friendsofED.com/download.html? isbn=1430229940.
These are the files used in this chapter:
Magnify.fla (Chapter01/Exercise Files_CH01/Exercise/Magnify.fla)
Leaf.fla (Chapter01/Exercise Files_CH01/Exercise/Leaf.fla)
Properties.fla (Chapter01/Exercise Files_CH01/Exercise/Properties.fla)
Layerss.fla (Chapter01/Exercise Files_CH01/Exercise/Layers.fla)
Garden.fla (Chapter01/ExerciseFiles_CH01/Exercise/Garden.fla)
FliesBuzzing.mp3 (Chapter01/ExerciseFiles_CH01/Exercise/FliesBuzzing.mp3)
XFL_Example (Chapter01/ExerciseFiles_CH01/Exercise/XFL_Example/)
What we are going to do in this chapter is take a walk through the authoring environment—called the
Flash interface—pointing out the sights and giving you an opportunity to play with some of the stuff we
will be pointing out. By the end of the stroll, you should be fairly comfortable with Flash and have a good
idea of what tools you can use and how to use them as you start creating a Flash movie.
As we go for our walk, we will also be having a conversation that will help you understand the
fundamentals of creating a Flash movie. Having this knowledge right at the start of the process gives you
the confidence to build upon what you have learned. So, let’s start our walk right at the beginning of the
process, the Start page.
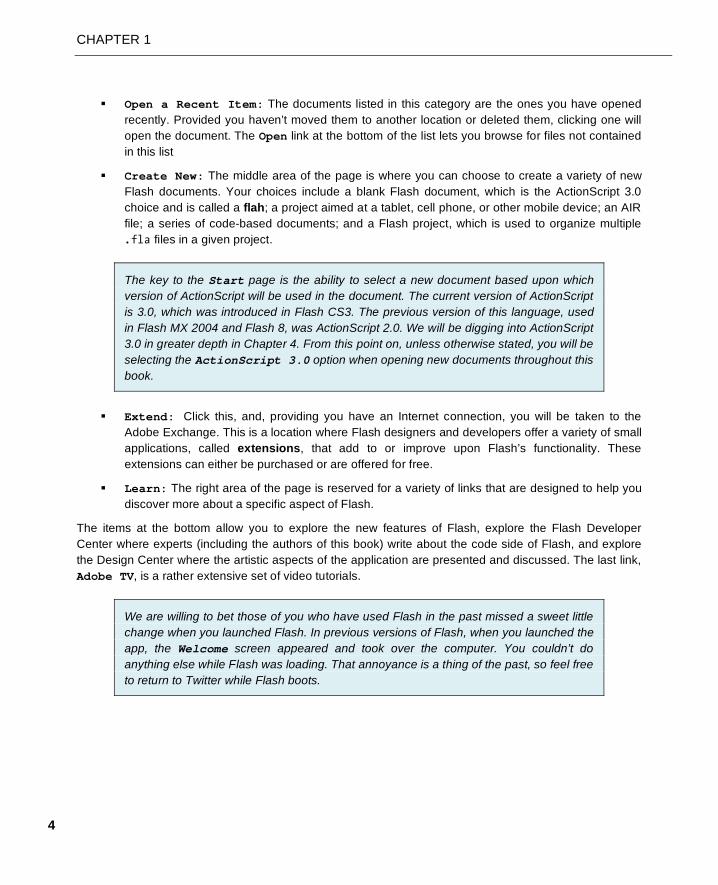
Getting started A couple of seconds after you double-click the application icon to launch Flash, the Start page, shown in
Figure 1-1, opens. This page, which is common to all the CS5 applications, is divided into six discrete
areas.

LEARNING THE FLASH CS5 PROFESSIONAL INTERFACE
3
Figure 1-1. The Start page
Create from Template: This category is a bit misleading. Double-clicking one of the choices
actually opens the New from Template dialog box shown in Figure 1-2. If you have used
previous versions of Flash, you will immediately notice that the variety and utility of the offered
templates—more than 50 of them—has greatly expanded.
Figure 1-2. Flash Professional CS5 contains a new lineup of templates designed to help you become
more productive.
CHAPTER 1
4
Open a Recent Item: The documents listed in this category are the ones you have opened
recently. Provided you haven’t moved them to another location or deleted them, clicking one will
open the document. The Open link at the bottom of the list lets you browse for files not contained
in this list
Create New: The middle area of the page is where you can choose to create a variety of new
Flash documents. Your choices include a blank Flash document, which is the ActionScript 3.0
choice and is called a flah; a project aimed at a tablet, cell phone, or other mobile device; an AIR
file; a series of code-based documents; and a Flash project, which is used to organize multiple
.fla files in a given project.
The key to the Start page is the ability to select a new document based upon which
version of ActionScript will be used in the document. The current version of ActionScript
is 3.0, which was introduced in Flash CS3. The previous version of this language, used
in Flash MX 2004 and Flash 8, was ActionScript 2.0. We will be digging into ActionScript
3.0 in greater depth in Chapter 4. From this point on, unless otherwise stated, you will be
selecting the ActionScript 3.0 option when opening new documents throughout this
book.
Extend: Click this, and, providing you have an Internet connection, you will be taken to the
Adobe Exchange. This is a location where Flash designers and developers offer a variety of small
applications, called extensions, that add to or improve upon Flash’s functionality. These
extensions can either be purchased or are offered for free.
Learn: The right area of the page is reserved for a variety of links that are designed to help you
discover more about a specific aspect of Flash.
The items at the bottom allow you to explore the new features of Flash, explore the Flash Developer
Center where experts (including the authors of this book) write about the code side of Flash, and explore
the Design Center where the artistic aspects of the application are presented and discussed. The last link,
Adobe TV, is a rather extensive set of video tutorials.
We are willing to bet those of you who have used Flash in the past missed a sweet little
change when you launched Flash. In previous versions of Flash, when you launched the
app, the Welcome screen appeared and took over the computer. You couldn’t do
anything else while Flash was loading. That annoyance is a thing of the past, so feel free
to return to Twitter while Flash boots.

LEARNING THE FLASH CS5 PROFESSIONAL INTERFACE
5
Creating a new Flash document Let’s continue our stroll through Flash by creating a new Flash document. To do this, simply click the
ActionScript 3.0 button in the Create New area of the Start page. This opens the interface shown
in Figure 1-3.
Figure 1-3. The Flash authoring environment
This interface is the feature-rich authoring environment that is the heart and soul of Flash. The Object
Windows Library (OWL) first introduced in the CS4 lineup is now common to practically all Adobe
applications in the CS5 lineup from Adobe. If you are a Mac user and, depending upon your “rabidity” of all
things Mac, you are going to either love this interface or hate it. The reason is that Adobe has dispensed
with the floating panels that tended to drive Flash developers and designers who worked “cross platform”
up the wall, across the ceiling, and down the other wall.
Let’s now step into that big white area on the screen and take a moment to look around. The stage, that
large white area in the center of the screen, is where the action happens. A good way of regarding the
stage in relation to Flash is this: if it isn’t on the stage, the user isn’t going to see it. There will be instances
where this last statement is not exactly true, but we’ll get into those later in this book.
On the far-right edge of the screen is a set of tools that will allow you to draw, color, and otherwise
manipulate objects on the stage. Just to the left of these tools is the Properties panel.
At the bottom of the interface is the Timeline panel, which longtime Flash users simply refer to as the
timeline. This is the place where action occurs. As you can see, the timeline is broken into a series of boxes
called frames. The best way of regarding frames is as individual frames of a film. When you put something
CHAPTER 1
6
on the stage, it will appear in a frame. If you want it to move from here to there, it will start in one frame and
move to another position on the stage in another frame a little further along the timeline. The box with the
vertical red stem draped over the timeline is called the playhead. Its purpose is to show you the current
frame being displayed. When a Flash movie is playing through a browser, the playhead is in motion, and the
user is seeing the frame where the playhead is located. This is how things appear to move in Flash. Another
thing you can do with the playhead is drag it across the timeline while you are creating the Flash movie. This
technique is known as scrubbing the timeline and has its roots in film editing.
To the right of the stage are the panels. Panels are used to modify and manipulate whatever object you
may have selected on the stage or to even add an object to the stage. These objects can be text,
photographs, line art, short animations, video, or even interface elements called components. You can
use the panels and the menus to change not only the characteristics of the objects but also how the
objects behave on the stage. Panels can be connected to each other (docked), or they can float freely in
the interface (floating) and can be placed anywhere you like. To move a panel simply, click the Panel tab
and drag it to a new location. If you see a blue line, the panel will dock to that location.
From our perspective, one of the more indispensable panels is the Properties panel. We’ll talk about this a
little later, but as you become more comfortable with the application, this panel will become a very important
place for you. In fact, we can’t think of any chapter in this book where we don’t refer to this panel.
Managing your workspace As you may have surmised, the Flash authoring environment is one busy place, and if you talk to a Flash
developer or designer, they will also tell you it can become one crowded place as well. As you start
creating Flash projects, you will discover that screen real estate is a valuable commodity because it fills up
with floating panels and other elements. This has all changed in Flash Professional CS5. Here’s how you
manage the panels:
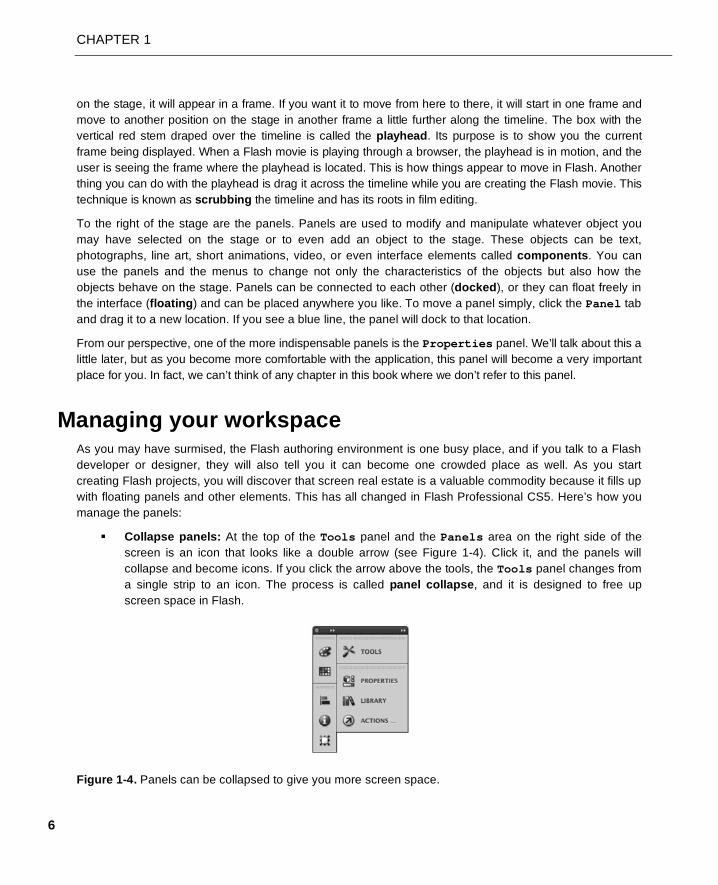
Collapse panels: At the top of the Tools panel and the Panels area on the right side of the
screen is an icon that looks like a double arrow (see Figure 1-4). Click it, and the panels will
collapse and become icons. If you click the arrow above the tools, the Tools panel changes from
a single strip to an icon. The process is called panel collapse, and it is designed to free up
screen space in Flash.
Figure 1-4. Panels can be collapsed to give you more screen space.
LEARNING THE FLASH CS5 PROFESSIONAL INTERFACE
7
Show collapsed panels as icons only: Sometimes you need the extra interface room taken up
by the panel’s name. Roll the mouse pointer to the left or right edge of the panel strip. When the
mouse pointer changes to a double-sided arrow, click and drag to expand and show the panel’s
name, or shrink to the width of the icons in the strip.
See tooltips for panel icons: When a panel is collapsed to nothing more than its icon, you only
need to place the mouse pointer over an icon, and a tooltip showing the panel name will appear.
This is especially handy when you see an icon and wonder, “What panel is that?”
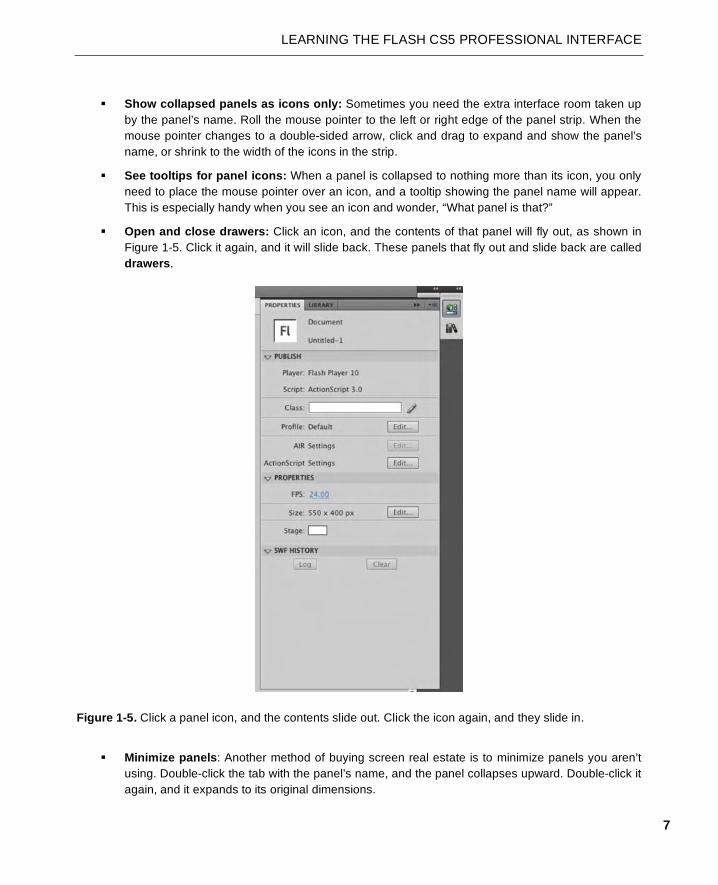
Open and close drawers: Click an icon, and the contents of that panel will fly out, as shown in
Figure 1-5. Click it again, and it will slide back. These panels that fly out and slide back are called
drawers.
Figure 1-5. Click a panel icon, and the contents slide out. Click the icon again, and they slide in.
Minimize panels: Another method of buying screen real estate is to minimize panels you aren’t
using. Double-click the tab with the panel’s name, and the panel collapses upward. Double-click it
again, and it expands to its original dimensions.
CHAPTER 1
8
Close panels: Right-click (Windows) or Control+click (Mac) a panel, and select Close from the
context menu. This not only closes the panel but also removes it from your workspace. To get it
back, simply open the Window menu, and click the name of the panel you closed to restore it.
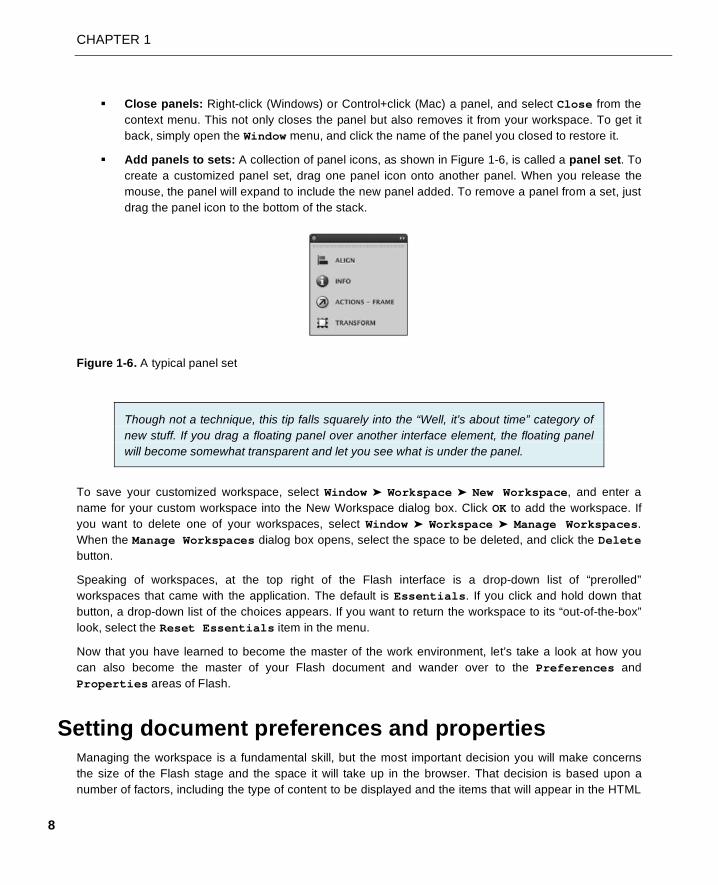
Add panels to sets: A collection of panel icons, as shown in Figure 1-6, is called a panel set. To
create a customized panel set, drag one panel icon onto another panel. When you release the
mouse, the panel will expand to include the new panel added. To remove a panel from a set, just
drag the panel icon to the bottom of the stack.
Figure 1-6. A typical panel set
Though not a technique, this tip falls squarely into the “Well, it’s about time” category of
new stuff. If you drag a floating panel over another interface element, the floating panel
will become somewhat transparent and let you see what is under the panel.
To save your customized workspace, select Window ➤ Workspace ➤ New Workspace, and enter a
name for your custom workspace into the New Workspace dialog box. Click OK to add the workspace. If
you want to delete one of your workspaces, select Window ➤ Workspace ➤ Manage Workspaces.
When the Manage Workspaces dialog box opens, select the space to be deleted, and click the Delete
button.
Speaking of workspaces, at the top right of the Flash interface is a drop-down list of “prerolled”
workspaces that came with the application. The default is Essentials. If you click and hold down that
button, a drop-down list of the choices appears. If you want to return the workspace to its “out-of-the-box”
look, select the Reset Essentials item in the menu.
Now that you have learned to become the master of the work environment, let’s take a look at how you
can also become the master of your Flash document and wander over to the Preferences and
Properties areas of Flash.
Setting document preferences and properties Managing the workspace is a fundamental skill, but the most important decision you will make concerns
the size of the Flash stage and the space it will take up in the browser. That decision is based upon a
number of factors, including the type of content to be displayed and the items that will appear in the HTML

LEARNING THE FLASH CS5 PROFESSIONAL INTERFACE
9
document beside the Flash movie. These decisions all affect the stage size and, in many respects, the
way the document is handled by Flash. These two factors are managed by the Preferences dialog box
and the Document Properties panel.
Document preferences
To access preferences, select Edit ➤ Preferences (Windows) or Flash Professional ➤
Preferences (Mac). This will open the Flash Preferences dialog box. There is a lot to this dialog box,
and we’ll explore it further at various points throughout this book. For now, we are concerned with the
general preferences in the Category area of the window. Click General, and the window will change to
show you the general preferences for Flash, as shown in Figure 1-7.
Figure 1-7. The general preferences can be used to manage not only the workspace but also items on
the stage.
If you examine the selections, you will realize they are fairly intuitive. You can choose to see the Welcome
screen when the application starts, to see tooltips when the mouse pointer is over a tool or object, and to have a
test movie appear in a tabbed window or float. You can determine how items are selected on the stage and the
timeline and even the colors that will be used to tell you what type of object has been selected on the stage.

CHAPTER 1
10
If you have been using Flash for a few years, the expansion of the Highlight color
list to include a variety of objects is a welcome addition.
Now that you know how to set your preferences, let’s take a look at managing a document’s properties.
Click the Cancel button to close the Preferences dialog box. When it closes, let’s wander back to the
stage and explore how a document’s properties are determined.
Document settings
To access the Document Settings dialog box, use one of the following techniques:
In the Properties panel, click the Edit button in the Properties area—not the Publish
area. This will open the Document Settings dialog box shown in Figure 1-8.
Select Modify ➤ Document.
Press Ctrl+J (Windows) or Cmd+J (Mac).
Right-click (Windows) or Control+click (Mac) the stage, and select Document Properties from
the context menu.
As you have just seen, there are a number of methods you can use in Flash to obtain
the same result. In this case, it is opening the Document Settings dialog box. Which
one is best? The answer is simple: whichever one you choose.
Figure 1-8. Set the stage size through the Document Settings dialog box.
Now that the Document Settings dialog box is open, let’s look around. The Dimensions input area is
where you can change the size of the stage. Enter the new dimensions, press the Enter (Return) key, or click
the OK button, and the stage will change. The Match area is commonly used to shrink the stage to the size of
the content on the stage. The Contents radio button is currently grayed out because the stage is empty.
Thi
s bo
ok w
as p
urch
ased
by
activ
e@tu
tspl
us.c
om
LEARNING THE FLASH CS5 PROFESSIONAL INTERFACE
11
For those of you wondering about the Adjust 3D Perspective Angle … selection,
sit tight. This is better explained in Chapter 9.
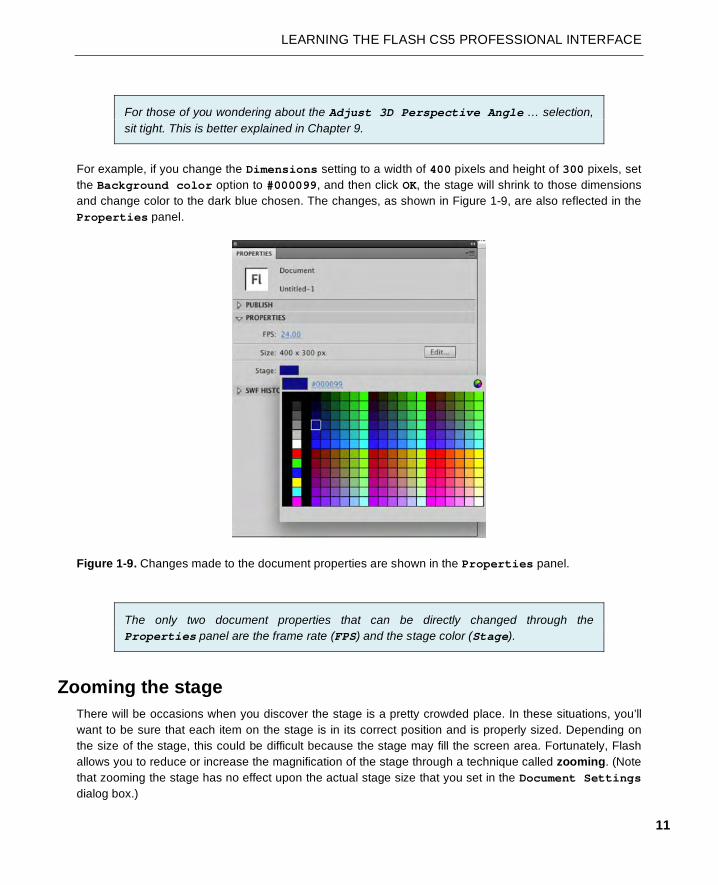
For example, if you change the Dimensions setting to a width of 400 pixels and height of 300 pixels, set
the Background color option to #000099, and then click OK, the stage will shrink to those dimensions
and change color to the dark blue chosen. The changes, as shown in Figure 1-9, are also reflected in the
Properties panel.
Figure 1-9. Changes made to the document properties are shown in the Properties panel.
The only two document properties that can be directly changed through the
Properties panel are the frame rate (FPS) and the stage color (Stage).
Zooming the stage
There will be occasions when you discover the stage is a pretty crowded place. In these situations, you’ll
want to be sure that each item on the stage is in its correct position and is properly sized. Depending on
the size of the stage, this could be difficult because the stage may fill the screen area. Fortunately, Flash
allows you to reduce or increase the magnification of the stage through a technique called zooming. (Note
that zooming the stage has no effect upon the actual stage size that you set in the Document Settings
dialog box.)
CHAPTER 1
12
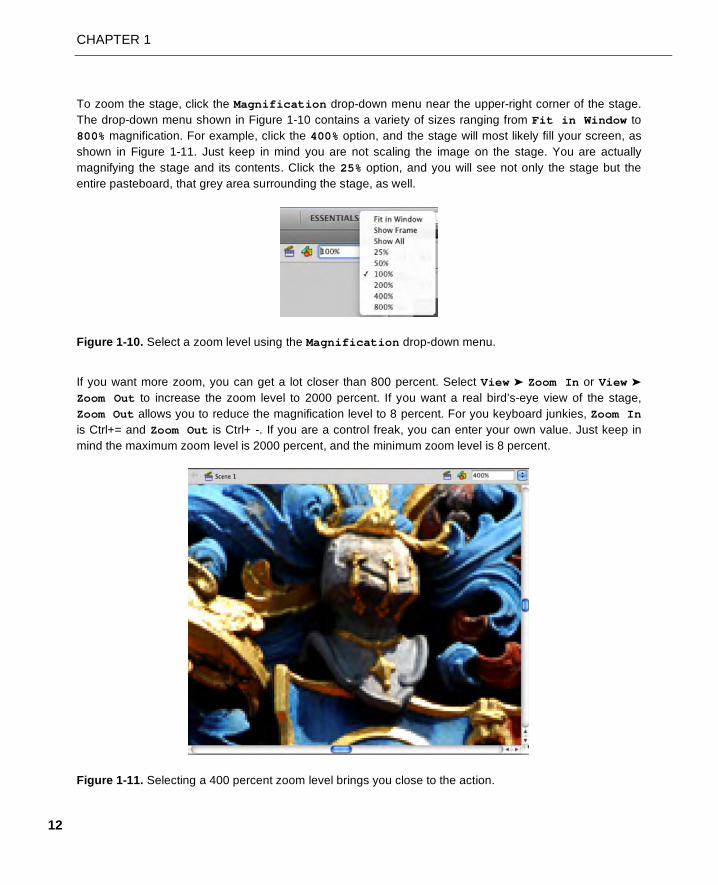
To zoom the stage, click the Magnification drop-down menu near the upper-right corner of the stage.
The drop-down menu shown in Figure 1-10 contains a variety of sizes ranging from Fit in Window to
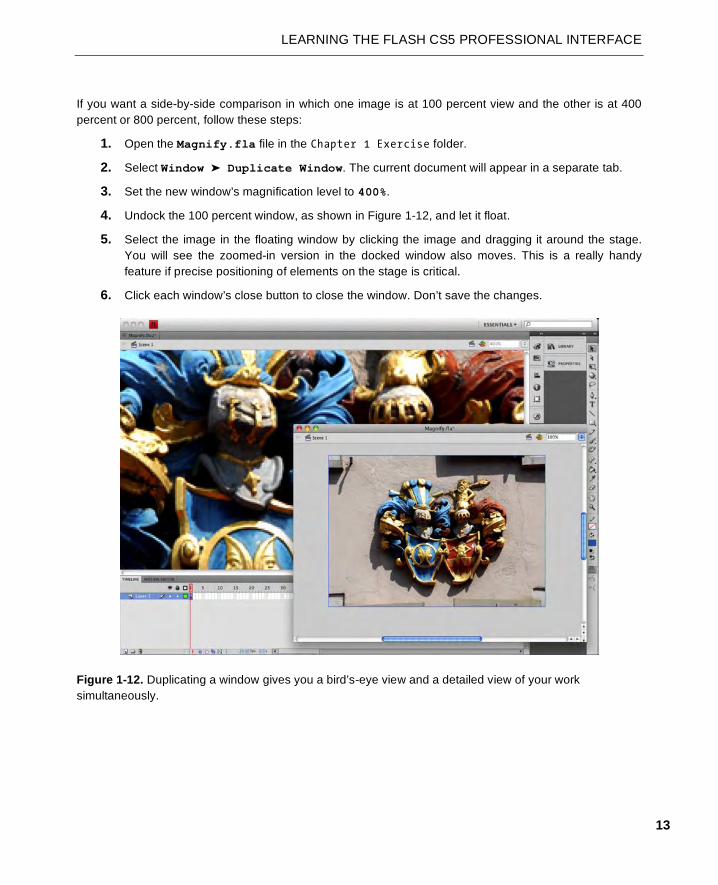
800% magnification. For example, click the 400% option, and the stage will most likely fill your screen, as
shown in Figure 1-11. Just keep in mind you are not scaling the image on the stage. You are actually
magnifying the stage and its contents. Click the 25% option, and you will see not only the stage but the
entire pasteboard, that grey area surrounding the stage, as well.
Figure 1-10. Select a zoom level using the Magnification drop-down menu.
If you want more zoom, you can get a lot closer than 800 percent. Select View ➤ Zoom In or View ➤
Zoom Out to increase the zoom level to 2000 percent. If you want a real bird’s-eye view of the stage,
Zoom Out allows you to reduce the magnification level to 8 percent. For you keyboard junkies, Zoom In
is Ctrl+= and Zoom Out is Ctrl+ -. If you are a control freak, you can enter your own value. Just keep in
mind the maximum zoom level is 2000 percent, and the minimum zoom level is 8 percent.
Figure 1-11. Selecting a 400 percent zoom level brings you close to the action.
LEARNING THE FLASH CS5 PROFESSIONAL INTERFACE
13
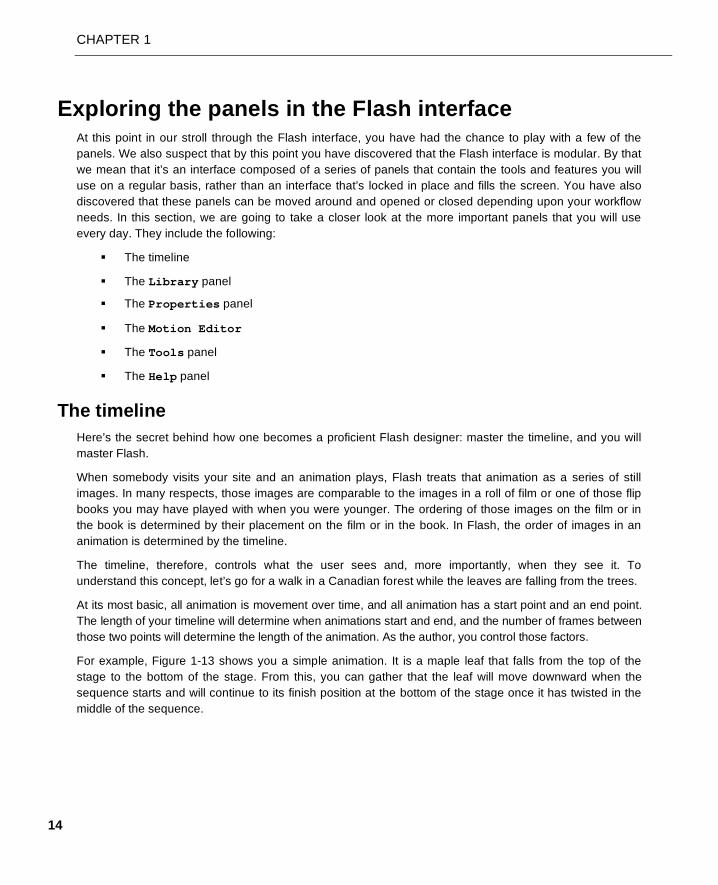
If you want a side-by-side comparison in which one image is at 100 percent view and the other is at 400
percent or 800 percent, follow these steps:
1. Open the Magnify.fla file in the Chapter 1 Exercise folder.
2. Select Window ➤ Duplicate Window. The current document will appear in a separate tab.
3. Set the new window’s magnification level to 400%.
4. Undock the 100 percent window, as shown in Figure 1-12, and let it float.
5. Select the image in the floating window by clicking the image and dragging it around the stage.
You will see the zoomed-in version in the docked window also moves. This is a really handy
feature if precise positioning of elements on the stage is critical.
6. Click each window’s close button to close the window. Don’t save the changes.
Figure 1-12. Duplicating a window gives you a bird’s-eye view and a detailed view of your work
simultaneously.
CHAPTER 1
14
Exploring the panels in the Flash interface At this point in our stroll through the Flash interface, you have had the chance to play with a few of the
panels. We also suspect that by this point you have discovered that the Flash interface is modular. By that
we mean that it’s an interface composed of a series of panels that contain the tools and features you will
use on a regular basis, rather than an interface that’s locked in place and fills the screen. You have also
discovered that these panels can be moved around and opened or closed depending upon your workflow
needs. In this section, we are going to take a closer look at the more important panels that you will use
every day. They include the following:
The timeline
The Library panel
The Properties panel
The Motion Editor
The Tools panel
The Help panel
The timeline
Here’s the secret behind how one becomes a proficient Flash designer: master the timeline, and you will
master Flash.
When somebody visits your site and an animation plays, Flash treats that animation as a series of still
images. In many respects, those images are comparable to the images in a roll of film or one of those flip
books you may have played with when you were younger. The ordering of those images on the film or in
the book is determined by their placement on the film or in the book. In Flash, the order of images in an
animation is determined by the timeline.
The timeline, therefore, controls what the user sees and, more importantly, when they see it. To
understand this concept, let’s go for a walk in a Canadian forest while the leaves are falling from the trees.
At its most basic, all animation is movement over time, and all animation has a start point and an end point.
The length of your timeline will determine when animations start and end, and the number of frames between
those two points will determine the length of the animation. As the author, you control those factors.
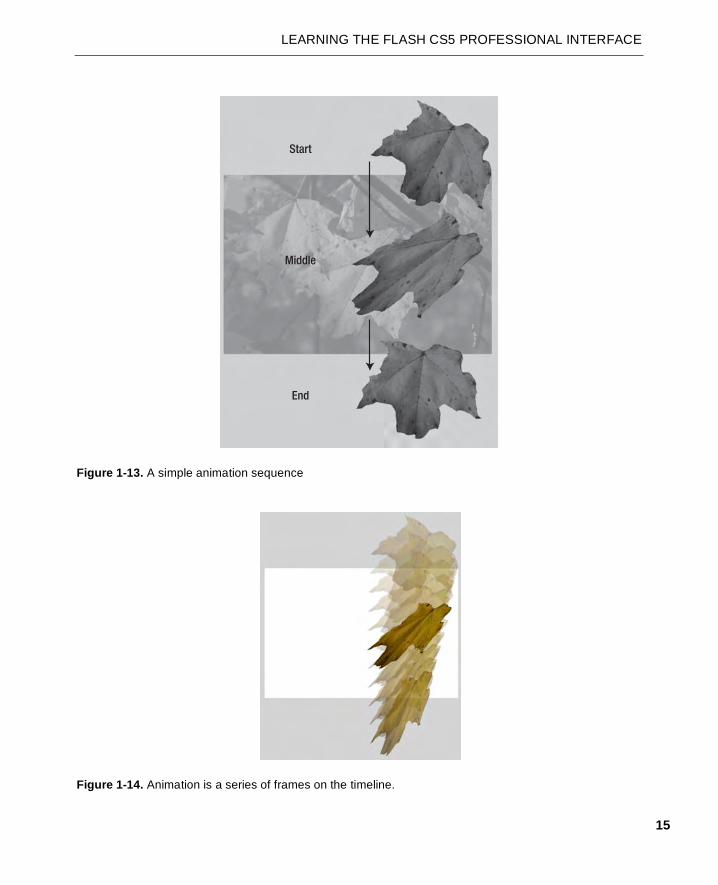
For example, Figure 1-13 shows you a simple animation. It is a maple leaf that falls from the top of the
stage to the bottom of the stage. From this, you can gather that the leaf will move downward when the
sequence starts and will continue to its finish position at the bottom of the stage once it has twisted in the
middle of the sequence.
LEARNING THE FLASH CS5 PROFESSIONAL INTERFACE
15
Figure 1-13. A simple animation sequence
Figure 1-14. Animation is a series of frames on the timeline.
CHAPTER 1
16
So, where does time come into play? Time is the number of frames between the start and middle or middle
and end points in the animation. The default timing in a Flash movie—called frame rate—is 24 frames per
second (fps). In the animation shown previously, the duration of the animation is 48 frames, which means
it will play for 2 seconds. You can assume from this that the leaf’s middle location, where it twists, is the
24th frame of the timeline. If, for example, you wanted to speed up the animation, you would reduce the
length of the timeline to 12 frames; if you wanted to slow it down, you would increase the number of
frames to 72 or decrease the frame rate. If you would like to see this animation, open the Timeline.swf
file in the O1_Complete folder.
So much for a walk in the woods; let’s wander over to the timeline and look at a frame.
Frames
If you unroll a spool of movie film, you will see that it is composed of a series of individual still images.
Each image is called a frame, and this analogy applies to Flash.
When you open Flash, your timeline will be empty, but you will see a series of rectangles—these are the
frames. You may also notice that these frames are divided into groups. Most frames are white, and every
fifth frame is gray (see Figure 1-15), just to help you keep your place. Flash movies can range in length
from 1 to 16,000 frames, although a Flash movie that is 16,000 frames in length is highly unusual.
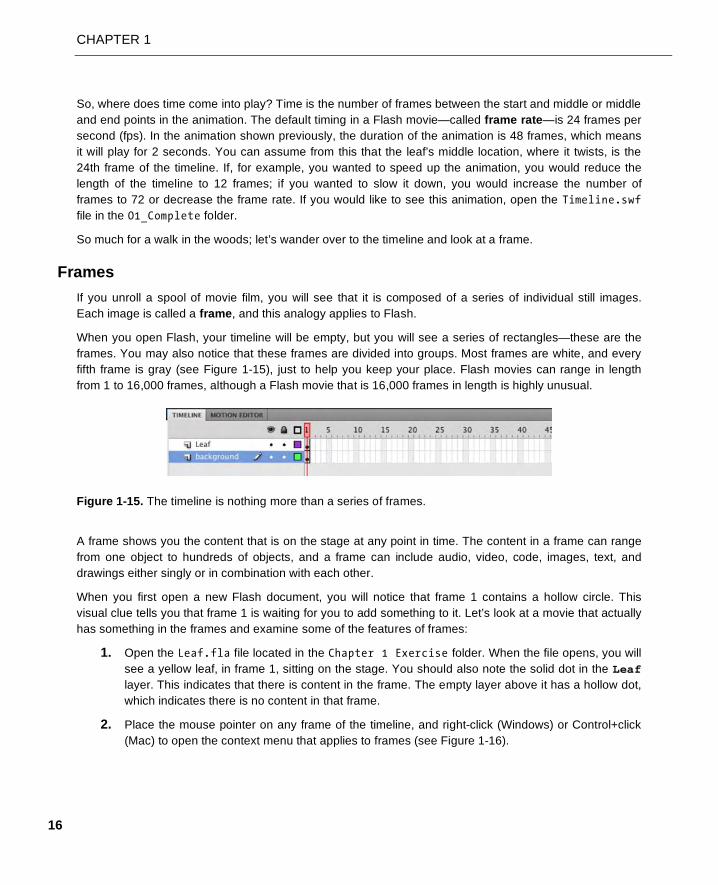
Figure 1-15. The timeline is nothing more than a series of frames.
A frame shows you the content that is on the stage at any point in time. The content in a frame can range
from one object to hundreds of objects, and a frame can include audio, video, code, images, text, and
drawings either singly or in combination with each other.
When you first open a new Flash document, you will notice that frame 1 contains a hollow circle. This
visual clue tells you that frame 1 is waiting for you to add something to it. Let’s look at a movie that actually
has something in the frames and examine some of the features of frames:
1. Open the Leaf.fla file located in the Chapter 1 Exercise folder. When the file opens, you will
see a yellow leaf, in frame 1, sitting on the stage. You should also note the solid dot in the Leaf
layer. This indicates that there is content in the frame. The empty layer above it has a hollow dot,
which indicates there is no content in that frame.
2. Place the mouse pointer on any frame of the timeline, and right-click (Windows) or Control+click
(Mac) to open the context menu that applies to frames (see Figure 1-16).

LEARNING THE FLASH CS5 PROFESSIONAL INTERFACE
17
Figure 1-16. The context menu that applies to frames on the timeline
As you can see, quite a few options are available to you. They range from adding motion to the
timeline to adding actions (code blocks) that control the objects in the frame. We aren’t going to
dig into what each menu item does just yet, but be assured, by the time you finish this book, you
will have used each menu item.
3. Place the mouse pointer at frame 36 of the Leaf layer, open the context menu, and select
Insert Keyframe. Repeat this step at frame 72 as well. What you will notice is that the
timeline changes to the series of gray frames and three black dots, as shown in Figure 1-17.
These gray rectangles represent a span of frames separated by keyframes.
If you prefer to use the keyboard, place the mouse pointer at frame 36, and press F5.
With that frame selected, press F6. The F5 command adds a frame, and F6 converts the
selected frame to a keyframe. If you just want to add a keyframe, select frame 36, and
press F6.
An obvious question at this point is, “So, guys, what’s a keyframe?” Remember when we talked earlier
about animations and how they had a start point and an end point? In Flash, those two points are called
keyframes; any movement or changes can occur only between keyframes. In Flash, there are two types
of keyframes: those with stuff in them (indicated by the solid dot shown in frame 1 of Figure 1-17) and
those with nothing in them. The latter are called blank keyframes, and they are shown as frames with a
hollow dot. The first frame in any layer, until you add something to that frame, is always indicated by a
blank keyframe.
CHAPTER 1
18
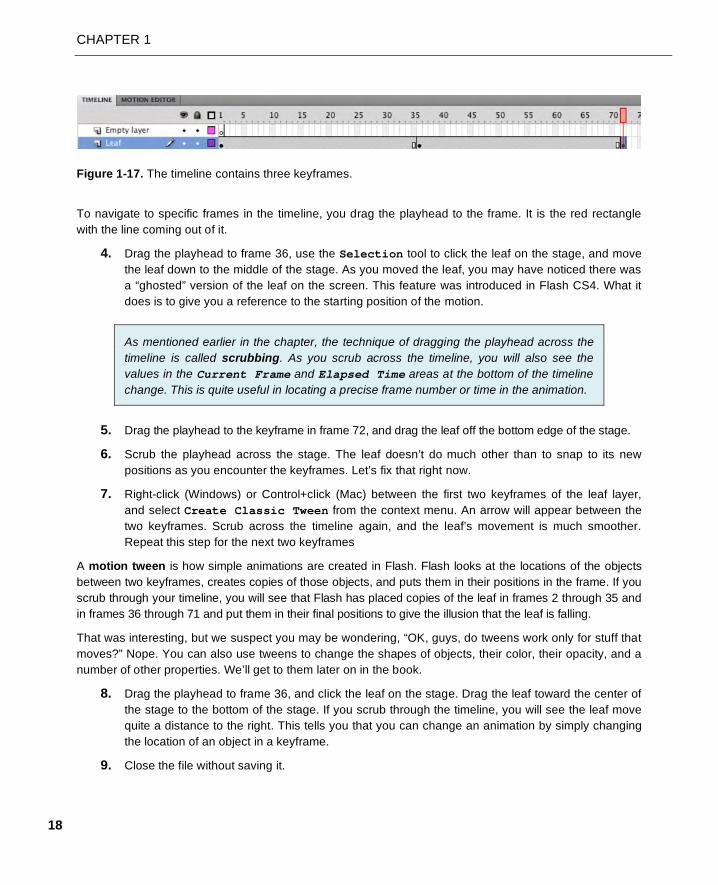
Figure 1-17. The timeline contains three keyframes.
To navigate to specific frames in the timeline, you drag the playhead to the frame. It is the red rectangle
with the line coming out of it.
4. Drag the playhead to frame 36, use the Selection tool to click the leaf on the stage, and move
the leaf down to the middle of the stage. As you moved the leaf, you may have noticed there was
a “ghosted” version of the leaf on the screen. This feature was introduced in Flash CS4. What it
does is to give you a reference to the starting position of the motion.
As mentioned earlier in the chapter, the technique of dragging the playhead across the
timeline is called scrubbing. As you scrub across the timeline, you will also see the
values in the Current Frame and Elapsed Time areas at the bottom of the timeline
change. This is quite useful in locating a precise frame number or time in the animation.
5. Drag the playhead to the keyframe in frame 72, and drag the leaf off the bottom edge of the stage.
6. Scrub the playhead across the stage. The leaf doesn’t do much other than to snap to its new
positions as you encounter the keyframes. Let’s fix that right now.
7. Right-click (Windows) or Control+click (Mac) between the first two keyframes of the leaf layer,
and select Create Classic Tween from the context menu. An arrow will appear between the
two keyframes. Scrub across the timeline again, and the leaf’s movement is much smoother.
Repeat this step for the next two keyframes
A motion tween is how simple animations are created in Flash. Flash looks at the locations of the objects
between two keyframes, creates copies of those objects, and puts them in their positions in the frame. If you
scrub through your timeline, you will see that Flash has placed copies of the leaf in frames 2 through 35 and
in frames 36 through 71 and put them in their final positions to give the illusion that the leaf is falling.
That was interesting, but we suspect you may be wondering, “OK, guys, do tweens work only for stuff that
moves?” Nope. You can also use tweens to change the shapes of objects, their color, their opacity, and a
number of other properties. We’ll get to them later on in the book.
8. Drag the playhead to frame 36, and click the leaf on the stage. Drag the leaf toward the center of
the stage to the bottom of the stage. If you scrub through the timeline, you will see the leaf move
quite a distance to the right. This tells you that you can change an animation by simply changing
the location of an object in a keyframe.
9. Close the file without saving it.

LEARNING THE FLASH CS5 PROFESSIONAL INTERFACE
19
Using the Motion Editor panel
As you get deeper into working with Flash, you will find there is a reason why the Timeline and Motion
Editor panels are docked beside each other in the interface; motion is created in the timeline and
manipulated in the Motion Editor. Make a change in one panel, and it is instantly reflected in the other.
In previous versions of Flash, the Property Inspector, which is now the Properties panel, could be
used to change the properties of an animation. This would include techniques such as “ramping” the speed
of an animation, called easing, or even changing how an animation occurs such as adding or removing
rotation. This is still true for shape tweens and classic tweens, but the true power of motion is realized in
the Motion Editor.
Though we are going to get deeper into using this panel’s features in Chapters 7 and 8, now would be a
good time to stroll over to it and take a peek at it. Open the MotionPath.fla file. When the file opens, the
first thing you will notice is there is an icon, as shown in Figure 1-18, beside the layer name. This “zooming
square” icon indicates the layer is a tween layer. The term tween indicates that something is changing at
some point in the layer—we’ll get into tweening in more detail later. The other thing you may have noticed,
especially if you have used Flash, is there are no arrows between the keyframes. The tween span is
indicated in blue, and because of the icon, the use of the arrow is not necessary. The dotted line you see
on the stage indicates a tween path.
If you are an After Effects user, you may be looking at that tween path and thinking,
“Nah, it can’t be!” Yes, it is a motion path, and just like an After Effects motion path, you
can adjust that path by clicking and dragging one of the dots. Each dot represents a
frame of the animation.
Drag the playhead across the timeline, and you will see the leaf tumble, grow, and shrink as you move the
playhead from left to right. Select the Leaf layer name on the timeline, and click the Motion Editor tab
to open the Motion Editor, as shown in Figure 1-18.
You may have noticed us mentioning After Effects when we talk about tweens and this panel. This is
deliberate because this feature of Flash can trace its roots in a straight line back to After Effects. In that
application, objects put in motion or otherwise manipulated over time have a full set of properties and
guides for each layer of content in an After Effects project. The major property is motion. Flash users who
use After Effects to create motion graphics for their Flash projects find the “After Effects way of doing
things” to be relatively compact and simple. The result over the years has been Flash designers wondering
why Flash didn’t have this feature. Obviously enough of you asked the question because it was introduced
in Flash CS4 and has been broadly accepted by the Flash community.
CHAPTER 1
20
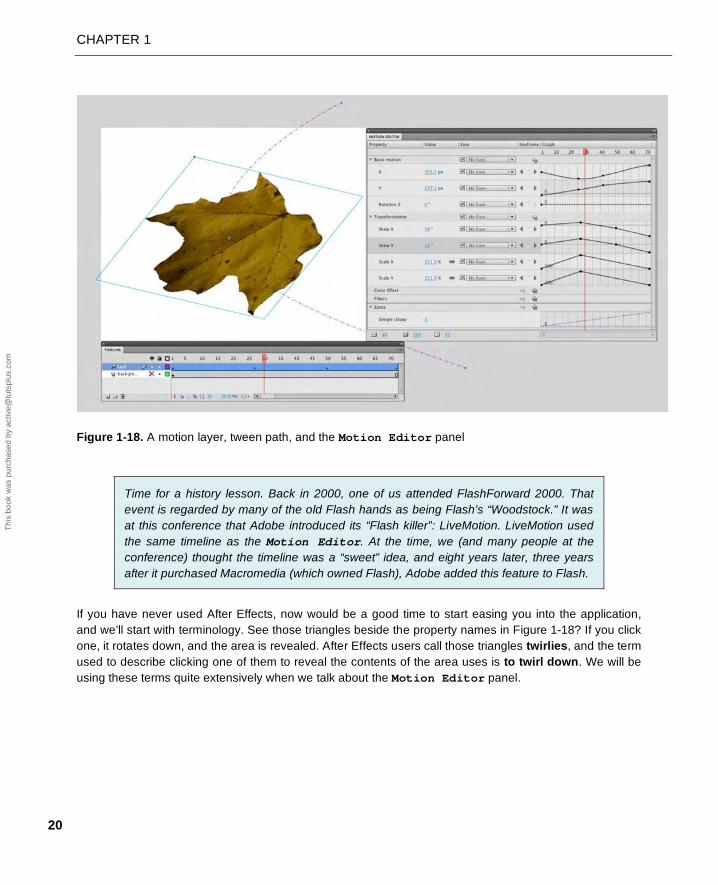
Figure 1-18. A motion layer, tween path, and the Motion Editor panel
Time for a history lesson. Back in 2000, one of us attended FlashForward 2000. That
event is regarded by many of the old Flash hands as being Flash’s “Woodstock.” It was
at this conference that Adobe introduced its “Flash killer”: LiveMotion. LiveMotion used
the same timeline as the Motion Editor. At the time, we (and many people at the
conference) thought the timeline was a “sweet” idea, and eight years later, three years
after it purchased Macromedia (which owned Flash), Adobe added this feature to Flash.
If you have never used After Effects, now would be a good time to start easing you into the application,
and we’ll start with terminology. See those triangles beside the property names in Figure 1-18? If you click
one, it rotates down, and the area is revealed. After Effects users call those triangles twirlies, and the term
used to describe clicking one of them to reveal the contents of the area uses is to twirl down. We will be
using these terms quite extensively when we talk about the Motion Editor panel.
Thi
s bo
ok w
as p
urch
ased
by
activ
e@tu
tspl
us.c
om
LEARNING THE FLASH CS5 PROFESSIONAL INTERFACE
21
The Motion Editor panel is broken into five distinct areas:
Basic Motion: If you twirl down Basic Motion, you will see that it controls the movement of the
object on the x- and y-axes and rotation on the z-axis.
Transformation: Think of this panel as a “by-the-numbers” version of the Free Transform
tool, which allows you to slant (skew) and resize (scale) the selected object.
Color Effect: This panel—click the + sign to open it—allows you to manipulate alpha
(transparency), color, brightness, and tint.
Filters: This is where you apply one of the filters—Drop Shadow, Blur, Glow, Bevel, Gradient
Glow, Gradient Bevel, Adjust Color—to the object on the stage.
Eases: This area is where you affect the starting or stopping motion of an animation.
When you twirl down an area of the panel, all of the properties it can affect are revealed.
The Color Effect and Filters areas are also available in the Properties panel.
Why? These are the properties of an object that can be changed, but they can also be
“tweened.” For example, you could have the leaf change from yellow to red if you tween
its Tint property.
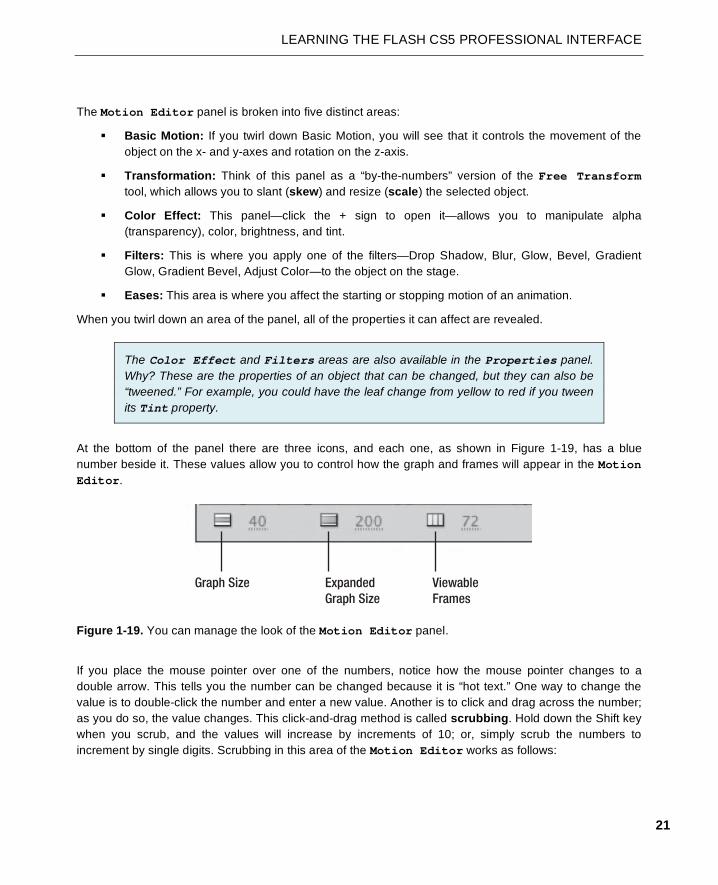
At the bottom of the panel there are three icons, and each one, as shown in Figure 1-19, has a blue
number beside it. These values allow you to control how the graph and frames will appear in the Motion
Editor.
Figure 1-19. You can manage the look of the Motion Editor panel.
If you place the mouse pointer over one of the numbers, notice how the mouse pointer changes to a
double arrow. This tells you the number can be changed because it is “hot text.” One way to change the
value is to double-click the number and enter a new value. Another is to click and drag across the number;
as you do so, the value changes. This click-and-drag method is called scrubbing. Hold down the Shift key
when you scrub, and the values will increase by increments of 10; or, simply scrub the numbers to
increment by single digits. Scrubbing in this area of the Motion Editor works as follows:
CHAPTER 1
22
Scrub across the Graph Size value, and the side of the graph in the panel gets larger or
smaller.
Scrub across the Expanded Graph Size value, and just the graph for the selected property
gets larger or smaller. This one, at first, is a bit tricky. Changing the value doesn’t result in an
immediate change. What you need to do to see the graph is to click the solid color area of the
strip. When you do this, the property strip expands to full size, and you can now make the
change.
Scrub across the Viewable Frames value, and you will see the frames in the graph get larger
or smaller. The maximum value for this feature is the current number of frames in the tween span,
not the Flash movie. Notice how you can’t get a number larger than the 72 frames in the
animation.
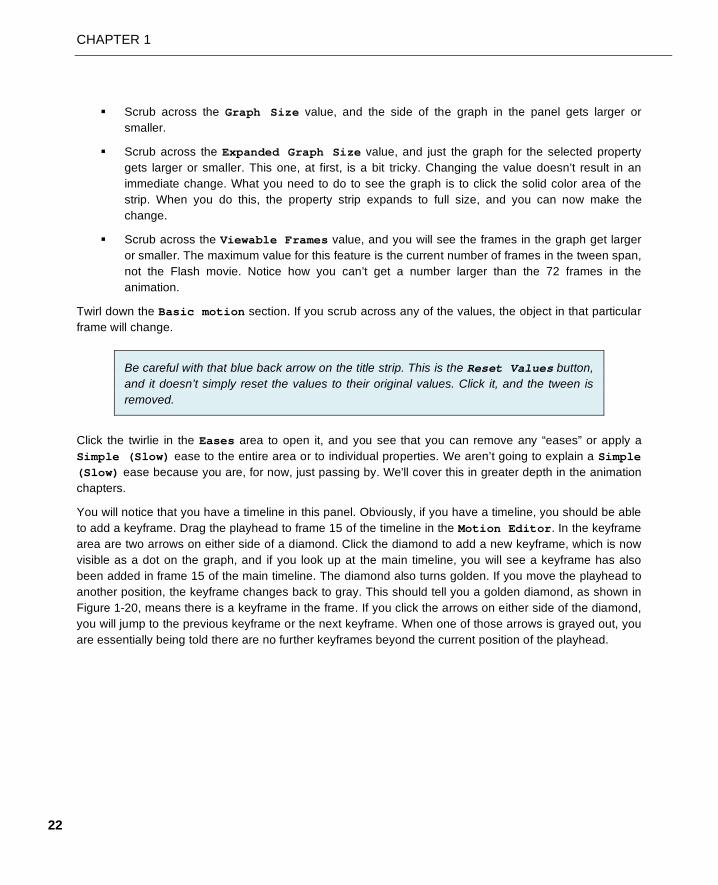
Twirl down the Basic motion section. If you scrub across any of the values, the object in that particular
frame will change.
Be careful with that blue back arrow on the title strip. This is the Reset Values button,
and it doesn’t simply reset the values to their original values. Click it, and the tween is
removed.
Click the twirlie in the Eases area to open it, and you see that you can remove any “eases” or apply a
Simple (Slow) ease to the entire area or to individual properties. We aren’t going to explain a Simple
(Slow) ease because you are, for now, just passing by. We’ll cover this in greater depth in the animation
chapters.
You will notice that you have a timeline in this panel. Obviously, if you have a timeline, you should be able
to add a keyframe. Drag the playhead to frame 15 of the timeline in the Motion Editor. In the keyframe
area are two arrows on either side of a diamond. Click the diamond to add a new keyframe, which is now
visible as a dot on the graph, and if you look up at the main timeline, you will see a keyframe has also
been added in frame 15 of the main timeline. The diamond also turns golden. If you move the playhead to
another position, the keyframe changes back to gray. This should tell you a golden diamond, as shown in
Figure 1-20, means there is a keyframe in the frame. If you click the arrows on either side of the diamond,
you will jump to the previous keyframe or the next keyframe. When one of those arrows is grayed out, you
are essentially being told there are no further keyframes beyond the current position of the playhead.

LEARNING THE FLASH CS5 PROFESSIONAL INTERFACE
23
Figure 1-20. Key frames added in the Motion Editor also appear on the main timeline.
The Colors, Filters, and Eases strips are treated a bit differently. Instead of an arrow, they have plus
and minus signs. Click the + in the Filters area. A drop-down menu containing a list of the filters, as
shown in Figure 1-21, appears. To remove a filter, click and hold the – sign. A drop-down list of the filters
applied to that object will appear. Click a filter in that list, and it will be removed.
Figure 1-21. Filters can also be added and tweened.
The Properties panel
We have been mentioning the Properties panel quite a bit to this point, so now would be a good time to
stroll over to it and take a closer look. Before we do that, let’s go sit down on the bench over there and
discuss a fundamental concept in Flash: everything has properties.
What are properties? These are the things objects have in common with each other. Tiago and Tom share
the Author property of this book. We are both males. We both have a common language property, English,
but we also have properties we don’t share. For example, our location properties are Zurich and Toronto.
Tiago is a bit taller than Tom. At our most basic, we are humans on the planet Earth. In Flash terms,
though, we are objects on the stage. Click the Tiago object, and you will instantly see that, even though he
and Tom share similar properties, they also have properties that are different. The properties of any object
on the Flash stage will appear in the Properties panel, and best of all, any properties appearing on the
panel can be changed.
CHAPTER 1
24
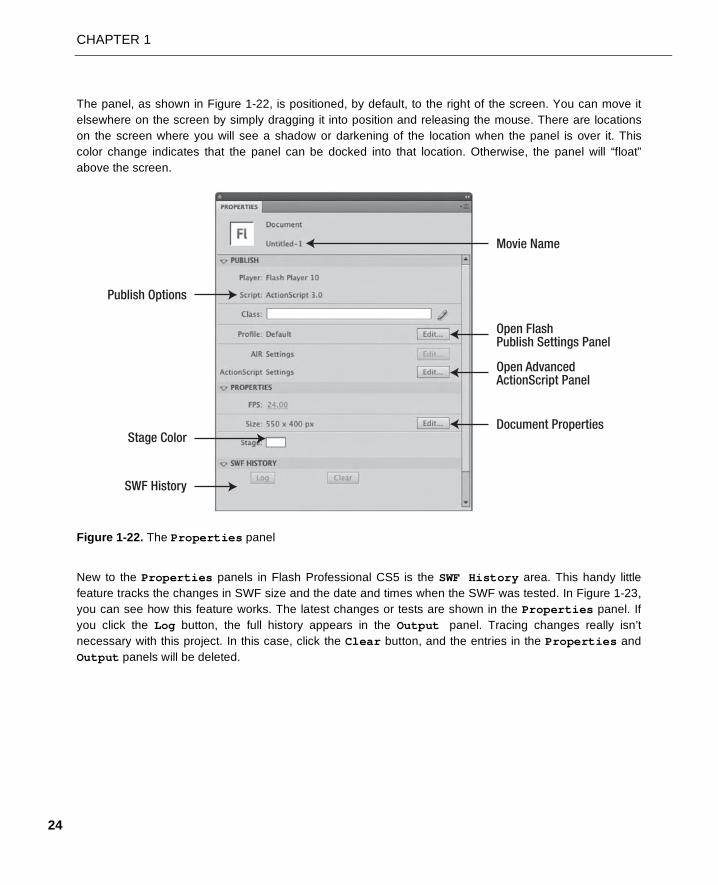
The panel, as shown in Figure 1-22, is positioned, by default, to the right of the screen. You can move it
elsewhere on the screen by simply dragging it into position and releasing the mouse. There are locations
on the screen where you will see a shadow or darkening of the location when the panel is over it. This
color change indicates that the panel can be docked into that location. Otherwise, the panel will “float”
above the screen.
Figure 1-22. The Properties panel
New to the Properties panels in Flash Professional CS5 is the SWF History area. This handy little
feature tracks the changes in SWF size and the date and times when the SWF was tested. In Figure 1-23,
you can see how this feature works. The latest changes or tests are shown in the Properties panel. If
you click the Log button, the full history appears in the Output panel. Tracing changes really isn’t
necessary with this project. In this case, click the Clear button, and the entries in the Properties and
Output panels will be deleted.

LEARNING THE FLASH CS5 PROFESSIONAL INTERFACE
25
Figure 1-23. SWF History is a useful addition to the application.
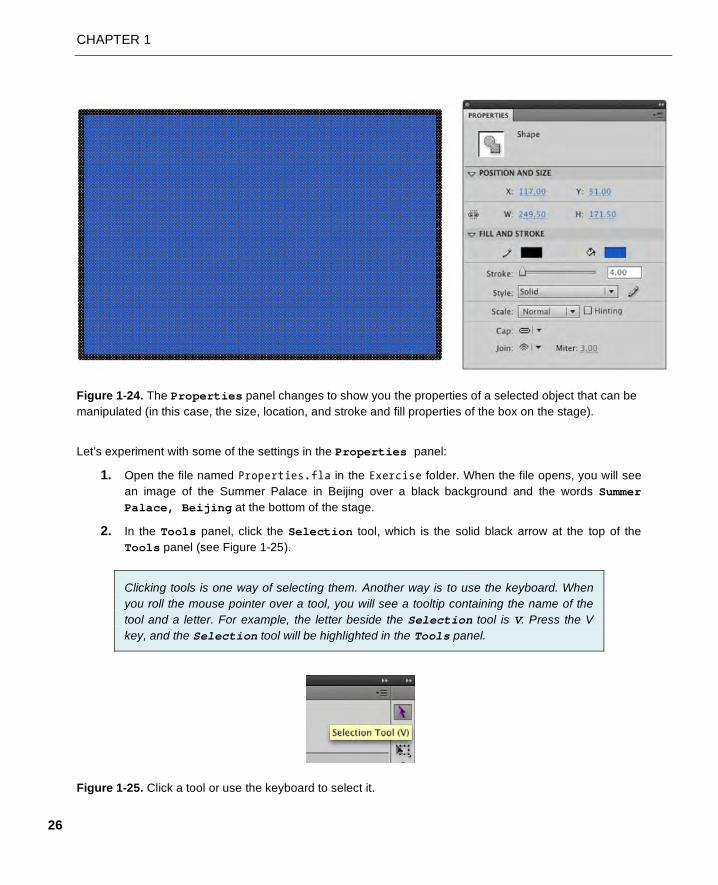
When an object is placed on the stage and selected, the Properties panel will change to reflect the
properties of the selected object that can be manipulated. For example, in Figure 1-24, a box has been
drawn on the stage. The Properties panel shows you the type of object that has been selected and tells
you the stroke and fill colors of the object can also be changed. In addition, you can change how scaling
will be applied to the object and the treatment of the red stroke around the box.
CHAPTER 1
26
Figure 1-24. The Properties panel changes to show you the properties of a selected object that can be
manipulated (in this case, the size, location, and stroke and fill properties of the box on the stage).
Let’s experiment with some of the settings in the Properties panel:
1. Open the file named Properties.fla in the Exercise folder. When the file opens, you will see
an image of the Summer Palace in Beijing over a black background and the words Summer
Palace, Beijing at the bottom of the stage.
2. In the Tools panel, click the Selection tool, which is the solid black arrow at the top of the
Tools panel (see Figure 1-25).
Clicking tools is one way of selecting them. Another way is to use the keyboard. When
you roll the mouse pointer over a tool, you will see a tooltip containing the name of the
tool and a letter. For example, the letter beside the Selection tool is V. Press the V
key, and the Selection tool will be highlighted in the Tools panel.
Figure 1-25. Click a tool or use the keyboard to select it.
LEARNING THE FLASH CS5 PROFESSIONAL INTERFACE
27
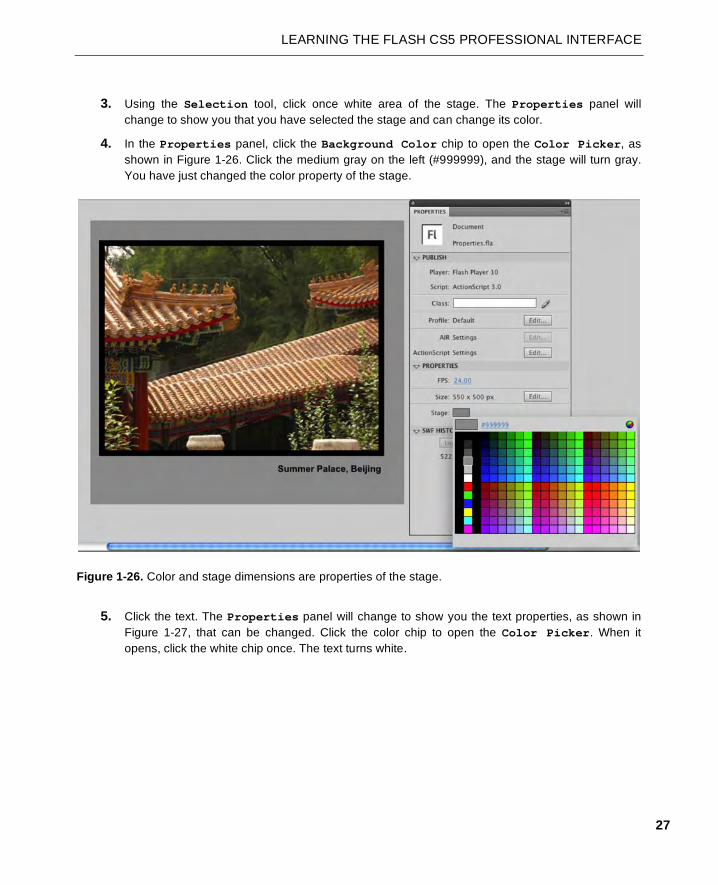
3. Using the Selection tool, click once white area of the stage. The Properties panel will
change to show you that you have selected the stage and can change its color.
4. In the Properties panel, click the Background Color chip to open the Color Picker, as
shown in Figure 1-26. Click the medium gray on the left (#999999), and the stage will turn gray.
You have just changed the color property of the stage.
Figure 1-26. Color and stage dimensions are properties of the stage.
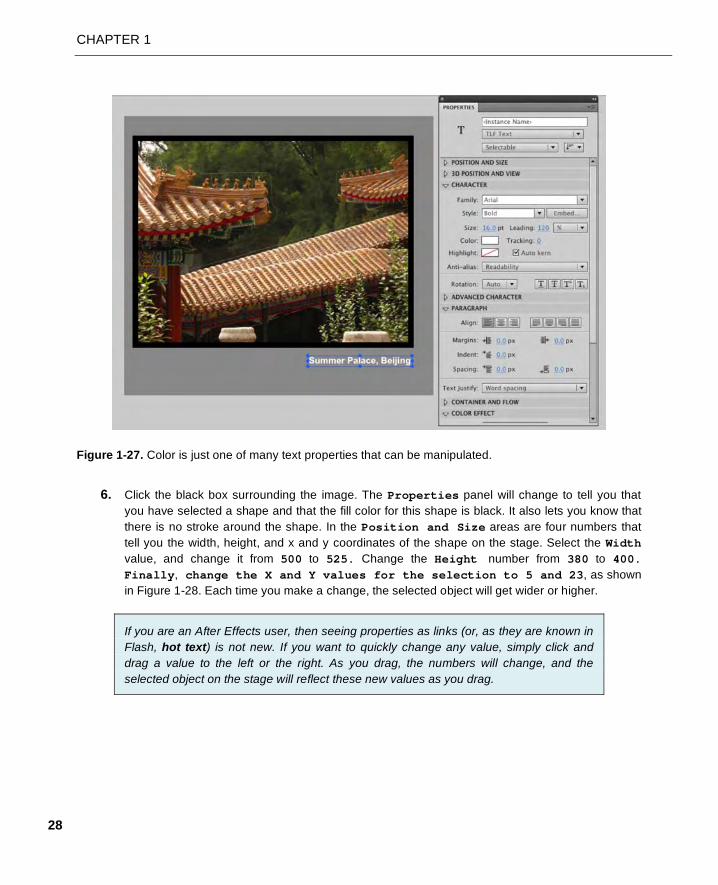
5. Click the text. The Properties panel will change to show you the text properties, as shown in
Figure 1-27, that can be changed. Click the color chip to open the Color Picker. When it
opens, click the white chip once. The text turns white.
CHAPTER 1
28
Figure 1-27. Color is just one of many text properties that can be manipulated.
6. Click the black box surrounding the image. The Properties panel will change to tell you that
you have selected a shape and that the fill color for this shape is black. It also lets you know that
there is no stroke around the shape. In the Position and Size areas are four numbers that
tell you the width, height, and x and y coordinates of the shape on the stage. Select the Width
value, and change it from 500 to 525. Change the Height number from 380 to 400.
Finally, change the X and Y values for the selection to 5 and 23, as shown
in Figure 1-28. Each time you make a change, the selected object will get wider or higher.
If you are an After Effects user, then seeing properties as links (or, as they are known in
Flash, hot text) is not new. If you want to quickly change any value, simply click and
drag a value to the left or the right. As you drag, the numbers will change, and the
selected object on the stage will reflect these new values as you drag.

LEARNING THE FLASH CS5 PROFESSIONAL INTERFACE
29
Figure 1-28. The size and the location of selections can also be changed in the Properties panel.
The Tools panel
The Tools panel, as shown in Figure 1-29, is divided into four major areas:
Tools: These allow you to create, select, and manipulate text and graphics placed on the stage.
View: These allow you to pan across the stage or to zoom in on specific areas of the stage.
Colors: These tools allow you to select and change fill, stroke, and gradient colors.
Options: This is a context-sensitive area of the panel. In many ways, it is not unlike the
Properties panel. It will change depending upon which tool you have selected.

CHAPTER 1
30
Figure 1-29. The Tools panel
Thi
s bo
ok w
as p
urch
ased
by
activ
e@tu
tspl
us.c
om
LEARNING THE FLASH CS5 PROFESSIONAL INTERFACE
31
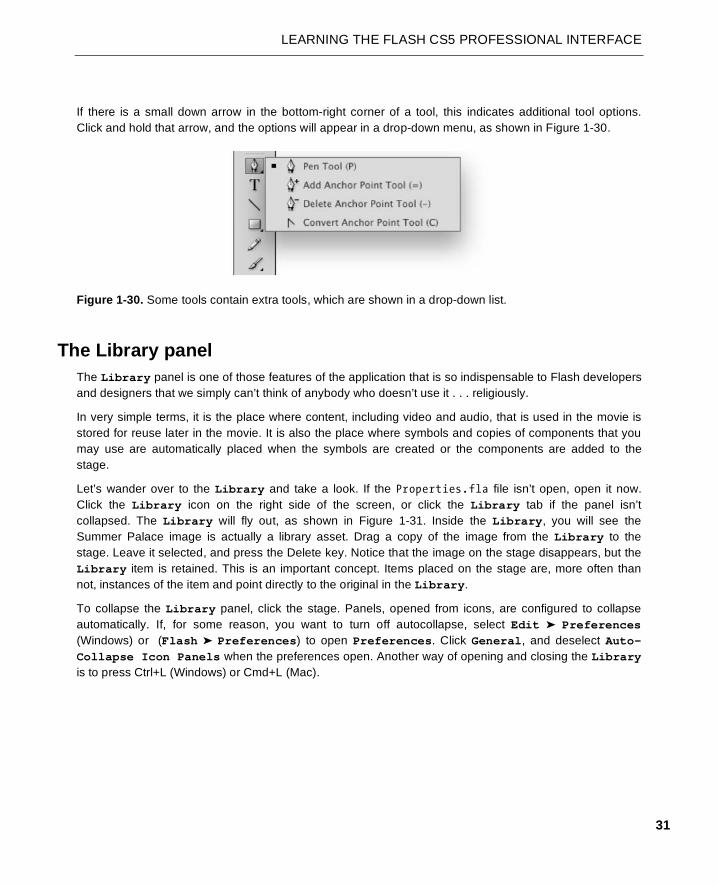
If there is a small down arrow in the bottom-right corner of a tool, this indicates additional tool options.
Click and hold that arrow, and the options will appear in a drop-down menu, as shown in Figure 1-30.
Figure 1-30. Some tools contain extra tools, which are shown in a drop-down list.
The Library panel
The Library panel is one of those features of the application that is so indispensable to Flash developers
and designers that we simply can’t think of anybody who doesn’t use it . . . religiously.
In very simple terms, it is the place where content, including video and audio, that is used in the movie is
stored for reuse later in the movie. It is also the place where symbols and copies of components that you
may use are automatically placed when the symbols are created or the components are added to the
stage.
Let’s wander over to the Library and take a look. If the Properties.fla file isn’t open, open it now.
Click the Library icon on the right side of the screen, or click the Library tab if the panel isn’t
collapsed. The Library will fly out, as shown in Figure 1-31. Inside the Library, you will see the
Summer Palace image is actually a library asset. Drag a copy of the image from the Library to the
stage. Leave it selected, and press the Delete key. Notice that the image on the stage disappears, but the
Library item is retained. This is an important concept. Items placed on the stage are, more often than
not, instances of the item and point directly to the original in the Library.
To collapse the Library panel, click the stage. Panels, opened from icons, are configured to collapse
automatically. If, for some reason, you want to turn off autocollapse, select Edit ➤ Preferences
(Windows) or (Flash ➤ Preferences) to open Preferences. Click General, and deselect Auto-
Collapse Icon Panels when the preferences open. Another way of opening and closing the Library
is to press Ctrl+L (Windows) or Cmd+L (Mac).

CHAPTER 1
32
Figure 1-31. The Library panel
Using layers The next stop on our walkabout is found under the stage: the layers feature of the timeline. There are a
few things you need to know regarding layers:
You can have as many layers in a Flash movie as you need. They have no effect upon the file
size.
Use layers to manage your movie. Flash movies are composed of objects, media, and code, and
it is a standard industry practice to give everything its own layer. This way, you can easily find
content on a crowded stage. In fact, any object that is tweened must be on its own layer.
Layers can be grouped. Layers can be placed inside a folder, which means you can, for example,
have a complex animation and have all the objects in the animation contained in their own layers
inside a folder.

LEARNING THE FLASH CS5 PROFESSIONAL INTERFACE
33
Layers stack on top of each other. For example, you can have a layer with a box in it and another
with a ball in it. If the ball layer is above the box layer, the ball will appear to be above the box.
Name your layers. This is another standard industry practice that makes finding content in the
movie very easy.
Screen real estate is always at a premium. If you need to see more of the stage, double-
click the Timeline tab to collapse the layers. Double-click the Timeline tab again,
and the layers are brought back.
Layer properties
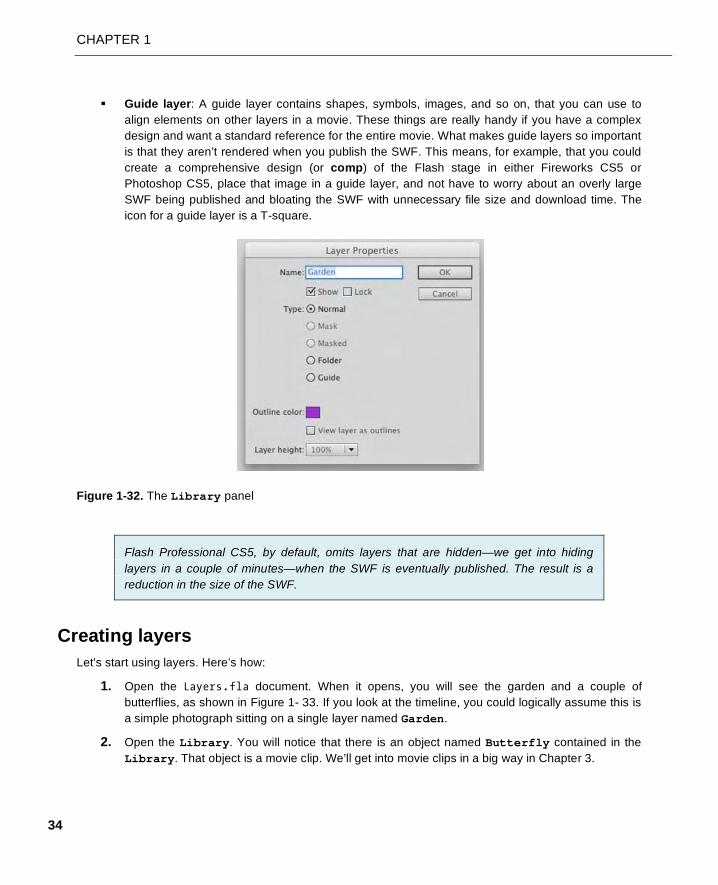
Layers can also be put to very specific uses, and this is accomplished by assigning one of five layer
properties, as shown in Figure 1-32, to a layer. Though they are called properties, they really should be
regarded more as layer modes than anything else. We will be covering these in great depth in Chapter 3
and Chapters 7 and 8, which focus on animation, but this is a good place to start learning where they are
and what they do. The modes, accessed by right-clicking (Windows) or Control+clicking (Mac) a layer
name and clicking Properties, are as follows:
Normal layer: This is the layer you have been working with to this point in the book. Objects on
these layers are always visible, and motion is more or less governed by the Motion Editor.
You can always identify a normal layer; its icon looks like a folded sheet of paper.
Mask layer: The shape of an object on a masking layer is used to hide anything outside the
shape and reveals only whatever is under the object. For example, place an image on the stage
and add a box in the layer above it. If that layer is a masking layer, only the pixels of the part of
the image directly under the box will be seen. The icon for a mask layer is a square with an oval
in the middle of it.
Masked layer: If you have a mask layer, you will also have one of these. Like Siamese twins,
mask layers and masked layers—any layer under a mask—are joined together. The icon for a
masked layer looks like a folded sheet of paper facing the opposite direction as the icon for a
normal layer. In addition, the layer name for a masked layer is indented.
Folder layer: The best way of thinking of this mode is as a folder containing layers. They also
provide quick access to layer groupings you may create. The icon for a folder layer is a file folder
with a twirlie. Click the twirlie, and the layers in the folder are revealed. Click the twirlie again, and
the layers collapse.
CHAPTER 1
34
Guide layer: A guide layer contains shapes, symbols, images, and so on, that you can use to
align elements on other layers in a movie. These things are really handy if you have a complex
design and want a standard reference for the entire movie. What makes guide layers so important
is that they aren’t rendered when you publish the SWF. This means, for example, that you could
create a comprehensive design (or comp) of the Flash stage in either Fireworks CS5 or
Photoshop CS5, place that image in a guide layer, and not have to worry about an overly large
SWF being published and bloating the SWF with unnecessary file size and download time. The
icon for a guide layer is a T-square.
Figure 1-32. The Library panel
Flash Professional CS5, by default, omits layers that are hidden—we get into hiding
layers in a couple of minutes—when the SWF is eventually published. The result is a
reduction in the size of the SWF.
Creating layers
Let’s start using layers. Here’s how:
1. Open the Layers.fla document. When it opens, you will see the garden and a couple of
butterflies, as shown in Figure 1- 33. If you look at the timeline, you could logically assume this is
a simple photograph sitting on a single layer named Garden.
2. Open the Library. You will notice that there is an object named Butterfly contained in the
Library. That object is a movie clip. We’ll get into movie clips in a big way in Chapter 3.

LEARNING THE FLASH CS5 PROFESSIONAL INTERFACE
35
Figure 1-33. We start with what appears to be a photograph of flowers and butterflies.
3. Click the keyframe in the Garden layer. Three objects—the two Monarch butterflies and the
image—are selected. What you have just learned is how to select everything on a layer. Click the
pasteboard to deselect the objects.
4. Each object should be placed on its own layer. Click the New Layer button—it looks like a page
with a turned-up corner—directly under the Garden layer strip. A new layer, named Layer1, is
added to the timeline.
5. Select the Garden layer by clicking it, and add a new layer. Notice how the new
layer is placed between Garden and Layer 1. This should tell you that all new layers added to
the timeline are added directly above the currently selected layer. Obviously, Layer 2 is out of
position. Let’s fix that.
6. Drag Layer 2 above Layer 1, and release the mouse. Now you know how to reorder layers
and move them around in the timeline. Layers can be dragged above or below each other.
7. Add a new layer, Layer 3. Hold on—we have four layers and three objects. The math doesn’t
work. That new layer has to go.
8. Select Layer 3, and click the Trash Can icon under the Garden strip. Layer 3 will now be
deleted, and now you know how to get rid of an extra layer.

CHAPTER 1
36
9. Double-click the Layer 1 layer name to select it. Rename the layer Butterfly. Now that you
know how to rename a layer, select File ➤ Revert to revert the file to its original state. It’s now
time to learn how to put content on layers.
Adding content to layers
Content can be added to layers in one of two ways:
Directly to the layer by moving an object from the Library to the layer
From one layer to another layer
Let’s explore how to use the two methods to place content into layers:
1. Create a new layer, name it Butterfly01, and drag the Butterfly movie clip from the
Library to cover the flower, as shown in Figure 1-34, in the bottom-right corner of the stage.
The hollow dot in the layer will change to a solid dot to indicate that there is content in the frame.
When moving objects from the Library to the stage, be sure to select the layer, sometimes
called a target layer, before you drag and drop. This way, you can prevent the content from
going in the wrong layer. Let’s now turn our attention to getting the two other butterflies into their
own layers.
Figure 1-34. Objects can be dragged directly from the Library and added to specific layers.
LEARNING THE FLASH CS5 PROFESSIONAL INTERFACE
37
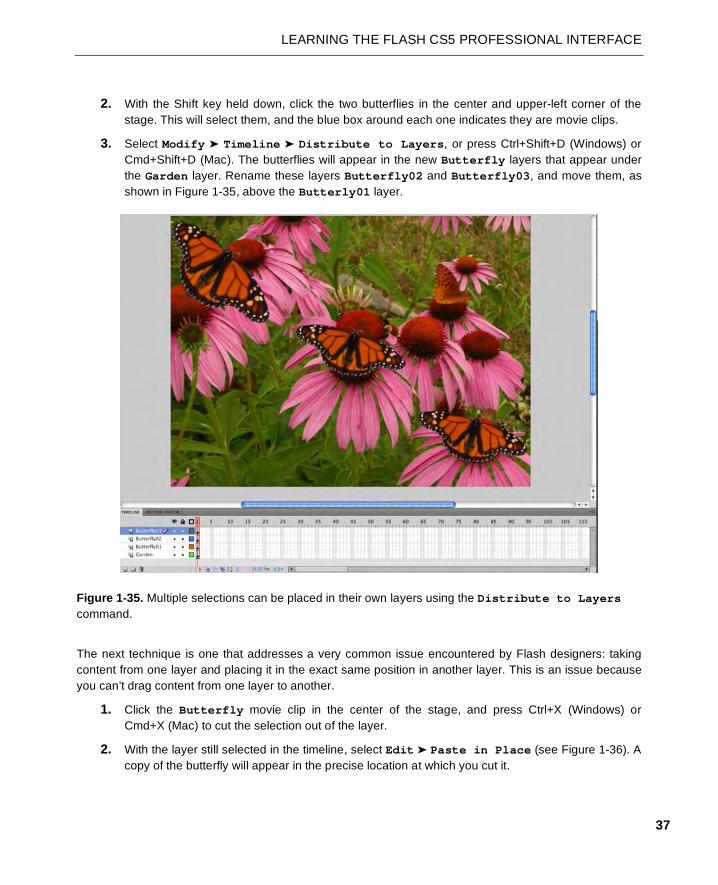
2. With the Shift key held down, click the two butterflies in the center and upper-left corner of the
stage. This will select them, and the blue box around each one indicates they are movie clips.
3. Select Modify ➤ Timeline ➤ Distribute to Layers, or press Ctrl+Shift+D (Windows) or
Cmd+Shift+D (Mac). The butterflies will appear in the new Butterfly layers that appear under
the Garden layer. Rename these layers Butterfly02 and Butterfly03, and move them, as
shown in Figure 1-35, above the Butterly01 layer.
Figure 1-35. Multiple selections can be placed in their own layers using the Distribute to Layers
command.
The next technique is one that addresses a very common issue encountered by Flash designers: taking
content from one layer and placing it in the exact same position in another layer. This is an issue because
you can’t drag content from one layer to another.
1. Click the Butterfly movie clip in the center of the stage, and press Ctrl+X (Windows) or
Cmd+X (Mac) to cut the selection out of the layer.
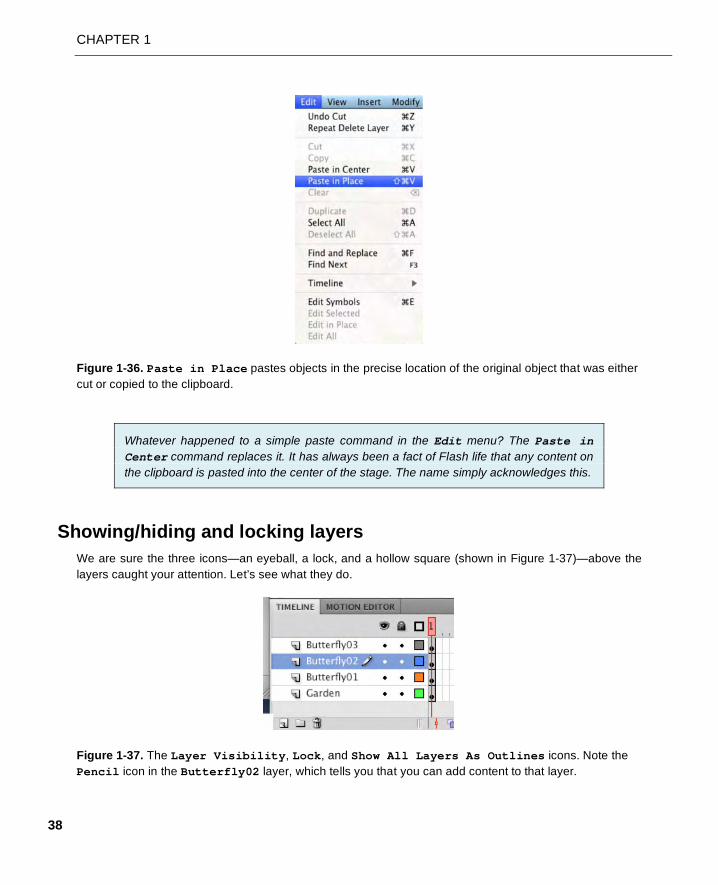
2. With the layer still selected in the timeline, select Edit ➤ Paste in Place (see Figure 1-36). A
copy of the butterfly will appear in the precise location at which you cut it.
CHAPTER 1
38
Figure 1-36. Paste in Place pastes objects in the precise location of the original object that was either
cut or copied to the clipboard.
Whatever happened to a simple paste command in the Edit menu? The Paste in
Center command replaces it. It has always been a fact of Flash life that any content on
the clipboard is pasted into the center of the stage. The name simply acknowledges this.
Showing/hiding and locking layers
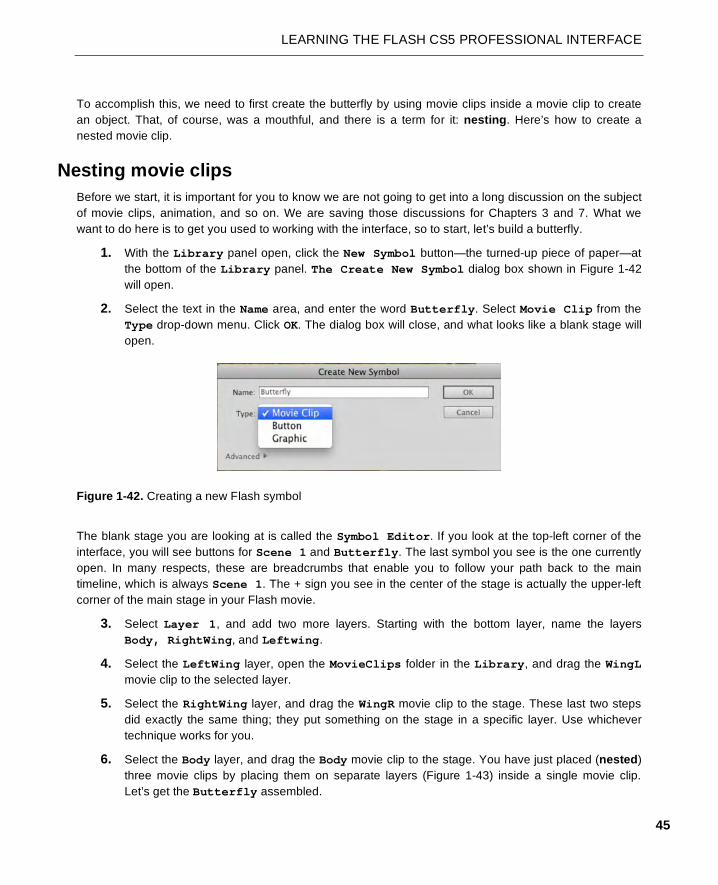
We are sure the three icons—an eyeball, a lock, and a hollow square (shown in Figure 1-37)—above the
layers caught your attention. Let’s see what they do.
Figure 1-37. The Layer Visibility, Lock, and Show All Layers As Outlines icons. Note the
Pencil icon in the Butterfly02 layer, which tells you that you can add content to that layer.

LEARNING THE FLASH CS5 PROFESSIONAL INTERFACE
39
Click the eyeball icon. Notice that everything on the stage disappears, and the dots under the eyeball in
each layer change to a red x. This eyeball is the Layer Visibility icon, and clicking it turns off the
visibility of all the content in the layers. Click the icon again, and everything reappears. This time, select
the Butterfly02 layer, and click the dot under the eyeball. Just the butterfly in the center of the stage
disappears. What this tells you is that you can turn off the visibility for a specific layer by clicking the dot in
the visibility column.
When you click a layer, you may notice that a pencil icon appears on the layer strip. This tells you that you
can add content to the layer. Click the Butterfly02 layer, and you’ll see the pencil icon. Now, click the
dot under the lock in the Butterfly02 layer. The lock icon will replace the dot. When you lock a layer,
you can’t draw on it or add content to it. You can see this because the pencil has a stroke through it. If you
try to drag the Butterfly movie clip from the Library to the Butterfly02 layer, you will also see that
the layer has been locked because the mouse pointer changes from a tan arrow to a circle with a line
through it. Also, if you try to click the butterfly on the stage, you won’t be able to select it. This is handy to
know in situations where precision is paramount and you don’t want to accidentally move something or,
god forbid, delete something from the stage.
OK, we sort of “stretched the truth” there by telling you that content can’t be added to a
locked layer. ActionScript is the only thing that can be added to a locked layer. This
explains why many Flash designers and developers create an ActionScript-only layer—
usually named scripts or actions—and then lock the layer. This prevents anything
other than code from being placed in the layer.
The final icon is the Show All Layers As Outlines icon. Click it, and the content on the stage turns
into outlines. This is somewhat akin to the wireframe display mode available in many 3D modeling
applications. In Flash, it can be useful in cases where dozens of objects overlap and you simply want a
quick “X-ray view” of how your content is arranged. With animation, in particular, it can be helpful to
evaluate the motion of objects without having to consider the distraction of color and shading. Like visibility
and locking, the outlines icon is also available on a per-layer basis.
You can change the color used for the outline in a layer by double-clicking the color chip
in the layer strip. This will open the Layer Properties dialog box. Double-click the
color chip in dialog box to open the Color Picker; then click a color, and that color will be
used.

CHAPTER 1
40
Grouping layers
You can also group layers using folders. Here’s how:
1. Click the Folder icon in the Layers panel. A new unnamed folder—Folder 1—will appear on
the timeline. You can rename a folder by double-clicking its name and entering a new name.
2. Drag the three Butterfly layers into the folder. As each one is placed in the folder, notice how
the name indents. This tells you that the layer is in a folder.
3. Next, remove the layers from the folder. To do so, simply drag the layer above the folder on the
timeline. You can also drag it to the left to unindent it.
4. To delete a folder, select it, and click the Trash Can icon.
Step away from the mouse, and put your hands where we can see them. Don’t think you
can simply select a folder and click the Trash Can icon to remove it. Make sure that
the folder is empty. If you delete a folder that contains layers, those layers will also be
deleted. If this happens to you, Adobe has sent a life raft in your direction. An alert box
telling you that you will also be deleting the layers in the folder will appear. Click Cancel
instead of OK.
Where to get help
In the early days of desktop computing, software was a major purchase, and nothing made you feel more
comfortable than the manuals that were tucked into the box. If you had a problem, you opened the manual
and searched for the solution. Those days have long passed. This is especially true with Flash, because
as its complexity has grown, the size of the manuals that would need to be packaged with the application
would also need to have grown. In this version of Flash, the user manuals are found in the Help menu.
Here’s how to access Help:
1. Select Help ➤ Flash Help, or press the F1 key. The Help panel that opens (see Figure 1-38)
is one of the most comprehensive sources of Flash knowledge on the planet; best of all, it’s free.
The Help panel is driven by an Adobe AIR application—Adobe Help—that is installed when you
install the CS5 applications. The Help menu is more generically known as Adobe Community
Help.
The panel is divided into two areas. On the left side you can enter your criteria for very specific
topics and choose to have the result drawn from Adobe Help on your computer—Local—or from
a variety of web sources, Online. The right side of the window allows you to choose a more
general topic.
Thi
s bo
ok w
as p
urch
ased
by
activ
e@tu
tspl
us.c
om

LEARNING THE FLASH CS5 PROFESSIONAL INTERFACE
41
Figure 1-38. The Flash Help panel is extensive.
2. Click the What’s new in Adobe Flash professional link to open it. As you can see,
the Help topics are actually collections of individual documents designed to help you learn what
you need to know, along with practical examples of specific techniques.
3. To go to a specific topic, just type the word into the text input box at the top of the interface, and
click the Search button. For example, enter video into this area, and press the Return (Enter)
key. The results are presented directly under your search criteria.
4. Click the first link, Create video for use in Flash, and the right pane will fill with the
selected page (as shown in Figure 1-39).

CHAPTER 1
42
Figure 1-39. Searching a term in the Flash Help documents
So much for the walkabout. It is time for you to put into practice what you have learned.
Your turn: building a Flash movie In this exercise, you are going to expand on your knowledge. We have shown you where many of the
interface features can be found and how they can be used, so we are now going to give you the
opportunity to see how all these features combine to create a Flash movie.
You will be undertaking such tasks as the following:
Using the Properties panel to precisely position and resize objects on the stage
Creating layers and adding content from the Library to the layers
Using the drawing tools to create a shape
Creating a simple animation through the use of a tween
Saving a Flash movie
Testing a Flash movie

LEARNING THE FLASH CS5 PROFESSIONAL INTERFACE
43
By the end of this exercise, you will have a fairly good understanding of how a Flash movie is assembled
and the workflow involved in the process.
1. Open the Garden.fla file.
2. When the file opens, if it isn’t already open, open the Library by selecting Window ➤ Library
or pressing Ctrl+L (Windows) or Cmd+L (Mac). As you can see in Figure 1-40, you are starting
with a background image and a few movie clips.
Figure 1-40. The assets are in place. It is your job to turn them into a movie.
3. The Library is still a bit messy. Let’s do a little tidying. Click the New Folder icon—it looks like
a file folder—at the bottom of the Library panel. A new, untitled folder will appear in the
Library. Double-click the folder name, not the icon, to select the name. Change the folder’s
name to MovieClips.
4. Drag all the movie clips—the blue files with the “gear” in the upper-right corner of the icon—into
the new folder. A movie clip is an animation with its own timeline. We get into that topic in
Chapter 3.
5. Create a new folder, and name it Audio.

CHAPTER 1
44
6. Let’s bring the audio file for this movie into the Library. To start, select File ➤ Import ➤
Import to Library. Navigate to this chapter’s Exercise folder, and select the
FliesBuzzing.mp3 file, as shown in Figure 1-41. Click the Import to Library button, and
when the file appears in the Library, move it to the Audio folder.
Figure 1-41. Importing a file to the Library
Though you are given the choice of importing content into the timeline or the Library,
it is considered a best practice in Flash to import everything directly into the Library.
The only file without the option of importing its content to the stage is an audio file.
With the assets in place, we can now turn our attention to the project.
The plan is to have a fly merrily buzz through the flowers and around the butterflies in the garden. The key
words are buzz and through. “Buzz” indicates there is an audio file, and you have brought that into the
Library. You will be adding that file to the project near the end of the process.
The “through” part may at first appear to be a no-brainer. Of course, a fly is going to buzz through the
flowers in the image. No, it isn’t. As the movie is currently set up, the fly will buzz above the flat image of
the flowers on the stage. It won’t go behind the flowers and butterflies because it can’t. What this should
tell you is that we are going to create the illusion of depth by using the layers in the Flash timeline and
creating a butterfly and some flowers for the fly to fly behind.
LEARNING THE FLASH CS5 PROFESSIONAL INTERFACE
45
To accomplish this, we need to first create the butterfly by using movie clips inside a movie clip to create
an object. That, of course, was a mouthful, and there is a term for it: nesting. Here’s how to create a
nested movie clip.
Nesting movie clips
Before we start, it is important for you to know we are not going to get into a long discussion on the subject
of movie clips, animation, and so on. We are saving those discussions for Chapters 3 and 7. What we
want to do here is to get you used to working with the interface, so to start, let’s build a butterfly.
1. With the Library panel open, click the New Symbol button—the turned-up piece of paper—at
the bottom of the Library panel. The Create New Symbol dialog box shown in Figure 1-42
will open.
2. Select the text in the Name area, and enter the word Butterfly. Select Movie Clip from the
Type drop-down menu. Click OK. The dialog box will close, and what looks like a blank stage will
open.
Figure 1-42. Creating a new Flash symbol
The blank stage you are looking at is called the Symbol Editor. If you look at the top-left corner of the
interface, you will see buttons for Scene 1 and Butterfly. The last symbol you see is the one currently
open. In many respects, these are breadcrumbs that enable you to follow your path back to the main
timeline, which is always Scene 1. The + sign you see in the center of the stage is actually the upper-left
corner of the main stage in your Flash movie.
3. Select Layer 1, and add two more layers. Starting with the bottom layer, name the layers
Body, RightWing, and Leftwing.
4. Select the LeftWing layer, open the MovieClips folder in the Library, and drag the WingL
movie clip to the selected layer.
5. Select the RightWing layer, and drag the WingR movie clip to the stage. These last two steps
did exactly the same thing; they put something on the stage in a specific layer. Use whichever
technique works for you.
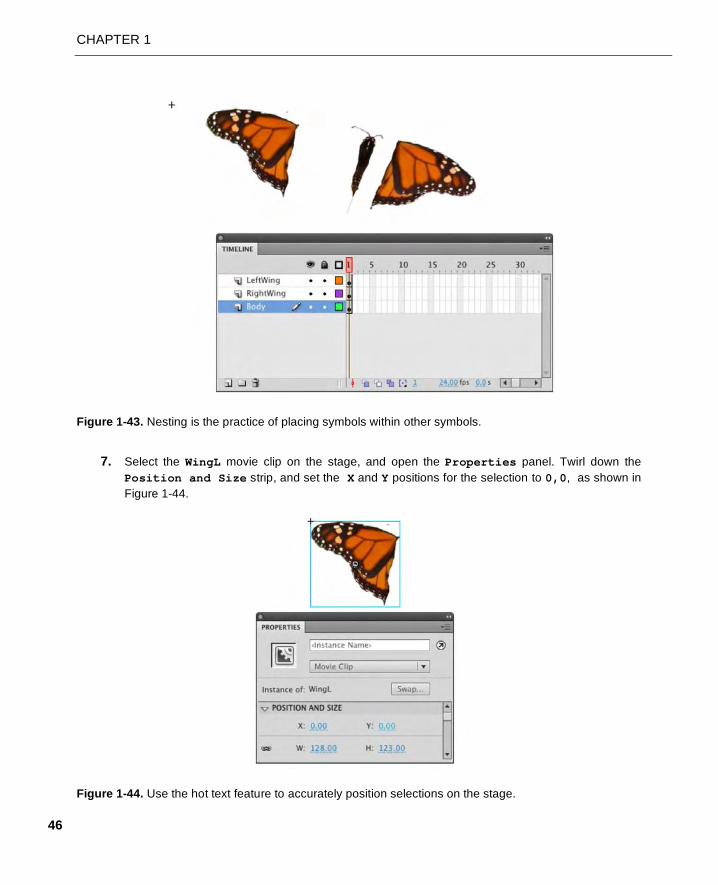
6. Select the Body layer, and drag the Body movie clip to the stage. You have just placed (nested)
three movie clips by placing them on separate layers (Figure 1-43) inside a single movie clip.
Let’s get the Butterfly assembled.
CHAPTER 1
46
Figure 1-43. Nesting is the practice of placing symbols within other symbols.
7. Select the WingL movie clip on the stage, and open the Properties panel. Twirl down the
Position and Size strip, and set the X and Y positions for the selection to 0,0, as shown in
Figure 1-44.
Figure 1-44. Use the hot text feature to accurately position selections on the stage.

LEARNING THE FLASH CS5 PROFESSIONAL INTERFACE
47
8. Click the Body movie clip, and drag it into position against the right edge of the left wing. Drag the
right wing to the right edge of the Body movie clip, as shown in Figure 1-45.
9. Click the Scene 1 link to save the Butterfly movie clip and to return to the main timeline.
Here’s a little “teacher trick” you might find useful. Use the Magnifying Glass tool to
zoom in on an object like the butterfly, as shown in Figure 1-45. Then select an object,
and use the arrow keys on your keyboard to nudge the selected object into place.
Figure 1-45. The butterfly you will be using in the movie has been assembled.
Drawing the fly
Having discovered how to create a movie clip using existing objects, let’s now create one from “scratch.”
We need a fly to buzz through the garden, and if you poke through the MovieClips folder in the Library,
you will notice the fly is missing.
Before we start, we aren’t going to ask you to draw a fly or create a cartoon version of one. Instead, you
are going to create a shape that is somewhat “flylike” and have it buzz through the flowers. Follow these
steps to create the fly:
1. Select Insert ➤ New Symbol, or press the Ctrl+F8 (Windows) or Cmd+F8 (Mac) keys to open
the Create New Symbol dialog box. In the previous exercise, you used the New Symbol
button in the Library to create a new symbol. This is another method of creating a symbol.
Which is best? Who cares? Use what works for you.
2. Name the symbol Fly, and select Movie Clip as its Type. Click OK to open the Symbol
Editor.
3. When the Symbol Editor opens, select 400% from the Zoom drop-down menu. This lets you
create a rather small object but still be able to see what you are doing.
4. Select the Pencil tool, and in the Stroke color area of the Tools, select Black as the stroke
color. Draw a shape that looks somewhat flylike.
CHAPTER 1
48
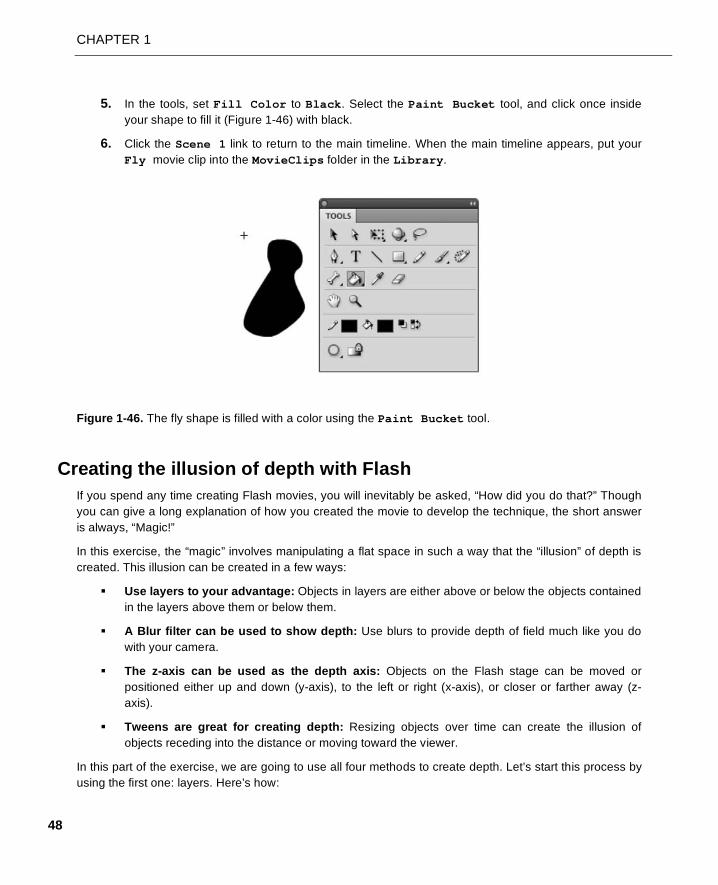
5. In the tools, set Fill Color to Black. Select the Paint Bucket tool, and click once inside
your shape to fill it (Figure 1-46) with black.
6. Click the Scene 1 link to return to the main timeline. When the main timeline appears, put your
Fly movie clip into the MovieClips folder in the Library.
Figure 1-46. The fly shape is filled with a color using the Paint Bucket tool.
Creating the illusion of depth with Flash
If you spend any time creating Flash movies, you will inevitably be asked, “How did you do that?” Though
you can give a long explanation of how you created the movie to develop the technique, the short answer
is always, “Magic!”
In this exercise, the “magic” involves manipulating a flat space in such a way that the “illusion” of depth is
created. This illusion can be created in a few ways:
Use layers to your advantage: Objects in layers are either above or below the objects contained
in the layers above them or below them.
A Blur filter can be used to show depth: Use blurs to provide depth of field much like you do
with your camera.
The z-axis can be used as the depth axis: Objects on the Flash stage can be moved or
positioned either up and down (y-axis), to the left or right (x-axis), or closer or farther away (z-
axis).
Tweens are great for creating depth: Resizing objects over time can create the illusion of
objects receding into the distance or moving toward the viewer.
In this part of the exercise, we are going to use all four methods to create depth. Let’s start this process by
using the first one: layers. Here’s how:
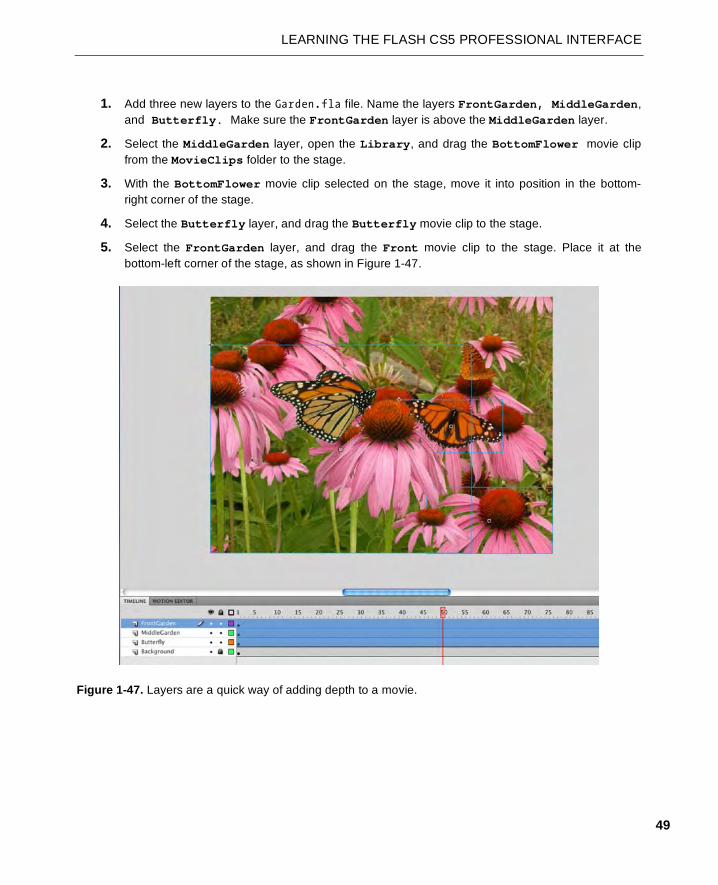
LEARNING THE FLASH CS5 PROFESSIONAL INTERFACE
49
1. Add three new layers to the Garden.fla file. Name the layers FrontGarden, MiddleGarden,
and Butterfly. Make sure the FrontGarden layer is above the MiddleGarden layer.
2. Select the MiddleGarden layer, open the Library, and drag the BottomFlower movie clip
from the MovieClips folder to the stage.
3. With the BottomFlower movie clip selected on the stage, move it into position in the bottom-
right corner of the stage.
4. Select the Butterfly layer, and drag the Butterfly movie clip to the stage.
5. Select the FrontGarden layer, and drag the Front movie clip to the stage. Place it at the
bottom-left corner of the stage, as shown in Figure 1-47.
Figure 1-47. Layers are a quick way of adding depth to a movie.

CHAPTER 1
50
Now that the objects are in place, let’s further add to the illusion of depth by adding some depth of field
and blurring the background image. Here’s how:
1. Drag the playhead to frame 50 of the timeline, and unlock the Background layer.
2. Right-click (Windows) or Control+click (Mac) frame 50 of the Background layer to open the
context menu. Select Insert Keyframe from the menu. The black dot that appears in the
frame, as shown in Figure 1-48, tells you this is a keyframe.
Figure 1-48. Adding a keyframe to a layer
3. Move the playhead to frame 1 of the timeline, and click the background image on the stage to
select it.
4. Open the Properties panel, and twirl down the Filters strip.
5. Click the Add Filter button—it looks like a turned-up piece of paper—at the bottom of the
panel, and select Blur from the pop-up menu. The Blur filter’s parameters, as shown in Figure
1-49, appear in the panel. Set the Blur X and Blur Y values to 10, and select High from the
Quality drop-down menu. The image blurs, and the three layers above it remain in sharp focus.
6. Save the file.
What’s with the keyframe? We are eventually going to require the background to return
to sharp focus. Adding the keyframe gives us the flexibility to have the image slowly
come into focus through the use of a motion tween.
Thi
s bo
ok w
as p
urch
ased
by
activ
e@tu
tspl
us.c
om
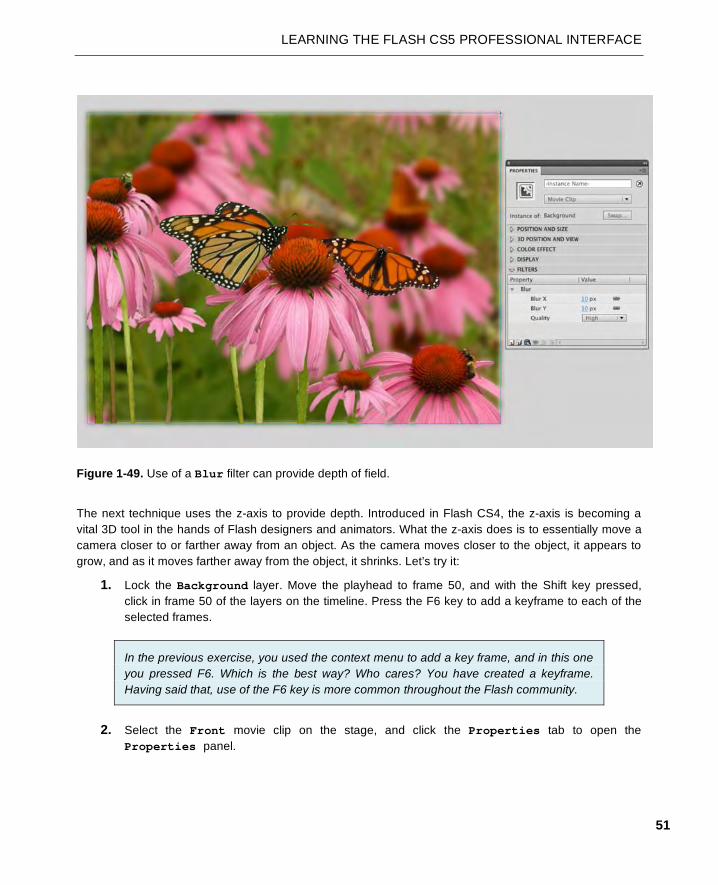
LEARNING THE FLASH CS5 PROFESSIONAL INTERFACE
51
Figure 1-49. Use of a Blur filter can provide depth of field.
The next technique uses the z-axis to provide depth. Introduced in Flash CS4, the z-axis is becoming a
vital 3D tool in the hands of Flash designers and animators. What the z-axis does is to essentially move a
camera closer to or farther away from an object. As the camera moves closer to the object, it appears to
grow, and as it moves farther away from the object, it shrinks. Let’s try it:
1. Lock the Background layer. Move the playhead to frame 50, and with the Shift key pressed,
click in frame 50 of the layers on the timeline. Press the F6 key to add a keyframe to each of the
selected frames.
In the previous exercise, you used the context menu to add a key frame, and in this one
you pressed F6. Which is the best way? Who cares? You have created a keyframe.
Having said that, use of the F6 key is more common throughout the Flash community.
2. Select the Front movie clip on the stage, and click the Properties tab to open the
Properties panel.

CHAPTER 1
52
3. Twirl down the 3D Position and View strip, and set the Z value to -100. The selection, as
shown in Figure 1-50, appears to get larger.
4. Use the following 3D position values for the flower and the butterfly in the other two layers:
Flower: X = 475, Y = 428, Z = -50
Butterfly: Z = -20
5. Save the file.
Figure 1-50. Negative values on the z-axis make selections look bigger.
Did the image get larger when we applied the negative z-axis value? Not quite. When thinking of the z-
axis, regard the surface of the computer’s screen as being the 0 value. Moving away from the screen
toward you, using negative z-axis values, actually pulls the object closer to the camera. In this case, the
camera is located at a position of about -500 pixels away from the screen. If you change the Z value of the
selection to -503, the image seems to disappear. In fact, the image is now behind the camera, and
because you can’t swivel the camera, it is essentially out of the movie.
Don’t go crazy with this effect. It is processor-intensive, and there are limits to how far you can go without
an error message. The reason is this effect is achieved through scaling.
As you change the Z values in the Property panel, notice how there is a corresponding change in the W
and H values. This is because, as shown in Figure 1-51, as you move along the positive values on the z-
axis, you start approaching the object’s vanishing point.

LEARNING THE FLASH CS5 PROFESSIONAL INTERFACE
53
Figure 1-51. Move along positive side of the z-axis, and you approach the vanishing point.
Now that we have the first three methods of creating depth in place, the time has arrived to put those
keyframes in frame 50 to good use. What we are going to do is to have the three layers with z-axis values
move back to a value of 0, and at the same time, the blurred image will come back into focus.
This can all be done because each of the objects to be affected is a movie clip. Here’s how:
1. Right-click (Windows) or Control+click (Mac) between the two key frames in the FrontGarden
layer. Select Create Motion Tween from the context menu. Two things will happen. The first
is that the span of frames between the two keyframes turns blue, and the icon for the layer
changes from a piece of paper with a turned-up corner to a piece of paper with a comet tail. Both,
as shown in Figure 1-52, are graphic indications that you have created a motion layer.
2. Unlock the Background layer, and add motion tweens to the remaining layers.
Figure 1-52. The layer icon and the powder blue color indicate a motion layer.
3. Click anywhere on the tween in the FrontGarden layer to select the span. Click the Motion
Editor tab to open the Motion Editor, as shown in Figure 1-53.

CHAPTER 1
54
4. Drag the playhead to the end of the timeline in the Motion Editor. Twirl down Basic
Motion, and change the Z value from -100 to 0. Notice how the graph changes from a straight
line to one that moves upward across the span.
Figure 1-53. Tweens are created by changing property values in the Motion Editor.
5. Repeat step 4 for the MiddleGarden and Butterfly layers. When finished, click the
Timeline tab to close the Motion Editor.
6. Select the object in the Background layer, and move the playhead to the last frame of the
motion tween.
7. In the Properties panel, change the Blur amount to 0. Notice the addition of a keyframe to
the layer.
8. The flower in the MiddleGarden layer, thanks to the 3D positioning, may be out of position. To
fix that, move the playhead to the last frame of the motion tween, select the flower, and move it
into position.
9. Scrub the playhead across the tweens, as shown in Figure 1-54, to preview the effect.

LEARNING THE FLASH CS5 PROFESSIONAL INTERFACE
55
10. Save the project.
Figure 1-54. Z-axis and blur properties can be tweened to create the illusion of depth.
Creating an animated fly
If you look at the project so far, you should feel pretty good about what you have been able to accomplish
with a few mouse clicks. The animation in the garden looks pretty good, and the blur tween is a pretty nifty
technique. Naturally, Flash designers are rarely satisfied with their projects when there is something else
that could be added to make it even more effective. In this case, the fly needs to buzz among the flowers,
butterflies, and bees in the images on the stage. The fly will reinforce the illusion of depth and provide
some visual interest to the viewer.
Before we start, let’s take a moment and have a brief chat about those last two sentences.
When people first start using this application, there is a real tendency to load up projects with all manner of
effects. In many cases, there is no rationale for the inclusion of these effects apart from the designer telling
his friends, “Aren’t I clever?”

CHAPTER 1
56
Flash is a powerful tool, and some of the most interesting Flash movies out there are ones where the
effects are subtle. They quietly support the design rather than overpower it. In this case, the effect will be a
small fly buzzing around the stage. The purpose of the fly is to reinforce the illusion of depth and to provide
a subtle animation in an otherwise static image. To create a fly buzzing among the flowers, follow these
steps:
1. Select the Background layer, and click the New Layer button to add a layer directly above the
Background layer. Name this layer Fly.
2. With the Fly layer selected, drag the Fly movie clip to the stage. Obviously, as shown in Figure
1-55, the fly is a bit large for the garden.
Figure 1-55. The fly is in its own layer and on the stage.
3. Click the fly on the stage, and select the Free Transform tool from the Tools panel. Click a
corner handle, and drag the handle inward to shrink the fly.
4. The fly is still a bit too distinct. With the fly still selected on the stage, apply a Blur filter to the
selection. Set the Blur X and Blur Y values to 3 px and the Quality value to High. Now
that the fly’s physical characteristics have been dealt with, let’s put the fly in motion.

LEARNING THE FLASH CS5 PROFESSIONAL INTERFACE
57
Using a motion guide
Putting the fly in motion is easy. The hard part is determining how to do it. That may seem a bit odd, but there
are several methods for putting the fly in motion. These methods range from frame-by-frame animation to a
purely code-driven approach. Picking the one best suited to the task at hand will make or break the project.
If you have ever watched flies, you will see that they move around in an erratic manner. Mimicking this
using a frame-by-frame approach would be too time-consuming to be worth it, and coding the movement
with changes in directions, loopbacks, and so on, would require some hard-core coding chops. The
solution is to draw the path for the fly to follow. Here’s how:
1. Lock all of the layers except the Fly layer, and move the Fly movie clip to the left of the stage
on the pasteboard. Scrub over to frame 721, and add a key frame on the Fly layer. Return the
playhead to frame 1.
2. Right-click (Windows) or Control+click (Mac) the label of the Fly layer. When the context menu
opens, select Add Classic Motion Guide, as shown in Figure 1-56. When you release the
mouse, a new layer named Guide:Fly appears above the Fly layer, and the Fly layer indents.
Figure 1-56. Adding a motion guide layer
3. Select the first frame of the Guide:Fly layer.
4. Select the Pencil tool, and starting where your fly is located, draw a meandering path, as shown
in Figure 1-57, around the stage and finishing on the pasteboard on the other side of the stage.
Don’t forget that you can smooth out the path after you have drawn it. Simply switch to
the Selection tool, and double-click the path to select it. With the path selected, click
the Smoothing button at the bottom of the Tools panel to make angular changes a bit
more rounded.
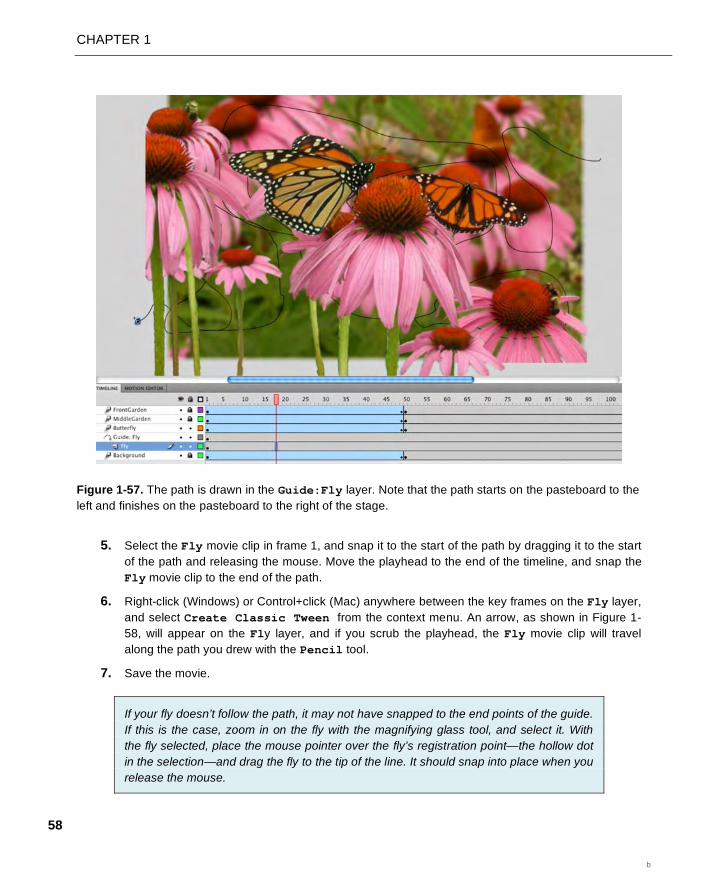
CHAPTER 1
58
Figure 1-57. The path is drawn in the Guide:Fly layer. Note that the path starts on the pasteboard to the
left and finishes on the pasteboard to the right of the stage.
5. Select the Fly movie clip in frame 1, and snap it to the start of the path by dragging it to the start
of the path and releasing the mouse. Move the playhead to the end of the timeline, and snap the
Fly movie clip to the end of the path.
6. Right-click (Windows) or Control+click (Mac) anywhere between the key frames on the Fly layer,
and select Create Classic Tween from the context menu. An arrow, as shown in Figure 1-
58, will appear on the Fly layer, and if you scrub the playhead, the Fly movie clip will travel
along the path you drew with the Pencil tool.
7. Save the movie.
If your fly doesn’t follow the path, it may not have snapped to the end points of the guide.
If this is the case, zoom in on the fly with the magnifying glass tool, and select it. With
the fly selected, place the mouse pointer over the fly’s registration point—the hollow dot
in the selection—and drag the fly to the tip of the line. It should snap into place when you
release the mouse.
b

LEARNING THE FLASH CS5 PROFESSIONAL INTERFACE
59
Figure 1-58. The classic tween snaps the movie clip to the path in the Guide:Fly layer.
Adding audio
Nothing mystifies us more than Flash designers who regard audio as an afterthought. In many respects,
this a huge mistake because audio can actually “seal the deal” when it comes to Flash movies. In this
case, it’s nice to have a fly buzzing around the movie, but the sound of the fly is what makes this whole
thing even more believable. Let’s add some audio:
1. Add a new layer above the FrontGarden layer, and name it Audio.
2. Open the library, and locate the FliesBuzzing.mp3 file in the Audio folder. Double-click it to
open the Sound Properties dialog box.
3. Click the Advanced button to reveal all the features of this dialog box, as shown in Figure 1-59.
Click the Test button to preview the audio file. The fly is buzzing, but you can also hear birds and
the wind blowing through the garden.
We would like to thank dobroide at freesound.org for permission to use this clip—
20060620.ambiance.forest.summer01.flac—in this project. This clip and others are
available at http://www.freesound.org/samplesViewSingle.php?id=20026.
For those of you who are interested, the file was downloaded from freesound.org as a
.flac (Free Lossless Audio Codec) file. It was renamed and converted to an .mp3 file
using xAct for Macintosh. We are telling you this just in case you are a Mac user and
you can’t get .flac files from freesound.org to convert to another format.
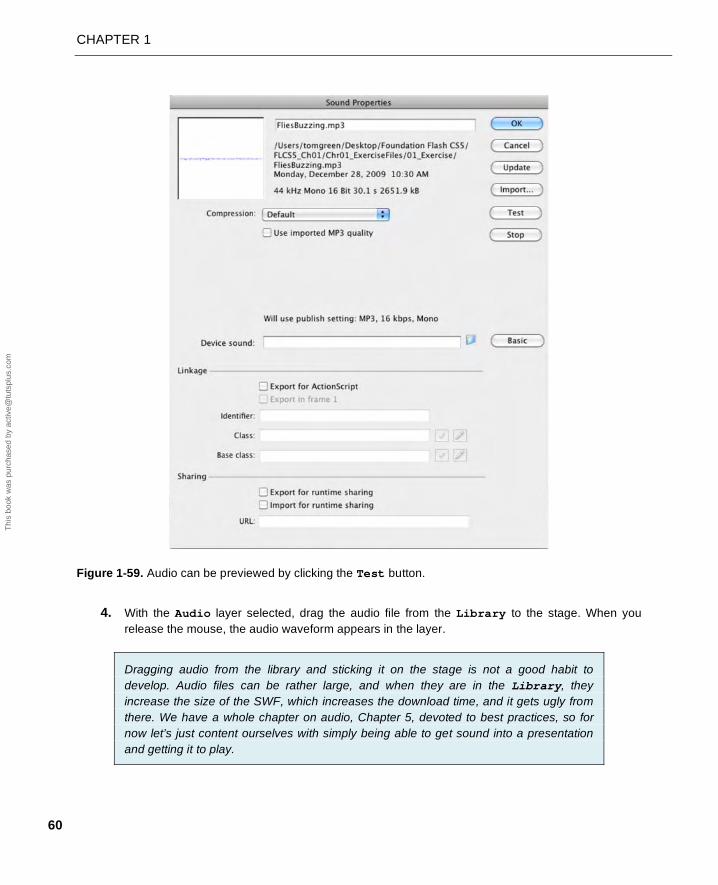
CHAPTER 1
60
Figure 1-59. Audio can be previewed by clicking the Test button.
4. With the Audio layer selected, drag the audio file from the Library to the stage. When you
release the mouse, the audio waveform appears in the layer.
Dragging audio from the library and sticking it on the stage is not a good habit to
develop. Audio files can be rather large, and when they are in the Library, they
increase the size of the SWF, which increases the download time, and it gets ugly from
there. We have a whole chapter on audio, Chapter 5, devoted to best practices, so for
now let’s just content ourselves with simply being able to get sound into a presentation
and getting it to play.
Thi
s bo
ok w
as p
urch
ased
by
activ
e@tu
tspl
us.c
om

LEARNING THE FLASH CS5 PROFESSIONAL INTERFACE
61
5. Click anywhere on the waveform, and you will see the Properties panel change to show you
the sound properties. If you don’t see them, click the Sound twirlie.
6. Click the Sync drop-down menu, and select Stream, as shown in Figure 1-60.
Figure 1-60. Audio waveform on the timeline and the Sound properties in the Properties panel
7. Scrub across the timeline, and you will hear the audio playing. This is possible because of the
use of the Stream syncing in the Sound properties. Return the playhead to frame 1, and press
the Return (Enter) key. The sound will start playing and stop only when the playhead reaches the
end of the timeline.
8. Save the file.
Noticing a pattern here? Get into the habit of saving your work every time you do
something major with your movie. Do this, and it isn’t a big deal should your computer
crash. Don’t get into the habit, and prepare to reconstruct entire files from the point of
your last save when the computer crashes.
Testing and saving Flash files
The fly is merrily buzzing among the flowers. The audio are playing, and the birds are singing. Maybe.
Even though you have created this animation and scrubbed through bits and pieces of it, you still haven’t
seen the whole project play from start to finish much as it would on a Web page. Now would be a really
good time to test the movie in Flash Player. We can’t stress enough the importance of test, test, test, and
test again! The procedure is, as one of us tells their students, rather simple: “Do a bit. Test it. Do a bit
more. Test it.” As you have seen, Flash movies can be complex. Each element or feature you add also
increases the complexity of the movie. This is why it is so important that you develop the habit of regularly
testing your work because, regardless of how simple it may appear to you, this is the place to identify and
fix any errors, mistakes, or problems you may see. What it comes down to is this: do you really want to

CHAPTER 1
62
examine the entrails of each frame of a completed movie along with hundreds of lines of code, or do you
want to catch simple errors early in the process? Your call.
To test a Flash movie, all you need to do is to press Ctrl+Enter (Windows) or Cmd+Return (Mac), and the
movie will start playing in Flash Player. If you prefer to use a menu, select Control ➤ Test Movie. You
will see an alert box telling you the movie is being exported and, when that finishes, the movie, as shown
in Figure 1-61, will open in Flash Player. What you should see is the flowers move into place, the fly
buzzing around the garden, and you will hear the audio track.
If you open the folder where the file has been saved, you will see that a SWF has been added to the
folder. A SWF (pronounced “swiff”) is the compact version of your animation that will be placed in a Web
page.
Figure 1-61. Testing the movie in Flash Player
The final part is a look at a feature that is new to Flash CS5: the end of the .fla format.
A couple of years ago, Richard Galvan, the Flash product manager, made it pretty clear to one of us over
lunch that the FLA format was being placed on the “Threatened Species” list. This wasn’t too much of a
shock because Adobe was starting to concentrate on the fact that data and presentation were two
separate entities and data was pretty sexy.

LEARNING THE FLASH CS5 PROFESSIONAL INTERFACE
63
The FLA format moved onto the “Endangered Species” list in the CS4 release of the product. A new output
format—XFL—was introduced to After Effects, and Flash CS4 could read an XFL file but couldn’t write
one. The release of Flash CS5 marks the start of the old FLA format on its progress toward extinction as
the new XFL format takes over. In Flash CS5, the default FLA file you’ll save is now created in the XFL
format, with the old style of FLA file being relegated to an option for backward compatibility—¡Viva la
revolución!
XFL? We know it sounds like an American Football league, but think of the XFL container format as a
folder that contains an XML file and all the assets referred to in the XML file. The assets and the XML are
the files used to build the FLA. Until this release of Flash, that container has, essentially, been sealed. Not
anymore.
1. With your Garden.fla file open, select File ➤ Save As to open the Save As dialog box.
Navigate to the XFL_Example folder in your Chapter 1 Exercise folder.
2. Click the Format drop-down menu, as shown in Figure 1-62, to open it. You now have three
choices:
Flash CS5 Document (*.fla): Select this, and you create the usual document that can be opened only by Flash CS5.
Flash CS4 Document (*.fla): Select this, and the file will be saved in a format that can be read by Flash CS4. Just be aware that any features available only in Flash CS5 won’t be available.
Flash CS5 Uncompressed Document (*xfl): Select this, and you create an “exploded” view of the file or what many are calling a folder of files.
Figure 1-62. The XFL format is the new kid on the block.
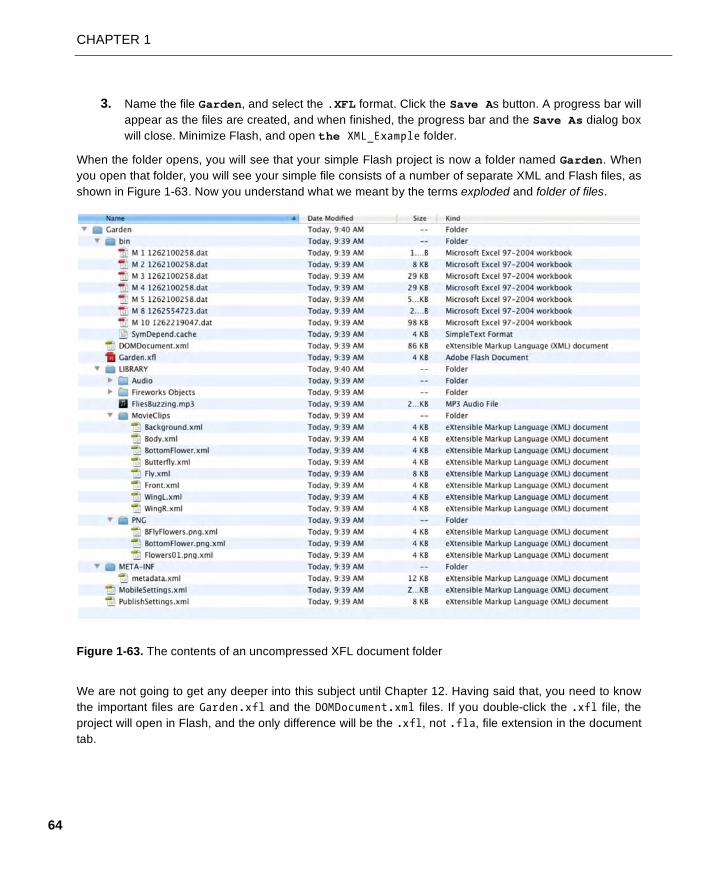
CHAPTER 1
64
3. Name the file Garden, and select the .XFL format. Click the Save As button. A progress bar will
appear as the files are created, and when finished, the progress bar and the Save As dialog box
will close. Minimize Flash, and open the XML_Example folder.
When the folder opens, you will see that your simple Flash project is now a folder named Garden. When
you open that folder, you will see your simple file consists of a number of separate XML and Flash files, as
shown in Figure 1-63. Now you understand what we meant by the terms exploded and folder of files.
Figure 1-63. The contents of an uncompressed XFL document folder
We are not going to get any deeper into this subject until Chapter 12. Having said that, you need to know
the important files are Garden.xfl and the DOMDocument.xml files. If you double-click the .xfl file, the
project will open in Flash, and the only difference will be the .xfl, not .fla, file extension in the document
tab.

LEARNING THE FLASH CS5 PROFESSIONAL INTERFACE
65
The XML document is where all the information about the project is kept. This includes pointers to
embedded fonts, audio, images, and anything else pertaining to the project including the layering order
and the contents of the layers.
If you create an uncompressed XFL file or are handed the XFL folder, make sure that
you always work in that folder and that you don’t, for obvious reasons, delete or remove
any files used in the project from the folder.
You have learned How to customize your Flash workspace
A number of methods of manipulating objects on the Flash stage
How to dock, undock, and minimize panels
The importance of the Properties panel in your daily workflow
The difference between a frame and a keyframe
The process involved in using frames to arrange and animate content and the properties of
content on the stage using the Motion Editor
How to add, delete, nest, and rearrange layers
How to test a Flash movie
How to create an uncompressed XFL document
That’s a lot of stuff you’ve learned by taking a casual stroll through Flash Professional CS5. In the next
chapter, you’ll learn how to use the tools to create content in your movies and how Fireworks CS5,
Photoshop C4, and Illustrator CS5 are important elements in your workflow.