Embed Size (px)
Citation preview
8/7/2019 Custom Video on Cue with Flash CS5
http://slidepdf.com/reader/full/custom-video-on-cue-with-flash-cs5 1/27
Custom Video on Cue with Flash CS5
By Paul Trani in Flash,Tutorial
Tuesday February 8, 2011
In this tutorial you will see how easy it is to bring video and graphics together for a
seamless, custom experience using Flash Professional CS5. You’ll learn how to import
video, apply a custom skin, and create your own video buttons without writing anyActionScript code. Then you’ll learn how to add cue points, making synchronization
between video and graphics a snap. Let’s take a tour of these capabilities.
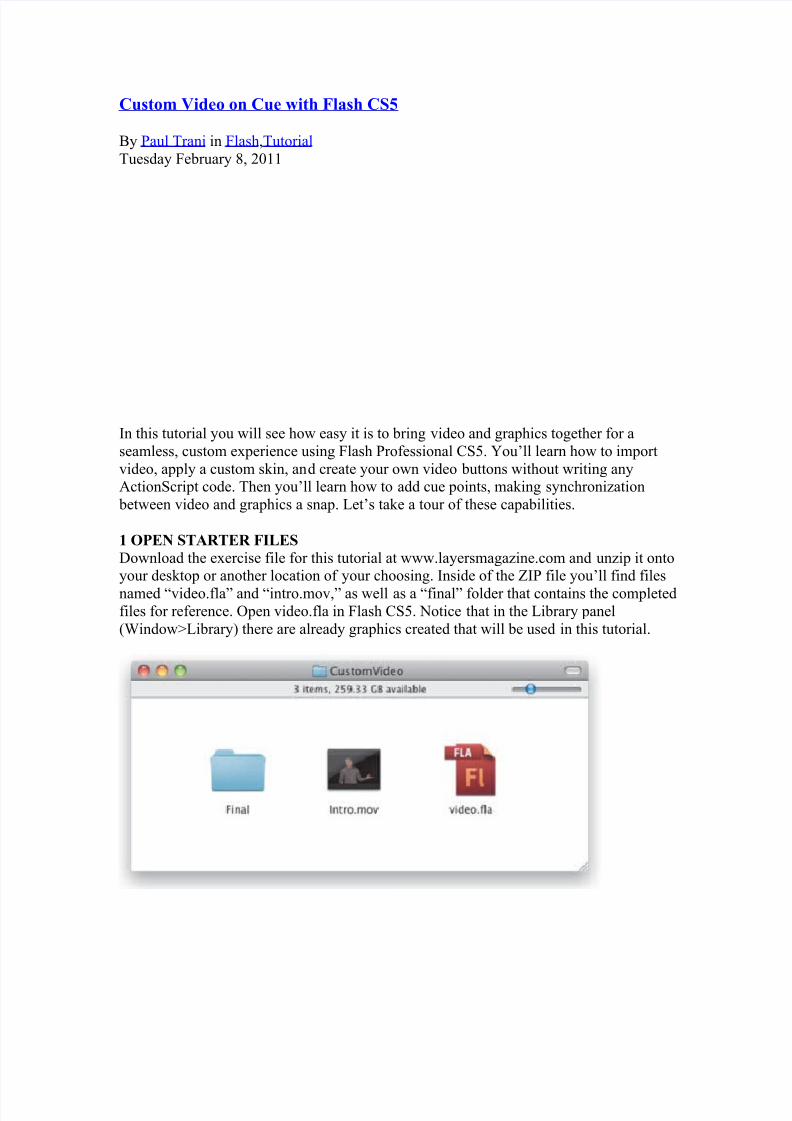
1 OPEN STARTER FILES
Download the exercise file for this tutorial at www.layersmagazine.com and unzip it ontoyour desktop or another location of your choosing. Inside of the ZIP file you’ll find files
named “video.fla” and “intro.mov,” as well as a “final” folder that contains the completedfiles for reference. Open video.fla in Flash CS5. Notice that in the Library panel
(Window>Library) there are already graphics created that will be used in this tutorial.
8/7/2019 Custom Video on Cue with Flash CS5
http://slidepdf.com/reader/full/custom-video-on-cue-with-flash-cs5 2/27
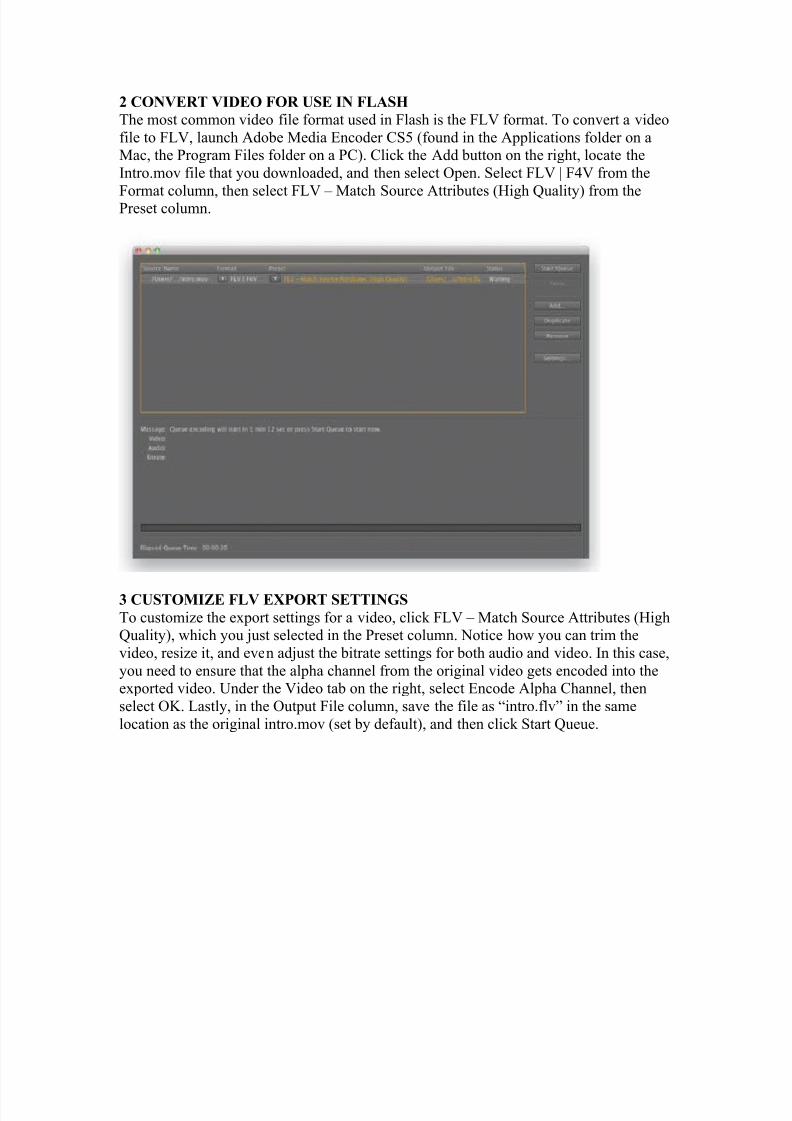
2 CONVERT VIDEO FOR USE IN FLASH
The most common video file format used in Flash is the FLV format. To convert a video
file to FLV, launch Adobe Media Encoder CS5 (found in the Applications folder on aMac, the Program Files folder on a PC). Click the Add button on the right, locate the
Intro.mov file that you downloaded, and then select Open. Select FLV | F4V from the
Format column, then select FLV – Match Source Attributes (High Quality) from thePreset column.
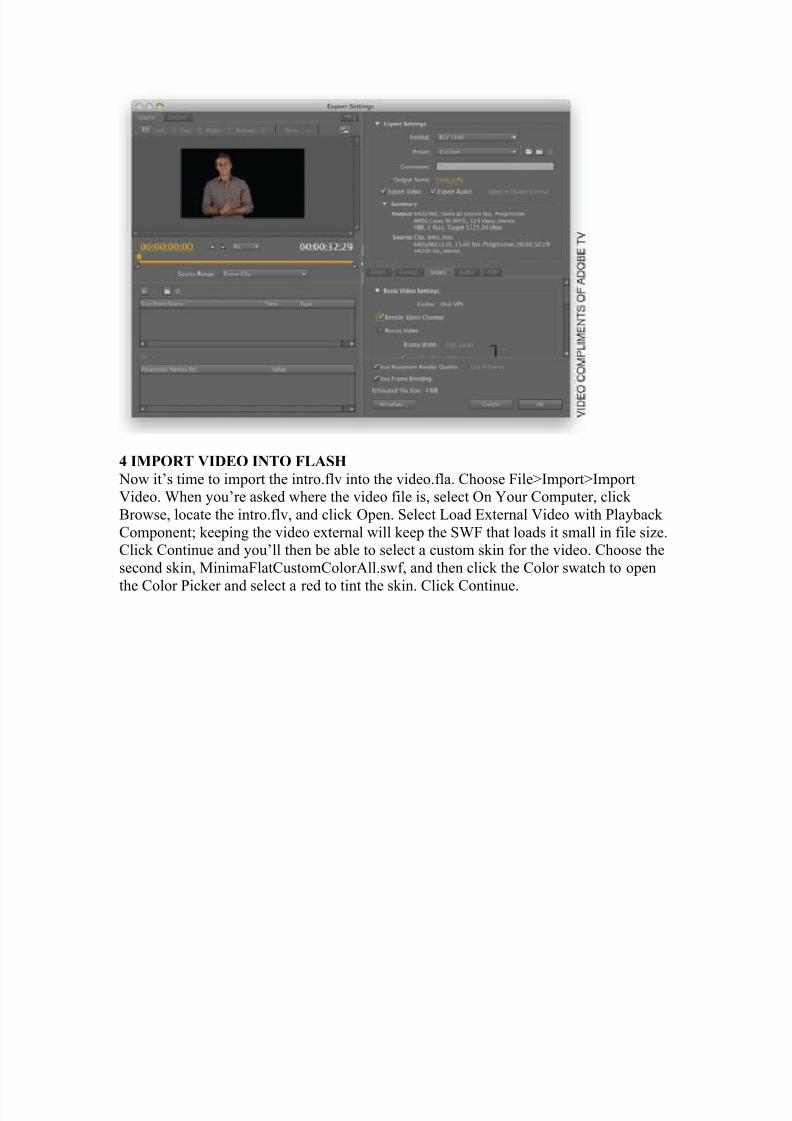
3 CUSTOMIZE FLV EXPORT SETTINGS
To customize the export settings for a video, click FLV – Match Source Attributes (HighQuality), which you just selected in the Preset column. Notice how you can trim the
video, resize it, and even adjust the bitrate settings for both audio and video. In this case,
you need to ensure that the alpha channel from the original video gets encoded into theexported video. Under the Video tab on the right, select Encode Alpha Channel, then
select OK. Lastly, in the Output File column, save the file as “intro.flv” in the same
location as the original intro.mov (set by default), and then click Start Queue.
8/7/2019 Custom Video on Cue with Flash CS5
http://slidepdf.com/reader/full/custom-video-on-cue-with-flash-cs5 3/27
4 IMPORT VIDEO INTO FLASH
Now it’s time to import the intro.flv into the video.fla. Choose File>Import>ImportVideo. When you’re asked where the video file is, select On Your Computer, click
Browse, locate the intro.flv, and click Open. Select Load External Video with Playback
Component; keeping the video external will keep the SWF that loads it small in file size.Click Continue and you’ll then be able to select a custom skin for the video. Choose the
second skin, MinimaFlatCustomColorAll.swf, and then click the Color swatch to open
the Color Picker and select a red to tint the skin. Click Continue.
8/7/2019 Custom Video on Cue with Flash CS5
http://slidepdf.com/reader/full/custom-video-on-cue-with-flash-cs5 4/27
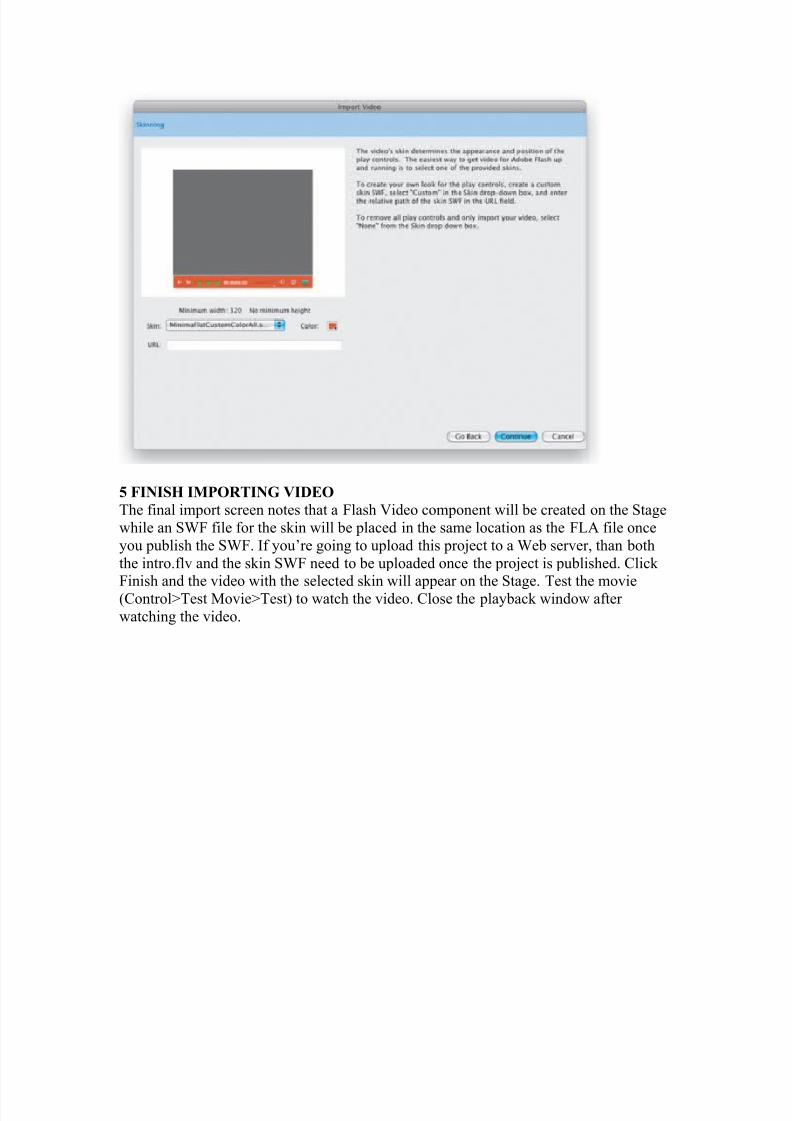
5 FINISH IMPORTING VIDEO
The final import screen notes that a Flash Video component will be created on the Stage
while an SWF file for the skin will be placed in the same location as the FLA file once
you publish the SWF. If you’re going to upload this project to a Web server, than both
the intro.flv and the skin SWF need to be uploaded once the project is published. Click Finish and the video with the selected skin will appear on the Stage. Test the movie
(Control>Test Movie>Test) to watch the video. Close the playback window after
watching the video.

8/7/2019 Custom Video on Cue with Flash CS5
http://slidepdf.com/reader/full/custom-video-on-cue-with-flash-cs5 5/27
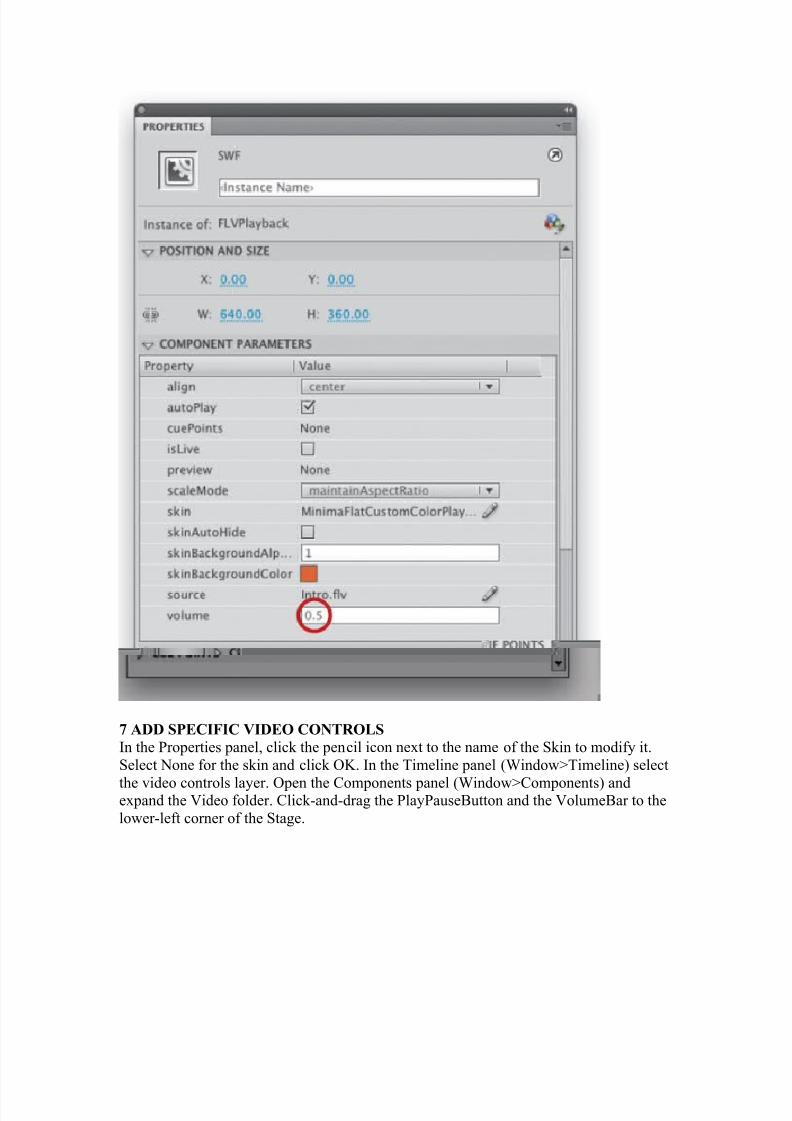
6 EDIT VIDEO PARAMETERS
All of the video controls for the imported video are active on the Stage. Click the playbutton (or press the Spacebar) to play the video. With the video selected, open the
Properties panel (Window>Properties) and notice how you can modify various video
parameters. Confirm that autoPlay is selected, and note that both skinBackgroundAlphaand Volume are set to 1, which is 100% in Flash. Change the volume to 0.5 so it will be
set to 50%.
8/7/2019 Custom Video on Cue with Flash CS5
http://slidepdf.com/reader/full/custom-video-on-cue-with-flash-cs5 6/27
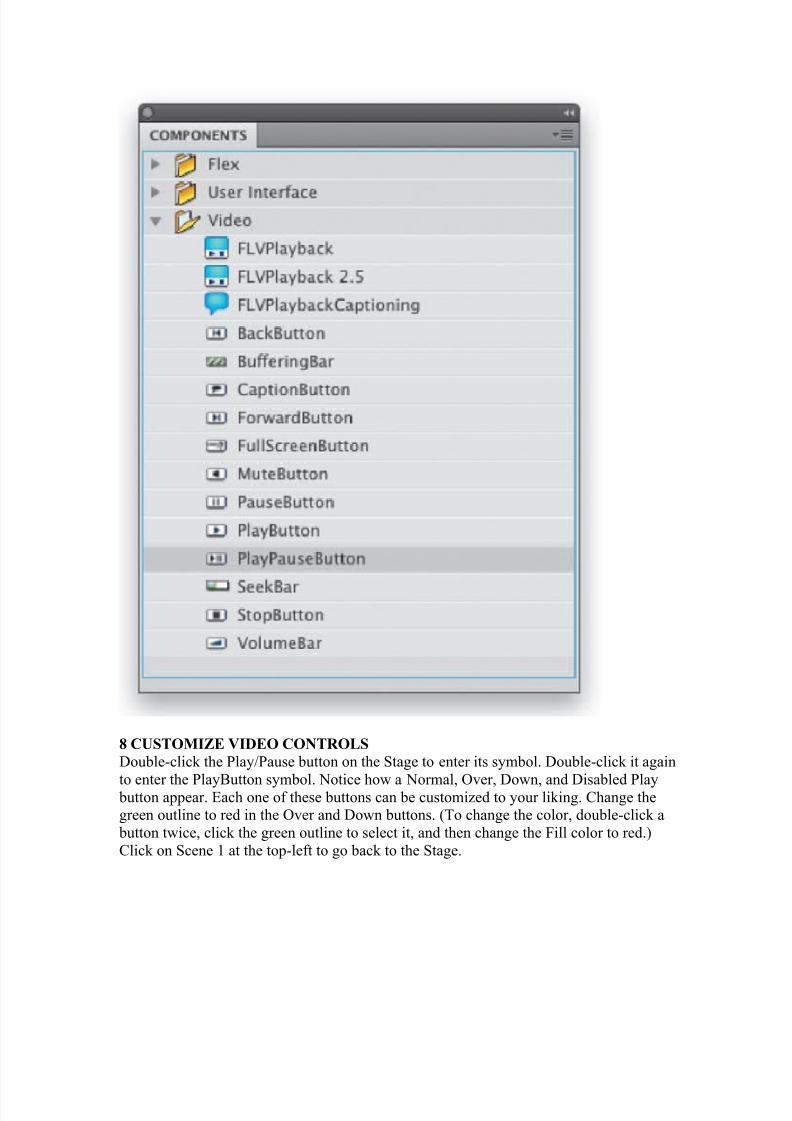
7 ADD SPECIFIC VIDEO CONTROLS
In the Properties panel, click the pencil icon next to the name of the Skin to modify it.
Select None for the skin and click OK. In the Timeline panel (Window>Timeline) select
the video controls layer. Open the Components panel (Window>Components) andexpand the Video folder. Click-and-drag the PlayPauseButton and the VolumeBar to the
lower-left corner of the Stage.
8/7/2019 Custom Video on Cue with Flash CS5
http://slidepdf.com/reader/full/custom-video-on-cue-with-flash-cs5 7/27
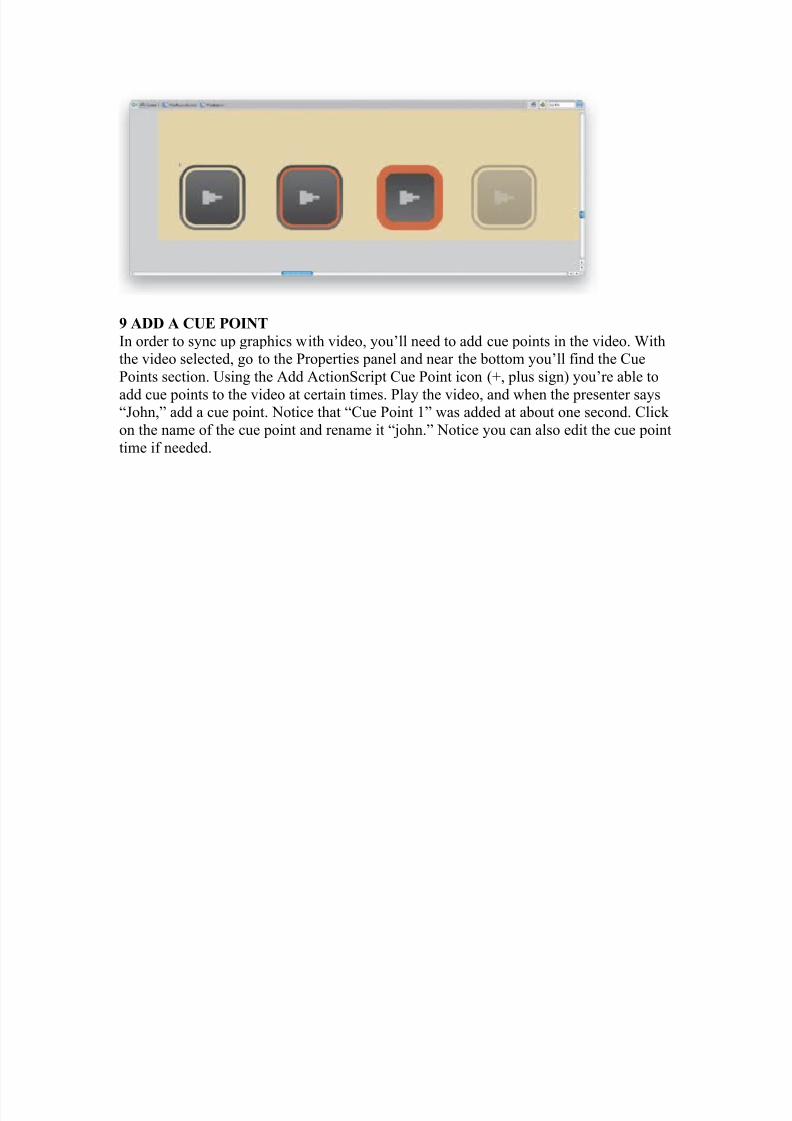
8 CUSTOMIZE VIDEO CONTROLS
Double-click the Play/Pause button on the Stage to enter its symbol. Double-click it again
to enter the PlayButton symbol. Notice how a Normal, Over, Down, and Disabled Playbutton appear. Each one of these buttons can be customized to your liking. Change thegreen outline to red in the Over and Down buttons. (To change the color, double-click a
button twice, click the green outline to select it, and then change the Fill color to red.)
Click on Scene 1 at the top-left to go back to the Stage.
8/7/2019 Custom Video on Cue with Flash CS5
http://slidepdf.com/reader/full/custom-video-on-cue-with-flash-cs5 8/27
9 ADD A CUE POINT
In order to sync up graphics with video, you’ll need to add cue points in the video. Withthe video selected, go to the Properties panel and near the bottom you’ll find the Cue
Points section. Using the Add ActionScript Cue Point icon (+, plus sign) you’re able to
add cue points to the video at certain times. Play the video, and when the presenter says“John,” add a cue point. Notice that “Cue Point 1” was added at about one second. Click
on the name of the cue point and rename it “john.” Notice you can also edit the cue point
time if needed.
8/7/2019 Custom Video on Cue with Flash CS5
http://slidepdf.com/reader/full/custom-video-on-cue-with-flash-cs5 9/27
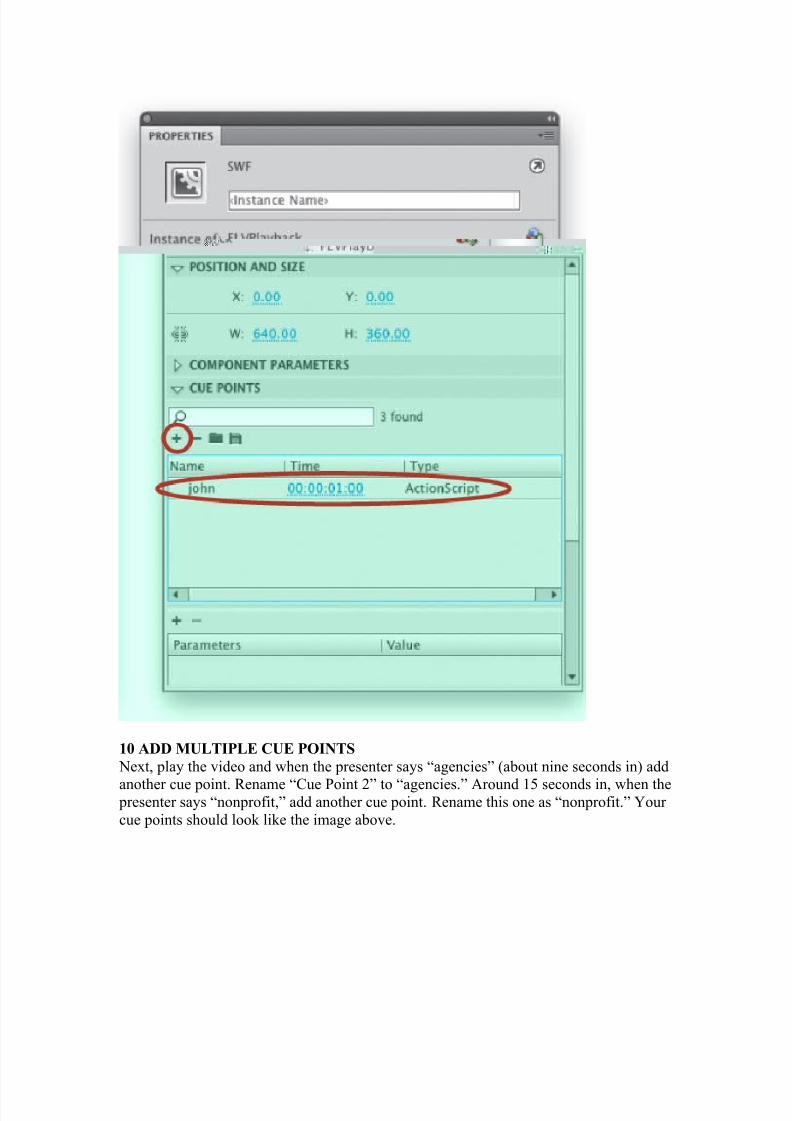
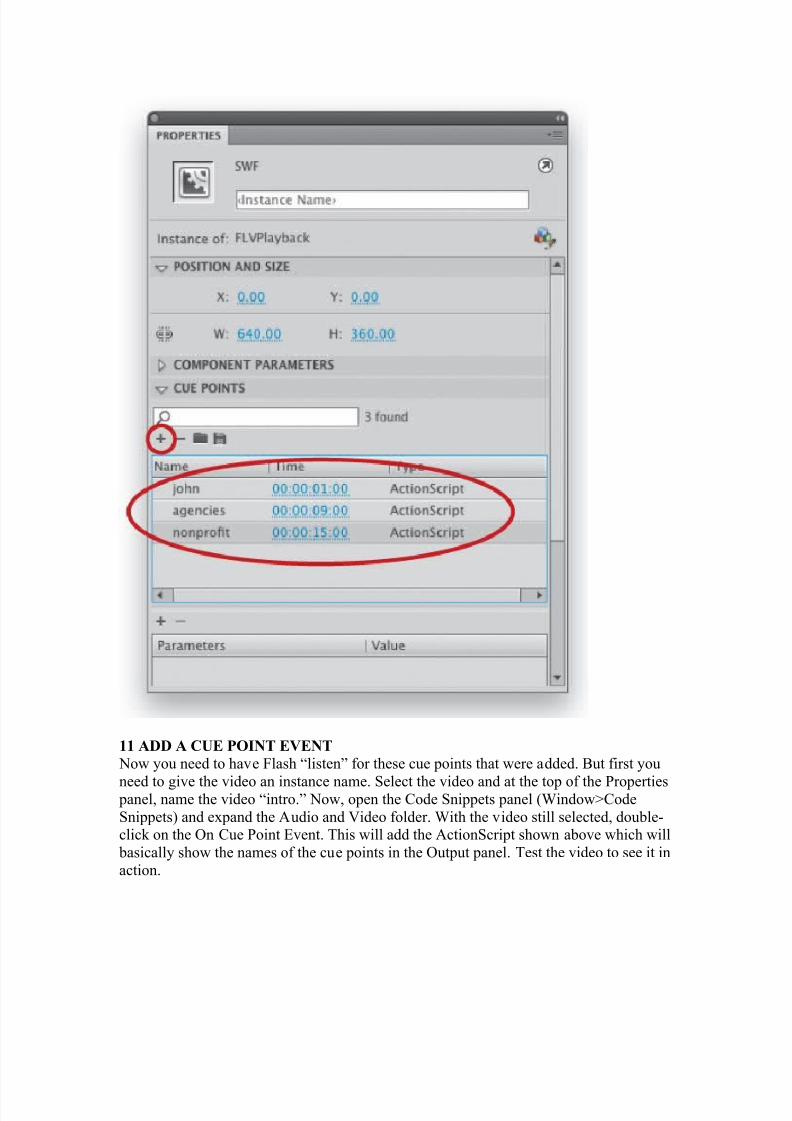
10 ADD MULTIPLE CUE POINTS
Next, play the video and when the presenter says “agencies” (about nine seconds in) add
another cue point. Rename “Cue Point 2” to “agencies.” Around 15 seconds in, when thepresenter says “nonprofit,” add another cue point. Rename this one as “nonprofit.” Your
cue points should look like the image above.
8/7/2019 Custom Video on Cue with Flash CS5
http://slidepdf.com/reader/full/custom-video-on-cue-with-flash-cs5 10/27
11 ADD A CUE POINT EVENT
Now you need to have Flash “listen” for these cue points that were added. But first you
need to give the video an instance name. Select the video and at the top of the Propertiespanel, name the video “intro.” Now, open the Code Snippets panel (Window>Code
Snippets) and expand the Audio and Video folder. With the video still selected, double-click on the On Cue Point Event. This will add the ActionScript shown above which will
basically show the names of the cue points in the Output panel. Test the video to see it in
action.
8/7/2019 Custom Video on Cue with Flash CS5
http://slidepdf.com/reader/full/custom-video-on-cue-with-flash-cs5 11/27
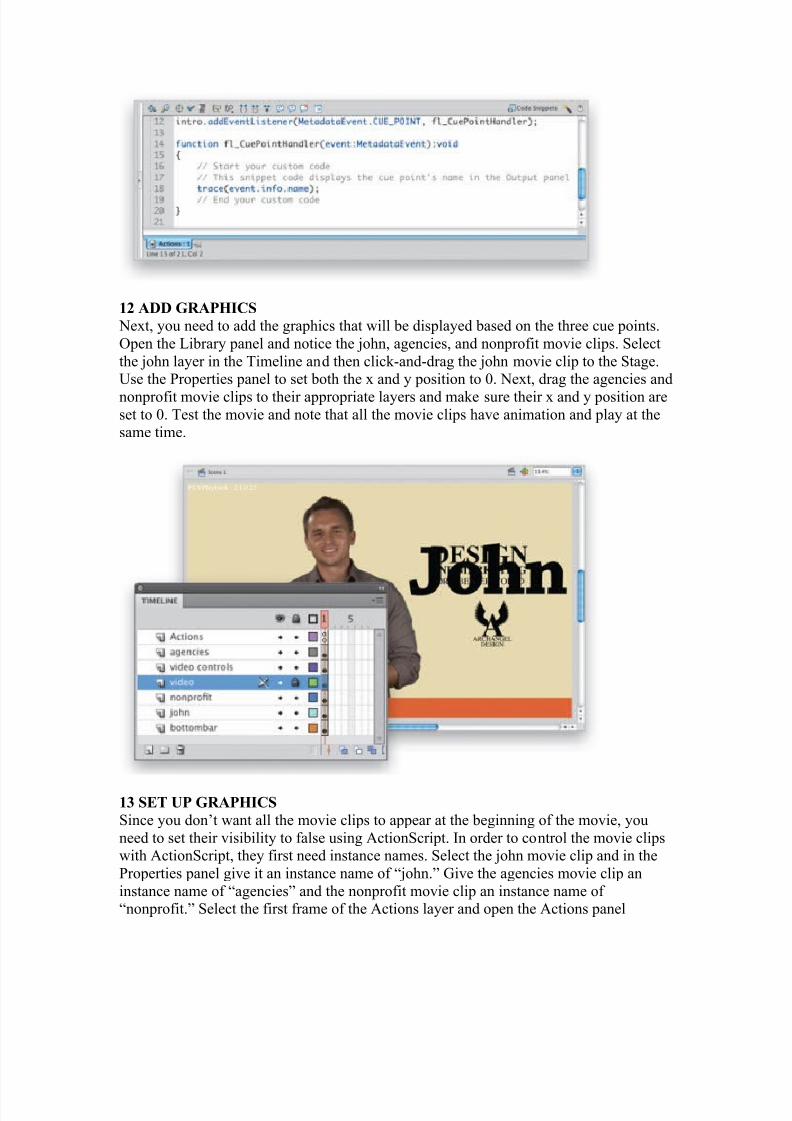
12 ADD GRAPHICS
Next, you need to add the graphics that will be displayed based on the three cue points.
Open the Library panel and notice the john, agencies, and nonprofit movie clips. Select
the john layer in the Timeline and then click-and-drag the john movie clip to the Stage.Use the Properties panel to set both the x and y position to 0. Next, drag the agencies and
nonprofit movie clips to their appropriate layers and make sure their x and y position areset to 0. Test the movie and note that all the movie clips have animation and play at thesame time.
13 SET UP GRAPHICS
Since you don’t want all the movie clips to appear at the beginning of the movie, you
need to set their visibility to false using ActionScript. In order to control the movie clipswith ActionScript, they first need instance names. Select the john movie clip and in the
Properties panel give it an instance name of “john.” Give the agencies movie clip an
instance name of “agencies” and the nonprofit movie clip an instance name of “nonprofit.” Select the first frame of the Actions layer and open the Actions panel
8/7/2019 Custom Video on Cue with Flash CS5
http://slidepdf.com/reader/full/custom-video-on-cue-with-flash-cs5 12/27
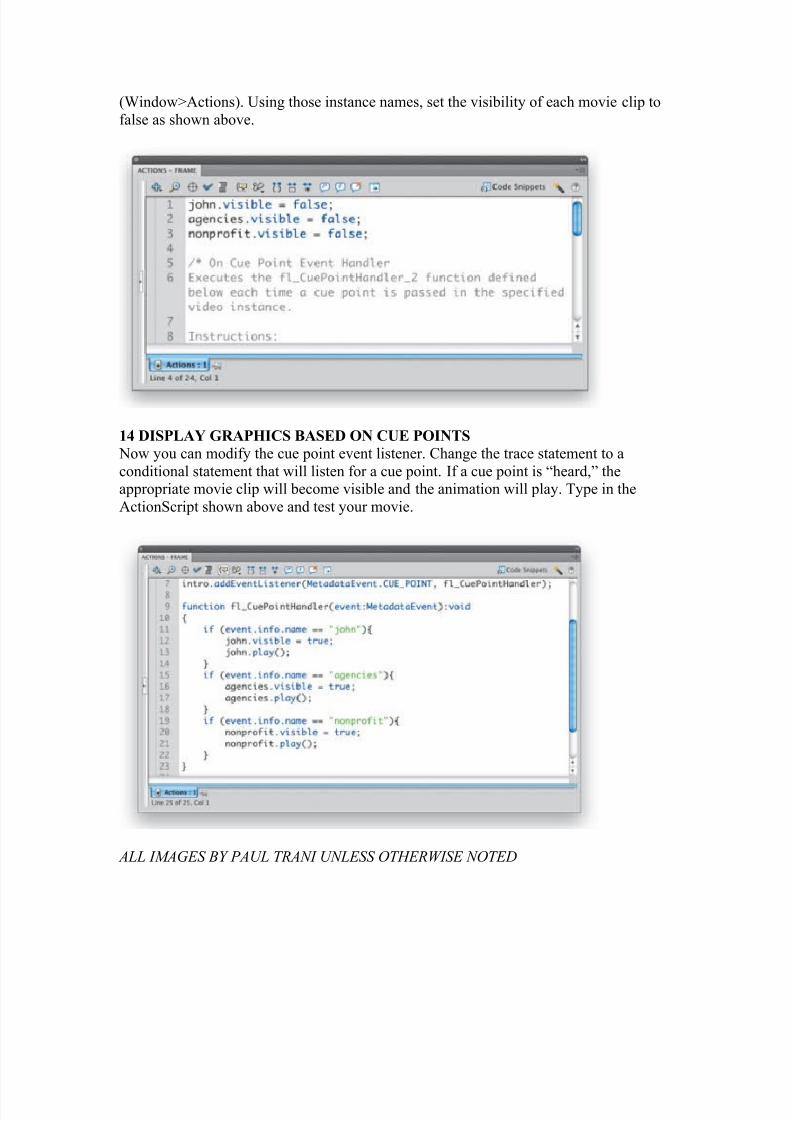
(Window>Actions). Using those instance names, set the visibility of each movie clip to
false as shown above.
14 DISPLAY GRAPHICS BASED ON CUE POINTS
Now you can modify the cue point event listener. Change the trace statement to a
conditional statement that will listen for a cue point. If a cue point is “heard,” theappropriate movie clip will become visible and the animation will play. Type in the
ActionScript shown above and test your movie.
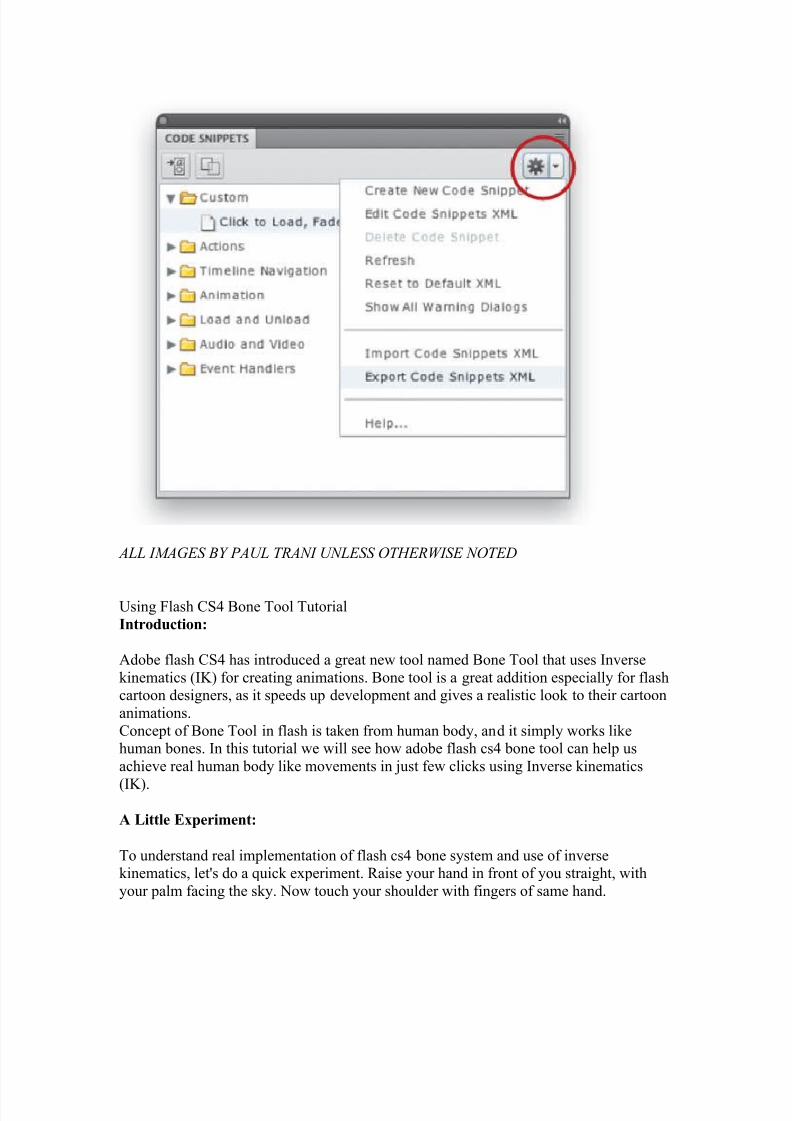
ALL IMAGES BY PAUL TRANI UNLESS OTHERWISE NOTED

8/7/2019 Custom Video on Cue with Flash CS5
http://slidepdf.com/reader/full/custom-video-on-cue-with-flash-cs5 13/27
Actionscript Made Easy
By Paul Trani in Flash,Tutorial
Tuesday November 30, 2010
[If you’d like to download the file used in this tutorial to practice these techniques, visit
www.layersmagazine.com and navigate to the Magazine section. All files are for personal
use only.]
Let’s face it, in the past new Flash users had to deal with a dauntingly empty Actionspanel and advanced users had to pillage previous projects to speed up development. Flash
CS5 has changed all this with the introduction of the surprisingly easy Code Snippets
panel, advanced code hinting, and custom class introspection. Let’s take a look.
1 OPEN THE STARTER FILEDownload the exercise file for this tutorial from the Layers website and unzip it onto
your desktop or other location of your choosing. Inside of the zip file you’ll find a file
named ImageGallery.fla. Open this file in Flash CS5. It’s important to note that this filetargets ActionScript 3, since the code we’re about to show you will only work when
targeting ActionScript 3. Also, note that on the Stage there’s one button. Select the button
with the Selection tool (V) and notice in the Properties panel that the Instance Name isimage_btn.
8/7/2019 Custom Video on Cue with Flash CS5
http://slidepdf.com/reader/full/custom-video-on-cue-with-flash-cs5 14/27
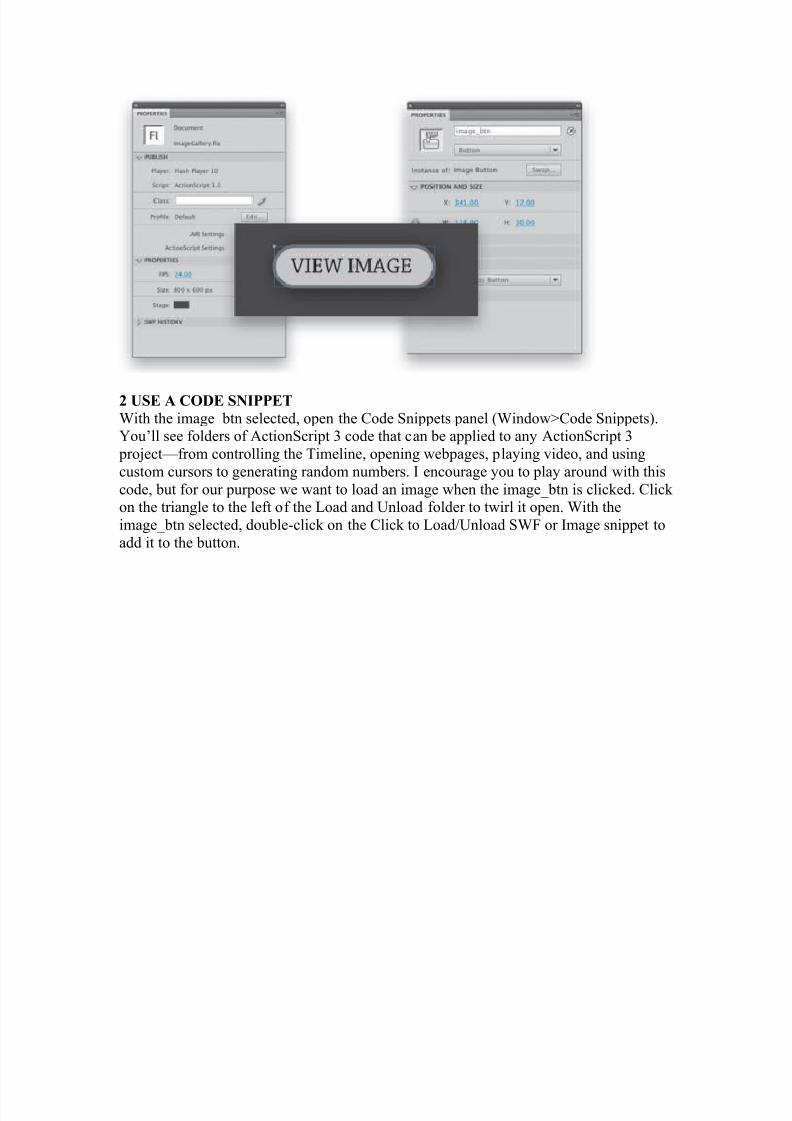
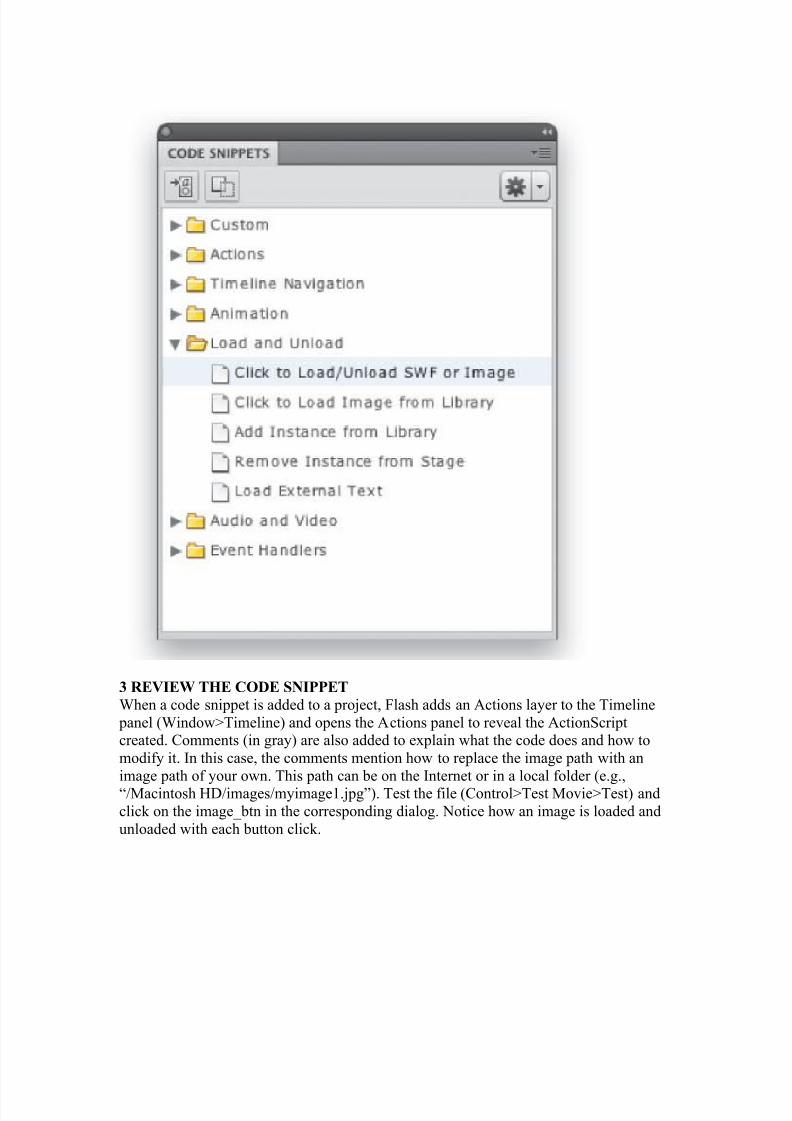
2 USE A CODE SNIPPET
With the image_btn selected, open the Code Snippets panel (Window>Code Snippets).You’ll see folders of ActionScript 3 code that can be applied to any ActionScript 3
project—from controlling the Timeline, opening webpages, playing video, and using
custom cursors to generating random numbers. I encourage you to play around with this
code, but for our purpose we want to load an image when the image_btn is clicked. Click on the triangle to the left of the Load and Unload folder to twirl it open. With the
image_btn selected, double-click on the Click to Load/Unload SWF or Image snippet to
add it to the button.
8/7/2019 Custom Video on Cue with Flash CS5
http://slidepdf.com/reader/full/custom-video-on-cue-with-flash-cs5 15/27
3 REVIEW THE CODE SNIPPET
When a code snippet is added to a project, Flash adds an Actions layer to the Timeline
panel (Window>Timeline) and opens the Actions panel to reveal the ActionScriptcreated. Comments (in gray) are also added to explain what the code does and how to
modify it. In this case, the comments mention how to replace the image path with an
image path of your own. This path can be on the Internet or in a local folder (e.g.,“/Macintosh HD/images/myimage1.jpg”). Test the file (Control>Test Movie>Test) and
click on the image_btn in the corresponding dialog. Notice how an image is loaded and
unloaded with each button click.
8/7/2019 Custom Video on Cue with Flash CS5
http://slidepdf.com/reader/full/custom-video-on-cue-with-flash-cs5 16/27
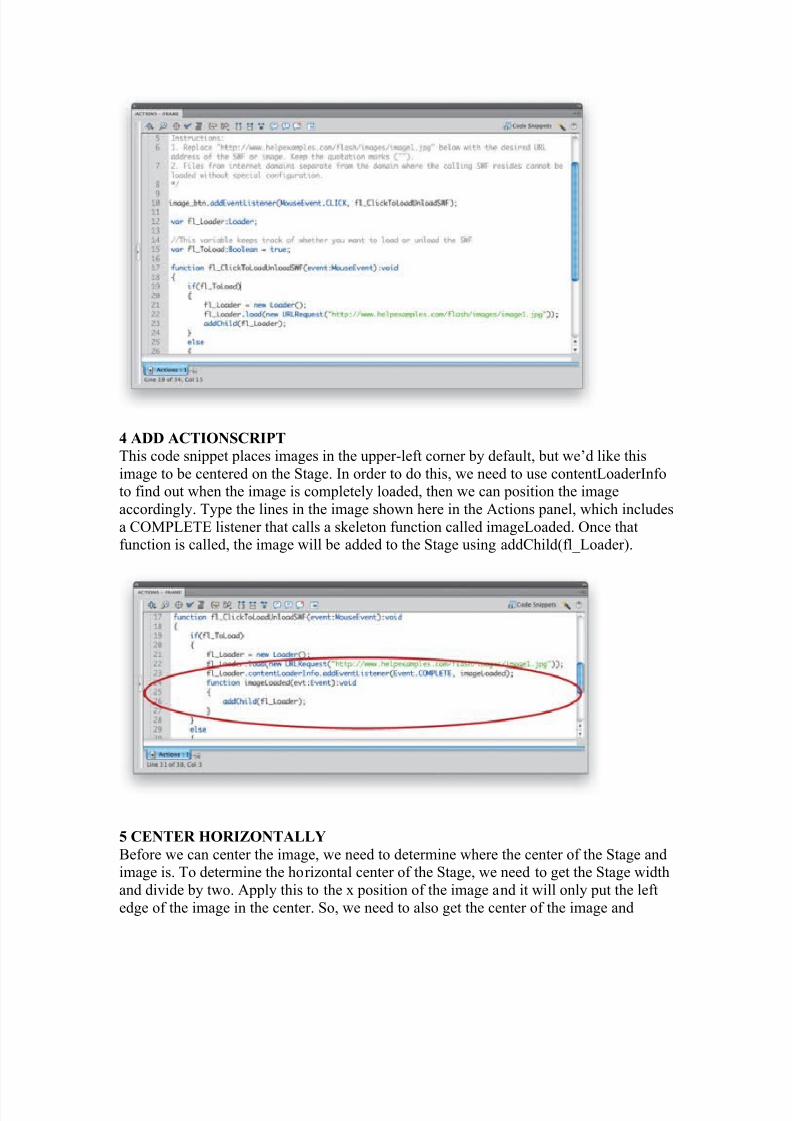
4 ADD ACTIONSCRIPT
This code snippet places images in the upper-left corner by default, but we’d like this
image to be centered on the Stage. In order to do this, we need to use contentLoaderInfoto find out when the image is completely loaded, then we can position the image
accordingly. Type the lines in the image shown here in the Actions panel, which includes
a COMPLETE listener that calls a skeleton function called imageLoaded. Once thatfunction is called, the image will be added to the Stage using addChild(fl_Loader).
5 CENTER HORIZONTALLY
Before we can center the image, we need to determine where the center of the Stage andimage is. To determine the horizontal center of the Stage, we need to get the Stage width
and divide by two. Apply this to the x position of the image and it will only put the left
edge of the image in the center. So, we need to also get the center of the image and
8/7/2019 Custom Video on Cue with Flash CS5
http://slidepdf.com/reader/full/custom-video-on-cue-with-flash-cs5 17/27
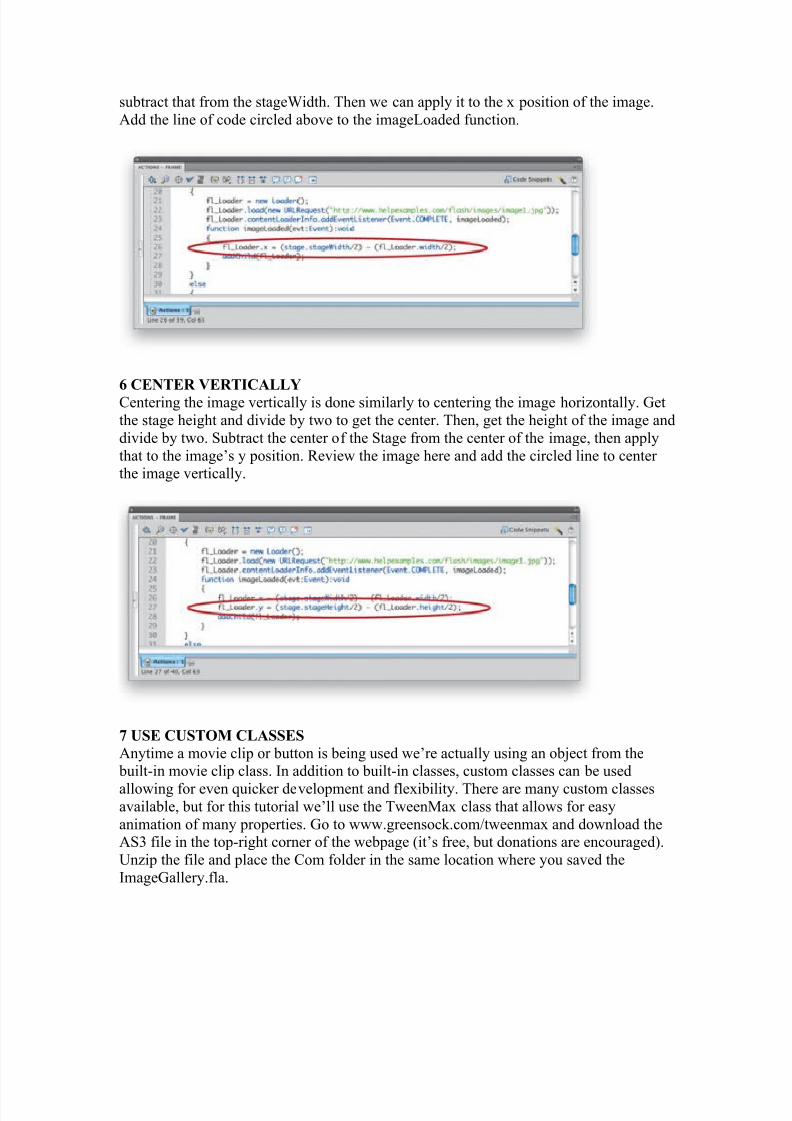
subtract that from the stageWidth. Then we can apply it to the x position of the image.
Add the line of code circled above to the imageLoaded function.
6 CENTER VERTICALLYCentering the image vertically is done similarly to centering the image horizontally. Get
the stage height and divide by two to get the center. Then, get the height of the image and
divide by two. Subtract the center of the Stage from the center of the image, then apply
that to the image’s y position. Review the image here and add the circled line to center the image vertically.
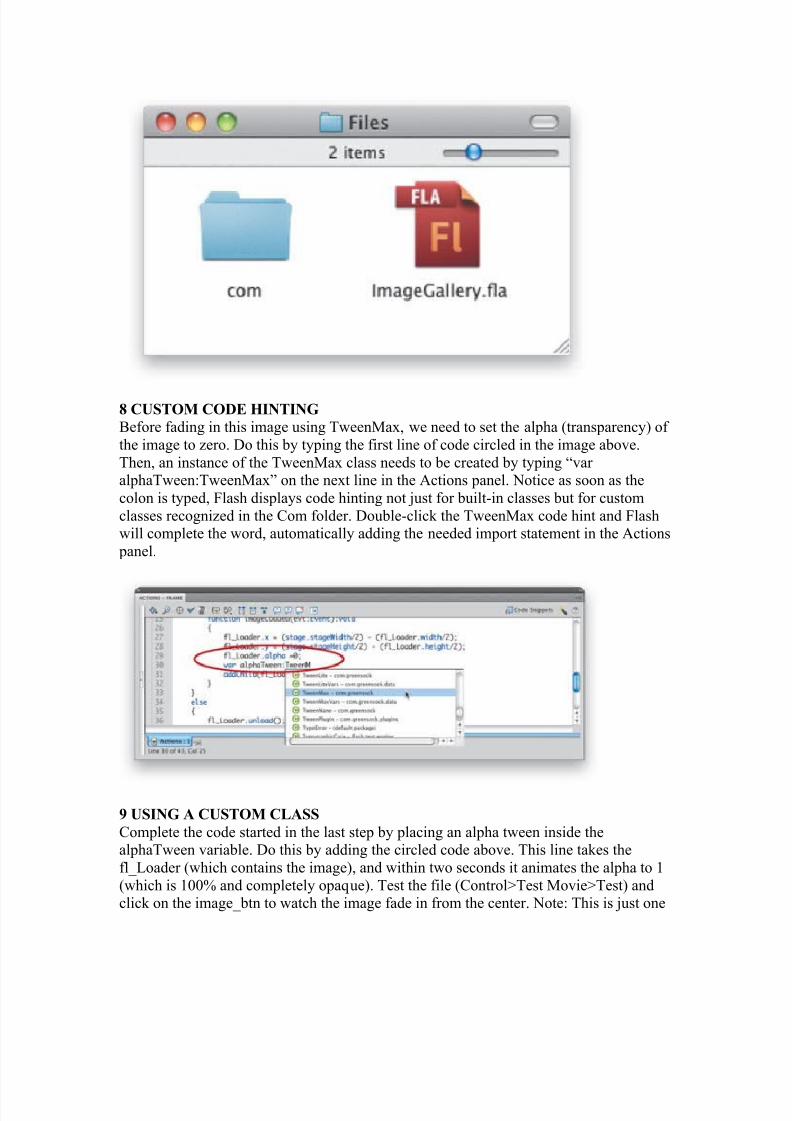
7 USE CUSTOM CLASSES
Anytime a movie clip or button is being used we’re actually using an object from thebuilt-in movie clip class. In addition to built-in classes, custom classes can be used
allowing for even quicker development and flexibility. There are many custom classesavailable, but for this tutorial we’ll use the TweenMax class that allows for easy
animation of many properties. Go to www.greensock.com/tweenmax and download theAS3 file in the top-right corner of the webpage (it’s free, but donations are encouraged).
Unzip the file and place the Com folder in the same location where you saved the
ImageGallery.fla.
8/7/2019 Custom Video on Cue with Flash CS5
http://slidepdf.com/reader/full/custom-video-on-cue-with-flash-cs5 18/27
8 CUSTOM CODE HINTING
Before fading in this image using TweenMax, we need to set the alpha (transparency) of
the image to zero. Do this by typing the first line of code circled in the image above.
Then, an instance of the TweenMax class needs to be created by typing “var alphaTween:TweenMax” on the next line in the Actions panel. Notice as soon as the
colon is typed, Flash displays code hinting not just for built-in classes but for custom
classes recognized in the Com folder. Double-click the TweenMax code hint and Flashwill complete the word, automatically adding the needed import statement in the Actions
panel.
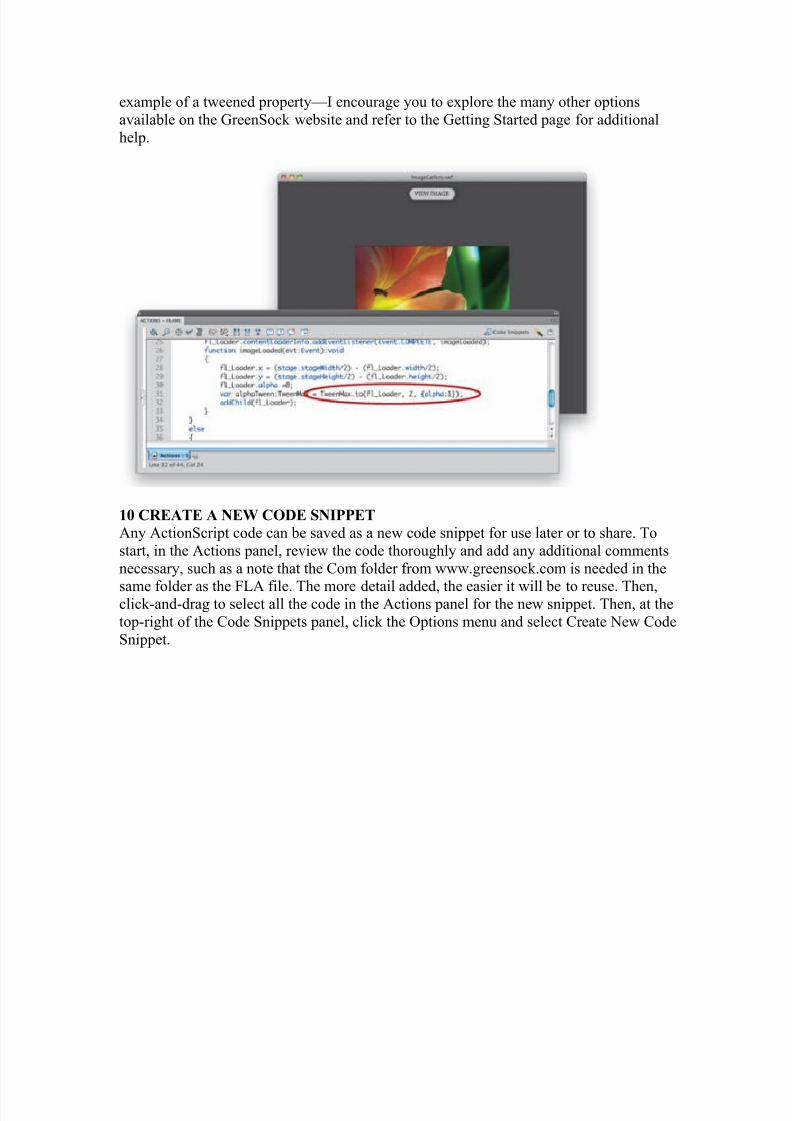
9 USING A CUSTOM CLASS
Complete the code started in the last step by placing an alpha tween inside thealphaTween variable. Do this by adding the circled code above. This line takes the
fl_Loader (which contains the image), and within two seconds it animates the alpha to 1
(which is 100% and completely opaque). Test the file (Control>Test Movie>Test) andclick on the image_btn to watch the image fade in from the center. Note: This is just one
8/7/2019 Custom Video on Cue with Flash CS5
http://slidepdf.com/reader/full/custom-video-on-cue-with-flash-cs5 19/27
example of a tweened property—I encourage you to explore the many other options
available on the GreenSock website and refer to the Getting Started page for additional
help.
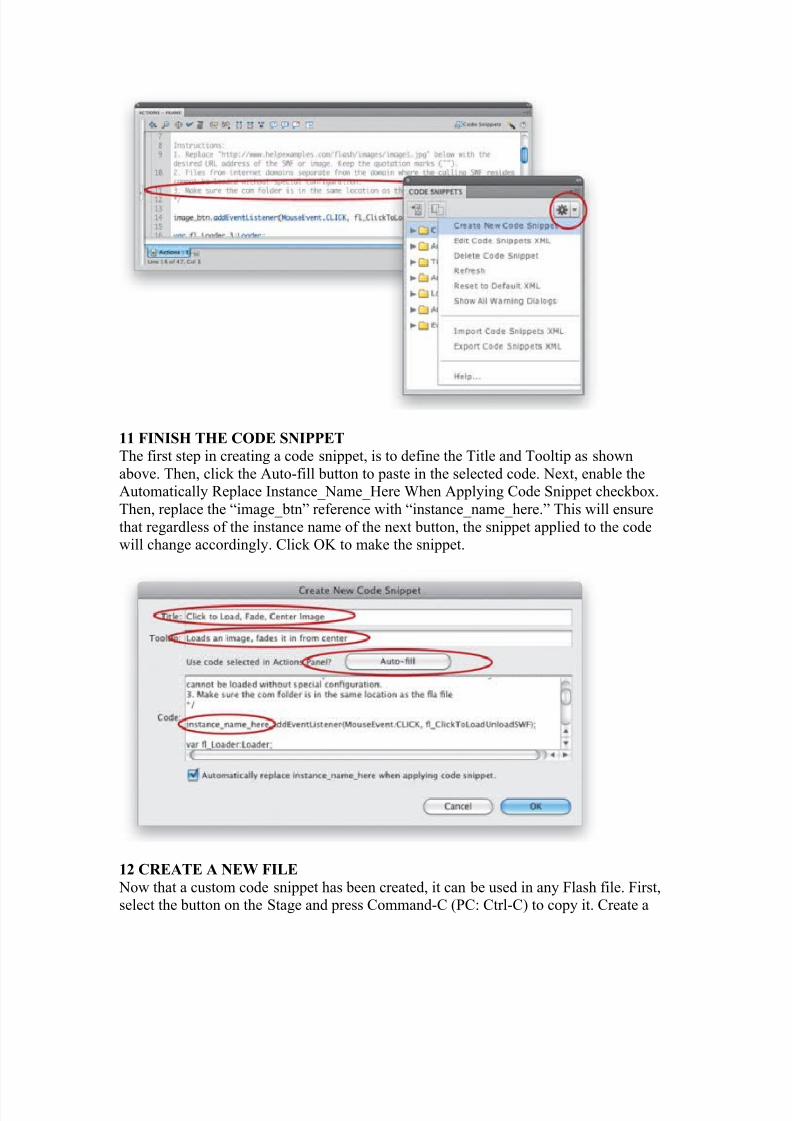
10 CREATE A NEW CODE SNIPPET
Any ActionScript code can be saved as a new code snippet for use later or to share. To
start, in the Actions panel, review the code thoroughly and add any additional comments
necessary, such as a note that the Com folder from www.greensock.com is needed in the
same folder as the FLA file. The more detail added, the easier it will be to reuse. Then,click-and-drag to select all the code in the Actions panel for the new snippet. Then, at the
top-right of the Code Snippets panel, click the Options menu and select Create New Code
Snippet.
8/7/2019 Custom Video on Cue with Flash CS5
http://slidepdf.com/reader/full/custom-video-on-cue-with-flash-cs5 20/27
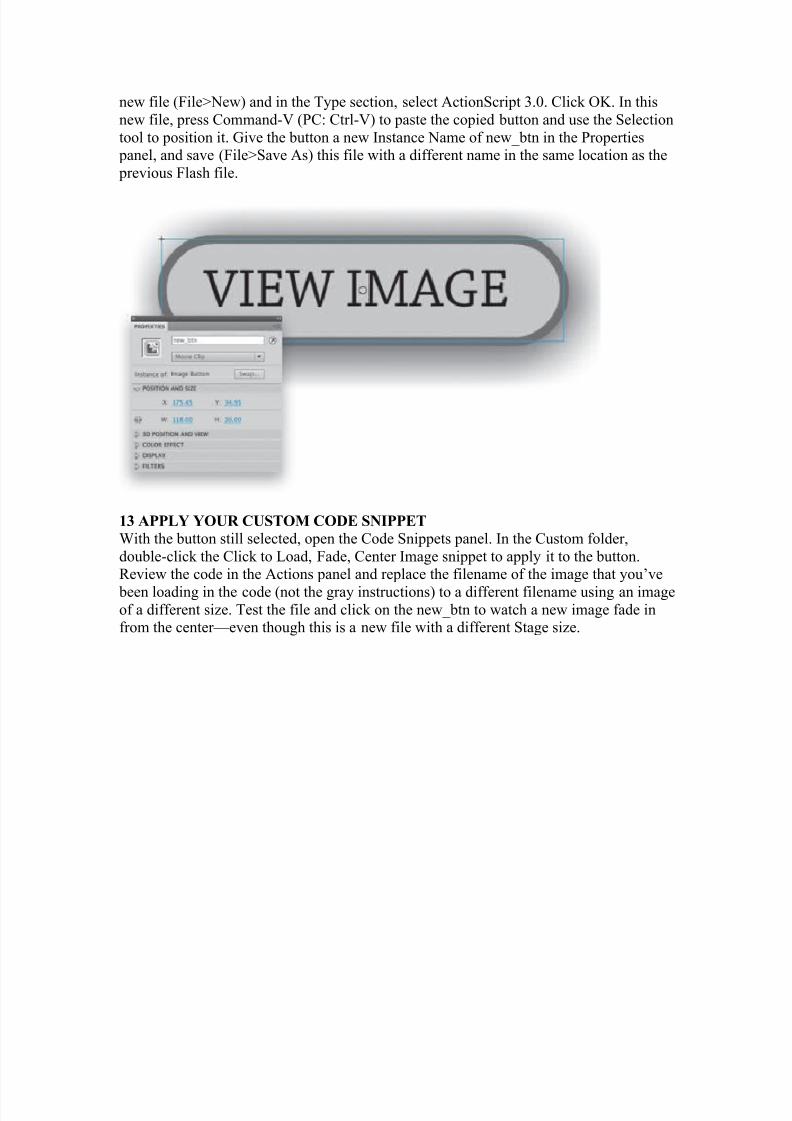
11 FINISH THE CODE SNIPPET
The first step in creating a code snippet, is to define the Title and Tooltip as shown
above. Then, click the Auto-fill button to paste in the selected code. Next, enable theAutomatically Replace Instance_Name_Here When Applying Code Snippet checkbox.
Then, replace the “image_btn” reference with “instance_name_here.” This will ensure
that regardless of the instance name of the next button, the snippet applied to the codewill change accordingly. Click OK to make the snippet.
12 CREATE A NEW FILE
Now that a custom code snippet has been created, it can be used in any Flash file. First,select the button on the Stage and press Command-C (PC: Ctrl-C) to copy it. Create a
8/7/2019 Custom Video on Cue with Flash CS5
http://slidepdf.com/reader/full/custom-video-on-cue-with-flash-cs5 21/27
new file (File>New) and in the Type section, select ActionScript 3.0. Click OK. In this
new file, press Command-V (PC: Ctrl-V) to paste the copied button and use the Selection
tool to position it. Give the button a new Instance Name of new_btn in the Propertiespanel, and save (File>Save As) this file with a different name in the same location as the
previous Flash file.
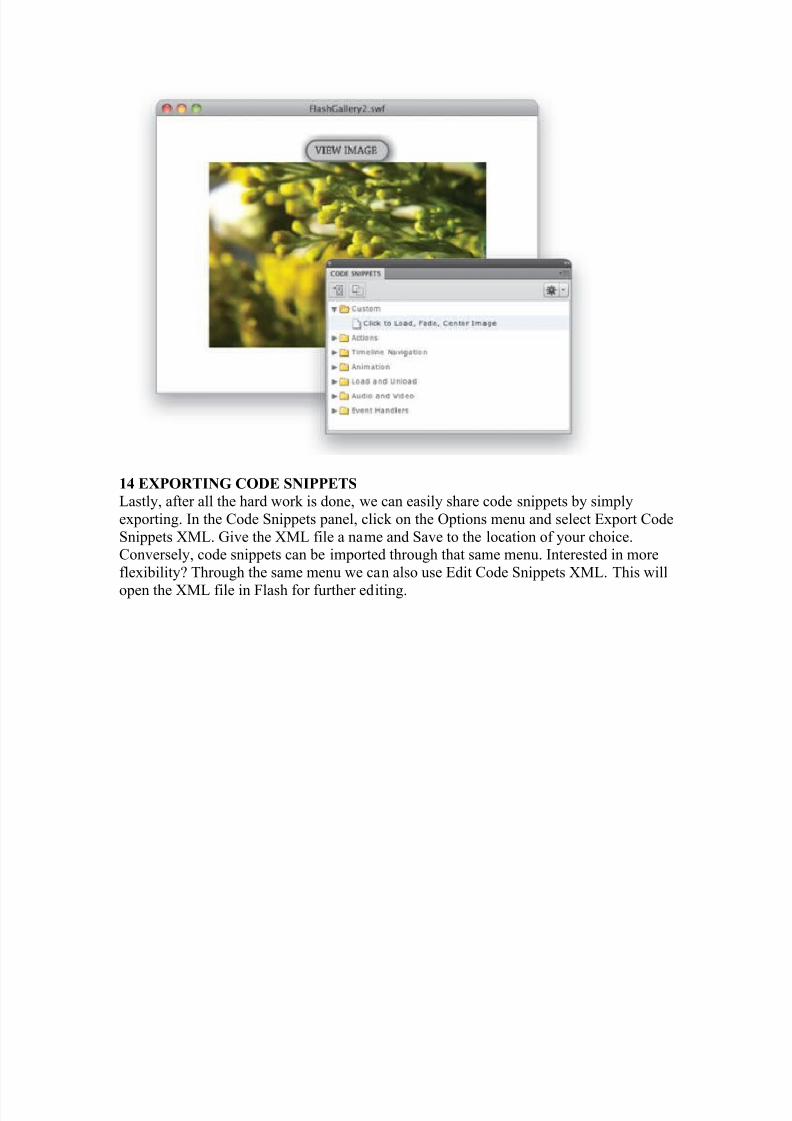
13 APPLY YOUR CUSTOM CODE SNIPPET
With the button still selected, open the Code Snippets panel. In the Custom folder,
double-click the Click to Load, Fade, Center Image snippet to apply it to the button.Review the code in the Actions panel and replace the filename of the image that you’ve
been loading in the code (not the gray instructions) to a different filename using an imageof a different size. Test the file and click on the new_btn to watch a new image fade infrom the center—even though this is a new file with a different Stage size.
8/7/2019 Custom Video on Cue with Flash CS5
http://slidepdf.com/reader/full/custom-video-on-cue-with-flash-cs5 22/27
8/7/2019 Custom Video on Cue with Flash CS5
http://slidepdf.com/reader/full/custom-video-on-cue-with-flash-cs5 23/27
ALL IMAGES BY PAUL TRANI UNLESS OTHERWISE NOTED
Using Flash CS4 Bone Tool Tutorial
Introduction:
Adobe flash CS4 has introduced a great new tool named Bone Tool that uses Inverse
kinematics (IK) for creating animations. Bone tool is a great addition especially for flashcartoon designers, as it speeds up development and gives a realistic look to their cartoon
animations.
Concept of Bone Tool in flash is taken from human body, and it simply works likehuman bones. In this tutorial we will see how adobe flash cs4 bone tool can help us
achieve real human body like movements in just few clicks using Inverse kinematics
(IK).
A Little Experiment:
To understand real implementation of flash cs4 bone system and use of inversekinematics, let's do a quick experiment. Raise your hand in front of you straight, with
your palm facing the sky. Now touch your shoulder with fingers of same hand.
8/7/2019 Custom Video on Cue with Flash CS5
http://slidepdf.com/reader/full/custom-video-on-cue-with-flash-cs5 24/27
What has happened is, two bones of your arm, one from shoulder till elbow, and other
from elbow till your hand have moved, bending at elbow joint, thus enabling you to touch
your shoulder.
Creating Bone Structure:
We will mimic the same bone structure in this tutorial using the bone tool, and see how
flash will automatically constraint our drawing’s movements to comply with human arm
like motions only.
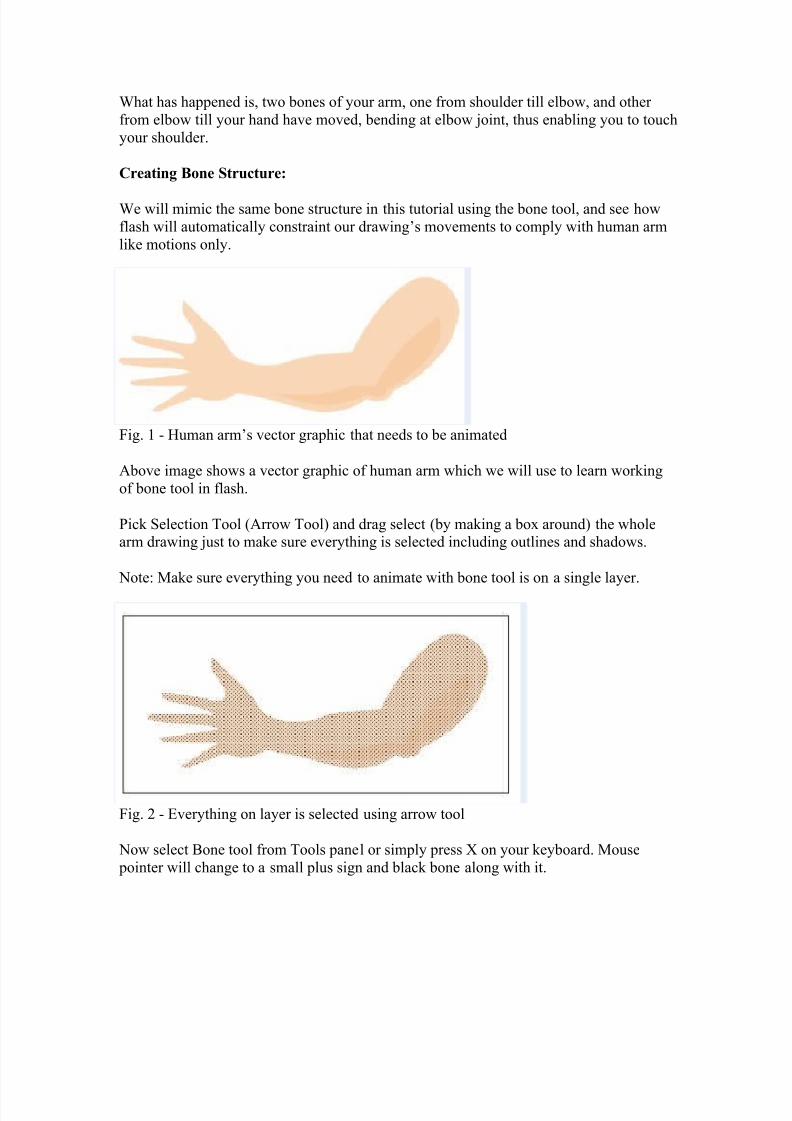
Fig. 1 - Human arm’s vector graphic that needs to be animated
Above image shows a vector graphic of human arm which we will use to learn working
of bone tool in flash.
Pick Selection Tool (Arrow Tool) and drag select (by making a box around) the wholearm drawing just to make sure everything is selected including outlines and shadows.
Note: Make sure everything you need to animate with bone tool is on a single layer.
Fig. 2 - Everything on layer is selected using arrow tool
Now select Bone tool from Tools panel or simply press X on your keyboard. Mouse
pointer will change to a small plus sign and black bone along with it.
8/7/2019 Custom Video on Cue with Flash CS5
http://slidepdf.com/reader/full/custom-video-on-cue-with-flash-cs5 25/27
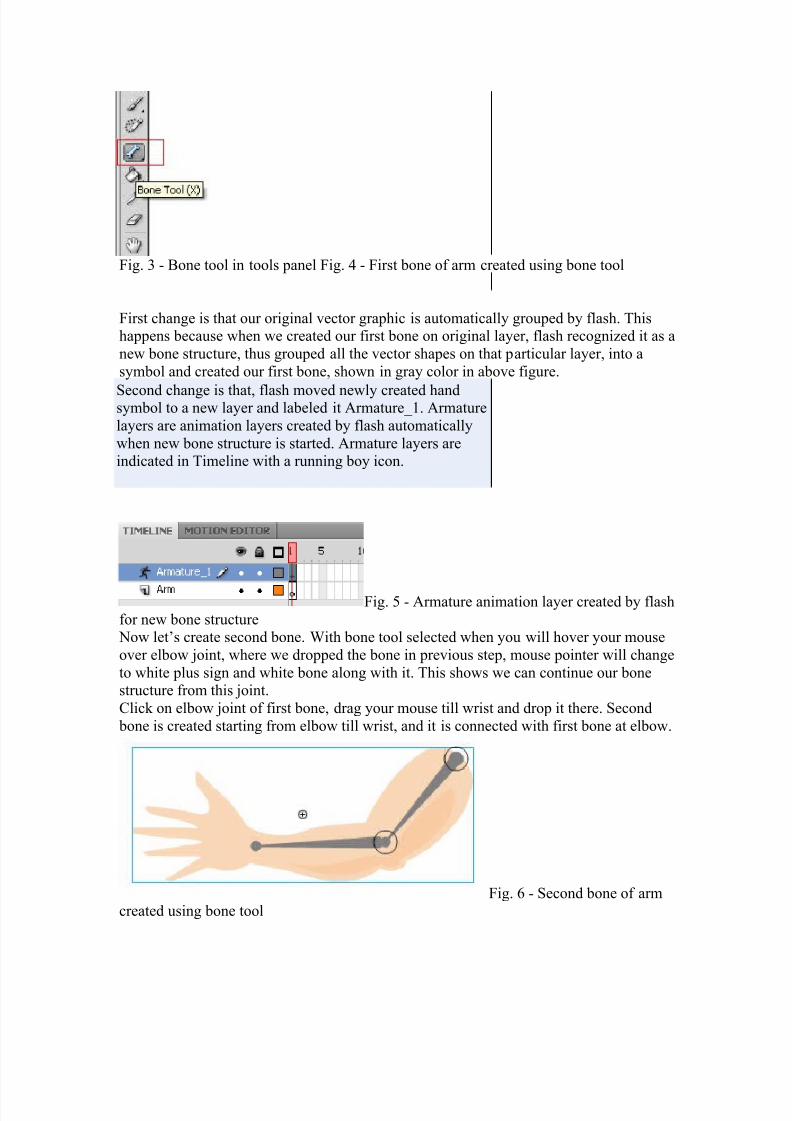
Fig. 3 - Bone tool in tools panel Fig. 4 - First bone of arm created using bone tool
First change is that our original vector graphic is automatically grouped by flash. Thishappens because when we created our first bone on original layer, flash recognized it as a
new bone structure, thus grouped all the vector shapes on that particular layer, into a
symbol and created our first bone, shown in gray color in above figure.
Second change is that, flash moved newly created handsymbol to a new layer and labeled it Armature_1. Armature
layers are animation layers created by flash automatically
when new bone structure is started. Armature layers areindicated in Timeline with a running boy icon.
Fig. 5 - Armature animation layer created by flash
for new bone structureNow let’s create second bone. With bone tool selected when you will hover your mouse
over elbow joint, where we dropped the bone in previous step, mouse pointer will change
to white plus sign and white bone along with it. This shows we can continue our bonestructure from this joint.
Click on elbow joint of first bone, drag your mouse till wrist and drop it there. Second
bone is created starting from elbow till wrist, and it is connected with first bone at elbow.
Fig. 6 - Second bone of armcreated using bone tool
8/7/2019 Custom Video on Cue with Flash CS5
http://slidepdf.com/reader/full/custom-video-on-cue-with-flash-cs5 26/27
Animating Bone Structure
With our simple bone structure in place, we will now see the real magic of inverse
kinematics using bones.In timeline panel, click on frame 15 of Armature_1 layer. Right click and select Insert
Pose from frame context menu.
Note: Insert Pose menu option will only appear for armature animation layers.
Flash will insert a pose, or keyframe you may say, for our armature animation layer and it
will also create all the intermediate frames to save us time of creating animation frame byframe.
While time indicator is still on frame 15, pick Selection Tool, click anywhere on arm
symbol and bring mouse pointer over second bone. You’ll notice mouse pointer changes
to a bone selection tool, by indicating a black arrow along with black bone.Now click on second bone. You’ll notice black circle around elbow joint gets
highlighted, which indicates currently this bone is selected.
Bone Properties Panel
At this point let’s examine the bone properties panel. If not already open, select Window> Properties to open properties panel. When a bone is selected on stage, properties panel
will show that particular bone’s properties.Bone properties are grouped into four categories, Location, Joint: Rotation, Joint: X
Translation and Joint: Y Translation.
With these properties you can control the speed of a particular bone with respect to whole
bone structure, you can completely disable a joint’s rotation, or even set a restrictedrotation. For example in our case you can restrict elbow joint not to move backwards,
because in realty too, your hand cannot touch elbow of same arm.
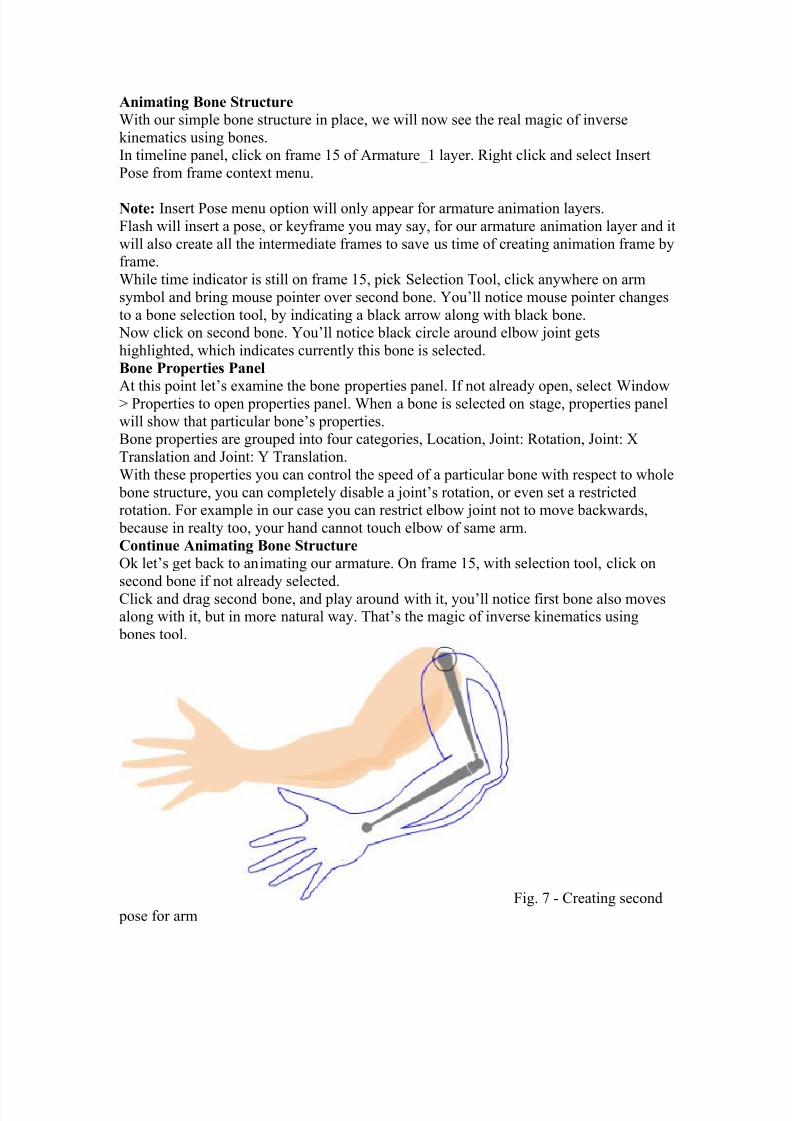
Continue Animating Bone Structure
Ok let’s get back to animating our armature. On frame 15, with selection tool, click on
second bone if not already selected.
Click and drag second bone, and play around with it, you’ll notice first bone also movesalong with it, but in more natural way. That’s the magic of inverse kinematics using
bones tool.
Fig. 7 - Creating second
pose for arm
8/7/2019 Custom Video on Cue with Flash CS5
http://slidepdf.com/reader/full/custom-video-on-cue-with-flash-cs5 27/27
Now let’s test our movie, select Control > Test Movie. You’ll see arm animating from its
start position to second pose Exercises:
Extend existing animation to move arm further backwards, do you notice any overlap or scrambling in arm symbol?
Extend this bone structure to create bones for fingers as well.
Disable a joint’s Rotation from bone properties panel. What change you notice in bone onthe stage? How is it indicated that this joint cannot rotate in flash.
Apply constraint on existing animation, so that arm cannot be rotated backwards at elbow
joint.Disable joint rotation of shoulder joint, can you move first bone? Can you move second
bone now?
in a natural way using articulated structure of bones.
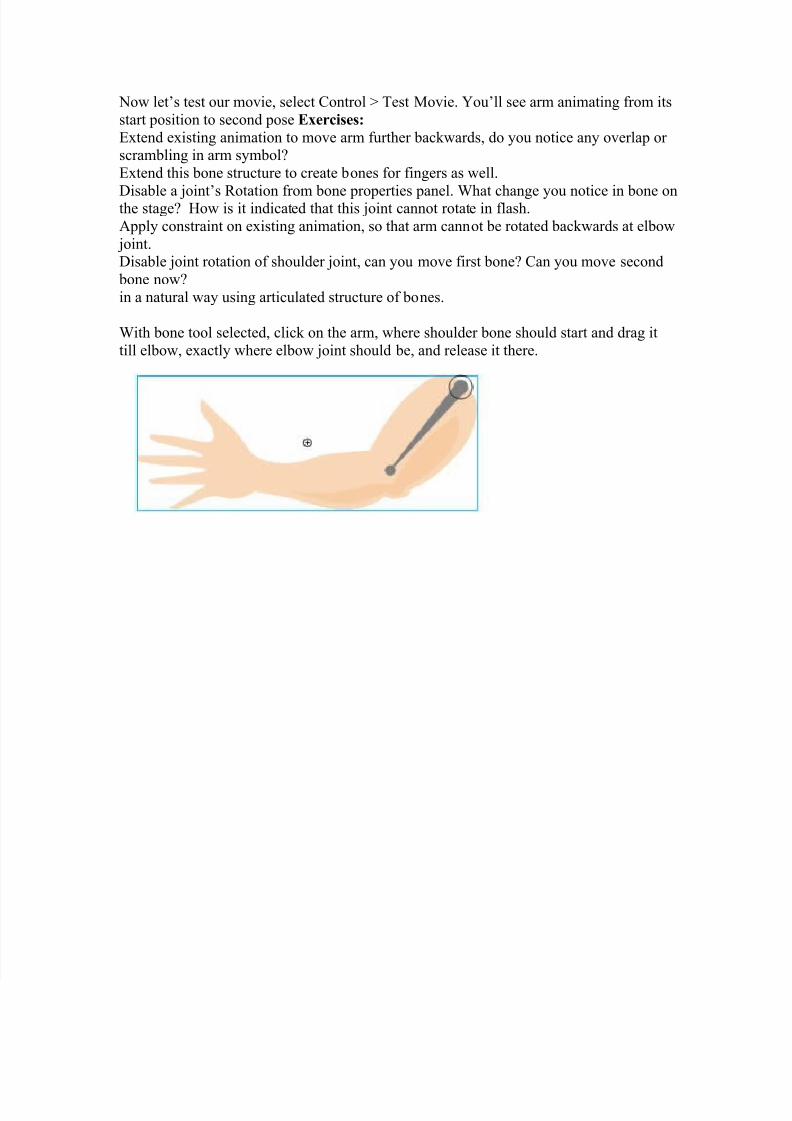
With bone tool selected, click on the arm, where shoulder bone should start and drag it
till elbow, exactly where elbow joint should be, and release it there.