Embed Size (px)
Citation preview
Flood Preparation

INTRODUCTION The Yukon government recognizes its responsibilities to aid and assist the public in preparing for and responding to disasters which threaten life and property. Local authorities and/or municipal governments respond first, but may call upon other levels of government to help. Every level of government has its share of responsibility for public safety and assistance to disaster victims. The Yukon’s Emergency Measures Organization helps municipalities develop and maintain a high level of emergency, preparedness and response. At one time or another residents in the Yukon may find that they, their family, home and property are threatened by one of a variety of natural disasters such as earthquakes, mud slides, tsunamis, violent storms or floods. This booklet is intended to provide information for use by individuals should their home be threatened by a flooding situation. The information provided represents general tips for consideration and is provided to help Yukoners be better prepared to deal with the perils of a flood. For further information contact you local EMO coordinator or Yukon EMO at:
° 867-667-5220 867-393-6266 (Fax) ° P.O Box 2703 Whitehorse, Yukon Y1A 2C6 ° Located at #60 Norsman Road in Whitehorse (up near the
airport) ° E-mail at [email protected]
Table of Contents
Page Flooding On Your Property______________________________ 3 Polyethylene Sheeting _________________________________ 7 Additional Considerations ______________________________10 Prepare Your Family Emergency Plan ____________________ 17
- Basic Kit - Preparing a Basic Kit over a 4-week shopping period
Important Emergency Information _______________________ 20
May 2007
- 3 -
Flooding on Your Property
Should your home or other structures be located in an area where flooding above first floor level is forecast, you may wish to do the following:
√ Listen carefully to the forecast and determine how high the predicted flood level will be, then allow an extra metre of coverage beyond that height
√ Remove all valuables from basement, turn off and disconnect all power and gas lines and remove all electric motors from the furnace and appliances which will remain in the basement during the flooding period.
√ Securely plug all basement drains and outlets such as: sewer drains, sinks, toilet bowls and laundry outlets to the sewer. It may be necessary to plug some outlets below the level of the weeping tile drains, in the primary sewer trap. Effective plugs can be made from wood or plastic bags. All plugs must be held in place by sandbags or other heavy materials, or held in place by braces securely fastened to floor joists.
√ Move all possessions within the structure above the projected flood water level √ Prepare sandbag-wall around your property (see sandbag dykes) √ Remove lawn furniture √ Move smaller outhouses to higher ground and away from potentially eroding
riverbanks.
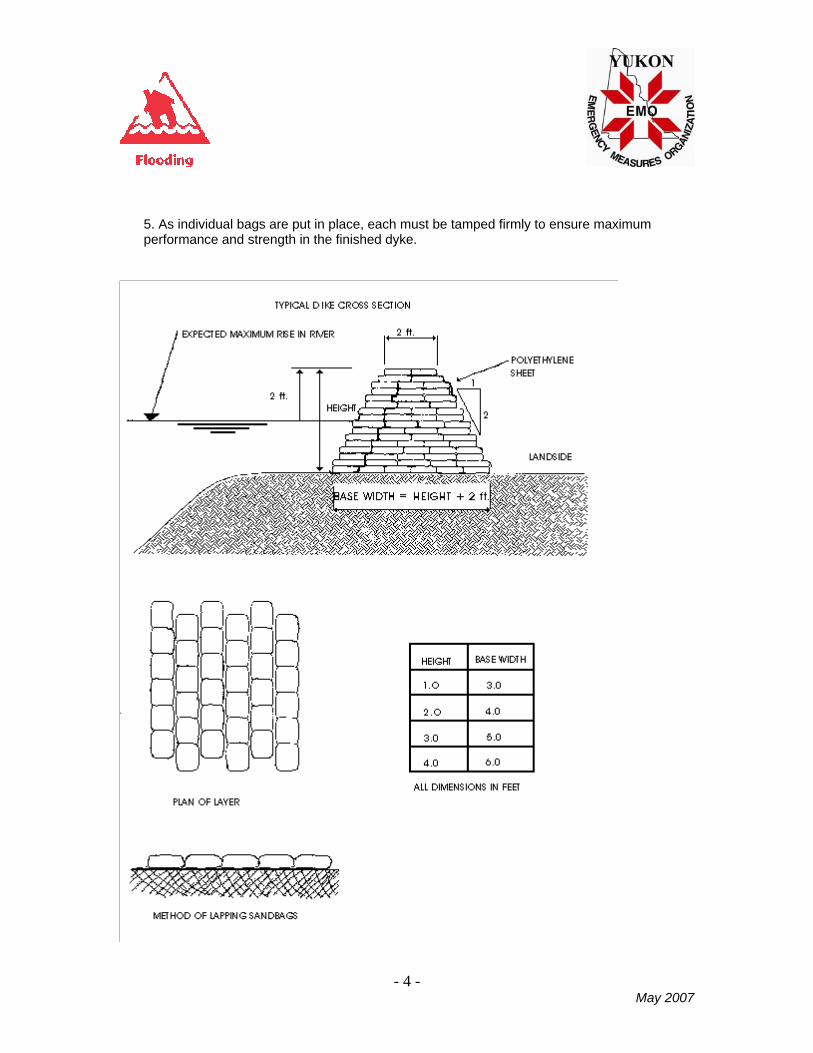
SANDBAG DYKES Construction of a sandbag dyke requires special procedures to achieve maximum strength and effectiveness. Should you choose to construct a sandbag dyke to protect your property in the event of a flood, the following tips may be useful. 1. Strip the sod or ground cover beneath the area for the proposed dyke and dig a "bonding trench" one sack in depth and two sacks wide as a foundation for the dyke structure. 2. To effectively provide protection from the forces of flooding water a dyke must be three times as wide at its base as it is high. A dyke intended to be one metre high must have a three metre wide base. 3. Sandbags should never be filled more than half-full and must be laid in alternating crisscross directions. The base level should be laid parallel to the flow of the water, the second level should be laid perpendicular to the flow, with the third level again laid parallel, continuing to the intended height of the dyke. Each successive layer is set back one-half sandbag width on both sides in each additional layer. A side view of a completed dyke would show a triangular cross section. 4. Individual bags need not be tied shut. Overlapping by successive bags will hold the sand in place. The method of keeping bag contents in place is called "lapping."
May 2007
- 4 -
5. As individual bags are put in place, each must be tamped firmly to ensure maximum performance and strength in the finished dyke.
- 5 -
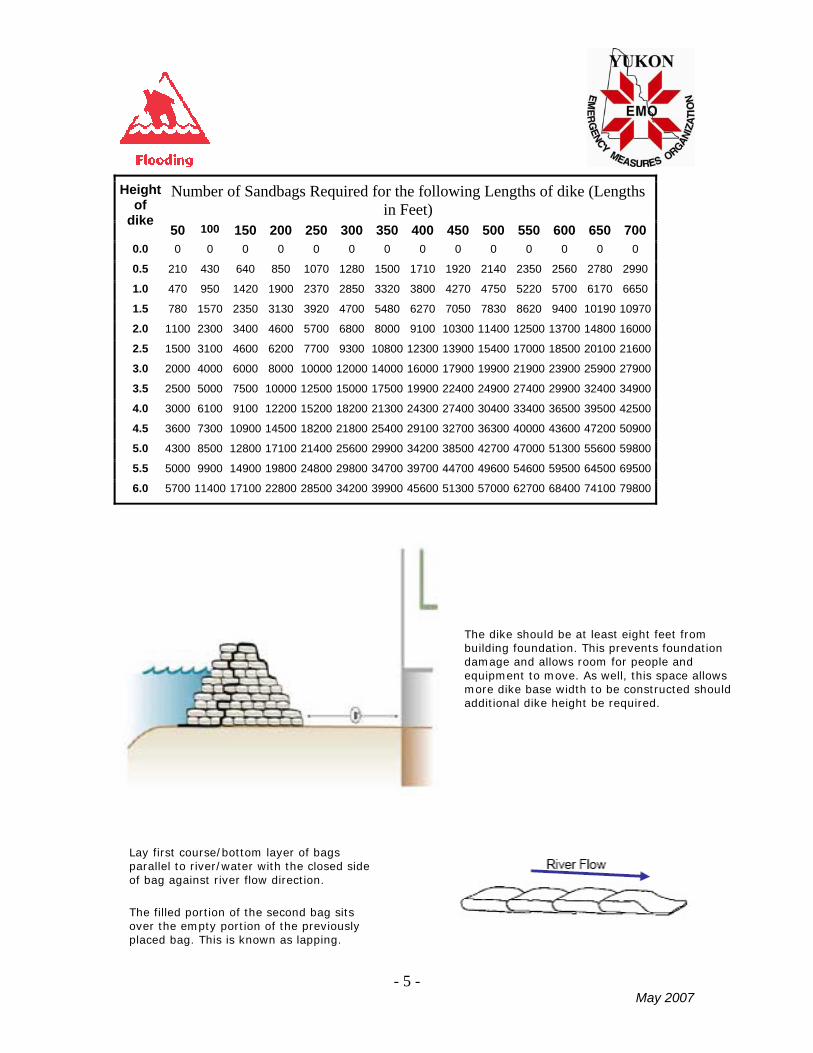
Number of Sandbags Required for the following Lengths of dike (Lengths in Feet)
Height of
dike 50 100 150 200 250 300 350 400 450 500 550 600 650 700
0.0 0 0 0 0 0 0 0 0 0 0 0 0 0 0
0.5 210 430 640 850 1070 1280 1500 1710 1920 2140 2350 2560 2780 2990
1.0 470 950 1420 1900 2370 2850 3320 3800 4270 4750 5220 5700 6170 6650
1.5 780 1570 2350 3130 3920 4700 5480 6270 7050 7830 8620 9400 10190 10970
2.0 1100 2300 3400 4600 5700 6800 8000 9100 10300 11400 12500 13700 14800 16000
2.5 1500 3100 4600 6200 7700 9300 10800 12300 13900 15400 17000 18500 20100 21600
3.0 2000 4000 6000 8000 10000 12000 14000 16000 17900 19900 21900 23900 25900 27900
3.5 2500 5000 7500 10000 12500 15000 17500 19900 22400 24900 27400 29900 32400 34900
4.0 3000 6100 9100 12200 15200 18200 21300 24300 27400 30400 33400 36500 39500 42500
4.5 3600 7300 10900 14500 18200 21800 25400 29100 32700 36300 40000 43600 47200 50900
5.0 4300 8500 12800 17100 21400 25600 29900 34200 38500 42700 47000 51300 55600 59800
5.5 5000 9900 14900 19800 24800 29800 34700 39700 44700 49600 54600 59500 64500 69500
6.0 5700 11400 17100 22800 28500 34200 39900 45600 51300 57000 62700 68400 74100 79800
The dike should be at least eight feet from building foundation. This prevents foundation damage and allows room for people and equipment to move. As well, this space allows more dike base width to be constructed should additional dike height be required.
Lay first course/bottom layer of bags parallel to river/water with the closed sideof bag against river flow direction.
The filled portion of the second bag sits over the empty portion of the previously placed bag. This is known as lapping.
May 2007
May 2007
6
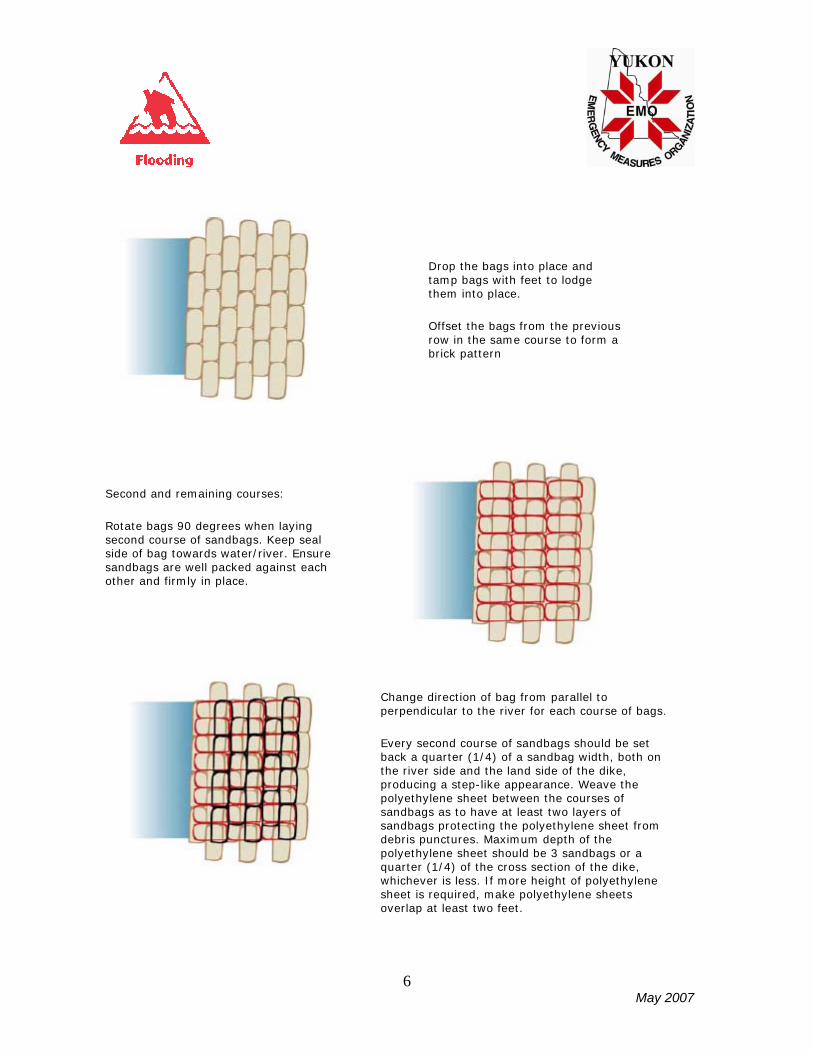
Drop the bags into place and tamp bags with feet to lodge them into place.
Offset the bags from the previous row in the same course to form a brick pattern
Second and remaining courses:
Rotate bags 90 degrees when laying second course of sandbags. Keep seal side of bag towards water/river. Ensure sandbags are well packed against each other and firmly in place.
Change direction of bag from parallel to perpendicular to the river for each course of bags.
Every second course of sandbags should be set back a quarter (1/4) of a sandbag width, both on the river side and the land side of the dike, producing a step-like appearance. Weave the polyethylene sheet between the courses of sandbags as to have at least two layers of sandbags protecting the polyethylene sheet from debris punctures. Maximum depth of the polyethylene sheet should be 3 sandbags or a quarter (1/4) of the cross section of the dike, whichever is less. If more height of polyethylene sheet is required, make polyethylene sheets overlap at least two feet.
May 2007
- 7 -
Polyethylene Sheeting Flooding Above First Floor Level
POLYETHYLENE SHEETING A reliable source of protection for the structure of your home and most other smaller buildings during severe flooding conditions is the proper use of polyethylene (plastic) sheeting. The following is a brief description of how, according to dyking engineers, an individual can provide protection to his or her home should potential flooding conditions be considered severe enough to require evacuation. This system has been successfully used throughout Canada and the United States, and is recommended for structures located in areas where flood depth is anticipated to extend above the level of the structure's first floor. It is not considered necessary in areas where only basement flooding is expected. Polyethylene sheeting is intended to add extra protection to the building's structure, but "sheeted" buildings are not considered suitable to live in once the sheeting has been completed. Use this procedure only if evacuation is anticipated.
May 2007
- 8 -
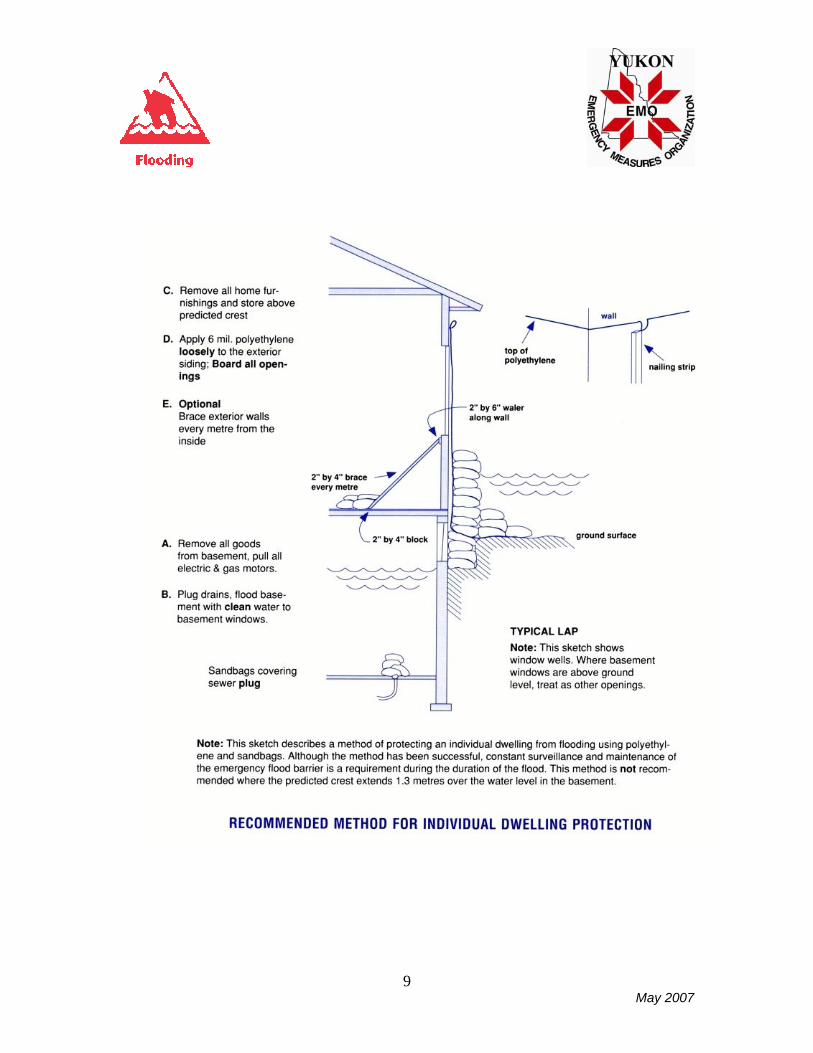
Procedure: The exterior lower levels of a home to be evacuated are wrapped in polyethylene sheeting, secured at joints with nailed strips of wood and anchored around the structure's foundation with sandbags or other heavy objects. For greatest protection, the use of 6-mil polyethylene sheets in 3 metre widths is recommended. Step-by-Step Instructions: Should your home or other structures be located in an area where flooding above first floor level is forecast, you may wish to do the following:
1. Listen carefully to the forecast and determine how high the predicted flood level will be, then allow an extra metre of coverage beyond that height.
2. Remove all valuables from basement, turn off and disconnect all power and gas lines and remove all electric motors from the furnace and appliances which will remain in the basement during the flooding period.
3. Securely plug all basement drains and outlets such as: sewer drains, sinks, toilet bowls and laundry outlets to the sewer. It may be necessary to plug some outlets below the level of the weeping tile drains, in the primary sewer trap. Effective plugs can be made from wood or plastic bags. All plugs must be held in place by sandbags or other heavy materials, or held in place by braces securely fastened to floor joists.
4. Move all possessions within the structure above the projected flood water level.
5. Flood the basement with clear water from an outside tap through a basement window. Bring water level inside the basement to window casement level.
6. Board up all windows, doors and other openings.
7. For additional protection against the force of outside flood waters, brace the walls of the structure from the inside by nailing "two-by-six" lengths or planking one metre above the floor. Once the two-by-six "walers" are .in place, add braces constructed from strips of two-by-fours, running at a 45 degree angle from the "walers" to the floor and hold in place with either sandbags, or wooden blocks nailed directly to the floor.
8. Apply the polyethylene barrier loosely to the exterior walls of the structure, starting at a height of one meter above the predicted flood level. Allow an additional one metre at the base of the structure for anchoring. At joints in the sheeting, allow a minimum one metre overlap. Place sandbags around the house against the polyethylene. Stack the bags in an overlapping fashion and at least 10 bags high.
9. At the base of the first stack of sandbags lift the remaining polyethylene sheeting up and cover the outside face of the initial sandbags, hold the plastic sheeting in place with a second wall of sandbags.
May 2007
9
May 2007
- 10 -
ADDITIONAL CONSIDERATIONS FOR HOUSEHOLDERS Additional considerations for householders to help prevent flood damage include:
a. If eaves troughs are connected to the house sewer system, disconnect them and re-channel the flow to points more than 1.3 metres from the building's foundations. This will help reduce the flow of water into the community sewage system..
b. Dangerous chemicals such as weed killer, insecticides and corrosives should be removed to dry areas to reduce the dangers of chemical contamination, fires, explosions and personal injuries..
c. Buoyant materials should be removed from the basement to lessen the potential for damage to first floor components of the structure should the basement flood..
If you plug the basement sewer, be sure to remove the toilet bowl from any basement bathroom and plug that sewer drain securely as well. If, through taste, colour or odour you suspect your drinking water is contaminated, do not drink it. Contaminated drinking water may be purified by boiling, by adding purification tablets (if available), or by adding household bleach. In most situations adding two drops of normal strength bleach to each litre of water is recommended. Allow the treated water to stand for at least 30 minutes before drinking. ELECTRICAL POWER In any area where immediate flooding is anticipated, it is essential to shut off all electrical power. In an urban area homeowners are advised to shut off the power by opening the main service switch. In a suburban or rural area the yard switch must be opened. Entry into a flooded room or basement where electrical power is believed to still be active should never, under any circumstances, be attempted. When disconnecting the power source it is essential to be standing on a dry platform. Avoid approaching any master switch if it is surrounded by water. The switch may be opened through the use of a non-conductive dry material such as a dry wooden stick or insulated tool of some sort. An additional precaution you are to consider if involved in rescue work, or if you are returning to property abandoned during a flood, concerns possible submerged electrical cables. In some flooded areas water levels may reach or submerge power bearing electrical cables. When operating a boat in flooded areas extreme caution must be exercised to avoid coming into contact with "live" wires. If your home is threatened by immediate flooding it is important not only to be prepared for the first line of flooding, but to make as many preparations as possible for the return to normal living once the flood has subsided.
May 2007
- 11 -
Some things to consider include:
a. If appliances such as deep freezers, furnaces, washers and dryers can not be moved above the anticipated flood level, then electrical controls and motors, should be removed to prevent water damage and expensive repairs. If an electrical motor has been submerged in water no attempt should be made to operate it until a complete overhaul and cleaning has been completed.
b. All insulation of thermally insulated appliances must be replaced before operation if the appliances have been partially or completed submerged. These appliances include: water heaters, refrigerators, freezers and ranges. (Note: With the present cost of parts and labour, repairs to such appliances may not be practical.)
c. Electric baseboard heaters and portable heaters must be moved above water level. It is doubtful such items could be rendered safe for operation once submerged.
d. Portable electric appliances such as kitchen blenders and mixers, as well as power tools must be kept dry, or not operated until completely dried, cleaned and overhauled.
e. Radios, televisions, stereo systems and other home electronic systems must be moved above the flood level. Repairs to such items following submersion is not practical.
In order to prevent fires or dangerous short circuits all wiring in homes and other buildings which have been partially or completely flooded must be inspected before being placed back in service. GAS FIRED APPLIANCES Ideally, if enough advance warning is provided of a potential flood, homeowners should have a professional contractor remove electric motor, burners and controls. If such help is not available, these are the steps you may wish to take:
1. Shut off the supply of all electrical power to the appliance and leave it off.
2. Shut off the gas supply valve to the appliance. These valves are usually in the gas line near the bottom of the appliance.
3. On warm air circulating furnaces remove the electric fan motor and, if possible, the fan unit as well.
4. For a hot water circulating system, remove the circulating pump motor, but do not try to remove the pump unit from the piping system.
May 2007
- 12 -
5. If advance warning time allows for the removal of gas fired clothes dryers, ranges and other such appliances it is essential to shut off the gas valve. It is also essential to cap the open end of the pipe leading from the valve to the appliance to prevent the back flow of flood water into the gas piping system. This may be accomplished by using plugs or pipe caps available at most hardware and plumbing stores.
6. If the hot water tank cannot be moved, do not drain. Shut off pipes leading to and from it and leave it in place.
Once the flood waters have subsided, do not attempt to place gas appliances back in service yourself. This work must be carried out by a licensed pipe fitter. OIL FIRED APPLIANCES As in the case of gas appliances, all work in preparing for a flood should be carried out by a professional. If this is not possible, here are some steps you may take to protect your home and property.
1. Shut off electrical supply to all equipment and leave it off.
2. Remove the oil burner and ignition transformer, or, if possible, remove the entire burner unit. If the complete burner unit is removed, cap the copper oil fuel line to ensure it is water tight. Turn off the fuel line at the tank.
3. For forced air furnaces, remove the fan motor and the fan unit, if possible.
4. On hot water boilers equipped with a circulating pump, remove the pump motor, but do not attempt to remove the pump from the piping system.
5. Remove the controls for the stack, high limit and fan.
6. If the height of the flood waters exceeds the top of the tank, damage may result as the floating tank exerts pressure on floor joists and components to the building above. To prevent this consider the following:
a. Remove oil level gauge and plug opening with the proper sized threaded plug.
b. Fill the tank with oil.
c. Place at least 136 kg of weight on top of the tank. Sandbags are ideal. If the tank is only half filled, a minimum of 544 kg of sandbags will be required.
d. As previously noted, shut off valve at the base of the tank.
May 2007
- 13 -
PROPANE TANKS Although located outside the structure, propane tanks can cause damage, potential for devastating explosions if ruptured and exposed to a spark. Such tanks are costly to replace as well. Because propane is considerably less dense than water, even a full tank is extremely buoyant. Secure anchoring is a necessity for flood conditions. Here are some steps for you to follow:
1. Turn off the valve at the tank.
2. Disconnect tubing to tank and securely plug it.
3. Fasten a cable, heavy rope or chain around the tank and secure the other end to a pole, building or substantial structure to prevent the tank from floating away.
Once the flood waters have gone down, call a propane installer to have the tank properly and safely re-installed and connected to the appliances for which it is a fuel source. Do not attempt to do the re-connection yourself. IF YOU MUST LEAVE YOUR HOME If rising flood waters threaten the safety of you and your family and you must evacuate your home, here are some things you may wish to consider:
1. Ensure that each member of your family has warm clothing and waterproof outer wear.
2. Take waterproof footwear for each family member.
3. Make sure each family member has at least one blanket, rolled in plastic sheeting or a plastic shopping bag.
4. Ensure each family member has identification, especially the young children. Name tags on clothing, wallet cards and wrist bands are all useful.
5. Seal all personal documents and family papers in plastic.
6. Take a supply of all essential medications, especially for those on prescription drugs, for each member of the family. You should always maintain a minimum two week supply of prescription drugs.
7. Carry all items necessary for the care and feeding of any infants in the family, including diapers, feeding bottles and foods.
May 2007
- 14 -
8. Bring hand towels and toiletry items for each person.
9. Take an AM transistor radio with extra batteries and a flashlight with extra batteries.
10. Determine a location to move to before leaving and make sure each family member knows where it is. Provide younger children with a note sealed in plastic stating the family's destination. This will reduce problems should the family be separated for any reason.
As you leave your home remember to do the following:
1. Lock all doors and windows and double check to ensure gas and other heating fuel sources are turned off, electricity is disconnected and the water is shut off at the main valve leading to the house.
2. Take extra care when driving. Familiar roads will appear drastically different when covered by flood waters.
3. Be on the lookout for damaged bridges, slides and washouts and be particularly alert for downed power lines.
4. Be alert for emergency personnel and signs providing evacuation route directions.
5. Obey officials who are directing traffic or involved in rescue or flood control operations. They are there to assist you and to make sure the situation is handled safely and effectively.
RETURNING HOME Do not return home until emergency operations headquarters announces the emergency situation is over. Before returning make sure there is a safe water supply and adequate sewage disposal system in operation. If you are in doubt, contact the local health unit office. If your home is in an area served by a public water supply it is quite possible safe drinking water will be available. For detailed information concerning the potential contamination of food stuffs contact your local health unit. As a general rule, avoid possible health hazards by not eating food contaminated by (submerged in) flood waters. Health officials recommend disposal of the following food stuffs:
• NON-LIQUID FOODS, including dried fruits; cereals; flour; shortenings; spices; packaged goods; meats (fresh and cured);
May 2007
- 15 -
• CANNED GOODS (if damaged and showing signs of seepage);
• BOTTLED FOOD PRODUCTS (including home preserves and home canned goods); bottled drinks (potential for contamination to gather under the rippled edge of the caps); and
• LEAFY VEGETABLES
AUTOMOBILES, TRUCKS, FARM EQUIPMENT- DIESEL OR GAS If time allows, move all vehicles, recreational vehicles, farm equipment and other modes of transportation with gasoline or diesel engines to high ground. Flood control headquarters and the local media will provide up-to-date information concerning anticipated flood crests. If the equipment can not be moved, then seal it as much as possible. Some considerations include:
1. Drain all oil and replace with SAE 30, MS or DG, run engine for approximately 10 to 15 minutes.
2. Remove spark plugs and place one or two tablespoons of oil in each cylinder; re-install the plugs.
3. Remove the starter, alternator, carburetor, coil and battery.
4. Seal all openings, including distributor, carburettor, oil filter, air intake and exhaust. Use polyethylene tied tightly where possible, wooden plugs, rubber plugs or tightly wadded polyethylene.
5. Transmissions are well sealed against water, but secure any breather vents, filler tubing or air vents with plugs.
6. Cover exterior of transmission with heavy grease. Clutch plates should be left released.
7. Carry out as thorough a grease job as possible.
May 2007
- 16 -
Once the waters have subsided the following procedure will reduce the damage caused by water intake to the engines:
1. Start the engine as soon as possible after the waters have receded, and allow to run for 10 to 15 minutes, or until normal operating temperature is reached. Drain the engine oil and replace the filter. Refill with SAE 30, MS or DG. Start and run for another 10 to 15 minutes to circulate oil to all internal moving parts, drain this oil, replace filter and refill once again.
2. Remove and re-pack all sealed bearings.
3. Coat all exposed wear parts with a good quality multipurpose grease.
4. Have vehicle serviced by a reliable mechanic as soon as possible.
PERSONAL RESPONSIBILITY Although there are many municipal, territorial and federal agencies ready to provide aid should a devastating flood occur in Yukon, it is the personal responsibility of each of us to be prepared to deal with disaster should it unexpectedly strike. Agencies from all levels of government can do their jobs more efficiently, if each one of us takes personal responsibility for preparedness. Preparing ourselves, our families and being ready to help our neighbors will help to reduce the devastating effects of disasters. Ensure your family knows and practices the Family Emergency Plan, knows where the Basic Emergency Kit is located, as well as its contents.
May 2007
- 17 -
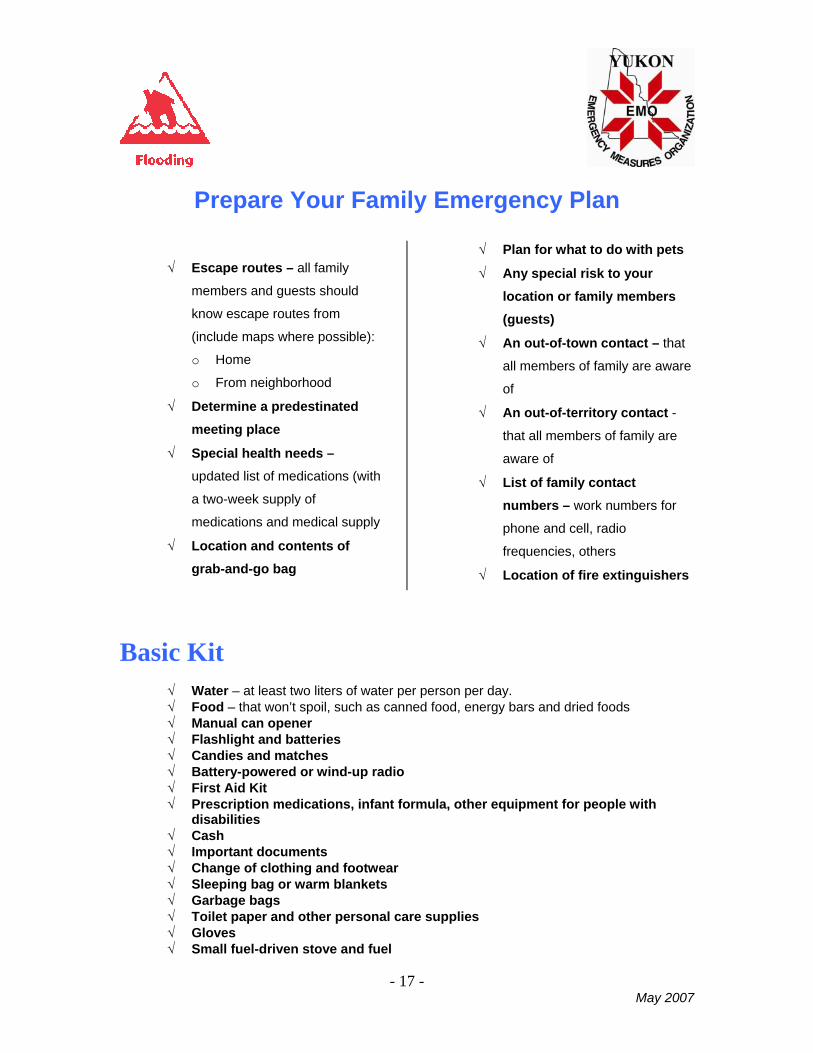
Prepare Your Family Emergency Plan
√ Escape routes – all family
members and guests should
know escape routes from
(include maps where possible):
o Home
o From neighborhood
√ Determine a predestinated meeting place
√ Special health needs – updated list of medications (with
a two-week supply of
medications and medical supply
√ Location and contents of grab-and-go bag
√ Plan for what to do with pets
√ Any special risk to your location or family members (guests)
√ An out-of-town contact – that
all members of family are aware
of
√ An out-of-territory contact - that all members of family are
aware of
√ List of family contact numbers – work numbers for
phone and cell, radio
frequencies, others
√ Location of fire extinguishers
Basic Kit
√ Water – at least two liters of water per person per day. √ Food – that won’t spoil, such as canned food, energy bars and dried foods √ Manual can opener √ Flashlight and batteries √ Candies and matches √ Battery-powered or wind-up radio √ First Aid Kit √ Prescription medications, infant formula, other equipment for people with
disabilities √ Cash √ Important documents √ Change of clothing and footwear √ Sleeping bag or warm blankets √ Garbage bags √ Toilet paper and other personal care supplies √ Gloves √ Small fuel-driven stove and fuel
May 2007
18
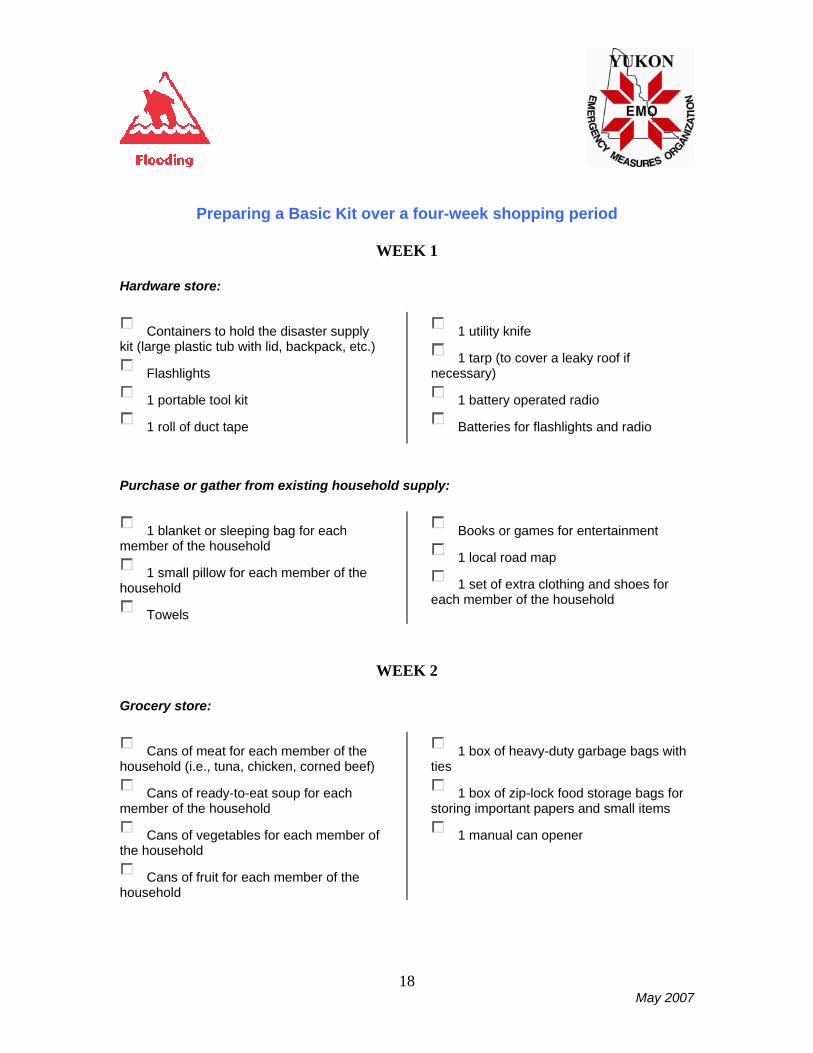
Preparing a Basic Kit over a four-week shopping period
WEEK 1
Hardware store:
Containers to hold the disaster supply kit (large plastic tub with lid, backpack, etc.)
Flashlights
1 portable tool kit
1 roll of duct tape
1 utility knife
1 tarp (to cover a leaky roof if necessary)
1 battery operated radio
Batteries for flashlights and radio
Purchase or gather from existing household supply:
1 blanket or sleeping bag for each member of the household
1 small pillow for each member of the household
Towels
Books or games for entertainment
1 local road map
1 set of extra clothing and shoes for each member of the household
WEEK 2
Grocery store:
Cans of meat for each member of the household (i.e., tuna, chicken, corned beef)
Cans of ready-to-eat soup for each member of the household
Cans of vegetables for each member of the household
Cans of fruit for each member of the household
1 box of heavy-duty garbage bags with ties
1 box of zip-lock food storage bags for storing important papers and small items
1 manual can opener
May 2007
19
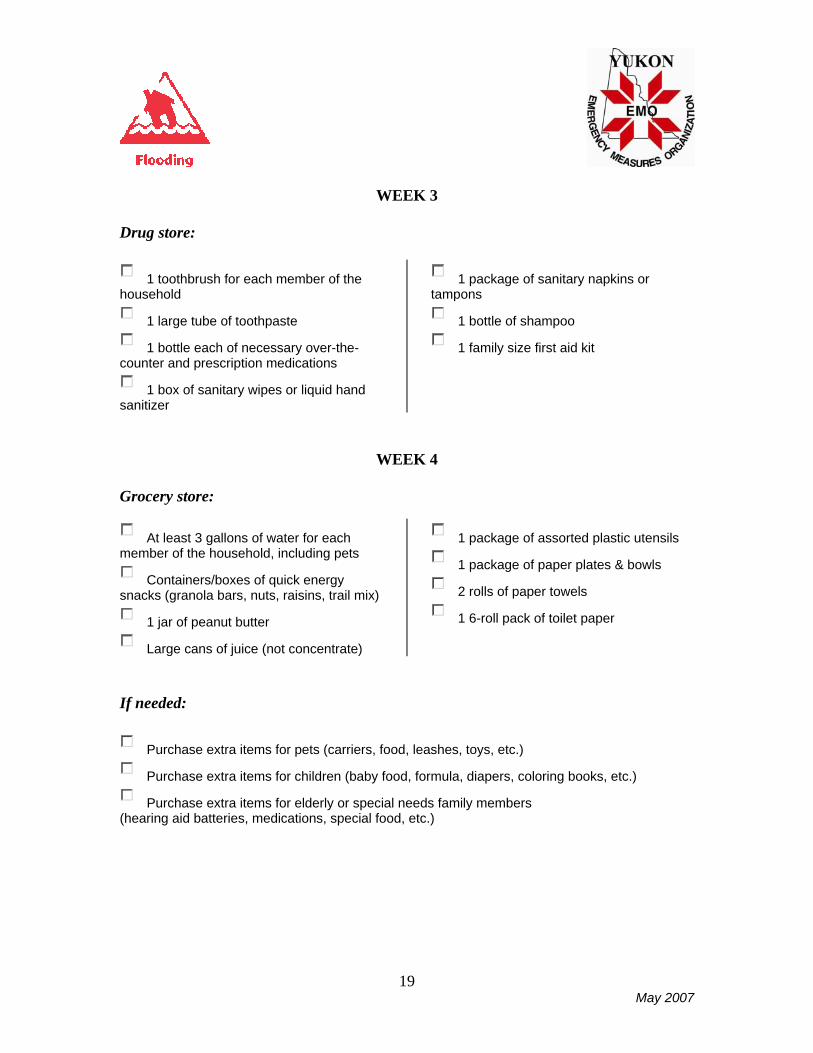
WEEK 3
Drug store:
1 toothbrush for each member of the household
1 large tube of toothpaste
1 bottle each of necessary over-the-counter and prescription medications
1 box of sanitary wipes or liquid hand sanitizer
1 package of sanitary napkins or tampons
1 bottle of shampoo
1 family size first aid kit
WEEK 4
Grocery store:
At least 3 gallons of water for each member of the household, including pets
Containers/boxes of quick energy snacks (granola bars, nuts, raisins, trail mix)
1 jar of peanut butter
Large cans of juice (not concentrate)
1 package of assorted plastic utensils
1 package of paper plates & bowls
2 rolls of paper towels
1 6-roll pack of toilet paper
If needed:
Purchase extra items for pets (carriers, food, leashes, toys, etc.)
Purchase extra items for children (baby food, formula, diapers, coloring books, etc.)
Purchase extra items for elderly or special needs family members (hearing aid batteries, medications, special food, etc.)
Important Emergency Information
Local Emergency Contact Numbers: 1. ____________________ 2. ____________________ 3. ____________________ 4. ____________________ 5. ____________________ 6. ____________________ 7. ____________________ 8. ____________________ 9. ____________________ 10. ____________________
Out-of-Territory Contact(s):
1. ____________________ ____________________
2. ____________________ ____________________
3. ____________________ ____________________
Neighborhood Meeting Place: ________________________________ ________________________________ ________________________________ Daycare Phone Number(s):
1. _________________________ 2. _________________________
Location of Emergency Kit: ______________________________ Date Last Checked
Directions to Dwelling for Emergency Responders
(Areas without street address)
- 20 -


![OF THE YUKON TfRRITORY - Government of Yukon · OF THE YUKON TfRRITORY PASSED BY THE ... GEORGE ALLEN ]ECKELL CONTROLLER ... son to prescribe or C1.dminister drugs for use internally](https://img.pdfslide.us/doc/110x75/5af031bc7f8b9a8b4c8d2bf3/of-the-yukon-tfrritory-government-of-the-yukon-tfrritory-passed-by-the-george.jpg)