Embed Size (px)
Citation preview

pdqlocks.com
Powered by Revitus
LEAN FILESRICH CONTENTEASY TO USE
Flexible BIM Models for Architectural Door Hardware
ApplicationRendering
Hardware Components
Hardware Components
Application Rendering

pdqlocks.com
About PDQDriven by family values and an independent spirit, PDQ has set the industry standard for service, quality and value since 1983. Headquartered in Lancaster County, PA, our in-house engineering and manufacturing capabilities give us the flexibility to create innovative, cutting edge products that meet and exceed our customers’ continually-evolving facility needs.
From architectural door hardware to IoT-based access management, PDQ prides itself on developing world-class, commercial grade solutions that reliably deliver the confidence and control you need to effectively manage your facility.
MORTISE LOCKS | CYLINDRICAL LOCKS | DEADBOLTS | KEYING & KEYWAYSCLOUD HOSTED ACCESS MANAGEMENT | ELECTRIFIED SOLUTIONS | EXIT DEVICES
CLOSERS | HINGES | FLAT GOODS | GENERAL HARDWARE | SLIDING DOOR HARDWARE
About RevitusRevitus focuses on developing high-quality, proprietary Revit Content Libraries for Building Product Manufacturers (BPM’s) and specializes in light weight adaptable BIM Models.
The firm was founded to address the lack of high-quality Revit Content available to architects and design professionals using Revit Architecture. Our mission is to enhance the amount of useful Revit Content for the community of Revit Users, make their architectural building projects more successful, better looking, and easier to develop and coordinate. In turn, it is a common understanding that the architects that use our Revit Families are expected to specify the BPM’s who are providing these high-quality useful models at no cost. We work directly with BPM’s and their technical staff to fully understand their products and develop very accurate and functional, parametric Revit models.
1

pdqlocks.com
Flexible BIM Models for Architectural Door Hardware
Simple, Flexible Lean Files that Save Time Simple, flexible and “light” Revit models (hardware set families) that will help you design, coordinate and specify the door hardware for your Revit project. The PDQ Revit files are fully parametric, offer excellent performance, and they don’t add a lot of weight to your project file. The files are optimized for 3D and 2D Views.
Developed by a Professional Architectural Revit Manager PDQ partnered with Revitus, a professional Revit Content Development firm to build the new library from the ground up natively in Revit. It was not developed by a manufacturer.
Prepopulates Common Door Configurations into Your WorkWe nested the most popular hardware items into loadable generic models for a single door and double door. They include hinges, locks, levers, closers, exit devices, and more. From these two families, nearly any combination of hardware components can be specified for as many hardware sets as you need for your project. Just place a hardware set family at each door and use our pre-configured Revit schedule to report the information you want to specify.
User-friendly Content and High Quality Graphics The PDQ Revit content is user friendly – it makes you more efficient and your job easier. It generates a higher level of visual details and superb graphics that will make your renderings shine. And best of all, it automatically generates an exportable door hardware schedule that can go right on your construction documents.
Give Revit Revolution a Try and See How Easy it Makes Your JobWe’d like you to test drive the PDQ Revit content and give us your feedback. Our goal is to help you work quicker, more efficiently, and increase your success. Once you have had a chance to digest the information, we would like to schedule a conference call between yourself, the Revit Developer and PDQ to answer questions and get your feedback. We want to know if there is anything we can do to improve the files to better suit your needs.
Powered by Revitus
2

pdqlocks.com
Overview
PDQ Locks has teamed up with Revitus to bring you the first ever complete Hardware Set Revit Families to be developed natively in Revit (no Imports!) as loadable Generic Model Families. They are fully parametric, lightweight, and user friendly. There is a Single Door Hardware Set Family and a Double Door Hardware Set Family. From these two families, nearly any combination of Door Hardware components can be specified for as many Hardware Sets as you need for your project.
Text parameters allow you to type in what you want to specify, and Graphics parameters (yes/no) enable you to control what geometry turns-on or off for each Hardware Set. The Text parameters will Schedule dynamically, and we have pre-configured a Revit PDQ Hardware Schedule that you can simply Copy to Clipboard, and Paste into your project. Then, just drag the Schedule on to a Sheet and you have a Hardware Schedule for your Construction Documents that will update automatically as you place your Hardware Set families at each door in your project. Place them in Medium Detail Level Plan Views and choose “Place on Work Plane”. When finished, turn off Generic Model Subcategories to hide them in Plan.
Each sub-component (Closer, Hinge, Lever, Exit Device, etc.) can be specified (and rendered) with any standard PDQ metal or paint finish, all of which load into your project when you load a PDQ Family. PDQ Standard Hardware Sets (currently named PDQ Type A thru PDQ Type P) have been pre-defined as Family Types (A thru L are in the Single Door family, M thru P are Double Doors). If you need a non-standard type, just duplicate the closest one and name it Hardware Set 01, Hardware Set 02, etc., and modify every parameter that applies.
3

pdqlocks.com
Placing the Hardware Sets in Your Project
Note: When placing Components, make sure you choose “Place on Work Plane” (not Place on Face) from the Contextual Tab*
TIP – When placing these objects, make sure you are in a Floor Plan with Level of Detail set to Medium or Fine, as these Families are set to be hidden in Course Level of Detail.
TIP – Use the Space Bar to rotate the component prior to placing it.
TIP – For consistency, always place the ball of the Hinge on the swing side of the door, and then use the flip controls to put the lever and hinge on their proper sides.
TIP – Place the component initially in an arbitrary position, and then use the Align tool to move the Center of the Hardware Set to the Center of the Door and the Face of the Lever to the Face of the Frame / Closed Panel. You can lock (constrain) the two objects together if you choose, but do this with caution as it can become detrimental to over-constrain your model.
PDQ Locks – Revit Guide v1.1 – 07/26/2018
2
Placing the Hardware Sets in your project: Go to Architecture > Component > Load Family (Load both the Single and Double Door Hardware Sets at the same time). Choose the Family Type you want to insert from the Type Selector drop-down. *When placing Components, make sure you choose “Place on Work Plane” (not Place on Face) from the Contextual Tab*
Tip – When placing these objects, make sure you are in a Floor Plan with Level of Detail set to Medium or Fine, as these Families are set to be hidden in Course Level of Detail. Tip – Use the Space Bar to rotate the component prior to placing it. Tip – For consistency, always place the ball of the Hinge on the swing side of the door, and then use the flip controls to put the lever and hinge on their proper sides. Tip – Place the component initially in an arbitrary position, and then use the Align tool to move the Center of the Hardware Set to the Center of the Door and the Face of the Lever to the Face of the Frame / Closed Panel. You can lock (constrain) the two objects together if you choose, but do this with caution as it can become detrimental to over-constrain your model.
4

pdqlocks.com
Parameters Reporting to Revit Schedules
As you can see, the Text parameters under the Construction grouping will populate on the PDQ Hardware Schedule.
The Schedule will update dynamically as you continue to populate your project model with these Hardware Set families. All of your custom (project-specific) Hardware Set Types will be added to the Schedule as you place them in your model. This makes it easy to quantify and coordinate the Hardware Sets for pricing and documentation. If necessary, you can modify the Hardware Schedule, eliminate any fields you don’t need, or add new Text parameters if you need other fields.
Just remember, Hardware Sets designated by letters are PDQ Standard Types – if you need project-specific types, denote them with numbers (i.e., 01, 02, 03, etc.).
PDQ Locks – Revit Guide v1.1 – 07/26/2018
3
Parameters Reporting to Revit Schedules:
As you can see, the Text parameters under the Construction grouping will populate on the PDQ Hardware Schedule.
The Schedule will update dynamically as you continue to populate your project model with these Hardware Set families. All of your custom (project-specific) Hardware Set Types will be added to the Schedule as you place them in your model. This makes it easy to quantify and coordinate the Hardware Sets for pricing and documentation. If necessary, you can modify the Hardware Schedule, eliminate any fields you don’t need, or add new Text parameters if you need other fields.
Just remember, Hardware Sets designated by letters are PDQ Standard Types – if you need project-specific types, denote them with numbers (i.e., 01, 02, 03, etc.).
5

pdqlocks.com
Revit Example for Hardware Set #01
1.) Create Additional Family Types:Duplicate one of the existing PDQ Types and name it Hardware Set 01 (or sim.).
Fill out all of the Construction parameters for how you want theinformation to appear on the PDQ Revit Schedule.
Check or un-check all of the Graphics parameters to coordinate with the Construction parameters.
PDQ Locks – Revit Guide v1.1 – 07/26/2018
4
Custom Hardware Set 01 (example): Create additional Family Types:
Duplicate one of the existing PDQ Types and name it Hardware Set 01 (or sim.).
Fill out all of the Construction parameters for how you want the information to appear on the PDQ Revit Schedule.
Check or un-check all of the Graphics parameters to coordinate with the Construction parameters.
Things to come:
We will continue to develop and refine these Revit Families, and intend to offer additional parameters for scheduling things like Wall Stops, Hold-Open Devices, Coordinators, Flush Bolts, etc.
Additional suites of PDQ Standard Types will likely be created for each major project type (i.e. Hotels, Office Buildings, Schools, etc.)
We intend to team up with other industry companies to include compatible Revit items like Thresholds, Weatherstripping, etc.
6

pdqlocks.com
2.) Choose Your Materials:All PDQ Standard Metal and Paint finishes have been configured as Revit Materials.
All of the Materials will load in to your project when you load either the Single or Double Door Revit Family.
There are no external image files required for these to render properly.
Use the Material named “N/A” for components that don’t exist in your current Hardware Set.
3.) Adjust Dimensions as Required:Here you can modify the Door Panel Size,Hinge Locations, and other dimensions as necessary for your particular opening.
PDQ Locks – Revit Guide v1.1 – 07/26/2018
5
Custom Hardware Set 01 (example) continued: Choose your Materials:
All PDQ Standard Metal and Paint finishes have been configured as Revit Materials.
All of the Materials will load in to your project when you load either the Single or Double Door Revit Family.
There are no external image files required for these to render properly.
Use the Material named “N/A” for components that don’t exist in your current Hardware Set.
Adjust Dimensions as required:
Here you can modify the Door Panel Size, Hinge Locations, and other dimensions as necessary for your particular opening.
7

pdqlocks.com
TipRemember to update the Type Comments and Description for each custom Hardware Set you create
Need Help?If you need any assistance with these Revit Files, simply send an email using the Manufacturer Email Contact parameter embeded in the file or email [email protected], additional information available at pdqlocks.com.
PDQ Locks – Revit Guide v1.1 – 07/26/2018
6
Custom Hardware Set 01 (example) continued: Revit Queries:
If you need any assistance with these Revit Files, simply send an email using the Manufacturer Email Contact parameter.
Use the Manufacturer Website URL to visit the PDQ website to collect more information.
Remember to update the Type Comments and Description for each custom Hardware Set you create.
Feedback:
We welcome your feedback – if you wish to send us your comments, please email either [email protected] or [email protected]
8

pdqlocks.com
Adding the Pre-configured PDQ Hardware Schedule to Your ProjectDownload the file PDQ_Hardware_Schedules-v1_1.rvt to your PDQ Locks sub-folder on your network Revit library. Open your project file and the PDQ Hardware Schedules Revit file in the same Revit session. In the PDQ_Hardware_Schedules-v1_1.rvt project, on the project browser, under Schedules/Quantities, Right-click on the schedule view PDQ HARDWARE SCHEDULE and choose Copy to Clipboard.
1.) Switch over to your current design project.
2.) Open any view other than a Schedule View.
3.) Access the Modify tab on the ribbon, and Click on the Paste tool.
4.) The Schedule View will now appear in the Project Browser in your current design project.
5.) This Schedule view is pre-configured to filter out all other Generic Models and only report the applicable PDQ content from your project.
6.) You can export these Schedules to .txt, then rename to .xls, add a little formatting in Excel, and send them off for pricing.
7.) Revit will automatically report how many instances of each Hardware Set are in the model / project.
PDQ Locks – Revit Guide v1.1 – 07/26/2018
7
Adding the pre-configured PDQ Hardware Schedule to your project: Download the file PDQ_Hardware_Schedules-v1_1.rvt to your PDQ Locks subfolder on your network Revit library. Open your project file and the PDQ Hardware Schedules Revit file in the same Revit session. In the PDQ_Hardware_Schedules-v1_1.rvt project, on the project browser, under Schedules/Quantities, Right-click on the schedule view PDQ HARDWARE SCHEDULE and choose Copy to Clipboard.
Switch over to your current design project. Open any view other than a Schedule View. Access the Modify tab on the ribbon, and Click on the Paste tool. The Schedule View will now appear in the Project Browser in your current design project. This Schedule view is pre-configured to filter out all other Generic Models and only report the applicable PDQ content from your project. You can export these Schedules to .txt, then rename to .xls, add a little formatting in Excel, and send them off for pricing. Revit will automatically report how many instances of each Hardware Set are in the model / project.
9
pdqlocks.com10
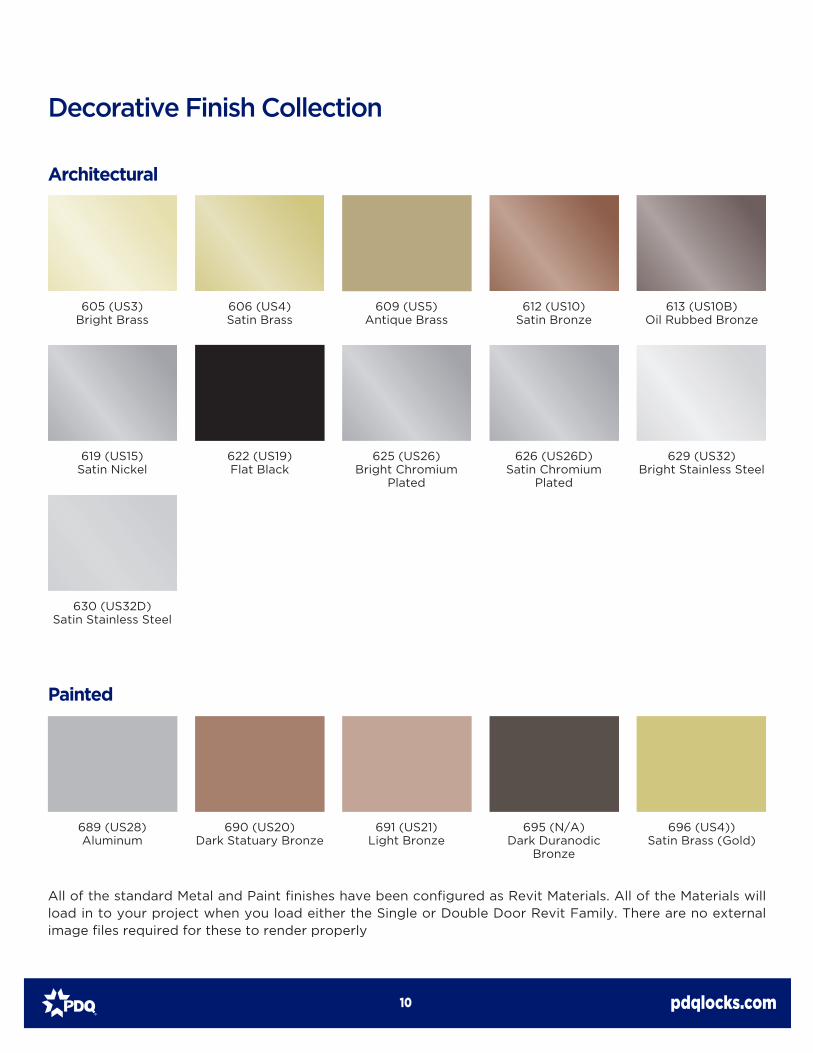
Decorative Finish Collection
All of the standard Metal and Paint finishes have been configured as Revit Materials. All of the Materials will load in to your project when you load either the Single or Double Door Revit Family. There are no external image files required for these to render properly
605 (US3)Bright Brass
606 (US4) Satin Brass
609 (US5) Antique Brass
612 (US10) Satin Bronze
613 (US10B) Oil Rubbed Bronze
619 (US15) Satin Nickel
630 (US32D) Satin Stainless Steel
622 (US19) Flat Black
625 (US26) Bright Chromium
Plated
626 (US26D) Satin Chromium
Plated
629 (US32) Bright Stainless Steel
Architectural
Painted
689 (US28) Aluminum
690 (US20) Dark Statuary Bronze
691 (US21) Light Bronze
695 (N/A) Dark Duranodic
Bronze
696 (US4)) Satin Brass (Gold)

pdqlocks.com
Limitations of the PDQ Revit ContentThese Hardware Set Families are not set up to rotate with a 3D Door Panel. If you need to show Hardware on an open door, you can access the nested families and load them into your Render Model as individual com-ponents and use “Place on Face” to put a Lever on a Door Panel, for instance. The Closers, Exit Devices and Hinges have not been modeled to show in the Open position. Most other components should look fairly correct on the Open Door Panel.
The Double Door Hardware Set Family currently will not accommodate an unequal pair, i.e. 5’-0” opening with (1) 3’-0” x 7’-0” panel and (1) 2’-0” x 7’-0” panel
Text parameters have not yet been created for additional Components such as Wall Stop, Threshold, Hold-Open, etc. You can use the Comments field if necessary (add it to the Schedule at the far right), or create new Text parameters in your project that pertain to Generic Models to add to the Schedule.
An option for a fourth Hinge for tall doors has not yet been developed (graphically). By using the Text parameters and the PDQ Hardware Schedule, you can call for (4) 35STBB 4545 NRP 626, for instance, but visually, you will still only see (3) Hinges.
Future Enhancement PlansWe intend to provide video tutorials in the future. The overall PDQ Revit Library is still under development. We hope that you find these files useful and we welcome your feedback. Please send queries or comments to [email protected] if you need any information regarding the PDQ Revit Content.
We plan to offer more tailored Revit Content in the future, including Hardware Set families pre-configured for certain building types, such as Hotels or Healthcare Facilities, etc.
We also plan to develop additional modeled geometry to represent more PDQ products to enhance the accuracy of the photo-realistic renderings. These enhancements would include additional Closer Arm Types, Lever Types (GT, XGT, TJ, etc., as well as BOS, MIA, ORL, etc.), Wide and Narrow Escutcheons, etc.
All PDQ Revit Content has been developed by Revitus, Revit Content Developers (www.revituspro.com).
This file was created on 7/26/2018. It was last updated on 7/26/2018. Verify with PDQ Locks if a more recent version exists. The current version of all PDQ Family Files is v1.1 and has all been developed with Revit 2015 as the base version.
Let Us Write Your Hardware Specification PDQ has experienced Architectural Hardware Consultants on staff to provide the architectural and design community with comprehensive consulting and design services surrounding architectural hardware and ac-cess control solutions. Our complimentary services will help you navigate the complex spec process no matter the project size, whether it’s six doors or six thousand. Our mission is to make your job easier and ensure your clients receive quality as well as value.
11

Complimentary Architectural Services
pdqlocks.com
PDQ has experienced Architectural Hardware Consultants on staff to provide the architectural and design community with comprehensive consulting and design services for architectural hardware and access control solutions. Our complimentary services will help you navigate the complex spec process no matter the project size, whether it’s six doors or six thousand. Our mission is to make your job easier and ensure your clients receive quality as well as value.
Specification Writing• Division 8 Door Hardware Specification Writing • Hardware budget preparation • Division 28 Electronic Safety and Security Specification Writing • Prepare catalog cuts for included products • Detailed, non-proprietary, open and competitive hardware specifications and door schedules
Consulting and Design Services• Value engineering • Review building programming, product options• Meet with design professional and owner to discuss project requirements • Assistance in developing keying schedule• Consult on necessary building codes to ensure compliance with fire, life safety
and accessibility requirements• Assist in design development • Security and access control analysis, collaboration and upgrade recommendations
Project Support• Technical support• Assist with product substitution requests, application and product questions/RFIs
and the value engineering process• Provide access control/electrified opening floor plan mark-up• Response to RFI’s, owner comments, and comments from other entities• Participate in owner meetings• Conduct job site reviews, pre-installation meetings, and post-installation inspections• Development of a punch list during contract administration
Our specification consultants prepare objective and accurate specifications for all building types, based on industry standards and in compliance with all applicable codes, regulations and laws.
Contact us on Your Next [email protected] or 717.656.5355
12
Powered by Revitus

Phone: 800.441.9692
Tech Support: 833.2.PDQTEC (833.273.7832)
FAX: 717.656.6892 | Email: [email protected]
Headquarters: 2230 Embassy Drive, Lancaster, PA 17603
P.O. Box 6426, Lancaster, PA 17607
Regional Distribution Centers: Lancaster, PA | Kansas City, MO
Henderson, NV | Auburn, WA
Design Office: Milan, Italy
pdqlocks.com
LT 9011 10-2018