Embed Size (px)
Citation preview

CYCL
ING
TEC
HN
IQU
E
OPERATION MANUAL
2

3© 2013 Life Fitness
CON
TACT
CORPORATE HEADQUARTERS5100 N River Road, Schiller Park, IL 60176, USA Telephone: (847) 288 3300 Fax: (847) 288 3703 Service phone number: 800 351 3737 (toll-free within USA and Canada)
AMERICAS North America Life Fitness Inc. 5100 N River Road, Schiller Park, IL 60176, USA Telephone: (847) 288 3300 Fax: (847) 288 3703 Service phone number: (847) 351 3737 Service email: customersupport@lifefi tness.com Service website: www.lifefi tness.com/parts Sales/marketing email: commercialsales@lifefi tness.com Operating hours: 07:00-18:00 (CST)
Brazil Life Fitness, Brazil Av. Cidade Jardim, 900 Jd. Paulistano, São Paulo, SP 01454-000 BRAZIL Telephone: (+55) 11 3095 5200 Fax: (+55) 11 3095 5201 SAC: 0800 773 8282 Service email: suporte@lifefi tness.com.br Sales/marketing email: lifefi tness@lifefi tness.com.br Service operating hours: 09:00-17:00 (BRT) (Monday-Friday) Store opening hours: 09:00-20:00 (BRT) (Monday-Friday) 10:00-16:00 (Saturday)
Latin America and Caribbean* Life Fitness Inc. 5100 N River Road, Schiller Park, IL 60176, USA Telephone: (847) 288 3300 Fax: (847) 288 3703 Service email: customersupport@lifefi tness.com Sales/marketing email: commercialsales@lifefi tness.com Operating hours: 07:00-18:00 (CST)
INTERNATIONAL OFFICESEUROPE, MIDDLE EAST AND AFRICA (EMEA) Netherlands and Luxemburg Life Fitness Atlantic BV Bijdorpplein 25-31, 2992 LB Barendrecht, THE NETHERLANDS Telephone: (+31) 180 646 666 Fax: (+31) 180 646 699 Service email: service.benelux@lifefi tness.com Sales/marketing email: marketing.benelux@lifefi tness.com Operating hours: 09:00-17:00 (CET)
United Kingdom and Ireland Life Fitness UK Ltd Queen Adelaide, Ely, CB7 4UB, UK Telephone: General offi ce (+44) 1353 666017 Customer support (+44) 1353 665507 Fax: (+44) 1353 666018 Service email: uk.support@lifefi tness.com Sales/marketing email: life@lifefi tness.com Operating hours: general offi ce: 09:00-17:00 (GMT) customer support: 08:30-17:00 (GMT)Global website: www.lifefi tness.com
Germany and Switzerland Life Fitness Europe GmbH Siemensstraße 3, 85716 Unterschleißheim, GERMANY Telephone: (+49) 89 31 77 51 0 (Germany) (+41) 0848 000 901 (Switzerland) Fax: (+49) 89 31 77 51 99 (Germany) (+41) 043 818 07 20 (Switzerland) Service email: kundendienst@lifefi tness.com Sales/marketing email: kundenberatung@lifefi tness.com Operating hours: 08:30-16:30 (CET)
Austria Life Fitness Austria Vertriebs GmbH. Dückegasse 7-9/3/36, 1220 Vienna, AUSTRIA Telephone: (+43) 1 61 57 198 Fax: (+43) 1 61 57 198 20 Service email: kundendienst@lifefi tness.com Marketing/sales email: kundenberatung@lifefi tness.com Operating hours: 08:00-16:30 (CET)
Spain Life Fitness Iberia C/Frederic Mompou 5,1º1ª 08960 Sant Just Desvern, Barcelona, SPAIN Telephone: (+34) 93 672 4660 Fax: (+34) 93 672 4670 Service email: servicio.tecnico@lifefi tness.com Sales/marketing email: info.iberia@lifefi tness.com Operating hours: 09:00-18:00 (Monday-Thursday) 08:30-15:00 (Friday)
Belgium Life Fitness Benelux NV Parc Industrial de Petit-Rechain 4800, Verviers, BELGIUM Telephone: (+32) 87 300 942 Fax: (+32) 87 300 943 Service email: service.benelux@lifefi tness.com Sales/marketing email: marketing.benelux@lifefi tness.com Operating hours: 09:00-17:00 (CET)
Italy Life Fitness Europe GmbH Siemensstraße 3, 85716 Unterschleißheim, GERMANY Telephone: (+39) 02 55378611 Service: 800 438836 (in Italy) Fax: (+39) 02 55378699 Service email: assistenzatecnica@lifefi tness.com Sales/marketing email: info@lifefi tnessitalia.com Operating hours: 08:30-16:30 (CET)
ALL OTHER EMEA COUNTRIES AND DISTRIBUTOR
BUSINESS C-EMEA* Bijdorpplein 25-31, 2992 LB Barendrecht, THE NETHERLANDS Telephone: (+31) 180 646 644 Fax: (+31) 180 646 699 Service email: service.db.cemea@lifefi tness.com Sales/marketing email: marketing.db.cemea@lifefi tness.com Operating hours: 09:00-17:00 (CET)
ASIA PACIFIC (AP) Japan Life Fitness Japan Nippon Brunswick Bldg., #8F 5-27-7 Sendagaya Shibuya-Ku, Tokyo, JAPAN 151-0051 Telephone: (+81) 3 3359 4309 Fax: (+81) 3 3359 4307 Service email: service@lifefi tnessjapan.com Sales/marketing email: sales@lifefi tnessjapan.com Operating hours: 09:00-17:00
China and Hong Kong Life Fitness Asia Pacifi c Ltd Room 2610, Miramar Tower, 132 Nathan Road, Tsimshatsui, Kowloon, HONG KONG Telephone: (+852) 2891 6677 Fax: (+852) 2575 6001 Service email: HongKongEnquiry@lifefi tness.com Sales/marketing email: ChinaEnquiry@lifefi tness.com Operating hours: 09:00-18:00
ALL OTHER ASIA PACIFIC COUNTRIES AND DISTRIBUTOR BUSINESS ASIA PACIFIC* Room 2610, Miramar Tower, 132 Nathan Road, Tsimshatsui, Kowloon, HONG KONG Telephone: (+852) 2891 6677 Fax: (+852) 2575 6001 Service email: HongKongEnquiry@lifefi tness.com Sales/marketing email: ChinaEnquiry@lifefi tness.com Operating hours: 09:00-18:00
* Also check www.lifefi tness.com for local representation or distributor/dealer.
Before using this product, it is essential to read this ENTIRE training manual and ALL assembly instructions. SAVE THESE INSTRUCTIONS.Operators and users of the LifeCycle GX® should follow these instructions. Failure to follow the health and operating safeguards may result in injury or serious health risk.
FCC Warning – possible radio/television interference Note: This equipment has been tested and found to comply with the limits for a Class B digital device, pursuant to part 15 of the FCC rules. These limits are designed to provide reasonable protection against harmful interference in a residential installation. This equipment generates, uses and can radiate radio frequency energy, and if not installed and used in accordance with the user manual, may cause harmful interference to radio communications. However, there is no guarantee that the interference will not occur in a particular installation. If this equipment does cause harmful interference to radio or television reception, which can be determined by turning the equipment off and on, the user is encouraged to try to correct the interference by one or more of the following measures:
• Re-orient or relocate the receiving antenna• Increase the separation between the
equipment and the receiver• Connect the equipment into an outlet on
a circuit diff erent from that to which the receiver is connected
• Consult the dealer or an experienced radio/TV technician for help
EN 957 Class H: Home use.
WARNING: Any changes or modifi cations to this equipment could void the product warranty. Any service, other than cleaning or user maintenance, must be performed by an authorised service representative. There are no user serviceable parts.
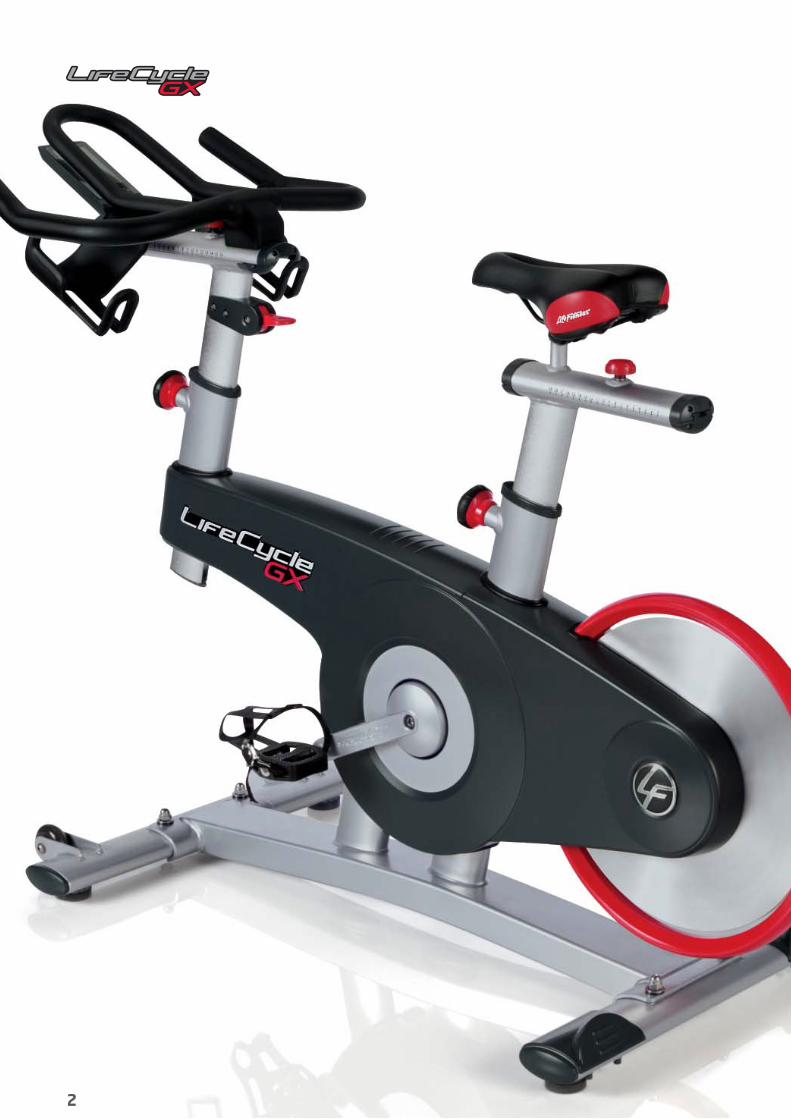
This training manual describes the functions of the following product: LifeCycle GX. See specifi cations in this manual for product-specifi c features.
Statements of purposeThe Life Fitness LifeCycle GX exercise bike is a machine that simulates the movements of riding a bicycle at various speeds and levels of resistance.
WARNING: Health-related injuries may result from incorrect or excessive use of exercise equipment. Life Fitness STRONGLY recommends seeing a physician for a complete medical exam before undertaking an exercise programme, particularly if the user has a family history of high blood pressure or heart disease, is over the age of 45, smokes, has high cholesterol, is obese, or has not exercised regularly in the past year. If, at any time while exercising, the user experiences faintness, dizziness, pain, or shortness of breath, he or she must stop immediately.

4

5© 2013 Life Fitness
LIFECYCLE® GX
IMPORTANT SAFETY INSTRUCTIONS7 Locking System
LIFECYCLE GX POSITION AND SETUP10 Seat height11 Saddle forward and back position11 Handlebar height12 Handlebar forward and back position13 Pedal strap adjustments and SPD usage13 Resistance control/brake lever14 Optional console display
CYCLING TECHNIQUE SKILLS20 Cycling technique22 Upper Body and Hand Positions
TRAINING INFORMATION24 Heart rate monitor training25 Warm-up and cool-down28 LIFECYCLE GX sample workouts
SERVICE AND TECHNICAL DATA30 Preventative maintenance tips30 Life Fitness approved cleaners30 Life Fitness compatible cleaners30 Preventative maintenance schedule
WARRANTY30 Warranty information31 Warranty coverage
SPECIFICATIONS31 Product Specifi cations
CONTENTS
6
• WARNING: Heart rate monitoring systems may be inaccurate. Over-exercising may result in serious injury or death. If you feel faint, stop exercising immediately.
• WARNING: Allow a distance of 16in (41cm) between the widest part of the bike and other objects on either side. Provide at least 3ft (0.9m) between the front or rear of the Life Fitness bike to any other objects.
• WARNING: Always install the product on a stable fl oor and properly level the unit.
• WARNING: Any of the adjustment devices that could interfere with the user’s movement should not be left projecting.
• WARNING: Do not lift the seat or handlebar height adjustment beyond the “STOP” mark
• WARNING: This is a Home use Product, when product is not in use, the equipment must be locked to prevent the drive gear from movement.
• WARNING: This appliance is not intented for use by persons (including children) with reduced physical, sensory or mental capabilities, or lack of experience and knowledge, unless they have been given supervision or instruction concerning use of the appliance by a person responsilble for their safety.
• Only use the LifeCycle GX for its intended purpose as described in this manual. Improper use may result in injury.
• Never operate a Life Fitness product if it has been dropped, damaged, or even partially immersed in water. Contact Life Fitness customer support services.
• Always follow the console instructions for proper operation.
• Do not use this product outdoors, near swimming pools or in areas of high humidity.
• Never insert objects into any opening in these products. Contact Life Fitness customer support services.
• Never place liquids of any type directly on the unit, except in an accessory tray or holder. Containers with lids are recommended.
• Do not use these products in bare feet. Always wear shoes. Wear shoes with rubber or high-traction soles. Do not use shoes with heels, leather soles, cleats or spikes. Ensure no stones are embedded in the soles.
• Keep all loose clothing, shoelaces and towels away from moving parts.
• Do not reach into or underneath the unit or tip it on its side during operation.
• Do not allow other people to interfere in any way with the user or equipment during a workout.
• Do not use attachments that have not been recommended by the manufacturer.
• Use caution when mounting or dismounting the LifeCycle exercise bike.
• Do not stand or sit on plastic shrouds.
• Do not insert any objects or any part of the body while the fl ywheel is in motion.
• Do not turn the crank arms by hand.
• Never face backward while using a LifeCycle GX exercise bike.
• This unit is NOT equipped with a freewheel system. If the fl ywheel is in motion, the pedals will be in motion. Do not attempt to stop the unit by applying reverse pressure to the pedals as knee injury may occur.
• Wait for the fl ywheel to coast to a stop. If you want to quickly stop the fl ywheel, apply fi rm downward pressure to the brake lever.
• Do not dismount the LifeCycle GX exercise bike until the pedals and the fl ywheel are at a complete stop. Spinning pedals may cause serious injury.
• To engage the emergency stop, apply fi rm pressure downward on the resistance lever until the emergency brake pad has engaged the fl ywheel.
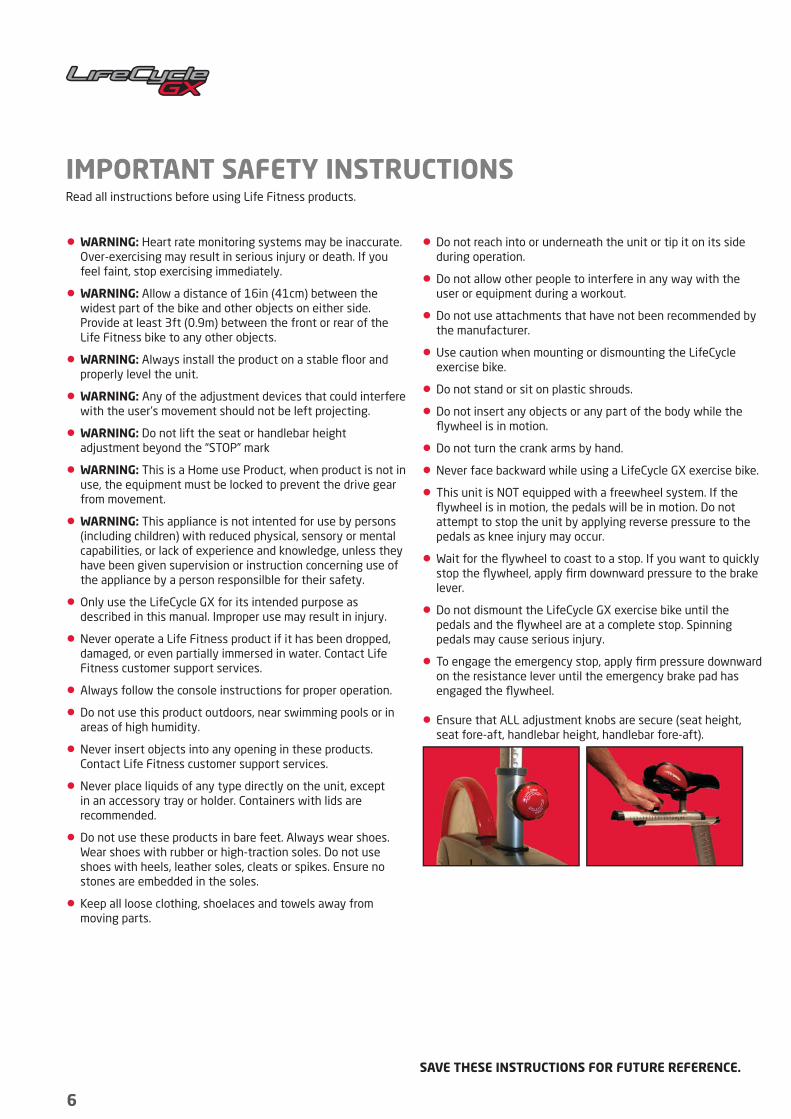
• Ensure that ALL adjustment knobs are secure (seat height, seat fore-aft, handlebar height, handlebar fore-aft).
IMPORTANT SAFETY INSTRUCTIONS Read all instructions before using Life Fitness products.
SAVE THESE INSTRUCTIONS FOR FUTURE REFERENCE.

7© 2013 Life Fitness
GET
TIN
G S
TAR
TED
SAVE THESE INSTRUCTIONS FOR FUTURE REFERENCE.
This exercise bike is equipped with a locking system to prevent the uncontrolled use or moving of rotating parts. Install cable and lock as shown below.
LOCKING SYSTEM
• WARNING: The equipment must be locked when not in use.

8

9© 2013 Life Fitness
LIFECYCLE GX POSITION AND SETUP

10
LIFECYCLE GX POSITION AND SETUPThis section outlines a step-by-step guide to ensuring the user is set up correctly. The correct setup sequence is:
1. Seat height2. Seat forward and back position3. Handlebar height4. Handlebar forward and back position5. Pedal strap adjustments and SPD usage6. Brake lever adjustments
• Stand next to the saddle facing forward towards the handlebars.
• Correct operation of seat and handlebar pop-pins: Turn the pop-pin knob counterclockwise and pull out on the pin to release it from its current preset location. Raise or lower to the desired height, then gently release the pop-pin. Raise or lower the seat slightly; if necessary until the pop-pin engages a preset hole. Turn the pop-pin knob clockwise to secure. Be sure to tighten fi rmly.
• Lift the saddle up so that the top of the saddle is level to top of thigh as shown in image.
• Secure the pop pin before mounting the bike. Make sure the pop-pin engages a preset hole and turn the knob clockwise to secure.
• Sit on the bike and bring the pedals in a vertical position, roughly 12 and 6 o’clock
• Place the heel of the foot on the pedal nearest the fl oor – the leg should be straight BUT not locked
• With the foot clipped in or in the pedal straps, the knee should be slightly bent and the ankle should be able to drop down
• Make adjustments if necessary to establish correct height:
a. If anterior knee discomfort is felt, raise the seat so that the knee angle is 15-20° from bottom of the pedal stroke
b. If posterior knee discomfort is felt, including pain in the calf and/or Achilles, lower the seat so that the knee angle is 25-35° from bottom of the pedal stroke
• WARNING: Always dismount the cycle before makingadjustments to the saddle.
• WARNING: Do not lift the seat or handlebar height adjustment beyond the “STOP” mark
Pedal backwards; there should be no excessive rocking of the hips and locking of the knees.
SEAT HEIGHTProper seat height ensures maximum effi ciency and comfort while reducing the risk of injury. The following steps will ensure that correct seat height is established:

11© 2013 Life Fitness
PO
SITI
ON
AN
D S
ETU
P
SEAT FORWARD AND BACK POSITIONOnce the proper saddle height has been established, bring the pedals to the horizontal position of 9 and 3 o’clock. Adjust the saddle fore and aft to ensure that the knee is in line with the pedal spindle. Tighten the knob.
HANDLEBAR HEIGHTHandlebar height varies between users due to personal preference, fi tness and fl exibility. A general starting point is to adjust the handlebar height so that it is in line with the saddle. For preferred lower settings ensure that it is no more than 2.5-4 inches (4-10cm) lower than the saddle. This will
ensure correct tilting from the hips.
Beginners or those with lower-back discomfort may want to raise it slightly above the saddle.
12
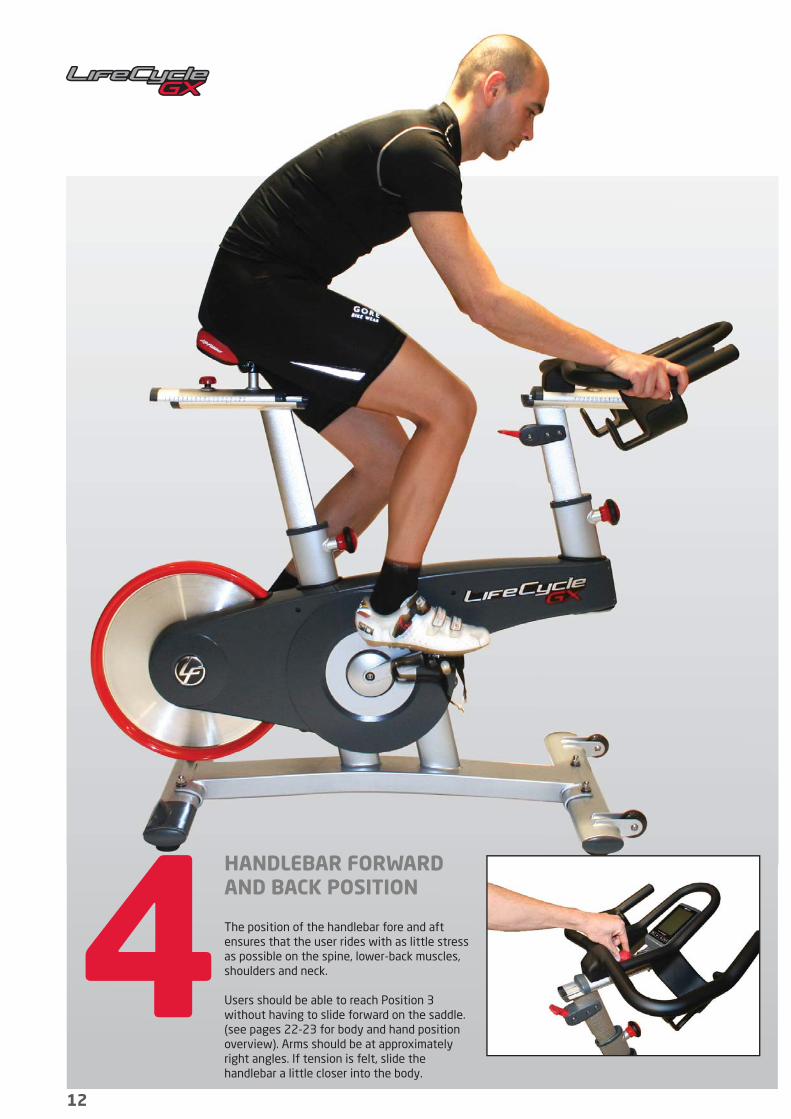
HANDLEBAR FORWARD AND BACK POSITION
The position of the handlebar fore and aft ensures that the user rides with as little stress as possible on the spine, lower-back muscles, shoulders and neck.
Users should be able to reach Position 3 without having to slide forward on the saddle. (see pages 22-23 for body and hand position overview). Arms should be at approximately right angles. If tension is felt, slide the handlebar a little closer into the body.

13© 2013 Life Fitness
PO
SITI
ON
AN
D S
ETU
P
PEDAL STRAP ADJUSTMENTS AND SPD USAGE
Pedal straps: Adjust to fi t snugly around the shoes and hold the foot in the pedal.
1. Place the feet into the pedal cage straps so that the ball of the foot is over the pedal axle
2. Rotate the pedals slowly until one foot is within arm’s reach, and then tighten to a snug fi t
3. Repeat for the other foot
4. Do several slow rotations of the pedals to ensure there is a snug fi t and the pedal stroke feels comfortable
SPD users should hear a defi nitive CLICK as the shoe cleat engages with the pedal. Ensure comfort while engaging and disengaging the foot.
BRAKE LEVER ADJUSTMENTS
Pedalling resistance is controlled by the incremental brake lever located under the handlebars. The intensity of the ride and cadence can be varied by using the lever. The resistance lever has 20 levels from which varying resistances
can be used. Push the lever down to increase resistance, and up to decrease resistance. By using the optional console, users will be able to view their current level on the screen.
To engage the emergency stop, apply fi rm pressure downward on the resistance lever until the emergency brake pad has engaged the fl ywheel.

DISPLAY 2
RPM MAX RPM AVG
MPH MAX MPH AVG
MAX % MAX
CAL/HOUR AVG
14444
112 641123
18108
14
OPTIONAL CONSOLE DISPLAYIF THE OPTIONAL CONSOLE DISPLAY WAS PURCHASED, PLEASE REVIEW THE FOLLOWING INFORMATION.
WARNING: Heart rate monitoring systems may be inaccurate. Over-exercising may result in serious injury or
death. If you feel faint, stop exercising immediately.
The console will display feedback consisting of: speed, distance, cadence, calories, time, heart rate (HR), Calories Per Hour and percentage (%) of HR max. % of HR max will allow the instructor to implement new and innovative classes. Current brands supporting the LifeCycle GX are:
Polar® and all brands Polar compatible. Accuracy of non-Polar brands may vary.
The console also has a Display 2 which will show the max and averages of all the data shown previously, throughout and at completion of the workout. The computer will also display the resivstance level (20 available); great for tracking progress and quantifying the workout.
Correct setup of the console will ensure the user has accurate feedback and a positive experience.
Pedal to wake the console
USER LOGO: Quick Press once for USER MODE, long press (2 seconds) reset display functions and user data (back to default)
DOWN ARROW: Quick press once for DISPLAY MODE 1 and 2
OK LOGO: Short press once for backlight
OK and LOGO: Press simultaneously for 3 seconds to enter SETUP MODE
UP ARROW: Quick press once for DISPLAY MODE 1 and 2

SET UP
USE UP OR DOWN ARROW TO SELECTPRESS OK TO CONFIRM
SELECT WEIGHT
LBSKG
SET UP
USE UP OR DOWN ARROW TO SELECTPRESS OK TO CONFIRM
SELECT LANGUAGE
ENGLISHESPANOLDEUTSCHITALIANOFRANCAISNEDERLANDSPORTUGUES
SET UP
USE UP OR DOWN ARROW TO SELECTPRESS OK TO CONFIRM
SELECT SYSTEM
MILESKM
SET UP
USE UP OR DOWN ARROW TO SELECTPRESS OK TO CONFIRM
CONFIGURATION
SHOW VERSIONCALIBRATIONBACKLIGHT TIMEEXIT SETUP
15© 2013 Life Fitness
CON
SOLE
DIS
PLA
Y
CONSOLE SETUP• Change language: English, Spanish, German, Italian, French, Dutch, Portuguese
• Change weight setting: lbs or kg
• Change system setting: miles or km
• Change backlight time: 5 or 15 or 30
• Confi guration: show version, calibration, exit setup
After setup is completed for the fi rst time, these setup values become default settings.
If the brake is not calibrated a “!” will appear on the console in the LEVEL window. Refer to Assembly Manual for brake calibration procedure.
NAVIGATING THE SETUP MODE1. To enter SETUP mode from other mode,
press and hold the OK and LOGO button simultaneously for three seconds
2. Use up arrow button and down arrow button to select language
3. Press OK button
4. Use up and down arrow button to select weight indicator (lbs or kg) setting for USER mode
5. Press OK button
6. Use up and down arrow button select system indicator for distance (miles or km) and speed (mph or or km/h)
7. Press OK button
8. Use up and down arrow button to select time (backlight will stay on after key press). Please note battery life decreases as greater time periods are selected.
9. Use up and down arrow button to show software version or perform brake calibration
10. Press OK button
11. Exit setup and press OK
LBS139
USER
ENTER WEIGHT FOR ACCURATECALORIES. USE UP OR DOWN ARROW
TO SELECT. PRESS OK TO CONFIRM
ENTER WEIGHT
MAX
USE UP OR DOWN ARROW TO SELECTPRESS OK TO CONFIRM
ENTER AGE
37
197
USER
DISPLAY 1
1:12:58
LEVEL
RPM
CAL/HOUR
12108 143
1123
43242.122.7
CALMILESMPH
DISPLAY 1
1:12:58
LEVEL
RPM
CAL/HOUR
12108
1123
43242.122.7
CALMILESMPH
16
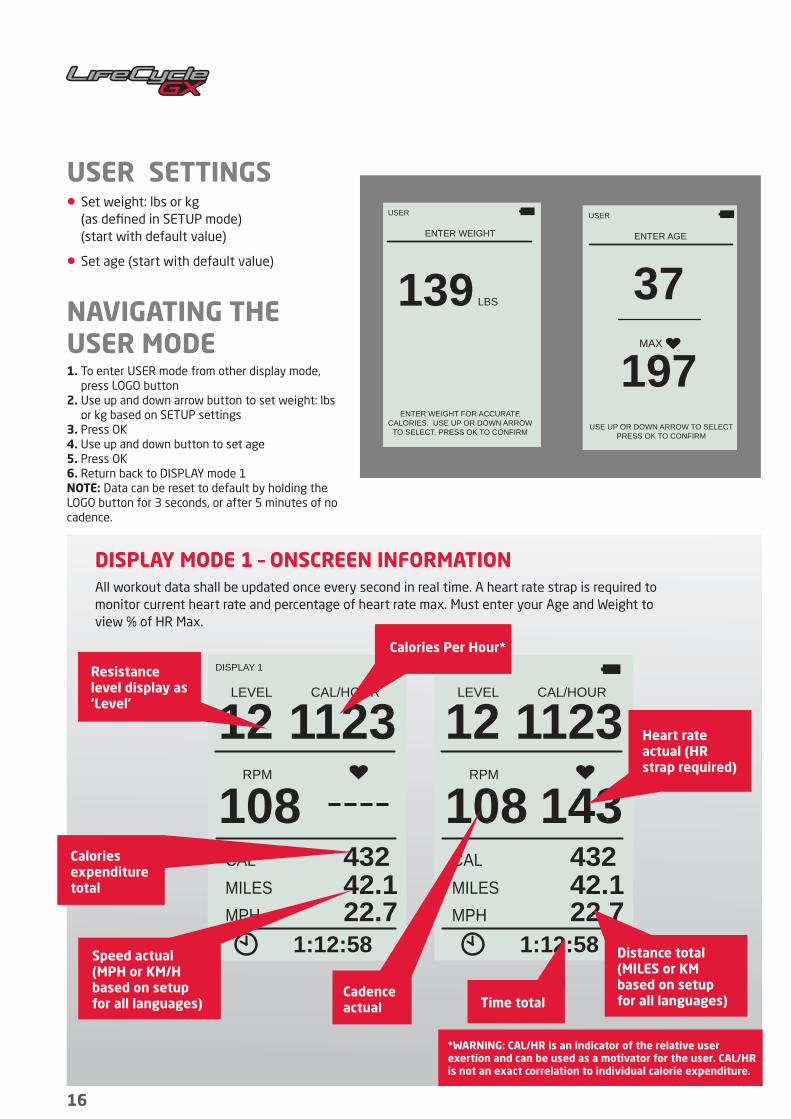
USER SETTINGS• Set weight: lbs or kg
(as defi ned in SETUP mode) (start with default value)
• Set age (start with default value)
NAVIGATING THE USER MODE1. To enter USER mode from other display mode,
press LOGO button2. Use up and down arrow button to set weight: lbs
or kg based on SETUP settings3. Press OK4. Use up and down button to set age5. Press OK6. Return back to DISPLAY mode 1NOTE: Data can be reset to default by holding the LOGO button for 3 seconds, or after 5 minutes of no cadence.
DISPLAY MODE 1 – ONSCREEN INFORMATIONAll workout data shall be updated once every second in real time. A heart rate strap is required to monitor current heart rate and percentage of heart rate max. Must enter your Age and Weight to view % of HR Max.
Cadence actual Time total
Distance total (MILES or KM based on setup for all languages)
Calories Per Hour*
Resistance level display as ‘Level’
Speed actual (MPH or KM/H based on setup for all languages)
Calories expendituretotal
Heart rate actual (HR strap required)
*WARNING: CAL/HR is an indicator of the relative user exertion and can be used as a motivator for the user. CAL/HR is not an exact correlation to individual calorie expenditure.

DISPLAY 2
RPM MAX RPM AVG
MPH MAX MPH AVG
MAX % MAX
CAL/HOUR AVG
14444
112 641123
18108
17© 2013 Life Fitness
CON
SOLE
DIS
PLA
Y
DISPLAY MODE 2 – ONSCREEN INFORMATIONAll workout data shall be updated once every second in real time. An HR strap is required to monitor HR max, percentage of heart rate max, average and percentage of average.
POWER ON/OFF• Console turns on when cadence
signal is received. • Console turns off automatically after
fi ve minutes if no signal (cadence) is being received
DEFAULT SETTING Default settings apply if no data are entered in setup or user mode. These values are preset in production.
Setup default• Language: English• Weight indicator: lbs• System indicator: miles
User mode default• Weight: 75kg or 165lbs• Age: 35
Power requirements• Battery: 2 D-Cell batteries• Approximate Battery life: 800hrs
Cadence max and average (RPM)
Calories Per Hour Average.
Heart rate MAX, and % Heart Rate MAX from Heart Rate actual. HR strap required
Speed max and average (MPH or KM/H MAX and AVG based on setup)

18

19© 2013 Life Fitness
CYCLING TECHNIQUESKILLS

20
CYCLING TECHNIQUE SKILLSOnce the bike is set up correctly the user is in a position to adopt a safe, effi cient and enjoyable workout.
CORRECT POSITIONING• Sit with your backside at the rear of the saddle
so that your sitting bones are supported
• Lift the chest and look straight ahead
• Lean forward, hinging from the hips and NOT arching the spine
• Place the hands on the handlebars in Position 2 and slightly relax shoulders and arms. (see pages 22-23 for body and hand position overview).
• The abdominals should be engaged to provide a strong core

21© 2013 Life Fitness
CYCL
ING
TEC
HN
IQU
E
PEDALLINGThe push phaseIf you imagine a clock face, the push phase is approximately at the 2’o clock position and will fi nish at the 5 o’clock position. This phase produces the most amount of power by recruiting the gluteals, quadriceps and calf muscles.
The pull/recovery phaseThis occurs at approximately the 7 o’clock position and ends at the 11 o’clock position with the recruitment moving towards the hamstrings and hip fl exors.
It is important to pay attention to BOTH phases to ensure a fl uid and even power output.
BASIC PEDALLING TECHNIQUE:• Slide the hips to the back of the saddle
• Push forward through the pedal by dropping the heel down
• Scrape the ball of the foot (as if removing dirt from their shoe)
• Lift the heel on the upwards/pull phase in order to recruit the hamstrings
ANKLE/FOOT POSITIONING DURING HIGH-CADENCE AND LOW-CADENCE WORKOUTSHigh cadence (sprints)During high-cadence workouts, the ankle stays in the same position through the whole rotation: approximately 90° with the toes slightly lower than the heels. It reduces the degrees through which the ankle must rotate, therefore speeding up each revolution.
The basics are
• Abs engaged
• Toes slightly down
• Add resistance if you are bouncing in the saddle
• Relax upper body
• Eyes forward
• Decrease resistance a little if legs start to slow down
Low cadence (muscular strength)Goal is maximal force through the legs/power output. Using the ankle to change the angle of foot on the pedal through the rotation will allow more force/power to be produced.
The basics are
• Push forward and down, drop heel down to go through the push point
• ‘Flick’ the heel up as you move down to be able to scrape with toes at the bottom (toes at their lowest level)
• ‘Flick’ the heel down again pulling backwards and lifting the knee on the way up
THE BASICS OF PEDALING AT SLOW SPEED WITH HEAVY RESISTANCE:• Slide backward
• Push and pull
• Drop the heel
• Push the knee to the handlebars when rolling over at the top of the pedal stroke
• Scrape the pedal at the bottom
HIGH CADENCE LOW CADENCE

22
POSITION 2 (CLIMBS, JUMPS, HOVERS, SPRINTS)In Position 2 the hands are extended in the forward position. This position is commonly used for climbs, jumps, hovers and sprints where leverage is needed.
• This forward position encourages further recruitment in the hips and is a more powerful position to use when sprinting and climbing, seated or standing
• Relax shoulders, keep elbows soft and face forward
• Avoid excessive rounding of the back - indicates too much pulling on the bars and building tension in the back muscles; wasting energy.
UPPER-BODY AND HAND POSITIONSThe position of the upper body is key in achieving good form and technique. The positioning of the hands will determine posture, breathing, comfort levels and can determine the objective for the particular block of workout such as a seated climb or sprint.
POSITION 1 (SEATED CLIMBS, WARM-UP AND COOL-DOWN)In Position 1 the hands are placed on the horizontal part of the handlebars. This position is commonly used for seated climbs as well as recovery.
• This position encourages a comfortable, upright position ensuring chest is open and breathing is easier
• Relax shoulders, apply a loose grip to the bars and keep elbows soft – this position ensures that tension is reduced and no unnecessary energy is wasted

23© 2013 Life Fitness
CYCL
ING
TEC
HN
IQU
E
POSITION 3 (TIME TRIAL, LONG EFFORTS)In Position 3 the hands are placed in the aero position in the middle of the bars. This position is commonly used for sustained eff orts and seated high-cadence eff orts in a tucked position.
• Relaxed shoulders and avoid any excessive tension
24
TRAINING INFORMATIONHEART RATE MONITOR TRAININGBy using the LifeCycle GX console in combination with a heart rate monitor a user can directly measure their exercise intensity. Using an HR monitor ensures that they are training within a specifi c HR zone by either monitoring their current HR or % max HR on the console. By using the console and HR monitor a user can ensure they are not over-exerting or underachieving. By using both, progression can be monitored and measured WARNING: Heart rate monitoring systems may be inaccurate. Over-exercising may result in serious injury or death. If you feel faint, stop exercising immediately.

25© 2013 Life Fitness
TRA
ININ
G IN
FOR
MAT
ION
WARM-UP AND COOL-DOWNThe warm-up is essential in preparing the body physically and mentally for the workout ahead and should include the following:
• Progress naturally in a controlled manner
• Intensity should be enough to raise the HR and body temperature
• Users should begin to perspire and be aware of their breathing rate
The cool-down is as important as the warm-up, and an integral part of any cycling workout and should include the following:
• Progress naturally in a controlled manner
• Can be monitored via HR to ensure the HR is reducing
• Should include some key stretches with regards to the muscle groups used in your workout (calves, quadriceps, hamstrings, hip fl exors, back extensors, etc.)
A typical warm-up for an indoor 60-minute cycling class:
• 5mins easy spinning 60-65% MHR, RPE 2
• 3mins, increasing level every minute, keeping cadence between 90-95rpm, 65%-70%-75% MHR, RPE 2-3-5
• 2mins easy spinning 60-65% MHR, RPE 2
• 1min fast cadence 100rpm+
• 1min easy spinning 60-65% MHR, RPE 2
• 1min fast cadence 100rpm+
• 2mins easy spinning before main set 60-65% MHR, RPE 2
A typical cool-down for an indoor 60-minute cycling workout will be between 5-10 minutes long depending upon the intensity of the session. A cool-down will start with easy pedalling in zone 1 HR or less than 65% MHR to ensure a gradual decline in HR and the fl ushing of any toxins in the legs.
How hard the rider should work in the warm-up, workout and cool-down stages is expressed in terms of Max Heart Rate(MHR) and Rate of Perceived Exertion(RPE). The RPE Scale is shown on page 26.

26
RPE SCALE:
0 – NOTHING AT ALL
1 – VERY LIGHT
2 – FAIRLY LIGHT
3 – MODERATE
4 – SOMEWHAT HARD
5 – HARD
6 – HARD
7 – VERY HARD
8 – VERY HARD
9 – VERY HARD
10 – VERY, VERY HARD
The RPE scale is used to measure the intensity of your exercise. The RPE scale runs from 0 – 10. The numbers below relate to phrases used to rate how easy or diffi cult you fi nd this activity.

27© 2013 Life Fitness
TRA
ININ
G IN
FOR
MAT
ION

28
LIFECYCLE GX SAMPLE WORKOUTSAll these workouts can be done by beginners to advanced based on Max Heart Rate (MHR).
LADDERS/UPS AND DOWNSWARM-UP
• 4mins easy spin 90rpm+ or 60-65% MHR, RPE 2, Position 1
• 1min hard eff ort 85-90% MHR, RPE 6, Position 2
• 1min hard eff ort 87-92% MHR, RPE 7, Position 2
• 4mins easy spin 90rpm+ or 60-65% MHR, RPE 2, Position 1
REPEAT X2
• 2mins 70-75% MHR, RPE 4, Position 1
• 2mins 75-80% MHR, RPE 5, Position 2
• 2mins 80-90% MHR, RPE 6, Position 2 out the saddle
• 2mins 75-80% MHR, RPE 5, Position 2
• 2mins 70-75% MHR, RPE 4, Position 3
• 1min easy spin 60-65% MHR, RPE 2, Position 1
RECOVERY
• 5mins easy spin 60-65%MHR, RPE 2, Position 1
REPEAT X1
• 2mins 70-75% MHR, RPE 4, Position 1
• 2mins 75-80% MHR, RPE 5, Position 2
• 2mins 80-90% MHR, RPE 6, Position 2 out the saddle
• 2mins 75-80% MHR, RPE 5, Position 2
• 2mins 70-75% MHR, RPE 4, Position 3
• 1min easy spin 60-65% MHR, RPE 2, Position 1
REPEAT X1
• 2mins 70-75% MHR, RPE 4, Position 1
• 2mins 75-80% MHR, RPE 5, Position 2
• 2mins 80-90% MHR, RPE 6, Position 2 out the saddle
COOL-DOWN
• 7mins easy spin 60-65% MHR, RPE 2, Position 1
ATTACKS/JUMPSWARM-UP
• 4mins easy spin 90rpm+ or 60-65% MHR, RPE 2, Position 1
• 45secs 75-80% MHR, RPE 5, Position 3
• 15secs Position 2 out the saddle, RPE 7
• 45secs 75-80% MHR, RPE 5, Position 3
• 15secs Position 2 out the saddle, RPE 7
• 45secs 75-80% MHR, RPE 5, Position 3

29© 2013 Life Fitness
TRA
ININ
G IN
FOR
MAT
ION
• 4mins easy spin 90rpm+ or 60-65% MHR, RPE 2, Position 1
REPEAT X6
• 45secs 75-80% MHR, RPE 5, Position 3
• 15secs Position 2 out the saddle, RPE 7
RECOVERY
• 3mins easy spin 60-65% MHR, RPE 2, Position 1
REPEAT X5
• 45secs 80-85% MHR, RPE 6, Position 3
• 15secs Position 2 out the saddle, RPE 7
RECOVERY
• 3mins easy spin 60-65% MHR, RPE 2, Position 1
REPEAT X10
• 45secs 85-90% MHR, RPE 6, Position 3
• 15secs Position 2 out the saddle, RPE 7
RECOVERY
• 3mins easy spin 60-65% MHR, RPE 2, Position 1
REPEAT X9
• 45secs 75-80% MHR, RPE 5, Position 3
• 15secs Position 2 out the saddle, RPE 7
COOL-DOWN
• 8mins easy spin 60-65% MHR, RPE 2, Position 1
DROP DOWNSWARM UP
• 4mins easy spin 90rpm+ or 60-65% MHR, RPE 2, Position 1
• 3mins going up each minute in %MHR from 70-75% – RPE 4, 75-80 – RPE 5, 80-85% MHR – RPE 6, Position 3
• 2mins easy spin 60-65% MHR, RPE 2, Position 1
• 1min at 85-95% MHR, RPE 8, Position 2
• 5mins easy spin 60-65% MHR Position 1
REPEAT X3
• 1min at 85-95% MHR, RPE 8, Position 2 out the saddle
• 2mins 80-85% MHR, RPE 6, Position 2 seated
• 4mins 75-80% MHR, RPE 5, Position 3
• 5mins easy spin 60-65% MHR, RPE 2, Position 1
REPEAT X1
• 1min at 85-95% MHR, RPE 8, Position 2 out the saddle
• 1min 80-85% MHR, RPE 6, Position 2 seated
• 1min 75-80% MHR, RPE 5, Position 3
COOL-DOWN
• 6mins easy spin 60-65% MHR, RPE 2, Position 1

30
PREVENTIVE MAINTENANCE TIPSLife Fitness products are backed by the engineering excellence and reliability of Life Fitness and are one of the most rugged and trouble-free pieces of exercise equipment on the market today. Commercial Life Fitness equipment are among the most popular of aerobic trainers in health clubs, colleges and military facilities worldwide.
Warning: Safety of the equipment can be maintained only if the equipment is examined regularly for damage or wear. Keep the equipment out of use until defective parts are repaired or replaced. Pay special attention to parts that are subject to wear, as outlined below.
The following preventive maintenance tips will keep the Life Fitness product operating at peak performance:
• Locate the product in a cool, dry place
• Apply the lubricant to a cotton cloth, then wipe on the upper area of the lower fore/aft sliders as needed. Note: only a few drops of lubricant are required per usage.
• Clean the display console and all exterior surfaces with an approved or compatible cleaner (see Life Fitness approved cleaners) and a microfi bre cloth
• Long fi ngernails may damage or scratch the surface of the console; use the pad of the fi nger to press the selection buttons on the console
• Clean the top surface of the pedals regularly
• Keep the pedal straps fastened securely when using the bikes
LIFE FITNESS APPROVED LUBRICANTBreak Free(R), Life Fitness part number SK50-P005-0000.
LIFE FITNESS APPROVED CLEANERS Two preferred cleaners have been approved by Life Fitness reliability experts: PureGreen 24 and Gym Wipes. Both cleaners will safely and eff ectively remove dirt, grime and sweat from equipment. PureGreen 24 and the antibacterial force formula of Gym Wipes are both disinfectants that are eff ective against MRSA and H1N1. PureGreen 24 is available in a spray which is convenient for gym staff to use. Apply the spray to a microfi bre cloth and wipe down the equipment. Use PureGreen 24 on the equipment for at least two minutes for general disinfection purposes and at least 10 minutes for fungus and viral control. Gym Wipes are large, durable pre-moistened wipes to use on the equipment before and after workouts. Use Gym Wipes on the equipment for at least two minutes for general disinfection purposes.
Contact customer support services to order these cleaners (1 800 351 3737 or email: customersupport@lifefi tness.com).
LIFE FITNESS COMPATIBLE CLEANERS Mild soap and water or a mild non-abrasive household cleaner can also be used to clean the display and all exterior surfaces. Use a soft microfi bre cloth only. Apply the cleaner to the microfi bre cloth before cleaning. DO NOT use ammonia or acid-based cleaners. DO NOT use abrasive cleaners. DO NOT use paper towels. DO NOT apply cleaners directly to the equipment surfaces.
PREVENTIVE MAINTENANCE SCHEDULE
WARRANTYWARRANTY INFORMATION: LifeCycle GX
WHAT IS COVERED?This Life Fitness consumer product is warranted to be free of all defects in material and workmanship.
WHO IS COVERED?The original purchaser or any person receiving a newly purchased Product as a gift from the original purchaser. Warranty will be voided on subsequent transfers.
HOW LONG IS IT COVERED?All coverage is provided by specifi c Product according to the guidelines listed on the warranty coverage chart.
WHO PAYS TRANSPORTATION AND INSURANCE FOR SERVICE?If the Product or any covered part must be returned to a service facility for repairs, we, Life Fitness, will pay all transportation and insurance charges for the fi rst year. You are responsible for transportation and insurance charges during the second and third years (if applicable).
WHAT WE WILL DO TO CORRECT COVERED DEFECTS We will ship to you any new or rebuilt replacement part or component or, at our option, replace the Product. Such replacement parts are warranted for the remaining portion of the original warranty period.
WHAT IS NOT COVEREDAny failures or damage caused by unauthorised service, misuse, accident, negligence, improper assembly or installation, debris resulting from any construction activities in the Product’s environment, rust or corrosion as a result of the Product’s location, alterations or modifi cations without our written authorisation or by failure on your part to use, operate and maintain the Product as set out in your operation manual (‘manual’).
SERVICE AND TECHNICAL DATA
ITEM WEEKLY MONTHLY BI-ANNUALLYCONSOLE OVERLAYS Clean Inspect
BOTTLE HOLDERS/ACCESSORY TRAYS Clean
CONSOLE MOUNTING BOLTS Inspect
HARDWARE Inspect
FRAMES Clean Inspect
PLASTIC COVERS Clean Inspect Inspect
PEDALS AND STRAPS Clean Inspect
SEAT AND HANDLEBAR FORE/AFT SLIDERS
Lubricate

31© 2013 Life Fitness
SER
VIC
E A
ND
TEC
HN
ICA
L D
ATA
All terms of this warranty are void if this product is moved beyond the continental borders of the United States of America (excluding Alaska, Hawaii and Canada) and are then subject to the terms provided by that country’s local authorised Life Fitness representative.
WHAT YOU MUST DORetain proof of purchase; use, operate and maintain the Product as specifi ed in the manual; notify customer support services of any defect within 10 days after discovery of the defect; if instructed, return any defective part for replacement or, if necessary, the entire Product for repair.
OPERATION MANUAL: It is VERY IMPORTANT THAT YOU READ THE MANUAL before operating the Product. Remember to perform the periodic maintenance requirements specifi ed in the manual to assure proper operation and your continued satisfaction.
HOW TO GET REPLACEMENT PARTS AND SERVICERefer to page one of this manual for your local service contact information. Reference your name, address and the serial number of your Product (consoles and frames may have separate serial numbers). They will tell you how to get a replacement part or, if necessary, arrange for service where your Product is located.
EXCLUSIVE WARRANTYTHIS LIMITED WARRANTY IS IN LIEU OF ALL OTHER WARRANTIES OF ANY KIND EITHER EXPRESSED OR IMPLIED, INCLUDING BUT NOT LIMITED TO THE IMPLIED WARRANTIES OF MERCHANTABILITY AND FITNESS FOR A PARTICULAR PURPOSE, AND ALL OTHER OBLIGATIONS OR LIABILITIES ON OUR PART. We neither assume nor authorise any person to assure for us any other obligation or liability concerning the sale of this Product. Under no circumstances shall we be liable under this warranty, or otherwise, of any damage to any person or property, including any lost profi ts or lost savings, for any special, indirect, secondary, incidental or consequential damages of any nature arising out of the use of or inability to use this Product. Some states do not allow the exclusion or limitation of implied warranties or of liability for incidental or consequential damages, so the above limitations or exclusions may not apply to you.
CHANGES IN WARRANTY NOT AUTHORISEDNo one is authorised to change, modify or extend the terms of this limited warranty.
EFFECT OF STATE LAWSThis warranty gives you specifi c legal rights and you may have other rights which vary from state to state.
OUR PLEDGE TO YOUOur products are designed and manufactured to the highest standards.
We want you to be completely satisfi ed with our products and will do everything possible under the terms of this warranty to keep you secure in knowing you have bought the best!
WARRANTY COVERAGE
SPECIFICATIONS• Designed use: Home
• Maximum user weight: 350lbs
• Display type: LCD
• Pedal speed range: 60-140rpm
• Pedal: 3.5” x 3.5” dual-sided SPD compatible
• Drive type: Multi-ribbed belt
• Console provides 20 levels of resistance
• Console display 1: Resistance level, rpm, heart rate, calories per hour, calories, distance, speed, time
• Console display 2: Speed max, speed average, rpm max, rpm average, calories per hour average, maximum heart rate, % of maximum heart rate
PHYSICAL DIMENSIONS• Length: 54.6” (139cm)• Width: 23” (58.5cm)• Height: 39.5” (100cm)• Weight: 111 lbs (50.5 kg)• Max User Weight: 350lbs (158kg)
SHIPPING DIMENSIONSLength - 49.6” (126 cm)
Width - 9.6” (24.5 cm)
Height - 40.8” (104 cm)
Weight - 136.7 lbs (62 kg)
FIVE YEARS THREE YEARS ONE YEAR 6 MONTHS 90 DAYS
STRUCTURAL FRAME X
CONSOLE X
PEDALS X
MECHANICAL COMPONENTS(cranks, fl ywheel, handlebar, handlebar post, seat post, bearings, seat and handlebar adjustment mechanisms, drive mechanisms, resistance mechanisms)
X
WEARABLE ITEMS(saddle, upholstery, pedal straps, water bottle holders)
X
LABOR X
COSMETIC COMPONENTS X

YOUR PARTNER FOR SUCCESS800.634.8637 lifefi tness.com follow us
© 2013 Life Fitness, a division of Brunswick Corporation. All rights reserved. Life Fitness and LifeCycle are a registered trademark of Brunswick Corporation. Printed in USA. PM-034-11 (12.11)
Part No. 9307801 REV. A-1