Embed Size (px)
Citation preview
7/30/2019 First Aid Module 3- Doing the course.doc
http://slidepdf.com/reader/full/first-aid-module-3-doing-the-coursedoc 1/16
Fa Module 3 Doing the course
PAGE 3:1
Following procedures (the primary
survey)First Aid trainees need to understand and be able to carry out First Aid procedures correctly. Written
procedures introduced during training may include both information and instructions. This page looks at the procedure for carrying out a primary survey and reinforces reading skills by distinguishing between
information and instructions in a piece of text.
MaterialsFlipchart
Learning outcomes (objectives)1 To identify instructions and procedures for carrying out a primary survey.
2 To understand the difference between procedures and instructions.
3 To recognise the language of written instructions (imperatives/must do words), includingconditional instructions.
4 To identify and use features which make procedures and instructions clearer, e.g. numbering,
bullet points, use of capitals, bold typeface, etc.
Suggested teaching activities• Check that learners understand the term ‘primary survey’. (Can they explain it? i.e. deciding on the right
course of action with a casualty.)
• Discuss the glossary definition of a procedure (a series of actions to carry something out) with learners. Are
there any procedures that learners need to follow in their workplace?
• Discuss the difference between a procedure and an instruction. (A procedure is a set of actions carried out ina certain sequence or manner; an instruction is one action that you must do.)
•Hand out copies of the learner page. Point out that the first sentence in the procedure is information – itinforms readers of the aim of the primary survey.
• Go over the use of the imperative in instructions. Ask learners to try inserting the words ‘you must’ beforethe word to aid understanding and identification.
• Ask learners to complete the question – underline all of the imperatives on the learner page example. Theycould highlight the words place, tilt, remove, lift, look, listen, feel, lift.
• If appropriate, compare the use of verbs in instruction sentences and those used in information sentences.Talk about the difference between information and instructions, or ask learners to define the two.
• Discuss the word conditional (see the instruction in bold capitals). This means that you only carry out the
instruction ‘if the casualty is not conscious …’. Ask learners to think of other examples from their training.
• Ask learners to comment on other ways in which instructions are made clearer or quicker to spot. (Use of bullet points, capitals etc.)
• Follow up with another example from the First Aid programme combining information about procedures
with specific instructions for learners to work on.
Suggestions for learners who are having difficulties• If learners have difficulty in recognising imperatives, ask them to try adding the words ‘you must’ before
the word/verb to check if it is an instruction. This is particularly helpful to ESOL learners who need to
recognise the stem/base form of the verb in order to understand instructions.
• Conditional instructions can be particularly difficult for ESOL learners. One answer is to turn theinstructions into direct commands, using key instruction words (imperatives), e.g. ‘The casualty is not
conscious. Shout for help, and then do the next check.’
Suggestions for advanced learnersAsk learners to look through their training manual and identify other procedures which contain both instructions
and information.
55
Curr ref Key Skills
Rt/L1.2Rs/L1.2
C1.2
7/30/2019 First Aid Module 3- Doing the course.doc
http://slidepdf.com/reader/full/first-aid-module-3-doing-the-coursedoc 2/16
Fa Module 3 Doing the course
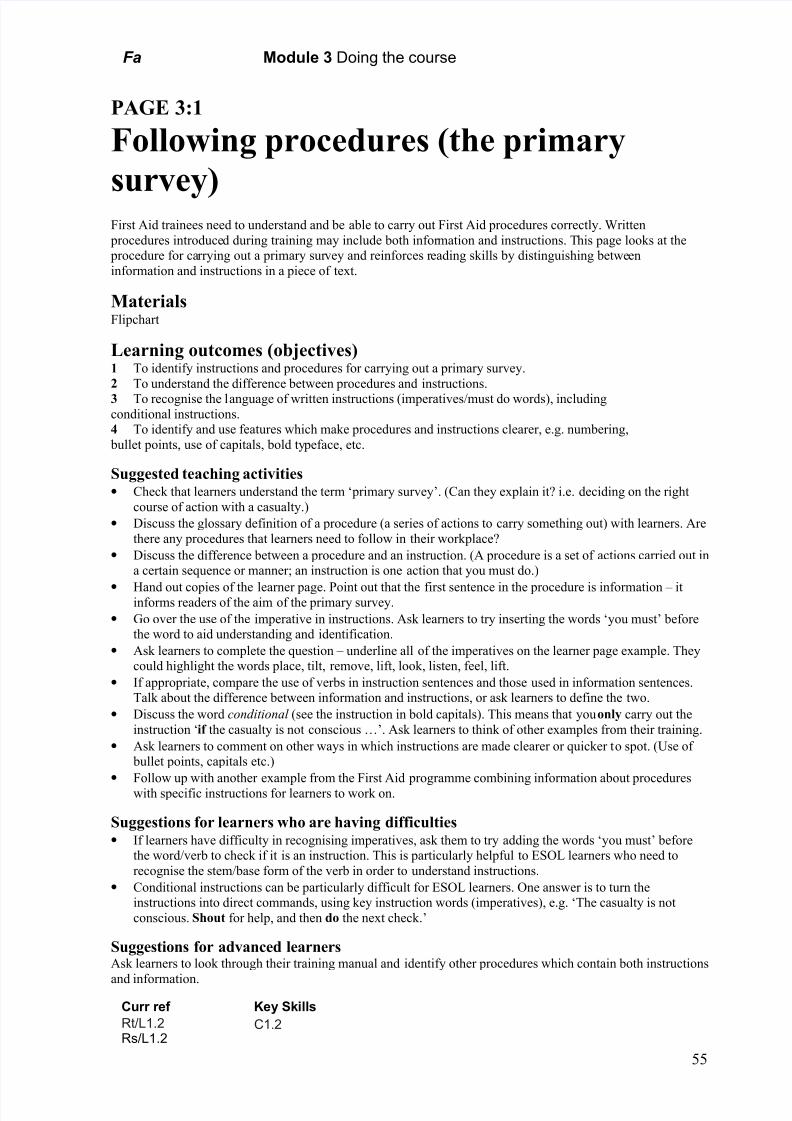
Following procedures 3:1
The primary surveyThere are a lot of procedures in First Aid that must be carried out correctly. The primary
survey is a first assessment of an emergency situation and of the casualty’s condition.
56
Procedures often give information as well as instructions.Instructions are usually written in short full sentences and begin withimperatives or command words. For example, ‘place’, ‘remove’ and lift’.The first sentence in this procedure gives information about the aim of a primary survey.
Primary surveyThe aim of a primary survey is to identify life-threatening conditions, to make sure thatthey are treated first.
The sequence of checks in a primary survey is:
1 DANGER Are you, or the casualty, inany danger?2 RESPONSE Is the casualty conscious?IF THE CASUALTY IS NOT CONSCIOUS,SHOUT FOR HELP, AND THEN DO THENEXT CHECK.
3 AIRWAY Is the casualty’s airway openand clear?4 BREATHING Is the casualty breathing?5 CIRCULATION Can you see, hear or feel breathing, coughing, movement, or any other signs of life? Is there any severebleeding?
To open the airway:
• Place one hand on the forehead and tilt thehead back.
• Remove any obstructions from thecasualty’s mouth.
• Lift the casualty’s chin with your fingertips.
To check for breathing:
• LOOK for chest movement.
• LISTEN for sounds of breathing.
• FEEL for breath on your cheek.
• LIFT the chin throughout the breathingcheck, to keep the airway open (thebreathing check should last for 10seconds).
You are checking for breathing, coughing,
movement, or any other signs of life when youlook, listen and feel for circulation.
This part informs
you of thesequence or order of checks inthe primarysurvey.Questions areused to help youthink about whatchecks to make.
There might be
severalinstructions ineach point.Look out for:• imperatives
(e.g. place, tilt)• new sentences• the word ‘and’
Can you underlineall of the instructionsin the primary
survey procedure?
Someinstructions areconditional. Thismeans you onlyhave to followthem in certaincircumstancesLook out for the
word ‘if’.
Key words arewritten in bold tomake them standout.
Bullet points make eachinstruction standout clearly.
7/30/2019 First Aid Module 3- Doing the course.doc
http://slidepdf.com/reader/full/first-aid-module-3-doing-the-coursedoc 3/16
Fa Module 3 Doing the course
PAGE 3:2
Using abbreviationsAbbreviations are very frequently used for common First Aid techniques, for example the primary survey of a
casualty (DRABC). In addition, many mnemonics have been devised and are standard practice for remembering how to manage particular conditions, e.g. sprains and strains, external bleeding, etc., so theyform a part of the training, and also a technique for remembering the training received.
MaterialsFlipchart
Learning outcomes (objectives)1 To identify the purposes of abbreviations and acronyms.
2 To practise using acronyms to remember important First Aid information.
3 To explore ways of remembering useful acronyms.
Suggested teaching activities• Explain that this activity is about abbreviations and their use in First Aid training. Ask learners what they
understand by ‘abbreviation’.
• Hand out a short list of abbreviations, both general and related to First Aid (for example mm., approx.,max., i.e., e.g., NHS, H&S, ABC). Learners say which ones they a) recognise, b) know the meaning of.
• Ask learners why we use abbreviations. Possible reasons are: something that we say very often, somethingwhich everyone (in the same line of work) will understand, something which is too long to say in full (e.g.
Health and Safety at Work Acts).
• Take the example NHS: What does it stand for? How is it formed? Explain that we often use the first letter of a group of words in this way. Sometimes this makes a word in its own right – give an example (AIDS).
In this case it is easier to remember the ‘word’ AIDS, than to remember what the initials stand for (Acquired Immune Deficiency Syndrome, if any learner asks).
• Introduce the term ‘acronym’. Have learners heard the word? Do they know what it means?• Ask learners to find the meaning of ‘acronym’ on the learner page (a word formed from the first letter of a
set of words).
• Explain that acronyms are pronounced just as they sound. They can be written in lower case letters with a
capital letter at the beginning (e.g. Scuba, Interpol) or as a string of capitals.
• Ask learners to look at the sets of initials (acronyms) at the top of each box. Which ones do they recognise?
• Discuss the meaning of the example acronyms – ask learners to try and guess their meaning, from the words
they are made up of. This will require some knowledge of First Aid but is a useful discussion exercisewithout such knowledge. (PEEP – management of external bleeding; RICE – management of sprains and
strains)
• Point out that there are three different types of initials on the page (ones that have a meaning – ABC – or can be given a meaning – DRABC; ones that make a real word – PEEP/RICE; ones that can sound like a
word, even though they are not – HASAWA/COSHH/RIDDOR).
• Ask learners which ones they find easiest to remember, and why.
Suggestions for learners who are having difficulties• For ESOL learners some of the acronyms may be of limited value, since they may not recognise the word
itself (e.g. PEEP) or some of the terms to be remembered (e.g. Expose/Elevate, Hazardous Substances).
• These learners could be encouraged to ‘translate’ these terms into ones with which they are more familiar,although they do still need to recognise them when they are used by trainers and others.
Suggestions for advanced learnersHigher reading skills do not necessarily mean that a learner is any more familiar with the use of acronyms as a
memory aid, so the steps in this activity may be equally useful to them. Even if they are familiar with it, theyshould in any case be encouraged to think about the ways of remembering which work best for them (which
may for example be visual rather than verbal).
57
Curr ref Key Skills
Rw/L1.2 C1.2
7/30/2019 First Aid Module 3- Doing the course.doc
http://slidepdf.com/reader/full/first-aid-module-3-doing-the-coursedoc 4/16
Fa Module 3 Doing the course
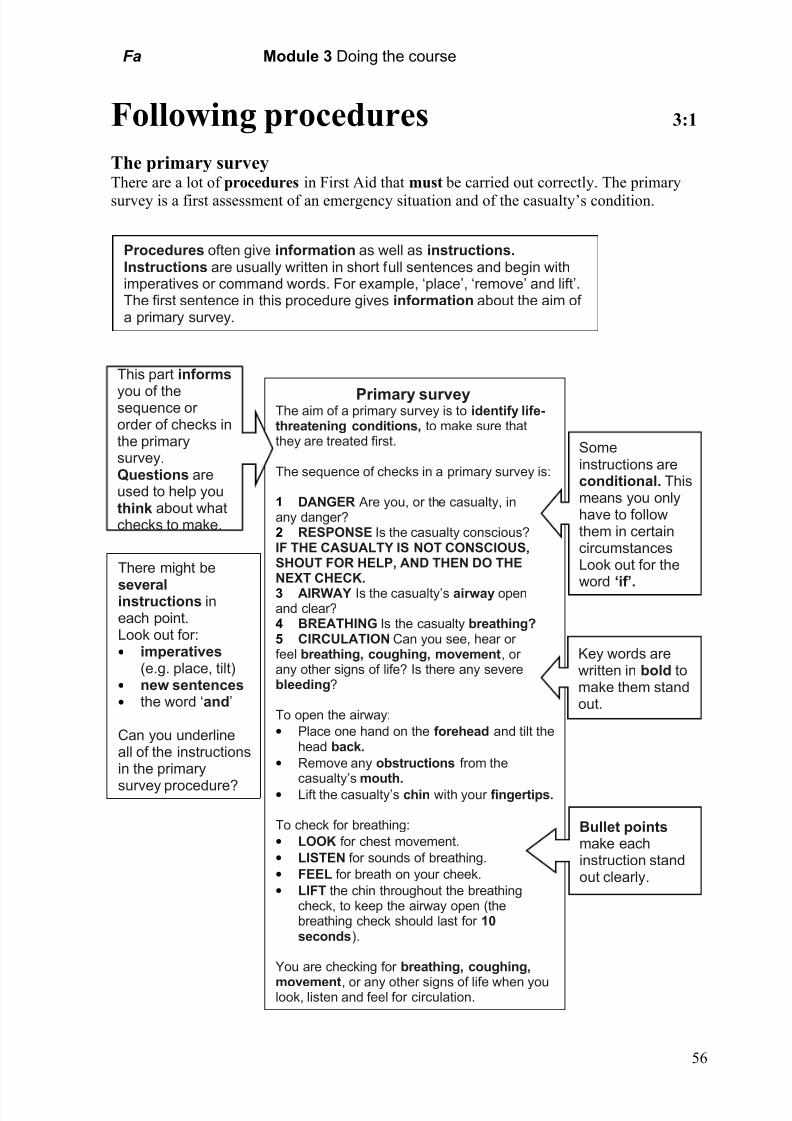
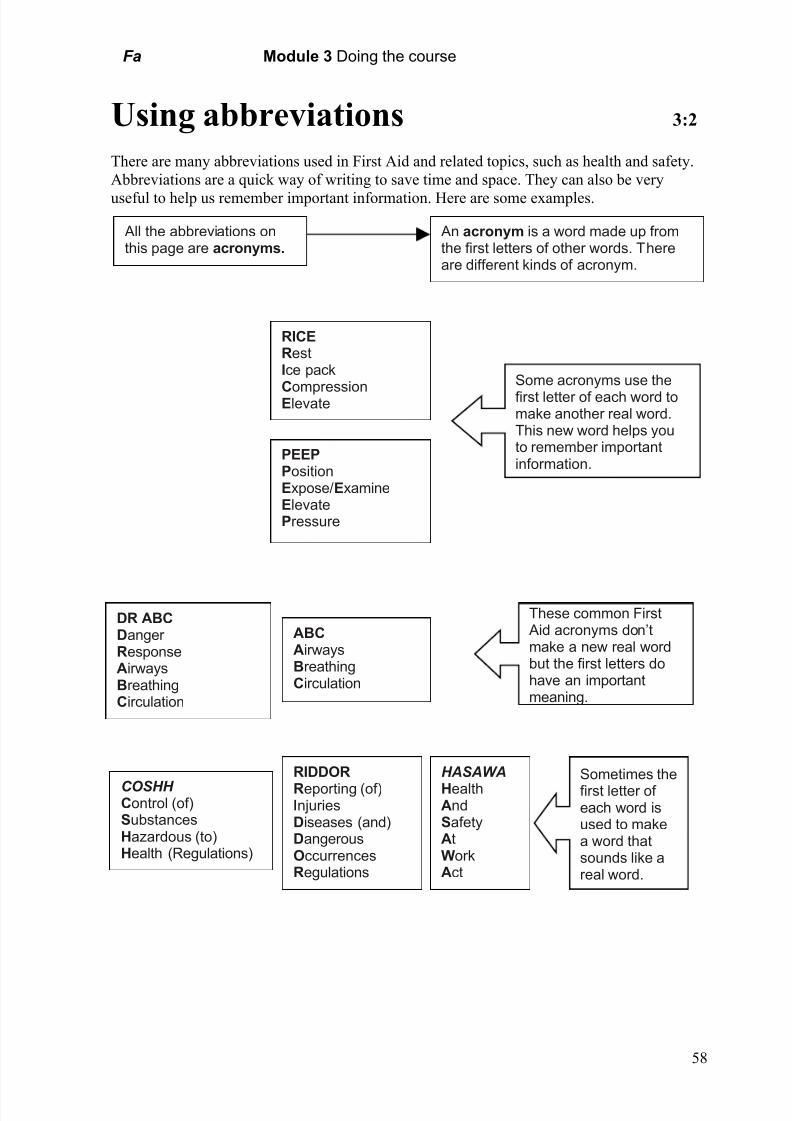
Using abbreviations 3:2
There are many abbreviations used in First Aid and related topics, such as health and safety.
Abbreviations are a quick way of writing to save time and space. They can also be very
useful to help us remember important information. Here are some examples.
58
All the abbreviations onthis page are acronyms.
An acronym is a word made up fromthe first letters of other words. Thereare different kinds of acronym.
RICERestIce pack
CompressionElevate
PEEPPositionExpose/ExamineElevatePressure
Some acronyms use the
first letter of each word tomake another real word.This new word helps youto remember importantinformation.
DR ABCDanger ResponseAirwaysBreathingCirculation
ABCAirwaysBreathingCirculation
These common First Aid acronyms don’tmake a new real wordbut the first letters dohave an importantmeaning.
COSHH Control (of)SubstancesHazardous (to)Health (Regulations)
RIDDOR
Reporting (of)InjuriesDiseases (and)DangerousOccurrencesRegulations
HASAWA
HealthAndSafetyAtWorkAct
Sometimes the
first letter of each word isused to makea word thatsounds like areal word.
7/30/2019 First Aid Module 3- Doing the course.doc
http://slidepdf.com/reader/full/first-aid-module-3-doing-the-coursedoc 5/16
Fa Module 3 Doing the course
PAGE 3:3
Using a dictionary or glossary
Even though training manuals may be written in a simple and learner-friendly way, an understanding of FirstAid involves the specialist areas of biology and medicine, and some of the technical vocabulary associated with
these areas. Learners therefore need to be able to use glossaries and dictionaries with some confidence in order to benefit fully from First Aid training.
MaterialsMultiple copies of dictionary(ies), glossary from these materials, Source page 0:04, flipchart
Learning outcomes (objectives)1 To use reference books to find the meaning of unfamiliar words related to First Aid.
2 To understand the purpose of glossaries and where they are likely to be found.3 To practise using a glossary to find the meanings of technical words.
4 To practise using a dictionary to find the meanings of unknown words.
Suggested teaching activities• Ask learners how they learn the meaning of new words, especially technical vocabulary. (Dictionary,
glossary, asking someone, other ways.)
• Explain that there are many different ways of doing this, but that the purpose of this session is to practiseusing dictionaries and glossaries. Check if learners understand the term glossary. (How is it different from a
dictionary?)
• Hand out copies of the learner page. Ask learners how many differences they can find between a dictionaryand a glossary. (Glossary: specialist or technical terms, often at the back of a manual; dictionary: all words,
all the different meanings of these words.)
• Point out the text extract in the centre of the page. Go through the information boxes on the page
surrounding the text extract.• Ask learners where they would look for the meaning of the words ‘oxygenated’, ‘defibrillator’, ‘resolve’,
‘arrest’, keeping in mind the differences between a dictionary and a glossary.
• Ask learners to read the definitions of ‘defibrillator’ and ‘resolve’ on the sheet. Where did these definitionscome from, a dictionary or a glossary? (Why?)
• Look at the definition of ‘oxygenated’. Point out that some definitions in a glossary may use other technical
words. Learners should keep going, looking up words as necessary, until they understand the meaning of thefirst word they looked up. Demonstrate this with ‘oxygenated’ and ‘oxygen’.
• Look together at the two definitions of ‘arrest’. What are the differences? (The dictionary definition
includes two possible meanings of the word, the glossary definition includes only the meaning of the wordas it is used in the extract.)
• Ask learners how much they use dictionaries, and if they have had any problems doing so. (Too many
meanings to choose from, explanations that also use difficult words?)• Show examples of different types of dictionary, e.g. standard and student versions. Ask students to choose
which they would prefer using for the next reading exercise.
Source page• Ask learners to read through the information. Point out that some of the words are shown in blue. Ask learners to
work in pairs and circle the words in blue that they think are technical and would be found in a glossary. (The
technical words learners might circle include breastbone, ounces, muscular, chambers, valves, backflow.)
• Ask learners to look up these words in the glossary.
• Now ask learners to follow up by looking for the other words in a dictionary. Where there is more than onemeaning, they discuss in their pair the meaning they think fits best in this text. Give help with the word search as
needed. Learners discuss as a group the meanings they have chosen. (The line numbers outside the box areintended to help with this discussion.)
• Ask learners to repeat this process with any other words in the text that they are not sure of.
• Point out that knowing where and how to get information about new words is an important skill.
59

7/30/2019 First Aid Module 3- Doing the course.doc
http://slidepdf.com/reader/full/first-aid-module-3-doing-the-coursedoc 6/16
Fa Module 3 Doing the course
• Discuss making a personal glossary (alphabetically-indexed note book) to record important words they meet
in their training, and their meanings. (It is also useful to include examples of sentences where the word isused correctly in context.)
Suggestions for learners who are having difficulties• Some learners may have difficulty finding words, because of difficulty in locating second and third letter
clues. These learners can be helped by providing them with an alphabet strip to use until they become moreconfident.
• Some learners may also need extra support in interpreting dictionary definitions, especially where there aremany alternatives to choose from.
Suggestions for advanced learnersLearners who are already familiar with the technical vocabulary on the Source page could scan other examples
of information of this type for unfamiliar vocabulary. They should then use sources of reference to look up themeanings, and use these words in other sentences as a way of reinforcing their knowledge.
60
Curr ref Key Skills
Rw/L1.1 C1.2
7/30/2019 First Aid Module 3- Doing the course.doc
http://slidepdf.com/reader/full/first-aid-module-3-doing-the-coursedoc 7/16
Fa Module 3 Doing the course
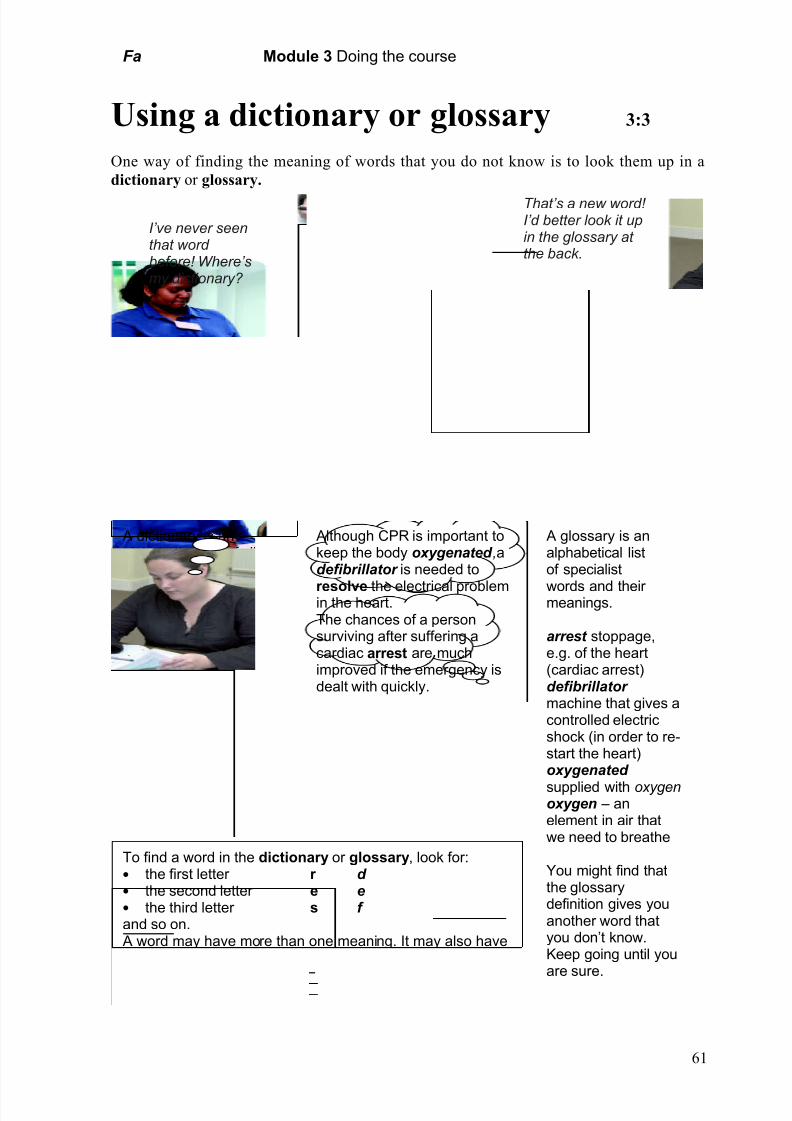
Using a dictionary or glossary 3:3
One way of finding the meaning of words that you do not know is to look them up in a
dictionary or glossary.
61
A dictionary is analphabetical list of allthe different meanings
of words.If you look a word up in adictionary, you might findseveral meanings.
arrest1 catch, take hold of
(person) by force2 stoppage (of the
heart)
resolve
1 decide on something2 deal with (or sort
out)
Although CPR is important tokeep the body oxygenated ,adefibrillator is needed to
resolve the electrical problemin the heart.The chances of a personsurviving after suffering acardiac arrest are muchimproved if the emergency isdealt with quickly.
A glossary is analphabetical listof specialist
words and their meanings.
arrest stoppage,e.g. of the heart(cardiac arrest)defibrillator machine that gives acontrolled electricshock (in order to re-start the heart)oxygenated
supplied with oxygenoxygen – anelement in air thatwe need to breathe
You might find thatthe glossarydefinition gives youanother word thatyou don’t know.Keep going until youare sure.
To find a word in the dictionary or glossary, look for:• the first letter r d • the second letter e e• the third letter s f and so on. A word may have more than one meaning. It may also haveboth an everyday and a technical meaning. The dictionary
will give both. The glossary may give only the technicalmeaning. (Look at the word ‘arrest’.)
I’ve never seenthat word before! Where’smy dictionary?
That’s a new word! I’d better look it upin the glossary at the back.

7/30/2019 First Aid Module 3- Doing the course.doc
http://slidepdf.com/reader/full/first-aid-module-3-doing-the-coursedoc 8/16
Fa Module 3 Doing the course
PAGE 3:4
Working out the meaning of wordsFirst Aid is based on an understanding of how the body works and can include some technical language. This
page gives learners practice in using some strategies to understand this specialist language.
MaterialsSource page 0:05, flipchart
Learning outcomes (objectives)To identify and practise a range of strategies for dealing with unfamiliar vocabulary.
Suggested teaching activities• Ask learners what they normally do when they came across a word they haven’t seen or heard before, or
don’t know the meaning of. Note learners’ ideas on the flipchart.
• Work through the three methods of dealing with new vocabulary suggested on the top half of the learner
page. Relate these methods back to the trainer’s words in order to exemplify and demonstrate each method.• Check which of these methods learners had already suggested and which are new to them.
• Elicit learners’ views on the different methods being suggested, and the advantages and disadvantages that
they see in them.
Source page• Explain to learners that they will now have the chance to try the methods out on a new text containing
unfamiliar/technical vocabulary.
• Ask learners to read through the text. Point out that the technical words are already printed in blue.
(Learners may know some of these words already, but there will probably be many which are new.)
• Ask learners to work in pairs and underline words where they think there is an explanation or example inthe text itself. (Possible answers: respiratory, to some extent carbon dioxide, inhaled, and the respiratory
tract.)
• Discuss learner’s ideas, and make brief notes of the meanings on the flipchart.
• Ask learners if they can say anything about the alveoli and the epiglottis, and why (alveoli is in the lungs – it says so; alveoli and epiglottis are both shown on the diagram).
• Now that learners have found the meaning of almost half of the words in blue, ask if they can guess any
others (for example ‘exhaled’ from having worked out ‘inhaled’).
• Explain that this is a good way of working out meaning, because we form many words by adding parts likein- or ex- at the start to make a new but related word. (Ask briefly for one or two other examples.)
• Ask learners how they would find out the words that remain (dictionary, glossary, ask someone). Direct any
learners who need help in using a dictionary or glossary to page 3:3 of the materials.
• Explain that asking someone else is a quick and useful way of finding out the meaning, as long as you canrely on the person you ask giving the right answer.
• Ask learners to practise this in pairs, giving their partner the line number of the word to make it easier to
find.• Ask learners to give an explanation in their own words of as many of these new words as they can, helping
each other out if anyone gets stuck. (They also have notes left on the flipchart to help them.)
Suggestions for learners who are having difficulties• Read the words with the learner separately and also in context. Ask learners to use their knowledge of the
human body, and the context, to try to predict the meaning of the words. Use other examples if they respondwell to this strategy.
• Encourage learners to keep a notebook of useful terminology or a personal glossary.
Suggestions for advanced learnersOn a more difficult text, highlight information that is difficult to access or technical language that is unknownand ask learners to use the range of strategies practised to work out the new words, and then say how they
have done it.
62
Curr ref Key Skills
Rw/L2.1 n/a

7/30/2019 First Aid Module 3- Doing the course.doc
http://slidepdf.com/reader/full/first-aid-module-3-doing-the-coursedoc 9/16
Fa Module 3 Doing the course
Working out the meaning of words 3:4
One way of finding the meaning of words is to look them up in a dictionary or glossary (see
page 3:3). But it is often possible to work out the meaning in other ways. Here are some
examples.
63
Listen for anexplanation of the technicalword. The trainer explains thatmyocardium isthe heartmuscle.
The heart muscle, which isalso known as themyocardium, is the part affected in a heart attack …The heart has valves, whichare like pumps, to stop blood
flowing back into the heart …Deoxygenated blood is then pumped from the heart to thelungs …
Listen for anexample whichexplains themeaning of theword. The trainer says that valvesare like pumps.
Ask the trainer, or a friend, if you arenot sure what aword means.
Excuse me, can you explain what
deoxygenated means please?
Look for diagrams thatwill help you tounderstand themeaning of unfamiliar technical vocabulary.
I can look at thisdiagram. It explains themeaning of atriaand ventricles.
TipOnce you understand themeaning of a technical word tryto use it.
7/30/2019 First Aid Module 3- Doing the course.doc
http://slidepdf.com/reader/full/first-aid-module-3-doing-the-coursedoc 10/16
Fa Module 3 Doing the course
PAGE 3:5
Using diagrams (chest compressions)
Diagrams are often used in training, either on their own or in conjunction with written explanations, to convey a precise understanding of practical techniques that would be difficult to convey as fully through words alone.
They are widely used in First Aid training, where precise use of particular techniques can save lives. They canalso be helpful in clarifying technical and semi-technical vocabulary.
MaterialsFlipchart
Learning outcomes (objectives)1 To identify how pictures can work in conjunction with written instructions in explaining a process.
2 To identify how pictures can assist in explaining difficult words in instructions.
Suggested teaching activities• Explain that this activity practises using diagrams to understand instructions. Start by giving oral
instructions for carrying out chest compressions. (You can use the headings 1) to 3) and instructions next todiagrams on learner page for this.) Ask how easy or difficult this was to follow. (Probably quite difficult.)
Why? (Understanding exact position, knowing which finger to use, possibly vocabulary.) What would help?(Diagram, photo)
• Hand out copies of the learner page. Ask what attracts learners’ attention first. (Elicit answer
pictures/diagrams.)
• Ask learners to cover up the text next to the pictures, and try to give exact instructions from the picturesalone. Then discuss what made it difficult. (Describing exactly action and location.)
• Now tell learners to look at the written instructions. Explain that each bullet point is one instruction.
Learners read them aloud one by one, and follow each one with their finger on the diagram.
• Check how learners found this task. (Have they worked with diagrams like this in the past? Is it a methodthey would use in future?) Agree the importance of using diagrams and written instructions in tandem.
• Review the tips in the text boxes. Ask if they contain any new information. (Dealing with unfamiliar
words.)
• Ask learners to use the pictures to explain/define the words that are highlighted. Check if there are other words that they do not recognise. Do the pictures help in understanding them?
• Follow-up with other examples of visuals supported by text from the First Aid manual, using the same
approach to reinforce these skills.
Suggestions for learners who are having difficulties• Ask learners to highlight any words they find difficult, discuss them and suggest they think of alternative ways of
saying the same thing. Remind them that the glossary will help them.
• If ESOL learners have specific vocabulary difficulties (e.g. precise parts of the body) then ask them to modelwhat they are seeing in the diagrams to show understanding.
Suggestions for advanced learnersProvide a set of jumbled illustrations of a particular set of instructions from another part of their First Aid
manual, and ask learners to put them in the correct order and then write a short description/set of instructionsfor each one. Learners can check against the original instructions in the manual that their version covers the
main points accurately.
64
Curr ref Key Skills
Rt/L1.3Rw/L1.2
C1.2
7/30/2019 First Aid Module 3- Doing the course.doc
http://slidepdf.com/reader/full/first-aid-module-3-doing-the-coursedoc 11/16
Fa Module 3 Doing the course
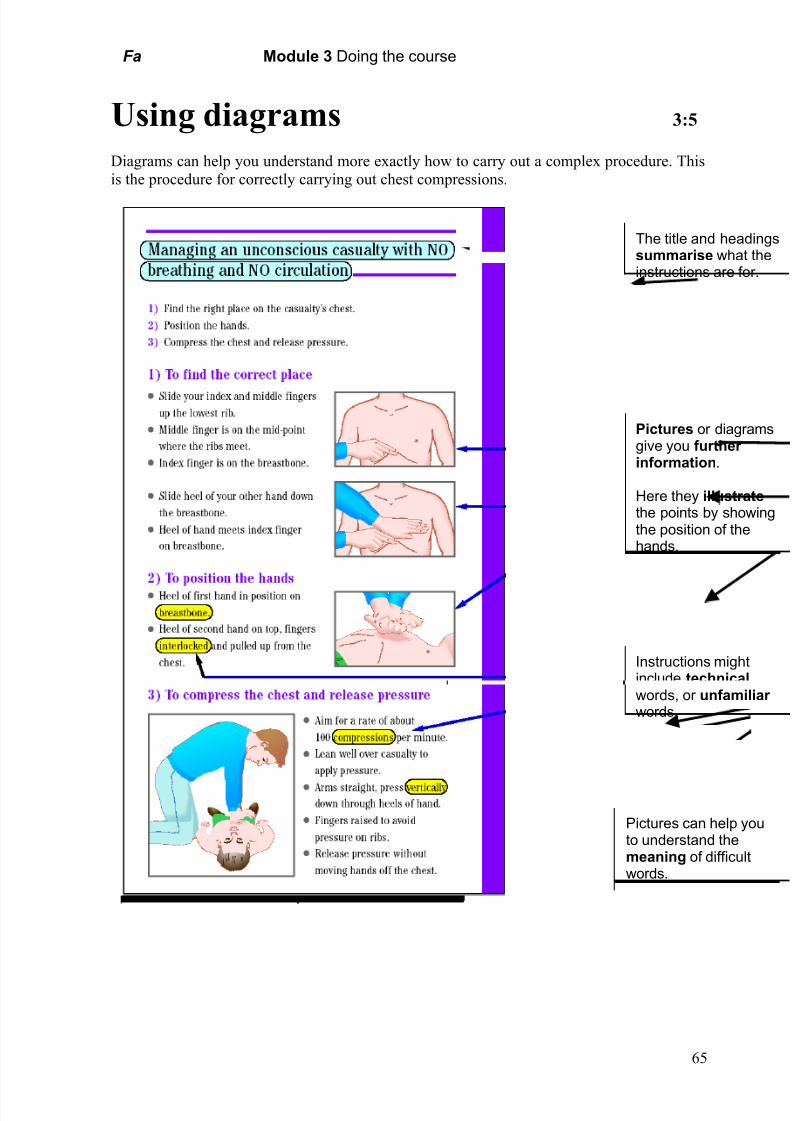
Using diagrams 3:5
Diagrams can help you understand more exactly how to carry out a complex procedure. This
is the procedure for correctly carrying out chest compressions.
65
The title and headingssummarise what theinstructions are for.
Pictures or diagramsgive you further information.
Here they illustratethe points by showingthe position of thehands.
Instructions mightinclude technicalwords, or unfamiliar words.
Pictures can help youto understand themeaning of difficultwords.
7/30/2019 First Aid Module 3- Doing the course.doc
http://slidepdf.com/reader/full/first-aid-module-3-doing-the-coursedoc 12/16
Fa Module 3 Doing the course
PAGE 3:6
Understanding flow chartsFlow charts are increasingly used in training to enable learners to gain an overview of procedures.
Understanding how to ‘read’ a flowchart and use it to review an accident or emergency in order to take the rightdecision is an important skill for learners. It may not be necessary to read every bit of a flow chart but what is
read needs to be read in detail and considered carefully.
MaterialsSource page 0:06; if possible, make and use an OHT of flow chart on learner page.
Learning outcomes (objectives)1 To identify the format and key features of a flow chart.
2 To practise using a flow chart to assess a casualty.
Suggested teaching activities• Find out if learners know what a flow chart is. (A set of steps or instructions presented in a certain way.)
Ask if they remember seeing a flow chart in their workplace.
• Explain that the chart on the learner page is a chart for taking decisions when first assessing a casualty (or
doing a primary survey).
• Mention that some flow charts can answer questions, give information and/or instruct.
• Read through together the information about flow charts in the tip boxes. (If possible, use an OHT of theflow chart to point at the features mentioned.)
• Ask a learner to imagine a casualty; you ask questions about this casualty. The learner replies Yes/No, and
other learners point out the route on the flow chart.
• Hand out the Source page. Read the first case study. Using the flow chart, decide as a group which route to
follow and ask one learner to point it out for the group on the actual flow chart (if an OHT is being used).
• Learners make notes in the Action you would take column of their sheet. (Remove danger if safe to do so.
Continue.) Check that learners keep their notes short, help with spellings if necessary, but point out that thisis not really important on notes they take for themselves (so long as they can understand them).
• Learners do the other two examples in small groups, and then write their notes (individually) on their sheets.
Get feedback from each group, and discuss answers given. Make sure that learners understand that theyneed to use the flow chart to decide what action they would take FIRST with each casualty.
• Ask learners to come up with more examples (from their experience, or as discussed in the training), and
then work out in groups the action they would take. Add notes of these examples in the blank rows on theSource page.
Suggestions for learners who are having difficulties• The format of the flow chart is the most likely problem. To counter this, go through the first example
‘modelling’ your thought processes aloud, e.g. ‘So starting with the first box on the top left, are there goingto be any dangers, either for me or for the casualty? Yes, there are, because of that electric cable. Now what
does it say in this next box – remove danger? So I need to remove the cable, which is the danger. So now
I’ve done that I can follow the arrow down from that box, and I’m back to the review on the left hand sideof the chart.’
• Ask learners to talk through aloud the next examples in the same way. Check while they do this that they
are actually following the right path on the chart.
Suggestions for advanced learnersFor learners who are already familiar with using flow charts and can do so easily, suggest that they try to createa flow chart for themselves, for example of an accident-reporting procedure. They would need to obtain a copy
of the procedure, either from their place of work or the training centre itself, and convert the main features into aflow chart.
66
Curr ref Key SkillsRt/L1.4Rt/L1.5HD1/L1.1
C1.2
7/30/2019 First Aid Module 3- Doing the course.doc
http://slidepdf.com/reader/full/first-aid-module-3-doing-the-coursedoc 13/16
Fa Module 3 Doing the course
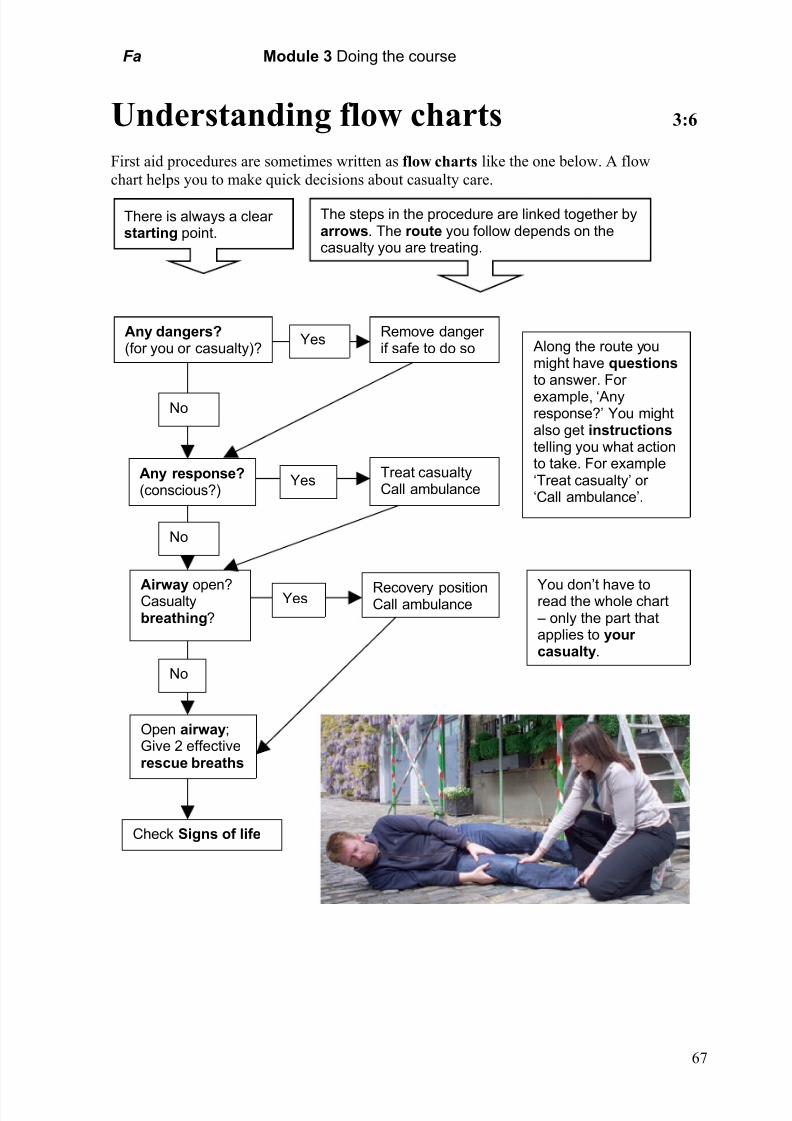
Understanding flow charts 3:6
First aid procedures are sometimes written as flow charts like the one below. A flow
chart helps you to make quick decisions about casualty care.
67
There is always a clear starting point.
The steps in the procedure are linked together byarrows. The route you follow depends on thecasualty you are treating.
Any dangers?(for you or casualty)?
YesRemove danger if safe to do so
Any response?(conscious?)
No
Treat casualtyCall ambulance
Yes
Airway open?Casualtybreathing?
No
Recovery positionCall ambulanceYes
Open airway;Give 2 effectiverescue breaths
No
Check Signs of life
Along the route youmight have questionsto answer. For
example, ‘Anyresponse?’ You mightalso get instructionstelling you what actionto take. For example‘Treat casualty’ or ‘Call ambulance’.
You don’t have toread the whole chart – only the part thatapplies to your casualty.
7/30/2019 First Aid Module 3- Doing the course.doc
http://slidepdf.com/reader/full/first-aid-module-3-doing-the-coursedoc 14/16
Fa Module 3 Doing the course
PAGE 3:7
Writing short answers
Many First Aid courses require learners to write their own answers to questions in the course manual. In generalthe emphasis is on short answers in note form, and it is important for learners to appreciate the type of answer
required, and understand how to complete them, without putting themselves under pressure by exaggerating therequirements (for example in terms of spelling, grammar, etc.).
MaterialsSource material for this page (0:07)
Learning outcomes (objectives)1 To identify different methods of testing and reviewing learning on a First Aid course.
2 To practise writing effective short answers on First Aid topics.
Suggested teaching activities• Explain to learners that this activity will help them to understand about shock as a medical condition, and to
write short answers about it.
• Discuss how learners test their own knowledge, on this or any other topic. (Do they do the written tasks in
the course book?)
• Hand out copies of the learner page and count the different types of question on the page. (Each type is in a
different coloured box.)
• Go through the tips for answering each of the four different question types with learners.
• Ask learners if they have completed multiple-choice questions before. (If so, did they find it easy? Were
they successful?) Discuss also possible dangers with multiple-choice tests (e.g. picking the ‘obvious’answer without checking in the text, reading only part of the question, etc. Refer again to the tips on the
learner page.)
• Point out the advantages – the answer is already written, you only have to pick the right one! (Some of the
answers to choose from will be so clearly wrong that they are not an option.)
Source page• Hand out the information sheet on ‘Recognising and treating shock’ (Source page 0:07).
• Go through the information with learners, encouraging them to use the glossary to look up and make anote of any terms or words that they are unsure of.
• Ask learners to work in pairs or small groups to write short answers to the three questions at the top of the
learner page (write notes/make a list/fill in gaps) and the two multiple choice questions at the bottom of the page.
• Go over the answers as a whole group and allow learners time to correct their answers as required.
• Discuss which question types learners found easiest/most difficult, and why. (If the problem is writing the
answers, are learners trying to write too much?)
Suggestions for learners who are having difficulties• One difficulty, particularly for ESOL learners, may be gap-fill exercises, since the clues to help pick the
missing word may not be so obvious. If so, they should work through more tasks of this type, in pairs or small groups, or with a native speaker.
• Help learners to find the information in the text that they need to answer each question.
• If learners find it difficult to fully understand the questions, they can select key words and write them on
cards. This will help them search in the text for words which match those on the cards.
• These learners may well need extra help with the language in the Source text. Encourage learners to make a
dot with a felt tip pen after each sentence, and force themselves to stop at each dot and check whether theyhave understood what they have just read.
• Assist learners in using the glossary to look up difficult words.
Suggestions for advanced learnersMore advanced learners could try to express their answers in their own words, perhaps with a particular reader in mind (e.g. a less experienced trainee, or a person with limited literacy skills).
68
Curr ref Key Skills
Wt/L1.2Wt/L1.5
C2.3

7/30/2019 First Aid Module 3- Doing the course.doc
http://slidepdf.com/reader/full/first-aid-module-3-doing-the-coursedoc 15/16
Fa Module 3 Doing the course
Writing short answers 3:7
On your First Aid course you will need to write short answers to different types of question.
This page gives you some tips to help you record your answers correctly.
69
Write your answer here. ________________________ ________________________ ________________________ ________________________
Write notesMake a brief note of whatshock is.
What you should not do _____________________ _____________________
_____________________ _____________________ _____________________
Make a listMake a list of thethings youshould not do
when treating aperson withshock.
There is not muchspace provided – soyour answer shouldbe short – key wordsonly, not a completesentence.
There are 5 bulletpoints – so you knowthat there are 5 thingsyou should not do.
Fill in gapsFill in the spaces to showdifferent ways that blood canbe lost. Write one word onlyin each space.
Blood may be lost through: _______ bleeding (e.g. cuts) _______ bleeding (e.g. damaged organ)
Multiple choice questionsQuestions may have a sentence thatis not finished. If so, choose thephrase that completes it correctly.Read the whole question carefully.Pay attention to words in CAPITALSor underlined.In multiple choice there is only one
right answer. If you think there aremore, choose the best answer.
Reduction in the fluid circulating in thebody is most often caused by:overheatingdiarrhoealoss of bloodvomiting A person suffering from shock will be:breathing fast
breathing slownot breathing
Now use the information on thesource page to answer all thedifferent questions.

7/30/2019 First Aid Module 3- Doing the course.doc
http://slidepdf.com/reader/full/first-aid-module-3-doing-the-coursedoc 16/16
Fa Module 3 Doing the course
70