Embed Size (px)
Citation preview
Operator’s guide
FA/FB headVersion 2.3
Published by:
ZSK Stickmaschinen GmbH- Dokumentation -D-47800 Krefeld-GartenstadtMagdeburger Str. 38 - 40 © ’09 by ZSK, Printed in Germany

Subject to change © ’09 by ZSK, Printed in Germany
Contents
00820t23IVZ.fm 15.6.09/Kx FA/FB head – Version 2.3 C - 1
Contents
Embroidery head diagram 1 - 1
Embroidery head switch 2 - 1
Switching embroidery head on and off . . . . . . . . . . . . . . . . . . . . . . . 2 - 1
Indication of a thread break . . . . . . . . . . . . . . . . . . . . . . . . . . . . . 2 - 2
Preparing to embroider 3 - 1
Exchange needle . . . . . . . . . . . . . . . . . . . . . . . . . . . . . . . . . . . . . . . 3 - 2
Removing needle. . . . . . . . . . . . . . . . . . . . . . . . . . . . . . . . . . . 3 - 2
Inserting needle . . . . . . . . . . . . . . . . . . . . . . . . . . . . . . . . . . . . 3 - 3
Filling yarn rack. . . . . . . . . . . . . . . . . . . . . . . . . . . . . . . . . . . . . . . . . 3 - 4
Threading upper thread . . . . . . . . . . . . . . . . . . . . . . . . . . . . . . . . . . 3 - 6
Pretension regulator (holding tension) . . . . . . . . . . . . . . . . . . . . . 3 - 6
Guide tubing. . . . . . . . . . . . . . . . . . . . . . . . . . . . . . . . . . . . . . . . . 3 - 6
Thread monitor reel . . . . . . . . . . . . . . . . . . . . . . . . . . . . . . . . . . . 3 - 7
Main tension regulator (bobbin tension). . . . . . . . . . . . . . . . . . . . 3 - 7
Threading . . . . . . . . . . . . . . . . . . . . . . . . . . . . . . . . . . . . . . . . . . . 3 - 8
Run of thread through pretension and
main tension regulators . . . . . . . . . . . . . . . . . . . . . . . . . . . . 3 - 10
Changing bobbin thread bobbin . . . . . . . . . . . . . . . . . . . . . . . . . . . 3 - 11
Taking out bobbin case . . . . . . . . . . . . . . . . . . . . . . . . . . . . . . . 3 - 11
Inserting bobbin thread bobbin. . . . . . . . . . . . . . . . . . . . . . . . . . 3 - 12
Checking direction of rotation of bobbin. . . . . . . . . . . . . . . . . . . 3 - 12
Cutting off bobbin thread . . . . . . . . . . . . . . . . . . . . . . . . . . . . . . 3 - 13
Before inserting the bobbin case: . . . . . . . . . . . . . . . . . . . . . 3 - 13
Cleaning gap . . . . . . . . . . . . . . . . . . . . . . . . . . . . . . . . . . . . . . . 3 - 14
Inserting bobbin case . . . . . . . . . . . . . . . . . . . . . . . . . . . . . . . . . 3 - 14
Adjusting thread tension . . . . . . . . . . . . . . . . . . . . . . . . . . . . . . . . . 3 - 15
Contents
C - 2 FA/FB head – Version 2.3 00820t23IVZ.fm 15.6.09/Kx
Upper thread tension, adjusting . . . . . . . . . . . . . . . . . . . . . . 3 - 15
Bobbin thread tension, adjusting . . . . . . . . . . . . . . . . . . . . . . 3 - 16
Adjusting presser foot height . . . . . . . . . . . . . . . . . . . . . . . . . . . . . 3 - 17
Rotating stop pin . . . . . . . . . . . . . . . . . . . . . . . . . . . . . . . . . . 3 - 17
Determining position of stop pin . . . . . . . . . . . . . . . . . . . . . . 3 - 18
Stitch types 4 - 1
Sequin embroidery . . . . . . . . . . . . . . . . . . . . . . . . . . . . . . . . . . . . . . 4 - 1
Boring embroidery . . . . . . . . . . . . . . . . . . . . . . . . . . . . . . . . . . . . . . 4 - 1
Double-roller cord embroidery . . . . . . . . . . . . . . . . . . . . . . . . . . . . . 4 - 2
Cord/loop embroidery . . . . . . . . . . . . . . . . . . . . . . . . . . . . . . . . . . . . 4 - 2
Cap embroidery . . . . . . . . . . . . . . . . . . . . . . . . . . . . . . . . . . . . . . . . 4 - 3
Reel-to-reel tape embroidery . . . . . . . . . . . . . . . . . . . . . . . . . . . . . . 4 - 3
Embroidery materials and needles 5 - 1
Embroidery backing and underlay materials. . . . . . . . . . . . . . . . . . . 5 - 1
Yarns . . . . . . . . . . . . . . . . . . . . . . . . . . . . . . . . . . . . . . . . . . . . . . . . 5 - 2
Needles. . . . . . . . . . . . . . . . . . . . . . . . . . . . . . . . . . . . . . . . . . . . . . . 5 - 2
Recommended needles . . . . . . . . . . . . . . . . . . . . . . . . . . . . . . . . 5 - 2
Yarn and needle size combinations . . . . . . . . . . . . . . . . . . . . . . . 5 - 3
Material and needle point combinations. . . . . . . . . . . . . . . . . . . . 5 - 3
Conventional round point (R point) . . . . . . . . . . . . . . . . . . . . . 5 - 4
Small ball point (SES point). . . . . . . . . . . . . . . . . . . . . . . . . . . 5 - 4
Medium ball point (SUK point). . . . . . . . . . . . . . . . . . . . . . . . . 5 - 4
Special features of tubular system machines . . . . . . . . . . . . . . . . . . 5 - 5
Maintenance and troubleshooting 6 - 1
For your safety . . . . . . . . . . . . . . . . . . . . . . . . . . . . . . . . . . . . . . . . . 6 - 1
Lubricants . . . . . . . . . . . . . . . . . . . . . . . . . . . . . . . . . . . . . . . . . . . . . 6 - 1
Overview. . . . . . . . . . . . . . . . . . . . . . . . . . . . . . . . . . . . . . . . . . . . . . 6 - 2

Contents
00820t23IVZ.fm 15.6.09/Kx FA/FB head – Version 2.3 C - 3
Troubleshooting . . . . . . . . . . . . . . . . . . . . . . . . . . . . . . . . . . . . . . . . 6 - 8
Index I - 1

Contents
C - 4 FA/FB head – Version 2.3 00820t23IVZ.fm 15.6.09/Kx
Embroidery head diagram
00820123.fm 15.6.09/Kx FA/FB head – Version 2.3 1 - 1
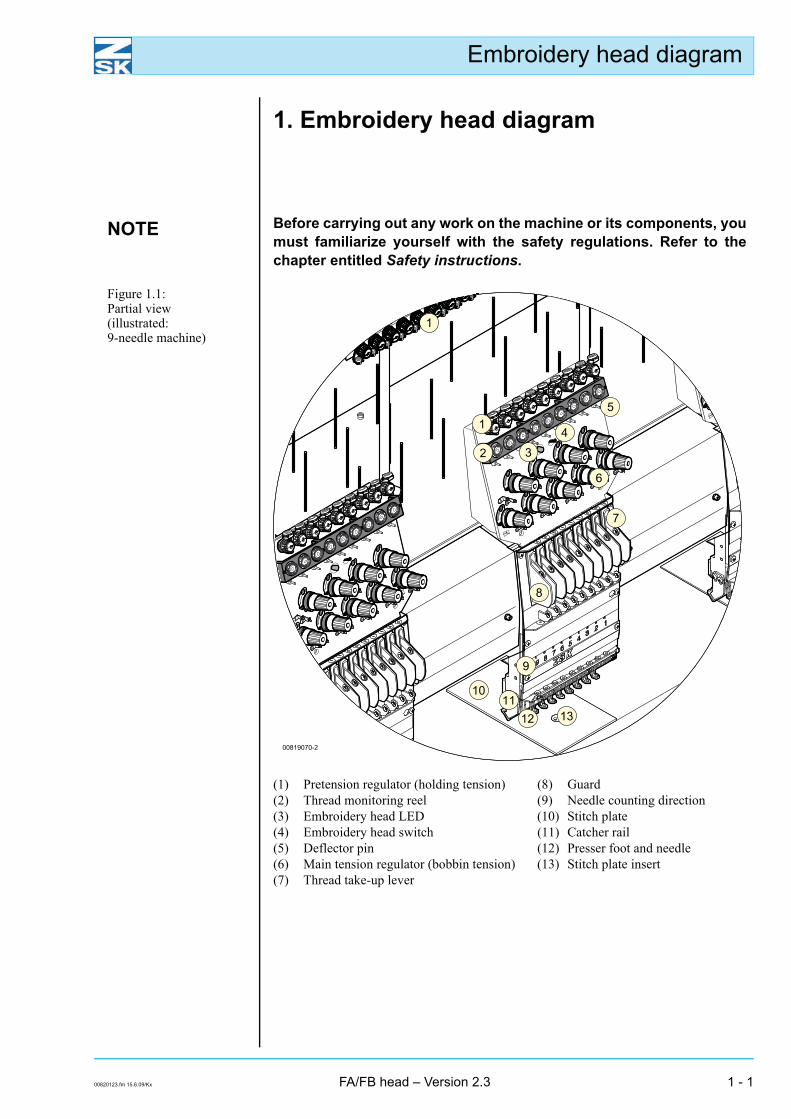
1. Embroidery head diagram
NOTE Before carrying out any work on the machine or its components, youmust familiarize yourself with the safety regulations. Refer to thechapter entitled Safety instructions.
Figure 1.1: Partial view(illustrated: 9-needle machine)
(1) Pretension regulator (holding tension) (8) Guard(2) Thread monitoring reel (9) Needle counting direction(3) Embroidery head LED (10) Stitch plate(4) Embroidery head switch (11) Catcher rail(5) Deflector pin (12) Presser foot and needle(6) Main tension regulator (bobbin tension) (13) Stitch plate insert(7) Thread take-up lever
Embroidery head diagram
1 - 2 FA/FB head – Version 2.3 00820123.fm/Kx15.6.09
Embroidery head switch
00820223.fm 15.6.09/Kx FA/FB head – Version 2.3 2 - 1
2. Embroidery head switch
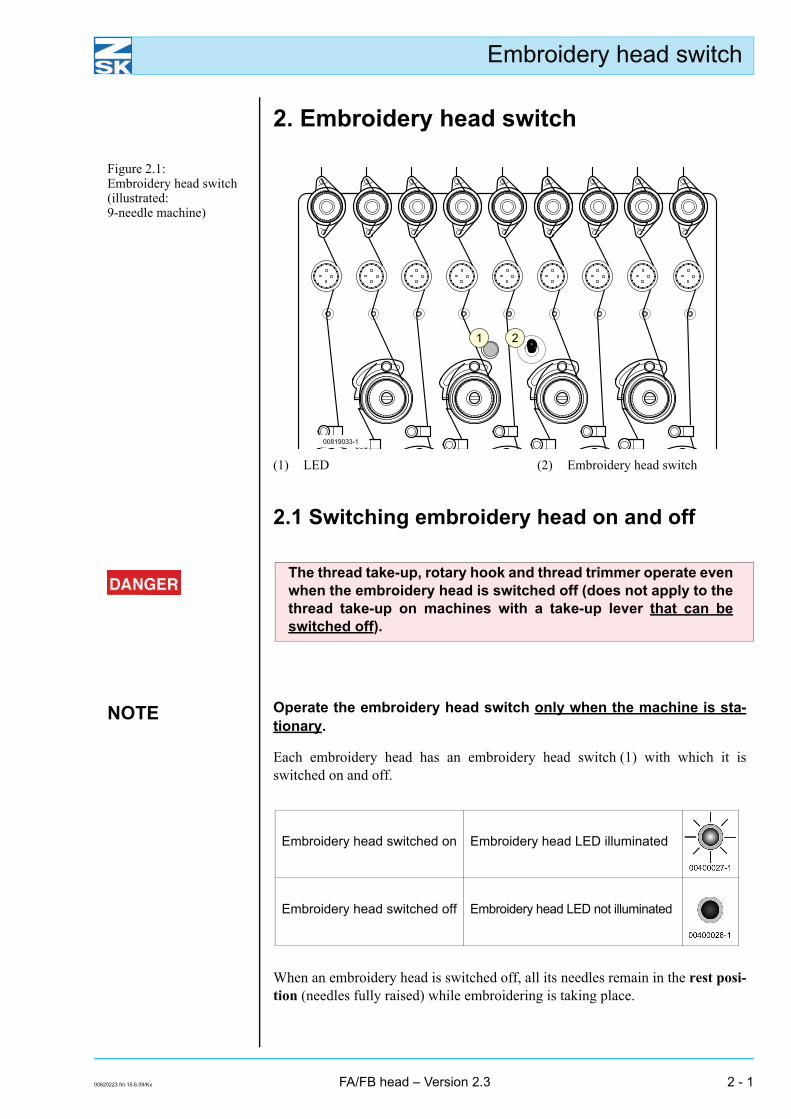
Figure 2.1: Embroidery head switch(illustrated: 9-needle machine)
(1) LED (2) Embroidery head switch
2.1 Switching embroidery head on and off
The thread take-up, rotary hook and thread trimmer operate evenwhen the embroidery head is switched off (does not apply to thethread take-up on machines with a take-up lever that can beswitched off).
NOTE Operate the embroidery head switch only when the machine is sta-tionary.
Each embroidery head has an embroidery head switch (1) with which it isswitched on and off.
Embroidery head switched on Embroidery head LED illuminated
Embroidery head switched off Embroidery head LED not illuminated
When an embroidery head is switched off, all its needles remain in the rest posi-tion (needles fully raised) while embroidering is taking place.
Embroidery head switch
2 - 2 FA/FB head – Version 2.3 00820223.fm/Kx15.6.09
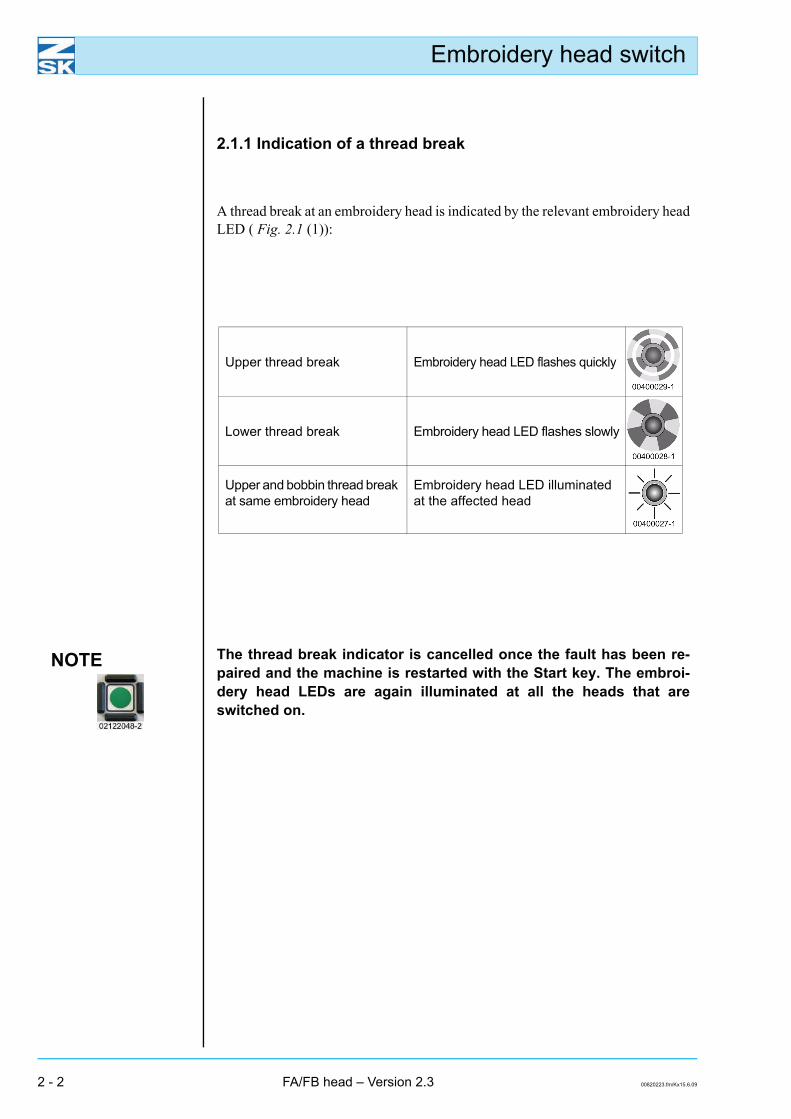
2.1.1 Indication of a thread break
A thread break at an embroidery head is indicated by the relevant embroidery headLED ( Fig. 2.1 (1)):
Upper thread break Embroidery head LED flashes quickly
Lower thread break Embroidery head LED flashes slowly
Upper and bobbin thread break at same embroidery head
Embroidery head LED illuminated at the affected head
NOTE The thread break indicator is cancelled once the fault has been re-paired and the machine is restarted with the Start key. The embroi-dery head LEDs are again illuminated at all the heads that areswitched on.
Preparing to embroider
00820323.fm 15.6.09/Kx FA/FB head – Version 2.3 3 - 1
3. Preparing to embroider
As a general rule, carry out the work described here only whenthe machine is stationary. Make sure that no-one is able to startthe machine while you are fitting the embroidery material andsetting it up.
This chapter describes all the work that has to be executed before embroidering.It covers the fundamental manual tasks that the operator also has to execute afterfaults (e.g. changing needles and threading) or in order to optimize the embroi-dered work (e.g. adjusting thread tension).
Preparing to embroider
3 - 2 FA/FB head – Version 2.3 00820323.fm/Kx15.6.09
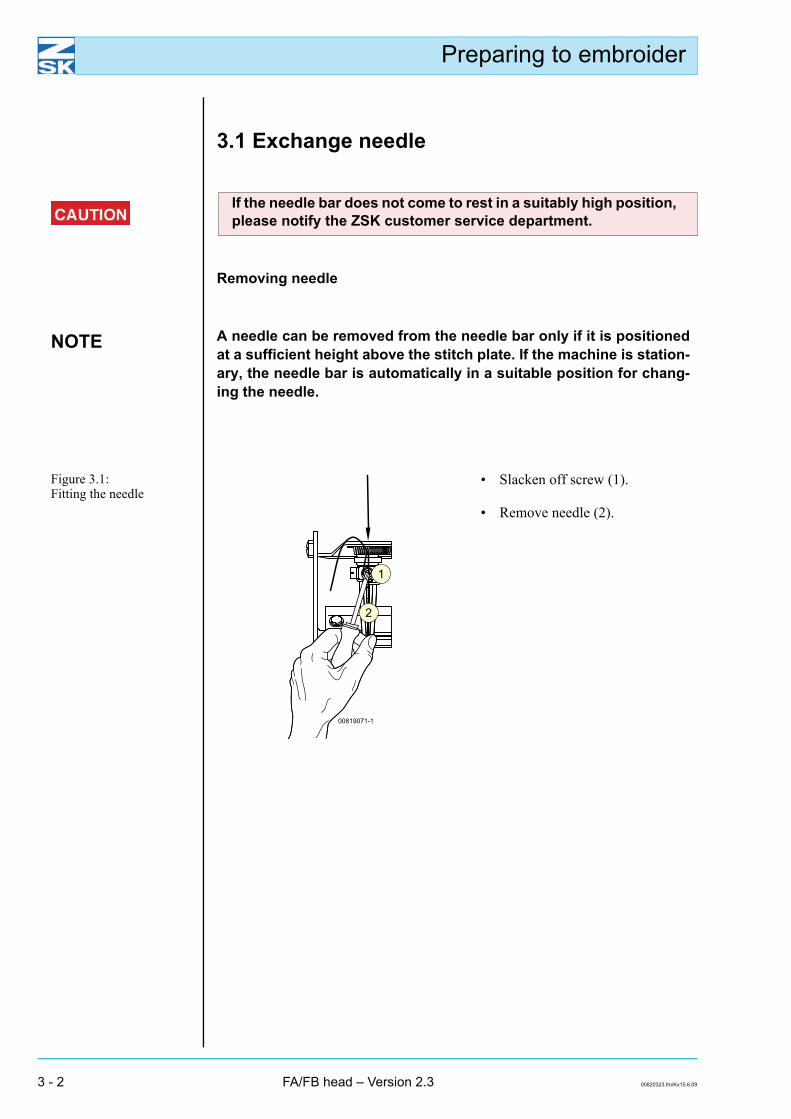
3.1 Exchange needle
If the needle bar does not come to rest in a suitably high position,please notify the ZSK customer service department.
Removing needle
NOTE A needle can be removed from the needle bar only if it is positionedat a sufficient height above the stitch plate. If the machine is station-ary, the needle bar is automatically in a suitable position for chang-ing the needle.
Figure 3.1: Fitting the needle
• Slacken off screw (1).
• Remove needle (2).
Preparing to embroider
00820323.fm 15.6.09/Kx FA/FB head – Version 2.3 3 - 3
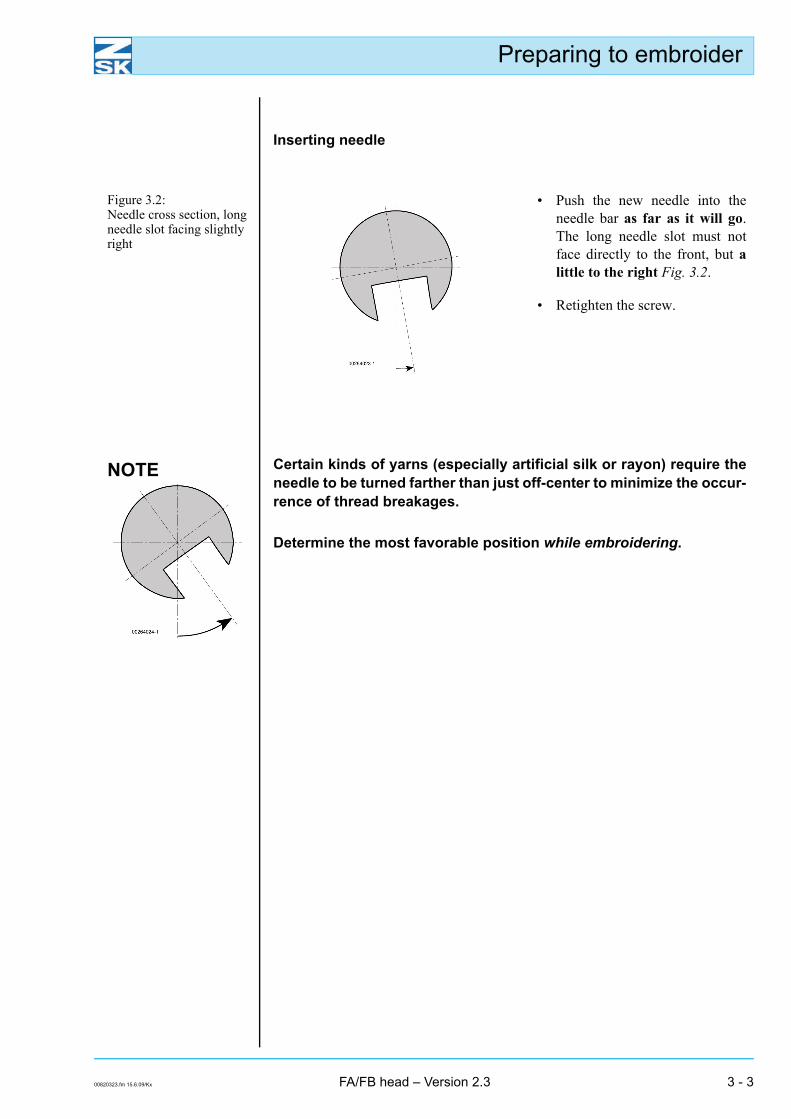
Inserting needle
Figure 3.2: Needle cross section, long needle slot facing slightly right
• Push the new needle into theneedle bar as far as it will go.The long needle slot must notface directly to the front, but alittle to the right Fig. 3.2.
• Retighten the screw.
NOTE Certain kinds of yarns (especially artificial silk or rayon) require theneedle to be turned farther than just off-center to minimize the occur-rence of thread breakages.
Determine the most favorable position while embroidering.
Preparing to embroider
3 - 4 FA/FB head – Version 2.3 00820323.fm/Kx15.6.09
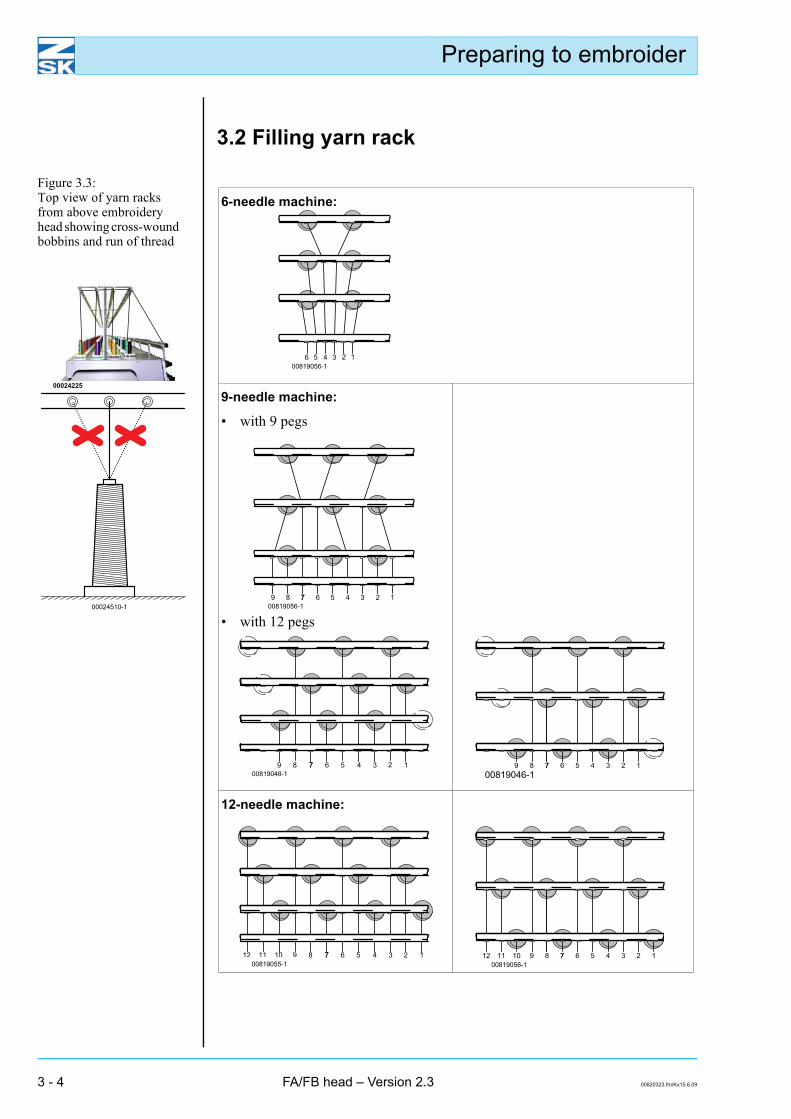
Figure 3.3: Top view of yarn racks from above embroidery head showing cross-wound bobbins and run of thread
3.2 Filling yarn rack
00024225
6-needle machine:
9-needle machine:
• with 9 pegs
• with 12 pegs
12-needle machine:
Preparing to embroider
00820323.fm 15.6.09/Kx FA/FB head – Version 2.3 3 - 5
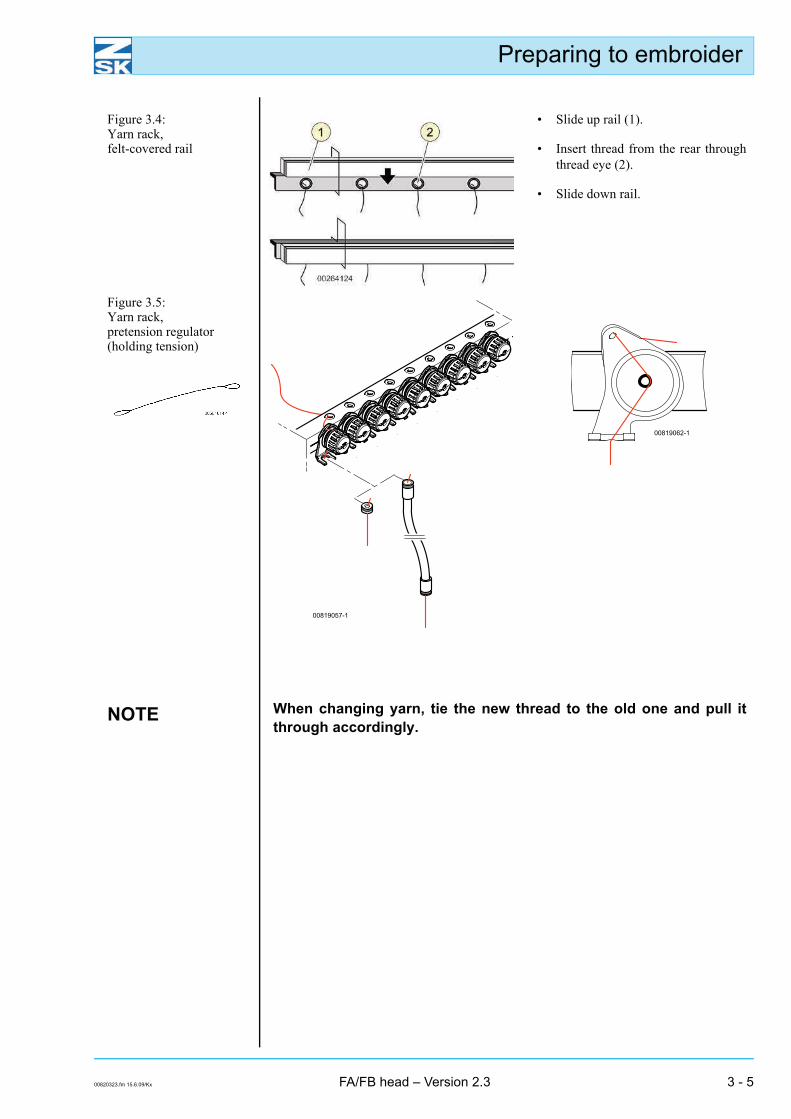
Figure 3.4: Yarn rack, felt-covered rail
• Slide up rail (1).
• Insert thread from the rear throughthread eye (2).
• Slide down rail.
Figure 3.5: Yarn rack, pretension regulator (holding tension)
NOTE When changing yarn, tie the new thread to the old one and pull itthrough accordingly.
Preparing to embroider
3 - 6 FA/FB head – Version 2.3 00820323.fm/Kx15.6.09
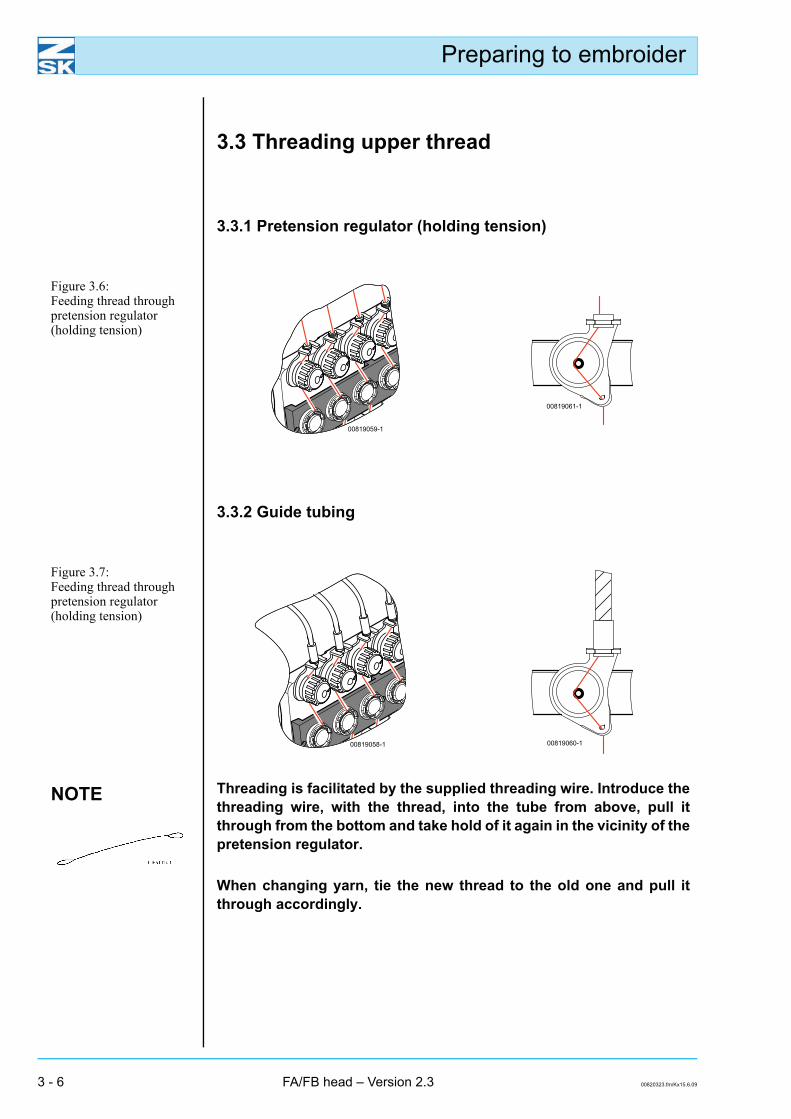
3.3 Threading upper thread
3.3.1 Pretension regulator (holding tension)
Figure 3.6: Feeding thread through pretension regulator (holding tension)
3.3.2 Guide tubing
Figure 3.7: Feeding thread through pretension regulator (holding tension)
NOTE Threading is facilitated by the supplied threading wire. Introduce thethreading wire, with the thread, into the tube from above, pull itthrough from the bottom and take hold of it again in the vicinity of thepretension regulator.
When changing yarn, tie the new thread to the old one and pull itthrough accordingly.
Preparing to embroider
00820323.fm 15.6.09/Kx FA/FB head – Version 2.3 3 - 7
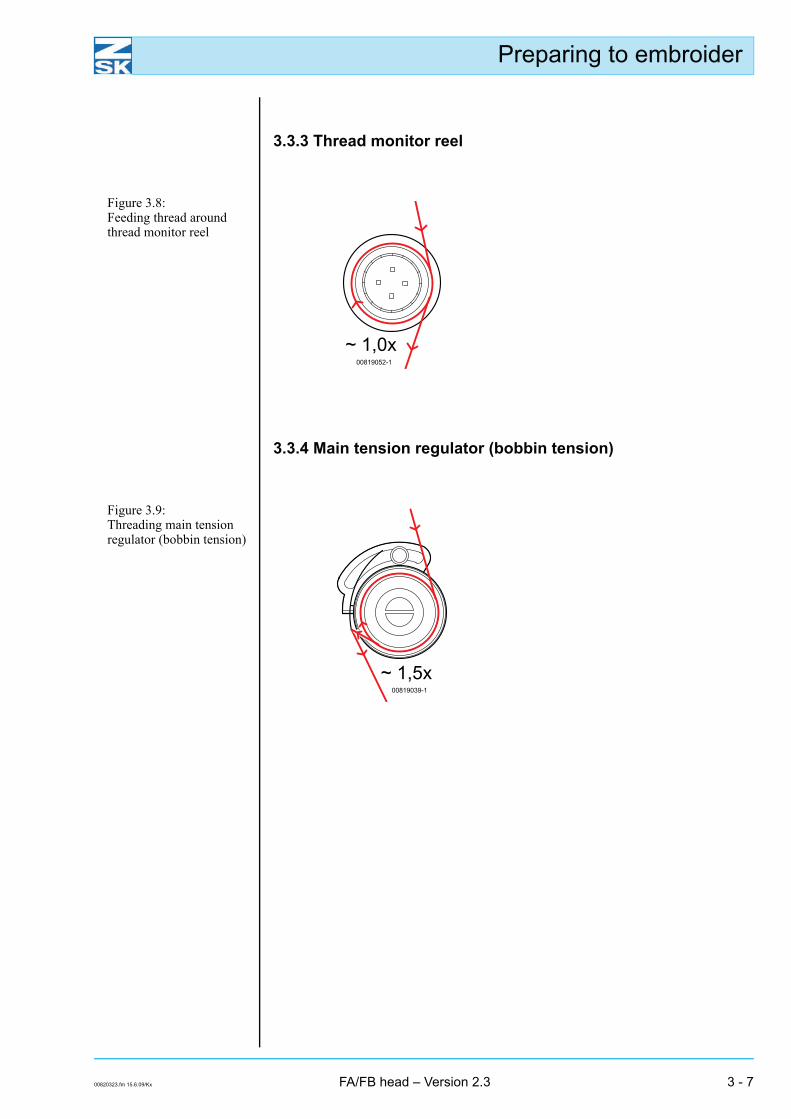
3.3.3 Thread monitor reel
Figure 3.8: Feeding thread around thread monitor reel
3.3.4 Main tension regulator (bobbin tension)
Figure 3.9: Threading main tension regulator (bobbin tension)
Preparing to embroider
3 - 8 FA/FB head – Version 2.3 00820323.fm/Kx15.6.09
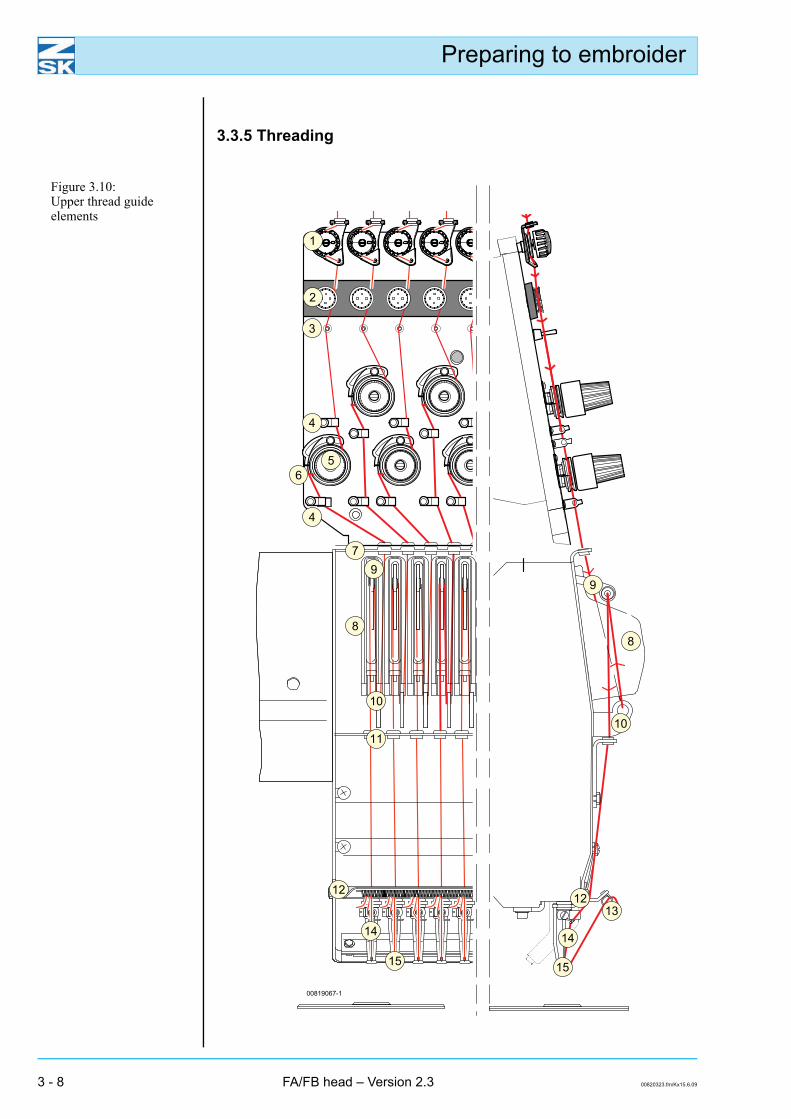
3.3.5 Threading
Figure 3.10: Upper thread guide elements
Preparing to embroider
00820323.fm 15.6.09/Kx FA/FB head – Version 2.3 3 - 9
(1) Pretension regulator (holding tension) (9) Guard(2) Thread monitoring reel (10) Deflection eye(3) Deflector pin (11) Guide rail, center(4) Eyelet (12) Clamping rail(5) Main tension regulator (bobbin tension) (13) Thread gripper(6) Thread controller spring (14) Needle(7) Guide rail, top (15) Presser foot(8) Thread take-up lever
Preparing to embroider
3 - 10 FA/FB head – Version 2.3 00820323.fm/Kx15.6.09
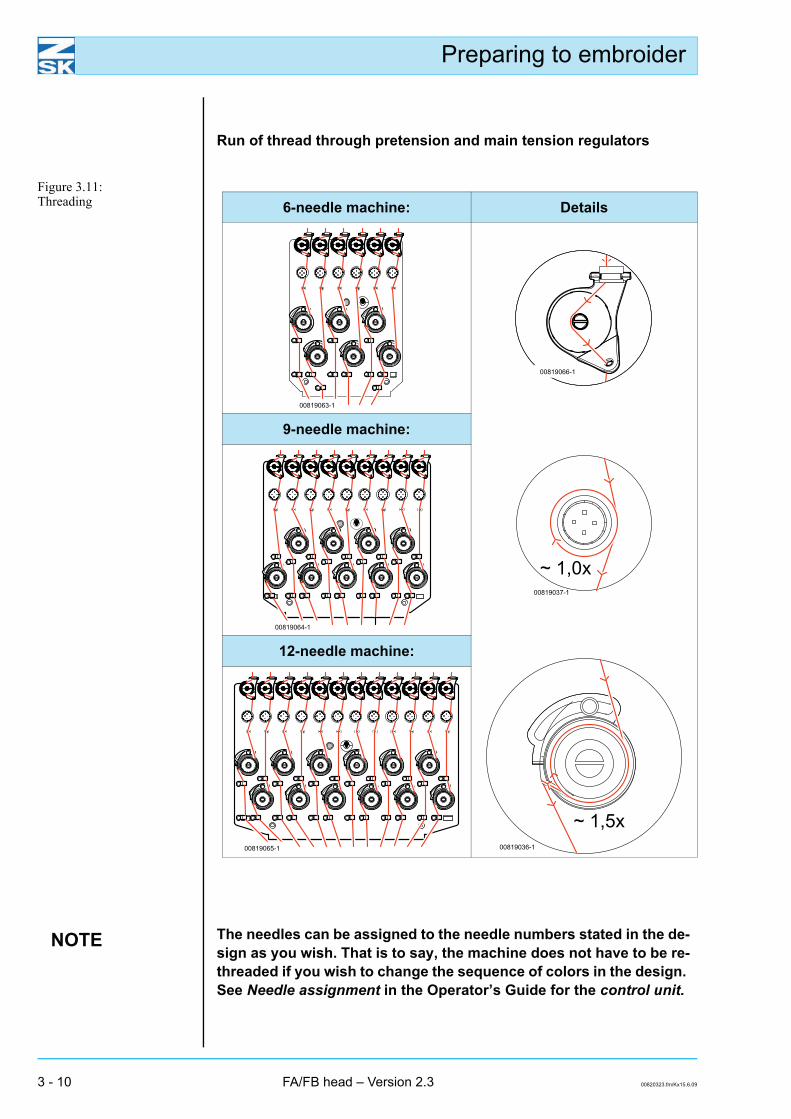
Figure 3.11: Threading
Run of thread through pretension and main tension regulators
6-needle machine: Details
9-needle machine:
12-needle machine:
~ 1,0 x
NOTE The needles can be assigned to the needle numbers stated in the de-sign as you wish. That is to say, the machine does not have to be re-threaded if you wish to change the sequence of colors in the design. See Needle assignment in the Operator’s Guide for the control unit.
Preparing to embroider
00820323.fm 15.6.09/Kx FA/FB head – Version 2.3 3 - 11
3.4 Changing bobbin thread bobbin
3.4.1 Taking out bobbin case
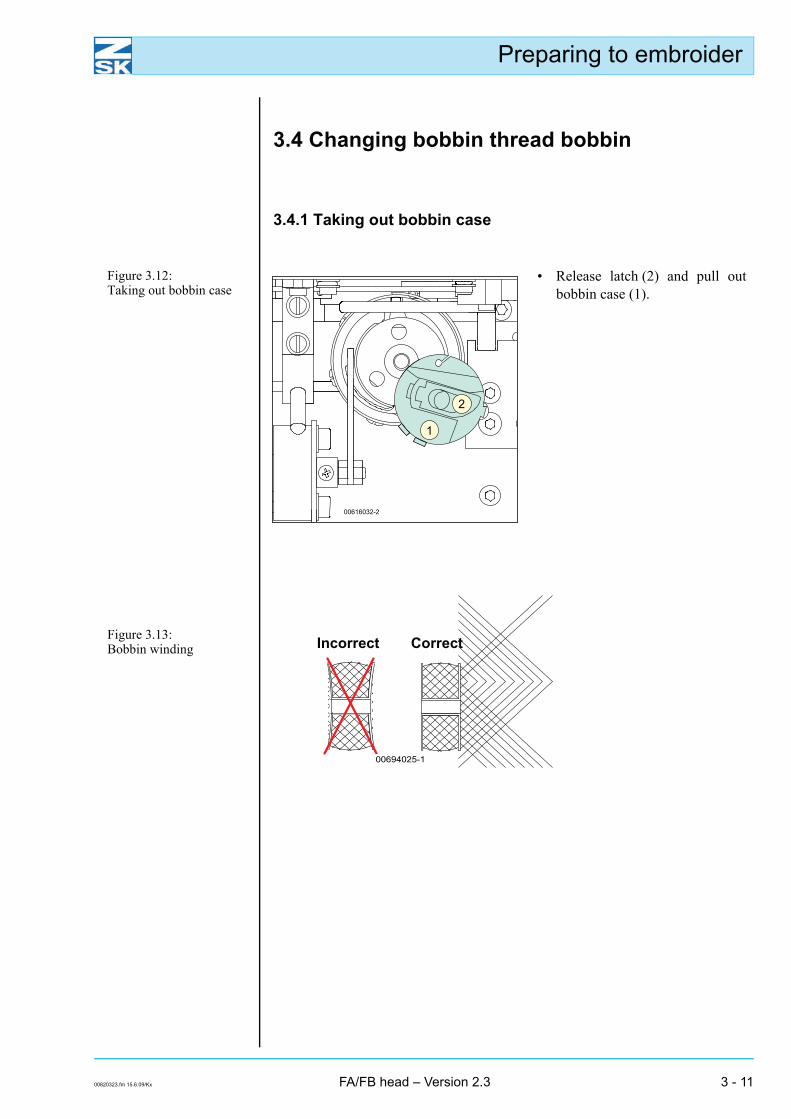
Figure 3.12: Taking out bobbin case
• Release latch (2) and pull outbobbin case (1).
Figure 3.13: Bobbin winding Incorrect Correct
Preparing to embroider
3 - 12 FA/FB head – Version 2.3 00820323.fm/Kx15.6.09
Insert thread in guide hole (3).
3.4.2 Inserting bobbin thread bobbin
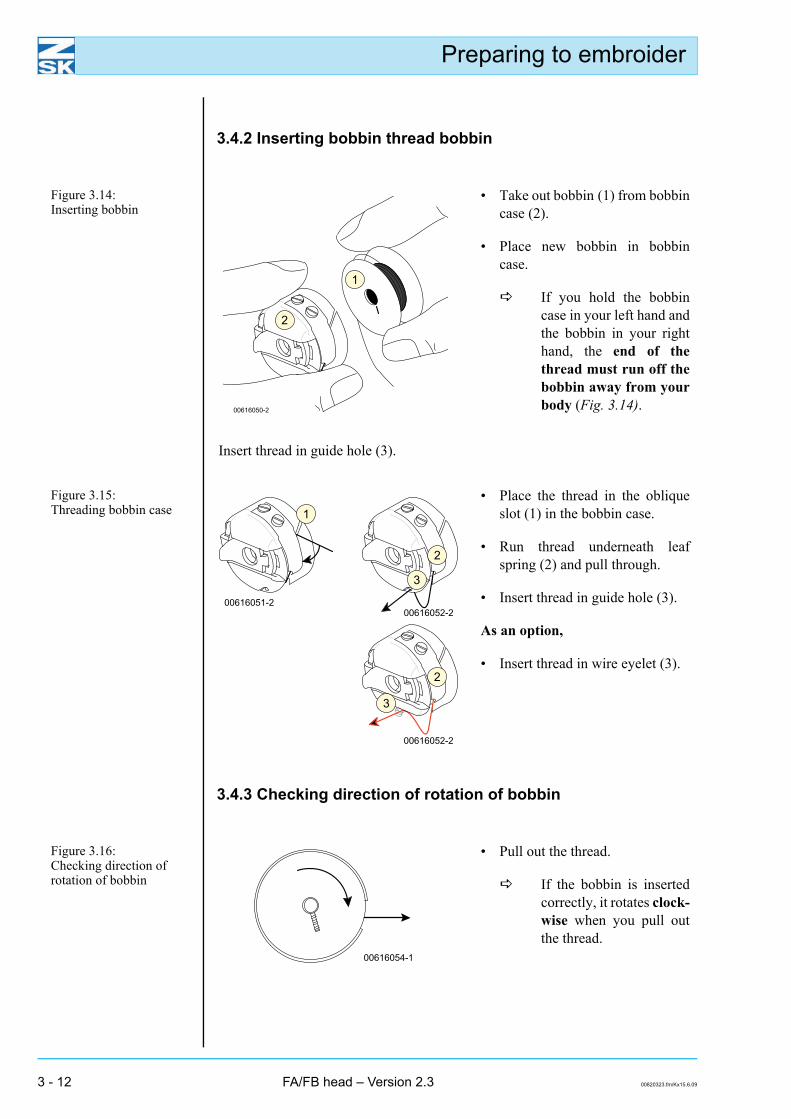
Figure 3.14: Inserting bobbin
• Take out bobbin (1) from bobbincase (2).
• Place new bobbin in bobbincase.
If you hold the bobbincase in your left hand andthe bobbin in your righthand, the end of thethread must run off thebobbin away from yourbody (Fig. 3.14).
Figure 3.15: Threading bobbin case
• Place the thread in the obliqueslot (1) in the bobbin case.
• Run thread underneath leafspring (2) and pull through.
• Insert thread in guide hole (3).
As an option,
• Insert thread in wire eyelet (3).
3.4.3 Checking direction of rotation of bobbin
Figure 3.16: Checking direction of rotation of bobbin
• Pull out the thread.
If the bobbin is insertedcorrectly, it rotates clock-wise when you pull outthe thread.
Preparing to embroider
00820323.fm 15.6.09/Kx FA/FB head – Version 2.3 3 - 13
3.4.4 Cutting off bobbin thread
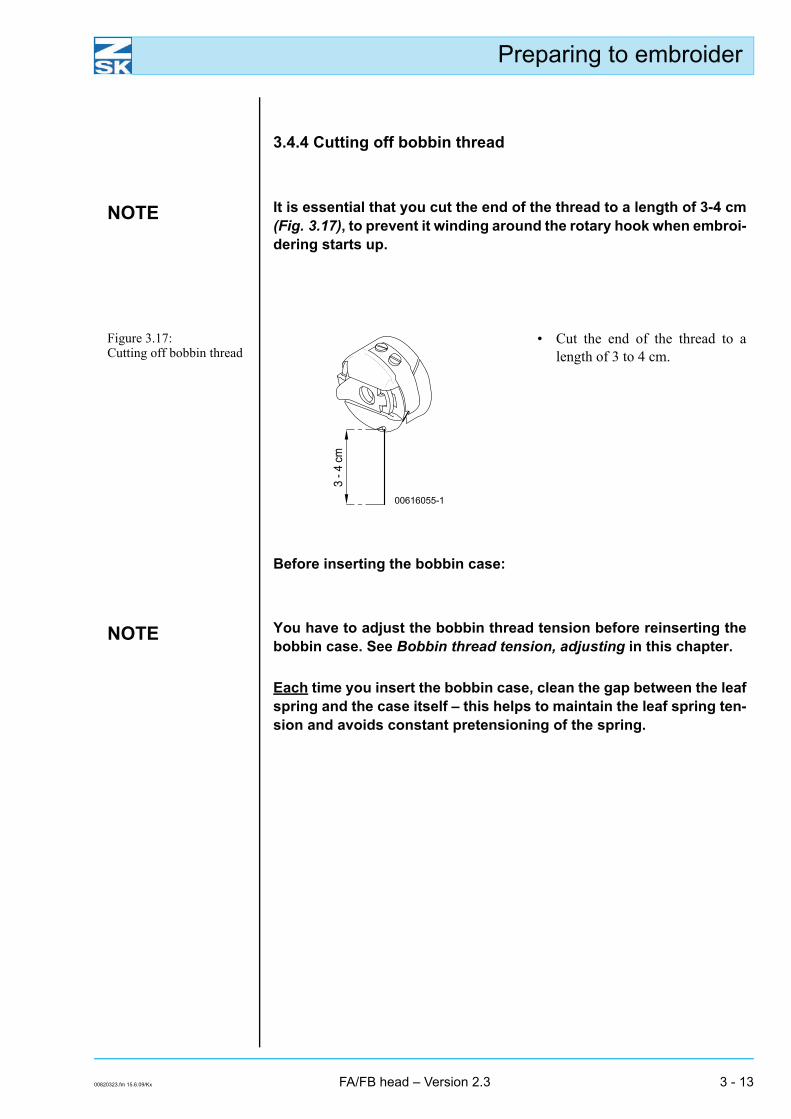
NOTE It is essential that you cut the end of the thread to a length of 3-4 cm(Fig. 3.17), to prevent it winding around the rotary hook when embroi-dering starts up.
Figure 3.17: Cutting off bobbin thread
• Cut the end of the thread to alength of 3 to 4 cm.
3 - 4
cm
Before inserting the bobbin case:
NOTE You have to adjust the bobbin thread tension before reinserting thebobbin case. See Bobbin thread tension, adjusting in this chapter.
Each time you insert the bobbin case, clean the gap between the leafspring and the case itself – this helps to maintain the leaf spring ten-sion and avoids constant pretensioning of the spring.

Preparing to embroider
3 - 14 FA/FB head – Version 2.3 00820323.fm/Kx15.6.09
3.4.5 Cleaning gap
Figure 3.18: Cleaning gap Each time you insert the bobbin:
• Hold the bobbin firmly and pulllightly on bobbin thread (2).
This lifts the leafspring (1) slightly.
• Clean gap (3) by blowing.
3.4.6 Inserting bobbin case
Figure 3.19: Bobbin case, inserting
• Insert the bobbin case in the ro-tary hook again with latch (1)opened, rotating it until it engag-es in the correct position.
NOTE Make certain that the latch is completely closed.
Preparing to embroider
00820323.fm 15.6.09/Kx FA/FB head – Version 2.3 3 - 15
.
3.5 Adjusting thread tension
NOTE The thread tension has a significant influence on the quality of theembroidery. The optimum tension can be obtained only by trial anderror on samples.
General rule: The thread tension is good if about 2/3 upper thread and 1/3 bob-bin thread are visible on the back of the embroidery.
If the tension is too low, the embroidered work will be untidy with undesirableloops; it will also cause knots and thread breaks.
If the tension is too high, the embroidered material will become gathered and theyarn will be exposed to an excessive load. This will result in puckering as well asneedle and thread breaks.
Upper thread tension, adjusting
NOTE Generate 2/3 of the upper thread tension with the pretension regula-tor (holding tension) and 1/3 with the main tension regulator (bobbintension).
Adjust the upper thread tension with the pretension and main tension regulators.
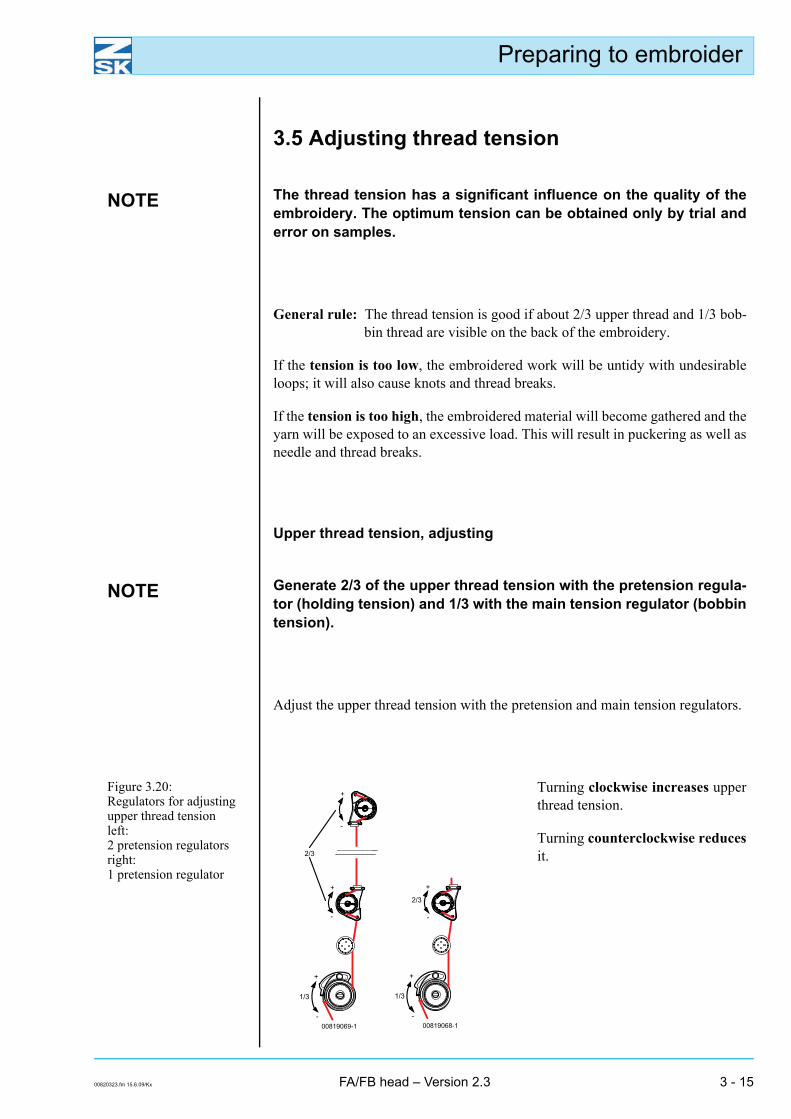
Figure 3.20: Regulators for adjusting upper thread tension left: 2 pretension regulatorsright:1 pretension regulator
Turning clockwise increases upperthread tension.
Turning counterclockwise reducesit.

Preparing to embroider
3 - 16 FA/FB head – Version 2.3 00820323.fm/Kx15.6.09
Bobbin thread tension, adjusting
Adjust the bobbin thread tension by turning the screw in the leaf spring.
Figure 3.21: Bobbin thread tension, adjusting
Τightening screw (1) increasesbobbin thread tension.
Slackening off screw (1) decreasesbobbin thread tension.
NOTE For most applications the appropriate bobbin thread tension is in therange 3 to 5 dN (corresponds to a weight of approx. 30 to 50 grams). Avoid significantly higher bobbin thread tension – if necessary, mod-ify the ratio between the upper and bobbin thread tension by adjust-ing the upper thread tension.
Preparing to embroider
00820323.fm 15.6.09/Kx FA/FB head – Version 2.3 3 - 17
3.6 Adjusting presser foot height
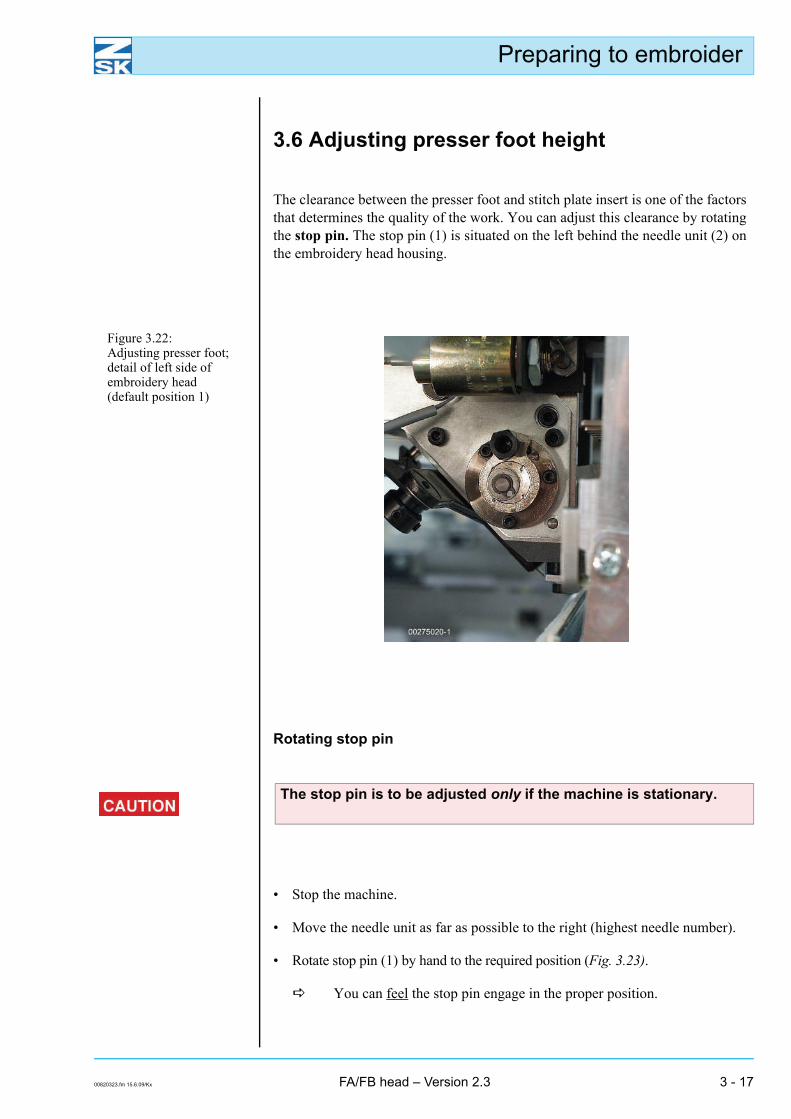
The clearance between the presser foot and stitch plate insert is one of the factorsthat determines the quality of the work. You can adjust this clearance by rotatingthe stop pin. The stop pin (1) is situated on the left behind the needle unit (2) onthe embroidery head housing.
Figure 3.22: Adjusting presser foot;detail of left side ofembroidery head(default position 1)
Rotating stop pin
The stop pin is to be adjusted only if the machine is stationary.
• Stop the machine.
• Move the needle unit as far as possible to the right (highest needle number).
• Rotate stop pin (1) by hand to the required position (Fig. 3.23).
You can feel the stop pin engage in the proper position.
Preparing to embroider
3 - 18 FA/FB head – Version 2.3 00820323.fm/Kx15.6.09
Determining position of stop pin
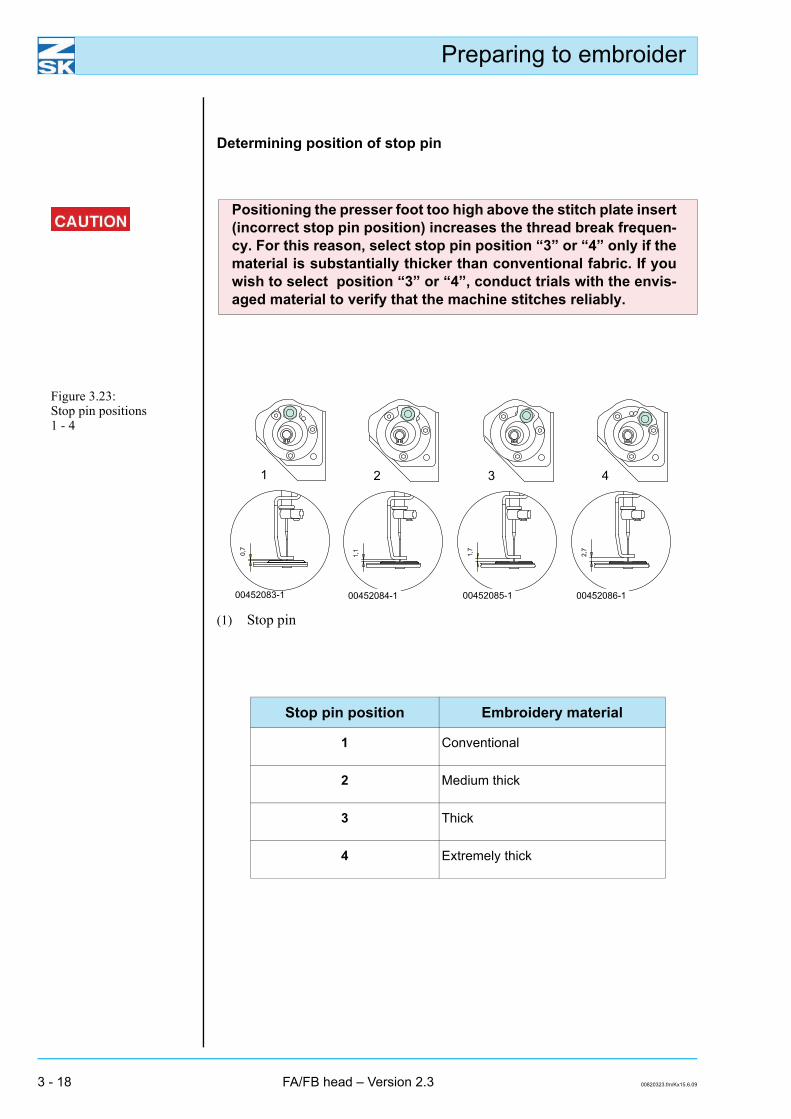
Positioning the presser foot too high above the stitch plate insert(incorrect stop pin position) increases the thread break frequen-cy. For this reason, select stop pin position “3” or “4” only if thematerial is substantially thicker than conventional fabric. If youwish to select position “3” or “4”, conduct trials with the envis-aged material to verify that the machine stitches reliably.
Figure 3.23: Stop pin positions1 - 4
(1) Stop pin
Stop pin position Embroidery material
1 Conventional
2 Medium thick
3 Thick
4 Extremely thick
Stitch types
00820423.fm 15.6.09/Kx FA/FB head – Version 2.3 4 - 1
4. Stitch types
This chapter provides an overview of the optional embroidery applications avail-able for the F head. Separate operator’s guides are supplied together with the in-dividual options.
NOTE Depending on the machine variant or version, the use of some at-tachments may be restricted or ruled out.
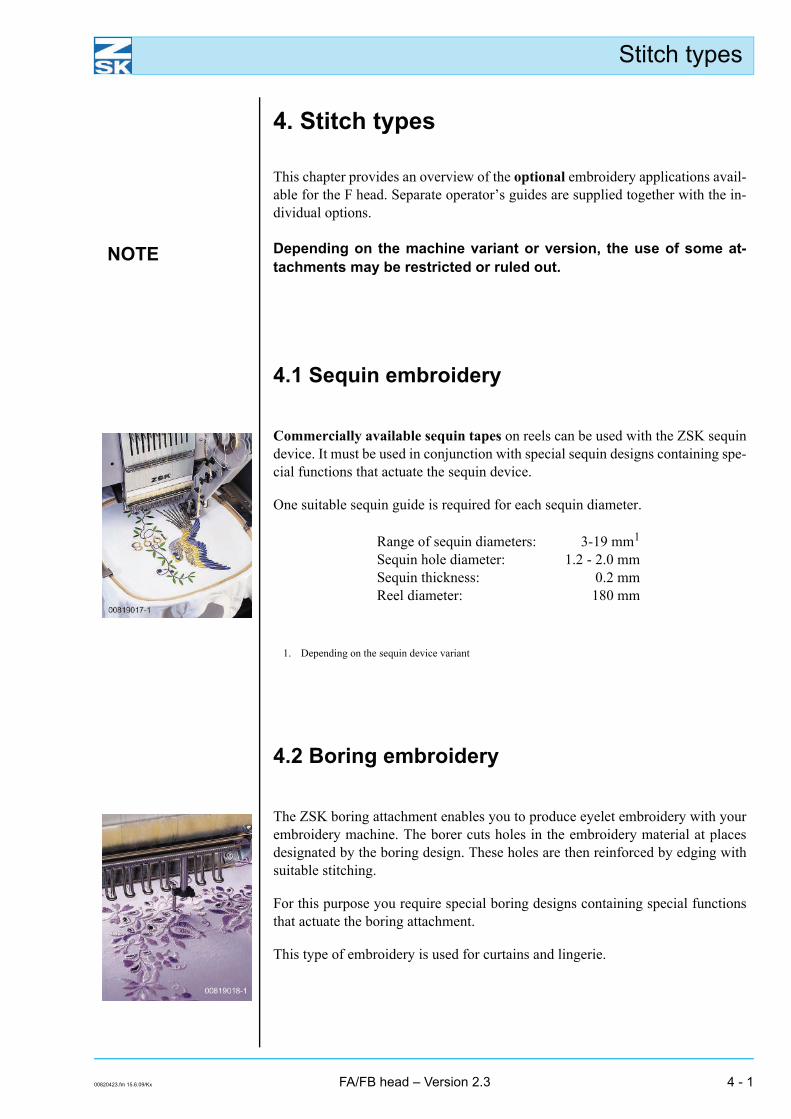
4.1 Sequin embroidery
Commercially available sequin tapes on reels can be used with the ZSK sequindevice. It must be used in conjunction with special sequin designs containing spe-cial functions that actuate the sequin device.
One suitable sequin guide is required for each sequin diameter.
Range of sequin diameters: 3-19 mm1
Sequin hole diameter: 1.2 - 2.0 mmSequin thickness: 0.2 mmReel diameter: 180 mm
1. Depending on the sequin device variant
4.2 Boring embroidery
The ZSK boring attachment enables you to produce eyelet embroidery with yourembroidery machine. The borer cuts holes in the embroidery material at placesdesignated by the boring design. These holes are then reinforced by edging withsuitable stitching.
For this purpose you require special boring designs containing special functionsthat actuate the boring attachment.
This type of embroidery is used for curtains and lingerie.
Stitch types
4 - 2 FA/FB head – Version 2.3 00820423.fm/Kx15.6.09
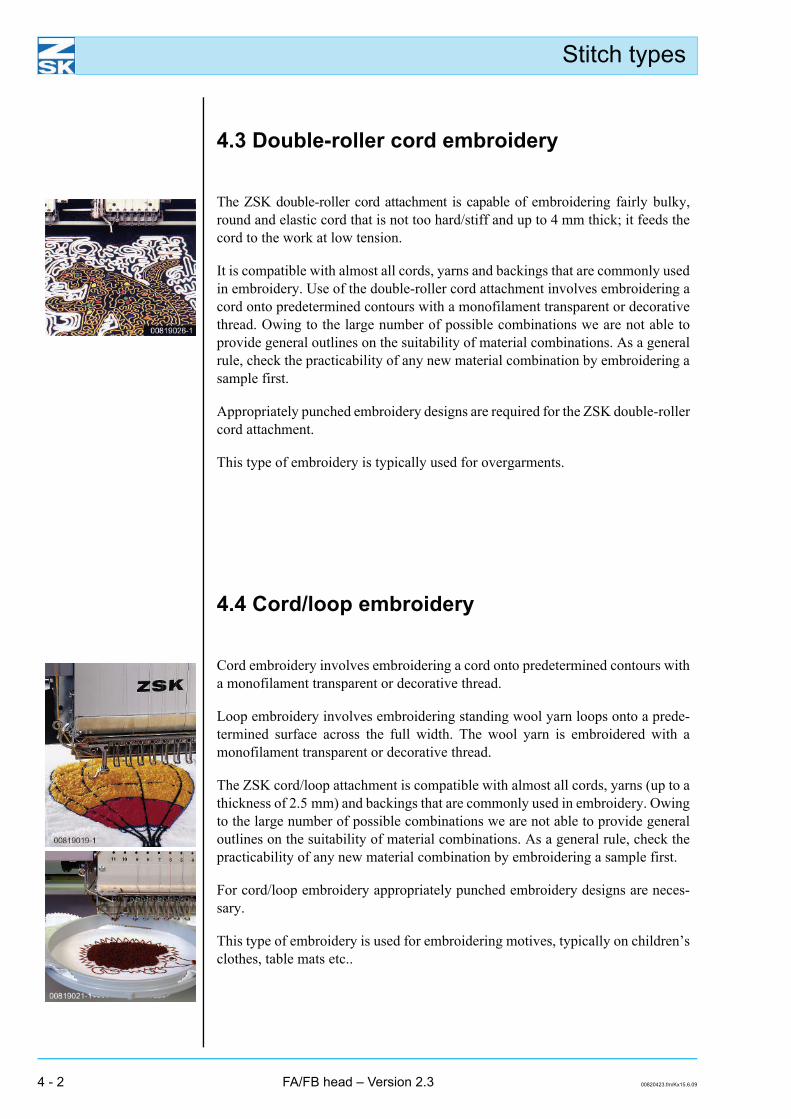
4.3 Double-roller cord embroidery
The ZSK double-roller cord attachment is capable of embroidering fairly bulky,round and elastic cord that is not too hard/stiff and up to 4 mm thick; it feeds thecord to the work at low tension.
It is compatible with almost all cords, yarns and backings that are commonly usedin embroidery. Use of the double-roller cord attachment involves embroidering acord onto predetermined contours with a monofilament transparent or decorativethread. Owing to the large number of possible combinations we are not able toprovide general outlines on the suitability of material combinations. As a generalrule, check the practicability of any new material combination by embroidering asample first.
Appropriately punched embroidery designs are required for the ZSK double-rollercord attachment.
This type of embroidery is typically used for overgarments.
4.4 Cord/loop embroidery
Cord embroidery involves embroidering a cord onto predetermined contours witha monofilament transparent or decorative thread.
Loop embroidery involves embroidering standing wool yarn loops onto a prede-termined surface across the full width. The wool yarn is embroidered with amonofilament transparent or decorative thread.
The ZSK cord/loop attachment is compatible with almost all cords, yarns (up to athickness of 2.5 mm) and backings that are commonly used in embroidery. Owingto the large number of possible combinations we are not able to provide generaloutlines on the suitability of material combinations. As a general rule, check thepracticability of any new material combination by embroidering a sample first.
For cord/loop embroidery appropriately punched embroidery designs are neces-sary.
This type of embroidery is used for embroidering motives, typically on children’sclothes, table mats etc..
Stitch types
00820423.fm 15.6.09/Kx FA/FB head – Version 2.3 4 - 3
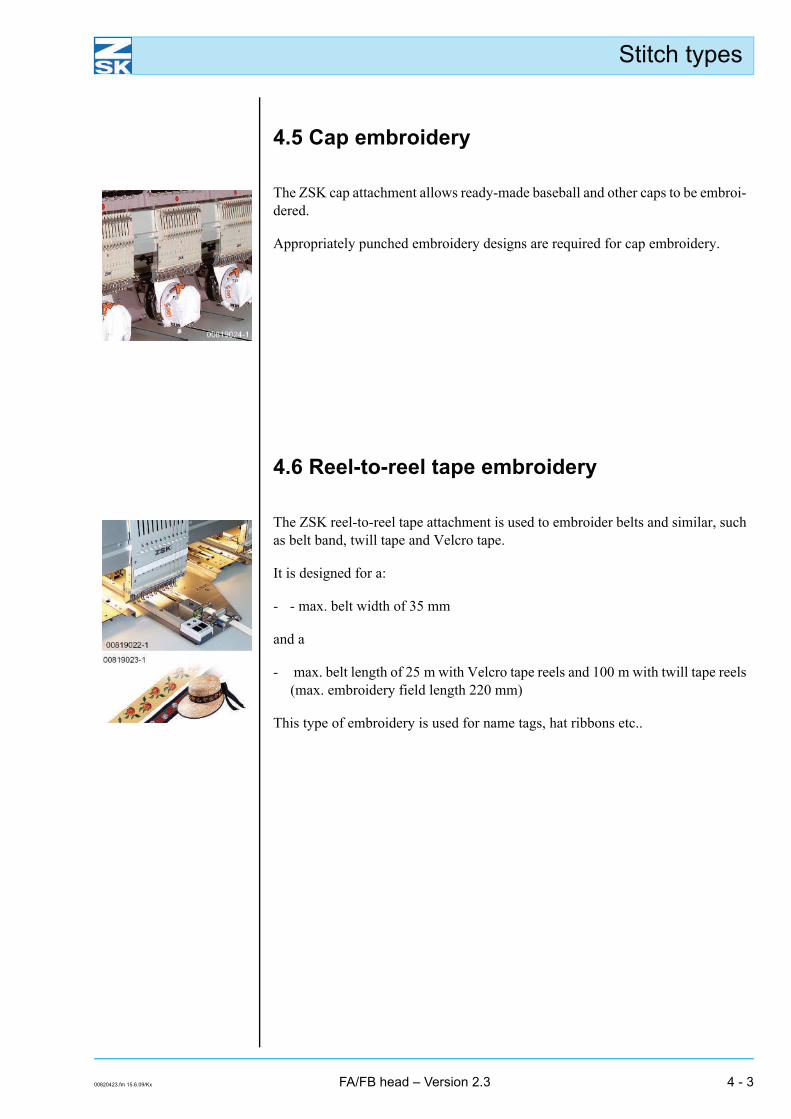
4.5 Cap embroidery
The ZSK cap attachment allows ready-made baseball and other caps to be embroi-dered.
Appropriately punched embroidery designs are required for cap embroidery.
4.6 Reel-to-reel tape embroidery
The ZSK reel-to-reel tape attachment is used to embroider belts and similar, suchas belt band, twill tape and Velcro tape.
It is designed for a:
- - max. belt width of 35 mm
and a
- max. belt length of 25 m with Velcro tape reels and 100 m with twill tape reels(max. embroidery field length 220 mm)
This type of embroidery is used for name tags, hat ribbons etc..

Stitch types
4 - 4 FA/FB head – Version 2.3 00820423.fm/Kx15.6.09
Embroidery materials and needles
00820523.fm 15.6.09/Kx FA/FB head – Version 2.3 5 - 1
5. Embroidery materials and needles
As a general rule, all conventional embroidery materials can be used with the ZSKsingle and multi-head embroidery machines. The embroidery backing, yarn andneedle must, however, be matched to each other. Not every combination results inoptimum embroidered work. As well as coordinated materials and the correctchoice of needles, the thread tension and the design have a major influence on thequality of the embroidery.
Owing to the large number of possible material combinations, we are able to pro-vide only general guidelines on the choice of embroidery material and needles. Onprinciple, you are recommended to test any new combination of materials by em-broidering a sample first.
Consult our customer service in case of doubt. We will gladly advise you and tryout unusual material combinations on your behalf if you submit samples.
5.1 Embroidery backing and underlay materials
Adhesive sprays are not be used in the vicinity of the embroiderymachine, but only on separate tables – the adhesive mist cancause the embroidery machine to malfunction.
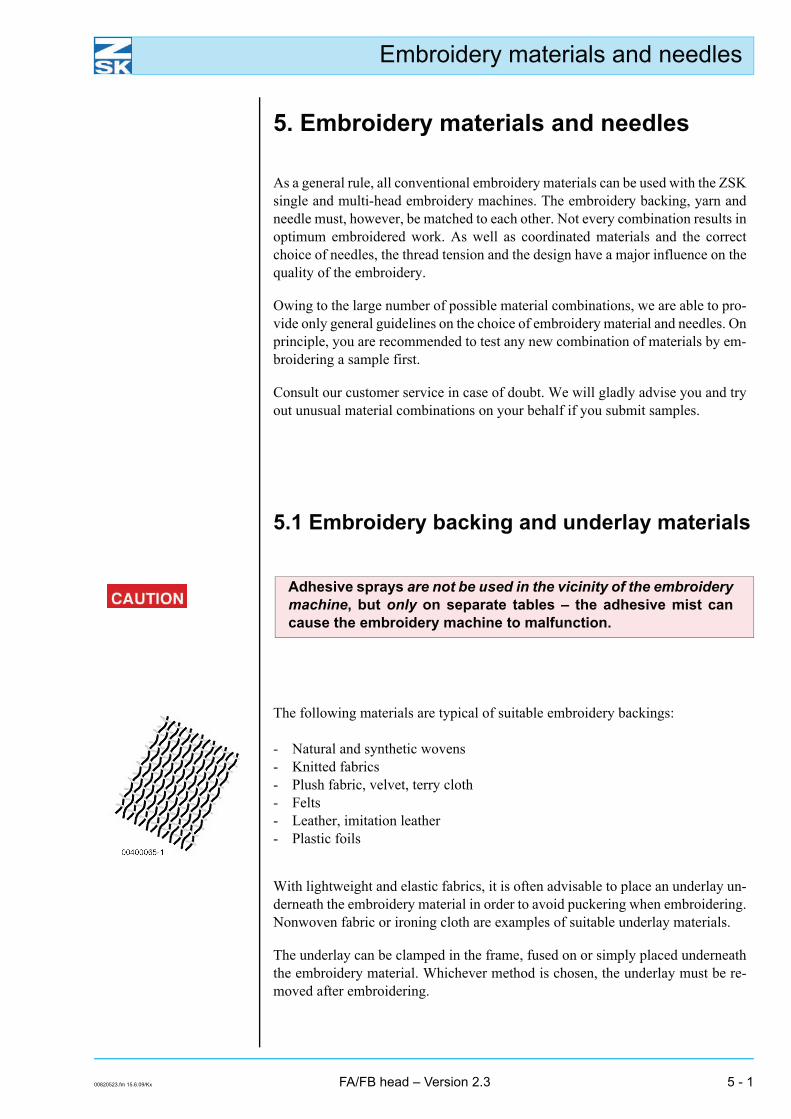
The following materials are typical of suitable embroidery backings:
- Natural and synthetic wovens- Knitted fabrics- Plush fabric, velvet, terry cloth- Felts- Leather, imitation leather- Plastic foils
With lightweight and elastic fabrics, it is often advisable to place an underlay un-derneath the embroidery material in order to avoid puckering when embroidering.Nonwoven fabric or ironing cloth are examples of suitable underlay materials.
The underlay can be clamped in the frame, fused on or simply placed underneaththe embroidery material. Whichever method is chosen, the underlay must be re-moved after embroidering.
Embroidery materials and needles
5 - 2 FA/FB head – Version 2.3 00820523.fm/Kx15.6.09
5.2 Yarns
Among the conventional yarns are:
- Cotton embroidery yarns- Rayon embroidery yarns- Polyester embroidery yarns- Metallized twisted yarns
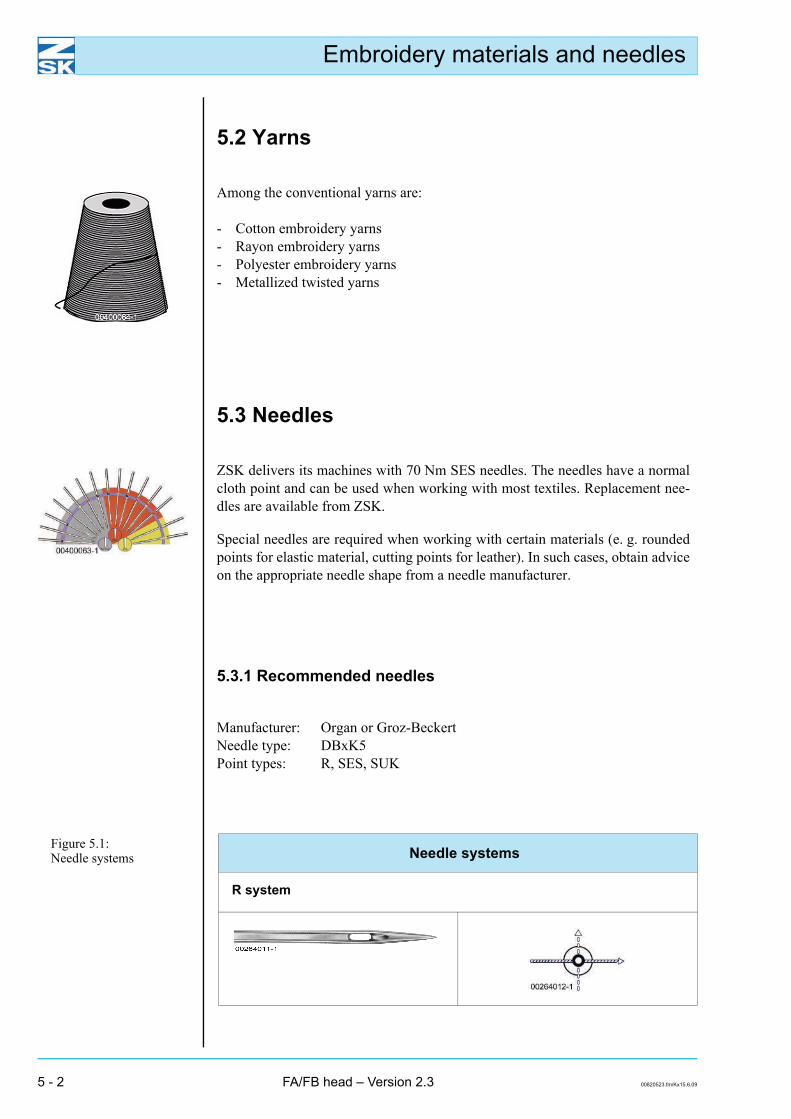
5.3 Needles
ZSK delivers its machines with 70 Nm SES needles. The needles have a normalcloth point and can be used when working with most textiles. Replacement nee-dles are available from ZSK.
Special needles are required when working with certain materials (e. g. roundedpoints for elastic material, cutting points for leather). In such cases, obtain adviceon the appropriate needle shape from a needle manufacturer.
5.3.1 Recommended needles
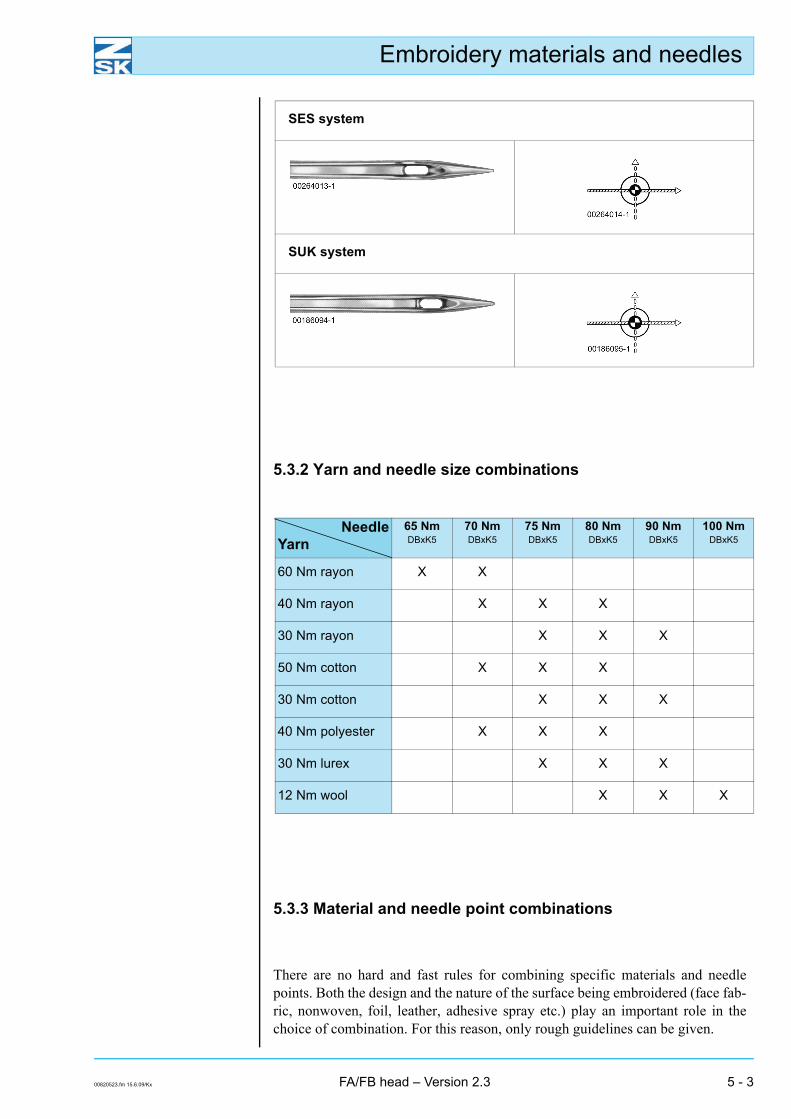
Manufacturer: Organ or Groz-BeckertNeedle type: DBxK5Point types: R, SES, SUK
Figure 5.1: Needle systems Needle systems
R system
Embroidery materials and needles
00820523.fm 15.6.09/Kx FA/FB head – Version 2.3 5 - 3
SES system
SUK system
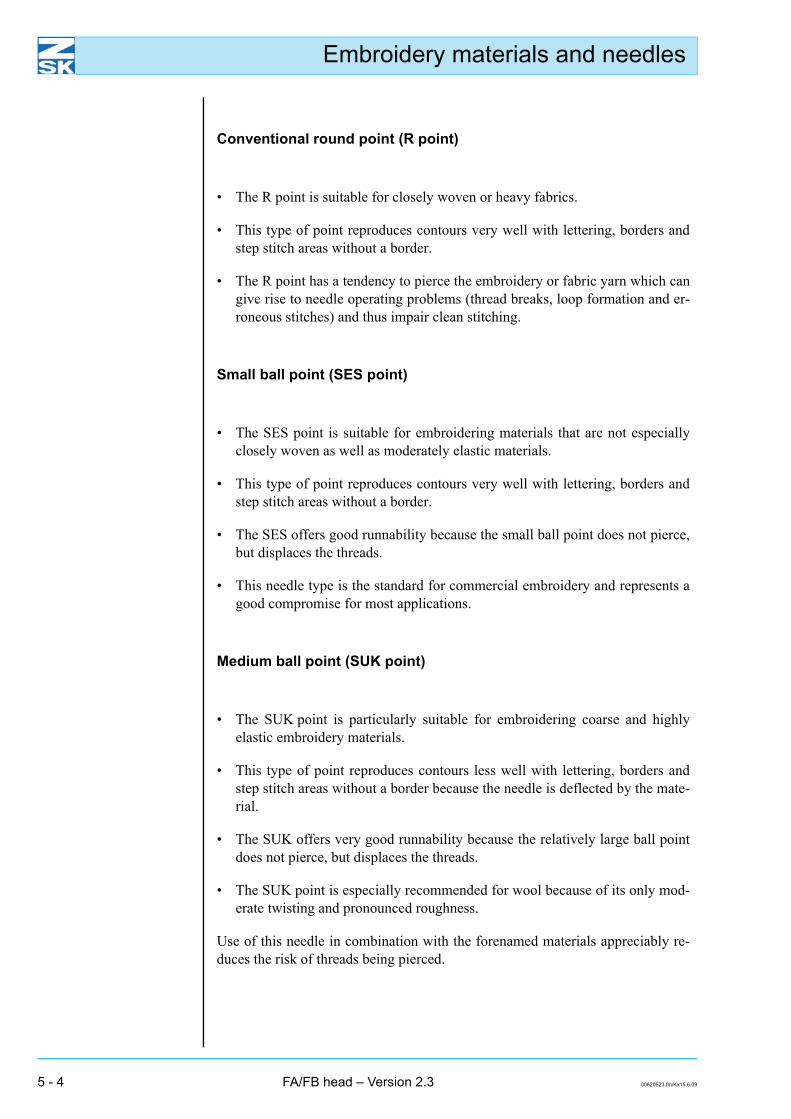
5.3.2 Yarn and needle size combinations
NeedleYarn
65 NmDBxK5
70 NmDBxK5
75 NmDBxK5
80 NmDBxK5
90 NmDBxK5
100 NmDBxK5
60 Nm rayon X X
40 Nm rayon X X X
30 Nm rayon X X X
50 Nm cotton X X X
30 Nm cotton X X X
40 Nm polyester X X X
30 Nm lurex X X X
12 Nm wool X X X
5.3.3 Material and needle point combinations
There are no hard and fast rules for combining specific materials and needlepoints. Both the design and the nature of the surface being embroidered (face fab-ric, nonwoven, foil, leather, adhesive spray etc.) play an important role in thechoice of combination. For this reason, only rough guidelines can be given.
Embroidery materials and needles
5 - 4 FA/FB head – Version 2.3 00820523.fm/Kx15.6.09
Conventional round point (R point)
• The R point is suitable for closely woven or heavy fabrics.
• This type of point reproduces contours very well with lettering, borders andstep stitch areas without a border.
• The R point has a tendency to pierce the embroidery or fabric yarn which cangive rise to needle operating problems (thread breaks, loop formation and er-roneous stitches) and thus impair clean stitching.
Small ball point (SES point)
• The SES point is suitable for embroidering materials that are not especiallyclosely woven as well as moderately elastic materials.
• This type of point reproduces contours very well with lettering, borders andstep stitch areas without a border.
• The SES offers good runnability because the small ball point does not pierce,but displaces the threads.
• This needle type is the standard for commercial embroidery and represents agood compromise for most applications.
Medium ball point (SUK point)
• The SUK point is particularly suitable for embroidering coarse and highlyelastic embroidery materials.
• This type of point reproduces contours less well with lettering, borders andstep stitch areas without a border because the needle is deflected by the mate-rial.
• The SUK offers very good runnability because the relatively large ball pointdoes not pierce, but displaces the threads.
• The SUK point is especially recommended for wool because of its only mod-erate twisting and pronounced roughness.
Use of this needle in combination with the forenamed materials appreciably re-duces the risk of threads being pierced.
Embroidery materials and needles
00820523.fm 15.6.09/Kx FA/FB head – Version 2.3 5 - 5
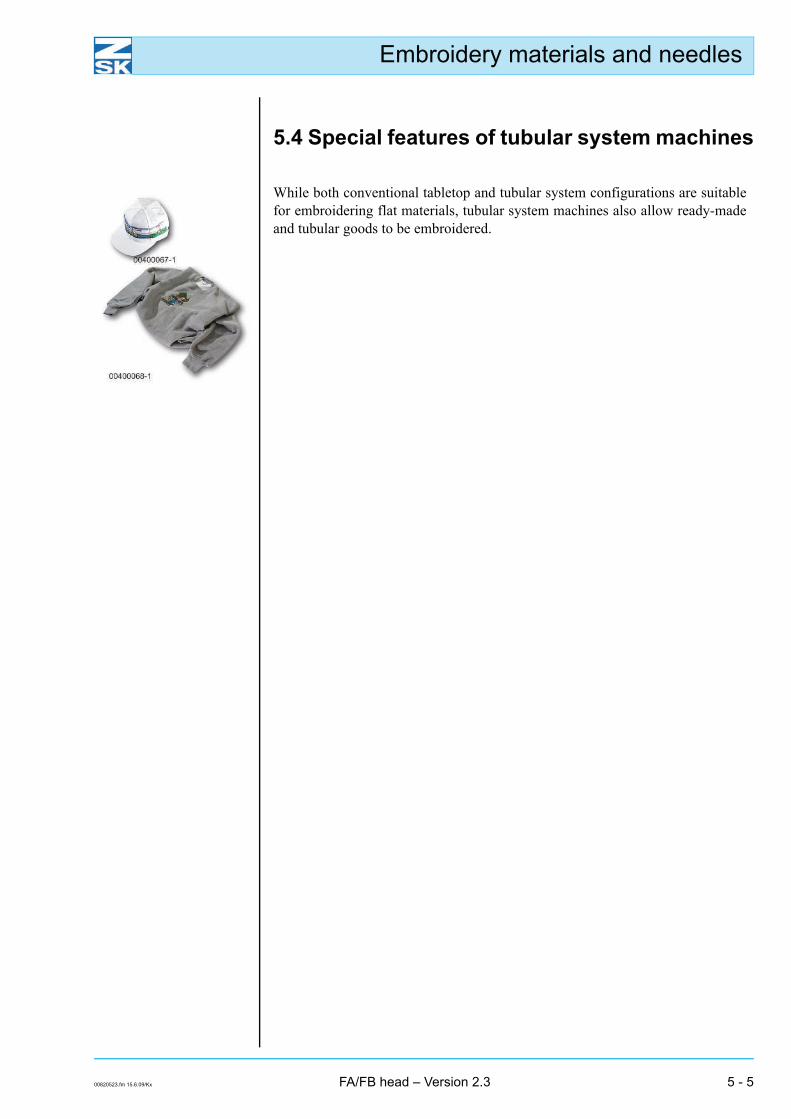
5.4 Special features of tubular system machines
While both conventional tabletop and tubular system configurations are suitablefor embroidering flat materials, tubular system machines also allow ready-madeand tubular goods to be embroidered.
Embroidery materials and needles
5 - 6 FA/FB head – Version 2.3 00820523.fm/Kx15.6.09

Maintenance and troubleshooting
00820623.fm 15.6.09/Kx FA/FB head – Version 2.3 6 - 1
6. Maintenance and troubleshooting
6.1 For your safety
Before undertaking any cleaning or maintenance work:
Make certain that the machine cannot be switched on uninten-tionally by unauthorized persons.
Covers have to be removed to perform some maintenance work.On no account is the machine to be restarted before you have re-installed all covers properly.
6.2 Lubricants
The standard machine accessories include:
- A spray can containing sewing machine oil(JCW 35 Super Lubrifiant, ZSK order No. 750 081)
- A grease cartridge (Gleitmo 585M, ZSK order No. 667 055).
As far as possible, use only the original lubricants supplied with the machine whencarrying out maintenance work. These lubricants are available from ZSK.
NOTE Waste grease and oil is to be treated and disposed of in compliancewith the regulations applicable in the country concerned.
Maintenance and troubleshooting
6 - 2 FA/FB head – Version 2.3 00820623.fm/Kx15.6.09
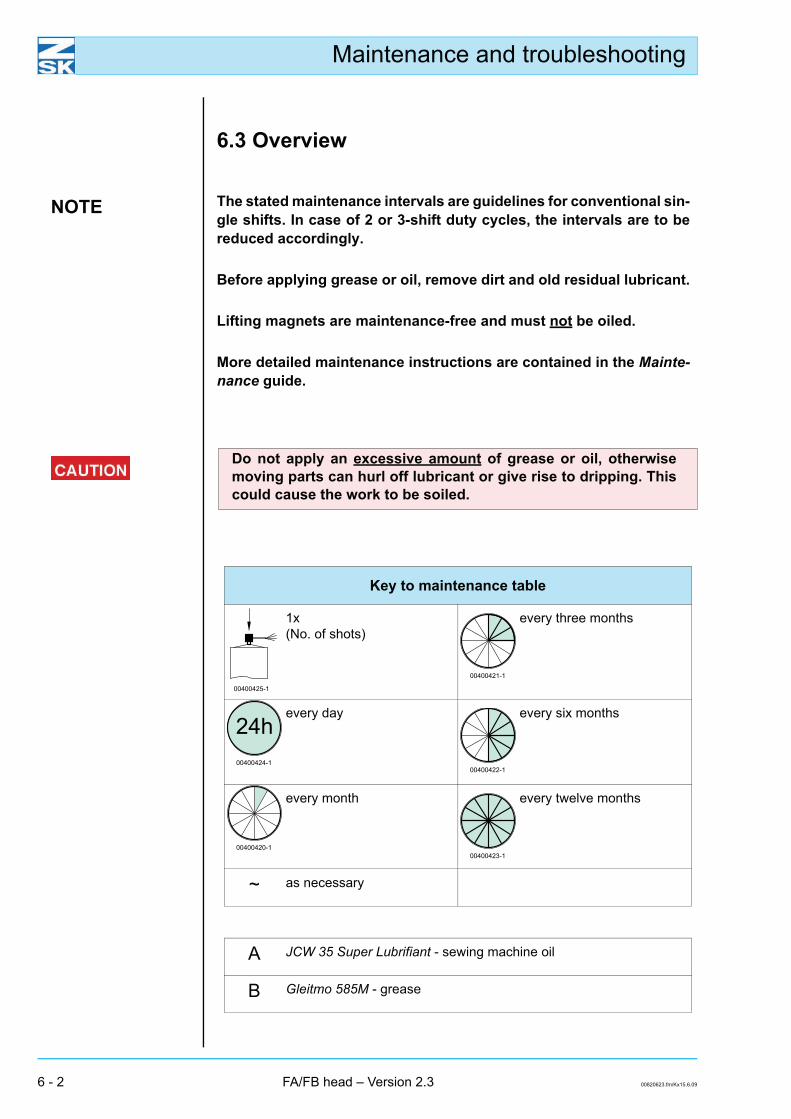
6.3 Overview
NOTE The stated maintenance intervals are guidelines for conventional sin-gle shifts. In case of 2 or 3-shift duty cycles, the intervals are to bereduced accordingly.
Before applying grease or oil, remove dirt and old residual lubricant.
Lifting magnets are maintenance-free and must not be oiled.
More detailed maintenance instructions are contained in the Mainte-nance guide.
Do not apply an excessive amount of grease or oil, otherwisemoving parts can hurl off lubricant or give rise to dripping. Thiscould cause the work to be soiled.
Key to maintenance table
1x(No. of shots)
every three months
every day every six months
every month every twelve months
~ as necessary
A JCW 35 Super Lubrifiant - sewing machine oil
B Gleitmo 585M - grease
Maintenance and troubleshooting
00820623.fm 15.6.09/K
xFA
/FB head – Version 2.3
6 - 3
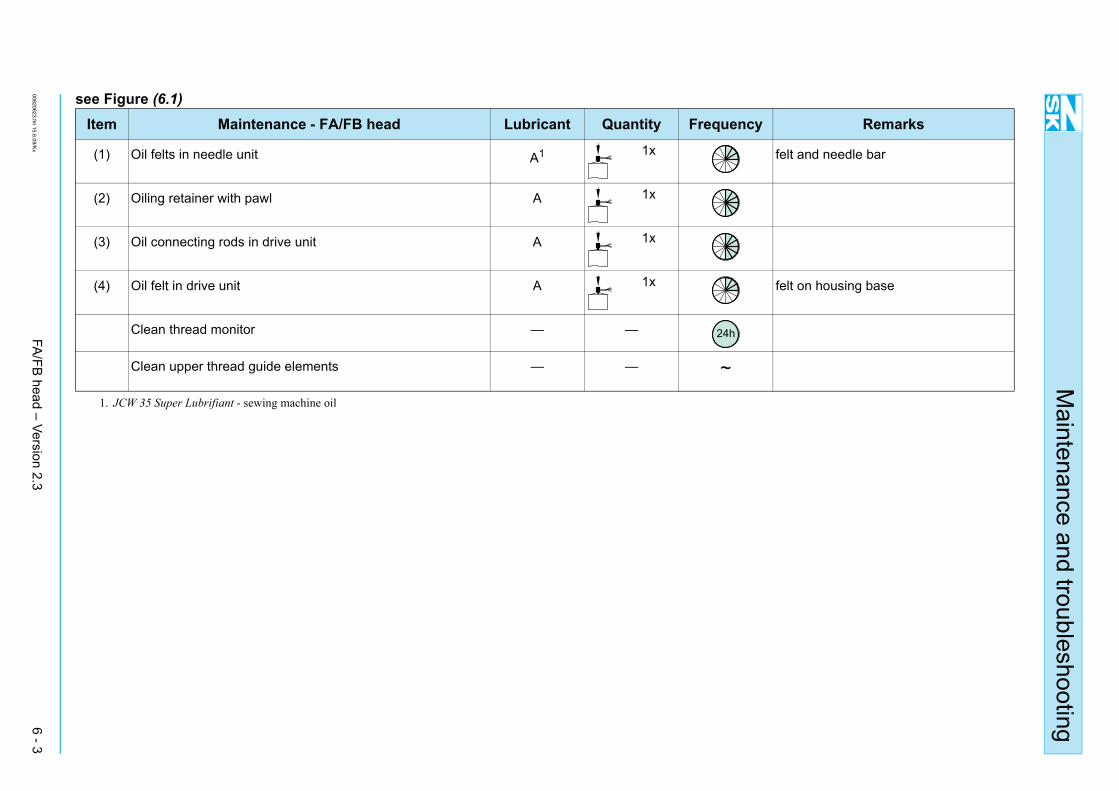
see Figure (6.1)Item Maintenance - FA/FB head Lubricant Quantity Frequency Remarks
(1) Oil felts in needle unit A1
1. JCW 35 Super Lubrifiant - sewing machine oil
1x felt and needle bar
(2) Oiling retainer with pawl A 1x
(3) Oil connecting rods in drive unit A 1x
(4) Oil felt in drive unit A 1x felt on housing base
Clean thread monitor — —
Clean upper thread guide elements — — ~
Maintenance and troubleshooting
6 - 4FA
/FB head – Version 2.3
00820623.fm 15.6.09/K
x
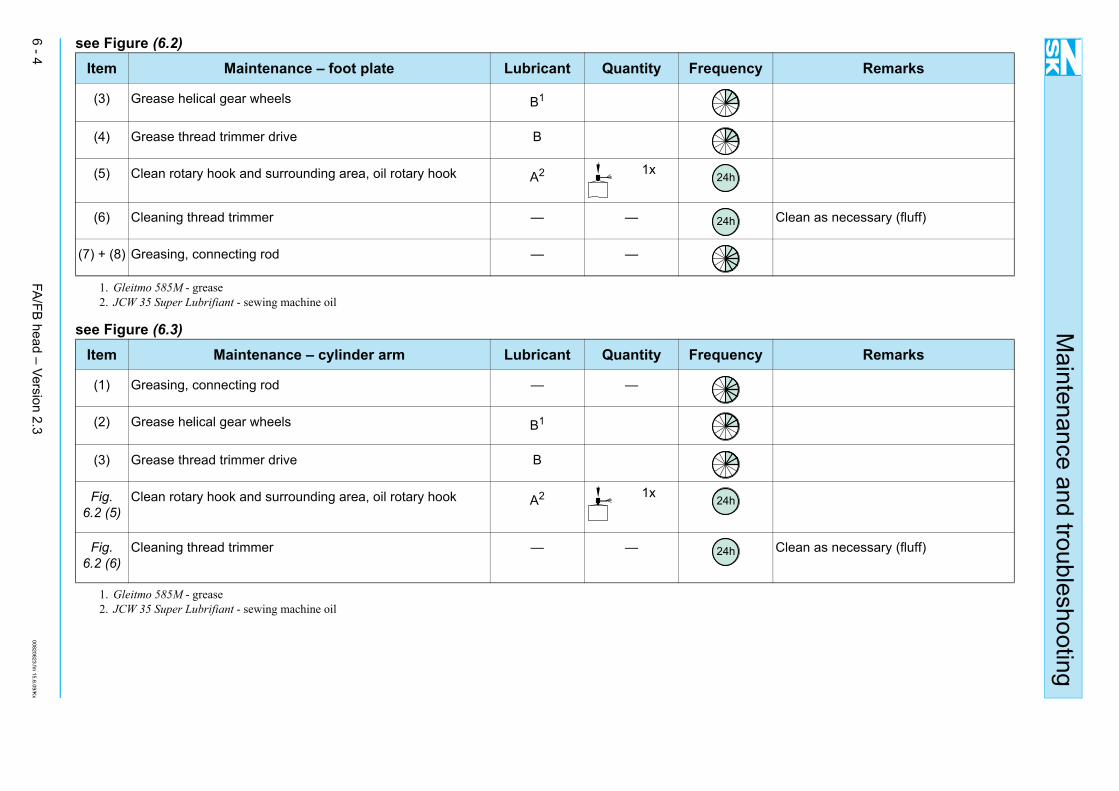
see Figure (6.2)
see Figure (6.3)
Item Maintenance – foot plate Lubricant Quantity Frequency Remarks
(3) Grease helical gear wheels B1
1. Gleitmo 585M - grease
(4) Grease thread trimmer drive B
(5) Clean rotary hook and surrounding area, oil rotary hook A2
2. JCW 35 Super Lubrifiant - sewing machine oil
1x
(6) Cleaning thread trimmer — — Clean as necessary (fluff)
(7) + (8) Greasing, connecting rod — —
Item Maintenance – cylinder arm Lubricant Quantity Frequency Remarks
(1) Greasing, connecting rod — —
(2) Grease helical gear wheels B1
1. Gleitmo 585M - grease
(3) Grease thread trimmer drive B
Fig.6.2 (5)
Clean rotary hook and surrounding area, oil rotary hook A2
2. JCW 35 Super Lubrifiant - sewing machine oil
1x
Fig.6.2 (6)
Cleaning thread trimmer — — Clean as necessary (fluff)
Maintenance and troubleshooting
00820623.fm 15.6.09/Kx FA/FB head – Version 2.3 6 - 5
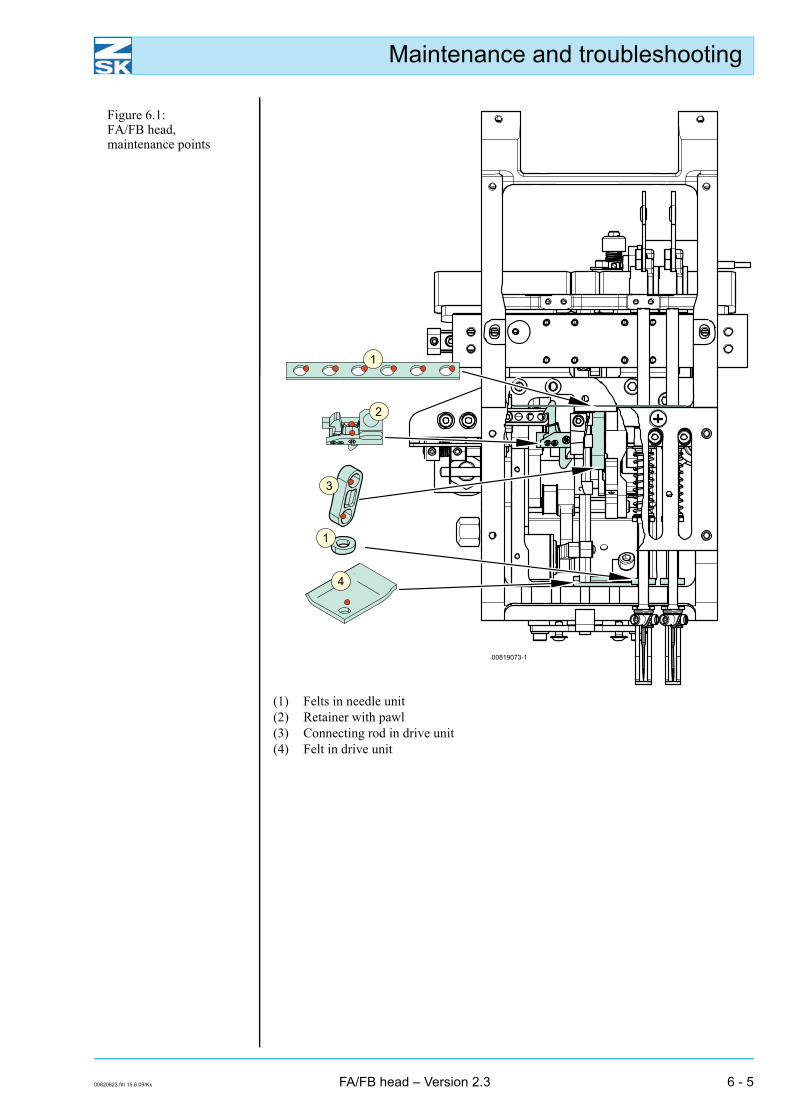
Figure 6.1: FA/FB head,maintenance points
(1) Felts in needle unit(2) Retainer with pawl(3) Connecting rod in drive unit(4) Felt in drive unit
Maintenance and troubleshooting
6 - 6 FA/FB head – Version 2.3 00820623.fm/Kx15.6.09
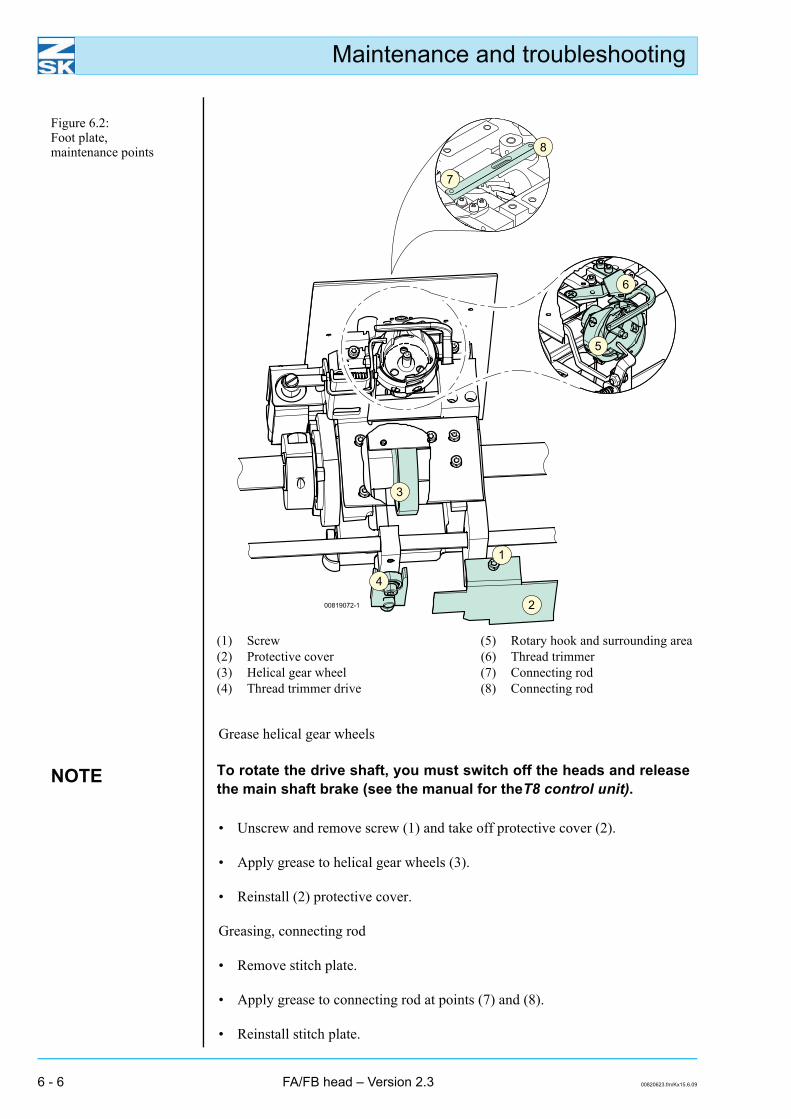
Grease helical gear wheels
• Unscrew and remove screw (1) and take off protective cover (2).
• Apply grease to helical gear wheels (3).
• Reinstall (2) protective cover.
Greasing, connecting rod
• Remove stitch plate.
• Apply grease to connecting rod at points (7) and (8).
• Reinstall stitch plate.
Figure 6.2: Foot plate,maintenance points
(1) Screw (5) Rotary hook and surrounding area(2) Protective cover (6) Thread trimmer(3) Helical gear wheel (7) Connecting rod(4) Thread trimmer drive (8) Connecting rod
NOTE To rotate the drive shaft, you must switch off the heads and releasethe main shaft brake (see the manual for theT8 control unit).
Maintenance and troubleshooting
00820623.fm 15.6.09/Kx FA/FB head – Version 2.3 6 - 7
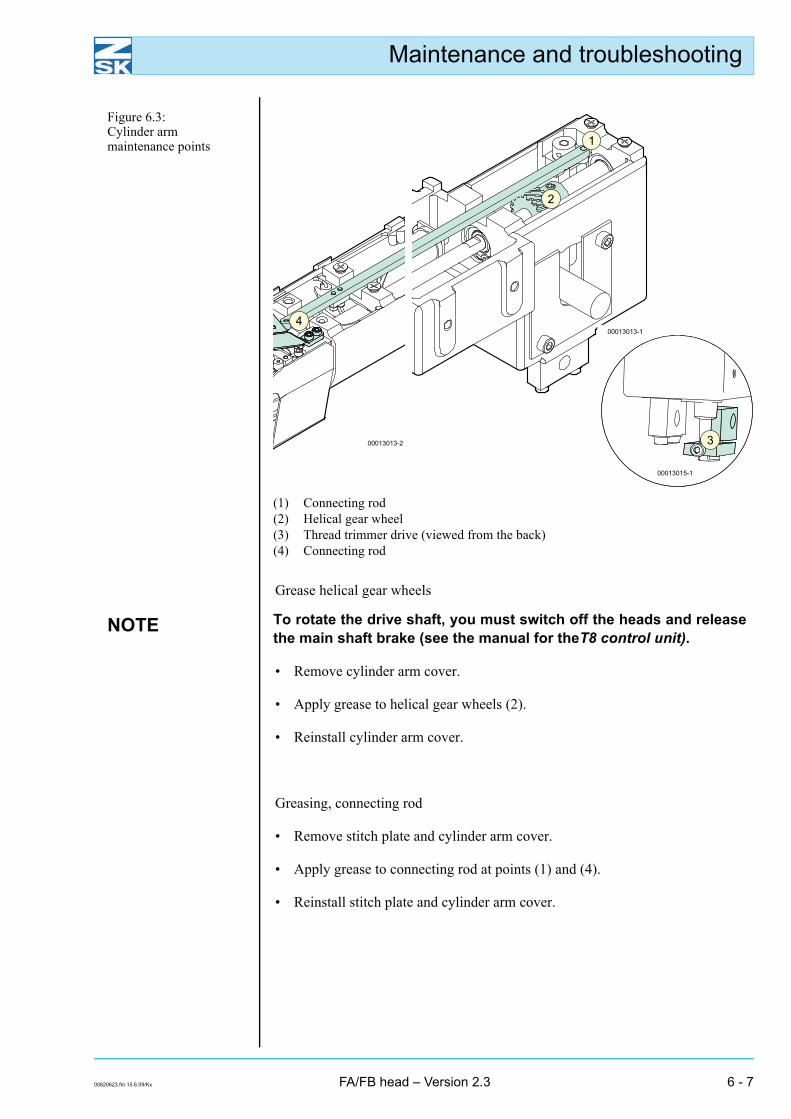
Grease helical gear wheels
• Remove cylinder arm cover.
• Apply grease to helical gear wheels (2).
• Reinstall cylinder arm cover.
Greasing, connecting rod
• Remove stitch plate and cylinder arm cover.
• Apply grease to connecting rod at points (1) and (4).
• Reinstall stitch plate and cylinder arm cover.
Figure 6.3: Cylinder armmaintenance points
(1) Connecting rod(2) Helical gear wheel(3) Thread trimmer drive (viewed from the back)(4) Connecting rod
NOTE To rotate the drive shaft, you must switch off the heads and releasethe main shaft brake (see the manual for theT8 control unit).
Maintenance and troubleshooting
6 - 8 FA/FB head – Version 2.3 00820623.fm 15.6.09/Kx
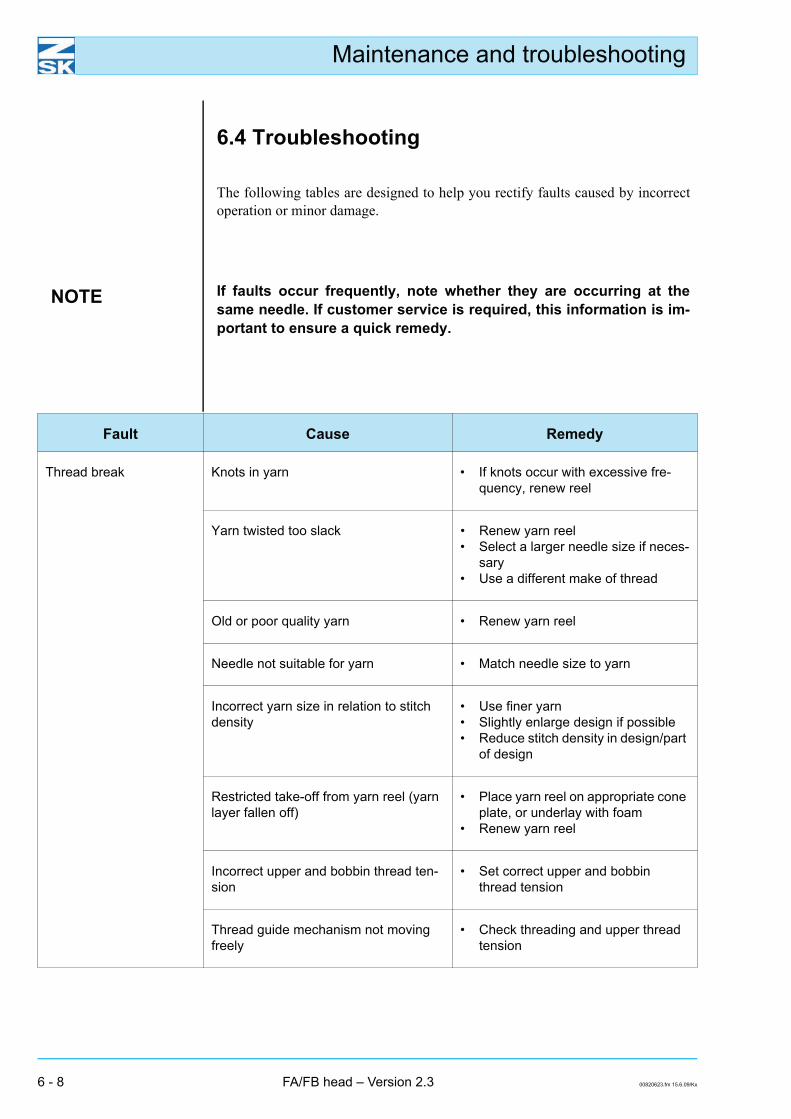
6.4 Troubleshooting
The following tables are designed to help you rectify faults caused by incorrectoperation or minor damage.
NOTE If faults occur frequently, note whether they are occurring at thesame needle. If customer service is required, this information is im-portant to ensure a quick remedy.
Fault Cause Remedy
Thread break Knots in yarn • If knots occur with excessive fre-quency, renew reel
Yarn twisted too slack • Renew yarn reel• Select a larger needle size if neces-
sary• Use a different make of thread
Old or poor quality yarn • Renew yarn reel
Needle not suitable for yarn • Match needle size to yarn
Incorrect yarn size in relation to stitch density
• Use finer yarn• Slightly enlarge design if possible• Reduce stitch density in design/part
of design
Restricted take-off from yarn reel (yarn layer fallen off)
• Place yarn reel on appropriate cone plate, or underlay with foam
• Renew yarn reel
Incorrect upper and bobbin thread ten-sion
• Set correct upper and bobbin thread tension
Thread guide mechanism not moving freely
• Check threading and upper thread tension
Maintenance and troubleshooting
00820623.fm 15.6.09/Kx FA/FB head – Version 2.3 6 - 9
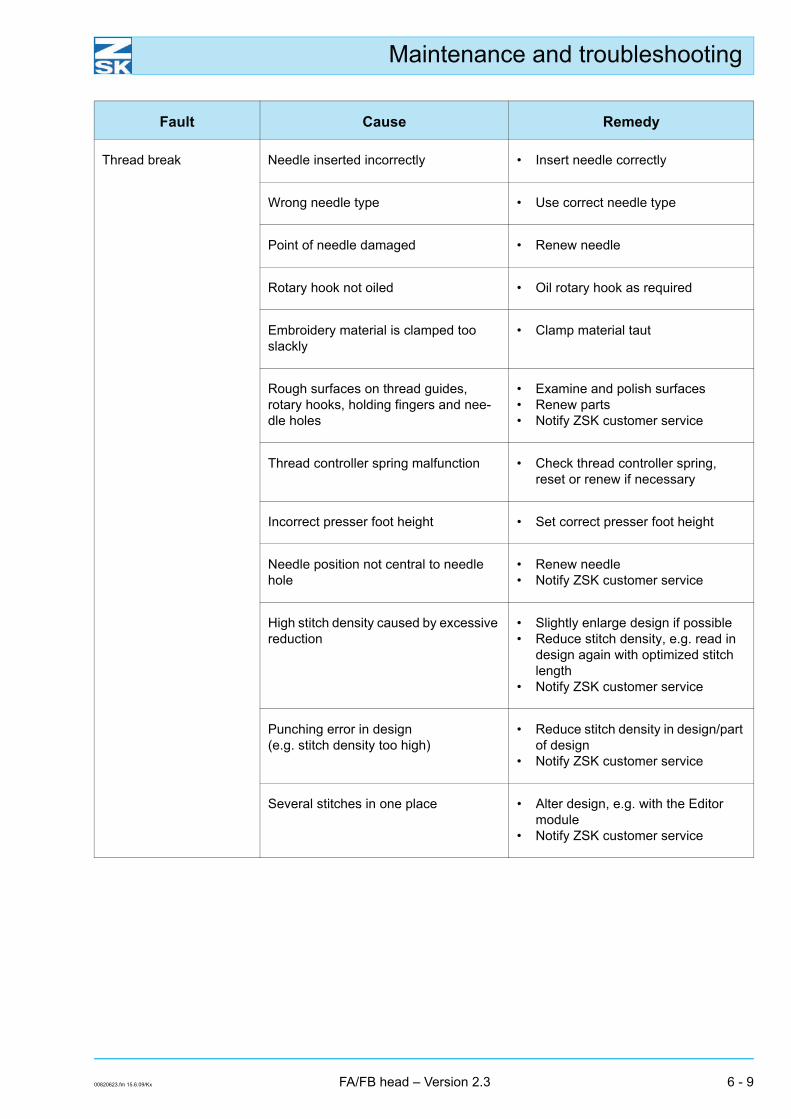
Thread break Needle inserted incorrectly • Insert needle correctly
Wrong needle type • Use correct needle type
Point of needle damaged • Renew needle
Rotary hook not oiled • Oil rotary hook as required
Embroidery material is clamped too slackly
• Clamp material taut
Rough surfaces on thread guides, rotary hooks, holding fingers and nee-dle holes
• Examine and polish surfaces• Renew parts• Notify ZSK customer service
Thread controller spring malfunction • Check thread controller spring, reset or renew if necessary
Incorrect presser foot height • Set correct presser foot height
Needle position not central to needle hole
• Renew needle• Notify ZSK customer service
High stitch density caused by excessive reduction
• Slightly enlarge design if possible• Reduce stitch density, e.g. read in
design again with optimized stitch length
• Notify ZSK customer service
Punching error in design(e.g. stitch density too high)
• Reduce stitch density in design/part of design
• Notify ZSK customer service
Several stitches in one place • Alter design, e.g. with the Editor module
• Notify ZSK customer service
Fault Cause Remedy
Maintenance and troubleshooting
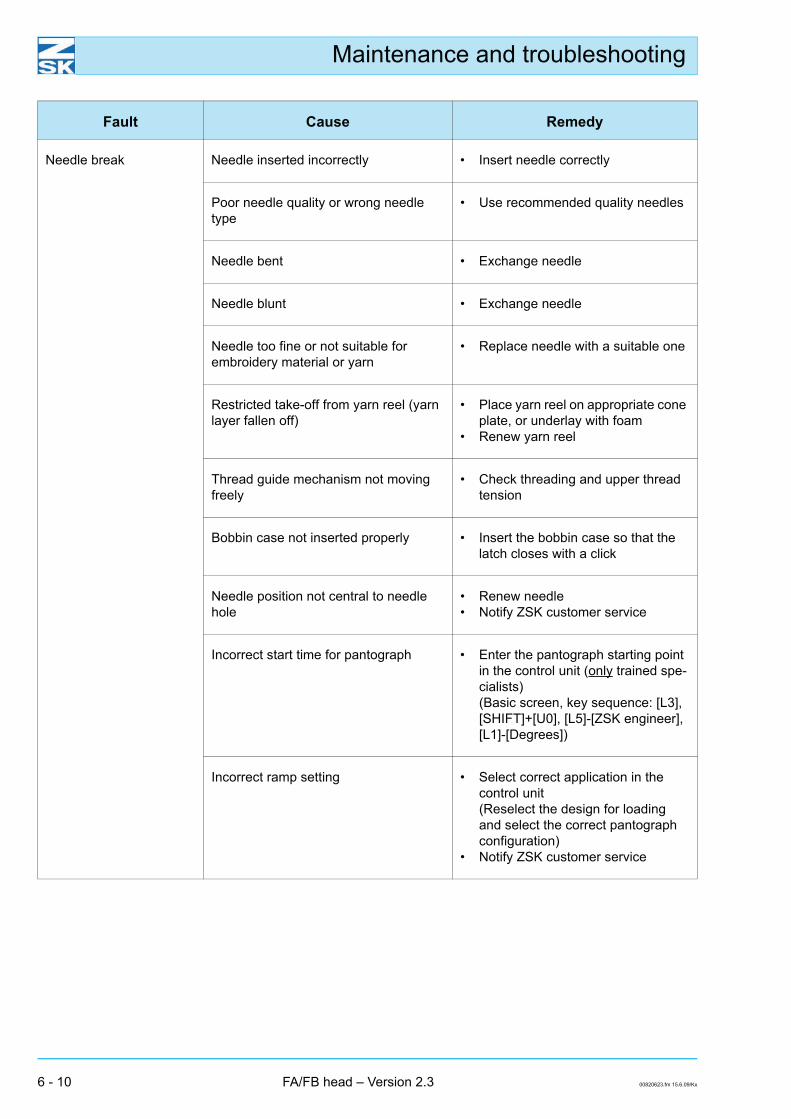
6 - 10 FA/FB head – Version 2.3 00820623.fm 15.6.09/Kx
Needle break Needle inserted incorrectly • Insert needle correctly
Poor needle quality or wrong needle type
• Use recommended quality needles
Needle bent • Exchange needle
Needle blunt • Exchange needle
Needle too fine or not suitable for embroidery material or yarn
• Replace needle with a suitable one
Restricted take-off from yarn reel (yarn layer fallen off)
• Place yarn reel on appropriate cone plate, or underlay with foam
• Renew yarn reel
Thread guide mechanism not moving freely
• Check threading and upper thread tension
Bobbin case not inserted properly • Insert the bobbin case so that the latch closes with a click
Needle position not central to needle hole
• Renew needle• Notify ZSK customer service
Incorrect start time for pantograph • Enter the pantograph starting point in the control unit (only trained spe-cialists)(Basic screen, key sequence: [L3], [SHIFT]+[U0], [L5]-[ZSK engineer], [L1]-[Degrees])
Incorrect ramp setting • Select correct application in the control unit(Reselect the design for loading and select the correct pantograph configuration)
• Notify ZSK customer service
Fault Cause Remedy
Maintenance and troubleshooting
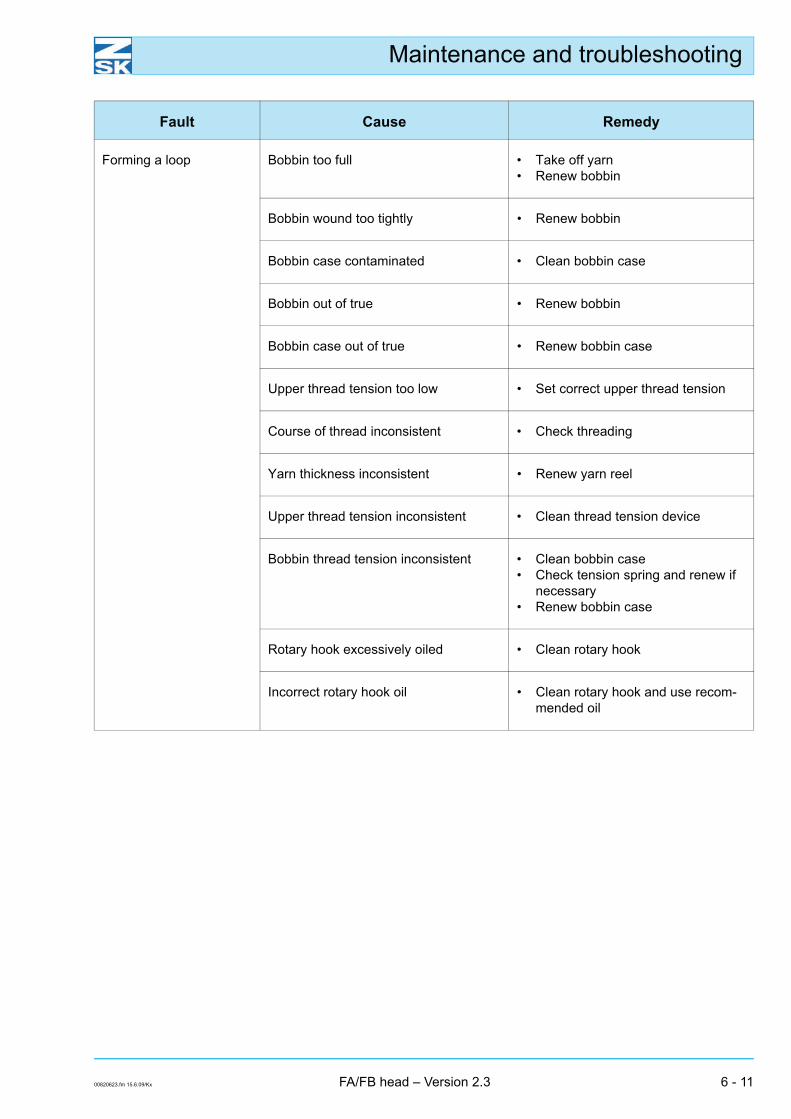
00820623.fm 15.6.09/Kx FA/FB head – Version 2.3 6 - 11
Forming a loop Bobbin too full • Take off yarn• Renew bobbin
Bobbin wound too tightly • Renew bobbin
Bobbin case contaminated • Clean bobbin case
Bobbin out of true • Renew bobbin
Bobbin case out of true • Renew bobbin case
Upper thread tension too low • Set correct upper thread tension
Course of thread inconsistent • Check threading
Yarn thickness inconsistent • Renew yarn reel
Upper thread tension inconsistent • Clean thread tension device
Bobbin thread tension inconsistent • Clean bobbin case• Check tension spring and renew if
necessary• Renew bobbin case
Rotary hook excessively oiled • Clean rotary hook
Incorrect rotary hook oil • Clean rotary hook and use recom-mended oil
Fault Cause Remedy
Maintenance and troubleshooting
6 - 12 FA/FB head – Version 2.3 00820623.fm 15.6.09/Kx
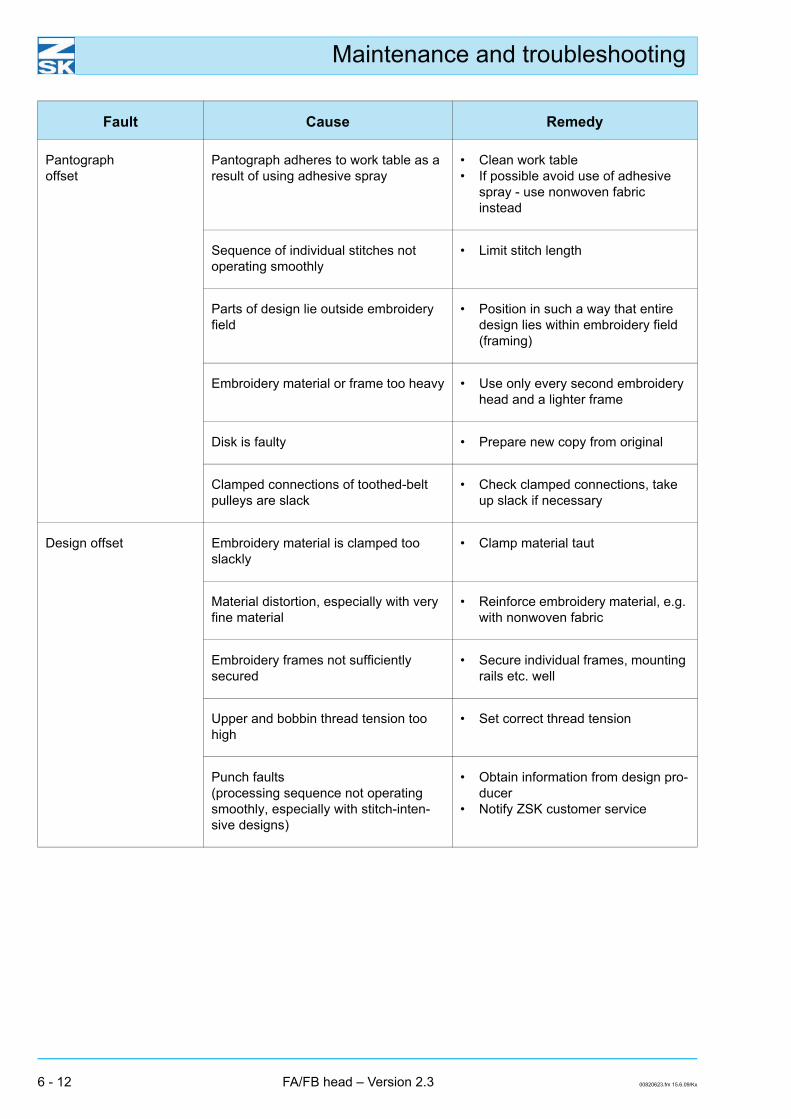
Pantographoffset
Pantograph adheres to work table as a result of using adhesive spray
• Clean work table• If possible avoid use of adhesive
spray - use nonwoven fabric instead
Sequence of individual stitches not operating smoothly
• Limit stitch length
Parts of design lie outside embroidery field
• Position in such a way that entire design lies within embroidery field (framing)
Embroidery material or frame too heavy • Use only every second embroidery head and a lighter frame
Disk is faulty • Prepare new copy from original
Clamped connections of toothed-belt pulleys are slack
• Check clamped connections, take up slack if necessary
Design offset Embroidery material is clamped too slackly
• Clamp material taut
Material distortion, especially with very fine material
• Reinforce embroidery material, e.g. with nonwoven fabric
Embroidery frames not sufficiently secured
• Secure individual frames, mounting rails etc. well
Upper and bobbin thread tension too high
• Set correct thread tension
Punch faults(processing sequence not operating smoothly, especially with stitch-inten-sive designs)
• Obtain information from design pro-ducer
• Notify ZSK customer service
Fault Cause Remedy

Maintenance and troubleshooting
00820623.fm 15.6.09/Kx FA/FB head – Version 2.3 6 - 13
Skipped stitches Needle faulty or bent • Renew needle
Needle not suitable for yarn • Match needle size to yarn
Needle inserted incorrectly • Insert needle correctly
Upper thread not threaded correctly • Check threading
Presser foot too high • Set correct presser foot height
Jump stitch facility incorrectly set • Set jump stitch facility correctly
Machine runsirregularly
Drive belts coated with oil and slipping • Degrease pulley• Renew drive belts
Belt tension too slack • Tighten belts
Components not running freely • Notify ZSK customer service
Inaccurate stopping posi-tion
Belt tension too slack • Tighten belts
Drive belts coated with oil and slipping • Degrease pulley• Renew drive belts
Components not running freely • Notify ZSK customer service
Machine does not start Power supply interrupted • Press ZSK-button on control panel (LED in start/stop switch group comes on)
False stops Upper or bobbin thread tension too slack
• Set correct upper or bobbin thread tension
• Renew tension spring• Renew bobbin case
Skipped stitches • See troubleshooting table Skipped stitches
Fault Cause Remedy
Maintenance and troubleshooting
6 - 14 FA/FB head – Version 2.3 00820623.fm 15.6.09/Kx
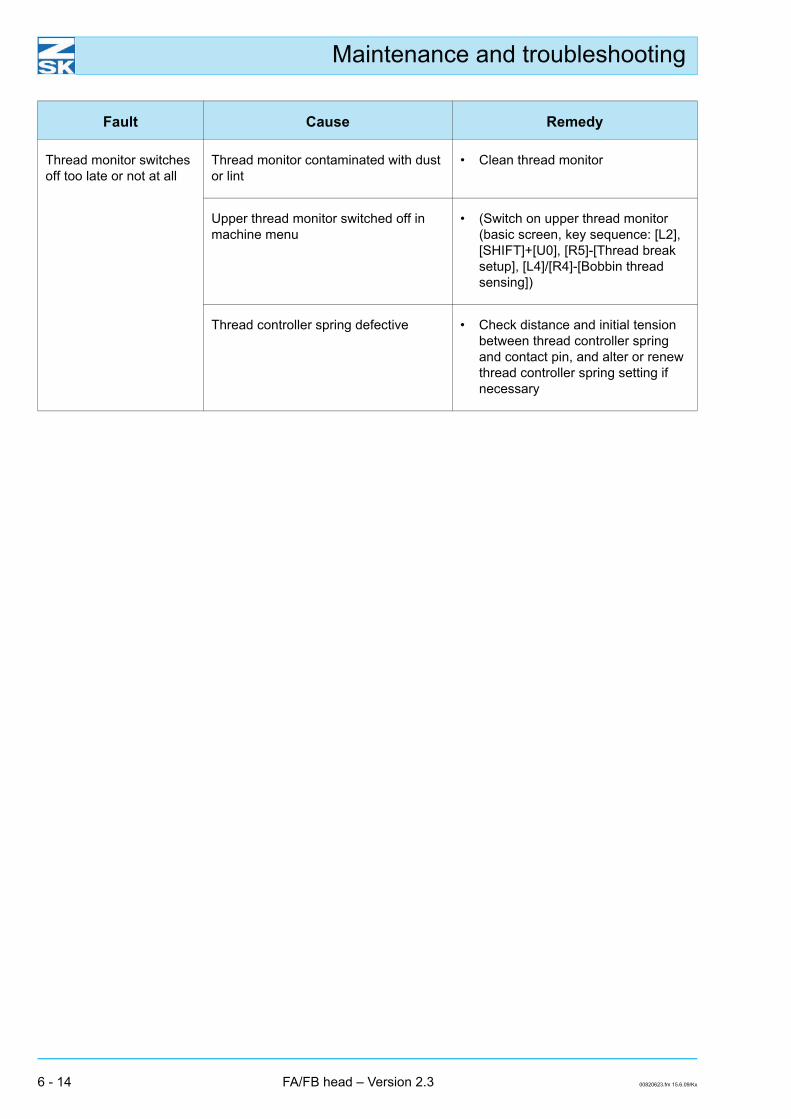
Thread monitor switches off too late or not at all
Thread monitor contaminated with dust or lint
• Clean thread monitor
Upper thread monitor switched off in machine menu
• (Switch on upper thread monitor(basic screen, key sequence: [L2], [SHIFT]+[U0], [R5]-[Thread break setup], [L4]/[R4]-[Bobbin thread sensing])
Thread controller spring defective • Check distance and initial tension between thread controller spring and contact pin, and alter or renew thread controller spring setting if necessary
Fault Cause Remedy
Index
00820t23MIX.fm 15.6.09/Ge,Kx FA/FB head – Version 2.3 Index - 1
AAdjusting bobbin thread tension 3 - 16Adjusting upper thread tension 3 - 15
BBobbin case 3 - 12Bobbin case,
adjusting screw 3 - 16inserting 3 - 14leaf spring 3 - 16length of thread 3 - 13taking out 3 - 11threading 3 - 12
Bobbin tension 1 - 1Bobbin tension,
feeding thread through main tension regulator 3 - 7Bobbin thread break 2 - 2Bobbin thread tension, adjusting 3 - 16Bobbin thread, cutting off 3 - 13Bobbin winding 3 - 11Bobbin, checking direction of rotation 3 - 12Boring embroidery 4 - 1
CCap embroidery 4 - 3Catcher rail 1 - 1Center guide rail 3 - 9Changing bobbin thread bobbin 3 - 11Clamping rail 3 - 9Cleaning gap between leaf spring and
bobbin case 3 - 133 - 14
Cleaning work 6 - 1Clearance between presser foot and
stitch plate insert 3 - 17Coordinated materials 5 - 1Cord/loop embroidery 4 - 2
DDefault position, presser foot 3 - 17Deflection eye 3 - 9Deflector pin 3 - 9Design offset 6 - 12Double-roller cord embroidery 4 - 2
EEmbroidered work, optimum 5 - 1Embroidering samples 5 - 1Embroidery backing materials 5 - 1Embroidery head 1 - 1Embroidery head LED flashes quickly 2 - 2Embroidery head LED flashes slowly 2 - 2
Embroidery head LED illuminated 2 - 12 - 2
Embroidery head LED not illuminated 2 - 1Embroidery head switch 1 - 1
2 - 1Embroidery head switched off 2 - 1Embroidery head switched on 2 - 1Embroidery head, switching on and off 2 - 1Embroidery technique 5 - 1Embroidery yarns,
cotton 5 - 2metallized twisted 5 - 2polyester 5 - 2rayon 5 - 2
Eyelet 3 - 9
FFalse stops 6 - 13Feeding thread around thread monitoring reel 3 - 7Fitting the needle 3 - 2
GGap between leaf spring and bobbin case,
cleaning 3 - 133 - 14
Grease, Gleitmo 585M 6 - 1Guard 1 - 1
3 - 9Guide rail, top 3 - 9
HHolding tension (pretension regulator) 1 - 1
3 - 6Holding tension,
feeding thread through pretension regulator 3 - 6
IInserting bobbin thread bobbin 3 - 12
LLeaf spring and bobbin case, cleaning gap 3 - 14Loop formation 6 - 11Lubricant, residual 6 - 2Lubricants 6 - 1
MMachine does not start 6 - 13Machine runs irregularly 6 - 13Main tension regulator 3 - 9Main tension regulator (bobbin tension) 1 - 1
3 - 7
Index
Index - 2 FA/FB head – Version 2.3 00820t23MIX.fm 15.6.09/Ge,Kx
Index
Main tension regulator, feeding thread through 3 - 7Maintenance intervals 6 - 2Maintenance points,
foot plate 6 - 66 - 7
head 6 - 5Maintenance work 6 - 1Maintenance, overview 6 - 2Maintenance-free 6 - 2Material combinations, unusual 5 - 1Material, nonwoven fabric or ironing cloth 5 - 1Materials for embroidering 5 - 1
NNeedle 1 - 1
3 - 95 - 15 - 2
Needle break 6 - 10Needle cross section 3 - 3Needle size 5 - 3Needle slot, long 3 - 3Needle systems 5 - 2Needle type 5 - 2Needle,
exchanging 3 - 2inserting 3 - 3removing 3 - 2
Needles, counting direction 1 - 1point type 5 - 2R point 5 - 2
5 - 4recommended 5 - 2SES point 5 - 4SUK point 5 - 3
5 - 4
OOil, JCW 35 Super Lubrifiant 6 - 1Overview, maintenance 6 - 2
PPantograph offset 6 - 12Preparing for embroidering 3 - 1
4 - 1Preparing to embroider 3 - 1
4 - 1Presser foot 1 - 1
3 - 9Presser foot height 3 - 17Presser foot, adjusting 3 - 18Pretension regulator (holding tension) 1 - 1
3 - 63 - 7
Pretension regulator, feeding thread through 3 - 6Pretension regulator, tube 3 - 6
RReel-to-reel tape embroidery 4 - 3Rotating stop pin 3 - 17Run of thread through pretension and
main tension regulators 3 - 10
SSafety, for your 6 - 1Sequin diameter 4 - 1Sequin embroidery 4 - 1SES needles 5 - 2Skipped stitches 6 - 13Stitch plate 1 - 1Stitch plate insert 1 - 1Stitch types 4 - 1Stop pin position, determining 3 - 18Stopping position, inaccurate 6 - 13Switching off, embroidery head 2 - 1Switching on, embroidery head 2 - 1
TTabletop embroidery 5 - 5Take-up lever, deselectable 2 - 1Thread break 6 - 8
6 - 9Thread break, indication 2 - 2Thread controller spring 3 - 9Thread gripper 3 - 9Thread monitor reel 3 - 9Thread monitor, switching off incorrectly 6 - 14Thread monitoring reel, feeding thread around 3 - 7Thread take-up lever 1 - 1
3 - 9Thread tension 3 - 15Thread tension disc 3 - 9Threading 3 - 8Threading main tension regulator 3 - 7Threading pretension regulator 3 - 6Threading upper thread,
main tension 3 - 7pretension 3 - 6
Threading wire 3 - 6Troubleshooting 6 - 8Tube, pretension regulator 3 - 6Tubular system embroidery 5 - 5Tubular system machines, special features 5 - 5
UUnderlay material 5 - 1Upper thread break 2 - 2Upper thread guide elements 3 - 8Upper thread tension, adjusting 3 - 15
YYarn rack variants 3 - 4Yarn rack, filling 3 - 4

Index
00820t23MIX.fm 15.6.09/Ge,Kx FA/FB head – Version 2.3 Index - 3
Yarn rack, plates ahead of front angle rail 3 - 5Yarn size 5 - 3

Index - 4 FA/FB head – Version 2.3 00820t23MIX.fm 15.6.09/Ge,Kx
Index