Embed Size (px)
Citation preview

SINGLE HEAD ELECTRONIC EMBROIDERY MACHINE
INSTRUCTION MANUAL
From the library of: Superior Sewing Machine & Supply LLC

From the library of: Superior Sewing Machine & Supply LLC

CONTENTS
The features of machine . . . . . . . . . . . . . . . . . . . . . . . . . . . . . . . . . . . . . . . . . . . . . . . . 1 Specifications . . . . . . . . . . . . . . . . . . . . . . . . . . . . . . . . . . . . . . . . . . . . . . . . . . . . . . . . . . 1
CHAPTER 1 Setting up................................................ 2
1 Part names . . . . . . . . . . . . . . . . . . . . . . . . . . . . . . . . . . . . . . . . . . . . . . . . . . . . . 2 2 Installation . . . . . . . . . . . . . . . . . . . . . . . . . . . . . . . . . . . . . . . . . . . . . . . . . . . . . 3
[]Carrying machine . . . . . . . . . . . . . . . . . . . . . . . . . . . . . . . . . . . . . . . . . . 3 [II Installing machine . . . . . . . . . . . . . . . . . . . . . . . . . . . . . . . . . . . . . . . . . 3 ~Installing operation panel . . . . . . . . . . . . . . . . . . . . . . . . . . . . . . . . . . 3 II] Installing guard bar . . . . . . . . . . . . . . . . . . . . . . . . . . . . . . . . . . . . . . . . 4 llil Setting up machine . . . . . . . . . . . . . . . . . . . . . . . . . . . . . . . . . . . . . . . . 4
3 Lubrication . . . . . . . . . . . . . . . . . . . . . . . . . . . . . . . . . . . . . . . . . . . . . . . . . . . . . 5 4 Replacing bobbin . . . . . . . . . . . . . . . . . . . . . . . . . . . . . . . . . . . . . . . . . . . . . . . 7 5 Replacing needle . . . . . . . . . . . . . . . . . . . . . . . . . . . . . . . . . . . . . . . . . . . . . . . . 7 6 Winding bobbin thread . . . . . . . . . . . . . . . . . . . . . . . . . . . . . . . . . . . . . . . . . . 8 7 Threading needle thread . . . . . . . . . . . . . . . . . . . . . . . . . . . . . . . . . . . . . . . . . 9 8 Thread tension . . . . . . . . . . . . . . . . . . . . . . . . . . . . . . . . . . . . . . . . . . . . . . . . . 10
Needle thread tension ....................................... 10 Bobbin thread tension ....................................... 10
9 Cleaning . . . . . . . . . . . . . . . . . . . . . . . . . . . . . . . . . . . . . . . . . . . . . . . . . . . . . . 10 10 Standard adjustment . . . . . . . . . . . . . . . . . . . . . . . . . . . . . . . . . . . . . . . . . . . 11
CHAPTER 2 Sewing procedures . . . . . . . . . . . . . . . . . . . . . . . . . . . . . . . . . . . . . . 14 <
Flowchart ...................................................... 14
' 1 DEFAULT SEWING ............................................... 15
I
1 Default sewing of patterns . . . . . . . . . . . . . . . . . . . . . . . . . . . . . . . . . . . . . . 15 2 Default sewing ................................•................ 18
I[ PREPARATION . . . . . . . . . . . . . . . . . . . . . . . . . . . . . . . . . . . . . . . . . . . . . . . . . . . 21
1 Attaching embroidery hoop to holder base ....................... 21 2 Inserting floppy disk . . . . . . . . . . . . . . . . . . . . . . . . . . . . . . . . . . . . . . . . . . . . 23 3 Names and functions of operation panel . . . . . . . . . . . . . . . . . . . . . . . . . . 24 4 Preparation of machine . . . . . . . . . . . . . . . . . . . . . . . . . . . . . . . . . . . . . . . . . 32
lll ENTRY ........................................................... 38
Summary of main menu . . . . . . . . . . . . . . . . . . . . . . . . . . . . . . . . . . . . . . . . . . . 38 1 Entering alphanumerics and symbols in alphabet mode . . . . . . . . . . . . 39 2 Entering color change in alphabet mode .......................... 44 3 Entering characters in code entry mode . . . . . . . . . . . . . . . . . . . . . . . . . . 45 4 Entering color change in code entry mode . . . . . . . . . . . . . . . . . . . . . . . . 49 5 Correcting letter . . . . . . . . . . . . . . . . . . . . . . . . . . . . . . . . . . . . . . . . . . . . . . . 50 6 Setting letter spacing . . . . . . . . . . . . . . . . . . . . . . . . . . . . . . . . . . . . . . . . . . . 52 7 Entering patterns . . . . . . . . . . . . . . . . . . . . . . . . . . . . . . . . . . . . . . . . . . . . . . 53
From the library of: Superior Sewing Machine & Supply LLC

l\ EDITING .......................................................... 59
Editing function outline . . . . . . . . . . . . . . . . . . . . . . . . . . . . . . . . . . . . . . . . . . . . . . . 59 Editing method . . . . . . . . . . . . . . . . . . . . . . . . . . . . . . . . . . . . . . . . . . . . . . . . . . . . . . . 65 Data available in BAS-411 . . . . . . . . . . . . . . . . . . . . . . . . . . . . . . . . . . . . . . . . . . . . . . 66 Editing function . . . . . . . . . . . . . . . . . . . . . . . . . . . . . . . . . . . . . . . . . . . . . . . . . . . . . . . 67
1 Enlarging and reducing . . . . . . . . . . . . . . . . . . . . . . . . . . . . . . . . . . . . . . . . . 67 2 Setting monogram area . . . . . . . . . . . . . . . . . . . . . . . . . . . . . . . . . . . . . . . . . 78 3 Setting sewing density a-nd letter thickness . . . . . . . . . . . . . . . . . . . . . . . 80 4 Arranging . . . . . . . . . . . . . . . . . . . . . . . . . . . . . . . . . . . . . . . . . . . . . . . . . . . . . 83
Arranging <Base line registration> . . . . . . . . . . . . . . . . . . . . . . . . . . . . . 93 5 s tt" . . e mg m1rror 1mage .......................................... 102 6 Setting hoop feed . . . . . . . . . . . . . . . . . . . . . . . . . . . . . . . . . . . . . . . . . . . . . 103 7 Rotating . . . . . . . . . . . . . . . . . . . . . . . . . . . . . . . . . . . . . . . . . . . . . . . . . . . . . 1 05 8 Centering . . . . . . . . . . . . . . . . . . . . . . . . . . . . . . . . . . . . . . . . . . . . . . . . . . . . 107 9 Setting repeat sewing ......................................... 119
10 s tt" t . . e mg au omat1c JUmp . . . . . . . . . . . . . . . . . . . . . . . . . . . . . . . . . . . . . . . . 126 11 Indicating material thickness . . . . . . . . . . . . . . . . . . . . . . . . . . . . . . . . . . . 127 12 Setting automatic thread trimmer .............................. 128 13 Setting needle return to sewing start point ...................... 129 14 Setting boring . . . . . . . . . . . . . . . . . . . . . . . . . . . . . . . . . . . . . . . . . . . . . . . . 130 15 Selecting stitch type ........................................... 132
\SEWING
1 Explanation of sewing function ................................ . 2 Sewing function ............................................. . 3 Sewing ...................................................... .
\1 COMMUNICATION
1 Setting communication mode ................................. . Receiving data from paper tape reader ...................... . Error messages when receiving data from paper tape reader ... . Receiving data from editing system ......................... . Error messages when receiving data from editing system ...... .
2. Connecting paper tape reader with machine .................... . Connecting cable with machine ............................. . Connecting cable with the paper tape reader ................ . Operating and preparing paper tape reader ................. . What's needed? ........................................... .
\llOTHER
133
133 134 140
149
149 150 151 152 153 154 154 155 156 157
158
1 Recommendation on embroidering . . . . . . . . . . . . . . . . . . . . . . . . . . . . . 158 2 Error messages . . . . . . . . . . . . . . . . . . . . . . . . . . . . . . . . . . . . . . . . . . . . . . . . 159 3 Troubleshooting . . . . . . . . . . . . . . . . . . . . . . . . . . . . . . . . . . . . . . . . . . . . . . 162 4 DIP switch functions . . . . . . . . . . . . . . . . . . . . . . . . . . . . . . . . . . . . . . . . . . . 166 5 Embroidery hoop types . . . . . . . . . . . . . . . . . . . . . . . . . . . . . . . . . . . . . . . . 169 6 Options . . . . . . . . . . . . . . . . . . . . . . . . . . . . . . . . . . . . . . . . . . . . . . . . . . . . . . 174
From the library of: Superior Sewing Machine & Supply LLC

The features of machine 1) This interactive machine enables even a complete beginner to easily embroider patterns from
monograms to multi-colored patterns. 2) This machine can be used in three different ways to respond to the various needs of the users:
alone with the editing system connected with the communication line to operate the five machines at one time.
3) By setting a program in advance, thread changing and trimming can be done automatically. Up to 99 colors can be put in a pattern and up to 168,000 stitches can be added to the memory.
4) Its wide sewing area is V285mm x H450mm. Also, the removal of the embroidery frame can be done easily.
5) Its wide variety of editing functions enables complex embroideries for many different purposes. 6) Besides 28 letter styles for the alphabet, it has an optional design frame and design floppy disks which
include the patterns of animals, flowers, sports and zodiac signs. If the tape reader (optional) is connected, the tapes and the floppy disks of Tajima, and the tapes of Barudan can be used.
7) Quick entry of alphanumerics is now possible with its easy-to-use keyboard. 8) By removing the table and using the cylindrical bed, embroidery for tubelar materials can be done
effortlessly. Embroidery on the caps can also be done using the cap frame device.
Specifications
Embroidery machine used
Application
Sewing speed
Sewing area
Stitch length
Storage medium
Bobbin thread trimming
Bobbin thread winding
Needle thread breakage
Power supply
Weight
Dimensions
Options
9 needle embroidery machine
Pattern em broidery
Maximum 1000 spm ( 61evels) normal rotation rate 650 spm
V285mm x H450mm
0.1 mm -12.7 mm (minimum pitch 0.1 mm)
3.5" 2DD.2HD (for letter data) floppy disk
Automatic thread trimmer
Bobbin thread winding with exclusive motor
Needle thread breakage detector
Single phase 240V, 220V, 200V, 120V maximum 500VA
165kg
W1 050 mm x L940 mm x H 1380 mm
Paper tape reader, design floppy disks, design frame, embroidery hoops in each size, holder base, ML651 lamp set,
cap framedevice, boring attachment, marking light
-1-From the library of: Superior Sewing Machine & Supply LLC

CHAPTER 1 Setting up
thread shaft
power switch
*Standard hoop and holder base
·Embroidery hoop . . . . . plastic square hoop (45 X 32)
·Holder base holder base assembly
·Floppy disk for 281etter styles of the alphabet
spool stands (9)
operation panel
key board
~~-~al of liquid crystal display
speed dial
X·Y carriage
~
disc drive
*Optional accessories (sold separately)
·Cap frame device ·Boring attachment ·Design floppy disks sports, flowers,
animals, zodiac signs, design frame
·Tubular frame holder base(24 x 30)
Embroidery hoops (including spider net hoops) in various sizes are also available.
-2-From the library of: Superior Sewing Machine & Supply LLC

After installing, get the power supply from an dedicated outlet.
!Il Carrying machine When holding the machine, be sure to hold the machine body (frame). [NOTE] Do NOT hold the table or the guard bar.
~ Installing machine
Installing operation panel
grounging wire (short)
1) Secure the level adjusters 0 so that the upper surface of the table is horizontal.
2) If the table wobbles, loosen the nuts @ and turn the level adjusters 0 to adjust.
When moving the machine, lift the level adjusters 0 so that the machine can be moved by the casters@ on the machine body.
1) Attach the keyboard cable @ and the grounding wire 0 to the keyboard stand @ with screws and the cord holder.
2) Attach the keyboard 0 to the keyboard stand 0 with four screws.
[NOTE] At this time, the shorter grounding wire should be attached with one of the four screws.
3) Plug the keyboard cable @to the keyboard 0 and secure with screw a.
[NOTE] At this time, the longer grounding wire should be attached with the screw.
-3-From the library of: Superior Sewing Machine & Supply LLC

•
[!I Installing guard bar
- -
I I ~ ®
& [§] Setting up machine
•
Attach the screws 0 so that the panel is in the best position for the operator to use.
1) Loosen the screws, and covers RD 0 and LD@. 2) Insert the guard bar @ and attach it with the bolt and washer
from the bottom side ofthe frame. 3) Install covers RD 0 and LD@ with the screws.
Before shipping, the machine is set as shown in the figure on the left.
Turn the clutch knurl 0 until its red mark @ is on the needle bar case side. The machine will be in the automatic jump condition. This is the standard condition of the machine.
[NOTE] Refer to the note on P.32 "[!] Preparation of machine (1)."
-4-From the library of: Superior Sewing Machine & Supply LLC

Lubrication is necessary for keeping the machine in good condition. Every day before using the machine, add 1-2 drop(s) of oil at the each arrow in the figure. [NOTE] G) Be sure to use the brother-specified sewing machine oil for lubrication.
~Too much lubrication may cause the oil to drip on the material.
1) Lubricate the six places at the arrows.
2) Add a drop of oil at the rail ofthe rotary hook. [NOTE] Do not lubricate other than the rotary hook.
I
3) Lubricate the two places of each needle of the needle bar. (18 places should be lubricated in total.)
-5-From the library of: Superior Sewing Machine & Supply LLC

Move the needle bar case all the way to the right or the left side. From the side of the machine head, apply one or two drop(s) of grease to the base needle bar and the base needle bar felt. Whe·n the machine is used every day, lubricate daily before using.
-6-From the library of: Superior Sewing Machine & Supply LLC

1. Removing bobbin case
0
1) Open the rotary hook assembly cover 0.
2) Hold the knob @ and remove the bobbin case.
3) Close the knob and remove the bobbin €).
0
Materials and needle selection
2. Replacing bobbin
01@cm of thceed. I
The thread should O be wrapped to the ~ right around the 8 bobbin.
1) Put the bobbin in the bobbin case.
2) Slide the thread under the tension spring 0 through the notch e.
3) Pull out the thread from the thread hole and pass it through the hook@.
4) Pull out the thread about 50mm.
1. Removing needle
3. Attaching bobbin case
1) Hold the knob @ and attach the bobbin case.
2) Close the cover 0. * The standard tension of the
bobbin thread should be about 20-30g.
Loosen the thumb screw 0 and remove the needle @.
2. Attaching needle
With the flat side facing the front, insert the needle all the way until it meets the end of the needle bar. Tighten the thumb screw 0 firmly.
[NOTE] Set the needle so that the notched part comes on the rotary· hook side.
Fabric type Needles Needle [NOTE1] When using special threads such as the gold, silver
and rame yarn, use a heavy-duty needle {#11-#16). For better finishing, paste the waxed paper on the back of the material.
Denim
Leather
Handkerchief DBx KS
Shirt
Towel
numbers
#14,
#16, #18
#9-#10
#11'
#12, #13
[NOTE2] For general materials, use DB x K5 #11 to #18 according to the thickness of the material. For knitted materials, use DB x K23 #11. Its round end prevents the knit thread from breaking.
-7-From the library of: Superior Sewing Machine & Supply LLC

1) Turn on the power. 2) Press the bobbin 0 on the bobbin winder shaft@. 3) Pass the thread through the thread guide@. 4) Wind the thread on the bobbin 0 several times
in the direction of the arrow. 5) Press the bobbin presser 0.
[NOTE] If the thread is not wound evenly on the bobbin, loosen the screw @ and move the thread guide @right and left. When winding more thread on the bobbin, loosen the screw @, then move the bobbin presser e.
6) When the winding is finished, remove the bobbin from the bobbin winder shaft and trim the thread with the thread trimmer f). [NOTE 1] If the thread comes out from the thread
guide @, loosen the knob @. If the thread is wound too loose, tighten the knob@.
[NOTE 2] The thread winder motor does not operate if the circuit protector activated. In that case, leave the protector until it's cooled off. Then, press the protector switch@.
-8-
If the protector is not cooled off, the switch does not work.
From the library of: Superior Sewing Machine & Supply LLC

3
2 . >=r= ~\
Procedures
1} Pass the thread up through the hole of the thread guide from the stand spool. Then, pass the thread over around and up through the second hole of the thread guide according to the diagram.
2} String the thread by lifting each thread guide tension disk with a finger.
3) Pass the thread through the thread path via the thread guide tension disk.
4} Pass the thread through the thread guide, wrapping it once around around the tension disk clockwise.
5} Pass the thread through the upper hole of the 2-stage thread guide, then thread the thread breakage detector spring.
6) Put the thread on the inner thread guide through the hole of the thread take-up. Pass the thread through the inner thread guide again.
7} Put the thread into a hole of the lower thread guide, then pass it through the thread path of the needle clamp through the presser foot and finally through the eye of the needle.
-9-From the library of: Superior Sewing Machine & Supply LLC

Needle thread tension
If the needle thread tension is too high, turn the dial counterclockwise. If the needle thread tension is too low, turn the dial clockwise.
Bobbin thread tension
Correct sewing tension Upper stitch width
Lower stitch width
Adjust the tension dial so that the needle thread is pulled to the back of the material, and the lower switch width is about 1/3 of the upper stitch width.
Increase Correct bobbin thread tension (20-30g) Use a tension gauge
to adjust.
tension
Keep the machine clean and unclogged to prevent machine trouble.
Keep the machine clean: Remove dirt with a soft, dry cloth. If necessary, clean with the detergent-soaked cloth, then wipe off the detergent with a cloth dampened with (hot) water_
Caution:
-10-
Do not clean with benzene, thinner, or other volatile solvents.
From the library of: Superior Sewing Machine & Supply LLC

[] Adjusting needle bar height
Tighten screw so that clearance is the same at all points.
1) Lower the needle bar to its lowest position. When the needle tip is raised 9 mm above the center of the rotary hook shaft, tighten the screw of the needle bar clamp @ so that the screw 0 leans to the right 25° -30°.
2) Lower the needle bar to its lowest position. Lightly press the stopper @to the cushion rubber 0 side. Then tighten the screw@ so that it is positioned in the front.
[NOTE] Make sure that the stopper does not strike the needle bar guide rail.
-11-From the library of: Superior Sewing Machine & Supply LLC

When using the gauge (optional)
'--ii)WE!rShaft
1) Loosen the screw 0 and remove the rotary hook@ from the lower shaft. 2) Insert the gauge (option) into the lower shaft. 3) Loosen the screw (i) ofthe needle bar clamp@. Turn the pulley until the needle tip lightly contacts the
gauge. [NOTE) Do not use the flat part of the gauge at this time.
4) Tighten the screw (i) ofthe needle bar clamp@ firmly. [NOTE) Check the stopper adjustment procedure on page 11 again.
-12-From the library of: Superior Sewing Machine & Supply LLC

11] Adjusting timing of needle and rotary hook
y Figure A
1· Aprrox. I I lmm I
I I I 7 6 5 4 3 I
I
1) Selectthefirstneedlebar 0. 2) Remove two screws and the needle plate@. 3) When the needle bar is raised 2.3 mm (201') above its lowest position (180'), loosen the screw 0 of the
rotary hook @,and adjust so that the needle meets the rotary hook point. Then, temporarily tighten the two stop screws. At this time, the needle bar height should be about 1 mm. (Figure A)
4) Select the ninth needle bar @. If the gap between the needle and rotary hook point is 0.01-0.2 mm, tighten the three screws of the rotary hook.
@] Adjusting cloth presser height
Cut and insert.
Adjust the cloth presser 0 height with the cushion rubber @. The cloth presser 0 height should be raised 1 - 1.3 mm from the needle plate @ at the cloth presser's lowest position. (A sheet of the cushion rubber is 0.5 mm thick.)
-13-From the library of: Superior Sewing Machine & Supply LLC

CHAPTER 2 Sewing procedures
I Default sewing Patterns (embroidery)
AI phabets (monogram)
'':t L Attaching embroidery hoop to %1---------1 holder base
'''''"'1,1
.. ,~~,~~: .. :~,~~,~:""''"' .,,J1 ;: ~!~:~gaf~~P~~~~~~ons of keys on
Ill Entry .-:-;.:· .. ;.· ..
::;:: IV Ed .JtJ'ng '1''1-· -------l t·
,.,:::~:- ... --~~.:~·=·=:=::·::: -·=::::::x::=:~·>:=:=:::.;;;,:;.,;-:,~:-~:-:::;'::··:,,: :'"(::.::>:=>:=>:=:=::::::::: ... :::x;;;:-:::::::::-ti:
operation panel 4. Preparation of machine
Alphabet entry
Code entry
Pattern entry
Alphanumerics and symbols
ASCI! code Letters and symbols
I File names
1. Enlargement/reduction 2. Monogram area 3. Sewing density and letter thickness 4. Arrangement 5. Mirror image 6. Hoop feed 7. Rotation 8. Centering 9. Repeat sewing
10. Automatic jump 11. Material thickness 12. Automatic thread trimmer 13. Returning to starting point 14. Boring 15. Stitch
ill---------1 i: ~:::~~(function selection) mode
V Sewing '" 3. suspension ,,!iJ·=::~iiJ=>=!il==<E=,,:;.z,:,c:=· =-E:=· =!iJ===-:!iJ··::::!ll-~~.-z,,.·z. ·<=!l!·=>E=<=>E==>>;.!iJ·::: §.;;:::.§: ·=:-!ll==~=E·=··==!l!··= ·mm==·==~E->·-·Ml·-~~ 4. Test sewi n g m od e
VI Communication
-14-
5. Needle bar setting mode 6. Needle bar selecting mode 7. Hoop feed mode 8. Stitch by stitch sewing mode 9. bobbin thread counter/thread breakage
sensor
Paper tape
Editing system
From the library of: Superior Sewing Machine & Supply LLC

T DEFAULT SEWING
Wf CJifME THE NEXT AfflJIEI. GEJIERATION BRU1IIER INDUS11IIES. LTD.
To embroider the pattern above (four-colored, file name :STAFF):
( ENTER )
I
oooooooooooooo .. F : oooonooo . ooo DOODODOQDOt~ATTRN.
1. Turn on the Power.
Main menu is displayed.
2. Insert the design floppy disc.
3. Press the <ENTER> key to enter the data.
[NOTE] Change the alphanumeric mode into the pattern mode in order to enter the pattern data.
4. Press the < PATTERN > key twice. The pattern mode is displayed.
5. Type the file name of the pattern " STAFF " with the alphabet key on the operation panel.
-15-From the library of: Superior Sewing Machine & Supply LLC

E N D
S T A R T
6. The entered file name is displayed on the second row.
7. Press the< ENTER> key.
A message," Reading now" is displayed on the third row, then after a while, a "i:r" appears on the first row.
8. Press the < END > key to return to the main menu.
9. Press the< START> key to get into the sewing (function selection) mode.
10. Pressing the< START> key begins sewing.
The number on the LED indicators shown during sewing indicates the rotation of the sewing machine.
After needle number 1 sewing finishes, the next needle number is displayed.
-16-From the library of: Superior Sewing Machine & Supply LLC
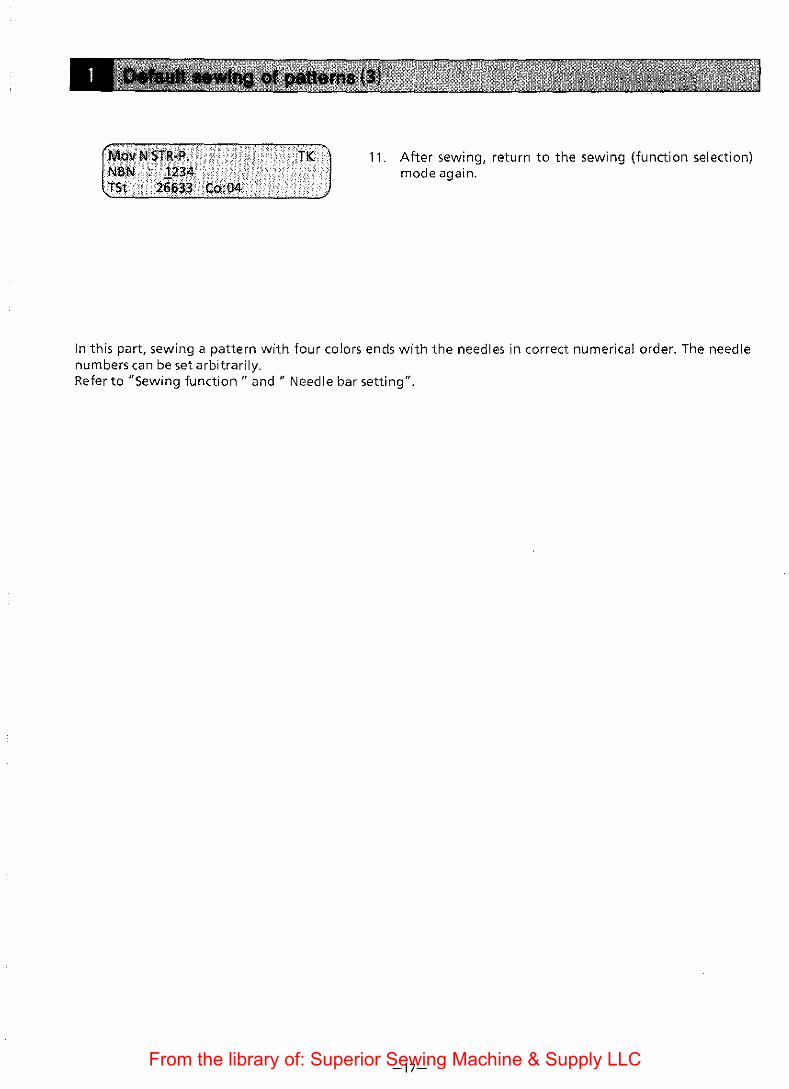
11. After sewing, return to the sewing (function selection) mode again.
In this part, sewing a pattern with four colors ends with the needles in correct numerical order. The needle numbers can be set arbitrarily. Refer to "Sewing function" and" Needle bar setting".
-17-From the library of: Superior Sewing Machine & Supply LLC

To embroider "Brother" in default:
S T A R T
1. Turn on the power_ The main menu [ENTER], [EDIT], [COMMUNICATE], [START(SEWING)] will be displayed.
2. Press the <ENTER> key on the operation panel to enter the data.
3. Type "Brother"_ 1) For a capital "B", press the <SHIFT 1 >key, then press
the <B >key_ 2) Release the <SHIFT 1 >key by pressing it twice. Then
press the <R>, <0>, <T>, <H>, <E>, and <R> keys.
*The message <Reading now> will be displayed at the bottom of the operation paneL When all data of the seven letters is stored, the message will disappear.
4. Press the <END> key. The display will return to the main menu.
5. Pressthe <START> key for sewing.
-18-From the library of: Superior Sewing Machine & Supply LLC

Brother · NBN:l STY!,: OJ:.
6. Select the sewing position using the jog key.
7. Press the <START> key for sewing.
8. After sewing, the display will return to the sewing (function selection) mode again.
-19-From the library of: Superior Sewing Machine & Supply LLC

<The default settings in the editing mode>
Screen ( 1)
;''~'(Jf,;!,~.~-
?Ajj?'~,!fi~;JOI)' 'iirt~~nmt~'mmml, LNG(V =vertical H =horizontal) All (W =width, H =height)
Screen (3)
lie#r ':,ti ¢11~, ,:vtimce '$P~'it;;'<)o~rtin,';!:'id,, ,· ,, JA.TJ:I<:d ~,·t;l s~; . Hoop':'i\nanu · · ... · .·
Screen (5)
Screen (2)
Screen (4)
srll. R'::oni'· I 601\JJ\IG i :'¢ff
SHIFT ., · · ;.Off.:
NOTE: If the <AC> key is pressed when the editing menu is displayed, all the editing menu values except automatic thread trimming value will be reset to default. lfthe < * > key is pressed once, the above screens will be displayed in sequence.
-20-From the library of: Superior Sewing Machine & Supply LLC

IT PREPARATION
1) Attach the holder base 0 to X carriage@ and tighten the two screws@. (Fit the protrusions of the X carriage in the holes that are closer to the center.)
2) Loosen the two screws 0 and set the plastic square hoop 0. 3) Fix the metal fittings on the left side of the hoop as shown in figure A, and fix the one on the right side
of the hoop as shown in figure B. Secure the screws 0. 4) Improper setting of the material in the embroidery hoop may cause skipped stitches, thread breakage,
or puckering. Use the screw@ for adjustment.
-21-From the library of: Superior Sewing Machine & Supply LLC

~ Attaching tubular square hoop to holder base [NOTE] Before using the tubular square hoop and the holder base, remove table (C) of the embroidery
machine.
1) Attach the tubular square frame @to the X carriage Owith the two screws @as shown in figure A. (Fit the protrusions @ ofthe X carriage in the hoi es that are closer to the center.)
2) Attach the metal fittings of the tubular square hoop 0 as shown in figures Band C. When attaching them, lift the plate spring roller @slightly and be sure to fit the protrusions @of the holder base in the holes of the frame.
3) Improper setting of the material in the embroidery hoop may cause skipped stitches, thread breakage or puckering. Use the screw f1 for adjustment.
-22-From the library of: Superior Sewing Machine & Supply LLC

Inserting = =
[NOTE 1] If the floppy disk is not properly inserted, the data will not be read.
[NOTE2] Keep the floppy disk away from magnets and televisions, for the data on the disk can be damaged by magnetism.
-23-
Ejecting
Press the eject button to take out the floppy disk. Do not eject the disk while the drive indicator is on.
From the library of: Superior Sewing Machine & Supply LLC

D
btother BAS-411
-24-From the library of: Superior Sewing Machine & Supply LLC

Main functions of keys on operation panel Use this key to;
START
[ G:D J
0 ·~ ;j';j~ 1l:
EMERGENCY
[ (,gJ J
t-JL-:7 1)7
AC
• Select <START> after data entry_ • Embroider the data stored in just the state it was in last embroidered. • Start after theca rriage moved to sewing start point. • Restart in the sewing mode during suspension.
Use this key to; • Clear the warning (needle thread breakage etc)_ • Finish needle setting_ • Exit from each menu in the editing mode and to exit from editing mode.
Use this key to; • Stop the machine during sewing_ • Clear the back-up memory when the power is turned on.
Use this key to; • Convert the character code into character_ • Set the area, letter size, style number, letter thickness, sewing start point,
etc • Receive data in the communication mode_ • Set the pause (suspension mark "*"l or release it after the needle bar
exchange_ * Because the pause and the color order function work together, the pause
cannot be set without color order function_
Use this key to; • Clear all the characters displayed in the data entry mode. • Change the edit data into default_ • Cancel the sewing during suspension in the sewing mode. • Set the color orderto default in the needle bar setting mode_
-25-From the library of: Superior Sewing Machine & Supply LLC

rii1El C0(:-1MUNICATE
~ ~
Use this key to; • Delete the character on the cursor in the display • Delete the characters one-by-one on the cursor while keeping set value. • Cancel one cycle of repeat in sewing mode.
Use this key to; • Move carriage at the beginning of sewing in any direction. • Move cursor in the display forward and backward • Restart forward and backward movement after thread breakage. (either
stitch by stitch or every 100 stitches) • Select color order in needle bar setting.
Use this key to; • Enter communication mode and communicate with editing system or
paper tape reader through communication line.
Use this key to; • Edit after data entry. • Select function out of the editing menu by the numeric key. * In editing mode, BAS-411 can edit only brother data format (block data
format). No other data format is available.
-26-From the library of: Superior Sewing Machine & Supply LLC

Mlf~.'if:
NEEDLE SET
if<~M"t
THREAD SENSOR
:!lt'~i!!
HOOP FEED
*f*'jg~R
NEEDLE SELECT
Use this key to set needle order when setting sewing start point and during suspension. * The maximum number of needle changes is 99.
Use this key to; • Switch ON/OFF of thread breakage detector. • Set the bobbin thread counter value. • Switch ON/OFF of the bobbin thread counter. • See the value on the stitch number counter.
* This key is available in sewing (function selection) mode.
Use this key to move X and Y carriages to attach or remove hoop or to superimpose material. * Only one hoop feed position can be set per embroidery cycle.
The hoop feed position can be changed during sewing. This key is available when the machine is standing by or in suspension.
Use this key to move the needles manually, not related to the needle order. This key is available during main menu mode, entry mode, editing mode, suspension and when the machine is standing by. * Using this key does not change needle order. Therefore, when the sewing
is begun,the needle that is set in the established needle order returns to needle hole.
* Press the needle number ( < 1 > - <9> key ) to replace the needle manually.
[NOTE] This key is not available during sewing mode.
-27-From the library of: Superior Sewing Machine & Supply LLC
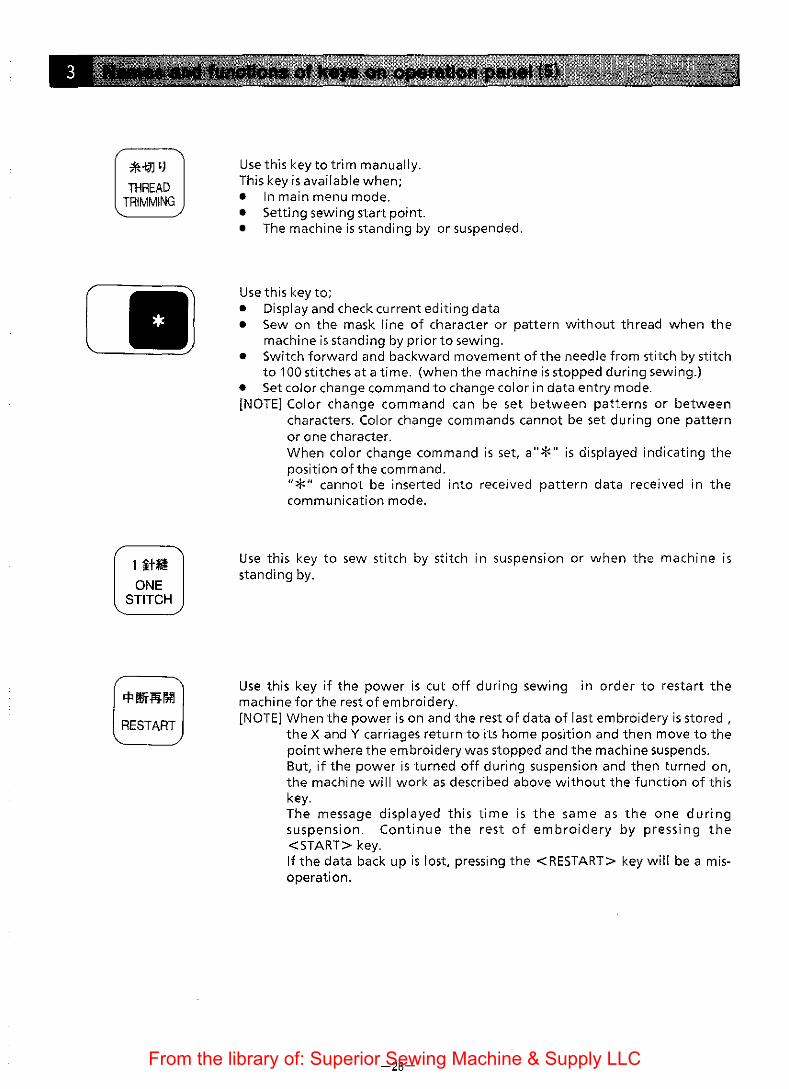
*~') THREAD
TRIMMING
1 £t@ ONE
STITCH
RESTART
Use this key to trim manually. This key is available when; • In main menu mode. • Setting sewing start point. • The machine is standing by or suspended.
Use this key to; • Display and check current editing data • Sew on the mask line of character or pattern without thread when the
machine is standing by prior to sewing. • Switch forward and backward movement of the needle from stitch by stitch
to 100 stitches at a time. (when the machine is stopped during sewing.) • Set color change command to change color in data entry mode. [NOTE] Color change command can be set between patterns or between
characters. Color change commands cannot be set during one pattern or one character. When color change command is set, a"*" is displayed indicating the position ofthe command. "*" cannot be inserted into received pattern data received in the communication mode.
Use this key to sew stitch by stitch in suspension or when the machine is standing by.
Use this key if the power is cut off during sewing in order to restart the machine for the rest of embroidery. [NOTE] When the power is on and the rest of data of last embroidery is stored ,
the X andY carriages return to its home position and then move to the point where the embroidery was stopped and the machine suspends. But, if the power is turned off during suspension and then turned on, the machine will work as described above without the function of this key. The message displayed this time is the same as the one during suspension. Continue the rest of embroidery by pressing the <START> key. If the data back up is lost, pressing the <RESTART> key will be a misoperation.
-28-From the library of: Superior Sewing Machine & Supply LLC

Alphanumeric and symbol keys
:!i'i/i~<'F
PATTERN
4~ y7 ~ 1
4. SHIFT1
• Y7 ~2 SHIFT 2
Use this key to; • Enter number and pattern. • Select menu.
Use this key to; • Enter characters in alphanumeric mode. • Enter 1-8 digit(s) code numbers (file name) in pattern mode.
Use this key to switch pattern mode, alphanumeric mode and code entry mode.
Up to 4 characters are allocated to each key and selected by the <SHIFT 1 > and <SHIFT 2> keys.
When shift 1(upper) indicator is lit; symbols, capital standard and European letters (on upper right) are available.
When shift 1(1ower) indicator is lit; numbers, capital standard and European letters (on lower right) are available.
When shift 2 indicator is lit; numbers, capital standard and European letters (on upper left) are available.
If neither shift key is lit; numbers, small standard and European letters (on lower left) are available.
Use this key to leave a space between patterns. One space makes a 10 mm interval.
-29-From the library of: Superior Sewing Machine & Supply LLC

1'-tr-tlt?__.+t THREAD SENSOR
SET e
t' j :Y' I J / ,,
CENTERING
c:-e -•
Operating procedure, data code number, letters entered, editing data and error messages are shown on the 3-line,15-letter display.
This indicator is lit when the thread breakage detector is working.
This indicator is lit when centering is selected.
ASCII code, code number (in entry mode), sewing speed (rotation) is displayed.
-30-From the library of: Superior Sewing Machine & Supply LLC

~~ SPEED
The speed dial is used to select one of the 6 sewing speeds, according to the chart below.
The levels are set according to the stitch length. (not changeable)
~ stitch length 0.1 -4.8
1 1 OOOrpm
2 750
3 650
4 550
5 500
6 350
::::r:-- t-- 5 :::z r------CONTRAST
4.9- 8.2 8.3-12.7
650 450
600 450
550 450
500 450
450 400
350 350
The contrast dial of liquid crystal display is used to adjust the darkness of the display.
-31-From the library of: Superior Sewing Machine & Supply LLC

[1] Check the following before switching on the machine
1. THREAD 2. EMBROIDERY HOOP 3. NEEDLE THREAD POSITION
(j) Threading is proper? (j) The embroidery hoop (j) The needle thread take-ups
® The needle is threaded? securely clamps? form a line?
® The bobbin thread is set? ® The embroidery hoop ® The needle bar is at its
®. The needle thread is set? increases the tension of the highest position?
material?
When the power switch is on, the message, "CAUTION MOVING!" is displayed and the buzzer sounds 'beep'. Then, the embroidery hoop automatically moves to the center of the X andY carriages. At this time, check that there is nothing on the hoop which runs against the point of the needle or the presser foot.
[NOTE] When the power supply cord is connected, be sure to connect the grounding wire as illustrated in the figure below.
grounging wire
-32-From the library of: Superior Sewing Machine & Supply LLC

~When turning on the power of the machine
1. If the following are displayed
( 1)
needle bar case side
[NOTE] When the needle bar and the pulley are not in the stop position or if even one of the needle thread takeups is not in line, lift the needle thread take-up with a finger. The needle thread take-ups form a line by the movement of the stopper.
This message shows that the needle bar case is not aligned with the needle hole of the needle plate. The machine cannot operate if this occurs.
1. First of all, check that the needle bar stop position is correct.
When the red mark & of the clutch knurl 0 is on the side of the needle bar case, it is in the automatic jump condition. This is the normal position.
2. Turn the shaft@ slowly. If it is unusually heavy or does not turn, the needle thread take-up 0 or the needle bar is not in the proper position. Check again and adjust it. [NOTE] Do not turn the shaft forcefully.
3. When the needle bar case comes to the proper position, in the middle of the undetected area where the needle bar case does not move although the shaft @ is turned, the buzzer sounds 'beep' and the messages, "CAUTION MOVING!" and "Press START key" are alternately displayed.
-33-From the library of: Superior Sewing Machine & Supply LLC

S T A R T
(2)
index
4. Press the <START> key.
The needle bar is not in the proper position. Under this condition, it is impossible to move the needle bar to the proper position.
When the needle bar stop position is not proper:
1. Align the pulley index to the stop position.
2. When the needle bar case comes to the proper position, the buzzer sounds 'beep', and the messages, "CAUTION MOVING!" and "Press START key" are alternately displayed.
[NOTE] Check that the needle bar does not go down. If it does, set the needle bar in the proper needle bar stop position.
3. Press the <START> key.
The X and Y carriages move automatically to the home position of the embroidery area.
4. The main menu is displayed.
-34-From the library of: Superior Sewing Machine & Supply LLC
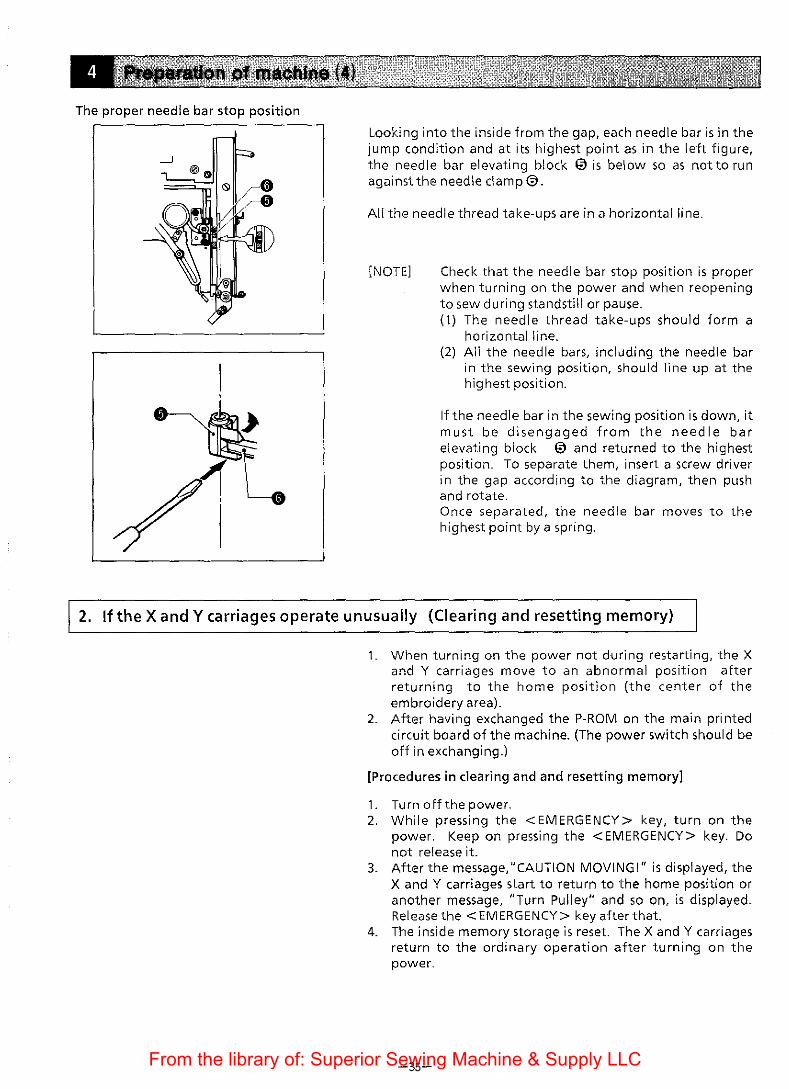
The proper needle bar stop position
Looking into the inside from the gap, each needle bar is in the jump condition and at its highest point as in the left figure, the needle bar elevating block 0 is below so as not to run against the needle clamp@.
All the needle thread take-ups are in a horizontal line.
[NOTE] Check that the needle bar stop position is proper when turning on the power and when reopening to sew during standstill or pause. {1) The needle thread take-ups should form a
horizontal line. (2) All the needle bars, including the needle bar
in the sewing position, should line up at the highest position.
If the needle bar in the sewing position is down, it must be disengaged from the needle bar elevating block 0 and returned to the highest position. To separate them, insert a screw driver in the gap according to the diagram, then push and rotate. Once separated, the needle bar moves to the highest point by a spring.
2. If the X andY carriages operate unusually (Clearing and resetting memory)
1. When turning on the power not during restarting, the X and Y carriages move to an abnormal position after returning to the home position (the center of the embroidery area).
2. After having exchanged the P-ROM on the main printed circuit board of the machine. (The power switch should be off in exchanging.)
[Procedures in clearing and and resetting memory]
1. Turn off the power. 2. While pressing the <EMERGENCY> key, turn on the
power. Keep on pressing the <EMERGENCY> key. Do not release it.
3. After the message," CAUTION MOVING!" is displayed, the X andY carriages start to return to the home position or another message, "Turn Pulley" and so on, is displayed. Release the <EMERGENCY> keyafterthat.
4. The inside memory storage is reset. The X andY carriages return to the ordinary operation after turning on the power.
-35-From the library of: Superior Sewing Machine & Supply LLC

3. Restarting
In the following cases, the message will be displayed and sewing can be resumed. When the power of the machine is cut off because of a power cut during sewing, or if the power switch is turned on after having been turned off during suspension or sewing:
(1) Turning off the power:
sewing
When the machine is suspended during sewing. After the <EMERGENCY> key has been pressed. When the machine is automatically suspended because of needle thread breakage, and so on.
I
1. Turn on the power. The embroidery hoop is automatically returned to the position where sewing was suspended before and the machine suspends.
2. Pressing the <START> keywill startsewing. Pressing the <AC> key will cancel sewing. The message, "Mov N STR-P. TK" will be displayed.
\
_)
-36-From the library of: Superior Sewing Machine & Supply LLC

(2) In case the power of the machine was cut off because of a power loss
The embroidery hoop is automatically returned to the position where sewing was suspended before.
R~eMv> $'t;"'. NBN ... ·•
RSt:
Sewing start Mov NF!N: TSt:
1. Turn on the power. The message, "RESTART or END" is displayed.
2. Press the <REST ART> key or the <END> key.
The restart is canceled and the main menu is displayed.
3. Press the <START> key or the <AC> key.
•·· :TI<.
[NOTE] In (1) and (2), if more than a day passed with the power off, the memory will be erased and the restart cannot be done. Turning on the power will display the main menu.
-37-From the library of: Superior Sewing Machine & Supply LLC

Ill ENTRY
The main menu
This main menu is displayed at the completion of each step.
The function of each item in the main menu
[ENTER] . . . . . . . . . . . . . . . Pressing the <ENTER> key will introduce the mode for entering the data of the letters and patterns.
[EDIT] . . . . . . . . . . . . . . . . . Pressing the <EDIT> key will open the mode for editing the data --arrangement, enlargement and reduction.
[COMMUNICATE] . . . . . . Pressing the <COMMUNICATE> key will enable the system to start receiving the data from the editing system (optional) and the paper tape reader (optional).
[START (Sewing)] . . . . . . . Pressing the <START> key will begin the sewing mode.
When the main menu is displayed, the following modes can be selected using these keys.
[NEEDLE SELECT]
If] lB ~
I!]
[NEEDLE SET]
The needle can be replaced manually regardless of the setting in the NEEDLE SET mode.
Pressing the JOG key will move the hoop position.
Pressing the< NEEDLE SET> key will enter the NEEDLE SET mode.
[THREAD SENSOR] . . . . . . Pressing the <THREAD SENSOR> key will: switch ON/OFF of thread breakage detector. set the bobbin thread counter value. switch ON/OFF of the bobbin thread counter. seethe value on the stitch number counter. * This key is available in sewing (function selection) mode.
[THREAD TRIMMING] . . . Pressing the <THREAD TRIMMING> key will perform thread trimming.
[0] . . . . . . . . . . . . . . . . . . . . Pressing the <0> key will enter the test mode.
[NOTE] While above keys are available, they are not displayed in the main menu.
-38-From the library of: Superior Sewing Machine & Supply LLC

1. When the alphanumeric mode is displayed, the alphanumerics and the symbols can be entered directly from the operation panel. (This mode is used for entering the alphabet from the floppy disk.)
This is displayed in default.
The available keys on this display are:
Available k(l!y
AJ~ric and Symbo 1 :keys
(B ~ liJ(!) {A C)
CD •'
( ENTER }
f PATTERN)
( E II 0 )
Function
To type all letters
To type only style number
To move cursor from side to side
To switch entry mode (letter entry~
style number) .. . . . - .... - .. [NOTE 1]
To clear all data ... - ....... [NOTE 2]
To delete letters on cursor
To change style number of stored letter
(style number entry mode) ...... [NOTE 3]
To change entry modes (alphabet mode,
code mode, pattern mode)
To end entry mode
[NOTE 1] Changing the style number can be made by typing a number with two-digits while the cursor appears on the second row by pressing the < [!] > key. Press the < [jJ > key in returning to the Jetter entry mode again. At this time, the cursor on the second row will disappear.
[NOTE 2] Note that all set values are cleared. (Refer to page 20.)
[NOTE 3] To change the style number of the stored letter, press the < [j] > key to display the cursor on the second row. After entering the style number with a two-digit number, press the <ENTER> key. Only a letter on the cursor can be changed.
2. Description of each setting item
~fOalif~--The stored letters are displayed. (If the data of the stored letter does not exist in the floppy disk, its letter is highlighted.) . . . . . . . . . . . . . . . . [NOTE 4[
The style number to store the letters is displayed.
L_-------Moving the cursor under the stored letter, the style number of the letter is displayed.
[NOTE 4] If there is a highlighted letter among the displayed letters in the first row, the display will not exit from the alphabet mode. Moving the cursor in the first row under the highlighted letter, delete the highlighted letter by using the <CLEAR> key, or after deleting it by using the <AC> key, enter the letter with another style number again.
-39-From the library of: Superior Sewing Machine & Supply LLC
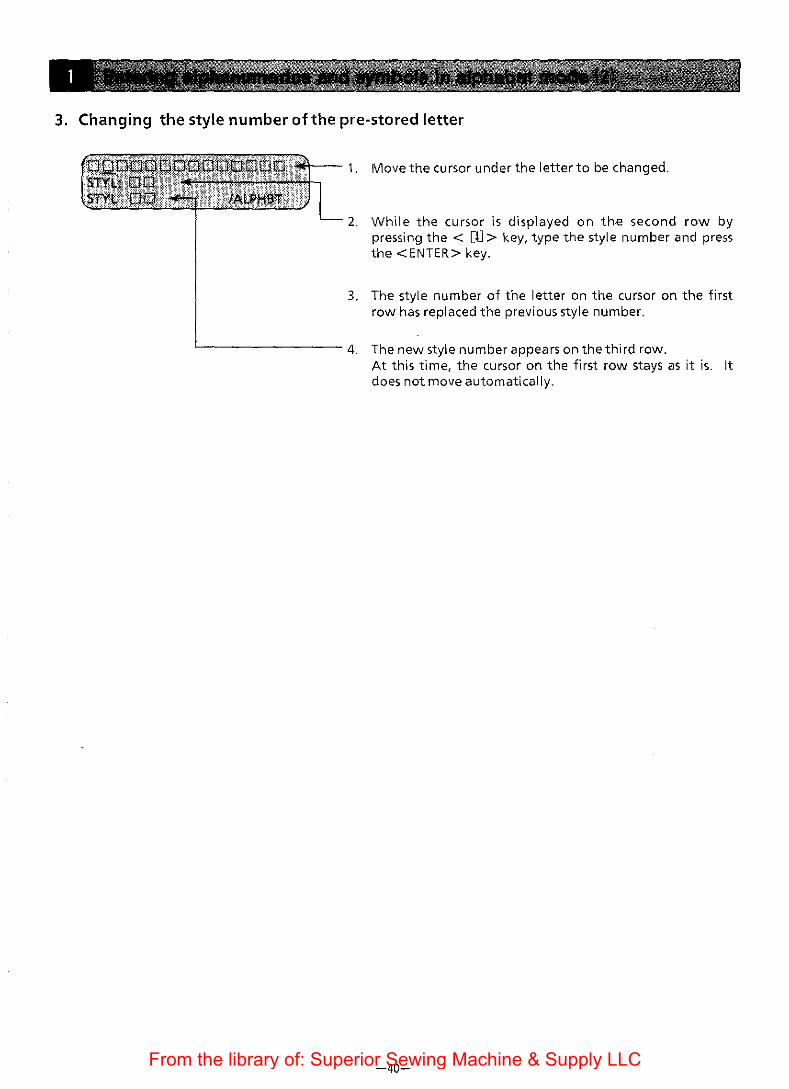
3. Changing the style number of the pre-stored letter
2. While the cursor is displayed on the second row by pressing the < rn > key, type the style number and press the <ENTER> key.
3. The style number of the letter on the cursor on the first row has replaced the previous style number.
'--------- 4. The new style number appears on the third row. At this time, the cursor on the first row stays as it is. It does not move automatically.
-40-From the library of: Superior Sewing Machine & Supply LLC

4. To type the letters of AB in practice
There e are 28 styles available including block letters, script, old English letters, italics in the alphabet (capital and lower case) and numbers. The alphabet and the numbers can be entered directly from the key board on the operation panel.
[EN,teM ,; ' ,~Wi:fl • [COMMU.NI!iA.TEl•', ,c.; . [$1' AA'r<5~iti lli i i'
ENTER
E N D
lE~tERl hll{;!~t;t) > ; ' {Crn./IMUNI(!»(lJi~•i''' .. STAI\'!:{Stmlrt!J)J;.) •< .....
1. Press the <ENTER> key.
2. When entering a capital letter, light the <SHIFT 1 > key (upper) or (lower). or the <SHIFT 2> key to enter. Pressing the <A> key and the <B> key will input the I etters d i recti y. The AB is stored.
3. Pressthe <END> key.
4. Return to the main menu.
5. Pressing the <START> key will start sewing.
-41-From the library of: Superior Sewing Machine & Supply LLC

5. Selecting alphabet style
Different styles can be selected prior to entering the alphabet (capital and small) and the numbers. Examples of four styles of embroidering A B
AB .J(£qJ Ala AB Style 01 Style 02
Block letters Script
Embroider the letters ~
Style 03 Style 04 Old English letters Italics
[NOTE] In addition to these, there are 24 styles available.
In the main menu
1. Press the <ENTER> key. The style number 01 is displayed. [NOTE 1] In default, the style number 01 is displayed. [NOTE 2] Select the style number with a two-digit
number.
2. In changing the style number, press the < ITJ > key to display the cursor in the second row, select the style number 02.
3. Press the <0> key and the <2> key.
4. Press the< ITJ > key. When entering the capital AB, light the <SHIFT 1 > key (upper) or (lower), or the <SHIFT 2> key to enter in turn.
-42-From the library of: Superior Sewing Machine & Supply LLC

[NOTE 4]
5. Press the <A> key. The message, "Reading now" is displayed in the third row.
6. Press the < B > key.
1-*--------- [NOTE 3] At this time, to check the style number of the
E N D
entered letter, move the cursor under it by pressing the jog key.
'-----This is the style number of the letter on the cursor in the first row.
The style number in the second row shows the style number of the letter to be typed.
'-----------~ The style number in the third row shows the style number of the letter on the cursor.
-43-From the library of: Superior Sewing Machine & Supply LLC

1. Setting color change
The color change can be selected for every letter or pattern by entering the color change code in entry mode. Select the alphabet made or the code mode when setting color change.
About a method of entering color change in alphabet mode
/ALPHBT
1. When entering a capital letter, light the <SHIFT 1 > key (upper) or (lower), or the <SHIFT 2> key, pressing and entering the <A> key.
2. Press the<*> key to indicate color change. The color-change code is entered and the mark, "*"which shows the color-change code, is displayed.
3. Press the < B > key on the key board to enter the letter B.
4. Pressingthe <END> key will returntothemainmenu.
If embroidering is done in the above setting, the color change will be automatically made from A to B, sewing continuously. In case of entering in the code entry mode, press the <PATTERN> key to select the code entry mode.
-44-From the library of: Superior Sewing Machine & Supply LLC

( PATTERN J
The available keys on this display are:
By pressing the <PATTERN> key, the code entry mode will be displayed. While this is displayed, it may be used in entering the alphabet by code number from the floppy disc.
[NOTE 1] The alphabet should be entered as a two-digit ASCII code. Refer to the ALPHABET 28 TYPES CORRESPONDING LIST.
Available key. Function
•••• To type ASCII code (using numerics and
{Number keY) A, B, C, D, E, F)
• to type style number
~ -~ ·. To move cursor from side to side
ffJ (!) To switch entry mode (ASCII code~
style number) .
(Ac}_.- _·.· To clear all data - ... - ... - [NOTE 2]
·. . •.
To delete character on cursor (In ASCII
f c 1 _.·· ..
·• : code mode, to delete 7SEG when 7SEG is
._.-.·-··· ;:, . displayed.)
( l .. -.-.
Eifl'Efl )·-) To store letters - ,.-.
····-·_· .. ·_·.·-.····-··' To change entry modes (alphabet mode, { P~TtERHl
code entry mode, pattern mode)
f E II ~ t '" To end entry mode
[NOTE 2] Note that all set values arc ·'oared. (Refer to page
20.)
-45-From the library of: Superior Sewing Machine & Supply LLC

Alphanumerics (two digits)
About [NOTE 1]
[NOTE 1] If the data of the stored letter does not exist in the floppy disk, the letter will be highlighted.
The style number of the letter to be entered is displayed.
If the highlighted letter among the displayed letters is in the first row, the display will not exit from the code entry mode. If the highlighted letter remains, there is no data for the letter. Move the cursor in the first row under the highlighted letter and delete the letter by pressing the <CLEAR> key.
-46-From the library of: Superior Sewing Machine & Supply LLC

There are 28 styles of the alphabet, including European letters available in the floppy disc included with the machine. Select the style to enter as a two- digit character number code of the alphabet. (Refer to the ALPHABET 28 TYPES CORRESPONDING LIST.)
PATTERN
ENTER
In the main menu
1. Press the <ENTER> key.
2. Indicate the code entry mode by pressing the <PATTERN> key.
3. Type 41, the character code A. The message, "Reading now" is displayed in the third row.
"41" is displayed.
4. Press the <ENTER > key.
5. Type 42, the character code B.
-47-From the library of: Superior Sewing Machine & Supply LLC

"42" is displayed.
6. Press the <ENTER > key.
7. The AB with the style number 01 is stored.
E N D
8. Press the <END> key.
9. Return to the main menu.
[NOTE 1] Pressing the <A>,< E > and < F> keys are displayed by capital. Pressing the < B >, <C> and < D > keys are displayed by small case.
[NOTE 2] If a highlighted letter is displayed, there is no data for the letter or the data is in another floppy disk.
[NOTE 3] lfthere is a highlighted letter, the display will not return to the main menu even if the <END> key is pressed. Either press the <CLEAR> key to erase the negative letter or insert another floopydiskand press the <END> keytogetthecorrectdata.
[NOTE 4] The alphabet and numbers, according to terms, can be embroidered up to 45 letters.
-48-From the library of: Superior Sewing Machine & Supply LLC

1. Type the character code A, 41, on the key board.
2. Press the <ENTER > key. "41 "will disappear leaving "A" on the display.
3. To indicate a color change, type the code, 2A, on the key board. "*"is displayed in the first row. This shows that the color change code has been entered.
4. Next, type the character code B, 42 on the key board.
5. Press the <ENTER> key. "42" will disappear to show Bon the display.
If embroidering is done in the above-setting, the color change will be automatically made from A to B, sewing continuously.
6. Pressing the <END> key will return to the main menu.
-49-From the library of: Superior Sewing Machine & Supply LLC

Letters can be changed after entering the character code.
When having entered the character code numb€r of A, not "41 ",but "44" by mistake
When correcting" AB" to" AC"
1. Press the <CLEAR> key or the <AC> key. "43" disappears.
2. Press the character code of the A, 41 correctly. "41" is displayed.
3. Press the <ENTER> key. The A is stored.
[NOTE 1] Letters can be changed after setting.
1. Move the cursor under the Busing the< E1 > key (the jog key).
2. Press the <CLEAR > key. The Bon the cursor disappears.
[NOTE] Pressing the <AC> key will delete all the displayed characters.
-50-From the library of: Superior Sewing Machine & Supply LLC

3. Press the character code C, 43. "43" is displayed.
4_ Press the< ENTER> key. "43" is disappeared, and the display has been corrected to "AC".
5. Press the <END > key.
The main menu will be displayed.
-51-From the library of: Superior Sewing Machine & Supply LLC

Entering the arrows will shift the letters stored 1 mm each in the direction of the arrow.
Changing the enlargement and reduction ratio can also change the letter positions up to 9.9 mm per arrow.
To shift the letters more than 9.9 mm, simply enter multiple arrows and change the ratio as required. For
example, to shift the letters AB 15 mm apart, enter A<--1 <--2, and specify an enlargement of 7 times for arrow
1, 8 times for arrow 2. Since 7 + 8 = 15, the letters will move 15 mm apart.
To shift the letters after entering, enter the following space code:
In moving the letters to the right, press 1 E.
In moving the I etters to the I eft, press 1 F.
In moving the letters up, press 1 C.
In moving the letters down, press 1 D.
[NOTE] According to the arrangement, the direction will be changed.
According to the enlargement and reduction ratio, the volume of the movement will be changed.
J When leaving a 1 mm space between A and B
*
1. Press the <ENTER> key. In case of entering capital letters, light the <SHIFT 1 > key (upper) or(lower), or the <SHIFT 2 >key.
2. Press the <A> key.
3. Press the <PATTERN > key to get into code entry mode.
4. Press the space code, 1 E. "1 E" is displayed.
5. Press the <ENTER> key.
6. Get into the alphabet mode by pressing the <PATTERN> key twice.
7. Press the < B > key.
8. Press the <END> key.
The main menu will be displayed.
To use the <space> key one time is to leave space of 10 mm.
-52-From the library of: Superior Sewing Machine & Supply LLC
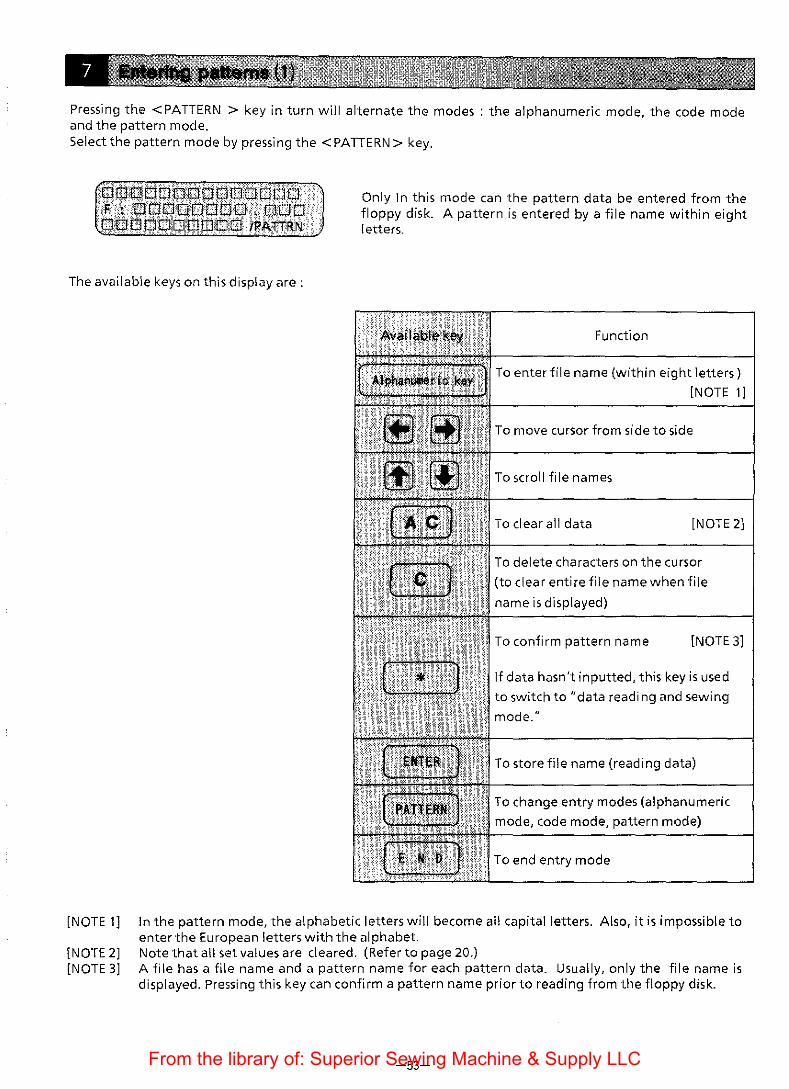
Pressing the <PATTERN > key in turn will alternate the modes : the alphanumeric mode, the code mode and the pattern mode. Select the pattern mode by pressing the <PATTERN> key.
Only In this mode can the pattern data be entered from the floppy disk. A pattern is entered by a file name within eight letters.
The available keys on this display are:
[NOTE 1]
[NOTE 2] [NOTE 3]
Function
To enter file name (within eight letters)
[NOTE 1]
·To move cursor from side to side
To scroll file names
To clear all data [NOTE 2]
To delete characters on the cursor
(to clear entire file name when file
name is displayed)
To confirm pattern name [NOTE 3]
If data hasn't inputted, this key is used
to switch to "data reading and sewing
mode."
: To store file name (reading data)
To change entry modes (alphanumeric
mode, code mode, pattern mode)
To end entry mode
In the pattern mode, the alphabetic letters will become all capital letters. Also, it is impossible to enter the European letters with the alphabet. Note that all set values are cleared. (Refer to page 20.) A file has a file name and a pattern name for each pattern data. Usually, only the file name is displayed. Pressing this key can confirm a pattern name prior to reading from the floppy disk.
-53-From the library of: Superior Sewing Machine & Supply LLC
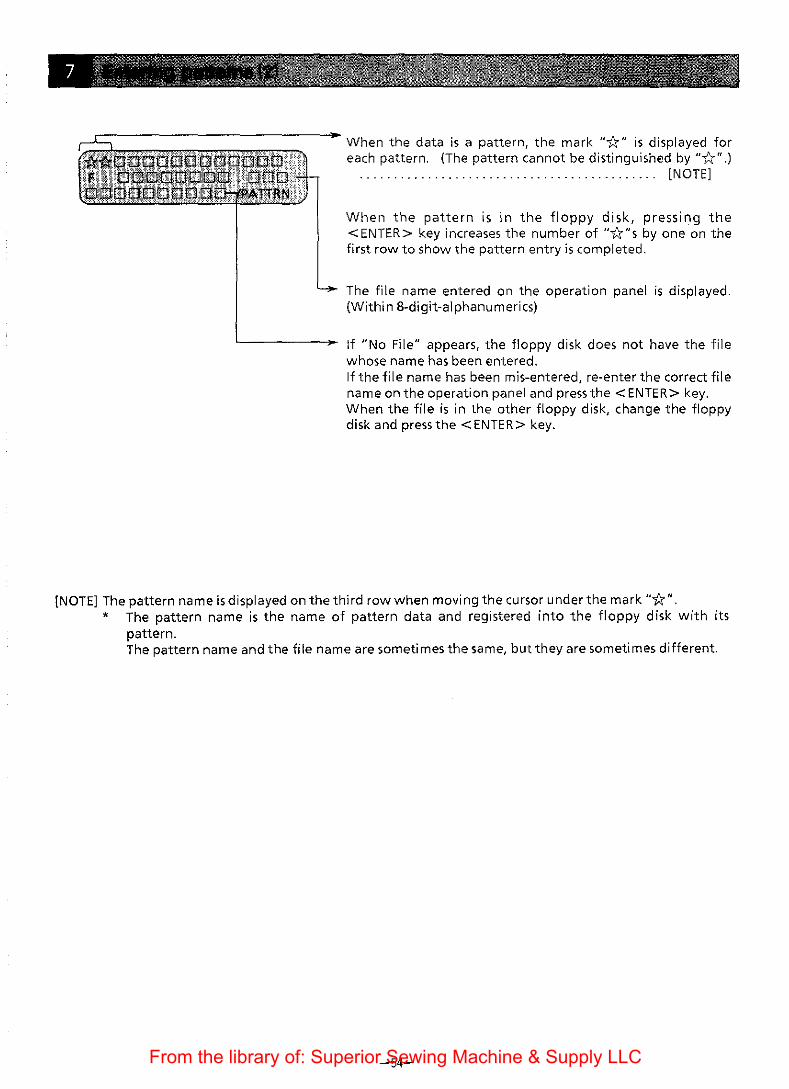
When the data is a pattern, the mark "u" is displayed for each pattern. (The pattern cannot be distinguished by "u".)
............................................ [NOTE]
When the pattern is in the floppy disk, pressing the <ENTER> key increases the number of "u"s by one on the first row to show the pattern entry is completed.
The file name entered on the operation panel is displayed. (Within 8-digit-alphanumerics)
If "No File" appears, the floppy disk does not have the file whose name has been entered. If the file name has been mis-entered, re-enter the correct file name on the operation panel and press the <ENTER> key. When the file is in the other floppy disk, change the floppy disk and press the <ENTER> key.
[NOTE] The pattern name is displayed on the third row when moving the cursor under the mark "u". * The pattern name is the name of pattern data and registered into the floppy disk with its
pattern. The pattern name and the file name are sometimes the same, but they are sometimes different.
-54-From the library of: Superior Sewing Machine & Supply LLC

1. Press the< ENTER> key.
2. The display will indicate the alphabet mode. Press the <PATTERN> key twice to get into the pattern mode.
3. Enter the file name "5 A K U R A".
4. The file name will be indicated in the second row of the display.
5. Press the <ENTER> key.
A ""fr" will appear in the first row of the display. The file name in the second row will disappear.
To display the pattern name for the ""fr" in the first row, move the cursor under the "'tr". Then the pattern name will be displayed in the third row. [NOTE 1]
6. Press the <END> key.
7. The main menu will be displayed.
-55-From the library of: Superior Sewing Machine & Supply LLC
[NOTE 1] In this case, both the file name and the pattern name are the same. There are cases, however, when the two names are different.
[NOTE2] When the <IIl> or <[]]>key is pressed, the file names in the floppy disk will appear in sequence in the second row of the display. To display the pattern name corresponding to a given file name, press the<*> key. The pattern name or the file name will be displayed in the third row.
The pause setting between the patterns (letters)
1) If "No File" is displayed in the third row after entering the file name: G) Press the< C> key to clear the "No File" display. Re-enter the file name. ®Check the file names in the floppy disk by displaying them in sequence. Follow the procedure above ([NOTE 2]) to display the names.
2) To enter the color-change code: (])Press the<*> key when in alphabet mode. ®Press the <2>, <A>,< ENTER> keys when in code entry mode. When entering the pattern and the color-change code at the same time, input the color-change code by either (j) or® above.
The pause setting within the pattern
[NOTE]
When changing the color of a part of the pattern, automatic pause setting can be done. This should be done in the needle bar setting mode of the sewing mode. Refer to the Needle bar setting [NOTE] in a chapter of Sewing (4).
When entering patterns from TFD floppy disk: The multi-volume patterns or files will not be read into the machine. This machine cannot manage multi-volume file (one pattern's data that separates into more than one volume).
-56-From the library of: Superior Sewing Machine & Supply LLC

When embroidering a pattern of a large number of stitches, the memory capacity inside the BAS-411 may not be large enough. If that is the case, do the following to embroider. [NOTE 1] This method is valid only with the TFDs (Tajima floppy disks). [NOTE 2] There are some other restrictions on data types and items in the editing mode. Please check
beforehand.
1. Enter the pattern entry mode.
2. If data is inputted, clear all data by pressing either the <AC> or <C> key.
3. Press the < * > key to enter the data reading & sewing mode.
4. Using the alphanumeric keys, < j > and < J. > keys, input or select the file name.
5. Press the< ENTER> key. Data reading will start.
-57-From the library of: Superior Sewing Machine & Supply LLC

E N D 6. Press the <END> key.
7. The main menu will be displayed.
[NOTE 1] Only one pattern's data can be entered at a time.
[NOTE 2] The data type should be the Tajima, or Barudan or Zangs data registered on a Tajima-format floppy disk (Hereafter TFD.). The Brother-format letter and design floppy disks cannot be used. A pattern in the multi-volume file (one pattern's data that separates into more than one volume) cannot be read.
[NOTE 3] Be sure to leave the floppy disk in the disk unit of BAS-411 during sewing. If the disk is taken out, BAS-411 cannot continue sewing.
[NOTE 4] When this function is used, there will be restrictions on editing mode and some other functions.
Editing Restriction
ENLRG (Enlargement and reduction) Not possible
DNS (sewing density and letter thickness) Not possible
ARRAN (alignment) Not possible
ROTAT(Rotation) Possible in 0, 90, 180, and 270 degrees Select using the<_.>< t > < j ><<->keys then set
using the< ENTER> key
CENT (Centering) Not possible The first stitch point will always be the starting point.
RePT (Repeat) Not possible
JMP (Jump) Not possible
Stitch (Stitch) Not possible
-58-From the library of: Superior Sewing Machine & Supply LLC

IV EDITING
<Editing items>
1. Enlargement/Reduction mode 2. Monogram area setting mode 3. Sewing density/letter thickness setting mode 4. Arrangement mode 5. Mirror image setting mode 6. Hoop feed setting mode 7. Rotation mode 8. Centering mode 9. Repeat sewing setting mode
10. Automatic jump setting mode 11. Material thickness indication mode 12. Automatic thread trimmer setting mode 13. Needle return setting mode (at the sewing end) 14. Boring mode 15. Stitch type selection mode
< H·ow to select each mode>
When you want to select a mode from the editing menu, press the following keys.
The first screen · < 1 > to select the "Enlargement/Reduction mode" · <2 > to select the "Monogram area setting mode" · < 3 > to select the "Sewing density/letter thickness setting mode" · <4> to select the" Arrangement mode" · < 5> to select the "Mirror image setting mode" · < 6 > to select the "Hoop feed setting mode" · <7 > to select the" Rotation mode" · <8> to select the "Centering mode"
The second screen · < 1 > to select the" Repeat sewing setting mode" · <2> toselectthe"Automaticjumpsettingmode" · < 3 > to select the "Material thickness indication mode" · <4> to select the" Automatic thread trimmer setting mode" · < 5> to select the "Needle return setting mode (at the sewing end)" · < 6 > to select the "Boring mode" · <7> to selectthe "Stitch type selection mode" · < 1' > < J, > to switch over the first and the second screen · < * > to check the settings in the editing menu · <NEEDLE SET> to select the "Needle bar setting mode" ·<NEEDLE SELECT> to select the needle bar manually ·<THREAD SENSOR> to switch ON/OFF ofthe detector and to set the bobbin thread counter · <END> to return to the main menu
-59-From the library of: Superior Sewing Machine & Supply LLC

1. Enlargement/Reduction mode
(1) Function: Setting the embroidery size by enlarging and reducing
(2) Available keys: ·< 1 > to select "Ratio" · < 2 > to select" Length" · <3> to select "Auto" ·<END> toreturntotheeditingmenu
1-1. Ratio
(1) Function: Setting the size ratio
(2) Available keys: ·<Numeric keys> ·<<-->,< -4> ·<EDIT> ·<ENTER> ·<CLEAR> ·<END>
1-2. Length
(1) Function: Setting the total length
(2) Available keys: ·<Numeric keys> ·<ENTER> ·<END>
1-3. Auto
(1) Function:
to input ratio to select the character (pattern) to be enlarged/reduced. [Each] to switch over [All] and [Each]. to confirm the inputted value and to switch width (W) and height (H). to set the default value to return to the editing menu
to input the total length to confirm the inputted value and to switch vertical (V) and horizontal (H) to return to the editing menu
Setting the automatic caluculation in the area (2) Available key (used only when an error occured):
·<END> toreturntotheeditingmenu
-60-From the library of: Superior Sewing Machine & Supply LLC

2. Monogram area setting mode
(1) Function: Setting the monogram area using the jog keys
(2) Available keys: ·<<--><-->>< i >< ~ > ·<ENTER>
to move the carriage
·<END> to confirm the carriage location to return to the editing menu
3. Sewing density and letter thickness setting mode
{1) Function: Setting sewing density and letter thickness
(2) Available keys: ·< Numerickeys>toenterratio ·<ENTER> to confirm the inputted value and to switch over sewing density and letter
thickness to set the default value ·<CLEAR>
·<END> to return to the editing menu
4. Arrangement mode
(1) Function: Arranging letters, symbols and patterns vertically or horizontally or on a curved line
5. Mirror image setting mode
(1) Function: Setting the mirror image
(2) Available keys: ·<1> J ·<2> 1:. ·<3> J: ·<4> '1
to select the mirror image to select the mirror image to select the mirror image to select the mirror image
·<END> to return to the editing menu
-61-From the library of: Superior Sewing Machine & Supply LLC

6. Hoop feed setting mode
(1) Function: Setting the hoop feed point
(2) Available keys: ·<~><->>< i >< ,j, > ·<ENTER>
to move the carriage to confirm the carriage location
·<CLEAR> ·<*> ·<END>
7. Rotation mode
(1) Function:
to set the default value (Center of the area: X= 225 mm. Y = 142 mm) to select "Manual'' or "Auto', to return to the editing menu
Setting the rotation angle (2) Available keys:
·<Numeric keys> ·<CLEAR> ·<END>
8. Centering mode
(1) Function: Setting the centering
(2) Available keys: ·<Numeric keys> ·<END>
to input the rotation angle to set the default value to return to the editing menu
to select the type of centering to return to the editing menu
9. Repeat sewing setting mode
(1) Function: Setting the repeat sewing
(2) Available keys: ·<Numeric keys> ·<ENTER> ·<j><,j,> ·<CLEAR> ·<END>
to input the number oftimes and space to confirm the inputted value and to switch over "Time" and "'SPC" to select the direction (H or V) to set the default value to return to the editing menu
-62-From the library of: Superior Sewing Machine & Supply LLC

10. Automatic jump setting mode
(1) Function: Setting the automatic jump
(2) Available keys: ·< 1 > to select "12.7 mm" · <2> toselect"4.8mm" ·<END> to return to the editing menu
11. Material thickness indication mode
(1) Function: Indicating the material thickness
(2) Available keys: · < 1 > to select" Thick" · <2> to select "Thin" · <END> to return to the editing menu
12. Automatic thread trimming mode
(1) Function: Setting the number of stitches for automatic thread trimming
(2) Available keys: · < 1 > to select "8 st" (8 stitches) · < 2 > to select" 5 st" (5 stitches) · <3> to select "3st"(3stitches) · <4> to select "NT" (No automatic thread trimming) ·<END> toreturntotheeditingmenu
13. Needle return mode
(1) Function: Setting the needle return to the first stitch point after sewing is complete.
(2) Available keys: ·<1> ·<2> ·<END>
to select "On" to select "Off" to return to the editing menu
-63-From the library of: Superior Sewing Machine & Supply LLC

14. Boring mode
(1) Function: Setting the boring sewing
(2) Available keys: -< 1' > . < ~ > ·<ENTER> ·<CLEAR> ·<END>
to select "YES" to select "NO" to confirm the inputted value and to switch over "Boring" and "SHIFT" to set the default value to return to the editing menu
15. Stitch type selection mode
(When Tatami was selected)
(1) Function: Selecting the stitch type
(2) Available keys: ·<1> ·<2> ·<ENTER> ·<Numeric keys> ·<CLEAR> ·<END>
to select "Satin" to select "Tatami" to confirm the selection (in this example, Tatami stitch) to set the sewing pitch (in this example, Tatami pitch) to set the default value (in this example, default for Tatami) to return to the editing menu
-64-From the library of: Superior Sewing Machine & Supply LLC

Select [EDIT] in the main menu.
Press the <EDIT> key. The machine will enter the editing mode.
The 8 items of the editing menu are displayed on the first screen. Pressing the < [I]> key displays the rest of the menu on the second screen.
To return to the first screen, press the < [j] > key.
[NOTE] When the editing menu is displayed, pressing the <AC > key sets the values such as the ratio of the items below to the default. Then, pressing the<*> key displays the default value. (Refer to page 24.) In the mark "D ",the defaulet value is not set. The previous value will remain.
1. Enlargement/reduction: altogether ratio setting width: 1.00 height: 1.00 2. Area: V:28Smm H:450mm 3. Sewing density· letter thickness: sewing density: 1.0 letterthickness: 1.0 4. Arrangement: horizontal arrangement 5. Mirror image: "J" (non-reversed mirror image) 6. Hoop feed: center of the moving area of the X andY carriages (coordinates: 225,
142) 7. Rotation: 000° (no rotation) 8. Centering: ['] 9. Repeat sewing: once, horizontally (non-repeat sewing)
10. Jump: 12.7mm 11. Automatic thread trimmer: 0 stitches 12. HOP/Manu 13. 14. 15.
STR R: OFF Boring/Shift: OFF Stitch: Satin
-65-From the library of: Superior Sewing Machine & Supply LLC

As shown below, three kinds of data are available but they differ with the processing during editing_
Data
(1) Block (condensed) format
Alphabet and Kanji floppy disks
supplied by Brother
Data Block format of Brother patent
type
(2) Normal format
TFD pattern floppy disk
Brother design floppy disk
Data in paper tape
Stitch by stitch sewing as well as
data in paper tape
Sewing density is not adjustable.
(3) Data from editing
system
Data sent by editing
system
Stitch by stitch sewing
Sewing density Sewing density is adjustable_
According to size enlargement or
reduction, stitch number changes
to keep sewing density_
Stitch number is fixed and does not adjustment, enlargement
change.
Feature There are 5 stitches/mm when
sewing density ratio is set to 1.0.
Enlarging size increases stitch
number.
For example, when enlarging
pattern 1.5 times, space between
stitches increases and sewing
density gets coarse because stitch
number is fixed. When reducing
pattern to-!-, otherwise, sewing
density gets fine.
Editing
Reducing size decreases stitch
number.
Sewing density: available set value Sewing density is not adjustable.
0.1-2.0 Enlargement/reduction:
Enlargement/reduction: available set values
availablesetvalues 0.10-9.99
0.10-9.99 [NOTE] Within 0.50-2.00 is enough
[NOTE] Within 0.50-5.00 is to get fine embroidery.
enough to get fine When reducing both height and
embroidery_ width tot, its area is reduced tot and sewing density increases 4
times because stitch number is
fixed.
In other words, sewing pitch
decreases to-!- and needle lowers
on same point 2-4times.
This may cause loose threads or
thread breakage.
-66-
and reduction are not
available.
No editing.
From the library of: Superior Sewing Machine & Supply LLC

Editing function
The monogram can be enlarged or reduced within the set area_ Enlargement and reduction can be set in three ways: [Ratio], [Length] and [Auto]_
A. Setting size ratio
Press the < 1 > key when the editing menu is displayed_
The setting items of enlargement and reduction are displayed_
Available key Function
8 To select [Ratio] (setting size ratio)
0 To select [Length] (setting total length)
0 To select [Auto] (automatic
calculation)
( E N D ) To return to editing menu
Ratio can be set either by [ALL] or [EACH]. By pressing the <EDIT> key, [ALL] and [EACH] are selected alternately.
A-1 Setting size ratio altogether
The enlargement and reduction ratio can be set in 0.01 increments within 0.10-9.99. Changing the ratio for one letter automatically changes the ratio for the other letters in the monogram_
1. Press the< 1 >key to select [Ratio]_
If [EACH] is selected, press the <EDIT> key once to change it to [ALL]_
-67-From the library of: Superior Sewing Machine & Supply LLC

The <EDIT> key switches over [ALL] and [EACH].
2. The cursor appears in the width ratio type area.
[NOTE] In default, the width "1.00" and the height "1.00" are displayed. When a different ratio has already been set, that ratio will be displayed.
Function
To type ratio Ratio can be set in 0.01 increments within 0.1 0-9.99.
To store typed ratio
To switch type area (width:!>height)
Cursor moves to another type area.
To set ratio to default (1.00)
To return to editing menu
Change size ratio for AB altogether (width:1.50, height:1.1 0)
3. Press the <1>, <5> and <0> keys. The width ratio" 1.50" will be displayed.
4. Press the <ENTER> key tostorethewidth ratio. The cursor will move to the height ratio type area.
5. Press the < 1 >, < 1 > and < 0 > keys. The height ratio" 1.10" will be displayed.
6. Press the <ENTER> key to store the height ratio. The cursor will move to the width ratio type area. Now the width ratio of 1.50 and height ratio of 1.10 are set.
[NOTE] When re-entering the ratio, press the <ENTER> key to move the cursor to the width or height you want, then enter the ratio. Pressing the <CLEAR> key sets the ratio to default (width: 1.00, height: 1.00).
7. Press the <END> key. The altogether ratio setting for the AB finishes. The editing menu will be displayed again.
-68-From the library of: Superior Sewing Machine & Supply LLC

Heighti 1.10 times AB
1 .. Width 1.50
..1. Width 1.50
times times
-1
The width and height can be changed to modify the shape of the letters in the monogram.
Ratio Width< Height Width= Height Width>Height
Modified A A .A. I etter
(Long narrow} (Standard} (Flat}
[NOTE1] Different letters have different sizes even if the same ratio is set. [NOTE2] The machine doe~ not sew the letters if the set ratio makes the letters larger than the set sewing
area.
A-2 Setting size ratio individually (1)
The enlargement and reduction ratio can be set in 0.01 increments within 0.1 0-9.99, for each letter or pattern individually.
<D!\a~il) l' ;;,-~l)en;th · ~~'-i1·~i: :,,,,,
1. Press the < 1 > key to select [Ratio].
If [ALL] is selected, press the <EDIT> key to change it to [EACH].
[NOTE] In default, W "1.00" and H "1.00" are displayed. When a different ratio has already been set, that ratio will be displayed.
-69-From the library of: Superior Sewing Machine & Supply LLC

The <EDIT> key switches over [ALL] and [EACH].
Function
To type ratio
Ratio can be set in 0.01 increments
within 0.1 0-9.99.
To move cursor
To store typed ratio
To switch type area (widthf>height)
Cursor moves to another type area.
To set default ratio ( 1.00)
To return to editing menu
Change size ratio for AB individually (The letters have already been stored.)
ENTER
A (width:1.50, height: 1.10) B (width: 1.20, height: 1.1 0)
2. Press the <1>, <5>, <0> keys. The width ratio for the letter A "1.50" will be displayed.
3. Press the <ENTER> key tostorethewidth ratio. The cursor will move to the height ratio type area.
4. Pressthe<1>,<1>and<O>keys.
5. Press the <ENTER> key to store the height ratio for the A. Now the width ratio of 1.50 and height ratio of 1.10 of the letter A are set.
[NOTE] When not changing the displayed ratio, just press <ENTER> key.
-70-From the library of: Superior Sewing Machine & Supply LLC

cp cp
T [ ENTER l
G I
$1tNt;R'G ~AR'EA: ®b,N:$ ·. <4! ~R:aAN <9~RR ': f$·~o# •.• ®ROTAT ~I'EN"f' • ! Hl •
6. Press the <FORWARD> key (jog key). The cursor will move to under the letter B. The width ratio and height ratio for the B will be displayed. Another cursor appears in the width ratio type area.
7. Press the <1 >, <2> and <0> keys.
8. Press the <ENTER> key to store the width ratio for the B.
9. The cursor moves to the height ratio type area.
10. Press the < 1 >, < 1 > and < 0 > keys.
11. Press the <ENTER> key to store the height ratio for the B. Now the width ratio of 1.20 and height ratio of 1 10 of the letter Bare set. The individual ratio setting for the AB finishes.
12. Press the <END> key. The editing menu will be displayed again.
Heighti 1 '1 0 times AB
1 .. Width 1.50
Width 1.20
times times
[NOTE1] After individual ratio setting is completed, to confirm the ratio for the letter where the cursor appears, press the< FORWARD> or< BACK> key.
[NOTE2] To change the ratio for the letter where the cursor appears, press the <CLEAR> key to display "1.00", then re-enter the ratio.
[NOTE3] The machine does not sew the letters if the set ratio makes the letters larger than the set sewing area_
-71-From the library of: Superior Sewing Machine & Supply LLC

A-3 Setting size ratio individually (2)
Inserting and deleting letter data Size ratio is not applied to a letter itself, but to a position in the display. Because of this, changing the size ratio, sewing and then adding or deleting letters causes letter sizes to change as shown below.
Ex. 1
~
[1st letter] [2nd letter]
A B Letter width Letter height Letter width Letter height
0.60 1.00 2.00 1.50
[Ratio for 1st letter] [Ratio for 2nd letter]
When the letter Cis inserted between A and B, the size ratios change as follows.
[1st letter] [2nd letter] [3rd letter]
~ A c B ICI [ID Letter width Letter height Letter width Letter height Letter width Letter height 0.60 1.00 2.00 1.50 1.00 1.00
[Ratio for 1st letter] [Ratio for 2nd letter] [Ratio for 3rd letter]
In short, when a letter is moved, the size is determined by the ratio assigned to the position in the display.
-72-From the library of: Superior Sewing Machine & Supply LLC
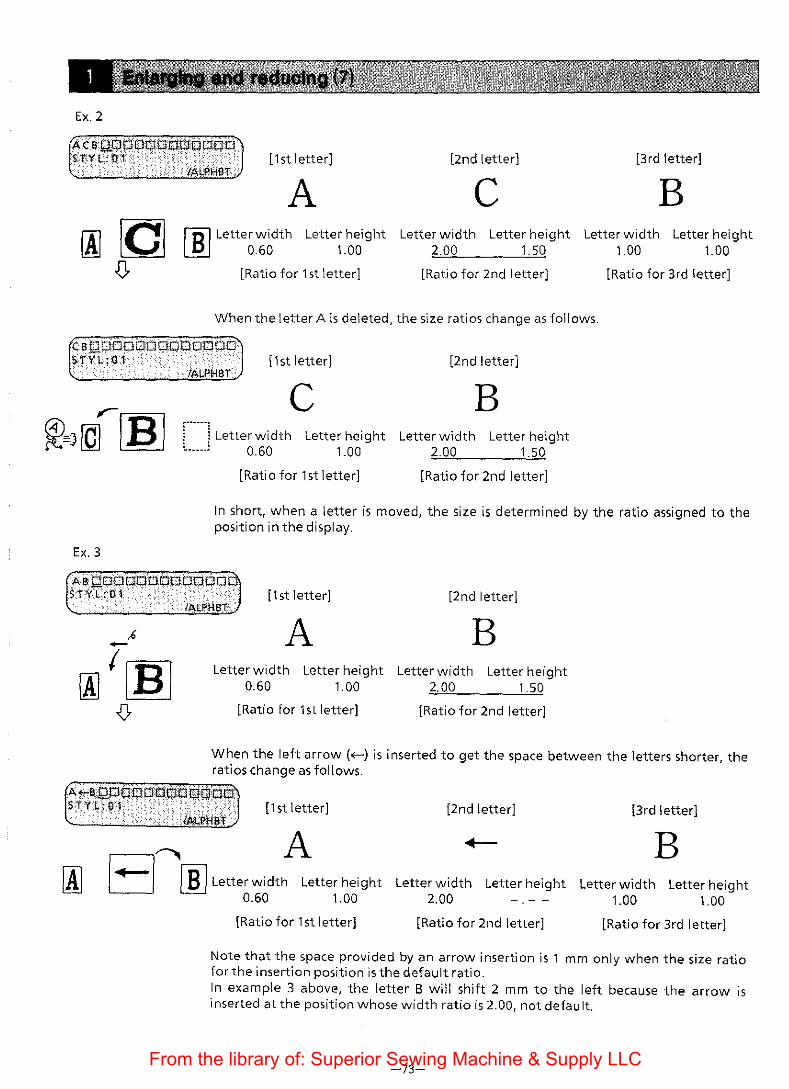
Ex.2
Ex.3
[1st letter] [2nd letter] [3rd letter]
A c B ftil Letter width Letter height Letter width Letter height Letter width Letter height LEJ 0.60 1.00 2.00 1.50 1.00 1.00
[Ratio for 1st letter] [Ratio for 2nd letter] [Ratio for 3rd letter]
When the letter A is deleted, the size ratios change as follows.
[1st letter] [2nd letter]
c B J-----j Letter width Letter height L. ____ ) 0.60 1.00
Letter width Letter height 2.00 1.50
[Ratio for 1st letter] [Ratio for 2nd letter]
In short, when a letter is moved, the size is determined by the ratio assigned to the position in the display.
[1st letter] [2nd letter]
A B Letter width Letter height Letter width Letter height
0.60 1.00 2.00 1.50
[Ratio for 1st letter] [Ratio for 2nd letter]
When the left arrow(<--) is inserted to get the space between the letters shorter, the ratios change as follows.
""A._.,_,.,.a:QP-==·. "::· • _,.,.tJ..,..,'EJ-p;"";~,..J:J"":o"'"m-, 14-,o-c o"""· .- .,
ST'njQ n: ~c ;.:ill;i~~~;: [1st letter] [2nd letter] [3rd letter]
~ A I 1 I [ID Letter width Letter height
0.60 1.00
B Letter width Letter height Letter width Letter height
2.00 1.00 1.00
[Ratio for 1st I etter] [Ratio for 2nd letter] [Ratio for 3rd letter]
Note that the space provided by an arrow insertion is 1 mm only when the size ratio for the insertion position is the default ratio. In example 3 above, the letter B will shift 2 mm to the left because the arrow ts inserted at the position whose width ratio is 2.00, not default.
-73-From the library of: Superior Sewing Machine & Supply LLC

B. Setting total length
The total length (width and height) can be set in 1 mm increments for enlargement and reduction.
1. Press the <2> key to select [Length].
2. The cursor appears in the height type area. Note that the current total length is displayed in three digits.
Function
To type total length
Total length can be set in 1 mm
increments
i To store typed length
To switch type area (height~width)
Cursor moves to another type area.
To return to editing menu
[NOTE] When confirming the total length after setting it: With the editing menu displayed, pressing the < * > key displays the total length on the third row. At this time, the displayed number might be slightly smaller than the set total length. Ex. Even if setting the total height to 200 mm and
width to 300 mm, the displayed total length in confirmation might be
"LNG:V 199 mm H 299 mm".
-74-From the library of: Superior Sewing Machine & Supply LLC

Set the total height to 20 mm and width to 40 mm for the entered data AB (area size:height 50 mm and width 50 mm)
4. Press the <0>, <2> and <0> keys. Be sure to type in three digits.
[NOTE] The total dimensions of the monogram must be within the set area.
"V 02Qmm" will be displayed.
5. Pressthe <ENTER> keytostoretheheight. The cursor will move to the width type area.
6. Press the <0>, <4> and <0> keys.
"H 04Qmm" will be displayed.
7. Press the <ENTER> keytostorethewidth. Again, the cursor will move to the height type area.
8. Press the <END> key. The total length setting for the AB finishes. The editing menu will be displayed again.
E E
0
"'
I Upper left origin ,__ __ ------- -..., I I E
i A B JJ! I 1 o I Total width 40 mm 1 f-L _________ __._lower
right Area width 50 mm point
[NOTE1] The machine does not sew the letters if the set ratio makes the letters larger than the set sewing area.
-75-From the library of: Superior Sewing Machine & Supply LLC

[NOTE2] When setting the total length after rotating the monogram (except 0°, 90°, 180°, and 270°), the total I ength might not be calculated precisely, resulting in a pattern too large for the area. To set the total length of the finishing monogram, be sure to set the total length before rotation.
---28 mm~ Ex. I I
14t/A .13)
r-~-------56 mm--------1
When confirming the total length using the < * > key after rotation, the displayed length is different from the set one as shown below:
"LNG:V 059 mm H 059 mm"
-76-From the library of: Superior Sewing Machine & Supply LLC

C. Automatic calculation
Letter size can be automatically calculated and sewn to fit the area size.
r------------------, ' ' ' ' ' '
iABCD! ' ' ' i ' ' ' ' ' L-------r----------~
L_Area
1. Press the < 3 > key to select [Auto].
The ratios for the total width and height are set to the maxi mum so that both of them fit in the set area.
2. After the automatic calculation is completed, the editing menu is displayed.
,------------------1
A I
B i c i I J:) ! L------i----- -------~
L__ Area
[NOTE1] The monogram size is set to the largest ratio at which both the length and width can be sewn within the area.
[NOTE2] To confirm the automatically calculated size: When the editing menu is displayed, press the < * > key. The automatically calculated s1ze displayed on the second row is smaller than the area size on the first row, as shown below:
-77-From the library of: Superior Sewing Machine & Supply LLC

The monogram area can be set within an embroidery hoop. The monogram area is set by determining the upper left origin and the lower right point to fit the shape of an embroidery hoop.
t
.. .. •
Function
To move carriage
To store upper left origin and lower
right point
To return to editing menu without
changing value
[NOTE 1] Set the area within the attached embroidery hoop. [NOTE2] The size and position of monogram letters depends
on the area size.
1. Press the <2> key to select [AREA].
2. By using the jog keys, move the needle position towards the upper left within the embroidery hoop to determine the upper left origin .
[NOTE] "Up-left-ORG>ENT" will be displayed until the <ENTER> key is pressed.
3. After determining the upper left origin, press the <ENTER> keytostoretheorigin. Then, "Dw-rigt-ORG>ENT" will be displayed.
-78-From the library of: Superior Sewing Machine & Supply LLC

t ..
/
ENTER
,__, /' ' Area height
200 mm
[NOTE] The height and width of an area are displayed in three digits.
4. By using the jog keys, move the needle position towards the lower right within the embroidery hoop to determine the lower right point.
While moving the needle position, the distance (height and width) of the current needle position from the upper left origin is displayed. When stopping the needle position and pressing the <ENTER> key, that needle position is stored as the lower right point.
5. Press the< ENTER> key to store the lower right point. Now the area is set. Then the editing menu is displayed.
[NOTE] To cancel area setting on the way, press the <END> key. The setting will return to the previous set value.
[NOTE1] The largest possible area is 285 mm in height and 450 mm in width. [NOTE2] Setting the area larger than the embroidery hoop causes the needle to strike the hoop during
sewing. Be sure to set the enlargement and reduction ratios, and set the sewing start point to keep the monogram within the hoop.
-79-From the library of: Superior Sewing Machine & Supply LLC

The sewing density can be set in 0.1 increments within 0.1-2.0, and the letter thickness can be set within 0.6-2.0.
1. Pressthe <3> keytoselect[DNS].
-80-
Function
To type sewing density and letter
thickness ratios
To store typed value
To switch type area (density~thickness) Cursor moves to another type area.
To set default value
To return to editing menu
From the library of: Superior Sewing Machine & Supply LLC

A. Setting sewing density
The sewing density ratio can be set within 0.1-2.0.
1. Press the < 3 > key to select [DNS].
2. The current sewing density and letter thickness ratios are displayed.
[NOTE1] In default, "1.0" appears. [NOTE2] When the sewing density ratio has already been
set, that ratio is displayed.
[Default]
Denser 2. 0 ~ 1. 0 --> 0. 1 Coarser
J·ExTI Change sewing density ratio to 1.2
Letter thickness can be set again.
1. Press the < 1 > key. A "0" will be carried and the "1" will appear in the first place.
2. Press the <2> key. The" 1" will be carried and the "2" will appear in the first place.
3. Press the <ENTER> key to store 1.2. The cursor will move to the letter thickness. The cursor alternately moves to DNS and THI each time the< ENTER> key is pressed.
4. Press the <END> key to return to the editing menu.
A A A 2.0 Default (1.0) 0.5
-81-From the library of: Superior Sewing Machine & Supply LLC

The letter thickness ratio can be set within 0.6-2.0.
1. Press the < 3 > key to select [DNS].
2. Press the <ENTER> key to move the cursor to the letter thickness type area.
[NOTE1] In default, "1.0" appears. [NOTE2] When the letter thickness ratio has already been
set, that ratio is displayed.
Change letter thickness ratio to 1. 5
E N 0 Sewing be set.
[Default]
Bolder 2.0 ~ 1.0 -> 0.6 Thinner
3. Press the < 1 > key. A "0" will be carrie·d and the "1" will appear in the first place.
4. Press the <5> key. The "1" will be carried and the "5" will appear in the first place.
5. Press the <ENTER> key to store "1.5." The cursor will move to the sewing density.
.,6. Press the <END> key to return to the editing menu.
A A A 2.0 Default(1.0) 0.6
-82-From the library of: Superior Sewing Machine & Supply LLC
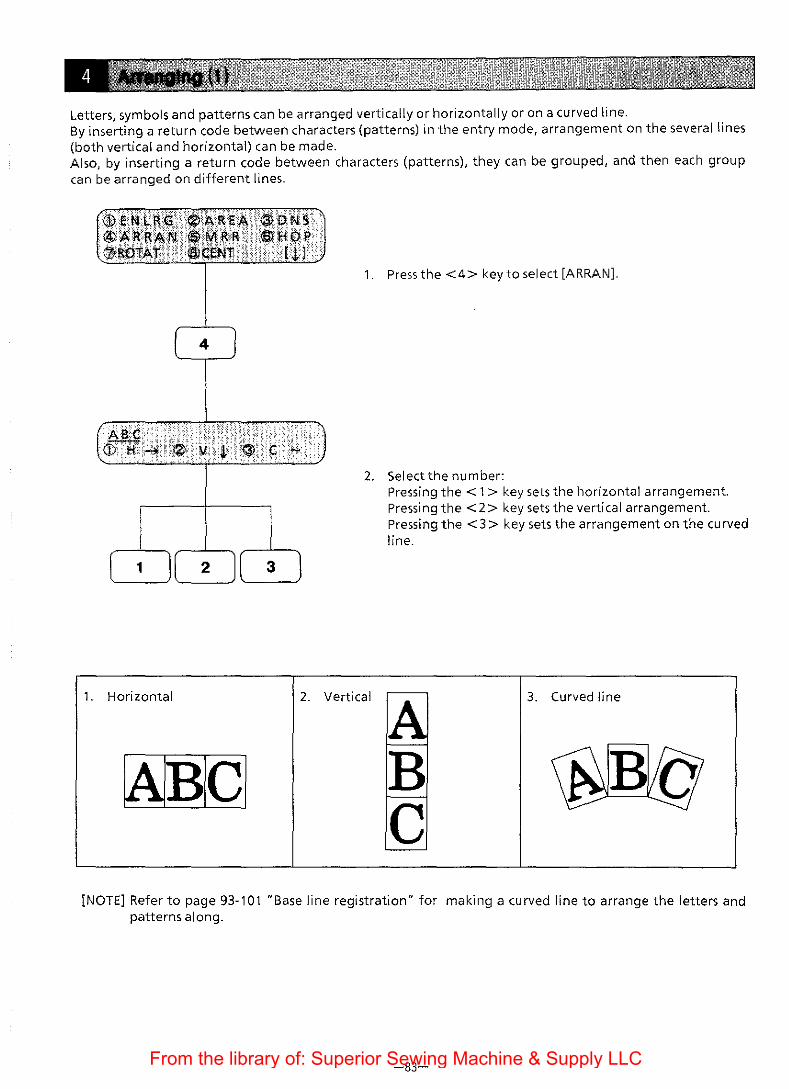
Letters, symbols and patterns can be arranged vertically or horizontally or on a curved line. By inserting a return code between characters (patterns) in the entry mode, arrangement on the several lines (both vertical and horizontal) can be made. Also, by inserting a return code between characters (patterns), they can be grouped, and then each group can be arranged on different lines.
1. Horizontal
~BICI
1. Press the <4> key to select [ARRAN].
2. Select the number:
2. Vertical
Pressing the < 1 > key sets the horizontal arrangement. Pressing the < 2 > key sets the vertical arrangement. Pressing the <3> key sets the arrangement on the curved line.
B c
3. Curved line
[NOTE] Refer to page 93-101 "Base line registration" for making a curved line to arrange the letters and patterns along.
-83-From the library of: Superior Sewing Machine & Supply LLC

When horizontal arrangement data includes return code:
db = characters are arranged above base I i ne
Set value in the editing: 1} Centering r::J 2} Ratio is set by each character or pattern
1. Press the< 1 >key to select "H-->."
2. Using the <I> (alphabet} key, select the arrangement type. The symbols for each arrangement type ( db , qp , and 1l' } are selected cyclically by pressing the< I> key.
[NOTE] A return code cannot be inserted between the characters (patterns} on the same curved line. Refer to page 88 for arranging characters (patterns} on different lines ..
qp = characters are arranged in the center of base line
-84-
1J' = characters are arranged below base line
From the library of: Superior Sewing Machine & Supply LLC

When vertical arrangement data includes return code:
t? = left side margin
Set value in the editing: 1) Centering ['] 2) Ratio is set by each character or pattern
1. Press the < 2 > key to select " V J,."
2. Using the <I> (alphabet) key, select the arrangement type. The symbols for each arrangement type ( ciJ , ~ , and t? ) are selected cyclically by pressing the <I> key.
[NOTE] A return code cannot be inserted between the characters (patterns) on the same curved line. Refer to page 88 for arranging characters (patterns) on different I i nes.
~ = center line g = right side margin
--71 - ---
JD H E B JFC =
-85-From the library of: Superior Sewing Machine & Supply LLC

When arrangement data only includes characters (patterns}:
EDIT
Base line registration (Refer to p.93.)
Set value in the editing: 1) Centering c::J 2) Ratio is set by each character or pattern
1. Press the <3> keytoselect "C-."
2. Press one ofthe < 1 >to <9 > keys to select base line.
I
In this example, <3> is selected.
3. Using the <I> (a I ph abet) key, select the arrangement type. The symbols for each arrangement type ( db , qp , and 9J' ) are selected cyclically by pressing the <I> key.
4. Press the <0> (alphabet) key to select character (pattern) orientation. A B ""' v sand ':__";are selected cyclically by pressing the .<o> k'ey:-"
[NOTE] If any base line has not been registered, (indicated by highlighted letters), press the <EDIT> key to go into the line registration mode and register the desired line.
-86-From the library of: Superior Sewing Machine & Supply LLC

arrangement type= db arrangement type= db character (pattern) orientation= A B character (pattern) orientation = ~
arrangement type= qp arrangement type= qp character (pattern) orientation = < 00 character (pattern) orientation = ,.,
arrangement type= 1P character (pattern) orientation = <"'
arrangement type= 1P character (pattern) orientation = ':.!
-87-From the library of: Superior Sewing Machine & Supply LLC

By deviding characters (patterns) into groups by inserting return codes, each group of characters (patterns) can be arranged on the different base lines. Ex. 4 explains how to create an embroidery like the illustration below.
I I
I I
I
/ /
/
IDIEIFI
' ' ' \ \ \ \ I
When curved arrangement data includes return code:
EDIT
Set value in the editing: 1) Centering 0 2) Ratio is set by each character (pattern)
1. Press the <EDIT> key to arrange characters (patterns) by each group.
-88-From the library of: Superior Sewing Machine & Supply LLC

( Number
Base I i ne Tracing registration (Refer to p. 93.}
Go to step 4.
2. Press the <3> keytoselect"C-."
[Arranging the character group "ABC" along the curved line]
3. By pressing the < B > or < N > oft he alphabet keys, select ''ABC." The selected group of characters (patterns) will be underlined with a dotted line.
4. Press one oft he < 1 > to < 9 > keys to select the base I i ne.
5. Press the <I> (alphabet} key to select the arrangement type. The symbols for each arrangement type ( db , qp , and 9J' } are selected cyclically by pressing the <I > key.
6. Press the <0> (alphabet) key to select the direction of the characters (patterns).
A B , """' , v H and ~ are selected cyclically by pressing the < o >key.
7. Press the <P> (alphabet} key to select the base point location. The base point location symbols ( D - Gl· - D are selected cyclically by pressing the< P> key.
[NOTE] Steps 4, 5, 6 and 7 can be skipped if the set values are not to be changed.
8. Using the jog keys<->,<---, j, J, >,move the hoop and the holder base to the desired position. Press the <ENTER> keytosetthe base point.
[NOTE 1] Do not forget to press the <ENTER> key after moving the hoop and the holder base. When the base point is set, the group of characters (patterns} will be underlined with a solid line.
[NOTE 2] If the < * > key is pressed here, the machine will trace the base line. At this time, the base point comes to the middle of the base line. If any base line has not been registered, (indicated by a highlighted number), press the <EDIT> key and then register a base line.
[NOTE 3] If the <CLEAR> key is pressed here, the base point set at step 8 will be cancelled and the machine goes back to step 4.
-89-From the library of: Superior Sewing Machine & Supply LLC
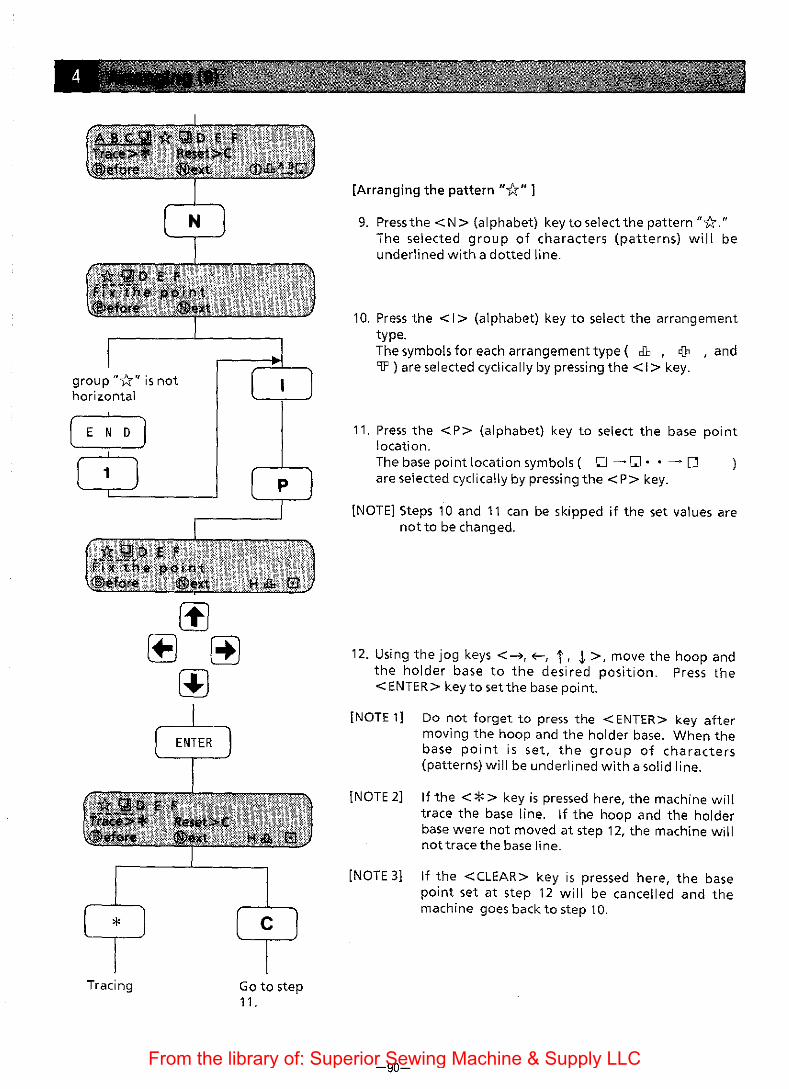
group "w" is not horizontal
E N D
Tracing Go to step 11 .
[Arranging the pattern "w" 1
9. Press the <N> (alphabet) key to select the pattern "w." The selected group of characters (patterns) will be underlined with a dotted line.
10. Press the <I> (alphabet) key to select the arrangement type. The symbols for each arrangement type ( db , qp , and 9J' ) are selected eye\ ica lly by pressing the <I > key.
11. Press the <P> (alphabet) key to select the base point location. The base point location symbols ( I:J - GJ • • - D are selected cyclically by pressing the < P> key.
[NOTE] Steps 10 and 11 can be skipped if the set values are not to be changed.
12. Using the jog keys<--'>, E-, j, ! >,move the hoop and the holder base to the desired position. Press the <ENTER> keytosetthe base point.
[NOTE 1] Do not forget to press the <ENTER> key after moving the hoop and the holder base. When the base point is set, the group of characters (patterns) will be underlined with a solid line.
[NOTE 2] If the < * > key is pressed here, the machine will trace the base line. If the hoop and the holder base were not moved at step 12, the machine will not trace the baseline.
[NOTE 3] If the <CLEAR> key is pressed here, the base point set at step 12 will be cancelled and the machine goes back to step 10.
-90-From the library of: Superior Sewing Machine & Supply LLC

group "DE F" is not horizontal
E N D
Tracing Go to step 14.
[Arranging the character group "DE F"]
13. Press the < N > (alphabet) key to select the character group "DE F." The selected group of characters (patterns) will be underlined with a dotted line.
14. Press the <I> (alphabet) key to select the arrangement type. The symbols for each arrangement type ( Jb , qp , and 'lP) are selected cyclically by pressing the< I> key.
15. Press the <P> (alphabet) key to select the base point location. The base point location symbols ( D- w • • - D are selected cyclically by pressing the <P> key.
[NOTE] Steps 14 and 15 can be skipped if the set values are not to be changed.
16. Using the jog keys<__.,~. f, ,j, >,move the hoop and the holder base to the desired position. Press the <ENTER> key to set the base point.
[NOTE 1] Do not forget to press the <ENTER> key after moving the hoop and the holder base. When the base point is set, the group of characters (patterns) will be underlined with a solid line.
[NOTE 2] If the <* > key is pressed here, the machine will trace the base line. If the hoop and the holder base were not moved at step 16, the machine will not trace the base I in e.
[NOTE 3] If the <CLEAR> key is pressed here, the base point set at step 16 will be cancelled and the machine goes back to step 14.
-91-From the library of: Superior Sewing Machine & Supply LLC

E N D
E N D
17. Press the <END> key twice to exit from the current mode.
[NOTE 1] If there is character (pattern) data on the curved line (see ex.4 on page 88}, rotation angle can be changed only by 90 degrees increment.
[NOTE 2] If there is character (pattern) data on the curved I ine (see ex.4 on page 88}, mirror image cannot be set. Also, space cannot be entered by the ASCII code and arrows indicating spaces cannot be displayed. If you wish to enter a space between characters (patterns), use the <SPACE> key on the operation panel.
(correct)
(incorrect)
B
DEF
-92-From the library of: Superior Sewing Machine & Supply LLC

A curved line can be made by the operator so that the characters (patterns) can be sewn along the desired base line. Up to 9 lines can be registered. Lines that can be registered are straight lines (including slanted lines), arcs and splines.
EDIT
1. After inputting character (pattern) data in the character (pattern) entry mode, go into the editing mode.
2. Press the <4 > key to select" ARRAN."
3. Pressthe <3> keytoselect "C-"
4. Press the <EDIT> key to go into the line registration mode.
Now the registration of lines is possible.
[NOTE] Line registration numbers are from CD to ®. Highlighted numbers indicate that lines are not registered under these numbers.
-93-From the library of: Superior Sewing Machine & Supply LLC

'~'P, ,,~,
JliJ!l To arrange the characters (patterns) on the straight line (2 points entered):
second point------<-~
..-~-----first point
1. To register a line in the underlined number, press the numeric key ofthat number. In this example, the number "1" is underlined, so press the< 1 >key.
2. Using the jog keys<~.<-, j, t >,move the hoop and the holder base to the desired position. Press the <ENTER> key to enter the first point.
[NOTE] Do not forget to press the <ENTER> key after moving the hoop.
3. Using the jog keys<~.<-, j, t >,move the hoop and the holder base to the desired position. Press the <ENTER> key to enter the second point.
-94-From the library of: Superior Sewing Machine & Supply LLC

EDIT
"*~r¥~i!ll~: m .. ~~~lf~ki>®. fTr~~~~1'!~ , '~*'}~~~ ; : . v ,,,. ·,;;; ,,,
'·' ,, ~ ·.· '
[ * J
tracing Gotostep1.
E N D
E N D
3. After entering the first and the second points, press the <EDIT> key. The hoop and the holder base move to the first point and stops there. The Curve No. "1" will be indicated with a positive number, indicating that the registration is complete.
[NOTE 1] If the < * > key is pressed here, the machine will trace the line between the two points.
[NOTE 2] If the <CLEAR> key is pressed here, the previously entered two points wi II be cancel I ed and the machine goes back to step 1. (Press this key when you want to re-enter the line.)
4. Press the <END> key twice to escape from the current mode.
This is the end of the line registration procedure.
-95-From the library of: Superior Sewing Machine & Supply LLC

To arrange the characters (patterns) on the arc (3 points entered):
first point
second point
1. To register a line under the desired number, press the numeric key of that number. For example, if you wish to register under the number "2", press the <2> key.
2. At this point, another line has already been registered under the number "2." Press the <CLEAR> key to cancel the previous registration.
-96-From the library of: Superior Sewing Machine & Supply LLC

Tracing
00 ~ ~ [!J~~ @1~~~$";
,,,,_,0000
'' :' L~~rrJ
ENTER
Go to step 3.
3. Using the jog keys<->,<--, t, 1. >,move the hoop and the holder base to the desired position. Press the <ENTER> key to enter the first point.
[NOTE] Do not forget to press the <ENTER> key after moving the hoop.
4. Using the jog keys<->,<--, t, 1. >,move the hoop and the holder base to the desired position. Press the <ENTER> key to enter the second point. Enter the third point in the same way.
[NOTE] Be sure to enter only three points. If four or more points are entered, the line will not be an arc.
5. After entering all the points, press the <EDIT> key. The hoop and the holder base move to the first point and stops there. The Curve No. "2" will be indicated with a positive number, indicating that the registration is complete.
[NOTE 1] If the < * > key is pressed here, the machine will trace the arc connecting the three points.
[NOTE 2] lfthe <CLEAR> key is pressed here, the previously entered three points will be cancelled and the machine goes back to step 3. (Press this key when you want to re-enter the line.)
-97-From the library of: Superior Sewing Machine & Supply LLC

E N D
E N D
6. Press the <END> key twice to exit from the current mode.
This is the end of the line registration procedure.
-98-From the library of: Superior Sewing Machine & Supply LLC

To arrange the characters (patterns) on the spline:
second point
first point
1. To register a line under the desired number, press the numeric key ofthat number. For example, if you wish to register under the number "2", press the< 2 > key.
2. At this point, another line has already been registered under the number "2." Press the <CLEAR> key to cancel the previous
registration.
-99-From the library of: Superior Sewing Machine & Supply LLC

ENTER
Tracing Go to step 3.
3. Using the jog keys<~.<--, j, t >,move the hoop and the holder base to the desired position. Press the <ENTER> key to enter the first point.
[NOTE] Do not forget to press the <ENTER> key after moving the hoop.
4. Using the jog keys <~. <--, j, t >, move the hoop and the holder base to the desired position. Press the <ENTER> key to enter the second point. Enter the third point to the last point (in this example, the last point is indicated as N) in the same way.
[NOTE] Up to 10 points can be entered. To make the spline, at least 4 points should be entered.
5. After entering all the points, press the <EDIT> key. The hoop and the holder base move to the first point and stops there. The Curve No. "2" will be indicated with a positive number, indicating that the registration is complete.
[NOTE 1] If the<*> key is pressed here, the machine will trace the spline connecting entered points.
[NOTE 2] If the <CLEAR> key is pressed here, the previously entered points will be cancelled and the machine goes back to step 3. (Press this key when you want to re-enter the line.)
-100-From the library of: Superior Sewing Machine & Supply LLC

tii~~:'D®'®®®®lC:V®® l!J~.~~:u.n:"HhH,, .. ~.'~~ttC ·
'<'
E N D
E N D
6. Press the <END> key twice to exit from the current mode.
This is the end of the li neregistration procedure.
-101-From the library of: Superior Sewing Machine & Supply LLC

Three kinds of mirror image processes--of X axis symmetry, Y axis symmetry and origin symmetry--can be set.
Number key
1. Press the <5> key to select [MRR].
2. Press one of the < 1 >, < 2 >, < 3 > and < 4 > keys to select the number.
3. After the number is selected, the editing menu appears.
Function
To select mirror image (1) J
To select mirror image (2) T.
To select mirror image (3) J:
To select mirror image (4) 'l
To return to editing menu
[NOTE] If pressing the <END> key without selecting the number, the current mirror image is retained and then the editing menu appears.
-102-From the library of: Superior Sewing Machine & Supply LLC

The hoop feed point for the X and Y carriage> can be >et so that a hoop i> ea>ily attached or removed to make an operation such a> material attachment smooth while the machine su>pends.
1. PreS> the <6> key to select [HOP].
0 I
The latest set coordinate> of the hoop feed point are di>played on the >econd row until the <ENTER> key i> preS>ed. When the <ENTER> key i> pre»ed, the current coordinates of the needle are displayed, then the editing menu is displayed.
The origin for the coordinates of the hoop feed point i> the upper left point in the maximum moving area for the X andY carriages. (unit: mm)
2. U>ing the jog key>, move the needle to the hoop feed point.
[ ENTER J
. . .
'.•tsJ··;·<·
3. After moving the needle, press the <ENTER> key. That coordinates appear then the editing menu is di>played.
Function
To move carriage and set hoop
feed point
To store coordinate>
To return to editing menu
To >elect AUTO or MANUAL for
hoop feed at sewing end
-103-
Example:
l<f-- 450 --.I
T 285 /
hoop feed point (X:450 mm Y:285 mm)
j_c____....------"
/
hoop feed point (X:225 mm Y:285 mm)
From the library of: Superior Sewing Machine & Supply LLC

The hoop feed point can be set outside the area .
T 285
1
..----- 450 -----... r----------------------------~
x (hoop feed point) :
' ' ' ' L----l~~~~~~~~------J
area
1. If starting sewing with the hoop feed point set outside the area, "Area over" appears. In that case, using the jog keys, move the needle to the sewing start point in the area.
2. "Mov N STR-P." appears. The hoop feed point will be set in the area to sew.
-104-From the library of: Superior Sewing Machine & Supply LLC

Letters, symbols and patterns can be rotated together counterclockwise in 1" increments.
<Ii£NI.R'~'i~All~A @ONS' :~:):I.R M!'l :~,M'fli~ @H-0 I' ~ ~~~1::" '_ <sJ .li:ll N1!' ' lJ.
~"'"'''' 7
1. Press the <7> key to select [ROT AT].
2. Press the numeric key to set the rotation angle. The angle can be set between 0'-359'.
3. Aftertheangleisset, press the <ENTER> key. The editing menu will appear.
Function
To set rotation angle
To set default (0')
To return to editing menu
To store typed value
When inputting a character (pattern)
data in the data reading & sewing
mode, if the data includes a return code
( J ), rotation angle can be changed
only in 90 degrees increments.
( i = 90', <- = 180', J. = 270', ---> = 0')
[NOTE1] If the <CLEAR> key is pressed before pressing the <END> key, the rotation angle is set to 0'.
-105-From the library of: Superior Sewing Machine & Supply LLC

[NOTE2] Rotating a combination of plural letters or patterns with the arrows ( j, ~,<-and~) might cause each piece ofthe combination to slip out of place.
i) Rotation angle is o• ii) Rotation angle is 90'
•
As shown above, each piece of the combination is sewn properly, but the position between them slips. Setting the individual ratios for the arrows to D .00 prevents this problem to some extent.
i) For example, when entering <D, ®,@and® as the pattern with the arrows, the display shows:
Setting the rotation angle to 000', the monogram will be sewn as shown in the picture on the left.
ii) Also, when entering <D, ®,@ and@ as the pattern with the arrows, and setting the rotation angle to 090', the monogram will be sewn as shown in the picture on the right.
-106-From the library of: Superior Sewing Machine & Supply LLC

The aligned letters can be centered.
1. Press the <8> key to select [CENT].
2. Then the editing menu appears.
Function
;'iJ:~!\ii'!J Select the centering point of a l''·~IH"'.;.;q: monogram or letter
(See the figure below.)
Sewing start points (Numbers correspond to the numbers for Centering points above.)
(j)----®----®
sewing pattern
sewing area Q)----@----®
operator position
-107-From the library of: Superior Sewing Machine & Supply LLC

Sewing start point
When monogram data includes arrow:
Set value in the editing: 1. Horizontal arrangement 2. Individual size ratio for j is 9.00.
<Finishing, sewing start point>
A A A. centering []
-108-From the library of: Superior Sewing Machine & Supply LLC

[~,1,'2] When monogram data includes arrow:
Set value in the editing: 1. Vertical arrangement 2. Individual size ratio for~ is 9.00.
<Finishing, sewing start point>
I
centering D / rAJ I centering [']
A! / y
A\ \A I
-109-From the library of: Superior Sewing Machine & Supply LLC
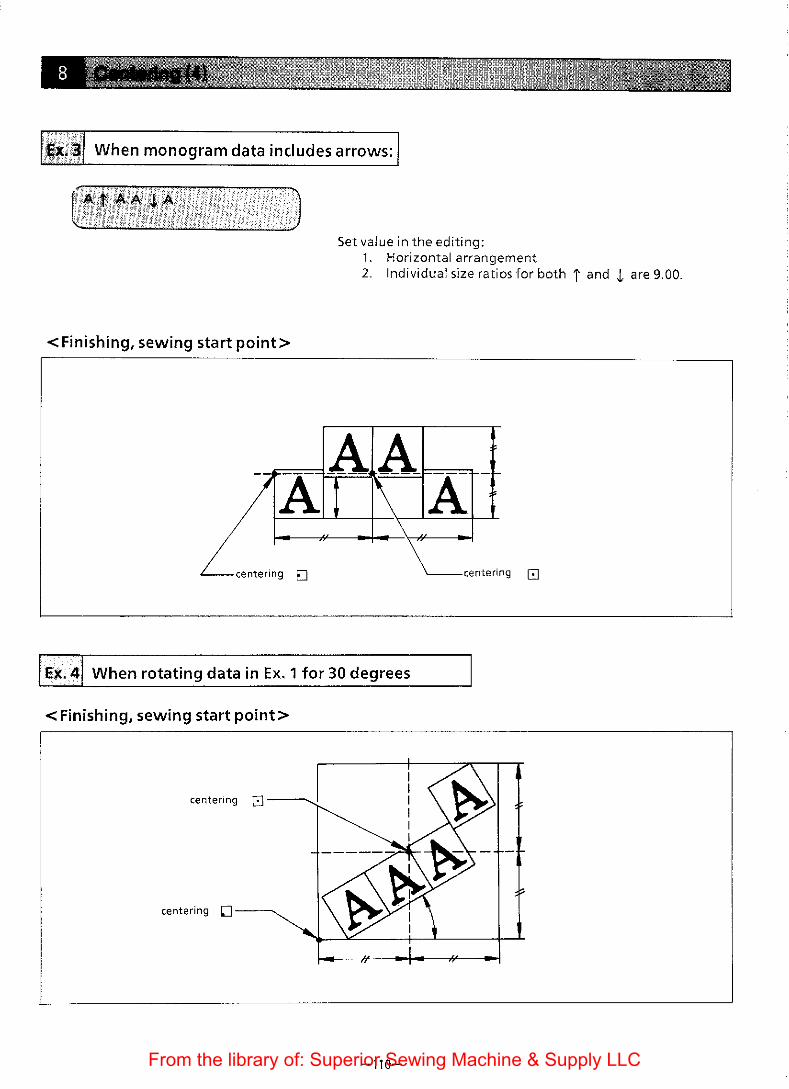
When monogram data includes arrows:
Set value in the editing: 1. Horizontal arrangement 2. Individual size ratios for both i and ~ are 9.00.
<Finishing, sewing start point>
Lcente g EJ
A A f-
l A 1\ A f
\
rin \ r:enteri ng 8
<Finishing, sewing start point>
-110-From the library of: Superior Sewing Machine & Supply LLC

When monogram data includes arrow:
Set value in the editing: 1. Horizontal arrangement 2. Individual size ratios for both J, and<-- are 9.00.
<Finishing, sewing start point>
A centering []
c centering G
When monogram data includes arrow:
Set value in the editing: 1. Vertical arrangement 2. Individual size ratios for both<-- and j are 9.00.
<Finishing sewing start point> ' ,/centering [']
c I I ~ centering [;]
I / /
I I
I - ----- -- 1\ f-.-I
I I A I ! i
-111-From the library of: Superior Sewing Machine & Supply LLC

When monogram data includes return code:
Set value in the editing: 1. Horizontal arrangement 2_ Size ratios for all letters are the same_
centering D
centering 0
A B ~ "' r--...
c D E centering 1:]
When monogram data includes return code:
Set value in the editing: 1. Horizontal arrangement 2. Size ratios for all letters are the same.
centering LJ ------------.. centering G A B
t; .. ~ E .. centering GJ
-112-From the library of: Superior Sewing Machine & Supply LLC

When monogram data includes return code:
Set value in the editing: 1. Horizontal arrangement 2. Size ratios for all letters are the same.
centering D
A B centering [3 v l,...oo
c D E ._ centering Q
When monogram data includes return code:
Set value in the editing: 1. Vertical arrangement 2. Size ratios for all letters are the same.
centering D __ /
-113-From the library of: Superior Sewing Machine & Supply LLC

;, I When monogram data includes return code:
Set value in the editing: 1. Vertical arrangement 2. Size ratios for all I etters are the same.
centering q c ~ A ~ f) ~~~ I"' E
centering D
centering [;]
.·When monogram data includes return code:
Set value in the editing: 1. Vertical arrangement 2. Size ratios for all letters are the same.
centering [] ------- r---,centering [J
~--centering Q
-114-From the library of: Superior Sewing Machine & Supply LLC

centering D common for OEJD
character arrangement type d:b
centering EJ common for ODD
characterarrangementtype c[p
centering D common for ODD
character arrangement type qp
starting point
starting point
Set value in the editing: 1. Arranging on the curved line [ALL] 2_ Size ratios for all letters are the same.
ending point
entered curved line
ending point
ending point
-115-From the library of: Superior Sewing Machine & Supply LLC

r.:~WWJwhen arranging monogram data:
Set value in the editing:
centering [J common for ';]0["]
character arrangement type c{b starting point
centering G common for [:J0["]
character arrangement type cflJ
starting point
starting point
centering LJ common for ';]0["]
character arrangement type qp
1. Arranging on the curved line [ALL] 2. Size ratios for all letters are the same.
,ending point
entered curved line
ending point
-116-From the library of: Superior Sewing Machine & Supply LLC

jEJ(.'ts']when arranging monogram data:
centering 0 common for Q[l[]
starting point character arrangement type dh
centering 0 common for I:JEJ[]
character arrangement type qp starting point
centering D common for I:JEJ[]
character arrangement type C[p
starting point
Set value in the editing: 1. Arranging on the curved line [ALL] 2. Size ratios for all letters are the same.
entered curved line
ending point
-117-From the library of: Superior Sewing Machine & Supply LLC

Set value in the editing: 1. Arranging on the curved line [EACH] 2. Size ratios for all letters are the same.
centering D D
centering EJ /centering 0
centering 8
centering 1:]
centering [J
-118-From the library of: Superior Sewing Machine & Supply LLC

A monogram can be sewn repeatedly, horizontally or vertically_
E N D
1_ When the first screen in the editing menu is displayed, press the < QJ > key to display the second screen_
2. Press the< 1 > key to select [RePT].
3_ In default, the direction is horizontal and the repeat time is 1. By pressing the < QJ > or < [j] > key, vertical and horizontal are selected alternately.
4. After setting, press the <ENTER> key to store the direction. The cursor will move to the repeat times_ Type repeat times using the number key-
5. Press the< ENTER> key to store the times.
-119-
Function
To store typed value
To select distance and repeat times
(cursor moves)
To type repeat times and space
To switch direction
(Horizontalal ~Vertical)
To set default (horizontal, 1 time, space
000 mm)
To return to editing menu
From the library of: Superior Sewing Machine & Supply LLC

A monogram can be sewn repeatedly, horizontally or vertically.
<Exercise 1 >
Set the vertical repeat sewing to 2 times for the letters ABC and put a 5 mm space between them.
ABC ~ 5 mm
ABC 1. After entering the data, select [EDIT].
2. Press the < [!] > key to display the second screen in the edit'mg menu.
3. Press the < 1 > key to select [RePT].
4. Press the <[JJ> keytosetthevertical.
5. Press the <2> key, and then the <ENTER> key to set the repeat times.
-120-From the library of: Superior Sewing Machine & Supply LLC

R e l>T: v. direC 2 t.Jri\"e SPC: 000 mm .... ··· •· , .••.•.....• LG: voobin~kdOD""rn• .
ReP!: V d'tr~~ ~Tjmt! · SP<;:: ((05mtn .·. . ;"" t.. G: voocln1m rHiJCHtlmln: .
I T J (jJ R t!rir ~ ~ 1)/l.P ®rHK ®A!HC. >@sT:If.lt ·~aOSlNG~$mtHT -
E N D
[ENlERI . te oir1;. [ COr.,ifrvtlJ f,llCA1'FL ; . [S! ART(Sewi.ng>r •.
6. Press the < 5 > key, and then the <ENTER> key to set the space.
[NOTE] The total size of the data (including the space) will be displayed at the LNG on the third row.
7. Now the second screen of the editing menu appears.
8. Press the< END> key to return to the main menu.
-121-From the library of: Superior Sewing Machine & Supply LLC

<Exercise 2 >
Set the horizontal repeat sewing to 2 times for the letters ABC and put a 5 mm space between them.
A B C-;;;A B C
ENTER
1. After entering the data, select [EDIT].
2. Press the <[I]> key to display the second screen in the editing menu.
3. Press the < 1 > key to select [RePT].
4. When "V" (vertical) is displayed, press the < [I]> key to change it to "H" (horizontal).
5. Press the <2> key, and then the< ENTER> key to set the repeat times.
-122-From the library of: Superior Sewing Machine & Supply LLC

gp~~> r )~J~mr,~e;N~,~:~:rn:~ii' ,~· <i i .l.IDOOrorn. H !;:llt:H:lfi,Jj> ;:;;.··
I
6. Press the < 5 > key, and then the <ENTER> key to set the space.
[NOTE] The total size of the data (including the space) will be displayed on the third row.
7. Press the <END> key to return to the second screen of the editing menu.
8. Press the <END> key to return to the main menu.
[NOTE 1] After setting the repeat sewing, the set repeat times will be displayed during sewing.
For example, when the vertical repeat is set to twice, "V 1/2" is displayed on the right of the third row during the first sewing.
[NOTE 2] To cancel the repeat sewing in the sewing mode after setting: Ex. When setting the repeat times to 3:
During the second sewing. ·When the <CLEAR> key is pressed, the machine cancels the second sewing and gets
ready for the third sewing. ·When the <AC> key is pressed, the machine cancels both the second and third sewing,
and gets ready for the first sewing.
[NOTE 3] If character (pattern) data was entered one by one in the entry mode, going back to the previous character (pattern) using the <back> key is possible. But if it was inputted using repeat function, it is not possible. (For example, once you started sewing the same characters (patterns) for the second time, going back to the characters sewn for the first time to fix them is not possible.)
-123-From the library of: Superior Sewing Machine & Supply LLC

Sewing start point with the repeat sewing
<Ex.1 >
1. Horizontal (Centering: [;] )
Patten
2. Horizontal (Centering: EJ )
Patten
Second sewing /
7
\ Sewing direction
I I \ Sewing start point \ Third sewing
Second sewing
Sewing direction
start point Third sewing
-124-From the library of: Superior Sewing Machine & Supply LLC

<Ex. 2>
.~tJJ~~iw~~~g@t:~f~"~
1. Vertical (Centering:['])
2. Vertical (Centering: D)
Sewing start point
c 0 . ., " Q) ~
'6
"' c
]
'::.l
c 0 . ., " Q) ~
'0
"' c: "3: Q)
(/)
I
I
Sewing start p oint
./ Patten
/
""" 1---- Second sewing
""'-- r---_ Third sewing
Patten v
/
""" 1---- Second sewing
"""- r---_ Third sewing
[NOTE] Pressing the <CLEAR> key then the <END> key returns data to the default value "RePT: H DR
1Time" (non-repeat sewing).
-125-From the library of: Superior Sewing Machine & Supply LLC

The automatic jump functions when the data includes stitches longer than the set stitch length. By this function, the machine continues to sew at the set speed.
1. Press the <III> key to display the second screen of the editing menu.
2. Pressthe<2>keytoselect[JMP]. The default stitch length is displayed.
3. To select CD, press the< 1 >key. To select®, press the < 2 > key. Then press the <END> key to return to the editing menu.
Function
To select (j) or®
To return to editing menu
In the selected range, the sewing speed is regulated according to the stitch length as shown below.
~m) 0.1 - 4.8 4.9 - 8.2 8.3- 12.7 R
1 1000rpm 650rpm 450rpm
2 750 600 450
3 650 550 450
4 550 500 450
5 500 450 400
6 350 350 350
-126-From the library of: Superior Sewing Machine & Supply LLC

Indicating the material thickness improves the sewing quality of any weight of material_
Thick material Thin material
Reference: L Thick material .. _ ...... _ ..... __ .. .
Thin material (maximum 1 mm) ... .
1. Press the <3> keytoselect[THK].
2. To select [(j)ThickL press the< 1 > key. To select [®Thin], press the <2> key_
3_ After pressing the <1 >or <2> key, the editing menu is displayed_
[NOTE] The selected thickness is displayed when setting the sewing start point in the sewing mode.
fabric for coats, corduroy, denim, leather georgette, broadcloth, tricot fabric, cuprammonium rayon (cupro), gingham
2_ When sewing thin material, a piece of non-woven fabric or paper attached to the back for support will improve embroidery quality_
-127-From the library of: Superior Sewing Machine & Supply LLC

The automatic thread trimmer operates according to the successive number of jump stitches in the pattern data. (This function is not available for the prepared letter data supplied by Brother.)
1. Press the <4> key to select [ATHC].
2. Indicate the jump stitch number fixed in the data.
After After After All jump thread thread thread stitches
trimming, trimming, trimming, without 8jump 5jump 3jump thread stitches stitches stitches trimming
3. The editing menu is now displayed.
[NOTE] This automatic thread trimmer function is available only when the data to be sewn includes a 3, 5 or 8-jump stitch.
-128-From the library of: Superior Sewing Machine & Supply LLC

In data reading and sewing mode (with TFD format data only), and when DIP switch 3 is ON (sewing start point is the position of the first stitch) in the editing mode, needle return to the sewing start point can be set.
1. Press the < ~ > key to get the next editing screen.
2. Press the < 5> key and select [STR_R].
3. If you wish to return the needle to the sewing start point, press the < 1 > key. If not, press the < 2 > key.
sewing start point (Needle returned.)
\
Monogram data
Monogram area '----·
-129-
sewing end point (Needle didn't return.)
I
I
•
From the library of: Superior Sewing Machine & Supply LLC

Boring setting is possible only with the sewing data made for boring. Since the sewing machine does not recognize ifthe data is for boring or not, please double-check before sewing. Before sewing, attach the boring knife and the needle plate for boring (Both are optional).
1. Press the < ,j, > key to get the second screen in the editing mode.
2. Press the <6> key to select [BORING].
3. Press the< i > keytoselectBORING:YES. (If the< ,j, >key is pressed, BORING:NO will be selected.)
4. Press the <ENTER> key. Now the BORING:YES is set.
5. Press the < i > key to select SHIFT:YES. (If the < ,j, > key is pressed, SHIFT: NO will be selected.)
6. Press the <ENTER> key. Now the SHIFT:YES is set.
-130-From the library of: Superior Sewing Machine & Supply LLC

E N D
ij;_ififfi; H!l!JDilli~~t, \®ji~~:~; __ ~i~tiilK: ::; 1 ®Ailrt<! • • ': !~isrr.R ; it;'; !Q¥.~Q~rN~l®s1J!Ifd,Ei•W ;;•-• • ';"~';;
l
7. Press the <END> key to returntotheediting menu.
[NOTE 1] If boring data has shift data in it, set the machine to "SHIFT: NO." If boring data does not have shift data in it, set the machine to "SHIFT: YES." In both cases, shifting amount is 15 mm.
[NOTE 2] Boring or shifting is only possible with the needle no.1.
[NOTE 3] With the boring set to YES, the following editing cannot be done. ·Enlarging /Reducing ·Mirror image · Returning the need I e to the start point
To get the fine boring result, arranging on the curved line is not recommended.
-131-From the library of: Superior Sewing Machine & Supply LLC

Only with the brother type letter data, stitches can be set either to Satin or to Tatami. The range of the Tatami sewing pitch is from 2.0 mm to 9.9 mm.
1. Press the < ~ > key to get the second screen in the editing mode.
2. Press the <7 > key to select [STITCH].
3. If you want Satin stitches, press the< 1 >key. If you want Tatami stitches, press the <2> key.
4. If you wish to set the Tatami pitch (stitch length used in Tatami sewing) to 2.5 mm, press < 2 >, < 5 > and then the <ENTER> key.
5. The display will return to the editing menu.
-132-From the library of: Superior Sewing Machine & Supply LLC

N SEWING
Sewing {function selection} mode Select one of the sewing functions in this menu.
Sewing In this mode, sewing may be begun.
Suspension An emergency stop results suspension.
Test sewing mode Test sewing is done in this mode.
Needle bar setting mode Needle bar order (color order) may be set.
Needle bar selecting mode To select needle bars.
Hoop feed mode To set hoop feed point.
Stitch by stitch sewing mode To sew stitch by stitch during suspension.
-133-From the library of: Superior Sewing Machine & Supply LLC

Press the <START> key to enter the sewing mode.
S T A R T
In the main menu
1. Press the <START> key.
2. Set the first-needle-drop point (sewing start point) using the jog keys.
[NOTE] In this operation, the needle may go out of sewing area. If the start point goes out of sewing area, the error message "AREA OVER" is displayed and sewing will not begin when the <START> key is pressed. If the Area over message appears: CD Reset sewing start point by using the jog keys. ®Press the <END> key and select [EDIT] in main
-134-
menu to reset the area.
Function
To select sewing mode
To select test sewing mode
Press <EMERGEN~Y> key to return to
sewing (function selection) mode.
To select needle bar setting mode
Press <END> key to return to the
sewing (function selection )mode.
To select needle bar selecting mode.
Press <END> key to return to sewing
(function selection )mode.
To feed hoop
Press it again to return to sewing
(function selection) mode.
To sew stitch by stitch
To enter bobbin thread counter/thread
breakage detector mode
To set sewing start point
To trim thread
To return to main menu
From the library of: Superior Sewing Machine & Supply LLC

Sewing starts
<Suspension mode>
START
EMERGENCY
S T A R T
E N D
Data entered is displayed here. As sewing finishes, the data scrolls to the left.
Needle number is displayed here when there is a thread change_ Again, data scrolls left.
Press the <EMERGENCY> key during sewing to enter the suspension mode.
-135-
Function
To sew stitch by stitch
To restart
1. To stitch without thread backward
and forward Press < El > key to stitch backward
and <El > key to stitch forward.
Press < E1 > key and < E1 > key once
for one stitch.
2. To stitch without thread
automatically, press < El > and
< El > keys for more than one
second. Press <EMERGENCY> key to stop.
· To feed hoop (hoop feed point can be
changed with rn IIl El El keys.)
To select needle bar
Continued on the next page_
From the library of: Superior Sewing Machine & Supply LLC

-136-
Function
To enter bobbin thread counter/thread
breakage detector mode
To cancel sewing and go back to the
sewing (function selection) mode.
To stop stitch without thread
automatically
To change stitching without thread
(backward/forward) to 100 stitches at a
time
To move the needle (the hoop and the
holder base) in 0.1 mm increments.
(W = j , Z = J, , A=.,_, 5 = __.)
From the library of: Superior Sewing Machine & Supply LLC

<Test sewing mode>
<Needle bar setting mode>
NEEDLE SET
1. Press the < * > key to start test sewing entered data.
2. During test sewing, the entered data scrolls to the left. After test sewing, the machine returns to the sewing (function selection) mode.
1. Press the <NEEDLE SET> key and set the order of needle bars.
-137-
Function
To type needle bar order
To move cursor
To set and release a pause during
sewing (set"'> release)
In " 0 0 5", the" 5" stands for a pause
(suspension mark).
To set needle bar order to default
(Needle bar order is set, repeating in
order from 1 to 9.)
To return to sewing (function selection)
mode
To select needle bar setting mode
From the library of: Superior Sewing Machine & Supply LLC

<Needle bar selecting mode>
To select any needle bar for sewing and move it to the needle hole on the needle plate.
In the sewing [function selection) mode;
1. Press the <NEEDLE SELECT> key and select the needle bar using the numeric key.
-138-
Function
To type needle number and move
needle to needle hole
* To exit from needle bar selecting
mode
* To return to main menu or sewing
mode or sewing suspension mode
[NOTE] After using this funct'1on, when
the sewing begins, the needle
bar returns to its original
position.
From the library of: Superior Sewing Machine & Supply LLC

<Hoop feed mode>
H 0 0 P F E E D
<Stitch by stitch mode>
S T A R T
In the sewing (function selection) mode
1. Press the <HOOP FEED> key to feed hoop.
Function
To move hoop to hoop feed point, set in
hoop feed mode
Press it again to return hoop to place it
was before and return to sewing mode
or suspension mode.
To interrupt hoop feeding motion
Press <HOOP FEED> key to restart.
Stitch by stitch sewing is done during suspension.
1. Press the <EMERGENCY> key to suspend during sewing.
2. Press the <ONE STITCH> key to sew stitch by stitch.
3. After stitch by stitch sewing, press the <START>key to restart the sewing.
-139-From the library of: Superior Sewing Machine & Supply LLC

S T A R T
After the sewing start
Store the AB. Press the <END> key to return to the main menu.
1. Press the <START >key to start sewing.
2. Set the sewing start point using the jog keys.
Thread breakage detector
Thread trimming
Stitch by stitch sewing
Hoop feed
Test sewing
point setting, these f-----+-~ Start functions are available. L ____________ _j
Needle bar setting
Needle bar selecting
End
-140-From the library of: Superior Sewing Machine & Supply LLC

<Test sewing>
To confirm the size and position of embroidery before sewing.
I ~xo1l Test Sewing for A B
1. Press the <*>key to select test sewing.
"AB" is displayed and test sewing begins. The carriage moves along the mask line of A.
When the test sewing of A finishes, "A" will disappear from
display. Then the carriage moves along the mask line of B.
After test sewing, the needle returns to the sewing start point.
The display goes back to the sewing mode.
-141-From the library of: Superior Sewing Machine & Supply LLC

Press the <START> key to sew the stored letters. Press the< END> key to return to the main menu. Select [EDIT] to edit the stored letters. [NOTEl] In test sewing, only carriage moves, not needles. [NOTE2] Press the <EMERGENCY> keytostoptestsewing.
Order of test stitches for AB
Sewing start point
<Changing sewing start point after test sewing>
1. Re-set the sewing start point using the jog keys.
2. Do the test sewing again. If the position is correct, press the <START> key to begin sewing.
-142-From the library of: Superior Sewing Machine & Supply LLC

<Needle bar setting>
Sewing 6-color-pattern that includes 5 color changes
(Needle number C})@@C§J(Qlr~ are used in this pattern.)
Color order
Needle number
1. Press the< NEEDLE SET> key.
2. Select the first digit of the needle bar number (NBN) 01 in the second row using the< El > key.
3. Press the < 1 > key.
4. The "3" is replaced with the "1". Now the needle bar number01 is set to 1.
5. Press the < E1 > key to scroll letter. The "1" disappears and the next number "1" is on the cursor now.
6. Press the < 3 > key. During setting, the needle bar number corresponding with the color order is always displayed on the left end.
[NOTE] In case that the set needle bar number is the same as the one which was set directly before, a pause is automatically set between them.
-143-From the library of: Superior Sewing Machine & Supply LLC

E N D
Continue setting needle bar number corresponding to the color order.
7. After setting, press the <END> key.
[NOTE1] Color change is also set in the entry mode using the color change mark"*"· In this case, changes can only be made by each letter, symbol or pattern and color cannot be changed during sewing one letter, symbol or pattern.
[NOTE2] Enter color change mark"*" using<*> key in the alphabet mode. Enter color change using <2·A> in the code entry mode. In both cases a"*" stands for a color change.
-144-From the library of: Superior Sewing Machine & Supply LLC

Setting a pause (suspension mark) after color change
"'"'~',.''1 (In case of setting a pause (suspension mark) after color change(*) of A*B.)
ENTER
E N D
Store the A* B. Press the <NEEDLE SET> key in the sewing (function selection) mode.
1. Select color order (CCN) 2 using the jog key< E1 >.
2. Press the <ENTER >key to set a pause. The "S" will be displayed after the color order.
[NOTE 1] Press the <ENTER> key again to rei ease the pause. The "S" will disappear.
[NOTE2] Pressing the <ENTER> key switches from set to release and vise versa.
3. Press the <END> key after setting.
After the pause setting above, when the sewing is restarted, the machine sews the A then the needle bar changes automatically (color change), then suspends before sewing the B.
-145-From the library of: Superior Sewing Machine & Supply LLC

<Needle bar selecting>
After data entry, any needle bar can be selected in sewing (function selection) mode. During suspension, any needle bar can be selected. This function simply moves the needle bar case.
[ When using after data entry
NUMERIC KEYS
E N 0
1. Press the< NEEDLE SELECT> key.
2. Enter the number of the required needle bar to move the needle bar.
[NOTE] Beware of needle bar case movement when entering the number.
The number of the moved needle bar is displayed.
3. Press the <END > key after setting. The machine will return to sewing (function selection) mode. At this time the needle bar will not move. Needle bar number in the display indicates the original needle bar.
When using during suspension
Follow the same procedure as above. After pressing the <END> key, press the <START> key to start sewing. The original needle bar returns to its position and sewing begins. Press the <AC> key to cancel the sewing.
-146-From the library of: Superior Sewing Machine & Supply LLC

<Bobbin thread counter and thread breakage detector>
Bobbin thread counter: After each completion or cancellation of sewing, the counter number is subtracted. The machine can be set so that a notice will be given if sewing is started after the counter number became 0. The counter number can be set from 0 to 99. The counter can be set to OFF if you wish. Thread breakage detector: This detector can be set to either ON/OFF. The stitch counter: This counter is useful in keeping track of sewing machine operation frequency, etc.
1. Press the<THREAD SENSOR> key.
2. Using numeric keys, set the bobbin thread counter to 57. Press the<*> key to confirm it.
3. An"*" will be displayed next to "57" when the setting is valid.
4. Press the <THREAD SENSOR> key to switch on and off of the detector. The display does not change, but the thread breakage detector indicator lights when it is ON.
-147-From the library of: Superior Sewing Machine & Supply LLC

E N D
5. To clear the stitch counter setting to 0, press the <AC> key. Even if the power switch of the sewing machine is turned off, the stitch counter memorizes the previous number and keeps adding the number until the <AC> key is pressed.
6. After setting the counter number, press the <END> key. The display will return to the sewing (function selection) mode.
-148-From the library of: Superior Sewing Machine & Supply LLC

V COMMUNICATION
The machine can receive the embroidery data from a paper tape reader or editing system through a communication line.
Select [COMMUNICATE] in the main menu.
COMMUNICATE 1. Press the <COMMUNICATE> key.
2. Press the< 1 >key to read data from the paper tape. Press the <2 > key to read data from the editing system.
[NOTE1] [NOTE2]
Only one pattern's data can be received through a communication line. In case some data is already stored, the message shown below is displayed.
E N D
To leave the stored data and return to the main menu
• ~' 0"
;:'"·
To clear stored data
1. Press the< END> key to leave the stored data and return to the main menu.
2. Press the <CLEAR> key to clear the stored data and receive new data.
-149-From the library of: Superior Sewing Machine & Supply LLC

<Receiving data from paper tape reader>
ENTER
E N D
1. Press the< 1 > key to select <D PTR (paper tape reader).
2. Tape type is displayed on the screen.
*
I TAJIMA I
I BARUDAN
I ZANGS I
Select one of them using the <[I]> and < [jJ > keys.
Prepare the paper tape and the paper tape reader referring to page 156.
3. Press the <ENTER> key to begin.
4. After this message is displayed, press the <END> key.
5. The machine returns to the main menu.
[NOTE] This machine cannot manage a multi-volume file (one pattern's data that separates into more than one volume). lfthat is the case, use the editing system.
-150-From the library of: Superior Sewing Machine & Supply LLC

<ERROR MESSAGES when receiving data from paper tape reader>
E N D
ENTER
(CAUSE) CD Communication cable breakage during receiving. ~ Paper tape breakage @ Paper tape reader is turned off. @ Improper baud rate (refer to the [NOTE 4] on page 156).
(CAUSE) CD Poor connection between the paper tape reader and the
machine. ® Paper tape reader is turned off. @ Communication cable breakage
Press the <END > key to clear the messages above.
Through the paper tape. Press the <ENTER> key to re-start.
-151-From the library of: Superior Sewing Machine & Supply LLC

<Receiving data from Editing system>
1. Press the <2> key to select ®Edit-Sy (editing system).
2. Type the file name (within 8 characters) for reading with the numeric keys.
3. Press the <ENTER> key to begin.
4. After reading is completed, press the <END> key.
5. The machine returns to the main menu.
-152-From the library of: Superior Sewing Machine & Supply LLC
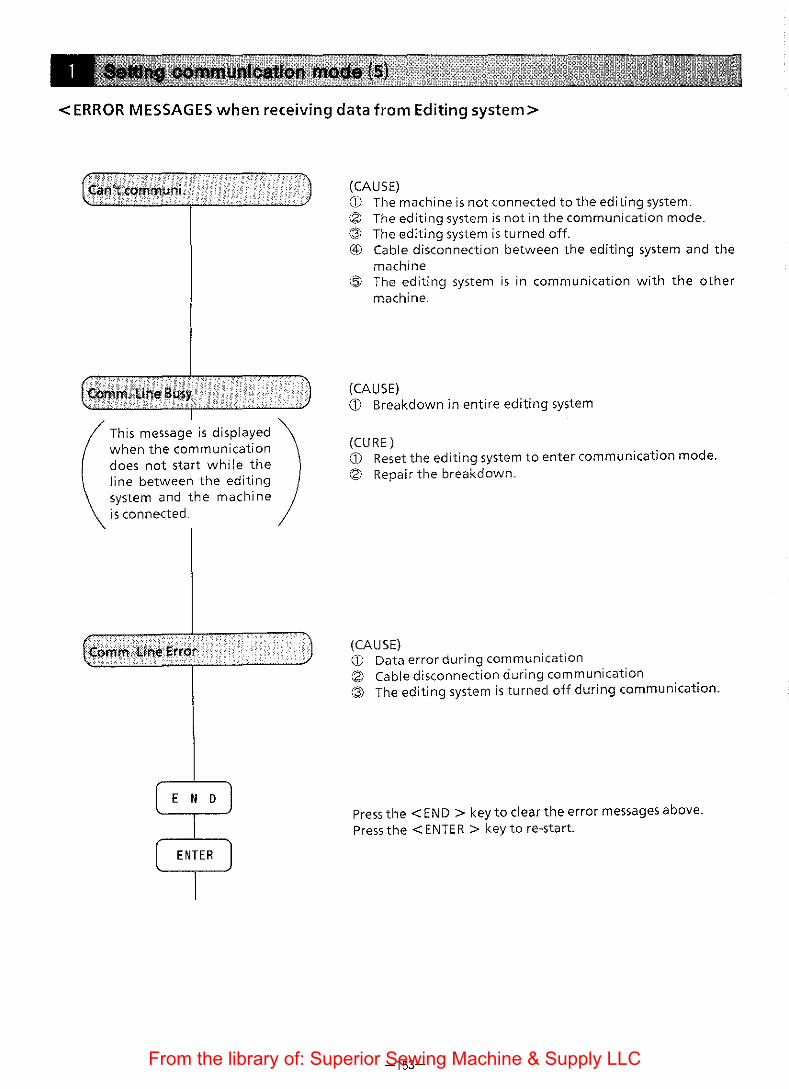
<ERROR MESSAGES when receiving data from Editing system>
This message is displayed when the communication does not start while the line between the editing system and the machine is connected.
~ [ ENTER l
(CAUSE) CD The machine is not connected to the editing system. @ The editing system is not in the communication mode. @ The editing system is turned off. ® Cable disconnection between the editing system and the
machine C5> The editing system is in communication with the other
machine.
(CAUSE) CD Breakdown in entire editing system
(CURE) CD Reset the editing system to enter communication mode. ® Repair the breakdown.
(CAUSE) CD Data error during communication ® Cable disconnection during communication @ The editing system is turned off during communication.
Press the <END > key to clear the error messages above. Press the <ENTER > key to re-start.
-153-From the library of: Superior Sewing Machine & Supply LLC

<Connecting cable with machine>
1. Remove the four nylatches 0 and the main PCB cover @.
2. Connect the connector (either of the two may be used) of the RS cable assembly €) (optional) with the connector @ of the RS plug circuit board Q_ Secure with the two screws @.
3. Put the cord of the RS cable assembly €) to the cord clamp 6. Attach the main PCB cover@ with four nylatches 0.
[NOTE] Make sure that the cord comes out through the recess of the cover@.
-154-From the library of: Superior Sewing Machine & Supply LLC
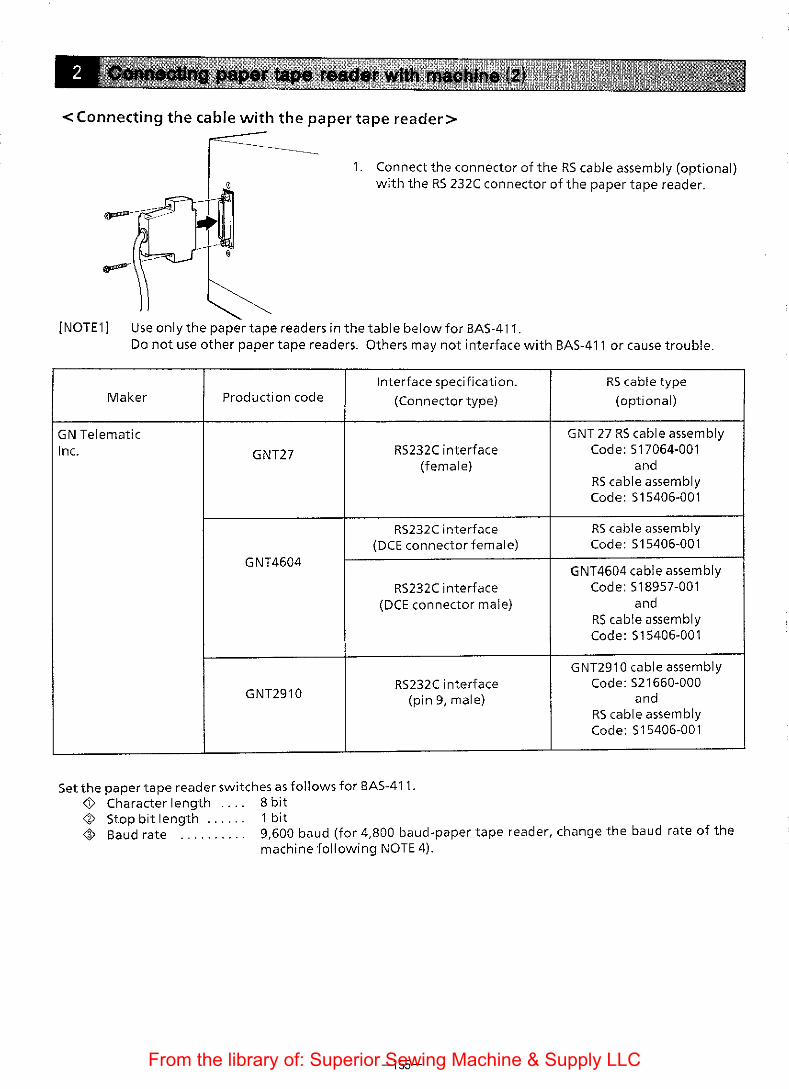
<Connecting the cable with the paper tape reader>
~···· ... 1. Connect the connector of the R5 cable assembly (optional)
with the R5 232C connector of the paper tape reader.
---[NOTE1] Use only the paper tape readers in the table below for BAS-411.
Do not use other paper tape readers. Others may not interface with BA5-411 or cause trouble.
Interface specification. Maker Production code (Connector type)
GN Telematic Inc. GNT27 R5232C interface
(female)
R5232C interface (DCE connector female)
GNT4604
R5232C interface (DCE connector male)
RS232C interface GNT2910 (pin 9, male)
Set the paper tape reader switches as follows for BAS-411. <!> Character length 8 bit
RS cable type
(optional)
GNT 27 RS cable assembly Code: 517064-001
and RS cable assembly Code: 515406-001
RS cable assembly Code: 515406-001
GNT4604 cable assembly Code: 518957-001
and R5 cable assembly Code: 515406-001
GNT2910 cable assembly Code: 521660-000
and RS cable assembly Code: 515406-001
¢ Stop bit length . . . . . . 1 bit ¢ Baud rate . . . . . . . . . . 9,600 baud (for 4,800 baud-paper tape reader, change the baud rate of the
machine following NOTE 4).
-155-From the library of: Superior Sewing Machine & Supply LLC

* Among paper tape readers that can be connected with the BAS-411, BROTHER deals in the following paper tape reader as an option. (Contact Brother's shop for detai Is.)
maker type name part code Vol. Spec.
GN telematic Inc. GNT27 GNT27-100V s 18444-000 AC120V- area or 240V-area
assembly AC220- 240V-area (in Europe)
[NOTE2] When you purchase above paper tape reader GNT27; GNT27RS cable assembly (517064-001) comes with it.
[NOTE3] The above three switches (Brother options) on the paper tape reader 0 <%> 4> are already set at shipping.
[NOTE4] Of the set points 0, <%>and 4>, only 4> (baud rate) can be changed on the machine using the <*>key in the tape reading mode.
Press the < 1 > key to set 9,600 baud. Press the <2 > key to set 4,800 baud.
This set point will be retained until the machine is turned off. Once the machine is turned off, the set point returns to 9,600 baud.
<Operating and preparing paper tape reader>
• Prepare the machine. (Turn on the power and select" paper tape" in communication mode.)
[GNT27) 1) Turn on the power.
2) Thread the paper tape to the paper tape reader. (1) For GNT27:
Turn the "READ" button ON (indicator lights). (2) For GNT4604:
Turn the "READER" button ON and set the mode switch on the operation panel to "LINE".
(3) For NPR-5200: Turn the "LINE" button ON (indicator lights).
(4) ForGNT2910: Turn the power switch ON.
Paper D button 3) Now that the paper tape reader is ready:
tape Press the <ENTER> key of the machine to begin.
-156-From the library of: Superior Sewing Machine & Supply LLC

The Editing System is basically a software program. To use it, the following hardware is required.
Hardware (j) IBM Personal Computer AT or PC-AT compatible with:
• 640KB of available memory • hard disk (capacity 20MB or larger) • appropriate keyboard • VGA or EGA display or equivalent • one or two 3.5-i nch floppy disk d rive(s) and the following interface units: •VGA or EGA video adapter • printer interface (14-pin connecter)
® MicroSoft mouse or equivalent
• mouse interface (compatible with®, below) • RS-232C interface (9-pin connecter)
• Use of a math coprocessor will increase the processing speed. • For operation of the editing system, refer to the" Instruction manual for the editing system".
-157-From the library of: Superior Sewing Machine & Supply LLC

VII OTHER
The following will occur when enlarging characters and patterns on the BAS-411.
Example: If the letter "0" is enlarged 9.99 times in font No. 1, under picking will continue from the first stitch (stitch length approx. 18 mm), but because the stitch length is too long, stitches will not be properly formed and thread cast-offs may occur. If this happens, sew with the following procedure.
1. "Thread breakage", "Press END-key" will be displayed alternately.
2. Press the <END> key.
3. Return to the stitch before the position at which the thread cast-off occurred with the step-back key, and then press the <EMERGENCY> key and stop the step back operation.
4. Hold the needle thread by hand and press the <ONE STITCH> key.
5. Pull the needle thread out and bring the bobbin thread to the top of the material.
6. Hold the needle and bobbin threads, and then press the <ONE STITCH> key 5-6 times. Cut the needle and bobbin threads held in hand with scissors.
7. Press the <START> key. Continue sewing.
-158-From the library of: Superior Sewing Machine & Supply LLC

Refer to the table below if an error message is displayed. By pressing the <END> key, the message will disappear and the display will return to the previous menu.
·. Mess~g~wh~n .powl'!rj$ • · .. -turo~d9oi ;_ · ·
Keyboard ROM NG.
N Bar stop ERR
Missed X ORG. PT Missed Y ORG. PT
Over travel
Memory Clear
No File
Data ERR.
Disk ERR.
PROM version of key board does not match PROM version of PCB.
Pulley is not in proper position.
Damaged circuit board, sensor defective, cable defective, pulse motor defective, blown fuse.
1. X-Y carriages movement exceeds maximum area.
2. Overtravel sensor is in incorrect position or defective.
3. XY home position sensor is in incorrect position or defective.
4. Damaged circuit board.
Back-up data in the memory disappears.
Inputted data has something wrong.
1. Data is input without inserting floppy disk.
2. While reading data, floppy disk is removed when machine runs in sewing mode.
Change PROM version of key board to matching PROM version of PCB. Contact your dealer.
Turn pulley till needle bar is in proper position.
Contact your dealer.
Turn power off. Move carriages X andY to center of area manually, then turn power on again. If same error message is displayed again, turn power off, then on again while pressing <EMERGENCY> key. (Clearing backup memory.) Contact your dealer.
Press key according to message.
Check file name of data andreenter.
Check where data was made, then contact your dealer.
Insert floppy disk in proper position and re-enter. Do not remove floppy disk from FDD during sewing in this mode.
3. Damaged circuit board, Contact your dealer. defective cable, defective FDD.
-159-From the library of: Superior Sewing Machine & Supply LLC

Can-'t edit Data
T. Length larger
Area Over
Arrangement Err
No inptted Data
Short of Area
* *th Data ERR
**th Memory OVR
Area over
B. Thread empty
Thread breakage
Over load
1. Some of data entered in communication mode has items that cannot edit.
2. Some of data entered in sewing mode while reading data has items that cannot edit.
3. According to editing item, there is item that cannot be set.
Refer to page 57
Entered value exceeds maximum Re-edit data. area (450 mm x 285 mm).
Improper area setting Re-set area or re-edit data.
Value set in arrangement mode Refer to page 83-101 "Arranging." by [Each) is incorrect (ex. spaces --;~ j ~ are inputted) or not all values are inputted. (ex. base line, base point.)
Without sewing data entered, you First, input sewing data, then start try to set machine to sewing mode. sewing.
Improper area setting
Entered data has something wrong.
Too much data, or number of inputted stitches is over inside memory capacity and cannot manage it.
When sewing starts from current needle position, sewing pattern is over the area.
Set sewing times in bobbin thread counter is completed.
1. Needle thread breakage 2. Needle thread is not passed
through the thread sensor spring.
3. Bobbin thread breakage 4. Bobbin thread runs out.
1. Pulley is too tight. 2. Electrical failure
-160-
Re-set area or re-edit data.
Check where data was made, then contact your dealer.
If memory expansion board (optional) is not set, set memory expansion board or decrease input data.
Move hoop to position where message disappears, or widen area.
Re-set sewing times in bobbin thread counter.
Pass thread.
Remove load. Contact your dealer.
From the library of: Superior Sewing Machine & Supply LLC

Communicate ERR.
Edit-Sy. busy
Tape read ERR
N. Case POS. ERR
N. Case locked
1. Paper tape reader or editing Link with exclusive cable. system does not connect with machine by cable.
2. Power of paper tape reader or Turn on power. editing system is not turned on.
3. Editing system does not enter communication mode.
4. Editing system is communicating with another machine.
1. Data error occurs during communicating with editing system.
2. Editing system exits from communication mode while machine is communicating with editing system.
3. Power of editing system is turned off during communicating with editing system.
Editing system is defective, or breakdown.
1. Poor punch of paper tape 2. Paper tape runs short. 3. Dirty head of paper tape
reader 4. Power of paper tape reader is
not turned on. 5. Paper tape type is wrongly
selected. 6. Improper communication baud
rate
1. Needle bar is not set properly. 2. Damaged circuit board
1. Need I e bar case is too tight mechanically, or locked and cannot move.
2. Electrical fai I u re
-161-
Set editing system to communication mode. Wait till communication ends.
Re-communicate.
Set editing system to communication mode, then communicate again.
Turn on power of editing system again, enter communication mode.
Turn on power of editing system again, enter communication mode. Contact your dealer.
Remake paper tape.
Clean head.
Turn on power.
Select proper type to read paper tape. Adjust baud rate.
Position needle bar case properly. Contact your dealer.
Remove load.
Contact your dealer.
From the library of: Superior Sewing Machine & Supply LLC

In case of a malfunction, diagnose the problem referring to the table below. If the problem persists, turn off the power and contact your dealer.
Problem Check point
1. The display is blank, though power is 1 . Is contrast dial properly adjusted>
on.
2. The indicator does not light, though 1. Is floppy disk damaged?
a floppy disk is in disk drive. 2. Is disk drive functioning properly?
3. Thread breakage 1. Is machine properly threaded?
2. Is thread tension too high>
3. Is rotary hook assembly clogged?
4. Is there thread in the bobbin?
5. Is needle bent?
6. Is there a rough edge or flaw on needle plate, rotary hook, or
bobbin case that might cut the thread?
7. Is needle installed correctly?
4. Needle touches embroidery hoop. 1. Is area setting done properly?
2. Is embroidery hoop too small>
5. Bobbin thread cannot be wound.
6. Needle breaks. 1. Is needle direction and height properly adjusted?
2. Is needle bent?
3. Is needle tip blunted?
4. Is timing of needle and rotary hook correct?
5. Is there looseness or play in the needle bar case?
When there is play in the needle bar case
~ I I collar
I 1...... cam shaft
~ r-l\\\ r,~ : ~ ~ ~ Adjust collar when there is looseness of cam shaft in needle
bar flip-up mechanism.
6. Is rotary hook holder properly attached so that rotary hook
does not rotate?
7. Monograms are not sewn properly. 1 . Is material edge caught in the machine?
(Are embroidery hoop and other related parts operating
correctly?)
2. Is material stretched properly?
3. Is thread tension proper?
-162-From the library of: Superior Sewing Machine & Supply LLC

Problem
8. Machine operates incorrectly.
9. Upper shaft is locked at some point
of a cycle.
Check point
1. Is set sere'" of rotary encoder loosened?
2. Is set screw of machine pulley loosened?
3. Is set screw of N65 pulley loosened?
4. Is synchronizer adjusted properly?
5. Are wires of carriages X andY off?
6. Are set screws of wire drums X andY loosened?
7. Are set screws of pinion gears in pulse motors X andY
loosened?
8. Is sewing data in floppy disk normal?
1. Is movable knife for thread trimming stopped in middle of
operation?
[How to adjust]
Remove thread or other interruption for correct thread
trimming operation.
Remove needle plate and reset it in proper position
manually as in the figure below.
movable knife 1mm
[NOTE] When movable knife is in middle of operation, the
safety system works so that the upper shaft cannot
rotate.
2. Is thread take-up stopped with striking upper case cover?
[How to adjust]
thread take-up
needle bar case
inner thread guide thread take-up operating lever
Loosen the bolt of the thread take-up operating lever to
adjust movable range of thread take-up, then re-tighten it.
3 Is position of needle bar clamp or stopper correct?
-163-From the library of: Superior Sewing Machine & Supply LLC

Problem Check point
10. Upper shaft does not turn. 1. Is thread tangled in rotary hook?
[How to adjust!
Remove rotary hook and see whether upper shaft rotates or
not.
If thread is tangled, turn upper shaft by force to trim thread
or remove rotary hook and thread.
11. Stitch cannot be made. 1. Is needle attached properly?
2. Is timing of needle and rotary hook correct?
12. When the power is turned on, the
hoop moves till the hoop is over the Turn off the power, then turn on the power again while pressing
sewing area. the emergency button.
13. When sewing is resumed in restart When there is a problem even if this is done, contact your dealer.
mode, the hoop moves till the hoop
is over the area.
14. Thread breakage detector functions Is thread breakage detect stud operation normal?
and machine stops although thread (Is spring tension proper?)
breakage does not occur.
-164-From the library of: Superior Sewing Machine & Supply LLC

Following is displayed when trying to read sewing data from a floppy disk while the floppy disk is inserted into the floppy disk drive.
(j) "Disk ERR." is displayed. ® "Data ERR." is displayed. @ "Reading" is displayed and remains.
When another floppy disk is inserted, reading and sewing can be performed normally. The floppy disk drive may not be defective, but it is not clear what is wrong.
[Cause and solution]
(1) Floppy disk has not been previously defective. If it occurs on the floppy disk which was able to use normally before, the floppy disk may be defective. (Repairing is impossible.) Carefully deal with floppy disk. And for security, back up data on other storage medium, like personal computer, punching machine and so on.
(2) The floppy disk was originally defective. If it occurs at a first-time use, the floppy disk may be originally defective. Consult with shop you bought it or its maker.
(3) Following floppy disk cannot be used in BAS-411 even though it can be used in other embroidery machine. When 3.5" 2HD floppy disk was made in 2DD format. When 3.5" 2DD floppy disk was made in 2HD format.
If your problem does not come under case (1), (2) or (3), please consult with Brother's shop.
-165-From the library of: Superior Sewing Machine & Supply LLC

f2lD 1 ~ 2 ll!liD 3 ll!liD 4 f2lD 5 ~ 6 ~ 7 ll!liD 8
ON
I -oN -sw
At shipping, a!! switches are
set to OFF.
By switching the DIP switch on, the total length of a pattern or the set sewing area can be specified in inches.
Display in inches
Example 1 Area
Example 2 Total length
Example 3 To set and confirm hoop feed point
-166-
This indicates that the vertical length is 10.10 inches ( = 257mm) and the horizontal length is 15.30 inches ( = 389mm).
When setting the total length: the data is in 4 digits, the minimum unit being 0.01 inches.
From the library of: Superior Sewing Machine & Supply LLC

Example entry
When setting the vertical length for 3.5 inches and the horizontal length for 10 inches:
Vertical Press numeric keys
Horizontal
Press numeric keys
Enter degits in order from left to right.
[NOTE] In using inches, errors within 0.254mm should be tolerated, for the minimum unit is 0.01 inches.
0
0
In using millimeters, errors within 1 mm should be tolerated, for the minimum unit is 1 mm.
(When actually in the entry mode, switching to the next mode is done by pressing the
PATTERN key.)
SW2= ON Pattern mode is displayed first.
I I • ·I Code mode Pattern mode Alphabet key I mode
SW2= OFF Alphabet key mode is displayed first.
Alphabetkey I Code mode I • l Pattern mode I mode
-167-From the library of: Superior Sewing Machine & Supply LLC

0
0
0
'
'
'
SW3= ON
When the entered data is one pattern, the needle location will be the sewing start point (the first
stitch).
In this case, the area check and the test feed function are not available.
In entry mode or when the entered data is two patterns or more, the sewing start point will be the
same as when the SW3 is OFF. SW3 =OFF
The sewing start point is selected by the centering function.
SW4= ON
Thread trimming will not be done between characters. (Cross-over stitch is possible.) SW4=0FF Thread trimming will be automatically done between characters. (Cross-over stitch is not possible.)
SW5= ON Even if another floppy disk is inserted during data reading or sewing of a character (pattern), machine will continue reading or sewing until it is done. SW5=0FF If another floppy disk is inserted during data reading or sewing of a pattern (character), machine will stop operation at that point.
[NOTE] Do not take out the floppy disk from the disk drive during data reading or sewing. It may cause errors or hinder correct sewing.
-168-From the library of: Superior Sewing Machine & Supply LLC

[NOTE] The parts indicated by the* symbol in the parts code column are standard parts.
IIJ Holder base
To embroider plain material. 00 00
~ ~ """
0- ~ FRAME HOLDER BASE ASSEMBLY
0 0 * S16128-001 0 0 .
axb
PLASTIC SQUARE FRAME WITH ---- 445 X 195 s 15654-001 ARMS SPF A-45 x 23
~~[ J Jp PLASTIC SQUARE FRAME WITH 445 X 240 s 15658-001 ARMS SPF A-45 x 27
-------- . -
* PLASTIC SQUARE FRAME WITH s 156S4-001 445 X 290 s 15660-001 ARMS SPF A-45 x 32
0 0 00 00 00
0 0 " 0 0 ~ ~ 0 0
/~ 0 0
Sl6129-001
axb
PLASTIC SQUARE FRAME WITH 0200 s 15642-001
ARMS SPF A-21
q~.YjP PLASTIC SQUARE FRAME WITH
0240 515646-001 ARMS SPF A-25
s 15642-001
PLASTIC SQUARE FRAME WITH =ffiP 226 X 226 s 15650-001 ARMS SPF A-24 x 24
s 15650-001
-169-
-. From the library of: Superior Sewing Machine & Supply LLC

~ Spider net frames
The two spider net frames can be set to the frame holder base. When repeat sewing is horizontally performed twice, input "L" mm space. Sewing can be repeatedly performed. (Refer to page 119.)
0 o FRAME HOLDER BASE ASSEMBLY
0 0
SPIDER NET FRAME HOLDER PFH2-2
S15612-000
550
527
{/ )!( ~ 0
~ /) ~
s 16128-001
SPIDER NET FRAME 0223 s 15613-000 SPFH-07
"~ Dp PLASTIC ROUND 062 s 15618-000 FRAME SPF-07
~1Dp SPIDER NET FRAME 0223 s 15614-000 SPFH-09
~
PLASTIC ROUND 082 s 15619-000 FRAME SPF-09 223
s 15613-000 SPIDER NET FRAME 0223 s 15615-000 SPFH-12
PLASTIC ROUND 0112 s 15620-000 FRAME SPF-12
SPIDER NET FRAME 0223 S15616-000 SPFH-15
E~ PLASTIC ROUND 0140 s 15621-000 FRAME SPF-15
SPIDER NET FRAME 0223 S15617-000 SPFH-18
PLASTIC ROUND 0170 515622-000 FRAME SPF-18 s 15618-000
-170-From the library of: Superior Sewing Machine & Supply LLC

@] Tubular frame
I ' ' I By removing the table plate and using the ' ' ' 0000 cooo cylinder bed, embroidery for tubular materials
'
!
can be done effortlessly. ' It is convenient when embroidering on sleeves I I
0 ' and the body of ready made clothing or on the 0
' 0
tJ 0
back of round-neck shirt. '
{/ ,, ft== U 1 I 1\ 1\ l/1
'\. ... --- ./:' I 0 ~--:::.- -::_"";:..~ I 0
' ).
~ ---\, «jl>
-~
_ __j
---1 '
/~-. - .. . . . :C:1'[:·, I .. ·· .
I /if '\\ I \~ '.'
0
' ' ' : ' ' 1-----~
'~ ' ' 0
: ' .-;. ' . -'
' ' ' ' 'oo~o oooo'
:
I
axb·
TUBULAR FRAME HOLDER BASE TUBULAR ROUND FRAME 058 s 15623-000 ASSEMBLY WITH ARMS TFA-07
S15353-001 078 TUBULAR ROUND FRAME s 15624-000
WITH ARMS TFA-09 f~~ (,0,!) ~~ oooo oooo TUBULAR ROUND FRAME 0108 s 15625-000
WITH ARMS TFA-12
TUBULAR ROUND FRAME 0136 S15626-000 WITH ARMS TFA-15 515623-000
0 0
TUBULAR SQUARE 226 X 226 S15627-000 FRAME WITH ARMS TFA-24 X 24 v '\
0
0
0
TUBULAR SQUARE "j 237 X 308 s 15628-000 FRAME WITH ARMS TFA-24x 30
515628-000
-171-From the library of: Superior Sewing Machine & Supply LLC

[!] Cap frame device
[§! Boring attachment
-172-
Embroidery for ready made cap can be done finely_
Boring embroidery for blouses and tablecloth can be done beautifully.
From the library of: Superior Sewing Machine & Supply LLC

[§] Name frame
HOOP (A) ASSEMBLY
100 X 100
509843-201
HOOP (B) ASSEMBLY
65 X 65
S09844-201
HOOP (C) ASSEMBLY
30 X 30
S09845-201
HOOP (D) ASSEMBLY
35 x65
S09846-201
HOOP (E) ASSEMBLY
65 x35
509847-201
MAGNET CLAMP
70x 90
509848-001
HOOP 3 x 6ASSEMBLY
50 X 100
157340-101
NAME FRAME A55EMLBY 520821-001
Embroidery of names can be done effortlessly.
-173-From the library of: Superior Sewing Machine & Supply LLC

W ML 651 lamp set (515378-001)
IZl Marking light (521 076-000)
-174-From the library of: Superior Sewing Machine & Supply LLC

@] Memory expansion board (518788-001/ circuit board 8439064 assembly)
~ Cap frame device (521 069-001)
-175-From the library of: Superior Sewing Machine & Supply LLC

~ Paper tape reader (518444-000)
GNT 27 RS cable assembly (S 17064-001) RS cable assembly (515406-001)
liD Boring attachment (521 061-001)
* Various kinds of optional parts are available besides the ones I isted here. Contact your dealer for more information.
-176-From the library of: Superior Sewing Machine & Supply LLC

BROTHER INDUSTRIES, LTD. NAGOYA. JAPAN
i~ I -411 192411-00: 1991 06. I
Pnnt~d .n • From the library of: Superior Sewing Machine & Supply LLC