Embed Size (px)
Citation preview

EURO IV

FOREWORDWelcome to the Royal Enfield family.The Royal Enfield motorcycles are being manufactured by us since 1955 with state of the art technology, while taking care tomaintain the traditional Classic looks.The Himalayan EFI that you have just bought, confirms to all applicable European homologation regulations pertainingto EURO IV.This manual will help to acquaint yourself with the important aspects of operation, care and minor maintenance of your newRoyal Enfield Motorcycle. We recommend that you read this manual carefully, before using the motorcycle, to get maximumperformance and to maintain your Motorcycle in top riding condition.We have also detailed, vital safety information for the rider and for the care and safety of the motorcycle. Please read and followthese carefully to get maximum riding pleasure and for safe riding.We request you to exercise utmost caution while riding. Please ride cautiously, safely and within the law. Always wear a helmet,good riding goggles and proper riding clothes while riding the motorcycle. Please also insist and ensure that your pillion alsofollows these while riding with you.Log on to the exciting world of Royal Enfield website : www.royalenfield.com to get to know more about the company, itsproducts and exciting news from time to time.We wish you many years of riding pleasure with your Royal Enfield motorcycle.Royal Enfield teamChennai, India.
2
NOTICEAll information in this manual is based on the latest product information available at the time of publication. Due tocontinuous improvements, there may be discrepancies between the information in this manual and your motorcycle.Royal Enfield reserves the right to make production changes at any time without prior notice and without incurring anyobligation to make the same or similar changes to motorcycles previously built or sold.
All images shown are for reference to explain and need not to be exactly the same on the model you own. Technicalspecifications are subject to change without prior notice.
“© Copyright 2017 Royal Enfield (A unit of Eicher Motors Ltd.). All Rights Reserved. No part of this manual shall be copied,distributed or otherwise dealt without the express permission in writing of Royal Enfield”.
3Part No. 1017081/A / Qty. 250 / Aug. ‘17
Disclaimer
1. Wash the motorcycle only with plain water. Do not use any cleaning agents or detergents, especially on paintedsurfaces, as it will cause discoloration and damage to the paint.
2. Do not polish your motorcycle as it will increase the gloss level and damage the paint.
3. Scratches or marks on painted / plastic surfaces cannot be removed OR touched up.
4. Warranty is not applicable for discoloration of the Silencer & Exhaust pipe, as it is a natural process that will happenduring usage.
NOTICE
4
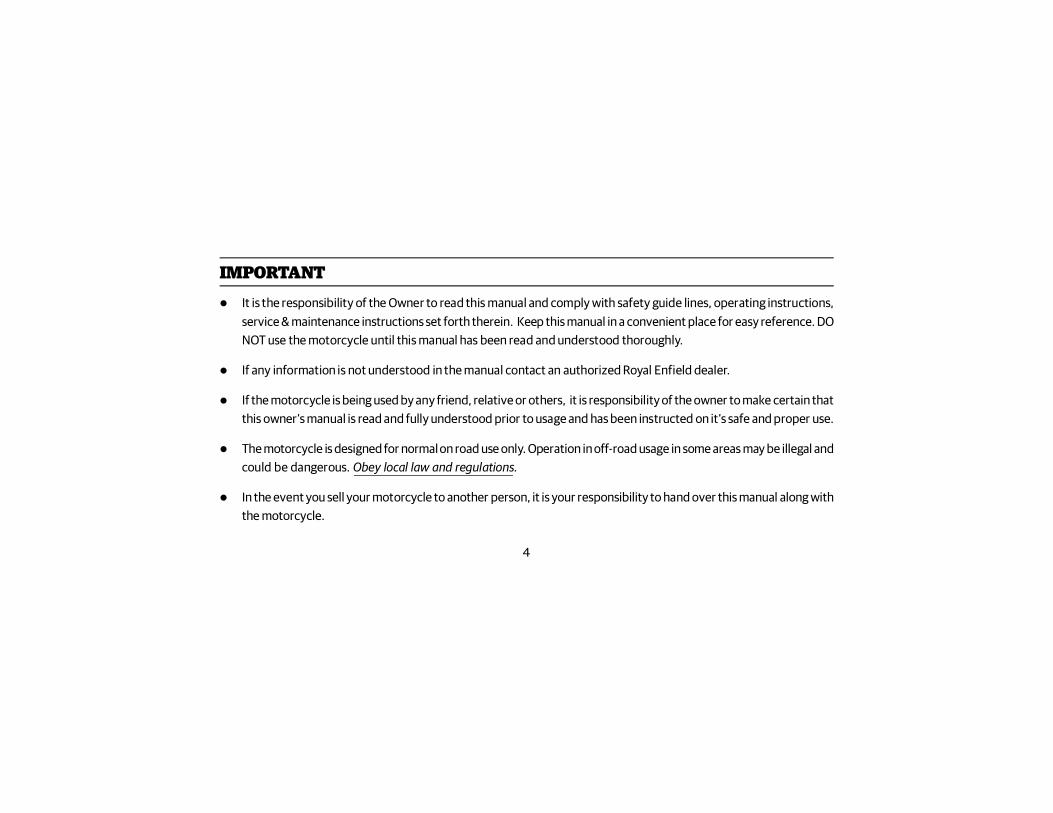
IMPORTANT It is the responsibility of the Owner to read this manual and comply with safety guide lines, operating instructions,
service & maintenance instructions set forth therein. Keep this manual in a convenient place for easy reference. DONOT use the motorcycle until this manual has been read and understood thoroughly.
If any information is not understood in the manual contact an authorized Royal Enfield dealer.
If the motorcycle is being used by any friend, relative or others, it is responsibility of the owner to make certain thatthis owner’s manual is read and fully understood prior to usage and has been instructed on it’s safe and proper use.
The motorcycle is designed for normal on road use only. Operation in off-road usage in some areas may be illegal andcould be dangerous. Obey local law and regulations.
In the event you sell your motorcycle to another person, it is your responsibility to hand over this manual along withthe motorcycle.
5
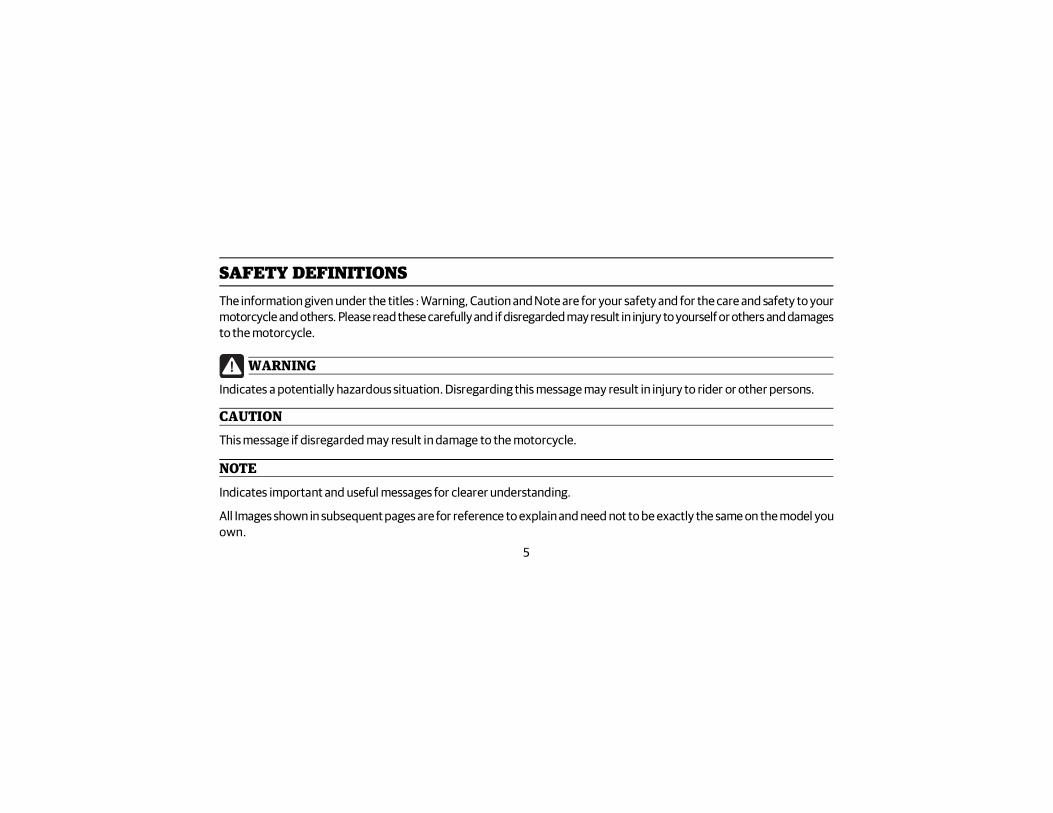
The information given under the titles : Warning, Caution and Note are for your safety and for the care and safety to yourmotorcycle and others. Please read these carefully and if disregarded may result in injury to yourself or others and damagesto the motorcycle.
WARNINGIndicates a potentially hazardous situation. Disregarding this message may result in injury to rider or other persons.
CAUTIONThis message if disregarded may result in damage to the motorcycle.
NOTEIndicates important and useful messages for clearer understanding.
All Images shown in subsequent pages are for reference to explain and need not to be exactly the same on the model youown.
SAFETY DEFINITIONS
6
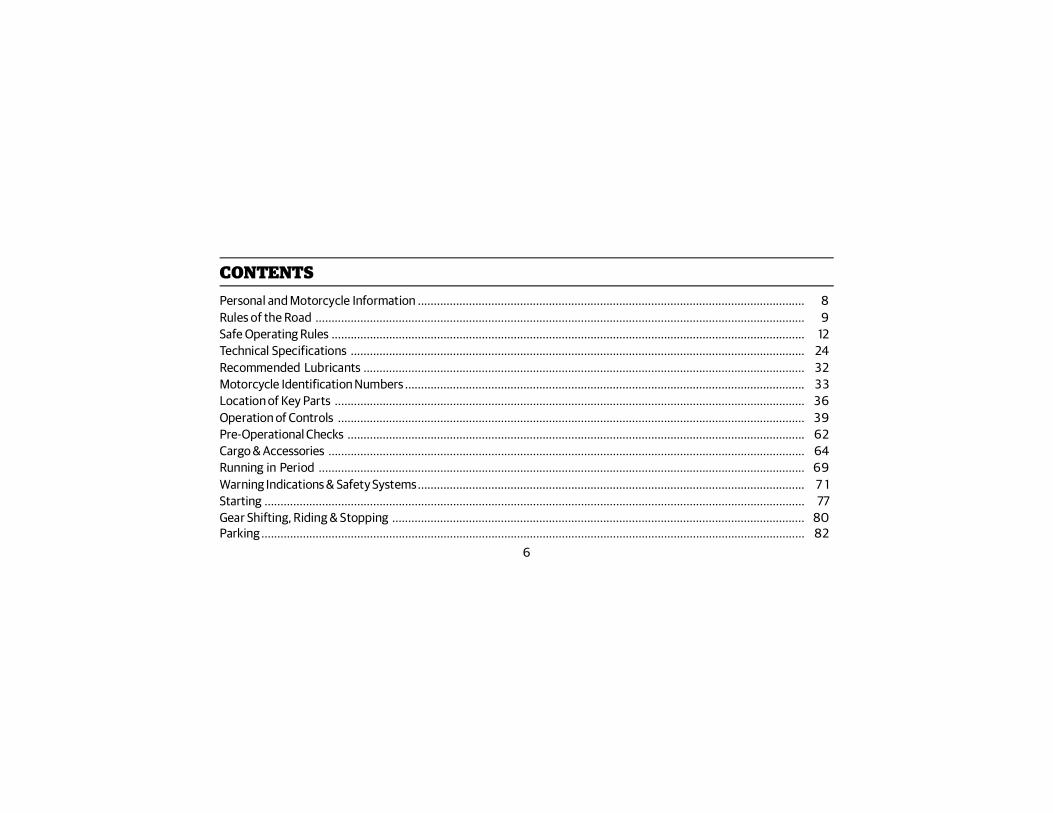
CONTENTSPersonal and Motorcycle Information ......................................................................................................................... 8Rules of the Road ......................................................................................................................................................... 9Safe Operating Rules .................................................................................................................................................... 12Technical Specifications .............................................................................................................................................. 24Recommended Lubricants .......................................................................................................................................... 32Motorcycle Identification Numbers ............................................................................................................................. 33Location of Key Parts ................................................................................................................................................... 36Operation of Controls .................................................................................................................................................. 39Pre-Operational Checks ............................................................................................................................................... 62Cargo & Accessories ..................................................................................................................................................... 64Running in Period ........................................................................................................................................................ 69Warning Indications & Safety Systems......................................................................................................................... 7 1Starting ......................................................................................................................................................................... 77Gear Shifting, Riding & Stopping ................................................................................................................................. 80Parking .......................................................................................................................................................................... 82

7
CONTENTSPeriodical Maintenance Chart ...................................................................................................................................... 84Tools kit ........................................................................................................................................................................ 90Minor Maintenance Tips .............................................................................................................................................. 91Long Trip Precautions .................................................................................................................................................. 116Shock Absorber ............................................................................................................................................................ 118Off Roading .................................................................................................................................................................. 119Washing Procedure ...................................................................................................................................................... 121Storage Precautions ..................................................................................................................................................... 125Wiring Diagram ............................................................................................................................................................ 126ABS Wiring Diagram ..................................................................................................................................................... 128Trouble Shooting .......................................................................................................................................................... 129Warranty Terms & Conditions ...................................................................................................................................... 133Evaporative Emission Control System Warranty ......................................................................................................... 137Service Maintenance Record ....................................................................................................................................... 139Notes ............................................................................................................................................................................ 143
8
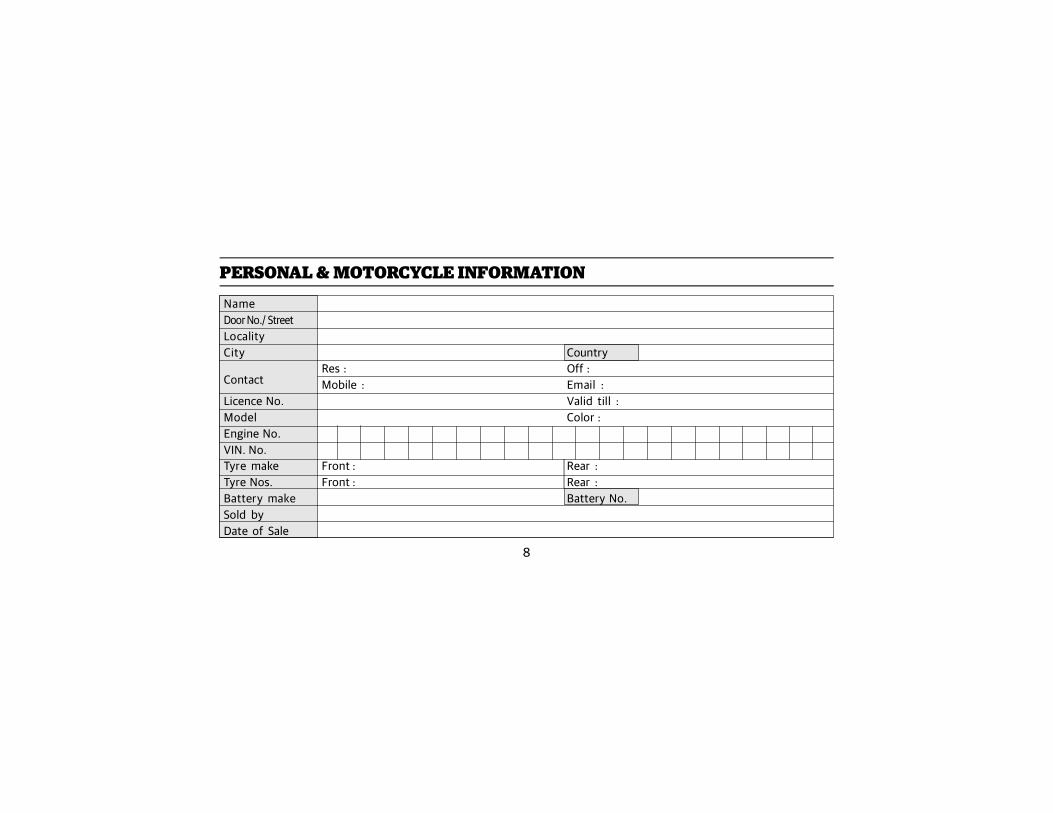
PERSONAL & MOTORCYCLE INFORMATION
NameDoor No./ StreetLocalityCity Country
ContactRes : Off :Mobile : Email :
Licence No. Valid till :Model Color :Engine No.VIN. No.Tyre make Front : Rear :Tyre Nos. Front : Rear :Battery make Battery No.Sold byDate of Sale
9
RULES OF THE ROAD Be sure your number plate is installed in the position specified by law and is clearly visible at all times.
Ride at a safe speed that is consistent with the type of road surface you are on. Pay strict attention to whether thesurface is :
Dry
Oily
Icy
Wet
Watch for loose debris, slippery substances or loose gravel that can hamper the stability of your vehicle.
DO NOT exceed the legal speed limit or drive too fast for existing conditions. Always reduce speed when poor drivingconditions exist. High speed increases the influence of any other condition affecting stability and increases thepossibility of loss of control.
Keep to the correct side of the road center line when meeting oncoming vehicle.
10
Always sound your horn, actuate your turn signals, and exercise caution when passing other vehicles going in thesame direction. Never try to pass another vehicle going in the same direction at street intersections, on curves, orwhen going up/or down a hill.
At street intersection give the right-of-way to the vehicle on your left or right. DO NOT presume you have the right-of-way.
Always signal when preparing to stop, turn or pass. While turning either right or left, watch for pedestrians, animals, as well as vehicles. All traffic signs, including manual controls at intersections, should be obeyed promptly. SLOW
DOWN at traffic signs near schools and CAUTION signs at railroad crossings. When intending to turn, signal at least 100 feet (30.5 meters) before reaching the turning. Be close
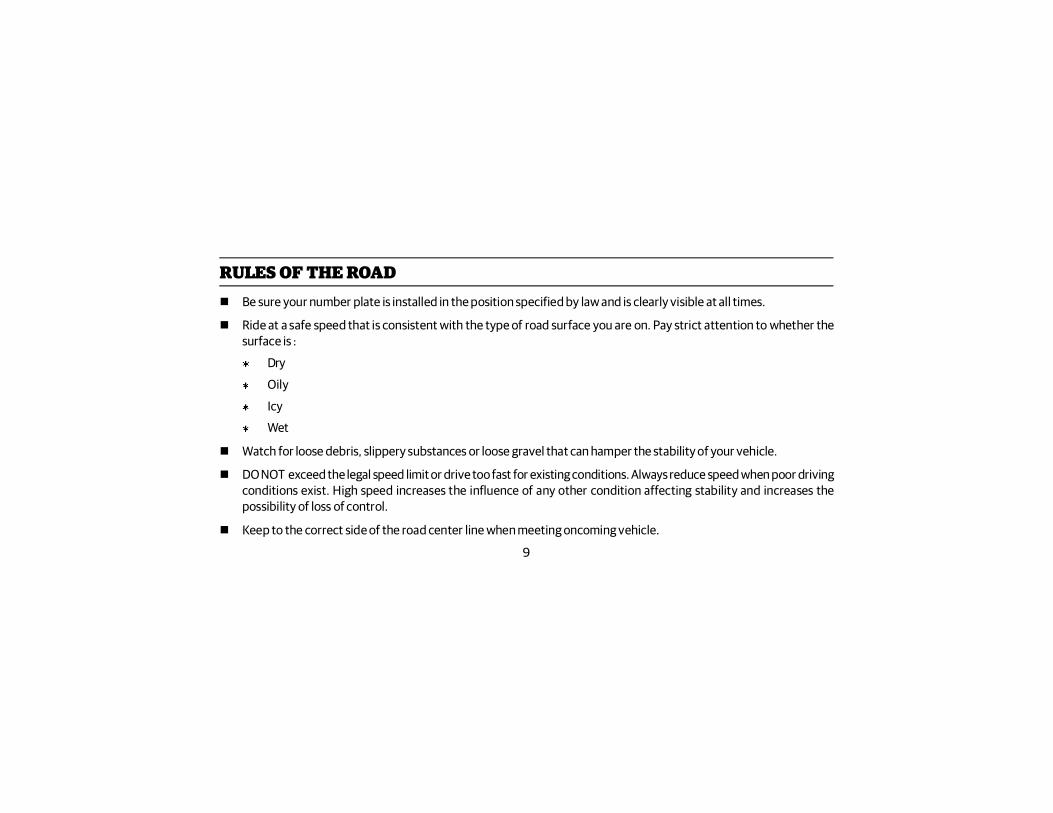
to the center line (unless local rules require otherwise), slow down and then turn carefully. Never jump a traffic light. When a change is imminent from GO to STOP (or vice versa) at
intersections, slow down and wait for the light to change to green. Never run through a yellow orred traffic light.
DO NOT leave the curb or parking area without signaling. Be sure your way is clear to enter movingtraffic. A moving line of traffic always has the right-of-way.
RULES OF THE ROAD
Red
Yellow
Green
11
RULES OF THE ROAD
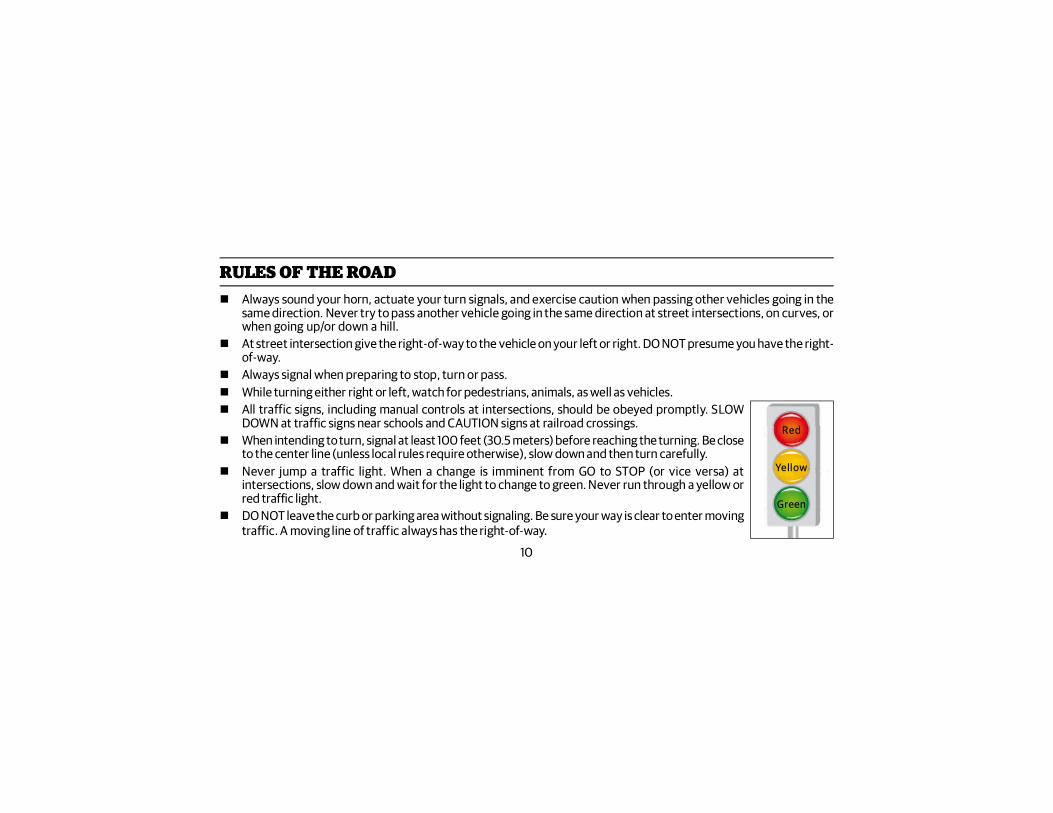
Your motorcycle is equipped with convex mirrors and have a curved surface. Thistype of mirror is designed to give a much wider view to the rear than a flat mirror;however, cars and other objects seen in this type of mirror will look smaller andfarther away than when seen in a flat mirror.Use care when judging the size or distance of objects seen in these mirrors.
SIDE VIEW MIRRORS
NOTETo help you establish the relative distance of vehicles behind your motorcycle, adjust each mirror in such a way, that asmall portion of your shoulder is visible and a large portion behind your motorcycle is seen clearly.
Park your motorcycle on a firm and flat surface to prevent it from falling over. Protect your motorcycle against theft. After parking your motorcycle, remove Ignition key from switch and lock the
steering head.
CAUTIONDO NOT high pressure water jet on mirror use only water spray cleaning and wipe with clean dry cloth.Objects in the mirror may be closer than they appear.
12
SAFE OPERATING RULES Before operating your new motorcycle, it is your responsibility to carefully read and follow the operating and
maintenance instructions detailed in this manual for your own safety, your motorcycle and that of others.
Know and respect the rules of the road. Be a safe rider for your own safety and for other road users.
Before starting the motorcycle, check for proper operation of brakes, clutch, gear shifter, handle bar controls, tyrepressures, fuel and oil levels.
Use only genuine Royal Enfield spare parts and approved accessories. Use of other manufacturer’s performanceparts may affect the performance of your motorcycle and render the motorcycle void of warranty. See your RoyalEnfield Authorized Dealer for details.
Royal Enfield cautions you against the use of certain nonstandard parts such as aftermarket and custom made extendedfront forks or suspensions, which may adversely affect performance and handling. Removing or altering original partsmay adversely affect performance and could result in an accident causing serious injury.
WARNING
13
Whenever refuelling your motorcycle, please exercise utmost caution and carefully observe the following rules : DO NOT smoke and please ensure that there are no open flames or sparks near the motorcycle, when refuelling
OR servicing the fuel system. Switch OFF mobile phones and other hand held electronic devices. Open the fuel filler cap slowly. Refuel in a well ventilated area with the engine turned off. DO NOT fill the tank to its brim. Please fill fuel only till the bottom of the filler neck insert, so as to leave air space
in the fuel tank to allow for fuel expansion.
SAFE OPERATING RULES
Gasoline is extremely flammable and highly explosive. Use care when handling gasoline. Always stop the engine whenrefuelling or servicing the fuel system. Do not smoke or allow open flames or sparks near gasoline. Do not store motorcyclewith gasoline in the tank, within the home or garage where open flames, pilot lights, sparks or electric motors are present.Inadequate safety precautions could cause an explosion or fire which could result in damage to property, serious injury.
WARNING
14
SAFE OPERATING RULES A new motorcycle must be operated according to the special break-in-procedure. See BREAK-IN-THE FIRST
300 Miles (500Kilometers) section in this manual.
Operate motorcycle only at moderate speeds and out of traffic until you have become thoroughly familiar with itsoperation and handling characteristics under all conditions.
DO NOT exceed the legal speed limit or drive too fast for existing conditions. Always reduce speed when poor drivingconditions exist. High speed increases the influence of any other condition affecting stability and increases thepossibility of loss of control.
NOTEIf you are an inexperienced rider we recommend that you obtain formal training on correct motorcycle riding techniquesand become thoroughly familiar with the operation of your particular motorcycle. New riders should gain experienceunder various conditions while driving at moderate speeds.
15
SAFE OPERATING RULES
Avoid overspeeding and never travel over the speed limit. Excessive speed may cause loss of control and could result inan accident causing serious injury.
WARNING
DO NOT exceed 70 MPH (110 km/h) riding solo.
DO NOT exceed 55 MPH (90Km/h) when carrying a passenger or cargo.
Pay strict attention to road surfaces and wind conditions. Any two wheeled motorcycle may be subject to the followingupsetting forces :
Wind blasts from passing trucks.
Rough uneven road surfaces.
Slippery road surfaces.
These forces may affect the handling characteristics of your motorcycle. If this happens, reduce speed and guide themotorcycle with a relaxed grip to a controlled condition. Do not brake abruptly or force the handlebar.
16
SAFE OPERATING RULES Operate your motorcycle defensively. Remember, a motorcycle does not afford the same protection as an automobile
in an accident. One of the most common accident situations occurs when the driver of the other motorcycle fails tosee or recognize a motorcycle and turns into the oncoming motorcyclist.
Wear an approved helmet, clothing, and foot gear suited for riding a motorcycle. Bright OR light colors are best forgreater visibility in traffic, especially at night. Avoid loose, flowing garments and scarves.
When carrying a pillion rider, it is your responsibility to instruct them on proper riding procedures.
DO NOT allow other individuals, under any circumstances, to operate your motorcycle unless you know they areexperienced, licensed riders and are thoroughly familiar with the operating conditions of your motorcycle.
Maintain the recommended tyre pressure. Ensure the front and rear wheels are correctly aligned and the tyres are seatedevenly & properly in the rims. Check for correct tightness of the spokes in the rims. Inspect your tyres periodically andreplace tyres with approved tyres only. Failure to do so can lead to improper balance, abnormal tread wear, poor handlingand could result in serious injury.
WARNING
17
SAFE OPERATING RULES
Royal Enfield recommends replacement of any tyre punctured or damaged. In some cases small punctures in the treadarea may be repaired from within the demounted tyre by your Royal Enfield Authorized Dealer. Speed should not exceed60 Km/h (40 MPH) for the first 24 hours after repair and the repaired tyre should Never be used over 90 Km/h (55 MPH).
In emergency situations, if a temporary repair is made ride slowly with as light a load as possible until the tyre is permanentlyrepaired or replaced.
Failure to heed this warning could result in serious injury.
Safe motorcycle operation requires alert mental judgement combined with a defensive driving attitude. DO NOTallow fatigue, alcohol or drugs to endanger your safety or that of others.
Maintain your motorcycle in proper operating condition in accordance with the Maintenance intervals chart in thisOwner’s Manual.
WARNING
18
SAFE OPERATING RULES
DO NOT operate motorcycle with a loose, worn or damaged steering system, including the front and rear suspensionsystem. Contact your Royal Enfield Authorized Dealer for repair of steering or suspension system. Damaged steering orsuspension components may adversely affect handling which could result in serious injury.
WARNING
Regularly inspect rear shockabsorbers and front forks for any defective suspension can adversely affect stability andhandling which could result in serious injury.
WARNING
For your personal welfare, all the listed service and maintenance recommendations should be performed. Lack of regularmaintenance at the suggested intervals may affect the safe operation of your motorcycle, which could result in seriousinjury.
WARNING
19
SAFE OPERATING RULES
Avoid any contact with the exhaust system. Wear clothing that will completely cover the legs while riding. The exhaustsystem gets very hot when the engine is running and remains too hot, even after the engine is turned off. Failure to wearproper or protective clothing could result in serious injury.
WARNING
Exhaust gases contains poisonous carbon monoxide and chemicals, known to cause Cancer, Birth Defects or otherreproductive defects.DO NOT INHALE exhaust gases. Never stand close to the exhaust system of the motorcycle when the engine is running.
WARNING
Motorcycle batteries contain lead and lead components, acids and chemicals known to cause cancer, birth defects orother reproductive harm. Exercise extreme caution while handling a battery. Wash hands thoroughly whenever a batteryis handled.
WARNING
20
SAFE OPERATING RULES
Consult your Royal Enfield Authorized Dealer regarding any questions or problems that occur in the operation of yourmotorcycle. Failure to do so may aggravate an initial problem, cause costly repairs, jeopardize your personal safety andcould result in serious injury.
WARNING
Use only genuine Royal Enfield replacement fasteners tightened to the proper torque (See your Royal Enfield Work ShopManual). We caution you against the use of certain nonstandard parts such as aftermarket and custom made fastenerswhich may not have specific strength, finish and type requirements to perform properly in the assembly and itsenvironment. The use of any nonstandard parts, including fasteners, could result in serious injury.
WARNING

21
DO NOT exceed the Gross Motorcycle Weight Rating of your motorcycle. The Gross Motorcycle Weight Rating (GVWR)is shown on the information plate, located on the frame Down tube. (GVWR is the sum of the weight of the motorcycle,accessories, and the maximum weight of the rider, passenger and cargo that may be safely carried.) Exceeding GVWRmay lead to instability of the motorcycle, which could cause an accident and result in serious injury.
SAFE OPERATING RULES
DO NOT tow a disabled motorcycle. The steering and handling for the disabled motorcycle will be impaired due to theforce of the towline. If a disabled motorcycle must be transported, use a truck or a trailer. Towing a motorcycle may causeloss of control of the motorcycle in the front, leading to an accident resulting in serious injury.
WARNING
DO NOT pull a trailer behind a motorcycle. Towing a trailer may cause reduced braking efficiency, tyre overloading andunstable handling. Towing a trailer may cause loss of control of the motorcycle in the front, leading to an accident resultingin serious injury.
WARNING
WARNING
22
SITTING POSTURECorrect sitting posture is a must for stable and safe riding.
Sit with your shoulders completely relaxed.
Do not lock your elbows and retain them at a slight bend to enable maneuvering.
Hold the handle grip close to its inner end.
Lightly grip the fuel tank with your knees.
Keep your toes in “straight ahead” direction.
Before turning, look extensively in the rear view mirror, without turning your head.
BRAKING Apply front and rear brakes gently and simultaneously for maximum braking efficiency.
Please use utmost caution while applying brakes, especially while riding under wet or bad road conditions.
SAFE OPERATING RULES
23
WARNINGThe hydraulic disc brakes fitted on your motorcycle requires very less effort. Applying any one of the brakes suddenly maylock the wheels. Failure to adhere to this warning may cause loss of control on the motorcycle, leading to a potentialaccident, resulting in serious injury to both rider and other road users, besides causing severe damage to the motorcycle.
WARNINGBrake pad wear will be increased if the motorcycle is used frequently off road. Always inspect the brake pads morefrequently if the motorcycle is used off-road & replace the brake pads before they become worn to or beyond the minimumservice thickness. Riding the worn brake pads may reduce braking efficiency, leading to loss of motorcycle control andan accident.
DO NOT place the foot on the brake pedal while riding unless braking is required. Because this will lead to premature wearof brake pad.
SAFE OPERATING RULES
24
TECHNICAL SPECIFICATIONS
ENGINEEngine Type ..................................... Single Cylinder, 4 Stroke, SOHC, Air cooled, Fuel InjectionBore ................................................. 78 mmStroke ............................................... 86 mmDisplacement .................................. 411 ccCompression ratio ........................... 9.5:1Max Power ....................................... 24.5 bhp (18.02 KW) @ 6500 rpmMax Torque ...................................... 32 Nm @ 4000 rpmIdle rpm ........................................... 1250 + 50 rpm @ EOT 80 degStarting System ............................... Electric StartAir filter element .............................. Paper elementLubrication ...................................... Forced Lubrication, Wet sumpEngine oil capacity .......................... 2.3 L (Initial fill only), 2.0 L (Subsequent Refills)
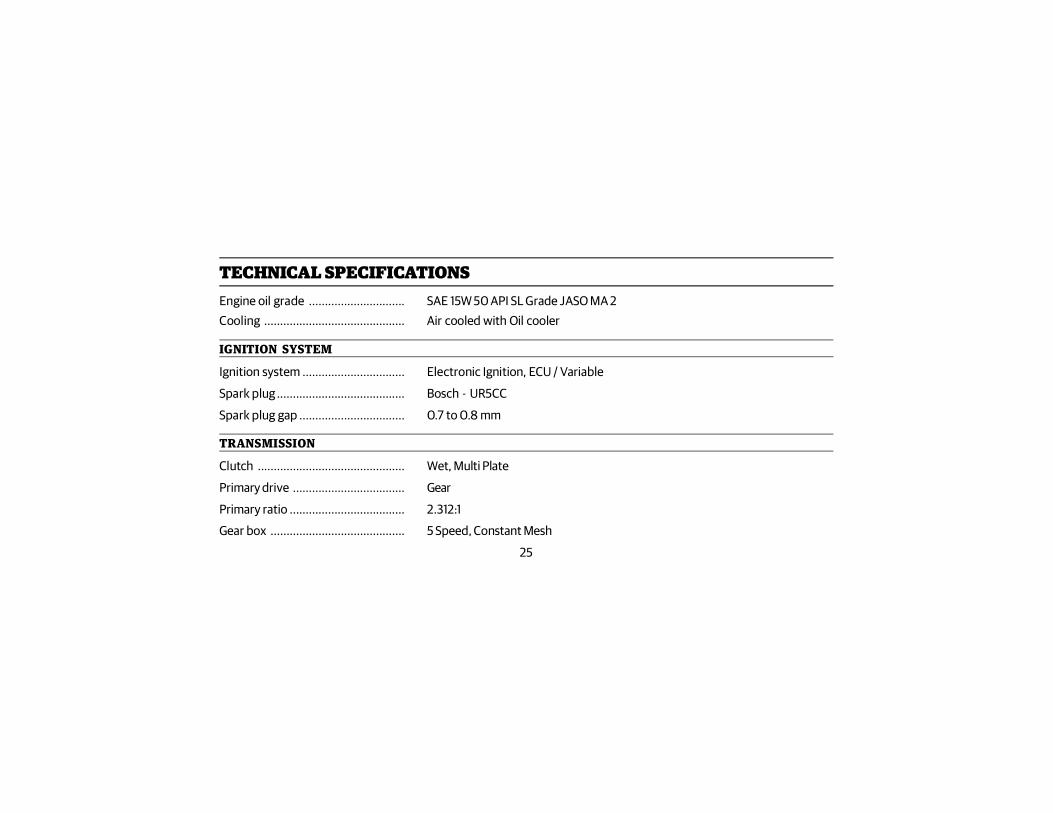
25
Engine oil grade .............................. SAE 15W 50 API SL Grade JASO MA 2Cooling ............................................ Air cooled with Oil cooler
IGNITION SYSTEM
Ignition system ................................ Electronic Ignition, ECU / Variable
Spark plug ........................................ Bosch - UR5CC
Spark plug gap ................................. 0.7 to 0.8 mm
TRANSMISSION
Clutch .............................................. Wet, Multi Plate
Primary drive ................................... Gear
Primary ratio .................................... 2.312:1
Gear box .......................................... 5 Speed, Constant Mesh
TECHNICAL SPECIFICATIONS
26
Gear Ratios
1st Gear ............................................. 1st 2.916:1
2nd Gear .......................................... 2nd 1.833:1
3rd Gear ........................................... 3rd 1.428:1
4th Gear ........................................... 4th 1.173:1
5th Gear ........................................... 5th 1:000:1
Secondary Drive ............................... 5/8” Chain & Sprocket
Secondary Ratio .............................. 2.533:1
Drive Chain links .............................. 110 links
TECHNICAL SPECIFICATIONS
27
TECHNICAL SPECIFICATIONS
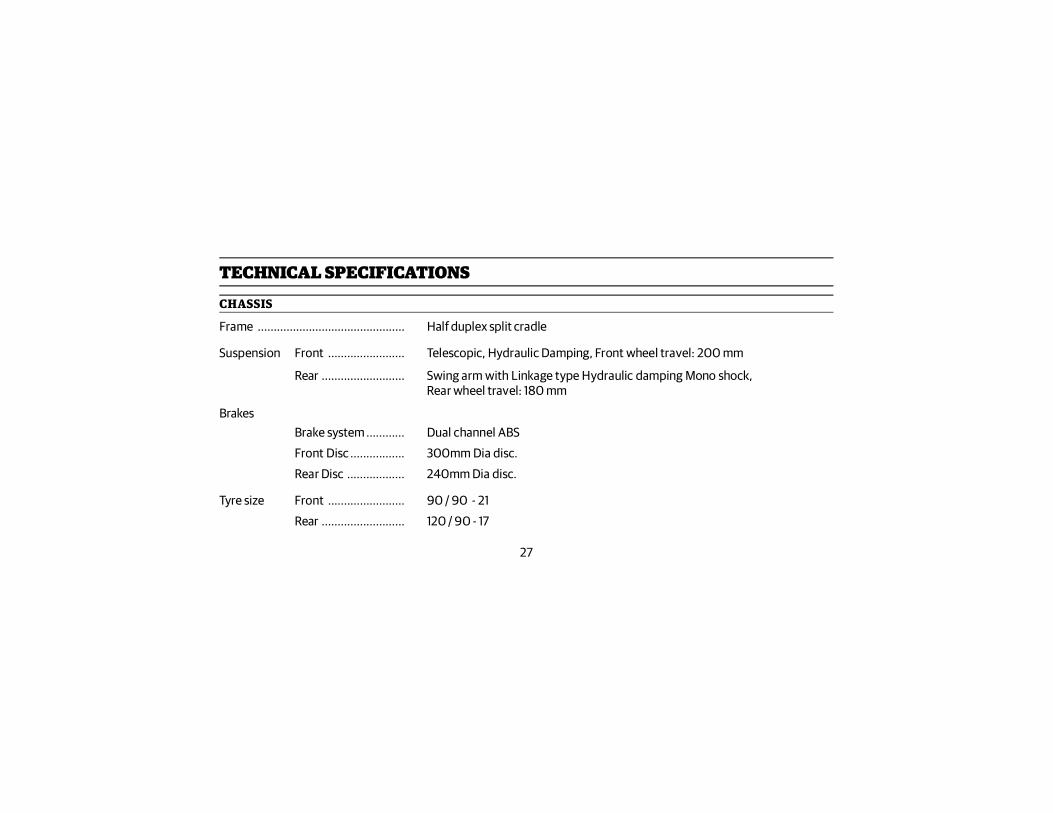
CHASSIS
Frame .............................................. Half duplex split cradle
Suspension Front ........................ Telescopic, Hydraulic Damping, Front wheel travel: 200 mm
Rear .......................... Swing arm with Linkage type Hydraulic damping Mono shock,................................. Rear wheel travel: 180 mm
BrakesBrake system ............ Dual channel ABS
Front Disc ................. 300mm Dia disc.
Rear Disc .................. 240mm Dia disc.
Tyre size Front ........................ 90 / 90 - 21
Rear .......................... 120 / 90 - 17
28
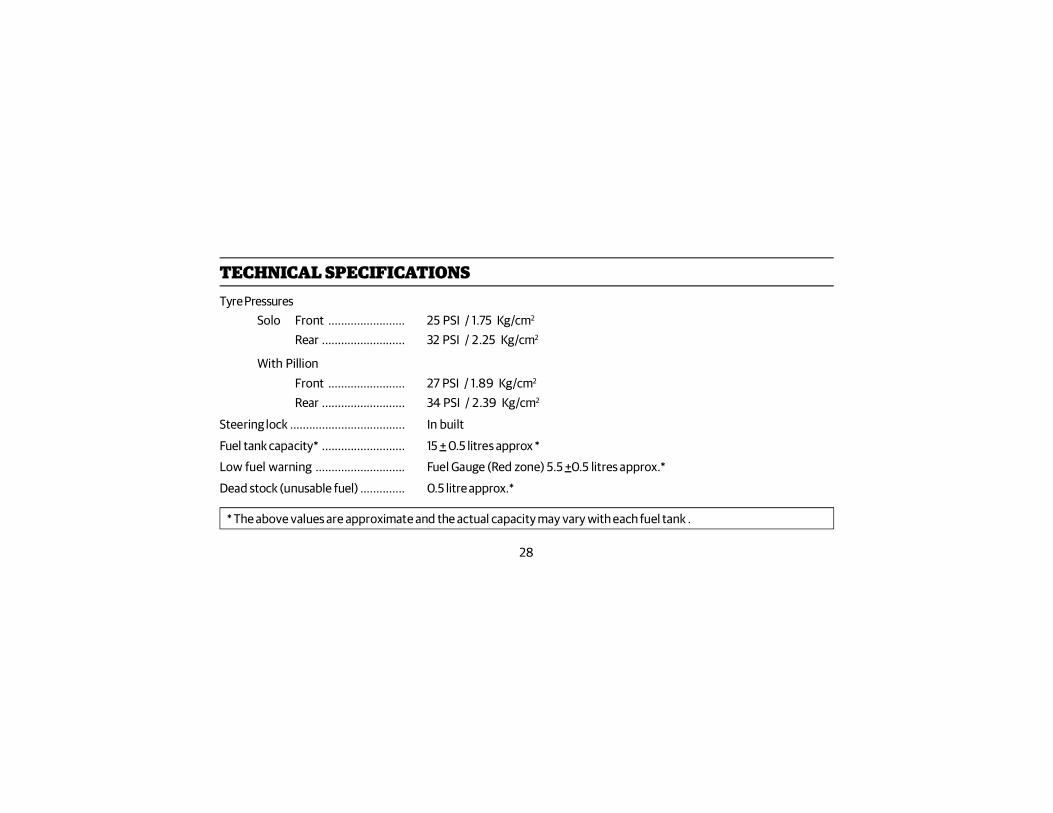
TECHNICAL SPECIFICATIONSTyre Pressures
Solo Front ........................ 25 PSI / 1.75 Kg/cm2
Rear .......................... 32 PSI / 2.25 Kg/cm2
With PillionFront ........................ 27 PSI / 1.89 Kg/cm2
Rear .......................... 34 PSI / 2.39 Kg/cm2
Steering lock .................................... In built
Fuel tank capacity* .......................... 15 + 0.5 litres approx *
Low fuel warning ............................ Fuel Gauge (Red zone) 5.5 +0.5 litres approx.*
Dead stock (unusable fuel) .............. 0.5 litre approx.*
* The above values are approximate and the actual capacity may vary with each fuel tank .
29
ELECTRICALSFlywheel magneto .......................... 221W @ 1500 rpm
Generation ....................................... Alternator, III Phase
System ............................................. 12V - DC
Battery ............................................. 12V - 8 AH MF
Head lamp ....................................... 12V, H4-60/55W - BULB
Tail lamp / Brake lamp ..................... 12V - 4/1W LED
Licence Plate illuminator ................ 12V - LED
Front position lamp ......................... 12V - LED
Speedometer lamp .......................... 12V - LED
Hi beam indicator ............................ 12V - LED
Neutral lamp telltale ........................ 12V - LED
TECHNICAL SPECIFICATIONS
30
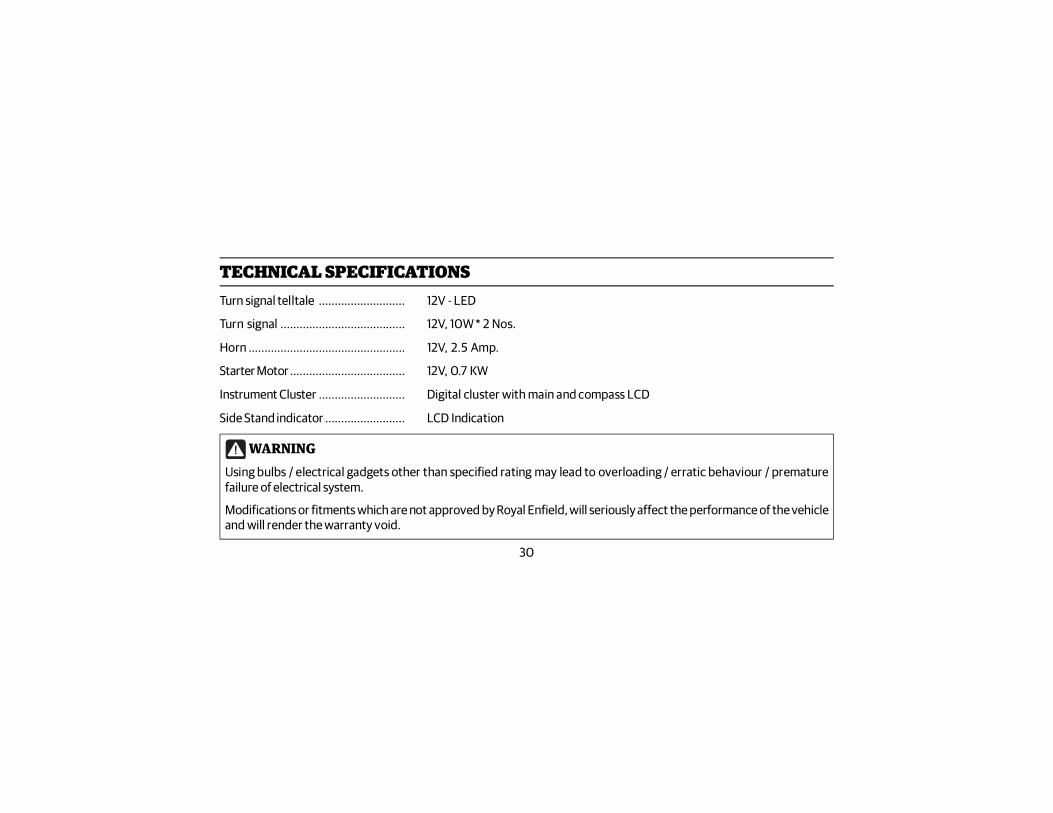
WARNINGUsing bulbs / electrical gadgets other than specified rating may lead to overloading / erratic behaviour / prematurefailure of electrical system.
Modifications or fitments which are not approved by Royal Enfield, will seriously affect the performance of the vehicleand will render the warranty void.
Turn signal telltale ........................... 12V - LED
Turn signal ....................................... 12V, 10W * 2 Nos.
Horn ................................................. 12V, 2.5 Amp.
Starter Motor .................................... 12V, 0.7 KW
Instrument Cluster ........................... Digital cluster with main and compass LCD
Side Stand indicator ......................... LCD Indication
TECHNICAL SPECIFICATIONS
31
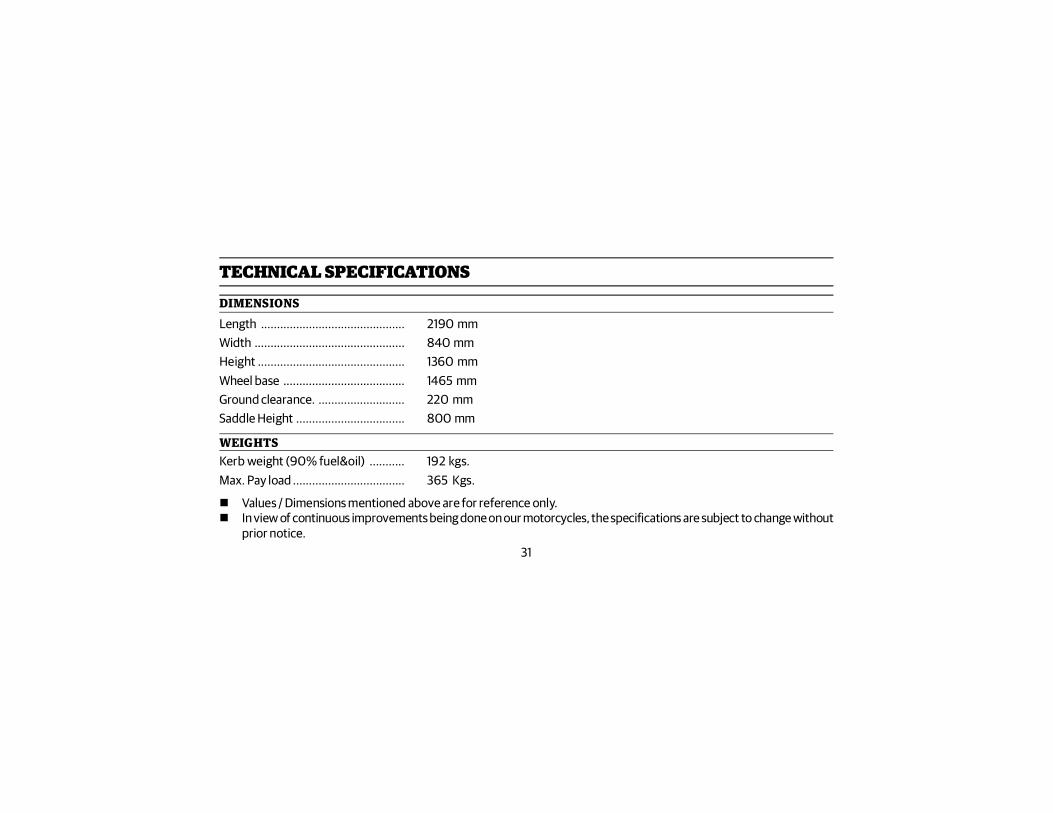
DIMENSIONSLength ............................................. 2190 mmWidth ............................................... 840 mmHeight .............................................. 1360 mmWheel base ...................................... 1465 mmGround clearance. ........................... 220 mmSaddle Height .................................. 800 mm
WEIGHTSKerb weight (90% fuel&oil) ........... 192 kgs.Max. Pay load ................................... 365 Kgs.
Values / Dimensions mentioned above are for reference only. In view of continuous improvements being done on our motorcycles, the specifications are subject to change without
prior notice.
TECHNICAL SPECIFICATIONS
32
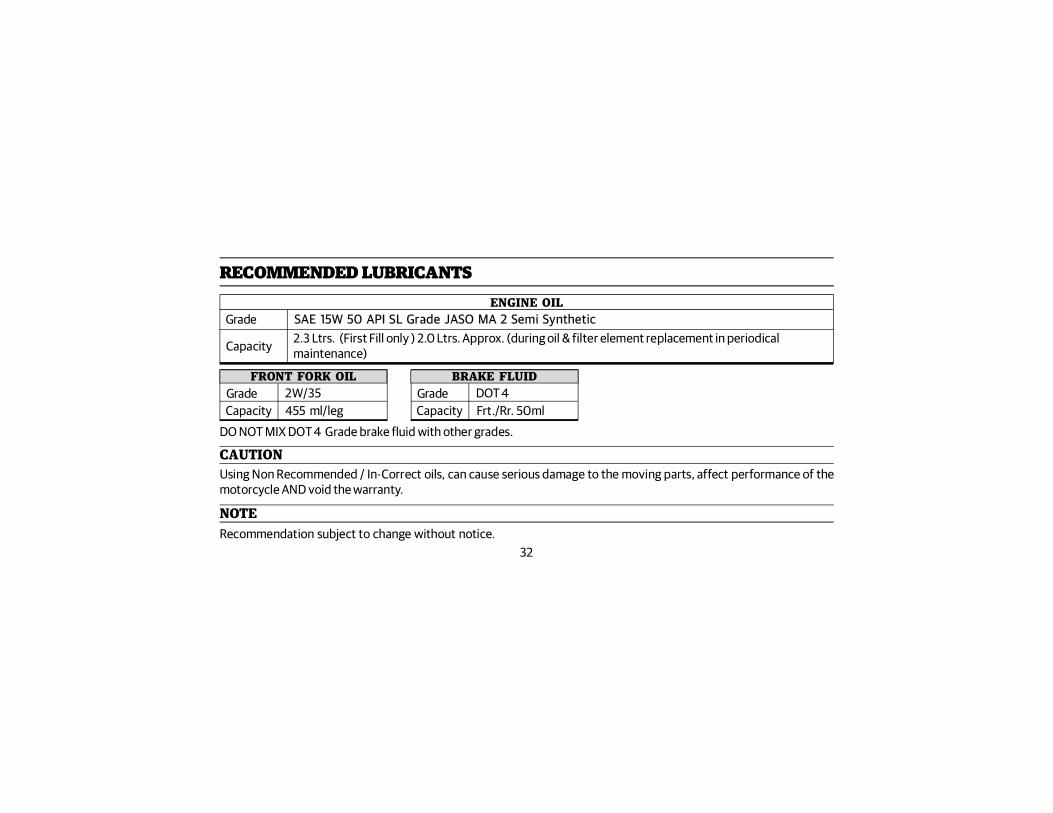
RECOMMENDED LUBRICANTS
Capacity
FRONT FORK OIL
SAE 15W 50 API SL Grade JASO MA 2 Semi SyntheticGrade2.3 Ltrs. (First Fill only ) 2.0 Ltrs. Approx. (during oil & filter element replacement in periodicalmaintenance)
CapacityGrade
455 ml/leg2W/35
ENGINE OIL
BRAKE FLUID
CapacityGrade
Frt./Rr. 50mlDOT 4
DO NOT MIX DOT 4 Grade brake fluid with other grades.
CAUTIONUsing Non Recommended / In-Correct oils, can cause serious damage to the moving parts, affect performance of themotorcycle AND void the warranty.
NOTERecommendation subject to change without notice.
33
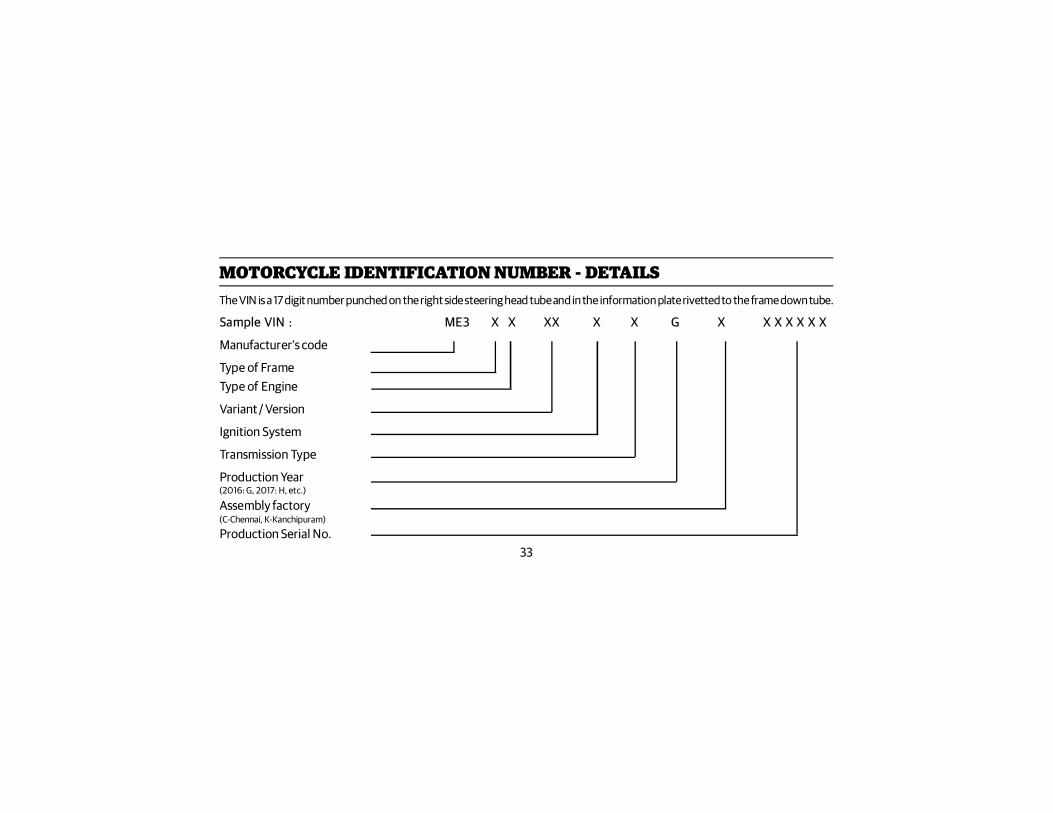
MOTORCYCLE IDENTIFICATION NUMBER - DETAILSThe VIN is a 17 digit number punched on the right side steering head tube and in the information plate rivetted to the frame down tube.
Sample VIN : ME3 X X XX X X G X X X X X X X
Manufacturer’s code
Type of FrameType of Engine
Variant / Version
Ignition System
Transmission Type
Production Year
Assembly factory
Production Serial No.(C-Chennai, K-Kanchipuram)
(2016: G, 2017: H, etc.)
34
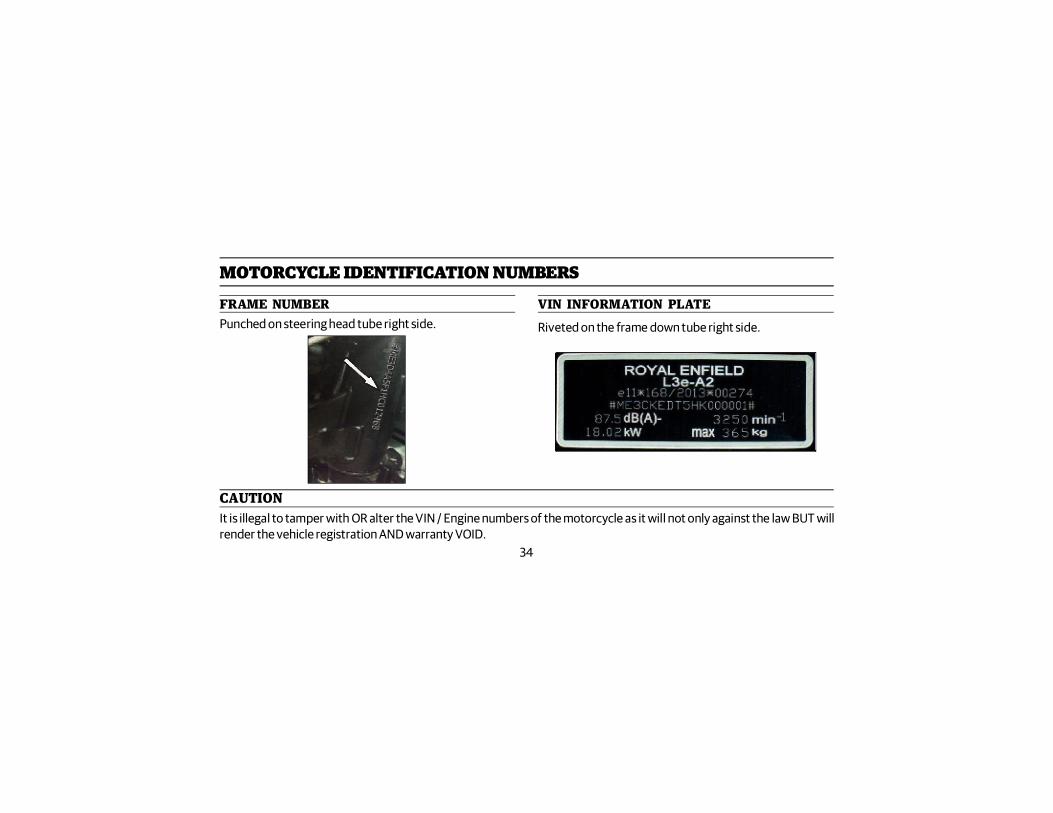
MOTORCYCLE IDENTIFICATION NUMBERS
FRAME NUMBERPunched on steering head tube right side.
VIN INFORMATION PLATERiveted on the frame down tube right side.
CAUTIONIt is illegal to tamper with OR alter the VIN / Engine numbers of the motorcycle as it will not only against the law BUT willrender the vehicle registration AND warranty VOID.
35
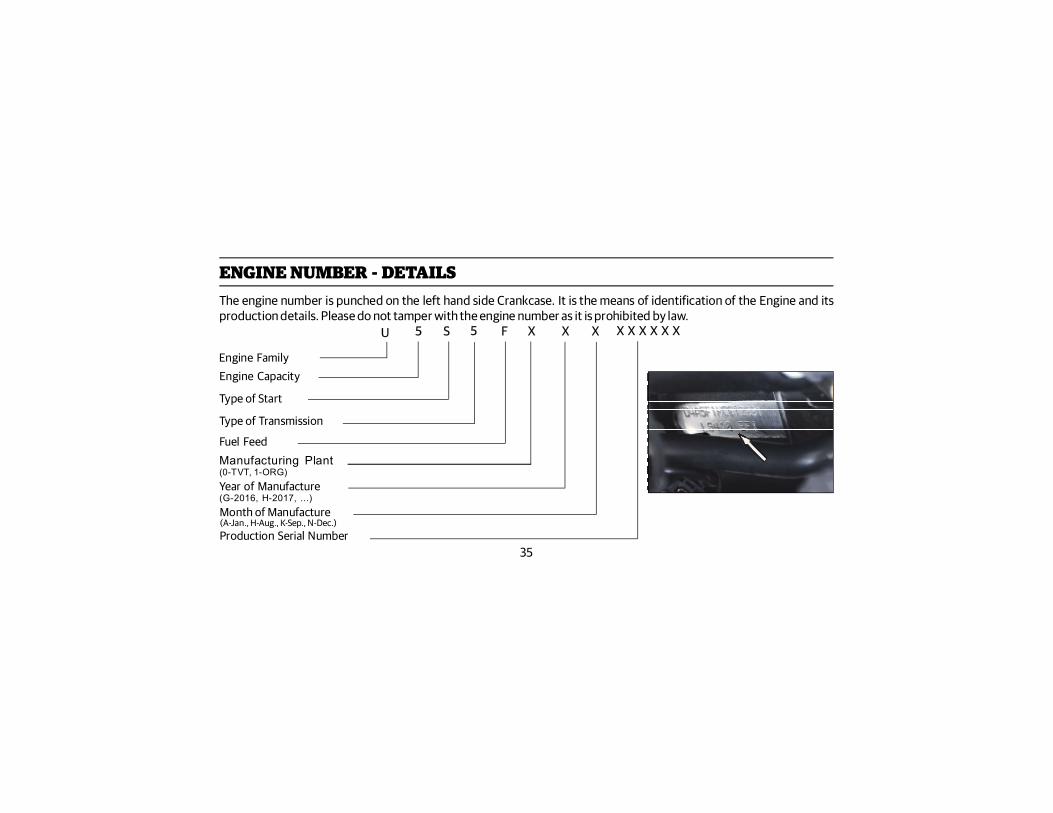
ENGINE NUMBER - DETAILSThe engine number is punched on the left hand side Crankcase. It is the means of identification of the Engine and itsproduction details. Please do not tamper with the engine number as it is prohibited by law.
Engine FamilyEngine Capacity
Type of Start
Type of Transmission
Fuel FeedManufacturing Plant
Year of Manufacture
Month of Manufacture
U 5 S 5 F X X X X X X X X X
(A-Jan., H-Aug., K-Sep., N-Dec.)
(0-TVT, 1-ORG)
(G-2016, H-2017, ...)
Production Serial Number
36
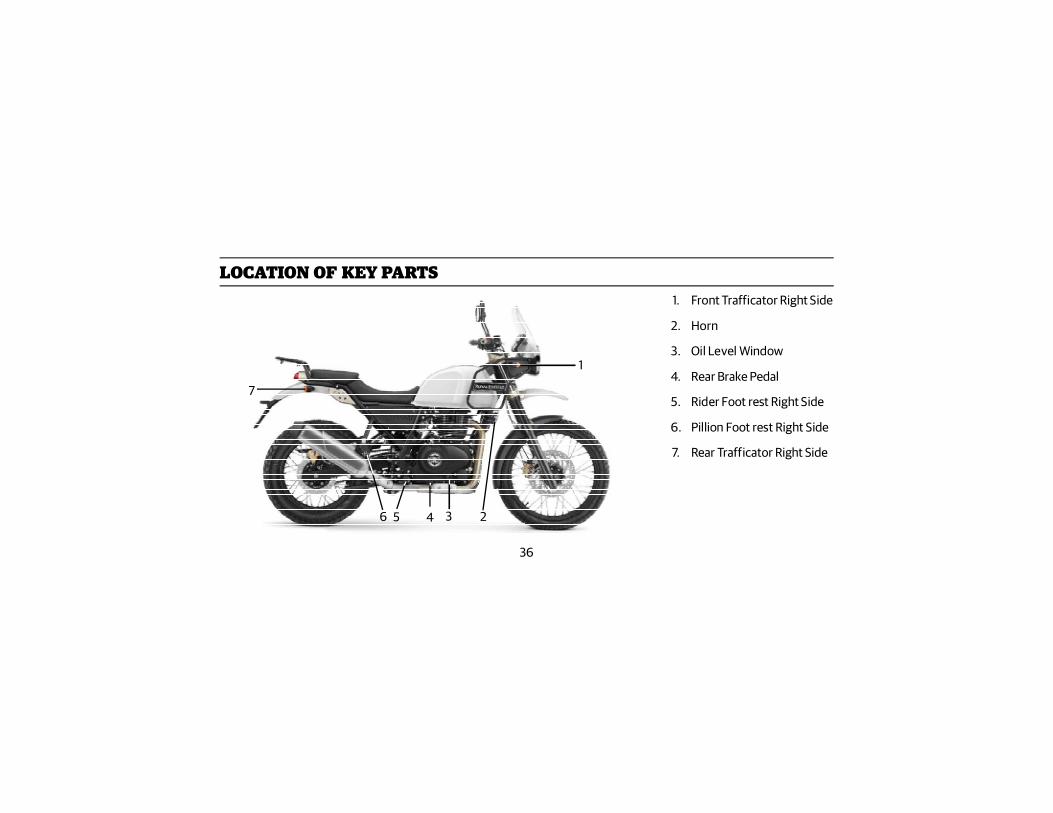
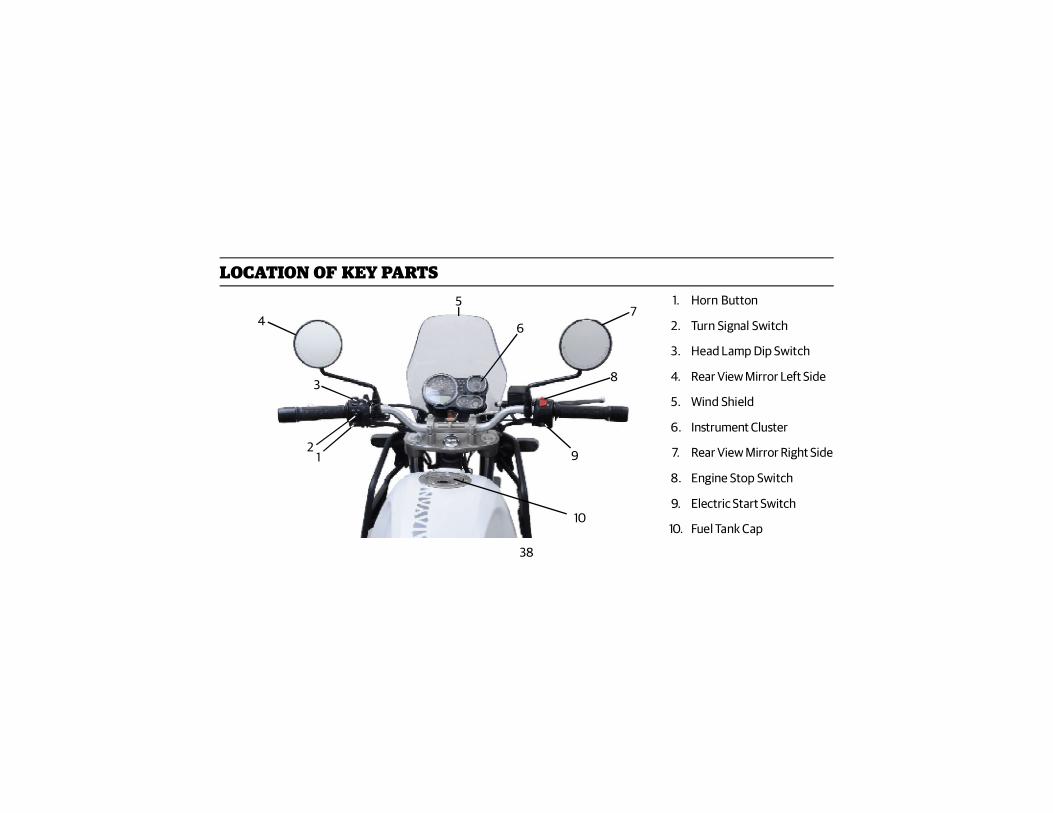
LOCATION OF KEY PARTS1. Front Trafficator Right Side
2. Horn
3. Oil Level Window
4. Rear Brake Pedal
5. Rider Foot rest Right Side
6. Pillion Foot rest Right Side
7. Rear Trafficator Right Side
7
1
23456
37
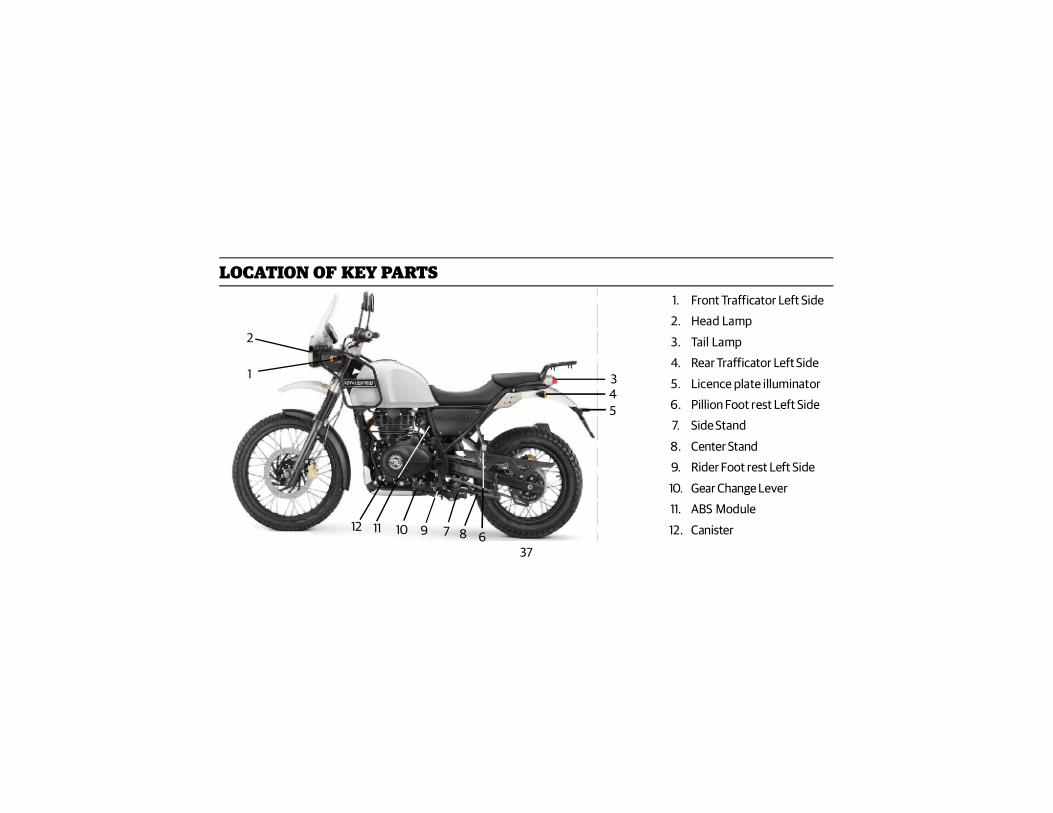
LOCATION OF KEY PARTS
1
1. Front Trafficator Left Side
2. Head Lamp
3. Tail Lamp
4. Rear Trafficator Left Side
5. Licence plate illuminator
6. Pillion Foot rest Left Side
7. Side Stand
8. Center Stand
9. Rider Foot rest Left Side
10. Gear Change Lever
11. ABS Module
12. Canister
2
345
6791012 811
38
LOCATION OF KEY PARTS1. Horn Button
2. Turn Signal Switch
3. Head Lamp Dip Switch
4. Rear View Mirror Left Side
5. Wind Shield
6. Instrument Cluster
7. Rear View Mirror Right Side
8. Engine Stop Switch
9. Electric Start Switch
10. Fuel Tank Cap
12
3
45
67
8
9
10
39
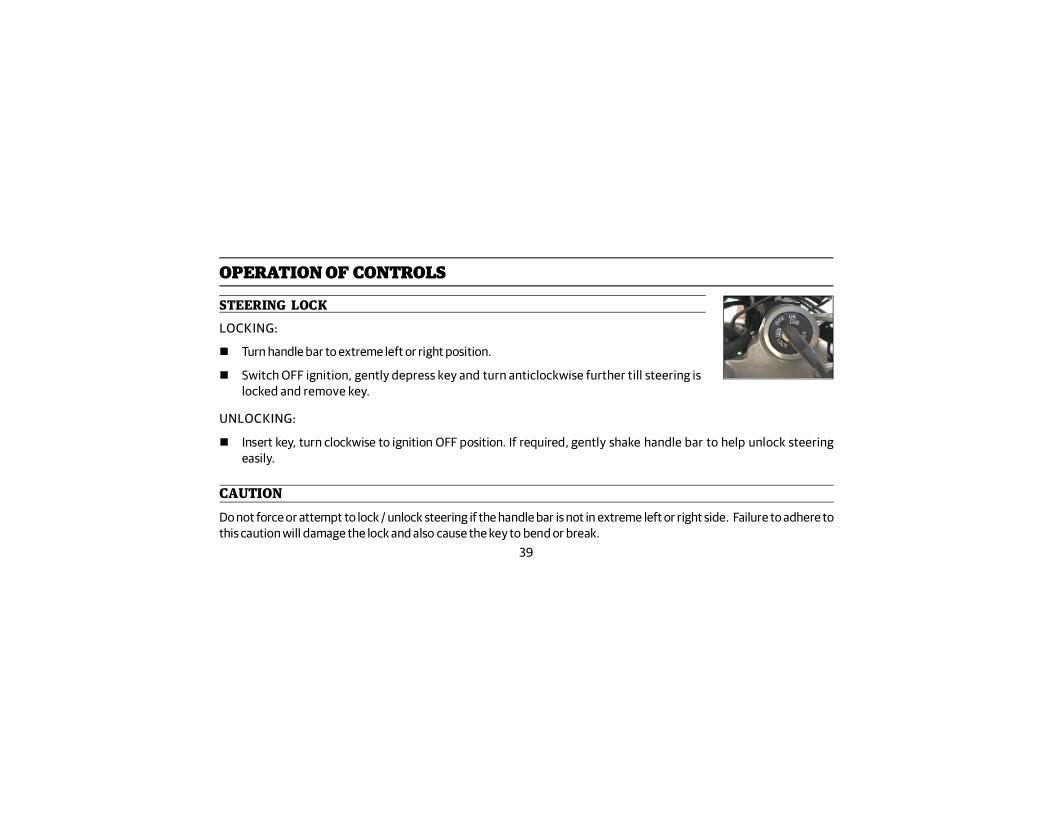
OPERATION OF CONTROLS
STEERING LOCKLOCKING:
Turn handle bar to extreme left or right position.
Switch OFF ignition, gently depress key and turn anticlockwise further till steering islocked and remove key.
UNLOCKING:
Insert key, turn clockwise to ignition OFF position. If required, gently shake handle bar to help unlock steeringeasily.
CAUTIONDo not force or attempt to lock / unlock steering if the handle bar is not in extreme left or right side. Failure to adhere tothis caution will damage the lock and also cause the key to bend or break.
40
After unlocking steering AND before starting engine, check the handle bar free movement by turning to both left andright sides, several times.Failure to do so may cause unstable riding, leading to a potential accident, resulting in serious injury to both rider andother road users, besides causing severe damage to the motorcycle.
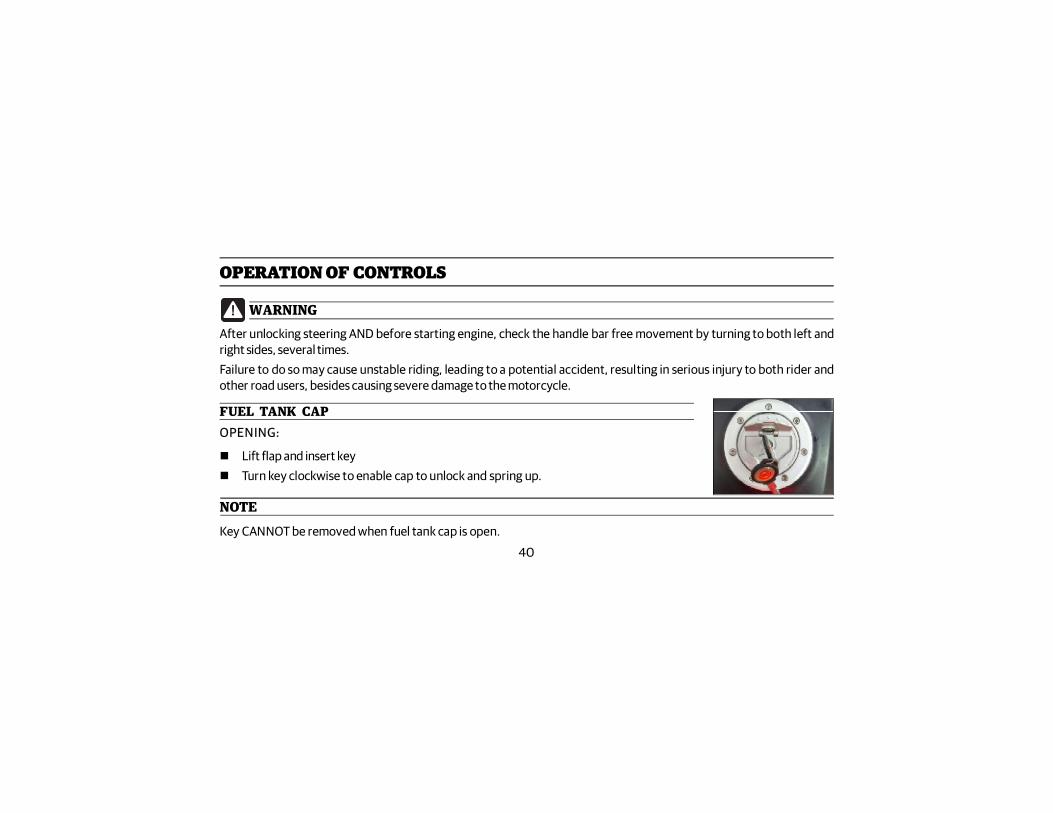
FUEL TANK CAPOPENING:
Lift flap and insert key Turn key clockwise to enable cap to unlock and spring up.
NOTEKey CANNOT be removed when fuel tank cap is open.
OPERATION OF CONTROLS
WARNING
41
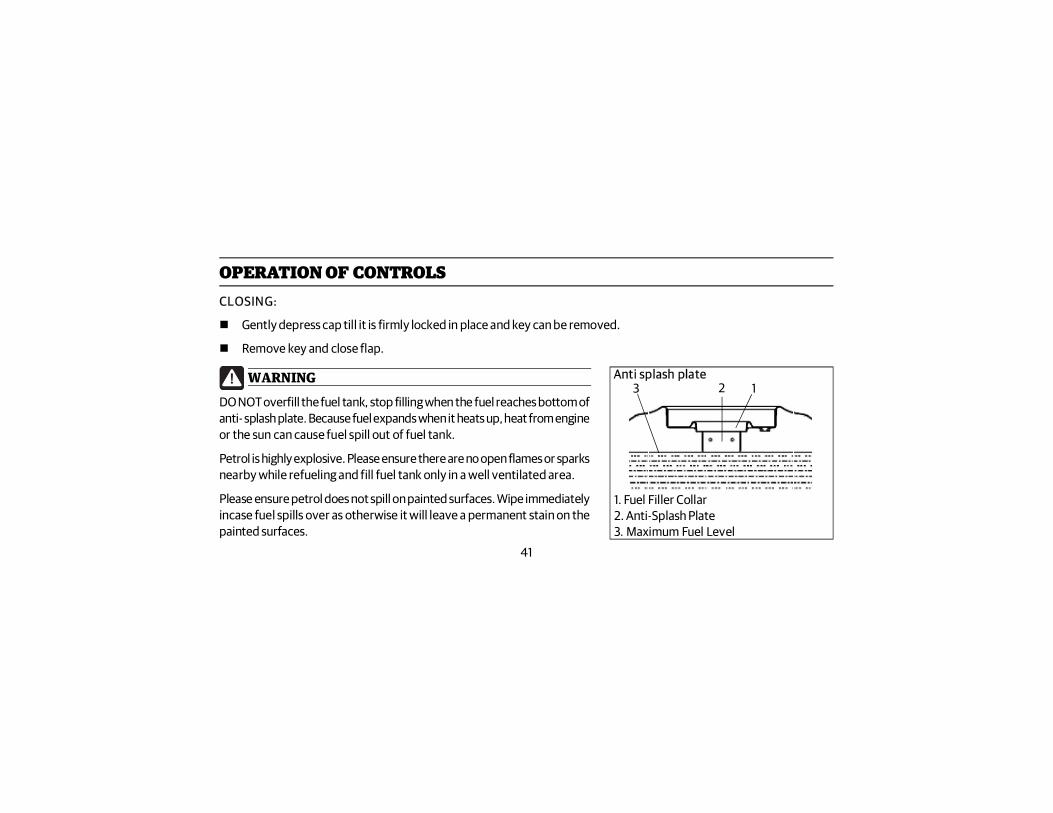
OPERATION OF CONTROLSCLOSING:
Gently depress cap till it is firmly locked in place and key can be removed.
Remove key and close flap.
DO NOT overfill the fuel tank, stop filling when the fuel reaches bottom ofanti- splash plate. Because fuel expands when it heats up, heat from engineor the sun can cause fuel spill out of fuel tank.
Petrol is highly explosive. Please ensure there are no open flames or sparksnearby while refueling and fill fuel tank only in a well ventilated area.
Please ensure petrol does not spill on painted surfaces. Wipe immediatelyincase fuel spills over as otherwise it will leave a permanent stain on thepainted surfaces.
WARNING Anti splash plate
1. Fuel Filler Collar2. Anti-Splash Plate3. Maximum Fuel Level
2 13
42
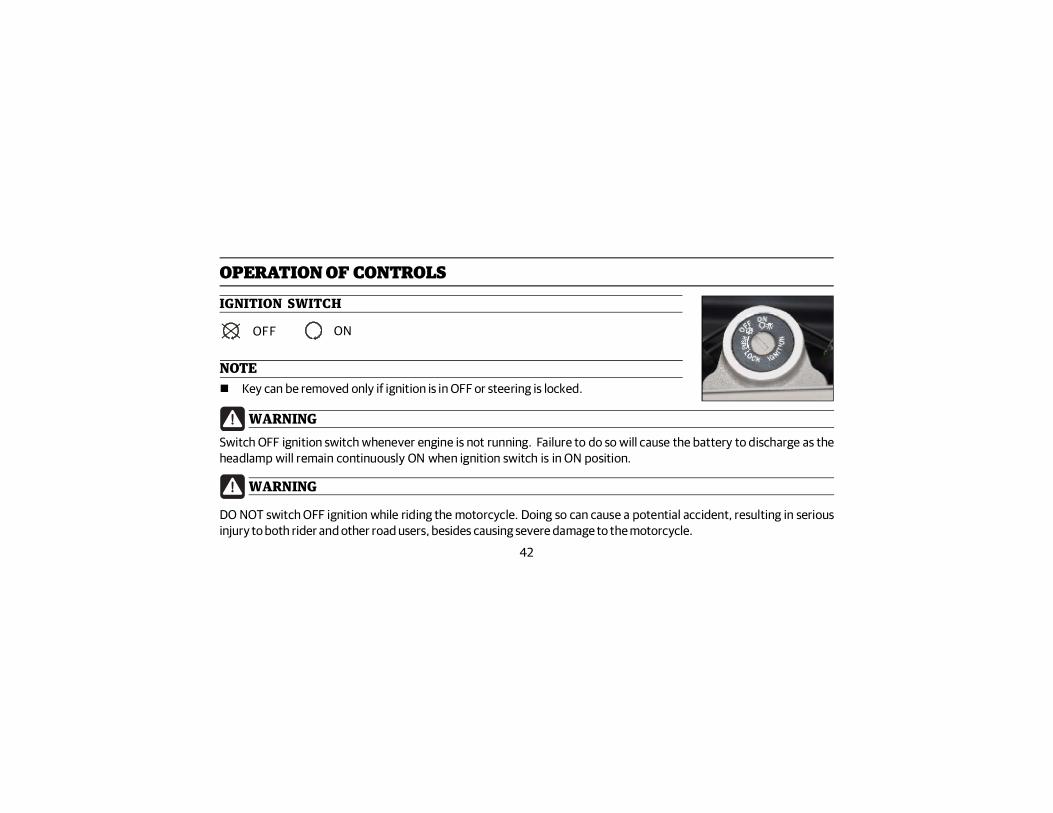
IGNITION SWITCH
OFF ON
WARNING
DO NOT switch OFF ignition while riding the motorcycle. Doing so can cause a potential accident, resulting in seriousinjury to both rider and other road users, besides causing severe damage to the motorcycle.
Switch OFF ignition switch whenever engine is not running. Failure to do so will cause the battery to discharge as theheadlamp will remain continuously ON when ignition switch is in ON position.
NOTE Key can be removed only if ignition is in OFF or steering is locked.
OPERATION OF CONTROLS
WARNING

43
OPERATION OF CONTROLS
HORN
Press
ENGINE STOP SWITCH
Engine OFF
E-START SWITCH
Depress & hold till engine starts.
Engine ON
44
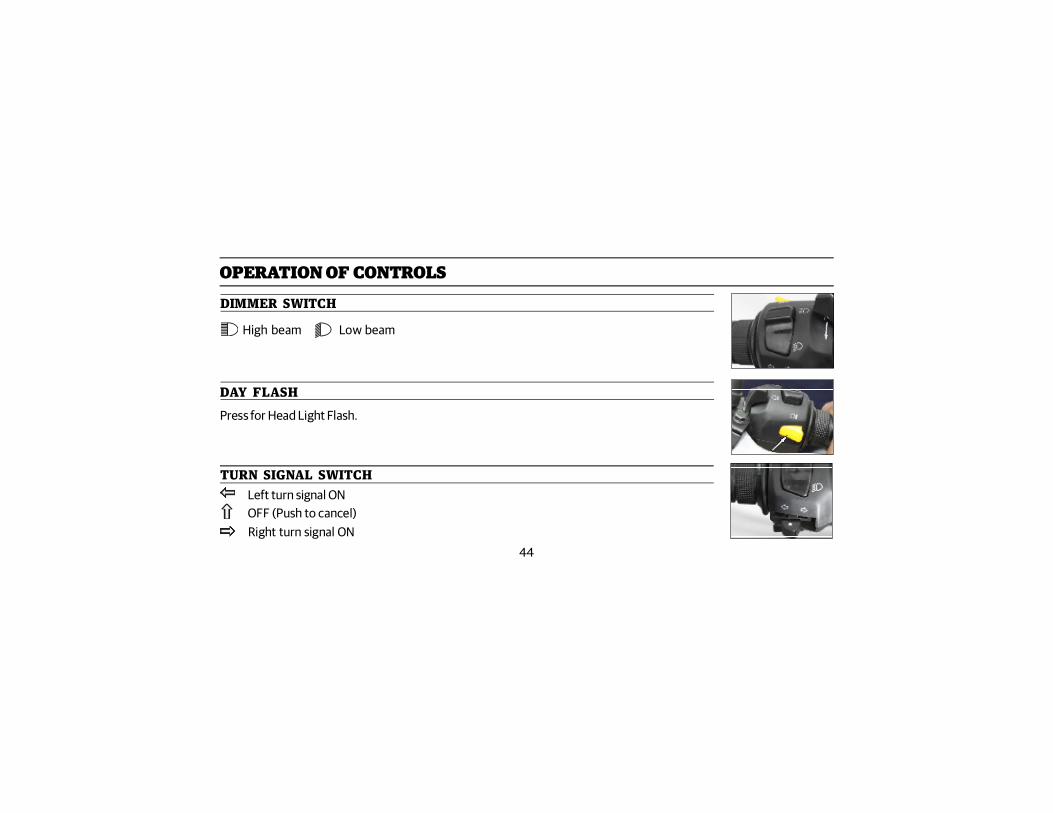
TURN SIGNAL SWITCH
OFF (Push to cancel)Right turn signal ON
Left turn signal ON
DIMMER SWITCH
High beam Low beam
DAY FLASHPress for Head Light Flash.
OPERATION OF CONTROLS
45
OPERATION OF CONTROLS
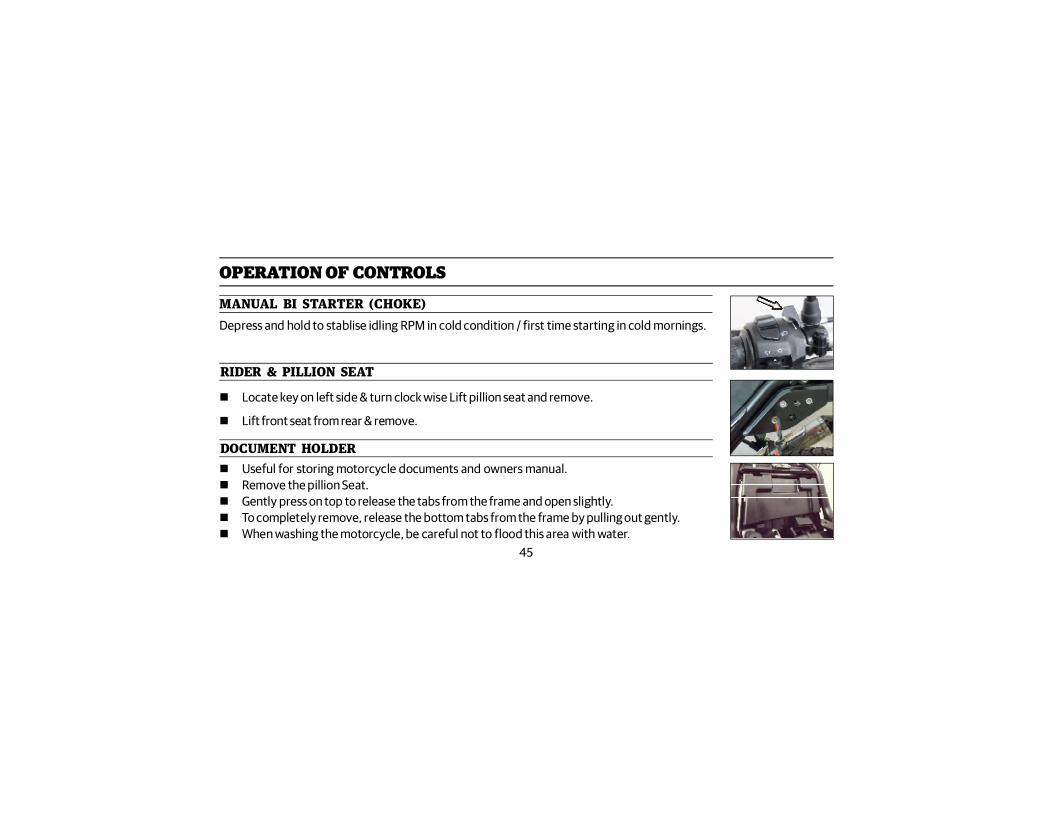
RIDER & PILLION SEAT
DOCUMENT HOLDER Useful for storing motorcycle documents and owners manual. Remove the pillion Seat. Gently press on top to release the tabs from the frame and open slightly. To completely remove, release the bottom tabs from the frame by pulling out gently. When washing the motorcycle, be careful not to flood this area with water.
MANUAL BI STARTER (CHOKE)Depress and hold to stablise idling RPM in cold condition / first time starting in cold mornings.
Locate key on left side & turn clock wise Lift pillion seat and remove.
Lift front seat from rear & remove.
46
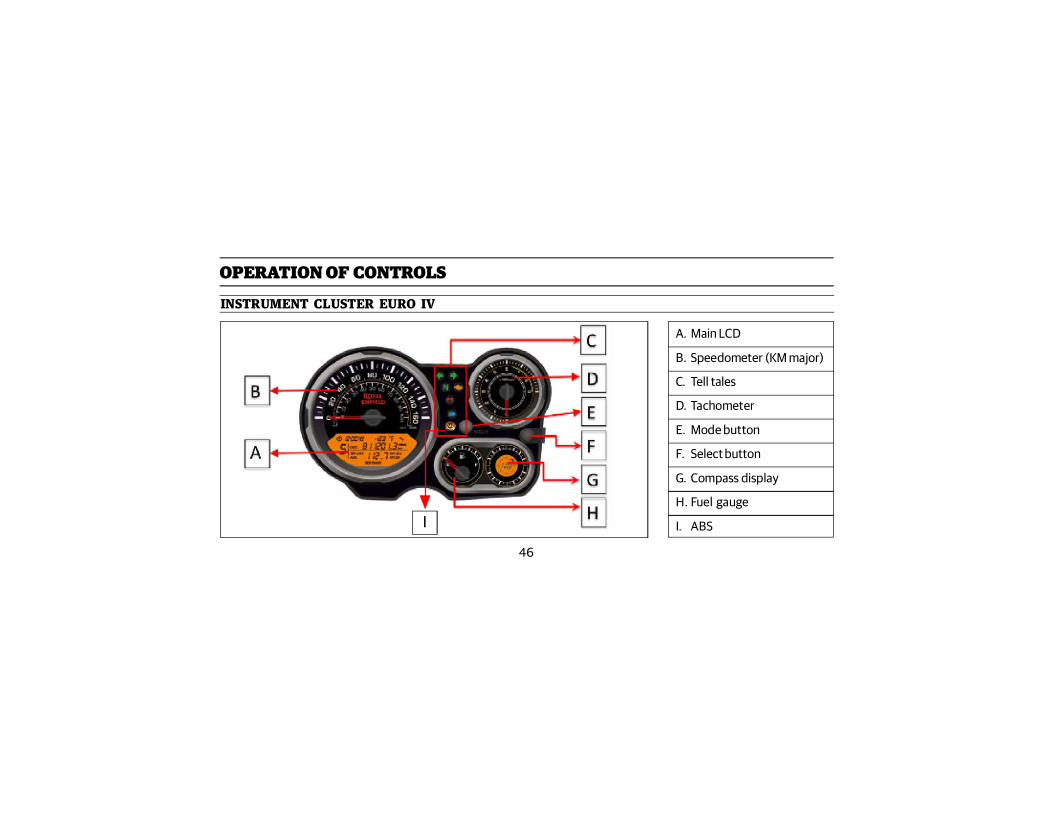
INSTRUMENT CLUSTER EURO IV
OPERATION OF CONTROLS
A. Main LCD
B. Speedometer (KM major)
C. Tell tales
D. Tachometer
E. Mode button
F. Select button
G. Compass display
H. Fuel gauge
I. ABSI
47
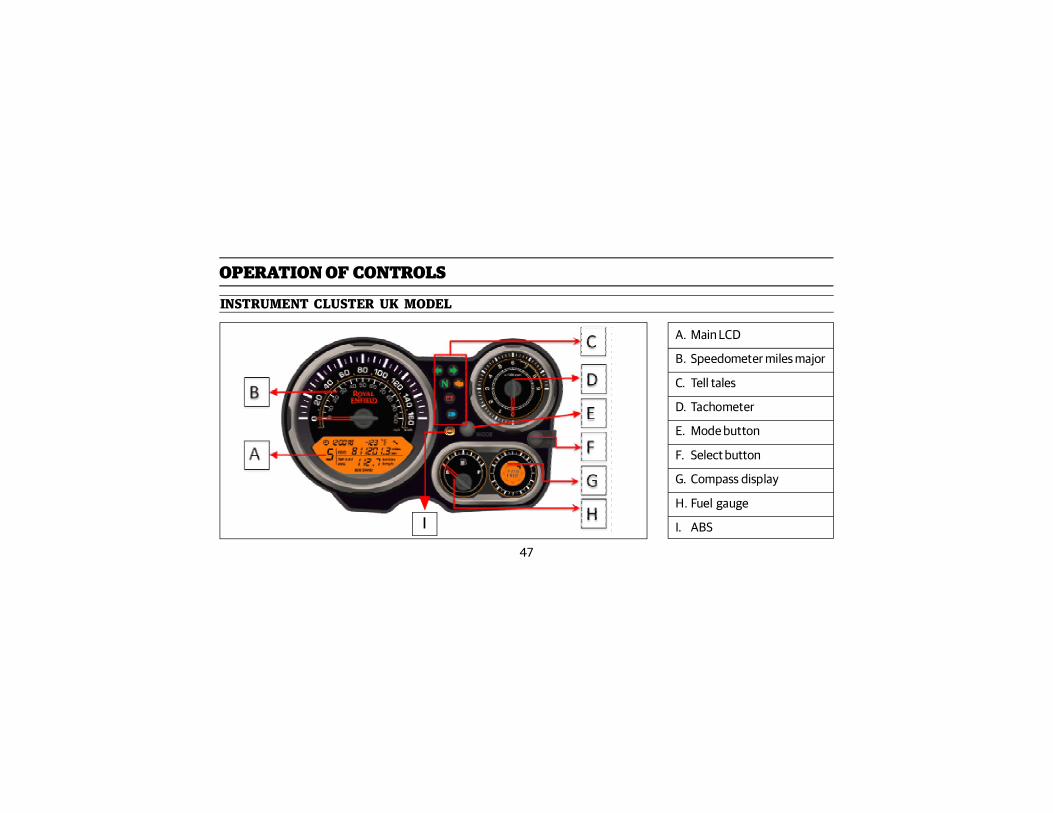
INSTRUMENT CLUSTER UK MODEL
A. Main LCD
B. Speedometer miles major
C. Tell tales
D. Tachometer
E. Mode button
F. Select button
G. Compass display
H. Fuel gauge
I. ABS
OPERATION OF CONTROLS
I
48
OPERATION OF CONTROLS
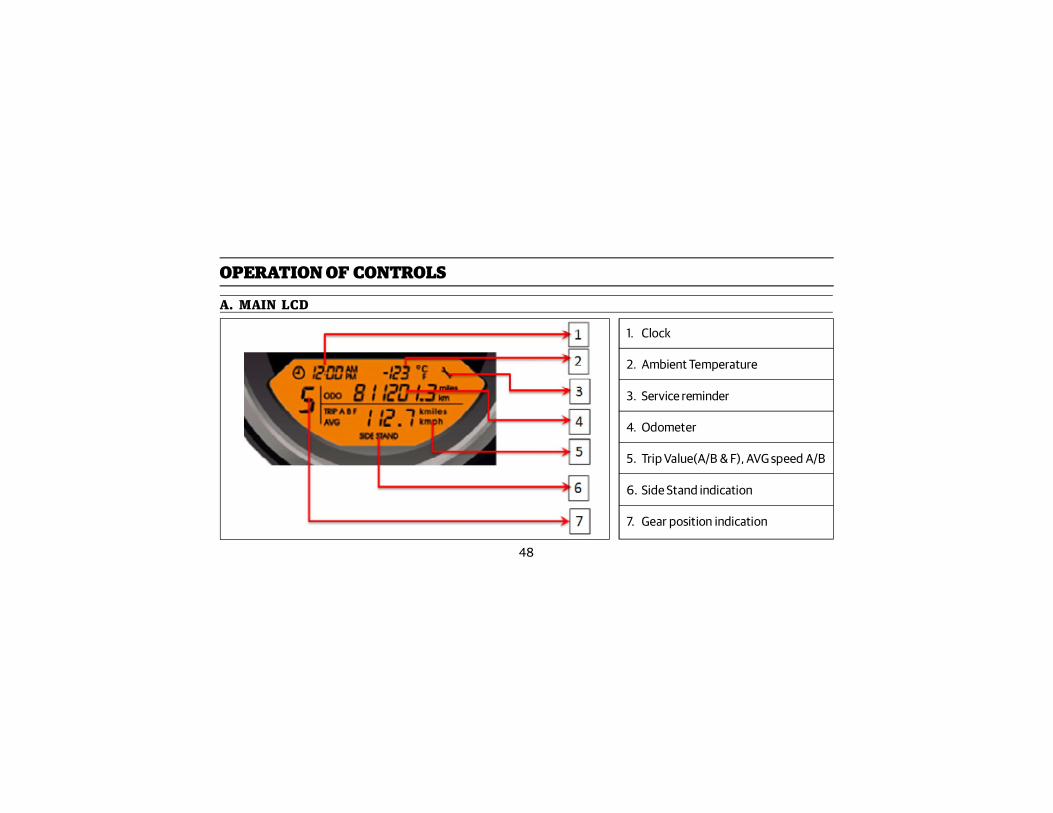
A. MAIN LCD
1. Clock
2. Ambient Temperature
3. Service reminder
4. Odometer
5. Trip Value(A/B & F), AVG speed A/B
6. Side Stand indication
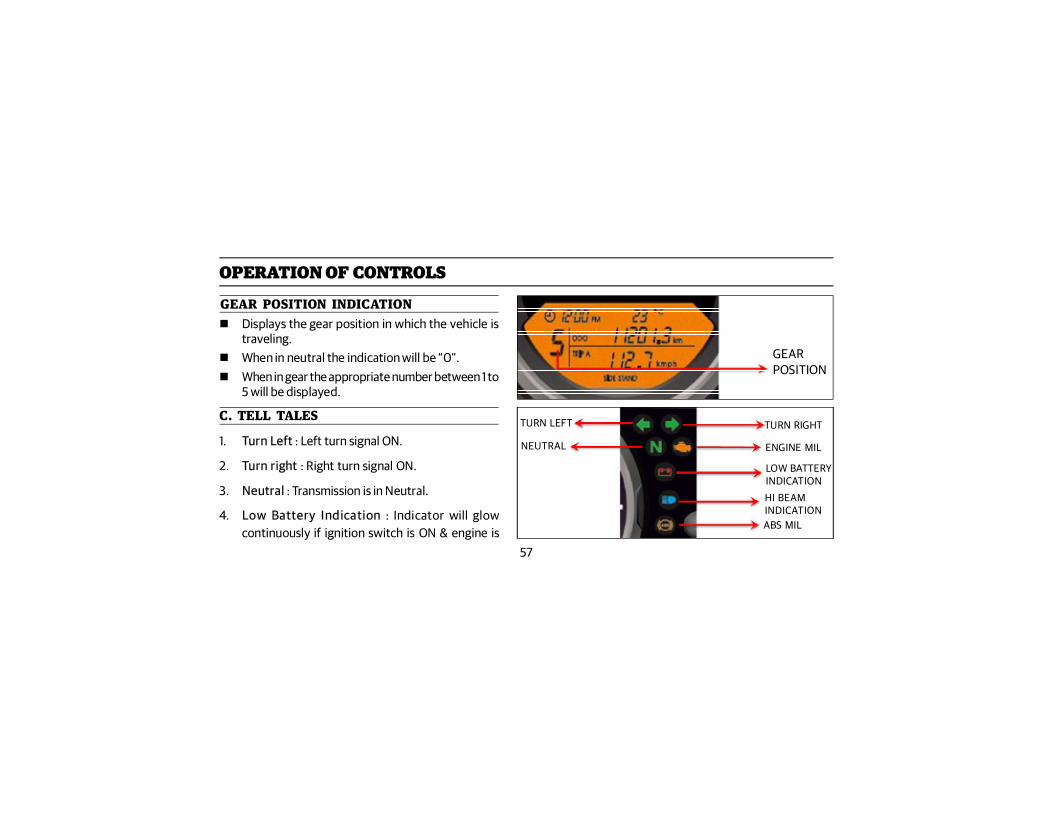
7. Gear position indication

49
OPERATION OF CONTROLS
CLOCK
Display in 12 hour format with AM/PM indication.
Will reset to 12:00 AM when battery is disconnected.
CLOCK
50
OPERATION OF CONTROLS
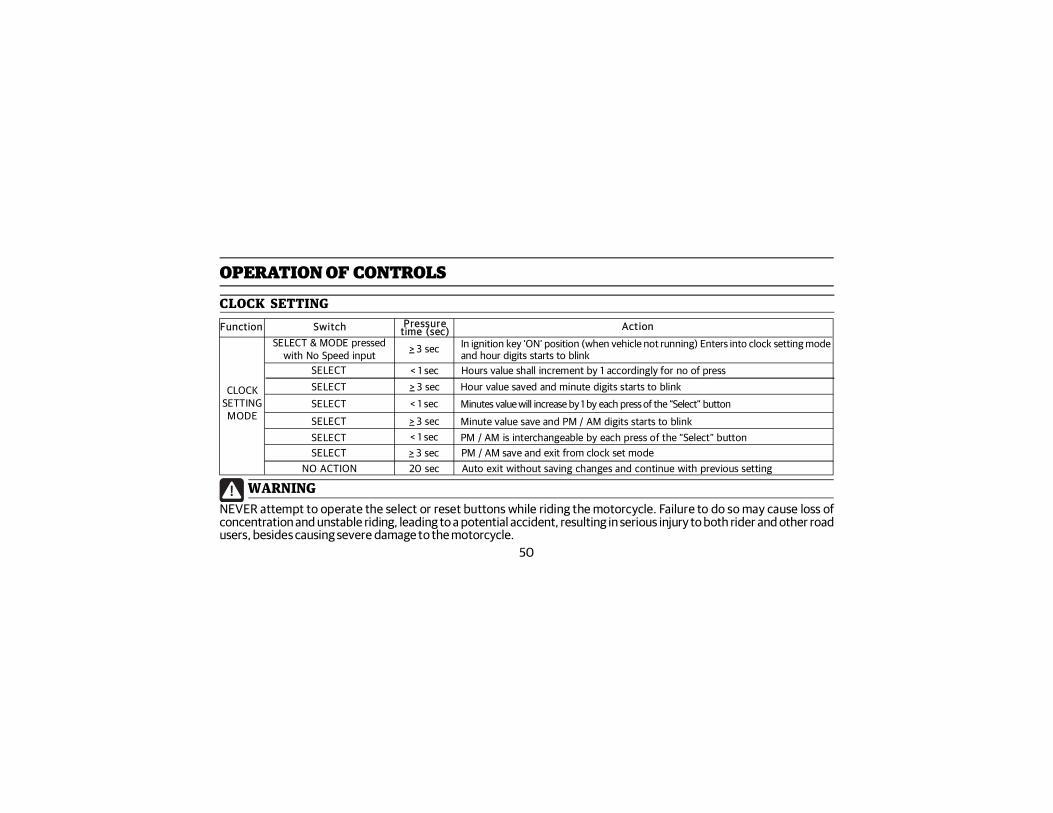
CLOCK SETTING
NEVER attempt to operate the select or reset buttons while riding the motorcycle. Failure to do so may cause loss ofconcentration and unstable riding, leading to a potential accident, resulting in serious injury to both rider and other roadusers, besides causing severe damage to the motorcycle.
WARNING
FunctionSELECT & MODE pressed
with No Speed input
Switch Pressuretime (sec) Action
CLOCKSETTING
MODE
> 3 sec In ignition key ‘ON’ position (when vehicle not running) Enters into clock setting modeand hour digits starts to blink
< 1 secSELECT Hours value shall increment by 1 accordingly for no of press> 3 secSELECT Hour value saved and minute digits starts to blink
< 1 sec Minutes value will increase by 1 by each press of the “Select” button
> 3 sec Minute value save and PM / AM digits starts to blink< 1 sec PM / AM is interchangeable by each press of the “Select” button> 3 sec PM / AM save and exit from clock set mode
SELECT
SELECTSELECTSELECT
Auto exit without saving changes and continue with previous setting20 secNO ACTION
51
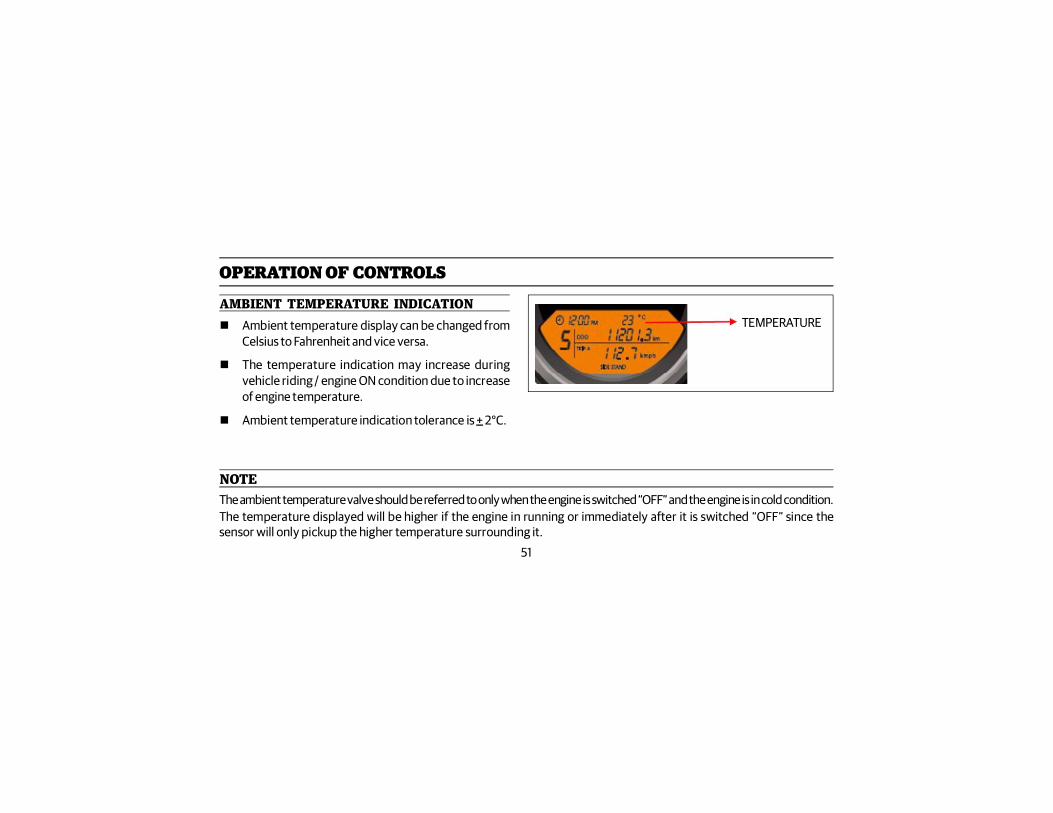
OPERATION OF CONTROLS
AMBIENT TEMPERATURE INDICATION Ambient temperature display can be changed from
Celsius to Fahrenheit and vice versa.
The temperature indication may increase duringvehicle riding / engine ON condition due to increaseof engine temperature.
Ambient temperature indication tolerance is + 2°C.
NOTEThe ambient temperature valve should be referred to only when the engine is switched “OFF” and the engine is in cold condition.The temperature displayed will be higher if the engine in running or immediately after it is switched “OFF” since thesensor will only pickup the higher temperature surrounding it.
TEMPERATURE
52
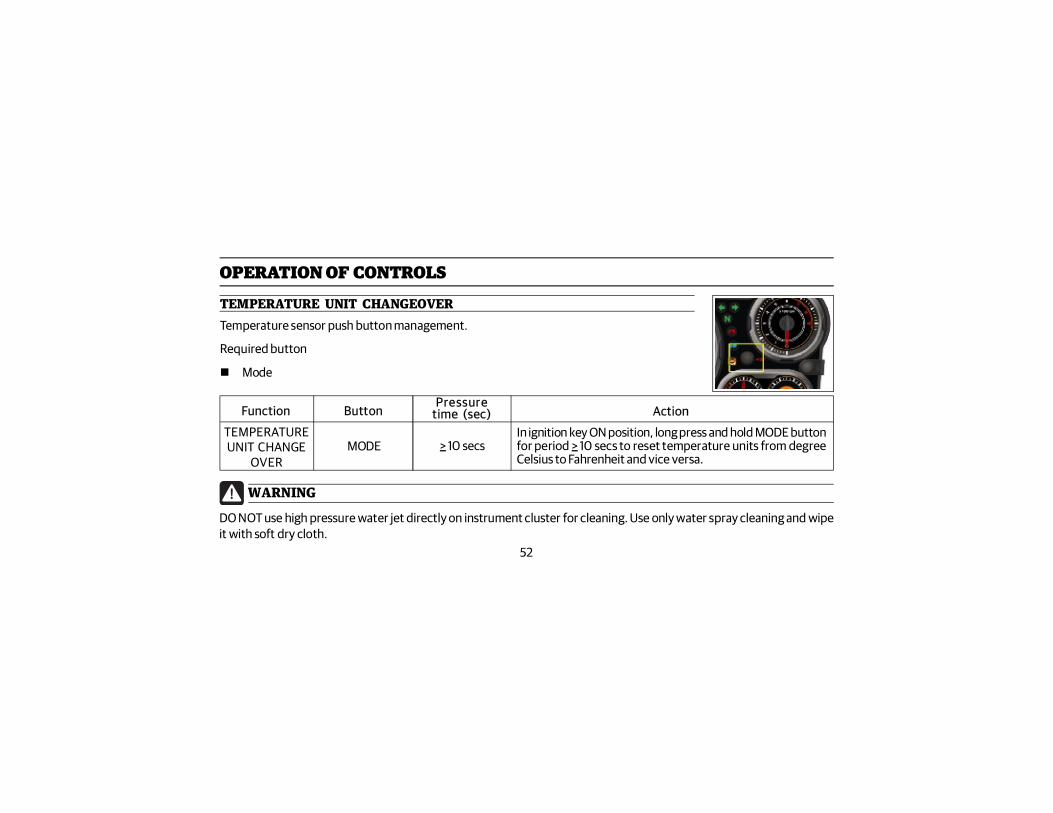
TEMPERATURE UNIT CHANGEOVERTemperature sensor push button management.
Required button
Mode
Function
MODE
ButtonPressure
time (sec) Action
> 10 secsIn ignition key ON position, long press and hold MODE buttonfor period > 10 secs to reset temperature units from degreeCelsius to Fahrenheit and vice versa.
TEMPERATUREUNIT CHANGE
OVER
OPERATION OF CONTROLS
DO NOT use high pressure water jet directly on instrument cluster for cleaning. Use only water spray cleaning and wipeit with soft dry cloth.
WARNING
53
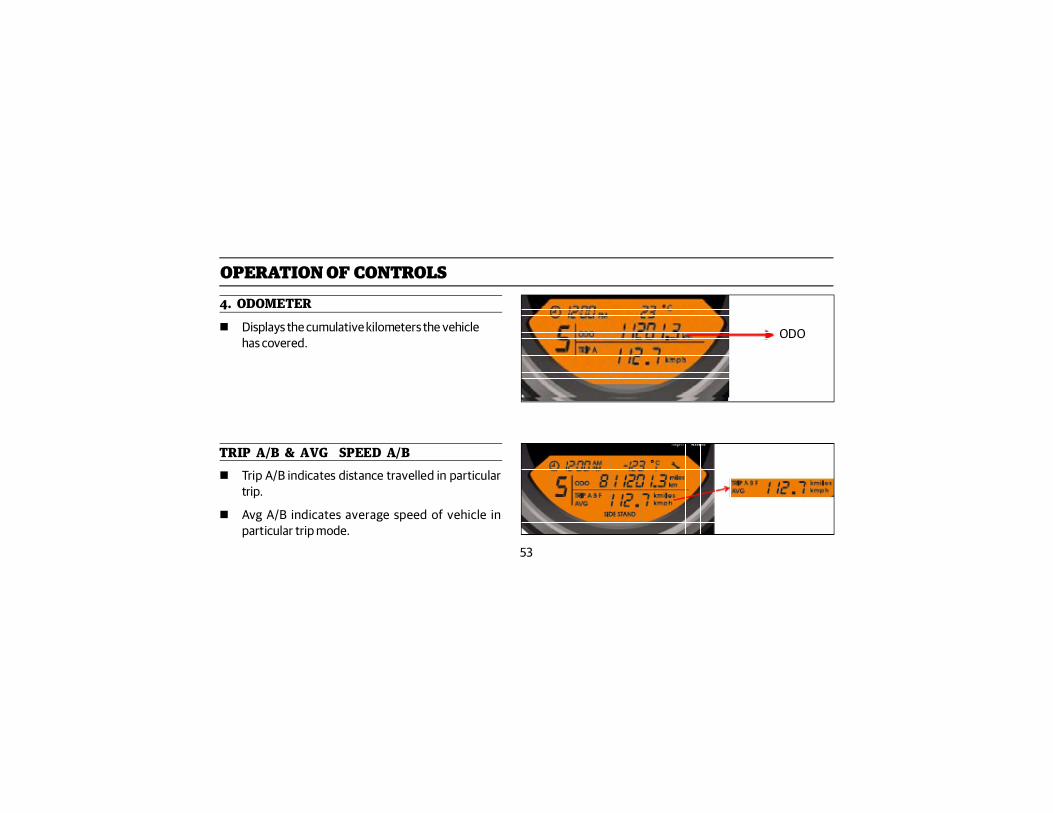
ODO
4. ODOMETER
TRIP A/B & AVG SPEED A/B
OPERATION OF CONTROLS
Displays the cumulative kilometers the vehiclehas covered.
Trip A/B indicates distance travelled in particulartrip.
Avg A/B indicates average speed of vehicle inparticular trip mode.
54
OPERATION OF CONTROLS
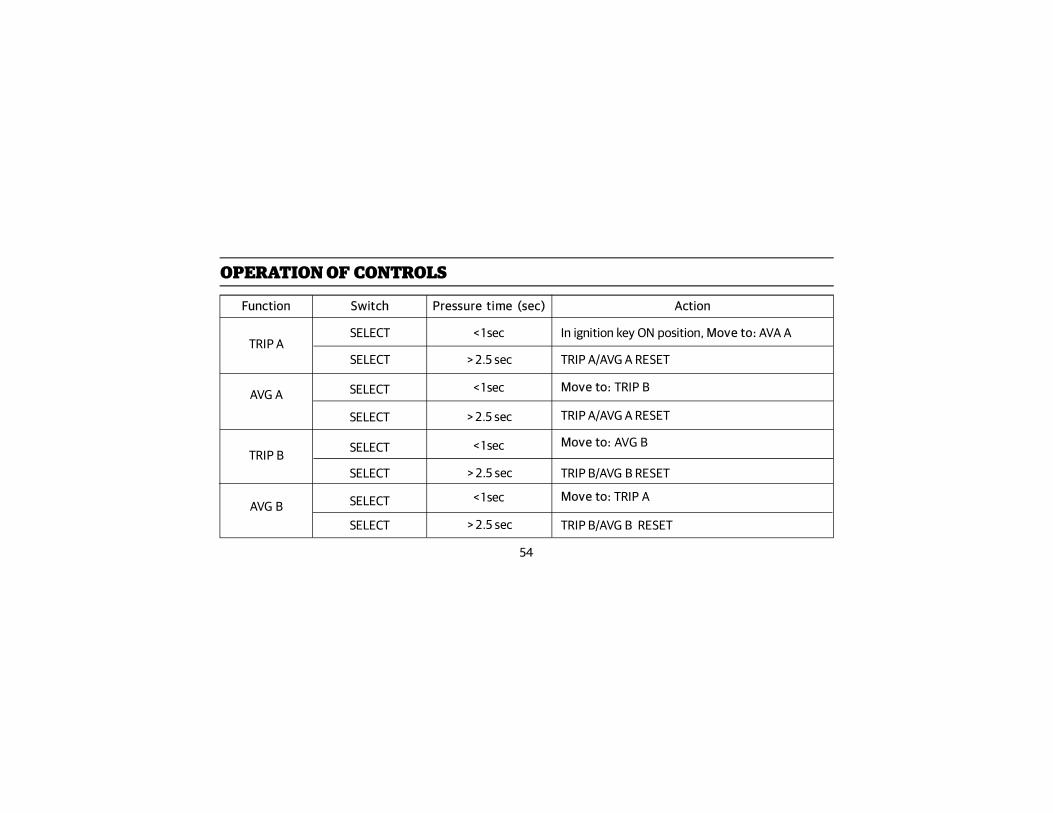
Function Switch Pressure time (sec) Action
SELECT < 1 sec In ignition key ON position, Move to: AVA ATRIP A
> 2.5 sec TRIP A/AVG A RESET
SELECT < 1 sec Move to: TRIP BAVG A
> 2.5 sec TRIP A/AVG A RESET
< 1 sec Move to: AVG BTRIP B
> 2.5 sec TRIP B/AVG B RESET
< 1 secAVG B
> 2.5 sec TRIP B/AVG B RESET
SELECT
SELECT
SELECT
SELECT
Move to: TRIP ASELECT
SELECT
55
OPERATION OF CONTROLS
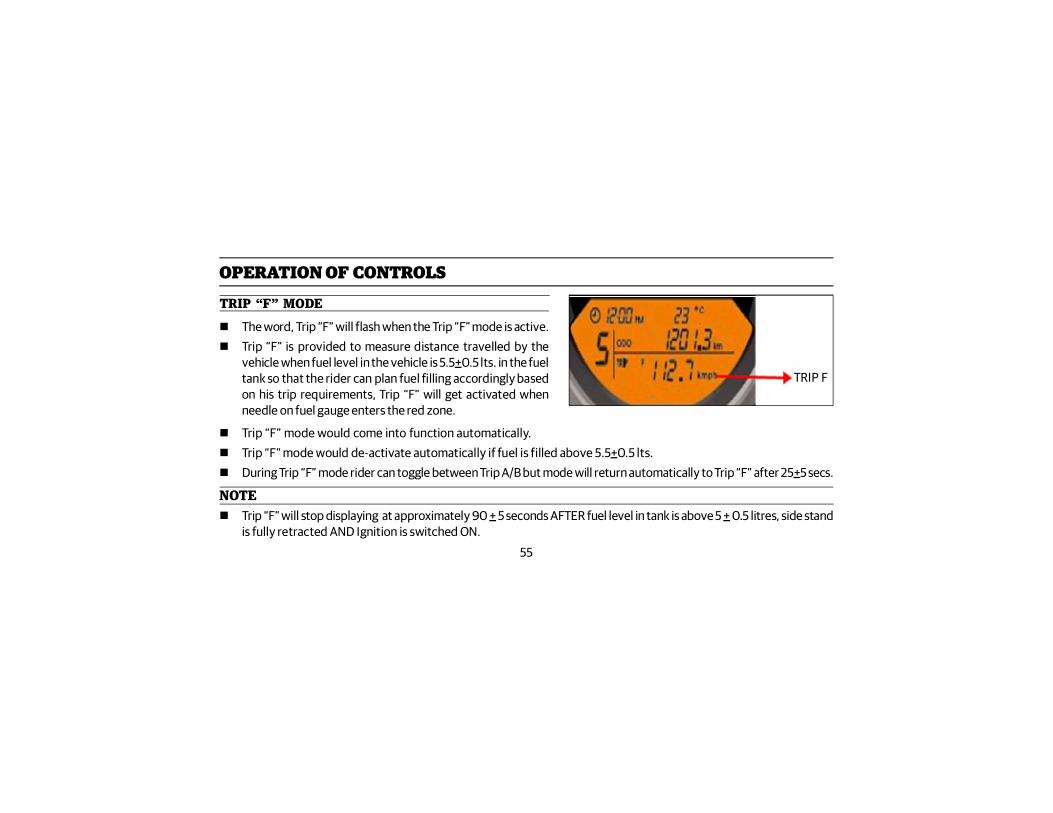
The word, Trip “F” will flash when the Trip “F” mode is active. Trip “F” is provided to measure distance travelled by the
vehicle when fuel level in the vehicle is 5.5+0.5 lts. in the fueltank so that the rider can plan fuel filling accordingly basedon his trip requirements, Trip “F” will get activated whenneedle on fuel gauge enters the red zone.
TRIP “F” MODE
NOTE Trip “F” will stop displaying at approximately 90 + 5 seconds AFTER fuel level in tank is above 5 + 0.5 litres, side stand
is fully retracted AND Ignition is switched ON.
Trip “F” mode would come into function automatically. Trip “F” mode would de-activate automatically if fuel is filled above 5.5+0.5 lts. During Trip “F” mode rider can toggle between Trip A/B but mode will return automatically to Trip “F” after 25+5 secs.
TRIP F
56
OPERATION OF CONTROLS
WARNING
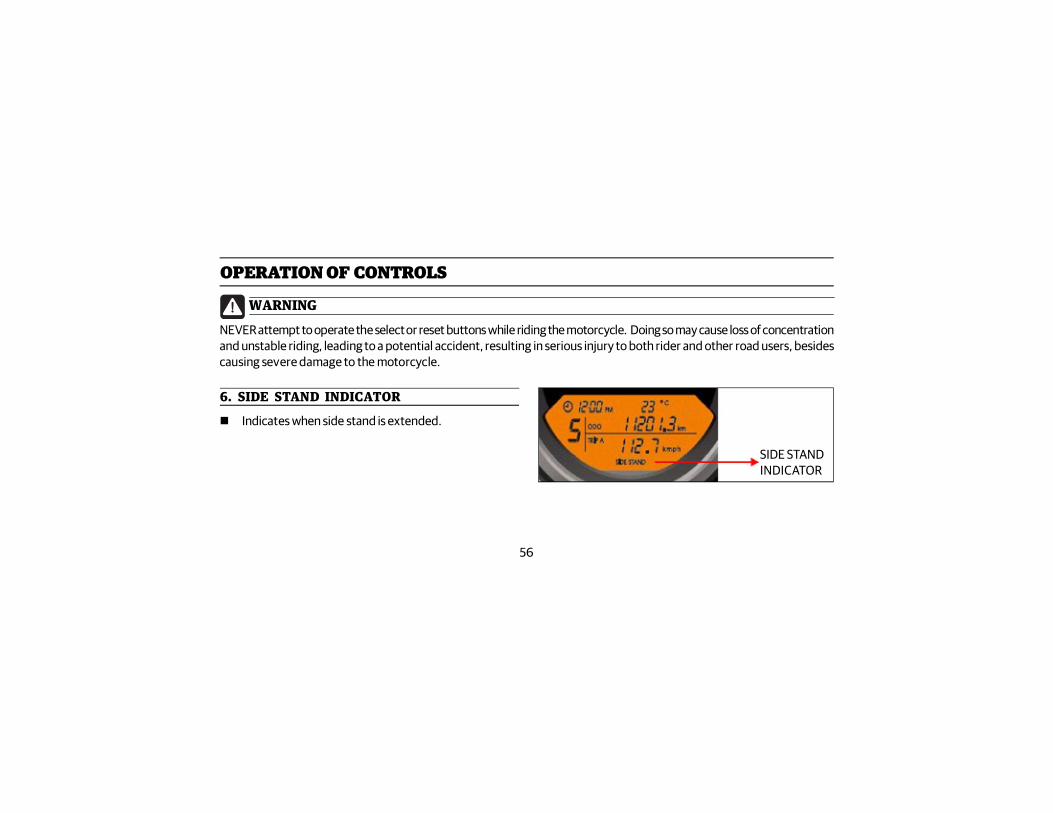
6. SIDE STAND INDICATOR
Indicates when side stand is extended.
SIDE STANDINDICATOR
NEVER attempt to operate the select or reset buttons while riding the motorcycle. Doing so may cause loss of concentrationand unstable riding, leading to a potential accident, resulting in serious injury to both rider and other road users, besidescausing severe damage to the motorcycle.
57
GEARPOSITION
OPERATION OF CONTROLS
Displays the gear position in which the vehicle istraveling.
When in neutral the indication will be “0”. When in gear the appropriate number between 1 to
5 will be displayed.
GEAR POSITION INDICATION
1. Turn Left : Left turn signal ON.
2. Turn right : Right turn signal ON.
3. Neutral : Transmission is in Neutral.
4. Low Battery Indication : Indicator will glowcontinuously if ignition switch is ON & engine is
TURN LEFT
NEUTRAL
TURN RIGHT
ENGINE MIL
LOW BATTERYINDICATIONHI BEAMINDICATIONABS MIL
C. TELL TALES
58
OPERATION OF CONTROLSnot running. Indication will switch off as soon as engine is started. If battery voltage is below 12 V, indicator will glowcontinuously indicating a low battery.
5. High Beam Indication : Head lamp high beam ‘ON’.
6. EMS Malfunction Indication :
Will be illuminated as soon as ignition & stop switch are ‘ON’ and will go ‘OFF’ after the engine is started.
Will remain continuously ‘ON’ incase of any malfunction of the EMS.
7. ABS MIL : Will be continuously ‘ON’ during initial check up (until or after vehicle running for a particular distance/speed) and will turn ‘OFF’ if system is ok, then will light up again in case of any ABS system malfunction.
CAUTIONDO NOT run motorcycle incase the malfunction remains ‘ON’ continuously as it can cause severe damage to the ECU &Sensors. Please visit the nearest authorized Royal Enfield dealer to diagnose & rectify the defect in the EMS.
59
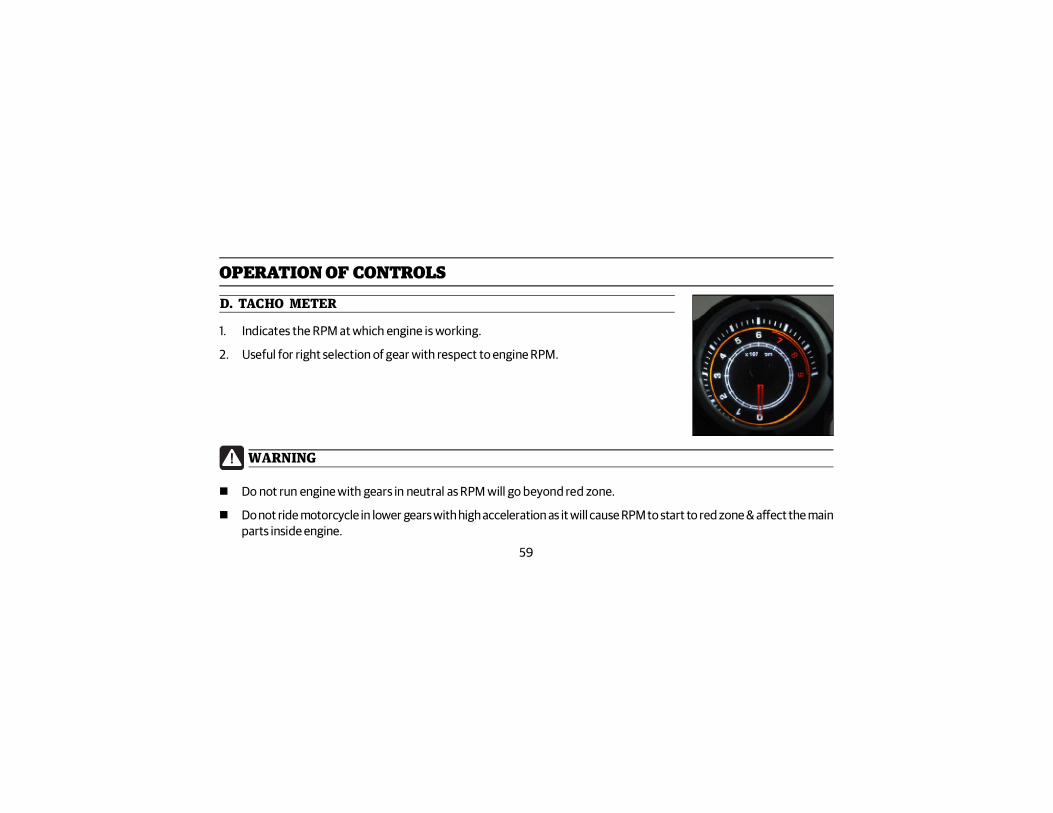
D. TACHO METER
1. Indicates the RPM at which engine is working.
2. Useful for right selection of gear with respect to engine RPM.
WARNING
Do not run engine with gears in neutral as RPM will go beyond red zone.
Do not ride motorcycle in lower gears with high acceleration as it will cause RPM to start to red zone & affect the mainparts inside engine.
OPERATION OF CONTROLS
60
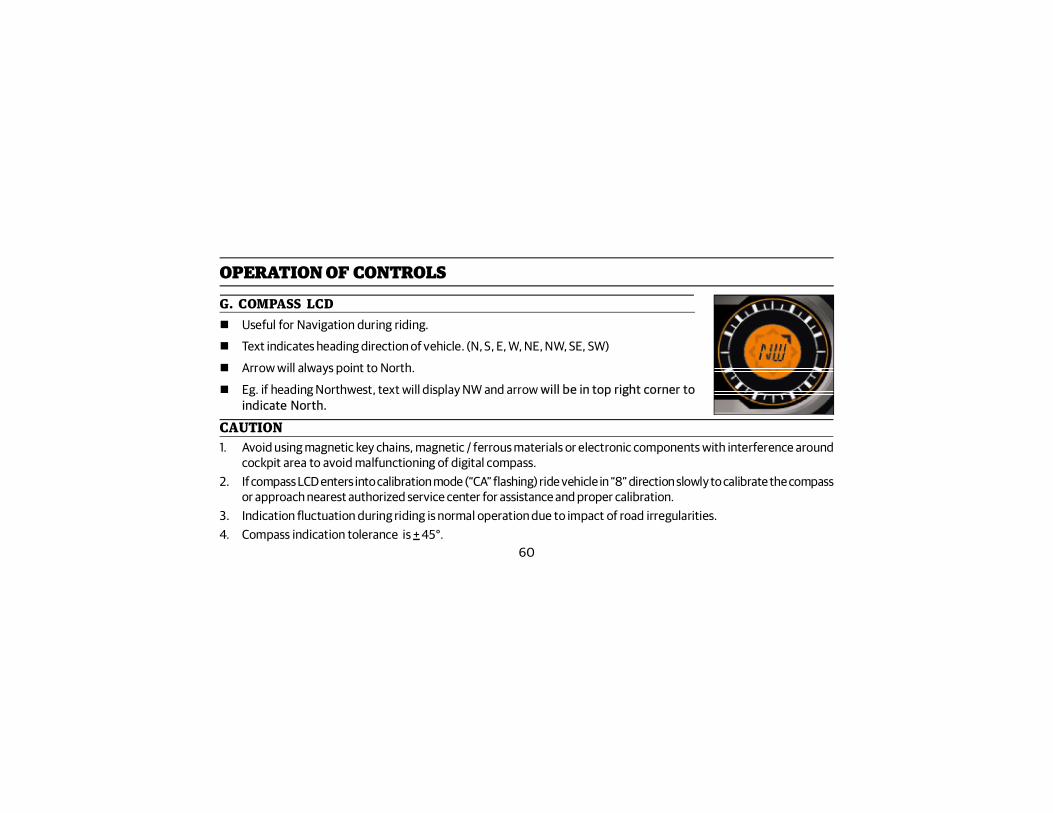
G. COMPASS LCD
OPERATION OF CONTROLS
Useful for Navigation during riding.
Text indicates heading direction of vehicle. (N, S, E, W, NE, NW, SE, SW)
Arrow will always point to North.
Eg. if heading Northwest, text will display NW and arrow will be in top right corner toindicate North.
CAUTION1. Avoid using magnetic key chains, magnetic / ferrous materials or electronic components with interference around
cockpit area to avoid malfunctioning of digital compass.2. If compass LCD enters into calibration mode (“CA” flashing) ride vehicle in “8” direction slowly to calibrate the compass
or approach nearest authorized service center for assistance and proper calibration.3. Indication fluctuation during riding is normal operation due to impact of road irregularities.4. Compass indication tolerance is + 45°.
61
OPERATION OF CONTROLS
H. FUEL GAUGE
WARNINGDo not use the motorcycle for long duration with the fuel indication in red zone. Refuel at the earliest.Failure to do so may cause the motorcycle to run out of fuel and get stranded, in addition to causing serious damage tothe fuel pump.
WARNING
DO NOT focus on the compass while riding. Doing so many cause loss of concentration and unstable riding, leading toa potential accident, resulting in serious injury to both rides & other road users besides causing severe damage to themotorcycle.
Indicates fuel level in tank.
62
PRE OPERATIONAL CHECKS1. Adequate fuel in fuel tank for the journey planned.
2. Tyres inflated to correct pressure.
3. No side wall cracks, cuts or abrasions in the front and rear tyres.
4. Rear chain for proper tension and sufficiently lubricated.
5. Engine Oil level.
6. Control cables, inner, not damaged, frayed or broken. Clutch and accelerator controls working smoothly.
7. Front and rear brakes efficiency.
8. Hydraulic oil level correct in both from and rear master cylinders.
9. Free movement of handle bar to left and right sides.
10. All electrical controls, horn working correctly.
63
WARNINGFor your personal welfare and safety, these pre-operational checks should be performed periodically. Failure to do so mayaffect safe operation, damage your motorcycle and could result in an accident causing serious injury.
PRE OPERATIONAL CHECKS11. Head lamp, tail lamps, brake lamps and indicator lamps working correctly.
12. Front and rear wheel axle nuts tightened properly to torque.
13. Front and rear wheel spokes having proper tightness, no loose or broken spokes.
14. All fasteners are tight to required torque.
15. Engine idling correctly and smooth.
16. No abnormal noise / leak from engine.
64
CARGO & ACCESSORIES
DO NOT exceed 70 MPH (110 Km/h) riding solo.
DO NOT exceed 55 MPH (90 Km/h) when carrying a passenger or cargo.
Keep cargo weight concentrated close to the motorcycle and as low as possible; this minimizes the change in themotorcycle’s center of gravity. Distribute weight evenly on both sides of the motorcycle.
Royal Enfield cannot test and make specific recommendations concerning specific or a combination of accessories sold.Therefore, the rider must be responsible for safe operation of the motorcycle when installing accessories or carryingadditional weight.
The following guidelines should be used when equipping a motorcycle, carrying cargo and / or passengers.
DO NOT load weight or install accessories improperly on the motorcycle. Doing so may affect the motorcycle’s stabilityhandling characteristics, and safe operating speed which could result in serious accident causing serious injury.
WARNING
65
CARGO & ACCESSORIES DO NOT load bulky items too far behind the rider or add weight to the handlebars or front forks.
DO NOT exceed 5 pounds (2.3 kgs) maximum load in each saddlebag.
Recheck the cargo periodically.
Be sure cargo is secured and will not shift while riding. Accessories secured loosely may affect the riding of themotorcycle and affect the stability of the motorcycle.
Additional electrical accessories and equipments may overload the motorcycle’s electrical system and will result insystem and / or component failure.
Large surfaces such as fairings, windshields, backrests and luggage racks can adversely affect handling of themotorcycle. Only genuine Royal Enfield accessories, designed specifically for the motorcycle model should be usedwith proper installation.
66
Royal Enfield motorcycles have been carefully designed and engineered for riding in their original configuration. DONOT alter the handling characteristics of these motorcycles. Doing so may affect its stability and could cause an accidentresulting in serious injury.
WARNING
CARGO & ACCESSORIES
Royal Enfield cautions you against use of nonstandard parts such as aftermarket and custom made extended front forkswhich may adversely affect the performance and handling of the motorcycle. Removing or altering original parts mayadversely affect the performance of the motorcycle, causing an accident, which could result in serious injury.
WARNING
DO NOT ignore model / design specifications. Doing so constitutes to motorcycle misuse which may adversely affect thehandling and performance of the motorcycle causing an accident, which could result in serious injury.
WARNING

67
CARGO & ACCESSORIESLOADING
Please do not fit Non OE or Non genuine accessories as they may cause damage to the motorcycle and also affect theriding and handling of the motorcycle.
Please ensure cargo is securely strapped to the rear and sides of the motorcycle and do not become loose or shift whileriding.
Ensure the weight is distributed evenly on both sides of the motorcycle. Do not carry excessively heavy or huge cargo on the motorcycle. The permissibly weight of the cargo that can be strapped to the luggage carrier is 3.5 Kgs. Do not hang any items on the handle bar and luggage carrier while riding which will lead to damage for the parts nearby.
WARNINGPlease exercise utmost caution while carrying cargo or luggage on the motorcycle. Failure to adhere to the aboveprecautions can cause loss of control on the motorcycle, leading to a potential accident, resulting in serious injury to bothrider and other road users, besides causing severe damage to the motorcycle.Total weight of the rider and any passenger, accessories and luggage must not exceed the maximum load limit.
68
CARGO & ACCESSORIESCAUTIONExhaust gases contains poisonous carbon monoxide and chemicals, known to cause Cancer, Birth defects or otherreproductive defects. Please park the motorcycle only in a well ventilated area and do not stay in the same place wherethe motorcycle is parked, especially when the engine and exhaust system are hot.
WARNINGDO NOT tow a disabled motorcycle. The steering and handling of the motorcycle will be impaired due to the force of thetowline. Towing a motorcycle can cause loss of control on the motorcycle, leading to a potential accident, resulting inserious injury to both rider and other road users, besides causing severe damage to the motorcycle.
WARNINGDO NOT attach a trailer to the motorcycle Attaching a trailer can cause loss of control on the motorcycle, leading to a potentialaccident, resulting in serious injury to both rider and other road users, besides causing severe damage to the motorcycle.
WARNINGMax load on grab rail not to exceed 5 Kg.
69
The Himalayan Motorcycle is capable of consistent high speeds. However as with any new motorcycle, a “RUNNING-IN”procedure is essential to help in proper “Bedding-In” of the various moving parts in your motorcycle and to achieveoptimum performance subsequently.
1. During the first 2000 Kms (1200 Miles) of run, do not exceed the speed limits as shown in the table below.
2. Do not exceed maximum specified pay load.
3. Warm up the engine for a few minutes at idling speed to allow engine oil to lubricate all the moving parts in the enginebefore riding the motorcycle.
4. Avoid full throttle operation and do not ride at constant throttle continuously. Vary the speed by 10% while riding.
5. Avoid sudden accelerations and racing starts.
6. Avoid prolonged full-throttle operation. Vary speed occasionally.
RUNNING IN PERIOD
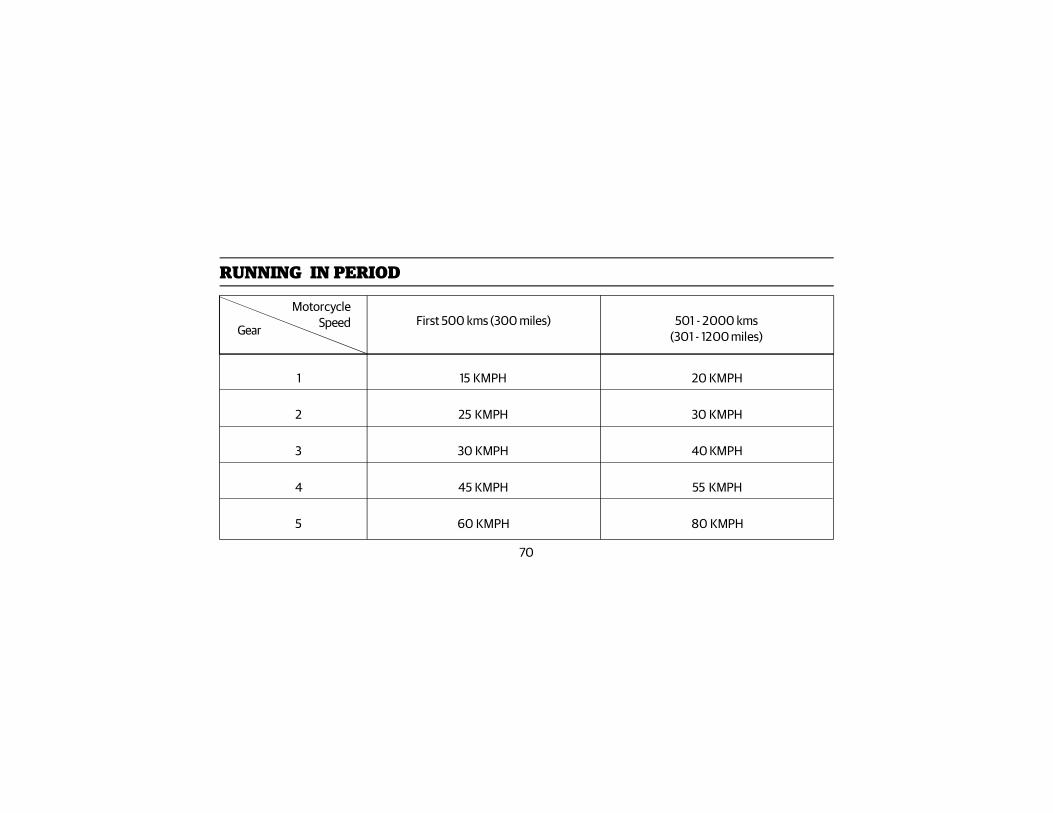
70
First 500 kms (300 miles) 501 - 2000 kms(301 - 1200 miles)
1 15 KMPH 20 KMPH
2 25 KMPH 30 KMPH
3 30 KMPH 40 KMPH
4 45 KMPH 55 KMPH
5 60 KMPH 80 KMPH
MotorcycleSpeedGear
RUNNING IN PERIOD
71
YOUR MOTORCYCLE IS FITTED WITH THE FOLLOWING WARNING INDICATIONS AND SAFETYSYSTEMS:
WARNING INDICATIONS & SAFETY SYSTEMS
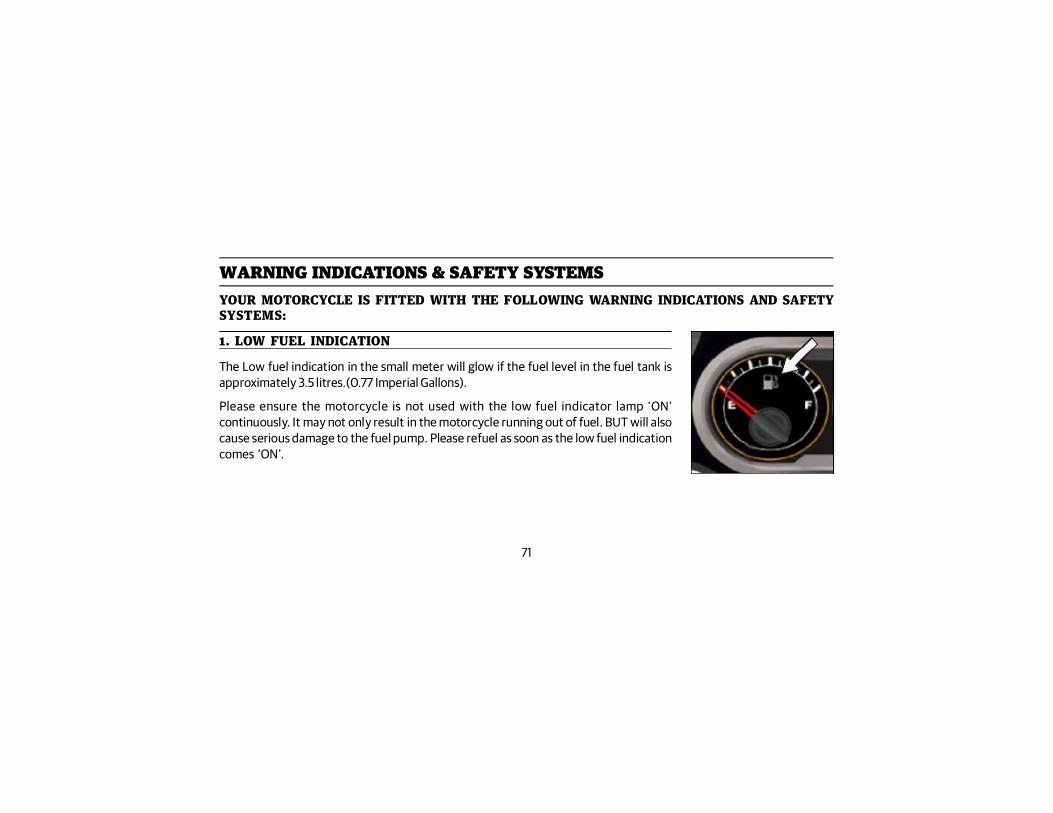
The Low fuel indication in the small meter will glow if the fuel level in the fuel tank isapproximately 3.5 litres.(0.77 Imperial Gallons).
Please ensure the motorcycle is not used with the low fuel indicator lamp ‘ON’continuously. It may not only result in the motorcycle running out of fuel. BUT will alsocause serious damage to the fuel pump. Please refuel as soon as the low fuel indicationcomes ‘ON’.
1. LOW FUEL INDICATION
72
WARNING INDICATIONS & SAFETY SYSTEMS
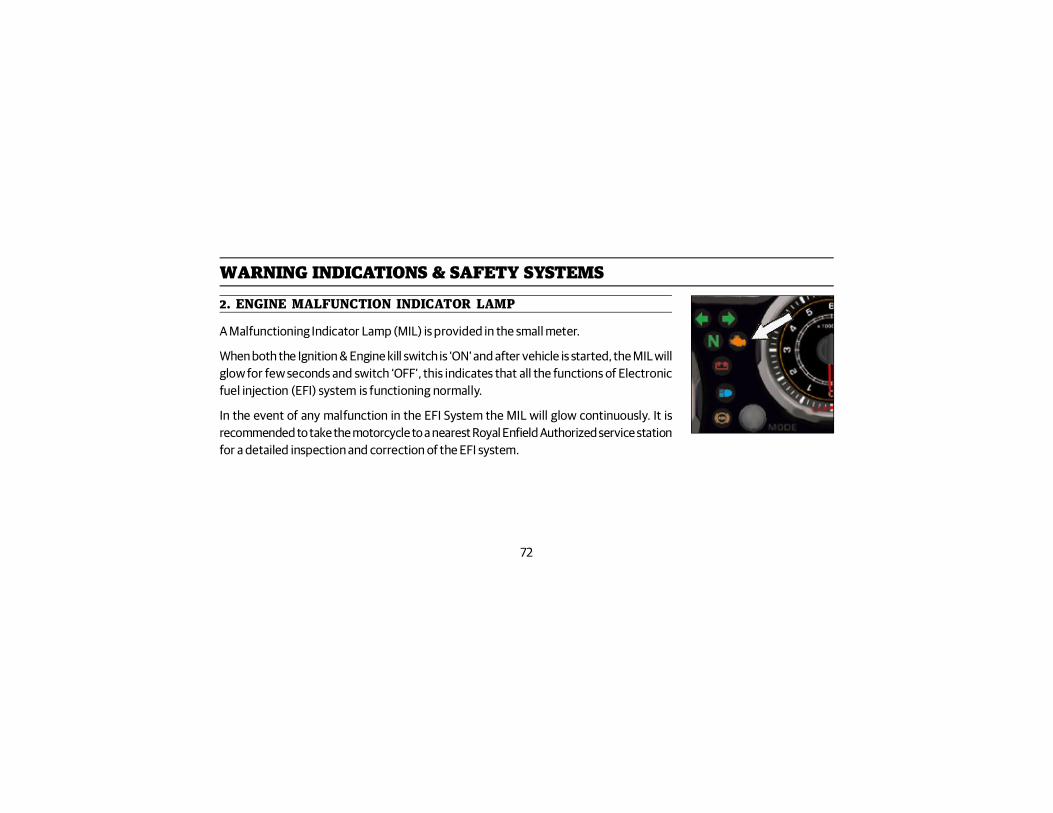
A Malfunctioning Indicator Lamp (MIL) is provided in the small meter.
When both the Ignition & Engine kill switch is ‘ON’ and after vehicle is started, the MIL willglow for few seconds and switch ‘OFF’, this indicates that all the functions of Electronicfuel injection (EFI) system is functioning normally.
In the event of any malfunction in the EFI System the MIL will glow continuously. It isrecommended to take the motorcycle to a nearest Royal Enfield Authorized service stationfor a detailed inspection and correction of the EFI system.
2. ENGINE MALFUNCTION INDICATOR LAMP
73
WARNING INDICATIONS & SAFETY SYSTEMS
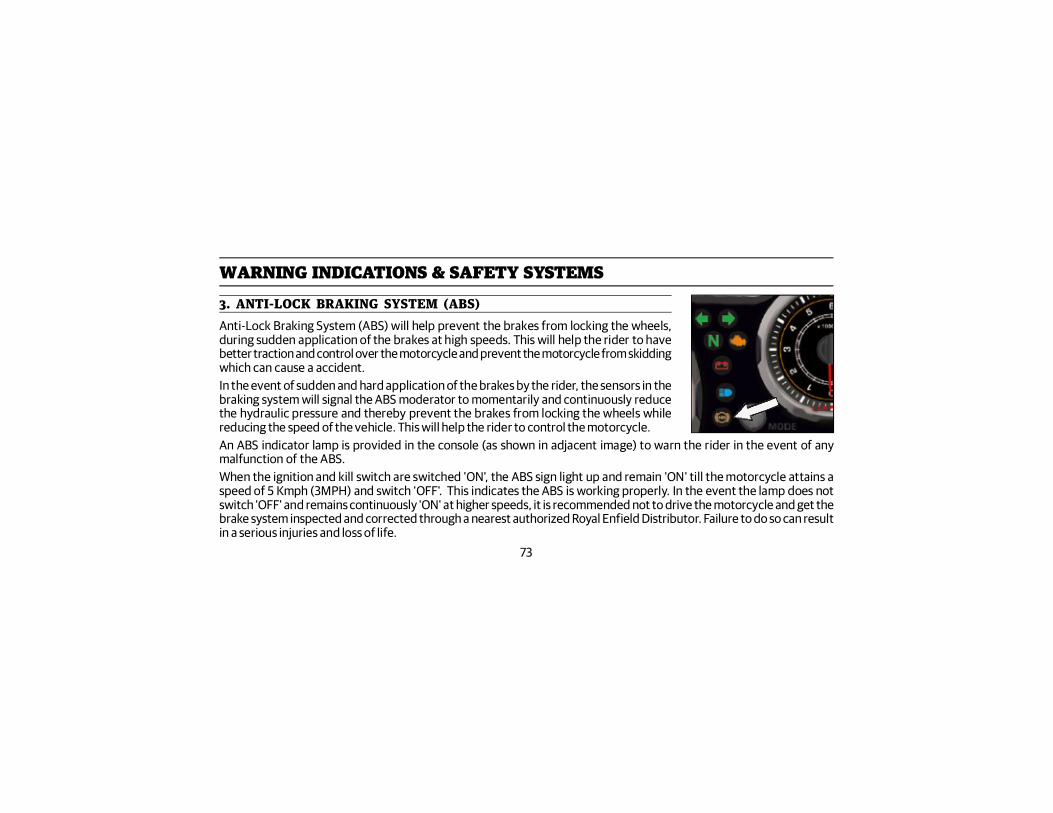
Anti-Lock Braking System (ABS) will help prevent the brakes from locking the wheels,during sudden application of the brakes at high speeds. This will help the rider to havebetter traction and control over the motorcycle and prevent the motorcycle from skiddingwhich can cause a accident.In the event of sudden and hard application of the brakes by the rider, the sensors in thebraking system will signal the ABS moderator to momentarily and continuously reducethe hydraulic pressure and thereby prevent the brakes from locking the wheels whilereducing the speed of the vehicle. This will help the rider to control the motorcycle.An ABS indicator lamp is provided in the console (as shown in adjacent image) to warn the rider in the event of anymalfunction of the ABS.When the ignition and kill switch are switched 'ON', the ABS sign light up and remain 'ON' till the motorcycle attains aspeed of 5 Kmph (3MPH) and switch 'OFF'. This indicates the ABS is working properly. In the event the lamp does notswitch 'OFF' and remains continuously 'ON' at higher speeds, it is recommended not to drive the motorcycle and get thebrake system inspected and corrected through a nearest authorized Royal Enfield Distributor. Failure to do so can resultin a serious injuries and loss of life.
3. ANTI-LOCK BRAKING SYSTEM (ABS)

74
CAUTION (ABS)
WARNING INDICATIONS & SAFETY SYSTEMS
ABS is a safety feature to help prevent locking of wheels during sudden application of brakes. It is by no means a substitutefor good riding practices and anticipatory braking.
Please ride carefully and apply brakes cautiously, especially while cornering. ABS cannot estimate the “weight shifts” andmomentum of the motorcycle while negotiating a corner and therefore prevent skidding due to loss of traction.
Please anticipate the stopping distance required for the speed of travel and apply brakes well in advance so as to bring themotorcycle to a safe stop.
Please apply both brakes to stop - front brake momentarily earlier, followed by rear brake, to have better traction andcontrol of the motorcycle.
Always ensure that you ride well within the legal speed limits.
Failure to adhere to the above can cause an accident resulting in serious injuries and loss of life.
75
WARNING INDICATIONS & SAFETY SYSTEMS
Don’ts
DO NOT RELEASE the brake lever / pedal whenpulsations are felt during hard application of thebrakes in an emergency situation. The pulsationsonly indicate that the ABS is activated.
DO NOT APPLY only the front OR rear brake as itcan lead to inefficient braking.
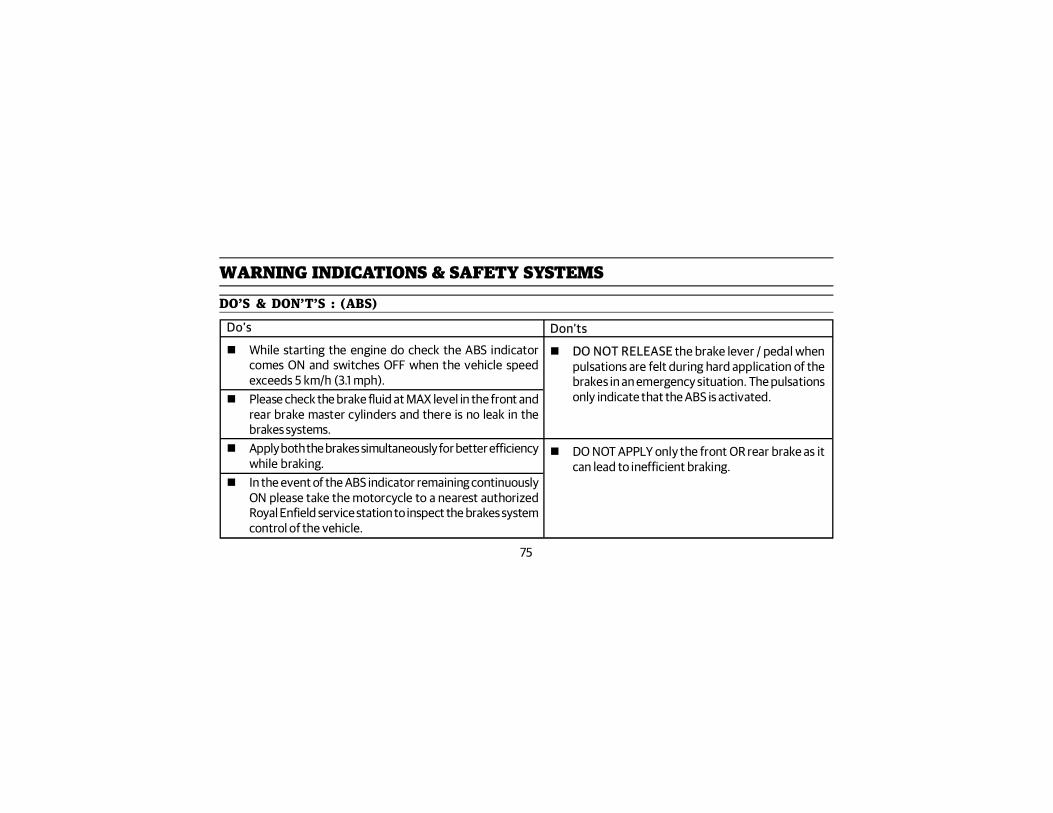
Do’s
While starting the engine do check the ABS indicatorcomes ON and switches OFF when the vehicle speedexceeds 5 km/h (3.1 mph).
Please check the brake fluid at MAX level in the front andrear brake master cylinders and there is no leak in thebrakes systems.
Apply both the brakes simultaneously for better efficiencywhile braking.
In the event of the ABS indicator remaining continuouslyON please take the motorcycle to a nearest authorizedRoyal Enfield service station to inspect the brakes systemcontrol of the vehicle.
DO’S & DON’T’S : (ABS)
76
WARNING INDICATIONS & SAFETY SYSTEMS
In the event of motorcycle falling over on eitherof its sides with the engine running and the gears engaged the Roll oversensor will "disable" both the ignition and fuel systems and switch ‘OFF’ the engine. This is to prevent any damage to themotorcycle and its rider. To reset the Roll over sensor and reactivate the ignition and fuel systems.
Ensure the motorcycle is made upright and is on its center stand.
Ensure gears are in correct neutral and the neutral lamp is glowing in the instrument console.
Switch ‘OFF’ both ignition & stop switches, wait for a few seconds and switch ‘ON’ the Ignition and stop switchagain, to start the engine.
4. ROLL OVER SENSOR
77
STARTING
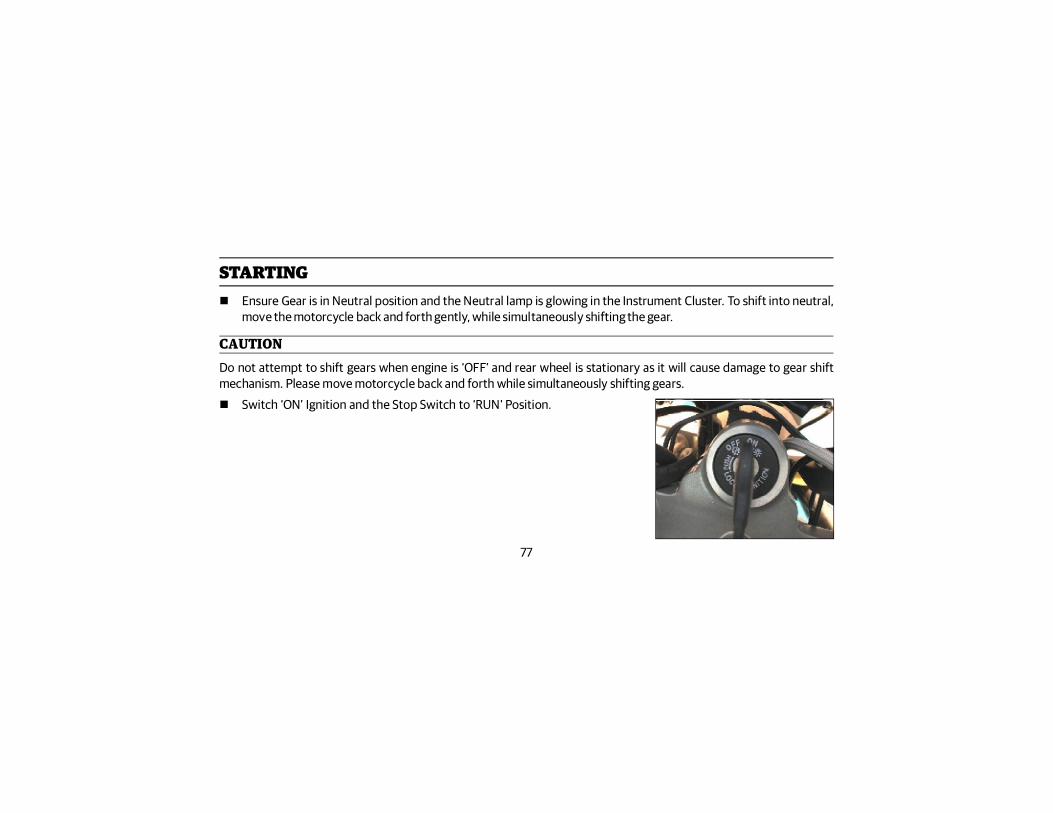
Switch ‘ON’ Ignition and the Stop Switch to ‘RUN’ Position.
Ensure Gear is in Neutral position and the Neutral lamp is glowing in the Instrument Cluster. To shift into neutral,move the motorcycle back and forth gently, while simultaneously shifting the gear.
CAUTIONDo not attempt to shift gears when engine is ‘OFF’ and rear wheel is stationary as it will cause damage to gear shiftmechanism. Please move motorcycle back and forth while simultaneously shifting gears.
78
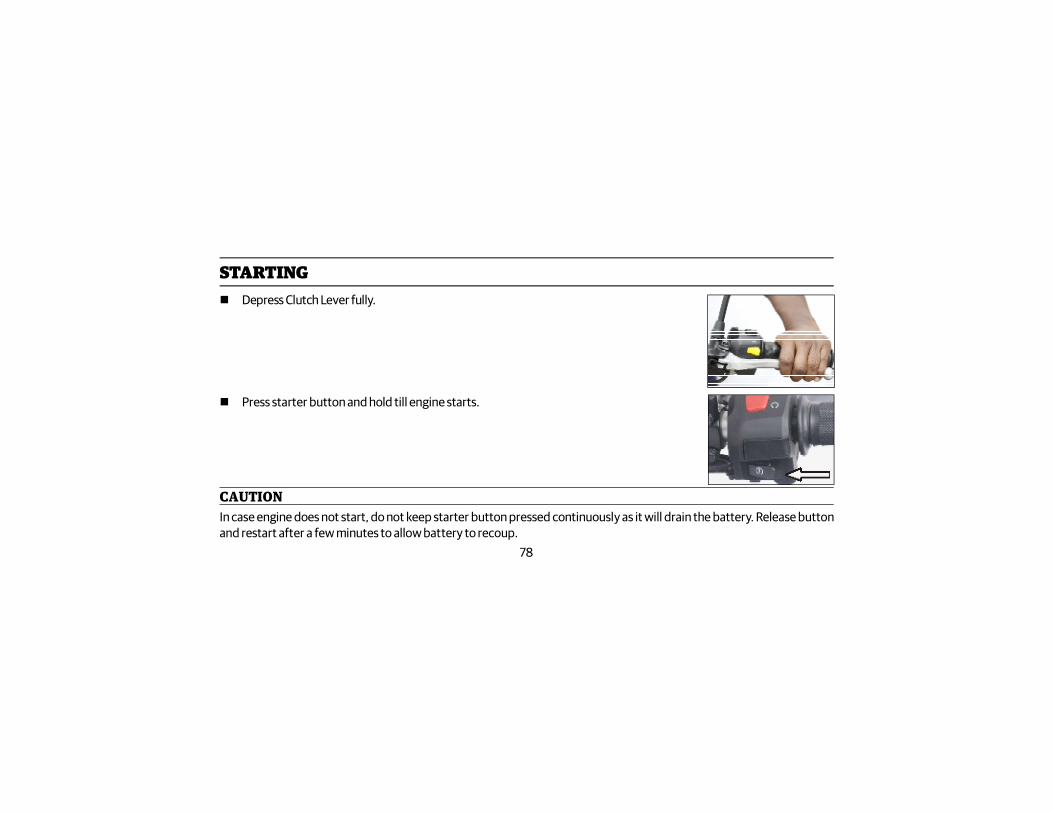
Depress Clutch Lever fully.
Press starter button and hold till engine starts.
CAUTIONIn case engine does not start, do not keep starter button pressed continuously as it will drain the battery. Release buttonand restart after a few minutes to allow battery to recoup.
STARTING
79
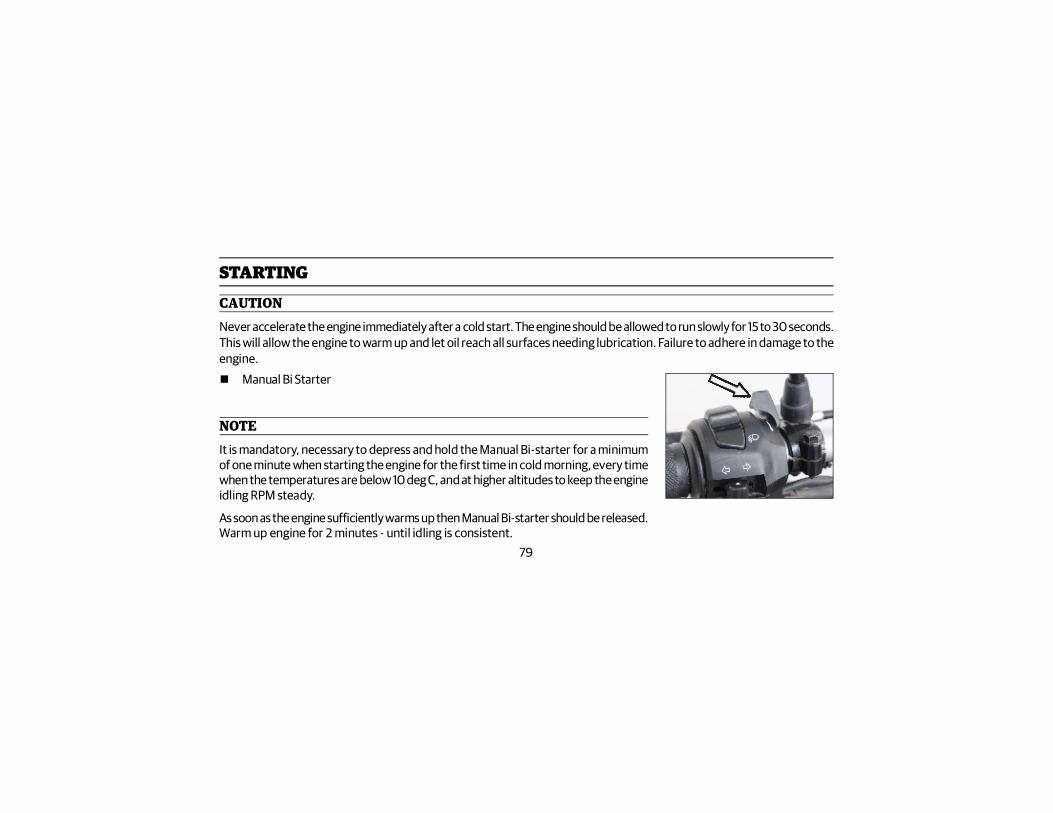
Manual Bi Starter
STARTING
NOTEIt is mandatory, necessary to depress and hold the Manual Bi-starter for a minimumof one minute when starting the engine for the first time in cold morning, every timewhen the temperatures are below 10 deg C, and at higher altitudes to keep the engineidling RPM steady.
As soon as the engine sufficiently warms up then Manual Bi-starter should be released.Warm up engine for 2 minutes - until idling is consistent.
CAUTIONNever accelerate the engine immediately after a cold start. The engine should be allowed to run slowly for 15 to 30 seconds.This will allow the engine to warm up and let oil reach all surfaces needing lubrication. Failure to adhere in damage to theengine.
80
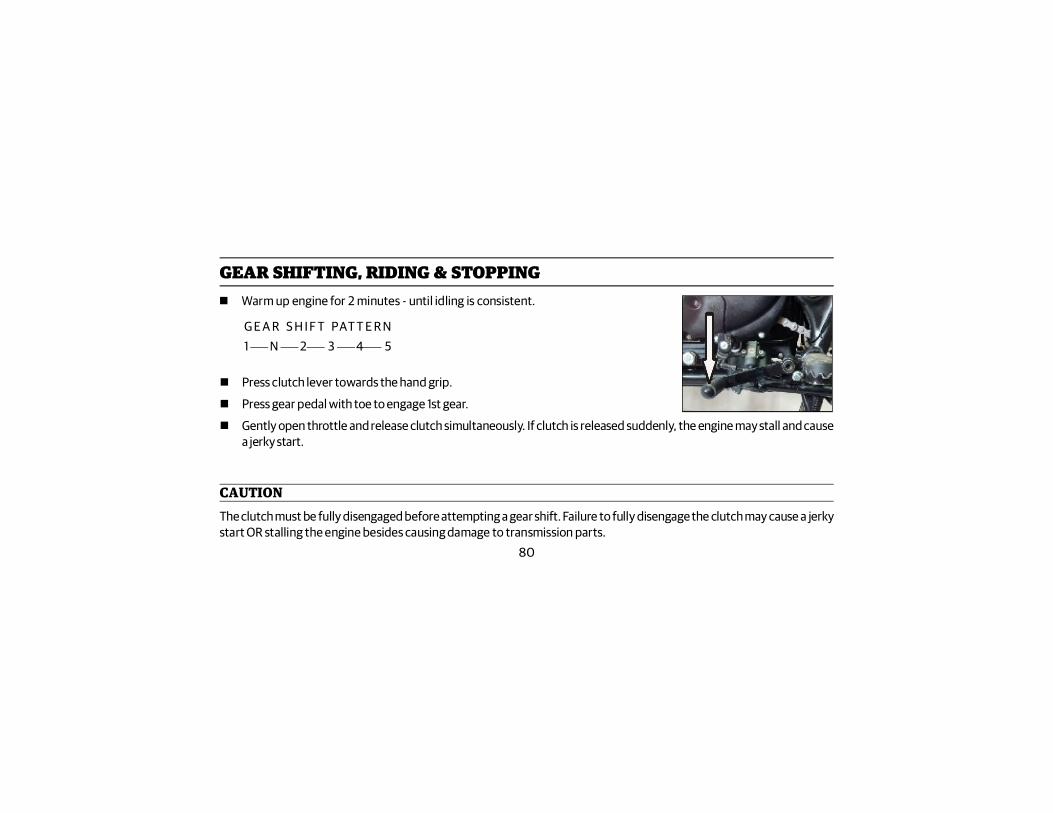
GEAR SHIFTING, RIDING & STOPPING Warm up engine for 2 minutes - until idling is consistent.
G E A R S H I F T PAT T E R N1 N 2 3 4 5
Press clutch lever towards the hand grip.
Press gear pedal with toe to engage 1st gear.
Gently open throttle and release clutch simultaneously. If clutch is released suddenly, the engine may stall and causea jerky start.
CAUTIONThe clutch must be fully disengaged before attempting a gear shift. Failure to fully disengage the clutch may cause a jerkystart OR stalling the engine besides causing damage to transmission parts.
81
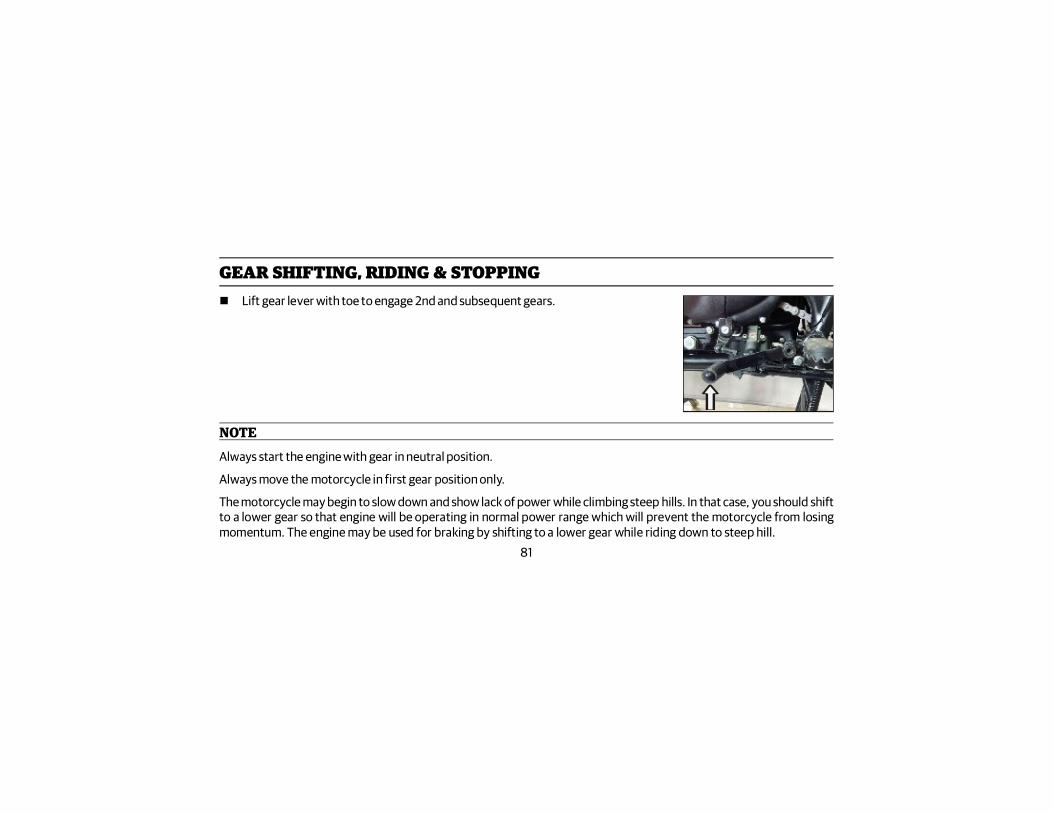
GEAR SHIFTING, RIDING & STOPPING Lift gear lever with toe to engage 2nd and subsequent gears.
NOTEAlways start the engine with gear in neutral position.
Always move the motorcycle in first gear position only.
The motorcycle may begin to slow down and show lack of power while climbing steep hills. In that case, you should shiftto a lower gear so that engine will be operating in normal power range which will prevent the motorcycle from losingmomentum. The engine may be used for braking by shifting to a lower gear while riding down to steep hill.
82
PARKING
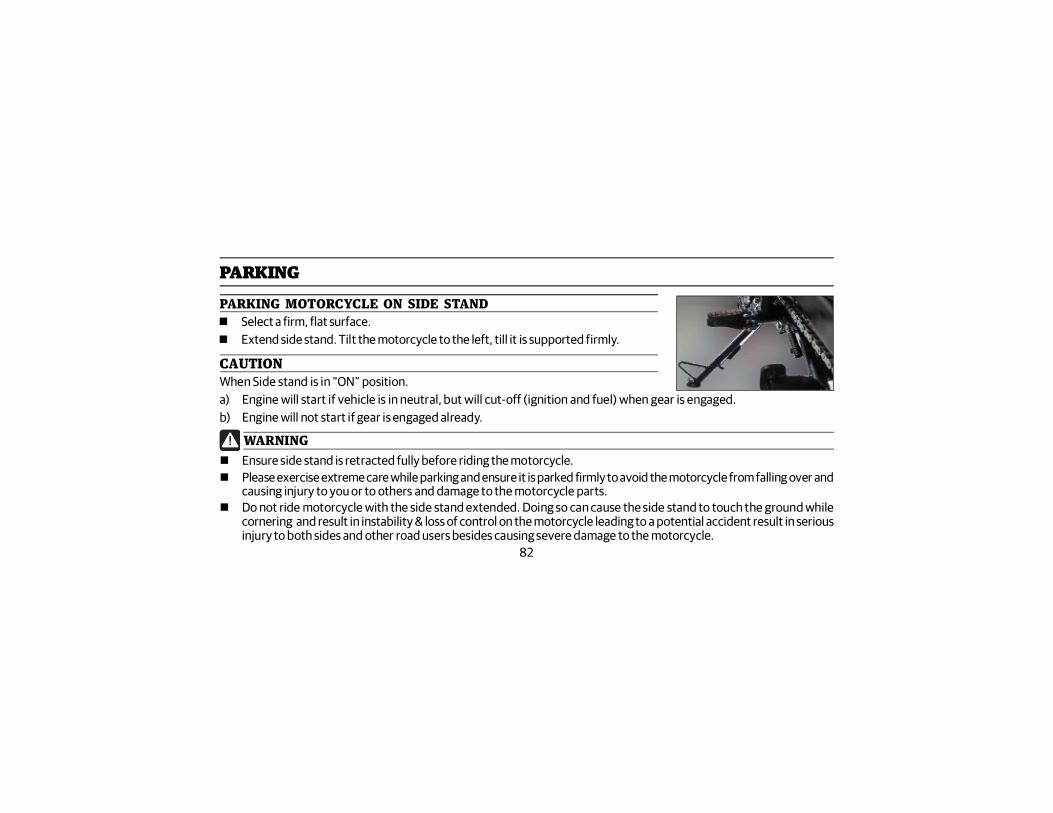
Select a firm, flat surface. Extend side stand. Tilt the motorcycle to the left, till it is supported firmly.
PARKING MOTORCYCLE ON SIDE STAND
WARNING Ensure side stand is retracted fully before riding the motorcycle. Please exercise extreme care while parking and ensure it is parked firmly to avoid the motorcycle from falling over and
causing injury to you or to others and damage to the motorcycle parts. Do not ride motorcycle with the side stand extended. Doing so can cause the side stand to touch the ground while
cornering and result in instability & loss of control on the motorcycle leading to a potential accident result in seriousinjury to both sides and other road users besides causing severe damage to the motorcycle.
CAUTIONWhen Side stand is in “ON” position.a) Engine will start if vehicle is in neutral, but will cut-off (ignition and fuel) when gear is engaged.b) Engine will not start if gear is engaged already.
83
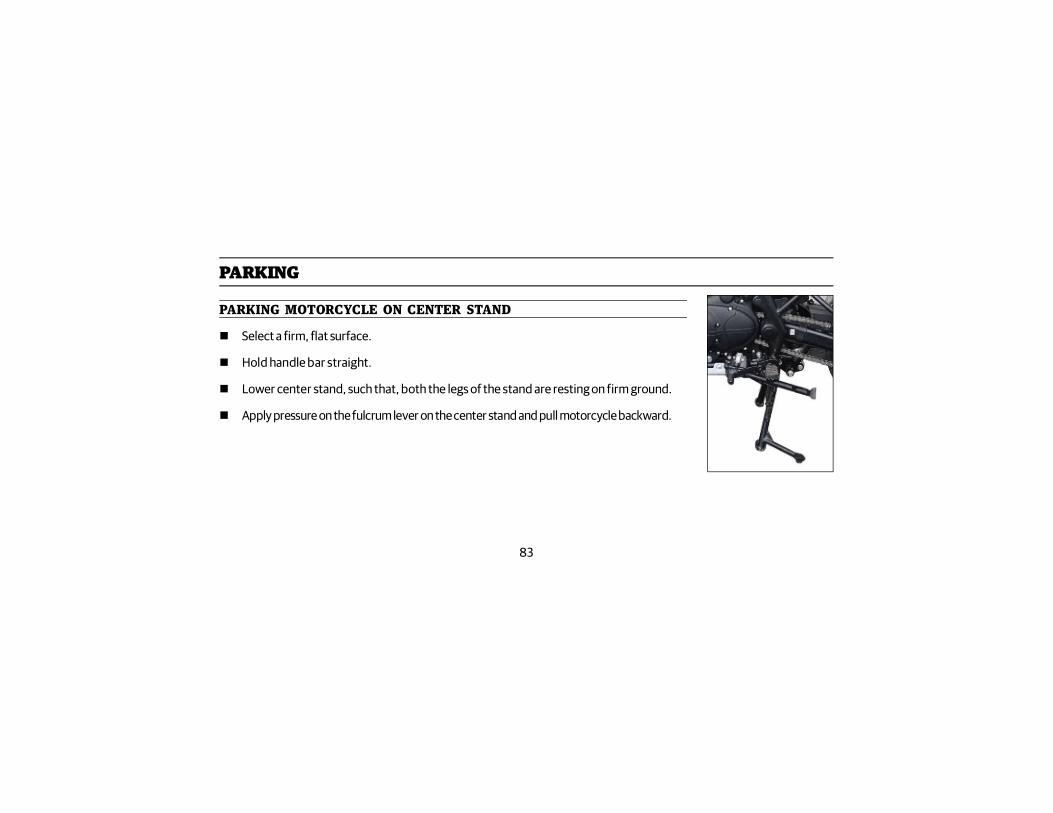
Select a firm, flat surface.
Hold handle bar straight.
Lower center stand, such that, both the legs of the stand are resting on firm ground.
Apply pressure on the fulcrum lever on the center stand and pull motorcycle backward.
PARKING MOTORCYCLE ON CENTER STAND
PARKING
84
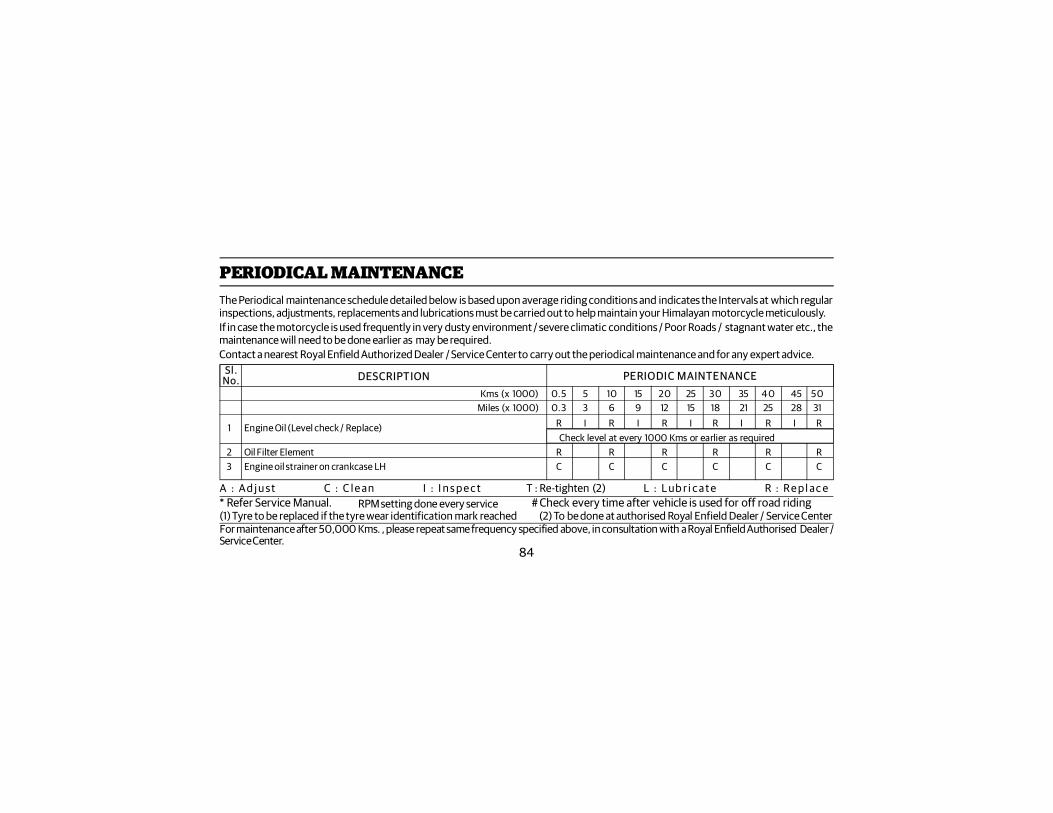
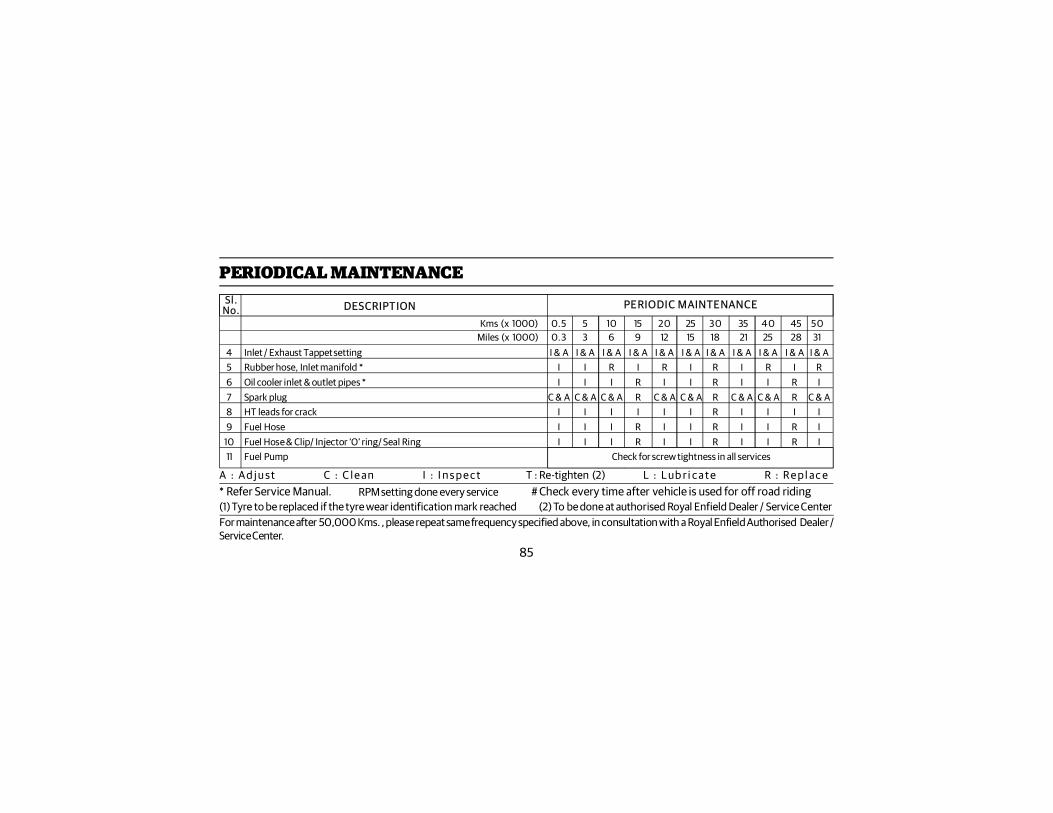
PERIODICAL MAINTENANCEThe Periodical maintenance schedule detailed below is based upon average riding conditions and indicates the Intervals at which regularinspections, adjustments, replacements and lubrications must be carried out to help maintain your Himalayan motorcycle meticulously.If in case the motorcycle is used frequently in very dusty environment / severe climatic conditions / Poor Roads / stagnant water etc., themaintenance will need to be done earlier as may be required.Contact a nearest Royal Enfield Authorized Dealer / Service Center to carry out the periodical maintenance and for any expert advice.
Sl .No. DESCRIPTION
Kms (x 1000) 0.5 5 10 15 20 25 30 35 4 0 45 50Miles (x 1000) 0.3 3 6 9 12 15 18 21 25 28 31
1 Engine Oil (Level check / Replace) R I R I R I R I R I RCheck level at every 1000 Kms or earlier as required
2 Oil Filter Element R R R R R R3 Engine oil strainer on crankcase LH C C C C C C
A : A d j u s t C : C l e a n I : I n s p e c t T : Re-tighten (2) L : L ub r i c a t e R : R e p l a c e* Refer Service Manual. # Check every time after vehicle is used for off road riding(1) Tyre to be replaced if the tyre wear identification mark reached (2) To be done at authorised Royal Enfield Dealer / Service CenterFor maintenance after 50,000 Kms. , please repeat same frequency specified above, in consultation with a Royal Enfield Authorised Dealer /Service Center.
RPM setting done every service
PERIODIC MAINTENANCE
85
PERIODICAL MAINTENANCE
Kms (x 1000) 0.5 5 10 15 20 25 30 35 4 0 45 50Miles (x 1000) 0.3 3 6 9 12 15 18 21 25 28 31
Sl .No. DESCRIPTION
4 Inlet / Exhaust Tappet setting I & A I & A I & A I & A I & A I & A I & A I & A I & A I & A I & A5 Rubber hose, Inlet manifold * I I R I R I R I R I R6 Oil cooler inlet & outlet pipes * I I I R I I R I I R I7 Spark plug C & A C & A C & A R C & A C & A R C & A C & A R C & A8 HT leads for crack I I I I I I R I I I I9 Fuel Hose I I I R I I R I I R I
10 Fuel Hose & Clip/ Injector ‘O’ ring/ Seal Ring I I I R I I R I I R I11 Fuel Pump Check for screw tightness in all services
A : A d j u s t C : C l e a n I : I n s p e c t T : Re-tighten (2) L : L ub r i c a t e R : R e p l a c e* Refer Service Manual. # Check every time after vehicle is used for off road riding(1) Tyre to be replaced if the tyre wear identification mark reached (2) To be done at authorised Royal Enfield Dealer / Service CenterFor maintenance after 50,000 Kms. , please repeat same frequency specified above, in consultation with a Royal Enfield Authorised Dealer /Service Center.
RPM setting done every service
PERIODIC MAINTENANCE
86
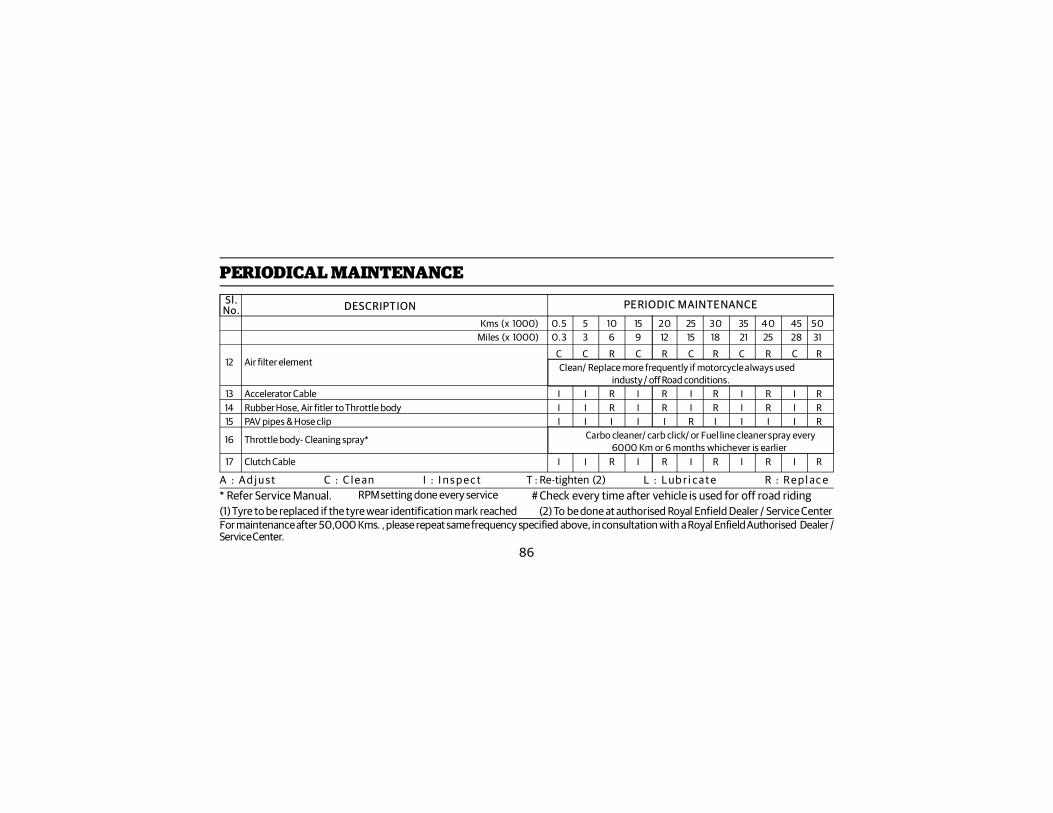
PERIODICAL MAINTENANCE
Kms (x 1000) 0.5 5 10 15 20 25 30 35 4 0 45 50Miles (x 1000) 0.3 3 6 9 12 15 18 21 25 28 31
Sl .No. DESCRIPTION
A : A d j u s t C : C l e a n I : I n s p e c t T : Re-tighten (2) L : L ub r i c a t e R : R e p l a c e* Refer Service Manual. # Check every time after vehicle is used for off road riding(1) Tyre to be replaced if the tyre wear identification mark reached (2) To be done at authorised Royal Enfield Dealer / Service CenterFor maintenance after 50,000 Kms. , please repeat same frequency specified above, in consultation with a Royal Enfield Authorised Dealer /Service Center.
12 Air filter elementC C R C R C R C R C RClean/ Replace more frequently if motorcycle always used
industy / off Road conditions.13 Accelerator Cable I I R I R I R I R I R14 Rubber Hose, Air fitler to Throttle body I I R I R I R I R I R15 PAV pipes & Hose clip I I I I I R I I I I R
16 Throttle body- Cleaning spray* Carbo cleaner/ carb click/ or Fuel line cleaner spray every6000 Km or 6 months whichever is earlier
17 Clutch Cable I I R I R I R I R I R
RPM setting done every service
PERIODIC MAINTENANCE
87
PERIODICAL MAINTENANCE
Kms (x 1000) 0.5 5 10 15 20 25 30 35 4 0 45 50Miles (x 1000) 0.3 3 6 9 12 15 18 21 25 28 31
Sl .No. DESCRIPTION
A : A d j u s t C : C l e a n I : I n s p e c t T : Re-tighten (2) L : L ub r i c a t e R : R e p l a c e* Refer Service Manual. # Check every time after vehicle is used for off road riding(1) Tyre to be replaced if the tyre wear identification mark reached (2) To be done at authorised Royal Enfield Dealer / Service CenterFor maintenance after 50,000 Kms. , please repeat same frequency specified above, in consultation with a Royal Enfield Authorised Dealer /Service Center.
RPM setting done every service
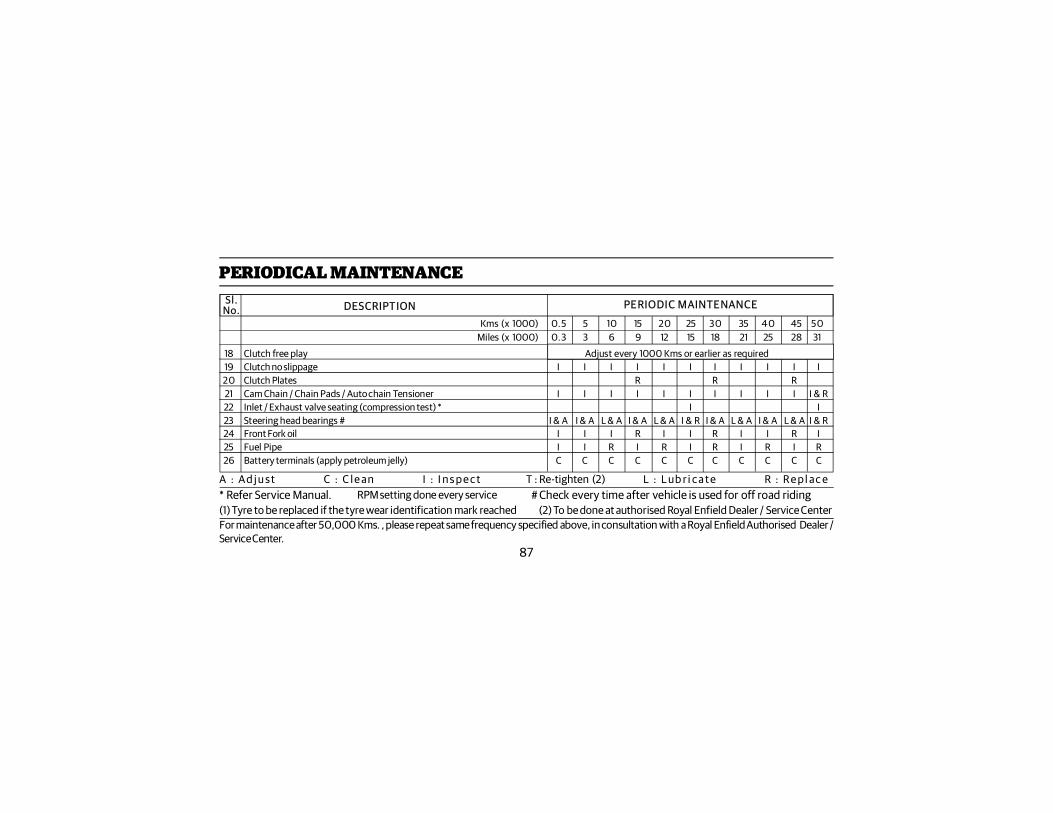
18 Clutch free play Adjust every 1000 Kms or earlier as required19 Clutch no slippage I I I I I I I I I I I20 Clutch Plates R R R21 Cam Chain / Chain Pads / Auto chain Tensioner I I I I I I I I I I I & R22 Inlet / Exhaust valve seating (compression test) * I I23 Steering head bearings # I & A I & A L & A I & A L & A I & R I & A L & A I & A L & A I & R24 Front Fork oil I I I R I I R I I R I25 Fuel Pipe I I R I R I R I R I R26 Battery terminals (apply petroleum jelly) C C C C C C C C C C C
PERIODIC MAINTENANCE
88
PERIODICAL MAINTENANCE
Kms (x 1000) 0.5 5 10 15 20 25 30 35 4 0 45 50Miles (x 1000) 0.3 3 6 9 12 15 18 21 25 28 31
Sl .No. DESCRIPTION
A : A d j u s t C : C l e a n I : I n s p e c t T : Re-tighten (2) L : L ub r i c a t e R : R e p l a c e* Refer Service Manual. # Check every time after vehicle is used for off road riding(1) Tyre to be replaced if the tyre wear identification mark reached (2) To be done at authorised Royal Enfield Dealer / Service CenterFor maintenance after 50,000 Kms. , please repeat same frequency specified above, in consultation with a Royal Enfield Authorised Dealer /Service Center.
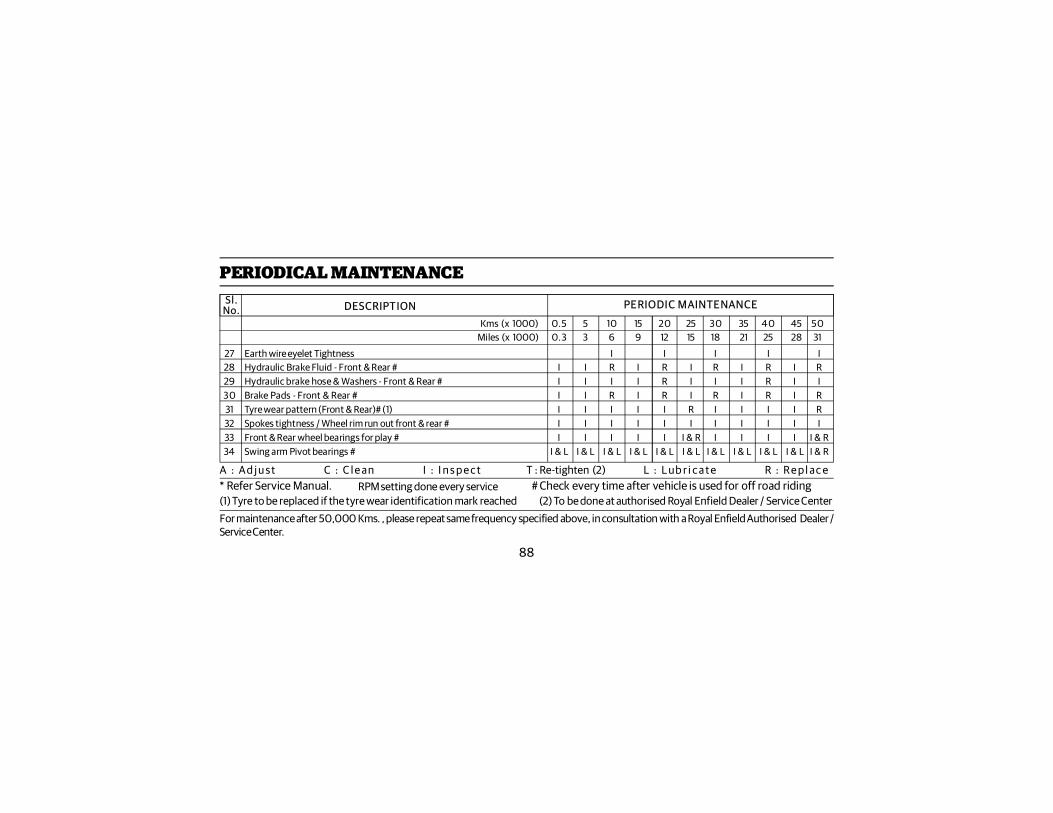
27 Earth wire eyelet Tightness I I I I I28 Hydraulic Brake Fluid - Front & Rear # I I R I R I R I R I R29 Hydraulic brake hose & Washers - Front & Rear # I I I I R I I I R I I30 Brake Pads - Front & Rear # I I R I R I R I R I R31 Tyre wear pattern (Front & Rear)# (1) I I I I I R I I I I R32 Spokes tightness / Wheel rim run out front & rear # I I I I I I I I I I I33 Front & Rear wheel bearings for play # I I I I I I & R I I I I I & R34 Swing arm Pivot bearings # I & L I & L I & L I & L I & L I & L I & L I & L I & L I & L I & R
RPM setting done every service
PERIODIC MAINTENANCE
89
PERIODICAL MAINTENANCE
Kms (x 1000) 0.5 5 10 15 20 25 30 35 4 0 45 50Miles (x 1000) 0.3 3 6 9 12 15 18 21 25 28 31
Sl .No. DESCRIPTION
35 Rear Suspension Linkages # I I & L I & L I & R I & L I & L I & R I & L I & L I & R I & L36 Rear Drive Chain # Clean, Lubricate & Adjust every 1000 Kms or earlier as required37 Drive chain & Sprockets set # I I R I R I R I R I R38 Rear wheel cush drive rubbers # I I R I R I R I R I R39 All Mounting Fasteners in vehicle for tightness # I & T I & T I & T I & T I & T I & T I & T I & T I & T I & T I & T4 0 Hand levers, Centre stand, side stand, Rider & Pillion foot rest Pivots & Gear shift Levers # Lubricate every 1000 Kms or earlier as required41 Evaporative Emission Equipment rubber hoses * I I I R I I R I I R I
A : A d j u s t C : C l e a n I : I n s p e c t T : Re-tighten (2) L : L ub r i c a t e R : R e p l a c e
* Refer Service Manual. # Check every time after vehicle is used for off road riding(1) Tyre to be replaced if the tyre wear identification mark reached (2) To be done at authorised Royal Enfield Dealer / Service CenterFor maintenance after 50,000 Kms. , please repeat same frequency specified above, in consultation with a Royal Enfield Authorised Dealer /Service Center.
RPM setting done every service
PERIODIC MAINTENANCE
90
1 2 3 4 5 6 7 8 9
TOOLS KITThe tool kit is strapped underneath the Pillion seat.S.No. Tool Description Purpose Qty.
1 Allen Key 4 mm To remove side panels LH & RH 1
2 Allen Key 6 mm To Loosen / tighten pinch bolt 1on fork end
3 Tool Spark Plug To Loosen / tighten Spark plug 1
4 Screw Driver To loosen / tighten screws 1of housing
5 Extension Tube Additional leverage for looseningtightening wheel axle nuts 1
6 Combination Spanner To loosen / tighten hex nuts 1Open end 17 * 13 mm
7 Combination Ring To Loosen / tighten wheel 1Spanner 24 * 14 mm axle nuts
8 D.E. Spanner 10 * 12 mm To loosen / tighten hex nuts 1
9 Tool wallet For storing tools 1
91
MINOR MAINTENANCE TIPSThe following simple maintenance activities will help in maintaining your motorcycle. However if you are in experiencedor feel it is best done by an experienced person, we recommend you to get in touch with a Royal Enfield Authorized Dealer/ Service Center.
SIDE STAND PIVOTSApply a few drops of oil on the pivots after cleaning the area of dirt.
HAND LEVER PIVOTSWipe the area free of dirt / grease.
Apply a few drops of oil on the pivots.
92
MINOR MAINTENANCE TIPS
PERIODICAL MAINTENANCE
Lubricate the centre stand pivot periodically for smoother operation of centre stand.
Lubricatethe centrestandmountingpivot.
93
DRIVE CHAINClean the drive chain carefully. Apply chain lubricant while simultaneously rotating the rearwheel. Wipe off the excess lubricant.
OIL LEVEL INSPECTION
MINMAX
Place motorcycle on its center stand on a firm surface.
Warm up engine for a few minutes & switch off before checking oil level.
The level is correct if the oil level is in the middle of the oil level window.
Top up only with recommended Engine oil.
CAUTIONUsing Non Recommended / In-Correct oils, can cause serious damage to the moving parts, affect performance of themotorcycle AND void the warranty.
MINOR MAINTENANCE TIPS
94
CLEANING AND ADJUSTING PLUG GAPGap 0.7 to 0.8 mm
MINOR MAINTENANCE TIPS
Remove spark plug using the plug spanner and tommy bar.
Clean the insulator tip and electrodes of the plug carefully.
Clean & adjust electrode gap every 500 km if required and replace every 15,000 kms.
Refit the spark plug on the cylinder head.
BRAKE FLUID
FRONT BRAKE REAR BRAKE
MAXMIN
MAXMIN
Check fluid level is between “MIN & MAX”.
Top up with DOT 4, if required.
Do not overfill.
DO NOT mix DOT 4 with other brake fluids.
SPARK PLUG
95
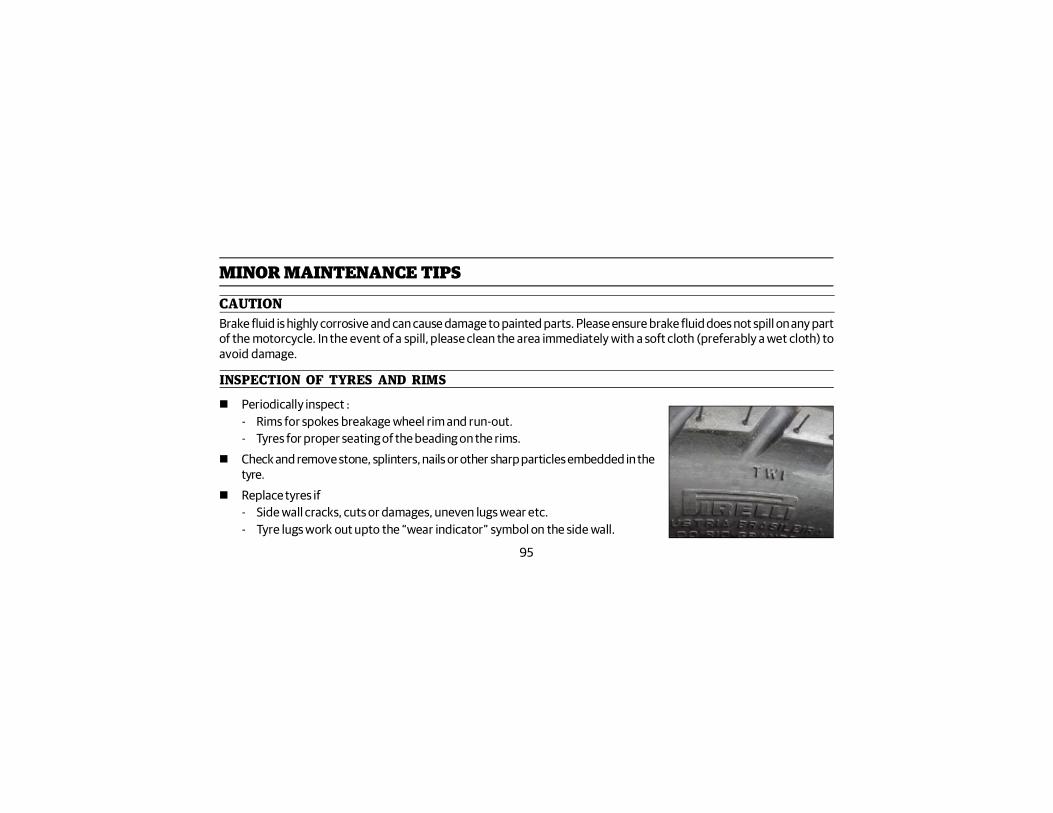
INSPECTION OF TYRES AND RIMS
CAUTIONBrake fluid is highly corrosive and can cause damage to painted parts. Please ensure brake fluid does not spill on any partof the motorcycle. In the event of a spill, please clean the area immediately with a soft cloth (preferably a wet cloth) toavoid damage.
MINOR MAINTENANCE TIPS
Periodically inspect :- Rims for spokes breakage wheel rim and run-out.- Tyres for proper seating of the beading on the rims.
Check and remove stone, splinters, nails or other sharp particles embedded in thetyre.
Replace tyres if- Side wall cracks, cuts or damages, uneven lugs wear etc.- Tyre lugs work out upto the “wear indicator” symbol on the side wall.
96
MINOR MAINTENANCE TIPS
Front RearSolo 1.75 kg/cm2 (25 PSI) 2.25 kg/cm2 (32 PSI)With Pillion 1.89 kg/cm2 (27 PSI) 2.39 kg/cm2 (34 PSI)
WARNINGDismantling and reassembly of the wheel should be done ONLY by an experienced technician.
Failure to do so may cause loss of control on the motorcycle, leading to a potential accident, resulting in serious injury toboth rider and other road users, besides causing severe damage to the motorcycle.
Use only recommended tyres & tubes, inflated to correct air pressure.
97
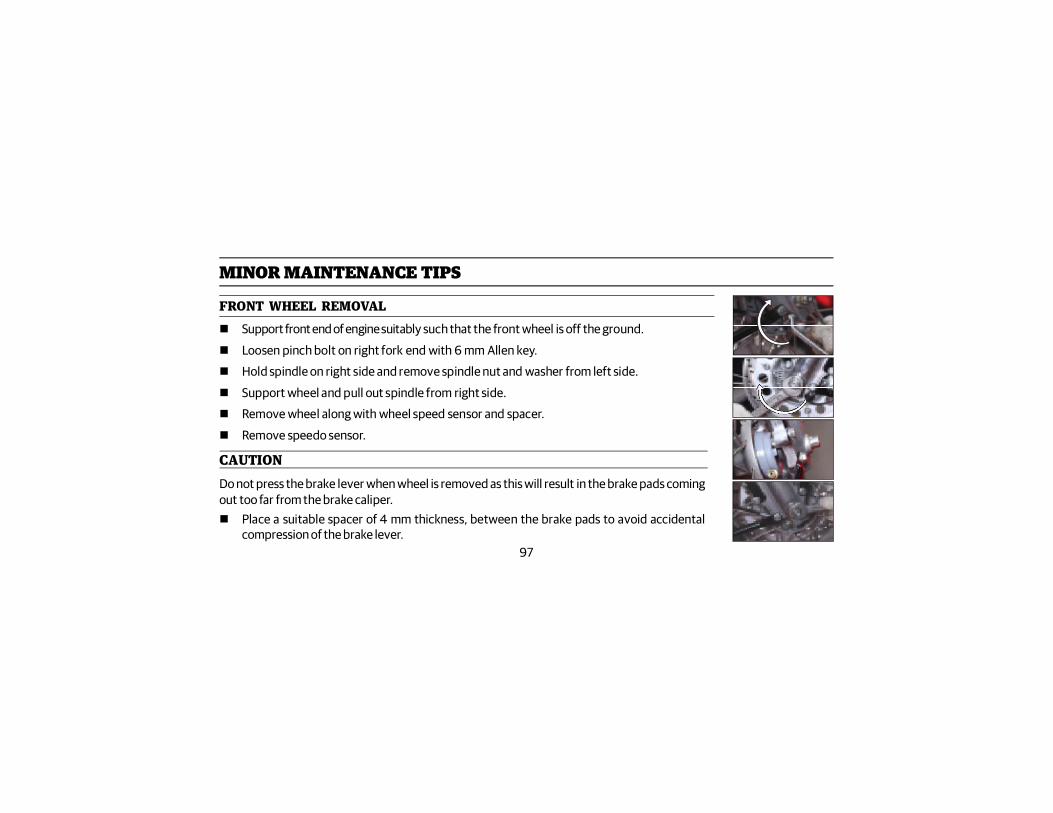
MINOR MAINTENANCE TIPS
FRONT WHEEL REMOVAL Support front end of engine suitably such that the front wheel is off the ground.
Loosen pinch bolt on right fork end with 6 mm Allen key.
Hold spindle on right side and remove spindle nut and washer from left side.
Support wheel and pull out spindle from right side.
Remove wheel along with wheel speed sensor and spacer.
Remove speedo sensor.
CAUTIONDo not press the brake lever when wheel is removed as this will result in the brake pads comingout too far from the brake caliper. Place a suitable spacer of 4 mm thickness, between the brake pads to avoid accidental
compression of the brake lever.
98
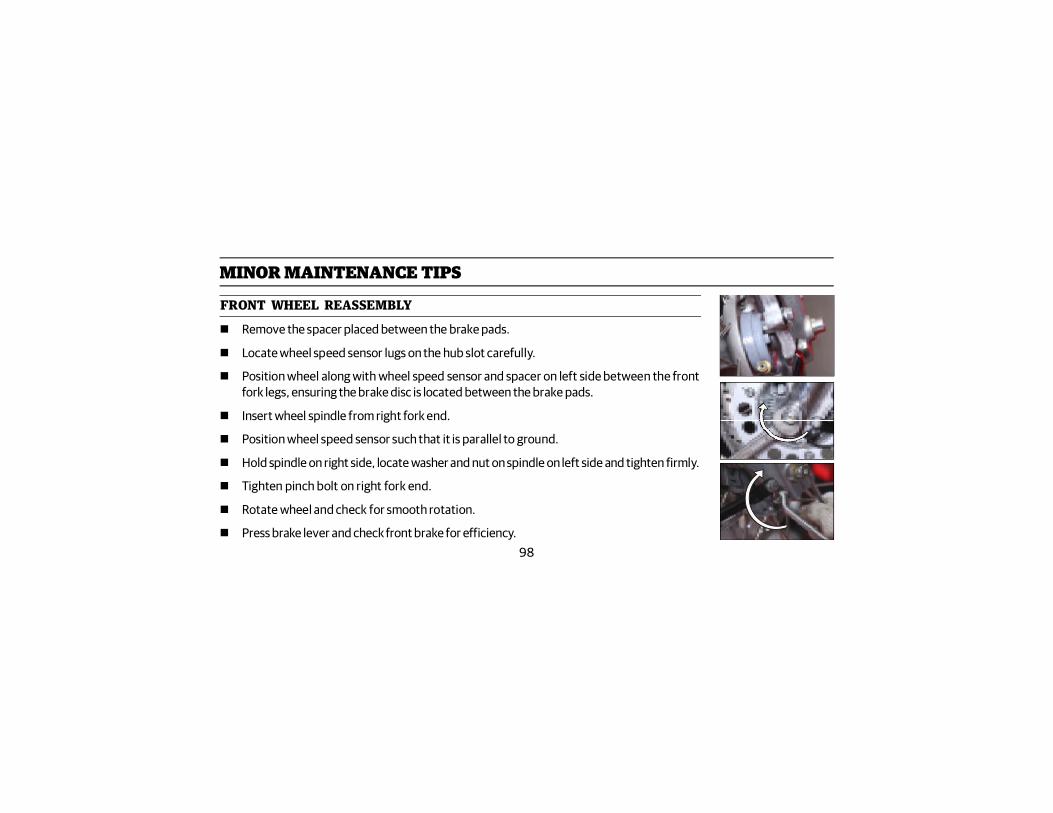
MINOR MAINTENANCE TIPS
FRONT WHEEL REASSEMBLY
Remove the spacer placed between the brake pads.
Locate wheel speed sensor lugs on the hub slot carefully.
Position wheel along with wheel speed sensor and spacer on left side between the frontfork legs, ensuring the brake disc is located between the brake pads.
Insert wheel spindle from right fork end.
Position wheel speed sensor such that it is parallel to ground.
Hold spindle on right side, locate washer and nut on spindle on left side and tighten firmly.
Tighten pinch bolt on right fork end.
Rotate wheel and check for smooth rotation.
Press brake lever and check front brake for efficiency.
99
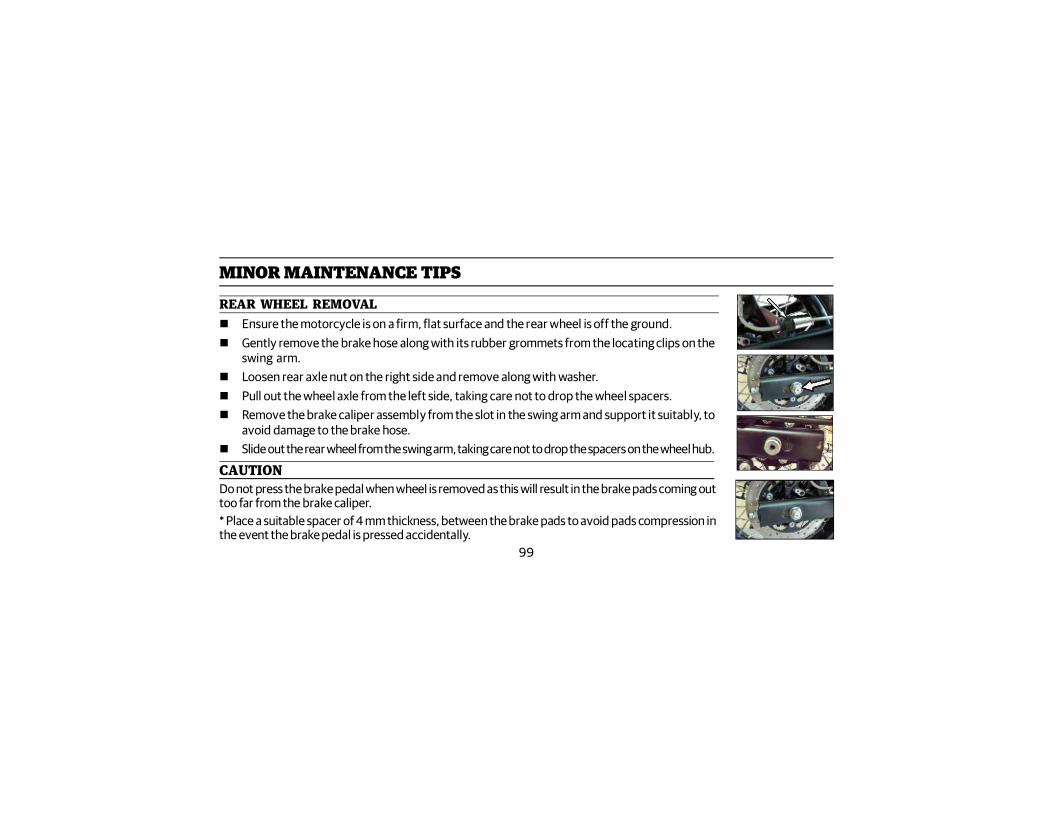
REAR WHEEL REMOVAL Ensure the motorcycle is on a firm, flat surface and the rear wheel is off the ground. Gently remove the brake hose along with its rubber grommets from the locating clips on the
swing arm. Loosen rear axle nut on the right side and remove along with washer. Pull out the wheel axle from the left side, taking care not to drop the wheel spacers. Remove the brake caliper assembly from the slot in the swing arm and support it suitably, to
avoid damage to the brake hose. Slide out the rear wheel from the swing arm, taking care not to drop the spacers on the wheel hub.
MINOR MAINTENANCE TIPS
CAUTIONDo not press the brake pedal when wheel is removed as this will result in the brake pads coming outtoo far from the brake caliper.* Place a suitable spacer of 4 mm thickness, between the brake pads to avoid pads compression inthe event the brake pedal is pressed accidentally.

100
MINOR MAINTENANCE TIPS
REAR WHEEL REASSEMBLY
Ensure the cush rubbers are in place in the wheel hub.
Insert the wheel assembly between the swing arms and position the cush rubbers on the rearsprocket lugs correctly.
Remove the spacer between the brake pads and locate the caliper such that the brake disc isbetween the brake pads.
Locate the caliper bracket slot on the lug in the swing arm.
Position the respective spacers on the left and right side of the wheel hub.
Ensure the axle mounting hole in the swing arm, wheel hub and caliper bracket are aligned.
Insert the wheel axle from the left side of the swing arm and gently tap it in.
101
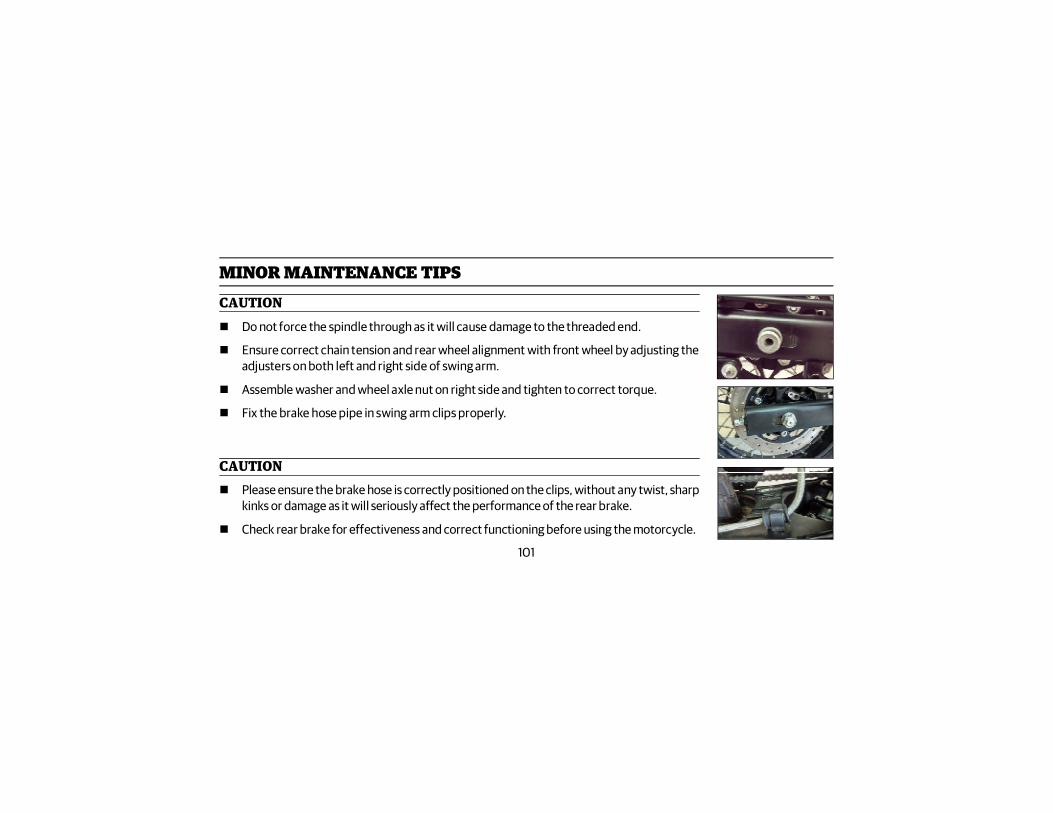
MINOR MAINTENANCE TIPSCAUTION Do not force the spindle through as it will cause damage to the threaded end.
Ensure correct chain tension and rear wheel alignment with front wheel by adjusting theadjusters on both left and right side of swing arm.
Assemble washer and wheel axle nut on right side and tighten to correct torque.
Fix the brake hose pipe in swing arm clips properly.
CAUTION Please ensure the brake hose is correctly positioned on the clips, without any twist, sharp
kinks or damage as it will seriously affect the performance of the rear brake.
Check rear brake for effectiveness and correct functioning before using the motorcycle.
102
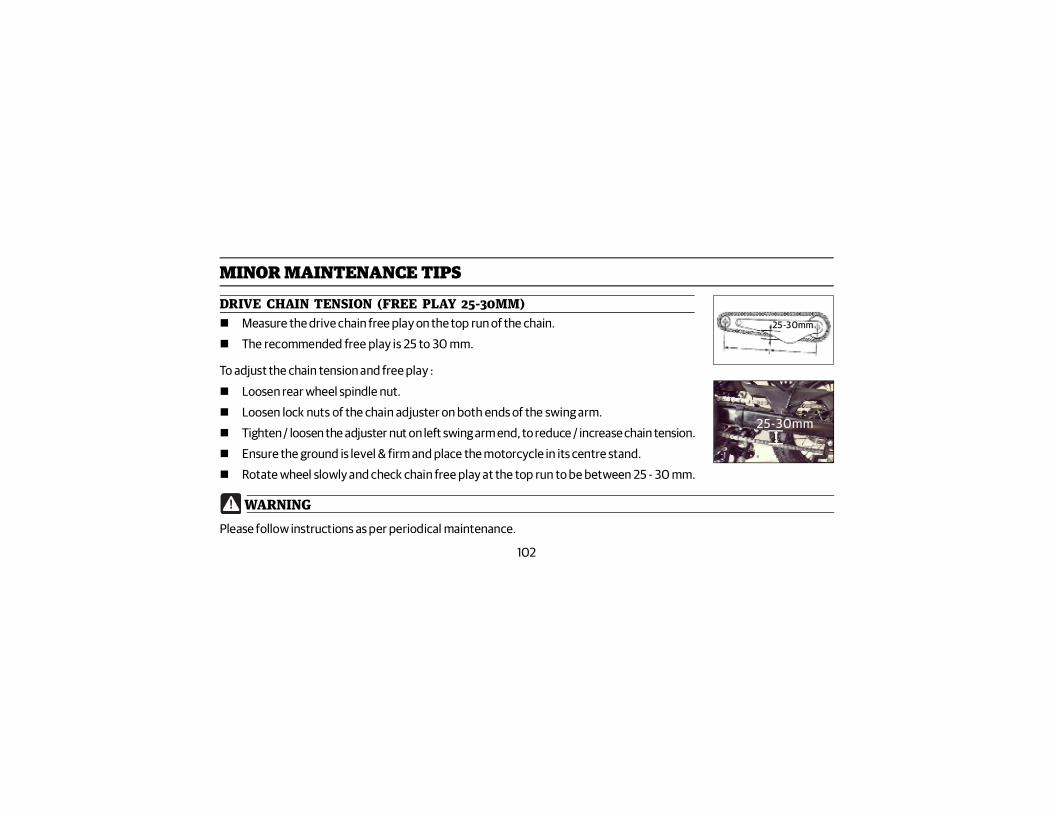
DRIVE CHAIN TENSION (FREE PLAY 25-30MM)
MINOR MAINTENANCE TIPS
Measure the drive chain free play on the top run of the chain.
The recommended free play is 25 to 30 mm.
To adjust the chain tension and free play :
Loosen rear wheel spindle nut.
Loosen lock nuts of the chain adjuster on both ends of the swing arm.
Tighten / loosen the adjuster nut on left swing arm end, to reduce / increase chain tension.
Ensure the ground is level & firm and place the motorcycle in its centre stand.
Rotate wheel slowly and check chain free play at the top run to be between 25 - 30 mm.
WARNINGPlease follow instructions as per periodical maintenance.
25-30mm
25-30mm
103
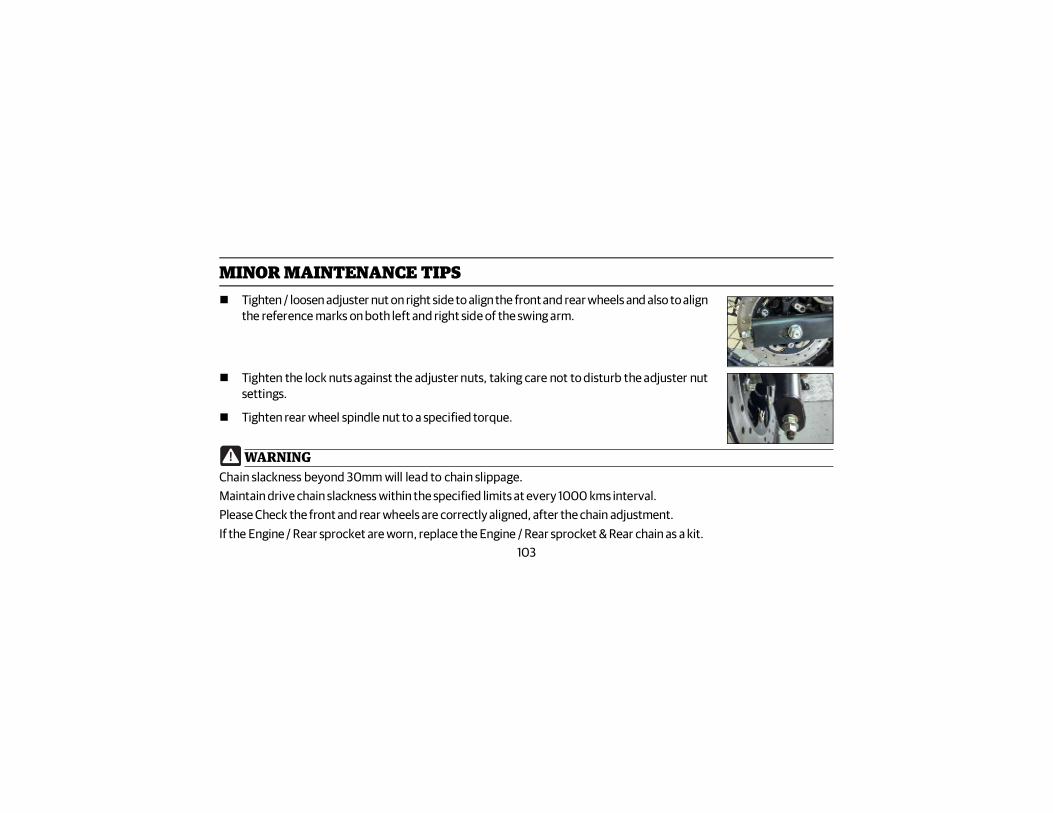
MINOR MAINTENANCE TIPS Tighten / loosen adjuster nut on right side to align the front and rear wheels and also to align
the reference marks on both left and right side of the swing arm.
Tighten the lock nuts against the adjuster nuts, taking care not to disturb the adjuster nutsettings.
Tighten rear wheel spindle nut to a specified torque.
WARNINGChain slackness beyond 30mm will lead to chain slippage.Maintain drive chain slackness within the specified limits at every 1000 kms interval.Please Check the front and rear wheels are correctly aligned, after the chain adjustment.If the Engine / Rear sprocket are worn, replace the Engine / Rear sprocket & Rear chain as a kit.
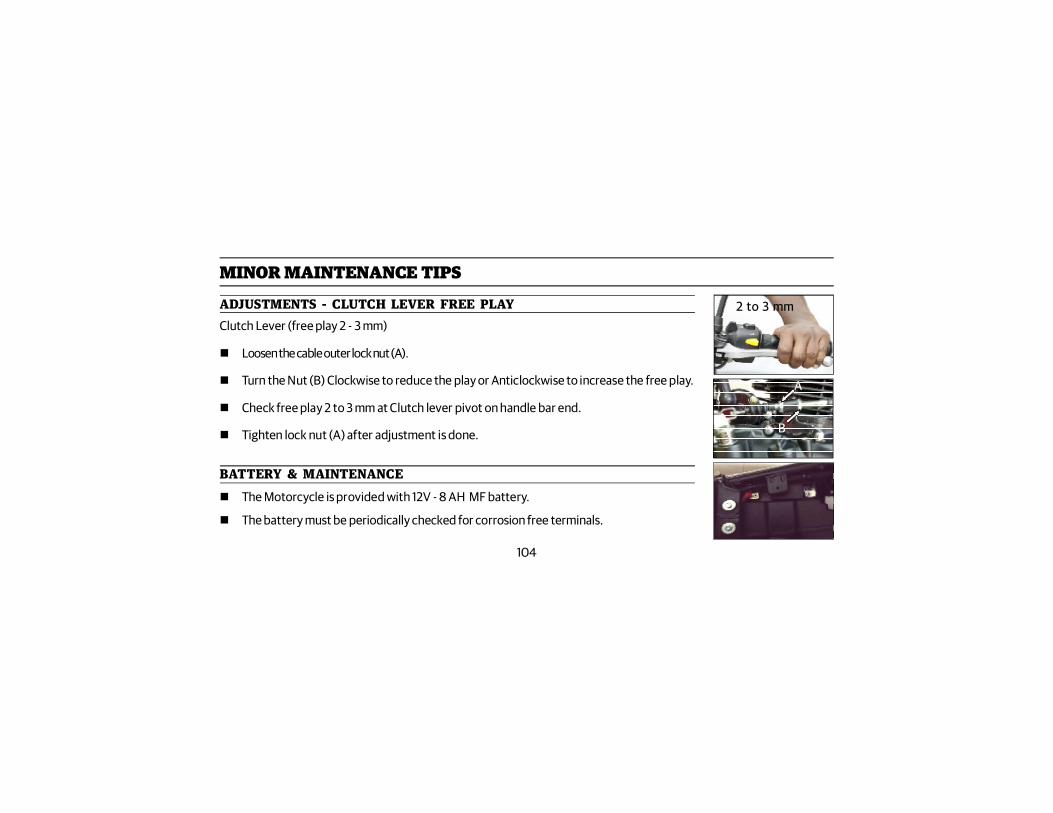
104
ADJUSTMENTS - CLUTCH LEVER FREE PLAYClutch Lever (free play 2 - 3 mm)
Loosen the cable outer lock nut (A).
Turn the Nut (B) Clockwise to reduce the play or Anticlockwise to increase the free play.
Check free play 2 to 3 mm at Clutch lever pivot on handle bar end.
Tighten lock nut (A) after adjustment is done.
2 to 3 mm
A
B
BATTERY & MAINTENANCE The Motorcycle is provided with 12V - 8 AH MF battery.
The battery must be periodically checked for corrosion free terminals.
MINOR MAINTENANCE TIPS
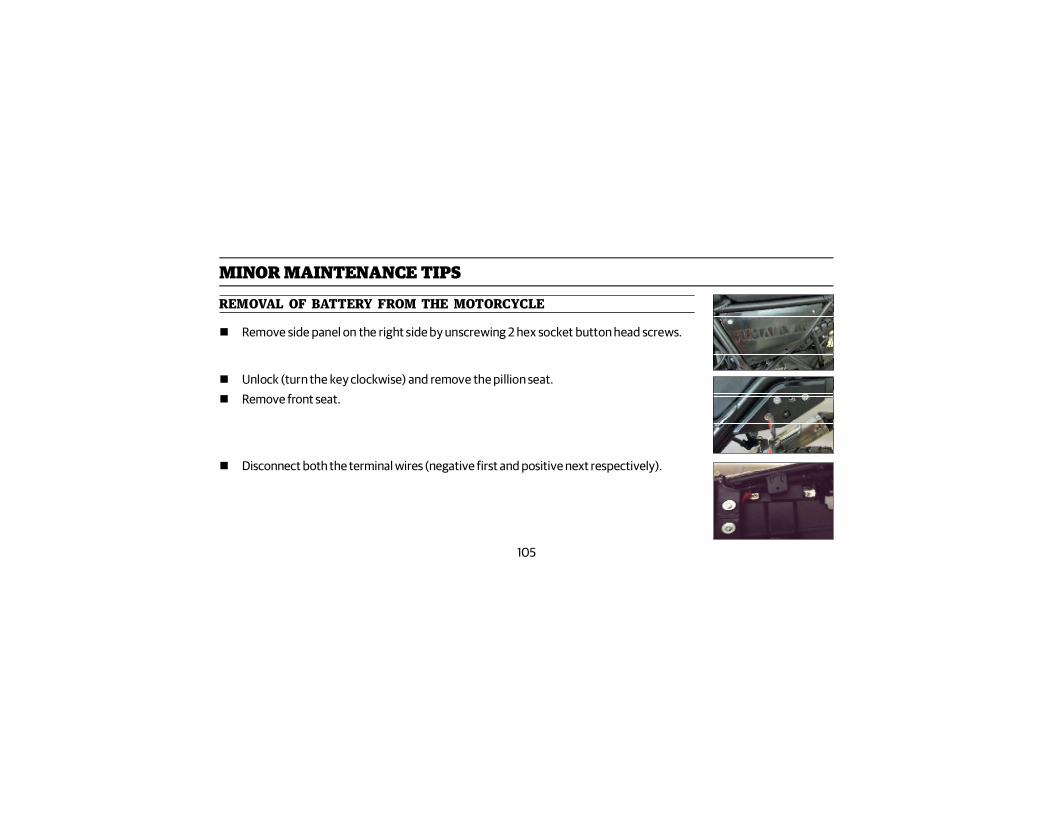
105
MINOR MAINTENANCE TIPS
REMOVAL OF BATTERY FROM THE MOTORCYCLE
Remove side panel on the right side by unscrewing 2 hex socket button head screws.
Unlock (turn the key clockwise) and remove the pillion seat. Remove front seat.
Disconnect both the terminal wires (negative first and positive next respectively).
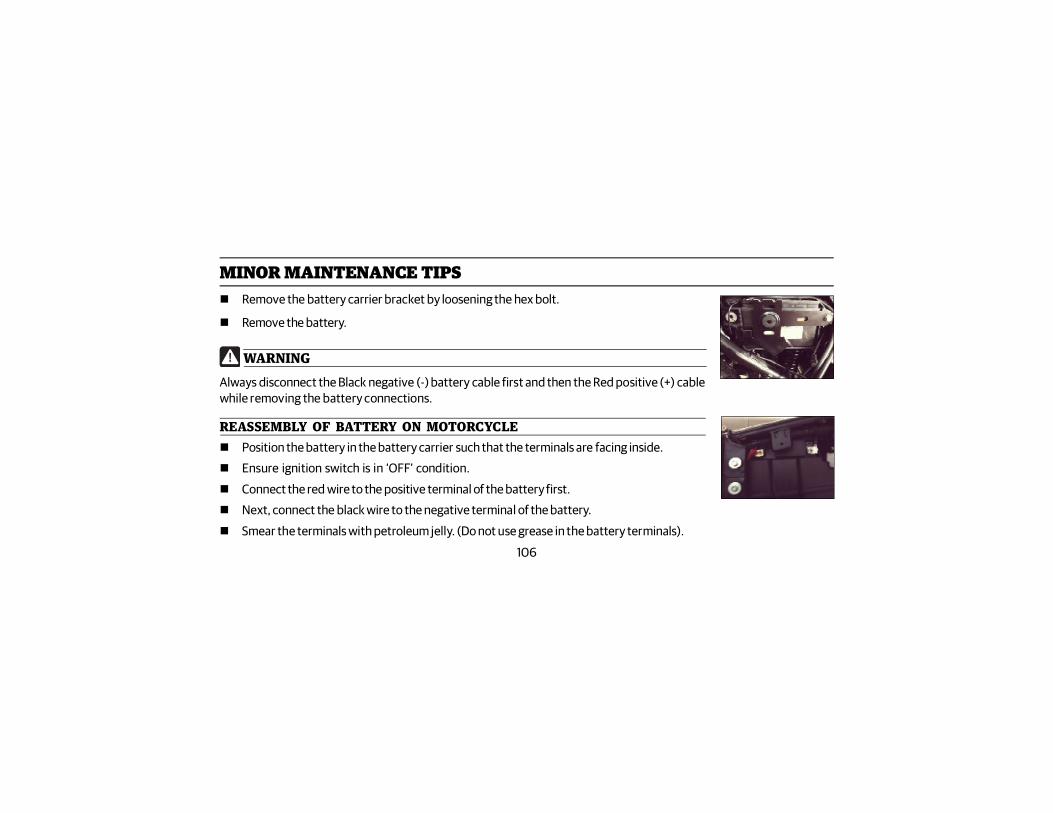
106
Remove the battery carrier bracket by loosening the hex bolt.
Remove the battery.
MINOR MAINTENANCE TIPS
WARNINGAlways disconnect the Black negative (-) battery cable first and then the Red positive (+) cablewhile removing the battery connections.
REASSEMBLY OF BATTERY ON MOTORCYCLE Position the battery in the battery carrier such that the terminals are facing inside.
Ensure ignition switch is in ‘OFF’ condition.
Connect the red wire to the positive terminal of the battery first.
Next, connect the black wire to the negative terminal of the battery.
Smear the terminals with petroleum jelly. (Do not use grease in the battery terminals).
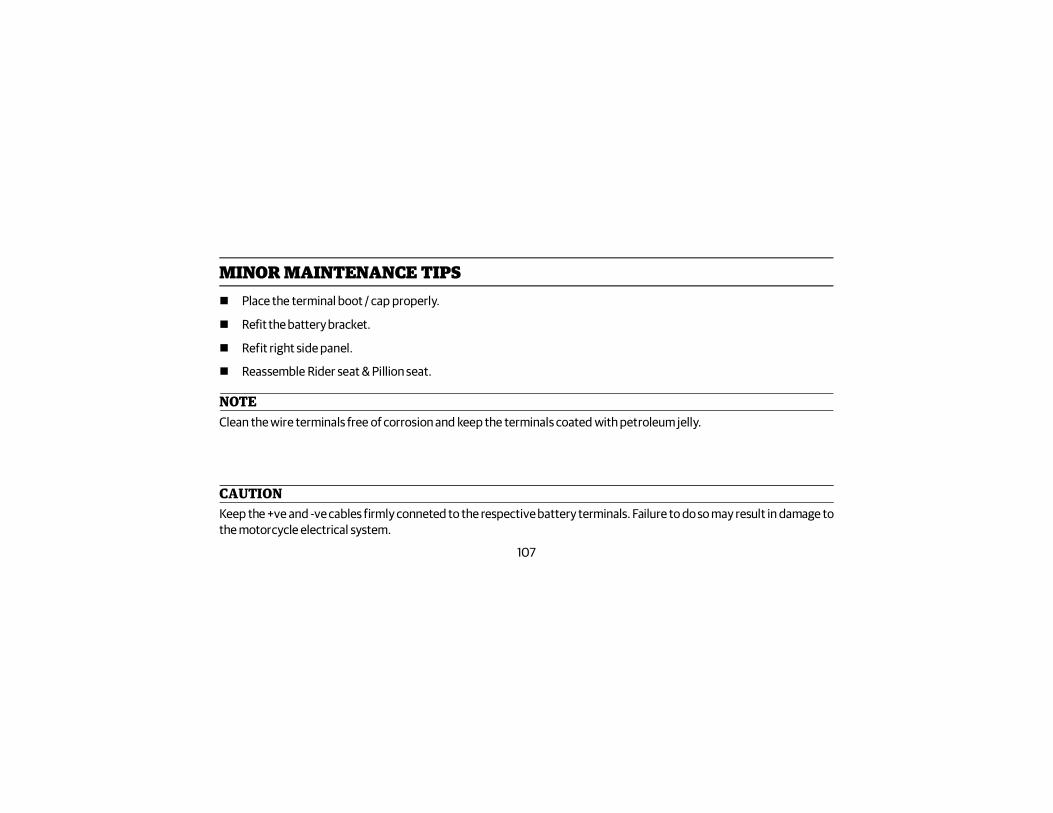
107
MINOR MAINTENANCE TIPS Place the terminal boot / cap properly.
Refit the battery bracket.
Refit right side panel.
Reassemble Rider seat & Pillion seat.
NOTEClean the wire terminals free of corrosion and keep the terminals coated with petroleum jelly.
CAUTIONKeep the +ve and -ve cables firmly conneted to the respective battery terminals. Failure to do so may result in damage tothe motorcycle electrical system.
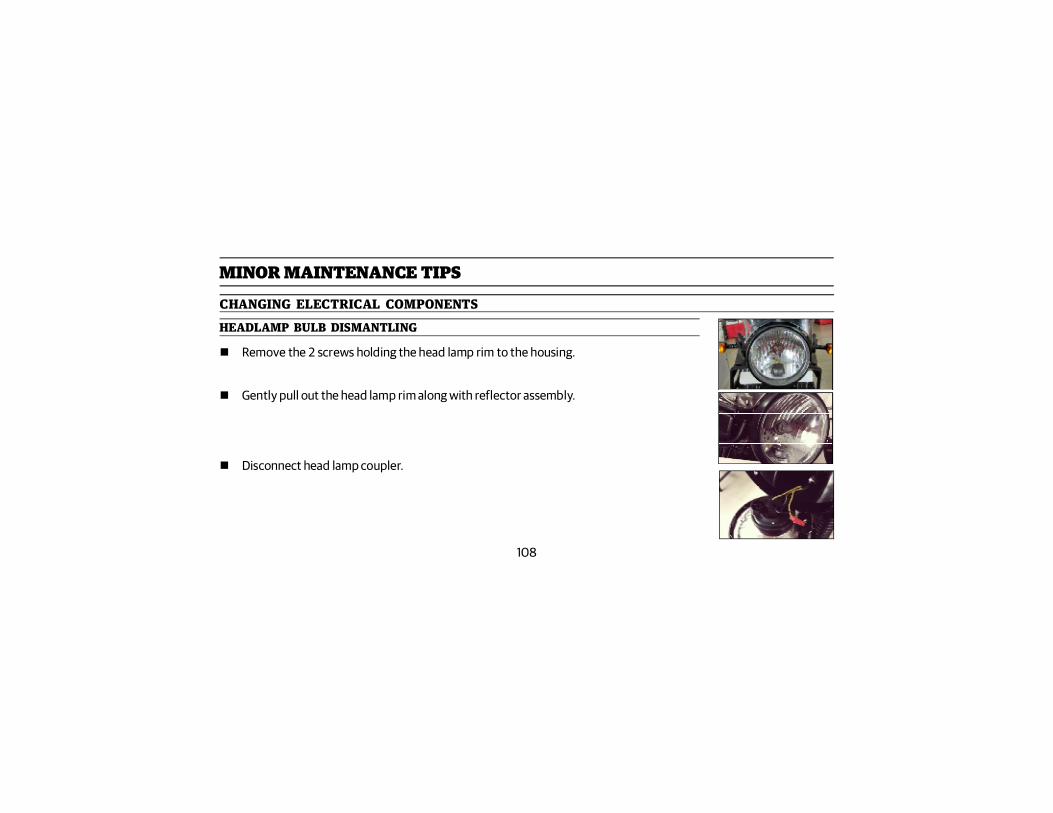
108
CHANGING ELECTRICAL COMPONENTSHEADLAMP BULB DISMANTLING
Remove the 2 screws holding the head lamp rim to the housing.
Gently pull out the head lamp rim along with reflector assembly.
Disconnect head lamp coupler.
MINOR MAINTENANCE TIPS
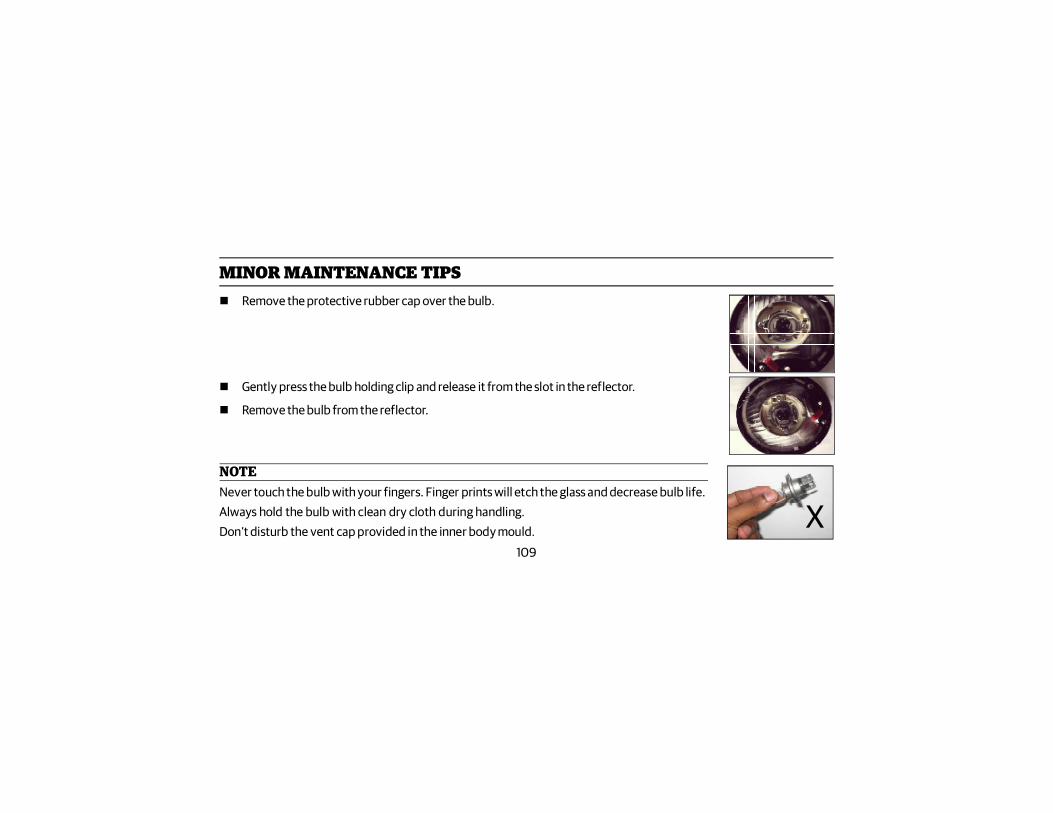
109
MINOR MAINTENANCE TIPS
X
Remove the protective rubber cap over the bulb.
Gently press the bulb holding clip and release it from the slot in the reflector.
Remove the bulb from the reflector.
NOTENever touch the bulb with your fingers. Finger prints will etch the glass and decrease bulb life.Always hold the bulb with clean dry cloth during handling.Don’t disturb the vent cap provided in the inner body mould.
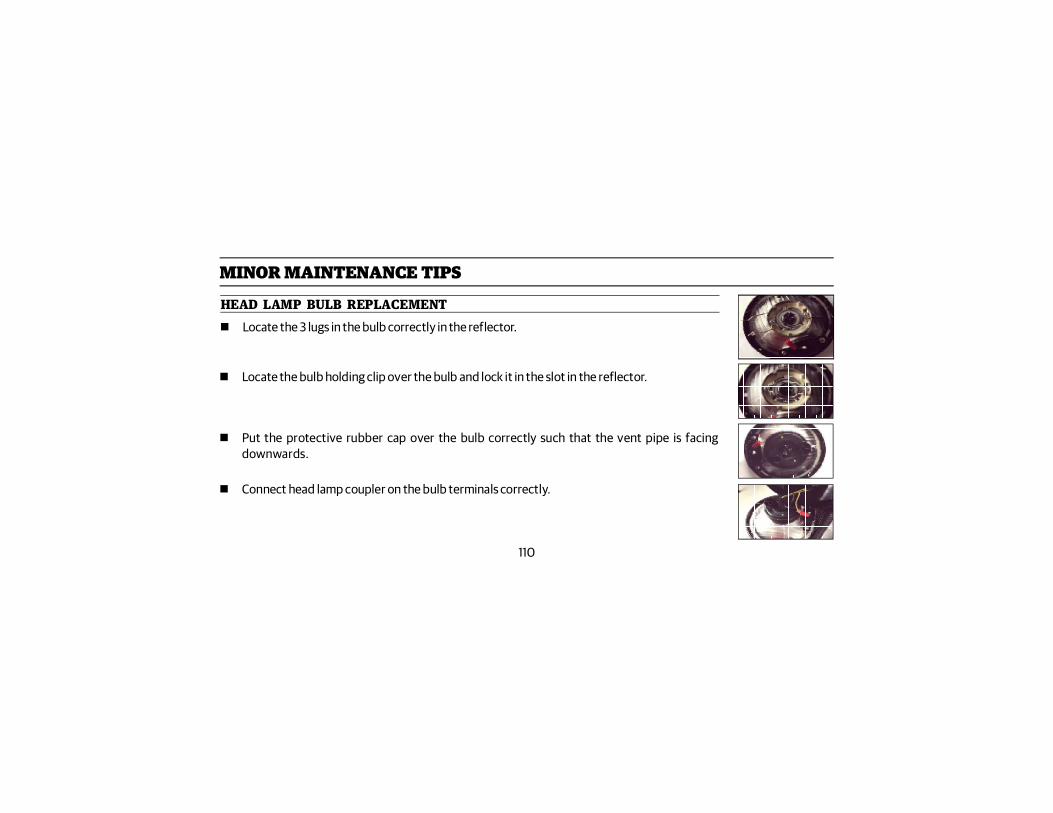
110
Locate the 3 lugs in the bulb correctly in the reflector.
HEAD LAMP BULB REPLACEMENT
MINOR MAINTENANCE TIPS
Locate the bulb holding clip over the bulb and lock it in the slot in the reflector.
Put the protective rubber cap over the bulb correctly such that the vent pipe is facingdownwards.
Connect head lamp coupler on the bulb terminals correctly.

111
MINOR MAINTENANCE TIPS Locate the head lamp rim in the housing correctly such that it locks in place and the 2
mounting holes of the rim are aligned with the holes in the housing.
Assemble the 2 screws and tighten firmly.
TAIL LAMPThe tail lamp has a LED lighting system. In the event of failure, the entire tail lamp assemblyshould be replaced.
Contact an Authorized Royal Enfield Dealer / Service Center to replace the same.
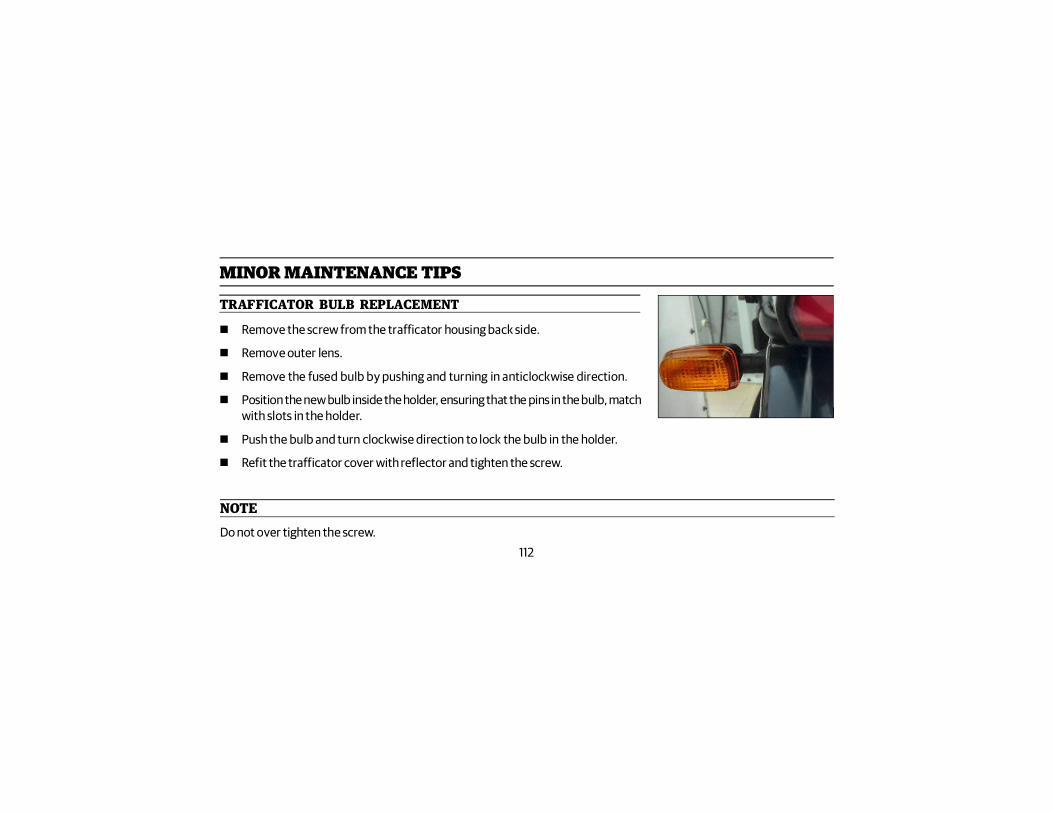
112
TRAFFICATOR BULB REPLACEMENT
Remove the screw from the trafficator housing back side.
Remove outer lens.
Remove the fused bulb by pushing and turning in anticlockwise direction.
Position the new bulb inside the holder, ensuring that the pins in the bulb, matchwith slots in the holder.
Push the bulb and turn clockwise direction to lock the bulb in the holder.
Refit the trafficator cover with reflector and tighten the screw.
MINOR MAINTENANCE TIPS
NOTEDo not over tighten the screw.
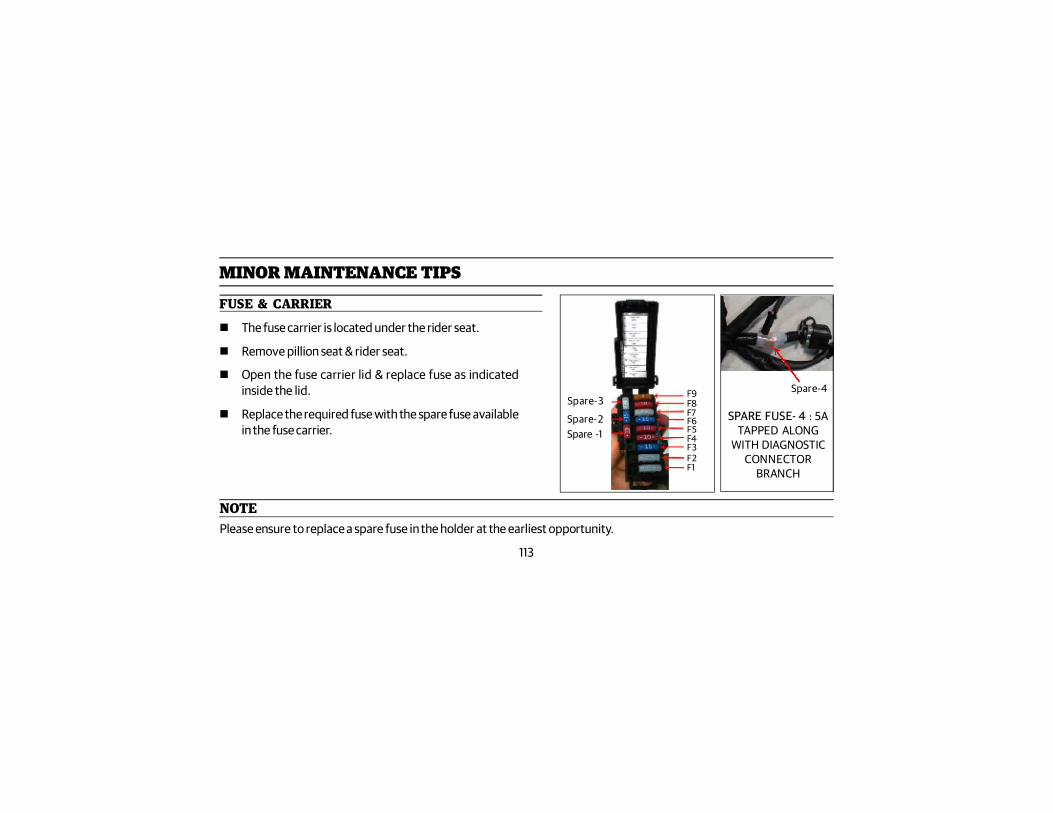
113
FUSE & CARRIER
The fuse carrier is located under the rider seat.
Remove pillion seat & rider seat.
Open the fuse carrier lid & replace fuse as indicatedinside the lid.
Replace the required fuse with the spare fuse availablein the fuse carrier. Spare -1
Spare-2
Spare-3F9
MINOR MAINTENANCE TIPS
NOTEPlease ensure to replace a spare fuse in the holder at the earliest opportunity.
F8F7F6F5F4F3F2F1
SPARE FUSE- 4 : 5ATAPPED ALONG
WITH DIAGNOSTICCONNECTOR
BRANCH
Spare-4
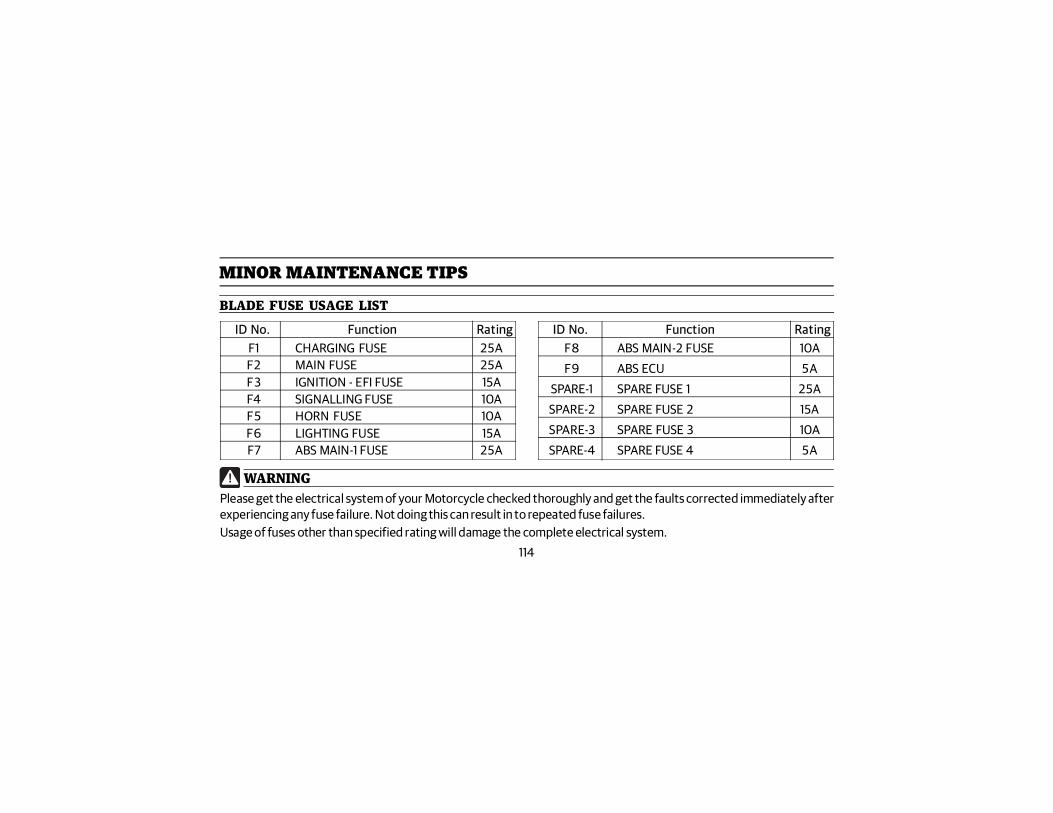
114
MINOR MAINTENANCE TIPS
BLADE FUSE USAGE LIST
WARNINGPlease get the electrical system of your Motorcycle checked thoroughly and get the faults corrected immediately afterexperiencing any fuse failure. Not doing this can result in to repeated fuse failures.Usage of fuses other than specified rating will damage the complete electrical system.
ID No. Function RatingF1 CHARGING FUSE 25AF2 MAIN FUSE 25AF3 IGNITION - EFI FUSE 15AF4 SIGNALLING FUSE 10AF5 HORN FUSE 10AF6 LIGHTING FUSE 15AF7 ABS MAIN-1 FUSE 25A
F8 ABS MAIN-2 FUSE 10AF9 ABS ECU 5A
SPARE-1 SPARE FUSE 1 25ASPARE-2 SPARE FUSE 2 15ASPARE-3 SPARE FUSE 3 10ASPARE-4 SPARE FUSE 4 5A
ID No. Function Rating
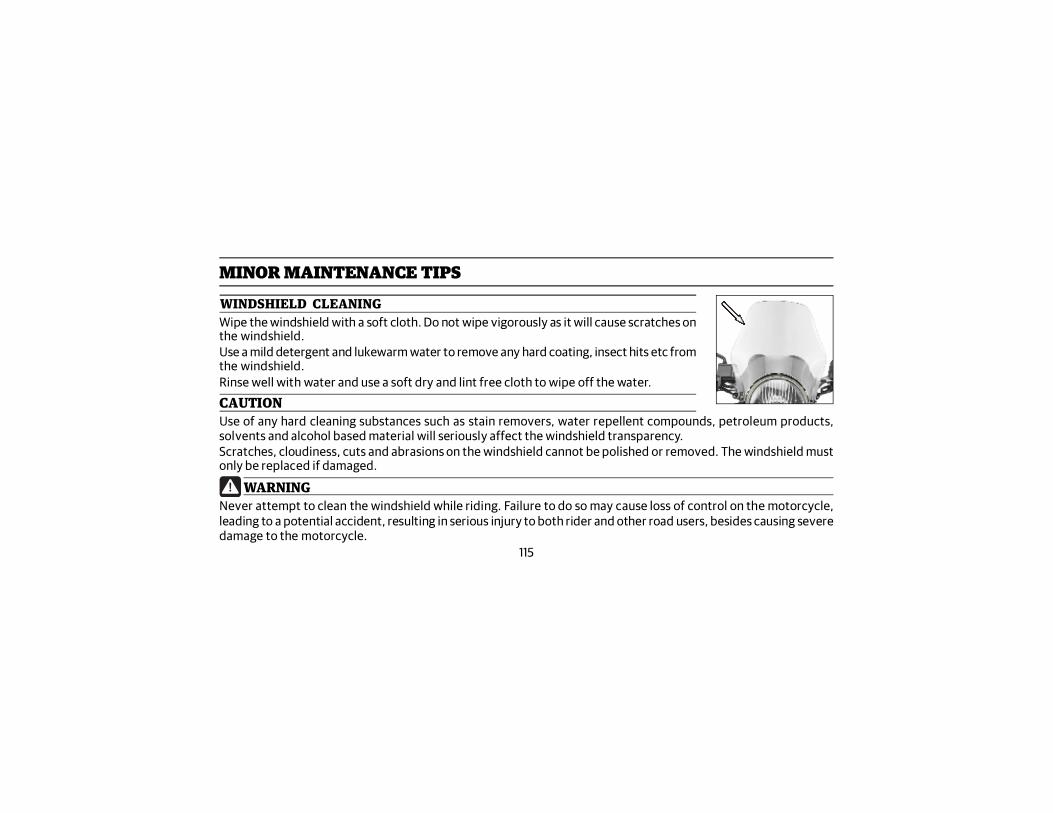
115
MINOR MAINTENANCE TIPS
WINDSHIELD CLEANINGWipe the windshield with a soft cloth. Do not wipe vigorously as it will cause scratches onthe windshield.Use a mild detergent and lukewarm water to remove any hard coating, insect hits etc fromthe windshield.Rinse well with water and use a soft dry and lint free cloth to wipe off the water.
CAUTIONUse of any hard cleaning substances such as stain removers, water repellent compounds, petroleum products,solvents and alcohol based material will seriously affect the windshield transparency.Scratches, cloudiness, cuts and abrasions on the windshield cannot be polished or removed. The windshield mustonly be replaced if damaged.
WARNINGNever attempt to clean the windshield while riding. Failure to do so may cause loss of control on the motorcycle,leading to a potential accident, resulting in serious injury to both rider and other road users, besides causing severedamage to the motorcycle.
116
LONG TRIP PRECAUTIONS
CHECKS PRIOR TO THE COMMENCEMENT OF LONG JOURNEY Service the motorcycle at a Royal Enfield Authorized Dealer / Service Center.
Ensure sufficient quantity of petrol in the fuel tank for the journey planned.
Check and correct tyre pressure if necessary.
CHECKS AFTER EVERY 1500 KMS OF RUN Any loose fasteners.
Condition of the tyres.
Correct oil level in engine.
Working of all lights and horn.
Proper drive chain tension.
117
ITEMS TO BE CARRIED Tool kit
Bulbs for Headlight, Trafficator light, Fuse.
Accelerator, Clutch cables.
Rear chain master link lock assembly.
Insulation tape.
Spark plug, Spark plug cap.
LONG TRIP PRECAUTIONS
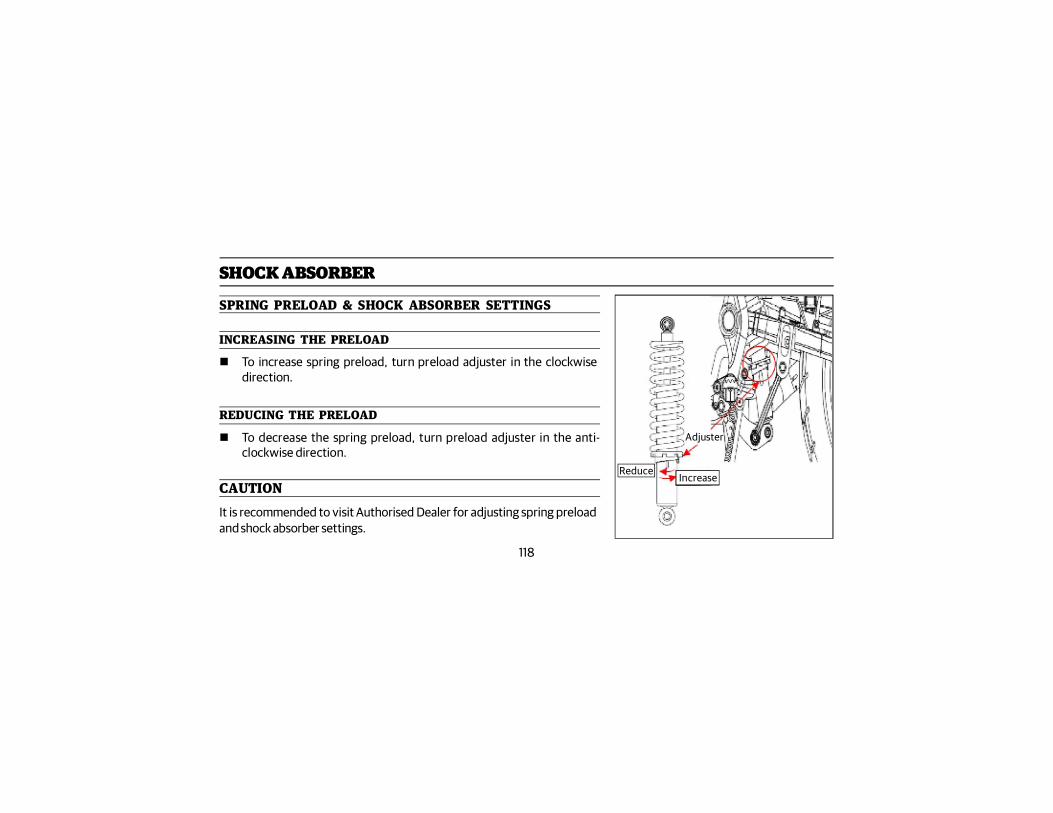
118
SPRING PRELOAD & SHOCK ABSORBER SETTINGS
INCREASING THE PRELOAD
To increase spring preload, turn preload adjuster in the clockwisedirection.
REDUCING THE PRELOAD
To decrease the spring preload, turn preload adjuster in the anti-clockwise direction.
SHOCK ABSORBER
ReduceIncrease
Adjuster
CAUTIONIt is recommended to visit Authorised Dealer for adjusting spring preloadand shock absorber settings.
119
AFTER OFF ROADINGIt is recommended to check the following after off roading :
TYRE PRESSURE
Tyre pressure needs to be optimal for effective riding on surfaced roads.
Always check the tyre pressures are correct.
BRAKES
Riding on dirty & muddy roads brakes may not be effective immediately because of dirts & moisture on the disc pads.
Apply the brakes in good time until the brakes have been cleaned.
RIMS
It is recommended to check the rims & wheels for damage after off roading.
OFF ROADING
120
SPRING PRELOAD & SHOCK ABSORBER SETTINGS
The off road settings of spring & shock absorber settings will impair the motorcycle’s handling characteristics onsurfaced roads.
Remember to correct the spring & shock absorber settings before returning to surfaced roads.
OFF ROADING
AIR FILTER ELEMENT
Cleaning of air filter element is recommended for effective utilisation of air filter element in returning to surfacedroads.
Check for any damages or clog in air filter and replace if required.
121
PRECAUTIONS Wash motorcycle when the engine is cold. Cover the silencer, tail pipe, horn and control switches with suitable plastic bags and tie it firmly to prevent water
entry. Remove ignition key and seal key hole using adhesive tape. Brush engine area with a solvent to remove dirt or grease. Use low pressure jet of water to clean. DO NOT spray water directly on the steering stem area as it will damage the bearings and course the handle bar
movement to become sticky. Never spray water with great force on head lamp, speedometer, flasher lights, front and rear wheel hubs, electrical
connections and wires, control cables, spark plug, battery, side mirrors, steering stem, etc. Do not apply any corrosive solvent on painted surfaces or rubber parts. Use luke warm water and mild detergent on the painted components to remove dirt, etc.
WASHING PROCEDURE
122
Rinse motorcycle thoroughly with plain water to remove the detergent. If possible, use compressed air and blow off water particles from the hard to reach areas of the motorcycle, electrical
connections etc. No direct jet at the edges of decal, electrical parts, coupler joints, silencer tail pipe, radiator lubrication points like
steering cone kit, brake pedal, wheel bearings, chain, brake cam & swing arm bushes to be washed in spray mode only(not in jet mode).
AFTER WASHING Ensure, the motorcycle is thoroughly dry by wiping with a clean soft absorbent cloth or chamois leather. Remove all plastic bags and adhesive tapes. Lubricate control cables, pivot and rear chain with lube oil. Polish the painted (except Stone Black Colour / Matt paint finish) and plated surfaces using polishing wax. Start engine and allow to run at idling speed for a few minutes to warm up engine. Drive the motorcycle slowly, applying both brakes intermittently to dry up the water in the brake shoes.
WASHING PROCEDURE
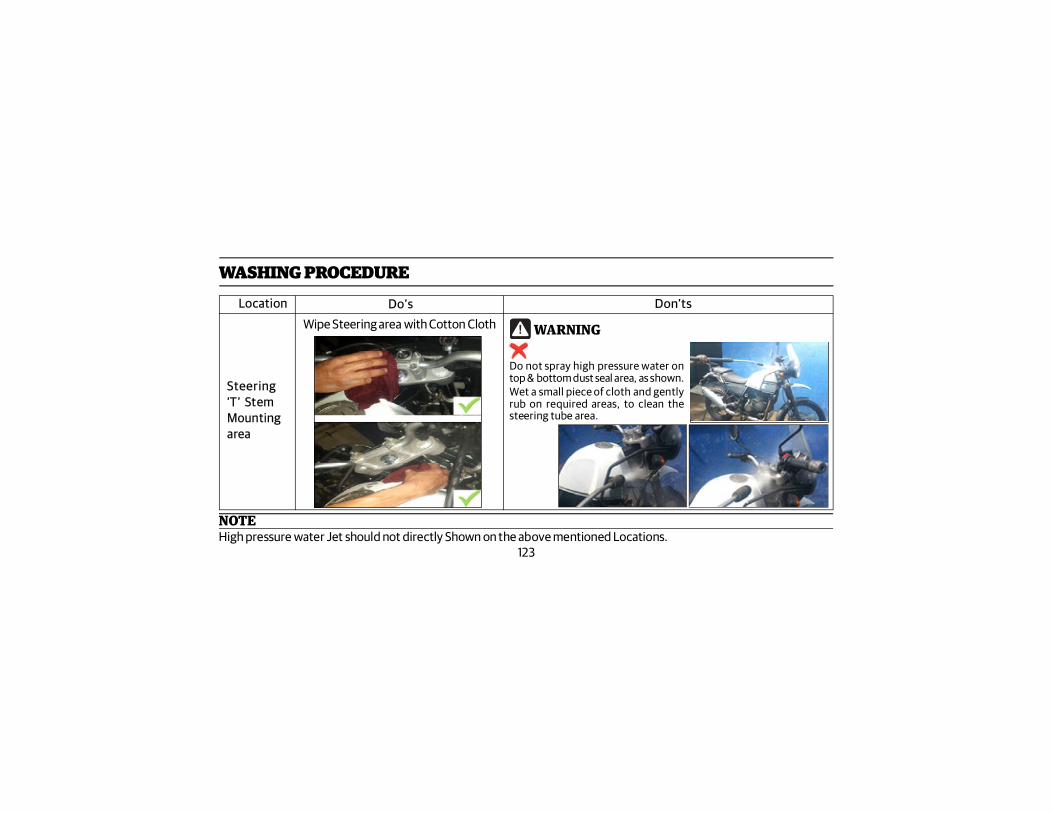
123
WASHING PROCEDURELocation Do’s Don’ts
Steering‘T’ StemMountingarea
Wipe Steering area with Cotton Cloth WARNING
Do not spray high pressure water ontop & bottom dust seal area, as shown.Wet a small piece of cloth and gentlyrub on required areas, to clean thesteering tube area.
NOTEHigh pressure water Jet should not directly Shown on the above mentioned Locations.
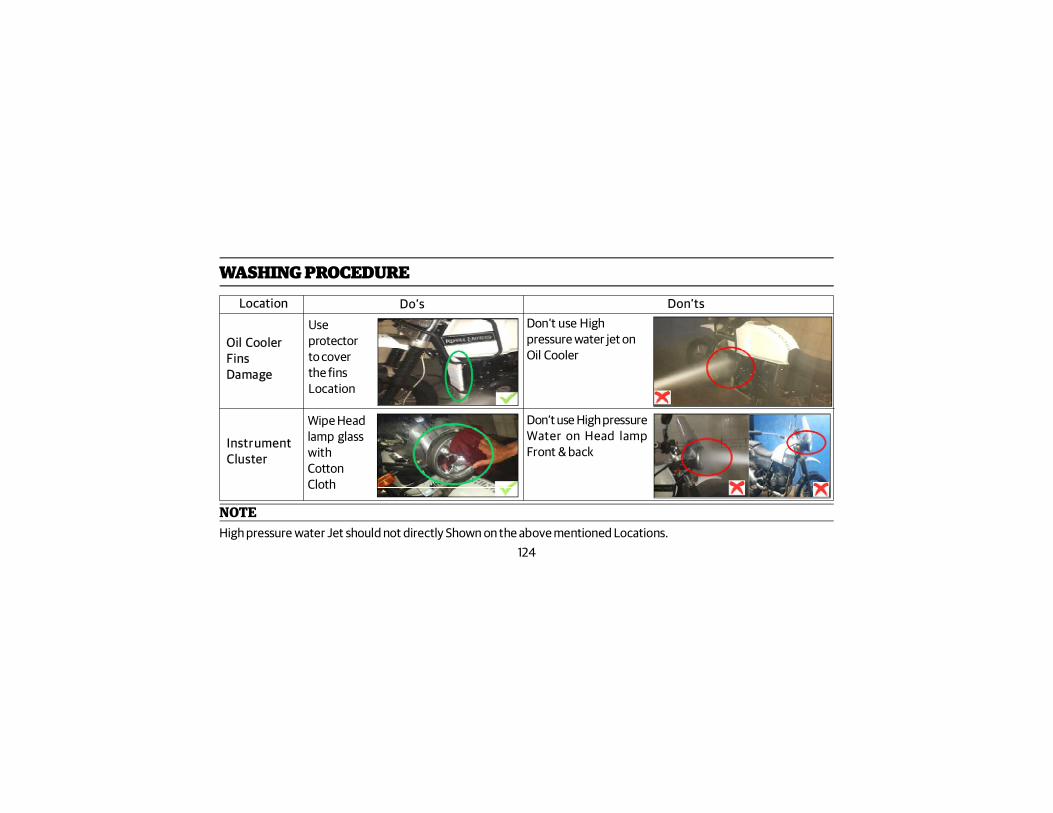
124
WASHING PROCEDURELocation Do’s Don’ts
Oil CoolerFinsDamage
InstrumentCluster
Useprotectorto coverthe finsLocation
Don’t use Highpressure water jet onOil Cooler
Wipe Headlamp glasswithCottonCloth
Don’t use High pressureWater on Head lampFront & back
NOTEHigh pressure water Jet should not directly Shown on the above mentioned Locations.
125
In case your Motorcycle is not going to be used for a month or more, the following precautions should be taken. Get the motorcycle serviced through a Royal Enfield Authorized Dealer / Service Center. Drain fuel tank and fuel line. Spray engine oil inside the fuel tank to prevent rusting. Remove spark plug. Pour in about 25ml of clean engine oil through spark plug hole. Close the hole and crank engine
several times and refit spark plug. Clean rear chain thoroughly and apply a chain lube. Remove battery from the motorcycle. Clean the terminals free of corrosion and apply petroleum jelly to terminals. Store the battery in a cool, dry and well ventilated place. Cover the silencer with plastic bags to prevent moisture entry. Set the motorcycle on its center stand. Apply anti rust solutions on all plated parts. Take care not to apply this solution on rubber or painted parts. Store motorcycle in a clean covered area free of moisture and dust. For re use after storage, it is preferable to get the motorcycle prepared through a Royal Enfield Authorized Dealer /
Service Center to ensure the motorcycle is restored to its peak operating conditions. It is advised to disconnect battery terminals and remove the battery. Before refitting the battery in the motorcycle,
check the battery voltage is within specification, if not, recharge it from authorized service workshop / battery dealer.
STORAGE PRECAUTIONS
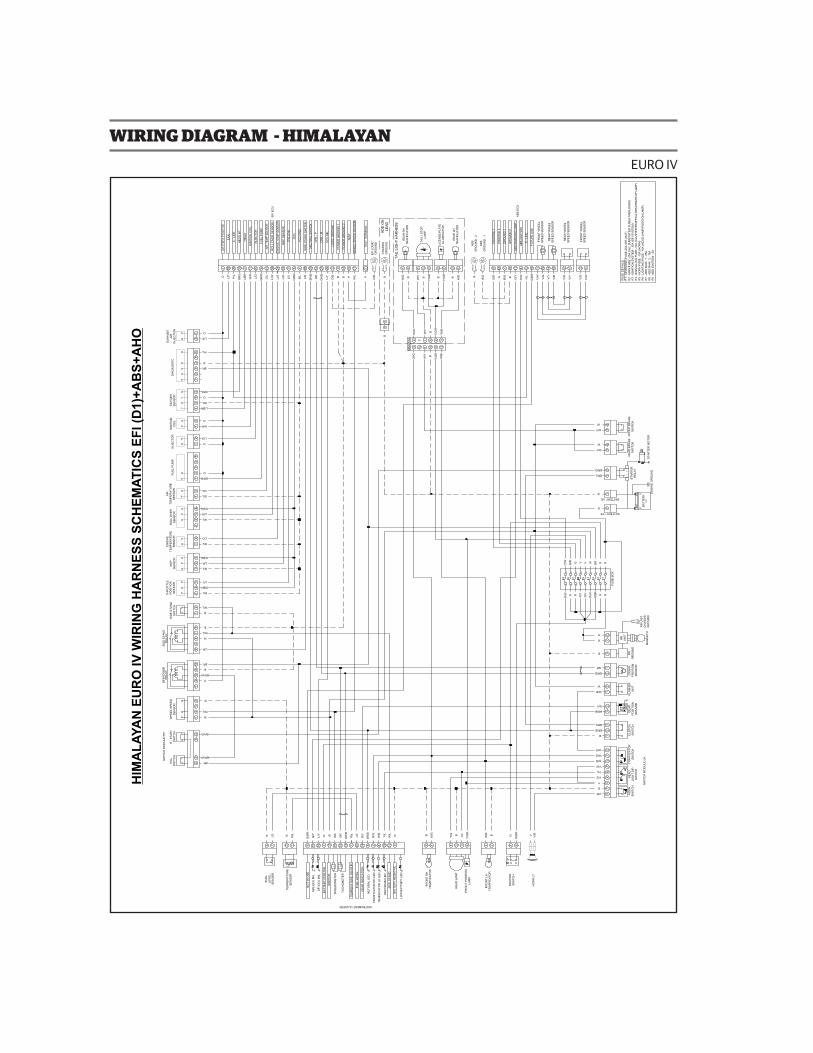
HIM
AL
AY
AN
EU
RO
IV
WIR
ING
HA
RN
ES
S S
CH
EM
AT
ICS
EF
I (D
1)+
AB
S+
AH
OC O M P L E T E W I R I N G D I A G R A MWIRING DIAGRAM - HIMALAYAN
EURO IV
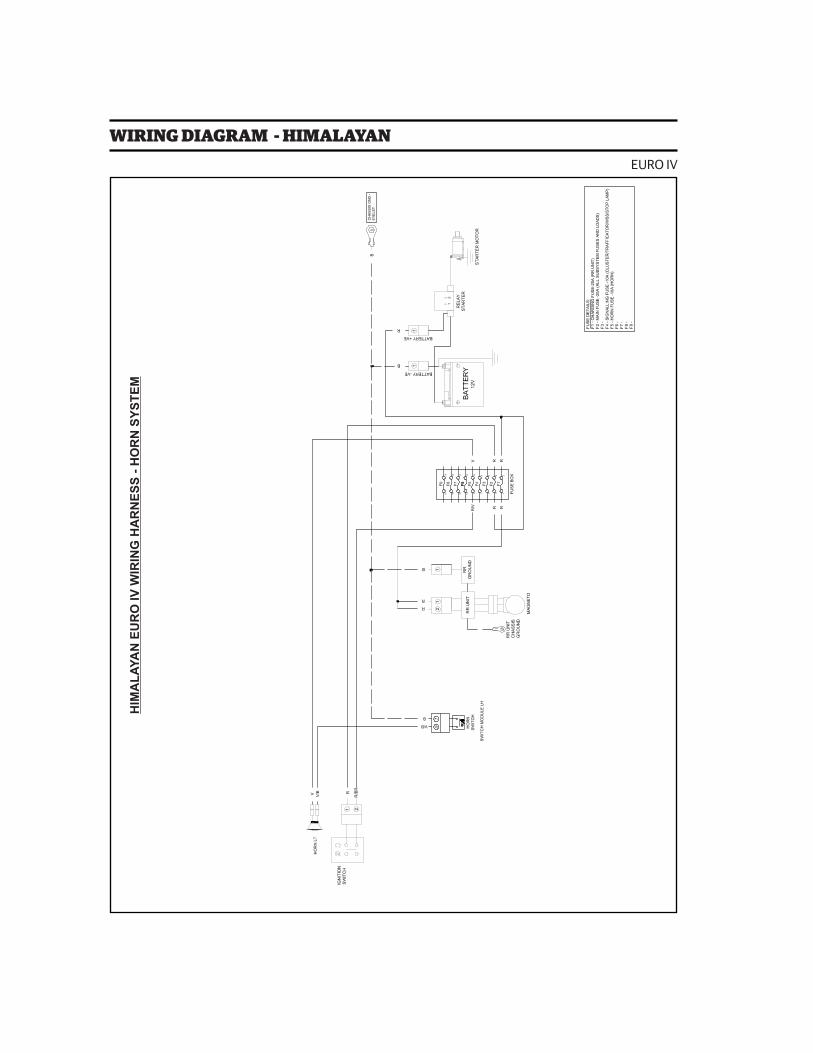
C O M P L E T E W I R I N G D I A G R A MWIRING DIAGRAM - HIMALAYANEURO IV
HIM
AL
AY
AN
EU
RO
IV
WIR
ING
HA
RN
ES
S -
HO
RN
SY
ST
EM
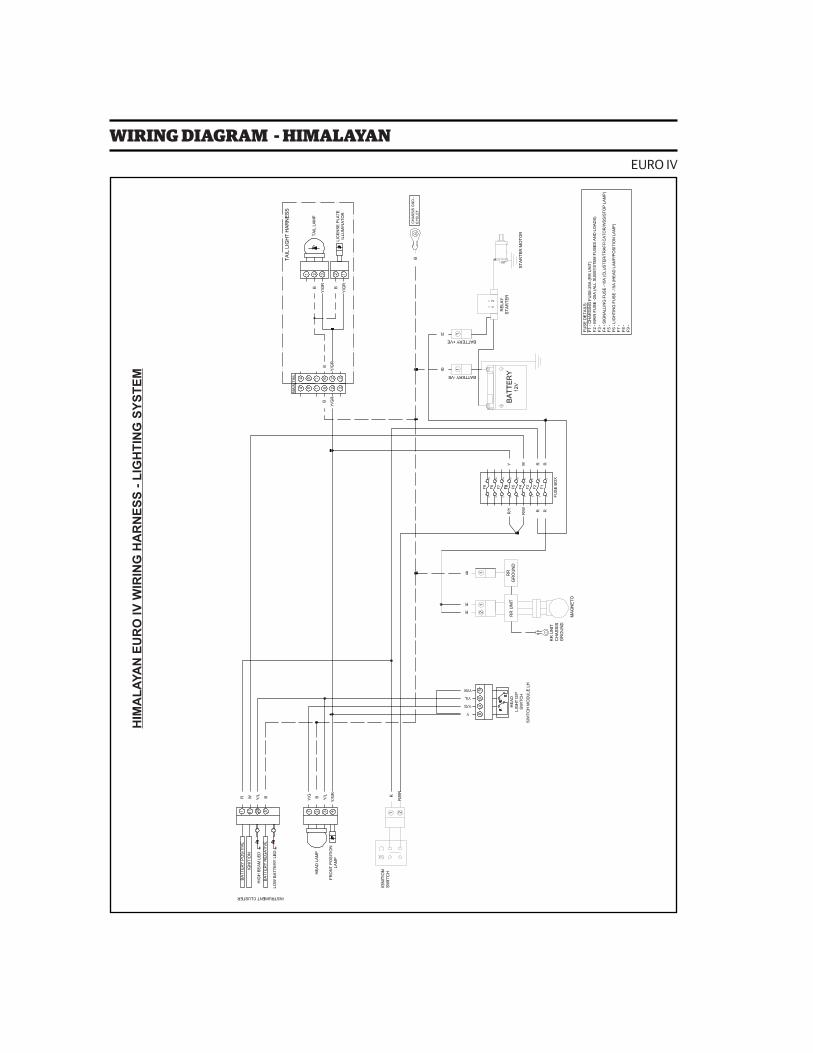
C O M P L E T E W I R I N G D I A G R A MWIRING DIAGRAM - HIMALAYANEURO IV
HIM
AL
AY
AN
EU
RO
IV
WIR
ING
HA
RN
ES
S -
LIG
HT
ING
SY
ST
EM
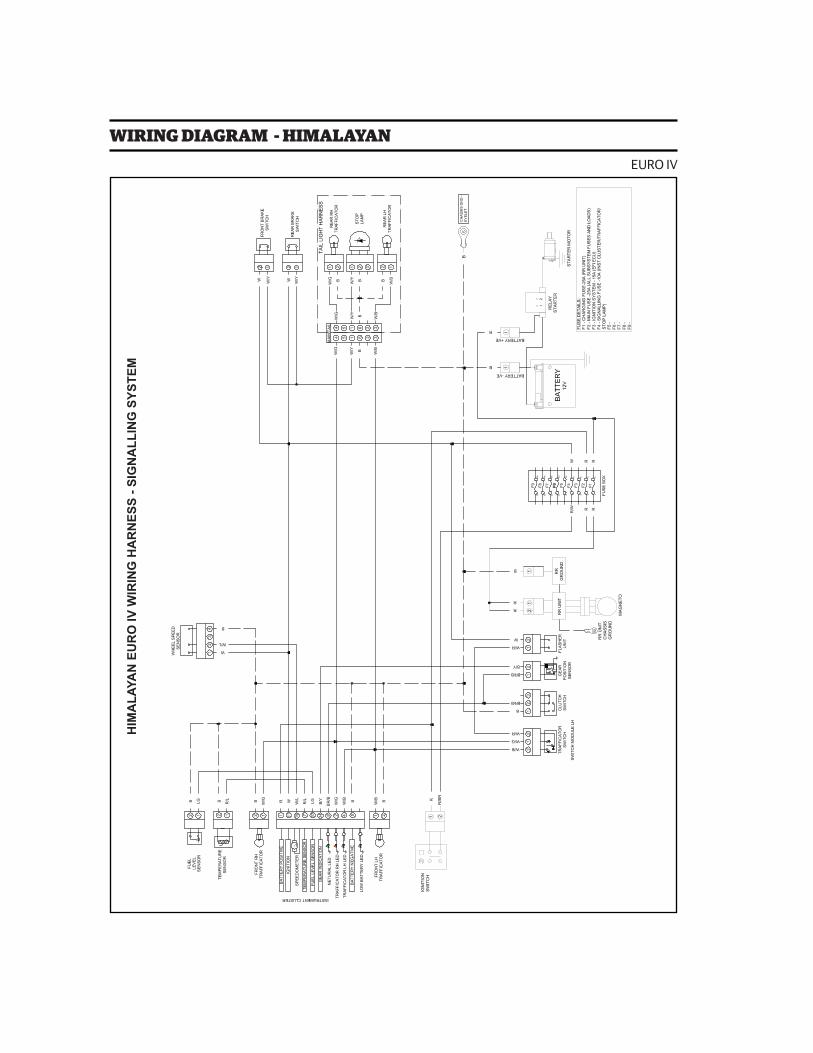
C O M P L E T E W I R I N G D I A G R A MWIRING DIAGRAM - HIMALAYANEURO IV
HIM
AL
AY
AN
EU
RO
IV
WIR
ING
HA
RN
ES
S -
SIG
NA
LL
ING
SY
ST
EM
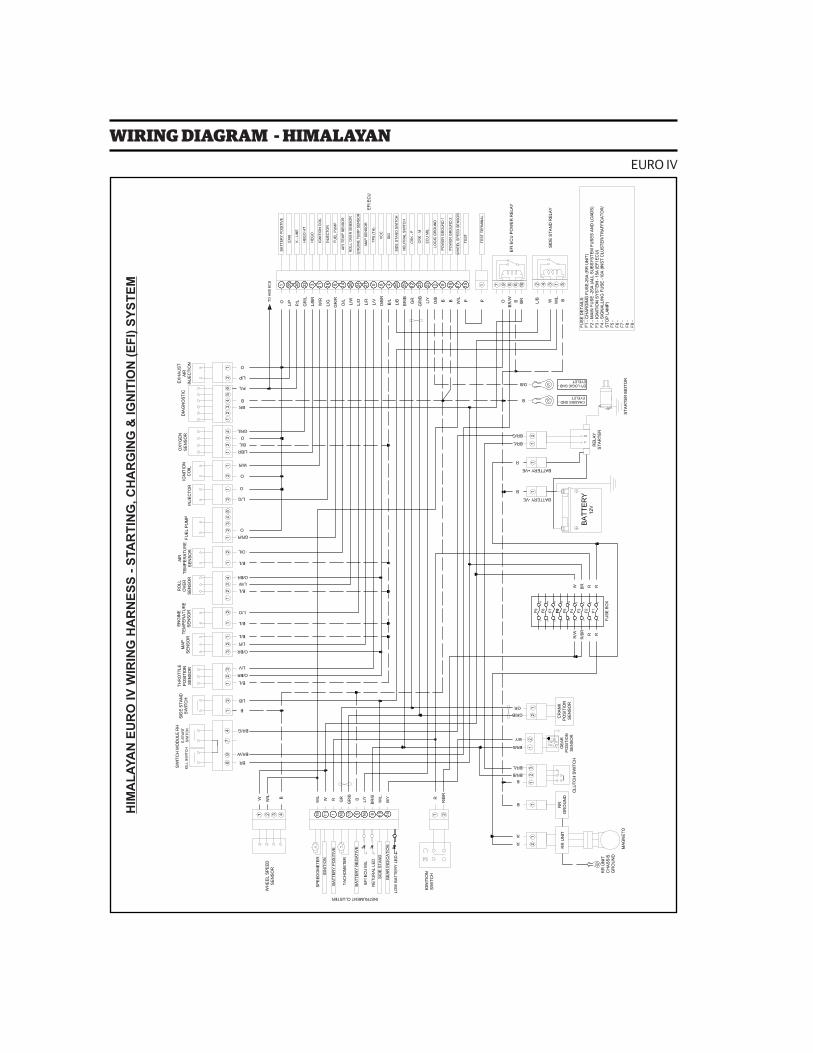
C O M P L E T E W I R I N G D I A G R A MWIRING DIAGRAM - HIMALAYANEURO IV
HIM
AL
AY
AN
EU
RO
IV
WIR
ING
HA
RN
ES
S -
STA
RT
ING
, C
HA
RG
ING
& I
GN
ITIO
N (
EF
I) S
YS
TE
M
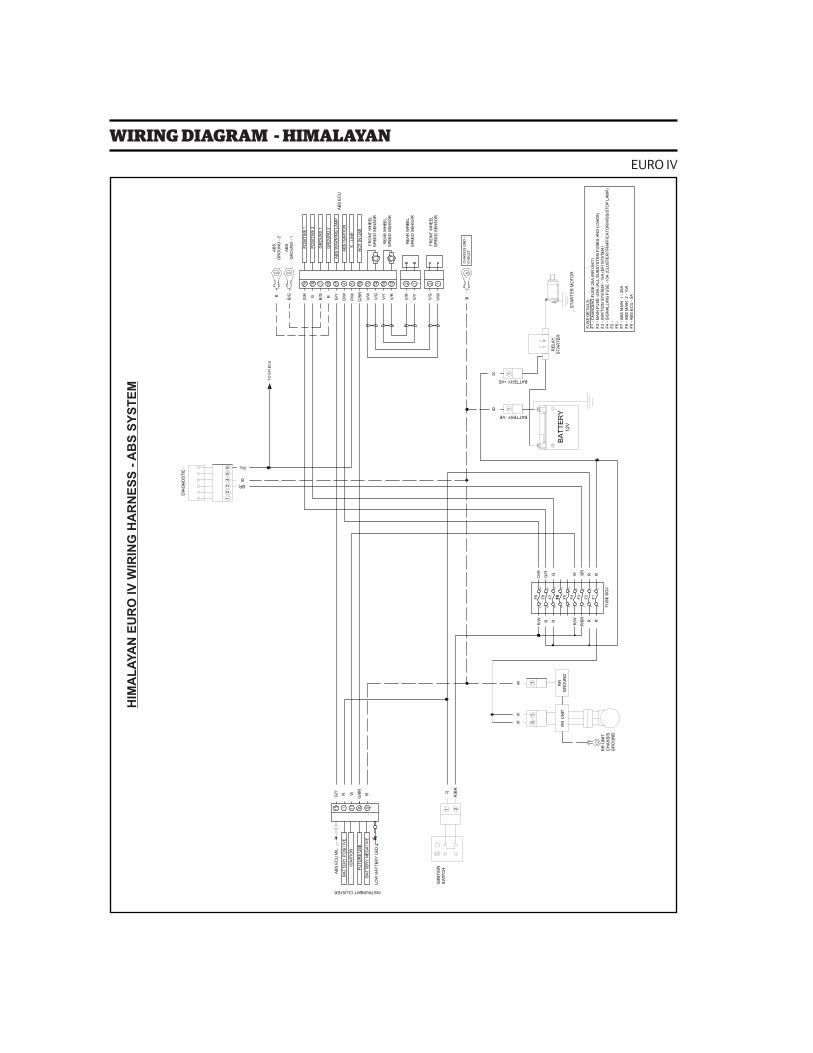
C O M P L E T E W I R I N G D I A G R A MWIRING DIAGRAM - HIMALAYANEURO IV
HIM
AL
AY
AN
EU
RO
IV
WIR
ING
HA
RN
ES
S -
AB
S S
YS
TE
M
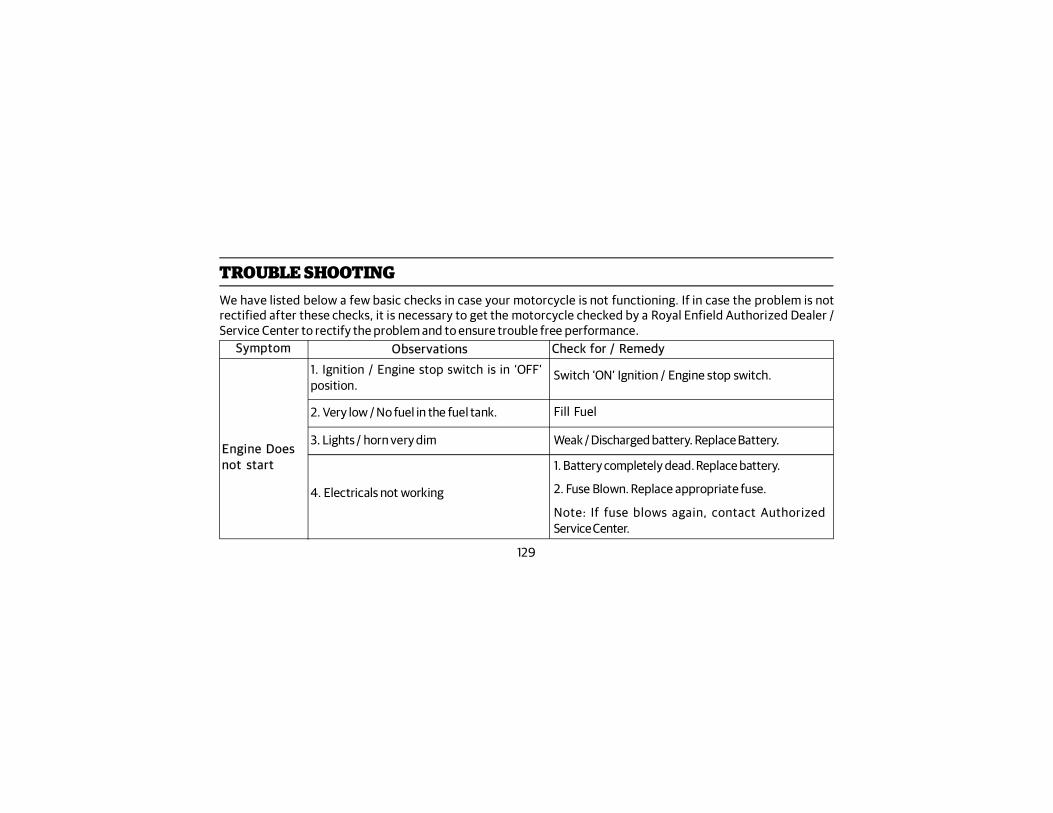
129
TROUBLE SHOOTINGWe have listed below a few basic checks in case your motorcycle is not functioning. If in case the problem is notrectified after these checks, it is necessary to get the motorcycle checked by a Royal Enfield Authorized Dealer /Service Center to rectify the problem and to ensure trouble free performance.
Symptom Observations Check for / Remedy
1. Ignition / Engine stop switch is in ‘OFF’position.
Engine Doesnot start
Switch ‘ON’ Ignition / Engine stop switch.
1. Battery completely dead. Replace battery.
2. Fuse Blown. Replace appropriate fuse.
Note: If fuse blows again, contact AuthorizedService Center.
4. Electricals not working
3. Lights / horn very dim Weak / Discharged battery. Replace Battery.
Fill Fuel2. Very low / No fuel in the fuel tank.

130
TROUBLE SHOOTINGSymptom Observations Check for / Remedy
5. Engine Cranking but not startingEngine Doesnot start
Spark plug Cap / wire disconnected. Reconnect.Check if SIDE STAND is ON / SIDE STAND SWITCHMALFUNCTION.
Check if gear is engaged and the side stand is down.
If the ambient Temperature is low use ManualBi-starter.
Engine shuts off as soon as throttle isclosed.
Engine StartsBUT shuts offimmediatley
Idling RPM set too low / setting disturbed.Contact Authorized Service Center for resetting theIdling RPM.
Check if the MIL Lamp is glowing; If yes, ContactAuthorized Service Center.
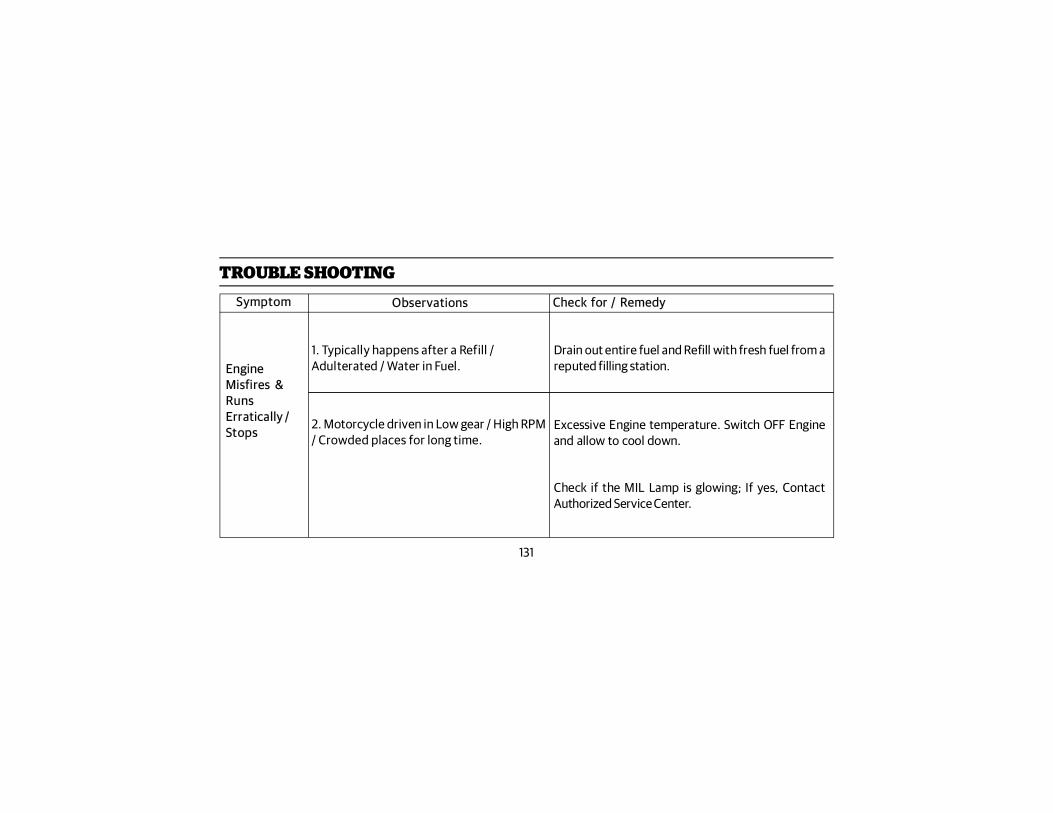
131
Symptom Observations Check for / Remedy
Drain out entire fuel and Refill with fresh fuel from areputed filling station.
1. Typically happens after a Refill /Adulterated / Water in Fuel.Engine
Misfires &RunsErratically /Stops
2. Motorcycle driven in Low gear / High RPM/ Crowded places for long time.
Excessive Engine temperature. Switch OFF Engineand allow to cool down.
Check if the MIL Lamp is glowing; If yes, ContactAuthorized Service Center.
TROUBLE SHOOTING
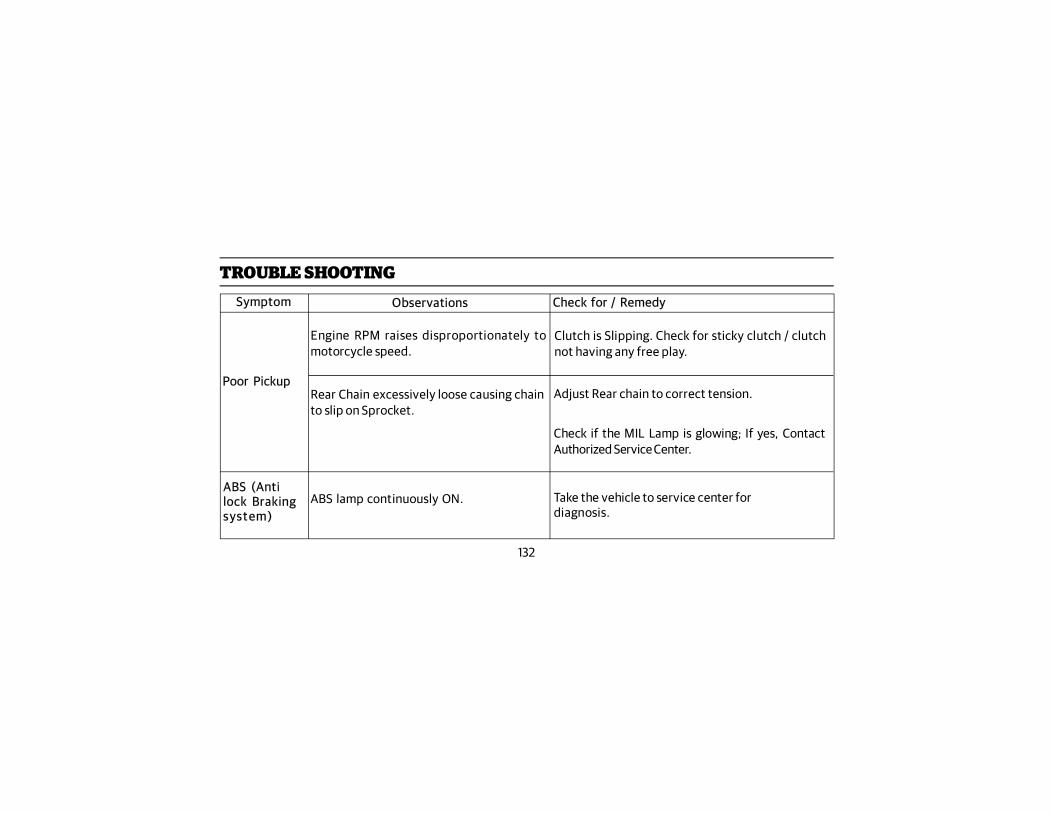
132
Symptom Observations Check for / Remedy
Engine RPM raises disproportionately tomotorcycle speed.
Poor Pickup
Clutch is Slipping. Check for sticky clutch / clutchnot having any free play.
Rear Chain excessively loose causing chainto slip on Sprocket.
Adjust Rear chain to correct tension.
Check if the MIL Lamp is glowing; If yes, ContactAuthorized Service Center.
TROUBLE SHOOTING
Take the vehicle to service center fordiagnosis.
ABS lamp continuously ON.ABS (Antilock Brakingsyst em)
133
WARRANTY TERMS & CONDITIONSRoyal Enfield Motorcycles are manufactured by following best Quality practices in respect of the material andworkmanship.
Royal Enfield (RE) warrants its motorcycle to be free from manufacturing and material defect under normal use subjectto following conditions.
1. Warranty shall be in force until the expiry of a period of 24 months from the first date of sale to the first customer andto any subsequent owners for the balance of the remaining period, until expiry of 24 months from the date of firstsale / registration of the motorcycle.
2. In order to effect Warranty, it is a prerequisite that the maintenance schedule prescribed by Royal Enfield in this Owner’smanual and warranty repairs if any, has been carried out at the Authorized Distributor’s service facility OR at theirAuthorized dealership’s service facility.
3. Record of all the regular services and periodical maintenance that have been carried out, along with proof of servicehistory will be required to be verified by the Authorized Distributor’s service facility OR their Authorized dealership’sservice facility, prior to carrying out a warranty service.
134
WARRANTY TERMS & CONDITIONS4. Proof of Ownership, in the form of Sales Registration OR Proof of Purchase documentation of the motorcycle, clearly
mentioning the Engine & VIN numbers, must be provided to the Distributor’s service facility OR their Authorizeddealership’s service facility.
5. During the warranty period, RE’s obligations shall be limited to repairing / replacing part(s) of the motorcycle for free,only if the part(s), on examination is deemed to have a manufacturing defect. Defective part(s) which have beenreplaced will become the sole property of RE.
6. Consumables like Oil, Oil Filter, Fuel etc used during warranty repair / replacement are not covered and chargeable tothe customer.
7. Claims on proprietary items like tyres, tubes, spark plug, battery etc. should be taken up with the respectivemanufacturer or their authorized agents in the area directly by the customer. RE shall not be liable in any manner toreplace them through their dealers. RE will, however, provide assistance in referring such claims on the respectivemanufacturer.
135
8. Warranty shall not apply to:
(a) Normal ageing, deterioration or rusting of plated parts, paints coat, rubber parts, soft items, glass items, plasticparts etc.
(b) Components like fuel filter, oil filter, air filter paper element, control cables, brake shoes / brake pads, clutchplates, drive chain & sprocket kit, steering ball races, electrical equipment, wiring harness etc., which are subjectedto normal wear and tear.
(c) Failures occurred due to use of non recommended grade lubricants, fuel or improper level.
(d) Damages due to use of non-genuine parts, lack of proper maintenance, incorrect riding habits.
(e) Damages to engine management system parts (like ECU, Throttle body, Sensors, etc.) due to tampering whichaffects the performance of the motorcycle.
(f) Parts damaged due to accidents, collision, abuse etc.
(g) Irregularities not recognised as affecting the quality or function of the motorcycle such as slight vibration, oilleakage, blue discoloration of exhaust bent pipe / silencer / soft or hard shockabsorber etc.
WARRANTY TERMS & CONDITIONS
136
WARRANTY TERMS & CONDITIONS(h) Defects arising from fitment of unauthorized or additional electrical loads.
(i) Motorcycle serviced or repaired at unauthorized service centers.
(j) Motorcycle used for competitions / racing / Stage Rallying etc.
(k) Electrical component like bulbs, fuses etc. and electronic components failure due to repairs by arc welding.
(l) Normal maintenance operations like adjustment of brakes, cleaning fuel system, engine tune-up and othersuch adjustments.
(m) Oxidization of buffed / painted / powder coated items etc.
9. Use only Royal Enfield approved parts and accessories. Use of certain other manufacturer’s performance parts willvoid your new motorcycle warranty.
10. RE reserves the right to finally decide on all warranty claims.
11. RE reserves the right to make changes in design of the motorcycle without any obligation to install these changes onpreviously supplied motorcycles.
137
The following warranty applies to the evaporative emission control system and is in addition to the LIMITED WARRANTY,EMISSION CONTROL SYSTEM WARRANTY & NOISE CONTROL SYSTEM WARRANTY.
Royal Enfield Motors warrants the first owner and each subsequent owner, that this motorcycle is designed and built soas to conform, at the time of sale, with applicable regulations specified by the European Union AND that the evaporativeemission control system related parts fitted to this motorcycle are free from defects in materials and workmanship whichmay cause this motorcycle not to meet applicable regulations of the European Union for a period of 24 Months from thedate of first use of the motorcycle.
The Warranty period shall begin either on the date the motorcycle is delivered to the first retail purchaser OR from the firstdate the motorcycle is used as a demonstrator OR as a display and / or trial motorcycle.
THE FOLLOWING ARE NOT COVERED BY THE EVAPORATIVE EMISSION CONTROL SYSTEMWARRANTY:
1. Failures which may arise as a result of misuse, alterations, accidents OR non performance of routine maintenance, asspecified in the Owner’s Manual.
EVAPORATIVE EMISSION CONTROL SYSTEM WARRANTY
138
2. Replacing OR removing OR modifying any portion of the EVAPORATIVE EMISSION CONTROL SYSTEM (consistingof Fuel tank, fuel tank cap, Canister, purge valve, throttle body, vapor hoses, fuel hoses and hose connectors) withparts not certified to be genuine.
3. Loss of time, inconvenience, loss of motorcycle use or any other consequential loss or damages.
4. Any motorcycle in which the Odometer has been tampered with, OR the Speedo cable has been disconnected forany reason OR is broken and not replaced immediately, due to which the exact distance covered cannot be determined.
5. Normal ageing of parts such as fuel hoses, vapor hoses, gaskets & rubber components.
RECOMMENDATIONS FOR REQUIRED MAINTENANCEIT IS RECOMMENDED THAT THE ROUTINE MAINTENANCE OF THE MOTORCYCLE BE CARRIED OUT AT SPECIFIEDINTERVALS AND ANY MAINTENANCE TO THE EVAPORATIVE EMISSION CONTROL SYSTEMS SHOULD BE PERFORMEDONLY BY AN AUTHORIZED ROYAL ENFIELD SERVICE DEALER AND USING ONLY GENUINE ROYAL ENFIELD SPAREPARTS.
EVAPORATIVE EMISSION CONTROL SYSTEM WARRANTY
139
SERVICE MAINTENANCE RECORD
S.No. Date Brief details of work / service
1.
2.
3.
4.
5.
6.
7.
8.
Job CardNo.
KMS /Miles
Royal EnfieldAuthorized Dealer

140
SERVICE MAINTENANCE RECORD
S.No. Date Brief details of work / service
9.
10.
11.
12.
13.
14.
15.
16.
Job CardNo.
KMS /Miles
Royal EnfieldAuthorized Dealer
141
SERVICE MAINTENANCE RECORD
S.No. Date Brief details of work / service
17.
18.
19.
20.
21.
22.
23.
24.
Job CardNo.
KMS /Miles
Royal EnfieldAuthorized Dealer

142
SERVICE MAINTENANCE RECORD
S.No. Date Brief details of work / service
25.
26.
27.
28.
29.
30.
31.
32.
Job CardNo.
KMS /Miles
Royal EnfieldAuthorized Dealer

143
NOTES
144
NOTES

Part No. 1017081/A


![Royal enfield [balu]](https://img.pdfslide.us/doc/110x75/55d4e76ebb61eb67158b458c/royal-enfield-balu.jpg)