Embed Size (px)
Citation preview

Gen V LT1/LT4 installation guide by Dave White – automobileman.com - rev e. - 12/15/2017 –
206-999-8138
This is a brief and concise guide to those who are interested in installing the new generation of GM LT crate
engines and junkyard pullouts for engine swaps.
Engine mounting plates
The LT block shares little with the previous generation of LS engines and requires a unique set of engine
mounting plates. I used a pair of sliding engine mounts from Dirty Dingo called LT adjustable conversion
mounts. They list for $154.95
They also make a single mounting bracket with four adjustable holes that runs $69.95.
ICT Billet also makes an LT engine swap bracket that retails for $64.95
Both systems use conventional small black Chevy Gen 1 engine mounting pads that will adapt to existing
engine mounting locations in classic cars such as Chevelles, Novas and Camaros. The stock engine cradle may
be a problem with a stock pan.
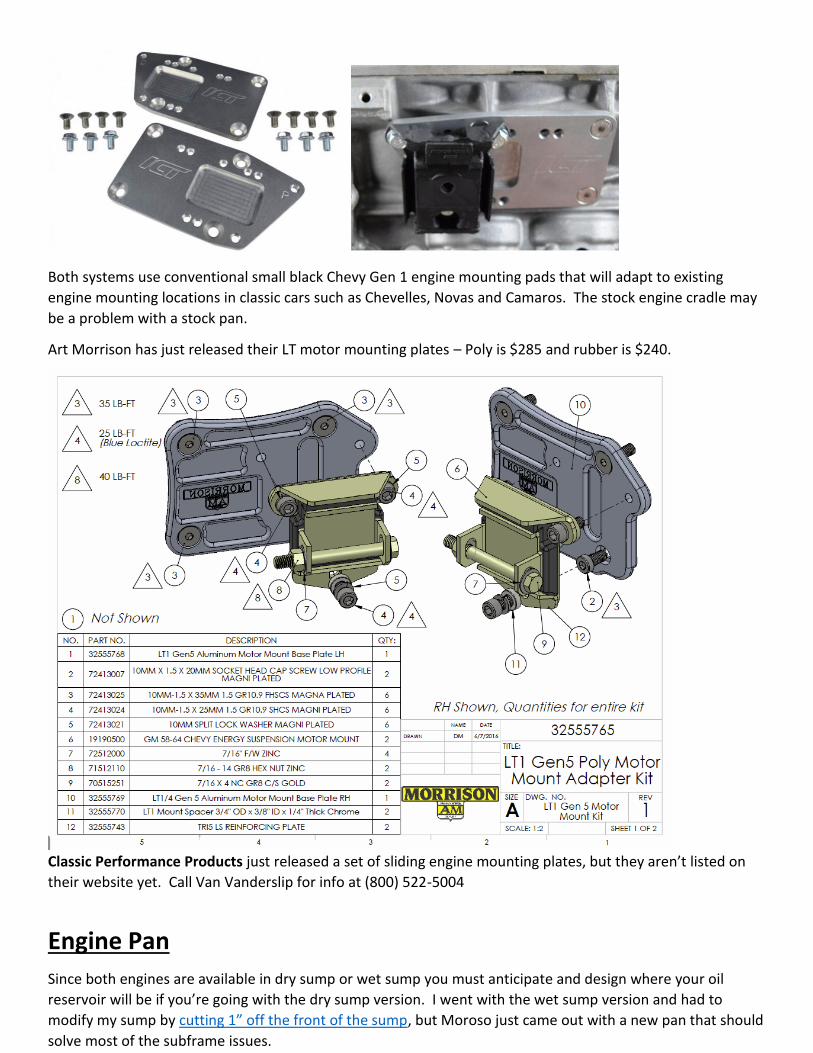
Art Morrison has just released their LT motor mounting plates – Poly is $285 and rubber is $240.
Classic Performance Products just released a set of sliding engine mounting plates, but they aren’t listed on
their website yet. Call Van Vanderslip for info at (800) 522-5004
Engine Pan
Since both engines are available in dry sump or wet sump you must anticipate and design where your oil
reservoir will be if you’re going with the dry sump version. I went with the wet sump version and had to
modify my sump by cutting 1” off the front of the sump, but Moroso just came out with a new pan that should
solve most of the subframe issues.

Moroso part # 20155
Holley just released their new LT1/4 pan under part number 301-20.
GM’s new Gen V LT direct
injected engines are starting to
find their way into a large variety
of vehicles. They make great
power, plus they’re very durable
and reliable. Unfortunately, the
factory oil pans don’t always fit
or they hang too low for today’s
hot rods. Holley’s new LT Retro-
fit Engine Oil Pan is designed to
help! It provides maximum
clearance to the chassis and
ground, plus provides an OEM
fitment for durability and proper
sealing. These oil pans are
perfect for: 1967-‘02
Camaro/Firebird, 1968-‘74
Nova/Apollo/Ventura/Omega, 1978-‘87 G-body, 1964-‘72 A-body, and 1973-‘87 Chevy/GMC Full Size Trucks
Features: • Designed for LT Engine Retro-Fit Installations in Classic Car and Truck Chassis Requiring More Oil Pan to Chassis
Clearance Around the Front Half of the Oil Pan • Allows for up to 4.00” Crankshaft Stroke • Can Be Used Anywhere a GM F-Body Oil Pan Can Be Used • Provides OEM fitment - Oil filter mounting, OEM Engine NVH Suppression, OEM Flange Sealing, Proper Structural
Rigidity and OEM Bell-Housing Attachments. • Traditional High-Quality Cast Aluminum Appearance With Clean Exterior Styling • Provides Maximum Clearance for Vehicles Where the Steering Linkage is Behind the Engine cross-member • Traditional high-quality cast aluminum appearance with clean exterior styling. • Provides maximum clearance for vehicles where the steering linkage is behind the engine crossmember. • Cast and machined aluminum • Oil Cooler Port Provision • 1/2” NPT port – Ideal for Turbo Oil Return or PCV Oil Return • Hinge Door Baffles Available

• Complete Kit Includes: Windage Tray, Sump Baffle, OE Style Pick-Up Tube, Sump Port Plug, Oil Filter Stud, Billet Oil Passage Cover, etc
The LT1 has a different oil cooler than the LT4 and it may or may not be an issue with mounting. The LT4 oil cooler is larger and hit the tubing that triangulated the Morrison front clip that I was using. I removed the sump and designed an air-cooled oil cooler rather than using the existing water-cooled radiator design. There have been numerous posts over the last year (2016) that identifies a cooling issue with LT4 engines that are used on the track and pushed hard. Once the oil temperature reaches 280 degrees the engine will shut down and run in “limp mode.” The 2017 Z06 and the ZL1 Camaro have improved cooling designs that will help with this problem. I remotely mounted a stacked plate cooler to the side and in front of the radiator on my ’68 Camaro. After running several “dyno tunes” we concluded that there was no IAT (Intake atmospheric temperature) increase in temperature and the stacked plate cooler provided sufficient cooling for most applications. Another big advantage with going with a remotely mounted oil cooler was the increase of 2 quarts of oil to the sump which now is 12 quarts instead of 10.
Hydraulic Power Steering
This is a big problem since all the automobiles that are produced now use electric power steering, both
engines have no provision for hydraulic power steering. I saw the 1970 GM SEMA Camaro and thought I could
copy and use the system the factory used to plumb in a GM type II power steering pump into the serpentine
belt system. This was not easy, took a considerable amount of time, but if you know how to engineer and
fabricate it’s not that bad.
The hydraulic power steering pulley simply replaces the idler pulley that was there. It’s a standard GM type II
pump that was sourced from Detroit Speed. I used a 2007 Dodge RAM power steering pulley that is slightly
undersized from stock. The factory actually took a stock 6 rib pulley, split it apart and welded two halves
together and then remachined it because GM does not manufacture an 8 rib pulley that will fit on the Type II
pump. I recently purchased an 8 rib pulley from Eddie Motorsports but the diameter is only 5” and it’s too
small (shown below).
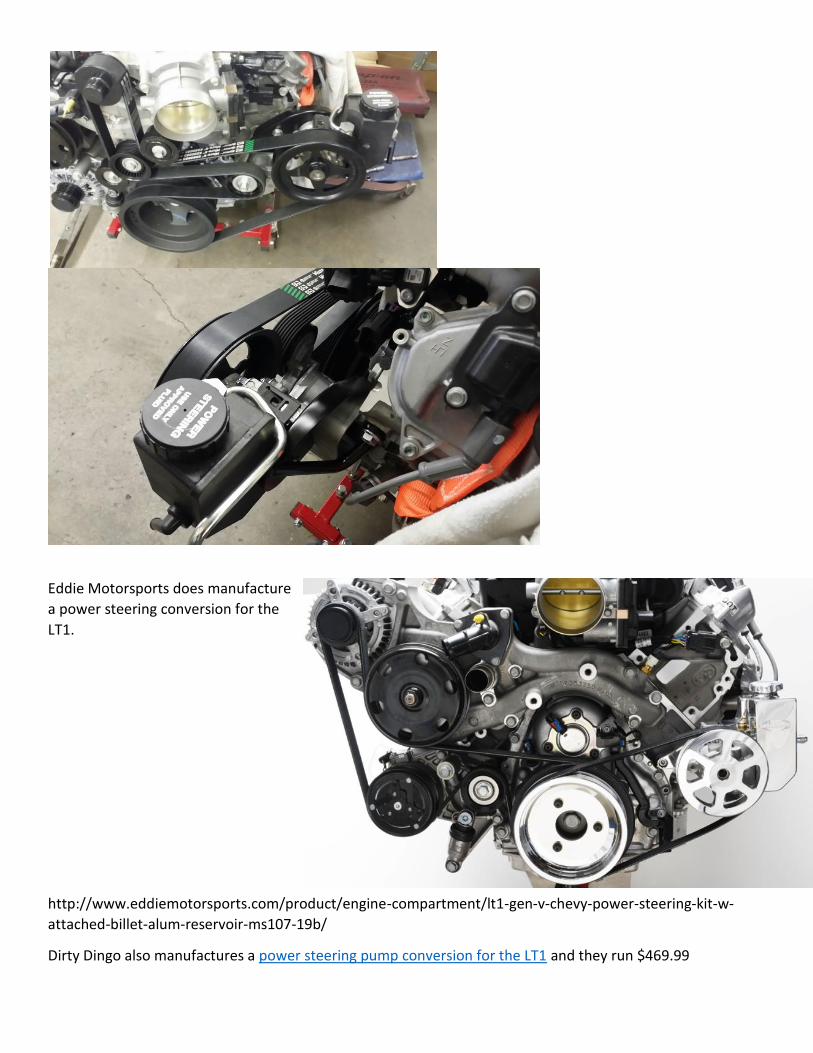
Eddie Motorsports does manufacture
a power steering conversion for the
LT1.
http://www.eddiemotorsports.com/product/engine-compartment/lt1-gen-v-chevy-power-steering-kit-w-
attached-billet-alum-reservoir-ms107-19b/
Dirty Dingo also manufactures a power steering pump conversion for the LT1 and they run $469.99

Pace Performance offers an LT1 and an LT4 serpentine system that includes hydraulic power steering and runs
around $3,000.00 (This is actually produced by the Street Shop, not sure if this is still produced.) Their system
does not support the stock PCV sump on the front of the engine.
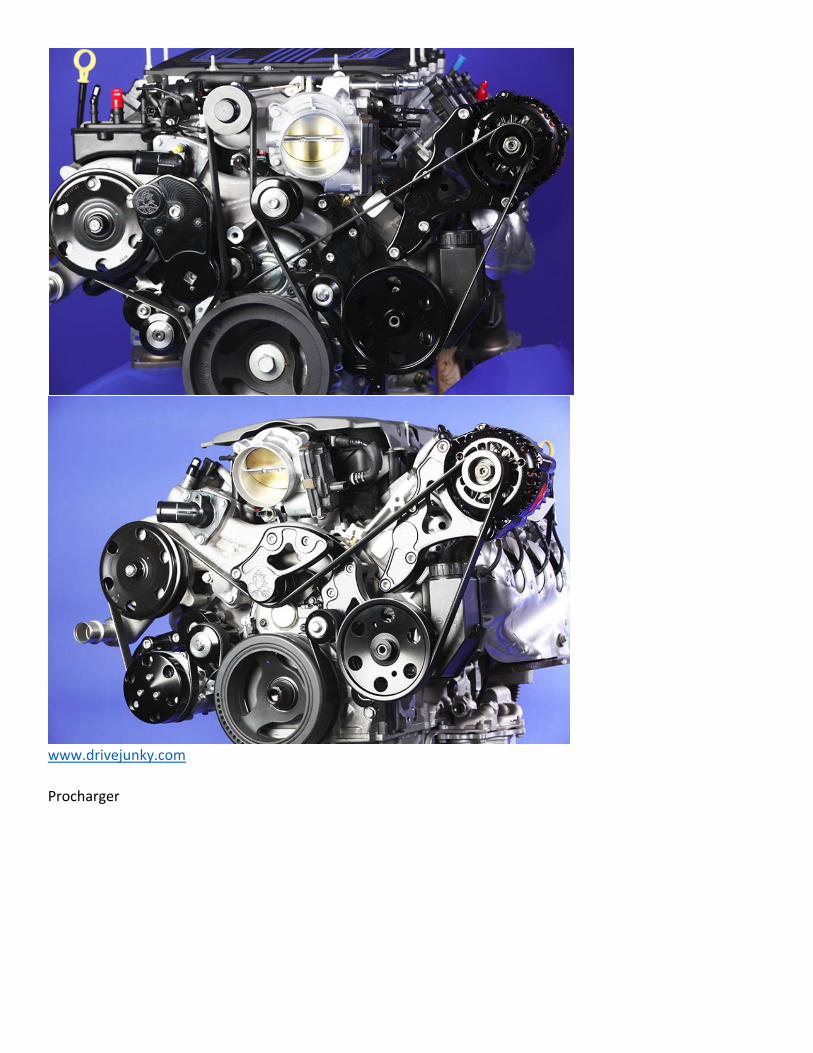
Drive Junky
Drive Junky has systems for both the LT1 and the
LT4. It’s the only one so far that dedicates the
supercharger drive to the 8 rib belt and drives
everything else with a 6 rib belt.

https://www.procharger.com/automotive-superchargers/general-motors/camaro/2016-camaro-ss-lt1
Procharger has just released a brand new centrifugal supercharger kit for LT-series swap that use the Corvette
water pump. Not only does their kit include their venerable centrifugal huffer, but they’ve also succeeded in
retrofitting a Sanden SD-7 positive displacement a/c compressor and power steering pump, solving the
problem that the stock LT1 crate engine leaves on the table; the lack of a power steering pump and the
variable displacement a/c compressor that is not compatible with most aftermarket a/c kits.
Holley

Holley’s Gen V serpentine system is now available
https://www.holley.com/products/ls_power/ls_and_lt_accessory_drives/lt_accessory_drives/parts/20-170
All-American Billet

Another version of the 8-rib pulley driving the supercharger, water pump and AC unit. They also offer systems
for LSX engines.
https://www.allamericanbillet.com/LT4---Polished-detail.htm?productId=-437775&browse=-30358&shopBy=-
15585
CVF Racing
LT4 serpentine system, not on their website yet, but it’s in their digital catalog

ICT Billet Brand new solution for adding power steering to the L83/L86 truck engines

http://www.ictbillet.com/lt1-l83-alternator-power-steering-pump-bracket-accessory-kit-truck-gen-v.html

Headers
These stock manifold replacement headers from Hooker Blackheart are constructed of lightweight 1 7/8-inch
diameter 18-gauge, mandrel bent 304 stainless steel primaries with a unique inline 4-1 merge collector. The
100% hand welded design is excellent for scavenging and the compact design makes for a number of
applications. Good for gains up to 14 hp and 12 ft-lbs torque, these replacement LT1 headers are also nearly
20 pounds lighter than the stock cast manifolds.
Kooks

https://www.kooksheaders.com/2016-camaro-ss-zl1-1-7-8-x-3-headers.html

Ultimate headers
http://www.ultimateheaders.com/swap-header-GM-LT1-LT4-camaro.shtml
Header Flange
The stock exhaust system uses a unique 4 bolt pattern that isn’t readily available. GM wants $57 for the
gasket and $600 for the down pipe, so coming up with an exhaust flange is problematic. I’ve provided a
template for the flange on my website, but you can order one now from Motion Raceworks.
https://www.motionraceworks.com/store/p874/GenVExhaustFlangeLT1Lt4L83L86

Motion Raceworks flanges allow you to build your own custom exhaust starting from the manifold back. The
flanges are CNC laser cut from Mild Steel or 304 Stainless Steel 3/8" thickness and come with new hardware
for the stud. These flanges have a 2.50" center hole allowing you to slide 2.50 inch exhaust into the flange for
easy welding. If you want to use a larger diameter exhaust you can weld to the outside (the manifold outlet is
not larger than 2.50 so performance will not be altered by welding exhaust to the outside).
Wiring and controller system
If you haven’t rewired a classic car for an LS or the LT series of engines, things have changed considerably since
the 50’s and 60’s. The controller system that comes with these engines includes a complete fuse panel and
ECM that controls every function of the engine. In the LS series of engines the ECM is relatively easy to mount
because it’s not that large, but in the LT engines it’s large, about the size of an iPad.
GM produces factory style wiring harnesses that match each of the “crate engine” that they product for both
for the LS series and the LT series. Part number 19303137 is the Harness/controller for the LT1 and part

number 19331517 is for the LT4. They are pricey, both systems run around $2,200. Part of the reason you
want to use the factory GM harness/controller is because it’s already dumbed down and has the VATS (vehicle
anti-theft system) removed as well as the
emissions controls.
My biggest issue was trying to find a place for
it because it simply didn’t fit anywhere. GM
buries these ECMs deep within the modern
cars and it’s a challenge just to find where
they put them. I chose to mount it as shown
and modified my heater box, but I wouldn’t
recommend it. Instead I should have installed
a Vintage Air System and completely removed
the existing heater system because then you
end up with a simple cover plate that goes
over where the old heater box used to be. It’s
much cleaner and a simpler way to go, plus it then gives you plenty of room to install this massive ECM. The
fuse box is just like the LS3 and includes all the fuses and relays to run the engine and additional electrical
demand, plus it controls the fuel pump and the dual fan relays. You only need to hook up one wire (ignition -
pink) to your existing system to get things going.
More and more mechanics want to use “Pull-out” or complete drivetrains from wrecking yards. There are
thousands of used engine/drivetrains combinations available on Ebay that include many of the older LS based
iron block truck engines and well as the newer direct injection VVT engines L83 and L86. If indeed you go this
route it will require the ECU to be reflashed and have both the VATS and emission control portions turned off.
Howell EFI
https://howellefi.com/product-category/general-motors/gm-lt1-lt4-products-2014/. Howell also offers a
reprograming (reflash) of stock ECUs.
Speartech
Speartech makes systems for both the LT1, LT4, L83 and L86. They also offer reprograming (reflash) of stock
ECUs for realistic pricing.

http://www.speartech.com/category_s/1836.htm
Current Performance Wiring
CPW makes systems for both the LT1, LT4, L83 and L86. They also offer reprograming (reflash) of stock ECUs.
http://www.currentperformance.com/shop/gen-v-lt1-lt4-l83-l86-stand-alone-harness/
VSS and the 8L90E transmission
The 8L90E transmission is a second-generation model that uses an electronic controller built within the transmission itself. If you’re using the GM “Connect and Cruise” system it includes a separate controller (black rectangle with blue connector above right) that communicates back and forth between the engine ECU and the transmission itself. This system is part of the CANBUS or GMLAN electronic control system and is for all practical purposes standalone, they don’t want you piggybacking off the system because you can potentially disrupt the network transmission protocol. For the 8 speed automatic transmissions, the vehicle speed information is fed to the transmission controller through a pulse signal. The Vehicle Speed Sensor connector (on the wiring harness) is not used because there isn’t one on the 8L90E to plug into (see below). The ECM is programmed and looking for 40 pulses per revolution.
I have successfully piggybacked off the VSS signal from a T56 manual transmission and generated the correct speed using the Dakota Digital VHX gauge package with their BIM 01-2 module. Using the VSS signal from an ECM requires a single wire input into the Dakota Digital bus. Since the signal is generated outside the GMLAN, a simple pulse generated inductive signal from a magnet, I believe it doesn’t disrupt the signal going to the

ECM (see my LT1/LT4 installation guide for more guidance). This is necessary because both the LT1 and LT4 Gen V engines require a VSS signal, without one they go into ‘limp mode’ and run at 1/3 throttle. Set up this way my engine and transmission function correctly because they do not generate any check engine codes or MIL lights.
GM Powertrain recently brought to my attention that pin 14 (grey/blue wire) out of the transmission will provide a non-CANBUS raw signal (pulse generated) that should drive a conventional electronic speedometer. This is an inductive type signal so voltage output is dependent on speed.
This is the plug that connects to the 8L90E
transmission, if you look closely you can see the
grey wire. The female wiring harness plug goes
here.
One simple solution available is a conventional shaft mounted VSS signal generator like this:
Summit Racing sells this part: https://www.summitracing.com/parts/dak-sen4165/overview/. This is a VSS magnet kit
with pick up coil. Normal rear wheel drive domestic installation takes four magnets on the drive shaft with a pickup coil
mounted approx 5/8″ away. It seems odd that you would use old school mechanical magnets spinning around on the
outside of your driveshaft to get a signal that your speedometer can read, but it’s a least a solution

The best solution seems to be the recently released STA-100 ODBII interface that not only handles the
speedometer issue, but also provides a tachometer signal. There is also pin C (white wire) output from the
bulkhead connector on the GM wiring harness that provides engine speed, but it’s a CANBUS signal and will
not drive an aftermarket electronic tachometer unless it’s OEM.
The STA-1000 plugs directly into the OBDII diagnostic connector, providing a user-adjustable traditional Speedometer, Tachometer and Check-Engine output for your choice of aftermarket instruments.
Features:
• Fully compatible with common aftermarket electronic speedometers • User selectable output of: 4k, 8k, 16k PPM signals, Sine or Square wave options • +/- 35 percent speed signal correction, compensating for tire size or gearing changes
• Adjustable 4, 6 or 8 cylinder tachometer signal output • Check Engine light output provides a grounded (-) output to activate a check engine light of your choice • Automatically calibrated output for an aftermarket cruise control can be activated by making
connection to the higher-resolution fixed VSS sensor • Small footprint measures 4-3/4″x 3″x 1″ making it easy to hide • Compatible with J1850 and CAN OBDII protocols
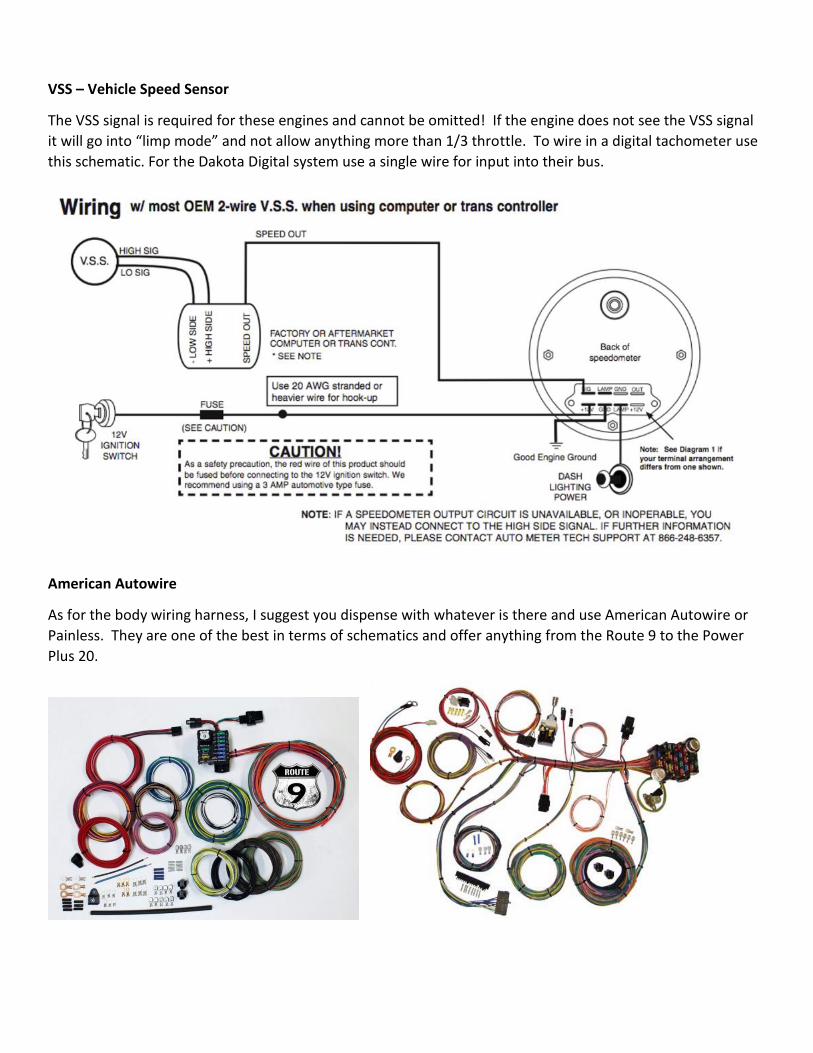
VSS – Vehicle Speed Sensor
The VSS signal is required for these engines and cannot be omitted! If the engine does not see the VSS signal
it will go into “limp mode” and not allow anything more than 1/3 throttle. To wire in a digital tachometer use
this schematic. For the Dakota Digital system use a single wire for input into their bus.
American Autowire
As for the body wiring harness, I suggest you dispense with whatever is there and use American Autowire or
Painless. They are one of the best in terms of schematics and offer anything from the Route 9 to the Power
Plus 20.

If you’ve got more than a simple street rod with power windows, 1500 watt amp or power seats, you’ll need
something more than the Route 9. They also offer complete restoration harnesses for cars like 1956 Chevys,
but they won’t work using the LT engines because the wiring theory is completely different than what was
done 50 years ago. Do not try to adapt one of these original harnesses to the LT engine. We don’t use
generators or ammeters anymore and we produce substantially more wattage than the older systems can
handle. I’ve done it both ways and in the end, it’s much better to remove what’s there and start from scratch.
Painless Wiring

Radiator
Since the LT4 develops 650 HP you need to make sure whatever radiator you’re using is up to handling the job,
and that means dual fans. There are lots of high-end radiators such as Ron Davis and AutoRad, but I ended up
using a US built radiator from Entrophy. This picture shows the LS/LT option with both inlet and outlet on the
same side. For those of you who have been running Gen 1/2 engines, these modern engines run much hotter,
the first fan kicks in at 207d and the second at 221d, do not attempt to modify these parameters. I’ve talked
with many old hot-rodders who do not understand this and attempt to lower the temperatures because they
feel uncomfortable with an engine running at those temperatures, this is foolish and will cause problems, not
to mention lower the overall performance of the engine.

Gauges and Instrumentation
GMs modern engines use something known as a CAN Bus (Controller Automotive Network) and GM’s version is known as GMLINK. To get your gauges to work I suggest you read Autometer’s installation guides for LS engines, first before you do anything. The easiest approach is to use Dakota Digital’s VHX or HDX gauge system with the BIM-01-2 OBD 2 interface. What this does is read the information from the OBD 2 diagnostic port and convert the signals into something that the VHX can understand.

The BIM-01-2 OBD-II (J1850/CAN) Interface allows you to plug directly into the engine diagnostic port,
extracting engine and transmission data from the vehicle's computer (ECM). The BIM-01-2 will collect and
output the following information to Dakota Digital Instrument Systems *:
Always available:
• Speed
• Tachometer
• Engine Temp
• Check Engine Indicator
Vehicle specific:
• Intake Air Temp
• Transmission Temp
• Ambient Air Temp
• Gear Position
• Oil Pressure
“Due to the various factory and modified ECM's,
additional data including (Intake Temp, Transmission Temp, Ambient Air Temp, Oil Pressure, and Gear
Position) may be available, but will vary from application to application. Dakota Digital cannot guarantee
the presence or accuracy of the Intake Temp, Transmission Temp, Ambient Air Temp, Oil Pressure, or Gear
Position displays since this is a function of the ECM and matching OEM functional sensors.”
For LS and LT engines which have a 2 wire oil pressure GMLAN reference sensor the VHX system cannot
read this signal through the ODB connection . As shown above the LT4 already has an extra oil pressure
sensor located right above the oil filter. You can install Dakota Digital’s 03-8 sender which is included in
their gauge package with a 12mm x 1.5 adapter to read the oil pressure. To read the signal only requires
changing the signal from BUS to Sender in the setup procedure.
Also, there are no blank plugs that are available to install a water temperature sender. Your options are
limited here unless you want to install it in the water pump outlet (drill a hole), the radiator hose or the
radiator itself.

I completely redesigned the oil cooling system,
removed the oil cooler from the side of the pan
and installed conventional oil coolers at the
front of the radiator. I installed a conventional
sender (DD 04-5) at the end of the water pump.
This was my
solution, but it
may not be
something you
want to attempt.
The existing water temperature sensor is
shown on the top of the water pump, but you
cannot share this connection because it’s part
of the CAN bus and won’t give you a signal that you can use unless you install the Dakota Digital VHX with BIM-
01-2.
Fuel Pump
GM recommends a Pulse Width Modulated returnless system.
The only vendor that I could find that would accept and use a conventional GM fuel pump 19303293 was
Rick’s Tanks in Texas. They manufacture both an adaptor plate and complete tanks.

They also offer specific fittings and the wiring adapter plugs for the fuel pump.
GM has decided that they no longer want to recycle unused gas from conventional pumps, so they’ve come up
with this new system to satisfy the demands of the new generation of Direct Injection Engines. Since the fuel
pressures can be upwards of 2,500 psi, the FPPM (Fuel Pump Pressure Module) monitors the fuel pressure
sensor (inline on the fuel hose) and communicates back and forth between the ECM and the fuel pump to
deliver sufficient pressure. It’s also recommended that you “do not use a fuel line filter” anywhere along the
system because the fuel pump itself has filters to take care of any issues. On a final note, there is no
conventional fuel pump relay in the system. It appears that the fuel pump relay is electronic and housed
within the FPPM module. As of this date GM has not addressed how the Fuel pump is fused. I suspect that it’s
the 30 amp fuse in the PT (Powertrain) relay No. 2 in the fuse panel but they haven’t responded yet.
For questions or additional information, please contact me at:
(206) 999-8138
David White rev e - 12/15/2017
automobileman.com


![GDC Rule Book - Vehicle and Driver Regulations | 2019 V1files.gdcdrift.de/GDC_Rule_Book_-_Vehicle_and_Driver_Regulations_2019_V1.0.pdf · [2.12] Mounting plates/mounting boxes must](https://img.pdfslide.us/doc/110x75/5d67812188c993d4378b8c06/gdc-rule-book-vehicle-and-driver-regulations-2019-212-mounting-platesmounting.jpg)