Embed Size (px)
Citation preview
Rookie Challenge-2
Water Saver SprintDescription: In this mini-game, a garden hose has been left on and it is threatening to flood your yard. It is up to you and a friend to see who can get to the hose first and turn it off. Who is faster you or your friend?
Intro
Open the SoftwareOpen up Game Maker 8 from your Program Files or Applications folder. When the title screen appears, click the button that says “Continue to use the light edition.”
Enable Advanced ModeBefore you get started, make sure Game Maker is in Advanced Mode (Look at that, you’re already Advanced! Way to go). This mode will unlock special options for you to work with.
Click on File in the Game Maker menu. When the drop down menu appears you will see an item named Advanced Mode. If there is a checkmark next to Advanced Mode then you are all set to go. Otherwise click Advanced Mode from the drop down menu.
Save Your Game
Click on File again and select Save. You can give your file any name you want, though we suggest you use “Water Saver Challenge” somewhere in the name to help you keep track of your file. Make sure to save often, just in case!
Sprites and Objects
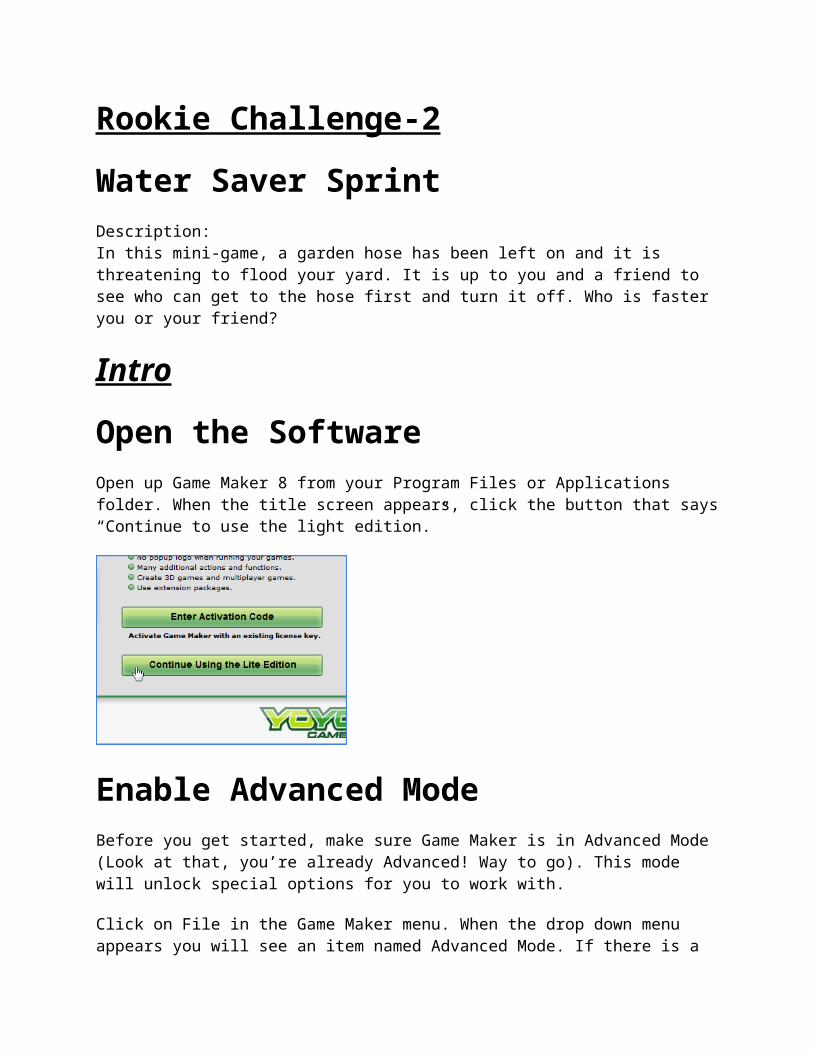
Create A SpriteA Sprite is a simple graphical image, usually with a transparent background, that is the building block of creating the visual look of your game. Sprites can be made in a bunch of different applications. We love Pixen, which can be downloaded at http://opensword.org/Pixen/. To create a Sprite in Gamemaker, click the Create a Sprite button in the toolbar. When the Sprite Properties window appears, change the name of the sprite from sprite0 to racer1. You can do this by double-clicking the text field where sprite0 appears and typing racer1.
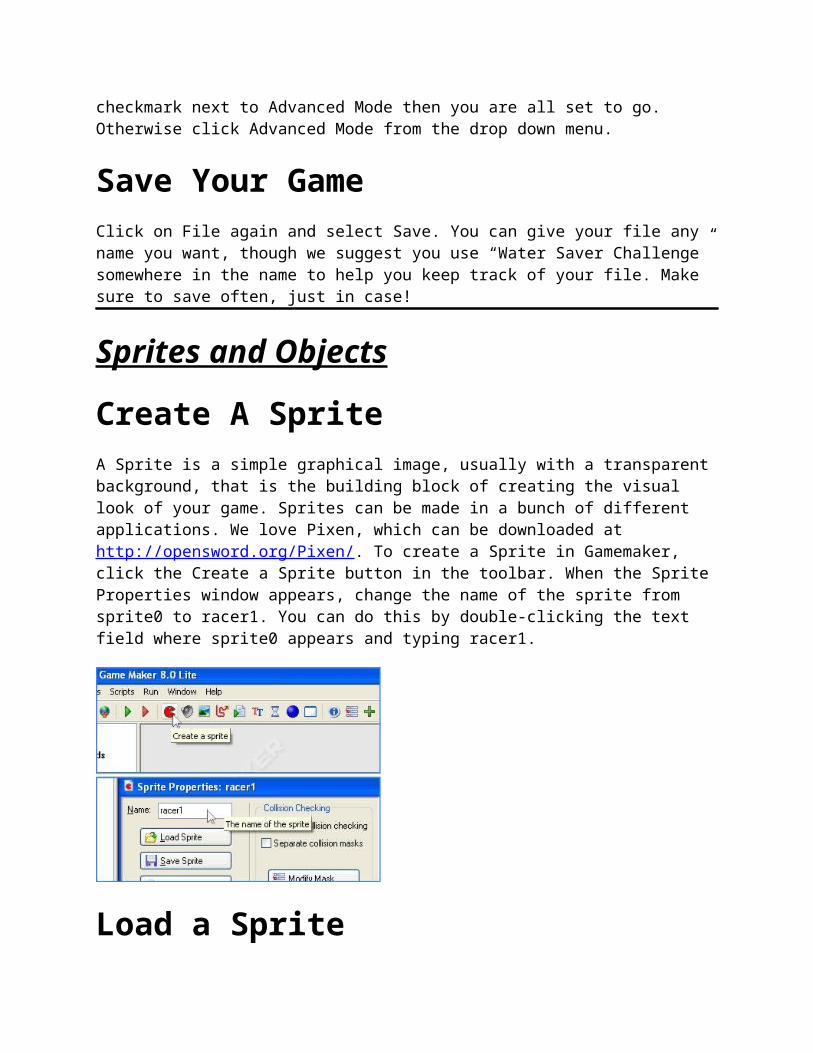
Load a SpriteClick the Load Sprite button. From the resource files you downloaded earlier, select the sprite named panel and then click Open. You will see the sprite you selected appear in the sprite properties window. Click Ok to save the settings to the sprite. You should see the sprite appear in the Sprites Folder in the Gamemaker window.
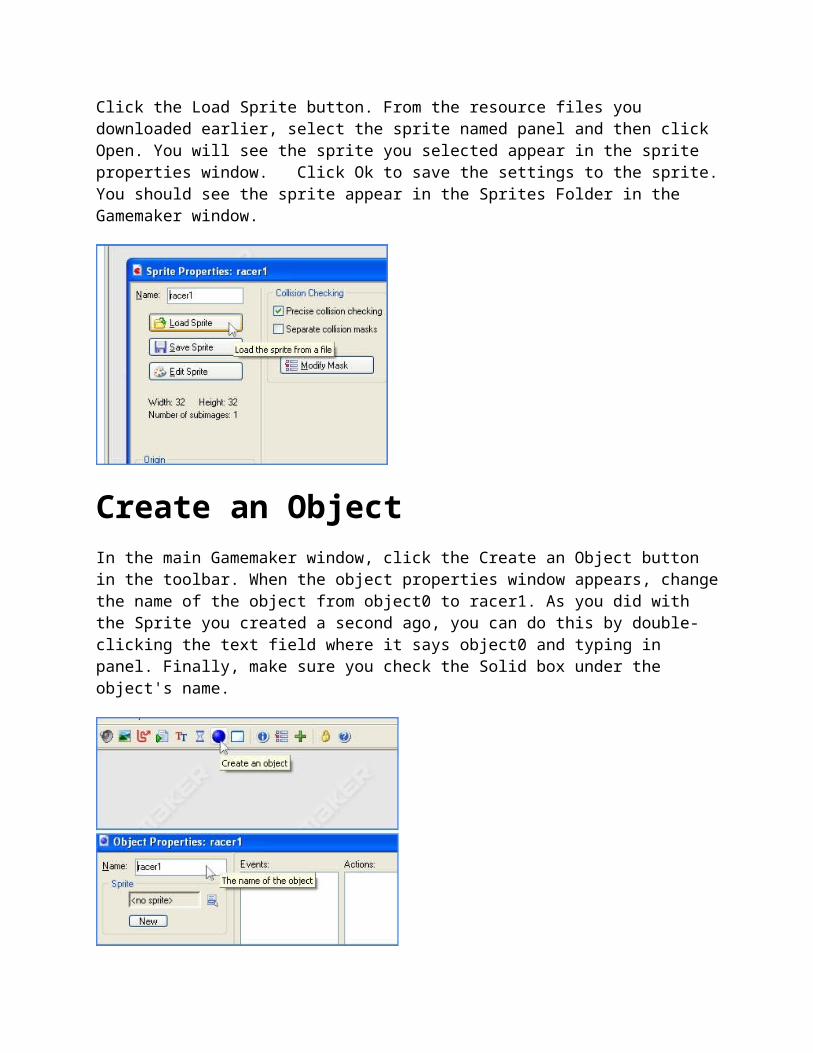
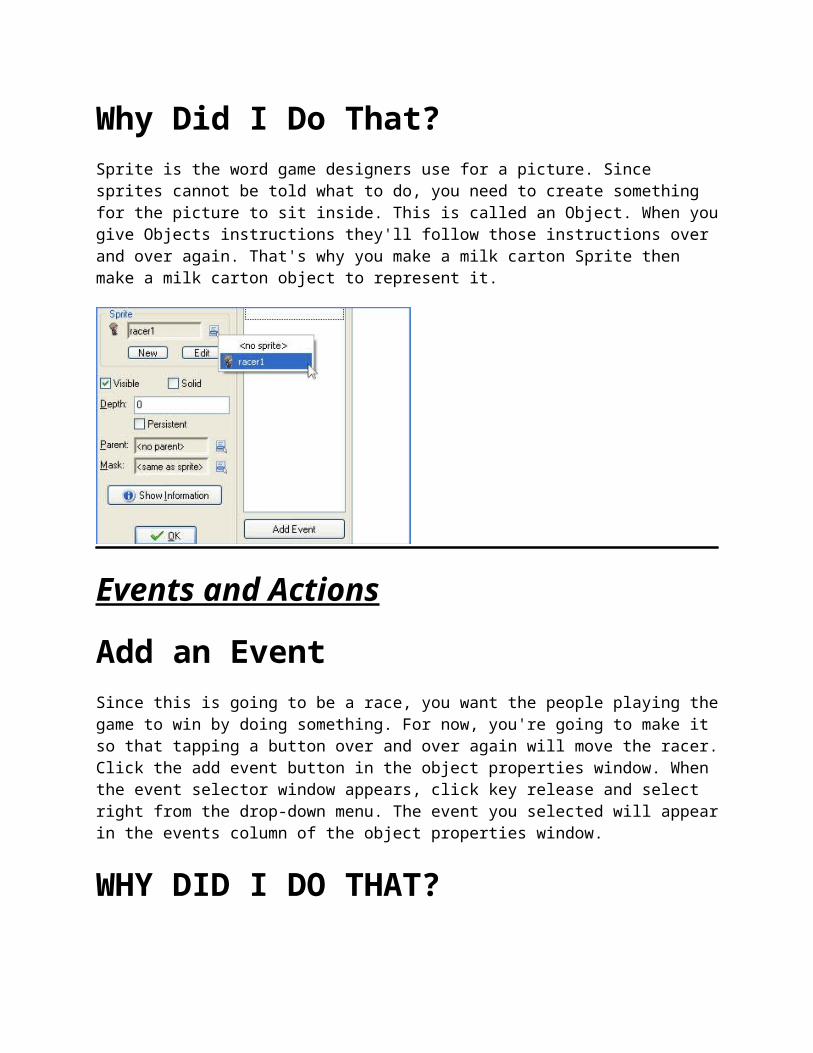
Create an ObjectIn the main Gamemaker window, click the Create an Object button in the toolbar. When the object properties window appears, change the name of the object from object0 to racer1. As you did with the Sprite you created a second ago, you can do this by double-clicking the text field where it says object0 and typing in panel. Finally, make sure you check the Solid box under the object's name.
Why Did I Do That?Sprite is the word game designers use for a picture. Since sprites cannot be told what to do, you need to create something for the picture to sit inside. This is called an Object. When you give Objects instructions they'll follow those instructions over and over again. That's why you make a milk carton Sprite then make a milk carton object to represent it.
Events and Actions
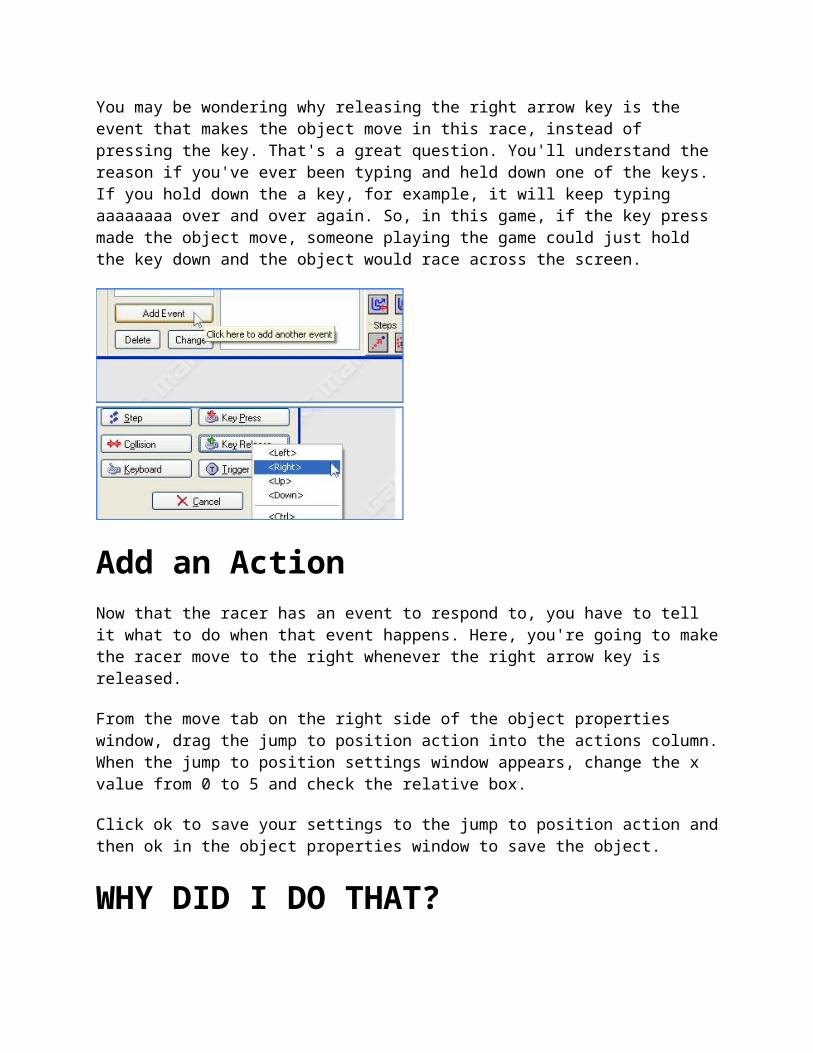
Add an EventSince this is going to be a race, you want the people playing the game to win by doing something. For now, you're going to make it so that tapping a button over and over again will move the racer. Click the add event button in the object properties window. When the event selector window appears, click key release and select right from the drop-down menu. The event you selected will appear in the events column of the object properties window.
WHY DID I DO THAT?You may be wondering why releasing the right arrow key is the event that makes the object move in this race, instead of pressing the key. That's a great question. You'll understand the reason if you've ever been typing and held down one of the keys. If you hold down the a key, for example, it will keep typing aaaaaaaa over and over again. So, in this game, if the key press made the object move, someone playing the game could just hold the key down and the object would race across the screen.
Add an ActionNow that the racer has an event to respond to, you have to tell it what to do when that event happens. Here, you're going to make the racer move to the right whenever the right arrow key is released.
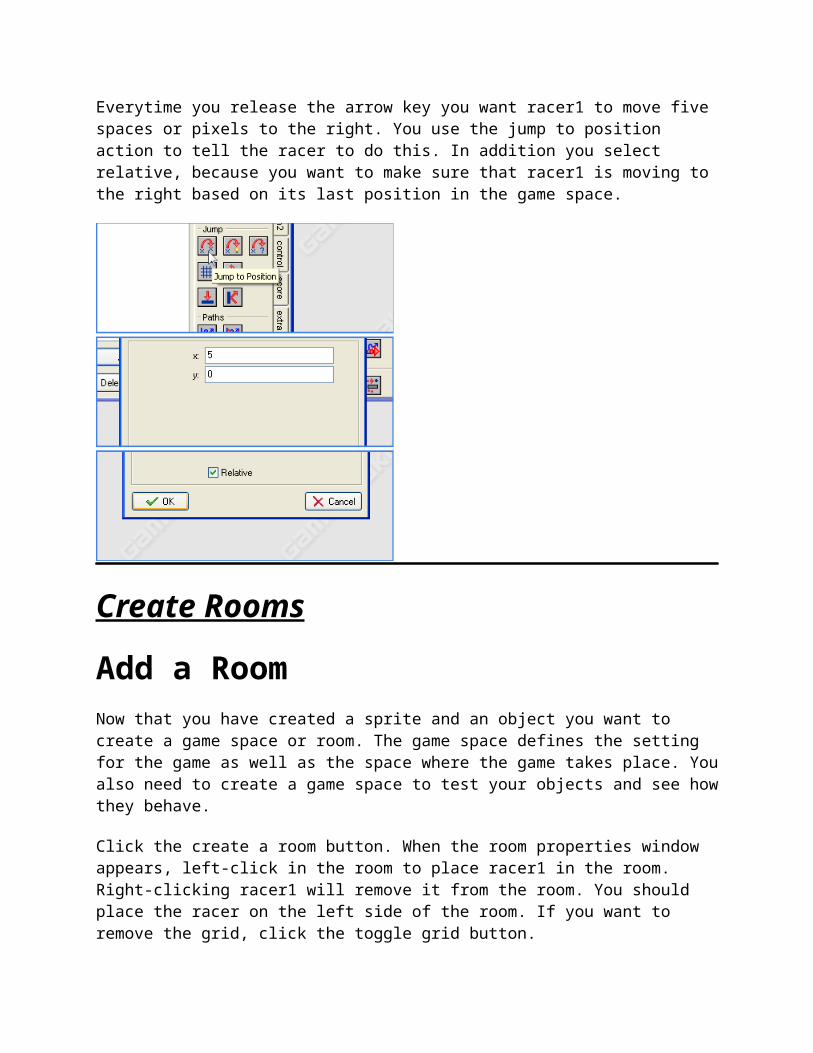
From the move tab on the right side of the object properties window, drag the jump to position action into the actions column. When the jump to position settings window appears, change the x value from 0 to 5 and check the relative box.
Click ok to save your settings to the jump to position action and then ok in the object properties window to save the object.
WHY DID I DO THAT?Everytime you release the arrow key you want racer1 to move five spaces or pixels to the right. You use the jump to position action to tell the racer to do this. In addition you select relative, because you want to make sure that racer1 is moving to the right based on its last position in the game space.
Create Rooms
Add a RoomNow that you have created a sprite and an object you want to create a game space or room. The game space defines the setting for the game as well as the space where the game takes place. You also need to create a game space to test your objects and see how they behave.
Click the create a room button. When the room properties window appears, left-click in the room to place racer1 in the room. Right-clicking racer1 will remove it from the room. You should place the racer on the left side of the room. If you want to remove the grid, click the toggle grid button.
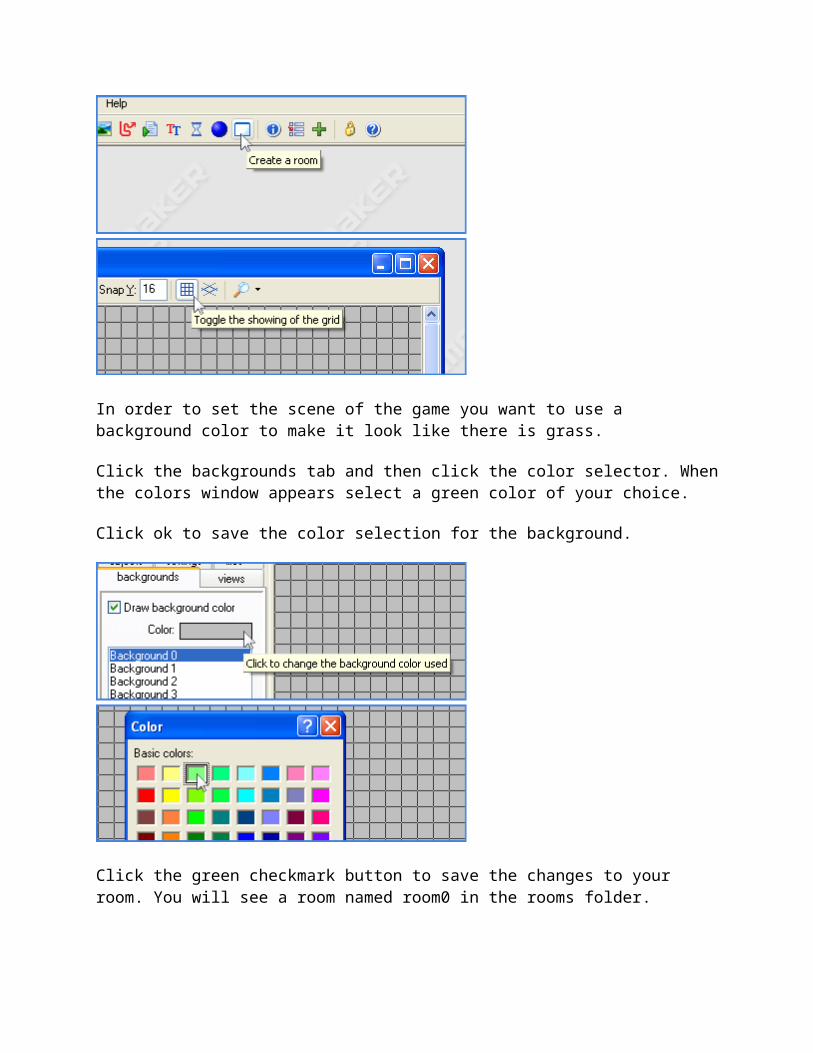
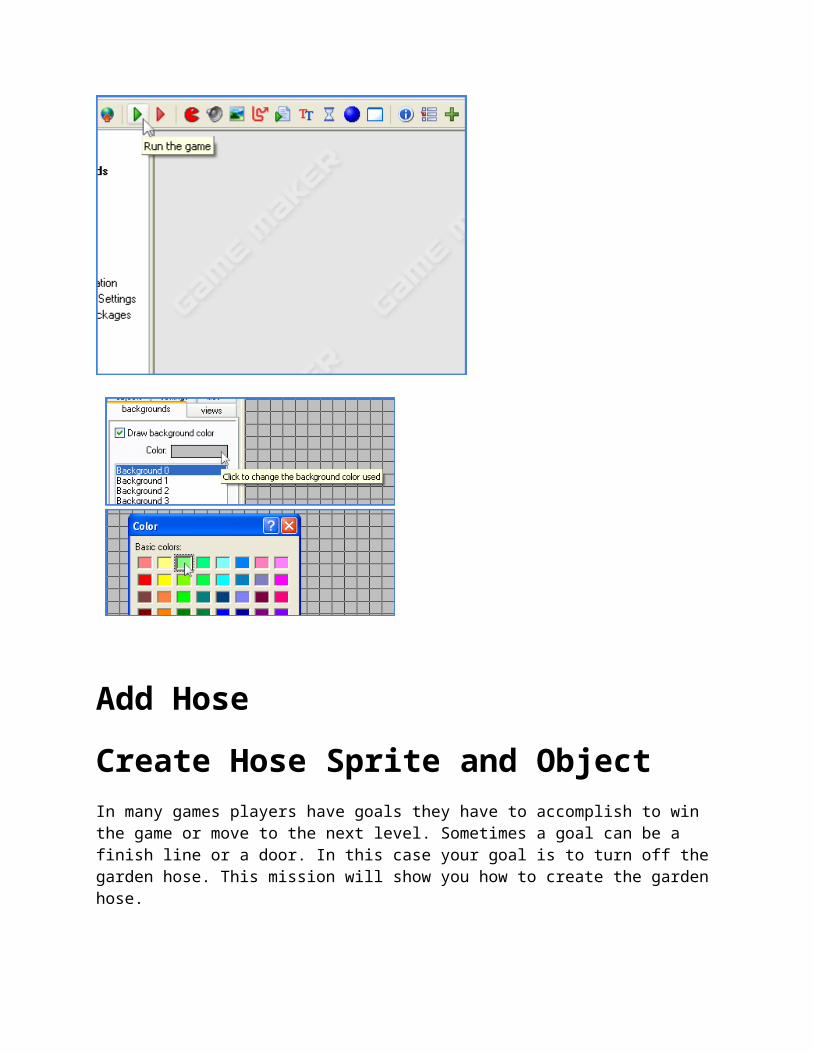
In order to set the scene of the game you want to use a background color to make it look like there is grass.
Click the backgrounds tab and then click the color selector. When the colors window appears select a green color of your choice.
Click ok to save the color selection for the background.
Click the green checkmark button to save the changes to your room. You will see a room named room0 in the rooms folder.
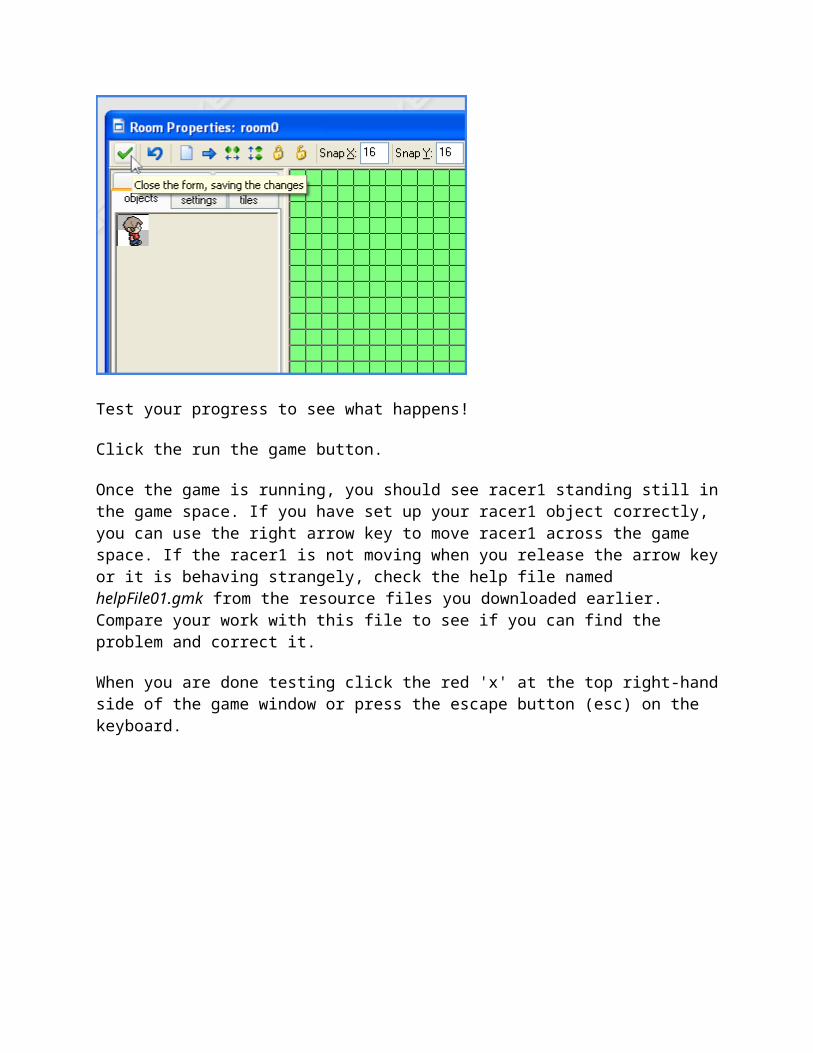
Test your progress to see what happens!
Click the run the game button.
Once the game is running, you should see racer1 standing still in the game space. If you have set up your racer1 object correctly, you can use the right arrow key to move racer1 across the game space. If the racer1 is not moving when you release the arrow key or it is behaving strangely, check the help file named helpFile01.gmk from the resource files you downloaded earlier. Compare your work with this file to see if you can find the problem and correct it.
When you are done testing click the red 'x' at the top right-hand side of the game window or press the escape button (esc) on the keyboard.
Add Hose
Create Hose Sprite and ObjectIn many games players have goals they have to accomplish to win the game or move to the next level. Sometimes a goal can be a finish line or a door. In this case your goal is to turn off the garden hose. This mission will show you how to create the garden hose.
Create a new sprite and object called hose1. From the resources files you downloaded earlier, select the sprite named hose_strip. In the preview window you will see that the hose looks it is on and water is running out of it. This is because this sprite is an animated sprite. It is made up of three separate sprites that appear continuously one after the other. This creates the illusion of animation sort of like a flipbook.
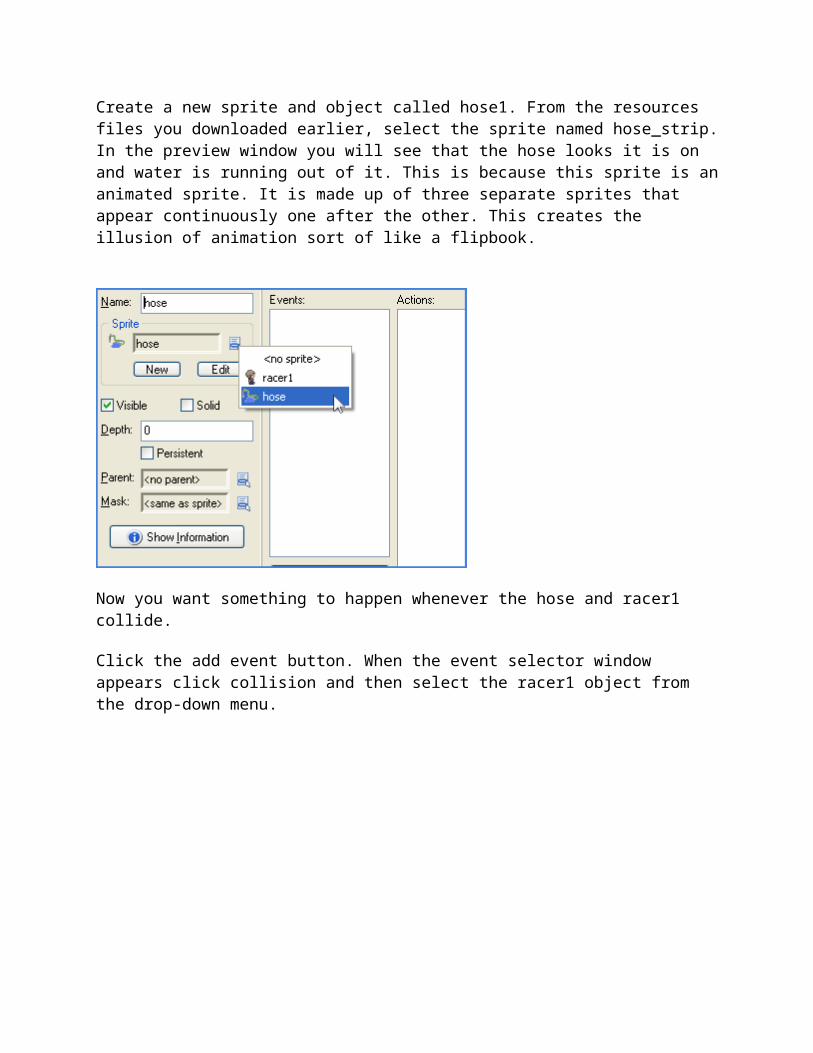
Now you want something to happen whenever the hose and racer1 collide.
Click the add event button. When the event selector window appears click collision and then select the racer1 object from the drop-down menu.
Now that the hose has an event to respond to, you have to tell it what to do when that event happens. Here, you're going to make the hose stop its animation cycle when racer1 collides with it.
From the main1 tab on the right of the object properties window, drag the change sprite action into the actions column. When the change sprite settings window appears click the context menu and select hose from the drop down menu. Then change the speed from 1 to 0. Click ok to save the settings to the change sprite action and then ok in the object properties window to save the object.
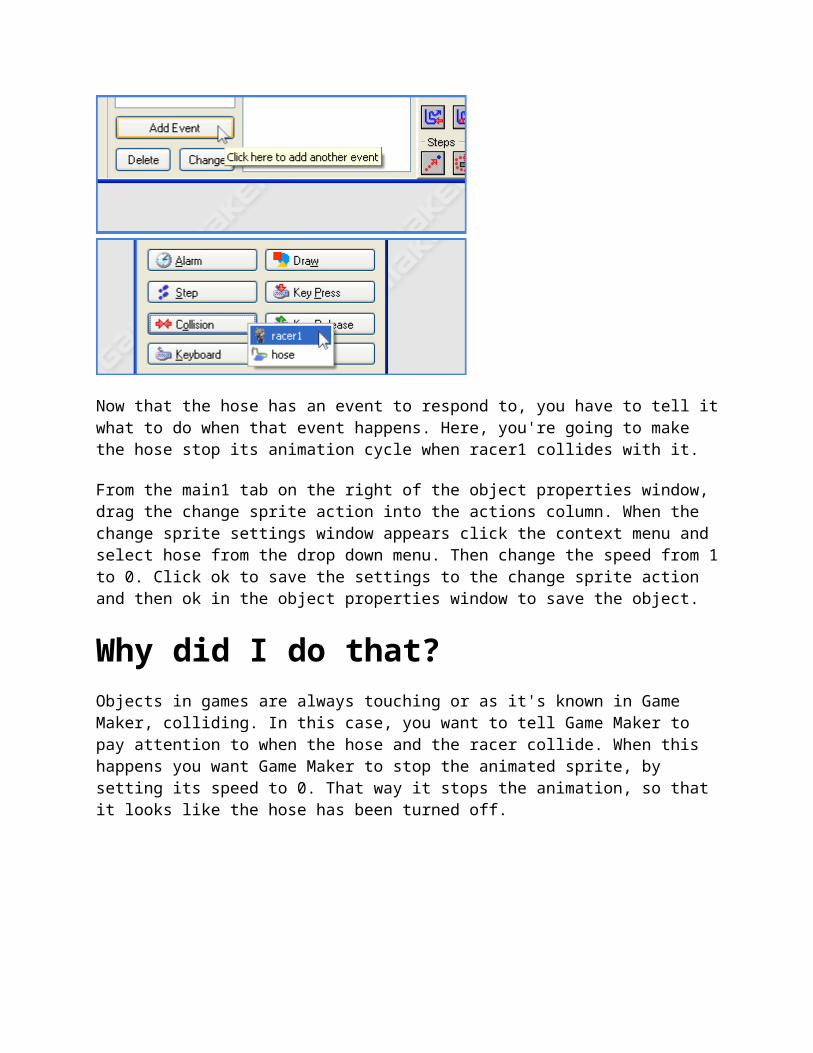
Why did I do that?Objects in games are always touching or as it's known in Game Maker, colliding. In this case, you want to tell Game Maker to pay attention to when the hose and the racer collide. When this happens you want Game Maker to stop the animated sprite, by setting its speed to 0. That way it stops the animation, so that it looks like the hose has been turned off.
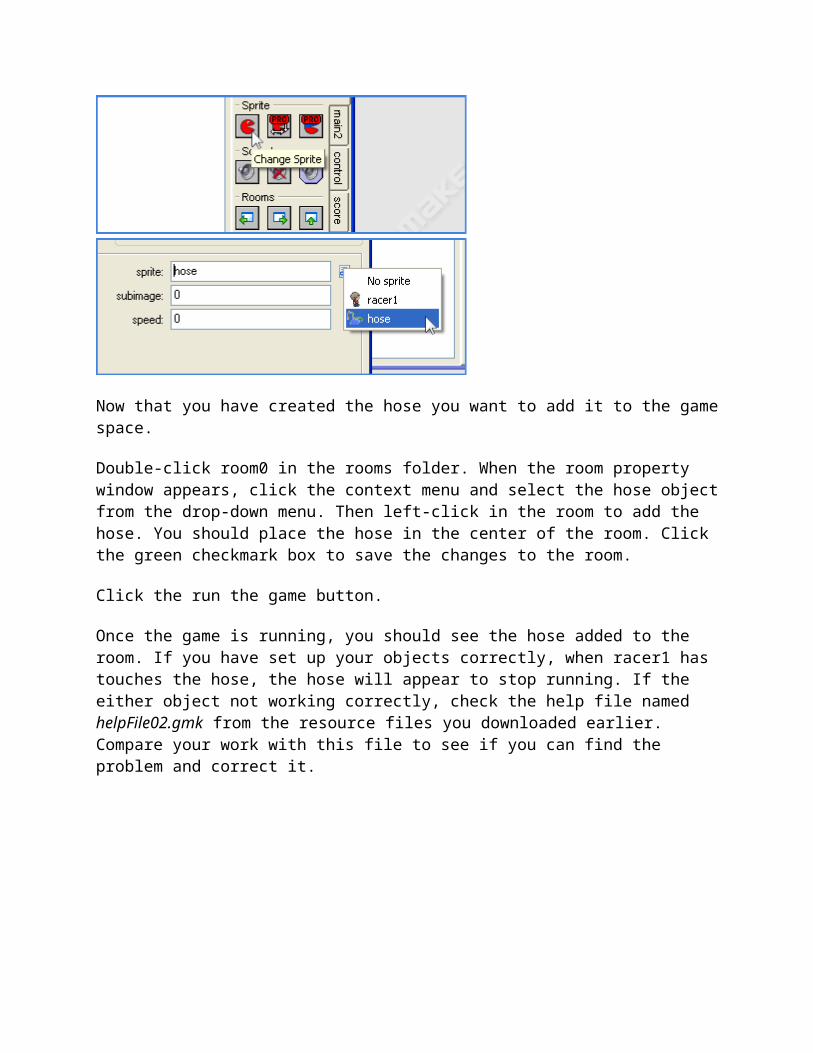
Now that you have created the hose you want to add it to the game space.
Double-click room0 in the rooms folder. When the room property window appears, click the context menu and select the hose object from the drop-down menu. Then left-click in the room to add the hose. You should place the hose in the center of the room. Click the green checkmark box to save the changes to the room.
Click the run the game button.
Once the game is running, you should see the hose added to the room. If you have set up your objects correctly, when racer1 has touches the hose, the hose will appear to stop running. If the either object not working correctly, check the help file named helpFile02.gmk from the resource files you downloaded earlier. Compare your work with this file to see if you can find the problem and correct it.
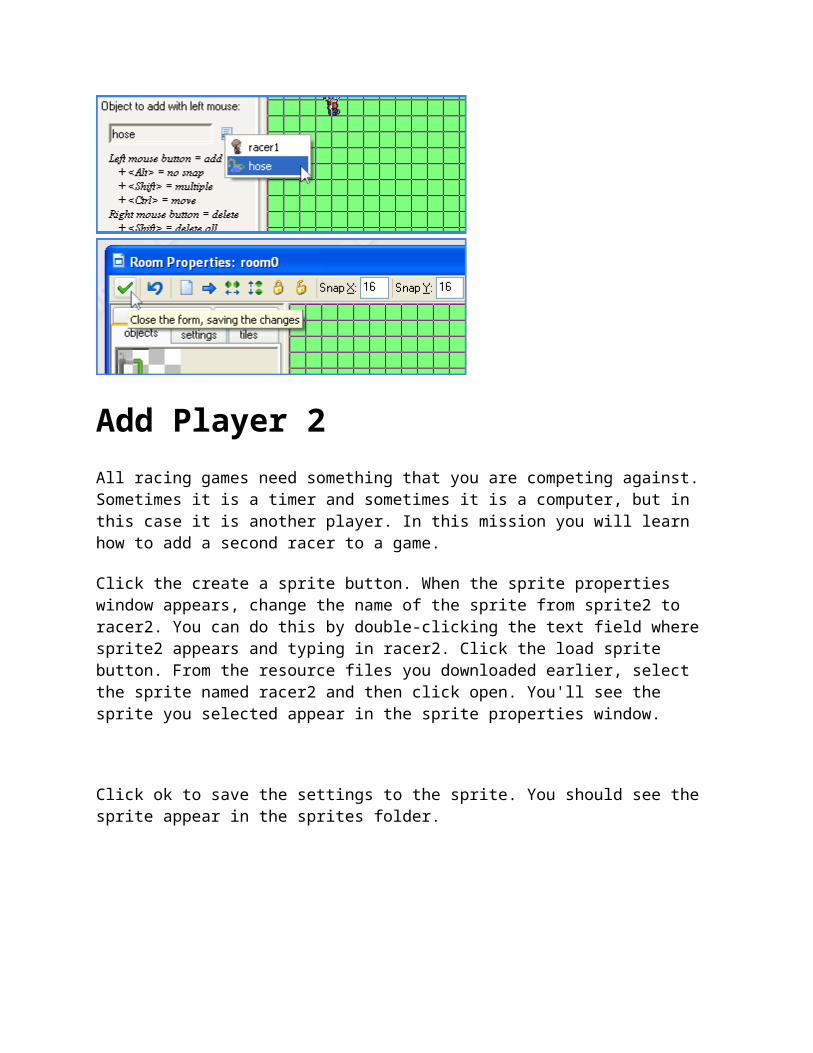
Add Player 2All racing games need something that you are competing against. Sometimes it is a timer and sometimes it is a computer, but in this case it is another player. In this mission you will learn how to add a second racer to a game.
Click the create a sprite button. When the sprite properties window appears, change the name of the sprite from sprite2 to racer2. You can do this by double-clicking the text field where sprite2 appears and typing in racer2. Click the load sprite button. From the resource files you downloaded earlier, select the sprite named racer2 and then click open. You'll see the sprite you selected appear in the sprite properties window.
Click ok to save the settings to the sprite. You should see the sprite appear in the sprites folder.
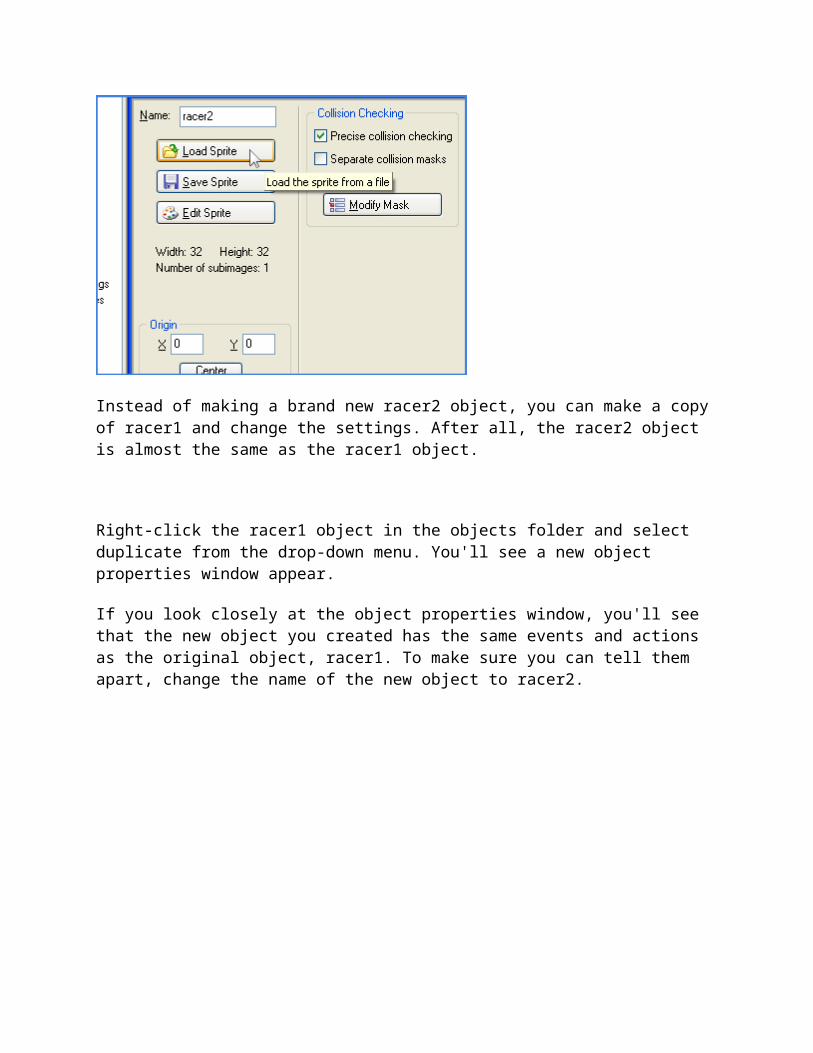
Instead of making a brand new racer2 object, you can make a copy of racer1 and change the settings. After all, the racer2 object is almost the same as the racer1 object.
Right-click the racer1 object in the objects folder and select duplicate from the drop-down menu. You'll see a new object properties window appear.
If you look closely at the object properties window, you'll see that the new object you created has the same events and actions as the original object, racer1. To make sure you can tell them apart, change the name of the new object to racer2.
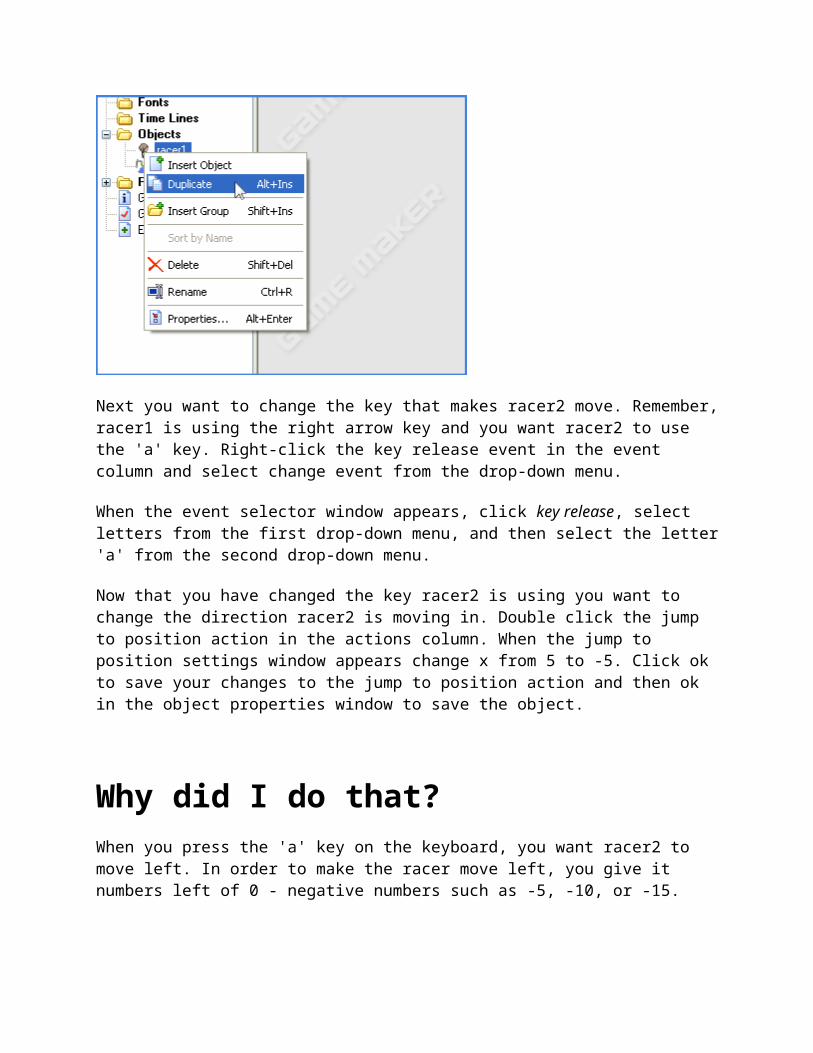
Next you want to change the key that makes racer2 move. Remember, racer1 is using the right arrow key and you want racer2 to use the 'a' key. Right-click the key release event in the event column and select change event from the drop-down menu.
When the event selector window appears, click key release, select letters from the first drop-down menu, and then select the letter 'a' from the second drop-down menu.
Now that you have changed the key racer2 is using you want to change the direction racer2 is moving in. Double click the jump to position action in the actions column. When the jump to position settings window appears change x from 5 to -5. Click ok to save your changes to the jump to position action and then ok in the object properties window to save the object.
Why did I do that?When you press the 'a' key on the keyboard, you want racer2 to move left. In order to make the racer move left, you give it numbers left of 0 - negative numbers such as -5, -10, or -15.
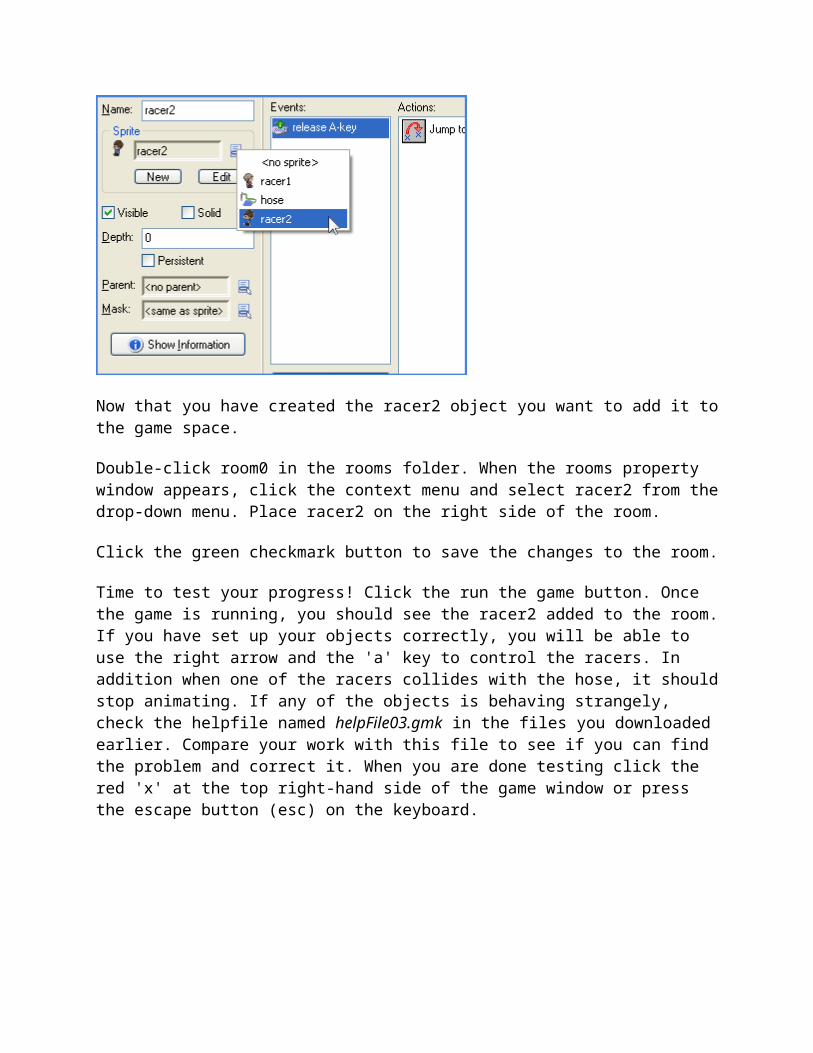
Now that you have created the racer2 object you want to add it to the game space.
Double-click room0 in the rooms folder. When the rooms property window appears, click the context menu and select racer2 from the drop-down menu. Place racer2 on the right side of the room.
Click the green checkmark button to save the changes to the room.
Time to test your progress! Click the run the game button. Once the game is running, you should see the racer2 added to the room. If you have set up your objects correctly, you will be able to use the right arrow and the 'a' key to control the racers. In addition when one of the racers collides with the hose, it should stop animating. If any of the objects is behaving strangely, check the helpfile named helpFile03.gmk in the files you downloaded earlier. Compare your work with this file to see if you can find the problem and correct it. When you are done testing click the red 'x' at the top right-hand side of the game window or press the escape button (esc) on the keyboard.
FINISHNow that you have completed the final mission of this challenge save your progress by clicking the save the game button and enter a name for it in the filename field.
Your challenge is to make a mini-game from the concepts and skills you learned about in this lesson. If you are having trouble getting started, experiment with the file you saved by going back to the racers and changing how fast they move. In addition you can try adding more keys and directions to the racers.
When you finished making your mini-game, make sure to test the game out with your friends. Testing games in an important part of game design and all game designers do it because it helps them realize what players like about their game and what needs to be fixed.
Once you feel that you game is complete, upload the .gmk file to the Activate website by logging into your account and uploading the file from the game submission page.
If you want to create a stand alone game for yourself, click the create a stand-alone button in Game Maker.