Embed Size (px)
Citation preview
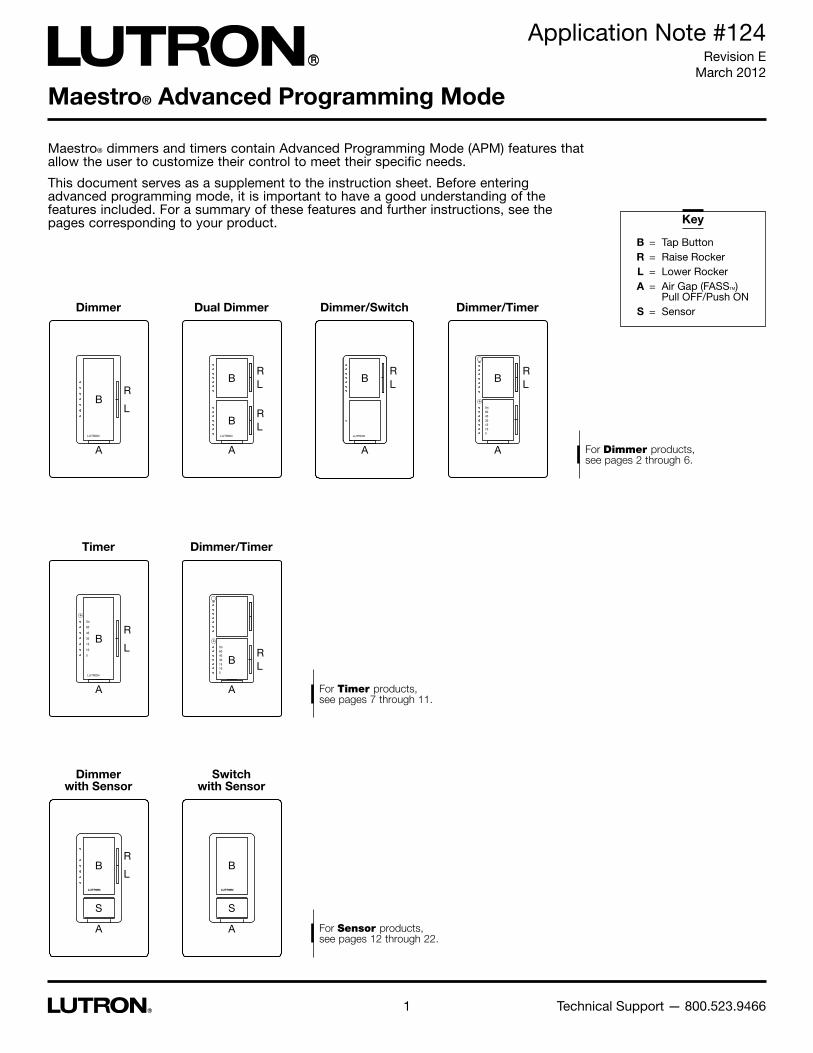
Maestro® Advanced Programming Mode
Application Note #124Revision E
March 2012
1 Technical Support — 800.523.9466
Maestro® dimmers and timers contain Advanced Programming Mode (APM) features that allow the user to customize their control to meet their specific needs.
This document serves as a supplement to the instruction sheet. Before entering advanced programming mode, it is important to have a good understanding of the features included. For a summary of these features and further instructions, see the pages corresponding to your product.
Dimmer
BR
L
A
Dual Dimmer
B
B
RL
RL
A
Dimmer/Switch
BRL
A
Timer
BR
L
A
Dimmer with Sensor
B
S
R
L
A
Dimmer/Timer
BRL
A
Dimmer/Timer
BRL
A
Key
B = Tap Button R = Raise Rocker L = Lower Rocker A = Air Gap (FASSTM) Pull OFF/Push ON S = Sensor
For Dimmer products, see pages 2 through 6.
For Timer products, see pages 7 through 11.
For Sensor products, see pages 12 through 22.
Switch with Sensor
B
S
A
Application Note #124
2 www.lutron.com
Dimmer Advanced Programming ModeThis section applies to the Maestro® Dimmer, eco-dim® dimmer, eco-minder® dimmer and individual dimmers on the Dual Dimmer, Dimmer/Timer, Dimmer/Switch, and Dimmer with Sensor. If you want to set the dimmer advanced features on the Dual Dimmer, use either the top or bottom set of tap buttons and raise/lower rockers corresponding to the dimmer you wish to program. If you want to set the dimmer advanced features on the Dimmer/Timer or Dimmer/Switch, use the top set of tap buttons and raise/lower rockers as described in the following pages.
Explanation of Advanced Dimmer FeaturesPreset Options: The user has two options for the preset light level on the dimmer: locked preset and unlocked preset.
• Locked Preset: When programmed for a locked preset, the dimmer will always turn on to the predetermined “locked” level anytime the dimmer is turned on with a single tap of the tap button.
• Unlocked Preset: When programmed for an unlocked preset, the dimmer will turn on to the light level that it was adjusted to the previous time that the light was on.
What do I want?If you always want the dimmer to come on to the same light level anytime you turn it on, choose the locked preset option. Remember that you can always double-tap the tap button when you want the lights to come on to full intensity. If it is important that the light return to the light level previously used, select the unlocked preset option.
“On” Fade Time: The user has options for how quickly the lights fade up when the dimmer is turned on. These options include fade times from “Off” to maximum light output in as fast as 0.5 seconds and as slow as 5 seconds.
What do I want?Quicker fade times are more practical and slower fade times are thought to be more elegant. If the light that is controlled by the dimmer is the first or only light that will be turned on in a particular room, most people find it advantageous to use a faster rate so that the room is immediately illuminated. Art lighting or other accent lighting is often more pleasing with a slow fade time.
“Off” Fade Time: The user has options for how quickly the lights fade down when the dimmer is turned off. These options include fade times from maximum light output to “Off” as fast as 1.5 seconds and as slow as 15 seconds.
What do I want?Having the lights fade off slowly can be very useful, allowing you to exit the room while the lights are still on. How quickly they should fade off is typically a question of personal preference. Keep in mind that it may appear that the light is not turning off as expected if a fade time of 6 seconds or longer is selected. This could be confusing to a visitor or guest.
Note: On the Dual Dimmer and Dimmer/Timer, the dimmers have their own settings independent of the other dimmer or timer.
Application Note #124
3 Technical Support — 800.523.9466
Using Dimmer Advanced Programming ModeAdvanced programming mode consists of two modes of operation that the user can interact with. The main menu mode allows the user to select which feature they would like to modify; the selection mode allows the user to change the setting of the feature they selected in the main menu mode.
Note: Once a feature is modified, that modification is immediately saved.
There is a step-by-step example on page 6.
Entering Main Menu Mode (refer to picture on page 1) 1. Pull the air gap (FASSTM) into the “Off” position.
2. Press and hold the tap button of the product you are programming.
3. Push the air gap to the “On” position while continuing to hold the tap button for approximately 5 seconds.
The bottom LED will begin to blink to indicate that you have entered advanced programming mode. Note: If there is no activity for 1 minute, the dimmer will automatically exit advanced programming mode.
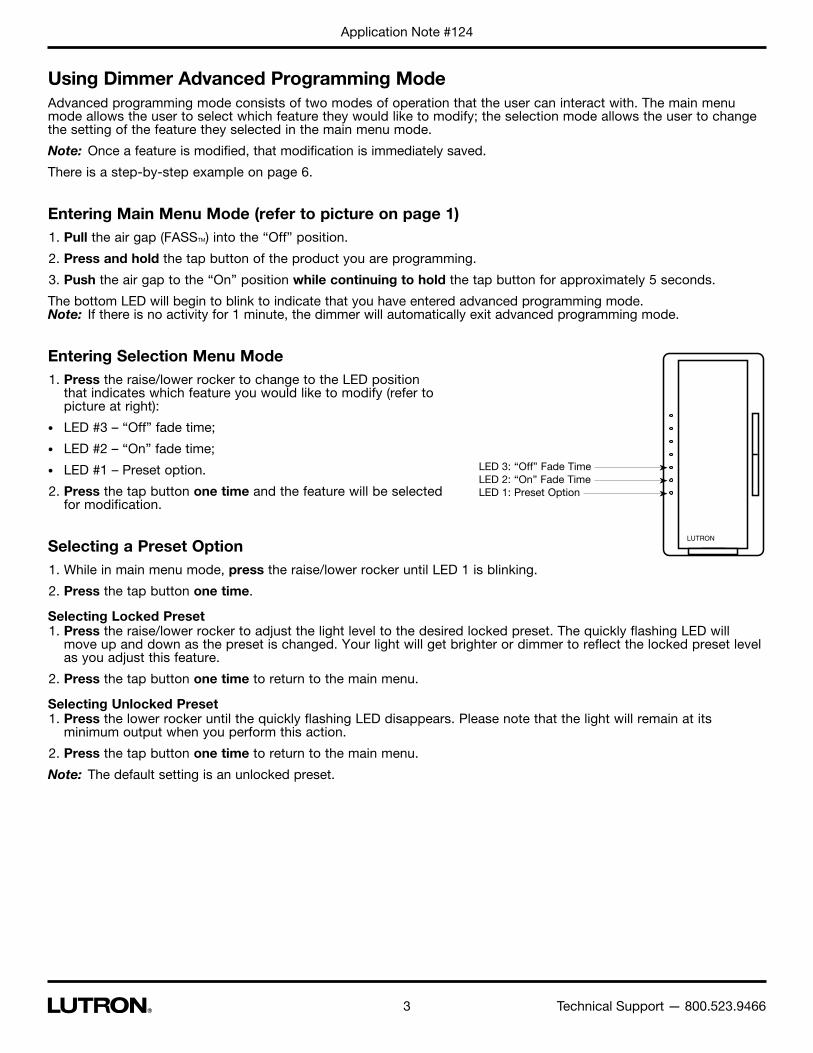
Entering Selection Menu Mode 1. Press the raise/lower rocker to change to the LED position
that indicates which feature you would like to modify (refer to picture at right):
• LED #3 – “Off” fade time;
• LED #2 – “On” fade time;
• LED #1 – Preset option.
2. Press the tap button one time and the feature will be selected for modification.
Selecting a Preset Option 1. While in main menu mode, press the raise/lower rocker until LED 1 is blinking.
2. Press the tap button one time.
Selecting Locked Preset 1. Press the raise/lower rocker to adjust the light level to the desired locked preset. The quickly flashing LED will
move up and down as the preset is changed. Your light will get brighter or dimmer to reflect the locked preset level as you adjust this feature.
2. Press the tap button one time to return to the main menu.
Selecting Unlocked Preset 1. Press the lower rocker until the quickly flashing LED disappears. Please note that the light will remain at its
minimum output when you perform this action.
2. Press the tap button one time to return to the main menu.
Note: The default setting is an unlocked preset.
LED 3: “Off” Fade TimeLED 2: “On” Fade TimeLED 1: Preset Option
Application Note #124
4 www.lutron.com
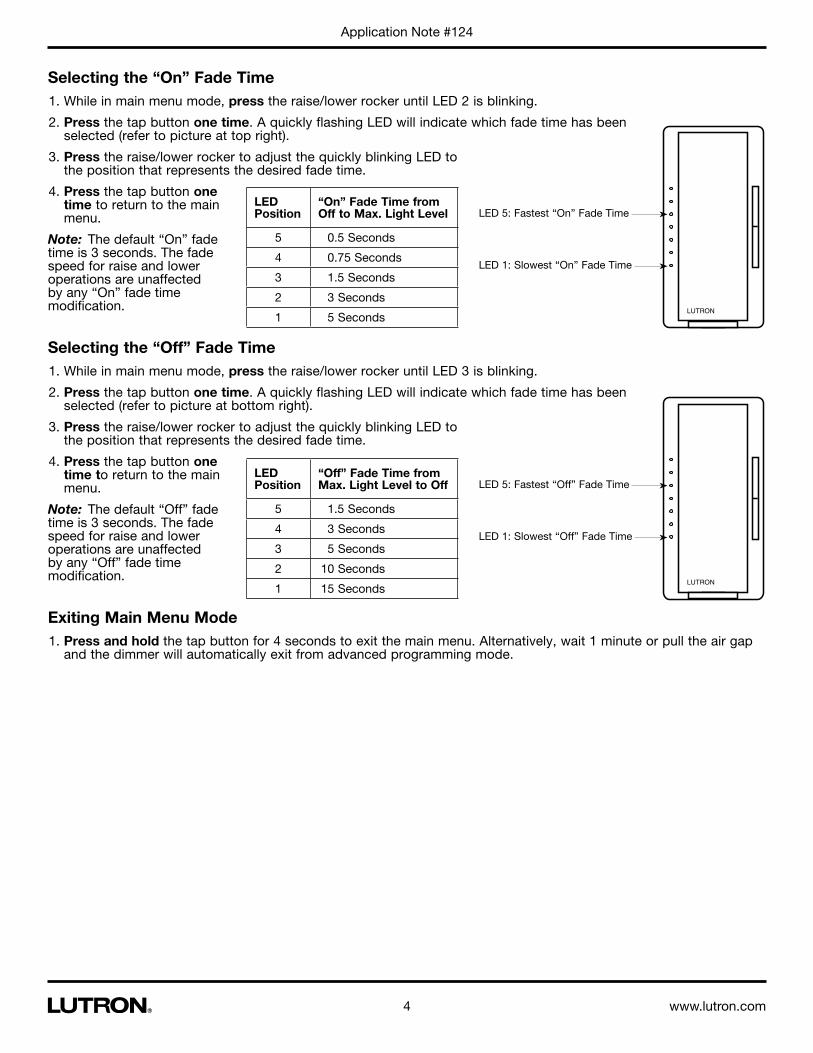
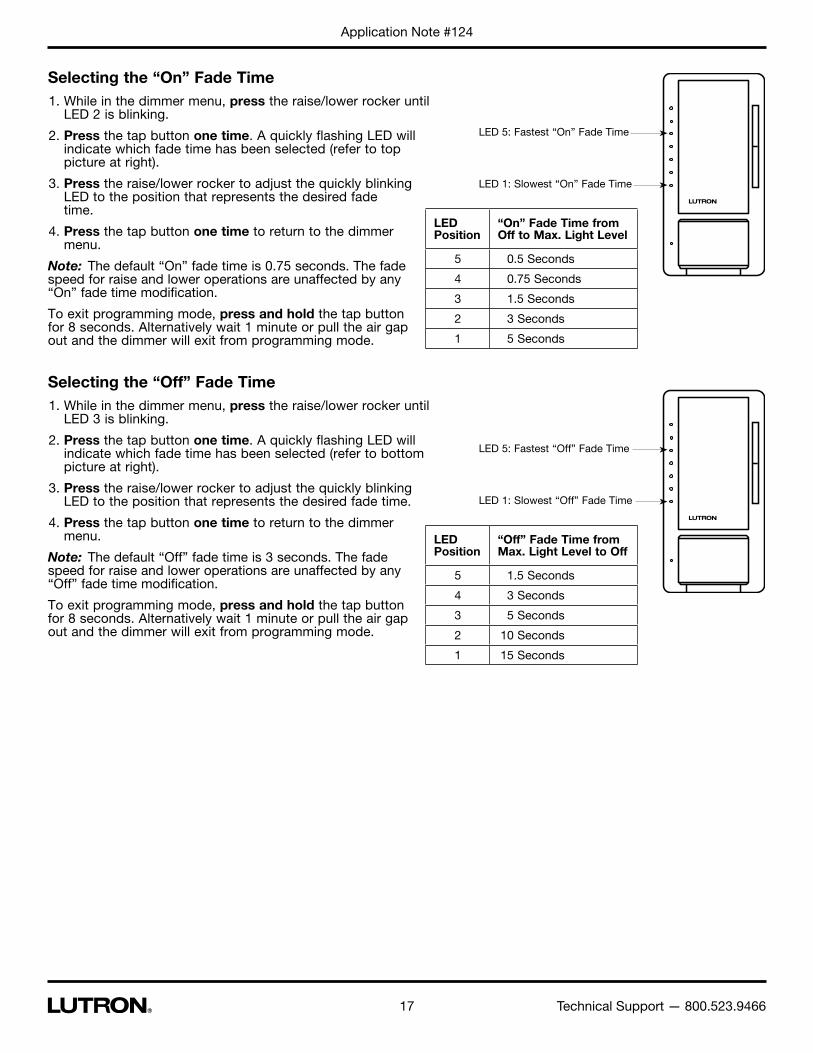
Selecting the “On” Fade Time 1. While in main menu mode, press the raise/lower rocker until LED 2 is blinking.
2. Press the tap button one time. A quickly flashing LED will indicate which fade time has been selected (refer to picture at top right).
3. Press the raise/lower rocker to adjust the quickly blinking LED to the position that represents the desired fade time.
4. Press the tap button one time to return to the main menu.
Note: The default “On” fade time is 3 seconds. The fade speed for raise and lower operations are unaffected by any “On” fade time modification.
Selecting the “Off” Fade Time 1. While in main menu mode, press the raise/lower rocker until LED 3 is blinking.
2. Press the tap button one time. A quickly flashing LED will indicate which fade time has been selected (refer to picture at bottom right).
3. Press the raise/lower rocker to adjust the quickly blinking LED to the position that represents the desired fade time.
4. Press the tap button one time to return to the main menu.
Note: The default “Off” fade time is 3 seconds. The fade speed for raise and lower operations are unaffected by any “Off” fade time modification.
Exiting Main Menu Mode 1. Press and hold the tap button for 4 seconds to exit the main menu. Alternatively, wait 1 minute or pull the air gap
and the dimmer will automatically exit from advanced programming mode.
LED Position
“On” Fade Time from Off to Max. Light Level
5 0.5 Seconds
4 0.75 Seconds
3 1.5 Seconds
2 3 Seconds
1 5 Seconds
LED Position
“Off” Fade Time from Max. Light Level to Off
5 1.5 Seconds
4 3 Seconds
3 5 Seconds
2 10 Seconds
1 15 Seconds
LED 5: Fastest “On” Fade Time
LED 1: Slowest “On” Fade Time
LED 5: Fastest “Off” Fade Time
LED 1: Slowest “Off” Fade Time
Application Note #124
5 Technical Support — 800.523.9466
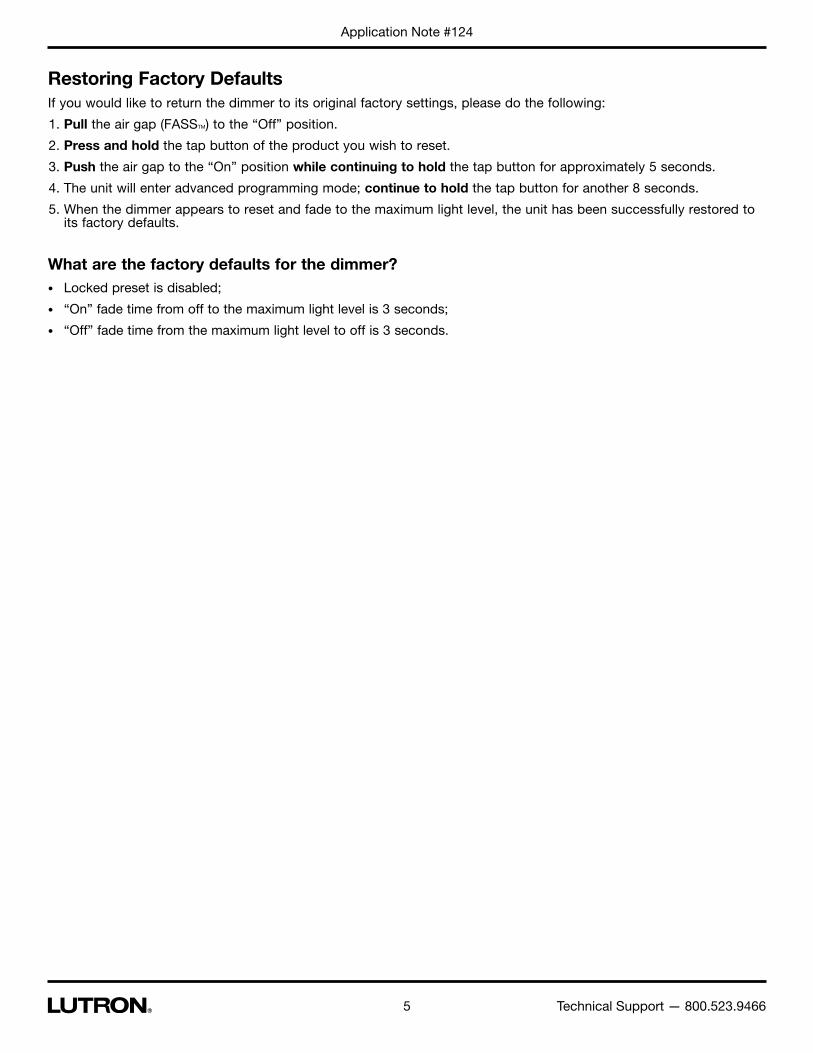
Restoring Factory DefaultsIf you would like to return the dimmer to its original factory settings, please do the following:
1. Pull the air gap (FASSTM) to the “Off” position.
2. Press and hold the tap button of the product you wish to reset.
3. Push the air gap to the “On” position while continuing to hold the tap button for approximately 5 seconds.
4. The unit will enter advanced programming mode; continue to hold the tap button for another 8 seconds.
5. When the dimmer appears to reset and fade to the maximum light level, the unit has been successfully restored to its factory defaults.
What are the factory defaults for the dimmer?• Locked preset is disabled;
• “On” fade time from off to the maximum light level is 3 seconds;
• “Off” fade time from the maximum light level to off is 3 seconds.
Application Note #124
6 www.lutron.com
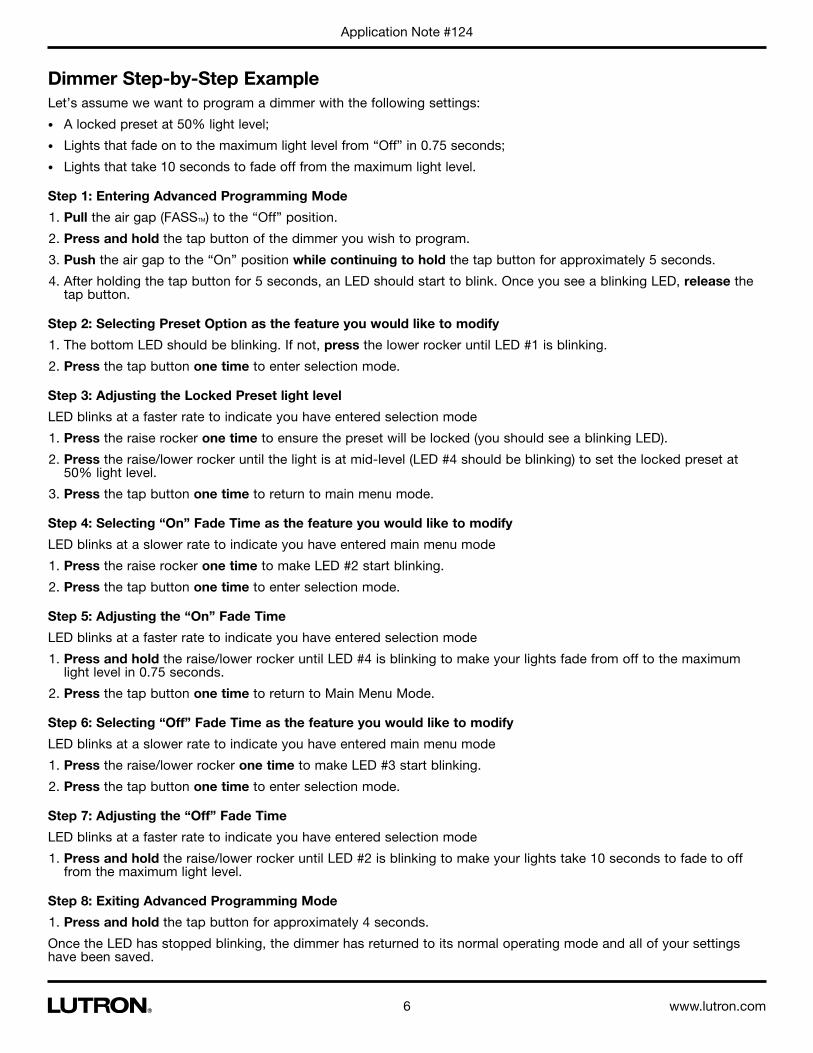
Dimmer Step-by-Step ExampleLet’s assume we want to program a dimmer with the following settings:
• A locked preset at 50% light level;
• Lights that fade on to the maximum light level from “Off” in 0.75 seconds;
• Lights that take 10 seconds to fade off from the maximum light level.
Step 1: Entering Advanced Programming Mode
1. Pull the air gap (FASSTM) to the “Off” position.
2. Press and hold the tap button of the dimmer you wish to program.
3. Push the air gap to the “On” position while continuing to hold the tap button for approximately 5 seconds.
4. After holding the tap button for 5 seconds, an LED should start to blink. Once you see a blinking LED, release the tap button.
Step 2: Selecting Preset Option as the feature you would like to modify
1. The bottom LED should be blinking. If not, press the lower rocker until LED #1 is blinking.
2. Press the tap button one time to enter selection mode.
Step 3: Adjusting the Locked Preset light level
LED blinks at a faster rate to indicate you have entered selection mode
1. Press the raise rocker one time to ensure the preset will be locked (you should see a blinking LED).
2. Press the raise/lower rocker until the light is at mid-level (LED #4 should be blinking) to set the locked preset at 50% light level.
3. Press the tap button one time to return to main menu mode.
Step 4: Selecting “On” Fade Time as the feature you would like to modify
LED blinks at a slower rate to indicate you have entered main menu mode
1. Press the raise rocker one time to make LED #2 start blinking.
2. Press the tap button one time to enter selection mode.
Step 5: Adjusting the “On” Fade Time
LED blinks at a faster rate to indicate you have entered selection mode
1. Press and hold the raise/lower rocker until LED #4 is blinking to make your lights fade from off to the maximum light level in 0.75 seconds.
2. Press the tap button one time to return to Main Menu Mode.
Step 6: Selecting “Off” Fade Time as the feature you would like to modify
LED blinks at a slower rate to indicate you have entered main menu mode
1. Press the raise/lower rocker one time to make LED #3 start blinking.
2. Press the tap button one time to enter selection mode.
Step 7: Adjusting the “Off” Fade Time
LED blinks at a faster rate to indicate you have entered selection mode
1. Press and hold the raise/lower rocker until LED #2 is blinking to make your lights take 10 seconds to fade to off from the maximum light level.
Step 8: Exiting Advanced Programming Mode
1. Press and hold the tap button for approximately 4 seconds.
Once the LED has stopped blinking, the dimmer has returned to its normal operating mode and all of your settings have been saved.
Application Note #124
7 Technical Support — 800.523.9466
Timer Advanced Programming ModeThis section applies to the Maestro® Timer, eco-timer® and the individual timer on the Dimmer/Timer. If you want to use the timer advanced features on the Dimmer/Timer, use the bottom set of tap buttons and raise/lower rockers as described in the following pages.
Explanation of Advanced Timer FeaturesPreset Options: The user has two options for the preset time setting on the timer: locked preset and unlocked preset.
• Locked Preset: When programmed for a locked preset, the timer will always return to the predetermined “locked” setting anytime it turns off with either a single tap of the tap button or an expiration of the countdown.
• Unlocked Preset: When programmed for an unlocked preset, the timer will return to the time setting it was adjusted to the previous time that the timer was on.
What do I want?If you frequently use the same time setting and don’t want to adjust it each time you use the timer, choose the locked preset option. If you frequently use different time settings, select the unlocked preset option.
Bypass Mode Options: (not available on eco-timer®) The user has two options for the maximum level of the timer: the “On” setting (enable bypass) and the 60-minute setting (disable bypass).
What do I want?If you always want the timer to time out regardless of how it is turned on, select the disable bypass mode option. This is useful for situations in which you would like the timer to always turn off automatically, even if the user double-taps the tap button. If you want to be able to access the “On” setting, select the enable bypass mode option.
Note: On the Dimmer/Timer, the timer has its own settings independent of the dimmer.
Application Note #124
8 www.lutron.com
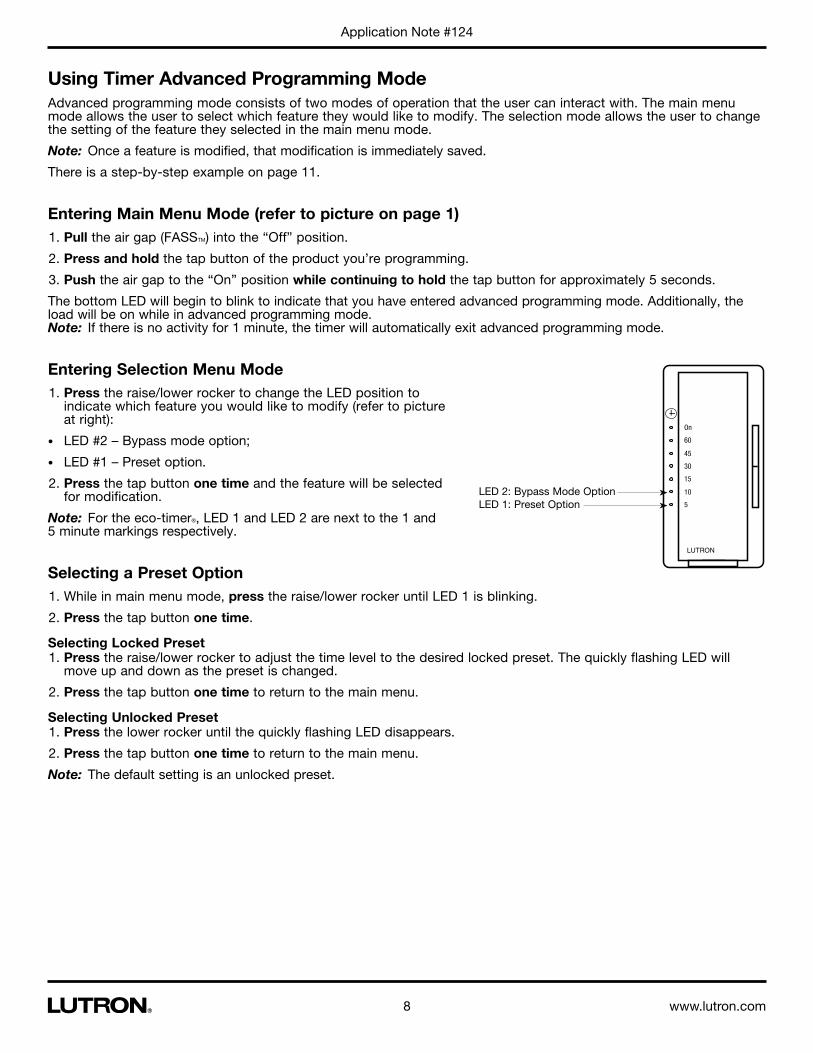
Using Timer Advanced Programming ModeAdvanced programming mode consists of two modes of operation that the user can interact with. The main menu mode allows the user to select which feature they would like to modify. The selection mode allows the user to change the setting of the feature they selected in the main menu mode.
Note: Once a feature is modified, that modification is immediately saved.
There is a step-by-step example on page 11.
Entering Main Menu Mode (refer to picture on page 1) 1. Pull the air gap (FASSTM) into the “Off” position.
2. Press and hold the tap button of the product you’re programming.
3. Push the air gap to the “On” position while continuing to hold the tap button for approximately 5 seconds.
The bottom LED will begin to blink to indicate that you have entered advanced programming mode. Additionally, the load will be on while in advanced programming mode. Note: If there is no activity for 1 minute, the timer will automatically exit advanced programming mode.
Entering Selection Menu Mode 1. Press the raise/lower rocker to change the LED position to
indicate which feature you would like to modify (refer to picture at right):
• LED #2 – Bypass mode option;
• LED #1 – Preset option.
2. Press the tap button one time and the feature will be selected for modification.
Note: For the eco-timer®, LED 1 and LED 2 are next to the 1 and 5 minute markings respectively.
Selecting a Preset Option 1. While in main menu mode, press the raise/lower rocker until LED 1 is blinking.
2. Press the tap button one time.
Selecting Locked Preset 1. Press the raise/lower rocker to adjust the time level to the desired locked preset. The quickly flashing LED will
move up and down as the preset is changed.
2. Press the tap button one time to return to the main menu.
Selecting Unlocked Preset 1. Press the lower rocker until the quickly flashing LED disappears.
2. Press the tap button one time to return to the main menu.
Note: The default setting is an unlocked preset.
LED 2: Bypass Mode OptionLED 1: Preset Option
Application Note #124
9 Technical Support — 800.523.9466
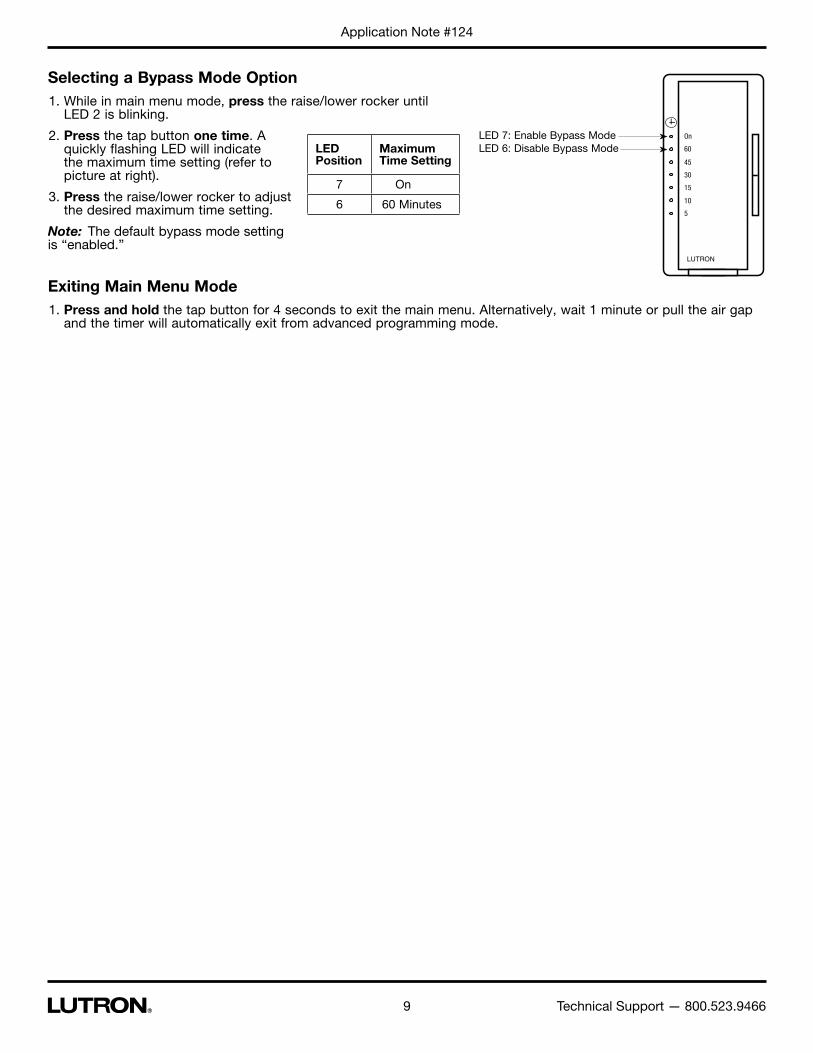
Selecting a Bypass Mode Option 1. While in main menu mode, press the raise/lower rocker until
LED 2 is blinking.
2. Press the tap button one time. A quickly flashing LED will indicate the maximum time setting (refer to picture at right).
3. Press the raise/lower rocker to adjust the desired maximum time setting.
Note: The default bypass mode setting is “enabled.”
Exiting Main Menu Mode 1. Press and hold the tap button for 4 seconds to exit the main menu. Alternatively, wait 1 minute or pull the air gap
and the timer will automatically exit from advanced programming mode.
LED Position
Maximum Time Setting
7 On
6 60 Minutes
LED 7: Enable Bypass ModeLED 6: Disable Bypass Mode
Application Note #124
10 www.lutron.com
Restoring Factory DefaultsIf you would like to return the timer to its original factory settings, please do the following:
1. Pull the air gap (FASSTM) to the “Off” position.
2. Press and hold the tap button of the product you wish to reset.
3. Push the air gap to the “On” position while continuing to hold the tap button for approximately 5 seconds.
4. The unit will enter advanced programming mode; continue to hold the tap button for another 8 seconds.
5. When the timer exits advanced programming mode and the LED position is at the “On” setting, the unit has been successfully restored to its factory defaults.
What are the factory defaults for the timer?• Locked preset is disabled;
• Bypass mode is enabled.
Application Note #124
11 Technical Support — 800.523.9466
Timer Step-by-Step ExampleLet’s assume we want to program a timer with the following settings:
• A locked preset at 30 minutes;
• Bypass mode disabled.
Step 1: Entering Advanced Programming Mode
1. Pull the air gap (FASSTM) to the “Off” position.
2. Press and hold the tap button of the timer you wish to program.
3. Push the air gap to the “On” position while continuing to hold the tap button for approximately 5 seconds.
4. After holding the tap button for 5 seconds, an LED should start to blink. Once you see a blinking LED, release the tap button.
Step 2: Selecting Preset Option as the feature you would like to modify
1. The bottom LED should be blinking. If not, press the lower rocker until LED #1 is blinking.
2. Press the tap button one time to enter selection mode.
Step 3: Adjusting the Locked Preset time level
LED blinks at a faster rate to indicate you have entered selection mode
1. Press the raise rocker one time to ensure the preset will be locked (you should see a blinking LED).
2. Press the raise/lower rocker until the LED is at mid-level (LED #4 should be blinking) to set the locked preset at 30 minutes.
3. Press the tap button one time to return to main menu mode.
Step 4: Selecting the Bypass Mode Option as the feature you would like to modify
LED blinks at a slower rate to indicate you have entered main menu mode
1. Press the raise rocker one time to make LED #2 start blinking.
2. Press the tap button one time to enter selection mode.
Step 5: Adjusting the Bypass Mode Option
LED blinks at a faster rate to indicate you have entered selection mode
1. Press the lower rocker one time to set the bypass mode option at the “60 minute” setting (LED #6 should be blinking) to disable bypass mode.
2. Press the tap button one time to return to main menu mode.
Step 6: Exiting Advanced Programming Mode
1. Press and hold the tap button for approximately 4 seconds.
Once the LED has stopped blinking, the timer has returned to its normal operating mode and all of your settings have been saved.
Application Note #124
12 www.lutron.com
Dimmer or Switch with Sensor Programming ModeThis Maestro® Occupancy or Vacancy sensor has many features to allow you to set the unit to meet your individual needs. The following is an overview of the all the features of the product.
Explanation of Dimmer or Switch with Sensor FeaturesTimeout: The approximate time in minutes after which the lights will go out after the last motion is detected. The default timeout is 5 minutes but can be adjusted to 1, 3 (dimmer only), 15, or 30 minutes. Typically, a shorter timeout should be used in a smaller room or a location where the duration of stay is short. Conversely, a longer timeout should be used in a larger room or a location where the duration of stay is long. The default timeout is 5 minutes.
What do I want?The size of the room in which the unit is installed, position of the sensor in relation to activity and typical duration of stay will influence your desired timeout setting. The longer you plan on occupying a room the longer the value the timeout should be set.
Off Warning (Dimmer Only): The Maestro® dimmer with sensor has the ability to warn the occupants that the lights are about to turn off. If enabled, the lights will dim to 50% of their current level 30 seconds prior to turning off. If disabled, the lights will turn off at the desired timeout period without warning. The off warning is enabled by default.
What do I want?In applications where room activity might be out of view of the sensor for periods of time, the off warning will give the occupants an opportunity to trigger the sensor before the lights are turned off.
Sensor Sensitivity: The sensitivity of the sensor can be adjusted based on the expected level of activity in the room. The sensitivity setting is high by default and will perform best for most applications. Rarely if the sensor is placed near external sources such as heating and cooling vents, it may turn the lights on without occupancy. If this occurs, changing the sensitivity to low should resolve the problem. The default setting is high sensitivity.
• High Sensitivity: This is the most sensitive setting and will detect very slight motions. This is the recommended setting, as it will work well for nearly all applications.
• Low Sensitivity: This is the least sensitive setting and is best used in areas of major or large motions.
What do I want?The type of activity and amount of foot traffic will help dictate at which setting the sensor should be set. High sensitivity is recommended for spaces where the occupants will often be seated for long periods of time and performing fine motions such as turning a page. Low sensitivity is recommended for spaces that generally only experience large motions such as foot traffic.
Auto-On Feature (Occupancy Version only): The automatic functionality of the sensor can be adjusted to control how the lights respond upon initial occupancy. There are two available settings: enabled and disabled. The default setting is enabled.
• Enabled: The lights will always turn on when occupancy is detected.
• Disabled: This setting converts the sensor to vacancy mode. The lights will not automatically turn on but will still automatically turn off after vacancy. The lights must be manually turned on by pressing the tap button on the dimmer or switch.
What do I want?If you want the lights to automatically turn on when someone enters the room, the auto-on setting should remain enabled. If you prefer the lights only turn on when the tap button is pressed, the auto-on feature should be disabled. Bedrooms are a typical application where the auto-on feature should be disabled.
Manual Off (Exit Time Delay): After the unit is manually turned off, the auto-on feature will be disabled for 25 seconds, even if motion is detected. This is to provide occupants time to exit larger rooms after manually turning the lights off. The unit can be manually turned on at any time. After 25 seconds, the unit will return to normal operation.
Application Note #124
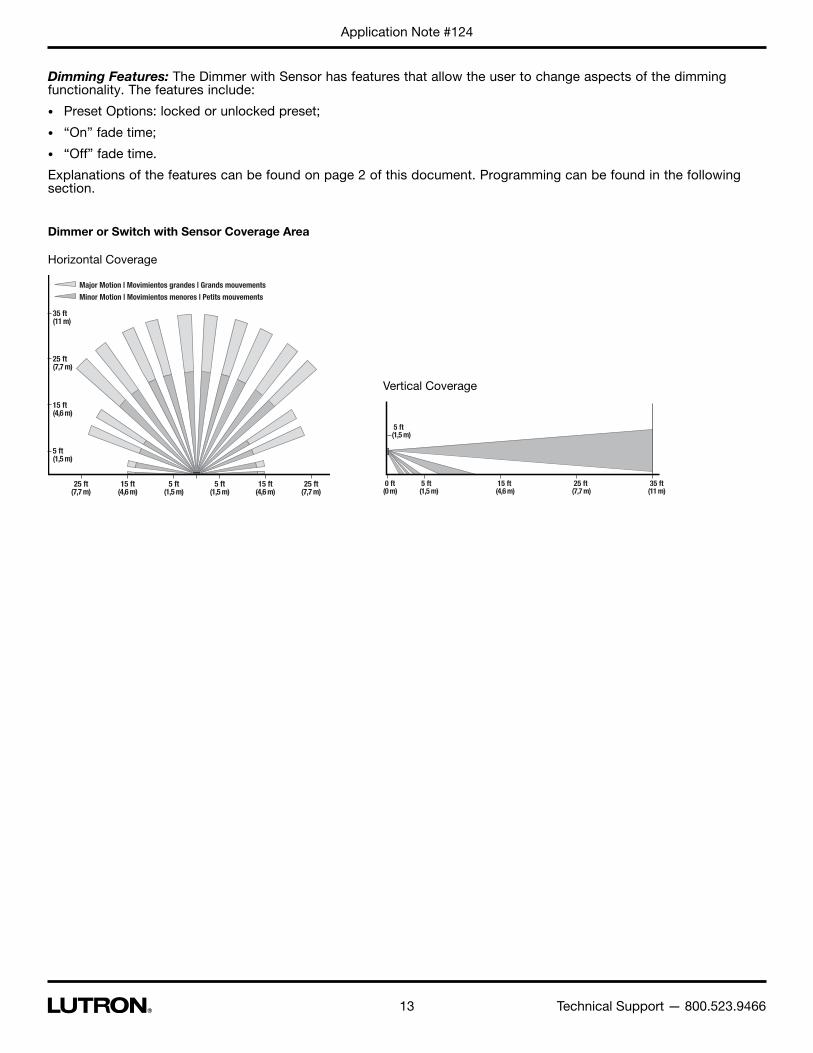
13 Technical Support — 800.523.9466
Dimming Features: The Dimmer with Sensor has features that allow the user to change aspects of the dimming functionality. The features include:
• Preset Options: locked or unlocked preset;
• “On” fade time;
• “Off” fade time.
Explanations of the features can be found on page 2 of this document. Programming can be found in the following section.
5 ft(1,5 m)
5 ft(1,5 m)
15 ft(4,6 m)
15 ft(4,6 m)
25 ft(7,7 m)
25 ft(7,7 m)
5 ft(1,5 m)
15 ft(4,6 m)
25 ft(7,7 m)
35 ft(11 m)
Major Motion | Movimientos grandes | Grands mouvements
Minor Motion | Movimientos menores | Petits mouvements
0 ft(0 m)
5 ft(1,5 m)
5 ft(1,5 m)
15 ft(4,6 m)
25 ft(7,7 m)
35 ft(11 m)
Dimmer or Switch with Sensor Coverage Area
Horizontal Coverage
Vertical Coverage
Application Note #124
14 www.lutron.com
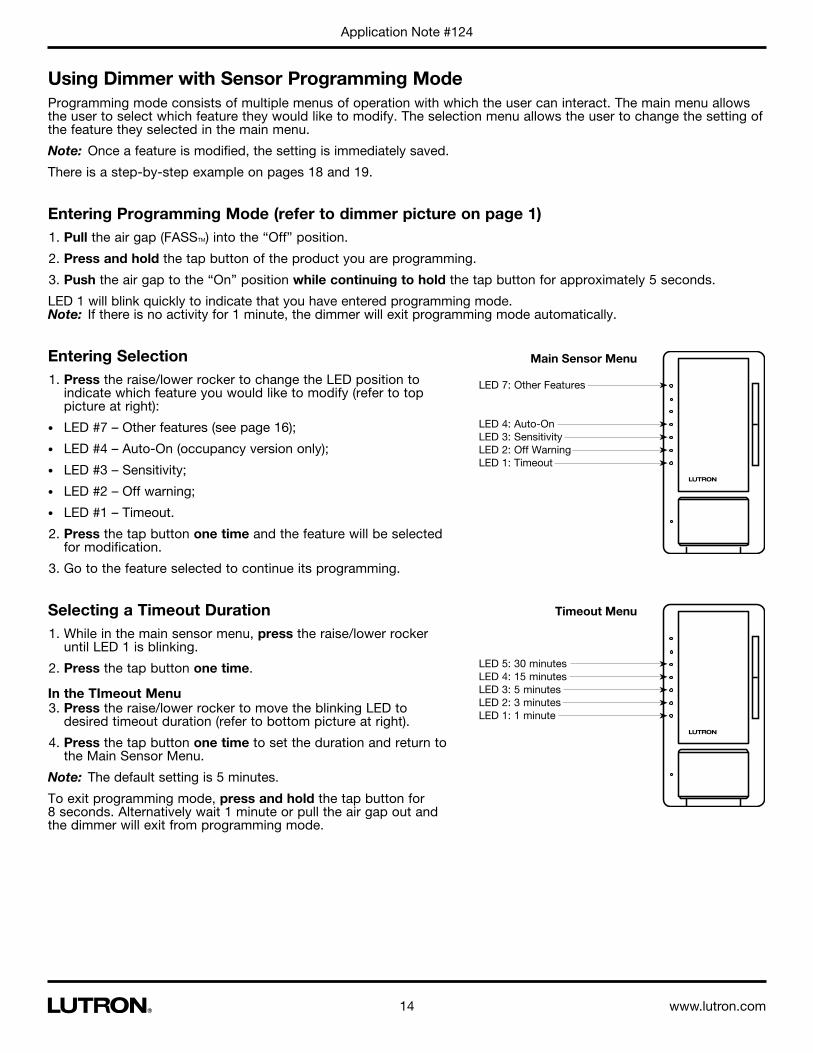
Using Dimmer with Sensor Programming ModeProgramming mode consists of multiple menus of operation with which the user can interact. The main menu allows the user to select which feature they would like to modify. The selection menu allows the user to change the setting of the feature they selected in the main menu.
Note: Once a feature is modified, the setting is immediately saved.
There is a step-by-step example on pages 18 and 19.
Entering Programming Mode (refer to dimmer picture on page 1) 1. Pull the air gap (FASSTM) into the “Off” position.
2. Press and hold the tap button of the product you are programming.
3. Push the air gap to the “On” position while continuing to hold the tap button for approximately 5 seconds.
LED 1 will blink quickly to indicate that you have entered programming mode. Note: If there is no activity for 1 minute, the dimmer will exit programming mode automatically.
Entering Selection 1. Press the raise/lower rocker to change the LED position to
indicate which feature you would like to modify (refer to top picture at right):
• LED #7 – Other features (see page 16);
• LED #4 – Auto-On (occupancy version only);
• LED #3 – Sensitivity;
• LED #2 – Off warning;
• LED #1 – Timeout.
2. Press the tap button one time and the feature will be selected for modification.
3. Go to the feature selected to continue its programming.
Selecting a Timeout Duration 1. While in the main sensor menu, press the raise/lower rocker
until LED 1 is blinking.
2. Press the tap button one time.
In the TImeout Menu 3. Press the raise/lower rocker to move the blinking LED to
desired timeout duration (refer to bottom picture at right).
4. Press the tap button one time to set the duration and return to the Main Sensor Menu.
Note: The default setting is 5 minutes.
To exit programming mode, press and hold the tap button for 8 seconds. Alternatively wait 1 minute or pull the air gap out and the dimmer will exit from programming mode.
Main Sensor Menu
LED 7: Other Features
LED 4: Auto-OnLED 3: SensitivityLED 2: Off WarningLED 1: Timeout
Timeout Menu
LED 5: 30 minutesLED 4: 15 minutesLED 3: 5 minutesLED 2: 3 minutesLED 1: 1 minute
Application Note #124
15 Technical Support — 800.523.9466
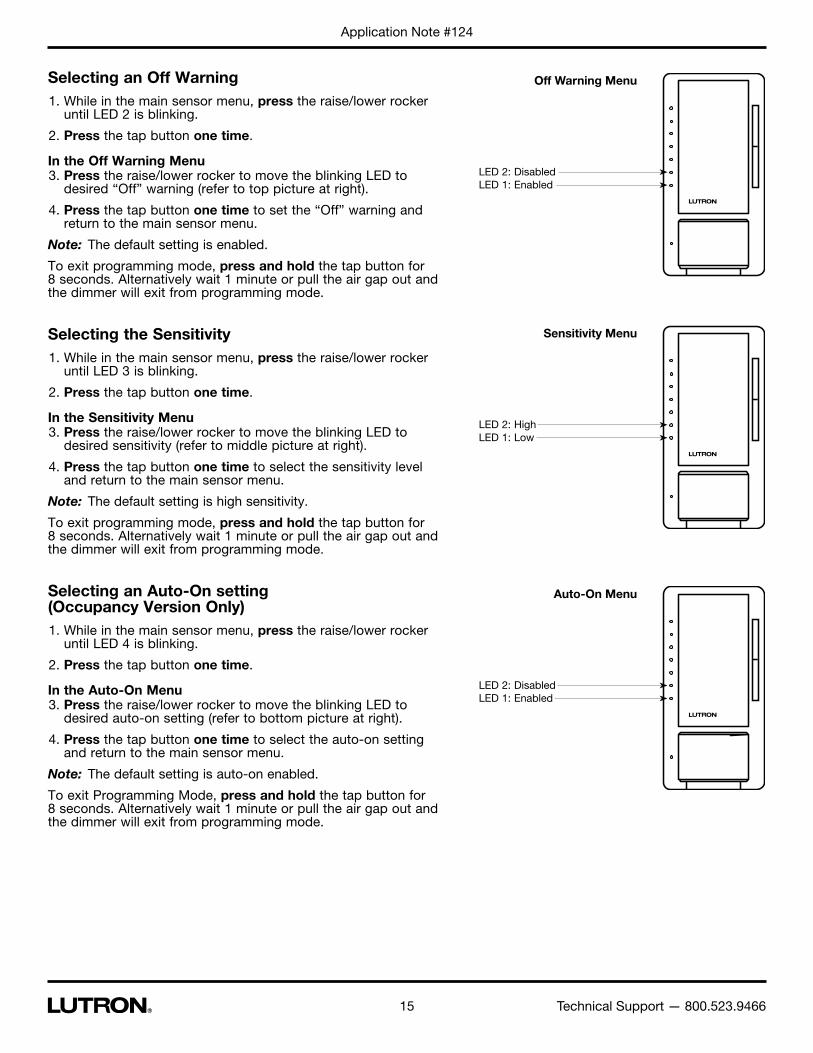
Selecting an Off Warning 1. While in the main sensor menu, press the raise/lower rocker
until LED 2 is blinking.
2. Press the tap button one time.
In the Off Warning Menu 3. Press the raise/lower rocker to move the blinking LED to
desired “Off” warning (refer to top picture at right).
4. Press the tap button one time to set the “Off” warning and return to the main sensor menu.
Note: The default setting is enabled.
To exit programming mode, press and hold the tap button for 8 seconds. Alternatively wait 1 minute or pull the air gap out and the dimmer will exit from programming mode.
Selecting the Sensitivity 1. While in the main sensor menu, press the raise/lower rocker
until LED 3 is blinking.
2. Press the tap button one time.
In the Sensitivity Menu 3. Press the raise/lower rocker to move the blinking LED to
desired sensitivity (refer to middle picture at right).
4. Press the tap button one time to select the sensitivity level and return to the main sensor menu.
Note: The default setting is high sensitivity.
To exit programming mode, press and hold the tap button for 8 seconds. Alternatively wait 1 minute or pull the air gap out and the dimmer will exit from programming mode.
Selecting an Auto-On setting (Occupancy Version Only) 1. While in the main sensor menu, press the raise/lower rocker
until LED 4 is blinking.
2. Press the tap button one time.
In the Auto-On Menu 3. Press the raise/lower rocker to move the blinking LED to
desired auto-on setting (refer to bottom picture at right).
4. Press the tap button one time to select the auto-on setting and return to the main sensor menu.
Note: The default setting is auto-on enabled.
To exit Programming Mode, press and hold the tap button for 8 seconds. Alternatively wait 1 minute or pull the air gap out and the dimmer will exit from programming mode.
Off Warning Menu
LED 2: DisabledLED 1: Enabled
Sensitivity Menu
LED 2: HighLED 1: Low
Auto-On Menu
LED 2: DisabledLED 1: Enabled
Application Note #124
16 www.lutron.com
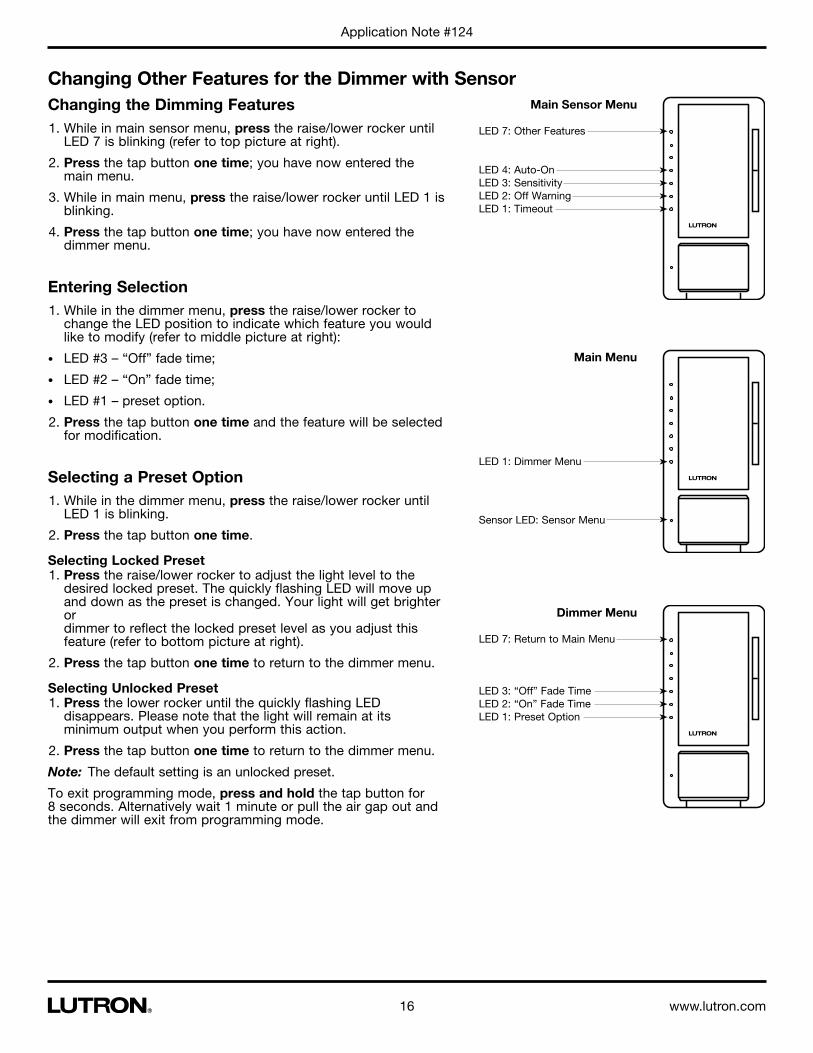
Changing Other Features for the Dimmer with SensorChanging the Dimming Features 1. While in main sensor menu, press the raise/lower rocker until
LED 7 is blinking (refer to top picture at right).
2. Press the tap button one time; you have now entered the main menu.
3. While in main menu, press the raise/lower rocker until LED 1 is blinking.
4. Press the tap button one time; you have now entered the dimmer menu.
Entering Selection 1. While in the dimmer menu, press the raise/lower rocker to
change the LED position to indicate which feature you would like to modify (refer to middle picture at right):
• LED #3 – “Off” fade time;
• LED #2 – “On” fade time;
• LED #1 – preset option.
2. Press the tap button one time and the feature will be selected for modification.
Selecting a Preset Option 1. While in the dimmer menu, press the raise/lower rocker until
LED 1 is blinking.
2. Press the tap button one time.
Selecting Locked Preset 1. Press the raise/lower rocker to adjust the light level to the
desired locked preset. The quickly flashing LED will move up and down as the preset is changed. Your light will get brighter or dimmer to reflect the locked preset level as you adjust this feature (refer to bottom picture at right).
2. Press the tap button one time to return to the dimmer menu.
Selecting Unlocked Preset 1. Press the lower rocker until the quickly flashing LED
disappears. Please note that the light will remain at its minimum output when you perform this action.
2. Press the tap button one time to return to the dimmer menu.
Note: The default setting is an unlocked preset.
To exit programming mode, press and hold the tap button for 8 seconds. Alternatively wait 1 minute or pull the air gap out and the dimmer will exit from programming mode.
Main Sensor Menu
LED 7: Other Features
LED 4: Auto-OnLED 3: SensitivityLED 2: Off WarningLED 1: Timeout
Main Menu
LED 1: Dimmer Menu
Sensor LED: Sensor Menu
Dimmer Menu
LED 7: Return to Main Menu
LED 3: “Off” Fade TimeLED 2: “On” Fade TimeLED 1: Preset Option
Application Note #124
17 Technical Support — 800.523.9466
Selecting the “On” Fade Time 1. While in the dimmer menu, press the raise/lower rocker until
LED 2 is blinking.
2. Press the tap button one time. A quickly flashing LED will indicate which fade time has been selected (refer to top picture at right).
3. Press the raise/lower rocker to adjust the quickly blinking LED to the position that represents the desired fade time.
4. Press the tap button one time to return to the dimmer menu.
Note: The default “On” fade time is 0.75 seconds. The fade speed for raise and lower operations are unaffected by any “On” fade time modification.
To exit programming mode, press and hold the tap button for 8 seconds. Alternatively wait 1 minute or pull the air gap out and the dimmer will exit from programming mode.
Selecting the “Off” Fade Time 1. While in the dimmer menu, press the raise/lower rocker until
LED 3 is blinking.
2. Press the tap button one time. A quickly flashing LED will indicate which fade time has been selected (refer to bottom picture at right).
3. Press the raise/lower rocker to adjust the quickly blinking LED to the position that represents the desired fade time.
4. Press the tap button one time to return to the dimmer menu.
Note: The default “Off” fade time is 3 seconds. The fade speed for raise and lower operations are unaffected by any “Off” fade time modification.
To exit programming mode, press and hold the tap button for 8 seconds. Alternatively wait 1 minute or pull the air gap out and the dimmer will exit from programming mode.
LED Position
“On” Fade Time from Off to Max. Light Level
5 0.5 Seconds
4 0.75 Seconds
3 1.5 Seconds
2 3 Seconds
1 5 Seconds
LED Position
“Off” Fade Time from Max. Light Level to Off
5 1.5 Seconds
4 3 Seconds
3 5 Seconds
2 10 Seconds
1 15 Seconds
LED 5: Fastest “Off” Fade Time
LED 1: Slowest “Off” Fade Time
LED 5: Fastest “On” Fade Time
LED 1: Slowest “On” Fade Time
Application Note #124
18 www.lutron.com
Restoring Factory DefaultsIf you would like to return the dimmer with sensor to its original factory settings, please do the following:
1. Pull the air gap (FASSTM) to the “Off” position.
2. Press and hold the tap button of the product you wish to reset.
3. Push the air gap to the “On” position while continuing to hold the tap button for approximately 20 seconds.
4. LED 1 will begin to blink. Once it stops blinking and LED 7 turns on, release the tap button. The unit has been successfully restored to its factory defaults.
What are the factory defaults for the dimmer with sensor?• Locked preset is disabled;
• “On” fade time from “Off” to the maximum light level is 0.75 seconds;
• “Off” fade time from the maximum light level to “Off” is 3 seconds;
• Timeout is 5 minutes;
• Off warning is enabled;
• Sensitivity is high;
• Auto-on is enabled.
Dimmer with Sensor Step-by-Step ExampleLet’s assume we want to program a dimmer with sensor with the following settings:
• A timeout duration of 1 minute;
• Off warning disabled;
• Low sensitivity with auto-on disabled.
Step 1: Entering Programming Mode
1. Pull the air gap (FASSTM) to the “Off” position.
2. Press and hold the tap button of the switch with sensor.
3. Push the air gap to the “On” position while continuing to hold the tap button for approximately 5 seconds.
4. Sensor LED on, LED 1 blinking quickly indicating that you are in programming mode. Once this happens, release the tap button.
Step 2: Selecting Timeout as the feature you would like to modify
Sensor LED on, LED 1 blinking quickly to indicate you are in programming mode
1. Press the tap button to select timeout as the feature you would like to modify.
Step 3: Adjusting Timeout Duration to 1 minute
1. Press lower rocker two times to select a timeout duration of 1 minute (LED 1 blinking).
2. Press and hold the tap button for 3 seconds to set the timeout duration. The dimmer will automatically return to the main menu once this action is completed.
Step 4: Selecting Off Warning as the feature you would like to modify
Sensor LED on, LED 1 blinking quickly to indicate you are in programming mode
1. Press the raise rocker one time to select off warning as the feature you want to modify (LED 2 blinking).
2. Press and hold the tap button for 3 seconds; you are now in off warning programming menu.
Application Note #124
19 Technical Support — 800.523.9466
Step 5: Adjusting the Off Warning setting
1. Press the raise rocker one time to select an off warning setting of disabled (LED 2 blinking).
2. Press and hold the tap button for 3 seconds to set the selected off warning setting. The dimmer will automatically return to the main menu once this action is completed.
Step 6: Selecting Sensitivity as the feature you would like to modify
Sensor LED on, LED 2 blinking quickly to indicate you are in programming mode
1. Press the raise rocker one time to select sensitivity as the feature you want to modify (LED 3 blinking).
2. Press and hold the tap button for 3 seconds; you are now in sensitivity programming menu.
Step 7: Adjusting the Sensitivity setting
1. Press the lower rocker one time to select a sensitivity setting of low (LED 1 blinking).
2. Press and hold the tap button for 3 seconds to set the selected sensitivity setting. The dimmer will automatically return to the main menu once this action is completed.
Step 8: Selecting Auto-On as the feature you would like to modify (Occupancy version only)
Sensor LED on, LED 3 blinking quickly to indicate you are in programming mode
1. Press the raise rocker one time to select auto-on as the feature you want to modify (LED 4 blinking).
2. Press and hold the tap button for 3 seconds; you are now in auto-on programming menu.
Step 9: Adjusting the Auto-On setting
1. Press the raise rocker one time to select an auto-on setting of disabled (LED 2 blinking).
2. Press and hold the tap button for 3 seconds to set the selected auto-on setting. The dimmer will automatically return to the main menu once this action is completed.
Step 10: Exiting Programming Mode
1. Press and hold the tap button for 8 seconds. Alternatively, wait 1 minute or pull the air gap and the switch will exit from programming mode.
Once the dimmer LED has stopped blinking, the dimmer with sensor has returned to its normal operating mode and all of your settings have been saved.
Application Note #124
20 www.lutron.com
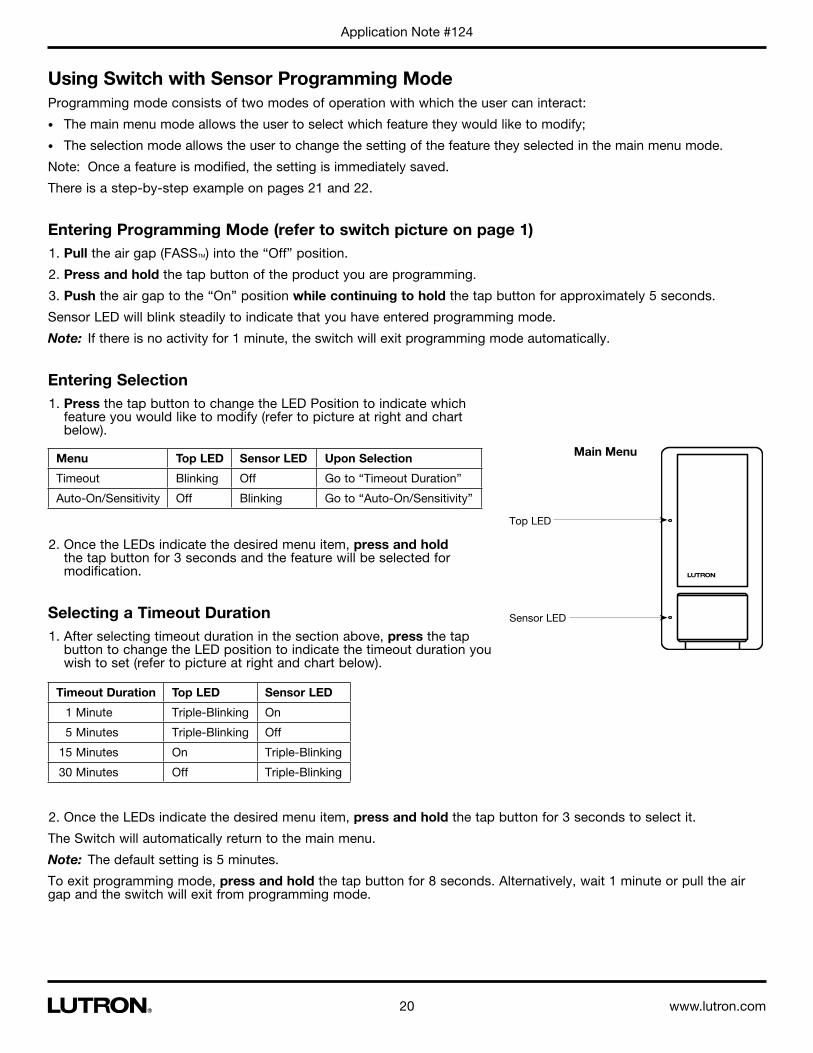
Using Switch with Sensor Programming ModeProgramming mode consists of two modes of operation with which the user can interact:
• The main menu mode allows the user to select which feature they would like to modify;
• The selection mode allows the user to change the setting of the feature they selected in the main menu mode.
Note: Once a feature is modified, the setting is immediately saved.
There is a step-by-step example on pages 21 and 22.
Entering Programming Mode (refer to switch picture on page 1) 1. Pull the air gap (FASSTM) into the “Off” position.
2. Press and hold the tap button of the product you are programming.
3. Push the air gap to the “On” position while continuing to hold the tap button for approximately 5 seconds.
Sensor LED will blink steadily to indicate that you have entered programming mode.
Note: If there is no activity for 1 minute, the switch will exit programming mode automatically.
Entering Selection 1. Press the tap button to change the LED Position to indicate which
feature you would like to modify (refer to picture at right and chart below).
2. Once the LEDs indicate the desired menu item, press and hold the tap button for 3 seconds and the feature will be selected for modification.
Selecting a Timeout Duration 1. After selecting timeout duration in the section above, press the tap
button to change the LED position to indicate the timeout duration you wish to set (refer to picture at right and chart below).
2. Once the LEDs indicate the desired menu item, press and hold the tap button for 3 seconds to select it.
The Switch will automatically return to the main menu.
Note: The default setting is 5 minutes.
To exit programming mode, press and hold the tap button for 8 seconds. Alternatively, wait 1 minute or pull the air gap and the switch will exit from programming mode.
Main Menu
Top LED
Sensor LED
Menu Top LED Sensor LED Upon Selection
Timeout Blinking Off Go to “Timeout Duration”
Auto-On/Sensitivity Off Blinking Go to “Auto-On/Sensitivity”
Timeout Duration Top LED Sensor LED
1 Minute Triple-Blinking On
5 Minutes Triple-Blinking Off
15 Minutes On Triple-Blinking
30 Minutes Off Triple-Blinking

Application Note #124
21 Technical Support — 800.523.9466
Selecting the Auto-On/Sensitivity Setting 1. After selecting auto-on/sensitivity in the section above, press
the tap button to change the LED position to indicate the auto-on/sensitivity setting you wish to set. Vacancy versions will only change the sensitivity in this step and use the last two rows in the chart (refer to picture at right and chart below).
2. Once the LEDs indicate the desired menu item, press and hold the tap button for 3 seconds to select it.
The switch will automatically return to the main menu.
Note: High sensitivity is the default setting for both versions with auto-on enabled for the occupancy version.
To exit Programming Mode, press and hold the tap button for 8 seconds. Alternatively, wait 1 minute or pull the air gap and the switch will exit from programming mode.
Restoring Factory DefaultsIf you would like to return the switch with sensor to its original factory settings, please do the following:
1. Pull the air gap (FASSTM) to the “Off” position.
2. Press and hold the tap button of the product you wish to reset.
3. Push the air gap to the “On” position while continuing to hold the tap button for approximately 20 seconds.
4. The sensor LED will begin to flash. When the switch with sensor’s LEDs are both on and solid, release the tap button. The unit has been successfully restored to its factory defaults.
What are the factory defaults for the dimmer with sensor?• Timeout is 5 minutes;
• Auto-on/sensitivity is high (both vacancy and occupancy versions);
• Auto-on is enabled for the occupancy version.
Switch with Sensor Step-by-Step ExampleLet’s assume we want to program a switch with sensor with the following settings:
• A timeout duration of 1 minute;
• Auto-on disabled;
• Low sensitivity.
Step 1: Entering Programming Mode
1. Pull the air gap (FASSTM) to the “Off” position.
2. Press and hold the tap button of the switch with sensor.
3. Push the air gap to the “On” position while continuing to hold the tap button for approximately 5 seconds.
4. The Sensor LED should start to blink steadily indicating that you are in programming mode. Once this happens, release the tap button.
Top LED
Sensor LED
Auto-On/Sensitivity Top LED Sensor LED
Enabled with High Sensitivity Double-Blinking On
Enabled with Low Sensitivity Double-Blinking On
Disabled with High Sensitivity On Double-Blinking
Disabled with Low Sensitivity On Double-Blinking
22Lutron Electronics Co., Inc.7200 Suter RoadCoopersburg, PA 18036-1299 U.S.A.P/N 048-124 Rev. E 3/2012
Application Note #124
Lutron Contact Numbers
Maestro, eco-dim, and eco-minder are registered trademarks and FASS is a trademark of Lutron Electronics Co., Inc.
WORLD HEADQUARTERS USA
Lutron Electronics Co., Inc. 7200 Suter Road Coopersburg, PA 18036-1299 TEL: +1.610.282.3800 FAX: +1.610.282.1243 Toll-Free: 1.888.LUTRON1 Technical Support: 1.800.523.9466
North & South America Technical Hotlines
USA, Canada, Caribbean: 1.800.523.9466 Mexico: +1.888.235.2910 Central/South America: +1.610.282.6701
EUROPEAN HEADQUARTERS United Kingdom
Lutron EA Ltd. 6 Sovereign Close London, E1W 3JF United Kingdom TEL: +44.(0)20.7702.0657 FAX: +44.(0)20.7480.6899 FREEPHONE (UK): 0800.282.107 Technical Support: +44.(0)20.7680.4481
ASIAN HEADQUARTERS Singapore
Lutron GL Ltd. 15 Hoe Chiang Road #07-03, Tower 15 Singapore 089316 TEL: +65.6220.4666 FAX: +65.6220.4333 Technical Support: 800.120.4491
Asia Technical HotlinesNorthern China: 10.800.712.1536 Southern China: 10.800.120.1536 Hong Kong: 800.901.849 Indonesia: 001.803.011.3994 Japan: +81.3.5575.8411 Macau: 0800.401 Taiwan: 00.801.137.737 Thailand: 001.800.120.665853 Other Countries: +65.6220.4666
Step 2: Selecting Timeout as the feature you would like to modify
Sensor LED blinking steadily to indicate you are in programming mode
1. Press the tap button one time to select timeout as the feature you want to modify (top LED blinking steadily, sensor LED off).
2. Press and hold the tap button for 3 seconds; you are now in timeout programming menu.
Step 3: Adjusting Timeout duration to 1 minute
1. Press the tap button three times to select a timeout duration of 1 minute (top LED triple-blinking, sensor LED on).
2. Press and hold the tap button for 3 seconds to set the timeout duration. The switch will automatically return to the main menu once this action is completed.
Step 4: Selecting Auto-On/Sensitivity as the feature you would like to modify
Sensor LED blinking steadily to indicate you are in the programming mode
1. Press the tap button one time to select auto-on/sensitivity as the feature you want to modify (top LED off, sensor LED blinking steadily).
2. Press and hold the tap button for 3 seconds; you are now in auto-on/sensitivity programming menu.
Step 5: Adjusting the Auto-On/Sensitivity setting
1. Press the tap button 3 times to select an auto-on (occupancy version only) setting of disabled and a sensitivity setting of low sensitivity (top LED off, sensor LED double-blinking).
2. Press and hold the tap button for 3 seconds to set the selected auto-on/sensitivity setting. The switch will automatically return to the main menu once this action is completed.
Step 6: Exiting Programming Mode
1. Press and hold the tap button for 8 seconds. Alternatively, wait 1 minute or pull the air gap and the switch will exit from programming mode.
Once one or both of the LEDs have stopped blinking, the switch with sensor has returned to its normal operating mode and all of your settings have been saved.


![Catalogue Couteaux cuisine [Mode de compatibilité] · PDF fileCUISINE EVERCUT Origine Maestro Furtif ABSOLU Palissandre ABS EQUILIBRE HECTOR LAGUIOLE Expression Evolution MAESTRO](https://img.pdfslide.us/doc/110x75/5aa8ef517f8b9a81188c24b1/catalogue-couteaux-cuisine-mode-de-compatibilit-evercut-origine-maestro-furtif.jpg)

![4K Maestro TX/RX 18Gbps - HDFury · The 4K Maestro TX/RX offers 2 functions per push button. [OUT1] Wake up from sleep/fade mode and/or set and switch active or inactive inputs for](https://img.pdfslide.us/doc/110x75/5f66b4ba9237fe4b91108384/4k-maestro-txrx-18gbps-hdfury-the-4k-maestro-txrx-offers-2-functions-per-push.jpg)