Embed Size (px)
Citation preview
Emma User Guide
Emma User Guide i
Contents
Getting Started with Emma ............. 2Prerequisites .................................................. 2Installation ..................................................... 4
Installing Emma............................................ 4Uninstalling Emma........................................ 4
Start and registration ..................................... 4Starting Emma............................................. 4Register........................................................ 5Log in.......................................................... 6Forgotten Password..................................... 6Changing Password..................................... 6Changing the Proxy Settings........................ 6
Network connections ..................................... 7Working Online/Offline.................................. 7Enabling peer-to-peer (P2P)......................... 7Changing the Proxy Setting.......................... 7
Help Information ............................................ 8About Emma................................................ 8About the User Guide.................................. 8
Updating Emma ............................................ 8
Understanding the Work Area ....... 10Work Area ................................................... 10
Connectors ..................................... 11Connector Overview .................................... 11Connector Details ........................................ 12Connecting a Connector .............................. 12
Deregistering a Connector.......................... 12Renaming a Connector.............................. 13
USB ............................................................ 13
Services .......................................... 14Service Details ............................................. 14Service List .................................................. 14
Sorting the Service List.............................. 14Changing Columns in the Service List......... 14Filtering the Service List............................. 15Service Information..................................... 15Service Types............................................ 15
Running a Service ....................................... 17Managing Local Services ............................. 18
Update/Remove Services........................... 18Importing Services...................................... 18Exporting Services..................................... 19
Downloading Services ................................. 20Aspects of large files ................................... 20
Security ........................................... 22USB Activation dongle ................................. 22
Installing Software for Activation Dongle...... 22Getting a New PIN code............................ 22Testing the Activation Dongle..................... 22
Tutorials .......................................... 23Flashing Devices .......................................... 23Customizing Devices ................................... 23
Running a Customize Service..................... 23Running an Activation Service.................... 23
Parallel Flashing of Devices .......................... 24
Troubleshooting ............................. 25
Recommendations for Successful Use of Emma..................................................................... 25Log in Problems .......................................... 25Identification Problems ................................. 25Service Problems ........................................ 25Activation Dongle Problems ......................... 26Removing USB Devices ............................... 27
Removing a USB Device............................ 27
Support ........................................... 28Support Functions ....................................... 28Reporting an Error ....................................... 28Finding the Emma Log File .......................... 28Emma Log Level ......................................... 28
Emma User Guide 2
Getting Started withEmma
Emma is a Sony Mobile application used for updating, customizing and activatingphones, tablets, and accessories. These operations are performed in services thatare run in Emma.
There is one start mode for devices:• Flash mode - this is used when "flashing" i.e. updating or customizing a
device and for activation of some device models. To set a USB device in flashmode you power it off and then press and hold the Volume Down button (orequivalent) while you connect the device to the USB cable.
For more specific instructions please see the device documentation.
You connect the devices to your computer through different types of connectors(USB cable) depending on the device model and working environment. You need auser name and password to be able to use the application.
Prerequisites
AdministratorYou must be administrator on your computer to be able to install and run Emma.
Operating SystemsThe following operating systems are supported by Emma:
• Windows 7 SP1 32/64-bit• Windows 8/8.1 32/64-bit• Windows 10 32/64-bit
Other HardwareRequired hardware for using Emma:
• One or more of the following connectors/cables: USB (Micro USB Cable, USB-C Cable).
• A USB Activation Dongle for activation services.

Emma User Guide 3
Note: We recommend that the USB cables are connected directly to thecomputers USB sockets. If a hub is used, it should be a good quality USB 2.0hub, with external power supply.
PC RecommendationsRequired PC hardware for using Emma.
Requirement PC HardwareRecommended forsingle flash
2.0 GHz processor 2 GB RAM
Recommended formultiflash
2.5 GHz processor 4 GB RAM
Note: If you do not follow the recommendations Sony Mobile cannot guaranteethe functionality.
Parallel Flashing RecommendationsYou can flash up to ten devices at the same time depending on hardware.
User TypesDepending on what user level you are on you will have different needs on hardwareand performance.
User type Services per day ExampleLow volume < 1 Single user
Medium volume < 10 Service center
High volume > 10 HVC (High VolumeCenter)
Network RequirementsLocal firewall(s) must allow all traffic to the below addresses.
• software.sonymobile.com/* port 80 and port 443.• cssemla.extranet.sonyericsson.com/* port 443.• CRL (Certificate Revocation List) distribution points:
• crl3.digicert.com/* port 80.• crl4.digicert.com/* port 80.
Internet Bandwidth RecommendationsTo guarantee communication with the Emma server a recommended Internetbandwidth has been estimated below. If you do not follow the recommendationsSony Mobile cannot guarantee the functionality.
User type Recommended Internet BandwidthLow volume 1.0 Mbps (available capacity)
Medium volume 4.0 Mbps (available capacity)
High volume 10 Mbps (available capacity)

Emma User Guide 4
Installation
Installing EmmaBefore you can use Emma you need to download and install it on your computer.
1. Go to https://software.sonymobile.com/ .2. Click Download Emma.3. In the File Download window, click Save.4. Choose where to save the file.5. Wait for the download to finish.6. Browse to where you downloaded Emma.7. Double click the Emma Setup file. If you see the Internet Explorer - Security
window, click Run.8. Read the End User License Agreement, then click I Agree.9. In the Emma Setup window, choose the path where you want Emma
to be installed (you should use the default path to simplify support andtroubleshooting). Make sure there is no existing Emma installation in the pathyou choose. Click Install.
10. Wait for the installation to finish.11. In the Emma Setup window, click Finish.
Note: Additional components may be installed as Emma starts up.
Uninstalling EmmaIf you do not want to have Emma on your computer you can uninstall it.
1. Find Emma in Add or Remove Programs or Programs and Features (in ControlPanel) and select uninstall..
2. In the Emma Uninstall window, click Yes.3. Alternately, go to Emma install path and run uninst.exe
Start and registrationStarting EmmaAfter you have installed Emma you can start the application.
1. In Windows, start from start menu or start screen.2. Wait for the application to start.3. The Log in window is shown.
To start using Emma you need to log in. If you are a new user you must first register.If you use a proxy server to access Internet you may need to change your proxysettings.

Emma User Guide 5
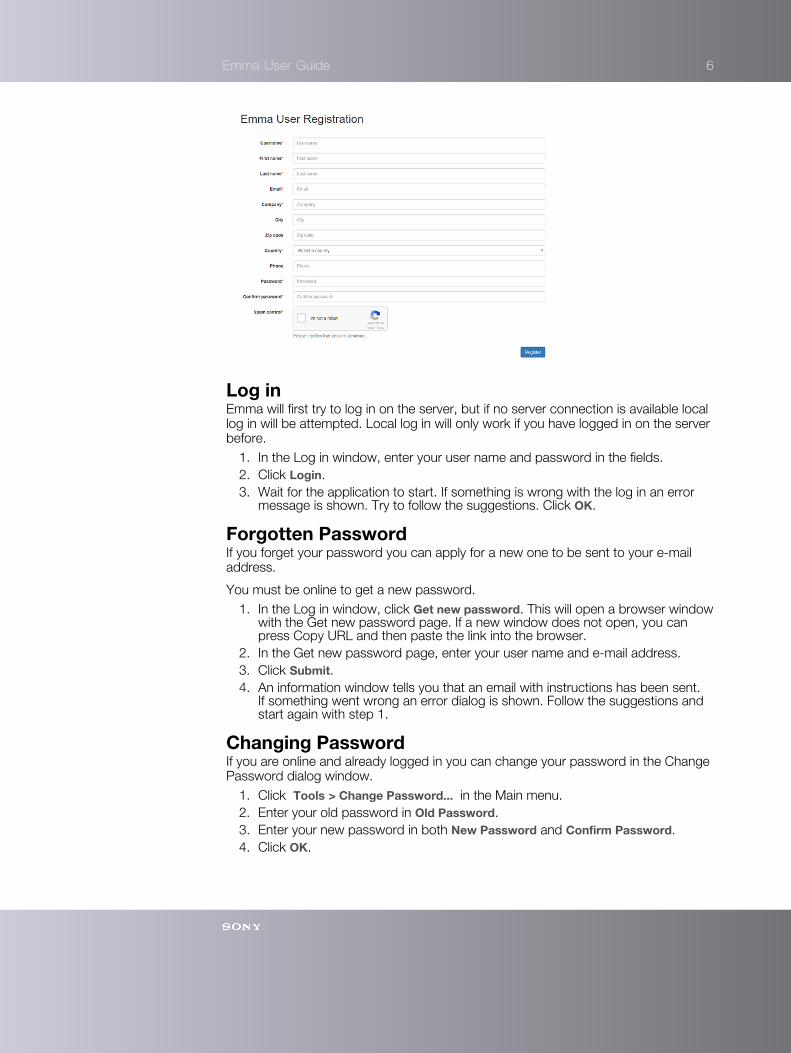
RegisterYou must have Internet access to register as an Emma user.
1. In the Login window, click New user registration. This will open a browserwindow with the new user registration page. If a new window does not open,you can press Copy URL and then paste the link into the browser.
2. In the New User Registration page, enter your information in the fields. Thereare some mandatory fields that have to be filled out correctly. These aremarked with asterisk.
3. Click Register (you cannot do this until all mandatory fields are filled outcorrectly). If something is wrong with the registration an error message isshown. In that case, click OK to return to the Login window and if possible startagain on step 1.
4. If registration is successful, you will receive an email to verify your emailaddress. To do so, press the link in the email.
You need to contact your Sony Mobile representative in order to activate youraccount. Please remember to provide your username. You can log in when youraccount has been activated and your email has been verified. For internal users seethe Emma Team site.
Emma User Guide 6
Log inEmma will first try to log in on the server, but if no server connection is available locallog in will be attempted. Local log in will only work if you have logged in on the serverbefore.
1. In the Log in window, enter your user name and password in the fields.2. Click Login.3. Wait for the application to start. If something is wrong with the log in an error
message is shown. Try to follow the suggestions. Click OK.
Forgotten PasswordIf you forget your password you can apply for a new one to be sent to your e-mailaddress.
You must be online to get a new password.1. In the Log in window, click Get new password. This will open a browser window
with the Get new password page. If a new window does not open, you canpress Copy URL and then paste the link into the browser.
2. In the Get new password page, enter your user name and e-mail address.3. Click Submit.4. An information window tells you that an email with instructions has been sent.
If something went wrong an error dialog is shown. Follow the suggestions andstart again with step 1.
Changing PasswordIf you are online and already logged in you can change your password in the ChangePassword dialog window.
1. Click Tools > Change Password... in the Main menu.2. Enter your old password in Old Password.3. Enter your new password in both New Password and Confirm Password.4. Click OK.

Emma User Guide 7
Changing the Proxy SettingsIf you use a proxy server to access Internet you may need to change your proxysettings.
1. In the Log in window, click Internet options.2. Change the settings to the one that applies to you. If you choose Manual proxy
configuration you must enter the proxy servers name and port number in thefields.
3. Click OK.
Network connectionsWorking Online/OfflineIf you work online it means that Emma communicates with the server and has accessto all services. Services that you have used online are stored locally (except for theActivation service and Theft Protection Unlock service) and you may later use themwhen you work offline.
1. Emma will always be in online mode if Emma can communicate with the server.2. If the server cannot be reached Emma will be in offline mode but will
automatically go online when the communication with the server has beenrestored.
Enabling peer-to-peer (P2P)If you want to download files you can get them from a neighboring Emma user, a socalled peer, instead of downloading them from the server. A neighbor is a computerbehind the same router or firewall.
1. Click Tools > Preferences in the Main menu.2. In the Preferences window, click P2P in the menu to the left.3. Choose Use Peer-to-peer file sharing to share software files with users in your
local network to share files with your peers.4. Click OK.

Emma User Guide 8
Changing the Proxy SettingIf you use a proxy server to access Internet you may need to change your proxysetting. The default setting, Use Windows internet options, will work for most users.
1. Click Tools > Preferences in the Main menu.2. The “Use Windows internet options” is used by default for user to contact to
server, change the settings to the one that applies to you.3. Click Test connection to check if the network is active.4. Click OK if the network is active.
Help InformationAbout EmmaNew versions of Emma are released on a regular basis (you do not need to installthese since Emma will update automatically). If you need to send in an error report itis important to know what version you are using.
1. Click Help > About Emma in the Main menu.2. In the About Emma window you can see information about the version.
About the User GuideThe documentation for using Emma is found in this User Guide. Help topics areupdated periodically. The User Guide exists as an online help and as a printabledocument.
• For the online version: Click Help > Help Contents in the Main menu, or Click Help > Search to search for a specific subject.
• For the printable version: Go to https://software.sonymobile.com/ .

Emma User Guide 9
Updating EmmaEmma will update to the latest version every time you login and periodically check forupdates in the background. You can also manually check for updates.
1. Click Help > Check for Updates in the Main menu.
If an update exist, Emma will download the update(s) and restart.
Emma User Guide 10
Understanding theWork Area
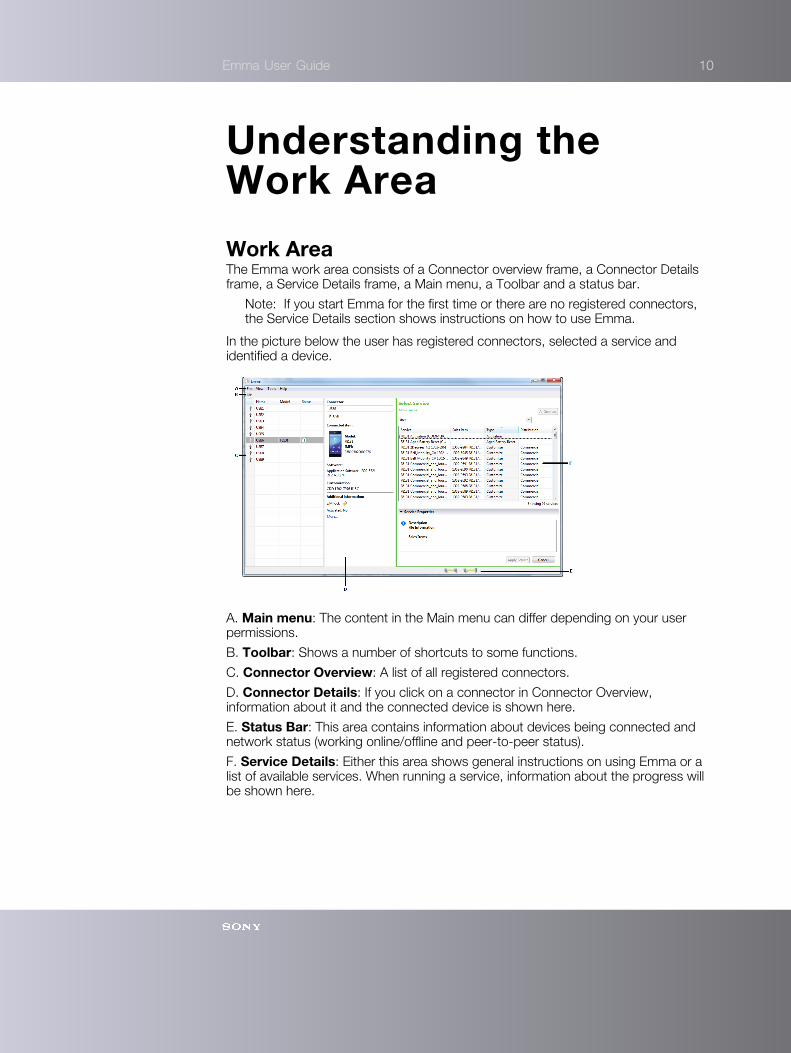
Work AreaThe Emma work area consists of a Connector overview frame, a Connector Detailsframe, a Service Details frame, a Main menu, a Toolbar and a status bar.
Note: If you start Emma for the first time or there are no registered connectors,the Service Details section shows instructions on how to use Emma.
In the picture below the user has registered connectors, selected a service andidentified a device.
A. Main menu: The content in the Main menu can differ depending on your userpermissions.
B. Toolbar: Shows a number of shortcuts to some functions.
C. Connector Overview: A list of all registered connectors.
D. Connector Details: If you click on a connector in Connector Overview,information about it and the connected device is shown here.
E. Status Bar: This area contains information about devices being connected andnetwork status (working online/offline and peer-to-peer status).
F. Service Details: Either this area shows general instructions on using Emma or alist of available services. When running a service, information about the progress willbe shown here.

Emma User Guide 11
ConnectorsThere are a number of different connectors/cables you can use with Emma: USB.
Connector OverviewIn Connector Overview you can find information about registered connectors anddevices that are connected to them.
A. Connector Icon: Shows the type of connector
Icon Connector TypeUSB
B. Name: The connectors name.
C. Model: The model of the connected device. It is only shown after identification.
D. Status: The status can either be a progress bar or an icon
Icon StatusAttention needed
Service completed successfully
Service failed
Service aborted by user
Progress bar
Emma User Guide 12
Note: Connectors can be sorted by clicking one of the column headers. If youclick the same header again the sorting order will be reversed.
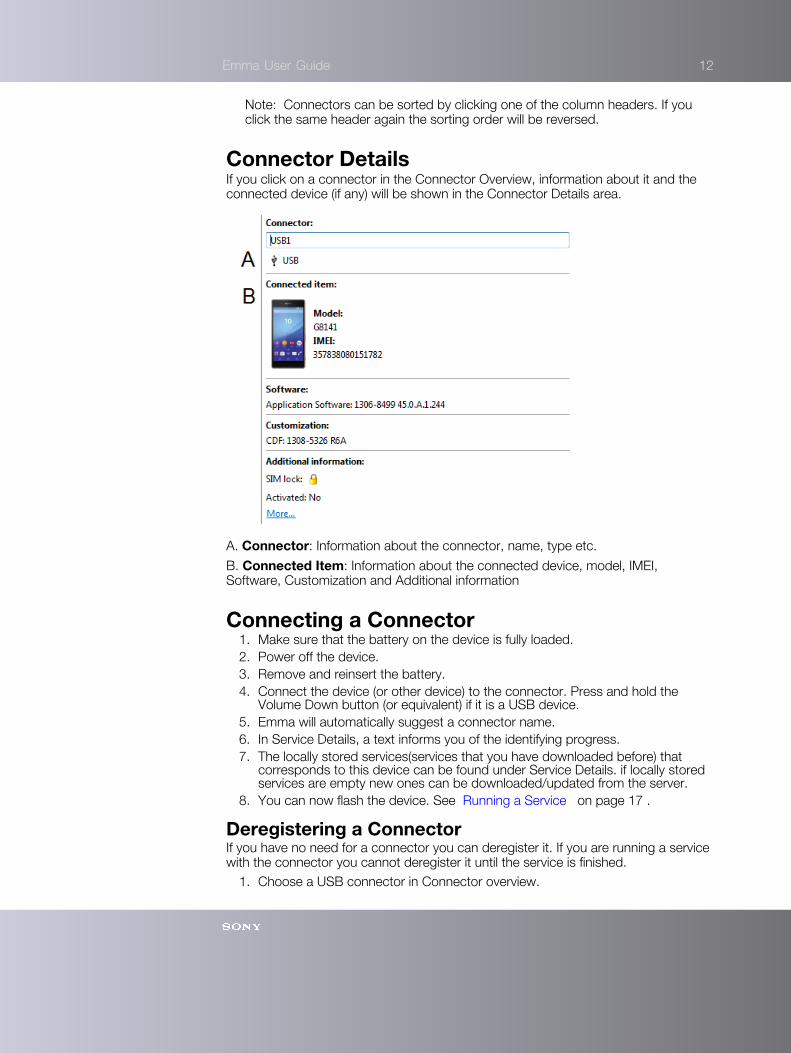
Connector DetailsIf you click on a connector in the Connector Overview, information about it and theconnected device (if any) will be shown in the Connector Details area.
A. Connector: Information about the connector, name, type etc.
B. Connected Item: Information about the connected device, model, IMEI,Software, Customization and Additional information
Connecting a Connector1. Make sure that the battery on the device is fully loaded.2. Power off the device.3. Remove and reinsert the battery.4. Connect the device (or other device) to the connector. Press and hold the
Volume Down button (or equivalent) if it is a USB device.5. Emma will automatically suggest a connector name.6. In Service Details, a text informs you of the identifying progress.7. The locally stored services(services that you have downloaded before) that
corresponds to this device can be found under Service Details. if locally storedservices are empty new ones can be downloaded/updated from the server.
8. You can now flash the device. See Running a Service on page 17 .
Deregistering a ConnectorIf you have no need for a connector you can deregister it. If you are running a servicewith the connector you cannot deregister it until the service is finished.
1. Choose a USB connector in Connector overview.

Emma User Guide 13
2. Click the Deregister Connector icon in the Toolbar.
3. In the Deregister Connector window, click Yes.
Renaming a ConnectorYou can rename a connector after you have registered it.
1. Choose the connector in Connector Overview.2. Click in the field with the connector name in Connector Details.3. Change the name and press ENTER.
USBUSB cables are used by all devices.
Micro USB Cable
USB C Cable
When working with a USB cable you should follow this work order:1. Connect a device to the USB cable.2. Connect the USB cable to your computer.3. Register the USB connector (only needed once per port).4. Flash the device.
Note: You do not have to install drivers for the USB cable. They are installedautomatically by Emma.

Emma User Guide 14
ServicesServices is the main function in Emma.
Service DetailsService Details can show different types of information, progress of identification,the Service list, prompts when running a service, start mode buttons, etc. Whenidentifying, running a service etc. a service log is shown at the bottom of ServiceDetails.
Service ListThe Service list in Service Details shows services that are available locally (that youhave used or downloaded before) and match the identified device. When you havemade a search, the list shows services that can be downloaded.
Sorting the Service ListIf you sort the service list it is easier to find what you are looking for.
1. Click on one of the column headers to sort the list based on that column. Thecolumn is sorted in an ascending order.
2. If you click on the same column header again you get a descending sortingorder. The current sorting is indicated by an arrow in the column header.
Changing Columns in the Service ListYou can also choose which columns you want to be present.
1. Right click on the Show or Hide column button under the All Services button.

Emma User Guide 15
2. Select which columns you want to be present.
Filtering the Service ListTo make it easier to find a service you can filter the service list.
1. Enter your search terms in the field Filter Results at the top of the service list.(Use space to separate words, filtering is not case sensitive.)
2. The service list is updated as you enter each character.
Service InformationWhen you click on a service in the Service list, information about it is shown at thebottom of Service Details under Service Properties.
Service TypesServices you can use in Emma.
Service Description Impact on user dataCustomize Includes a full software
flash and will alsochange customizationdata. After running this
All user data is erased.

Emma User Guide 16
Service Description Impact on user dataservice you need to runan activation service tounlock the unit.
Activation Unlocks the device(SIMLock). Onlineservice only. Note:USB Activation dongleis required to run thisservice type.
Refurbish Refreshes allcustomization dataand sets the unit tofactory default. Pre-loaded content is alsorefreshed. Includesa full software flashbut will not changethe customization.Device model andthe customizationwill determine whichservices are available.
All user data is erased,including user data onbuilt-in "SD card" whereapplicable.
Software UpdateContent Erase
Refreshes allcustomization dataand sets the unit tofactory default. Pre-loaded content is notrefreshed. Includesa full software flashbut will not changethe customization.Device model andthe customizationwill determine whichservices are available.
All user data is erased,including user dataon built-in "SD card"memory whereapplicable.
Software UpdateContent Refresh
Refreshes allcustomization dataand sets the unit tofactory default. Includesa full software flashbut will not changethe customization.Device model andthe customizationwill determine whichservices are available.
All user data is erased,except data on built-in "SD card" memorywhere applicable.
Software Update Updates software.The device model andthe language, or thecustomization decidewhich services areavailable.
No user data is erased.
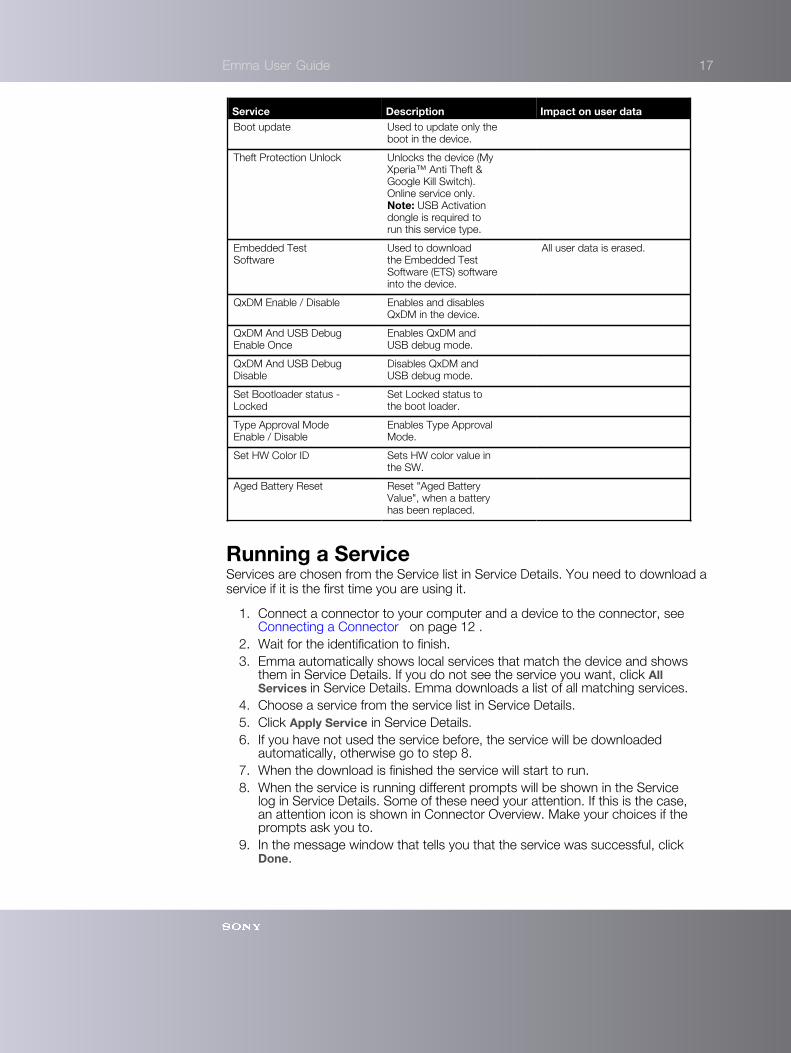
Emma User Guide 17
Service Description Impact on user dataBoot update Used to update only the
boot in the device.
Theft Protection Unlock Unlocks the device (MyXperia™ Anti Theft &Google Kill Switch).Online service only.Note: USB Activationdongle is required torun this service type.
Embedded TestSoftware
Used to downloadthe Embedded TestSoftware (ETS) softwareinto the device.
All user data is erased.
QxDM Enable / Disable Enables and disablesQxDM in the device.
QxDM And USB DebugEnable Once
Enables QxDM andUSB debug mode.
QxDM And USB DebugDisable
Disables QxDM andUSB debug mode.
Set Bootloader status -Locked
Set Locked status tothe boot loader.
Type Approval ModeEnable / Disable
Enables Type ApprovalMode.
Set HW Color ID Sets HW color value inthe SW.
Aged Battery Reset Reset "Aged BatteryValue", when a batteryhas been replaced.
Running a ServiceServices are chosen from the Service list in Service Details. You need to download aservice if it is the first time you are using it.
1. Connect a connector to your computer and a device to the connector, see Connecting a Connector on page 12 .
2. Wait for the identification to finish.3. Emma automatically shows local services that match the device and shows
them in Service Details. If you do not see the service you want, click AllServices in Service Details. Emma downloads a list of all matching services.
4. Choose a service from the service list in Service Details.5. Click Apply Service in Service Details.6. If you have not used the service before, the service will be downloaded
automatically, otherwise go to step 8.7. When the download is finished the service will start to run.8. When the service is running different prompts will be shown in the Service
log in Service Details. Some of these need your attention. If this is the case,an attention icon is shown in Connector Overview. Make your choices if theprompts ask you to.
9. In the message window that tells you that the service was successful, clickDone.

Emma User Guide 18
Note: After you have run a service successfully you get the suggestion"Automatically run this service…" in Service details. Mark the checkbox if youwant this. This is useful if you want to run the same service on many devices.
Managing Local ServicesManage the services that you have downloaded to your computer.
Update/Remove ServicesYou can update and remove services that you have downloaded to your computer.
1. Click Tools > Manage Local Services in the Main menu.2. In the Manage local services, all services that are stored locally are shown.3. You can filter the list by entering any number of characters in the field Filter list.4. Choose a service by clicking in its checkbox. You can choose several services.5. To update a service, click Update Selected. To remove a service, click Delete
Selected.6. If you choose to update a service and there is an available update, downloading
will start automatically after clicking Update selected
Importing ServicesYou can import services that you have downloaded and exported to an local servicearchive (.essa) file

Emma User Guide 19
1. Click Tools > Manage Local Services in the Main menu.2. To Import services, click Import....3. Choose an exported file to import. Emma will only accept files that has .eesa as
file ending.4. Click Open
Exporting ServicesExporting services to an Local Service Archive (.essa) file. The Exported Local ServiceArchive file can later on be used to import these services in Emma.
1. Click Tools > Manage Local Services in the Main menu.2. In the Manage local services, all services that are stored locally are shown.3. You can filter the list by entering any number of characters in the field Filter list.4. Choose a service by clicking in its checkbox. You can choose several services.5. To export these service(s), click Export Selected ....6. Choose a folder and a file name for the local service archive (.eesa) file.
Emma User Guide 20
7. Click Save
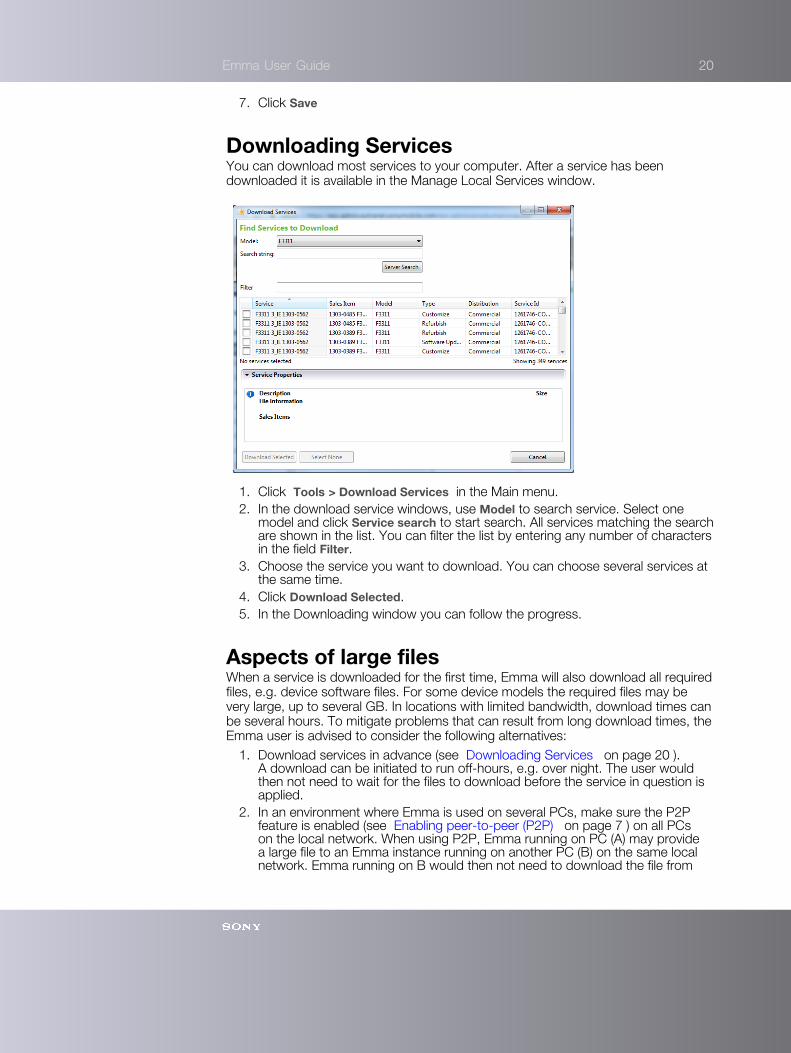
Downloading ServicesYou can download most services to your computer. After a service has beendownloaded it is available in the Manage Local Services window.
1. Click Tools > Download Services in the Main menu.2. In the download service windows, use Model to search service. Select one
model and click Service search to start search. All services matching the searchare shown in the list. You can filter the list by entering any number of charactersin the field Filter.
3. Choose the service you want to download. You can choose several services atthe same time.
4. Click Download Selected.5. In the Downloading window you can follow the progress.
Aspects of large filesWhen a service is downloaded for the first time, Emma will also download all requiredfiles, e.g. device software files. For some device models the required files may bevery large, up to several GB. In locations with limited bandwidth, download times canbe several hours. To mitigate problems that can result from long download times, theEmma user is advised to consider the following alternatives:
1. Download services in advance (see Downloading Services on page 20 ).A download can be initiated to run off-hours, e.g. over night. The user wouldthen not need to wait for the files to download before the service in question isapplied.
2. In an environment where Emma is used on several PCs, make sure the P2Pfeature is enabled (see Enabling peer-to-peer (P2P) on page 7 ) on all PCson the local network. When using P2P, Emma running on PC (A) may providea large file to an Emma instance running on another PC (B) on the same localnetwork. Emma running on B would then not need to download the file from

Emma User Guide 21
the Internet. Note however that this works only if Emma running on A hasdownloaded the file completely.

Emma User Guide 22
SecurityYou need an USB Activation dongle when you run the Activation service. Servicecards are no longer supported by Emma.
USB Activation dongleYou need a dongle to use the Activation service. If you enter an incorrect password(PIN code) three times, the dongle will stop to function. Please note that the donglesolution requires administrator access on some OS configurations.
Installing Software for Activation DongleYou need to install Middleware for the Activation dongle to work. Please uninstall anyprevious versions of SafeSign or RaakSign before continuing with the installation.
1. Go to https://software.sonymobile.com/ .2. Under Downloads, click Activation Dongle Software.3. If the File Download window is shown, click Save.4. Choose where to save the file. Click Save.5. In the Download complete window, click Close.6. Extract the file and choose where to save it.7. Go to the folder where the files were extracted.8. Double click on the file SafeSign-Identity-Client-3.0.33-user.exe.9. Follow the instructions to install the Middleware on your computer.
Getting a New PIN codeIf you enter the wrong PIN three times the dongle will be locked.
A popup window will display that the dongle is locked, and you need to contactyour local SOMC Customer Service representative in order to have the PIN reset.Forgotten PIN can be retrieved by contacting your local SOMC Customer Servicerepresentative.
Testing the Activation DongleBy visiting the Dongle test page you can test the activation dongle.
1. Connect Activation Dongle to the computer.2. Go to https://cssemla.extranet.sonyericsson.com/ , using Internet Explorer.3. In the Choose a digital certificate window, click OK.4. In the Enter PIN window, enter your PIN code, click OK.5. If a test page is shown the activation dongle is working properly.
Emma User Guide 23
TutorialsBelow is a list of tutorials that will help you get started using Emma. Before goingthrough the tutorials, it is helpful to know how the work area, connectors andservices work.
Flashing DevicesHow to flash devices in Emma.
1. Connect a powered off device to a connector while holding down the VolumeDown button (or equivalent) on the device while connecting.
2. Wait for Emma to identify the device. When identification starts you can releasethe Volume Down button (or equivalent).
3. Emma automatically makes a local search for services. When the identificationand search has finished, the list is shown in Service Details.
4. If the service you want is not in the list, click All Services in Service Details.Emma downloads a service list to Service Details.
5. Choose a service from the list. Click Apply Service in Service Details.6. If the service requires an USB Activation Dongle, enter the PIN code.7. Wait for the service to finish.8. Disconnect the device.
Customizing DevicesTo customize a device use a Customize service.
1. Run a Customization service (gives the device a new customization and locksit).
2. Run an Activation service (unlocks the device).
Running a Customize Service1. Connect a connector to your computer.2. Make sure that the battery is fully charged.3. Power off the device.4. If possible, remove and re-insert the battery.5. Connect the device to the connector/cable while holding down the Volume
Down button (or equivalent) on the device when connecting.6. Wait for the identification to finish.7. If you see the customization service you want in Service Details go to step 8.
Otherwise click All Services in Service Details.8. Click on the customization service you want in the Service Details.9. Click Apply service in Service Details.
10. Wait for the service to finish.11. Disconnect the device from the connector.12. Power on the device to make sure it works.13. After a Customize service has been used an Activation service must be run.
Emma User Guide 24
Running an Activation Service1. Connect a connector to you computer.2. Make sure that the battery is fully charged.3. If possible, remove the battery.4. Remove the SIM Card.5. If removed, reinsert the battery.6. Connect the device to the connector/cable while holding down the Volume
Down button (or equivalent) on the device when connecting.7. Wait for identification to start.8. If you see the Activation service in Service Details go to step 9. Otherwise click
on All Services in Service Details.9. Click on the Customization Activation service in Service Details.
10. Click Apply service in Service Details.11. If it is the first Activation service you are running you must enter the USB
activation dongles PIN code (later Activation services will not require the donglePIN code until Emma is restarted).
12. Wait for the service to finish.13. Disconnect the device from the connector.14. Power on the device.15. Press *#*#SERVICE#*#* on the device to go to the Service menu16. In the Service menu, go to Service info > SIM lock and check that the locks
are unlocked. Most locks will be unlocked after the Activation. If the locks arelocked and the digits are all zeroes, then the Activation has failed.
17. Power off the device.
Parallel Flashing of DevicesIt is recommended that no more than eight devices be flashed at the same time.
1. Connect the device to the connector.2. Connect the next device. Repeat for each new device.
Emma User Guide 25
Troubleshooting
Recommendations for Successful Use of EmmaBatteries:
• Make sure that the battery is fully charged, or use a dummy battery.• If possible, before running a service, remove the battery from the device and
insert it again.
Services:• Run Emma online to get access to the latest services.
Log in ProblemsWhat to do if you have problems logging in.
1. The first log in after installation has to be done online (for each user account).Therefore make sure that you are connected to the Internet.
2. If you use a proxy to access Internet you may have to change the proxysettings. In the Login window, click Internet Options to open the ProxyConfiguration window, see Changing the Proxy Settings on page 6 .
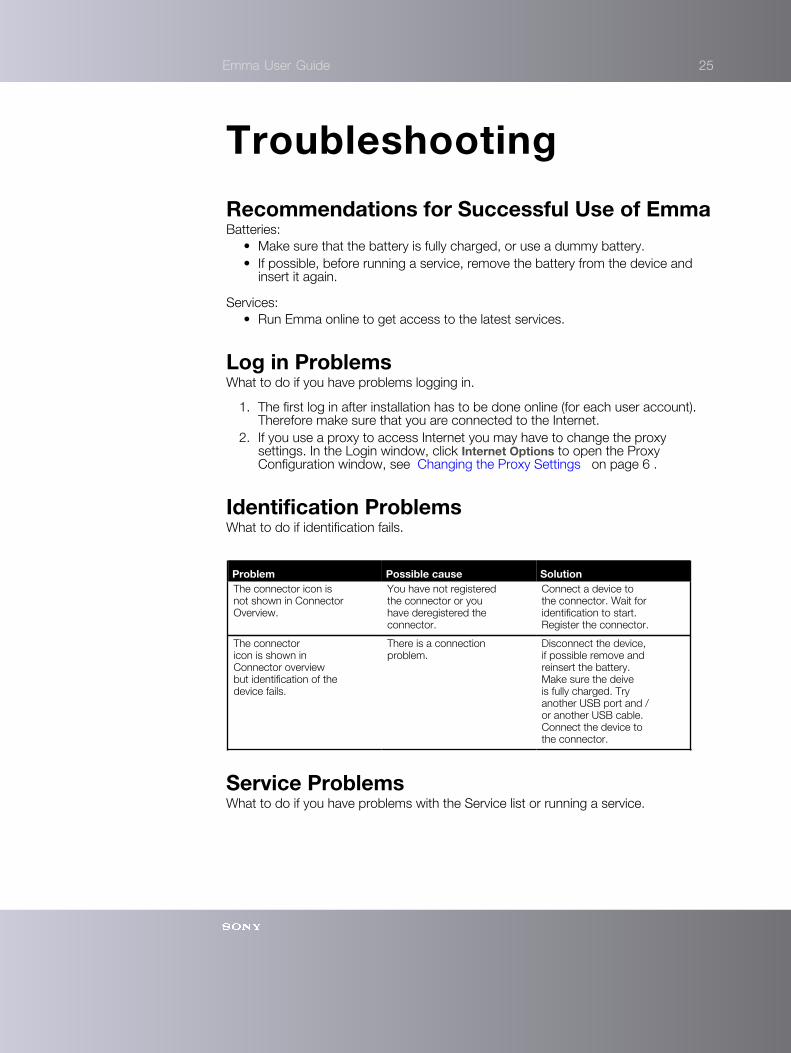
Identification ProblemsWhat to do if identification fails.
Problem Possible cause SolutionThe connector icon isnot shown in ConnectorOverview.
You have not registeredthe connector or youhave deregistered theconnector.
Connect a device tothe connector. Wait foridentification to start.Register the connector.
The connectoricon is shown inConnector overviewbut identification of thedevice fails.
There is a connectionproblem.
Disconnect the device,if possible remove andreinsert the battery.Make sure the deiveis fully charged. Tryanother USB port and /or another USB cable.Connect the device tothe connector.
Service ProblemsWhat to do if you have problems with the Service list or running a service.

Emma User Guide 26
Problem Possible cause SolutionIn Service Details, thebutton All Services isgreyed out.
You have lostconnection to theserver, or a serversearch has been madeautomatically and is notneeded again.
Check your networkconnection. If problempersists it is stillpossible to keepworking in offline mode.
When you connect apowered off the devicestarts charging or isturned on.
The device was notpowered off, it waspowered on and hadentered file sharemode, or you did notpress and hold theVolume Down button(or equivalent).
Disconnect the device.Remove and reinsertthe battery (if possible).Connect the device tothe connector holdingthe Volume Downbutton (or equivalent).On Android devices ahard boot may help.Press and hold theVolume Up button andPower button until thedevice vibrates threetimes.
Activation Dongle ProblemsWhat to do if you have problems using the USB Activation dongle.
Problem Possible cause SolutionActivation fails, networkproblems.
Firewall, proxy. With the dongleconnected to yourcomputer, go to https://cssemla.extranet.sonyericsson.com/using Internet Explorer.You should be askedto enter the DonglePIN code. A test pageshould appear. If youneed specific SSLproxy settings, clickTools > Preferences inthe Main menu.
Activation fails, dongleproblems.
No dongle, no dongledriver, no Middleware.
If there was noproblems with thenetwork but you arestill not prompted witha PIN, make sure thatyou have installedthe Dongle driver andMiddleware.
Activation fails, and youhave had more thanone dongle connectedto the computer.
Even if a dongle isremoved, Windowskeeps information aboutit. This causes theprogram to sometimeschoose a removeddongle rather than theone plugged in.
Restart your computeror follow the stepsbelow.
1. For Windows 7, click Start > Run . For Windows 8 goto start screen.2. Type mmc. Press Enter.

Emma User Guide 27
3. In Microsoft Management Console, click File > Add/Remove Snap-in in themenu.
4. In the Add/Remove Snap-in window, click Add.5. In the Add Standalone Snap-in window, choose Certificates and click Add.6. In the Certificates snap-in window, choose My user account and click Finish.7. In the Add Standalone Snap-in window, click Close.8. In the Add/Remove Snap-in window, click OK.9. Under Console Root in the Microsoft Management Console, choose
Certificates - Current User > Personal > Certificate .10. This will display the list of dongles that your computer is aware of.11. Right click on the dongle(s) that you want to remove and choose Delete.
Removing USB DevicesUSB devices can be removed either manually or automatically.
Removing a USB DeviceIf you for some reason need to remove a USB device you can do that via the ControlPanel in Windows. USB devices not currently connected cannot be seen. To showthese devices follow steps 1 to 2. Then, to remove them follow steps 3 to 7.
1. At a command prompt, type: setdevmgr_show_nonpresent_devices=1
2. Press ENTER.3. In Windows, press Windows key and Pause/Break and navigate to the System
Properties window.4. In the System Properties window, click the tab Hardware.5. Click Device manager.6. Click View/Show hidden devices.7. Delete the greyed out devices.
Emma User Guide 28
Support
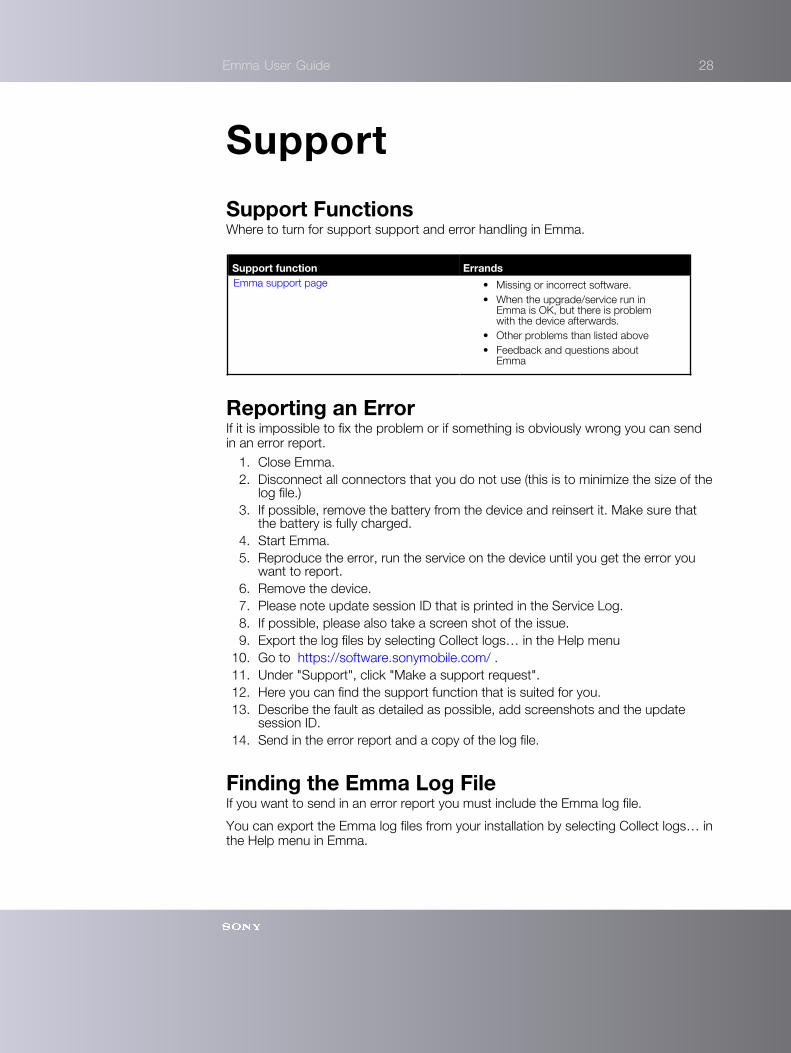
Support FunctionsWhere to turn for support support and error handling in Emma.
Support function ErrandsEmma support page • Missing or incorrect software.
• When the upgrade/service run inEmma is OK, but there is problemwith the device afterwards.
• Other problems than listed above• Feedback and questions about
Emma
Reporting an ErrorIf it is impossible to fix the problem or if something is obviously wrong you can sendin an error report.
1. Close Emma.2. Disconnect all connectors that you do not use (this is to minimize the size of the
log file.)3. If possible, remove the battery from the device and reinsert it. Make sure that
the battery is fully charged.4. Start Emma.5. Reproduce the error, run the service on the device until you get the error you
want to report.6. Remove the device.7. Please note update session ID that is printed in the Service Log.8. If possible, please also take a screen shot of the issue.9. Export the log files by selecting Collect logs… in the Help menu
10. Go to https://software.sonymobile.com/ .11. Under "Support", click "Make a support request".12. Here you can find the support function that is suited for you.13. Describe the fault as detailed as possible, add screenshots and the update
session ID.14. Send in the error report and a copy of the log file.
Finding the Emma Log FileIf you want to send in an error report you must include the Emma log file.
You can export the Emma log files from your installation by selecting Collect logs… inthe Help menu in Emma.

Emma User Guide 29
Emma Log LevelThe Emma log is used for troubleshooting.
Setting the Emma log levelYou can change how much information you want Emma to record in the log file.
1. Click Tools > Preferences in the Main menu.2. In the Preferences window, click System Log in the menu to the left.3. Choose how much information you want to be saved by the log file.4. Click OK.
Emma Log LevelsThe log file is encrypted and if you want it analysed you must send it to support.
Emma log level DescriptionStandard Almost every activity is logged. This is
the setting you should use when youwant to send an error report.
Full Full activity logging. Only use this settingif instructed by Support.
Since the level affects how much information that is recorded, a log level set to Fulllogging can slow down Emma.