Embed Size (px)
Citation preview
ELECTRO FREEZE Cocktail/Slush Freezer Model 812
123456789012345123456789012345123456789012345123456789012345123456789012345123456789012345123456789012345123456789012345123456789012345123456789012345123456789012345123456789012345123456789012345123456789012345123456789012345123456789012345123456789012345123456789012345123456789012345123456789012345123456789012345123456789012345123456789012345123456789012345123456789012345123456789012345123456789012345123456789012345123456789012345123456789012345123456789012345123456789012345123456789012345123456789012345123456789012345123456789012345123456789012345123456789012345123456789012345123456789012345123456789012345123456789012345123456789012345123456789012345123456789012345123456789012345123456789012345123456789012345123456789012345123456789012345123456789012345123456789012345123456789012345123456789012345123456789012345123456789012345123456789012345123456789012345123456789012345123456789012345123456789012345123456789012345123456789012345123456789012345123456789012345123456789012345123456789012345123456789012345123456789012345123456789012345123456789012345123456789012345123456789012345123456789012345123456789012345123456789012345123456789012345123456789012345123456789012345123456789012345123456789012345123456789012345123456789012345123456789012345123456789012345123456789012345123456789012345123456789012345123456789012345123456789012345123456789012345123456789012345123456789012345123456789012345123456789012345123456789012345123456789012345123456789012345123456789012345123456789012345123456789012345123456789012345123456789012345123456789012345123456789012345123456789012345123456789012345123456789012345123456789012345123456789012345123456789012345123456789012345123456789012345123456789012345123456789012345123456789012345123456789012345123456789012345123456789012345123456789012345123456789012345123456789012345123456789012345123456789012345123456789012345123456789012345123456789012345123456789012345123456789012345123456789012345123456789012345123456789012345123456789012345123456789012345123456789012345123456789012345123456789012345123456789012345123456789012345123456789012345123456789012345123456789012345123456789012345123456789012345123456789012345123456789012345123456789012345123456789012345123456789012345123456789012345123456789012345123456789012345123456789012345123456789012345123456789012345123456789012345123456789012345123456789012345123456789012345123456789012345123456789012345123456789012345123456789012345123456789012345123456789012345123456789012345123456789012345123456789012345123456789012345123456789012345123456789012345123456789012345123456789012345123456789012345123456789012345123456789012345123456789012345123456789012345123456789012345
184946 1
2 Note to Installer
Model 812 is specifically designed todispense a high quality, smooth-frozen,noncarbonated, water and sugar baseddrink that is served in a variety of flavors.The product can be a neutral base or apre-mixed flavor. This model is alsodesigned to dispense a variety ofsmooth-frozen alcoholic drinks with lessthan 8% alcohol.
This manual has been prepared to assistyou in the proper operation and generalmaintenance of your Electro FreezeModel 812 Slush and Cocktail Freezer.
Your freezer will not compensate for, orcorrect, any assembly or priming errorsmade during the initial start-up. So it isimportant that you follow the assemblyand priming procedures detailed in thismanual.
Be sure all personnel responsible forequipment operation completely readand understand this manual beforeoperating the freezer. When properlyoperated and maintained, your freezerwill produce a consistent quality product.
If you require technical assistance,please contact your local authorizedElectro Freeze Distributor, as follows:
Name:
Address:
Phone:
or — for factory service assistance —contact H. C. Duke & Son, Inc., ElectroFreeze Service Department by phone orFAX:
Phone: (309) 755-4553FAX: (309) 755-9858(
1 Introduction
This freezer must be installed and serviced by an “Electro Freeze” Distributoror authorized service technician in accordance with the installation instruc-tions.
After installation the warranty registration card must be completed and re-turned to validate the warranty.
ELECTRO FREEZE Cocktail/Slush Freezer Model 812
123456789012345123456789012345123456789012345123456789012345123456789012345123456789012345123456789012345123456789012345123456789012345123456789012345123456789012345123456789012345123456789012345123456789012345123456789012345123456789012345123456789012345123456789012345123456789012345123456789012345123456789012345123456789012345123456789012345123456789012345123456789012345123456789012345123456789012345123456789012345123456789012345123456789012345123456789012345123456789012345123456789012345123456789012345123456789012345123456789012345123456789012345123456789012345123456789012345123456789012345123456789012345123456789012345123456789012345123456789012345123456789012345123456789012345123456789012345123456789012345123456789012345123456789012345123456789012345123456789012345123456789012345123456789012345123456789012345123456789012345123456789012345123456789012345123456789012345123456789012345123456789012345123456789012345123456789012345123456789012345123456789012345123456789012345123456789012345123456789012345123456789012345123456789012345123456789012345123456789012345123456789012345123456789012345123456789012345123456789012345123456789012345123456789012345123456789012345123456789012345123456789012345123456789012345123456789012345123456789012345123456789012345123456789012345123456789012345123456789012345123456789012345123456789012345123456789012345123456789012345123456789012345123456789012345123456789012345123456789012345123456789012345123456789012345123456789012345123456789012345123456789012345123456789012345123456789012345123456789012345123456789012345123456789012345123456789012345123456789012345123456789012345123456789012345123456789012345123456789012345123456789012345123456789012345123456789012345123456789012345123456789012345123456789012345123456789012345123456789012345123456789012345123456789012345123456789012345123456789012345123456789012345123456789012345123456789012345123456789012345123456789012345123456789012345123456789012345123456789012345123456789012345123456789012345123456789012345123456789012345123456789012345123456789012345123456789012345123456789012345123456789012345123456789012345123456789012345123456789012345123456789012345123456789012345123456789012345123456789012345123456789012345123456789012345123456789012345123456789012345123456789012345123456789012345123456789012345123456789012345123456789012345123456789012345123456789012345123456789012345123456789012345123456789012345123456789012345123456789012345123456789012345123456789012345123456789012345123456789012345123456789012345123456789012345123456789012345123456789012345123456789012345123456789012345123456789012345123456789012345123456789012345123456789012345123456789012345
2 184946
2.1 Uncrating and Inspection
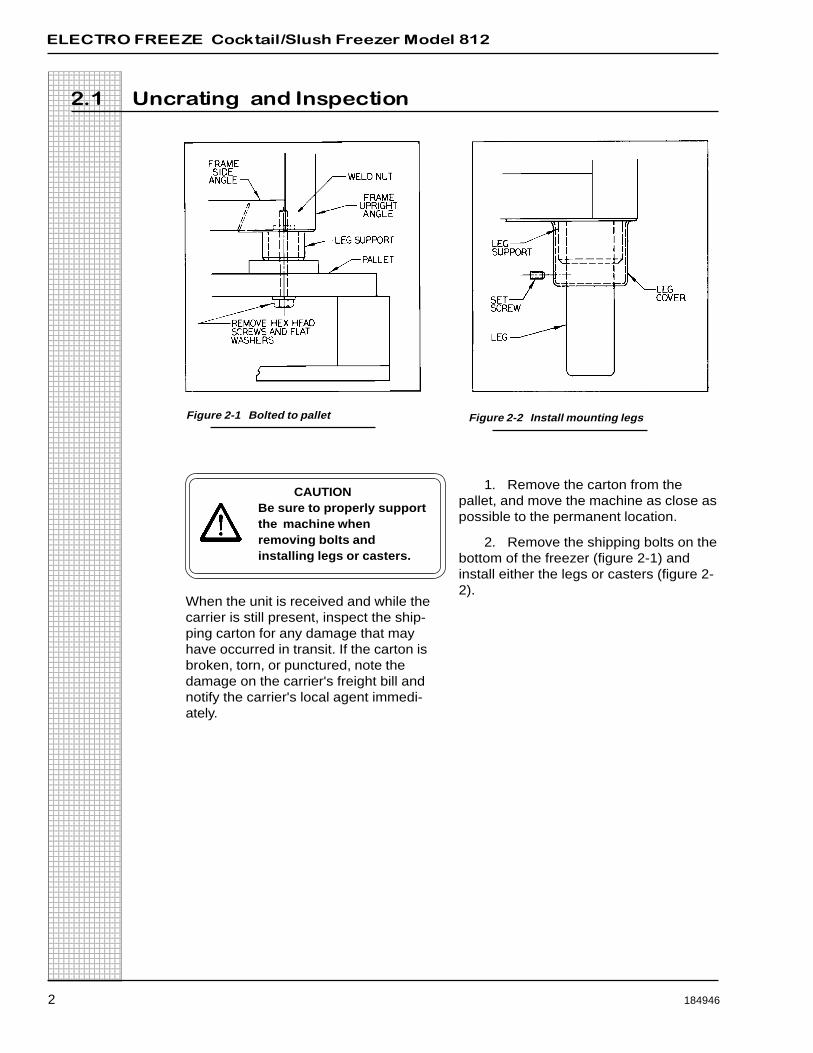
Figure 2-1 Bolted to pallet Figure 2-2 Install mounting legs
CAUTIONBe sure to properly supportthe machine whenremoving bolts andinstalling legs or casters.
When the unit is received and while thecarrier is still present, inspect the ship-ping carton for any damage that mayhave occurred in transit. If the carton isbroken, torn, or punctured, note thedamage on the carrier's freight bill andnotify the carrier's local agent immedi-ately.
1. Remove the carton from thepallet, and move the machine as close aspossible to the permanent location.
2. Remove the shipping bolts on thebottom of the freezer (figure 2-1) andinstall either the legs or casters (figure 2-2).
ELECTRO FREEZE Cocktail/Slush Freezer Model 812
123456789012345123456789012345123456789012345123456789012345123456789012345123456789012345123456789012345123456789012345123456789012345123456789012345123456789012345123456789012345123456789012345123456789012345123456789012345123456789012345123456789012345123456789012345123456789012345123456789012345123456789012345123456789012345123456789012345123456789012345123456789012345123456789012345123456789012345123456789012345123456789012345123456789012345123456789012345123456789012345123456789012345123456789012345123456789012345123456789012345123456789012345123456789012345123456789012345123456789012345123456789012345123456789012345123456789012345123456789012345123456789012345123456789012345123456789012345123456789012345123456789012345123456789012345123456789012345123456789012345123456789012345123456789012345123456789012345123456789012345123456789012345123456789012345123456789012345123456789012345123456789012345123456789012345123456789012345123456789012345123456789012345123456789012345123456789012345123456789012345123456789012345123456789012345123456789012345123456789012345123456789012345123456789012345123456789012345123456789012345123456789012345123456789012345123456789012345123456789012345123456789012345123456789012345123456789012345123456789012345123456789012345123456789012345123456789012345123456789012345123456789012345123456789012345123456789012345123456789012345123456789012345123456789012345123456789012345123456789012345123456789012345123456789012345123456789012345123456789012345123456789012345123456789012345123456789012345123456789012345123456789012345123456789012345123456789012345123456789012345123456789012345123456789012345123456789012345123456789012345123456789012345123456789012345123456789012345123456789012345123456789012345123456789012345123456789012345123456789012345123456789012345123456789012345123456789012345123456789012345123456789012345123456789012345123456789012345123456789012345123456789012345123456789012345123456789012345123456789012345123456789012345123456789012345123456789012345123456789012345123456789012345123456789012345123456789012345123456789012345123456789012345123456789012345123456789012345123456789012345123456789012345123456789012345123456789012345123456789012345123456789012345123456789012345123456789012345123456789012345123456789012345123456789012345123456789012345123456789012345123456789012345123456789012345123456789012345123456789012345123456789012345123456789012345123456789012345123456789012345123456789012345123456789012345123456789012345123456789012345123456789012345123456789012345123456789012345123456789012345123456789012345123456789012345123456789012345123456789012345123456789012345123456789012345123456789012345
184946 3
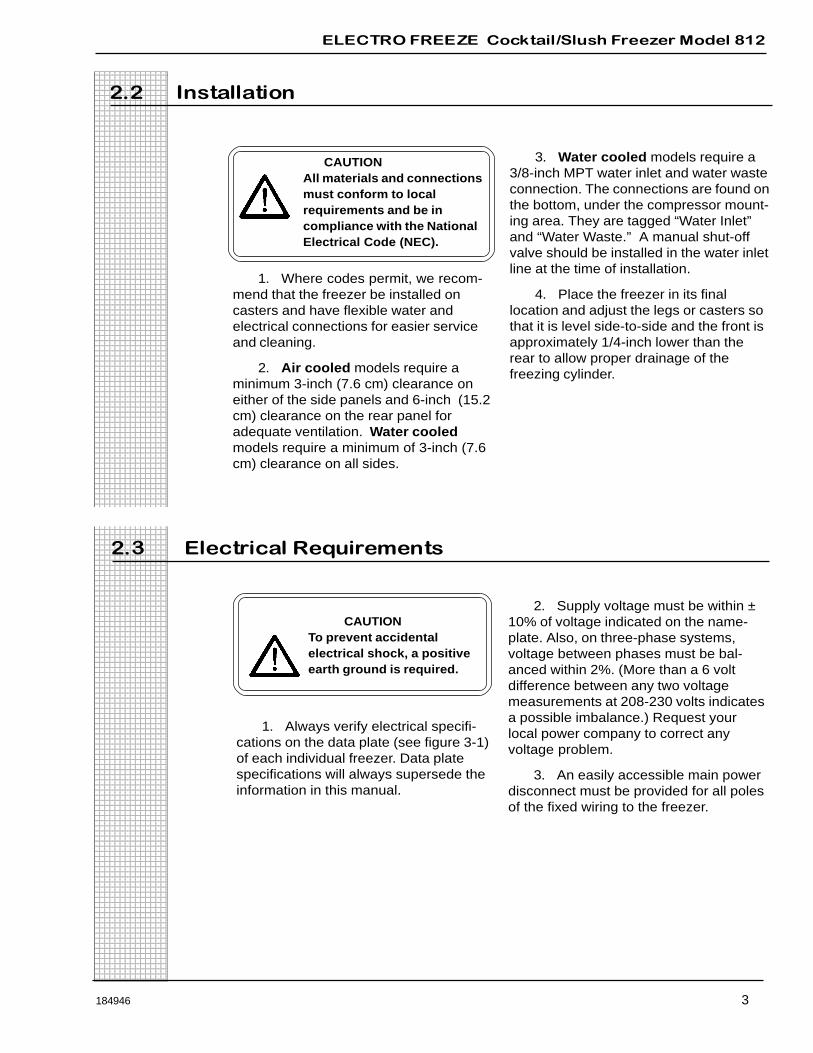
2.2 Installation
1. Where codes permit, we recom-mend that the freezer be installed oncasters and have flexible water andelectrical connections for easier serviceand cleaning.
2. Air cooled models require aminimum 3-inch (7.6 cm) clearance oneither of the side panels and 6-inch (15.2cm) clearance on the rear panel foradequate ventilation. Water cooledmodels require a minimum of 3-inch (7.6cm) clearance on all sides.
CAUTIONAll materials and connectionsmust conform to localrequirements and be incompliance with the NationalElectrical Code (NEC).
3. Water cooled models require a3/8-inch MPT water inlet and water wasteconnection. The connections are found onthe bottom, under the compressor mount-ing area. They are tagged “Water Inlet”and “Water Waste.” A manual shut-offvalve should be installed in the water inletline at the time of installation.
4. Place the freezer in its finallocation and adjust the legs or casters sothat it is level side-to-side and the front isapproximately 1/4-inch lower than therear to allow proper drainage of thefreezing cylinder.
2.3 Electrical Requirements
CAUTIONTo prevent accidentalelectrical shock, a positiveearth ground is required.
1. Always verify electrical specifi-cations on the data plate (see figure 3-1)of each individual freezer. Data platespecifications will always supersede theinformation in this manual.
2. Supply voltage must be within ±10% of voltage indicated on the name-plate. Also, on three-phase systems,voltage between phases must be bal-anced within 2%. (More than a 6 voltdifference between any two voltagemeasurements at 208-230 volts indicatesa possible imbalance.) Request yourlocal power company to correct anyvoltage problem.
3. An easily accessible main powerdisconnect must be provided for all polesof the fixed wiring to the freezer.
ELECTRO FREEZE Cocktail/Slush Freezer Model 812
123456789012345123456789012345123456789012345123456789012345123456789012345123456789012345123456789012345123456789012345123456789012345123456789012345123456789012345123456789012345123456789012345123456789012345123456789012345123456789012345123456789012345123456789012345123456789012345123456789012345123456789012345123456789012345123456789012345123456789012345123456789012345123456789012345123456789012345123456789012345123456789012345123456789012345123456789012345123456789012345123456789012345123456789012345123456789012345123456789012345123456789012345123456789012345123456789012345123456789012345123456789012345123456789012345123456789012345123456789012345123456789012345123456789012345123456789012345123456789012345123456789012345123456789012345123456789012345123456789012345123456789012345123456789012345123456789012345123456789012345123456789012345123456789012345123456789012345123456789012345123456789012345123456789012345123456789012345123456789012345123456789012345123456789012345123456789012345123456789012345123456789012345123456789012345123456789012345123456789012345123456789012345123456789012345123456789012345123456789012345123456789012345123456789012345123456789012345123456789012345123456789012345123456789012345123456789012345123456789012345123456789012345123456789012345123456789012345123456789012345123456789012345123456789012345123456789012345123456789012345123456789012345123456789012345123456789012345123456789012345123456789012345123456789012345123456789012345123456789012345123456789012345123456789012345123456789012345123456789012345123456789012345123456789012345123456789012345123456789012345123456789012345123456789012345123456789012345123456789012345123456789012345123456789012345123456789012345123456789012345123456789012345123456789012345123456789012345123456789012345123456789012345123456789012345123456789012345123456789012345123456789012345123456789012345123456789012345123456789012345123456789012345123456789012345123456789012345123456789012345123456789012345123456789012345123456789012345123456789012345123456789012345123456789012345123456789012345123456789012345123456789012345123456789012345123456789012345123456789012345123456789012345123456789012345123456789012345123456789012345123456789012345123456789012345123456789012345123456789012345123456789012345123456789012345123456789012345123456789012345123456789012345123456789012345123456789012345123456789012345123456789012345123456789012345123456789012345123456789012345123456789012345123456789012345123456789012345123456789012345123456789012345123456789012345123456789012345123456789012345123456789012345123456789012345123456789012345123456789012345123456789012345123456789012345123456789012345
4 184946
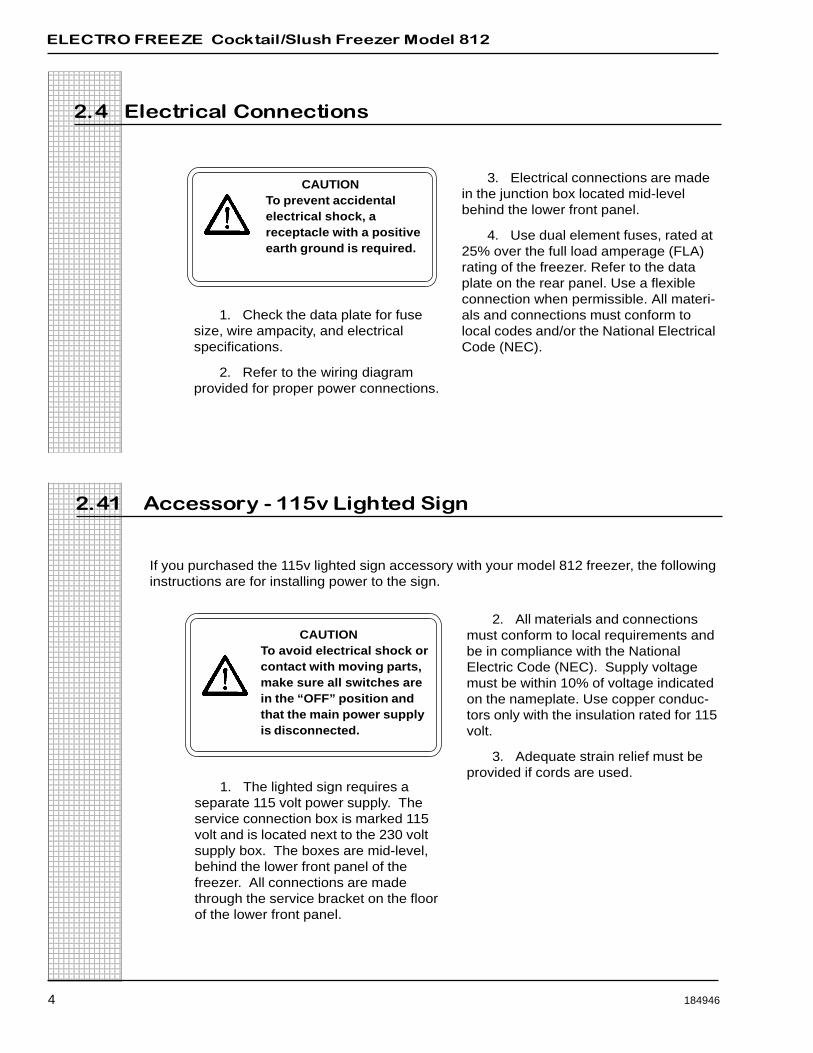
2.4 Electrical Connections
CAUTIONTo prevent accidentalelectrical shock, areceptacle with a positiveearth ground is required.
1. Check the data plate for fusesize, wire ampacity, and electricalspecifications.
2. Refer to the wiring diagramprovided for proper power connections.
2.41 Accessory - 115v Lighted Sign
If you purchased the 115v lighted sign accessory with your model 812 freezer, the followinginstructions are for installing power to the sign.
CAUTIONTo avoid electrical shock orcontact with moving parts,make sure all switches arein the “OFF” position andthat the main power supplyis disconnected.
1. The lighted sign requires aseparate 115 volt power supply. Theservice connection box is marked 115volt and is located next to the 230 voltsupply box. The boxes are mid-level,behind the lower front panel of thefreezer. All connections are madethrough the service bracket on the floorof the lower front panel.
2. All materials and connectionsmust conform to local requirements andbe in compliance with the NationalElectric Code (NEC). Supply voltagemust be within 10% of voltage indicatedon the nameplate. Use copper conduc-tors only with the insulation rated for 115volt.
3. Adequate strain relief must beprovided if cords are used.
3. Electrical connections are madein the junction box located mid-levelbehind the lower front panel.
4. Use dual element fuses, rated at25% over the full load amperage (FLA)rating of the freezer. Refer to the dataplate on the rear panel. Use a flexibleconnection when permissible. All materi-als and connections must conform tolocal codes and/or the National ElectricalCode (NEC).

ELECTRO FREEZE Cocktail/Slush Freezer Model 812
123456789012345123456789012345123456789012345123456789012345123456789012345123456789012345123456789012345123456789012345123456789012345123456789012345123456789012345123456789012345123456789012345123456789012345123456789012345123456789012345123456789012345123456789012345123456789012345123456789012345123456789012345123456789012345123456789012345123456789012345123456789012345123456789012345123456789012345123456789012345123456789012345123456789012345123456789012345123456789012345123456789012345123456789012345123456789012345123456789012345123456789012345123456789012345123456789012345123456789012345123456789012345123456789012345123456789012345123456789012345123456789012345123456789012345123456789012345123456789012345123456789012345123456789012345123456789012345123456789012345123456789012345123456789012345123456789012345123456789012345123456789012345123456789012345123456789012345123456789012345123456789012345123456789012345123456789012345123456789012345123456789012345123456789012345123456789012345123456789012345123456789012345123456789012345123456789012345123456789012345123456789012345123456789012345123456789012345123456789012345123456789012345123456789012345123456789012345123456789012345123456789012345123456789012345123456789012345123456789012345123456789012345123456789012345123456789012345123456789012345123456789012345123456789012345123456789012345123456789012345123456789012345123456789012345123456789012345123456789012345123456789012345123456789012345123456789012345123456789012345123456789012345123456789012345123456789012345123456789012345123456789012345123456789012345123456789012345123456789012345123456789012345123456789012345123456789012345123456789012345123456789012345123456789012345123456789012345123456789012345123456789012345123456789012345123456789012345123456789012345123456789012345123456789012345123456789012345123456789012345123456789012345123456789012345123456789012345123456789012345123456789012345123456789012345123456789012345123456789012345123456789012345123456789012345123456789012345123456789012345123456789012345123456789012345123456789012345123456789012345123456789012345123456789012345123456789012345123456789012345123456789012345123456789012345123456789012345123456789012345123456789012345123456789012345123456789012345123456789012345123456789012345123456789012345123456789012345123456789012345123456789012345123456789012345123456789012345123456789012345123456789012345123456789012345123456789012345123456789012345123456789012345123456789012345123456789012345123456789012345123456789012345123456789012345123456789012345123456789012345123456789012345123456789012345123456789012345123456789012345123456789012345123456789012345123456789012345
184946 5
3.2 Data Plate
The data plate provides importantinformation that the operator shouldrecord and have available for partsordering, warranty inquiries, and servicerequests.
3 Specifications
3.1 Particulars
Width (in/cm) 16/41Height (in/cm) 58/147Depth (in/cm) 36/91Weight (lbs/kg) 525/238*Voltage 208-230-1-60, 2 wireMin. Circuit Ampacity 22.5 (air)
21.0 (water)Compressor 2 HPBeater Motor .5 HP
Refrigerant 404aCharge 3.75 lb/1.70 kgCooling Air or waterHopper 20 qts/18.9 LCylinder 12 qts/11.4 L
*Contact factory for other voltages.
E
Write inReference InformationHERE!
Fill in the following information as soonas you receive your Electro Freeze 812(The item numbers correspond to thecallout numbers in figure 3-1,above.)
3.3 Reference Information
Figure 3-1 Data Plate
1 Model Number:_________________
2 Serial Number: _________________
3 Electrical Spec: Voltage_________
Phase_________Hertz__________
4 Maximum Fuse Size:_____________
5 Minimum Circuit Ampacity:_________
ELECTRO FREEZE Cocktail/Slush Freezer Model 812
123456789012345123456789012345123456789012345123456789012345123456789012345123456789012345123456789012345123456789012345123456789012345123456789012345123456789012345123456789012345123456789012345123456789012345123456789012345123456789012345123456789012345123456789012345123456789012345123456789012345123456789012345123456789012345123456789012345123456789012345123456789012345123456789012345123456789012345123456789012345123456789012345123456789012345123456789012345123456789012345123456789012345123456789012345123456789012345123456789012345123456789012345123456789012345123456789012345123456789012345123456789012345123456789012345123456789012345123456789012345123456789012345123456789012345123456789012345123456789012345123456789012345123456789012345123456789012345123456789012345123456789012345123456789012345123456789012345123456789012345123456789012345123456789012345123456789012345123456789012345123456789012345123456789012345123456789012345123456789012345123456789012345123456789012345123456789012345123456789012345123456789012345123456789012345123456789012345123456789012345123456789012345123456789012345123456789012345123456789012345123456789012345123456789012345123456789012345123456789012345123456789012345123456789012345123456789012345123456789012345123456789012345123456789012345123456789012345123456789012345123456789012345123456789012345123456789012345123456789012345123456789012345123456789012345123456789012345123456789012345123456789012345123456789012345123456789012345123456789012345123456789012345123456789012345123456789012345123456789012345123456789012345123456789012345123456789012345123456789012345123456789012345123456789012345123456789012345123456789012345123456789012345123456789012345123456789012345123456789012345123456789012345123456789012345123456789012345123456789012345123456789012345123456789012345123456789012345123456789012345123456789012345123456789012345123456789012345123456789012345123456789012345123456789012345123456789012345123456789012345123456789012345123456789012345123456789012345123456789012345123456789012345123456789012345123456789012345123456789012345123456789012345123456789012345123456789012345123456789012345123456789012345123456789012345123456789012345123456789012345123456789012345123456789012345123456789012345123456789012345123456789012345123456789012345123456789012345123456789012345123456789012345123456789012345123456789012345123456789012345123456789012345123456789012345123456789012345123456789012345123456789012345123456789012345123456789012345123456789012345123456789012345123456789012345123456789012345123456789012345123456789012345123456789012345123456789012345123456789012345123456789012345123456789012345123456789012345
6 184946
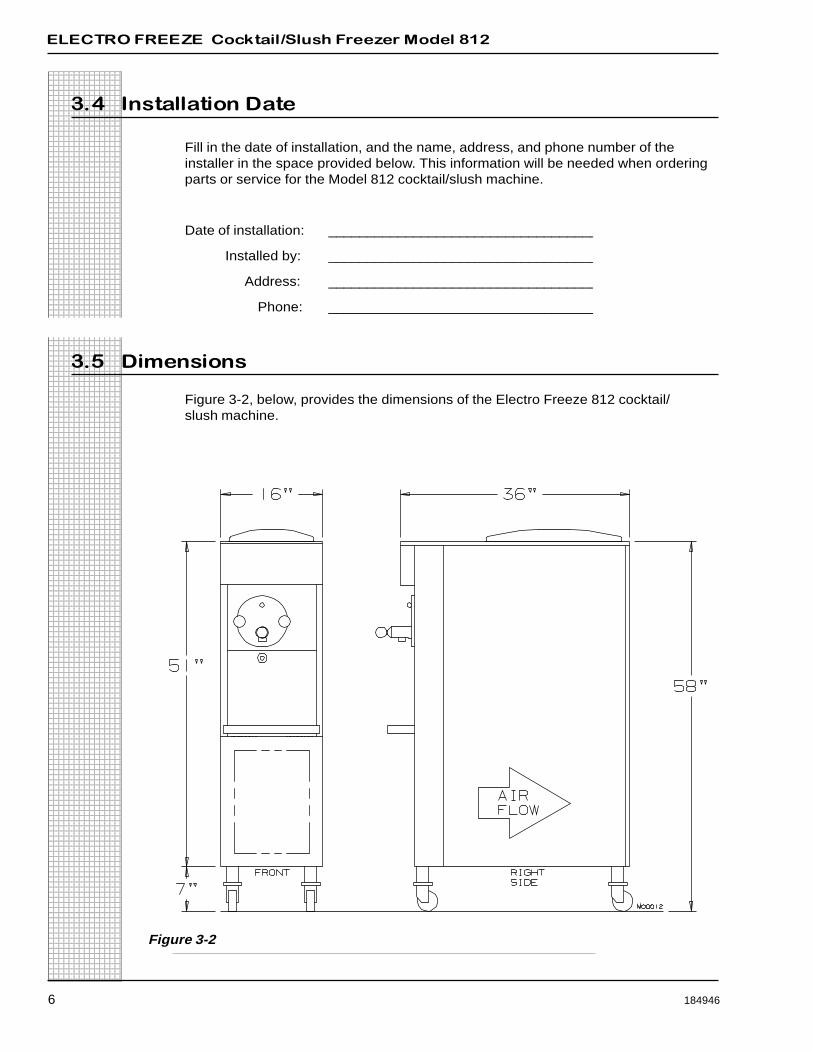
3.5 Dimensions
Fill in the date of installation, and the name, address, and phone number of theinstaller in the space provided below. This information will be needed when orderingparts or service for the Model 812 cocktail/slush machine.
Date of installation: ____________________________________
Installed by: ___________________________________________
Address: ___________________________________
Phone: _____________________________________
Figure 3-2, below, provides the dimensions of the Electro Freeze 812 cocktail/slush machine.
Figure 3-2
3.4 Installation Date
H
ELECTRO FREEZE Cocktail/Slush Freezer Model 812
123456789012345123456789012345123456789012345123456789012345123456789012345123456789012345123456789012345123456789012345123456789012345123456789012345123456789012345123456789012345123456789012345123456789012345123456789012345123456789012345123456789012345123456789012345123456789012345123456789012345123456789012345123456789012345123456789012345123456789012345123456789012345123456789012345123456789012345123456789012345123456789012345123456789012345123456789012345123456789012345123456789012345123456789012345123456789012345123456789012345123456789012345123456789012345123456789012345123456789012345123456789012345123456789012345123456789012345123456789012345123456789012345123456789012345123456789012345123456789012345123456789012345123456789012345123456789012345123456789012345123456789012345123456789012345123456789012345123456789012345123456789012345123456789012345123456789012345123456789012345123456789012345123456789012345123456789012345123456789012345123456789012345123456789012345123456789012345123456789012345123456789012345123456789012345123456789012345123456789012345123456789012345123456789012345123456789012345123456789012345123456789012345123456789012345123456789012345123456789012345123456789012345123456789012345123456789012345123456789012345123456789012345123456789012345123456789012345123456789012345123456789012345123456789012345123456789012345123456789012345123456789012345123456789012345123456789012345123456789012345123456789012345123456789012345123456789012345123456789012345123456789012345123456789012345123456789012345123456789012345123456789012345123456789012345123456789012345123456789012345123456789012345123456789012345123456789012345123456789012345123456789012345123456789012345123456789012345123456789012345123456789012345123456789012345123456789012345123456789012345123456789012345123456789012345123456789012345123456789012345123456789012345123456789012345123456789012345123456789012345123456789012345123456789012345123456789012345123456789012345123456789012345123456789012345123456789012345123456789012345123456789012345123456789012345123456789012345123456789012345123456789012345123456789012345123456789012345123456789012345123456789012345123456789012345123456789012345123456789012345123456789012345123456789012345123456789012345123456789012345123456789012345123456789012345123456789012345123456789012345123456789012345123456789012345123456789012345123456789012345123456789012345123456789012345123456789012345123456789012345123456789012345123456789012345123456789012345123456789012345123456789012345123456789012345123456789012345123456789012345123456789012345123456789012345123456789012345123456789012345123456789012345123456789012345123456789012345
184946 7
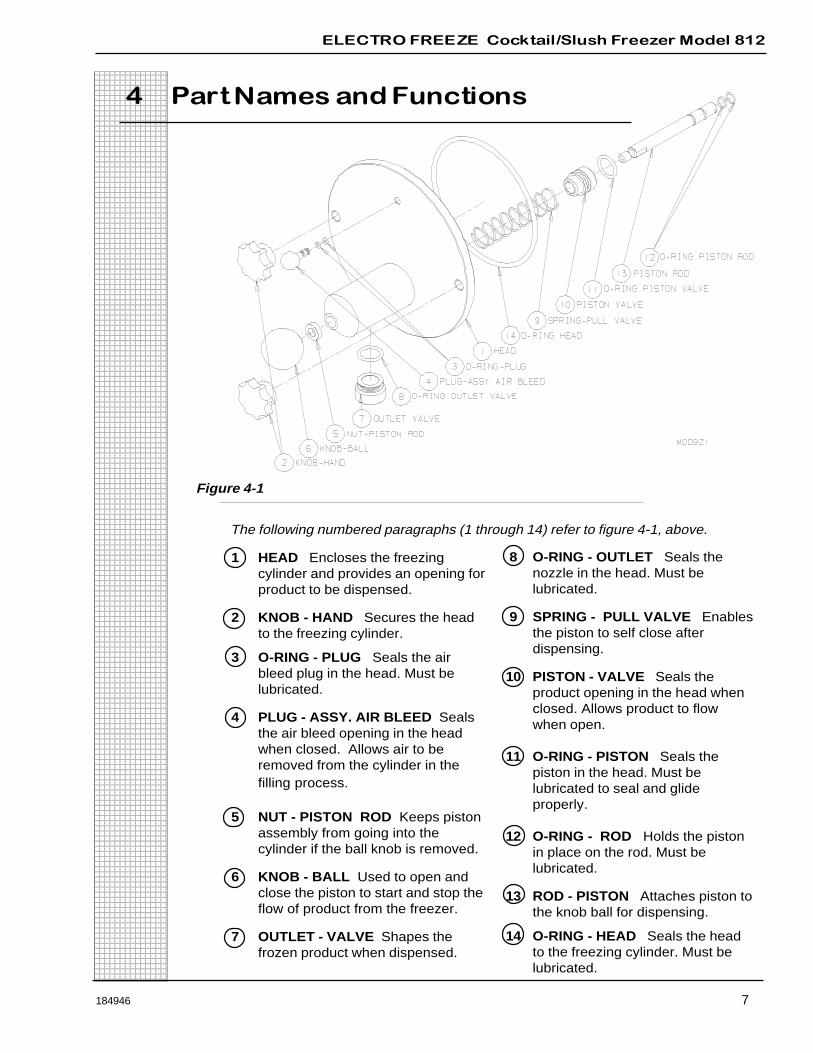
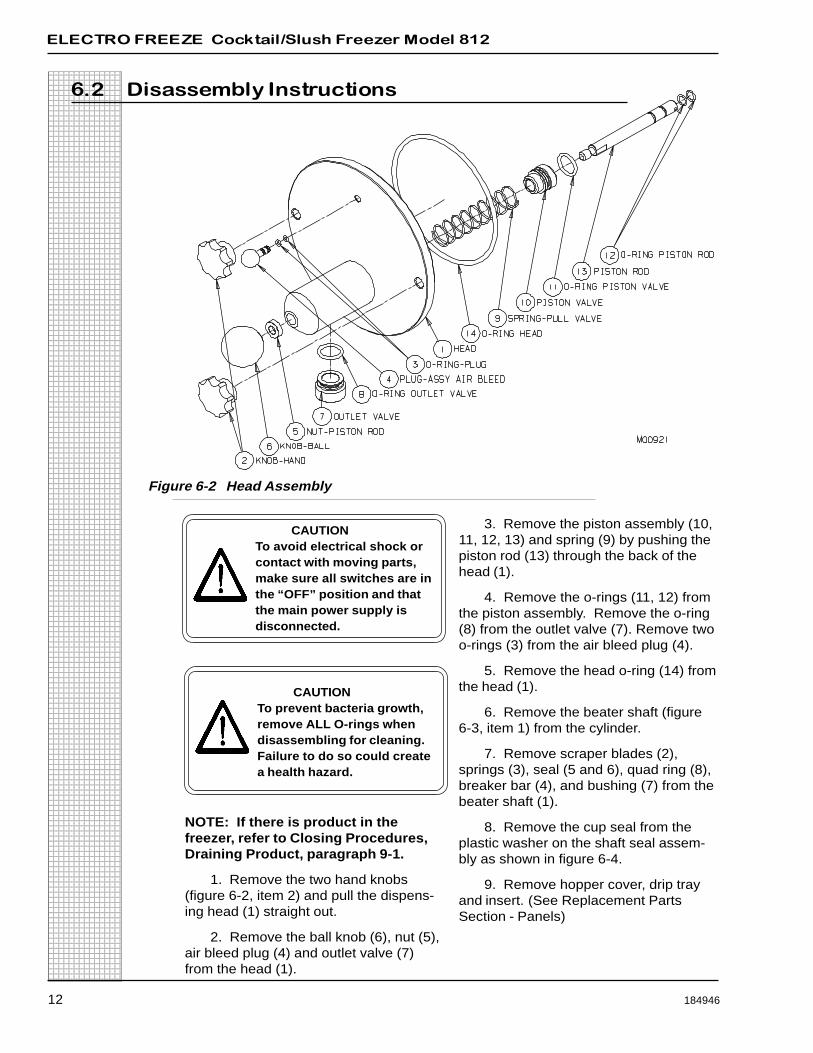
8 O-RING - OUTLET Seals thenozzle in the head. Must belubricated.
9 SPRING - PULL VALVE Enablesthe piston to self close afterdispensing.
10 PISTON - VALVE Seals theproduct opening in the head whenclosed. Allows product to flowwhen open.
11 O-RING - PISTON Seals thepiston in the head. Must belubricated to seal and glideproperly.
12 O-RING - ROD Holds the pistonin place on the rod. Must belubricated.
13 ROD - PISTON Attaches piston tothe knob ball for dispensing.
14 O-RING - HEAD Seals the headto the freezing cylinder. Must belubricated.
1 HEAD Encloses the freezingcylinder and provides an opening forproduct to be dispensed.
2 KNOB - HAND Secures the headto the freezing cylinder.
3 O-RING - PLUG Seals the airbleed plug in the head. Must belubricated.
4 PLUG - ASSY. AIR BLEED Sealsthe air bleed opening in the headwhen closed. Allows air to beremoved from the cylinder in thefilling process.
5 NUT - PISTON ROD Keeps pistonassembly from going into thecylinder if the ball knob is removed.
6 KNOB - BALL Used to open andclose the piston to start and stop theflow of product from the freezer.
7 OUTLET - VALVE Shapes thefrozen product when dispensed.
The following numbered paragraphs (1 through 14) refer to figure 4-1, above.
4 Part Names and Functions
Figure 4-1
ELECTRO FREEZE Cocktail/Slush Freezer Model 812
123456789012345123456789012345123456789012345123456789012345123456789012345123456789012345123456789012345123456789012345123456789012345123456789012345123456789012345123456789012345123456789012345123456789012345123456789012345123456789012345123456789012345123456789012345123456789012345123456789012345123456789012345123456789012345123456789012345123456789012345123456789012345123456789012345123456789012345123456789012345123456789012345123456789012345123456789012345123456789012345123456789012345123456789012345123456789012345123456789012345123456789012345123456789012345123456789012345123456789012345123456789012345123456789012345123456789012345123456789012345123456789012345123456789012345123456789012345123456789012345123456789012345123456789012345123456789012345123456789012345123456789012345123456789012345123456789012345123456789012345123456789012345123456789012345123456789012345123456789012345123456789012345123456789012345123456789012345123456789012345123456789012345123456789012345123456789012345123456789012345123456789012345123456789012345123456789012345123456789012345123456789012345123456789012345123456789012345123456789012345123456789012345123456789012345123456789012345123456789012345123456789012345123456789012345123456789012345123456789012345123456789012345123456789012345123456789012345123456789012345123456789012345123456789012345123456789012345123456789012345123456789012345123456789012345123456789012345123456789012345123456789012345123456789012345123456789012345123456789012345123456789012345123456789012345123456789012345123456789012345123456789012345123456789012345123456789012345123456789012345123456789012345123456789012345123456789012345123456789012345123456789012345123456789012345123456789012345123456789012345123456789012345123456789012345123456789012345123456789012345123456789012345123456789012345123456789012345123456789012345123456789012345123456789012345123456789012345123456789012345123456789012345123456789012345123456789012345123456789012345123456789012345123456789012345123456789012345123456789012345123456789012345123456789012345123456789012345123456789012345123456789012345123456789012345123456789012345123456789012345123456789012345123456789012345123456789012345123456789012345123456789012345123456789012345123456789012345123456789012345123456789012345123456789012345123456789012345123456789012345123456789012345123456789012345123456789012345123456789012345123456789012345123456789012345123456789012345123456789012345123456789012345123456789012345123456789012345123456789012345123456789012345123456789012345123456789012345123456789012345123456789012345123456789012345123456789012345123456789012345123456789012345123456789012345123456789012345
8 184946
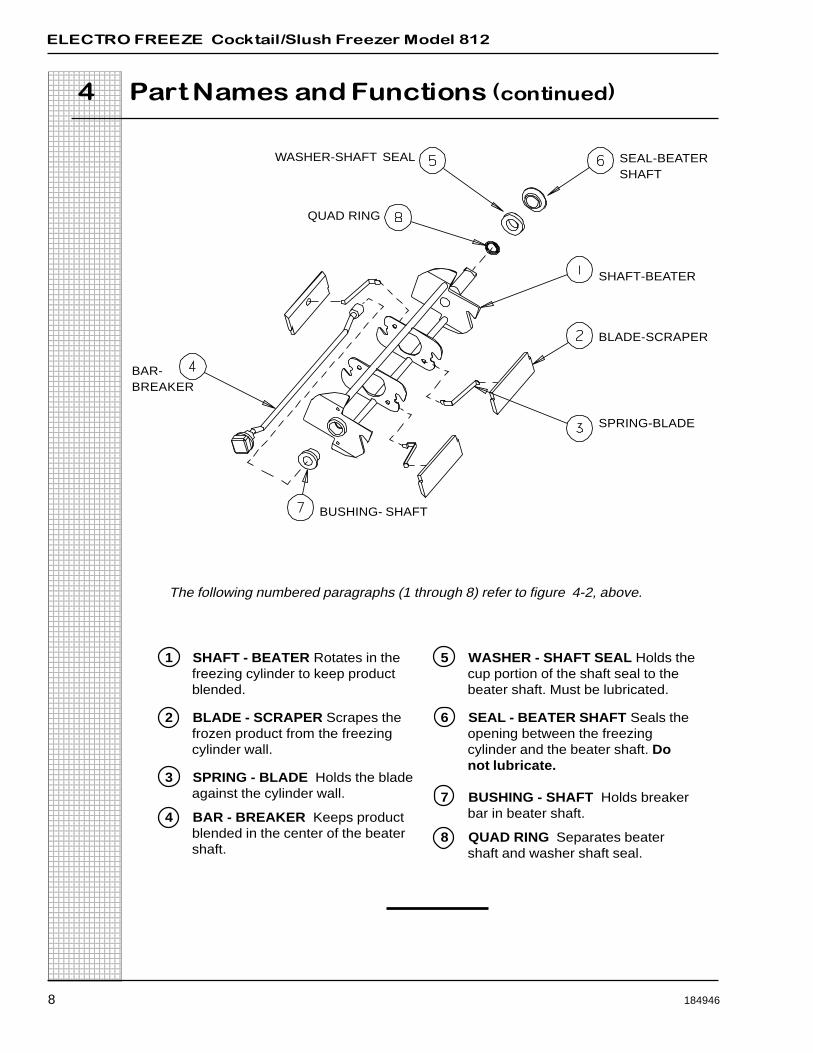
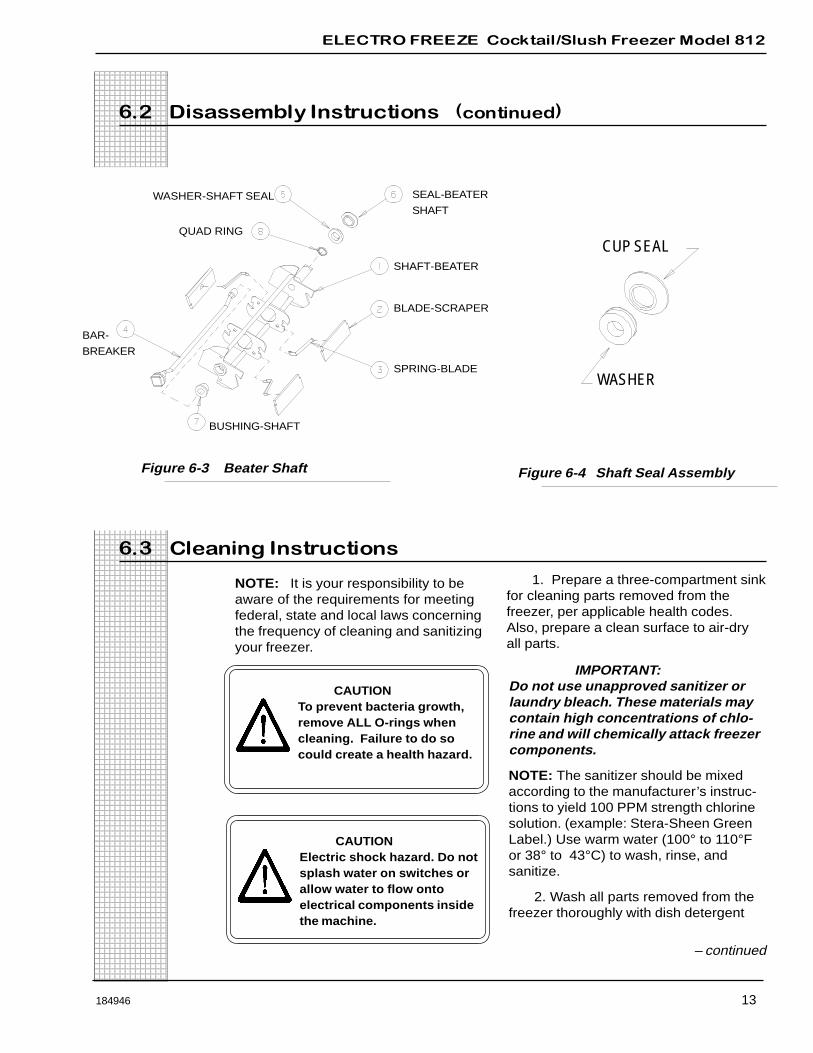
5 WASHER - SHAFT SEAL Holds thecup portion of the shaft seal to thebeater shaft. Must be lubricated.
6 SEAL - BEATER SHAFT Seals theopening between the freezingcylinder and the beater shaft. Donot lubricate.
7 BUSHING - SHAFT Holds breakerbar in beater shaft.
8 QUAD RING Separates beatershaft and washer shaft seal.
4 Part Names and Functions (continued)
The following numbered paragraphs (1 through 8) refer to figure 4-2, above.
1 SHAFT - BEATER Rotates in thefreezing cylinder to keep productblended.
2 BLADE - SCRAPER Scrapes thefrozen product from the freezingcylinder wall.
3 SPRING - BLADE Holds the bladeagainst the cylinder wall.
4 BAR - BREAKER Keeps productblended in the center of the beatershaft.
SEAL-BEATERSHAFT
SHAFT-BEATER
BLADE-SCRAPER
SPRING-BLADE
WASHER-SHAFT SEAL
QUAD RING
BAR-BREAKER
BUSHING- SHAFT
ELECTRO FREEZE Cocktail/Slush Freezer Model 812
123456789012345123456789012345123456789012345123456789012345123456789012345123456789012345123456789012345123456789012345123456789012345123456789012345123456789012345123456789012345123456789012345123456789012345123456789012345123456789012345123456789012345123456789012345123456789012345123456789012345123456789012345123456789012345123456789012345123456789012345123456789012345123456789012345123456789012345123456789012345123456789012345123456789012345123456789012345123456789012345123456789012345123456789012345123456789012345123456789012345123456789012345123456789012345123456789012345123456789012345123456789012345123456789012345123456789012345123456789012345123456789012345123456789012345123456789012345123456789012345123456789012345123456789012345123456789012345123456789012345123456789012345123456789012345123456789012345123456789012345123456789012345123456789012345123456789012345123456789012345123456789012345123456789012345123456789012345123456789012345123456789012345123456789012345123456789012345123456789012345123456789012345123456789012345123456789012345123456789012345123456789012345123456789012345123456789012345123456789012345123456789012345123456789012345123456789012345123456789012345123456789012345123456789012345123456789012345123456789012345123456789012345123456789012345123456789012345123456789012345123456789012345123456789012345123456789012345123456789012345123456789012345123456789012345123456789012345123456789012345123456789012345123456789012345123456789012345123456789012345123456789012345123456789012345123456789012345123456789012345123456789012345123456789012345123456789012345123456789012345123456789012345123456789012345123456789012345123456789012345123456789012345123456789012345123456789012345123456789012345123456789012345123456789012345123456789012345123456789012345123456789012345123456789012345123456789012345123456789012345123456789012345123456789012345123456789012345123456789012345123456789012345123456789012345123456789012345123456789012345123456789012345123456789012345123456789012345123456789012345123456789012345123456789012345123456789012345123456789012345123456789012345123456789012345123456789012345123456789012345123456789012345123456789012345123456789012345123456789012345123456789012345123456789012345123456789012345123456789012345123456789012345123456789012345123456789012345123456789012345123456789012345123456789012345123456789012345123456789012345123456789012345123456789012345123456789012345123456789012345123456789012345123456789012345123456789012345123456789012345123456789012345123456789012345123456789012345123456789012345123456789012345123456789012345123456789012345123456789012345123456789012345123456789012345123456789012345
184946 9
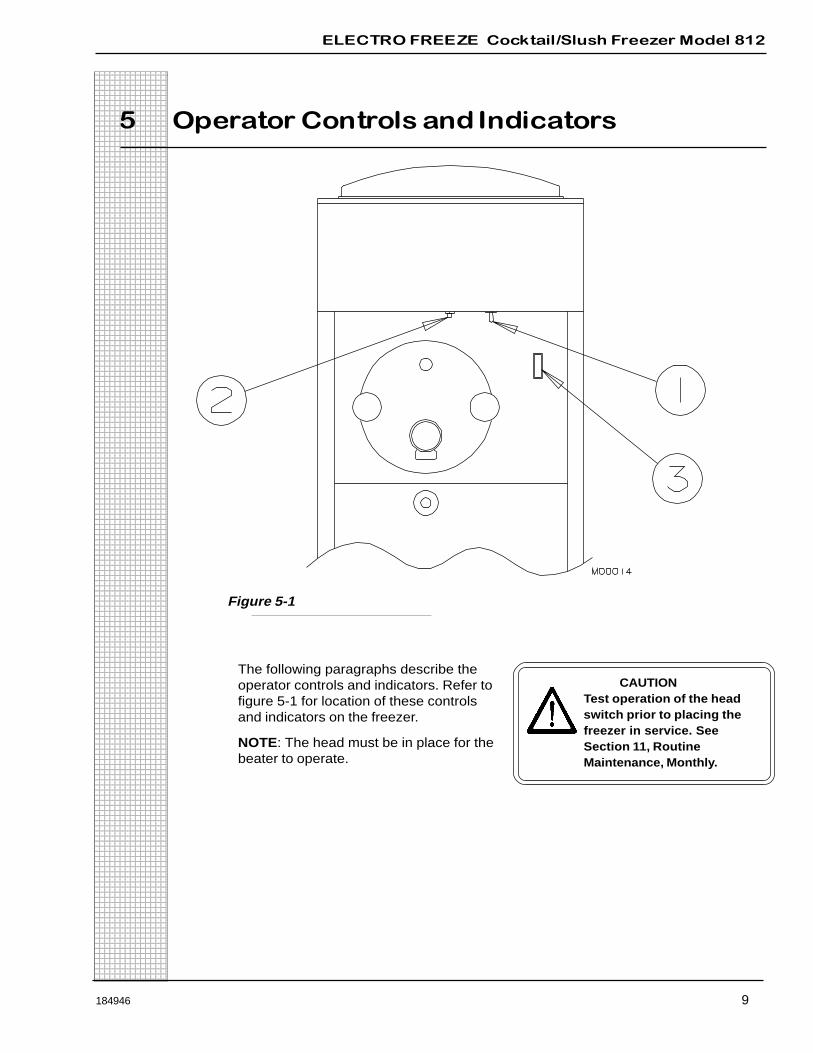
5 Operator Controls and Indicators
CAUTIONTest operation of the headswitch prior to placing thefreezer in service. SeeSection 11, RoutineMaintenance, Monthly.
The following paragraphs describe theoperator controls and indicators. Refer tofigure 5-1 for location of these controlsand indicators on the freezer.
NOTE: The head must be in place for thebeater to operate.
Figure 5-1
ELECTRO FREEZE Cocktail/Slush Freezer Model 812
123456789012345123456789012345123456789012345123456789012345123456789012345123456789012345123456789012345123456789012345123456789012345123456789012345123456789012345123456789012345123456789012345123456789012345123456789012345123456789012345123456789012345123456789012345123456789012345123456789012345123456789012345123456789012345123456789012345123456789012345123456789012345123456789012345123456789012345123456789012345123456789012345123456789012345123456789012345123456789012345123456789012345123456789012345123456789012345123456789012345123456789012345123456789012345123456789012345123456789012345123456789012345123456789012345123456789012345123456789012345123456789012345123456789012345123456789012345123456789012345123456789012345123456789012345123456789012345123456789012345123456789012345123456789012345123456789012345123456789012345123456789012345123456789012345123456789012345123456789012345123456789012345123456789012345123456789012345123456789012345123456789012345123456789012345123456789012345123456789012345123456789012345123456789012345123456789012345123456789012345123456789012345123456789012345123456789012345123456789012345123456789012345123456789012345123456789012345123456789012345123456789012345123456789012345123456789012345123456789012345123456789012345123456789012345123456789012345123456789012345123456789012345123456789012345123456789012345123456789012345123456789012345123456789012345123456789012345123456789012345123456789012345123456789012345123456789012345123456789012345123456789012345123456789012345123456789012345123456789012345123456789012345123456789012345123456789012345123456789012345123456789012345123456789012345123456789012345123456789012345123456789012345123456789012345123456789012345123456789012345123456789012345123456789012345123456789012345123456789012345123456789012345123456789012345123456789012345123456789012345123456789012345123456789012345123456789012345123456789012345123456789012345123456789012345123456789012345123456789012345123456789012345123456789012345123456789012345123456789012345123456789012345123456789012345123456789012345123456789012345123456789012345123456789012345123456789012345123456789012345123456789012345123456789012345123456789012345123456789012345123456789012345123456789012345123456789012345123456789012345123456789012345123456789012345123456789012345123456789012345123456789012345123456789012345123456789012345123456789012345123456789012345123456789012345123456789012345123456789012345123456789012345123456789012345123456789012345123456789012345123456789012345123456789012345123456789012345123456789012345123456789012345123456789012345123456789012345123456789012345123456789012345123456789012345123456789012345
10 184946
5 Operator Controls and Indicators (continued)
This three-position (toggle) switch selectsthe mode of operation of the freezer.
a. “CLEAN” (left) — This positionoperates the beater only (no refrigera-tion). This position must be used in allcleaning and sanitizing operations.
b. “OFF” (center) — In this positionthe beater motor and refrigeration systemwill not operate.
Important:Do not use the “FREEZE” positionwith water or sanitizer in the cylinderor hopper—freezer will be damaged.
c. “FREEZE” (right) — Thisposition activates both the beater motorand refrigeration unit. This is the normaloperating position.
5.1 Selector Switch 1
5.2 Overload � Reset 2
This control protects the beater motoragainst failure from an overload conditionby automatically shutting down thefreezer. To restart properly, turn theselector switch to “OFF”, wait 2-3 min-utes, then depress the reset button andturn the selector switch back to the“FREEZE” or “CLEAN” position.
Important:If the overload trips frequently, yourfreezer should be checked for properproduct consistency and voltage.Contact your Electro Freeze Distribu-tor.
When blinking, this light indicates the mixin the hopper is low and should be refilledas soon as possible. Always maintain atleast 2 inches (5.1 cm) of mix in thehopper. For best operating results, keephopper full.
Important:If proper mix level is not maintained, afreeze-up may occur and damage thefreezer.
5.3 Indicator Light ��ADD MIX� (Optional) 3
ELECTRO FREEZE Cocktail/Slush Freezer Model 812
123456789012345123456789012345123456789012345123456789012345123456789012345123456789012345123456789012345123456789012345123456789012345123456789012345123456789012345123456789012345123456789012345123456789012345123456789012345123456789012345123456789012345123456789012345123456789012345123456789012345123456789012345123456789012345123456789012345123456789012345123456789012345123456789012345123456789012345123456789012345123456789012345123456789012345123456789012345123456789012345123456789012345123456789012345123456789012345123456789012345123456789012345123456789012345123456789012345123456789012345123456789012345123456789012345123456789012345123456789012345123456789012345123456789012345123456789012345123456789012345123456789012345123456789012345123456789012345123456789012345123456789012345123456789012345123456789012345123456789012345123456789012345123456789012345123456789012345123456789012345123456789012345123456789012345123456789012345123456789012345123456789012345123456789012345123456789012345123456789012345123456789012345123456789012345123456789012345123456789012345123456789012345123456789012345123456789012345123456789012345123456789012345123456789012345123456789012345123456789012345123456789012345123456789012345123456789012345123456789012345123456789012345123456789012345123456789012345123456789012345123456789012345123456789012345123456789012345123456789012345123456789012345123456789012345123456789012345123456789012345123456789012345123456789012345123456789012345123456789012345123456789012345123456789012345123456789012345123456789012345123456789012345123456789012345123456789012345123456789012345123456789012345123456789012345123456789012345123456789012345123456789012345123456789012345123456789012345123456789012345123456789012345123456789012345123456789012345123456789012345123456789012345123456789012345123456789012345123456789012345123456789012345123456789012345123456789012345123456789012345123456789012345123456789012345123456789012345123456789012345123456789012345123456789012345123456789012345123456789012345123456789012345123456789012345123456789012345123456789012345123456789012345123456789012345123456789012345123456789012345123456789012345123456789012345123456789012345123456789012345123456789012345123456789012345123456789012345123456789012345123456789012345123456789012345123456789012345123456789012345123456789012345123456789012345123456789012345123456789012345123456789012345123456789012345123456789012345123456789012345123456789012345123456789012345123456789012345123456789012345123456789012345123456789012345123456789012345123456789012345123456789012345123456789012345123456789012345123456789012345123456789012345123456789012345123456789012345
184946 11
6 Disassembly and Cleaning
It is important that the freezer be disas-sembled, washed, lubricated and sani-tized before operation.
The cleaning and sanitizing instructionsexplained in this manual are required tomaintain a clean, sanitary freezer. Yourfreezer should be disassembled,
CAUTIONTo avoid electrical shock or contact withmoving parts, make sure all switches are inthe “OFF" position and that the main powersource is disconnected.
cleaned, reassembled, lubricated andsanitized to ensure the best possibleproduct and freezer operation. Personsassembling, cleaning or sanitizing thefreezer must first wash and sanitize theirhands and forearms with an approvedsanitizer.
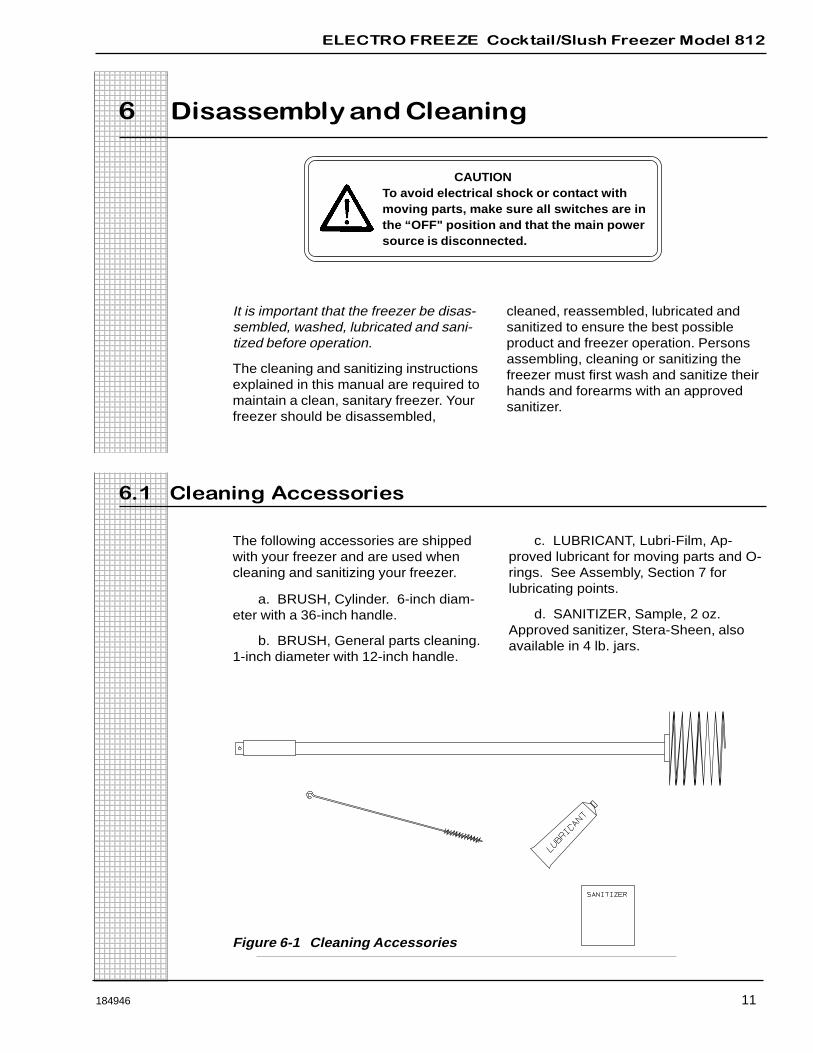
6.1 Cleaning Accessories
The following accessories are shippedwith your freezer and are used whencleaning and sanitizing your freezer.
a. BRUSH, Cylinder. 6-inch diam-eter with a 36-inch handle.
b. BRUSH, General parts cleaning.1-inch diameter with 12-inch handle.
c. LUBRICANT, Lubri-Film, Ap-proved lubricant for moving parts and O-rings. See Assembly, Section 7 forlubricating points.
d. SANITIZER, Sample, 2 oz.Approved sanitizer, Stera-Sheen, alsoavailable in 4 lb. jars.
Figure 6-1 Cleaning Accessories
ELECTRO FREEZE Cocktail/Slush Freezer Model 812
123456789012345123456789012345123456789012345123456789012345123456789012345123456789012345123456789012345123456789012345123456789012345123456789012345123456789012345123456789012345123456789012345123456789012345123456789012345123456789012345123456789012345123456789012345123456789012345123456789012345123456789012345123456789012345123456789012345123456789012345123456789012345123456789012345123456789012345123456789012345123456789012345123456789012345123456789012345123456789012345123456789012345123456789012345123456789012345123456789012345123456789012345123456789012345123456789012345123456789012345123456789012345123456789012345123456789012345123456789012345123456789012345123456789012345123456789012345123456789012345123456789012345123456789012345123456789012345123456789012345123456789012345123456789012345123456789012345123456789012345123456789012345123456789012345123456789012345123456789012345123456789012345123456789012345123456789012345123456789012345123456789012345123456789012345123456789012345123456789012345123456789012345123456789012345123456789012345123456789012345123456789012345123456789012345123456789012345123456789012345123456789012345123456789012345123456789012345123456789012345123456789012345123456789012345123456789012345123456789012345123456789012345123456789012345123456789012345123456789012345123456789012345123456789012345123456789012345123456789012345123456789012345123456789012345123456789012345123456789012345123456789012345123456789012345123456789012345123456789012345123456789012345123456789012345123456789012345123456789012345123456789012345123456789012345123456789012345123456789012345123456789012345123456789012345123456789012345123456789012345123456789012345123456789012345123456789012345123456789012345123456789012345123456789012345123456789012345123456789012345123456789012345123456789012345123456789012345123456789012345123456789012345123456789012345123456789012345123456789012345123456789012345123456789012345123456789012345123456789012345123456789012345123456789012345123456789012345123456789012345123456789012345123456789012345123456789012345123456789012345123456789012345123456789012345123456789012345123456789012345123456789012345123456789012345123456789012345123456789012345123456789012345123456789012345123456789012345123456789012345123456789012345123456789012345123456789012345123456789012345123456789012345123456789012345123456789012345123456789012345123456789012345123456789012345123456789012345123456789012345123456789012345123456789012345123456789012345123456789012345123456789012345123456789012345123456789012345123456789012345123456789012345123456789012345123456789012345123456789012345123456789012345123456789012345123456789012345
12 184946
6.2 Disassembly Instructions
Figure 6-2 Head Assembly
CAUTIONTo avoid electrical shock orcontact with moving parts,make sure all switches are inthe “OFF” position and thatthe main power supply isdisconnected.
CAUTIONTo prevent bacteria growth,remove ALL O-rings whendisassembling for cleaning.Failure to do so could createa health hazard.
NOTE: If there is product in thefreezer, refer to Closing Procedures,Draining Product, paragraph 9-1.
1. Remove the two hand knobs(figure 6-2, item 2) and pull the dispens-ing head (1) straight out.
2. Remove the ball knob (6), nut (5),air bleed plug (4) and outlet valve (7)from the head (1).
3. Remove the piston assembly (10,11, 12, 13) and spring (9) by pushing thepiston rod (13) through the back of thehead (1).
4. Remove the o-rings (11, 12) fromthe piston assembly. Remove the o-ring(8) from the outlet valve (7). Remove twoo-rings (3) from the air bleed plug (4).
5. Remove the head o-ring (14) fromthe head (1).
6. Remove the beater shaft (figure6-3, item 1) from the cylinder.
7. Remove scraper blades (2),springs (3), seal (5 and 6), quad ring (8),breaker bar (4), and bushing (7) from thebeater shaft (1).
8. Remove the cup seal from theplastic washer on the shaft seal assem-bly as shown in figure 6-4.
9. Remove hopper cover, drip trayand insert. (See Replacement PartsSection - Panels)
ELECTRO FREEZE Cocktail/Slush Freezer Model 812
123456789012345123456789012345123456789012345123456789012345123456789012345123456789012345123456789012345123456789012345123456789012345123456789012345123456789012345123456789012345123456789012345123456789012345123456789012345123456789012345123456789012345123456789012345123456789012345123456789012345123456789012345123456789012345123456789012345123456789012345123456789012345123456789012345123456789012345123456789012345123456789012345123456789012345123456789012345123456789012345123456789012345123456789012345123456789012345123456789012345123456789012345123456789012345123456789012345123456789012345123456789012345123456789012345123456789012345123456789012345123456789012345123456789012345123456789012345123456789012345123456789012345123456789012345123456789012345123456789012345123456789012345123456789012345123456789012345123456789012345123456789012345123456789012345123456789012345123456789012345123456789012345123456789012345123456789012345123456789012345123456789012345123456789012345123456789012345123456789012345123456789012345123456789012345123456789012345123456789012345123456789012345123456789012345123456789012345123456789012345123456789012345123456789012345123456789012345123456789012345123456789012345123456789012345123456789012345123456789012345123456789012345123456789012345123456789012345123456789012345123456789012345123456789012345123456789012345123456789012345123456789012345123456789012345123456789012345123456789012345123456789012345123456789012345123456789012345123456789012345123456789012345123456789012345123456789012345123456789012345123456789012345123456789012345123456789012345123456789012345123456789012345123456789012345123456789012345123456789012345123456789012345123456789012345123456789012345123456789012345123456789012345123456789012345123456789012345123456789012345123456789012345123456789012345123456789012345123456789012345123456789012345123456789012345123456789012345123456789012345123456789012345123456789012345123456789012345123456789012345123456789012345123456789012345123456789012345123456789012345123456789012345123456789012345123456789012345123456789012345123456789012345123456789012345123456789012345123456789012345123456789012345123456789012345123456789012345123456789012345123456789012345123456789012345123456789012345123456789012345123456789012345123456789012345123456789012345123456789012345123456789012345123456789012345123456789012345123456789012345123456789012345123456789012345123456789012345123456789012345123456789012345123456789012345123456789012345123456789012345123456789012345123456789012345123456789012345123456789012345123456789012345123456789012345123456789012345123456789012345123456789012345123456789012345123456789012345
184946 13
6.2 Disassembly Instructions (continued)
IMPORTANT:Do not use unapproved sanitizer orlaundry bleach. These materials maycontain high concentrations of chlo-rine and will chemically attack freezercomponents.
NOTE: The sanitizer should be mixedaccording to the manufacturer’s instruc-tions to yield 100 PPM strength chlorinesolution. (example: Stera-Sheen GreenLabel.) Use warm water (100° to 110°For 38° to 43°C) to wash, rinse, andsanitize.
2. Wash all parts removed from thefreezer thoroughly with dish detergent
– continued
Figure 6-3 Beater Shaft
6.3 Cleaning Instructions
NOTE: It is your responsibility to beaware of the requirements for meetingfederal, state and local laws concerningthe frequency of cleaning and sanitizingyour freezer.
CAUTIONTo prevent bacteria growth,remove ALL O-rings whencleaning. Failure to do socould create a health hazard.
1. Prepare a three-compartment sinkfor cleaning parts removed from thefreezer, per applicable health codes.Also, prepare a clean surface to air-dryall parts.
CAUTIONElectric shock hazard. Do notsplash water on switches orallow water to flow ontoelectrical components insidethe machine.
Figure 6-4 Shaft Seal Assembly
WASHER
SEAL-BEATER
SHAFT
SHAFT-BEATER
BLADE-SCRAPER
SPRING-BLADE
WASHER-SHAFT SEAL
QUAD RING
BAR-
BREAKER
BUSHING-SHAFT
CUP SEAL
ELECTRO FREEZE Cocktail/Slush Freezer Model 812
123456789012345123456789012345123456789012345123456789012345123456789012345123456789012345123456789012345123456789012345123456789012345123456789012345123456789012345123456789012345123456789012345123456789012345123456789012345123456789012345123456789012345123456789012345123456789012345123456789012345123456789012345123456789012345123456789012345123456789012345123456789012345123456789012345123456789012345123456789012345123456789012345123456789012345123456789012345123456789012345123456789012345123456789012345123456789012345123456789012345123456789012345123456789012345123456789012345123456789012345123456789012345123456789012345123456789012345123456789012345123456789012345123456789012345123456789012345123456789012345123456789012345123456789012345123456789012345123456789012345123456789012345123456789012345123456789012345123456789012345123456789012345123456789012345123456789012345123456789012345123456789012345123456789012345123456789012345123456789012345123456789012345123456789012345123456789012345123456789012345123456789012345123456789012345123456789012345123456789012345123456789012345123456789012345123456789012345123456789012345123456789012345123456789012345123456789012345123456789012345123456789012345123456789012345123456789012345123456789012345123456789012345123456789012345123456789012345123456789012345123456789012345123456789012345123456789012345123456789012345123456789012345123456789012345123456789012345123456789012345123456789012345123456789012345123456789012345123456789012345123456789012345123456789012345123456789012345123456789012345123456789012345123456789012345123456789012345123456789012345123456789012345123456789012345123456789012345123456789012345123456789012345123456789012345123456789012345123456789012345123456789012345123456789012345123456789012345123456789012345123456789012345123456789012345123456789012345123456789012345123456789012345123456789012345123456789012345123456789012345123456789012345123456789012345123456789012345123456789012345123456789012345123456789012345123456789012345123456789012345123456789012345123456789012345123456789012345123456789012345123456789012345123456789012345123456789012345123456789012345123456789012345123456789012345123456789012345123456789012345123456789012345123456789012345123456789012345123456789012345123456789012345123456789012345123456789012345123456789012345123456789012345123456789012345123456789012345123456789012345123456789012345123456789012345123456789012345123456789012345123456789012345123456789012345123456789012345123456789012345123456789012345123456789012345123456789012345123456789012345123456789012345123456789012345123456789012345123456789012345123456789012345123456789012345123456789012345
14 184946
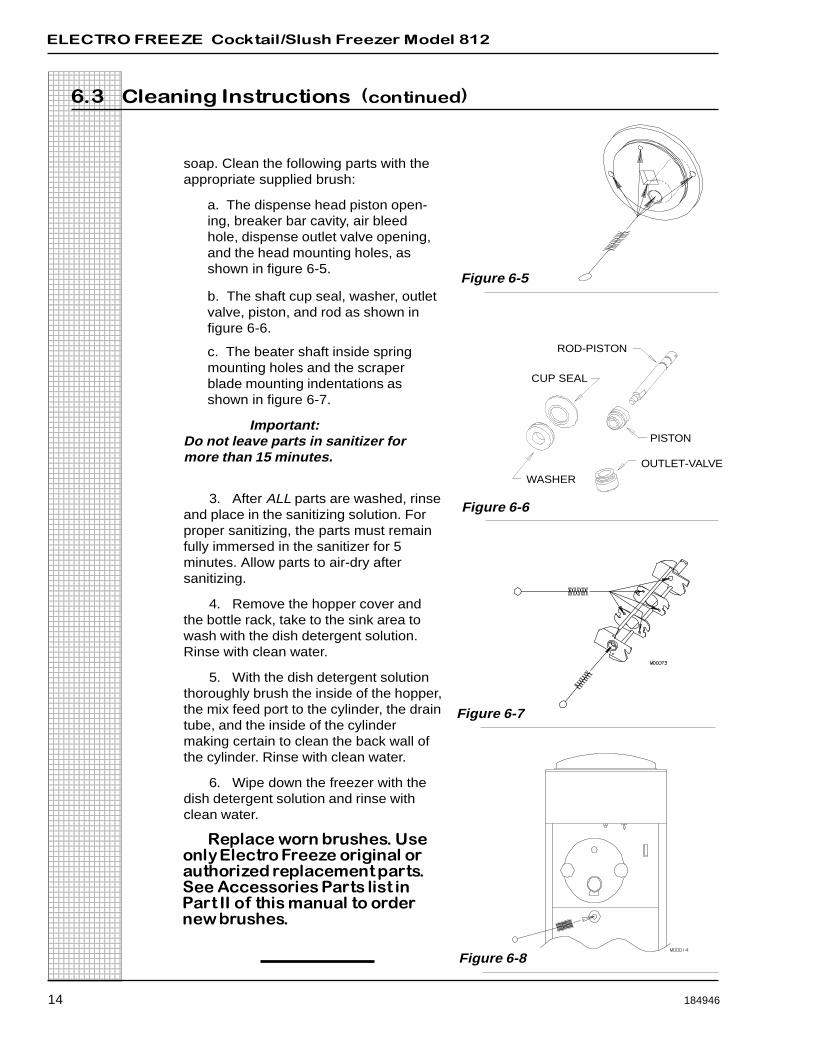
soap. Clean the following parts with theappropriate supplied brush:
a. The dispense head piston open-ing, breaker bar cavity, air bleedhole, dispense outlet valve opening,and the head mounting holes, asshown in figure 6-5.
b. The shaft cup seal, washer, outletvalve, piston, and rod as shown infigure 6-6.
c. The beater shaft inside springmounting holes and the scraperblade mounting indentations asshown in figure 6-7.
Important:Do not leave parts in sanitizer formore than 15 minutes.
3. After ALL parts are washed, rinseand place in the sanitizing solution. Forproper sanitizing, the parts must remainfully immersed in the sanitizer for 5minutes. Allow parts to air-dry aftersanitizing.
4. Remove the hopper cover andthe bottle rack, take to the sink area towash with the dish detergent solution.Rinse with clean water.
5. With the dish detergent solutionthoroughly brush the inside of the hopper,the mix feed port to the cylinder, the draintube, and the inside of the cylindermaking certain to clean the back wall ofthe cylinder. Rinse with clean water.
6. Wipe down the freezer with thedish detergent solution and rinse withclean water.
Replace worn brushes. Useonly Electro Freeze original orauthorized replacement parts.See Accessories Parts list inPart II of this manual to ordernew brushes.
6.3 Cleaning Instructions (continued)
Figure 6-5
Figure 6-6
Figure 6-7
Figure 6-8
PISTON
OUTLET-VALVE
ROD-PISTON
WASHER
CUP SEAL
ELECTRO FREEZE Cocktail/Slush Freezer Model 812
123456789012345123456789012345123456789012345123456789012345123456789012345123456789012345123456789012345123456789012345123456789012345123456789012345123456789012345123456789012345123456789012345123456789012345123456789012345123456789012345123456789012345123456789012345123456789012345123456789012345123456789012345123456789012345123456789012345123456789012345123456789012345123456789012345123456789012345123456789012345123456789012345123456789012345123456789012345123456789012345123456789012345123456789012345123456789012345123456789012345123456789012345123456789012345123456789012345123456789012345123456789012345123456789012345123456789012345123456789012345123456789012345123456789012345123456789012345123456789012345123456789012345123456789012345123456789012345123456789012345123456789012345123456789012345123456789012345123456789012345123456789012345123456789012345123456789012345123456789012345123456789012345123456789012345123456789012345123456789012345123456789012345123456789012345123456789012345123456789012345123456789012345123456789012345123456789012345123456789012345123456789012345123456789012345123456789012345123456789012345123456789012345123456789012345123456789012345123456789012345123456789012345123456789012345123456789012345123456789012345123456789012345123456789012345123456789012345123456789012345123456789012345123456789012345123456789012345123456789012345123456789012345123456789012345123456789012345123456789012345123456789012345123456789012345123456789012345123456789012345123456789012345123456789012345123456789012345123456789012345123456789012345123456789012345123456789012345123456789012345123456789012345123456789012345123456789012345123456789012345123456789012345123456789012345123456789012345123456789012345123456789012345123456789012345123456789012345123456789012345123456789012345123456789012345123456789012345123456789012345123456789012345123456789012345123456789012345123456789012345123456789012345123456789012345123456789012345123456789012345123456789012345123456789012345123456789012345123456789012345123456789012345123456789012345123456789012345123456789012345123456789012345123456789012345123456789012345123456789012345123456789012345123456789012345123456789012345123456789012345123456789012345123456789012345123456789012345123456789012345123456789012345123456789012345123456789012345123456789012345123456789012345123456789012345123456789012345123456789012345123456789012345123456789012345123456789012345123456789012345123456789012345123456789012345123456789012345123456789012345123456789012345123456789012345123456789012345123456789012345123456789012345123456789012345123456789012345123456789012345123456789012345123456789012345123456789012345
184946 15
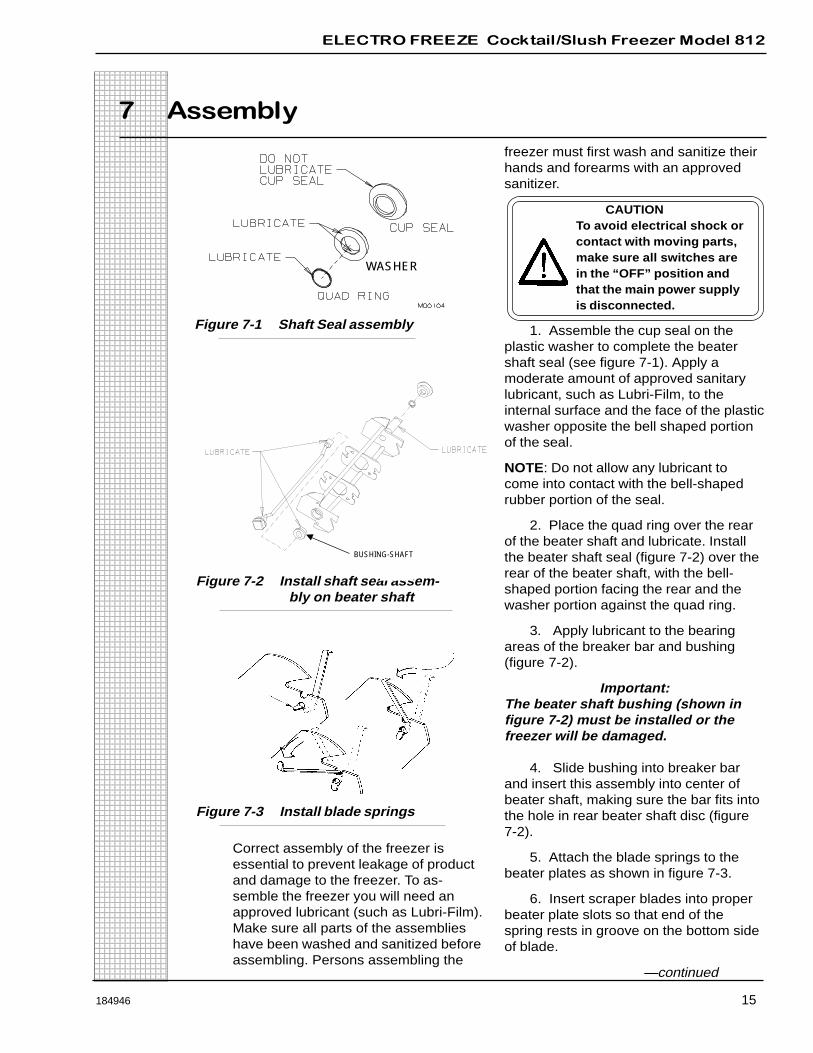
Figure 7-1 Shaft Seal assembly
Figure 7-3 Install blade springs
Figure 7-2 Install shaft seal assem-bly on beater shaft
7 Assembly
Correct assembly of the freezer isessential to prevent leakage of productand damage to the freezer. To as-semble the freezer you will need anapproved lubricant (such as Lubri-Film).Make sure all parts of the assemblieshave been washed and sanitized beforeassembling. Persons assembling the
—continued
WASHER
BUSHING-SHAFT
freezer must first wash and sanitize theirhands and forearms with an approvedsanitizer.
CAUTIONTo avoid electrical shock orcontact with moving parts,make sure all switches arein the “OFF” position andthat the main power supplyis disconnected.
1. Assemble the cup seal on theplastic washer to complete the beatershaft seal (see figure 7-1). Apply amoderate amount of approved sanitarylubricant, such as Lubri-Film, to theinternal surface and the face of the plasticwasher opposite the bell shaped portionof the seal.
NOTE: Do not allow any lubricant tocome into contact with the bell-shapedrubber portion of the seal.
2. Place the quad ring over the rearof the beater shaft and lubricate. Installthe beater shaft seal (figure 7-2) over therear of the beater shaft, with the bell-shaped portion facing the rear and thewasher portion against the quad ring.
3. Apply lubricant to the bearingareas of the breaker bar and bushing(figure 7-2).
Important:The beater shaft bushing (shown infigure 7-2) must be installed or thefreezer will be damaged.
4. Slide bushing into breaker barand insert this assembly into center ofbeater shaft, making sure the bar fits intothe hole in rear beater shaft disc (figure7-2).
5. Attach the blade springs to thebeater plates as shown in figure 7-3.
6. Insert scraper blades into properbeater plate slots so that end of thespring rests in groove on the bottom sideof blade.
ELECTRO FREEZE Cocktail/Slush Freezer Model 812
123456789012345123456789012345123456789012345123456789012345123456789012345123456789012345123456789012345123456789012345123456789012345123456789012345123456789012345123456789012345123456789012345123456789012345123456789012345123456789012345123456789012345123456789012345123456789012345123456789012345123456789012345123456789012345123456789012345123456789012345123456789012345123456789012345123456789012345123456789012345123456789012345123456789012345123456789012345123456789012345123456789012345123456789012345123456789012345123456789012345123456789012345123456789012345123456789012345123456789012345123456789012345123456789012345123456789012345123456789012345123456789012345123456789012345123456789012345123456789012345123456789012345123456789012345123456789012345123456789012345123456789012345123456789012345123456789012345123456789012345123456789012345123456789012345123456789012345123456789012345123456789012345123456789012345123456789012345123456789012345123456789012345123456789012345123456789012345123456789012345123456789012345123456789012345123456789012345123456789012345123456789012345123456789012345123456789012345123456789012345123456789012345123456789012345123456789012345123456789012345123456789012345123456789012345123456789012345123456789012345123456789012345123456789012345123456789012345123456789012345123456789012345123456789012345123456789012345123456789012345123456789012345123456789012345123456789012345123456789012345123456789012345123456789012345123456789012345123456789012345123456789012345123456789012345123456789012345123456789012345123456789012345123456789012345123456789012345123456789012345123456789012345123456789012345123456789012345123456789012345123456789012345123456789012345123456789012345123456789012345123456789012345123456789012345123456789012345123456789012345123456789012345123456789012345123456789012345123456789012345123456789012345123456789012345123456789012345123456789012345123456789012345123456789012345123456789012345123456789012345123456789012345123456789012345123456789012345123456789012345123456789012345123456789012345123456789012345123456789012345123456789012345123456789012345123456789012345123456789012345123456789012345123456789012345123456789012345123456789012345123456789012345123456789012345123456789012345123456789012345123456789012345123456789012345123456789012345123456789012345123456789012345123456789012345123456789012345123456789012345123456789012345123456789012345123456789012345123456789012345123456789012345123456789012345123456789012345123456789012345123456789012345123456789012345123456789012345123456789012345123456789012345123456789012345123456789012345123456789012345123456789012345123456789012345123456789012345
16 184946
7 Assembly (continued)
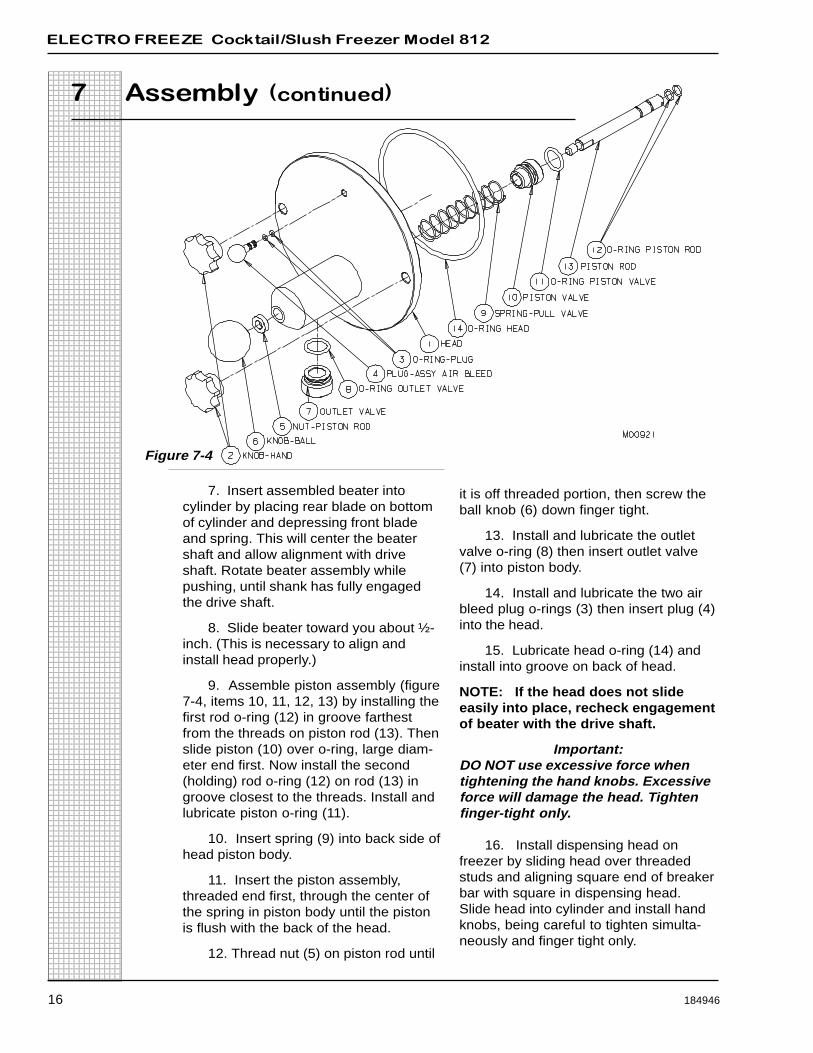
7. Insert assembled beater intocylinder by placing rear blade on bottomof cylinder and depressing front bladeand spring. This will center the beatershaft and allow alignment with driveshaft. Rotate beater assembly whilepushing, until shank has fully engagedthe drive shaft.
8. Slide beater toward you about ½-inch. (This is necessary to align andinstall head properly.)
9. Assemble piston assembly (figure7-4, items 10, 11, 12, 13) by installing thefirst rod o-ring (12) in groove farthestfrom the threads on piston rod (13). Thenslide piston (10) over o-ring, large diam-eter end first. Now install the second(holding) rod o-ring (12) on rod (13) ingroove closest to the threads. Install andlubricate piston o-ring (11).
10. Insert spring (9) into back side ofhead piston body.
11. Insert the piston assembly,threaded end first, through the center ofthe spring in piston body until the pistonis flush with the back of the head.
12. Thread nut (5) on piston rod until
it is off threaded portion, then screw theball knob (6) down finger tight.
13. Install and lubricate the outletvalve o-ring (8) then insert outlet valve(7) into piston body.
14. Install and lubricate the two airbleed plug o-rings (3) then insert plug (4)into the head.
15. Lubricate head o-ring (14) andinstall into groove on back of head.
NOTE: If the head does not slideeasily into place, recheck engagementof beater with the drive shaft.
Important:DO NOT use excessive force whentightening the hand knobs. Excessiveforce will damage the head. Tightenfinger-tight only.
16. Install dispensing head onfreezer by sliding head over threadedstuds and aligning square end of breakerbar with square in dispensing head.Slide head into cylinder and install handknobs, being careful to tighten simulta-neously and finger tight only.
Figure 7-4

ELECTRO FREEZE Cocktail/Slush Freezer Model 812
123456789012345123456789012345123456789012345123456789012345123456789012345123456789012345123456789012345123456789012345123456789012345123456789012345123456789012345123456789012345123456789012345123456789012345123456789012345123456789012345123456789012345123456789012345123456789012345123456789012345123456789012345123456789012345123456789012345123456789012345123456789012345123456789012345123456789012345123456789012345123456789012345123456789012345123456789012345123456789012345123456789012345123456789012345123456789012345123456789012345123456789012345123456789012345123456789012345123456789012345123456789012345123456789012345123456789012345123456789012345123456789012345123456789012345123456789012345123456789012345123456789012345123456789012345123456789012345123456789012345123456789012345123456789012345123456789012345123456789012345123456789012345123456789012345123456789012345123456789012345123456789012345123456789012345123456789012345123456789012345123456789012345123456789012345123456789012345123456789012345123456789012345123456789012345123456789012345123456789012345123456789012345123456789012345123456789012345123456789012345123456789012345123456789012345123456789012345123456789012345123456789012345123456789012345123456789012345123456789012345123456789012345123456789012345123456789012345123456789012345123456789012345123456789012345123456789012345123456789012345123456789012345123456789012345123456789012345123456789012345123456789012345123456789012345123456789012345123456789012345123456789012345123456789012345123456789012345123456789012345123456789012345123456789012345123456789012345123456789012345123456789012345123456789012345123456789012345123456789012345123456789012345123456789012345123456789012345123456789012345123456789012345123456789012345123456789012345123456789012345123456789012345123456789012345123456789012345123456789012345123456789012345123456789012345123456789012345123456789012345123456789012345123456789012345123456789012345123456789012345123456789012345123456789012345123456789012345123456789012345123456789012345123456789012345123456789012345123456789012345123456789012345123456789012345123456789012345123456789012345123456789012345123456789012345123456789012345123456789012345123456789012345123456789012345123456789012345123456789012345123456789012345123456789012345123456789012345123456789012345123456789012345123456789012345123456789012345123456789012345123456789012345123456789012345123456789012345123456789012345123456789012345123456789012345123456789012345123456789012345123456789012345123456789012345123456789012345123456789012345123456789012345123456789012345123456789012345123456789012345123456789012345123456789012345123456789012345
184946 17
8 Start-up Instructions
8.1 Sanitizing
Figure 8-1
The washing and sanitizing instructionsexplained in this manual are importantprocedures designed to remove bacteriaand maintain a clean, sanitary freezer.The slush/cocktail freezer must bedisassembled and cleaned according tothe instructions in the manual beforeassembly and sanitizing to ensure thebest possible cleanliness.
CAUTIONTo prevent bacteria growth,use only approved sanitizersto sanitize the machine.Sanitizing must be done justprior to starting the machine.Failure to do so could createa health hazard.
Important:Do not use unapproved sanitizers orlaundry bleach. These materials maycontain high concentrations of chlo-rine and will chemically attack freezercomponents.
NOTE: It is your responsibility to beaware of the requirements for meetingfederal, state and local laws concerningthe frequency of cleaning and sanitizingthe freezer.
1. Wash and sanitize your hands andforearms.
2. Prepare 4 gallons (15.2 liters) ofsanitizing solution (example: Stera-Sheen Green Label) in a container.Sanitizing solution must be mixed ac-cording to manufacturer’s instructions toyield 100 PPM strength chlorine solution.
Important:Never let the sanitizer remain in thefreezer for more than 15 minutes.
Important:Do not insert any tools or objects intothe port from the hopper to the cylin-der or the head dispensing hole whilethe freezer is running.
3. Pour sanitizing solution into thehopper pan. Using a clean brush, washdown the hopper walls and the mix feedtube from the hopper to the cylinder, asshown in figure 8-1. Wipe the hoppercover with the sanitzing solution.
Important:
DO NOT use the “FREEZE” positionwith sanitizer in the cylinder. Thefreezer will be damaged.
4. When the cylinder has filled withsanitizing solution, reconnect the mainpower supply to the freezer. Turn theselector switch to the “CLEAN” positionand allow the beater to run for 5 minutes.
5. At this time check for leaks aroundthe head, plunger, and drain tube.
Important:DO NOT hang containers from thedispensing spout. Doing so will dam-age the head.
6. Place an empty container underthe dispensing head and drain the solu-tion by opening the plunger to allow thecylinder and hopper to empty.
7. When the sanitizing solution hasdrained from the freezer, turn the selectorswitch to the “OFF” position.
ELECTRO FREEZE Cocktail/Slush Freezer Model 812
123456789012345123456789012345123456789012345123456789012345123456789012345123456789012345123456789012345123456789012345123456789012345123456789012345123456789012345123456789012345123456789012345123456789012345123456789012345123456789012345123456789012345123456789012345123456789012345123456789012345123456789012345123456789012345123456789012345123456789012345123456789012345123456789012345123456789012345123456789012345123456789012345123456789012345123456789012345123456789012345123456789012345123456789012345123456789012345123456789012345123456789012345123456789012345123456789012345123456789012345123456789012345123456789012345123456789012345123456789012345123456789012345123456789012345123456789012345123456789012345123456789012345123456789012345123456789012345123456789012345123456789012345123456789012345123456789012345123456789012345123456789012345123456789012345123456789012345123456789012345123456789012345123456789012345123456789012345123456789012345123456789012345123456789012345123456789012345123456789012345123456789012345123456789012345123456789012345123456789012345123456789012345123456789012345123456789012345123456789012345123456789012345123456789012345123456789012345123456789012345123456789012345123456789012345123456789012345123456789012345123456789012345123456789012345123456789012345123456789012345123456789012345123456789012345123456789012345123456789012345123456789012345123456789012345123456789012345123456789012345123456789012345123456789012345123456789012345123456789012345123456789012345123456789012345123456789012345123456789012345123456789012345123456789012345123456789012345123456789012345123456789012345123456789012345123456789012345123456789012345123456789012345123456789012345123456789012345123456789012345123456789012345123456789012345123456789012345123456789012345123456789012345123456789012345123456789012345123456789012345123456789012345123456789012345123456789012345123456789012345123456789012345123456789012345123456789012345123456789012345123456789012345123456789012345123456789012345123456789012345123456789012345123456789012345123456789012345123456789012345123456789012345123456789012345123456789012345123456789012345123456789012345123456789012345123456789012345123456789012345123456789012345123456789012345123456789012345123456789012345123456789012345123456789012345123456789012345123456789012345123456789012345123456789012345123456789012345123456789012345123456789012345123456789012345123456789012345123456789012345123456789012345123456789012345123456789012345123456789012345123456789012345123456789012345123456789012345123456789012345123456789012345123456789012345123456789012345123456789012345123456789012345123456789012345123456789012345
18 184946
8.2 Product Preparation
Important:DO NOT use the freezer for purposesother than freezing a “slush” productor cocktail mix, and DO NOT attemptto freeze plain water. This will result indamage to the freezer.
1. Use a container of sufficient ca-pacity and with gallon measurementmarkings to accurately mx in quantitiesrequired by the product manufacturer’sinstructions.
2. Prepare at least 5 gallons (18.9L) of mix. Follow the directions exactly asshown on product label.
EXAMPLE: For powdered neutralbase, add contents of package and5 lbs. (2.3 kg) of sugar with enough
water to make 5 gallons (18.9 L) ofneutral base. Never add morewater than instructions call for.
NOTE: The product should registerbetween 12–14 ° Brix on a refractometeror a hydrometer.
3. It is recommended the slush mixbe precooled before filling the freezer.Cool at 36°F (2.2°C). DO NOT FREEZE.
4. Always thoroughly stir mix beforefilling machine. Ingredients can separateover time and change Brix reading.
5. When using a fruit or milk basedproduct the hopper thermostat must beturned to the “ON” position and adjustedfor proper hopper temperature of 36-38°F (2.2-3.3°C).
8.3 Priming
1. While holding the piston open,pour the mix directly into the hopper,allowing the mix to force out the remain-ing sanitizer (approximately 16 ounces or500 ml).
2. When pure mix appears (allsanitizer is expelled), close the piston.
Important:Failure to completely remove sanitizeror water from the freezing cylinderbefore placing in “FREEZE” willdamage the freezer.
3. Remove the air bleed plug andallow the cylinder to completely fill withmix. Replace the air bleed plug when themix reaches the bottom of the air bleedplug opening.
4. Finish filling the hopper with mix.The freezer will hold 7.25 gallons—9quarts in the freezer cylinder and 20quarts in the hopper (27.4 Liters—8.5 L incylinder and 18.9 L in hopper.)
NOTE: If the proper mix level is notmaintained, operational problems willoccur. Do not allow the level of mix inthe hopper to fall below 1/3 full.
5. Turn the selector switch to the“FREEZE” position.
6. Place the hopper cover over thehopper.
7. When the mix has been frozen tothe proper consistency, the compressorwill automatically shut off. It will restartwhenever the product consistencychanges. The beater will run continually.
NOTE: If your slush mix is above 70ºF(21ºC), it will take approximately 12minutes to freeze down to the properconsistency.
8. See Slush/Cocktail Mix Informa-tion, Section 10, for determining consis-tency and making adjustments.
Priming the freezer removes excess air from the freezing cylinder and sets the properconsistency for the first cylinder of product.
ELECTRO FREEZE Cocktail/Slush Freezer Model 812
123456789012345123456789012345123456789012345123456789012345123456789012345123456789012345123456789012345123456789012345123456789012345123456789012345123456789012345123456789012345123456789012345123456789012345123456789012345123456789012345123456789012345123456789012345123456789012345123456789012345123456789012345123456789012345123456789012345123456789012345123456789012345123456789012345123456789012345123456789012345123456789012345123456789012345123456789012345123456789012345123456789012345123456789012345123456789012345123456789012345123456789012345123456789012345123456789012345123456789012345123456789012345123456789012345123456789012345123456789012345123456789012345123456789012345123456789012345123456789012345123456789012345123456789012345123456789012345123456789012345123456789012345123456789012345123456789012345123456789012345123456789012345123456789012345123456789012345123456789012345123456789012345123456789012345123456789012345123456789012345123456789012345123456789012345123456789012345123456789012345123456789012345123456789012345123456789012345123456789012345123456789012345123456789012345123456789012345123456789012345123456789012345123456789012345123456789012345123456789012345123456789012345123456789012345123456789012345123456789012345123456789012345123456789012345123456789012345123456789012345123456789012345123456789012345123456789012345123456789012345123456789012345123456789012345123456789012345123456789012345123456789012345123456789012345123456789012345123456789012345123456789012345123456789012345123456789012345123456789012345123456789012345123456789012345123456789012345123456789012345123456789012345123456789012345123456789012345123456789012345123456789012345123456789012345123456789012345123456789012345123456789012345123456789012345123456789012345123456789012345123456789012345123456789012345123456789012345123456789012345123456789012345123456789012345123456789012345123456789012345123456789012345123456789012345123456789012345123456789012345123456789012345123456789012345123456789012345123456789012345123456789012345123456789012345123456789012345123456789012345123456789012345123456789012345123456789012345123456789012345123456789012345123456789012345123456789012345123456789012345123456789012345123456789012345123456789012345123456789012345123456789012345123456789012345123456789012345123456789012345123456789012345123456789012345123456789012345123456789012345123456789012345123456789012345123456789012345123456789012345123456789012345123456789012345123456789012345123456789012345123456789012345123456789012345123456789012345123456789012345123456789012345123456789012345123456789012345123456789012345123456789012345123456789012345123456789012345
184946 19
9 Closing Procedures
NOTE: It is your responsibility to beaware of, and conform to, the require-ments for meeting local, state, andfederal laws concerning the frequency ofcleaning and sanitizing the freezer.
1. If the mix is nonperishable (sugarbase), place the selector switch in the“OFF” position at the end of the day.
2. To restart the freezer on thefollowing day, place the selector switch inthe “FREEZE” position. The mix in thecylinder will remain partially frozenovernight and this will reduce the freezingtime to 5–10 minutes.
3. If the mix is perishable (fruitbase), leave the selector switch in the“FREEZE” position or drain the productfrom the freezer.
9.1 Draining Product from the Freezer
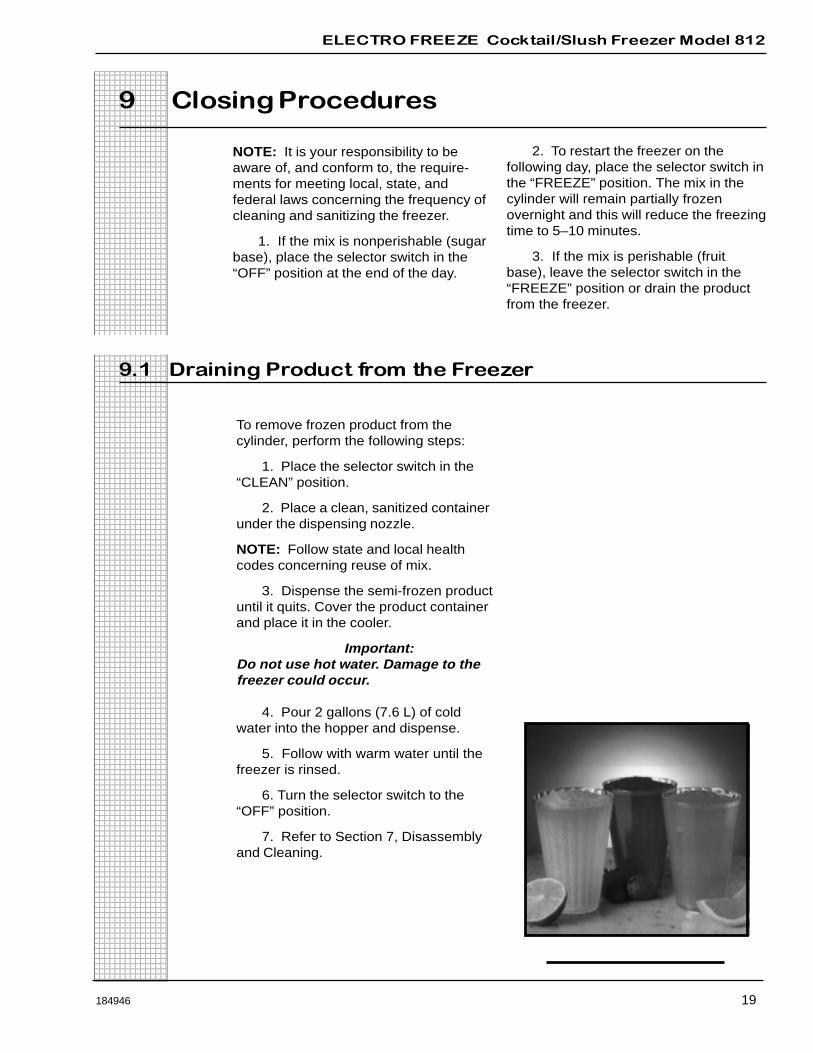
To remove frozen product from thecylinder, perform the following steps:
1. Place the selector switch in the“CLEAN” position.
2. Place a clean, sanitized containerunder the dispensing nozzle.
NOTE: Follow state and local healthcodes concerning reuse of mix.
3. Dispense the semi-frozen productuntil it quits. Cover the product containerand place it in the cooler.
Important:Do not use hot water. Damage to thefreezer could occur.
4. Pour 2 gallons (7.6 L) of coldwater into the hopper and dispense.
5. Follow with warm water until thefreezer is rinsed.
6. Turn the selector switch to the“OFF” position.
7. Refer to Section 7, Disassemblyand Cleaning.
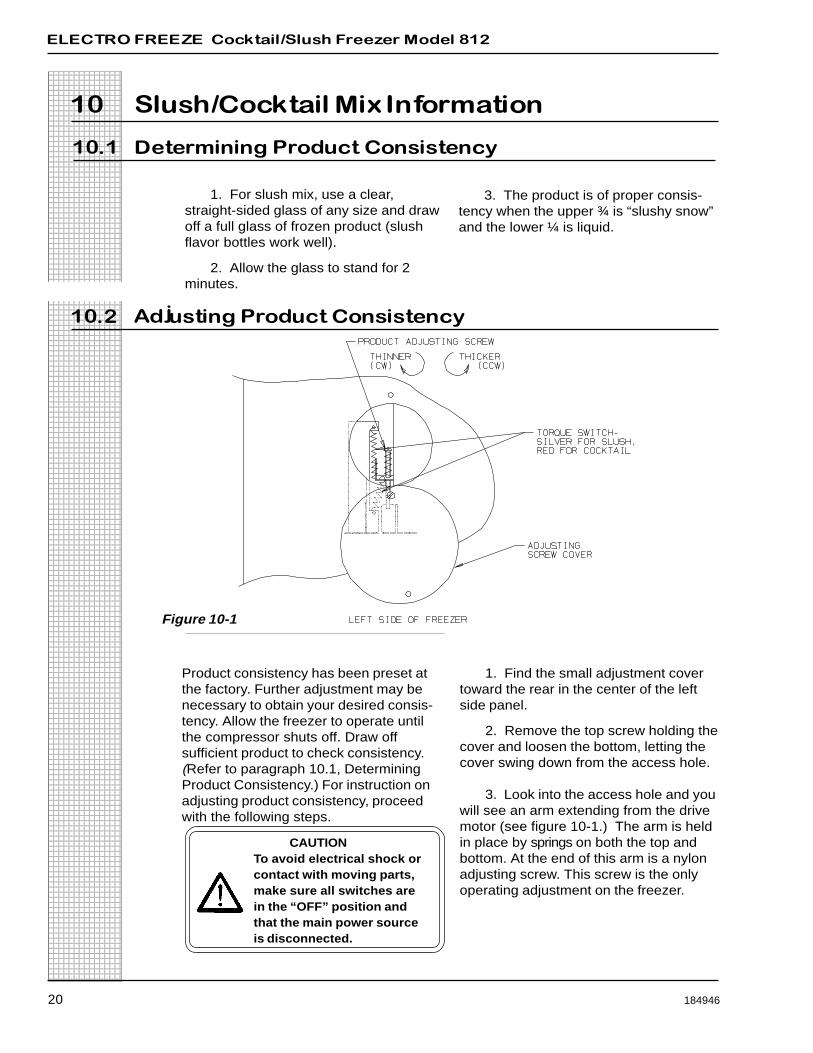
ELECTRO FREEZE Cocktail/Slush Freezer Model 812
123456789012345123456789012345123456789012345123456789012345123456789012345123456789012345123456789012345123456789012345123456789012345123456789012345123456789012345123456789012345123456789012345123456789012345123456789012345123456789012345123456789012345123456789012345123456789012345123456789012345123456789012345123456789012345123456789012345123456789012345123456789012345123456789012345123456789012345123456789012345123456789012345123456789012345123456789012345123456789012345123456789012345123456789012345123456789012345123456789012345123456789012345123456789012345123456789012345123456789012345123456789012345123456789012345123456789012345123456789012345123456789012345123456789012345123456789012345123456789012345123456789012345123456789012345123456789012345123456789012345123456789012345123456789012345123456789012345123456789012345123456789012345123456789012345123456789012345123456789012345123456789012345123456789012345123456789012345123456789012345123456789012345123456789012345123456789012345123456789012345123456789012345123456789012345123456789012345123456789012345123456789012345123456789012345123456789012345123456789012345123456789012345123456789012345123456789012345123456789012345123456789012345123456789012345123456789012345123456789012345123456789012345123456789012345123456789012345123456789012345123456789012345123456789012345123456789012345123456789012345123456789012345123456789012345123456789012345123456789012345123456789012345123456789012345123456789012345123456789012345123456789012345123456789012345123456789012345123456789012345123456789012345123456789012345123456789012345123456789012345123456789012345123456789012345123456789012345123456789012345123456789012345123456789012345123456789012345123456789012345123456789012345123456789012345123456789012345123456789012345123456789012345123456789012345123456789012345123456789012345123456789012345123456789012345123456789012345123456789012345123456789012345123456789012345123456789012345123456789012345123456789012345123456789012345123456789012345123456789012345123456789012345123456789012345123456789012345123456789012345123456789012345123456789012345123456789012345123456789012345123456789012345123456789012345123456789012345123456789012345123456789012345123456789012345123456789012345123456789012345123456789012345123456789012345123456789012345123456789012345123456789012345123456789012345123456789012345123456789012345123456789012345123456789012345123456789012345123456789012345123456789012345123456789012345123456789012345123456789012345123456789012345123456789012345123456789012345123456789012345123456789012345123456789012345123456789012345123456789012345123456789012345123456789012345123456789012345
20 184946
10 Slush/Cocktail Mix Information
10.1 Determining Product Consistency
1. For slush mix, use a clear,straight-sided glass of any size and drawoff a full glass of frozen product (slushflavor bottles work well).
2. Allow the glass to stand for 2minutes.
3. The product is of proper consis-tency when the upper ¾ is “slushy snow”and the lower ¼ is liquid.
10.2 Adjusting Product Consistency
Product consistency has been preset atthe factory. Further adjustment may benecessary to obtain your desired consis-tency. Allow the freezer to operate untilthe compressor shuts off. Draw offsufficient product to check consistency.(Refer to paragraph 10.1, DeterminingProduct Consistency.) For instruction onadjusting product consistency, proceedwith the following steps.
CAUTIONTo avoid electrical shock orcontact with moving parts,make sure all switches arein the “OFF” position andthat the main power sourceis disconnected.
Figure 10-1
1. Find the small adjustment covertoward the rear in the center of the leftside panel.
2. Remove the top screw holding thecover and loosen the bottom, letting thecover swing down from the access hole.
3. Look into the access hole and youwill see an arm extending from the drivemotor (see figure 10-1.) The arm is heldin place by springs on both the top andbottom. At the end of this arm is a nylonadjusting screw. This screw is the onlyoperating adjustment on the freezer.
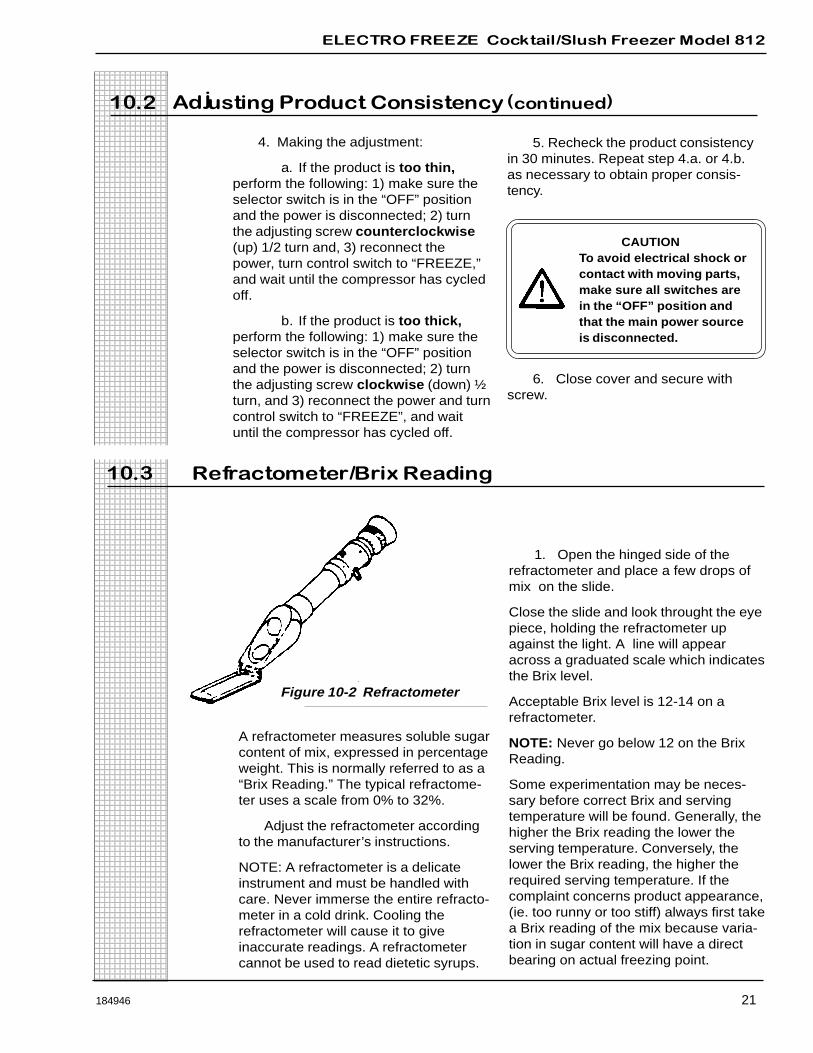
ELECTRO FREEZE Cocktail/Slush Freezer Model 812
123456789012345123456789012345123456789012345123456789012345123456789012345123456789012345123456789012345123456789012345123456789012345123456789012345123456789012345123456789012345123456789012345123456789012345123456789012345123456789012345123456789012345123456789012345123456789012345123456789012345123456789012345123456789012345123456789012345123456789012345123456789012345123456789012345123456789012345123456789012345123456789012345123456789012345123456789012345123456789012345123456789012345123456789012345123456789012345123456789012345123456789012345123456789012345123456789012345123456789012345123456789012345123456789012345123456789012345123456789012345123456789012345123456789012345123456789012345123456789012345123456789012345123456789012345123456789012345123456789012345123456789012345123456789012345123456789012345123456789012345123456789012345123456789012345123456789012345123456789012345123456789012345123456789012345123456789012345123456789012345123456789012345123456789012345123456789012345123456789012345123456789012345123456789012345123456789012345123456789012345123456789012345123456789012345123456789012345123456789012345123456789012345123456789012345123456789012345123456789012345123456789012345123456789012345123456789012345123456789012345123456789012345123456789012345123456789012345123456789012345123456789012345123456789012345123456789012345123456789012345123456789012345123456789012345123456789012345123456789012345123456789012345123456789012345123456789012345123456789012345123456789012345123456789012345123456789012345123456789012345123456789012345123456789012345123456789012345123456789012345123456789012345123456789012345123456789012345123456789012345123456789012345123456789012345123456789012345123456789012345123456789012345123456789012345123456789012345123456789012345123456789012345123456789012345123456789012345123456789012345123456789012345123456789012345123456789012345123456789012345123456789012345123456789012345123456789012345123456789012345123456789012345123456789012345123456789012345123456789012345123456789012345123456789012345123456789012345123456789012345123456789012345123456789012345123456789012345123456789012345123456789012345123456789012345123456789012345123456789012345123456789012345123456789012345123456789012345123456789012345123456789012345123456789012345123456789012345123456789012345123456789012345123456789012345123456789012345123456789012345123456789012345123456789012345123456789012345123456789012345123456789012345123456789012345123456789012345123456789012345123456789012345123456789012345123456789012345123456789012345123456789012345123456789012345123456789012345123456789012345123456789012345123456789012345123456789012345
184946 21
10.3 Refractometer/Brix Reading
Figure 10-2 Refractometer
1. Open the hinged side of therefractometer and place a few drops ofmix on the slide.
Close the slide and look throught the eyepiece, holding the refractometer upagainst the light. A line will appearacross a graduated scale which indicatesthe Brix level.
Acceptable Brix level is 12-14 on arefractometer.
NOTE: Never go below 12 on the BrixReading.
Some experimentation may be neces-sary before correct Brix and servingtemperature will be found. Generally, thehigher the Brix reading the lower theserving temperature. Conversely, thelower the Brix reading, the higher therequired serving temperature. If thecomplaint concerns product appearance,(ie. too runny or too stiff) always first takea Brix reading of the mix because varia-tion in sugar content will have a directbearing on actual freezing point.
A refractometer measures soluble sugarcontent of mix, expressed in percentageweight. This is normally referred to as a“Brix Reading.” The typical refractome-ter uses a scale from 0% to 32%.
Adjust the refractometer accordingto the manufacturer’s instructions.
NOTE: A refractometer is a delicateinstrument and must be handled withcare. Never immerse the entire refracto-meter in a cold drink. Cooling therefractometer will cause it to giveinaccurate readings. A refractometercannot be used to read dietetic syrups.
10.2 Adjusting Product Consistency (continued)
4. Making the adjustment:
a. If the product is too thin,perform the following: 1) make sure theselector switch is in the “OFF” positionand the power is disconnected; 2) turnthe adjusting screw counterclockwise(up) 1/2 turn and, 3) reconnect thepower, turn control switch to “FREEZE,”and wait until the compressor has cycledoff.
b. If the product is too thick,perform the following: 1) make sure theselector switch is in the “OFF” positionand the power is disconnected; 2) turnthe adjusting screw clockwise (down) ½turn, and 3) reconnect the power and turncontrol switch to “FREEZE”, and waituntil the compressor has cycled off.
5. Recheck the product consistencyin 30 minutes. Repeat step 4.a. or 4.b.as necessary to obtain proper consis-tency.
CAUTIONTo avoid electrical shock orcontact with moving parts,make sure all switches arein the “OFF” position andthat the main power sourceis disconnected.
6. Close cover and secure withscrew.
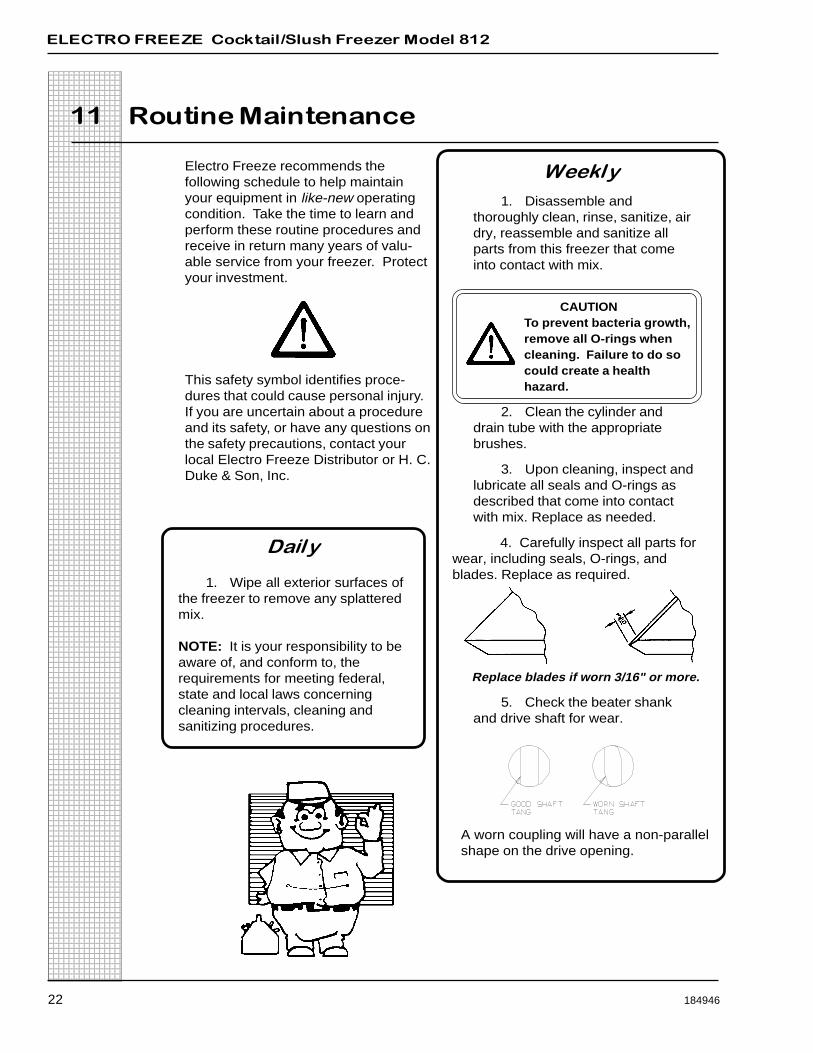
ELECTRO FREEZE Cocktail/Slush Freezer Model 812
123456789012345123456789012345123456789012345123456789012345123456789012345123456789012345123456789012345123456789012345123456789012345123456789012345123456789012345123456789012345123456789012345123456789012345123456789012345123456789012345123456789012345123456789012345123456789012345123456789012345123456789012345123456789012345123456789012345123456789012345123456789012345123456789012345123456789012345123456789012345123456789012345123456789012345123456789012345123456789012345123456789012345123456789012345123456789012345123456789012345123456789012345123456789012345123456789012345123456789012345123456789012345123456789012345123456789012345123456789012345123456789012345123456789012345123456789012345123456789012345123456789012345123456789012345123456789012345123456789012345123456789012345123456789012345123456789012345123456789012345123456789012345123456789012345123456789012345123456789012345123456789012345123456789012345123456789012345123456789012345123456789012345123456789012345123456789012345123456789012345123456789012345123456789012345123456789012345123456789012345123456789012345123456789012345123456789012345123456789012345123456789012345123456789012345123456789012345123456789012345123456789012345123456789012345123456789012345123456789012345123456789012345123456789012345123456789012345123456789012345123456789012345123456789012345123456789012345123456789012345123456789012345123456789012345123456789012345123456789012345123456789012345123456789012345123456789012345123456789012345123456789012345123456789012345123456789012345123456789012345123456789012345123456789012345123456789012345123456789012345123456789012345123456789012345123456789012345123456789012345123456789012345123456789012345123456789012345123456789012345123456789012345123456789012345123456789012345123456789012345123456789012345123456789012345123456789012345123456789012345123456789012345123456789012345123456789012345123456789012345123456789012345123456789012345123456789012345123456789012345123456789012345123456789012345123456789012345123456789012345123456789012345123456789012345123456789012345123456789012345123456789012345123456789012345123456789012345123456789012345123456789012345123456789012345123456789012345123456789012345123456789012345123456789012345123456789012345123456789012345123456789012345123456789012345123456789012345123456789012345123456789012345123456789012345123456789012345123456789012345123456789012345123456789012345123456789012345123456789012345123456789012345123456789012345123456789012345123456789012345123456789012345123456789012345123456789012345123456789012345123456789012345123456789012345123456789012345123456789012345123456789012345123456789012345123456789012345
22 184946
11 Routine Maintenance
Weekly
1. Disassemble andthoroughly clean, rinse, sanitize, airdry, reassemble and sanitize allparts from this freezer that comeinto contact with mix.
CAUTIONTo prevent bacteria growth,remove all O-rings whencleaning. Failure to do socould create a healthhazard.
2. Clean the cylinder anddrain tube with the appropriatebrushes.
3. Upon cleaning, inspect andlubricate all seals and O-rings asdescribed that come into contactwith mix. Replace as needed.
4. Carefully inspect all parts forwear, including seals, O-rings, andblades. Replace as required.
Replace blades if worn 3/16" or more.
5. Check the beater shankand drive shaft for wear.
Electro Freeze recommends thefollowing schedule to help maintainyour equipment in like-new operatingcondition. Take the time to learn andperform these routine procedures andreceive in return many years of valu-able service from your freezer. Protectyour investment.
This safety symbol identifies proce-dures that could cause personal injury.If you are uncertain about a procedureand its safety, or have any questions onthe safety precautions, contact yourlocal Electro Freeze Distributor or H. C.Duke & Son, Inc.
Daily
1. Wipe all exterior surfaces ofthe freezer to remove any splatteredmix.
NOTE: It is your responsibility to beaware of, and conform to, therequirements for meeting federal,state and local laws concerningcleaning intervals, cleaning andsanitizing procedures.
A worn coupling will have a non-parallelshape on the drive opening.
ELECTRO FREEZE Cocktail/Slush Freezer Model 812
123456789012345123456789012345123456789012345123456789012345123456789012345123456789012345123456789012345123456789012345123456789012345123456789012345123456789012345123456789012345123456789012345123456789012345123456789012345123456789012345123456789012345123456789012345123456789012345123456789012345123456789012345123456789012345123456789012345123456789012345123456789012345123456789012345123456789012345123456789012345123456789012345123456789012345123456789012345123456789012345123456789012345123456789012345123456789012345123456789012345123456789012345123456789012345123456789012345123456789012345123456789012345123456789012345123456789012345123456789012345123456789012345123456789012345123456789012345123456789012345123456789012345123456789012345123456789012345123456789012345123456789012345123456789012345123456789012345123456789012345123456789012345123456789012345123456789012345123456789012345123456789012345123456789012345123456789012345123456789012345123456789012345123456789012345123456789012345123456789012345123456789012345123456789012345123456789012345123456789012345123456789012345123456789012345123456789012345123456789012345123456789012345123456789012345123456789012345123456789012345123456789012345123456789012345123456789012345123456789012345123456789012345123456789012345123456789012345123456789012345123456789012345123456789012345123456789012345123456789012345123456789012345123456789012345123456789012345123456789012345123456789012345123456789012345123456789012345123456789012345123456789012345123456789012345123456789012345123456789012345123456789012345123456789012345123456789012345123456789012345123456789012345123456789012345123456789012345123456789012345123456789012345123456789012345123456789012345123456789012345123456789012345123456789012345123456789012345123456789012345123456789012345123456789012345123456789012345123456789012345123456789012345123456789012345123456789012345123456789012345123456789012345123456789012345123456789012345123456789012345123456789012345123456789012345123456789012345123456789012345123456789012345123456789012345123456789012345123456789012345123456789012345123456789012345123456789012345123456789012345123456789012345123456789012345123456789012345123456789012345123456789012345123456789012345123456789012345123456789012345123456789012345123456789012345123456789012345123456789012345123456789012345123456789012345123456789012345123456789012345123456789012345123456789012345123456789012345123456789012345123456789012345123456789012345123456789012345123456789012345123456789012345123456789012345123456789012345123456789012345123456789012345123456789012345123456789012345123456789012345123456789012345123456789012345123456789012345
184946 23
11 Routine Maintenance (continued)
Monthly
CAUTIONMoving parts. DO NOT placehands in the freezingcylinder. Severe personalinjury could result.
6. Look inside the freezingcylinder toward the rear. The driveshaft coupling should NOT beturning. Turn the switch off anddisconnect the main power supply.
7. If the drive shaft couplingis turning, or you are unable todetermine whether or not the shaftis turning, turn the switch to the“OFF” position, disconnect themain power supply and contactyour Electro Freeze Distributor forservice. DO NOT place the freezerin service until the problem hasbeen fixed.
C. Water Condenser.
Check the outlet water temperatureof water-cooled condensers at thefloor drain. Water temperaturesshould be about 95°F with a 70°Fwater inlet temperature.
A. Clean Condenser Fins.
Have air-cooled condenser finscleaned by an authorized servicetechnical to remove all forms ofdirt, lint and dust.
B. Test Head Switch.
The head switch feature isdesigned to prevent the beatershaft from being accidentallyactivated. It is essential that theproper operation of this switch beverified on a routine basis. Use thefollowing instructions to test forproper operation:
1. Be sure all switches are inthe “OFF” position.
2. Disconnect the main powersupply.
3. Remove the dispense headand beater shaft assembly.
4. Connect the main powersupply.
5. Turn the selector switch tothe “CLEAN” position.
Accessory - Lighted SignChanging Light Bulb
1. Remove screws holding top coverof light assembly.
2. Slide out decal and plastic lens toexpose light.
3. Rotate light bulb horizontally toremove from sockets.
4. Replace with identical light of samerating and reassemble top cover.
CAUTIONTo avoid electrical shock orcontact with moving parts,make sure all switches arein the “OFF” position andthat the main power supplyis disconnected.
ELECTRO FREEZE Cocktail/Slush Freezer Model 812
123456789012345123456789012345123456789012345123456789012345123456789012345123456789012345123456789012345123456789012345123456789012345123456789012345123456789012345123456789012345123456789012345123456789012345123456789012345123456789012345123456789012345123456789012345123456789012345123456789012345123456789012345123456789012345123456789012345123456789012345123456789012345123456789012345123456789012345123456789012345123456789012345123456789012345123456789012345123456789012345123456789012345123456789012345123456789012345123456789012345123456789012345123456789012345123456789012345123456789012345123456789012345123456789012345123456789012345123456789012345123456789012345123456789012345123456789012345123456789012345123456789012345123456789012345123456789012345123456789012345123456789012345123456789012345123456789012345123456789012345123456789012345123456789012345123456789012345123456789012345123456789012345123456789012345123456789012345123456789012345123456789012345123456789012345123456789012345123456789012345123456789012345123456789012345123456789012345123456789012345123456789012345123456789012345123456789012345123456789012345123456789012345123456789012345123456789012345123456789012345123456789012345123456789012345123456789012345123456789012345123456789012345123456789012345123456789012345123456789012345123456789012345123456789012345123456789012345123456789012345123456789012345123456789012345123456789012345123456789012345123456789012345123456789012345123456789012345123456789012345123456789012345123456789012345123456789012345123456789012345123456789012345123456789012345123456789012345123456789012345123456789012345123456789012345123456789012345123456789012345123456789012345123456789012345123456789012345123456789012345123456789012345123456789012345123456789012345123456789012345123456789012345123456789012345123456789012345123456789012345123456789012345123456789012345123456789012345123456789012345123456789012345123456789012345123456789012345123456789012345123456789012345123456789012345123456789012345123456789012345123456789012345123456789012345123456789012345123456789012345123456789012345123456789012345123456789012345123456789012345123456789012345123456789012345123456789012345123456789012345123456789012345123456789012345123456789012345123456789012345123456789012345123456789012345123456789012345123456789012345123456789012345123456789012345123456789012345123456789012345123456789012345123456789012345123456789012345123456789012345123456789012345123456789012345123456789012345123456789012345123456789012345123456789012345123456789012345123456789012345123456789012345123456789012345123456789012345123456789012345123456789012345123456789012345123456789012345
24 184946
11 Routine Maintenance (continued)
Annually
Contact your Electro Freeze Distributor topreform the following services:
1. Have qualified refrigerationtechnician inspect and clean the beater drivemotor.
2. Have qualified refrigeration replacedrive belt.
3. Have qualified refrigeration cleanthe inside of the freezer including base, sidepanels, condenser, etc.
4. Have qualified refrigeration checkwater-cooled condenser and flush clean ifnecessary (water-cooled only).
5. Have qualified refrigeration checkthe refrigeration system and make anynecessary adjustments.
USE ONLY ORIGINAL OR AUTHORIZEDREPLACEMENT PARTS WITH THIS FREEZER.
(See your Illustrated Replacement Parts Manual)
Should you have any questions onitems that are not included in thismaintenance schedule, or problemswhere service assistance is needed,please call your local Electro FreezeDistributor or H. C. Duke & Son, Inc.,Electro Freeze Service Department, forfactory service at (309) 755-4553.
Winter Storage
To protect the unit during seasonalshutdown, it is important to store thecocktail/slush freezer properly. Pleaseuse the following procedures:
1. Disconnect all power to thefreezer.
2. Disassemble and wash all partsthat come into contact with the mix with awarm, mild detergent solution. Rinse inclear water and dry all parts thoroughly.
3. Store the loose parts, such as theparts in the head assembly and beaterassembly, in a safe dry place.
4. Do not lay heavy objects on theplastic or rubber parts.
5. Cover the freezer and all looseparts to protect them from dust or otherelements that could contaminate themwhile in storage. Place the freezer in adry location.
6. Have air-cooled condenser finscleaned by an authorized service techni-cian to remove all forms of dirt, lint, anddust.
Important:For water-cooled freezers, failure topurge the freezer of water may resultin severe damage to the coolingsystem.
7. Call an authorized servicetechnician to perform this step. Forwater-cooled freezers, disconnect thewater supply. Use compressed air toblow out all remaining water in thecondenser.