Embed Size (px)
Citation preview

R
Panasonic
EFERENCE
G
UIDE
- Please read the Imomm &mm INSTRUCU~NS on pages 20 through the buck cover before use. Read and understand all instructions.
MODEL No. KX-T7880

THANK YOUFORPURCHASING THE KX-T7880.
Contents FOR BEST PERFORMANCE.. ............................................................ 3 PREPARATION ................................................................................ 5
LOCATION OF CONTROLS ............................................................... 8
WALL MOUNTING ........................................................................ 10
LOCATING THE HANDSET FROM THE BASE UNIT.. ......................... 10
ADJUSTING THE RINGER VOLUME ................................................ 11 SELECTING THE ANSWERING MODE ..................................................... 1 1
KEY LOCK .................................................................................. 11 PROGRAMMING FOR SPEED OR ONE-TOUCH DIAL - SLT MODE ... 12 OPERATING INSTRUCTIONS - SLT MODE ...................................... 13
PROGRAMMING FOR ONE-TOUCH DIAL - EMSS MODE.. ................ 14 OPERATING INSTRUCTIONS - EMSS MODE .................................. 15 OPERATING INSTRUCTIONS FOR KX-T336 ...................................... 16 FEATURE NUMBER TABLE.. ........................................................... 17
REPLACING THE BATTERY.. ........................................................... 18
TROUBLESHOOTING ...................................................................... 19 IMPORTANT SAFETY INSTRUCTIONS.. ............................................. 20
Handset 1 Accessories
I I One 1 Base Unit One [ Charging Unit One
Handset Cover Cradle Cover Handset Clip Wall Mounting Plate
One
Note: l The KX-T7880 can be used as a single line telephone (SLT) for home use. This is called “SLT mode” in this manual. The KX-T7880 can be connected to the Panasonic KX-TIKX-TD series. This is called “EMSS mode” in this manual.
l To order accessories, call toll free l-800-332-5368. l Battery*: Please use only Panasonic KX-A43 battery.
2

FOR BEST PERFORMANCE Ll Noise Calls are transmitted between the base unit and the handset using wireless radio waves. For maximum distance and noise free operation, the recommended base unit location is:
Away from electrical appliances such as a fax, radio, or personal computer.
In a HIGH location, with no obstructions or interference from electrical appliances.
l Wireless telephones, except for the 900MHz telephone, can be used together. . X-P. out of range. an alarm tone sounds continuously during a conversation.
Cl Operating Distance The handset should always be at least 1 m from the base unit.
4 r,
lm
When using more than two base units, place the base units at least 1 m away from each other, or else proper radio transmission cannot be obtained.
4 c
lm
3

FOR BEST PERFORMANCE Cl Battery Charge To power the handset, install the battery in the handset (see page 7) and place the handset on the charging unit for about 15 hours to charge before initial use.
l The handset can also be placed with the dialing buttons facing upward.
l The CHARGE indicator lights. l The battery cannot be overcharged.
OR
Note: l Clean the charge contacts with a soft cloth once a month, or the battery may not
charge properly. l Once the handset battery is fully charged, you do not have to place the handset on the
charging unit until the TALWBATT. LOW indicator flashes.
Recharge the handset battery, when the TALIUBATT. LOW indicator flashes or beep tones sound every 15 seconds during a conversation.
TALWBATT. LOW Indicator
Cl Standard Battery Life If your Panasonic battery KX-A43 is fully charged:
While the phone is in use (TALK) . . . . . . . . . . . . . . . . . . . . . . . . Up to about three hours
While the phone is not in use (Stand-by) . . . . . . . . . . . . . . Up to about 40 hours
Buttery life may vary depending on usage conditions and ambient tempeiature.
4

PREPARATION
II Charging Unit
. . Connect as shown.
Fasten the AC Adaptor cord to the cord holder
2. Close the cradle cover (included).
To Power Outlet
AC Adaptor
THE WALL OUTLET POWER SOCKET SHOULD BE LOCATED NEAR THIS EQUIPMENT AND BE EASILY ACCESSIBLE.
Vote: 1 Spare Battery*: When the handset battery needs charging, replace it with the fully charged spare battery. This will eliminate waiting for the handset battery to fully recharge.
1 USE ONLY Panasonic AC ADAPTOR KX-Al 1. The adaptor must remain connected at all times.
1 The AC adaptor may feel warm during use. This is normal. 1 The unit will not function during a power failure.
5
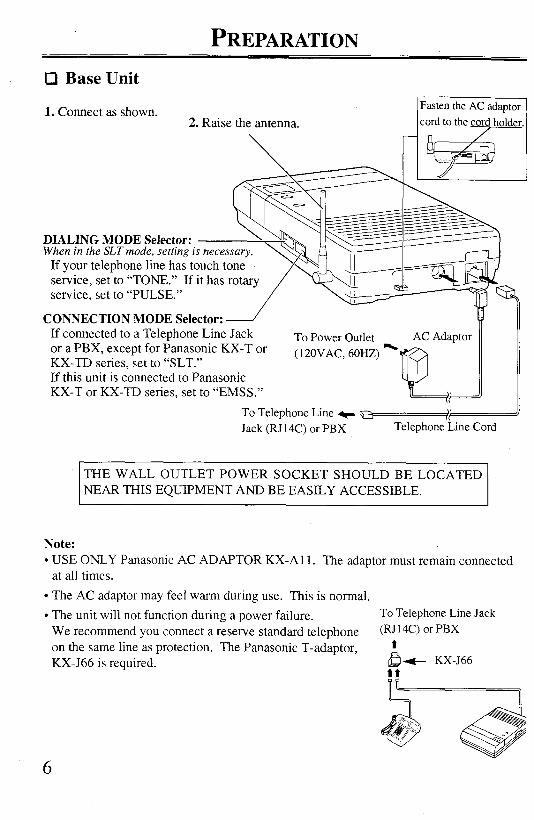
PREPARATION 0 Base Unit
1. Connect as shown. 2. Raise the antenna.
adaptor 1
DIALING MODE Selector: \ When in the SLT mode, setting is necessary.
If your telephone line has touch tone service, set to “TONE?.” If it has rotary service, set to “PULSE.”
CONNECTION MODE Selector: 2 If connected to a Telephone Line Jack To Power Outlet or a PBX, except for Panasonic KX-T or
AC Adaptor
KX-TD series, set to “SLT.” (120VAC, 60HZ) - .
m If this unit is connected to Panasonic KX-T or KX-TD series, set to “EMSS.”
To Telephone Line _ =-<A Jack (RJ 14C) or PBX Telephone Line Cord
THE WALL OUTLET POWER SOCKET SHOULD BE LOCATED NEAR THIS EQUIPMENT AND BE EASILY ACCESSIBLE.
Note: l USE ONLY Panasonic AC ADAPTOR KX-Al 1. The adaptor must remain connected
at all times. l The AC adaptor may feel warm during use. This is normal. l The unit will not function during a power failure. To Telephone Line Jack
We recommend you connect a reserve standard telephone (RJ 14C) or PBX on the same line as protection. The Panasonic T-adaptor, t KX-J66 is required. fj+ KX-J66
i;:
6
PREPARATION
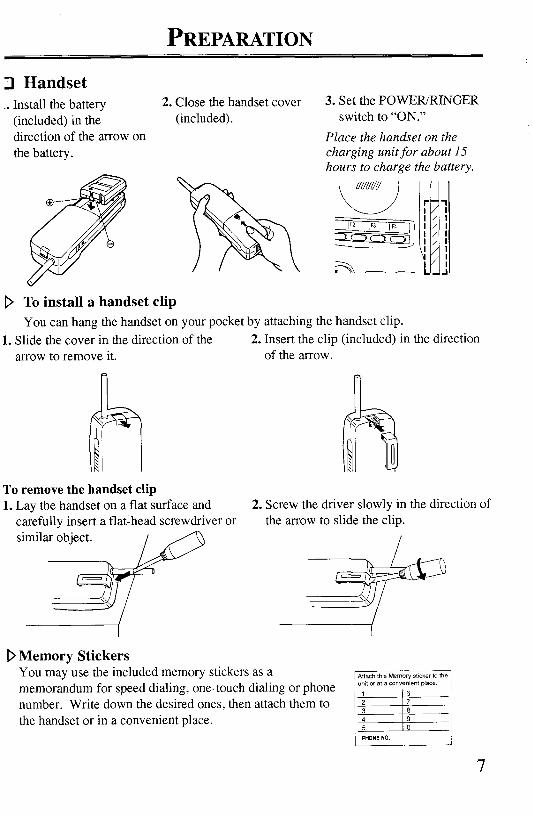
iI Handset _. Install the battery 2. Close the handset cover
(included) in the (included). direction of the arrow on the battery.
3. Set the POWER/RINGER switch to “ON.”
Place the handset on the charging unit for about 15 hours to charge the battery.
uuuuu
k-/J
-ii
D To install a handset clip You can hang the handset on your pocket by attaching the handset clip.
1. Slide the cover in the direction of the 2. Insert the clip (included) in the direction arrow to remove it. of the arrow.
To remove the handset clip 1. Lay the handset on a flat surface and 2. Screw the driver slowly in the direction of
carefully insert a flatlhead screwdriver or the arrow to slide the clip.
D Memory Stickers You may use the included memory stickers as a memorandum for speed dialing, one-touch dialing or phone number. Write down the desired ones, then attach them to the handset or in a convenient place.

LOCATION OF CONTROLS
Cl Base Unit
IN USE Indicator
POWER Indicate
Antenna
CONNECTION MODE
DIALING MODE Selector
v ‘LOCATOR Button
Cl Charging Unit
CHARGE Indicator
SPARE CHARGE _ Indicator
Charge Contacts Cradle Cover
Battery Charge Compartment for Spare Battery (under the cover)

LOCATION OF CONTROLS
.(Il Handset
Antenna
Flexible Keys (1 through 4) and Indicators:
Used as a One-Touch Dialing, CO button, etc. Used to make or receive an intercom (Fl) i outside (F2 - F4) call in EMSS mode.
AUTO Button: Used before dialing a speed dial number. Used to store programming in EMSS mode.
TALK Button and
Used to make or receive a call. The indicator flashes when the battery is low.
pulse to tone during a call in SLT mode.
POWER/RINGER Switch: Set to “ON.” If set to “OFF,” battery power will be saved, but the handset will not operate
Flexible S/XFER (Transfer)
Used as an One-Touch Dialing button in SLT mode. Used to transfer a call to another extension in EMSS
REDIAL Button:
Used to disconnect the line. Used PAUSEXONF (Conference) when you misdial. Also can be used Button: to send a hooking signal to a Central . Office for Calf Waiting for an outside Microphone ‘\,
Used to insert a pause in SLT mode and EMSS
call. Charge Coniacts (Bottom of the handset)
programming mode. Used to establish a three-party conference in EMSS mode.
D Numbering Sheet You may write down the names related to the one-touch dialing on the sheet. You may reverse the sheet for EMSS use.
Front Back i, 12 15 Fd INT I 2 2
pf%q)
9
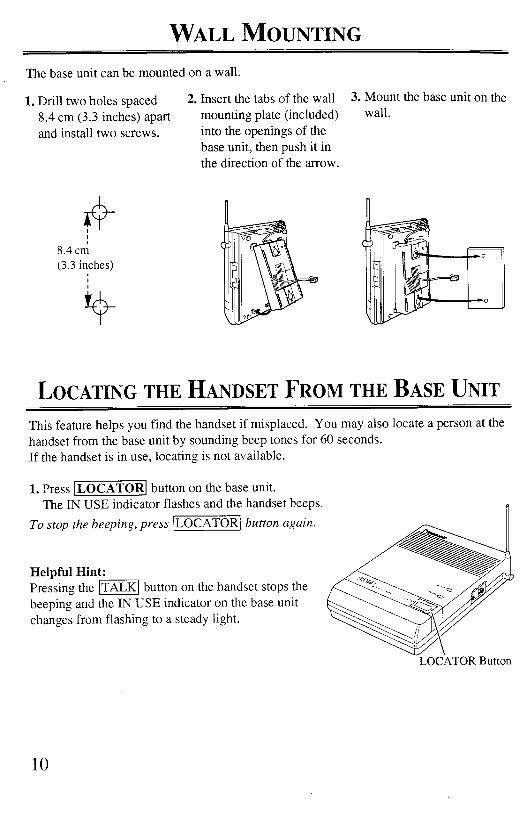
WALL MOUNTING The base unit can be mounted on a wall.
1. Drill two holes spaced 2. Insert the tabs of the wall 8.4 cm (3.3 inches) apart mounting plate (included) and install two screws. into the openings of the
base unit, then push it in the direction of the arrow.
8.4 cn; (3.3 inches)
3. Mount the base unit on the wall.
LOCATING THE HANDSET FROM THE BASE UNIT This feature helps you find the handset if misplaced. You may also locate a person at the handset from the base unit by sounding beep tones for 60 seconds. If the handset is in use, locating is not available.
1. Press m button on the base unit. The IN USE indicator flashes and the handset beeps.
To stop the beeping, press -1 button again.
Helpful Hint: Pressing the ITALK] button on the handset stops the beeping and the IN USE indicator on the base unit changes from flashing to a steady light.
LOCATOR Button
10
ADJUSTING THE RINGER VOLUME
You can adjust the ringer volume. (Default: High)
1. Press q key until a confirmation tone sounds. (More than one second.) 2. Press q key again. You will hear the current volume level. 3. By pressing q key, the volume level alternates between High and Low.
SELECTING THE ANSWERING MODE You can select either Automatic or Manual to answer a call. (Default: Automatic) In Automatic mode, you just pick up the handset from the charging unit to answer a call.
Setting
1. Press q key until a confirmation tone sounds. The TALKIBAX LOW indicator lights red.
2. Enter q or q . - 1: Automatic - 2: Manual
KEY LOCK This feature prevents buttons from being pressed while carrying the handset or when in idle use.
Locking
1. Press q key until a confirmation tone sounds. (More than one second.)
Unlocking
1. Set the POWER/RINGER switch to “OFF” and return to “ON.”
Note: During key lock, if you press the m button or -1 keys, or press the q key for more than one second, an alarm tone will sound.
11

PROGRAMMING FOR SPEED OR ONE-TOUCH DIAGSLT MODE
To enter station programming mode; Set the POWER/RINGER switch to “ON,” while pressing (PROG button.
The TALKIBATT. LOW indicator lights red.
You hear a conJirmation tone.
To exit; Press (TALK1 button or place the handset on the charging unit.
D Storing telephone numbers
Flexible (Fl - F4)
AUTO
FYXFER
For Speed Dialing; 1. Enter Programming Mode.
2. Enter /phone number ( . 3. Press m button.
4. Enter Ispeed dialing number ( (0 -
5. To store an another number, repeat
2 through 4.
9). steps
6. Exit from programming mode.
For One-Touch Dialing; 1. Enter Programming Mode.
2. Enter 1 phone number I.
3. Press the desired w] key or
IFS/XFERI button.
4. To store an another number, repeat steps
2 through 3.
5. Exit from programming mode.
Conditions: l Ten phone numbers for Speed Dialing and five phone numbers for One-Touch Dialing
can be stored. l Each number has a maximum of 20 digits. The valid characters are 0 through 9, * , # ,
and the FLASH and PAUSECONF buttons. l If you do not enter anything for 30 seconds during programming, the programming
mode is canceled.
12
SAFETY INSTALLATION INSTRUCTIONS
When installing telephone wiring, basic safety precautions should always be followed to reduce the risk of fire, electric shock and injury to persons, including the following:
1.
2.
3.
4.
Never install telephone wiring during a light- ning storm.
Never install telephone jacks in wet locations unless the jack is specifically designed for wet locations.
Never touch uninsulated telephone wires or terminals unless the telephone line has been disconnected at the network interface.
Use caution when installing or modifying telephone lines.

Panasonic Consumer Electronics Company, Panasonic Sales Company, Division of Matsushita Electric Corporation of Division of Matsushita Electric of America Puerto Rico, inc. One Panasonic Way Ave. 65 de Infanterfa, Km. 9.5, San Gabriel Secaucus, New Jersey 07094 industrial Park, Carolina, Puerto Rico 00985
PANASONIC Business Telephone System (BTS) Products
Limited Warranty Panasonic Consumer Electronics Company or Panasonic Sales Company (collectively referred to as ‘The warrantor”) will repair this product with new or refurbished parts or systems, free of charge, in the USA or Puerto Rico for one (1) year from the date of original purchase in the event of a defect in materials or workmanship.
Batteries (when applicable) - New rechargeable batteries in exchange for defective rechargeable batteries for ten (10) days from the date of original purchase. Non-rechargeable batteries are not warranted.
Carry-in or mail-in service in the USA or Puerto Rico can be obtained during the warranty period from a Panasonic Services Company (PASC) Factory Servicenter listed in the Servicenter Directory. Please refer to the Servicenter Directory or call, toll free, 1-800-545-2672 to locate a PASC Factory Servicenter. Carry-in or mail-in service in Puerto Rico can be obtained during the warranty period by calling the Panasonic Sales Company telephone number listed in the Servicenter Directory.
This warranty is extended only to the original purchaser. A purchase receipt or other proof of date of original purchase will be required before warranty service is rendered.
This warranty only covers failures due to defects in materials and workmanship which occur during normal use. The warranty does not cover damages which occurred in shipment, or failures which are caused by products not supplied by the warrantor or failures which result from accident, misuse, abuse, neglect, mishandling, faulty installation, misapplication, set-up adjustments, improper operation or maintenance, alteration, modification, power line surge, improper voltage supply, lightning damage, signal reception problems, or serviced by anyone other than a PASC Factory Servicenter or a PASC authorized Servicenter, or damage that is attributable to acts of God.
LIMITS AND EXCLUSIONS There are no express warranties except as listed above. THE WARRANTOR SHALL NOT BE LIABLE FOR INCIDENTAL OR CONSEQUENTIAL DAMAGES RESULTING FROM THE USE OF THIS PRODUCT, OR ARISING OUT OF ANY BREACH OF THIS WARRANTY. EXCEPT AS EXPRESSLY PROVIDED ABOVE, THERE IS NO WARRANTY OR GUARANTY OF MERCHANTABILITY, OR FITNESS FOR A PARTICULAR PURPOSE OR WARRANTY OF ANY OTHER KIND, EXPRESS OR IMPLIED. THERE ARE NO WARRANTIES WHICH EXTEND BEYOND THE DESCRIPTION ON THE FACE HEREOF.
Some states do not allow the exclusion or limitation of incidental or consequential damages, or limitations on how long an implied warranty lasts, so the above exclusions or limitations may not apply to you.
1 This warranty gives you specific legal rights and you may also have other rights which vary from state to state. If a problem with this product develops during or after the warranty period, you may contact your dealer or Setvicenter. If the problem is not handled to your satisfaction, then write to the Customer Satisfaction Center at the company address indicated above.
2

Setvicenter Directory Panasonic
Customer Satisfaction Center 2F-3, One Panasonic Way, Secaucus, NJ 07094 (Headquarters) 201-348-9090 (9:00am-8:OOpm Monday-Friday, EST)
l-800-332-5388 (Consumer Orders Only) Panasonic Services Company 20421 84th Avenue South Kent, WA 98032 (6:OO am to 6:00 pm Monday-Friday; 6:OO am to IO:30 am Saturday, PST) (Visa, Master card, Discover card, American Express or Check)
To locate an independent authorized servicenter or parts distributor in your area, within the USA dial toll free l-800-545-2872,24 hours a day, 7 days a week.
Panasonic Services Company BTS Centers
Matsushita Electric of Puerto Rico, Inc. 8655 Roswell Road, Suite 2221 Cabot&&vard Panasonic Sales Company/ 200 W&Suite8 Factory Servicenter I Atlanta, GA 30350 Phone (770) 516-6469 Fax (770) 552-l 521
Langhome. PA. 19047 Phone (215) 741-0679 Fax (215) 741-0521
Ave. 65 de Infanteria, Km. 9.5 San Gabriel Industrial Park Carolina, Puerto Rico 00985 Phone (787) 750-4300 Fax (787) 768-2910
Regional Customer Care Department
EAST (PCE) EAST (PCE) CENTRAL (PCC) WEST (PCW) 2221 CabotBa~lward WsstSuiiA 1225 Northbmk Parkway 1707 North Randall Road 6550 Katella Avenue Langhorne, PA 19047 Suite 2390 Elgin, IL 60123 Cypress, CA 90630 Phone (215) 741-0676 Suwannee. GA 30174 Phone (847) 468-5530 Phone (714) 373-744 Fax (215) 750-6492 Phone (770) 338-6860 Fax (847) 4685528 Fax (714) 373-7447
Fax (770) 338-6548
Coven: CCVWS Covers: covers: CT, DE, ME, MD, MA, AL, FL, GA, MS, NC, AR, IL, IN, IA, KS, KY, AK, AZ, CA, CO, ID, NH, NJ, NY, PA, RI, VT, SC, TN LA, MI, MN, MO, NE, MT, NV, NM, OR, UT, VA, DC, WV, ND, OK, SD, TX, WI, OH WA, WY, HI
. As of January ‘97
3

Panasonic Consumer Electronics Company, Division of Matsushita Electric Corporation of America One Panasonic Way, Secaucus, New Jersey 07094
Panasonic Sales Company (“PSC”), Division of Matsushita Electric of Puerto Rico, Inc. Ave. 65 de Infanteria, Km. 9.5, San Gabriel Industrial Park, Carolina, Puerto Rico 00985
Printed in Japan PSQV1013YA KK1295NS6017CM
OPERATING INSTRUCTIONS-SLT MODE
-HOLD
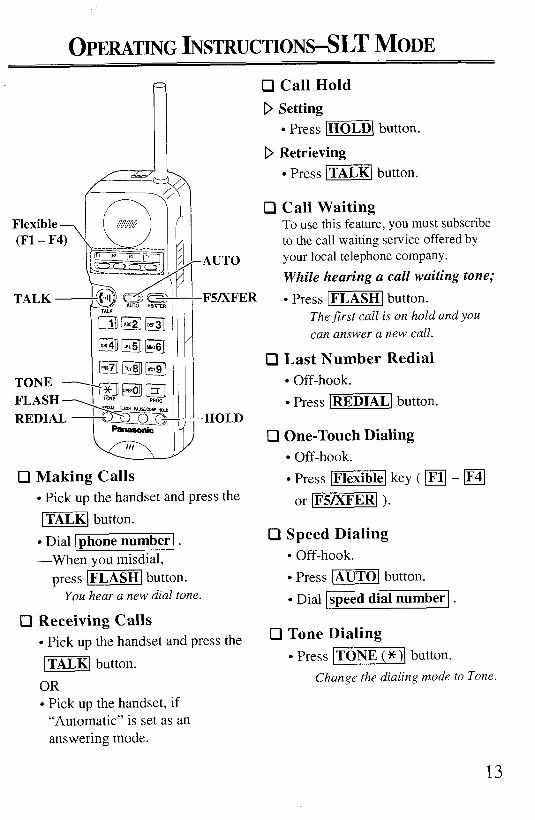
0 Making Calls l Pick up the handset and press the -1 button.
l Dial 1 phone number I. -When you misdial,
press (FLASH1 button. You hear a new dial tone.
Cl Receiving Calls . Pick up the handset and press the -1 button.
OR l Pick up the handset, if
“Automatic” is set as an answering mode.
tl Call Hold D Setting
. Press (HOLD\ button.
D Retrieving l Press )TALK] button.
Cl Call Waiting To use this feature, you must subscribe to the call waiting service offered by your local telephone company. While hearing a call waiting tone; . Press m button.
The first call is on hold and you can answer a new call.
III Last Number Redial l Off-hook. l Press r-1 button.
III One-Touch Dialing l Off-hook. l Press -1 key ( B - m
or IFS/XFERI ).
Cl Speed Dialing l Off-hook. l Press ml button.
l Dial speed dial number .
•l Tone Dialing l Press (TONE1 button.
Change the dialing mode to Tone.
13
PROGRAMMING FOR ONE-TOUCH DIAL-EMSS MODE
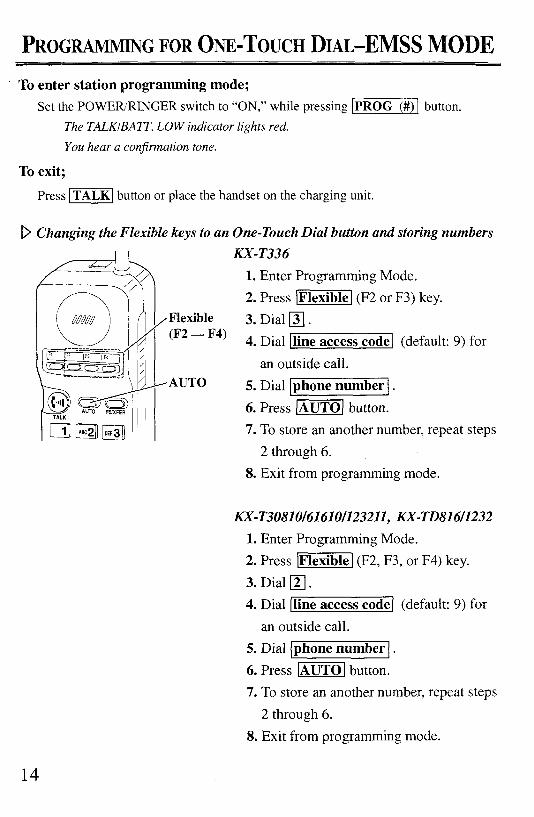
To enter station programming mode; Set the POWER/RINGER switch to “ON,” while pressing [PROG(#) button.
The TALKIBATT. LOW indicator lights red.
You hear a conjknation tone.
To exit;
D
Press -1 button or place the handset on the charging unit.
Changing the Flexible keys to an One-Touch Dial button and storing numbers KX-T336
1. Enter Programming Mode. 2. Press /Flexiblel (F2 or F3) key.
3. Dial q . 4. Dial Iline access code\ (default: 9) for
an outside call.
7. To store an another number, repeat steps
2 through 6. 8. Exit from programming mode.
KX-T30810/61610/123211, KX-TD81611232 1. Enter Programming Mode. 2. Press -1 (F2, F3, or F4) key.
3. Dial q . 4. Dial (line access code1 (default: 9) for
an outside call. 5. Dial (phone number I.
6. Press ml button. 7. To store an another number, repeat steps
2 through 6.
8. Exit from programming mode.
14
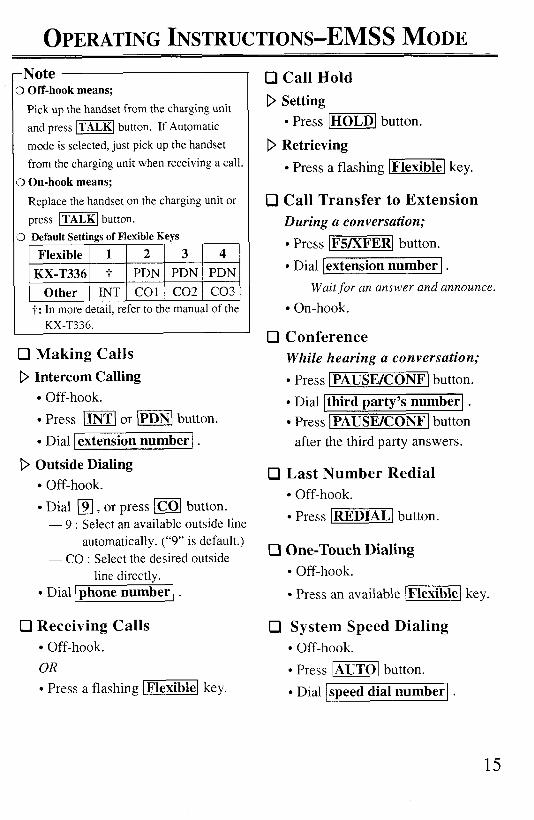
OPERATING INSTRUCTIONS-EMSS MODE -Note I) Off-hook means;
Pick up the handset from the charging unit
and press m button. If Automatic
mode is selected, just pick up the handset from the charging unit when receiving a call.
3 On-hook means;
Replace the handset on the charging unit or press ml button.
3 Default Settings of Flexible Keys
Flexible 1 2 3 4 KX-T336 t PDN PDN PDN
]T;pO~3;~IN~’ CO1 j CO21 CO31 1 n more detail refer to the manual of the
0 Making Calls D Intercom Calling
. Off-hook.
l Press m or I=] button. l Dial extension number .
D Outside Dialing . Off-hook. l Dial q , or press (co( button.
- 9 : Select an available outside line automatically. (“9” is default.)
- CO : Select the desired outside line directly.
l Dial 1 phone number 1 .
Cl Receiving Calls . Off-hook. OR
l Press a flashing -1 key.
0 Call Hold D Setting
. Press -1 button.
D Retrieving l Press a flashing 1-1 key.
0 Call Transfer to Extension During a conversation; l Press [F5/XFERI button.
l Dial extension number . Wait for an answer and announce.
l On-hook.
0 Conference While hearing a conversation;
l Press ) PAUSEKONF 1 button. l Dial 1 third party’s number1 . l Press PAUSEKONF button
after the third party answers.
0 Last Number Redial . Off-hook. . Press -1 button.
0 One-Touch Dialing l Off-hook.
l Press an available [a[ key.
0 System Speed Dialing l Off-hook. . Press m button. l Dial speed dial number .
15
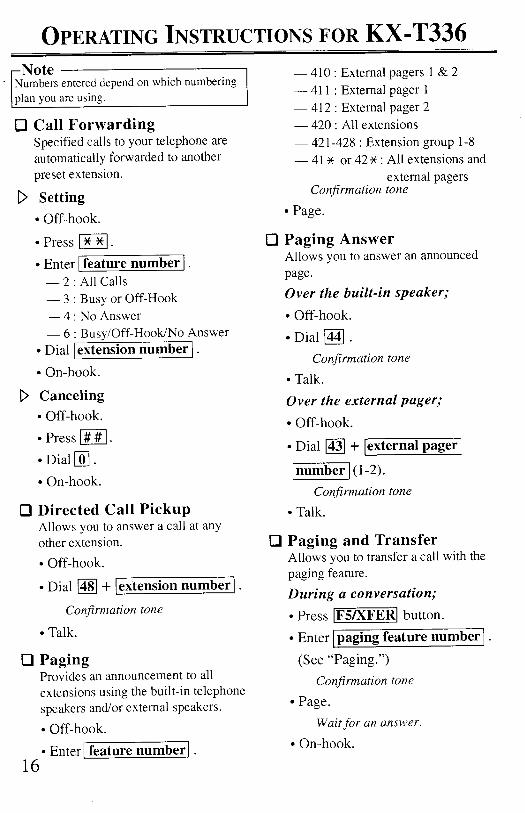
OPERATING INSTRUCTIONS FOR KX-T336 -Note Numbers entered depend on which numbering plan you are using.
0 Call Forwarding Specified calls to your telephone are automatically forwarded to another preset extension.
D Setting . Off-hook.
l Press m.
l Enter [feature number I. - 2 : All Calls - 3 : Busy or Off-Hook - 4 : No Answer - 6 : Busy/Off-HooWNo Answer
l Dial Iextension number ) . l On-hook.
D Canceling l Off-hook. . Press r##I .
l Dial q .
l On-hook.
III Directed Call Pickup Allows you to answer a call at any other extension.
. Off-hook.
. Dial 1481 + Iextension number ) .
Confirmation tone
l Talk.
0 Paging Provides an announcement to all extensions using the built-in telephone speakers and/or external speakers.
. Off-hook.
16 l Enter 1 feature number) .
- 410 : External pagers 1 & 2 - 411 : External pager 1 - 412 : External pager 2 - 420 : All extensions - 42 l-428 : Extension group l-8 - 41% or 42 x : All extensions and
external pagers Confirmation tone
- Page.
0 Paging Answer Allows you to answer an announced page. Over the built-in speaker;
. Off-hook. l Dial [441 .
Confirmation tone
l Talk.
Over the external pager; l Off-hook.
l Dial 1431 + Iexternal pager
numberj(l-2). Confirmation tone
l Talk.
Cl Paging and Transfer Allows you to transfer a call with the paging feature.
During a conversation; . Press IF5/XFERI button. l Enter paging feature number 1.
(See “Paging.“) Confirmation tone
l Page. Wait for an answer.
l On-hook.

FEATURE NUMBER TABLE The feature numbers for KX-T308 1016 16 1 O/ 1232 11 and KX-TD8 1611232 are listed below. For more information, please refer to the manual of your PBX.
Feature
Busy Station Signaling
Feature Number KX-T30810161610 KX-T123211 KX-TD81611232
1 1 1
Call Forwarding _-----__----____-___~~~~~~~~~~~~~~-~~~~~~~-----~~~~----~-~-~--------~~~~ - All Calls 71+EXTN+# 711+EXTN+# 7102+EXTN ____---__----------------------------------------------~---------------- -Busy or No Answer - 7 12+ EXTN+ # 7105 + EXTN _____--___---------------------------------------------~---------------- - Busy - 7103 + EXTN _____--___------_--------------------------------------~---------------- - No Answer - - 7104 + EXTN ___----__----------------------------------------------~---------------- - Cancel 70+# 710+# 7100
Direct Call Pickup 4 + EXTN 4 + EXTN 41+ EXTN
Paging __-----_-----------------------------------------------~.---------------- - All extensions 34 330 330 __-----___-----_---------------------------------------~---------------- - External pager 1 33 321 321 ___----____----__--------------------------------------~---------------- - External pager 2 - 322 322 -------_-----------------------------------------------~---------------- - External pager 3 - - 323 (1232 only) --------_----------------------------------------------~---------------- - External pager 4 - - 324 (1232 only) _------__----------------------------------------------~---------------- -All external pagers - 320 320 -------------------------------------------------------~---------------- - Extension Groups 35 through 38 33 + group no. 33 + group no. -------------------------------------------------------~---------------- - All extension and - 32* or33* 32* or33++
pager
Paging - Answer ------____-----__--------------------------------------~---------------- Over built-in speaker 43 43 43 _____-_______--___-------------------------------------~---------------- Over pager 43 42 + pager no. 42 + pager no.
Note: l The numbers entered for the KX-TD8 16/l 232 depend on which numbering plan you are
using. l “EXTN” means extension number.
17
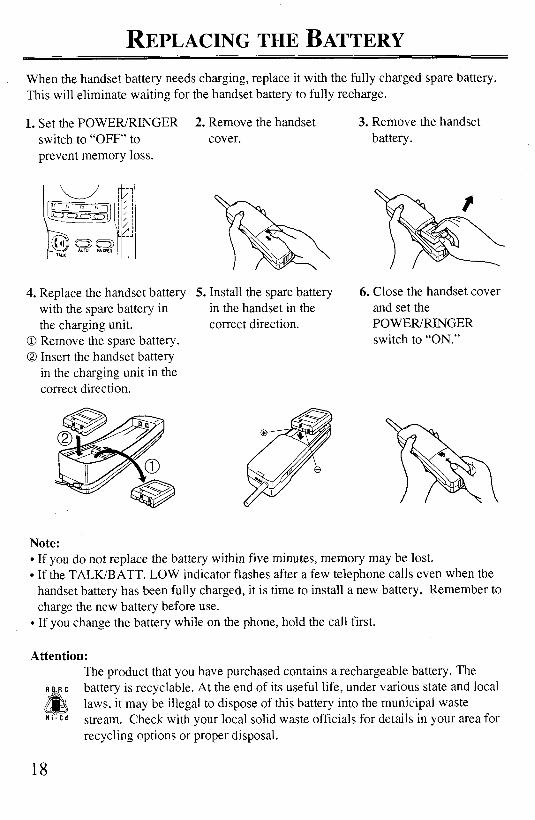
REPLACINGTHEBATTERY When the handset battery needs chargin,, 0 replace it with the fully charged spare battery. This will eliminate waiting for the handset battery to fully recharge.
1. Set the POWER/RINGER 2. Remove the handset switch to “OFF” to cover. prevent memory loss.
3. Remove the handset battery.
4. Replace the handset battery 5. Install the spare battery with the spare battery in in the handset in the the charging unit. correct direction.
0 Remove the spare battery. 0 Insert the handset battery
in the charging unit in the correct direction.
6. Close the handset cover and set the POWER/RINGER switch to “ON.”
Note: l If you do not replace the battery within five minutes, memory may be lost. l If the TALWBATT. LOW indicator flashes after a few telephone calls even when the
handset battery has been fully charged, it is time to install a new battery. Remember to charge the new battery before use.
l If you change the battery while on the phone, hold the call first.
Attention: The product that you have purchased contains a rechargeable battery. The
A R c
&
battery is recyclable. At the end of its useful life, under various state and local laws, it may be illegal to dispose of this battery into the municipal waste
Ni-Cd stream. Check with your local solid waste officials for details in your area for recycling options or proper disposal.
18
TROUBLESHOOTING
The unit does not work. l Set the POWER/RINGER switch to “ON.” l The unit was not connected properly.
(See pages 5 and 6.) l The handset battery is weak. Charge the
battery fully, or replace with the fully charged spare battery.
Sound flutters or fades. l You are too far from the base unit. Move
closer to the base unit. l Raise the base unit antenna.
Noise occurs. l Place the base unit away from office
equipment such as computers.
I am encountering interference from another unit. l Set the handset and the base unit away
from other electrical appliances.
The handset does not ring. l Set the POWER/RINGER switch to “ON.”
The TALK/BATT. LOW indicator flashes. Beep tones sound every 15 seconds during a conversation. l Charge the battery fully, or replace the
handset battery with the spare battery in the charging unit.
I charged the battery for 15 hours, but the TALK/BATT. LOW indicator starts to flash after a few telephone calls. l Clean the battery charge contacts and
charge once more. l It is time to change the battery. Replace
with a new one.
I cannot use the unit during a power failure. l The unit will not function during a power
failure. We recommend you connect a reserve standard telephone on the same line. For parallel connection, see page 6.
While using the handset, an alarm tone sounds continuously. l Approach the base unit. l Make sure that the AC adaptor is
connected to the base unit.
I cannot store a phone number into memory. l Do not pause for over 30 seconds while
storing.
While operating the unit, the AC adaptor feels warm. While charging the battery, the unit feels warm. The SPARE CHARGE indicator does not go out even after charging for 15hours. l These are normal conditions.
The unit does not ring when receiving an intercom call in EMSS mode. l “Voice-Calling mode” is set. (Refer to
the manual of your PBX; Alternate Calling - Ring/Voice.) “Voice-Calling mode” is not available on this unit. Set to the “Ring-Calling” mode.
19

IMPORTANTSAFETY INSTRUCTIONS l If there is any trouble, disconnect the unit
and connect a known working phone. If the known working phone operates properly, have your unit repaired by one of the authorized Panasonic Factory Servicenter. If the known working telephone does not operate properly, consult with your telephone company or have the PBX repaired, if connected.
l Keep the unit away from heating appliances and electrical noise generating devices such as fluorescent lamps and motors.
l The unit should be kept free of dust, moisture and vibration, and should not be exposed to direct sunlight.
l Do not use benzine, thinner, or any abrasive powder, to clean the cabinet. Wipe it with a soft cloth.
l The unit should be situated so that the location or position does not interfere with its proper ventilation. Allow 10 cm (4 inches) clearance around the unit.
Take special care to follow the safety suggestions listed below. Safety 1) Power Source: The unit should be
connected to a power supply only of the type described in the operating instructions or as marked on the unit.
2) Nonuse Periods: When the unit is not in use, turn the power off. When left unused for a long period of time, the base unit and the charging unit should be unplugged from the AC outlet.
Installation Environment 1) Water and Moisture: Do not use this unit
near water - for example, near a bathtub, washbowl, sink, etc. Damp basements should also be avoided.
2) Heat: The unit should be situated away from heat sources such as radiators, kitchen ranges, etc. It also should not be placed in rooms where the temperature is lower than 5°C (41°F) or higher than 40°C (104°F).
Placement 1) Stacking: Do not place heavy objects on
top of this unit. 2) Foreign material: Care should be taken
so that objects do not fall into and liquids are not spilled into the unit. Do not subject this unit to excessive smoke, dust, mechanical vibration, or shock.
3) Surface: Place the unit on a flat surface. For best performance 1) If noise prevents the conversation from
being understood at the handset, approach the base unit to lessen the noise.
2) The handset should be fully recharged in the charging unit when the TALWBATT. LOW indicator flashes.
3) The antenna of the handset should not be touched during use because of its high sensitivity.
4) The possible calling distance may be shortened when the unit is used in the following places: Near obstacles such as hills, tunnels, undergrounds, near metal objects such as wire fences, etc.
20
IMPORTANT SAFETY INSTRUCTIONS When using this unit, basic safety precautions should always be followed to reduce the risk of fire, electric shock, or personal injury. 1. Read and understand all instructions.
2. Follow all warnings and instructions marked on the unit.
3. Unplug this unit from wall outlets before cleaning. Do not use liquid or aerosol cleaners. Use a damp cloth for cleaning.
4. Do not use this unit near water, for example, near a bathtub, washbowl, kitchen sink, or the like. Never spill any liquid on the unit.
5. Install this unit securely on a stable surface. Serious damage and/or injury may result if the unit falls.
6. Do not cover slots and openings on the unit. They are provided for ventilation and protection against overheating. Never place the unit near radiators, or a place where proper ventilation is not available.
7. Use only the power source as marked on the unit. If you are not sure of the type of power supplied to your home, consult your dealer or local power company.
8. Do not place objects on the power cord. Install the unit where no one can step or trip on the cord.
9. Do not overload wall outlets and extension cords. This can result in the risk of fire or electric shock.
10. Never push any objects into the unit through the slots. This may result in risk of fire or electric shock.
11. To reduce the risk of electric shock, do not disassemble this unit. Take it to an authorized servicenter when service is required. Opening or removing covers may expose you to dangerous voltages or other risks. Incorrect reassembly can cause electric shock when the appliance is subsequently used.
12. Unplug this unit from the wall outlet and refer servicing to an authorized servicenter when the following conditions occur:
A. When the power supply cord or plug is damaged or frayed.
B. If liquid has been spilled into the unit. C. If the unit has been exposed to rain or
water. D. If the unit does not work normally by
following the operating instructions. Adjust only controls covered by the operating instructions. Improper adjustment of internal controls may require extensive work by an authorized servicenter.
E. If the unit has been dropped or physically damaged.
F. If the unit exhibits a distinct change in performance.
13. During thunderstorms, avoid using telephones except cordless types. There may be a remote risk of electric shock from lightning.
14. Do not use this unit to report a gas leak, when in the vicinity of the gas leak.
SAVE THESE INSTRUCTIONS
2 1

IMPORTANT SAFETY INSTRUCTIONS CAUTION: To reduce the risk of fire or injury to
persons, read, understand and follow these
instructions.
1. Use only the battery(ies) specified by
the manufacturer.
2. Do not dispose of the battery(ies) in a fire. They may explode. Check with
local waste management codes for
special disposal instructions.
3. Do not open or mutilate the battery(ies). Released electrolyte is corrosive and may cause bums or injury to the eyes or skin. The electrolyte may be toxic if
swallowed.
4. Exercise care in handling batteries in order not to short the battery with
conducting materials such as rings, bracelets, and keys. The battery or conductor may overheat and cause bums.
5. Charge the battery(ies) that are provided or identified for use with this
product only in accordance with the instructions and limitations specified in
this manual.
WARNING: TO PREVENT FIRE OR SHOCK HAZARD, DO NOT EXPOSE THIS
PRODUCT TO RAIN OR ANY TYPE OF
MOISTURE.
FCC Information If required by the telephone company,
inform them as follows.
-FCC Registration No.:
(found on the bottom of the unit)
-Ringer Equivalence: 0.2B -The particular telephone lines to which
the equipment is connected.
Ringer Equivalence Number (REN):
The REN is useful in determining the quantity of devices you may connect to
your telephone line and still have all of those devices ring when your telephone number is called. In most, but not all areas, the sum of the REN’s of all devices
connected to one line should not exceed five (5.0). To be certain of the number of devices you may connect to your line, as determined by the REN, you should contact your local telephone company to determine the maximum REN for your calling area.
In the event terminal equipment causes
harm to the telephone network, the telephone company should notify the customer, if possible, that service may be stopped. However, where prior notice is impractical, the company may temporarily
cease service providing that they:
a) Promptly notify the customer. b) Give the customer an opportunity to
correct the problem with their
equipment.
22

c) Inform the customer of the right to bring
a complaint to the Federal Communication Commission pursuant
to procedures set out in FCC Rules and
Regulations Subpart E of Part 68.
The Telephone Company may make changes in its communications facilities,
equipment, operations, or procedures, where such action is reasonably required
in the operation of its business and is not
inconsistent with the rules and regulations in FCC Part 68.
If such changes can be reasonably expected to render any customer terminal equipment incompatible with telephone company communications facilities, or require modification or alteration of such terminal equipment, or otherwise materially affect its use or performance, the customer shall be given adequate notice in writing, to allow the customer an
opportunity to maintain uninterrupted service.
CAUTION: Any changes or modifications not
expressly approved by the party responsible for compliance could void the
user’s authority to operate this device.
NOTE:
This equipment has been tested and found
to comply with the limits for a Class B
digital device, pursuant to Part 15 of the
FCC Rules. These limits are designed to
provide reasonable protection against harmful interference in a residential
installation. This equipment generates, uses, and can radiate radio frequency
energy and, if not installed and used in accordance with the instructions, may cause harmful interference to radio
communications.
However, there is no guarantee that interference will not occur in a particular
installation. If this equipment does cause harmful interference to radio or television
reception, which can be determined by turning the equipment off and on, the user
is encouraged to try to correct the interference by one or more of the following measures: -Reorient or relocate the receiving
antenna. -Increase the separation between the
equipment and receiver. -Connect the equipment into an outlet on
a circuit different from that to which the
receiver is connected. -Consult the dealer or an experienced
radio/TV technician for help.
Privacy of communications may not be ensured when using this phone.
23

*” / d’
IMPORTANT SAPETY INSTRUCTIONS .I ‘. This unit must not be connected to a coin! %
operated line. If you are on a party line, 4: check with your local telephone company:!
When programming emergency numbers
and/or making test calls to emergency
numbers: 1. Remain on the line and briefly explain
to the dispatcher the reason for the call before hanging up.
2. Perform such activities in the off-peak hours, such as early morning hours or
late evenings.
Hearing Aid Compatibility This telephone provides magnetic coupling for hearing aids.
When you ship the product
Carefully pack and send it prepaid,
adequately insured and preferably in the
original carton. Attach a postage-paid
letter, detailing the symptom, to the
outside of the carton. DO NOT send the
product to the Executive or Regional Sales
offices. They are NOT equipped to make
repairs.
Product Service Panasonic Servicenters for this product are
listed in the servicenter directory. Consult your authorized Panasonic dealer for
detailed instructions.
For your future reference SERIAL NO. DATE OF PURCHASE (found on the bottom of the unit)
NAME OF DEALER
DEALER’S ADDRESS
Matsushita Consumer Electronics Company, Division of Matsushita Electric Corporation of America One Panasonic Way, Secaucus, New Jersey 07094
Panasonic Sales Company (,‘PSC”>, Division of Matsushita Electric of Puerto Rico, Inc. Ave. 65 de Infanteria, Km.9.5, San Gabriel Industrial Park Carolina, Puerto Rico 00985
Printed in Japan PSQXlOS3ZA KEl295NS 1026