Embed Size (px)
Citation preview

o p e r a t i o n s m a n u a l
EDC X9WILSON COMBAT
W A R N I N G:BEFORE USING THIS FIREARM, READ, UNDERSTAND AND FOLLOW THESE INSTRUCTIONS. THIS FIREARM SHOULD BE CONSIDERED
LOADED AND READY TO FIRE UNTIL YOU REMOVE THE MAGAZINE AND VERIFY THAT THE CHAMBER IS UNLOADED.
If there is anything you do not understand, get assistance from a qualified gunsmith in the safe handling and maintenance of firearms.
This instruction manual should always accompany this firearm and be transferred with it upon change of ownership, or when the firearm is loaned or presented to another person.
Nothing can ever take the place of proper instruction and training. We recommend beginning with an NRA training course near you. For more information, go to https://firearmtraining.nra.org

Instruction Manual for EDC X9
Technical Questions(800) 955-4856
WILSON COMBAT2452 CR 719
BERRYVILLE, AR 72616-4573Order Toll Free: 1-800-955-4856
Copyright© 2017 Wilson’s Gun Shop, Inc.
State-By-State Warnings:Some states require by law that specified warning notices in “larger-than-normal” type be conspicuously included by the manufacturer, distributor, or retailer with firearms sold in that state. Since our products may be sold in those states we include the following:
California:
WARNING“Children are attracted to and can operate firearms that can cause severe injuries or death. Prevent child access by always keeping guns locked away and unloaded when not in use. If you keep a loaded firearm where a child obtains and improperly uses it, you may be fined or sent to prison.”
ADVERTENCIA“Los niños se sienten atraídos y se puede operar las armas de fuego que pueden causar lesiones graves o la muerte. Evitar el acceso niño siempre manteniendo las armas bajo llave y descargadas cuando no esté en uso. Si usted mantiene un arma de fuego cargada en que un niño obtiene y utiliza inadecuadamente, usted puede recibir una multa de enviado a la cárcel.”
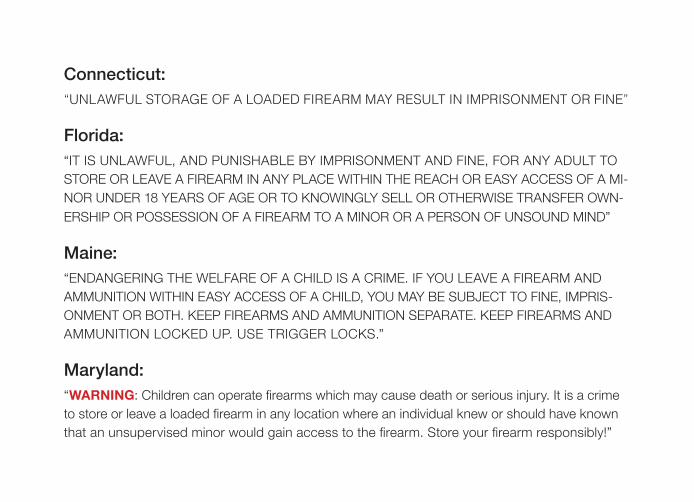
Connecticut:“UNLAWFUL STORAGE OF A LOADED FIREARM MAY RESULT IN IMPRISONMENT OR FINE”
Florida:“IT IS UNLAWFUL, AND PUNISHABLE BY IMPRISONMENT AND FINE, FOR ANY ADULT TO STORE OR LEAVE A FIREARM IN ANY PLACE WITHIN THE REACH OR EASY ACCESS OF A MI-NOR UNDER 18 YEARS OF AGE OR TO KNOWINGLY SELL OR OTHERWISE TRANSFER OWN-ERSHIP OR POSSESSION OF A FIREARM TO A MINOR OR A PERSON OF UNSOUND MIND”
Maine:“ENDANGERING THE WELFARE OF A CHILD IS A CRIME. IF YOU LEAVE A FIREARM AND AMMUNITION WITHIN EASY ACCESS OF A CHILD, YOU MAY BE SUBJECT TO FINE, IMPRIS-ONMENT OR BOTH. KEEP FIREARMS AND AMMUNITION SEPARATE. KEEP FIREARMS AND AMMUNITION LOCKED UP. USE TRIGGER LOCKS.”
Maryland:“WARNING: Children can operate firearms which may cause death or serious injury. It is a crime to store or leave a loaded firearm in any location where an individual knew or should have known that an unsupervised minor would gain access to the firearm. Store your firearm responsibly!”
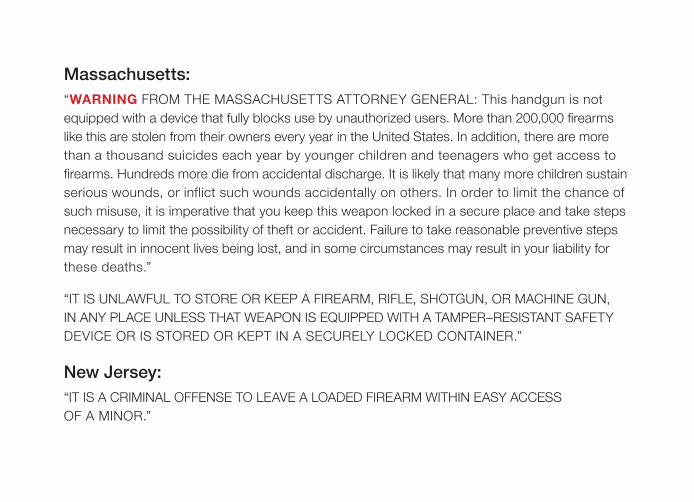
Massachusetts:“WARNING FROM THE MASSACHUSETTS ATTORNEY GENERAL: This handgun is not equipped with a device that fully blocks use by unauthorized users. More than 200,000 firearms like this are stolen from their owners every year in the United States. In addition, there are more than a thousand suicides each year by younger children and teenagers who get access to firearms. Hundreds more die from accidental discharge. It is likely that many more children sustain serious wounds, or inflict such wounds accidentally on others. In order to limit the chance of such misuse, it is imperative that you keep this weapon locked in a secure place and take steps necessary to limit the possibility of theft or accident. Failure to take reasonable preventive steps may result in innocent lives being lost, and in some circumstances may result in your liability for these deaths.”
“IT IS UNLAWFUL TO STORE OR KEEP A FIREARM, RIFLE, SHOTGUN, OR MACHINE GUN, IN ANY PLACE UNLESS THAT WEAPON IS EQUIPPED WITH A TAMPER–RESISTANT SAFETY DEVICE OR IS STORED OR KEPT IN A SECURELY LOCKED CONTAINER.”
New Jersey:“IT IS A CRIMINAL OFFENSE TO LEAVE A LOADED FIREARM WITHIN EASY ACCESS OF A MINOR.”
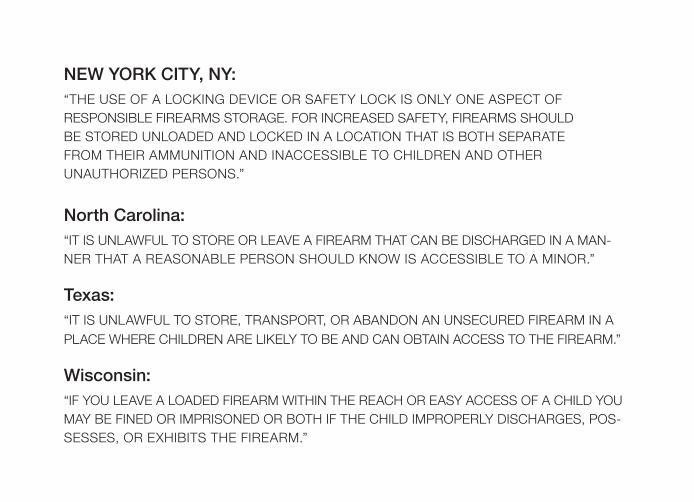
NEW YORK CITY, NY:“THE USE OF A LOCKING DEVICE OR SAFETY LOCK IS ONLY ONE ASPECT OFRESPONSIBLE FIREARMS STORAGE. FOR INCREASED SAFETY, FIREARMS SHOULDBE STORED UNLOADED AND LOCKED IN A LOCATION THAT IS BOTH SEPARATEFROM THEIR AMMUNITION AND INACCESSIBLE TO CHILDREN AND OTHERUNAUTHORIZED PERSONS.”
North Carolina:“IT IS UNLAWFUL TO STORE OR LEAVE A FIREARM THAT CAN BE DISCHARGED IN A MAN-NER THAT A REASONABLE PERSON SHOULD KNOW IS ACCESSIBLE TO A MINOR.”
Texas:“IT IS UNLAWFUL TO STORE, TRANSPORT, OR ABANDON AN UNSECURED FIREARM IN A PLACE WHERE CHILDREN ARE LIKELY TO BE AND CAN OBTAIN ACCESS TO THE FIREARM.”
Wisconsin:“IF YOU LEAVE A LOADED FIREARM WITHIN THE REACH OR EASY ACCESS OF A CHILD YOU MAY BE FINED OR IMPRISONED OR BOTH IF THE CHILD IMPROPERLY DISCHARGES, POS-SESSES, OR EXHIBITS THE FIREARM.”
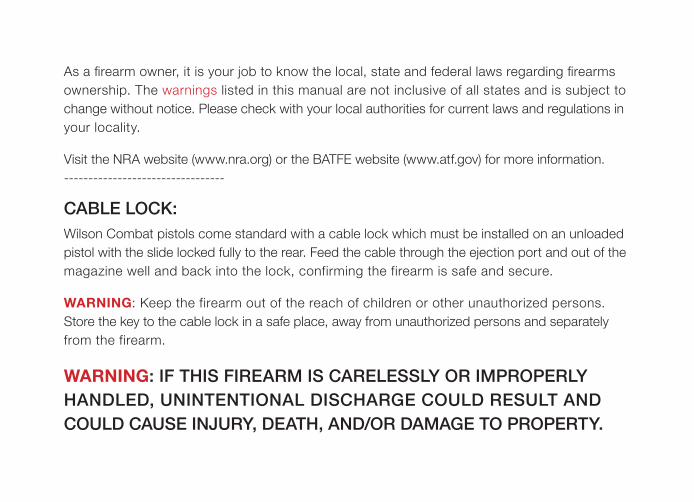
As a firearm owner, it is your job to know the local, state and federal laws regarding firearms ownership. The warnings listed in this manual are not inclusive of all states and is subject to change without notice. Please check with your local authorities for current laws and regulations in your locality.
Visit the NRA website (www.nra.org) or the BATFE website (www.atf.gov) for more information. ---------------------------------
CABLE LOCK:Wilson Combat pistols come standard with a cable lock which must be installed on an unloaded pistol with the slide locked fully to the rear. Feed the cable through the ejection port and out of the magazine well and back into the lock, confirming the firearm is safe and secure.
WARNING: Keep the firearm out of the reach of children or other unauthorized persons. Store the key to the cable lock in a safe place, away from unauthorized persons and separately from the firearm.
WARNING: IF THIS FIREARM IS CARELESSLY OR IMPROPERLY HANDLED, UNINTENTIONAL DISCHARGE COULD RESULT AND COULD CAUSE INJURY, DEATH, AND/OR DAMAGE TO PROPERTY.
GENERAL FIREARM SAFETY CAUTIONS:1. Always keep your pistol pointed in a safe direction. Treat ALL firearms as if they are loaded!2. Keep your finger off the trigger until you’re ready to shoot.3. Keep your pistol unloaded until you are ready to use it.4. Be sure your pistol is in good working condition.5. Know how to safely use this pistol BEFORE use.6. Use only the correct, quality ammunition in this pistol.7. Know your target AND what is beyond it.8. ALWAYS wear eye and ear protection.9. NEVER use alcohol or drugs before or during shooting.10. When not in use, store this pistol where it is NOT accessible to unauthorized persons.
HELP KEEP OUR SHOOTING SPORTS SAFE:To quote the founder of Practical Pistolcraft, Jeff Cooper -• Every gun is ALWAYS loaded!• NEVER let the muzzle cover anything which you are not willing to destroy!• Keep your finger OFF the trigger till your sights are ON THE TARGET!• ALWAYS be sure of your target!
If these simple rules are ALWAYS followed this pistol will provide you with many years of enjoyable use.
WARNING: LEAD EXPOSUREDischarging firearms in a poorly ventilated area, or handling or cleaning firearms and ammunition can result in an exposure to lead and other harmful substances known in the state of California to cause birth defects, reproductive harm, and other serious physical injury. Adequate ventilation must be maintained at all times when handling, cleaning or firing firearms. Wash your hands thoroughly after exposure. The use of gloves, glasses and other protective gear during firearm cleaning is recommended.


Welcome To Wilson Combat—Our Promise To You
Since 1977, we strive to provide our valued customers with superior firearms, parts, and accessories. Our policy of 100%, complete customer satisfaction is the cornerstone of doing business with Wilson Combat®. We want every experience you have in dealing with us to be pleasant and rewarding and we take pride in how we deliver our products and services.
If for any reason you are unhappy with a Wilson Combat® product, Wilson Combat® service, or how your issue has been addressed by an employee of Wilson Combat®, feel free to contact our Customer Service Director at: info@wilsoncombat .com.

In the event that you need to return or exchange a product, please follow the instructions on our Merchandise Return Form found on our website, email us at info@wilsoncombat .com, or call us at (800) 955-4856.
For firearms service repair work please contact [email protected] and include “Attn: Service Repairs” in the subject.
For answers to frequently asked questions, a complete list of available firearms, parts, accessories, services and upgrades, or to find a Wilson Combat® dealer near you, please visit our website at ht tps: //www.wi lsoncombat.com
For helpful video instructions for many of our products, please visit our YouTube® channel at ht tps: //www.youtube.com/user/gowi lsoncombat

DISCLAIMERS:
Wilson’s Gun Shop, Inc. expressly disclaims liability for incidental or consequential damages. As provided for below, we do not offer any written or implied warranty on our products and expressly disclaim any implied warranty of merchantability or fitness for any particular purpose.
As a condition of sale, any controversy or claim arising out of or relating to this sale shall be settled by arbitration in accordance with the Commercial Arbitration Rules of the American Arbitration As-sociation, and judgment upon the award rendered by the arbitrator(s) may be entered in any court having jurisdiction thereof. On any claim related to goods or services sold by Wilson’s Gun Shop, Inc. jurisdiction for the arbitration shall be exclusively in Arkansas, regardless of where the claim may arise. No claim shall be actionable unless commenced within one year from date of sale.
No parts sold by us are intended for installation except by a trained gunsmith, and parts and firearms sold by us are only intended for factory specification standard velocity ammunition. Any verbal representations made by us, related to installation, should be confirmed with your local gunsmith to assure safe operation in your particular firearm.
NO WRITTEN WARRANTY: Due to the complexities of complying with the Federal warranty law, Wilson’s Gun Shop, Inc. does not offer a written warranty. We continue to stand behind our prod-ucts and services, and to care for our customers, but we cannot make guarantees or warranties of any kind. This general statement of policies and disclaimers is effective July 1, 1985, and no prior statements or promises shall be of any effect for transactions after July 1, 1985.
BEFORE FIRING ANY FIREARM:
• Be sure that the barrel is free from obstructions. Firing a firearm with an obstruction in the barrel could result in serious injury or death.
• Confirm that your ammunition and the caliber of your firearm are compatible.
• In case of a hang fire (an unexpected delay between the action of pulling the trigger and the ignition of cartridge propellant), keep your firearm pointed in a safe direction for at least 30 seconds. If after 30 seconds the cartridge has not fired, remove the magazine, clear the chamber, and examine the cartridge that did not fire. If there is a no indentation on the primer, a very light strike, or off center strike on the primer, please call Wilson Combat support. Dispose of unfired ammunition in accordance with the manufacturer’s guidelines. If you suspect there is a bullet lodged in the barrel, disassemble the unloaded firearm and remove the barrel to confirm. If so, contact Wilson Combat.
WARNING: DO NOT FIRE ANY FIREARM IF A BULLET IS LODGED IN THE BARREL. DOING SO CREATES EXTREME PRESSURE AND COULD RESULT IN SERIOUSINJURY OR DEATH.
• Never pull the trigger if the slide has not fully closed. This could induce an out of battery firing which can cause an escape of pressure toward the shooter and cause serious injury.
CLEARING MALFUNCTIONS
• All semi-automatic firearms may experience a malfunction from time to time. Most malfunctions are caused by improper maintenance, out of spec ammunition, improperly maintained magazines, insufficient grip, or debris that has been introduced to the internal parts of the firearm. To minimize the frequency of malfunctions, your firearm should be maintained in accordance with the MAINTENANCE section of this instruction manual.
• To clear a malfunction, always keep the firearm pointed in a safe direction. Keep your finger outside of the trigger guard at all times. Take note of the type of malfunction so that remedial maintenance or repair can be performed if necessary. Retract the action (slide or bolt) to its fully rearward position and lock it open. Remove the magazine and clear the malfunction using your fingers or a small wooden tool. (Metal tools should not be introduced into the action of a firearm as they can cause damage or detonate the primer of the cartridge.)
• If you are unable to clear the malfunction, contact Wilson Combat or your local gunsmith for further instructions.
Activating the Safety
WARNING: While loading, keep the muzzle of the handgun pointed in a safe direction with the safety in the FIRE (down) position, finger off the trigger and outside the trigger guard. The slide will not retract, and you will not be able to load the handgun if the safety is in the SAFE (up) position.
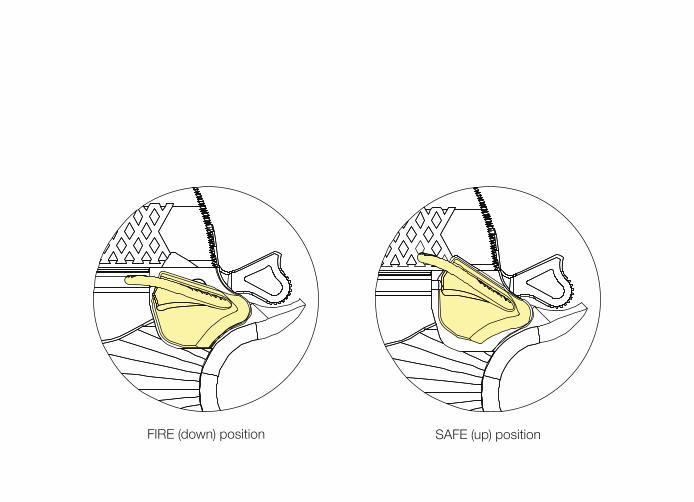
FIRE (down) position SAFE (up) position
Loading
WARNING: The process for loading your handgun is simple, but if not done correctly, could be dangerous or deadly.
Loading the handgun is done in three simple steps.
1. Load the magazine
2. Inserting the magazine into the handgun
3. Loading the chamber
WARNING: Keep the gun pointed in a safe direction and your finger off the trigger during the entire loading sequence.
Loading the Magazine
1. Hold the magazine in your non-dominant hand with the feed lips up, and the opening in the top of the magazine pointing outward.
2. With your shooting hand, insert a cartridge through the opening in the top of the magazine while pressing down on the spring-loaded follower. Press down and to the rear of the magazine until the cartridge is positioned completely in the magazine. The base of the cartridge should rest against the rear of the magazine. Repeat until the magazine is full.
Inserting the Magazine
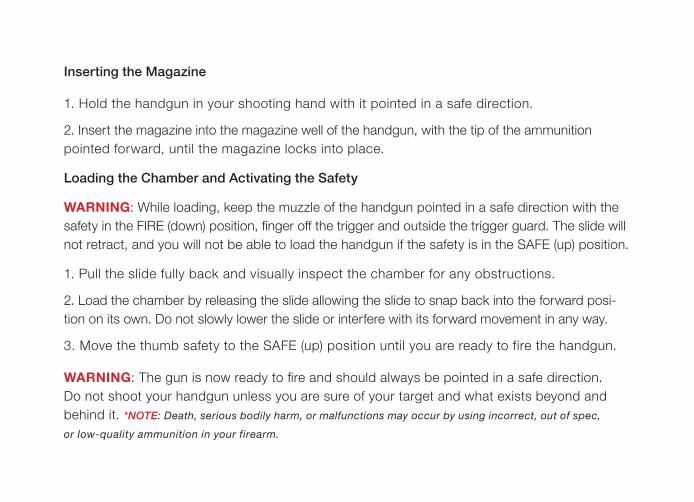
1. Hold the handgun in your shooting hand with it pointed in a safe direction.
2. Insert the magazine into the magazine well of the handgun, with the tip of the ammunition pointed forward, until the magazine locks into place.
Loading the Chamber and Activating the Safety
WARNING: While loading, keep the muzzle of the handgun pointed in a safe direction with the safety in the FIRE (down) position, finger off the trigger and outside the trigger guard. The slide will not retract, and you will not be able to load the handgun if the safety is in the SAFE (up) position.
1. Pull the slide fully back and visually inspect the chamber for any obstructions.
2. Load the chamber by releasing the slide allowing the slide to snap back into the forward posi-tion on its own. Do not slowly lower the slide or interfere with its forward movement in any way.
3. Move the thumb safety to the SAFE (up) position until you are ready to fire the handgun.
WARNING: The gun is now ready to fire and should always be pointed in a safe direction. Do not shoot your handgun unless you are sure of your target and what exists beyond and behind it. *NOTE: Death, serious bodily harm, or malfunctions may occur by using incorrect, out of spec, or low-quality ammunition in your firearm.
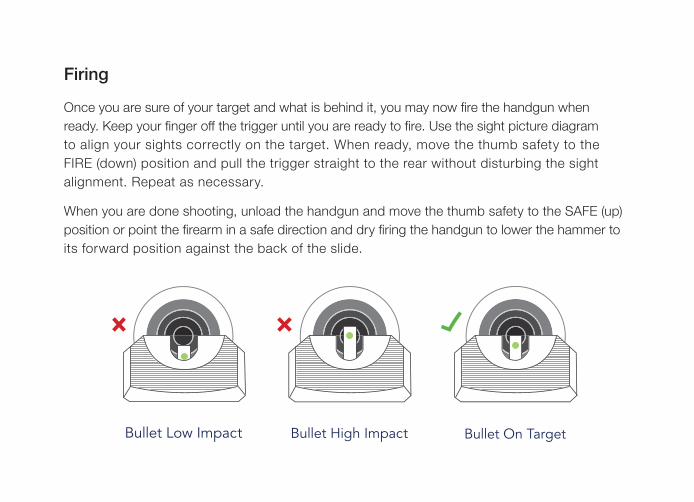
Firing
Once you are sure of your target and what is behind it, you may now fi re the handgun when ready. Keep your fi nger off the trigger until you are ready to fi re. Use the sight picture diagram to align your sights correctly on the target. When ready, move the thumb safety to the FIRE (down) position and pull the trigger straight to the rear without disturbing the sight alignment. Repeat as necessary.
When you are done shooting, unload the handgun and move the thumb safety to the SAFE (up) position or point the fi rearm in a safe direction and dry fi ring the handgun to lower the hammer to its forward position against the back of the slide.
Unloading
WARNING: The process for unloading your handgun is simple, but if not done correctly, could be dangerous or deadly.
Unloading the handgun is done in three simple steps.
1. Remove the magazine.
2. Retract the slide to unload the chamber.
3. Visually and phisically confirm there is not a cartridge in the chamber, and the magazine is not in the handgun.
Front & Rear Sight Adjustment and CareTools needed — T8 Torx head (front sight) & T10 Torx head (rear sight).
Front Sight ReplacementYour EDC X9 is equipped with a user-removable front sight. These sights are installed with loctite at Wilson Combat.
To Remove Front Sight for Replacement.
1) Remove slide from the pistol.
2) Remove the recoil spring, recoil spring rod, plug and barrel from slide and set aside.
3) Apply heat to the screw from the bottom of the slide with a torch/lighter/soldering iron taking care not to melt your fiber optic insert.
4) Remove screw with T8 Torx head driver from the bottom of the slide. Turn screw counterclockwise to remove.
5) Reinstall with Threadlocker on the screw for a semi-permanent installation.

Tactical Adjustable Battlesight Adjustment and CareTo Adjust Elevation — Using a properly sized flat head screwdriver turn your elevation screw clockwise to raise your bullet’s point of impact-counterclockwise to lower it. One click will move your point of impact approximately ¾” at 25 yards.
To Adjust Windage — Adjust windage like any other fixed rear sight.(note-side hex screws are cap screws only and WILL NOT adjust the sight!)Secure your slide in non-marring vise jaws. Loosen the top sight set screws with the appropriate driver. Tap sight body in the direction you need to move your point of impact with a non-marring tool (nylon or delrin punch or sight mover), tighten your set screws. For a semi-permanentinstallation use blue loctite on your set screws.
Adjustment ScrewOne click will move your point of impact approximately ¾″ at 25 yds.
*Note: The Tactical Adjustable Battlesight is made of parkerized carbon steel. To prevent rusting or corrosion, keep it protected with a liquid corrosion inhibitor.
Any high spots or scratches that develop over time can be darkened with a cold blue solution.
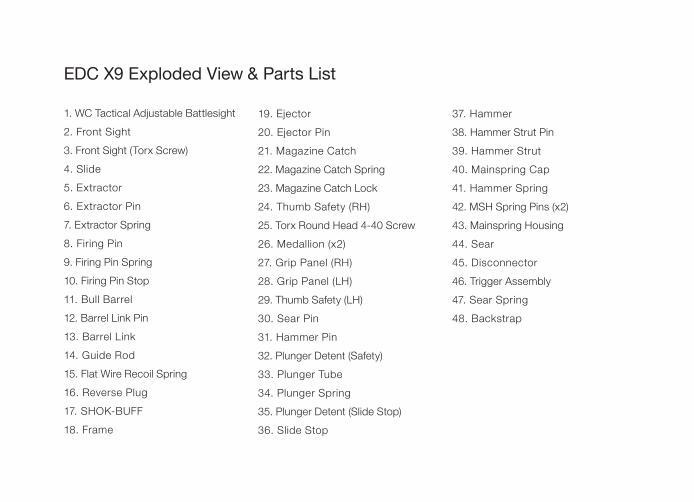
EDC X9 Exploded View
1. WC Tactical Adjustable Battlesight2. Front Sight3. Front Sight (Torx Screw)4. Slide5. Extractor6. Extractor Pin7. Extractor Spring8. Firing Pin9. Firing Pin Spring 10. Firing Pin Stop11. Bull Barrel12. Barrel Link Pin13. Barrel Link14. Guide Rod15. Flat Wire Recoil Spring16. Reverse Plug17. SHOK-BUFF18. Frame
19. Ejector20. Ejector Pin21. Magazine Catch22. Magazine Catch Spring23. Magazine Catch Lock24. Thumb Safety (RH)25. Torx Round Head 4-40 Screw 26. Medallion (x2)27. Grip Panel (RH)28. Grip Panel (LH)29. Thumb Safety (LH)30. Sear Pin31. Hammer Pin32. Plunger Detent (Safety)33. Plunger Tube34. Plunger Spring35. Plunger Detent (Slide Stop)36. Slide Stop
37. Hammer38. Hammer Strut Pin39. Hammer Strut40. Mainspring Cap41. Hammer Spring42. MSH Spring Pins (x2)43. Mainspring Housing44. Sear45. Disconnector46. Trigger Assembly47. Sear Spring48. Backstrap
& Parts List
A A
D D
N N
R R
DRAWN
A A
D D
N N
R R
DRAWN
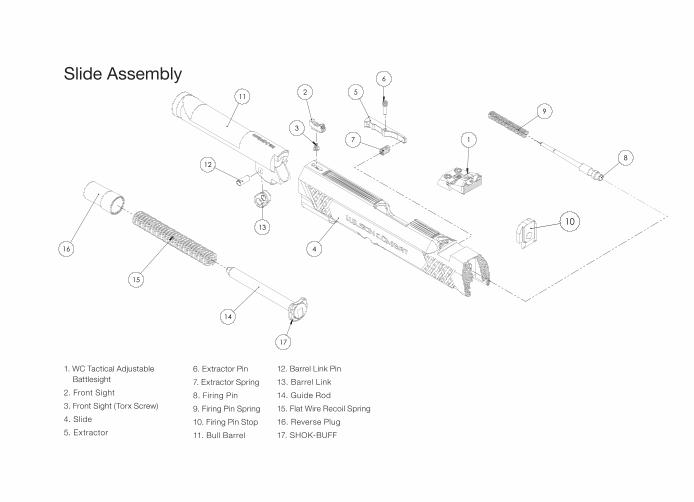
1. WC Tactical Adjustable Battlesight2. Front Sight3. Front Sight (Torx Screw)4. Slide5. Extractor
6. Extractor Pin7. Extractor Spring8. Firing Pin9. Firing Pin Spring 10. Firing Pin Stop11. Bull Barrel
12. Barrel Link Pin13. Barrel Link14. Guide Rod15. Flat Wire Recoil Spring16. Reverse Plug17. SHOK-BUFF
Slide Assembly

A A
D D
N N
R R
DRAWN
18. Frame19. Ejector20. Ejector Pin21. Magazine Catch22. Magazine Catch Spring23. Magazine Catch Lock24. Thumb Safety (RH)25. Torx Round Head 4-40 Screw 26. Medallion (x2)
27. Grip Panel (RH)28. Grip Panel (LH)29. Thumb Safety (LH)30. Sear Pin31. Hammer Pin
32. Plunger Detent (Safety)33. Plunger Tube34. Plunger Spring35. Plunger Detent (Slide Stop)36. Slide Stop
Frame Assembly
A A
D D
N N
R R
DRAWN
A A
D D
N N
R R
DRAWN
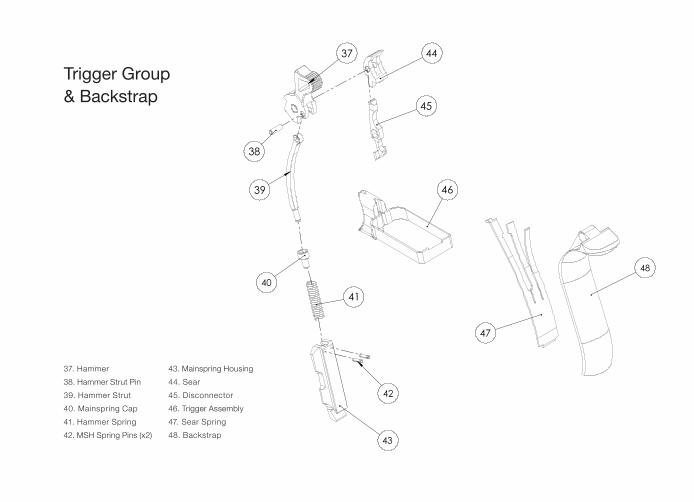
37. Hammer38. Hammer Strut Pin39. Hammer Strut40. Mainspring Cap41. Hammer Spring42. MSH Spring Pins (x2)
43. Mainspring Housing44. Sear45. Disconnector46. Trigger Assembly47. Sear Spring48. Backstrap
Trigger Group& Backstrap

Fieldstripping
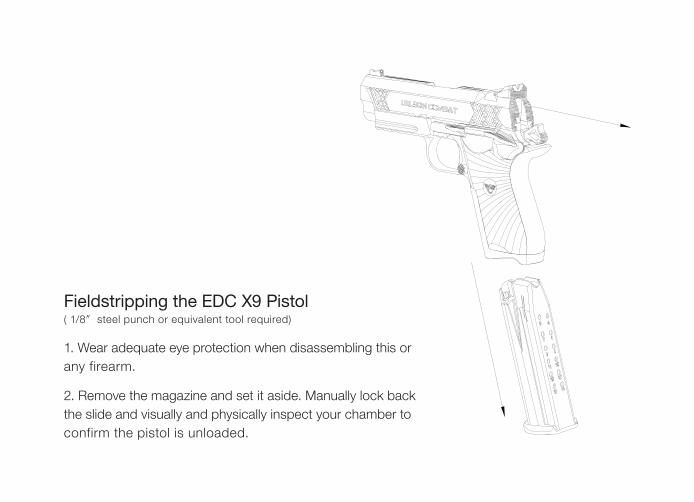
Fieldstripping the EDC X9 Pistol( 1/8″ steel punch or equivalent tool required)
1. Wear adequate eye protection when disassembling this or any firearm.
2. Remove the magazine and set it aside. Manually lock back the slide and visually and physically inspect your chamber to confirm the pistol is unloaded.

3. Retract the slide to align the take down notch of the slide with the inner lug of the slide stop, completely push the slide stop out and remove.
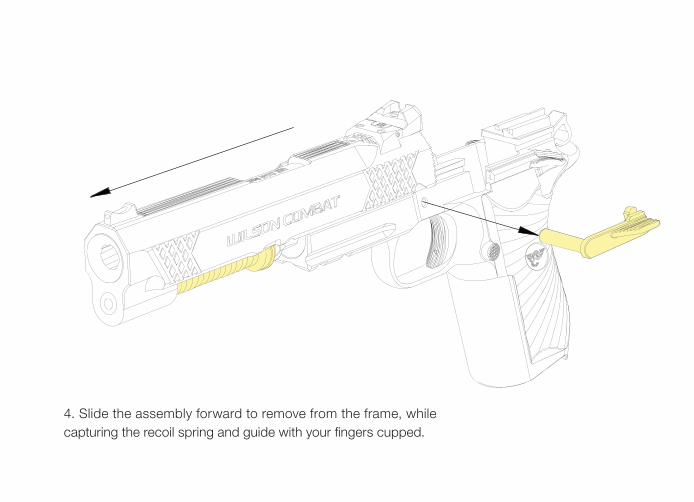
4. Slide the assembly forward to remove from the frame, while capturing the recoil spring and guide with your fi ngers cupped.
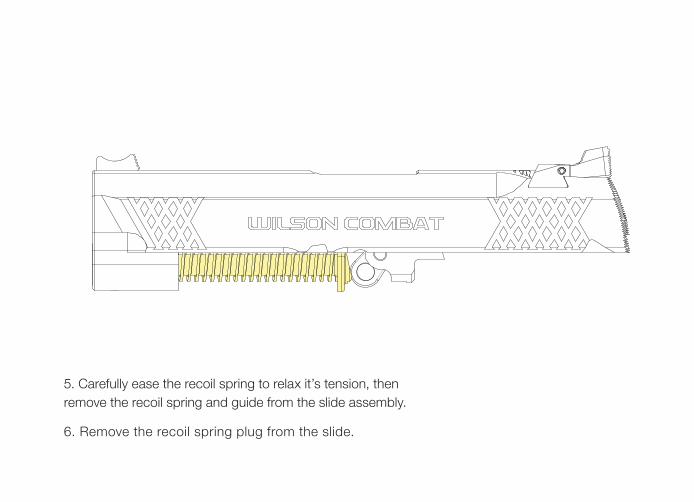
5. Carefully ease the recoil spring to relax it’s tension, then remove the recoil spring and guide from the slide assembly.
6. Remove the recoil spring plug from the slide.
A A
B B
C C
D D
E E
F F
G G
H H
J J
K K
L L
M M
N N
P P
R R
T T
24
24
23
23
22
22
21
21
20
20
19
19
18
18
17
17
16
16
15
15
14
14
13
13
12
12
11
11
10
10
9
9
8
8
7
7
6
6
5
5
4
4
3
3
2
2
1
1
A A
B B
C C
D D
E E
F F
G G
H H
J J
K K
L L
M M
N N
P P
R R
T T
24
24
23
23
22
22
21
21
20
20
19
19
18
18
17
17
16
16
15
15
14
14
13
13
12
12
11
11
10
10
9
9
8
8
7
7
6
6
5
5
4
4
3
3
2
2
1
1
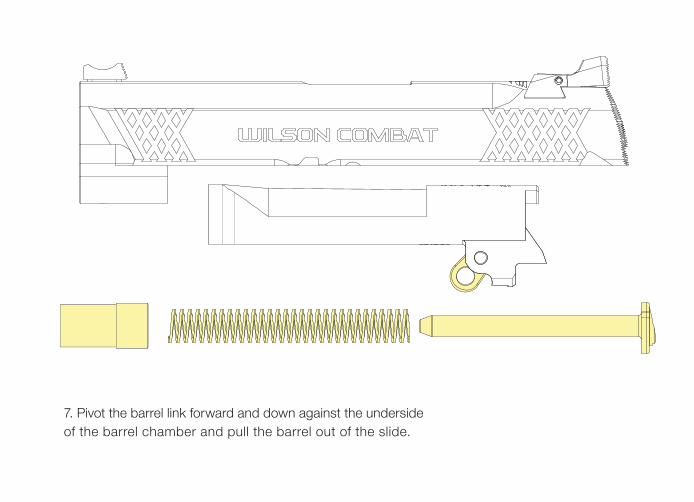
7. Pivot the barrel link forward and down against the underside of the barrel chamber and pull the barrel out of the slide.
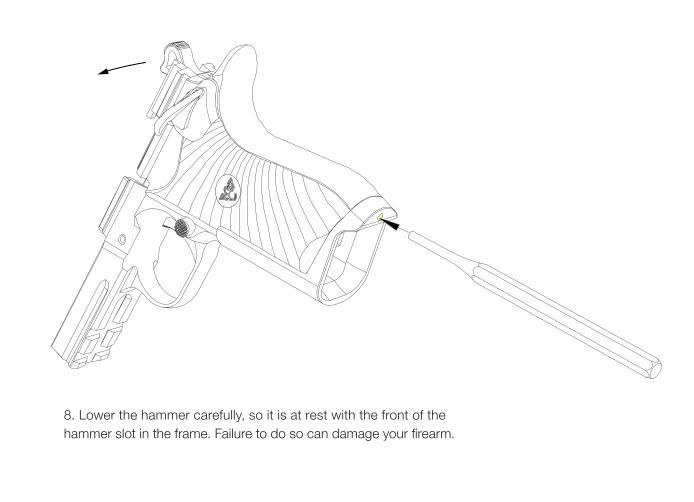
8. Lower the hammer carefully, so it is at rest with the front of the hammer slot in the frame. Failure to do so can damage your fi rearm.
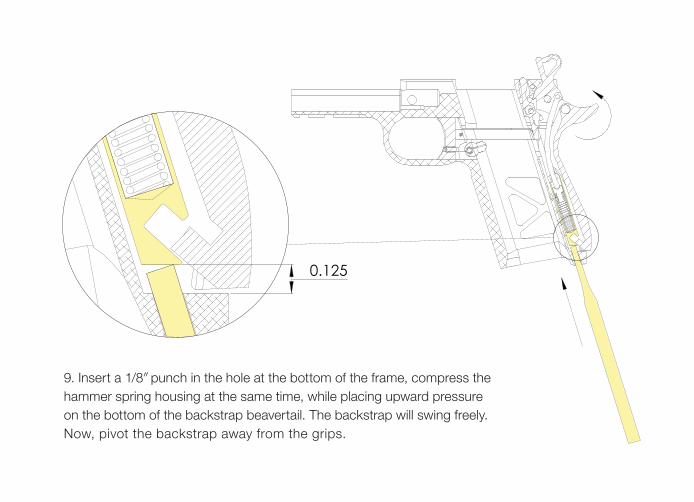
9. Insert a 1/8″ punch in the hole at the bottom of the frame, compress the hammer spring housing at the same time, while placing upward pressure on the bottom of the backstrap beavertail. The backstrap will swing freely. Now, pivot the backstrap away from the grips.
0.125
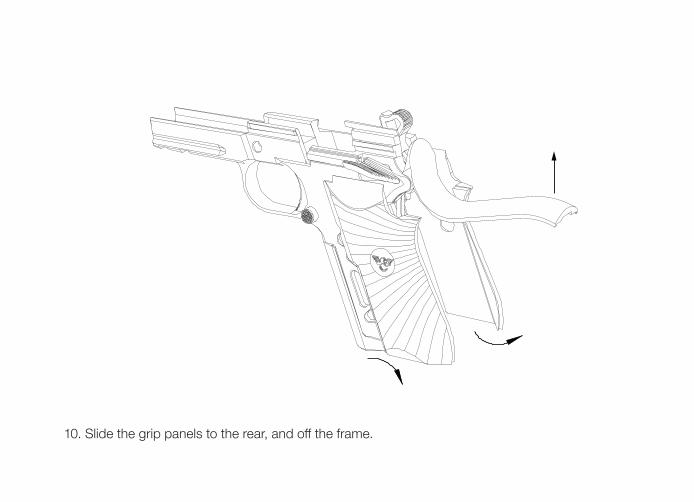
10. Slide the grip panels to the rear, and off the frame.
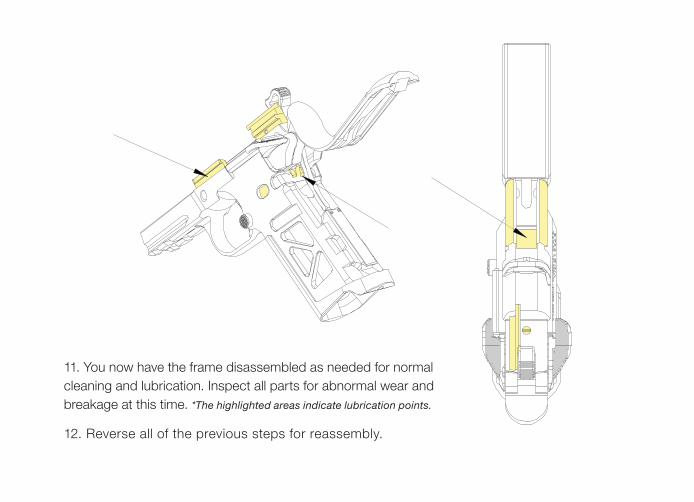
11. You now have the frame disassembled as needed for normal cleaning and lubrication. Inspect all parts for abnormal wear and breakage at this time. *The highlighted areas indicate lubrication points.
12. Reverse all of the previous steps for reassembly.
WARNING: Never adjust or alter the internal components of this firearm unless specifically directed to do so in this manual. Doing so may cause an unsafe condition and could result in serious injury or death. Please contact Wilson Combat directly if you feel the firearm is in need of alteration or adjustment that is not covered in this manual. Anyone other than a Wilson Combat pistolsmith performing gunsmithing or repair work on your firearm may result in a nullification of our customer service policy.

For reliable function, clean and lubricate the EDC X9 as you would a normal 1911 model pistol. It is advised to clean your handgun thoroughly as soon as operation becomes sluggish or impaired.
• Apply Wilson Combat Carbon Remover or Universal Bore Cleaner to internal areas of the disassembled firearm that are caked with fouling or carbon.
• When cleaning the bore, use slow complete strokes (full length of bore) with a properly sized nylon brush. Allow to stand for 3 to 5 minutes then wipe clean with a dry patch.
• Wipe away dirt and fouling on the interior and exterior of the firearm with non-abrasive patches or swabs.
• After cleaning, lightly lubricate the moving parts of the EDC X9 with Ultima-Lube™ Light Oil. Make sure to lubricate the barrel locking surfaces and frame/slide rails.
• You are now ready to reassemble the firearm.
Other Information and Precautions • We only recommend high quality, standard pressure or +P 9mm ammunition.• The use of +P+ ammunition or any ammunition outside SAAMI specifications for the 9mm Luger cartridge is not
advised and may cause excessive wear and tear or cause reliability issues.
Recommended Maintenance for and EDC X9 PistolsUpon receipt of your EDC X9 closely inspect your pistol. Prior to your first range trip, lubricate all bearing surfaces well with Wilson Combat Ultima-Lube™ II Light Oil (or equivalent) by locking the slide back and adding a few drops of lubricant to the slide rail grooves and the top of the barrel chamber area. Hand cycle the slide to disperse the lubricant and you are ready for your first range trip.
Notes

Every 300 rounds: • Fieldstrip, quick clean slide/frame rail area, barrel exterior and chamber. Lubricate frame rails, barrel hood and
barrel locking lugs.
Every 1200 rounds: • Fieldstrip, thorough clean, inspect condition of SHOK-BUFF and replace if any signs of cutting, re-lubricate frame
rails, barrel hood and barrel locking lugs.
Every 6000 rounds: • Follow the 1200 round recommended maintenance plus the following.• Remove extractor and clean under it, replace extractor spring and pin when you re-install.
Discard old extractor spring.• Remove firing pin, clean firing pin hole/tunnel in the slide, replace the firing pin spring when you re-install.
Discard old firing pin spring.Remove grips, clean trigger group components with aerosol cleaner designed for firearms use and re-lubricate exposed parts of trigger group sparingly with Ultima-Lube Oil or equivalent.
Recommended lubricant:• 60 degrees or warmer – Ultima-Lube™ II Oil or equivalent• Under 60 degrees – Ultima-Lube™ II Light Oil or equivalent
Further Maintenance
Note: If any handgun component begins to show damage, unusual or excessive wear, or breakage, stop using the firearm immediately and contact Wilson Combat.
Firing Pin Removal
We recommend occasional removal of the firing pin for cleaning of the firing pin channel and firing pin spring replacement.
WARNING: Wear eye protection at all times when servicing a firearm. Modern firearms contain springs that are under compression and can eject with significant striking force causing eye or other bodily injury.
Before removing the firing pin and stop, the side with the firing pin (rear of the slide) must point in a safe direction.
1. While firmly holding the rear of the slide, depress the firing pin with a 1/8” punch tool; releasing the spring tension holding the stop in place.
2. Use your finger to retain the firing pin while sliding the stop down and out of the way. This will keep the firing pin from ejecting from the slide.
3. Slowly allow the firing pin spring to release its compressed spring tension and then remove it from the slide.
4. Remove the firing pin spring from the firing pin by turning the firing pin clockwise and firmly pulling off the spring.
Reinstall the firing pin by reversing the instructions.
Further Maintenance
Inspecting The Shok-Buff
Every time you clean your pistol, it’s important to check your Wilson Combat Shok-Buff for any visible signs of cutting or damage. At the minimum, replace the buffer every 1200 rounds. Remove the Shok-Buff from the base of the guide rod, inspect both sides, and replace if cut, torn or swollen. Wipe down the guide rod with a clean patch, and align the groove at the top of the Shok-Buff with the base of the guide rod before fitting the recoil spring. The Buffer is recommended for general use but not required for safe and reliable operation of the EDC X9.
Cleaning The Barrel
To clean your X9 barrel, attach a 9mm nylon bore brush to a cleaning rod, and apply bore cleaner liberally. Run the brush through the bore several times, pushing the rod all the way through. Spray degreaser through the barrel, and allow to dry. Replace the brush on the cleaning rod with a slotted tip, and run patches through the bore until they are no longer dirty.
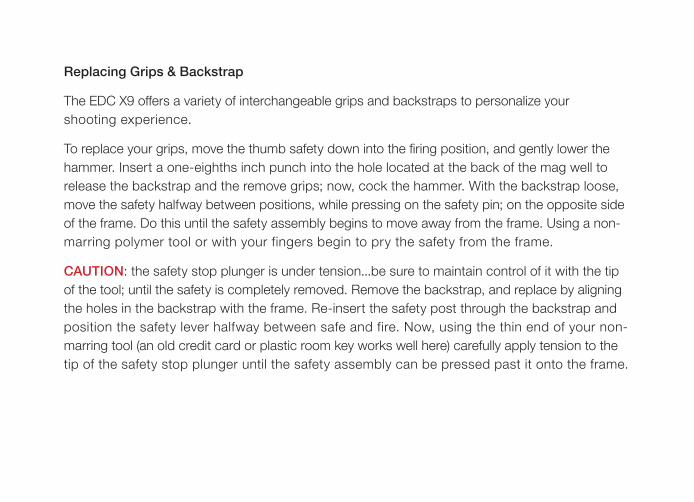
Replacing Grips & Backstrap
The EDC X9 offers a variety of interchangeable grips and backstraps to personalize your shooting experience.
To replace your grips, move the thumb safety down into the firing position, and gently lower the hammer. Insert a one-eighths inch punch into the hole located at the back of the mag well to release the backstrap and the remove grips; now, cock the hammer. With the backstrap loose, move the safety halfway between positions, while pressing on the safety pin; on the opposite side of the frame. Do this until the safety assembly begins to move away from the frame. Using a non-marring polymer tool or with your fingers begin to pry the safety from the frame.
CAUTION: the safety stop plunger is under tension...be sure to maintain control of it with the tip of the tool; until the safety is completely removed. Remove the backstrap, and replace by aligning the holes in the backstrap with the frame. Re-insert the safety post through the backstrap and position the safety lever halfway between safe and fire. Now, using the thin end of your non-marring tool (an old credit card or plastic room key works well here) carefully apply tension to the tip of the safety stop plunger until the safety assembly can be pressed past it onto the frame.
Further Maintenance
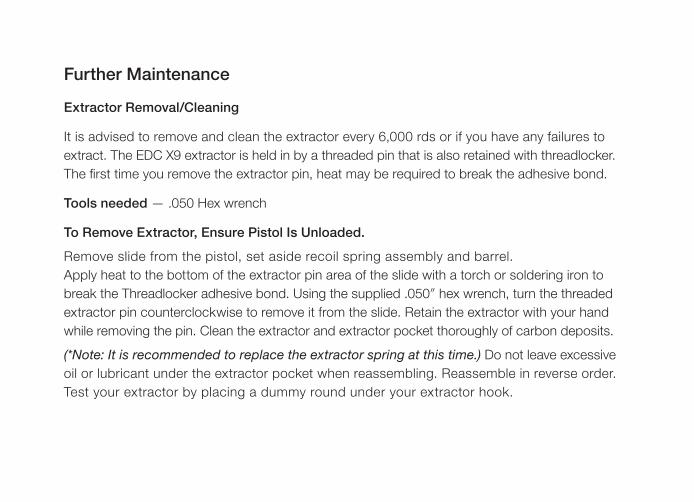
Extractor Removal/Cleaning
It is advised to remove and clean the extractor every 6,000 rds or if you have any failures to extract. The EDC X9 extractor is held in by a threaded pin that is also retained with threadlocker. The first time you remove the extractor pin, heat may be required to break the adhesive bond.
Tools needed — .050 Hex wrench
To Remove Extractor, Ensure Pistol Is Unloaded.
Remove slide from the pistol, set aside recoil spring assembly and barrel. Apply heat to the bottom of the extractor pin area of the slide with a torch or soldering iron to break the Threadlocker adhesive bond. Using the supplied .050″ hex wrench, turn the threaded extractor pin counterclockwise to remove it from the slide. Retain the extractor with your hand while removing the pin. Clean the extractor and extractor pocket thoroughly of carbon deposits.
(*Note: It is recommended to replace the extractor spring at this time.) Do not leave excessive oil or lubricant under the extractor pocket when reassembling. Reassemble in reverse order.Test your extractor by placing a dummy round under your extractor hook.


Notes

Notes

Notes


EDC X9WILSON COMBAT
o p e r a t i o n s m a n u a l


![Corel VideoStudio Ultimate X9 Reviewer's Guidehelp.corel.com/videostudio/v19/main/en/rg/videostudio-x9-reviewers... · Corel VideoStudio Ultimate X9 Reviewer’s Guide [ i ] ... •](https://img.pdfslide.us/doc/110x75/5b0a0feb7f8b9ac7678bc60d/corel-videostudio-ultimate-x9-reviewers-videostudio-ultimate-x9-reviewers-guide.jpg)