Embed Size (px)
Citation preview
ECDL® Advanced
European Computer Driving Licence®
Advanced Database Software
BCS ITQ Level 3
Using Microsoft® Access® 2013
Syllabus Version 2.0
This training, which has been approved by BCS, The Chartered Institute for IT, includes exercise items intended to assist learners in their training for an ECDL Certification Programme. These exercises are not ECDL certification tests. For information about Approved Centres in the UK please visit the BCS website at www.bcs.org/ecdl.
Release ECDL287_UKv1
ECDL Advanced Advanced Database Software
Access 2013 5 © CiA Training Ltd 2013
Contents
SECTION 1 FUNDAMENTALS.......................................................................................... 8
1 - DATABASE CONCEPTS ...................................................................................................... 9
2 - DATABASE DEVELOPMENT ............................................................................................. 10
3 - SQL................................................................................................................................ 11
4 - CREATING A DATABASE ................................................................................................. 12
5 - CREATING TABLES ......................................................................................................... 13
6 - REVISION ........................................................................................................................ 15
SECTION 2 FIELD PROPERTIES................................................................................... 16
7 - LOOKUP FIELDS .............................................................................................................. 17
8 - LOOKUP A TABLE ........................................................................................................... 19
9 - DEFAULT VALUES .......................................................................................................... 20
10 - SETTING A MANDATORY FIELD .................................................................................... 21
11 - VALIDATION RULES/TEXT ............................................................................................ 23
12 - INPUT MASKS ............................................................................................................... 25
13 - REVISION ...................................................................................................................... 28
SECTION 3 QUERIES........................................................................................................ 29
14 - SUM .............................................................................................................................. 30
15 - COUNT .......................................................................................................................... 31
16 - AVERAGE VALUES........................................................................................................ 32
17 - MAXIMUM AND MINIMUM VALUES .............................................................................. 33
18 - CALCULATED FIELDS: QUERIES .................................................................................... 34
19 - PARAMETER QUERIES ................................................................................................... 36
20 - USING WILDCARDS IN A QUERY ................................................................................... 38
21 - REVISION ...................................................................................................................... 39
22 - REVISION ...................................................................................................................... 40
SECTION 4 RELATIONSHIPS......................................................................................... 41
23 - APPLYING A PRIMARY KEY .......................................................................................... 42
24 - APPLYING RELATIONSHIPS ........................................................................................... 44
25 - ONE-TO-ONE RELATIONSHIPS ...................................................................................... 47
26 - MANY-TO-MANY RELATIONSHIPS ................................................................................ 49
27 - APPLYING JOINS ........................................................................................................... 51
28 - SELF JOINS.................................................................................................................... 53
29 - REFERENTIAL INTEGRITY.............................................................................................. 55
30 - CASCADE OPTIONS ....................................................................................................... 57
Advanced Database Software ECDL Advanced
© CiA Training Ltd 2013 6 Access 2013
31 - REVISION ...................................................................................................................... 59
32 - REVISION ...................................................................................................................... 60
SECTION 5 FORMS ........................................................................................................... 61
33 - MAIN/SUBFORM: FORM WIZARD .................................................................................. 62
34 - MAIN/SUBFORM: SUBFORM WIZARD............................................................................ 64
35 - MAIN/SUBFORM: MANUAL ........................................................................................... 66
36 - LINKING FORMS............................................................................................................ 68
37 - REVISION ...................................................................................................................... 70
38 - REVISION ...................................................................................................................... 71
SECTION 6 FORM CONTROLS...................................................................................... 72
39 - CALCULATED FIELDS: FORMS....................................................................................... 73
40 - COMBO BOX 1: WIZARD ............................................................................................... 75
41 - LIMIT TO LIST ............................................................................................................... 78
42 - COMBO BOX 2: WIZARD ............................................................................................... 79
43 - COMBO BOX 3: WIZARD ............................................................................................... 80
44 - COMBO BOX: MANUAL................................................................................................. 81
45 - LIST BOXES .................................................................................................................. 83
46 - CHECK BOXES .............................................................................................................. 85
47 - OPTION GROUPS ........................................................................................................... 86
48 - FORM HEADERS AND FOOTERS ..................................................................................... 88
49 - COMMAND BUTTON: WIZARD ...................................................................................... 89
50 - REVISION ...................................................................................................................... 90
51 - REVISION ...................................................................................................................... 91
SECTION 7 REPORTS....................................................................................................... 92
52 - GROUPED REPORT: WIZARD ......................................................................................... 93
53 - GROUPED REPORT: MANUAL........................................................................................ 95
54 - SUBREPORTS ................................................................................................................. 97
55 - CALCULATED FIELDS: REPORTS ................................................................................... 99
56 - CALCULATING PERCENTAGES..................................................................................... 102
57 - REPORT HEADERS & FOOTERS ................................................................................... 103
58 - PRINTING REPORTS ..................................................................................................... 105
59 - REVISION .................................................................................................................... 106
60 - REVISION .................................................................................................................... 107
SECTION 8 IMPORT AND LINK DATA...................................................................... 108
61 - IMPORTING SPREADSHEETS ........................................................................................ 109
62 - IMPORTING TEXT FILES .............................................................................................. 111

ECDL Advanced Advanced Database Software
Access 2013 7 © CiA Training Ltd 2013
63 - IMPORTING TABLES .................................................................................................... 113
64 - LINKING DATA ........................................................................................................... 114
65 - REVISION .................................................................................................................... 116
66 - REVISION .................................................................................................................... 117
SECTION 9 ACTION QUERIES..................................................................................... 118
67 - APPEND QUERY .......................................................................................................... 119
68 - DELETE QUERY .......................................................................................................... 121
69 - MAKE-TABLE QUERY ................................................................................................. 122
70 - UPDATE QUERY .......................................................................................................... 124
71 - REVISION .................................................................................................................... 125
72 - REVISION .................................................................................................................... 126
SECTION 10 QUERY WIZARDS................................................................................... 127
73 - CROSSTAB QUERY ...................................................................................................... 128
74 - FIND DUPLICATES QUERY .......................................................................................... 130
75 - FIND UNMATCHED QUERY.......................................................................................... 131
76 - REVISION .................................................................................................................... 132
SECTION 11 MACROS.................................................................................................... 133
77 - CREATE A NEW MACRO.............................................................................................. 134
78 - ATTACHING A MACRO TO A CONTROL........................................................................ 136
79 - ATTACHING A MACRO TO AN OBJECT......................................................................... 138
80 - CREATE MACROS FROM CONTROLS............................................................................ 139
81 - COMMAND BUTTON MACROS..................................................................................... 141
82 - REVISION .................................................................................................................... 142
83 - REVISION .................................................................................................................... 143
ANSWERS.......................................................................................................................... 144
RECORD OF ACHIEVEMENT MATRIX .................................................................... 146
GLOSSARY........................................................................................................................ 150

ECDL Advanced Section 3 Queries
Access 2013 29 © CiA Training Ltd 2013
Section 3
Queries
By the end of this section you should be able to:
Create Sum and Count Queries
Use Group By in Queries
Show Average, Maximum and Minimum Values
Create Calculated Fields
Create Parameter Queries
Use Wildcards
Work through the Driving Lessons in this section to gain an understanding of
the above features.
For each Driving Lesson, read all of the Park and Read instructions and then
perform the numbered steps of the Manoeuvres. Complete the Revision
exercise(s) at the end of the section to test your knowledge.
Section 3 Queries ECDL Advanced
© CiA Training Ltd 2013 30 Access 2013
Driving Lesson 14 - Sum
Park and Read
Queries can be created in Access where summary values only are displayed rather than individual records. The summary values can be displayed for the whole query, or as subtotals for certain groups of records. Common summary calculations include finding the total and average of a set of figures, the maximum and minimum value and counting the number of records. These calculations are carried out on a Total line within the query.
Manoeuvres
1. Open the Premises database which holds information on commercial properties for sale in a large city. Create a new query in Design View based on the Commercial table. Place the Location and Price fields on to the query grid.
2. Make sure the DESIGN tab is selected and click on the Totals button. A new row appears on the grid marked Total: with the default entry of Group By. The Total button is highlighted in pink.
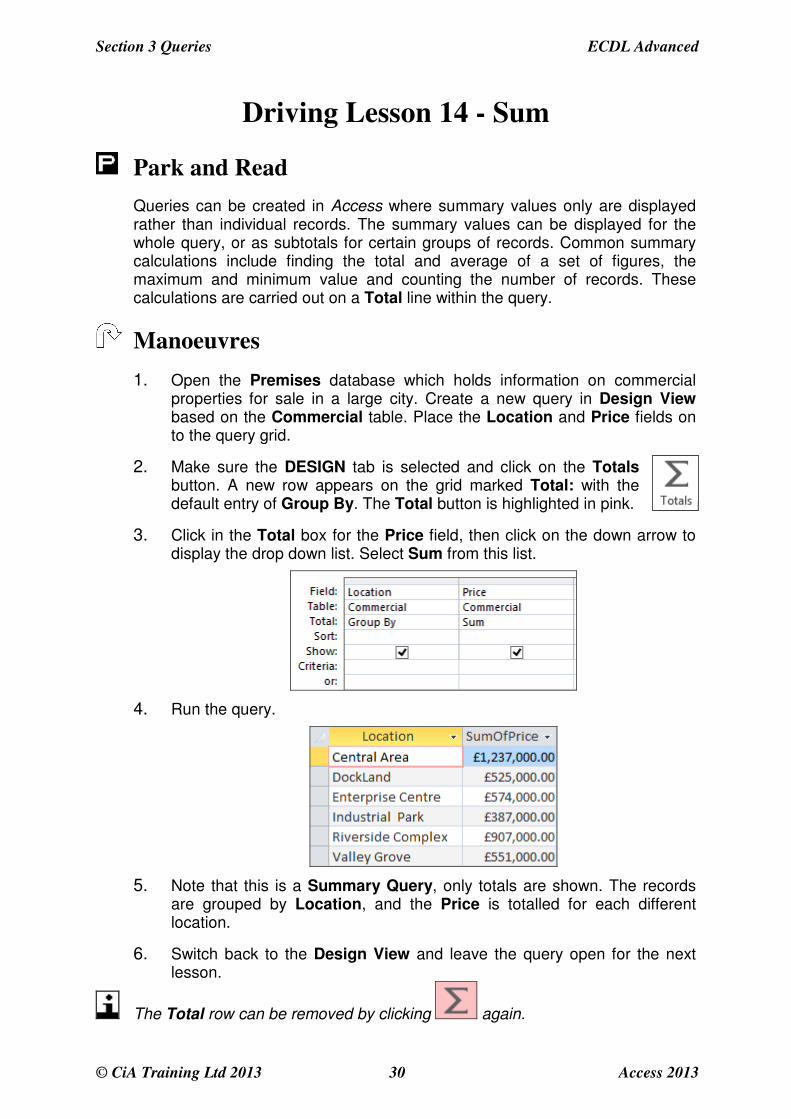
3. Click in the Total box for the Price field, then click on the down arrow to display the drop down list. Select Sum from this list.
4. Run the query.
5. Note that this is a Summary Query, only totals are shown. The records are grouped by Location, and the Price is totalled for each different location.
6. Switch back to the Design View and leave the query open for the next lesson.
The Total row can be removed by clicking again.
ECDL Advanced Section 3 Queries
Access 2013 31 © CiA Training Ltd 2013
Driving Lesson 15 - Count
Park and Read
The Count calculation is another summary calculation, which counts how many entries in a query have a value in a particular field, including duplicate values. It does not count null entries, i.e. empty fields.
Manoeuvres
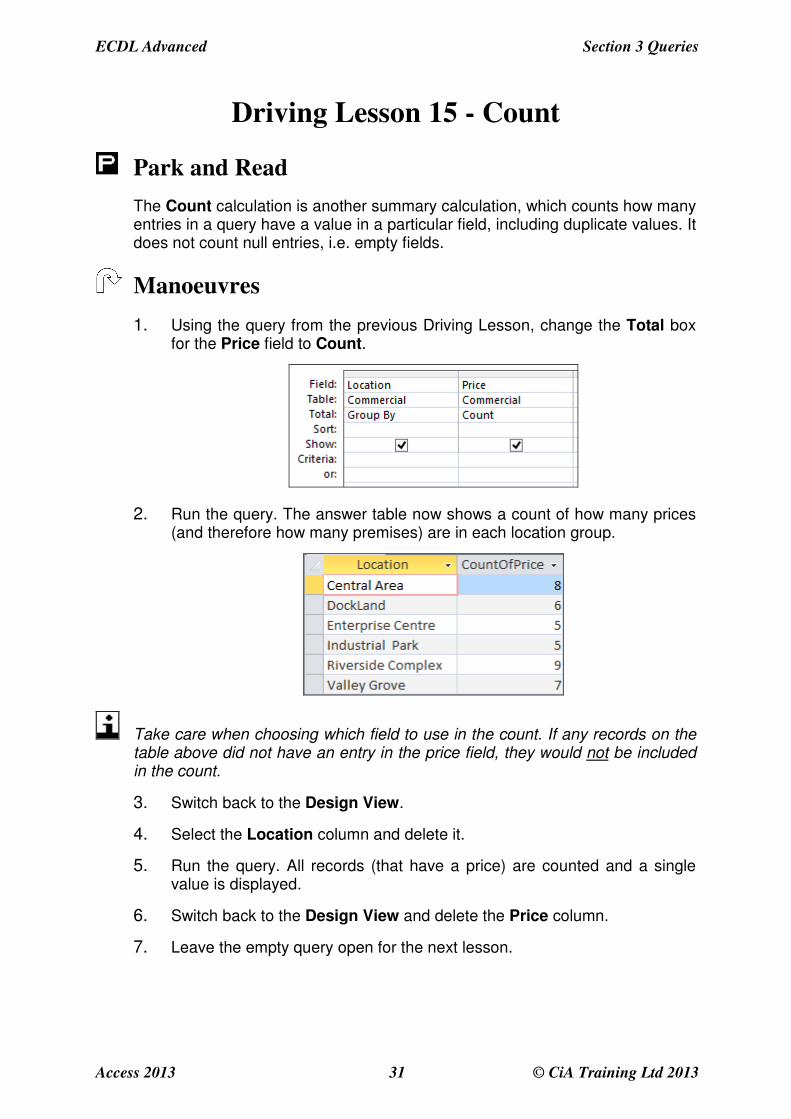
1. Using the query from the previous Driving Lesson, change the Total box for the Price field to Count.
2. Run the query. The answer table now shows a count of how many prices (and therefore how many premises) are in each location group.
Take care when choosing which field to use in the count. If any records on the table above did not have an entry in the price field, they would not be included in the count.
3. Switch back to the Design View.
4. Select the Location column and delete it.
5. Run the query. All records (that have a price) are counted and a single value is displayed.
6. Switch back to the Design View and delete the Price column.
7. Leave the empty query open for the next lesson.
Section 3 Queries ECDL Advanced
© CiA Training Ltd 2013 32 Access 2013
Driving Lesson 16 - Average Values
Park and Read
Avg is another summary calculation. It calculates the average of all values in a field. It is selected from the Total row in the query grid, in a similar way as Count and Sum. All summary calculations can be combined with selection criteria to obtain statistics on certain parts of the data.
Manoeuvres
1. Using the query from the previous Driving Lesson, add the field Type of Premises. Leave the Total box as Group By.
2. Add the field Price to the grid. Select the calculation Avg in the Total box.
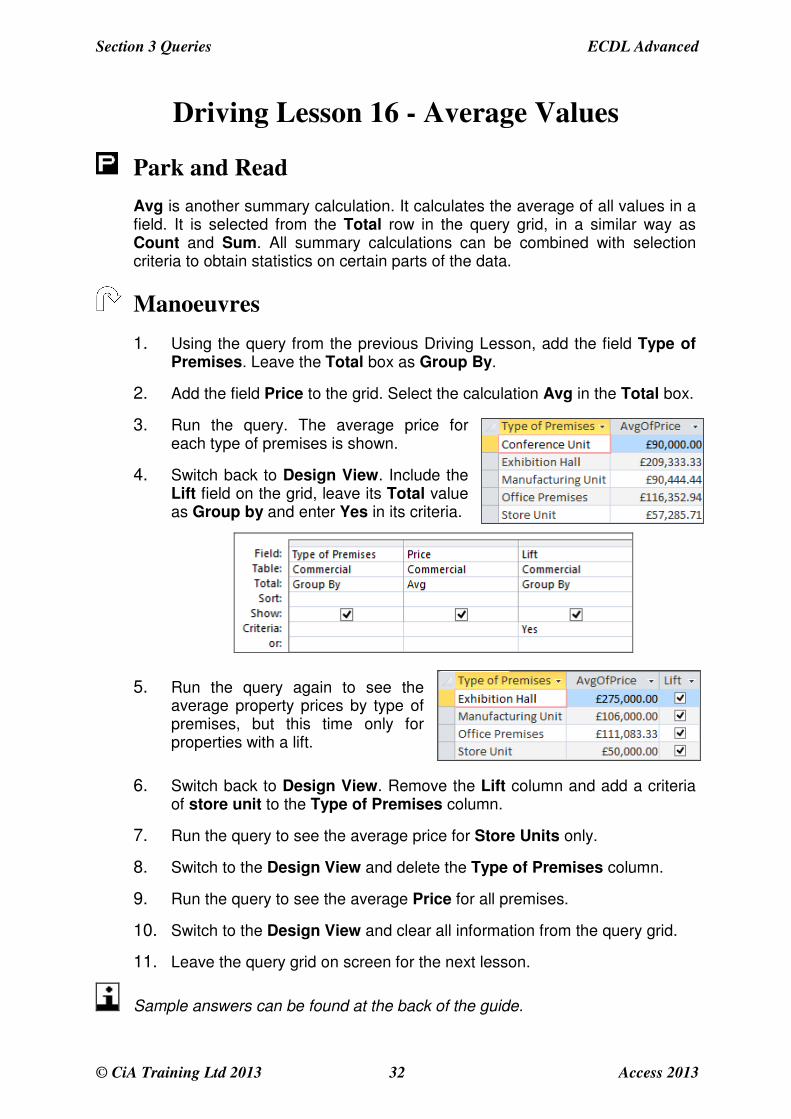
3. Run the query. The average price for each type of premises is shown.
4. Switch back to Design View. Include the Lift field on the grid, leave its Total value as Group by and enter Yes in its criteria.
5. Run the query again to see the average property prices by type of premises, but this time only for properties with a lift.
6. Switch back to Design View. Remove the Lift column and add a criteria of store unit to the Type of Premises column.
7. Run the query to see the average price for Store Units only.
8. Switch to the Design View and delete the Type of Premises column.
9. Run the query to see the average Price for all premises.
10. Switch to the Design View and clear all information from the query grid.
11. Leave the query grid on screen for the next lesson.
Sample answers can be found at the back of the guide.
ECDL Advanced Section 3 Queries
Access 2013 33 © CiA Training Ltd 2013
Driving Lesson 17 - Maximum and Minimum
Values
Park and Read
Max and Min are summary calculations showing the maximum and minimum values of specified fields for all selected records. A range of the highest and lowest values in a table can be displayed using the TopValues property.
Manoeuvres
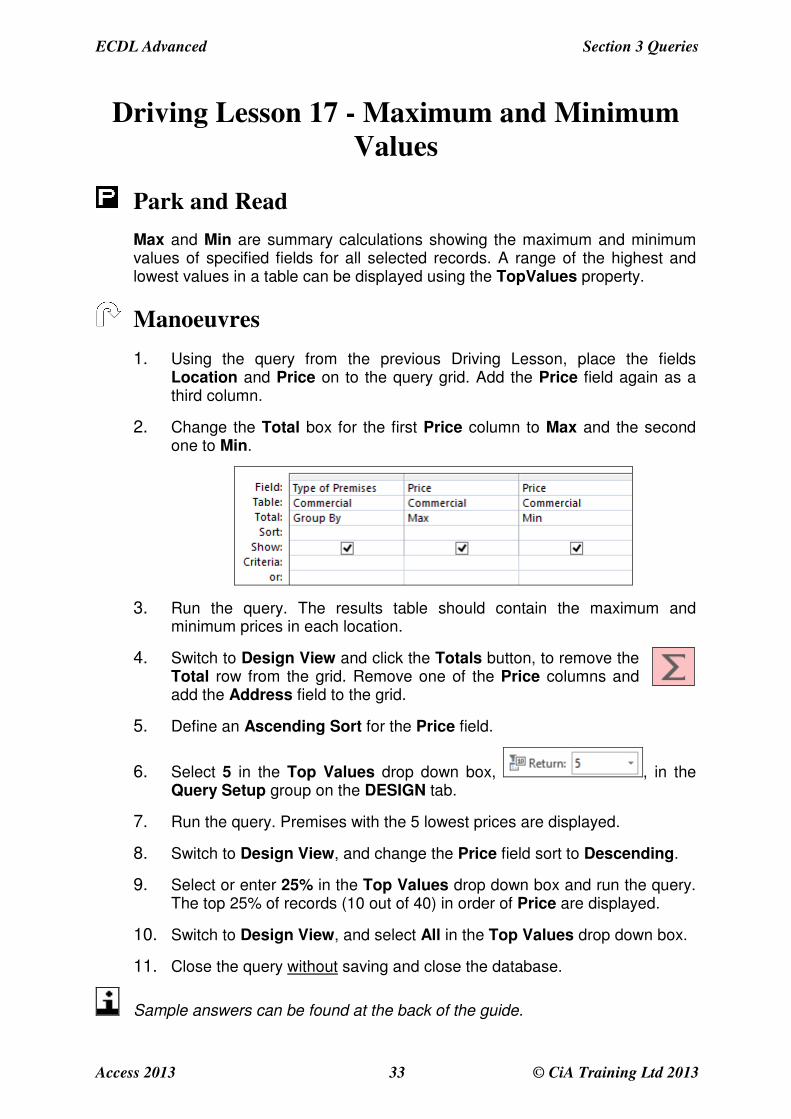
1. Using the query from the previous Driving Lesson, place the fields Location and Price on to the query grid. Add the Price field again as a third column.
2. Change the Total box for the first Price column to Max and the second one to Min.
3. Run the query. The results table should contain the maximum and minimum prices in each location.
4. Switch to Design View and click the Totals button, to remove the Total row from the grid. Remove one of the Price columns and add the Address field to the grid.
5. Define an Ascending Sort for the Price field.
6. Select 5 in the Top Values drop down box, , in the Query Setup group on the DESIGN tab.
7. Run the query. Premises with the 5 lowest prices are displayed.
8. Switch to Design View, and change the Price field sort to Descending.
9. Select or enter 25% in the Top Values drop down box and run the query. The top 25% of records (10 out of 40) in order of Price are displayed.
10. Switch to Design View, and select All in the Top Values drop down box.
11. Close the query without saving and close the database.
Sample answers can be found at the back of the guide.
Section 3 Queries ECDL Advanced
© CiA Training Ltd 2013 34 Access 2013
Driving Lesson 18 - Calculated Fields: Queries
Park and Read
When a calculation is required in a query, based on the contents of one or more of the available fields, a Calculated Field may be used. This is a field that the user creates, to display the results of a calculation defined with an expression. The expression may involve one or more numerical fields, and involve any mathematical calculations or logical definitions. It allows, for example, two fields to be multiplied together, or for a price field to be multiplied by a percentage, or a discount applied to all values in a particular field.
The name of the new field is entered in the Field row of a query grid, followed by a colon, :. The expression is then entered, with field names enclosed in square brackets. Once a calculated field is defined, it can be used like any other field. It can be used for selection, for sorting, or appear in forms and reports.
The standard mathematical symbols are Add +, Subtract -, Divide / and Multiply *.
Manoeuvres
1. Open the Pets database.
2. Start a new query in Design View based on Pet Details and place the Animal, Price and Number Sold fields into the grid.
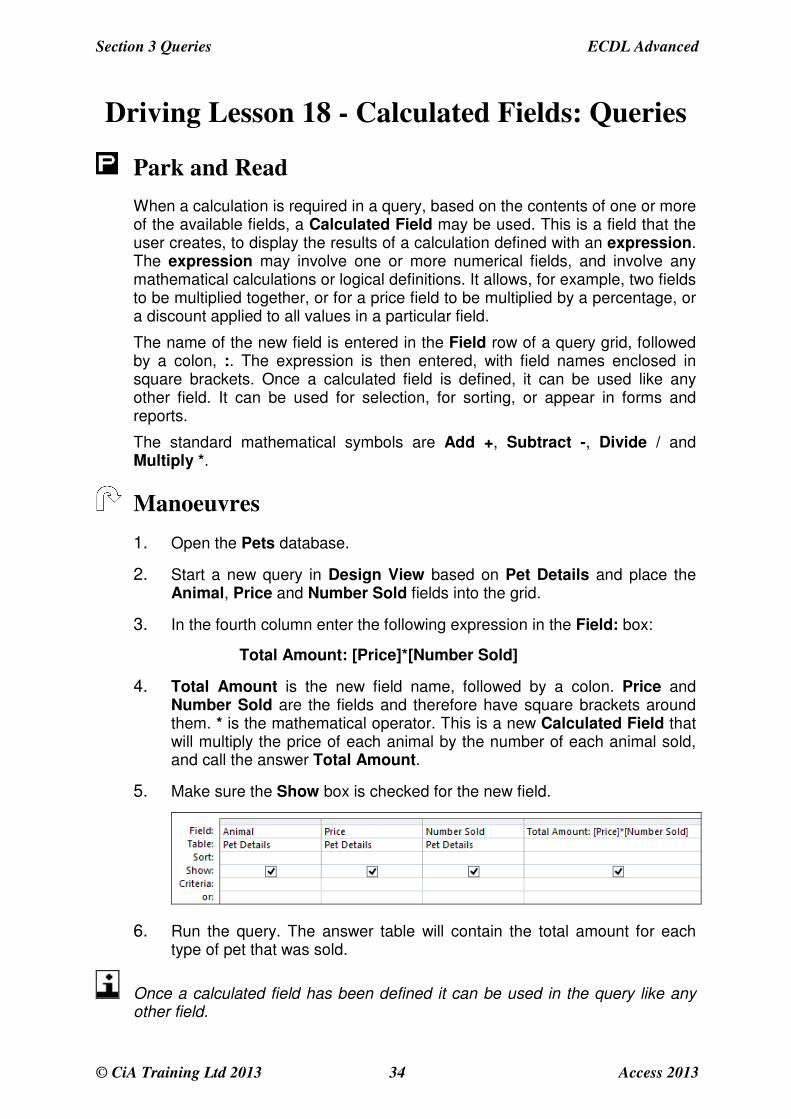
3. In the fourth column enter the following expression in the Field: box:
Total Amount: [Price]*[Number Sold]
4. Total Amount is the new field name, followed by a colon. Price and Number Sold are the fields and therefore have square brackets around them. * is the mathematical operator. This is a new Calculated Field that will multiply the price of each animal by the number of each animal sold, and call the answer Total Amount.
5. Make sure the Show box is checked for the new field.
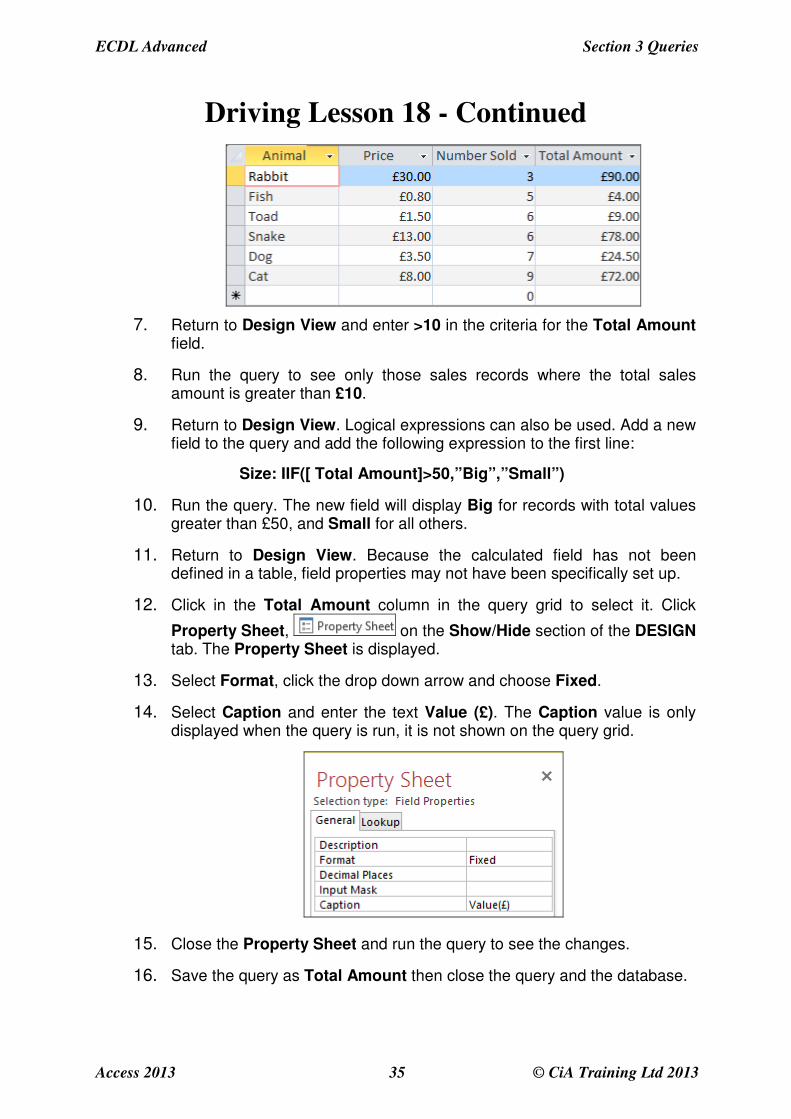
6. Run the query. The answer table will contain the total amount for each type of pet that was sold.
Once a calculated field has been defined it can be used in the query like any other field.
ECDL Advanced Section 3 Queries
Access 2013 35 © CiA Training Ltd 2013
Driving Lesson 18 - Continued
7. Return to Design View and enter >10 in the criteria for the Total Amount field.
8. Run the query to see only those sales records where the total sales amount is greater than £10.
9. Return to Design View. Logical expressions can also be used. Add a new field to the query and add the following expression to the first line:
Size: IIF([ Total Amount]>50,”Big”,”Small”)
10. Run the query. The new field will display Big for records with total values greater than £50, and Small for all others.
11. Return to Design View. Because the calculated field has not been defined in a table, field properties may not have been specifically set up.
12. Click in the Total Amount column in the query grid to select it. Click
Property Sheet, on the Show/Hide section of the DESIGN tab. The Property Sheet is displayed.
13. Select Format, click the drop down arrow and choose Fixed.
14. Select Caption and enter the text Value (£). The Caption value is only displayed when the query is run, it is not shown on the query grid.
15. Close the Property Sheet and run the query to see the changes.
16. Save the query as Total Amount then close the query and the database.
Section 3 Queries ECDL Advanced
© CiA Training Ltd 2013 36 Access 2013
Driving Lesson 19 - Parameter Queries
Park and Read
If a query is being run frequently and all that is changing is the selection criteria for one or two fields, then a Parameter Query can be used. A Parameter Query displays a dialog box prompting for the criteria information. Once the information is entered, the query is performed, with the entered value being used as the selection criteria. The next time the query is run, a different value can be entered and used, without having to change the query design.
Parameters can be used together with other types of query, such as partial queries using wildcards and range queries.
A query can contain as many parameter values as required. Simply set a parameter value for each required field. Every time the query is run, a dialog box will appear for each field that contains a parameter value. The dialog boxes will appear in the order of the field names on the query grid, from left to right.
Manoeuvres
1. Open the Premises database.
2. Start a new query in Design View based on the Commercial table and place the following fields on to the grid: Location, Address, Type of Premises and Price.
3. To create the parameter query, in the Location field enter the following text as the criteria: [Enter Area Required].
Ensure that the prompt text between square brackets is not the same as any field name. For example, [Location] would not work because there is a field with that name, but [Location?] would be OK.
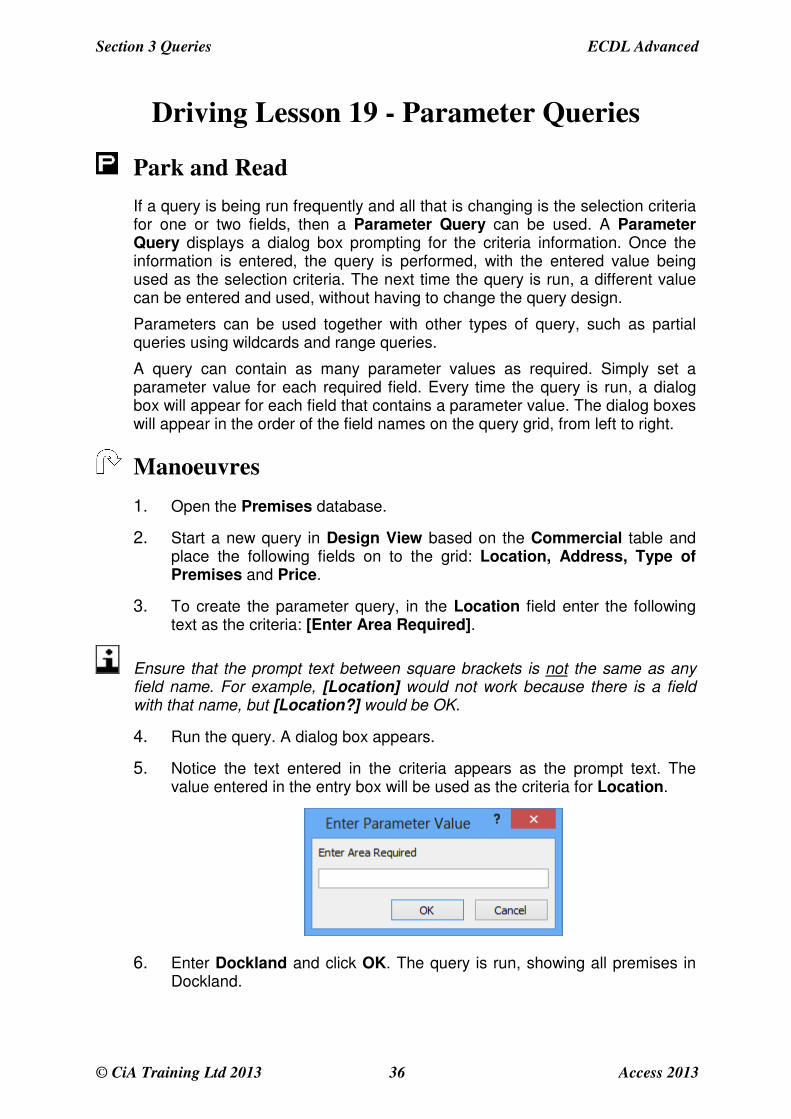
4. Run the query. A dialog box appears.
5. Notice the text entered in the criteria appears as the prompt text. The value entered in the entry box will be used as the criteria for Location.
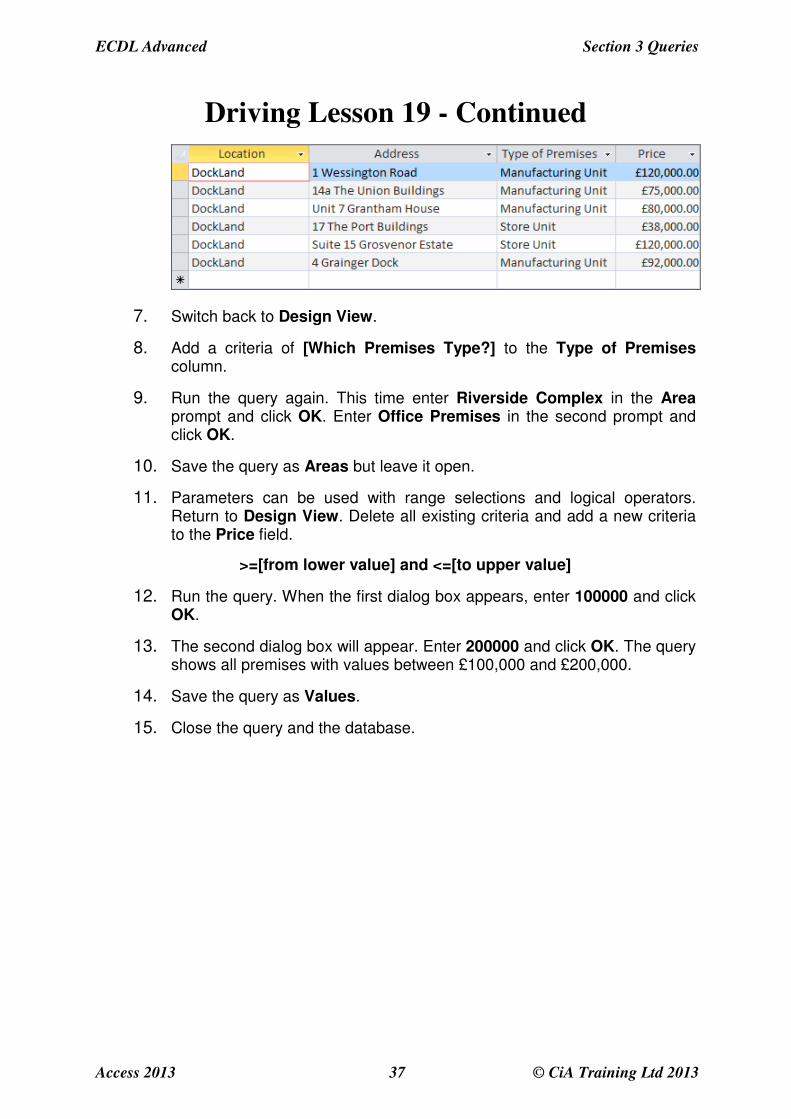
6. Enter Dockland and click OK. The query is run, showing all premises in Dockland.
ECDL Advanced Section 3 Queries
Access 2013 37 © CiA Training Ltd 2013
Driving Lesson 19 - Continued
7. Switch back to Design View.
8. Add a criteria of [Which Premises Type?] to the Type of Premises column.
9. Run the query again. This time enter Riverside Complex in the Area prompt and click OK. Enter Office Premises in the second prompt and click OK.
10. Save the query as Areas but leave it open.
11. Parameters can be used with range selections and logical operators. Return to Design View. Delete all existing criteria and add a new criteria to the Price field.
>=[from lower value] and <=[to upper value]
12. Run the query. When the first dialog box appears, enter 100000 and click OK.
13. The second dialog box will appear. Enter 200000 and click OK. The query shows all premises with values between £100,000 and £200,000.
14. Save the query as Values.
15. Close the query and the database.
Section 3 Queries ECDL Advanced
© CiA Training Ltd 2013 38 Access 2013
Driving Lesson 20 - Using Wildcards in a Query
Park and Read
The use of basic wildcard characters ? and * is covered in the standard syllabus for this qualification. There are however further characters which can be used, such as [ ], !, -, #.
Manoeuvres
1. Open the Staff database,
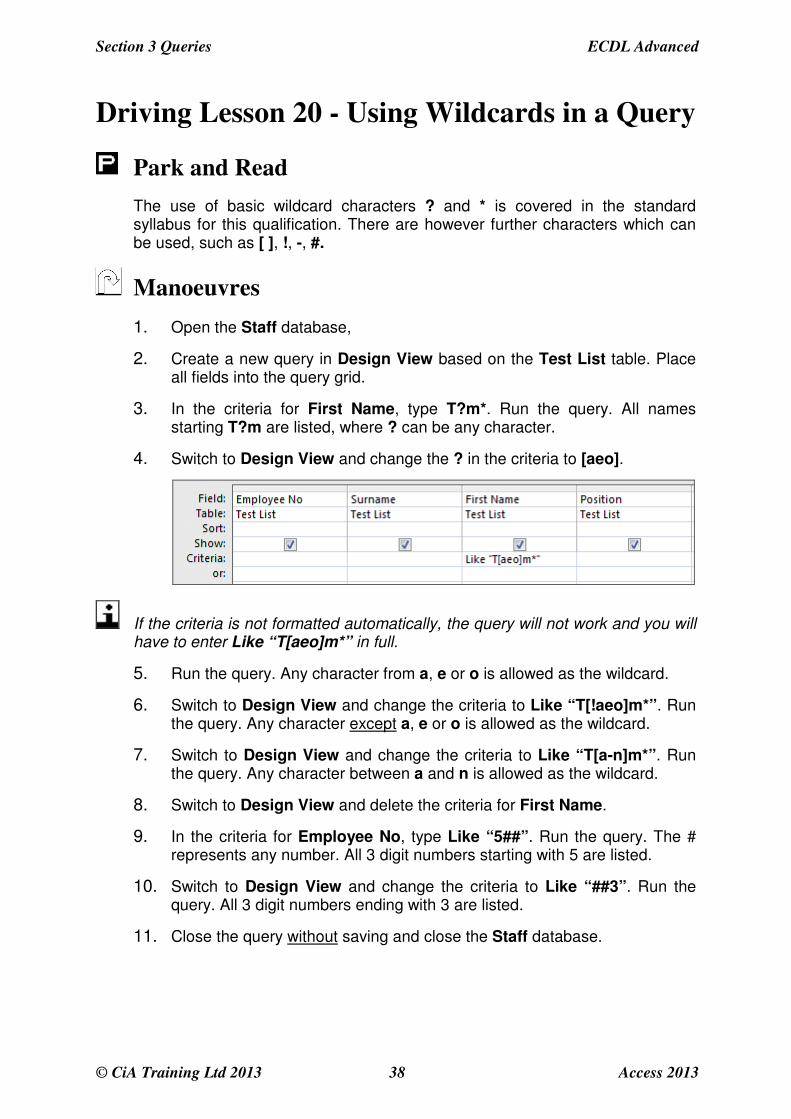
2. Create a new query in Design View based on the Test List table. Place all fields into the query grid.
3. In the criteria for First Name, type T?m*. Run the query. All names starting T?m are listed, where ? can be any character.
4. Switch to Design View and change the ? in the criteria to [aeo].
If the criteria is not formatted automatically, the query will not work and you will have to enter Like “T[aeo]m*” in full.
5. Run the query. Any character from a, e or o is allowed as the wildcard.
6. Switch to Design View and change the criteria to Like “T[!aeo]m*”. Run the query. Any character except a, e or o is allowed as the wildcard.
7. Switch to Design View and change the criteria to Like “T[a-n]m*”. Run the query. Any character between a and n is allowed as the wildcard.
8. Switch to Design View and delete the criteria for First Name.
9. In the criteria for Employee No, type Like “5##”. Run the query. The # represents any number. All 3 digit numbers starting with 5 are listed.
10. Switch to Design View and change the criteria to Like “##3”. Run the query. All 3 digit numbers ending with 3 are listed.
11. Close the query without saving and close the Staff database.

ECDL Advanced Section 3 Queries
Access 2013 39 © CiA Training Ltd 2013
Driving Lesson 21 - Revision
Park and Read
At the end of every section you get the chance to complete one or more revision exercises to develop your skills and prepare you for your ECDL certification test. You should aim to complete the following steps without referring back to the previous lessons.
Manoeuvres
1. Open the database Computer Shop and create a new query in Design View based on the Repairs table.
2. Use Group By to find the number of engineers.
3. What are the minimum and maximum job prices?
4. What is the total price of all the jobs on the database?
5. Change the query to find the average job price grouped by engineer. Which engineer has the highest average job price?
6. Save the query as Query21a and close it.
7. Create a parameter query to ask for a particular engineer then show all the jobs for that engineer above an entered price. Show all fields from the Repairs table.
8. Use that query to find how many jobs Keith has that cost more than £100.
9. Save the query as Query21b and close it.
10. Close the database.
11. Open the database Transport and create a new query in Design View based on the Buses table. Include the fields Fleet Number, Size and Route.
12. Use wildcards to select only Fleet Numbers that have the following structure: Any 1 character followed by any 1 number followed by the number 5. What is the criteria? How many records are found?
13. Close the query without saving and close the database.
Sample answers can be found at the back of the guide.

Section 3 Queries ECDL Advanced
© CiA Training Ltd 2013 40 Access 2013
Driving Lesson 22 - Revision
Manoeuvres
1. Using the Houses database and Property table, create a new Summary query in Design View.
2. Use the query to display the total and average Price of each property grouped by Type of Property.
3. Which type of property has the highest average price?
4. Save the query as Query22a and close it.
5. Create a new query on the same table and include the fields Location, Address, Type of Property, Price and Bedrooms.
6. Create a new calculated field in the query, after the Bedrooms field. Name the new field Rate and define the calculation as Price divided by Bedrooms. Format the new field as Currency.
7. Display the query in descending order of Rate. Which property has the highest value for Rate?
8. Change the query so that it prompts for Location with the message “Which Location”.
9. Use the query to find the property in Rose Mount with the highest value of Rate.
10. Save the query as Price per Bedroom and close it and the database.
Sample answers can be found at the back of the guide.
Now complete the Record of Achievement Matrix at the back of the guide. You should only move on when confident with the topics and features described in this section.

ECDL Advanced Section 4 Relationships
Access 2013 41 © CiA Training Ltd 2013
Section 4
Relationships
By the end of this section you should be able to:
Apply Primary Keys
Apply and Modify Different Types of Relationship
Query Related Tables
Understand Joins
Apply Referential Integrity
Update and Delete Related Records
Work with Subdatasheets
Work through the Driving Lessons in this section to gain an understanding of
the above features.
For each Driving Lesson, read all of the Park and Read instructions and then
perform the numbered steps of the Manoeuvres. Complete the Revision
exercise(s) at the end of the section to test your knowledge.
Section 4 Relationships ECDL Advanced
© CiA Training Ltd 2013 42 Access 2013
Driving Lesson 23 - Applying a Primary Key
Park and Read
When creating relational databases which use more than one table, it is important to be able to uniquely identify individual records in a table if they are to be referenced from another table. Records are usually identified by specifying a field in the table which contains unique data for each record, e.g. a serial number or identification number. This is then defined as the Primary Key.
Use of a Primary Key prevents duplication of records in a table and also allows sorting and querying to be performed more efficiently. It also enables the linking of tables.
Manoeuvres
1. Open the Custom Computers database and then the Computers table in Design View. Make sure the DESIGN tab is selected.
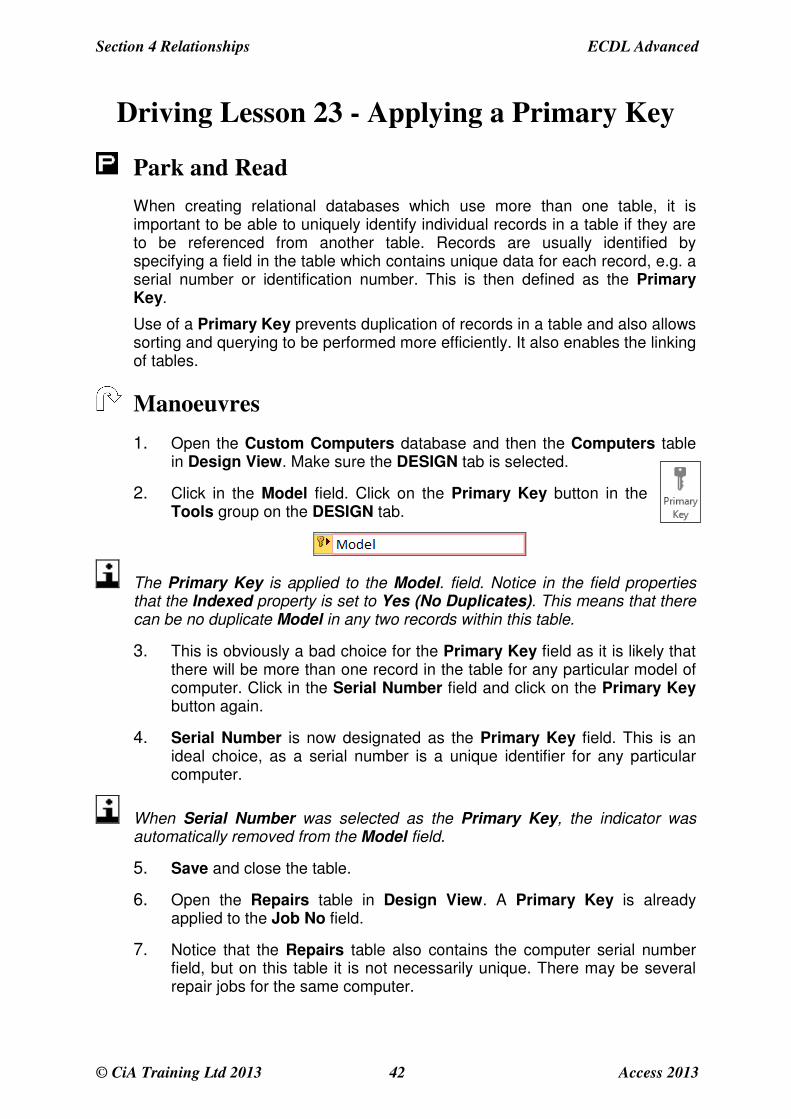
2. Click in the Model field. Click on the Primary Key button in the Tools group on the DESIGN tab.
The Primary Key is applied to the Model. field. Notice in the field properties that the Indexed property is set to Yes (No Duplicates). This means that there can be no duplicate Model in any two records within this table.
3. This is obviously a bad choice for the Primary Key field as it is likely that there will be more than one record in the table for any particular model of computer. Click in the Serial Number field and click on the Primary Key button again.
4. Serial Number is now designated as the Primary Key field. This is an ideal choice, as a serial number is a unique identifier for any particular computer.
When Serial Number was selected as the Primary Key, the indicator was automatically removed from the Model field.
5. Save and close the table.
6. Open the Repairs table in Design View. A Primary Key is already applied to the Job No field.
7. Notice that the Repairs table also contains the computer serial number field, but on this table it is not necessarily unique. There may be several repair jobs for the same computer.
ECDL Advanced Section 4 Relationships
Access 2013 43 © CiA Training Ltd 2013
Driving Lesson 23 - Continued
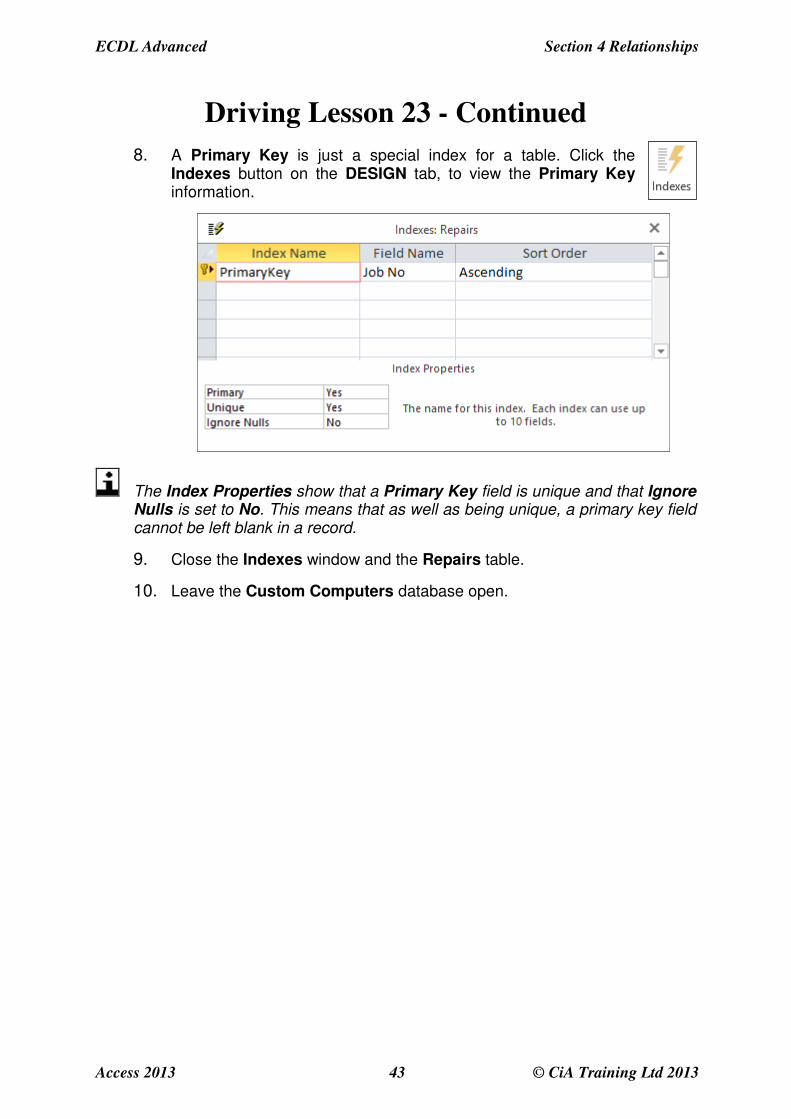
8. A Primary Key is just a special index for a table. Click the Indexes button on the DESIGN tab, to view the Primary Key information.
The Index Properties show that a Primary Key field is unique and that Ignore Nulls is set to No. This means that as well as being unique, a primary key field cannot be left blank in a record.
9. Close the Indexes window and the Repairs table.
10. Leave the Custom Computers database open.

Section 4 Relationships ECDL Advanced
© CiA Training Ltd 2013 44 Access 2013
Driving Lesson 24 - Applying Relationships
Park and Read
Once tables have been designed and primary keys applied, a Relationship may be applied between two or more tables to link them together. Once two or more tables are linked by a relationship, the data from all of the tables may be used to create a single query, form or report.
Relationships are always applied between tables which contain a common field. Usually, the related field in the first table is the primary key field and is known as the Primary Table. In this way, a record in one table can link to further information on another table. The related field in the second table is known as the Foreign Key.
Applying relationships allows many smaller tables to be linked together to form the complete database, improving its overall efficiency. In the Driving Lesson below, if the Computer and Repairs tables are linked using the common field serial number, there is no need to have all computer details on every repair record. A query on the Repairs table will use Serial Number to access all related data on the Computers table automatically.
This lesson describes the most common type of relationship, One to Many. Other types of relationships are introduced over the next few Driving Lessons.
Manoeuvres
1. Display the DATABASE TOOLS tab and click the Relationships button. A blank Relationship window will be
displayed.
2. If the Show Table dialog box is not shown, click the Show Table button, on the RELATIONSHIP TOOLS - DESIGN tab. This displays the available tables in this database.
ECDL Advanced Section 4 Relationships
Access 2013 45 © CiA Training Ltd 2013
Driving Lesson 24 - Continued
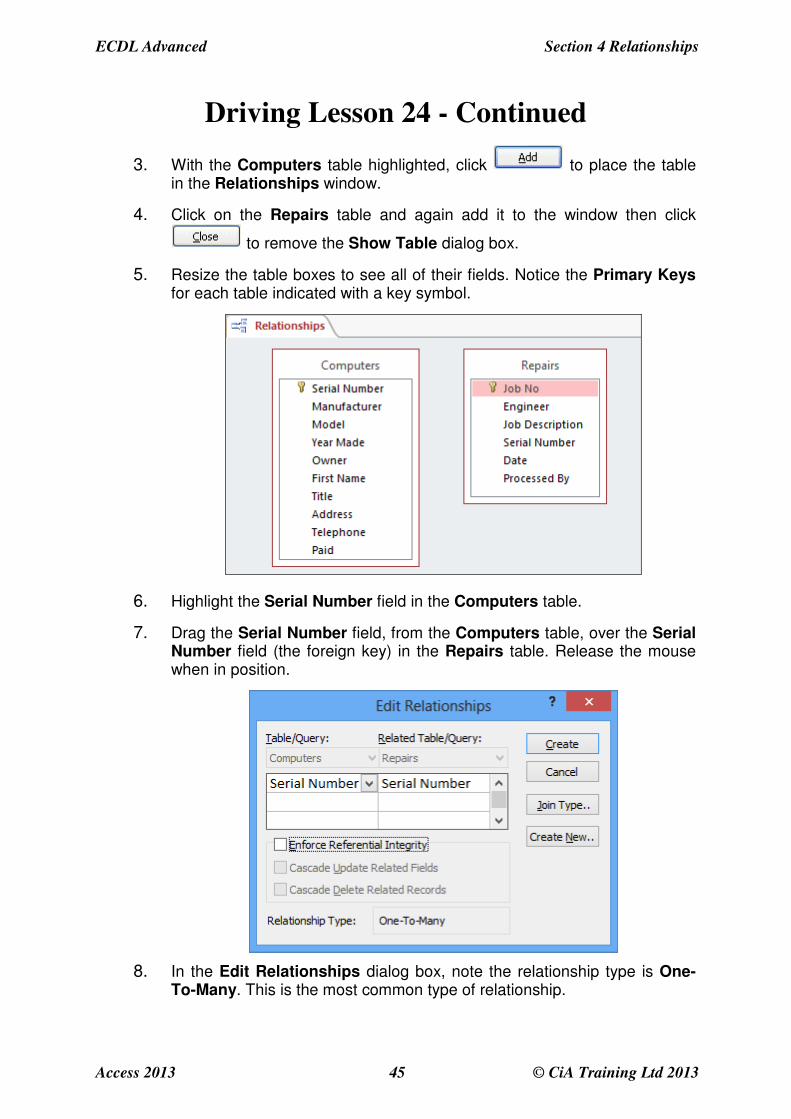
3. With the Computers table highlighted, click to place the table in the Relationships window.
4. Click on the Repairs table and again add it to the window then click
to remove the Show Table dialog box.
5. Resize the table boxes to see all of their fields. Notice the Primary Keys for each table indicated with a key symbol.
6. Highlight the Serial Number field in the Computers table.
7. Drag the Serial Number field, from the Computers table, over the Serial Number field (the foreign key) in the Repairs table. Release the mouse when in position.
8. In the Edit Relationships dialog box, note the relationship type is One-To-Many. This is the most common type of relationship.
Section 4 Relationships ECDL Advanced
© CiA Training Ltd 2013 46 Access 2013
Driving Lesson 24 - Continued
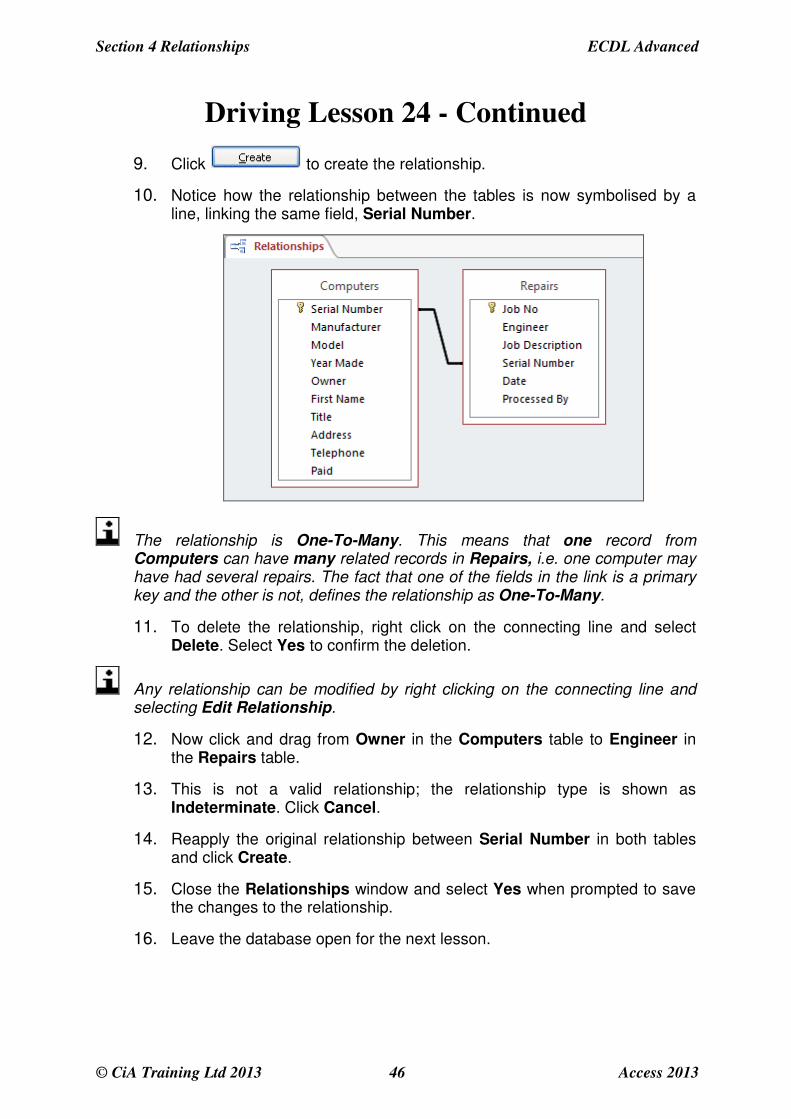
9. Click to create the relationship.
10. Notice how the relationship between the tables is now symbolised by a line, linking the same field, Serial Number.
The relationship is One-To-Many. This means that one record from Computers can have many related records in Repairs, i.e. one computer may have had several repairs. The fact that one of the fields in the link is a primary key and the other is not, defines the relationship as One-To-Many.
11. To delete the relationship, right click on the connecting line and select Delete. Select Yes to confirm the deletion.
Any relationship can be modified by right clicking on the connecting line and selecting Edit Relationship.
12. Now click and drag from Owner in the Computers table to Engineer in the Repairs table.
13. This is not a valid relationship; the relationship type is shown as Indeterminate. Click Cancel.
14. Reapply the original relationship between Serial Number in both tables and click Create.
15. Close the Relationships window and select Yes when prompted to save the changes to the relationship.
16. Leave the database open for the next lesson.

ECDL Advanced Section 4 Relationships
Access 2013 47 © CiA Training Ltd 2013
Driving Lesson 25 - One-to-One Relationships
Park and Read
A One-to-One relationship is used where one record in one table is linked to only one record in another. This can be used to split a large table with many fields, or if part of a table needs to be removed for security reasons, or if the second table contains optional data which is not always required.
Manoeuvres
1. To create a One-to-One relationship in the Custom Computers database, first create a table in Design View with two fields, Job No and Charge.
2. The Job No field will have a data type of Number and the Charge field will be Currency.
3. Make the Job No field the Primary Key and save the table as Cost. Close it without adding any data.
4. Open the Relationships window showing the existing relationship and use the Show Table button to display the dialog box.
5. Select Cost then click Add to add it to the Relationships window. Close the Show Table box.
6. Reposition the Cost table if necessary, then make the link between Job No in the Repairs table and Job No in the Cost table. Because each of these fields is a primary key, this time in the Edit Relationships box, the Relationship Type is One-To-One.
7. Click Create to return to the Relationships window with the new relationship displayed.
Section 4 Relationships ECDL Advanced
© CiA Training Ltd 2013 48 Access 2013
Driving Lesson 25 - Continued
The relationship can be deleted or modified in this display by right clicking on the connecting line and selecting Delete or Edit Relationship.
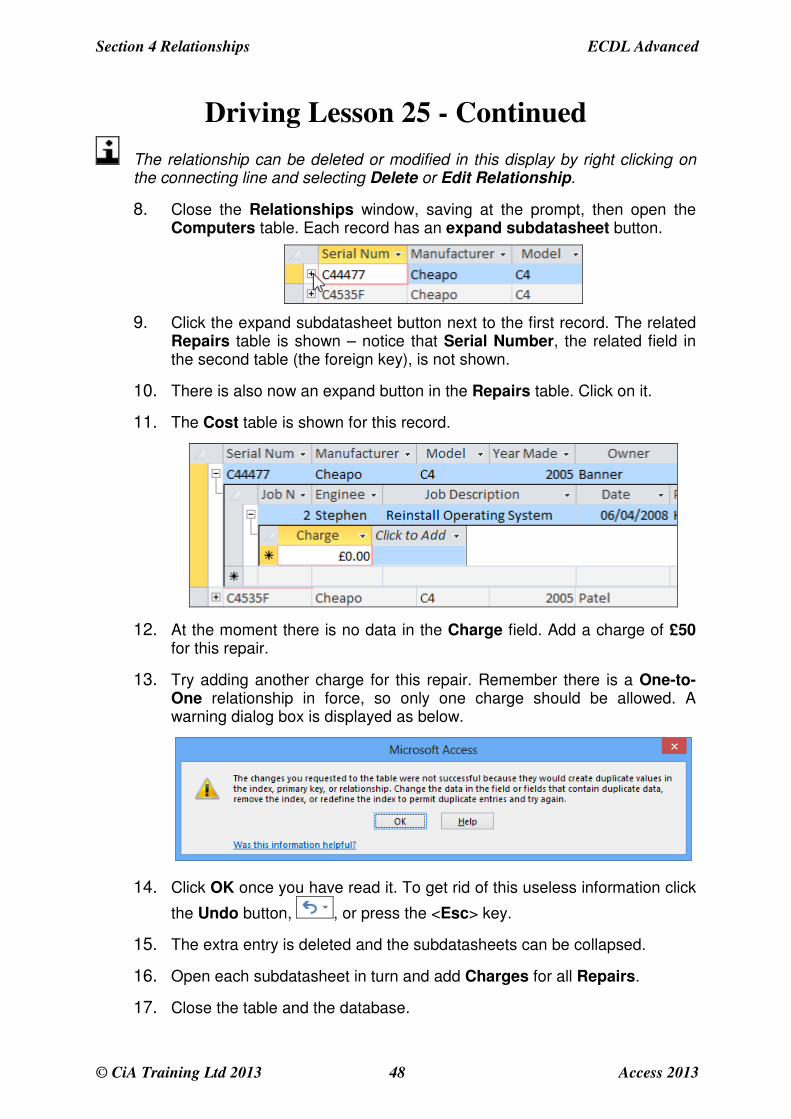
8. Close the Relationships window, saving at the prompt, then open the Computers table. Each record has an expand subdatasheet button.
9. Click the expand subdatasheet button next to the first record. The related Repairs table is shown – notice that Serial Number, the related field in the second table (the foreign key), is not shown.
10. There is also now an expand button in the Repairs table. Click on it.
11. The Cost table is shown for this record.
12. At the moment there is no data in the Charge field. Add a charge of £50 for this repair.
13. Try adding another charge for this repair. Remember there is a One-to-One relationship in force, so only one charge should be allowed. A warning dialog box is displayed as below.
14. Click OK once you have read it. To get rid of this useless information click
the Undo button, , or press the <Esc> key.
15. The extra entry is deleted and the subdatasheets can be collapsed.
16. Open each subdatasheet in turn and add Charges for all Repairs.
17. Close the table and the database.
ECDL Advanced Section 4 Relationships
Access 2013 49 © CiA Training Ltd 2013
Driving Lesson 26 - Many-to-Many
Relationships
Park and Read
A Many-to-Many relationship is used when a record in the first table can have many matching records in the second, and vice versa. For example, a single product may have many orders and a single order may be for many products. A single Many-to-Many relationship cannot exist. An intermediate junction table must be created with One to Many links to the two original tables. It must contain two fields: the foreign keys from both tables.
Manoeuvres
1. Open the CiA database.
2. To create a Many-to-Many relationship between the Orders table and the Products table it is first necessary to create an intermediate, junction table.
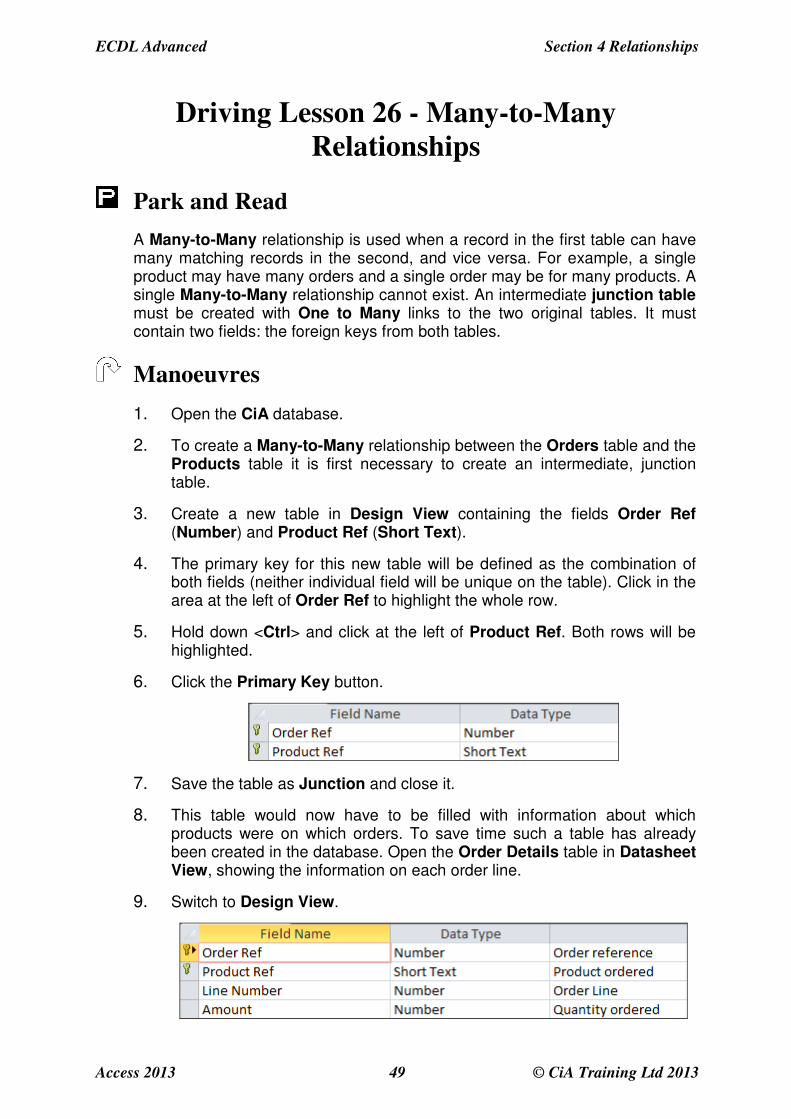
3. Create a new table in Design View containing the fields Order Ref (Number) and Product Ref (Short Text).
4. The primary key for this new table will be defined as the combination of both fields (neither individual field will be unique on the table). Click in the area at the left of Order Ref to highlight the whole row.
5. Hold down <Ctrl> and click at the left of Product Ref. Both rows will be highlighted.
6. Click the Primary Key button.
7. Save the table as Junction and close it.
8. This table would now have to be filled with information about which products were on which orders. To save time such a table has already been created in the database. Open the Order Details table in Datasheet View, showing the information on each order line.
9. Switch to Design View.
Section 4 Relationships ECDL Advanced
© CiA Training Ltd 2013 50 Access 2013
Driving Lesson 26 - Continued
In a working database, this table would be maintained as part of the Order Entry process.
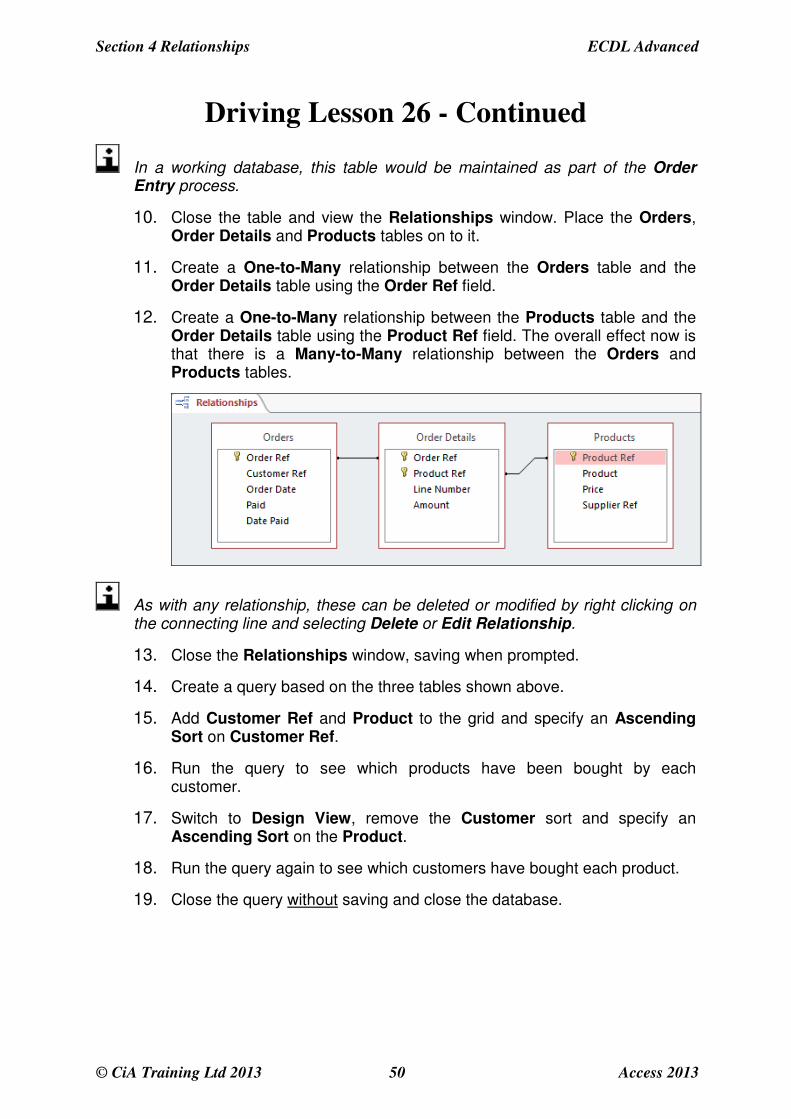
10. Close the table and view the Relationships window. Place the Orders, Order Details and Products tables on to it.
11. Create a One-to-Many relationship between the Orders table and the Order Details table using the Order Ref field.
12. Create a One-to-Many relationship between the Products table and the Order Details table using the Product Ref field. The overall effect now is that there is a Many-to-Many relationship between the Orders and Products tables.
As with any relationship, these can be deleted or modified by right clicking on the connecting line and selecting Delete or Edit Relationship.
13. Close the Relationships window, saving when prompted.
14. Create a query based on the three tables shown above.
15. Add Customer Ref and Product to the grid and specify an Ascending Sort on Customer Ref.
16. Run the query to see which products have been bought by each customer.
17. Switch to Design View, remove the Customer sort and specify an Ascending Sort on the Product.
18. Run the query again to see which customers have bought each product.
19. Close the query without saving and close the database.
ECDL Advanced Section 4 Relationships
Access 2013 51 © CiA Training Ltd 2013
Driving Lesson 27 - Applying Joins
Park and Read
Joins describe the links between tables. They affect the way queries select records when related tables are involved.
The default join type, which is applied by Access automatically, is an inner join. With this type of join, a query will only display records where there is a corresponding entry in both tables. For example, a query on linked Computers and Repairs tables would only show computers that had a repair. Any computers without a repair job, or jobs without relevant computer records, would not be displayed. This is an important point to remember. Sometimes a linked tables query will not display all the records you expect because of this.
Using the above example, if you wanted to display all computers in a query, whether or not they had a match in the Repairs table, you would redefine the link as an outer join based on the Computers table. An alternative outer join based on the Repairs table could also be defined, which would show all repair records, even when there was no associated computer record. A subtract join is the opposite of an outer join; it includes only those records in one table that don’t match any record in the other table.
Manoeuvres
1. Open the Custom Computers database and open the Computers table.
2. Create the following record: B12345A, Bantacom, Pentio, 2007, Smallfoot, Andrew, Mr, 234 Cedar Drive. Leave all other fields blank.
3. Close the table. The computer is registered but has had no repairs yet.
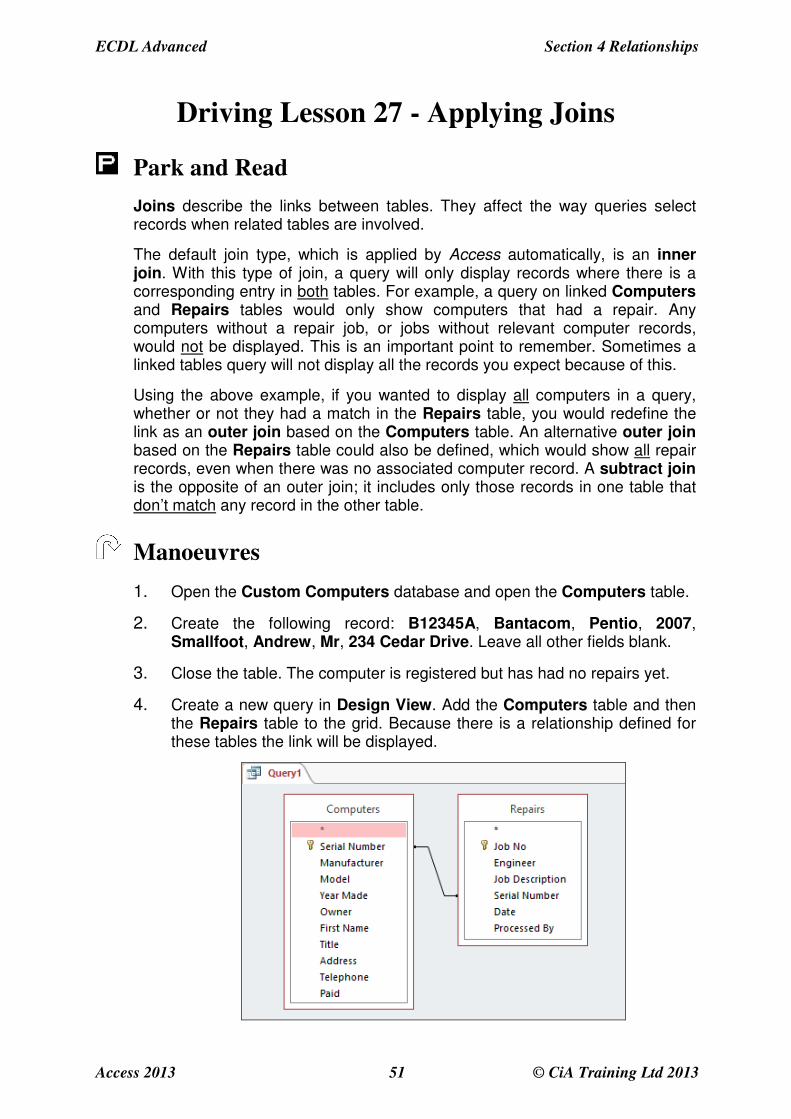
4. Create a new query in Design View. Add the Computers table and then the Repairs table to the grid. Because there is a relationship defined for these tables the link will be displayed.