Embed Size (px)
Citation preview
DRY-PACK HANDOUTS
This document contains home food storage handouts. This is an excellent information resource for members, leaders, and welfare specialists.
Table of Contents
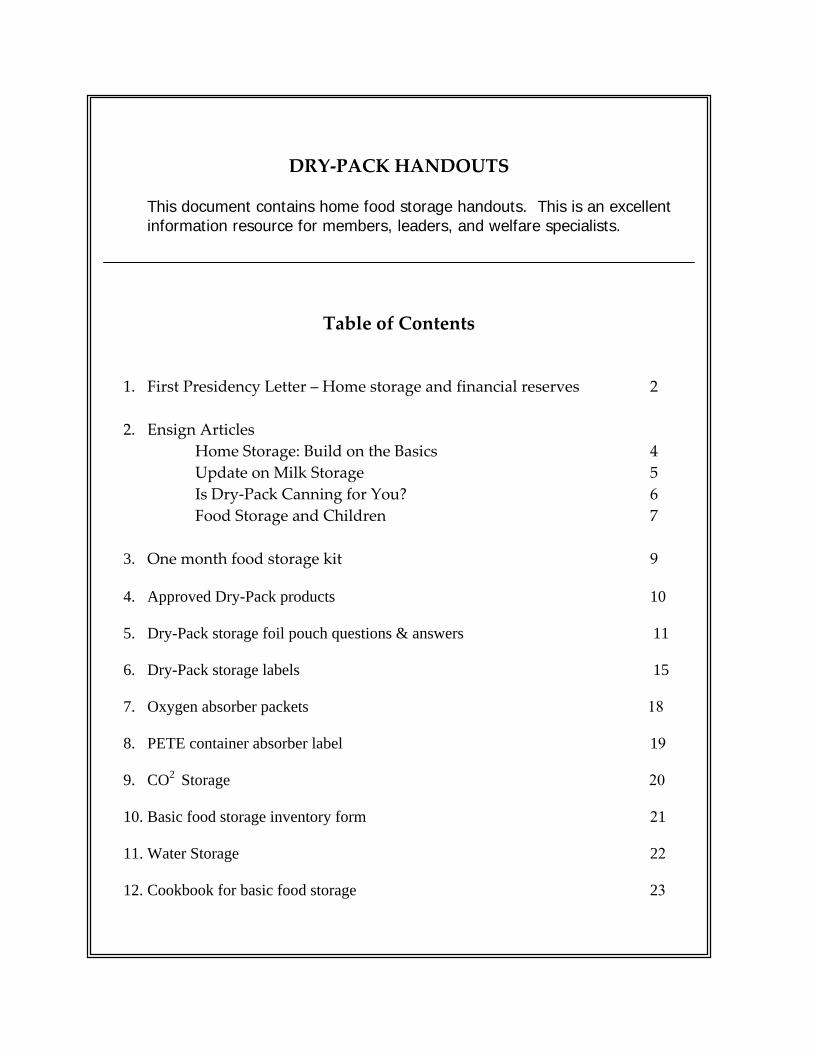
1. First Presidency Letter – Home storage and financial reserves 2 2. Ensign Articles
Home Storage: Build on the Basics 4 Update on Milk Storage 5 Is Dry-Pack Canning for You? 6 Food Storage and Children 7
3. One month food storage kit 9 4. Approved Dry-Pack products 10 5. Dry-Pack storage foil pouch questions & answers 11
6. Dry-Pack storage labels 15
7. Oxygen absorber packets 18
8. PETE container absorber label 19
9. CO2 Storage 20
10. Basic food storage inventory form 21
11. Water Storage 22
12. Cookbook for basic food storage 23

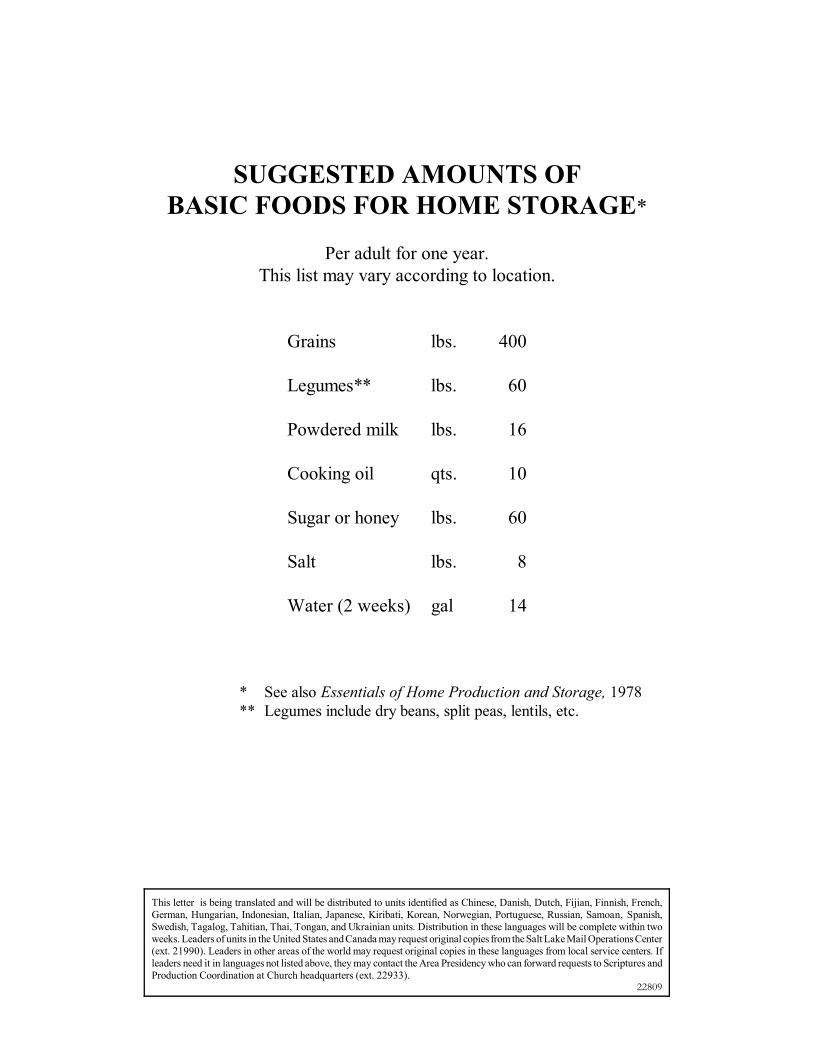
SUGGESTED AMOUNTS OFBASIC FOODS FOR HOME STORAGE*
Per adult for one year.This list may vary according to location.
Grains lbs. 400
Legumes** lbs. 60
Powdered milk lbs. 16
Cooking oil qts. 10
Sugar or honey lbs. 60
Salt lbs. 8
Water (2 weeks) gal 14
* See also Essentials of Home Production and Storage, 1978** Legumes include dry beans, split peas, lentils, etc.
This letter is being translated and will be distributed to units identified as Chinese, Danish, Dutch, Fijian, Finnish, French,German, Hungarian, Indonesian, Italian, Japanese, Kiribati, Korean, Norwegian, Portuguese, Russian, Samoan, Spanish,Swedish, Tagalog, Tahitian, Thai, Tongan, and Ukrainian units. Distribution in these languages will be complete within twoweeks. Leaders of units in the United States and Canada may request original copies from the Salt Lake Mail Operations Center(ext. 21990). Leaders in other areas of the world may request original copies in these languages from local service centers. Ifleaders need it in languages not listed above, they may contact the Area Presidency who can forward requests to Scriptures andProduction Coordination at Church headquarters (ext. 22933).
22809
HOME STORAGE: BUILD ON THE BASICS (Ensign, June 1989)
From Brigham Young’s time to the present day, latter-day prophets have counseled Church members to store food for times of need. Recently, the First Presidency spoke again on this subject: “We continue to encourage members to store sufficient food, clothing, and where possible, fuel for at least one year. We have not laid down an exact formula for what should be stored. However, we suggest that members concentrate on essential foods that sustain life, such as grains, legumes, cooking oil, powdered milk, salt , sugar or honey, and water. Most families can achieve and maintain this basic level of preparedness. The decision to do more than this rests with the individual. “We encourage you to follow this counsel with the assurance that a people prepared through obedience to the commandments of God need not fear” (Letter to priesthood leaders, 24 June 1988). If families would think in terms of storing only foods basic to survival, or if they would supplement the food storage they already have with the basics to build it up to a year’s supply, the task would be simpler than they might think. They would then be prepared for food emergencies. A year’s supply of food storage is beneficial in several ways: 1. It provides peace of mind as we obey the counsel to store. 2. It helps ensure survival in case of personal or natural disaster. 3. It strengthens skills in preparing and using basic foods. Once you have stored the basic food items, you need to regularly include them in your daily meals. This article and other suggestions that will be printed in the following months in the Random Sampler department of the Ensign will provide information on how to store, prepare, and serve meals based on foodstuffs recommended in the First Presidency letter. Other sources of information include ward and stake priesthood leaders and Relief Society presidencies, Church welfare centers or canneries, local extension agents or agricultural services departments, and public and educational libraries. The following guidelines will help in purchasing and storing basic food items. GRAINS—Grains include wheat, rice, rolled oats, dried corn, pearled barley, and other cereal grains. Flour, cornmeal, and pasta products such as macaroni
and spaghetti are also included. Each family should store various grain items that suit their individual circumstances. For example, rather than storing three to four hundred pounds of wheat per person a family might choose to store two hundred pounds of wheat, one hundred pounds of flour, twenty-five pounds of rice, twenty-five pounds of rolled oats, twenty-five pounds of dried corn, and twenty-five pounds of macaroni per person. There are numerous combinations. This gives variety to the menu and encourages using and rotating the supply. It also provides choices for those who do not like or cannot eat a particular grain. Most grains can be dry-pack canned in small containers (see below). This makes them more convenient to use and reduces the possibility of spoilage. Grains may also be stored in tightly sealed metal or heavy plastic containers. LEGUMES—an inexpensive, nutritious protein food—include beans (soy, pinto, white, kidney, lima, winged, red, navy, pink, and black-eyed), split peas, lentils, and peanuts. They can be stored in clean, dry metal or plastic containers with tight-fitting lids. They may also be dry-pack canned. POWDERED MILK—Nonfat powdered milk, instant or regular, is an excellent storage item. It contains all the nutrients, except fat, found in fresh milk. In the past, storing large amounts of powdered milk has been recommended. However, this has often led to spoilage and waste. More recent studies show that smaller quantities of milk are adequate if people store and eat larger quantities of grains. Powdered milk can be stored in the original sealed packages, or if purchased in bulk, it can be stored in tightly covered metal or plastic containers. It can also be dry-pack canned. You may also use canned milk as part of the milk storage program, but you must rotate it regularly. FATS AND OIL—Fat is essential to every diet. Shortening, cooking oil, margarine, and mayonnaise are suggested for storage. Store fats in sealed containers in cool, dry, dark places and rotate them frequently. SALT—Nutritionists recommend iodized rather than plain salt, when it is available. Store salt in its original container in a cool, dry place. SUGAR AND HONEY—Whether to store sugar or honey is a matter of personal choice. Sugar may
harden; honey may crystallize and/or darken. Neither affects the safety of the product. Store honey in small containers. Then, if it crystallizes, you can immerse the containers in hot (not boiling) water to reliquefy it. Store granulated sugar in a tightly covered metal or plastic container or place it on a shelf away from moisture in its unopened cloth or paper bag. Occasionally knead the bag to help prevent the sugar from hardening. WATER—Water is more essential than food in sustaining life. Store a minimum of seven gallons of water per person for drinking and food preparation. Store an additional seven gallons per person of the same quality water for bathing, brushing teeth, and dishwashing. Use heavy plastic containers with tight-fitting lids. Metal containers, which may corrode, tend to give water an unpleasant taste. If you have any doubt as to the bacterial safety of stored water, you may purify it by boiling vigorously for one to two minutes or by adding chlorine bleach (5 percent sodium hypochlorite solution). Generally, half a teaspoon of bleach will purify five gallons of clear water, and one teaspoon will purify five gallons of cloudy water.* If you store it away from sunlight in clean containers, and if it is safe bacterially at the time of storage, water will remain pure indefinitely. STORAGE GUIDELINES— 1. Use storage areas that are well ventilated, clean, dark, dry, and cool. If your conditions are less satisfactory, rotate contents more frequently than recommended. Even though space may be limited, there are usually “hidden areas” for storage. Use your imagination! 2. Do not place food storage containers on or against cement or dirt floors and walls. Place pieces of wood between the storage containers and the floor or wall to provide ventilation and protect against moisture. 3. Keep stored food away from products that may affect the flavor of the food. 4. Rotate and use food storage items regularly. Date food items as you purchase or can them, then store new supplies of food at the back of the shelves, moving earlier purchases forward to be used first. 5. Do not go into debt. Acquire food items gradually. At the very least, save a few dollars a week for storage items. Using the basic foods in day-to-day menus can cut food costs and allow you to purchase more supplies. Or, as a family, give up some of the nonessentials for a short time until you can accumulate additional foods. Through prayer and concerted effort, you can work out a food storage plan that will provide you with security and peace of mind.
No single food storage plan will work for everyone. Each family’s needs differ, as does their financial ability to accumulate the storage items. But by working under the direction of the First Presidency “to concentrate on essential foods,” it can be done. President Ezra Taft Benson has said on at least three different occasions, “The revelation to produce and store food may be as essential to our temporal welfare today as boarding the ark was to the people in the days of Noah” (Ensign, Nov. 1980, p. 33). *, ** DRY-PACK CANNING—With the exception of foods containing fats, most of the storage items discussed here can be sealed by a dry-pack method of canning. Dry-pack canning is easy and inexpensive and uses containers that are small enough that they can be easily rotated and handled. In addition to dry-pack canning equipment available for use at some Church canneries, dry-pack canners may be checked out from the canneries for local use. For more information, contact your region welfare agent (your stake president can tell you who it is), welfare cannery, or bishops’ storehouse.** *2002 UPDATE – EPA water treatment recommendations are for 1/2 teaspoon per gallon for clear water and 1 teaspoon per gallon if the water is cloudy or colored. **2002 UPDATE—Church canneries now provide foil pouch packaging as well as #10 can dry-pack storage of basic staple food items.
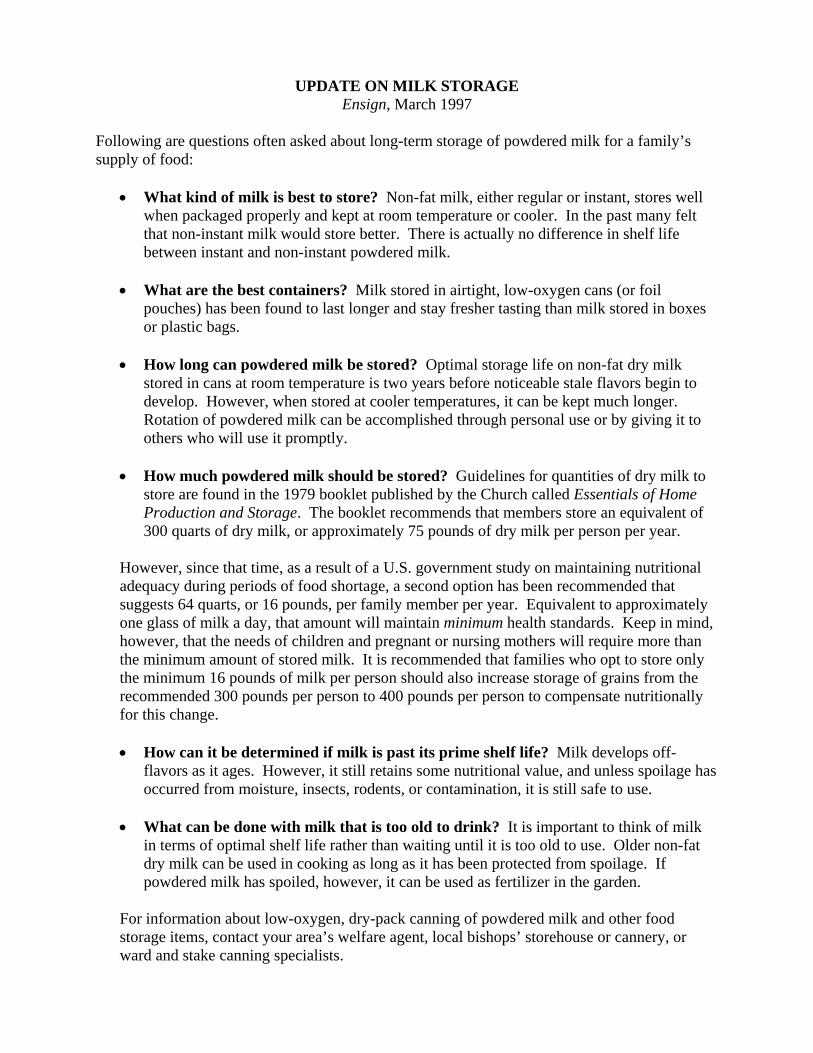
UPDATE ON MILK STORAGE Ensign, March 1997
Following are questions often asked about long-term storage of powdered milk for a family’s supply of food:
• What kind of milk is best to store? Non-fat milk, either regular or instant, stores well
when packaged properly and kept at room temperature or cooler. In the past many felt that non-instant milk would store better. There is actually no difference in shelf life between instant and non-instant powdered milk.
• What are the best containers? Milk stored in airtight, low-oxygen cans (or foil
pouches) has been found to last longer and stay fresher tasting than milk stored in boxes or plastic bags.
• How long can powdered milk be stored? Optimal storage life on non-fat dry milk
stored in cans at room temperature is two years before noticeable stale flavors begin to develop. However, when stored at cooler temperatures, it can be kept much longer. Rotation of powdered milk can be accomplished through personal use or by giving it to others who will use it promptly.
• How much powdered milk should be stored? Guidelines for quantities of dry milk to
store are found in the 1979 booklet published by the Church called Essentials of Home Production and Storage. The booklet recommends that members store an equivalent of 300 quarts of dry milk, or approximately 75 pounds of dry milk per person per year.
However, since that time, as a result of a U.S. government study on maintaining nutritional adequacy during periods of food shortage, a second option has been recommended that suggests 64 quarts, or 16 pounds, per family member per year. Equivalent to approximately one glass of milk a day, that amount will maintain minimum health standards. Keep in mind, however, that the needs of children and pregnant or nursing mothers will require more than the minimum amount of stored milk. It is recommended that families who opt to store only the minimum 16 pounds of milk per person should also increase storage of grains from the recommended 300 pounds per person to 400 pounds per person to compensate nutritionally for this change.
• How can it be determined if milk is past its prime shelf life? Milk develops off-
flavors as it ages. However, it still retains some nutritional value, and unless spoilage has occurred from moisture, insects, rodents, or contamination, it is still safe to use.
• What can be done with milk that is too old to drink? It is important to think of milk
in terms of optimal shelf life rather than waiting until it is too old to use. Older non-fat dry milk can be used in cooking as long as it has been protected from spoilage. If powdered milk has spoiled, however, it can be used as fertilizer in the garden.
For information about low-oxygen, dry-pack canning of powdered milk and other food storage items, contact your area’s welfare agent, local bishops’ storehouse or cannery, or ward and stake canning specialists.
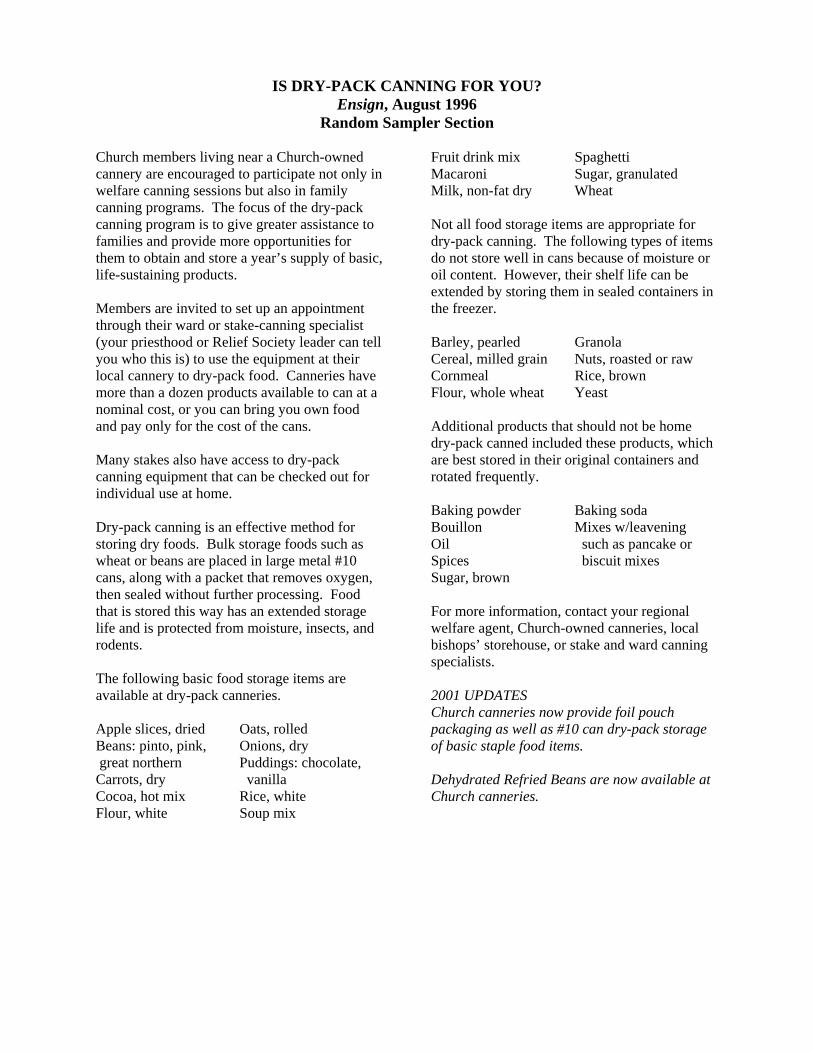
IS DRY-PACK CANNING FOR YOU? Ensign, August 1996
Random Sampler Section Church members living near a Church-owned cannery are encouraged to participate not only in welfare canning sessions but also in family canning programs. The focus of the dry-pack canning program is to give greater assistance to families and provide more opportunities for them to obtain and store a year’s supply of basic, life-sustaining products. Members are invited to set up an appointment through their ward or stake-canning specialist (your priesthood or Relief Society leader can tell you who this is) to use the equipment at their local cannery to dry-pack food. Canneries have more than a dozen products available to can at a nominal cost, or you can bring you own food and pay only for the cost of the cans. Many stakes also have access to dry-pack canning equipment that can be checked out for individual use at home. Dry-pack canning is an effective method for storing dry foods. Bulk storage foods such as wheat or beans are placed in large metal #10 cans, along with a packet that removes oxygen, then sealed without further processing. Food that is stored this way has an extended storage life and is protected from moisture, insects, and rodents. The following basic food storage items are available at dry-pack canneries. Apple slices, dried Oats, rolled Beans: pinto, pink, Onions, dry great northern Puddings: chocolate, Carrots, dry vanilla Cocoa, hot mix Rice, white Flour, white Soup mix
Fruit drink mix Spaghetti Macaroni Sugar, granulated Milk, non-fat dry Wheat Not all food storage items are appropriate for dry-pack canning. The following types of items do not store well in cans because of moisture or oil content. However, their shelf life can be extended by storing them in sealed containers in the freezer. Barley, pearled Granola Cereal, milled grain Nuts, roasted or raw Cornmeal Rice, brown Flour, whole wheat Yeast Additional products that should not be home dry-pack canned included these products, which are best stored in their original containers and rotated frequently. Baking powder Baking soda Bouillon Mixes w/leavening Oil such as pancake or Spices biscuit mixes Sugar, brown For more information, contact your regional welfare agent, Church-owned canneries, local bishops’ storehouse, or stake and ward canning specialists. 2001 UPDATES Church canneries now provide foil pouch packaging as well as #10 can dry-pack storage of basic staple food items. Dehydrated Refried Beans are now available at Church canneries.
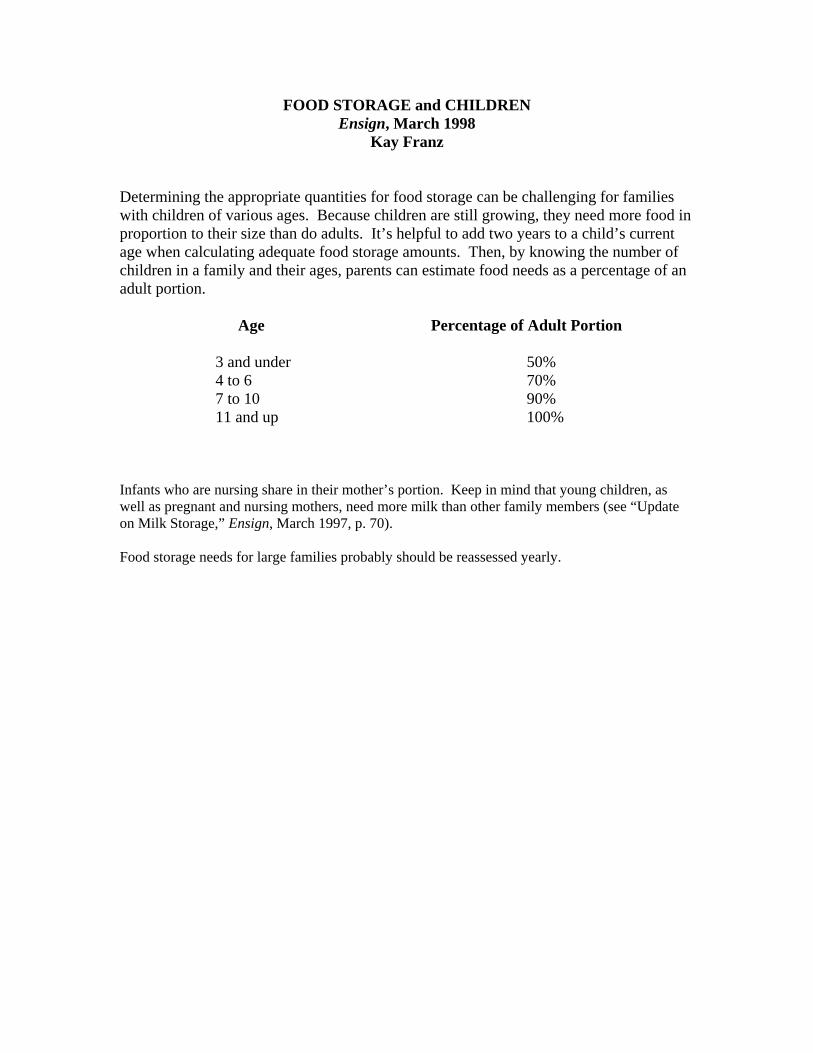
FOOD STORAGE and CHILDREN Ensign, March 1998
Kay Franz Determining the appropriate quantities for food storage can be challenging for families with children of various ages. Because children are still growing, they need more food in proportion to their size than do adults. It’s helpful to add two years to a child’s current age when calculating adequate food storage amounts. Then, by knowing the number of children in a family and their ages, parents can estimate food needs as a percentage of an adult portion.
Age
3 and under 4 to 6 7 to 10 11 and up
Percentage of Adult Portion 50% 70% 90% 100%
Infants who are nursing share in their mother’s portion. Keep in mind that young children, as well as pregnant and nursing mothers, need more milk than other family members (see “Update on Milk Storage,” Ensign, March 1997, p. 70). Food storage needs for large families probably should be reassessed yearly.
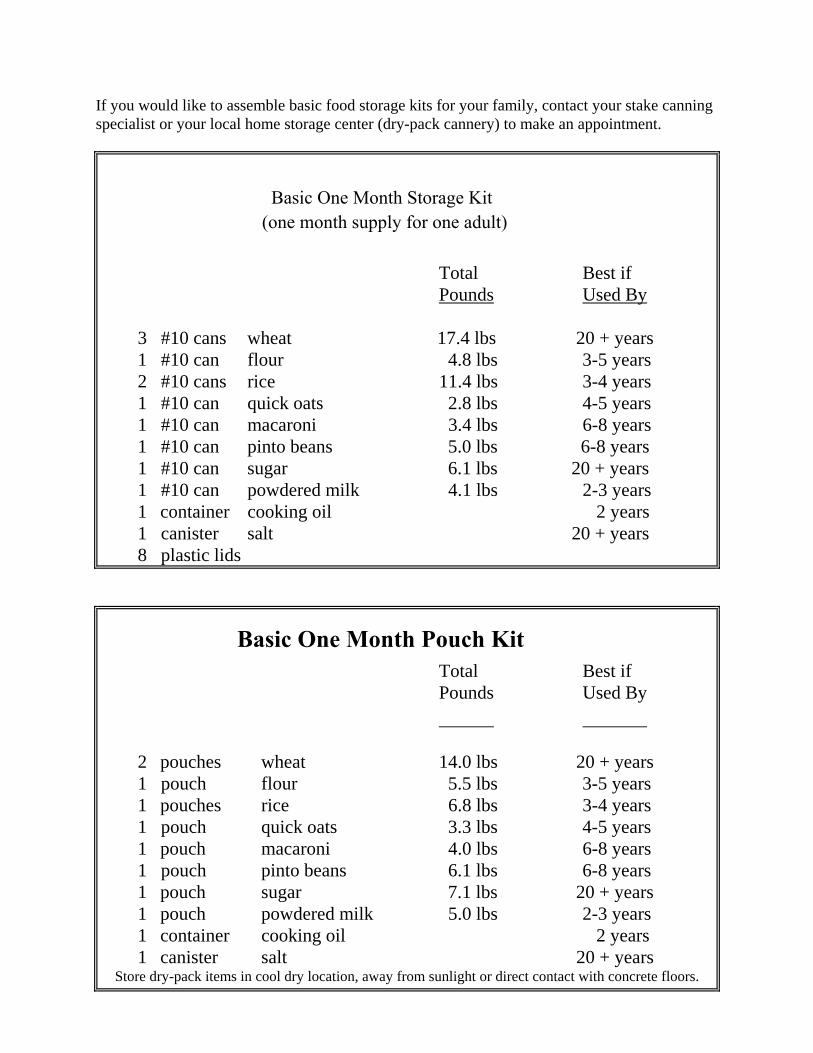
If you would like to assemble basic food storage kits for your family, contact your stake canning specialist or your local home storage center (dry-pack cannery) to make an appointment.
Basic One Month Storage Kit(one month supply for one adult)
Total Best if Pounds Used By
3 #10 cans wheat 17.4 lbs 20 + years 1 #10 can flour 4.8 lbs 3-5 years 2 #10 cans rice 11.4 lbs 3-4 years 1 #10 can quick oats 2.8 lbs 4-5 years 1 #10 can macaroni 3.4 lbs 6-8 years 1 #10 can pinto beans 5.0 lbs 6-8 years 1 #10 can sugar 6.1 lbs 20 + years 1 #10 can powdered milk 4.1 lbs 2-3 years 1 container cooking oil 2 years 1 canister salt 20 + years 8 plastic lids
Total Best if Pounds Used By
2 pouches wheat 14.0 lbs 20 + years 1 pouch flour 5.5 lbs 3-5 years 1 pouches rice 6.8 lbs 3-4 years 1 pouch quick oats 3.3 lbs 4-5 years 1 pouch macaroni 4.0 lbs 6-8 years 1 pouch pinto beans 6.1 lbs 6-8 years 1 pouch sugar 7.1 lbs 20 + years 1 pouch powdered milk 5.0 lbs 2-3 years 1 container cooking oil 2 years 1 canister salt 20 + years
Store dry-pack items in cool dry location, away from sunlight or direct contact with concrete floors.
Basic One Month Pouch Kit
Welfare Services Home Storage Center
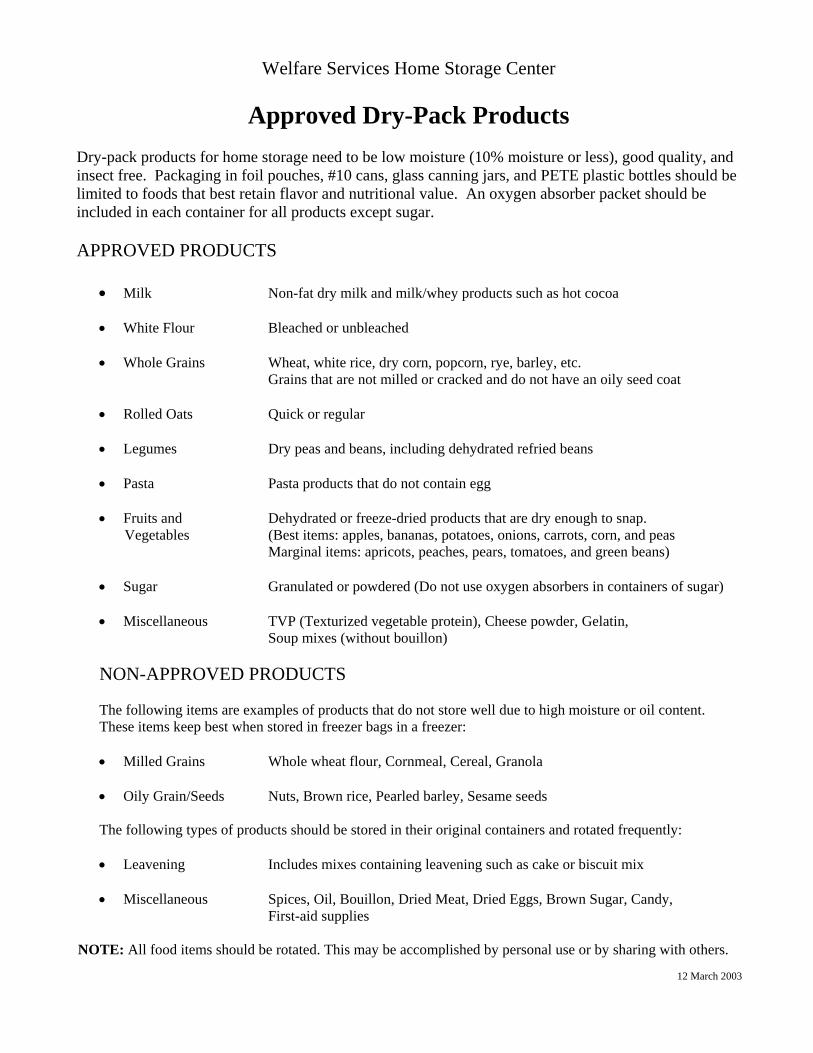
Approved Dry-Pack Products
Dry-pack products for home storage need to be low moisture (10% moisture or less), good quality, and insect free. Packaging in foil pouches, #10 cans, glass canning jars, and PETE plastic bottles should be limited to foods that best retain flavor and nutritional value. An oxygen absorber packet should be included in each container for all products except sugar. APPROVED PRODUCTS
• Milk Non-fat dry milk and milk/whey products such as hot cocoa
• White Flour Bleached or unbleached
• Whole Grains Wheat, white rice, dry corn, popcorn, rye, barley, etc. Grains that are not milled or cracked and do not have an oily seed coat
• Rolled Oats Quick or regular
• Legumes Dry peas and beans, including dehydrated refried beans
• Pasta Pasta products that do not contain egg
• Fruits and Dehydrated or freeze-dried products that are dry enough to snap.
Vegetables (Best items: apples, bananas, potatoes, onions, carrots, corn, and peas Marginal items: apricots, peaches, pears, tomatoes, and green beans)
• Sugar Granulated or powdered (Do not use oxygen absorbers in containers of sugar) • Miscellaneous TVP (Texturized vegetable protein), Cheese powder, Gelatin,
Soup mixes (without bouillon)
NON-APPROVED PRODUCTS
The following items are examples of products that do not store well due to high moisture or oil content. These items keep best when stored in freezer bags in a freezer:
• Milled Grains Whole wheat flour, Cornmeal, Cereal, Granola
• Oily Grain/Seeds Nuts, Brown rice, Pearled barley, Sesame seeds
The following types of products should be stored in their original containers and rotated frequently:
• Leavening Includes mixes containing leavening such as cake or biscuit mix
• Miscellaneous Spices, Oil, Bouillon, Dried Meat, Dried Eggs, Brown Sugar, Candy,
First-aid supplies NOTE: All food items should be rotated. This may be accomplished by personal use or by sharing with others.
12 March 2003
Welfare Services
DRY-PACK FOIL POUCHES Questions and Answers
What type of pouch is provided by Welfare Services? The pouches are made of multilayer laminated plastic and aluminum. The material is 7 mils (178 microns) thick and provides protection for food against moisture and insects. The pouches hold 1 gallon (4 liters) of product. How are foil pouches used? Foil pouches, like metal cans, are used by the food industry for packaging a wide range of both wet and dry pack foods. Wet pack in pouches requires sophisticated pressure systems that are not practical for home processing. Welfare Services uses pouches for dry pack only. What are the advantages of pouches? • Easy to transport and warehouse empty pouches • Can be cut into smaller packages • Do not rust • Easily reusable What food can be dry-packed in pouches? Foods, which are shelf-stable and low in moisture and oil content. (Refer to the attached Approved Dry-Pack Products list) How much food does each pouch hold? Example weights: Wheat 7 lbs. (3.2 kilos), Rice 6.8 lbs. (3.1 kilos), and Dry Milk 5 lbs. (2.3kilos).
Does food react with the aluminium in the pouches? No. Foods do not come in contact with the aluminum in the pouch. The aluminum barrier is important in protecting the food from moisture and oxygen and is separated from the food by an inner layer of food grade polyethylene. What is the purpose for using oxygen absorbers in the pouches? Absorbers remove oxygen from the air in the pouch. The low oxygen content is lethal to insects. What is the best way to seal pouches? Impulse pouch sealers that meet the following specifications: 3/16 in. (5 mm) wide seal, 11.5 in. (305 mm) wide jaws, rated for up to 8 mils (205 microns) thick pouches, and equipped with a safety switch to cancel operation if jaw is obstructed. • The impulse sealer models used by Welfare Services are American International Electric
AIE 305 A1 and Mercier ME 305 A1 • Do not use clothes irons or other household heating devices to seal these pouches.

Will the sides of the pouch pull in?yes, but it may not be noticeable. The amount of “vacuum packed” appearance of the pouch will depend on the type of product and amount of air left in the pouch. Within a few days of packaging, the sides of the pouches will begin to draw in as the oxygen is absorbed. This is more noticeable with granular foods than with powdered products. The residual air in the pouch is mostly nitrogen, which is an inert gas that does not affect food. How should pouches of food be stored? Dry pack pouches may be stored on shelves, in cardboard boxes, or in other containers. Exposure to direct sunlight should be avoided. Food storage is best in a cool, dry, rodent free area. Storage containers should be spaced away from direct contact with concrete floors or walls. How long will it keep? Examples of “Best if used by” recommendations for dry-pack food in pouches: 10 year s 8 years 5 years 4 years 3 years 1-8 years Wheat Beans Rolled oats White rice Non fat dry milk Dry fruit and White sugar Pasta White flour Instant potatoes Vegetables Are pouches rodent proof? No. Pouches are not rodent proof. If rodents are a significant potential problem in the storage area, the pouches could be placed into larger, more rodent resistant containers such as plastic storage containers, plastic buckets, metal drums, new metal garbage cans, etc. Can pouches with zip lock seals use be used with oxygen absorbers?No. Zip locks do not provide a seal that is adequate for oxygen absorber packaging. Can 72 hour kits be packaged in pouches? No. Many of the items in emergency supplies are not suitable for packaging in either #10 cans or foil pouches. First aid supplies and emergency rations, such as granola bars, are best packaged in containers with removable lids for frequent rotation. Can pouches be used for water storage? No. The pouch sealers are not waterproof. They are to be used for dry pack storage only. �Technical Notes • Typical physical construction of the 7 mil (178 microns) thick dry pack pouch is: Polyester/aluminum/polyethylene (PET/AL/PE) • Pouch inside dimensions are: 280 mm x 330 mm. Factory side seals are 10 mm wide. • The barrier qualities of the pouch are: Oxygen Transmission Rate @ 100% oxygen per 100 sq. in./24 hrs. < 0.0005 cc Moisture Vapor Transmission Rate @ 100 deg. F. per 100 sq. in./24 hrs. < 0.0006 gms • Air is approximately 80% nitrogen and 20% oxygen. Absorbers remove only oxygen. 3 December 2004
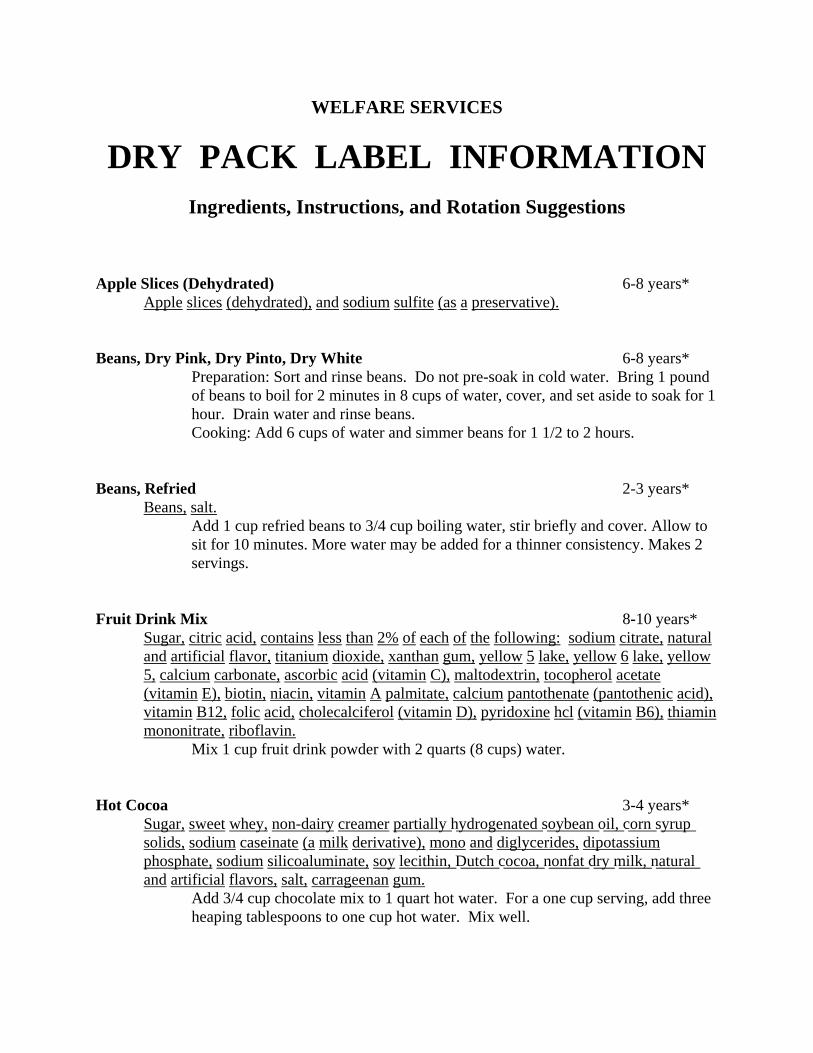
WELFARE SERVICES
DRY PACK LABEL INFORMATION
Ingredients, Instructions, and Rotation Suggestions
Apple Slices (Dehydrated) 6-8 years* Apple slices (dehydrated), and sodium sulfite (as a preservative).
Beans, Dry Pink, Dry Pinto, Dry White 6-8 years*
Preparation: Sort and rinse beans. Do not pre-soak in cold water. Bring 1 pound of beans to boil for 2 minutes in 8 cups of water, cover, and set aside to soak for 1 hour. Drain water and rinse beans. Cooking: Add 6 cups of water and simmer beans for 1 1/2 to 2 hours.
Beans, Refried 2-3 years*
Beans, salt. Add 1 cup refried beans to 3/4 cup boiling water, stir briefly and cover. Allow to sit for 10 minutes. More water may be added for a thinner consistency. Makes 2 servings.
Fruit Drink Mix 8-10 years*
Sugar, citric acid, contains less than 2% of each of the following: sodium citrate, natural and artificial flavor, titanium dioxide, xanthan gum, yellow 5 lake, yellow 6 lake, yellow 5, calcium carbonate, ascorbic acid (vitamin C), maltodextrin, tocopherol acetate (vitamin E), biotin, niacin, vitamin A palmitate, calcium pantothenate (pantothenic acid), vitamin B12, folic acid, cholecalciferol (vitamin D), pyridoxine hcl (vitamin B6), thiamin mononitrate, riboflavin.
Mix 1 cup fruit drink powder with 2 quarts (8 cups) water.
Hot Cocoa 3-4 years*
Sugar, sweet whey, non-dairy creamer partially hydrogenated soybean oil, corn syrup solids, sodium caseinate (a milk derivative), mono and diglycerides, dipotassium phosphate, sodium silicoaluminate, soy lecithin, Dutch cocoa, nonfat dry milk, natural and artificial flavors, salt, carrageenan gum.
Add 3/4 cup chocolate mix to 1 quart hot water. For a one cup serving, add three heaping tablespoons to one cup hot water. Mix well.
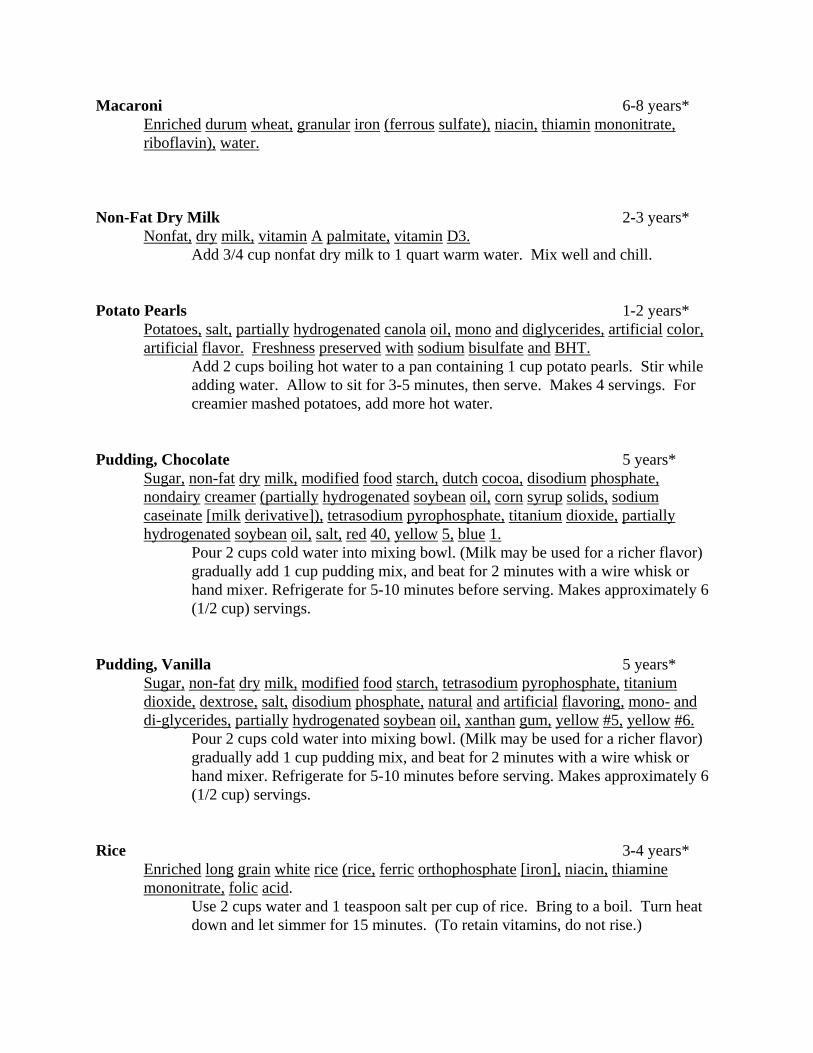
Macaroni 6-8 years* Enriched durum wheat, granular iron (ferrous sulfate), niacin, thiamin mononitrate, riboflavin), water.
Non-Fat Dry Milk 2-3 years*
Nonfat, dry milk, vitamin A palmitate, vitamin D3. Add 3/4 cup nonfat dry milk to 1 quart warm water. Mix well and chill.
Potato Pearls 1-2 years*
Potatoes, salt, partially hydrogenated canola oil, mono and diglycerides, artificial color, artificial flavor. Freshness preserved with sodium bisulfate and BHT.
Add 2 cups boiling hot water to a pan containing 1 cup potato pearls. Stir while adding water. Allow to sit for 3-5 minutes, then serve. Makes 4 servings. For creamier mashed potatoes, add more hot water.
Pudding, Chocolate 5 years*
Sugar, non-fat dry milk, modified food starch, dutch cocoa, disodium phosphate, nondairy creamer (partially hydrogenated soybean oil, corn syrup solids, sodium caseinate [milk derivative]), tetrasodium pyrophosphate, titanium dioxide, partially hydrogenated soybean oil, salt, red 40, yellow 5, blue 1.
Pour 2 cups cold water into mixing bowl. (Milk may be used for a richer flavor) gradually add 1 cup pudding mix, and beat for 2 minutes with a wire whisk or hand mixer. Refrigerate for 5-10 minutes before serving. Makes approximately 6 (1/2 cup) servings.
Pudding, Vanilla 5 years*
Sugar, non-fat dry milk, modified food starch, tetrasodium pyrophosphate, titanium dioxide, dextrose, salt, disodium phosphate, natural and artificial flavoring, mono- and di-glycerides, partially hydrogenated soybean oil, xanthan gum, yellow #5, yellow #6.
Pour 2 cups cold water into mixing bowl. (Milk may be used for a richer flavor) gradually add 1 cup pudding mix, and beat for 2 minutes with a wire whisk or hand mixer. Refrigerate for 5-10 minutes before serving. Makes approximately 6 (1/2 cup) servings.
Rice 3-4 years*
Enriched long grain white rice (rice, ferric orthophosphate [iron], niacin, thiamine mononitrate, folic acid.
Use 2 cups water and 1 teaspoon salt per cup of rice. Bring to a boil. Turn heat down and let simmer for 15 minutes. (To retain vitamins, do not rise.)
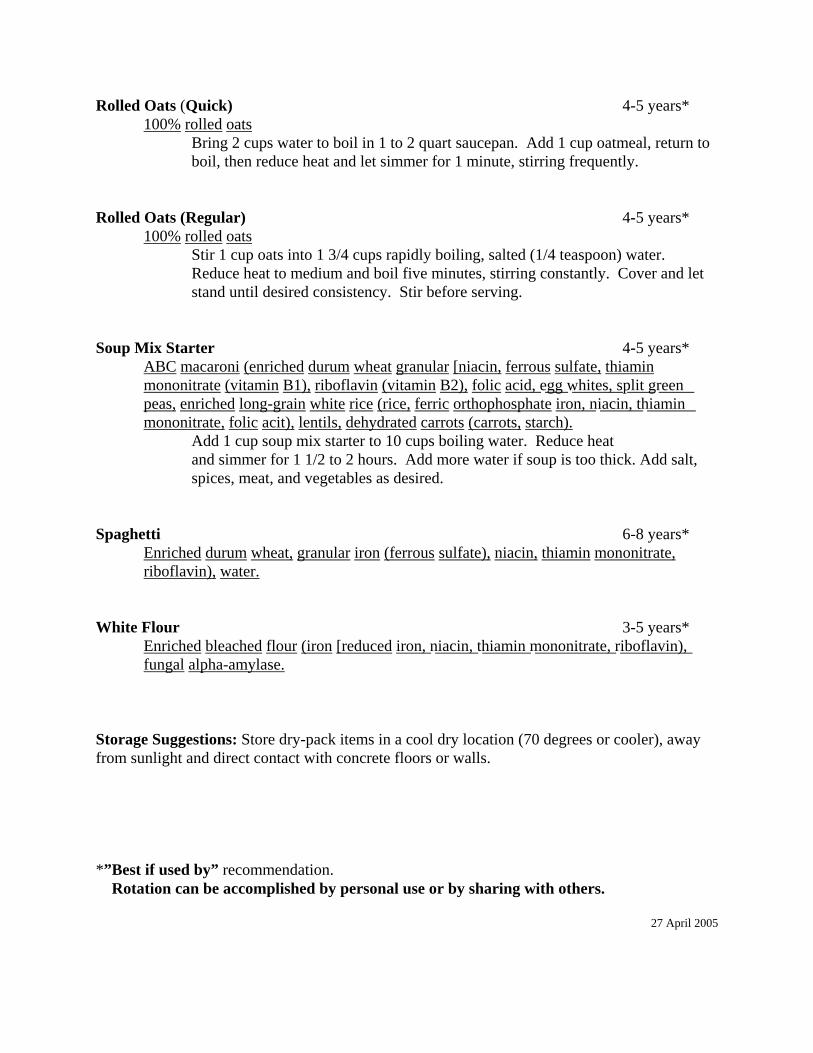
Rolled Oats (Quick) 4-5 years* 100% rolled oats
Bring 2 cups water to boil in 1 to 2 quart saucepan. Add 1 cup oatmeal, return to boil, then reduce heat and let simmer for 1 minute, stirring frequently.
Rolled Oats (Regular) 4-5 years* 100% rolled oats
Stir 1 cup oats into 1 3/4 cups rapidly boiling, salted (1/4 teaspoon) water. Reduce heat to medium and boil five minutes, stirring constantly. Cover and let stand until desired consistency. Stir before serving.
Soup Mix Starter 4-5 years*
ABC macaroni (enriched durum wheat granular [niacin, ferrous sulfate, thiamin mononitrate (vitamin B1), riboflavin (vitamin B2), folic acid, egg whites, split green peas, enriched long-grain white rice (rice, ferric orthophosphate iron, niacin, thiamin mononitrate, folic acit), lentils, dehydrated carrots (carrots, starch).
Add 1 cup soup mix starter to 10 cups boiling water. Reduce heat and simmer for 1 1/2 to 2 hours. Add more water if soup is too thick. Add salt, spices, meat, and vegetables as desired.
Spaghetti 6-8 years*
Enriched durum wheat, granular iron (ferrous sulfate), niacin, thiamin mononitrate, riboflavin), water.
White Flour 3-5 years*
Enriched bleached flour (iron [reduced iron, niacin, thiamin mononitrate, riboflavin), fungal alpha-amylase.
Storage Suggestions: Store dry-pack items in a cool dry location (70 degrees or cooler), away from sunlight and direct contact with concrete floors or walls. *”Best if used by” recommendation. Rotation can be accomplished by personal use or by sharing with others.
27 April 2005
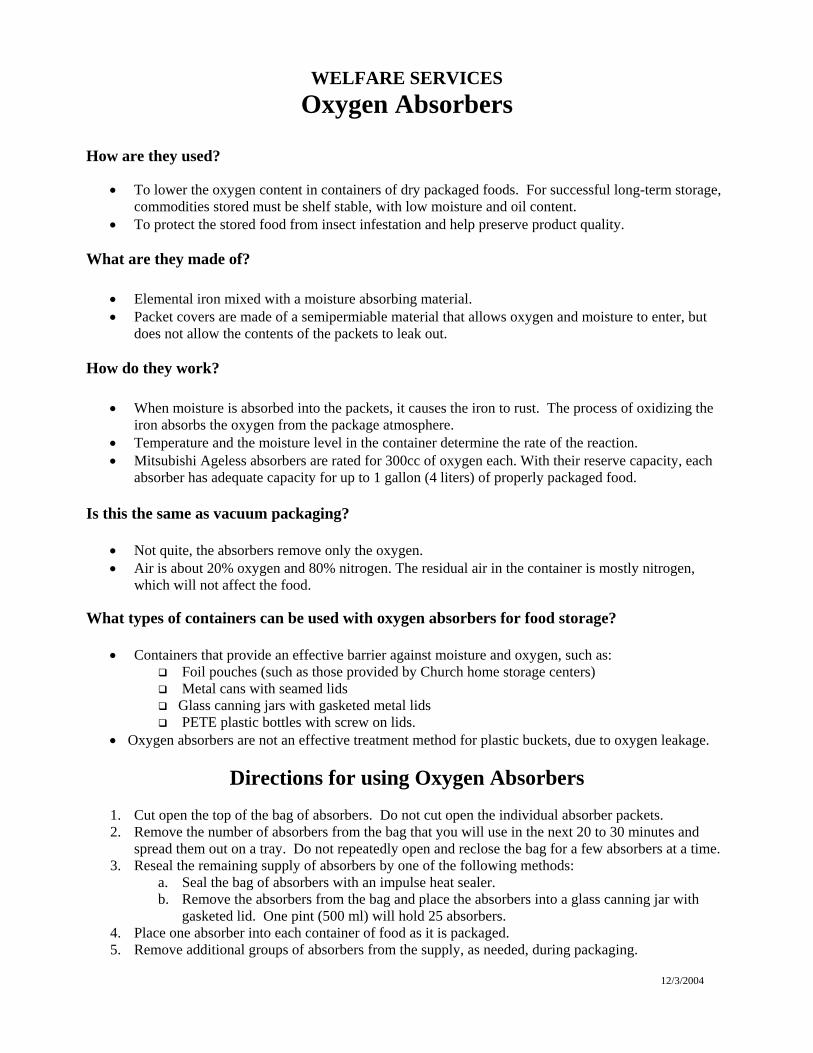
WELFARE SERVICES Oxygen Absorbers
How are they used?
• To lower the oxygen content in containers of dry packaged foods. For successful long-term storage, commodities stored must be shelf stable, with low moisture and oil content.
• To protect the stored food from insect infestation and help preserve product quality. What are they made of?
• Elemental iron mixed with a moisture absorbing material. • Packet covers are made of a semipermiable material that allows oxygen and moisture to enter, but
does not allow the contents of the packets to leak out. How do they work?
• When moisture is absorbed into the packets, it causes the iron to rust. The process of oxidizing the iron absorbs the oxygen from the package atmosphere.
• Temperature and the moisture level in the container determine the rate of the reaction. • Mitsubishi Ageless absorbers are rated for 300cc of oxygen each. With their reserve capacity, each
absorber has adequate capacity for up to 1 gallon (4 liters) of properly packaged food.
Is this the same as vacuum packaging?
• Not quite, the absorbers remove only the oxygen. • Air is about 20% oxygen and 80% nitrogen. The residual air in the container is mostly nitrogen,
which will not affect the food. What types of containers can be used with oxygen absorbers for food storage?
• Containers that provide an effective barrier against moisture and oxygen, such as: Foil pouches (such as those provided by Church home storage centers) Metal cans with seamed lids Glass canning jars with gasketed metal lids PETE plastic bottles with screw on lids.
• Οxygen absorbers are not an effective treatment method for plastic buckets, due to oxygen leakage.
Directions for using Oxygen Absorbers
1. Cut open the top of the bag of absorbers. Do not cut open the individual absorber packets. 2. Remove the number of absorbers from the bag that you will use in the next 20 to 30 minutes and
spread them out on a tray. Do not repeatedly open and reclose the bag for a few absorbers at a time. 3. Reseal the remaining supply of absorbers by one of the following methods:
a. Seal the bag of absorbers with an impulse heat sealer. b. Remove the absorbers from the bag and place the absorbers into a glass canning jar with
gasketed lid. One pint (500 ml) will hold 25 absorbers. 4. Place one absorber into each container of food as it is packaged. 5. Remove additional groups of absorbers from the supply, as needed, during packaging.
12/3/2004
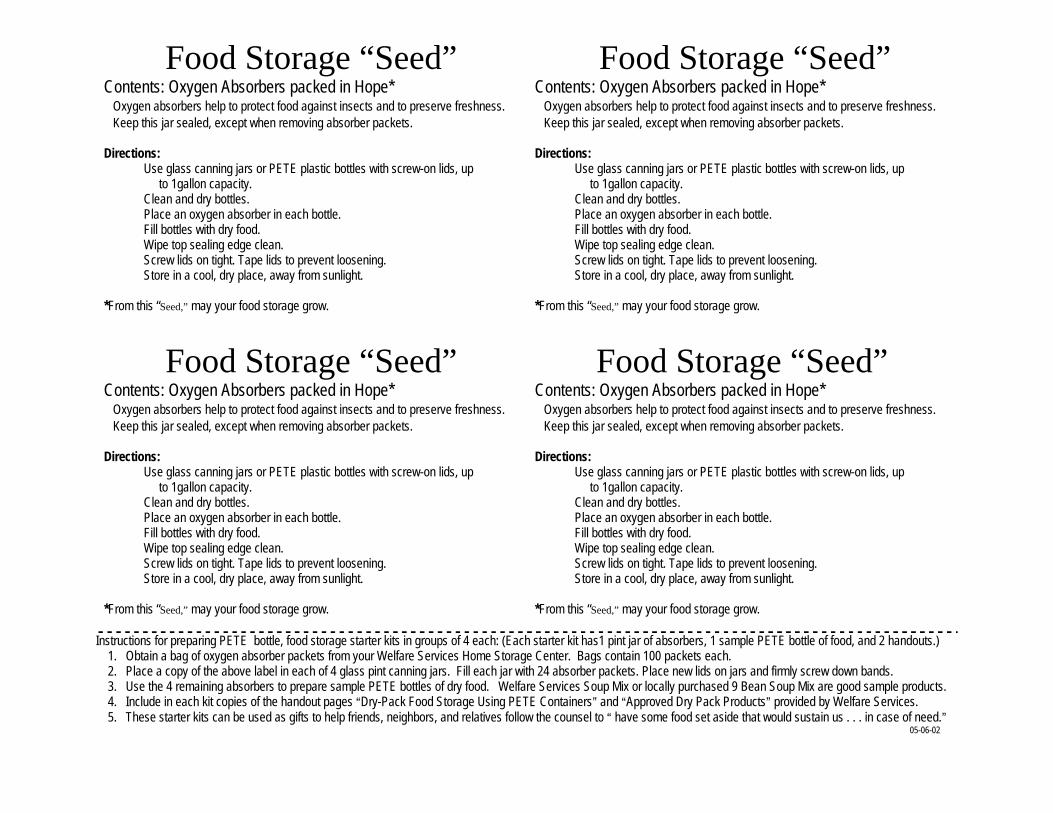
Food Storage “Seed” Contents: Oxygen Absorbers packed in Hope* Oxygen absorbers help to protect food against insects and to preserve freshness. Keep this jar sealed, except when removing absorber packets. Directions:
Use glass canning jars or PETE plastic bottles with screw-on lids, up to 1gallon capacity.
Clean and dry bottles. Place an oxygen absorber in each bottle. Fill bottles with dry food. Wipe top sealing edge clean. Screw lids on tight. Tape lids to prevent loosening. Store in a cool, dry place, away from sunlight.
*From this “Seed,” may your food storage grow.
Instructions for preparing PETE bottle, food storage starter kits in groups of 4 each: (Each starter kit has1 pint jar of absorbers, 1 sample PETE bottle of food, and 2 handouts.) 1. Obtain a bag of oxygen absorber packets from your Welfare Services Home Storage Center. Bags contain 100 packets each. 2. Place a copy of the above label in each of 4 glass pint canning jars. Fill each jar with 24 absorber packets. Place new lids on jars and firmly screw down bands. 3. Use the 4 remaining absorbers to prepare sample PETE bottles of dry food. Welfare Services Soup Mix or locally purchased 9 Bean Soup Mix are good sample products. 4. Include in each kit copies of the handout pages ADry-Pack Food Storage Using PETE Containers@ and AApproved Dry Pack Products@ provided by Welfare Services. 5. These starter kits can be used as gifts to help friends, neighbors, and relatives follow the counsel to A have some food set aside that would sustain us . . . in case of need.@
05-06-02
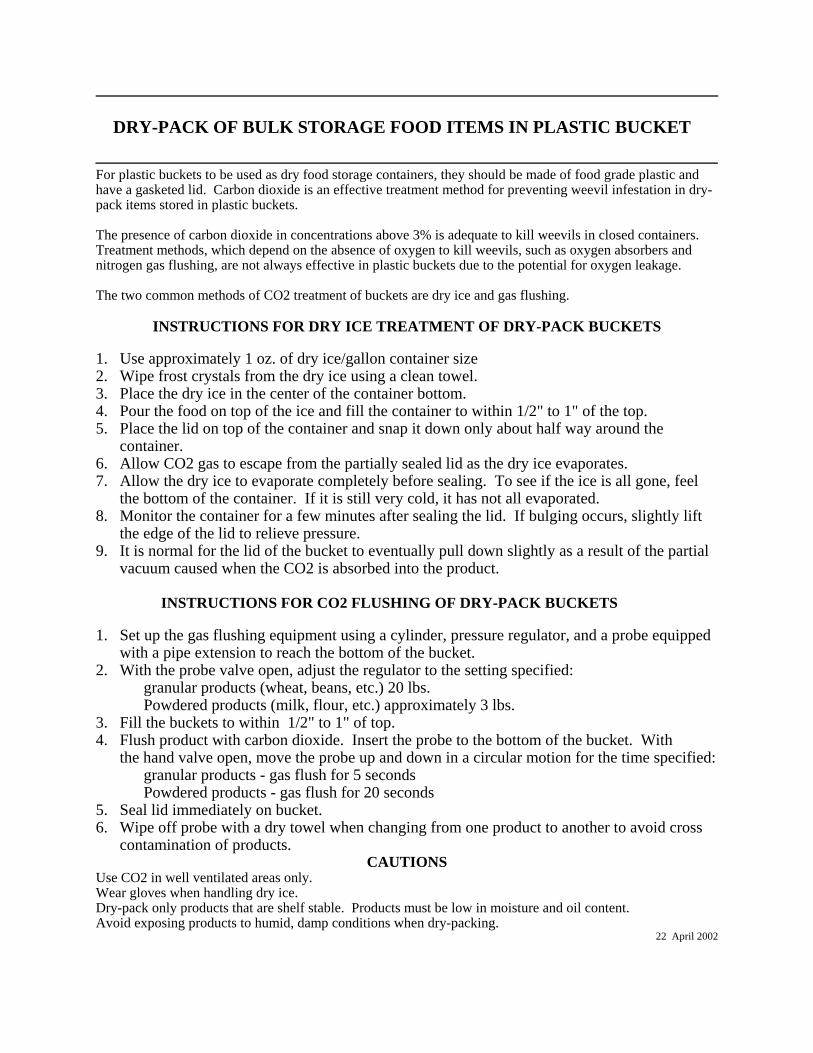
DRY-PACK OF BULK STORAGE FOOD ITEMS IN PLASTIC BUCKET For plastic buckets to be used as dry food storage containers, they should be made of food grade plastic and have a gasketed lid. Carbon dioxide is an effective treatment method for preventing weevil infestation in dry-pack items stored in plastic buckets. The presence of carbon dioxide in concentrations above 3% is adequate to kill weevils in closed containers. Treatment methods, which depend on the absence of oxygen to kill weevils, such as oxygen absorbers and nitrogen gas flushing, are not always effective in plastic buckets due to the potential for oxygen leakage. The two common methods of CO2 treatment of buckets are dry ice and gas flushing.
INSTRUCTIONS FOR DRY ICE TREATMENT OF DRY-PACK BUCKETS 1. Use approximately 1 oz. of dry ice/gallon container size 2. Wipe frost crystals from the dry ice using a clean towel. 3. Place the dry ice in the center of the container bottom. 4. Pour the food on top of the ice and fill the container to within 1/2" to 1" of the top. 5. Place the lid on top of the container and snap it down only about half way around the
container. 6. Allow CO2 gas to escape from the partially sealed lid as the dry ice evaporates. 7. Allow the dry ice to evaporate completely before sealing. To see if the ice is all gone, feel
the bottom of the container. If it is still very cold, it has not all evaporated. 8. Monitor the container for a few minutes after sealing the lid. If bulging occurs, slightly lift
the edge of the lid to relieve pressure. 9. It is normal for the lid of the bucket to eventually pull down slightly as a result of the partial
vacuum caused when the CO2 is absorbed into the product.
INSTRUCTIONS FOR CO2 FLUSHING OF DRY-PACK BUCKETS 1. Set up the gas flushing equipment using a cylinder, pressure regulator, and a probe equipped
with a pipe extension to reach the bottom of the bucket. 2. With the probe valve open, adjust the regulator to the setting specified:
granular products (wheat, beans, etc.) 20 lbs. Powdered products (milk, flour, etc.) approximately 3 lbs.
3. Fill the buckets to within 1/2" to 1" of top. 4. Flush product with carbon dioxide. Insert the probe to the bottom of the bucket. With
the hand valve open, move the probe up and down in a circular motion for the time specified: granular products - gas flush for 5 seconds Powdered products - gas flush for 20 seconds
5. Seal lid immediately on bucket. 6. Wipe off probe with a dry towel when changing from one product to another to avoid cross
contamination of products. CAUTIONS
Use CO2 in well ventilated areas only. Wear gloves when handling dry ice. Dry-pack only products that are shelf stable. Products must be low in moisture and oil content. Avoid exposing products to humid, damp conditions when dry-packing.
22 April 2002
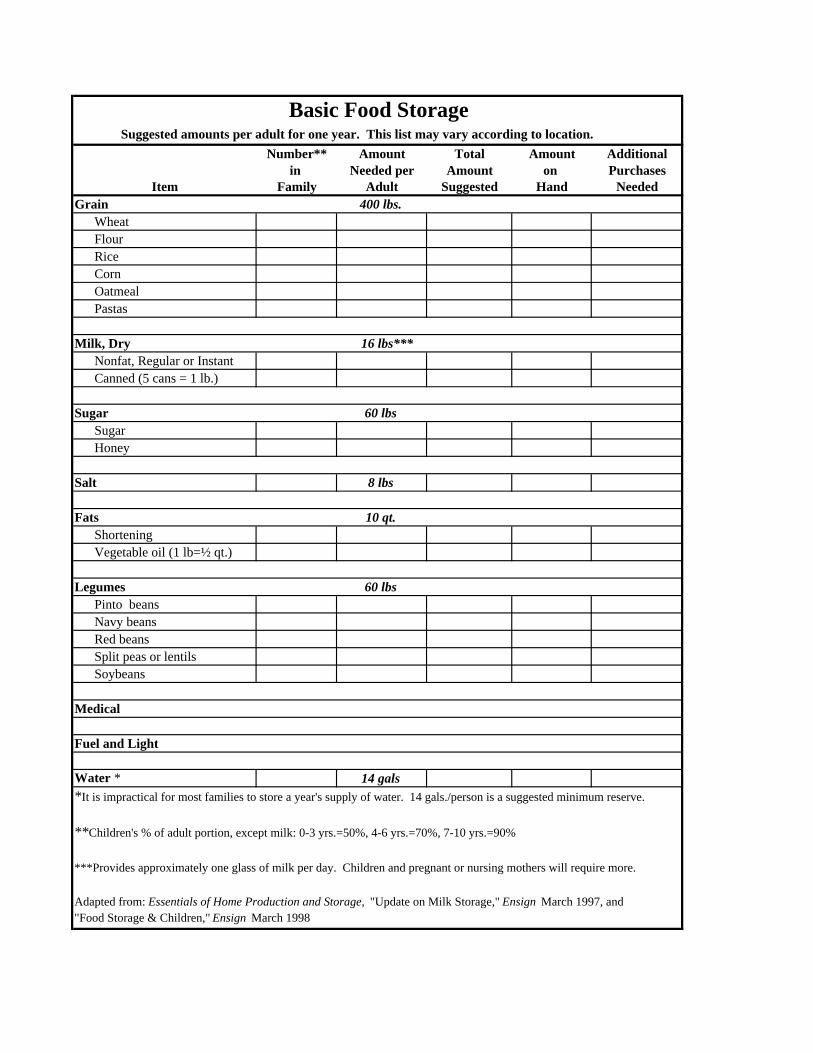
Basic Food Storage Suggested amounts per adult for one year. This list may vary according to location.
Number** Amount Total Amount Additionalin Needed per Amount on Purchases
Item Family Adult Suggested Hand NeededGrain 400 lbs. Wheat Flour Rice Corn Oatmeal Pastas
Milk, Dry 16 lbs*** Nonfat, Regular or Instant Canned (5 cans = 1 lb.)
Sugar 60 lbs Sugar Honey
Salt 8 lbs
Fats 10 qt. Shortening Vegetable oil (1 lb=½ qt.)
Legumes 60 lbs Pinto beans Navy beans Red beans Split peas or lentils Soybeans
Medical
Fuel and Light
Water * 14 gals*It is impractical for most families to store a year's supply of water. 14 gals./person is a suggested minimum reserve.
**Children's % of adult portion, except milk: 0-3 yrs.=50%, 4-6 yrs.=70%, 7-10 yrs.=90%
***Provides approximately one glass of milk per day. Children and pregnant or nursing mothers will require more.
Adapted from: Essentials of Home Production and Storage, "Update on Milk Storage," Ensign March 1997, and"Food Storage & Children," Ensign March 1998
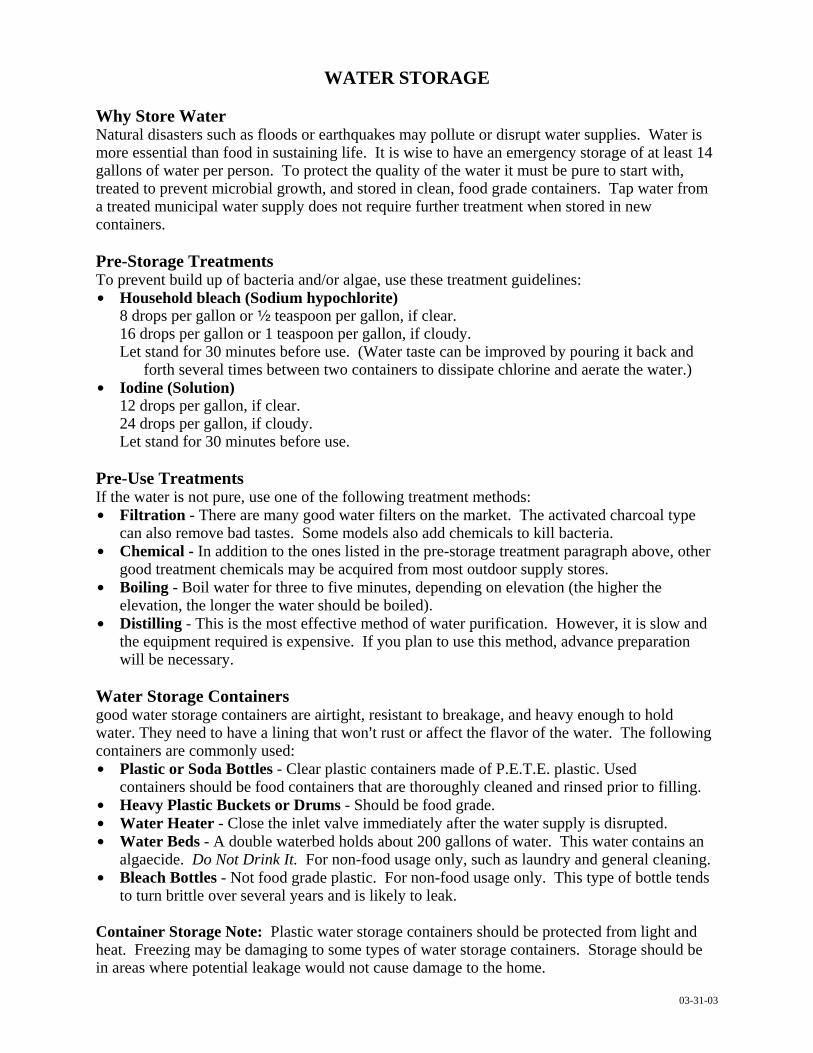
WATER STORAGE
Why Store Water Natural disasters such as floods or earthquakes may pollute or disrupt water supplies. Water is more essential than food in sustaining life. It is wise to have an emergency storage of at least 14 gallons of water per person. To protect the quality of the water it must be pure to start with, treated to prevent microbial growth, and stored in clean, food grade containers. Tap water from a treated municipal water supply does not require further treatment when stored in new containers. Pre-Storage Treatments To prevent build up of bacteria and/or algae, use these treatment guidelines: $ Household bleach (Sodium hypochlorite)
8 drops per gallon or 2 teaspoon per gallon, if clear. 16 drops per gallon or 1 teaspoon per gallon, if cloudy. Let stand for 30 minutes before use. (Water taste can be improved by pouring it back and forth several times between two containers to dissipate chlorine and aerate the water.)
$ Iodine (Solution) 12 drops per gallon, if clear. 24 drops per gallon, if cloudy. Let stand for 30 minutes before use.
Pre-Use Treatments If the water is not pure, use one of the following treatment methods: $ Filtration - There are many good water filters on the market. The activated charcoal type
can also remove bad tastes. Some models also add chemicals to kill bacteria. $ Chemical - In addition to the ones listed in the pre-storage treatment paragraph above, other
good treatment chemicals may be acquired from most outdoor supply stores. $ Boiling - Boil water for three to five minutes, depending on elevation (the higher the
elevation, the longer the water should be boiled). $ Distilling - This is the most effective method of water purification. However, it is slow and
the equipment required is expensive. If you plan to use this method, advance preparation will be necessary.
Water Storage Containers good water storage containers are airtight, resistant to breakage, and heavy enough to hold water. They need to have a lining that won=t rust or affect the flavor of the water. The following containers are commonly used: $ Plastic or Soda Bottles - Clear plastic containers made of P.E.T.E. plastic. Used
containers should be food containers that are thoroughly cleaned and rinsed prior to filling. $ Heavy Plastic Buckets or Drums - Should be food grade. $ Water Heater - Close the inlet valve immediately after the water supply is disrupted. $ Water Beds - A double waterbed holds about 200 gallons of water. This water contains an
algaecide. Do Not Drink It. For non-food usage only, such as laundry and general cleaning. $ Bleach Bottles - Not food grade plastic. For non-food usage only. This type of bottle tends
to turn brittle over several years and is likely to leak. Container Storage Note: Plastic water storage containers should be protected from light and heat. Freezing may be damaging to some types of water storage containers. Storage should be in areas where potential leakage would not cause damage to the home.
03-31-03

New Ideas
for
Cooking
with
Basic Food Storage
1
TABLE OF CONTENTS Tips. . . ............................................................................................................................ 2 Whole wheat ................................................................................................................... 3 Legumes ......................................................................................................................... 7 Rice ................................................................................................................................. 9 Oats............................................................................................................................... 10 Powdered milk............................................................................................................... 12 Soup mix ....................................................................................................................... 15 Pasta ............................................................................................................................. 16 Dried apples .................................................................................................................. 16 Cornmeal....................................................................................................................... 18 Flour basics................................................................................................................... 18 Honey............................................................................................................................ 19 Sourdough..................................................................................................................... 19 Dry-pack product directions (for selected items) ........................................................... 21
2
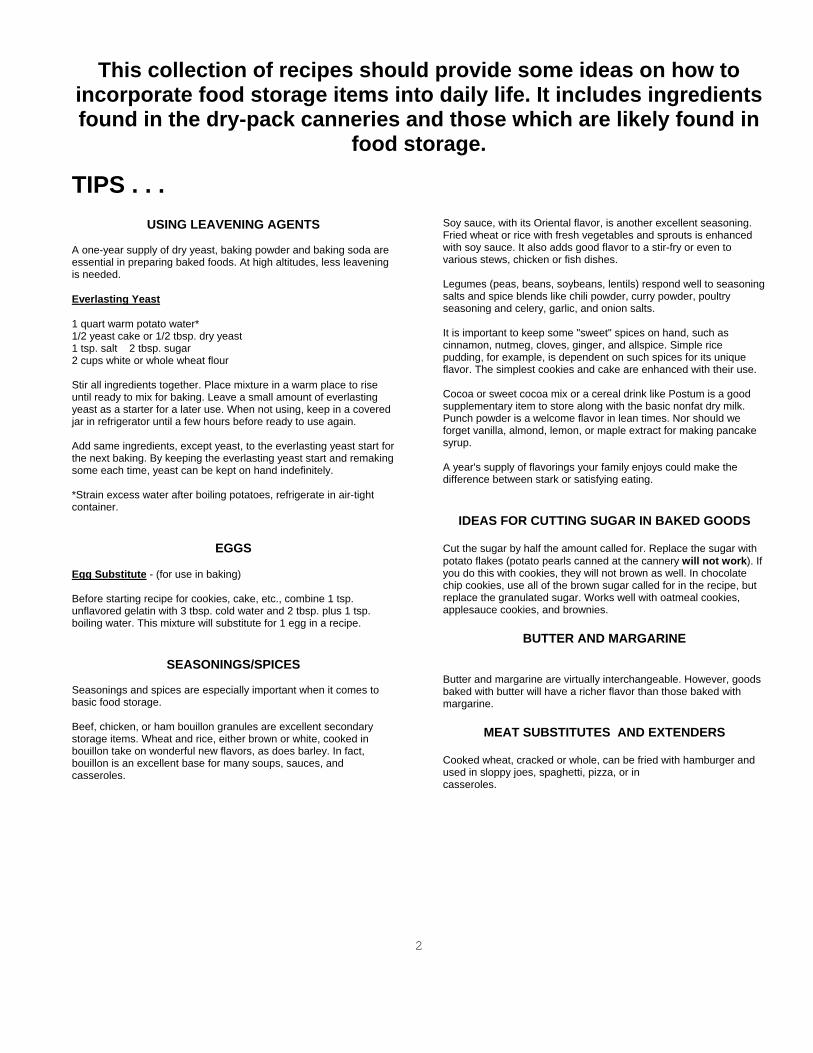
This collection of recipes should provide some ideas on how to incorporate food storage items into daily life. It includes ingredients found in the dry-pack canneries and those which are likely found in
food storage.
TIPS . . .
USING LEAVENING AGENTS A one-year supply of dry yeast, baking powder and baking soda are essential in preparing baked foods. At high altitudes, less leavening is needed. Everlasting Yeast 1 quart warm potato water* 1/2 yeast cake or 1/2 tbsp. dry yeast 1 tsp. salt 2 tbsp. sugar 2 cups white or whole wheat flour Stir all ingredients together. Place mixture in a warm place to rise until ready to mix for baking. Leave a small amount of everlasting yeast as a starter for a later use. When not using, keep in a covered jar in refrigerator until a few hours before ready to use again. Add same ingredients, except yeast, to the everlasting yeast start for the next baking. By keeping the everlasting yeast start and remaking some each time, yeast can be kept on hand indefinitely. *Strain excess water after boiling potatoes, refrigerate in air-tight container.
EGGS
Egg Substitute - (for use in baking) Before starting recipe for cookies, cake, etc., combine 1 tsp. unflavored gelatin with 3 tbsp. cold water and 2 tbsp. plus 1 tsp. boiling water. This mixture will substitute for 1 egg in a recipe.
SEASONINGS/SPICES Seasonings and spices are especially important when it comes to basic food storage. Beef, chicken, or ham bouillon granules are excellent secondary storage items. Wheat and rice, either brown or white, cooked in bouillon take on wonderful new flavors, as does barley. In fact, bouillon is an excellent base for many soups, sauces, and casseroles.
Soy sauce, with its Oriental flavor, is another excellent seasoning. Fried wheat or rice with fresh vegetables and sprouts is enhanced with soy sauce. It also adds good flavor to a stir-fry or even to various stews, chicken or fish dishes. Legumes (peas, beans, soybeans, lentils) respond well to seasoning salts and spice blends like chili powder, curry powder, poultry seasoning and celery, garlic, and onion salts. It is important to keep some "sweet" spices on hand, such as cinnamon, nutmeg, cloves, ginger, and allspice. Simple rice pudding, for example, is dependent on such spices for its unique flavor. The simplest cookies and cake are enhanced with their use. Cocoa or sweet cocoa mix or a cereal drink like Postum is a good supplementary item to store along with the basic nonfat dry milk. Punch powder is a welcome flavor in lean times. Nor should we forget vanilla, almond, lemon, or maple extract for making pancake syrup. A year's supply of flavorings your family enjoys could make the difference between stark or satisfying eating.
IDEAS FOR CUTTING SUGAR IN BAKED GOODS Cut the sugar by half the amount called for. Replace the sugar with potato flakes (potato pearls canned at the cannery will not work). If you do this with cookies, they will not brown as well. In chocolate chip cookies, use all of the brown sugar called for in the recipe, but replace the granulated sugar. Works well with oatmeal cookies, applesauce cookies, and brownies.
BUTTER AND MARGARINE
Butter and margarine are virtually interchangeable. However, goods baked with butter will have a richer flavor than those baked with margarine.
MEAT SUBSTITUTES AND EXTENDERS
Cooked wheat, cracked or whole, can be fried with hamburger and used in sloppy joes, spaghetti, pizza, or in casseroles.

3
WHOLE WHEAT
USING WHOLE WHEAT FLOUR Use wheat in recipes your family already likes, then it is not totally unfamiliar and you know the recipe is good. Try wheat in desserts first--who can turn down a cookie? Do not feel you must use 100 percent whole wheat. Half white and half whole wheat gives excellent results.
How to substitute whole wheat in your favorite recipes
Wheat flour is heavier than white flour and needs more leavening. In yeast breads, use more yeast and/or let it rise longer. In baking powder leavened products, increase baking powder by 1 tsp. for each 3 cups of whole wheat flour. Recipes using baking soda do not need to be adjusted. In baked products using eggs, separate the eggs and beat the whites until stiff. Then fold in just before baking. For extra lightness, an extra separated egg may be added. Good for waffles and especially cakes.
BULGUR WHEAT Wash wheat in cool water and discard water. Add enough water to cover wheat, simmer until all water is absorbed and wheat is tender. Spread wheat thinly on cookie sheet or shallow pan and dry in oven at 200º until very dry so that it will crack easily. Wet surface of dried wheat slightly and rub kernels between hands to loosen and remove chaff. Crack wheat in moderate size pieces, using a mill, grinder, or leave whole. This processed bulgur when thoroughly dried is easily stored and may be used in many wheat recipes. If the recipe calls for cooked wheat or bulgur, simply boil in water for 5-10 minutes, it will approximately double in volume. It makes an excellent meat extender when used in meat loaves, meat balls, chili and recipes where rice is used. Soaked overnight in salt water, it may be added to yeast bread recipes to give a nut like taste.
CRACKED WHEAT Cracked wheat may be made in a blender by using the “chop” selection on the machine. Depending upon the coarseness desired, adjust the length of processing time. Cracked wheat may also be made by using various food processors or a nut chopper.
WHOLE WHEAT BREAD Makes 3 loaves 1 tbsp. dry yeast 1/4 cup warm water 2 cups hot water 2 tbsp. shortening 1/2 cup brown sugar 2 tsp. salt 1 cup cold water 1/2 cup dry milk 7-8 cups whole wheat flour Mix yeast and warm water and set aside. Pour hot water over shortening, sugar, and salt. Mix dry milk with 1 cup whole wheat flour, add hot water mixture and 1 cup of cold water, then add yeast mixture. Add 6-7 more cups of whole wheat flour. Knead until smooth and elastic; let rise almost double--then time as follows: Let rise 40 minutes - punch down; 20 minutes - punch down; and 20 minutes - punch down. Shape into 3 loaves and place in 3 small greased bread pans. Allow to rise until double in bulk. Bake at 375o for 40-45 minutes.
SOFT AND DELICIOUS TWO-HOUR
WHOLE WHEAT BREAD Makes 4 loaves 5 cups warm water 2 tbsp. yeast 1/3 cup honey 1/3 cup oil 2 eggs 1/3 cup potato flakes 6 cups whole wheat flour 1 tbsp. salt 4 to 5 cups unbleached flour Dissolve yeast as package suggests. Make a sponge using all ingredients, including salt. Use bread mixer or hand-held electric beaters. Let rest about 10 minutes. Add remaining flour gradually as needed to make a soft dough. Knead on floured board; cover with plastic wrap and let rise until double. Punch down; shape into four loaves; place in greased bread pans. Cover and let rise again until double. Bake at 350o for 30 to 40 minutes. Put hot bread on a towel to cool for a soft crust.
BLENDER WHEAT PANCAKES Makes 6 to 8 pancakes 1 cup milk 1 cup uncooked whole wheat 2 eggs 2 tbsp. oil 2 tsp. baking powder 2 tbsp. honey or sugar 1 1/2 tsp. salt Put milk and wheat in blender. Blend on highest speed for four or five minutes or until batter is smooth. Add and blend on low, eggs, oil, baking powder, honey, and salt. Bake on hot griddle.
4
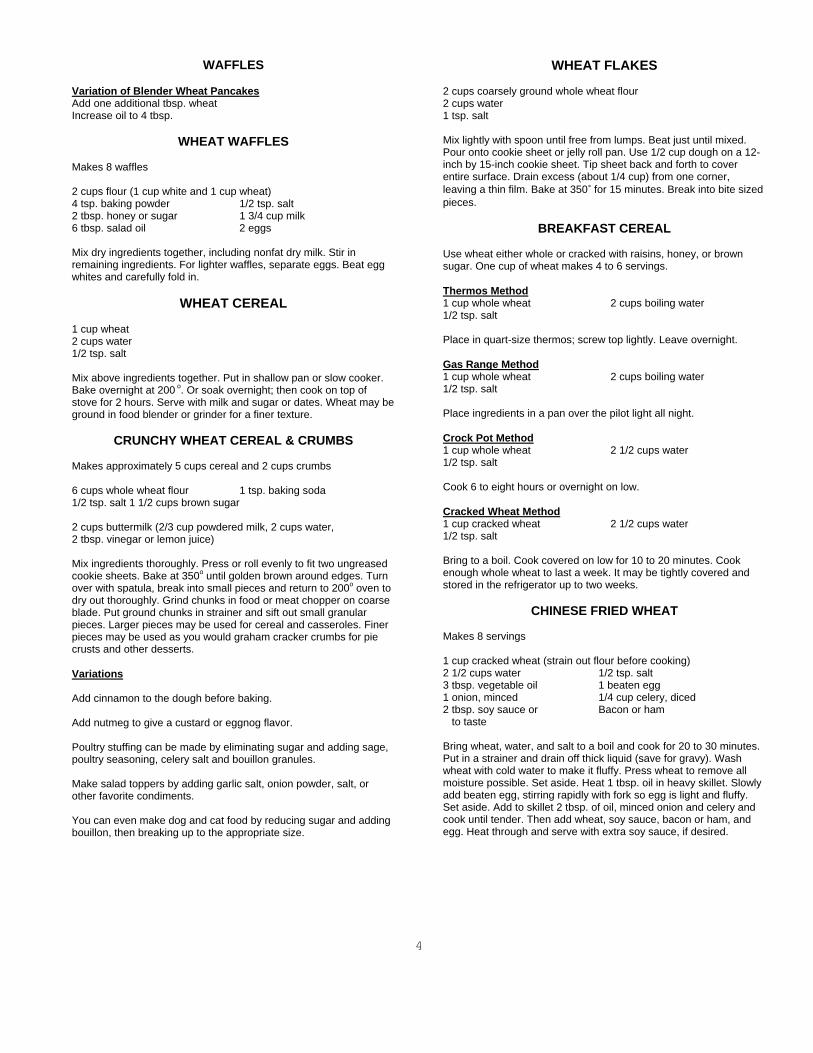
WAFFLES Variation of Blender Wheat Pancakes Add one additional tbsp. wheat Increase oil to 4 tbsp.
WHEAT WAFFLES Makes 8 waffles 2 cups flour (1 cup white and 1 cup wheat) 4 tsp. baking powder 1/2 tsp. salt 2 tbsp. honey or sugar 1 3/4 cup milk 6 tbsp. salad oil 2 eggs Mix dry ingredients together, including nonfat dry milk. Stir in remaining ingredients. For lighter waffles, separate eggs. Beat egg whites and carefully fold in.
WHEAT CEREAL 1 cup wheat 2 cups water 1/2 tsp. salt Mix above ingredients together. Put in shallow pan or slow cooker. Bake overnight at 200 o. Or soak overnight; then cook on top of stove for 2 hours. Serve with milk and sugar or dates. Wheat may be ground in food blender or grinder for a finer texture.
CRUNCHY WHEAT CEREAL & CRUMBS Makes approximately 5 cups cereal and 2 cups crumbs 6 cups whole wheat flour 1 tsp. baking soda 1/2 tsp. salt 1 1/2 cups brown sugar 2 cups buttermilk (2/3 cup powdered milk, 2 cups water, 2 tbsp. vinegar or lemon juice) Mix ingredients thoroughly. Press or roll evenly to fit two ungreased cookie sheets. Bake at 350o until golden brown around edges. Turn over with spatula, break into small pieces and return to 200o oven to dry out thoroughly. Grind chunks in food or meat chopper on coarse blade. Put ground chunks in strainer and sift out small granular pieces. Larger pieces may be used for cereal and casseroles. Finer pieces may be used as you would graham cracker crumbs for pie crusts and other desserts. Variations Add cinnamon to the dough before baking. Add nutmeg to give a custard or eggnog flavor. Poultry stuffing can be made by eliminating sugar and adding sage, poultry seasoning, celery salt and bouillon granules. Make salad toppers by adding garlic salt, onion powder, salt, or other favorite condiments. You can even make dog and cat food by reducing sugar and adding bouillon, then breaking up to the appropriate size.
WHEAT FLAKES 2 cups coarsely ground whole wheat flour 2 cups water 1 tsp. salt Mix lightly with spoon until free from lumps. Beat just until mixed. Pour onto cookie sheet or jelly roll pan. Use 1/2 cup dough on a 12-inch by 15-inch cookie sheet. Tip sheet back and forth to cover entire surface. Drain excess (about 1/4 cup) from one corner, leaving a thin film. Bake at 350< for 15 minutes. Break into bite sized pieces.
BREAKFAST CEREAL Use wheat either whole or cracked with raisins, honey, or brown sugar. One cup of wheat makes 4 to 6 servings. Thermos Method 1 cup whole wheat 2 cups boiling water 1/2 tsp. salt Place in quart-size thermos; screw top lightly. Leave overnight. Gas Range Method 1 cup whole wheat 2 cups boiling water 1/2 tsp. salt Place ingredients in a pan over the pilot light all night. Crock Pot Method 1 cup whole wheat 2 1/2 cups water 1/2 tsp. salt Cook 6 to eight hours or overnight on low. Cracked Wheat Method 1 cup cracked wheat 2 1/2 cups water 1/2 tsp. salt Bring to a boil. Cook covered on low for 10 to 20 minutes. Cook enough whole wheat to last a week. It may be tightly covered and stored in the refrigerator up to two weeks.
CHINESE FRIED WHEAT Makes 8 servings 1 cup cracked wheat (strain out flour before cooking) 2 1/2 cups water 1/2 tsp. salt 3 tbsp. vegetable oil 1 beaten egg 1 onion, minced 1/4 cup celery, diced 2 tbsp. soy sauce or Bacon or ham to taste Bring wheat, water, and salt to a boil and cook for 20 to 30 minutes. Put in a strainer and drain off thick liquid (save for gravy). Wash wheat with cold water to make it fluffy. Press wheat to remove all moisture possible. Set aside. Heat 1 tbsp. oil in heavy skillet. Slowly add beaten egg, stirring rapidly with fork so egg is light and fluffy. Set aside. Add to skillet 2 tbsp. of oil, minced onion and celery and cook until tender. Then add wheat, soy sauce, bacon or ham, and egg. Heat through and serve with extra soy sauce, if desired.
5
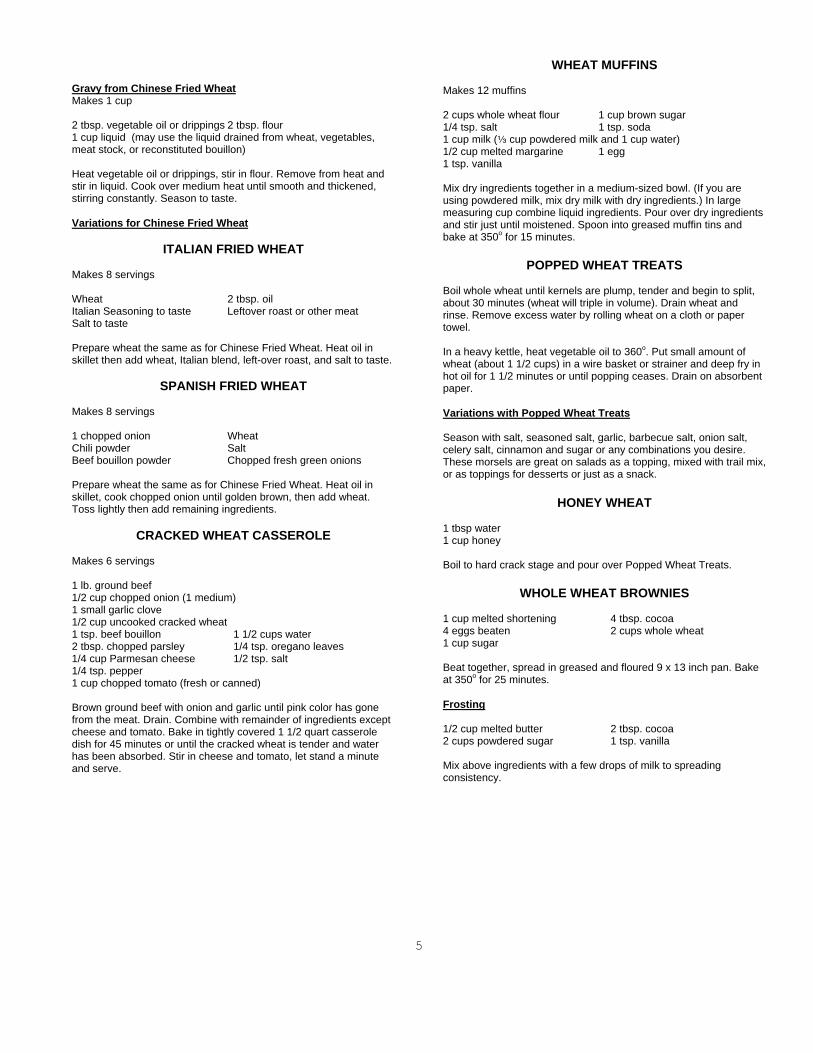
Gravy from Chinese Fried Wheat Makes 1 cup 2 tbsp. vegetable oil or drippings 2 tbsp. flour 1 cup liquid (may use the liquid drained from wheat, vegetables, meat stock, or reconstituted bouillon) Heat vegetable oil or drippings, stir in flour. Remove from heat and stir in liquid. Cook over medium heat until smooth and thickened, stirring constantly. Season to taste. Variations for Chinese Fried Wheat
ITALIAN FRIED WHEAT Makes 8 servings Wheat 2 tbsp. oil Italian Seasoning to taste Leftover roast or other meat Salt to taste Prepare wheat the same as for Chinese Fried Wheat. Heat oil in skillet then add wheat, Italian blend, left-over roast, and salt to taste.
SPANISH FRIED WHEAT Makes 8 servings 1 chopped onion Wheat Chili powder Salt Beef bouillon powder Chopped fresh green onions Prepare wheat the same as for Chinese Fried Wheat. Heat oil in skillet, cook chopped onion until golden brown, then add wheat. Toss lightly then add remaining ingredients.
CRACKED WHEAT CASSEROLE Makes 6 servings 1 lb. ground beef 1/2 cup chopped onion (1 medium) 1 small garlic clove 1/2 cup uncooked cracked wheat 1 tsp. beef bouillon 1 1/2 cups water 2 tbsp. chopped parsley 1/4 tsp. oregano leaves
1/4 cup Parmesan cheese 1/2 tsp. salt 1/4 tsp. pepper 1 cup chopped tomato (fresh or canned) Brown ground beef with onion and garlic until pink color has gone from the meat. Drain. Combine with remainder of ingredients except cheese and tomato. Bake in tightly covered 1 1/2 quart casserole dish for 45 minutes or until the cracked wheat is tender and water has been absorbed. Stir in cheese and tomato, let stand a minute and serve.
WHEAT MUFFINS Makes 12 muffins 2 cups whole wheat flour 1 cup brown sugar 1/4 tsp. salt 1 tsp. soda 1 cup milk (a cup powdered milk and 1 cup water) 1/2 cup melted margarine 1 egg 1 tsp. vanilla Mix dry ingredients together in a medium-sized bowl. (If you are using powdered milk, mix dry milk with dry ingredients.) In large measuring cup combine liquid ingredients. Pour over dry ingredients and stir just until moistened. Spoon into greased muffin tins and bake at 350o for 15 minutes.
POPPED WHEAT TREATS Boil whole wheat until kernels are plump, tender and begin to split, about 30 minutes (wheat will triple in volume). Drain wheat and rinse. Remove excess water by rolling wheat on a cloth or paper towel. In a heavy kettle, heat vegetable oil to 360o. Put small amount of wheat (about 1 1/2 cups) in a wire basket or strainer and deep fry in hot oil for 1 1/2 minutes or until popping ceases. Drain on absorbent paper. Variations with Popped Wheat Treats Season with salt, seasoned salt, garlic, barbecue salt, onion salt, celery salt, cinnamon and sugar or any combinations you desire. These morsels are great on salads as a topping, mixed with trail mix, or as toppings for desserts or just as a snack.
HONEY WHEAT
1 tbsp water 1 cup honey Boil to hard crack stage and pour over Popped Wheat Treats.
WHOLE WHEAT BROWNIES 1 cup melted shortening 4 tbsp. cocoa 4 eggs beaten 2 cups whole wheat 1 cup sugar Beat together, spread in greased and floured 9 x 13 inch pan. Bake at 350o for 25 minutes. Frosting 1/2 cup melted butter 2 tbsp. cocoa 2 cups powdered sugar 1 tsp. vanilla Mix above ingredients with a few drops of milk to spreading consistency.
6
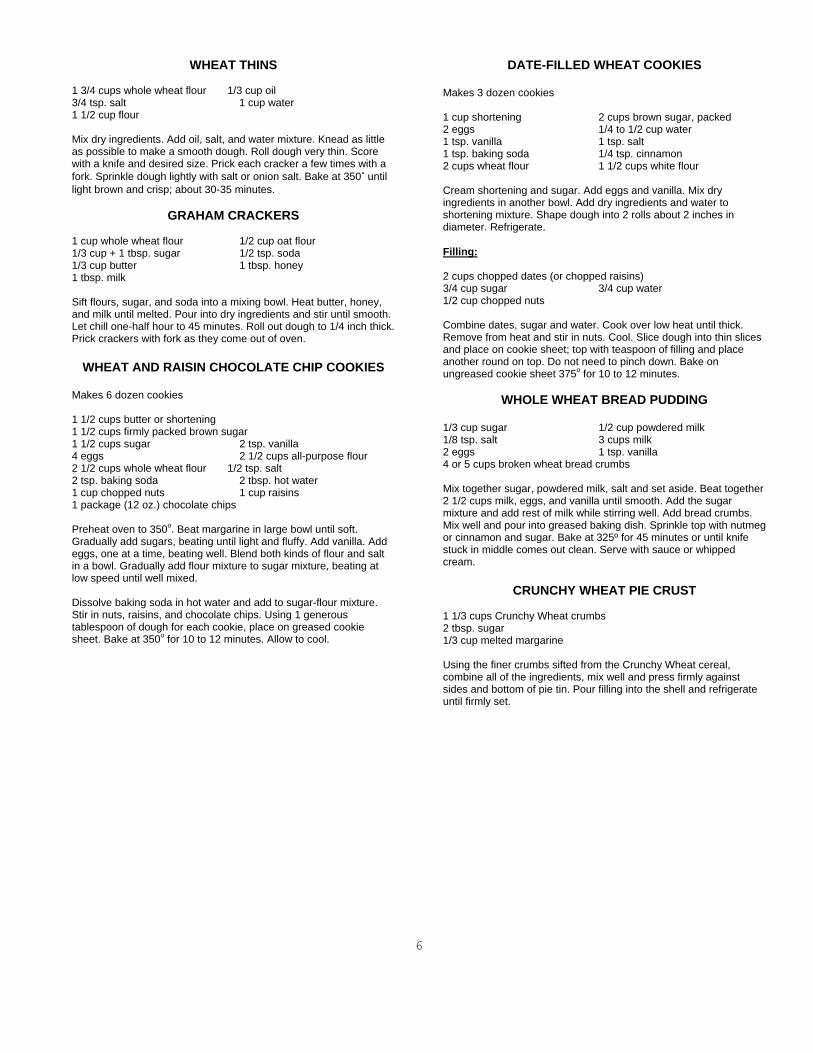
WHEAT THINS 1 3/4 cups whole wheat flour 1/3 cup oil 3/4 tsp. salt 1 cup water 1 1/2 cup flour Mix dry ingredients. Add oil, salt, and water mixture. Knead as little as possible to make a smooth dough. Roll dough very thin. Score with a knife and desired size. Prick each cracker a few times with a fork. Sprinkle dough lightly with salt or onion salt. Bake at 350< until light brown and crisp; about 30-35 minutes.
GRAHAM CRACKERS 1 cup whole wheat flour 1/2 cup oat flour 1/3 cup + 1 tbsp. sugar 1/2 tsp. soda 1/3 cup butter 1 tbsp. honey 1 tbsp. milk Sift flours, sugar, and soda into a mixing bowl. Heat butter, honey, and milk until melted. Pour into dry ingredients and stir until smooth. Let chill one-half hour to 45 minutes. Roll out dough to 1/4 inch thick. Prick crackers with fork as they come out of oven.
WHEAT AND RAISIN CHOCOLATE CHIP COOKIES
Makes 6 dozen cookies 1 1/2 cups butter or shortening 1 1/2 cups firmly packed brown sugar 1 1/2 cups sugar 2 tsp. vanilla 4 eggs 2 1/2 cups all-purpose flour 2 1/2 cups whole wheat flour 1/2 tsp. salt 2 tsp. baking soda 2 tbsp. hot water 1 cup chopped nuts 1 cup raisins 1 package (12 oz.) chocolate chips Preheat oven to 350o. Beat margarine in large bowl until soft. Gradually add sugars, beating until light and fluffy. Add vanilla. Add eggs, one at a time, beating well. Blend both kinds of flour and salt in a bowl. Gradually add flour mixture to sugar mixture, beating at low speed until well mixed. Dissolve baking soda in hot water and add to sugar-flour mixture. Stir in nuts, raisins, and chocolate chips. Using 1 generous tablespoon of dough for each cookie, place on greased cookie sheet. Bake at 350o for 10 to 12 minutes. Allow to cool.
DATE-FILLED WHEAT COOKIES Makes 3 dozen cookies 1 cup shortening 2 cups brown sugar, packed 2 eggs 1/4 to 1/2 cup water 1 tsp. vanilla 1 tsp. salt 1 tsp. baking soda 1/4 tsp. cinnamon 2 cups wheat flour 1 1/2 cups white flour Cream shortening and sugar. Add eggs and vanilla. Mix dry ingredients in another bowl. Add dry ingredients and water to shortening mixture. Shape dough into 2 rolls about 2 inches in diameter. Refrigerate. Filling: 2 cups chopped dates (or chopped raisins) 3/4 cup sugar 3/4 cup water 1/2 cup chopped nuts Combine dates, sugar and water. Cook over low heat until thick. Remove from heat and stir in nuts. Cool. Slice dough into thin slices and place on cookie sheet; top with teaspoon of filling and place another round on top. Do not need to pinch down. Bake on ungreased cookie sheet 375o for 10 to 12 minutes.
WHOLE WHEAT BREAD PUDDING 1/3 cup sugar 1/2 cup powdered milk 1/8 tsp. salt 3 cups milk 2 eggs 1 tsp. vanilla 4 or 5 cups broken wheat bread crumbs Mix together sugar, powdered milk, salt and set aside. Beat together 2 1/2 cups milk, eggs, and vanilla until smooth. Add the sugar mixture and add rest of milk while stirring well. Add bread crumbs. Mix well and pour into greased baking dish. Sprinkle top with nutmeg or cinnamon and sugar. Bake at 325º for 45 minutes or until knife stuck in middle comes out clean. Serve with sauce or whipped cream.
CRUNCHY WHEAT PIE CRUST
1 1/3 cups Crunchy Wheat crumbs 2 tbsp. sugar 1/3 cup melted margarine Using the finer crumbs sifted from the Crunchy Wheat cereal, combine all of the ingredients, mix well and press firmly against sides and bottom of pie tin. Pour filling into the shell and refrigerate until firmly set.
7
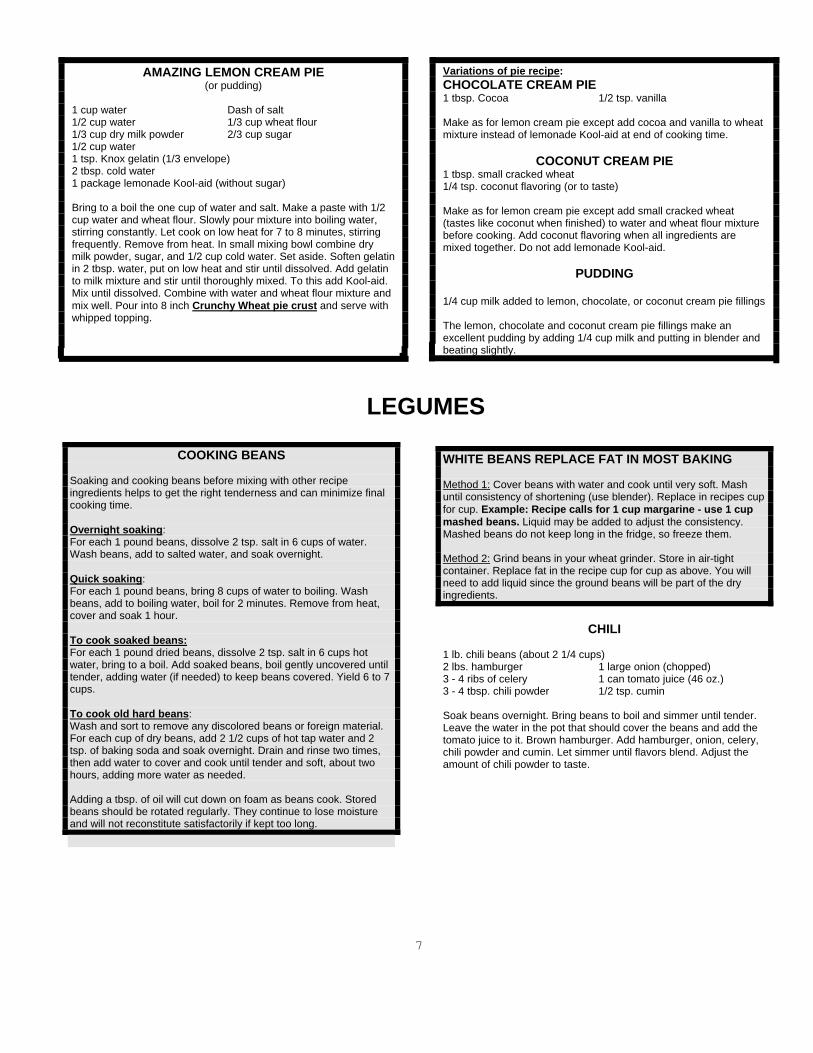
AMAZING LEMON CREAM PIE (or pudding)
1 cup water Dash of salt 1/2 cup water 1/3 cup wheat flour 1/3 cup dry milk powder 2/3 cup sugar 1/2 cup water 1 tsp. Knox gelatin (1/3 envelope) 2 tbsp. cold water 1 package lemonade Kool-aid (without sugar) Bring to a boil the one cup of water and salt. Make a paste with 1/2 cup water and wheat flour. Slowly pour mixture into boiling water, stirring constantly. Let cook on low heat for 7 to 8 minutes, stirring frequently. Remove from heat. In small mixing bowl combine dry milk powder, sugar, and 1/2 cup cold water. Set aside. Soften gelatin in 2 tbsp. water, put on low heat and stir until dissolved. Add gelatin to milk mixture and stir until thoroughly mixed. To this add Kool-aid. Mix until dissolved. Combine with water and wheat flour mixture and mix well. Pour into 8 inch Crunchy Wheat pie crust and serve with whipped topping.
Variations of pie recipe: CHOCOLATE CREAM PIE 1 tbsp. Cocoa 1/2 tsp. vanilla Make as for lemon cream pie except add cocoa and vanilla to wheat mixture instead of lemonade Kool-aid at end of cooking time.
COCONUT CREAM PIE 1 tbsp. small cracked wheat 1/4 tsp. coconut flavoring (or to taste) Make as for lemon cream pie except add small cracked wheat (tastes like coconut when finished) to water and wheat flour mixture before cooking. Add coconut flavoring when all ingredients are mixed together. Do not add lemonade Kool-aid.
PUDDING 1/4 cup milk added to lemon, chocolate, or coconut cream pie fillings The lemon, chocolate and coconut cream pie fillings make an excellent pudding by adding 1/4 cup milk and putting in blender and beating slightly.
LEGUMES
COOKING BEANS Soaking and cooking beans before mixing with other recipe ingredients helps to get the right tenderness and can minimize final cooking time. Overnight soaking: For each 1 pound beans, dissolve 2 tsp. salt in 6 cups of water. Wash beans, add to salted water, and soak overnight. Quick soaking: For each 1 pound beans, bring 8 cups of water to boiling. Wash beans, add to boiling water, boil for 2 minutes. Remove from heat, cover and soak 1 hour. To cook soaked beans: For each 1 pound dried beans, dissolve 2 tsp. salt in 6 cups hot water, bring to a boil. Add soaked beans, boil gently uncovered until tender, adding water (if needed) to keep beans covered. Yield 6 to 7 cups. To cook old hard beans: Wash and sort to remove any discolored beans or foreign material. For each cup of dry beans, add 2 1/2 cups of hot tap water and 2 tsp. of baking soda and soak overnight. Drain and rinse two times, then add water to cover and cook until tender and soft, about two hours, adding more water as needed. Adding a tbsp. of oil will cut down on foam as beans cook. Stored beans should be rotated regularly. They continue to lose moisture and will not reconstitute satisfactorily if kept too long.
WHITE BEANS REPLACE FAT IN MOST BAKING Method 1: Cover beans with water and cook until very soft. Mash until consistency of shortening (use blender). Replace in recipes cup for cup. Example: Recipe calls for 1 cup margarine - use 1 cup mashed beans. Liquid may be added to adjust the consistency. Mashed beans do not keep long in the fridge, so freeze them. Method 2: Grind beans in your wheat grinder. Store in air-tight container. Replace fat in the recipe cup for cup as above. You will need to add liquid since the ground beans will be part of the dry ingredients.
CHILI
1 lb. chili beans (about 2 1/4 cups) 2 lbs. hamburger 1 large onion (chopped) 3 - 4 ribs of celery 1 can tomato juice (46 oz.) 3 - 4 tbsp. chili powder 1/2 tsp. cumin Soak beans overnight. Bring beans to boil and simmer until tender. Leave the water in the pot that should cover the beans and add the tomato juice to it. Brown hamburger. Add hamburger, onion, celery, chili powder and cumin. Let simmer until flavors blend. Adjust the amount of chili powder to taste.
8
PINTO BEAN CASSEROLE 1 15 oz. can pinto beans (use juice) 1 lb. hamburger 1 package corn tortillas 1 cup grated cheese 1 15 oz. can Italian style Marinara
Sauce Butter tortillas and layer and cover bottom of oblong cake pan. Brown hamburger and drain. Put beans over tortillas, then sauce and hamburger and grated cheese. Bake at 350º for 30 minutes.
BARBECUED LIMA BEANS
Makes 8 to 10 servings 2 cups large dried lima beans 8 cups water 1/4 pound bacon cut into ½ inch pieces (if desired, cook and drain before adding) 1 small onion, chopped 1 clove garlic, minced 1/2 cup margarine 1 tsp. prepared mustard 2 tsp. Worcestershire sauce 1 1/2 tsp. chili powder 1 can (8 oz.) tomato sauce 2 tbsp. brown sugar 2 tbsp. vinegar 1/4 lb. bacon slices (if desired, cook and drain before adding) Sort and rinse beans, do not soak. In 4-quart saucepan, combine rinsed beans, water, and 1/4 pound diced bacon. Bring to a boil; reduce heat. Cover and simmer until beans are almost tender (1 to 1 1/2 hours), checking several times. Add hot water as needed to keep beans just covered while cooking. Drain, reserving 1/2 cup liquid. Cook onion and garlic in margarine until soft. Add remaining ingredients except drained limas and bacon slices. Cook 5 minutes, add to lima beans. Place in greased 2-quart casserole, top with sliced bacon. Cover, bake for 2 hours at 350o, adding reserved bean liquid if necessary.
BAKED BEANS (WHITE BEANS) 2 cups white beans 1 tsp. salt 1 onion chopped 1/8 lb. bacon diced 3/4 cup brown sugar 1/4 cup catsup 1 tsp. dry mustard 1 tbsp. soy sauce 1 cup reserved liquid Cover beans with cold water and add salt. Simmer until tender. Drain off all except 1 cup of the water. Add remaining ingredients. Place in greased casserole or bean pot. Top with diced bacon. Bake at 275< for 6-8 hours.
REFRIED BEANS (from pinto beans)
Fill crock pot 1/3 full of pinto beans (sorted and rinsed). Fill with water until 3/4 full. Cook beans until tender. Add more water if needed. Takes approximately 4 hours on high. In a sauce pan cook 1 clove garlic and 1 small onion in 1 tbsp. of shortening or oil. Add beans, mashed. Add oregano and salt to taste. Can be frozen.
PIONEER STEW Makes 8 servings 1 1/4 cups (1/2 pound) dried pinto or kidney beans 3 cups cold water 1 tsp. salt *1/2 to 1 pound ground beef 1/2 cup chopped onion 1/2 cup finely diced green pepper 1 can (16 oz.) whole kernel corn, undrained 1 can (16 oz.) tomatoes, undrained 1/2 tsp. chili powder 3/4 teaspoon salt 1/2 cup shredded sharp American cheese In large saucepan place washed and drained beans, cold water, and salt. Bring to a boil. Cover and simmer 2 minutes. Remove from heat and let stand for 1 hour. Return to heat and simmer 1 hour and 15 minutes. In skillet cook ground beef, chopped onion, and green pepper until meat is browned and vegetables are tender. Drain off fat. Add meat mixture, corn, tomatoes, chili powder and salt to taste to beans. Simmer 20 minutes. Combine 1 tbsp. flour with 2 tbsp. water. Stir into stew. Cook and stir until thickened and bubbly. Stir in cheese. * or 1 can of chunk turkey or beef
SPLIT PEA SOUP WITH SAUSAGE BALLS 1 lb. (2 1/4 cups) green split peas 1/4 tsp. marjoram 3 quarts water 1 cup diced celery 2 tsp. salt 1 cup diced onion 1/2 tsp. pepper Salt to taste 1 lb. bulk pork sausage 1 cup diced potatoes 1 cup diced carrots 1 cup flour Wash split peas and sort. In large saucepan, combine water and seasonings and bring to a boil. Add peas gradually so water does not stop boiling. Shape sausage into 1-inch balls (about 28 of them) and roll in flour. Drop into soup, cover, and simmer until sausage is well done and peas are tender. About 20 minutes before time to serve, add vegetables and cook until tender. NOTE: You may wish to cook and drain sausage before adding it to the soup. Makes 12 servings.
CREAM OF SPLIT PEA SOUP 2 cups split peas 4 1/2 cups boiling water 1/2 cup celery, diced 1/2 cup carrots, diced 1 onion, chopped 2 tsp. salt 2 1/2 cups milk (2/3 cup powdered milk and 2 1/2 cups water) Season to taste (may add chunks of ham, bacon, etc.) Wash split peas and sort. In large saucepan combine water, split peas, vegetables, and salt. Simmer until peas are soft, about 45 minutes, stirring occasionally. Put through a sieve or a blender. Add powdered milk and seasonings, chunks of meat, then reheat and serve. Makes 8 servings.
9
CALIFORNIA BEAN SOUP 2 cups white beans (rinsed) 2 1/2 quarts water (10 cups) 1 quart tomatoes 1/4 cup dried onion or 1/2 cup chopped onion 1/4 cup dried diced carrots or 1/2 to 1 cup chopped carrots 1/2 cup dried celery chopped or 1 cup chopped celery 1 or 2 ham hocks or 5-7 tbsp. ham soup base or bouillon Soak beans in water overnight or boil 5 minutes and soak 1 hour. Add tomatoes. Cook 2 hours. Add remaining ingredients and cook until beans are soft.
LENTIL SOUP
2 cups lentils 1 1/2 quarts water and 6 chicken bouillon cubes (or 3 - 14 1/2 oz. cans chicken broth and 3 cans of water) 1 large can (No. 2 1/2) stewed tomatoes 1 bay leaf 3 carrots, cut in chunks 1 onion, cut up Salt and pepper to taste 1 lb. cooked hamburger Put all ingredients except hamburger in a 4-quart kettle, bring to a boil, and let cook until tender. Add cooked hamburger and heat. A ham hock may be cooked with above ingredients instead of hamburger, or pieces of ham may be added at the last. Makes 8 to 10 servings.
PINTO BEAN FUDGE 1 cup cooked soft pinto beans (drained and mashed) 1/4 cup milk 1 tbsp. vanilla 6 oz. unsweetened chocolate 6 tbsp. butter or margarine 2 lbs. powdered sugar Nuts (optional) In large bowl stir beans and milk together, adding enough milk to resemble mashed potatoes; stir in vanilla. Melt chocolate and butter or margarine and stir into bean mixture. Gradually stir in powdered sugar. Knead with hands until well blended. Spread into lightly greased 9-inch baking dish or form into two 1-1/2 inch rolls. Chill 1-2 hours.
NAVY BEAN BUNDT CAKE 1 2/3 cups cooked navy beans 1 cup butter (softened) 1 cup sugar 2/3 cup brown sugar (firmly packed) 1 tbsp. vanilla 2 eggs 2 cups flour 1 1/2 tsp. baking powder 1 tsp. baking soda 1 1/2 tsp. nutmeg 2 tsp. cinnamon 1/3 cup evaporated milk 1/3 cup water 1 1/3cups flaked coconut 1/2 cup chopped pecans or walnuts Puree beans in blender or mash with fork. Set aside. In large bowl combine butter, sugars and vanilla, beat until creamy. At high speed, add eggs. Stir in beans. In medium bowl, combine flour baking powder, baking soda, nutmeg and cinnamon. Stir one half of dry ingredients until blended. Add nuts and coconut, blend. Pour into greased bundt pan. Bake at 350< for 50-55 minutes, pour into 13 x 9 x 2 greased pan and bake for 25-30 minutes.
REALLY GOOD PINTO BEAN PIE 1/2 cup granulated sugar 1 cup brown sugar, packed 2 eggs, beaten 1 stick (1/2 cup) butter, softened 1 heaping cup mashed, cooked pinto beans 1 unbaked 9-inch pie shell Whipped cream, whipped topping, or scoop of ice cream Beat until creamy the granulated sugar, brown sugar, eggs and butter. Add pinto beans, blend well. Pour into unbaked pie shell and bake at 375o for 20 minutes. Reduce heat to 350o and bake an additional 25 minutes or until a knife inserted in center comes out clean. Serve with whipped cream, whipped topping, or scoop of ice cream.
10
RICE
USING RICE Cook rice in beef or chicken broth instead of water. Mix cooked rice with a variety of things – sliced mushrooms, sauteed onions, crumbled pieces of bacon, slivered almonds or grated cheese. Try sour cream and chives mixed into cooked rice. Substitute 1/2 cup fruit juice (orange, apple, cherry) for 1/2 cup water when cooking. Vegetable juice cocktail or tomato juice may also be exchanged for 1 cup of the water used in cooking. Add one of the following herbs to the cooking water when preparing rice: 1/8 tsp. dried thyme, oregano, sage, rosemary, basil or savory 1/2 tsp. celery seeds or dried dill Seasoned salt instead of salt 3/4 tsp. dried marjoram 1 small bay leaf To cook rice: One cup of uncooked rice equals 3 cups of cooked rice, or four servings. Combine: 1 cup uncooked rice 1 tsp. salt (optional) 2 cups of boiling water Combine the ingredients. Bring to a boil in a covered pan, stirring several times. Lower the heat to simmer. Cook about 15 minutes without removing the lid or stirring, or until the liquid is absorbed and the rice is tender.
FRANKFURTER SOUP 2 frankfurters thinly sliced 2 tbsp. chopped onions 1 tbsp. butter 1 can tomato soup 1 soup can water or milk 1/2 cup cooked rice (optional) Brown the frankfurters and onions in butter. Add soup, liquid and rice. Heat and serve. Makes 2 - 3 servings.
RICE PILAF Makes 8 servings 2 cups rice 2/3 stick margarine 4 cups liquid (chicken broth if served with fowl; beef broth with beef) 3/4 cup chopped celery 3/4 cup chopped carrots 3/4 cup chopped green onions 1 cup slivered almonds Salt and pepper to taste 1 can chunk turkey or beef
(optional) Brown rice lightly with margarine in skillet. Place in casserole with boiling broth. Cover and bake for one-half hour at 375o. Take from oven and add vegetables and nuts, and meat (if desired), stirring and mixing well with fork. Return to oven for one-half hour. Add salt and pepper to taste before serving.
BROWNED RICE Makes 6 to 8 servings 1 cup rice 1/4 cup shortening 1/4 cup chopped meat (pre-cooked), onion, celery, or other vegetables 1 tsp. salt 3 1/2 cups water Heat shortening in skillet. Add rice. Cook, stirring constantly, about 10 minutes or until lightly browned. Add meat or vegetables and continue cooking 2 or 3 minutes (optional). Add salt and water. Simmer over low heat 20 to 25 minutes or until rice is tender and excess liquid has evaporated.
RICE PUDDING Makes 8 servings 3 eggs 2 tbsp. honey 6 tbsp. sugar 1/2 tsp. nutmeg 1 tsp. cinnamon 1/2 tsp. vanilla 1 cup milk (1/3 cup non-fat dry milk and 1 cup water) 3/4 cup evaporated milk (2/3 cup nonfat dry milk to 3/4 cup water) 1 1/2 cups cooked rice 1/2 cup raisins Beat eggs. Add sugar and spices. Mix well. Stir in vanilla, milk, rice, and raisins. Place in a 2-quart casserole dish. Bake at 325o for 45 minutes. Stir after 25 minutes.
11
OATS
Regular oats and quick oats are basically interchangeable. However, when using regular oats in a recipe that calls for quick oats, it is advisable to soak the regular oats in water for about 5 minutes to soften them.
OATMEAL BREAD Makes 2 loaves 1/2 cup warm water 2 tbsp. dry yeast 3/4 cup water, boiling 3/4 cup rolled oats 1 cup buttermilk (or 1/3 cup powdered milk, 1 cup water, 1 tablespoon vinegar or lemon juice) 1/3 cup vegetable oil 1/2 cup honey or molasses 2 cups all-purpose flour 1 tbsp. salt 1/2 tsp. baking soda 3 to 3 1/2 cups all-purpose flour In small bowl, stir yeast into 1/2 cup warm water; allow to stand until yeast dissolves and bubbles up. In medium saucepan, bring 3/4 cup water to boiling; stir in oats and cook several minutes. Remove from heat; add buttermilk, oil, and honey or molasses. Sift flour, salt, and baking soda into a large mixing bowl. Add yeast mixture and oats mixture and beat with wire whip or slotted spoon; let stand 5 minutes. Gradually add enough of remaining flour until dough is stiff enough for kneading. Turn out onto floured surface and knead 8 to 10 minutes or until a soft, elastic ball forms. Place dough in clean, greased bowl; cover with plastic wrap and allow to rise until double in size, about 1 1/2 hours. Punch down dough and divide into two portions; cover with bowl or towel and allow to rest 10 minutes. Form into loaves and place in greased 8 x 4-inch pans. Cover and let rise until double in size. Bake at 350o to 375o for 45 to 50 minutes or until done. Remove from oven and turn out to cool on wire rack.
OATMEAL RAISIN MUFFINS 1 egg 3 tsp. baking powder 3/4 cup milk 1/2 tsp. salt 1 cup raisins 1/2 tsp. ground nutmeg 1/2 cup vegetable oil 1/4 tsp. ground cinnamon 1 cup white / whole wheat flour 1/3 cup sugar 1 cup rolled oats Heat oven to 400o. Grease bottoms of about 12 medium muffin cups or line with cupcake liners. Beat egg, stir in milk, raisins and oil. Stir in remaining ingredients all at once just until flour is moistened (batter will be lumpy). Fill muffin cups about 3/4 full. Bake in preheated oven until golden brown, about 20 minutes. Remove from pan immediately.
DELICIOUS OATMEAL PANCAKES Makes 8 to 10 pancakes 1/2 cup whole wheat flour 2 tsp. baking powder 1/4 tsp. salt 2 tbsp. sugar 1/3 cup nonfat powdered milk 2 eggs, separated 1 cup water 3 tbsp. vegetable oil 1 cup rolled oats In medium bowl, combine flour, baking powder, salt, sugar, and powdered milk; stir until well blended. In small bowl, beat egg whites until stiff; set aside. In large mixing bowl, combine egg yolks, water, oil, and oats; beat slightly and allow to stand 5 minutes, then beat until blended. Mix in dry ingredients, then fold in beaten egg whites. For small pancakes, drop 2 tablespoons batter onto griddle, or pour 1/4 measuring cup full, if larger pancakes are desired. Bake until cakes are full of bubbles on top and undersides are lightly browned. Turn with spatula and brown other side. Serve with applesauce or jam or butter and maple syrup.
INSTANT OATMEAL PACKETS Makes 10 packets of Instant Oatmeal To make individual instant packets: Blend 1/2 cup of oats until powdery. Into each of the 10 packets (perhaps individual reclosable sandwich bags), combine the following ingredients: 1/4 cup unpowdered oats 2 tbsp. powdered oats 1/8 tsp. salt 1 tsp. sugar (optional) Close the top and store in a dry place. Microwave directions for cooking: Empty packet into microwavable bowl. Add 2/3 cup water or milk. Microwave on high about 1 1/2 minutes; stir. Stove directions for cooking: Empty packet into pan. Add 1/2 cup boiling water; cook and stir over heat until thickened.
MUESLI
4 cups quick cooking rolled oats 1 cup chopped nuts 1 cup Crunchy Wheat Cereal (optional - found on page 4) 1 cup wheat flakes Dried apples, apricots, raisins, or other fruit Mix together and put in covered container. Keep fruit separated until ready to serve.
12
GRANOLA Makes about 2 quarts 6 cups rolled oats 1/4 cup sunflower seeds 1/2 cup brown sugar 1/2 cup raisins 1 cup coconut 1 cup chopped nuts 1/3 cup sesame seeds Mix all ingredients except raisins. Stir in and coat thoroughly with 1/2 cup oil 1/3 cup honey 2 tsp. vanilla Spread on cookie sheet and bake at 350o for 25 minutes. Add raisins or other dried fruit and bake 5 more minutes.
GRANOLA BARS Use the recipe for Rice Crispy Treats and substitute with granola cereal. 1/4 cup butter 1 10-ounce package marshmallows ro 4 cups miniature marshmallows 5 cups granola Melt butter in saucepan over low heat. Add marshmallows and stir until completely melted. Cook over low heat for 3 minutes longer, stirring constantly. Remove from heat. Add granola. Stir until well coated. Press mixture evenly into buttered 13 x 9 x 2 inch pan. Cut into 2 inch squares when cool. Makes 24.
FRUIT AND CEREAL BRUNCH CAKE 2 cups granola or any corn flake type cereal 1 cup orange juice 1/4 cup oil 1 egg 2 medium bananas mashed 1 1/2 cups gold medal flour 3/4 cup sugar 1/2 cup raisins 1 tsp. baking soda 1 tsp. cinnamon 1/2 tsp. salt Heat oven to 350 o. Grease square pan. Mix cereal and orange juice in large bowl; let stand until softened about 2 minutes. Mix in oil, egg and bananas. Stir in flour, sugar, raisins, baking soda, cinnamon and salt. Spread in pan. Bake until top springs back when touched, 40-45 minutes. Sprinkle Streusel Topping over warm coffee cake. Set oven control to broil and put cake pan bake in oven for about 1 minute until bubbly. Streusel Topping 1/2 cup brown sugar, packed 1/2 cup chopped nuts 1/4 cup flour 1/4 cup butter 1/2 tsp. cinnamon Mix all ingredients until crumbly.
OH HENRY BARS 1/2 cup melted butter 1/2 cup Karo syrup 1 cup brown sugar 1 tsp. vanilla 1/2 cup peanut butter 4 cups oats 1 6-ounce package chocolate chips Mix together first five ingredients. Heat until dissolved. Stir in oats and chips. Press into greased 9 x 13 inch pan. Bake at 375o for 15 minutes. Don't over bake. Cut into bars.
OATMEAL CAKE WITH BROILED ICING 1 1/4 cups boiling water 1 cup rolled oats 1/2 cup (1 stick) butter 3/4 cup granulated sugar 3/4 cup brown sugar, packed 2 eggs, slightly beaten 1 1/2 cups sifted flour 1 tsp. soda 1/2 tsp. salt 1 tsp. cinnamon 1/2 tsp. nutmeg Broiled Coconut Icing (recipe
below) Pour boiling water over rolled oats; let stand 20 minutes. (Makes 1 1/2 cups thick oatmeal.) Cream together butter or margarine and sugars. Add eggs. Stir in oatmeal, then sifted dry ingredients. Bake in greased 9 x 13-inch pan at 350o for 40 to 45 minutes or until done when tested with tooth pick. Spread with Coconut Icing; broil until frosting bubbles, taking care not to burn. Broiled Coconut Icing 6 tbsp. (3/4 stick) butter 1/2 cup brown sugar, packed 1/4 cup cream or evaporated milk 3/4 cups nuts, coarsely chopped 1 cup coconut Combine all ingredients. Spread over spice, oatmeal, or carrot cake. Broil until frosting bubbles and browns slightly, taking care not to burn.
13
POWDERED MILK
USE DRY MILK IN ANY RECIPE Foods made with powdered milk will have fewer calories and less cholesterol than those made from whole milk. Adding additional milk to the recipe will enhance the nutritive value of the recipe. In any recipe calling for milk, simply add the dry milk to other dry ingredients. Sift to blend, then add water for the milk called for in the recipe. For use in meat loaf, hamburgers, etc., use 1/4 to 1/2 cup per pound of meat. In mashed potatoes: mash cooked potatoes, then add 1/4 cup dry milk for each cup of potatoes. Use either the water the potatoes were cooked in or fresh milk to give the right consistency. Cooked cereals: add 1/4 to 1/2 cup dry milk to each cup of cereal before cooking. Instant and non-instant powdered milk are basically interchangeable. However, because of different consistencies, end product will vary when using other than what is called for in the recipe. Non-instant powdered milk lasts longer than instant powdered milk.
BUTTERMILK
1 cup non-instant (1 3/4 instant) dry milk 3 cups slightly warm water 1/2 cup commercial or previously made buttermilk Shake or beat until blended. Cover and allow to stand at room temperature until clabbered (6-12 hours). Refrigerate after clabbering, makes 1 quart. NOTE: Buttermilk will keep in the refrigerator for 2-3 weeks. It may be frozen. It will be necessary to use a fresh start of buttermilk occasionally.
BAKER’S CHEESE (Tastes like Ricotta or cream cheese, may be used in any recipe calling for either.) 1/4 rennet tablet (Junket) 2 quarts warm water 3 cups non-instant (5-1/3 cups instant) dry milk 1/2 cup buttermilk Dissolve rennet tablet in warm water. Thoroughly mix in dry milk. Add buttermilk and mix well. Cover and allow to stand at room temperature until set (about 5-10 hours). Pour into a cheesecloth covered strainer, close the cheesecloth and squeeze out as much whey as possible. The whey may be saved for use in bread. Place the cheese in the refrigerator until well chilled (usually overnight). Knead cheese until the texture is smooth. Cheese will freeze well for up to 6 months. (Makes about 1 pound.) (Rennet in available in most grocery stores near the gelatin section. Rennet is the enzyme rennin).
YOGURT 1 qt. lukewarm water 2 cups dry milk powder 2 tbsp. plain yogurt or dry yogurt starter Mix all ingredients together. Pour into a thermos bottle and let stand overnight. To make cream cheese: Hang the finished yogurt in a cheesecloth bag overnight. Add salt to taste. To make salad dressing or sour cream substitute: Add salt and seasonings. To serve as a dessert, add sugar to taste.
14
WHOLE MILK 1 cup water 1/3 cup powdered milk
EVAPORATED MILK 1 cup water 2/3 cup powdered milk
WHIPPED EVAPORATED MILK Makes 3 cups 1 cup evaporated milk 2 tbsp. lemon juice Thoroughly chill evaporated milk. Add lemon juice and whip until stiff. Sweeten and flavor as desired.
WHIPPED TOPPING 1 cup ice cold water 1 cup powdered milk 1 cup powdered sugar Whip at high speed until desired consistency is achieved. Store in refrigerator.
WHIPPED TOPPING 6 tbsp. instant (3-½ non-instant) dry milk 1 cup boiling water 2 tsp. unflavored gelatin 2 tbsp. cold water 2-4 tbsp. sugar 1 tsp. vanilla Dissolve the milk in the cup of water and scald. Soak the gelatin in cold water. Combine the scalded milk, dissolved gelatin and sugar. Stir and chill in the refrigerator until it jells. Now beat the mixture until it acquires the consistency of whipped cream. Add the vanilla and whip again.
CONDENSED MILK 1/2 cup hot water 1 cup sugar 1 cup powdered milk Blend thoroughly in blender. Can be stored in refrigerator or frozen.
“EAGLE BRAND” SWEETENED CONDENSED MILK
1 cup hot water 2 cups sugar 4 cups powdered milk ¼ cup butter Blend in blender very well. Can be stored in the refrigerator or frozen.
SWEETENED CONDENSED MILK Makes about 14 ounces 3/4 cup non-instant (1-1/3 instant) dry milk 3/4 cup sugar 1/2 cup hot tap water Place hot water in blender. With blender going add sugar and dry milk, blend until smooth.
SWEETENED CONDENSED MILK 1 cup plus 2 tbsp. powdered milk 1/2 cup warm water 3/4 cup sugar Stir all ingredients until dissolved. If necessary, set bowl in hot water to hasten dissolving. Although not as thick as regular sweetened condensed milk, this works well as a substitute.
BUTTERMILK OR SOUR MILK
1 cup water 1/3 cup powdered milk 1 tbsp. vinegar or lemon juice
DRINKABLE POWDERED MILK To improve the flavor of powdered milk, mix it half and half with whole or 2% milk. Another suggestion would be to try adding a little sugar or vanilla to enhance the flavor. Let it chill several hours before drinking.
COCOA MIX Makes enough for 10 quarts or 40 one-cup servings 15 cups instant dry milk 1 1/2 cups sugar 1 cup cocoa 1 1/2 tsp. salt Mix well. To use: Mix 1/2 cup mix with 1 cup hot water.
RICH COCOA MIX Makes enough for 8 quarts 10 2/3 cups instant dry milk 1 jar (6 oz.) instant coffee 1/2 cup powdered sugar creamer 1 pound can instant chocolate Mix well. To use: Mix 1/2 cup mix with 1 cup hot water.
15
ORANGE JULIUS Makes 3 6-ounce servings 2 cups orange juice 2 tbsp. sugar 1/2 cup powdered milk 1/2 tsp. vanilla 1/2 cup crushed ice Put all ingredients in blender and blend until ice is totally crushed.
FRUIT SMOOTHIES (A good way to use bottled fruit)
Serves 4 2 cups bottled fruit with juice 3/4 cup nonfat powdered milk (4 tbsp. non-fat dry milk to 3/4 cup of water) 1 to 2 drops almond flavoring or 1 tbsp. lemon juice Put in blender and blend until smooth. Add 1/2 tray ice cubes and blend until smooth. Variation To use fresh fruit, use one cup of fruit and 1 cup water and sweeten to taste. (Use almond flavoring with cherries and large stone fruits, lemon juice with berries.)
PEANUT BUTTER CHEWS
1 cup powdered sugar 2 cups instant (cup non-instant) dry 1 cup peanut butter milk 1 cup corn syrup or honey Mix powdered sugar and powdered milk thoroughly. Add peanut butter and syrup mixture. You may need to knead it with your hands. Press into a cake pan or roll into walnut size balls. Variations: Add nuts or Rice Krispies. Dip in chocolate.
HONEY MINTS
1 cup warm honey 4 drops oil of peppermint Green food coloring 2 3/4 cups powdered milk (non-instant) Mix ingredients and knead until all milk is absorbed.
TOOTSIE ROLLS 1 cup honey 1 tsp. vanilla 1/2 cup cocoa 1 cup non-instant powdered milk Cook honey to 255< (hard ball). Do not overcook. Remove from heat. Add vanilla. Mix cocoa and powdered milk well and stir into honey. Pull like taffy until gloss is gone and roll into rolls.
MAGIC MIX 4 cups instant (2 1/3 non-instant) dry milk 1 cup flour or 1/2 cup cornstarch 1 cup (2 sticks) margarine Combine dry milk, flour, and margarine into a large bowl and mix until it looks like cornmeal. Keep mix tightly covered in the refrigerator. (Makes 5 cups Magic Mix.) NOTE: Magic Mix can be used in many recipes to make food preparation easy and economical. Try a few of the following recipes.
CREAM SOUP Serves 4 4 cups water 2 cups Magic Mix 1 cube or 1 tsp. bouillon granules Add one or more of the following: 3 cooked carrots, mashed 3 potatoes, cooked and chopped and 1 tbsp. chopped onion 1 can chopped clams 1 package chopped spinach, cooked 1 can cream-style corn and 1 tbsp. chopped onion Combine water, Magic Mix, and bouillon in saucepan. Stir over medium heat until slightly thick. Add desired ingredients. Heat thoroughly.
WHITE SAUCE Makes 1 cup 2/3 cup Magic Mix 1 cup water In saucepan combine Magic Mix White Sauce and water. Stir rapidly over medium heat until it starts to bubble. NOTE: Use Magic Sauce for all recipes calling for a white or cream sauce.
MACARONI AND CHEESE
Serves 4 1 cup white sauce from Magic Mix 1 cup uncooked macaroni 4 to 5 ounces grated cheese (about 1 cup) 1/2 to 1 tsp. salt or garlic salt (optional) Cook macaroni in boiling water until tender. Drain. Combine macaroni, white sauce, cheese and seasoning. Heat through.
PUDDING Makes 4 1/2 cup servings 1/2 cup sugar 2-3 tbsp. cocoa (optional) 1 cup Magic Mix 2 cups water 1 tsp. vanilla Combine Magic Mix, sugar, and cocoa in saucepan and mix well. Add water, stir over medium heat until pudding bubbles. Add vanilla and beat. Cover and cool.
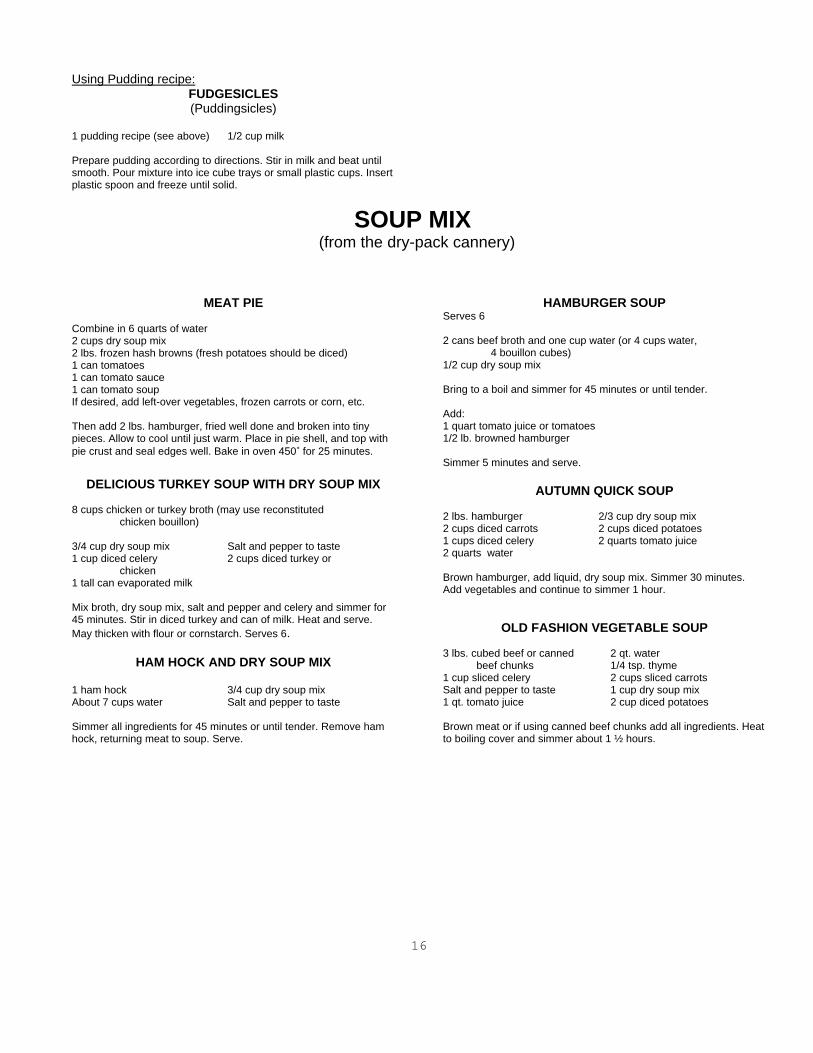
16
Using Pudding recipe: FUDGESICLES (Puddingsicles)
1 pudding recipe (see above) 1/2 cup milk Prepare pudding according to directions. Stir in milk and beat until smooth. Pour mixture into ice cube trays or small plastic cups. Insert plastic spoon and freeze until solid.
SOUP MIX(from the dry-pack cannery)
MEAT PIE
Combine in 6 quarts of water 2 cups dry soup mix 2 lbs. frozen hash browns (fresh potatoes should be diced) 1 can tomatoes 1 can tomato sauce 1 can tomato soup If desired, add left-over vegetables, frozen carrots or corn, etc. Then add 2 lbs. hamburger, fried well done and broken into tiny pieces. Allow to cool until just warm. Place in pie shell, and top with pie crust and seal edges well. Bake in oven 450< for 25 minutes.
DELICIOUS TURKEY SOUP WITH DRY SOUP MIX 8 cups chicken or turkey broth (may use reconstituted chicken bouillon) 3/4 cup dry soup mix Salt and pepper to taste 1 cup diced celery 2 cups diced turkey or chicken 1 tall can evaporated milk Mix broth, dry soup mix, salt and pepper and celery and simmer for 45 minutes. Stir in diced turkey and can of milk. Heat and serve. May thicken with flour or cornstarch. Serves 6.
HAM HOCK AND DRY SOUP MIX 1 ham hock 3/4 cup dry soup mix About 7 cups water Salt and pepper to taste Simmer all ingredients for 45 minutes or until tender. Remove ham hock, returning meat to soup. Serve.
HAMBURGER SOUP Serves 6 2 cans beef broth and one cup water (or 4 cups water, 4 bouillon cubes) 1/2 cup dry soup mix Bring to a boil and simmer for 45 minutes or until tender. Add: 1 quart tomato juice or tomatoes 1/2 lb. browned hamburger Simmer 5 minutes and serve.
AUTUMN QUICK SOUP 2 lbs. hamburger 2/3 cup dry soup mix 2 cups diced carrots 2 cups diced potatoes 1 cups diced celery 2 quarts tomato juice 2 quarts water Brown hamburger, add liquid, dry soup mix. Simmer 30 minutes. Add vegetables and continue to simmer 1 hour.
OLD FASHION VEGETABLE SOUP 3 lbs. cubed beef or canned 2 qt. water beef chunks 1/4 tsp. thyme 1 cup sliced celery 2 cups sliced carrots Salt and pepper to taste 1 cup dry soup mix 1 qt. tomato juice 2 cup diced potatoes Brown meat or if using canned beef chunks add all ingredients. Heat to boiling cover and simmer about 1 ½ hours.
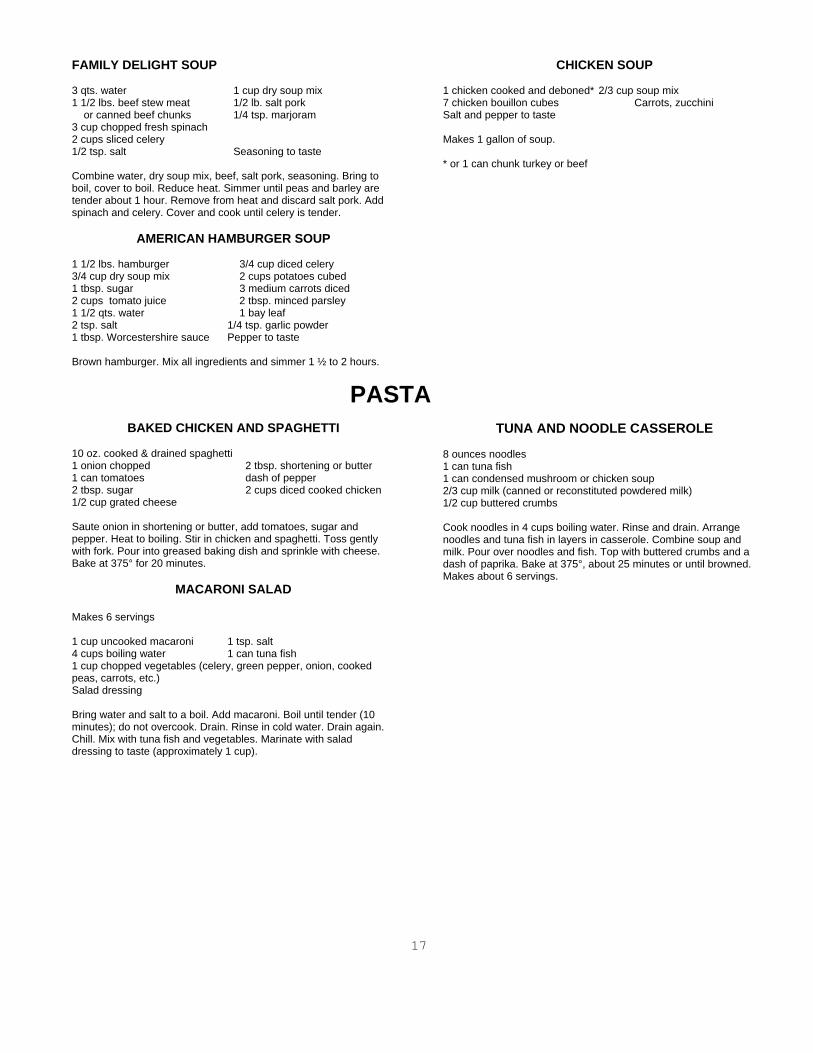
17
FAMILY DELIGHT SOUP 3 qts. water 1 cup dry soup mix 1 1/2 lbs. beef stew meat 1/2 lb. salt pork or canned beef chunks 1/4 tsp. marjoram 3 cup chopped fresh spinach 2 cups sliced celery 1/2 tsp. salt Seasoning to taste Combine water, dry soup mix, beef, salt pork, seasoning. Bring to boil, cover to boil. Reduce heat. Simmer until peas and barley are tender about 1 hour. Remove from heat and discard salt pork. Add spinach and celery. Cover and cook until celery is tender.
AMERICAN HAMBURGER SOUP 1 1/2 lbs. hamburger 3/4 cup diced celery 3/4 cup dry soup mix 2 cups potatoes cubed 1 tbsp. sugar 3 medium carrots diced 2 cups tomato juice 2 tbsp. minced parsley 1 1/2 qts. water 1 bay leaf 2 tsp. salt 1/4 tsp. garlic powder 1 tbsp. Worcestershire sauce Pepper to taste Brown hamburger. Mix all ingredients and simmer 1 ½ to 2 hours.
CHICKEN SOUP 1 chicken cooked and deboned* 2/3 cup soup mix 7 chicken bouillon cubes Carrots, zucchini Salt and pepper to taste Makes 1 gallon of soup. * or 1 can chunk turkey or beef
PASTA
BAKED CHICKEN AND SPAGHETTI
10 oz. cooked & drained spaghetti 1 onion chopped 2 tbsp. shortening or butter 1 can tomatoes dash of pepper 2 tbsp. sugar 2 cups diced cooked chicken 1/2 cup grated cheese Saute onion in shortening or butter, add tomatoes, sugar and pepper. Heat to boiling. Stir in chicken and spaghetti. Toss gently with fork. Pour into greased baking dish and sprinkle with cheese. Bake at 375° for 20 minutes.
MACARONI SALAD Makes 6 servings 1 cup uncooked macaroni 1 tsp. salt 4 cups boiling water 1 can tuna fish 1 cup chopped vegetables (celery, green pepper, onion, cooked peas, carrots, etc.) Salad dressing Bring water and salt to a boil. Add macaroni. Boil until tender (10 minutes); do not overcook. Drain. Rinse in cold water. Drain again. Chill. Mix with tuna fish and vegetables. Marinate with salad dressing to taste (approximately 1 cup).
TUNA AND NOODLE CASSEROLE 8 ounces noodles 1 can tuna fish 1 can condensed mushroom or chicken soup 2/3 cup milk (canned or reconstituted powdered milk) 1/2 cup buttered crumbs Cook noodles in 4 cups boiling water. Rinse and drain. Arrange noodles and tuna fish in layers in casserole. Combine soup and milk. Pour over noodles and fish. Top with buttered crumbs and a dash of paprika. Bake at 375°, about 25 minutes or until browned. Makes about 6 servings.
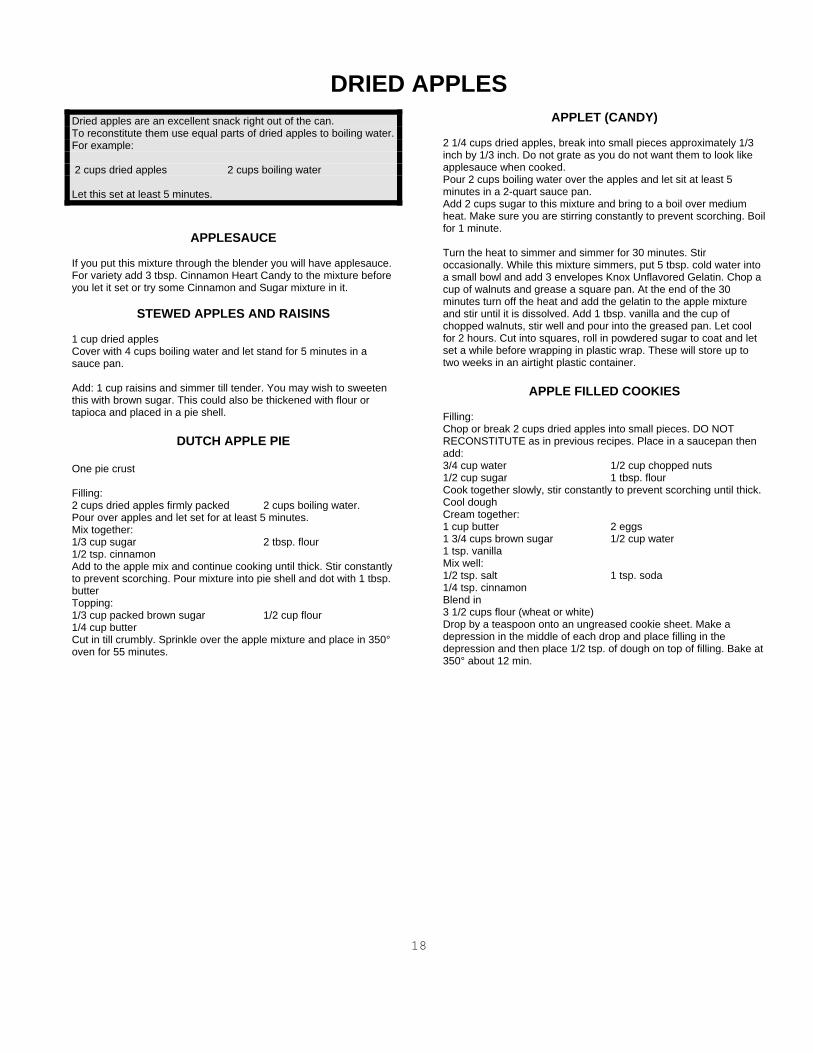
18
DRIED APPLES Dried apples are an excellent snack right out of the can. To reconstitute them use equal parts of dried apples to boiling water. For example: 2 cups dried apples 2 cups boiling water Let this set at least 5 minutes.
APPLESAUCE If you put this mixture through the blender you will have applesauce. For variety add 3 tbsp. Cinnamon Heart Candy to the mixture before you let it set or try some Cinnamon and Sugar mixture in it.
STEWED APPLES AND RAISINS 1 cup dried apples Cover with 4 cups boiling water and let stand for 5 minutes in a sauce pan. Add: 1 cup raisins and simmer till tender. You may wish to sweeten this with brown sugar. This could also be thickened with flour or tapioca and placed in a pie shell.
DUTCH APPLE PIE One pie crust Filling: 2 cups dried apples firmly packed 2 cups boiling water. Pour over apples and let set for at least 5 minutes. Mix together: 1/3 cup sugar 2 tbsp. flour 1/2 tsp. cinnamon Add to the apple mix and continue cooking until thick. Stir constantly to prevent scorching. Pour mixture into pie shell and dot with 1 tbsp. butter Topping: 1/3 cup packed brown sugar 1/2 cup flour 1/4 cup butter Cut in till crumbly. Sprinkle over the apple mixture and place in 350° oven for 55 minutes.
APPLET (CANDY) 2 1/4 cups dried apples, break into small pieces approximately 1/3 inch by 1/3 inch. Do not grate as you do not want them to look like applesauce when cooked. Pour 2 cups boiling water over the apples and let sit at least 5 minutes in a 2-quart sauce pan. Add 2 cups sugar to this mixture and bring to a boil over medium heat. Make sure you are stirring constantly to prevent scorching. Boil for 1 minute. Turn the heat to simmer and simmer for 30 minutes. Stir occasionally. While this mixture simmers, put 5 tbsp. cold water into a small bowl and add 3 envelopes Knox Unflavored Gelatin. Chop a cup of walnuts and grease a square pan. At the end of the 30 minutes turn off the heat and add the gelatin to the apple mixture and stir until it is dissolved. Add 1 tbsp. vanilla and the cup of chopped walnuts, stir well and pour into the greased pan. Let cool for 2 hours. Cut into squares, roll in powdered sugar to coat and let set a while before wrapping in plastic wrap. These will store up to two weeks in an airtight plastic container.
APPLE FILLED COOKIES
Filling: Chop or break 2 cups dried apples into small pieces. DO NOT RECONSTITUTE as in previous recipes. Place in a saucepan then add: 3/4 cup water 1/2 cup chopped nuts 1/2 cup sugar 1 tbsp. flour Cook together slowly, stir constantly to prevent scorching until thick. Cool dough Cream together: 1 cup butter 2 eggs 1 3/4 cups brown sugar 1/2 cup water 1 tsp. vanilla Mix well: 1/2 tsp. salt 1 tsp. soda 1/4 tsp. cinnamon Blend in 3 1/2 cups flour (wheat or white) Drop by a teaspoon onto an ungreased cookie sheet. Make a depression in the middle of each drop and place filling in the depression and then place 1/2 tsp. of dough on top of filling. Bake at 350° about 12 min.

19
APPLESAUCE OATMEAL COOKIES Cream: 1 cup shortening 2 cups sugar Add: 2 eggs 2 cups applesauce (applesauce: 2 cups dried apples, 2 cups boiling water let stand 5 minutes) Add and mix well: 2 tsp. soda 1 tsp. cinnamon 1 tsp. nutmeg 1 tsp. cloves 1 tsp. salt Add: 3 1/2 cups flour 2 cups oatmeal 1 cup chopped nuts 1 cup chocolate chips (optional) 1 cup raisins (optional) Mix well and drop by spoonfuls on greased baking sheet. Bake at 350 degrees 10-12 minutes.
APPLE BROWN BETTY Pour 2 cups boiling water over 4 cups dried apples Let stand at least 5 minutes. Topping: Mix the following ingredients well: 1/2 cup flour 1/4 cups oatmeal 1/2 tsp. cinnamon 1/4 cup brown sugar Then cut in 1/4 cup butter Place the apples and liquid remaining in a greased 9 x 9 pan. Sprinkle the topping over the apples. Bake at 350° for 55 minutes.
APPLE PIE FILLING 1 2/3 cups dry apple slices 2 1/2 cups water 2 tbsp. cornstarch 2/3 cup sugar 1/4 tsp. salt 2 tsp. lemon juice (optional) 1/2 tsp. cinnamon 1/4 tsp. nutmeg Mix all dry ingredients together, then add water and mix well. Bring to a rolling boil, stirring occasionally. If baking in a pie, preheat oven to 425°, place in oven and bake 40 minutes or until golden brown in pastry shell. (May use peeled and sliced fresh apples - enough to fill pie crust.)
APPLE CRISP (WITH PIE FILLING)
Put pie filling in a greased square pan. Mix together: 1/4 cup flour 1/4 cup butter 1/4 tsp. salt 1/4 cup rolled oats or oatmeal 2 tbsp. sugar Mix together thoroughly and spread over pie filling. Bake in 375º oven for 25 minutes.
CORNMEAL
CORN TORTILLAS 1 cup cornmeal 1 cup white flour Ground corn may be substituted for above two ingredients 1/2 cup water 1/2 teaspoon salt Mix ingredients together and knead well. Add small amount of water, if necessary. Let stand for 10 minutes. Knead and pat or slap into the shape of a thin pancake. Add more water or flour as needed. Cook on top of the stove in ungreased heavy iron or Teflon-coated skillet, turning so as to cook through but not to burn. Serve with a topping of mashed chili beans and grated cheese (opt.).
CORN BREAD
1 2/3 cups flour 2/3 cup sugar 5 tsp. baking powder 1 tsp. salt 1 2/3 cups yellow cornmeal 2 eggs, beaten 1 2/3 cups milk 1/3 cup margarine, melted Mix flour, sugar, baking powder, and salt in a large bowl. Stir in cornmeal until well blended. Add eggs and milk, stir to smooth batter. Stir in melted margarine just until blended. Do not over stir. Pour into well-buttered 9 x 5 x 3 loaf pan. Bake at 425o for 40 to 50 minutes or until toothpick inserted in center comes out clean. Cool in pan 10 minutes, loosen around edges and turn out to cool. Makes one loaf.
TAMALE PIE Serves 8 to 10 1 pound hamburger 1 cup chopped green pepper 1 chopped onion 1 clove garlic, minced 1 16 oz. can tomatoes 1 6 oz. can tomato paste 1 12 oz. can corn, drained 1 can sliced ripe olives (optional) 1 tbsp. sugar 1 tsp. salt and a dash of pepper 2-3 tsp. chili powder 1 1/2 cups sharp American 1 tbsp. butter cheese, grated 1 1/2 cups cold milk 1/2 cup yellow cornmeal 1/2 tsp. salt Brown together the hamburger, green pepper, onion, and garlic. Drain the fat and add tomatoes, tomato paste, corn, olives, sugar, salt, chili powder, and pepper. Simmer 20 minutes until thick. Add cheese and stir until melted. Pour into 9x13 inch baking dish. Make corn meal topping by heating milk in double boiler, add salt and slowly stir in corn meal. Cook and stir until thick (about 20 minutes), add butter and spread over top of meat mixture. Bake at 375o for 40 min.
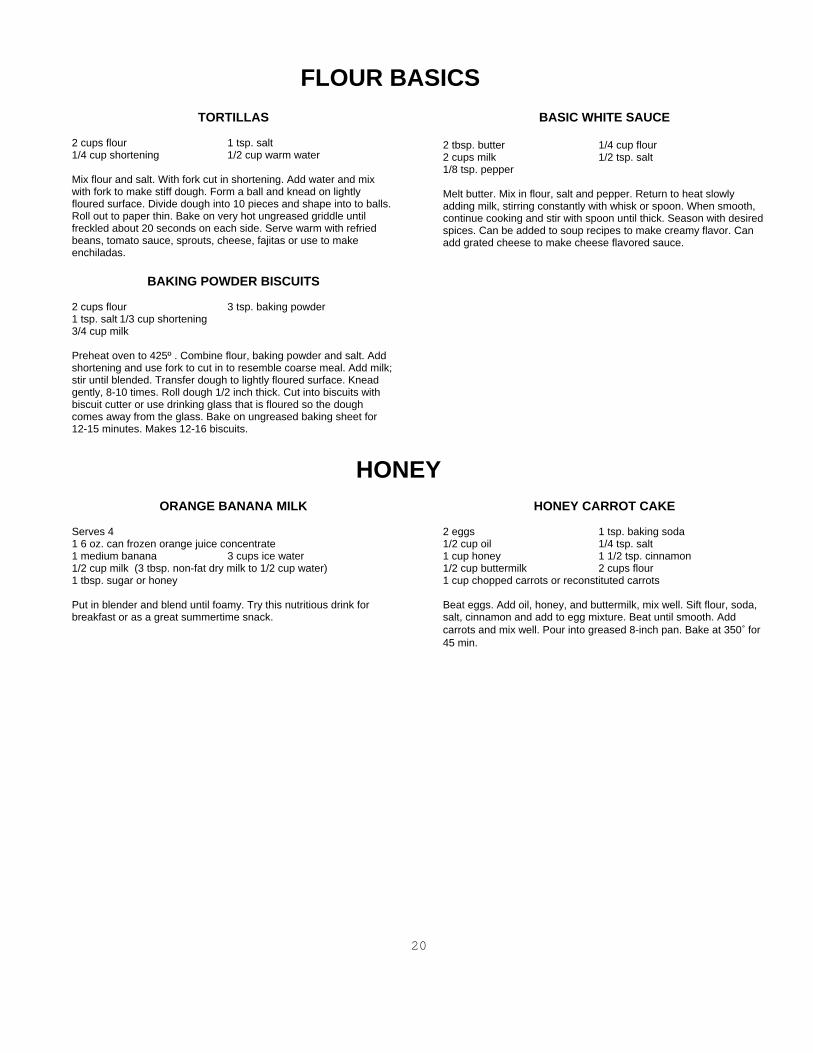
20
FLOUR BASICS
TORTILLAS 2 cups flour 1 tsp. salt 1/4 cup shortening 1/2 cup warm water Mix flour and salt. With fork cut in shortening. Add water and mix with fork to make stiff dough. Form a ball and knead on lightly floured surface. Divide dough into 10 pieces and shape into to balls. Roll out to paper thin. Bake on very hot ungreased griddle until freckled about 20 seconds on each side. Serve warm with refried beans, tomato sauce, sprouts, cheese, fajitas or use to make enchiladas.
BAKING POWDER BISCUITS
2 cups flour 3 tsp. baking powder 1 tsp. salt 1/3 cup shortening 3/4 cup milk Preheat oven to 425º . Combine flour, baking powder and salt. Add shortening and use fork to cut in to resemble coarse meal. Add milk; stir until blended. Transfer dough to lightly floured surface. Knead gently, 8-10 times. Roll dough 1/2 inch thick. Cut into biscuits with biscuit cutter or use drinking glass that is floured so the dough comes away from the glass. Bake on ungreased baking sheet for 12-15 minutes. Makes 12-16 biscuits.
BASIC WHITE SAUCE 2 tbsp. butter 1/4 cup flour 2 cups milk 1/2 tsp. salt 1/8 tsp. pepper Melt butter. Mix in flour, salt and pepper. Return to heat slowly adding milk, stirring constantly with whisk or spoon. When smooth, continue cooking and stir with spoon until thick. Season with desired spices. Can be added to soup recipes to make creamy flavor. Can add grated cheese to make cheese flavored sauce.
HONEY
ORANGE BANANA MILK Serves 4 1 6 oz. can frozen orange juice concentrate 1 medium banana 3 cups ice water 1/2 cup milk (3 tbsp. non-fat dry milk to 1/2 cup water) 1 tbsp. sugar or honey Put in blender and blend until foamy. Try this nutritious drink for breakfast or as a great summertime snack.
HONEY CARROT CAKE 2 eggs 1 tsp. baking soda 1/2 cup oil 1/4 tsp. salt 1 cup honey 1 1/2 tsp. cinnamon 1/2 cup buttermilk 2 cups flour 1 cup chopped carrots or reconstituted carrots Beat eggs. Add oil, honey, and buttermilk, mix well. Sift flour, soda, salt, cinnamon and add to egg mixture. Beat until smooth. Add carrots and mix well. Pour into greased 8-inch pan. Bake at 350< for 45 min.
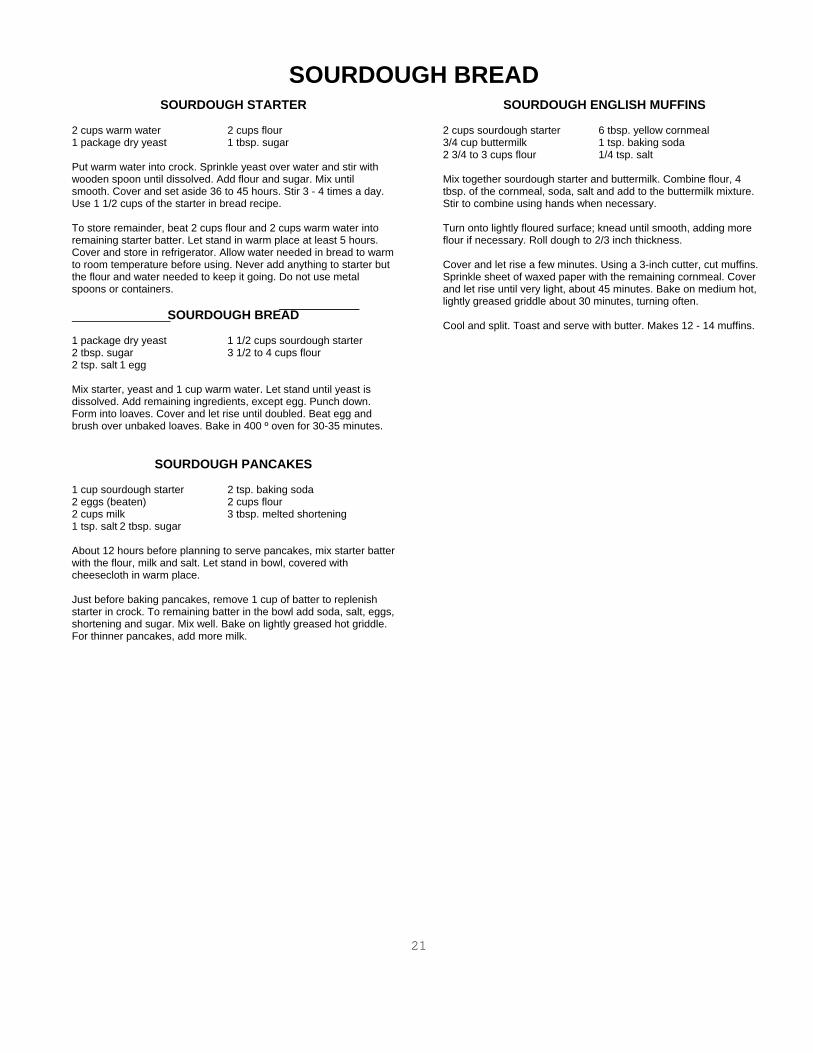
21
SOURDOUGH BREAD
SOURDOUGH STARTER 2 cups warm water 2 cups flour 1 package dry yeast 1 tbsp. sugar Put warm water into crock. Sprinkle yeast over water and stir with wooden spoon until dissolved. Add flour and sugar. Mix until smooth. Cover and set aside 36 to 45 hours. Stir 3 - 4 times a day. Use 1 1/2 cups of the starter in bread recipe. To store remainder, beat 2 cups flour and 2 cups warm water into remaining starter batter. Let stand in warm place at least 5 hours. Cover and store in refrigerator. Allow water needed in bread to warm to room temperature before using. Never add anything to starter but the flour and water needed to keep it going. Do not use metal spoons or containers.
SOURDOUGH BREAD 1 package dry yeast 1 1/2 cups sourdough starter 2 tbsp. sugar 3 1/2 to 4 cups flour 2 tsp. salt 1 egg Mix starter, yeast and 1 cup warm water. Let stand until yeast is dissolved. Add remaining ingredients, except egg. Punch down. Form into loaves. Cover and let rise until doubled. Beat egg and brush over unbaked loaves. Bake in 400 º oven for 30-35 minutes.
SOURDOUGH PANCAKES 1 cup sourdough starter 2 tsp. baking soda 2 eggs (beaten) 2 cups flour 2 cups milk 3 tbsp. melted shortening 1 tsp. salt 2 tbsp. sugar About 12 hours before planning to serve pancakes, mix starter batter with the flour, milk and salt. Let stand in bowl, covered with cheesecloth in warm place. Just before baking pancakes, remove 1 cup of batter to replenish starter in crock. To remaining batter in the bowl add soda, salt, eggs, shortening and sugar. Mix well. Bake on lightly greased hot griddle. For thinner pancakes, add more milk.
SOURDOUGH ENGLISH MUFFINS 2 cups sourdough starter 6 tbsp. yellow cornmeal 3/4 cup buttermilk 1 tsp. baking soda 2 3/4 to 3 cups flour 1/4 tsp. salt Mix together sourdough starter and buttermilk. Combine flour, 4 tbsp. of the cornmeal, soda, salt and add to the buttermilk mixture. Stir to combine using hands when necessary. Turn onto lightly floured surface; knead until smooth, adding more flour if necessary. Roll dough to 2/3 inch thickness. Cover and let rise a few minutes. Using a 3-inch cutter, cut muffins. Sprinkle sheet of waxed paper with the remaining cornmeal. Cover and let rise until very light, about 45 minutes. Bake on medium hot, lightly greased griddle about 30 minutes, turning often. Cool and split. Toast and serve with butter. Makes 12 - 14 muffins.
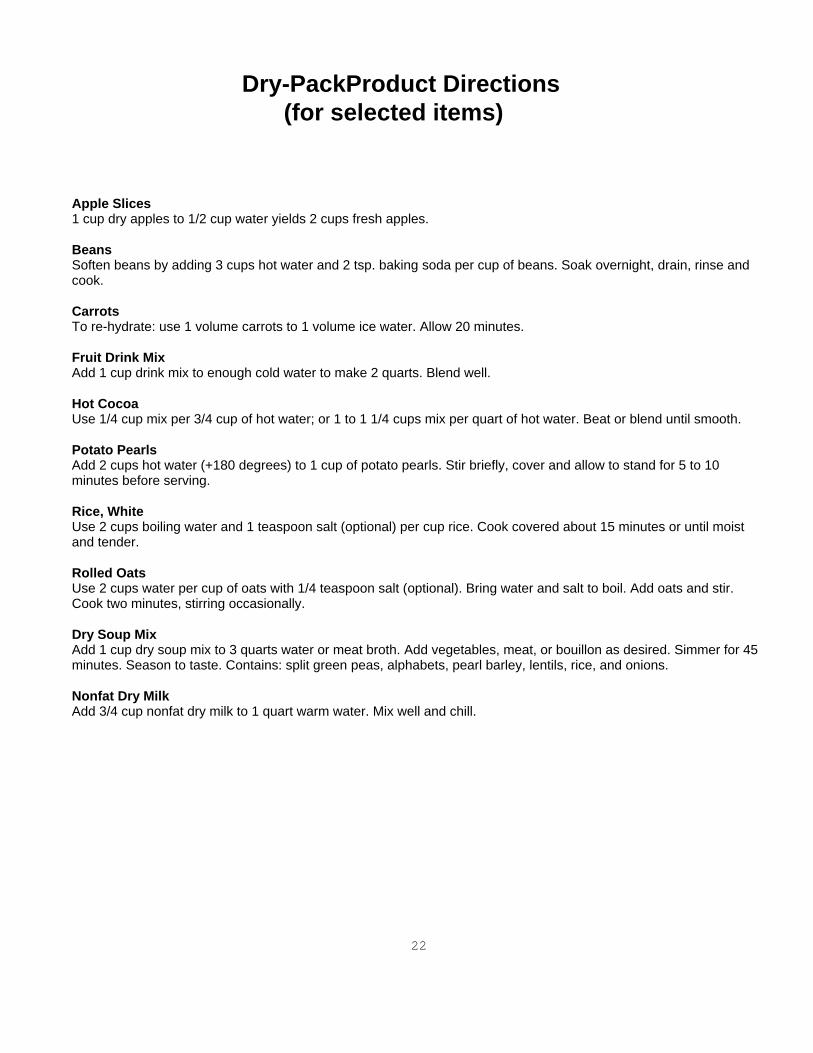
22
Dry-PackProduct Directions (for selected items)
Apple Slices 1 cup dry apples to 1/2 cup water yields 2 cups fresh apples. Beans Soften beans by adding 3 cups hot water and 2 tsp. baking soda per cup of beans. Soak overnight, drain, rinse and cook. Carrots To re-hydrate: use 1 volume carrots to 1 volume ice water. Allow 20 minutes. Fruit Drink Mix Add 1 cup drink mix to enough cold water to make 2 quarts. Blend well. Hot Cocoa Use 1/4 cup mix per 3/4 cup of hot water; or 1 to 1 1/4 cups mix per quart of hot water. Beat or blend until smooth. Potato Pearls Add 2 cups hot water (+180 degrees) to 1 cup of potato pearls. Stir briefly, cover and allow to stand for 5 to 10 minutes before serving. Rice, White Use 2 cups boiling water and 1 teaspoon salt (optional) per cup rice. Cook covered about 15 minutes or until moist and tender. Rolled Oats Use 2 cups water per cup of oats with 1/4 teaspoon salt (optional). Bring water and salt to boil. Add oats and stir. Cook two minutes, stirring occasionally. Dry Soup Mix Add 1 cup dry soup mix to 3 quarts water or meat broth. Add vegetables, meat, or bouillon as desired. Simmer for 45 minutes. Season to taste. Contains: split green peas, alphabets, pearl barley, lentils, rice, and onions. Nonfat Dry Milk Add 3/4 cup nonfat dry milk to 1 quart warm water. Mix well and chill.