Embed Size (px)
Citation preview

E
D
F
J
Printed in Japan
HS0512-0 DFQW5658ZA
ENGLISH OPERATING INSTRUCTIONSIntroduction ....................................................5Handling Precautions ....................................6Using the Drive ..............................................8Using the Software ......................................13Troubleshooting ...........................................21Specifications ..............................................22
DEUTSCH BEDIENUNGSANLEITUNGEinführung ...................................................24Vorsichtsmaßnahmen zum Gebrauch .......25Gebrauch des Laufwerks ............................27Gebrauch von Software ..............................32Störungsbehebung ......................................40Technische Daten ........................................41
FRANÇAIS INSTRUCTIONS D’UTILISATION
Introduction ..................................................43Précautions de manipulation .....................44Utilisation du lecteur ...................................46Utilisation du logiciel ..................................51Dépannage ...................................................59Spécifications ..............................................60
日本語 取扱説明書保証書付き(日本国内向け) はじめに............................................................. 61
安全上のご注意................................................. 62使用上のお願い................................................. 63ドライブを使う................................................. 65ソフトウェアを使う.......................................... 70困ったときのQ&A............................................ 78仕様..................................................................... 79保証とアフターサービス.................................. 80
• 取扱説明書をよくお読みのうえ、正しく安全にお使いください。
•. ご使用前に「安全上のご注意」( .62ページ)を必ずお読みください。
• 保証書は「お買い上げ日・販売店名」などの記入を確かめ、取扱説明書とともに大切に保管してください。
DVD MULTI Drive Pack/DVD MULTI-Laufwerk-Pack/Lecteur DVD MULTI/DVD MULTIドライブパック
Model No./Modell-Nr./Numéro de modèle/品番 CF-VDM312U
DFQW5658ZA_CF-VDM312U_OI_EGFJ.indb 1 2012/05/23 13:21:51

2
CAUTION!THIS PRODUCT UTILIZES A LASER.USE OF CONTROLS, ADJUSTMENTS OR PERFORMANCE OF PROCEDURES OTHER THAN THOSE SPECIFIED HEREIN MAY RESULT IN HAZARDOUS RADIATION EXPOSURE.DO NOT OPEN COVERS AND DO NOT REPAIR YOURSELF.REFER SERVICING TO QUALIFIED PERSONNEL.
12-E-1
WARNUNG!DIESES PROUKT ERZEUGT LASERSTAHLUNG.DURCHFÜHRUNG ANDERER VORGÄNGE ALS DER HIER ANGEGEBENEN KANN ZU GEFÄHRLICHER STRAHLUNG FÜHREN.REPARATUREN DÜRFEN NUR VON QUALIFIZIERTEM FACHPERSONAL DURCHGEFÜHRT WERDEN.
12-G-1
AVERTISSEMENT!CET APPAREIL UTILISE UN LASER.L’UTILISATION DE COMMANDES OU DE RÉGLAGES OU L’EXÉCUTION DE PROCÉDURES AUTRES QUE CELLES SPÉCIFIÉES ICI PEUVENT PROVOQUER UNE EXPOSITION À DES RADIATIONS DANGEREUSES.NE PAS OUVRIR LES COUVERCLES NI ESSAYER DE RÉPARER SOI-MÊME.CONFIER TOUT TRAVAIL D’ENTRETIEN À UN PERSONNEL QUALIFIÉ.
12-F-1
CLASS 1 LASER PRODUCTLASER KLASSE 1
DFQW5658ZA_CF-VDM312U_OI_EGFJ.indb 2 2012/05/23 13:21:51

3
For U.S.A.
Federal Communications Commission Radio Frequency Interference Statement
Note: This equipment has been tested and found to comply with the limits for a Class B digital device, pursuant to Part 15 of the FCC Rules. These limits are designed to provide reasonable protection against harmful interference in a residential installation. This equip-ment generates, uses and can radiate radio frequency energy and, if not installed and used in accordance with the instructions, may cause harmful interference to radio communica-tions. However, there is no guarantee that interference will not occur in a particular instal-lation. If this equipment does cause harmful interference to radio or television reception, which can be determined by turning the equipment off and on, the user is encouraged to try to correct the interference by one or more of the following measures: Reorient or relocate the receiving antenna. Increase the separation between the equipment and receiver. Connect the equipment into an outlet on a circuit different from that to which the receiv-er is connected.
Consult the Panasonic Service Center or an experienced radio/TV technician for help.
WarningTo assure continued compliance, use only shielded interface cables when connecting to a computer or peripheral. Also, any changes or modifications not expressly approved by the party responsible for compliance could void the user’s authority to operate this equipment.
This device complies with Part 15 of the FCC Rules. Operation is subject to the following two conditions:(1) This device may not cause harmful interference, and(2) This device must accept any interference received, including interference that may
cause undesired operation.
This device is Class B verified to comply with Part 15 of FCC Rules when used with Pana-sonic Notebook Computer.
Responsible Party: Panasonic Corporation of North America One Panasonic Way Secaucus, NJ 07094 Tel No:1-800-LAPTOP5 (1-800-527-8675)
6-M-1
DFQW5658ZA_CF-VDM312U_OI_EGFJ.indb 3 2012/05/23 13:21:51
4
<Read the “Notice for the products using LCD” in the Operating Instructions as follows.>
USA Only: This product has a fluorescent lamp that contains mercury. Disposal may be regulated in your community due to environmental considerations. For disposal or recycling information, please visit Panasonic website: http://www.panasonic.com/environmental or call 1-888-769-0149
65-M-1
<Other models>USA Only: Disposal may be regulated in your community due to environmental considerations. For disposal or recycling information, please visit Panasonic website: http://www.panasonic.com/environmental or call 1-888-769-0149
65-M-2
For Canada
Canadian ICES-003This Class B digital apparatus complies with Canadian ICES-003.Cet appareil numérique de la classe B est conforme à la norme NMB-003 du Canada.
7-M-2
Models for Europe
Declaration of Conformity (DoC)“Hereby, Panasonic declares that this DVD Multi Drive Pack is in compliance with the essential requirements and other relevant provisions of EU Council Directives.”
Authorised Representative:Panasonic Testing CentrePanasonic Marketing Europe GmbHWinsbergring 15, 22525 Hamburg, Germany
18-E-0
Models for India
For the purpose of recycling to facilitate effective utilization of resources, please return this product to a nearby authorized collection center, registered dismantler or recycler, or Panasonic service center when disposing of this product.Please see the Panasonic website for further information on collection centers, etc.http://www.panasonic.co.in/wps/portal/home
DFQW5658ZA_CF-VDM312U_OI_EGFJ.indb 4 2012/05/23 13:21:51

5
E
Thank you for purchasing this Panasonic product*1.This drive connects to the computer through the multimedia pocket.Please read these instructions carefully before using this product, and save this manual for future use.*1 For information about the computer(s) for which the DVD MULTI Drive Pack can be used, refer
to the catalogs, etc.
Introduction
Microsoft® and Windows® are registered trademarks of Microsoft Corporation in the United States and/or other countries.Roxio Creator is a trademark or registered trademark of Corel Corporation in the United States and/or other countries.
DVD MULTI Drive Pack ...............1Operating Instructions
(This book) ...................................1
DVD Drive Utility Disc*2 ...............1
NOTE
The DVD MULTI Drive Pack may also be referred to as the drive. This manual explains the procedure for default settings. The procedure may differ according to the settings. : Page in these Operating Instructions or in the Reference Manual. : Refers to the on-screen manuals.
*2 This contains the programs used to install “Roxio CreatorTM LJB (hereafter, Roxio Creator LJB)” and “PowerDVDTM (OEM Version) (hereafter, PowerDVD)”.
DFQW5658ZA_CF-VDM312U_OI_EGFJ.indb 5 2012/05/23 13:21:51

6
E
Handling Precautions
● Do not expose the drive to excessive smoke that may leave a residue, e.g., oil smoke, or tobacco smoke. Doing so can shorten the life of the drive lens. ● We recommend cleaning the drive lens with an air puffer used for camera lenses. (Do not use any spray-type of lens cleaning products.)
When opening/closing the tray ● When the computer is on, use the eject button ( page 8) or eject through Windows. ● When inserting or removing a disc, be careful not to touch the lens and other parts of the laser pickup. ● Do not leave the tray open and do not touch the lens and other parts of the laser pickup. The laser pickup and disc can become dusty in some conditions. It may cause malfunction in reading or writing. ● Do not apply excessive force to the tray in the open position. ● Never insert a foreign object such as a paper clip into the drive. Doing so may cause malfunction. ● Do not place items other than discs on the tray.
While the drive is being accessed ● Do not open the tray or move the computer while the drive is being accessed. Doing so could cause the disc to shift position and this may damage the disc, or cause the drive to malfunction. In addition, after running an application involving access to a disc, close the application before opening the tray or removing the disc.
Drive Handling Care
Do Not Look Into the DriveLooking directly at the internal laser light source may result in damage to eyesight.Do Not Use Discs That Are Cracked or DeformedBecause the discs rotate at high speeds, damaged discs may break apart causing injury.
● Discs that are not round and discs that have been repaired using adhesives are similarly dangerous, and so should not be used.
DFQW5658ZA_CF-VDM312U_OI_EGFJ.indb 6 2012/05/23 13:21:51

7
E
● Before using a disc, carefully read the operating/handling instructions and package of the disc. ● If the discs are not handled appropriately, they may become dirty or scratched. Furthermore the writing speed may get slower and the data may not be correctly written on or read from the disc. Other damage may cause a drive failure. ● Note the following precautions.• Do not touch the disc surface (the side with no printing).• Keep the disc surface clean and free from dirt, dust, fingerprints and scratches.• Do not write on the surface of the disc with a ballpoint pen or other writing instrument.• Do not attach stickers to discs.• Do not drop, bend, or place heavy objects on top of discs.• Do not place or store discs in locations exposed to heat, direct sunlight, humidity or dust.• If a disc is brought from a cold to a warm location, condensation may form on the disc.
For read-only discs, wipe off the condensation using a soft, dry, lint-free cloth before using the disc. For recordable/rewritable discs, wait until the condensation dries.
• When not using discs, keep them in their protective cases or cartridges.
To clean discs
How to hold a disc
<For read-only discs>Wipe discs with a dry, soft cloth from the center toward the edge. If discs get very dirty, wipe with a moist, soft cloth from the center toward the edge, then wipe again with a dry cloth to take up remaining moisture.<For recordable/rewritable discs>Use the recordable/rewritable disc cleaner to clean these discs.Do not use a cloth, CD cleaners or any other such cleaners under any circumstances.
Disc Handling Care
DFQW5658ZA_CF-VDM312U_OI_EGFJ.indb 7 2012/05/23 13:21:52

8
E
Using the Drive
For details on how to insert and remove the drive, refer to “Multimedia Pocket” in the Reference Manual included with your computer.
Inserting/Removing the Drive
1 Turn on the computer.
2 Slide the latch (A) and open the cover.
3 Press the eject button (B) and slowly pull out the tray.
4 Insert/Remove the disc. To insert
Set the disc with the label side up and press the center of the disc until it clicks in place. To remove
Press on the center spindle (C) and carefully lift up the edge of the disc.
5 Close the tray and the cover.Do not press the eject button.
Setting a Disc
NOTE To remove a disc when the computer is powered off, insert a pointed object (e.g., the bent-out tip of a paper clip) into the emergency hole (D). Pushing it to the end allows the tray to come out. If the vibration of the drive is excessive, check the disc. For AutoPlay CD/DVD:• If an AutoPlay CD/DVD does not start after the computer resumes from sleep
or hibernation, remove the disc from the drive and then reinsert it after waiting 15 seconds.
• An AutoPlay CD/DVD may start during file access depending on the status of the disc.
When playing back video from a disc, playback may not be smooth in some conditions.
DFQW5658ZA_CF-VDM312U_OI_EGFJ.indb 8 2012/05/23 13:21:52

9
E
Power-saving ModeIf the drive is not accessed for 30 seconds, the drive motor will automatically be shut down to reduce the power consumption. When the drive is accessed again, the drive motor is turned on. In this case, reading of the disc data will take approximately 30 seconds.
DFQW5658ZA_CF-VDM312U_OI_EGFJ.indb 9 2012/05/23 13:21:52

10
E
Using the Drive
Information
NOTE
[Confirm Region] appears when the DVD-Video has only one region code and the drive is set for another region code.
([Confirm Region] may not appear with some DVD-Video discs. To check the current region code and the number of remaining times of changing the code, right-click on the [CyberLink PowerDVD] screen and click [Settings...] - [Information].)
You can change the region code setting up to five times including the initial setting. Be extremely careful because you cannot change the region code anymore after the fifth change, even if you reinstalled the operating system. Any problem resulting from illegal changing or altering of the region code is the user’s responsibility.
CAUTION
To play DVD-Video or MPEG2 files, install the DVD playback software using “DVD Drive Utility Disc” (included). For information on how to install the software, refer to page 17.
Region Code SettingDVD-Videos are allocated to region codes according to where they are sold. To play a DVD-Video, the player’s software and the drive must have the corresponding region code.e.g.,For U.S.A. and Canada: “1”For Europe: “2”
The region code of the drive is not set at purchase. The operation depends on the DVD-Video that is first played.• DVD-Video with a specific region code:
The drive will automatically be set at the same region code as the DVD-Video.• DVD-Video with multiple region codes:
[Confirm Region] appears. Select the region code and click [OK]. Play now begins.
DFQW5658ZA_CF-VDM312U_OI_EGFJ.indb 10 2012/05/23 13:21:52

11
E
Writing to Discs Windows 7 includes the standard function that enables you to write or rewrite data to a disc. You can copy a CD/DVD or create a music CD, data CD/DVD, etc. by installing “Roxio Creator LJB” using the included “DVD Drive Utility Disc”. ( page 15) Be sure to use discs conforming to the proper write speeds. ( page 22) If the write operation is to involve a long period of time, be sure to connect the AC adaptor of the computer. If the battery power runs low and the power of the computer is cut, the write operation may end in failure.
*1 *2
You can read from/write to the following discs.
You can read from the following discs.
*1 DVD-RAM: Only non-cartridge type or removable cartridge type can be used.*2 Does not support DVD-RW Ver.1.0.
DFQW5658ZA_CF-VDM312U_OI_EGFJ.indb 11 2012/05/23 13:21:52

12
E
<CD-R> ● HITACHI MAXELL, Ltd. ● MITSUBISHI KAGAKU MEDIA CO., Ltd. ● TAIYO YUDEN Co., Ltd.
<CD-RW/High-Speed CD-RW> ● MITSUBISHI KAGAKU MEDIA CO., Ltd.
<Ultra-Speed CD-RW> ● MITSUBISHI KAGAKU MEDIA CO., Ltd.
<DVD-R> ● Panasonic Corporation ● MITSUBISHI KAGAKU MEDIA CO., Ltd. ● TAIYO YUDEN Co., Ltd.
<DVD-R DL> ● MITSUBISHI KAGAKU MEDIA CO., Ltd.
● <DVD-RW> ● MITSUBISHI KAGAKU MEDIA CO., Ltd. ● Victor Company of Japan, Limited
<DVD-RAM> ● Panasonic Corporation ● HITACHI MAXELL, Ltd.
<+R> ● MITSUBISHI KAGAKU MEDIA CO., Ltd. ● TAIYO YUDEN Co., Ltd.
<+RW> ● MITSUBISHI KAGAKU MEDIA CO., Ltd.
<+R DL> ● MITSUBISHI KAGAKU MEDIA CO., Ltd.
<High Speed +RW> ● MITSUBISHI KAGAKU MEDIA CO., Ltd.
Recommended discs for writing• The quality of written data depends on the disc.
<DVD-R for General> ● 1X-SPEED (4.7 GB) ● 1-2X-SPEED (4.7 GB) ● 1-4X-SPEED (4.7 GB) ● 1-8X-SPEED (4.7 GB) ● 1-16X-SPEED (4.7 GB)
<DVD-R DL> ● 2-4X-SPEED (8.5 GB) ● 2-8X-SPEED (8.5 GB)
<DVD-RW> ● 1X-SPEED (4.7 GB/9.4 GB) ● 1-2X-SPEED (4.7 GB/9.4 GB) ● 2-4X-SPEED (4.7 GB/9.4 GB) ● 2-6X-SPEED (4.7 GB/9.4 GB)
<DVD-RAM> ● 2X-SPEED (4.7 GB/9.4 GB) ● 2-3X-SPEED (4.7 GB/9.4 GB) ● 2-5X-SPEED (4.7 GB/9.4 GB)
<+R> ● 1-2.4X-SPEED (4.7 GB) ● 1-4X-SPEED (4.7 GB) ● 1-8X-SPEED (4.7 GB) ● 1-16X-SPEED (4.7 GB)
<+R DL> ● 2.4X-SPEED (8.5 GB) ● 2.4-8X-SPEED (8.5 GB)
<+RW> ● 1-2.4X-SPEED (4.7 GB) ● 1-4X-SPEED (4.7 GB)
DVD discs you can use for writing
Using the Drive
DFQW5658ZA_CF-VDM312U_OI_EGFJ.indb 12 2012/05/23 13:21:52

13
E
Using the Software
Do not install the software using a drive other than this drive. Be sure to insert this drive into your computer, and then insert the disc for installation. Close all other software application before running the Setup program for the software applications. Log on to Windows as an administrator.
CAUTION
NOTE
To play a DVD-Video, use “PowerDVD”. ( page 17)
If necessary, install the software application contained in the “DVD Drive Utility Disc” (supplied): “Roxio Creator LJB” and “PowerDVD”
Insert the drive into the multimedia pocket. ( Reference Manual “Multimedia Pocket”)
Before Installing the Software
DFQW5658ZA_CF-VDM312U_OI_EGFJ.indb 13 2012/05/23 13:21:52

14
E
Using the Software
Roxio Creator LJB“Roxio Creator LJB” is CD/DVD writing software application developed by Sonic Solutions. Here, explanations are given on general information about “Roxio Creator LJB,” the installation procedure, and how to access the online manual. For further information, refer to the online manual of “Roxio Creator LJB” ( page 16).
General Information What you can do with this software application• Creation of music CDs and data CD/DVD• Creation of back-up CD/DVD• Restoring the backup data divided into the multiple discs
NOTE
For details on the functions of the software application and media, refer to the online manual of the application as well.
About CopiesWhen writing to discs, make sure that you are not infringing any copyrights.It is illegal to copy audio CDs for non-personal use.When backing up software, make sure that you are not infringing any software copyrights for that product.
DFQW5658ZA_CF-VDM312U_OI_EGFJ.indb 14 2012/05/23 13:21:53

15
E
1 GB of free space on the hard disk is needed to install all the components of “Roxio Creator LJB.” Close all other software application before running the Setup program for “Roxio Creator LJB.” Log on to Windows as an administrator.
CAUTION
NOTE
Depending on the computer, preparatory steps may be necessary before installation. Before installing the application, be sure to read the Operating Instructions or Reference Manual of the computer.
1 Log on to Windows as an administrator.2 Set “DVD Drive Utility Disc” in the drive. 3 At the [AutoPlay] message, click [Run SETUPUTIL.EXE]. [Utility Setup tool] screen
will appear (allow some time for disc recognition). When the setup program will not run automatically, click (Start) and input [x:\setuputil.exe]*1 in [Search programs and files], and press Enter.*1 “x” is the drive letter. You can change the letter to suit your preference.
4 Click [Roxio Creator Setup].5 Select your language at [Setup], then click [OK].
Follow the on-screen instructions. During the installation, you will be required to agree the License Agreement. After reading the agreement, click [I accept the terms in the license agreement], then click [Next].
6 Click [Finish].7 A message appears advising that the computer must be restarted. Click [Yes]. Use the Packet Write function which Windows 7 includes so that you can write to a
CD-R, CD-RW, DVD-R, DVD-RW, +R, or +RW in the same way as in the floppy disk operation.
To install the software application, follow the procedure below.
Installing Roxio Creator LJB
DFQW5658ZA_CF-VDM312U_OI_EGFJ.indb 15 2012/05/23 13:21:53
16
E
Using the Software
Click (Start) - [All Programs] - [Roxio] - [Roxio Creator LJB].
Running Roxio Creator JLB
After running Roxio Creator LJB, you can access the online manual.Click [Help] from the menu, and then click [Help].
How to access the Online Manual
When using “Roxio Creator LJB,” set the display resolution to 1024 × 768 or more.
Cautions on Use
If “Roxio Creator LJB” does not operate properly, we recommend carefully reading the online help file first for problems with the operating environment or operations.Then install the latest Windows Service Pack.If you still cannot troubleshoot the problem, contact Panasonic Technical Support. For further information, refer to the following URL.http://www.roxio.com/enu
Information
DFQW5658ZA_CF-VDM312U_OI_EGFJ.indb 16 2012/05/23 13:21:53
17
E
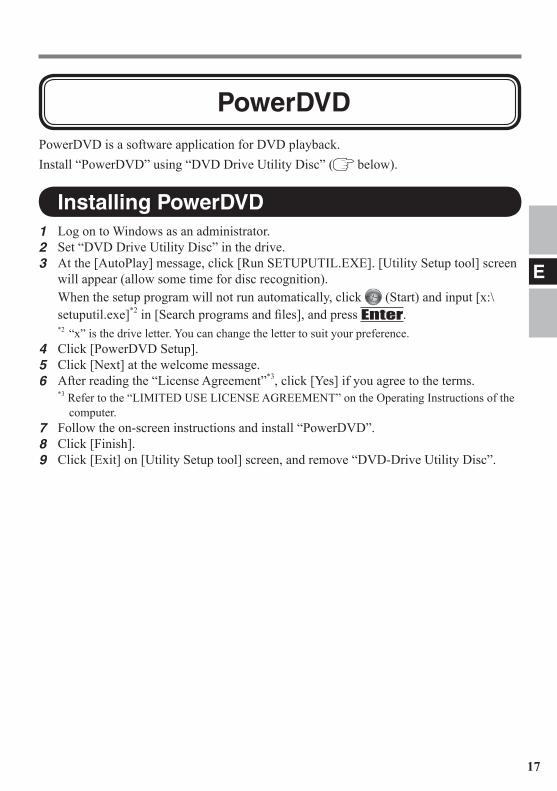
PowerDVD
Installing PowerDVD
PowerDVD is a software application for DVD playback.Install “PowerDVD” using “DVD Drive Utility Disc” ( below).
1 Log on to Windows as an administrator.2 Set “DVD Drive Utility Disc” in the drive. 3 At the [AutoPlay] message, click [Run SETUPUTIL.EXE]. [Utility Setup tool] screen
will appear (allow some time for disc recognition). When the setup program will not run automatically, click (Start) and input [x:\
setuputil.exe]*2 in [Search programs and files], and press Enter.*2 “x” is the drive letter. You can change the letter to suit your preference.
4 Click [PowerDVD Setup].5 Click [Next] at the welcome message.6 After reading the “License Agreement”*3, click [Yes] if you agree to the terms.
*3 Refer to the “LIMITED USE LICENSE AGREEMENT” on the Operating Instructions of the computer.
7 Follow the on-screen instructions and install “PowerDVD”.8 Click [Finish].9 Click [Exit] on [Utility Setup tool] screen, and remove “DVD-Drive Utility Disc”.
DFQW5658ZA_CF-VDM312U_OI_EGFJ.indb 17 2012/05/23 13:21:53

18
E
Using the Software
You can run “PowerDVD” using either of the following procedures. Double-click on the desktop. Click (Start) - [All Programs] - [CyberLink PowerDVD 10 for Panasonic] - [CyberLink PowerDVD 10 for Panasonic].
Running PowerDVD
To access the Online Manual Right-click on the [CyberLink PowerDVD] screen and click [Settings...] - [Help]. Click “ ” of the [CyberLink PowerDVD] screen.
NOTE
DVD-Audio cannot be played back using “PowerDVD”. Do not start “PowerDVD” while the drive indicator is blinking immediately after the computer is turned on. While “PowerDVD” is running, do not:• Enter sleep or hibernate.• Switch the display by pressing + P or Fn + F3 . During video playback, do not:• Eject the disc.• Use other applications or the Command Prompt.• Change the settings of the screen properties. If you maximize the video display window, you can return to the original window size by double-clicking over the images. When the number of display colors is increased, a message appears and the DVD cannot be played:• Reduce the number of display colors. Immediately after resuming from a pause, frame dropping may occur depending on the operating environment or DVD-Video (images or sounds are disrupted).
NOTE
When a disc has so many folders, “PowerDVD” may not operate correctly. Remove the disc as follows.• Click (Start) - [Computer], right-click [DVD RW Drive (x:)] and select [Eject]
from the menu.
DFQW5658ZA_CF-VDM312U_OI_EGFJ.indb 18 2012/05/23 13:21:53

19
E
NOTE
In the Extended Desktop or simultaneous (internal/external) display mode, there are times when images or video are not displayed correctly. During a prolonged period of rapid advance, the pause mode may be established at some point. If this happens, exit “PowerDVD”, and restart. Do not install another player software together with “PowerDVD”.
Doing so may interfere with smooth playback. Some DVD-Video discs contain the player software and start installing. In this case, cancel the installation as soon as possible. If you accidentally installed another player software and find a problem in playback, try the following procedures.• Uninstall the player software by clicking (Start) - [Control Panel] - [Uninstall a
program]. (Make sure the name of the uninstalled player software with the operating instructions of the player software.)
DFQW5658ZA_CF-VDM312U_OI_EGFJ.indb 19 2012/05/23 13:21:53

20
E
The following restrictions apply: Depending on the condition (record quality, cracks, dirt, modification, copy protection, type of drive/disc maker used when creating the disc, etc.) of a disc, it may not be possible to be read or play it correctly. In order to play discs other than DVD-RAM, they must be finalized (a process that enables it to play on other DVD players, etc.). For information on the finalizing method used by your DVD recorder, refer to its operating instructions. Media in which digital broadcasts have been recorded using copyright management technologies such as CPRM (Content Protection for Recordable Media) cannot be played back.
DVD Discs Created Using a DVD Recorder
SUPPORT INFORMATIONIf “PowerDVD” does not operate properly, we recommend carefully reading the online help file first for problems with the operating environment or operations.If you still cannot troubleshoot the problem, refer to the homepage via the online help.
Using the Software
DFQW5658ZA_CF-VDM312U_OI_EGFJ.indb 20 2012/05/23 13:21:53

21
E
The computer does not recognize the drive
Is the drive properly mounted in the multimedia pocket? Restart the computer.
The drive indicator does not light
Is the disc loaded on the tray correctly?( page 8)
Cannot play disc or read data from it
Is the disc bent, scratched, or dirty? An error may occur if, after the tray has been closed or operation has been resumed from the sleep hibernate modes, the drive is accessed before the drive indicator goes off. Also, an error may occur if the drive is accessed by the application software automatically. In a case like this, remove the disc, re-insert it, and try again.
“Roxio Creator LJB” does not work properly
Is writing software other than “Roxio Creator LJB” installed? Uninstall the writing software other than “Roxio Creator LJB.”
Cannot eject disc Turn on the computer. To remove a disc when the
computer is powered off, insert a pin of 1.3 mm {0.05"} in diameter into the emergency hole (A). (When the diameter of the pin is smaller than this, insert the pin slightly downward.) Pushing it completely to the end will free the tray so that it can be pulled out. (The position of the emergency hole differs depending on the drive.) If a disc with fingerprints or other dirt is used, you may not be able to remove it. Use a clean disc. ( page 7)
The disc tray does not close Do not touch the eject button when closing the tray.Other disc operation problems Use another drive or media.
Troubleshooting
DFQW5658ZA_CF-VDM312U_OI_EGFJ.indb 21 2012/05/23 13:21:53

22
E
SpecificationsItem Description
Operating voltage range DC 5 V ± 0.25 VDrive Data
Transfer Rate*1
Reading*2 DVD-ROM: 8X (Max.), CD-ROM: 24X (Max.)
Writing*3 CD-R: 24X (Max.), CD-RW: 4XHigh-Speed CD-RW: 10XUltra-Speed CD-RW: 24X (Max.)DVD-R: 8X (Max.), DVD-R DL: 6X (Max.)DVD-RW: 6X (Max.), DVD-RAM: 5X (Max.)+R: 8X (Max.), +R DL: 6X (Max.)+RW: 4X (Max.), High Speed +RW: 8X (Max.)
Supported Discs/Format*4
Reading DVD-ROM (4.7 GB, 8.5 GB, 9.4 GB, 17 GB), DVD-Video, DVD-R (1.4 GB, 3.95 GB, 4.7 GB), DVD-R DL (8.5 GB), DVD-RW*5 (1.4 GB, 2.8 GB, 4.7 GB, 9.4 GB), DVD-RAM*6 (1.4 GB, 2.8 GB, 4.7 GB, 9.4 GB), +R (4.7 GB), +R DL (8.5 GB), +RW (4.7 GB), High Speed +RW (4.7 GB), CD-Audio, CD-ROM, CD-R, Photo CD, Video CD, CD-RW, High-Speed CD-RW, Ultra-Speed CD-RW, CD TEXT, CD-EXTRA
Writing DVD-R (1.4 GB, 4.7 GB for General), DVD-R DL (8.5 GB), DVD-RW*5 (1.4 GB, 2.8 GB, 4.7 GB, 9.4 GB), DVD-RAM*6 (1.4 GB, 2.8 GB, 4.7 GB, 9.4 GB), +R (4.7 GB), +R DL (8.5 GB), +RW (4.7 GB), High Speed +RW (4.7 GB), CD-R, CD-RW, High-Speed CD-RW, Ultra-Speed CD-RW
Buffer underrun error prevention function SupportedInterface Serial ATADimensions (width × depth × height) 132 mm × 149 mm × 14 mm {5.2" × 5.9" × 0.6"}Weight Approx. 181 g {0.40 lb.}
*1 The data transfer rate of DVD per 1X speed is 1,350 KB/s. The data transfer rate of CD per 1X speed is 150 KB/s.*2 If an unbalanced disc (e.g., a disc with which the balance has been displaced from the center) is
inserted, the speed may become slower if there are large vibrations while the disc is rotating.*3 Depending on the disc, the writing speed may become slower.*4 1GB = 1,000,000,000 bytes. Your operating system or some application software will report as
fewer GB.*5 Does not support DVD-RW Ver.1.0.*6 DVD-RAM: Only non-cartridge type or removable cartridge type can be used.
DFQW5658ZA_CF-VDM312U_OI_EGFJ.indb 22 2012/05/23 13:21:53

D
23
Modelle für Europa
Konformitätserklärung (DoC)“Wir erklären hiermit, dass diese DVD MULTI-Laufwerk-Pack den notwendigen Anforderungen und anderen relevanten Bedingungen der EU-Direktiven entspricht.”
Autorisierter Händler:Panasonic Testing CentrePanasonic Marketing Europe GmbHWinsbergring 15, 22525 Hamburg, Deutschland
18-G-0
DFQW5658ZA_CF-VDM312U_OI_EGFJ.indb 23 2012/05/23 13:21:53
D
24
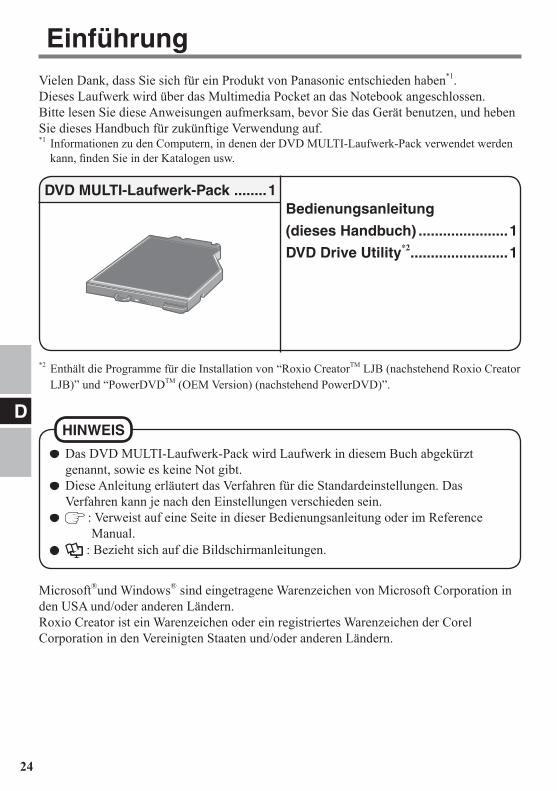
EinführungVielen Dank, dass Sie sich für ein Produkt von Panasonic entschieden haben*1.Dieses Laufwerk wird über das Multimedia Pocket an das Notebook angeschlossen.Bitte lesen Sie diese Anweisungen aufmerksam, bevor Sie das Gerät benutzen, und heben Sie dieses Handbuch für zukünftige Verwendung auf.*1 Informationen zu den Computern, in denen der DVD MULTI-Laufwerk-Pack verwendet werden
kann, finden Sie in der Katalogen usw.
Das DVD MULTI-Laufwerk-Pack wird Laufwerk in diesem Buch abgekürzt genannt, sowie es keine Not gibt.
Diese Anleitung erläutert das Verfahren für die Standardeinstellungen. Das Verfahren kann je nach den Einstellungen verschieden sein.
: Verweist auf eine Seite in dieser Bedienungsanleitung oder im Reference Manual.
: Bezieht sich auf die Bildschirmanleitungen.
HINWEIS
Microsoft®und Windows® sind eingetragene Warenzeichen von Microsoft Corporation in den USA und/oder anderen Ländern.Roxio Creator ist ein Warenzeichen oder ein registriertes Warenzeichen der Corel Corporation in den Vereinigten Staaten und/oder anderen Ländern.
DVD MULTI-Laufwerk-Pack ........1Bedienungsanleitung
(dieses Handbuch) ......................1
DVD Drive Utility*2 ........................1
*2 Enthält die Programme für die Installation von “Roxio CreatorTM LJB (nachstehend Roxio Creator LJB)” und “PowerDVDTM (OEM Version) (nachstehend PowerDVD)”.
DFQW5658ZA_CF-VDM312U_OI_EGFJ.indb 24 2012/05/23 13:21:54

D
25
Vorsichtsmaßnahmen zum Gebrauch
● Das Laufwerk darf keinem übermäßigen Rauch (z. B. durch Verbrennung von Fetten oder Tabak) ausgesetzt werden, der zu Ablagerungen führen kann. Anderenfalls könnte die Lebensdauer der Laufwerkslinse verkürzt werden. ● Wir empfehlen die Reinigung der Laufwerkslinse mit einem Blasebalg, der auch zum Reinigen von Kameraobjektiven verwendet wird. (Verwenden Sie zum Reinigen der Linse keine Reinigungssprays.)
Öffnen und Schließen des Fachs ● Wenn der Computer eingeschaltet ist, verwenden Sie die Auswurftaste ( Seite 27), oder öffnen Sie das Disc-Fach über Windows. ● Achten Sie beim Einlegen oder Entfernen einer Disc darauf, dass Sie die Linse und andere Teile der Lasereinheit nicht berühren. ● Lassen Sie das Disc-Fach nicht offen, und berühren Sie die Linse und andere Teile der Lasereinheit nicht. Unter bestimmten Bedingungen kann sich Staub auf der Lasereinheit und der Disc absetzen. Daraus können Lese- oder Schreibfehler resultieren. ● Achten Sie darauf, das geöffnete Fach nicht zu stark zu belasten. ● Führen Sie in das Laufwerk keine Fremdkörper wie z. B. Büroklammern ein. Anderenfalls können Funktionsstörungen auftreten. ● Legen Sie ausschließlich Discs in das Fach ein.
Während auf das Laufwerk zugegriffen wird ● Während auf das Laufwerk zugegriffen wird, darf das Disc-Fach nicht geöffnet und der Computer nicht bewegt werden. Anderenfalls kann die Disc verrutschen und dabei beschädigt werden oder im Laufwerk eine Funktionsstörung auftreten. Außerdem sollten Sie bei Verwendung einer Anwendung, die den Zugriff auf eine Disc erfordert, die Anwendung zuerst schließen, bevor Sie das Disc-Fach öffnen oder die Disc herausnehmen.
Sorgfältiger Umgang mit dem Laufwerk
Nicht in das Laufwerk blickenDer direkte Blick in die interne Laser-Lichtquelle kann zu Augenschäden führen.Keine CDs mit Rissen oder Verformungen verwendenAuf Grund der hohen Rotationsgeschwindigkeit können beschädigte CDs auseinander brechen und Verletzungen verursachen.
● CDs, die keine runde Form aufweisen oder mit Klebstoffen repariert wurden, sind ähnlich gefährlich und sollten daher nicht verwendet werden.
DFQW5658ZA_CF-VDM312U_OI_EGFJ.indb 25 2012/05/23 13:21:54

D
26
● Bevor Sie die Discs verwenden, lesen Sie die Bedienungsanleitung, die Anleitungen zur Handhabung von Discs und alle Hinweise auf der Disc-Verpackung bitte aufmerksam durch. ● Falls die Discs nicht richtig behandelt werden, können sie verschmutzt oder zerkratzt werden. Außerdem kann sich die Schreibgeschwindigkeit verringern, und die Daten werden möglicherweise nicht korrekt aufgezeichnet oder wiedergegeben. Oder es können andere Schäden auftreten, einschließlich Laufwerkversagen. ● Beachten Sie daher die folgenden Vorsichtshinweise.• Berühren Sie nie die (unbedruckte) Datenoberfläche.• Halten Sie die Disc-Oberfläche sauber und frei von Schmutz, Staub und
Fingerabdrücken, und vermeiden Sie Kratzer.• Schreiben Sie nicht mit einem Kugelschreiber oder anderen Schreibinstrumenten auf
der Disc-Oberfläche.• Bringen Sie keine Aufkleber auf den Discs an.• Discs dürfen weder fallengelassen noch verbogen oder durch schwere Gegenstände
belastet werden.• Verwahren Sie Ihre Discs nicht an einem Ort, wo sie zu hohen Temperaturen, direkter
Sonneneinstrahlung, Feuchtigkeit oder Staub ausgesetzt sind.• Wenn Discs aus kalten in warme Räume gebracht werden, kann auf ihnen Feuchtigkeit
kondensieren. Diese muss bei Nur-Lese-Discs mit einem weichen, trockenen, fusselfreien Tuch entfernt werden, bevor Sie die Disc in das Laufwerk einlegen können. Bei beschreibbaren Discs müssen Sie so lange warten, bis der Niederschlag abgetrocknet ist.
• Wenn die Discs nicht verwendet werden, bewahren Sie sie in ihren Schutzhüllen oder Kassetten auf.
falschrichtigFesthalten der Disc
Sorgfältige Handhabung der Discs
So reinigen Sie die Discs
<Für Nur-Lese-Discs>Wischen Sie die Disc mit einem weichen, trockenen Tuch geradlinig von der Mitte nach außen ab.Falls die Disc stark verschmutzt ist, wischen Sie sie mit einem weichen, feuchten Tuch ab, indem Sie von der Mitte gerade nach außen wischen, und wischen Sie dann mit einem trockenen Tuch nach, um die verbleibende Feuchtigkeit aufzunehmen.<Für wieder beschreibbare Discs>Verwenden Sie das Reinigungsmittel für wiederbeschreibbare Discs, um diese Discs zu reinigen.Verwenden Sie auf alle Fälle weder ein Tuch noch CD-Reinigungsmittel oder andere derartige Reinigungsmittel.
falschrichtig
Vorsichtsmaßnahmen zum Gebrauch
DFQW5658ZA_CF-VDM312U_OI_EGFJ.indb 26 2012/05/23 13:21:54

D
27
1 Schalten Sie den Computer ein.2 Verschieben Sie die Arretierung (A),
und öffnen Sie die Abdeckung.
3 Drücken Sie die Auswurftaste (B), und ziehen Sie das Laufwerk vorsichtig heraus.
4 Legen Sie die Disc ein, bzw. entfernen Sie die Disc.
So legen Sie die Disc einLegen Sie die Disc mit der Beschriftung nach oben in das Laufwerk ein. Drücken Sie die Disc nach unten, bis sie in den Zentrierring einrastet. So entfernen Sie die DiscDrücken Sie auf den Zentrierring (C), und heben Sie Disc an ihrer Kante vorsichtig an.
5 Schließen Sie das Disc-Fach und die Abdeckung.Drücken Sie nicht die Auswurftaste.
Einlegen einer Disc
Gebrauch des Laufwerks
Hinweise zum Einsetzen/Entfernen des Laufwerks finden Sie unter “Multimedia Pocket” im Reference Manual, das mit Ihrem Computer mitgeliefert wird.
Einsetzen/Entfernen des Laufwerks
Um die Disc bei ausgeschaltetem Computer zu entfernen, schieben Sie einen spitzen Gegenstand (z. B. eine aufgebogene Büroklammer) in die Notfallöffnung (D) ein. Durch Einschieben bis zum Anschlag öffnet sich das Fach. (Die genaue Lage der Notfallöffnung hängt von dem jeweiligen Laufwerkmodell ab.) Falls die Disc zu stark vibriert, überprüfen Sie sie. Hinweise zu AutoPlay-CD/DVDs:• Wenn eine CD/DVD mit Automatische Wiedergabe nicht startet, nachdem
der Computer aus dem Modus Energie sparen oder dem Ruhezustand wieder aktiviert wurde, entnehmen Sie die Disc aus dem Laufwerk, warten Sie 15 Sekunden und legen Sie sie dann erneut ein.
• Je nach Status der Disc, kann eine AutoPlay-CD/DVD während des Dateizugriffs gestartet werden.
Beim Abspielen von Videos von einer Disc kann es vorkommen, dass die Wiedergabe unter bestimmten Umständen nicht gleichmäßig erfolgt.
HINWEIS
DFQW5658ZA_CF-VDM312U_OI_EGFJ.indb 27 2012/05/23 13:21:54

D
28
Energiesparfunktion30 Sekunden nach dem letzten Zugriff auf das Laufwerk wird der Laufwerksmotor automatisch abgeschaltet, um den Stromverbrauch zu reduzieren. Bei einem erneuten Zugriff auf das Laufwerk wird der Motor wieder eingeschaltet. Das Hochlaufen dauert etwa 30 Sekunden, erst danach können wieder Daten von der Disc gelesen werden.
Gebrauch des Laufwerks
DFQW5658ZA_CF-VDM312U_OI_EGFJ.indb 28 2012/05/23 13:21:54

D
29
Über die RegionalcodeeinstellungAlle DVD-Videos sind mit einem Regionalcode versehen, der sich je nach Verkaufsgebiet unterscheidet. Um eine DVD wiedergeben zu können, muss der Regionalcode von Player-Software und Laufwerk mit dem entsprechenden Code der DVD übereinstimmen.z. B.,Für die USA und Kanada: “1”Für Europa: “2”
Der Regionalcode dieses Laufwerks ist bei der Lieferung vom Werk noch nicht eingestellt. Der Betrieb hängt daher von der zuerst im Laufwerk wiedergegebenen DVD ab.• Im Falle einer DVD mit einem bestimmten Regionalcode:
Das Laufwerk wird automatisch auf denselben Regionalcode wie die DVD eingestellt.• Im Falle einer DVD mit mehreren Regionalcodes:
[Bestätigung der Region] wird angezeigt. Wählen Sie den Regionalcode, und klicken Sie auf [OK]. Die Wiedergabe beginnt.
Der Regionalcode kann insgesamt nur fünfmal eingestellt werden (einschließlich Ausgangseinstellung). Seien Sie daher besonders vorsichtig, denn nach der vierten Einstellung ist der Regionalcode entgültig festgelegt, und es können keine weiteren Einstellungen vorgenommen werden, auch nicht wenn Sie das Betriebssystem neu installieren. Der Benutzer ist für Probleme verantwortlich, die sich aus der illegalen Abänderung des Regionalcodes ergeben.
VORSICHT
InformationenUm DVD-Video-Discs oder MPEG2-Dateien abzuspielen, installieren Sie die DVD-Wiedergabe-Software mit Hilfe der “DVD Drive Utility Disc” (im Lieferumfang).Informationen zur Installation der Software finden Sie auf Seite 36.
[Bestätigung der Region] wird auch angezeigt, wenn eine DVD mit einem bestimmten Regionalcode in ein Laufwerk eingelegt wird, für das bereits ein anderer Regionalcode eingestellt wurde. (Bei einigen DVD-Videos wird [Bestätigung der Region] unter Umständen nicht angezeigt. Um den gegenwärtigen Regionalcode und die restliche Anzahl der möglichen Einstellungsänderungen zu überprüfen, klicken Sie mit der rechten Maustaste auf die Schaltfläche [CyberLink PowerDVD], und klicken Sie auf [Einstellungen...] - [Informationen].)
HINWEIS
DFQW5658ZA_CF-VDM312U_OI_EGFJ.indb 29 2012/05/23 13:21:54

D
30
Schreiben auf Discs Windows Vista umfasst die Standardfunktionen, mit denen Sie Daten auf eine Disc schreiben oder diese neu beschreiben können.
Sie können eine CD/DVD kopieren oder eine Musik-CD, Daten-CD/DVD usw. erstellen, indem Sie “Roxio Creator LJB” installieren. Diese Software ist auf der beigefügten “ DVD Drive Utility Disc”enthalten. ( Seite 34)
Verwenden Sie nur Discs, die die folgenden geeigneten Schreibgeschwindigkeiten aufweisen. ( Seite 41)
Falls der Schreibvorgang eine lange Zeit in Anspruch nehmen soll, schließen Sie immer den Netzadapter des Computers an. Falls sich die Batterie erschöpft und die Stromversorgung des Computers deshalb ausfällt, kann es zu einem Ausfall beim Schreibvorgang kommen.
Die folgenden Medien eignen sich zum Lesen/Schreiben.
*1 *2
*1 DVD-RAM: Es können nur Discs ohne Cartridge bzw. mit abnehmbarer Cartridge verwendet werden.
*2 DVD-RW Ver.1.0 wird nicht unterstützt.
Die folgenden Medien eignen sich zum Lesen.
Gebrauch des Laufwerks
DFQW5658ZA_CF-VDM312U_OI_EGFJ.indb 30 2012/05/23 13:21:54

D
31
<CD-R> ● HITACHI MAXELL, Ltd. ● MITSUBISHI KAGAKU MEDIA CO., Ltd. ● TAIYO YUDEN Co., Ltd.
<CD-RW/High-Speed CD-RW> ● MITSUBISHI KAGAKU MEDIA CO., Ltd.
<Ultra-Speed CD-RW> ● MITSUBISHI KAGAKU MEDIA CO., Ltd.
<DVD-R> ● Panasonic Corporation ● MITSUBISHI KAGAKU MEDIA CO., Ltd. ● TAIYO YUDEN Co., Ltd.
<DVD-R DL> ● MITSUBISHI KAGAKU MEDIA CO., Ltd.
<DVD-RW> ● MITSUBISHI KAGAKU MEDIA CO., Ltd. ● Victor Company of Japan, Limited
<DVD-RAM> ● Panasonic Corporation ● HITACHI MAXELL, Ltd.
<+R> ● MITSUBISHI KAGAKU MEDIA CO., Ltd. ● TAIYO YUDEN Co., Ltd.
<+RW> ● MITSUBISHI KAGAKU MEDIA CO., Ltd.
<+R DL> ● MITSUBISHI KAGAKU MEDIA CO., Ltd.
<High Speed +RW> ● MITSUBISHI KAGAKU MEDIA CO., Ltd.
Zum Schreiben empfohlene Discs• Die Qualität der geschriebenen Daten hängt von der Disc ab.
<DVD-R für allgemeine Zwecke> ● 1X-SPEED (4,7 GB) ● 1-2X-SPEED (4,7 GB) ● 1-4X-SPEED (4,7 GB) ● 1-8X-SPEED (4,7 GB) ● 1-16X-SPEED (4,7 GB)
<DVD-R DL> ● 2-4X-SPEED (8,5 GB) ● 2-8X-SPEED (8,5 GB)
<DVD-RW> ● 1X-SPEED (4,7 GB/9,4 GB) ● 1-2X-SPEED (4,7 GB/9,4 GB) ● 2-4X-SPEED (4,7 GB/9,4 GB) ● 2-6X-SPEED (4,7 GB/9,4 GB)
<DVD-RAM> ● 2X-SPEED (4,7 GB/9,4 GB) ● 2-3X-SPEED (4,7 GB/9,4 GB) ● 2-5X-SPEED (4,7 GB/9,4 GB)
<+R> ● 1-2,4X-SPEED (4,7 GB) ● 1-4X-SPEED (4,7 GB) ● 1-8X-SPEED (4,7 GB) ● 1-16X-SPEED (4,7 GB)
<+R DL> ● 2,4X-SPEED (8,5 GB) ● 2,4-8X-SPEED (8,5 GB)
<+RW> ● 1-2,4X-SPEED (4,7 GB) ● 1-4X-SPEED (4,7 GB)
Zum Schreiben geeignete DVDs
DFQW5658ZA_CF-VDM312U_OI_EGFJ.indb 31 2012/05/23 13:21:54

D
32
Gebrauch von SoftwareInstallieren Sie bei Bedarf die Software-Anwendungen, die auf der “DVD Drive Utility Disc” (mitgeliefert) enthalten sind: “Roxio Creator LJB” und “PowerDVD”
Installieren Sie die Software nicht mit Hilfe eines anderen Laufwerks als diesem Laufwerk. Achten Sie darauf, dieses Laufwerk in den Computer einzusetzen, und setzen Sie dann die Disc in das Laufwerk ein, um die Installation durchzuführen. Schließen Sie alle anderen Software-Anwendungen, bevor Sie das Setup-Programm für die Software-Anwendungen durchführen. Melden Sie sich bei Windows als Administrator an.
VORSICHT
Um eine DVD-Video wiederzugeben, verwenden Sie “PowerDVD”.( Seite 36)
HINWEIS
Setzen Sie das Laufwerk in das Multimedien-Ablagefach ein. ( Reference Manual “Мultimedia Pocket”)
Bevor Sie die Software installieren
DFQW5658ZA_CF-VDM312U_OI_EGFJ.indb 32 2012/05/23 13:21:54

D
33
“Roxio Creator LJB” ist eine Software-Anwendungen zum Schreiben von CD/DVD, die von Sonic Solutions entwickelt wurde.Nachfolgend finden Sie allgemeine Erkläungen zu der Anwendung “Roxio Creator LJB”, dem Installationsverfahren und dem Zugriff auf das Online-Handbuch. Weitere Informationen finden Sie im Online-Handbuch des “Roxio Creator LJB” ( Seite 35).
Allgemeine Informationen
Roxio Creator LJB
Was man mit dieser Software-Anwendung machen kann• Erstellen von Musik-CDs und Daten-CD/DVD• Erstellen von Sicherungs-CD/DVD• Um die auf mehrere Discs verteilten Sicherungsdaten wiederherzustellen
Einzelheiten zu den Funktionen der Software-Anwendung und den Medien finden Sie ebenfalls im Online-Handbuch der Anwendung.
HINWEIS
Über die KopienVor der Vervielfältigung einer Datei, prüfen Sie bitte stets, ob Urheberrechte Dritter diesem entgegenstehen.
DFQW5658ZA_CF-VDM312U_OI_EGFJ.indb 33 2012/05/23 13:21:54

D
34
Auf der Festplatte ist ein freier Speicherraum von 1 GB erforderlich, um alle Komponenten von “Roxio Creator LJB” zu installieren. Schließen Sie alle anderen Software-Anwendungen, bevor Sie das Setup-Programm für die “Roxio Creator LJB” durchführen. Melden Sie sich bei Windows als Administrator an.
VORSICHT
Je nach Computer können auch Vorbereitungsschritte vor der eigentlichen Installation erforderlich sein. Lesen Sie bitte die Bedienungshinweise oder das Benutzerhandbuch des Computers, bevor Sie die Anwendung installieren.
HINWEIS
1 Melden Sie sich bei Windows als Administrator an.2 Legen Sie “DVD Drive Utility Disc” in das Laufwerk ein.3 Wenn die Autostart-Meldung erscheint, klicken Sie auf [SETUPUTIL.EXE ausführen].
Der Bildschirm [Utility Setup tool] erscheint (lassen Sie aber etwas Zeit für die Er-kennung der Disc). Falls das Einrichtungsprogramm nicht automatisch gestartet wird, klicken Sie auf (Start) und geben Sie [x:\setuputil.exe]*1 unter [Programme/Dateien durchsuchen] ein, drücken Sie dann .*1 “x” bezeichnet das Laufwerk. Sie können das Laufwerk nach Belieben ändern.
4 Klicken Sie auf [Roxio Creator Setup].5 Wählen Sie Ihre Sprache in [Setup] und klicken Sie dann [OK]. Folgen Sie dann den angezeigten Anleitungen.
Während der Installation werden Sie aufgefordert, dem Lizenzabkommen zuzustimmen. Nachdem Sie das Abkommen gelesen haben, klicken Sie [Ich akzeptiere die Bedingungen der Lizenzvereinbarung], und klicken Sie dann [Weiter].
6 Klicken Sie [Fertig stellen].7 Eine Meldung wird angezeigt, die Sie darauf hinweist, dass ein Neustart des
Computers erforderlich ist. Klicken Sie [Ja]. Verwenden Sie die Paket-Schreib-Funktion von Windows 7, um Daten auf eine CD-R, CD-RW, DVD-R, DVD-RW, +R oder +RW zu schreiben, so wie Sie sie auf eine Diskette schreiben würden.
Fünren Sie das folgende Verfahren durch, um zu installieren.
Installation von Roxio Creator LJB
Gebrauch von Software
DFQW5658ZA_CF-VDM312U_OI_EGFJ.indb 34 2012/05/23 13:21:55

D
35
Klicken Sie (Start) - [Alle Programme] - [Roxio] - [Roxio Creator LJB].
Verwenden von Roxio Creator LJB
Nach dem Ausführen von Roxio Creator LJB haben Sie Zugriff auf die Online-Betriebsanleitung.Klicken Sie auf [Help] im Menü und klicken Sie dann auf [Help].
Zugriff auf das Online-Handbuch
Stellen Sie die Auflösung bei der Verwendung von “Roxio Creator LJB” auf 1024 × 768 oder höher ein.
Vorsichtsmaßnahmen zum Gebrauch
Falls “Roxio Creator LJB” nicht richtig funktioniert, empfehlen wir Ihnen, zuerst die Online-Hilfe-Dateien zu lesen, um Probleme mit der Betriebsumgebung oder den Betriebsvorgägen ausfindig zu machen. Installieren Sie dann das neueste Windows Service Pack. Falls das Problem auf diese Weise nicht behoben werden kann, wenden Sie sich bitte an den Panasonic-Kundendienst. Weitere Informationen finden Sie unter dem folgenden URL.http://www.roxio.com/enu
Informationen
DFQW5658ZA_CF-VDM312U_OI_EGFJ.indb 35 2012/05/23 13:21:55

D
36
PowerDVD ist eine Software-Anwendung für die DVD-Wiedergabe.Installieren Sie die “PowerDVD” Hilfe der “DVD Drive Utility Disc” ( unten).
1 Melden Sie sich bei Windows als Administrator an.2 Legen Sie “DVD Drive Utility Disc” in das Laufwerk. 3 Wenn die Autostart-Meldung erscheint, klicken Sie auf [SETUPUTIL.EXE ausführen].
Der Bildschirm [Utility Setup tool] erscheint (lassen Sie aber etwas Zeit für die Er-kennung der Disc). Falls das Einrichtungsprogramm nicht automatisch gestartet wird, klicken Sie auf (Start) und geben Sie [x:\setuputil.exe]*2 unter [Programme/Dateien durchsuchen] ein, drücken Sie dann .*2 “x” bezeichnet das Laufwerk. Sie können das Laufwerk nach Belieben ändern.
4 Klicken Sie auf [PowerDVD Setup].5 Klicken Sie auf [Weiter] in der Willkommensmeldung.6 Nachdem Sie das “Lizenzvereinbarung”*3 gelesen haben, klicken Sie auf [Ja], falls Sie
den Bedingungen zustimmen.*3 Siehe die “LIMITED USE LIZENZVEREINBARUNG” in der Bedienungsanleitung des
Computers.7 Befolgen Sie die auf dem Bildschirm angezeigten Anleitungen, um “PowerDVD” zu
installieren.8 Klicken Sie auf [Fertig stellen].9 Klicken Sie im Bildschirm [Utility Setup tool] auf [Exit] und entnehmen Sie die
“DVD-Drive Utility Disc”.
PowerDVD
Installation von PowerDVD
Gebrauch von Software
DFQW5658ZA_CF-VDM312U_OI_EGFJ.indb 36 2012/05/23 13:21:55

D
37
Sie können “PowerDVD“ mit einem der folgenden beiden Verfahren verwenden. Doppelklicken Sie auf der Arbeitsfläche. Klicken Sie auf (Start) - [Alle Programme] - [CyberLink PowerDVD 10 for Panasonic] - [CyberLink PowerDVD 10 for Panasonic].
Rechtsklicken Sie auf den [CyberLink PowerDVD]-Bildschirm, und klicken Sie auf [Einstellungen...] - [Hilfe].
Klicken Sie im Bildschirm [CyberLink PowerDVD] auf “ ”.
Verwendung von PowerDVD
So greifen Sie auf das Online-Handbuch zu
Eine DVD-Audiodisc kann mit “PowerDVD” nicht wiedergegeben werden. Starten Sie “PowerDVD” nicht, solange die Laufwerkanzeige kurz nach dem Computerstart blinkt. Während “PowerDVD” ausgeführt wird, vermeiden Sie Folgendes:• Aktivieren Sie Energie sparen oder den Ruhezustand.• Wechseln Sie das Display durch Drücken von + P oder Fn + F3 . Während der Wiedergabe vermeiden Sie Folgendes:• Auswerfen der Disc.• Verwendung anderer Anwendung oder der Eingabeaufforderung.• Ändern der Bildschirmeigenschaften. Falls Sie das Video-Displayfenster maximieren, können Sie erneut auf die ursprüngliche Fenstergröße zurückschalten, indem Sie auf den Bildern doppelklicken. Wenn die Anzahl der Anzeigefarben erhöht wird, erscheint eine Meldung, und die DVD kann nicht wiedergegeben werden:• Reduzieren Sie die Anzahl der Anzeigefarben. Unmittelbar nach dem Fortsetzen aus einem Pause-Zustand können Einzelbilder übersprungen werden, und zwar in Abhängigkeit von der Betriebsumgebung oder dem DVD-Video (Bild und Ton werden unterbrochen).
HINWEIS
Wenn eine Disc sehr viele Ordner aufweist, arbeitet “PowerDVD” eventuell nicht richtig. Entfernen Sie die Disc wie folgt.• Klicken Sie auf (Start) - [Computer], rechtsklicken Sie dann auf [DVD-RW-
Laufwerk (x:)], und wählen Sie [Auswerfen] im Menü aus.
HINWEIS
DFQW5658ZA_CF-VDM312U_OI_EGFJ.indb 37 2012/05/23 13:21:55

D
38
Im Extended Desktop oder im gleichzeitigen (internen/externen) Anzeigemodus gibt es Fälle, in denen Einzelbilder oder Videobilder nicht korrekt wiedergegeben werden. Bei lang andauerndem Schnellvorlauf kann es vorkommen, dass der Pause-Modus ab einem gewissen Punkt aktiviert wird. Falls dies der Fall ist, springen Sie aus dem Programm “PowerDVD” aus, und starten Sie dann erneut. Installieren Sie mit “PowerDVD” keine andere Player-Software.Anderenfalls können Störungen bei der Wiedergabe auftreten. Manche DVD-Videos installieren bei der Wiedergabe ihre eigene Player-Software. In diesem Fall brechen Sie den Installationsvorgang so schnell wie möglich ab. Wenn Sie versehentlich eine andere Player-Software installiert haben und ein Problem bei der Wiedergabe auftritt, versuchen Sie die folgenden Verfahren.• Deinstallieren Sie die Player-Software, indem, Sie auf (Start) -
[Systemsteuerung] - [Programm deinstallieren] klicken. (Stellen Sie den Namen der deinstallierten Player-Software anhand der Gebrauchsanleitung der Player-Software sicher.)
HINWEIS
Gebrauch von Software
DFQW5658ZA_CF-VDM312U_OI_EGFJ.indb 38 2012/05/23 13:21:55

D
39
Wiedergabe von DVDs, die mit einem DVD-Recorder erstellt wurdenEs gelten folgende Einschränkungen:
Je nach Zustand der Disc (Aufnahmequalität, Kratzer, Schmutz, Einschränkungen, Kopierschutz, beim Erstellen der Disk verwendetes Laufwerk/Aufnahmegerät usw.) ist die Wiedergabe ggf. nicht möglich. Um andere Medien als DVD-RAM wiederzugeben, müssen diese finalisiert sein (darunter versteht man einen Vorgang, der die Wiedergabe dieser Discs auf anderen DVD-Playern usw. ermöglicht). Informationen zur Finalisierungsmethode, die von Ihrem DVD-Recorder verwendet wird, finden Sie in der Bedienungsanleitung. Medien, auf denen digitale Sendungen mit Kopierschutztechnologien aufgezeichnet wurden, wie etwa CPRM (Content Protection for Recordable Media – Inhaltsschutz für bespielbare Medien), können nicht wiedergegeben werden.
KUNDENUNTERSTÜTZUNGSINFORMATIONFalls “PowerDVD” nicht richtig funktioniert, empfehlen wir Ihnen, zuerst die Online-Hilfedatei aufmerksam durchzulesen, besonders den Teil, in dem die Probleme mit der Betriebsumgebung oder dem Betrieb beschrieben sind.Wenn Sie das Problem immer noch nicht lösen können, gehen Sie über das Online-Handbuch auf die Startseite.
DFQW5658ZA_CF-VDM312U_OI_EGFJ.indb 39 2012/05/23 13:21:55

D
40
Störungsbehebung
Das Notebook erkennt das Laufwerk nicht
Ist das Laufwerk einwandfrei in das Multimedia-Pocket eingesetzt? Führen Sie einen Neustart des Computers durch.
Die Laufwerkanzeige leuchtet nicht
Ist die Disc korrekt in das Laufwerkfach eingelegt? ( Seite 27)
Eine Disc kann nicht abgespielt oder gelesen werden
Ist die Disc verbogen, zerkratzt oder schmutzig? Möglicherweise tritt ein Fehler auf, wenn die Lade geschlossen oder der Betrieb nach Energie sparen /Ruhezustand wieder aufgenommen wurde und auf das Laufwerk zugegriffen wird, bevor die Laufwerkanzeige
erlischt. Außerdem kann ein Fehler ebenfalls auftreten, wenn die Anwendungssoftware das Laufwerk automatisch zu verwenden sucht. Nehmen Sie in diesem Fall die Disc heraus, legen Sie sie dann wieder ein, und versuchen Sie, den Betriebsvorgang erneut durchzuführen.
“Roxio Creator LJB” funktionieren nicht richtig
Ist ein anderes Schreibsoftwareprogramm als “Roxio Creator LJB” installiert?
Deinstallieren Sie das andere Schreibsoftwareprogramm als “Roxio Creator LJB”.
Die Disc wird nicht ausgeworfen
Schalten Sie den Computer ein.Um eine Disc bei ausgeschaltetem Computer zu entfernen, führen Sie einen Stift mit einem Durchmesser von 1,3 mm in die Notfallöffnung (A) ein. (Ist der Durchmesser des Stifts kleiner, führen Sie den Stift leicht nach unten geneigt ein.) Nach dem Einschieben bis zum Anschlag wird das Fach entriegelt, sodass Sie es herausziehen können. (Die genaue Lage der Notfallöffnung hängt von dem Laufwerkmodell ab.) Falls eine Disc verwendet wird, auf der sich Fingerabdrücke oder sonstiger Schmutz befindet, kann es vorkommen, dass die Disc nicht entfernt werden kann. Verwenden Sie daher eine saubere Disc. ( Seite 26)
Das Fach schließt nicht Beim Schließen des Fachs darf die Auswurftaste nicht berührt werden.
Sonstige Bedienungsprobleme mit der Disc
Verwenden Sie ein anderes Laufwerk oder andere Medien.
DFQW5658ZA_CF-VDM312U_OI_EGFJ.indb 40 2012/05/23 13:21:55

D
41
Technische DatenGegenstand Beschreibung
Betriebsspannung DC 5 V ± 0,25 VLaufwerk Datenüber
tragungsrate *1Lesen*2 DVD-ROM: 8X (max.), CD-ROM: 24X (max.)Schreiben*3 CD-R: 24X (Max.), CD-RW: 4X
High-Speed CD-RW: 10XUltra-Speed CD-RW: 24X (Max.)DVD-R: 8X (Max.), DVD-R DL: 6X (Max.)DVD-RW: 6X (Max.), DVD-RAM: 5X (Max.)+R: 8X (Max.), +R DL: 6X (Max.)+RW: 4X (Max.), High Speed +RW: 8X (Max.)
Unterstützte Discs/Formate*4
Lesen DVD-ROM (4,7 GB, 8,5 GB, 9,4 GB, 17 GB), DVD-Video, DVD-R (1,4 GB, 3,95 GB, 4,7 GB), DVD-R DL (8,5 GB), DVD-RW*5 (1,4 GB, 2,8 GB, 4,7 GB, 9,4 GB), DVD-RAM*6 (1,4 GB, 2,8 GB, 4,7 GB, 9,4 GB), +R (4,7 GB), +R DL (8,5 GB), +RW (4,7 GB), High Speed +RW (4,7 GB), CD-Audio, CD-ROM, CD-R, Photo CD, Video CD, CD-RW, High-Speed CD-RW, Ultra-Speed CD-RW, CD TEXT, CD-EXTRA
Schreiben DVD-R (1,4 GB, 4,7 GB für allgemeine Zwecke), DVD-R DL (8,5 GB), DVD-RW*5 (1,4 GB, 2,8 GB, 4,7 GB, 9,4 GB), DVD-RAM*6 (1,4 GB, 2,8 GB, 4,7 GB, 9,4 GB), +R (4,7 GB), +R DL (8,5 GB), +RW (4,7 GB), High Speed +RW (4,7 GB), CD-R, CD-RW, High-Speed CD-RW, Ultra-Speed CD-RW
Zwischenspeicher-Unterlauffehler-Verhütungsfunktion
Unterstützt
Schnittstelle Serial ATAAbmessungen (Breite × Tiefe × Höhe) 132 mm × 149 mm × 14 mmGewicht Ca. 181 g
*1 Die Datenübertragungsrate pro DVD bei einfacher Geschwindigkeit (1X) beträgt 1.350 KB/s. Die Datenübertragungsrate pro CD bei einfacher Geschwindigkeit (1X) beträgt 150 KB/s.*2 Falls eine Form-Disc oder eine Disc mit großer Unwucht (z. B., Schwerpunkt der Disc liegt au-
ßerhalb der Mitte) eingelegt wird, die bei der Rotation stark vibriert, kann die Geschwindigkeit geringer sein.
*3 Je nach der Disc kann die Schreibgeschwindigkeit abnehmen.*4 1 GB = 1.000.000.000 Bytes. Ihr Betriebssystem oder manches Anwendungsprogramm wird für
diesen Wert eine kleinere Zahl anzeigen.*5 Unterstützt die DVD-RW Ver.1.0 nicht.*6 DVD-RAM: Es konnen nur Discs ohne Cartridge bzw. mit entfernbarer Cartridge verwendet
werden.
DFQW5658ZA_CF-VDM312U_OI_EGFJ.indb 41 2012/05/23 13:21:55

42
F
Modèles pour l’EuropeDéclaration de conformité (DoC)“Par le présent document, Panasonic déclare que ce lecteur DVD MULTI est conforme aux exigences fondamentales et aux autres dispositions applicables des Directives du Conseil de l’Union européenne.”
Représentant autorisé :Panasonic Testing CentrePanasonic Marketing Europe GmbHWinsbergring 15, 22525 Hambourg, Allemagne
18-F-0
DFQW5658ZA_CF-VDM312U_OI_EGFJ.indb 42 2012/05/23 13:21:55

43
F
Lecteur DVD MULTI ....................1
IntroductionNous vous remercions d’avoir acheté ce produit Panasonic*1.Le lecteur se connecte à l’ordinateur par l’intermédiaire du Multimedia Pocket.Veillez lire attentivement ces instructions avant d’utiliser ce produit, et les conserver pour future référence.*1 Pour plus d’informations sur les ordinateurs avec lesquel s le Lecteur DVD MULTI
peutêtre utilisé, consultez le catalogues, etc.
REMARQUE
Microsoft® et Windows® sont des marques déposées de Microsoft Corporation aux États-Unis et/ou dans d’autres pays.Roxio Creator est une marque commerciale ou une marque déposée de Corel Corporation aux États-Unis et/ou dans d’autres pays.
Instructions d’utilisation
(ce manuel) ................................. 1
DVD Drive Utility Disc*2 .............. 1
*2 Contient les programmes utilisés pour installer “Roxio CreatorTM LJB (ci-après appelé Roxio Creator LJB)” et “PowerDVDTM (Version OEM) (ci-après appelé PowerDVD)”.
Lecteur DVD MULTI peut également être parfois appelé lecteur. Ce “instructions d’utilisation” explique la procédure en fonction des réglages d’usine. La procédure peut être différente suivant les réglages effectués. : Page du présent manuel (Instructions d’utilisation) ou du Manuel de référence. : Reportez-vous aux manuels sur écran.
DFQW5658ZA_CF-VDM312U_OI_EGFJ.indb 43 2012/05/29 10:25:46

44
F
Précautions de manipulation
● Évitez de trop exposer le lecteur à la fumée pouvant y laisser un résidu, telle que la fumée dégagée par l’huile ou le tabac. Cela risquerait de réduire la durée de service de la lentille du lecteur. ● Nous recommandons de nettoyer la lentille du lecteur avec une poire soufflante pour lentille d’appareil photo. (N’utilisez aucun produit de nettoyage des lentilles en bombe aérosol.)
Lors de l’ouverture/la fermeture du tiroir ● Lorsque l’ordinateur est sous tension, utilisez le bouton d’éjection ( page 46) ou éjectez le disque en utilisant Windows. ● Lors de l’insertion ou de l’éjection d’un disque, veillez à ne pas toucher la lentille ou d’autres parties du capteur laser. ● Évitez de laisser le tiroir en position ouverte et de toucher la lentille ou d’autres parties du capteur laser. Dans certaines conditions, de la poussière peut s’accumuler sur le capteur laser ou sur un disque. Cela risque d’entraîner des problèmes de lecture ou d’écriture. ● N’appliquez pas de force excessive sur le tiroir lorsqu’il est ouvert. ● N’insérez jamais un objet étranger, comme un trombone, dans le lecteur. Cela pourrait provoquer un dysfonctionnement. ● Ne placez pas d’objets autres que des disques dans le tiroir.
Pendant l’accès au lecteur ● Évitez d’ouvrir le tiroir ou de déplacer l’ordinateur pendant l’accès au lecteur. Le disque risquerait de changer de position, ce qui peut endommager le disque ou causer un dysfonctionnement du lecteur. De plus, après l’exécution d’une application impliquant l’accès à un disque, fermez l’application avant d’ouvrir le tiroir ou de retirer le disque.
Manipulation du lecteur
Ne pas regarder dans le lecteurRegarder directement le faisceau laser interne risque d'endommager la vue.Ne pas utiliser de disques fendus ou déformésLes disques tournant à vitesse élevée, les disques endommagés risquent de casser et de causer des blessures.
● Des disques qui ne sont pas circulaires ou qui ont été réparés à l'aide d'adhésif sont dangereux et ne doivent donc pas être utilisés.
DFQW5658ZA_CF-VDM312U_OI_EGFJ.indb 44 2012/05/23 13:21:55

45
F
<Pour les disques en lecture seule>Essuyez le disque avec un tissu doux et sec, depuis le centre vers l’extérieur.Si le disque est très sale, essuyez-le avec un tissu doux et humide, depuis le centre vers l’extérieur, puis essuyez-le de nouveau avec un tissu sec pour retirer toute humidité restante.<Pour les disques enregistrables/réinscriptibles>Utilisez le produit de nettoyage pour disque enregistrable/réinscriptible pour nettoyer ces disques.N’utilisez jamais de tissu, produit de nettoyage pour CD ou autre produit similaire.
● Avant d’utiliser un disque, lisez attentivement les instructions d’utilisation/de manipulation et l’emballage du disque.
● Si les disques ne sont pas manipulés correctement, ils peuvent se salir ou se rayer. De plus, la vitesse d’écriture peut se réduire ou des données peuvent ne pas être enregistrées ou lues correctement. Cela peut provoquer d’autres problèmes, y compris une panne de lecteur. ● Conservez les précautions à prendre suivantes.• Ne touchez pas la surface du disque (la face sans lettres imprimées).• Assurez-vous que la surface du disque est propre, sans saleté, poussière ou traces de
doigts et faites attention qu’elle ne soit pas rayée.• Évitez d’écrire sur la surface du disque avec un stylo à bille ou tout autre instrument d’écriture.• Évitez de placer des autocollants sur les disques.• Prenez garde de ne pas laisser tomber ou plier les disques, et de ne pas placer d’objet lourd dessus.• Ne posez pas et ne rangez pas les disques dans un endroit exposé à la chaleur, à la
lumière directe du soleil, à l’humidité ou à la poussière.• Si le disque est déplacé d’un endroit froid à un endroit plus chaud, de l’humidité risque
de se déposer sur le disque. Pour les disques en lecture seule, essuyez l’humidité avec un chiffon doux, sec et sans peluches avant d’utiliser le disque. Pour les disques enregistrables/réinscriptibles, attendez que l’humidité sèche toute seule.
• Lorsque des disques ne sont pas utilisés, veillez à les placer à l’intérieur de leurs boîtiers ou cartouches de protection.
Manipulation des disques
Nettoyage des disques
Comment tenir le disque
DFQW5658ZA_CF-VDM312U_OI_EGFJ.indb 45 2012/05/23 13:21:56

46
F
Utilisation du lecteur
Pour de plus amples informations sur la façon d’insérer ou de retirer le lecteur, reportez-vous à “Multimedia Pocket” dans le Manuel de référence qui accompagne l’ordinateur.
Insertion/Retrait du lecteur
1 Allumez l’ordinateur.2 Glissez le loquet (A) et ouvrez le
couvercle.
3 Appuyez sur le bouton d’éjection (B) puis retirez lentement le tiroir.
4 Insérez/retirez le disque. Insertion d’un disquePlacez le disque dans le lecteur avec l’étiquette sur le dessus et enfoncez-le jusqu’à ce que le déclic du support central se fasse entendre. Retrait d’un disquePosez un doigt sur le support central (C) puis soulevez soigneusement le disque par les bords.
5 Fermez le tiroir et le couvercle.N’appuyez pas sur le bouton d’éjection.
Mise en place d’un disque
Pour retirer un disque lorsque l’ordinateur est éteint, insérez un objet pointu tel que le bout d’un trombone, d’un crayon ou d’un stylo à bille dans l’orifice d’urgence (D). En l’insérant complètement, vous dégagerez le tiroir qui pourra alors être sorti complètement. (L’emplacement de l’orifice d’urgence varie en fonction du lecteur.) Si le lecteur vibre trop, assurez-vous que le disque y est correctement inséré et en bon état. Pour les CD/DVD AutoPlay:• Si un CD/DVD à exécution automatique ne démarre pas lorsque l’ordinateur sort
des modes mettre en veille ou mettre en veille prolongée, retirez le disque du lecteur et attendez 15 secondes avant de l’insérer à nouveau.
• Il se peut qu’un CD/DVD à démarrage automatique démarre pendant l’accès au fichier, suivant l’état du disque en question.
Notez que la lecture correcte risque de n’être pas possible dans certains cas lors de la lecture d’un film à partir d’un disque.
REMARQUE
DFQW5658ZA_CF-VDM312U_OI_EGFJ.indb 46 2012/05/29 10:25:46

47
F
Mode d’économie d’énergieS’il n’y a pas eu d’accès au lecteur pendant 30 secondes, le moteur du lecteur sera automatiquement arrêté pour réduire la consommation d’énergie. Lorsque l’on accède de nouveau au lecteur, l’alimentation du moteur du lecteur est rétablie. Il faut toutefois environ 30 secondes pour que les données du disque soient effectivement lues.
DFQW5658ZA_CF-VDM312U_OI_EGFJ.indb 47 2012/05/23 13:21:56
48
F
REMARQUE
InformationsPour lire un DVD-Vidéo ou des fichiers MPEG2, installez le logiciel de lecture de DVD au moyen du “DVD Drive Utility Disc”(fourni).Pour plus d’informations sur la manière d’installer le logiciel, reportez-vous à la page 55.
Réglages de zoneLes DVD-Vidéo possèdent un code de zone qui est assigné en fonction de la région où ils sont vendus. Pour pouvoir faire la lecture d’un DVD-Vidéo, il faut que le code de zone du logiciel de lecture et du lecteur corresponde à celui du DVD-Vidéo.Exemple:Pour les États-Unis et le Canada: “1”Pour l’Europe: “2”
Le code de zone du lecteur n’est pas spécifié en usine avant son expédition. L’opération effectuée par le lecteur variera suivant le code de zone du premier DVD-Vidéo dont vous ferez la lecture.• Dans le cas d’un DVD-Vidéo à code de zone spécifique:
Le lecteur sera automatiquement réglé sur le même code de zone que le DVD-Vidéo.• Dans le cas d’un DVD-Vidéo à codes de zones multiples:
[Confirmer la zone] apparaît. Sélectionnez le code de zone et cliquez sur [OK]. La lecture commence alors.
Le code de zone du lecteur peut être réglé un total de cinq fois, y compris le réglage initial.Veuillez procéder avec beaucoup d’attention car le code de zone sélectionné après le cinquième changement sera définitif et vous ne pourrez plus le modifier, même si vous réinstallez le système d’exploitation. L’utilisateur sera tenu responsable pour tout problème survenant après qu’il ait changé ou modifié de manière illégale le code de zone.
ATTENTION
[Confirmer la zone] apparaît lorsque le DVD-Vidéo a un seul code de zone et que le code spécifié sur le lecteur est différent.([Confirmer la zone] peut ne pas apparaître pour certains DVD-Vidéo. Pour vérifier le code de zone actuel du lecteur et le nombre de réglages restants, cliquez avec le bouton droit de la souris sur l’écran [CyberLink PowerDVD] et cliquez sur [Paramètres...] - [Information].)
Utilisation du lecteur
DFQW5658ZA_CF-VDM312U_OI_EGFJ.indb 48 2012/05/23 13:21:56

49
F
Pour écrire sur des disques Windows 7 comporte la fonction classique qui permet l’écriture ou la réécriture des données sur un disque. Vous pouvez copier un CD/DVD ou créer un CD de musique, un CD/DVD de données, etc. en installant “Roxio Creator LJB” au moyen du “DVD Drive Utility Disc”. ( page 53) Veillez à utiliser des disques conformes aux vitesses d’écriture correctes. ( page 60) Si l’écriture doit prendre beaucoup de temps, assurez-vous d’avoir branché l’adaptateur secteur de l’ordinateur. Si la charge de la batterie baisse et que l’alimentation de l’ordinateur est coupée, l’opération d’écriture peut se terminer par un échec. Vous pouvez lire ou enregistrer sur les formats de disques suivants.
*1 *2
Vous pouvez lire les formats de disques suivants.
*1 DVD-RAM: Seul le type sans cartouche ou le type avec cartouche amovible peut être utilisé.*2 DVD-RW Ver.1.0 n’est pas pris en charge.
DFQW5658ZA_CF-VDM312U_OI_EGFJ.indb 49 2012/05/23 13:21:56

50
F
<CD-R> ● HITACHI MAXELL, Ltd. ● MITSUBISHI KAGAKU MEDIA CO., Ltd. ● TAIYO YUDEN Co., Ltd.
<CD-RW/High-Speed CD-RW> ● MITSUBISHI KAGAKU MEDIA CO., Ltd.
<Ultra-Speed CD-RW> ● MITSUBISHI KAGAKU MEDIA CO., Ltd.
<DVD-R> ● Panasonic Corporation ● MITSUBISHI KAGAKU MEDIA CO., Ltd. ● TAIYO YUDEN Co., Ltd.
<DVD-R DL> ● MITSUBISHI KAGAKU MEDIA CO., Ltd.
<DVD-RW> ● MITSUBISHI KAGAKU MEDIA CO., Ltd. ● Victor Company of Japan, Limited
<DVD-RAM> ● Panasonic Corporation ● HITACHI MAXELL, Ltd.
<+R> ● MITSUBISHI KAGAKU MEDIA CO., Ltd. ● TAIYO YUDEN Co., Ltd.
<+RW> ● MITSUBISHI KAGAKU MEDIA CO., Ltd.
<+R DL> ● MITSUBISHI KAGAKU MEDIA CO., Ltd.
<High Speed +RW> ● MITSUBISHI KAGAKU MEDIA CO., Ltd.
Disques recommandés pour l’écriture• La qualité des données enregistrées dépend du disque.
Disques DVD que vous pouvez utiliser pour l’écriture<DVD-R pour Général>
● 1X-SPEED (4,7 GB) ● 1-2X-SPEED (4,7 GB) ● 1-4X-SPEED (4,7 GB) ● 1-8X-SPEED (4,7 GB) ● 1-16X-SPEED (4,7 GB)
<DVD-R DL> ● 2-4X-SPEED (8,5 GB) ● 2-8X-SPEED (8,5 GB)
<DVD-RW> ● 1X-SPEED (4,7 GB/9,4 GB) ● 1-2X-SPEED (4,7 GB/9,4 GB) ● 2-4X-SPEED (4,7 GB/9,4 GB) ● 2-6X-SPEED (4,7 GB/9,4 GB)
<DVD-RAM> ● 2X-SPEED (4,7 GB/9,4 GB) ● 2-3X-SPEED (4,7 GB/9,4 GB) ● 2-5X-SPEED (4,7 GB/9,4 GB)
<+R> ● 1-2,4X-SPEED (4,7 GB) ● 1-4X-SPEED (4,7 GB) ● 1-8X-SPEED (4,7 GB) ● 1-16X-SPEED (4,7 GB)
<+R DL> ● 2,4X-SPEED (8,5 GB) ● 2,4-8X-SPEED (8,5 GB)
<+RW> ● 1-2,4X-SPEED (4,7 GB) ● 1-4X-SPEED (4,7 GB)
Utilisation du lecteur
DFQW5658ZA_CF-VDM312U_OI_EGFJ.indb 50 2012/05/23 13:21:56

51
F
Utilisation du logicielSi nécessaire, installez les applications logicielles que contient le disque “DVD Drive Utility Disc” (fourni) : “Roxio Creator LJB” et “PowerDVD”
ATTENTION
N’installez pas le logiciel en utilisant un lecteur autre que ce lecteur. Assurez-vous d’insérer ce lecteur dans votre ordinateur, puis insérez le disque pour l’installation. Fermez toutes les autres applications logicielles avant d’exécuter le programme d’installation des applications logicielles. Ouvrez une session Windows en tant qu’administrateur.
REMARQUE
Pour faire la lecture d’un DVD-Vidéo, utilisez “PowerDVD”. ( page 55)
Insérez le lecteur dans l’appareil Multimedia Pocket. ( Manuel de référence “Multimedia Pocket”)
Avant d’nstaller le logiciel
DFQW5658ZA_CF-VDM312U_OI_EGFJ.indb 51 2012/05/29 10:25:47

52
F
“Roxio Creator LJB” est une application logicielle de gravure de CD/DVD développée par Sonic Solutions. Les explications données ici sont des informations généales sur “Roxio Creator LJB”, la procédure d’nstallation et la façon d’accéder au manuel en ligne. Pour plus d’informations, consultez le manuel en ligne de “Roxio Creator LJB” ( page 54).
Informations générales
Roxio Creator LJB
Ce que vous pouvez faire avec cette application logicielle• Création de CD de musique et de CD/DVD• Création de CD/DVD de sauvegarde• Restaurer des données de sauvegarde réparties sur plusieurs disques
Pour plus de détails sur les fonctions de l’application logicielle et des supports reportez-vous aussi au manuel en ligne de l’application.
REMARQUE
Sur les copies<Pour la France>Panasonic rappelle que le logiciel fourni avec le présent produit Panasonic est conçu pour vous aider à reproduire des œuvres dont vous êtes titulaires des droits d’auteur, ou pour lesquelles vous avez obtenu une autorisation auprès du titulaire des droits d’auteur. Dans le cas contraire, toute reproduction sera considérée comme une infraction à la législation sur les droits d’auteur et sera sanctionnée par des amendes ou le paiement de dédommagements.<Pour le Canada>Avant d’enregistrer du matériel sur un disque s’assurer que l’enregistrement n’enfreint pas de droits de propriété intellectuelle.Il est illégal de copier des disques compacts audio pour un usage autre que strictement personnel.Lors de la réalisation d’une copie de sauvegarde d’un logiciel, s’assurer de ne pas déroger aux droits d’auteur sur le produit.
Utilisation du logiciel
DFQW5658ZA_CF-VDM312U_OI_EGFJ.indb 52 2012/05/23 13:21:56
53
F
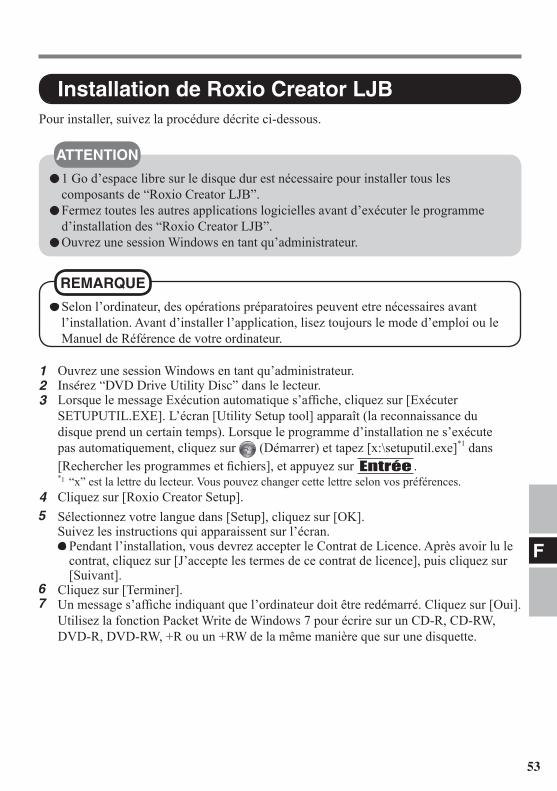
Pour installer, suivez la procédure décrite ci-dessous.
Installation de Roxio Creator LJB
1 Go d’espace libre sur le disque dur est nécessaire pour installer tous les composants de “Roxio Creator LJB”. Fermez toutes les autres applications logicielles avant d’exécuter le programme d’installation des “Roxio Creator LJB”. Ouvrez une session Windows en tant qu’administrateur.
ATTENTION
Selon l’ordinateur, des opérations préparatoires peuvent etre nécessaires avant l’installation. Avant d’installer l’application, lisez toujours le mode d’emploi ou le Manuel de Référence de votre ordinateur.
REMARQUE
1 Ouvrez une session Windows en tant qu’administrateur.2 Insérez “DVD Drive Utility Disc” dans le lecteur.3 Lorsque le message Exécution automatique s’affiche, cliquez sur [Exécuter
SETUPUTIL.EXE]. L’écran [Utility Setup tool] apparaît (la reconnaissance du disque prend un certain temps). Lorsque le programme d’installation ne s’exécute pas automatiquement, cliquez sur (Démarrer) et tapez [x:\setuputil.exe]*1 dans [Rechercher les programmes et fichiers], et appuyez sur Entrée .*1 “x” est la lettre du lecteur. Vous pouvez changer cette lettre selon vos préférences.
4 Cliquez sur [Roxio Creator Setup].5 Sélectionnez votre langue dans [Setup], cliquez sur [OK]. Suivez les instructions qui apparaissent sur l’écran.
Pendant l’installation, vous devrez accepter le Contrat de Licence. Après avoir lu le contrat, cliquez sur [J’accepte les termes de ce contrat de licence], puis cliquez sur [Suivant].
6 Cliquez sur [Terminer].7 Un message s’affiche indiquant que l’ordinateur doit être redémarré. Cliquez sur [Oui].
Utilisez la fonction Packet Write de Windows 7 pour écrire sur un CD-R, CD-RW, DVD-R, DVD-RW, +R ou un +RW de la même manière que sur une disquette.
DFQW5658ZA_CF-VDM312U_OI_EGFJ.indb 53 2012/05/23 13:21:57

54
F
Cliquez sur (Démarrer) - [Tous les programmes] - [Roxio] - [Roxio Creator LJB].
Lancement de Roxio Creator LJB
Après avoir exécuté Roxio Creator LJB, vous pouvez accéder au manuel en ligne.Cliquez sur [Help] dans le menu puis cliquez sur [Help].
Comment accéder au manuel en ligne
Lors de l’utilisation de “Roxio Creator LJB”, réglez la résolution d’affichage sur 1024 × 768 ou plus.
Précautions d’utilisation
Informations Si “Roxio Creator LJB” ne fonctionne pas correctement, nous recommandons de lire tout d’abord attentivement le fichier d’aide en ligne décrivant les problèmes avec le contexte d’exploitation ou des opérations. Puis installez le dernier Service Pack Windows. Si vous ne pouvez toujours pas remédier au probleme, prenez contact avec l’assistance technique de Panasonic.
Reportez-vous à l’URL suivant pour plus d’informations.http://www.roxio.com/enu
Utilisation du logiciel
DFQW5658ZA_CF-VDM312U_OI_EGFJ.indb 54 2012/05/23 13:21:57

55
F
Installation de PowerDVD
PowerDVDPowerDVD est une application logicielle pour la lecture de DVD.Installez “PowerDVD” au moyen du “DVD Drive Utility Disc” ( ci-dessous).
1 Ouvrez une session Windows en tant qu’administrateur.2 Insérez “DVD Drive Utility Disc” dans le lecteur. 3 Lorsque le message Exécution automatique s’affiche, cliquez sur [Exécuter
SETUPUTIL.EXE]. L’écran [Utility Setup tool] apparaît (la reconnaissance du disque prend un certain temps). Lorsque le programme d’installation ne s’exécute pas automatiquement, cliquez sur (Démarrer) et tapez [x:\setuputil.exe]*2 dans [Rechercher les programmes et fichiers], et appuyez sur Entrée .*2 “x” est la lettre du lecteur. Vous pouvez changer cette lettre selon vos préférences.
4 Cliquez sur [PowerDVD Setup].5 Cliquez sur [Suivant] sur le message de bienvenue.6 Après avoir lu le “Contrat de licence”*3, cliquez sur [Oui] si vous en acceptez les
termes.*3 Référez-vous au “Contrat de licence d’usage limité” des instructions d’utilisation qui
accompagnent l’ordinateur.7 Suivez les instructions qui apparaissent sur l’écran et installez “PowerDVD”.8 Cliquez sur [Terminer].9 Cliquez sur [Exit] dans l’écran [Utility Setup tool], et retirez le “DVD-Drive Utility
Disc”.
DFQW5658ZA_CF-VDM312U_OI_EGFJ.indb 55 2012/05/23 13:21:57

56
F
L’une ou l’autre des procédures suivantes permet de lancer “PowerDVD”. Double-cliquez sur le bureau. Cliquez sur (Démarrer) - [Tous les programmes] - [CyberLink PowerDVD 10 for Panasonic] - [CyberLink PowerDVD 10 for Panasonic].
Cliquez avec le bouton droit de la souris sur l’écran [CyberLink PowerDVD] et cliquez sur [Paramètres...] - [Aide]. Cliquez sur “ ” dans l’écran [CyberLink PowerDVD].
REMARQUEREMARQUE
Les DVD-Audio ne peuvent être lus à l’aide de “PowerDVD”. Ne lancez pas “PowerDVD” pendant que le voyant du lecteur clignote immédiatement après le démarrage de l’ordinateur. Pendant l’exécution de “PowerDVD”, n’effectuez pas les opérations suivantes:• Mettre en veille ou mettre en veille prolongée.• Basculer l’affichage en appuyant sur + P or Fn + F3 . Pendant la lecture vidéo, n’effectuez pas les opérations suivantes:• Éjecter le disque.• Utiliser d’autres applications ou invite de commande.• Modifier les paramètres des propriétés de l’écran. Si vous agrandissez au maximum la fenêtre d’affichage vidéo, vous pouvez revenir à la taille de fenêtre initiale en cliquant deux fois sur les images. Lorsque vous augmentez le nombre de couleurs de l’affichage, un message apparaît et la lecture du DVD n’est pas possible:• Réduisez le nombre de couleurs de l’affichage. Immédiatement après la reprise depuis une pause, une perte d’image peut parfois se produire selon le contexte d’exploitation ou le DVD-Vidéo utilisé (les images ou les sons sont interrompus).
REMARQUEREMARQUE
Lorsqu’un disque possède de nombreux dossiers, il est possible que “PowerDVD” ne fonctionne pas correctement. Retirez le disque de la manière suivante.• Cliquez sur (Démarrer) - [Ordinateur], cliquez avec le bouton droit sur [Lecteur
DVD-RW (x:)] et sélectionnez [Éjecter] à partir du menu.
Utilisation du logiciel
Lancement de PowerDVD
Pour accéder au manuel en ligne
DFQW5658ZA_CF-VDM312U_OI_EGFJ.indb 56 2012/05/23 13:21:57
57
F
REMARQUEREMARQUE
En Extended Desktop ou en mode d’affichage simultané (interne/externe), les images ou la vidéo ne sont parfois pas affichées correctement. Durant une période prolongée d’avancement rapide, le mode pause peut être établi à moment donné. Si cela se produit, quittez “PowerDVD” et redémarrez. Évitez d’installer un autre logiciel de lecture si “PowerDVD” est installé.Cela pourrait entraîner des problèmes de lecture. Certains DVD-Vidéo contiennent un logiciel de lecture dont l’installation commence automatiquement. Dans une telle situation, annulez cette installation aussi vite que possible. Si vous avez accidentellement installé un autre logiciel de lecture et que vous rencontrez des problèmes de lecture, essayez les procédures suivantes.• Désinstallez le logiciel de lecture en cliquant sur (Démarrer) - [Panneau de
configuration] - [Désinstaller un programme]. (Vérifiez que le nom du logiciel de lecture désinstallé est conforme aux instructions d’utilisation du logiciel de lecture.)
DFQW5658ZA_CF-VDM312U_OI_EGFJ.indb 57 2012/05/23 13:21:57

58
F
Les restrictions suivantes s’appliquent : La lecture d’un disque peut ne pas être possible en fonction des conditions (qualité d’enregistrement, fissures, poussières, modification, protection contre la copie, type de lecteur/logiciel d’enregistrement utilisé pour créer le disque, etc.). Afin de lire des disques autres que des DVD-RAM, ils doivent être finalisés (un procédé qui permet de les lire sur d’autres lecteurs DVD, etc.). Pour plus d’informations sur la méthode de finalisation utilisée par votre enregistreur DVD, reportez-vous à son mode d’emploi. La lecture d’un support sur lequel des émissions numériques ont été enregistrées au moyen de technologies de protection des droits d’auteur comme CPRM (Content Protection for Recordable Media – Protection de contenu pour support enregistrable) n’est pas possible.
INFORMATIONS SUR L’ASSISTANCESi “PowerDVD” ne fonctionne pas correctement, il est recommandé de d’abord lire attentivement le fichier d’aide en ligne concernant les problèmes d’environnement d’exploitation ou d’opérations.Si vous n’arrivez toujours pas à résoudre le problème, consultez la page d’accueil, via le manuel en ligne.
Utilisation du logiciel
Disques DVD créés avec un enregistreur DVD
DFQW5658ZA_CF-VDM312U_OI_EGFJ.indb 58 2012/05/23 13:21:57

59
F
Dépannage
L’ordinateur n’identifie pas le lecteur
Le lecteur est-il correct-ement monté dans le Multimedia Pocket? Redémarrez l’ordinateur.
Le voyant du lecteur ne s’allume pas
Le disque est-il inséré correctement dans le tiroir de disque? ( page 46)
Impossible de lire le disque ou d’accéder à ses données
Le disque est-il plié, égratigné ou sale? Une erreur peut se produire une fois le tiroir fermé ou si l’opération est reprise depuis les modes mettre en veille/mettre en veille prolongée, le lecteur est accédé avant que le voyant du lecteur ne s’éteigne. Une erreur peut aussi se produire lorsque le logiciel d’application accède automatiquement au lecteur. Dans ce cas, retirez le disque, réintroduisez-le et réessayez.
“Roxio Creator LJB” ne fonctionnent pas correctement
Un logiciel d’écriture autre que “Roxio Creator LJB” est-il installé?
Désinstallez le logiciel d’écriture autre que “Roxio Creator LJB”.
Le disque ne peut pas être éjecté
Allumez l’ordinateur. Pour retirer un disque lorsque
l’ordinateur est éteint, insérez une épingle d’1,3 mm {0,05"} de diamètre dans l’orifice d’urgence (A). (Lorsque le diamètre de l’épingle est inférieur, insérez-la légèrement vers le bas.) En l’insérant complètement, vous dégagerez le tiroir qui pourra alors être sorti complètement. (L’emplacement de l’orifice d’urgence varie en fonction du lecteur.) Si vous utilisez un disque portant des traces de doigts ou sale, vous ne pourrez peut-être pas le retirer. Utilisez un disque propre. ( page 45)
Le tiroir de disque ne se ferme pas
N’appuyez pas sur le bouton d’éjection pour fermer le tiroir.
Autres problèmes de fonctionnement du disque
Utilisez un autre lecteur ou support.
DFQW5658ZA_CF-VDM312U_OI_EGFJ.indb 59 2012/05/23 13:21:57

60
F
Spécifications
Article DescriptionTension de fonctionnement DC 5 V ± 0,25 V
Lecteur Taux de transfert desdonnée*1
Lecture*2 DVD-ROM: 8X (Max.), CD-ROM: 24X (Max.)Écriture*3 CD-R: 24X (Max.), CD-R: 4X
High-Speed CD-RW: 10XUltra-Speed CD-RW: 24X (Max.)DVD-R: 8X (Max.), DVD-R DL: 6X (Max.)DVD-RW: 6X (Max.), DVD-RAM: 5X (Max.)+R: 8X (Max.), +R DL: 6X (Max.)+RW: 4X (Max.), High Speed +RW: 8X (Max.)
Disques/formats pris en charge*4
Lecture DVD-ROM (4,7 Go, 8,5 Go, 9,4 Go, 17 Go), DVD-Video, DVD-R (1,4 Go, 3,95 Go, 4,7 Go), DVD-R DL (8,5 Go), DVD-RW*5 (1,4 Go, 2,8 Go, 4,7 Go, 9,4 Go), DVD-RAM*6 (1,4 Go, 2,8 Go, 4,7 Go, 9,4 Go), +R (4,7 Go), +R DL (8,5 Go), +RW (4,7 Go), High Speed +RW (4,7 Go), CD-Audio, CD-ROM, CD-R, Photo CD, Video CD, CD-RW, High-Speed CD-RW, Ultra-Speed CD-RW, CD TEXT, CD-EXTRA
Écriture DVD-R (1,4 Go, 4,7 Go pour Général), DVD-R DL (8,5 Go), DVD-RW*5 (1,4 Go, 2,8 Go, 4,7 Go, 9,4 Go), DVD-RAM*6 (1,4 Go, 2,8 Go, 4,7 Go, 9,4 Go), +R (4,7 Go), +R DL (8,5 Go), +RW (4,7 Go), High Speed +RW (4,7 Go), CD-R, CD-RW, High-Speed CD-RW, Ultra-Speed CD-RW
Fonction de prévention de sous-utilisation de la mémoire tampon
Prise en charge
Interface Serial ATA
Dimensions (largeur × profondeur × hauteur)
132 mm × 149 mm × 14 mm
Poids Environ 181 g*1 La cadence de transfert des données d’un disque DVD par vitesse 1X est de 1 350 Ko/s. La cadence de transfert des données d’un disque CD par vitesse 1X est de 150 Ko/s.*2 L’utilisation d’un disque déséquilibré (c’est-à-dire un disque sur lequel les données sont
excentrées) risque de ralentir la vitesse de transfert des données en cas de vibrations importantes pendant la rotation.
*3 Suivant le disque utilisé, il se peut que la vitesse d’écriture diminue.*4 1 Go = 1 000 000 000 d’octets. Votre système d’exploitation ou certains logiciels d’application
indiqueront moins de Go.*5 Ne prend pas en charge DVD-RW Ver.1.0.*6 DVD-RAM: Seul le type sans cartouche ou le type avec cartouche amovible peut être utilisé.
DFQW5658ZA_CF-VDM312U_OI_EGFJ.indb 60 2012/05/23 13:21:57
61
J
はじめに
取扱説明書 (本書 ) ..................1冊DVD Drive Utility Disc *2 ..............1枚
DVD MULTIドライブパック ......1個
このたびは、パナソニック製品をお買い上げいただき、まことにありがとうございます。本製品は、当社製パソコン *1のマルチメディアポケットに取り付けてお使いいただけます。*1 DVD MULTIドライブパック対応のパソコンについては、カタログ等でご確認ください。
本書では、DVD MULTIドライブパックのことを「ドライブ」と表記しています。 本書では、工場出荷状態の設定での手順で説明しています。設定によっては、手順が異なることがあります。
: 本書や、パソコン本体に保存されている『操作マニュアル』などの参照先を意味します。
:画面で見るマニュアルを意味します。
Microsoft®とそのロゴ、Windows®は、米国 Microsoft Corporationの米国及びその他の国における登録商標です。Roxio Creatorは米国 Corel Corporationの商標または登録商標です。
お知らせ
この装置は、クラス B 情報技術装置です。この装置は、家庭環境で使用することを目的としていますが、この装置がラジオやテレビジョン受信機に近接して使用されると、受信障害を引き起こすことがあります。取扱説明書に従って正しい取り扱いをしてください。
VCCI-B2-J-2
*2 「Roxio Creator ™ LJB」(以降「Roxio Creator LJB」と表記)および「PowerDVD ™(OEM版)」(以降「PowerDVD」と記載)のインストールプログラムが入っています。
DFQW5658ZA_CF-VDM312U_OI_EGFJ.indb 61 2012/05/23 13:21:57

62
J
安全上のご注意
注意
高速で回転するため、飛び散ってけがの原因になることがあります。
ひび割れたり変形したりしたディスクは使用しない
禁止円形でないディスクや、接着剤などで補修したディスクも同様に危険ですので、使用しないでください。
内部のレーザー光源を直視すると、視力障害の原因になることがあります。
ドライブの内部をのぞきこまない
内部の点検・調整・修理は、販売店にご相談ください。
禁止
必ずお守りください
この絵表示は、してはいけない「禁止」内容です。
■お守りいただく内容の種類を、次の絵表示で、説明しています。
お使いになる人や他の人への危害、財産への損害を未然に防止するため、必ずお守りいただくことを、次のように説明しています。
■表示内容を無視して誤った使い方をしたときに生じる危害や損害の程度を、次の表示で区分し、説明しています。
注意 この表示の欄は、「傷害を負う可能性または物質的損害のみが発生する可能性が想定される」内容です。
DFQW5658ZA_CF-VDM312U_OI_EGFJ.indb 62 2012/05/23 13:21:58

63
J
使用上のお願い
油煙やたばこの煙の多いところでは使用しないでください。レンズの寿命が短くなることがあります。
ドライブのレンズのクリーニングには、カメラ用のレンズブロアーの使用をおすすめします。(スプレー式の強力なものは使わないでください。)
ディスクトレイを開けるとき/閉じるときパソコンの電源がオンのときは、ディスク取り出しボタンを使用するか( 65ページ)、またはWindowsの操作で取り出してください。ディスクをセットする/取り出すときは、ピックアップやレンズ部に触れないように注意してください。トレイを開けたままで放置したり、レンズなど光ピックアップ部に手を触れたりしないでください。ゴミやほこりが付着し、データを読み書きできなくなる場合があります。トレイが開いているときに、トレイに無理な力をかけないでください。故障の原因になります。ドライブのすき間部分にクリップなどの異物を入れないでください。故障の原因になります。トレイにディスク以外のものを載せないでください。
ドライブアクセス中 トレイを開けたり、パソコンを持ち運んだりしないでください。
ディスクが外れて傷ついたり、ドライブの故障の原因になったりします。 また、ディスクにアクセスするアプリケーションソフトを起動した後は、そのアプリケーションソフトを終了するまで、トレイを開けたりディスクを取り出したりしないでください。
ドライブの取り扱い
DFQW5658ZA_CF-VDM312U_OI_EGFJ.indb 63 2012/05/23 13:21:58

64
J
<読み取り専用のディスクの場合>乾いた柔らかい布で、中心から外側へ軽くふいてください。汚れがひどい場合は、水を含ませた柔らかい布で中心から外側へふいた後、からぶきしてください。<書き込み/書き換え可能なディスクの場合>当社製ディスククリーナーのご使用をお勧めします。布などは、絶対に使わないでください。
本書およびお使いのディスクの取扱説明書や包装に記載されている内容をよくお読みのうえ、ディスクをお使いください。
ディスクを正しく取り扱わないと、ディスクが汚れたり傷ついたりして、書き込み速度が低下したり、データの記録や再生が正常に行われなくなることがあります。また、ドライブの故障などの損害が発生するおそれがあります。
以下のことをお守りください。• 再生/記録面に触れない。• ディスクの表面を、ゴミやほこり、指紋などで汚したり、傷つけたりしない。• ボールペンなどで表面に字を書いたり、紙を貼ったりしない。• ステッカーをディスクに貼り付けない。• 落としたり、曲げたり、重いものを載せない。• ゴミやほこりの多い場所、温度や湿度の高い場所、直射日光の当たる場所に置かない。
• 温度差の激しい場所に置かない(結露が生じます)。 急に暖かい室内に持ち込んだときなどに露が付いたら: 読み取り専用のディスクの場合は、乾いた柔らかい布でふいてください。 書き込み/書き換え可能なディスクの場合は、布でふかずにそのまま乾くまで置いておいてください。•ディスクを使用しないときは、必ず保護ケースまたはカートリッジに入れる。
ディスクの取り扱い
汚れを取るには
持ち方
使用上のお願い
DFQW5658ZA_CF-VDM312U_OI_EGFJ.indb 64 2012/05/23 13:21:58

65
J
ディスクのセット/取り出し
1. 本体の電源を入れる。2 ラッチ (A) をスライドし、カバーを開ける。
3 ディスク取り出しボタン (B) を押し、ゆっくり引き出す。
4 ディスクをセットする/取り出す。 ディスクをセットするとき
タイトル面を上にして、ディスクを置き、ディスクの中心部をカチッと音がするまで押してしっかりとセットします。
ディスクを取り出すとき センターホルダー (C) に指を添え、ディスクの端を浮かせながら取り出します。
5 トレイとカバーを閉じる。ディスク取り出しボタンは押さないでください。
ドライブを使う
詳しくは、パソコン本体の 『操作マニュアル』「マルチメディアポケット」をご覧ください。
取り付け/取り外し
DFQW5658ZA_CF-VDM312U_OI_EGFJ.indb 65 2012/05/23 13:21:58

66
J
ドライブを使う
省電力モードについて約 30秒間ドライブにアクセスがないと、省電力のために自動的にドライブモーターの電源が切れます。ドライブにアクセスがあるとドライブモーターの電源が入ります。電源が入った後、ディスクからデータが実際に読めるようになるまで、約 30秒かかります。
パソコンの電源がオフのときにディスクを取り出したいときは、クリップを引き伸ばしたものなどをエマージェンシーホール(D)に挿し込んでください。トレイが出てきます。
ドライブの振動が大きい場合は、ディスクを確認してください。 自動実行のディスクについて• スリープや休止状態からのリジューム後、自動実行のディスクを挿入しても実行されない場合は、15秒以上待ってからディスクを入れ直してください。
• ディスクの状態によっては、ファイルへのアクセス中に自動実行が開始されることがあります。
ディスクから動画を再生したときに、滑らかに再生できないことがあります。あらかじめご了承ください。
お知らせ
リージョンコード設定について DVD-Videoには、販売される地域のリージョンコードが設定されています。DVD-Videoを再生するには、ドライブと再生ソフトのリージョンコードが一致している必要があります。
例 日本・ヨーロッパ:「2」 アメリカ・カナダ:「1」
使用時のお願いDVD-Videoや MPEG2ファイルを再生する場合は、付属の「DVD Drive Utility Disc」を使ってアプリケーションソフトをインストールしてください。インストールの方法については、74ページをご覧ください。
DFQW5658ZA_CF-VDM312U_OI_EGFJ.indb 66 2012/05/23 13:21:58

67
J
リージョンコードは、最初の設定も 1回に含めて全部で 5回設定できます。5回目の設定を行うと、そのリージョンコードに固定され、システムを再インストールしてもそれ以上変更できなくなりますので、十分にお気を付けください。
不正にリージョンコードを改変した場合の問題については、お客さまの責任となります。
お願い
お知らせ ドライブのリージョンコードと異なるリージョンコードの DVD-Videoをセットした場合も、リージョンコードの確認画面が表示されます。
(一部の DVD-Videoでは、リージョンコードの確認画面が表示されないことがあります。ドライブに設定されているリージョンコードと残りの設定回数は、「CyberLink PowerDVD」の画面上で右クリックし、[設定 ...] から [情報 ]を選んで確認してください。)
ディスクに書き込みや書き換えを行うWindows7には、ディスクに書き込み/書き換えができる機能が標準で搭載されています。付属の「DVDDriveUtilityDisc」から「RoxioCreatorLJB」をインストールすれば、CD/DVDをコピーしたり、音楽 CDやデータ CD/DVDを作成したりすることができます。( 72ページ)書き込み/書き換え速度に応じたディスクをご使用ください。( 79ページ)書き込み作業が長時間におよぶ場合は、パソコンに ACアダプターを接続しておいてください。作業中にバッテリー切れが起こると書き込みに失敗する場合があります。
本機は工場出荷時にリージョンコードが設定されていません。そのため、初めて DVD-Videoを再生したときは、以下のようになります。• 特定のリージョンコードが設定されている DVD-Videoの場合
DVD-Videoと同じリージョンコードが自動的に設定されます。• 複数のリージョンコードが設定されている DVD-Videoの場合リージョンコードの確認画面が表示されます。リージョンコードを選び、[OK]をクリックしてください。再生が始まります。
DFQW5658ZA_CF-VDM312U_OI_EGFJ.indb 67 2012/05/23 13:21:58

68
J
ドライブを使う
*1 *2
以下のディスクは本機で読み込みができます。
*1 DVD-RAM:カートリッジなしのディスクまたはカートリッジから取り出せるディスクのみ使用できます。
*2 DVD-RW Ver.1.0には対応していません。
以下のディスクは、本機で読み込み/書き込み/書き換えができます。
DFQW5658ZA_CF-VDM312U_OI_EGFJ.indb 68 2012/05/23 13:21:58

69
J
●.書き込み/書き換えの推奨ディスク• 書き込み/書き換えの品質は、ディスクに依存します。<CD-R>
●日立マクセル (株 )製 ●三菱化学メディア (株 )製 ●太陽誘電 (株 )製<CD-RW/High-SpeedCD-RW>
●三菱化学メディア (株 )製<Ultra-SpeedCD-RW>
●三菱化学メディア (株 )製<DVD-R>
●パナソニック (株 )製 ●三菱化学メディア (株 )製 ●太陽誘電 (株 )製<DVD-RDL>
●三菱化学メディア (株 )製
<DVD-RW> ●三菱化学メディア (株 )製 ●日本ビクター (株 )製<DVD-RAM>
●パナソニック (株 )製 ●日立マクセル (株 )製<+R>
●三菱化学メディア (株 )製 ●太陽誘電 (株 )製<+RW>
●三菱化学メディア (株 )製<+RDL>
●三菱化学メディア (株 )製<HighSpeed+RW>
●三菱化学メディア (株 )製
<DVD-RforGeneral>● 1 倍速 (4.7 GB) ● 1~ 2倍速 (4.7 GB) ● 1~ 4倍速 (4.7 GB) ● 1~ 8倍速 (4.7 GB) ● 1~ 16倍速 (4.7 GB)<DVD-RDL>
● 2~ 4倍速 (8.5GB) ● 2~ 8倍速 (8.5GB)<DVD-RW>
● 1倍速 (4.7 GB/ 9.4 GB) ● 1~ 2倍速 (4.7 GB/ 9.4 GB) ● 2~ 4倍速 (4.7 GB/ 9.4 GB) ● 2~ 6倍速 (4.7GB/ 9.4GB)
<DVD-RAM>● 2 倍速 (4.7 GB/9.4GB) ● 2~ 3倍速 (4.7GB/ 9.4GB) ● 2~ 5倍速 (4.7GB/ 9.4GB)<+R>● 1 ~ 2.4倍速 (4.7 GB) ● 1~ 4倍速 (4.7 GB) ● 1~ 8倍速 (4.7 GB) ● 1~ 16倍速(4.7GB)<+RDL>● 2.4 倍速 (8.5 GB) ● 2.4~ 8倍速(8.5GB)<+RW>● 1 ~ 2.4倍速 (4.7 GB) ● 1~ 4倍速(4.7GB)
●.書き込み/書き換えできるDVDディスク
DFQW5658ZA_CF-VDM312U_OI_EGFJ.indb 69 2012/05/23 13:21:59
70
J
ソフトウェアを使う必要に応じて、付属の「DVDDriveUtilityDisc」に入っているアプリケーションソフト「RoxioCreatorLJB」および「PowerDVD」をインストールしてください。
お願い
本機以外のドライブを使ってソフトウェアをインストールしないでください。必ず、本機をパソコンにセットした後でディスクを入れてインストールしてください。
ソフトウェアのセットアッププログラムを起動する前に、他のすべてのアプリケーションソフトを終了してください。
コンピューターの管理者の権限で Windows にログオンしてください。
DVD-Videoの再生には、「PowerDVD」をお使いください。( 74ページ)
マルチメディアポケットにドライブをセットしてください。( 『操作マニュアル』「マルチメディアポケット」)
インストールの前に
お知らせ
DFQW5658ZA_CF-VDM312U_OI_EGFJ.indb 70 2012/05/23 13:21:59

71
J
「Roxio Creator LJB」でできること• 音楽 CDの作成、データ CD/DVDの作成• バックアップ CD/DVDの作成• 複数のディスクに分割されたバックアップデータの復元
概要
「Roxio Creator LJB」は、Sonic Solutions社によって開発された CD/DVDライティングソフトウェアです。本紙では、「Roxio Creator LJB」の概要、インストールのしかた、オンラインヘルプの見かたなどについて説明しています。詳しくは、「Roxio Creator LJB」のオンラインヘルプをご覧ください。( 73ページ)
「Roxio Creator LJB」の機能、使用できるディスクの種類について詳しくは、オンラインヘルプをご覧ください。
Roxio Creator LJB
お知らせ
複製について映像・音楽などの著作物の複製は、個人的または家庭内で使用する以外は、著作権法上、権利者に無断で使用できません。
DFQW5658ZA_CF-VDM312U_OI_EGFJ.indb 71 2012/05/23 13:21:59

72
J
ソフトウェアを使う
インストールのしかた下記の手順に従ってインストールしてください。
お願い
「Roxio Creator LJB」のすべてのコンポーネントをインストールするときには、1 GBのハードディスク空き容量が必要です。
セットアッププログラムを起動する前に他のすべてのアプリケーションソフトを終了してください。
コンピューターの管理者の権限でログオンしてください。
パソコンによっては、ソフトをインストールする前に、準備が必要な場合があります。インストールの前に、必ずパソコンの『取扱説明書』や『操作マニュアル』をお読みください。
お知らせ
1 コンピューターの管理者の権限でWindowsにログオンする。2 「DVDDriveUtilityDisc」をドライブにセットする。3 [自動再生 ]のメッセージが表示されたら、[SETUPUTIL.EXEの実行 ]をクリックする。
[ ユーティリティーセットアップツール ]画面が表示されます。( ディスクを認識するまでに少し時間がかかります。)自動的に [ユーティリティーセットアップツール ]画面が表示されない場合は、 (スタート)をクリックし、[プログラムとファイルの検索 ]に [x:¥setuputil.exe]*1 と入力してEnterを押してください。*1「x」はドライブ文字です。パソコンの使用状況に合わせて変更してください。
4 [RoxioCreatorのインストール ]をクリックする。5 「セットアップ」で [日本語 ]が選ばれていることを確認して、[OK]をクリックする。
以降、画面の指示に従って操作してください。 「RoxioCreatorLJB」のインストール中に、使用許諾契約が表示されます。
使用許諾契約をよく読んで、[使用許諾契約の条項に同意します ]をクリックし、[次へ ]をクリックしてください。
6 [完了 ]をクリックする。7 Windowsの再起動をお知らせするメッセージが表示されますので、[はい ]をクリックして再起動する。
Windows7に含まれているパケットライト機能を使用することで、フロッピーディスクと同じような操作で CD-R、CD-RW、DVD-R、DVD-RW、+R、+RWに書き込むことができます。
DFQW5658ZA_CF-VDM312U_OI_EGFJ.indb 72 2012/05/23 13:21:59

73
J
「Roxio Creator LJB」を起動すると、オンラインマニュアルを見ることができます。メニューから [ヘルプ ]をクリックし、[ヘルプ ]をクリックする。
オンラインヘルプの見かた
(スタート) - [すべてのプログラム ] - [Roxio] - [Roxio Creator LJB] をクリックする。
Roxio Creator LJBを使う
「Roxio Creator LJB」を使用するときは、画面の解像度を 1024×768以上に設定してください。
使用上のお願い
「Roxio Creator LJB」が正常に動作しない場合、動作環境や操作についてオンラインヘルプで確認してください。その後、Windowsの最新の ServicePackをインストールしてください。 それでも解決しない場合は、ご相談窓口( パソコン本体の『取扱説明書』)にご連絡ください。
「RoxioCreatorLJB」について詳しくは、下記の URLをご覧ください。http://www.roxio.jp/
お知らせ
DFQW5658ZA_CF-VDM312U_OI_EGFJ.indb 73 2012/05/23 13:21:59

74
J
ソフトウェアを使う
PowerDVD
「PowerDVD」は、DVDビデオ再生用のソフトウェアです。「DVDDriveUtilityDisc」を使って「PowerDVD」をインストールしてください。( 下記 )
インストールのしかた1 コンピューターの管理者の権限でWindowsにログオンする。2 「DVDDriveUtilityDisc」をドライブにセットする。3 [自動再生 ]のメッセージが表示されたら、[SETUPUTIL.EXEの実行 ]をクリックする。
[ユーティリティーセットアップツール ]画面が表示されます。(ディスクを認識するまでに少し時間がかかります。) 自動的に [ユーティリティーセットアップツール ]画面が表示されない場合は、 (スタート)をクリックし、[プログラムとファイルの検索 ]に [x:¥setuputil.exe]*2と入力してEnterを押してください。*2「x」はドライブ文字です。パソコンの使用状況に合わせて変更してください。
4 [PowerDVDのインストール ]をクリックする。5 ようこその画面で [次へ ]をクリックする。6 使用許諾契約 *3を読んで、同意する場合は [はい ]をクリックする。
*3 パソコンの『取扱説明書』に記載されている「ソフトウェア使用許諾書」を参照してください。
7 画面の指示に従って「PowerDVD」をインストールする。8 [完了 ]をクリックする。9 [ユーティリティーセットアップツール ]画面の [終了 ]をクリックし、「DVD
DriveUtilityDisc」を取り出してください。
DFQW5658ZA_CF-VDM312U_OI_EGFJ.indb 74 2012/05/23 13:21:59

75
J
以下のどちらかの方法で起動することができます。 デスクトップの をダブルクリックする。 (スタート) - [すべてのプログラム ] - [CyberLink PowerDVD 10 for Panasonic] - [CyberLink PowerDVD 10 for Panasonic]をクリックする。
PowerDVDを使う
[CyberLink PowerDVD]の画面上で右クリックし、 [設定…] - [ヘルプ ] をクリックする。
[CyberLink PowerDVD]のウィンドウ上の「 」をクリックする。
オンラインヘルプの見かた
DVD-Audioは「PowerDVD」では再生できません。 パソコンの起動直後、ドライブ状態表示ランプ が点滅しているときは、「PowerDVD」を起動しないでください。 「PowerDVD」の起動中に、以下のことを行わないでください。• スリープ・休止状態に入る• + P またはFn + F3で表示先を切り替える
ビデオの再生中は、以下のことをしないでください。• ディスクを取り出す• 他のアプリケーションソフトやコマンドプロンプトを使う• 画面のプロパティを変更する
最大化したビデオの再生画面は、画面上でダブルクリックすると元のサイズに戻ります。
画面の色数を増やしたら、メッセージが表示されて DVDが再生できなくなった場合:• 画面の色数を減らしてください。
動作環境や DVD-Videoによっては、一時停止の解除後すぐに、コマ落ち(映像や音声が途切れる)が発生することがあります。
お知らせ
フォルダー数が非常に多いディスクは、「PowerDVD」では正常に動作しないことがあります。以下の手順でディスクを取り出してください。• (スタート) - [コンピューター ]をクリックし、[DVD RW ドライブ(X:)]を右クリックして、メニューから [取り出し ]を選んでください。
お知らせ
DFQW5658ZA_CF-VDM312U_OI_EGFJ.indb 75 2012/05/29 10:25:50

76
J
ソフトウェアを使う
拡張デスクトップ使用中や、内部 LCDと外部ディスプレイの同時表示を行っている場合、画像やビデオが正しく表示されないことがあります。
一定時間以上早送りを行うと、一時停止状態になることがあります。その場合は、「PowerDVD」を終了し、再度起動してください。
「PowerDVD」と、他の再生ソフトを共存させないでください。「PowerDVD」以外の再生ソフトをインストールすると、正しく再生できなくなる場合があります。市販の DVD-Videoの中には、再生時に独自の再生ソフトをインストールする仕組みになっているものがあります。このような DVD-Videoで、インストール開始画面が表示された場合は、必ずインストールを中止してください。誤ってインストールし、正しく再生できなくなった場合は、以下の方法をお試しください。• (スタート)- [コントロールパネル ] - [プログラムのアンインストール ]を選んで再生ソフトをアンインストールしてください。 (アンインストールする再生ソフトの名称は、再生ソフトの説明書などで確認してください。)
お知らせ
DFQW5658ZA_CF-VDM312U_OI_EGFJ.indb 76 2012/05/23 13:21:59

77
J
次のような制限があります。 ディスクの状態(記録品質、傷、汚れ、変形、コピープロテクション、作成に使用した DVD レコーダーやディスクのメーカーなど)によっては、正しく読み込み/再生ができない場合があります。
DVD-RAM 以外のディスクを再生するには、ファイナライズ(他の DVD プレーヤーなどで再生できるようにする処理)が必要です。ファイナライズの方法は、お使いの DVD レコーダーの取扱説明書を参照してください。
デジタル放送などを CPRM(ContentProtection forRecordableMedia)などの著作権管理技術で録画したメディアは再生できません。
DVDレコーダーなどで作成したDVDの再生について
サポート情報「PowerDVD」 が正常に動作しない場合、動作環境、オペレーションについての疑問点がございましたら、まずオンラインヘルプをよくお読みください。それでも解決しない場合は、オンラインヘルプを経由してホームページを参照してください。
DFQW5658ZA_CF-VDM312U_OI_EGFJ.indb 77 2012/05/23 13:21:59

78
J
困ったときの Q&A
ドライブを認識しない ドライブを取り付け直してください。 パソコンを再起動してみてください。
ドライブ状態表示ランプ が点灯しない
ディスクは正しくトレイにセットされていますか?( 65ページ)
ディスクの再生や読み出しができない
ディスクが変形していたり、傷や汚れが付いたりしていませんか?トレイを閉じた後、またはスリープ・休止状態からリジュームした後、ドライブ状態表示ランプ が消える前にドライブにアクセスすると、エラーが発生する場合があります。また、アプリケーションソフトが自動的にドライブにアクセスして、エラーが発生する場合もあります。この場合、ディスクを取り出し、セットし直してください。
「RoxioCreatorLJB」が正しく動作しない
「Roxio Creator LJB」以外の書き込みソフトをインストールしていませんか? 「Roxio Creator LJB」以外の書き込みソフトをアンインストールしてください。
ディスクが取り出せない パソコンの電源が入っていますか?電源が入っていない状態でディスクを取り出すには、直径 1.3mmのピンをエマージェンシーホール(A)に挿し込んで、トレイを引き出してください。(ピンの直径がこれより小さい場合は、ピンを少し下に向けて挿し込んでください。また、穴の位置はドライブによって異なります。)指紋などの汚れが付いたディスクを使用すると、ディスクが取り出せなくなることがあります。汚れていないディスクをお使いください。( 64ページ)
トレイが閉じない トレイを閉じるとき、ディスク取り出しボタンを押しませんでしたか?
その他(ディスクが動作しない)
他のドライブもしくはディスクを使用してください。
DFQW5658ZA_CF-VDM312U_OI_EGFJ.indb 78 2012/05/23 13:21:59

79
J
仕様項目 内容
動作保証電圧 DC5V±0.25V
ドライブ 転送速度 *1 読み込み *2 DVD-ROM:最大 8倍速、CD-ROM:最大 24倍速
書き込み *3 CD-R:最大 24倍速、CD-RW:4 倍速High-SpeedCD-RW:10 倍速Ultra-SpeedCD-RW:最大 24倍速DVD-R:最大 8倍速、DVD-RDL:最大 6倍速DVD-RW:最大 6倍速、DVD-RAM:最大 5倍速+R:最大 8倍速、+RDL:最大 6倍速+RW:最大 4倍速、HighSpeed+RW:最大 8倍速
使用可能ディスク *4
読み込み DVD-ROM(4.7GB、8.5GB、9.4GB、17GB)、DVD-Video、DVD-R(1.4GB、3.95GB、4.7GB)、DVD-RDL(8.5GB)、DVD-RW*5(1.4GB、2.8GB、4.7GB、9.4GB)、DVD-RAM*6(1.4GB、2.8GB、4.7GB、9.4GB)、+R(4.7GB)、+RDL(8.5GB)、+RW(4.7GB)、HighSpeed+RW(4.7GB)、CD-Audio、CD-ROM、CD-R、PhotoCD、VideoCD、CD-RW、High-SpeedCD-RW、Ultra-SpeedCD-RW、CDTEXT、CD-EXTRA
書き込み DVD-R(1.4GB、4.7GBforGeneral)、DVD-RDL(8.5GB)、DVD-RW*5(1.4GB、2.8GB、4.7GB、9.4GB)、DVD-RAM*6(1.4GB、2.8GB、4.7GB、9.4GB)、+R(4.7GB)、+RDL(8.5GB)、+RW(4.7GB)、HighSpeed+RW(4.7GB)、CD-R、CD-RW、High-SpeedCD-RW、Ultra-SpeedCD-RW
バッファーアンダーランエラー防止機能 対応
インターフェース シリアルATA準拠
外形寸法(幅×奥行き×高さ) 132mm×149mm×14mm
質量 約 181g*1 DVDの1倍速の転送速度は1,350KB/ 秒。CDの 1倍速の転送速度は 150KB/ 秒。*2 偏重心のCD(重心が中央にないCD)を使用すると、振動が大きくなり速度が遅くなることがあります。
*3 使用するディスクによって、書き込み速度が遅くなることがあります。*4 1GB= 1,000,000,000 バイト。OSまたは一部のアプリケーションソフトでは、これよりも小さな数値でGB表示される場合があります。
*5 DVD-RWVer.1.0 には対応していません。*6 DVD-RAMは、カートリッジなしのディスクまたはカートリッジから取り出せるディスクのみ使用できます。
DFQW5658ZA_CF-VDM312U_OI_EGFJ.indb 79 2012/05/23 13:21:59

80
保証とアフターサービスパソコン本体の『取扱説明書』をご覧ください。
© Panasonic Corporation 2012
パナソニック株式会社 IT プロダクツビジネスユニット〒 570-0021.大阪府守口市八雲東町一丁目 10番 12号
Panasonic CorporationPanasonic System Communications Company of North America3PanasonicWay,Panazip2F-5,Secaucus,NJ07094
Panasonic Canada Inc.5770AmblerDriveMississauga,OntarioL4W2T3
Importer’sname&addresspursuanttotheEUGPSD(GeneralProductSafetyDirective)2001/95/ECArt.5Panasonic System Communications Company Europe, Panasonic Marketing Europe GmbHHagenauerStraße4365203WiesbadenGermany
WebSite:http://panasonic.net/
DFQW5658ZA_CF-VDM312U_OI_EGFJ.indb 80 2012/05/23 13:21:59

81
MEMO
DFQW5658ZA_CF-VDM312U_OI_EGFJ.indb 81 2012/05/29 10:25:51

82
MEMO
DFQW5658ZA_CF-VDM312U_OI_EGFJ.indb 82 2012/05/29 10:25:51

(切 り 取 り 線)
〈無料修理規定〉1.取扱説明書、本体貼付ラベル等の注意書に従った使用状態で保証期間内に故障した場合には、無料修理をさせていただきます。
( イ ) 無料修理をご依頼になる場合には、商品に取扱説明書から切り離した本書を添えていただきお買い上げの販売店にお申しつけください。
( ロ ) お買い上げの販売店に無料修理をご依頼にならない場合には、お近くの修理ご相談窓口にご連絡ください。
2.ご転居の場合の修理ご依頼先等は、お買い上げの販売店またはお近くの修理ご相談窓口にご相談ください。
3.ご贈答品等で本保証書に記入の販売店で無料修理をお受けになれない場合には、お近くの修理ご相談窓口へご連絡ください。
4.保証期間内でも次の場合には原則として有料にさせていただきます。 ( イ ) 使用上の誤り及び不当な修理や改造による故障及び損傷 ( ロ ) お買い上げ後の輸送、落下などによる故障及び損傷 ( ハ ) 火災、地震、水害、落雷、その他天災地変及び公害、塩害、ガ
ス害(硫化ガスなど)、異常電圧、指定外の使用電源(電圧、周波数)などによる故障及び損傷
( ニ ) 車両、船舶等に搭載された場合に生ずる故障及び損傷 ( ホ ) 本書のご添付がない場合 ( へ ) 本書にお買い上げ年月日、お客様名、販売店名の記入のない場
合、あるいは字句を書き換えられた場合 ( ト ) 持込修理の対象商品を直接修理窓口へ送付した場合の送料等
はお客様の負担となります。また、出張修理を行った場合には、出張料はお客様の負担となります。
5.本書は日本国内においてのみ有効です。6.本書は再発行いたしませんので大切に保管してください。7.お近くのご相談窓口はパソコン本体の取扱説明書の「修理ご相談窓口」をご参照ください。
修理メモ
※お客様にご記入いただいた個人情報(保証書控)は、保証期間内の無料修理対応及びその後の安全点検活動のために利用させていただく場合がございますのでご了承ください。
※この保証書は、本書に明示した期間、条件のもとにおいて無料修理をお約束するものです。従ってこの保証書によって、保証書を発行している者(保証責任者)、及びそれ以外の事業者に対するお客様の法律上の権利を制限するものではありませんので、保証期間経過後の修理についてご不明の場合は、お買い上げの販売店またはお近くの修理ご相談窓口にお問い合わせください。
※保証期間経過後の修理や補修用性能部品の保有期間についてはパソコン本体の取扱説明書の「保証とアフターサービス」をご覧ください。
※ThiswarrantyisvalidonlyinJapan.
DFQW5658ZA_CF-VDM312U_OI_EGFJ.indb 83 2012/05/23 13:21:59

ご販売店様へ ※印欄は必ず記入してお渡しください。
(切 り 取 り 線)
DVD MULTI
CF-VDM 312U
DFQW5658ZA_CF-VDM312U_OI_EGFJ.indb 84 2012/05/23 13:22:00