Embed Size (px)
Citation preview
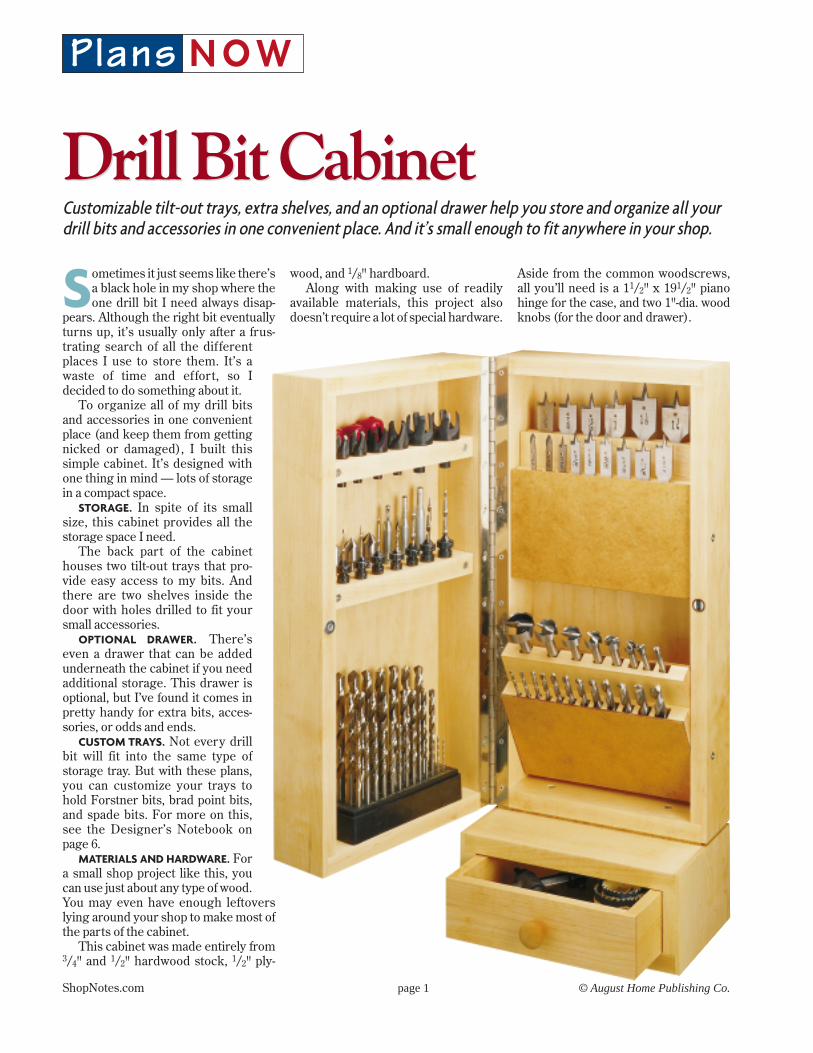
Drill Bit CabinetDrill Bit CabinetCustomizable tilt-out trays, extra shelves, and an optional drawer help you store and organize all yourdrill bits and accessories in one convenient place. And it’s small enough to fit anywhere in your shop.
Sometimes it just seems like there’sa black hole in my shop where theone drill bit I need always disap-
pears. Although the right bit eventuallyturns up, it’s usually only after a frus-trating search of all the differentplaces I use to store them. It’s awaste of time and effort, so Idecided to do something about it.
To organize all of my drill bitsand accessories in one convenientplace (and keep them from gettingnicked or damaged), I built thissimple cabinet. It’s designed withone thing in mind — lots of storagein a compact space.
STORAGE. In spite of its smallsize, this cabinet provides all thestorage space I need.
The back part of the cabinethouses two tilt-out trays that pro-vide easy access to my bits. Andthere are two shelves inside thedoor with holes drilled to fit yoursmall accessories.
OPTIONAL DRAWER. There’seven a drawer that can be addedunderneath the cabinet if you needadditional storage. This drawer isoptional, but I’ve found it comes inpretty handy for extra bits, acces-sories, or odds and ends.
CUSTOM TRAYS. Not every drillbit will fit into the same type ofstorage tray. But with these plans,you can customize your trays tohold Forstner bits, brad point bits,and spade bits. For more on this,see the Designer’s Notebook onpage 6.
MATERIALS AND HARDWARE. Fora small shop project like this, youcan use just about any type of wood.You may even have enough leftoverslying around your shop to make most ofthe parts of the cabinet.
This cabinet was made entirely from3/4" and 1/2" hardwood stock, 1/2" ply-
wood, and 1/8" hardboard.Along with making use of readily
available materials, this project alsodoesn’t require a lot of special hardware.
Aside from the common woodscrews,all you’ll need is a 11/2" x 191/2" pianohinge for the case, and two 1"-dia. woodknobs (for the door and drawer).
ShopNotes.com page 1 © August Home Publishing Co.
Plans N O W
A
A
M
N
G
H
I
J
E
F
B
C
C
D
LK
1"-DIA.WOOD KNOB
FRONT
SHELF
BOTTOM(CUT IN HALF)
DRAWERFRONT DRAWER
BOTTOM
DRAWERSIDE
BOXSIDE
BOX TOP
BOX BACK
SPACER
#8 x 1Fh WOODSCREW
!/2"
(/16"-DIA.MAGNETIC
CATCH
TRAYBOTTOM
SIDE(CUT IN HALF)
TRAY CORE
TRAY COVER
BACK
TOP(CUT IN HALF)1 x 19
PIANO HINGE!/2" !/2"
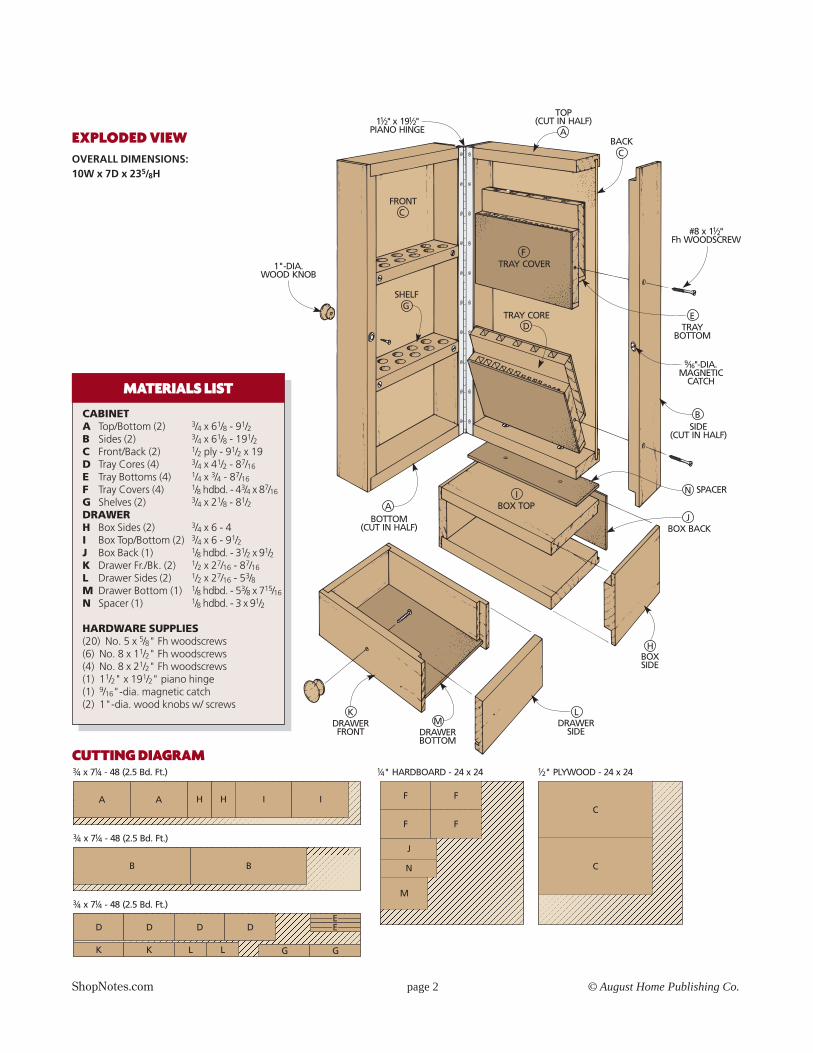
EXPLODED VIEWOVERALL DIMENSIONS:10W x 7D x 235/8H
CUTTING DIAGRAM
CABINETA Top/Bottom (2) 3/4 x 61/8 - 91/2B Sides (2) 3/4 x 61/8 - 191/2C Front/Back (2) 1/2 ply - 91/2 x 19D Tray Cores (4) 3/4 x 41/2 - 87/16
E Tray Bottoms (4) 1/4 x 3/4 - 87/16
F Tray Covers (4) 1/8 hdbd. - 43/4 x 87/16
G Shelves (2) 3/4 x 21/8 - 81/2DRAWERH Box Sides (2) 3/4 x 6 - 4I Box Top/Bottom (2) 3/4 x 6 - 91/2J Box Back (1) 1/8 hdbd. - 31/2 x 91/2K Drawer Fr./Bk. (2) 1/2 x 27/16 - 87/16
L Drawer Sides (2) 1/2 x 27/16 - 53/8M Drawer Bottom (1) 1/8 hdbd. - 53/8 x 715/16
N Spacer (1) 1/8 hdbd. - 3 x 91/2
HARDWARE SUPPLIES(20) No. 5 x 5/8" Fh woodscrews(6) No. 8 x 11/2" Fh woodscrews(4) No. 8 x 21/2" Fh woodscrews(1) 11/2" x 191/2" piano hinge(1) 9/16"-dia. magnetic catch(2) 1"-dia. wood knobs w/ screws
MATERIALS LIST
EE
G G
HH I I
J
AA
BB
C
C
D D D D
F F
F F
LK K L
N
M
#/4 !/47 - 48 (2.5 B . F .)x d t
#/4 !/47 - 48x (2.5 B . F .)d t
#/4 !/47 - 48x (2.5 B . F .)d t
!/4" HARDBOARD - 24 24x !/2" PLYWOOD - 24 24x
ShopNotes.com page 2 © August Home Publishing Co.
CASE
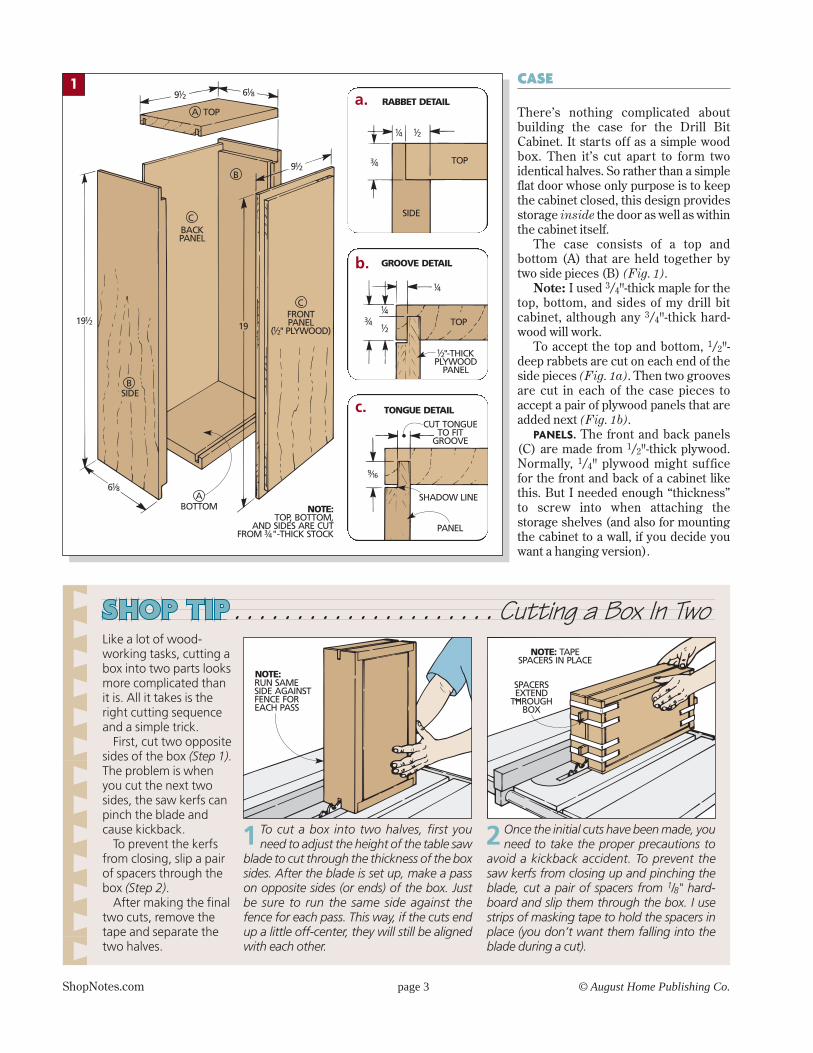
There’s nothing complicated aboutbuilding the case for the Drill BitCabinet. It starts off as a simple woodbox. Then it’s cut apart to form twoidentical halves. So rather than a simpleflat door whose only purpose is to keepthe cabinet closed, this design providesstorage inside the door as well as withinthe cabinet itself.
The case consists of a top andbottom (A) that are held together bytwo side pieces (B) (Fig. 1).
Note: I used 3/4"-thick maple for thetop, bottom, and sides of my drill bitcabinet, although any 3/4"-thick hard-wood will work.
To accept the top and bottom, 1/2"-deep rabbets are cut on each end of theside pieces (Fig. 1a). Then two groovesare cut in each of the case pieces toaccept a pair of plywood panels that areadded next (Fig. 1b).
PANELS. The front and back panels(C) are made from 1/2"-thick plywood.Normally, 1/4" plywood might sufficefor the front and back of a cabinet likethis. But I needed enough “thickness”to screw into when attaching thestorage shelves (and also for mountingthe cabinet to a wall, if you decide youwant a hanging version).
A
A
B
C
C
TOP
9!/2 6!/8
BACKPANEL
BOTTOM
19FRONTPANEL
( PLYWOOD)!/2"
9!/2
NOTE:TOP, BOTTOM,
AND SIDES ARE CUTFROM "-THICK STOCK#/4
BSIDE
6!/8
19!/2
1RABBET DETAIL
!/4 !/2
#/4 TOP
SIDE
a.
GROOVE DETAIL
!/4
!/4#/4
!/2TOP
!/2"-THICKPLYWOOD
PANEL
b.
PANEL
SHADOW LINE
(/16
CUT TONGUETO FIT
GROOVE
TONGUE DETAILc.
NOTE:RUN SAMESIDE AGAINSTFENCE FOREACH PASS
NOTE: TAPESPACERS IN PLACE
SPACERSEXTEND
THROUGHBOX
Like a lot of wood-working tasks, cutting abox into two parts looksmore complicated thanit is. All it takes is theright cutting sequenceand a simple trick.
First, cut two oppositesides of the box (Step 1).The problem is whenyou cut the next twosides, the saw kerfs canpinch the blade andcause kickback.
To prevent the kerfsfrom closing, slip a pairof spacers through thebox (Step 2).
After making the finaltwo cuts, remove thetape and separate thetwo halves.
1 To cut a box into two halves, first youneed to adjust the height of the table saw
blade to cut through the thickness of the boxsides. After the blade is set up, make a passon opposite sides (or ends) of the box. Justbe sure to run the same side against thefence for each pass. This way, if the cuts endup a little off-center, they will still be alignedwith each other.
2 Once the initial cuts have been made, youneed to take the proper precautions to
avoid a kickback accident. To prevent thesaw kerfs from closing up and pinching theblade, cut a pair of spacers from 1/8" hard-board and slip them through the box. I usestrips of masking tape to hold the spacers inplace (you don’t want them falling into theblade during a cut).
. . . . . . . . . . . . . . . Cutting a Box In Two. . . . . .
ShopNotes.com page 3 © August Home Publishing Co.
Note: Unfortunately, 1/2" maple ply-wood isn’t always easy to come by. Ifyou can’t find any locally, you can glueup two pieces of 1/4"-thick birch ply-wood as a substitute to make the frontand back panels.
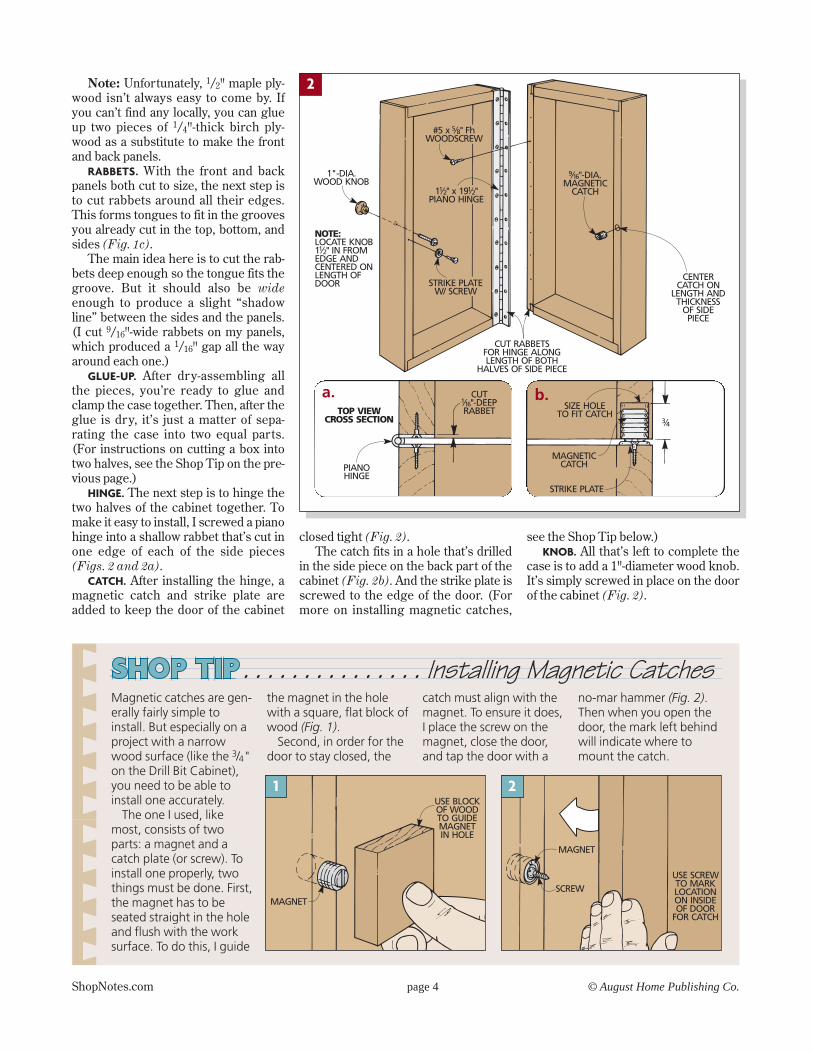
RABBETS. With the front and backpanels both cut to size, the next step isto cut rabbets around all their edges.This forms tongues to fit in the groovesyou already cut in the top, bottom, andsides (Fig. 1c).
The main idea here is to cut the rab-bets deep enough so the tongue fits thegroove. But it should also be wideenough to produce a slight “shadowline” between the sides and the panels.(I cut 9/16"-wide rabbets on my panels,which produced a 1/16" gap all the wayaround each one.)
GLUE-UP. After dry-assembling allthe pieces, you’re ready to glue andclamp the case together. Then, after theglue is dry, it’s just a matter of sepa-rating the case into two equal parts.(For instructions on cutting a box intotwo halves, see the Shop Tip on the pre-vious page.)
HINGE. The next step is to hinge thetwo halves of the cabinet together. Tomake it easy to install, I screwed a pianohinge into a shallow rabbet that’s cut inone edge of each of the side pieces(Figs. 2 and 2a).
CATCH. After installing the hinge, amagnetic catch and strike plate areadded to keep the door of the cabinet
closed tight (Fig. 2).The catch fits in a hole that’s drilled
in the side piece on the back part of thecabinet (Fig. 2b). And the strike plate isscrewed to the edge of the door. (Formore on installing magnetic catches,
#5 x FhWOODSCREW
%/8"
1 x 19PIANO HINGE
!/2" !/2"
STRIKE PLATEW/ SCREW
1"-DIA.WOOD KNOB
NOTE:LOCATE KNOB1 IN FROMEDGE ANDCENTERED ONLENGTH OFDOOR
!/2"
CUT RABBETSFOR HINGE ALONGLENGTH OF BOTH
HALVES OF SIDE PIECE
CENTERCATCH ON
LENGTH ANDTHICKNESS
OF SIDEPIECE
(/16"-DIA.MAGNETIC
CATCH
2
see the Shop Tip below.)KNOB. All that’s left to complete the
case is to add a 1"-diameter wood knob.It’s simply screwed in place on the doorof the cabinet (Fig. 2).
CUT-DEEP
RABBET!/16"
PIANOHINGE
TOP VIEWCROSS SECTION
a.
#/4
SIZE HOLETO FIT CATCH
MAGNETICCATCH
STRIKE PLATE
b.
Magnetic catches are gen-erally fairly simple toinstall. But especially on aproject with a narrowwood surface (like the 3/4"on the Drill Bit Cabinet),you need to be able toinstall one accurately.
The one I used, likemost, consists of twoparts: a magnet and acatch plate (or screw). Toinstall one properly, twothings must be done. First,the magnet has to beseated straight in the holeand flush with the worksurface. To do this, I guide
the magnet in the holewith a square, flat block ofwood (Fig. 1).
Second, in order for thedoor to stay closed, the
catch must align with themagnet. To ensure it does,I place the screw on themagnet, close the door,and tap the door with a
no-mar hammer (Fig. 2).Then when you open thedoor, the mark left behindwill indicate where tomount the catch.
MAGNET
USE BLOCKOF WOODTO GUIDEMAGNETIN HOLE
1
MAGNET
SCREWUSE SCREWTO MARKLOCATIONON INSIDEOF DOOR
FOR CATCH
2
. . . . . . . . . . . . . . . Installing Magnetic Catches
ShopNotes.com page 4 © August Home Publishing Co.
TRAYS
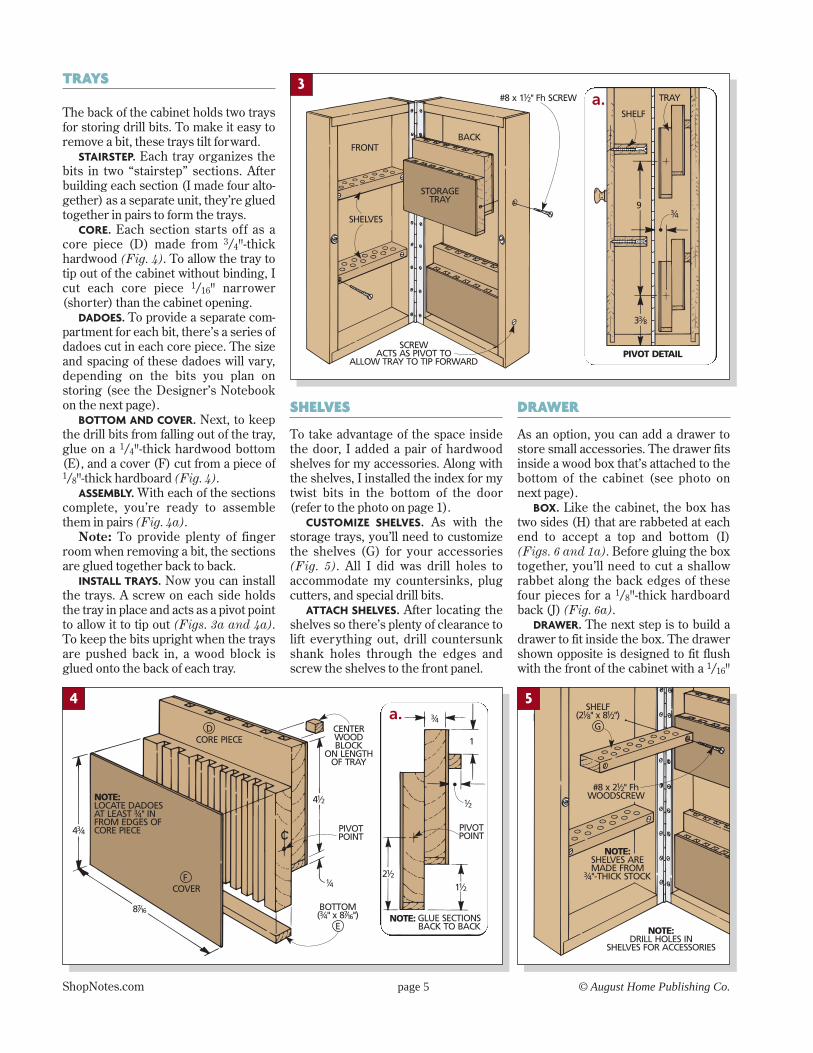
The back of the cabinet holds two traysfor storing drill bits. To make it easy toremove a bit, these trays tilt forward.
STAIRSTEP. Each tray organizes thebits in two “stairstep” sections. Afterbuilding each section (I made four alto-gether) as a separate unit, they’re gluedtogether in pairs to form the trays.
CORE. Each section starts off as acore piece (D) made from 3/4"-thickhardwood (Fig. 4). To allow the tray totip out of the cabinet without binding, Icut each core piece 1/16" narrower(shorter) than the cabinet opening.
DADOES. To provide a separate com-partment for each bit, there’s a series ofdadoes cut in each core piece. The sizeand spacing of these dadoes will vary,depending on the bits you plan onstoring (see the Designer’s Notebookon the next page).
BOTTOM AND COVER. Next, to keepthe drill bits from falling out of the tray,glue on a 1/4"-thick hardwood bottom(E), and a cover (F) cut from a piece of1/8"-thick hardboard (Fig. 4).
ASSEMBLY. With each of the sectionscomplete, you’re ready to assemblethem in pairs (Fig. 4a).
Note: To provide plenty of fingerroom when removing a bit, the sectionsare glued together back to back.
INSTALL TRAYS. Now you can installthe trays. A screw on each side holdsthe tray in place and acts as a pivot pointto allow it to tip out (Figs. 3a and 4a).To keep the bits upright when the traysare pushed back in, a wood block isglued onto the back of each tray.
FRONTBACK
STORAGETRAY
SHELVES
SCREWACTS AS PIVOT TO
ALLOW TRAY TO TIP FORWARD
#8 x 1 Fh SCREW!/2"
3
NOTE:
E
F
DCORE PIECE
LOCATE DADOESAT LEAST INFROM EDGES OFCORE PIECE
#/4"
4#/4
COVER
8&/16 BOTTOM( x 8 )#/4" &/16"
!/4
PIVOTPOINT
4!/2
CENTERWOODBLOCK
ON LENGTHOF TRAY
4
G
SHELF(2 x 8 )!/8" !/2"
#8 x 2 FhWOODSCREW
!/2"
NOTE:SHELVES AREMADE FROM-THICK STOCK#/4"
NOTE:DRILL HOLES IN
SHELVES FOR ACCESSORIES
5
SHELVES
To take advantage of the space insidethe door, I added a pair of hardwoodshelves for my accessories. Along withthe shelves, I installed the index for mytwist bits in the bottom of the door(refer to the photo on page 1).
CUSTOMIZE SHELVES. As with thestorage trays, you’ll need to customizethe shelves (G) for your accessories(Fig. 5). All I did was drill holes toaccommodate my countersinks, plugcutters, and special drill bits.
ATTACH SHELVES. After locating theshelves so there’s plenty of clearance tolift everything out, drill countersunkshank holes through the edges andscrew the shelves to the front panel.
DRAWER
As an option, you can add a drawer tostore small accessories. The drawer fitsinside a wood box that’s attached to thebottom of the cabinet (see photo onnext page).
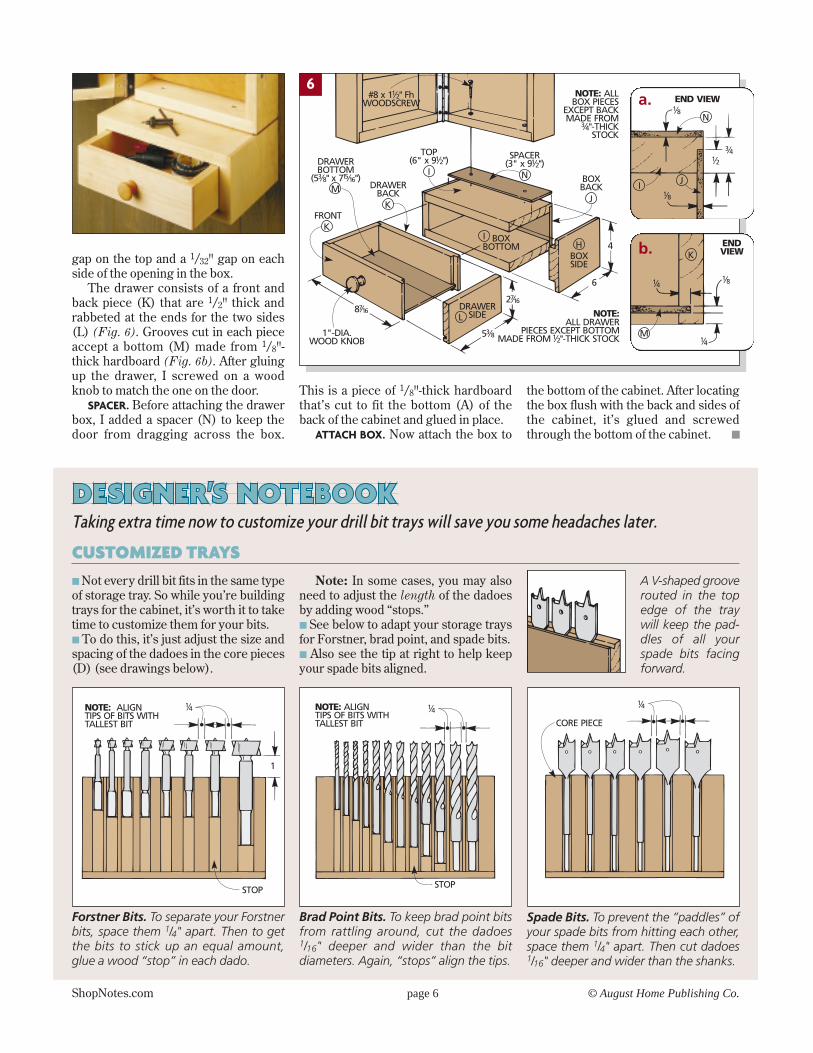
BOX. Like the cabinet, the box hastwo sides (H) that are rabbeted at eachend to accept a top and bottom (I)(Figs. 6 and 1a). Before gluing the boxtogether, you’ll need to cut a shallowrabbet along the back edges of thesefour pieces for a 1/8"-thick hardboardback (J) (Fig. 6a).
DRAWER. The next step is to build adrawer to fit inside the box. The drawershown opposite is designed to fit flushwith the front of the cabinet with a 1/16"
SHELF
TRAY
9#/4
3#/8
PIVOT DETAIL
a.
NOTE:
#/4
1
!/2
PIVOTPOINT
1!/2
2!/2
GLUE SECTIONSBACK TO BACK
a.
ShopNotes.com page 5 © August Home Publishing Co.
M
N
HI
I
J
L
K
K
#8 x 1 FhWOODSCREW
!/2"
DRAWERBOTTOM
(5 x 7 )#/8" !%/16"
FRONT
DRAWERBACK
TOP(6" x 9 )!/2"
BOXBOTTOM
SPACER(3" x 9 )!/2"
BOXBACK
BOXSIDE
1"-DIA.WOOD KNOB
DRAWERSIDE
8&/16
5#/8
2&/16
6
4
NOTE:ALL DRAWER
PIECES EXCEPT BOTTOMMADE FROM -THICK STOCK!/2"
NOTE: ALLBOX PIECES
EXCEPT BACKMADE FROM
-THICKSTOCK
#/4"
6
gap on the top and a 1/32" gap on eachside of the opening in the box.
The drawer consists of a front andback piece (K) that are 1/2" thick andrabbeted at the ends for the two sides(L) (Fig. 6). Grooves cut in each pieceaccept a bottom (M) made from 1/8"-thick hardboard (Fig. 6b). After gluingup the drawer, I screwed on a woodknob to match the one on the door.
SPACER. Before attaching the drawerbox, I added a spacer (N) to keep thedoor from dragging across the box.
This is a piece of 1/8"-thick hardboardthat’s cut to fit the bottom (A) of theback of the cabinet and glued in place.
ATTACH BOX. Now attach the box to
the bottom of the cabinet. After locatingthe box flush with the back and sides ofthe cabinet, it’s glued and screwedthrough the bottom of the cabinet. ■
N
I J
END VIEW
!/8
!/8
!/2#/4
a.
M
K
!/4
!/4 !/8
ENDVIEWb.
Spade Bits. To prevent the “paddles” ofyour spade bits from hitting each other,space them 1/4" apart. Then cut dadoes1/16" deeper and wider than the shanks.
NOTE: ALIGNTIPS OF BITS WITHTALLEST BIT
!/4
1
STOP
Forstner Bits. To separate your Forstnerbits, space them 1/4" apart. Then to getthe bits to stick up an equal amount,glue a wood “stop” in each dado.
NOTE: ALIGNTIPS OF BITS WITHTALLEST BIT
!/4
STOP
Brad Point Bits. To keep brad point bitsfrom rattling around, cut the dadoes1/16" deeper and wider than the bitdiameters. Again, “stops” align the tips.
CORE PIECE
!/4
A V-shaped grooverouted in the topedge of the traywill keep the pad-dles of all yourspade bits facingforward.
CUSTOMIZED TRAYS■ Not every drill bit fits in the same typeof storage tray. So while you’re buildingtrays for the cabinet, it’s worth it to taketime to customize them for your bits.■ To do this, it’s just adjust the size andspacing of the dadoes in the core pieces(D) (see drawings below).
Note: In some cases, you may alsoneed to adjust the length of the dadoesby adding wood “stops.”■ See below to adapt your storage traysfor Forstner, brad point, and spade bits.■ Also see the tip at right to help keepyour spade bits aligned.
Taking extra time now to customize your drill bit trays will save you some headaches later.
ShopNotes.com page 6 © August Home Publishing Co.