Embed Size (px)
Citation preview

P/N 9925851 Rev 01 07/14 Page 1 of 9
BEFORE YOU BEGINRead these instructions thoroughly and make sure all parts and tools are accounted for. Please retain these installation instructions for future reference and parts ordering information.
P/N 2880646
DOOR AND SOFT TOP KIT
APPLICATIONSPORTSMAN ACE
Ref DescriptionDoor and
Soft Top Kit (2880646)
Spare Kits
Serv
ice
Har
dwar
e K
it (2
2057
71)
Latc
h/St
riker
Kit
(220
5772
)
LH D
oor S
kin
Kit
(220
5773
)
RH
Doo
r Ski
n K
it (2
2057
74)
Roo
f Ser
vice
H
ardw
are
Kit
(220
5775
)
1 Left Hand Side Door Skin 1x - - 1x - -2 Right Hand Side Door Skin 1x - - - 1x -3 Soft Top 1x - - - - -4 Adhesive Backed Loop Fastener 2x 2x - - - -5 Alcohol Wipes 2x 2x - - - -6 Loctite 1x - 1x - - -7 Large Hose Clamp 4x 4x - - - -8 ROPS Attachment Bracket 4x 4x - - - -9 Latch Plate 2x - 2x - - -
10 Latch Left 1x - 1x - - -
11 Latch Right 1x - 1x - - -12 Striker Bracket 2x - 2x - - -13 P-Channel 1x - - - - 1x14 ¼-20x3/4 Bolts 7x - 4x - - 3x15 ¼-20 Nuts 7x - 4x - - 3x16 1/4 Washers 7x - 4x - - 3x17 M8 x 1.25 Bolt 2x - 2x - - -18 Latch Knobs 2x - 2x - - -19 Screws 2x - 2x - - -20 Webbing Pulls 2x - 2x - - -21 LH Door Frame 1x - - - - -22 RH Door Frame 1x - - - - -
Instructions (P/N 9925851) 1x
KIT CONTENTS
P/N 9925851 Rev 01 07/14 Page 2 of 9
IMPORTANT•Your Polaris DOOR AND SOFT TOP KIT is exclusively designed for use with this vehicle. Please read the
installation instructions carefully and completely and verify that all components are included in this kit.•Installation is easier if the vehicle is clean and free of debris.•Door preparation including cleaning and installing adhesive backed fasteners must be done indoors at room
temperature. All adhesives must be given 24 hours to cure before attaching.•You must wear safety glasses when installing this kit.•Please use the following torque chart when installing fasteners:
Size Required Torque1/4-20 8 ft. lbs. (10.8 Nm)M8 18 ft. lbs. (24.4 Nm)
Hose Clamp 3 ft. lbs. (4.1 Nm)
TOOLS NEEDEDTorx Drivers (M8) Metric Nut Driver Set Metric Open End Wrench Set
APPROXIMATE ASSEMBLY TIME40-60 mins
P/N 9925851 Rev 01 07/14 Page 3 of 9
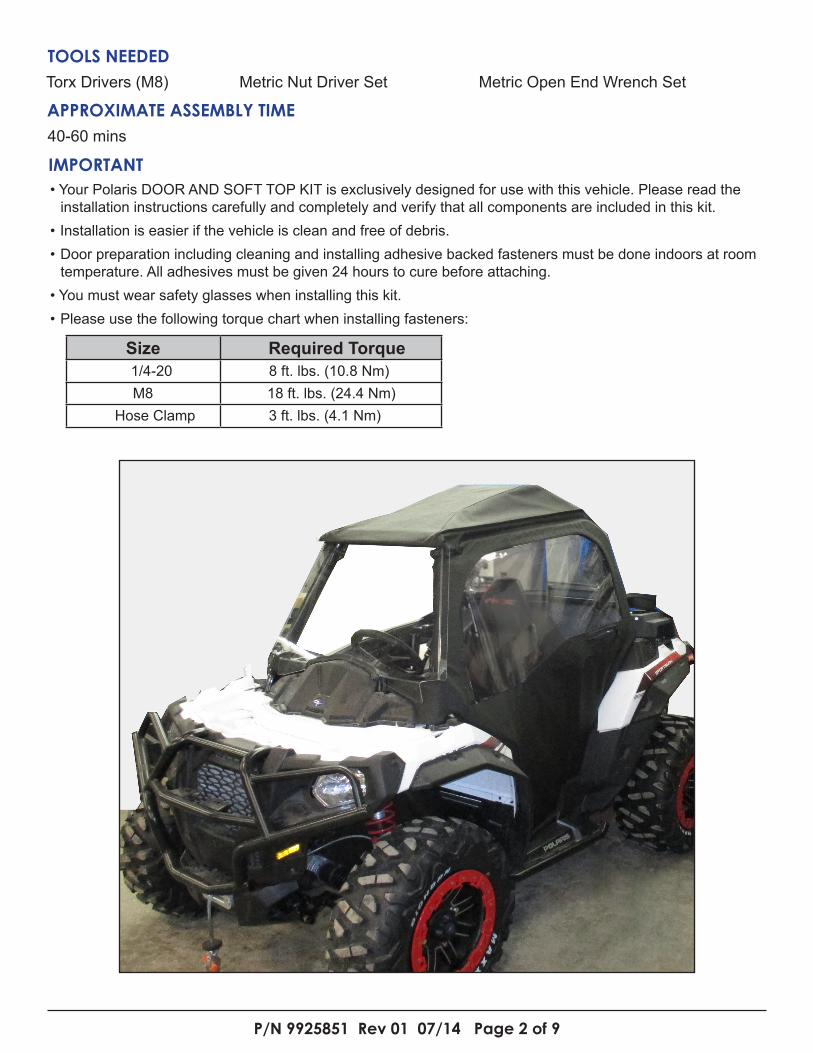
2. Laythetwodoorsoutonflat,cleansurface with the inside of the doors (grey side of the material) facing up. Each door will have three pieces of adhesive backed hook fastener attached to a similarly sized piece of loop fastener that is sewn to the door fabric.•Clean the aluminum door frames
(21 and 22) using the alcohol pads in the locations under these fasteners. Remove each piece of adhesive backed hook fastener from the loop fastener,removetheprotectivebacking,andapplythefastenertothe frame with the hook side facing the interior of the doors.
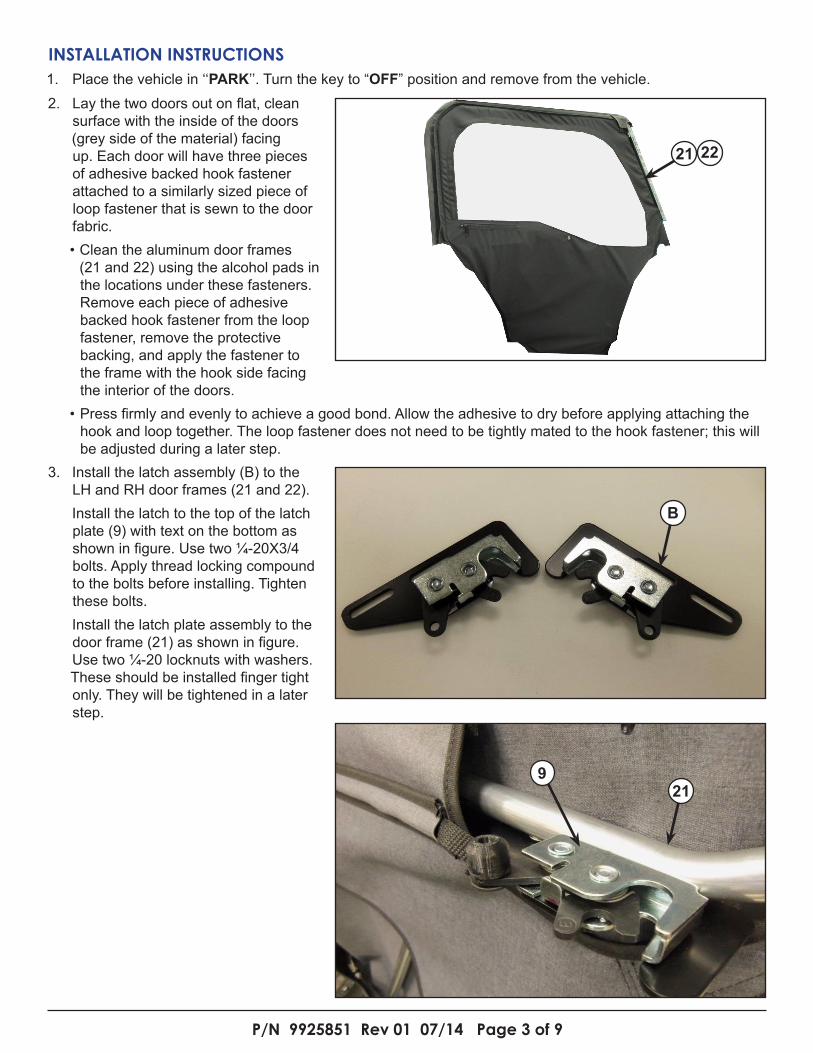
3. Install the latch assembly (B) to the LH and RH door frames (21 and 22).Install the latch to the top of the latch plate (9) with text on the bottom as showninfigure.Usetwo¼-20X3/4bolts. Apply thread locking compound to the bolts before installing. Tighten these bolts.Install the latch plate assembly to the doorframe(21)asshowninfigure.Usetwo¼-20locknutswithwashers.Theseshouldbeinstalledfingertightonly. They will be tightened in a later step.
INSTALLATION INSTRUCTIONS1. Place the vehicle in ‘‘PARK’’. Turn the key to “OFF” position and remove from the vehicle.
21
•Pressfirmlyandevenlytoachieveagoodbond.Allowtheadhesivetodrybeforeapplyingattachingthehook and loop together. The loop fastener does not need to be tightly mated to the hook fastener; this will be adjusted during a later step.
B
219
22

P/N 9925851 Rev 01 07/14 Page 4 of 9
4. Install the P-channel (13) to the windshield (D). Remove the windshield (D) from the vehicle. Align the P-channel (13) with the opening facing downinthelocationasshowninfigure.The top edge of the P-Channel should be positioned 1.5” from the top edge of the windshield (approximately 0.5” from the bend). The P-channel should be centered side to side.UsingtheholesintheP-channelasaguide,drillthree11/32”holesinthewindshield. Clean and de-burr the holes.Install the P-channel using the three remaining1/4-20bolts,nutsandwashers,withtheboltsinsertedfromthe outside and the nuts and washers on the inside of the windshield.Reinstall the windshield to the vehicle.
6. Cut out templates (G) for positioning front lower door hinge and locate as showninfigure.Frontedgeshouldbeagainst plastic and large hole should clear head of bolt. Drill 0.25” holes into theplasticfloorboardsatthelowerfront of each side of the vehicle.
5. Install the hose clamps and ROPS attachment brackets (8) to the A-pillars. The upper brackets should be installed directly below the upper windshield clamps (E). The lower brackets should be installed directly above the lower windshield clamps (F). The hinges on the brackets should lock to the inside of the vehicle.The hose clamps should be tight enough to keep the brackets from movingupordownontheA-pillar,butstill loose enough to allow the brackets to rotate. They will be tightened in a later step.
1.5”0.5”
13
D
F
8
E
8
G
P/N 9925851 Rev 01 07/14 Page 5 of 9
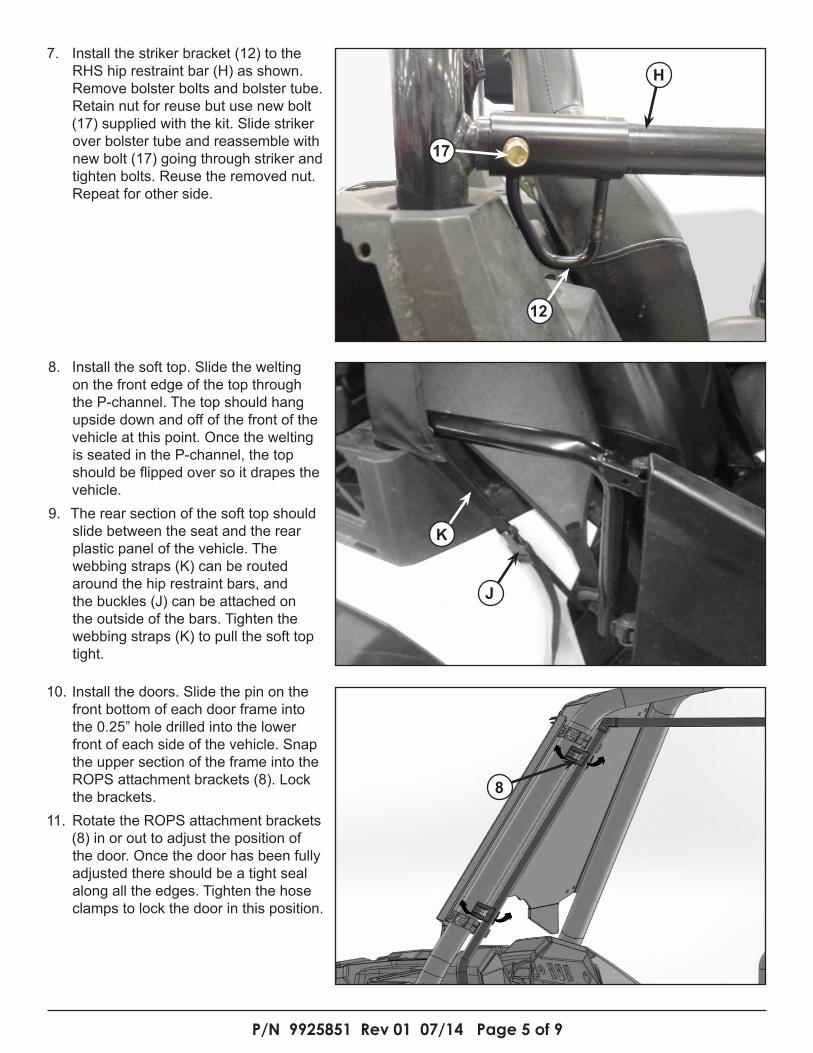
8. Install the soft top. Slide the welting on the front edge of the top through the P-channel. The top should hang upside down and off of the front of the vehicle at this point. Once the welting isseatedintheP-channel,thetopshouldbeflippedoversoitdrapesthevehicle.
9. The rear section of the soft top should slide between the seat and the rear plastic panel of the vehicle. The webbing straps (K) can be routed aroundthehiprestraintbars,andthe buckles (J) can be attached on the outside of the bars. Tighten the webbing straps (K) to pull the soft top tight.
7. Install the striker bracket (12) to the RHS hip restraint bar (H) as shown. Remove bolster bolts and bolster tube. Retain nut for reuse but use new bolt (17) supplied with the kit. Slide striker over bolster tube and reassemble with new bolt (17) going through striker and tighten bolts. Reuse the removed nut. Repeat for other side.
10. Install the doors. Slide the pin on the front bottom of each door frame into the 0.25” hole drilled into the lower front of each side of the vehicle. Snap the upper section of the frame into the ROPS attachment brackets (8). Lock the brackets.
11. Rotate the ROPS attachment brackets (8) in or out to adjust the position of the door. Once the door has been fully adjusted there should be a tight seal along all the edges. Tighten the hose clamps to lock the door in this position.
12
K
J
8
H
17
P/N 9925851 Rev 01 07/14 Page 6 of 9
12. InsertthefrontfabricflapofthedoorsbetweenthewindshieldandtheA-pillar.Thefabricshouldwraparound the A-pillar and attach to the hook fastener on the frames. The rubber seal should be pulled into the space between the windshield and the A-pillar. Insert hook-loop strap on top front of door around A-pillar abovewindshieldclampandattachtolooponfabricflap.
15. Tightly close the RHS door and adjust the latch and striker bracket so the latch fully engages when the door is closed.Usethelocknutstoadjustthe RHS door latch from front to back. When all of the components areadjustedcorrectly,tightenthelocknuts.
16. Tightly close the LHS door and adjust the latch and striker bracket so the latch fully engages when the door is closed.Usethelocknutstoadjustthe LHS door latch from front to back. When all of the components are adjustedcorrectly,tightenthelocknuts.
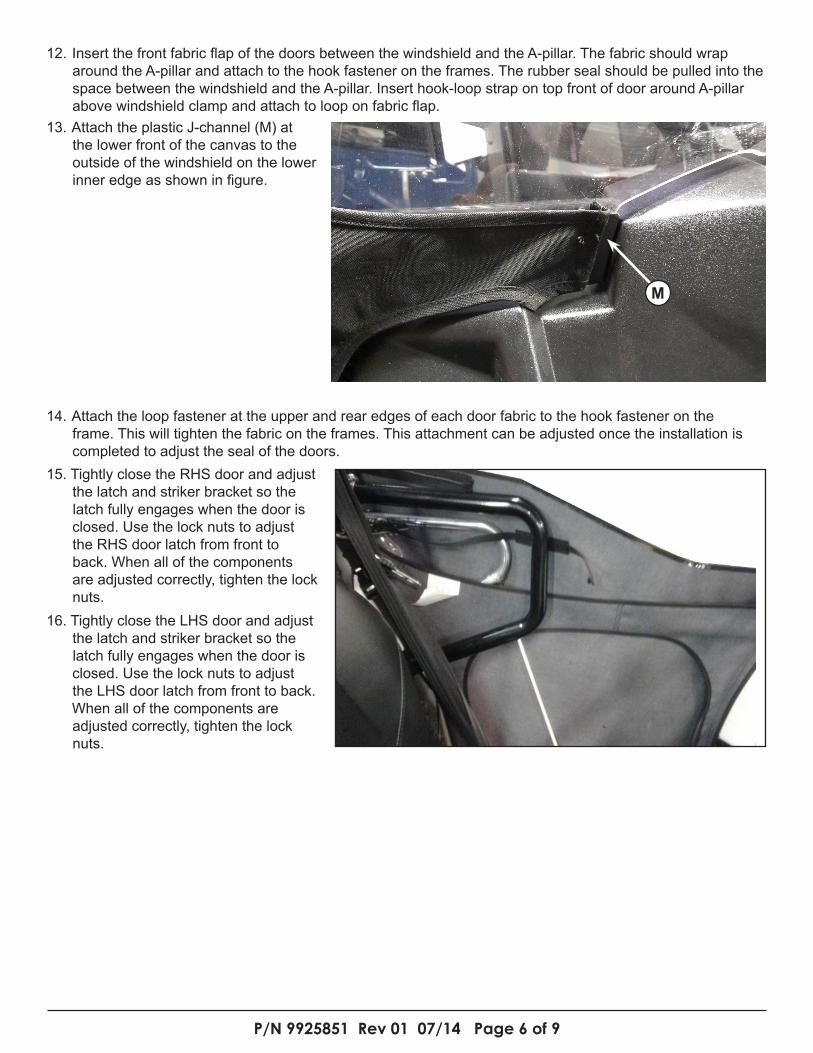
13. Attach the plastic J-channel (M) at the lower front of the canvas to the outside of the windshield on the lower inneredgeasshowninfigure.
14. Attach the loop fastener at the upper and rear edges of each door fabric to the hook fastener on the frame. This will tighten the fabric on the frames. This attachment can be adjusted once the installation is completed to adjust the seal of the doors.
M

P/N 9925851 Rev 01 07/14 Page 7 of 9
18. The doors and soft top should be fully installed with a good seal at all edges. All fasteners should be tightened down. The LHS and RHS door should close securely with the latch.
17. Tightly close the RHS door and adjust Insert the ½” webbing strap (20) with the red webbing handle through the channel on the doors from front to back. Screw the ½” webbing strap tothelatchusingthesuppliedscrew,threading it into the supplied knob (18).
1820
OPERATING INSTRUCTIONS• Thewindowsonthefrontandreardoorscanbeunzipped,rolleddown,andsecuredwiththewebbing
straps and snaps. It is recommended to remove the cab from the vehicle before towing on a trailer.

P/N 9925851 Rev 01 07/14 Page 8 of 9
THIS PAGE IS INTENTIONALLY LEFT BLANK
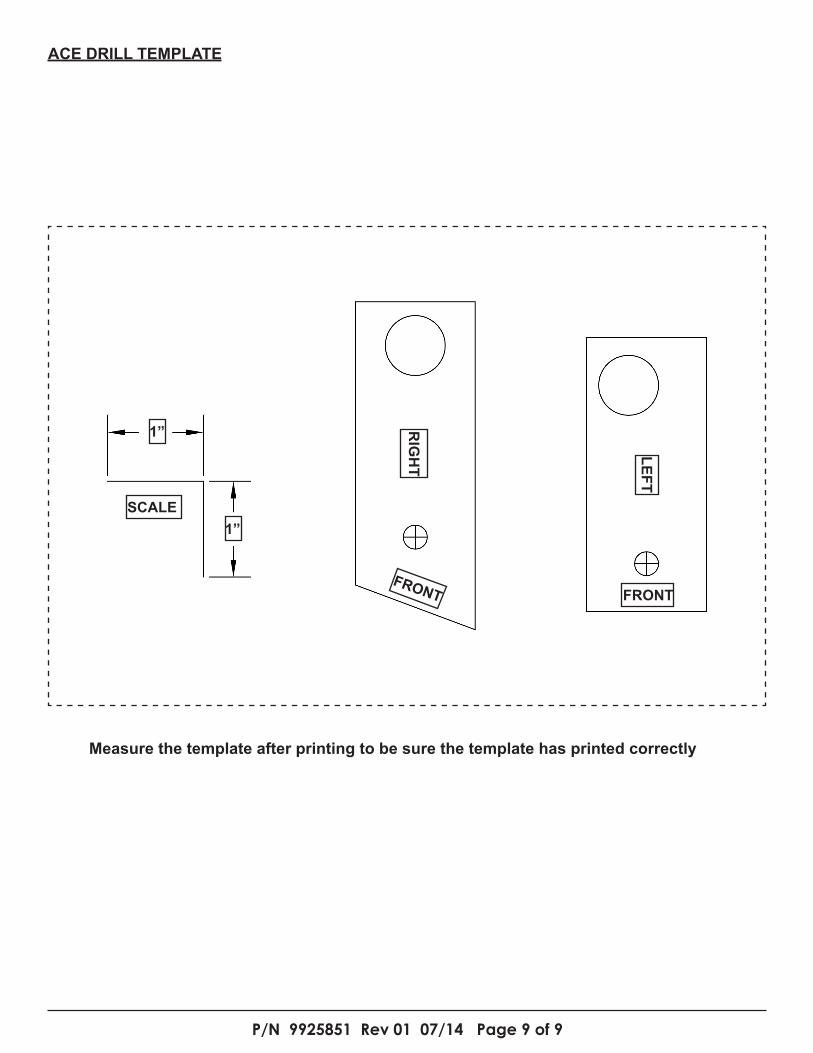
P/N 9925851 Rev 01 07/14 Page 9 of 9
Measure the template after printing to be sure the template has printed correctly
ACE DRILL TEMPLATE
RIG
HT
LEFT
FRONTFRONT
SCALE
1”
1”