Embed Size (px)
Citation preview

1
Please read the manual fully before using the appliance and keep the
manual safe for future reference.
Domestic Vacuum Sealer
Pour la version française veuillez consulter notre site de web
www.andrewjamesworldwide.com
Die deutsche Version finden Sie auf unsere Webseite
www.andrewjamesworldwide.com

2
Important safety Information
When using any electrical
appliance, basic safety
precautions should always be
followed, including:
This appliance can be used
by children aged from 8
years and above and
persons with reduced
physical, sensory or mental
capabilities or lack of
experience and knowledge if
they have been given
supervision or instruction
concerning use of the
appliance in a safe way and
understand the hazards
involved. Children shall not
play with the appliance.
Cleaning and user
maintenance shall not be
made by children unless
they are older than 8 and
supervised. Keep the
appliance and its cord out of
reach of children less than 8
years old.
Always ensure the voltage
on the rating label
corresponds to the voltage
in your home.
Check the power cord and
plug regularly for any
damage. If the cord or the
plug is damaged, it must be
replaced by a qualified
electrician or a service
repair centre. If in doubt
please contact our
customer service team.
The appliance is intended
for domestic use only.
Industrial or commercial
use will void the warranty.
The supplier cannot be held
responsible for injury or
damage if the appliance
has been used for anything
other than its intended use.
Incorrect operation and use
can damage the appliance
and cause injury to the

3
user.
Do not use the appliance if it
has been dropped or
damaged in anyway. If the
unit has been damaged take
the unit for examination and
or repair by and authorised
service agent.
Do not immerse or expose
the motor assembly, plug or
the power cord in water or
any other liquid for any
reason.
If the supply cord is
damaged, it must be
replaced by the
manufacturer or by someone
who is suitably qualified to
avoid a potential hazard.
Do not let the cord hang over
the edge of a table or
counter. Ensure that the cord
is not in a position where it
can be pulled or tripped over
accidentally.
Do not allow the cord to
touch hot surfaces and do
not place the cord near hot
gas or electric burners or in
a heated oven.
Use of an extension cord
with this appliance is not
recommended. However if
it is necessary to use an
extension cord, ensure that
the extension cord is equal
to or greater than the
power consumption of the
appliance to avoid
overheating of the
appliance and extension
cord. Do not use any other
appliance on the extension
cord. Do not place the
extension cord in a position
where it can be pulled on by
children or animals or be
tripped over.
Always operate the
appliance on a smooth,
even and stable surface. Do

4
not place the unit on a hot
surface.
Always remove the plug of
the appliance safely. Do not
pull on the appliances cord
to remove the appliance plug
from the electrical socket.
Never handle or operate the
appliance with wet hands.
Illustration of functions
1. 2.
3. 4.
5.
1. Seal only
2. Indicator lamp (for seal)
3. Cancel
4. Indicator lamp
(for vacuum)
5. Vacuum/seal
5
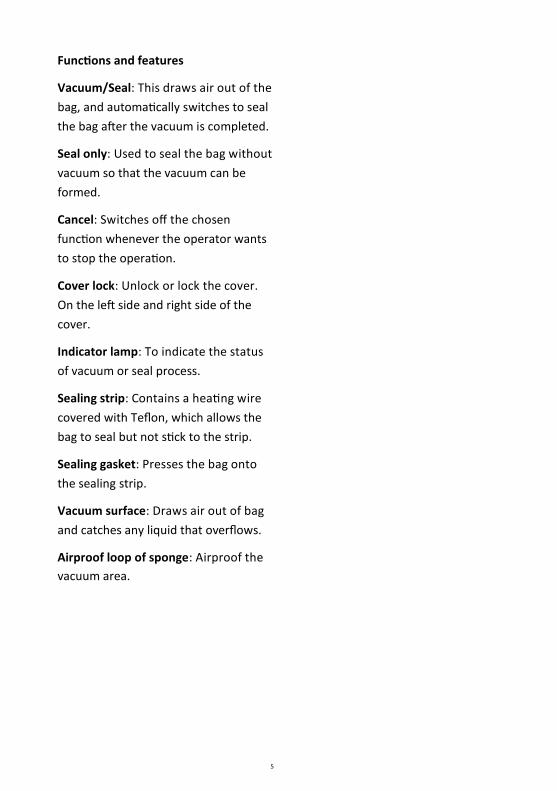
Functions and features
Vacuum/Seal: This draws air out of the
bag, and automatically switches to seal
the bag after the vacuum is completed.
Seal only: Used to seal the bag without
vacuum so that the vacuum can be
formed.
Cancel: Switches off the chosen
function whenever the operator wants
to stop the operation.
Cover lock: Unlock or lock the cover.
On the left side and right side of the
cover.
Indicator lamp: To indicate the status
of vacuum or seal process.
Sealing strip: Contains a heating wire
covered with Teflon, which allows the
bag to seal but not stick to the strip.
Sealing gasket: Presses the bag onto
the sealing strip.
Vacuum surface: Draws air out of bag
and catches any liquid that overflows.
Airproof loop of sponge: Airproof the
vacuum area.

6
Illustration of operation
1. Push the opening of the bag to the bottom of the air portal.
2. Press to Lock.
3. Press for release.
Fig 2.
Fig 1.
Fig 3.

7
Operating instructions
Making a bag
1. Plug the unit into the power source.
2. Unroll the bag and put one end of the
bag on top of the black rubber strip,
then close the cover (Fig 1).
3. Press the cover down on both sides by
the line area using two hands, until
two click sounds can be heard (Fig 2).
4. Press the “Seal Only” button and the
red LED will illuminate.
5. When the LED light disappears, the
bag is sealed. Note, it will not make a
noise while sealing,
6. Pull out the bag roll and cut to your
desired length. The bag is now ready.
Preserve food with vacuum
1. Put the food that you want to
preserve inside the bag.
2. Clean and straighten the open end of
the bag, ensure there are no wrinkles
or ripples on the panels of the open
ends.
3. Make sure that both panels of the bag
are located within the rippled area
(vacuum plate) below the round post
(vacuum pump hole), to prevent
leaking.
4. Close the cover and then press heavily
on both sides of the cover in the lined
areas until two click sounds can be
heard.
5. Press the “vacuum/seal” button,
then the bag will be automatically
vacuumed and sealed.
6. Press the two side lock buttons and
the process is completed.
Hints for best vacuuming performance
1. Do not put too much food inside the
bag, leave enough empty space so
the operating process is not
hindered.
2. Do not wet the open end of the bag.
Wet bags may be difficult to melt
and seal tightly.
3. Clean and straighten the open end
of the bag before sealing the bags.
Make sure there are no wrinkles or
creased lines on the open panels, as
foreign objects or creased bags may
be difficult to tightly seal.
4. Do not leave too much air inside the
bag. Press the bag down to allow
extra air to escape from the bag
before vacuuming it. Too much air
inside the bag increases the vacuum
pump loading and may cause the
motor to have insufficient power to
draw away all the air inside the bag.
5. Do not vacuum seal objects with
sharp points like fish bones and hard
shells, as sharp points may

8
penetrate and tear the bag.
6. For the best sealing effect, it is best to
let the appliance cool down for 1
minute before using it again.
7. Wipe off any excess liquid or food
residue left on the Interface after each
bag package.
8. If the vacuum has not been created,
the vacuum system will shut
automatically after 30 seconds. If this
occurs please check if the bag has a
leak, or the bag was not placed
properly on the appliance.
Open a sealed bag
Cut the bag straight across with
scissors, just inside of the seal.
Resealing
You can reseal many foods in their
original packaging (i.e. crisp packets)
follow steps of “Preserve food with
Vacuum”.
Note: The vacuum preservation
system can’t be directly used for the
vacuum sealing of the canisters or
jars.
Vacuum bag guidelines
Vacuum sealing for the refrigerator
For the busy family, on-the-go meals can
be prepared ahead and vacuum-sealed
in individual servings, ready to heat at
any time.
Preparing food for the freezer
1. In properly stored conditions, the
vacuum sealer helps you to maintain
the foods freshness. Try to start with
the freshest food possible.
2. Freeze foods which need to hold
their shape or are fragile in nature,
then vacuum seal in a vacuum bag
and return to freezer.
3. To vacuum seal liquid-based foods,
such as soups, casseroles or stews,
first freeze them in a baking pan or
tempered dish. Next, vacuum seal,
label and stack in your freezer as
soon as they are frozen solid.
4. Blanch the vegetables by cooking
them briefly in boiling water or
microwaving them. Then allow them
to cool down, and vacuum seal in
convenient portions.
5. To vacuum seal the foods that are
not frozen, allow two extra inches of
bag length to allow for expansion
while freezing. Place the meat or fish
on a paper towel, and vacuum seal
with the paper towel in the bag. This
will help to absorb moisture from
the foods.
6. Before storing the foods such as
tortillas, crepes or hamburger
patties, use wax or parchment paper
between them to stack the pieces.
This makes it convenient to remove

9
some of the food, reseal the rest and
immediately place them in the
freezer.
Cleaning and maintenance
Always unplug the unit before
cleaning the appliance.
Do not immerse it in water or any
other liquid.
Do not use abrasive cleaners to clean
the unit, as they will scratch the
surface.
Wipe the outside of the unit with a
damp cloth or sponge and mild
detergent.
To clean the inside of the unit, wipe
away any food or liquid with a paper
towel
Dry thoroughly before using it again.
Preserving the bags
Wash the bags in warm water with a
mild detergent, then rinse the bags
well and allow them to dry thoroughly
before re-using them.
Bags can be washed on the top rack in
your dishwasher by turning the bags
inside out. Stand the bag up so the
water can flow from inside of the bag.
Dry thoroughly before re-using.
Note: Bags used to store raw meats, fish
or greasy foods can’t be re-used.
Bags and Rolls
Your machine includes 10 bags 22cm X
30cm + 5 bags of 28cm X 40cm For
replacement bags and rolls please call
us on 0844 335 8464 or purchase direct
from our website:
www.andrewjamesworldwide.com
Storing your vacuum sealer
Keep the unit in a flat and safe place,
out of the reach of children.

10
Nothing happens when pressing the vacuum sealer
Make sure the power cord is correctly plugged into the electrical outlet and in the “on” position. Test electrical outlet by plugging in another appliance, if it is not working, please check the circuit breakers or fuses in your home.
Check power cord and plug, make sure they are not damaged in
any way. If damaged, do not use the vacuum sealer.
Air is not removed from the bag completely
To seal properly, the open end of the bag should be resting
entirely inside the vacuum channel area.
Check the sealing strip and gasket beneath the lid for debris and
position. Wipe clean and smooth them back into place.
The bag may have a hole. To test, seal the bag with some air in it, submerge in water, and apply pressure. If bubbles are present it is an indicator that there is a leak and a new bag should be used.
Check if the lid is completely latched into place.
Vacuum sealer bag loses vacuum after being sealed.
Wrinkles, crumbs, grease or liquids may cause leaks along the seal. Reopen the bag, wipe the top inside of the bag and smooth it out along the sealing strip before resealing.
Check if there is moisture or juices from the food present within the bag, you may need to cut open the bag and reseal it, or use an entirely new bag. Foods with excess liquids should be frozen before vacuum sealing.
Items with sharp edges, may have punctured the bag, and
released the vacuum. Cushion sharp edges in the contents of the bag with paper towels.
Troubleshooting

11
UK and EU Guarantee
Your new Andrew James product comes
with a 24 month guarantee and a 2 year
fixed warranty, effective from receipt
confirmation. Your receipt or order
number is required as proof of purchase
date so it is imperative that you keep it
safe. This guarantee only applies if the
item has been used solely for the use
intended, and all instructions have been
followed accordingly. Please note this
product is only for domestic use only and
is not for commercial use.
Abuse of your product will invalidate the
guarantee. Returned goods can only be
accepted if repackaged properly within
the original colour product box, and
presented with the original receipt of
sale / order number. This does not affect
your statutory rights.
Returned products must be cleaned and
returned to us in as close to delivery
condition as possible.
If your product develops a problem
within the first 12 months of the fixed
warranty, we will pay all shipping costs
to have it returned to us. After 12
months the customer will be liable for
the cost of returning the product to us.
We will then pay to have the repaired /
replaced item shipped back to the
customer.
If you wish to return your item for a full
refund, you have the right to do so
within the first 7 days. For our returns
policy please go to:
www.andrewjamesworldwide.com
Customers are responsible for any taxes
applied to our products when they are
shipped outside of the EU.
All of our prices are inclusive of VAT.
Once a product has been returned to
us, we will aim to repair or replace it
within 30 days of receipt.
The guarantee does not cover any
defect arising from improper use,
damage, build-up of lime scale or repair
attempts made by third-parties. Also,
the guarantee does not cover normal
wear and tear of individual parts.
Electrical Information
Always ensure the voltage on the rating
label corresponds to the power supply
where the product is being used.
Class II double insulation. This tool is
double insulated therefore no
earth connection is required.
Precautions should be followed for safe
cable management and connection to
the power supply
If a new mains plug needs to be fitted
follow the fitting instructions supplied
with good quality BS1363A plugs. If in
doubt consult a qualified electrician or

12
appliance repair agent.
Warning! For double insulated product
no connection is made to the Earth
terminal.
Recommended fuse: 3A
If an extension cable is required, a 2 core
or 3 core (earthed) extension can be
used. To avoid overheating the extension
cable should be rated no less than 3A
and be fully unwound before use.
Do not attempt to modify electrical plugs
or sockets or attempt to make an
alternative connection to the electrical
supply.
Disposal of Appliance
Waste Electrical & Electronic Equipment
(WEEE) Waste & Recycling
Disposal of Electrical and Electronic
Waste
Non-household waste. This product must
not be disposed of together with
ordinary household waste.
Separate collection of used products,
batteries and packaging allows the
recovery and recycling of materials.
Reuse of materials helps prevent
environmental pollution and reduces
the demand for raw materials.
Local authorities, retailers and
collection organisations may provide
for separate collection of electrical
products, batteries and packaging.
Safely dispose of the old plug.
Connect the brown lead to the live terminal “L” in the new plug.
Connect the blue lead to the neutral “N” terminal.
13
Contact details
Andrew James UK LTD
Unit 1
P C Henderson Premises
Bowburn North Industrial Estate
Bowburn
Co Durham
DH6 5NG
Customer Service / Technical Support
Telephone: 0844 335 8464
Email: [email protected]
Web: www.andrewjamesworldwide.com
Twitter: @andrewjamesltd
Facebook: Andrew James
Copyright Andrew James
Pour la version française de ce notice veuillez visiter notre site:
www.andrewjamesworldwide.com
Bitte finden Sie die deutsche Version dieser Bedienungsanleitung auf unserer
www.andrewjamesworldwide.com
AJ000164 / AJ000557
09/2016