Embed Size (px)
Citation preview
1
Build Your Own BBQ Island and Save $1,000’s
Go from this to this
Then THIS…. For around $1,000 complete!
My DIY Manual will show you how to complete this is a few days.
2
Thanks for checking into my Sample Manual
www.symphonybbq.com
I’ve spent many months writing this manual to give you all you need to know
“How to Design and Build a BBQ Island”
The information is so explicit, you could even start your own
BBQ Island Design and Build Company.
Look at the following pages, and you determine if this is the best source of information available.
Go to my website:
www.symphonybbq.com
and click on the TV screen, just below the DIY manual.
There’s a YOUTUBE video that will show you how to make a simple joint with the steel studding.
Or click here: https://www.youtube.com/watch?v=6OJJVBJlIhc Then go to Lowes or Home Depot, buy a length of studding and a few
screws for $6. See how easy it is to do, then come back, buy my manual and save yourself thousands of dollars by building your own island.
Did you know that the basic frame materials for an “L” shape Island only cost around $250 ?
There are several ways you came to this page. A Google/Yahoo Search could have brought you here via my website :
www.symphonybbq.com.
OR…via a Pirate Site…. Unfortunately, several unscrupulous customers / competitors have tried to give my DIY
Manual away free to enhance their own business. They are hard to track, so I placed some traps which redirects their
cheating ways to this page. Here I can give away a sample of my manual, plus a link for customers to get the Full
Manual via Honest means. Sorry to be so blunt, but it’s the truth and the only way I’ve found to bypass them.
3
Symphony BBQ Sample Manual
The following pages are purely for example, showing, I hope, how easy it is to follow my instructions and build your own BBQ Island.
The first 2 pages are extracted from the introduction pages. (Pages 5 & 6)
The next 3 pages are extracted from the assembly instructions.
Actual pages in the manual are 12, 13 & 14.
The full manual is 88 pages long…
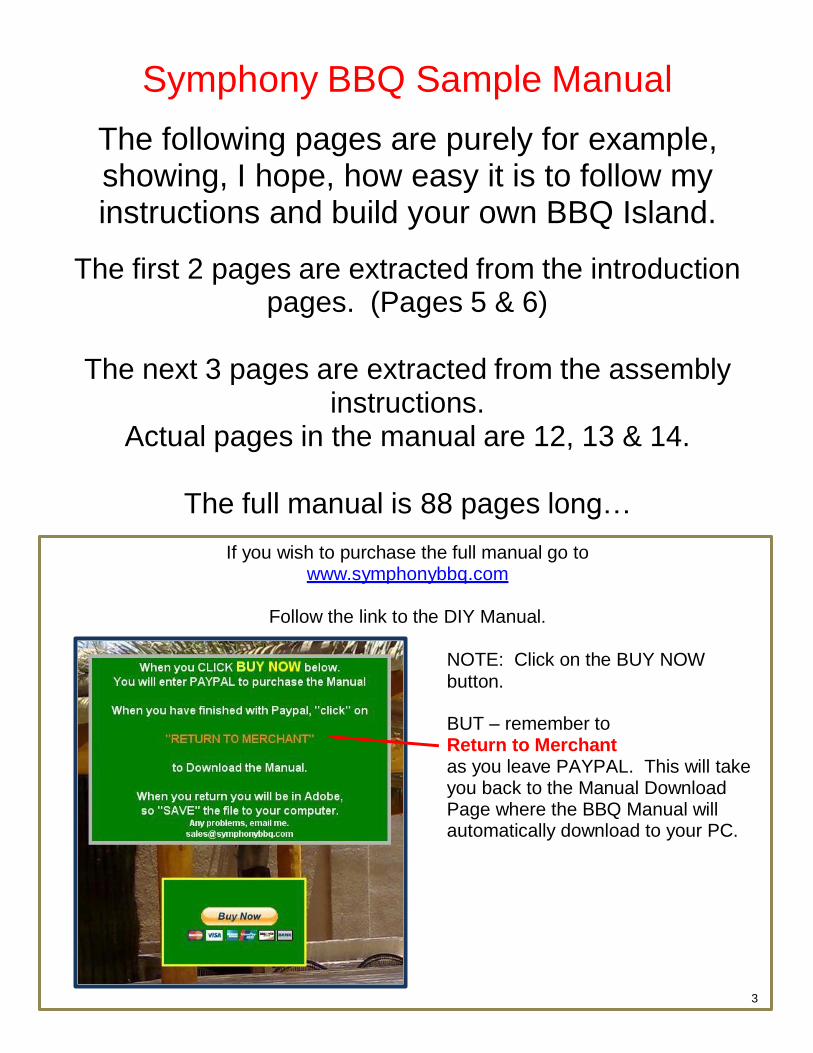
If you wish to purchase the full manual go to www.symphonybbq.com
Follow the link to the DIY Manual.
NOTE: Click on the BUY NOW button.
BUT – remember to Return to Merchant as you leave PAYPAL. This will take you back to the Manual Download Page where the BBQ Manual will automatically download to your PC.
3
Custom Hole Drawing
Barbeque Custom Grill
Barbeque Support Lip
Doors below unit
Square bottom grill
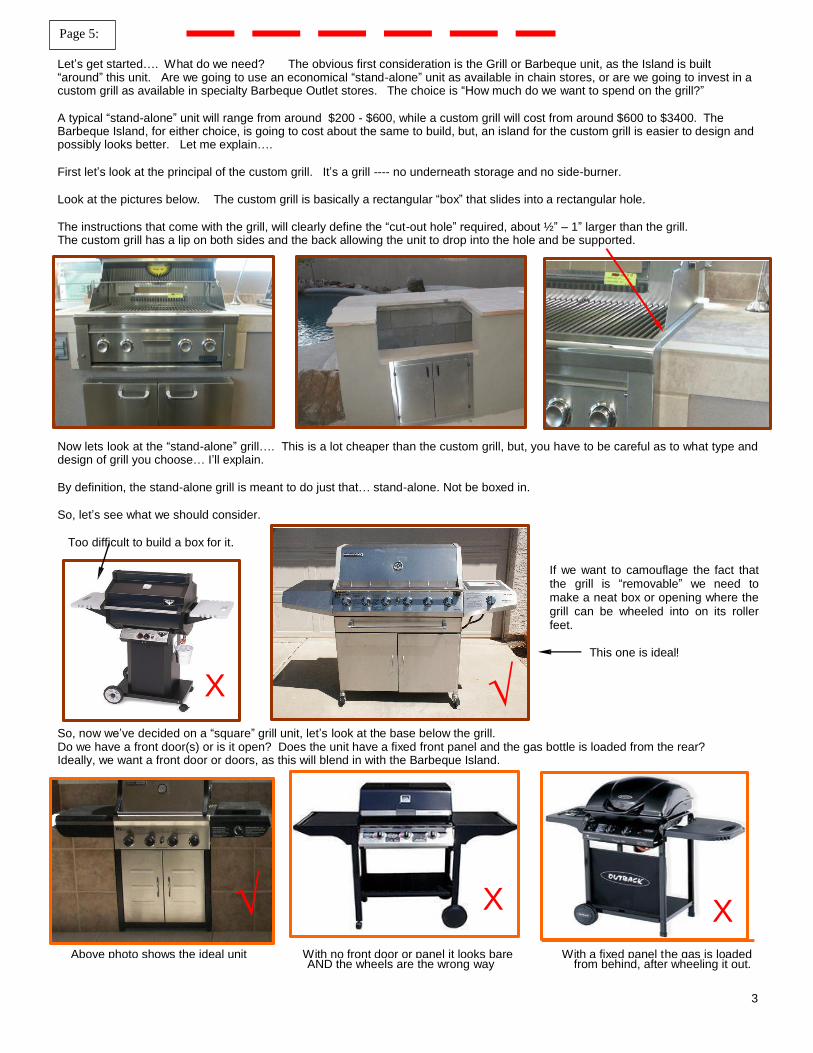
Let’s get started…. What do we need? The obvious first consideration is the Grill or Barbeque unit, as the Island is built “around” this unit. Are we going to use an economical “stand-alone” unit as available in chain stores, or are we going to invest in a custom grill as available in specialty Barbeque Outlet stores. The choice is “How much do we want to spend on the grill?”
A typical “stand-alone” unit will range from around $200 - $600, while a custom grill will cost from around $600 to $3400. The Barbeque Island, for either choice, is going to cost about the same to build, but, an island for the custom grill is easier to design and possibly looks better. Let me explain….
First let’s look at the principal of the custom grill. It’s a grill ---- no underneath storage and no side-burner.
Look at the pictures below. The custom grill is basically a rectangular “box” that slides into a rectangular hole.
The instructions that come with the grill, will clearly define the “cut-out hole” required, about ½” – 1” larger than the grill. The custom grill has a lip on both sides and the back allowing the unit to drop into the hole and be supported.
Now lets look at the “stand-alone” grill…. This is a lot cheaper than the custom grill, but, you have to be careful as to what type and design of grill you choose… I’ll explain.
By definition, the stand-alone grill is meant to do just that… stand-alone. Not be boxed in.
So, let’s see what we should consider.
Too difficult to build a box for it.
If we want to camouflage the fact that the grill is “removable” we need to make a neat box or opening where the grill can be wheeled into on its roller feet.
This one is ideal!
X √
So, now we’ve decided on a “square” grill unit, let’s look at the base below the grill. Do we have a front door(s) or is it open? Does the unit have a fixed front panel and the gas bottle is loaded from the rear? Ideally, we want a front door or doors, as this will blend in with the Barbeque Island.
√ X X
Above photo shows the ideal unit With no front door or panel it looks bare With a fixed panel the gas is loaded AND the wheels are the wrong way from behind, after wheeling it out.
Page 5:
NO
Tools
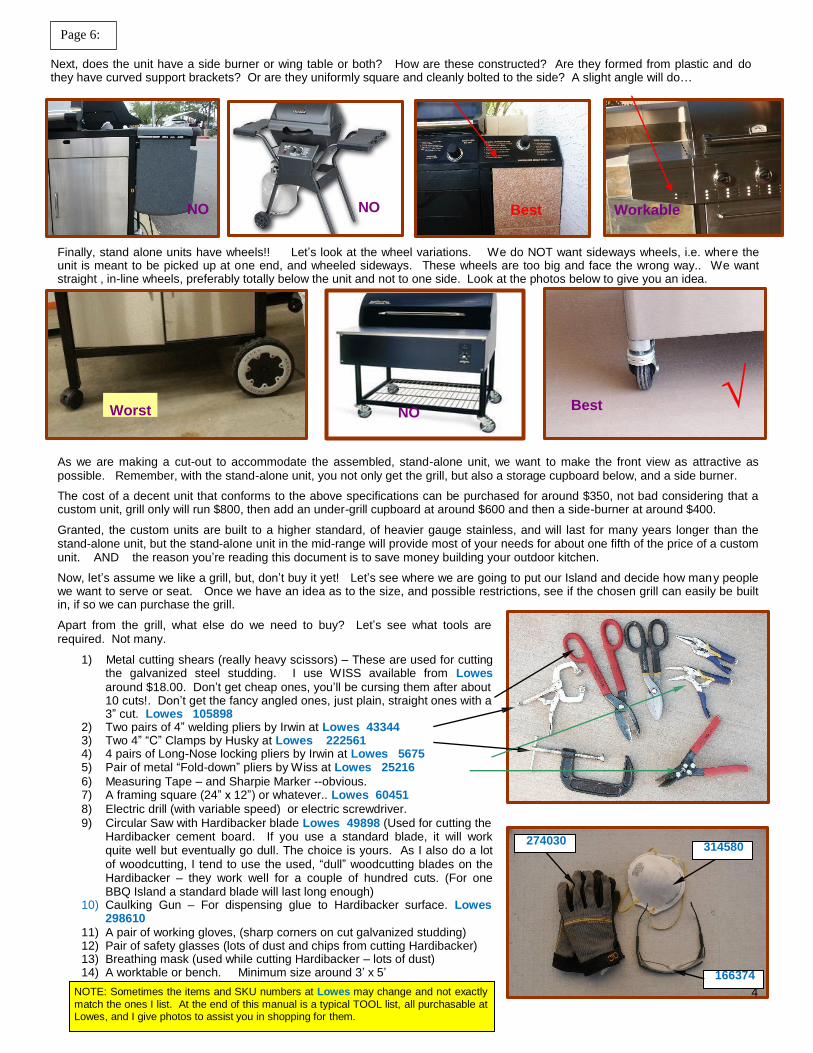
Next, does the unit have a side burner or wing table or both? How are these constructed? Are they formed from plastic and do they have curved support brackets? Or are they uniformly square and cleanly bolted to the side? A slight angle will do…
NO NO Best Workable
Finally, stand alone units have wheels!! Let’s look at the wheel variations. We do NOT want sideways wheels, i.e. wher e the unit is meant to be picked up at one end, and wheeled sideways. These wheels are too big and face the wrong way.. We want straight , in-line wheels, preferably totally below the unit and not to one side. Look at the photos below to give you an idea.
Worst NO
Best √
As we are making a cut-out to accommodate the assembled, stand-alone unit, we want to make the front view as attractive as possible. Remember, with the stand-alone unit, you not only get the grill, but also a storage cupboard below, and a side burner.
The cost of a decent unit that conforms to the above specifications can be purchased for around $350, not bad considering that a custom unit, grill only will run $800, then add an under-grill cupboard at around $600 and then a side-burner at around $400.
Granted, the custom units are built to a higher standard, of heavier gauge stainless, and will last for many years longer than the stand-alone unit, but the stand-alone unit in the mid-range will provide most of your needs for about one fifth of the price of a custom unit. AND the reason you’re reading this document is to save money building your outdoor kitchen.
Now, let’s assume we like a grill, but, don’t buy it yet! Let’s see where we are going to put our Island and decide how man y people we want to serve or seat. Once we have an idea as to the size, and possible restrictions, see if the chosen grill can easily be built in, if so we can purchase the grill.
Apart from the grill, what else do we need to buy? Let’s see what tools are required. Not many.
1) Metal cutting shears (really heavy scissors) – These are used for cutting the galvanized steel studding. I use WISS available from Lowes
around $18.00. Don’t get cheap ones, you’ll be cursing them after about 10 cuts!. Don’t get the fancy angled ones, just plain, straight ones with a 3” cut. Lowes 105898
2) Two pairs of 4” welding pliers by Irwin at Lowes 43344 3) Two 4” “C” Clamps by Husky at Lowes 222561 4) 4 pairs of Long-Nose locking pliers by Irwin at Lowes 5675 5) Pair of metal “Fold-down” pliers by Wiss at Lowes 25216
6) Measuring Tape – and Sharpie Marker --obvious. 7) A framing square (24” x 12”) or whatever.. Lowes 60451
8) Electric drill (with variable speed) or electric screwdriver.
9) Circular Saw with Hardibacker blade Lowes 49898 (Used for cutting theHardibacker cement board. If you use a standard blade, it will work quite well but eventually go dull. The choice is yours. As I also do a lot of woodcutting, I tend to use the used, “dull” woodcutting blades on the Hardibacker – they work well for a couple of hundred cuts. (For one BBQ Island a standard blade will last long enough)
10) Caulking Gun – For dispensing glue to Hardibacker surface. Lowes 298610
11) A pair of working gloves, (sharp corners on cut galvanized studding) 12) Pair of safety glasses (lots of dust and chips from cutting Hardibacker) 13) Breathing mask (used while cutting Hardibacker – lots of dust) 14) A worktable or bench. Minimum size around 3’ x 5’
NOTE: Sometimes the items and SKU numbers at Lowes may change and not exactly
match the ones I list. At the end of this manual is a typical TOOL list, all purchasable at Lowes, and I give photos to assist you in shopping for them.
274030
314580
166374
4
Page 6:
Shears cutting both sides.
Cutting across the studding bend with shears.
5
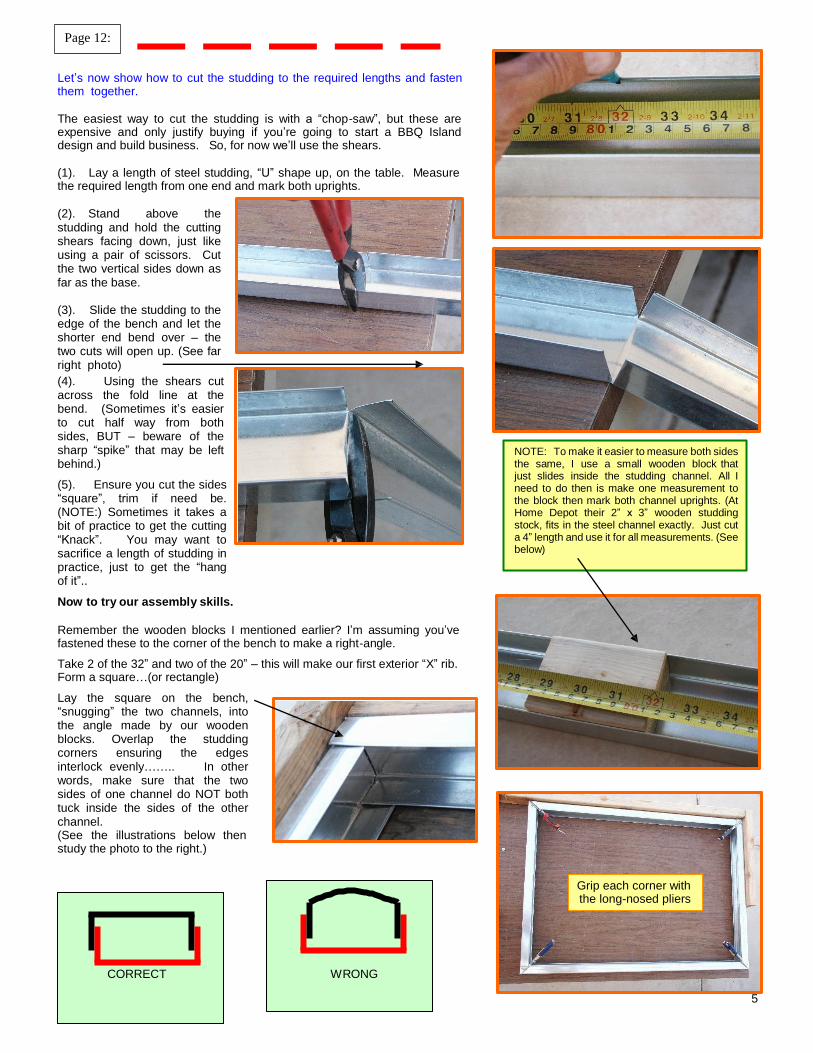
Let’s now show how to cut the studding to the required lengths and fasten them together.
The easiest way to cut the studding is with a “chop-saw”, but these are expensive and only justify buying if you’re going to start a BBQ Island design and build business. So, for now we’ll use the shears.
(1). Lay a length of steel studding, “U” shape up, on the table. Measure the required length from one end and mark both uprights.
(2). Stand above the studding and hold the cutting shears facing down, just like using a pair of scissors. Cut the two vertical sides down as far as the base.
(3). Slide the studding to the edge of the bench and let the shorter end bend over – the two cuts will open up. (See far right photo)
(4). Using the shears cut across the fold line at the bend. (Sometimes it’s easier to cut half way from both sides, BUT – beware of the sharp “spike” that may be left behind.)
(5). Ensure you cut the sides “square”, trim if need be. (NOTE:) Sometimes it takes a bit of practice to get the cutting “Knack”. You may want to sacrifice a length of studding in practice, just to get the “hang of it”..
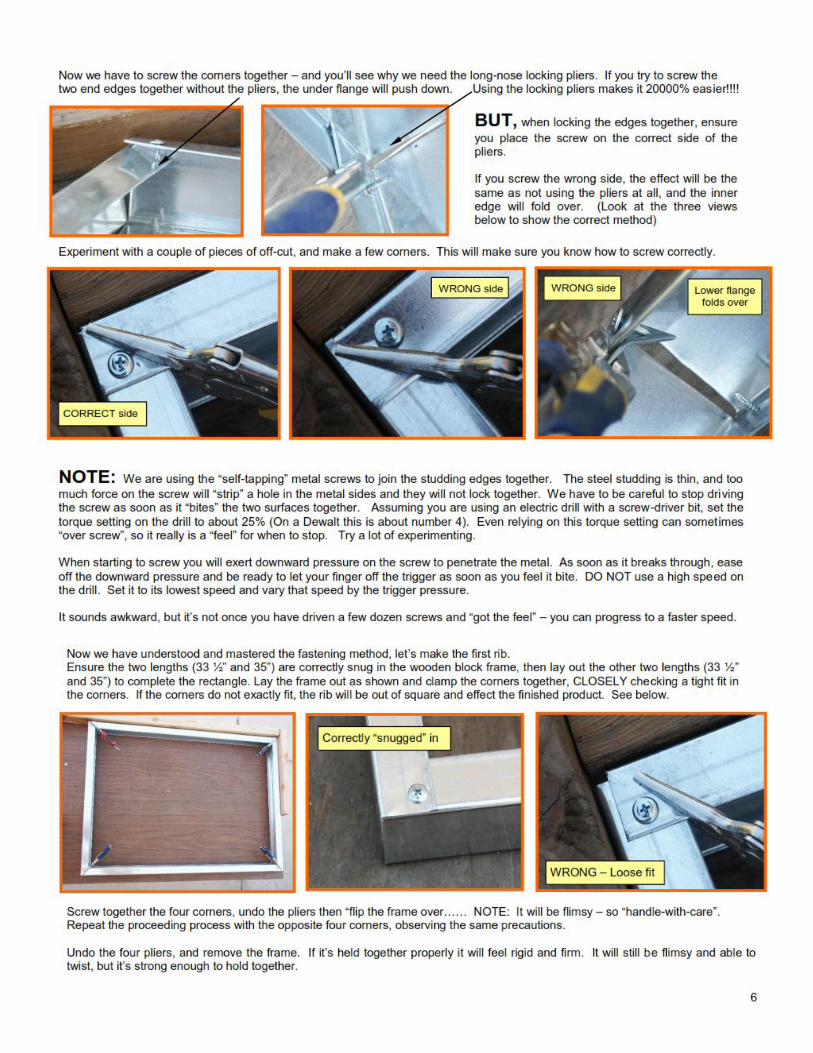
Now to try our assembly skills.
Remember the wooden blocks I mentioned earlier? I’m assuming you’ve fastened these to the corner of the bench to make a right-angle.
Take 2 of the 32” and two of the 20” – this will make our first exterior “X” rib. Form a square…(or rectangle)
Lay the square on the bench, “snugging” the two channels, into the angle made by our wooden blocks. Overlap the studding corners ensuring the edges interlock evenly…….. In other words, make sure that the two sides of one channel do NOT both tuck inside the sides of the other channel. (See the illustrations below then study the photo to the right.)
NOTE: To make it easier to measure both sides the same, I use a small wooden block that just slides inside the studding channel. All I need to do then is make one measurement to the block then mark both channel uprights. (At Home Depot their 2” x 3” wooden studding stock, fits in the steel channel exactly. Just cut a 4” length and use it for all measurements. (See below)
Grip each corner with the long-nosed pliers
CORRECT WRONG
Page 12:
7
8
Back bottom rail in position
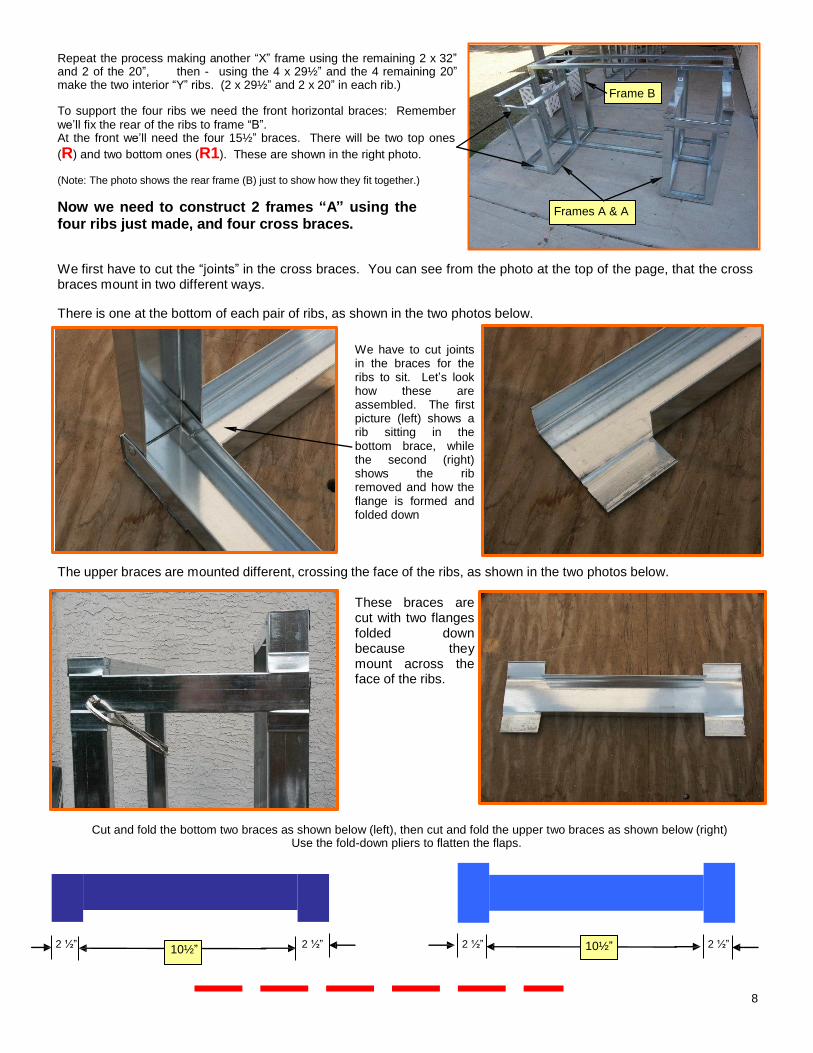
Repeat the process making another “X” frame using the remaining 2 x 32” and 2 of the 20”, then - using the 4 x 29½” and the 4 remaining 20” make the two interior “Y” ribs. (2 x 29½” and 2 x 20” in each rib.)
To support the four ribs we need the front horizontal braces: Remember we’ll fix the rear of the ribs to frame “B”. At the front we’ll need the four 15½” braces. There will be two top ones
(R) and two bottom ones (R1). These are shown in the right photo.
(Note: The photo shows the rear frame (B) just to show how they fit together.)
Now we need to construct 2 frames “A” using the four ribs just made, and four cross braces.
Frame B Frames A & A
We first have to cut the “joints” in the cross braces. You can see from the photo at the top of the page, that the cross braces mount in two different ways.
There is one at the bottom of each pair of ribs, as shown in the two photos below.
We have to cut joints in the braces for the ribs to sit. Let’s look how these are assembled. The first picture (left) shows a rib sitting in the bottom brace, while the second (right) shows the rib removed and how the flange is formed and folded down
The upper braces are mounted different, crossing the face of the ribs, as shown in the two photos below.
These braces are cut with two flanges folded down because they mount across the face of the ribs.
Cut and fold the bottom two braces as shown below (left), then cut and fold the upper two braces as shown below (right)
Use the fold-down pliers to flatten the flaps.
2 ½”
10½” 2 ½” 2 ½” 10½” 2 ½”