Embed Size (px)
Citation preview

DIGITALER TÜRSPION - HANDBUCH(2 - 4)
DIGITAL DOOR VIEWER - USER MANUAL(5 - 7)
VISEUR NUMÉRIQUE - NOTICE D´UTILISATION(8 - 10)
SPIONCINO DIGITALE - MANUALE D´USO(11-13)
DIGITALE DEURSPION - GEBRUIKERSHANDLEIDING(14 - 16)
DIGITALNO KUKALO - NAVODILA ZA UPORABO(17 - 19)
P R I RU Č N I K Z A KO R I Š T E N J E D I G I TA L N O G Š P I J U N A Z A V R ATA
(20 - 22)
PODRĘCZNIK UŻYTKOWNIKAWIZJERA CYFROWEGO
(23 - 25)
Digital Door Viewer
User Manual
1.Power Button:Press and release the power button, then the unitwill continue working for the next 10 seconds.
2.Light Indicator:If the light indicator turns on, please replace thebatteries.
Fits any door:38-110mm (1.50"-4.33") thickFits any barrel hole: 14-22mmSensor: 0.3 Mega Pixel CMOSLCD screen: 3.2" TFTPower source: 2 AAA BatteriesSize: 125(W)x68(H)x15(D)mmWeight: 160g
Operation:
Specification:
Installation and replacement of the batteries
1.Slide the cover left to open.2.Install the batteries in accordance with the +/- sign.3.Reverse this process to close the cover.

A 2
DEINSETZEN UND AUSTAUSCHEN DER BATTERIE1. Schieben Sie die Abdeckung nach links, um diese zu öffnen.
2. Setzen Sie die Batterien ein. Achten Sie dabei auf die Polarität (+/-) der Batterien.
3. Setzen Sie die Abdeckung wieder auf und schließen Sie diese.
BETRIEB:
1. Ein-/Aus-Schalter: Drücken Sie kurz den Ein-/Aus-Schalter und das Gerät wird für die nächsten 10 Sekunden eingeschaltet sein.
2. Warnlämpchen: Wenn das Warnlämpchen aufleuchtet, bitte Batterien austauschen.
SPEZIFIKATION:Passt zu jeder Tür: 38 - 110 mm (1,50 - 4,33 Zoll)
Dicke passt zu jeder Hülsenöffnung: 14 - 22 mm
Sensor: 0,3 Megapixel CMOS
LCD-Bildschirm: 3,2 Zoll TFT
Stromquelle: 2 AAA-Batterien
Abmessungen 125 (B) x 68 (H) x 15 (T) mm
Gewicht: 160 g
Digital Door Viewer
User Manual
1.Power Button:Press and release the power button, then the unitwill continue working for the next 10 seconds.
2.Light Indicator:If the light indicator turns on, please replace thebatteries.
Fits any door:38-110mm (1.50"-4.33") thickFits any barrel hole: 14-22mmSensor: 0.3 Mega Pixel CMOSLCD screen: 3.2" TFTPower source: 2 AAA BatteriesSize: 125(W)x68(H)x15(D)mmWeight: 160g
Operation:
Specification:
Installation and replacement of the batteries
1.Slide the cover left to open.2.Install the batteries in accordance with the +/- sign.3.Reverse this process to close the cover.

A 3
ACHTUNG:1. Bitte lesen Sie vor Verwendung die Bedienungsanleitung.2. Nehmen Sie die Kamera oder das Gehäuse NICHT auseinander.3. Behandeln Sie das Gerät vorsichtig4. Bitte lösen Sie die Schraube an der Unterseite des digitalen Türspions, nehmen Sie die Halteplatte heraus, entfernen Sie die Kunststoffabdeckung darauf und bereiten Sie die Installation vor.
BATTERIE:Sorgen Sie für eine korrekte Entsorgung gebrauchter Batterien.Batterien NICHT vergraben oder verbrennen und von Kindern fernhalten. NICHT verschlucken. Die Batterien NICHT wieder aufladenoder auseinander nehmen.
INHALT DER PACKUNG:
1. DIGITALER TÜRSPION2. BEFESTIGUNGSSCHRAUBE 1 STÜCK3. 2x AAA BATTERIEN4. HALTEPLATTE
5. UNTERLEGSCHEIBE6. KAMERA7. VERRIEGELUNGSHÜLSE8. BEFESTIGUNGSWERKZEUG
②
⑤
⑥
① ③
AA
A
AA
A
Attention:
Battery:
1.Please read the instruction manual before use.
2.DO NOT disassemble the camera or the mainbody.3.Handle with care.
4.Please unscrew from the bottom of the digital doorviewer, take out the holding plate
and prepare to install.and take off the
plastic cover on it
Dispose of used batteries appropriately, DO NOT bury orburn the batteries and keep them away from children. DONOT swallow. DO NOT re-charge or disassemble thebatteries.
Package Contents:
④
⑧
Digital door viewer①
Before installation:
Prior to mounting the peephole viewer, please make sureyou have installed the batteries included.
Installation:
1. Replace the existing door viewer or drill a 14mm holein the door at eye level. Insert the camera from theoutside while inserting the washer between the back ofthe lens and the door. Make sure that the arrow mark onfront of the camera points upwards.(FIG. 1)
2 AAA batteries③
Washer⑤
Locking barrel⑦
②Locking bolt 1 pc
Holding plate④
Camera⑥
Tightening tool⑧
2. Fit the holding plate over the end of the lens then screwthe locking barrel on to the threaded part of the cameraand tighten(a tightening tool is provided), this will holdthe plate to the door.Make sure that the arrow on theplate points upwards.(FIG. 2)
3. The data wire should be fully plugged in at the back ofthe screen; excess wire should be gently placed intothe groove at the back of the screen.
4. Hook the over the bracket at the topof the locking plate and secure the digital door viewercase with the locking bolt.
digital door viewer
(FIG. 3)
⑦FIG. 1
FIG. 2 FIG. 4
FIG. 3

A 4
VOR DER INSTALLATION:Achten Sie vor der Installation darauf, dass Sie die mitgeliefertenBatterien eingelegt haben.
INSTALLATION:1. Nehmen Sie den vorhandenen Türspion ab oder bohren Sie auf Augenhöhe ein Loch mit 14 mm Durchmesser in die Tür. Führen Sie die Kamera von außen ein. Platzieren Sie dabei die Unterlegscheibe zwischen der Rückseite des Objektivs und der Tür. Achten Sie darauf, dass die Pfeilmarkierung an der Vorderseite der Kamera nach oben zeigt. (Abb. 1)
2. Setzen Sie die Halteplatte über das Ende des Objektivs und schrauben Sie die Verriegelungshülse auf das Gewinde der Kamera - festziehen (ein Befestigungswerkzeug ist im Lieferumfang enthalten). Dadurch wird die Platte an der Tür befestigt. Achten Sie darauf, dass die Pfeilmarkierung an der Platte nach oben zeigt. (Abb. 2)
3. Das Kabel der Kamera muss mit der Buchse auf der Rückseite des Bildschirms verbunden werden. Verstauen Sie überschüssiges Kabel in der Vertiefung an der Rückseite des Bildschirms.
4. Hängen Sie den digitalen Türspion über den Bügel an der Oberseite der Halteplatte und sichern Sie das Gehäuse des digitalen Türspions mit der Befestigungschraube. (Abb. 3)
②
⑤
⑥
① ③
AA
A
AA
A
Attention:
Battery:
1.Please read the instruction manual before use.
2.DO NOT disassemble the camera or the mainbody.3.Handle with care.
4.Please unscrew from the bottom of the digital doorviewer, take out the holding plate
and prepare to install.and take off the
plastic cover on it
Dispose of used batteries appropriately, DO NOT bury orburn the batteries and keep them away from children. DONOT swallow. DO NOT re-charge or disassemble thebatteries.
Package Contents:
④
⑧
Digital door viewer①
Before installation:
Prior to mounting the peephole viewer, please make sureyou have installed the batteries included.
Installation:
1. Replace the existing door viewer or drill a 14mm holein the door at eye level. Insert the camera from theoutside while inserting the washer between the back ofthe lens and the door. Make sure that the arrow mark onfront of the camera points upwards.(FIG. 1)
2 AAA batteries③
Washer⑤
Locking barrel⑦
②Locking bolt 1 pc
Holding plate④
Camera⑥
Tightening tool⑧
2. Fit the holding plate over the end of the lens then screwthe locking barrel on to the threaded part of the cameraand tighten(a tightening tool is provided), this will holdthe plate to the door.Make sure that the arrow on theplate points upwards.(FIG. 2)
3. The data wire should be fully plugged in at the back ofthe screen; excess wire should be gently placed intothe groove at the back of the screen.
4. Hook the over the bracket at the topof the locking plate and secure the digital door viewercase with the locking bolt.
digital door viewer
(FIG. 3)
⑦FIG. 1
FIG. 2 FIG. 4
FIG. 3

A 5
ENINSTALLATION AND REPLACEMENT OF THE BATTERIES1. Slide the cover left to open.
2. Install the batteries in accordance with hte (+/-) sign.
3. Reverse this process to close the cover.
OPERATION:
1. Power Button: Press and release the power button, then the unit will continue working for the next 10 seconds.
2. Light Indicator: If the light indicator turns on, please replace the batteries.
SPECIFICATION:Fits any door: 38 - 110 mm (1,50“ - 4,33“) thick
Fits any barrel hole: 14 - 22 mm
Sensor: 0,3 Mega Pixel CMOS
LCD-Screen: 3,2“ TFT
Power source: 2 AAA-Batterien
Size: 125 (W) x 68 (H) x 15 (D) mm
Weight: 160 g
Digital Door Viewer
User Manual
1.Power Button:Press and release the power button, then the unitwill continue working for the next 10 seconds.
2.Light Indicator:If the light indicator turns on, please replace thebatteries.
Fits any door:38-110mm (1.50"-4.33") thickFits any barrel hole: 14-22mmSensor: 0.3 Mega Pixel CMOSLCD screen: 3.2" TFTPower source: 2 AAA BatteriesSize: 125(W)x68(H)x15(D)mmWeight: 160g
Operation:
Specification:
Installation and replacement of the batteries
1.Slide the cover left to open.2.Install the batteries in accordance with the +/- sign.3.Reverse this process to close the cover.

A 6
ATTENTION:1. Please read the instruction manual before use.2. DO NOT disassemble the camera or the mainbody.3. Handle with care.4. Please unscrew from the bottom of the digital door viewer, take out the holding plate and take off the plastic cover on it and prepare to install.
BATTERY:Dispose of used batteries appropriately, DO NOT bury or burn the batteriesand keep them away from children. DO NOT swallow. DO NOT re-charge ordisassemble the batteries.
PACKAGE CONTENTS:
1. DIGITAL DOOR VIEWER2. LOCKING BOLT 1 PC3. 2x AAA BATTERIES4. HOLDING PLATE
5. WASHER6. CAMERA7. LOCKING BARREL8. TIGHTENING TOOL
②
⑤
⑥
① ③
AA
A
AA
A
Attention:
Battery:
1.Please read the instruction manual before use.
2.DO NOT disassemble the camera or the mainbody.3.Handle with care.
4.Please unscrew from the bottom of the digital doorviewer, take out the holding plate
and prepare to install.and take off the
plastic cover on it
Dispose of used batteries appropriately, DO NOT bury orburn the batteries and keep them away from children. DONOT swallow. DO NOT re-charge or disassemble thebatteries.
Package Contents:
④
⑧
Digital door viewer①
Before installation:
Prior to mounting the peephole viewer, please make sureyou have installed the batteries included.
Installation:
1. Replace the existing door viewer or drill a 14mm holein the door at eye level. Insert the camera from theoutside while inserting the washer between the back ofthe lens and the door. Make sure that the arrow mark onfront of the camera points upwards.(FIG. 1)
2 AAA batteries③
Washer⑤
Locking barrel⑦
②Locking bolt 1 pc
Holding plate④
Camera⑥
Tightening tool⑧
2. Fit the holding plate over the end of the lens then screwthe locking barrel on to the threaded part of the cameraand tighten(a tightening tool is provided), this will holdthe plate to the door.Make sure that the arrow on theplate points upwards.(FIG. 2)
3. The data wire should be fully plugged in at the back ofthe screen; excess wire should be gently placed intothe groove at the back of the screen.
4. Hook the over the bracket at the topof the locking plate and secure the digital door viewercase with the locking bolt.
digital door viewer
(FIG. 3)
⑦FIG. 1
FIG. 2 FIG. 4
FIG. 3

A 7
5. WASHER6. CAMERA7. LOCKING BARREL8. TIGHTENING TOOL
BEFORE INSTALLATION:Prior to mounting the peephole viewer, please make sure you haveinstalled the batteries included.
INSTALLATION:
1. Replace the existing door viewer or drill a 14 mm hole in the door at eye level. Insert the camera from the outside while inserting the washer between the back of the lens and the door. Make sure that the arrow mark on front on the camera points upwards. (FIG. 1)
2. Fit the holding plate over the end of the lens then screw the locking barrel on to the threaded part of the camera an tighten (a tightening tool is provided), this will hold the plate to the door. Make sure that the arrow on the plate points upwards. (FIG. 2)
3. The data wire should be fully plugged in at the back of the screen; excess wire should be gently placed into the groove at the back of the screen.
4. Hook the digital door viewer over the bracket at the top of the locking plate and secure the digital door viewer case with the locking bolt. (FIG. 3)
②
⑤
⑥
① ③
AA
A
AA
A
Attention:
Battery:
1.Please read the instruction manual before use.
2.DO NOT disassemble the camera or the mainbody.3.Handle with care.
4.Please unscrew from the bottom of the digital doorviewer, take out the holding plate
and prepare to install.and take off the
plastic cover on it
Dispose of used batteries appropriately, DO NOT bury orburn the batteries and keep them away from children. DONOT swallow. DO NOT re-charge or disassemble thebatteries.
Package Contents:
④
⑧
Digital door viewer①
Before installation:
Prior to mounting the peephole viewer, please make sureyou have installed the batteries included.
Installation:
1. Replace the existing door viewer or drill a 14mm holein the door at eye level. Insert the camera from theoutside while inserting the washer between the back ofthe lens and the door. Make sure that the arrow mark onfront of the camera points upwards.(FIG. 1)
2 AAA batteries③
Washer⑤
Locking barrel⑦
②Locking bolt 1 pc
Holding plate④
Camera⑥
Tightening tool⑧
2. Fit the holding plate over the end of the lens then screwthe locking barrel on to the threaded part of the cameraand tighten(a tightening tool is provided), this will holdthe plate to the door.Make sure that the arrow on theplate points upwards.(FIG. 2)
3. The data wire should be fully plugged in at the back ofthe screen; excess wire should be gently placed intothe groove at the back of the screen.
4. Hook the over the bracket at the topof the locking plate and secure the digital door viewercase with the locking bolt.
digital door viewer
(FIG. 3)
⑦FIG. 1
FIG. 2 FIG. 4
FIG. 3

A 8
INSTALLATION ET REMPLACEMENT DES PILES1. Faire glisser le couvercle pour ouvrir.
2. Installer les piles en respectant les pôles (+/-).
3. Refermer le couvercle.
MANUAL D´UTILISATEUR D´UN VISEUR NUMÉRIQUE DE PORTE:
1. Bouton marche: Presser et relâcher le bouton marche, l´appareil se mettra en route dans les 10 secondes.
2. Indicateur lumineux: Si l´indicateur lumineux s´allum, il faut remplacer les piles.
SPÉCIFICATIONS:Convient á toutes portes: 38 - 110 mm d´épaisseur
Convient á tout cylindre: 14 - 22 mm
Détecteur: 0,3 méga Pixel CMOS
Ecran LCD: 3,2“ TFT
Alimentation: 2 piles AAA
Taille: 125 (l) x 68 (h) x 15 (p) mm
Poids: 160 g
FR
Digital Door Viewer
User Manual
1.Power Button:Press and release the power button, then the unitwill continue working for the next 10 seconds.
2.Light Indicator:If the light indicator turns on, please replace thebatteries.
Fits any door:38-110mm (1.50"-4.33") thickFits any barrel hole: 14-22mmSensor: 0.3 Mega Pixel CMOSLCD screen: 3.2" TFTPower source: 2 AAA BatteriesSize: 125(W)x68(H)x15(D)mmWeight: 160g
Operation:
Specification:
Installation and replacement of the batteries
1.Slide the cover left to open.2.Install the batteries in accordance with the +/- sign.3.Reverse this process to close the cover.

A 9
ATTENTION:1. Veuillez lire le manuel d´instruction avant l´emploi.2. NE PASDEMONTER l´appareil ni le corps principal.3. Manipuler avec soin.4. Dévisser le bas du capot du viseur numérique, retirer la plaque et enlever, le revêtement en plastique, puis préparer l´installation.
PILES:Veuillez recycler les piles usagées. NE JAMAIS brûler ni enterrer les piles.Les garder hors portée des enfants. NE PAS avaler. NE PAS recharger nidémonter les piles.
CONTENU DU LOT:
1. VISEUR NUMÉRIQUE2. ECROU DE FIXATION 1 PC3. 2x PILES AAA4. PLAQUE DE FIXATION
5. JOINT6. APPAREIL7. CYLINDRE DE FIXATION8. OUTIL DE SERRAGE
②
⑤
⑥
① ③
AA
A
AA
A
Attention:
Battery:
1.Please read the instruction manual before use.
2.DO NOT disassemble the camera or the mainbody.3.Handle with care.
4.Please unscrew from the bottom of the digital doorviewer, take out the holding plate
and prepare to install.and take off the
plastic cover on it
Dispose of used batteries appropriately, DO NOT bury orburn the batteries and keep them away from children. DONOT swallow. DO NOT re-charge or disassemble thebatteries.
Package Contents:
④
⑧
Digital door viewer①
Before installation:
Prior to mounting the peephole viewer, please make sureyou have installed the batteries included.
Installation:
1. Replace the existing door viewer or drill a 14mm holein the door at eye level. Insert the camera from theoutside while inserting the washer between the back ofthe lens and the door. Make sure that the arrow mark onfront of the camera points upwards.(FIG. 1)
2 AAA batteries③
Washer⑤
Locking barrel⑦
②Locking bolt 1 pc
Holding plate④
Camera⑥
Tightening tool⑧
2. Fit the holding plate over the end of the lens then screwthe locking barrel on to the threaded part of the cameraand tighten(a tightening tool is provided), this will holdthe plate to the door.Make sure that the arrow on theplate points upwards.(FIG. 2)
3. The data wire should be fully plugged in at the back ofthe screen; excess wire should be gently placed intothe groove at the back of the screen.
4. Hook the over the bracket at the topof the locking plate and secure the digital door viewercase with the locking bolt.
digital door viewer
(FIG. 3)
⑦FIG. 1
FIG. 2 FIG. 4
FIG. 3

A 10
AVANT L´INSTALLATION:Avant de monter le viseur, vérifier que les piles livrées soient bien misesen place.
INSTALLATION:
1. Remplacer le viseur existant ou percer un trou de 14 mm dans la porte au niveau des yeux. Insérer l´appareil depuis l´extérieur tout en insérant la rondelle entre le dos de la lentille et la porte. S´assurer que fléche sur l´avant de l´appareil pointe vers le haut. (FIG. 1)
2. Placer la plaque de retenue sur l´extrémité de la lentille, puis visser le cylindre de blocage sur la partie filetée de l´appareil, et serrer (un outil de serrage est fourni), cela fera tenir la plaque su la porte. S´assurer que la fléche sur la plaque pointe vers le haut. (FIG. 2)
3. Le câble des données doit étre totalement enfoncé á l´arriére de l´ecran; le câble en excédent sera placé doucement dans le creux au dos d l´ecran
4. Accrocher le viseur numérique sur le collier au sommet de la plaque de verrouillage et fixer le boítier du viseur numérique avec l´ecrou de fixation. (FIG. 3)
②
⑤
⑥
① ③
AA
A
AA
A
Attention:
Battery:
1.Please read the instruction manual before use.
2.DO NOT disassemble the camera or the mainbody.3.Handle with care.
4.Please unscrew from the bottom of the digital doorviewer, take out the holding plate
and prepare to install.and take off the
plastic cover on it
Dispose of used batteries appropriately, DO NOT bury orburn the batteries and keep them away from children. DONOT swallow. DO NOT re-charge or disassemble thebatteries.
Package Contents:
④
⑧
Digital door viewer①
Before installation:
Prior to mounting the peephole viewer, please make sureyou have installed the batteries included.
Installation:
1. Replace the existing door viewer or drill a 14mm holein the door at eye level. Insert the camera from theoutside while inserting the washer between the back ofthe lens and the door. Make sure that the arrow mark onfront of the camera points upwards.(FIG. 1)
2 AAA batteries③
Washer⑤
Locking barrel⑦
②Locking bolt 1 pc
Holding plate④
Camera⑥
Tightening tool⑧
2. Fit the holding plate over the end of the lens then screwthe locking barrel on to the threaded part of the cameraand tighten(a tightening tool is provided), this will holdthe plate to the door.Make sure that the arrow on theplate points upwards.(FIG. 2)
3. The data wire should be fully plugged in at the back ofthe screen; excess wire should be gently placed intothe groove at the back of the screen.
4. Hook the over the bracket at the topof the locking plate and secure the digital door viewercase with the locking bolt.
digital door viewer
(FIG. 3)
⑦FIG. 1
FIG. 2 FIG. 4
FIG. 3

A 11
INSTALLAZIONE E SOSTITUZIONE DELLE BATTERIE1. Far scorrere il coperchio verso sinistra per aprire il vano batterie.
2. Installare le batterie facendo attenzione alla polarità (+/-). 3. Per richiudere il coperchio, farlo scorrere nella direzione opposta.
FUNZIONAMENTO:
1. Pulsante Accensione: Premere e rilasciare il pulsante di accensione; l‘unità continua a funzionare per 10 secondi.
2. Spia luminosa: Se la spia si accende, sostituire le batterie.
SPECIFICHE:
Adatto per qualsiasi porta: spessore 38-110mm
Adatto per qualsiasi foro: 14-22 mm
Sensore: 0,3 Mega Pixel CMOS Display LCD: 3.2» TFT
Alimentazione: 2 Batterie AAA
125 (L) x 68 (H) x 15 (P) mm
Peso: 160 g
IT
Digital Door Viewer
User Manual
1.Power Button:Press and release the power button, then the unitwill continue working for the next 10 seconds.
2.Light Indicator:If the light indicator turns on, please replace thebatteries.
Fits any door:38-110mm (1.50"-4.33") thickFits any barrel hole: 14-22mmSensor: 0.3 Mega Pixel CMOSLCD screen: 3.2" TFTPower source: 2 AAA BatteriesSize: 125(W)x68(H)x15(D)mmWeight: 160g
Operation:
Specification:
Installation and replacement of the batteries
1.Slide the cover left to open.2.Install the batteries in accordance with the +/- sign.3.Reverse this process to close the cover.

A 12
ATTENZIONE:1. Leggere le presenti instuzioni prima dell´uso.2. NON smontare la videocamera o il corpo del dispositivo.3. Trattare con cura.4. Svitare la vite sul fondo dello spioncino digitale, estrarre la piastrina di fermo e rimuovere la pellicola di plastica per predisporre l’installazione.
BATTERIE:Smaltire correttamente le batterie usate, NON interrarle o bruciarle e tenerle lontano dalla portata dei bambini. NON ingerire. NON ricaricare o disassemblare le batterie.
CONTENUTO DELLA CONFEZIONE:
1. SPIONCINO DIGITALE2. BULLONE BLOCCAGGIO 1 PZ 3. 2 BATTERIE AAA 4. PIASTRINA DI FERMO
5. RONDELLA6. VIDEOCAMERA7. SBARRA BLOCCAGGIO 8. STRUMENTO DI SERRAGGIO
②
⑤
⑥
① ③
AA
A
AA
A
Attention:
Battery:
1.Please read the instruction manual before use.
2.DO NOT disassemble the camera or the mainbody.3.Handle with care.
4.Please unscrew from the bottom of the digital doorviewer, take out the holding plate
and prepare to install.and take off the
plastic cover on it
Dispose of used batteries appropriately, DO NOT bury orburn the batteries and keep them away from children. DONOT swallow. DO NOT re-charge or disassemble thebatteries.
Package Contents:
④
⑧
Digital door viewer①
Before installation:
Prior to mounting the peephole viewer, please make sureyou have installed the batteries included.
Installation:
1. Replace the existing door viewer or drill a 14mm holein the door at eye level. Insert the camera from theoutside while inserting the washer between the back ofthe lens and the door. Make sure that the arrow mark onfront of the camera points upwards.(FIG. 1)
2 AAA batteries③
Washer⑤
Locking barrel⑦
②Locking bolt 1 pc
Holding plate④
Camera⑥
Tightening tool⑧
2. Fit the holding plate over the end of the lens then screwthe locking barrel on to the threaded part of the cameraand tighten(a tightening tool is provided), this will holdthe plate to the door.Make sure that the arrow on theplate points upwards.(FIG. 2)
3. The data wire should be fully plugged in at the back ofthe screen; excess wire should be gently placed intothe groove at the back of the screen.
4. Hook the over the bracket at the topof the locking plate and secure the digital door viewercase with the locking bolt.
digital door viewer
(FIG. 3)
⑦FIG. 1
FIG. 2 FIG. 4
FIG. 3

A 13
5. RONDELLA6. VIDEOCAMERA7. SBARRA BLOCCAGGIO 8. STRUMENTO DI SERRAGGIO
OPERAZIONI PRELIMINARI ALL’INSTALLAZIONE:Prima di montare lo spioncino digitale, accertarsi di avere installato le batterie fornite in dotazione.
INSTALLAZIONE:
1. Sostituire lo spioncino esistente oppure praticare un foro di 14 mm nella porta, all’altezza degli occhi. Inserire la videocamera dall’esterno, inserendo la rondella tra la parte posteriore della lente e la porta. Accertarsi che la freccia sulla parte frontale della videocamera sia rivolta verso l’alto. (FIG. 1)
2. Posizionare la piastrina di fermo sopra l’estremità della lente, quindi avvitare la sbarra di bloccaggio sulla parte filettata della videocamera e stringere (nella confezione è incluso un apposito strumento) per fissare saldamente la piastrina sulla porta. Accertarsi che la freccia sulla piastrina sia rivolta verso l’alto (FIG. 2).
3. Il cavo dati deve essere completamente inserito sul retro dello schermo; il cavo in eccesso deve essere inserito con cautela nella scanalatura sul retro dello schermo.
4. Agganciare lo spioncino digitale sulla staffa sopra la piastrina di fermo e assicurare l’alloggiamento dello spioncino con il bullone di bloccaggio.(FIG. 3)
②
⑤
⑥
① ③
AA
A
AA
A
Attention:
Battery:
1.Please read the instruction manual before use.
2.DO NOT disassemble the camera or the mainbody.3.Handle with care.
4.Please unscrew from the bottom of the digital doorviewer, take out the holding plate
and prepare to install.and take off the
plastic cover on it
Dispose of used batteries appropriately, DO NOT bury orburn the batteries and keep them away from children. DONOT swallow. DO NOT re-charge or disassemble thebatteries.
Package Contents:
④
⑧
Digital door viewer①
Before installation:
Prior to mounting the peephole viewer, please make sureyou have installed the batteries included.
Installation:
1. Replace the existing door viewer or drill a 14mm holein the door at eye level. Insert the camera from theoutside while inserting the washer between the back ofthe lens and the door. Make sure that the arrow mark onfront of the camera points upwards.(FIG. 1)
2 AAA batteries③
Washer⑤
Locking barrel⑦
②Locking bolt 1 pc
Holding plate④
Camera⑥
Tightening tool⑧
2. Fit the holding plate over the end of the lens then screwthe locking barrel on to the threaded part of the cameraand tighten(a tightening tool is provided), this will holdthe plate to the door.Make sure that the arrow on theplate points upwards.(FIG. 2)
3. The data wire should be fully plugged in at the back ofthe screen; excess wire should be gently placed intothe groove at the back of the screen.
4. Hook the over the bracket at the topof the locking plate and secure the digital door viewercase with the locking bolt.
digital door viewer
(FIG. 3)
⑦FIG. 1
FIG. 2 FIG. 4
FIG. 3

A 14
NLPLAATSEN EN VERVANGEN VAN BATTERIJEN1. Schuif het klepje naar links om het te openen.
2. Plaats de batterijen overeenkomstig het +/- teken.
3. Sluit het klepje.
BEDIENING:
1. Aan-knop: Duw op de aan-knop, het toestel zal de volgende 10 seconden werken.
2. Waarschuwingslampje: Als het waarschuwingslampje brandt, is het tijd om de batterijen te vervangen.
TECHNISCHE GEGEVENS:
Past op elke deur: 38-110 mm
dik Past in elk deurspionnetje: 14-22 mm
Sensor: 0,3 Mega pixel CMOS
LCD-scherm: 3.2» TFT
Stroombron: 2 AAA batterijen
Afmetingen: 125 (B) x 68 (H) x 15 (D) mm Gewicht: 160 g
Digital Door Viewer
User Manual
1.Power Button:Press and release the power button, then the unitwill continue working for the next 10 seconds.
2.Light Indicator:If the light indicator turns on, please replace thebatteries.
Fits any door:38-110mm (1.50"-4.33") thickFits any barrel hole: 14-22mmSensor: 0.3 Mega Pixel CMOSLCD screen: 3.2" TFTPower source: 2 AAA BatteriesSize: 125(W)x68(H)x15(D)mmWeight: 160g
Operation:
Specification:
Installation and replacement of the batteries
1.Slide the cover left to open.2.Install the batteries in accordance with the +/- sign.3.Reverse this process to close the cover.

A 15
OPGELET:1. Lees deze handleiding aandachtig voor u het toestel gebruikt.2. Demonteer NOOIT de camera of de behuizing.3. Spring voorzichtig met het toestel om.4. Draai los aan de onderkant van de digitale deurspion, neem het bevestigings plaatje en verwijder de plastic bescherming. Nu is alles klaar voor de installatie.
BATTERIJ:Verwijder batterijen conform de voorschriften, begraaf of verbrand batterijen NOOIT en houd ze uit de buurt van kinderen. Slik ze NIET in. Herlaad de batterijen NIET of haal ze NIET uit elkaar.
INHOUD VAN DE VERPAKKING:
1. DIGITALE DEURSPION2. BORGPEN 1 ST.3. 2 AAA BATTERIJEN4. BEVESTIGINGSPLAATJE
5. SLUITRING6. CAMERA7. VERGRENDELBOUT8. GEREEDSCHAP OM VAST TE DRAAIEN
②
⑤
⑥
① ③
AA
A
AA
A
Attention:
Battery:
1.Please read the instruction manual before use.
2.DO NOT disassemble the camera or the mainbody.3.Handle with care.
4.Please unscrew from the bottom of the digital doorviewer, take out the holding plate
and prepare to install.and take off the
plastic cover on it
Dispose of used batteries appropriately, DO NOT bury orburn the batteries and keep them away from children. DONOT swallow. DO NOT re-charge or disassemble thebatteries.
Package Contents:
④
⑧
Digital door viewer①
Before installation:
Prior to mounting the peephole viewer, please make sureyou have installed the batteries included.
Installation:
1. Replace the existing door viewer or drill a 14mm holein the door at eye level. Insert the camera from theoutside while inserting the washer between the back ofthe lens and the door. Make sure that the arrow mark onfront of the camera points upwards.(FIG. 1)
2 AAA batteries③
Washer⑤
Locking barrel⑦
②Locking bolt 1 pc
Holding plate④
Camera⑥
Tightening tool⑧
2. Fit the holding plate over the end of the lens then screwthe locking barrel on to the threaded part of the cameraand tighten(a tightening tool is provided), this will holdthe plate to the door.Make sure that the arrow on theplate points upwards.(FIG. 2)
3. The data wire should be fully plugged in at the back ofthe screen; excess wire should be gently placed intothe groove at the back of the screen.
4. Hook the over the bracket at the topof the locking plate and secure the digital door viewercase with the locking bolt.
digital door viewer
(FIG. 3)
⑦FIG. 1
FIG. 2 FIG. 4
FIG. 3

A 16
VOOR DE INSTALLATIE:U moet de bijgesloten batterijen plaatsen vóór u de digitale deurspion monteert.
INSTALLATIE:
1. Vervang de bestaande deurspion of boor een gat van 14 mm in de deur op ooghoogte. Steek de camera langs buiten in het gat met de sluitring tussen de achterkant van de lens en de deur. Zorg ervoor dat het pijltje vooraan op de camera naar boven wijst. (FIG. 1)
2. Pas het bevestigingsplaatje over het uiteinde van de lens; schroef vervolgens de vergrendelbout op de schroefdraad van de camera en draai vast (met bijgesloten gereedschap). Zorg ervoor dat het pijltje op op het plaatje naar boven wijst. (FIG. 2)
3. De datakabel moet goed ingestoken worden aan de achterkant van het scherm; overtollige kabel moet voorzichtig in de groef aan de achterkant van het scherm gestopt worden.
4. Haak de digitale deurspion over het klepje bovenaan aan het bevestigingsplaatje en beveilig de digitale deurspion met de borgpen.
(FIG. 3)
②
⑤
⑥
① ③
AA
A
AA
A
Attention:
Battery:
1.Please read the instruction manual before use.
2.DO NOT disassemble the camera or the mainbody.3.Handle with care.
4.Please unscrew from the bottom of the digital doorviewer, take out the holding plate
and prepare to install.and take off the
plastic cover on it
Dispose of used batteries appropriately, DO NOT bury orburn the batteries and keep them away from children. DONOT swallow. DO NOT re-charge or disassemble thebatteries.
Package Contents:
④
⑧
Digital door viewer①
Before installation:
Prior to mounting the peephole viewer, please make sureyou have installed the batteries included.
Installation:
1. Replace the existing door viewer or drill a 14mm holein the door at eye level. Insert the camera from theoutside while inserting the washer between the back ofthe lens and the door. Make sure that the arrow mark onfront of the camera points upwards.(FIG. 1)
2 AAA batteries③
Washer⑤
Locking barrel⑦
②Locking bolt 1 pc
Holding plate④
Camera⑥
Tightening tool⑧
2. Fit the holding plate over the end of the lens then screwthe locking barrel on to the threaded part of the cameraand tighten(a tightening tool is provided), this will holdthe plate to the door.Make sure that the arrow on theplate points upwards.(FIG. 2)
3. The data wire should be fully plugged in at the back ofthe screen; excess wire should be gently placed intothe groove at the back of the screen.
4. Hook the over the bracket at the topof the locking plate and secure the digital door viewercase with the locking bolt.
digital door viewer
(FIG. 3)
⑦FIG. 1
FIG. 2 FIG. 4
FIG. 3

A 17
SLNAMESTITEV IN ZAMENJAVA BATERIJ1. Potisnite pokrov v levo, da se odpre.
2. Namestite baterije in upoštevajte pravilno polarnost.
3. Ponovno namestite pokrov in ga potisnite v desno, da se zapre.
DELOVANJE:
1. Gumb za vklop: Na kratko pritisnite gumb za vklop. Naprava začne delovati čez približno 10 s.
2. Svetlobni indikator: Če zasveti svetlobni indikator, je to znak, da je treba zamenjati baterije.
TEHNIČNI PODATKI:Primerno za vse vrste vrat z debelino 38–110 mm (1,50–4,33 cole)
Primerno za odprtino premera 14–22 mm
Senzor: CMOS kamera z 0,3 mio slikovnih točk
LCD zaslon: 3,2-inčni TFT
Napajanje: 2 bateriji AAA
Dimenzije: 125 (Š) x 68 ( V ) x 15 (G) mm
Masa: 160 g
Digital Door Viewer
User Manual
1.Power Button:Press and release the power button, then the unitwill continue working for the next 10 seconds.
2.Light Indicator:If the light indicator turns on, please replace thebatteries.
Fits any door:38-110mm (1.50"-4.33") thickFits any barrel hole: 14-22mmSensor: 0.3 Mega Pixel CMOSLCD screen: 3.2" TFTPower source: 2 AAA BatteriesSize: 125(W)x68(H)x15(D)mmWeight: 160g
Operation:
Specification:
Installation and replacement of the batteries
1.Slide the cover left to open.2.Install the batteries in accordance with the +/- sign.3.Reverse this process to close the cover.

A 18
POZOR:1. Pred uporabo pozorno preberite ta navodila.2. V nobenem primeru NE odpirajte kamere ali ohišja.3. Z napravo ravnajte pazljivo.4. Odvijte vijak na spodnji strani digitalnega kukala, snemite nosilno ploščico in z nje odstranite plastični pokrov ter jo pripravite za montažo.
BATERIJE:Izrabljene baterije NI dovoljeno zakopati ali sežigati ampak jih odstra-nite v skladu s predpisi. Baterije držite izven dosega otrok. NE dajajte v usta. Izrabljenih baterij NE polnite ali razstavljajte.
OBSEG DOBAVE:
1. DIGITALNO KUKALO2. PRITRDILNI VIJAK3. DVE BATERIJI AAA4. NOSILNA PLOŠČICA
5. PODLOZKA6. KAMERA7. TULEC ZA KUKALO8. KLJUČ ZA PRITRDITEV
②
⑤
⑥
① ③
AA
A
AA
A
Attention:
Battery:
1.Please read the instruction manual before use.
2.DO NOT disassemble the camera or the mainbody.3.Handle with care.
4.Please unscrew from the bottom of the digital doorviewer, take out the holding plate
and prepare to install.and take off the
plastic cover on it
Dispose of used batteries appropriately, DO NOT bury orburn the batteries and keep them away from children. DONOT swallow. DO NOT re-charge or disassemble thebatteries.
Package Contents:
④
⑧
Digital door viewer①
Before installation:
Prior to mounting the peephole viewer, please make sureyou have installed the batteries included.
Installation:
1. Replace the existing door viewer or drill a 14mm holein the door at eye level. Insert the camera from theoutside while inserting the washer between the back ofthe lens and the door. Make sure that the arrow mark onfront of the camera points upwards.(FIG. 1)
2 AAA batteries③
Washer⑤
Locking barrel⑦
②Locking bolt 1 pc
Holding plate④
Camera⑥
Tightening tool⑧
2. Fit the holding plate over the end of the lens then screwthe locking barrel on to the threaded part of the cameraand tighten(a tightening tool is provided), this will holdthe plate to the door.Make sure that the arrow on theplate points upwards.(FIG. 2)
3. The data wire should be fully plugged in at the back ofthe screen; excess wire should be gently placed intothe groove at the back of the screen.
4. Hook the over the bracket at the topof the locking plate and secure the digital door viewercase with the locking bolt.
digital door viewer
(FIG. 3)
⑦FIG. 1
FIG. 2 FIG. 4
FIG. 3

A 19
5. PODLOZKA6. KAMERA7. TULEC ZA KUKALO8. KLJUČ ZA PRITRDITEV
PRED MONTAŽO:Pred montažo kukala je treba namestiti priložene baterije.
MONTAŽA:
1. Namestite digitalno kukalo namesto obstoječega ali v vrata v višini oči izvrtajte luknjo s premerom 14 mm. Vstavite kamero z zunanje strani vrat in pri tem med zadnjo stran leče in vrata namestite podložko. Upoštevajte, da mora biti puščica na sprednji strani kamere obrnjena navzgor (slika 1).
2. Na notranji strani vrat na kamero namestite nosilno ploščico in nato na zunanji navoj kamere privijte še tulec za kukalo. Nato tulec trdno zategnite s pomočjo priloženega ključa, s tem pa boste pritrdili tudi nosilno ploščico. Upoštevajte, da mora biti puščica na nosilni ploščici obrnjena navzgor (slika 2).
3. Podatkovni kabel je v celoti priključen na zadnji strani zaslona. Presežek kabla previdno potisnite v utor na zadnji strani zaslona.
4. Zataknite digitalno kukalo na jeziček na zgornji strani nosilne ploščice in ga prislonite ob vrata. Nato privijte pritrdilni vijak na spodnji strani naprave.
②
⑤
⑥
① ③
AA
A
AA
A
Attention:
Battery:
1.Please read the instruction manual before use.
2.DO NOT disassemble the camera or the mainbody.3.Handle with care.
4.Please unscrew from the bottom of the digital doorviewer, take out the holding plate
and prepare to install.and take off the
plastic cover on it
Dispose of used batteries appropriately, DO NOT bury orburn the batteries and keep them away from children. DONOT swallow. DO NOT re-charge or disassemble thebatteries.
Package Contents:
④
⑧
Digital door viewer①
Before installation:
Prior to mounting the peephole viewer, please make sureyou have installed the batteries included.
Installation:
1. Replace the existing door viewer or drill a 14mm holein the door at eye level. Insert the camera from theoutside while inserting the washer between the back ofthe lens and the door. Make sure that the arrow mark onfront of the camera points upwards.(FIG. 1)
2 AAA batteries③
Washer⑤
Locking barrel⑦
②Locking bolt 1 pc
Holding plate④
Camera⑥
Tightening tool⑧
2. Fit the holding plate over the end of the lens then screwthe locking barrel on to the threaded part of the cameraand tighten(a tightening tool is provided), this will holdthe plate to the door.Make sure that the arrow on theplate points upwards.(FIG. 2)
3. The data wire should be fully plugged in at the back ofthe screen; excess wire should be gently placed intothe groove at the back of the screen.
4. Hook the over the bracket at the topof the locking plate and secure the digital door viewercase with the locking bolt.
digital door viewer
(FIG. 3)
⑦FIG. 1
FIG. 2 FIG. 4
FIG. 3

A 20
HRPOSTAVL JANJE I ZAMJENA BATERIJA1. Pomaknite poklopac ulijevo i otvorite ga.
2. Umetnite baterije u skladu sa znakovima +/-.
3. Učinite sve u suprotnom smjeru kako biste zatvorili poklopac.
UKL JUČIVANJE:
1. Tipka za paljenje i gašenje: Ako pritisnite i pustite tipku za paljenje i gašenje, uređaj će nastaviti radititi tijekom sljedećih 10 sekundi.
2. Svjetlosni pokazivač: Ako se svijetlo upali, molimo vas zamijenite baterije.
SPECIFIKACIJE:Odgovara za sva vrata: 38-110mm (1.50”-4.33”) debljine
Odgovara za sve otvore: 14-22mm
Senzor: 0.3 Mega Pixel CMOS
LCD monitor: 3.2” TFT
Izvor napajanja: 2 baterije AAA
Veličina: 125( W )x68(H)x15(D)mm
Težina: 160g
Digital Door Viewer
User Manual
1.Power Button:Press and release the power button, then the unitwill continue working for the next 10 seconds.
2.Light Indicator:If the light indicator turns on, please replace thebatteries.
Fits any door:38-110mm (1.50"-4.33") thickFits any barrel hole: 14-22mmSensor: 0.3 Mega Pixel CMOSLCD screen: 3.2" TFTPower source: 2 AAA BatteriesSize: 125(W)x68(H)x15(D)mmWeight: 160g
Operation:
Specification:
Installation and replacement of the batteries
1.Slide the cover left to open.2.Install the batteries in accordance with the +/- sign.3.Reverse this process to close the cover.

A 21
UPOZORENJE:1. Molimo vas pročitajte, prije uporabepriručnik za korištenje.2. NEMOJTE rastavljati kameru niti njezino glavno kučište.3. Postupajte oprezno4. Molimo vas odšarafite vidu na dnu digitalnog špijuna za vrata, izvadi-te potpornu ploču te skinite plastičnu zaštitu i pripremite instaliranje.
BATTERIJA:Uklonite korištene baterije prikladno, baterije NEMOJTE zakopati niti zapaliti. Držite ih daleko od djece. NEMOJTE ih gutati. NEMOJTE puniti niti rastavljati baterije.
SADRŽAJ PAKIRANJA:
1. DIGITALNI ŠPIJUN ZA VRATA2. VIJAK ZA ZAKLJUČAVANJE 1 KOMAD3. 2 BATERIJE AAA4. POTPORNA PLOČA
5. BRTVENI PRSTEN6. KAMERA7. VALJAK ZA ZAKLJUČAVANJE8. ALAT ZA PRITEZANJE
②
⑤
⑥
① ③
AA
A
AA
A
Attention:
Battery:
1.Please read the instruction manual before use.
2.DO NOT disassemble the camera or the mainbody.3.Handle with care.
4.Please unscrew from the bottom of the digital doorviewer, take out the holding plate
and prepare to install.and take off the
plastic cover on it
Dispose of used batteries appropriately, DO NOT bury orburn the batteries and keep them away from children. DONOT swallow. DO NOT re-charge or disassemble thebatteries.
Package Contents:
④
⑧
Digital door viewer①
Before installation:
Prior to mounting the peephole viewer, please make sureyou have installed the batteries included.
Installation:
1. Replace the existing door viewer or drill a 14mm holein the door at eye level. Insert the camera from theoutside while inserting the washer between the back ofthe lens and the door. Make sure that the arrow mark onfront of the camera points upwards.(FIG. 1)
2 AAA batteries③
Washer⑤
Locking barrel⑦
②Locking bolt 1 pc
Holding plate④
Camera⑥
Tightening tool⑧
2. Fit the holding plate over the end of the lens then screwthe locking barrel on to the threaded part of the cameraand tighten(a tightening tool is provided), this will holdthe plate to the door.Make sure that the arrow on theplate points upwards.(FIG. 2)
3. The data wire should be fully plugged in at the back ofthe screen; excess wire should be gently placed intothe groove at the back of the screen.
4. Hook the over the bracket at the topof the locking plate and secure the digital door viewercase with the locking bolt.
digital door viewer
(FIG. 3)
⑦FIG. 1
FIG. 2 FIG. 4
FIG. 3

A 22
PRIJE INSTALIRANJA:Prije nego što sastavljate špijun za promatranje, molimo vas provjerite jeste li umetnuli baterije koje se nalaze u ovom pakiranju.
INSTALIRANJE:
1. Zamijenite postojeći špijun za vrata ili izbušite rupu od 14 mm u vrata u visini očiju. Umetnite kameru s vanjske strane te postavite brtveni prsten između stražnje strane leće i vrata. Provjerite pokazuje li strijelica na prednjoj strani kamere prema gore (slika 1.)
2. Postavite držeću ploču preko završetka leće, zatim zašarafite valjak za zakjučavanje na dio kamere koji ima navoj te ga pričvr-stite (imate u ovom pakiranju i alat za pričvrščivanje); na ovaj će način ploča biti pričvršćena uz vrata. Pazite da strijelica na ploči pokazuje prema gore. (slika 2.)
3. Podatkovna žica trebala bi biti čvrsto ukopčana na poleđini moni-tora; višak žice biste trebali pažljivo spremiti u žlijeb na poleđini monitora.
4. Objesite digitalni špijun za vrata iznad nosača na vrhu ploče za zaključavanje i osigurajete kutiju digitalnog špijuna za vrata zakovicom. (slika 3.)
②
⑤
⑥
① ③
AA
A
AA
A
Attention:
Battery:
1.Please read the instruction manual before use.
2.DO NOT disassemble the camera or the mainbody.3.Handle with care.
4.Please unscrew from the bottom of the digital doorviewer, take out the holding plate
and prepare to install.and take off the
plastic cover on it
Dispose of used batteries appropriately, DO NOT bury orburn the batteries and keep them away from children. DONOT swallow. DO NOT re-charge or disassemble thebatteries.
Package Contents:
④
⑧
Digital door viewer①
Before installation:
Prior to mounting the peephole viewer, please make sureyou have installed the batteries included.
Installation:
1. Replace the existing door viewer or drill a 14mm holein the door at eye level. Insert the camera from theoutside while inserting the washer between the back ofthe lens and the door. Make sure that the arrow mark onfront of the camera points upwards.(FIG. 1)
2 AAA batteries③
Washer⑤
Locking barrel⑦
②Locking bolt 1 pc
Holding plate④
Camera⑥
Tightening tool⑧
2. Fit the holding plate over the end of the lens then screwthe locking barrel on to the threaded part of the cameraand tighten(a tightening tool is provided), this will holdthe plate to the door.Make sure that the arrow on theplate points upwards.(FIG. 2)
3. The data wire should be fully plugged in at the back ofthe screen; excess wire should be gently placed intothe groove at the back of the screen.
4. Hook the over the bracket at the topof the locking plate and secure the digital door viewercase with the locking bolt.
digital door viewer
(FIG. 3)
⑦FIG. 1
FIG. 2 FIG. 4
FIG. 3

A 23
PLMONTAŻ I WYMIANA BATERII1. Przesunąć pokrywę w lewą stronę, aby ją otworzyć.
2. Włożyć baterie zgodnie z oznaczeniem +/-.
3. Zamknąć pokrywę, przesuwając ją w prawą stronę.
OBSŁUGA:
1. Przycisk włączenia: Wcisnąć i zwolnić przycisk włączenia, po czym urządzenie włączy się na 10 sekund.
2. Kontrolka: Jeżeli zaświeci się kontrolka, należy wymienić baterie.
SPECYFIKACJA:Pasuje do każdych drzwi o grubości 38 - 110 mm
Pasuje do każdego otworu na bębenek: 14 - 22 mm
Czujnik: CMOS, 0,3 megapiksela
Wyświetlacz LCD: 3,2“ TFT
Zasilanie: 2 baterie AAA
Wymiary: 125 (szer.) x 68 (wys.) x 15 (gł.) mm
Waga: 160 g
Digital Door Viewer
User Manual
1.Power Button:Press and release the power button, then the unitwill continue working for the next 10 seconds.
2.Light Indicator:If the light indicator turns on, please replace thebatteries.
Fits any door:38-110mm (1.50"-4.33") thickFits any barrel hole: 14-22mmSensor: 0.3 Mega Pixel CMOSLCD screen: 3.2" TFTPower source: 2 AAA BatteriesSize: 125(W)x68(H)x15(D)mmWeight: 160g
Operation:
Specification:
Installation and replacement of the batteries
1.Slide the cover left to open.2.Install the batteries in accordance with the +/- sign.3.Reverse this process to close the cover.
A 24
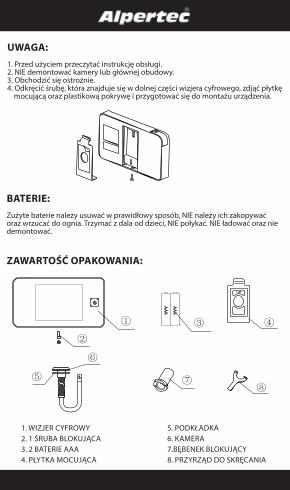
UWAGA:1. Przed użyciem przeczytać instrukcję obsługi.2. NIE demontować kamery lub głównej obudowy.3. Obchodzić się ostrożnie.4. Odkręcić śrubę, która znajduje się w dolnej części wizjera cyfrowego, zdjąć płytkę mocującą oraz plastikową pokrywę i przygotować się do montażu urządzenia.
BATERIE:Zużyte baterie należy usuwać w prawidłowy sposób, NIE należy ich zakopywać oraz wrzucać do ognia. Trzymać z dala od dzieci, NIE połykać. NIE ładować oraz nie demontować.
ZAWARTOŚĆ OPAKOWANIA:
1. WIZJER CYFROWY2. 1 ŚRUBA BLOKUJĄCA 3. 2 BATERIE AAA 4. PŁYTKA MOCUJĄCA
5. PODKŁADKA6. KAMERA7.BĘBENEK BLOKUJĄCY8. PRZYRZĄD DO SKRĘCANIA
②
⑤
⑥
① ③
AA
A
AA
A
Attention:
Battery:
1.Please read the instruction manual before use.
2.DO NOT disassemble the camera or the mainbody.3.Handle with care.
4.Please unscrew from the bottom of the digital doorviewer, take out the holding plate
and prepare to install.and take off the
plastic cover on it
Dispose of used batteries appropriately, DO NOT bury orburn the batteries and keep them away from children. DONOT swallow. DO NOT re-charge or disassemble thebatteries.
Package Contents:
④
⑧
Digital door viewer①
Before installation:
Prior to mounting the peephole viewer, please make sureyou have installed the batteries included.
Installation:
1. Replace the existing door viewer or drill a 14mm holein the door at eye level. Insert the camera from theoutside while inserting the washer between the back ofthe lens and the door. Make sure that the arrow mark onfront of the camera points upwards.(FIG. 1)
2 AAA batteries③
Washer⑤
Locking barrel⑦
②Locking bolt 1 pc
Holding plate④
Camera⑥
Tightening tool⑧
2. Fit the holding plate over the end of the lens then screwthe locking barrel on to the threaded part of the cameraand tighten(a tightening tool is provided), this will holdthe plate to the door.Make sure that the arrow on theplate points upwards.(FIG. 2)
3. The data wire should be fully plugged in at the back ofthe screen; excess wire should be gently placed intothe groove at the back of the screen.
4. Hook the over the bracket at the topof the locking plate and secure the digital door viewercase with the locking bolt.
digital door viewer
(FIG. 3)
⑦FIG. 1
FIG. 2 FIG. 4
FIG. 3

A 25
5. PODKŁADKA6. KAMERA7.BĘBENEK BLOKUJĄCY8. PRZYRZĄD DO SKRĘCANIA
PRZED ROZPOCZĘCIEM MONTAŻU:Przed rozpoczęciem montażu wizjera, należy włożyć do niego baterie dołączone do zestawu.
MONTAŻ:
1. Wyjąć wizjer zamontowany w drzwiach lub wywiercić w drzwiach 14-mm otwór na wysokości wzroku. Włożyć kamerę od zewnątrz, umieszczając jednocześnie podkładkę pomiędzy tylną częścią obiektywu a drzwiami. Pamiętać, że strzałka z przodu kamery musi być skierowana ku górze (RYS. 1).
2. Przełożyć płytkę mocującą przez końcową część obiektywu i wkręcić bębenek mocujący w nagwintowaną część kamery, po czym dokręcić (za pomocą dostarczonego przyrządu), przymocowując w ten sposób płytkę do drzwi. Pamiętać, że strzałka na płytce musi być skierowana ku górze (RYS. 2).
3. Przewód przesyłający dane należy dokładnie podłączyć do tylnej części urządzenia. Nadmiar przewodu należy ostrożnie umieścić w rowku, który znajduje się na tylnej części urządzenia.
4. Zawiesić wizjer cyfrowy na wsporniku, w górnej części płytki mocującej i zamocować jego obudowę, wkręcając śrubę blokującą (RYS. 3).
②
⑤
⑥
① ③
AA
A
AA
A
Attention:
Battery:
1.Please read the instruction manual before use.
2.DO NOT disassemble the camera or the mainbody.3.Handle with care.
4.Please unscrew from the bottom of the digital doorviewer, take out the holding plate
and prepare to install.and take off the
plastic cover on it
Dispose of used batteries appropriately, DO NOT bury orburn the batteries and keep them away from children. DONOT swallow. DO NOT re-charge or disassemble thebatteries.
Package Contents:
④
⑧
Digital door viewer①
Before installation:
Prior to mounting the peephole viewer, please make sureyou have installed the batteries included.
Installation:
1. Replace the existing door viewer or drill a 14mm holein the door at eye level. Insert the camera from theoutside while inserting the washer between the back ofthe lens and the door. Make sure that the arrow mark onfront of the camera points upwards.(FIG. 1)
2 AAA batteries③
Washer⑤
Locking barrel⑦
②Locking bolt 1 pc
Holding plate④
Camera⑥
Tightening tool⑧
2. Fit the holding plate over the end of the lens then screwthe locking barrel on to the threaded part of the cameraand tighten(a tightening tool is provided), this will holdthe plate to the door.Make sure that the arrow on theplate points upwards.(FIG. 2)
3. The data wire should be fully plugged in at the back ofthe screen; excess wire should be gently placed intothe groove at the back of the screen.
4. Hook the over the bracket at the topof the locking plate and secure the digital door viewercase with the locking bolt.
digital door viewer
(FIG. 3)
⑦FIG. 1
FIG. 2 FIG. 4
FIG. 3