Embed Size (px)
Citation preview
(index.html)
Share 18Tweet
Previous Page
Dermatome Chart / Dermatome Map
Use of the following dermatome chart/map is free for personal use in reports and educationalpresentations on condition the copyright on the poster is kept intact and no alterations are made tothe chart. Every effort has been made to ensure the accuracy of the following dermatome chart, but ifinaccuracies are found in the poster, please contact us so we may amend the chart accordingly.
Please note that the dermatome diagram is supplied in good faith, and by downloading the chart, youare confirming that you have checked the chart is accurate for the purposes you wish to use it for, andwill not hold apparelyzed liable for any damages, direct or consequential arising from it's use. Use ofthe dermatome chart below for commercial gain or resale is prohibited without the expressed writtenconsent of Apparelyzed.com. If any of the dermatome images below are used on the internet, a returnlink to www.apparelyzed.com must be included on the page containing the image.
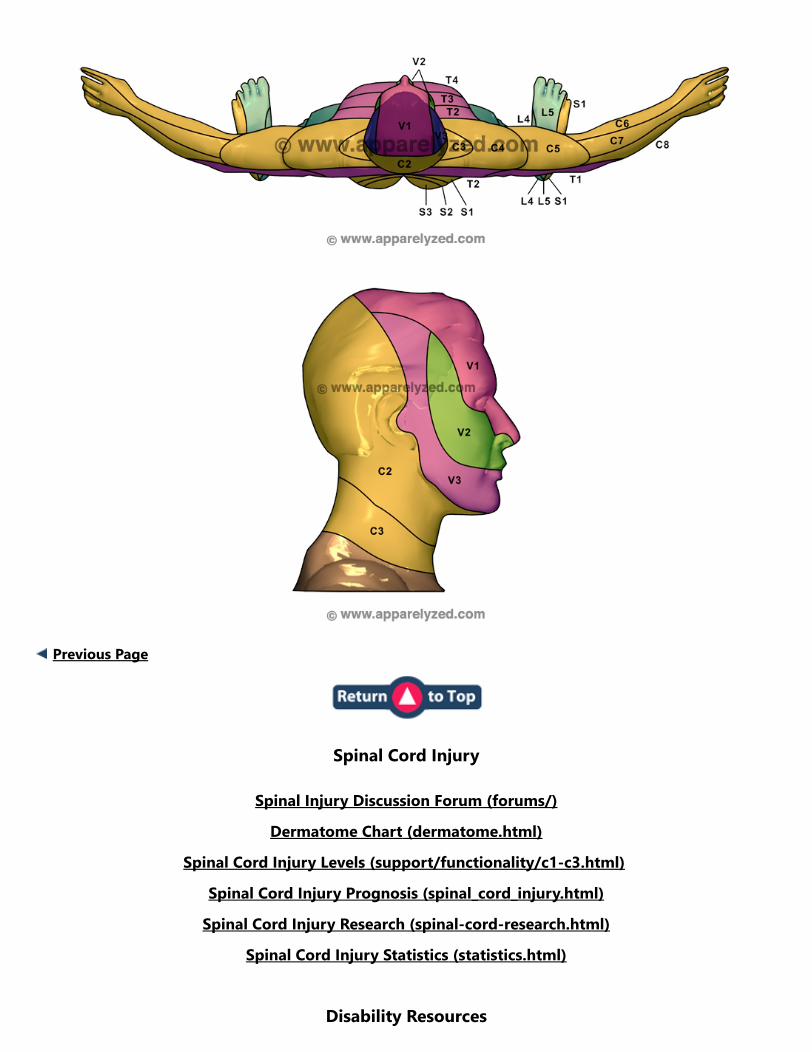
Test Dermatome Points at Dots
Upper Body Test Points C2 ‐ Occipital Protuberance C3 ‐ Supraclavicular Fossa C4 ‐ Acromioclavicular Joint C5 ‐ Lateral Antecubital Fossa C6 ‐ Thumb C7 ‐ Middle Finger C8 ‐ Little Finger T1 ‐ Medial Antecubital Fossa T2 ‐ Apex of Axilla
Lower Body Test Points L1 ‐ Upper Anterior Thigh L2 ‐ Mid Anterior Thigh L3 ‐ Medial Femoral Condyle L4 ‐ Medial Malleolus L5 ‐ Dorsum 3rd MTP Joint S1 ‐ Lateral Heel S2 ‐ Popliteal Fossa S3 ‐ Ischial Tuberosity
486Like Share
Home (index.html) Forum Spinal Cord Injury Conditions Resources
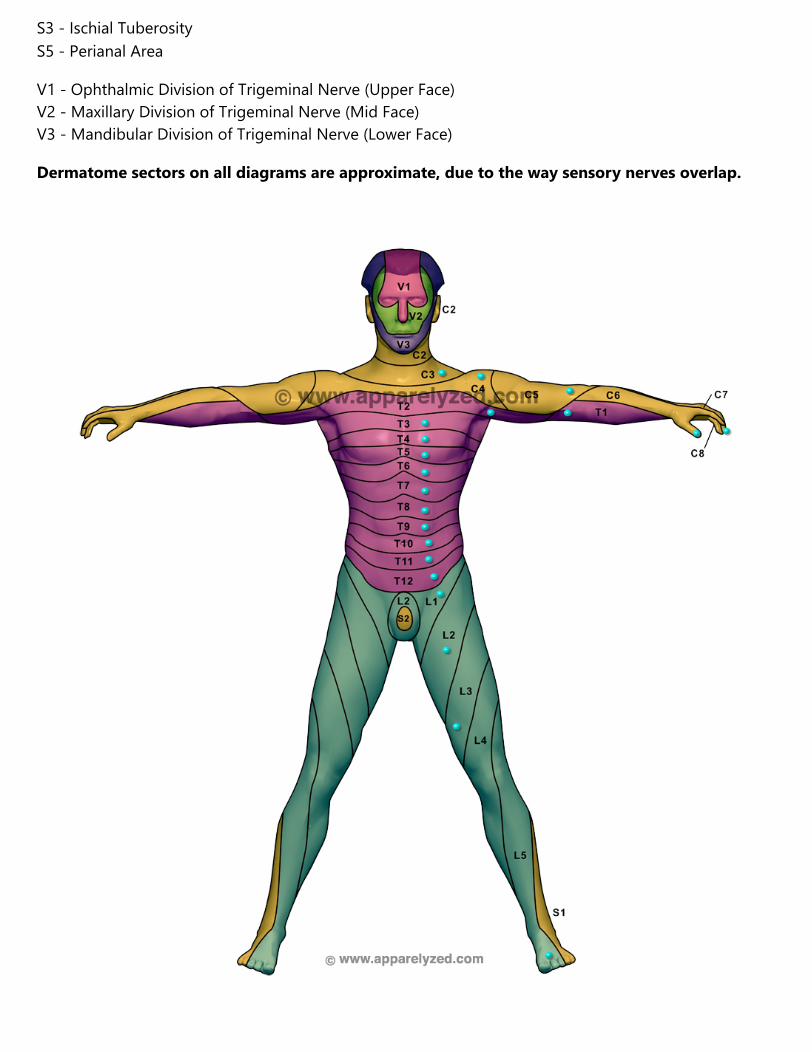
S3 ‐ Ischial Tuberosity S5 ‐ Perianal Area
V1 ‐ Ophthalmic Division of Trigeminal Nerve ﴾Upper Face﴿ V2 ‐ Maxillary Division of Trigeminal Nerve ﴾Mid Face﴿ V3 ‐ Mandibular Division of Trigeminal Nerve ﴾Lower Face﴿
Dermatome sectors on all diagrams are approximate, due to the way sensory nerves overlap.

Previous Page
Spinal Cord Injury
Spinal Injury Discussion Forum ﴾forums/﴿
Dermatome Chart ﴾dermatome.html﴿
Spinal Cord Injury Levels ﴾support/functionality/c1‐c3.html﴿
Spinal Cord Injury Prognosis ﴾spinal_cord_injury.html﴿
Spinal Cord Injury Research ﴾spinal‐cord‐research.html﴿
Spinal Cord Injury Statistics ﴾statistics.html﴿
Disability Resources