Embed Size (px)
Citation preview
Operating Instructions
Dental Thermal DisinfectorG 7881
To prevent accidentsand machine damageread these instructionsbeforeinstallation or use.
UV
M.-Nr. 05 970 440

2
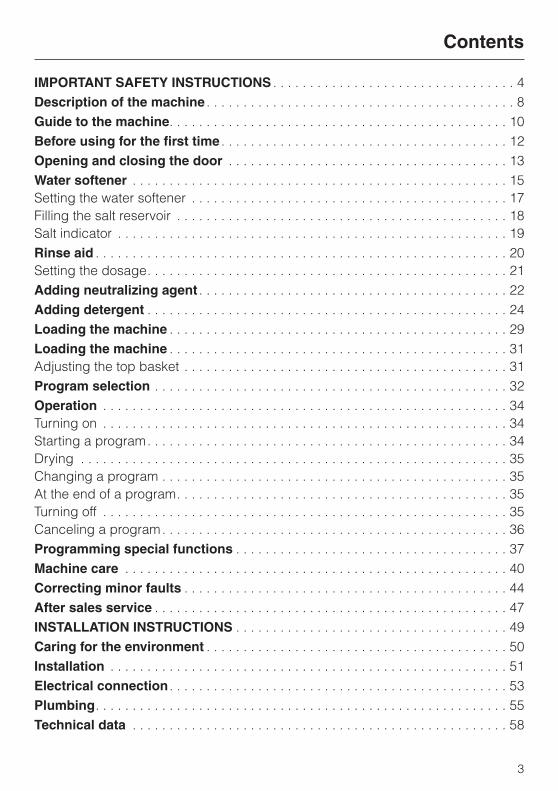
IMPORTANT SAFETY INSTRUCTIONS . . . . . . . . . . . . . . . . . . . . . . . . . . . . . . . . . 4Description of the machine . . . . . . . . . . . . . . . . . . . . . . . . . . . . . . . . . . . . . . . . . . 8Guide to the machine. . . . . . . . . . . . . . . . . . . . . . . . . . . . . . . . . . . . . . . . . . . . . . 10Before using for the first time . . . . . . . . . . . . . . . . . . . . . . . . . . . . . . . . . . . . . . . 12Opening and closing the door . . . . . . . . . . . . . . . . . . . . . . . . . . . . . . . . . . . . . . 13Water softener . . . . . . . . . . . . . . . . . . . . . . . . . . . . . . . . . . . . . . . . . . . . . . . . . . . 15Setting the water softener . . . . . . . . . . . . . . . . . . . . . . . . . . . . . . . . . . . . . . . . . . . 17Filling the salt reservoir . . . . . . . . . . . . . . . . . . . . . . . . . . . . . . . . . . . . . . . . . . . . . 18Salt indicator . . . . . . . . . . . . . . . . . . . . . . . . . . . . . . . . . . . . . . . . . . . . . . . . . . . . . 19Rinse aid . . . . . . . . . . . . . . . . . . . . . . . . . . . . . . . . . . . . . . . . . . . . . . . . . . . . . . . . 20Setting the dosage. . . . . . . . . . . . . . . . . . . . . . . . . . . . . . . . . . . . . . . . . . . . . . . . . 21Adding neutralizing agent . . . . . . . . . . . . . . . . . . . . . . . . . . . . . . . . . . . . . . . . . . 22Adding detergent . . . . . . . . . . . . . . . . . . . . . . . . . . . . . . . . . . . . . . . . . . . . . . . . . 24Loading the machine . . . . . . . . . . . . . . . . . . . . . . . . . . . . . . . . . . . . . . . . . . . . . . 29Loading the machine . . . . . . . . . . . . . . . . . . . . . . . . . . . . . . . . . . . . . . . . . . . . . . 31Adjusting the top basket . . . . . . . . . . . . . . . . . . . . . . . . . . . . . . . . . . . . . . . . . . . . 31Program selection . . . . . . . . . . . . . . . . . . . . . . . . . . . . . . . . . . . . . . . . . . . . . . . . 32Operation . . . . . . . . . . . . . . . . . . . . . . . . . . . . . . . . . . . . . . . . . . . . . . . . . . . . . . . 34Turning on . . . . . . . . . . . . . . . . . . . . . . . . . . . . . . . . . . . . . . . . . . . . . . . . . . . . . . . 34Starting a program. . . . . . . . . . . . . . . . . . . . . . . . . . . . . . . . . . . . . . . . . . . . . . . . . 34Drying . . . . . . . . . . . . . . . . . . . . . . . . . . . . . . . . . . . . . . . . . . . . . . . . . . . . . . . . . . 35Changing a program . . . . . . . . . . . . . . . . . . . . . . . . . . . . . . . . . . . . . . . . . . . . . . . 35At the end of a program. . . . . . . . . . . . . . . . . . . . . . . . . . . . . . . . . . . . . . . . . . . . . 35Turning off . . . . . . . . . . . . . . . . . . . . . . . . . . . . . . . . . . . . . . . . . . . . . . . . . . . . . . . 35Canceling a program. . . . . . . . . . . . . . . . . . . . . . . . . . . . . . . . . . . . . . . . . . . . . . . 36Programming special functions . . . . . . . . . . . . . . . . . . . . . . . . . . . . . . . . . . . . . 37Machine care . . . . . . . . . . . . . . . . . . . . . . . . . . . . . . . . . . . . . . . . . . . . . . . . . . . . 40Correcting minor faults . . . . . . . . . . . . . . . . . . . . . . . . . . . . . . . . . . . . . . . . . . . . 44After sales service . . . . . . . . . . . . . . . . . . . . . . . . . . . . . . . . . . . . . . . . . . . . . . . . 47INSTALLATION INSTRUCTIONS . . . . . . . . . . . . . . . . . . . . . . . . . . . . . . . . . . . . . 49Caring for the environment . . . . . . . . . . . . . . . . . . . . . . . . . . . . . . . . . . . . . . . . . 50Installation . . . . . . . . . . . . . . . . . . . . . . . . . . . . . . . . . . . . . . . . . . . . . . . . . . . . . . 51Electrical connection . . . . . . . . . . . . . . . . . . . . . . . . . . . . . . . . . . . . . . . . . . . . . . 53Plumbing. . . . . . . . . . . . . . . . . . . . . . . . . . . . . . . . . . . . . . . . . . . . . . . . . . . . . . . . 55Technical data . . . . . . . . . . . . . . . . . . . . . . . . . . . . . . . . . . . . . . . . . . . . . . . . . . . 58
Contents
3
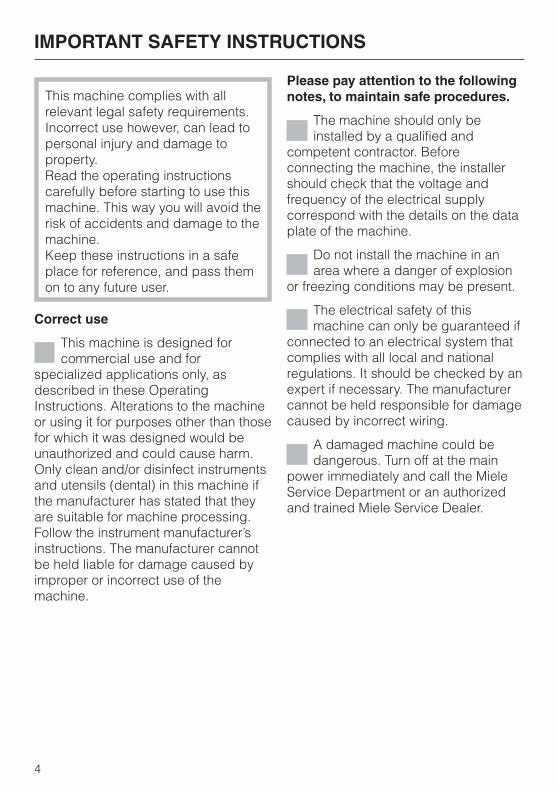
This machine complies with allrelevant legal safety requirements.Incorrect use however, can lead topersonal injury and damage toproperty.Read the operating instructionscarefully before starting to use thismachine. This way you will avoid therisk of accidents and damage to themachine.Keep these instructions in a safeplace for reference, and pass themon to any future user.
Correct use
This machine is designed forcommercial use and for
specialized applications only, asdescribed in these OperatingInstructions. Alterations to the machineor using it for purposes other than thosefor which it was designed would beunauthorized and could cause harm.Only clean and/or disinfect instrumentsand utensils (dental) in this machine ifthe manufacturer has stated that theyare suitable for machine processing.Follow the instrument manufacturer’sinstructions. The manufacturer cannotbe held liable for damage caused byimproper or incorrect use of themachine.
Please pay attention to the followingnotes, to maintain safe procedures.
The machine should only beinstalled by a qualified and
competent contractor. Beforeconnecting the machine, the installershould check that the voltage andfrequency of the electrical supplycorrespond with the details on the dataplate of the machine.
Do not install the machine in anarea where a danger of explosion
or freezing conditions may be present.
The electrical safety of thismachine can only be guaranteed if
connected to an electrical system thatcomplies with all local and nationalregulations. It should be checked by anexpert if necessary. The manufacturercannot be held responsible for damagecaused by incorrect wiring.
A damaged machine could bedangerous. Turn off at the main
power immediately and call the MieleService Department or an authorizedand trained Miele Service Dealer.
IMPORTANT SAFETY INSTRUCTIONS
4
Personnel operating the machineshould be trained regularly.
Children and untrained personnel mustnot be allowed access to the machineor its controls.
Take care when handling liquidagents and additives. These may
contain irritant or corrosive ingredients.Do not use organic solvents as thesecould cause an explosion. Wearprotective gloves and goggles. With allchemical agents the manufacturer’ssafety conditions must be observed.
Avoid inhalation of powdercleaners.
They can cause burning in the mouthand throat if swallowed, or inhibitbreathing.
The water in the machine must notbe used as drinking water.
Do not sit or lean on an open door.The machine could tip and be
damaged or cause an injury.
Be careful when loading items withsharp pointed ends. Position them
in the machine so that you do not hurtyourself or create a danger when theitems are unloaded.
When using this machine in thehigher temperature ranges be
careful not to scald or burn yourselfwhen opening the door! Baskets andinserts must be allowed to cool beforethey are unloaded. Any water remainingin containers could still be very hot.Empty them into the wash cabinetbefore taking them out.
Do not touch the heating elementsif you open the door during or
directly after the end of a program, youcould burn yourself. They remain hot forsome time after the end of the program.
Never clean the machine with awater hose or a high pressure
hose.
Before any maintenance or repairwork is performed, the machine
must be disconnected from the mainpower supply.
IMPORTANT SAFETY INSTRUCTIONS
5

Disinfection programs must not beinterrupted, this can have a limiting
effect on the disinfection result.However, should this be necessary, thecomplete program must be repeated.
Only use Miele approved cleaningagents formulated for use in
washer disinfectors. Using unsuitablecleaning agents could adversely affectitems being cleaned as well ascomponents in the machine.
Pre-treating with cleaning ordisinfecting agents can create
foam, as can certain types of soilingand rinsing agents. Foam can have anadverse effect on the disinfection andcleaning process. Manual pre-rinsingmay be necessary.
The performance of the cycles wastested using Neodisher products.
The use of other products is notdiscouraged but may not yield identicalresults. Please be aware that changesin formulation, storage conditions, etc.which may not be publicized by thechemical manufacturer can have anegative effect on cleaning results.
When using cleaning agents andspecialized products, it is essential
that the manufacturer’s instructions arefollowed. Chemicals must only be usedfor the purpose they are designed andin the situation specified, to theexclusion of other chemicals. This willavoid such dangers as chemicalreactions and material damage.
The machine is designed only foroperation with water and additive
cleaning agents. Organic solvents mustnot be used in the machine.An explosion or machine corrosioncould result.
IMPORTANT SAFETY INSTRUCTIONS
6
In critical applications where verystringent requirements have to be
met, it is strongly recommended that allthe relevant factors for the process,such as cleaning agent, quality ofwater, etc. are discussed with a MieleTechnical Application specialist.
If the cleaning result is subject toparticularly stringent requirements,
a regular quality control test should becarried out by the user to ensure thatrequired standards of cleanliness arebeing achieved.
The mobile units and specialinserts should only be used for
their specific application.
Empty any containers or utensilsbefore arranging them in the
machine.
Do not allow any remains of acidsor solvents, and in particular
hydrochloric acid or chloride solutionsto get into the wash cabinet. Similarlyavoid any materials with a corrosiveeffect. The presence in compounds ofany solvents should be minimal,(especially those in hazard class A1).
Ensure that solutions or steamcontaining hydrochloric acid do not
come into contact with the steel outercasing of the machine, to avoidcorrosion damage.
Please follow the advice oninstallation in these instructions
and the separate "InstallationInstructions".
Using accessories
Only use genuine Mieleaccessories with this machine.
Consult Miele on the type andapplication of such equipment.
Disposal of your old machine
Before disposing of your oldmachine, first make it unusable.
Disconnect it from the power supplyand cut off the power cord.For environmental and safety reasons,ensure the machine is completelydrained of any residual water andcleaning agent. (Observe safetyregulations and wear safety gogglesand gloves).Make the door lock inoperative, so thatchildren cannot accidentally shutthemselves in. Then make appropriatearrangements for the safe disposal ofthe machine.
The manufacturer cannot be heldliable for damage caused bynon-compliance with these"Important Safety Instructions".
IMPORTANT SAFETY INSTRUCTIONS
7
High-level disinfection
The G 7881 Dental Thermal Disinfectoris suitable for automatic treatment ofdental instruments and accessories. Itcleans and in the disinfection programsimultaneously thermally disinfects, at200°F/93°C, instruments andaccessories.
Areas of effectiveness are physicalremoval or thermal inactivation ofvegetative bacteria includingmycobacteria, fungi, fungal spores, andviruses. These categories include theMycobacterium tuberculosis and theEnterococcus faecium.
Important: Only the programs labeled"Disinfection" disinfect! Only use thisprogram when handling contaminateditems. All other programs are designedto clean items without disinfectingthem.
All relevant safety procedures shouldbe obeyed. Relevant safety proceduresinclude, but are not limited to, theCenters for Disease Control’sRecommended Infection ControlPractices for Dentistry and the OSHABloodborne Pathogens Standard.
The G 7881 Dental Thermal Disinfectorachieves high-level disinfection asdefined by the Spauldingcategorization.
The Spaulding category high-leveldisinfection is the same type of meansas in the sterilant category except thatthe use pattern is different. The sterilantis used as a high-level disinfectant bye.g. reducing the exposure time withinits effective range of tuberculocidal,virucidal, and bactericidal action.
According to the Centers for DiseaseControl’s Recommended InfectionControl Practices for Dentistry,instruments should be classified in oneof the following categories and betreated accordingly:
All critical instruments must besterilized after treatment in the G 7881Dental Thermal Disinfector. Criticalinstruments are used to penetrate softtissue or bone, e.g. forceps, scalpels,bone chisels or scales.
Semicritical instruments should besterilized after treatment in the G 7881Dental Thermal Disinfector. If however,sterilization is not feasible because theinstrument will be damaged by higherheat exposure, the instruments may betreated thermally in the G 7881 DentalThermal Disinfector. Semicriticalinstruments do not penetrate softtissues or bone but contact oral tissues,e.g. mirrors and amalgam placementinstruments.
Noncritical instruments may betreated thermally in the G 7881 DentalThermal Disinfector. Noncriticalinstruments or devices come intocontact only with intact skin, e.g.external components of x-ray heads.
Description of the machine
8

Instruments suitable for processingin the thermal disinfector
In general, only high quality stainlesssteel instruments are suitable forprocessing in the G 7881. Allinstruments, accessories and otheritems to be cleaned and disinfected inthe machine should have the followingproperties:
– heat resistance to a temperature ofup to 95°C / 203°F.
– corrosion resistance in the presenceof heat and alkalinity.
The heat retention capacity of stainlesssteel allows for fast drying. Plastic has alower heat retention capacity, thusrequiring a longer drying time. In thiscase, a slightly extended waiting periodof 5-15 minutes may be necessary afterthe disinfection cycle.
Aluminum instruments may discolorduring the cleaning process. Aluminumhas only a limited suitability forprocessing in this system.
Carbon steel and chrome-platedinstruments may corrode during thecleaning process. Processing thesetypes of instruments in the G 7881 isnot recommended.
Hand pieces, drill bits, grinders, rootcanal instruments or other rotatinginstruments are not suitable for thethermal disinfector. Do not processthem in the thermal disinfector.
Do not clean fiberoptics or electricalequipment and components in thethermal disinfector.
Rhodium coated mirrors must bearranged so that their surfaces do notsuffer any mechanical damage. Not allspecula with glass are suitable formachine treatment.
If you have questions regardingwhether an instrument is suitable forprocessing in the G 7881 DentalDisinfector, please seek the advice ofthe instrument manufacturer.
Water quality
Good water quality is essential forprocessing instruments in the dentalwasher disinfector. Otherwise,instrument corrosion may result.
Poor water quality consists of, but is notlimited to, high concentrations ofchlorides (over 50 ppm). High chloridelevels will cause even high qualitystainless steel instruments to rust whenprocessed in the machine. Othereffects that may be noticed aretarnishing or "blueing" of instrumentsdue to dissolved minerals in the water.
If you notice any of the abovesymptoms in your instruments, pleasecontact a Miele ApplicationsSpecialist at:
(800) 991-9380
Description of the machine
9
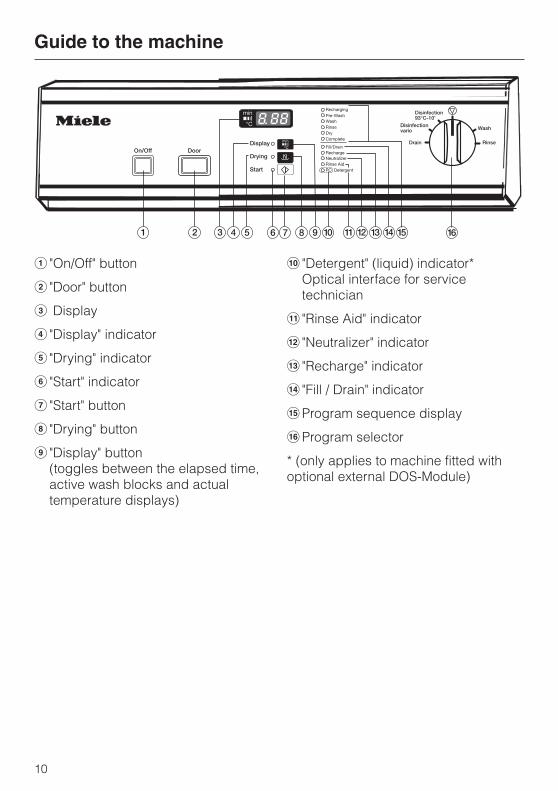
a "On/Off" button
b "Door" button
c Display
d "Display" indicator
e "Drying" indicator
f "Start" indicator
g "Start" button
h "Drying" button
i "Display" button(toggles between the elapsed time,active wash blocks and actualtemperature displays)
j "Detergent" (liquid) indicator*Optical interface for servicetechnician
k "Rinse Aid" indicator
l "Neutralizer" indicator
m "Recharge" indicator
n "Fill / Drain" indicator
o Program sequence display
p Program selector
* (only applies to machine fitted withoptional external DOS-Module)
Guide to the machine
10
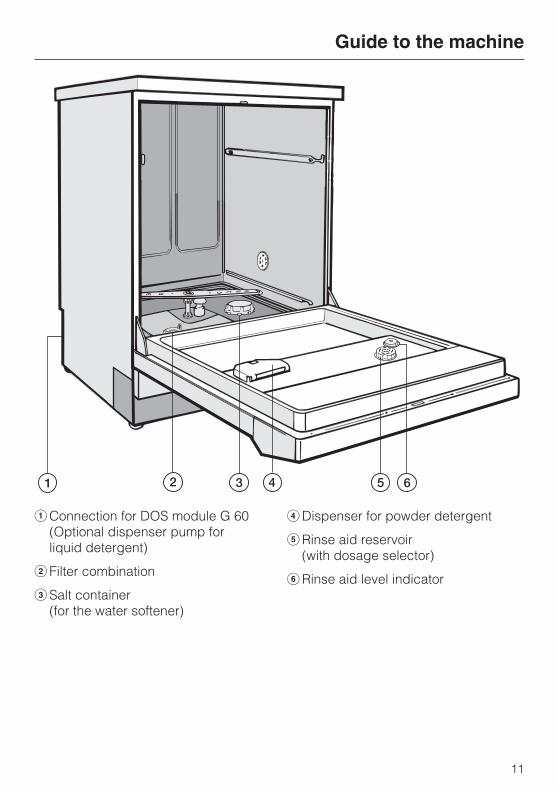
a Connection for DOS module G 60(Optional dispenser pump forliquid detergent)
b Filter combination
c Salt container(for the water softener)
d Dispenser for powder detergent
e Rinse aid reservoir(with dosage selector)
f Rinse aid level indicator
Guide to the machine
11
Before using for the first time pleasepay special attention to the followingpoints:
Detailed information on these pointscan be found in the relevant sectionof the Operating Instructions.
Set the water softener
The water softener must be set to thewater hardness level of your area.
Contact your local water authority tofind your hardness level, in parts permillion (ppm) or grains per gallon(gr/gal).
The salt reservoir must be filled firstwith water and then with reactivationsalt.
Filling the salt reservoir with cleaningagent by mistake will cause seriousdamage to the water softener.Please check every time beforerefilling that the package containsreactivation salt.
Add rinsing agent
Inadvertently filling the rinsing agentreservoir with cleaning agent(including liquid cleaning agentsand dishwashing soap) will causeserious damage to the reservoir.
Only use detergents suitable for usein disinfecting washers.
Do not use detergents formulated foruse in domestic dishwashers.
Load the machine carefully
Arrange the load so that water willcome into contact with all surfaces.Concealed surfaces will not becleaned.The spray arms must not be blocked byany items.
Adding detergent
Follow the dosage recommendations ofthe cleaning agent manufacturer.
The filter combination at the base ofthe wash cabinet and the spray armsmust be clean.
Regular checking and cleaning isessential.
Before using for the first time
12
Electric door lockThe machine is equipped with anelectric door lock. The door can only beopened when the electrical supply tothe machine is turned on, and the"On/Off" button is pressed.
To open the door^ Press the "Door" button in as far as it
will go. At the same time, grip thehandle and open the door.
After the first intake of water, the doorremains locked and cannot be openeduntil the end of the program (exceptduring the "Rinse" and "Drain"programs). The machine can beprogrammed to open during the"Drying" program, if desired.
Do not touch the heating elements.They remain hot for some time afterthe end of the program and cancause burns.
To close the door^ Lift the door upwards and push it
until it clicks shut. Do not press therelease catch while shutting the door.
To cancel a programIf a program has to be canceled in anemergency, e.g. the program has beeninterrupted due to a fault, the door willhave to be opened manually.
^ Turn the program selector to the"Stop" f position. The program iscanceled after approximately2 seconds.
Opening and closing the door
13
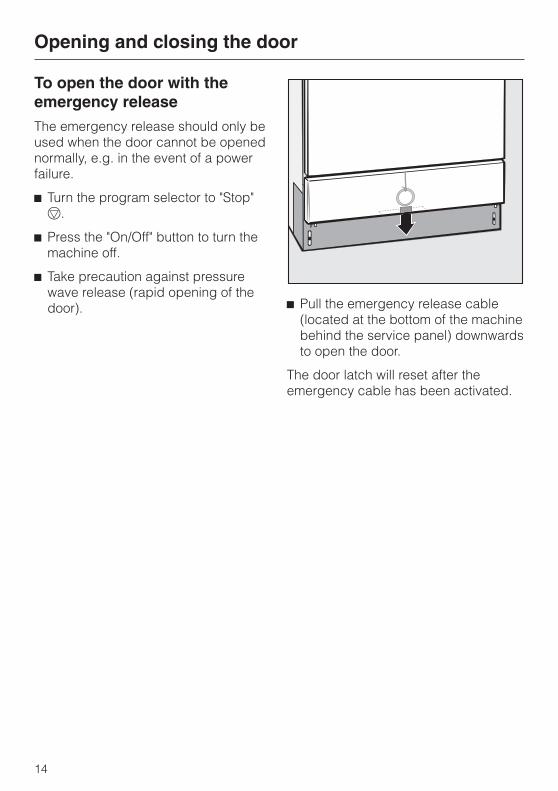
To open the door with theemergency releaseThe emergency release should only beused when the door cannot be openednormally, e.g. in the event of a powerfailure.
^ Turn the program selector to "Stop"f.
^ Press the "On/Off" button to turn themachine off.
^ Take precaution against pressurewave release (rapid opening of thedoor). ^ Pull the emergency release cable
(located at the bottom of the machinebehind the service panel) downwardsto open the door.
The door latch will reset after theemergency cable has been activated.
Opening and closing the door
14
Before using the machine for the firsttime, the water softener should beprogrammed. The water needs to besoftened to avoid calcium depositbuildup on instruments and in themachine itself.
To ensure a steady supply of soft water:
1. Make sure the water softener isprogrammed correctly.The softener contains settings from1 - 60 gr/gal or 20 - 1080 ppm.
2. The salt reservoir must be filled withreactivation salt.(If the water hardness level is below4 gr/gal [70 ppm], the reservoir doesnot need to be filled.)
The machine is set at the factory for awater hardness level of 19 gr/gal(340 ppm).
Your local water authority will adviseyou on the water hardness in yourarea. If the water supply is harder orsofter than the factory setting(including below 4 gr/gal or70 ppm), the setting will need to bechanged. See "Setting the watersoftener".
Water softener
15
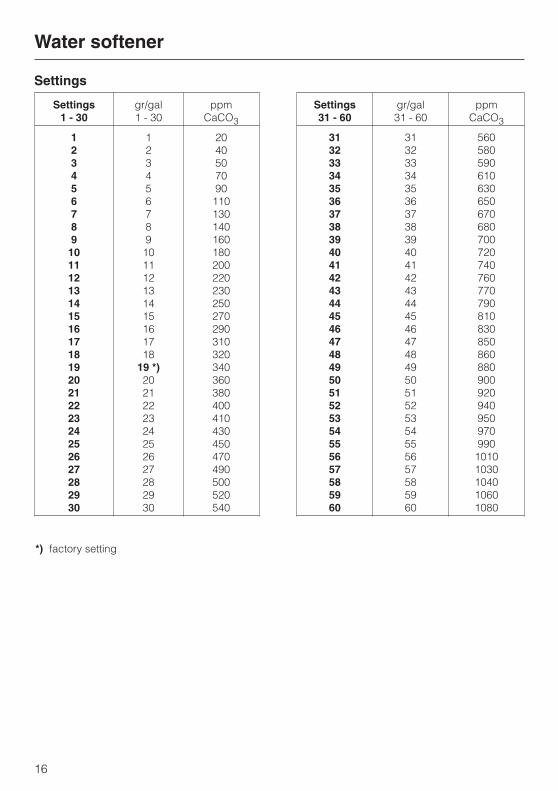
Settings
Settings1 - 30
gr/gal1 - 30
ppmCaCO3
Settings31 - 60
gr/gal31 - 60
ppmCaCO3
123456789
101112131415161718192021222324252627282930
123456789
101112131415161718
19 *)2021222324252627282930
2040507090110130140160180200220230250270290310320340360380400410430450470490500520540
313233343536373839404142434445464748495051525354555657585960
313233343536373839404142434445464748495051525354555657585960
56058059061063065067068070072074076077079081083085086088090092094095097099010101030104010601080
*) factory setting
Water softener
16
Setting the water softener^ Turn off the machine with the "On/Off"
button.
^ Turn the program selector to the"Stop" f position.
^ Press and hold the "Start" 6 and"Display" ß buttons at the sametime. Turn the machine on with the"On/Off" button.
The current program status "P..." willappear in the display and the"Fill/Drain" indicator will illuminate.
^ Press the "Drying" 0 button once."E01" (programming level 1) willappear in the display.
^ Turn the program selector one switchposition clockwise (1 o’clockposition).The number "19" will appear in thedisplay (this indicates the factorywater hardness setting in gr/gal,equivalent to 340 ppm).
^ Press the "Display" ß button asmany times as necessary, or hold it inuntil the required value (hardnesslevel in gr/gal) appears in the display.Once the number "60" has beenreached, the counter will begin againat "0".
^ Press the "Start" 6 button. "SP" willappear in the display.
^ Press the "Start" 6 button again.
The setting will now be stored inmemory. The display will go out.
For future servicing, it is useful to makea note of your water hardness level.
^ Enter your water hardness level here:
gr/gal
or
ppm
Water softener
17
Filling the salt reservoir
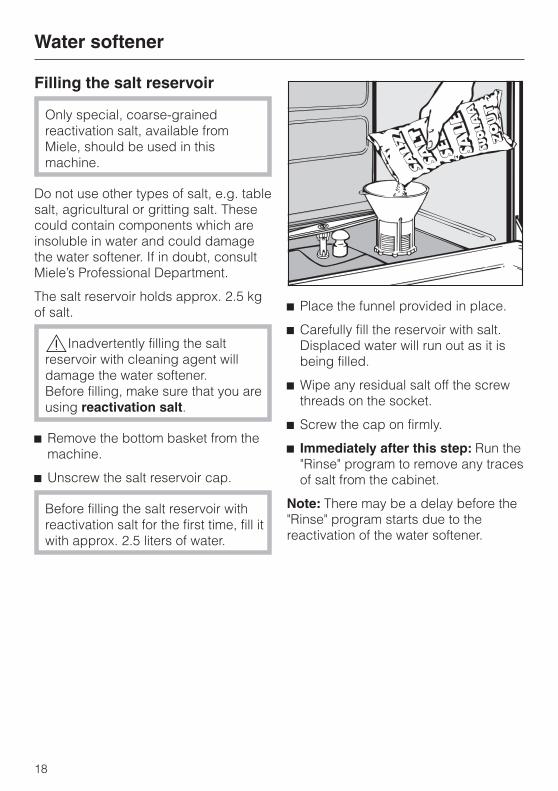
Only special, coarse-grainedreactivation salt, available fromMiele, should be used in thismachine.
Do not use other types of salt, e.g. tablesalt, agricultural or gritting salt. Thesecould contain components which areinsoluble in water and could damagethe water softener. If in doubt, consultMiele’s Professional Department.
The salt reservoir holds approx. 2.5 kgof salt.
,Inadvertently filling the saltreservoir with cleaning agent willdamage the water softener.Before filling, make sure that you areusing reactivation salt.
^ Remove the bottom basket from themachine.
^ Unscrew the salt reservoir cap.
Before filling the salt reservoir withreactivation salt for the first time, fill itwith approx. 2.5 liters of water.
^ Place the funnel provided in place.
^ Carefully fill the reservoir with salt.Displaced water will run out as it isbeing filled.
^ Wipe any residual salt off the screwthreads on the socket.
^ Screw the cap on firmly.
^ Immediately after this step: Run the"Rinse" program to remove any tracesof salt from the cabinet.
Note: There may be a delay before the"Rinse" program starts due to thereactivation of the water softener.
Water softener
18
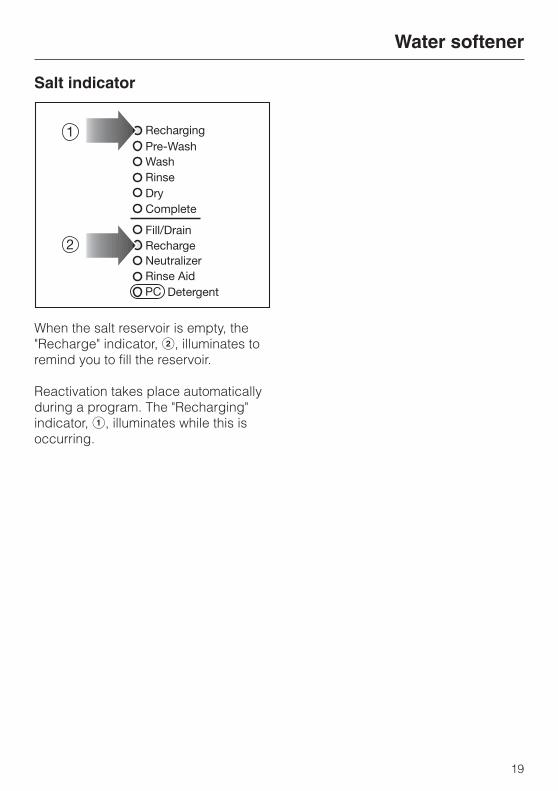
Salt indicator
When the salt reservoir is empty, the"Recharge" indicator, b, illuminates toremind you to fill the reservoir.
Reactivation takes place automaticallyduring a program. The "Recharging"indicator, a, illuminates while this isoccurring.
Water softener
19
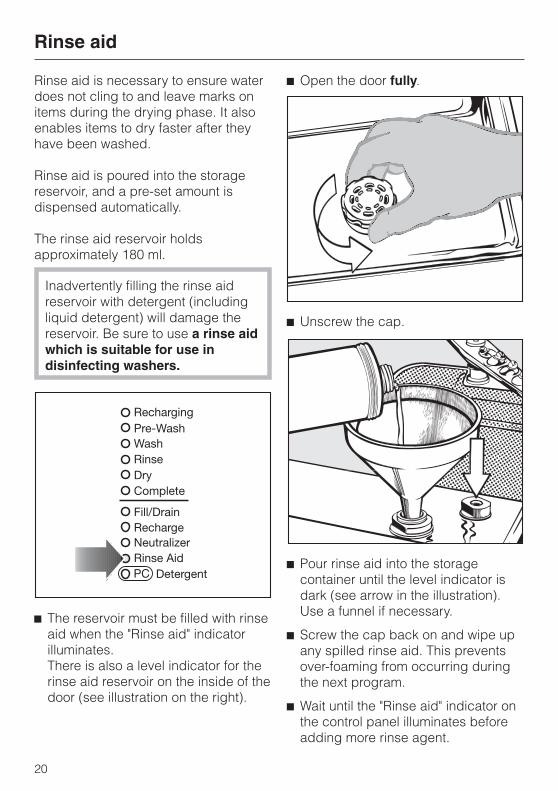
Rinse aid is necessary to ensure waterdoes not cling to and leave marks onitems during the drying phase. It alsoenables items to dry faster after theyhave been washed.
Rinse aid is poured into the storagereservoir, and a pre-set amount isdispensed automatically.
The rinse aid reservoir holdsapproximately 180 ml.
Inadvertently filling the rinse aidreservoir with detergent (includingliquid detergent) will damage thereservoir. Be sure to use a rinse aidwhich is suitable for use indisinfecting washers.
^ The reservoir must be filled with rinseaid when the "Rinse aid" indicatorilluminates.There is also a level indicator for therinse aid reservoir on the inside of thedoor (see illustration on the right).
^ Open the door fully.
^ Unscrew the cap.
^ Pour rinse aid into the storagecontainer until the level indicator isdark (see arrow in the illustration).Use a funnel if necessary.
^ Screw the cap back on and wipe upany spilled rinse aid. This preventsover-foaming from occurring duringthe next program.
^ Wait until the "Rinse aid" indicator onthe control panel illuminates beforeadding more rinse agent.
Rinse aid
20
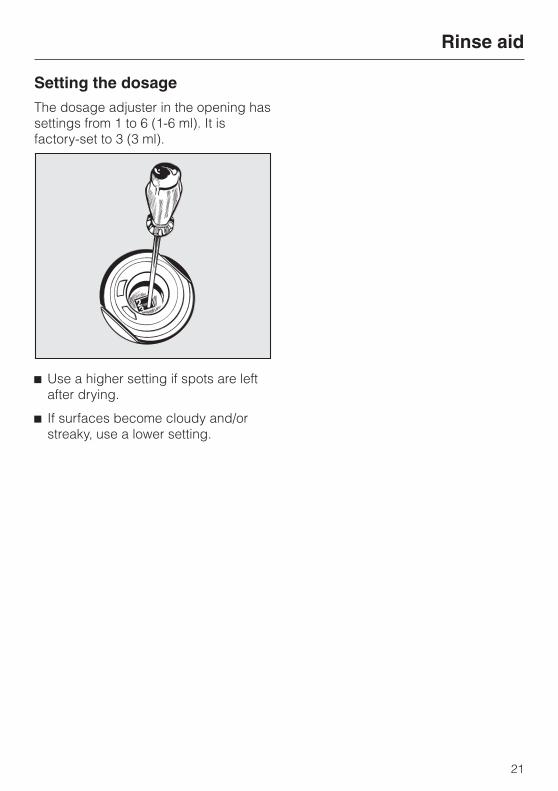
Setting the dosageThe dosage adjuster in the opening hassettings from 1 to 6 (1-6 ml). It isfactory-set to 3 (3 ml).
^ Use a higher setting if spots are leftafter drying.
^ If surfaces become cloudy and/orstreaky, use a lower setting.
Rinse aid
21
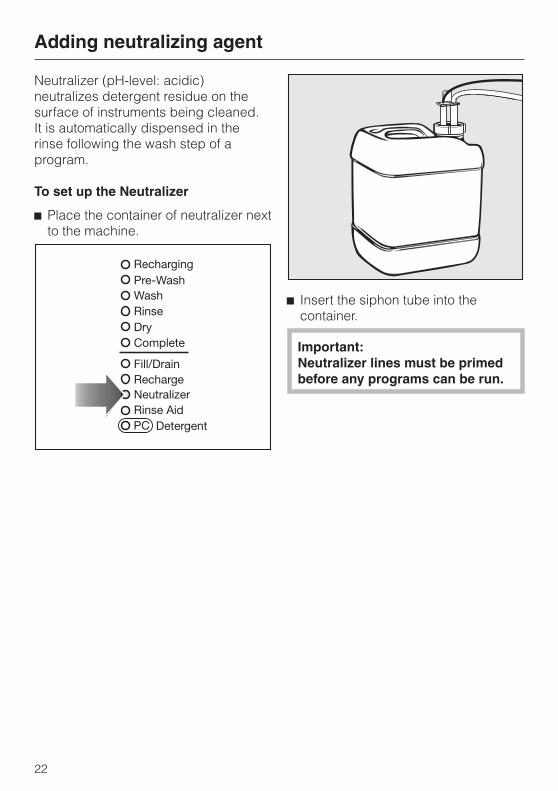
Neutralizer (pH-level: acidic)neutralizes detergent residue on thesurface of instruments being cleaned.It is automatically dispensed in therinse following the wash step of aprogram.
To set up the Neutralizer
^ Place the container of neutralizer nextto the machine.
^ Insert the siphon tube into thecontainer.
Important:Neutralizer lines must be primedbefore any programs can be run.
Adding neutralizing agent
22
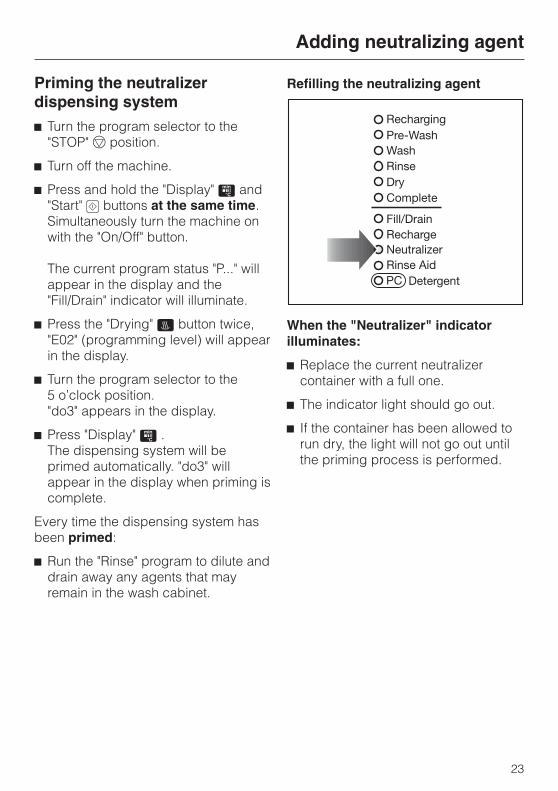
Priming the neutralizerdispensing system^ Turn the program selector to the
"STOP" f position.
^ Turn off the machine.
^ Press and hold the "Display" ß and"Start" 6 buttons at the same time.Simultaneously turn the machine onwith the "On/Off" button.
The current program status "P..." willappear in the display and the"Fill/Drain" indicator will illuminate.
^ Press the "Drying" 0 button twice,"E02" (programming level) will appearin the display.
^ Turn the program selector to the5 o’clock position."do3" appears in the display.
^ Press "Display" ß .The dispensing system will beprimed automatically. "do3" willappear in the display when priming iscomplete.
Every time the dispensing system hasbeen primed:
^ Run the "Rinse" program to dilute anddrain away any agents that mayremain in the wash cabinet.
Refilling the neutralizing agent
When the "Neutralizer" indicatorilluminates:
^ Replace the current neutralizercontainer with a full one.
^ The indicator light should go out.
^ If the container has been allowed torun dry, the light will not go out untilthe priming process is performed.
Adding neutralizing agent
23
Only use detergents recommendedand sold by Miele for the dentaldisinfector.
Detergent comes in two forms –a powder or a liquid option.
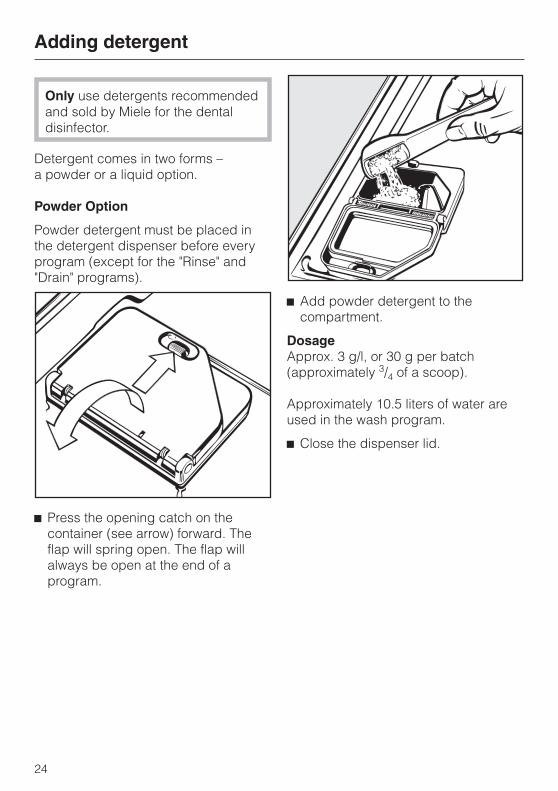
Powder Option
Powder detergent must be placed inthe detergent dispenser before everyprogram (except for the "Rinse" and"Drain" programs).
^ Press the opening catch on thecontainer (see arrow) forward. Theflap will spring open. The flap willalways be open at the end of aprogram.
^ Add powder detergent to thecompartment.
DosageApprox. 3 g/l, or 30 g per batch(approximately 3/4 of a scoop).
Approximately 10.5 liters of water areused in the wash program.
^ Close the dispenser lid.
Adding detergent
24
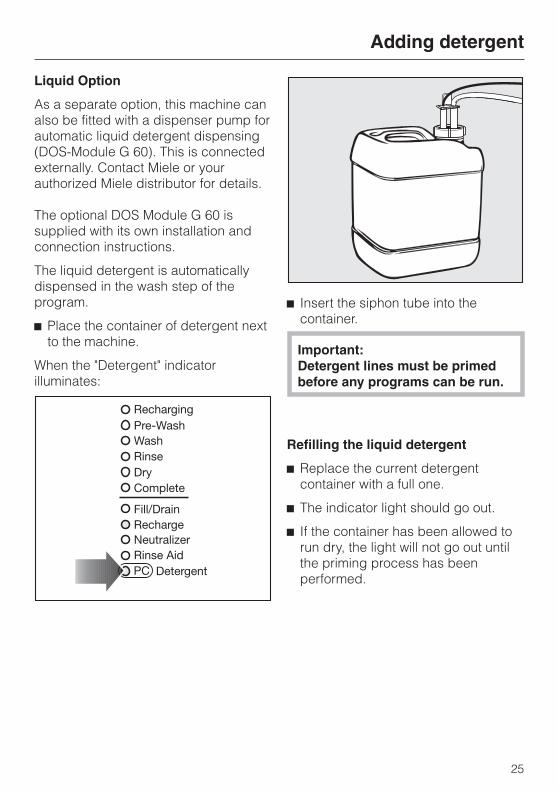
Liquid Option
As a separate option, this machine canalso be fitted with a dispenser pump forautomatic liquid detergent dispensing(DOS-Module G 60). This is connectedexternally. Contact Miele or yourauthorized Miele distributor for details.
The optional DOS Module G 60 issupplied with its own installation andconnection instructions.
The liquid detergent is automaticallydispensed in the wash step of theprogram.
^ Place the container of detergent nextto the machine.
When the "Detergent" indicatorilluminates:
^ Insert the siphon tube into thecontainer.
Important:Detergent lines must be primedbefore any programs can be run.
Refilling the liquid detergent
^ Replace the current detergentcontainer with a full one.
^ The indicator light should go out.
^ If the container has been allowed torun dry, the light will not go out untilthe priming process has beenperformed.
Adding detergent
25
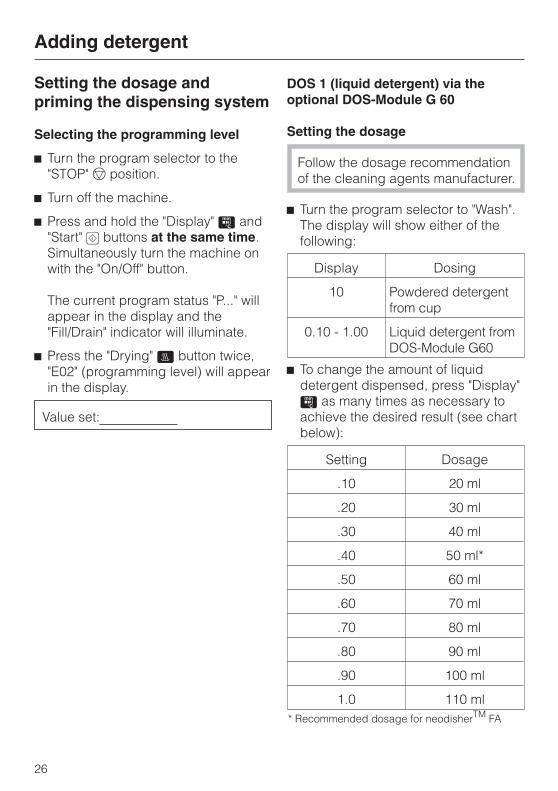
Setting the dosage andpriming the dispensing system
Selecting the programming level
^ Turn the program selector to the"STOP" f position.
^ Turn off the machine.
^ Press and hold the "Display" ß and"Start" 6 buttons at the same time.Simultaneously turn the machine onwith the "On/Off" button.
The current program status "P..." willappear in the display and the"Fill/Drain" indicator will illuminate.
^ Press the "Drying" 0 button twice,"E02" (programming level) will appearin the display.
Value set:
DOS 1 (liquid detergent) via theoptional DOS-Module G 60
Setting the dosage
Follow the dosage recommendationof the cleaning agents manufacturer.
^ Turn the program selector to "Wash".The display will show either of thefollowing:
Display Dosing
10 Powdered detergentfrom cup
0.10 - 1.00 Liquid detergent fromDOS-Module G60
^ To change the amount of liquiddetergent dispensed, press "Display"ß as many times as necessary toachieve the desired result (see chartbelow):
Setting Dosage
.10 20 ml
.20 30 ml
.30 40 ml
.40 50 ml*
.50 60 ml
.60 70 ml
.70 80 ml
.80 90 ml
.90 100 ml
1.0 110 ml* Recommended dosage for neodisherTM FA
Adding detergent
26
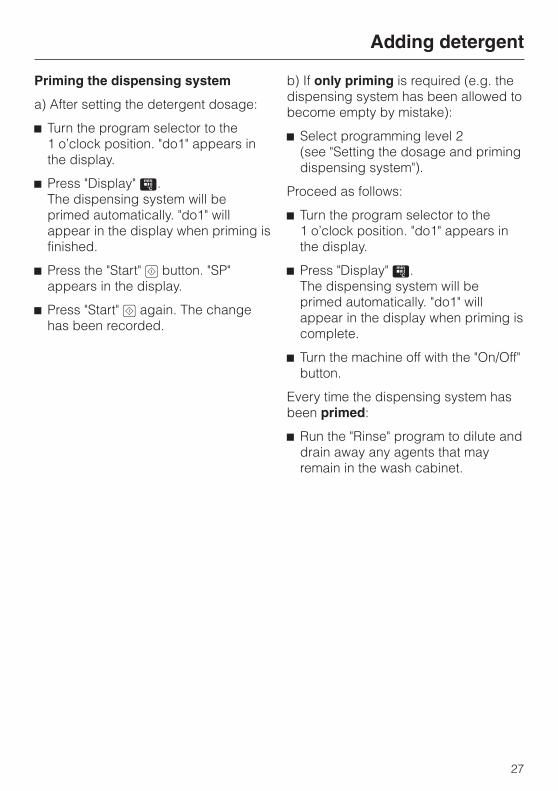
Priming the dispensing system
a) After setting the detergent dosage:
^ Turn the program selector to the1 o’clock position. "do1" appears inthe display.
^ Press "Display" ß.The dispensing system will beprimed automatically. "do1" willappear in the display when priming isfinished.
^ Press the "Start" 6 button. "SP"appears in the display.
^ Press "Start" 6 again. The changehas been recorded.
b) If only priming is required (e.g. thedispensing system has been allowed tobecome empty by mistake):
^ Select programming level 2(see "Setting the dosage and primingdispensing system").
Proceed as follows:
^ Turn the program selector to the1 o’clock position. "do1" appears inthe display.
^ Press "Display" ß.The dispensing system will beprimed automatically. "do1" willappear in the display when priming iscomplete.
^ Turn the machine off with the "On/Off"button.
Every time the dispensing system hasbeen primed:
^ Run the "Rinse" program to dilute anddrain away any agents that mayremain in the wash cabinet.
Adding detergent
27
Maintenance of the dispensingsystemTo ensure trouble-free operation, thefollowing regular maintenance shouldbe carried out by a Miele approvedservice technician.
^ Replace the dispensing hoses in theDOS modules every 12-18 months.
Take care when handling liquidagents and additives. These maycontain irritant or corrosiveingredients.Follow the manufacturer’s safetyinstructions and relevant Health andSafety procedures carefully.Wear protective gloves and goggles.
Adding detergent
28
This disinfecting washer normallyrequires a top and bottom basket.Various inserts and special baskets arealso available for a wide variety ofinstruments.
Loading the machine
Preparation
^ Empty all containers before loadinginto the machine.
Ensure that no acid or solventresidue, especially hydrochloric acidor chlorides, gets into the washcabinet.
Note
^ Load items so that water will comeinto contact with all surfaces. Thisensures proper cleaning.
^ Do not place items to be cleanedinside other pieces where they maybe concealed.
^ Hollow items should be inverted andplaced in the correct inserts. Thewater must have unobstructedaccess to them.
^ Deep-based items should be placedat an angle to ensure watercoverage.
^ Tall, narrow pieces should be placedin the center of the baskets to ensurewater coverage.
^ The spray arms must not be blockedby items which are too tall or hangdown in their path. If necessary,manually rotate the arms to test.
^ In order to avoid corrosion, it isrecommended that only high-qualitystainless steel instruments arecleaned in the machine.
^ Nickel plated instruments andanodized aluminum instruments arenot suitable for machine processing.
^ Plastic items must be thermallystable.
^ Single-use instruments must not beput into the machine for processing.
^ As soon as the program finishes,partially open the door of themachine (by about 10 cm) for about5 minutes before unloading. Theresidual heat in the machine will helpachieve a good drying result andprevent instruments from corroding.
^ As little dental cement or amalgamremains should be on the instrumentsas possible. If necessary, wipe offexcess with a swab. Otherwise,manual cleaning is required afterthermal disinfection.
^ When loading cassettes, be sure toangle them toward the rear of thechamber, so as not to block thepowder detergent cup from opening.
Loading the machine
29
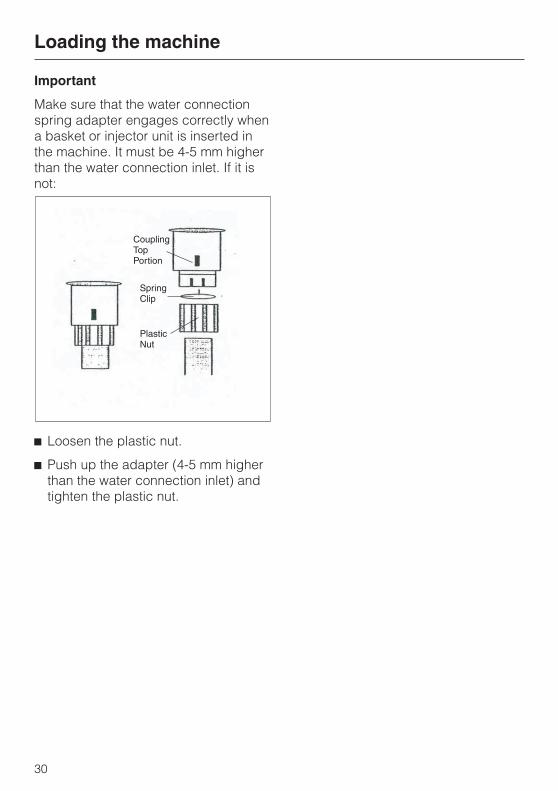
Important
Make sure that the water connectionspring adapter engages correctly whena basket or injector unit is inserted inthe machine. It must be 4-5 mm higherthan the water connection inlet. If it isnot:
^ Loosen the plastic nut.
^ Push up the adapter (4-5 mm higherthan the water connection inlet) andtighten the plastic nut.
Loading the machine
30
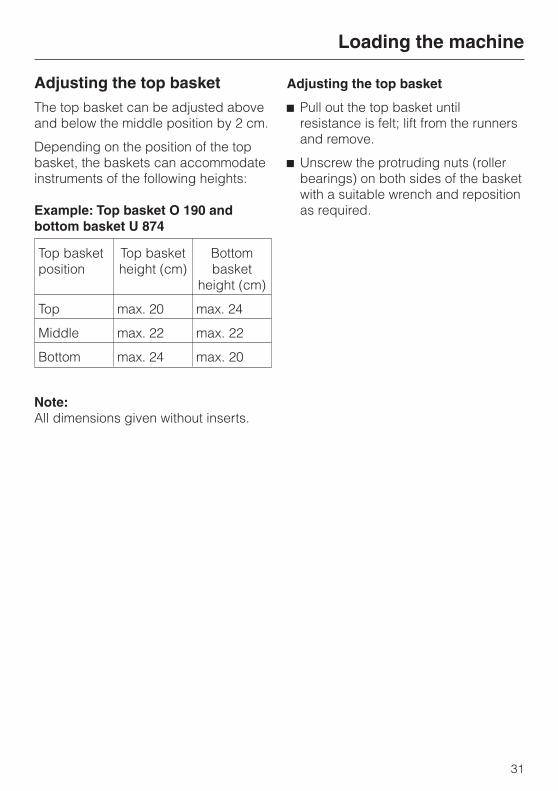
Adjusting the top basketThe top basket can be adjusted aboveand below the middle position by 2 cm.
Depending on the position of the topbasket, the baskets can accommodateinstruments of the following heights:
Example: Top basket O 190 andbottom basket U 874
Top basketposition
Top basketheight (cm)
Bottombasket
height (cm)
Top max. 20 max. 24
Middle max. 22 max. 22
Bottom max. 24 max. 20
Note:All dimensions given without inserts.
Adjusting the top basket
^ Pull out the top basket untilresistance is felt; lift from the runnersand remove.
^ Unscrew the protruding nuts (rollerbearings) on both sides of the basketwith a suitable wrench and repositionas required.
Loading the machine
31
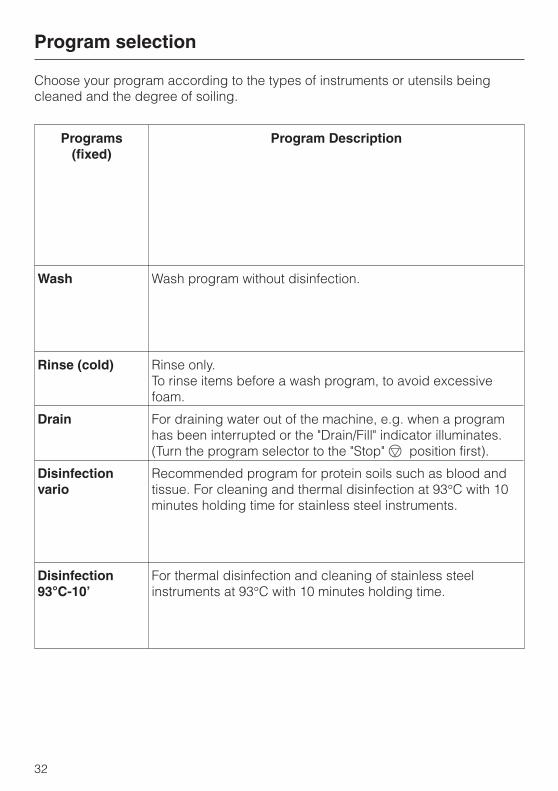
Choose your program according to the types of instruments or utensils beingcleaned and the degree of soiling.
Programs(fixed)
Program Description
Wash Wash program without disinfection.
Rinse (cold) Rinse only.To rinse items before a wash program, to avoid excessivefoam.
Drain For draining water out of the machine, e.g. when a programhas been interrupted or the "Drain/Fill" indicator illuminates.(Turn the program selector to the "Stop" f position first).
Disinfectionvario
Recommended program for protein soils such as blood andtissue. For cleaning and thermal disinfection at 93�C with 10minutes holding time for stainless steel instruments.
Disinfection93°C-10’
For thermal disinfection and cleaning of stainless steelinstruments at 93�C with 10 minutes holding time.
Program selection
32
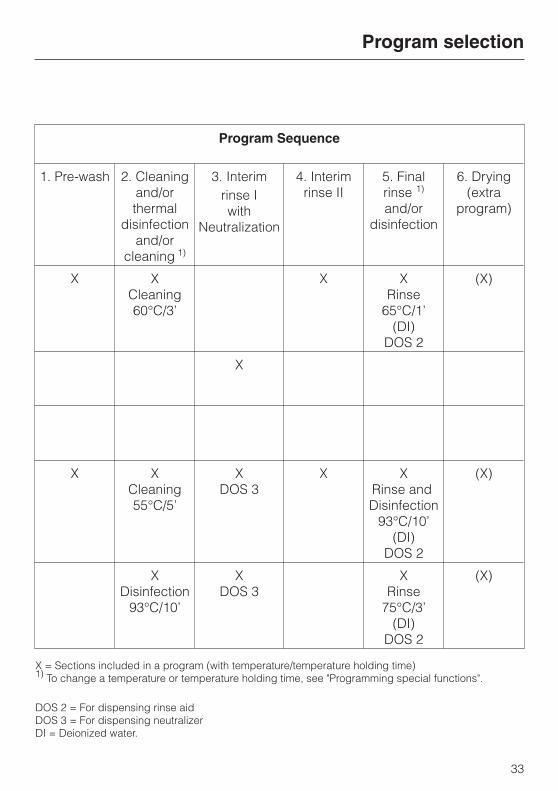
Program Sequence
1. Pre-wash 2. Cleaningand/orthermal
disinfectionand/or
cleaning 1)
3. Interimrinse Iwith
Neutralization
4. Interimrinse II
5. Finalrinse 1)
and/ordisinfection
6. Drying(extra
program)
X XCleaning60°C/3’
X XRinse
65°C/1’(DI)
DOS 2
(X)
X
X XCleaning55°C/5’
XDOS 3
X XRinse andDisinfection
93°C/10’(DI)
DOS 2
(X)
XDisinfection
93°C/10’
XDOS 3
XRinse
75°C/3’(DI)
DOS 2
(X)
X = Sections included in a program (with temperature/temperature holding time)1) To change a temperature or temperature holding time, see "Programming special functions".
DOS 2 = For dispensing rinse aidDOS 3 = For dispensing neutralizerDI = Deionized water.
Program selection
33
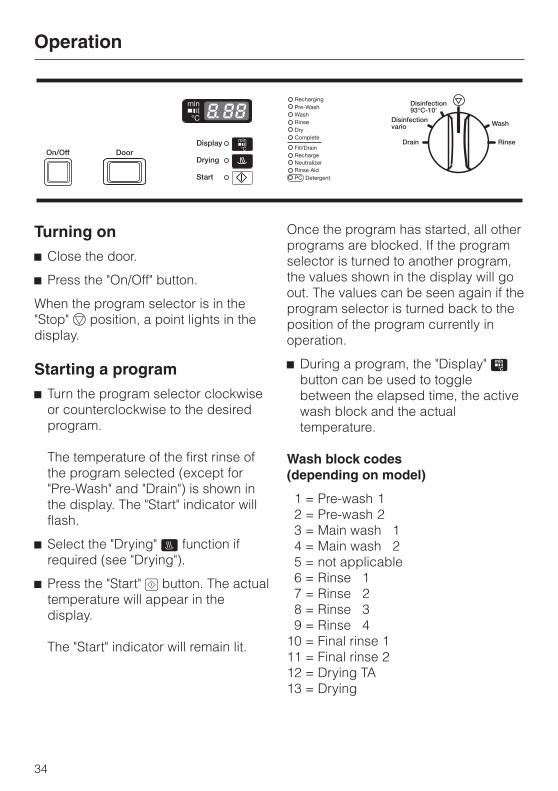
Turning on^ Close the door.
^ Press the "On/Off" button.
When the program selector is in the"Stop" f position, a point lights in thedisplay.
Starting a program^ Turn the program selector clockwise
or counterclockwise to the desiredprogram.
The temperature of the first rinse ofthe program selected (except for"Pre-Wash" and "Drain") is shown inthe display. The "Start" indicator willflash.
^ Select the "Drying" 0 function ifrequired (see "Drying").
^ Press the "Start" 6 button. The actualtemperature will appear in thedisplay.
The "Start" indicator will remain lit.
Once the program has started, all otherprograms are blocked. If the programselector is turned to another program,the values shown in the display will goout. The values can be seen again if theprogram selector is turned back to theposition of the program currently inoperation.
^ During a program, the "Display" ßbutton can be used to togglebetween the elapsed time, the activewash block and the actualtemperature.
Wash block codes(depending on model)
1 = Pre-wash 12 = Pre-wash 23 = Main wash 14 = Main wash 25 = not applicable6 = Rinse 17 = Rinse 28 = Rinse 39 = Rinse 4
10 = Final rinse 111 = Final rinse 212 = Drying TA13 = Drying
Operation
34

Drying"Drying" 0 may be selected as anadditional feature once a program hasbeen selected (except in the "Rinse"and "Drain" programs).
Drying is phased over 10 minutes. Ifselected, the total running time of theprogram lengthens accordingly.
Changing a programA wrongly selected program may bechanged as described below.
If the "Start" 6 button has not yetbeen pressed
^ Turn the program selector to therequired program.
^ Select the "Drying" 0 function ifrequired (see "Drying").
^ Press the "Start" 6 button.
If "Start" 6 has already beenpressed, see "Canceling a program".
At the end of a program^ The "Complete" indicator in the
program sequence displayilluminates, and the "Start" 6indicator will go out.
^ A "0" will appear in the middle of thedisplay. All indicators will come onand go out in sequence.
^ Simultaneously, a buzzer will soundfor approximately 30 seconds(standard setting). The buzzerfunction can be changed (see"Programming special functions").
Use the "Display" ß button to view thetotal running time or temperature of aprogram.
Turning off^ Press and release the "On/Off" button.
Note:The machine is fitted with an electricdoor lock. The door can only beopened if the "On/Off" button is pressed(see "Opening and closing the door").
Operation
35
Canceling a program^ Turn the program selector to the
"Stop" f position (the program willstop after approximately 2 seconds).
^ Open the door.
,Caution: Water and items in themachine may be hot. Danger ofburning or scalding.
^ Arrange the load securely. Wearprotective gloves when necessary,and observe appropriate health andsafety regulations relating toinfectious diseases.
^ Replenish powder detergent, ifnecessary.
^ Close the door.
^ Select and start the "Drain" program.
^ When finished with "Drain", select andrestart the desired program.
Operation
36
For future servicing, pleasedocument any alterations to thestandard factory settings.Enter any alterations in the fieldValue set:________.
General notes
Program selector positions that havenot been allocated a function areindicated in the middle part of thedisplay by a bar (-).
The programming level is called up viathe "Stop" f position.
To program special functions
Enter the programming level of thecontrols first before performing specialfunctions as follows:
1. Setting the liquid detergentdosage and priming thedispensing system^ Turn the program selector to the
"Stop" f position.
^ Turn off the machine.
^ Press and hold "Display" ß and"Start" 6 at the same time.Simultaneously, turn the machine onwith the "On/Off" button.The current program status "P..." willappear in the display and the"Fill/Drain" indicator will illuminate.
^ Press "Drying" 0 twice."E02" (programming level) wil appearin the display.
Value set:
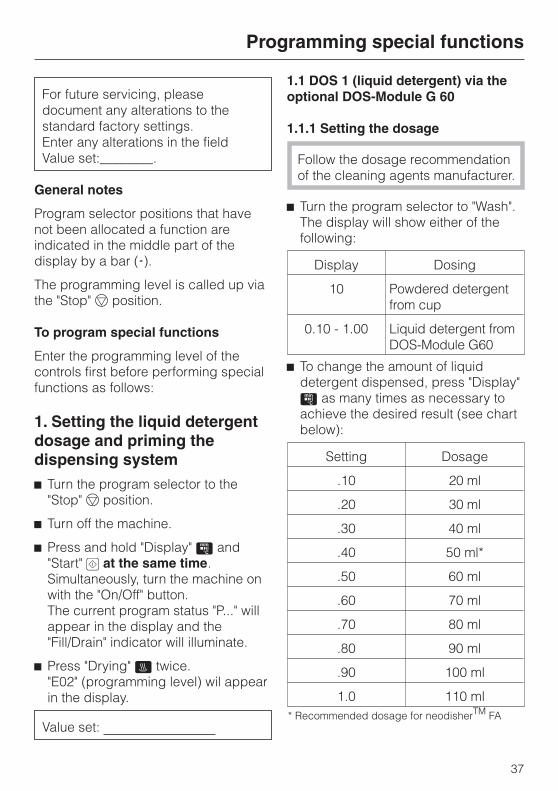
1.1 DOS 1 (liquid detergent) via theoptional DOS-Module G 60
1.1.1 Setting the dosage
Follow the dosage recommendationof the cleaning agents manufacturer.
^ Turn the program selector to "Wash".The display will show either of thefollowing:
Display Dosing
10 Powdered detergentfrom cup
0.10 - 1.00 Liquid detergent fromDOS-Module G60
^ To change the amount of liquiddetergent dispensed, press "Display"ß as many times as necessary toachieve the desired result (see chartbelow):
Setting Dosage
.10 20 ml
.20 30 ml
.30 40 ml
.40 50 ml*
.50 60 ml
.60 70 ml
.70 80 ml
.80 90 ml
.90 100 ml
1.0 110 ml* Recommended dosage for neodisherTM FA
Programming special functions
37
1.1.2 Priming the dispensing system
a) After setting the detergent dosage:
^ Turn the program selector to the1 o’clock position. "do1" appears inthe display.
^ Press "Display" ß.The dispensing system will beprimed automatically. "do1" willappear in the display when priming isfinished.
^ Press the "Start" 6 button. "SP"appears in the display.
^ Press "Start" 6 again. The changehas been recorded.
b) If only priming is required (e.g. thedispensing system has been allowed tobecome empty by mistake):
^ Select programming level 2(see 1.).
Proceed as follows:
^ Turn the program selector to the1 o’clock position. "do1" appears inthe display.
^ Press "Display" ß.The dispensing system will beprimed automatically. "do1" willappear in the display when priming isfinished.
^ Turn the machine off with the "On/Off"button.
Every time the dispensing system hasbeen primed:
^ Run the "Rinse" program to dilute anddrain away any agents that mayremain in the wash cabinet.
Programming special functions
38

2. BuzzerThis special function allows you toprogram a buzzer (lasting a maximumof 30 seconds) for the followingfunctions:
– Program end = Constant buzzer
– Fault warning = Buzzer at onesecond intervals
^ Turn the program selector to the"Stop" f position.
^ Turn off the machine.
^ Press and hold "Display" ß and"Start" 6 at the same time.Simultaneously, turn the machine onwith the "On/Off" button.
The current program status "P..." willappear in the display and the"Fill/Drain" indicator will illuminate.
^ Press "Drying" 0 four times. "E04"(programming level 4) appears in thedisplay.
^ Turn the program selector to "Rinse".A number will appear in the display:
20 = Buzzer switched off21 = Buzzer at end of program
(standard setting)22 = Fault indication23 = Fault indication and buzzer at
end of program
^ Press the "Display" ß button asmany times as necessary, or hold itpressed in, until the desired valueappears in the display.
^ Press the "Start" 6 button. "SP"appears in the display.
^ Press "Start" 6 again. The changehas been recorded.
Value set:________.
Turning the buzzer off
The buzzer can be turned off early by:
– Turning the program selector to the"Stop" f position.
– Pressing the "Display" ß button.
– Interrupting the power supply (e.g.by opening and closing the door).
Programming special functions
39
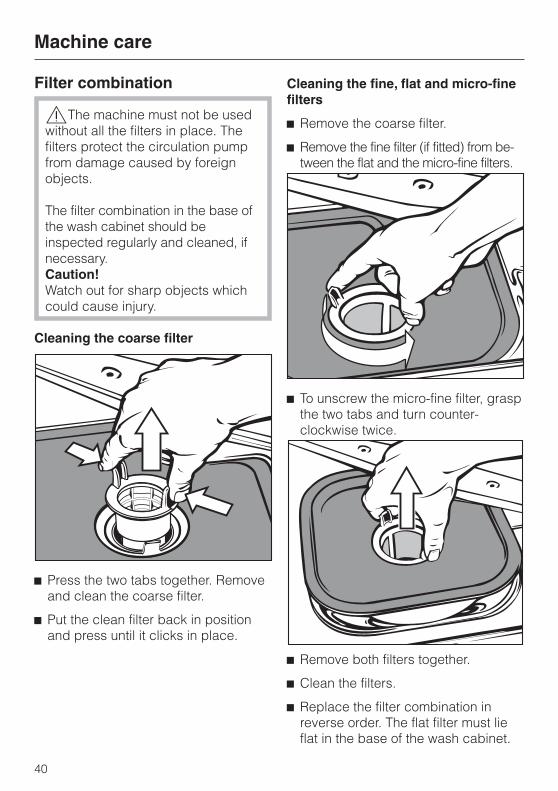
Filter combination
,The machine must not be usedwithout all the filters in place. Thefilters protect the circulation pumpfrom damage caused by foreignobjects.
The filter combination in the base ofthe wash cabinet should beinspected regularly and cleaned, ifnecessary.Caution!Watch out for sharp objects whichcould cause injury.
Cleaning the coarse filter
^ Press the two tabs together. Removeand clean the coarse filter.
^ Put the clean filter back in positionand press until it clicks in place.
Cleaning the fine, flat and micro-finefilters
^ Remove the coarse filter.
^ Remove the fine filter (if fitted) from be-tween the flat and the micro-fine filters.
^ To unscrew the micro-fine filter, graspthe two tabs and turn counter-clockwise twice.
^ Remove both filters together.
^ Clean the filters.
^ Replace the filter combination inreverse order. The flat filter must lieflat in the base of the wash cabinet.
Machine care
40
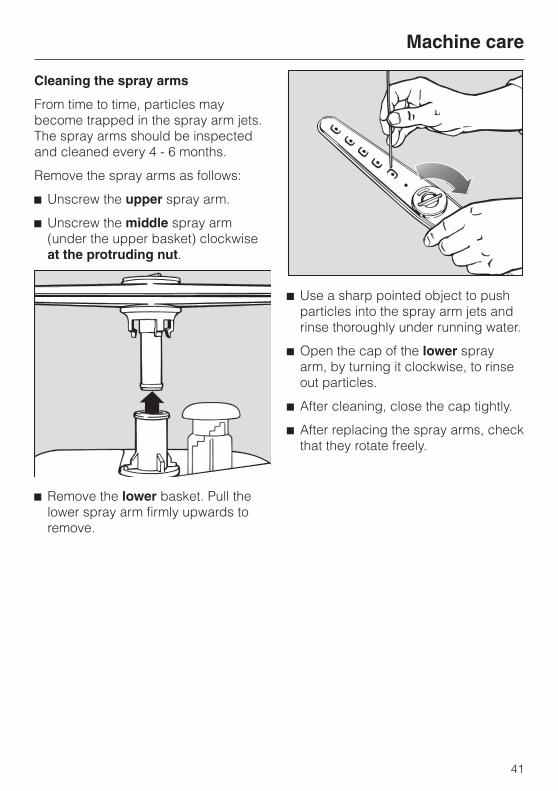
Cleaning the spray arms
From time to time, particles maybecome trapped in the spray arm jets.The spray arms should be inspectedand cleaned every 4 - 6 months.
Remove the spray arms as follows:
^ Unscrew the upper spray arm.
^ Unscrew the middle spray arm(under the upper basket) clockwiseat the protruding nut.
^ Remove the lower basket. Pull thelower spray arm firmly upwards toremove.
^ Use a sharp pointed object to pushparticles into the spray arm jets andrinse thoroughly under running water.
^ Open the cap of the lower sprayarm, by turning it clockwise, to rinseout particles.
^ After cleaning, close the cap tightly.
^ After replacing the spray arms, checkthat they rotate freely.
Machine care
41
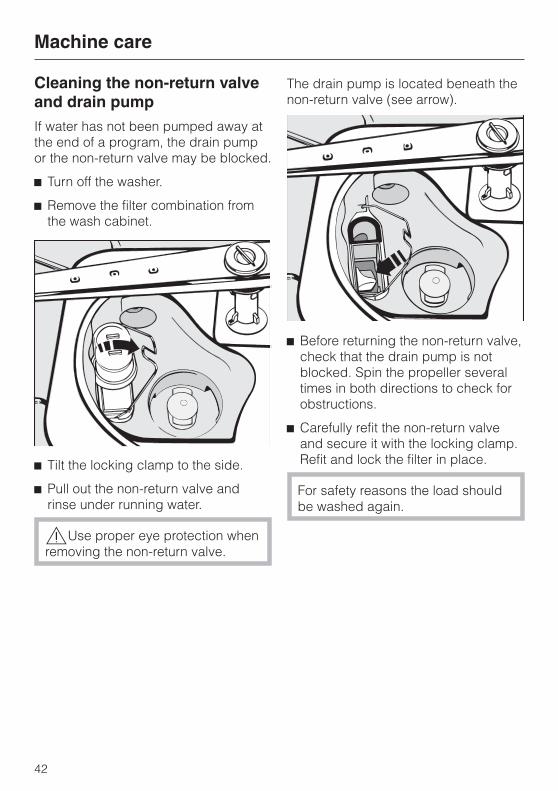
Cleaning the non-return valveand drain pumpIf water has not been pumped away atthe end of a program, the drain pumpor the non-return valve may be blocked.
^ Turn off the washer.
^ Remove the filter combination fromthe wash cabinet.
^ Tilt the locking clamp to the side.
^ Pull out the non-return valve andrinse under running water.
,Use proper eye protection whenremoving the non-return valve.
The drain pump is located beneath thenon-return valve (see arrow).
^ Before returning the non-return valve,check that the drain pump is notblocked. Spin the propeller severaltimes in both directions to check forobstructions.
^ Carefully refit the non-return valveand secure it with the locking clamp.Refit and lock the filter in place.
For safety reasons the load shouldbe washed again.
Machine care
42
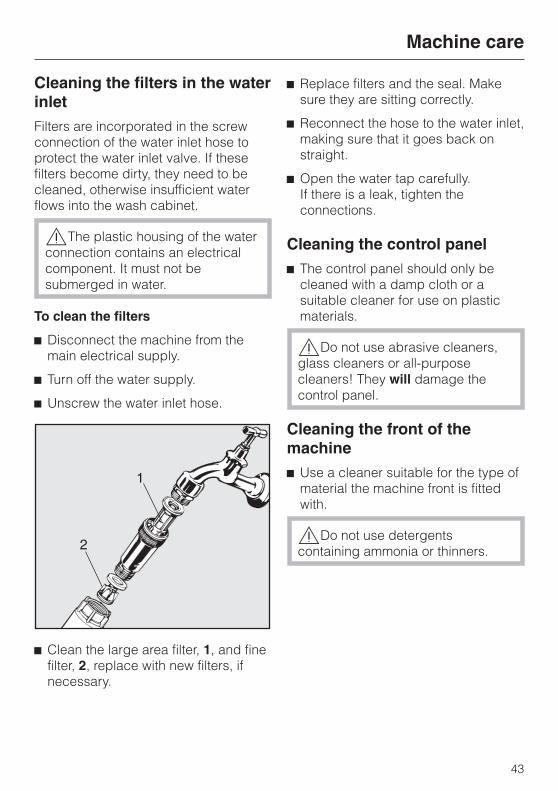
Cleaning the filters in the waterinletFilters are incorporated in the screwconnection of the water inlet hose toprotect the water inlet valve. If thesefilters become dirty, they need to becleaned, otherwise insufficient waterflows into the wash cabinet.
,The plastic housing of the waterconnection contains an electricalcomponent. It must not besubmerged in water.
To clean the filters
^ Disconnect the machine from themain electrical supply.
^ Turn off the water supply.
^ Unscrew the water inlet hose.
^ Clean the large area filter, 1, and finefilter, 2, replace with new filters, ifnecessary.
^ Replace filters and the seal. Makesure they are sitting correctly.
^ Reconnect the hose to the water inlet,making sure that it goes back onstraight.
^ Open the water tap carefully.If there is a leak, tighten theconnections.
Cleaning the control panel^ The control panel should only be
cleaned with a damp cloth or asuitable cleaner for use on plasticmaterials.
,Do not use abrasive cleaners,glass cleaners or all-purposecleaners! They will damage thecontrol panel.
Cleaning the front of themachine^ Use a cleaner suitable for the type of
material the machine front is fittedwith.
,Do not use detergentscontaining ammonia or thinners.
Machine care
43
Before contacting the Miele servicedepartment, please read the followingtroubleshooting steps.
Any work on the electricalcomponents of the machine shouldonly be carried out by a qualifiedtechnician in accordance with localand national safety regulations.Unauthorized repairs could bedangerous.
Faults / possible causes
The machine does not start be surethat :
– the door is properly closed.
– the plug is properly inserted into thesocket.
– the fuse has not blown or isdefective.
A few minutes after turning on, the"Fill/Drain" indicator flashes (faultcode "F..E" appears in the display)
^ Turn the program selector to the"Stop" f position (the fault codegoes out).
^ Turn the machine off (press "On/Off").
– The water supply may be interrupted.Check to see that the water supply isturned on and flowing.
– The filters in the water inlet hose aredirty. Check and clean, if necessary.
– The water pressure is too low.Contact the Miele ServiceDepartment.
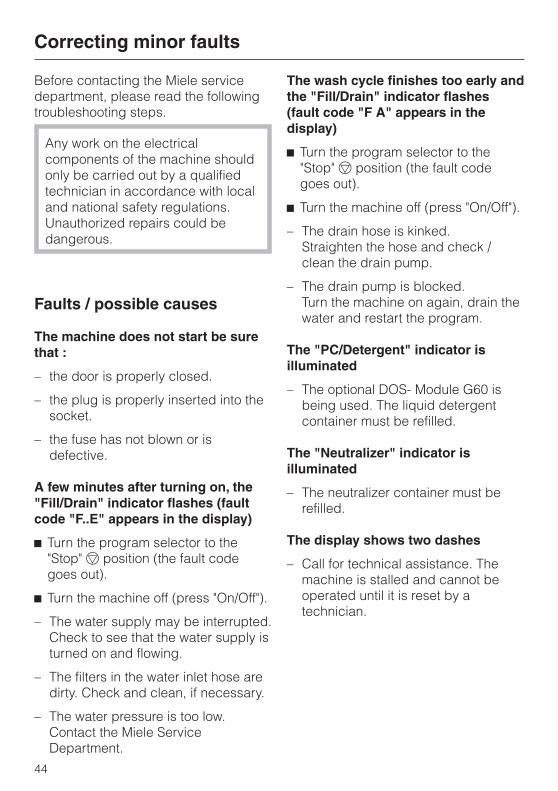
The wash cycle finishes too early andthe "Fill/Drain" indicator flashes(fault code "F A" appears in thedisplay)
^ Turn the program selector to the"Stop" f position (the fault codegoes out).
^ Turn the machine off (press "On/Off").
– The drain hose is kinked.Straighten the hose and check /clean the drain pump.
– The drain pump is blocked.Turn the machine on again, drain thewater and restart the program.
The "PC/Detergent" indicator isilluminated
– The optional DOS- Module G60 isbeing used. The liquid detergentcontainer must be refilled.
The "Neutralizer" indicator isilluminated
– The neutralizer container must berefilled.
The display shows two dashes
– Call for technical assistance. Themachine is stalled and cannot beoperated until it is reset by atechnician.
Correcting minor faults
44
Unsatisfactory cleaning results
Unsatisfactory cleaning results mayoccur as drying spots, or as spots thatlook like corrosion. Presumably,corrosion spots are often bio-debris.They have the shape of drying spots,blurry edges and a rust color.Bio-debris may also appear onsurfaces that were not contaminatedbefore processing. To remedy thisproblem:
^ Run the machine within six hours ofloading, even if it is partially loaded.
^ Check the dosage of the detergentand adjust. Too little or too muchdetergent may deteriorate cleaningresults.
^ Rearrange the load to be cleaned sothat the spray arms can rotate freely.
^ Check if anything obstructs thepowdered detergent dispenser flap.
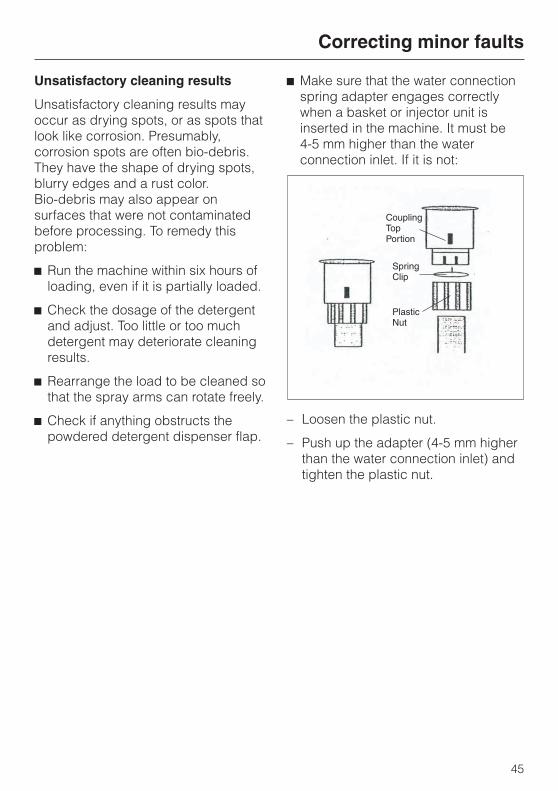
^ Make sure that the water connectionspring adapter engages correctlywhen a basket or injector unit isinserted in the machine. It must be4-5 mm higher than the waterconnection inlet. If it is not:
– Loosen the plastic nut.
– Push up the adapter (4-5 mm higherthan the water connection inlet) andtighten the plastic nut.
Correcting minor faults
45
The water in the wash cabinet is notheated or the program sequencelasts too long (fault code "F01-F03,F18, F19" appears in the display)
The machine has a resettabletemperature limiter which will shut offthe heating elements in the case ofoverheating. This could be caused iflarge articles cover the heatingelements or if the filters in the washcabinet are blocked.
^ Remove the cause of overheating.
^ Remove the service panel.
^ Press the blue "Reset" button on thetemperature limiter.
If this switch trips repeatedly, contactthe Miele Technical ServiceDepartment.
Correcting minor faults
46
ImportantWhen a fault occurs, please check thatthe fault has not been caused byincorrect operation. This will help avoidan unnecessary service call.
^ Turn the program selector to the"Stop" f position (the fault code willgo out).
^ Turn the machine off.
^ Restart the machine and reselect theprogram.
If you still have difficulty or if a faultcode "F..." appears in the display,please contact your authorized ServiceDealer or the Miele ServiceDepartment. See back cover foraddresses.
Please quote the fault code as well asthe model type and serial number ofyour machine, which is given on thedata plate inside the door (see"Electrical connection").
After sales service
47

48
INSTALLATION INSTRUCTIONS
Disposal of the packingmaterialThe protective packing materials areenvironmentally safe and can berecycled.
Ensure that any plastic wrappings,bags, etc. are disposed of safely andkept out of the reach of children.Danger of suffocation!
Disposal of the applianceAppliances contain materials which canbe recycled. Please contact your localauthorities about recycling in your area.
Ensure that the machine presents nodanger to children while being storedfor disposal. See "Important SafetyInstructions".
Caring for the environment
50
Please refer to the installationdiagram supplied with the machine.
,Furniture and fittings installednear the machine must be of acommercial standard (able towithstand the effects of steam).
Installation options
– Free-standing
– Undercounter
The machine can be installed under acontinuous counter or sink drain. Therecess must be at least 23 5/8" (60 cm)wide, 23 5/8" (60 cm) deep and 32 5/16"(82 cm) high.
Positioning and securing themachineTo ensure stability, the machine must bealigned and screwed to the counter.
^ Open the door.
^ Secure the machine to the front edgeof the worktop using screws to theleft and right of the front trim.
^ When not mounted undercounter,floor mounting brackets must beused.
Do not use silicone sealant to sealthe gaps between the machine andany neighboring units. This willhinder ventilation to the circulationpump.
Steam Deflector (protects thecountertop)
Depending on the requirements for anundercounter installation, a steamdeflector can be ordered from the MieleTechnical Service Department.
The underside of the countertop isprotected from steam damage by thisstainless steel plate.
Installation
51
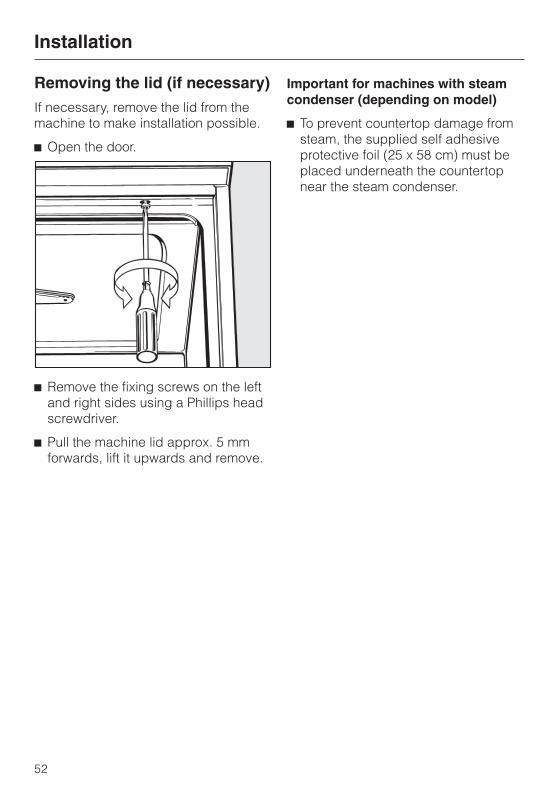
Removing the lid (if necessary)If necessary, remove the lid from themachine to make installation possible.
^ Open the door.
^ Remove the fixing screws on the leftand right sides using a Phillips headscrewdriver.
^ Pull the machine lid approx. 5 mmforwards, lift it upwards and remove.
Important for machines with steamcondenser (depending on model)
^ To prevent countertop damage fromsteam, the supplied self adhesiveprotective foil (25 x 58 cm) must beplaced underneath the countertopnear the steam condenser.
Installation
52
,All electrical work must beperformed by a qualified person inaccordance with local and nationalsafety regulations.
The machine comes equipped forconnection to a 208 V, 60 Hz, 1 phasepower supply. It is equipped with a 6 ft.long, 10/3 AWG power cord, without aplug. It must be hardwired into anelectrical junction box that has beeninstalled on the wall or in a cabinetadjacent to the machine. It should beconnected to the main power supply.
Voltage: 208 V, 1 phase
Frequency: 60 Hz
Rated Load: 6 kW
Circuit breaker: 2 x 30 A
Black: connect to L1 (hot)
White: connect to L2 (hot)
Green: connect to GND (ground)
A damaged power cord must onlybe replaced with a genuine Mielecord by a Miele service technician.
WARNINGTHIS APPLIANCE MUST BEGROUNDED
Grounding connection^ The ground lead must be connected
to the screw connection point(marked with the ground symbol 8) atthe back of the machine.
The machine must only be operatedwith the voltage, frequency andfusing shown on the data platelocated on the rear of the machine,and on the plinth (behind the servicepanel).
The conversion diagram and thewiring diagram is secured to the innerside of the service panel.
Electrical connection
53
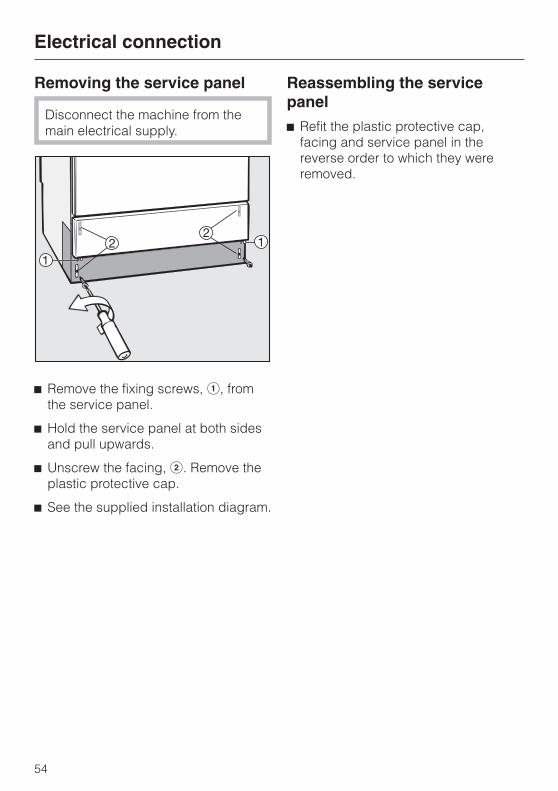
Removing the service panel
Disconnect the machine from themain electrical supply.
^ Remove the fixing screws, a, fromthe service panel.
^ Hold the service panel at both sidesand pull upwards.
^ Unscrew the facing, b. Remove theplastic protective cap.
^ See the supplied installation diagram.
Reassembling the servicepanel^ Refit the plastic protective cap,
facing and service panel in thereverse order to which they wereremoved.
Electrical connection
54
Connection to the water inlet
,Water in the machine is notsuitable for drinking.
^ For technical application reasons, themachine is supplied as standard forconnection to cold water only.The inlet hoses (water inlet andsteam condenser) must only beconnected to the cold water inlets.See also "DI water connection" (hosemarked H2O pur).
^ The machine must be connected tothe water supply in accordance withlocal and national regulations.
^ Acceptable water pressure(flow rate): 10 - 147 psiRecommended water pressure(flow rate): 25 - 60 psi
^ If the water pressure is not in therange listed above, the "Fill/Drain"indicator may come on and the faultcode "F..E" will appear in the display.If this occurs, contact the MieleTechnical Service Department foradvice.
^ Connections with a 3/4" GHT malethread are to be provided on site.They should be easily accessible sothat the water supply can be turnedoff when the machine is not in use.
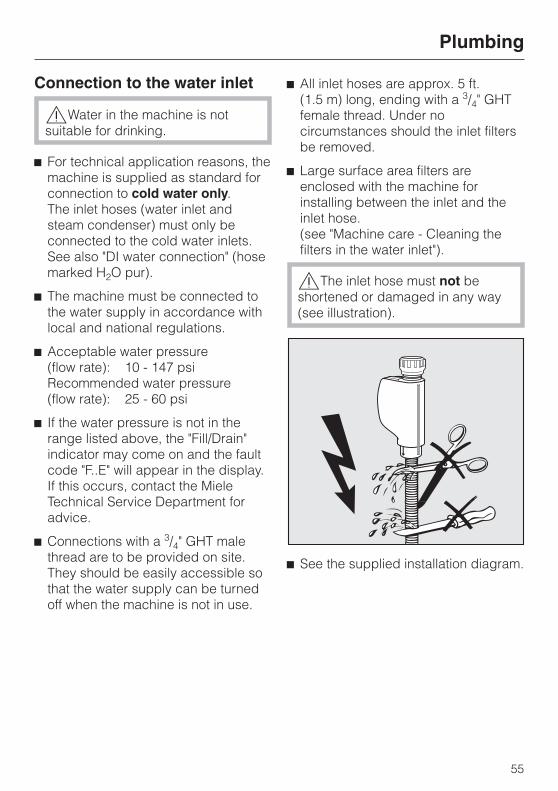
^ All inlet hoses are approx. 5 ft.(1.5 m) long, ending with a 3/4" GHTfemale thread. Under nocircumstances should the inlet filtersbe removed.
^ Large surface area filters areenclosed with the machine forinstalling between the inlet and theinlet hose.(see "Machine care - Cleaning thefilters in the water inlet").
,The inlet hose must not beshortened or damaged in any way(see illustration).
^ See the supplied installation diagram.
Plumbing
55
DI water connection(available as an optional accessory)
As an option the machine can besupplied for connection to a DI watersupply of:Acceptable water pressure(flow rate): 10 - 147 psiRecommended water pressure(flow rate): 25 - 60 psi
^ The DI pressure-tested hose (marked"H2O pur") with a 3/4" (19 mm) GHTfemale hose thread must beconnected onsite to the DI inlet forpurified water.
If the machine has a DI waterconnection which is not going to beused, the electronics will need to bereprogrammed by a Miele technician.The inlet hose will remain at the rearof the machine.
Plumbing
56
Drainage^ The drainage system is fitted with a
non-return valve which prevents dirtywater from flowing back into themachine via the drain hose.
^ The machine should preferably beconnected to a separate drainagesystem onsite.If separate drainage is not availablecontact your Miele applicationspecialist for advice.The onsite drain connection pointshould be located between 1 ft.(0.3 m) and 3 ft. (1 m) above thelower edge of the machine.If it is lower than 1 ft. (0.3 m), lay thehose in a curve at a height of at least1 ft. (0.3 m).The drainage system must be able totake a minimum drainage flow of16 l/min.
^ The drain hose is approx. 5 ft. (1.5 m)long, is flexible and has an internaldiameter of 7/8 in. (22 mm). It mustnot be shortened. Hose clamps aresupplied for securing it in position.
^ A longer drain hose (up to 13 ft. [4 m]long) is available to order from Miele.
^ The drainage system must notexceed 13 ft. (4 meters).
^ See the supplied installation diagram.
Plumbing
57
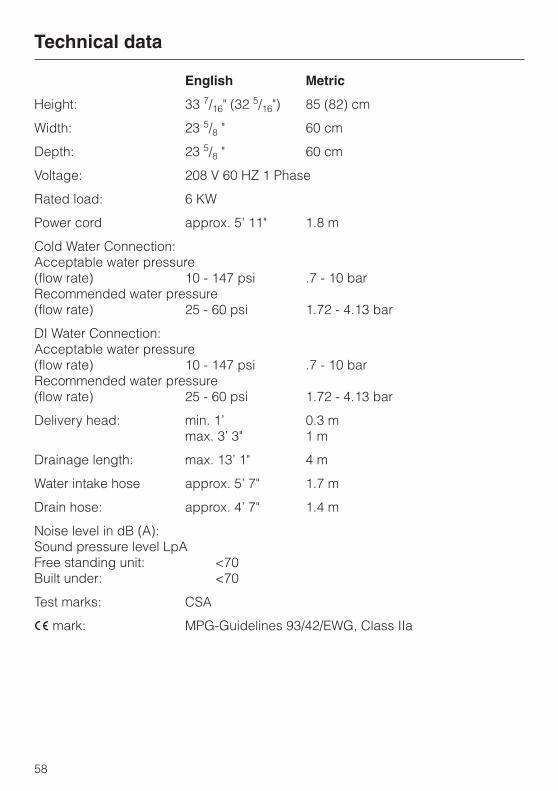
English Metric
Height: 33 7/16" (32 5/16") 85 (82) cm
Width: 23 5/8 " 60 cm
Depth: 23 5/8 " 60 cm
Voltage: 208 V 60 HZ 1 Phase
Rated load: 6 KW
Power cord approx. 5’ 11" 1.8 m
Cold Water Connection:Acceptable water pressure(flow rate) 10 - 147 psi .7 - 10 barRecommended water pressure(flow rate) 25 - 60 psi 1.72 - 4.13 bar
DI Water Connection:Acceptable water pressure(flow rate) 10 - 147 psi .7 - 10 barRecommended water pressure(flow rate) 25 - 60 psi 1.72 - 4.13 bar
Delivery head: min. 1’ 0.3 mmax. 3’ 3" 1 m
Drainage length: max. 13’ 1" 4 m
Water intake hose approx. 5’ 7" 1.7 m
Drain hose: approx. 4’ 7" 1.4 m
Noise level in dB (A):Sound pressure level LpAFree standing unit: <70Built under: <70
Test marks: CSA
! mark: MPG-Guidelines 93/42/EWG, Class IIa
Technical data
58

59

All rights reserved / 4805 M.-Nr. 05 970 440 / 03


![ISBN 978-973-7881-74-8 789737 1811741] BT.pdf · ISBN 978-973-7881-74-8 789737 1811741] Title: coperta BT.cdr Created Date: 4/4/2011 6:01:58 PM](https://img.pdfslide.us/doc/110x75/5e1a2fcbf3926b6327155326/isbn-978-973-7881-74-8-789737-1811741-btpdf-isbn-978-973-7881-74-8-789737-1811741.jpg)
![Adopting a new cleaner disinfector to optimise cleanliness ... · swab testing of multiple high-touch surfaces], ... Adopting a new cleaner disinfector to optimise cleanliness and](https://img.pdfslide.us/doc/110x75/5b7b44677f8b9a474a8c4f2f/adopting-a-new-cleaner-disinfector-to-optimise-cleanliness-swab-testing.jpg)