Embed Size (px)
Citation preview
13077.4
Technical White Paper
Dell EMC Isilon: Backup Using Commvault
Abstract This white paper outlines best practices for deploying Dell EMC™ Isilon™ scale-
out NAS storage with Commvault software to provide a flexible and scalable
backup solution.
April 2019
Revisions
2 Dell EMC Isilon: Backup Using Commvault | 13077.4
Revisions
Date Description
April 2019 Updated to new template
Acknowledgements
This paper was produced by the following:
Author: Richard Bicknell
The information in this publication is provided “as is.” Dell Inc. makes no representations or warranties of any kind with respect to the information in this
publication, and specifically disclaims implied warranties of merchantability or fitness for a particular purpose.
Use, copying, and distribution of any software described in this publication requires an applicable software license.
Copyright © 2019 Dell Inc. or its subsidiaries. All Rights Reserved. Dell, EMC, Dell EMC and other trademarks are trademarks of Dell Inc. or its
subsidiaries. Other trademarks may be trademarks of their respective owners. [4/24/2019] [Technical White Paper] [13077.4]
Table of contents
3 Dell EMC Isilon: Backup Using Commvault | 13077.4
Table of contents
Revisions............................................................................................................................................................................. 2
Acknowledgements ............................................................................................................................................................. 2
Table of contents ................................................................................................................................................................ 3
Executive summary ............................................................................................................................................................. 5
Audience ............................................................................................................................................................................. 5
1 Introduction ................................................................................................................................................................... 6
1.1 Backup target challenges with traditional storage .............................................................................................. 6
1.1.1 Compounding effect of backups ......................................................................................................................... 6
1.1.2 Management overhead ....................................................................................................................................... 6
1.1.3 Refresh cycle and data migration ....................................................................................................................... 6
1.2 Backup target solutions with Isilon and Commvault ........................................................................................... 6
1.3 Backup source challenges and solutions with Isilon and Commvault ................................................................ 7
1.4 Terminology ........................................................................................................................................................ 7
1.5 Solution components .......................................................................................................................................... 8
2 Architecture overview ................................................................................................................................................... 9
3 Backup target configuration and best practices ......................................................................................................... 11
3.1 Isilon storage configuration ............................................................................................................................... 11
3.1.1 Basic ................................................................................................................................................................. 11
3.1.2 Advanced .......................................................................................................................................................... 14
3.2 Commvault configuration .................................................................................................................................. 14
3.2.1 Basic ................................................................................................................................................................. 14
3.2.2 Advanced .......................................................................................................................................................... 19
4 Backup source configuration and best practices ........................................................................................................ 22
4.1 Isilon storage configuration ............................................................................................................................... 22
4.1.1 Basic ................................................................................................................................................................. 22
4.1.2 Advanced .......................................................................................................................................................... 23
4.2 Commvault configuration .................................................................................................................................. 24
4.2.1 Basic ................................................................................................................................................................. 24
4.2.2 Advanced .......................................................................................................................................................... 24
5 Integrations ................................................................................................................................................................. 25
5.1 Snapshots ......................................................................................................................................................... 25
5.2 Isilon SnapshotIQ ............................................................................................................................................. 25
5.3 Offline replication of snapshots ........................................................................................................................ 25
5.4 Isilon SyncIQ ..................................................................................................................................................... 25

Table of contents
4 Dell EMC Isilon: Backup Using Commvault | 13077.4
5.5 WORM retention ............................................................................................................................................... 25
5.6 Isilon SmartLock ............................................................................................................................................... 26
5.6.1 NDMP ............................................................................................................................................................... 26
5.7 Snapshot-based Incremental (Faster Incremental) backups ........................................................................... 26
5.8 Incremental Forever (level 10) backups ........................................................................................................... 26
5.9 Restartable (BRE) backups .............................................................................................................................. 26
5.10 Multi-Stream backups ....................................................................................................................................... 27
6 Conclusion .................................................................................................................................................................. 28
A Integrations: configuration steps ................................................................................................................................ 29
A.1 Snapshots: Isilon SnapshotIQ .......................................................................................................................... 29
A.2 Offline replication of snapshots: Isilon SyncIQ ................................................................................................. 31
A.3 WORM retention: Isilon SmartLock .................................................................................................................. 33
A.4 NDMP ............................................................................................................................................................... 34
A.4.1 Configuring NDMP backups ............................................................................................................................. 34
A.4.2 Snapshot-based Incremental (Faster Incremental) backups ........................................................................... 37
A.4.3 Incremental Forever (Level 10) backups .......................................................................................................... 38
A.4.4 Restartable (BRE) backups .............................................................................................................................. 38
A.4.5 Multi-Stream backups ....................................................................................................................................... 39
B Technical support and resources ............................................................................................................................... 40
Executive summary
5 Dell EMC Isilon: Backup Using Commvault | 13077.4
Executive summary
Dell EMC™ Isilon™ scale-out NAS storage together with Commvault® software provides a comprehensive,
flexible, and scalable backup and archive solution that lets enterprises of all sizes address their backup
needs; from data protection to preservation while providing secure self-service access to data.
This paper describes the best practices and solution-specific configuration steps for deployment of
Commvault™ Complete Backup & Recovery with Isilon storage as a backup target or disk library, and Isilon
storage as a backup source using NDMP to perform a backup of the cluster.
Audience
This document is intended for administrators who will deploy and configure Isilon storage with Commvault
software. The assumed level of technical knowledge for the devices and technologies described in this
document is high.
Introduction
6 Dell EMC Isilon: Backup Using Commvault | 13077.4
1 Introduction
1.1 Backup target challenges with traditional storage
1.1.1 Compounding effect of backups Each year organizations are generating more data and keeping that data longer. This growth can be
exponential, since traditionally many full backup copies are kept weekly, monthly, and yearly. For example: If
the most recent weekly backups are kept for 8 weeks, monthly backups for 10 months (covering the
remainder of the year), and yearly backups for 7 years, then one file could have 25 copies. Using this
example, just 40 TB of new data would need 1 PB of storage. There are mechanisms to reduce some of the
common data, like compression, deduplication, and snapshots, but portions of the data will be unique or not
easily reduced.
This compounding growth affects the cost of tape even more, since many of these data reduction
mechanisms are not available, typically only native tape drive compression is available. In addition, there are
many often overlooked issues that need to be considered when using tape – the cost of secure off-site
storage, cost to periodically retrieve backups from storage to perform test restores as needed for compliance
or business policy, and the risk of older tapes being unreadable due to age or incompatibilities with new tape
drives.
1.1.2 Management overhead Individually monitoring performance and free space on traditional RAID-based volumes/LUNs becomes a
huge burden. The constant juggling and adding of new volumes/LUNs when capacity or hardware limits are
reached consumes more and more time, and each storage change often requires changes to an application’s
configuration. For example, adding capacity to a CommCell that is using traditional RAID-based storage
requires many configuration steps on both the storage system and the CommCell. The storage system needs
to be manually configured to provision the additional storage on existing or new volumes/LUNs. The
CommCell Disk Library may need to be modified with additional mount paths or a new Disk Library created,
which may require new Storage Policies to be defined. This could also require that Subclients be manually
rebalanced across the Storage Policies. These are time consuming tasks that are eliminated when Isilon
storage is used.
1.1.3 Refresh cycle and data migration The inevitable, and often overlooked, hardware refresh every 3 to 5 years will more than likely take up many
nights and weekends, data center resources, and budget with traditional RAID-based storage systems. This
often requires extensive planning, a complete re-evaluation of performance, capacity, and future needs out to
3 or more years to size the new environment properly. This new environment will then need to be stood up
alongside the old to allow for data migration, and will likely require one or more outage windows to cut-over.
Provisioning data center rack space, power, cooling, and network infrastructure for this type of hardware
refresh can be very expensive and time consuming.
1.2 Backup target solutions with Isilon and Commvault Isilon scale-out technology removes the hurdles of multiple backup copies, management overhead,
application reconfiguration, and data migration; so you can focus on your organization’s backup and archive
strategy.
Introduction
7 Dell EMC Isilon: Backup Using Commvault | 13077.4
The Dell EMC Isilon OneFS™ operating system, the intelligence behind the Isilon scale-out NAS, combines
the three layers of traditional storage architectures — file system, volume manager, and data protection—into
one unified software layer, creating a single intelligent file system that spans across all nodes within a cluster.
The application only needs to be configured once to use the single namespace provided by OneFS. New
cluster capacity can be expanded in minutes and is immediately available for use by the application without
any manual intervention. To eliminate performance and capacity hot-spots, and the juggling of volumes/LUNs,
Isilon automatically distributes clients, file data, and free space across the entire cluster. With Isilon’s
utilization rate of up to 80%, not achievable with RAID-based storage systems, fewer hard drives are needed
to satisfy the capacity demands while providing a comparable or higher level of data protection. The ability to
grow capacity to over 68 PB within a single cluster and push-button retire older hardware greatly simplifies
data migration on hardware upgrades and eliminates the need to support two infrastructures simultaneously.
This saves valuable data center rack space, power, cooling, and network infrastructure, not to mention time.
Commvault is a comprehensive information protection and preservation platform that offers advanced
features like Deduplication, Compression, and OnePass which converges backup, archive and reporting
operations into a single job maximizing efficiency while minimizing any impact of production infrastructure.
1.3 Backup source challenges and solutions with Isilon and Commvault This tremendous growth is occurring with NAS file data as well, which can challenge backup strategies as
data approaches PB scale. Isilon offers several options with Commvault integrations to create a backup
solution. For the best RTO and RPO, snapshots can be taken of a directory tree for quick local backup and
recovery using SnapshotIQ. For an online remote copy, replication can be used of a directory tree snapshot
using SyncIQ. And for an offline copy, NDMP backups can be taken of a directory tree using a number of
Isilon feature, including the Multi-stream NDMP feature that is unique to Isilon, to increase the backup
performance and minimize the amount of data to backup.
This document describes the best practices and solution-specific configuration steps for deployment of
Commvault with Isilon as a backup target for both basic and advanced deployments, and Isilon as a backup
source. Basic best practices enable quick, easy, and straightforward deployments using the fewest settings to
get you started. The advanced best practices identify opportunities to configure the system for performance,
scalability, or highly secure environments for a more optimized deployment model. This requires a high level
of knowledge, support, and time to plan the deployment of all the components in advance.
1.4 Terminology The abbreviations used in this document are summarized as follows:
CS: CommServe Server
MA: MediaAgent Server
MP: Mount Path (Disk Library)
DB: Database
DDB: Deduplication Database
SQL: Microsoft SQL Server
WORM: Write Once Read Many
Introduction
8 Dell EMC Isilon: Backup Using Commvault | 13077.4
NDMP: Network Data Management Protocol
DMA: Data Management Application (i.e. Commvault)
FC: Fibre Channel
Tape Media: Tape Library, Tape Drives, Media Changer, or Virtual Tape Library (VTL)
BRE: Backup Restartable Extension
Isilon Backup Accelerator Node: Any Isilon node that has FC connectivity to tape media.
2-Way NDMP (Local): Tape media is local or directly connected to the Isilon cluster, so backup or restore
data flows between the Isilon cluster and local tape media over FC, though catalog data flows from the Isilon
cluster to the DMA over Ethernet. Backup Accelerator nodes are added to Isilon clusters to provide local FC
connectivity.
3-Way NDMP (Remote): Tape media is remote to the Isilon cluster, so backup or restore data flows between
the Isilon cluster and remote tape media over Ethernet, including the catalog data which flows from the Isilon
cluster to the DMA over Ethernet.
1.5 Solution components The following solution components are described in this document:
• Commvault Complete Backup & Recovery 11 and Dell EMC Isilon scale-out NAS with OneFS 8.1
Architecture overview
9 Dell EMC Isilon: Backup Using Commvault | 13077.4
2 Architecture overview To understand the Commvault architecture, let us first discuss the components and their function. Starting at
the edge and working our way towards the center, the iDataAgent software is deployed on all servers,
workstations, and laptops where backups are needed; they are collectively called clients. There are specific
iDataAgents for each of the different File Systems, Applications, and Databases supported by Commvault.
The MediaAgent software is deployed on dedicated servers that maintains the deduplication databases and
manages the transfer of data between the clients and storage systems, and multiple MediaAgents are used to
distribute the load. Isilon is setup as a Disk Library when it is a backup target and Isilon is setup as a client
when it is a backup source going to tape media. The CommServe software is deployed on a dedicated server
that communicates and coordinates all operations; backups, restores, copies, media management, etc. The
CommServe creates a logical grouping of MediaAgents and clients called a CommCell; depending on the size
of the environment, or network and physical boundaries, there can be multiple CommCells within an
organization.
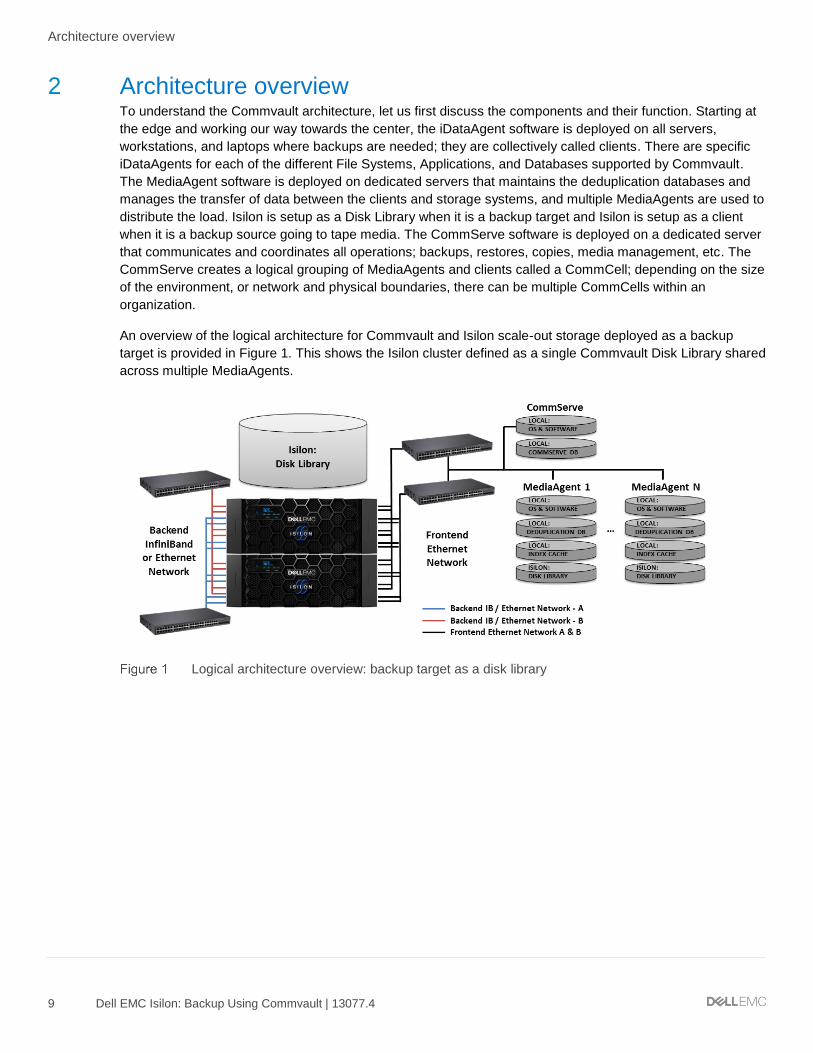
An overview of the logical architecture for Commvault and Isilon scale-out storage deployed as a backup
target is provided in Figure 1. This shows the Isilon cluster defined as a single Commvault Disk Library shared
across multiple MediaAgents.
Logical architecture overview: backup target as a disk library
Architecture overview
10 Dell EMC Isilon: Backup Using Commvault | 13077.4
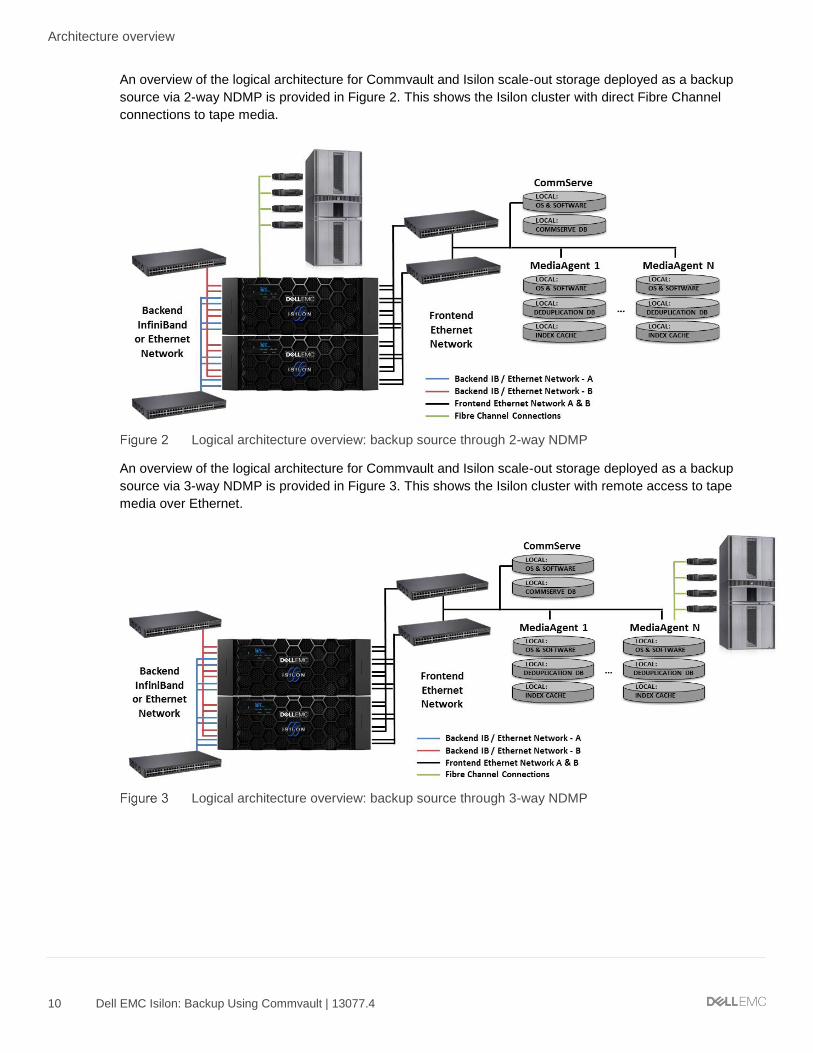
An overview of the logical architecture for Commvault and Isilon scale-out storage deployed as a backup
source via 2-way NDMP is provided in Figure 2. This shows the Isilon cluster with direct Fibre Channel
connections to tape media.
Logical architecture overview: backup source through 2-way NDMP
An overview of the logical architecture for Commvault and Isilon scale-out storage deployed as a backup
source via 3-way NDMP is provided in Figure 3. This shows the Isilon cluster with remote access to tape
media over Ethernet.
Logical architecture overview: backup source through 3-way NDMP
Backup target configuration and best practices
11 Dell EMC Isilon: Backup Using Commvault | 13077.4
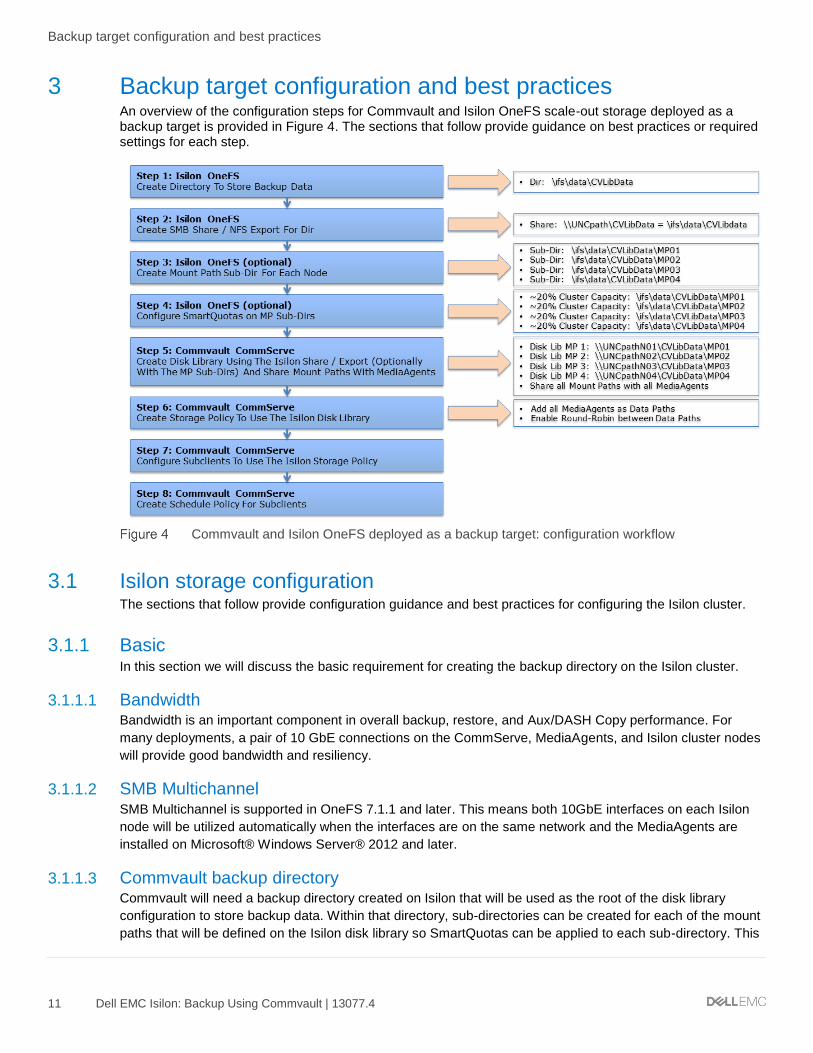
3 Backup target configuration and best practices An overview of the configuration steps for Commvault and Isilon OneFS scale-out storage deployed as a backup target is provided in Figure 4. The sections that follow provide guidance on best practices or required settings for each step.
Commvault and Isilon OneFS deployed as a backup target: configuration workflow
3.1 Isilon storage configuration The sections that follow provide configuration guidance and best practices for configuring the Isilon cluster.
3.1.1 Basic In this section we will discuss the basic requirement for creating the backup directory on the Isilon cluster.
3.1.1.1 Bandwidth Bandwidth is an important component in overall backup, restore, and Aux/DASH Copy performance. For
many deployments, a pair of 10 GbE connections on the CommServe, MediaAgents, and Isilon cluster nodes
will provide good bandwidth and resiliency.
3.1.1.2 SMB Multichannel SMB Multichannel is supported in OneFS 7.1.1 and later. This means both 10GbE interfaces on each Isilon
node will be utilized automatically when the interfaces are on the same network and the MediaAgents are
installed on Microsoft® Windows Server® 2012 and later.
3.1.1.3 Commvault backup directory Commvault will need a backup directory created on Isilon that will be used as the root of the disk library
configuration to store backup data. Within that directory, sub-directories can be created for each of the mount
paths that will be defined on the Isilon disk library so SmartQuotas can be applied to each sub-directory. This

Backup target configuration and best practices
12 Dell EMC Isilon: Backup Using Commvault | 13077.4
will ensure the appropriate total cluster capacity is visible to Commvault for accuracy and to ensure
Commvault can react accordingly when the disk library free space is low. SmartQuotas can still be applied
after an Isilon disk library has been created with a single common root directory/path using the unique sub-
directories Commvault creates for each mount path, though be aware that these sub-directories are unique to
the minute since the naming includes the date and time to the minute (i.e. Folder_12.31.2020_23.59). This
means it may be necessary to monitor the time when adding mount paths in quick succession to a disk library
to ensure each is added during a different minute on the server clock. Otherwise, Commvault will report an
error when adding a mount path until enough time has passed for the minute to change due to the directory
name collision.
3.1.1.4 Commvault backup share and permissions The default share or export for /ifs can be used to access the newly created backup directory (i.e.
\\IsilonClusterFQDN\ifs\data\CVLibData), though creating a specific share will provide better control over
access and share settings (i.e. \\IsilonClusterFQDN\CVLibData). This will also help show the workloads on a
cluster from a visibility and manageability perspective, which is facilitated by the additional details that can be
recorded within the share or export description.
The account that will be configured in Commvault to connect to the Isilon Disk Library should be set up with
full control permissions on both the Isilon share and directory.
3.1.1.5 Commvault sparse file support: data aging and space reclamation To enhance space reclamation during the Commvault data aging process of deduplicated data, enable the
Sparse File option under the Isilon SMB share settings. This new option was specifically designed to support
the Commvault “Drill Hole” operations to free-up capacity from within backup container files with deduplicated
data. It requires Commvault 11 SP10 and later with OneFS 8.2 and later and is configurable from the Isilon
CLI. This is in addition to the existing support for space savings from delete and truncate operations on
backup container files.
Capacity utilization with sparse file savings is best viewed with the ‘du -sh’ CLI command on the Isilon cluster.
The file and folder properties from Windows will accurately represent the savings from delete and truncate
operations but may not represent the sparse file savings.
Refer to the Isilon OneFS CLI Administration Guide for complete configuration procedures. The following CLI
example enables the SMB Sparse File support.
isilon-1# isi smb settings share view | grep Sparse
Sparse File: No
isilon-1# isi smb settings share modify --sparse-file=True
isilon-1# isi smb settings share view | grep Sparse
Sparse File: Yes
3.1.1.6 Create CIFS/SMB share: WebUI Refer to the Isilon OneFS Web Administration Guide for complete configuration procedures.
Overview:
1. Ensure the SMB service is enabled.
2. Create the SMB share and backup directory at the same time (see Figure 5).
3. Add Full Control share permissions for the user account used by the CommServe and MediaAgents.
4. Create sub-directories for the Disk Library Mount Paths.
5. Configure SmartQuotas on the sub-directories.

Backup target configuration and best practices
13 Dell EMC Isilon: Backup Using Commvault | 13077.4
6. Test the SMB share by browsing to it from the CommServe and MediaAgent servers using the above
user account.
Isilon SMB WebUI
3.1.1.7 Create NFS export: WebUI Refer to the Isilon OneFS Web Administration Guide for complete configuration procedures.
Overview:
1. Ensure the NFS service is enabled.
2. Create an NFS export (see Figure 6).
3. Add CommServe and MediaAgent Server IP Addresses in the NFS client list and allow Read-Write
access.
4. Create an NFS Alias (optional).
5. Create sub-directories for the Disk Library Mount Paths.
6. Configure SmartQuotas on the sub-directories.
7. Test the NFS export by mounting it on the CommServe and MediaAgent servers.
Isilon NFS WebUI
Backup target configuration and best practices
14 Dell EMC Isilon: Backup Using Commvault | 13077.4
3.1.2 Advanced In this section we will discuss the advanced options of creating a Commvault specific share or export on the
Isilon cluster.
3.1.2.1 Create CIFS/SMB Share – CLI Refer to the Isilon OneFS CLI Administration Guide for complete configuration procedures. The following CLI
example creates the SMB share and backup directory at the same time.
isilon-1# isi smb shares create --name=CVLibData --path=/ifs/data/CVLibData --
create-path --description="Share for Commvault backup data."
isilon-1# isi smb shares permission create --share=CVLibData --
user=commvaultuser --permission=full --permission-type=allow
isilon-1# chown commvaultuser /ifs/data/CVLibData
Be sure to adjust the share/export and directory permissions so the user account used by the CommServe
and MediaAgents has the appropriate access.
3.1.2.2 Create NFS export: CLI Refer to the Isilon OneFS CLI Administration Guide for complete configuration procedures. The following CLI
example creates the Commvault backup directory, the NFS export, and an NFS alias (optional).
isilon-1# mkdir /ifs/data/CVLibData
isilon-1# isi nfs exports create /ifs/data/CVLibData --read-write-
clients=10.1.2.0/24 --description="Export for Commvault backup data"
isilon-1# isi nfs aliases create --name=/CVLibData --path=/ifs/data/CVLibData
isilon-1# chown commvaultuser /ifs/data/CVLibData
Be sure to adjust the share/export and directory permissions so the user account used by the CommServe
and MediaAgents has the appropriate access.
3.2 Commvault configuration The sections that follow provide configuration guidance and best practices for configuring the Commvault
CommCell.
3.2.1 Basic In this section we will discuss the basic best practice for configuring a single Isilon Disk Library to be shared
with multiple MediaAgents and the CommCell policy configurations.
3.2.1.1 Isilon disk library and storage policy To ensure all cluster resources can be appropriately utilized for Commvault backup, restore, and Aux/DASH
copy operations, create the Isilon Disk Library with multiple mount paths and share it with multiple
MediaAgents. Configure a new or existing storage policy to use the Isilon Disk Library with the appropriate
aging rules and other settings needed for the environment, and add the remaining MediaAgents as Data
Paths with Round-Robin enabled. Below are the steps necessary to accomplish this task.
Basic configuration steps:
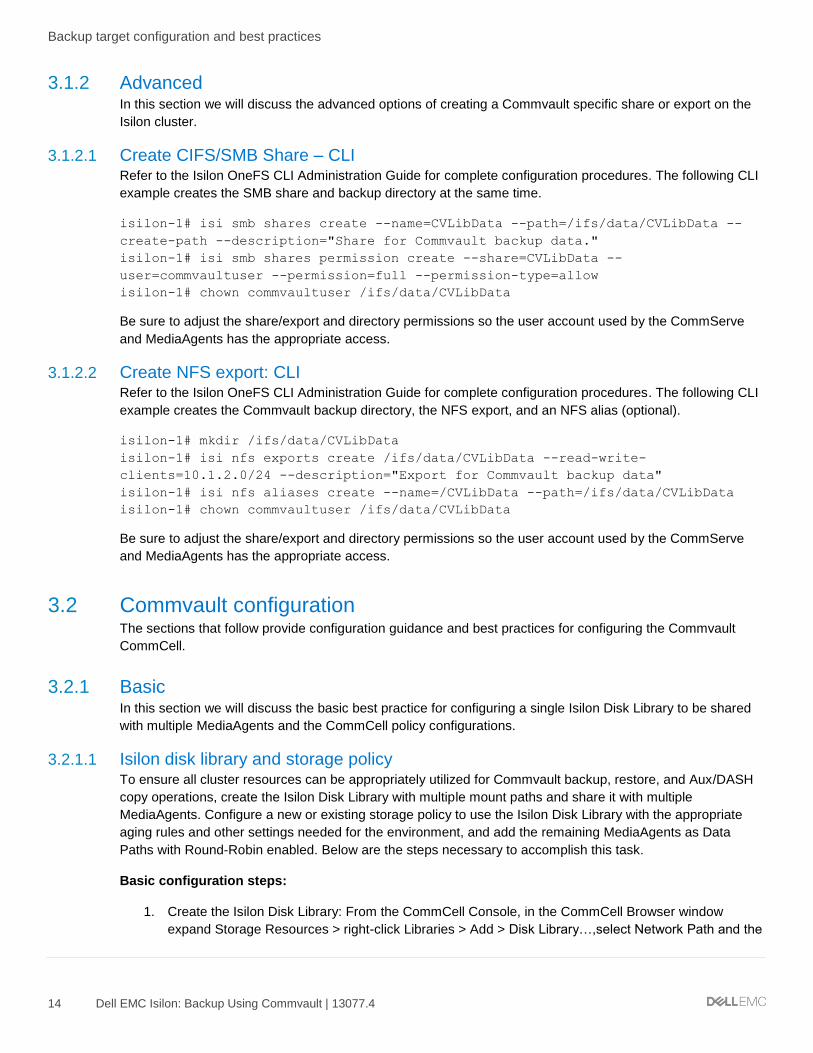
1. Create the Isilon Disk Library: From the CommCell Console, in the CommCell Browser window
expand Storage Resources > right-click Libraries > Add > Disk Library…,select Network Path and the
Backup target configuration and best practices
15 Dell EMC Isilon: Backup Using Commvault | 13077.4
first MediaAgent that will utilize the disk library, then fill-in the remaining fields like Name, Connect As
(the user configured with permissions to the Isilon share and directory), Password, and Folder
(specify a UNC path to the Commvault share on Isilon using the DNS A record for the first node in the
Isilon cluster and include the first mount path directory, if created beforehand), click OK (see Figure
7).
Create an Isilon disk library: step 1
Backup target configuration and best practices
16 Dell EMC Isilon: Backup Using Commvault | 13077.4
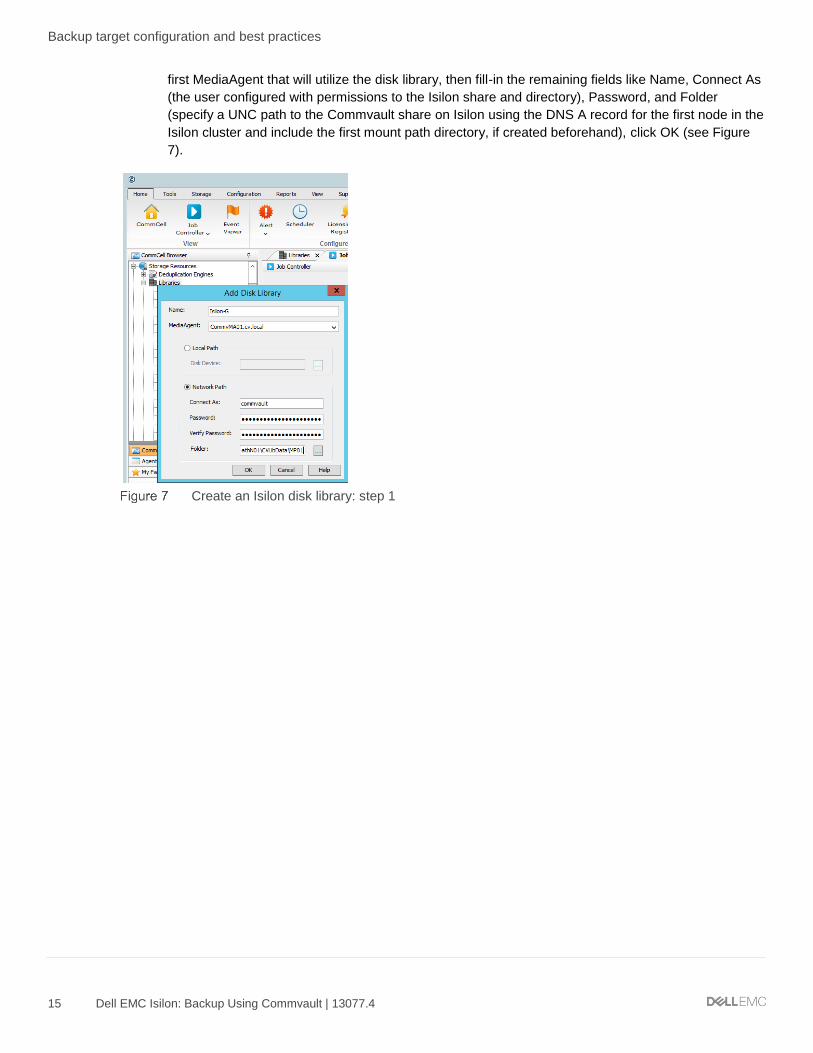
2. Add Mount Paths: For each of the remaining Isilon nodes in the cluster, right-click the newly created
Isilon Disk Library > Add Mount Path, select Network Path and the next MediaAgent that will utilize
the disk library (eventually looping back around to the first MediaAgent), then fill-in the remaining
fields similar to Step # 1 above, except use the next node in the Isilon cluster and the next mount path
directory, if created beforehand (see Figure 8).
Add mount paths to the Isilon disk library: step 2

Backup target configuration and best practices
17 Dell EMC Isilon: Backup Using Commvault | 13077.4
3. Share Mount Paths with MediaAgents: For each mount path configured on the Isilon Disk Library,
right-click the mount path > Share Mount Path, click Share button > select each of the remaining
MediaAgents that will utilize the disk library, ensure Read/Write Access is selected, fill-in the
password (same as Step # 1 & 2 above), click OK. (see Figure 9).
Share mount paths with MediaAgents: step 3
4. Spill and Fill Setting: Ensure this option is selected to load balance backup data across all mount
paths in the disk library, right-click the Isilon Disk Library > Properties > Mount Paths tab, ensure
“Spill and fill mount paths (Load balance use of mount paths)” is selected (see Figure 10).
Spill and Fill setting on Isilon disk library: step 4
Backup target configuration and best practices
18 Dell EMC Isilon: Backup Using Commvault | 13077.4
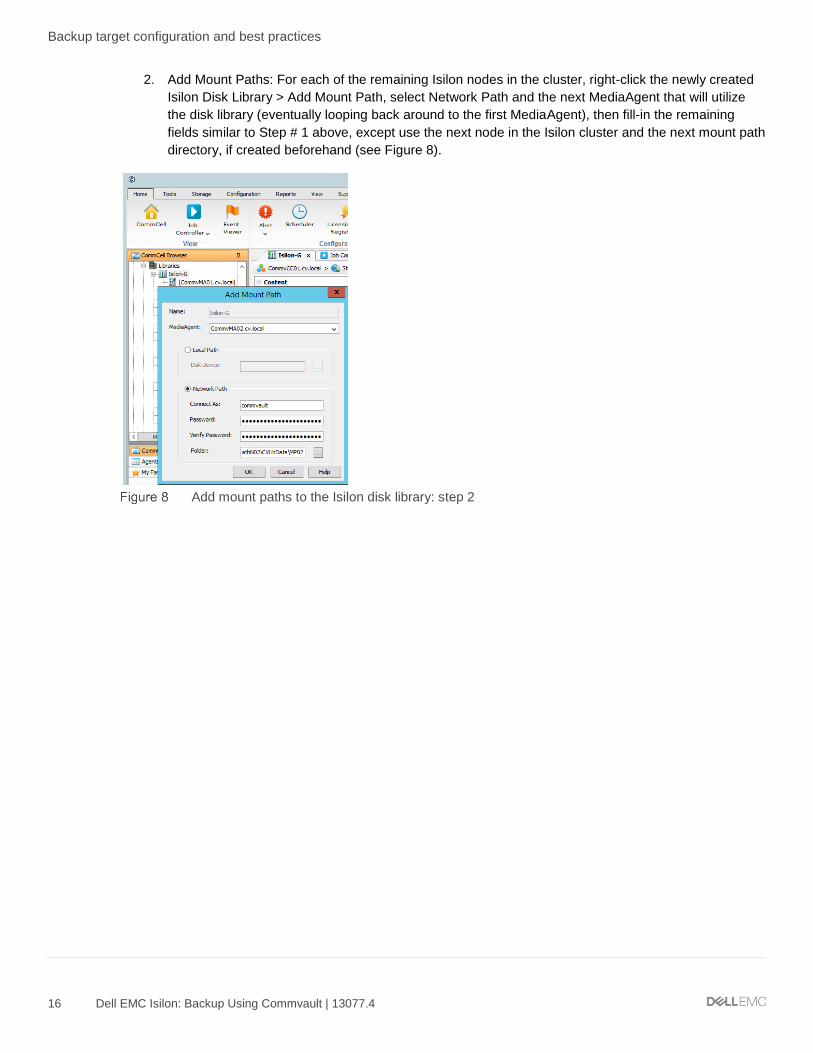
5. Create a Store Policy and add Data Paths: Add each of the remaining MediaAgent (configured on the
Isilon Disk Library) as data paths on the storage policy, right-click the Primary copy of the storage
policy configured to use the Isilon Disk Library > Properties > Data Paths tab > Add button > hold Ctrl
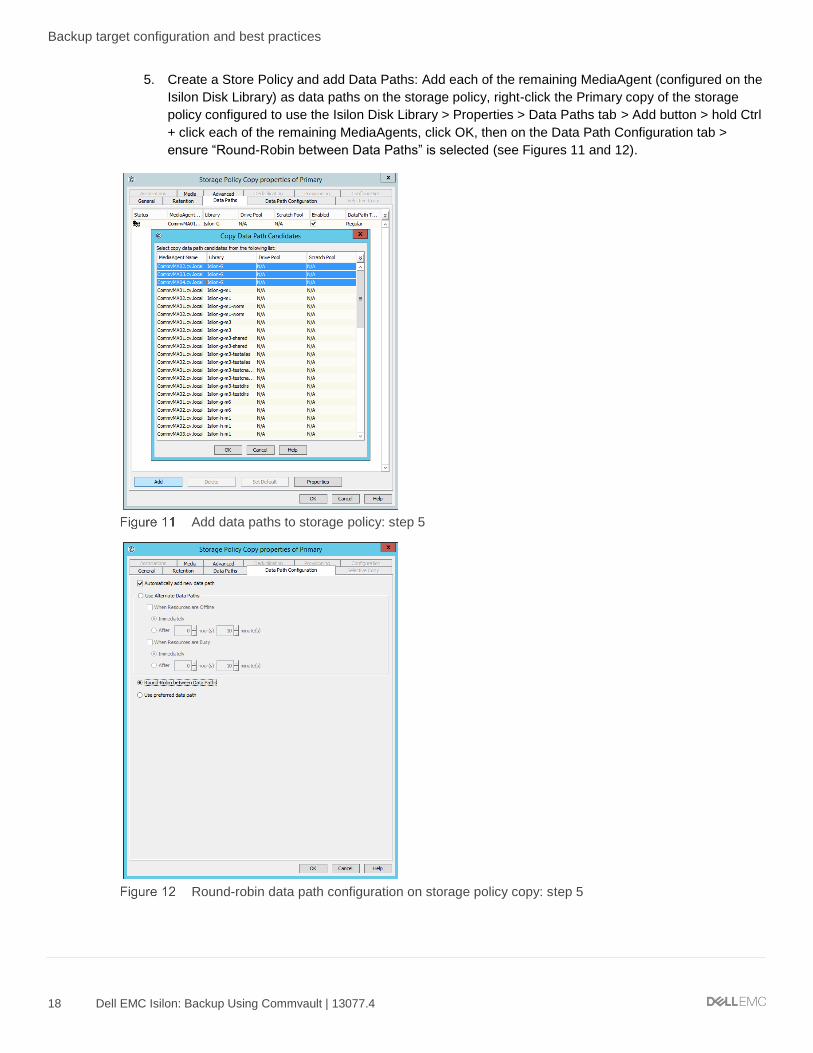
+ click each of the remaining MediaAgents, click OK, then on the Data Path Configuration tab >
ensure “Round-Robin between Data Paths” is selected (see Figures 11 and 12).
Add data paths to storage policy: step 5
Round-robin data path configuration on storage policy copy: step 5
Backup target configuration and best practices
19 Dell EMC Isilon: Backup Using Commvault | 13077.4
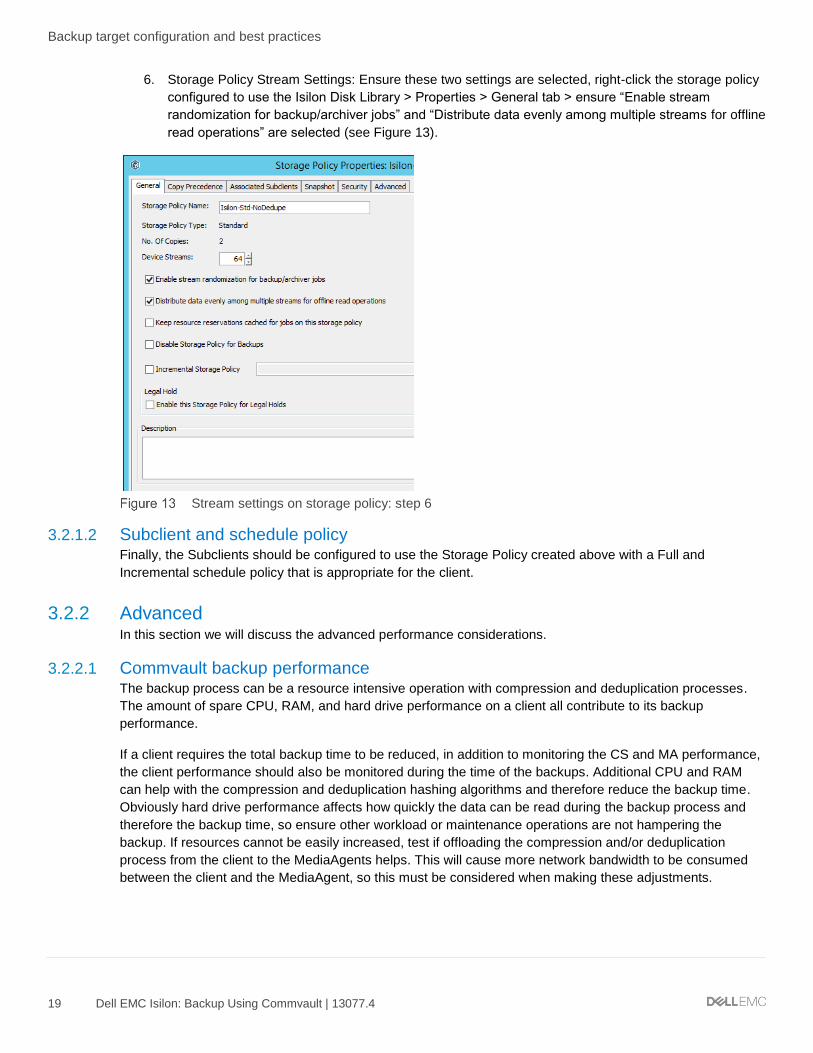
6. Storage Policy Stream Settings: Ensure these two settings are selected, right-click the storage policy
configured to use the Isilon Disk Library > Properties > General tab > ensure “Enable stream
randomization for backup/archiver jobs” and “Distribute data evenly among multiple streams for offline
read operations” are selected (see Figure 13).
Stream settings on storage policy: step 6
3.2.1.2 Subclient and schedule policy Finally, the Subclients should be configured to use the Storage Policy created above with a Full and
Incremental schedule policy that is appropriate for the client.
3.2.2 Advanced In this section we will discuss the advanced performance considerations.
3.2.2.1 Commvault backup performance The backup process can be a resource intensive operation with compression and deduplication processes.
The amount of spare CPU, RAM, and hard drive performance on a client all contribute to its backup
performance.
If a client requires the total backup time to be reduced, in addition to monitoring the CS and MA performance,
the client performance should also be monitored during the time of the backups. Additional CPU and RAM
can help with the compression and deduplication hashing algorithms and therefore reduce the backup time.
Obviously hard drive performance affects how quickly the data can be read during the backup process and
therefore the backup time, so ensure other workload or maintenance operations are not hampering the
backup. If resources cannot be easily increased, test if offloading the compression and/or deduplication
process from the client to the MediaAgents helps. This will cause more network bandwidth to be consumed
between the client and the MediaAgent, so this must be considered when making these adjustments.

Backup target configuration and best practices
20 Dell EMC Isilon: Backup Using Commvault | 13077.4
For maximum backup and Aux/DASH Copy performance, schedule these different types of jobs to run at
different times so they do not overlap; running these operations simultaneously can hinder the performance of
either or both.
3.2.2.2 Commvault mount path writers The number of writers per mount path can be modified to tune the amount of cluster resources utilized during
backup operations, versus other tasks such as restore operations. The number of writers per mount path can
be defined on the disk library properties, if all of the Isilon nodes are similar, or the number of writer can be
defined in the properties of each mount path, if the nodes are not similar (see Figures 14 and 15).
As a general starting point, set the number of writers per mount path equal to the CPU Cores or LWIO
threads available per Isilon cluster node, then increase or decrease the writers to use more or less cluster
resources for backup operations while leaving some room for restore operations as well. Use InsightIQ to
monitor cluster resources to determine if adjustments are needed for the environment.
Writers per mount path in disk library properties
Writers on each mount path properties
Backup target configuration and best practices
21 Dell EMC Isilon: Backup Using Commvault | 13077.4
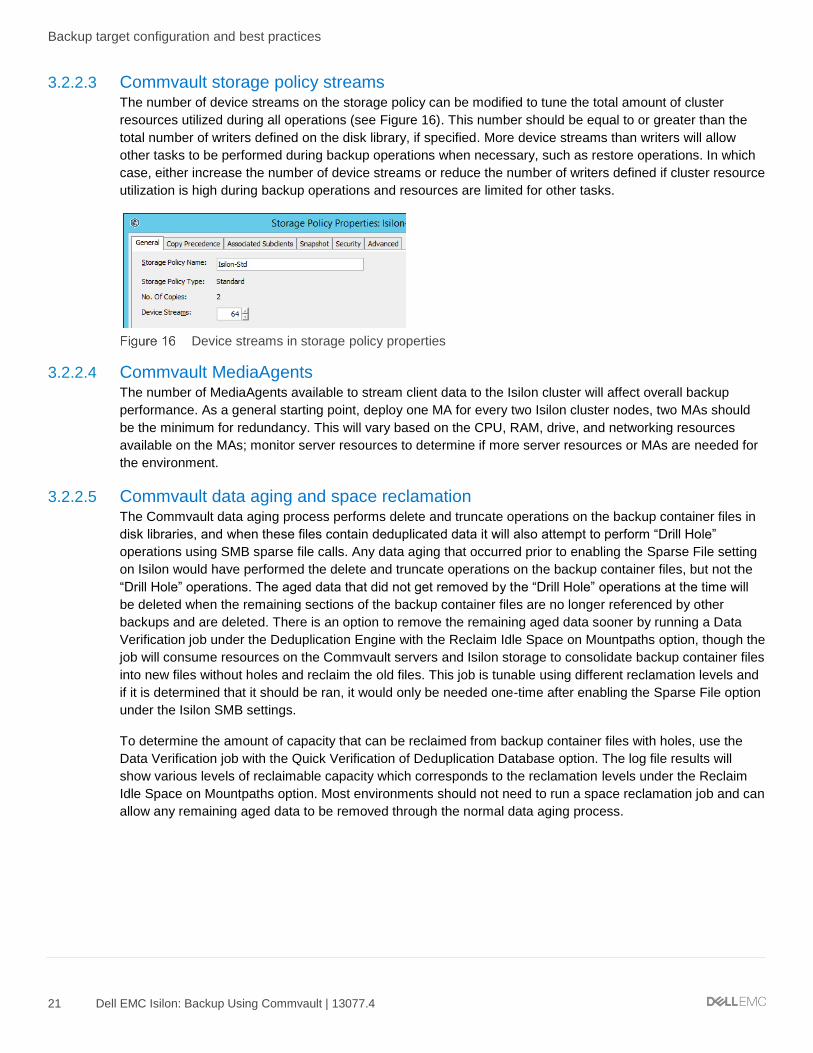
3.2.2.3 Commvault storage policy streams The number of device streams on the storage policy can be modified to tune the total amount of cluster
resources utilized during all operations (see Figure 16). This number should be equal to or greater than the
total number of writers defined on the disk library, if specified. More device streams than writers will allow
other tasks to be performed during backup operations when necessary, such as restore operations. In which
case, either increase the number of device streams or reduce the number of writers defined if cluster resource
utilization is high during backup operations and resources are limited for other tasks.
Device streams in storage policy properties
3.2.2.4 Commvault MediaAgents The number of MediaAgents available to stream client data to the Isilon cluster will affect overall backup
performance. As a general starting point, deploy one MA for every two Isilon cluster nodes, two MAs should
be the minimum for redundancy. This will vary based on the CPU, RAM, drive, and networking resources
available on the MAs; monitor server resources to determine if more server resources or MAs are needed for
the environment.
3.2.2.5 Commvault data aging and space reclamation The Commvault data aging process performs delete and truncate operations on the backup container files in
disk libraries, and when these files contain deduplicated data it will also attempt to perform “Drill Hole”
operations using SMB sparse file calls. Any data aging that occurred prior to enabling the Sparse File setting
on Isilon would have performed the delete and truncate operations on the backup container files, but not the
“Drill Hole” operations. The aged data that did not get removed by the “Drill Hole” operations at the time will
be deleted when the remaining sections of the backup container files are no longer referenced by other
backups and are deleted. There is an option to remove the remaining aged data sooner by running a Data
Verification job under the Deduplication Engine with the Reclaim Idle Space on Mountpaths option, though the
job will consume resources on the Commvault servers and Isilon storage to consolidate backup container files
into new files without holes and reclaim the old files. This job is tunable using different reclamation levels and
if it is determined that it should be ran, it would only be needed one-time after enabling the Sparse File option
under the Isilon SMB settings.
To determine the amount of capacity that can be reclaimed from backup container files with holes, use the
Data Verification job with the Quick Verification of Deduplication Database option. The log file results will
show various levels of reclaimable capacity which corresponds to the reclamation levels under the Reclaim
Idle Space on Mountpaths option. Most environments should not need to run a space reclamation job and can
allow any remaining aged data to be removed through the normal data aging process.
Backup source configuration and best practices
22 Dell EMC Isilon: Backup Using Commvault | 13077.4
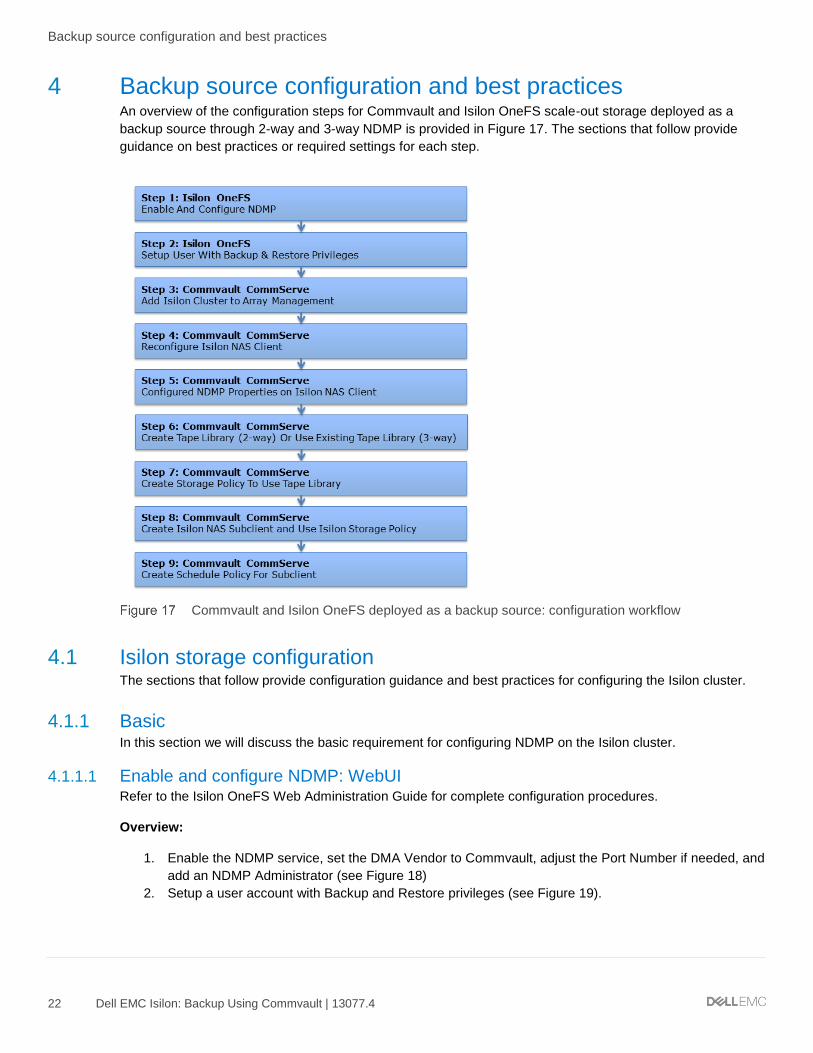
4 Backup source configuration and best practices An overview of the configuration steps for Commvault and Isilon OneFS scale-out storage deployed as a
backup source through 2-way and 3-way NDMP is provided in Figure 17. The sections that follow provide
guidance on best practices or required settings for each step.
Commvault and Isilon OneFS deployed as a backup source: configuration workflow
4.1 Isilon storage configuration The sections that follow provide configuration guidance and best practices for configuring the Isilon cluster.
4.1.1 Basic In this section we will discuss the basic requirement for configuring NDMP on the Isilon cluster.
4.1.1.1 Enable and configure NDMP: WebUI Refer to the Isilon OneFS Web Administration Guide for complete configuration procedures.
Overview:
1. Enable the NDMP service, set the DMA Vendor to Commvault, adjust the Port Number if needed, and
add an NDMP Administrator (see Figure 18)
2. Setup a user account with Backup and Restore privileges (see Figure 19).

Backup source configuration and best practices
23 Dell EMC Isilon: Backup Using Commvault | 13077.4
Isilon NDMP WebUI
Isilon roles and privileges WebUI
4.1.2 Advanced In this section we will include a CLI example.
4.1.2.1 Enable and configure NDMP: CLI Refer to the Isilon OneFS CLI Administration Guide for complete configuration procedures. The following CLI
example creates the NDMP Administrator, enables the NDMP service with the default port 10000, and
configures the DMA Vendor to Commvault.
isilon-1# isi ndmp users create --name=commvaultndmp --password=[ENTER PASSWORD]
isilon-1# isi ndmp users list
isilon-1# isi ndmp settings global modify --dma=commvault --service=true
isilon-1# isi ndmp settings global view
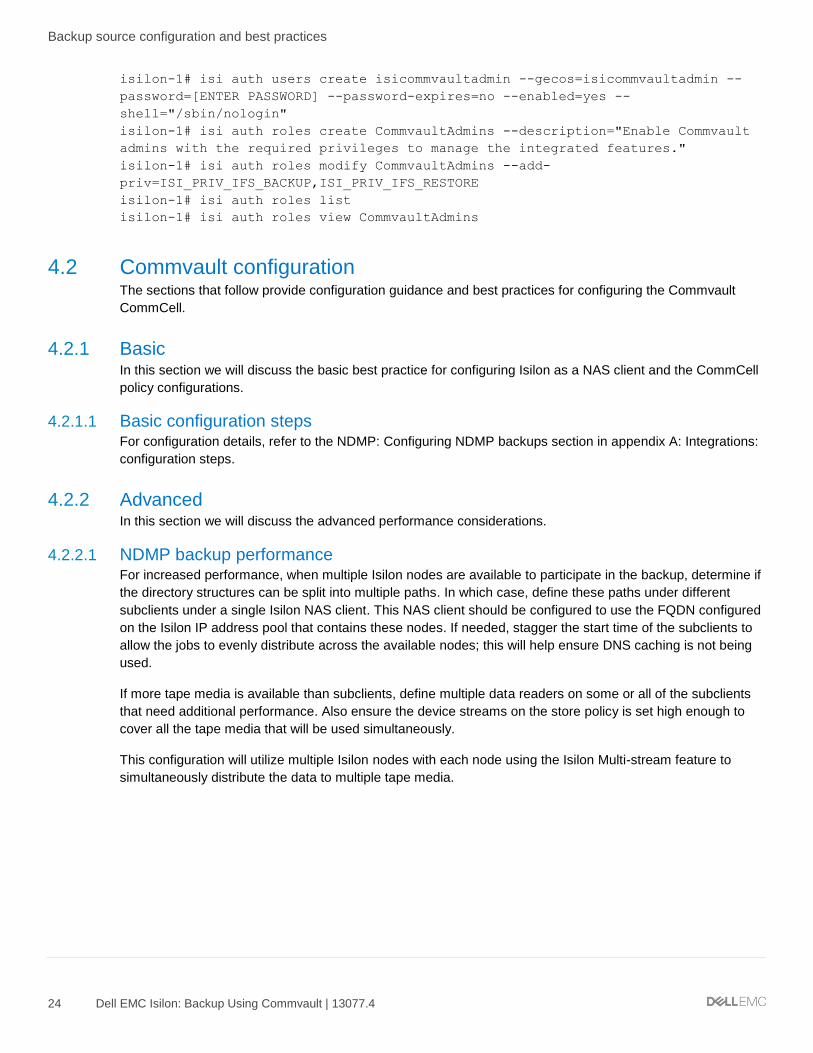
The following CLI example creates a user and role, and adds the Backup and Restore privileges.
Backup source configuration and best practices
24 Dell EMC Isilon: Backup Using Commvault | 13077.4
isilon-1# isi auth users create isicommvaultadmin --gecos=isicommvaultadmin --
password=[ENTER PASSWORD] --password-expires=no --enabled=yes --
shell="/sbin/nologin"
isilon-1# isi auth roles create CommvaultAdmins --description="Enable Commvault
admins with the required privileges to manage the integrated features."
isilon-1# isi auth roles modify CommvaultAdmins --add-
priv=ISI_PRIV_IFS_BACKUP,ISI_PRIV_IFS_RESTORE
isilon-1# isi auth roles list
isilon-1# isi auth roles view CommvaultAdmins
4.2 Commvault configuration The sections that follow provide configuration guidance and best practices for configuring the Commvault
CommCell.
4.2.1 Basic In this section we will discuss the basic best practice for configuring Isilon as a NAS client and the CommCell
policy configurations.
4.2.1.1 Basic configuration steps For configuration details, refer to the NDMP: Configuring NDMP backups section in appendix A: Integrations:
configuration steps.
4.2.2 Advanced In this section we will discuss the advanced performance considerations.
4.2.2.1 NDMP backup performance For increased performance, when multiple Isilon nodes are available to participate in the backup, determine if
the directory structures can be split into multiple paths. In which case, define these paths under different
subclients under a single Isilon NAS client. This NAS client should be configured to use the FQDN configured
on the Isilon IP address pool that contains these nodes. If needed, stagger the start time of the subclients to
allow the jobs to evenly distribute across the available nodes; this will help ensure DNS caching is not being
used.
If more tape media is available than subclients, define multiple data readers on some or all of the subclients
that need additional performance. Also ensure the device streams on the store policy is set high enough to
cover all the tape media that will be used simultaneously.
This configuration will utilize multiple Isilon nodes with each node using the Isilon Multi-stream feature to
simultaneously distribute the data to multiple tape media.
Integrations
25 Dell EMC Isilon: Backup Using Commvault | 13077.4
5 Integrations
5.1 Snapshots The Snapshots section that follows provides information and guidance where snapshots are needed for the
environment when Isilon is the backup source.
5.2 Isilon SnapshotIQ The Commvault IntelliSnap® integration with the Isilon SnapshotIQ software module in OneFS enables single
pane management of Isilon cluster snapshots with policy-based retention settings and individual file recovery
while retaining many of the SnapshotIQ benefits, such as more granular snapshots at the directory level
versus the volume level, being highly efficient by removing the need to pre-allocate and consume capacity
specifically to hold snapshot data, client self-service to snapshot data via the OneFS built-in Windows support
for using the Previous Versions tab in file properties, and being highly scalable by supporting thousands of
snapshots per Isilon cluster.
Snapshots provide the lowest RPO and RTO for quick local recovery and are often the preferred recovery
method. Snapshots are also an important mechanism to protect data against malicious or accidental deletion
and virus or malware attacks.
For configuration details, refer to the Snapshots: Isilon SnapshotIQ section in appendix A: Integrations:
configuration steps.
5.3 Offline replication of snapshots The Offline Replication of Snapshots section that follows provides information and guidance where replication
is needed for the environment when Isilon is the backup source.
5.4 Isilon SyncIQ Commvault extends the management of snapshots with Isilon to include the ability to perform “Offline
Replication of Snapshots”, which is a method to copy snapshots from one Isilon cluster to another using the
SyncIQ replication software module available in OneFS. Within Commvault, different retention rules can be
applied to the replica/target snapshot versus the primary/source snapshot, and the replica snapshot can be
used for restore operations as well. This approach leverages the many benefits of SyncIQ, such as sending
only changed data (blocks), parallelized data transfer using as many or as few nodes as desired on the
source and target clusters, impact throttling, and bandwidth metering, with the single pane management
available with Commvault.
For configuration details, refer to the Offline replication of snapshots: Isilon SyncIQ section in appendix A:
Integrations: configuration steps.
5.5 WORM retention The WORM Retention section that follows provides information and guidance where WORM retention is
needed for the environment when Isilon is the backup target.

Integrations
26 Dell EMC Isilon: Backup Using Commvault | 13077.4
5.6 Isilon SmartLock Storage enforcement of retention rules using WORM is an important feature for critical and/or regulated data.
Commvault supports SmartLock on Isilon Disk Libraries and the backup and archiver retention settings can
be configured on storage policy copies, whichever is higher will be the retention that is applied.
For configuration details, refer to the WORM retention: Isilon SmartLock section in appendix A: Integrations:
configuration steps.
5.6.1 NDMP The NDMP sections that follow provide information and guidance where backup to tape media is needed for
the environment when Isilon is the backup source. All of these features can be used together, except the
Restartable (BRE) and Multi-Stream backup features which are not supported together at this time.
For configuration details for these features, refer to the NDMP section in appendix A: Integrations:
configuration steps.
5.7 Snapshot-based Incremental (Faster Incremental) backups The Snapshot-based Incremental or Faster Incremental backup feature in Isilon enables OneFS to compare
the snapshot from a prior successful back to the snapshot taken for the current backup to quickly find
changes without performing a lengthy treewalk of the targeted directory structure. This can significantly
improve backup times when the data change rate is low. This can be utilized without activating the
SnapshotIQ license on the Isilon cluster.
Commvault has integrated with this feature and it is enabled by default on NDMP backups of an Isilon cluster.
This feature is often very useful, though it can be disabled if the change rate is too high to realize the benefits.
5.8 Incremental Forever (level 10) backups The Incremental Forever backup feature in Isilon enables OneFS to continuously provide the incremental
changes since the last successful full or incremental backup. This removes the requirement to perform a full
backup after no more than nine incremental backups using Level 1 to 9, Level 0 performs a full backup, and
maintains the benefits of smaller and faster incremental backups forever or for as long as is defined by your
organization.
Commvault has integrated with this feature and it is also enabled by default on NDMP backups of an Isilon
cluster.
5.9 Restartable (BRE) backups The Restartable backup feature in Isilon enables OneFS to take checkpoints throughout the backup process
and restart a failed backup job from the last checkpoint automatically. This eliminates the time required to
backup data that was previously successful up to the last checkpoint and focuses resources on the failed
portion of the backup, minimizing the time required to successfully finish a failed backup.
The Restartable feature is not supported in conjunction with the Multi-Stream feature and has a higher priority
than Multi-Stream so if enabled, Multi-Stream will be disabled. Though Commvault will automatically not
attempt to use the Restartable feature on any Multi-Stream backup jobs.
Integrations
27 Dell EMC Isilon: Backup Using Commvault | 13077.4
Commvault has integrated with this feature and it is also enabled by default on single-stream NDMP backups
of an Isilon cluster.
5.10 Multi-Stream backups The Multi-Stream backup feature in Isilon is an innovative feature that is unique to Isilon. It is an order of
magnitude improvement in backup throughput, management, and scalability. The feature automatically splits
a backup dataset into multiple segments or streams, and each backup steam is sent simultaneously to its own
tape media using parallel treewalks with built-in dynamic load balancing and fault-tolerance between streams.
This feature eliminates the need to manually split a directory structure across multiple backup jobs, which is
error-prone, time intensive, and very difficult to evenly distribute due to varying directory sizes and file counts.
Often, one or more backup jobs will be much larger than the others due to this uneven distribution leading to
longer backup times. In comparison, streams within a Multi-Stream backup are not bound by directory
borders, spits can even occur between files in the same directory.
As mentioned above, the Restartable feature is not supported in conjunction with the Multi-Stream feature
and has a higher priority than Multi-Stream so if enabled, Multi-Stream will be disabled. Though Commvault
will automatically not attempt to use the Restartable feature on any Multi-Stream backup jobs.
Commvault has integrated with this feature and it is also enabled by default on NDMP backups of an Isilon
cluster when both the device streams value under the storage policy and the data readers value under the
subclient are greater than one.
Conclusion
28 Dell EMC Isilon: Backup Using Commvault | 13077.4
6 Conclusion The accelerating amount of data being generated today can have an exponential effect on the amount of
space needed for backups. This creates unprecedented challenges on storage systems not built with scale-
out as a core component of their technology. Choosing the right storage solution that provides ease of
management, automated distribution, seamlessly scales, saves valuable datacenter resources, and turns the
inevitable hardware refresh/migration into a simple push-button affair is critical to providing peace of mind to
IT organizations already stretched thin on resources.
Using the basic deployment method, you will be able to implement the Commvault and Dell EMC Isilon
environment with the least amount of effort, provide good resiliency and performance, and have the
information necessary to avoid common issues. The advanced deployment method provides additional
information to customize, administer, and optimize backup performance. And the integrations available with
Commvault and Isilon greatly enhance the solution with performance improvements, reduced backup times,
ease of manageability, and enhanced data protection and compliance.
Integrations: configuration steps
29 Dell EMC Isilon: Backup Using Commvault | 13077.4
A Integrations: configuration steps
This section details the configuration steps needed to utilize the integrations between Commvault and Isilon
using examples where appropriate.
A.1 Snapshots: Isilon SnapshotIQ
The basic configuration steps to implement snapshots using the Isilon SnapshotIQ feature are detailed below.
Basic configuration steps:
1. Isilon: Create a role with the snapshot and SMB privileges with Read/Write access, Platform API
privileges with Read-Only access, and add a user account that Commvault will use to manage the
snapshots.
a. OneFS WebUI (example): Access > Membership & Roles > Roles tab > Create a Role button
i. Role Name: CommvaultAdmins
ii. Description: Enable Commvault to create and manage snapshots.
iii. Members: [add a user account that will be used in Commvault]
iv. Privileges: [see list below]
1. Add “Snapshot” with “read_write Access” selected
2. Add “SMB” with “read_write Access” selected
3. Add “Platform API” with “read_only Access” selected
v. Click Create Role button
b. OneFS CLI (example):
i. isi auth users create isicommvaultadmin --gecos=isicommvaultadmin --
password=[ENTER PASSWORD] --password-expires=no --enabled=yes --
shell="/sbin/nologin"
ii. isi auth roles create CommvaultAdmins --description="Enable Commvault admins with
the required privileges to manage the integrated features."
iii. isi auth roles modify CommvaultAdmins --add-user=isicommvaultadmin --add-
priv=ISI_PRIV_SNAPSHOT,ISI_PRIV_SMB,ISI_PRIV_LOGIN_PAPI
iv. isi auth roles list
v. isi auth roles view CommvaultAdmins
2. Commvault: Add the Isilon Cluster to Array Management with the user account that has Isilon Snapshot
privileges (created above)
a. CommCell Console > Storage tab > click Array Management > Add
i. General tab:
1. Snap Vendor: EMC Isilon
2. Name: [FQDN of Isilon cluster]
3. Control Host: [FQDN of Isilon cluster, should match NAS client above]
4. Credentials: [click Change button, enter user name and password with Isilon
snapshot privileges]
ii. Array Controllers tab:
1. Selected Array Controllers: [add 2 or more MediaAgents local to the Isilon cluster
to communicate the API commands]
iii. Snapshot Configuration tab:
1. Auto Update Array Host Aliases: [enable checkbox, unless manual entry of host
aliases for the Isilon cluster are needed in the below list]
2. Array Host Aliases: [leave blank, unless manual entry of host aliases for the
Isilon cluster are needed]

Integrations: configuration steps
30 Dell EMC Isilon: Backup Using Commvault | 13077.4
3. Access Zone: [leave blank if the snapshot is of an SMB share in the default
System zone, otherwise specify the Access Zone name of the SMB share]
iv. Click OK
3. Commvault: Reconfigure to enable and license the Isilon cluster client
a. From the CommCell Browser > select Client Computers > View tab > click Refresh (to see the
newly added Isilon cluster)
i. Right-click [Isilon cluster] under Client Computers > All Tasks > Reconfigure
ii. View tab > Refresh (again to see the Isilon cluster change from gray to color)
4. Commvault: Add the Network Share Backup on the Isilon cluster client
a. From the CommCell Browser > Client Computers > right-click [Isilon cluster] > All Tasks > Add
Network Share Backup > General tab
i. Enable “Network Share” checkbox
ii. Clear “Unix” checkbox
iii. Client Name: [enter FQDN of Isilon cluster]
iv. Host Name: [enter FQDN of Isilon cluster]
v. Click OK
5. Commvault: Enable IntelliSnap on the Isilon cluster client
a. From the CommCell Browser > Client Computers > right-click [Isilon cluster] > Properties > click
Advanced button (near OK and Cancel buttons) > enable “Enable IntelliSnap” checkbox, click OK
twice
6. Commvault: Create a Storage Policy to define snapshot retention of the Isilon cluster client (Optional)
a. Note: This is optional as the retention settings on an existing Storage Policy may meet the
organization’s needs for snapshots as well, though often retention settings will need to be
different for snapshots at some point so having a Storage Policy specifically for snapshots can be
helpful.
b. From the CommCell Browser > Policies > right-click Storage Policies > New Storage Policy
i. Select Data Protection and Archiving > click Next
ii. Storage Policy Name: [enter a name] > click Next
iii. Use Existing Global Deduplication Policy (if asked): No > click Next
iv. Library for Primary Copy: [select any destination, not used to store snapshot data] > click
Next
v. MediaAgent: [select a local MA to the Isilon cluster] > click Next
vi. Number of Device Streams: [default is fine, not used for snapshots] > Aging Rules: [enter
Days and Cycles or Infinite as needed] > click Next
vii. Software Encryption: [leave checkbox clear, not used for snapshots] > click Next
viii. Deduplication: [clear “Yes” checkbox, not used for snapshots] > click Next
ix. Click Finish
7. Commvault: Create a Subclient
a. From the CommCell Browser > Client Computers > [Isilon cluster] > Windows File System > right-
click the defaultBackupSet > All Tasks > New Subclient
i. General tab:
1. Subclient Name: [enter a name]
ii. Content tab:
1. Add Paths button > enter the UNC path with SMB share and directory to
snapshot > click OK
2. Impersonate User window:
a. Enter the user account and password with Isilon snapshot privileges
(above)
b. Note: This can be updated later using the “As User” button
iii. Storage Device tab > Data Storage Policy tab:
1. Storage Policy: [select an existing or the newly created Storage Policy above]
iv. Backup Nodes tab > add Media Agents to the Selected Data Access Nodes listing
v. Optionally configure any other tab settings as needed.
Integrations: configuration steps
31 Dell EMC Isilon: Backup Using Commvault | 13077.4
vi. Advanced button (near OK and Cancel buttons):
1. IntelliSnap Operations tab:
a. IntelliSnap: [enable checkbox]
b. Available Snap Engines: EMC Isilon Snap
c. Optionally configure the Proxy settings or any other tab settings as
needed
2. Click OK
vii. Click OK
8. Commvault: Run a Backup/Create a Snapshot Manually
a. Note: When the first backup is performed, a Primary Snap copy will be created under the storage
policy being used by the subclient. Once successful, snapshot can be seen:
i. Right-click [the new Subclient above] > List Snaps.
b. From the CommCell Browser > Client Computers > [Isilon cluster] > Windows File System >
defaultBackupSet > right-click [the new Subclient above] > Backup > Click OK
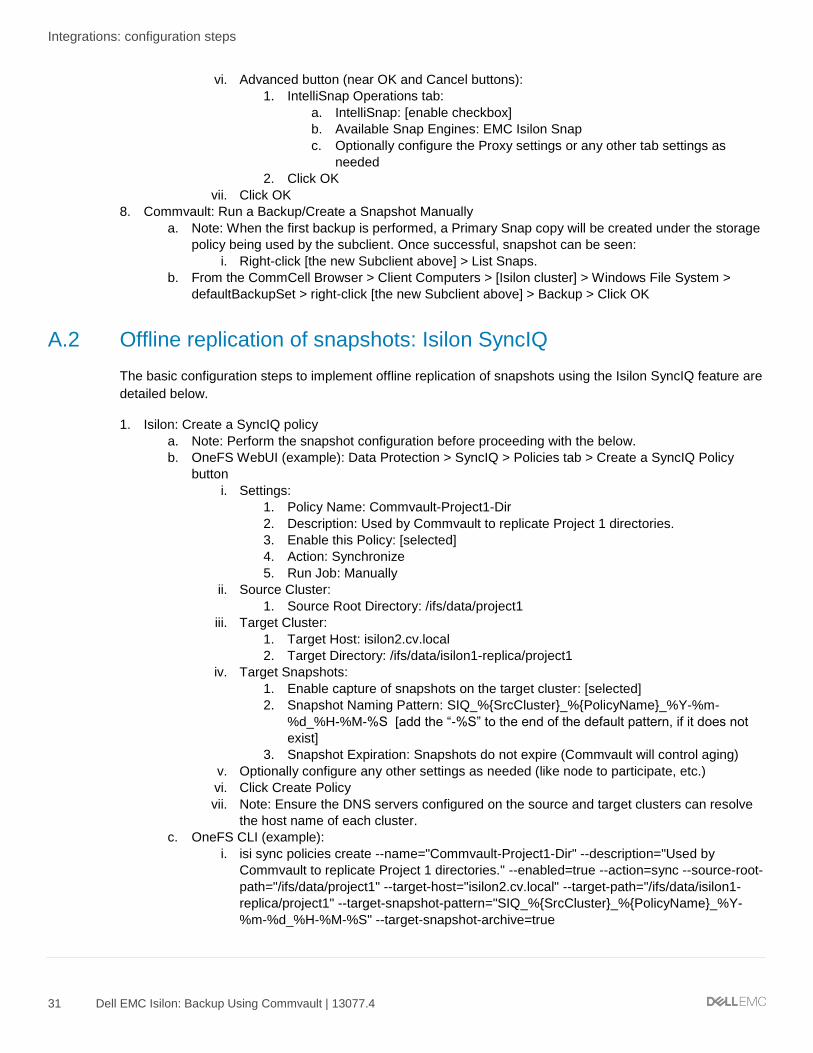
A.2 Offline replication of snapshots: Isilon SyncIQ
The basic configuration steps to implement offline replication of snapshots using the Isilon SyncIQ feature are
detailed below.
1. Isilon: Create a SyncIQ policy
a. Note: Perform the snapshot configuration before proceeding with the below.
b. OneFS WebUI (example): Data Protection > SyncIQ > Policies tab > Create a SyncIQ Policy
button
i. Settings:
1. Policy Name: Commvault-Project1-Dir
2. Description: Used by Commvault to replicate Project 1 directories.
3. Enable this Policy: [selected]
4. Action: Synchronize
5. Run Job: Manually
ii. Source Cluster:
1. Source Root Directory: /ifs/data/project1
iii. Target Cluster:
1. Target Host: isilon2.cv.local
2. Target Directory: /ifs/data/isilon1-replica/project1
iv. Target Snapshots:
1. Enable capture of snapshots on the target cluster: [selected]
2. Snapshot Naming Pattern: SIQ_%{SrcCluster}_%{PolicyName}_%Y-%m-
%d_%H-%M-%S [add the “-%S” to the end of the default pattern, if it does not
exist]
3. Snapshot Expiration: Snapshots do not expire (Commvault will control aging)
v. Optionally configure any other settings as needed (like node to participate, etc.)
vi. Click Create Policy
vii. Note: Ensure the DNS servers configured on the source and target clusters can resolve
the host name of each cluster.
c. OneFS CLI (example):
i. isi sync policies create --name="Commvault-Project1-Dir" --description="Used by
Commvault to replicate Project 1 directories." --enabled=true --action=sync --source-root-
path="/ifs/data/project1" --target-host="isilon2.cv.local" --target-path="/ifs/data/isilon1-
replica/project1" --target-snapshot-pattern="SIQ_%{SrcCluster}_%{PolicyName}_%Y-
%m-%d_%H-%M-%S" --target-snapshot-archive=true
Integrations: configuration steps
32 Dell EMC Isilon: Backup Using Commvault | 13077.4
1. No schedule or target snapshot expiration are specified in the command above
so the policy runs manually and snapshots do not expire.
ii. isi sync policies list
iii. isi sync policies view Commvault-Project1-Dir
iv. Note: Ensure the DNS servers configured on the source and target clusters can resolve
the host name of each other.
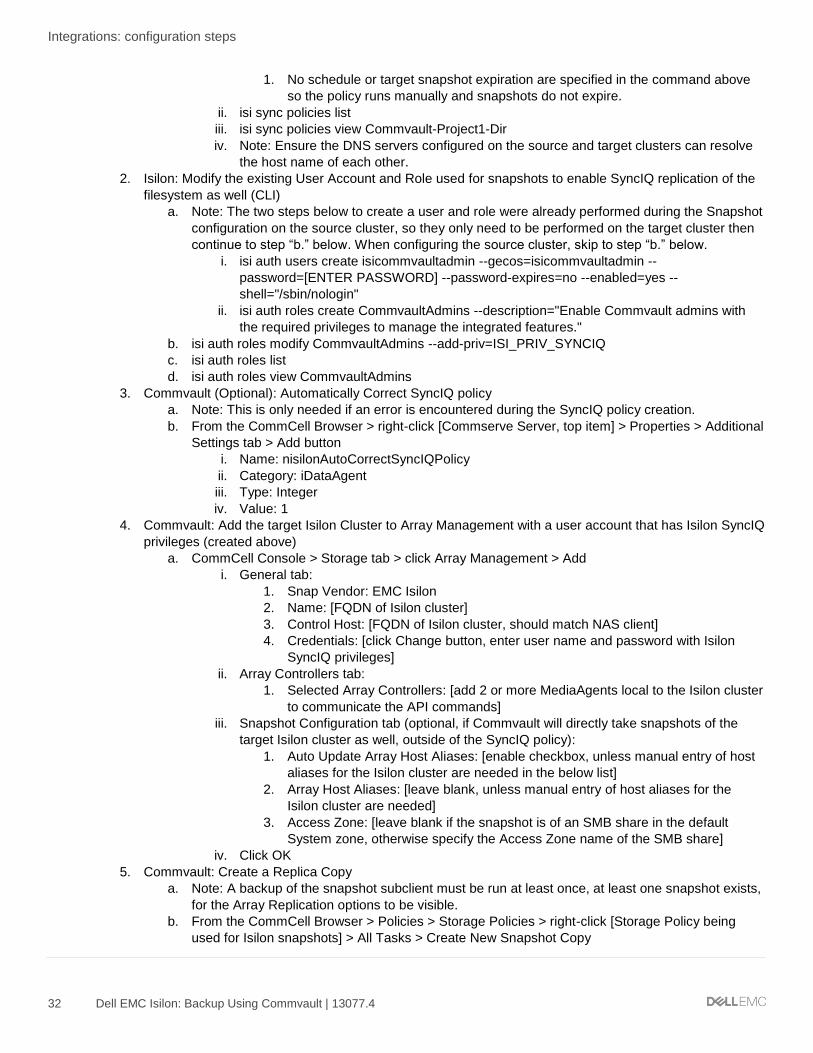
2. Isilon: Modify the existing User Account and Role used for snapshots to enable SyncIQ replication of the
filesystem as well (CLI)
a. Note: The two steps below to create a user and role were already performed during the Snapshot
configuration on the source cluster, so they only need to be performed on the target cluster then
continue to step “b.” below. When configuring the source cluster, skip to step “b.” below.
i. isi auth users create isicommvaultadmin --gecos=isicommvaultadmin --
password=[ENTER PASSWORD] --password-expires=no --enabled=yes --
shell="/sbin/nologin"
ii. isi auth roles create CommvaultAdmins --description="Enable Commvault admins with
the required privileges to manage the integrated features."
b. isi auth roles modify CommvaultAdmins --add-priv=ISI_PRIV_SYNCIQ
c. isi auth roles list
d. isi auth roles view CommvaultAdmins
3. Commvault (Optional): Automatically Correct SyncIQ policy
a. Note: This is only needed if an error is encountered during the SyncIQ policy creation.
b. From the CommCell Browser > right-click [Commserve Server, top item] > Properties > Additional
Settings tab > Add button
i. Name: nisilonAutoCorrectSyncIQPolicy
ii. Category: iDataAgent
iii. Type: Integer
iv. Value: 1
4. Commvault: Add the target Isilon Cluster to Array Management with a user account that has Isilon SyncIQ
privileges (created above)
a. CommCell Console > Storage tab > click Array Management > Add
i. General tab:
1. Snap Vendor: EMC Isilon
2. Name: [FQDN of Isilon cluster]
3. Control Host: [FQDN of Isilon cluster, should match NAS client]
4. Credentials: [click Change button, enter user name and password with Isilon
SyncIQ privileges]
ii. Array Controllers tab:
1. Selected Array Controllers: [add 2 or more MediaAgents local to the Isilon cluster
to communicate the API commands]
iii. Snapshot Configuration tab (optional, if Commvault will directly take snapshots of the
target Isilon cluster as well, outside of the SyncIQ policy):
1. Auto Update Array Host Aliases: [enable checkbox, unless manual entry of host
aliases for the Isilon cluster are needed in the below list]
2. Array Host Aliases: [leave blank, unless manual entry of host aliases for the
Isilon cluster are needed]
3. Access Zone: [leave blank if the snapshot is of an SMB share in the default
System zone, otherwise specify the Access Zone name of the SMB share]
iv. Click OK
5. Commvault: Create a Replica Copy
a. Note: A backup of the snapshot subclient must be run at least once, at least one snapshot exists,
for the Array Replication options to be visible.
b. From the CommCell Browser > Policies > Storage Policies > right-click [Storage Policy being
used for Isilon snapshots] > All Tasks > Create New Snapshot Copy

Integrations: configuration steps
33 Dell EMC Isilon: Backup Using Commvault | 13077.4
i. General Tab:
1. Copy Name: [enter name]
2. Library: [select the same library being used on the Primary storage policy]
3. MediaAgent: [select a MediaAgent that is local to the source Isilon cluster]
4. Array Replication: Vault/Replica (automatically enables the Selective Copy
checkbox and enables the Selective Copy and Configuration tabs)
ii. Copy Policy tab:
1. Clear “All Backups” (will prompt to perform this step if skipped)
2. Backup On and After: [select a date, default is today’s date] (will prompt to
perform this step if skipped)
3. Enable “Specify Source for Array Replica Copy” checkbox: Primary Snap
iii. Click OK
6. Commvault: Run an Offline Replication
a. From the CommCell Browser > Policies > Storage Policies > right-click [Storage Policy being
used for Isilon snapshots] > All Tasks > Run Auxiliary Copy
i. General Tab:
1. Select A Copy: [select the new snapshot copy created above]
2. Enable “Use Scalable Resource Allocation” checkbox (if not already selected)
ii. Click OK
A.3 WORM retention: Isilon SmartLock
The basic configuration steps to implement WORM retention using the Isilon SmartLock feature are detailed
below.
Basic configuration steps:
1. Isilon: Create an SMB share and directory with appropriate permissions, and define a WORM domain for
that directory.
a. Note: Before creating a SmartLock domain, create an SMB share and directory as detailed
elsewhere, and be sure to adjust the share and directory permissions so the user account used
by Commvault has the appropriate access.
b. OneFS WebUI (example): File System > SmartLock > Create Domain button
i. Click Browse button to drill-down to the path and click Select
ii. Clear “Apply a default retention span” checkbox
iii. Click Create Domain
c. OneFS CLI (example):
i. isi worm domains create --path=/ifs/data/CVLibDataWORM
ii. isi worm domains list
iii. isi worm domains view /ifs/data/CVLibDataWORM
2. Commvault: Create a Disk Library using the SmartLock directory
a. Note: Create a Disk Library as detailed elsewhere with the additional setting below.
b. From the CommCell Browser > Storage Resources > Libraries > right-click [newly created Isilon
Disk Library using the SmartLock directory] > Properties > General tab
i. Enable “Mark Archive files as Read-Only” checkbox
ii. Click OK
3. Commvault: Configured the MediaAgents with the EnableIsilonSmartLock additional setting
a. From the CommCell Browser > Storage Resources > MediaAgents > right-click [MediaAgent] >
Properties > Additional Settings tab > Add
i. Name: EnableIsilonSmartLock
ii. Category: MediaAgent
iii. Type: Integer
Integrations: configuration steps
34 Dell EMC Isilon: Backup Using Commvault | 13077.4
iv. Value: 1
b. Repeat the above for each MediaAgent that is sharing the Isilon SmartLock Disk Library.
4. Commvault: Create a Storage Policy to use the SmartLock Disk Library with the desired retention rules
a. Note: Create a Storage Policy as detailed elsewhere to use the SmartLock Disk Library with the
desired retention rules. The retention can be adjusted for new data in the following area, existing
files will not be modified.
b. From the CommCell Browser > Policies > Storage Policies > [SmartLock Storage Policy] > right-
click Primary copy > Properties > Retention tab
c. Adjust the retention rules as needed
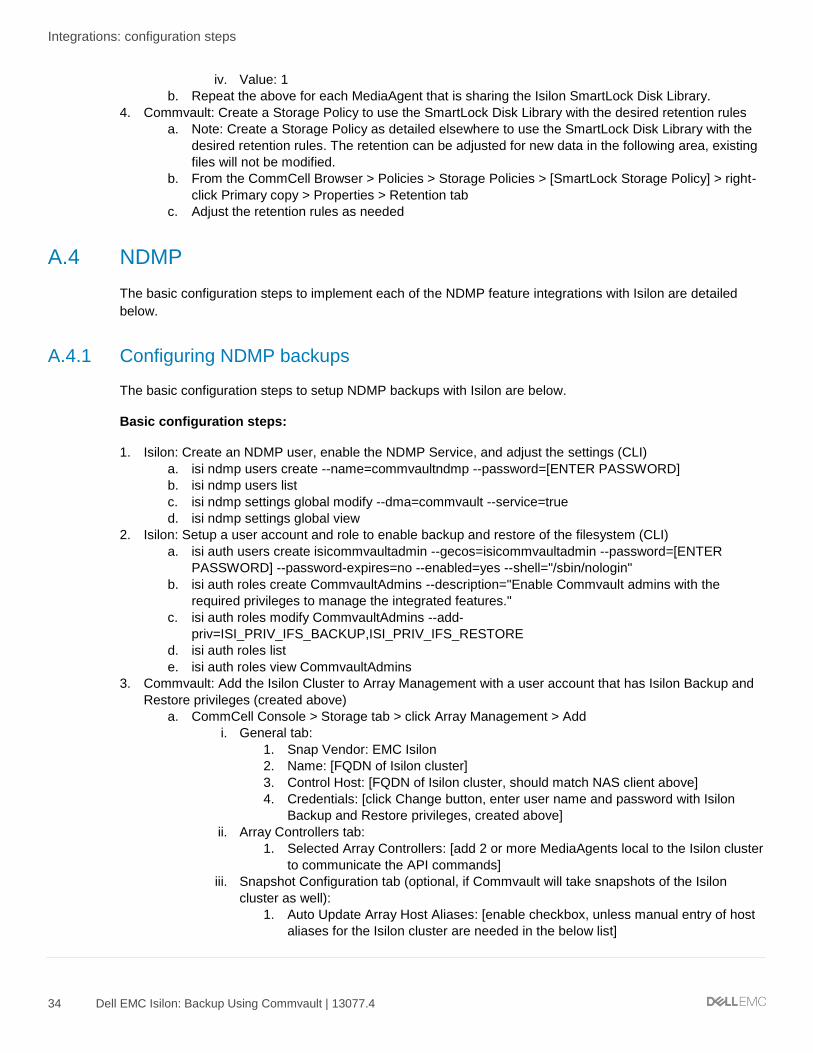
A.4 NDMP
The basic configuration steps to implement each of the NDMP feature integrations with Isilon are detailed
below.
A.4.1 Configuring NDMP backups
The basic configuration steps to setup NDMP backups with Isilon are below.
Basic configuration steps:
1. Isilon: Create an NDMP user, enable the NDMP Service, and adjust the settings (CLI)
a. isi ndmp users create --name=commvaultndmp --password=[ENTER PASSWORD]
b. isi ndmp users list
c. isi ndmp settings global modify --dma=commvault --service=true
d. isi ndmp settings global view
2. Isilon: Setup a user account and role to enable backup and restore of the filesystem (CLI)
a. isi auth users create isicommvaultadmin --gecos=isicommvaultadmin --password=[ENTER
PASSWORD] --password-expires=no --enabled=yes --shell="/sbin/nologin"
b. isi auth roles create CommvaultAdmins --description="Enable Commvault admins with the
required privileges to manage the integrated features."
c. isi auth roles modify CommvaultAdmins --add-
priv=ISI_PRIV_IFS_BACKUP,ISI_PRIV_IFS_RESTORE
d. isi auth roles list
e. isi auth roles view CommvaultAdmins
3. Commvault: Add the Isilon Cluster to Array Management with a user account that has Isilon Backup and
Restore privileges (created above)
a. CommCell Console > Storage tab > click Array Management > Add
i. General tab:
1. Snap Vendor: EMC Isilon
2. Name: [FQDN of Isilon cluster]
3. Control Host: [FQDN of Isilon cluster, should match NAS client above]
4. Credentials: [click Change button, enter user name and password with Isilon
Backup and Restore privileges, created above]
ii. Array Controllers tab:
1. Selected Array Controllers: [add 2 or more MediaAgents local to the Isilon cluster
to communicate the API commands]
iii. Snapshot Configuration tab (optional, if Commvault will take snapshots of the Isilon
cluster as well):
1. Auto Update Array Host Aliases: [enable checkbox, unless manual entry of host
aliases for the Isilon cluster are needed in the below list]
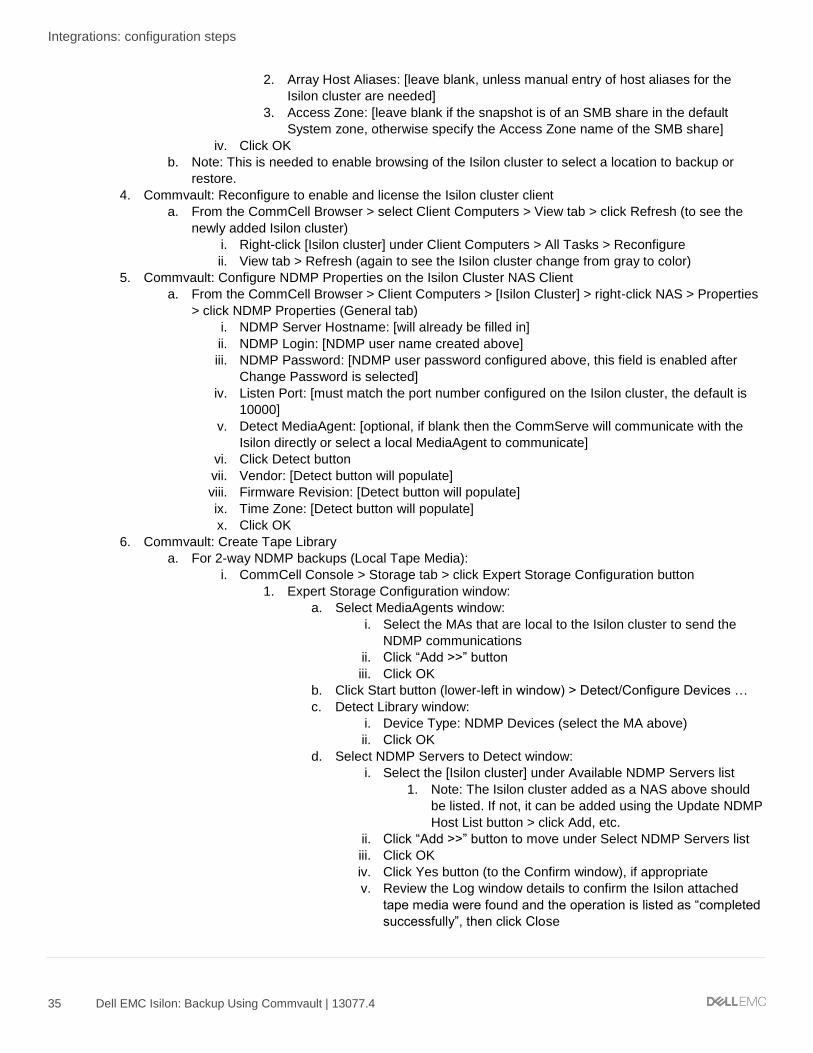
Integrations: configuration steps
35 Dell EMC Isilon: Backup Using Commvault | 13077.4
2. Array Host Aliases: [leave blank, unless manual entry of host aliases for the
Isilon cluster are needed]
3. Access Zone: [leave blank if the snapshot is of an SMB share in the default
System zone, otherwise specify the Access Zone name of the SMB share]
iv. Click OK
b. Note: This is needed to enable browsing of the Isilon cluster to select a location to backup or
restore.
4. Commvault: Reconfigure to enable and license the Isilon cluster client
a. From the CommCell Browser > select Client Computers > View tab > click Refresh (to see the
newly added Isilon cluster)
i. Right-click [Isilon cluster] under Client Computers > All Tasks > Reconfigure
ii. View tab > Refresh (again to see the Isilon cluster change from gray to color)
5. Commvault: Configure NDMP Properties on the Isilon Cluster NAS Client
a. From the CommCell Browser > Client Computers > [Isilon Cluster] > right-click NAS > Properties
> click NDMP Properties (General tab)
i. NDMP Server Hostname: [will already be filled in]
ii. NDMP Login: [NDMP user name created above]
iii. NDMP Password: [NDMP user password configured above, this field is enabled after
Change Password is selected]
iv. Listen Port: [must match the port number configured on the Isilon cluster, the default is
10000]
v. Detect MediaAgent: [optional, if blank then the CommServe will communicate with the
Isilon directly or select a local MediaAgent to communicate]
vi. Click Detect button
vii. Vendor: [Detect button will populate]
viii. Firmware Revision: [Detect button will populate]
ix. Time Zone: [Detect button will populate]
x. Click OK
6. Commvault: Create Tape Library
a. For 2-way NDMP backups (Local Tape Media):
i. CommCell Console > Storage tab > click Expert Storage Configuration button
1. Expert Storage Configuration window:
a. Select MediaAgents window:
i. Select the MAs that are local to the Isilon cluster to send the
NDMP communications
ii. Click “Add >>” button
iii. Click OK
b. Click Start button (lower-left in window) > Detect/Configure Devices …
c. Detect Library window:
i. Device Type: NDMP Devices (select the MA above)
ii. Click OK
d. Select NDMP Servers to Detect window:
i. Select the [Isilon cluster] under Available NDMP Servers list
1. Note: The Isilon cluster added as a NAS above should
be listed. If not, it can be added using the Update NDMP
Host List button > click Add, etc.
ii. Click “Add >>” button to move under Select NDMP Servers list
iii. Click OK
iv. Click Yes button (to the Confirm window), if appropriate
v. Review the Log window details to confirm the Isilon attached
tape media were found and the operation is listed as “completed
successfully”, then click Close
Integrations: configuration steps
36 Dell EMC Isilon: Backup Using Commvault | 13077.4
1. If an Information window appears saying, “No new
devices were detected”, Click OK and rerun the steps
above to try again
2. If an Information window appears saying, “Right-click a
particular device to continue its confirmation”, Click OK
and continue below
e. Right-click each Isilon attached tape drives and/or Libraries found >
Configure
i. Select Library and all drives (or Library Only, if appropriate) >
Click OK
ii. Answer any prompted questions, such as “Does this library
[LIBRARY NAME] have a barcode reader?” or “Should the media
be automatically discovered?”, the Default Media Type, etc.
f. Right-click each Isilon attached tape drives and/or Libraries > Properties
(Optional)
i. Make any necessary changes, like possibly append the Isilon
cluster host name to the tape library Alias name to clarify the FC
connectivity is from the Isilon cluster
g. Click Start button (lower-left in window) > Exit
b. For 3-way NDMP Backups (Remote Tape Media):
i. This tape library is external the Isilon cluster, see Commvault documentation for setup
and configuration information.
7. Commvault: Create Storage Policy to use the Tape Library (created above)
a. From the CommCell Browser > Policies > right-click Storage Policies > New Storage Policy
i. Select Data Protection and Archiving > click Next
ii. Storage Policy Name: [enter a name] > click Next
iii. Use Existing Global Deduplication Policy? (if asked): [select the appropriate setting] >
click Next
iv. Library for Primary Copy: [select a tape library created above, additional tape libraries
can be added later] > click Next
v. For Primary Copy:
1. MediaAgent: [select the Isilon cluster client name for 2-way NDMP backups or
select a local MA to the Isilon cluster for 3-way NDMP backups]
2. Drive Pool: [select a drive pool] > click Next
vi. Scratch Pool for Primary Copy: [select a scratch pool] > click Next
vii. Enter the streams and retention criteria:
1. Number of Device Streams: [equal to the number of drives available in the tape
library]
a. The Isilon Multi-Stream Backup feature integration will be utilized
automatically if this value and the data readers value under the storage
policy are both greater than one, see below for details.
2. Aging Rules: [enter Days and Cycles or Infinite as needed] > click Next
viii. Advanced settings for the primary copy:
1. Hardware Compression: [configuration as needed]
2. Encryption Settings: [configure as needed] > click Next
b. Click Finish
c. If additional Isilon attached tape drives and/or Libraries need to be added:
i. From the CommCell Browser > Policies > Storage Policies > [newly created Isilon NDMP
storage policy created above] > right-click Primary > Properties
1. Data Paths tab:
a. Click Add > select any other Isilon attached tape drives and/or Libraries
> click OK
2. Data Path Configuration tab:
Integrations: configuration steps
37 Dell EMC Isilon: Backup Using Commvault | 13077.4
a. Select Round-Robin between Data Paths radio button
3. Click OK
ii. From the CommCell Browser > Policies > Storage Policies > right-click [newly created
Isilon NDMP storage policy created above] > Properties > General tab
1. Change the value in Device Streams: [equal to the total number of drives
available in the tape libraries configured on the storage policy as data paths]
8. Commvault: Create a Subclient
a. From the CommCell Browser > Client Computers > [Isilon cluster] > NAS > right-click
defaultBackupSet > All Taks > New Subclient
i. General tab:
1. Subclient Name: [enter name]
ii. Content tab:
1. Click the Browse button > select the path and click the Add button for each, once
finished click the Close button, paths will be listed in the Contents of subclient
box
a. For browsing to function, primary Step # 2 and 3 above must be
complete regarding the new user account and adding the Isilon cluster to
Array Management.
2. Alternatively, manually enter the full path into the lower Backup Content Path
textbox and click Add for each, paths will be listed in the Contents of subclient
box
iii. Advanced Options tab:
1. Number of Data Readers: [number of tape drives this subclient should utilize
from those available under the storage policy created above]
a. The Isilon Multi-Stream Backup feature integration will be utilized
automatically if this value and the device streams value under the
storage policy are both greater than one, see below for details.
iv. Storage Device tab > Data Storage Policy tab:
1. Storage Policy: [select the newly created storage policy above]
v. Optionally configure any other tab settings as needed.
vi. Click OK
vii. Backup Schedule window:
1. Select an existing schedule, create a new schedule, or do not schedule/click
Cancel to manually run backups.
a. The Isilon Incremental Forever (Level 10) and Snapshot-based
Incremental (Faster Incremental) Backup feature integrations will be
utilized automatically when Incremental backups are ran, and the
Restartable (BRE) feature will be utilized automatically when the Multi-
Stream feature is not utilized on a backup job, see below for details.
A.4.2 Snapshot-based Incremental (Faster Incremental) backups
The basic configuration steps to adjust the Snapshot-based Incremental (Faster Incremental) Backup feature
with Isilon are below. This feature is enabled by default when Isilon is the NAS client.
Basic configuration steps for a schedule policy:
1. Commvault: Set or adjust the job Fast Incremental option
a. From the CommCell Browser > Policies > Schedule Policies > right-click [Schedule Policy] > Edit
> select [Schedule Name] > Edit button > Advanced button (near OK and Cancel buttons) > NAS
Options tab
i. Backup from Snapshot: Yes
Integrations: configuration steps
38 Dell EMC Isilon: Backup Using Commvault | 13077.4
ii. Click OK to Advanced Backup Options
iii. Click OK to Backup Task Options
iv. Click OK to [Schedule Policy]
Basic configuration steps for a specific manual backup job:
1. Commvault: Set or adjust the job Fast Incremental option
a. From the CommCell Browser > Client Computers > [Isilon cluster] > NAS > defaultBackupSet >
right-click [Subclient] > Backup > Advanced button (near OK and Cancel buttons) > NAS Options
tab
i. Enable “Fast Incremental (Use Snapshot for Backup)” checkbox (default is enabled)
ii. Click OK
b. Select the Backup Type and Schedule > click OK
To utilize the Isilon feature, Commvault initiates a Level-based backup so the Isilon cluster saves a snapshot
from each level so Commvault can leverage snapshots for incremental and differential backups.
A.4.3 Incremental Forever (Level 10) backups
The basic configuration steps to confirm the Incremental Forever (Level 10) Backup feature with Isilon are
below. This feature is enabled by default when Isilon is the NAS client.
Confirmation steps:
1. Commvault: Run a Full Backup (Level 0) then an Incremental Backup (Level 10)
a. Either manually on a subclient or using a schedule policy.
2. Isilon: Confirm the last backup job, the incremental backup, is listed as a Level 10 in the dumpdates file
(CLI)
a. isi ndmp dumpdates list
To utilize the Isilon feature, Commvault specifies incremental backups as Level 10.
A.4.4 Restartable (BRE) backups
The basic configuration steps to adjust the Restartable Backup feature with Isilon are below. This feature is
enabled by default when Isilon is the NAS client and the backup utilizes a single-stream.
Basic configuration steps for the entire commcell:
1. Commvault: Set or adjust the job Restartable options
a. CommCell Console > Home tab > Control Panel > Job Management (under Data)
b. Job Restarts tab
i. Select [Job Type – like “File System and Indexing Based (Data Protection)”]
ii. Enable “Restartable” checkbox
iii. Max Restarts = [adjust the default as needed]
iv. Restart Interval (Mins) = [adjust the default as needed]
c. Click OK
Integrations: configuration steps
39 Dell EMC Isilon: Backup Using Commvault | 13077.4
Basic configuration steps for a specific manual backup job:
1. Note: This will override the Control Panel settings above.
2. Commvault: Set or adjust the job Restartable options
a. From the CommCell Browser > Client Computers > [Isilon cluster] > NAS > defaultBackupSet >
right-click [Subclient] > Backup > Advanced button (near OK and Cancel buttons)
i. Job Retry tab
1. Enable “Enable Number of Retries” checkbox: [enter a value]
ii. Click OK
b. Select the Backup Type
c. Select Immediate or Schedule
d. Click OK
A.4.5 Multi-Stream backups
The basic configuration steps to configure the Multi-Stream Backup feature with Isilon are below. The number
of Data Readers/Streams configured will be evenly distributed between the data paths, if multiple data paths
are defined in a Subclient. This feature is enabled by default when Isilon is the NAS client, and when both the
device streams value under the storage policy and the data readers value under the subclient are greater
than one.
Basic configuration steps:
1. Commvault: Set or adjust the number of Device Streams under the storage policy
a. From the CommCell Browser > Policies > Storage Policies > right-click [newly created Isilon
NDMP storage policy created above] > Properties > General tab
i. Device Streams: [equal to the total number of drives available in the tape libraries
configured on the storage policy as data paths]
2. Commvault: Set or adjust the number of Data Readers under each NAS Subclient
a. From the CommCell Browser > Client Computers > [Isilon cluster] > NAS > defaultBackupSet >
right-click [Subclient] > Properties > Advanced Options tab
i. Number of Data Readers: [number of tape drives this subclient should utilize from those
available under the storage policy]
ii. Click OK

Technical support and resources
40 Dell EMC Isilon: Backup Using Commvault | 13077.4
B Technical support and resources
Dell.com/support is focused on meeting customer needs with proven services and support.
Storage technical documents and videos provide expertise that helps to ensure customer success on Dell
EMC storage platforms.