Embed Size (px)
Citation preview
1
Data in a Flash: Everything You Need to Know About NVMe
Petros Koutoupis
2
Table of Contents About the Author .................................................................................................................................................... 3
Data in a Flash, Part I: the Evolution of Disk Storage and an Introduction to NVMe .............................................. 4
A Brief History of Computer Memory ................................................................................................................. 6
Moving Closer to the CPU ................................................................................................................................... 7
The Solid-State Drive .......................................................................................................................................... 8
Introducing NAND Memory ................................................................................................................................ 9
The Boring Details ............................................................................................................................................ 10
Non-Volatile Memory Express (NVMe) ............................................................................................................ 10
Non-Volatile Memory Express over Fabric (NVMeoF) ...................................................................................... 11
Conclusion ........................................................................................................................................................ 12
For Further Reading .......................................................................................................................................... 12
Data in a Flash, Part II: Using NVMe Drives and Creating an NVMe over Fabrics Network .................................. 13
Drive Management ........................................................................................................................................... 15
Accessing the Drive across a Network .............................................................................................................. 18
Setting Up a Soft-RoCE Network .................................................................................................................. 19
Exporting a Target ........................................................................................................................................ 21
Importing a Target ....................................................................................................................................... 23
Summary .......................................................................................................................................................... 25
Resources ......................................................................................................................................................... 25
Data in a Flash, Part III: NVMe over Fabrics Using TCP ......................................................................................... 26
Software Requirements .................................................................................................................................... 27
Accessing the Drive across a Network over TCP ............................................................................................... 28
Exporting a Target ........................................................................................................................................ 29
Importing a Target ....................................................................................................................................... 31
Summary .......................................................................................................................................................... 33
Resources ......................................................................................................................................................... 33
Data in a Flash, Part IV: the Future of Memory Technologies .............................................................................. 34
Storage Class Memory ...................................................................................................................................... 35
Intel's Optane, Samsung's Z-SSD (and Others) ................................................................................................. 35
Computational Storage ..................................................................................................................................... 36
Today's Challenges ........................................................................................................................................... 36
Summary .......................................................................................................................................................... 37
3
About the Author
Petros Koutoupis, is a senior software developer and freelance author. He is also the creator and maintainer of the RapidDisk Project. Petros has worked in the data storage industry for well over a decade and has helped pioneer the many technologies unleashed in the wild today. For more information about the author and the technologies he works on, please visit his personal website: www.petroskoutoupis.com or his technology focused blog: www.koutoupis.com.
4
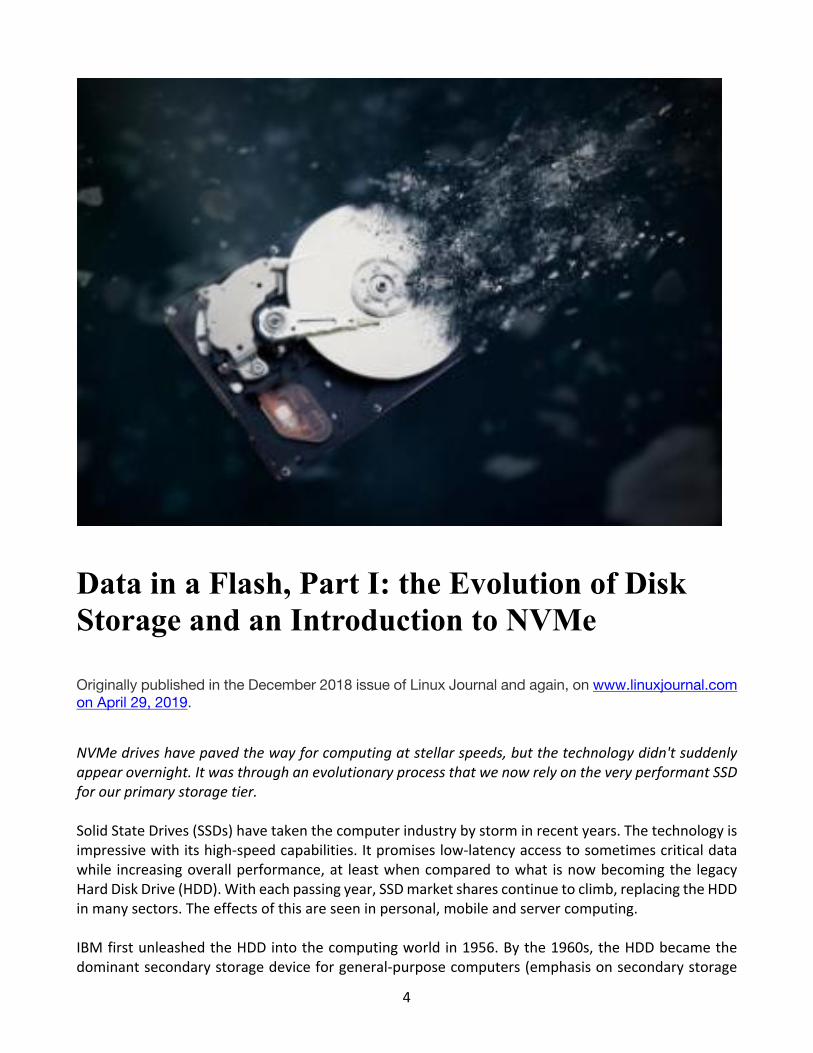
Data in a Flash, Part I: the Evolution of Disk Storage and an Introduction to NVMe Originally published in the December 2018 issue of Linux Journal and again, on www.linuxjournal.com on April 29, 2019.
NVMe drives have paved the way for computing at stellar speeds, but the technology didn't suddenly appear overnight. It was through an evolutionary process that we now rely on the very performant SSD for our primary storage tier. Solid State Drives (SSDs) have taken the computer industry by storm in recent years. The technology is impressive with its high-speed capabilities. It promises low-latency access to sometimes critical data while increasing overall performance, at least when compared to what is now becoming the legacy Hard Disk Drive (HDD). With each passing year, SSD market shares continue to climb, replacing the HDD in many sectors. The effects of this are seen in personal, mobile and server computing. IBM first unleashed the HDD into the computing world in 1956. By the 1960s, the HDD became the dominant secondary storage device for general-purpose computers (emphasis on secondary storage
5
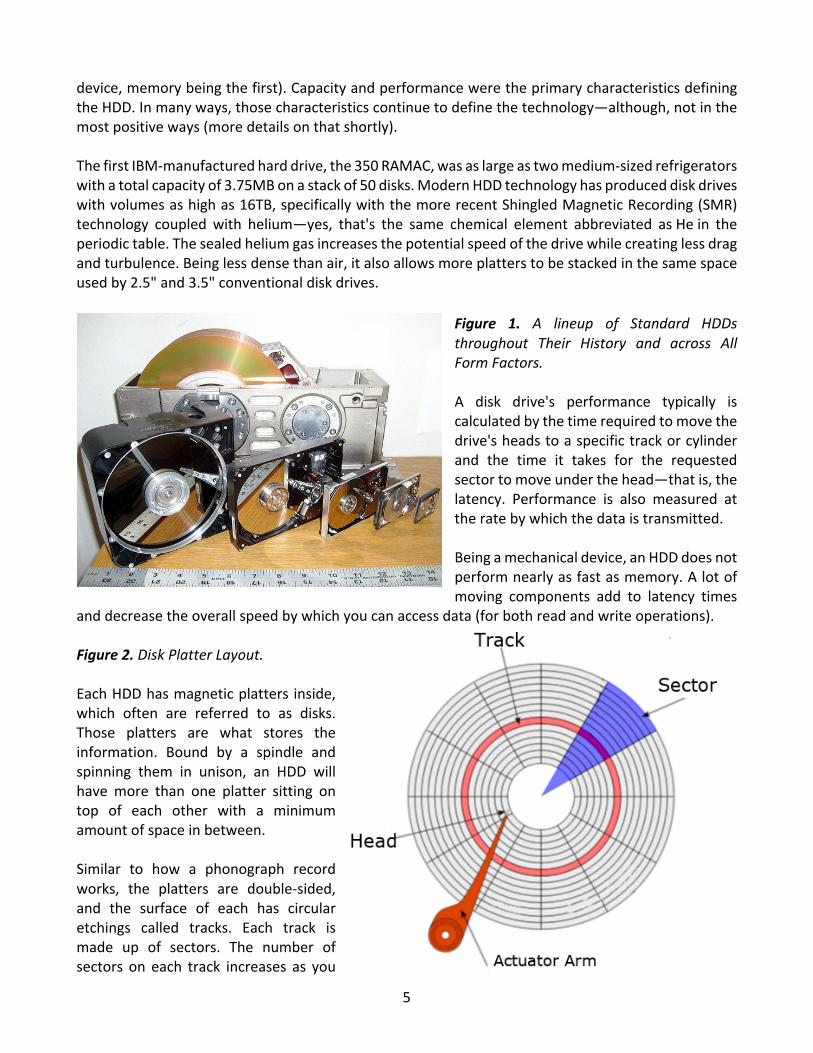
device, memory being the first). Capacity and performance were the primary characteristics defining the HDD. In many ways, those characteristics continue to define the technology—although, not in the most positive ways (more details on that shortly). The first IBM-manufactured hard drive, the 350 RAMAC, was as large as two medium-sized refrigerators with a total capacity of 3.75MB on a stack of 50 disks. Modern HDD technology has produced disk drives with volumes as high as 16TB, specifically with the more recent Shingled Magnetic Recording (SMR) technology coupled with helium—yes, that's the same chemical element abbreviated as He in the periodic table. The sealed helium gas increases the potential speed of the drive while creating less drag and turbulence. Being less dense than air, it also allows more platters to be stacked in the same space used by 2.5" and 3.5" conventional disk drives.
Figure 1. A lineup of Standard HDDs throughout Their History and across All Form Factors. A disk drive's performance typically is calculated by the time required to move the drive's heads to a specific track or cylinder and the time it takes for the requested sector to move under the head—that is, the latency. Performance is also measured at the rate by which the data is transmitted. Being a mechanical device, an HDD does not perform nearly as fast as memory. A lot of moving components add to latency times
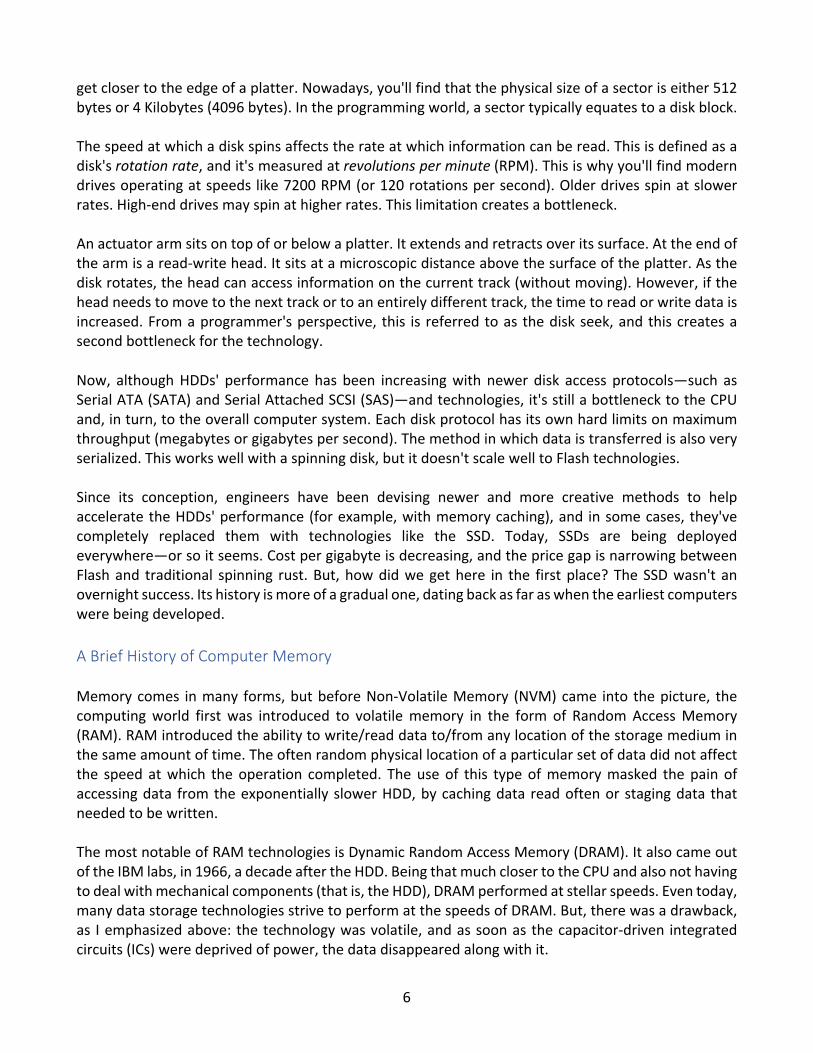
and decrease the overall speed by which you can access data (for both read and write operations). Figure 2. Disk Platter Layout. Each HDD has magnetic platters inside, which often are referred to as disks. Those platters are what stores the information. Bound by a spindle and spinning them in unison, an HDD will have more than one platter sitting on top of each other with a minimum amount of space in between. Similar to how a phonograph record works, the platters are double-sided, and the surface of each has circular etchings called tracks. Each track is made up of sectors. The number of sectors on each track increases as you
6
get closer to the edge of a platter. Nowadays, you'll find that the physical size of a sector is either 512 bytes or 4 Kilobytes (4096 bytes). In the programming world, a sector typically equates to a disk block. The speed at which a disk spins affects the rate at which information can be read. This is defined as a disk's rotation rate, and it's measured at revolutions per minute (RPM). This is why you'll find modern drives operating at speeds like 7200 RPM (or 120 rotations per second). Older drives spin at slower rates. High-end drives may spin at higher rates. This limitation creates a bottleneck. An actuator arm sits on top of or below a platter. It extends and retracts over its surface. At the end of the arm is a read-write head. It sits at a microscopic distance above the surface of the platter. As the disk rotates, the head can access information on the current track (without moving). However, if the head needs to move to the next track or to an entirely different track, the time to read or write data is increased. From a programmer's perspective, this is referred to as the disk seek, and this creates a second bottleneck for the technology. Now, although HDDs' performance has been increasing with newer disk access protocols—such as Serial ATA (SATA) and Serial Attached SCSI (SAS)—and technologies, it's still a bottleneck to the CPU and, in turn, to the overall computer system. Each disk protocol has its own hard limits on maximum throughput (megabytes or gigabytes per second). The method in which data is transferred is also very serialized. This works well with a spinning disk, but it doesn't scale well to Flash technologies. Since its conception, engineers have been devising newer and more creative methods to help accelerate the HDDs' performance (for example, with memory caching), and in some cases, they've completely replaced them with technologies like the SSD. Today, SSDs are being deployed everywhere—or so it seems. Cost per gigabyte is decreasing, and the price gap is narrowing between Flash and traditional spinning rust. But, how did we get here in the first place? The SSD wasn't an overnight success. Its history is more of a gradual one, dating back as far as when the earliest computers were being developed. A Brief History of Computer Memory Memory comes in many forms, but before Non-Volatile Memory (NVM) came into the picture, the computing world first was introduced to volatile memory in the form of Random Access Memory (RAM). RAM introduced the ability to write/read data to/from any location of the storage medium in the same amount of time. The often random physical location of a particular set of data did not affect the speed at which the operation completed. The use of this type of memory masked the pain of accessing data from the exponentially slower HDD, by caching data read often or staging data that needed to be written. The most notable of RAM technologies is Dynamic Random Access Memory (DRAM). It also came out of the IBM labs, in 1966, a decade after the HDD. Being that much closer to the CPU and also not having to deal with mechanical components (that is, the HDD), DRAM performed at stellar speeds. Even today, many data storage technologies strive to perform at the speeds of DRAM. But, there was a drawback, as I emphasized above: the technology was volatile, and as soon as the capacitor-driven integrated circuits (ICs) were deprived of power, the data disappeared along with it.
7
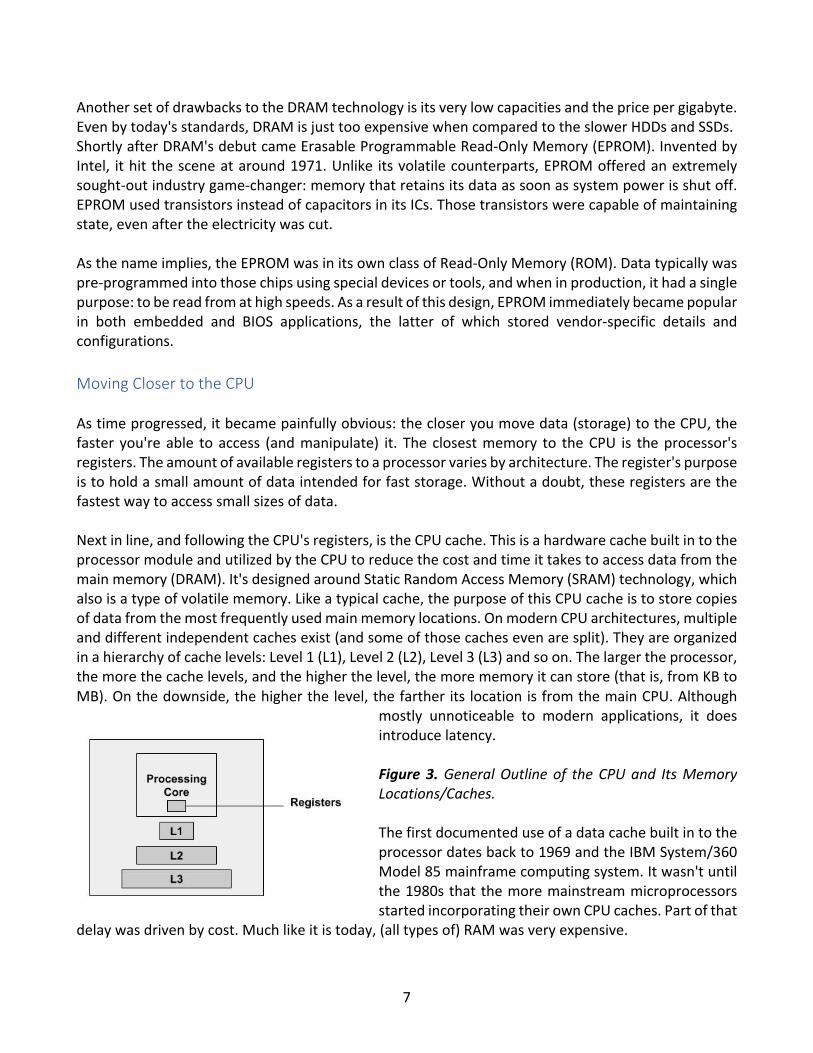
Another set of drawbacks to the DRAM technology is its very low capacities and the price per gigabyte. Even by today's standards, DRAM is just too expensive when compared to the slower HDDs and SSDs. Shortly after DRAM's debut came Erasable Programmable Read-Only Memory (EPROM). Invented by Intel, it hit the scene at around 1971. Unlike its volatile counterparts, EPROM offered an extremely sought-out industry game-changer: memory that retains its data as soon as system power is shut off. EPROM used transistors instead of capacitors in its ICs. Those transistors were capable of maintaining state, even after the electricity was cut. As the name implies, the EPROM was in its own class of Read-Only Memory (ROM). Data typically was pre-programmed into those chips using special devices or tools, and when in production, it had a single purpose: to be read from at high speeds. As a result of this design, EPROM immediately became popular in both embedded and BIOS applications, the latter of which stored vendor-specific details and configurations. Moving Closer to the CPU As time progressed, it became painfully obvious: the closer you move data (storage) to the CPU, the faster you're able to access (and manipulate) it. The closest memory to the CPU is the processor's registers. The amount of available registers to a processor varies by architecture. The register's purpose is to hold a small amount of data intended for fast storage. Without a doubt, these registers are the fastest way to access small sizes of data. Next in line, and following the CPU's registers, is the CPU cache. This is a hardware cache built in to the processor module and utilized by the CPU to reduce the cost and time it takes to access data from the main memory (DRAM). It's designed around Static Random Access Memory (SRAM) technology, which also is a type of volatile memory. Like a typical cache, the purpose of this CPU cache is to store copies of data from the most frequently used main memory locations. On modern CPU architectures, multiple and different independent caches exist (and some of those caches even are split). They are organized in a hierarchy of cache levels: Level 1 (L1), Level 2 (L2), Level 3 (L3) and so on. The larger the processor, the more the cache levels, and the higher the level, the more memory it can store (that is, from KB to MB). On the downside, the higher the level, the farther its location is from the main CPU. Although
mostly unnoticeable to modern applications, it does introduce latency. Figure 3. General Outline of the CPU and Its Memory Locations/Caches. The first documented use of a data cache built in to the processor dates back to 1969 and the IBM System/360 Model 85 mainframe computing system. It wasn't until the 1980s that the more mainstream microprocessors started incorporating their own CPU caches. Part of that
delay was driven by cost. Much like it is today, (all types of) RAM was very expensive.
8
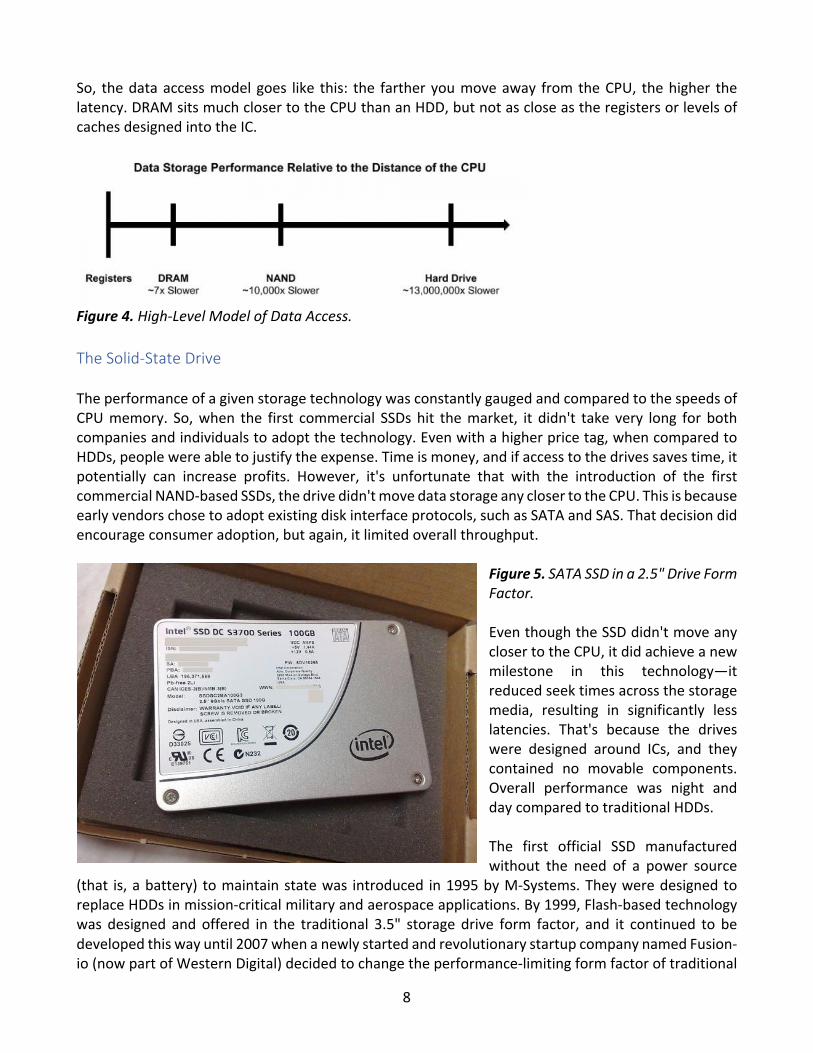
So, the data access model goes like this: the farther you move away from the CPU, the higher the latency. DRAM sits much closer to the CPU than an HDD, but not as close as the registers or levels of caches designed into the IC.
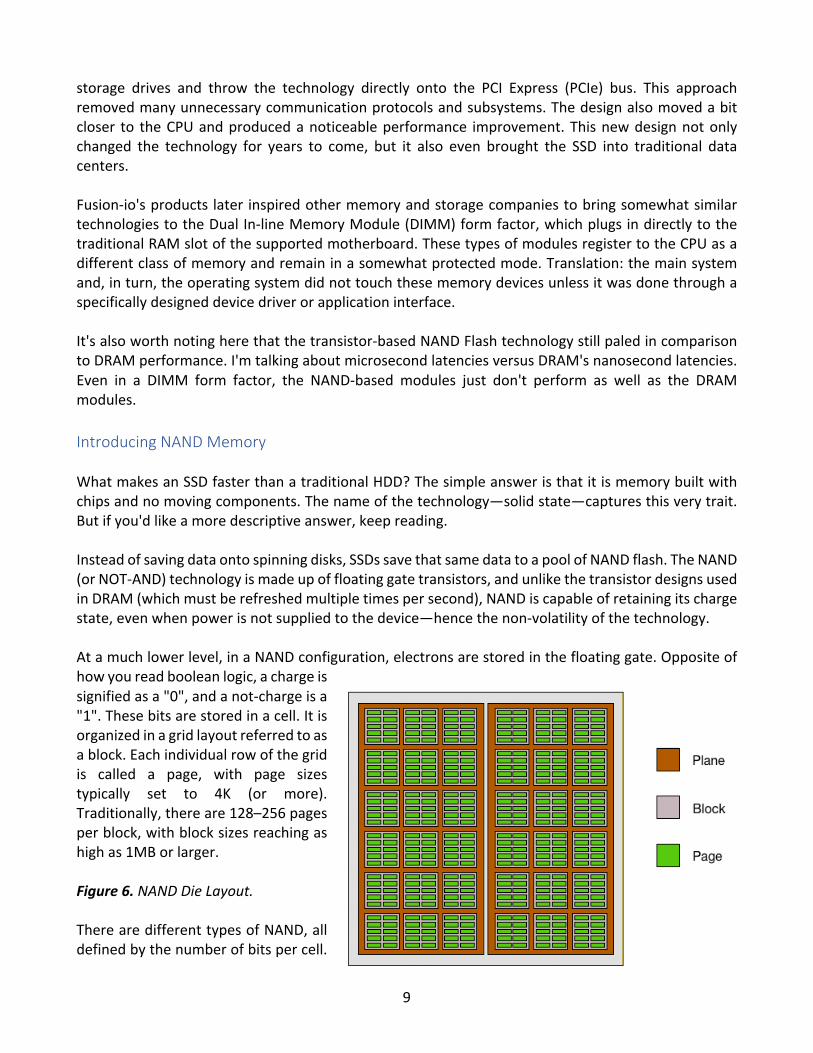
Figure 4. High-Level Model of Data Access. The Solid-State Drive The performance of a given storage technology was constantly gauged and compared to the speeds of CPU memory. So, when the first commercial SSDs hit the market, it didn't take very long for both companies and individuals to adopt the technology. Even with a higher price tag, when compared to HDDs, people were able to justify the expense. Time is money, and if access to the drives saves time, it potentially can increase profits. However, it's unfortunate that with the introduction of the first commercial NAND-based SSDs, the drive didn't move data storage any closer to the CPU. This is because early vendors chose to adopt existing disk interface protocols, such as SATA and SAS. That decision did encourage consumer adoption, but again, it limited overall throughput.
Figure 5. SATA SSD in a 2.5" Drive Form Factor. Even though the SSD didn't move any closer to the CPU, it did achieve a new milestone in this technology—it reduced seek times across the storage media, resulting in significantly less latencies. That's because the drives were designed around ICs, and they contained no movable components. Overall performance was night and day compared to traditional HDDs. The first official SSD manufactured without the need of a power source
(that is, a battery) to maintain state was introduced in 1995 by M-Systems. They were designed to replace HDDs in mission-critical military and aerospace applications. By 1999, Flash-based technology was designed and offered in the traditional 3.5" storage drive form factor, and it continued to be developed this way until 2007 when a newly started and revolutionary startup company named Fusion-io (now part of Western Digital) decided to change the performance-limiting form factor of traditional
9
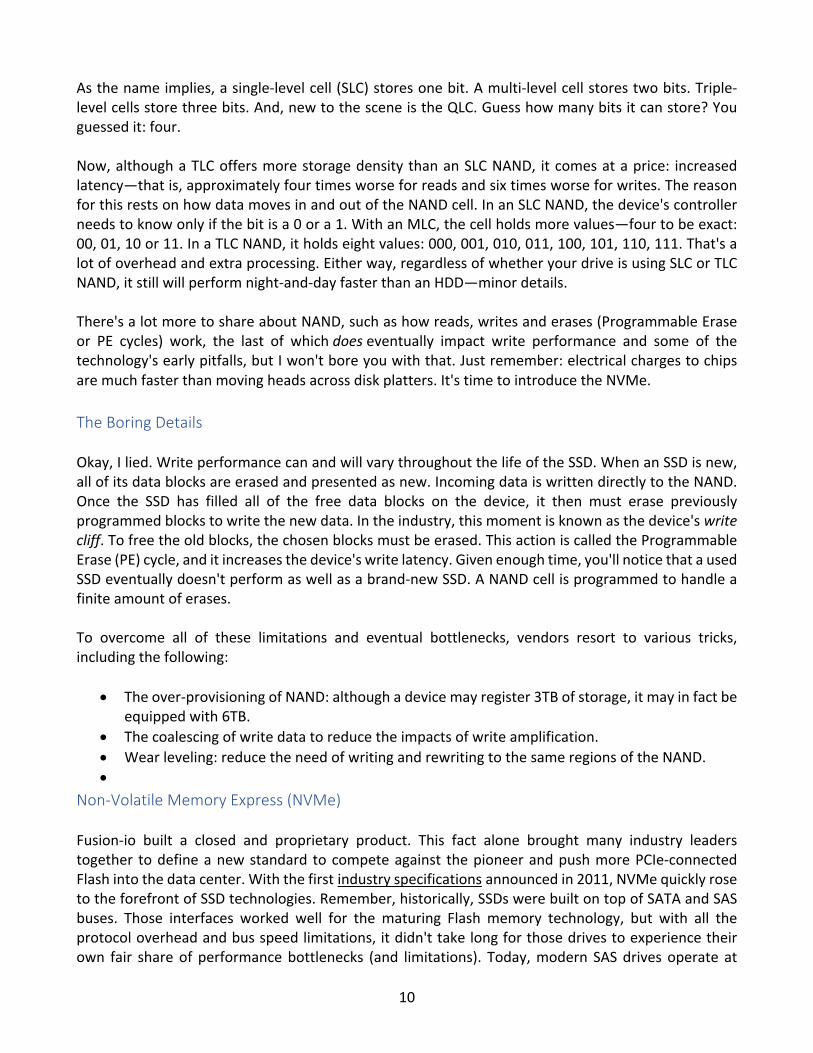
storage drives and throw the technology directly onto the PCI Express (PCIe) bus. This approach removed many unnecessary communication protocols and subsystems. The design also moved a bit closer to the CPU and produced a noticeable performance improvement. This new design not only changed the technology for years to come, but it also even brought the SSD into traditional data centers. Fusion-io's products later inspired other memory and storage companies to bring somewhat similar technologies to the Dual In-line Memory Module (DIMM) form factor, which plugs in directly to the traditional RAM slot of the supported motherboard. These types of modules register to the CPU as a different class of memory and remain in a somewhat protected mode. Translation: the main system and, in turn, the operating system did not touch these memory devices unless it was done through a specifically designed device driver or application interface. It's also worth noting here that the transistor-based NAND Flash technology still paled in comparison to DRAM performance. I'm talking about microsecond latencies versus DRAM's nanosecond latencies. Even in a DIMM form factor, the NAND-based modules just don't perform as well as the DRAM modules. Introducing NAND Memory What makes an SSD faster than a traditional HDD? The simple answer is that it is memory built with chips and no moving components. The name of the technology—solid state—captures this very trait. But if you'd like a more descriptive answer, keep reading. Instead of saving data onto spinning disks, SSDs save that same data to a pool of NAND flash. The NAND (or NOT-AND) technology is made up of floating gate transistors, and unlike the transistor designs used in DRAM (which must be refreshed multiple times per second), NAND is capable of retaining its charge state, even when power is not supplied to the device—hence the non-volatility of the technology. At a much lower level, in a NAND configuration, electrons are stored in the floating gate. Opposite of how you read boolean logic, a charge is signified as a "0", and a not-charge is a "1". These bits are stored in a cell. It is organized in a grid layout referred to as a block. Each individual row of the grid is called a page, with page sizes typically set to 4K (or more). Traditionally, there are 128–256 pages per block, with block sizes reaching as high as 1MB or larger. Figure 6. NAND Die Layout. There are different types of NAND, all defined by the number of bits per cell.
10
As the name implies, a single-level cell (SLC) stores one bit. A multi-level cell stores two bits. Triple-level cells store three bits. And, new to the scene is the QLC. Guess how many bits it can store? You guessed it: four. Now, although a TLC offers more storage density than an SLC NAND, it comes at a price: increased latency—that is, approximately four times worse for reads and six times worse for writes. The reason for this rests on how data moves in and out of the NAND cell. In an SLC NAND, the device's controller needs to know only if the bit is a 0 or a 1. With an MLC, the cell holds more values—four to be exact: 00, 01, 10 or 11. In a TLC NAND, it holds eight values: 000, 001, 010, 011, 100, 101, 110, 111. That's a lot of overhead and extra processing. Either way, regardless of whether your drive is using SLC or TLC NAND, it still will perform night-and-day faster than an HDD—minor details. There's a lot more to share about NAND, such as how reads, writes and erases (Programmable Erase or PE cycles) work, the last of which does eventually impact write performance and some of the technology's early pitfalls, but I won't bore you with that. Just remember: electrical charges to chips are much faster than moving heads across disk platters. It's time to introduce the NVMe. The Boring Details Okay, I lied. Write performance can and will vary throughout the life of the SSD. When an SSD is new, all of its data blocks are erased and presented as new. Incoming data is written directly to the NAND. Once the SSD has filled all of the free data blocks on the device, it then must erase previously programmed blocks to write the new data. In the industry, this moment is known as the device's write cliff. To free the old blocks, the chosen blocks must be erased. This action is called the Programmable Erase (PE) cycle, and it increases the device's write latency. Given enough time, you'll notice that a used SSD eventually doesn't perform as well as a brand-new SSD. A NAND cell is programmed to handle a finite amount of erases. To overcome all of these limitations and eventual bottlenecks, vendors resort to various tricks, including the following:
• The over-provisioning of NAND: although a device may register 3TB of storage, it may in fact be equipped with 6TB.
• The coalescing of write data to reduce the impacts of write amplification. • Wear leveling: reduce the need of writing and rewriting to the same regions of the NAND. •
Non-Volatile Memory Express (NVMe) Fusion-io built a closed and proprietary product. This fact alone brought many industry leaders together to define a new standard to compete against the pioneer and push more PCIe-connected Flash into the data center. With the first industry specifications announced in 2011, NVMe quickly rose to the forefront of SSD technologies. Remember, historically, SSDs were built on top of SATA and SAS buses. Those interfaces worked well for the maturing Flash memory technology, but with all the protocol overhead and bus speed limitations, it didn't take long for those drives to experience their own fair share of performance bottlenecks (and limitations). Today, modern SAS drives operate at
11
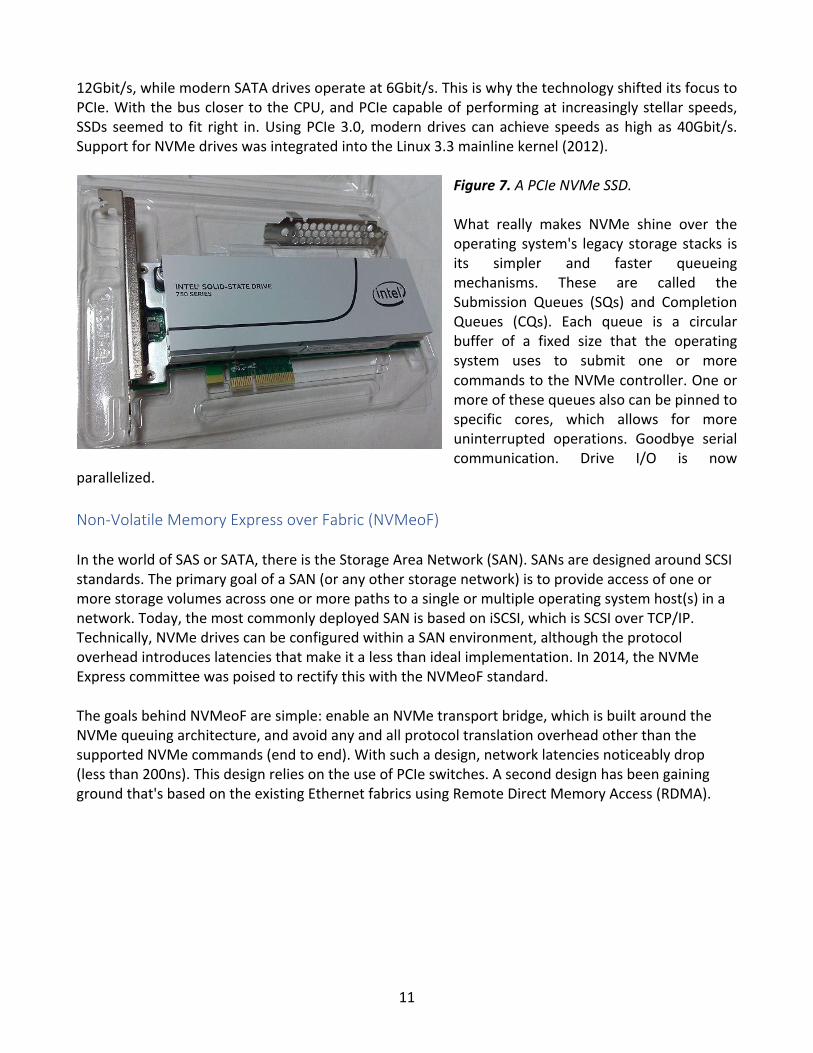
12Gbit/s, while modern SATA drives operate at 6Gbit/s. This is why the technology shifted its focus to PCIe. With the bus closer to the CPU, and PCIe capable of performing at increasingly stellar speeds, SSDs seemed to fit right in. Using PCIe 3.0, modern drives can achieve speeds as high as 40Gbit/s. Support for NVMe drives was integrated into the Linux 3.3 mainline kernel (2012).
Figure 7. A PCIe NVMe SSD. What really makes NVMe shine over the operating system's legacy storage stacks is its simpler and faster queueing mechanisms. These are called the Submission Queues (SQs) and Completion Queues (CQs). Each queue is a circular buffer of a fixed size that the operating system uses to submit one or more commands to the NVMe controller. One or more of these queues also can be pinned to specific cores, which allows for more uninterrupted operations. Goodbye serial communication. Drive I/O is now
parallelized. Non-Volatile Memory Express over Fabric (NVMeoF) In the world of SAS or SATA, there is the Storage Area Network (SAN). SANs are designed around SCSI standards. The primary goal of a SAN (or any other storage network) is to provide access of one or more storage volumes across one or more paths to a single or multiple operating system host(s) in a network. Today, the most commonly deployed SAN is based on iSCSI, which is SCSI over TCP/IP. Technically, NVMe drives can be configured within a SAN environment, although the protocol overhead introduces latencies that make it a less than ideal implementation. In 2014, the NVMe Express committee was poised to rectify this with the NVMeoF standard. The goals behind NVMeoF are simple: enable an NVMe transport bridge, which is built around the NVMe queuing architecture, and avoid any and all protocol translation overhead other than the supported NVMe commands (end to end). With such a design, network latencies noticeably drop (less than 200ns). This design relies on the use of PCIe switches. A second design has been gaining ground that's based on the existing Ethernet fabrics using Remote Direct Memory Access (RDMA).
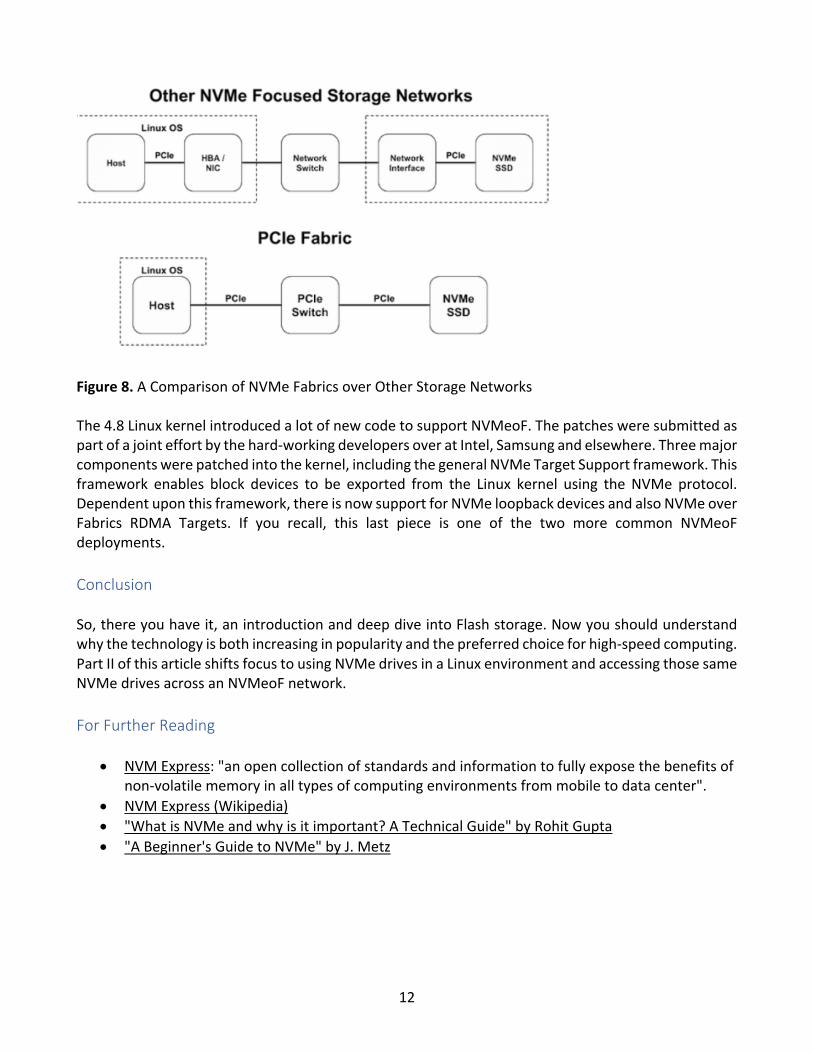
12
Figure 8. A Comparison of NVMe Fabrics over Other Storage Networks The 4.8 Linux kernel introduced a lot of new code to support NVMeoF. The patches were submitted as part of a joint effort by the hard-working developers over at Intel, Samsung and elsewhere. Three major components were patched into the kernel, including the general NVMe Target Support framework. This framework enables block devices to be exported from the Linux kernel using the NVMe protocol. Dependent upon this framework, there is now support for NVMe loopback devices and also NVMe over Fabrics RDMA Targets. If you recall, this last piece is one of the two more common NVMeoF deployments. Conclusion So, there you have it, an introduction and deep dive into Flash storage. Now you should understand why the technology is both increasing in popularity and the preferred choice for high-speed computing. Part II of this article shifts focus to using NVMe drives in a Linux environment and accessing those same NVMe drives across an NVMeoF network. For Further Reading
• NVM Express: "an open collection of standards and information to fully expose the benefits of non-volatile memory in all types of computing environments from mobile to data center".
• NVM Express (Wikipedia) • "What is NVMe and why is it important? A Technical Guide" by Rohit Gupta • "A Beginner's Guide to NVMe" by J. Metz

13
Data in a Flash, Part II: Using NVMe Drives and Creating an NVMe over Fabrics Network
Originally published in the December 2018 issue of Linux Journal and again, on www.linuxjournal.com on May 20, 2019.
By design, NVMe drives are intended to provide local access to the machines they are plugged in to; however, the NVMe over Fabric specification seeks to address this very limitation by enabling remote network access to that same device. This article puts into practice what you learned in Part I and shows how to use NVMe drives in a Linux environment. But, before continuing, you first need to make sure that your physical (or virtual) machine is up to date. Once you verify that to be the case, make sure you're able to see all connected NVMe devices:
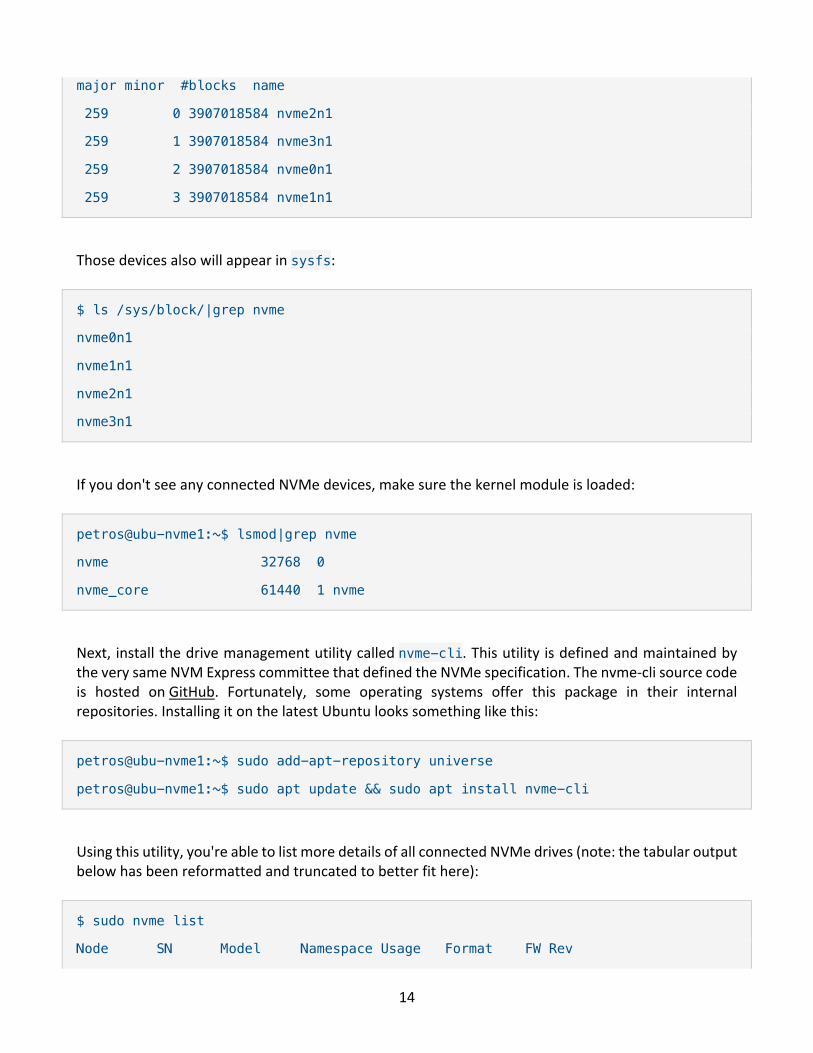
$ cat /proc/partitions |grep -e nvme -e major
14
major minor #blocks name
259 0 3907018584 nvme2n1
259 1 3907018584 nvme3n1
259 2 3907018584 nvme0n1
259 3 3907018584 nvme1n1
Those devices also will appear in sysfs:
$ ls /sys/block/|grep nvme
nvme0n1
nvme1n1
nvme2n1
nvme3n1
If you don't see any connected NVMe devices, make sure the kernel module is loaded:
petros@ubu-nvme1:~$ lsmod|grep nvme
nvme 32768 0
nvme_core 61440 1 nvme
Next, install the drive management utility called nvme-cli. This utility is defined and maintained by the very same NVM Express committee that defined the NVMe specification. The nvme-cli source code is hosted on GitHub. Fortunately, some operating systems offer this package in their internal repositories. Installing it on the latest Ubuntu looks something like this:
petros@ubu-nvme1:~$ sudo add-apt-repository universe
petros@ubu-nvme1:~$ sudo apt update && sudo apt install nvme-cli
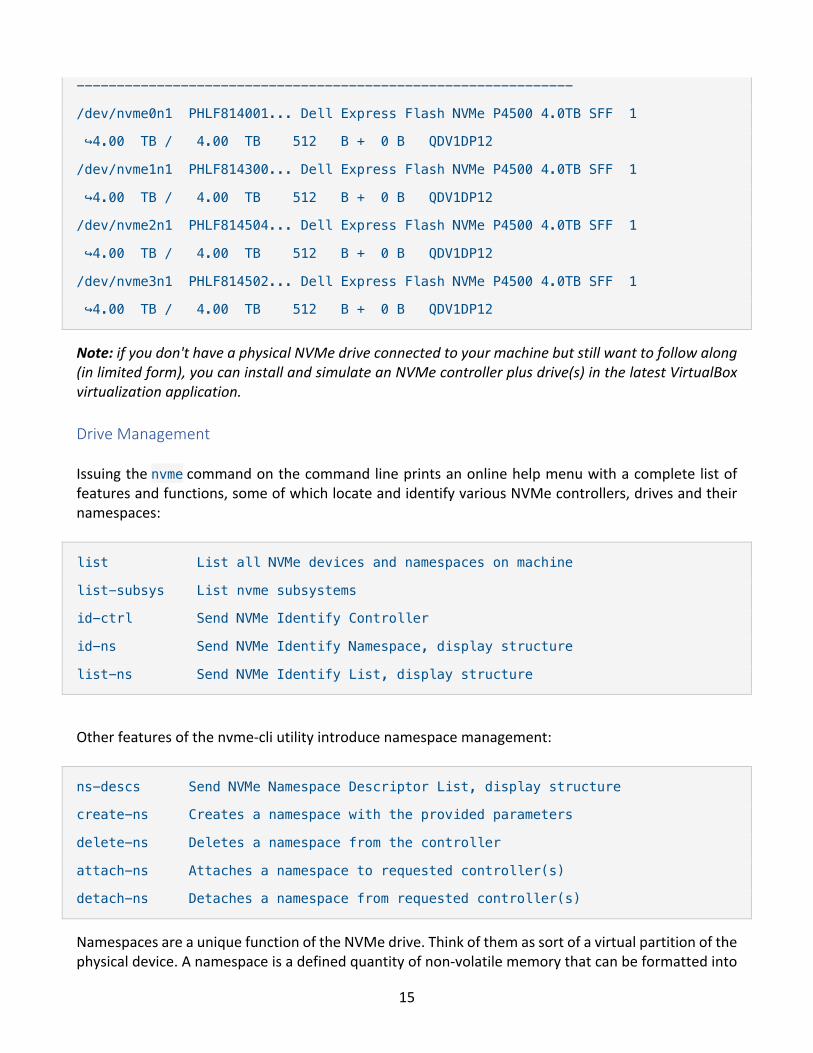
Using this utility, you're able to list more details of all connected NVMe drives (note: the tabular output below has been reformatted and truncated to better fit here):
$ sudo nvme list
Node SN Model Namespace Usage Format FW Rev
15
--------------------------------------------------------------
/dev/nvme0n1 PHLF814001... Dell Express Flash NVMe P4500 4.0TB SFF 1
↪4.00 TB / 4.00 TB 512 B + 0 B QDV1DP12
/dev/nvme1n1 PHLF814300... Dell Express Flash NVMe P4500 4.0TB SFF 1
↪4.00 TB / 4.00 TB 512 B + 0 B QDV1DP12
/dev/nvme2n1 PHLF814504... Dell Express Flash NVMe P4500 4.0TB SFF 1
↪4.00 TB / 4.00 TB 512 B + 0 B QDV1DP12
/dev/nvme3n1 PHLF814502... Dell Express Flash NVMe P4500 4.0TB SFF 1
↪4.00 TB / 4.00 TB 512 B + 0 B QDV1DP12
Note: if you don't have a physical NVMe drive connected to your machine but still want to follow along (in limited form), you can install and simulate an NVMe controller plus drive(s) in the latest VirtualBox virtualization application. Drive Management Issuing the nvme command on the command line prints an online help menu with a complete list of features and functions, some of which locate and identify various NVMe controllers, drives and their namespaces:
list List all NVMe devices and namespaces on machine
list-subsys List nvme subsystems
id-ctrl Send NVMe Identify Controller
id-ns Send NVMe Identify Namespace, display structure
list-ns Send NVMe Identify List, display structure
Other features of the nvme-cli utility introduce namespace management:
ns-descs Send NVMe Namespace Descriptor List, display structure
create-ns Creates a namespace with the provided parameters
delete-ns Deletes a namespace from the controller
attach-ns Attaches a namespace to requested controller(s)
detach-ns Detaches a namespace from requested controller(s)
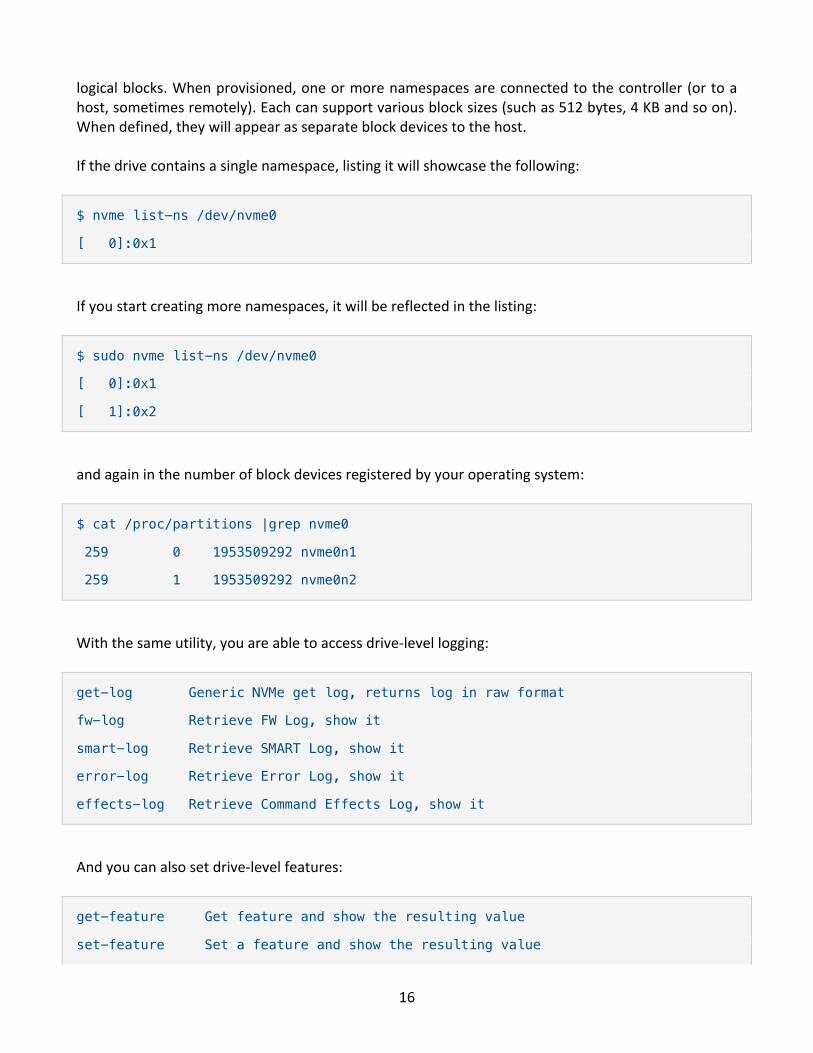
Namespaces are a unique function of the NVMe drive. Think of them as sort of a virtual partition of the physical device. A namespace is a defined quantity of non-volatile memory that can be formatted into
16
logical blocks. When provisioned, one or more namespaces are connected to the controller (or to a host, sometimes remotely). Each can support various block sizes (such as 512 bytes, 4 KB and so on). When defined, they will appear as separate block devices to the host. If the drive contains a single namespace, listing it will showcase the following:
$ nvme list-ns /dev/nvme0
[ 0]:0x1
If you start creating more namespaces, it will be reflected in the listing:
$ sudo nvme list-ns /dev/nvme0
[ 0]:0x1
[ 1]:0x2
and again in the number of block devices registered by your operating system:
$ cat /proc/partitions |grep nvme0
259 0 1953509292 nvme0n1
259 1 1953509292 nvme0n2
With the same utility, you are able to access drive-level logging:
get-log Generic NVMe get log, returns log in raw format
fw-log Retrieve FW Log, show it
smart-log Retrieve SMART Log, show it
error-log Retrieve Error Log, show it
effects-log Retrieve Command Effects Log, show it
And you can also set drive-level features:
get-feature Get feature and show the resulting value
set-feature Set a feature and show the resulting value
17
set-property Set a property and show the resulting value
For example, let's say you want to enable (1) or disable (0) the drive's volatile write cache (VWC). You can list its current setting like so:
$ sudo nvme id-ctrl /dev/nvme0|grep vwc
vwc : 0
And, set it like so:
$ sudo nvme set-feature /dev/nvme0 -f 0x6 -v 1
You can manage and update drive firmware:
fw-commit Verify and commit firmware to a specific slot
↪(fw-activate in old version < 1.2)
fw-download Download new firmware
Reset the controller (but not the connected drives):
reset Resets the controller
subsystem-reset Resets the controller
Discover and connect to other NVMe devices over a network (see below):
discover Discover NVMeoF subsystems
connect-all Discover and Connect to NVMeoF subsystems
connect Connect to NVMeoF subsystem
disconnect Disconnect from NVMeoF subsystem
gen-hostnqn Generate NVMeoF host NQN
And more.
18
The utility even has plugin extensions to support vendor-specific functions. The latest revision includes:
intel Intel vendor specific extensions
lnvm LightNVM specific extensions
memblaze Memblaze vendor specific extensions
wdc Western Digital vendor specific extensions
huawei Huawei vendor specific extensions
netapp NetApp vendor specific extensions
toshiba Toshiba NVME plugin
micron Micron vendor specific extensions
seagate Seagate vendor specific extensions
Accessing the Drive across a Network Let's look at how to leverage the high-speed SSD technology and expand it beyond the local server. An NVMe doesn't have to be limited to the server that it's physically plugged in to. In this example, let's configure a Soft RDMA over Converged Ethernet (RoCE) network on top of traditional TCP/IP and export/import an NVMe block device via this method. This will be your NVMeoF network. Before continuing though, you'll need to understand a couple concepts:
• Host: as it relates to the current environment, a host will be the server connecting to a remote block device—specifically, an NVMe target.
• Target: the target will be the server exporting the NVMe device across the network and to the host server.
In this example, and for the sake of convenience, I'm describing using two virtual machines to create the network. There's absolutely no advantage in doing this, and I don't recommend that anyone do the same other than to follow along with the exercise. Realistically, you should enable the following only on physical machines with high-speed network cards connected. Having said that, in the target virtual machine, let's attach a couple low-capacity virtual NVMe drives (2GB each):
$ sudo nvme list
Node SN Model Namespace Usage Format FW Rev
--------------------------------------------------------------
/dev/nvme0n1 VB1234-56789 ORCL-VBOX-NVME-VER12 1 2.15 GB / 2.15 GB
↪512 B + 0 B 1.0
19
/dev/nvme0n2 VB1234-56789 ORCL-VBOX-NVME-VER12 2 2.15 GB / 2.15 GB
↪512 B + 0 B 1.0
(Note: the above tabular output has been edited to fit the column width.) Again, I've been using a recent release of Ubuntu. To prepare both the host and target operating environments, install the following packages:
$ sudo apt install libibverbs-dev libibverbs1 rdma-core ibverbs-utils
On some distributions, you may need to specify the librxe package (on Ubuntu, its functions are packaged in rdma-core). Again, on both the host and target, you'll now load the required kernel modules (there are a few):
$ sudo modprobe nvme-rdma
$ sudo modprobe ib_uverbs
$ sudo modprobe rdma_ucm
$ sudo modprobe rdma_rxe
$ sudo modprobe nvmet
$ sudo modprobe nvmet-rdma
The following instructions rely heavily on the sysfs virtual filesystem. In theory, you could export NVMe targets with the nvmet-cli open-source utility, which does all of that complex heavy-lifting. But, where is the fun in that?
Setting Up a Soft-RoCE Network
An RDMA network needs be established between both the host and target servers. On each server, identify the network interface to enable for this method of transport:
$ ip addr show enp0s3
2: enp0s3: <BROADCAST,MULTICAST,UP,LOWER_UP> mtu 1500 qdisc
↪fq_codel state UP group default qlen 1000
link/ether 08:00:27:15:4b:da brd ff:ff:ff:ff:ff:ff
20
inet 192.168.1.85/24 brd 192.168.1.255 scope global dynamic enp0s3
valid_lft 85865sec preferred_lft 85865sec
inet6 fe80::a00:27ff:fe15:4bda/64 scope link
valid_lft forever preferred_lft forever
Let's configure the RDMA interface on top of the preferred Ethernet interface, but before doing so, first verify that one doesn't already exist:
$ sudo rxe_cfg status
Name Link Driver Speed NMTU IPv4_addr RDEV RMTU
enp0s3 yes e1000
Enable the RDMA environment and add the Ethernet interface:
$ sudo rxe_cfg start
$ sudo rxe_cfg add enp0s3
Verify that you now have your RDMA interface (rxe):
$ sudo rxe_cfg status
Name Link Driver Speed NMTU IPv4_addr RDEV RMTU
enp0s3 yes e1000 rxe0 (?)
You'll also find this interface listed in sysfs:
$ ls /sys/class/infiniband
rxe0
After applying the same instructions to both host and target machines, you'll need to test the RDMA network. On the host, set up the server:
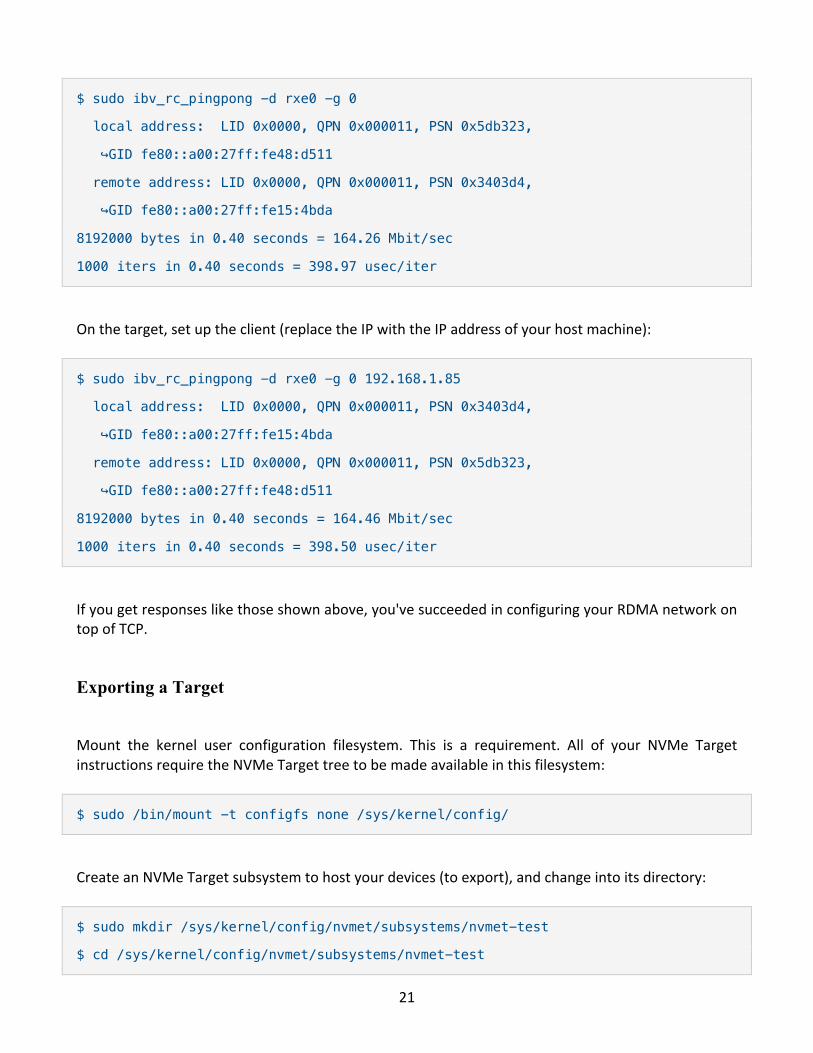
21
$ sudo ibv_rc_pingpong -d rxe0 -g 0
local address: LID 0x0000, QPN 0x000011, PSN 0x5db323,
↪GID fe80::a00:27ff:fe48:d511
remote address: LID 0x0000, QPN 0x000011, PSN 0x3403d4,
↪GID fe80::a00:27ff:fe15:4bda
8192000 bytes in 0.40 seconds = 164.26 Mbit/sec
1000 iters in 0.40 seconds = 398.97 usec/iter
On the target, set up the client (replace the IP with the IP address of your host machine):
$ sudo ibv_rc_pingpong -d rxe0 -g 0 192.168.1.85
local address: LID 0x0000, QPN 0x000011, PSN 0x3403d4,
↪GID fe80::a00:27ff:fe15:4bda
remote address: LID 0x0000, QPN 0x000011, PSN 0x5db323,
↪GID fe80::a00:27ff:fe48:d511
8192000 bytes in 0.40 seconds = 164.46 Mbit/sec
1000 iters in 0.40 seconds = 398.50 usec/iter
If you get responses like those shown above, you've succeeded in configuring your RDMA network on top of TCP.
Exporting a Target
Mount the kernel user configuration filesystem. This is a requirement. All of your NVMe Target instructions require the NVMe Target tree to be made available in this filesystem:
$ sudo /bin/mount -t configfs none /sys/kernel/config/
Create an NVMe Target subsystem to host your devices (to export), and change into its directory:
$ sudo mkdir /sys/kernel/config/nvmet/subsystems/nvmet-test
$ cd /sys/kernel/config/nvmet/subsystems/nvmet-test
22
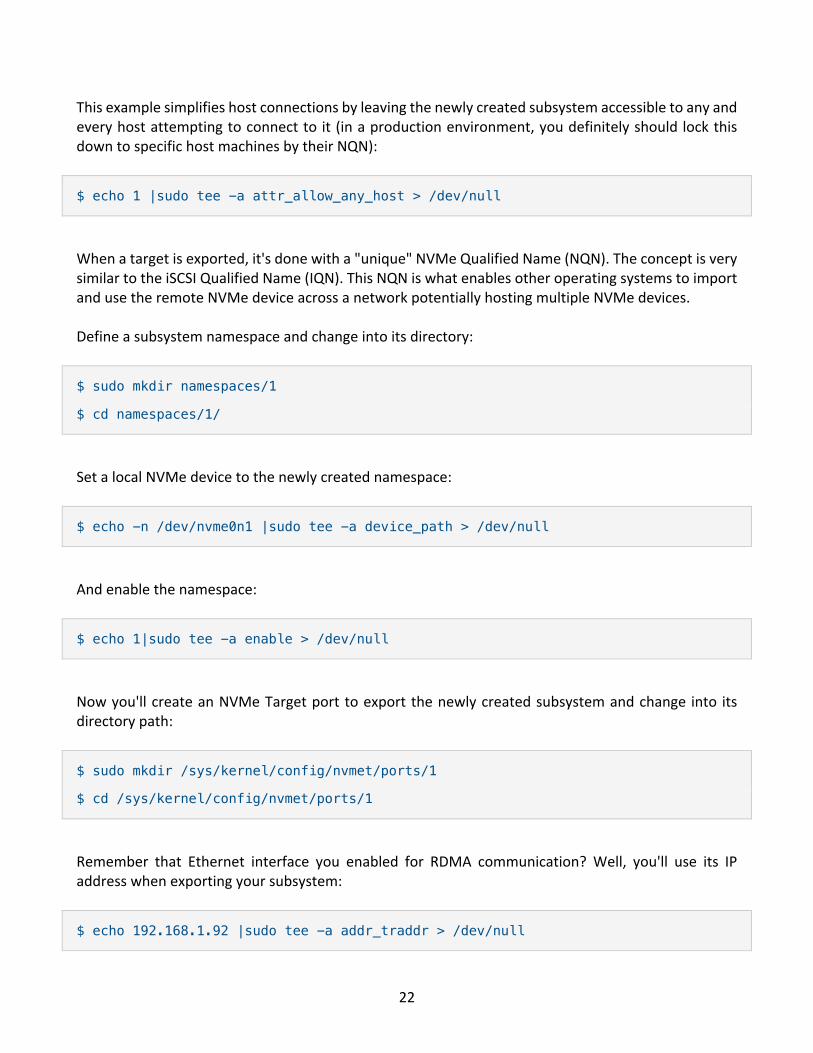
This example simplifies host connections by leaving the newly created subsystem accessible to any and every host attempting to connect to it (in a production environment, you definitely should lock this down to specific host machines by their NQN):
$ echo 1 |sudo tee -a attr_allow_any_host > /dev/null
When a target is exported, it's done with a "unique" NVMe Qualified Name (NQN). The concept is very similar to the iSCSI Qualified Name (IQN). This NQN is what enables other operating systems to import and use the remote NVMe device across a network potentially hosting multiple NVMe devices. Define a subsystem namespace and change into its directory:
$ sudo mkdir namespaces/1
$ cd namespaces/1/
Set a local NVMe device to the newly created namespace:
$ echo -n /dev/nvme0n1 |sudo tee -a device_path > /dev/null
And enable the namespace:
$ echo 1|sudo tee -a enable > /dev/null
Now you'll create an NVMe Target port to export the newly created subsystem and change into its directory path:
$ sudo mkdir /sys/kernel/config/nvmet/ports/1
$ cd /sys/kernel/config/nvmet/ports/1
Remember that Ethernet interface you enabled for RDMA communication? Well, you'll use its IP address when exporting your subsystem:
$ echo 192.168.1.92 |sudo tee -a addr_traddr > /dev/null
23
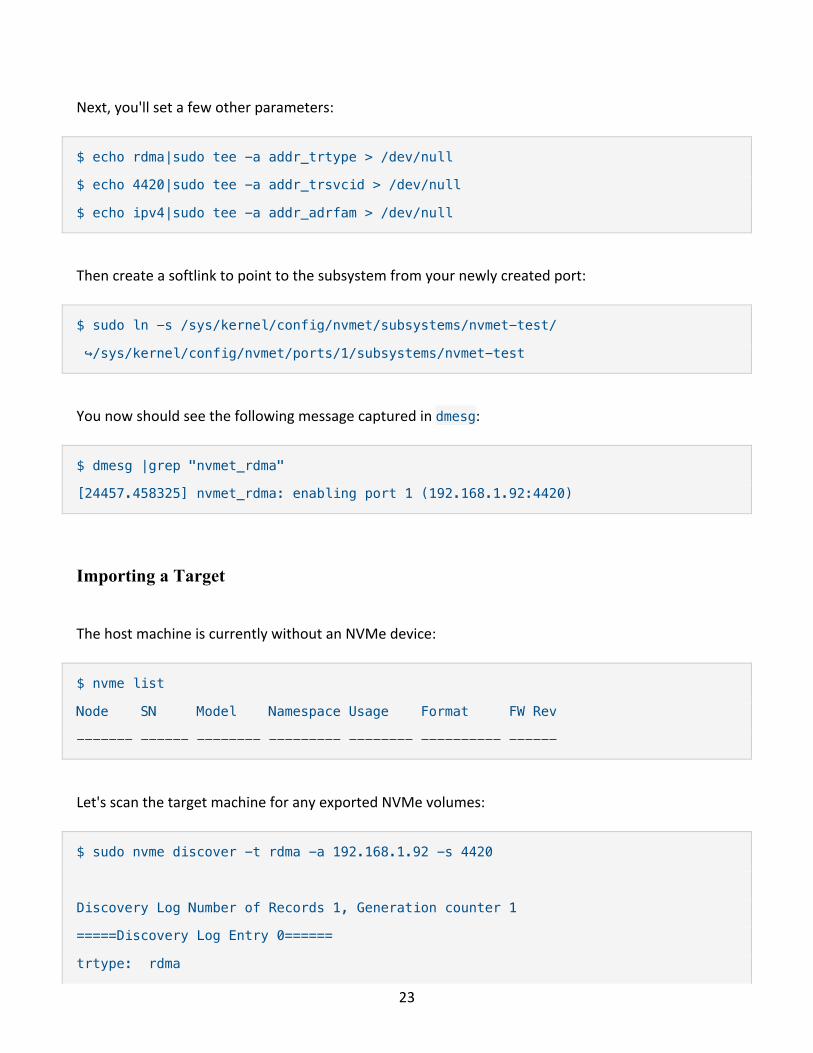
Next, you'll set a few other parameters:
$ echo rdma|sudo tee -a addr_trtype > /dev/null
$ echo 4420|sudo tee -a addr_trsvcid > /dev/null
$ echo ipv4|sudo tee -a addr_adrfam > /dev/null
Then create a softlink to point to the subsystem from your newly created port:
$ sudo ln -s /sys/kernel/config/nvmet/subsystems/nvmet-test/
↪/sys/kernel/config/nvmet/ports/1/subsystems/nvmet-test
You now should see the following message captured in dmesg:
$ dmesg |grep "nvmet_rdma"
[24457.458325] nvmet_rdma: enabling port 1 (192.168.1.92:4420)
Importing a Target
The host machine is currently without an NVMe device:
$ nvme list
Node SN Model Namespace Usage Format FW Rev
------- ------ -------- --------- -------- ---------- ------
Let's scan the target machine for any exported NVMe volumes:
$ sudo nvme discover -t rdma -a 192.168.1.92 -s 4420
Discovery Log Number of Records 1, Generation counter 1
=====Discovery Log Entry 0======
trtype: rdma
24
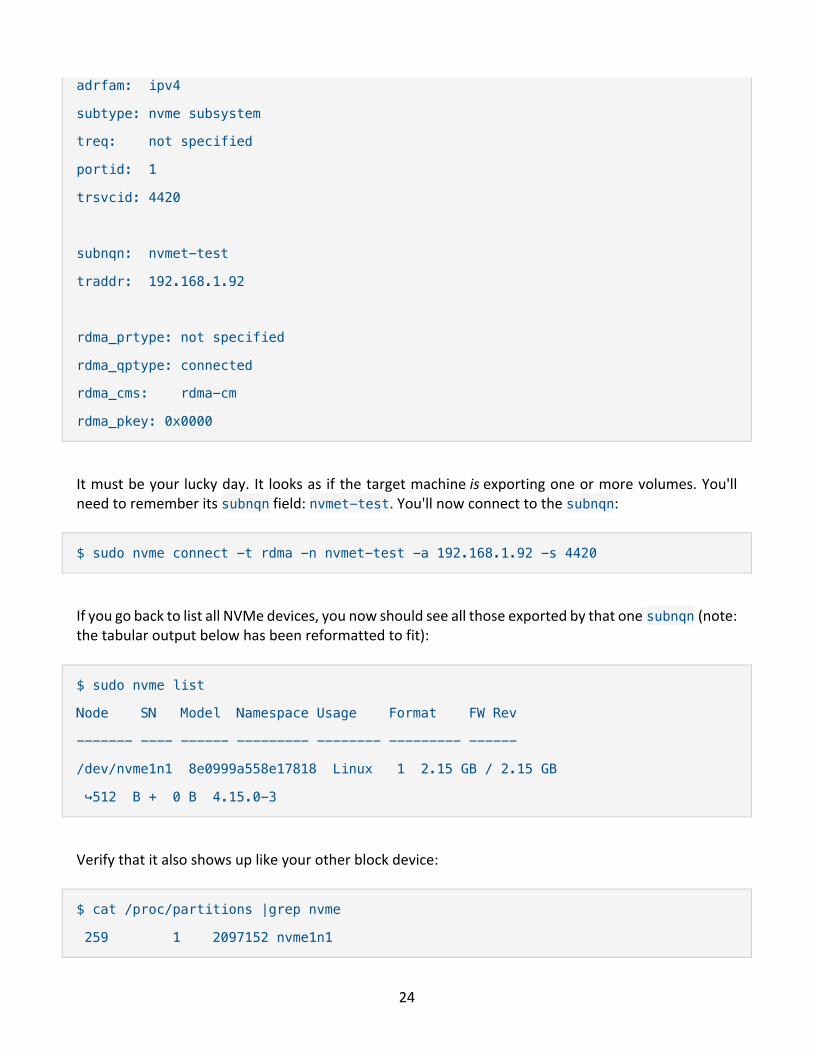
adrfam: ipv4
subtype: nvme subsystem
treq: not specified
portid: 1
trsvcid: 4420
subnqn: nvmet-test
traddr: 192.168.1.92
rdma_prtype: not specified
rdma_qptype: connected
rdma_cms: rdma-cm
rdma_pkey: 0x0000
It must be your lucky day. It looks as if the target machine is exporting one or more volumes. You'll need to remember its subnqn field: nvmet-test. You'll now connect to the subnqn:
$ sudo nvme connect -t rdma -n nvmet-test -a 192.168.1.92 -s 4420
If you go back to list all NVMe devices, you now should see all those exported by that one subnqn (note: the tabular output below has been reformatted to fit):
$ sudo nvme list
Node SN Model Namespace Usage Format FW Rev
------- ---- ------ --------- -------- --------- ------
/dev/nvme1n1 8e0999a558e17818 Linux 1 2.15 GB / 2.15 GB
↪512 B + 0 B 4.15.0-3
Verify that it also shows up like your other block device:
$ cat /proc/partitions |grep nvme
259 1 2097152 nvme1n1
25
You can disconnect from the target device by typing:
$ sudo nvme disconnect -d /dev/nvme1n1
There you have it: a remote NVMe block device exported via an NVMe over Fabrics network. You now can write to and read from it like any other locally attached high-performance block device. Note: if you're seeing I/O errors, there is a known issue with the Linux rxe code, and you may need to run a newer kernel. It is believed that kernel commit 2da36d44a9d54a2c6e1f8da1f7ccc26b0bc6cfec addresses this issue, and it was merged into a later 4.16 release. Summary The NVMe drive has changed the landscape of high-speed computing. Both the specification and technology have redefined access to NAND-based SSD media and have been updated to cater better to modern workloads. And although NVMe typically runs within a local machine, it isn't limited to it. Using the NVMe over Fabrics technology, the NVMe can expand beyond that local server and across an entire high-speed network. Resources
• nvme-cli Utility on GitHub • NVM Express
26
Data in a Flash, Part III: NVMe over Fabrics Using TCP Originally published in the June 2019 issue of Linux Journal and again, on www.linuxjournal.com on June 10, 2019. A remote NVMe block device exported via an NVMe over Fabrics network using TCP. Version 5.0 of the Linux kernel brought with it many wonderful features, one of which was the introduction of NVMe over Fabrics (NVMeoF) across native TCP. If you recall, in the previous part to this series ("Data in a Flash, Part II: Using NVMe Drives and Creating an NVMe over Fabrics Network", I explained how to enable your NVMe network across RDMA (an Infiniband protocol) through a little method referred to as RDMA over Converged Ethernet (RoCE). As the name implies, it allows for the transfer of RDMA across a traditional Ethernet network. And although this works well, it introduces a bit of overhead (along with latencies). So when the 5.0 kernel introduced native TCP support for NVMe targets, it simplifies the method or procedure one needs to take to configure the same network, as shown in my last article, and it also makes accessing the remote NVMe drive faster.
27
Software Requirements To continue with this tutorial, you'll need to have a 5.0 Linux kernel or later installed, with the following modules built and inserted into the operating systems of both your initiator (the server importing the remote NVMe volume) and the target (the server exporting its local NVMe volume):
# NVME Support
CONFIG_NVME_CORE=y
CONFIG_BLK_DEV_NVME=y
# CONFIG_NVME_MULTIPATH is not set
CONFIG_NVME_FABRICS=m
CONFIG_NVME_RDMA=m
# CONFIG_NVME_FC is not set
CONFIG_NVME_TCP=m
CONFIG_NVME_TARGET=m
CONFIG_NVME_TARGET_LOOP=m
CONFIG_NVME_TARGET_RDMA=m
# CONFIG_NVME_TARGET_FC is not set
CONFIG_NVME_TARGET_TCP=m
More specifically, you need the module to import the remote NVMe volume:
CONFIG_NVME_TCP=m
And the module to export a local NVMe volume:
CONFIG_NVME_TARGET_TCP=m
Before continuing, make sure your physical (or virtual) machine is up to date. And once you verify that to be the case, make sure you are able to see all locally connected NVMe devices (which you'll export across your network):
$ cat /proc/partitions |grep -e nvme -e major
major minor #blocks name
28
259 0 3907018584 nvme2n1
259 1 3907018584 nvme3n1
259 2 3907018584 nvme0n1
259 3 3907018584 nvme1n1
If you don't see any connected NVMe devices, make sure the kernel module is loaded:
petros@ubu-nvme1:~$ lsmod|grep nvme
nvme 32768 0
nvme_core 61440 1 nvme
The following modules need to be loaded on the initiator:
$ sudo modprobe nvme
$ sudo modprobe nvme-tcp
And, the following modules need to be loaded on the target:
$ sudo modprobe nvmet
$ sudo modprobe nvmet-tcp
Next, you'll install the drive management utility called nvme-cli. This utility is defined and maintained by the very same NVM Express committee that has defined the NVMe specification. You can find the GitHub repository hosting the source code here. A recent build is needed. Clone the source code from the GitHub repository. Build and install it:
$ make
$ make install
Accessing the Drive across a Network over TCP The purpose of this section is to leverage the high-speed SSD technology and expand it beyond the local server. An NVMe does not have to be limited to the server it is physically plugged in to. In this example, and for the sake of convenience, I'm using two virtual machines to create this network. There
29
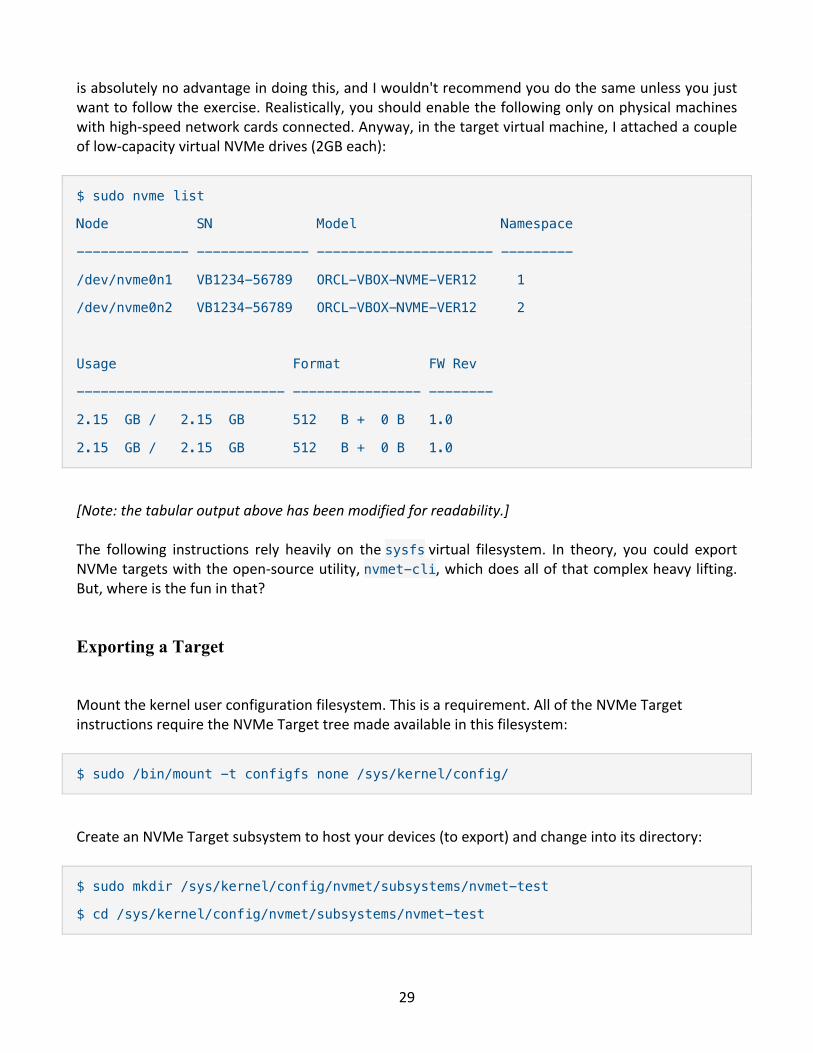
is absolutely no advantage in doing this, and I wouldn't recommend you do the same unless you just want to follow the exercise. Realistically, you should enable the following only on physical machines with high-speed network cards connected. Anyway, in the target virtual machine, I attached a couple of low-capacity virtual NVMe drives (2GB each):
$ sudo nvme list
Node SN Model Namespace
-------------- -------------- ---------------------- ---------
/dev/nvme0n1 VB1234-56789 ORCL-VBOX-NVME-VER12 1
/dev/nvme0n2 VB1234-56789 ORCL-VBOX-NVME-VER12 2
Usage Format FW Rev
-------------------------- ---------------- --------
2.15 GB / 2.15 GB 512 B + 0 B 1.0
2.15 GB / 2.15 GB 512 B + 0 B 1.0
[Note: the tabular output above has been modified for readability.] The following instructions rely heavily on the sysfs virtual filesystem. In theory, you could export NVMe targets with the open-source utility, nvmet-cli, which does all of that complex heavy lifting. But, where is the fun in that?
Exporting a Target
Mount the kernel user configuration filesystem. This is a requirement. All of the NVMe Target instructions require the NVMe Target tree made available in this filesystem:
$ sudo /bin/mount -t configfs none /sys/kernel/config/
Create an NVMe Target subsystem to host your devices (to export) and change into its directory:
$ sudo mkdir /sys/kernel/config/nvmet/subsystems/nvmet-test
$ cd /sys/kernel/config/nvmet/subsystems/nvmet-test

30
This example will simplify host connections by leaving the newly created subsystem accessible to any and every host attempting to connect to it. In a production environment, you definitely should lock this down to specific host machines by their NQN:
$ echo 1 |sudo tee -a attr_allow_any_host > /dev/null
When a target is exported, it is done so with a "unique" NVMe Qualified Name (NQN). The concept is very similar to the iSCSI Qualified Name (IQN). This NQN is what enables other operating systems to import and use the remote NVMe device across a network potentially hosting multiple NVMe devices. Define a subsystem namespace and change into its directory:
$ sudo mkdir namespaces/1
$ cd namespaces/1/
Set a local NVMe device to the newly created namespace:
$ echo -n /dev/nvme0n1 |sudo tee -a device_path > /dev/null
And enable the namespace:
$ echo 1|sudo tee -a enable > /dev/null
Now, you'll create an NVMe Target port to export the newly created subsystem and change into its directory path:
$ sudo mkdir /sys/kernel/config/nvmet/ports/1
$ cd /sys/kernel/config/nvmet/ports/1
Well, you'll use the IP address of your preferred Ethernet interface port when exporting your subsystem (for example, eth0):
$ echo 192.168.1.92 |sudo tee -a addr_traddr > /dev/null
31
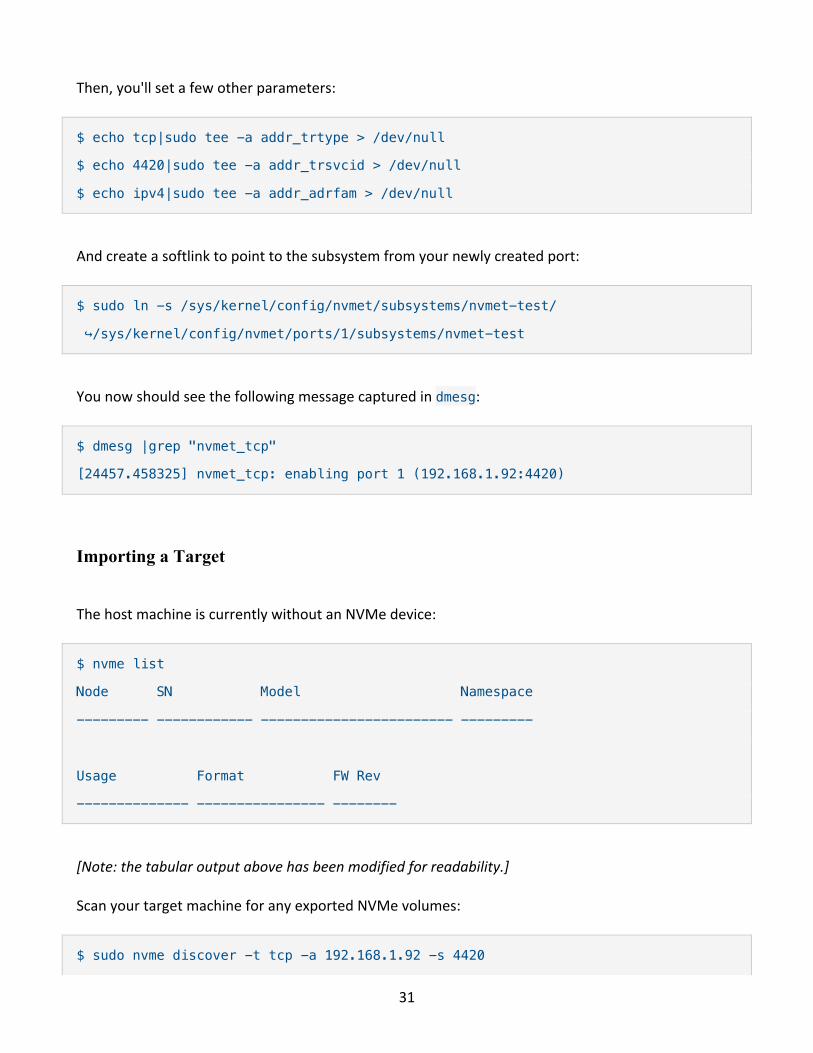
Then, you'll set a few other parameters:
$ echo tcp|sudo tee -a addr_trtype > /dev/null
$ echo 4420|sudo tee -a addr_trsvcid > /dev/null
$ echo ipv4|sudo tee -a addr_adrfam > /dev/null
And create a softlink to point to the subsystem from your newly created port:
$ sudo ln -s /sys/kernel/config/nvmet/subsystems/nvmet-test/
↪/sys/kernel/config/nvmet/ports/1/subsystems/nvmet-test
You now should see the following message captured in dmesg:
$ dmesg |grep "nvmet_tcp"
[24457.458325] nvmet_tcp: enabling port 1 (192.168.1.92:4420)
Importing a Target
The host machine is currently without an NVMe device:
$ nvme list
Node SN Model Namespace
--------- ------------ ------------------------ ---------
Usage Format FW Rev
-------------- ---------------- --------
[Note: the tabular output above has been modified for readability.] Scan your target machine for any exported NVMe volumes:
$ sudo nvme discover -t tcp -a 192.168.1.92 -s 4420
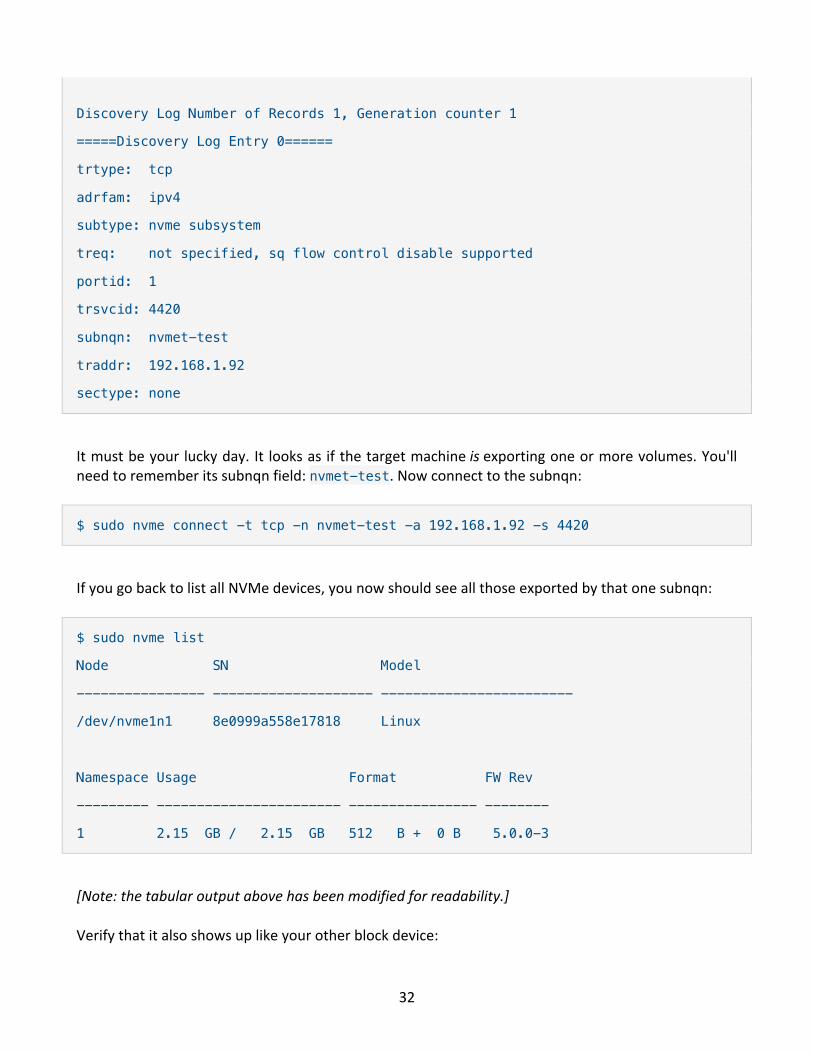
32
Discovery Log Number of Records 1, Generation counter 1
=====Discovery Log Entry 0======
trtype: tcp
adrfam: ipv4
subtype: nvme subsystem
treq: not specified, sq flow control disable supported
portid: 1
trsvcid: 4420
subnqn: nvmet-test
traddr: 192.168.1.92
sectype: none
It must be your lucky day. It looks as if the target machine is exporting one or more volumes. You'll need to remember its subnqn field: nvmet-test. Now connect to the subnqn:
$ sudo nvme connect -t tcp -n nvmet-test -a 192.168.1.92 -s 4420
If you go back to list all NVMe devices, you now should see all those exported by that one subnqn:
$ sudo nvme list
Node SN Model
---------------- -------------------- ------------------------
/dev/nvme1n1 8e0999a558e17818 Linux
Namespace Usage Format FW Rev
--------- ----------------------- ---------------- --------
1 2.15 GB / 2.15 GB 512 B + 0 B 5.0.0-3
[Note: the tabular output above has been modified for readability.] Verify that it also shows up like your other block device:
33
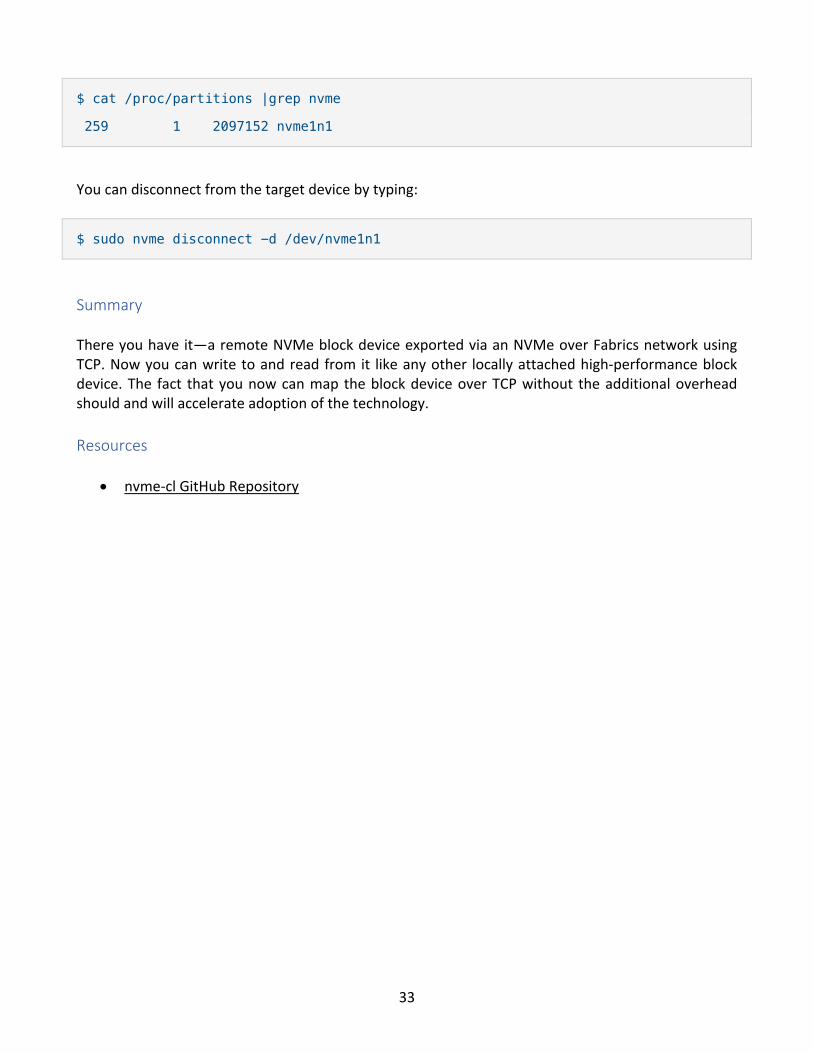
$ cat /proc/partitions |grep nvme
259 1 2097152 nvme1n1
You can disconnect from the target device by typing:
$ sudo nvme disconnect -d /dev/nvme1n1
Summary There you have it—a remote NVMe block device exported via an NVMe over Fabrics network using TCP. Now you can write to and read from it like any other locally attached high-performance block device. The fact that you now can map the block device over TCP without the additional overhead should and will accelerate adoption of the technology. Resources
• nvme-cl GitHub Repository
34
Data in a Flash, Part IV: the Future of Memory Technologies Originally published on www.linuxjournal.com on July 19, 2019. I have spent the first three parts of this series describing the evolution and current state of Flash storage. I also described how to configure an NVMe over Fabric (NVMeoF) storage network to export NVMe volumes across RDMA over Converged Ethernet (RoCE) and again over native TCP. [See Petros' "Data in a Flash, Part I: the Evolution of Disk Storage and an Introduction to NVMe", "Data in a Flash, Part II: Using NVMe Drives and Creating an NVMe over Fabrics Network" and "Data in a Flash, Part III: NVMe over Fabrics Using TCP".] But what does the future of memory technologies look like? With traditional Flash technologies that are enabled via NVMe, you should continue to expect higher capacities. For instance, what comes after QLC or Quad-Level Cells NAND technology? Only time will tell. The next-generation NVMe specification will introduce a protocol standard operating across more PCI Express lanes and at a higher bandwidth. As memory technologies continue to evolve, the method in which you plug that technology into your computers will evolve with it.
35
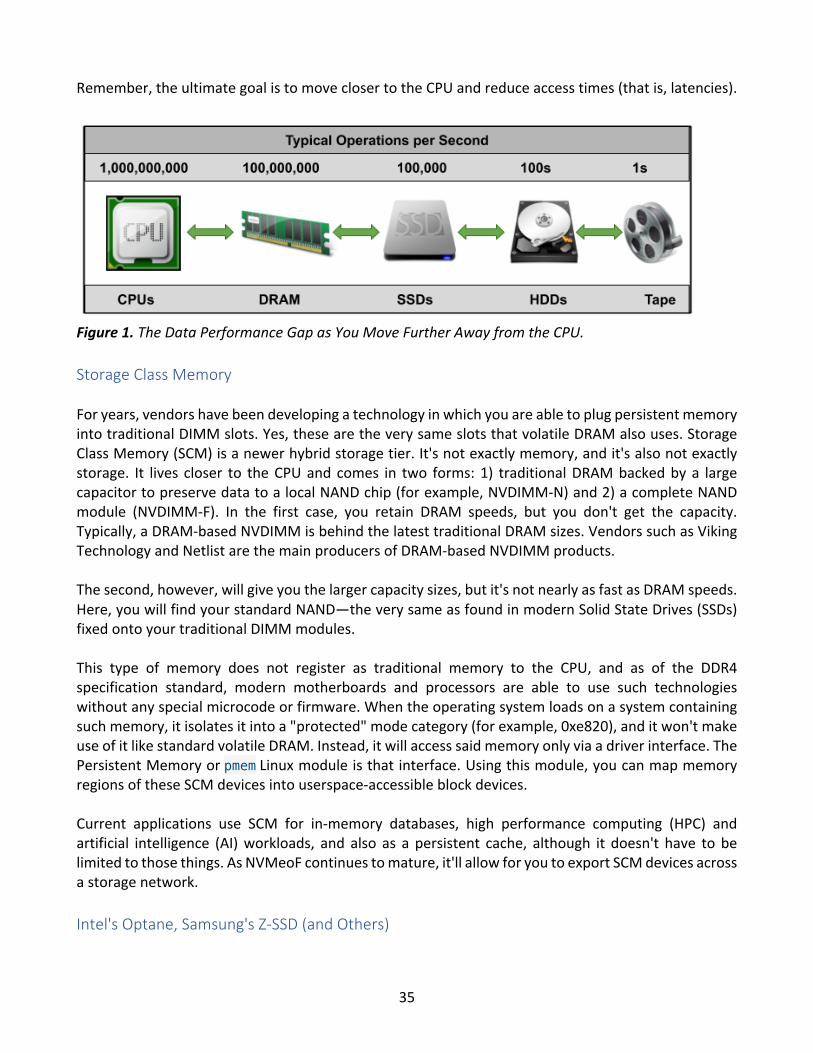
Remember, the ultimate goal is to move closer to the CPU and reduce access times (that is, latencies).
Figure 1. The Data Performance Gap as You Move Further Away from the CPU. Storage Class Memory For years, vendors have been developing a technology in which you are able to plug persistent memory into traditional DIMM slots. Yes, these are the very same slots that volatile DRAM also uses. Storage Class Memory (SCM) is a newer hybrid storage tier. It's not exactly memory, and it's also not exactly storage. It lives closer to the CPU and comes in two forms: 1) traditional DRAM backed by a large capacitor to preserve data to a local NAND chip (for example, NVDIMM-N) and 2) a complete NAND module (NVDIMM-F). In the first case, you retain DRAM speeds, but you don't get the capacity. Typically, a DRAM-based NVDIMM is behind the latest traditional DRAM sizes. Vendors such as Viking Technology and Netlist are the main producers of DRAM-based NVDIMM products. The second, however, will give you the larger capacity sizes, but it's not nearly as fast as DRAM speeds. Here, you will find your standard NAND—the very same as found in modern Solid State Drives (SSDs) fixed onto your traditional DIMM modules. This type of memory does not register as traditional memory to the CPU, and as of the DDR4 specification standard, modern motherboards and processors are able to use such technologies without any special microcode or firmware. When the operating system loads on a system containing such memory, it isolates it into a "protected" mode category (for example, 0xe820), and it won't make use of it like standard volatile DRAM. Instead, it will access said memory only via a driver interface. The Persistent Memory or pmem Linux module is that interface. Using this module, you can map memory regions of these SCM devices into userspace-accessible block devices. Current applications use SCM for in-memory databases, high performance computing (HPC) and artificial intelligence (AI) workloads, and also as a persistent cache, although it doesn't have to be limited to those things. As NVMeoF continues to mature, it'll allow for you to export SCM devices across a storage network. Intel's Optane, Samsung's Z-SSD (and Others)

36
Somewhere in between DRAM and traditional SSD are emerging technologies such as Intel's Optane (originally built in collaboration with Micron and named 3D-XPoint) and Samsung's Z-SSD. These technologies are very new, and not much is known about them except for the fact that they're neither DRAM nor NAND. In the case of Intel's Optane, it's a new persistent memory technology, and it's believed that it relies on Phase-Change Memory (PCM). Optane performs better than NAND but not nearly as well as DRAM. Another advantage is that it has better endurance or cell life than NAND—that is, it's capable of more drive writes per day (DWPD) than your standard NAND SSD. Computational Storage Often, the latency introduced between an application and the data it needs to access is too long, or the CPU cycles required to host that application consume too many resources on the host machine, introducing additional latencies to the drive itself. What does one do to avoid such negative impacts? Instead, one moves the application to the physical drive itself. This is a more recent emerging trend, and it's referred to as Computational Storage. Standing at the forefront of said technology are NGD Systems, ScaleFlux and even Samsung. So, what is Computational Storage? And, how is it implemented? The idea is to relocate data processing into the data storage layer and avoid moving the data into the computer's main memory (originally to be processed by the host CPU). Think about it. On a traditional system, it takes resources to move data from where it is stored, process it and then move it back to the same storage target. The entire process will take time and will introduce access latencies—even more so if the host system is tending to other related (or unrelated) tasks. In addition, the larger the data set, the more time it will take to move in/out. To address this pain point, a few vendors have started to integrate an embedded microprocessor into the controller of their NVMe SSDs. The processor will run a standard operating system (such as Ubuntu Linux) and will allow a piece of software to run locally on that SSD for in situ computing. Today's Challenges What are the challenges that memory technologies face, preventing wider adoption, in today's market? The first is price per gigabyte. While a hard disk drive (HDD) costs $0.03–$0.06 per gigabyte, a NAND-based SSD is approximately $0.13–$0.15 per gigabyte. In the grand scheme of things, that may not sound like much but at scale, but it makes a world of difference. Imagine trying to fill a data center with SSDs instead of HDDs. It will get expensive. Another category where HDD continues to outperform SSD technologies is in capacities across standard form factors. You can fit only so many terabytes of storage into your standard server. And, you can fit much more HDD storage than you can SSD. As memory technologies evolve, this will likely change in the coming years.
37
Another place where SSDs struggle is in the software application realm. Many software applications do not conform to the most optimal methods of which one needs to access NAND memory. These applications will both increase drive access latencies and reduce the cell life of the NAND. Summary As it relates to memory technologies, the future looks very promising and very exciting. Will the SSD completely replace the traditional spinning HDD? I doubt it. Look at tape technology. It's still around and continues to find a place in the archival storage space. The HDD most likely will have a similar fate. Although until then, the HDD will continue to compete with the SSD in both price and capacity.