Embed Size (px)
Citation preview
1
Creating Quizzes in D2L
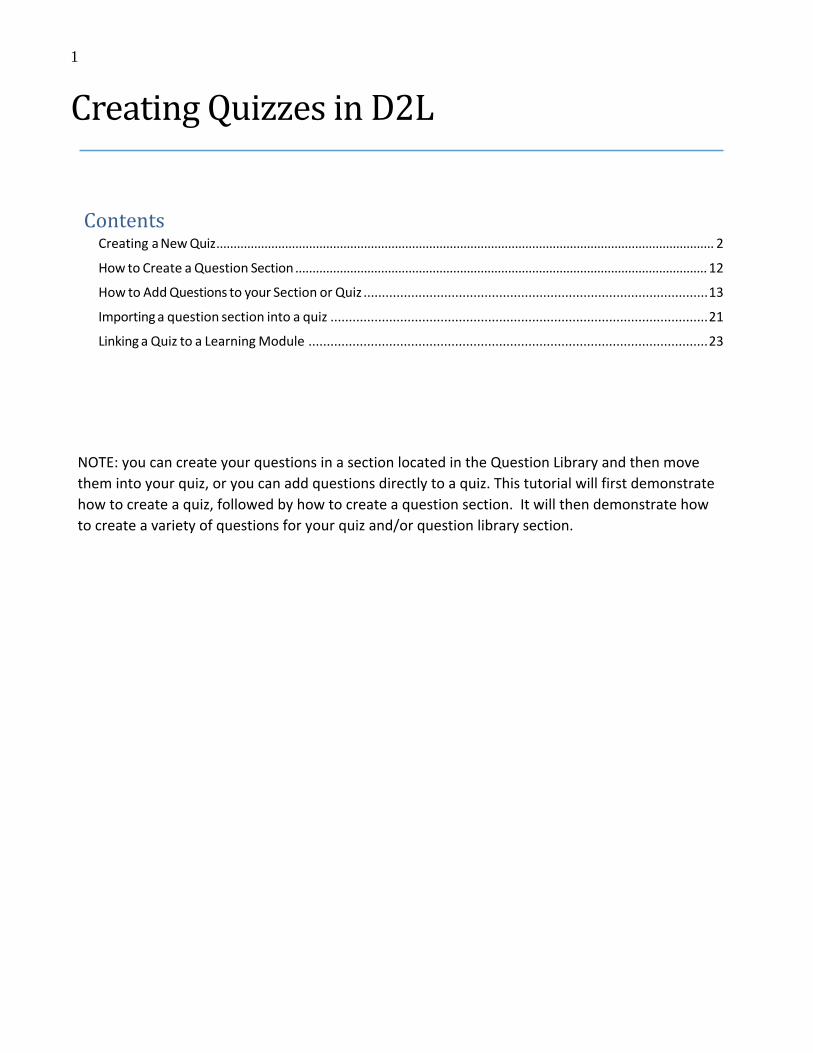
Contents
Creating a New Quiz ................................................................................................................................................. 2
How to Create a Question Section ........................................................................................................................ 12
How to Add Questions to your Section or Quiz .............................................................................................. 13
Importing a question section into a quiz ....................................................................................................... 21
Linking a Quiz to a Learning Module ............................................................................................................. 23
NOTE: you can create your questions in a section located in the Question Library and then move them into your quiz, or you can add questions directly to a quiz. This tutorial will first demonstrate how to create a quiz, followed by how to create a question section. It will then demonstrate how to create a variety of questions for your quiz and/or question library section.
2
Creating a New Quiz
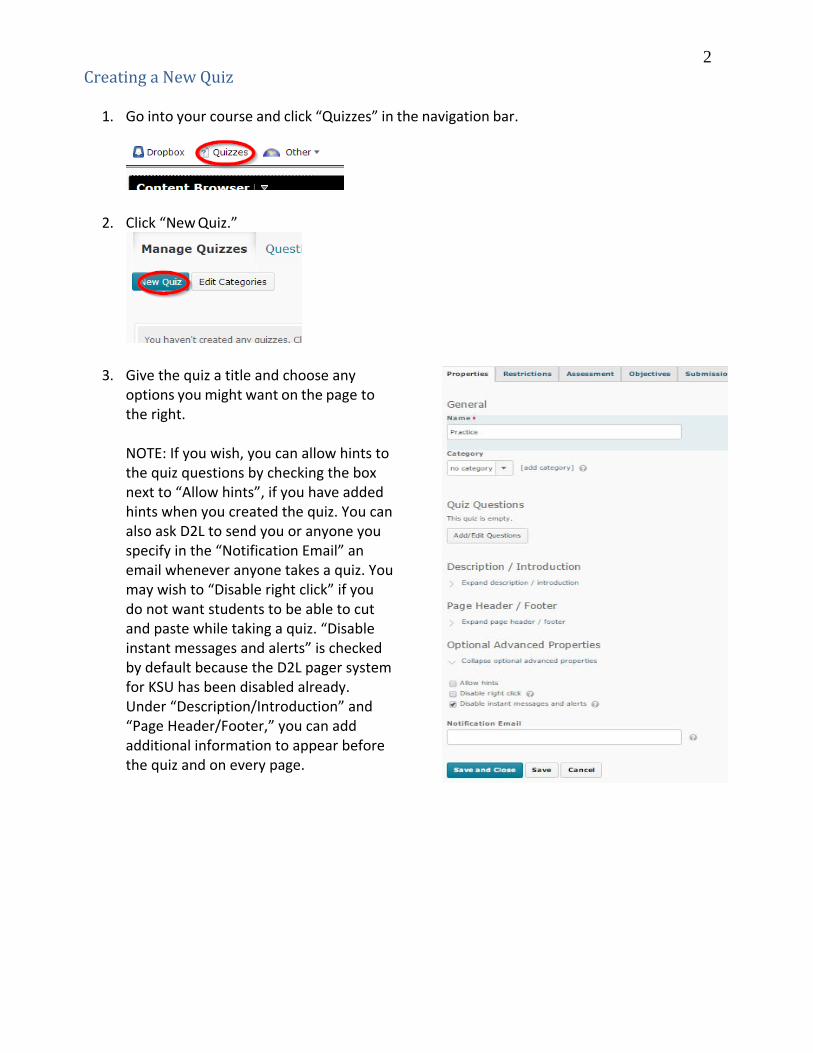
1. Go into your course and click “Quizzes” in the navigation bar.
2. Click “New Quiz.”
3. Give the quiz a title and choose any options you might want on the page to the right.
NOTE: If you wish, you can allow hints to the quiz questions by checking the box next to “Allow hints”, if you have added hints when you created the quiz. You can also ask D2L to send you or anyone you specify in the “Notification Email” an email whenever anyone takes a quiz. You may wish to “Disable right click” if you do not want students to be able to cut and paste while taking a quiz. “Disable instant messages and alerts” is checked by default because the D2L pager system for KSU has been disabled already. Under “Description/Introduction” and “Page Header/Footer,” you can add additional information to appear before the quiz and on every page.
3
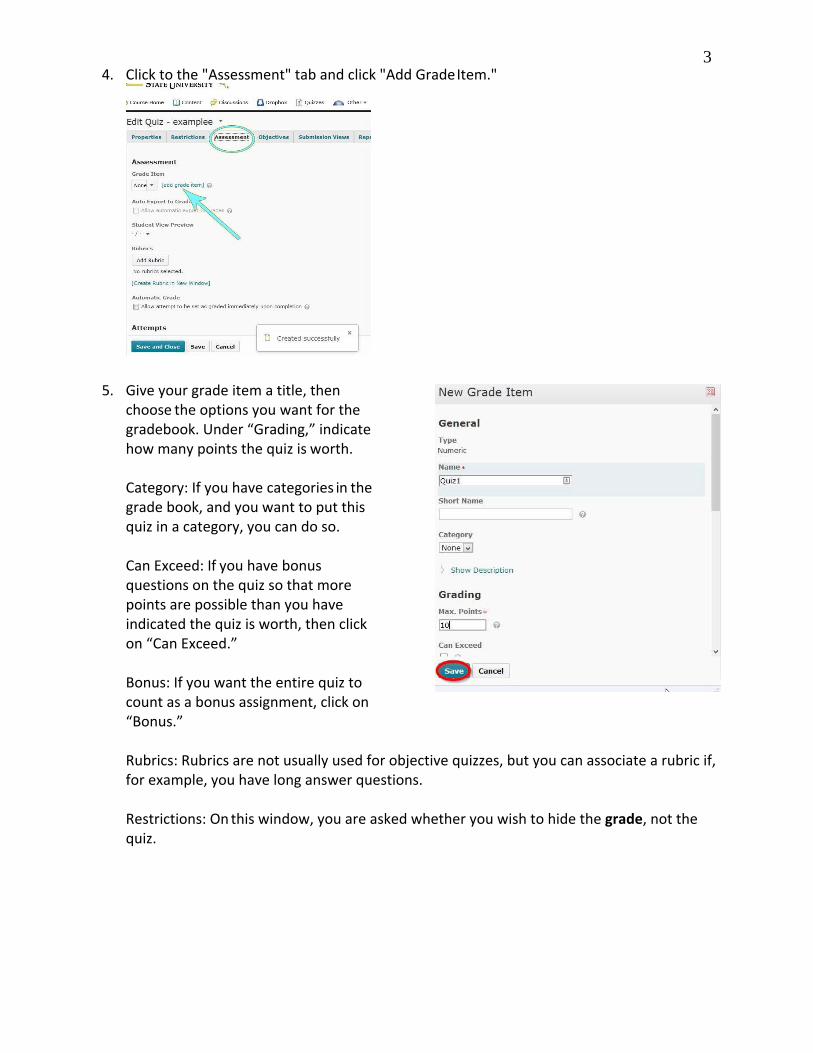
4. Click to the "Assessment" tab and click "Add Grade Item."
5. Give your grade item a title, then choose the options you want for the gradebook. Under “Grading,” indicate how many points the quiz is worth.
Category: If you have categories in the grade book, and you want to put this quiz in a category, you can do so. Can Exceed: If you have bonus questions on the quiz so that more points are possible than you have indicated the quiz is worth, then click on “Can Exceed.” Bonus: If you want the entire quiz to count as a bonus assignment, click on “Bonus.” Rubrics: Rubrics are not usually used for objective quizzes, but you can associate a rubric if, for example, you have long answer questions. Restrictions: On this window, you are asked whether you wish to hide the grade, not the quiz.
4
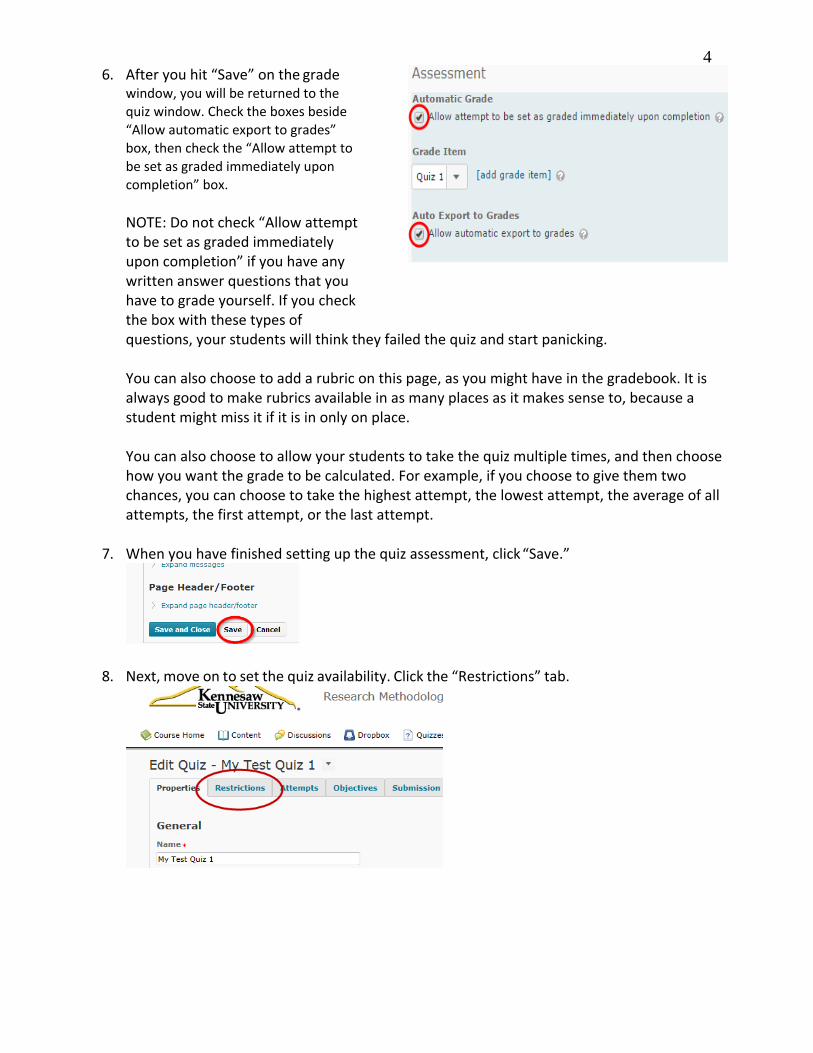
6. After you hit “Save” on the grade window, you will be returned to the quiz window. Check the boxes beside “Allow automatic export to grades” box, then check the “Allow attempt to be set as graded immediately upon completion” box.
NOTE: Do not check “Allow attempt to be set as graded immediately upon completion” if you have any written answer questions that you have to grade yourself. If you check the box with these types of questions, your students will think they failed the quiz and start panicking.
You can also choose to add a rubric on this page, as you might have in the gradebook. It is always good to make rubrics available in as many places as it makes sense to, because a student might miss it if it is in only on place.
You can also choose to allow your students to take the quiz multiple times, and then choose how you want the grade to be calculated. For example, if you choose to give them two chances, you can choose to take the highest attempt, the lowest attempt, the average of all attempts, the first attempt, or the last attempt.
7. When you have finished setting up the quiz assessment, click “Save.”
8. Next, move on to set the quiz availability. Click the “Restrictions” tab.
5
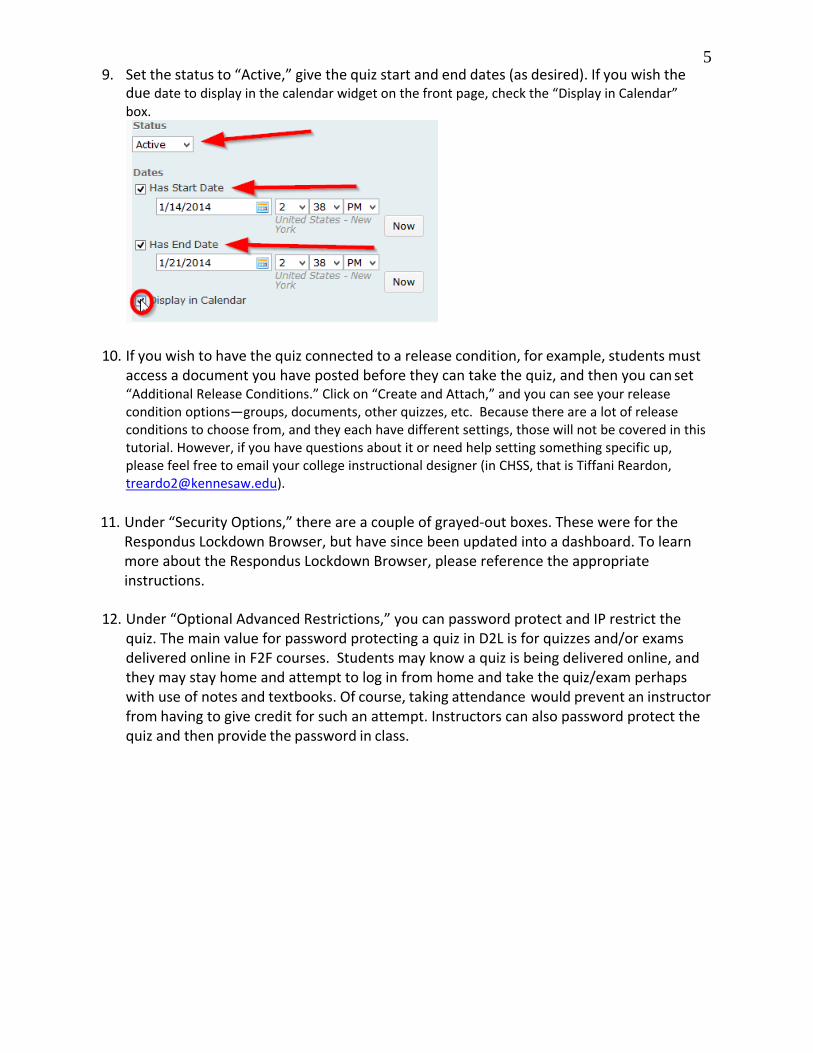
9. Set the status to “Active,” give the quiz start and end dates (as desired). If you wish the due date to display in the calendar widget on the front page, check the “Display in Calendar” box.
10. If you wish to have the quiz connected to a release condition, for example, students must access a document you have posted before they can take the quiz, and then you can set “Additional Release Conditions.” Click on “Create and Attach,” and you can see your release condition options—groups, documents, other quizzes, etc. Because there are a lot of release conditions to choose from, and they each have different settings, those will not be covered in this tutorial. However, if you have questions about it or need help setting something specific up, please feel free to email your college instructional designer (in CHSS, that is Tiffani Reardon, [email protected]).
11. Under “Security Options,” there are a couple of grayed-out boxes. These were for the
Respondus Lockdown Browser, but have since been updated into a dashboard. To learn more about the Respondus Lockdown Browser, please reference the appropriate instructions.
12. Under “Optional Advanced Restrictions,” you can password protect and IP restrict the quiz. The main value for password protecting a quiz in D2L is for quizzes and/or exams delivered online in F2F courses. Students may know a quiz is being delivered online, and they may stay home and attempt to log in from home and take the quiz/exam perhaps with use of notes and textbooks. Of course, taking attendance would prevent an instructor from having to give credit for such an attempt. Instructors can also password protect the quiz and then provide the password in class.
6
13. Under Timing, select “Enforce a time limit” to give the quiz a time limit. If you want the quiz to stop when time is up and force the student to submit, click “Quiz is flagged as late, and student is prevented from making any further changes,” and give a Grace Period (the lowest you can go is 1 minute).
If you choose “Quiz is flagged as late, but student can continue working,” then users can always submit their quizzes no matter how much time is elapsed. You will have to look at the quiz records individually to see who exceeded the time allowed. If you choose “Quiz is flagged as late, but student can continue working. Quiz will be automatically scored as zero after the specified limit,” then students will be able to work as long as they want, but if they go past the time limit then they get an automatic zero on the quiz. The most common choice here is “Quiz is flagged as late, and student is prevented from making any further changes.”
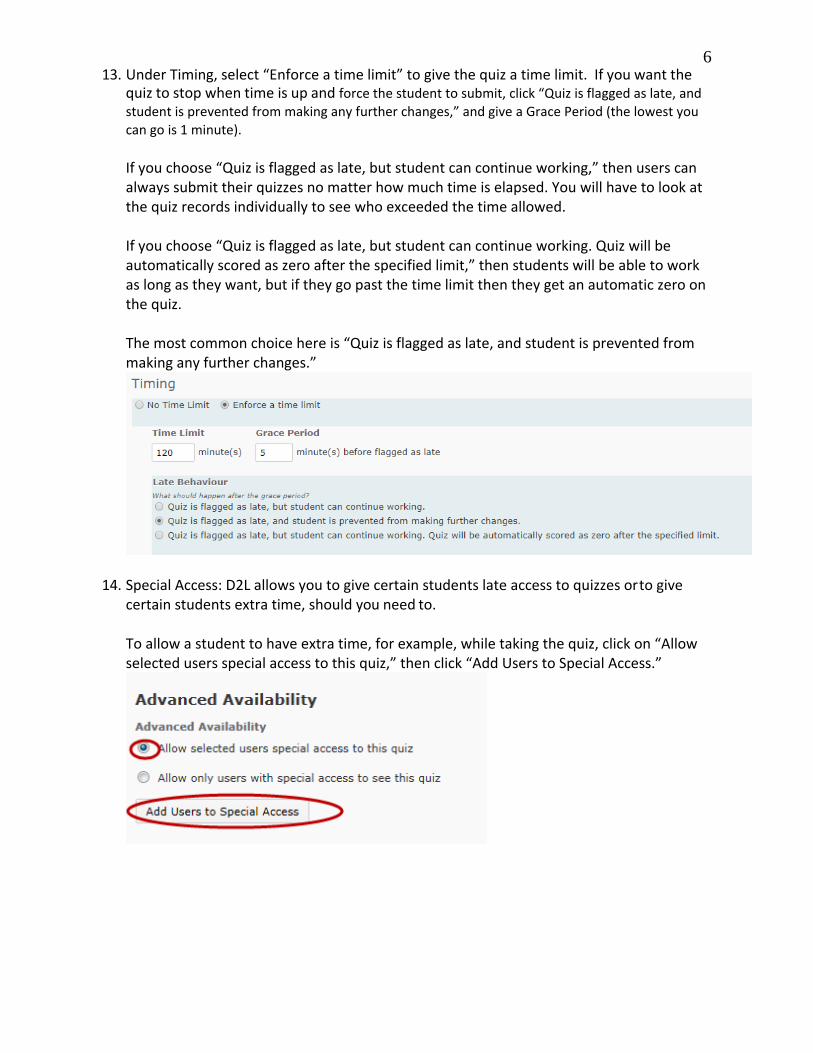
14. Special Access: D2L allows you to give certain students late access to quizzes or to give certain students extra time, should you need to.
To allow a student to have extra time, for example, while taking the quiz, click on “Allow selected users special access to this quiz,” then click “Add Users to Special Access.”
7
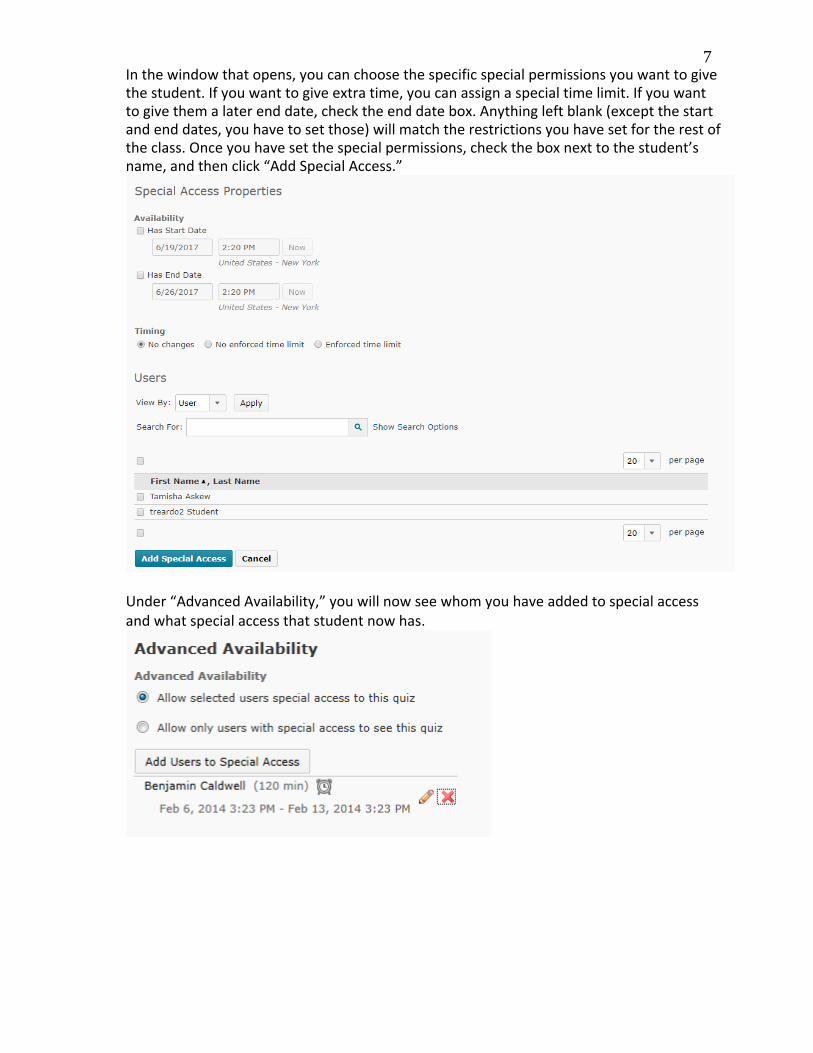
In the window that opens, you can choose the specific special permissions you want to give the student. If you want to give extra time, you can assign a special time limit. If you want to give them a later end date, check the end date box. Anything left blank (except the start and end dates, you have to set those) will match the restrictions you have set for the rest of the class. Once you have set the special permissions, check the box next to the student’s name, and then click “Add Special Access.”
Under “Advanced Availability,” you will now see whom you have added to special access and what special access that student now has.
8
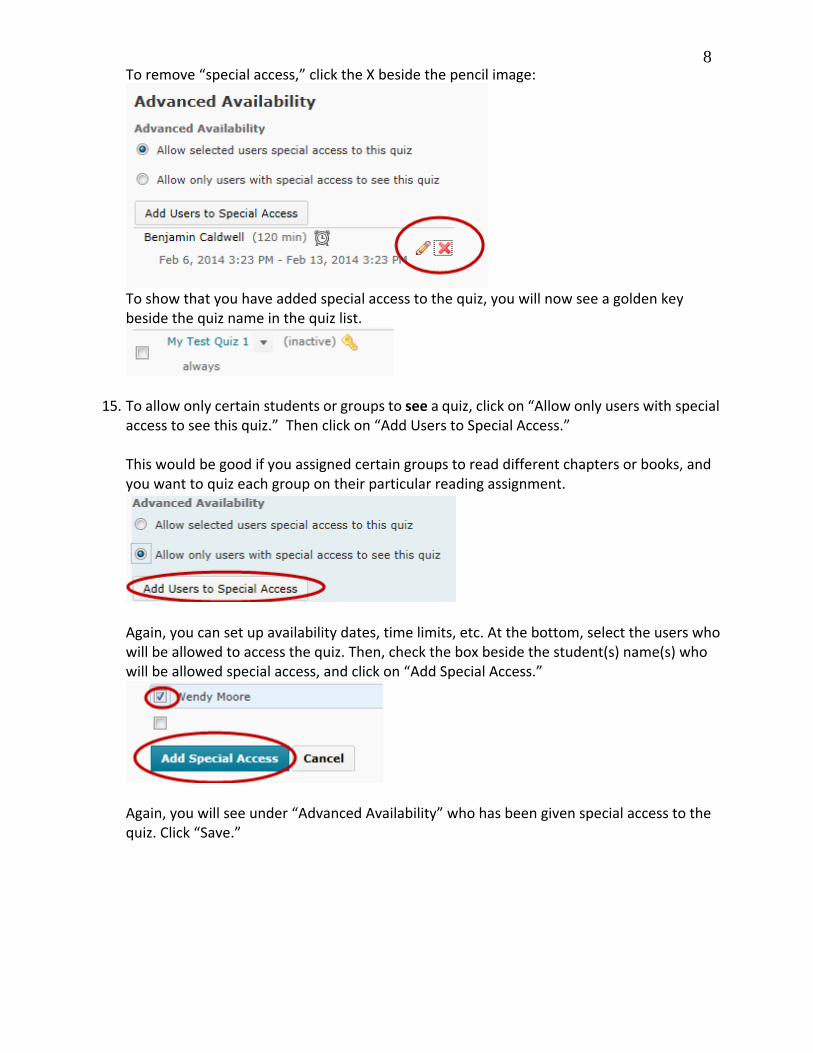
To remove “special access,” click the X beside the pencil image:
To show that you have added special access to the quiz, you will now see a golden key beside the quiz name in the quiz list.
15. To allow only certain students or groups to see a quiz, click on “Allow only users with special access to see this quiz.” Then click on “Add Users to Special Access.”
This would be good if you assigned certain groups to read different chapters or books, and you want to quiz each group on their particular reading assignment.
Again, you can set up availability dates, time limits, etc. At the bottom, select the users who will be allowed to access the quiz. Then, check the box beside the student(s) name(s) who will be allowed special access, and click on “Add Special Access.”
Again, you will see under “Advanced Availability” who has been given special access to the quiz. Click “Save.”
9
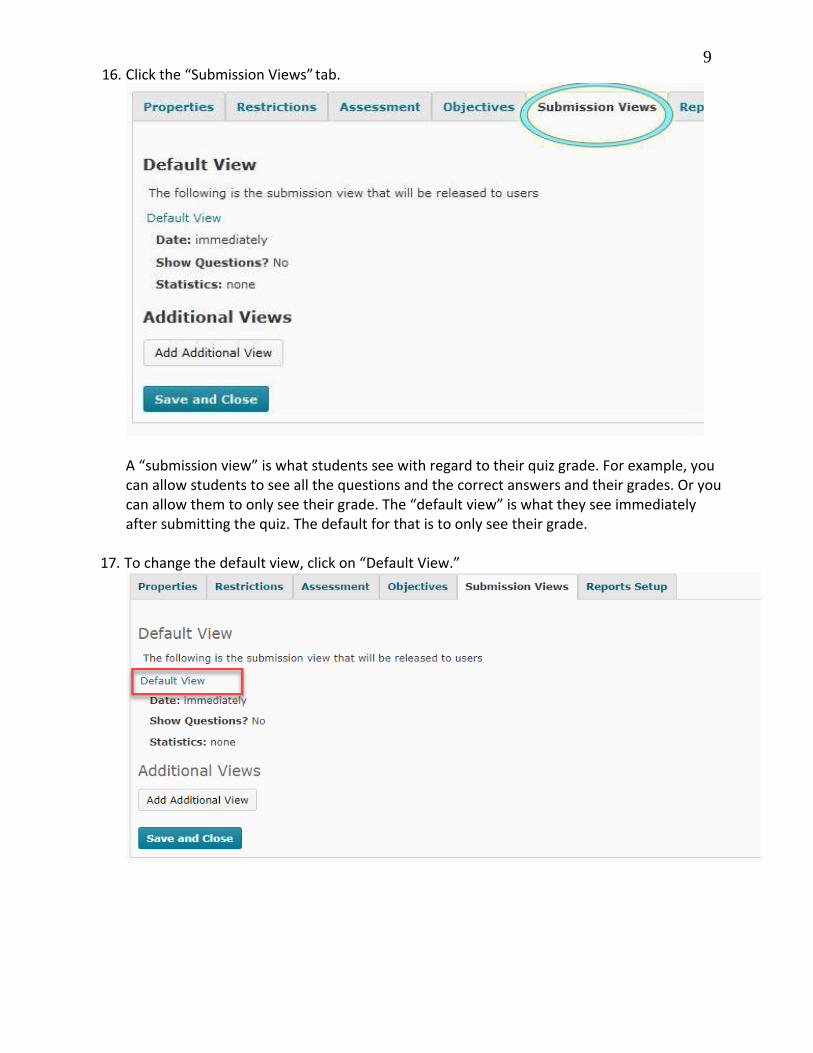
16. Click the “Submission Views” tab.
A “submission view” is what students see with regard to their quiz grade. For example, you can allow students to see all the questions and the correct answers and their grades. Or you can allow them to only see their grade. The “default view” is what they see immediately after submitting the quiz. The default for that is to only see their grade.
17. To change the default view, click on “Default View.”
10
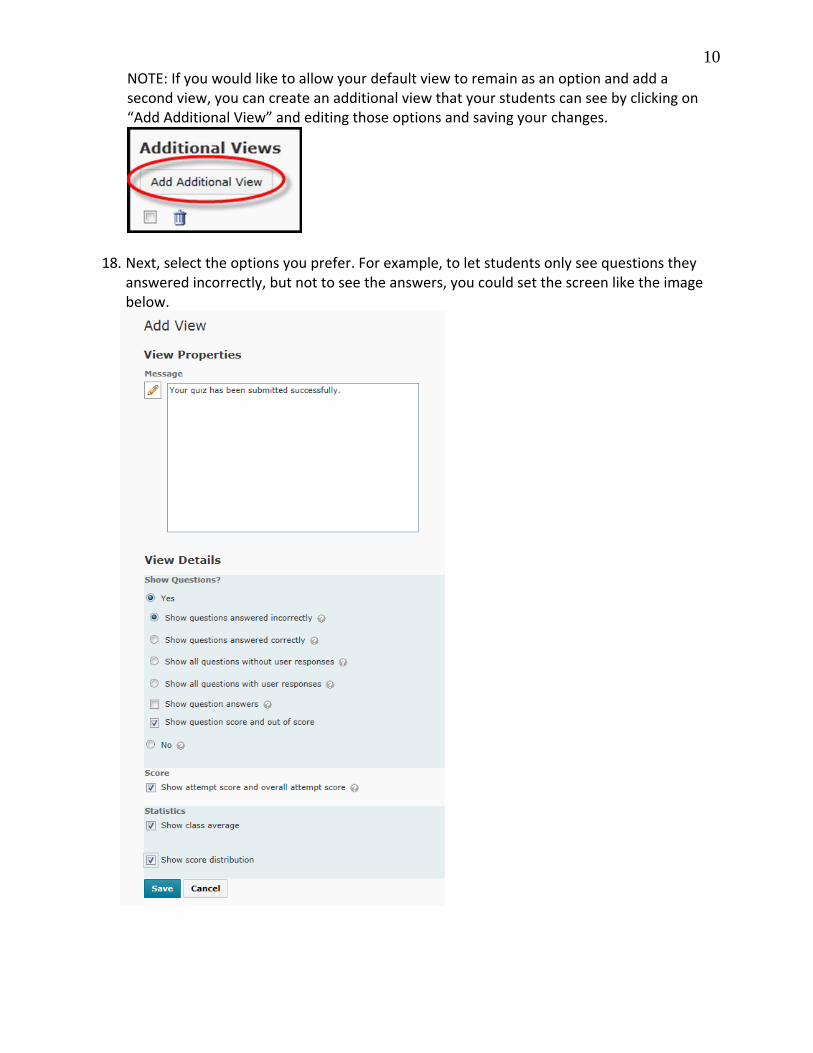
NOTE: If you would like to allow your default view to remain as an option and add a second view, you can create an additional view that your students can see by clicking on “Add Additional View” and editing those options and saving your changes.
18. Next, select the options you prefer. For example, to let students only see questions they
answered incorrectly, but not to see the answers, you could set the screen like the image below.
11
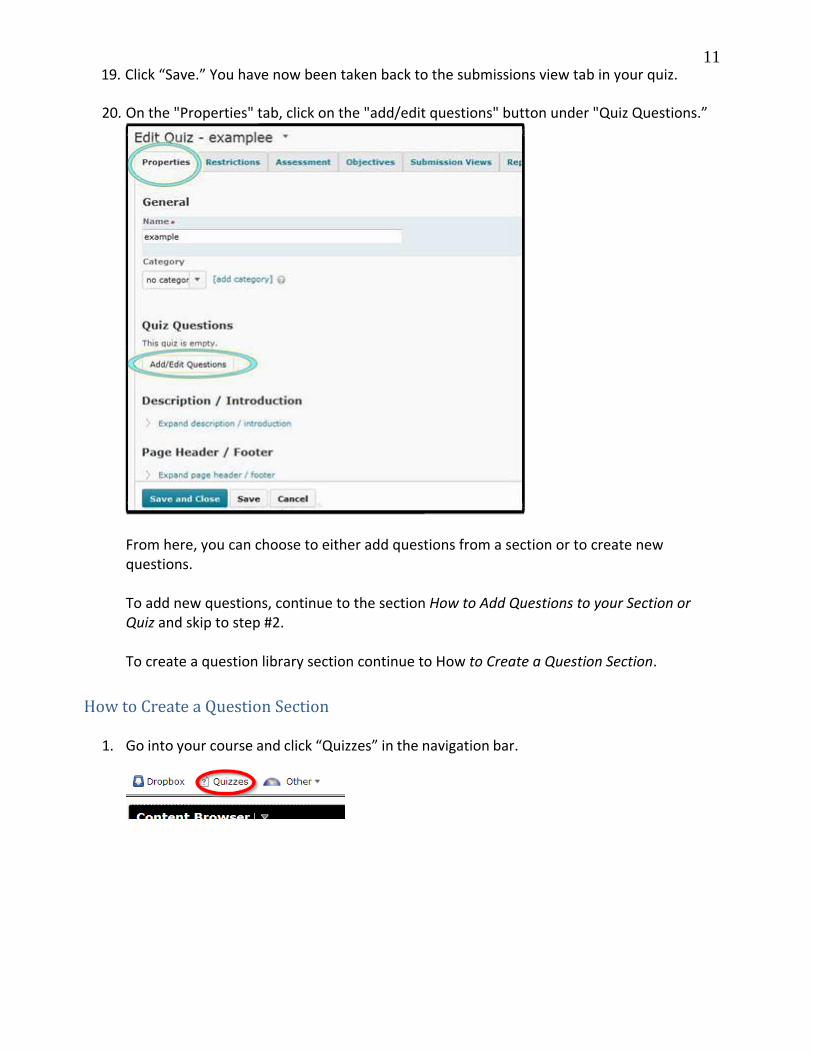
19. Click “Save.” You have now been taken back to the submissions view tab in your quiz.
20. On the "Properties" tab, click on the "add/edit questions" button under "Quiz Questions.”
From here, you can choose to either add questions from a section or to create new questions.
To add new questions, continue to the section How to Add Questions to your Section or Quiz and skip to step #2.
To create a question library section continue to How to Create a Question Section.
How to Create a Question Section
1. Go into your course and click “Quizzes” in the navigation bar.
12
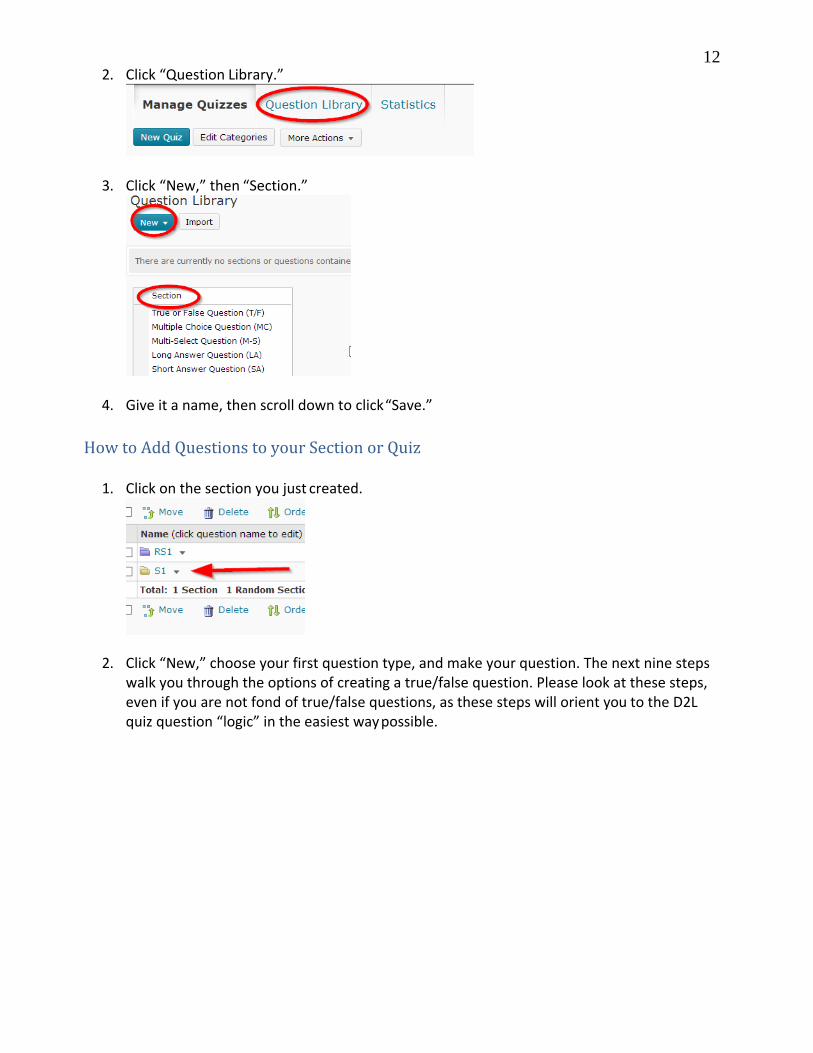
2. Click “Question Library.”
3. Click “New,” then “Section.”
4. Give it a name, then scroll down to click “Save.” How to Add Questions to your Section or Quiz
1. Click on the section you just created.
2. Click “New,” choose your first question type, and make your question. The next nine steps walk you through the options of creating a true/false question. Please look at these steps, even if you are not fond of true/false questions, as these steps will orient you to the D2L quiz question “logic” in the easiest way possible.
13
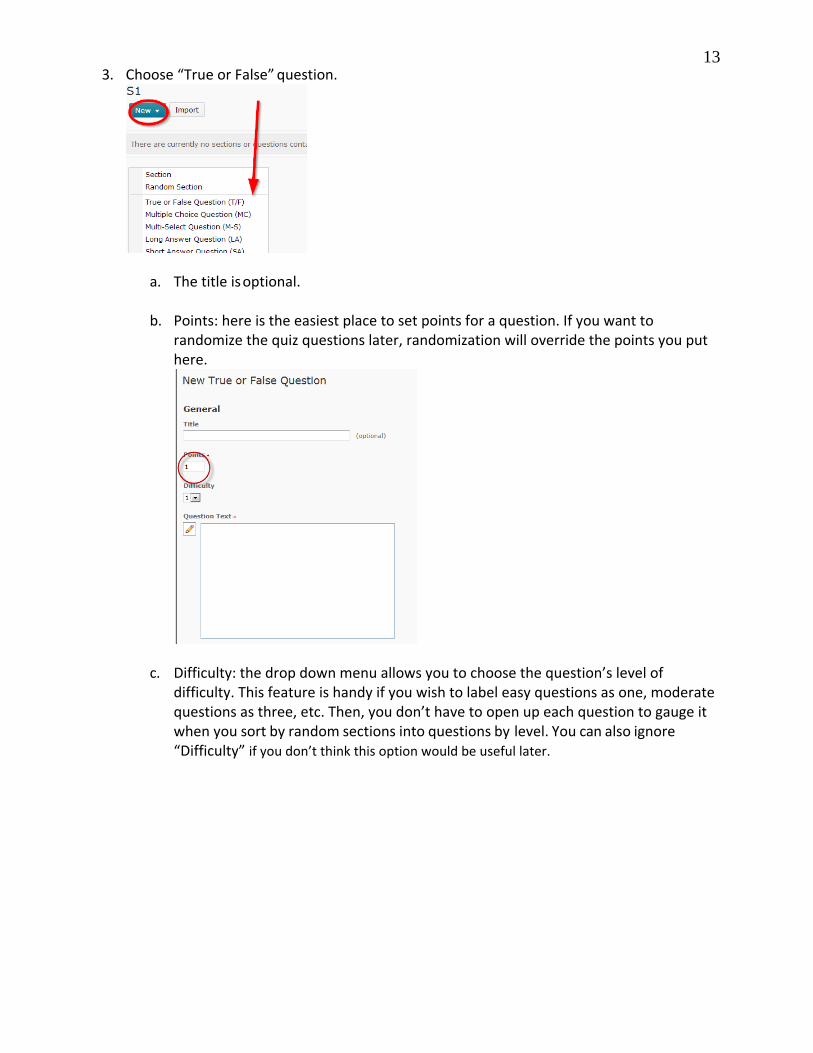
3. Choose “True or False” question.
a. The title is optional.
b. Points: here is the easiest place to set points for a question. If you want to randomize the quiz questions later, randomization will override the points you put here.
c. Difficulty: the drop down menu allows you to choose the question’s level of difficulty. This feature is handy if you wish to label easy questions as one, moderate questions as three, etc. Then, you don’t have to open up each question to gauge it when you sort by random sections into questions by level. You can also ignore “Difficulty” if you don’t think this option would be useful later.
14
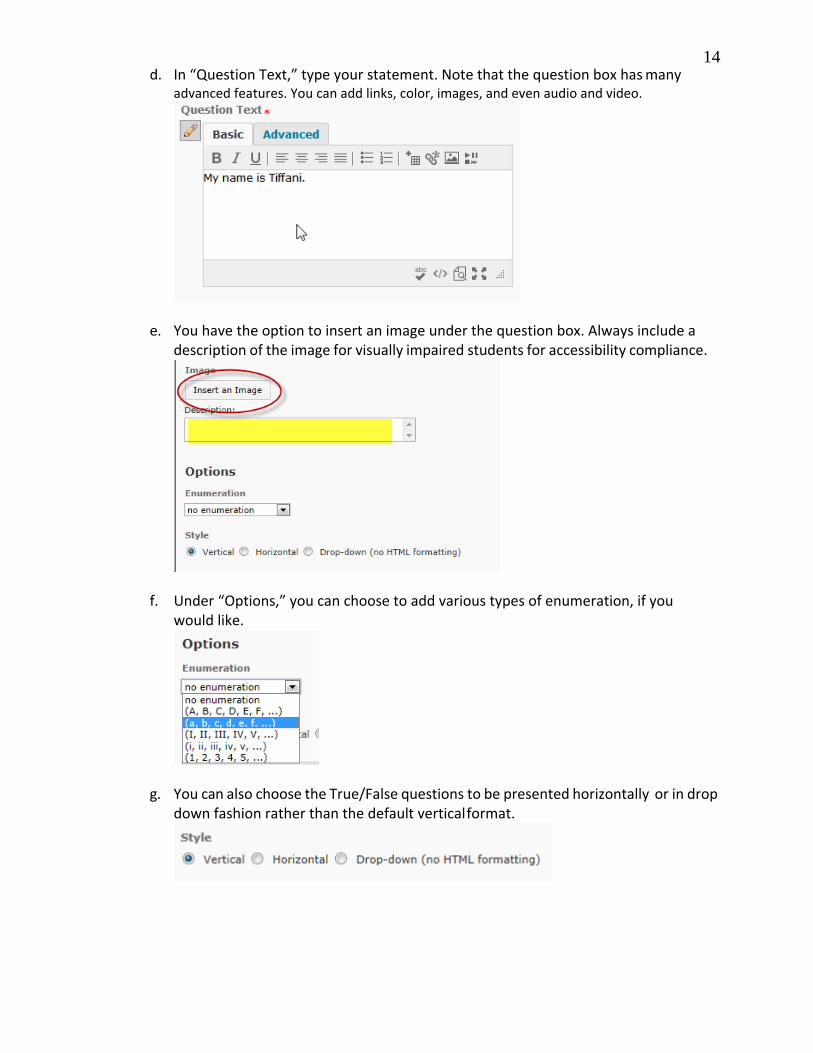
d. In “Question Text,” type your statement. Note that the question box has many advanced features. You can add links, color, images, and even audio and video.
e. You have the option to insert an image under the question box. Always include a description of the image for visually impaired students for accessibility compliance.
f. Under “Options,” you can choose to add various types of enumeration, if you would like.
g. You can also choose the True/False questions to be presented horizontally or in drop down fashion rather than the default vertical format.
15
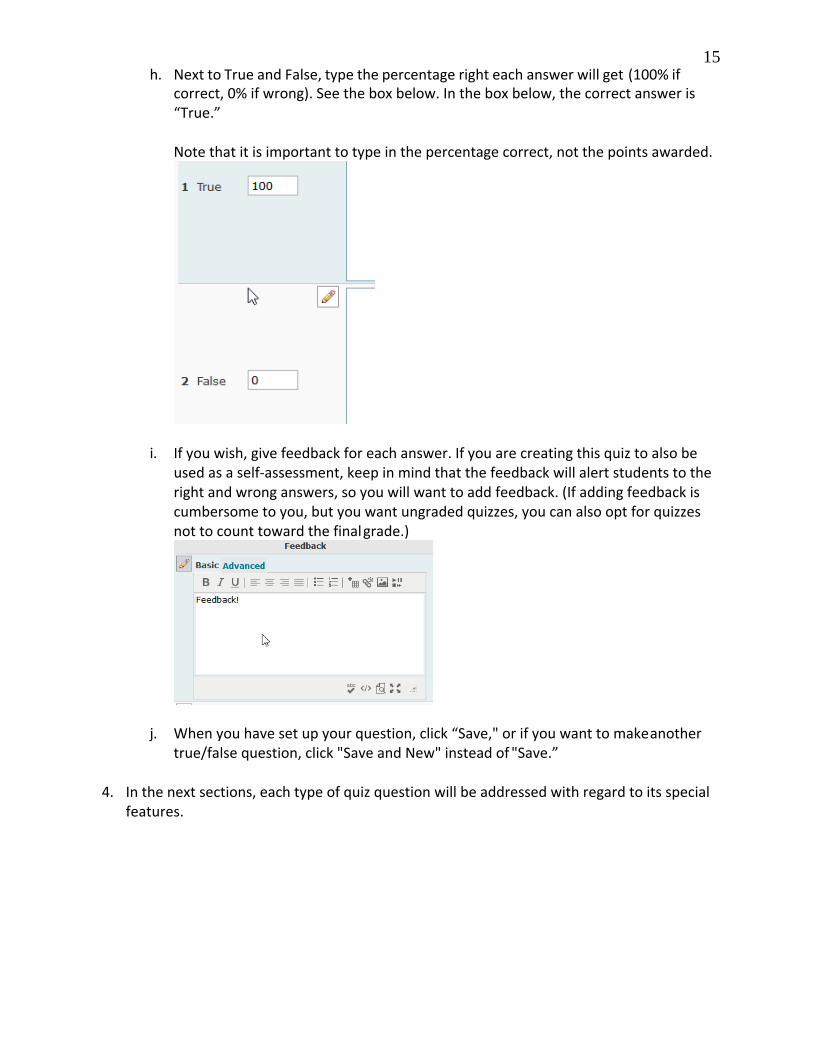
h. Next to True and False, type the percentage right each answer will get (100% if correct, 0% if wrong). See the box below. In the box below, the correct answer is “True.”
Note that it is important to type in the percentage correct, not the points awarded.
i. If you wish, give feedback for each answer. If you are creating this quiz to also be used as a self-assessment, keep in mind that the feedback will alert students to the right and wrong answers, so you will want to add feedback. (If adding feedback is cumbersome to you, but you want ungraded quizzes, you can also opt for quizzes not to count toward the final grade.)
j. When you have set up your question, click “Save," or if you want to make another true/false question, click "Save and New" instead of "Save.”
4. In the next sections, each type of quiz question will be addressed with regard to its special
features.
16
5. Multiple Choice: Important Features
a. Randomize options: check this box to have the answers to this question appear in a different order each time the question is presented. This option DOES NOT randomize the order of questions in the quiz. It simply randomizes the order of answers in this question.
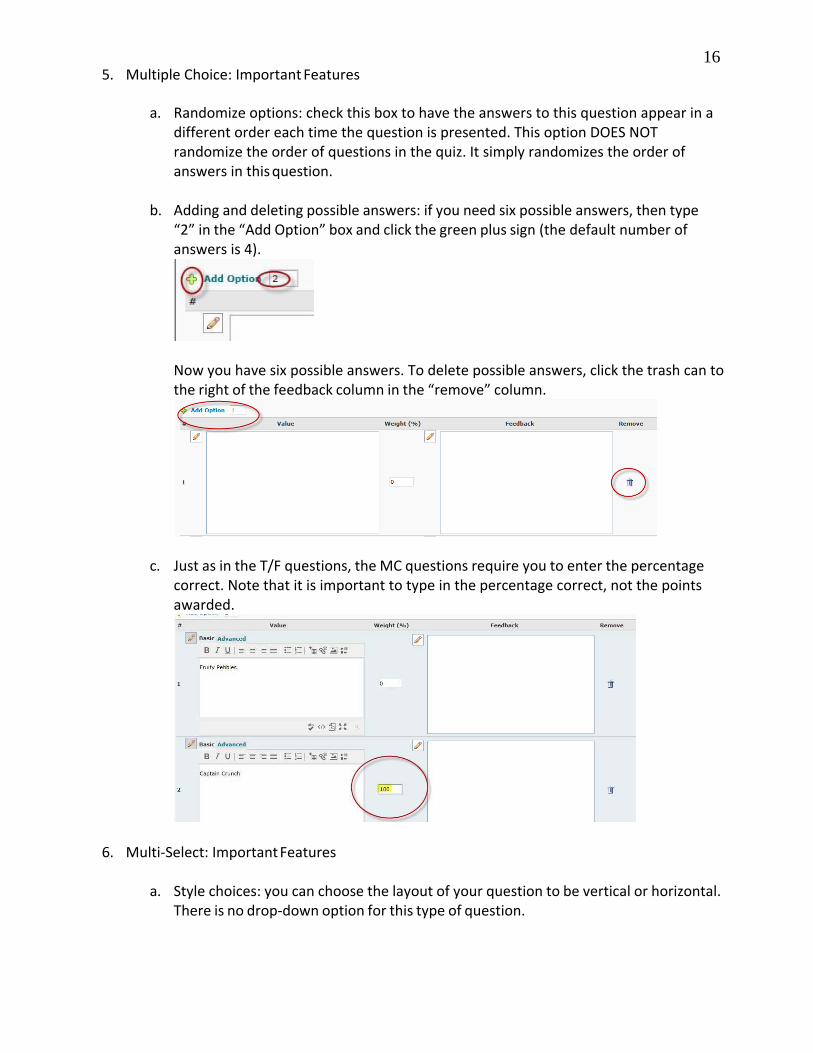
b. Adding and deleting possible answers: if you need six possible answers, then type
“2” in the “Add Option” box and click the green plus sign (the default number of answers is 4).
Now you have six possible answers. To delete possible answers, click the trash can to the right of the feedback column in the “remove” column.
c. Just as in the T/F questions, the MC questions require you to enter the percentage correct. Note that it is important to type in the percentage correct, not the points awarded.
6. Multi-Select: Important Features
a. Style choices: you can choose the layout of your question to be vertical or horizontal. There is no drop-down option for this type of question.
17
b. Grading choices: the multi-select question options allow you to choose whether you want students to be graded by which ones they got correct (correct answers), by whether they got all of them right (all or nothing), or by taking the number they got right and subtracting the number they got wrong (right minus wrong). For example, if you had ten matching questions and a student got seven correct, then under “correct answers,” the student would receive 7/10. Under “all or nothing,” the student would receive a zero. Under “right minus wrong,” the student would receive a 4/10.
c. Randomize options: check this box to randomize the answers. Note: this will not
randomize your questions, only the answers in this specific question.
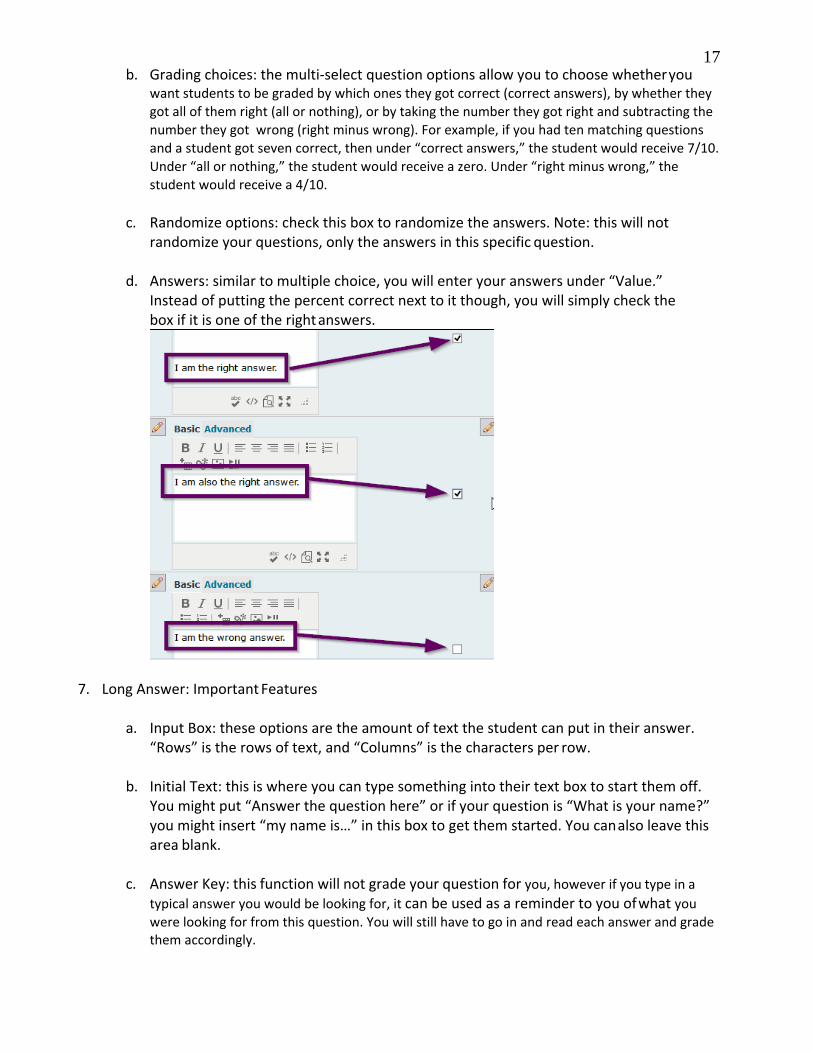
d. Answers: similar to multiple choice, you will enter your answers under “Value.” Instead of putting the percent correct next to it though, you will simply check the box if it is one of the right answers.
7. Long Answer: Important Features
a. Input Box: these options are the amount of text the student can put in their answer. “Rows” is the rows of text, and “Columns” is the characters per row.
b. Initial Text: this is where you can type something into their text box to start them off.
You might put “Answer the question here” or if your question is “What is your name?” you might insert “my name is…” in this box to get them started. You can also leave this area blank.
c. Answer Key: this function will not grade your question for you, however if you type in a
typical answer you would be looking for, it can be used as a reminder to you of what you were looking for from this question. You will still have to go in and read each answer and grade them accordingly.
18
8. Fill in the Blank: Important Features
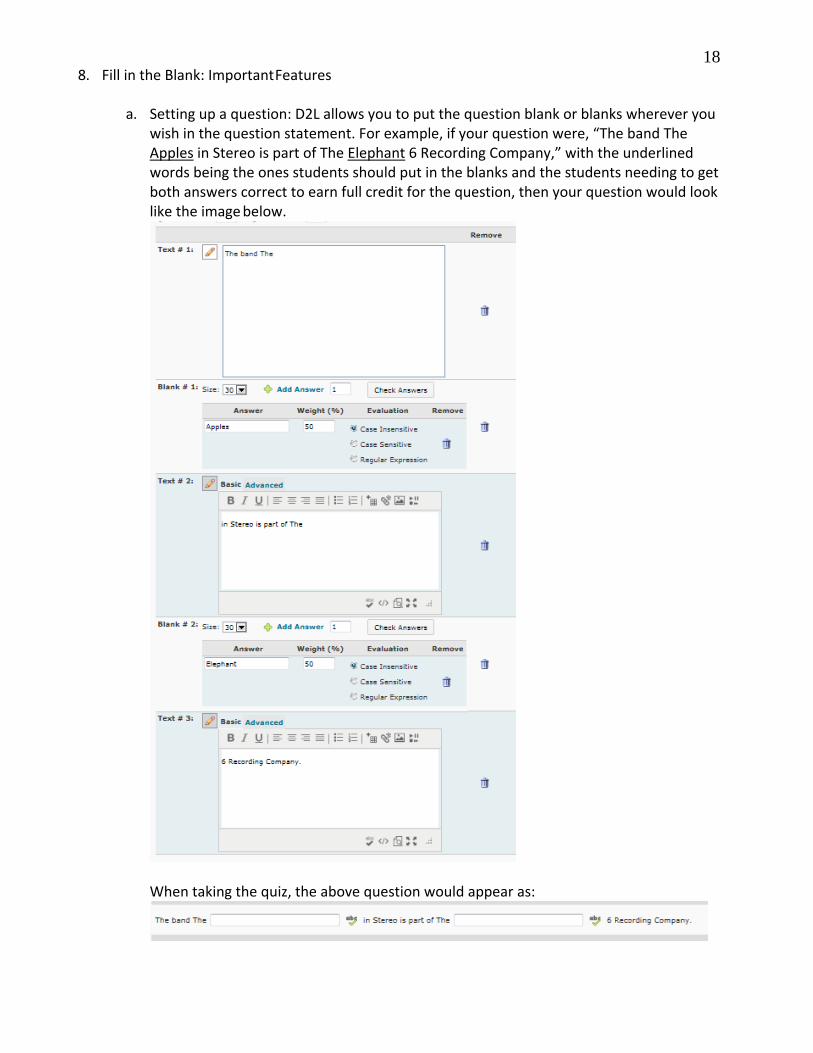
a. Setting up a question: D2L allows you to put the question blank or blanks wherever you wish in the question statement. For example, if your question were, “The band The Apples in Stereo is part of The Elephant 6 Recording Company,” with the underlined words being the ones students should put in the blanks and the students needing to get both answers correct to earn full credit for the question, then your question would look like the image below.
When taking the quiz, the above question would appear as:
19
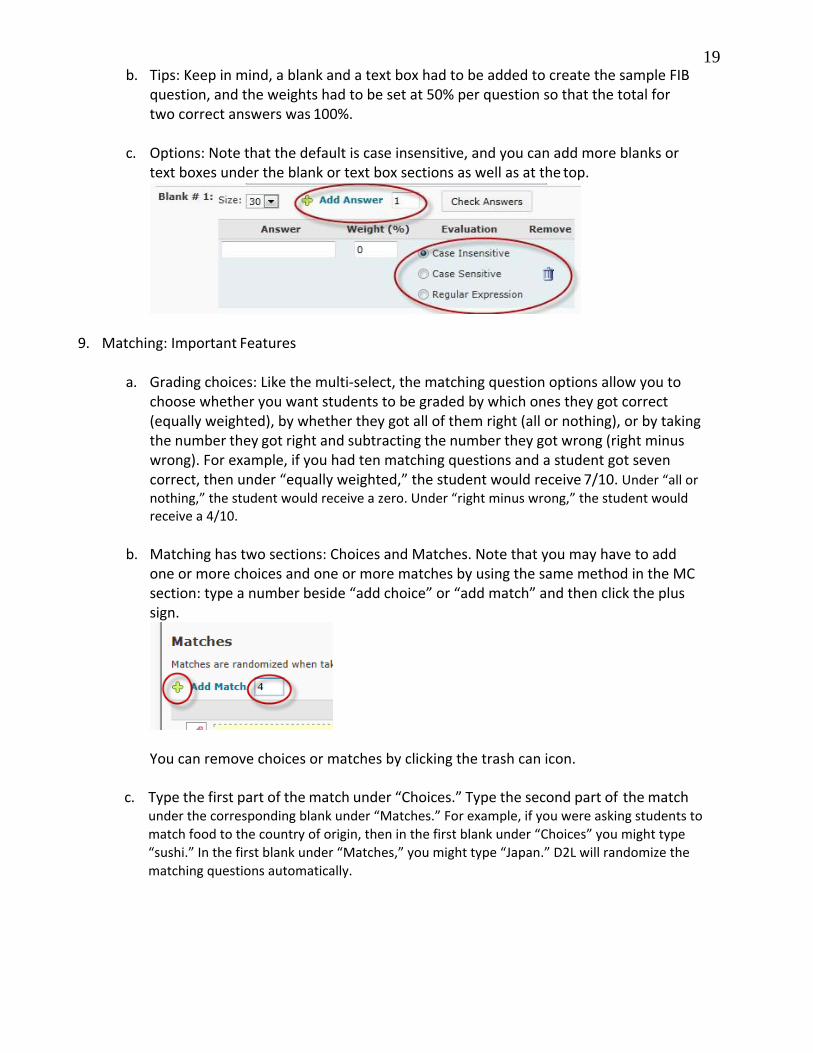
b. Tips: Keep in mind, a blank and a text box had to be added to create the sample FIB question, and the weights had to be set at 50% per question so that the total for two correct answers was 100%.
c. Options: Note that the default is case insensitive, and you can add more blanks or
text boxes under the blank or text box sections as well as at the top.
9. Matching: Important Features
a. Grading choices: Like the multi-select, the matching question options allow you to choose whether you want students to be graded by which ones they got correct (equally weighted), by whether they got all of them right (all or nothing), or by taking the number they got right and subtracting the number they got wrong (right minus wrong). For example, if you had ten matching questions and a student got seven correct, then under “equally weighted,” the student would receive 7/10. Under “all or nothing,” the student would receive a zero. Under “right minus wrong,” the student would receive a 4/10.
b. Matching has two sections: Choices and Matches. Note that you may have to add
one or more choices and one or more matches by using the same method in the MC section: type a number beside “add choice” or “add match” and then click the plus sign.
You can remove choices or matches by clicking the trash can icon.
c. Type the first part of the match under “Choices.” Type the second part of the match under the corresponding blank under “Matches.” For example, if you were asking students to match food to the country of origin, then in the first blank under “Choices” you might type “sushi.” In the first blank under “Matches,” you might type “Japan.” D2L will randomize the matching questions automatically.
20
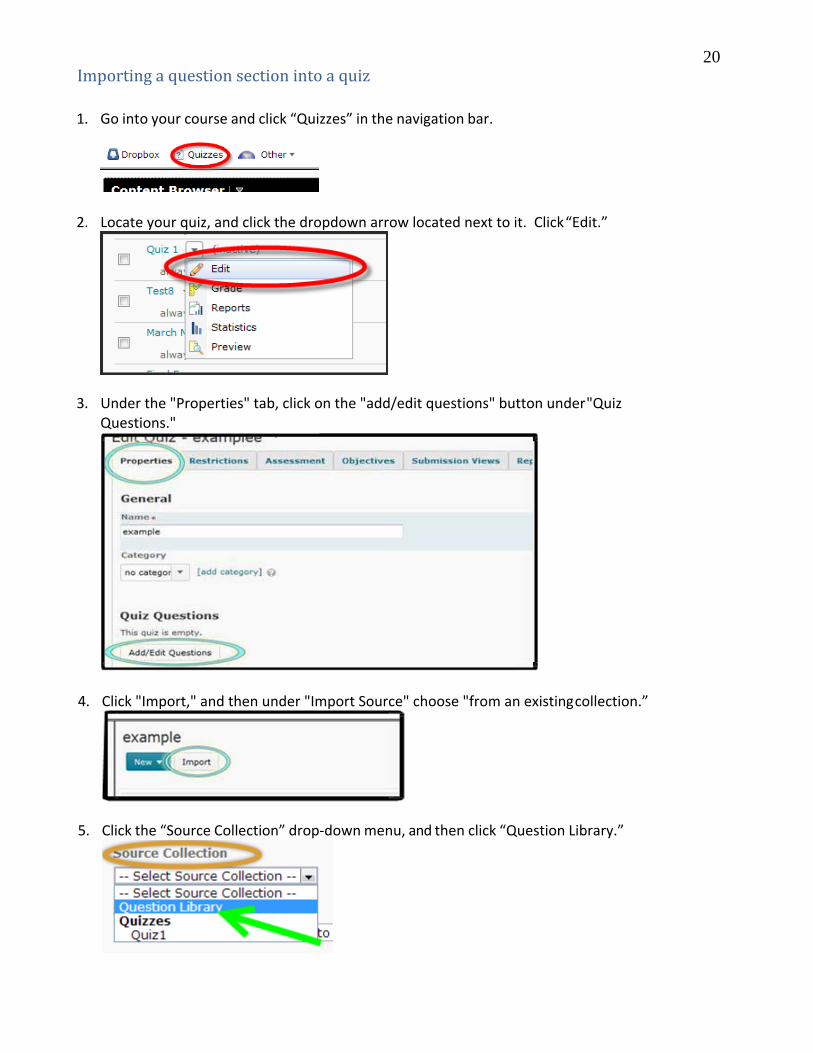
Importing a question section into a quiz 1. Go into your course and click “Quizzes” in the navigation bar.
2. Locate your quiz, and click the dropdown arrow located next to it. Click “Edit.”
3. Under the "Properties" tab, click on the "add/edit questions" button under "Quiz Questions."
4. Click "Import," and then under "Import Source" choose "from an existing collection.”
5. Click the “Source Collection” drop-down menu, and then click “Question Library.”
21
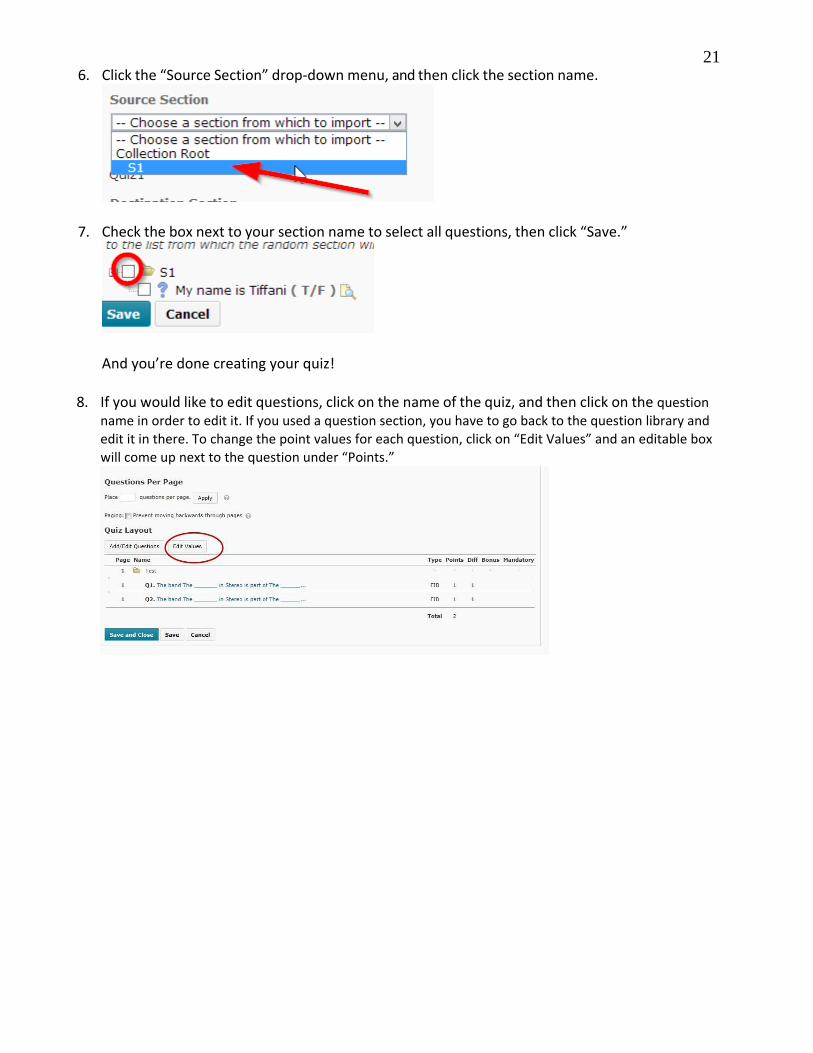
6. Click the “Source Section” drop-down menu, and then click the section name.
7. Check the box next to your section name to select all questions, then click “Save.”
And you’re done creating your quiz!
8. If you would like to edit questions, click on the name of the quiz, and then click on the question name in order to edit it. If you used a question section, you have to go back to the question library and edit it in there. To change the point values for each question, click on “Edit Values” and an editable box will come up next to the question under “Points.”
22
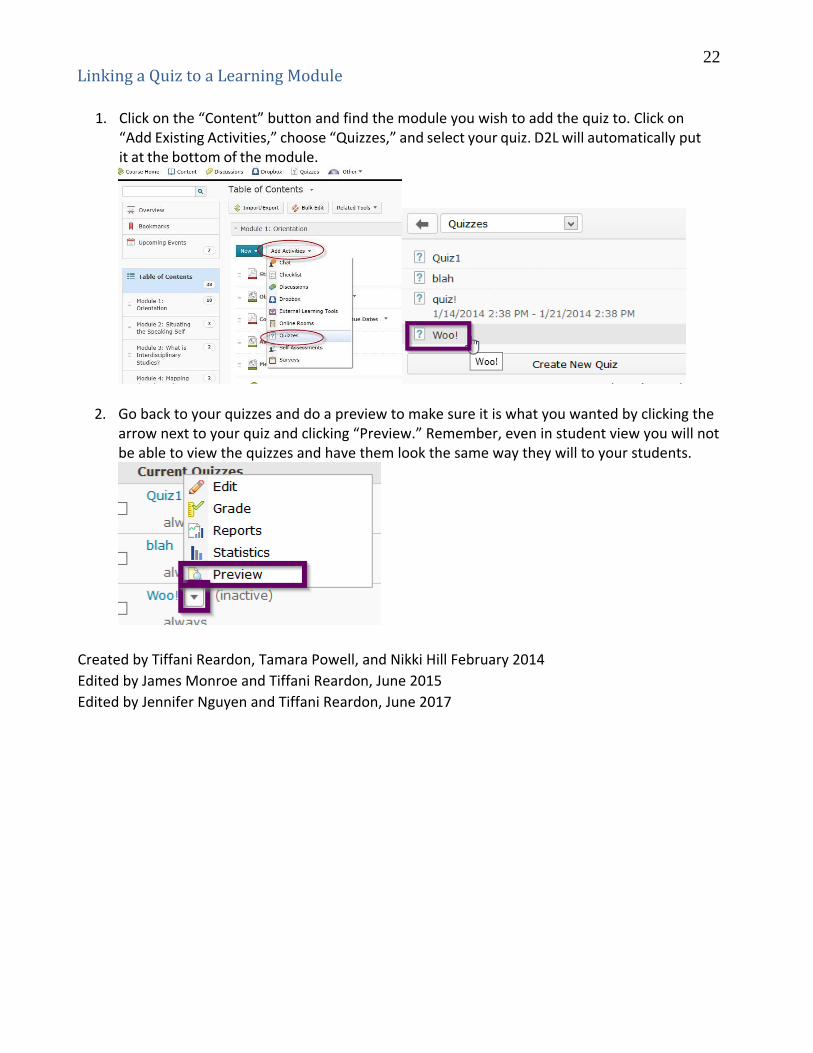
Linking a Quiz to a Learning Module
1. Click on the “Content” button and find the module you wish to add the quiz to. Click on “Add Existing Activities,” choose “Quizzes,” and select your quiz. D2L will automatically put it at the bottom of the module.
2. Go back to your quizzes and do a preview to make sure it is what you wanted by clicking the arrow next to your quiz and clicking “Preview.” Remember, even in student view you will not be able to view the quizzes and have them look the same way they will to your students.
Created by Tiffani Reardon, Tamara Powell, and Nikki Hill February 2014 Edited by James Monroe and Tiffani Reardon, June 2015 Edited by Jennifer Nguyen and Tiffani Reardon, June 2017