Embed Size (px)
Citation preview
1
Customizing,Reporting, andSystemAdministration inOracle� HRMS(Canada)Release 11iPart No. A73324–01
2
Customizing, Reporting, and System Administration in Oracle� HRMS(Canada) Release 11i
The Part No. for this book is A73324–01
The Part No. for this set is A77150–01Copyright � 2000 Oracle Corporation. All rights reserved.Contributing Authors: John Cafolla, Juliette Fleming, Kevin Kelley, Rebecca Peters, LouiseRaffo
Contributors: Martin Bocutt, Keith Ekiss, Charles Hudson, Michael Laverty, JuliaMargetson, Janet McCandless, Andrew Moran, Michael O’Shea, Mark Rowe, Sarju Shah,Mark Swaine, John Woodward
The Programs are not intended for use in any nuclear, aviation, mass transit, medical, orother inherently dangerous applications. It shall be licensee’s responsibility to take allappropriate fail–safe, back–up redundancy and other measures to ensure the safe use ofsuch applications if the Programs are used for such purposes, and Oracle disclaimsliability for any damages caused by such use of the Programs.
The Programs (which include both the software and documentation) contain proprietaryinformation of Oracle Corporation; they are provided under a license agreementcontaining restrictions on use and disclosure and are also protected by copyright, patentand other intellectual and industrial property laws. Reverse engineering, disassembly ordecompilation of the Programs is prohibited.
Program Documentation is licensed for use solely to support the deployment of thePrograms and not for any other purpose.
The information contained in this document is subject to change without notice. If youfind any problems in the documentation, please report them to us in writing. OracleCorporation does not warrant that this document is error free. Except as may be expresslypermitted in your license agreement for these Programs, no part of these Programs may bereproduced or transmitted in any form or by any means, electronic or mechanical, for anypurpose, without the express written permission of Oracle Corporation.
If the Programs are delivered to the US Government or anyone licensing or using thePrograms on behalf of the US government, the following notice is applicable:
Restricted Rights NoticePrograms delivered subject to the DOD FAR Supplement are “commercial computersoftware” and use, duplication and disclosure of the Programs including documentation,shall be subject to the licensing restrictions set forth in the applicable Oracle licenseagreement. Otherwise, Programs delivered subject to the Federal Acquisition Regulationsare “restricted computer software” and use, duplication and disclosure of the Programsshall be subject to the restrictions in FAR 52.227–19, Commercial Computer Software –Restricted Rights (June 1987). Oracle Corporation, 500 Oracle Parkway, Redwood City,CA 94065.
Oracle is a registered trademark, and, Oracle Alert, Oracle Financials, SQL*Forms,SQL*Plus, SQL*Report, Oracle Application Object Library, and Oracle Business Managerare trademarks or registered trademarks of Oracle Corporation. Other names may betrademarks of their respective owners.
iContents
Contents
������� ��
Audience for This Guide x. . . . . . . . . . . . . . . . . . . . . . . . . . . . . . How To Use This Guide x. . . . . . . . . . . . . . . . . . . . . . . . . . . . . . . Finding Out What’s New xi. . . . . . . . . . . . . . . . . . . . . . . . . . . . . . Other Information Sources xi. . . . . . . . . . . . . . . . . . . . . . . . . . . . .
Online Documentation xi. . . . . . . . . . . . . . . . . . . . . . . . . . . . . Related User Guides xii. . . . . . . . . . . . . . . . . . . . . . . . . . . . . . . User Guides Related to All Products xii. . . . . . . . . . . . . . . . . User Guides Related to This Product xiii. . . . . . . . . . . . . . . . .
Do Not Use Database Tools to Modify Oracle Applications Data xviii. . . . . . . . . . . . . . . . . . . . . . . . . . . . . . . . . . . . . . . . . . . . . . . . About Oracle xviii. . . . . . . . . . . . . . . . . . . . . . . . . . . . . . . . . . . . . . . . Your Feedback xix. . . . . . . . . . . . . . . . . . . . . . . . . . . . . . . . . . . . . . .
Chapter 1 Extend and Customize 1 – 1. . . . . . . . . . . . . . . . . . . . . . . . . . . . . . . . . . . Extend and Customize Oracle HRMS 1 – 2. . . . . . . . . . . . . . . . . . . . . . .
Can you link associated windows together? 1 – 2. . . . . . . . . . . How can you hold additional information? 1 – 2. . . . . . . . . . . How can you ensure the same terminology is used and speed up data entry? 1 – 2. . . . . . . . . . . . . . . . . . . . . . . . . . . . . . . Can you define the formats for currency? 1 – 2. . . . . . . . . . . . .
Extend and Customize Oracle HRMS Overview 1 – 3. . . . . . . . . . . . . . Key Components 1 – 3. . . . . . . . . . . . . . . . . . . . . . . . . . . . . . . . . .
Task Flow 1 – 5. . . . . . . . . . . . . . . . . . . . . . . . . . . . . . . . . . . . . . . . . . . Using Forms or Workflow 1 – 5. . . . . . . . . . . . . . . . . . . . . . . . . .
ii Customizing, Reporting, and System Administration in Oracle HRMS (Canada)
Sequential or Branched Structure 1 – 5. . . . . . . . . . . . . . . . . . . . Predefined Task Flows 1 – 5. . . . . . . . . . . . . . . . . . . . . . . . . . . . .
Task Flow Windows 1 – 7. . . . . . . . . . . . . . . . . . . . . . . . . . . . . . . . . . Including the Assignment Window 1 – 9. . . . . . . . . . . . . . . . . .
Task Flow (Oracle Workflow) 1 – 11. . . . . . . . . . . . . . . . . . . . . . . . . . Key Rules 1 – 11. . . . . . . . . . . . . . . . . . . . . . . . . . . . . . . . . . . . . . . .
Windows You Can Customize 1 – 13. . . . . . . . . . . . . . . . . . . . . . . . . . List of Customizable Windows 1 – 13. . . . . . . . . . . . . . . . . . . . . . Types of Data Restrictions 1 – 14. . . . . . . . . . . . . . . . . . . . . . . . . .
Flexfields 1 – 16. . . . . . . . . . . . . . . . . . . . . . . . . . . . . . . . . . . . . . . . . . . . User Definable Key Flexfields 1 – 17. . . . . . . . . . . . . . . . . . . . . . . . . .
How Oracle HRMS Uses Key Flexfields 1 – 17. . . . . . . . . . . . . . What You Must Set Up 1 – 18. . . . . . . . . . . . . . . . . . . . . . . . . . . . .
User Definable Descriptive Flexfields 1 – 20. . . . . . . . . . . . . . . . . . . Segments 1 – 20. . . . . . . . . . . . . . . . . . . . . . . . . . . . . . . . . . . . . . . . . Types of Descriptive Flexfield 1 – 20. . . . . . . . . . . . . . . . . . . . . . .
Descriptive Flexfield List 1 – 22. . . . . . . . . . . . . . . . . . . . . . . . . . . . . . Descriptive Flexfields and Address Styles 1 – 25. . . . . . . . . . . . . . .
Address Styles 1 – 25. . . . . . . . . . . . . . . . . . . . . . . . . . . . . . . . . . . . Extra Information Types (EITs) 1 – 26. . . . . . . . . . . . . . . . . . . . . . . . .
Key Flexfield Combinations 1 – 26. . . . . . . . . . . . . . . . . . . . . . . . . Dates and EITs 1 – 27. . . . . . . . . . . . . . . . . . . . . . . . . . . . . . . . . . . .
EITs and Security 1 – 28. . . . . . . . . . . . . . . . . . . . . . . . . . . . . . . . . . . . . Restricting Access to Extra Information 1 – 28. . . . . . . . . . . . . . .
Developer Flexfields 1 – 29. . . . . . . . . . . . . . . . . . . . . . . . . . . . . . . . . Soft Coded Legislation Key Flexfield 1 – 30. . . . . . . . . . . . . . . . . Bank Details Key Flexfield 1 – 30. . . . . . . . . . . . . . . . . . . . . . . . . .
User–Defined Tables 1 – 31. . . . . . . . . . . . . . . . . . . . . . . . . . . . . . . . . . Entering and Accessing Table Values 1 – 31. . . . . . . . . . . . . . . . .
Lookups 1 – 32. . . . . . . . . . . . . . . . . . . . . . . . . . . . . . . . . . . . . . . . . . . . Predefined Lookup Types 1 – 32. . . . . . . . . . . . . . . . . . . . . . . . . . Global and Local Lookup Types 1 – 32. . . . . . . . . . . . . . . . . . . . .
User and Extensible Lookups 1 – 34. . . . . . . . . . . . . . . . . . . . . . . . . . Canadian Element Classifications 1 – 49. . . . . . . . . . . . . . . . . . . . . . . Canadian Lookup Types 1 – 50. . . . . . . . . . . . . . . . . . . . . . . . . . . . . . Example Script to Register EITs 1 – 51. . . . . . . . . . . . . . . . . . . . . . . .
Extend and Customize Oracle HRMS 1 – 57. . . . . . . . . . . . . . . . . . . . . . . Customization 1 – 57. . . . . . . . . . . . . . . . . . . . . . . . . . . . . . . . . . . . Opening Multiple Windows 1 – 57. . . . . . . . . . . . . . . . . . . . . . . . Flexfield Database Item 1 – 57. . . . . . . . . . . . . . . . . . . . . . . . . . . . Extra Information Types (EITs) 1 – 58. . . . . . . . . . . . . . . . . . . . . . Enable Currency 1 – 58. . . . . . . . . . . . . . . . . . . . . . . . . . . . . . . . . .

iiiContents
Lookups and User Defined Tables 1 – 58. . . . . . . . . . . . . . . . . . . Defining an Element or Distribution Set 1 – 59. . . . . . . . . . . . . . . . . Defining a Customized Version of a Window 1 – 60. . . . . . . . . . . . . Adding the Customized Window to a Menu or Task Flow 1 – 61. Restricting Access to Query–Only Mode 1 – 62. . . . . . . . . . . . . . . . . Creating Task Flows Using Forms 1 – 63. . . . . . . . . . . . . . . . . . . . . . Creating Task Flows Using Workflow 1 – 64. . . . . . . . . . . . . . . . . . . Changing Default National Address Styles 1 – 65. . . . . . . . . . . . . . Using Parameters for HRMS Form Functions 1 – 67. . . . . . . . . . . . Defining Task Flow Nodes 1 – 68. . . . . . . . . . . . . . . . . . . . . . . . . . . . . Defining Task Flows 1 – 69. . . . . . . . . . . . . . . . . . . . . . . . . . . . . . . . . . Copying an Existing Task Flow 1 – 71. . . . . . . . . . . . . . . . . . . . . . . . . Adding a New Window to an Existing Task Flow 1 – 72. . . . . . . . . Amending the Navigation of a Task Flow 1 – 73. . . . . . . . . . . . . . . . Creating a Top Level Process 1 – 74. . . . . . . . . . . . . . . . . . . . . . . . . . . Creating Sub Processes 1 – 76. . . . . . . . . . . . . . . . . . . . . . . . . . . . . . . . Creating Button Labels 1 – 77. . . . . . . . . . . . . . . . . . . . . . . . . . . . . . . . Positioning Button Display 1 – 78. . . . . . . . . . . . . . . . . . . . . . . . . . . . Identifying Windows or Blocks to Display 1 – 79. . . . . . . . . . . . . . . Identifying Customized Forms to Include in the Task Flow 1 – 80Verifying and Saving the Workflow 1 – 81. . . . . . . . . . . . . . . . . . . . . Generating a Task Flow From Oracle Workflow 1 – 82. . . . . . . . . . Disabling Multiple Windows 1 – 83. . . . . . . . . . . . . . . . . . . . . . . . . . Creating Descriptive Flexfield Database Items 1 – 84. . . . . . . . . . . . Creating Key Flexfield Database Items 1 – 85. . . . . . . . . . . . . . . . . . Setting Up Extra Information Types (Excluding Organization EITs) 1 – 86. . . . . . . . . . . . . . . . . . . . . . . . . . . . . . . . . . . . . . . . . . . . . . . . Setting Up Extra Information Types for an Organization Classification 1 – 88. . . . . . . . . . . . . . . . . . . . . . . . . . . . . . . . . . . . . . . . Setting Up Extra Information Types Against a Responsibility 1 – 90. . . . . . . . . . . . . . . . . . . . . . . . . . . . . . . . . . . . . . . Entering Extra Information 1 – 91. . . . . . . . . . . . . . . . . . . . . . . . . . . . Enabling Currencies 1 – 92. . . . . . . . . . . . . . . . . . . . . . . . . . . . . . . . . . Adding Lookup Types and Values 1 – 93. . . . . . . . . . . . . . . . . . . . . .
Defining Lookup Types 1 – 93. . . . . . . . . . . . . . . . . . . . . . . . . . . . Defining Lookup Values 1 – 94. . . . . . . . . . . . . . . . . . . . . . . . . . . .
Removing Lookup Values 1 – 95. . . . . . . . . . . . . . . . . . . . . . . . . . . . . Setting Up User Tables, Columns and Rows 1 – 96. . . . . . . . . . . . . . Entering Table Values 1 – 98. . . . . . . . . . . . . . . . . . . . . . . . . . . . . . . . .
Chapter 2 Security 2 – 1. . . . . . . . . . . . . . . . . . . . . . . . . . . . . . . . . . . . . . . . . . . . . . . . Security 2 – 2. . . . . . . . . . . . . . . . . . . . . . . . . . . . . . . . . . . . . . . . . . . . . . . . .
iv Customizing, Reporting, and System Administration in Oracle HRMS (Canada)
In what ways can you use security of access for different users? 2 – 2. . . . . . . . . . . . . . . . . . . . . . . . . . . . . . . . . . . . . . . . . . . . How does Oracle HRMS allow data restriction for display in a window? 2 – 2. . . . . . . . . . . . . . . . . . . . . . . . . . . . . . . . . . . . . How does Oracle HRMS enable users to view multiple Business Groups? 2 – 2. . . . . . . . . . . . . . . . . . . . . . . . . . . . . . . . . .
Security Overview 2 – 3. . . . . . . . . . . . . . . . . . . . . . . . . . . . . . . . . . . . . . . Security in your Enterprise 2 – 3. . . . . . . . . . . . . . . . . . . . . . . . . Standard HRMS Security 2 – 4. . . . . . . . . . . . . . . . . . . . . . . . . . . Cross Business Group Responsibility Security 2 – 5. . . . . . . . . Security Components 2 – 6. . . . . . . . . . . . . . . . . . . . . . . . . . . . . .
Security Models 2 – 8. . . . . . . . . . . . . . . . . . . . . . . . . . . . . . . . . . . . . . Standard HRMS Security 2 – 8. . . . . . . . . . . . . . . . . . . . . . . . . . . Cross Business Group Responsibility Security 2 – 8. . . . . . . . .
User Profiles 2 – 10. . . . . . . . . . . . . . . . . . . . . . . . . . . . . . . . . . . . . . . . . Query–Only Access to Forms 2 – 11. . . . . . . . . . . . . . . . . . . . . . . Profile Options Summary 2 – 11. . . . . . . . . . . . . . . . . . . . . . . . . . . Profile Options 2 – 13. . . . . . . . . . . . . . . . . . . . . . . . . . . . . . . . . . . .
Security Profiles 2 – 17. . . . . . . . . . . . . . . . . . . . . . . . . . . . . . . . . . . . . . Responsibilities 2 – 19. . . . . . . . . . . . . . . . . . . . . . . . . . . . . . . . . . . . . .
Responsibility 2 – 19. . . . . . . . . . . . . . . . . . . . . . . . . . . . . . . . . . . . . Access Control Through Responsibility 2 – 20. . . . . . . . . . . . . . .
Menu Structure 2 – 21. . . . . . . . . . . . . . . . . . . . . . . . . . . . . . . . . . . . . . The Default Menu Structure 2 – 21. . . . . . . . . . . . . . . . . . . . . . . .
Request Groups 2 – 23. . . . . . . . . . . . . . . . . . . . . . . . . . . . . . . . . . . . . . Security Groups (Cross Business Group Responsibility Security Only) 2 – 24. . . . . . . . . . . . . . . . . . . . . . . . . . . . . . . . . . . . . . .
Example 2 – 25. . . . . . . . . . . . . . . . . . . . . . . . . . . . . . . . . . . . . . . . . Categorizing Information By Security Groups 2 – 25. . . . . . . . .
Reporting Access 2 – 27. . . . . . . . . . . . . . . . . . . . . . . . . . . . . . . . . . . . . Security Processes 2 – 28. . . . . . . . . . . . . . . . . . . . . . . . . . . . . . . . . . . .
Generate Secure User Process (SECGEN) 2 – 28. . . . . . . . . . . . . Security List Maintenance Process (LISTGEN) 2 – 28. . . . . . . . . Grant Permissions To Roles Process (ROLEGEN) 2 – 29. . . . . . Enable Multiple Security Groups 2 – 29. . . . . . . . . . . . . . . . . . . .
Security Profiles by Organization and Organization Hierarchy 2 – 30. . . . . . . . . . . . . . . . . . . . . . . . . . . . . . . . . . . . . . . . . . . Security Profiles By Position and Position Hierarchies 2 – 31. . . . . Setting Up Standard HRMS Security 2 – 33. . . . . . . . . . . . . . . . . . . . Defining a Security Profile 2 – 35. . . . . . . . . . . . . . . . . . . . . . . . . . . . . Setting Up Cross Business Group Responsibility Security 2 – 36. . Using the Find Security Profile Assignment window 2 – 38. . . . . . Assigning Security Profiles 2 – 39. . . . . . . . . . . . . . . . . . . . . . . . . . . .
vContents
Updating the Security Model 2 – 41. . . . . . . . . . . . . . . . . . . . . . . . . . Setting Up Reporting Users 2 – 42. . . . . . . . . . . . . . . . . . . . . . . . . . . . Defining Menus 2 – 43. . . . . . . . . . . . . . . . . . . . . . . . . . . . . . . . . . . . . . Structuring Menus 2 – 44. . . . . . . . . . . . . . . . . . . . . . . . . . . . . . . . . . . Defining Menu Functions 2 – 45. . . . . . . . . . . . . . . . . . . . . . . . . . . . .
Chapter 3 Audit Trail 3 – 1. . . . . . . . . . . . . . . . . . . . . . . . . . . . . . . . . . . . . . . . . . . . . . AuditTrail 3 – 2. . . . . . . . . . . . . . . . . . . . . . . . . . . . . . . . . . . . . . . . . . . . . . .
What does AuditTrail provide? 3 – 2. . . . . . . . . . . . . . . . . . . . . . AuditTrail Overview 3 – 3. . . . . . . . . . . . . . . . . . . . . . . . . . . . . . . . . . . . .
Performing AuditTrail 3 – 3. . . . . . . . . . . . . . . . . . . . . . . . . . . . . Audit Information Reports 3 – 4. . . . . . . . . . . . . . . . . . . . . . . . . . . . Custom Audit Reports 3 – 6. . . . . . . . . . . . . . . . . . . . . . . . . . . . . . . .
Dynamic SQL Structure 3 – 6. . . . . . . . . . . . . . . . . . . . . . . . . . . . HR Audit Tables 3 – 6. . . . . . . . . . . . . . . . . . . . . . . . . . . . . . . . . .
AuditTrail 3 – 8. . . . . . . . . . . . . . . . . . . . . . . . . . . . . . . . . . . . . . . . . . . . . . . Using AuditTrail 3 – 8. . . . . . . . . . . . . . . . . . . . . . . . . . . . . . . . . .
Setting Up AuditTrail 3 – 9. . . . . . . . . . . . . . . . . . . . . . . . . . . . . . . . . Disabling AuditTrail 3 – 10. . . . . . . . . . . . . . . . . . . . . . . . . . . . . . . . . . Running the Predefined Audit Report 3 – 11. . . . . . . . . . . . . . . . . . .
Chapter 4 Information Access 4 – 1. . . . . . . . . . . . . . . . . . . . . . . . . . . . . . . . . . . . . . Information Access 4 – 2. . . . . . . . . . . . . . . . . . . . . . . . . . . . . . . . . . . . . . .
Does Oracle HRMS provide flexible access to information? 4 – 2. . . . . . . . . . . . . . . . . . . . . . . . . . . . . . . . . . . . . . How can you use Oracle HRMS to support typical hr activities? 4 – 2. . . . . . . . . . . . . . . . . . . . . . . . . . . . . . . . . . . . . . . . What range of reporting options are available in Oracle HRMS? 4 – 2. . . . . . . . . . . . . . . . . . . . . . . . . . . . . . . . . . . . . . . . . . Can you pose ”what–if” scenarios? 4 – 2. . . . . . . . . . . . . . . . . . Can you use Oracle HRMS information for strategic planning? 4 – 3. . . . . . . . . . . . . . . . . . . . . . . . . . . . . . . . . . . . . . . . Can you run multilingual reports? 4 – 3. . . . . . . . . . . . . . . . . . .
Overview 4 – 4. . . . . . . . . . . . . . . . . . . . . . . . . . . . . . . . . . . . . . . . . . . . . . . Inquiry Windows 4 – 4. . . . . . . . . . . . . . . . . . . . . . . . . . . . . . . . . . Predefined Reports 4 – 4. . . . . . . . . . . . . . . . . . . . . . . . . . . . . . . . Multilingual Reporting 4 – 5. . . . . . . . . . . . . . . . . . . . . . . . . . . . . Using Oracle HRMS with Spreadsheets 4 – 5. . . . . . . . . . . . . . . QuickPaint 4 – 5. . . . . . . . . . . . . . . . . . . . . . . . . . . . . . . . . . . . . . . Attachments 4 – 6. . . . . . . . . . . . . . . . . . . . . . . . . . . . . . . . . . . . . .
Information Access 4 – 7. . . . . . . . . . . . . . . . . . . . . . . . . . . . . . . . . . . . . . .

vi Customizing, Reporting, and System Administration in Oracle HRMS (Canada)
Attachments 4 – 7. . . . . . . . . . . . . . . . . . . . . . . . . . . . . . . . . . . . . . Inquiry Windows and Folders 4 – 7. . . . . . . . . . . . . . . . . . . . . . . Report Types 4 – 7. . . . . . . . . . . . . . . . . . . . . . . . . . . . . . . . . . . . . .
Using Attachments 4 – 8. . . . . . . . . . . . . . . . . . . . . . . . . . . . . . . . . . . Using Inquiry Windows and Folders 4 – 11. . . . . . . . . . . . . . . . . . . . Defining QuickPaint Reports 4 – 13. . . . . . . . . . . . . . . . . . . . . . . . . . .
Positioning Items 4 – 13. . . . . . . . . . . . . . . . . . . . . . . . . . . . . . . . . . Adding Conditions or Calculations to QuickPaint Reports 4 – 14. . . . . . . . . . . . . . . . . . . . . . . . . . . . . . . . . . . . . . . . . .
Running QuickPaint Reports 4 – 15. . . . . . . . . . . . . . . . . . . . . . . . . . . Running Predefined and User Defined Reports 4 – 16. . . . . . . . . . . . . .
Defining Custom Reports 4 – 18. . . . . . . . . . . . . . . . . . . . . . . . . . . . . Creating New Report Formats 4 – 18. . . . . . . . . . . . . . . . . . . . . . .
Creating an Assignment Set 4 – 20. . . . . . . . . . . . . . . . . . . . . . . . . . . . Defining an Assignment Set Using Formula Criteria 4 – 21. . . . . . Defining an Assignment Set by Including or Excluding Assignments 4 – 24. . . . . . . . . . . . . . . . . . . . . . . . . . . . . . . . . . . . . . . . .
Chapter 5 Letter Generation 5 – 1. . . . . . . . . . . . . . . . . . . . . . . . . . . . . . . . . . . . . . . . Letter Generation 5 – 2. . . . . . . . . . . . . . . . . . . . . . . . . . . . . . . . . . . . . . . . Letter Generation Overview 5 – 3. . . . . . . . . . . . . . . . . . . . . . . . . . . . . . .
Which Method Should You Use? 5 – 3. . . . . . . . . . . . . . . . . . . . Concurrent Processing 5 – 4. . . . . . . . . . . . . . . . . . . . . . . . . . . . . . . .
Using Oracle Reports 5 – 4. . . . . . . . . . . . . . . . . . . . . . . . . . . . . . Using Word Processors 5 – 4. . . . . . . . . . . . . . . . . . . . . . . . . . . . .
Creating Standard Letters 5 – 6. . . . . . . . . . . . . . . . . . . . . . . . . . . . . Method 1 – Concurrent Processing 5 – 6. . . . . . . . . . . . . . . . . . .
Using Oracle Reports to Set Up Standard Letters 5 – 7. . . . . . . . . Planning Standard Letter Requirements 5 – 8. . . . . . . . . . . . . . . . . Writing a SQL*Plus Script for MultiMate or WordPerfect 5 – 9. . Registering the SQL*Plus Script 5 – 10. . . . . . . . . . . . . . . . . . . . . . . . Linking the SQL*Plus Script With a Letter 5 – 11. . . . . . . . . . . . . . . Writing a Skeleton Letter 5 – 12. . . . . . . . . . . . . . . . . . . . . . . . . . . . . . Requesting Letters/Running the Report 5 – 13. . . . . . . . . . . . . . . . . Merging the Data File with the Standard Letter 5 – 15. . . . . . . . . . . Writing a SQL*Plus Script for Microsoft Word 5 – 16. . . . . . . . . . . . Writing and Registering the Report 5 – 18. . . . . . . . . . . . . . . . . . . . . Linking the Report With a Letter 5 – 19. . . . . . . . . . . . . . . . . . . . . . .
Appendix A Windows and Reports A – 1. . . . . . . . . . . . . . . . . . . . . . . . . . . . . . . . . . . Default Navigation Menu for SuperHRMS Responsibility A – 2. . . . .

viiContents
Windows and their Navigation Paths A – 15. . . . . . . . . . . . . . . . . . . . . . . Reports and Processes in Oracle HRMS A – 62. . . . . . . . . . . . . . . . . . . . .
Processes A – 64. . . . . . . . . . . . . . . . . . . . . . . . . . . . . . . . . . . . . . . . .
Appendix B Appendix B B – 1. . . . . . . . . . . . . . . . . . . . . . . . . . . . . . . . . . . . . . . . . . . . . Publicly Callable Business Process APIs B – 2. . . . . . . . . . . . . . . . .
Appendix C Appendix C C – 1. . . . . . . . . . . . . . . . . . . . . . . . . . . . . . . . . . . . . . . . . . . . . PERWPOUK Template C – 2. . . . . . . . . . . . . . . . . . . . . . . . . . . . . . . . PERWPWUK Template C – 5. . . . . . . . . . . . . . . . . . . . . . . . . . . . . . . . OTA SQL*Plus Script C – 7. . . . . . . . . . . . . . . . . . . . . . . . . . . . . . . . .
Produce Confirmation Letters C – 7. . . . . . . . . . . . . . . . . . . . . . .
Glossary
Index

viii Customizing, Reporting, and System Administration in Oracle HRMS (Canada)

Reader’s Comment Form
Customizing, Reporting, and System Administration in Oracle� HRMS (Canada)A73324–01
Oracle Corporation welcomes your comments and suggestions on the quality and usefulnessof this publication. Your input is an important part of the information we use for revision.
• Did you find any errors?
• Is the information clearly presented?
• Do you need more information? If so, where?
• Are the examples correct? Do you need more examples?
• What features did you like most about this manual? What did you like least about it?
If you find any errors or have any other suggestions for improvement, please indicate the topic, chapter,and page number below:
Please send your comments to:
Oracle Applications Documentation ManagerOracle Corporation500 Oracle ParkwayRedwood Shores, CA 94065Phone: (650) 506–7000 Fax: (650) 506–7200
If you would like a reply, please give your name, address, and telephone number below:
Thank you for helping us improve our documentation.


ixPreface
Preface

x Customizing, Reporting, and System Administration in Oracle HRMS (Canada)
Audience for This Guide
Welcome to Release 11i of the Customizing, Reporting, and System Administrationin Oracle HRMS (Canada) user guide.
This guide assumes you have a working knowledge of the following:
• The principles and customary practices of your business area.
• Oracle� HRMS
If you have never used Oracle� HRMS, we suggest you attendone or more of the Oracle� HRMS training classes availablethrough Oracle University.
• The Oracle Applications graphical user interface.
To learn more about the Oracle Applications graphical userinterface, read the Oracle Applications User Guide.
See Other Information Sources for more information about OracleApplications product information.
How To Use This Guide
This guide contains the information you need to understand and useOracle� HRMS.
This preface explains how this user guide is organized and introducesother sources of information that can help you. This guide contains thefollowing chapters:
• Chapter 1 explains how to extend and customize Oracle HRMSso it works exactly how your enterprise does.
• Chapter 2 explains how you set up security in Oracle HRMS.Security is a major concern of all payroll and human resourcedepartments. Oracle HRMS includes security models for keepinginformation secure and preventing unauthorized access.
• Chapter 3 explains how you can track and record changes toyour data. AuditTrail provides a flexible approach to trackingthe changes to your data. It enables you keep a history ofchanges to your important data: what changed, who changed it,and when.
• Chapter 4 explains how you can access information withinOracle HRMS. You can use the same information in a variety ofdifferent ways depending on your business purpose.

xiPreface
• Chapter 5 explains how you can create standard letter to manageyour enterprise’s recruitment or enrollment activities moreeasily.
• Appendix A lists the default navigation paths for all thewindows and reports in Oracle HRMS for Canada, as they aresupplied. It also list the default menus that give you access to allthe windows on the system.
• Appendix B lists the publicly callable business process APIs.
• Appendix C provides a template SQL*Plus script for use withstandard letters.
Finding Out What’s New
From the HTML help window for Oracle� HRMS, choose the sectionthat describes new features or what’s new from the expandable menu.This section describes:
• New features in 11i. This information is updated for each newrelease of Oracle� HRMS.
• Information about any features that were not yet available whenthis user guide was printed. For example, if your systemadministrator has installed software from a mini pack as anupgrade, this document describes the new features.
Other Information Sources
You can choose from many sources of information, including onlinedocumentation, training, and support services, to increase yourknowledge and understanding of Oracle� HRMS.
If this guide refers you to other Oracle Applications documentation,use only the Release 11i versions of those guides unless we specifyotherwise.
Online Documentation
All Oracle Applications documentation is available online (HTML andPDF). The technical reference guides are available in paper formatonly. Note that the HTML documentation is translated into overtwenty languages.
xii Customizing, Reporting, and System Administration in Oracle HRMS (Canada)
The HTML version of this guide is optimized for onscreen reading, andyou can use it to follow hypertext links for easy access to other HTMLguides in the library. When you have an HTML window open, you canuse the features on the left side of the window to navigate freelythroughout all Oracle Applications documentation.
• You can use the Search feature to search by words or phrases.
• You can use the expandable menu to search for topics in themenu structure we provide. The Library option on the menuexpands to show all Oracle Applications HTML documentation.
You can view HTML help in the following ways:
• From an application window, use the help icon or the help menuto open a new Web browser and display help about that window.
• Use the documentation CD.
• Use a URL provided by your system administrator.
Your HTML help may contain information that was not available whenthis guide was printed.
Related User Guides
Oracle� HRMS shares business and setup information with otherOracle Applications products. Therefore, you may want to refer toother user guides when you set up and use Oracle� HRMS.
If you do not have the hardcopy versions of these guides, you can readthem online by choosing Library from the expandable menu on yourHTML help window, by reading from the Oracle ApplicationsDocument Library CD, or by using a Web browser with a URL thatyour system administrator provides.
User Guides Related to All Products
Oracle Applications User Guide
This guide explains how to navigate the system, enter data, and queryinformation, and introduces other basic features of the GUI availablewith this release of Oracle� HRMS (and any other Oracle Applicationsproduct).
xiiiPreface
You can also access this user guide online by choosing ”Getting Startedand Using Oracle Applications” from the Oracle Applications helpsystem.
Oracle Alert User Guide
Use this guide to define periodic and event alerts that monitor thestatus of your Oracle Applications data.
Oracle Applications Implementation Wizard User Guide
If you are implementing more than one Oracle product, you can use theOracle Applications Implementation Wizard to coordinate your setupactivities. This guide describes how to use the wizard.
Oracle Applications Developer’s Guide
This guide contains the coding standards followed by the OracleApplications development staff. It describes the Oracle ApplicationObject Library components needed to implement the OracleApplications user interface described in the Oracle Applications UserInterface Standards. It also provides information to help you build yourcustom Developer/2000 forms so that they integrate with OracleApplications.
Oracle Applications User Interface Standards
This guide contains the user interface (UI) standards followed by theOracle Applications development staff. It describes the UI for theOracle Applications products and how to apply this UI to the design ofan application built by using Oracle Forms.
User Guides Related to This Product
Using Oracle HRMS – The Fundamentals
This user guide explains how to setup and use enterprise modeling,organization management, and cost analysis. It also includesinformation about defining payrolls.
Managing People Using Oracle HRMS
Use this guide to find out about using employee management,recruitment activities, career management, and budgeting.

xiv Customizing, Reporting, and System Administration in Oracle HRMS (Canada)
Running Your Payroll Using Oracle HRMS
This user guide provides information about wage attachments, taxesand social insurance, the payroll run, and other processes.
Managing Compensation and Benefits Using Oracle HRMS
Use this guide to learn about compensation setup, entry and analysis,setting up basic, standard and advanced benefits, salaryadministration, and absence management and PTO accruals.
Customizing, Reporting and System Administration
This guide provides information about extending and customizingOracle HRMS, managing security, auditing, information access, andletter generation.
Implementing Oracle HRMS
This user guide explains the setup procedures you need to do in orderto successfully implement Oracle HRMS in your enterprise.
Implementing Oracle Self–Service Human Resources (SSHR)
This guide provides information about setting up the self–servicehuman resources management functions for managers and employees.Managers and employees can then use an intranet and Web browser tohave easy and intuitive access to personal and career managementfunctionality
Using Oracle FastFormula
This guide provides information about writing, editing, and usingformulas to customize your system. Oracle FastFormula provides asimple way to write formulas using English words and basicmathematical functions. For example, Oracle FastFormula enables youto specify elements in payroll runs or create rules for PTO and accrualplans.
Using Oracle Training Administration (OTA)
This guide provides information about how to set up and use OracleTraining Administration to facilitate your training and certificationbusiness.
xvPreface
Using Oracle SSP/SMP
This guide provdes information about setting up and using OracleSSP/SMP to meet your statutory sick pay and statutory maternity payobligations.
Using Application Data Exchange and Hierarchy Diagrammers
This guide provides information about using Application DataExchange to view HRMS data with desktop tools, and upload reviseddata to your application. This guide also provides information aboutusing Hierarchy Diagrammers to view hierarchy diagrams fororganizations and positions.
Oracle Business Intelligence System Implementation Guide
This guide provides information about implementing Oracle BusinessIntelligence (BIS) in your environment.
BIS 11i User Guide Online Help
This guide is provided as online help only from the BIS application andincludes information about intelligence reports, Discoverer workbooks,and the Performance Management Framework.
Using Oracle Time Management
This guide provides information about capturing work patterns such asshift hours so that this information can be used by other applicationssuch as General Ledger.
Oracle Applications Flexfields Guide
This guide provides flexfields planning, setup, and referenceinformation for the Oracle� HRMS implementation team, as well as forusers responsible for the ongoing maintenance of Oracle Applicationsproduct data. This guide also provides information on creating customreports on flexfields data.
Installation and System Administration Guides
Oracle Applications Concepts
This guide provides an introduction to the concepts, features,technology stack, architecture, and terminology for Oracle Applications

xvi Customizing, Reporting, and System Administration in Oracle HRMS (Canada)
Release 11i. It provides a useful first book to read before an installationof Oracle Applications. This guide also introduces the concepts behind,and major issues, for Applications–wide features such as BusinessIntelligence (BIS), languages and character sets, and self–serviceapplications.
Installing Oracle Applications
This guide provides instructions for managing the installation of OracleApplications products. In Release 11i, much of the installation processis handled using Oracle One–Hour Install, which minimizes the time ittakes to install Oracle Applications and the Oracle 8i Server technologystack by automating many of the required steps. This guide containsinstructions for using Oracle One–Hour Install and lists the tasks youneed to perform to finish your installation. You should use this guidein conjunction with individual product user guides andimplementation guides.
Upgrading Oracle Applications
Refer to this guide if you are upgrading your Oracle ApplicationsRelease 10.7 or Release 11.0 products to Release 11i. This guidedescribes the upgrade process in general and lists database upgradeand product–specific upgrade tasks. You must be at either Release 10.7(NCA, SmartClient, or character mode) or Release 11.0 to upgrade toRelease 11i. You cannot upgrade to Release 11i directly from releasesprior to 10.7.
Using the AD Utilities
Use this guide to help you run the various AD utiltities, such asAutoInstall, AutoPatch, AD Administration, AD Controller, Relink,and others. It contains how–to steps, screenshots, and otherinformation that you need to run the AD utilities.
Oracle Applications Product Update Notes
Use this guide as a reference if you are responsible for upgrading aninstallation of Oracle Applications. It provides a history of the changesto individual Oracle Applications products between Release 11.0 andRelease 11i. It includes new features and enhancements and changesmade to database objects, profile options, and seed data for thisinterval.

xviiPreface
Oracle Applications System Administrator’s Guide
This guide provides planning and reference information for the OracleApplications System Administrator. It contains information on how todefine security, customize menus and online help, and manageprocessing.
Oracle HRMS Applications Technical Reference Guide
This reference guide contains database diagrams and a detaileddescription of database tables, forms, reports, and programs for OracleHRMS, including Oracle� HRMS and related applications. Thisinformation helps you convert data from your existing applications,integrate Oracle� HRMS with non–Oracle applications, and writecustom reports for Oracle� HRMS.
You can order a technical reference guide for any product you havelicensed. Technical reference guides are available in paper format only.
Oracle Workflow Guide
This guide explains how to define new workflow business processes aswell as customize existing Oracle Applications–embedded workflowprocesses. You also use this guide to complete the setup stepsnecessary for any Oracle Applications product that includesworkflow–enabled processes.
Training and Support
Training
We offer a complete set of training courses to help you and your staffmaster Oracle Applications. We can help you develop a training planthat provides thorough training for both your project team and yourend users. We will work with you to organize courses appropriate toyour job or area of responsibility.
Training professionals can show you how to plan your trainingthroughout the implementation process so that the right amount ofinformation is delivered to key people when they need it the most. Youcan attend courses at any one of our many Educational Centers, or youcan arrange for our trainers to teach at your facility. We also offer Netclasses, where training is delivered over the Internet, and many CDmultimedia–based courses. In addition, we can tailor standard coursesor develop custom courses to meet your needs.
xviii Customizing, Reporting, and System Administration in Oracle HRMS (Canada)
Support
From on–site support to central support, our team of experiencedprofessionals provides the help and information you need to keepOracle� HRMS working for you. This team includes your TechnicalRepresentative, Account Manager, and Oracle’s large staff ofconsultants and support specialists with expertise in your businessarea, managing an Oracle server, and your hardware and softwareenvironment.
Do Not Use Database Tools to Modify Oracle Applications Data
We STRONGLY RECOMMEND that you never use SQL*Plus, OracleData Browser, database triggers, or any other tool to modify OracleApplications tables, unless we tell you to do so in our guides.
Oracle provides powerful tools you can use to create, store, change,retrieve, and maintain information in an Oracle database. But if youuse Oracle tools such as SQL*Plus to modify Oracle Applications data,you risk destroying the integrity of your data and you lose the ability toaudit changes to your data.
Because Oracle Applications tables are interrelated, any change youmake using an Oracle Applications form can update many tables atonce. But when you modify Oracle Applications data using anythingother than Oracle Applications forms, you might change a row in onetable without making corresponding changes in related tables. If yourtables get out of synchronization with each other, you risk retrievingerroneous information and you risk unpredictable results throughoutOracle Applications.
When you use Oracle Applications forms to modify your data, OracleApplications automatically checks that your changes are valid. OracleApplications also keeps track of who changes information. But, if youenter information into database tables using database tools, you maystore invalid information. You also lose the ability to track who haschanged your information because SQL*Plus and other database toolsdo not keep a record of changes.
About Oracle
Oracle Corporation develops and markets an integrated line ofsoftware products for database management, applications

xixPreface
development, decision support and office automation, as well as OracleApplications, an integrated suite of more than 45 software modules forfinancial management, supply chain management, manufacturing,project systems, human resources and sales and service management.
Oracle products are available for mainframes, minicomputers, personalcomputers, network computers, and personal digital assistants,enabling organizations to integrate different computers, differentoperating systems, different networks, and even different databasemanagement systems, into a single, unified computing and informationresource.
Oracle is the world’s leading supplier of software for informationmanagement, and the world’s second largest independent softwarecompany. Oracle offers its database, tools, and application products,along with related consulting, education and support services, in over145 countries around the world.
Your Feedback
Thank you for using Oracle� HRMS and this user guide.
We value your comments and feedback. At the back of this guide is aReader’s Comment Form you can use to explain what you like ordislike about Oracle� HRMS or this user guide. Mail your commentsto the following address or call us directly at (650) 506–7000.
Oracle Applications Documentation ManagerOracle Corporation500 Oracle ParkwayRedwood Shores, CA 94065U.S.A.
Or, send electronic mail to [email protected].

xx Customizing, Reporting, and System Administration in Oracle HRMS (Canada)
C H A P T E R
1
1 – 1Extend and Customize
Extend and Customize

1 – 2 Customizing, Reporting, and System Administration in Oracle HRMS (Canada)
Extend and Customize Oracle HRMS
You can extend and customize Oracle HRMS to meet the needs of yourenterprise.
Can you link associated windows together?
Yes. Oracle recognizes that to complete many tasks, you need to usemore than one window. You can link these windows together in a taskflow so that you can choose a button to bring up each window in turnwithout returning to the menu.
How can you hold additional information?
You can add data fields to windows to hold any additional informationyou require. Flexfields are flexible fields that enable you to do this.
Then, when you click in a flexfield you have set up, a window opens,displaying segments into which you can enter data.
You can also set up your own tables to hold data such as wage codes,shift differentials, or the amounts of certain deductions
How can you ensure the same terminology is used and speed up data entry?
Oracle provides lists of values called Lookups for certain items ofinformation. Lookups ensure that all users use the same terminology,making it easier to inquire and report on information. Lookups alsospeed up data entry because you can enter just enough to identify thevalue, and the system completes the entry.
Can you define the formats for currency?
Yes. You can define the formats for displaying currency amounts.
1 – 3Extend and Customize
Extend and Customize Oracle HRMS OverviewYou need to understand the key components Oracle HRMS provides toextend and customize the application. Once you have identifiedwhether to customize parts of the system, define additionalinformation or to add your own Lookups, you are ready to set up thedata that all users share across the application.
Key Components
• Task Flows
You often need to use more than one window to complete manytasks. For example, to hire a new employee, you typically gofrom the People window, to the Address window, to the SpecialInformation window, to the Assignment window, and so on. Youcan link these windows together in a task flow so that you canchoose a button to bring up each window in turn withoutreturning to the menu.
There are two methods you can use to set up and maintain yourtask flows:
– Using Forms
– Using Oracle Workflow
• Windows
You can create customized versions of standard windows, ifrequired. This approach restricts the list of values on certainfields and therefore provides for faster data entry. It also enablesyou to limit access to certain types of information.
• Flexfields
You can add data fields to windows to hold any additionalinformation you require. Flexfields are flexible fields that enableyou to do this.
– Key flexfields enable you customize some of the mostimportant parts of the system, including the names of jobs,positions and grades, how payroll costs are allocated, andanalysis information for employees and other people.
– Descriptive flexfields enable you to add fields to windowsto record additional information.
– Extra Information Types enable you to set up multiplecategories of information for the most important entities inOracle HRMS. For example, you might use EITs to add
1 – 4 Customizing, Reporting, and System Administration in Oracle HRMS (Canada)
details to assignment records in special circumstances suchas, information about a leave of absence or extrainformation about a temporary assignment to a project.
– Protected Flexfields
Oracle HRMS supplies two key flexfields and threedescriptive flexfields that are predefined and protected.Your localization team defines these flexfields to meet thespecific legislative and reporting needs of your country.
• User–Defined Tables
You can set up user tables to provide matrixes of valid valuesthat vary according to a factor such as age, or job, or number ofyears service. You can access these values from formulas, or yourown forms or reports. The GET_TABLE_VALUE function issupplied for using in your formulas. Some user tables arepredefined in certain legislations, for example to hold values forpayroll calculations.
• Lookups
Lookups provide lists of valid values on certain fieldsthroughout the system. For many types of lookup you can addyour own values and change the values that are predefined.Lookups not only ensure that all users use the same terminology,but they also speed up data entry.
• Currencies
You will also need to define the formats for displaying currencyamounts.
• CUSTOM Library Events
CUSTOM Library Events enable you to customize the logic thatis executed at defined points within a window. Generic eventsare available to all Oracle Applications and Product SpecificEvents are also available to help you to apply business rulesspecific to Oracle HRMS.
• APIs
See: Oracle Applications System Administrator’s Guide
1 – 5Extend and Customize
Task Flow
You can link windows used to complete tasks in a task flow. Then, youcan choose a button to bring up each window in turn without returningto the menu.
The first window in the task flow defines the context of the subsequentwindows. For example, if the task flow begins with the Peoplewindow, all subsequent information is entered for the person you enteror query in the People window.
You can include customized forms in task flows. For example, youmight create a customized version of the People window that handlesapplicants only. Then you could use this customization in arecruitment task flow.
Using Forms or Workflow
There are two methods you can use to set up and maintain your taskflows:
• Creating Task Flows Using Forms: page 1 – 63
• Task Flow (Oracle Workflow): page 1 – 11
You can model your task flows using Oracle Workflow (version2.0.3.8.1 or higher) then generate a task flow. This method of creatingtask flows has the advantage of using a diagrammer to help you designthe sequence of windows.
Warning: Do not use apostrophes or ”%” symbols in task flownames or task flow node names.
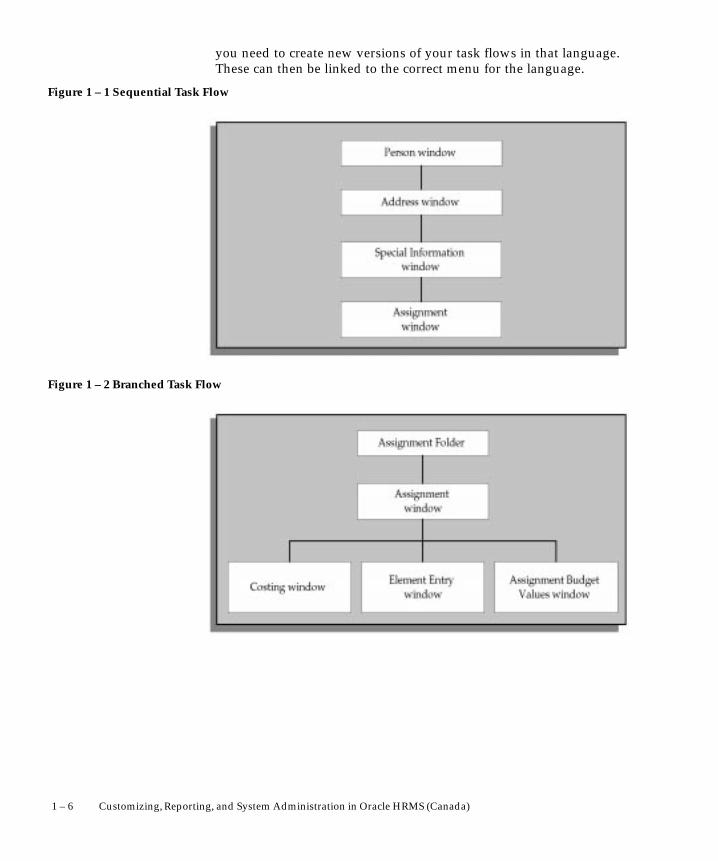
Sequential or Branched Structure
Task flows can follow a sequential or a branched structure, as shown inthe following two figures. You can choose how many navigationoptions users have from each window in the task flow. You can alsochoose the labels that appear on the navigation buttons, and you candefine access keys.
Predefined Task Flows
Oracle HRMS supplies several predefined task flows that include allthe windows that you can use in task flows. They are designed as asimple structure to use during implementation, not as a recommendedstructure for users.
Predefined task flows are translated into your base language when youinstall Oracle HRMS. However, if you install an additional language,
1 – 6 Customizing, Reporting, and System Administration in Oracle HRMS (Canada)
you need to create new versions of your task flows in that language.These can then be linked to the correct menu for the language.
Figure 1 – 1 Sequential Task Flow
Figure 1 – 2 Branched Task Flow

☞
1 – 7Extend and Customize
Task Flow Windows
You can create your own task flows by referencing the windows listedin the table below, or customized versions of them. Some of thesewindows require the context of an assignment. This means that eitherthe Assignment window or the Assignments Folder window or theApplication window (for applicant assignments) must appear abovethem in the task flow.
All task flows must begin with one of the following forms:
• People and Assignment (PERWSHRG)
• People (PERWSEPI)
• People Folder (PERWSFPE)
• Assignments Folder (PERWSFAS)
• Job (PERWSDJT)
• Position (HRWSPSF)
• Location (PERWSLOC)
Attention: Using the combined People and Assignment form(PERWSHRG), rather than the separate forms (PERWSEPI andPERWSEMA), the Assignment window opens more quicklyfrom the People window. We therefore recommend that youuse the combined form in any taskflow that requires bothwindows. The predefined taskflows use the combined form.
Window Context Required
Absence Detail Person (employee)
Address Person
Adjust Balances (Oracle Payroll) Assignment (employee)
Applicant Interview Assignment (applicant)
Application Person (applicant)
Assignment Person (employee)
Assignment Budget Values Assignment
Assignments Folder None
Beneficiaries (US Legislation Only) Element entry
Book Events Person (employee orapplicant)
Windows You Can Use in Task Flows
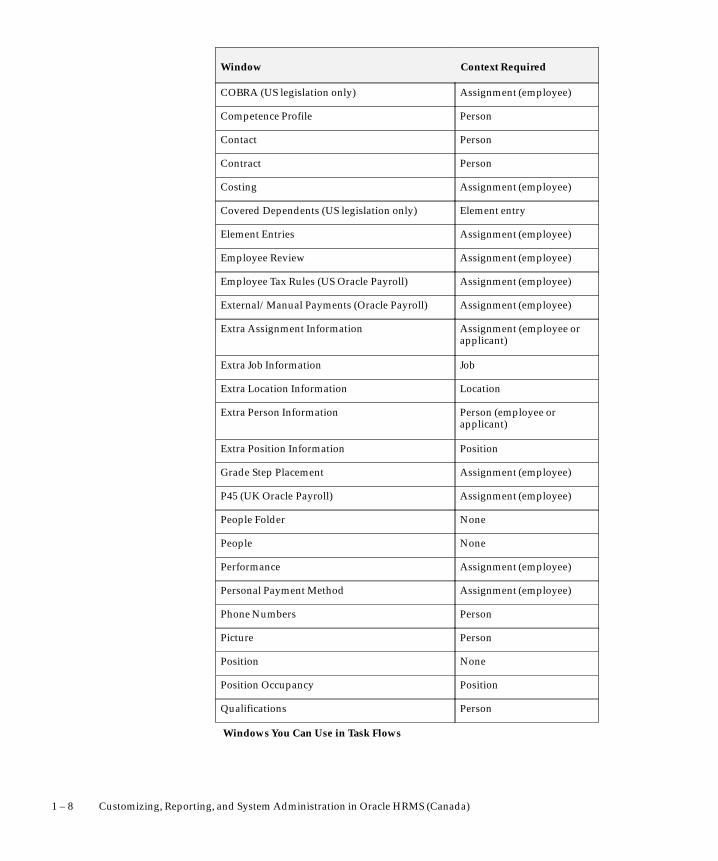
1 – 8 Customizing, Reporting, and System Administration in Oracle HRMS (Canada)
Context RequiredWindow
COBRA (US legislation only) Assignment (employee)
Competence Profile Person
Contact Person
Contract Person
Costing Assignment (employee)
Covered Dependents (US legislation only) Element entry
Element Entries Assignment (employee)
Employee Review Assignment (employee)
Employee Tax Rules (US Oracle Payroll) Assignment (employee)
External/Manual Payments (Oracle Payroll) Assignment (employee)
Extra Assignment Information Assignment (employee orapplicant)
Extra Job Information Job
Extra Location Information Location
Extra Person Information Person (employee orapplicant)
Extra Position Information Position
Grade Step Placement Assignment (employee)
P45 (UK Oracle Payroll) Assignment (employee)
People Folder None
People None
Performance Assignment (employee)
Personal Payment Method Assignment (employee)
Phone Numbers Person
Picture Person
Position None
Position Occupancy Position
Qualifications Person
Windows You Can Use in Task Flows

1 – 9Extend and Customize
Context RequiredWindow
QuickPay (Oracle Payroll) Assignment (employee)
Reverse Payroll Run (Oracle Payroll) Assignment (employee)
Salary Administration Assignment (employee)
Salary History Assignment (employee)
Schools and Colleges (EstablishmentAttendances)
Person
Secondary Statuses Assignment
SOE Report (UK Oracle Payroll) Assignment (employee)
Special Information Person
Statutory Details (UK Oracle Payroll) Assignment (employee)
Terminate Person (employee)
Terminate Applicant Person (applicant)
View Element Entry History Assignment (employee)
Work Choices (Job or Position) Job or Position
Work Choices (Person) Person
View Employee Accruals (US legislation only) Assignment (employee)
View Employee Benefits (US legislation only) Assignment (employee)
View Employee Earnings & Deduction Balances(US Oracle Payroll)
Assignment (employee)
View Employee Tax Balances (US OraclePayroll)
Assignment (employee)
View SOE (US Oracle Payroll) Assignment (employee)
Windows You Can Use in Task Flows
Including the Assignment Window
When users move down a task flow from the combined People andAssignment form, the Assignment window remains visible in thebackground. They can return to the Assignment window by closingtheir current window. Therefore you should not define a button to callthe Assignment window.
However, if you are defining a task flow to the Assignment windowfrom any window except the People window, you should use the

1 – 10 Customizing, Reporting, and System Administration in Oracle HRMS (Canada)
Assignment form (PERWSEMA). In this case you can add anAssignment button to any forms below the Assignment window in thetaskflow. This enables users to return to the Assignment windowwithout going back to the top window.

1 – 11Extend and Customize
Task Flow (Oracle Workflow)
As an alternative to using forms to set up and maintain task flows, youcan model your task flows using Oracle Workflow (version 2.0.3.8.1 orhigher) then generate a task flow. This method of creating task flowshas the advantage of using a diagrammer to help you design thesequence of windows.
Note: When you create a task flow using Oracle Workflow,you must continue to maintain it using Oracle Workflow. Youcannot edit a generated task flow using the Define Task Flowform.
Oracle HRMS supplies the HR Task Flow item type and a functionactivity for every window that can be task flowed. You model theseinto a workflow process for each task flow. By setting activityattributes, you create button labels and the position of buttons on eachwindow.
Key Rules
There are two key rules in defining task flows:
• Only certain windows are valid first windows (or top nodes) in atask flow. To check which windows are valid first windows,check the Lookup Types using Oracle Workflow Designer.
When you create a workflow process to model your task flow,your Start activity must connect to the Top Node Selectoractivity. This activity ensures that your first window is valid.
• Each window in a task flow can only be connected to a windowthat supplies the correct context.
For example, the Position Occupancy window requires thecontext of a position, while the Qualifications window requiresthe context of a person. Each workflow activity supplied for awindow has its Result Type set to a lookup type that defines thecontext that must be passed to it. For example, the F4 EnterAddress window has the Result Type set to Person ContextWindows. This means it must be given the context of a person.
Task flows are associated with one of the following contexts:
– Assignment
– Element Entry
– Job
– Location

1 – 12 Customizing, Reporting, and System Administration in Oracle HRMS (Canada)
– PA Request (Govt HR)
– People
– Position Description (Govt HR)
– Position
– Top node HRMS windows
1 – 13Extend and Customize
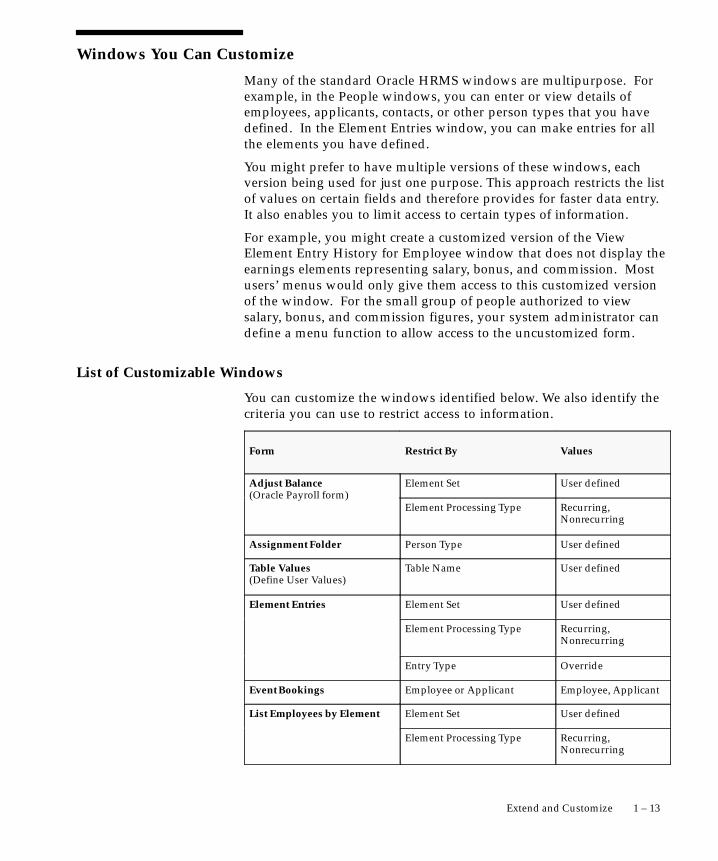
Windows You Can Customize
Many of the standard Oracle HRMS windows are multipurpose. Forexample, in the People windows, you can enter or view details ofemployees, applicants, contacts, or other person types that you havedefined. In the Element Entries window, you can make entries for allthe elements you have defined.
You might prefer to have multiple versions of these windows, eachversion being used for just one purpose. This approach restricts the listof values on certain fields and therefore provides for faster data entry.It also enables you to limit access to certain types of information.
For example, you might create a customized version of the ViewElement Entry History for Employee window that does not display theearnings elements representing salary, bonus, and commission. Mostusers’ menus would only give them access to this customized versionof the window. For the small group of people authorized to viewsalary, bonus, and commission figures, your system administrator candefine a menu function to allow access to the uncustomized form.
List of Customizable Windows
You can customize the windows identified below. We also identify thecriteria you can use to restrict access to information.
Form Restrict By Values
Adjust Balance Element Set User defined(Oracle Payroll form)
Element Processing Type Recurring,Nonrecurring
Assignment Folder Person Type User defined
Table Values(Define User Values)
Table Name User defined
Element Entries Element Set User defined
Element Processing Type Recurring,Nonrecurring
Entry Type Override
Event Bookings Employee or Applicant Employee, Applicant
List Employees by Element Element Set User defined
Element Processing Type Recurring,Nonrecurring

1 – 14 Customizing, Reporting, and System Administration in Oracle HRMS (Canada)
ValuesRestrict ByForm
List People by Special Employee or Applicant Employee, ApplicantInformation
Special Information Type User defined
Person Type User defined
Organization Organization Classification List of OrganizationClassifications
Payroll and AssignmentProcesses(Oracle Payroll form)
Action Type List of Action Types(e.g. Run,Pre–payments,Reversal)
People Folder Person Type User defined
People (PERWSEPI), Peopleand Assignment(PERWSHRG)
Person Function Enter Employee,Enter Applicant, Hirepeople already onsystem
Person Type User defined
Position Occupancy Folder Employee or Applicant Employee, Applicant
Run QuickPaint Report QuickPaint Inquiry User defined
Person Type User defined
Assignments Assignment Sets,Assignments
Special Information Special Information Type User defined
View Element Entry History Element Set User definedfor Employee
Element Processing Type Recurring,Nonrecurring
Extra AssignmentInformation
Extra Information Type User defined
Extra Job Information Extra Information Type User defined
Extra Location Information Extra Information Type User defined
Extra People Information Extra Information Type User defined
Extra Position Information Extra Information Type User defined
Types of Data Restrictions
You can restrict the information that appears in a customized windowby the following sorts of criteria:

1 – 15Extend and Customize
• Element processing type (recurring or nonrecurring)
• Element set (user defined)
• Person function (enter employee, enter applicant, hire someoneon system)
• Person type (user defined)
• Special information type (user defined)
• Organization classification
• Employee or applicant
• QuickPaint report (user defined)
• Extra Information Type (user defined)
If you want to restrict the data by a user defined information type, youmust create it first:
• To restrict by element set, create the set in the Element andDistribution Set window.
• To restrict by QuickPaint Report, create the report in the DefineQuickPaint Report window.
See: Defining QuickPaint Reports: page 4 – 13
• To restrict by Special Information Type, define your informationtype as an instance of the Personal Analysis key flexfield.
See: Setting Up Special Information, Managing People UsingOracle HRMS
• To restrict by person types, define your user person types in thePerson Types window.
See: Defining Person Types, Managing People Using Oracle HRMS
• To restrict by Extra Information Type, define your informationtype as an instance of the appropriate extra information flexfield.
See: Setting Up Extra Information Types (Excluding OrganizationEITs): page 1 – 86
1 – 16 Customizing, Reporting, and System Administration in Oracle HRMS (Canada)
Flexfields
Flexfields are flexible fields that enable you to customize and extendOracle Applications by adding fields to windows. There are two typesof flexfield:
• Key flexfields enable you to define additional information youwant to record in existing fields.
• Descriptive flexfields enable you to add fields to windows torecord additional information.
Extra Information Types (EITs) are a type of descriptive flexfieldthat enable you to set up unlimited amounts of extra informationfor six of the most important entities in Oracle HRMS:
You can set up each flexfield to contain a number of segments, whichact like separate fields.
When a user clicks in a flexfield you have set up, a window opens,displaying the segments that you have defined. For each segment, youcan define:
• Its prompt
• The type of data it can contain
• The values a user can enter
You can provide a list or range of valid values. You also control the sizeand display characteristics of each segment and the sequence in whichthe segments appear.

1 – 17Extend and Customize
User Definable Key Flexfields
In Oracle HRMS there are six user definable key flexfields, for each ofwhich you can define up to 30 segments:
• Job
• Position
• Grade
• People Group
• Personal Analysis
• Cost Allocation
The Personal Analysis key flexfield is different from the others. Youcan set up an unlimited number of structures for this flexfield.
Note: Each separate structure can have up to 30 segments.
How Oracle HRMS Uses Key Flexfields
Oracle HRMS uses key flexfields in a number of distinct ways:
Unique Identifiers
The Job, Position, and Grade Name flexfields let you create a uniquename, which is a combination of separate components or segments.You use these flexfields when you are defining the work structures thatexist in your enterprise.
Suggestion: When you are defining your requirements forthese key flexfields you should consider the following points.
– The task of defining the segment combinations is normallyrestricted to one or two users only. Therefore, you may notneed to use value sets, or cross validation rule options tocontrol the values that can be entered.
– The names that users see are made up of a combination ofsegment values. The segment values are displayed, not themeanings.
– Avoid segments containing information that may changeregularly. There is no history of changes to thecombinations you create. For example, do not defineminimum and maximum values for grades as segments ofthe Grade flexfield.
1 – 18 Customizing, Reporting, and System Administration in Oracle HRMS (Canada)
Analysis Information
The People Group and Personal Analysis flexfields let you add keyinformation to records of employee assignments and people. You canuse the individual segments of these flexfields to identify or report onspecific groups of people.
Payroll Costing
The Cost Allocation key flexfield is used to collect and to accumulatecosts associated with running a payroll.
What You Must Set Up
The key flexfields are central to Oracle HRMS, therefore you mustcreate certain definitions before you can set up your Business Group.
Job, Position, And Grade Key Flexfields
• You can only define one structure per Business Group for each ofthese flexfields.
• Use of these flexfields is optional, but almost all Oracle HRMSinstallations use job and grade. Positions are used most often inlarge, highly structured enterprises, such as those in the areas ofgovernment, education, and health care.
• You must define a structure name for these three flexfields beforeyou can define a Business Group.
• You associate these structures with a Business Group in theBusiness Group Information window, which opens from theOrganization window.
People Group Key Flexfield
• You can only define one structure per Business Group for thisflexfield.
• You do not create separate combinations of segments for thePeople Group flexfield. You enter values for each employee aspart of the employee assignment.
• You must define a structure name for this flexfield before youcan define a Business Group.
• You must define at least one segment for the People Groupflexfield in order to be able to use the Assignment window.
Personal Analysis Key Flexfield
• You can create any number of structures per Business Group forthis flexfield. Each one represents a Special Information Type.

1 – 19Extend and Customize
• You do not need to define any structures for the PersonalAnalysis flexfield before you can use Oracle HRMS.
• You link each structure to a Business Group in the SpecialInformation Types window while you are logged on to thatBusiness Group.
• You can customize windows to restrict access to specificInformation Types, such as medical or disciplinary information.
Cost Allocation Key Flexfield
• You can only define one structure per Business Group for thisflexfield.
• You can control the levels at which users can enter costinformation by using the flexfield qualifiers.
• You must define a structure name for this flexfield before youcan define a Business Group.
• A number of windows in Oracle HRMS check for the existenceof a valid flexfield structure for Cost Allocation. You mustdefine at least one segment for your Cost Allocation flexfield.
See: Oracle Applications Flexfields Guide

1 – 20 Customizing, Reporting, and System Administration in Oracle HRMS (Canada)
User Definable Descriptive Flexfields
The predefined fields in Oracle HRMS windows are designed to meetyour core information requirements. However, like all enterprises, youmay have special requirements that are best met by fields that youdesign yourself. Oracle HRMS provides a flexible mechanism calleddescriptive flexfields to enable you to add fields to windows.
All window blocks in which you can enter information contain a userdefinable descriptive flexfield. You decide in which blocks you want torecord additional information. Each user definable descriptive flexfieldhas 20 segments that you can define. After you define a descriptiveflexfield, Oracle HRMS treats the segments as part of the window.
The following figure illustrates the distinctive appearance ofdescriptive flexfields. When users click in a flexfield that you have setup, a window opens, displaying up to 20 segments that you havedefined.
Figure 1 – 3Recognizing a Descriptive Flexfield
Segments
For each segment, you can define:
• Its prompt
• The type of data it can contain
• The values a user can enter
You can provide a list or range of valid values. You also control thesize and display characteristics of each segment and the order in whichthe segments appear.
Types of Descriptive Flexfield
You can define two types of descriptive flexfield segments:
• Global segments, which always appear in the window.
• Context sensitive segments, that appear only when a definedcontext exists. You can prompt the user to provide the context,or you can provide the context automatically from a referencefield in the same block.

☞
1 – 21Extend and Customize
For example, a segment to hold information about an employee’sdisability might appear only when the Disabled field is checked.
Attention: Some descriptive flexfields appear in more thanone window. For example, the Additional Evaluation Detailsflexfield appears in the Job Evaluation window and thePosition Evaluation window.
Check all of the windows that use a descriptive flexfield beforeyou define any of the segments. This is especially important ifyou intend to make the flexfield context sensitive to anotherfield. You must ensure that the reference field is present in allof the windows that use the flexfield.
See: Descriptive Flexfield List: page 1 – 22 for a full list of userdefinable descriptive flexfields in Oracle HRMS.
1 – 22 Customizing, Reporting, and System Administration in Oracle HRMS (Canada)
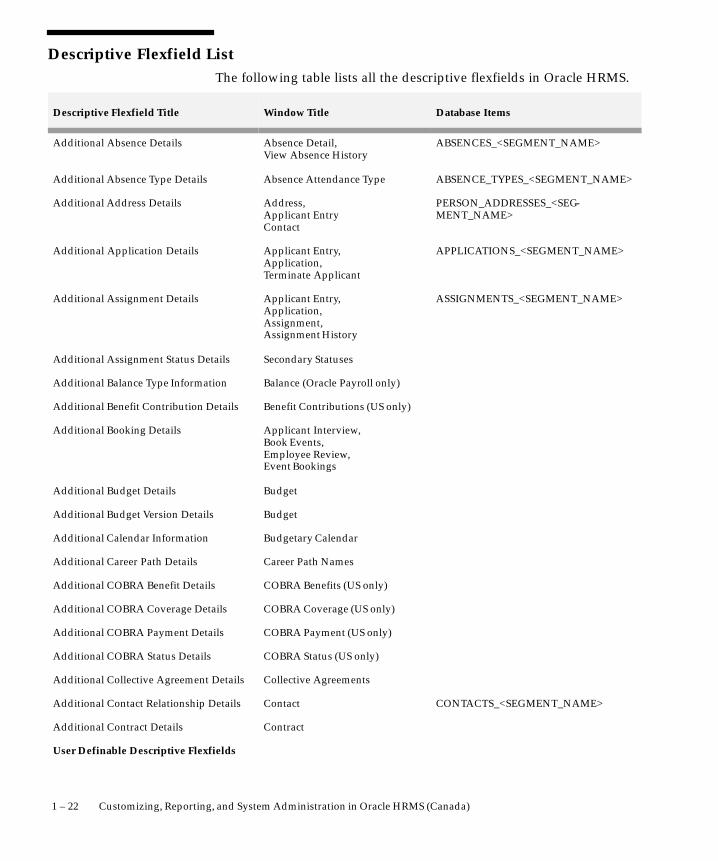
Descriptive Flexfield ListThe following table lists all the descriptive flexfields in Oracle HRMS.
Descriptive Flexfield Title Window Title Database Items
Additional Absence Details Absence Detail,View Absence History
ABSENCES_<SEGMENT_NAME>
Additional Absence Type Details Absence Attendance Type ABSENCE_TYPES_<SEGMENT_NAME>
Additional Address Details Address,Applicant EntryContact
PERSON_ADDRESSES_<SEG-MENT_NAME>
Additional Application Details Applicant Entry,Application,Terminate Applicant
APPLICATIONS_<SEGMENT_NAME>
Additional Assignment Details Applicant Entry,Application,Assignment,Assignment History
ASSIGNMENTS_<SEGMENT_NAME>
Additional Assignment Status Details Secondary Statuses
Additional Balance Type Information Balance (Oracle Payroll only)
Additional Benefit Contribution Details Benefit Contributions (US only)
Additional Booking Details Applicant Interview,Book Events,Employee Review,Event Bookings
Additional Budget Details Budget
Additional Budget Version Details Budget
Additional Calendar Information Budgetary Calendar
Additional Career Path Details Career Path Names
Additional COBRA Benefit Details COBRA Benefits (US only)
Additional COBRA Coverage Details COBRA Coverage (US only)
Additional COBRA Payment Details COBRA Payment (US only)
Additional COBRA Status Details COBRA Status (US only)
Additional Collective Agreement Details Collective Agreements
Additional Contact Relationship Details Contact CONTACTS_<SEGMENT_NAME>
Additional Contract Details Contract
User Definable Descriptive Flexfields

1 – 23Extend and Customize
Database ItemsWindow TitleDescriptive Flexfield Title
Additional Element Entry Information Adjust Balance (Oracle Payrollonly),Element Entries,View Element Entry History forEmployee
Additional Element Link Information Element Link
Additional Element Type Details Element
Additional Evaluation Details Job,Position
Additional Event Details Applicant Interview,Employee Review,Event Bookings
EVENTS_<SEGMENT_NAME>
Additional Grade Details Grade GRADES_<SEGMENT_NAME>
Additional Job Details Job JOBS_<SEGMENT_NAME>
Additional Letter Details Letter
Additional Location Details Location
Additional Organization Information Organization
Additional Organization Payment MethodDetails
Organizational Payment Method
Additional Organization Structure Detail Organization Hierarchy
Additional Organization Unit Details Organization ORGANIZATION_<SEGMENT_NAME>
Additional Pay Scale Information Pay Scale
Additional Pay Rate Details Grade Rate,Scale Rate
Additional Payroll Details Payroll PAYROLLS_<SEGMENT_NAME>
Additional Period Information Budgetary Calendar,Period Dates (Payroll form)
Additional Period of Service Details Terminate PERIODS_OF_SERVICE_<SEG-MENT_NAME>
Additional Period Type Information Period Types
Additional Person Analysis Details Special Information,List People By Special Information
User Definable Descriptive Flexfields
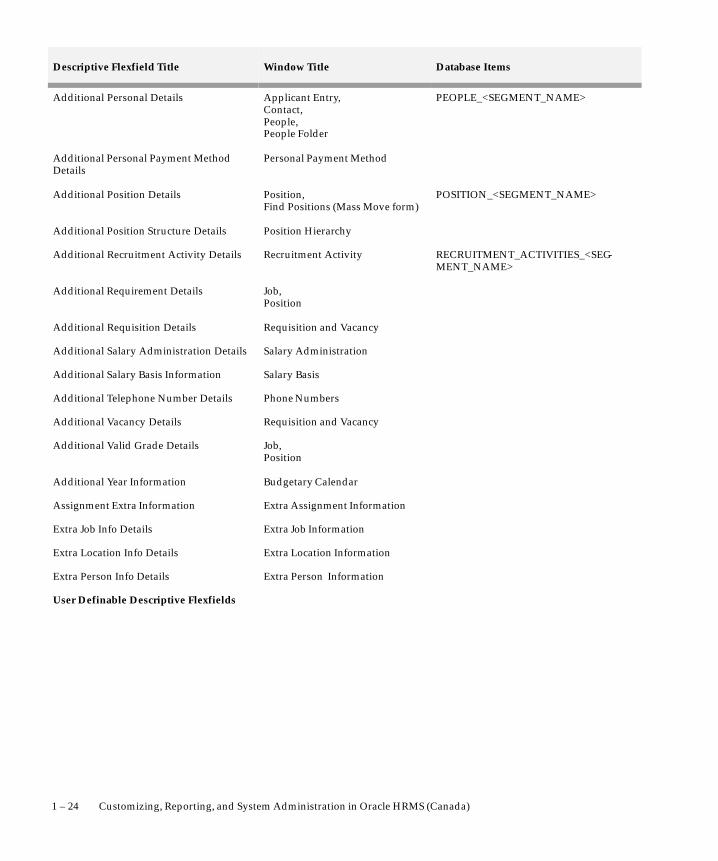
1 – 24 Customizing, Reporting, and System Administration in Oracle HRMS (Canada)
Database ItemsWindow TitleDescriptive Flexfield Title
Additional Personal Details Applicant Entry,Contact,People,People Folder
PEOPLE_<SEGMENT_NAME>
Additional Personal Payment MethodDetails
Personal Payment Method
Additional Position Details Position,Find Positions (Mass Move form)
POSITION_<SEGMENT_NAME>
Additional Position Structure Details Position Hierarchy
Additional Recruitment Activity Details Recruitment Activity RECRUITMENT_ACTIVITIES_<SEG-MENT_NAME>
Additional Requirement Details Job,Position
Additional Requisition Details Requisition and Vacancy
Additional Salary Administration Details Salary Administration
Additional Salary Basis Information Salary Basis
Additional Telephone Number Details Phone Numbers
Additional Vacancy Details Requisition and Vacancy
Additional Valid Grade Details Job,Position
Additional Year Information Budgetary Calendar
Assignment Extra Information Extra Assignment Information
Extra Job Info Details Extra Job Information
Extra Location Info Details Extra Location Information
Extra Person Info Details Extra Person Information
User Definable Descriptive Flexfields

☞
1 – 25Extend and Customize
Descriptive Flexfields and Address Styles
Oracle HRMS supplies two predefined descriptive flexfields to holdaddress information in different styles for different countries. Theseare the:
• Personal Address Information descriptive flexfield: This holdsthe address information of your employee or applicant.
• Location Address descriptive flexfield: This holds the addressinformation of your locations.
Oracle HRMS holds the addresses of people and location separately toenable you to record different information for tax reporting.
You can use these descriptive flexfields to add new address styles or tochange the styles included in Oracle HRMS.
Attention: If you change the predefined styles, your changeswill be overwritten when you upgrade Oracle HRMS. If youadd new styles, your changes may be overwritten if newstartup data contains address styles for these countries.
Address Styles
Address styles vary between countries, so Oracle HRMS providesdescriptive flexfields that use context sensitive segments to hold eachline of an address.
Title Table Name Window Title
Personal AddressInformation
PER_ADDRESSES Address, Applicant Entry
Location Address HR_LOCATIONS Location, Organization
Address Styles in Oracle HRMS
The available address styles are defined as the contexts for theseflexfields. The values used are the territory codes. These codes can befound in the FND_TERRITORIES table. You can have only oneAddress Style for each Territory in the FND_TERRITORIES table.
Address styles are provided as startup data in these flexfields. If yourequire additional address styles, you need to define a new context andsegments.

1 – 26 Customizing, Reporting, and System Administration in Oracle HRMS (Canada)
Extra Information Types (EITs)
Extra Information Types are defined using descriptive flexfields. Youcan set up any number of different EITs for:
• Location
• Job
• Position
• Person
• Assignment
• Organization
Note: EITs for organization are different because you candefine which organization classification the EIT is available for.
For each EIT you can define up to 30 fully validated segments ofinformation (or 20 for organizations).
Note: Oracle HRMS provides some predefined EITs. You mayadd your own information types, but you must not change thedefinitions of the delivered EITs.
Unlike the usual descriptive flexfields, EITs are child entities withseparate tables to hold the information you enter. This means that youcan have multiple instances of an EIT for each main record. When youdefine the EIT, you can specify whether you want to allow multipleinstances. With the exception of organizations, EIT data is viewed andentered in a separate window which you can task flow.
The windows for all the EITs have the common look and feel of all thedescriptive flexfield windows. This means that you can use your newEITs as soon as you save your definitions. Since flexfield definitions arepreserved through upgrades, EITs do not require expensive recoding ofcustom forms with each new release.
Key Flexfield Combinations
EITs are very similar to Special Information Types (SITs). For analyzingpeople’s attributes and job requirements, Oracle enables you to choosewhether to set up extra or special information types, or both. Bothtypes of information use flexfields to define the structure andvalidation of their segments.
However, SITs are stored in a key flexfield combination table where thecombination of segments must be unique – a feature of all keyflexfields. Whereas, EITs are stored in a descriptive flexfield tablewhere the combination of segment values do not need to form a uniquekey.

1 – 27Extend and Customize
This means that EITs have performance advantages in large scale, orglobal implementations where you may want to transfer large volumesof information between separate installations.
Dates and EITs
EITs are not datetracked. Even if the parent entity, for example People,is datetracked, the extra information is not. However, if you want totrack changes to specific EITs you can define date segments for Startand End Dates and use multiple rows of the EIT to track changes.

1 – 28 Customizing, Reporting, and System Administration in Oracle HRMS (Canada)
EITs and Security
Both special and extra information types use CustomForm and taskflow security to restrict access to information. This means that you canrestrict access to the information types as part of a specific userprocess. For example, in a ’Transfer to the UK’ process you might wantto enter additional UK specific information. You could design your userprocess to include a ’UK Info’ window as part of the task flow andrestrict the window to display only the UK information type.
To provide extra security for EITs, you must associate each EIT with theresponsibilities that should have access to the information. Forexample. you might record details of an extended leave of absence inan EIT for an assignment and provide access only to managers whoneed to know.
Restricting Access to Extra Information
You can restrict access to EITs using a combination of the following:
• Using menus and task flows : Without the EIT window a usercannot see or change any extra information for the entity.
• Using CustomForm and task flows: This restricts EITs tospecific user processes.
For example, at the person level you might define EITs to holdmedical details, security information and information requiredfor working in other countries. In this situation you might wantto create two custom task flows. The first with a button forentering only medical details and the second with a button forentering the other types of extra information
• Using responsibility level security: For each responsibility, youmust select the EITs to be viewed. CustomForm and task flowrestrictions provide additional security. You might define that aresponsibility can access an EIT, but users of this responsibilitywon’t be able to view the extra information unless they haveaccess to a window that displays it.
Note: This security does not apply to extra information onorganizations.
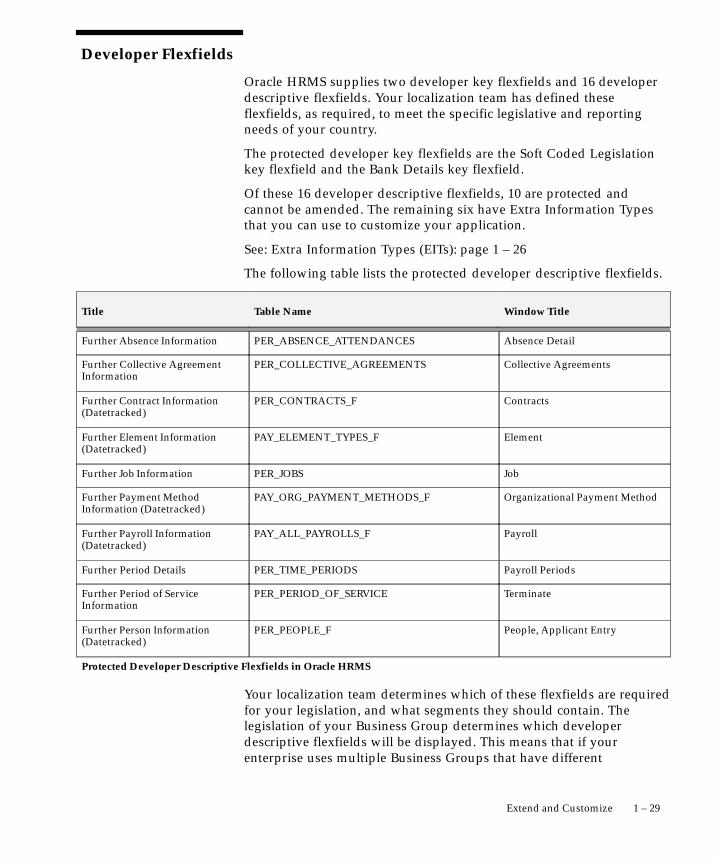
1 – 29Extend and Customize
Developer Flexfields
Oracle HRMS supplies two developer key flexfields and 16 developerdescriptive flexfields. Your localization team has defined theseflexfields, as required, to meet the specific legislative and reportingneeds of your country.
The protected developer key flexfields are the Soft Coded Legislationkey flexfield and the Bank Details key flexfield.
Of these 16 developer descriptive flexfields, 10 are protected andcannot be amended. The remaining six have Extra Information Typesthat you can use to customize your application.
See: Extra Information Types (EITs): page 1 – 26
The following table lists the protected developer descriptive flexfields.
Title Table Name Window Title
Further Absence Information PER_ABSENCE_ATTENDANCES Absence Detail
Further Collective AgreementInformation
PER_COLLECTIVE_AGREEMENTS Collective Agreements
Further Contract Information(Datetracked)
PER_CONTRACTS_F Contracts
Further Element Information(Datetracked)
PAY_ELEMENT_TYPES_F Element
Further Job Information PER_JOBS Job
Further Payment MethodInformation (Datetracked)
PAY_ORG_PAYMENT_METHODS_F Organizational Payment Method
Further Payroll Information(Datetracked)
PAY_ALL_PAYROLLS_F Payroll
Further Period Details PER_TIME_PERIODS Payroll Periods
Further Period of ServiceInformation
PER_PERIOD_OF_SERVICE Terminate
Further Person Information(Datetracked)
PER_PEOPLE_F People, Applicant Entry
Protected Developer Descriptive Flexfields in Oracle HRMS
Your localization team determines which of these flexfields are requiredfor your legislation, and what segments they should contain. Thelegislation of your Business Group determines which developerdescriptive flexfields will be displayed. This means that if yourenterprise uses multiple Business Groups that have different
1 – 30 Customizing, Reporting, and System Administration in Oracle HRMS (Canada)
legislations, different developer descriptive flexfields will be displayedfor Business Groups of each legislation.
Warning: Do not attempt to alter the definitions of theseprotected flexfields. These definitions are a fundamental part ofOracle HRMS. Any change to them may lead to errors in theoperating of the system.
It is possible that Oracle HRMS will use other segments ofthese flexfields in the future. Therefore, do not add segments toany protected flexfield. This can affect your ability to upgradeyour system in the future.
Soft Coded Legislation Key Flexfield
This key flexfield holds legislation–specific information. The legislationof your Business Group determines the flexfield structure that you see.
Each localization team will define a flexfield structure, if required,which will enable you to enter information specific to your legislationat the employee assignment level.
Bank Details Key Flexfield
This flexfield holds legislation–specific bank account information. Thelegislation of your Business Group determines the flexfield structurethat you see. Each localization team defines a flexfield structure thatallows you to record the bank account information relevant to yourlegislation. You enter this information in the Organizational PaymentMethod window and Personal Payment Method window.

1 – 31Extend and Customize
User–Defined Tables
You may need to set up your own tables in your Oracle HRMS system,to hold data such as wage codes, shift differentials, or the amounts ofcertain deductions. You can set up all the tables you require using theTable Structure window. Using Oracle FastFormula, you can writesimple formulas for validating entries made in table columns.
Notice that the Oracle HRMS user–defined tables are different from thedatabase tables of the Oracle Relational Database Management System.When you set up a user table, you define the rows as well as thecolumns, like a matrix. For example, you could set up a table showingbonus amounts (the column) against years of service (the rows).
Entering and Accessing Table Values
To enter values in tables, you use the Table Values window. Tableentries and rows are both datetracked, so you can delete existingentries or rows, and add new ones, as of an effective date.
Oracle HRMS provides the GET_TABLE_VALUE function to accesstable values. You can yourself write formulas that include calls to thisfunction, perhaps for QuickPaint inquiries. Also, it is easy for MISpersonnel to write PL/SQL statements that call this function, to includein the code for a form or report process, for example.
1 – 32 Customizing, Reporting, and System Administration in Oracle HRMS (Canada)
Lookups
Providing lists of valid values for certain items of information has twokey advantages:
• It ensures that all users use the same terminology, which makesit easier to inquire and report on the information.
• It speeds up data entry because you can enter just enough toidentify the value, and the system completes the entry.
In Oracle HRMS, a list of values is called a Lookup type. Each valuecomprises a code and a meaning. For example:
Lookup Type Code Meaning
YES_NO Y Yes
N No
The codes are used internally; users do not see them. There is amaximum of 250 Lookups for each Lookup type.
Predefined Lookup Types
A number of Lookup types are included in Oracle HRMS. Somecontain codes as startup data. You can never delete these codes, butyou can change their meaning. For some Lookup types, you can alsodisable the codes that are supplied. Your ability to disable codes andadd new codes is determined by the access level of the Lookup type:
You can add codes and you can disable suppliedcodes.
You can add new codes, but you cannot disablesupplied codes because the system uses them.
You can neither add codes nor disable suppliedcodes. You can only change the meaning ordescription of supplied codes.
See User and Extensible Lookups: page 1 – 34 for a list of thepredefined Lookup types with an access level of User or Extensible.
You can also create your own Lookup Types in the Lookup typewindow. These all have an access level of User.
Global and Local Lookup Types
If you are using Cross Business Group Responsibility security Lookuptypes may be either global or local:
User
Extensible
System
1 – 33Extend and Customize
• Global lookup types are available to all Business Groups
• Local lookup types are only available to the BusinessGroup/Security Group in which they are created.
Local lookups can be implemented in each of the following ways:
• You can create an override. This means that you retain theglobal name for the lookup type, but supply local valuesappropriate for your business group. The extent to which youcan do this is determined by the access level for the lookup type.
• You can create an entirely new lookup type with lookup valuesthat are only applicable to your local business group.
When you connect to any Business Group you will therefore haveaccess to each of the following:
• The global lookup types and values
• Local overrides to the global lookup values
• Local lookup types and values
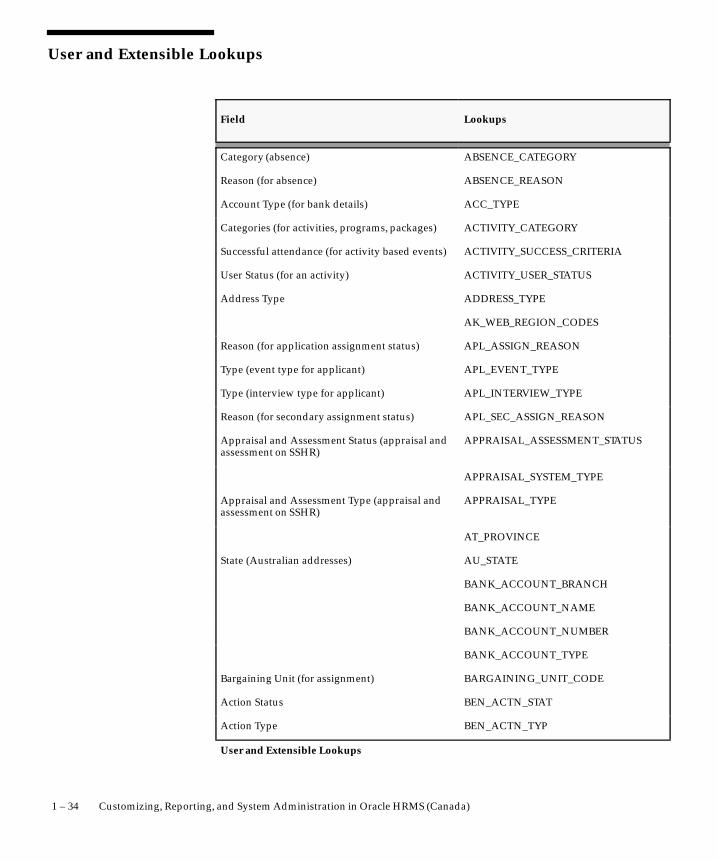
1 – 34 Customizing, Reporting, and System Administration in Oracle HRMS (Canada)
User and Extensible Lookups
Field Lookups
Category (absence) ABSENCE_CATEGORY
Reason (for absence) ABSENCE_REASON
Account Type (for bank details) ACC_TYPE
Categories (for activities, programs, packages) ACTIVITY_CATEGORY
Successful attendance (for activity based events) ACTIVITY_SUCCESS_CRITERIA
User Status (for an activity) ACTIVITY_USER_STATUS
Address Type ADDRESS_TYPE
AK_WEB_REGION_CODES
Reason (for application assignment status) APL_ASSIGN_REASON
Type (event type for applicant) APL_EVENT_TYPE
Type (interview type for applicant) APL_INTERVIEW_TYPE
Reason (for secondary assignment status) APL_SEC_ASSIGN_REASON
Appraisal and Assessment Status (appraisal andassessment on SSHR)
APPRAISAL_ASSESSMENT_STATUS
APPRAISAL_SYSTEM_TYPE
Appraisal and Assessment Type (appraisal andassessment on SSHR)
APPRAISAL_TYPE
AT_PROVINCE
State (Australian addresses) AU_STATE
BANK_ACCOUNT_BRANCH
BANK_ACCOUNT_NAME
BANK_ACCOUNT_NUMBER
BANK_ACCOUNT_TYPE
Bargaining Unit (for assignment) BARGAINING_UNIT_CODE
Action Status BEN_ACTN_STAT
Action Type BEN_ACTN_TYP
User and Extensible Lookups

1 – 35Extend and Customize
LookupsField
Action Type Due Date BEN_ACTN_TYP_DUE_DT
Activity Reference Period BEN_ACTY_REF_PERD
Activity Type BEN_ACTY_TYP
Age to Use BEN_AGE_TO_USE_CD
BEN_BENMINGLE_MD
BEN_BENTMPCM_MD
Block BEN_BLOCK
Boundary Period BEN_BNDRY_PERD
Benefits Balance Usage BEN_BNFTS_BAL_USG
Operation BEN_BNFT_RT_TYP
Restrict Change Based On BEN_BNFT_R_OPT_RSTRN
Certification Type BEN_BNF_CTFN_TYP
Default Beneficiary Code BEN_BNF_DFLT
Plan Beneficiary Designation Code BEN_BNF_DSGN
Measures Allowed BEN_BNF_PCT_AMT_ALWD
Benefit Type BEN_BNF_TYP
Expression BEN_BOOL
Close Enrollment Date to Use BEN_CLS_ENRT_DT_TO_USE
BEN_CMCD_REF_PERD
BEN_CMPNT_REF
Claims to Coverage or Balance BEN_CMPR_CLMS_TO_CVG_OR_BAL
BEN_CMP_ENRT_ACTN_TYP
BEN_CM_TRGR_SRC
Type of Trigger BEN_CM_TRGR_TYP
Usage BEN_CM_USG
BEN_CM_USG_ARA
Alternate Value BEN_COMP_ALT_VAL_T0_USE
User and Extensible Lookups

1 – 36 Customizing, Reporting, and System Administration in Oracle HRMS (Canada)
LookupsField
Compensation Category BEN_COMP_TYP
Type BEN_CRT_ORDR_TYP
BEN_CTL_TTL_TYP
Value Calculation Rule BEN_CVG_CALC_MTHD_RL
BEN_CVG_DET_DT
Validate BEN_DB_UPD_MD
Deduction Schedule BEN_DED_SCHED
Default Enrollment Code BEN_DFLT_ENRT
Default Enrollment Method Code BEN_DFLT_ENRT_MTHD
Default Excess Treatment BEN_DFLT_EXCS_TRTMT
Assign Code BEN_DFLT_TO_ASN_PNDG_CTFN
Delivery Medium BEN_DLVRY_MED
Delivery Method BEN_DLVRY_MTHD
BEN_DLVRY_SCHED_INFO
Dependent Coverage Certification Type BEN_DPNT_CVG_CTFN_TYP
Dependent Coverage End Date BEN_DPNT_CVG_END
Dependent Coverage Start Date BEN_DPNT_CVG_STRT
BEN_DRVBL_FCTR_PRPS
BEN_DRVBL_FCTR_UOM_PRPS
Type BEN_DSGN_TYP
BEN_DTA_TYP
BEN_DY_NAME
BEN_ELIG_ENRL
Eligible/Ineligible BEN_ELIG_INELIG
BEN_ENRL_DET_DT
BEN_ENRT
Enrollment Certification Type BEN_ENRT_CTFN_TYP
User and Extensible Lookups

1 – 37Extend and Customize
LookupsField
Enrollment Coverage End Date Code BEN_ENRT_CVG_END
Enrollment Coverage Start Date Code BEN_ENRT_CVG_STRT
Enrollment Period End Dates Code BEN_ENRT_PERD_END
Enrollment Period Start Dates Code BEN_ENRT_PERD_STRT
BEN_ENRT_RSLT_MTHD
BEN_ENRT_R_BNFT_CTFN
Enrollment Type BEN_ENRT_TYP_CYCL
Foreign Earning/Deduction Type BEN_ERG_DED
Collapsing Logic Code BEN_EVAL
Life Event Occurred Date Code BEN_EVAL_DET
Event BEN_EVENT
Excess Treatment BEN_EXCS_TRTMT
Change Event BEN_EXT_CHG_EVT
Format Mask BEN_EXT_FRMT_MASK
Run Status BEN_EXT_STAT
Condition (Optional) Where BEN_EXT_TTL_COND_OPER
Total Information Function BEN_EXT_TTL_FNCTN
Field BEN_FIELD
BEN_FILE_CTL_TTL_TYP
BEN_FILE_DTA_TYP
Type BEN_FILE_RCRD_TYP
BEN_FILE_TYP
BEN_FILE_UPDT_TYP
BEN_FL_TM_PT_TM
Family Member Code BEN_FMLY_MMBR
Frequency BEN_FREQ
BEN_FRST_PYMT_DUE_DET
User and Extensible Lookups

1 – 38 Customizing, Reporting, and System Administration in Oracle HRMS (Canada)
LookupsField
Usage BEN_GD_OR_SVC_USG
Type BEN_GD_R_SVC_TYP
BEN_GNDR
Group Relationship BEN_GRP_RLSHP
Health Service BEN_HLTH_CARE_SVC_TYP
Alternate Value BEN_HRS_ALT_VAL_TO_USE
Determination Code BEN_HRS_WKD_DET
Source BEN_HRS_WKD_SRC
Subject to Imputed Income BEN_IMPTD_INCM_CALC
Imputed Income Type BEN_IMPTD_INCM_TYP
BEN_INELG_RSN
BEN_INFO_SRC
BEN_INTRFC_TYP
BEN_LER_CHG_DPNT_CVG
Timeliness Evaluation BEN_LER_TMLNS_EVAL
Timeliness Period BEN_LER_TMLNS_PERD
Type BEN_LER_TYP
Determination BEN_LMT_DET
Alternate Value BEN_LOS_ALT_VAL_TO_USE
Determination Code BEN_LOS_DET
Date to Use Code BEN_LOS_DT_TO_USE
BEN_MED_CNTNT_TYP
BEN_MED_FMT_TYP
BEN_MOLY_PYMT_DUE_DY_NUM
Maximum Enrollment Determination Date Code BEN_MX_POE_DET_DT
BEN_MX_WTG_DT_TO_USE
BEN_MX_WTG_PERD_PRTE_DET
User and Extensible Lookups
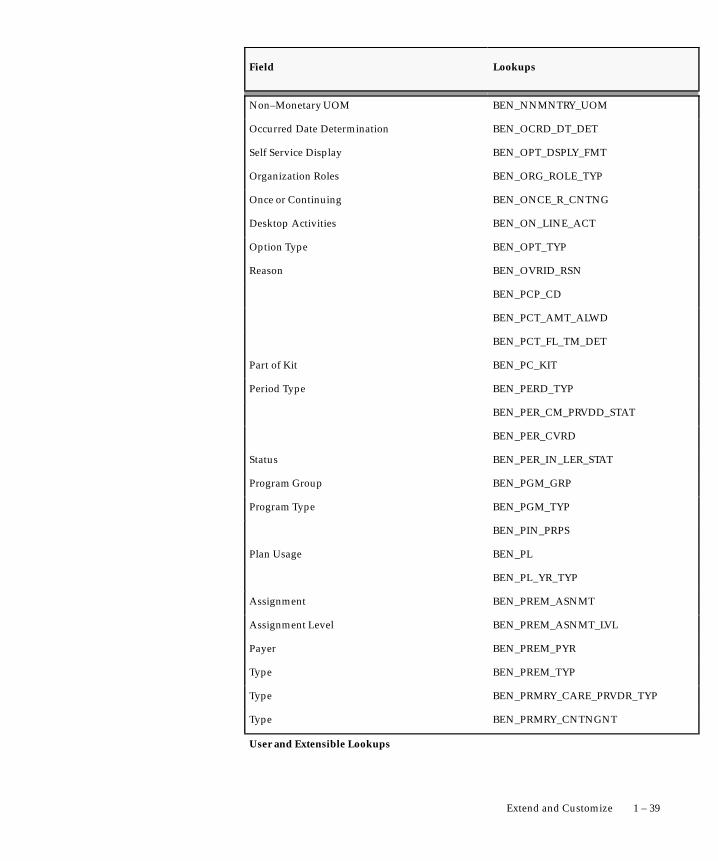
1 – 39Extend and Customize
LookupsField
Non–Monetary UOM BEN_NNMNTRY_UOM
Occurred Date Determination BEN_OCRD_DT_DET
Self Service Display BEN_OPT_DSPLY_FMT
Organization Roles BEN_ORG_ROLE_TYP
Once or Continuing BEN_ONCE_R_CNTNG
Desktop Activities BEN_ON_LINE_ACT
Option Type BEN_OPT_TYP
Reason BEN_OVRID_RSN
BEN_PCP_CD
BEN_PCT_AMT_ALWD
BEN_PCT_FL_TM_DET
Part of Kit BEN_PC_KIT
Period Type BEN_PERD_TYP
BEN_PER_CM_PRVDD_STAT
BEN_PER_CVRD
Status BEN_PER_IN_LER_STAT
Program Group BEN_PGM_GRP
Program Type BEN_PGM_TYP
BEN_PIN_PRPS
Plan Usage BEN_PL
BEN_PL_YR_TYP
Assignment BEN_PREM_ASNMT
Assignment Level BEN_PREM_ASNMT_LVL
Payer BEN_PREM_PYR
Type BEN_PREM_TYP
Type BEN_PRMRY_CARE_PRVDR_TYP
Type BEN_PRMRY_CNTNGNT
User and Extensible Lookups
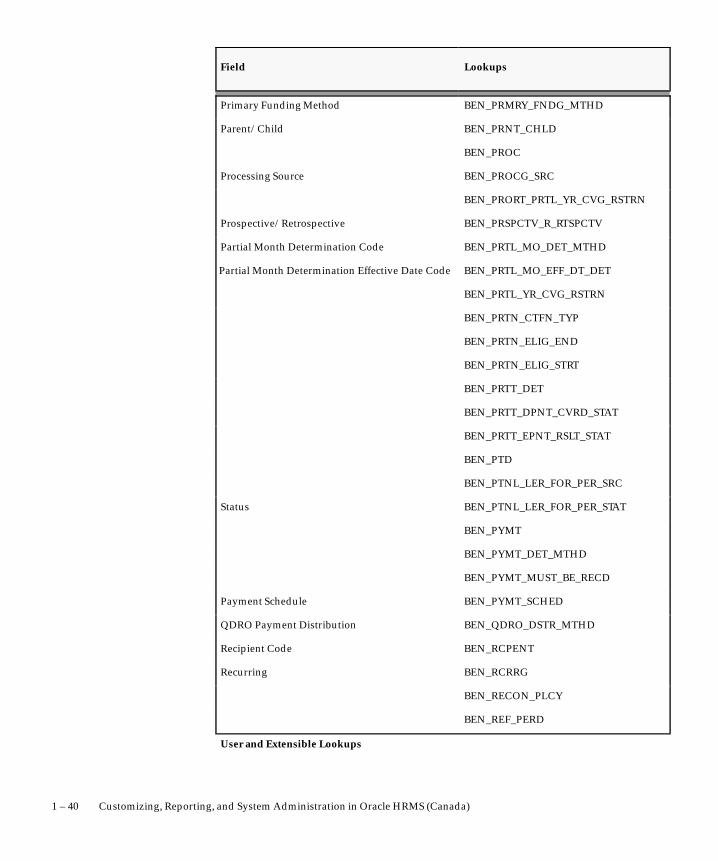
1 – 40 Customizing, Reporting, and System Administration in Oracle HRMS (Canada)
LookupsField
Primary Funding Method BEN_PRMRY_FNDG_MTHD
Parent/Child BEN_PRNT_CHLD
BEN_PROC
Processing Source BEN_PROCG_SRC
BEN_PRORT_PRTL_YR_CVG_RSTRN
Prospective/Retrospective BEN_PRSPCTV_R_RTSPCTV
Partial Month Determination Code BEN_PRTL_MO_DET_MTHD
Partial Month Determination Effective Date Code BEN_PRTL_MO_EFF_DT_DET
BEN_PRTL_YR_CVG_RSTRN
BEN_PRTN_CTFN_TYP
BEN_PRTN_ELIG_END
BEN_PRTN_ELIG_STRT
BEN_PRTT_DET
BEN_PRTT_DPNT_CVRD_STAT
BEN_PRTT_EPNT_RSLT_STAT
BEN_PTD
BEN_PTNL_LER_FOR_PER_SRC
Status BEN_PTNL_LER_FOR_PER_STAT
BEN_PYMT
BEN_PYMT_DET_MTHD
BEN_PYMT_MUST_BE_RECD
Payment Schedule BEN_PYMT_SCHED
QDRO Payment Distribution BEN_QDRO_DSTR_MTHD
Recipient Code BEN_RCPENT
Recurring BEN_RCRRG
BEN_RECON_PLCY
BEN_REF_PERD
User and Extensible Lookups
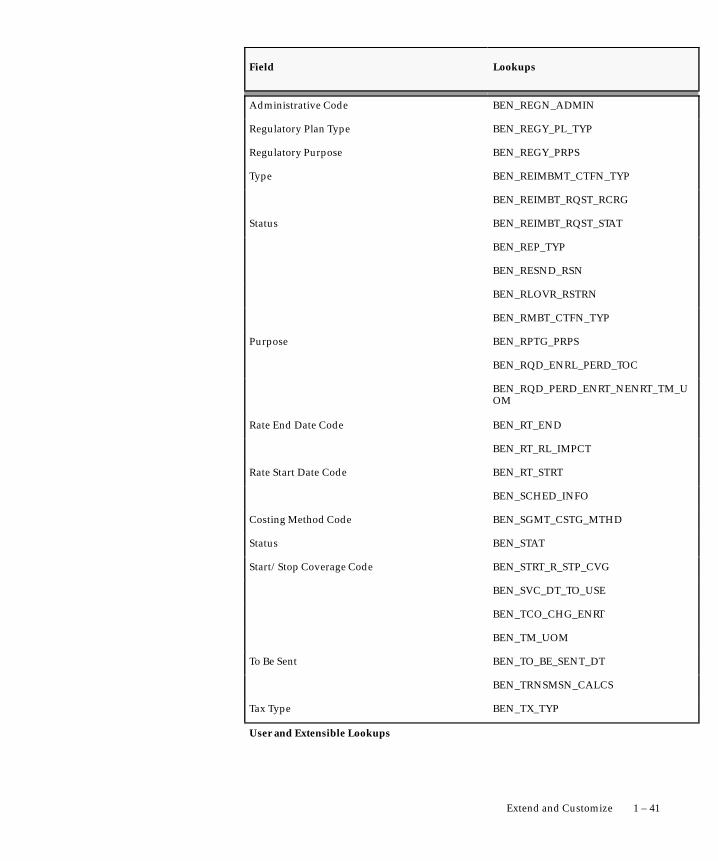
1 – 41Extend and Customize
LookupsField
Administrative Code BEN_REGN_ADMIN
Regulatory Plan Type BEN_REGY_PL_TYP
Regulatory Purpose BEN_REGY_PRPS
Type BEN_REIMBMT_CTFN_TYP
BEN_REIMBT_RQST_RCRG
Status BEN_REIMBT_RQST_STAT
BEN_REP_TYP
BEN_RESND_RSN
BEN_RLOVR_RSTRN
BEN_RMBT_CTFN_TYP
Purpose BEN_RPTG_PRPS
BEN_RQD_ENRL_PERD_TOC
BEN_RQD_PERD_ENRT_NENRT_TM_UOM
Rate End Date Code BEN_RT_END
BEN_RT_RL_IMPCT
Rate Start Date Code BEN_RT_STRT
BEN_SCHED_INFO
Costing Method Code BEN_SGMT_CSTG_MTHD
Status BEN_STAT
Start/Stop Coverage Code BEN_STRT_R_STP_CVG
BEN_SVC_DT_TO_USE
BEN_TCO_CHG_ENRT
BEN_TM_UOM
To Be Sent BEN_TO_BE_SENT_DT
BEN_TRNSMSN_CALCS
Tax Type BEN_TX_TYP
User and Extensible Lookups
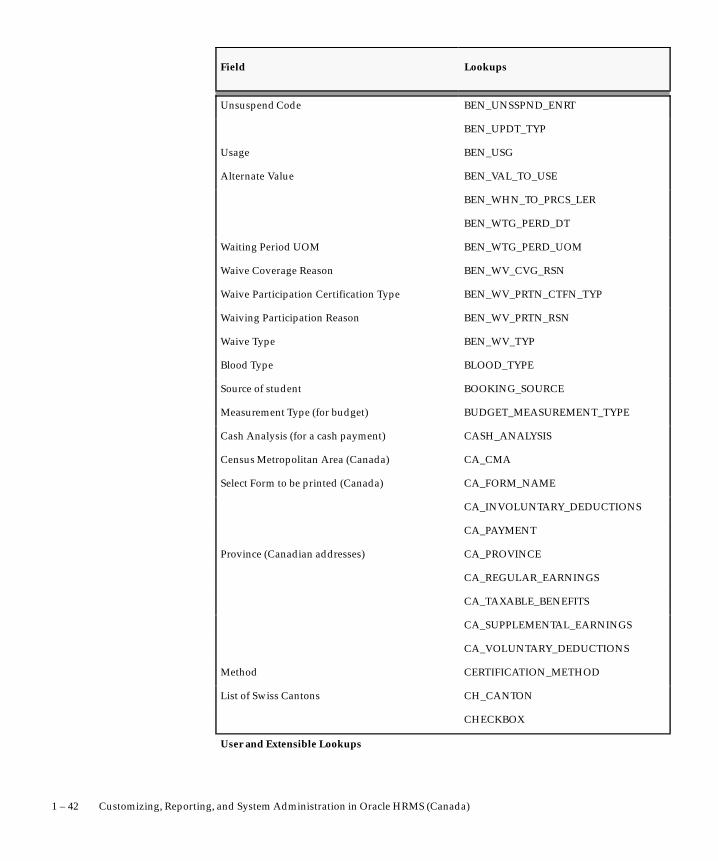
1 – 42 Customizing, Reporting, and System Administration in Oracle HRMS (Canada)
LookupsField
Unsuspend Code BEN_UNSSPND_ENRT
BEN_UPDT_TYP
Usage BEN_USG
Alternate Value BEN_VAL_TO_USE
BEN_WHN_TO_PRCS_LER
BEN_WTG_PERD_DT
Waiting Period UOM BEN_WTG_PERD_UOM
Waive Coverage Reason BEN_WV_CVG_RSN
Waive Participation Certification Type BEN_WV_PRTN_CTFN_TYP
Waiving Participation Reason BEN_WV_PRTN_RSN
Waive Type BEN_WV_TYP
Blood Type BLOOD_TYPE
Source of student BOOKING_SOURCE
Measurement Type (for budget) BUDGET_MEASUREMENT_TYPE
Cash Analysis (for a cash payment) CASH_ANALYSIS
Census Metropolitan Area (Canada) CA_CMA
Select Form to be printed (Canada) CA_FORM_NAME
CA_INVOLUNTARY_DEDUCTIONS
CA_PAYMENT
Province (Canadian addresses) CA_PROVINCE
CA_REGULAR_EARNINGS
CA_TAXABLE_BENEFITS
CA_SUPPLEMENTAL_EARNINGS
CA_VOLUNTARY_DEDUCTIONS
Method CERTIFICATION_METHOD
List of Swiss Cantons CH_CANTON
CHECKBOX
User and Extensible Lookups

1 – 43Extend and Customize
LookupsField
User friendly names for cheque/check–orderingSQL statement
CHEQUE_PROCEDURE
User friendly names for cheque/check–writingSRW2 reports.
CHEQUE_REPORT
Company Age (for salary surveys mappings) COMPANY_AGE
Company Size (for salary surveys) COMPANY_SIZE
Primary Evaluation Method COMPETENCE_EVAL_TYPE
Competence Type COMPETENCE_TYPE
Type (relationship of one person to another) CONTACT
Contract End Reason CONTRACT_END_REASON
Contract Start Reason CONTRACT_START_REASON
Contract Status CONTRACT_STATUS
Contract Status Reason CONTRACT_STATUS_REASON
Contract Types CONTRACT_TYPE
Type (of MIX batch control total) CONTROL_TYPE
Reason a student failed to successfully completean event.
DELEGATE_FAILURE_REASON
User defined Type to categorize developmentevents.
DEV_EVENT_TYPE
DE_REGION
Reason (for element entry) ELE_ENTRY_REASON
Reason (for employee assignment) EMP_ASSIGN_REASON
Employment Category EMP_CAT
Type (of employee event) EMP_EVENT_TYPE
Type (of interview for employee) EMP_INTERVIEW_TYPE
Reason (for secondary assignment status) EMP_SEC_ASSIGN_REASON
Reason (for change in enrollment status) ENROLLMENT_STATUS_REASON
ES_PROVINCE
Ethnic Origin ETH_TYPE
User and Extensible Lookups

1 – 44 Customizing, Reporting, and System Administration in Oracle HRMS (Canada)
LookupsField
System (job or position evaluation system) EVAL_SYSTEM
Measurement In (type for EVAL SYSTEM) EVAL_SYSTEM_MEAS
User defined status for an event EVENT_USER_STATUS
Type (of work pattern exception) EXCEPTION_CATEGORY
Type (of finance line) FINANCE_LINE_TYPE
Type (of formula) FORMULA_TYPE
FR_REGION
Frequency (eg per week, per month) FREQUENCY
Authority (for PAYE details) GB_AUTHORITY
Bank Name GB_BANKS
Certificate (for element NI) GB_CERTIFICATE
Cheque/Check Style GB_CHEQUE_REPORT
County (UK addresses) GB_COUNTY
Pay day type GB_PAY_DAY_TYPE
Pension GB_PENSION
Allows users to to define valid SCON number forNI SCON input
GB_SCON
Sequence (for the BACS process) GB_SORT_SEQUENCE
Date Posted HR_APPLICATION_DATE
Hire Date HR_HIRE_DATE
Date Posted HR_JOB_POSTED_DATE
Batch process used by OTM HXT_BATCH_STATUS
Days of the week HXT_DAY_OF_WEEK
Process modes used by OTM HXT_PROCESS_MODE
IE_COUNTY
Industry (for salary survey) INDUSTRY
Extra Job Information JOB_CATEGORY
User and Extensible Lookups

1 – 45Extend and Customize
LookupsField
Categories of Jobs JOB_CATEGORIES
Reason (for leaving) LEAV_REAS
LOCAL_BAL_FORM_NAME
Marital Status MAR_STATUS
MX_STATE
MY_STATE
North American Industry Code for Canada NAIC
Nationality NATIONALITY
NI Unique Error or Warning NI_UNIQUE_ERROR_WARNING
NL_REGION
NZ_COUNTIES
Name (of organization classification) ORG_CLASS
Organization Type ORG_TYPE
Class Begins OTA_ENROLL_CLASS_DATE
Use to which a work pattern is or may be put PATTERN_PURPOSE
Type of checksum used for deductions batches PAY_PDT_DED_CKSUM
Type of checksum used for earnings deductionsbatches
PAY_PDT_EARN_CKSUM
Type of checksum used for time entry batches PAY_PDT_TIME_CKSUM
Category PER_CATEGORIES
Communication delivery method PER_CM_MTHD
FTE Capacity PER_FTE_CAPACITY
Minimum Service PER_LENGTHS_OF_SERVICE
Relocation PER_RELOCATION_PREFERENCES
Status PER_SUBJECT_STATUSES
Subject PER_SUBJECTS
Work Duration PER_TIME_SCALES
User and Extensible Lookups

1 – 46 Customizing, Reporting, and System Administration in Oracle HRMS (Canada)
LookupsField
Tuition Method PER_TUITION_METHODS
I9 Status PER_US_I9_STATE
Work Hours PER_WORK_HOURS
Work Schedule PER_WORK_SCHEDULE
Rating PERFORMANCE_RATING
Type PHONE_TYPE
Reason (for grade step placement) PLACEMENT_REASON
Position Family POSITION_FAMILY
Status (of reserved position) POSITION_RESERVED_STATUS
Status (of position) POSITION_STATUS
Student Enrollments Priority PRIORITY_LEVEL
Type (of Professional Credits) PROFESSIONAL_CREDIT_TYPE
Source of Proficiency Rating PROFICIENCY_SOURCE
A label given to group events within a program PROGRAM_MEMBERSHIP_GROUP
Reason (for salary proposal) PROPOSAL_REASON
Units (qualifying units for probation period) QUALIFYING_UNITS
Type (of recruitment activity, also used inapplication source)
REC_TYPE
RECON_STATUS
Type (of resource) RESOURCE_TYPE
Reason (a resource is used by an activity) RESOURCE_USAGE_REASON
Survey Age (for salary surveys) SURVEY_AGE
Survey Company (for salary surveys) SURVEY_COMPANY
Job Name (for salary surveys) SURVEY_JOB_NAME
Region (for salary surveys) SURVEY_REGION
Seniority (for salary surveys) SURVEY_SENIORITY
Reason (for terminating application) TERM_APL_REASON
User and Extensible Lookups

1 – 47Extend and Customize
LookupsField
Prefix TITLE
Uses Tobacco (for benefits) TOBACCO_USER
Role (of trainer in event) TRAINER_PARTICIPATION
Center (where event takes place) TRAINING_CENTRE
Type (of unit for event pricing) TRAINING_UNIT
Accrual Start US_ACCRUAL_START_TYPE
Status of request for accommodation US_ADA_STATUSES
Coverage Level (for medical, dental and visionbenefit plans)
US_BENEFIT_COVERAGE
Status (of continued coverage) US_COBRA_STATUS
Reason (for COBRA Termination) US_COBRA_TERM_REASON
Category (within Earnings classification) US_EARNINGS
Category (within Imputed Earningsclassification)
US_IMPUTED_EARNINGS
Category (within Information classification) US_INFORMATION
Category (within Involuntary Deductionsclassification)
US_INVOLUNTARY_DEDUCTIONS
Job Groups US_JOB_GROUPS
Filing Status for local income tax US_LIT_FILING_STATUS
Exemption Reason (for excluding employee fromNew Hire report)
US_NEW_HIRE_EXCEPTIONS
Category (within Nonpayroll Paymentsclassification)
US_PAYMENT
Category (of accrual plan) US_PTO_ACCRUAL
Filing Status for state income tax US_SIT_FILING_STATUS
State (US addresses) US_STATE
Category (within Supplemental Earningsclassification)
US_SUPPLEMENTAL_EARNINGS
Row Type (for Payroll Tables) US_TABLE_ROW_TYPES
US_TAX_REPORT
User and Extensible Lookups
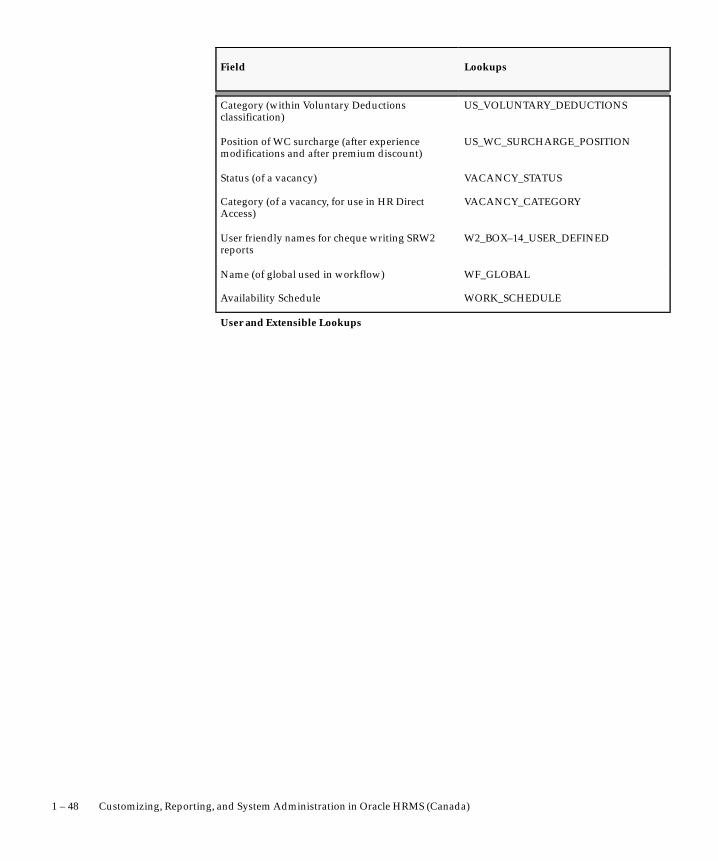
1 – 48 Customizing, Reporting, and System Administration in Oracle HRMS (Canada)
LookupsField
Category (within Voluntary Deductionsclassification)
US_VOLUNTARY_DEDUCTIONS
Position of WC surcharge (after experiencemodifications and after premium discount)
US_WC_SURCHARGE_POSITION
Status (of a vacancy) VACANCY_STATUS
Category (of a vacancy, for use in HR DirectAccess)
VACANCY_CATEGORY
User friendly names for cheque writing SRW2reports
W2_BOX–14_USER_DEFINED
Name (of global used in workflow) WF_GLOBAL
Availability Schedule WORK_SCHEDULE
User and Extensible Lookups
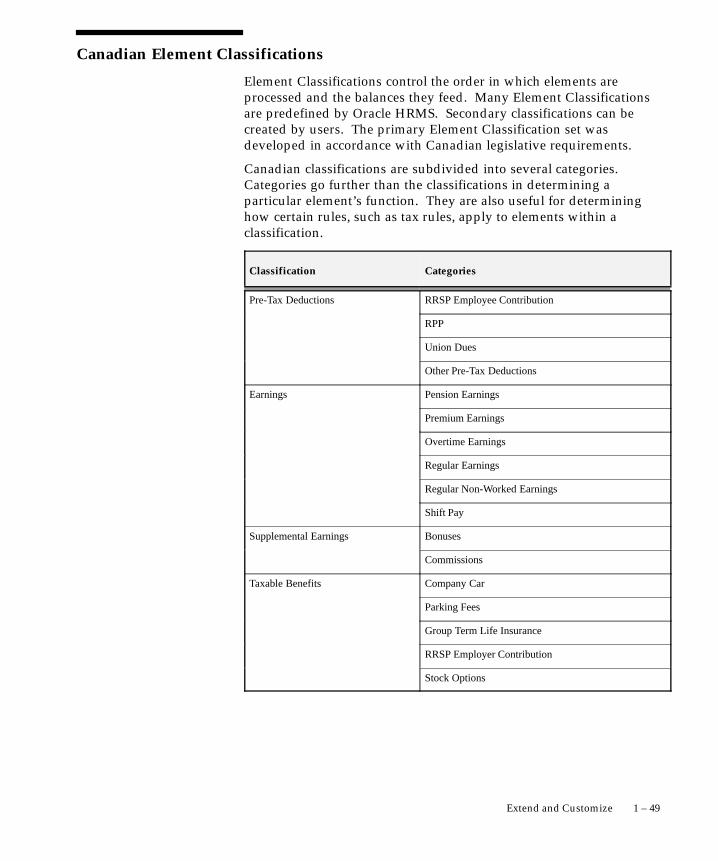
1 – 49Extend and Customize
Canadian Element Classifications
Element Classifications control the order in which elements areprocessed and the balances they feed. Many Element Classificationsare predefined by Oracle HRMS. Secondary classifications can becreated by users. The primary Element Classification set wasdeveloped in accordance with Canadian legislative requirements.
Canadian classifications are subdivided into several categories.Categories go further than the classifications in determining aparticular element’s function. They are also useful for determininghow certain rules, such as tax rules, apply to elements within aclassification.
Classification Categories
Pre-Tax Deductions RRSP Employee Contribution
RPP
Union Dues
Other Pre-Tax Deductions
Earnings Pension Earnings
Premium Earnings
Overtime Earnings
Regular Earnings
Regular Non-Worked Earnings
Shift Pay
Supplemental Earnings Bonuses
Commissions
Taxable Benefits Company Car
Parking Fees
Group Term Life Insurance
RRSP Employer Contribution
Stock Options
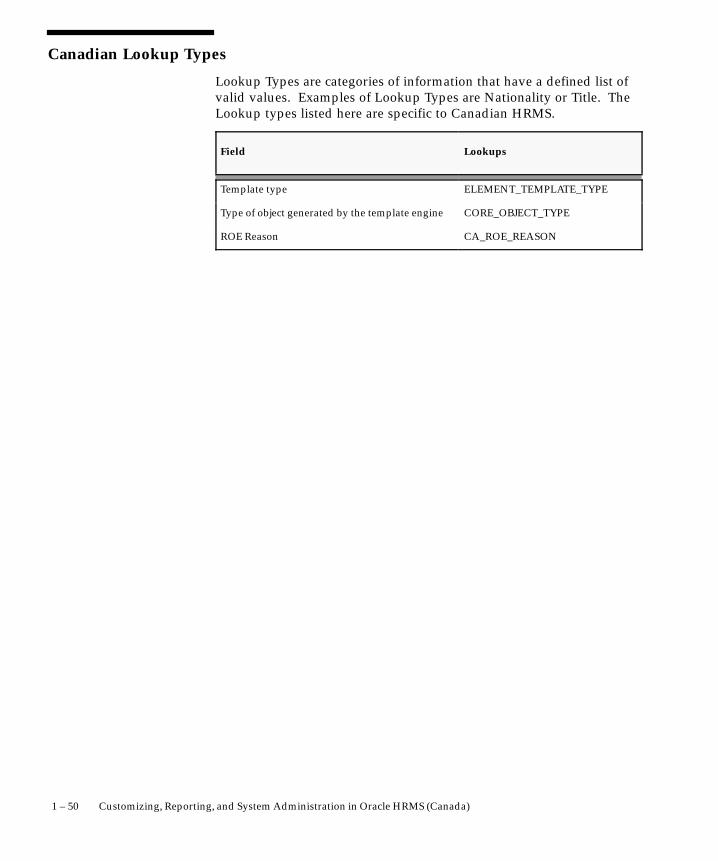
1 – 50 Customizing, Reporting, and System Administration in Oracle HRMS (Canada)
Canadian Lookup Types
Lookup Types are categories of information that have a defined list ofvalid values. Examples of Lookup Types are Nationality or Title. TheLookup types listed here are specific to Canadian HRMS.
Field Lookups
Template type ELEMENT_TEMPLATE_TYPE
Type of object generated by the template engine CORE_OBJECT_TYPE
ROE Reason CA_ROE_REASON
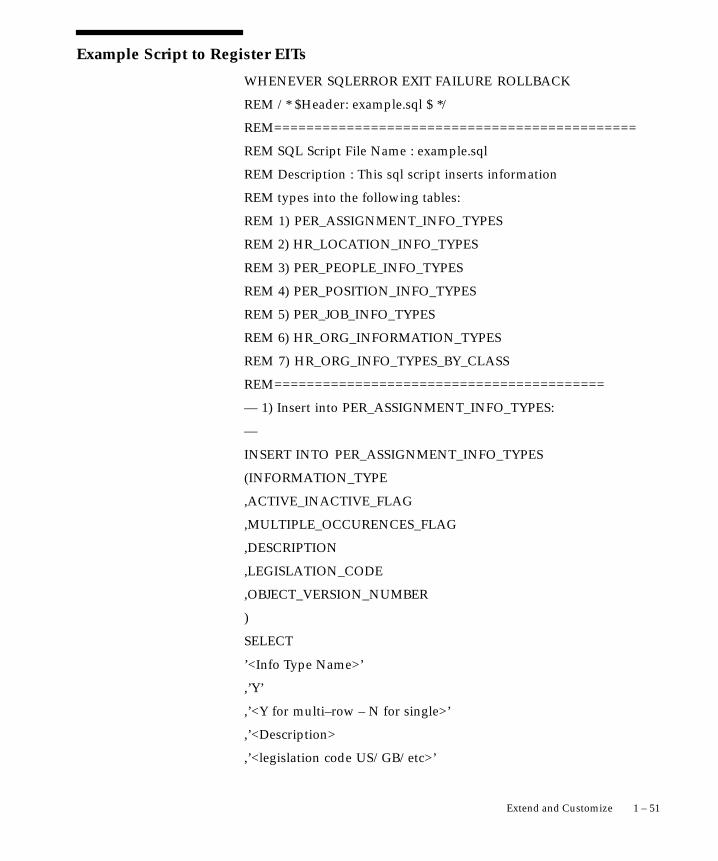
1 – 51Extend and Customize
Example Script to Register EITs
WHENEVER SQLERROR EXIT FAILURE ROLLBACK
REM /* $Header: example.sql $ */
REM =============================================
REM SQL Script File Name : example.sql
REM Description : This sql script inserts information
REM types into the following tables:
REM 1) PER_ASSIGNMENT_INFO_TYPES
REM 2) HR_LOCATION_INFO_TYPES
REM 3) PER_PEOPLE_INFO_TYPES
REM 4) PER_POSITION_INFO_TYPES
REM 5) PER_JOB_INFO_TYPES
REM 6) HR_ORG_INFORMATION_TYPES
REM 7) HR_ORG_INFO_TYPES_BY_CLASS
REM =========================================
–– 1) Insert into PER_ASSIGNMENT_INFO_TYPES:
––
INSERT INTO PER_ASSIGNMENT_INFO_TYPES
(INFORMATION_TYPE
,ACTIVE_INACTIVE_FLAG
,MULTIPLE_OCCURENCES_FLAG
,DESCRIPTION
,LEGISLATION_CODE
,OBJECT_VERSION_NUMBER
)
SELECT
’<Info Type Name>’
,’Y’
,’<Y for multi–row – N for single>’
,’<Description>
,’<legislation code US/GB/etc>’

1 – 52 Customizing, Reporting, and System Administration in Oracle HRMS (Canada)
,1
FROM sys.dual
WHERE not exists (SELECT 1
FROM PER_ASSIGNMENT_INFO_TYPES
WHERE INFORMATION_TYPE = ’<Info TypeName>’);
––2) Insert into HR_LOCATION_INFO_TYPES:––
–
INSERT INTO HR_LOCATION_INFO_TYPES
(INFORMATION_TYPE
,ACTIVE_INACTIVE_FLAG
,MULTIPLE_OCCURENCES_FLAG
,DESCRIPTION
,LEGISLATION_CODE
,OBJECT_VERSION_NUMBER
)
SELECT
’<Location EIT Name>’
,’Y’
,’<Y for multi–row – N for single>’
,’<Description>’
,’<legislation code US/GB/etc>’
,1
FROM sys.dual
WHERE not exists (SELECT 1
FROM HR_LOCATION_INFO_TYPES
WHERE INFORMATION_TYPE = ’<Location EIT
Name>’);
––3) Insert into PER_PEOPLE_INFO_TYPES:––
–
INSERT INTO PER_PEOPLE_INFO_TYPES

1 – 53Extend and Customize
(INFORMATION_TYPE
,ACTIVE_INACTIVE_FLAG
,MULTIPLE_OCCURENCES_FLAG
,DESCRIPTION
,LEGISLATION_CODE
,OBJECT_VERSION_NUMBER
)
SELECT
’<Person EIT Name>’
,’Y’
,’<Y for multi–row – N for single>’
,’<Description>’
,’<legislation code US/GB/etc>’
,1
FROM sys.dual
WHERE not exists (SELECT 1
FROM PER_PEOPLE_INFO_TYPES
WHERE INFORMATION_TYPE = ’<Person EIT Name>’);
––
––4) Insert into PER_POSITION_INFO_TYPES:––
–
INSERT INTO PER_POSITION_INFO_TYPES
(INFORMATION_TYPE
,ACTIVE_INACTIVE_FLAG
,MULTIPLE_OCCURENCES_FLAG
,DESCRIPTION
,LEGISLATION_CODE
,OBJECT_VERSION_NUMBER
)
SELECT
’<Position EIT Name>’

1 – 54 Customizing, Reporting, and System Administration in Oracle HRMS (Canada)
,’Y’
,’<Y for multi–row – N for single>’
,’<Description>’
,’<legislation code US/GB/etc>’
,1
FROM sys.dual
WHERE not exists (SELECT 1
FROM PER_POSITION_INFO_TYPES
WHERE INFORMATION_TYPE = ’<Position EIT Name>’);
––5) Insert into PER_JOB_INFO_TYPES:––
–
INSERT INTO PER_JOB_INFO_TYPES
(INFORMATION_TYPE
,ACTIVE_INACTIVE_FLAG
,MULTIPLE_OCCURENCES_FLAG
,DESCRIPTION
,LEGISLATION_CODE
,OBJECT_VERSION_NUMBER
)
SELECT
’<Job EIT Name>’
,’Y’
,’<Y for multi–row – N for single>’
,’<Description>’
,’<legislation code US/GB/etc>’
,1
FROM sys.dual
WHERE not exists (SELECT 1
FROM PER_POSITION_INFO_TYPES
WHERE INFORMATION_TYPE = ’<Job EIT Name>’);
––6) Insert into HR_ORG_INFORMATION_TYPES:–––
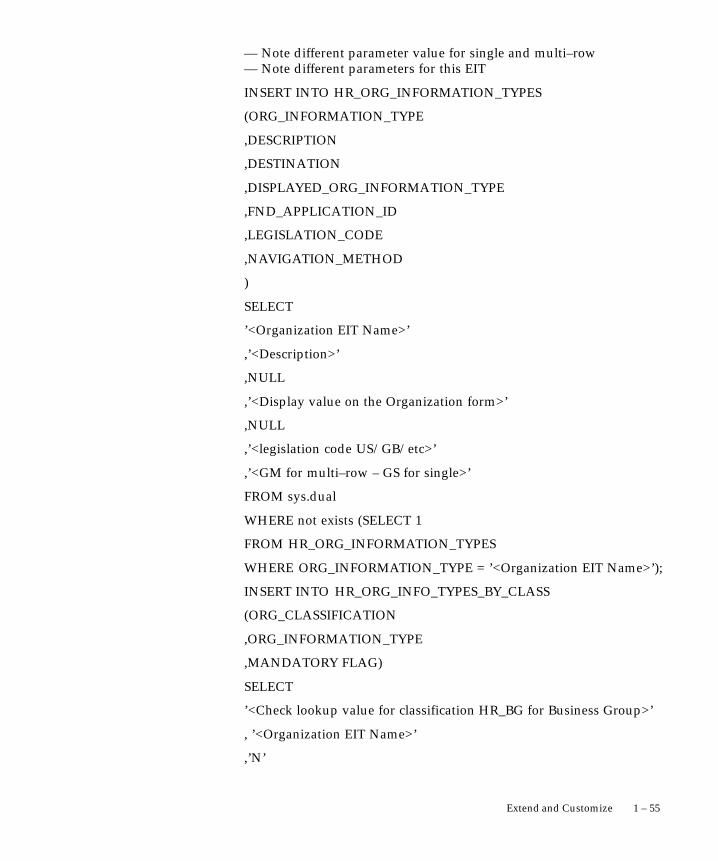
1 – 55Extend and Customize
–– Note different parameter value for single and multi–row–– Note different parameters for this EIT
INSERT INTO HR_ORG_INFORMATION_TYPES
(ORG_INFORMATION_TYPE
,DESCRIPTION
,DESTINATION
,DISPLAYED_ORG_INFORMATION_TYPE
,FND_APPLICATION_ID
,LEGISLATION_CODE
,NAVIGATION_METHOD
)
SELECT
’<Organization EIT Name>’
,’<Description>’
,NULL
,’<Display value on the Organization form>’
,NULL
,’<legislation code US/GB/etc>’
,’<GM for multi–row – GS for single>’
FROM sys.dual
WHERE not exists (SELECT 1
FROM HR_ORG_INFORMATION_TYPES
WHERE ORG_INFORMATION_TYPE = ’<Organization EIT Name>’);
INSERT INTO HR_ORG_INFO_TYPES_BY_CLASS
(ORG_CLASSIFICATION
,ORG_INFORMATION_TYPE
,MANDATORY FLAG)
SELECT
’<Check lookup value for classification HR_BG for Business Group>’
, ’<Organization EIT Name>’
,’N’
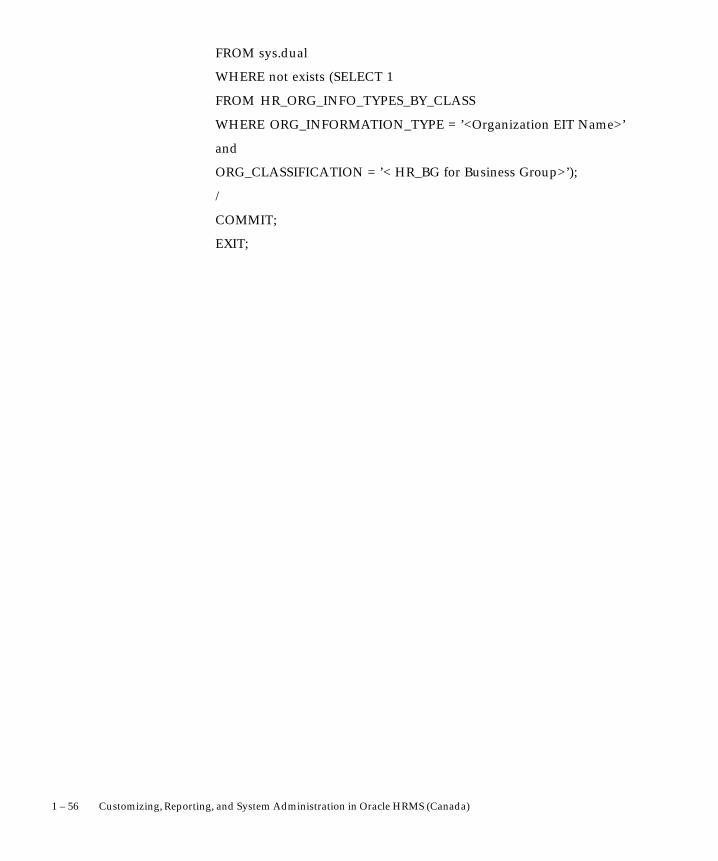
1 – 56 Customizing, Reporting, and System Administration in Oracle HRMS (Canada)
FROM sys.dual
WHERE not exists (SELECT 1
FROM HR_ORG_INFO_TYPES_BY_CLASS
WHERE ORG_INFORMATION_TYPE = ’<Organization EIT Name>’
and
ORG_CLASSIFICATION = ’< HR_BG for Business Group>’);
/
COMMIT;
EXIT;

1 – 57Extend and Customize
Extend and Customize Oracle HRMSYou can customize and extend Oracle Applications to meet the needs ofyour enterprise.
Customization Define an Element or Distribution Set: page 1 – 59
Define a Customized Version of a Window: page 1 – 60
Add the Customized Window to a Menu or Task Flow: page 1 – 61
Restrict Access to Query–only Mode: page 1 – 62
Create Task Flows Using Forms: page 1 – 63
Create Task Flows Using Workflow: page 1 – 64
Change Default National Address Styles: page 1 – 65
Calling Customized Forms and Task Flows from Menus: page 1 – 67
Defining Task Flow Nodes: page 1 – 68
Defining Task Flows: page 1 – 69
Copying an Existing Task Flow: page 1 – 71
Adding a New Window to an Existing Task Flow: page 1 – 72
Amending the Navigation of a Task Flow: page 1 – 73
Creating a Top Level Process: page 1 – 74
Creating Sub Processes: page 1 – 76
Creating Button Labels: page 1 – 77
Positioning Button Display: page 1 – 78
Identifying Windows or Blocks to Display: page 1 – 79
Identifying Customized Forms to Include in the Task Flow: page 1 – 80
Verifying the Workflow: page 1 – 81
Generating a Task Flow From Oracle Workflow: page 1 – 82
Opening Multiple Windows
Opening Multiple Windows: page 1 – 83
Flexfield Database Item
Create Descriptive Flexfield Database Items: page 1 – 84

1 – 58 Customizing, Reporting, and System Administration in Oracle HRMS (Canada)
Create Key Flexfield Database Items: page 1 – 85
Extra Information Types (EITs)
Set Up Extra Information Types (Excluding Organization EITs): page1 – 86
Set Up Extra Information Types for an Organization Classification:page 1 – 88
Set up Extra Information Types Against a Responsibility: page 1 – 90
Enter Extra Information: page 1 – 91
Enable Currency
Enable Currencies: page 1 – 92
Lookups and User Defined Tables Add Lookup Types and Values: page 1 – 93
Remove Lookup Values: page 1 – 95
Set Up User Tables, Columns, and Rows: page 1 – 96
Enter Table Values: page 1 – 98

1 – 59Extend and Customize
Defining an Element or Distribution Set
In the Element and Distribution Set window, you can select elementclassifications or individual elements to define a set. There are threetypes of set:
• Customization set: You can use a Customization set to restrictthe elements that can be entered or viewed on a customizedversion of the Element Entries window. You can also select acustomization set for element entry using BEE in the BatchAssignment Entry window.
• Run set: Oracle Payroll users can use a Run set to specify theelements to be processed in a payroll run. If you are creating aRun set for US payroll, you must include the VERTEX recurringelement (see step 4).
• Distribution set: Oracle Payroll users can use a Distribution setto define the elements over which the costs of other elements areto be distributed.
� To define an element or distribution set:
1. Enter a unique name for the set and select the type: Distribution,Run, or Customization.
2. Save your new set.
3. If you want to include all elements in a classification, choose theClassification Rules button.
• In the Classification Rules window, select one or moreclassifications to include. Save the set and close this window.
The elements in the classifications you choose are now listed inthe Elements region.
• If you want to exclude individual elements, place your cursor inthe element’s row and choose the Exclude Element button.
4. If you want to include particular elements from otherclassifications, choose the Include Element button.
5. Select the element you want to include in the Elements window,and choose the OK button.
Note: After you include a particular element, you cannot go to theClassification Rules window and include the classification to whichthis element belongs.
6. Save your set.
7. If you want to see a list of the individual elements you haveincluded or excluded from the set, choose the Element Rulesbutton. The Element Rules window is view–only.

1 – 60 Customizing, Reporting, and System Administration in Oracle HRMS (Canada)
Defining a Customized Version of a Window
You can define customized versions of certain windows in the FormCustomization window.
See: List of Customizable Windows: page 1 – 13
Note: If you want to restrict access to query–only for awindow, you do not need to create a customized version.Instead you create a new form function, setting theQUERY_ONLY parameter to YES.
See: Restricting Access to Query–only Mode: page 1 – 62
� To define a customized version of a window:
1. Select the name of the standard window in the Form to becustomized field. The names of all forms used in this release areprefixed by F4.
2. Enter the name of your new version in the Name field. This nameis used when defining menus but it is not seen by users.
3. Select Enabled if you want the restrictions to come into effect. Ifyou do not select this option, the customized version of thewindow behaves the same way as the standard version.
4. Enter the titles to appear in the new version of the window:
• In the Standard Title field, enter the window title to be seen byusers who can use the window for data entry and editing.
• In the Query Title field, enter the window title to be seen byusers who have view–only access to the window.
5. Save your new version.
6. In the Restrictions block, select the Type and Value of the restrictionyou want to define. The types and values available depend on thewindow you are customizing.

1 – 61Extend and Customize
Adding the Customized Window to a Menu or Task Flow
You can add your customized windows to a menu or a task flow:
� Adding customized windows:
1. If you want to add the customized window to a task flow, youmust create a Task Flow Node for it.
2. If the customized window is called directly from the Navigatorwindow, you must define a menu function to call the window withthe customization. You can add this function to any menu.
Note: If you want to use a customized version of the Peoplewindow, People Folder, or Assignment Folder to start a taskflow, you should define a new customized task flow node andthen define a menu function to call the task flow.
See: Form Functions Window, Oracle Applications User’s Guide.

1 – 62 Customizing, Reporting, and System Administration in Oracle HRMS (Canada)
Restricting Access to Query–Only Mode
� To restrict access to query–only mode for an individual form:
1. In the Form Functions window, select the form and specify theparameter QUERY_ONLY=YES. If you want to specify otherparameters for this form function, separate them with a space.
2. Enter a user function name to identify your new function, and saveit.
3. In the Menus window, select your new function instead of thesupplied form function.
1 – 63Extend and Customize
Creating Task Flows Using Forms
Complete the following steps to create task flows using forms:
1. Define Task Flow Nodes: page 1 – 68
2. Define Task Flows: page 1 – 69
You can also complete these optional steps, if required:
3. Copy an Existing Task Flow: page 1 – 71
4. Add a New Window to an Existing Task Flow: page 1 – 72
5. Amend the Navigation of a Task Flow: page 1 – 73

1 – 64 Customizing, Reporting, and System Administration in Oracle HRMS (Canada)
Creating Task Flows Using Workflow
Complete the following steps to create task flows using OracleWorkflow:
1. Create a Top Level Process: page 1 – 74
2. Create Sub Processes: page 1 – 76
3. Create Button Labels: page 1 – 77
4. Position Button Display: page 1 – 78
Combined People and Assignment Form Only
If you are creating task flows using the combined People andAssignment form, you have an additional step to perform:
5. Identify Windows or Blocks to Display: page 1 – 79
Customized Versions of Forms Only
If you have created a customized version of a form, you have anadditional step to perform:
6. Identify Customized Forms to Include in the Task Flow: page 1 – 80
All Forms
7. Verify and Save the Workflow: page 1 – 81
8. Generate a Task Flow From Oracle Workflow: page 1 – 82

1 – 65Extend and Customize
Changing Default National Address Styles
The different national address styles are held and configured in thePersonal Address Information, and the Location Address descriptiveflexfield. You can configure them using the Descriptive FlexfieldSegments window.
You cannot construct any flexfield segment value sets with:
• Profile options, $PROFILE$
• Previous segment values, $FLEX$
• Block.field references
• Security rules
Note: You must ensure the Personal_Address, orLocation_Address protected flag is off.
To change the address style for any country, redefine those segmentsyou do not want to use. Then define new segments to record your owninformation. However, these changes will be overwritten when youupgrade Oracle HRMS.
� To alter an existing style:
1. Enter Oracle Human Resources in the application field.
2. Enter Personal Address Information, or Location Address in thetitle field.
3. Run the query.
4. Uncheck the Freeze Flexfield Definition check box.
Note: Read the warning.
5. Select the country code.
6. Click the segments button.
This will open a new window with the segment and value setinformation of the selected country.
7. Update the segments.
Note: You must make country segment mandatory. Do notchange the validation on any segment as this may invalidateexisting data.
8. Save your work, and open the Descriptive Flexfield Segmentswindow. Make sure any new segments are enabled, and displayed.
9. Check the Freeze Flexfield Definition check box.

1 – 66 Customizing, Reporting, and System Administration in Oracle HRMS (Canada)
10. Click the compile button.
When compilation is complete, exit your current login session.Then log in again to see your updated styles.
� To add a style:
1. Enter Oracle Human Resources in the application field.
2. Enter Personal Address Information, or Location Address in thetitle field.
3. Run the query.
4. Un–check the Freeze Flexfield Definition check box
Note: Read the warning.
5. Choose New from the File menu
6. Enter the country code in the code and name fields.
7. Enter a description and select the Segments button.
8. Define the segments.
Note: You can only use the columns provided by Oracle HRfor your segments.
9. Save your work.
Note: Make sure any new segments are enabled. You canchoose whether segments are displayed or not.
10. Check the Freeze Flexfield Definition check box.
11. Choose the Compile button.
When compilation is complete, exit your current login session. Then login again to see your updated styles.
1 – 67Extend and Customize
Using Parameters for HRMS Form Functions
For certain options you must define menu functions that include aparameter in the Parameters field of the Form Functions window, asfollows:
• If the menu entry calls a customized form, use the followingparameter:
HR_CUSTOMIZATION = ”customization name”
• If the menu entry calls the first form in a task flow, use thefollowing parameter:
WORKFLOW_NAME = ”task flow name”
• If the menu entry calls a form in query–only mode, use thefollowing parameter:
QUERY_ONLY=YES
• If the menu entry calls the Define Rate form (PAYWSGEV), usethe following parameter:
FORM_MODE = ”grade” (for the Grade Rate window)
FORM_MODE = ”spine” (for the Scale Rate window)
• If the menu entry calls the Payroll and Assignment Processesform (PAYWSACT – used in Oracle Payroll), use the followingparameter:
FORM_MODE = ”assignment” (for the Assignment Processeswindow)
FORM_MODE = ”payroll” (for the Payroll Processes window)
If you need to specify more than one parameter for a form function,separate the parameters with a space.

1 – 68 Customizing, Reporting, and System Administration in Oracle HRMS (Canada)
Defining Task Flow Nodes
Each form in a task flow is a node. There are predefined nodes forevery form that you can include in a task flow. However, if you createa customization of one of these forms, you must create a node for thecustomization before you can include it in a task flow.
Suggestion: If you want to use a customized form as the firstnode in a task flow you should define this as a new node.
You could add both the task flow and the customization asarguments to a single menu function but this may be moredifficult to maintain.
You create nodes in the Define Task Flow Nodes window.
� To create a task flow node:
1. Enter a name for the node. You select this name when you create atask flow containing the node. It is not visible to users.
Warning: Do not use apostrophes or ”%” symbols in the nodename.
2. Select the form that you customized. Leave the Block field blank.
3. Select the customization that you created.
4. Save the new node.
1 – 69Extend and Customize
Defining Task Flows
You define task flows in the Define Task Flow window. If there is asimilar existing task flow, you can copy it to form the basis of your newflow.
Suggestion: When defining the navigation buttons in yourtask flows:
– Don’t have long sequences where you cannot go back to theprevious step
– Use the same button names for the same nodes
– Use different button names for customized nodes
Before you can include the task flow in a menu, you must define a newmenu function for the first form in the task flow with the followingargument in the Parameters field:
WORKFLOW_NAME = ”task flow name”
� To define a new task flow:
1. Enter a name for the task flow and save it.
Warning: Do not use apostrophes or ”%” symbols in task flownames.
Note: Do not choose the Convert button. This is provided only forconverting task flows you created in Oracle Workflow. See CreatingTask Flows Using Workflow: page 1 – 64.
2. In the Node block, select the name of the node that you want to bethe first form in the task flow.
3. For this node, select the Top Node check box.
4. Create a new record in the Node block and select another node.You must create all the nodes for the task flow before you can beginentering the navigation paths between them.
5. In the Navigation Options region, for each node, select the othernodes to which you can navigate.
6. Enter a sequence number to determine the order in which thenavigation options appear as buttons (from left to right) along thebase of the window or as options in a navigation list.
7. Select the Button check box for the navigation options that shouldappear as buttons. There is a limit on the number of buttons thatcan appear on each form. This number varies from form to form.
The other options are displayed in a navigation list when the userchooses a button labelled Others. Or, if there is only one other

1 – 70 Customizing, Reporting, and System Administration in Oracle HRMS (Canada)
option, this form displays when the user chooses a button labelledNext.
8. There is a default label that appears on buttons or in the navigationlist for every form. You can override this with your own label.
If the label in the Define Taskflow window appears blue, this is thedefault value. It is a dynamic default: if the seeded value changes(for example, as the result of an upgrade), the label will be updatedautomatically in all task flows where it has not been overridden.
If the label appears black, the default value has been overridden.To re–inherit the default label, clear the field.
9. To define an access key (or keyboard shortcut) for a navigationoption, precede the appropriate letter in the label with anampersand (&). For example, to use ALT+P (in the MicrosoftWindows environment) as the access key for the Picture window,enter the label &Picture.
Note: Do not use the following letters since they are used on theOracle Applications menu: A, E, F, G, H, Q, S, W.
There is no validation to prevent the same letter being used morethan once for a group of buttons.
10. Save the task flow.

1 – 71Extend and Customize
Copying an Existing Task Flow
� To copy an existing task flow:
1. Query the existing flow and choose the Copy To button.
2. Enter the name of the new task flow and choose OK.
3. Query your new task flow and edit it as required.
1 – 72 Customizing, Reporting, and System Administration in Oracle HRMS (Canada)
Adding a New Window to an Existing Task Flow
You can use the Define Task Flow window to add a new window, usingits node name, to an existing task flow. If you have already used thewindow in the task flow you only have to amend the navigation, see:Amending the Navigation of a Task Flow: page 1 – 73
Note: If you have created a task flow using Oracle Workflow,you must continue to maintain it using Oracle Workflow. Youcannot edit a generated task flow using the Define Task Flowwindow.
� To add a new window to an existing task flow
1. Query the task flow you want to amend in the Name field.
2. In the Node block, enter the window’s node name.
3. Save your changes.
You must now include the node in the navigation path for the taskflow.
4. Select the existing node you want the new node to be accessedfrom in the Node block.
5. Enter the new node‘s details in the Navigation Options region andedit the existing navigation path as required. For information abouthow to set up the Navigation Options region refer to steps 5 to 9 in‘To define a new task flow’: page 1 – 69.

1 – 73Extend and Customize
Amending the Navigation of a Task Flow
Use the Define Task Flow window to amend the navigation of a taskflow.
� To amend the navigation of a task flow:
1. Query the task flow for which you want to amend the navigation inthe Name field.
2. Select the node name in the Node block.
3. Edit the existing navigation path in the Navigation Options region,as required. For information on the Navigation Options refer tosteps 5 to 9 in To define a new task flow: page 1 – 69.
1 – 74 Customizing, Reporting, and System Administration in Oracle HRMS (Canada)
Creating a Top Level Process
You must define a top level process for each task flow. The top levelprocess can contain sub processes, but not any other top levelprocesses.
A top level process must have a Top Node Selector activity. Thisensures that the first window in a task flow is a valid top nodewindow. All windows that can be a top node are defined within theTop Node HRMS Context Windows lookup type.
The Top Node Selector must have two transitions. The first transitionmust go to the Top Node activity and its value must be the windowactivity name. The second transaction must be <Default> and go to theend activity.
You use the Process Diagrammers within Oracle Workflow to createyour task flows. You do this by adding and connecting the windowsyou want to appear.
� To create a top level process:
1. Enter a unique internal and display name for the new process forthe HR Task flow item type.
Suggestion: Use a naming convention for Internal andDisplay names. For example, a good internal name might bePOSITION_DETAILS_TL with a Display name of PositionDetails (Top Level).
2. Define the process as runnable.
3. Open the Process Diagrammer window and add one Start activityand at least one End activity.
4. Add a Top Node Selector activity. The Start activity must connectto the Top Node Selector activity.
5. Connect the Top Node Selector to the End activity with a <Default>transition result value.
6. Add the Top Node window.
7. Connect the Top Node Selector to the Top Node window,specifying the name of this window activity as the transition resultvalue.
8. Connect the Top Node window to the End Activity with a<Default> transition result value.
9. Add other windows to the process, noting the following rules:
• A window can only connect to another window where the resulttype is the same (such as, both Person Context windows).
1 – 75Extend and Customize
• The transition result value must be the name of the windowactivity you are connecting to (for example, F4 EnterAssignment).
• Each window can only connect once to any other window.
• Each window must be connected to the Top Node window witha <Default> transition result value.
• You can connect a window back to its parent using the <Parent>transition result value, rather than the name of the parentwindow.
1 – 76 Customizing, Reporting, and System Administration in Oracle HRMS (Canada)
Creating Sub Processes
You can group a logical set of task flow windows into a sub process,which can then be used by several top level processes. This simplifiesprocess modelling. Each sub process can contain other sub processes.There are two rules to note regarding sub processes:
• A sub process cannot be defined as runnable.
• When you use a sub process in another process, you mustconnect the sub process to the Top Node window.
� To create sub processes:
1. Enter a unique internal and display name for the new process forthe HR Task flow item type.
Suggestion: Use a naming convention for Internal andDisplay names. For example, a good Internal name might beASSIGNMENT_DETAILS_SL with a Display name ofAssignment Details (Sub Level)
2. Define the process as NOT runnable.
3. Specify a user defined result set as a Process Result Type if the subprocess requires more than one result value.
4. Open the Process Diagrammer window and add one Start activityand at least one End activity
Because a process can have more than one result value, many Endactivities may be required. At least one End activity is required toindicate that the process must connect back to the Top Level nodewindow.
5. Connect the Start activity to another window.
Note: The Start activity can connect to one window only.
6. Add other windows to the process, noting the following rules:
• A window can only connect to another window where the resulttype is the same (such as, both Person Context windows).
• The transition result value must be the name of the windowactivity you are connecting to (for example, F4 EnterAssignment).
• Each window can only connect once to any other window.
• Each window must connect to an End Activity with a <Default>transition result value.
• You can connect a window back to its parent using the <Parent>transition result value, rather than the name of the parentwindow.
1 – 77Extend and Customize
Creating Button Labels
You can enter the label you want to appear on the task flowed forms,such as Photo (for the Picture window), and such. Each task flowwindow activity has an attribute called Button Label. Use this attributeto override the default button label for a window and to define anaccess key (or keyboard shortcut).
� To create button labels:
1. Display the process in the Oracle Workflow Process Diagrammer.
2. Select the activity by choosing Edit – Properties. (You can alsodouble click on Edit – Properties to select it).
3. Select the Attribute Values tab frame
4. Enter the label you want to appear on the forms.
Precede the appropriate letter in the label with an ampersand (&) todefine an access key. For example, to use ALT+P (in the MicrosoftWindows environment) as the access key for the Picture window,you could enter the label &Photo.

1 – 78 Customizing, Reporting, and System Administration in Oracle HRMS (Canada)
Positioning Button Display
You can position the display order of buttons on the form. Forexample, you might want the first button to display the Picturewindow.
The number of task flow navigation buttons that can be displayed on awindow varies from window to window. If there are too manynavigation options for them all to appear as buttons, the last button onthe window is called Other and it displays a list of values containingthe other navigation options.
You determine the navigation options available from a window bydefining transitions to other windows in the Process Diagrammer. Nowyou can use the activity attributes Display Button 1..4 to specify whichnavigation options should display as buttons and the order in whichthey should appear.
� To position buttons:
1. Display the process in the Oracle Workflow Process Diagrammer.
2. Select the activity by choosing Edit – Properties. (You can alsodouble click on Edit – Properties to select it).
3. Select the Attribute Values tab frame.
4. Enter the name of the window you want displaying on the buttonfor the Display Button 1 attribute.
For example, if you want the first button to display the Picturewindow, enter F4 Enter Picture. If the window is the parentwindow then you can specify the <Parent> special connectionvalue.
5. Repeat step 4 for the attributes Display Button 2 .. 4. If you do notwant a button to appear on the window, enter the value <Null>.
For example, if you only want three buttons to be displayed, enter<Null> as the value for Display Button 4.

1 – 79Extend and Customize
Identifying Windows or Blocks to Display
For most task flow forms, you must display the first block of the formon entry. However, when you use the Combined People andAssignment form in a task flow, you must specify whether to displaythe People window (or block) or the Assignment window on entry.
� To identify windows or blocks to display:
1. Display the process in the Oracle Workflow Process Diagrammer,
2. Select the window activity by choosing Edit – Properties. (You canalso double click on Edit – Properties to select it).
3. Select the Attribute Values tab frame.
4. Enter the name of the block you want to display on entry for theBlock Name attribute.

1 – 80 Customizing, Reporting, and System Administration in Oracle HRMS (Canada)
Identifying Customized Forms to Include in the Task Flow
If you have created a customized version of a window, you can use thecustomized version of the form in the task flow.
� To identify customized forms to include in the task flow:
1. Display the process in the Oracle Workflow Process Diagrammer.
2. Select the window activity by choosing Edit – Properties. (You canalso double click on Edit – Properties to select it).
3. Select the Attribute Values tab frame.
4. Enter the name of your Form Customization for the Customizationattribute.

1 – 81Extend and Customize
Verifying and Saving the Workflow
When you have completed the task flow definition within OracleWorkflow, use the Workflow Verify function to check that yourworkflow conforms to Oracle Workflow modeling rules.
When you have successfully verified the Workflow, save it to theHRMS database.
� To verify and save the Workflow:
1. Choose File – Verify.
Note: This process does not check that you have created avalid task flow. This check is done when you generate the taskflow.
2. Choose File – Save.
1 – 82 Customizing, Reporting, and System Administration in Oracle HRMS (Canada)
Generating a Task Flow From Oracle Workflow
After modeling a task flow in Oracle Workflow and saving it to thedatabase, you must generate task flow definitions.
Use the Define Task Flow window from the HRMS application.
� To generate a task flow from Oracle Workflow:
1. Query the task flow(s) you have created and choose the Convertbutton.
2. Choose OK to convert the task flows from Oracle Workflow.
Oracle HRMS indicates how many task flows have beensuccessfully converted. If any task flows have not been converted,these are identified and are not saved to the database. You mustcorrect the errors then verify, save and regenerate the task flowsagain.
Note: Having modeled a task flow in Oracle Workflow, youcannot edit it using the Define Task Flow window. You mustmake any edits using Oracle Workflow, save it and thenregenerate the task flow definitions.

☞
1 – 83Extend and Customize
Disabling Multiple Windows
In most Oracle Applications, you can open multiple windows from theNavigator window without closing the window you already haveopen. HRMS, however, does not support Multiform functionality.
Attention: You must disable this feature on menu structuresthat accesses Oracle HRMS windows.
� To disable the Multiple Open Window feature:
1. Add a Function type menu entry to the top–level menu referencedby your new responsibility.
2. Select the function whose User Function Name and Function Nameare:
• Navigator: Disable Multiform
• FND_FNDSCSGN_DISABLE_MUL TIFORM
3. Save your changes.
1 – 84 Customizing, Reporting, and System Administration in Oracle HRMS (Canada)
Creating Descriptive Flexfield Database Items
You can use descriptive flexfield segments in QuickPaint reports andformulas if there are database items for these segments.
You can see the descriptive flexfields: page 1 – 22 for which you cancreate database items.
Submit the process from the Submit Requests window.
� To create descriptive flexfield database items
1. Run the Create Descriptive Flexfield DB Items process.
Run this process whenever you create or change these descriptiveflexfield definitions.
See: Submitting a Request, Oracle Applications User’s Guide.
Note: The process can only create database items for globalsegments. It does not create database items forcontext–sensitive segments.
1 – 85Extend and Customize
Creating Key Flexfield Database Items
The Create Key Flexfield DB Items process turns data in key flexfieldsinto database items that Oracle FastFormula can access. It is essentialto run this process whenever you create or change the Grade, Job,Position, or People Group key flexfield definitions.
Submit the process from the Submit Requests window.
� To create key flexfield database items
� Run the Create Key Flexfield DB Items process.
Run this process whenever you create or change these key flexfielddefinitions.
See: Submitting a Request, Oracle Applications User’s Guide.

☞
1 – 86 Customizing, Reporting, and System Administration in Oracle HRMS (Canada)
Setting Up Extra Information Types (Excluding Organization EITs)
The following steps explain how to set up Extra Information Types(EITs) to use in Oracle HRMS.
Note: EITs for organizations are set up differently. See: SettingUp Extra Information Types for an Organization Classification:page 1 – 88.
1. In the Descriptive Flexfield Segments window, select the relevantdescriptive flexfield by title (such as, Extra Job Information) Thedescriptive flexfields available are:
• Extra Location Information (30 Segments)
• Extra Job Information (30 Segments)
• Extra Position Information (30 Segments)
• Extra Person Information (30 Segments)
• Further Assignment Information (30 Segments)
2. Unprotect the relevant extra information type using the RegisterDescriptive Flexfield window. You must do this before you canquery the flexfield in the Descriptive Flexfield window.
3. Create a new record in the Context Field Values region of theDescriptive Flexfield window and enter the name of your newInformation Type in the Code field. As these are context sensitivedescriptive flexfields, enter INFORMATION_TYPE in theReference Field.
4. Enter the segment values and compile in the same way as astandard descriptive flexfield.
See: Defining Descriptive Flexfield Structures, Oracle ApplicationsFlexfields Guide
Attention: There are some predefined EITs in Oracle HRMS.These definitions are a fundamental part of your Oracle HRMSinstallation and any change to them may lead to errors in theoperation of the system. Do not attempt to alter the definitionsof these developer flexfields or to add other segments to them.It is possible that Oracle will use other segments of theseflexfields in the future. Any changes you make can affect yourability to upgrade your system in the future.
5. Reset the protection in the Register Descriptive Flexfield windowso the flexfield remains a protected descriptive flexfield.
6. Use SQL to insert a row for each EIT into the relevant InformationType table. In this release there is no window to register your new
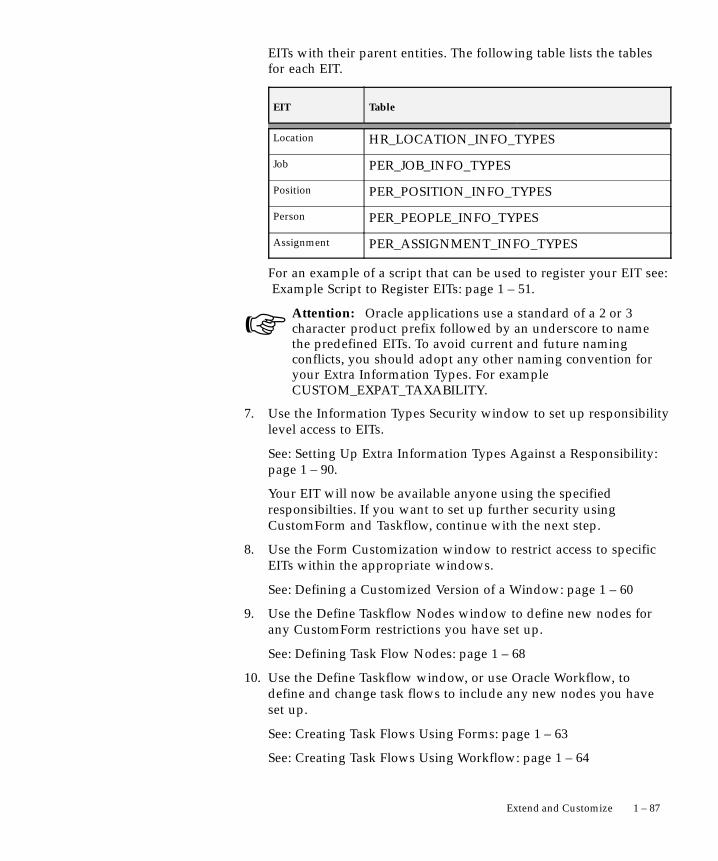
☞
1 – 87Extend and Customize
EITs with their parent entities. The following table lists the tablesfor each EIT.
EIT Table
Location HR_LOCATION_INFO_TYPES
Job PER_JOB_INFO_TYPES
Position PER_POSITION_INFO_TYPES
Person PER_PEOPLE_INFO_TYPES
Assignment PER_ASSIGNMENT_INFO_TYPES
For an example of a script that can be used to register your EIT see: Example Script to Register EITs: page 1 – 51.
Attention: Oracle applications use a standard of a 2 or 3character product prefix followed by an underscore to namethe predefined EITs. To avoid current and future namingconflicts, you should adopt any other naming convention foryour Extra Information Types. For exampleCUSTOM_EXPAT_TAXABILITY.
7. Use the Information Types Security window to set up responsibilitylevel access to EITs.
See: Setting Up Extra Information Types Against a Responsibility:page 1 – 90.
Your EIT will now be available anyone using the specifiedresponsibilties. If you want to set up further security usingCustomForm and Taskflow, continue with the next step.
8. Use the Form Customization window to restrict access to specificEITs within the appropriate windows.
See: Defining a Customized Version of a Window: page 1 – 60
9. Use the Define Taskflow Nodes window to define new nodes forany CustomForm restrictions you have set up.
See: Defining Task Flow Nodes: page 1 – 68
10. Use the Define Taskflow window, or use Oracle Workflow, todefine and change task flows to include any new nodes you haveset up.
See: Creating Task Flows Using Forms: page 1 – 63
See: Creating Task Flows Using Workflow: page 1 – 64

1 – 88 Customizing, Reporting, and System Administration in Oracle HRMS (Canada)
Setting Up Extra Information Types for an Organization Classification
� To add Extra Information Types (EITs) to an organizationclassification:
1. Define a new organization classification. You do not need to do thisif you are setting up an EIT for a classification that already exists.
Note: To define a new classification, enter a new value for theLookup type ORG_CLASS in the Lookup Values window.
2. Define the new EIT.
• Unprotect the Org Developer DF using the Register DescriptiveFlexfield window. You must do this before you can query theflexfield on the Descriptive Flexfield window
• Add the new structure for the EIT to the Org Developer DFdescriptive flexfield using the Descriptive Flexfield Segmentswindow. The structure must have as its context the name of theextra information type, and as this is a context sensitivedescriptive flexfield you must enterC_ORG_INFORMATION_CONTEXT in the Reference Field.Compile in the same way as a standard descriptive flexfield.
• Reset the protection, so the flexfield remains a protecteddescriptive flexfield.
3. Enter a row into HR_ORG_INFORMATION_TYPES. The columnsyou should enter are:
Column name Description
ORG_INFORMATION Name of the type (same as DDF context).
DESCRIPTION Description of the extra information type.
DISPLAYED_ORG_INFORMATION_TYPE
The Name of the Extra Information Typedisplayed in the Organization window.
NAVIGATION_METHOD ’GS’ for single row, a user can only enterone extra information row for eachorganization. Alternatively, ’GM’ for multirow, a user can enter more than one rowfor each organization.
LEGISLATION_CODE Optionally, you can enter a legislationcode to resrtict to which Business Groupsthe EIT is available. If you do not enter alegislation code it will be valid for allBusiness Groups

1 – 89Extend and Customize
4. Specify for which organization classifications this EIT should beavailable.
To do this, enter a row into HR_ORG_INFO_TYPES_BY_CLASS.
Column name Description
ORG_CLASSIFICATION ORG_CLASS lookup code
ORG_INFORMATION_TYPE Org extra information type
MANDATORY_FLAG Y (for Yes) or N (for No)

1 – 90 Customizing, Reporting, and System Administration in Oracle HRMS (Canada)
Setting Up Extra Information Types Against a Responsibility
Extra Information Types (EITs) must be added to a responsibility beforea user can access the information type using that responsibility. By notadding information types to a responsibility, you restrict theinformation types that a user can access.
Use the Information Type Security window to link EITs to aresponsibility.
� To set up EITs for a responsibility:
1. Select the name of the responsibility for the EIT.
Oracle HRMS displays a list of EITs already associated with theresponsibility you have chosen.
2. Enter the new EIT you want to link to the responsibility.
3. Save the responsibility and EITs.
� To copy EITs between responsibilities:
1. Query the responsibility from which you want to copy.
2. Select the Copy Responsibility button
3. Enter the responsibility to which you want to copy.
This responsibility is then displayed with the new EITs.
4. Save the responsibility and EITs.

1 – 91Extend and Customize
Entering Extra Information
You enter extra information in one or more windows available from themain window (such as job). Your system administrator may havecreated customized versions of the extra information windows so thatyou can use each version for one information type only.
Your implementation team may have defined one or more types ofextra information for you to record for:
• Locations
• Jobs
• Positions
• People
• Assignments
• Organizations
� To enter extra information:
1. Enter the type of extra information, for example job category.
Note: To access extra information in the Organization windowselect the Others button in the Organization Classifications region.
2. Click in the Details field to display the extra information fields youcan enter.
3. Enter your extra information.
4. Save your extra information details.

1 – 92 Customizing, Reporting, and System Administration in Oracle HRMS (Canada)
Enabling Currencies
Oracle HRMS enables you to use multiple currencies for enteringinformation about employee compensation and benefits. You can alsorecord your payment methods to employees in different currencies.
For example, if you have employees living and working temporarily inother countries, you might want to record specific earnings ordeductions for these employees in local currencies. You might alsowant to pay these employees a fixed amount into a bank account intheir home currency. The remainder you would pay in a local currency.
Your startup data includes the definitions of all world currencies.These definitions are shared by all Oracle Applications and arecontrolled by the system administrator responsibility. You enable thosecurrencies you want to use in the Currencies window.
Note: You must enable at least one currency as the defaultcurrency for all information related to money in your system.This default is known as the Base Currency for your BusinessGroup.
� To enable a currency:
� Query the currency you want to enable and check the Enabledcheck box. Save your choice to enable the currency.
You can never delete a currency, but you can disable it.
� To disable a currency:
� Uncheck Enabled, or enter an End Date for the currency.

☞
1 – 93Extend and Customize
Adding Lookup Types and Values
To create a new Lookup type, add values to an existing Lookup type, orprevent existing values from appearing in a Lookup type, use theApplication Utilities Lookups window.
Note: You must log out and log in again to see the effect ofyour changes.
Defining Lookup Types
You can create your own Lookup Types to provide lists of values, forexample to validate element entries.
� To define a new Lookup type and the Lookup values:
1. Choose the access level for the lookup type.
2. Enter the lookup type.
3. Enter the user name of the lookup. This is the name that users willsee from within the application.
4. Select the application in which the lookup will be used.
5. Optionally, add a description of the Lookup type.
6. Select whether Lookup type and values you add are global to allSecurity Groups/Business Groups or specific to your currentSecurity Group/Business Group.
Attention: The Global checkbox only displays if you are usingCross Business Group Responsibility Security. If you useStandard HRMS security all Lookup types are global.
If you uncheck the Global checkbox any lookup values you add areonly be available in the Security Group/Business Group linked toyour current responsibility. However, predefined Lookup valuesare available to all Business Groups.
See: Categorizing Information By Security Groups: page 2 – 25
7. Uncheck the Standard Security Group checkbox to set up lookupvalues for the Security Group, and therefore Business Group,linked to your current responsibility. Otherwise, the lookups valuesare available to all Business Groups.
8. Enter the code, meaning and optionally a description for eachvalue.
If you do not enter a start date, the new Lookup is validimmediately. If you do not enter an end date, the new Lookup isvalid indefinitely.

1 – 94 Customizing, Reporting, and System Administration in Oracle HRMS (Canada)
9. Save your work.
Defining Lookup Values
� To add Lookup values to an existing Lookup type:
1. Query the Lookup Type to which you want add a value.
You cannot add values if the Access Level is System.
2. Enter the code, meaning and optionally a description for eachvalue.
If you do not enter a start date, the new Lookup is validimmediately. If you do not enter an end date, the new Lookup isvalid indefinitely.
3. Save your work.
1 – 95Extend and Customize
Removing Lookup Values
You can only remove Lookup values if they are set up for a specificsecurity group. However, you can stop all lookups appearing in lists ofvalues.
Note: You must be using Cross Business Group Responsibilitysecurity to categorize lookups by Security Groups. See:Categorizing Information By Security Groups: page 2 – 25
� To remove a user defined Lookup:
� In the Application Utilities Lookups window, do one of thefollowing:
• Enter an end date if you want to prevent users selecting thisvalue after a certain date.
• Disable the code by unchecking the Enabled check box if youwant to prevent users selecting this value with immediate effectfrom the current date.
• Change the meaning and description to create a replacementLookup.
If you add, disable, or change the meaning of a Lookup, users must logout and log back in again for your changes to take effect.
� To remove a Lookup set up for a Security Group:
1. In the Application Utilities Lookups window, select the Lookuptype which has lookups for a specific security group.
2. Check the Global checkbox.
This removes all lookups which have been set up for the securitygroup linked to your current responsibility. Predefined lookups arenot removed.
If you add, disable, or change the meaning of a Lookup, users must logout and log back in again for your changes to take effect.

1 – 96 Customizing, Reporting, and System Administration in Oracle HRMS (Canada)
Setting Up User Tables, Columns and Rows
You set up user tables in the Table Structure window.
� To set up the structure of a table:
1. Set your effective date to the date from which you want the table’srow labels to take effect.
2. Enter the table name.
3. For the table’s match type, select Match or Range. Select Match ifeach row is for one item, such as one job or one code. Select Rangeif each row is for a range of numeric values, such as an age range ora pay range.
4. If the match type is Match, select Date, Number or Text as the KeyUnits of Measure, depending on whether entries in the rows aredates, numbers, or alphanumeric text.
If the table’s match type is Range, the Key Units of Measureautomatically becomes Number.
5. Enter the row label as the Row Title.
For example, if the table rows refer to rate codes, an appropriaterow title would be Rate Code. If the rows refer to age ranges, youmight use the title Age Range.
6. Save your work, and choose the Columns button to go to theColumns window.
� To set up columns:
1. Enter labels for the table columns in the Name field.
Note: To add a new column to a table that already exists, placethe cursor on the name of the column after which you want toenter the new column name, and choose Insert Record from theEdit menu to obtain a clear field.
2. If you are using formula validation for a column’s entries, select thename of the validation formula for the column.
3. Save your work and close the window.
� To set up rows:
1. In the Table Structure window, choose the Rows button to go to theRows window.
2. If the match type of the table is Match, enter the label for each tablerow in the fields under the heading Exact.
1 – 97Extend and Customize
If the match type of the table is Range, enter numbers representingthe lower and upper boundary of each row’s range.
3. In the Sequence fields, you can optionally enter a number for eachrow label to determine the order in which it appears on a list in theTable Values window. Logical sequencing of row labels helps usersenter table values rapidly and accurately.
4. When you are finished, save your work and close the window.Your table is now set up and ready to receive entries into itscolumns.
1 – 98 Customizing, Reporting, and System Administration in Oracle HRMS (Canada)
Entering Table Values
If you have set up user–defined tables, you can enter and maintainvalues in the Table Values window.
You can access table values from any formula used for input–valuevalidation, payroll calculation or definition of skip–rules, assignmentsets or QuickPaint reports. You can access this information using theGET_TABLE_VALUE function.
Note: The system administrator can create customizedversions of the Table Values window so that you use eachversion for one user table only.
� To enter values into table columns:
1. Set your effective date to the date from which you want the entriesto take effect.
2. Query the table name.
3. With the cursor in the Column Name field, use the up and downarrows to locate the name of the column in which you want tomake entries.
4. In the Values region, select each row for which you want to makean entry. You select rows in the Exact field or the Lower Boundfield, depending on the match type of the table.
5. For each row, make the appropriate entry in the Value field.
6. Save your work.
C H A P T E R
2
2 – 1Security
Security

2 – 2 Customizing, Reporting, and System Administration in Oracle HRMS (Canada)
SecurityYou can set up and maintain security of access for different classes ofusers. Once you have identified who will use Oracle HRMS, whatinformation they require, and how they will use it, you can grouptogether users with similar requirements and give them the same viewof the system.
In what ways can you use security of access for different users?
You can set up menus using structures and names that make sense tothe users. You can also restrict the data users can view and edit incertain windows, so they only see what they need to see.
This provides security for your data and an efficient interface designedfor your users’ needs.
How does Oracle HRMS allow data restriction for display in a window?
If you want different users to view the same window for differentpurposes, you can restrict their views in different ways. For example:
• Limiting access to list of values for faster data entry
• Limiting access to certain types of information
For example, you might create a customized version of the ViewElement Entry History for Employee form that does not displaythe earnings elements representing salary, bonus andcommission. Most users’ menus would only give them access tothis customized version of the form. Those authorized to viewsalary, bonus and commission figures, can have a menu functiondefined to allow access to the uncustomized form.
How does Oracle HRMS enable users to view multiple Business Groups?
Oracle HRMS is installed with two security models, each enabling youto set up security for an enterprise which uses multiple BusinessGroups. Using both models you can only view records for one businessgroup at any one time. The difference between the models is as follows:
• Using Cross Business Group Responsibility security you can setup the same responsibility for different Business Groups. Thismeans you switch responsibility and security groups to view adifferent Business Group.
• Using Standard HRMS security you can only link one BusinessGroup to a single responsibility. This means you must changeyour user identification to view a different Business Group.

2 – 3Security
Security Overview
As part of your implementation plan, you identify who will use OracleHRMS, what information they require and how they use it.
Defining who users see and what information they see about peoplewithin a Business Group is fundamental to HRMS security.
Note: It is important to remember that a user can only viewthe records for one Business Group at any one time.
Within a Business Group you can control:
• Who the user can access using security profiles. You canrestricted access by organizations, position, position hierarchiesand payrolls.
• What the user can access using menus, windows, customizationsand taskflows. You can control exactly what a user can see aboutthe people they can access.
Security in your Enterprise
Oracle HRMS understands that different enterprises have differentsecurity needs. Because of this there are different methods for settingup who and what users can access. The first and most importantdecision you need to make is which security model should be used byyour enterprise.
The two security models, Standard HRMS security and Cross BusinessGroup Responsibility security, both control security by restricting whoand what the user can see. What differs is how you can set up security,menus and how users log in.
The following diagrams provide an overview of each of model,highlighting the relationship between the different securitycomponents. For more detailed information about each of the securitymodels, see Security Models: page 2 – 8.

2 – 4 Customizing, Reporting, and System Administration in Oracle HRMS (Canada)
Standard HRMS Security
Figure 2 – 1 Standard HRMS Security Components
Using Standard HRMS security you log in using a username andpassword. You then select a responsibility. Your user name andresponsibility are linked to a Business Group. You can only accessrecords for this Business Group. The responsibility is also linked to arequest group, this restricts the reports and processes you can access.Who you can access is restricted by the security profile. What detailsyou can access is restricted by the menus, taskflows, windows andform customization. This restricts the who and what you can see in theBusiness Group.
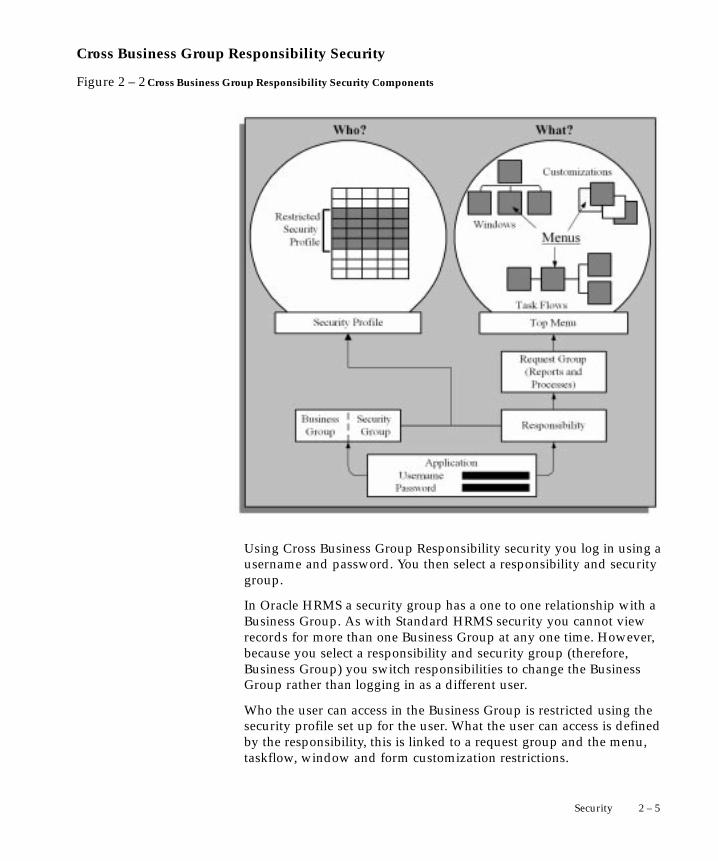
2 – 5Security
Cross Business Group Responsibility Security
Figure 2 – 2 Cross Business Group Responsibility Security Components
Using Cross Business Group Responsibility security you log in using ausername and password. You then select a responsibility and securitygroup.
In Oracle HRMS a security group has a one to one relationship with aBusiness Group. As with Standard HRMS security you cannot viewrecords for more than one Business Group at any one time. However,because you select a responsibility and security group (therefore,Business Group) you switch responsibilities to change the BusinessGroup rather than logging in as a different user.
Who the user can access in the Business Group is restricted using thesecurity profile set up for the user. What the user can access is definedby the responsibility, this is linked to a request group and the menu,taskflow, window and form customization restrictions.
2 – 6 Customizing, Reporting, and System Administration in Oracle HRMS (Canada)
Security Components
To set up security for your users you also need to have a detailedunderstanding of the following security components:
User Profiles
A user profile is a set of changeable options that affects the way yourapplication runs. You can set user profile options at site level,application level, responsibility level and user level.
You can restrict access to query–only for all or a selection of your HRand Payroll forms using a user profile option and the parameterQUERY_ONLY=YES at form function level.
Security Profiles
By defining security profiles, you can control access to records ofemployees at or above a certain level in an organization. For example,you can give a department’s administrator access to all departmentemployee records except those of the manager and assistant manager.
Responsibility
The responsibility is your primary means of defining security. BusinessGroups, menu structures, task flows, and information types are linkedto a responsibility.
Menu Structures
Using menu structures, you can limit the functions a user can access.You can also restrict access to information types by choosing whichinformation types a user can view.
You can also create multiple version of the same form, each one usedfor just one task. This approach restricts the list of values on certainfields and therefore provides for faster data entry. It also enables you tolimit access to certain types of information.
Request Groups
You can specify which processes and reports a reporting user can runby setting up request groups. Within the request group, you use securityprofiles to restrict the records accessed by the reporting user, who mayrun reports against the system without having online access throughthe system’s forms.
Security Groups (Cross Business Group Responsibility only)
If you are using the Cross Business Group Responsibility model youalso need to understand the concept of security groups. Security groups

2 – 7Security
are a method of partitioning data. This is particularly useful if you are aService Center because you can manage information for multipleBusiness Groups using one responsibility.
Reporting Access
You can set up access restrictions for employees who never use theproduct’s windows and do not change database information, but doaccess the database.
Security Processes
There are system security processes that enable you to:
• Grant permissions to a new reporting user.
• Maintain the lists of organizations, positions, payrolls,employees and applicants that security profile holders canaccess.
• Set up and update your system to use Cross Business GroupResponsibility security.

2 – 8 Customizing, Reporting, and System Administration in Oracle HRMS (Canada)
Security Models
Oracle HRMS provides two different security models which enable youto set up security specifically for your enterprise: Standard HRMSsecurity and Cross Business Group Responsibility security.
Note: If you want to set up security for employees who canaccess the database, but do not change database information,see: Reporting Access: page 2 – 27 and Setting Up ReportingUsers: page 2 – 42
Standard HRMS Security
Standard HRMS security is used by most enterprises and enables youto link one responsibility to one Business Group. You cannot enablemore than one Business Group for a Responsibility. If you use multipleBusiness Groups you set up a separate responsibility for each BusinessGroup. Using this model, you must log on as a different user to viewand manage records in a different Business Group.
When you use Standard HRMS security each responsibility is assignedto one security profile, and therefore one Business Group. This isdifferent to the Cross Business Group Responsibility security whereyou use the Assign Security Profile window to enable one responsibilityfor a number Business Groups and security profiles.
Using the Standard HRMS security model you do not use securitygroups or the Assign Security Profile window. The Enable SecurityGroups profile is defaulted to No at site level. You should not overridethis default at Application level.
If the business needs of your enterprise change you can move fromStandard HRMS security to Cross Business Group Responsibilitysecurity. To do this, you must follow the steps in Updating the SecurityModel: page 2 – 41. These ensure you have the correct profile optionsset up and security groups are created for all your existing BusinessGroups.
Cross Business Group Responsibility Security
You should use Cross Business Group Responsibility security if youhave multiple Business Groups set up on a single database install andyou want one responsibility to be enabled for more than one BusinessGroup.
This method saves you time when setting up security as you do nothave to set up a new responsibility for each Business Group. You canalso link more than one security profile to a responsibility, as long as

☞
2 – 9Security
the user is different. This saves you setting up a new responsibility foreach security profile you use.
However, using Cross Business Group Responsibility security youmust not set up HRMS and non HRMS windows and functions on thesame menu. For example, you should not have Oracle HRMS andOracle Financial windows on one super menu. Instead you must set upseparate menus and responsibilities for each Oracle application.However, you can set up HRMS and System Administrator windows(forms with names that begin with FND) on the same menu.
From a user’s perspective you only have to change the responsibilityand security group combination to view records for a different BusinessGroup, rather than logging on as a different user.
Note: Using this model you still log on using oneresponsibility and Business Group. You cannot view multipleBusiness Group records at the same time. This ensures theintegrity of your Business Group records.
This model of security is particularly useful if your enterprise is aService Center.
Security Groups
The key concept used in this model is Security Groups. Oracle HRMSuses Security Groups to enable one responsibility to use multipleBusiness Groups.
Attention: You must be sure you need to use Cross BusinessGroup Responsibility security. Once you have set up OracleHRMS to use this model you cannot change to Standard HRMSsecurity.
To set up Oracle HRMS to use security groups you must set the userprofile option Enable Security Groups to Yes and run the MultipleSecurity Groups process.
Note: If you want to enable the Enable Security Groups profileoption you must set it to Yes at Application level.
Oracle HRMS then:
• Creates a security group when you create a Business Group
• Enables you to link a responsibility, user and Business Group to asecurity profile using the Assign Security Profile window
Using this model you do not need to enter the HR: Security Profileprofile option as it is automatically set up. If you do enter a securityprofile in the HR: Security Profile profile option it is ignored.
For more information on how Security Groups and Business Groupsare used in security see: Security Groups (Cross Business GroupResponsibility Only): page 2 – 24.
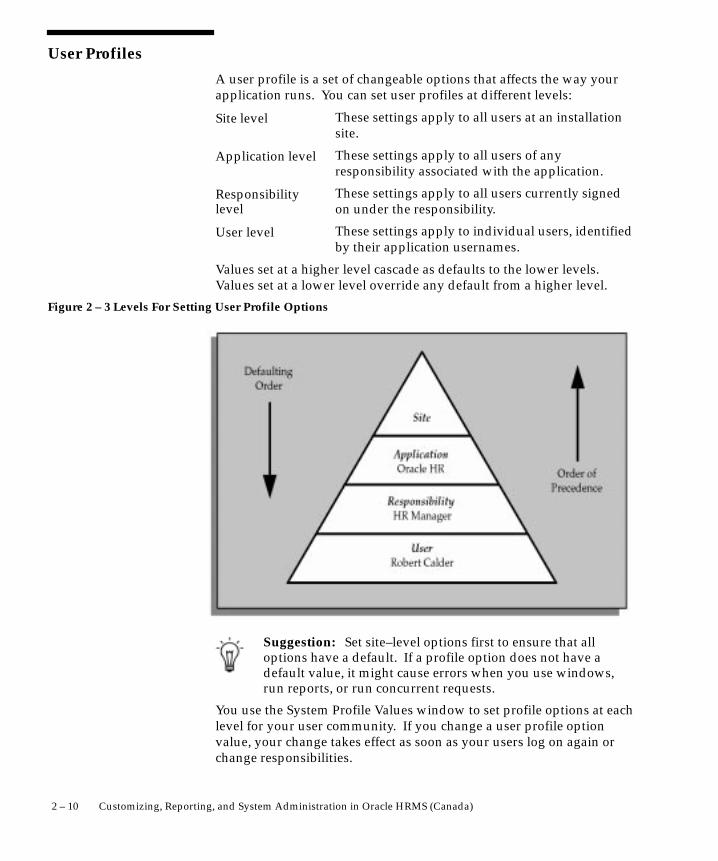
2 – 10 Customizing, Reporting, and System Administration in Oracle HRMS (Canada)
User Profiles
A user profile is a set of changeable options that affects the way yourapplication runs. You can set user profiles at different levels:
These settings apply to all users at an installationsite.
These settings apply to all users of anyresponsibility associated with the application.
These settings apply to all users currently signedon under the responsibility.
These settings apply to individual users, identifiedby their application usernames.
Values set at a higher level cascade as defaults to the lower levels.Values set at a lower level override any default from a higher level.
Figure 2 – 3 Levels For Setting User Profile Options
Suggestion: Set site–level options first to ensure that alloptions have a default. If a profile option does not have adefault value, it might cause errors when you use windows,run reports, or run concurrent requests.
You use the System Profile Values window to set profile options at eachlevel for your user community. If you change a user profile optionvalue, your change takes effect as soon as your users log on again orchange responsibilities.
Site level
Application level
Responsibilitylevel
User level
2 – 11Security
See: System Profile Values Window, Oracle System Administration Guide.
Application users can use the Personal Profile Values window to settheir own profile options at the user level. Not all profile options arevisible to users, and some profile options, while visible, cannot beupdated by end users. Any changes users make to their personalprofile options take effect immediately.
See: Personal Profile Values Window, Oracle System AdministrationGuide.
Query–Only Access to Forms
You can restrict access to query–only for all HR and Payroll forms on amenu by setting the user profile option HR:Query Only Mode to Yes.You can set this profile for individual responsibilities or users, or at thesite or application level.
If you want to give query–only access to some forms and full access toother forms, set the HR:Query Only Mode profile to No and use theparameter QUERY_ONLY=YES at form function level to restrict accessto individual forms.
Note: You can set the parameter QUERY_ONLY=YES for aform function that also launches a task flow. In this case,specify two parameters in the Form Function window:
QUERY_ONLY=YES
WORKFLOW_NAME=”task flow name”
The entire task flow will be query–only, not just the first form.
See: Restricting Access to Query–Only Mode: page 1 – 62.
Profile Options Summary
The table below indicates whether you (the ”User”) can view or updatethe profile option and at which System Administrator levels the profileoptions can be updated: at the user, responsibility, application, or sitelevels.
A ”Required” profile option requires you to provide a value. An”Optional” profile option already provides a default value, so you onlyneed to change it if you do not want to accept the default.
Note: The only option that a user can change isDateTrack:Reminder.
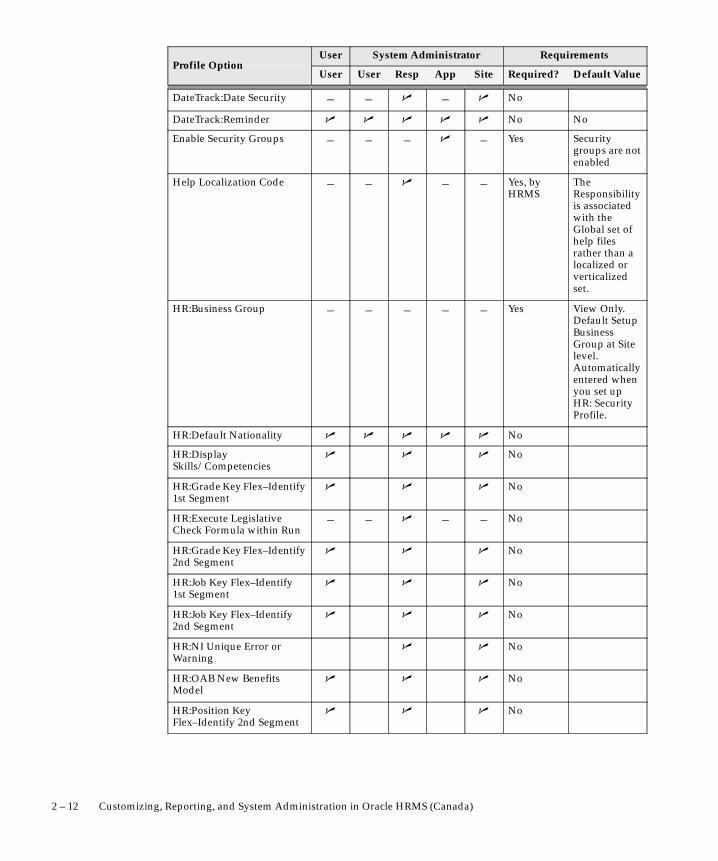
2 – 12 Customizing, Reporting, and System Administration in Oracle HRMS (Canada)
User System Administrator RequirementsProfile Option
User User Resp App Site Required? Default Value
DateTrack:Date Security – – � – � No
DateTrack:Reminder � � � � � No No
Enable Security Groups – – – � – Yes Securitygroups are notenabled
Help Localization Code – – � – – Yes, byHRMS
TheResponsibilityis associatedwith theGlobal set ofhelp filesrather than alocalized orverticalizedset.
HR:Business Group – – – – – Yes View Only.Default SetupBusinessGroup at Sitelevel.Automaticallyentered whenyou set upHR: SecurityProfile.
HR:Default Nationality � � � � � No
HR:DisplaySkills/Competencies
� � � No
HR:Grade Key Flex–Identify1st Segment
� � � No
HR:Execute LegislativeCheck Formula within Run
– – � – – No
HR:Grade Key Flex–Identify2nd Segment
� � � No
HR:Job Key Flex–Identify1st Segment
� � � No
HR:Job Key Flex–Identify2nd Segment
� � � No
HR:NI Unique Error orWarning
� � No
HR:OAB New BenefitsModel
� � � No
HR:Position KeyFlex–Identify 2nd Segment
� � � No

2 – 13Security
RequirementsSystem AdministratorUserProfile Option
Default ValueRequired?SiteAppRespUserUserProfile Option
HR:Position Key Identify1st Segment
� � � No
HR:Query Only Mode – � � No
HR: Security Profile – – � – – Yes Defaultview–allsecurityprofile at Sitelevel
HR:Use StandardAttachments
– � � � Yes Yes at SiteLevel, No atSeededResponsibilityLevel
HR:User Type – � Yes
View Unpublished 360 SelfAppraisal
� � � No Default valueis Null
Key
� You can update the profile option.
– You can view the profile option value but you cannotchange it.
Profile Options
DateTrack:Date Security
Controls the way users can change their effective date:
• All (users can change to any date)
• Past (users can change to dates in the past only)
• Present (users cannot change their effective date)
• Future (users can change to dates in the future only)
DateTrack:Reminder
Determines whether the Decision window appears when you open awindow in which you can enter, update, or delete datetrackedinformation. Notice that the Decision window never appears onwindows where you can query datetracked information but not updateit. There are three possible values:
• Always (the window always appears)

2 – 14 Customizing, Reporting, and System Administration in Oracle HRMS (Canada)
• Never (the window never appears)
• Not Today (the window appears only if the effective date is notthe system date)
Enable Security Groups
Controls whether you use security groups within security. Only changethe default Yes at application level if your enterprise is using CrossBusiness Group Responsibility security. If you change the default toYes, you must run the Enable Multiple Security Groups process.
Note: Non HRMS applications do not support multiplesecurity groups in Release 11i.
Help Localization Code
Controls which set of help files are linked to each responsibility. If youaccept the default, then the set of help files for Global HRMS will beassociated with the responsibility. However, if you want to specify alegislative or vertical variant of HRMS you must set the HelpLocalization Code as follows:
• CA for Canadian HR Help
• FD for US Federal HR Help
• JP for Japanese HRMS Help
• UK for UK HRMS Help
• US for US HRMS Help
These entries must be in upper case.
HR:Business Group
This is view only. Determines the Business Group linked to aresponsibility. The Setup Business Group is defaulted at Site level.
If you use Cross Business Group Responsibility security this option isautomatically set up when you create a security profile assignment.
If you use Standard HRMS security this option is automatically set upwhen you enter the HR:Security Profile profile option.
HR:Default Nationality
Defines the default nationality for a user. When a new person is enteredin the People window, the nationality entered here is automaticallydisplayed in the Nationality field.
2 – 15Security
HR:Display Skills/Profile Options
Controls the display of competencies in an Advanced Search. It is usedto control the display of skill categories in:
• Apply for a Job
• Enroll in a Class
HR:Execute Legislative Check Formula within Run
Determines whether the legislation–specific check is performed duringa payroll run.
HR:Grade Key Flex–Identify 1st and 2nd Segments
These options are used to control which two segments of the keyflexfields appear in Person Search.
HR:Job Flex–Identify 1st and 2nd Segments
These options are used to control which two segments of the keyflexfields appear in Person Search.
HR:NI Unique Error or Warning
Enables you to change the default warning to an error message.
If you want to warn users that the national identifier they have enteredalready exists, leave the default as warning. If you want to prevent auser entering the same national identifier more than once, you canchange the message to an error. This stops the user entering the samenational identifier.
HR:OAB New Benefits Model
Enables you to set up whether you are using the new benefits model,that is, Standard or Advanced Benefits. Enter Yes, if you are using thenew benefits model. Enter No, if you are using the compensation andbenefit models from previous releases.
HR:Position Flex–Identify 1st and 2nd Segments
These options are used to control which two segments of the keyflexfields appear in Person Search.
HR:Query Only Mode
Restricts access to view–only for all HR and Payroll forms on a menu.

2 – 16 Customizing, Reporting, and System Administration in Oracle HRMS (Canada)
HR:Security Profile
Restricts access to the organization, positions and payrolls defined inthe security profile. This option is predefined at Site Level with theview–all security profile created for the Startup Business Group.
If you use Standard HRMS security you must set up the HR:SecurityProfile profile option for each responsibility.
If you use Cross Business Group Responsibility security you must notset up the HR:Security Profile profile option. This is set upautomatically when you assign security profiles using the AssignSecurity Profile window. You must only change the HR:Security Profileoption by assigning a different security profile to a responsibility usingthe Assign Security Profile window.
HR:Use Standard Attachments
Disables the facility to attach short text comments to records. Enablesthe attachment of multiple items of various types including OLEobjects, Web pages, images, and word processed documents.
HR:User Type
Limits field access on windows shared between Oracle HumanResources and Oracle Payroll. If you do not use Oracle Payroll, it mustbe set to HR User for all responsibilities.
If you do use Oracle Payroll, you can give each Responsibility one ofthe following user types, depending on the work role of the holders ofthe responsibility:
• HR User
• HR with Payroll User
• Payroll User
View Unpublished Employee 360 Degree Self Appraisal
Enables a manager to view their employee’s unpublished 360 Degreeself appraisals. Set the profile option to Yes to view an employee’sunpublished 360 Degree self appraisals. The default value is Null.

2 – 17Security
Security Profiles
The security profile linked to the user’s responsibility and BusinessGroup determines which applicant and employee records are availableto holders of that responsibility.
Using HRMS Standard security the security profile is set up for oneresponsibility using the HR:Security Profile profile option.
Using Cross Business Group Responsibility security you link a securityprofile to the user’s responsibility and Business group using the AssignSecurity Profile window. You can also link more than one securityprofile to a responsibility, as long as the user is different. This save yousetting up a new responsibility for each security profile you use.
Note: Using Cross Business Group Responsibility security youmust not use the HR:Security Profile profile option. This isautomatically set up when you assign security profiles usingthe Assign Security Profile window.
You associate a security profile with work structures. The records ofemployees and applicants assigned to these work structures are thenaccessible to holders of the responsibility.
The work structures you can name in security profiles are:
• Internal organizations and organization hierarchies. Organizationsinclude structures like departments, sections, groups and teams.Each security profile allows access to one Business Group only.
• Positions and position hierarchies. Positions are jobs performedwithin specified organizations.
• Payrolls. Restrict access to employee records by payroll. Forexample, you can give payroll staff who work on the payroll at aparticular location access to records of employees on this payrollonly.
Controlling security by payroll assignment limits the employeerecords users can see and update on employee–related windows,such as those for employee information, and element entry.
Of course, if an employee assignment does not include a payroll,payroll security cannot apply to this assignment. Payroll securitynever applies to applicant records since applicants are notassigned to payrolls.
The windows for compensation definition are unrelated to anyparticular employee records or payroll assignments. Thereforelimiting access by payroll does not affect users’ access to thesewindows.
2 – 18 Customizing, Reporting, and System Administration in Oracle HRMS (Canada)
When you create a Business Group a view–all security profile isautomatically created. The security profile provides access to allemployee records, and all applicant records in the Business Group. Thesystem administrator links this view–all profile to users who are settingup the system. They in turn can set up security for other users.

2 – 19Security
Responsibilities
You can control users’ access to human resources information byrecord, window and function.
The responsibility is your primary means of defining security. To definewhat a user can access you link a user, responsibility and BusinessGroup to a security profile. Other important components of theresponsibility are the menu structures, task flows and informationtypes. These also help you limit the employee records a user can access.
Users can sign on to the system only through the responsibilities yougive them. So their responsibilities control what they can see and do inthe system.
Responsibility
A responsibility is linked to a security profile and composed of:
• A menu structure
• A request group for reporting users (optional)
• Extra information types available to the user
Responsibilities are also linked to Business Groups. However,depending on which security model you use, you link responsibilitiesdifferently.
• Standard HRMS Security
You can only link one Business Group to one responsibility usingStandard HRMS security. You must set up differentresponsibilities for each Business Group.
• Cross Business Group Responsibility Security
You can enable more than one Business Group for a singleresponsibility. However, you still only view records for oneBusiness Group at a time.
Each model enables you to set up multiple responsibilities. You canassign multiple responsibilities to users who need to:
• Access applicant and employee records from two or moresecurity profiles.
• Use more than one menu structure to view or make changes tothe records they can access.
• Access records for more than one Business Group if you useStandard HRMS security. For example, an enterprise with

☞
2 – 20 Customizing, Reporting, and System Administration in Oracle HRMS (Canada)
international operations may have a US–Based Business Groupand a UK–Based Business Group. A few of your employeesmight need to access both.
Access Control Through Responsibility
The following key components help control user access to OracleHRMS:
• Security profiles determine the organizations, positions andpayrolls whose applicant and employee records responsibilityholders can access.
• Business Groups determine the set of records a user can access.Using Cross Business Group Responsibility security you canenable one responsibility for many Business Groups. UsingStandard HRMS security you must set up a new responsibilityfor each Business Group.
• Menu structures and functions control:
– The particular windows a responsibility holder can access
– Whether he or she can perform data entry, change ordeletion on these windows
You can produce customized versions of some windows. Eachcustomized version enables access to a subset of certain types ofinformation, such as person types, special information types, orelements. You define additional menu functions to callcustomized windows or task flows, and then you add thesefunctions to a menu structure, which is linked to a responsibility.
• Request groups determine the group of processes and reports aresponsibility holder can initiate. A request group is an optionalcomponent of a responsibility. If holders of a responsibilityshould not initiate any reports or processes, you do not include arequest group in the responsibility.
• Extra Information types are an optional component of aresponsibility. By defining which extra information types areincluded in a responsibility, you effectively create a customizedversion of a window for users who are assigned theresponsibility.
Attention: If you do not associate any extra information typeswith a responsibility, a person assigned to this responsibilitywill not have access to any extra information types in theproduct.
For each responsibility, you must also define the user profile optionHR:User Type.

2 – 21Security
Menu Structure
Users access standard windows, customized windows, and the firstwindow in a task flow through the menu structure displayed in theNavigator window. Each responsibility includes a menu structure torestrict the windows users can access, and what they can do on thesewindows.
A function is a part of an application’s functionality that is registeredunder a unique name for the purpose of assigning it to, or excluding itfrom, a responsibility. There are two types of functions: form functions,and non–form functions. For clarity, we refer to a form function as aform, and a non–form function as a subfunction, even though both arejust instances of functions in the database.
Using Function Security system administrators can further restrictaccess to individual menu options. You can include:
• Standard windows, displayed in edit or view–only mode
• Customized windows, on which you have restricted the range ofdata that can be displayed
• The first window in task flows that link a number of windowsthat are used in sequence to complete a task
By defining menus with function security for groups of users, you can:
• Limit the range of information users can access for the applicantand employee records available to them
• Improve users’ efficiency in using the system by reducing menuchoices
• Restrict users to query–only access to some or all windows
Each responsibility you define must be linked to a root menu. The rootmenu lists the menu options when the Navigator window first opens.
The Default Menu Structure
The AutoInstall program creates a default menu structure for yourHRMS product. This menu structure lets you access all of the windowsfor your system. Normally, only a system administrator has access tothe full default menu structure.
The supplied menus give you access to all of the available submenus.However, a number of predefined functions are not enabled on thesemenus. You need to add them for the responsibilities that should haveaccess to these functions.

2 – 22 Customizing, Reporting, and System Administration in Oracle HRMS (Canada)
• HR View Medical
This causes the Medical Information tabbed region to display inthe People window.
• HR View Background
This causes the Background Information tabbed region to displayin the People window.
• HR View Benefits
This causes the Benefits tabbed region to display in the Peoplewindow.
• HR View Rehire
This causes the Rehire Information tabbed region to display inthe People window.
• Salary Administration: Approve
This enables the user to approve salary proposals in the SalaryAdministration window and the Salary Management folder.
• HR View Projects Information
This causes the Projects Information tabbed region to display inthe Assignment window. You must have Oracle Projects installedto display this region.
Warning: Oracle HRMS with DateTrack and task flows doesnot fully support multiple active windows. When you define anew menu for use with Oracle HRMS the top menu mustinclude the following function as a separate menu option:
Disable Multiform
See: Disabling Multiple Windows: page 1 – 83

2 – 23Security
Request Groups
When you build a responsibility for employees who must initiatereports or processes, you can attach a request group to theresponsibility. The request group lists a group of processes and reportsits holders can run. Holders of responsibilities with no request groupscannot run any processes or reports.
The group Reports and Processes gives access to all predefined reportsand processes.
☞
2 – 24 Customizing, Reporting, and System Administration in Oracle HRMS (Canada)
Security Groups (Cross Business Group Responsibility Security Only)
When you use Cross Business Group Responsibility security, data ispartitioned using Business Groups. Therefore, with Oracle HRMS,when data is partitioned by Security Group, it is the same aspartitioning by Business Group.
Attention: Security groups are only used if you have set upyour enterprise using the Cross Business Group Responsibilitysecurity model. Standard HRMS security only partitions datausing Business Groups.
Security Groups are the key component in Cross Business GroupResponsibility security. They enable you to set up one responsibilityand link this to a number of different Business Groups.
Before you can start using this security model you must set up HRMSto use Security Groups. To do this you set the Enable Security Groupsprofile option to Yes and run the Enable Multiple Security Groupprocess. See: Setting Up Cross Business Group Responsibility Security:page 2 – 36.
Note: You can also change from Standard HRMS security toCross Business Group Responsibility security. See: Updatingthe Security Model: page 2 – 41
Once you have set up your enterprise to use security groups, OracleHRMS automatically creates a security group when you set up aBusiness Group. The security group has the same name as the BusinessGroup. For example, if you create a Business Group called UKHeadquarters, Oracle HRMS automatically creates a security groupcalled UK Headquarters. The Setup Business Group is an exception, ituses the predefined security group called Standard.
Note: If you change the name of your Business Group, thesecurity group name is not updated. You must select theresponsibility linked to the Business Group’s original name.
Using the Assign Security Profile window you link the user,responsibility and Business Group to a security profile. By entering aBusiness Group you are automatically linking the responsibility to thesecurity group.
You then log on using the Responsibility and Security Group pairing.As security groups are automatically linked to a Business Group, youcan then view and manage the records for that Business Group.
When you log on, Oracle HRMS displays all the pairings you havecreated between Business Groups and responsibilities. You could havethe same responsibility listed twice with different security groups andtherefore Business Groups. By looking at the security group you can
☞
☞
2 – 25Security
select the correct responsibility for the Business Group you want toaccess.
Using this model you cannot view multiple Business Group records atthe same time. To change Business Group you must switch to analternative responsibility and Business Group pairing. This ensures theintegrity of your Business Group records.
Attention: Security groups are automatically created for youwhen you use Oracle HRMS. Do not use the SystemAdministrator ’s Security Groups window to add securitygroups as these will not be linked to your Business Groups.
Example
If your user is set up with a responsibility called HRMS Manager youcould link this to:
• UK Headquarters (Business Group)
• Scotland Operations (Security Profile)
Using the same responsibility (HRMS Manager), you could also link toa different Business Group:
• Canadian Headquarters (Business Group)
• Vancouver Operations (Security Profile)
Therefore, you only need to set up one responsibility (HRMS Manager)but you can enable two Business Groups (UK Headquarters andCanadian Headquarters).
When the Business Group UK Headquarters was set up, a securitygroup UK Headquarters would automatically have been created. Whenyou linked the Business Group to the user’s responsibility, the securitygroup UK Headquarters would also be linked.
To view the records for Business Group UK headquarters you wouldselect the HRMS Manager responsibility and the UK Headquarterssecurity group.
If you then wanted to view the records for the Canadian HeadquartersBusiness Group you would switch responsibility and security grouppairing, selecting the same responsibility (HRMS Manager) and thedifferent security group Canadian Headquarters.
Categorizing Information By Security Groups
Attention: You can only categorize information by SecurityGroups if you are using Cross Business Group Responsibilitysecurity.
2 – 26 Customizing, Reporting, and System Administration in Oracle HRMS (Canada)
You can categorize the following information within your enterpriseusing security groups:
• Lookups
Using the Application Utilities Lookups window you can set uplookups specifically for a security group. These lookups are onlyavailable to users who access the Business Group associated withthe security group.
See: Adding Lookup Types and Values: page 1 – 93
• Concurrent Programs
Using the Concurrent Parameters Program window you canenter a security group against a concurrent program, this createsa specific list of concurrent programs for a Security Group andtherefore Business Group. When a user selects a concurrentprogram using the Submit Request window, they can select fromthe concurrent programs for their Business Group.
Note: You do not have to enter a security group against all theconcurrent programs. Concurrent programs which are notlinked to a security group display for all SecurityGroups/Business Groups.
See: Concurrent Parameters Program window, ApplicationsSystem Administrator’s Guide.
2 – 27Security
Reporting Access
Oracle HRMS enables you to set up reporting users who can query andreport on the information in the database, but cannot insert, update ordelete information. Reporting users can use Oracle tools, or other toolsconnected to the Oracle database, to report on information. Regardlessof the tools used to access the database, reporting users can only readinformation, they cannot update information.
Using Oracle HRMS you can set up similar security restrictions to userswho can update, insert or delete information. This ensures reportingusers can only query and report on appropriate records.
All secure users connect to the APPS ORACLE ID. This is created whenthe system is installed. However, for reporting users, you should createone or more new reporting user ORACLE IDs. By associating thesewith a restricted security profile you can control whose records areporting user can access.
You can make any of your restricted security profiles available not onlyfor regular users, but also for reporting users. The security profilerestricts a reporting user’s access to employee records in exactly thesame way as it limits regular users’ access.
Reporting users can see all the details about the records they canaccess. To restrict the access of what a reporting user can view youmust use view–based accesses. To support this need of reporting usersyou can use third party reporting tools to create business views.
For information about how to set up database access without on-lineaccess, see: Setting Up Reporting Users: page 2 – 42.
☞
2 – 28 Customizing, Reporting, and System Administration in Oracle HRMS (Canada)
Security Processes
There are three system security processes:
• Generate Secure User
Run this process when you create a new security profile thatreferences a reporting user.
• Security List Maintenance
Run this process every night.
• Enable Multiple Security Groups
Run this process when you first set up Cross Business GroupResponsibility security.
You run these processes using a system administrator responsibilityfrom the Submit Requests window.
There is also another security process – Grant Permissions To Roles.However, this is run automatically as part of the autoinstall process.
Generate Secure User Process (SECGEN)
This process grants permissions to new reporting users. It grants the”hr_reporting_user” role to the REPORTING_ORACLE_USERNAMEspecified in the security profile.
Run this process when you have created a new security profile thatreferences a reporting user. In the Submit Requests window, select thename of the new security profile. This is the only parameter for theprocess.
Security List Maintenance Process (LISTGEN)
This process maintains the lists of organizations, positions, employeesand applicants that security profile holders can access. You shouldschedule it to run every night to take account of changes made duringthe day. If a disruption, such as a power cut, occurs while the processis running, you can manually restart it from the Submit Requestswindow.
There is one required parameter for this process: Effective Date, whichshould normally be set to SYSDATE. You can also enter a securityprofile name to generate list entries for that security profile only.
Attention: LISTGEN should normally run when there are nousers logged on to the system. Users attached while LISTGENis running may experience unexpected results; for example,

☞
2 – 29Security
additional employees may become visible or previously visibleemployees may disappear from view.
Grant Permissions To Roles Process (ROLEGEN)
All reporting users in the system share access to a set of publicsynonyms for tables and views. Reporting users are grantedpermissions to make them usable. The Grant Permissions To Rolesprocess creates these public synonyms and grants permissions on them.
Attention: The Grant Permissions to Roles process isunrelated to setting up workflow roles for Oracle products thatsupport security by workflow.
This process is automatically run as part of the autoinstall processwhen you install HR, or when you upgrade the system.
The process creates public synonyms for each of the required HRobjects and then grants SELECT permissions to the role’hr_reporting_user ’. Permissions are not granted on the secured tables,but only on the secure views of those tables. All permissions previouslygranted to the role are revoked before the new grants are made. Thisensures that the correct grants exist for the valid HR objects.
Enable Multiple Security Groups
You must run the Enable Multiple Security Groups process if you setthe Enable Security Groups profile to Yes. This process must be runwhen:
• You set up Cross Business Group Responsibility security for thefirst time to ensure HRMS is enabled to use security groups andall the Cross Business Group Responsibility security features.
• You change from Standard HRMS security to Cross BusinessGroup Responsibility security. This ensures that all your existingBusiness Groups have security groups and all the Cross BusinessGroup Responsibility security features are enabled.
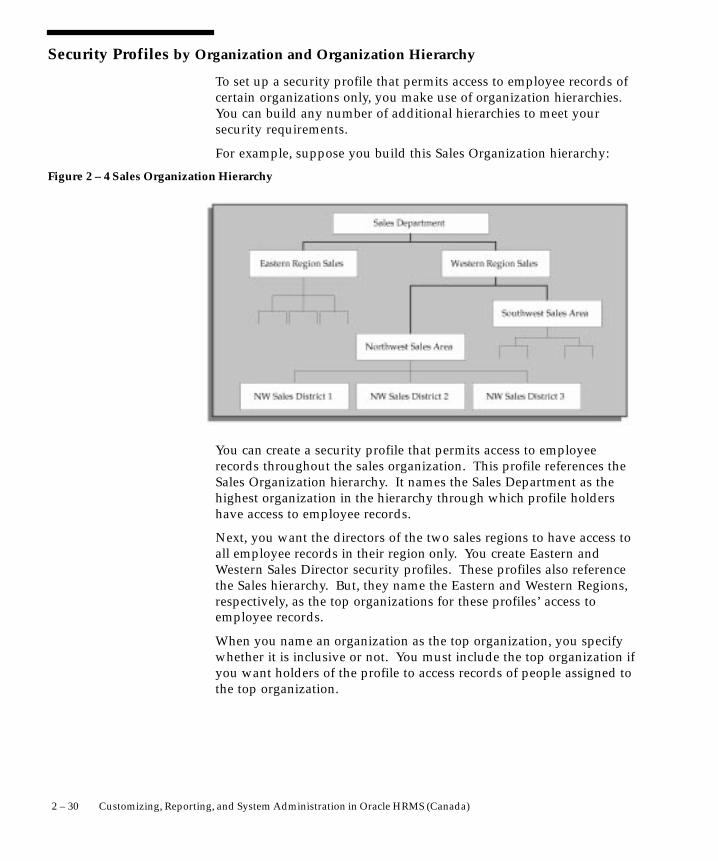
2 – 30 Customizing, Reporting, and System Administration in Oracle HRMS (Canada)
Security Profiles by Organization and Organization Hierarchy
To set up a security profile that permits access to employee records ofcertain organizations only, you make use of organization hierarchies.You can build any number of additional hierarchies to meet yoursecurity requirements.
For example, suppose you build this Sales Organization hierarchy:
Figure 2 – 4 Sales Organization Hierarchy
You can create a security profile that permits access to employeerecords throughout the sales organization. This profile references theSales Organization hierarchy. It names the Sales Department as thehighest organization in the hierarchy through which profile holdershave access to employee records.
Next, you want the directors of the two sales regions to have access toall employee records in their region only. You create Eastern andWestern Sales Director security profiles. These profiles also referencethe Sales hierarchy. But, they name the Eastern and Western Regions,respectively, as the top organizations for these profiles’ access toemployee records.
When you name an organization as the top organization, you specifywhether it is inclusive or not. You must include the top organization ifyou want holders of the profile to access records of people assigned tothe top organization.
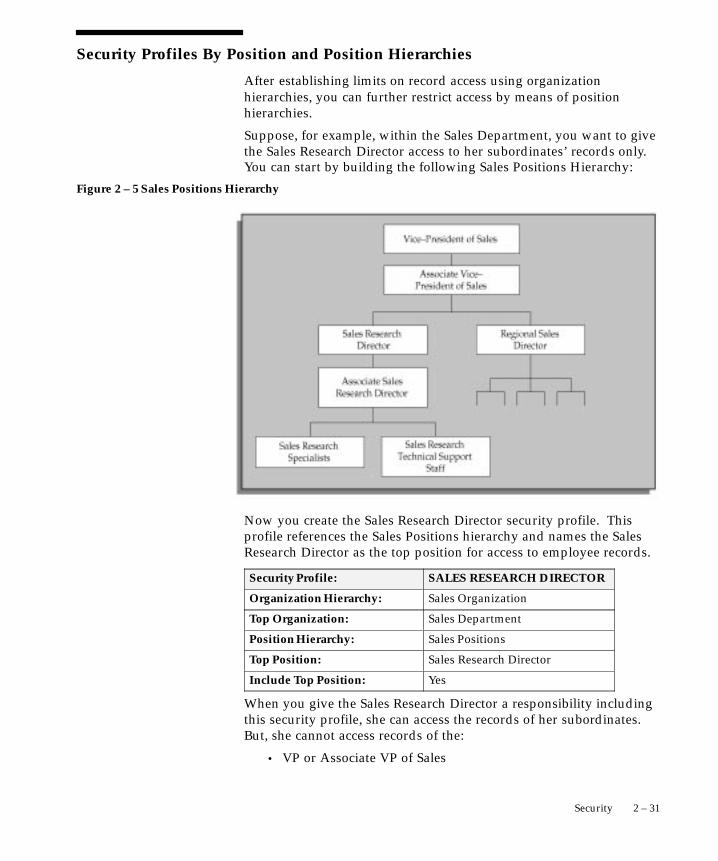
2 – 31Security
Security Profiles By Position and Position Hierarchies
After establishing limits on record access using organizationhierarchies, you can further restrict access by means of positionhierarchies.
Suppose, for example, within the Sales Department, you want to givethe Sales Research Director access to her subordinates’ records only.You can start by building the following Sales Positions Hierarchy:
Figure 2 – 5 Sales Positions Hierarchy
Now you create the Sales Research Director security profile. Thisprofile references the Sales Positions hierarchy and names the SalesResearch Director as the top position for access to employee records.
Security Profile: SALES RESEARCH DIRECTOR
Organization Hierarchy: Sales Organization
Top Organization: Sales Department
Position Hierarchy: Sales Positions
Top Position: Sales Research Director
Include Top Position: Yes
When you give the Sales Research Director a responsibility includingthis security profile, she can access the records of her subordinates.But, she cannot access records of the:
• VP or Associate VP of Sales

2 – 32 Customizing, Reporting, and System Administration in Oracle HRMS (Canada)
• Regional Sales Director
• Regional Sales Director ’s subordinates
As with organization hierarchies, you can specify that profiles do notinclude access to the top position.
2 – 33Security
Setting Up Standard HRMS Security
Use the following setup steps if your enterprise sets up a differentresponsibility for each Business Group.
� To set up users for Standard HRMS security:
1. Ensure that the Enable Security Groups profile option is set to Noat site and application level.
If this option is set to Yes then you are not using Standard HRMSsecurity.
See: System Profile Values, Oracle Applications User’s Guide.
2. Define a Security Profile: page 2 – 35
3. Ensure required functions or menus are set up.
This is required for the responsibility. For menu functions callingcustomized forms or task flows, you must enter a parameter in theParameter field of the Form Functions window.
See: Defining Menus: page 2 – 43
4. Ensure required request group is set up.
You can define the groups of standard reports and processes that auser can run from the Submit a New Request window. Everyresponsibility can have access to one request group.
Use the Request Groups window.
See: Request Groups window, Oracle Applications SystemAdministrator’s User’s Guide.
5. Define a responsibility using the Responsibility window.
See: Responsibilities Window, Oracle Applications SystemAdministrator’s Guide.
6. Set the HR User Profile Options for the new responsibility using theSystem Profile Values window. You must set up the:
• HR: User Type
Use this profile option to limit field access on windows sharedbetween Oracle Human Resources and Oracle Payroll.
• HR:Security Profile
Enter the security profile for the responsibility. This must be setup at responsibility level, otherwise the default view–all securityprofile is used. Using Standard HRMS security you can only setup one security profile for a responsibility.

☞
2 – 34 Customizing, Reporting, and System Administration in Oracle HRMS (Canada)
You can set also set up other User Profile Options.
See: System Profile Value Window, Oracle Applications SystemAdministrator’s Guide
7. Create the username and password using the User window.
Link the user to as many responsibilities as they need using theUser window.
Attention: Do not use the HRMS Assign Security Profilewindow if you are setting up Standard HRMS security.
See: Users Window, Oracle Applications System Administrator’sGuide
8. Run system security process using the Submit Request window:
• Security List Maintenance
Ensure this process is run every night.
See: Submitting a Request, Oracle Applications User’s Guide
2 – 35Security
Defining a Security Profile
Using a view–all responsibility, you can define security profiles in theSecurity Profile window.
If you want to associate a reporting user with the new security profile,the ORACLE database administrator must create a new reporting userORACLE ID. The system administrator must register the newORACLE IDs with the Application Object Library.
� To define a security profile:
1. Enter a name for the security profile and select a Business Group.This does not need to be the Business Group associated with yourresponsibility.
2. If you want reporting users to be able to use this security profile,select the Reporting User name for the ID set up by the databaseadministrator.
3. Uncheck the View All Employees and View All Applicants checkboxes if you want to restrict access to these person types byorganizations, positions, or payrolls.
4. To restrict access by organization, uncheck the View AllOrganizations check box. Select an organization hierarchy, and atop organization. Check the Include Top Organization check box ifyou want to allow access to this organization.
5. To restrict access by position, uncheck the View All Positions checkbox. Select a position hierarchy, and a top position. Check theInclude Top Position check box if you want to allow access to thisposition.
6. In the Payroll Security tabbed region:
• To give access to many payrolls, check the View All Payrollscheck box, and uncheck the Include check box. Select thepayrolls you want to exclude.
• To give access to a small number of payrolls, uncheck the ViewAll Payrolls check box, and check the Include check box. Selectthe payrolls to include.
7. Save your work.
2 – 36 Customizing, Reporting, and System Administration in Oracle HRMS (Canada)
Setting Up Cross Business Group Responsibility Security
Use the following setup steps if your enterprise wants to enable manyBusiness Groups for one responsibility. This type of security is mostcommonly used by Service Centers.
Note: You only only need to perform steps 1 and 2 when youfirst implement Oracle HRMS security. You can perform theother steps at any time.
� To set up users for Cross Business Group Responsibility security:
1. Set the Enable Security Groups Profile Option.
Ensure the Enable Security Groups profile option is set to Yes at theapplication level.
Note: If this option is set to No then you are not using CrossBusiness Group Responsibility security.
See: System Profile Values, Oracle Applications User’s Guide.
2. Run the Enable Multiple Security Group Process.
You must run the Enable Multiple Security Group process to set upOracle HRMS to use security groups.
See: Submitting a Request, Oracle Applications User’s Guide.
3. Define a Security Profile: page 2 – 35
4. Ensure that the functions or menus you require are set up.
This is required for the responsibility. For menu functions callingcustomized forms or task flows, you must enter a parameter in theParameter field of the Form Functions window.
See: Defining Menus: page 2 – 43
5. Ensure that the request group you require is set up.
You can define the groups of standard reports and processes that auser can run from the Submit a New Request window. Everyresponsibility can have access to one request group.
Use the Request Group window.
See: Request Group window, Oracle Applications SystemAdministrator’s User’s Guide.
6. Define a responsibility using the Responsibility window.
See: Responsibility Window, Oracle Applications SystemAdministrator’s Guide.
7. Set the HR User Profile Options for the new responsibility using theSystem Profile Values window. You must set up the HR: User Typeoption.

☞
2 – 37Security
Note: For Cross Business Group Responsibility security do notset up or amend the HR:Security Profile profile option using theSystem Profile Values window. To set up or change this profileoption use the Assign Security Profile window.
You can set also set up other User Profile Options.
See: System Profile Value Window, Oracle Applications SystemAdministrator’s Guide
8. Create usernames and passwords using the User window.
Attention: Do not link responsibilities and security groups(Business Groups) to users in this window, use the AssignSecurity Profile window. If you do enter a responsibility andsecurity group in this window, you still need to use the AssignSecurity Profile window, to link your user to a responsibilityand security profile. If you do not use the Assign SecurityProfile window, the default view–all security profile is used andyour user will be able to see all records in the Business Group.
See: Users Window, Oracle Applications System Administrator’s Guide
9. Assign Security Profiles: page 2 – 39
Associate a security profile with a user, responsibility and BusinessGroup using the Assign Security Profile window.
10. Run system security process using the Submit Request window:
• Security List Maintenance
Ensure this process is run every night.
See: Submitting a Request, Oracle Applications User’s Guide

2 – 38 Customizing, Reporting, and System Administration in Oracle HRMS (Canada)
Using the Find Security Profile Assignment window
This window enables you to search for security profile assignments thathave already been set up. You only use security profile assignments ifyou are setting up Cross Business Group Responsibility security.
If you want to set up a new security profile assignment select the Newbutton. For more information on setting up new security profileassignments, see Assigning Security Profiles: page 2 – 39.
Note: When you navigate to the Assign Security Profileswindow, the Find Security Profile Assignment windowautomatically displays.
� To query a security profile assignment:
1. Enter a full or partial query on one, a selection or all of thefollowing:
• User name
• Application
• Responsibility
• Business Group
• Security profile
2. Check the Retrieve Only Active Assignments check box if you wantto query security profile assignments that are active as of today’sdate. Uncheck the Retrieve Only Active Assignments check box ifyou want to query security profile assignments which are no longeractive or assignments which will be available in the future.
3. Choose the Find button.
The security profile assignments found by the query are displayedin the Assign Security Profile window.
☞
2 – 39Security
Assigning Security ProfilesUse the Assign Security Profile window to link user names, andsecurity profiles to responsibilities. Only use this window if you areusing Cross Business Group Responsibility security.
Attention: When using Cross Business Group Responsibilitysecurity even if you have linked a user to a responsibility usingthe User window, you must still link your user to responsibilityand security profile using the HRMS Assign Security Profilewindow. If you do not use the Assign Security Profile window,HRMS uses the default view–all security profile for theBusiness Group and the user will see all records for theBusiness Group.
The Assign Security Profile window is an essential part of setting upand maintaining HRMS security for Cross Business GroupResponsibility security. You must use this window to update yoursecurity profile assignment. Any changes entered for the securityprofile assignment are also shown on the User window. However, ifyou end date a user’s responsibility using the User window, this is notshown on the Assign Security Profile window.
When you navigate to the Assign Security Profile window, the FindSecurity Profile Assignments window displays automatically. SelectNew to create a new assignment. For information about queryingexisting security profile assignments, see Using the Find SecurityProfile Assignment window: page 2 – 38.
� To assign a new security profile:
1. Enter the user name you want to link to a responsibility.
2. Enter the application and responsibility you want to link to theuser.
3. Assign a Business Group to the user’s responsibility.
4. Assign a security profile to the user’s responsibility.
You can link more than one security profile to a responsibility aslong as the user is different.
5. Enter the time period of security profile assignment.
You must enter a start date. Optionally, enter an end date if youwant the security profile assignment to end on a particular date.
6. Save the security profile assignment.
� To end a security profile assignment:
You cannot delete security profile assignments. If a user no longerneeds an assignment you must enter an end date.

2 – 40 Customizing, Reporting, and System Administration in Oracle HRMS (Canada)
1. Query the security profile assignment you want to end.
2. Enter an end date. The user cannot use this responsibility, BusinessGroup and security profile from this date.
☞
2 – 41Security
Updating the Security Model
If the business needs of your enterprise change you can update yoursecurity model from Standard HRMS security to Cross Business Groupresponsibility.
Attention: Ensure that you definitely need to use CrossBusiness Group Responsibility security. Once you are using thissecurity model you cannot change to Standard HRMS security.
� To change to Cross Business Group Responsibility security:
1. Change the HR: Enable Security Profile option to Yes at applicationlevel using the System Profiles Values window.
See: User Profiles: page 2 – 10
2. Run the Enable Multiple Security Groups process from the Submita Request window. This creates security groups for all your existingBusiness Groups.
See: Submitting a Request, Oracle Applications User’s Guide.
3. Set up your Cross Business Group Responsibility security.
See: Setting Up Cross Business Group Responsibility Security: page2 – 36

2 – 42 Customizing, Reporting, and System Administration in Oracle HRMS (Canada)
Setting Up Reporting Users
Reporting users do not have online access to the database throughsystem forms. They use reporting tools to prepare reports on theinformation their security profiles grant.
All secure users connect to the APPS ORACLE ID. This is createdwhen the system is installed. However, for reporting users, you shouldcreate one or more new reporting user ORACLE IDs and associate eachwith a restricted security profile.
The first step in this procedure is the job of the ORACLE databaseadministrator. The other steps are normally completed by the systemadministrator.
� To set up a new reporting user:
1. Create a new reporting user ORACLE ID.
2. Register the new ORACLE ID with Application Object Libraryusing the Register window.
3. Using a ’view–all responsibility’, define a security profile in theSecurity Profile window for the new ORACLE ID.
See: Defining a Security Profile: page 2 – 35
4. Run the HR security processes using the Generate Secure UserProcess.
See: Submitting a New Request, Oracle Applications User’s Guide.

2 – 43Security
Defining Menus
Use the Menus window to add predefined functions to a menu.
Warning: Oracle HRMS with DateTrack and task flows doesnot fully support multiple active windows. When you define anew menu for use with Oracle HRMS the top menu mustinclude the following function as a separate menu option:
Disable Multiform
A number of predefined functions are not provided on the suppliedmenus. You can add them to your own menus. See: Menu Structure:page for a list of these functions.
� To define a menu:
1. Query the menu onto which to add the function.
2. Add a new line and select the function.
For example, select Salary Administration: Approve to enable usersto approve salary proposals.
3. Save your changes.
See: Menus Window, Oracle Applications System Administrator’s Guide.

2 – 44 Customizing, Reporting, and System Administration in Oracle HRMS (Canada)
Structuring Menus
Using function security and the Menus window, you can use thedefault menu for any number of responsibilities and restrict access tothe default menu options. You can also define any number of newfunctions and menus to restrict the access of other users. To view thehierarchy of menus you have defined, you can run the Menu Structuresreport.
Warning: You should not modify the default functions andmenus supplied with the system. On upgrade, these defaultswill be overwritten.
If you want to add window customization options or taskflows you should define your own menus.
The supplied menus give you access to all of the available submenus.However, a number of predefined functions are not enabled on thesemenus. You need to add them for the responsibilities that should haveaccess to these functions.
� Structuring Menus:
1. Start by drawing it out on paper. This helps you to decide the beststructure and the best prompts and descriptions.
2. Decide how to structure your menus. Menus can be structured indifferent ways:
• Following a Sequence of Tasks.
For example:
1. Define a Requisition and Vacancy
2. Define a Recruitment Activity
3. Enter Applicant Information
• By Type:
For example, all inquiry windows grouped together. If youstructure the menu by type, the grouping is important but thesequence is not.
4. Work from the lowest level of sub–menu to the highest and definethe root menu as the last step in the sequence.
5. Define as many submenus as you require under each menu option.We recommend that you restrict the number of menu levels to threebecause a menu structure with more levels is cumbersome to use.
2 – 45Security
Defining Menu Functions
Use the Form Functions window to define your menu functions.
Function Security helps you to control the menu options you makeavailable to each responsibility. When you define a responsibility youcan restrict the submenus or functions for that responsibility.
Warning: You should not modify the default functions andmenus supplied with the system. On upgrade, these defaultswill be overwritten.
If you want to add window customization options or taskflows you should define your own menus.
� Define Menu Functions
� Define your menu function using the Form Functions window.
See: Form Functions Window, Oracle Applications User’s Guide.

2 – 46 Customizing, Reporting, and System Administration in Oracle HRMS (Canada)
C H A P T E R
3
3 – 1Audit Trail
Audit Trail

3 – 2 Customizing, Reporting, and System Administration in Oracle HRMS (Canada)
AuditTrail
AuditTrail is an Oracle HRMS system administration task whichenables you to track and record changes to your data.
What does AuditTrail provide?
AuditTrail provides a flexible approach to tracking the changes to yourdata. It enables you keep a history of changes to your important data:what changed, who changed it, and when. With AuditTrail, you caneasily determine how any data row or element obtained its currentvalue. You can track information on most types of fields, includingcharacter, number and date fields.
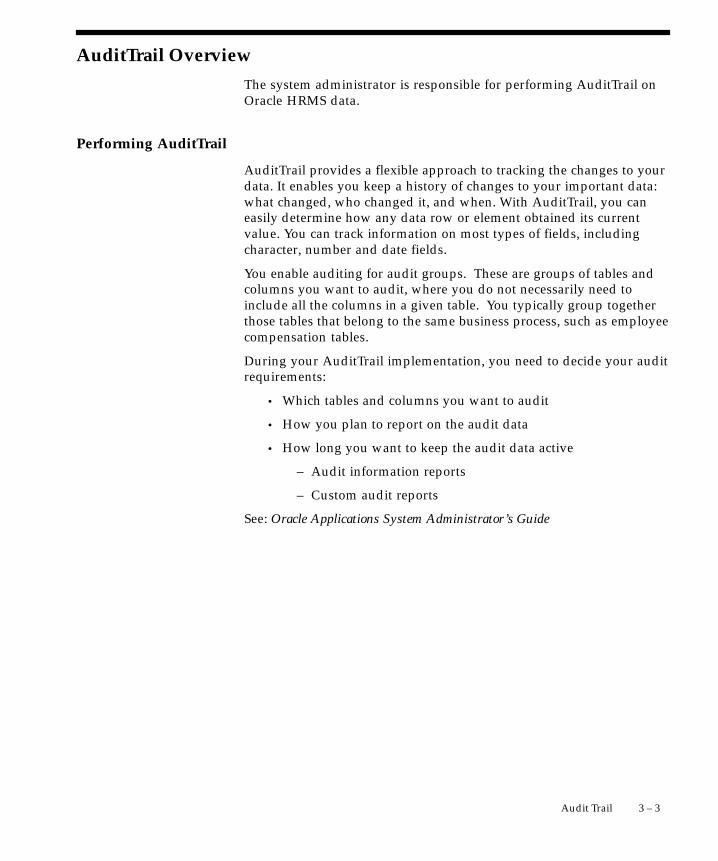
3 – 3Audit Trail
AuditTrail Overview
The system administrator is responsible for performing AuditTrail onOracle HRMS data.
Performing AuditTrail
AuditTrail provides a flexible approach to tracking the changes to yourdata. It enables you keep a history of changes to your important data:what changed, who changed it, and when. With AuditTrail, you caneasily determine how any data row or element obtained its currentvalue. You can track information on most types of fields, includingcharacter, number and date fields.
You enable auditing for audit groups. These are groups of tables andcolumns you want to audit, where you do not necessarily need toinclude all the columns in a given table. You typically group togetherthose tables that belong to the same business process, such as employeecompensation tables.
During your AuditTrail implementation, you need to decide your auditrequirements:
• Which tables and columns you want to audit
• How you plan to report on the audit data
• How long you want to keep the audit data active
– Audit information reports
– Custom audit reports
See: Oracle Applications System Administrator’s Guide
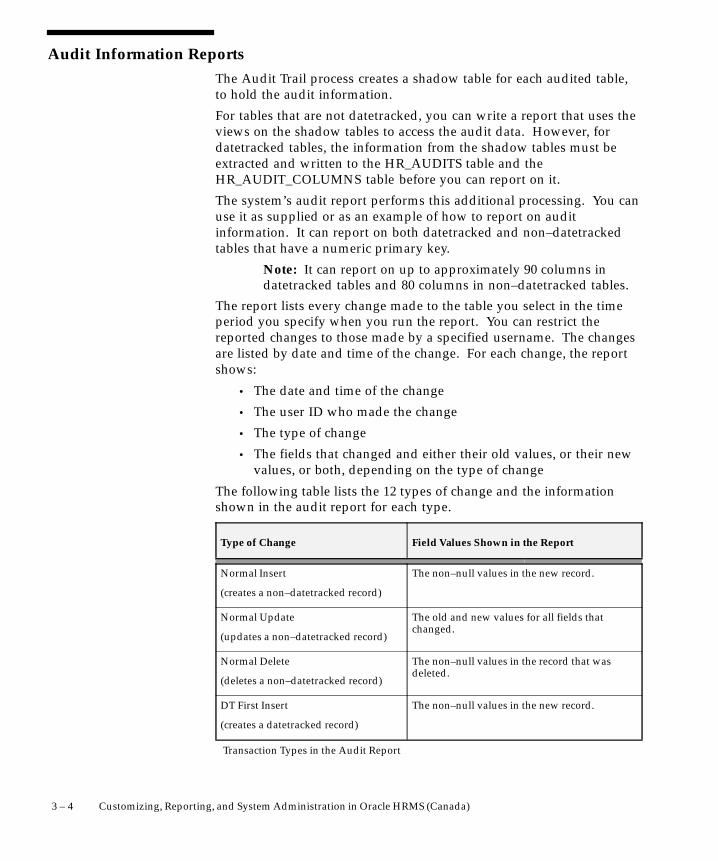
3 – 4 Customizing, Reporting, and System Administration in Oracle HRMS (Canada)
Audit Information ReportsThe Audit Trail process creates a shadow table for each audited table,to hold the audit information.
For tables that are not datetracked, you can write a report that uses theviews on the shadow tables to access the audit data. However, fordatetracked tables, the information from the shadow tables must beextracted and written to the HR_AUDITS table and theHR_AUDIT_COLUMNS table before you can report on it.
The system’s audit report performs this additional processing. You canuse it as supplied or as an example of how to report on auditinformation. It can report on both datetracked and non–datetrackedtables that have a numeric primary key.
Note: It can report on up to approximately 90 columns indatetracked tables and 80 columns in non–datetracked tables.
The report lists every change made to the table you select in the timeperiod you specify when you run the report. You can restrict thereported changes to those made by a specified username. The changesare listed by date and time of the change. For each change, the reportshows:
• The date and time of the change
• The user ID who made the change
• The type of change
• The fields that changed and either their old values, or their newvalues, or both, depending on the type of change
The following table lists the 12 types of change and the informationshown in the audit report for each type.
Type of Change Field Values Shown in the Report
Normal Insert
(creates a non–datetracked record)
The non–null values in the new record.
Normal Update
(updates a non–datetracked record)
The old and new values for all fields thatchanged.
Normal Delete
(deletes a non–datetracked record)
The non–null values in the record that wasdeleted.
DT First Insert
(creates a datetracked record)
The non–null values in the new record.
Transaction Types in the Audit Report
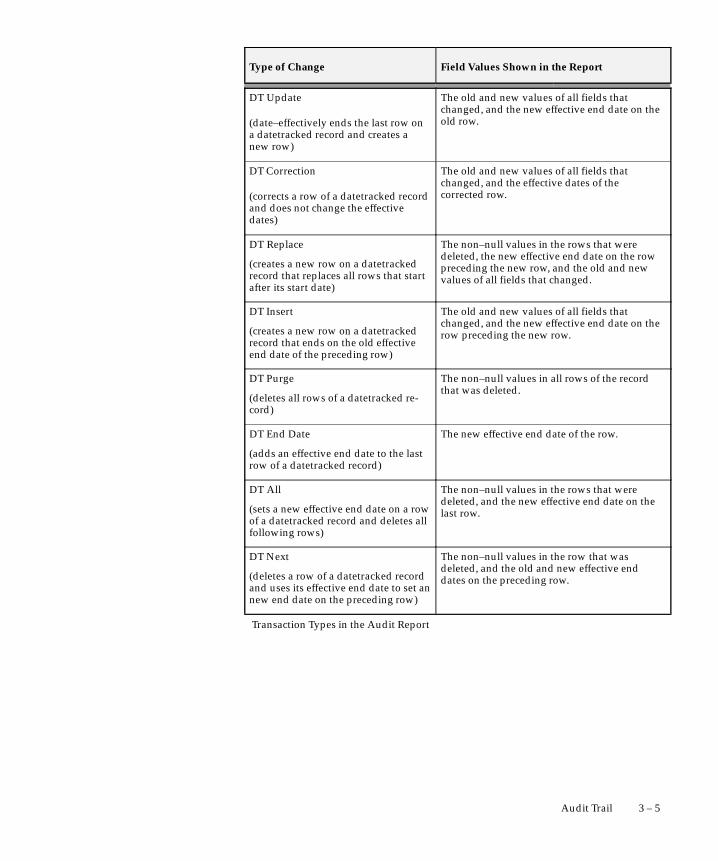
3 – 5Audit Trail
Field Values Shown in the ReportType of Change
DT Update
(date–effectively ends the last row ona datetracked record and creates anew row)
The old and new values of all fields thatchanged, and the new effective end date on theold row.
DT Correction
(corrects a row of a datetracked recordand does not change the effectivedates)
The old and new values of all fields thatchanged, and the effective dates of thecorrected row.
DT Replace
(creates a new row on a datetrackedrecord that replaces all rows that startafter its start date)
The non–null values in the rows that weredeleted, the new effective end date on the rowpreceding the new row, and the old and newvalues of all fields that changed.
DT Insert
(creates a new row on a datetrackedrecord that ends on the old effectiveend date of the preceding row)
The old and new values of all fields thatchanged, and the new effective end date on therow preceding the new row.
DT Purge
(deletes all rows of a datetracked re-cord)
The non–null values in all rows of the recordthat was deleted.
DT End Date
(adds an effective end date to the lastrow of a datetracked record)
The new effective end date of the row.
DT All
(sets a new effective end date on a rowof a datetracked record and deletes allfollowing rows)
The non–null values in the rows that weredeleted, and the new effective end date on thelast row.
DT Next
(deletes a row of a datetracked recordand uses its effective end date to set annew end date on the preceding row)
The non–null values in the row that wasdeleted, and the old and new effective enddates on the preceding row.
Transaction Types in the Audit Report
3 – 6 Customizing, Reporting, and System Administration in Oracle HRMS (Canada)
Custom Audit Reports
If you want to design your own audit report, you can copy thesupplied report and use it as the basis of your own version. Thesupplied report uses a dynamic SQL structure to retrieve informationfor the report, and an Oracle Report to format it.
Dynamic SQL Structure
For a non–datetracked table, the dynamic SQL structure retrievesinformation and uses a private procedure to retrieve the new values foran update.
For a datetracked table, the dynamic SQL structure retrievesinformation from the function and procedure created for eachdatetracked table by the Audit Trail Update Datetracked Tablesprocess:
• The <tablename>_TT function identifies the type of datetrackedtransaction represented by each row of the shadow table.
• The <tablename>_VP procedure gets new values from theshadow table for update and insert transactions. It writes theseto the HR_AUDITS and HR_AUDIT_COLUMNS tables.
The dynamic SQL structure comprises several character strings, whichare concatenated into one long string, then parsed and executed usingthe dynamic SQL generator. If you change a string, you must ensurethat you do not exceed the text space allocated to it, as listed in thepackage header.
The structure is built up by identifying the audited table columninformation, which is retrieved from the FND_AUDIT_COLUMNStable. The logic varies depending on the data type being audited.
The package for the dynamic SQL is called py_audit_report_pkg. It isfound in the script pyadyn.pkh/pyadyn.pkb.
HR Audit Tables
The HR_AUDITS table holds audit information about the transaction.The HR_AUDIT_COLUMNS table holds the changed column

3 – 7Audit Trail
information for that transaction. The structure of these tables is asfollows:
HR_AUDITS Table
COLUMN TYPE NULL
––––––––––––––––––––––––––– –––––––––––– ––––––––
audit_id number(15) not null
commit_id number(9) not null
current_session_id number not null
primary_key varchar2(30) not null
primary_key_value number(15) mot null
sequence_id number(9) not null
session_id number not null
table_name varchar2(30) not null
timestamp date not null
transaction varchar2(30) not null
transaction_type varchar2(30) not null
user_name varchar2(100) not null
effective_end_date date null
effective_start_date date null
HR_AUDIT_COLUMNS Table
COLUMN TYPE NULL
––––––––––––––––––––––––––– –––––––––––– ––––––––
audit_id number(15) not null
column_id number(9) not null
column_name varchar2(30) not null
new_value varchar2(240) null
old_value varchar2(240) null

3 – 8 Customizing, Reporting, and System Administration in Oracle HRMS (Canada)
AuditTrail
You can view changes to your HR database based on the tables andcolumns you include in an audit group.
Using AuditTrail
Set up AuditTrail: page 3 – 9
Disable AuditTrail: page 3 – 10
Run the Predefined Audit Report: page 3 – 11
☞
3 – 9Audit Trail
Setting Up AuditTrail
Setting up AuditTrail is normally a task for the system administrator.
The first four steps must be done to enable auditing of any OracleApplications table. They are explained in more detail in the OracleApplications System Administrator’s Guide. The fifth step is required onlyfor tables in the HR account.
� To set up AuditTrail:
1. Have your database administrator grant SELECT privileges onSYS.DBA_TABLES to the APPLSYS account. Normally this stepwould already have been done as part of your installation orupgrade.
2. Select the tables you want to audit in the Audit Groups window,and select which columns in these tables you want to audit in theAudit Tables window.
Note: You cannot audit LONG, RAW, or LONG RAW columns.
3. Select the registered ORACLE IDs you want to audit in the AuditInstallations window.
4. Run the Audit Trail Update Tables process. You do this in theSubmit Requests window for a System Administratorresponsibility. This process:
• Creates database triggers on your audited tables
• Creates one shadow table for each audited table, to contain theaudit information
• Builds special views on non–datetracked tables, which you canuse to retrieve your audit data for reporting
5. Run the Audit Trail Update Datetracked Tables process. You dothis in the Submit Requests window for an HR responsibility. Foreach datetracked table, this process:
• Creates an index on the shadow table
• Creates the function <tablesname>_TT and the procedure<tablename>_VP, which extracts information from the shadowtable when you run the predefined audit report
Attention: Re–run these processes whenever you update any ofyour audit definitions.

3 – 10 Customizing, Reporting, and System Administration in Oracle HRMS (Canada)
Disabling AuditTrail
You can disable the auditing of an audit group at any time by selectinga Disable state in the Audit Groups window.
Suggestion: If you are planning high volume transactions onan audited table, such as loading a batch of information fromanother system, consider disabling auditing for the table’saudit group. This will enable the batch loading to completemore quickly.
Before you restart auditing, you should archive your audit data,according to your business needs, and purge the shadow tables. Youpurge the tables by setting the audit group to Disable – Purge Table andrunning the Audit Trail Update Tables report. To restart auditing, youset the audit group to Enable Requested and rerun the Audit TrailUpdate Tables process and the Audit Trail Update Datetracked Tablesprocess.
3 – 11Audit Trail
Running the Predefined Audit Report
You can run an audit report using the system’s predefined structure, oryou can design your own audit report.
� To run the predefined audit report:
1. In the Submit Requests window, select Audit Report in the Namefield.
2. Enter the Parameters field to open the Parameters window.
3. Select an audited table (that is, one in an audit group).
4. Select a value for the Initialization parameter:
• Yes means that the report removes obsolete data related to yourselected table from the HR_AUDITS table and theHR_AUDIT_COLUMNS table. It populate the tables with newvalues, then reports on these.
• No means that the report runs on the existing data in theHR_AUDITS table and the HR_AUDIT_COLUMNS table.
• Refresh means that the report removes all obsolete data from theHR_AUDITS table and the HR_AUDIT_COLUMNS table. Itpopulate the tables with new values, then reports on these.
5. If you only want to report on the changes made by one user, enterthe username.
6. Enter start and end dates to limit the time period for reportingaudit information.
7. Choose the Submit button.
You can use the View Requests window to check the progress of thereport.

3 – 12 Customizing, Reporting, and System Administration in Oracle HRMS (Canada)
C H A P T E R
4
4 – 1Information Access
Information Access

4 – 2 Customizing, Reporting, and System Administration in Oracle HRMS (Canada)
Information Access
Does Oracle HRMS provide flexible access to information?
The information held in Oracle HRMS is an extremely valuableresource for your enterprise. You can use the same information in avariety of different ways depending on your business purpose. Forexample, you can use Oracle HRMS information in support of each ofthe following business activities:
• Performing a full range of HR functions on a day–to–day basis
• Reporting on HR activities
• Performing what–if exercises to determine the viability ofalternatives scenarios
• Performing strategic planning with the Business IntelligenceSystem
How can you use Oracle HRMS to support typical hr activities?
You can extract details about a single employee or a group ofemployees. Particular examples are:
• Selecting an employee or a set of employees for HR processing
• Extracting HRMS information in to produce standard letters
• Viewing organization hierarchies and position hierarchies
• Viewing a historical record of previous changes
What range of reporting options are available in Oracle HRMS?
When you are reporting on activities using HRMS you may want to useeach of the following reporting options depending on your businesspurpose:
• Define a report using parameters that you supply
• Run a predefined report
• Specify the intervals at which a report should run
• Combine several reports into a set so that they can be run at thesame time
Can you pose ”what–if” scenarios?
There will be occasions when you want to see the effect of a proposedchange before deciding whether to implement it. For example, you

4 – 3Information Access
may want to calculate the effect of a salary change for a range ofemployees. In these circumstances it would not be appropriate tochange the data in HRMS until you have assessed the implications.Oracle HRMS allows you to transfer a copy of current data to yourdesktop so that you can test a succession of modifications beforeuploading the data to HRMS.
Can you use Oracle HRMS information for strategic planning?
Using the Business Intelligence System you can:
• Establish a set of Key Performance Indicators to providemeasures of compliance for each of your business activities
• Produce reports to illustrate trends and identify future businessstrategy
• Make integrated use of individual reporting tools to solvecomplex enquiries
Can you run multilingual reports?
Yes, you can run HRMS in more than one language on a singledatabase. This means that you can enter and report on informationusing more than one language. For example, your base, or source,language could be French, but you could also install German andEnglish. You would then be able to enter and produce reports inGerman and English.
4 – 4 Customizing, Reporting, and System Administration in Oracle HRMS (Canada)
OverviewOracle HRMS provides a range of inquiry and reporting mechanisms tomeet the needs of different users:
• Inquiry windows (including folders)
• Predefined reports that can be scheduled and grouped forperiodic processing
• QuickPaint, to create your own online inquiries and reportsabout people and assignments
• Multilingual reporting for some reports
• Use of desktop tools for reporting or editing HRMS data. Forexample, you can use Application Data Exchange (ADE) todownload information to a spreadsheet, and then upload themodified data to HRMS.
Inquiry Windows
Oracle HRMS includes some inquiry windows to meet the mostcommon online reporting requirements. In these windows, youtypically enter selection criteria in the first block then choose the Findbutton to view a list of people, assignments, or other entities that matchyour criteria. Some of these windows use folders to display theinformation retrieved by your criteria.
Folders are online views that you can customize. By default, the folderblock in an inquiry window displays all records matching your inquiryand all fields available within the folder. However, you can create yourown folders to display a subset of these records and fields. You canalso choose the field labels, their size and order, and the sort sequenceof the retrieved records.
For example, in the Assignment Folder window, you could create afolder called List Sales Employees by Grade. This folder has the querycriteria Organization = ’Sales’, and it is sorted by grade.
Predefined Reports
There are a number of predefined reports that you can use immediatelywithout any further set up. They have a predefined format but you canchoose which records to view by entering a set of parameters when yousubmit the report.
You can also create your own reports using Oracle Reports or SQL*Plusor another tool of your choice. You can register them with Application

4 – 5Information Access
Object Library. This means you can run them from the standardSubmit Requests window, and you can schedule them in report setswith other reports and processes.
Multilingual Reporting
Oracle HRMS enables you to print reports in the language of yourchoice.
HR Reports
You can select in which language the following reports are printed:
• Full Person Details
• Full Applicant Details
• Full Assignment Details
• Full Work Details
Using Oracle HRMS with Spreadsheets
You can use Oracle Application Data Exchange (ADE) to downloadinformation from the HRMS database to a spreadsheet for analysis andmanipulation. For example, you can download data on current andproposed salaries for a group of employees. You can adjust the salaryproposals in the spreadsheet, or enter new ones, and upload therevised data to the database. The ADE upload process reports anyerrors and ensures that only valid data is saved in the database.
To download information from a form to a spreadsheet using ADE,your system administrator needs to create a style in ADE. The styledefines the form it is used for, the responsibilities that can use it, andthe columns (or fields) to be downloaded. You determine whichrecords are downloaded by running a query in the form beforelaunching ADE.
A style for downloading salary proposals is predefined.
QuickPaint
QuickPaint is a powerful and flexible tool to design reports aboutassignments in the format you require. You can include the followingsorts of information in a QuickPaint report:
• Personal information
• Contact information
4 – 6 Customizing, Reporting, and System Administration in Oracle HRMS (Canada)
• Assignment information
• Application information
• Compensation and benefit information
• Descriptive flexfield information
Once you have designed a QuickPaint report, you and other users canrun the report online for any assignment or set of assignments. You canview the results online or print them.
Customization of the Run QuickPaint Report Window
Using the standard QuickPaint Report window, you can run the reportfor an assignment or an assignment set. The assignments can be heldby current employees or applicants.
Your system administrator can create customized versions of thiswindow to restrict the reports you can run and the people you canreport on. A customized version might be subject to one or more of thefollowing restrictions:
• Report on one person type only (employees OR applicants).
• Run one report only.
• Report on single assignments only, or report on assignment setsonly.
If the window is subject to the third type of restriction, it will lookdifferent to the standard version since it will contain either theassignment region or the assignment set region, but not both.
Attachments
You can add attachments to a large number of HRMS records.Examples of attachments are word processed documents, Web pages orvideo images.

4 – 7Information Access
Information Access
In Oracle HRMS you can access information in various waysdepending on your business purpose. You can retrieve information inpredefined inquiry windows, reports and folders,. and you cancustomise your own folders and reports. For a graphical display of joband position hierarchies you can use the Oracle HRMS HierarchyDiagrammers which are launched from Oracle Application DataExchange (ADE). You can also use ADE to modify HR informationwith desktop tools.
For enquiries about long–term trends, interrelationships betweendifferent categories of information, and compliance with keyperformance indicators you can use Oracle Business IntelligenceSystem.
Attachments
Using Attachments: page 4 – 8
Inquiry Windows and Folders
Use Inquiry Windows and Folders: page 4 – 11
Report Types
Define QuickPaint Reports: page 4 – 13
Run QuickPaint Reports: page 4 – 15
Run Predefined and User Defined Reports: page4 – 1
Define Custom Reports: page 4 – 3
Assignment Sets for QuickPaint Reports
Creating an Assignment Set: page 4 – 5
Defining an Assignment Set Using Formula Criteria: page 4 – 6
Defining an Assignment Set by Including or Excluding Assignments:page 4 – 9
4 – 8 Customizing, Reporting, and System Administration in Oracle HRMS (Canada)
Using Attachments
You can attach short comments, word processed documents, images,video, OLE objects, or Web pages to many records in Oracle HRMS.For example, you could attach a resume to an applicant record and aposition description to a position record.
Each record can have one or more attachments, and you can copyattachments from one record to another. You can store the attachmentsin the database or in your file system.
� To view attachments or add new attachments
Click the Attachments icon. By default, clicking the attachments icondisplays a Comments window where you can enter text up to 2000characters. This is the Comments facility available in earlier releases ofOracle HRMS. If you want to replace this facility with the ability toattach multiple items, ask your system administrator to set your userprofile option HR:Use Standard Attachments to Yes.
The HRMS entities that support attachments are:
• Absence
• Absence Type
• Address
• Application
• Assignment
• Balance (Oracle Payroll)
• Batch Header
• Booking
• Budgets
• Budget Version
• Calendar
• Career Path
• Collective Agreements
• Consolidation Set (Oracle Payroll)
• Contact Relationship
• Contracts
• Customization
• Element

4 – 9Information Access
• Element Entry
• Element Link
• Element Set
• Event
• Grade
• Grade Rate
• Job
• Job Evaluation
• Job Requirement
• Letter Type
• Monetary Unit (Oracle Payroll)
• Organization
• Organization Payment Method
• Organization Hierarchy
• Pay Scale
• Payroll Process (Oracle Payroll)
• Period of Service
• Person
• Person Analysis/Special Information
• Personal Payment Method
• Position
• Position Hierarchy
• Recruitment Activity
• Requisition
• Salary Basis
• Salary Proposal
• Salary Proposal Component
• Secondary Assignment Status
• Special Information Type
• Status Processing Rules (Oracle Payroll)
• Vacancy

4 – 10 Customizing, Reporting, and System Administration in Oracle HRMS (Canada)
• Valid Grade

4 – 11Information Access
Using Inquiry Windows and Folders
You can define public folders, which all users can view, as well asprivate folders for your own use.
See: Customizing the Presentation of Data in a Folder: (OracleApplications User’s Guide)
Inquiry Window Information Provided
Assignments Folder Lists of assignments in a folder
Employee AssignmentProcesses (Oracle Payroll– UK and US legislationsonly)
All the assignment processes for one employee assignment,which you can view, retry or roll back, with furtherinformation on run messages, run results, balances,payment details and costing
Payroll Processes (OraclePayroll – UK and USlegislations only )
All the payroll processes for one payroll for a specifiedperiod, which you can view, retry or roll back, with furtherdetails on assignment processes, run messages and costing
People Folder Lists of people in a folder
Salary ManagementFolder
List of assignments with their current approved salary andproposed new salary
Position OccupancyFolder
Lists of people who have held a selected position, or areapplying for it, and the dates of their occupancy
List Assignments Assignments that match the assignment components youspecify for current applicants, employees, or both
List People byAssignment
People whose assignments match the assignmentcomponents you specify for current or former applicants,employees, or both
List Employees byOrganization
All employees assigned to one organization and, optionally,to all organizations below it in a specified hierarchy
Assignment History The dates of assignments and periods of service for anemployee who has had more than one assignment..
NOTE: use DateTrack History on the Assignment windowto see historical changes to one assignment
List Employees byPosition
All employees assigned to a specified position ororganization and job
List Employees byPosition Hierarchy
Current holders of positions at and below a specifiedposition in a position hierarchy
View Employee GradeComparatio
The amount employees receive for a specified element as apercentage of the mid–value of their grade rate range
Inquiry Windows in Oracle HRMS

4 – 12 Customizing, Reporting, and System Administration in Oracle HRMS (Canada)
Information ProvidedInquiry Window
List Employees byAbsence Type
All absences of a particular absence type or categorywithin, optionally, a specified time period
View Employee AbsenceHistory
Periods of absence for a specified employee
List People by SpecialInformation
All people for whom you have entered details about aspecified special information type
List Employees byElement
All employee assignments receiving a specifiedcompensation element within a given time period
View Element EntryHistory for Employee
The history of entries of one or more elements for anemployee assignment
List Position BudgetVariance
Variances between the number of actual position holdersand the values entered in a specified budget for positionsbelow a chosen position in a hierarchy
List Budget Variance byOrganization
Variances between the number of actual position holdersand the values entered in a specified budget for allpositions in organizations at and below a chosenorganization in a hierarchy
View Employee Benefits(US only)
View benefit plans on which an employee is enrolled andthe coverage level and contributions for each plan
View Vacancies Vacancies matching assignment components and othercriteria you select
Inquiry Windows in Oracle HRMS
4 – 13Information Access
Defining QuickPaint ReportsYou can design QuickPaint reports in the Define QuickPaint Reportwindow.
In the Report Definition area, you can enter free text to introduce thereport and to label the information that the report extracts from thedatabase. You can also select database items, which are tags representingthe information to be extracted from the database. When you run thereport, the database item names are replaced by the appropriate datafor the assignment or set of assignments for which the report is run.
You must be careful how you position the database items so thatQuickPaint interprets them correctly and formats the report in thelayout you require.
� To define a QuickPaint Report:
1. Enter a name, and optionally a description, of the report.
The Protected field is display only; some reports provided bylocalization teams are protected against edits.
2. In the Report Definition area, enter free text exactly as you want itto appear on the report.
3. To select database items, choose the Show Items button and run aquery to display a list of database items, then select and copy itemsto the Report Definition area.
Notice that the database item name must begin with an ampersand(&). Names without an ampersand are treated as free text.
4. Save the report definition.
Positioning Items
If you want to add free text immediately after a database item, youmust separate it from the database item with at least one space.Otherwise QuickPaint reads the database item as free text.
Both free text and database items appear in the report results on theline on which you painted them in the Report Definition area. Theyalso generally appear in the column in which you painted them.However, it might be that the data replacing a database item name islong enough to push later items on the same line to the right.
For example, if you paint database items and free text like this:&ASG_JOB in &ASG_ORG
the report results print like this:Technician in Biochemistry
Scientific Officer in Biochemistry
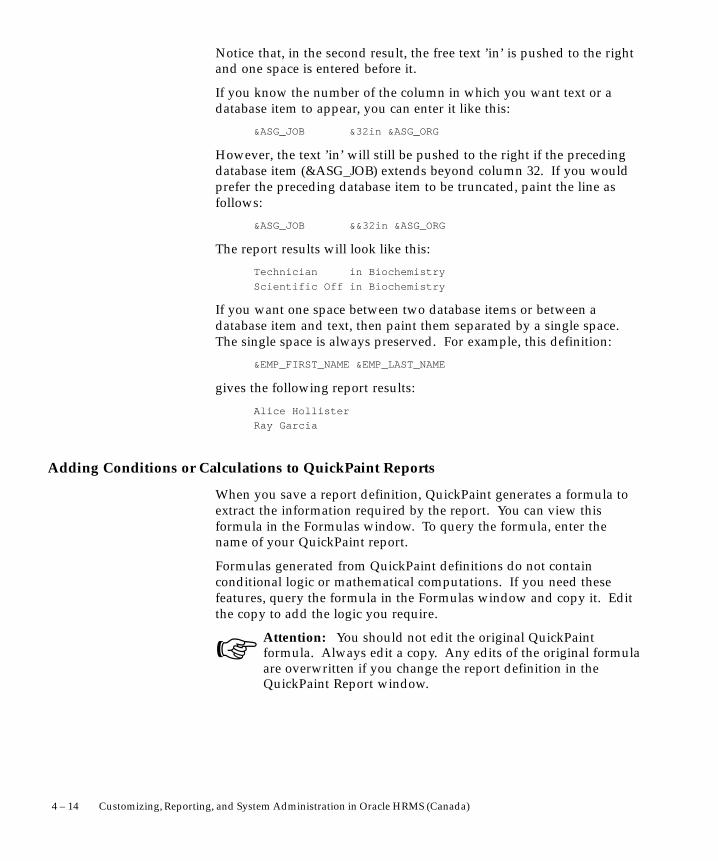
☞
4 – 14 Customizing, Reporting, and System Administration in Oracle HRMS (Canada)
Notice that, in the second result, the free text ’in’ is pushed to the rightand one space is entered before it.
If you know the number of the column in which you want text or adatabase item to appear, you can enter it like this:
&ASG_JOB &32in &ASG_ORG
However, the text ’in’ will still be pushed to the right if the precedingdatabase item (&ASG_JOB) extends beyond column 32. If you wouldprefer the preceding database item to be truncated, paint the line asfollows:
&ASG_JOB &&32in &ASG_ORG
The report results will look like this:
Technician in Biochemistry
Scientific Off in Biochemistry
If you want one space between two database items or between adatabase item and text, then paint them separated by a single space.The single space is always preserved. For example, this definition:
&EMP_FIRST_NAME &EMP_LAST_NAME
gives the following report results:
Alice Hollister
Ray Garcia
Adding Conditions or Calculations to QuickPaint Reports
When you save a report definition, QuickPaint generates a formula toextract the information required by the report. You can view thisformula in the Formulas window. To query the formula, enter thename of your QuickPaint report.
Formulas generated from QuickPaint definitions do not containconditional logic or mathematical computations. If you need thesefeatures, query the formula in the Formulas window and copy it. Editthe copy to add the logic you require.
Attention: You should not edit the original QuickPaintformula. Always edit a copy. Any edits of the original formulaare overwritten if you change the report definition in theQuickPaint Report window.
4 – 15Information Access
Running QuickPaint Reports
You run QuickPaint reports from the Run QuickPaint Report window.You can run a report for one assignment or for a group of assignments.
� To run a report for one assignment:
1. Select the type Assignment.
2. In the Assignment region, select the assignment for which youwant to run the report.
3. In the Report field, select the report you want to run.
4. Choose the Run Report button.
The message line tells you when the report is complete.
5. Choose the View Report button to see the report results.
When you run a QuickPaint report, the system runs the formulaassociated with the report. The first time you run a report, thesystem may take several seconds to identify all of the related dataand bring it back to the screen. All subsequent inquiries for otheremployees or applicants will run very quickly.
� To run a report for an assignment set:
1. Select the type Assignment Set.
2. In the Assignment Set region, select the assignment set for whichyou want to run the report.
3. In the Report field, select the report you want to run.
4. Choose the Run Report button.
The message line tells you when the report is complete.
5. Choose the View Report button to see the report results.

4 – 16 Customizing, Reporting, and System Administration in Oracle HRMS (Canada)
Running Predefined and User Defined ReportsThese reports run in batch mode. You submit them for processing inthe Submit Requests window, and you can view their progress usingthe View Requests window. The requests are handled by a concurrentmanager so you can continue working online while your request isprocessed.
See: Submitting a Request, Oracle Applications User’s Guide
You can schedule the reports to run regularly and you can group themwith other reports and processes to run as a set. You can also controlaccess to the reports and control their printing. For example, thesystem administrator may want to ensure that users in one locationalways print their reports on a local printer.
Report Name Information Provided
Absences Absence details for an employee or organization, for someor all absence types.
Assignment Status All employees, applicants or both assigned to selected workstructures.
Current and ProjectedProgression Point Values
The expected results of running the Increment ProgressionPoints process, that is the projected point and value changesfor a group of employees.
Element Link Details The eligibility criteria for an element or group of elements.
Employee IncrementResults
The actual results of running the Increment ProgressionPoints process, that is progression point and value changesfor a group of employees.
Employee OrganizationMovements
New hires, terminations, transfers in and transfer out of aselected organization, or organization hierarchy.
Employee PayrollMovements
New hires, terminations, transfers in and transfer out of aselected payroll.
Employee Summary Addresses, contacts, periods of service, assignments, specialinformation, personal payment methods and elemententries for a selected employee.
Full Applicant Details Applications and applicant interviews for one applicant.
Full Assignment Details Assignment information including periods of service,payment methods, and element entries for one employee.
Full Personal DetailsReport Set
Person details, applicant details, assignment details andwork details for one employee.
Full Person Details Addresses and information entered in the Person windowsuch as name, date of birth, nationality and work telephonenumber for one employee.

4 – 17Information Access
Information ProvidedReport Name
Full Work Details Miscellaneous work information including specialinformation, absences, recruitment activities and contactsfor one employee.
Job and Position SkillsMatching
Lists of employees, applicants or both that meet some or allskill requirements of a job or position.
Organization Hierarchy The organizations and optionally their managers below aselected organization in a particular hierarchy.
Position Hierarchy The positions and optionally their holders below a selectedposition in a particular hierarchy.
Requisition Summary Applicants and their interview schedules for a selection ofvacancies.
Salary Review Current, past and proposed salaries for a selected list ofemployees.
Staffing Budget Details Actual staffing level with budgeted levels over a specifiedperiod.
Terminations The number of employees from selected organizationsleaving your enterprise within a particular period,and thereason for leaving.

☞
4 – 18 Customizing, Reporting, and System Administration in Oracle HRMS (Canada)
Defining Custom Reports
The Custom Reports function provides a generic reporting capabilitythat makes use of a single report to print out a custom definition. Thisreport is called PERGENRP.
The report is registered as a concurrent process and prints, in landscapeformat, the contents of the temporary tablePER_GENERIC_OUTPUT_REPORT.
This table contains the individual components of a custom report and ispopulated by the PL/SQL package PERGENRP.pkb, stored in$PER_TOP/admin/sql. This package is executed when you select theGenerate Report button on the Custom Reports window.
� To submit a Custom Report:
1. Navigate to the Custom Reports window.
2. Select the report by name.
3. Enter any parameters for this report.
Attention: Parameter values are not validated until you choosethe Generate Report button.
4. Choose the Generate Report button
The default for the report is to print the output automatically. It isa System Administrator task to set default printers for all users, orto reset this option on the Concurrent Program window.
Creating New Report Formats
A special feature of Custom Reports is that you do not need to createmultiple reports. You modify the generic package (PERGENRP.pkb)and report to provide additional formats and parameters.
Three sample report formats are provided, each with a different set ofparameters:
• PERCS001 – Custom Report 1
There is one parameter: Vacancy. The format in PERGENRP isFull Name of Applicant and Gender.
• PERCS002 – Custom Report 2
Parameters are Vacancy and Gender. The format in PERGENRPis Full Name of Applicant in uppercase.
• PERCS003 Custom Report 3

☞
4 – 19Information Access
Parameters are Vacancy, Gender and Marital Status. The formatin PERGENRP is Full Name of Applicant, Gender and then FullName in uppercase.
You can edit the generic package to change:
• Report Title Page
• Header
• Footer
• Body Text
After you have modified the package, you need to register a newcustom report, with the parameter set for that report. This is a task forthe System Administrator.
� To register a new Custom Report with parameters:
1. Navigate to the Concurrent Programs window.
2. Enter the name of the Custom Report as the Program.
3. Enter a short name for the Custom Report.
Attention: You must start the short name with PERCS. Thiswill limit the list of values available to users in the CustomReport window.

4 – 20 Customizing, Reporting, and System Administration in Oracle HRMS (Canada)
Creating an Assignment Set
There are three uses of assignment sets in Oracle HRMS:
• You can run a QuickPaint report for a set of assignments, ratherthan individual assignments.
• You can process subsets of the employees assigned to a payroll.Normally you initiate payroll runs and other post–run processesfor one or more payrolls at a time. However, if you need toprocess smaller groups within a single payroll, you define anassignment set.
• You can use a BEE concurrent process to create an identical batchline for each assignment in an assignment set.
There are three ways to define the set:
• You can enter selection criteria, which the system generates intoa formula. When you use the assignment set, OracleFastFormula runs the formula to find the assignments that matchthe criteria. It checks all the assignments in the Business Groupor, if you select a payroll when you define the set, all theassignments to that payroll. When you define the set you canalso include or exclude individual assignments to modify the setcreated by the formula.
See: Defining an Assignment Set Using Formula Criteria: page4 – 21
• You can select individually all the assignments you want toinclude in the set.
• You can start from a full set of all the employees in the BusinessGroup or all the employees assigned to a selected payroll. Thenyou can exclude individual assignments from the set.
See: Defining an Assignment Set by Including or ExcludingAssignments: page 4 – 24
4 – 21Information Access
Defining an Assignment Set Using Formula Criteria
Use the Assignment Set window to define your set.
� To define an assignment set using criteria for a formula:
1. Enter a unique name for the set.
2. Do one of the following:
• If you are defining an assignment set for payroll processing,select a payroll. You cannot process an assignment set drawnfrom more than one payroll.
• If you are defining an assignment set for other purposes,selecting a payroll is optional. If you select a payroll, the formulagenerated from your selection criteria will select assignmentsfrom this payroll only. If you do not select a payroll, the formulawill select assignments from the whole Business Group.
3. Save the new set and choose the Criteria button.
4. In the Assignment Criteria window, enter one criterion in each row,and join the criteria with AND or OR in the Condition field. Fielddetails are as follows:
No.: The sequence number of each condition in your rule. If youuse sequence numbers that are multiples of 10, it will be easier toinsert new conditions later.
Condition: Leave the first row blank. Enter AND or OR forsecond and subsequent rows.
Database Item: Select database items as variables for yourdefinition. All database items are prefixed by an ampersand [&].
Operator: Select operators to determine relationships betweendatabase items or values. The list of operators is shown in theValues in Operator Field table.
Value/Database Item: Select database items for the secondvariable. Alternatively, you can enter a fixed value of the sametype as the database item.
As an example, here is a definition for an assignment set ofemployees with salaries between 16,000 and 24,000:

4 – 22 Customizing, Reporting, and System Administration in Oracle HRMS (Canada)
No. Condition Database Item Operator
Value/DatabaseItem
10 &SALARY_PAY_VALUE_ENTRY_VALUE >= 16000
20 AND &SALARY_PAY_VALUE_ENTRY_VALUE <= 24000
Assignment Set Criteria
5. Save your criteria and choose the Generate button to generate theformula.
You can view and edit the formula in the Formula window. Itsname is the same as the assignment set name.
6. If you want to include or exclude individual assignments from theset defined by your criteria, choose the Amendment button. Selectthe assignments you want to include or exclude from the set.
Note: The list of assignments you see in this window is either allthe assignments in the Business Group or, if you selected a payroll,all the assignments to that payroll. It does not show theassignments matching your criteria since these are identifieddynamically each time the formula runs.
7. Save the set.
Operator Symbols Meaning
Equals = The condition is true if both expressions haveexactly the same value. For text, the case ofthe expression must be the same. So, forexample, ’Smith’ is not equal to ’SMITH’.
Not Equal != The condition is true if the result of the firstexpression does NOT have the same value asthe result of the second expression.
Greater than > The condition is true if the first expression isalphabetically after, or has a numericallygreater value, or a later date than the secondexpression.
Less than < The condition is true if the first expression isalphabetically before, or has a numericallysmaller value, or an earlier date than thesecond expression.
Values in Operator Field

4 – 23Information Access
MeaningSymbolsOperator
Greater than or equal to >= The condition is true if either the greater thanOR the equal to operator returns a true result.
Less than or equal to <= The condition is true if either the less than ORthe equal to operator returns a true result.
Values in Operator Field

☞
4 – 24 Customizing, Reporting, and System Administration in Oracle HRMS (Canada)
Defining an Assignment Set by Including or Excluding Assignments
Use the Assignment Set window to define your set.
� To define a set by including or excluding assignments:
1. Enter a unique name for the set.
2. If you are defining a set for payroll processing, select a Payroll.
3. Save the new set.
4. Choose the Amendment button.
5. Do one of the following:
• If you want to create a small set of assignments, select Include inthe Inc/Exc field and select all the assignments for the set.
• If you want to start from the full set of assignments for thepayroll or Business Group, select Exclude in the Inc/Exc fieldand select assignments to remove from the set.
Attention: Do not create a mixture of Include and Exclude rows ifyou have not entered criteria and generated a formula.
6. Save your set.
C H A P T E R
5
5 – 1Letter Generation
Letter Generation

5 – 2 Customizing, Reporting and System Administration in Oracle US Federal HRMS
Letter Generation
Standard letters enable you to manage your enterprise’s recruitment orenrollment activities more easily. Using Oracle Human Resources orOracle Training Administration, you can issue standard letters toapplicants and students respectively, triggered by changes inassignment or enrollment status. For example, you can set up astandard enrollment confirmation letter that is triggered when astudent’s enrollment status is set to Placed or you can set up a rejectionletter that is triggered when an applicant’s assignment status is set toRejected.
Here are a few examples of letters you can set up to help you tomanage recruitment or enrollment activities:
Oracle Human Resources Oracle Training Administration
Acknowledgement letters (for allactive applications)
Acknowledgement letters (for allrequested enrollments)
Confirmation letters (for inter-views)
Confirmation letters (for placedenrollments, including event join-ing instructions based on the date,venue, and trainers)
Reports for interviewers andschedules
Reports for trainers (listing thestudents to attend an event)
Offer and Rejection letters (for ap-plicants)
Chase–up letters (for non–re-sponse or non–payment)
Acknowledgement letters (forcancellations)
Certificates (of successful coursecompletion)
5 – 3Letter Generation
Letter Generation Overview
There are two different methods provided to create standard letters:
• Online using Application Data Exchange (ADE), Application DataExchange and Hierarchy Diagrammers User’s Guide.
• Concurrent processing: page 5 – 4
Which Method Should You Use?
Use the online method (ADE), if you want to generate and review yourletters immediately.
ADE enables you to generate standard letters and reports by retrievingdata and exporting it to a data file that is merged with a standard wordprocessed document. The word processed document includes all themerge fields required to merge the data and the standard text for theletter. ADE is fully compatible with Microsoft Word 6.
You can use ADE to generate standard letters for recruitment orenrollment by performing a mail merge from the Request Letterwindow in your application.
Alternatively, you can use the concurrent processing method to set upyour standard letters. With concurrent processing, you generate andreview your letters without interrupting other work you perform atyour computer. You can control when a concurrent process runs andschedule long–running processes to run at times when the system islightly loaded. Another advantage of using concurrent processing isthat you do not need to have Windows 95 or 98, Excel or Lotus 123installed.
5 – 4 Customizing, Reporting and System Administration in Oracle US Federal HRMS
Concurrent Processing
There are two methods of using concurrent processing to set up yourstandard letters:
• Using Oracle Reports
• Using word processors
Using Oracle Reports
As an alternative to using a word processor to produce standardletters, you can use the Standard Letter and Label features of OracleReports. Use this method if you do not want to use word processors toprint your letters (or if you do not have word processors).
See: Using Oracle Reports: page 5 – 7 to set up your standard letters.
Using Word Processors
You can use any word processor to produce standard letters fromOracle HRMS. If you use a word processor, you can submit aconcurrent request in the Letter Request window to generate the mailmerge file. When the concurrent request is complete, you can use yourword processor ’s mail merge facilities to create the merged letters.
To create standard letters using a word processor, you need to extractthe data you want to include in the letters from the Oracle HRMSdatabase. To do this, create a program, such as a SQL*Plus script, toextract the data, which is then stored in a data file. You also writeskeleton standard letters using your word processor.
Note: Oracle HRMS supplies SQL*Plus script templates foruse with MultiMate, WordPerfect and Microsoft Word. It alsosupplies two sample Microsoft Word documents containingmerge codes for the SQL*Plus scripts. You can copy theSQL*Plus script templates (or Word documents) and modifythem to create the standard letters you require.
Each time you run your SQL*Plus script, it extracts data to the data file.You then use the mail merge features of your word processor to mergethis data with the skeleton standard letters you previously prepared.This merging process creates the actual letters that you send out tostudents and applicants.
An overview of creating standard letters using a word processor isshown in the following figure.
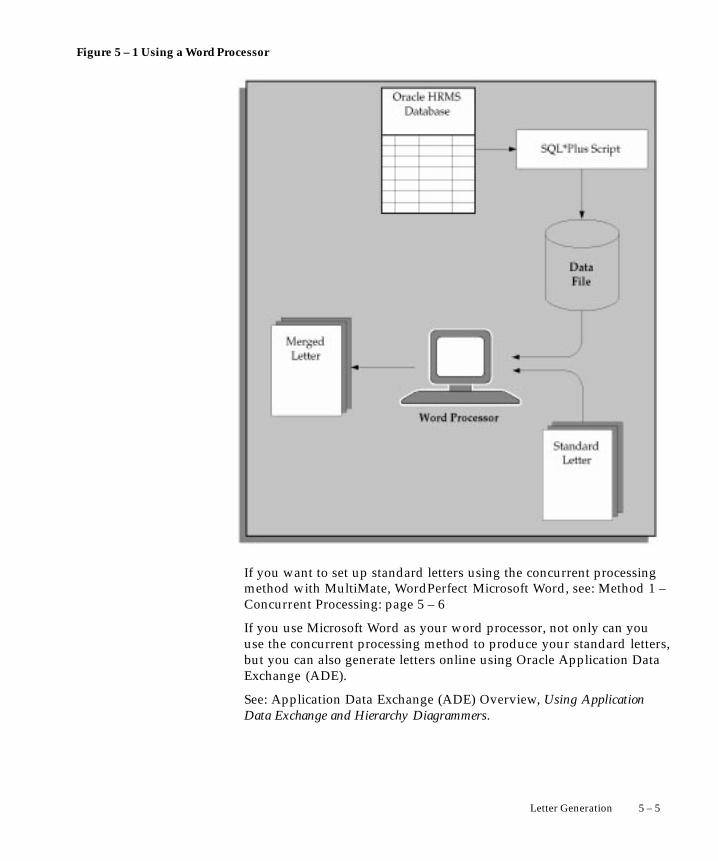
5 – 5Letter Generation
Figure 5 – 1 Using a Word Processor
If you want to set up standard letters using the concurrent processingmethod with MultiMate, WordPerfect Microsoft Word, see: Method 1 –Concurrent Processing: page 5 – 6
If you use Microsoft Word as your word processor, not only can youuse the concurrent processing method to produce your standard letters,but you can also generate letters online using Oracle Application DataExchange (ADE).
See: Application Data Exchange (ADE) Overview, Using ApplicationData Exchange and Hierarchy Diagrammers.
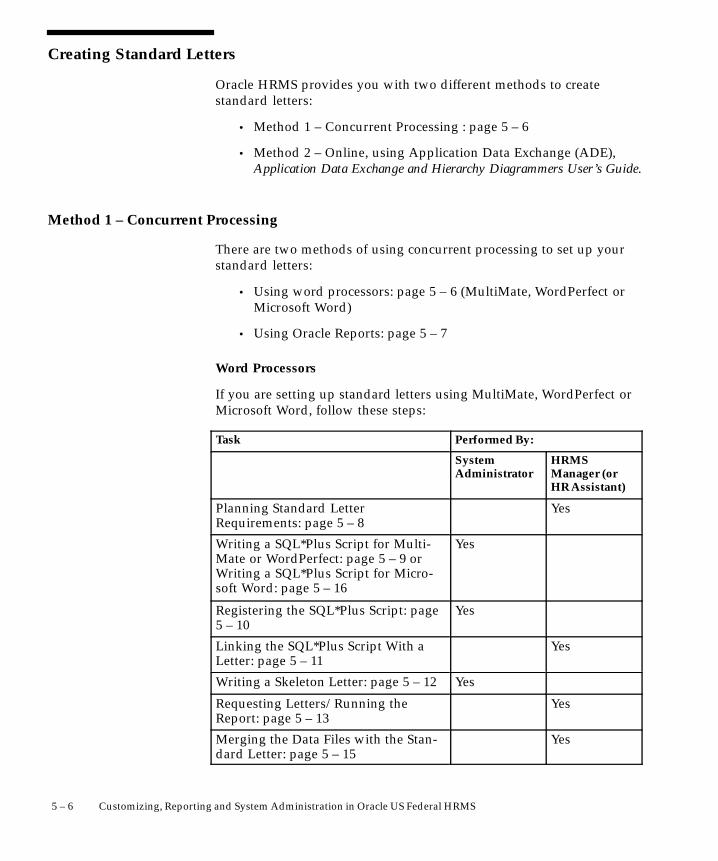
5 – 6 Customizing, Reporting and System Administration in Oracle US Federal HRMS
Creating Standard Letters
Oracle HRMS provides you with two different methods to createstandard letters:
• Method 1 – Concurrent Processing : page 5 – 6
• Method 2 – Online, using Application Data Exchange (ADE),Application Data Exchange and Hierarchy Diagrammers User’s Guide.
Method 1 – Concurrent Processing
There are two methods of using concurrent processing to set up yourstandard letters:
• Using word processors: page 5 – 6 (MultiMate, WordPerfect orMicrosoft Word)
• Using Oracle Reports: page 5 – 7
Word Processors
If you are setting up standard letters using MultiMate, WordPerfect orMicrosoft Word, follow these steps:
Task Performed By:
SystemAdministrator
HRMSManager (orHR Assistant)
Planning Standard LetterRequirements: page 5 – 8
Yes
Writing a SQL*Plus Script for Multi-Mate or WordPerfect: page 5 – 9 orWriting a SQL*Plus Script for Micro-soft Word: page 5 – 16
Yes
Registering the SQL*Plus Script: page5 – 10
Yes
Linking the SQL*Plus Script With aLetter: page 5 – 11
Yes
Writing a Skeleton Letter: page 5 – 12 Yes
Requesting Letters/Running theReport: page 5 – 13
Yes
Merging the Data Files with the Stan-dard Letter: page 5 – 15
Yes
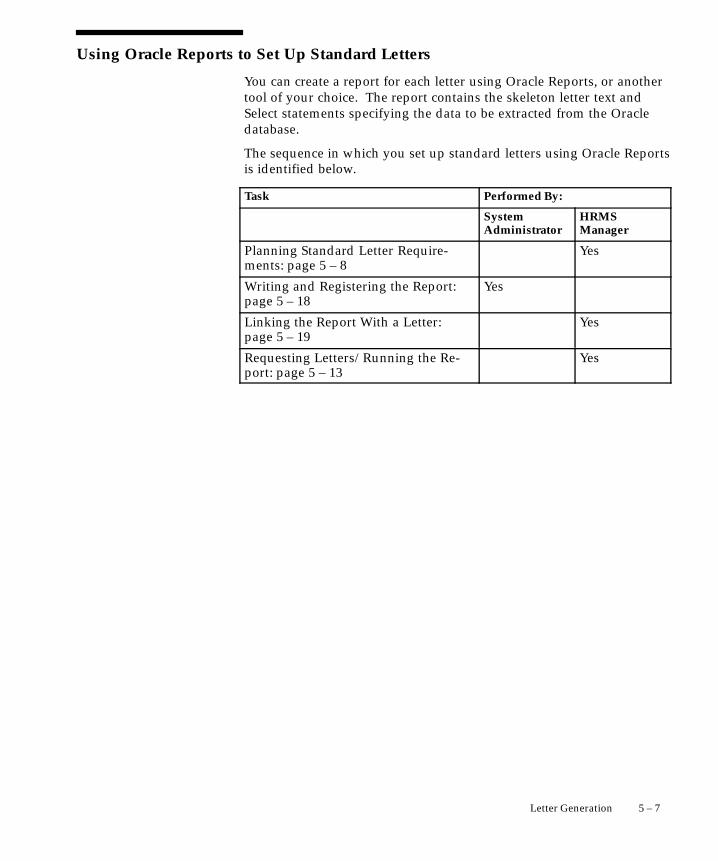
5 – 7Letter Generation
Using Oracle Reports to Set Up Standard Letters
You can create a report for each letter using Oracle Reports, or anothertool of your choice. The report contains the skeleton letter text andSelect statements specifying the data to be extracted from the Oracledatabase.
The sequence in which you set up standard letters using Oracle Reportsis identified below.
Task Performed By:
SystemAdministrator
HRMSManager
Planning Standard Letter Require-ments: page 5 – 8
Yes
Writing and Registering the Report:page 5 – 18
Yes
Linking the Report With a Letter:page 5 – 19
Yes
Requesting Letters/Running the Re-port: page 5 – 13
Yes

5 – 8 Customizing, Reporting and System Administration in Oracle US Federal HRMS
Planning Standard Letter Requirements
Before creating standard letters, you need to identify several things.
� To plan standard letter requirements:
1. Identify the database information to include in the letters.
You need to identify the select statements to provide you with thedata as the content of your letters. Oracle HRMS supplies you withSQL*Plus scripts as templates to help you do this.
2. Identify the text that you want to include as the body of your letters.
3. Decide whether to associate your standard letters with studentenrollment or applicant assignment statuses.
4. Identify which statuses you want to trigger your standard letters (ifyou do want to link your standard letters to student enrollment orapplicant assignment statuses).
For example, do you want to link your standard enrollmentconfirmation letter to the status Placed so that the letter is triggeredwhen you set a student’s enrollment status to Placed? Do you wantto link your standard rejection letter to the status Rejected so that itis triggered when an applicant’s assignment status is set toRejected?

5 – 9Letter Generation
Writing a SQL*Plus Script for MultiMate or WordPerfect
Oracle HRMS supplies you with SQL*Plus scripts as templates forextracting database information for standard letters. You can copy theSQL*Plus script templates and modify them to create the standardletters you require.
The template scripts Oracle HRMS provides are:
Scripts Purpose UsedBy
PERWPMUK.sql Example UK SQL*Plus scriptfor MultiMate
HR
PERWPMUS.sql Example US SQL*Plus scriptfor MultiMate
HR
PERWPWUK.sql Example US SQL*Plus scriptfor WordPerfect
HR
PERWPWUS.sql Example US SQL*Plus scriptfor WordPerfect
HR
One of the template SQL*Plus scripts (PERWPWUK.sql) is provided asa example. See PERWPWUK Template: page C – 5.
Oracle Training Administration does not provide template scripts, butwe provide an example of a Confirmation letter SQL mail merge file.See OTA SQL*Plus Script: page C – 7
� To write a SQL*Plus script for MultiMate or WordPerfect:
1. Copy the appropriate SQL*Plus script from the server side sqldirectory of the HR product tree (consult your installation guide fordetails).
2. Edit (or write) a SQL*Plus script to select data from the database ina format your word processor can read and that is compatible withthe standard letter.
3. Save the file with the name PERWP*** (or OTAWP*** for OTA).
You must use this prefix for the system to recognize it as a type ofletter. See your Oracle Applications installation server guides fordetails of where the concurrent manager places the files.
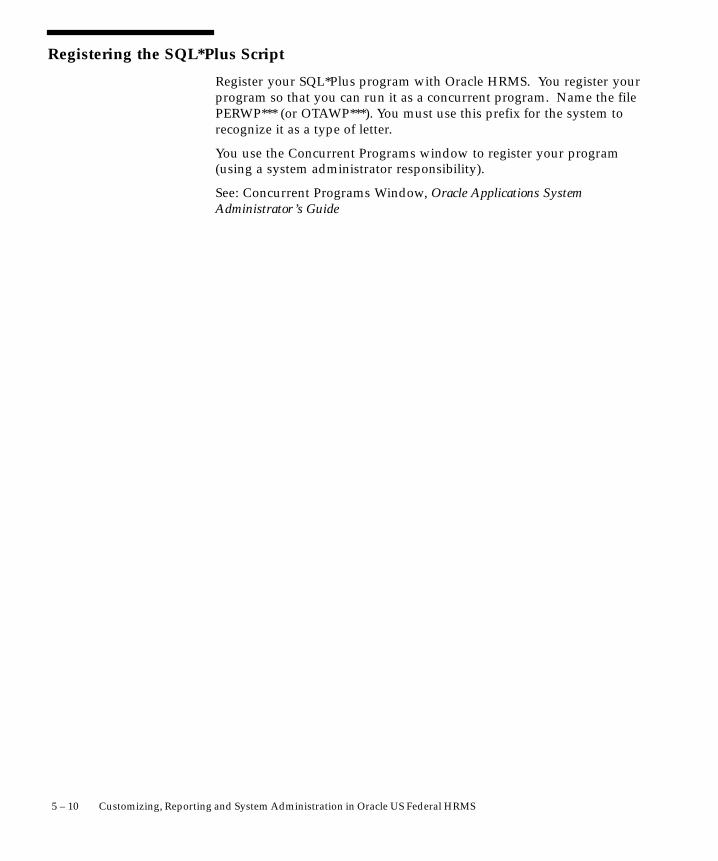
5 – 10 Customizing, Reporting and System Administration in Oracle US Federal HRMS
Registering the SQL*Plus Script
Register your SQL*Plus program with Oracle HRMS. You register yourprogram so that you can run it as a concurrent program. Name the filePERWP*** (or OTAWP***). You must use this prefix for the system torecognize it as a type of letter.
You use the Concurrent Programs window to register your program(using a system administrator responsibility).
See: Concurrent Programs Window, Oracle Applications SystemAdministrator’s Guide

5 – 11Letter Generation
Linking the SQL*Plus Script With a Letter
You need to link your SQL*Plus script with a letter and one or morestatuses. In Oracle Human Resources, you can link one or moreapplicant assignment statuses with each recruitment letter. A requestfor the letter is then created automatically when an applicant is givenan associated assignment status. For example, you can link yourstandard recruitment rejection letter to the status Rejected so that theletter is triggered when you set an applicant’s assignment status toRejected.
In Oracle Training Administration, you can link one or more enrollmentstatuses with each enrollment letter. A request for the letter is thencreated automatically when an enrollment is given an associated status.
Define your standard letter types in the Letter window.
� To define a standard letter type:
1. Enter a name for the letter in the Name field.
2. Select the Concurrent Program Name assigned by your SystemAdministrator to the SQL*Plus script.
For Oracle Human Resources:
3. Select one or more applicant assignment statuses to create letterrequests automatically for applicants, and check the Enabled box.
When an applicant is given one of these statuses, a pending requestfor this letter type is created automatically. If a pending letterrequest already exists, the applicant is added to the list of people toreceive the letter when you submit the request.
For Oracle Training Administration:
4. Select one or more enrollment statuses to create letter requestsautomatically for enrollments, and check the Enabled box.
When an enrollment is given one of these statuses, a pendingrequest for this letter type is created automatically. If a pendingletter request already exists, the enrollment is added to the list ofpeople to receive the letter when you submit the request.

5 – 12 Customizing, Reporting and System Administration in Oracle US Federal HRMS
Writing a Skeleton Letter
Write a skeleton letter using your word processor. Include theappropriate merge codes from the data source for the word processoryou are using.
Figure 5 – 2 Merging Data with Standard Letters
The mail merge feature of any word processor enables you to mergetext from the data file you create into a standard letter. Each line in thedata file contains the text to merge into one standard letter for onerecipient.
Within the program, you can format the data and include thecharacters that are recognized as separators by your word processor.
A standard letter comprises standard text with a number of embeddedvariables in it. When you print the letter, the variables are replacedwith specific items of data, such as name and address details fordifferent people.

5 – 13Letter Generation
Requesting Letters/Running the Report
When you, or other users, set the status for an applicant or enrollmentthat triggers your standard letters, Oracle HRMS creates a letterrequest automatically, with the status of Pending. It also adds theapplicant’s or student’s name to the request. You can view the pendingrequest and names through the Request Letter window.
Then, when you change the letter request from Pending to Requested,Oracle HRMS runs the report or SQL*Plus script for this type of letter.
You can add further names to the list manually, if required. Forexample, you might have a last minute acknowledgement letter tosend.
You can also create manual letter requests. You do this by entering thestatus of Pending yourself, then entering all the recipients of the letterbefore changing the status of the letter to Requested.
� To submit an automatic letter request:
1. Query the letter you require in the Letter Name field.
2. Ensure that the method is Automatic.
3. Move to the Requested For block to query the applicants, events orstudents that have been entered automatically on this request,according to their status. You can add further names manually.
4. Update the status from Pending to Requested.
5. Save your changes.
A concurrent request ID number appears in the ConcurrentRequest field. When the Concurrent Manager has processed therequest it changes the status to Completed.
6. You can query the request ID in the Concurrent Requests windowand monitor its progress.
Note: Consult your installation guide for details of the locationConcurrent Manager places the output or data file.
� To create a manual letter request:
1. Select the Letter Name for the letter type you want to request.
2. Ensure that the method is Manual.
3. Leave the status of the request as Pending.
4. Save the changes.

5 – 14 Customizing, Reporting and System Administration in Oracle US Federal HRMS
Adding the Names
5. Select the names to add:
• Select employees or applicants (for Oracle Human Resources) toreceive the letter in the Requested For region.
The Assignment field displays the organization to which theperson is assigned. You can view the other components of theassignment by choosing List of Values from the Edit menu.
• Select events or students or both (for Oracle TrainingAdministration) in the Requested For region.
This depends on how the letter has been set up on your system.For example, an enrollment confirmation letter might be definedso that it is sent to all students with the status Confirmed whoare enrolled on the event selected in the Requested For region.
6. Save the changes.
Changing the Status
7. Update the status from Pending to Requested.
8. Save the changes.
A concurrent request ID number appears in the ConcurrentRequest field. When the Concurrent Manager has processed therequest it changes the status to Completed.
9. You can query the request ID in the Concurrent Requests windowand monitor its progress.
Note: Consult your installation guide for details of the locationConcurrent Manager places the output file.

5 – 15Letter Generation
Merging the Data File with the Standard Letter
When the concurrent manager has finished processing a letter request,you can merge the data in the Data File with your skeleton letters.
� To merge the data file with the standard letter:
1. Merge the data in the Data File with your skeleton letters to createyour standard letters. The merging of text and data files isnormally carried out using the mail merge features of your wordprocessor.
If you do not have access to the directory where the Data Fileresides (consult your installation guide for details of the locationConcurrent Manager places the file), you need to transfer the mailmerge files created by the concurrent process to your wordprocessor before you can merge the data file with the skeletonletters.
2. If you are using a word processor to merge the data file, you needto save the merged letters you generate.
If you do not save the merged letters, when you exit the wordprocessor you lose the letters. You do not lose the data file or theskeleton letter, however.
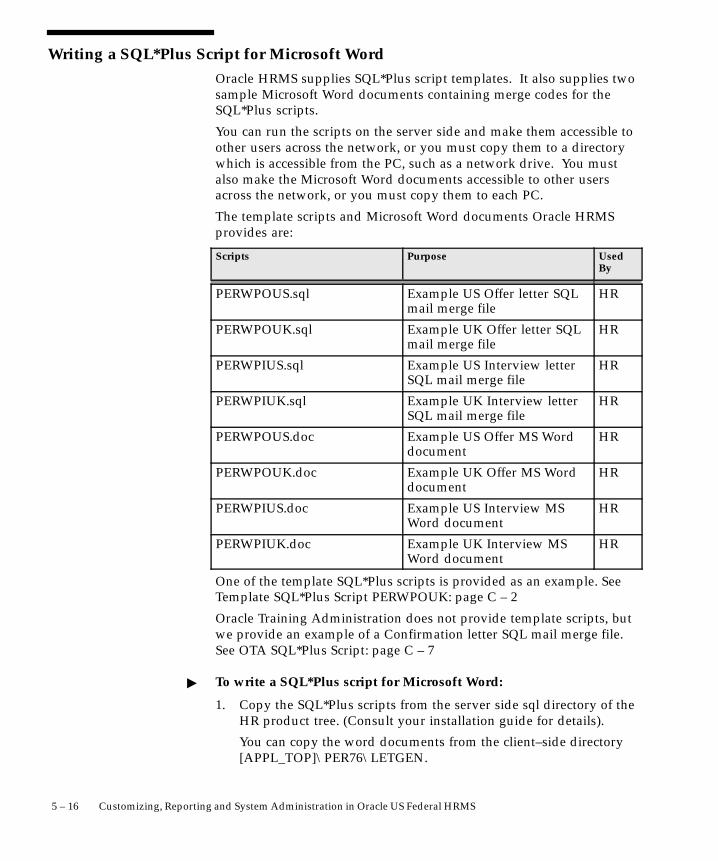
5 – 16 Customizing, Reporting and System Administration in Oracle US Federal HRMS
Writing a SQL*Plus Script for Microsoft WordOracle HRMS supplies SQL*Plus script templates. It also supplies twosample Microsoft Word documents containing merge codes for theSQL*Plus scripts.
You can run the scripts on the server side and make them accessible toother users across the network, or you must copy them to a directorywhich is accessible from the PC, such as a network drive. You mustalso make the Microsoft Word documents accessible to other usersacross the network, or you must copy them to each PC.
The template scripts and Microsoft Word documents Oracle HRMSprovides are:
Scripts Purpose UsedBy
PERWPOUS.sql Example US Offer letter SQLmail merge file
HR
PERWPOUK.sql Example UK Offer letter SQLmail merge file
HR
PERWPIUS.sql Example US Interview letterSQL mail merge file
HR
PERWPIUK.sql Example UK Interview letterSQL mail merge file
HR
PERWPOUS.doc Example US Offer MS Worddocument
HR
PERWPOUK.doc Example UK Offer MS Worddocument
HR
PERWPIUS.doc Example US Interview MSWord document
HR
PERWPIUK.doc Example UK Interview MSWord document
HR
One of the template SQL*Plus scripts is provided as an example. SeeTemplate SQL*Plus Script PERWPOUK: page C – 2
Oracle Training Administration does not provide template scripts, butwe provide an example of a Confirmation letter SQL mail merge file.See OTA SQL*Plus Script: page C – 7
� To write a SQL*Plus script for Microsoft Word:
1. Copy the SQL*Plus scripts from the server side sql directory of theHR product tree. (Consult your installation guide for details).
You can copy the word documents from the client–side directory[APPL_TOP]\PER76\LETGEN.
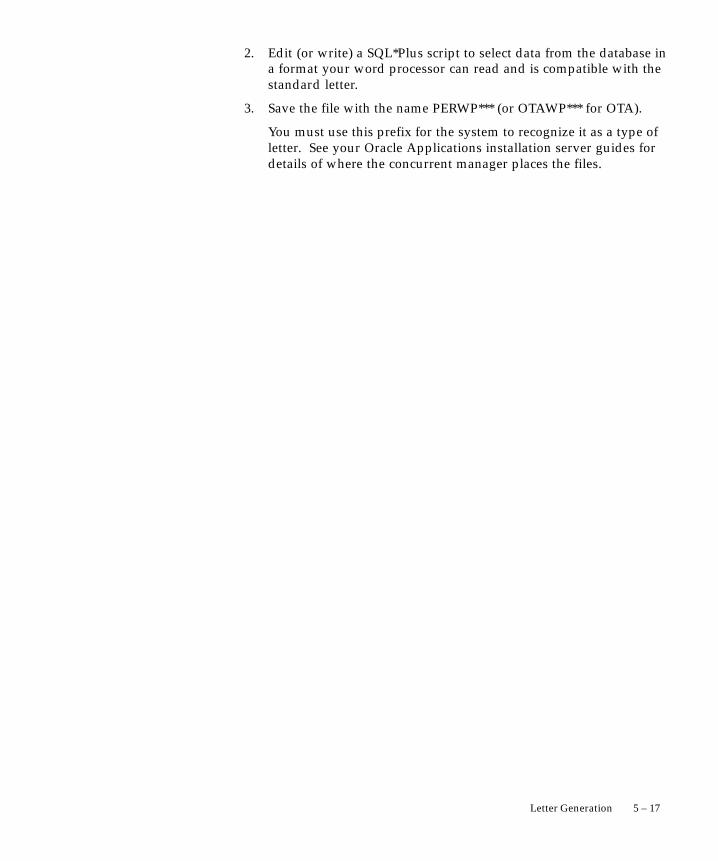
5 – 17Letter Generation
2. Edit (or write) a SQL*Plus script to select data from the database ina format your word processor can read and is compatible with thestandard letter.
3. Save the file with the name PERWP*** (or OTAWP*** for OTA).
You must use this prefix for the system to recognize it as a type ofletter. See your Oracle Applications installation server guides fordetails of where the concurrent manager places the files.

5 – 18 Customizing, Reporting and System Administration in Oracle US Federal HRMS
Writing and Registering the Report
You need to write and register the report.
� To write and register the report:
1. Identify which data you want to extract from the database. Writeyour skeleton letter text and Select statements specifying the datato be extracted from the Oracle database
2. Register your report with Oracle HRMS. You register your reportso that you can run it as a concurrent program. Name the filePERWP*** (or OTAWP*** for OTA). You must use this prefix for thesystem to recognize it.
You use the Concurrent Programs window to register your report(using a system administrator responsibility).
See: Concurrent Programs Window, Oracle Applications SystemAdministrator’s Guide
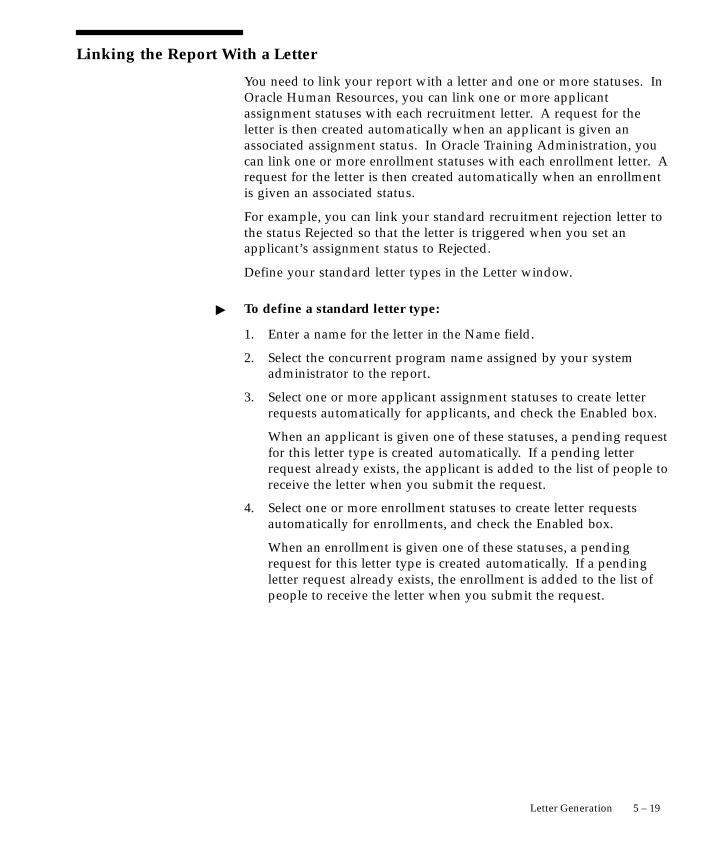
5 – 19Letter Generation
Linking the Report With a Letter
You need to link your report with a letter and one or more statuses. InOracle Human Resources, you can link one or more applicantassignment statuses with each recruitment letter. A request for theletter is then created automatically when an applicant is given anassociated assignment status. In Oracle Training Administration, youcan link one or more enrollment statuses with each enrollment letter. Arequest for the letter is then created automatically when an enrollmentis given an associated status.
For example, you can link your standard recruitment rejection letter tothe status Rejected so that the letter is triggered when you set anapplicant’s assignment status to Rejected.
Define your standard letter types in the Letter window.
� To define a standard letter type:
1. Enter a name for the letter in the Name field.
2. Select the concurrent program name assigned by your systemadministrator to the report.
3. Select one or more applicant assignment statuses to create letterrequests automatically for applicants, and check the Enabled box.
When an applicant is given one of these statuses, a pending requestfor this letter type is created automatically. If a pending letterrequest already exists, the applicant is added to the list of people toreceive the letter when you submit the request.
4. Select one or more enrollment statuses to create letter requestsautomatically for enrollments, and check the Enabled box.
When an enrollment is given one of these statuses, a pendingrequest for this letter type is created automatically. If a pendingletter request already exists, the enrollment is added to the list ofpeople to receive the letter when you submit the request.

5 – 20 Customizing, Reporting and System Administration in Oracle US Federal HRMS
A P P E N D I X
AT
A – 1Windows and Reports
Windows and Reports
his appendix includes information about:
• Windows and their navigation paths
• Reports and process in Oracle HRMS
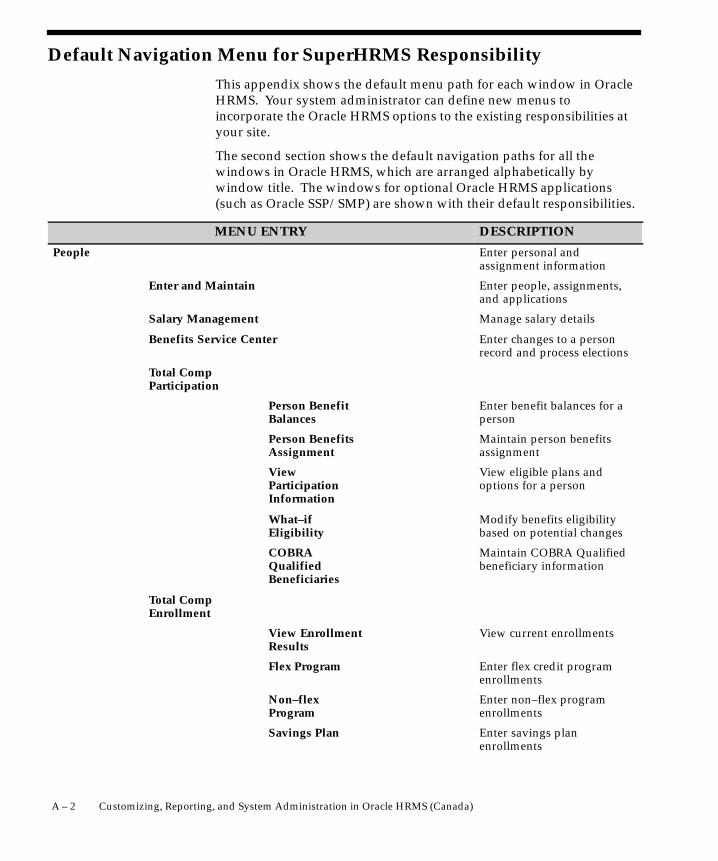
A – 2 Customizing, Reporting, and System Administration in Oracle HRMS (Canada)
Default Navigation Menu for SuperHRMS Responsibility
This appendix shows the default menu path for each window in OracleHRMS. Your system administrator can define new menus toincorporate the Oracle HRMS options to the existing responsibilities atyour site.
The second section shows the default navigation paths for all thewindows in Oracle HRMS, which are arranged alphabetically bywindow title. The windows for optional Oracle HRMS applications(such as Oracle SSP/SMP) are shown with their default responsibilities.
MENU ENTRY DESCRIPTION
People Enter personal andassignment information
Enter and Maintain Enter people, assignments,and applications
Salary Management Manage salary details
Benefits Service Center Enter changes to a personrecord and process elections
Total CompParticipation
Person BenefitBalances
Enter benefit balances for aperson
Person BenefitsAssignment
Maintain person benefitsassignment
ViewParticipationInformation
View eligible plans andoptions for a person
What–ifEligibility
Modify benefits eligibilitybased on potential changes
COBRAQualifiedBeneficiaries
Maintain COBRA Qualifiedbeneficiary information
Total CompEnrollment
View EnrollmentResults
View current enrollments
Flex Program Enter flex credit programenrollments
Non–flexProgram
Enter non–flex programenrollments
Savings Plan Enter savings planenrollments
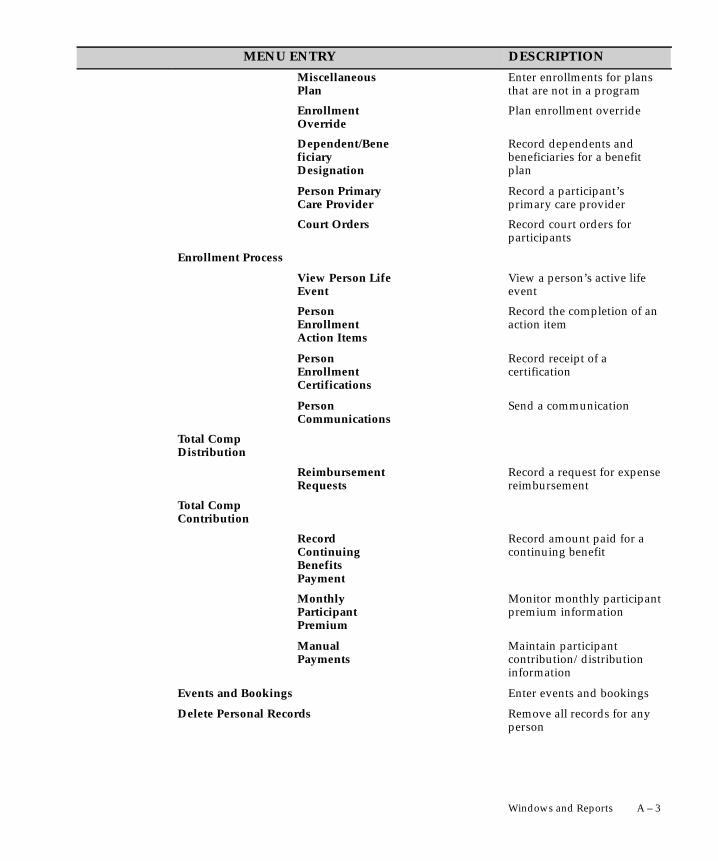
A – 3Windows and Reports
DESCRIPTIONMENU ENTRY
MiscellaneousPlan
Enter enrollments for plansthat are not in a program
EnrollmentOverride
Plan enrollment override
Dependent/BeneficiaryDesignation
Record dependents andbeneficiaries for a benefitplan
Person PrimaryCare Provider
Record a participant’sprimary care provider
Court Orders Record court orders forparticipants
Enrollment Process
View Person LifeEvent
View a person’s active lifeevent
PersonEnrollmentAction Items
Record the completion of anaction item
PersonEnrollmentCertifications
Record receipt of acertification
PersonCommunications
Send a communication
Total CompDistribution
ReimbursementRequests
Record a request for expensereimbursement
Total CompContribution
RecordContinuingBenefitsPayment
Record amount paid for acontinuing benefit
MonthlyParticipantPremium
Monitor monthly participantpremium information
ManualPayments
Maintain participantcontribution/distributioninformation
Events and Bookings Enter events and bookings
Delete Personal Records Remove all records for anyperson

A – 4 Customizing, Reporting, and System Administration in Oracle HRMS (Canada)
DESCRIPTIONMENU ENTRY
FastPath Enter personal andassignment informationquickly
Absence Enter absence information
Accruals View net accruals to date
Address Enter address details
Adjust Balances Adjust balances
Application Enter application details
Assignment Enter assignment details
Assignment Budget Enter budget values for anassignment
Assignment Extra Information Enter Extra InformationTypes for an assignment
Basic Benefits View basic benefit details
Competence Profile Define a competence profile
Contact Enter contact information
Costing Enter cost information
Employee Balances View employee balances
Employee Review Perform an employee review
End Application End an application
End Employment Enter termination details foran employee
Entries Maintain element entries andvalues for an assignment
Event Book an event for a person
External/Manual Payments Enter external or manualpayments for an employee
Grade Step Enter grade step placementfor an assignment
Pay Method Enter personal paymentmethods for an assignment
Picture Enter pictures for a person
Person Extra Information Enter Extra InformationTypes for a person
Person Type Usage Enter person types
Personal Delivery Method Enter delivery method forpersonal communications

A – 5Windows and Reports
DESCRIPTIONMENU ENTRY
Phones Enter phone numbers
Picture Enter a picture for a person
Qualifications Define qualifications
QuickPay Run QuickPay for oneemployee
Reverse Payroll Run Reverse payroll run resultsfor one employee
Salary Maintain salary for anemployee
Salary History View salary history
Secondary Status Enter secondary status for anassignment
Special Information Enter Special InformationTypes for a person
UK P45 Form View and print a P45 form
UK Statement of Earnings View statement of earnings
UK Tax Enter UK tax details
Adjust Tax Balances Adjust US tax balances
Tax Balances View tax balances
Tax Balance Summary View tax balance summaryinformation
US Statement of Earnings View statement of earnings
US Tax Information Enter US tax details
US/CA Address Enter US or Canadianaddress details
Recruitment Manage recruiting
Requisition and Vacancy Enter a requisition and anyvacancies
Recruitment Activity Enter a recruitment activity
Applicant Quick Entry Quick entry of personal andapplication information
Mass Update of Applicants Mass Update of Applicants
Request Recruitment Letter Request a mailmerge file or astandard letter
Career Management Career Management
Rating Scales Define general methods ofmeasuring competencies
Competencies Define competencies
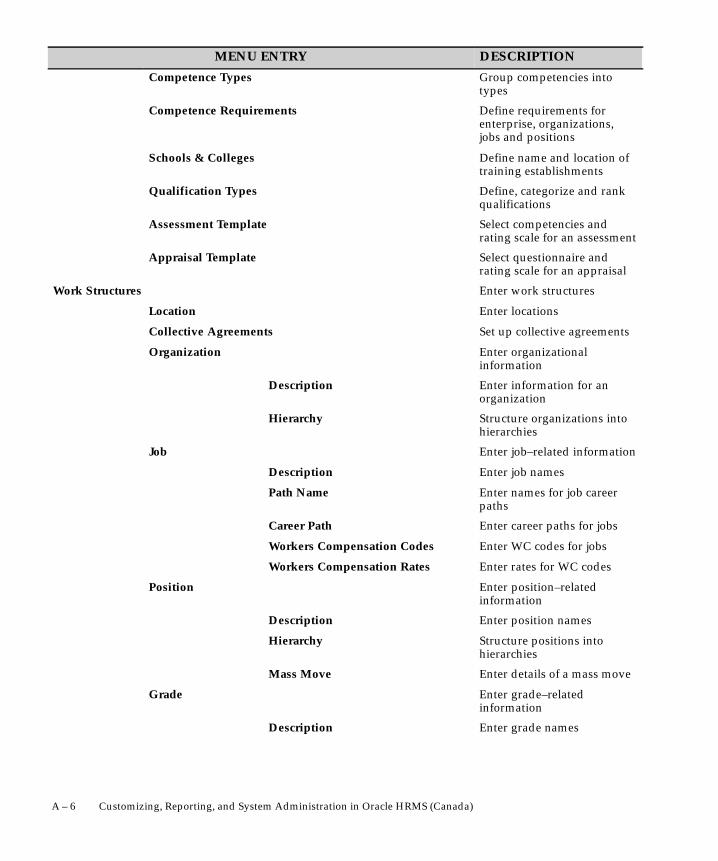
A – 6 Customizing, Reporting, and System Administration in Oracle HRMS (Canada)
DESCRIPTIONMENU ENTRY
Competence Types Group competencies intotypes
Competence Requirements Define requirements forenterprise, organizations,jobs and positions
Schools & Colleges Define name and location oftraining establishments
Qualification Types Define, categorize and rankqualifications
Assessment Template Select competencies andrating scale for an assessment
Appraisal Template Select questionnaire andrating scale for an appraisal
Work Structures Enter work structures
Location Enter locations
Collective Agreements Set up collective agreements
Organization Enter organizationalinformation
Description Enter information for anorganization
Hierarchy Structure organizations intohierarchies
Job Enter job–related information
Description Enter job names
Path Name Enter names for job careerpaths
Career Path Enter career paths for jobs
Workers Compensation Codes Enter WC codes for jobs
Workers Compensation Rates Enter rates for WC codes
Position Enter position–relatedinformation
Description Enter position names
Hierarchy Structure positions intohierarchies
Mass Move Enter details of a mass move
Grade Enter grade–relatedinformation
Description Enter grade names
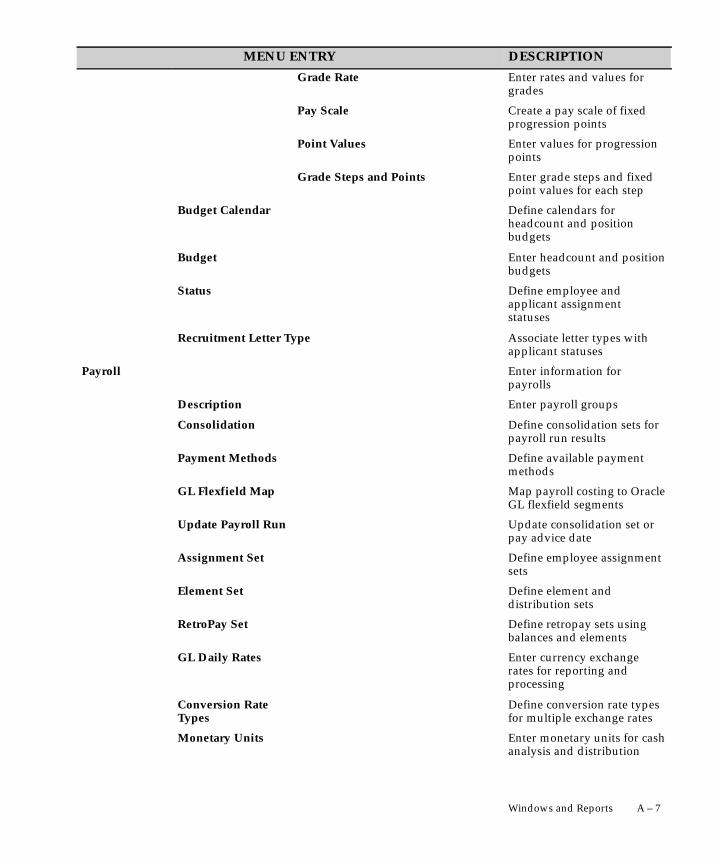
A – 7Windows and Reports
DESCRIPTIONMENU ENTRY
Grade Rate Enter rates and values forgrades
Pay Scale Create a pay scale of fixedprogression points
Point Values Enter values for progressionpoints
Grade Steps and Points Enter grade steps and fixedpoint values for each step
Budget Calendar Define calendars forheadcount and positionbudgets
Budget Enter headcount and positionbudgets
Status Define employee andapplicant assignmentstatuses
Recruitment Letter Type Associate letter types withapplicant statuses
Payroll Enter information forpayrolls
Description Enter payroll groups
Consolidation Define consolidation sets forpayroll run results
Payment Methods Define available paymentmethods
GL Flexfield Map Map payroll costing to OracleGL flexfield segments
Update Payroll Run Update consolidation set orpay advice date
Assignment Set Define employee assignmentsets
Element Set Define element anddistribution sets
RetroPay Set Define retropay sets usingbalances and elements
GL Daily Rates Enter currency exchangerates for reporting andprocessing
Conversion RateTypes
Define conversion rate typesfor multiple exchange rates
Monetary Units Enter monetary units for cashanalysis and distribution

A – 8 Customizing, Reporting, and System Administration in Oracle HRMS (Canada)
DESCRIPTIONMENU ENTRY
Total Compensation Enter information oncompensation and benefits
Basic
ElementDescription
Enter compensation andbenefit information
Earnings Activate and review earningstypes
Tax WithholdingRules
Enter withholding rules forearnings
Link Enter eligibility rules forcompensations and benefits
Salary Basis Enter available salary basesfor salary administration
Salary Survey Enter salary surveyinformation
Deductions Activate and reviewdeductions
BenefitContributions
Enter benefit contributionlevels and values
Absence Types Define absence types
Accrual Plans Enter accrual plans
Write Formulas Enter and modify formulas
Formula Results Define what happens toformula results
Global Values Enter global values for use informulas
Balance Enter balances with feedsand dimensions
Classification Define additional elementclassifications
GeneralDefinitions
Eligibility/RateFactors
Benefits Groups Define a benefits group
Derived Factors Define derived factors usedto determine eligibility andactivity rates
Postal/Zip Define numeric postal rangesfor eligibility and activityrates

A – 9Windows and Reports
DESCRIPTIONMENU ENTRY
Service Areas Define a geographical servicearea by postal code ranges
EligibilityProfiles
Participant Define eligibility profiles forparticipants
DependentCoverage
Define eligibility profiles fordependents
Additional Setup
Program/PlanYears
Define periods for benefitprograms and plans
Regulations Record policies that governplan administration
ReportingGroups
Group programs and plans
BenefitsBalances
Define benefit balance types
Goods andServices
Define reimbursable goodsand services
Life EventReasons
Define life events
Collapse LifeEvents
Define collapsible life events
CommunicationTypes
Define communications
EnrollmentAction Types
Define action items
MessageConfiguration
Define messages to display inBenefits Service Center
AuthenticationActivities
Define forms to display inBenefits Service Center
Programs and Plans
View ProgramStructure
View the benefits programhierarchy
Plan Types Define benefit plan types
Options Define benefit options
Plans Define benefit plans
Plan EnrollmentRequirements
Define benefit planenrollment requirements

A – 10 Customizing, Reporting, and System Administration in Oracle HRMS (Canada)
DESCRIPTIONMENU ENTRY
PlanReimbursements
Define reimbursement plans
Programs Define benefit programs
ProgramEnrollmentRequirements
Define benefit programenrollment requirements
Rates/CoverageDefinitions
Variable RateProfiles
Define variable activity rateprofiles
Standard Rates Define activity ratecalculations
Period–to–DateLimits
Define period–to–date limits
CoverageCalculations
Define benefit coveragecalculations
Coverage AcrossPlan Types
Define coverage across plantypes
Actual Premiums Define actual premium costs
Imputed Income Define imputed incomecalculations
Benefits Pools Define flex credit benefitpools
Combinations Define combinations of plans,plan types, and options andplan types
Flex Credits Define flex credit calculations
Monthly Premiums Monthly premiuminformation
Wage Attachment View Wage Attachment
Earnings Rules Define Wage AttachmentsEarnings Rules
Exemption Rules Define Wage AttachmentsExemption Rules
Fee Rules Define Wage AttachmentsFee Rules
Limit Rules Define Wage AttachmentsLimit Rules
View View HRMS information
Histories

A – 11Windows and Reports
DESCRIPTIONMENU ENTRY
Employee Assignment Employee assignment history
Absence Employee absence historyfolder
Run Results Employee run result history
Salary
1 AssignmentFolder
––––> 2 SalaryHistory
Salary history for anemployee assignment
Entries
1 AssignmentFolder
––––> 2 EntryHistory
Entry history for anemployee assignment
Contribution Histories (Def Comp457)
Employee ContributionHistory (DeferredCompensation 457)
Lists
People Folder People folder
Assignment Folder Assignment folder
People by Assignment List people by assignmentfolder
Assignments List assignments folder
Employees by Organization List employees byorganization folder
Employees by Position List employees by positionfolder
Emps by Position Hierarchy List employees by positionhierarchy folder
Employees by Element List employees by element
Employees by Absence Type List employees by absencetype folder
People by Special Information List people by specialinformation folder
Vacancies View vacancies folder
Organization Budgets View organization budgetvariance folder
Position Budgets View position budgetvariance folder
Grade Comparatio View employee gradecomparatio folder
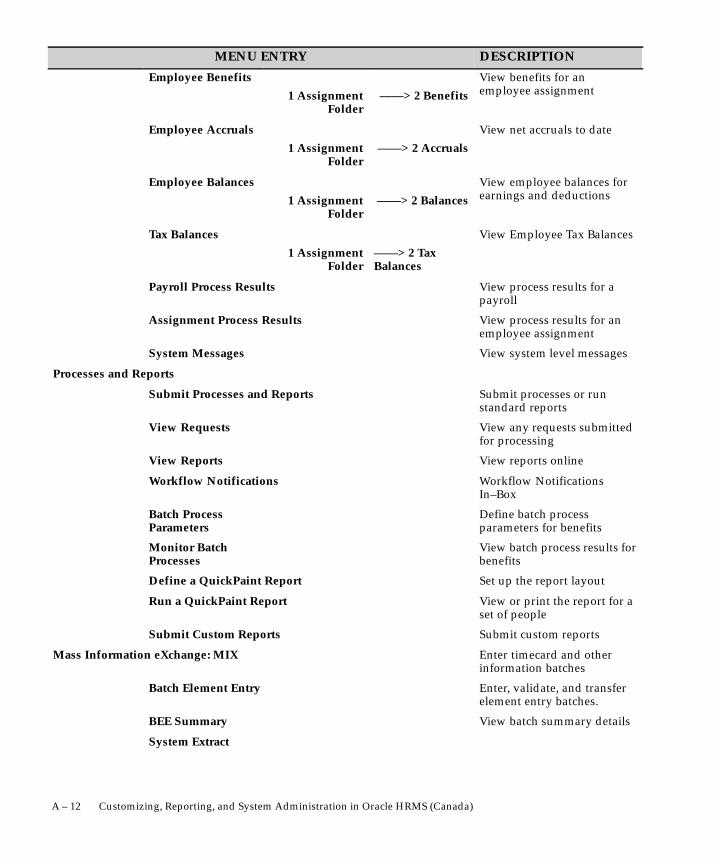
A – 12 Customizing, Reporting, and System Administration in Oracle HRMS (Canada)
DESCRIPTIONMENU ENTRY
Employee Benefits
1 AssignmentFolder
––––> 2 Benefits
View benefits for anemployee assignment
Employee Accruals
1 AssignmentFolder
––––> 2 Accruals
View net accruals to date
Employee Balances
1 AssignmentFolder
––––> 2 Balances
View employee balances forearnings and deductions
Tax Balances
1 AssignmentFolder
––––> 2 TaxBalances
View Employee Tax Balances
Payroll Process Results View process results for apayroll
Assignment Process Results View process results for anemployee assignment
System Messages View system level messages
Processes and Reports
Submit Processes and Reports Submit processes or runstandard reports
View Requests View any requests submittedfor processing
View Reports View reports online
Workflow Notifications Workflow NotificationsIn–Box
Batch ProcessParameters
Define batch processparameters for benefits
Monitor BatchProcesses
View batch process results forbenefits
Define a QuickPaint Report Set up the report layout
Run a QuickPaint Report View or print the report for aset of people
Submit Custom Reports Submit custom reports
Mass Information eXchange: MIX Enter timecard and otherinformation batches
Batch Element Entry Enter, validate, and transferelement entry batches.
BEE Summary View batch summary details
System Extract
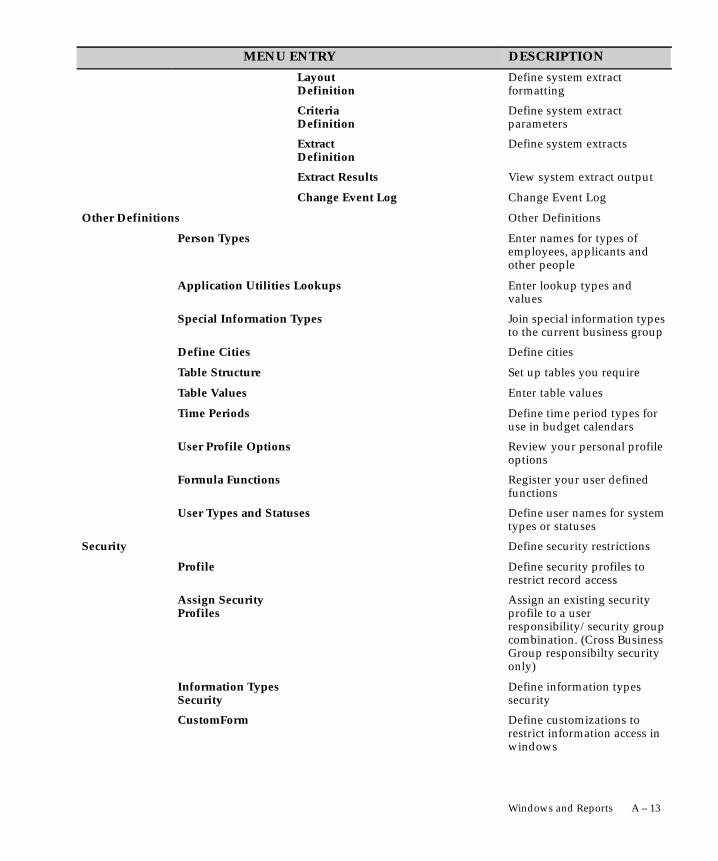
A – 13Windows and Reports
DESCRIPTIONMENU ENTRY
LayoutDefinition
Define system extractformatting
CriteriaDefinition
Define system extractparameters
ExtractDefinition
Define system extracts
Extract Results View system extract output
Change Event Log Change Event Log
Other Definitions Other Definitions
Person Types Enter names for types ofemployees, applicants andother people
Application Utilities Lookups Enter lookup types andvalues
Special Information Types Join special information typesto the current business group
Define Cities Define cities
Table Structure Set up tables you require
Table Values Enter table values
Time Periods Define time period types foruse in budget calendars
User Profile Options Review your personal profileoptions
Formula Functions Register your user definedfunctions
User Types and Statuses Define user names for systemtypes or statuses
Security Define security restrictions
Profile Define security profiles torestrict record access
Assign SecurityProfiles
Assign an existing securityprofile to a userresponsibility/security groupcombination. (Cross BusinessGroup responsibilty securityonly)
Information TypesSecurity
Define information typessecurity
CustomForm Define customizations torestrict information access inwindows

A – 14 Customizing, Reporting, and System Administration in Oracle HRMS (Canada)
DESCRIPTIONMENU ENTRY
Report Sets Define sets to restrict reportand process access
Task Flow Nodes Define task flow nodes andcustomizations
Task Flow Definitions Define task flows
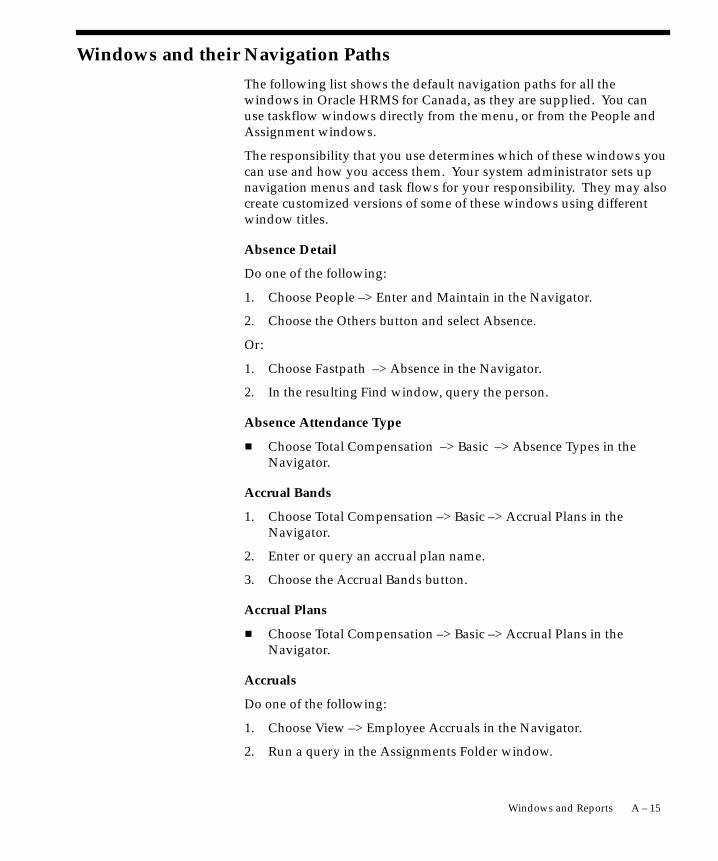
A – 15Windows and Reports
Windows and their Navigation Paths
The following list shows the default navigation paths for all thewindows in Oracle HRMS for Canada, as they are supplied. You canuse taskflow windows directly from the menu, or from the People andAssignment windows.
The responsibility that you use determines which of these windows youcan use and how you access them. Your system administrator sets upnavigation menus and task flows for your responsibility. They may alsocreate customized versions of some of these windows using differentwindow titles.
Absence Detail
Do one of the following:
1. Choose People –> Enter and Maintain in the Navigator.
2. Choose the Others button and select Absence.
Or:
1. Choose Fastpath –> Absence in the Navigator.
2. In the resulting Find window, query the person.
Absence Attendance Type
� Choose Total Compensation –> Basic –> Absence Types in theNavigator.
Accrual Bands
1. Choose Total Compensation –> Basic –> Accrual Plans in theNavigator.
2. Enter or query an accrual plan name.
3. Choose the Accrual Bands button.
Accrual Plans
� Choose Total Compensation –> Basic –> Accrual Plans in theNavigator.
Accruals
Do one of the following:
1. Choose View –> Employee Accruals in the Navigator.
2. Run a query in the Assignments Folder window.

A – 16 Customizing, Reporting, and System Administration in Oracle HRMS (Canada)
3. Select an employee assignment and choose the Accruals button.
Or:
1. Choose Fastpath –> Accruals in the Navigator.
2. In the resulting Find window, query the person.
Action Types
1. Choose Total Compensation –> Programs and Plans –> PlanEnrollment Requirements in the Navigator.
2. Query or enter a plan.
3. Choose the Actions button.
Actvity Rate
1. Choose Total Compensation –> Rates/Coverage Definitions –> FlexCredits in the Navigator.
2. Query a compensation object.
3. Choose the Activity Rate button.
Activity Variable Rates and Rules
1. Choose Total Compensation –> Rates/Coverage Definitions –> FlexCredits in the Navigator.
2. Query a compensation object.
3. Choose the Variable Rates button.
Actual Premiums
� Choose Total Compensation –> General Definitions –>Rate/Coverage Definitions –> Actual Premiums in the Navigator.
Address
Do one of the following:
1. Choose People –> Enter and Maintain in the Navigator.
2. Enter or query a person.
3. Choose the Address button.
Or:
1. Choose Fastpath –> Address in the Navigator.
2. In the resulting Find window, query the person.

A – 17Windows and Reports
Advanced Criteria
1. Choose Benefits Extract –> Criteria Definition in the Navigator.
2. Query or enter a criteria definition and choose the Advanced tab.
3. Select a Criteria Type and choose the Details button.
Additional Absence Detail Information <Employee>
Do one of the following:
1. Choose People –> Enter and Maintain in the Navigator.
2. Enter or query an employee.
3. Choose the Others button.
4. Select Absence.
Or:
1. Choose People –> Fastpath –> Absence Information in theNavigator.
2. In the resulting Find window, query an employee.
Alter Effective Date
� Choose Tools –> Alter Effective Date from the Tools menu.
Applicant Entry
� Choose Recruitment –> Applicant Quick Entry in the Navigator.
Applicant Interview
1. Choose People –> Enter and Maintain in the Navigator.
2. Enter or query an applicant.
3. Choose the Others button and select Application.
4. Choose the Interview button.
Application
Do one of the following:
1. Choose People –> Enter and Maintain in the Navigator.
2. Enter or query an applicant.
3. Choose the Others button and select Application.
Or:
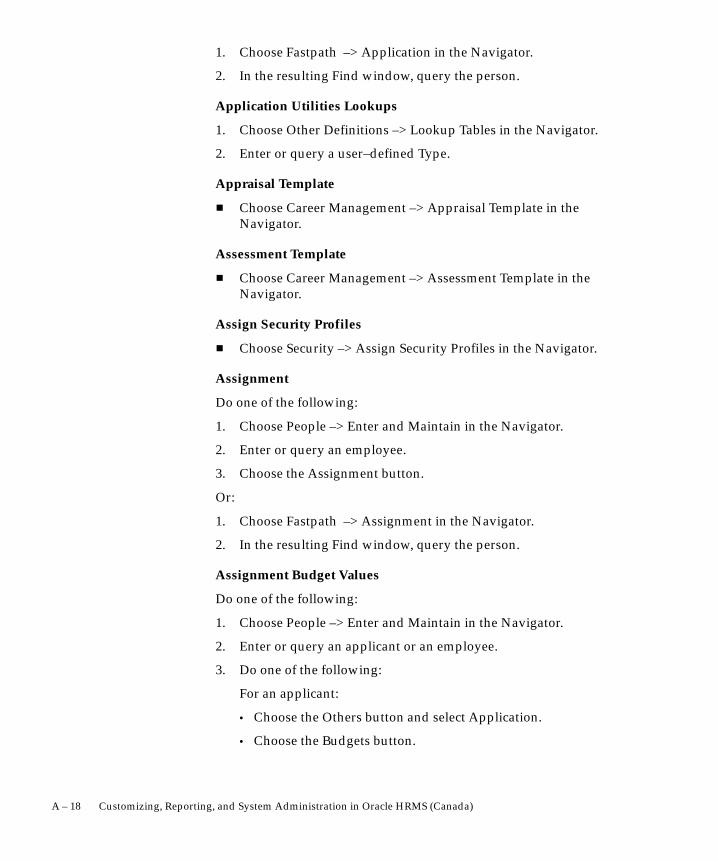
A – 18 Customizing, Reporting, and System Administration in Oracle HRMS (Canada)
1. Choose Fastpath –> Application in the Navigator.
2. In the resulting Find window, query the person.
Application Utilities Lookups
1. Choose Other Definitions –> Lookup Tables in the Navigator.
2. Enter or query a user–defined Type.
Appraisal Template
� Choose Career Management –> Appraisal Template in theNavigator.
Assessment Template
� Choose Career Management –> Assessment Template in theNavigator.
Assign Security Profiles
� Choose Security –> Assign Security Profiles in the Navigator.
Assignment
Do one of the following:
1. Choose People –> Enter and Maintain in the Navigator.
2. Enter or query an employee.
3. Choose the Assignment button.
Or:
1. Choose Fastpath –> Assignment in the Navigator.
2. In the resulting Find window, query the person.
Assignment Budget Values
Do one of the following:
1. Choose People –> Enter and Maintain in the Navigator.
2. Enter or query an applicant or an employee.
3. Do one of the following:
For an applicant:
• Choose the Others button and select Application.
• Choose the Budgets button.
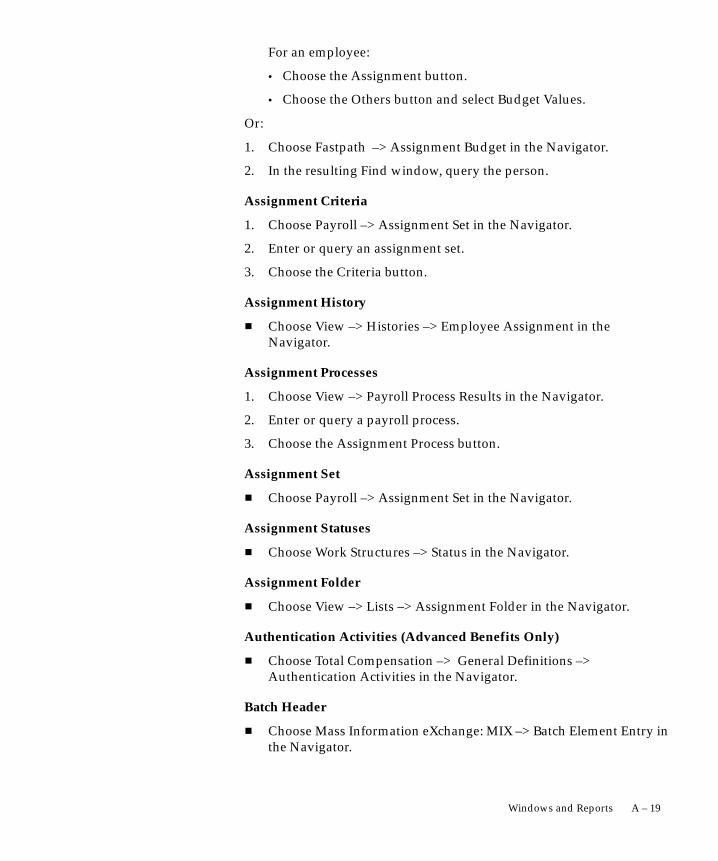
A – 19Windows and Reports
For an employee:
• Choose the Assignment button.
• Choose the Others button and select Budget Values.
Or:
1. Choose Fastpath –> Assignment Budget in the Navigator.
2. In the resulting Find window, query the person.
Assignment Criteria
1. Choose Payroll –> Assignment Set in the Navigator.
2. Enter or query an assignment set.
3. Choose the Criteria button.
Assignment History
� Choose View –> Histories –> Employee Assignment in theNavigator.
Assignment Processes
1. Choose View –> Payroll Process Results in the Navigator.
2. Enter or query a payroll process.
3. Choose the Assignment Process button.
Assignment Set
� Choose Payroll –> Assignment Set in the Navigator.
Assignment Statuses
� Choose Work Structures –> Status in the Navigator.
Assignment Folder
� Choose View –> Lists –> Assignment Folder in the Navigator.
Authentication Activities (Advanced Benefits Only)
� Choose Total Compensation –> General Definitions –>Authentication Activities in the Navigator.
Batch Header
� Choose Mass Information eXchange: MIX –> Batch Element Entry inthe Navigator.

A – 20 Customizing, Reporting, and System Administration in Oracle HRMS (Canada)
Batch Process Parameters (Advanced Benefits only)
� Choose Processes and Reports –> Batch Process Parameters in theNavigator.
Batch Summary
� Choose Mass Information eXchange: MIX –> BEE Summary in theNavigator.
Beneficiaries
1. Choose People –> Enter and Maintain in the Navigator.
2. Enter or query an employee or applicant.
3. Choose the Others button and select Contact.
4. Choose the Entries button.
5. Select the element representing the benefit for which you areentering a beneficiary.
6. Choose the Others button and select Beneficiary.
Beneficiary Certifications
1. Choose Total Compensation –> Programs and Plans –> PlanEnrollment Requirements in the Navigator.
2. Query a plan.
3. Choose the Designations tab.
4. Choose the Beneficiary tab.
5. Choose the Certifications button.
Benefits Authentication Form (Advanced Benefits only)
� Choose People –> Total Comp Contribution –> BenefitsAuthentication Form in the Navigator.
Benefits Balances
� Choose Total Compensation –> General Definitions –> AdditionalSetup –> Benefits Balances in the Navigator.
Benefit Contributions
� Choose Total Compensation –> Basic –> Benefit Contributions in theNavigator.
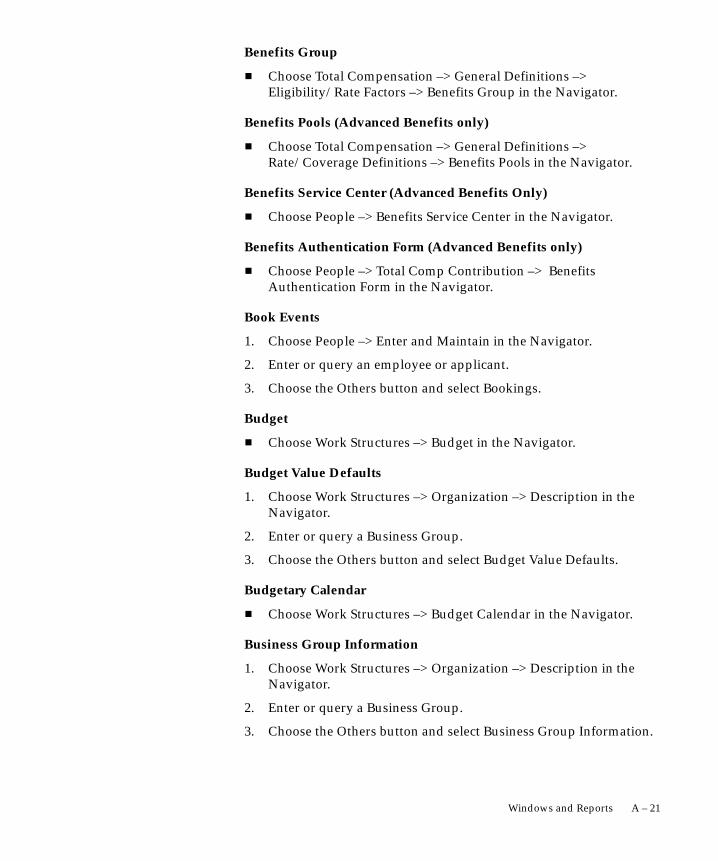
A – 21Windows and Reports
Benefits Group
� Choose Total Compensation –> General Definitions –>Eligibility/Rate Factors –> Benefits Group in the Navigator.
Benefits Pools (Advanced Benefits only)
� Choose Total Compensation –> General Definitions –>Rate/Coverage Definitions –> Benefits Pools in the Navigator.
Benefits Service Center (Advanced Benefits Only)
� Choose People –> Benefits Service Center in the Navigator.
Benefits Authentication Form (Advanced Benefits only)
� Choose People –> Total Comp Contribution –> BenefitsAuthentication Form in the Navigator.
Book Events
1. Choose People –> Enter and Maintain in the Navigator.
2. Enter or query an employee or applicant.
3. Choose the Others button and select Bookings.
Budget
� Choose Work Structures –> Budget in the Navigator.
Budget Value Defaults
1. Choose Work Structures –> Organization –> Description in theNavigator.
2. Enter or query a Business Group.
3. Choose the Others button and select Budget Value Defaults.
Budgetary Calendar
� Choose Work Structures –> Budget Calendar in the Navigator.
Business Group Information
1. Choose Work Structures –> Organization –> Description in theNavigator.
2. Enter or query a Business Group.
3. Choose the Others button and select Business Group Information.

A – 22 Customizing, Reporting, and System Administration in Oracle HRMS (Canada)
Career Path Names
� Choose Work Structures –> Job –> Path Name in the Navigator.
Certifications
1. Choose Total Compensation –> Programs and Plans –> PlanEnrollment Requirements in the Navigator.
2. Query or enter a plan.
3. Choose the General tab.
4. Choose the Plan or Option tab.
5. Choose the Certifications button.
Change Event Log
1. Choose Benefits Extract –> Change Event Log in the Navigator.
Cities
� Choose Other Definitions –> Cities in the Navigator.
Collective Agreements
� Choose Work Structures –> Collective Agreements in the Navigator.
Columns
1. Choose Other Definitions –> Table Structure in the Navigator.
2. Enter or query a table.
3. Choose the Columns button.
Communication Delivery Methods
� Choose Fastpath –> Personal Delivery Method in the Navigator.
Communication Types (Advanced Benefits only)
� Choose Total Compensation –> General Definitions –> AdditionalSetup –> Communication Types in the Navigator.
CommunicationType Children
1. Choose Total Compensation –> General Definitions –> AdditionalSetup –> Communication Types in the Navigator.
2. Query a communication type kit.
3. Choose the View Children button.

A – 23Windows and Reports
Comminication Type Delivery Methods
1. Choose Total Compensation –> General Definitions –> AdditionalSetup –> Communication Types in the Navigator.
2. Query or enter a communication type.
3. Choose the Delivery button.
Communication Type Triggers
1. Choose Total Compensation –> General Definitions –> AdditionalSetup –> Communication Types in the Navigator.
2. Query or enter a communication type.
3. Choose the Triggers button.
Communication Type Usages
1. Choose Total Compensation –> General Definitions –> AdditionalSetup –> Communication Types in the Navigator.
2. Query or enter a communication type.
3. Choose the Usages button.
Competence Profile
1. Choose People –> Enter and Maintain in the Navigator.
2. Enter or query a person.
3. Choose the Others button and select Competence Profile.
Competence Requirements
� Choose Career Management –> Competence Requirements in theNavigator.
Competence Types
� Choose Career Management –> Competence Types in the Navigator.
Competencies
� Choose Career Management –> Competencies in the Navigator.
Consolidation Sets (Payroll only)
� Choose Payroll –> Consolidation in the Navigator.
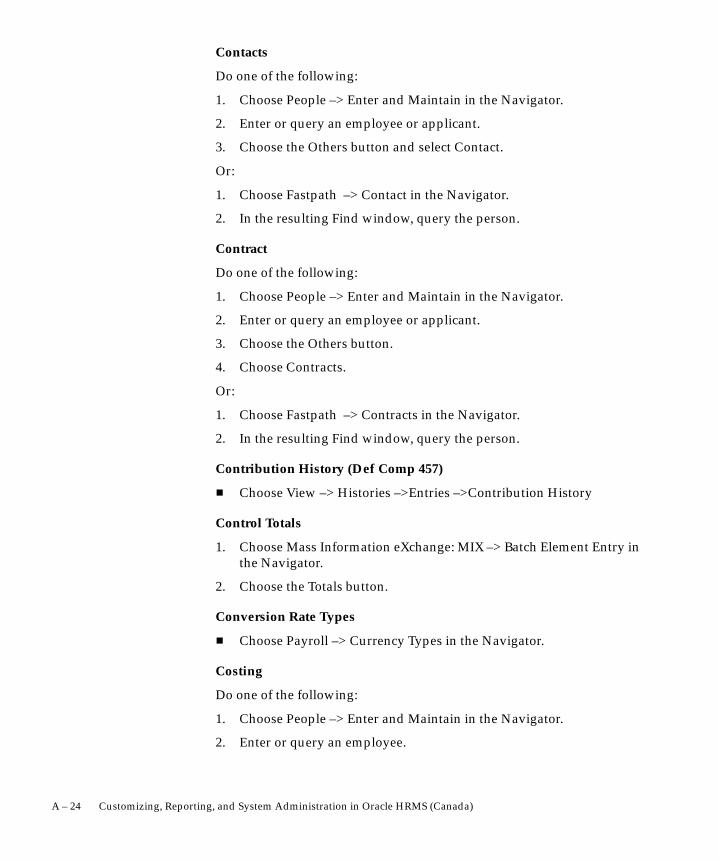
A – 24 Customizing, Reporting, and System Administration in Oracle HRMS (Canada)
Contacts
Do one of the following:
1. Choose People –> Enter and Maintain in the Navigator.
2. Enter or query an employee or applicant.
3. Choose the Others button and select Contact.
Or:
1. Choose Fastpath –> Contact in the Navigator.
2. In the resulting Find window, query the person.
Contract
Do one of the following:
1. Choose People –> Enter and Maintain in the Navigator.
2. Enter or query an employee or applicant.
3. Choose the Others button.
4. Choose Contracts.
Or:
1. Choose Fastpath –> Contracts in the Navigator.
2. In the resulting Find window, query the person.
Contribution History (Def Comp 457)
� Choose View –> Histories –>Entries –>Contribution History
Control Totals
1. Choose Mass Information eXchange: MIX –> Batch Element Entry inthe Navigator.
2. Choose the Totals button.
Conversion Rate Types
� Choose Payroll –> Currency Types in the Navigator.
Costing
Do one of the following:
1. Choose People –> Enter and Maintain in the Navigator.
2. Enter or query an employee.
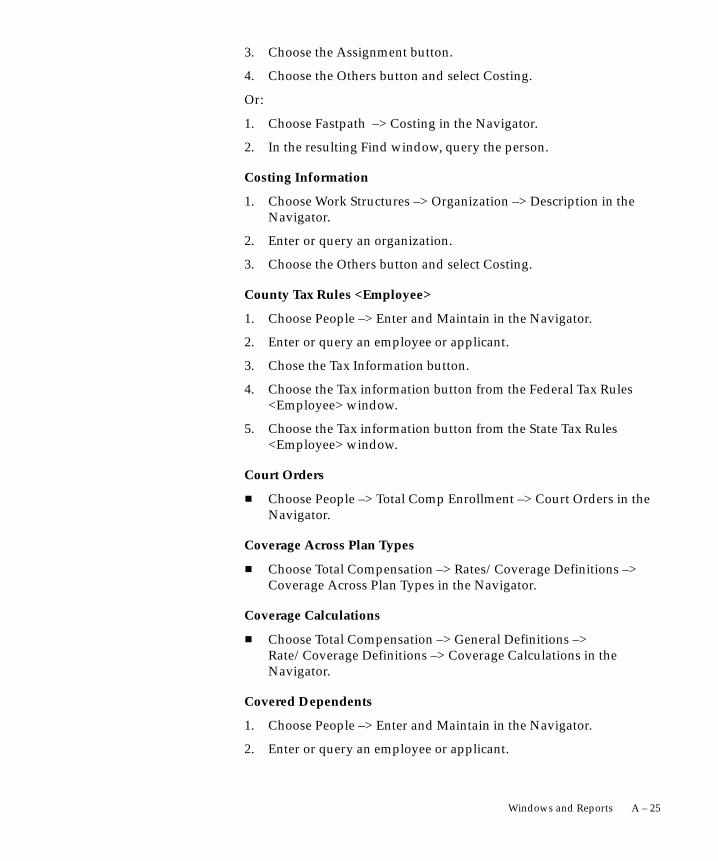
A – 25Windows and Reports
3. Choose the Assignment button.
4. Choose the Others button and select Costing.
Or:
1. Choose Fastpath –> Costing in the Navigator.
2. In the resulting Find window, query the person.
Costing Information
1. Choose Work Structures –> Organization –> Description in theNavigator.
2. Enter or query an organization.
3. Choose the Others button and select Costing.
County Tax Rules <Employee>
1. Choose People –> Enter and Maintain in the Navigator.
2. Enter or query an employee or applicant.
3. Chose the Tax Information button.
4. Choose the Tax information button from the Federal Tax Rules<Employee> window.
5. Choose the Tax information button from the State Tax Rules<Employee> window.
Court Orders
� Choose People –> Total Comp Enrollment –> Court Orders in theNavigator.
Coverage Across Plan Types
� Choose Total Compensation –> Rates/Coverage Definitions –>Coverage Across Plan Types in the Navigator.
Coverage Calculations
� Choose Total Compensation –> General Definitions –>Rate/Coverage Definitions –> Coverage Calculations in theNavigator.
Covered Dependents
1. Choose People –> Enter and Maintain in the Navigator.
2. Enter or query an employee or applicant.
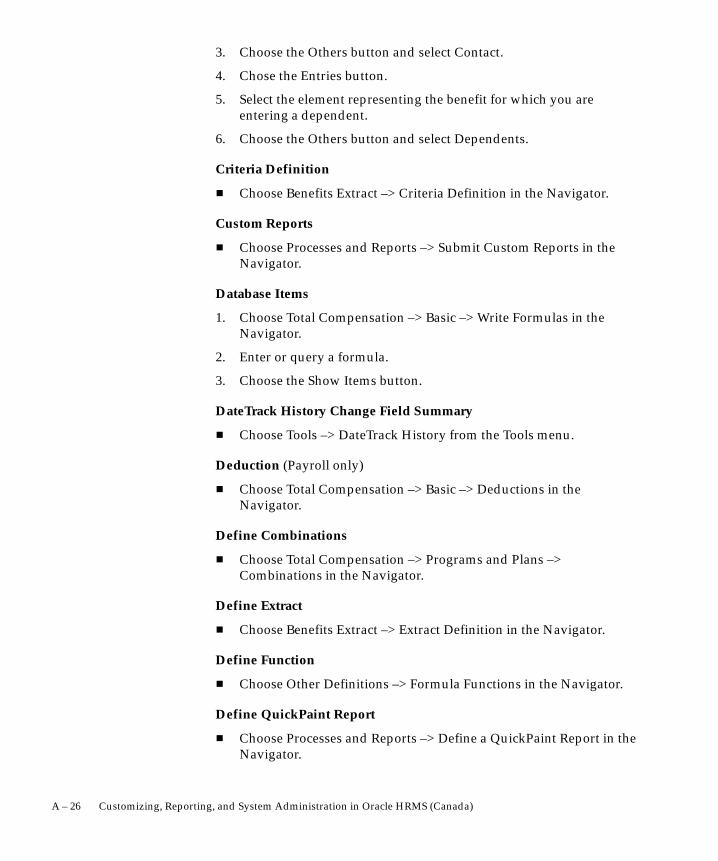
A – 26 Customizing, Reporting, and System Administration in Oracle HRMS (Canada)
3. Choose the Others button and select Contact.
4. Chose the Entries button.
5. Select the element representing the benefit for which you areentering a dependent.
6. Choose the Others button and select Dependents.
Criteria Definition
� Choose Benefits Extract –> Criteria Definition in the Navigator.
Custom Reports
� Choose Processes and Reports –> Submit Custom Reports in theNavigator.
Database Items
1. Choose Total Compensation –> Basic –> Write Formulas in theNavigator.
2. Enter or query a formula.
3. Choose the Show Items button.
DateTrack History Change Field Summary
� Choose Tools –> DateTrack History from the Tools menu.
Deduction (Payroll only)
� Choose Total Compensation –> Basic –> Deductions in theNavigator.
Define Combinations
� Choose Total Compensation –> Programs and Plans –>Combinations in the Navigator.
Define Extract
� Choose Benefits Extract –> Extract Definition in the Navigator.
Define Function
� Choose Other Definitions –> Formula Functions in the Navigator.
Define QuickPaint Report
� Choose Processes and Reports –> Define a QuickPaint Report in theNavigator.
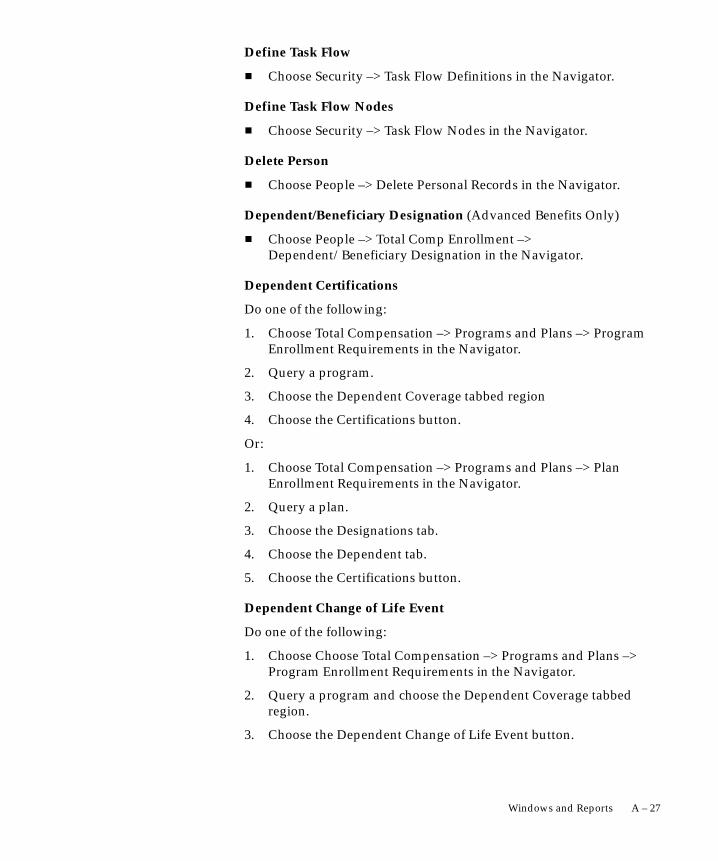
A – 27Windows and Reports
Define Task Flow
� Choose Security –> Task Flow Definitions in the Navigator.
Define Task Flow Nodes
� Choose Security –> Task Flow Nodes in the Navigator.
Delete Person
� Choose People –> Delete Personal Records in the Navigator.
Dependent/Beneficiary Designation (Advanced Benefits Only)
� Choose People –> Total Comp Enrollment –>Dependent/Beneficiary Designation in the Navigator.
Dependent Certifications
Do one of the following:
1. Choose Total Compensation –> Programs and Plans –> ProgramEnrollment Requirements in the Navigator.
2. Query a program.
3. Choose the Dependent Coverage tabbed region
4. Choose the Certifications button.
Or:
1. Choose Total Compensation –> Programs and Plans –> PlanEnrollment Requirements in the Navigator.
2. Query a plan.
3. Choose the Designations tab.
4. Choose the Dependent tab.
5. Choose the Certifications button.
Dependent Change of Life Event
Do one of the following:
1. Choose Choose Total Compensation –> Programs and Plans –>Program Enrollment Requirements in the Navigator.
2. Query a program and choose the Dependent Coverage tabbedregion.
3. Choose the Dependent Change of Life Event button.
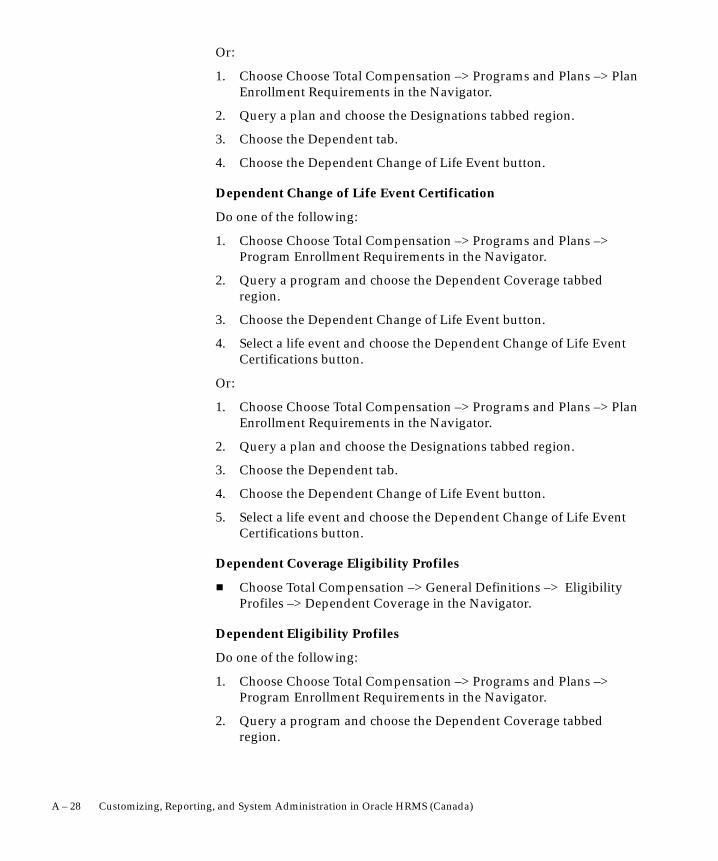
A – 28 Customizing, Reporting, and System Administration in Oracle HRMS (Canada)
Or:
1. Choose Choose Total Compensation –> Programs and Plans –> PlanEnrollment Requirements in the Navigator.
2. Query a plan and choose the Designations tabbed region.
3. Choose the Dependent tab.
4. Choose the Dependent Change of Life Event button.
Dependent Change of Life Event Certification
Do one of the following:
1. Choose Choose Total Compensation –> Programs and Plans –>Program Enrollment Requirements in the Navigator.
2. Query a program and choose the Dependent Coverage tabbedregion.
3. Choose the Dependent Change of Life Event button.
4. Select a life event and choose the Dependent Change of Life EventCertifications button.
Or:
1. Choose Choose Total Compensation –> Programs and Plans –> PlanEnrollment Requirements in the Navigator.
2. Query a plan and choose the Designations tabbed region.
3. Choose the Dependent tab.
4. Choose the Dependent Change of Life Event button.
5. Select a life event and choose the Dependent Change of Life EventCertifications button.
Dependent Coverage Eligibility Profiles
� Choose Total Compensation –> General Definitions –> EligibilityProfiles –> Dependent Coverage in the Navigator.
Dependent Eligibility Profiles
Do one of the following:
1. Choose Choose Total Compensation –> Programs and Plans –>Program Enrollment Requirements in the Navigator.
2. Query a program and choose the Dependent Coverage tabbedregion.

A – 29Windows and Reports
3. Choose the Eligibility Profiles button.
Or:
1. Choose Choose Total Compensation –> Programs and Plans –> PlanEnrollment Requirements in the Navigator.
2. Query a plan and choose the Designations tabbed region.
3. Choose the Dependent tab.
4. Choose the Eligibility Profiles button.
Derived Factors
� Choose Total Compensation –> General Definitions –>Eligibility/Rate Factors –> Derived Factors in the Navigator.
Designation Requirements
Do one of the following:
1. Choose Total Compensation –> Programs and Plans –> Options inthe Navigator.
2. Query or enter an option.
3. Choose the Designation Requirements button.
Or:
1. Choose Total Compensation –> Programs and Plans –> PlanEnrollment Requirements in the Navigator.
2. Query a plan.
3. Choose the General tab.
4. Choose the Plan or Option tab.
5. Choose the Designations button.
Earnings (Payroll only)
� Choose Total Compensation –> Basic –> Earnings in the Navigator.
Edit Formula
1. Choose Total Compensation –> Basic –> Write Formulas in theNavigator.
2. Enter or query a formula.
3. Choose the Edit button.
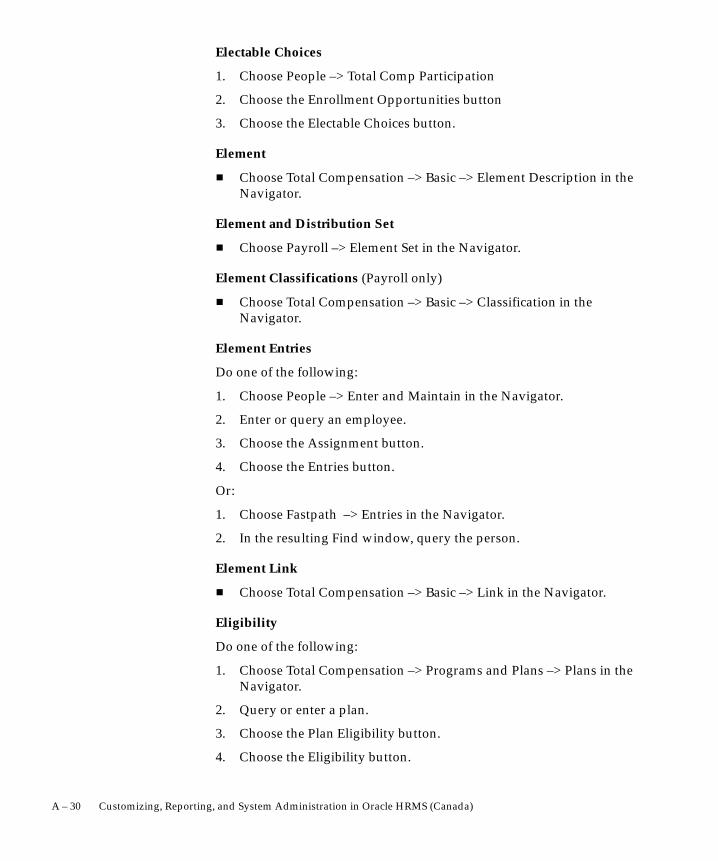
A – 30 Customizing, Reporting, and System Administration in Oracle HRMS (Canada)
Electable Choices
1. Choose People –> Total Comp Participation
2. Choose the Enrollment Opportunities button
3. Choose the Electable Choices button.
Element
� Choose Total Compensation –> Basic –> Element Description in theNavigator.
Element and Distribution Set
� Choose Payroll –> Element Set in the Navigator.
Element Classifications (Payroll only)
� Choose Total Compensation –> Basic –> Classification in theNavigator.
Element Entries
Do one of the following:
1. Choose People –> Enter and Maintain in the Navigator.
2. Enter or query an employee.
3. Choose the Assignment button.
4. Choose the Entries button.
Or:
1. Choose Fastpath –> Entries in the Navigator.
2. In the resulting Find window, query the person.
Element Link
� Choose Total Compensation –> Basic –> Link in the Navigator.
Eligibility
Do one of the following:
1. Choose Total Compensation –> Programs and Plans –> Plans in theNavigator.
2. Query or enter a plan.
3. Choose the Plan Eligibility button.
4. Choose the Eligibility button.

A – 31Windows and Reports
Or:
1. Choose Total Compensation –> Programs and Plans –> Plans in theNavigator.
2. Query or enter a plan.
3. Choose the Options button.
4. Choose the Option Eligibility button.
5. Choose the Eligibility button.
Or:
1. Choose Total Compensation –> Programs and Plans –> Programs inthe Navigator.
2. Query or enter a program.
3. Choose the Plans and Plan Types button.
4. Choose the Plans tab or the Plan Types tab.
5. Choose the Participation Eligibility button.
6. Choose the Eligibility button.
Or:
1. Choose Total Compensation –> Programs and Plans –> Programs inthe Navigator.
2. Query or enter a program.
3. Choose the Participation Eligibility button.
4. Choose the Eligibility button.
Employee Assignment Processes
� Choose View –> Assignment Process Results in the Navigator.
Employee Review
Do one of the following:
1. Choose People –> Enter and Maintain in the Navigator.
2. Enter or query an employee.
3. Choose the Assignment button.
4. Choose the Others button and select Reviews.
Or:
1. Choose Fastpath –> Employee Review in the Navigator.
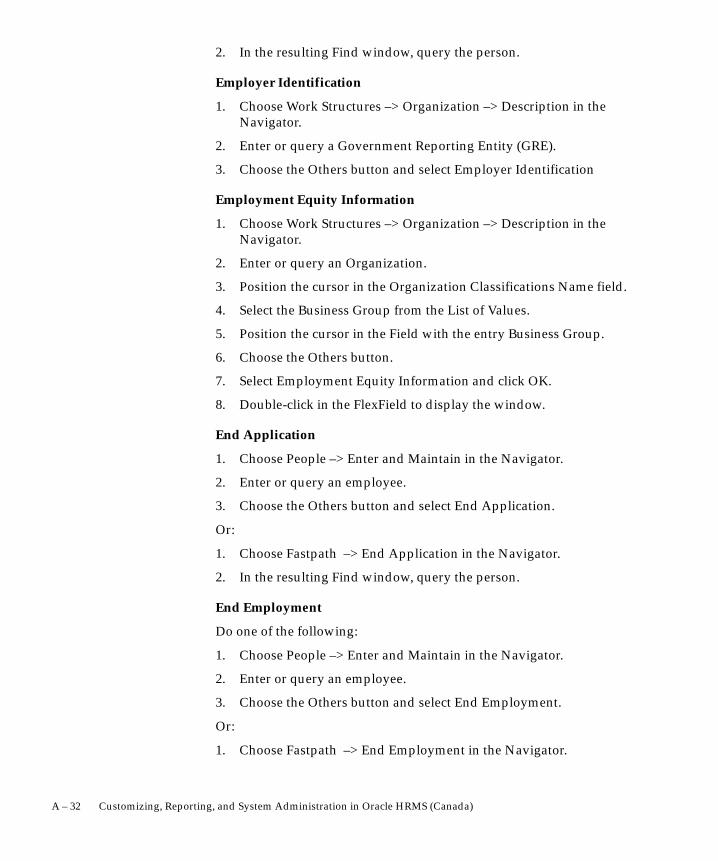
A – 32 Customizing, Reporting, and System Administration in Oracle HRMS (Canada)
2. In the resulting Find window, query the person.
Employer Identification
1. Choose Work Structures –> Organization –> Description in theNavigator.
2. Enter or query a Government Reporting Entity (GRE).
3. Choose the Others button and select Employer Identification
Employment Equity Information
1. Choose Work Structures –> Organization –> Description in theNavigator.
2. Enter or query an Organization.
3. Position the cursor in the Organization Classifications Name field.
4. Select the Business Group from the List of Values.
5. Position the cursor in the Field with the entry Business Group.
6. Choose the Others button.
7. Select Employment Equity Information and click OK.
8. Double-click in the FlexField to display the window.
End Application
1. Choose People –> Enter and Maintain in the Navigator.
2. Enter or query an employee.
3. Choose the Others button and select End Application.
Or:
1. Choose Fastpath –> End Application in the Navigator.
2. In the resulting Find window, query the person.
End Employment
Do one of the following:
1. Choose People –> Enter and Maintain in the Navigator.
2. Enter or query an employee.
3. Choose the Others button and select End Employment.
Or:
1. Choose Fastpath –> End Employment in the Navigator.
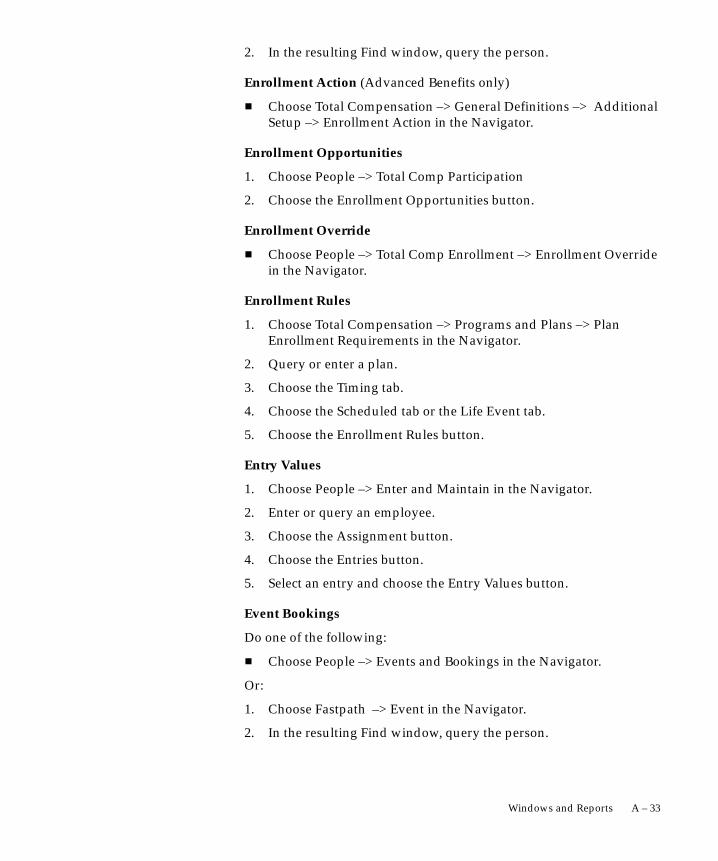
A – 33Windows and Reports
2. In the resulting Find window, query the person.
Enrollment Action (Advanced Benefits only)
� Choose Total Compensation –> General Definitions –> AdditionalSetup –> Enrollment Action in the Navigator.
Enrollment Opportunities
1. Choose People –> Total Comp Participation
2. Choose the Enrollment Opportunities button.
Enrollment Override
� Choose People –> Total Comp Enrollment –> Enrollment Overridein the Navigator.
Enrollment Rules
1. Choose Total Compensation –> Programs and Plans –> PlanEnrollment Requirements in the Navigator.
2. Query or enter a plan.
3. Choose the Timing tab.
4. Choose the Scheduled tab or the Life Event tab.
5. Choose the Enrollment Rules button.
Entry Values
1. Choose People –> Enter and Maintain in the Navigator.
2. Enter or query an employee.
3. Choose the Assignment button.
4. Choose the Entries button.
5. Select an entry and choose the Entry Values button.
Event Bookings
Do one of the following:
� Choose People –> Events and Bookings in the Navigator.
Or:
1. Choose Fastpath –> Event in the Navigator.
2. In the resulting Find window, query the person.

A – 34 Customizing, Reporting, and System Administration in Oracle HRMS (Canada)
Extract Definition
� Choose Mass Information Exchange –> System Extract –> ExtractDefinition in the Navigator.
Extract Results
� Choose Benefits Extract –> Extract Results in the Navigator.
Extract Results Errors
1. Choose Benefits Extract –> Extract Results in the Navigator.
Extract Results Detail
1. Choose Benefits Extract –> Extract Results in the Navigator.
2. Query an extract run result and choose the Details button.
Extract Results Header and Trailer
1. Choose Benefits Extract –> Extract Results in the Navigator.
2. Query an extract run result and choose the Header and Trailerbutton.
3. Query an extract run result and choose the Errors and Warningsbutton.
File Layout Advanced Conditions
1. Choose Benefits Extract –> Layout Definition in the Navigator.
2. Choose the File Layout tab and query or enter a file layout.
3. Select a record and choose the Advanced Conditions button.
Flex Credits (Advanced Benefits only)
� Choose Total Compensation –> General Definitions –>Rate/Coverage Definitions –> Flex Credits in the Navigator.
Flex Program (Advanced Benefits only)
� Choose People –> Total Comp Enrollment –> Flex Program in theNavigator.
Form Customization
� Choose Security –> CustomForm in the Navigator.

A – 35Windows and Reports
Formula
� Choose Total Compensation –> Basic –> Write Formulas in theNavigator.
Frequency Rules
1. Choose Total Compensation –> Basic –> Deductions in theNavigator.
2. Enter or query a deduction.
3. Choose the Frequency Rules button.
Globals
� Choose Total Compensation –> Basic –> Global Values in theNavigator.
GL Daily Rates
� Choose Total Compensation –> Basic –> Global Values in theNavigator.
Goods and Services
� Choose Total Compensation –> General Definitions –> AdditionalSetup –> Goods and Services in the Navigator.
Grade Rate
� Choose Work Structures –> Grade –> Grade Rate in the Navigator.
Grade Scale
� Choose Work Structures –> Grade –> Grade Steps and Points in theNavigator.
Grade Step Placement
Do one of the following:
1. Choose People –> Enter and Maintain in the Navigator.
2. Enter or query an employee.
3. Choose the Assignment button.
4. Choose the Others button and select Grade Step.
Or:
1. Choose Fastpath –> Grade Step in the Navigator.

A – 36 Customizing, Reporting, and System Administration in Oracle HRMS (Canada)
2. In the resulting Find window, query the person.
Grades
� Choose Work Structures –> Grade –> Description in the Navigator.
GREs and other information <Employee>
1. Choose People –> Enter and Maintain in the Navigator.
2. Enter or query an employee.
3. Choose the Assignment button.
4. Select the GREs and other information region.
Federal Tax Information <Employee>
Do one of the following:
1. Choose People –> Enter and Maintain in the Navigator.
2. Enter or query an employee.
3. Choose the Assignment button.
4. Choose the Tax Information button.
5. Select the Federal Tax Information region (if not already selected).
Or:
1. Choose People –> Fastpath –> Tax Sign-up in the Navigator.
2. In the resulting Find window, query an employee.
3. Select the Federal Tax Information region.
� Choose Total Compensation –> General Definitions –>Rate/Coverage Definitions –> Imputed Income in the Navigator.
Information Type Security
� Choose Security –> Information Types Security in the Navigator.
Input Values
1. Choose Total Compensation –> Basic –> Element Description in theNavigator.
2. Enter or query an element.
3. Choose the Input Values button.
A – 37Windows and Reports
Investment Options
1. Choose People –> Total Comp Enrollment –> Savings Plan in theNavigator.
2. Query a person.
3. Choose the Investment Options button.
Job
� Choose Work Structures –> Job –> Description in the Navigator.
Job Evaluation
1. Choose Work Structures –> Job –> Description in the Navigator.
2. Enter or query a job.
3. Choose the Evaluation button.
Job Requirements
1. Choose Work Structures –> Job –> Description in the Navigator.
2. Enter or query a job.
3. Choose the Requirements button.
Layout Definition
� Choose Benefits Extract –> Layout Definition in the Navigator.
Life Event
Do one of the following:
1. Choose Total Compensation –> Programs and Plans –> Programs inthe Navigator.
2. Query or enter a program.
3. Choose the Plan and Plan Types button.
4. Choose the Plans tab or the Plan Types tab.
5. Choose the Life Event button.
Or:
1. Choose Total Compensation –> Programs and Plans –> Programs inthe Navigator.
2. Query or enter a program.
3. Choose the Life Event button.

A – 38 Customizing, Reporting, and System Administration in Oracle HRMS (Canada)
Life Event Certifications
1. Choose Total Compensation –> Programs and Plans –> PlanEnrollment Requirements in the Navigator.
2. Query or enter a plan.
3. Choose the General tab.
4. Choose the Plan or Option tab.
5. Choose the Life Event Certifications button.
Life Event Reason Impact on Eligibility (Advanced Benefits)
1. Choose Total Compensation –> Programs and Plans –> Plans in theNavigator.
2. Query or enter a plan.
3. Choose the Options button.
4. Choose the Life Event Eligibility button.
Life Event Reasons (Advanced Benefits only)
� Choose Total Compensation –> General Definitions –> AdditionalSetup –> Life Event Reasons in the Navigator.
Limit Rules (Payroll only)
� Choose View –> Wage Attachments –> Limit Rules in the Navigator.
Link Input Values
1. Choose Total Compensation –> Basic –> Link in the Navigator.
2. Enter or query an element.
3. Choose the Input Values button.
List Assignments
� Choose View –> Lists –> Assignments in the Navigator.
List Budget Variance by Organization
� Choose View –> Organization Budgets in the Navigator.
List Employees by Absence Type
� Choose View –> Lists –> Employees by Absence Type in theNavigator.
A – 39Windows and Reports
List Employees by Element
� Choose View –> Lists –> Employees by Element in the Navigator.
List Employees by Organization
� Choose View –> Lists –> Employees by Organization in theNavigator.
List Employees by Position
� Choose View –> Lists –> Employees by Position in the Navigator.
List Employees by Position Hierarchy
� Choose View –> Lists –> Emps by Position Hierarchy in theNavigator.
List People by Assignment
� Choose View –> Lists –> People by Assignment in the Navigator.
List People by Special Information
� Choose View –> Lists –> People by Special Information in theNavigator.
List Position Budget Variance
� Choose View –> Position Budgets in the Navigator.
Location
� Choose Work Structures –> Location in the Navigator.
Lookups
� Choose Other Definitions –> Lookup Tables in the Navigator.
Maintain On Line Activities (Advanced Benefits)
� Choose Total Compensation –> General Definitions –> On–lineActivities for Authentication in the Navigator.
Maintain Options Eligibility
1. Choose Total Compensation –> Programs and Plans –> Plans in theNavigator.
2. Query or enter a plan.
3. Choose the Options button.
A – 40 Customizing, Reporting, and System Administration in Oracle HRMS (Canada)
4. Choose the Option Eligibility button.
Maintain Plan Eligibility
1. Choose Total Compensation –> Programs and Plans –> Plans in theNavigator.
2. Query or enter a plan.
3. Choose the Plan Eligibility button.
Maintain Plan Options
1. Choose Total Compensation –> Programs and Plans –> Plans in theNavigator.
2. Query or enter a plan.
3. Choose the Options button.
Maintain Plan Related Details
1. Choose Total Compensation –> Programs and Plans –> Plans in theNavigator.
2. Query or enter a plan.
3. Choose the Details button.
Maintain Pop Up Messages (Advanced Benefits only)
� Choose Total Compensation –> General Definitions –> DefineMessages in the Navigator.
Map Career Path
� Choose Work Structures –> Job –> Career Path in the Navigator.
Map Salary Survey
1. Choose Work Structures –> Position –> Description in theNavigator.
2. Complete the Position window and save your work.
3. Choose the Define Survey Map button.
Or:
1. Choose Work Structures –> Job –> Description in the Navigator.
2. Complete the Job window and save your work.
3. Choose the Define Salary Map button.
A – 41Windows and Reports
Mass Move
� Choose Work Structures –> Position –> Mass Move in the Navigator.
Mass Move – Assignments
1. Choose Work Structures –> Position –> Mass Move in the Navigator.
2. Complete the Mass Move window and save your work.
3. Choose the Positions button.
4. Complete the Find Positions window.
5. Choose the Find button.
6. Complete the Mass Move – Positions window.
7. Choose the Assignments button.
Mass Move – Messages
1. Choose Work Structures –> Position –> Mass Move in the Navigator.
2. Complete the Mass Move window and save your work.
3. Choose the Positions button.
4. Complete the Find Positions window and choose the Find button.
5. Complete the Mass Move – Positions window and choose theAssignments button.
6. Complete the Mass Move – Assignments window and close it.
7. From the Mass Move – Positions window, choose the Valid Gradesbutton.
8. Complete the Valid Grades window and close it.
9. Close the Mass Move – Positions window.
10. From the Mass Move window, choose the Execute button.
11. If the Status field shows In Error or Complete with Warnings, aMessage button appears.
12. If the Message button appears, choose it to view messages in theMass Move – Messages window.
Note: Alternatively, you can view messages for saved (but not yetsuccessfully executed) mass moves as follows:
1. Choose Work Structures –> Position –> Mass Move in the Navigator.
2. Enter the name of the saved mass move in the Description field.

A – 42 Customizing, Reporting, and System Administration in Oracle HRMS (Canada)
3. When the Mass Move window is populated with data and theMessage button appears, choose the Message button .
Mass Move – Positions
1. Choose Work Structures –> Position –> Mass Move in the Navigator.
2. Complete the Mass Move window.
3. Save your work.
4. Choose the Positions button.
5. In the resulting Find Positions window, select or enter a Source Joband Source Position.
6. Choose the Find button.
Mass Move – Valid Grades
1. Choose Work Structures –> Position –> Mass Move in the Navigator.
2. Complete the Mass Move window and save your work.
3. Choose the Positions button.
4. Complete the Find Positions window.
5. Choose the Find button.
6. Complete the Mass Move – Positions window.
7. Choose the Valid Grades button.
Mass Update of Applicants
� Choose Recruitment –> Mass Update of Applicants in theNavigator.
Messages
1. Choose Mass Information eXchange: MIX –> Batch Element Entry inthe Navigator.
2. Choose the Messages button.
Message Configuration (Advanced Benefits only)
� Choose Total Compensation –> General Definitions –> MessageConfiguration in the Navigator.
Miscellaneous Plan
� Choose People –> Total Comp Enrollment –> Miscellaneous Plan inthe Navigator.

A – 43Windows and Reports
MIX Batch Header
� Choose Mass Information eXchange: MIX –> Batch Element Entry inthe Navigator.
Monitor Batch Processes (Advanced Benefits only)
� Choose Processes and Reports –> Monitor Batch Processes in theNavigator.
Monthly Participant Premium
� Choose People –> Enrollment Process –> Monthly ParticipantPremium in the Navigator.
Monthly Plan or Option Premium
� Choose Total Compensation –> Monthly Premium in the Navigator.
1. Choose Total Compensation –> Basic –> Accrual Plans in theNavigator.
2. Enter or query an accrual plan name.
3. Choose the Net Calculation Rules button.
New Hire Reporting
1. Choose Work Structures –> Organization –> Description in theNavigator.
2. Enter or query a GRE.
3. Choose the Others button.
4. Select New Hire Reporting
Non–Flex Program
� Choose People –> Total Comp Enrollment –> Non–Flex Program inthe Navigator.
5. Click in the Additional Organization Information field.
Options
� Choose Total Compensation –> General Definitions –> Programsand Plans –> Options in the Navigator.
Organization
� Choose Work Structures –> Organization –> Description in theNavigator.
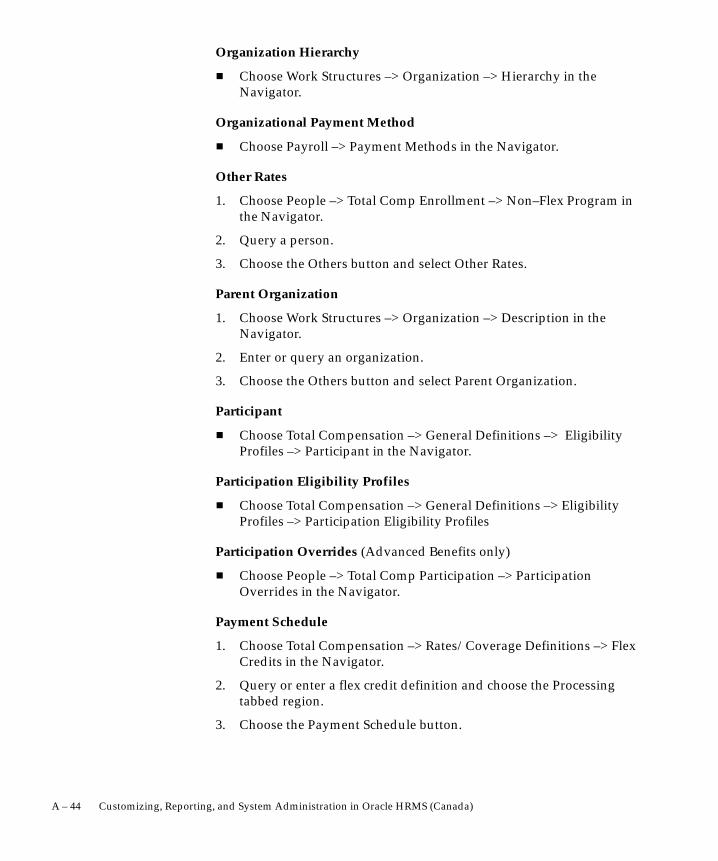
A – 44 Customizing, Reporting, and System Administration in Oracle HRMS (Canada)
Organization Hierarchy
� Choose Work Structures –> Organization –> Hierarchy in theNavigator.
Organizational Payment Method
� Choose Payroll –> Payment Methods in the Navigator.
Other Rates
1. Choose People –> Total Comp Enrollment –> Non–Flex Program inthe Navigator.
2. Query a person.
3. Choose the Others button and select Other Rates.
Parent Organization
1. Choose Work Structures –> Organization –> Description in theNavigator.
2. Enter or query an organization.
3. Choose the Others button and select Parent Organization.
Participant
� Choose Total Compensation –> General Definitions –> EligibilityProfiles –> Participant in the Navigator.
Participation Eligibility Profiles
� Choose Total Compensation –> General Definitions –> EligibilityProfiles –> Participation Eligibility Profiles
Participation Overrides (Advanced Benefits only)
� Choose People –> Total Comp Participation –> ParticipationOverrides in the Navigator.
Payment Schedule
1. Choose Total Compensation –> Rates/Coverage Definitions –> FlexCredits in the Navigator.
2. Query or enter a flex credit definition and choose the Processingtabbed region.
3. Choose the Payment Schedule button.
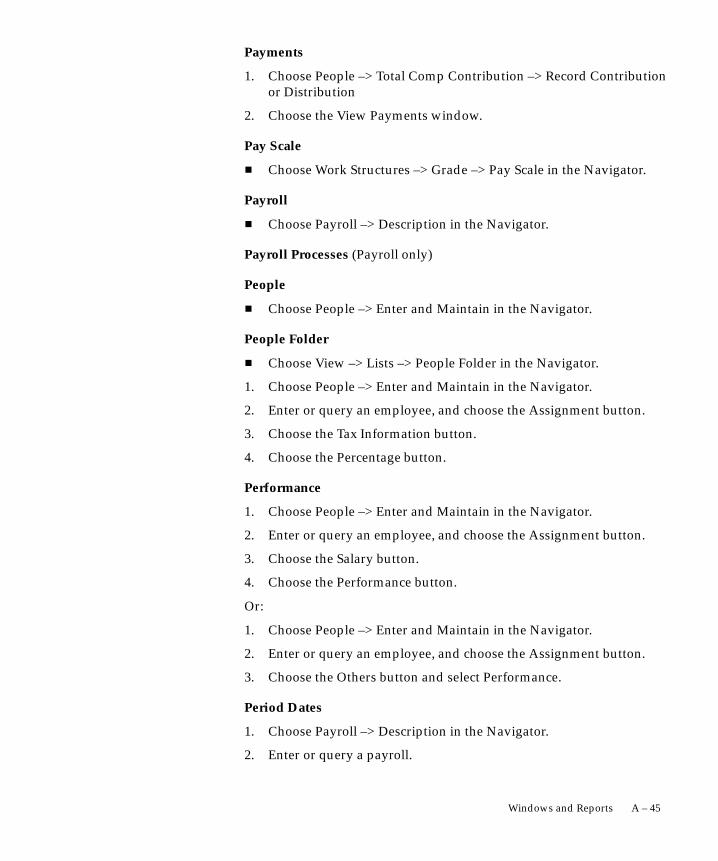
A – 45Windows and Reports
Payments
1. Choose People –> Total Comp Contribution –> Record Contributionor Distribution
2. Choose the View Payments window.
Pay Scale
� Choose Work Structures –> Grade –> Pay Scale in the Navigator.
Payroll
� Choose Payroll –> Description in the Navigator.
Payroll Processes (Payroll only)
People
� Choose People –> Enter and Maintain in the Navigator.
People Folder
� Choose View –> Lists –> People Folder in the Navigator.
1. Choose People –> Enter and Maintain in the Navigator.
2. Enter or query an employee, and choose the Assignment button.
3. Choose the Tax Information button.
4. Choose the Percentage button.
Performance
1. Choose People –> Enter and Maintain in the Navigator.
2. Enter or query an employee, and choose the Assignment button.
3. Choose the Salary button.
4. Choose the Performance button.
Or:
1. Choose People –> Enter and Maintain in the Navigator.
2. Enter or query an employee, and choose the Assignment button.
3. Choose the Others button and select Performance.
Period Dates
1. Choose Payroll –> Description in the Navigator.
2. Enter or query a payroll.

A – 46 Customizing, Reporting, and System Administration in Oracle HRMS (Canada)
3. Choose the Period Dates button.
Period–to–Date Limits
Do one of the following:
� Choose Total Compensation –> General Definitions –>Rate/Coverage Definitions –> Period–to–Date Limits in theNavigator.
Or:
1. Choose Total Compensation –> Rates/Coverage Definitions –> FlexCredits in the Navigator.
2. Query a compensation object.
3. Choose the Activity Rate button.
4. Choose the Period to Date Limit button.
Period Types
� Choose Other Definitions –> Time Periods in the Navigator.
Person Benefits Assignment
� Choose People –> Total Comp Participation –> Person BenefitsAssignment
Person Benefits Balances
� Choose People –> Total Comp Participation –> Person BenefitsBalances in the Navigator.
Person Changes (Advanced Benefits only)
1. Choose Total Compensation –> General Definitions –> AdditionalSetup –> Life Event Reasons in the Navigator.
2. Query or enter a life event.
3. Choose the Person Changes button.
4. Choose the Add Person Change button.
Person Changes Cause Life Events (Advanced Benefits only)
1. Choose Total Compensation –> General Definitions –> AdditionalSetup –> Life Event Reasons in the Navigator.
2. Query or enter a life event.
3. Choose the Person Changes button.
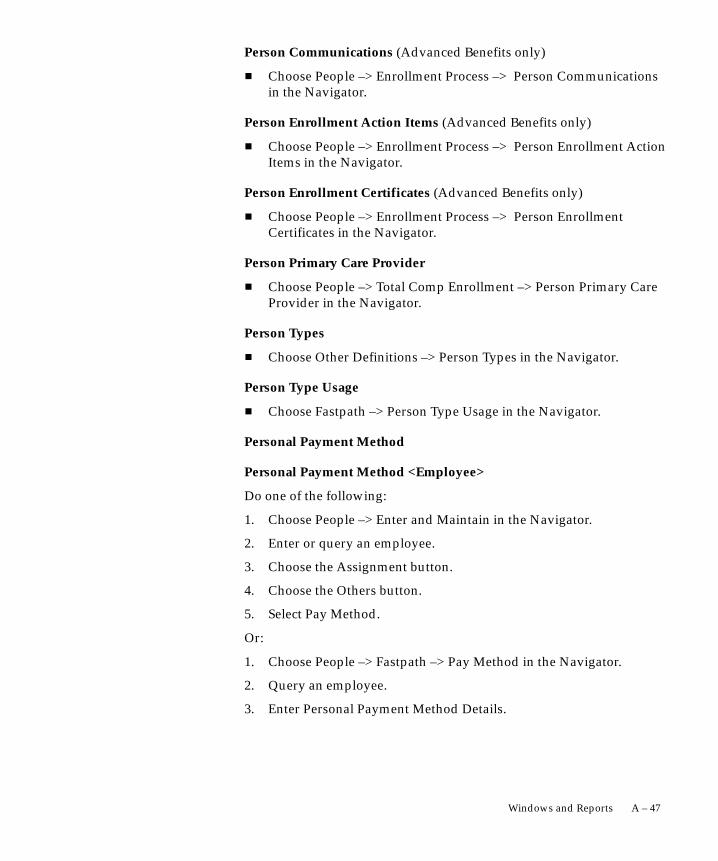
A – 47Windows and Reports
Person Communications (Advanced Benefits only)
� Choose People –> Enrollment Process –> Person Communicationsin the Navigator.
Person Enrollment Action Items (Advanced Benefits only)
� Choose People –> Enrollment Process –> Person Enrollment ActionItems in the Navigator.
Person Enrollment Certificates (Advanced Benefits only)
� Choose People –> Enrollment Process –> Person EnrollmentCertificates in the Navigator.
Person Primary Care Provider
� Choose People –> Total Comp Enrollment –> Person Primary CareProvider in the Navigator.
Person Types
� Choose Other Definitions –> Person Types in the Navigator.
Person Type Usage
� Choose Fastpath –> Person Type Usage in the Navigator.
Personal Payment Method
Personal Payment Method <Employee>
Do one of the following:
1. Choose People –> Enter and Maintain in the Navigator.
2. Enter or query an employee.
3. Choose the Assignment button.
4. Choose the Others button.
5. Select Pay Method.
Or:
1. Choose People –> Fastpath –> Pay Method in the Navigator.
2. Query an employee.
3. Enter Personal Payment Method Details.

A – 48 Customizing, Reporting, and System Administration in Oracle HRMS (Canada)
Phone Numbers
Do one of the following:
1. Choose People –> Enter and Maintain in the Navigator.
2. Enter or query an employee.
3. Choose the Others button.
4. Choose Phones.
Or:
1. Choose Fastpath –> Phones in the Navigator.
2. In the resulting Find window, query the person.
Picture
Do one of the following:
1. Choose People –> Enter and Maintain in the Navigator
2. Enter or query a person.
3. Choose the Picture button.
Or:
1. Choose Fastpath –> Picture in the Navigator.
2. In the resulting Find window, query the person.
Plan and Plan Type
1. Choose Total Compensation –> Programs and Plans –> Programs inthe Navigator.
Plan Enrollment Requirements
� Choose Total Compensation –> General Definitions –> Programsand Plans –> Plan Enrollment Requirements in the Navigator.
2. Query or enter a program.
3. Choose the Plan and Plan Types button.
Plan in Program Participation Eligibility
1. Choose Total Compensation –> Programs and Plans –> Programs inthe Navigator.
2. Query or enter a program.
3. Choose the Plan and Plan Types button.
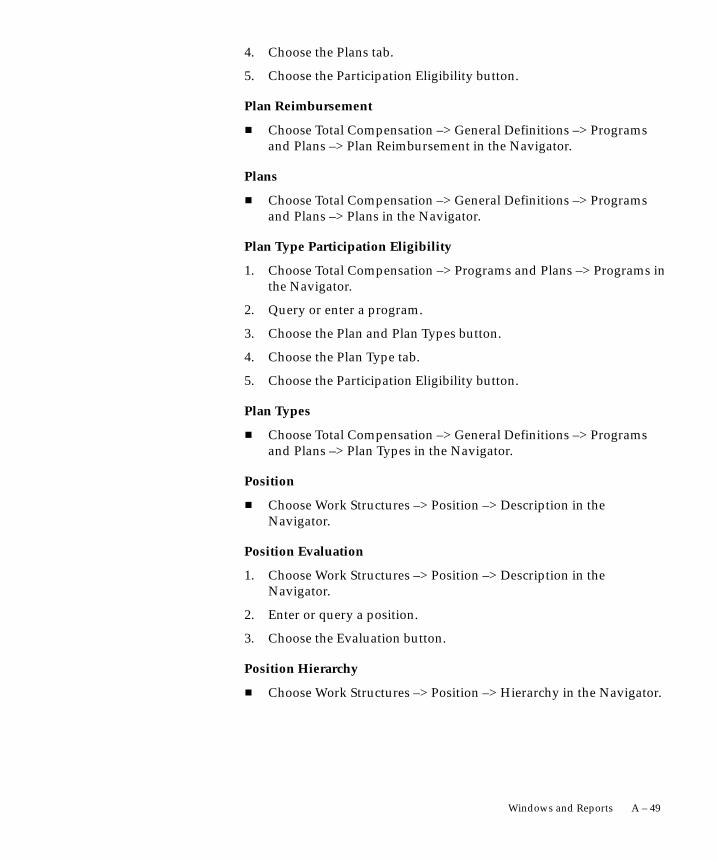
A – 49Windows and Reports
4. Choose the Plans tab.
5. Choose the Participation Eligibility button.
Plan Reimbursement
� Choose Total Compensation –> General Definitions –> Programsand Plans –> Plan Reimbursement in the Navigator.
Plans
� Choose Total Compensation –> General Definitions –> Programsand Plans –> Plans in the Navigator.
Plan Type Participation Eligibility
1. Choose Total Compensation –> Programs and Plans –> Programs inthe Navigator.
2. Query or enter a program.
3. Choose the Plan and Plan Types button.
4. Choose the Plan Type tab.
5. Choose the Participation Eligibility button.
Plan Types
� Choose Total Compensation –> General Definitions –> Programsand Plans –> Plan Types in the Navigator.
Position
� Choose Work Structures –> Position –> Description in theNavigator.
Position Evaluation
1. Choose Work Structures –> Position –> Description in theNavigator.
2. Enter or query a position.
3. Choose the Evaluation button.
Position Hierarchy
� Choose Work Structures –> Position –> Hierarchy in the Navigator.

A – 50 Customizing, Reporting, and System Administration in Oracle HRMS (Canada)
Position Occupancy Folder
1. Choose Work Structures –> Position –> Description in theNavigator.
2. Query a position.
3. Choose the Occupancy button.
Position Reporting To
1. Choose Work Structures –> Position –> Description in theNavigator.
2. Enter or query a position.
3. Choose the Reporting To button.
Position Requirements
1. Choose Work Structures –> Position –> Description in theNavigator.
2. Enter or query a position.
3. Choose the Requirements button.
Possible Certifications
1. Choose People –> Total Comp Participation
2. Choose the Enrollment Opportunities button.
3. Choose the Electable Choices button
4. Choose the Possible Certifications button
Postal/Zip
� Choose Total Compensation –> General Definitions –>Eligibility/Rate Factors –> Postal/Zip in the Navigator.
Primary Care Providers
Do one of the following:
� Choose People –> Total Comp Enrollment –> Person Primary CareProvider
Or:
1. Choose People –> Total Comp Enrollment –> Flex Program in theNavigator.
2. Query a person.

A – 51Windows and Reports
3. Choose the Care Providers button.
Program/Plan Years
� Choose Total Compensation –> General Definitions –> AdditionalSetup –> Program/Plan Years in the Navigator.
Programs
� Choose Total Compensation –> General Definitions –> Programsand Plans –> Programs in the Navigator.
Program Enrollment Requirements
� Choose Total Compensation –> General Definitions –> Programsand Plans –> Program Enrollment Requirements in the Navigator.
Program Participation Eligibility
1. Choose Total Compensation –> Programs and Plans –> Programs inthe Navigator.
2. Query or enter a program.
3. Choose the Participation Eligibility button.
Program Waive Certifications
1. Choose Total Compensation –> Programs and Plans –> Programs inthe Navigator.
2. Query or enter a program.
3. Choose the Plan and Plan Types button.
4. Choose the Plan Types tab.
5. Choose the Waive button.
6. Choose the Waive Certification button.
Program Waive Reasons
1. Choose Total Compensation –> Programs and Plans –> Programs inthe Navigator.
2. Query or enter a program.
3. Choose the Plan and Plan Types button.
4. Choose the Plan Types tab.
5. Choose the Waive button.
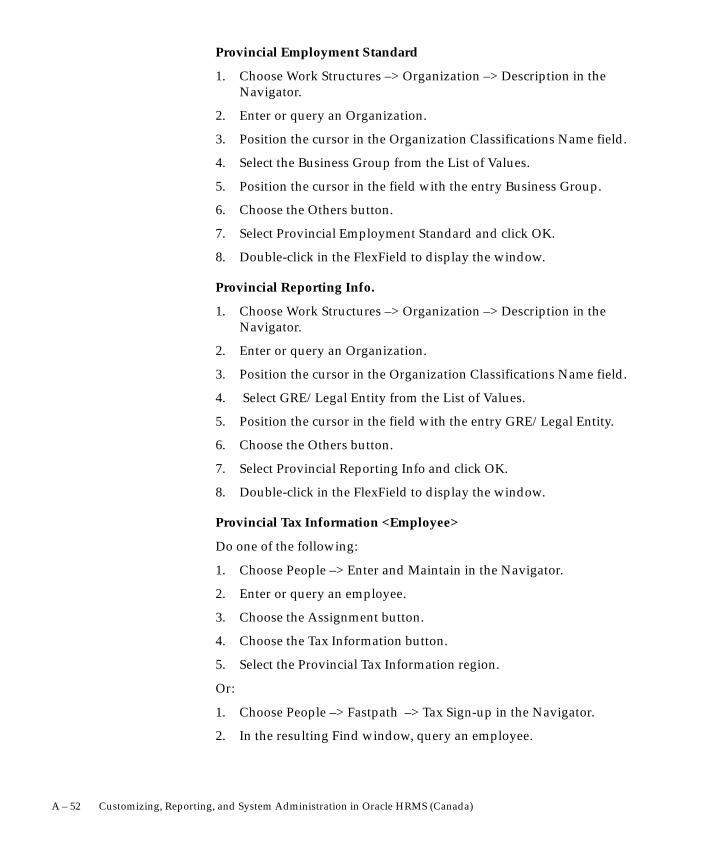
A – 52 Customizing, Reporting, and System Administration in Oracle HRMS (Canada)
Provincial Employment Standard
1. Choose Work Structures –> Organization –> Description in theNavigator.
2. Enter or query an Organization.
3. Position the cursor in the Organization Classifications Name field.
4. Select the Business Group from the List of Values.
5. Position the cursor in the field with the entry Business Group.
6. Choose the Others button.
7. Select Provincial Employment Standard and click OK.
8. Double-click in the FlexField to display the window.
Provincial Reporting Info.
1. Choose Work Structures –> Organization –> Description in theNavigator.
2. Enter or query an Organization.
3. Position the cursor in the Organization Classifications Name field.
4. Select GRE/Legal Entity from the List of Values.
5. Position the cursor in the field with the entry GRE/Legal Entity.
6. Choose the Others button.
7. Select Provincial Reporting Info and click OK.
8. Double-click in the FlexField to display the window.
Provincial Tax Information <Employee>
Do one of the following:
1. Choose People –> Enter and Maintain in the Navigator.
2. Enter or query an employee.
3. Choose the Assignment button.
4. Choose the Tax Information button.
5. Select the Provincial Tax Information region.
Or:
1. Choose People –> Fastpath –> Tax Sign-up in the Navigator.
2. In the resulting Find window, query an employee.

A – 53Windows and Reports
3. Select the Provincial Tax Information region.
Qualifications
1. Choose People –> Enter and Maintain in the Navigator.
2. Enter or query a person.
3. Choose the Others button and select Qualifications.
Qualification Types
� Choose Career Management –> Qualification Types in theNavigator.
Quebec Tax Information <Employee>
Do one of the following:
1. Choose People –> Enter and Maintain in the Navigator.
2. Enter or query an employee.
3. Choose the Assignment button.
4. Choose the Tax Information button.
5. Select the Quebec Tax Information region.
Or:
1. Choose People –> Fastpath –> Tax Sign-up in the Navigator.
2. In the resulting Find window, query an employee.
3. Select the Quebec Tax Information region.
QuickPaint Inquiry
1. Choose Processes and Reports –> Run a QuickPaint Report in theNavigator.
2. Query a report that has been run.
3. Choose the View Report button.
Rating Scales
� Choose Career Management –> Rating Scales in the Navigator.
Record Continuing Benefits Payments
� Choose People –> Total Comp Contribution –> Record ContinuingBenefits Payments in the Navigator.
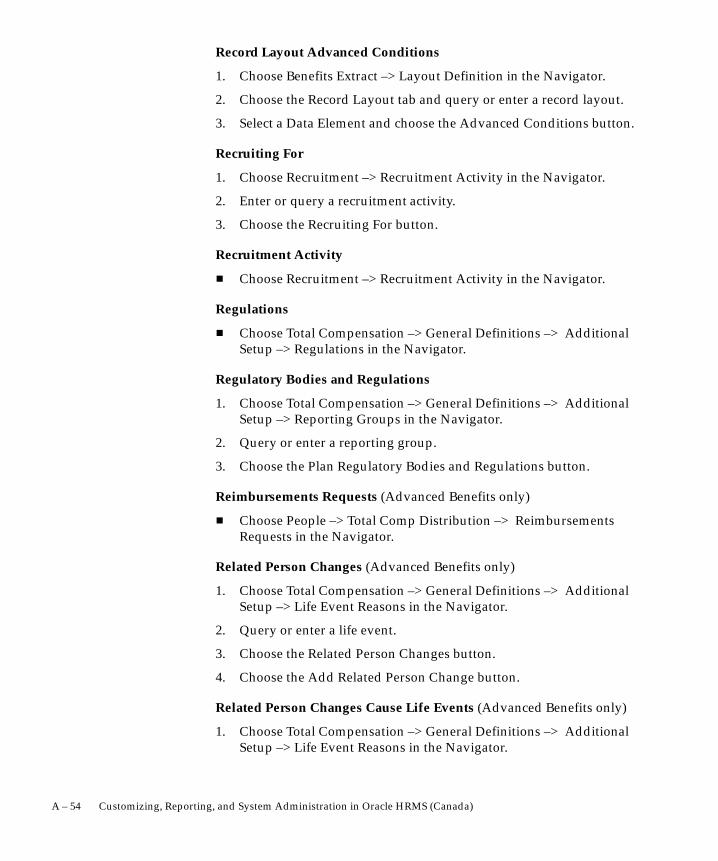
A – 54 Customizing, Reporting, and System Administration in Oracle HRMS (Canada)
Record Layout Advanced Conditions
1. Choose Benefits Extract –> Layout Definition in the Navigator.
2. Choose the Record Layout tab and query or enter a record layout.
3. Select a Data Element and choose the Advanced Conditions button.
Recruiting For
1. Choose Recruitment –> Recruitment Activity in the Navigator.
2. Enter or query a recruitment activity.
3. Choose the Recruiting For button.
Recruitment Activity
� Choose Recruitment –> Recruitment Activity in the Navigator.
Regulations
� Choose Total Compensation –> General Definitions –> AdditionalSetup –> Regulations in the Navigator.
Regulatory Bodies and Regulations
1. Choose Total Compensation –> General Definitions –> AdditionalSetup –> Reporting Groups in the Navigator.
2. Query or enter a reporting group.
3. Choose the Plan Regulatory Bodies and Regulations button.
Reimbursements Requests (Advanced Benefits only)
� Choose People –> Total Comp Distribution –> ReimbursementsRequests in the Navigator.
Related Person Changes (Advanced Benefits only)
1. Choose Total Compensation –> General Definitions –> AdditionalSetup –> Life Event Reasons in the Navigator.
2. Query or enter a life event.
3. Choose the Related Person Changes button.
4. Choose the Add Related Person Change button.
Related Person Changes Cause Life Events (Advanced Benefits only)
1. Choose Total Compensation –> General Definitions –> AdditionalSetup –> Life Event Reasons in the Navigator.
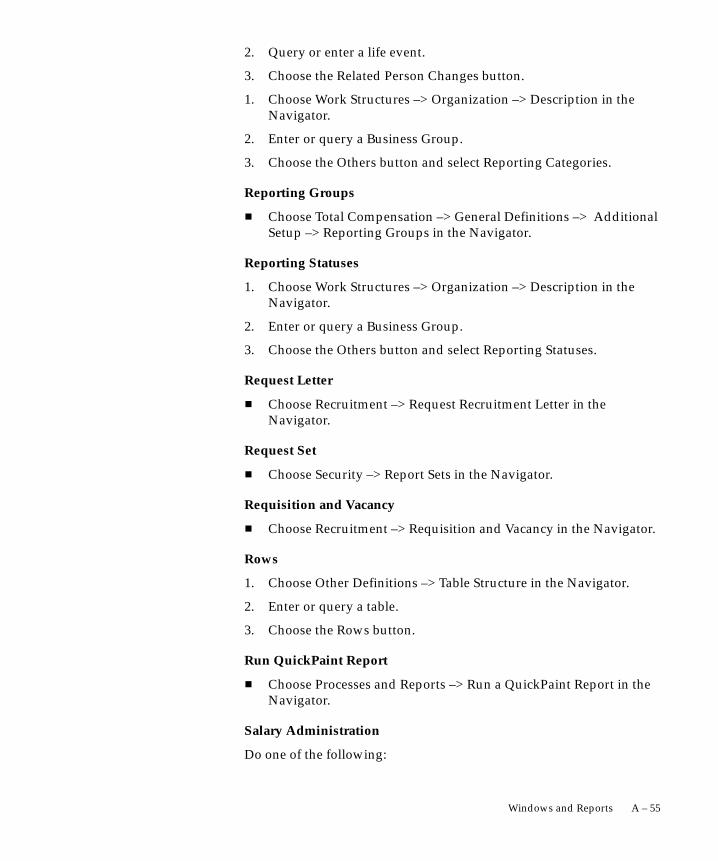
A – 55Windows and Reports
2. Query or enter a life event.
3. Choose the Related Person Changes button.
1. Choose Work Structures –> Organization –> Description in theNavigator.
2. Enter or query a Business Group.
3. Choose the Others button and select Reporting Categories.
Reporting Groups
� Choose Total Compensation –> General Definitions –> AdditionalSetup –> Reporting Groups in the Navigator.
Reporting Statuses
1. Choose Work Structures –> Organization –> Description in theNavigator.
2. Enter or query a Business Group.
3. Choose the Others button and select Reporting Statuses.
Request Letter
� Choose Recruitment –> Request Recruitment Letter in theNavigator.
Request Set
� Choose Security –> Report Sets in the Navigator.
Requisition and Vacancy
� Choose Recruitment –> Requisition and Vacancy in the Navigator.
Rows
1. Choose Other Definitions –> Table Structure in the Navigator.
2. Enter or query a table.
3. Choose the Rows button.
Run QuickPaint Report
� Choose Processes and Reports –> Run a QuickPaint Report in theNavigator.
Salary Administration
Do one of the following:
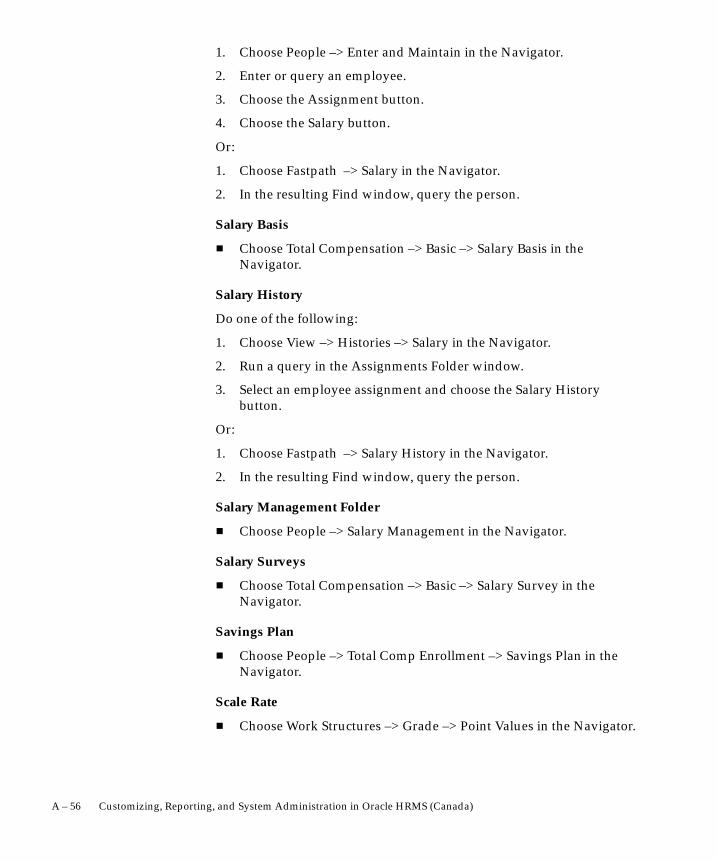
A – 56 Customizing, Reporting, and System Administration in Oracle HRMS (Canada)
1. Choose People –> Enter and Maintain in the Navigator.
2. Enter or query an employee.
3. Choose the Assignment button.
4. Choose the Salary button.
Or:
1. Choose Fastpath –> Salary in the Navigator.
2. In the resulting Find window, query the person.
Salary Basis
� Choose Total Compensation –> Basic –> Salary Basis in theNavigator.
Salary History
Do one of the following:
1. Choose View –> Histories –> Salary in the Navigator.
2. Run a query in the Assignments Folder window.
3. Select an employee assignment and choose the Salary Historybutton.
Or:
1. Choose Fastpath –> Salary History in the Navigator.
2. In the resulting Find window, query the person.
Salary Management Folder
� Choose People –> Salary Management in the Navigator.
Salary Surveys
� Choose Total Compensation –> Basic –> Salary Survey in theNavigator.
Savings Plan
� Choose People –> Total Comp Enrollment –> Savings Plan in theNavigator.
Scale Rate
� Choose Work Structures –> Grade –> Point Values in the Navigator.

A – 57Windows and Reports
Schools and Colleges
� Choose Career Management –> Schools and Colleges in theNavigator.
Schools and Colleges Attended
1. Choose People –> Enter and Maintain in the Navigator.
2. Enter or query a person.
3. Choose the Others button and select Schools/Colleges.
Secondary Statuses
Do one of the following:
1. Choose People –> Enter and Maintain in the Navigator.
2. Enter or query an applicant or employee.
3. Do one of the following:
For an applicant:
• Choose the Others button and select Application.
• Choose the Secondary Status button.
For an employee:
• Choose the Assignment button.
• Choose the Others button and select Secondary Status.
Or:
1. Choose Fastpath –> Secondary Status in the Navigator.
2. In the resulting Find window, query the person.
Security Profile
� Choose Security –> Profile in the Navigator.
Service Areas
� Choose Total Compensation –> General Definitions –>Eligibility/Rate Factors –> Service Areas in the Navigator.
Sort
1. Choose Benefits Extract –> Layout Definition in the Navigator.
2. Choose the File Layout tab and select a Record Name.
3. Choose the Sort button.

A – 58 Customizing, Reporting, and System Administration in Oracle HRMS (Canada)
Special Information
Do one of the following:
1. Choose People –> Enter and Maintain in the Navigator.
2. Enter or query a person.
3. Choose the Special Info button.
Or:
1. Choose Fastpath –> Special Information in the Navigator.
2. In the resulting Find window, query the person.
Special Rates
1. Choose People –> Total Comp Enrollment –> Flex Program in theNavigator.
2. Query a person.
3. Choose the Special Rates button.
Special Information Types
� Choose Other Definitions –> Special Information Types in theNavigator.
Standard Rates
� Choose Total Compensation –> General Definitions –>Rate/Coverage Definitions –> Standard Rates in the Navigator.
Standard Holiday Absences <Employee>
Do one of the following:
1. Choose People –> Enter and Maintain in the Navigator.
2. Enter or query an employee.
3. Choose the Others button.
4. Select Standard Holiday Absences.
Or:
1. Choose People –> Fastpath –> Statutory Holidays in the Navigator.
2. In the resulting Find window, query an employee.
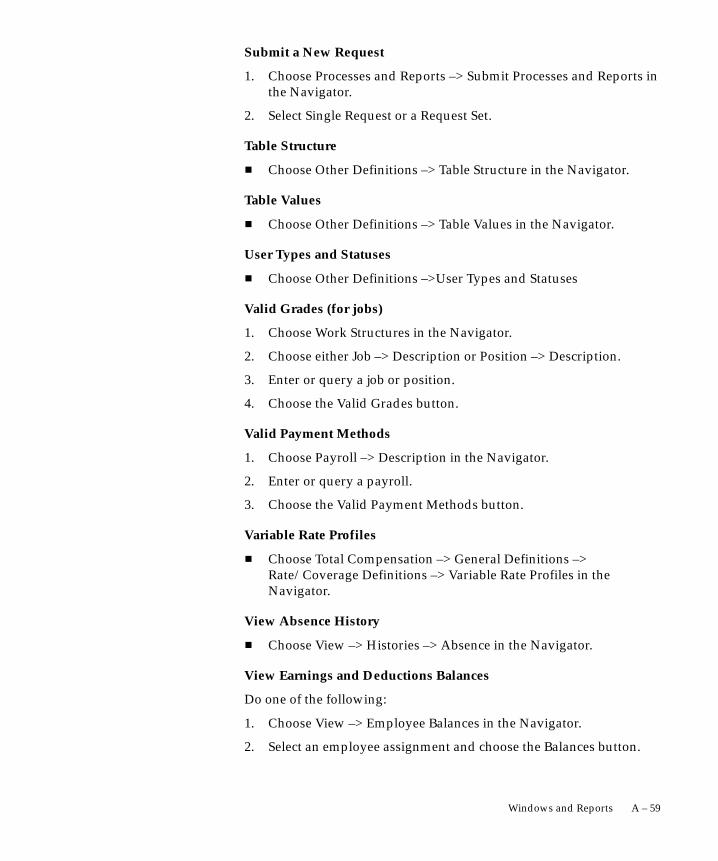
A – 59Windows and Reports
Submit a New Request
1. Choose Processes and Reports –> Submit Processes and Reports inthe Navigator.
2. Select Single Request or a Request Set.
Table Structure
� Choose Other Definitions –> Table Structure in the Navigator.
Table Values
� Choose Other Definitions –> Table Values in the Navigator.
User Types and Statuses
� Choose Other Definitions –>User Types and Statuses
Valid Grades (for jobs)
1. Choose Work Structures in the Navigator.
2. Choose either Job –> Description or Position –> Description.
3. Enter or query a job or position.
4. Choose the Valid Grades button.
Valid Payment Methods
1. Choose Payroll –> Description in the Navigator.
2. Enter or query a payroll.
3. Choose the Valid Payment Methods button.
Variable Rate Profiles
� Choose Total Compensation –> General Definitions –>Rate/Coverage Definitions –> Variable Rate Profiles in theNavigator.
View Absence History
� Choose View –> Histories –> Absence in the Navigator.
View Earnings and Deductions Balances
Do one of the following:
1. Choose View –> Employee Balances in the Navigator.
2. Select an employee assignment and choose the Balances button.

A – 60 Customizing, Reporting, and System Administration in Oracle HRMS (Canada)
Or:
1. Choose Fastpath –> Employee Balances in the Navigator.
2. In the resulting Find window, query the person.
View Element Entry History for Employee
1. Choose View –> Histories –> Entries in the Navigator.
2. Run a query in the Assignments Folder window.
3. Select an employee assignment and choose the Entry Historybutton.
View Employee Dental, Medical and Vision Benefits
1. Choose View –> Employee Benefits in the Navigator.
2. Run a query in the Assignments Folder window.
3. Select an employee assignment and choose the View Benefits button.
View Employee Grade Comparatio
� Choose View –> Grade Comparatio in the Navigator.
View Enrollment Results
� Choose People –> Total Comp Enrollment –> View EnrollmentResults in the Navigator.
View Participation Information (Advanced Benefits only)
� Choose People –> Total Comp Participation –> View ParticipationInfomation in the Navigator.
View Program Structure
� Choose Total Compensation –> Programs and Plans –> ViewProgram Structure in the Navigator.
View Tax Balances
Do one of the following:
1. Choose View –> Tax Information –> Tax Balances in the Navigator.
2. Select an employee assignment and choose the Balances button.
Or:
1. Choose Fastpath –> Tax Balances in the Navigator.
2. In the resulting Find window, query the person.
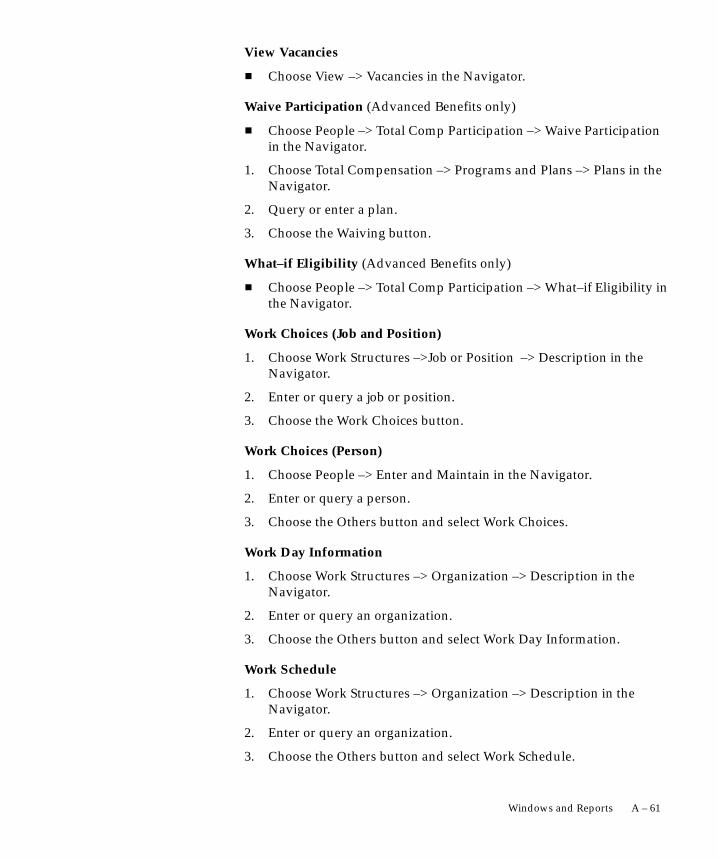
A – 61Windows and Reports
View Vacancies
� Choose View –> Vacancies in the Navigator.
Waive Participation (Advanced Benefits only)
� Choose People –> Total Comp Participation –> Waive Participationin the Navigator.
1. Choose Total Compensation –> Programs and Plans –> Plans in theNavigator.
2. Query or enter a plan.
3. Choose the Waiving button.
What–if Eligibility (Advanced Benefits only)
� Choose People –> Total Comp Participation –> What–if Eligibility inthe Navigator.
Work Choices (Job and Position)
1. Choose Work Structures –>Job or Position –> Description in theNavigator.
2. Enter or query a job or position.
3. Choose the Work Choices button.
Work Choices (Person)
1. Choose People –> Enter and Maintain in the Navigator.
2. Enter or query a person.
3. Choose the Others button and select Work Choices.
Work Day Information
1. Choose Work Structures –> Organization –> Description in theNavigator.
2. Enter or query an organization.
3. Choose the Others button and select Work Day Information.
Work Schedule
1. Choose Work Structures –> Organization –> Description in theNavigator.
2. Enter or query an organization.
3. Choose the Others button and select Work Schedule.
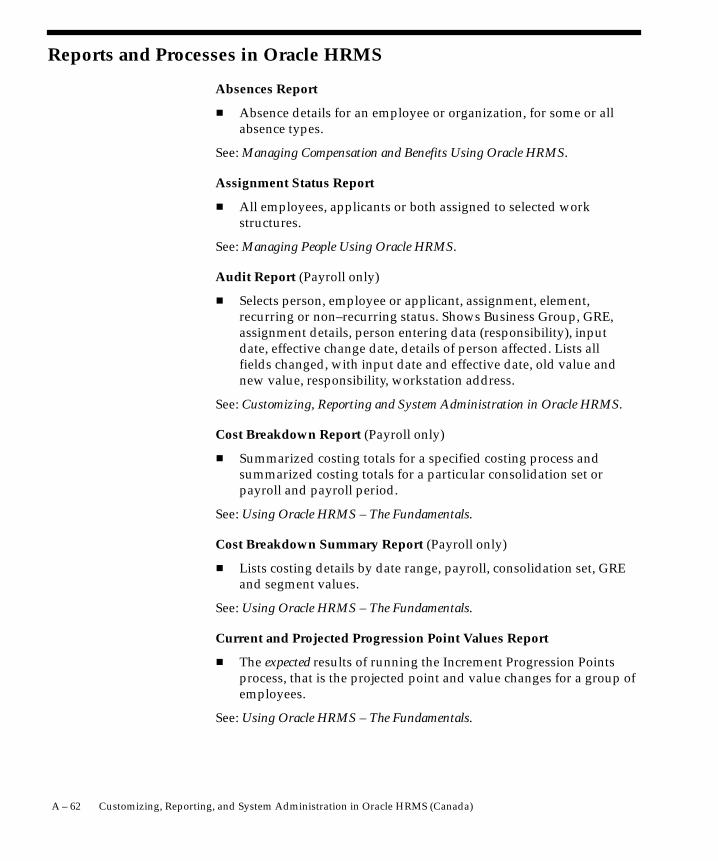
A – 62 Customizing, Reporting, and System Administration in Oracle HRMS (Canada)
Reports and Processes in Oracle HRMS
Absences Report
� Absence details for an employee or organization, for some or allabsence types.
See: Managing Compensation and Benefits Using Oracle HRMS.
Assignment Status Report
� All employees, applicants or both assigned to selected workstructures.
See: Managing People Using Oracle HRMS.
Audit Report (Payroll only)
� Selects person, employee or applicant, assignment, element,recurring or non–recurring status. Shows Business Group, GRE,assignment details, person entering data (responsibility), inputdate, effective change date, details of person affected. Lists allfields changed, with input date and effective date, old value andnew value, responsibility, workstation address.
See: Customizing, Reporting and System Administration in Oracle HRMS.
Cost Breakdown Report (Payroll only)
� Summarized costing totals for a specified costing process andsummarized costing totals for a particular consolidation set orpayroll and payroll period.
See: Using Oracle HRMS – The Fundamentals.
Cost Breakdown Summary Report (Payroll only)
� Lists costing details by date range, payroll, consolidation set, GREand segment values.
See: Using Oracle HRMS – The Fundamentals.
Current and Projected Progression Point Values Report
� The expected results of running the Increment Progression Pointsprocess, that is the projected point and value changes for a group ofemployees.
See: Using Oracle HRMS – The Fundamentals.

A – 63Windows and Reports
Element Link Details Report
� The eligibility criteria for an element or group of elements.
See: Managing Compensation and Benefits Using Oracle HRMS.
Element Result Listing
� Run results processed for a particular element over a definedperiod, and run results for selected input values of each employee’slast assignment process.
See: Running Your Payroll Using Oracle HRMS.
Employee Increment Results Report
� The actual results of running the Increment Progression Pointsprocess, that is progression point and value changes for a group ofemployees.
See: Using Oracle HRMS – The Fundamentals.
Employee Organization Movements Report
� New hires, terminations, transfers in and transfer out of a selectedorganization, or organization hierarchy.
See: Managing People Using Oracle HRMS.
Employee Payroll Movements Report (Payroll only)
See: Managing People Using Oracle HRMS.
Employee Run Results (Payroll only)
See: Running Your Payroll Using Oracle HRMS.
Employee Summary Report
� Addresses, contacts, periods of service, assignments, specialinformation, personal payment methods and element entries for aselected employee.
See: Managing People Using Oracle HRMS.
Full Personal Details Report Set
� Person details, applicant details, assignment details and workdetails for one employee.
See: Managing People Using Oracle HRMS.
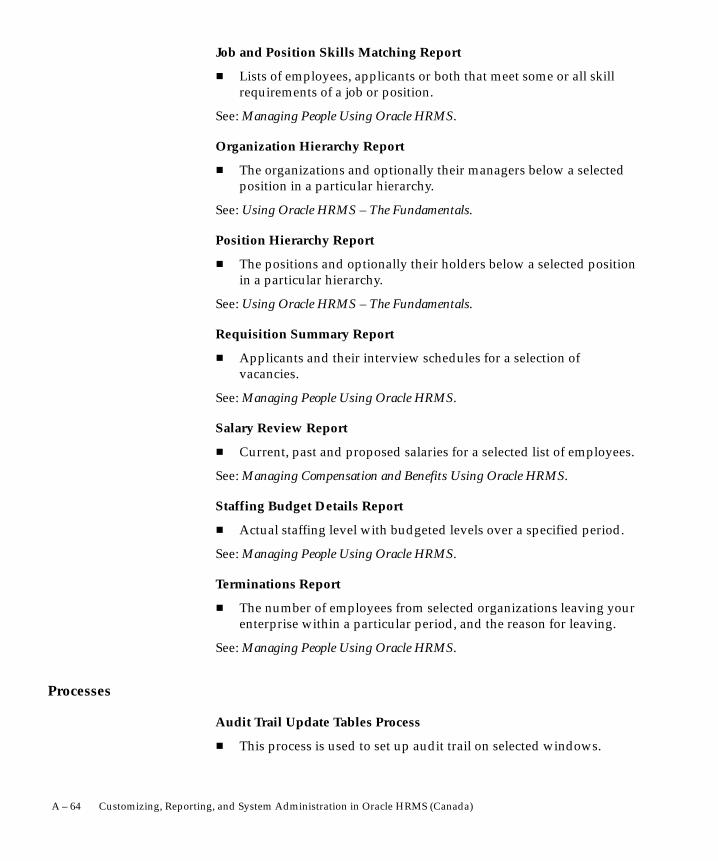
A – 64 Customizing, Reporting, and System Administration in Oracle HRMS (Canada)
Job and Position Skills Matching Report
� Lists of employees, applicants or both that meet some or all skillrequirements of a job or position.
See: Managing People Using Oracle HRMS.
Organization Hierarchy Report
� The organizations and optionally their managers below a selectedposition in a particular hierarchy.
See: Using Oracle HRMS – The Fundamentals.
Position Hierarchy Report
� The positions and optionally their holders below a selected positionin a particular hierarchy.
See: Using Oracle HRMS – The Fundamentals.
Requisition Summary Report
� Applicants and their interview schedules for a selection ofvacancies.
See: Managing People Using Oracle HRMS.
Salary Review Report
� Current, past and proposed salaries for a selected list of employees.
See: Managing Compensation and Benefits Using Oracle HRMS.
Staffing Budget Details Report
� Actual staffing level with budgeted levels over a specified period.
See: Managing People Using Oracle HRMS.
Terminations Report
� The number of employees from selected organizations leaving yourenterprise within a particular period, and the reason for leaving.
See: Managing People Using Oracle HRMS.
Processes
Audit Trail Update Tables Process
� This process is used to set up audit trail on selected windows.
A – 65Windows and Reports
See: Customizing, Reporting and System Administration in Oracle HRMS.
Audit Trail Update Datetracked Tables Process
� This process is used to set up audit trail on selected windows.
See: Customizing, Reporting and System Administration in Oracle HRMS.
BEE Batch Process (Purge)
� This process is used to delete a batch from the BEE tables oncompletion of the concurrent request.
See: Managing Compensation and Benefits Using Oracle HRMS.
BEE Batch Process (Validate)
� This process is used to test each batch line against predefined rulesabout element entries, and against any additional validationprocedures that you have created.
See: Managing Compensation and Benefits Using Oracle HRMS.
BEE Batch Process (Transfer)
� This process is used to create element entries in the Oracle HRMSEntries table from the existing entries in the BEE temporary tables.
See: Managing Compensation and Benefits Using Oracle HRMS.
BEE Batch Process (Rollback)
� This process is used to completely remove a BEE transfer, providedyou have not purged the batch from the BEE tables
See: Managing Compensation and Benefits Using Oracle HRMS.
Bulk Compile Formulas
� Run this process to compile all your formulas.
See: Using Oracle FastFormula.
Close Action Items Process (Advanced Benefits Only)
� Run this process before the Close Enrollments Process to close anyopen action items that are required or optional for the persons youselect.
See: Managing Compensation and Benefits Using Oracle HRMS.
A – 66 Customizing, Reporting, and System Administration in Oracle HRMS (Canada)
Close Enrollments Process (Advanced Benefits Only)
� Run this process to close a person’s enrollment after elections havebeen made.
See: Managing Compensation and Benefits Using Oracle HRMS.
Communications Triggers Process (Advanced Benefits Only)
� Use the communications triggers process to generatecommunications for persons who meet the selection criteria thatyou specify.
See: Managing Compensation and Benefits Using Oracle HRMS.
Costing Process
� Generates journal entries for your ledgers and costing informationrelating to labor costs.
See: Using Oracle HRMS – The Fundamentals.
Default Enrollment Process (Advanced Benefits Only)
� Run this process to enroll participants into the default benefit planwhen participants have not made an election.
See: Managing Compensation and Benefits Using Oracle HRMS.
Dependent Eligibility Process (Advanced Benefits Only)
� Run this process for those benefit plans that include an age factor indetermining dependent eligibility.
See: Managing Compensation and Benefits Using Oracle HRMS.
Extract Process (Advanced Benefits Only)
� Run the extract process to save the output of your system extract tothe directory and file that you specified in your extract definition.
See: Managing Compensation and Benefits Using Oracle HRMS.
Enable Multiple Security Groups Process
� Run this process when you first set up single responsibility security.
See: Customizing, Reporting and System Administration in Oracle HRMS.
Grant Permissions to Roles Process (ROLEGEN)
� Dynamically grants select permissions on Oracle HRMS tables andviews to the HR_REPORTING_USER role.

A – 67Windows and Reports
See: Customizing, Reporting and System Administration in Oracle HRMS.
Generate Secure User Process (SECGEN)
� Run this process when you create a new security profile thatreferences a reporting user.
See: Customizing, Reporting and System Administration in Oracle HRMS.
Participation Batch Process: Life Event (Advanced Benefits Only)
� Run this process to determine eligibility and electable choices forbenefits participants based on a life event you select.
See: Managing Compensation and Benefits Using Oracle HRMS.
Participation Batch Process: Scheduled (Advanced Benefits Only)
� Run this process to determine eligibility and electable choices forbenefits participants based on a scheduled enrollment event.
See: Managing Compensation and Benefits Using Oracle HRMS.
Participation Batch Process: Selection (Advanced Benefits Only)
� Run this process to determine eligibility for benefits participants.This process does not create electable choices.
See: Managing Compensation and Benefits Using Oracle HRMS.
Security List Maintenance Process (LISTGEN
� This process is usually run every night to maintain the lists oforganizations, positions, payrolls, employees, and applicants thatsecurity profile holders can access.
See: Customizing, Reporting and System Administration in Oracle HRMS.
Synchronize Positions Process
� This process updates the non–datetracked Positions table(PER_ALL_POSITIONS_F) with changes made to the datetrackedtable (HR_ALL_POSITIONS_F). When you run the process, anydatetracked changes with an effective date on or before today areapplied to the non–datetracked table.

A – 68 Customizing, Reporting, and System Administration in Oracle HRMS (Canada)
A P P E N D I X
BT
B – 1Appendix B
Appendix B
his appendix provides template SQL*Plus scripts to extract data toinclude in standard letters.
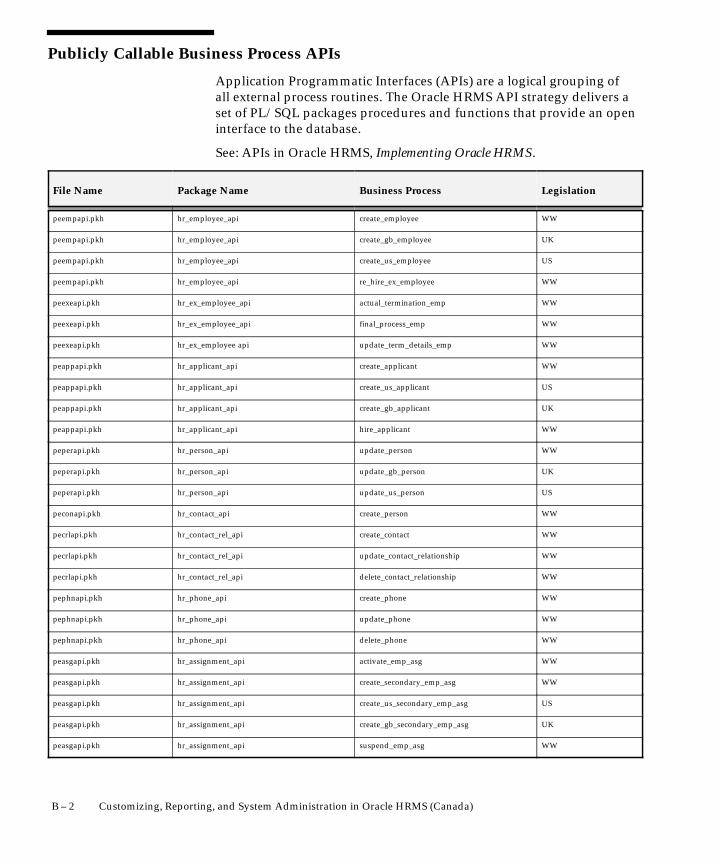
B – 2 Customizing, Reporting, and System Administration in Oracle HRMS (Canada)
Publicly Callable Business Process APIs
Application Programmatic Interfaces (APIs) are a logical grouping ofall external process routines. The Oracle HRMS API strategy delivers aset of PL/SQL packages procedures and functions that provide an openinterface to the database.
See: APIs in Oracle HRMS, Implementing Oracle HRMS.
File Name Package Name Business Process Legislation
peempapi.pkh hr_employee_api create_employee WW
peempapi.pkh hr_employee_api create_gb_employee UK
peempapi.pkh hr_employee_api create_us_employee US
peempapi.pkh hr_employee_api re_hire_ex_employee WW
peexeapi.pkh hr_ex_employee_api actual_termination_emp WW
peexeapi.pkh hr_ex_employee_api final_process_emp WW
peexeapi.pkh hr_ex_employee api update_term_details_emp WW
peappapi.pkh hr_applicant_api create_applicant WW
peappapi.pkh hr_applicant_api create_us_applicant US
peappapi.pkh hr_applicant_api create_gb_applicant UK
peappapi.pkh hr_applicant_api hire_applicant WW
peperapi.pkh hr_person_api update_person WW
peperapi.pkh hr_person_api update_gb_person UK
peperapi.pkh hr_person_api update_us_person US
peconapi.pkh hr_contact_api create_person WW
pecrlapi.pkh hr_contact_rel_api create_contact WW
pecrlapi.pkh hr_contact_rel_api update_contact_relationship WW
pecrlapi.pkh hr_contact_rel_api delete_contact_relationship WW
pephnapi.pkh hr_phone_api create_phone WW
pephnapi.pkh hr_phone_api update_phone WW
pephnapi.pkh hr_phone_api delete_phone WW
peasgapi.pkh hr_assignment_api activate_emp_asg WW
peasgapi.pkh hr_assignment_api create_secondary_emp_asg WW
peasgapi.pkh hr_assignment_api create_us_secondary_emp_asg US
peasgapi.pkh hr_assignment_api create_gb_secondary_emp_asg UK
peasgapi.pkh hr_assignment_api suspend_emp_asg WW

B – 3Appendix B
LegislationBusiness ProcessPackage NameFile Name
hrpypapi.pkh hr_maintain_proposal_api insert_salary_proposal WW
hrpypapi.pkh hr_maintain_proposal_api approve_salary_proposa WW
hrpypapi.pkh hr_maintain_proposal_api delete_salary_proposal WW
hrpypapi.pkh hr_maintain_proposal_api insert_proposal_component WW
hrpypapi.pkh hr_maintain_proposal_api update_proposal_component WW
hrpypapi.pkh hr_maintain_proposal_api delete_proposal_component WW
hrpypapi.pkh hr_maintain_proposal_api upload_salary_proposal WW
pedsapi.pkh hr_periods_of_service_api update_pds_detail WW
peasgapi.pkh hr_assignment_api update_emp_asg WW
peasgapi.pkh hr_assignment_api update_us_emp_asg US
peasgapi.pkh hr_assignment_api update_gb_emp_asg UK
peasgapi.pkh hr_assignment_api update_emp_asg_criteria WW
peasgapi.pkh hr_assignment_api update_apl_asg WW
peasgapi.pkh hr_assignment_api create_secondary_apl_asg WW
peasgapi.pkh hr_assignment_api offer_apl_asg WW
peasgapi.pkh hr_assignment_api actual_termination_emp_asg WW
peasgapi.pkh hr_assignment_api final_process_emp_asg WW
peaplapi.pkh hr_application_api update_apl_details WW
peaddapi.pkh hr_person_address_api1 create_person_address WW
peaddapi.pkh hr_person_address_api create_gb_person_address UK
peaddapi.pkh hr_person_address_api create_us_person_address US
peaddapi.pkh hr_person_address_api1 update_person_address WW
peaddapi.pkh hr_person_address_api update_gb_person_address UK
peaddapi.pkh hr_person_address_api update_us_person_address US
pesitapi.pkh hr_sit_api create_sit WW
pesitapi.pkh hr_sit_api update_sit WW
pyppmapi.pkh hr_personal_pay_method_api create_personal_pay_method WW
pyppmapi.pkh hr_personal_pay_method_api create_us_personal_pay_method US
pyppmapi.pkh hr_personal_pay_method_api create_gb_personal_pay_method UK
pyppmapi.pkh hr_personal_pay_method_api update_personal_pay_method WW
pyppmapi.pkh hr_personal_pay_method_api update_us_personal_pay_method US
pyppmapi.pkh hr_personal_pay_method_api update_gb_personal_pay_method UK

B – 4 Customizing, Reporting, and System Administration in Oracle HRMS (Canada)
LegislationBusiness ProcessPackage NameFile Name
pyppmapi.pkh hr_personal_pay_method_api delete_personal_pay_method WW
hrpypapi.pkh hr_upload_proposal_api upload_salary_proposal WW
pyeleapi.pkh py_element_entry_api create_element_entry WW
pyeleapi.pkh py_element_entry_api delete_element_entry WW
pyeleapi.pkh py_element_entry_api update_element_entry WW
pygrrapi.pkh hr_grade_api create_grade_rate_value WW
pygrrapi.pkh hr_grade_api delete_grade_rate_value WW
pygrrapi.pkh hr_grade_api update_grade_rate_value WW
pypsrapi.pkh hr_pay_scale_api create_pay_scale_value WW
pypsrapi.pkh hr_pay_scale_api delete_pay_scale_value WW
pypsrapi.pkh hr_pay_scale_api update_pay_scale_value WW
peposapi.pkh hr_position_api create_position WW
pypsrapi.pkh hr_position_api update_position WW
pepsrapi.pkh hr_position_requirement_api create_position_requirement WW
pejobapi.pkh hr_job_api create_job WW
pejbrapi.pkh hr_job_requirement_api create_job_requirement WW
pemmvapi.pkh hr_mass_move_api mass_move WW
pevgrapi.pkh hr_valid_grade_api create_valid_grade WW
hrabmapi.pkh hr_batch_message_line_api create_message_line WW
hrabmapi.pkh hr_batch_message_line_api delete_message_line WW
hrabmapi.pkh hr_batch_message_line_api delete_batch_lines WW
peaprapi.pkh hr_appraisals_api create_appraisal WW
peaprapi.pkh hr_appraisals_api update_appraisal WW
peaprapi.pkh hr_appraisals_api delete_appraisal WW
peaptapi.pkh hr_appraisal_templates_api create_appraisal_template WW
peaptapi.pkh hr_appraisal_templates_api update_appraisal_template WW
peaptapi.pkh hr_appraisal_templates_api delete_appraisal_template WW
peasnapi.pkh hr_assessments_api create_assessment WW
peasnapi.pkh hr_assessments_api update_assessment WW
peasnapi.pkh hr_assessments_api delete_assessment WW
peasrapi.pkh hr_assessment_groups_api create_assessment_group WW
peasrapi.pkh hr_assessment_groups_api update_assessment_group WW

B – 5Appendix B
LegislationBusiness ProcessPackage NameFile Name
peasrapi.pkh hr_assessment_groups_api delete_assessment_group WW
peastapi.pkh hr_assessment_types_api create_assessment_type WW
peastapi.pkh hr_assessment_types_api update_assessment_type WW
peastapi.pkh hr_assessment_types_api delete_assessment_type WW
pecelapi.pkh hr_competence_element_api create_competence_element WW
pecelapi.pkh hr_competence_element_api update_competence_element WW
pecelapi.pkh hr_competence_element_api update_personal_comp_element WW
pecelapi.pkh hr_competence_element_api delete_competence_element WW
pecelapi.pkh hr_competence_element_api maintain_student_comp_element WW
pecelapi.pkh hr_competence_element_api copy_competencies WW
pecelapi.pkh hr_competence_element_api update_delivered_dates WW
pecpnapi.pkh hr_competences_api create_competence WW
pecpnapi.pkh hr_competences_api update_competence WW
pecpnapi.pkh hr_competences_api delete_competence WW
peparapi.pkh hr_participants_api create_participant WW
peparapi.pkh hr_participants_api update_participant WW
peparapi.pkh hr_participants_api delete_participant WW
peprtapi.pkh hr_performance_ratings_api create_performance_rating WW
peprtapi.pkh hr_performance_ratings_api update_performance_rating WW
peprtapi.pkh hr_performance_ratings_api delete_performance_rating WW
perscapi.pkh hr_rating_scales_api create_rating_scale WW
perscapi.pkh hr_rating_scales_api update_rating_scale WW
perscapi.pkh hr_rating_scales_api delete_rating_scale WW
pertlapi.pkh hr_rating_levels_api create_rating_level WW
pertlapi.pkh hr_rating_levels_api update_rating_level WW
pertlapi.pkh hr_rating_levels_api delete_rating_level WW
peahcapi.pkh hr_api_hook_call_api create_api_hook_call WW
peahcapi.pkh hr_api_hook_call_api update_api_hook_call WW
peahcapi.pkh hr_api_hook_call_api delete_api_hook_call WW
peprvapi.pkh hr_perf_review_api create_perf_review WW
peprvapi.pkh hr_perf_review_api update_perf_review WW
peprvapi.pkh hr_perf_review_api delete_perf_review WW

B – 6 Customizing, Reporting, and System Administration in Oracle HRMS (Canada)
LegislationBusiness ProcessPackage NameFile Name
pepypapi.pkh hr_maintain_proposal_api insert_salary_proposal WW
pepypapi.pkh hr_maintain_proposal_api update_salary_proposal WW
pepypapi.pkh hr_maintain_proposal_api approve_salary_proposal WW
pepypapi.pkh hr_maintain_proposal_api delete_salary_proposal WW
pepypapi.pkh hr_maintain_proposal_api insert_proposal_component WW
pepypapi.pkh hr_maintain_proposal_api update_proposal_component WW
pepypapi.pkh hr_maintain_proposal_api delete_proposal_component WW
hrctcapi.pkh hr_contract_api create contract WW
hrctcapi.pkh hr_contract_api update contract WW
hrctcapi.pkh hr_contract_api delete contract WW
pedsapi.pkh hr_periods_of_service_api update pds detail WW
A P P E N D I X
CT
C – 1Appendix C
Appendix C
his appendix provides template SQL*Plus scripts to extract data toinclude in standard letters.
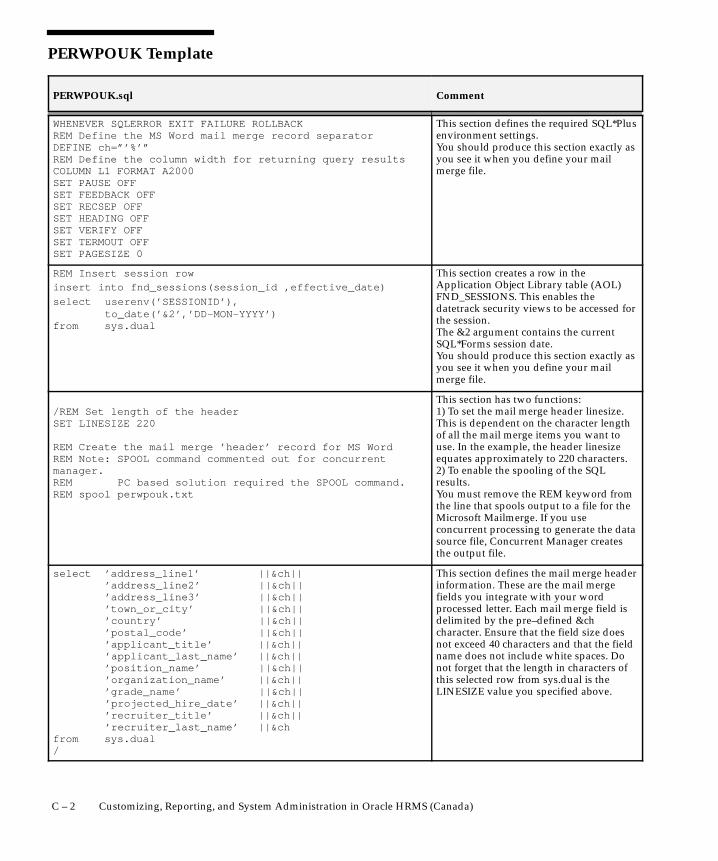
C – 2 Customizing, Reporting, and System Administration in Oracle HRMS (Canada)
PERWPOUK Template
PERWPOUK.sql Comment
WHENEVER SQLERROR EXIT FAILURE ROLLBACKREM Define the MS Word mail merge record separatorDEFINE ch=”’%’”REM Define the column width for returning query resultsCOLUMN L1 FORMAT A2000SET PAUSE OFFSET FEEDBACK OFFSET RECSEP OFFSET HEADING OFFSET VERIFY OFFSET TERMOUT OFFSET PAGESIZE 0
This section defines the required SQL*Plusenvironment settings.You should produce this section exactly asyou see it when you define your mailmerge file.
REM Insert session rowinsert into fnd_sessions(session_id ,effective_date)
select userenv(’SESSIONID’), to_date(’&2’,’DD–MON–YYYY’)from sys.dual
This section creates a row in theApplication Object Library table (AOL)FND_SESSIONS. This enables thedatetrack security views to be accessed forthe session.The &2 argument contains the currentSQL*Forms session date.You should produce this section exactly asyou see it when you define your mailmerge file.
/REM Set length of the headerSET LINESIZE 220
REM Create the mail merge ’header’ record for MS WordREM Note: SPOOL command commented out for concurrentmanager.REM PC based solution required the SPOOL command.REM spool perwpouk.txt
This section has two functions:1) To set the mail merge header linesize.This is dependent on the character lengthof all the mail merge items you want touse. In the example, the header linesizeequates approximately to 220 characters.2) To enable the spooling of the SQLresults. You must remove the REM keyword fromthe line that spools output to a file for theMicrosoft Mailmerge. If you useconcurrent processing to generate the datasource file, Concurrent Manager createsthe output file.
select ’address_line1’ ||&ch|| ’address_line2’ ||&ch|| ’address_line3’ ||&ch|| ’town_or_city’ ||&ch|| ’country’ ||&ch|| ’postal_code’ ||&ch|| ’applicant_title’ ||&ch|| ’applicant_last_name’ ||&ch|| ’position_name’ ||&ch|| ’organization_name’ ||&ch|| ’grade_name’ ||&ch|| ’projected_hire_date’ ||&ch|| ’recruiter_title’ ||&ch|| ’recruiter_last_name’ ||&chfrom sys.dual/
This section defines the mail merge headerinformation. These are the mail mergefields you integrate with your wordprocessed letter. Each mail merge field isdelimited by the pre–defined &chcharacter. Ensure that the field size doesnot exceed 40 characters and that the fieldname does not include white spaces. Donot forget that the length in characters ofthis selected row from sys.dual is theLINESIZE value you specified above.
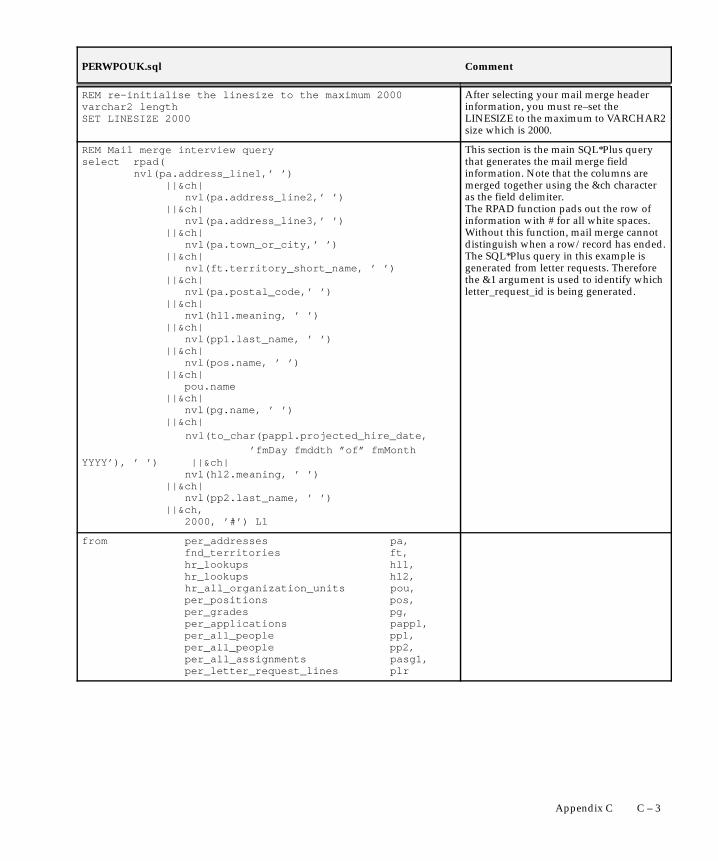
C – 3Appendix C
CommentPERWPOUK.sql
REM re–initialise the linesize to the maximum 2000varchar2 lengthSET LINESIZE 2000
After selecting your mail merge headerinformation, you must re–set theLINESIZE to the maximum to VARCHAR2size which is 2000.
REM Mail merge interview queryselect rpad( nvl(pa.address_line1,’ ’) ||&ch| nvl(pa.address_line2,’ ’) ||&ch| nvl(pa.address_line3,’ ’) ||&ch| nvl(pa.town_or_city,’ ’) ||&ch| nvl(ft.territory_short_name, ’ ’) ||&ch| nvl(pa.postal_code,’ ’) ||&ch| nvl(hl1.meaning, ’ ’) ||&ch| nvl(pp1.last_name, ’ ’) ||&ch| nvl(pos.name, ’ ’) ||&ch| pou.name ||&ch| nvl(pg.name, ’ ’) ||&ch| nvl(to_char(pappl.projected_hire_date,
’fmDay fmddth ”of” fmMonthYYYY’), ’ ’) ||&ch| nvl(hl2.meaning, ’ ’) ||&ch| nvl(pp2.last_name, ’ ’) ||&ch, 2000, ’#’) L1
This section is the main SQL*Plus querythat generates the mail merge fieldinformation. Note that the columns aremerged together using the &ch characteras the field delimiter.The RPAD function pads out the row ofinformation with # for all white spaces.Without this function, mail merge cannotdistinguish when a row/record has ended.The SQL*Plus query in this example isgenerated from letter requests. Thereforethe &1 argument is used to identify whichletter_request_id is being generated.
from per_addresses pa, fnd_territories ft, hr_lookups hl1, hr_lookups hl2, hr_all_organization_units pou, per_positions pos, per_grades pg, per_applications pappl, per_all_people pp1, per_all_people pp2, per_all_assignments pasg1, per_letter_request_lines plr

C – 4 Customizing, Reporting, and System Administration in Oracle HRMS (Canada)
CommentPERWPOUK.sql
where plr.letter_request_id = &1and pp1.person_id =plr.person_idand pa.primary_flag (+) = ’Y’and pa.person_id (+) =pp1.person_idand ft.territory_code (+) =pa.countryand hl1.lookup_code (+) =pp1.titleand hl1.lookup_type (+) = ’TITLE’and pasg1.assignment_id (+) =plr.assignment_idand pos.position_id (+) =pasg1.position_idand pou.organization_id (+) =pasg1.organization_idand pg.grade_id (+) =pasg1.grade_idand pappl.application_id (+) =pasg1.application_idand pp2.person_id (+) =pasg1.recruiter_idand hl2.lookup_code (+) =pp2.titleand hl2.lookup_type (+) = ’TITLE’/REM Note: SPOOL command commented out for concurrentmanager.REM PC based solution required the SPOOL command.REM spool off
REM update the letter request_status from PENDING toCOMPLETEupdate per_letter_requests plrset plr.request_status = ’COMPLETE’where plr.letter_request_id = &1and plr.request_status = ’PENDING’/
This section updates the letter requestfrom Pending to Complete (as the exampleis for letter requests).
REM delete the session row createddelete from fnd_sessions fswhere fs.session_id = userenv(’sessionid’)and fs.effective_date = to_date(’&2’,’DD–MON–YYYY’)
This section deletes the row inserted intoFND_SESSIONS.
/
REM commit the changescommit/
exit
This section commits the changes and exitsthe SQL*Plus session.

C – 5Appendix C
PERWPWUK Template
PERWPWUK.sql Comment
REMDEFINE line_size=80DEFINE field_size= &line_size–1DEFINE ch=”’%’”SET PAGESIZE 0SET LINESIZE &line_sizeBREAK ON L1 SKIP PAGECOLUMN L1 FORMAT A&line_size COLUMN L2 FORMAT A&line_size COLUMN L3 FORMAT A&line_size COLUMN L4 FORMAT A&line_size COLUMN L5 FORMAT A&line_size COLUMN L6 FORMAT A&line_size COLUMN L7 FORMAT A&line_size COLUMN L8 FORMAT A&line_size COLUMN L9 FORMAT A&line_size SET FEEDBACK OFFSET RECSEP OFFSET HEADING OFFSET VERIFY OFFSET TERMOUT OFF
This section defines the required SQL*Plusenvironment settings.You should produce this section exactly asyou see it when you define your mailmerge file.
insert into fnd_sessions(session_id ,effective_date)select userenv(’SESSIONID’), to_date(’&2’,’DD–MON–YYYY’)from sys.dual
This section creates a row in theApplication Object Library table (AOL)FND_SESSIONS. The &2 argumentcontains the current SQL*Forms sessiondate.You should produce this section exactly asyou see it when you define your mailmerge file.
REM re–initialise the linesize to the maximum 2000varchar2 lengthSET LINESIZE 2000
After selecting your mail merge headerinformation, you must re–set theLINESIZE to the maximum to VARCHAR2size which is 2000.
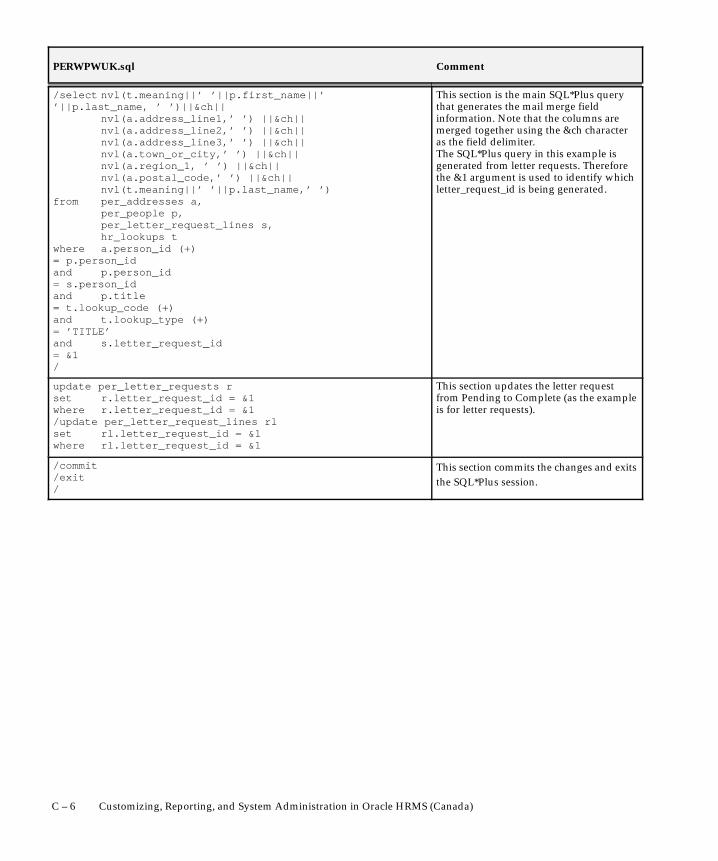
C – 6 Customizing, Reporting, and System Administration in Oracle HRMS (Canada)
CommentPERWPWUK.sql
/select nvl(t.meaning||’ ’||p.first_name||’’||p.last_name, ’ ’)||&ch||
nvl(a.address_line1,’ ’) ||&ch||nvl(a.address_line2,’ ’) ||&ch||nvl(a.address_line3,’ ’) ||&ch||nvl(a.town_or_city,’ ’) ||&ch||nvl(a.region_1, ’ ’) ||&ch||nvl(a.postal_code,’ ’) ||&ch||nvl(t.meaning||’ ’||p.last_name,’ ’)
from per_addresses a,per_people p,per_letter_request_lines s,hr_lookups t
where a.person_id (+) = p.person_idand p.person_id = s.person_idand p.title = t.lookup_code (+)and t.lookup_type (+) = ’TITLE’and s.letter_request_id = &1/
This section is the main SQL*Plus querythat generates the mail merge fieldinformation. Note that the columns aremerged together using the &ch characteras the field delimiter.The SQL*Plus query in this example isgenerated from letter requests. Thereforethe &1 argument is used to identify whichletter_request_id is being generated.
update per_letter_requests rset r.letter_request_id = &1where r.letter_request_id = &1/update per_letter_request_lines rlset rl.letter_request_id = &1where rl.letter_request_id = &1
This section updates the letter requestfrom Pending to Complete (as the exampleis for letter requests).
/commit/exit/
This section commits the changes and exitsthe SQL*Plus session.
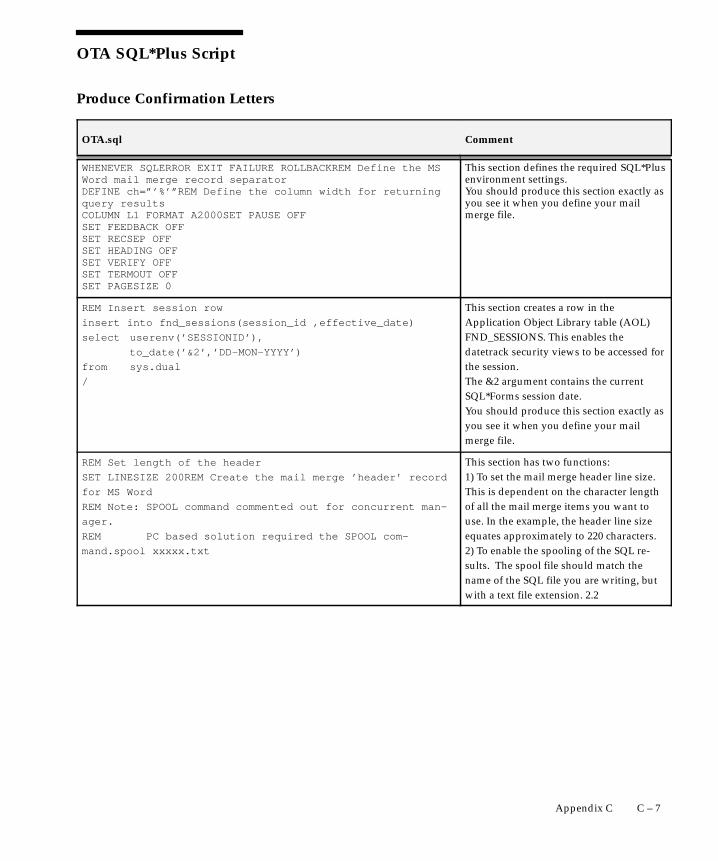
C – 7Appendix C
OTA SQL*Plus Script
Produce Confirmation Letters
OTA.sql Comment
WHENEVER SQLERROR EXIT FAILURE ROLLBACKREM Define the MSWord mail merge record separatorDEFINE ch=”’%’”REM Define the column width for returningquery resultsCOLUMN L1 FORMAT A2000SET PAUSE OFFSET FEEDBACK OFFSET RECSEP OFFSET HEADING OFFSET VERIFY OFFSET TERMOUT OFFSET PAGESIZE 0
This section defines the required SQL*Plusenvironment settings.You should produce this section exactly asyou see it when you define your mailmerge file.
REM Insert session row
insert into fnd_sessions(session_id ,effective_date)
select userenv(’SESSIONID’),
to_date(’&2’,’DD–MON–YYYY’)
from sys.dual
/
This section creates a row in theApplication Object Library table (AOL)FND_SESSIONS. This enables thedatetrack security views to be accessed forthe session.The &2 argument contains the currentSQL*Forms session date.You should produce this section exactly asyou see it when you define your mailmerge file.
REM Set length of the header
SET LINESIZE 200REM Create the mail merge ’header’ record
for MS Word
REM Note: SPOOL command commented out for concurrent man-
ager.
REM PC based solution required the SPOOL com-
mand.spool xxxxx.txt
This section has two functions:1) To set the mail merge header line size.This is dependent on the character lengthof all the mail merge items you want touse. In the example, the header line sizeequates approximately to 220 characters.2) To enable the spooling of the SQL re-sults. The spool file should match thename of the SQL file you are writing, butwith a text file extension. 2.2
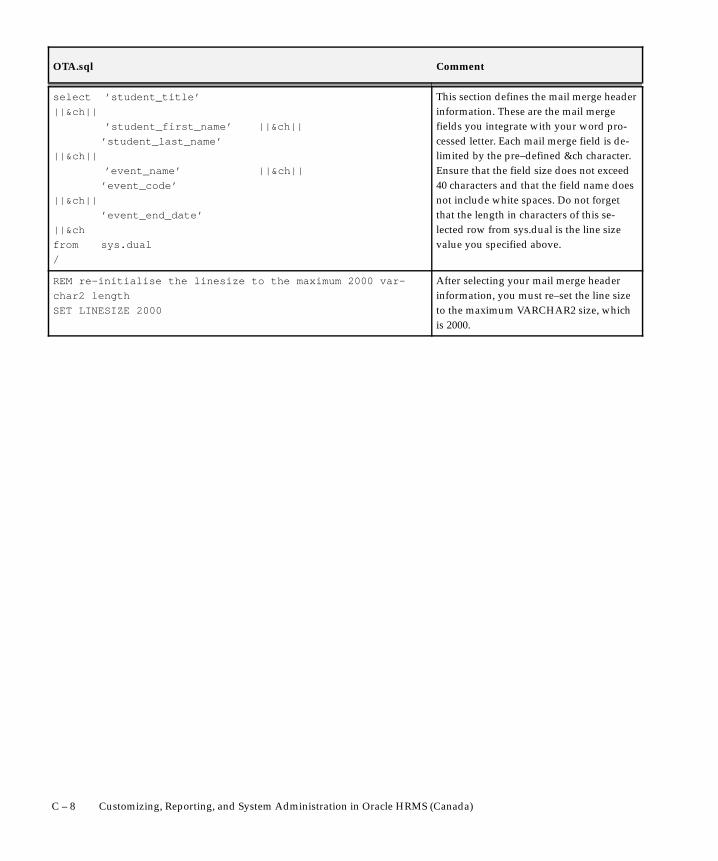
C – 8 Customizing, Reporting, and System Administration in Oracle HRMS (Canada)
CommentOTA.sql
select ’student_title’
||&ch||
’student_first_name’ ||&ch||
’student_last_name’
||&ch||
’event_name’ ||&ch||
’event_code’
||&ch||
’event_end_date’
||&ch
from sys.dual
/
This section defines the mail merge headerinformation. These are the mail mergefields you integrate with your word pro-cessed letter. Each mail merge field is de-limited by the pre–defined &ch character.Ensure that the field size does not exceed40 characters and that the field name doesnot include white spaces. Do not forgetthat the length in characters of this se-lected row from sys.dual is the line sizevalue you specified above.
REM re–initialise the linesize to the maximum 2000 var-
char2 length
SET LINESIZE 2000
After selecting your mail merge headerinformation, you must re–set the line sizeto the maximum VARCHAR2 size, whichis 2000.

C – 9Appendix C
CommentOTA.sql
REM Mail merge confirmation query
select rpad(
initcap(nvl(d.delegate_title_meaning,’ ’ ))
||&ch||
nvl(d.delegate_first_name,’ ’)
||&ch||
nvl(d.delegate_last_name,’ ’ )
||&ch||
nvl(v.description,’ ’)
||&ch||
nvl(d.event_activity_version_name,’ ’ )
||&ch||
to_char(d.course_end_date, ’DD fmMonth YYYY’)
||&ch,
2000, ’#’)
L1
from ota_delegate_bookings_v
d,
ota_activity_versions
v,
per_letter_request_lines
plr
where plr.letter_request_id
= &1
and (plr.ota_booking_id
= d.booking_id
or plr.ota_event_id
= d.event_id)
and d.activity_version_id = v.activ-
ity_version_id
/
This section is the main SQL*Plus querythat generates the mail merge field in-formation. Note that the columns aremerged together using the &ch characteras the field delimiter.The RPAD function pads out the row ofinformation with # for all white spaces.Without this function, mail merge cannotdistinguish when a row/record has ended.The SQL*Plus query in this example isgenerated from letter requests. Thereforethe &1 argument is used to identify whichletter_request_id is being generated.
REM Note: SPOOL command commented out for concurrent man-
ager.
REM PC based solution required the SPOOL command.
spool off

C – 10 Customizing, Reporting, and System Administration in Oracle HRMS (Canada)
CommentOTA.sql
REM Update the letter request_status from PENDING to COM-
PLETE
update per_letter_requests
plr
set plr.request_status
=’COMPLETE’
where plr.letter_request_id
=&1
and plr.request_status
=’PENDING’
/
This section updates the letter requestfrom Pending to Complete (as the exampleis for letter requests).
REM delete the session row created
delete from fnd_sessions
fs
where fs.session_id
= userenv(’sessionid’)
and fs.effective_date
= to_date(’&2’,’DD–MON–YYYY’)
/
This section deletes the row inserted intoFND_SESSIONS.
REM commit the changes
commit
/
exit
/
This section commits the changes and exitsthe SQL*Plus session
Glossary – 1
Glossary
360 Degree Appraisal Part of the SSHRAppraisal function and also known as aGroup Appraisal. This is an employeeappraisal undertaken by managers withparticipation by reviewers.
360 Degree Self Appraisal Part of the SSHRAppraisal function and also known as aGroup Appraisal. This is a 360 Degreeappraisal initiated by an employee. Theemployee (initiator) can add managers andreviewers to the appraisal.
AAbsence Types Categories of absence, such as
medical leave or vacation leave, that youdefine for use in absence windows.
Accrual Band A range of values thatdetermines how much paid time off anemployee accrues. The values may be yearsof service, grades, hours worked, or anyother factor.
Accrual Plan See: PTO Accrual Plan
Accrual Period The unit of time, within anaccrual term, in which PTO is accrued. Inmany plans, the same amount of time isaccrued in each accrual period, such as twodays per month. In other plans, the amountaccrued varies from period to period, or theentitlement for the full accrual term is givenas an up front amount at the beginning ofthe accrual term.
Accrual Term The period, such as one year,for which accruals are calculated. In mostaccrual plans, unused PTO accruals mustbe carried over or lost at the end of theaccrual term. Other plans have a rollingaccrual term which is of a certain durationbut has no fixed start and end dates.
Activity Rate The monetary amount orpercentage associated with an activity, suchas $12.35 per pay period as an employeepayroll contribution for medical coverage.Activity rates can apply to participation,eligibility, coverages, contributions, anddistributions.
Glossary – 2 Customizing, Reporting, and System Administration inOracle HRMS (Canada)
Actual Premium The per–participantpremium an insurance carrier charges theplan sponsor for a given benefit.
Administrative Enrollment A type ofscheduled enrollment caused by a changein plan terms or conditions and resulting ina re–enrollment.
Applicant A candidate for employment in aBusiness Group.
Appraisee A person being appraised by anappraiser..
Appraiser A person, usually a manager, whoappraises an employee.
Appraisal An appraisal is a process where anemployee’s work performance is rated andfuture objectives set. See also: Assessment.
Appraising Manager The person who initiatesand performs an Employee–Manager or 360Degree Appraisal. An appraising managercan create appraisal objectives.
Apply for a Job An SSHR function thatenables an employee to, apply, search andprepare applications for an internallyadvertised vacancy.
Arrestment Scottish court order made out forunpaid debts or maintenance payments.See also: Court Order
Assessment An information gatheringexercise, from one or many sources, toevaluate a person’s ability to do a job. Seealso: Appraisal.
Assignment An employee’s assignmentidentifies his or her role and payroll withina Business Group. The assignment is madeup of a number of assignment components.Of these, organization is mandatory, andpayroll is a required component forpayment purposes.
Assignment Number A number that uniquelyidentifies an employee’s assignment. Anemployee with multiple assignments hasmultiple assignment numbers.
Assignment Set A grouping of employeesand/or applicants that you define forrunning QuickPaint reports and processingpayrolls. See also: QuickPaint Report
Assignment Status For employees, used totrack their permanent or temporarydepartures from your enterprise, and tocontrol the remuneration they receive. Forapplicants, used to track the progress oftheir applications.
BBACS Banks Automated Clearing System.
This is the UK system for making directdeposit payments to employees.
Balances Positive or negative accumulationsof values over periods of time normallygenerated by payroll runs. A balance cansum pay values, time periods or numbers.See also: Predefined Components
Balance Adjustment A correction you maketo a balance. You can adjust user balancesand assignment level predefined balancesonly.
Balance Dimension The period for which abalance sums its balance feeds, or the set ofassignments/transactions for which it sumsthem. There are five time dimensions: Run,Period, Quarter, Year and User. You canchoose any reset point for user balances.
Balance Feeds These are the input values ofmatching units of measure of any elementsdefined to feed the balance.
Glossary – 3
Bargaining Unit A bargaining unit is a legallyorganized group of people which have theright to negotiate on all aspects of termsand conditions with employers or employerfederations. A bargaining unit is generally atrade union or a branch of a trade union.
Base Currency The currency in which OraclePayroll performs all payroll calculations foryour Business Group. If you payemployees in different currencies to this,Oracle Payroll calculates the amounts basedon exchange rates defined in the system.
Behavioral Indicators Characteristics thatidentify how a competence is exhibited inthe work context. See also: Proficiency Level
Benefit Any part of an employee’sremuneration package that is not pay.Vacation time, employer–paid medicalinsurance and stock options are allexamples of benefits. See also: Elements
Block The largest subordinate unit of awindow, containing information for aspecific business function or entity. Everywindow consists of at least one block.Blocks contain fields and, optionally,regions. They are delineated by a bevellededge. You must save your entries in oneblock before navigating to the next. Seealso: Region, Field
Budget Value In Oracle Human Resourcesyou can enter staffing budget values andactual values for each assignment tomeasure variances between actual andplanned staffing levels in an organization orhierarchy.
Business Group The highest levelorganization in the Oracle HRMS system.A Business Group may correspond to thewhole of your enterprise or to a majorgrouping such as a subsidiary or operatingdivision. Each Business Group mustcorrespond to a separate implementation ofOracle HRMS.
Business Number (BN) In Canada, this is theemployer’s account number with RevenueCanada. Consisting of 15 digits, the first 9identify the employer, the next 2 identifythe type of tax account involved (payroll vs.corporate tax), and the last 4 identify theparticular account for that tax.
CCafeteria Benefits Plan See: Flexible Benefits
ProgramCalendars In Oracle Human Resources you
define calendars that determine the startand end dates for budgetary years, quartersand periods. For each calendar you select abasic period type. In Oracle SSP/SMP youdefine calendars to determine the start dateand time for SSP qualifying patterns.
Calendar Exceptions In Oracle SSP/SMP youdefine calendar exceptions for an SSPqualifying pattern, to override the patternon given days. Each calendar exception isanother pattern which overrides the usualpattern.
Glossary – 4 Customizing, Reporting, and System Administration inOracle HRMS (Canada)
Canada/Quebec Pension Plan (CPP/QPP)Contributions Contributions paid byemployers and employees to each of theseplans provide income benefits uponretirement.
Candidate Offers An SSHR function used by aline manager to offer a job to a candidate.This function is supplied with its ownresponsibility.
Career Path This shows a possible progressionfrom one job or position from any numberof other jobs or positions within theBusiness Group. A career path must bebased on either job progression or positionprogression; you cannot mix the two.
Carry Over The amount of unused paid timeoff entitlement an employee brings forwardfrom one accrual term to the next. It may besubject to an expiry date i.e. a date bywhich it must be used or lost. See also:Residual
Cash Analysis A specification of the differentcurrency denominations required forpaying your employees in cash. Unioncontracts may require you to follow certaincash analysis rules.
Certification Documentation required toenroll or change elections in a benefits planas the result of a life event, to waiveparticipation in a plan, to designatedependents for coverage, or to receivereimbursement for goods or services underan FSA.
Ceiling The maximum amount of unusedpaid time off an employee can have in anaccrual plan. When an employee reachesthis maximum, he or she must use someaccrued time before any more time willaccrue.
Child/Family Support payments In Canada,these are payments withheld from anemployee’s compensation to satisfy a childor family support order from a ProvincialCourt. The employer is responsible forwithholding and remitting the payments tothe court named in the order.
Collective Agreement A collective agreement isa form of contract between an employer oremployer representative, for example, anemployer federation, and a bargaining unitfor example, a union or a union branch.
Communications Benefits plan informationthat is presented in some form toparticipants. Examples include apre–enrollment package, an enrollmentconfirmation statement, or a notice ofdefault enrollment.
Compensation The pay you give toemployees, including wages or salary, andbonuses. See also: Elements
Competence Any measurable behaviorrequired by an organization, job or positionthat a person may demonstrate in the workcontext. A competence can be a piece ofknowledge, a skill, an attitude or anattribute.
Competence Evaluation A method used tomeasure an employees ability to do adefined job.
Competence Profile Where you recordapplicant and employee accomplishments,for example, proficiency in a competence.
Competence Requirements Competenciesrequired by an organization, job or position.See also: Competence, Core Competencies
Competence Type A group of relatedcompetencies.
Glossary – 5
Consolidation Set A grouping of payroll runswithin the same time period for which youcan schedule reporting, costing, andpost–run processing.
Contact A person who has a relationship to anemployee that you want to record.Contacts can be dependents, relatives,partners or persons to contact in anemergency.
Contract A contract of employment is anagreement between an employer andemployee or potential employee thatdefines the fundamental legal relationshipbetween an employing organization and aperson who offers his or her services forhire. The employment contract defines theterms and conditions to which both partiesagree and those that are covered by locallaws.
Contribution An employer’s or employee’smonetary or other contribution to a benefitsplan.
Core Competencies Also known as LeadershipCompetencies or Management Competencies.The competencies required by every personto enable the enterprise to meet its goals.See also: Competence
Costable Type A feature that determines theprocessing an element receives foraccounting and costing purposes. There arefour costable types in Oracle HRMS:costed, distributed costing, fixed costing,and not costed.
Costing Recording the costs of an assignmentfor accounting or reporting purposes.Using Oracle Payroll, you can calculate andtransfer costing information to your generalledger and into systems for projectmanagement or labor distribution.
Court Order A ruling from a court thatrequires an employer to make deductionsfrom an employee’s salary for maintenancepayments or debts, and to pay the sumsdeducted to a court or local authority. Seealso: Arrestment
Cross Business Group ResponsibilitySecurity This security model uses securitygroups and enables you to link oneresponsibility to many Business Groups.
Customizable Forms Forms that your systemadministrator can modify for ease of use orsecurity purposes by means of CustomForm restrictions. The Form Customizationwindow lists the forms and their methodsof customization.
DDatabase Item An item of information in
Oracle HRMS that has specialprogramming attached, enabling OracleFastFormula to locate and retrieve it for usein formulas.
Date To and Date From These fields are usedin windows not subject to DateTrack. Theperiod you enter in these fields remainsfixed until you change the values in eitherfield. See also: DateTrack, Effective Date
DateTrack When you change your effectivedate (either to past or future), DateTrackenables you to enter information that takeseffect on your new effective date, and toreview information as of the new date. Seealso: Effective Date
Deployment Factors See: Work Choices

Glossary – 6 Customizing, Reporting, and System Administration inOracle HRMS (Canada)
Derived Factor A factor (such as age, percentof fulltime employment, length of service,compensation level, or the number of hoursworked per period) that is used incalculations to determine ParticipationEligibility or Activity Rates for one or morebenefits.
Descriptive Flexfield A field that yourorganization can customize to captureadditional information required by yourbusiness but not otherwise tracked byOracle Applications. See also: Key Flexfield
Developer Descriptive Flexfield A flexfielddefined by your localization team to meetthe specific legislative and reporting needsof your country. See also: Extra InformationTypes
Direct Deposit The electronic transfer of anemployee’s net pay directly into theaccount(s) designated by the employee.
Distribution Monetary payments made from,or hours off from work as allowed by, acompensation or benefits plan.
EEffective Date The date for which you are
entering and viewing information. You setyour effective date in the Alter EffectiveDate window. See also: DateTrack
EIT See: Extra Information TypeElements Components in the calculation of
employee pay. Each element represents acompensation or benefit type, such assalary, wages, stock purchase plans, andpension contributions.
Element Classifications These control theorder in which elements are processed andthe balances they feed. Primary elementclassifications and some secondaryclassifications are predefined by OraclePayroll. Other secondary classifications canbe created by users.
Element Entry The record controlling anemployee’s receipt of an element, includingthe period of time for which the employeereceives the element and its value. See also:Recurring Elements, Nonrecurring Elements
Element Link The association of an element toone or more components of an employeeassignment. The link establishes employeeeligibility for that element. Employeeswhose assignment components match thecomponents of the link are eligible for theelement. See also: Standard Link
Element Set A group of elements that youdefine to process in a payroll run, or tocontrol access to compensation informationfrom a customized form, or for distributingcosts.
Employee Histories An SSHR function for anemployee to view their, Training History, Job Application History, EmploymentHistory, Absence History, or Salary History.A manager can also use this function toview information on their direct reports.
Employment Category A component of theemployee assignment. Four categories aredefined: Full Time – Regular, Full Time –Temporary, Part Time – Regular, and PartTime – Temporary.
Employment Insurance (EI) Benefit plan runby the federal government to which themajority of Canadian employers andemployees must contribute.
Employment Insurance Rate In Canada, this isthe rate at which the employer contributesto the EI fund. The rate is expressed as apercentage of the employee’s contribution.If the employer maintains an approvedwage loss replacement program, they canreduce their share of EI premiums byobtaining a reduced contribution rate.Employers would remit payroll deductionsunder a different employer account numberfor employees covered by the plan.
Glossary – 7
Employment Equity Occupational Groups(EEOG) In Canada, the Employment EquityOccupational Groups (EEOG) consist of 14classifications of work used in theEmployment Equity Report. The EEOGswere derived from the NationalOccupational Classification system.
Enroll in a Class An SSHR function whichenables an employee to search and enroll inan internally published class. An employeecan also use this function to maintain theircompetencies.
Enrollment Action Type Any action requiredto complete enrollment or de–enrollment ina benefit.
ESS Employee Self Service. A predefinedSSHR responsibility.
Event An activity such as a training day,review, or meeting, for employees orapplicants.
Expected Week of Confinement (EWC) Inthe UK, this is the week in which anemployee’s baby is due. The Sunday of theexpected week of confinement is used inthe calculations for Statutory Maternity Pay(SMP).
Extra Information Type (EIT) A type ofdeveloper descriptive flexfield that enablesyou to create an unlimited number ofinformation types for six key areas inOracle HRMS. Localization teams may alsopredefine some EITs to meet the specificlegislative requirements of your country.See also: Developer Descriptive Flexfield
FField A view or entry area in a window where
you enter, view, update, or deleteinformation. See also: Block, Region
Flex Credit A unit of ”purchasing power” in aflexible benefits program. An employeeuses flex credits, typically expressed inmonetary terms, to ”purchase” benefitsplans and/or levels of coverage withinthese plans.
Flexible Benefits Program A benefitsprogram that offers employees choicesamong benefits plans and/or levels ofcoverage. Typically, employees are given acertain amount of flex credits or moneyswith which to ”purchase” these benefitsplans and/or coverage levels.
Flexible Spending Account (FSA) Under USInternal Revenue Code Section 125,employees can set aside money on a pretaxbasis to pay for eligible unreimbursedhealth and dependent care expenses.Annual monetary limits and use–it–or–loseit provisions exist. Accounts are subject toannual maximums and forfeiture rules.
Form A predefined grouping of functions,called from a menu and displayed, ifnecessary, on several windows. Formshave blocks, regions and fields as theircomponents. See also: Block, Region, Field
GGlobal Value A value you define for any
formula to use. Global values can be dates,numbers or text.
Goods or Service Type A list of goods orservices a benefit plan sponsor hasapproved for reimbursement.
Grade A component of an employee’sassignment that defines their level and canbe used to control the value of their salaryand other compensation elements.
Glossary – 8 Customizing, Reporting, and System Administration inOracle HRMS (Canada)
Grade Comparatio A comparison of theamount of compensation an employeereceives with the mid–point of the validvalues defined for his or her grade.
Grade Rate A value or range of valuesdefined as valid for a given grade. Usedfor validating employee compensationentries.
Grade Scale A sequence of steps valid for agrade, where each step corresponds to onepoint on a pay scale. You can place eachemployee on a point of their grade scaleand automatically increment all placementseach year, or as required. See also: Pay Scale
Grade Step An increment on a grade scale.Each grade step corresponds to one pointon a pay scale. See also: Grade Scale
Grandfathered A term used in BenefitsAdministration. A person’s benefits aresaid to be grandfathered when a planchanges but they retain the benefitsaccrued.
Group A component that you define, usingthe People Group key flexfield, to assignemployees to special groups such aspension plans or unions. You can usegroups to determine employees’ eligibilityfor certain elements, and to regulate accessto payrolls.
HHierarchy An organization or position
structure showing reporting lines or otherrelationships. You can use hierarchies forreporting and for controlling access toOracle HRMS information.
IImputed Income Certain forms of indirect
compensation that US Internal RevenueService Section 79 defines as fringe benefitsand taxes the recipient accordingly.Examples include employer payment ofgroup term life insurance premiums over acertain monetary amount, personal use of acompany car, and other non–cash awards.
Initiator In SSHR a person who starts a 360Degree appraisal (Employee or Self) on anindividual. An initiator and the appraiseeare the only people who can see allappraisal information.
Input Values Values you define to holdinformation about elements. In OraclePayroll, input values are processed byformulas to calculate the element’s runresult. You can define up to fifteen inputvalues for an element.
Instructions An SSHR user assistancecomponent displayed on a web page todescribe page functionality.
KKey Flexfield A flexible data field made up of
segments. Each segment has a name youdefine and a set of valid values you specify.Used as the key to uniquely identify anentity, such as jobs, positions, grades, costcodes, and employee groups. See also:Descriptive Flexfield

Glossary – 9
LLeaver’s Statement In the UK, this Records
details of Statutory Sick Pay (SSP) paidduring a previous employment (issued asform SSP1L) which is used to calculate anew employee’s entitlement to SSP. If anew employee falls sick, and the last datethat SSP was paid for under the previousemployment is less than eight calendarweeks before the first day of the PIW forthe current sickness, the maximum liabilityfor SSP is reduced by the number of weeksof SSP shown on the statement.
Life Event A significant change in a person’slife that results in a change in eligibility orineligibility for a benefit.
Life Event Collision A situation in which theimpacts from multiple life events onparticipation eligibility, enrollability, level ofcoverage or activity rates conflict with eachother.
Life Event Enrollment A benefits planenrollment that is prompted by a life eventoccurring at any time during the plan year.
Linking Interval In the UK, this is the numberof days that separate two periods ofincapacity for work. If a period ofincapacity for work (PIW) is separated froma previous PIW by less than the linkinginterval, they are treated as one PIWaccording to the legislation for entitlementto Statutory Sick Pay (SSP). An employeecan only receive SSP for the maximumnumber of weeks defined in the legislationfor one PIW.
Linked PIWs In the UK, these are linkedperiods of incapacity for work that aretreated as one to calculate an employee’sentitlement to Statutory Sick Pay (SSP). Aperiod of incapacity for work (PIW) links toan earlier PIW if it is separated by less thanthe linking interval. A linked PIW can beup to three years long.
LMSS Line Manager Self Service. Apredefined SSHR responsibility.
Lookup Types Categories of information,such as nationality, address type and taxtype, that have a limited list of valid values.You can define your own Lookup Types,and you can add values to some predefinedLookup Types.
Lower Earnings Limit (LEL) In the UK, this isthe minimum average weekly amount anemployee must earn to pay NationalInsurance contributions. Employees whodo not earn enough to pay NationalInsurance cannot receive Statutory Sick Pay(SSP) or Statutory Maternity Pay (SMP).
MManager–Employee Appraisal Part of the
SSHR Appraisal function. A managerappraisal of an employee. However, anappraising manager does not have to be amanager.
Glossary – 10 Customizing, Reporting, and System Administration inOracle HRMS (Canada)
Maternity Pay Period In the UK, this is theperiod for which Statutory Maternity Pay(SMP) is paid. It may start at any time fromthe start of the 11th week before theexpected week of confinement and cancontinue for up to 18 weeks. The start dateis usually agreed with the employee, butcan start at any time up to the birth. Anemployee is not eligible to SMP for anyweek in which she works or for any otherreason for ineligibility, defined by thelegislation for SMP.
Menus You set up your own navigationmenus, to suit the needs of different users.
NNACHA National Automated Clearing House
Association. This is the US system formaking direct deposit payments toemployees.
Net Accrual Calculation The rule that defineswhich element entries add to or subtractfrom a plan’s accrual amount to give netentitlement.
Net Entitlement The amount of unused paidtime off an employee has available in anaccrual plan at any given point in time.
Nonrecurring Elements Elements that processfor one payroll period only unless youmake a new entry for an employee. Seealso: Recurring Elements
North American Industrial Classification(NAIC) code The North AmericanIndustrial Classification system (NAICs)was developed jointly by the US, Canadaand Mexico to provide comparability instatistics regarding business activity acrossNorth America. The NAIC replaces the USStandard Industrial Classification (SIC)system, and is used in the EmploymentEquity Report.
National Occupational Classification (NOC)code In Canada, the National OccupationalClassification (NOC) System wasdeveloped to best reflect the type of workperformed by employees. Occupations aregrouped in terms of particular tasks, dutiesand responsibilities. The use of thisstandardized system ensures consistency ofdata from year to year within the samecompany as well as between companies.These codes are used in the EmploymentEquity Report.
Not in Program Plan A benefit plan that youdefine outside of a program.
OOpen Enrollment A type of scheduled
enrollment in which participants can enrollin or alter elections in one or more benefitsplans.
Oracle FastFormula An Oracle tool thatallows you to write Oracle HRMS formulaswithout using a programming language.
Organization A required component ofemployee assignments. You can define asmany organizations as you want withinyour Business Group. Organizations can beinternal, such as departments, or external,such as recruitment agencies. You canstructure your organizations intoorganizational hierarchies for reportingpurposes and for system access control.
OSSWA Oracle Self Service Web Applications.OTM Oracle Training Management.
PPattern A pattern comprises a sequence of
time units that are repeated at a specifiedfrequency. Oracle SSP/SMP uses SSPqualifying patterns to determine employeesentitlement to Statutory Sick Pay (SSP).

Glossary – 11
Pattern Time Units A sequence of time unitsspecifies a repeating pattern. Each timeunit specifies a time period of hours, daysor weeks.
Pay Scale A set of progression points that canbe related to one or more rates of pay.Employee’s are placed on a particular pointon the scale according to their grade and,usually, work experience. See also: GradeScale
Payment Type There are three standardpayment types for paying employees:check, cash and direct deposit. You candefine your own payment methodscorresponding to these types.
Payroll A group of employees that OraclePayroll processes together with the sameprocessing frequency, for example, weekly,monthly or bimonthly. Within a BusinessGroup, you can set up as many payrolls asyou need.
People List An SSHR line manager utility usedto locate an employee.
Performance (within Assessment) Anexpectation of ”normal” performance of acompetence over a given period. Forexample, a person may exceed performanceexpectation in the communicationcompetence. See also: Proficiency (withinAssessment), Competence, Assessment
Period of Incapacity for Work (PIW) In theUK, this is a period of sickness that lastsfour or more days in a row, and is theminimum amount of sickness for whichStatutory Sick Pay can be paid. If a PIW isseparated by less then the linking interval, alinked PIW is formed and the two PIWs aretreated as one.
Period Type A time division in a budgetarycalendar, such as week, month, or quarter.
Person Search An SSHR function whichenables a manager to search for a person.There are two types of search, Simple andAdvanced.
Person Type There are eight system persontypes in Oracle HRMS. Seven of these arecombinations of employees, ex–employees,applicants, and ex–applicants. The eighthcategory is ’External’. You can create yourown user person types based on the eightsystem types.
Personal Tax Credits Return (TD1) A RevenueCanada form which each employee mustcomplete. Used by the employee to reducehis or her taxable income at source byclaiming eligible credits and also providespayroll with such important information ascurrent address, birth date, and SIN. Thesecredits determine the amount to withholdfrom the employee’s wages forfederal/provincial taxes.
Plan Design The functional area that allowsyou to set up your benefits programs andplans. This process involves defining therules which govern eligibility, availableoptions, pricing, plan years, third partyadministrators, tax impacts, plan assets,distribution options, required reporting,and communications.
Plan Sponsor The legal entity or businessresponsible for funding and administering abenefits plan. Generally synonymous withemployer.
Position A specific role within the BusinessGroup derived from an organization and ajob. For example, you may have a positionof Shipping Clerk associated with theorganization Shipping and the job Clerk.
Glossary – 12 Customizing, Reporting, and System Administration inOracle HRMS (Canada)
Predefined Components Some elements andbalances, all primary element classificationsand some secondary classifications aredefined by Oracle Payroll to meetlegislative requirements, and are suppliedto users with the product. You cannotdelete these predefined components.
Professional Information An SSHR functionwhich allows an employee to maintain theirown professional details or a line managerto maintain their direct reports professionaldetails.
Proficiency (within Assessment) Theperceived level of expertise of a person in acompetence, in the opinion of the assessor,over a given period. For example, a personmay demonstrate the communicationcompetence at Expert level. See also:Performance (within Assessment), Competence,Assessment
Proficiency Level A system for expressing andmeasuring how a competence is exhibitedin the work context. See also: BehavioralIndicators.
Progression Point A pay scale is calibrated inprogression points, which form a sequencefor the progression of employees up the payscale. See also: Pay Scale
Provincial/Territorial Employment StandardsActs In Canada, these are laws coveringminimum wages, hours of work, overtime,child labour, maternity, vacation,public/general holidays, parental andadoption leave, etc., for employeesregulated by provincial/territoriallegislation.
Provincial Health Number In Canada, this isthe account number of the provinciallyadministered health care plan that theemployer would use to make remittances.There would be a unique number for eachof the provincially controlled plans i.e.EHT, Quebec HSF, etc.
PTO Accrual Plan A benefit in whichemployees enroll to entitle them to accrueand take paid time off. The purpose ofabsences allowed under the plan, who canenroll, how much time accrues, when thetime must be used, and other rules aredefined for the plan.
QQPP (See Canada/Quebec Pension Plan)Qualification Type An identified
qualification method of achievingproficiency in a competence, such as anaward, educational qualification, a licenseor a test. See also: Competence
Qualifying Days In the UK, these are days onwhich Statutory Sick Pay (SSP) can be paid,and the only days that count as waitingdays. Qualifying days are normally workdays, but other days may be agreed.
Qualifying Pattern See: SSP Qualifying PatternQualifying Week In the UK, this is the week
during pregnancy that is used as the basisfor the qualifying rules for StatutoryMaternity Pay (SMP). The date of thequalifying week is fifteen weeks before theexpected week of confinement and anemployee must have been continuouslyemployed for at least 26 weeks continuinginto the qualifying week to be entitled toSMP.
Quebec Business Number In Canada, this isthe employer’s account number with theMinistere du Revenu du Quebec, alsoknown as the Quebec Identificationnumber. It consists of 15 digits, the first 9identify the employer, the next 2 identifythe type of tax account involved (payroll vs.corporate tax), and the last 4 identify theparticular account for that tax.
Glossary – 13
Questionnaire An SSHR function whichrecords the results of an appraisal.
QuickPaint Report A method of reporting onemployee and applicant assignmentinformation. You can select items ofinformation, paint them on a report layout,add explanatory text, and save the reportdefinition to run whenever you want. Seealso: Assignment Set
RRates A set of values for employee grades or
progression points. For example, you candefine salary rates and overtime rates.
Rating Scale Used to describe an enterprise’scompetencies in a general way. You do nothold the proficiency level at the competencelevel. See also: Proficiency Level
Record of Employment (ROE) A HumanResources Development Canada form thatmust be completed by an employerwhenever an interruption of earningsoccurs for any employee. This form isnecessary to claim Employment Insurancebenefits.
Recruitment Activity An event or program toattract applications for employment.Newspaper advertisements, career fairsand recruitment evenings are all examplesof recruitment activities. You can groupseveral recruitment activities togetherwithin an overall activity.
Recurring Elements Elements that processregularly at a predefined frequency.Recurring element entries exist from thetime you create them until you delete them,or the employee ceases to be eligible for theelement. Recurring elements can havestandard links. See also: NonrecurringElements, Standard Link
Region A collection of logically related fieldsin a window, set apart from other fields bya rectangular box or a horizontal line acrossthe window. See also: Block, Field
Registered Pension Plan (RPP) This is apension plan that has been registered withRevenue Canada. It is a plan where fundsare set aside by an employer, an employee,or both to provide a pension to employeeswhen they retire. Employee contributionsare generally exempt from tax.
Registered Retirement Savings Plan (RRSP)This is an individual retirement savingsplan that has been registered with RevenueCanada. Usually, contributions to theRRSP, and any income earned within theRRSP, is exempt from tax.
Report Parameters Inputs you make whensubmitting a report to control the sorting,formatting, selection, and summarizing ofinformation in the report.
Report Set A group of reports and concurrentprocesses that you specify to run together.
Requisition The statement of a requirementfor a vacancy or group of vacancies.
Request Groups A list of reports andprocesses that can be submitted by holdersof a particular responsibility. See also:Responsibility
Residual The amount of unused paid time offentitlement an employee loses at the end ofan accrual term. Typically employees cancarry over unused time, up to a maximum,but they lose any residual time that exceedsthis limit. See also: Carry Over

Glossary – 14 Customizing, Reporting, and System Administration inOracle HRMS (Canada)
Responsibility A level of authority in anapplication. Each responsibility lets youaccess a specific set of Oracle Applicationsforms, menus, reports, and data to fulfillyour business role. Several users can sharea responsibility, and a single user can havemultiple responsibilities. See also: SecurityProfile, User Profile Options, Request Groups,Security Groups
Retry Method of correcting a payroll run orother process before any post–runprocessing takes place. The original runresults are deleted and the process is runagain.
Revenue Canada Department of theGovernment of Canada which, amongstother responsibilities, administers,adjudicates, and receives remittances for alltaxation in Canada including income tax,Employment Insurance premiums, CanadaPension Plan contributions, and the Goodsand Services Tax (legislation is currentlyproposed to revise the name to the CanadaCustoms and Revenue Agency). In theprovince of Quebec the equivalent is theMinistere du Revenu du Quebec.
Reviewer (SSHR) A person invited by anappraising manager to add reviewcomments to an appraisal.
Reversal Method of correcting payroll runs orQuickPay runs after post–run processinghas taken place. The system replacespositive run result values with negativeones, and negative run result values withpositive ones. Both old and new valuesremain on the database.
Rollback Method of removing a payroll runor other process before any post–runprocessing takes place. All assignmentsand run results are deleted.
SSearch by Date An SSHR sub–function used
to search for a Person by Hire date,Application date, Job posting date or searchby a Training event date.
Salary Basis The period of time for which anemployee’s salary is quoted, such as hourlyor annually. Defines a group of employeesassigned to the same salary basis andreceiving the same salary element.
Scheduled Enrollment A benefits planenrollment that takes place during apredefined enrollment period, such as anopen enrollment. Scheduled enrollmentscan be administrative, open, orunrestricted.
Security Group Security groups enable HRMSusers to partition data by Business Group.Only used for Cross Business GroupResponsibility security. See also:Responsibility, Security Profile, User ProfileOptions
Security Profile Security profiles controlaccess to organizations, positions andemployee and applicant records within theBusiness Group. System administrators usethem in defining users’ responsibilities. Seealso: Responsibility
Self Appraisal Part of the SSHR Appraisalfunction. This is an appraisal undertaken byan employee to rate their own performanceand competencies.
SMP See: Statutory Maternity Pay Social Insurance Number (SIN) A unique
number provided by Human ResourcesDevelopment Canada (HRDC) to eachperson commencing employment inCanada. The number consists of 9 digits inthe following format (###–###–###).

Glossary – 15
Source Deductions Return (TP 1015.3) AMinistere du Revenu du Quebec formwhich each employee must complete. Thisform is used by the employee to reduce hisor her taxable income at source by claimingeligible credits and also provides payrollwith such important information as currentaddress, birth date, and SIN. These creditsdetermine the amount of provincial tax towithhold from the employee’s wages.
Special Information Types Categories ofpersonal information, such as skills, thatyou define in the Personal Analysis keyflexfield.
SSHR Oracle Self–Service Human Resources.An HR management system using anintranet and web browser to deliverfunctionality to employees and theirmanagers.
SSP See: Statutory Sick Pay SSP Qualifying Pattern In the UK, an SSP
qualifying pattern is a series of qualifyingdays that may be repeated weekly, monthlyor some other frequency. Each week in apattern must include at least one qualifyingday. Qualifying days are the only days forwhich Statutory Sick Pay (SSP) can be paid,and you define SSP qualifying patterns forall the employees in your organization sothat their entitlement to SSP can becalculated.
Standard Link Recurring elements withstandard links have their element entriesautomatically created for all employeeswhose assignment components match thelink. See also: Element Link, RecurringElements
Statement of Commissions and Expenses forSource Deduction Purposes (TP1015.R.13.1) A Ministere du Revenu duQuebec form which allows an employeewho is paid partly or entirely bycommissions to pay a constant percentageof income tax based on his or her estimatedcommissions for the year, less allowablebusiness expenses.
Statement of Remuneration and Expenses(TD1X) In Canada, the Statement ofRemuneration and Expenses allows anemployee who is paid partly or entirely bycommission to pay a constant percentage ofincome tax, based on his or her estimatedincome for the year, less business-relatedexpenses.
Statutory Maternity Pay In the UK, you payStatutory Maternity Pay (SMP) to femaleemployees who take time off work to havea baby, providing they meet the statutoryrequirements set out in the legislation forSMP.
Standard HRMS Security The standardsecurity model. Using this security modelyou must log on as a different user to see adifferent Business Group. See: MultipleResponsibility Security
Statutory Sick Pay In the UK, you payStatutory Sick Pay (SSP) to employees whoare off work for four or more days becausethey are sick, providing they meet thestatutory requirements set out in thelegislation for SSP.
Succession Planning An SSHR function whichenables a manager to prepare a successionplan.

Glossary – 16 Customizing, Reporting, and System Administration inOracle HRMS (Canada)
Suitability Matching An SSHR function whichenables a manager to compare and rank apersons competencies.
TTabbed Regions Parts of a window that
appear in a stack so that only one is visibleat any time. You click on the tab of therequired region to bring it to the top of thestack.
Task Flows A sequence of windows linked bybuttons to take you through the stepsrequired to complete a task, such as hiring anew recruit. System administrators cancreate task flows to meet the needs ofgroups of users.
Terminating Employees You terminate anemployee when he or she leaves yourorganization. Information about theemployee remains on the system but allcurrent assignments are ended.
Termination Rule Specifies when entries of anelement should close down for an employeewho leaves your enterprise. You can definethat entries end on the employee’s actualtermination date or remain open until afinal processing date.
Tips An SSHR user assistance component thatprovides information about a field.
UUser Assistance Components SSHR online
help comprising tips and instructions.User Balances Users can create, update and
delete their own balances, includingdimensions and balance feeds. See also:Balances
User Profile Options Features that allowsystem administrators and users to tailorOracle HRMS to their exact requirements.See also: Responsibility, Security Profile
VViewer (SSHR) A person with view only
access to an appraisal. An appraisingmanager or an employee in a 360 DegreeSelf appraisal can appoint view only accessto an appraisal.
WWCB Account Number In Canada, this is the
account number of the provinciallyadministered Worker’s CompensationBoard that the employer would use to makeremittances. There would be a uniquenumber for each of the provinciallycontrolled boards i.e. Workplace Safety &Insurance Board of Ontario, CSST, etc.
Waiting Days In the UK, statutory Sick Pay isnot payable for the first three qualifyingdays in period of incapacity for work(PIW), which are called waiting days. Theyare not necessarily the same as the firstthree days of sickness, as waiting days canbe carried forward from a previous PIW ifthe linking interval between the two PIWsis less than 56 days.
Work Choices Also known as WorkPreferences, Deployment Factors, or WorkFactors. These can affect a person’s capacityto be deployed within an enterprise, suchwillingness to travel or relocate. You canhold work choices at both job and positionlevel, or at person level.

Glossary – 17
Worker’s Compensation Board In Canada,this is a provincially governed legislativebody which provides benefits to employeesupon injury, disability, or death whileperforming the duties of the employer.Worker’s Compensation Board premiumsare paid entirely by the employer.
Workflow An Oracle application which usescharts to manage approval processes and inaddition is used in SSHR to configuredisplay values of sections within a webpage and instructions.
Work Structures The fundamental definitionsof organizations, jobs, positions, grades,payrolls and other employee groups withinyour enterprise that provide the frameworkfor defining the work assignments of youremployees.

Glossary – 18 Customizing, Reporting, and System Administration inOracle HRMS (Canada)

Index – 1
Index
AAddress styles, 1 – 25Application Data Export, 4 – 5Assignment sets, overview, 4 – 20Attachments
attaching comments or objects to records, 4 –8
Oracle HRMS entities that support, 4 – 8Audit groups, 3 – 9AuditTrail, 3 – 2
overview, 3 – 3setting up audit groups, 3 – 9Update Datetracked Tables process, 3 – 9
BBank account information, 1 – 30Base currency, 1 – 92Business Groups
enabling one responsibility for manyBusiness Groups, 2 – 20
ways of linking to responsibilities, 2 – 19
CComments, attaching to records, 4 – 8Concurrent managers, 4 – 16
Country–specific requirementsaddress styles, 1 – 25predefined developer flexfields, 1 – 29
Cross Business Group Responsibility Security,2 – 8
setting up, 2 – 36Currencies, enabling, 1 – 92Customizing
menu structures, 2 – 21 to 2 – 23QuickPaint Report window, 4 – 6
Customizing windowsHR_CUSTOMIZATION parameter, 1 – 67list of customizable windows, 1 – 13overview, 1 – 13 to 1 – 15types of data restrictions, 1 – 14
DDatabase items, in QuickPaint reports, 4 – 13Descriptive flexfields, 1 – 16
creating database items, 1 – 84defining segments of, 1 – 20 to 1 – 22enabling users to add fields to windows, 1 –
20for address styles, 1 – 25list of user definable, 1 – 22 to 1 – 25
Developer descriptive flexfields, 1 – 29 to 1 –31
Developer key flexfields, 1 – 29 to 1 – 31

Index – 2 Customizing, Reporting, and System Administrationin Oracle HRMS (Canada)
Distribution sets, 1 – 59
EElement Classifications, 1 – 49Element sets, 1 – 59Extra Information types, 1 – 16
entering, 1 – 91example script, 1 – 51optional components of a responsibility, 2 –
20setting up, 1 – 86setting up for an organization classification,
1 – 88setting up responsibilities, 1 – 90
FFolders, 4 – 4 to 4 – 6Form functions, defining parameters for
different form types, 1 – 67
IInquiry windows, list of, 4 – 11
KKey flexfield setup, 1 – 17 to 1 – 19
creating database items, 1 – 85uses of key flexfields, 1 – 17
Key flexfields, 1 – 16Bank Details, 1 – 30Cost Allocation, 1 – 19Grade Name, 1 – 18Job Name, 1 – 18People Group, 1 – 18Personal Analysis, 1 – 18Position Name, 1 – 18Soft Coded Legislation, 1 – 30
LLetter generation
ADE and concurrent processing compared, 5– 3
standard letter overview, 5 – 2 to 5 – 6using Oracle Reports, 5 – 4using word processors, 5 – 4
LISTGEN, 2 – 28Lookup Types, 1 – 50Lookups
access levels, 1 – 32defining new lookup types, 1 – 93 to 1 – 95defining new lookup values, 1 – 94 to 1 – 96global and local types, 1 – 32list of user and extensible types, 1 – 34 to 1 –
48overview, 1 – 32 to 1 – 34removing lookup values, 1 – 95
MMail merge, 5 – 2 to 5 – 6, 5 – 15Menu Structures report, 2 – 44Menus
default menu paths, A – 2defining, 2 – 21 to 2 – 22, 2 – 43defining functions, 2 – 45for security, 2 – 20, 2 – 21query–only access, 2 – 11
NNational address styles, changing default
styles, 1 – 65
OOracle Human Resources, using with
spreadsheets, 4 – 5 to 4 – 6

Index – 3
ORACLE IDs, 2 – 42Organization hierarchies, in security profiles, 2
– 30OTA, SQL*Plus script, C – 7 to C – 10
PPayrolls, in security profiles, 2 – 17PERWPOUK, SQL*Plus script, C – 2 to C – 5PERWPWUk, SQL*Plus script, C – 5 to C – 8Position hierarchies, in security profiles, 2 – 31Process security, 2 – 23Processes
Create Descriptive Flexfield DB Items, 1 – 84Create Key Flexfield DB Items, 1 – 85
QQuery–only access to windows, 2 – 11QuickPaint reports, 4 – 5
customizing, 4 – 6defining, 4 – 13 to 4 – 14running, 4 – 15
RReport security, 2 – 23Reporting users, 2 – 27
setting up, 2 – 42Reports
defining, 4 – 4list of, 4 – 16 to 4 – 18Menu Structure, 2 – 44QuickPaint, 4 – 13 to 4 – 14
Request groups, 2 – 20, 2 – 23Responsibilities, 2 – 19, 2 – 21
defining, 2 – 33, 2 – 36Restricting access to records
by menu structures, 2 – 21by organization hierarchy, 2 – 30by payroll, 2 – 17by position hierarchy, 2 – 31by responsibilities, 2 – 19 to 2 – 20
by security profiles, 2 – 17from other tools, 2 – 27
ROLEGEN, 2 – 29Roles, 2 – 19
SSECGEN, 2 – 28Security
creating Oracle IDs, 2 – 42enabling currencies, 1 – 92extra information types, 2 – 20of reports and processes, 2 – 20, 2 – 23running HR security processes, 2 – 28setting user profile options, 2 – 10
Security groups, 2 – 24Security models, 2 – 8
cross business group responsibility security,2 – 8
standard HRMS security, 2 – 8Security processes
Enable Multiple Security Groups, 2 – 29Generate Secure User (SECGEN), 2 – 28Grant Permissions To Roles (ROLEGEN), 2 –
29Security List Maintenance (LISTGEN), 2 – 28
Security profiles, 2 – 17 to 2 – 18, 2 – 20defining, 2 – 35
Soft coded legislation, 1 – 30Spreadsheets, 4 – 5 to 4 – 6SQL*Plus script
OTA – for confirmation letters, C – 7 to C –10
PERWPOUK, C – 2 to C – 5PERWPWUK, C – 5 to C – 8
Standard HRMS security, 2 – 8setting up, 2 – 33
Standard letters, 5 – 2
TTables, user–defined, 1 – 31
accessing values in, 1 – 31entering values into, 1 – 98

Index – 4 Customizing, Reporting, and System Administrationin Oracle HRMS (Canada)
setting up, 1 – 96 to 1 – 97Task flows, 1 – 5 to 1 – 6
adding a new form/node, 1 – 72adding to a menu, 1 – 67amending the navigation, 1 – 73copying an existing task flow, 1 – 71creating using forms, 1 – 63creating using Oracle Workflow, 1 – 64defining nodes, 1 – 68defining task flows, 1 – 69Oracle Workflow, 1 – 11WORKFLOW_NAME parameter, 1 – 67
TemplatePERWPOUK, C – 2 to C – 5PERWPWUK, C – 5 to C – 8
UUser profile options, 2 – 36
overview, 2 – 10 to 2 – 12profile options listing, 2 – 11 to 2 – 16
User tables, 1 – 31Users, creating, 2 – 34, 2 – 37
VViews, list of, 4 – 11
WWindows
Application Utilities Lookups, 1 – 93, 1 – 95
Assignment Criteria, 4 – 21Assignment Set, 4 – 21, 4 – 24Columns, 1 – 96default navigation paths, A – 15Define Task Flow, 1 – 69Define Task Flow Nodes, 1 – 68Element and Distribution Set, 1 – 59Extra Information, 1 – 91Find Security Profile Assignment, 2 – 38Form Customization, 1 – 60Grade Rate, 1 – 67Information Type Security, 1 – 90Letter, 5 – 11Menu, 2 – 44Personal Profile Values, 2 – 11QuickPaint Inquiry, 4 – 15QuickPaint Report, 4 – 13Request Letter, 5 – 13Rows, 1 – 96Scale Rate, 1 – 67Security Profile, 2 – 35Submit Requests, 4 – 16System Profile Values, 2 – 10Table Structure, 1 – 96Table Values, 1 – 98View Requests, 4 – 16
Word processors, supported makes for lettergeneration, 5 – 4 to 5 – 5