Embed Size (px)
DESCRIPTION
CTE Registration System Workshop. http://london.spsu.edu. Objectives. By the end of this workshop you will: Tour the CTE registration system using an Admin account Create , edit, and manage Programs Create , edit, and manage Topics and Workshops - PowerPoint PPT Presentation
Citation preview
1
CTE Registration System Workshop
http://london.spsu.edu

2
Objectives
By the end of this workshop you will:
• Tour the CTE registration system using an Admin account
• Create, edit, and manage Programs
• Create, edit, and manage Topics and Workshops
• Approve workshops and upload presenter content
• View the Calendar
• Cancel workshop registrations with Manage User Events
• Generate Sign-In sheets with Reports
• Mark participants as attended with Manage User Events
• View and print Transcripts and Certificates
3
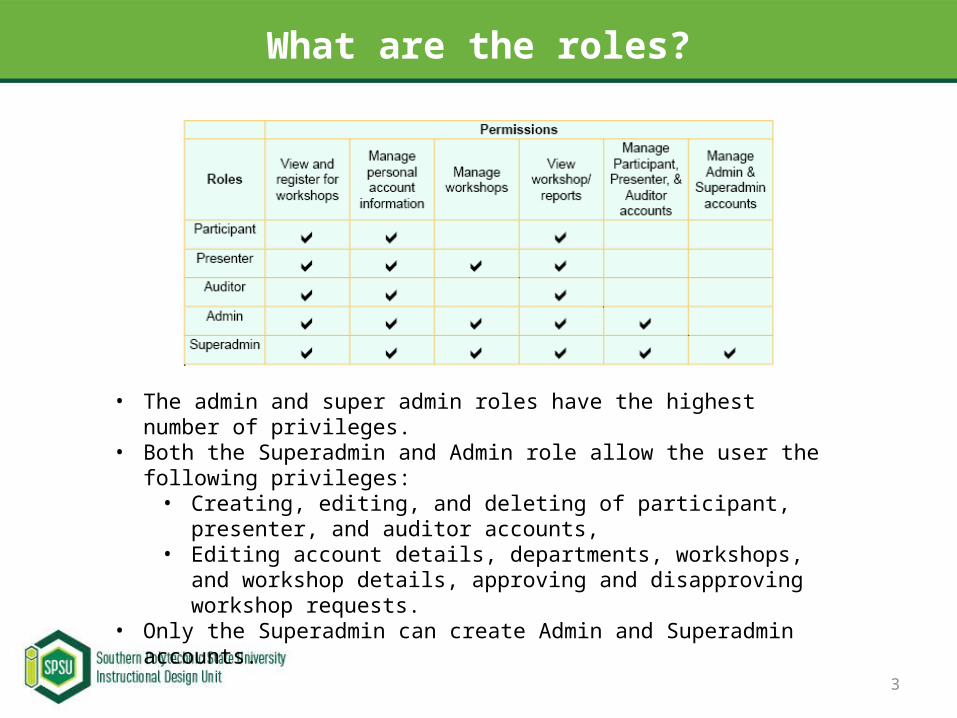
What are the roles?
• The admin and super admin roles have the highest number of privileges. • Both the Superadmin and Admin role allow the user the following privileges:
• Creating, editing, and deleting of participant, presenter, and auditor accounts,
• Editing account details, departments, workshops, and workshop details, approving and disapproving workshop requests.
• Only the Superadmin can create Admin and Superadmin accounts.
4
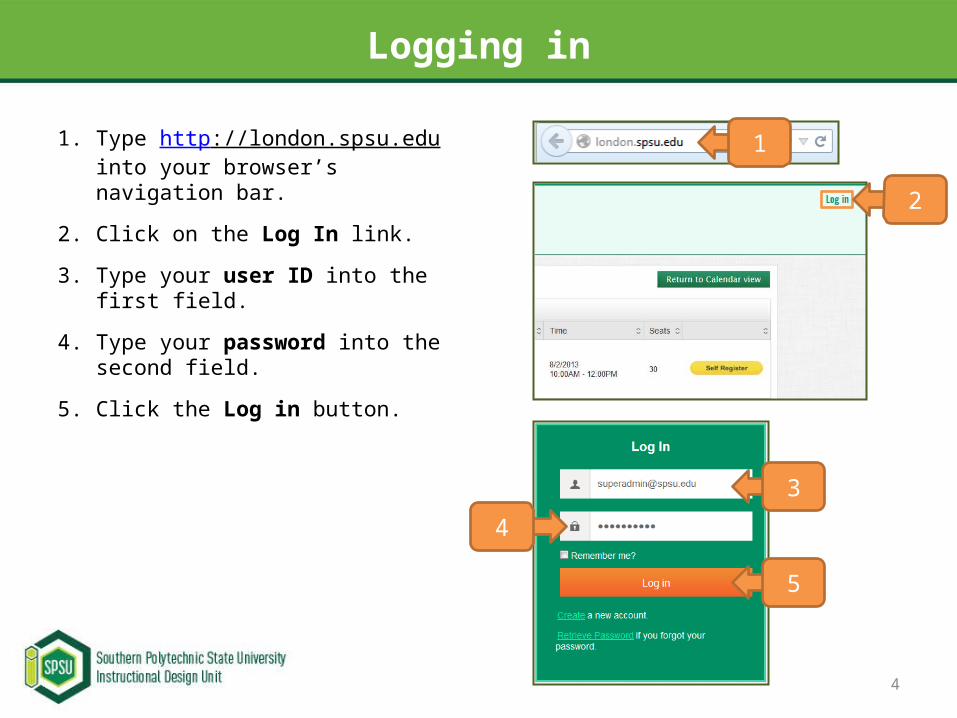
Logging in
1. Type http://london.spsu.edu into your browser’s navigation bar.
2. Click on the Log In link.
3. Type your user ID into the first field.
4. Type your password into the second field.
5. Click the Log in button.
1
5
4
3
2
5
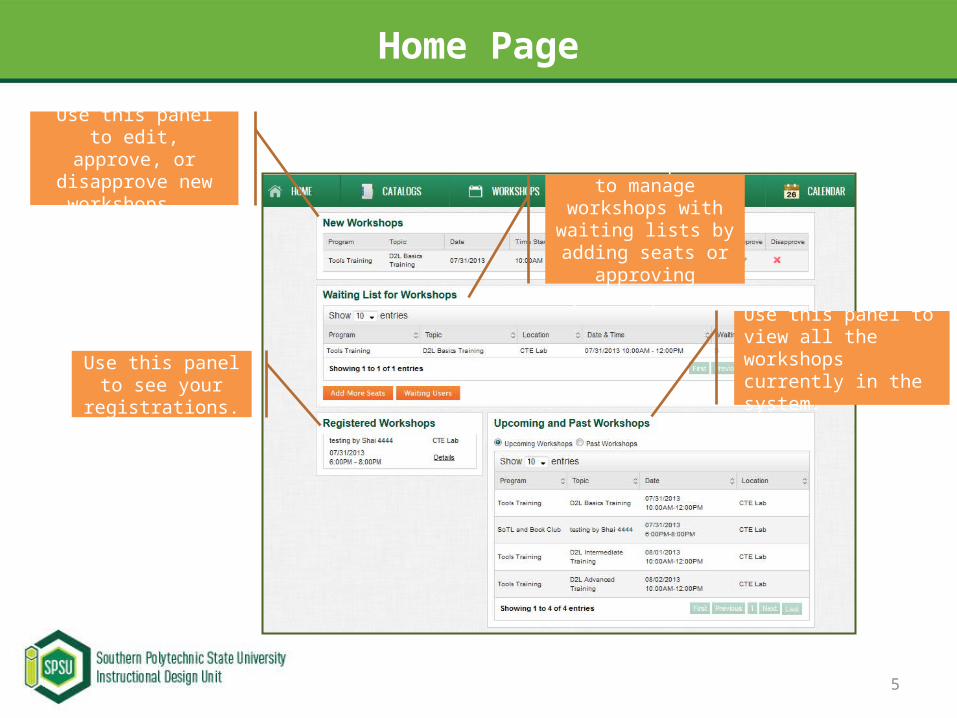
Home Page
Use this panel to edit, approve, or disapprove
new workshops. Use this panel to manage workshops with waiting lists by
adding seats or approving participants.
Use this panel to view all the workshops currently in the system.Use this panel to see
your registrations.
6
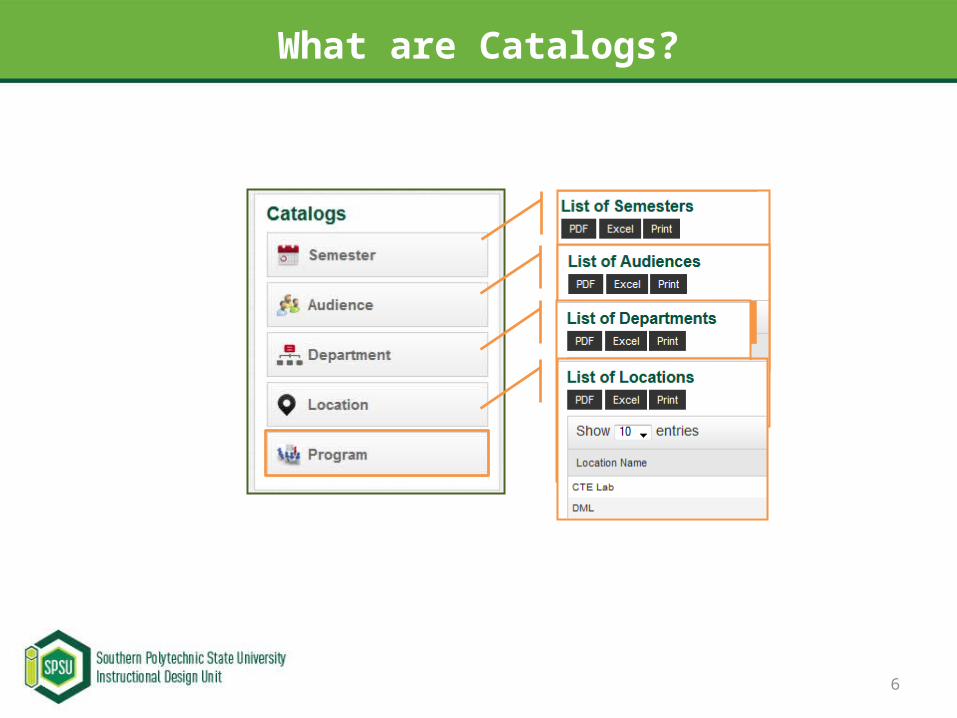
What are Catalogs?
7
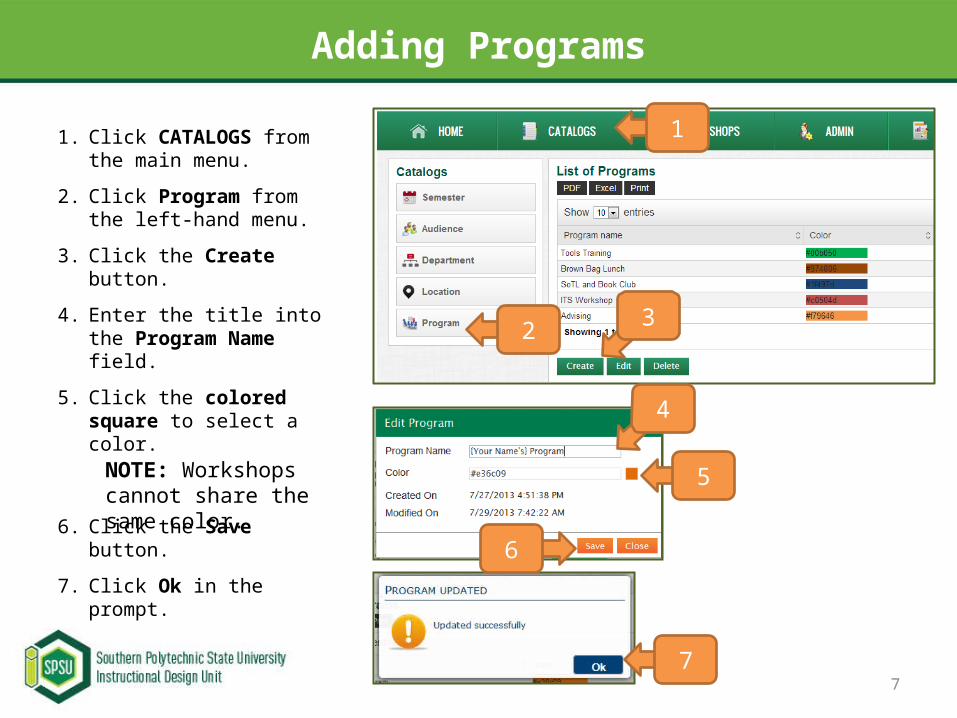
Adding Programs
1. Click CATALOGS from the main menu.
2. Click Program from the left-hand menu.
3. Click the Create button.
4. Enter the title into the Program Name field.
5. Click the colored square to select a color.
6. Click the Save button.
7. Click Ok in the prompt.
1
2
5
4
NOTE: Workshops cannot share the same color.
3
6
7
8
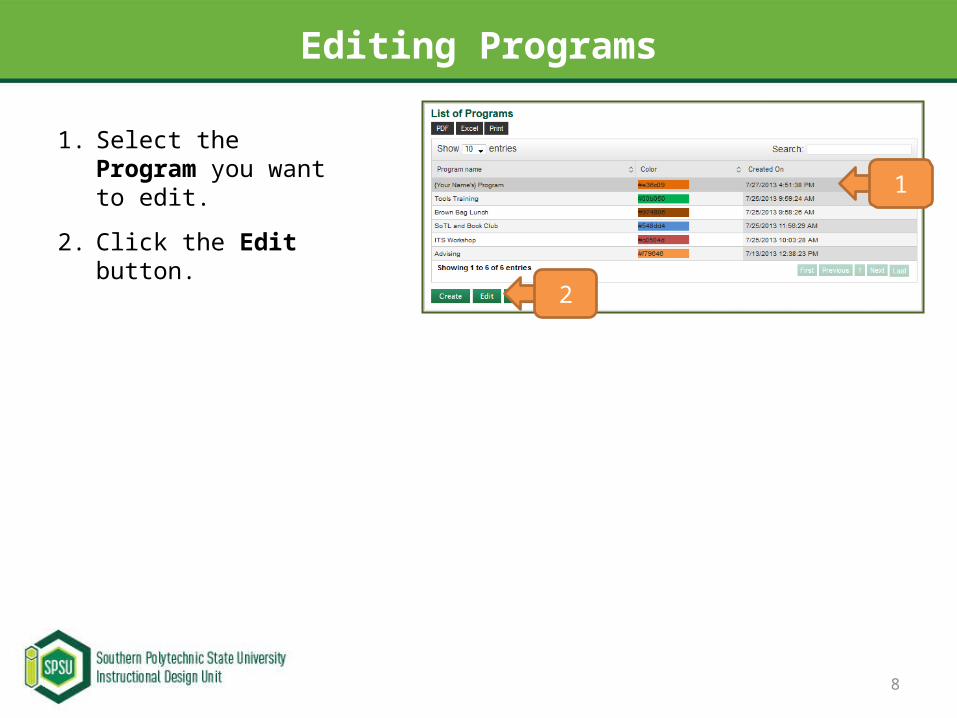
Editing Programs
1. Select the Program you want to edit.
2. Click the Edit button.1
2
9
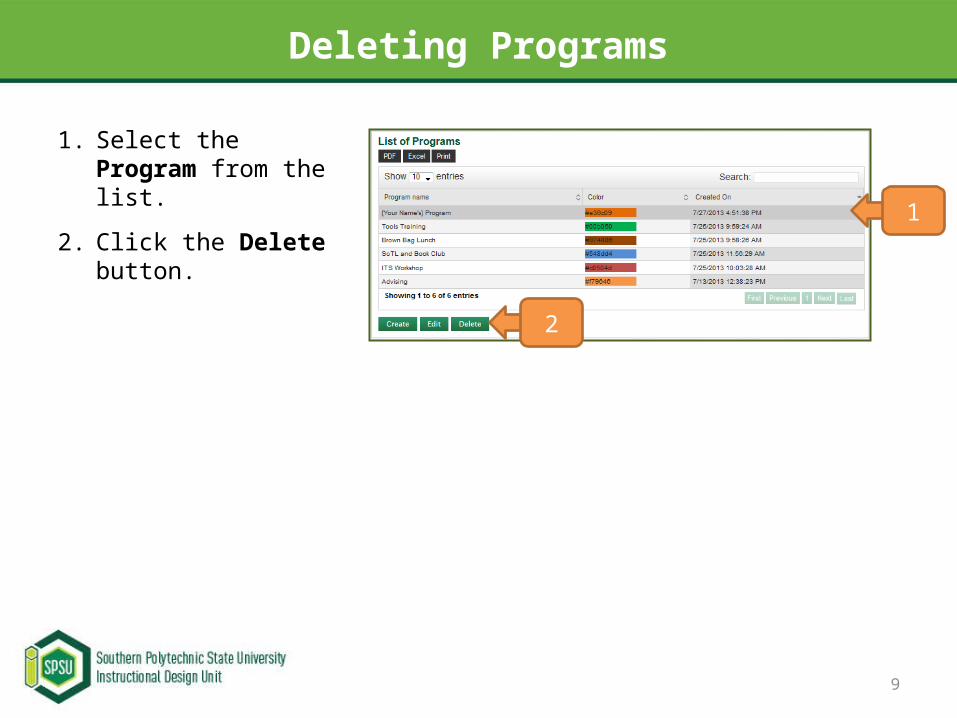
Deleting Programs
1. Select the Program from the list.
2. Click the Delete button. 1
2
10
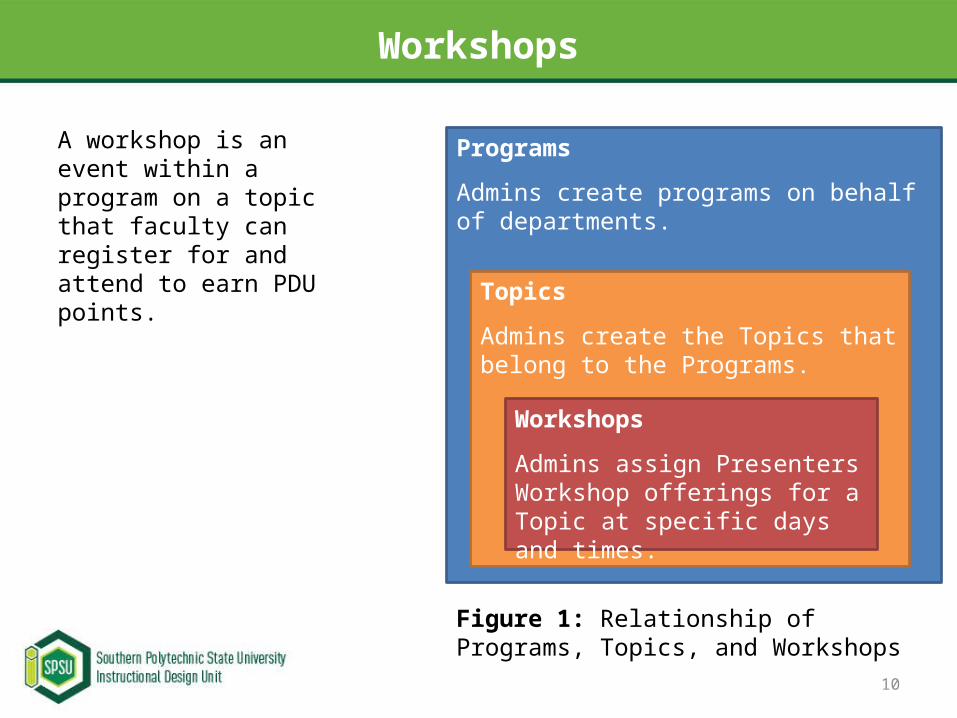
Workshops
A workshop is an event within a program on a topic that faculty can register for and attend to earn PDU points.
Programs
Admins create programs on behalf of departments.
Topics
Admins create the Topics that belong to the Programs.
Workshops
Admins assign Presenters Workshop offerings for a Topic at specific days and times.
Figure 1: Relationship of Programs, Topics, and Workshops
11
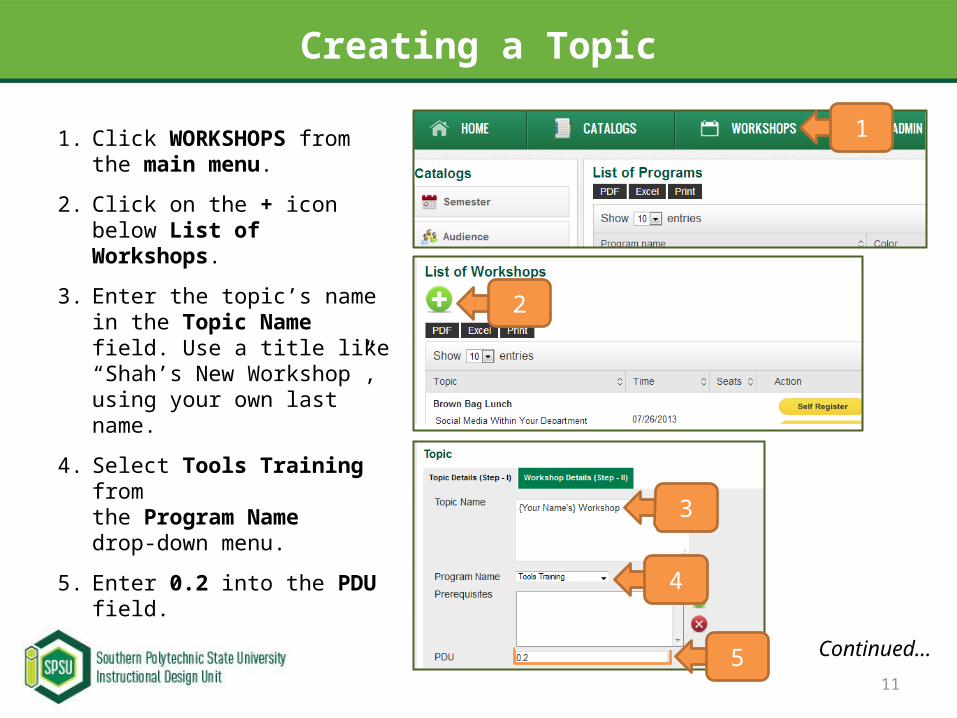
Creating a Topic
1. Click WORKSHOPS from the main menu.
2. Click on the + icon below List of Workshops.
3. Enter the topic’s name in the Topic Name field. Use a title like “Shah’s New Workshop”, using your own last name.
4. Select Tools Training from the Program Name drop-down menu.
5. Enter 0.2 into the PDU field.
Continued…
1
2
3
4
5
12
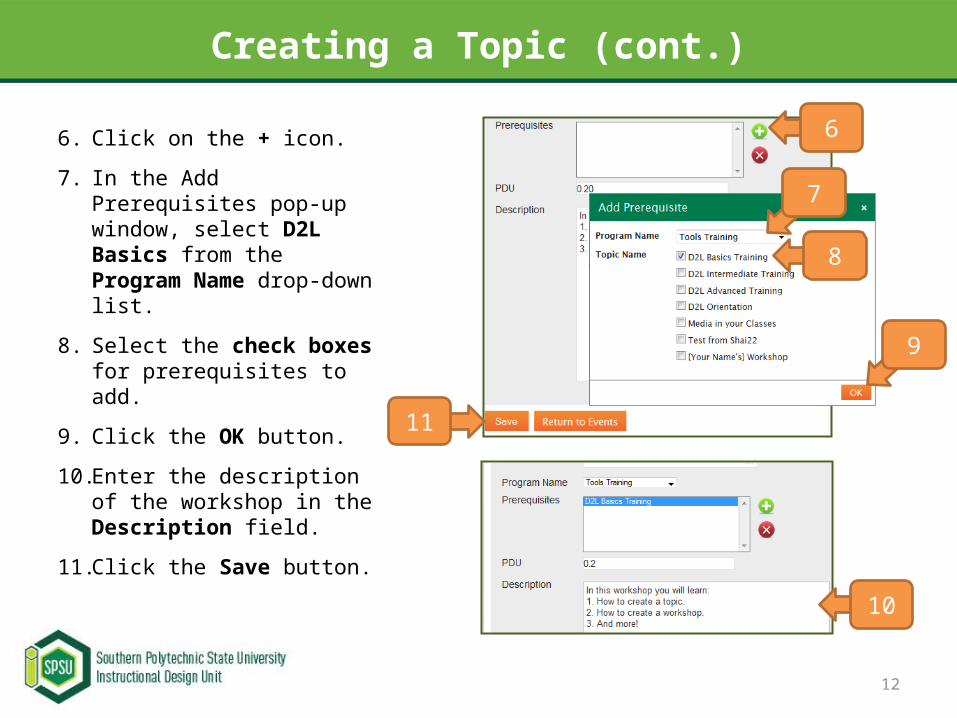
Creating a Topic (cont.)
6. Click on the + icon.
7. In the Add Prerequisites pop-up window, select D2L Basics from the Program Name drop-down list.
8. Select the check boxes for prerequisites to add.
9. Click the OK button.
10. Enter the description of the workshop in the Description field.
11. Click the Save button. 10
11
6
7
8
9
13
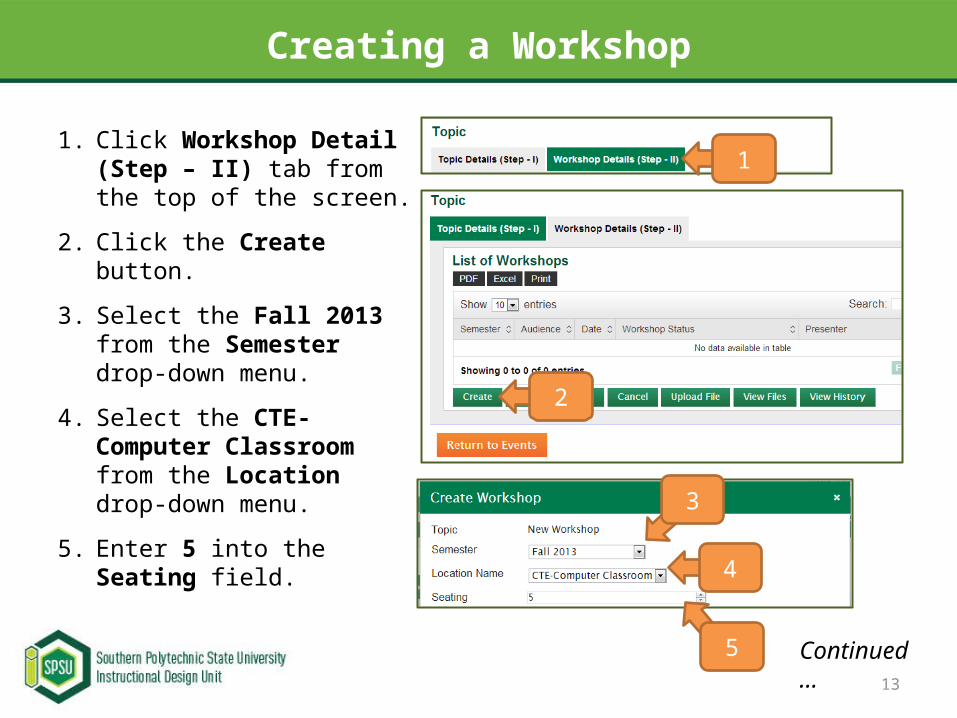
Creating a Workshop
1. Click Workshop Detail (Step – II) tab from the top of the screen.
2. Click the Create button.
3. Select the Fall 2013 from the Semester drop-down menu.
4. Select the CTE-Computer Classroom from the Location drop-down menu.
5. Enter 5 into the Seating field.
1
2
4
3
5 Continued…
14
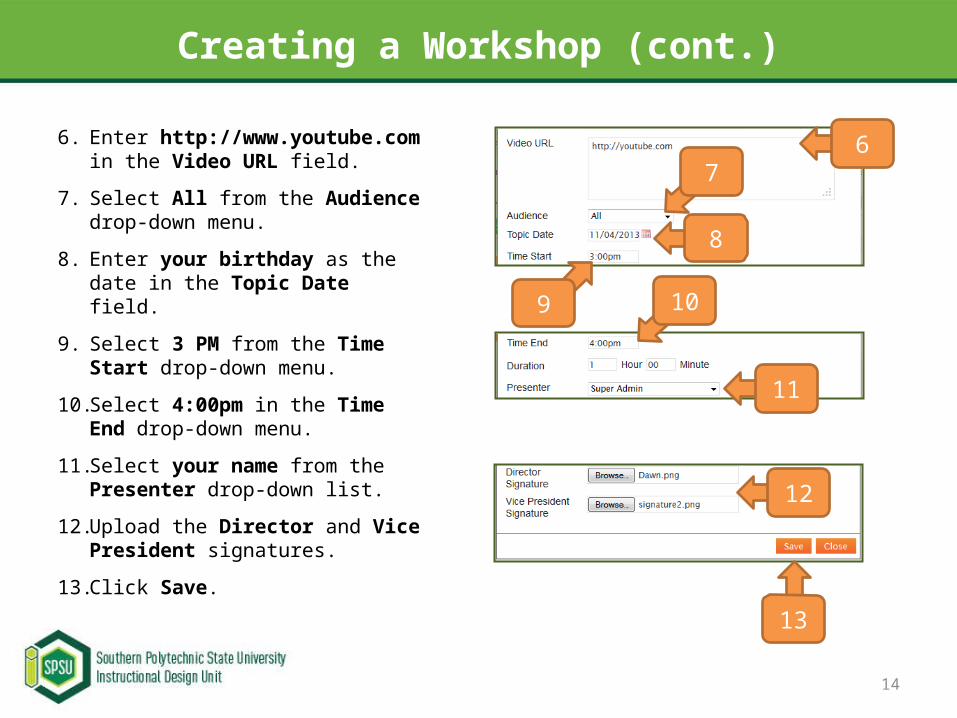
Creating a Workshop (cont.)
6. Enter http://www.youtube.com in the Video URL field.
7. Select All from the Audience drop-down menu.
8. Enter your birthday as the date in the Topic Date field.
9. Select 3 PM from the Time Start drop-down menu.
10. Select 4:00pm in the Time End drop-down menu.
11. Select your name from the Presenter drop-down list.
12. Upload the Director and Vice President signatures.
13. Click Save.
67
11
10
8
13
9
12
15
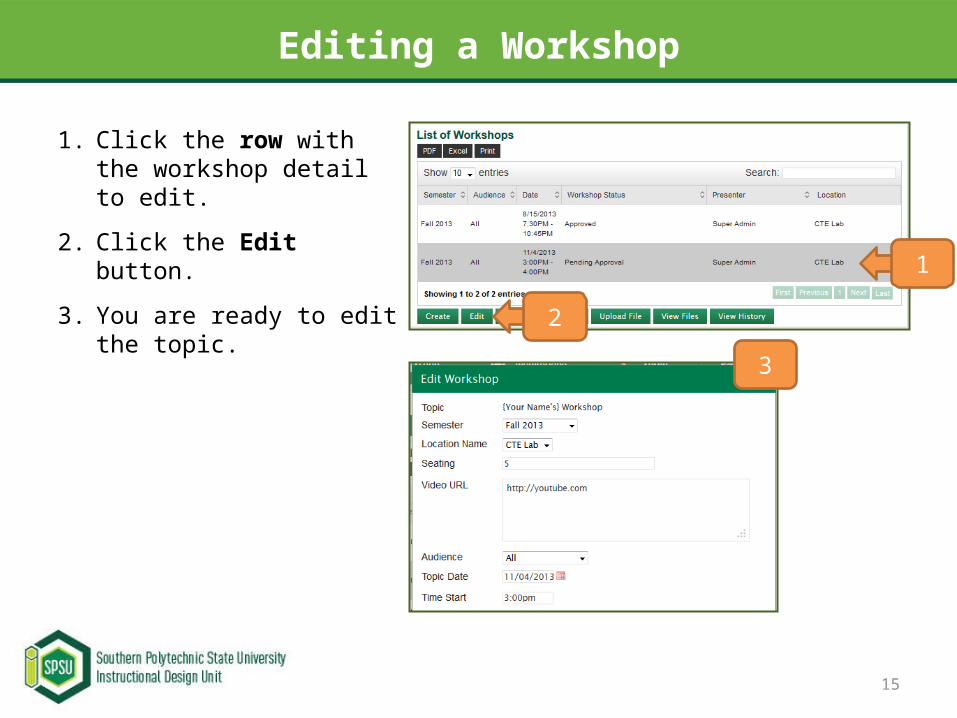
Editing a Workshop
1. Click the row with the workshop detail to edit.
2. Click the Edit button.
3. You are ready to edit the topic. 1
2
3
16
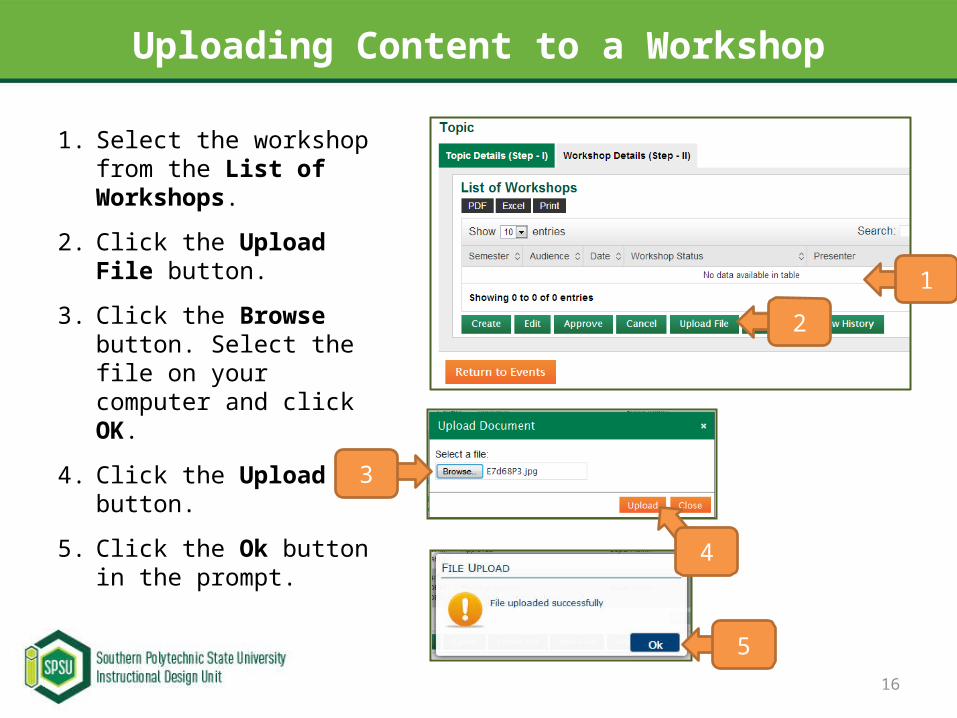
Uploading Content to a Workshop
1. Select the workshop from the List of Workshops.
2. Click the Upload File button.
3. Click the Browse button. Select the file on your computer and click OK.
4. Click the Upload button.
5. Click the Ok button in the prompt.
1
2
3
4
5
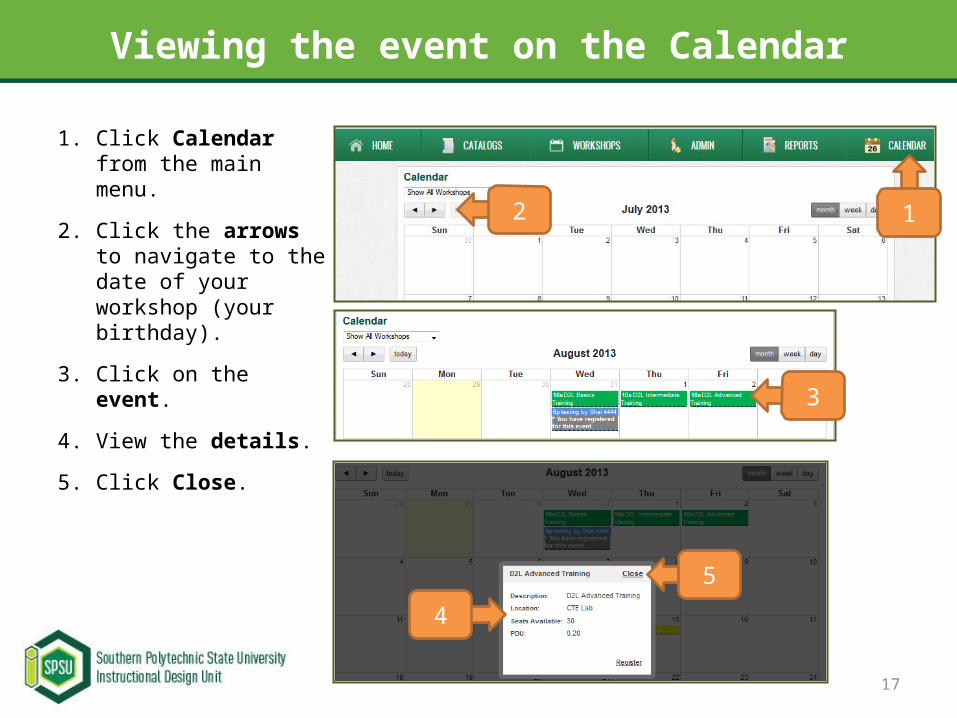
Viewing the event on the Calendar
1. Click Calendar from the main menu.
2. Click the arrows to navigate to the date of your workshop (your birthday).
3. Click on the event.
4. View the details.
5. Click Close.
12
5
3
4
17
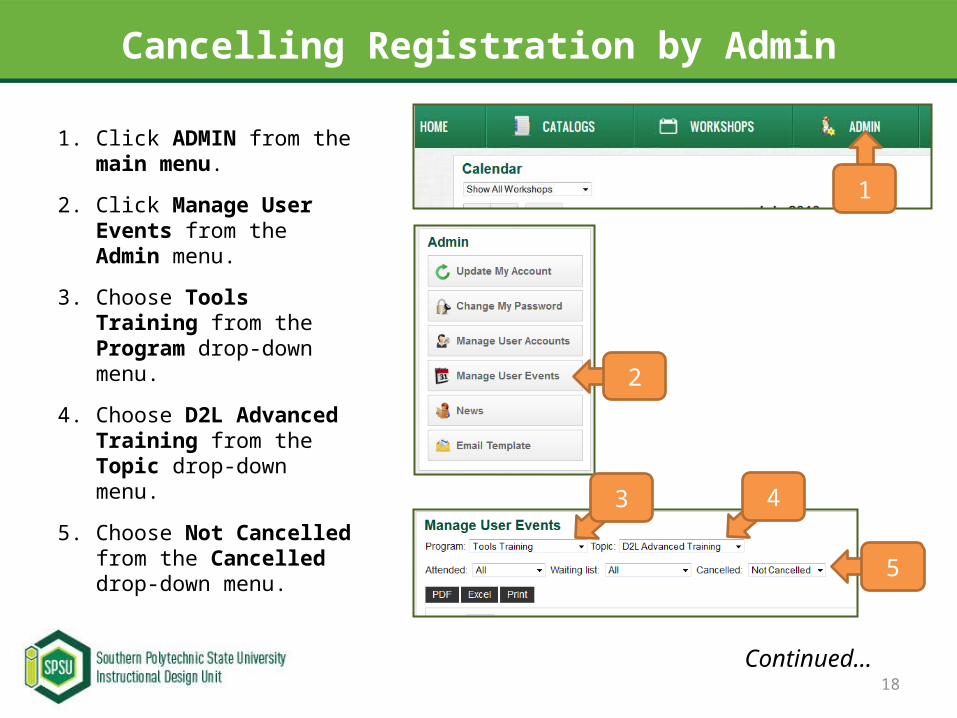
Cancelling Registration by Admin
1. Click ADMIN from the main menu.
2. Click Manage User Events from the Admin menu.
3. Choose Tools Training from the Program drop-down menu.
4. Choose D2L Advanced Training from the Topic drop-down menu.
5. Choose Not Cancelled from the Cancelled drop-down menu.
18
1
5
2
43
Continued…
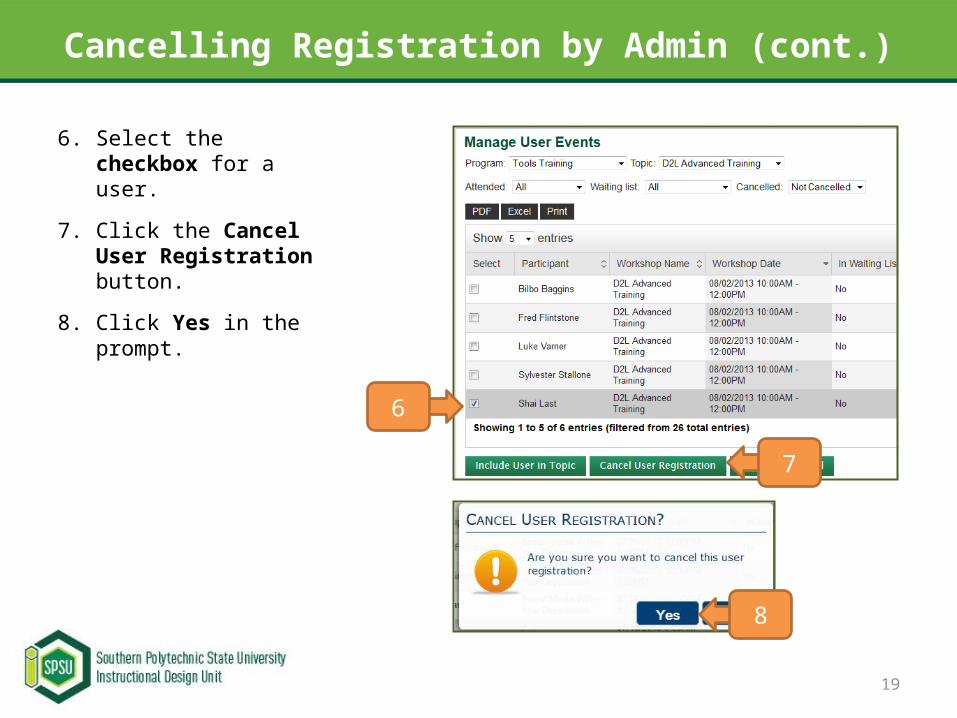
Cancelling Registration by Admin (cont.)
6. Select the checkbox for a user.
7. Click the Cancel User Registration button.
8. Click Yes in the prompt.
19
7
6
8
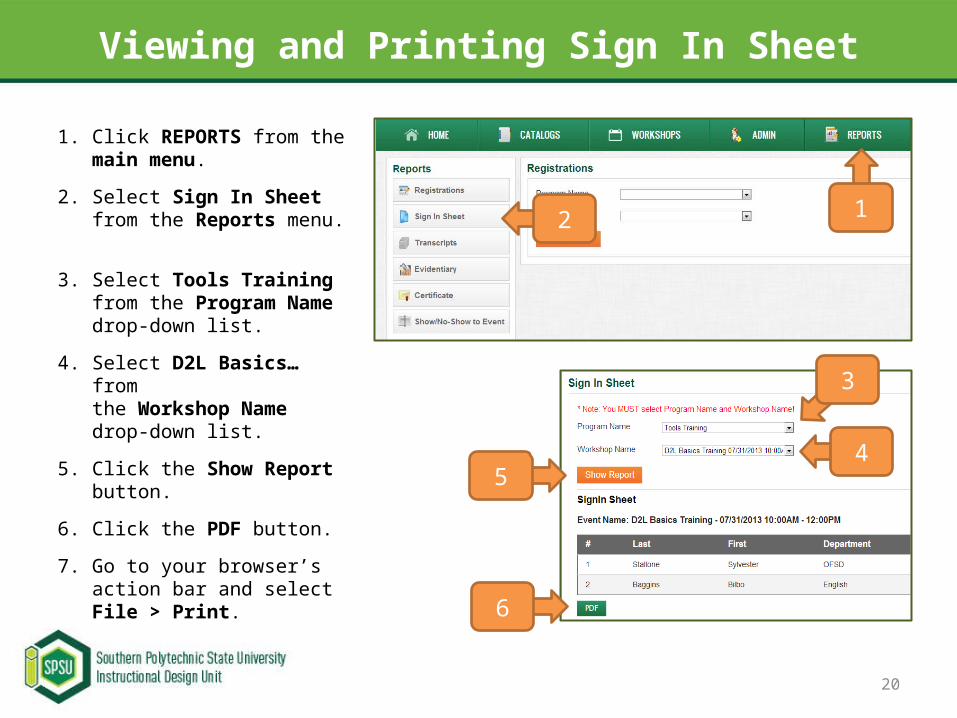
Viewing and Printing Sign In Sheet
1. Click REPORTS from the main menu.
2. Select Sign In Sheet from the Reports menu.
3. Select Tools Training from the Program Name drop-down list.
4. Select D2L Basics… from the Workshop Name drop-down list.
5. Click the Show Report button.
6. Click the PDF button.
7. Go to your browser’s action bar and select File > Print.
12
4
3
5
6
20
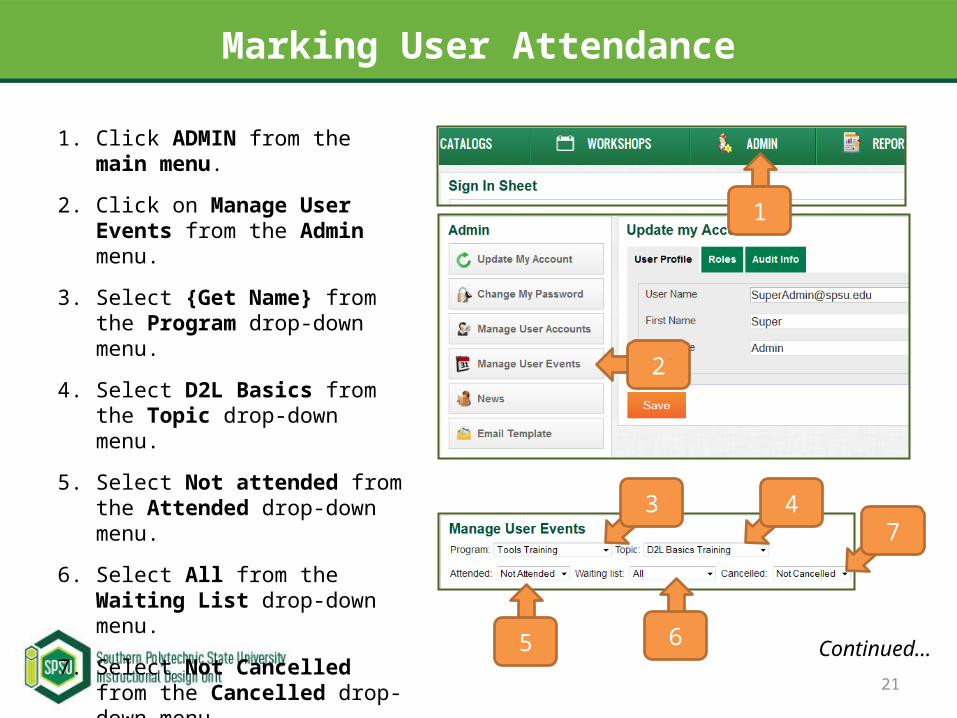
Marking User Attendance
1. Click ADMIN from the main menu.
2. Click on Manage User Events from the Admin menu.
3. Select {Get Name} from the Program drop-down menu.
4. Select D2L Basics from the Topic drop-down menu.
5. Select Not attended from the Attended drop-down menu.
6. Select All from the Waiting List drop-down menu.
7. Select Not Cancelled from the Cancelled drop-down menu.
21
Continued…
1
2
3 47
5 6
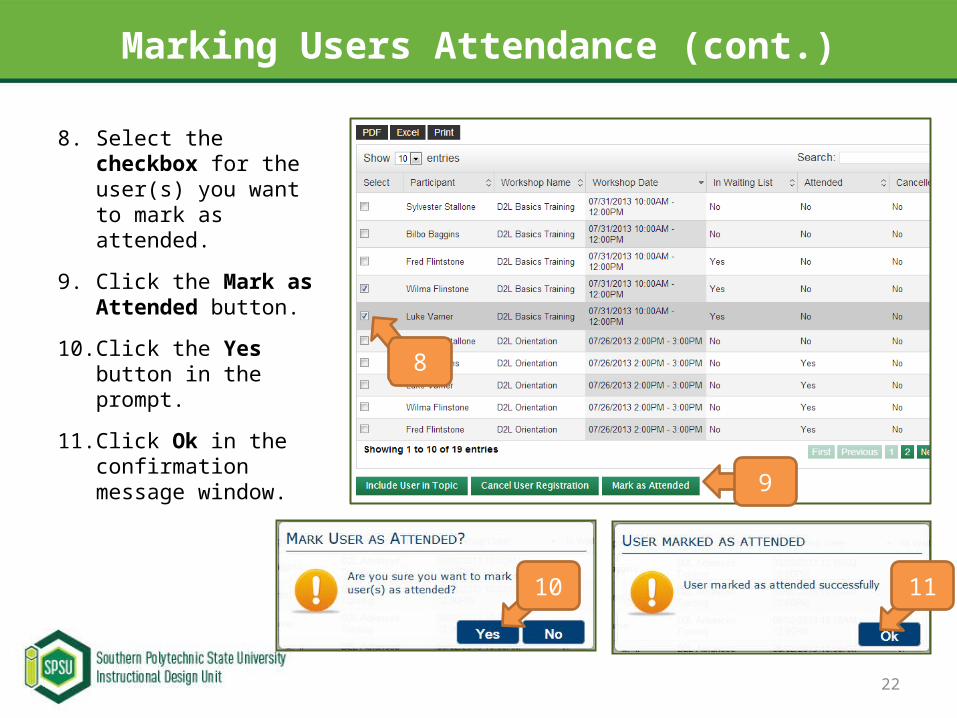
Marking Users Attendance (cont.)
8. Select the checkbox for the user(s) you want to mark as attended.
9. Click the Mark as Attended button.
10. Click the Yes button in the prompt.
11. Click Ok in the confirmation message window.
22
8
9
10 11
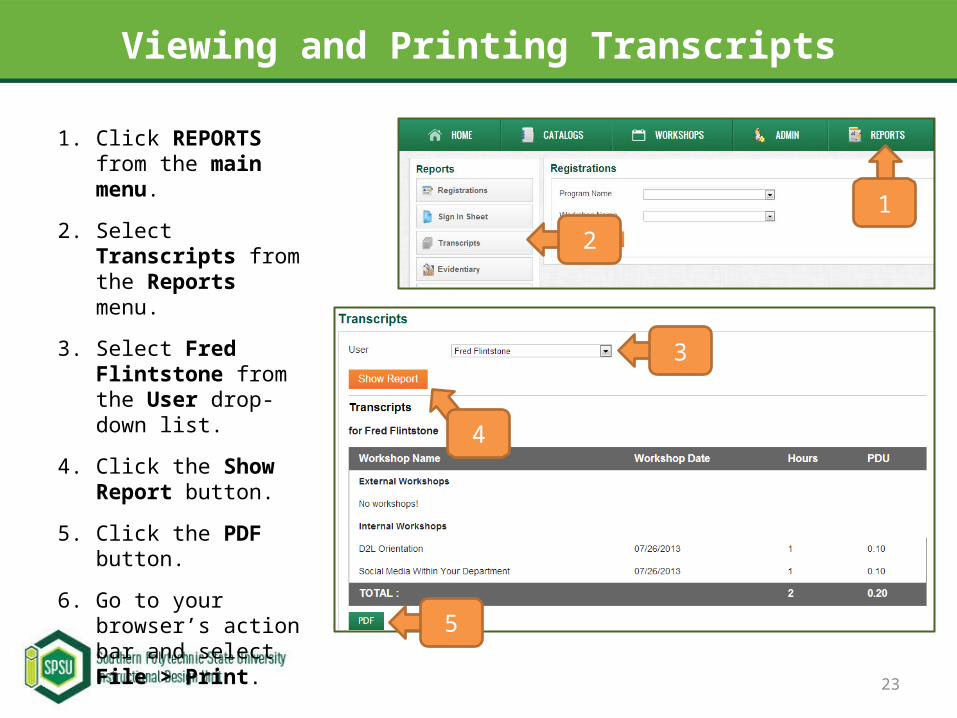
Viewing and Printing Transcripts
1. Click REPORTS from the main menu.
2. Select Transcripts from the Reports menu.
3. Select Fred Flintstone from the User drop-down list.
4. Click the Show Report button.
5. Click the PDF button.
6. Go to your browser’s action bar and select File > Print.
12
3
4
5
23
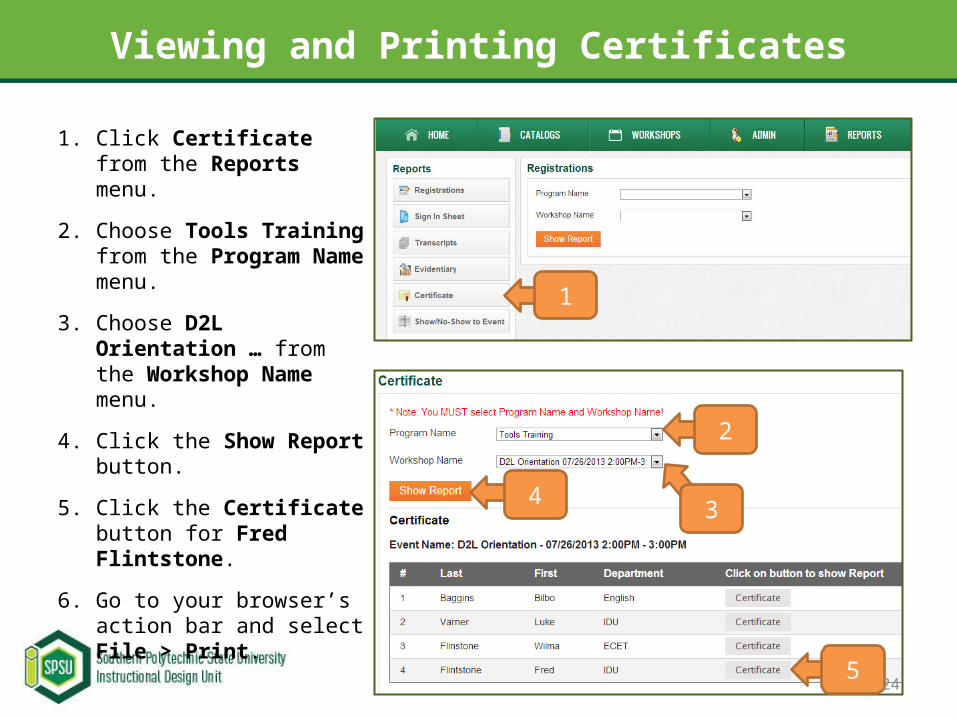
Viewing and Printing Certificates
1. Click Certificate from the Reports menu.
2. Choose Tools Training from the Program Name menu.
3. Choose D2L Orientation … from the Workshop Name menu.
4. Click the Show Report button.
5. Click the Certificate button for Fred Flintstone.
6. Go to your browser’s action bar and select File > Print.
1
2
3
5
4
24