Embed Size (px)
Citation preview
cSRX Deployment Guide for Bare-Metal LinuxServer
Modified: 2018-08-07
Copyright © 2018, Juniper Networks, Inc.
Juniper Networks, Inc.1133 InnovationWaySunnyvale, California 94089USA408-745-2000www.juniper.net
Juniper Networks, the Juniper Networks logo, Juniper, and Junos are registered trademarks of Juniper Networks, Inc. and/or its affiliates inthe United States and other countries. All other trademarks may be property of their respective owners.
Juniper Networks assumes no responsibility for any inaccuracies in this document. Juniper Networks reserves the right to change, modify,transfer, or otherwise revise this publication without notice.
cSRX Deployment Guide for Bare-Metal Linux ServerCopyright © 2018 Juniper Networks, Inc. All rights reserved.
The information in this document is current as of the date on the title page.
YEAR 2000 NOTICE
Juniper Networks hardware and software products are Year 2000 compliant. Junos OS has no known time-related limitations through theyear 2038. However, the NTP application is known to have some difficulty in the year 2036.
ENDUSER LICENSE AGREEMENT
The Juniper Networks product that is the subject of this technical documentation consists of (or is intended for use with) Juniper Networkssoftware. Use of such software is subject to the terms and conditions of the End User License Agreement (“EULA”) posted athttps://www.juniper.net/support/eula/. By downloading, installing or using such software, you agree to the terms and conditions of thatEULA.
Copyright © 2018, Juniper Networks, Inc.ii
Table of Contents
About the Documentation . . . . . . . . . . . . . . . . . . . . . . . . . . . . . . . . . . . . . . . . . . . . ix
Documentation and Release Notes . . . . . . . . . . . . . . . . . . . . . . . . . . . . . . . . . . ix
Documentation Conventions . . . . . . . . . . . . . . . . . . . . . . . . . . . . . . . . . . . . . . . ix
Documentation Feedback . . . . . . . . . . . . . . . . . . . . . . . . . . . . . . . . . . . . . . . . . xi
Requesting Technical Support . . . . . . . . . . . . . . . . . . . . . . . . . . . . . . . . . . . . . xii
Self-Help Online Tools and Resources . . . . . . . . . . . . . . . . . . . . . . . . . . . xii
Opening a Case with JTAC . . . . . . . . . . . . . . . . . . . . . . . . . . . . . . . . . . . . . xii
Chapter 1 Overview . . . . . . . . . . . . . . . . . . . . . . . . . . . . . . . . . . . . . . . . . . . . . . . . . . . . . . . . . 15
Understanding cSRX with a Bare-Metal Linux Server . . . . . . . . . . . . . . . . . . . . . . . 15
cSRX Overview . . . . . . . . . . . . . . . . . . . . . . . . . . . . . . . . . . . . . . . . . . . . . . . . . 15
cSRX Benefits and Uses . . . . . . . . . . . . . . . . . . . . . . . . . . . . . . . . . . . . . . . . . . 17
Docker Overview . . . . . . . . . . . . . . . . . . . . . . . . . . . . . . . . . . . . . . . . . . . . . . . . 18
cSRX Scale-Up Performance . . . . . . . . . . . . . . . . . . . . . . . . . . . . . . . . . . . . . . 19
Junos OS Features Supported on cSRX . . . . . . . . . . . . . . . . . . . . . . . . . . . . . . . . . 20
Supported SRX Series Features on cSRX . . . . . . . . . . . . . . . . . . . . . . . . . . . . 20
SRX Series Features Not Supported on cSRX . . . . . . . . . . . . . . . . . . . . . . . . . 22
Chapter 2 Installing cSRX . . . . . . . . . . . . . . . . . . . . . . . . . . . . . . . . . . . . . . . . . . . . . . . . . . . 29
Requirements for Deploying cSRX on a Bare-Metal Linux Server . . . . . . . . . . . . . 29
Host Requirements . . . . . . . . . . . . . . . . . . . . . . . . . . . . . . . . . . . . . . . . . . . . . . 29
cSRX Basic Configuration Settings . . . . . . . . . . . . . . . . . . . . . . . . . . . . . . . . . 30
Interface Naming and Mapping . . . . . . . . . . . . . . . . . . . . . . . . . . . . . . . . . . . . 30
Installing cSRX in a Bare-Metal Linux Server . . . . . . . . . . . . . . . . . . . . . . . . . . . . . . 31
Before You Deploy . . . . . . . . . . . . . . . . . . . . . . . . . . . . . . . . . . . . . . . . . . . . . . . 31
Confirming Docker Installation . . . . . . . . . . . . . . . . . . . . . . . . . . . . . . . . . . . . . 31
Loading the cSRX Image . . . . . . . . . . . . . . . . . . . . . . . . . . . . . . . . . . . . . . . . . . 33
Creating the Linux Bridge Network for the cSRX . . . . . . . . . . . . . . . . . . . . . . . 34
Launching the cSRX Container . . . . . . . . . . . . . . . . . . . . . . . . . . . . . . . . . . . . . . . . 35
Chapter 3 Managing cSRX Containers . . . . . . . . . . . . . . . . . . . . . . . . . . . . . . . . . . . . . . . . 39
cSRX Environment Variables Overview . . . . . . . . . . . . . . . . . . . . . . . . . . . . . . . . . . 39
Specifying an Initial Root Password for Logging into a cSRXContainer in a Linux
Docker Environment . . . . . . . . . . . . . . . . . . . . . . . . . . . . . . . . . . . . . . . . . . . . . 40
Changing the Size of a cSRX Container . . . . . . . . . . . . . . . . . . . . . . . . . . . . . . . . . . 41
Configuring Traffic Forwarding on a cSRX Container . . . . . . . . . . . . . . . . . . . . . . . 41
Configuring Routing Mode . . . . . . . . . . . . . . . . . . . . . . . . . . . . . . . . . . . . . . . . 42
Configuring Secure-Wire Mode . . . . . . . . . . . . . . . . . . . . . . . . . . . . . . . . . . . . 44
Specifying the Packet I/O Driver for a cSRX Container . . . . . . . . . . . . . . . . . . . . . 45
Specifying the Poll Mode Driver . . . . . . . . . . . . . . . . . . . . . . . . . . . . . . . . . . . . 46
Specifying the Interrupt Mode Driver . . . . . . . . . . . . . . . . . . . . . . . . . . . . . . . . 47
iiiCopyright © 2018, Juniper Networks, Inc.
Configuring CPU Affinity for a cSRX Container . . . . . . . . . . . . . . . . . . . . . . . . . . . . 47
Enabling Persistent Log File Storage to a Linux Host Directory . . . . . . . . . . . . . . . 48
Managing cSRX Containers . . . . . . . . . . . . . . . . . . . . . . . . . . . . . . . . . . . . . . . . . . . 48
Pausing/Resuming Processes within a cSRX Container . . . . . . . . . . . . . . . . . 48
Viewing Container Processes on a Running cSRX Container . . . . . . . . . . . . . 49
Removing a cSRX Container or Image . . . . . . . . . . . . . . . . . . . . . . . . . . . . . . . 49
Chapter 4 Configuring cSRX . . . . . . . . . . . . . . . . . . . . . . . . . . . . . . . . . . . . . . . . . . . . . . . . . . 51
cSRX Configuration and Management Tools . . . . . . . . . . . . . . . . . . . . . . . . . . . . . . 51
Understanding the Junos OS CLI and Junos Scripts . . . . . . . . . . . . . . . . . . . . . 51
Understanding cSRX with Contrail and Openstack Orchestration . . . . . . . . . 51
Configuring cSRX Using the Junos OS CLI . . . . . . . . . . . . . . . . . . . . . . . . . . . . . . . . 52
Copyright © 2018, Juniper Networks, Inc.iv
cSRX Deployment Guide for Bare-Metal Linux Server
List of Figures
Chapter 1 Overview . . . . . . . . . . . . . . . . . . . . . . . . . . . . . . . . . . . . . . . . . . . . . . . . . . . . . . . . . 15
Figure 1: cSRX Container Overview . . . . . . . . . . . . . . . . . . . . . . . . . . . . . . . . . . . . . . 17
Figure 2: Docker Container Environment . . . . . . . . . . . . . . . . . . . . . . . . . . . . . . . . . 19
Chapter 3 Managing cSRX Containers . . . . . . . . . . . . . . . . . . . . . . . . . . . . . . . . . . . . . . . . 39
Figure 3: cSRX in Secure-Wire Mode . . . . . . . . . . . . . . . . . . . . . . . . . . . . . . . . . . . . 45
vCopyright © 2018, Juniper Networks, Inc.

Copyright © 2018, Juniper Networks, Inc.vi
cSRX Deployment Guide for Bare-Metal Linux Server
List of Tables
About the Documentation . . . . . . . . . . . . . . . . . . . . . . . . . . . . . . . . . . . . . . . . . . ix
Table 1: Notice Icons . . . . . . . . . . . . . . . . . . . . . . . . . . . . . . . . . . . . . . . . . . . . . . . . . . x
Table 2: Text and Syntax Conventions . . . . . . . . . . . . . . . . . . . . . . . . . . . . . . . . . . . . x
Chapter 1 Overview . . . . . . . . . . . . . . . . . . . . . . . . . . . . . . . . . . . . . . . . . . . . . . . . . . . . . . . . . 15
Table 3: cSRX Scale Up Performance . . . . . . . . . . . . . . . . . . . . . . . . . . . . . . . . . . . 20
Table 4: SRX Series Features Supported on cSRX . . . . . . . . . . . . . . . . . . . . . . . . . 21
Table 5: SRX Series Features Not Supported on cSRX . . . . . . . . . . . . . . . . . . . . . . 22
Chapter 2 Installing cSRX . . . . . . . . . . . . . . . . . . . . . . . . . . . . . . . . . . . . . . . . . . . . . . . . . . . 29
Table 6: Host Requirement Specifications for cSRX . . . . . . . . . . . . . . . . . . . . . . . 30
Table 7: cSRX Interface Assignment . . . . . . . . . . . . . . . . . . . . . . . . . . . . . . . . . . . . 31
Chapter 3 Managing cSRX Containers . . . . . . . . . . . . . . . . . . . . . . . . . . . . . . . . . . . . . . . . 39
Table 8: Summary of cSRX Environment Variables . . . . . . . . . . . . . . . . . . . . . . . . 40
Table 9: cSRX Size Comparison . . . . . . . . . . . . . . . . . . . . . . . . . . . . . . . . . . . . . . . . 41
Table 10: cSRX Poll and Interrupt Mode Driver Comparison . . . . . . . . . . . . . . . . . 46
viiCopyright © 2018, Juniper Networks, Inc.

Copyright © 2018, Juniper Networks, Inc.viii
cSRX Deployment Guide for Bare-Metal Linux Server
About the Documentation
• Documentation and Release Notes on page ix
• Documentation Conventions on page ix
• Documentation Feedback on page xi
• Requesting Technical Support on page xii
Documentation and Release Notes
To obtain the most current version of all Juniper Networks®technical documentation,
see the product documentation page on the Juniper Networks website at
https://www.juniper.net/documentation/.
If the information in the latest release notes differs from the information in the
documentation, follow the product Release Notes.
Juniper Networks Books publishes books by Juniper Networks engineers and subject
matter experts. These books go beyond the technical documentation to explore the
nuances of network architecture, deployment, and administration. The current list can
be viewed at https://www.juniper.net/books.
Documentation Conventions
Table 1 on page x defines notice icons used in this guide.
ixCopyright © 2018, Juniper Networks, Inc.
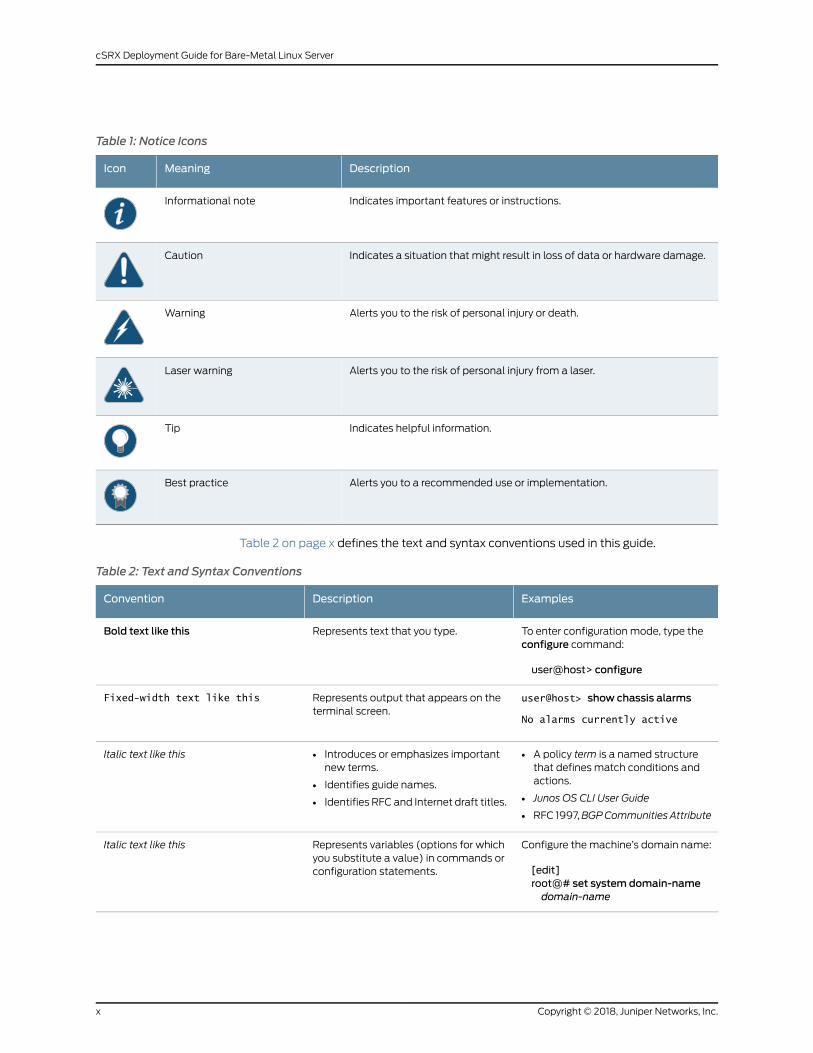
Table 1: Notice Icons
DescriptionMeaningIcon
Indicates important features or instructions.Informational note
Indicates a situation that might result in loss of data or hardware damage.Caution
Alerts you to the risk of personal injury or death.Warning
Alerts you to the risk of personal injury from a laser.Laser warning
Indicates helpful information.Tip
Alerts you to a recommended use or implementation.Best practice
Table 2 on page x defines the text and syntax conventions used in this guide.
Table 2: Text and Syntax Conventions
ExamplesDescriptionConvention
To enter configuration mode, type theconfigure command:
user@host> configure
Represents text that you type.Bold text like this
user@host> show chassis alarms
No alarms currently active
Represents output that appears on theterminal screen.
Fixed-width text like this
• A policy term is a named structurethat defines match conditions andactions.
• Junos OS CLI User Guide
• RFC 1997,BGPCommunities Attribute
• Introduces or emphasizes importantnew terms.
• Identifies guide names.
• Identifies RFC and Internet draft titles.
Italic text like this
Configure themachine’s domain name:
[edit]root@# set system domain-namedomain-name
Represents variables (options for whichyou substitute a value) in commands orconfiguration statements.
Italic text like this
Copyright © 2018, Juniper Networks, Inc.x
cSRX Deployment Guide for Bare-Metal Linux Server
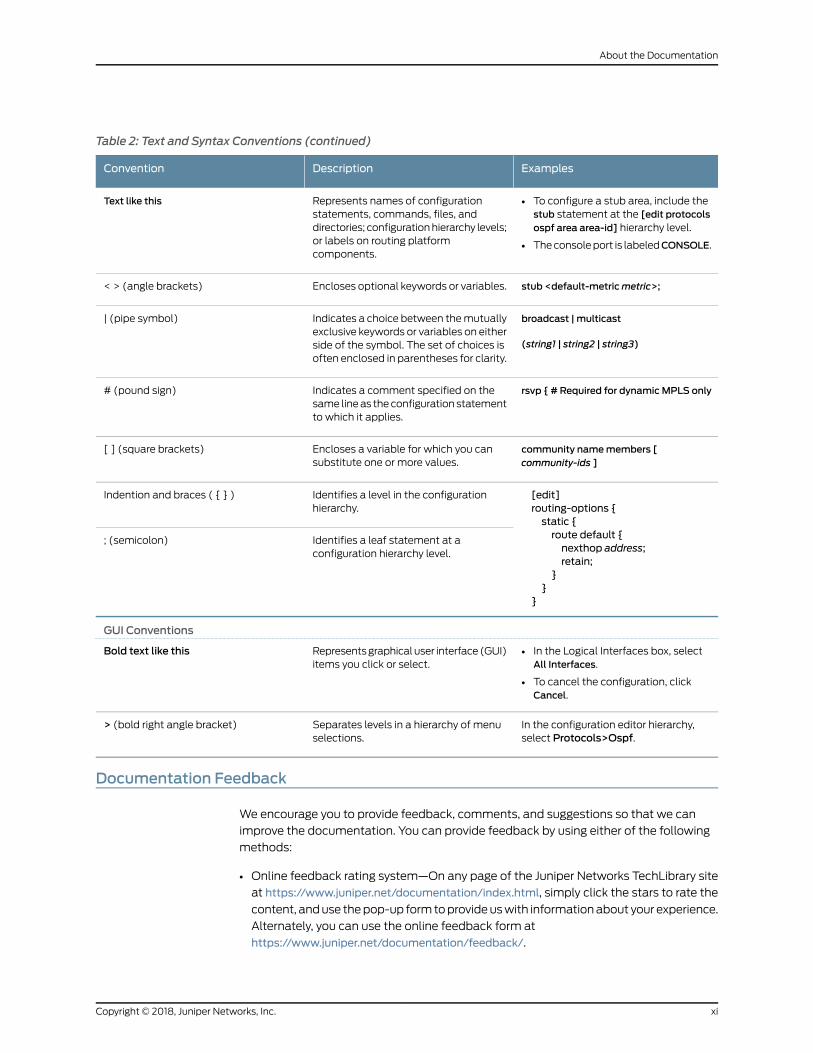
Table 2: Text and Syntax Conventions (continued)
ExamplesDescriptionConvention
• To configure a stub area, include thestub statement at the [edit protocolsospf area area-id] hierarchy level.
• Theconsoleport is labeledCONSOLE.
Represents names of configurationstatements, commands, files, anddirectories; configurationhierarchy levels;or labels on routing platformcomponents.
Text like this
stub <default-metricmetric>;Encloses optional keywords or variables.< > (angle brackets)
broadcast | multicast
(string1 | string2 | string3)
Indicates a choice between themutuallyexclusive keywords or variables on eitherside of the symbol. The set of choices isoften enclosed in parentheses for clarity.
| (pipe symbol)
rsvp { # Required for dynamicMPLS onlyIndicates a comment specified on thesame lineas theconfiguration statementto which it applies.
# (pound sign)
community namemembers [community-ids ]
Encloses a variable for which you cansubstitute one or more values.
[ ] (square brackets)
[edit]routing-options {static {route default {nexthop address;retain;
}}
}
Identifies a level in the configurationhierarchy.
Indention and braces ( { } )
Identifies a leaf statement at aconfiguration hierarchy level.
; (semicolon)
GUI Conventions
• In the Logical Interfaces box, selectAll Interfaces.
• To cancel the configuration, clickCancel.
Representsgraphicaluser interface(GUI)items you click or select.
Bold text like this
In the configuration editor hierarchy,select Protocols>Ospf.
Separates levels in a hierarchy of menuselections.
> (bold right angle bracket)
Documentation Feedback
We encourage you to provide feedback, comments, and suggestions so that we can
improve the documentation. You can provide feedback by using either of the following
methods:
• Online feedback rating system—On any page of the Juniper Networks TechLibrary site
at https://www.juniper.net/documentation/index.html, simply click the stars to rate the
content, anduse thepop-up formtoprovideuswith informationabout your experience.
Alternately, you can use the online feedback form at
https://www.juniper.net/documentation/feedback/.
xiCopyright © 2018, Juniper Networks, Inc.
About the Documentation

• E-mail—Sendyourcommentsto [email protected]. Includethedocument
or topic name, URL or page number, and software version (if applicable).
Requesting Technical Support
Technical product support is available through the JuniperNetworksTechnicalAssistance
Center (JTAC). If you are a customer with an active J-Care or Partner Support Service
support contract, or are covered under warranty, and need post-sales technical support,
you can access our tools and resources online or open a case with JTAC.
• JTAC policies—For a complete understanding of our JTAC procedures and policies,
review the JTAC User Guide located at
https://www.juniper.net/us/en/local/pdf/resource-guides/7100059-en.pdf.
• Product warranties—For product warranty information, visit
https://www.juniper.net/support/warranty/.
• JTAC hours of operation—The JTAC centers have resources available 24 hours a day,
7 days a week, 365 days a year.
Self-Help Online Tools and Resources
For quick and easy problem resolution, Juniper Networks has designed an online
self-service portal called the Customer Support Center (CSC) that provides youwith the
following features:
• Find CSC offerings: https://www.juniper.net/customers/support/
• Search for known bugs: https://prsearch.juniper.net/
• Find product documentation: https://www.juniper.net/documentation/
• Find solutions and answer questions using our Knowledge Base: https://kb.juniper.net/
• Download the latest versions of software and review release notes:
https://www.juniper.net/customers/csc/software/
• Search technical bulletins for relevant hardware and software notifications:
https://kb.juniper.net/InfoCenter/
• Join and participate in the Juniper Networks Community Forum:
https://www.juniper.net/company/communities/
• Open a case online in the CSC Case Management tool: https://www.juniper.net/cm/
Toverify serviceentitlementbyproduct serial number, useourSerialNumberEntitlement
(SNE) Tool: https://entitlementsearch.juniper.net/entitlementsearch/
Opening a Casewith JTAC
You can open a case with JTAC on theWeb or by telephone.
• Use the Case Management tool in the CSC at https://www.juniper.net/cm/.
• Call 1-888-314-JTAC (1-888-314-5822 toll-free in the USA, Canada, and Mexico).
Copyright © 2018, Juniper Networks, Inc.xii
cSRX Deployment Guide for Bare-Metal Linux Server
For international or direct-dial options in countries without toll-free numbers, see
https://www.juniper.net/support/requesting-support.html.
xiiiCopyright © 2018, Juniper Networks, Inc.
About the Documentation

Copyright © 2018, Juniper Networks, Inc.xiv
cSRX Deployment Guide for Bare-Metal Linux Server
CHAPTER 1
Overview
• Understanding cSRXwith a Bare-Metal Linux Server on page 15
• Junos OS Features Supported on cSRX on page 20
Understanding cSRXwith a Bare-Metal Linux Server
ThecSRXContainer Firewall is acontainerizedversionof theSRXSeriesServicesGateway
witha lowmemory footprint. cSRXprovidesadvancedsecurity services, includingcontent
security, AppSecure, and unified threatmanagement in a container form factor. By using
a Docker container in a bare-metal Linux server, the cSRX can substantially reduce
overhead because each container shares the Linux host’s OS kernel. Regardless of how
many containers a Linux server hosts, only one OS instance is in use. And because of the
containers’ lightweight quality, a server can host manymore container instances than it
can virtual machines (VMs), yielding tremendous improvements in utilization. With its
small footprint and Docker as a container management system, the cSRX Container
Firewall enables agile, high-density security service deployment.
This section includes the following topics:
• cSRX Overview on page 15
• cSRX Benefits and Uses on page 17
• Docker Overview on page 18
• cSRX Scale-Up Performance on page 19
cSRXOverview
The cSRX Container Firewall runs as a single container on a Linux bare-metal server. It
uses a Linux bare-metal server as the hosting platform for the Docker container
environment. The cSRX container packages all of the dependent processes (daemons)
and libraries to support the different Linux host distribution methods (Ubuntu, Red Hat
Enterprise Linux, or CentOS). You use standard Docker commands tomanage the cSRX
container. cSRX isbuilt on the Junosoperating system(JunosOS)anddeliversnetworking
and security features similar to those available on the software releases for the SRX
Series.
When the cSRX container runs, there are several daemons inside the Docker container
that launchautomaticallywhenthecSRXbecomesactive.SomedaemonssupportLinux
features, providing the same service as if they are running on a Linux host (for example,
15Copyright © 2018, Juniper Networks, Inc.

sshd, rsyslogd, monit, and so on). Other daemons are compiled and ported from Junos
OS to perform configuration and control jobs for security service (for example, MGD,
NSD, UTM, IDP, AppID, and so on). srxpfe is the data-plane daemon that receives and
sends packets from the two revenue ports of a cSRX container. The cSRX uses srxpfe
for Layer 2 through 3 forwarding functions (secure-wire forwarding or static routing
forwarding) as well as for Layer 4 through 7 network security services.
The cSRX Container Firewall enables advanced security at the network edge in a
multitenant virtualized environment. cSRX provides Layer 4 through 7 advanced security
features such as firewall, IPS, and AppSecure. The cSRX container provides a pair of
revenue ports attached to the trusted and untrusted zones. The cSRX container also
provides an additional interface to manage the cSRX. When cSRX is operating in Layer
2 secure wire mode, incoming Layer 2 frames from one interface go through Layer 4
through7processingbasedontheconfiguredcSRXservices. cSRXthensends the frames
out of the other interface. The cSRX container either allows the frames to pass through
unaltered or drops the frames, based on the configured security policies.
Figure 1 on page 17 illustrates a high-level view of a cSRX container instance. It is an
example of how a cSRX container is bridgedwith an external network. In this illustration,
cSRX eth1 is bridged with host physical NIC eth1 and cSRX eth2 is bridged with host
physical NIC eth2.
NOTE: As part of your Docker container configuration, youmust connect thecSRXcontainer to threevirtualnetworks:onevirtualnetwork forout-of-bandmanagementsessions, theother twovirtualnetworks to receiveand transmitin-band data traffic. See “Installing cSRX in a Bare-Metal Linux Server” onpage 31.
Copyright © 2018, Juniper Networks, Inc.16
cSRX Deployment Guide for Bare-Metal Linux Server
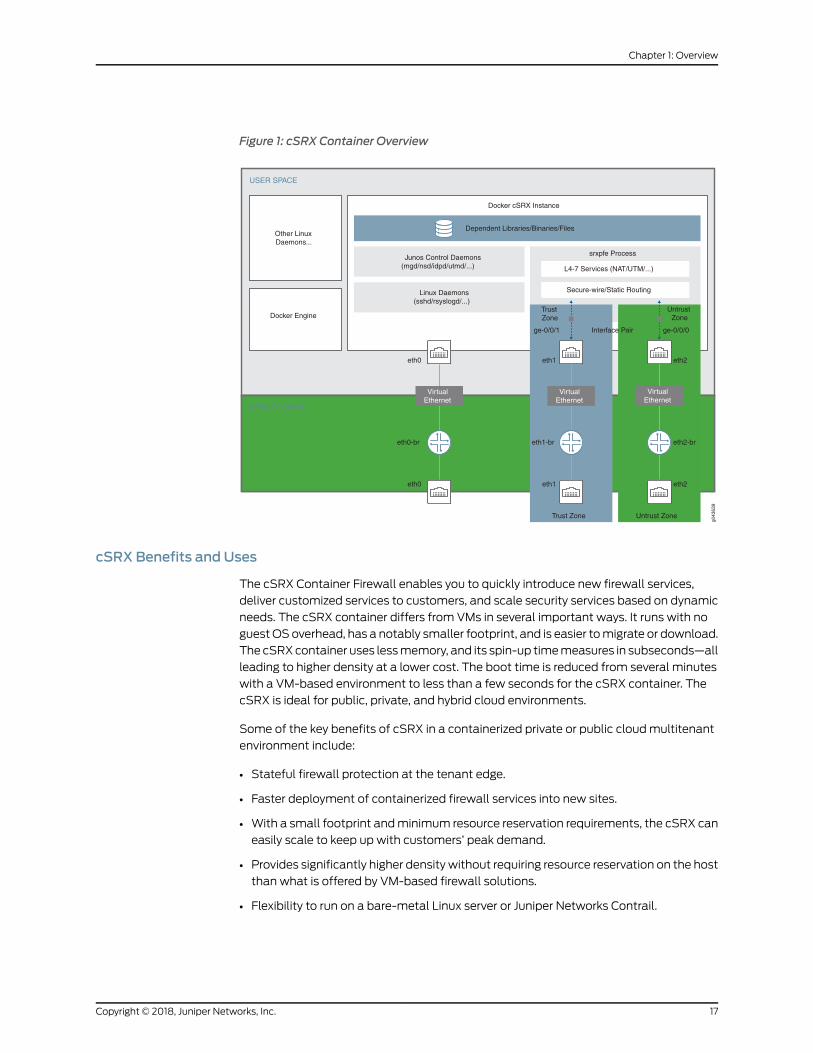
Figure 1: cSRX Container Overview
g043
639
USER SPACE
KERNEL SPACE
Other LinuxDaemons...
Docker cSRX Instance
Docker Engine
eth0-br
eth0
eth0
VirtualEthernet
Dependent Libraries/Binaries/Files
srxpfe Process
L4-7 Services (NAT/UTM/...)
Secure-wire/Static Routing
ge-0/0/0ge-0/0/1
Junos Control Daemons(mgd/nsd/idpd/utmd/...)
Linux Daemons(sshd/rsyslogd/...)
eth1-br
eth1
eth1
VirtualEthernet
eth2-br
eth2
eth2
VirtualEthernet
Interface Pair
TrustZone
UntrustZone
Trust Zone Untrust Zone
cSRX Benefits and Uses
The cSRX Container Firewall enables you to quickly introduce new firewall services,
deliver customized services to customers, and scale security services based on dynamic
needs. The cSRX container differs from VMs in several important ways. It runs with no
guestOSoverhead, has a notably smaller footprint, and is easier tomigrate or download.
The cSRXcontainer uses lessmemory, and its spin-up timemeasures in subseconds—all
leading to higher density at a lower cost. The boot time is reduced from several minutes
with a VM-based environment to less than a few seconds for the cSRX container. The
cSRX is ideal for public, private, and hybrid cloud environments.
Some of the key benefits of cSRX in a containerized private or public cloudmultitenant
environment include:
• Stateful firewall protection at the tenant edge.
• Faster deployment of containerized firewall services into new sites.
• With a small footprint andminimum resource reservation requirements, the cSRX can
easily scale to keep up with customers’ peak demand.
• Provides significantly higher density without requiring resource reservation on the host
than what is offered by VM-based firewall solutions.
• Flexibility to run on a bare-metal Linux server or Juniper Networks Contrail.
17Copyright © 2018, Juniper Networks, Inc.
Chapter 1: Overview
• In theContrailNetworkingcloudplatform, cSRXcanbeused toprovidedifferentiated
Layer 4 through 7 security services for multiple tenants as part of a service chain.
• With theContrail orchestrator, cSRXcanbedeployedasa large scale security service.
• Application security features (including IPS and AppSecure).
• UTM content security features (including antispam, Sophos Antivirus, web filtering,
and content filtering).
• Authentication and integrated user firewall features.
NOTE: While the security services features between cSRX and vSRX aresimilar, there are scenarios in which each product is the optimal option inyour environment. For example, thecSRXdoesnot support routing instancesandprotocols, switching features,MPLSLSPsandMPLSapplications, chassiscluster, andsoftwareupgrade features.Forenvironments that require routingor switching, a vSRX VM provides the best feature set. For environmentsfocused on security services in a Docker containerized deployment, cSRX isa better fit.
See “Junos OS Features Supported on cSRX” on page 20 for a summary ofthe featurecategories supportedoncSRX,andalso forasummaryof featuresnot supported on cSRX.
You can deploy the cSRX Container Firewall in the following scenarios:
• CloudCPE–Forserviceproviders (SPs)andmanagedsecurityserviceproviders (MSSPs)
where there is a large subscriber base of branch offices or residential subscribers.
MSSPs can offer differentiated services to individual subscribers.
• Contrail microsegmentation–Within a Contrail environment running mixed workloads
ofVMsandcontainers, cSRXcanprovide security for Layer4 through7 traffic,managed
by Security Director.
• Private clouds–cSRX can provide security services in a private cloud running
containerized workloads and can include Contrail integration.
Docker Overview
Docker is an open source software platform that simplifies the creation, management,
and teardown of a virtual container that can run on any Linux server. A Docker container
is anopen source softwaredevelopmentplatform,with itsmainbenefit being topackage
applications in “containers” to allow them to be portable among any system running the
Linux operating system (OS). A container provides an OS-level virtualization approach
for an application and associated dependencies that allow the application to run on a
specific platform. Containers are not VMs, rather they are isolated virtual environments
with dedicated CPU, memory, I/O, and networking.
Acontainer image isa lightweight, standalone, executablepackageofapieceof software
that includes everything required to run it: code, runtime, system tools, system libraries,
Copyright © 2018, Juniper Networks, Inc.18
cSRX Deployment Guide for Bare-Metal Linux Server
settings, and so on. Because containers include all dependencies for an application,
multiple containerswith conflictingdependencies can runon the sameLinuxdistribution.
Containersuse thehostOSLinuxkernel features, suchasgroupsandnamespace isolation,
to allowmultiple containers to run in isolation on the same Linux host OS. An application
in a container can have a smallmemory footprint because the container does not require
a guest OS, which is required with VMs, because it shares the kernel of its Linux host’s
OS.
Containers have a high spin-up speed and can take much less time to boot up as
compared to VMs. This enables you to install, run, and upgrade applications quickly and
efficiently.
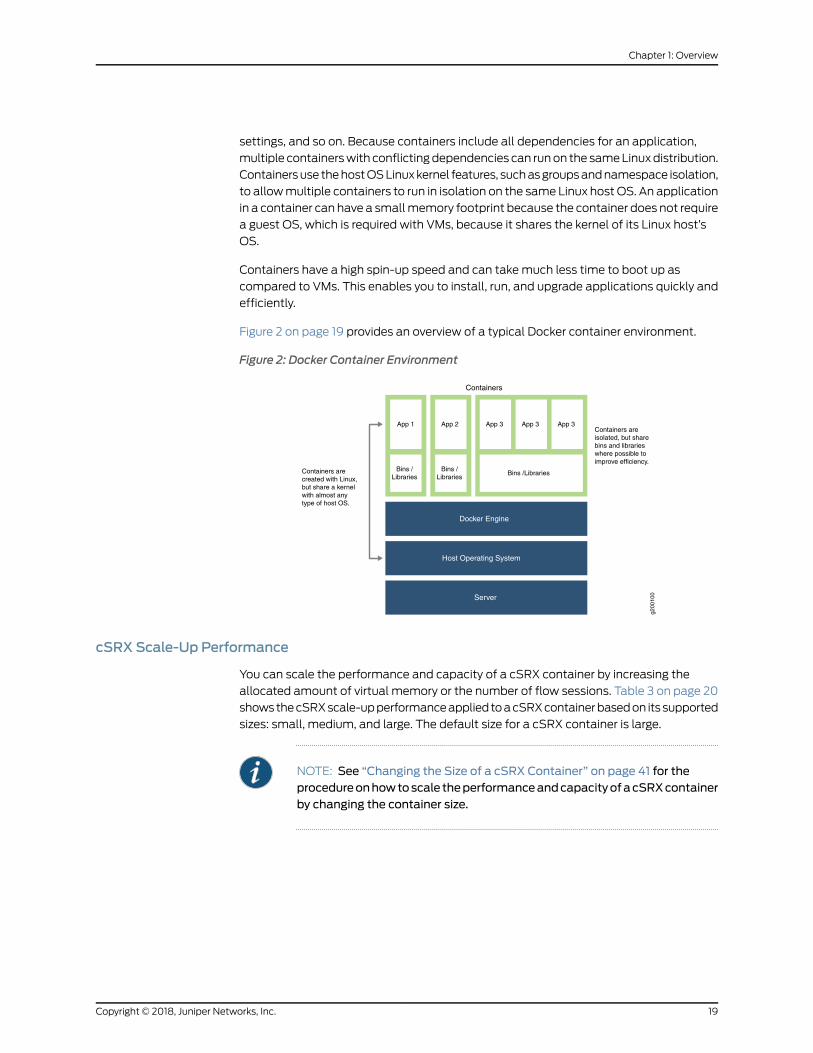
Figure 2 on page 19 provides an overview of a typical Docker container environment.
Figure 2: Docker Container Environment
Containers arecreated with Linux,but share a kernelwith almost anytype of host OS.
Containers areisolated, but sharebins and librarieswhere possible toimprove efficiency.
Server
Host Operating System
Docker Engine
App 2 App 3 App 3 App 3App 1
Bins /Libraries
Bins /Libraries
Bins /Libraries
Containers
g200
100
cSRX Scale-Up Performance
You can scale the performance and capacity of a cSRX container by increasing the
allocated amount of virtual memory or the number of flow sessions. Table 3 on page 20
showsthecSRXscale-upperformanceapplied toacSRXcontainerbasedon its supported
sizes: small, medium, and large. The default size for a cSRX container is large.
NOTE: See “Changing the Size of a cSRX Container” on page 41 for theprocedureonhowtoscale theperformanceandcapacityofacSRXcontainerby changing the container size.
19Copyright © 2018, Juniper Networks, Inc.
Chapter 1: Overview
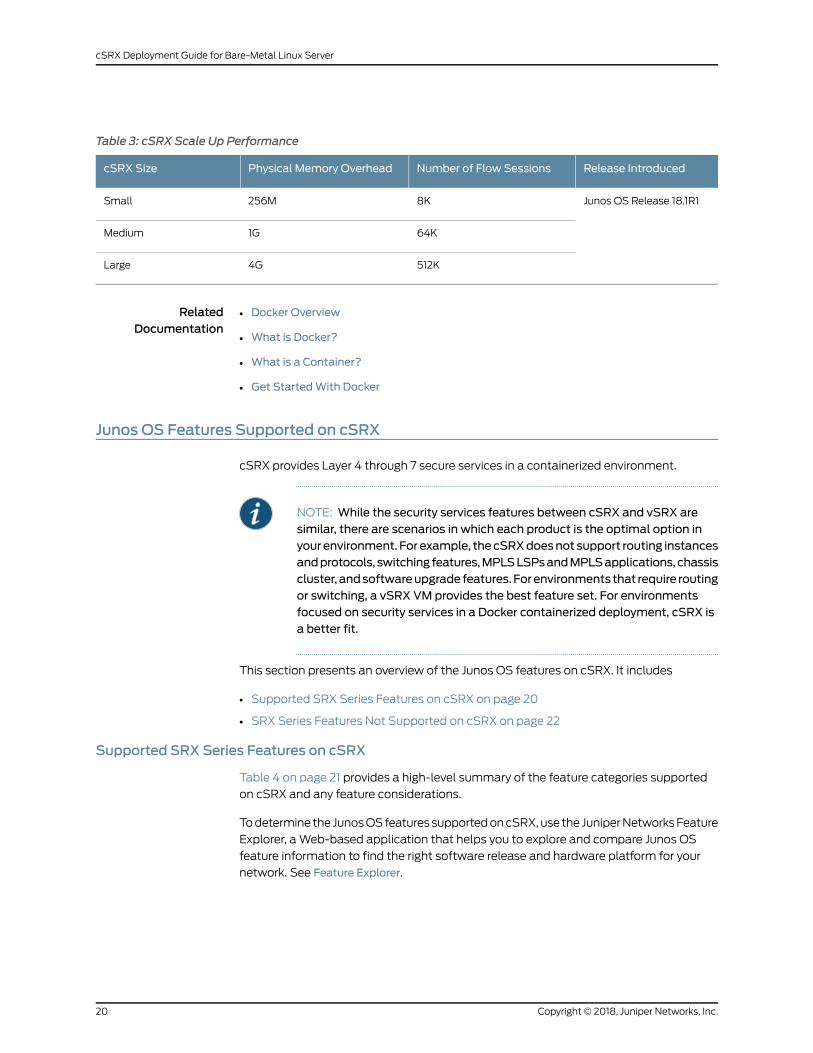
Table 3: cSRX Scale Up Performance
Release IntroducedNumber of Flow SessionsPhysical Memory OverheadcSRX Size
Junos OS Release 18.1R18K256MSmall
64K1GMedium
512K4GLarge
RelatedDocumentation
Docker Overview•
• What is Docker?
• What is a Container?
• Get StartedWith Docker
Junos OS Features Supported on cSRX
cSRX provides Layer 4 through 7 secure services in a containerized environment.
NOTE: While the security services features between cSRX and vSRX aresimilar, there are scenarios in which each product is the optimal option inyour environment. For example, thecSRXdoesnot support routing instancesandprotocols, switching features,MPLSLSPsandMPLSapplications, chassiscluster, andsoftwareupgrade features.Forenvironments that require routingor switching, a vSRX VM provides the best feature set. For environmentsfocused on security services in a Docker containerized deployment, cSRX isa better fit.
This section presents an overview of the Junos OS features on cSRX. It includes
• Supported SRX Series Features on cSRX on page 20
• SRX Series Features Not Supported on cSRX on page 22
Supported SRX Series Features on cSRX
Table 4 on page 21 provides a high-level summary of the feature categories supported
on cSRX and any feature considerations.
Todetermine the JunosOSfeatures supportedoncSRX, use the JuniperNetworksFeature
Explorer, a Web-based application that helps you to explore and compare Junos OS
feature information to find the right software release and hardware platform for your
network. See Feature Explorer.
Copyright © 2018, Juniper Networks, Inc.20
cSRX Deployment Guide for Bare-Metal Linux Server
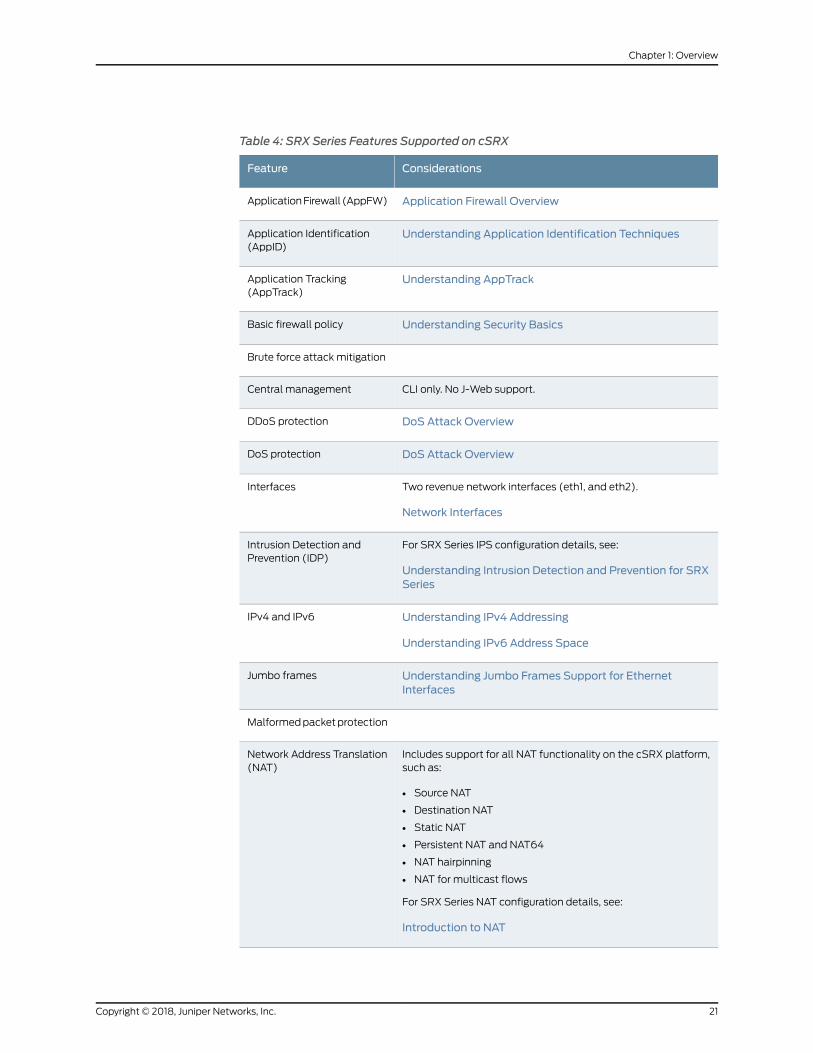
Table 4: SRX Series Features Supported on cSRX
ConsiderationsFeature
Application Firewall OverviewApplicationFirewall (AppFW)
Understanding Application Identification TechniquesApplication Identification(AppID)
Understanding AppTrackApplication Tracking(AppTrack)
Understanding Security BasicsBasic firewall policy
Brute force attack mitigation
CLI only. No J-Web support.Central management
DoS Attack OverviewDDoS protection
DoS Attack OverviewDoS protection
Two revenue network interfaces (eth1, and eth2).
Network Interfaces
Interfaces
For SRX Series IPS configuration details, see:
Understanding Intrusion Detection and Prevention for SRXSeries
Intrusion Detection andPrevention (IDP)
Understanding IPv4 Addressing
Understanding IPv6 Address Space
IPv4 and IPv6
Understanding Jumbo Frames Support for EthernetInterfaces
Jumbo frames
Malformedpacketprotection
Includes support for all NAT functionality on the cSRX platform,such as:
• Source NAT
• Destination NAT
• Static NAT
• Persistent NAT and NAT64
• NAT hairpinning
• NAT for multicast flows
For SRX Series NAT configuration details, see:
Introduction to NAT
Network Address Translation(NAT)
21Copyright © 2018, Juniper Networks, Inc.
Chapter 1: Overview
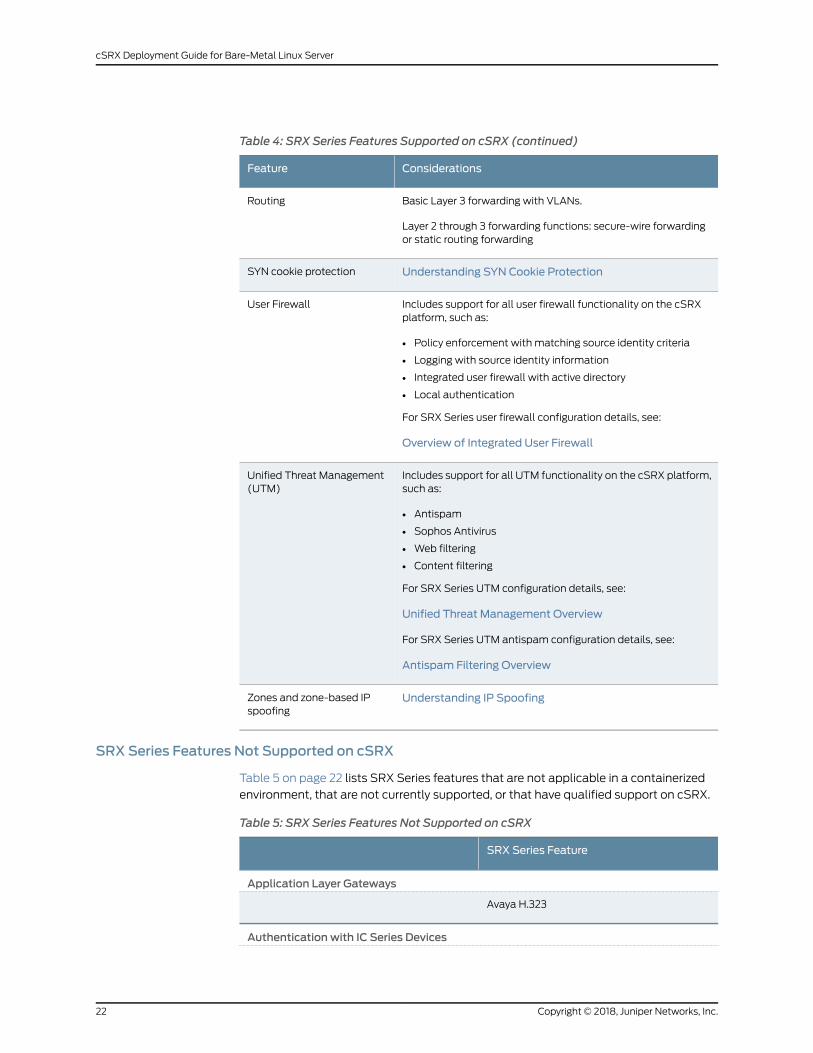
Table 4: SRX Series Features Supported on cSRX (continued)
ConsiderationsFeature
Basic Layer 3 forwarding with VLANs.
Layer 2 through 3 forwarding functions: secure-wire forwardingor static routing forwarding
Routing
Understanding SYN Cookie ProtectionSYN cookie protection
Includes support for all user firewall functionality on the cSRXplatform, such as:
• Policy enforcement with matching source identity criteria
• Logging with source identity information
• Integrated user firewall with active directory
• Local authentication
For SRX Series user firewall configuration details, see:
Overview of Integrated User Firewall
User Firewall
Includes support for all UTM functionality on the cSRX platform,such as:
• Antispam
• Sophos Antivirus
• Web filtering
• Content filtering
For SRX Series UTM configuration details, see:
Unified Threat Management Overview
For SRX Series UTM antispam configuration details, see:
Antispam Filtering Overview
Unified Threat Management(UTM)
Understanding IP SpoofingZones and zone-based IPspoofing
SRX Series Features Not Supported on cSRX
Table 5 on page 22 lists SRX Series features that are not applicable in a containerized
environment, that are not currently supported, or that have qualified support on cSRX.
Table 5: SRX Series Features Not Supported on cSRX
SRX Series Feature
Application Layer Gateways
Avaya H.323
Authentication with IC Series Devices
Copyright © 2018, Juniper Networks, Inc.22
cSRX Deployment Guide for Bare-Metal Linux Server
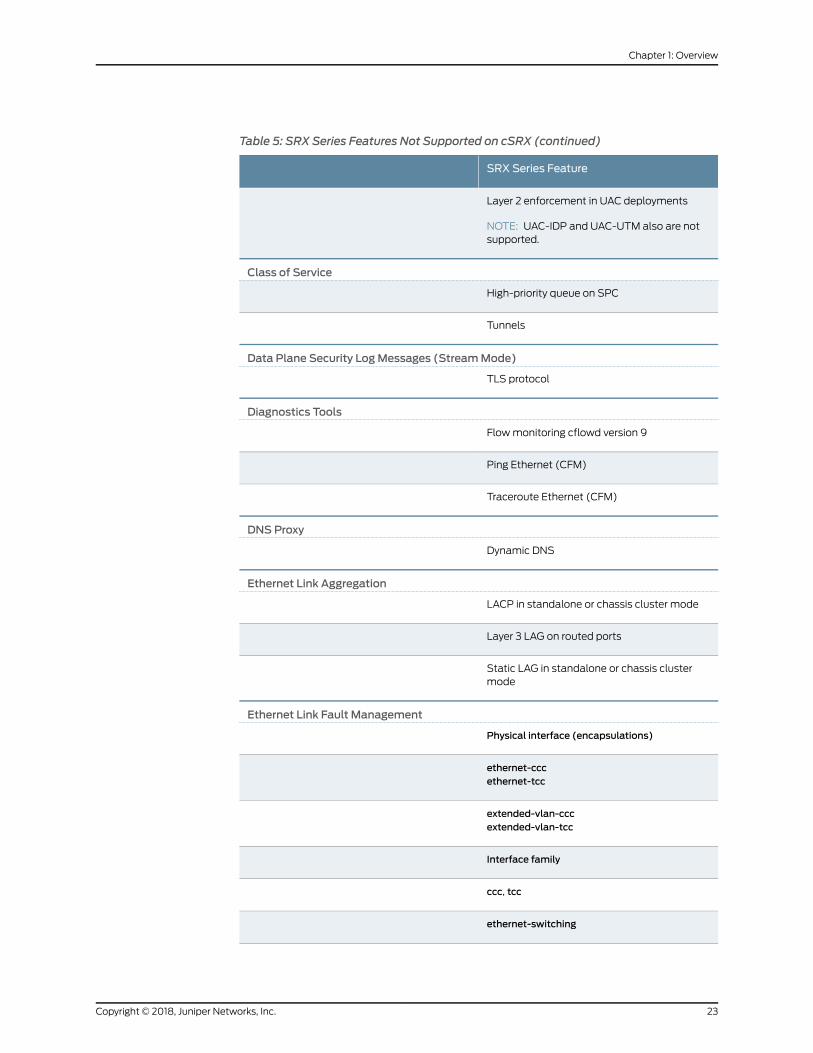
Table 5: SRX Series Features Not Supported on cSRX (continued)
SRX Series Feature
Layer 2 enforcement in UAC deployments
NOTE: UAC-IDP and UAC-UTM also are notsupported.
Class of Service
High-priority queue on SPC
Tunnels
Data Plane Security LogMessages (StreamMode)
TLS protocol
Diagnostics Tools
Flowmonitoring cflowd version 9
Ping Ethernet (CFM)
Traceroute Ethernet (CFM)
DNS Proxy
Dynamic DNS
Ethernet Link Aggregation
LACP in standalone or chassis cluster mode
Layer 3 LAG on routed ports
Static LAG in standalone or chassis clustermode
Ethernet Link Fault Management
Physical interface (encapsulations)
ethernet-cccethernet-tcc
extended-vlan-cccextended-vlan-tcc
Interface family
ccc, tcc
ethernet-switching
23Copyright © 2018, Juniper Networks, Inc.
Chapter 1: Overview
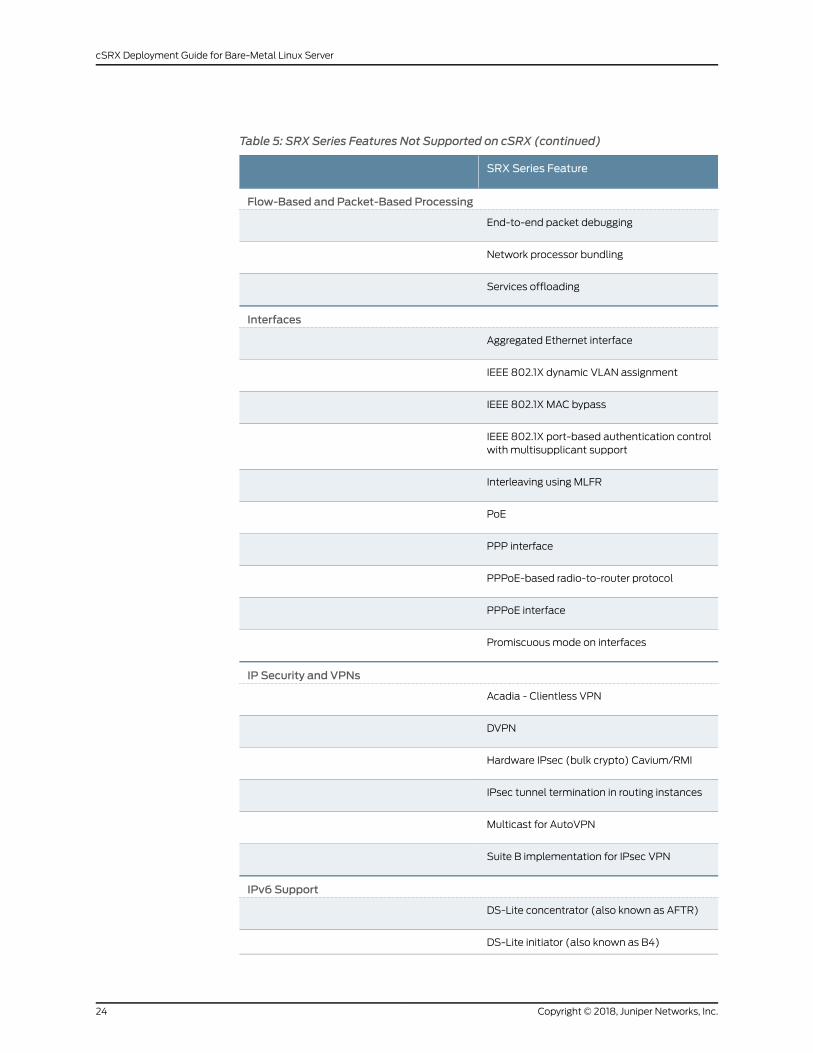
Table 5: SRX Series Features Not Supported on cSRX (continued)
SRX Series Feature
Flow-Based and Packet-Based Processing
End-to-end packet debugging
Network processor bundling
Services offloading
Interfaces
Aggregated Ethernet interface
IEEE 802.1X dynamic VLAN assignment
IEEE 802.1X MAC bypass
IEEE 802.1X port-based authentication controlwith multisupplicant support
Interleaving using MLFR
PoE
PPP interface
PPPoE-based radio-to-router protocol
PPPoE interface
Promiscuous mode on interfaces
IP Security and VPNs
Acadia - Clientless VPN
DVPN
Hardware IPsec (bulk crypto) Cavium/RMI
IPsec tunnel termination in routing instances
Multicast for AutoVPN
Suite B implementation for IPsec VPN
IPv6 Support
DS-Lite concentrator (also known as AFTR)
DS-Lite initiator (also known as B4)
Copyright © 2018, Juniper Networks, Inc.24
cSRX Deployment Guide for Bare-Metal Linux Server
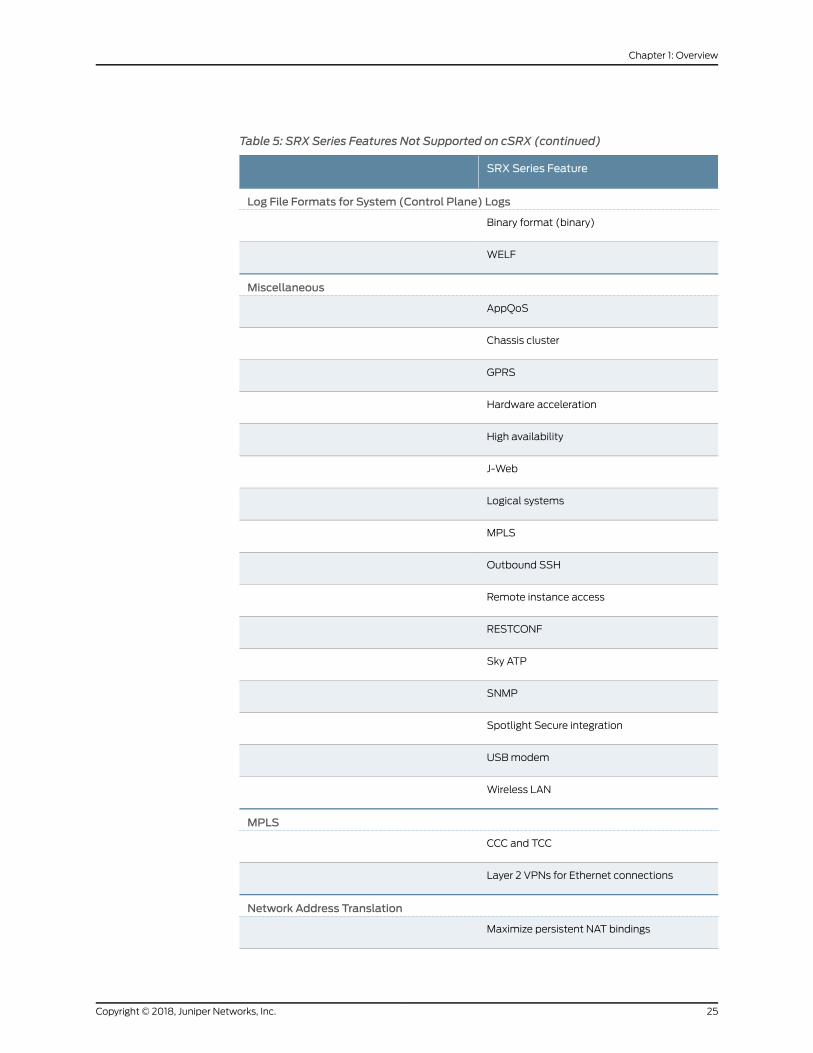
Table 5: SRX Series Features Not Supported on cSRX (continued)
SRX Series Feature
Log File Formats for System (Control Plane) Logs
Binary format (binary)
WELF
Miscellaneous
AppQoS
Chassis cluster
GPRS
Hardware acceleration
High availability
J-Web
Logical systems
MPLS
Outbound SSH
Remote instance access
RESTCONF
Sky ATP
SNMP
Spotlight Secure integration
USBmodem
Wireless LAN
MPLS
CCC and TCC
Layer 2 VPNs for Ethernet connections
Network Address Translation
Maximize persistent NAT bindings
25Copyright © 2018, Juniper Networks, Inc.
Chapter 1: Overview
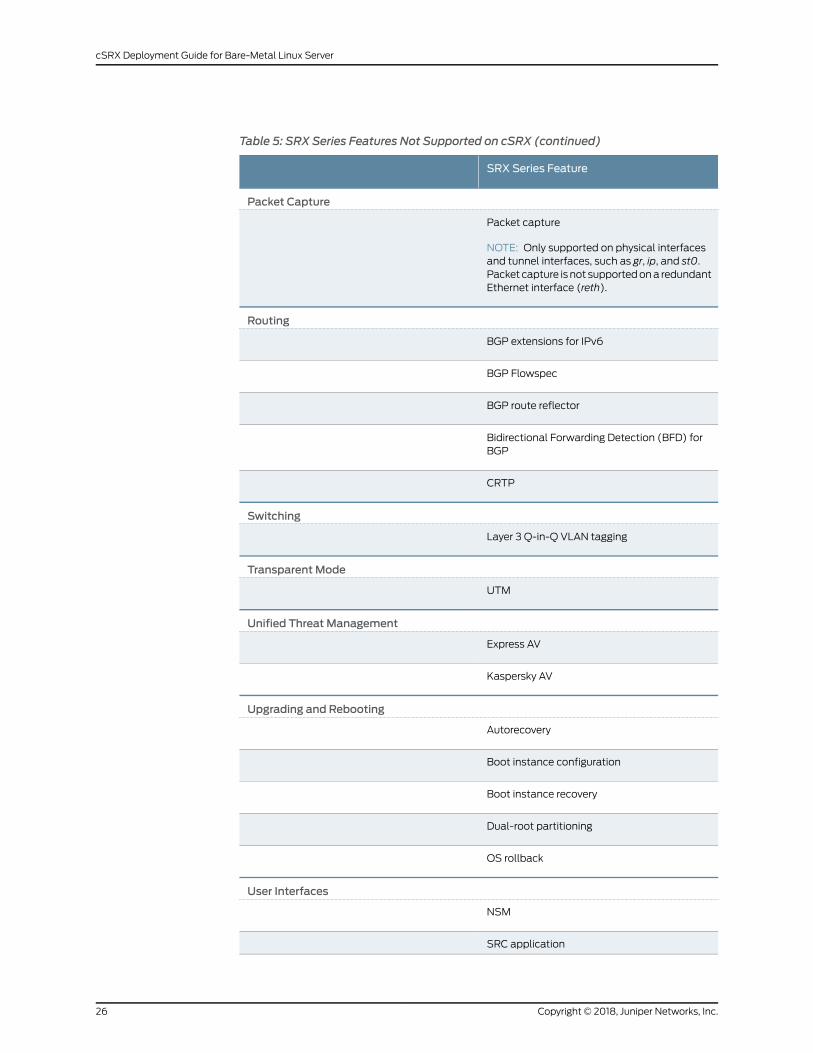
Table 5: SRX Series Features Not Supported on cSRX (continued)
SRX Series Feature
Packet Capture
Packet capture
NOTE: Only supported on physical interfacesand tunnel interfaces, such as gr, ip, and st0.Packet capture is not supportedona redundantEthernet interface (reth).
Routing
BGP extensions for IPv6
BGP Flowspec
BGP route reflector
Bidirectional Forwarding Detection (BFD) forBGP
CRTP
Switching
Layer 3 Q-in-Q VLAN tagging
Transparent Mode
UTM
Unified Threat Management
Express AV
Kaspersky AV
Upgrading and Rebooting
Autorecovery
Boot instance configuration
Boot instance recovery
Dual-root partitioning
OS rollback
User Interfaces
NSM
SRC application
Copyright © 2018, Juniper Networks, Inc.26
cSRX Deployment Guide for Bare-Metal Linux Server
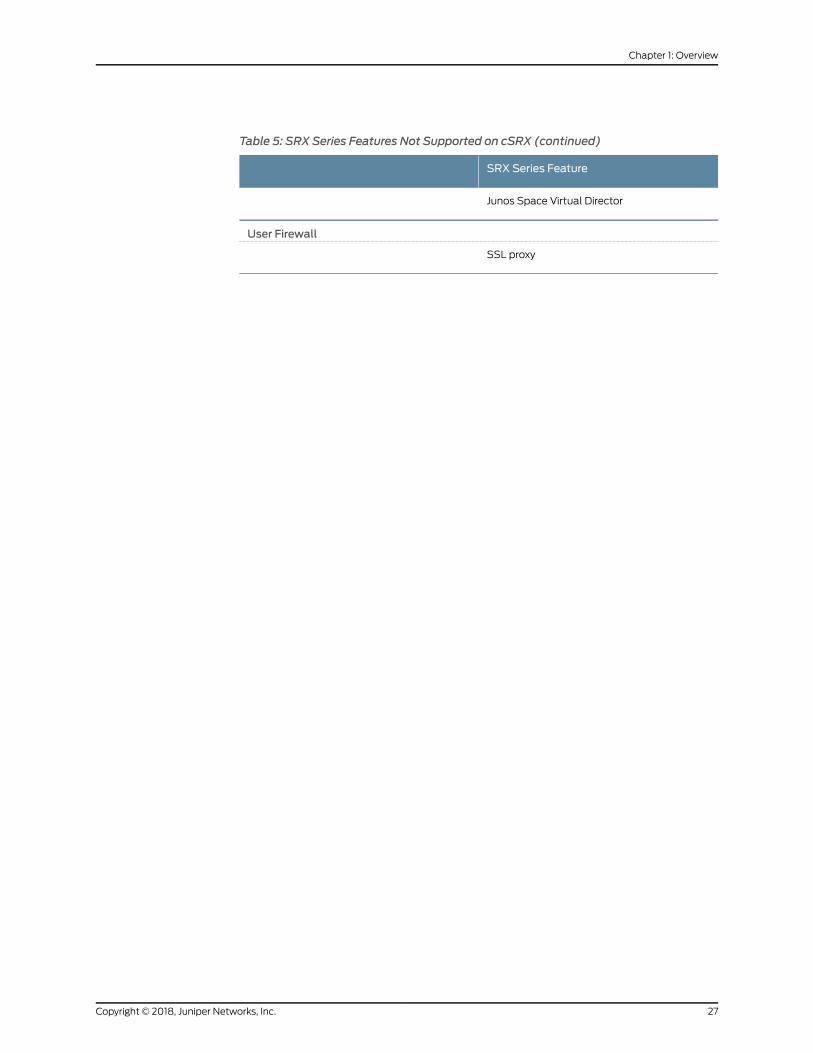
Table 5: SRX Series Features Not Supported on cSRX (continued)
SRX Series Feature
Junos Space Virtual Director
User Firewall
SSL proxy
27Copyright © 2018, Juniper Networks, Inc.
Chapter 1: Overview

Copyright © 2018, Juniper Networks, Inc.28
cSRX Deployment Guide for Bare-Metal Linux Server

CHAPTER 2
Installing cSRX
• Requirements for Deploying cSRX on a Bare-Metal Linux Server on page 29
• Installing cSRX in a Bare-Metal Linux Server on page 31
• Launching the cSRX Container on page 35
Requirements for Deploying cSRX on a Bare-Metal Linux Server
This section presents an overview of requirements for deploying a cSRX container on a
bare-metal Linux server:
• Host Requirements on page 29
• cSRX Basic Configuration Settings on page 30
• Interface Naming and Mapping on page 30
Host Requirements
Table 6 on page 30 lists the Linux host requirement specifications for deploying a cSRX
container on a bare-metal Linux server.
NOTE: The cSRX can run either on a physical server or virtual machine. Forscalability andavailability reasons,we recommendedusing aphysical serverto deploy the cSRX container.
29Copyright © 2018, Juniper Networks, Inc.
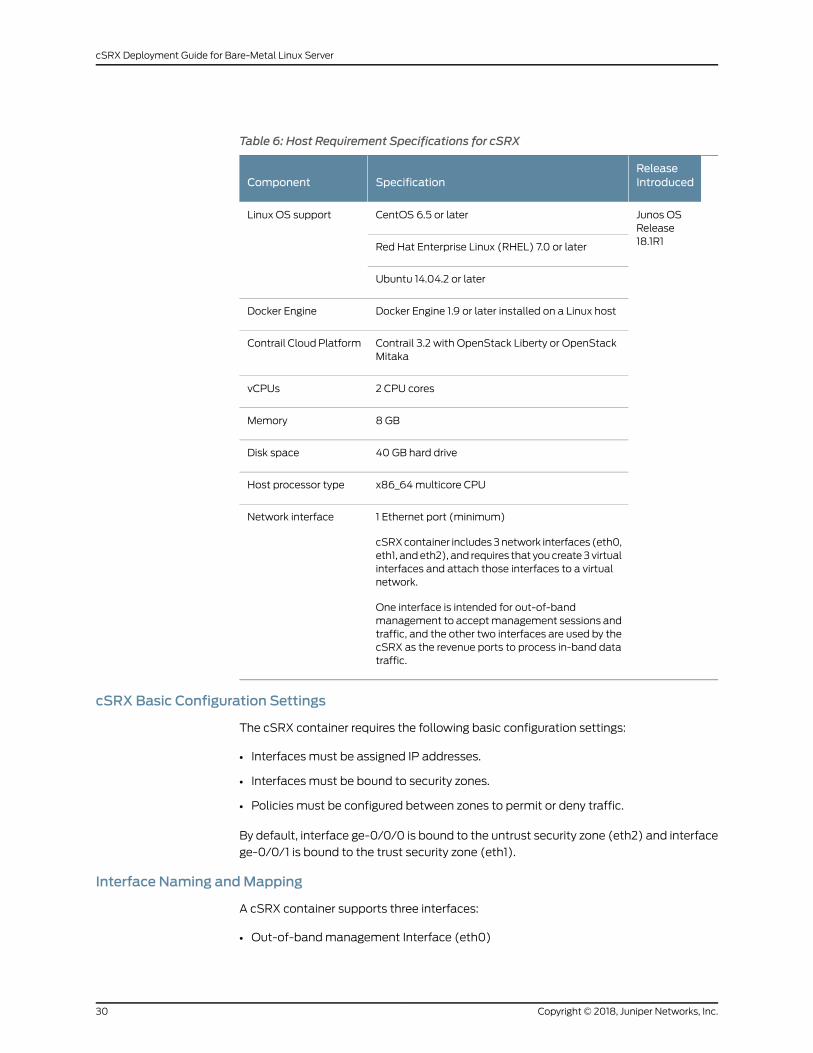
Table 6: Host Requirement Specifications for cSRX
ReleaseIntroducedSpecificationComponent
Junos OSRelease18.1R1
CentOS 6.5 or laterLinux OS support
Red Hat Enterprise Linux (RHEL) 7.0 or later
Ubuntu 14.04.2 or later
Docker Engine 1.9 or later installed on a Linux hostDocker Engine
Contrail 3.2 with OpenStack Liberty or OpenStackMitaka
Contrail CloudPlatform
2 CPU coresvCPUs
8 GBMemory
40 GB hard driveDisk space
x86_64multicore CPUHost processor type
1 Ethernet port (minimum)
cSRXcontainer includes3network interfaces (eth0,eth1, andeth2), and requires that youcreate3 virtualinterfaces and attach those interfaces to a virtualnetwork.
One interface is intended for out-of-bandmanagement to acceptmanagement sessions andtraffic, and the other two interfaces are used by thecSRX as the revenue ports to process in-band datatraffic.
Network interface
cSRX Basic Configuration Settings
The cSRX container requires the following basic configuration settings:
• Interfaces must be assigned IP addresses.
• Interfaces must be bound to security zones.
• Policies must be configured between zones to permit or deny traffic.
By default, interface ge-0/0/0 is bound to the untrust security zone (eth2) and interface
ge-0/0/1 is bound to the trust security zone (eth1).
Interface Naming andMapping
A cSRX container supports three interfaces:
• Out-of-bandmanagement Interface (eth0)
Copyright © 2018, Juniper Networks, Inc.30
cSRX Deployment Guide for Bare-Metal Linux Server
• In-band interfaces (eth1 and eth2)
Table 7 on page 31 lists the cSRX interface assignments with Docker.
Table 7: cSRX Interface Assignment
Security ZoneDocker InterfacescSRX InterfacesInterfaceNumber
–eth0eth01
Trusteth1ge-0/0/12
Untrusteth2ge-0/0/03
Installing cSRX in a Bare-Metal Linux Server
This section outlines the steps to install the cSRX container in a Linux bare-metal server
environment that is running Ubuntu, Red Hat Enterprise Linux (RHEL) , or CentOS. The
cSRXcontainer is packaged in aDocker imageand runs in theDocker Engine on the Linux
host.
This section includes the following topics:
• Before You Deploy on page 31
• Confirming Docker Installation on page 31
• Loading the cSRX Image on page 33
• Creating the Linux Bridge Network for the cSRX on page 34
Before You Deploy
Before you deploy the cSRXContainer Firewall as an advanced security service in a Linux
container environment, ensure that you:
• Review “Requirements for Deploying cSRX on a Bare-Metal Linux Server” on page 29
to verify the system software requirement specifications for the Linux server required
to deploy the cSRX container.
• Install and configure Docker on your Linux host platform to implement the Linux
container environment. Docker installation requirements vary based on the platform
and the host OS (Ubuntu, Red Hat Enterprise Linux (RHEL), or CentOS). See Install
Docker for installation instructions on the different supported Linux host operating
systems.
Confirming Docker Installation
Before you load the cSRX image, confirm that Docker is properly installed on the Linux
host and that the Docker Engine is running.
To confirm Docker installation:
31Copyright © 2018, Juniper Networks, Inc.
Chapter 2: Installing cSRX
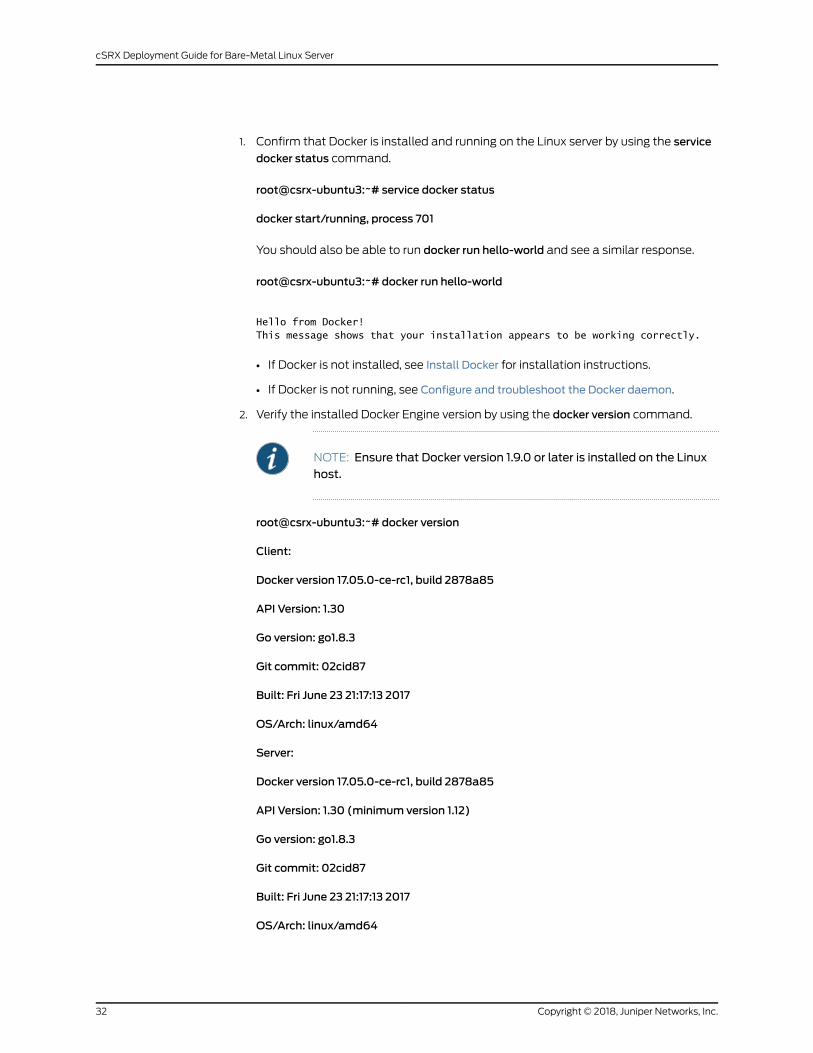
1. Confirm that Docker is installed and running on the Linux server by using the service
docker status command.
root@csrx-ubuntu3:~# service docker status
docker start/running, process 701
You should also be able to run docker run hello-world and see a similar response.
root@csrx-ubuntu3:~# docker run hello-world
Hello from Docker!This message shows that your installation appears to be working correctly.
• If Docker is not installed, see Install Docker for installation instructions.
• If Docker is not running, see Configure and troubleshoot the Docker daemon.
2. Verify the installed Docker Engine version by using the docker version command.
NOTE: Ensure that Docker version 1.9.0 or later is installed on the Linuxhost.
root@csrx-ubuntu3:~# docker version
Client:
Docker version 17.05.0-ce-rc1, build 2878a85
API Version: 1.30
Go version: go1.8.3
Git commit: 02cid87
Built: Fri June 23 21:17:13 2017
OS/Arch: linux/amd64
Server:
Docker version 17.05.0-ce-rc1, build 2878a85
API Version: 1.30 (minimum version 1.12)
Go version: go1.8.3
Git commit: 02cid87
Built: Fri June 23 21:17:13 2017
OS/Arch: linux/amd64
Copyright © 2018, Juniper Networks, Inc.32
cSRX Deployment Guide for Bare-Metal Linux Server

Experimental: False
Loading the cSRX Image
The cSRX image is available as a cSRX Docker file from the Juniper Internal Docker
registry.
Once theDockerEnginehasbeen installedon thehost, performthe following todownload
and start using the cSRX image:
1. Login to the Juniper Internal Docker registry using the login name and password that
you received as part of the sales fulfillment process when ordering cSRX.
root@csrx-ubuntu3:~csrx# docker login hub.juniper.net -u <username> -p <password>
2. To browse the existing images from the Juniper Internal Docker registry for a cSRX
image, use the curl CLI command:
root@csrx-ubuntu3:~csrx# curl -u <<username>> -X GET
https://hub.juniper.net/v2/security/csrx/tags/list
Enter host password for user '<<username>>:
{"name":"security/csrx","tags":["18.1R1.9","18.2R1.9"]}
root@csrx-ubuntu3:~csrx#
NOTE: To browse the existing images from the Juniper Internal Dockerregistry by using aWeb browser instead of using the curl CLI command,
you can launch aWeb browser withhttps://hub.juniper.net/v2/security/csrx/tags/list. Use the login name and
password that you received as part of the sales fulfillment process.
3. Pull the cSRX image from the Juniper Internal Docker registry.
root@csrx-ubuntu3:~csrx# docker pull hub.juniper.net/security/csrx:<version>
For example, to pull cSRX image version 18.2R1.9:
root@csrx-ubuntu3:~csrx# docker pull hub.juniper.net/security/csrx:18.2R1.9
4. After the cSRX image loads, confirm that it is listed in the repository of Docker images.
root@csrx-ubuntu3:~/csrx# docker images
REPOSITORY TAG IMAGE ID CREATED SIZE
csrx 18.1R1.0 6fcdebe006e4 Less than a second ago 585MB
33Copyright © 2018, Juniper Networks, Inc.
Chapter 2: Installing cSRX
root@csrx-ubuntu3:~/csrx#
Creating the Linux Bridge Network for the cSRX
A Linux bridge is a virtual switch implemented as a kernel module. This Linux bridge is
used within a Linux host to emulate a hardware bridge. Docker allows you to create a
Linux bridge network and connect the cSRX container to this network to implement
management and data processing sessions. The interfaces are created with the Linux
VETH driver and are used to communicate with the Linux kernel.
This procedure describes how to create a three-bridge network for the cSRX container
that includes: mgt_bridge (eth0), left_bridge (eth1), and right_bridge (eth2). The
mgt_bridge is used by the cSRX for out-of-bandmanagement to accept management
sessions and traffic, and the left_bridge and right_bridge are both used by the cSRX as
the revenue ports to process in-band data traffic.
NOTE: srxpfe is the data-plane daemon that receives and sends packetsfromthe two revenueportsofacSRXcontainer. srxpfe requires theuntrustedinterface (eth1) and trusted interface (eth2) to be attached to the Linuxbridge, and it will not properly load if the two revenue ports are not attached.
The trusted and untrusted interfaces required by a cSRX connector are connected to this
Linuxbridgeoneth1 andeth2. In this example, the untrusted interface (eth1) is connected
to Linux bridge Br1 and the trusted interface (eth2) is connected to Linux bridge Br2. By
default, the cSRX boots in Layer 3 mode where it performs forwarding between the
trusted and untrusted interfaces.
NOTE: Docker automatically connects themanagement interface (eth0) tothe Linux bridge and assigns an IP address. Interfaces eth1 and eth2 are forthe inband traffic and youmust assign a trusted and untrusted interface tothe two revenue interfaces. cSRXmust be bound with the Linux bridge topass traffic.
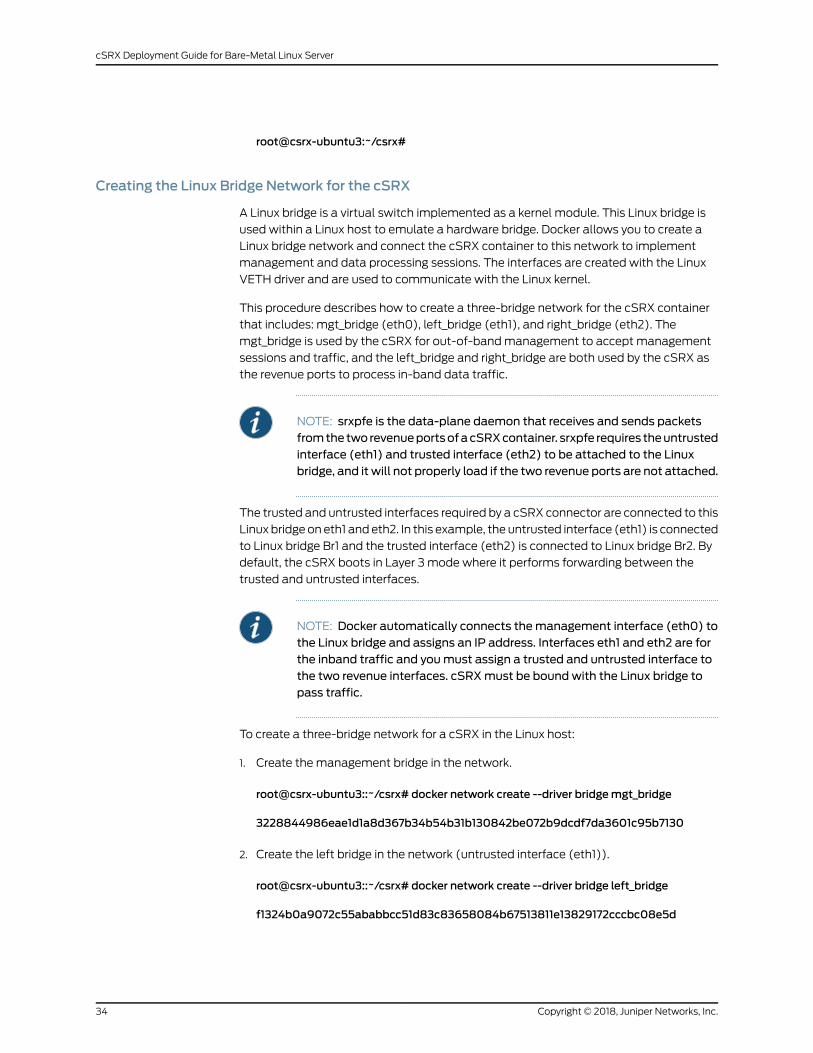
To create a three-bridge network for a cSRX in the Linux host:
1. Create the management bridge in the network.
root@csrx-ubuntu3::~/csrx# docker network create --driver bridgemgt_bridge
3228844986eae1d1a8d367b34b54b31b130842be072b9dcdf7da3601c95b7130
2. Create the left bridge in the network (untrusted interface (eth1)).
root@csrx-ubuntu3::~/csrx# docker network create --driver bridge left_bridge
f1324b0a9072c55ababbcc51d83c83658084b67513811e13829172cccbc08e5d
Copyright © 2018, Juniper Networks, Inc.34
cSRX Deployment Guide for Bare-Metal Linux Server
3. Create the right bridge in the network (trusted interface (eth2)).
root@csrx-ubuntu3::~/csrx# docker network create --driver bridge right_bridge
196bd039f7c2401df4c117ea684114548a3df0b9d406cf3cf8f17338fab96774
RelatedDocumentation
Docker commands•
Launching the cSRX Container
You are now ready to launch the cSRX container that is running in Docker on the Linux
bare-metal server. When you start the cSRX image, you have a running container of the
image. You can stop and restart the cSRX container (see “Managing cSRX Containers”
on page 48), and the container will retain all settings and file system changes unless
those changes are explicitly deleted. However, the cSRX will lose anything in memory
and all processes will be restarted.
You have a series of cSRX environment variables that enable you to modify operating
characteristics of the cSRX container when it is launched. You canmodify:
• Initial root account password to log in to the cSRX container using SSH
• Traffic forwarding mode (static route or secure-wire)
• cSRX container size (small, medium, or large)
• Packet I/O driver (polled or interrupt)
• CPU affinity for cSRX control and data daemons
• Address Resolution Protocol (ARP) and Neighbor Discovery Protocol (NDP) entry
timeout values
NOTE: Specification of an environment variable is not mandatory whenlaunching the cSRX container; most environment variables have a defaultvalue as shown in “cSRX Environment Variables Overview” on page 39. Youcan launch the cSRX using the default environment variable settings.
To launch the cSRX container:
35Copyright © 2018, Juniper Networks, Inc.
Chapter 2: Installing cSRX
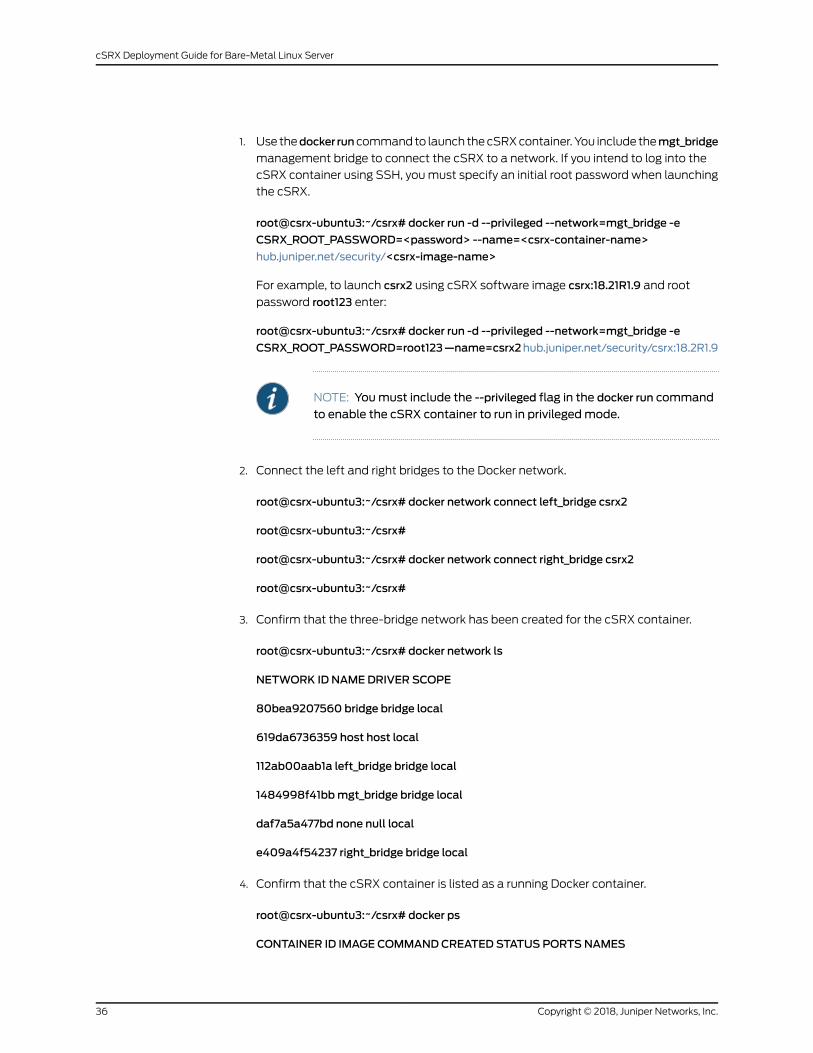
1. Use thedocker runcommand to launch thecSRXcontainer. You include themgt_bridge
management bridge to connect the cSRX to a network. If you intend to log into the
cSRX container using SSH, youmust specify an initial root password when launching
the cSRX.
root@csrx-ubuntu3:~/csrx# docker run -d --privileged --network=mgt_bridge -e
CSRX_ROOT_PASSWORD=<password> --name=<csrx-container-name>
hub.juniper.net/security/<csrx-image-name>
For example, to launch csrx2 using cSRX software image csrx:18.21R1.9 and root
password root123 enter:
root@csrx-ubuntu3:~/csrx# docker run -d --privileged --network=mgt_bridge -e
CSRX_ROOT_PASSWORD=root123—name=csrx2hub.juniper.net/security/csrx:18.2R1.9
NOTE: Youmust include the --privileged flag in the docker run command
to enable the cSRX container to run in privilegedmode.
2. Connect the left and right bridges to the Docker network.
root@csrx-ubuntu3:~/csrx# docker network connect left_bridge csrx2
root@csrx-ubuntu3:~/csrx#
root@csrx-ubuntu3:~/csrx# docker network connect right_bridge csrx2
root@csrx-ubuntu3:~/csrx#
3. Confirm that the three-bridge network has been created for the cSRX container.
root@csrx-ubuntu3:~/csrx# docker network ls
NETWORK ID NAMEDRIVER SCOPE
80bea9207560 bridge bridge local
619da6736359 host host local
112ab00aab1a left_bridge bridge local
1484998f41bbmgt_bridge bridge local
daf7a5a477bd none null local
e409a4f54237 right_bridge bridge local
4. Confirm that the cSRX container is listed as a running Docker container.
root@csrx-ubuntu3:~/csrx# docker ps
CONTAINER ID IMAGE COMMANDCREATED STATUS PORTSNAMES
Copyright © 2018, Juniper Networks, Inc.36
cSRX Deployment Guide for Bare-Metal Linux Server
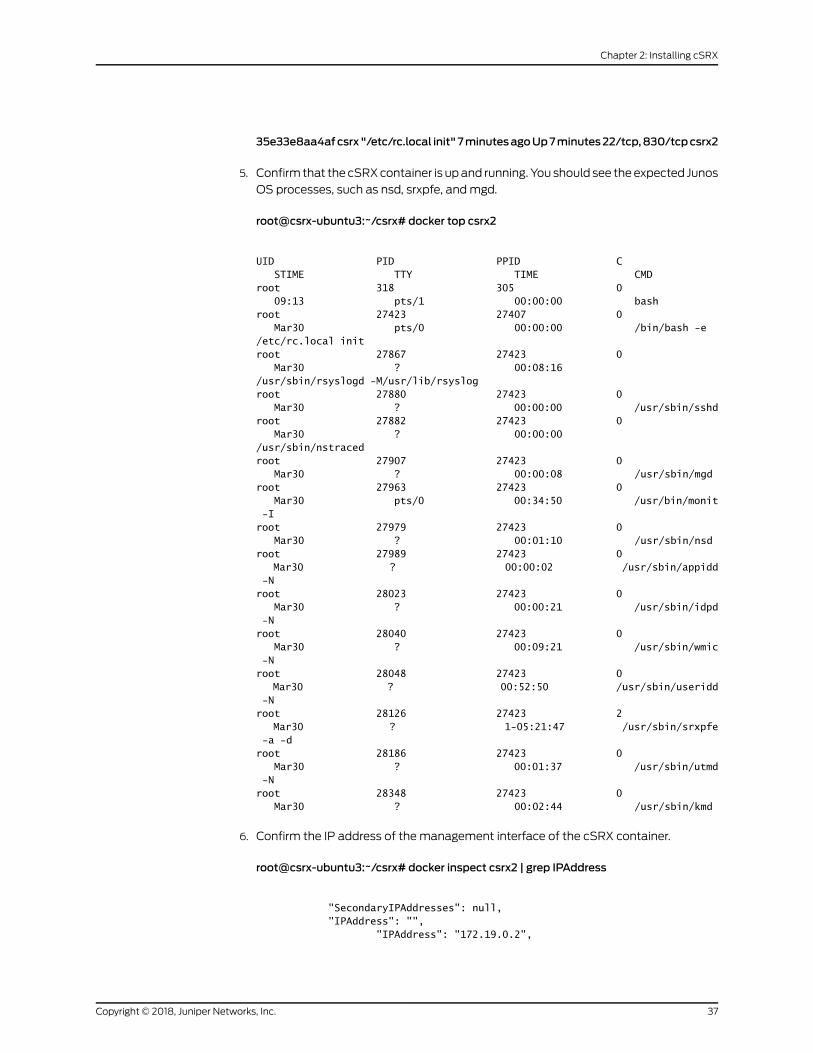
35e33e8aa4afcsrx "/etc/rc.local init" 7minutesagoUp7minutes22/tcp,830/tcpcsrx2
5. Confirm that the cSRXcontainer is upand running. You should see theexpected Junos
OS processes, such as nsd, srxpfe, andmgd.
root@csrx-ubuntu3:~/csrx# docker top csrx2
UID PID PPID C STIME TTY TIME CMDroot 318 305 0 09:13 pts/1 00:00:00 bashroot 27423 27407 0 Mar30 pts/0 00:00:00 /bin/bash -e /etc/rc.local initroot 27867 27423 0 Mar30 ? 00:08:16 /usr/sbin/rsyslogd -M/usr/lib/rsyslogroot 27880 27423 0 Mar30 ? 00:00:00 /usr/sbin/sshdroot 27882 27423 0 Mar30 ? 00:00:00 /usr/sbin/nstracedroot 27907 27423 0 Mar30 ? 00:00:08 /usr/sbin/mgdroot 27963 27423 0 Mar30 pts/0 00:34:50 /usr/bin/monit -Iroot 27979 27423 0 Mar30 ? 00:01:10 /usr/sbin/nsdroot 27989 27423 0 Mar30 ? 00:00:02 /usr/sbin/appidd -Nroot 28023 27423 0 Mar30 ? 00:00:21 /usr/sbin/idpd -Nroot 28040 27423 0 Mar30 ? 00:09:21 /usr/sbin/wmic -Nroot 28048 27423 0 Mar30 ? 00:52:50 /usr/sbin/useridd -Nroot 28126 27423 2 Mar30 ? 1-05:21:47 /usr/sbin/srxpfe -a -droot 28186 27423 0 Mar30 ? 00:01:37 /usr/sbin/utmd -Nroot 28348 27423 0 Mar30 ? 00:02:44 /usr/sbin/kmd
6. Confirm the IP address of the management interface of the cSRX container.
root@csrx-ubuntu3:~/csrx# docker inspect csrx2 | grep IPAddress
"SecondaryIPAddresses": null, "IPAddress": "", "IPAddress": "172.19.0.2",
37Copyright © 2018, Juniper Networks, Inc.
Chapter 2: Installing cSRX
"IPAddress": "172.18.0.2", "IPAddress": "172.20.0.2",
RelatedDocumentation
• Docker commands
Copyright © 2018, Juniper Networks, Inc.38
cSRX Deployment Guide for Bare-Metal Linux Server

CHAPTER 3
Managing cSRX Containers
• cSRX Environment Variables Overview on page 39
• Specifying an Initial RootPassword for Logging into a cSRXContainer in a LinuxDocker
Environment on page 40
• Changing the Size of a cSRX Container on page 41
• Configuring Traffic Forwarding on a cSRX Container on page 41
• Specifying the Packet I/O Driver for a cSRX Container on page 45
• Configuring CPU Affinity for a cSRX Container on page 47
• Enabling Persistent Log File Storage to a Linux Host Directory on page 48
• Managing cSRX Containers on page 48
cSRX Environment Variables Overview
Docker allows you to store data such as configuration settings as environment variables.
At runtime, theenvironmentvariablesareexposed to theapplication inside thecontainer.
You can set any number of parameters to take effect when the cSRX image launches.
You set an environment variable by specifying the docker run -e VARIABLE=VALUE ... key.
A series of cSRX environment variables enables you to modify the characteristics of the
cSRX instance when it is launched. The specification of an environment variable is not
mandatory; most environment variables have a default value as shown in
Table 8 on page 40. If desired, you can launch the cSRX using the default environment
variable settings.
For example, to launch a cSRX instance with an initial root account password, in
secure-wire forwarding mode, and using the middle size cSRX configuration:
root@csrx-ubuntu3:~/csrx# docker run -d --privileged --network=mgt_bridge -e
CSRX_ROOT_PASSWORD=<password> -e CSRX_SIZE="middle" -e
CSRX_FORWARD_MODE="wire" --name=<csrx-container-name> <csrx-image-name>
NOTE: Youmust include the --privileged flag in the docker run command to
enable the cSRX container to run in privilegedmode.
39Copyright © 2018, Juniper Networks, Inc.

Table 8 on page 40 summarizes the list of available cSRX environment variables along
with a link to the topic that outlines its usage.
Table 8: Summary of cSRX Environment Variables
TopicDefaultValuesDescriptionVariable
“Changing the Size of a cSRXContainer” on page 41
"large""small" |"middle" |"large"
cSRX size.CSRX_SIZE
“Configuring Traffic ForwardingonacSRXContainer” onpage41
"routing""routing" |"wire"
Traffic forwarding mode.CSRX_FORWARD_MODE
“Specifying thePacket I/ODriverfor a cSRX Container” onpage 45
"poll""poll" |"interrupt"
Packet I/O driver.CSRX_PACKET_DRIVER
“Specifying an Initial RootPassword for Logging into acSRX Container in a LinuxDockerEnvironment”onpage40
No defaultrootpassword
stringInitial root account passwordto log in to the cSRXcontainerusing SSH.
CSRX_ROOT_PASSWORD
“Configuring CPU Affinity for acSRX Container” on page 47
No CPUaffinity
hex valueCPUmask, indicating whichCPU is running the cSRXcontrol plane daemons (suchas nsd, mgd, nstraced, utmd,and so on).
CSRX_CTRL_CPU
“Configuring CPU Affinity for acSRX Container” on page 47
No CPUaffinity
hex valueCPUmask, indicating whichCPU is running the cSRX dataplane daemon (srxpfe).
CSRX_DATA_CPU
“Configuring Traffic ForwardingonacSRXContainer” onpage41
Same as theLinux host
decimalvalue
ARP entry timeout value forthecontrolplaneARP learningor response.
CSRX_ARP_TIMEOUT
“Configuring Traffic ForwardingonacSRXContainer” onpage41
Same as theLinux host
decimalvalue
NDP entry timeout value forthecontrolplaneNDP learningor response.
CSRX_NDP_TIMEOUT
Specifyingan InitialRootPassword forLogging intoacSRXContainer inaLinuxDockerEnvironment
If you intend to log into the cSRX container using SSH, specify an initial root password
when launching the cSRX.Whena cSRXcontainer is launched, remote access usingSSH
will be enforced with username and password.
NOTE: After the cSRX container is started, change the password and, ifdesired, the authenticationmethod for the root-level user.
Copyright © 2018, Juniper Networks, Inc.40
cSRX Deployment Guide for Bare-Metal Linux Server
To specify an initial root password for logging into the cSRX container:
root@csrx-ubuntu3:~/csrx# docker run -d --privileged --network=mgt_bridge -e
CSRX_ROOT_PASSWORD=<password> --name=<csrx-container-name>
<csrx-image-name>
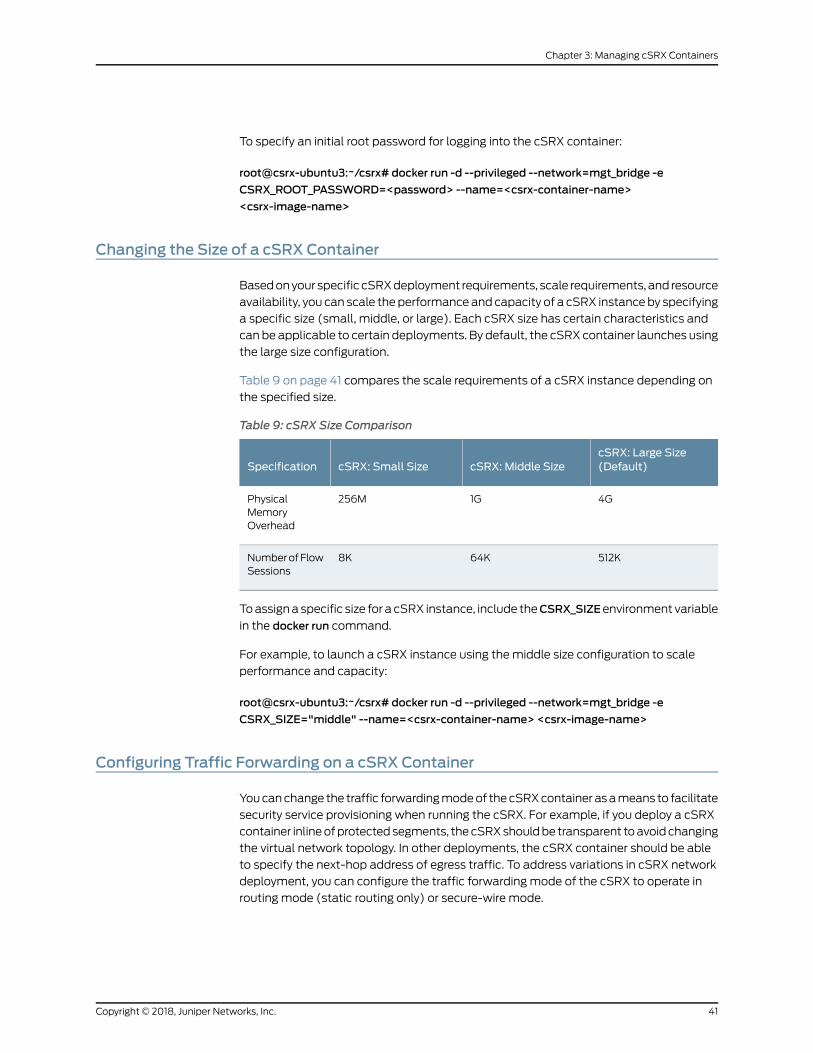
Changing the Size of a cSRX Container
Basedonyour specific cSRXdeployment requirements, scale requirements, and resource
availability, you can scale theperformanceand capacity of a cSRX instanceby specifying
a specific size (small, middle, or large). Each cSRX size has certain characteristics and
can be applicable to certain deployments. By default, the cSRX container launches using
the large size configuration.
Table 9 on page 41 compares the scale requirements of a cSRX instance depending on
the specified size.
Table 9: cSRX Size Comparison
cSRX: Large Size(Default)cSRX: Middle SizecSRX: Small SizeSpecification
4G1G256MPhysicalMemoryOverhead
512K64K8KNumberofFlowSessions
Toassigna specific size for a cSRX instance, include theCSRX_SIZEenvironment variable
in the docker run command.
For example, to launch a cSRX instance using the middle size configuration to scale
performance and capacity:
root@csrx-ubuntu3:~/csrx# docker run -d --privileged --network=mgt_bridge -e
CSRX_SIZE="middle" --name=<csrx-container-name> <csrx-image-name>
Configuring Traffic Forwarding on a cSRX Container
Youcanchange the traffic forwardingmodeof thecSRXcontainer asameans to facilitate
security service provisioning when running the cSRX. For example, if you deploy a cSRX
container inlineofprotectedsegments, thecSRXshouldbe transparent toavoidchanging
the virtual network topology. In other deployments, the cSRX container should be able
to specify the next-hop address of egress traffic. To address variations in cSRX network
deployment, you can configure the traffic forwarding mode of the cSRX to operate in
routing mode (static routing only) or secure-wire mode.
41Copyright © 2018, Juniper Networks, Inc.
Chapter 3: Managing cSRX Containers
NOTE: The cSRX uses routing as the default environment variable for traffic
forwardingmode.
This section includes the following topics:
• Configuring Routing Mode on page 42
• Configuring Secure-Wire Mode on page 44
Configuring RoutingMode
When running thecSRXcontainer in routingmode, thecSRXusesastatic route to forward
traffic for routes destined to interfaces ge-0/0/0 and ge-0/0/1. You will need to create
a static route and specify the next-hop address.
Include the -e CSRX_FORWARD_MODE=routing environment variable in the docker run
command to instruct the cSRX to run in static route forwarding mode.
To configure the cSRX container to run in static routing mode:
1. Launch the cSRX container in routing forwarding mode:
root@csrx-ubuntu3:~/csrx# docker run -d --privileged --network=mgt_bridge -e
CSRX_FORWARD_MODE="routing"--name=<csrx-container-name><csrx-image-name>
2. After you start the cSRX container, log in to it and configure static routes.
root@csrx# cli
root@csrx> configure
[edit]
root@csrx# show | display set
root@csrx# set interfaces ge-0/0/0 unit 0 family inet address 1.0.0.1/8
root@csrx# set interfaces ge-0/0/1 unit 0 family inet address 2.0.0.1/8
root@csrx# set routing-options static route 3.0.0.0/28 next-hop 1.0.0.10/32
3. View the forwarding table to verify the static routes.
root@csrx> show route forwarding-table
Routing table: default.inetInternet:Destination Type RtRef Next hop Type Index NhRef Netif0.0.0.0 perm 0 dscd 517 11.0.0.1 perm 0 1.0.0.1 locl 2006 11.0.0.10 perm 0 1.0.0.10 ucast 5501 11.255.255.255 perm 0 bcst 2007 1
Copyright © 2018, Juniper Networks, Inc.42
cSRX Deployment Guide for Bare-Metal Linux Server
1/8 perm 0 rslv 2009 12.0.0.1 perm 0 2.0.0.1 locl 2001 12.0.0.10 perm 0 2.0.0.10 ucast 5500 12.255.255.255 perm 0 bcst 2002 12/8 perm 0 rslv 2004 1224.0.0.1 perm 0 mcst 515 1224/4 perm 0 mdsc 516 13.0.0.0/28 perm 0 1.0.0.10 ucast 5501 1
Routing table: default.inet6Internet6:Destination Type RtRef Next hop Type Index NhRef Netif:: perm 0 dscd 527 1ff00::/8 perm 0 mdsc 526 1ff02::1 perm 0 mcst 525 1
4. Specify a route for themanagement interface. Static routes can only configure routes
destined for interfaces ge-0/0/0 and ge-0/0/1. The route destined for the
management interfaces(eth0)mustbeaddedbyusing theLinux routeshell command.
root@csrx% route add -net 10.10.10.0/24 gw 172.31.12.1
root@csrx% route -n
Kernel IP routing tableDestination Gateway Genmask Flags Metric Ref Use Iface0.0.0.0 0.0.0.0 0.0.0.0 U 0 0 0 pfe_tun1.0.0.0 0.0.0.0 255.0.0.0 U 0 0 0 tap12.0.0.0 0.0.0.0 255.0.0.0 U 0 0 0 tap03.0.0.0 1.0.0.10 255.255.255.240 UG 0 0 0 tap110.10.10.0 172.31.12.1 255.255.255.0 UG 0 0 0 eth0172.31.0.0 0.0.0.0 255.255.0.0 U 0 0 0 eth0
5. If required for your network environment, you can configure an IPv6 static route for
the cSRX using the set routing-options rib inet6.0 static route command.
[edit routing-options]
root@csrx#setrouting-optionsrib inet6.0static route3000::0/64next-hop1000::10/128
[edit interfaces]
root@csrx# commit
root@csrx# show routing-options rib inet6.0
static {
route 3000::0/64 next-hop 1000::10/128;
}
6. Under routing mode, the control plane ARP/NDP learning/response is provided by
the Linux kernel through the TAP 0 and TAP 1 interfaces created to host the traffic for
eth1 and eth2 through srxpfe. You can view ARP entries by using the Linux arp shell
command.
43Copyright © 2018, Juniper Networks, Inc.
Chapter 3: Managing cSRX Containers
NOTE: While there aremultiple interfaces created inside the cSRXcontainer, only two interfaces, ge-0/0/0andge-0/0/1, are visible in srxpfeand added to security zones by default.
root@csrx% arp -a
? (2.0.0.10) at 6e:81:38:41:5e:0e [ether] on tap0? (1.0.0.10) at 96:33:66:a1:e5:03 [ether] on tap1? (172.31.12.1) at 02:c4:39:fa:0a:0d [ether] on eth0
Thedefault ARP/NDPentries timeout is set to 1200seconds. You canadjust this value
by modifying either the ARP_TIMEOUT or NDP_TIMEOUT environment variable when
launching the cSRX container. For example:
root@csrx-ubuntu3:~/csrx# docker run -d --privileged --network=mgt_bridge -e
CSRX_FORWARD_MODE="routing" -e CSRX_ARP_TIMEOUT=<seconds> -e
CSRX_NDP_TIMEOUT=<seconds>--name=<csrx-container-name><csrx-image-name>
Themaximum ARP entry number is controlled by the Linux host kernel. If there are a
large number of neighbors, youmight need to adjust the ARP or NDP entry limitations
on the Linux host. There are options in the sysctl commandon the Linux host to adjust
the ARP or NDP entry limitations.
For example, to adjust the maximum ARP entries to 4096:
# sysctl -w net.ipv4.neigh.default.gc_thresh1=1024
# sysctl -w net.ipv4.neigh.default.gc_thresh2=2048
# sysctl -w net.ipv4.neigh.default.gc_thresh3=4096
For example, to adjust the maximumNDP entries to 4096:
# sysctl -w net.ipv6.neigh.default.gc_thresh1=1024
# sysctl -w net.ipv6.neigh.default.gc_thresh1=2048
# sysctl -w net.ipv6.neigh.default.gc_thresh1=4096
Configuring Secure-Wire Mode
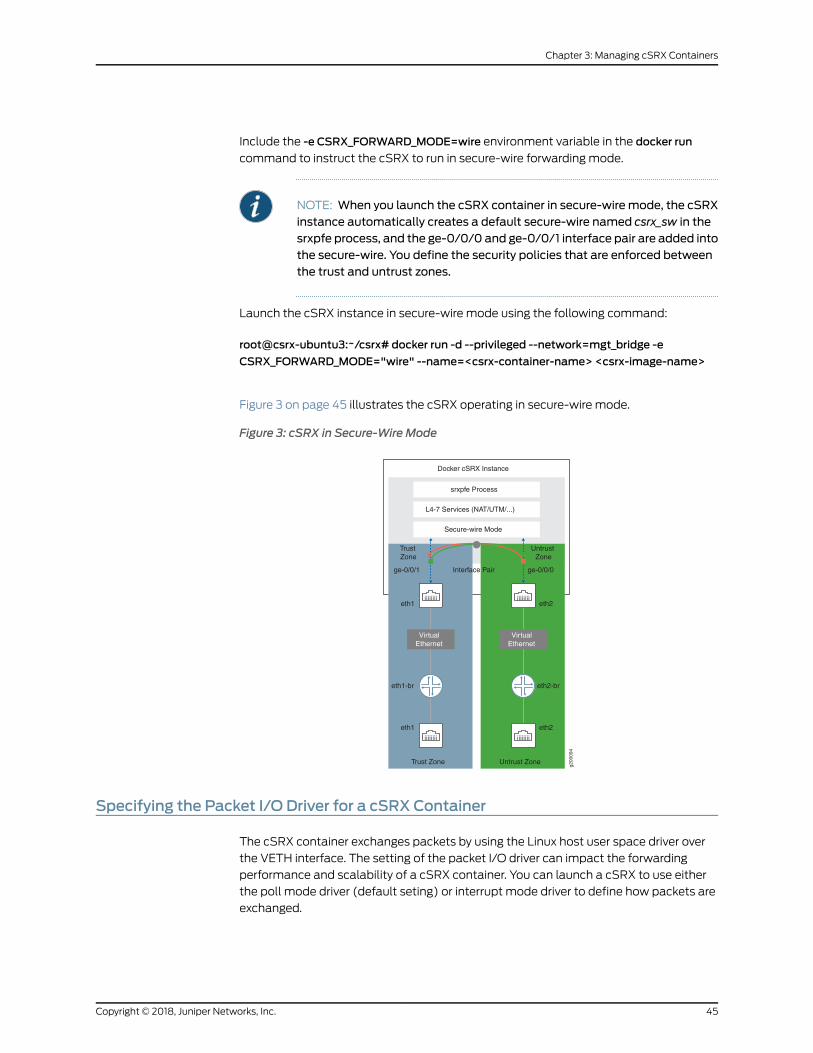
When operating in secure-wire mode, all traffic that arrives on a specific interface,
ge-0/0/0 or ge-0/0/1, will be forwarded unchanged through the interface. Thismapping
of interfaces, called secure wire, allows the cSRX to be deployed in the path of network
traffic without requiring a change to routing tables or a reconfiguration of neighboring
devices. A cross-connection is set up between interface pairs ge-0/0/0 and ge-0/0/1 to
steer traffic fromoneport to theotherport basedon the Interworkingand Interoperability
Function (IIF) as the input key.
Copyright © 2018, Juniper Networks, Inc.44
cSRX Deployment Guide for Bare-Metal Linux Server
Include the -e CSRX_FORWARD_MODE=wire environment variable in the docker run
command to instruct the cSRX to run in secure-wire forwarding mode.
NOTE: When you launch the cSRX container in secure-wiremode, the cSRXinstance automatically creates a default secure-wire named csrx_sw in thesrxpfe process, and the ge-0/0/0 and ge-0/0/1 interface pair are added intothe secure-wire. You define the security policies that are enforced betweenthe trust and untrust zones.
Launch the cSRX instance in secure-wire mode using the following command:
root@csrx-ubuntu3:~/csrx# docker run -d --privileged --network=mgt_bridge -e
CSRX_FORWARD_MODE="wire" --name=<csrx-container-name> <csrx-image-name>
Figure 3 on page 45 illustrates the cSRX operating in secure-wire mode.
Figure 3: cSRX in Secure-Wire Mode
g200
094
Docker cSRX Instance
srxpfe Process
L4-7 Services (NAT/UTM/...)
Secure-wire Mode
ge-0/0/0ge-0/0/1 Interface Pair
TrustZone
UntrustZone
eth1-br
eth1
eth1
VirtualEthernet
eth2-br
eth2
eth2
VirtualEthernet
Trust Zone Untrust Zone
Specifying the Packet I/O Driver for a cSRX Container
The cSRX container exchanges packets by using the Linux host user space driver over
the VETH interface. The setting of the packet I/O driver can impact the forwarding
performance and scalability of a cSRX container. You can launch a cSRX to use either
the poll mode driver (default seting) or interrupt mode driver to define how packets are
exchanged.
45Copyright © 2018, Juniper Networks, Inc.
Chapter 3: Managing cSRX Containers
NOTE: Poll mode is the default setting for the CSRX_PACKET_DRIVERenvironment variable.
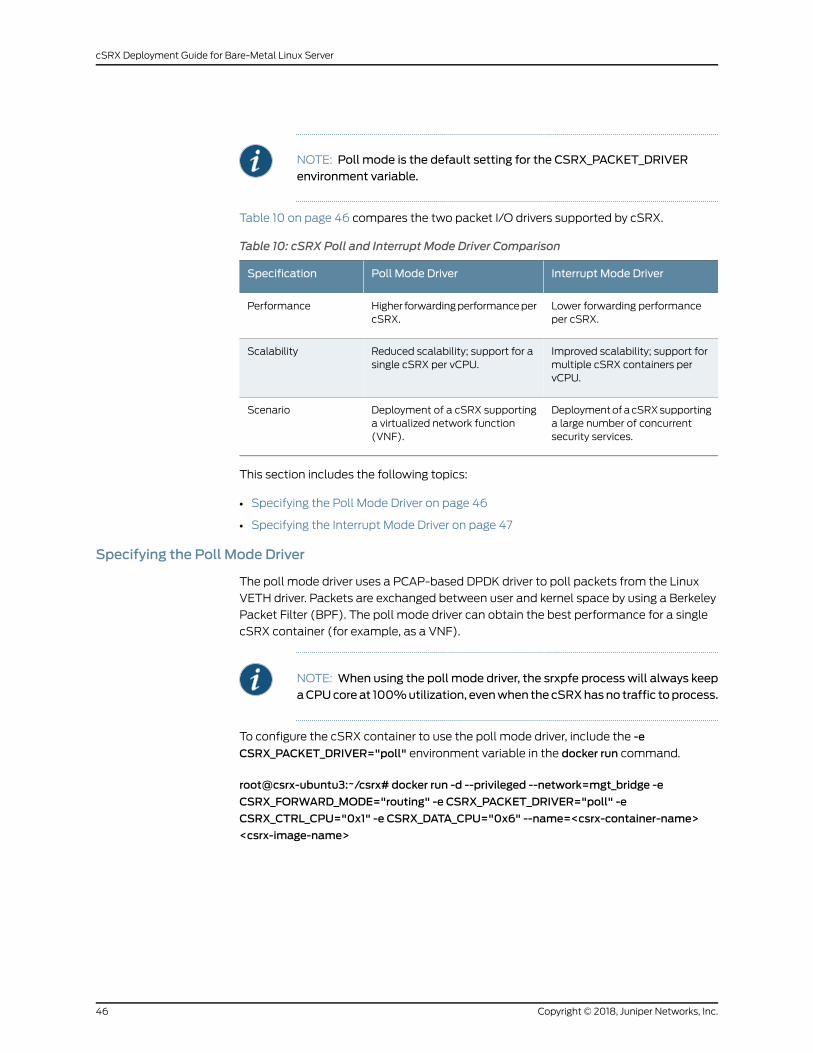
Table 10 on page 46 compares the two packet I/O drivers supported by cSRX.
Table 10: cSRX Poll and Interrupt Mode Driver Comparison
Interrupt Mode DriverPoll Mode DriverSpecification
Lower forwarding performanceper cSRX.
Higher forwardingperformancepercSRX.
Performance
Improved scalability; support formultiple cSRX containers pervCPU.
Reduced scalability; support for asingle cSRX per vCPU.
Scalability
DeploymentofacSRXsupportinga large number of concurrentsecurity services.
Deployment of a cSRX supportinga virtualized network function(VNF).
Scenario
This section includes the following topics:
• Specifying the Poll Mode Driver on page 46
• Specifying the Interrupt Mode Driver on page 47
Specifying the Poll Mode Driver
The poll mode driver uses a PCAP-based DPDK driver to poll packets from the Linux
VETH driver. Packets are exchanged between user and kernel space by using a Berkeley
Packet Filter (BPF). The poll mode driver can obtain the best performance for a single
cSRX container (for example, as a VNF).
NOTE: When using the poll mode driver, the srxpfe process will always keepaCPUcoreat 100%utilization, evenwhen thecSRXhasno traffic toprocess.
To configure the cSRX container to use the poll mode driver, include the -e
CSRX_PACKET_DRIVER="poll" environment variable in the docker run command.
root@csrx-ubuntu3:~/csrx# docker run -d --privileged --network=mgt_bridge -e
CSRX_FORWARD_MODE="routing" -e CSRX_PACKET_DRIVER="poll" -e
CSRX_CTRL_CPU="0x1" -e CSRX_DATA_CPU="0x6" --name=<csrx-container-name>
<csrx-image-name>
Copyright © 2018, Juniper Networks, Inc.46
cSRX Deployment Guide for Bare-Metal Linux Server
Specifying the Interrupt Mode Driver
The interrupt mode driver receives and transmits packets using the packet socket on
user space. By using the epoll mechanism provided by the Linux operating system, the
interrupt mode driver can aid the srxpfe process in waiting until packets arrive on the
VETH interfaces. If no packets load on the revenue ports of a cSRX instance, the srxpfe
process remains in a sleep state as ameans to help preserve CPU resources. With the
support of the epoll mechanism, the Linux server can then sustain a large number of
cSRX instances, in particular when there are multiple cSRX instances per CPU. In this
case, the scheduler keeps track of which srxpfe process is busy and allocates CPU
resources to that srxpfe process.
When you launch start a cSRX instance, you can include the CSRX_CTRL_CPU and
CSRX_DATA_CPU environmental variables to specify a specific CPU to run control plane
and data plane tasks. The CPUwill schedule the srxpfe process among those CPUs
according to their CPU status. See“Configuring CPU Affinity for a cSRX Container” on
page 47 for details on the CSRX_CTRL_CPU and CSRX_DATA_CPU environmental
variables.
To configure the cSRX container to use the interrupt mode driver, include the -e
CSRX_PACKET_DRIVER="interrupt" environment variable in the docker run command.
root@csrx-ubuntu3:~/csrx# docker run -d --privileged --network=mgt_bridge -e
CSRX_FORWARD_MODE="routing" -e CSRX_PACKET_DRIVER="interrupt" -e
CSRX_CTRL_CPU="0x1" -e CSRX_DATA_CPU="0x6" --name=<csrx-container-name>
<csrx-image-name>
Configuring CPUAffinity for a cSRX Container
A cSRX instance requires two CPU cores in the Linux server. To help schedule the Linux
server tasks and adjust performance of the cSRX container running on a Linux host, you
can launch the cSRX container and assign its control and data processes (or daemons)
to a specific CPU. In a cSRX container, srxpfe is the data plane daemon and all other
daemons (such as nsd, mgd, nstraced, utmd, and so on) are control plane daemons.
CPU affinity ensures that the cSRX control and data plane daemons are pinned to a
specific physical CPU, which can improve the cSRX container performance by using the
CPU cache efficiently. By default, there is not a defined CPU affinity for the cSRX control
and data plane daemons; the CPU on which the control and data plane daemons run
depends on Linux kernel scheduling.
To assign cSRX container control and data daemons to a specific CPU, include the
environmentvariablesCSRX_CTRL_CPUandCSRX_DATA_CPU in thedocker runcommand.
47Copyright © 2018, Juniper Networks, Inc.
Chapter 3: Managing cSRX Containers

For example, to configure the cSRX container to launch the control plane daemons on
CPU 1 and the data plane daemon on CPU 2:
root@csrx-ubuntu3:~/csrx# docker run -d --privileged --network=mgt_bridge -e
CSRX_CTRL_CPU="0x1" -e CSRX_DATA_CPU="0x2" --name=<csrx-container-name>
<csrx-image-name>
Enabling Persistent Log File Storage to a Linux Host Directory
In a cSRX container, log files are stored in the /var/log directory. By default, if there are
no external volumesmounted for the /var/log directory, the log files will be maintained
only for this cSRX container. If, at a future point, the cSRX container is deleted, those log
files will be lost. You can enable persistent log file storage to a Linux host directory as a
means to directly mount a directory from a Linux host to the cSRX container when the
cSRX is launched.
To configure the cSRX container to enable persistent log file storage to a Linux host
directory, use the following command.
root@csrx-ubuntu3:~/csrx# docker run -d --privileged --network=mgt_bridge -e
CSRX_FORWARD_MODE="routing" -e CSRX_PACKET_DRIVER="poll" –e
CSRX_CTRL_CPU="0x1" –e CSRX_DATA_CPU="0x6" -v
<path-log-directory-on-host>:/var/log--name=<csrx-container-name><csrx-image-name>
Managing cSRX Containers
This section outlines basic Docker commands that you can use with a running cSRX
container. It includes the following topics:
• Pausing/Resuming Processes within a cSRX Container on page 48
• Viewing Container Processes on a Running cSRX Container on page 49
• Removing a cSRX Container or Image on page 49
Pausing/Resuming Processes within a cSRX Container
You can suspend or resume all processes within one ormore cSRX containers. On Linux,
this task is performed using the cgroups freezer process.
To pause and restart a cSRX container:
1. Use the docker pause command to suspend all processes in a cSRX container.
hostOS# docker pause <csrx-container-name>
2. Use the docker unpause command to resume all processes in the cSRX container.
hostOS# docker unpause <csrx-container-name>
Copyright © 2018, Juniper Networks, Inc.48
cSRX Deployment Guide for Bare-Metal Linux Server
Viewing Container Processes on a Running cSRX Container
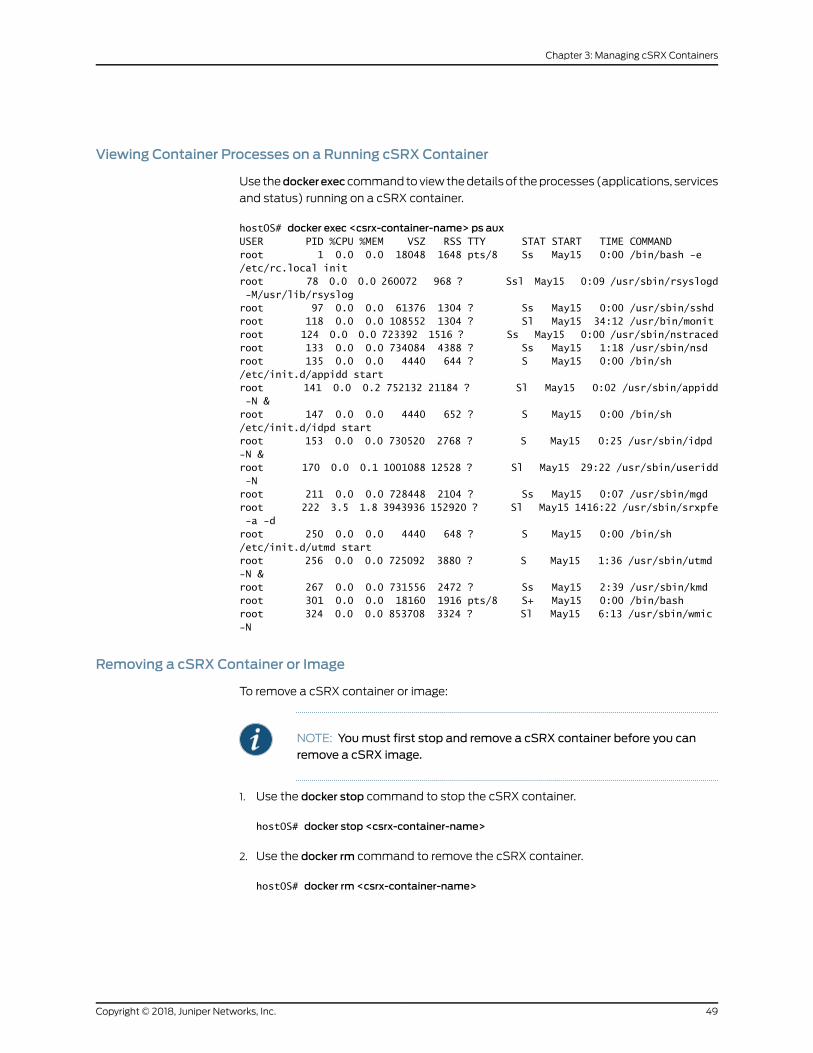
Use thedockerexeccommand toviewthedetails of theprocesses (applications, services
and status) running on a cSRX container.
hostOS# docker exec <csrx-container-name> ps auxUSER PID %CPU %MEM VSZ RSS TTY STAT START TIME COMMANDroot 1 0.0 0.0 18048 1648 pts/8 Ss May15 0:00 /bin/bash -e /etc/rc.local initroot 78 0.0 0.0 260072 968 ? Ssl May15 0:09 /usr/sbin/rsyslogd -M/usr/lib/rsyslogroot 97 0.0 0.0 61376 1304 ? Ss May15 0:00 /usr/sbin/sshdroot 118 0.0 0.0 108552 1304 ? Sl May15 34:12 /usr/bin/monitroot 124 0.0 0.0 723392 1516 ? Ss May15 0:00 /usr/sbin/nstracedroot 133 0.0 0.0 734084 4388 ? Ss May15 1:18 /usr/sbin/nsdroot 135 0.0 0.0 4440 644 ? S May15 0:00 /bin/sh /etc/init.d/appidd startroot 141 0.0 0.2 752132 21184 ? Sl May15 0:02 /usr/sbin/appidd -N &root 147 0.0 0.0 4440 652 ? S May15 0:00 /bin/sh /etc/init.d/idpd startroot 153 0.0 0.0 730520 2768 ? S May15 0:25 /usr/sbin/idpd -N &root 170 0.0 0.1 1001088 12528 ? Sl May15 29:22 /usr/sbin/useridd -Nroot 211 0.0 0.0 728448 2104 ? Ss May15 0:07 /usr/sbin/mgdroot 222 3.5 1.8 3943936 152920 ? Sl May15 1416:22 /usr/sbin/srxpfe -a -droot 250 0.0 0.0 4440 648 ? S May15 0:00 /bin/sh /etc/init.d/utmd startroot 256 0.0 0.0 725092 3880 ? S May15 1:36 /usr/sbin/utmd -N &root 267 0.0 0.0 731556 2472 ? Ss May15 2:39 /usr/sbin/kmdroot 301 0.0 0.0 18160 1916 pts/8 S+ May15 0:00 /bin/bashroot 324 0.0 0.0 853708 3324 ? Sl May15 6:13 /usr/sbin/wmic -N
Removing a cSRX Container or Image
To remove a cSRX container or image:
NOTE: Youmust first stop and remove a cSRX container before you canremove a cSRX image.
1. Use the docker stop command to stop the cSRX container.
hostOS# docker stop <csrx-container-name>
2. Use the docker rm command to remove the cSRX container.
hostOS# docker rm <csrx-container-name>
49Copyright © 2018, Juniper Networks, Inc.
Chapter 3: Managing cSRX Containers
NOTE: Include --force to force the removal of a running cSRX container.
3. Use the docker rmi command to remove one or more cSRX images from the Docker
Engine.
NOTE: Include --force to force the removal a cSRX image.
hostOS# docker rmi <csrx-container-name>
RelatedDocumentation
• Docker Engine User Guide
• Docker commands
Copyright © 2018, Juniper Networks, Inc.50
cSRX Deployment Guide for Bare-Metal Linux Server
CHAPTER 4
Configuring cSRX
• cSRX Configuration and Management Tools on page 51
• Configuring cSRX Using the Junos OS CLI on page 52
cSRX Configuration andManagement Tools
• Understanding the Junos OS CLI and Junos Scripts on page 51
• Understanding cSRXwith Contrail and Openstack Orchestration on page 51
Understanding the Junos OS CLI and Junos Scripts
The Junosoperating systemcommand-line interface (JunosOSCLI) is a JuniperNetworks
specific command shell that runs on top of a UNIX-based operating system kernel.
Built into Junos OS, Junos script automation is an onboard toolset available on all Junos
OS platforms, including routers, switches, and security instances.
You can use the JunosOSCLI and the JunosOS scripts to configure,manage, administer,
and troubleshoot the cSRX container.
Understanding cSRXwith Contrail and Openstack Orchestration
The cSRX Container Firewall can provide security services in a software-defined
networking (SDN) environment. Juniper Networks Contrail is an open, standards-based
software-defined networking (SDN) platform that delivers network virtualization and
service automation for federated cloud networks. You use the Contrail Cloud Platform
with open cloud orchestration systems such as OpenStack or CloudStack to instantiate
instances of cSRX in a containerized environment. Contrail Cloud Platform automates
the orchestration of compute, storage, and networking resources to create and scale
open, intelligent, and reliable OpenStack clouds that seamlessly merge and hybridize
through highly intelligent secure networks.
cSRXcanbedeployedas adedicated firewall compute node in aContrail Cloudplatform
environment to provide differentiated Layer 4 through 7 security services for multiple
tenantsaspart of a servicechain in theContrail cloudplatform. In theContrail networking
environment, you can deploy the cSRX container as a large-scale security service in a
multicloud environment, and configure the cSRX to steer traffic from a vRouter with
vRouter interface (VIF). Traffic and health statistics aremonitored by the Contrail service
orchestrator.
51Copyright © 2018, Juniper Networks, Inc.

See cSRX Guide for Contrail for details on using cSRXwith Juniper Networks Contrail.
RelatedDocumentation
Introducing the Junos OS Command-Line Interface•
• Contrail Networks
• Mastering Junos Automation Programming
Configuring cSRXUsing the Junos OS CLI
To configure the cSRX container using the Junos OS CLI:
1. Log in to the cSRX container using SSH.
root@csrx-ubuntu3:~/csrx#ssh 192.168.42.81
2. Start the CLI as root user.
NOTE: When a cSRX container is launched, if you specified to log into thecSRXcontainerwithan initial rootpassword, access to thecSRXcontainerusing SSHwill be enforced with user name and password.
root#cliroot@>
3. Verify the interfaces.
root@> show interfaces
Physical interface: ge-0/0/1, Enabled, Physical link is Up Interface index: 100 Link-level type: Ethernet, MTU: 1514 Current address: 02:42:ac:13:00:02, Hardware address: 02:42:ac:13:00:02Physical interface: ge-0/0/0, Enabled, Physical link is Up Interface index: 200 Link-level type: Ethernet, MTU: 1514 Current address: 02:42:ac:14:00:02, Hardware address: 02:42:ac:14:00:02
4. Enter configuration mode.
configure[edit]root@#
5. Set the root authentication password by entering a cleartext password, an encrypted
password, or an SSH public key string (DSA or RSA).
[edit]root@# set system root-authentication plain-text-passwordNew password: passwordRetype new password: password
Copyright © 2018, Juniper Networks, Inc.52
cSRX Deployment Guide for Bare-Metal Linux Server
6. Configure the hostname.
[edit]root@# set system host-name host-name
7. Configure the two traffic interfaces.
NOTE: Docker automatically connects the fxp0management interface(eth0) to the Linux bridge and automatically assigns an IP address. If isnotnecessary for you toconfigure themanagement interface for thecSRXcontainer.
[edit]root@# set interfaces ge-0/0/0 unit 0 family inet address 192.168.20.2/24root@# set interfaces ge-0/0/1 unit 0 family inet address 192.168.10.2/24
8. Configure basic security zones for the public and private interfaces and bind them to
traffic interfaces.
[edit]root@# set security zones security-zone untrust interfaces ge-0/0/0.0root@# set security zones security-zone trust interfaces ge-0/0/1.0root@# set security policies default-policy permit-all
9. Verify the configuration.
[edit]root@# commit checkconfiguration check succeeds
10. Commit the configuration to activate it on the cSRX instance.
[edit]root@# commitcommit complete
11. (Optional) Use the show command to display the configuration to verify that it is
correct.
RelatedDocumentation
• Junos OS for SRX Series
• Introducing the Junos OS Command-Line Interface
53Copyright © 2018, Juniper Networks, Inc.
Chapter 4: Configuring cSRX

Copyright © 2018, Juniper Networks, Inc.54
cSRX Deployment Guide for Bare-Metal Linux Server


![Introduction to Tokyo Climate Center (TCC) and TCC ...ds.data.jma.go.jp/tcc/tcc/library/library2015/... · Introduction to TCC and TCC training seminar 2015 / Plans for 2015 [1] In](https://img.pdfslide.us/doc/110x75/600dca8f9be1e172842925cf/introduction-to-tokyo-climate-center-tcc-and-tcc-dsdatajmagojptcctcclibrarylibrary2015.jpg)